

Page 1

LED LCD TV
OWNER' S MANUAL
MOD EL: L E 3 2 B 5 0
Please RE AD this manual carefully
before op erating your TV, and retain
it for futu re reference
Page 2

Contents
1、 Safety an d warnings. .. ....... .. ....... .. ....... .. ....... .. ......... ......... ......... .. ....... .. ....... .. ....... .. ....... .. ..2-3
2、 Introdu ction.... .. ....... .. ....... .. ....... .. ....... .. ......... ......... ......... ......... .. ....... .. ....... .. ....... .. ......... .4
3、 Install ation.... .. ....... .. ....... .. ....... .. ....... .. ......... ......... ......... ......... .. ....... .. ....... .. ....... .. ......... .. 5-8
4、 Remote Co ntroller.. ......... ......... ......... ......... .. ....... .. ....... .. ....... .. ......... ......... ......... ......... .. .. 9
5、 TV Op eration .. ....... .. ....... .. ....... .. ......... ......... ......... ......... .. ....... .. ....... .. ....... .. ....... .. ......... ..10-13
6、 Trouble sh ooting... ......... ......... .. ....... .. ....... .. ....... .. ....... .. ......... ......... ......... .. ....... .. ....... .. ... 14
-1-
Page 3

IMPORTANT SAFETY INSTRUCTION
1) Read the se instruct ions.
2) Keep the se instruct ions.
3) Heed all w arnings.
4) Follow a ll instruct ions.
5) Do not use t his apparat us n ear water.
6) Clean on ly with dry clo th.
7) Do not blo ck any ventil ation openi ng s, instal l
in accord ance with the i nstructio ns .
8) Do not ins tall near any h eat sources s uc h as
radiati ons, heat reg isters, sto ve s, or other
apparat us (includi ng amplifie rs ) that prod uc e
heat.
9) Do not def eat the safet y purpose of th e
polariz ed plug. If the p rovided plu g do es not fit
into your o utlet, cons ult an electr ician for
replace ment of the obs olete outle t.
10) Prote cted the powe r cord from bei ng w alked
on or pinch ed particul arly at plugs , co nvenien ce
recepta cles, and the p oint where th ey exit from
the appar atus.
11) Only use att achments/ ac cessori es s pecifie d
by the manu facturer.
12) Unplu g this appara tu s during li gh ting
storms or w hen unused fo r lo ng period s of t ime.
13) Refer a ll servicin g to qualifie d se rvice
personn el. Servici ng i s require d wh en the
apparat us has been dam aged in any way, such as
power-supply c or d or plug is da ma ged, liqu id
has been sp illed or obje cts have fall en into the
apparat us, the appar atus has been e xp osed to
rain or moi sture, does n ot o perate no rm ally, or
has been dr opped.
14) Mains p lug is used as th e di sconnec t de vice,
the disco nnect devic e shall remai n readily
operabl e.
15) The v entilat io n should not be i mpeded by
coverin g the ventila tion openin gs w ith items ,
such as new spapers, ta bl e-cloth , cu rtains, e tc .
16) No nake d flame sourc es , such as lig ht ed
candles , should be pla ced on the appa ra tus.
17) Atte nt ion should be d rawn to the
environ mental aspe cts of batter y di sposal.
18) The u se of appar at us in moderat e climate.
19) The a pparatu s sh all not be ex po sed to
drippin g or splashin g an d that no obj ec ts filled
with liqu ids, such as va se s, shall be p la ced on
the appar atus.
SA FE TY AND WARNINGS
CAUT ION
RISK OF ELECTRIC SHOCK
DO NOT OPEN!
TO REDUCE THE RISK OF ELECTRIC SHOCK, DO
NOT REMOVE COVER (OR BACK).NO USER
SERVICEABLE PARTS INSIDE. REFER SERVICING
TO QUALIFIED SERVICE PERSONNEL.
The symbol indicates that dangerous
voltages constituting a risk of electric shock
are present within this unit.
The symbol indicates that there are
important operating and maintenance
instructions in the literaturaccompanying this
unit.
WARNING :
To red uc e the risk of f ir e or electr ic s hock, do
not expos e this appara tus to rain or mo is ture.
WARNING:
The batte ries shall no t be exposed to
excessi ve heat such as s un shine, fi re o r the
like.
This symbol indicates that this product
incorporates double insulation between
hazardous mains voltage and user accessible
parts. When servicing use only
identical replacement parts.
This mark ing indicat es that this pr od uct shoul d
not be disp osed with oth er h ousehol d wa stes
through out the EU. To preven t possible ha rm t o
the envir onment or hum an health fro m
uncontr olled waste d is posal, re cy cle it
respons ibly to promo te t he sustai na ble reuse o f
materia l resources . To ret urn your used d ev ice,
please us e the return an d collectio n sy stems or
contact t he retailer w here the prod uct was
purchas ed. The y ca n take this p ro duct for
environ mental safe r ecycling.
CAUTI ON
-2-
Page 4
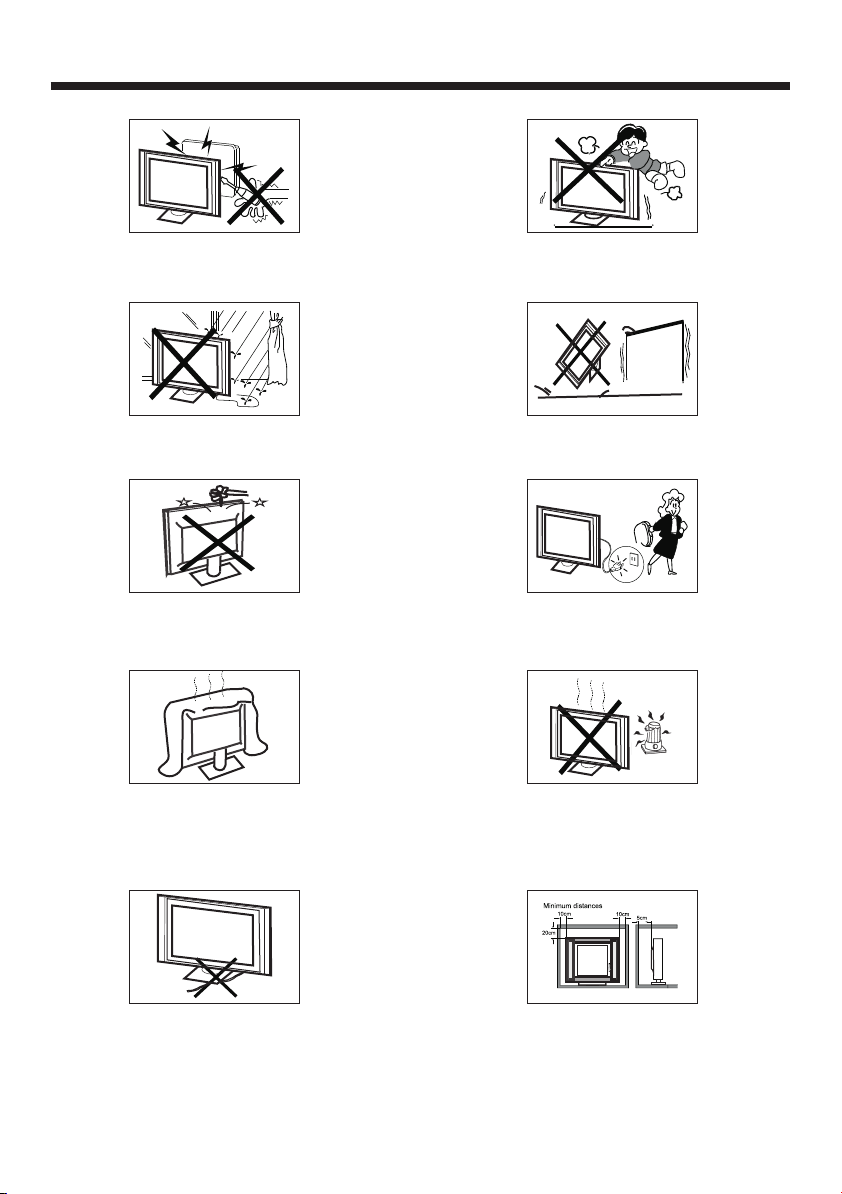
High voltages are used in the operation of this television
receiver. Do not remove the cabinet back from your set.
Refer servicing to qualified service personnel.
SA FE TY AND WARN IN GS
Never stand on, lean on, or suddenly push the television or
its stand. You should pay special attention to children.
Serious injury may result if it falls.
To prevent fire or electrical shock hazard, do not expose
the television receiver to rain or moisture.
Do not drop or push objects into the television cabinet
slots or openings. Never spill any kind of liquid on the
television receiver.
Do not block the ventilation holes in the back cover.
Adequate ventilation is essential to prevent failure of
electrical components.
Do not place your television on an unstable cart, stand,
shelf or table. Serious injury to an individual , and damage
to the television, may result if it falls.
When th e tel ev isi on rece iver is n ot us ed f or an
exten ded p er iod o f time, i t is advi sab le t o dis conne ct
the AC pow er co rd from t he AC outl et.
Avoid exposing the television receiver to direct sunlight
and other sources of heat. Do not stand the television
receiver directly on other products which give off heat,
e.g. video cassette players and audio amplifiers. Do not
place naked flame sources, such as lighted candles on
the television.
Do not trap the power supply cord under the television
receiver.
If the television is to be built into a compartment or similar
enclosure, the minimum distances must be maintained. Heat
build-up can reduce the service life of your television, and
can also be dangerous.
-3-
Dim:515*320mm(不包 括底座)
Page 5
INTRODUCTION
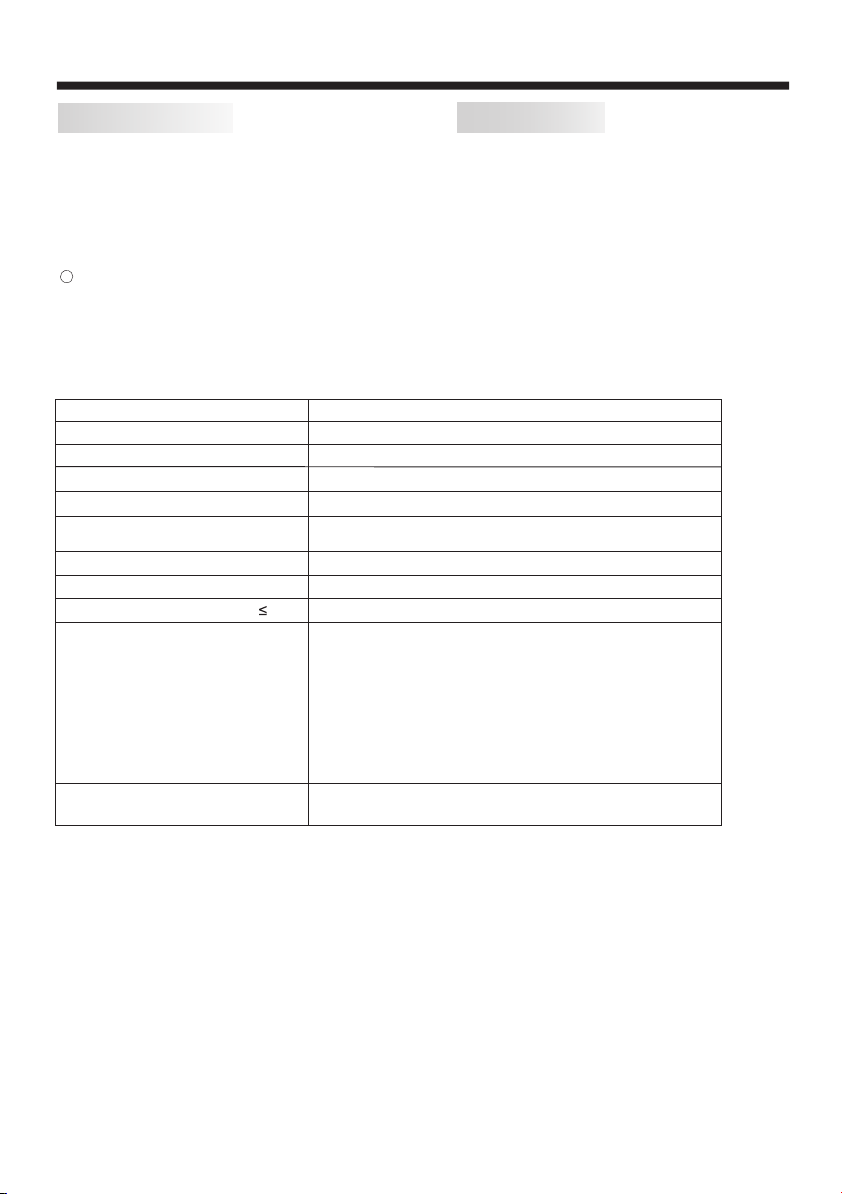
Main features
① Used as Television, display terminal, PC display;
② High luminance, wide viewing angle;
③ Can store 200 TV programs;
④ HDMI interface;
5 Multi-Media player (USB);
Main parameter
Viewing Picture Size (Diagonal)
Resolution
Aspect Ratio
TV System
Video Signal System
Receiving Channel
Input Power Voltage
Power consumption
Audio Output Power
Signal Input/Output
Horizon
tal definition(TV line)
(THD 7% )
32 inch
1366x768
16 : 9
PAL/BG PAL/I PAL/DK SECAM/BG SECAM/DK
PAL/NTSC/SECAM
1-200
AC 100-240V 50/60Hz
50W
2x8W
Analog RGB(VGA) x 1
High-Definition Multimedia Interface (HDMI) x 2
Composite Video Input x 1
Composite Video output x1
Audio Input x 2
Headphone x 1
YCb (Pb )Cr (P R) x 1
USB x 1
RF x 1
Composite Video input >=350
Y Cb(Pb ) Cr(Pr) >=400
Accessories
Infra red R em ote C ontro ller.. ... ..... ..
Batte ry( AA A). ..... ..... ..... ... ..... ..... ..2
User’s M anua l.. .. ... ..... ..... ..... ... ..... .1
1
-4-
Page 6
INSTALLATION
Front panel
23
30 30
USB
MUTE
ASPECT
SLEEP
PICTURE AUDIO
RECALL
DISPLAY
MENU INPUT
OK
CH.LIST
EXIT
CH+
VOL+
CH-
VOL-
PLAY/PAUSESTOP PREV NEXT
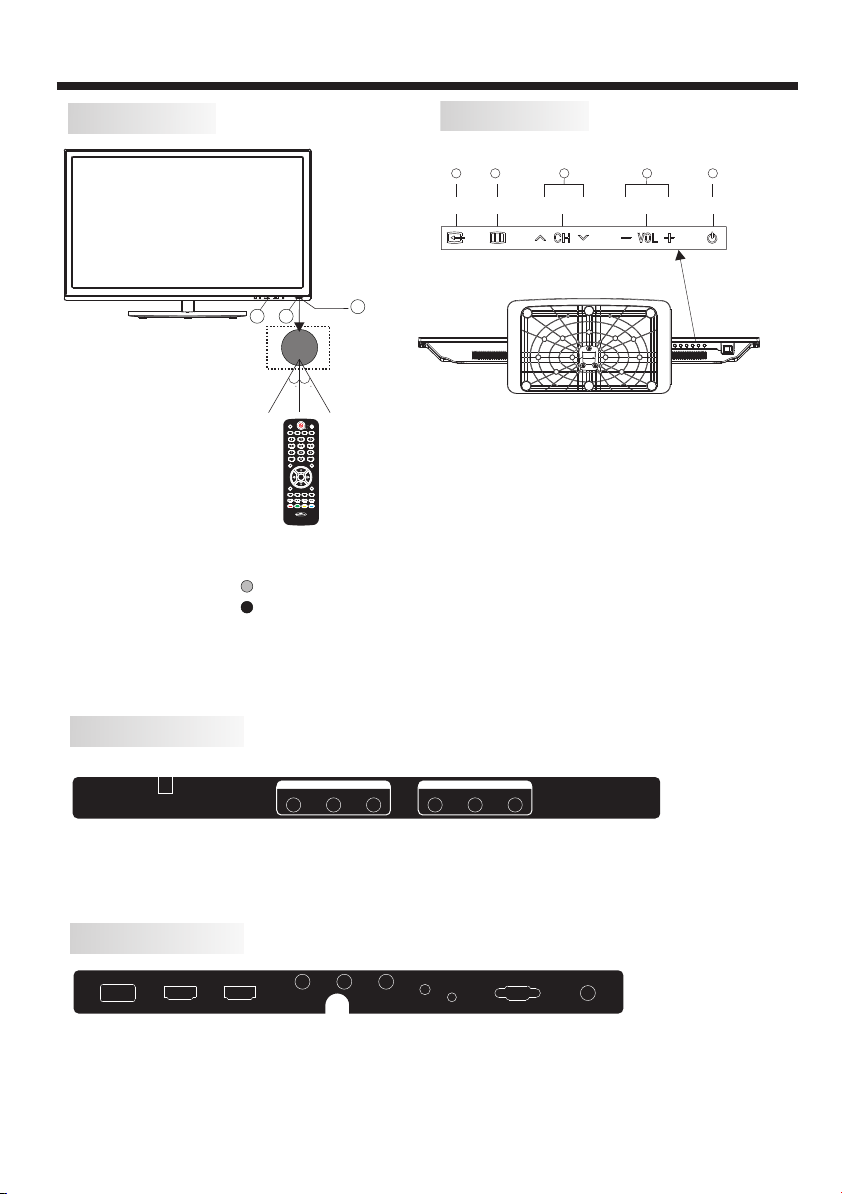
1: Remo te co nt rol s ensor.
2: Indi cat or L ED: B LUE POW ER ON.
RED STAND BY.
3: Key bo ard
KEYBOARD
1
2 3 4 5
MENU
SOUR CE
1
1.SOURCE:
Display the input source menu.
2.MENU:
Display main MENU.
3.CH+/CH-
In TV mode,press“CH+”or“CH-”to change
the channel up and down.
In MENU mode, press “CH+”or“CH-”to select
items.
4.VOL+/VOL-
Adjust sound level.
In MENU mode, press“VOL+”or“VOL-”to
adjust the item that you selected.
5. STANDBY
Press this button to turn the unit ON from
STANDBY mode.
Press it again to turn the set back to STANDBY.
CH+ CH- VOL+ STANDB YVOL-
REAR AV Connections
AV INPUT
AC-I NPUT
100- 240V~ 50/60 Hz
VIDE O L R
All the terminals are(from left to right):
AC POWER SOCKET, AV INPUT, AV OUTPUT.
Note: VIDEO and YPbPr share one audio channel.
AV OUTP UT
VIDE O L R
REAR AV Connections(SIDE)
USB
HDMI 2
HDMI 1
Pb
Y
HEAD PHONE
Pr
PC AUD IO
VGA
All the terminals are (from left to right):
USB, HDMI2,HDMI1, YPbPr INPUT, HEADPHONE, PC AUDIO, VGA, RF.
Note: When HDMI port get DVI signal, the audio signal receives from the PC
Audio channel.
-5-
RF
Page 7
ANTENNA
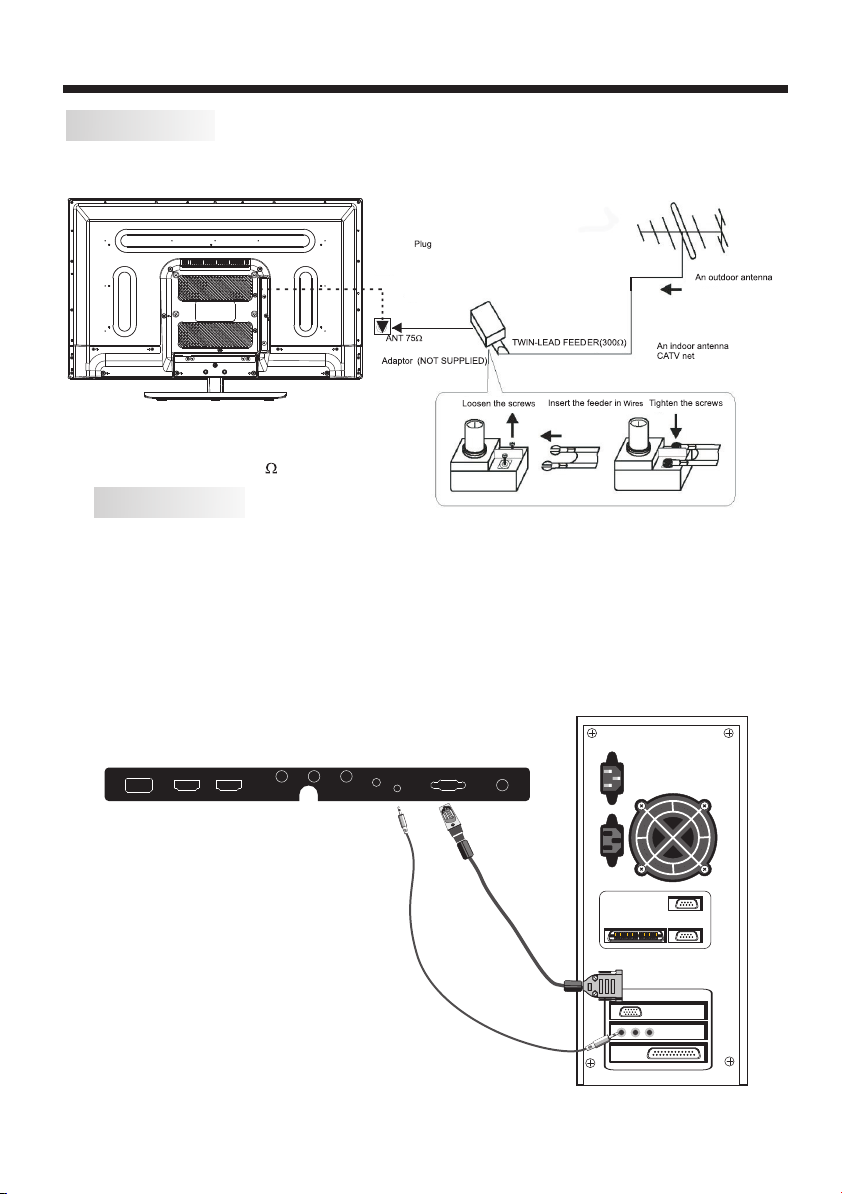
Note:
Aerial co nnections : IEC(femal e) .
Input imp endance: 75 u nbalanced .
PC
STEPS:
Be sure both the TV and computer are
set to Power off.
1.Connect VGA and audio cable.
2.Connect the power cord.
3.Power on the TV, switch to PC mode.
4.Power on the PC.
This sequence is very important.
INSTALLATION
USB
HDMI2
HDMI1
Y
HEADP HONE
Pb
Pr
PC AUDI O
-6-
RF
VGA
Page 8
INSTALLATION
AV INPUT
AC-INP UT
100-24 0V~50 /60Hz
VIDEO L R
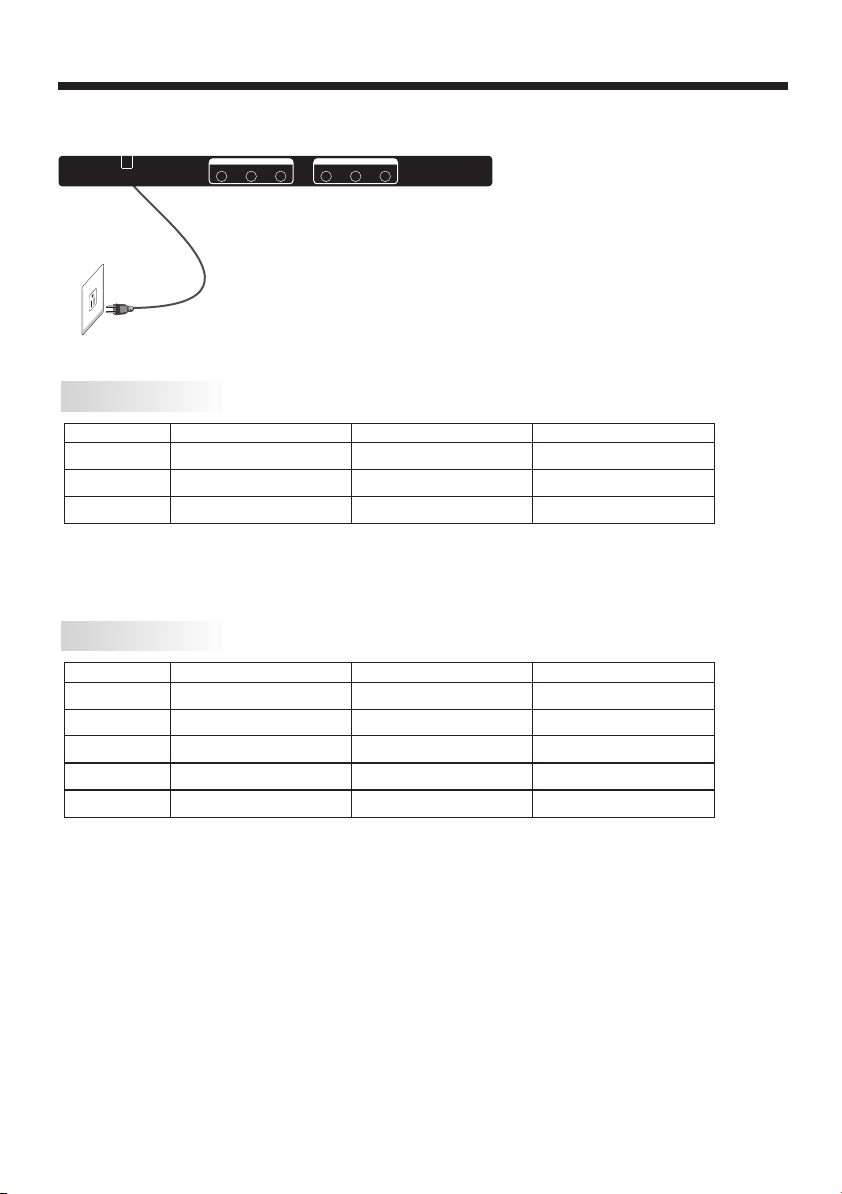
PRESET MODE (PC)
1
2
3
NOTE: PC V.Freq.(Hz) not more than 60Hz.
RESOLUTION
800*600
1024*768
1360*768
PRESET MODE (HDMI)
1
2
3
4
5
RESOLUTION
800*600
1024*768
1360*768
1280*768
1920*1080
AV OUTPU T
VIDEO L R
V.Freq.(Hz) H.Freq.(KHz)
60
60
60
V.Freq.(Hz) H.Freq.(KHz)
60
60
60
60
60
37.88
48.36
47.7
37.88
48.36
47.7
47.3
67.5
-7-
Page 9

INSTALLATION
AV EQUIPMENT
This TV provides one group of AV ,one group of YPbPr for convenient connection to VCR, DVD
or other video equipment. Please refer to the owner's manual of the equipment to be connected
as well.
You can use the input terminals on TV set rear as follows.
USB
HDMI
100- 240V~ 50/60 Hz
TO AUDIO OUTPUTS
HDMI 2
Y
Yellow (video)
R
Red (audio R)
W
White(audio L)
R
Red(Pr or Cr)
B
Blue(Pb or Cb)
G
Green(Y)
AC-I NPUT
VIDE O EQUIP MENT
W R
Y
TO VIDEO
OUTPUTS
HDMI 1
Pb
Y
G
B
W
AV INPU T
VIDE O L R
W R
Y
HEAD PHONE
Pr
R
R
PC AUD IO
AV OUTP UT
VIDE O L R
Y
VGA
VIDEO EQUIPMENT with YPbPr
W R
RF
GBR
TO AUDIO INPUTS
W
R
VIDE O EQUIP MENT
W
R
TO VIDEO
INPUTS
It can be connected to the following appliances: VCR, multi disc player, DVD, camcorder,
video game or stereo system, etc.....
YPbPr can support these video formats:480i,576i,480p,576p,720p,1080i,1080P.
Note:
1.AV and YPb Pr s ha re o ne a ud io c ha nn el .
2.When HDMI port get DVI signal, the "PC Audio" channel is changed to receive the
audio for HDMI port.
3.Sometimes it will not support in diff er en t de vi ce b ec au se t he d ev ic e su pp ly s
nonstandard signal.
4.When current source is TV, AV OUT si gn al i s TV; when current source is AV, AV OUT
signal is AV; other sources have no AV OU T signal.
-8-
Page 10

REMOTE CONTROLLER
The remote control cannot be operated unless the batteries are properly loaded inserted.
When using the remote control, aim it at the remote control sensor on the TV.
Function introduction
1
1.Press to turn on and off the TV.
2
4
5
6
7
8
9
10
11
12
USB
PICTURE AUDIO
DISPLAY
MENU INPUT
CH.LIST
VOL-
PLAY/PAUSE STOP PREV NEXT
VOL+
OK
ASPECT
CH-
MUTE
SLEEP
RECALL
EXIT
CH+
2.USB: Press to launch the USB multimedia mode
3
3. Switches the TV sound on or off.
4. Press repeatedly to cycle through the available
13
picture modes.
14
5.Press to cycle through the differ en t so un d mo de
settings
6. Press to change a channel.
7.Press to display the TV status information on the bottom.
8.Press to open the on-screen menu
9. Open the channel list in TV mode.
15
10.Press CH+ or CH- to go to the next or previous
channel. Press VOL+ or VOL- to increase or
16
decrease the volume.
11. Play/Pause Stop Previous Next
17
12.Be used in programme edit:
18
Red: Delete
Green: Rename
Yell ow : Mo ve
19
Blue: Skip
13.Press to display the sleep timer option.
14.To change the picture aspect ratio: Auto,4:3,
16:9,Zoom, Zoom2.
15.Press to go to the last viewed channel.
16.Show the input source menu.
17.Press to confirm selections in an on-screen menu
or to open a submenu.
18.To move within the menu.
19.Exit On Screen Display.
-9-
Page 11

1. CHAN NEL ME NU
The fir st it em o f the M ENU is ch annel m enu ( f or
TV so urce on ly).
You can sea rch c ha nne ls and ed it prog ram s he re.
Press t o mov e, p res s OK butt on to con firm,
and pre ss to a dj ust .
Aut o Tuning
Sou nd Syst em
Man ual Tuni ng
CHA NNEL
< >
1).Au to tu ni ng:
Searc h all t he TV channe ls au to mat icall y.
Pro gramm e Edit
Sof tware U pdate (USB)
2). Sou nd Sy st em:
You can cha nge t he s oun d syste m.
3). Man ual t un ing :
You can sea rch t he TV channe ls an d fi ne tu ne the
chann els , th en st orage t he chan nel s yo u sel ected .
Man ual Tuni ng
_
Sto rage To 2
Cur rent CH 2
Sea rch
Fin e-Tune
Fre quenc y 874.3 7 MHz
Sav e MENU
NOTE:
Press r ed bu tt on to s torag e to chan nels
after m anu al t uni ng .
4). Progra m Edit:
You can Del ete , Re nam e, Move , or Skip a ny pr og ram s.
+
TV OPERATION
Dele te
Delet e
Press t o cho os e the p rogra m.
Press r ed bu tt on, t he prog ram wil l delet e.
Rena me
Renam e
Move th e cur so r to th e progr am, pre ss
green b utt on t o ren ame the p rogra m.
Press t o cho os e the c harac ter. Pre ss to
move th e cur so r.
Press M ENU b ut ton t o exit ed it, Pre ss EXIT to exi t
the men u.
Note: The TV pr ogram s name on ly can be 5 c har acter s.
Move
Move
Move th e cur so r to th e progr am, pre ss
yello w but to n, it w ill sho w yello w curso r, Press
to move t he pr og ram .
Skip
Skip
Press t o cho os e the p rogra m, pres s
blue bu tto n to s kip t his pro gram, The ic on will
show on t he ri gh t sid e of the pr ogram .
Choos e the s ki ppe d progr am, pre ss the bl ue bu tton
again , you c an c anc el the sk ip, Then the i con wil l
disap pea r.
5). Sof twa re upda te( US B):
Updat e the T V set ' s softw are b y US B.
2. PICT URE M EN U
The sec ond i te m of th e MENU is P ICTUR E MENU.
You can adj ust p ic tur e eff ect her e, such a s contr ast ,
brigh tne ss , etc .
Press t o mov e, p res s OK butt on to con firm,
and pre ss to a dj ust .
Pic ture Mo de Stan dard
Col or Temper ature
Asp ect Rat io
Noi se Redu ction
PICT URE
< >
Scr een
Pro gramm e Edit
1
2
3
Del ete Ren ame Mov e
OK
Ski p
MEN U
NOTE:
1).Tin t is avai lable i n NTS C sy ste m only.
2).Th ere a re f our c olor te mpera tur e mo des
can be se lec te d, su ch as med ium, wa rm, c oo l, an d user.
3).Sc ree n is a vai lable i n PC mode o nly, w hich
can adj ust h or izo ntal po sitio n, ve rt ica l posit ion,
size an d pha se .
-10-
Page 12
3. SOUN D MEN U
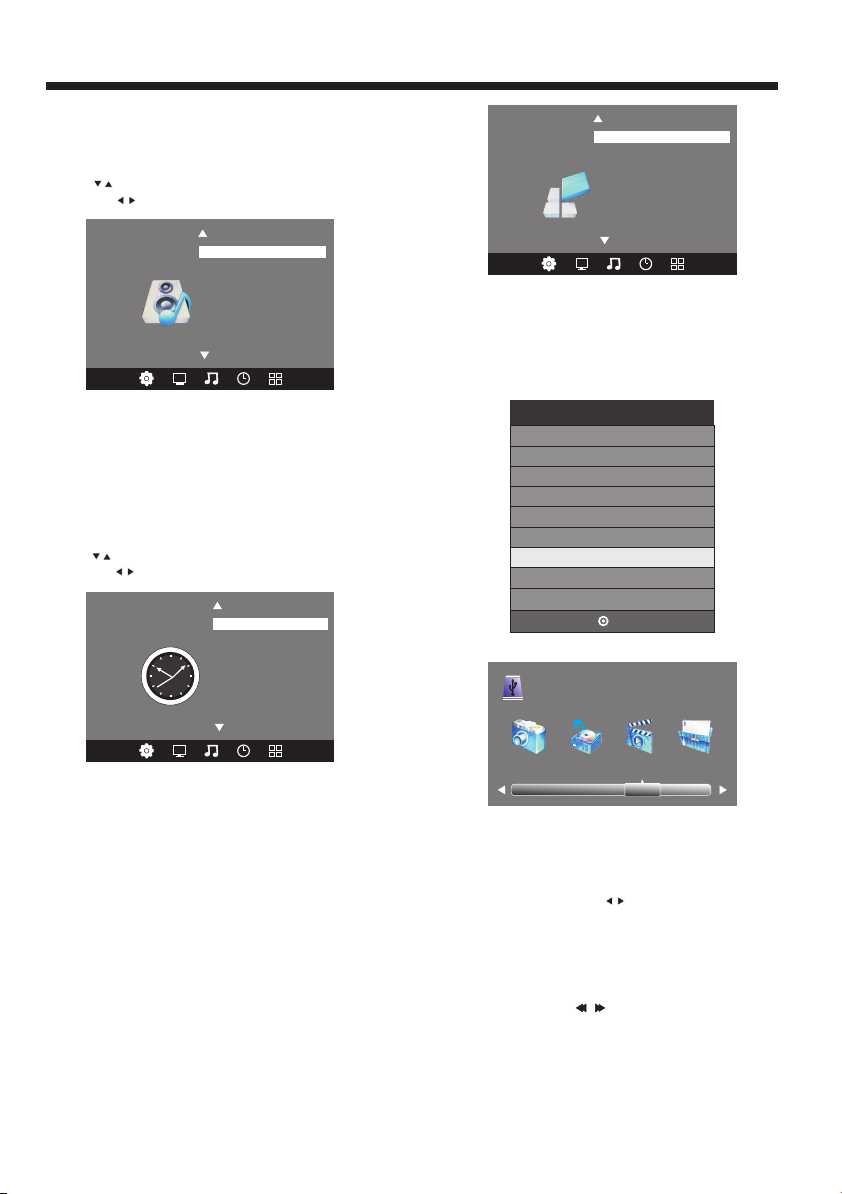
The thi rd it em o f the M ENU is th e SOUND
MENU.
You can adj ust t he s oun d eff ect her e such as
trebl e, ba ss , bal ance et c.
Press t o mov e, p res s OK butt on to con firm,
and pre ss to a dj ust .
Sou nd Mode S tanda rd
Bal ance
Aut o Volume
SOUN D
< >
Note:
Auto vo lum e: o nly a vaila ble whe n the i np ut
signa l vol um e is to o large or dis torti on.
4. TI ME MENU
The for th it em o f the m enu is th e TIM E MENU
You can adj ust t he c loc k, powe r on/off tim e,
sleep t ime e tc .
Press t o mov e, p res s OK butt on to con firm,
and pre ss to a dj ust .
Sur round S ound
TV OPERATION
OSD L angua ge Engl ish
Res tore Fa ctory D efaul t
Blu e Scree n
OSD B lend
OPTI ON
< >
NOTE:
Resto re fa ct ory d efaul t will cl ear a ll t he pr ogram s
and Res et al l th e set tings t o defau lt va lu e.
6. USB FU NCT IO N
You must en ter t he S our ce menu f irst, the n ch oic e the
USB and p res s OK b utt on,th e USB men u will ap pea r.
Inp ut Sour ce
TV
YPB PR
PC
HDM I1
HDM I2
AV
USB
Clo ck
Off Ti me
On Tim e
Sle ep Timer
TIME
< >
NOTE:
Within 1 5 minut es ther e is no s ignal , the TV
will au to sl ee p.
Once yo u pow er o ff th e TV set by AC, t he cl oc k tim e
will be r ese t.
5. OPTI ON ME NU
The fif th it em o f the M ENU is th e OPTIO N MENU.
You can adj ust t he O SD la nguag e, Rest ore fac tor y
defau lt, B lu e Scr een or OS D Blend .
Aut o Sleep
OK
USB 2 .0
PHOT O MUSIC M OVIE TE XT
Pleas e mak e su re th at the US B devic e hav e pl ugg ed in
the slo t. Th ere are f our t ype med ia item c an be sel ect ed,
such as p hot o, m usi c, Movi e and tex t. Sele ct th e type
media i tem b y pr ess ing , pre ss OK but ton t o en ter
the dis k sel ec tio n menu.
In the mo vie m od e, wh en you us e FB, FF fu nctio n, Th e
audio m ay be p au se in s evera l secon ds to s yn chr onize
the aud io si gn al an d video s ignal .
In text m ode , pr ess t o make pa ge up and p age d ow n.
NOTE:
When th e USB d ev ice i sn't su pport ed, it ma y be th at the
power o f the U SB d evi ce isn' t enoug h.
-11-
Page 13
1/1
Retu rn C
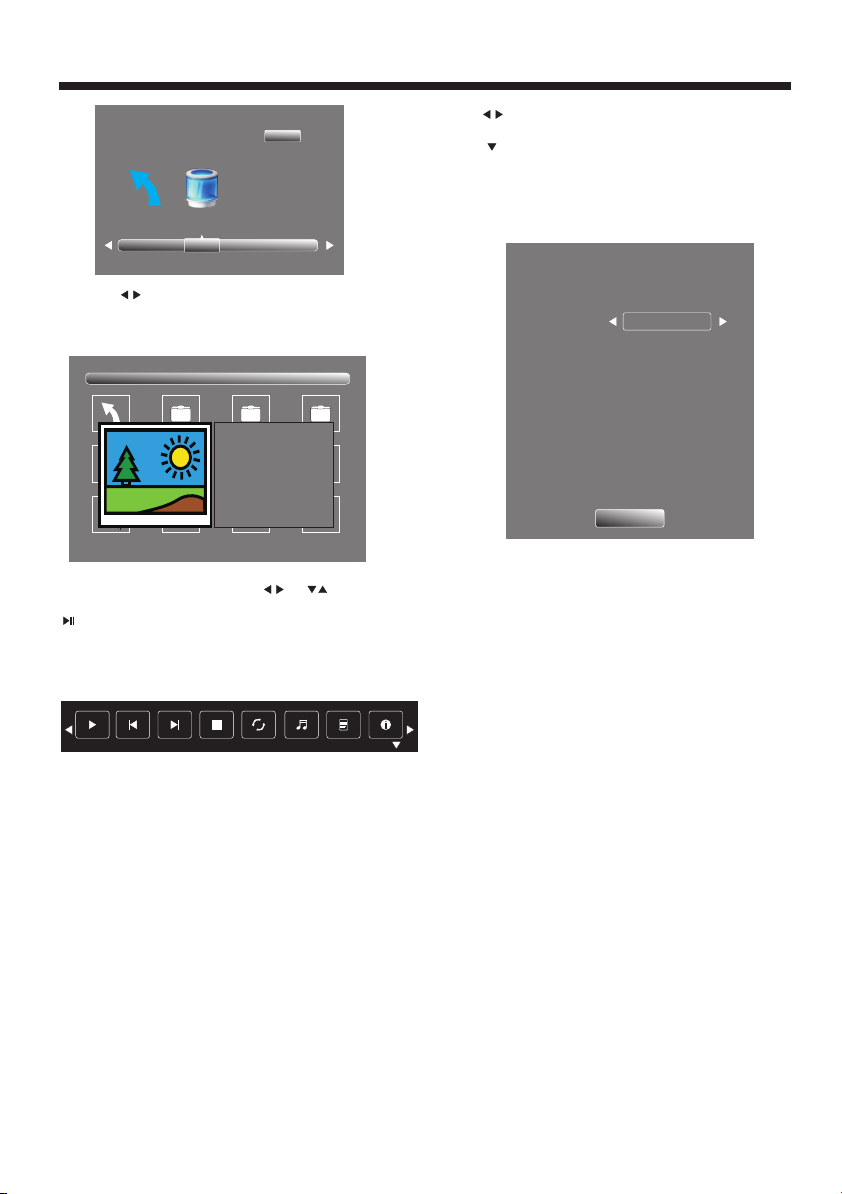
Press t he to s el ect t he righ t disk an d pre ss O K to
displ ay me di a fil es and fo lder li st or c ho ose R eturn t o
back to t he me di a typ e selec tion me nu.
1/1
Ret urn
Mov ies
Samp le1.t s
Sam ple1. ts Sampl e2.ts S ample 3.ts Sa mple4 .ts
Selec t the m ed ia fi le by pre ssing o r , the n
the pre vie w fr ame w ill pop u p. Pres s the but ton
to play t he me di a fil e in full s creen . Whe n the
media f ile ( ph oto , music , Movie o r tex t ty pe) i s
playi ng, p re ss th e OK or Inf o butto n can d is pla y the
contr ol ba r.
Res oluti on: 688 x412
Aud ioTra ck: 1 /2
Sub title : 1/3
Pro gram: 1 /5
Siz e: 51145 7 KBy tes
TV OPERATION
Press t o sel ec t the f uncti on icon , press O K but ton to
confi rm th e fu nct ion.
Press o r EXI T butto n to ex it the co ntrol b ar.
NOTE:
You can adj ust t he a udi o track , subti tle , or p rog ram in
the Inf o men u wh ile P layin g the vid eo fi le .
Choos e the I nf o ico n and pre ss OK can d ispla y the I nfo
MENU.
Sampl e1 .ts
Resol ut ion: 720x 57 6
Audio Track :
Subti tl e: 1/ 3
Progr am : 1 /6
Size: 3 05 74 KBytes
1/2
Close
Music f unc ti on ne ed to put m usic an d pic tu re in t he
same fo lde r.
-12-
Page 14

Hotel Mod e:
Pleas e pre ss s our ce key fi rst,a nd then p res s numbe r key
“1001 ” to en te r int o Hotel M ode.
Hotel Mode Operation
Hotel Mode Operation
Panel key lock
Max volume
Start Source
Start Channel
Setup Menu display
Input source change
Save To USB
Load
Volume default
OFF
OFF
100
TV
1
Yes
Yes
0
Hotel M ode O pe rat ion: Se t Hotel m ode o n/ off .
Pan el key l ock : Ke ypad w ill be locked, when Key Lock
mode is o n.
Max volum e: Set max volum e limitted .T his op tio n allo ws
you t o set t he Ma x Volu me Le vel .
Sta rt So urc e:Cho ose s ource , the o pti ons as fo llo w:
TV/Y PBP R/PC/ HDMI1 /HDMI 2/AV/USB, pre ss th e ◄ or ►
but ton to sel ect t he de sired s ource.
Sta rt Ch annel : I n TV mo de, you c an se lec t a cha nnel
num ber to be s et as t he TV p resen t cha nne l. Pr ess t he ◄ or
► but ton to sel ect t he de sir ed ch annel n umber .
TV OPERATION
Set up Me nu disp lay :Ma in me nu lo ck , ma in menu w ill not
dis play wh en se t to “N o”
Inp ut sour ce ch ang e : Sou rce l ock,y ou ca n't c han ge th e
sou rce, wh en se t to “N o”
Sav e To USB: B ack up al l TV se tti ng da ta to USB disk.
(ba ckup fi le na med D ATABASE.bin)
Loa d: Resto re this d ata to TV fro m USB dis k. When
restore i s executed,th e TV will r ebo ot.
Volu me defa ult : Po wer on de fault volume, press the ◄ or
► but ton to sel ect t he de sir ed vo lum e.
-13-
Page 15
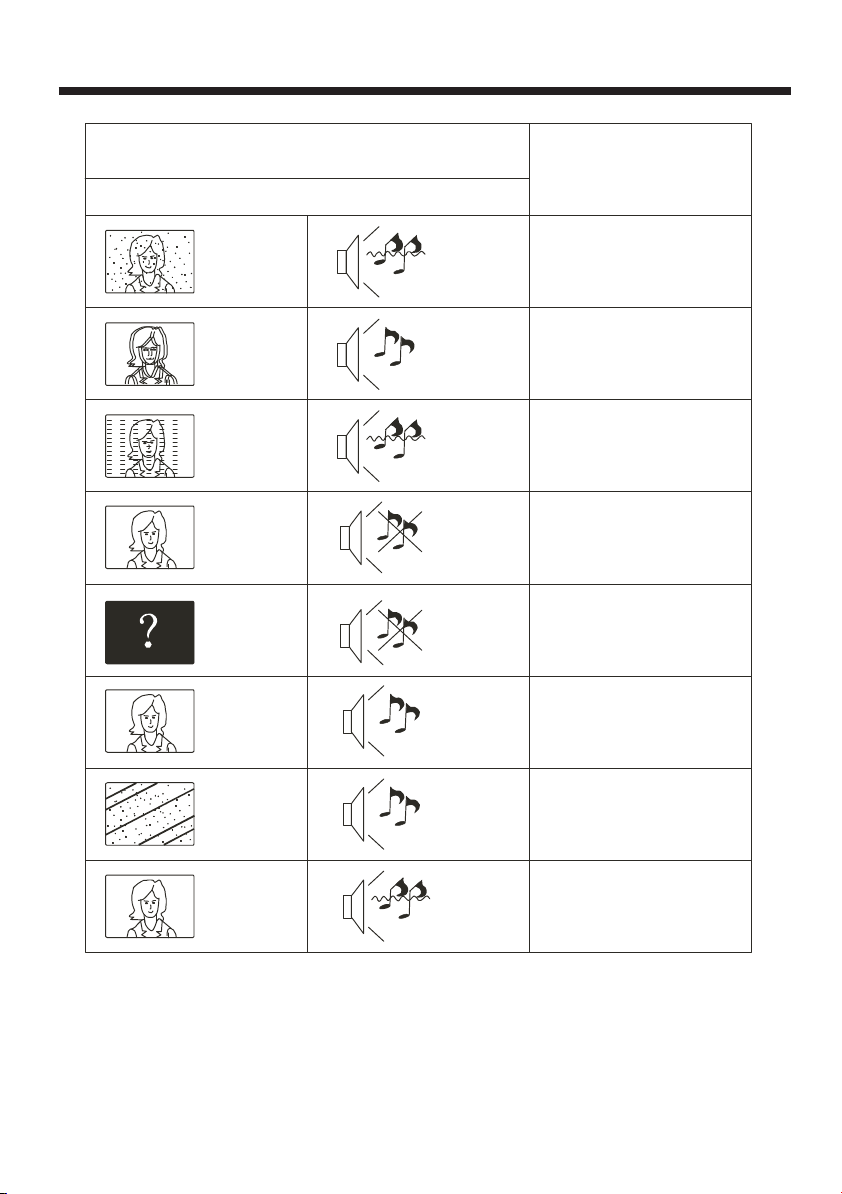
Trouble phenomenon
TR OU BL E SH OO TI NG
Picture Audio
Snow Noise
Ghost
Inter fere
Norma l Picture
No pict ure Mute
No colo r Norm al audi o co lor con tro l
Norma l audio
Noise
Mute
Inspection
anten na po si tio n, dire ction
or conn ect io n
anten na po si tio n, dire ction
or conn ect io n
elect ron ic e qui pment ,car/
motor cyc le ,fl uores cent li ght
Volume (insp ect w et her t he
mute fu nct io n on th e remot e
contr ol ar e st art ed , or aud io
syste m are c or rec t or not)
Power c ord i s no t ins erted
Power s wit ch i s not o pened
Contr ast a nd b rig htnes s/vol ume
setup
Press s tan db y key o n the rem ote
contr ol fo r in spe cting
Scram ble
No colo r
Norma l audio
or weak
Noise
retun e cha nn el
Audi o sy ste m
Special Expla na ti on:The access ories such as r em ote contr ol i s not belon gs
to the guar antee。
-14-
Page 16

 Loading...