

Page 1
LE22M600CF
LE24M600CF
LE28M600C
LE32M600C
Please read this manual carefully before operating the unit,and keep it for
future reference.
Page 2
Welcome
Important Information
01 Safety Warnings
2
2
Safety notice
Warning and cautions
3
4
Main Parameter
Base Stand Assembly Instruction
02 Introduction
5
7
Wall Mounting Installation Guidelines
Front Control Panel
8
10
Rear/Side Sockets
11
Connecting to your Haier TV
Common Interface
12
15
Remote Control
03 Remote Control
16
Teletext
17
Installation Guide
04 Operation
18
CHA NNEL ME NU18
Auto Tunin g (DVB-T )18
Auto Tunin g (DVB- C)19
DTV Man ual Tunin g (DVB-T )
DTV Man ual Tunin g (DVB- C)
ATV Manual Tuni ng
20
20
20
PIC TURE MENU21
22
Audio MEN U
21
Clo ck
MEN U
22
SET UP MEN U
LOCK MEN U
EPG M enu(Electronic Program Guid e)
23
PVR File System(only for DTV )
23
Prepare to record the p rogram
24
22
Rec ord the program
24
Play the recording
24
Time shift
25
USB P layer
26
Trouble shooting
05 Trouble shooting
28
Specification31
Program edit
Common Inter face
20
21
Signal Information
Software Updated(USB)
21
21
06 Specification
Page 3
Thanks for buying this 22"/24"/28"/32" LED LCD TV.This guide will help you set up and begin using your TV.
IMPOR
TANT INFORMATION
READ ALL INSTRUCTIONS BEFORE USE AND KEEP FOR FUTURE REFERENCE.
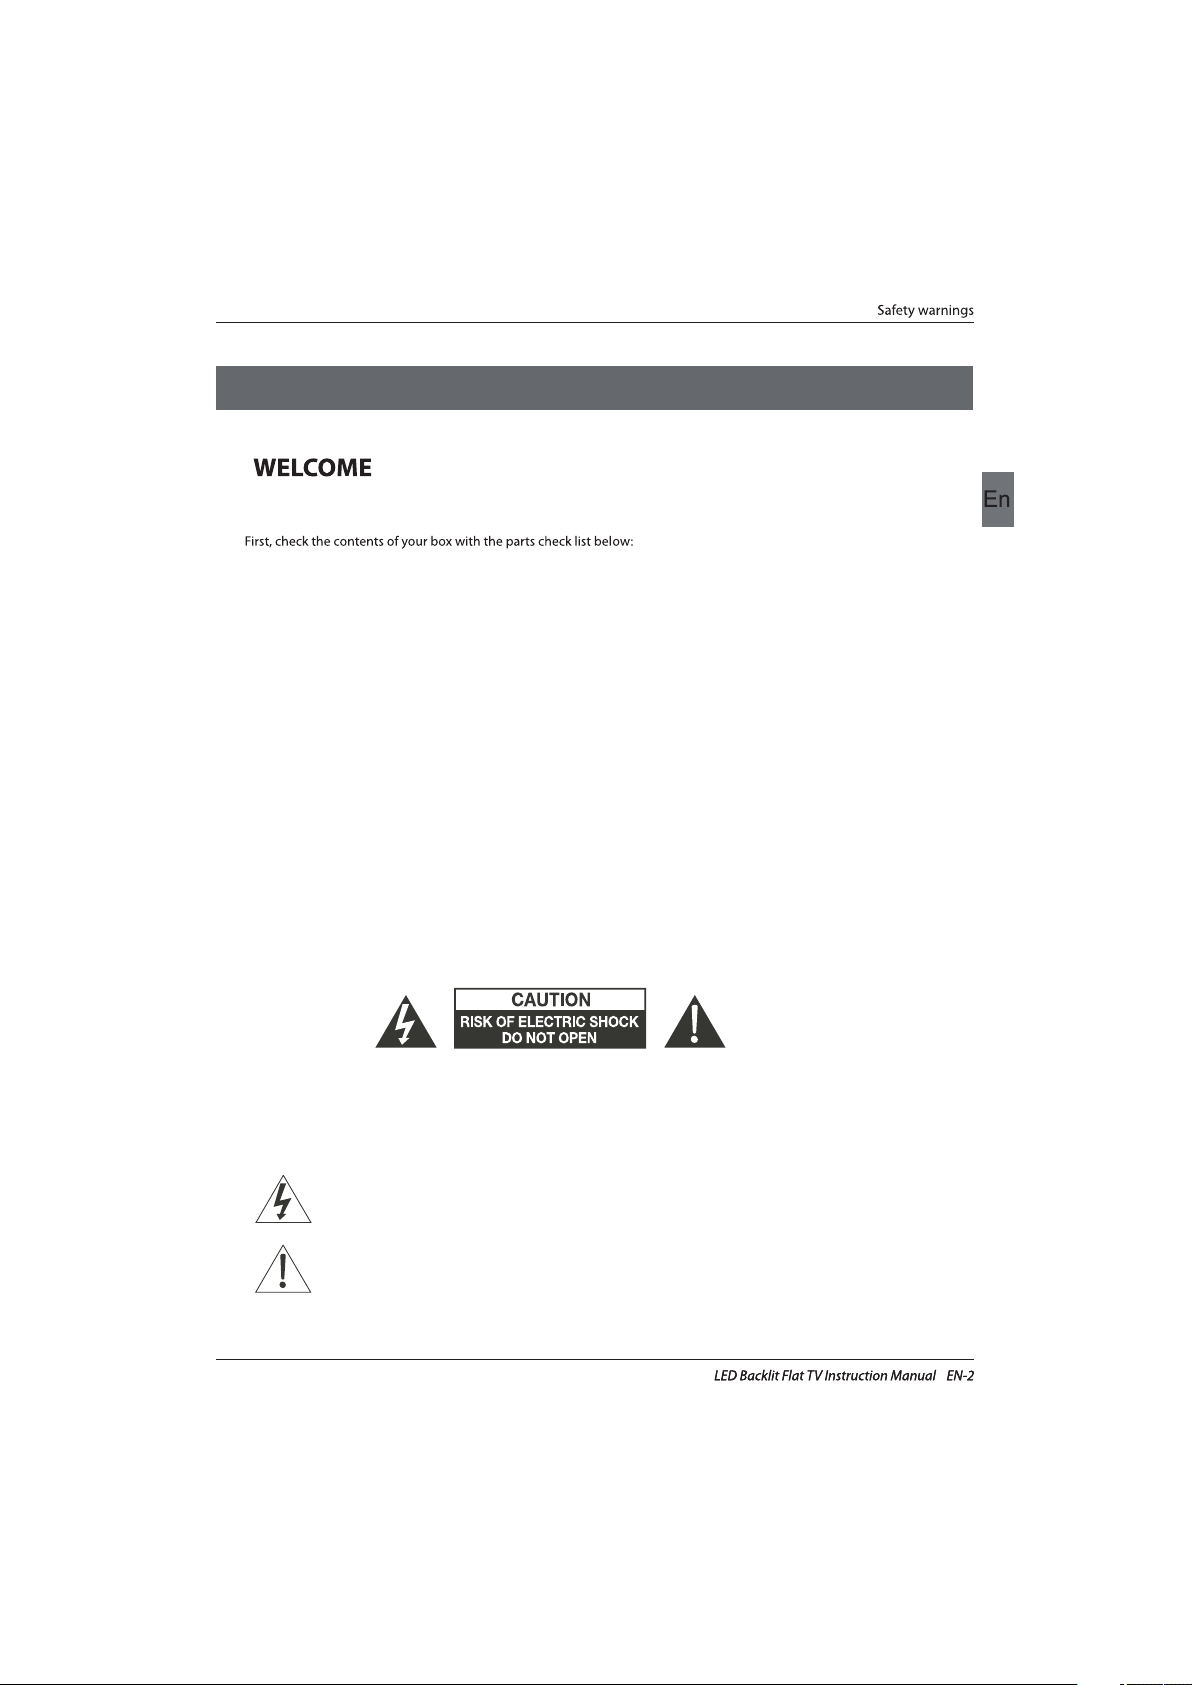
CAUTION
TO REDUCE THE RISK OF ELECTRIC SHOCK, DO NOT REMOVE COVER (OR BACK).NO USER SERVICEABLE PARTS INSIDE.
FOR ANY PROBLEMS, REFER SERVICING TO THE CUSTOMER HELP LINE. THERE IS A LIGHTNING ARROW SYMBOL IN
THE TRIANGLE: THIS SYMBOL INDICATES HIGH VOLTAGE IS PRESENT INSIDE. IT IS DANGEROUS TO MAKE ANY KIND OF
CONTACT WITH ANYINSIDE PART OF THIS PRODUCT.
THERE IS A EXCLAMATION MARK IN THE TRIANGLE: THIS SYMBOL ALERTS YOU THAT IMPORTANT LITERATURE
CONCERNING OPERATION AND MAINTENANCE HAS BEEN INCLUDED WITH THIS PRODUCT.
CAUTION:TO REDUCE THE RISK OF ELECTRIC SHOCK AND FIRE, DO NOT PUT THE TV SET NEAR
SOURCES OF HUMIDITY. DO NOT USE ANY ABRASIVE CLEANERS WHICH MAY SCRATCH OR DAMAGE
THE LCD SCREEN. AVOID CONTACT WITH OBJECTS THAT MAY SCRATCH THE LCD SCREEN.
NOTE: SERVICING THE UNIT YOURSELF IS UNAUTHORISED AND COULD LEAD TO INJURY OR PRODUCT
DAMAGE. REFER ALL SERVICING TO THE CUSTOMER HELPLINE.
Now you can get star
ted!
22" FULL HD 1080P Digital LED LCD TV
Remote control
Instruction Manual
Quick start guide
AAA ba x2ttery
01 Safety warnings
Warranty Card
24" FULL HD 1080P Digital LED LCD TV
Remote control
Instruction Manual
Quick start guide
AAA ba x2ttery
28" HD Ready Digital LED LCD TV
Remote control
Instruction Manual
Quick start guide
AAA ba x2ttery
Screws
32" HD Ready Digital LED LCD TV
Remote control
Instruction Manual
Quick start guide
AAA ba x2ttery
YPbPr Connect Cable
Screws
Screws
Screws
Warranty Card
Warranty Card
Warranty Card
Stand
Stand
Stand
Stand
Page 4
Safety notice
EN-3
CAUTION:When the apparatus was in
electrostatic circumstance, it maybe
malfunction and need to reset by user.
Page 5
Dim:515*320mm(不 包括底座)
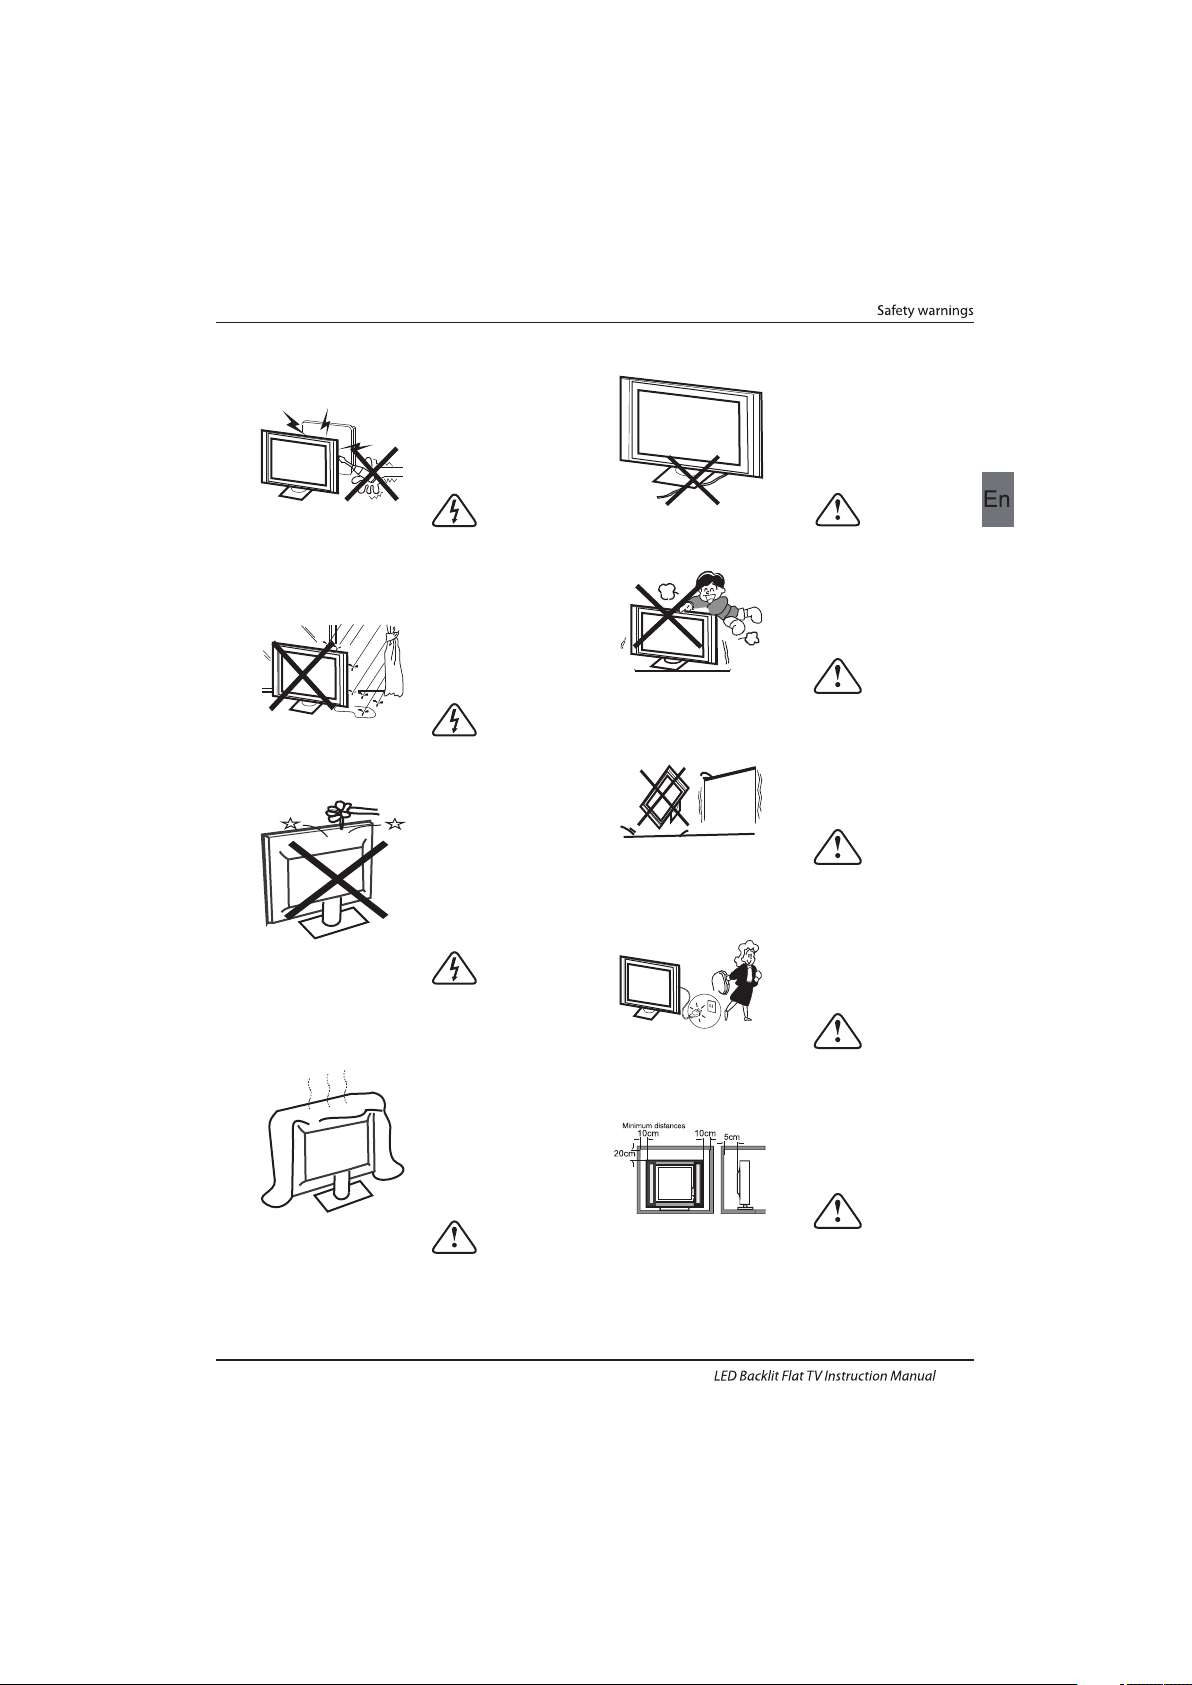
Warning
High voltages are used in the operation of this
television receiver. Do not remove the cabinet
back from your set. Refer servicing to qualified
service personnel.
Warning
To prevent fire or electrical shock hazard, do
not expose the television receiver to rain or
moisture.
Warning
Do not drop or push objects into the
television cabinet slots or openings. Never
spill any kind of liquid on the television
receiver.
Caution
Do not block the ventilation holes in the back
cover. Adequate ventilation is essential to
prevent failure of electrical components.
Caution
Do not trap the power supply cord under the
television receiver.
Caution
Never stand on, lean on, or suddenly push the
television or its stand. You should pay special
attention to children. Serious injury may result if
it should fall.
Caution
Do not place your television on an unstable cart,
stand, shelf or table. Serious injury to an
individual , and damage to the television, may
result if it should fall.
Caution
When the television receiver is not used for an
extended period of time, it is advisable to
disconnect the AC power cord from the AC
outlet.
Caution
If the television is to be built into a compartment
or similar enclosure, the minimum distances must
be maintained. Heat build-up can reduce the
service life of your television, and can also be
dangerous.
WARNING AND CAUTIONS
EN-4
Page 6
Panel
PAL-B/G ,I ,D/K
PAL/SECAM/MPEG2/MPEG4/H.264
AC100-240 V50/60Hz
2x3W
Analog RGB(PC) x1; PC audio x1
High-Definition Multimedia Interface (HDMI) x 2
Composite Input x 1
YPbPr x 1
SCART Input x 1
22"
CI x 1
USB x 1
RF Co-Ax x 1
Composite video input>=350
YPbPr>=400
Headphone x 1
COAXIAL x 1
TV System
Video Signal System
Input Power Voltage
Power consumption
Standby Power consumption
Audio Output Power (THD 7%)
Signal Input
Signal output
Horizontal definition (TV line)
SECAM-B/G , D/K , L
<0.30W
DVB-T, DVB-C
INSTALLATIONCAUTION
*Locate the TV in the room where light does
not strike the screen directly.
*Total darkness or a reflection on the picture
screen can cause eyestrain. Soft and indirect
lighting is recommended for comfortable
viewing.
*Allow enough space between the TV and the
wall to permit ventilation.
*Avoid excessively warm locations to prevent
possible damage to the cabinet or premature
component failure.
*Do not cover the ventilation openings when
using theTV.
Main parameter
Main features
4 NICAM;
5 T;ime-shift
3
HDMI interface and SCART
Inter face;
High luminance, wide viewing
angle;
2
Used as Television, display terminal,
PC display;
1
Never tamper with any components inside the
TV, or any other adjustment controls not
described in this manual. All LED-TV's are high
voltage electrical equipment.
When you clean dust or any water drops off the
SCREEN or CABINET or around any of the
buttons or connectors, the power cabled should
be removed from the power socket. Wipe the TV
with a soft, dry, dust free cloth.
During thunderstorms, unplug the power cable
and aerial / antenna cable to prevent damage to
your TV and any other devices connected to it.
All repairs to this TV should only be performed
by qualified TV service
personnel.
02 Introdution
Introduction
EN-5
1000(DTV);100(ATV)Storage channel number
24"
38W40W
SCART Output x 1
28"32"
41W50W
2x3W
2x8W
2x8W
Page 7
SUPPORTED MODE
PC
3
5
1024x768
1280x1024
60
60
1
640x480
60
31.47
2
800x600
60
37.88
48.36
63.98
RESOLUTION
V.Freq.(KHz)H.Freq.(KHz)
4
1366x768
60
47.7
Introduction
EN-6
6
1920x1080
60
66.64
(only for 22",24")
Page 8
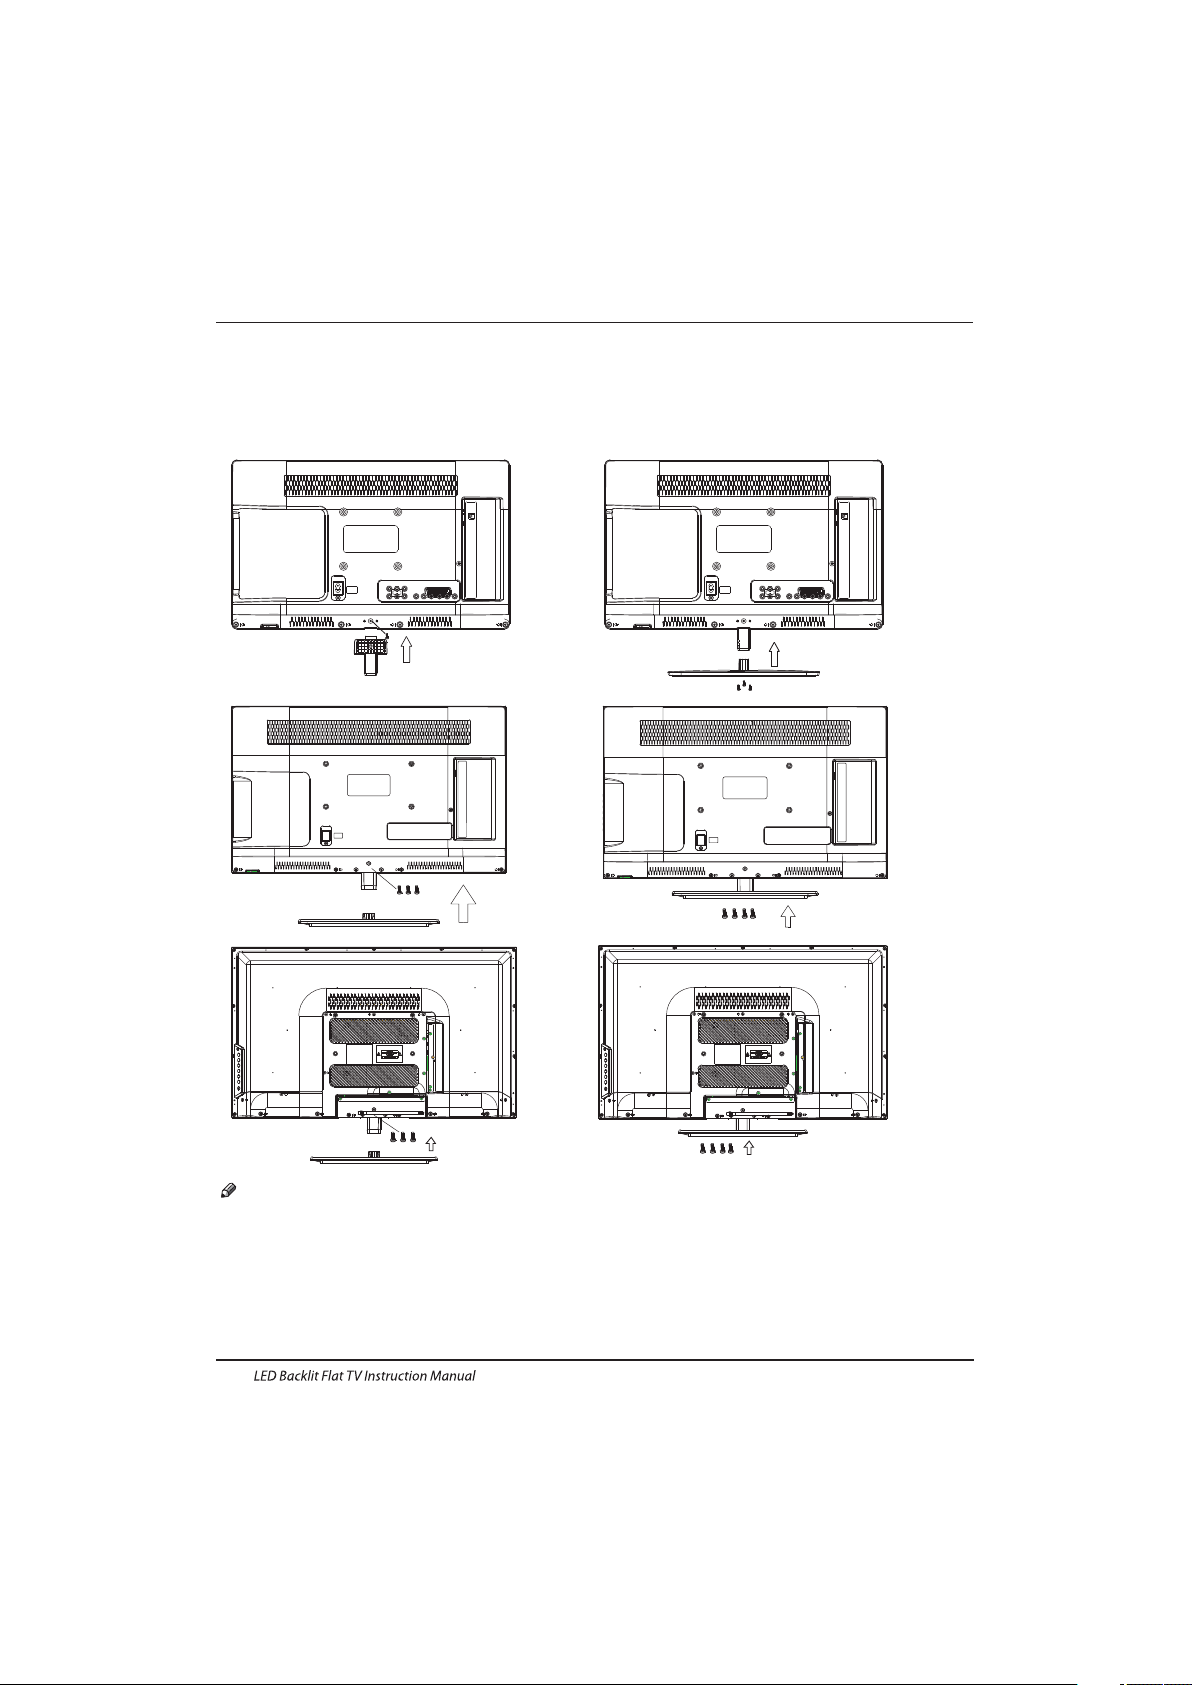
Base Stand Assembly Instruction
Locate the TV in a room where light does not strike the screen directly. Total darkness or a
reflection on the screen can cause eyestrain. Soft and indirect lighting is recommended for
comfortable viewing.
Allow enough space between the TV and the wall to permit ventilation.
Please do not attempt to rotate the TV on the stand.
Avoid excessively warm locations to prevent possible damage to the cabinet or premature
component failure.
INSTALLATION NOTES
Introduction
EN-7
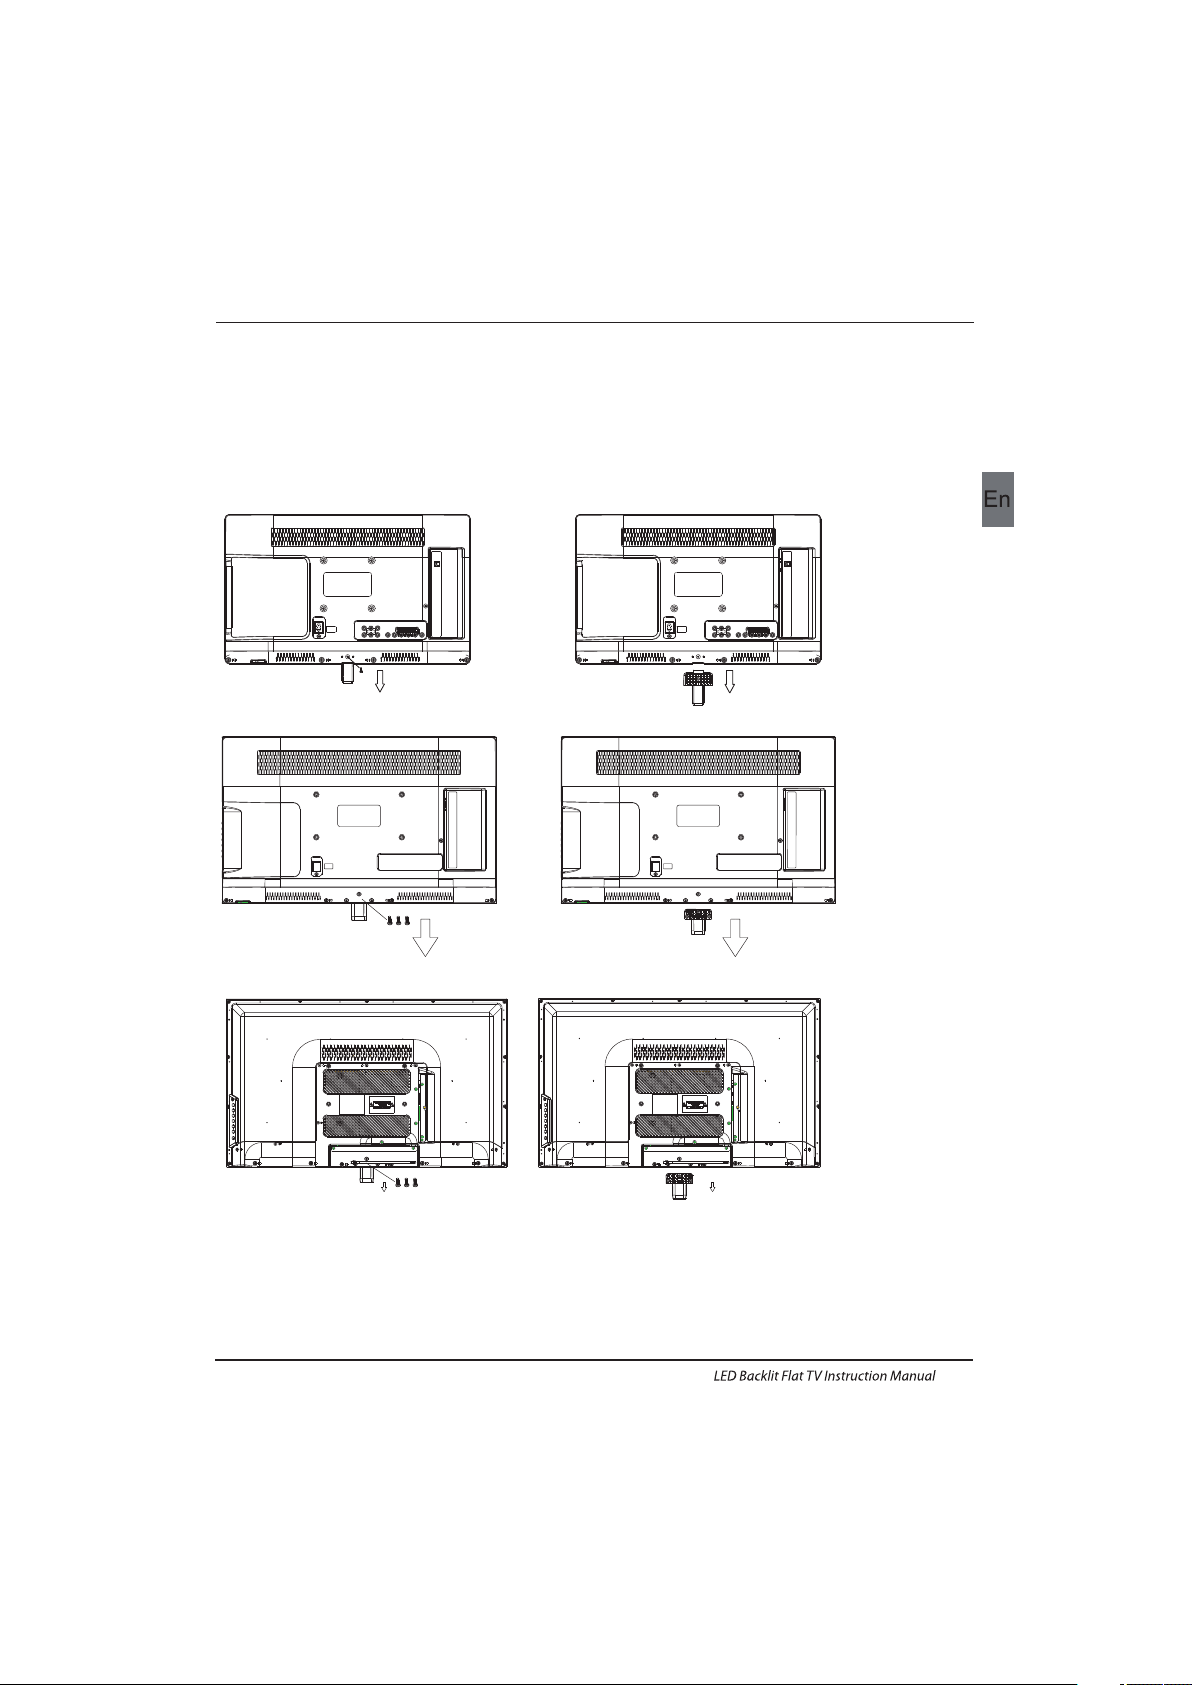
2. Attach the stand base plate to the stand pole
by firmly tightening the supplied screw.
1.Place the TV with the display side down on a flat
surface.Use a cloth to protect the display.Position
the stand base plate onto the bottom of the stand
pole.
(22",24")
(28")
(32")
Page 9
WALL MOUNTING INSTALLATION GUIDELINES
2.Remove the screws from the lower par t of the
television, where the base joins to the TV, and take
away the stand (put the stand somewhere safe for
future use).
1.Place the LED LCD Television onto a solid
surface. Please place some soft material
over the front of the screen to protect it
from any damage.
Introduction
EN-8
This television can be wall mounted as follows:
(22",24")
(28")
(32")
Page 10
Introduction
EN-9
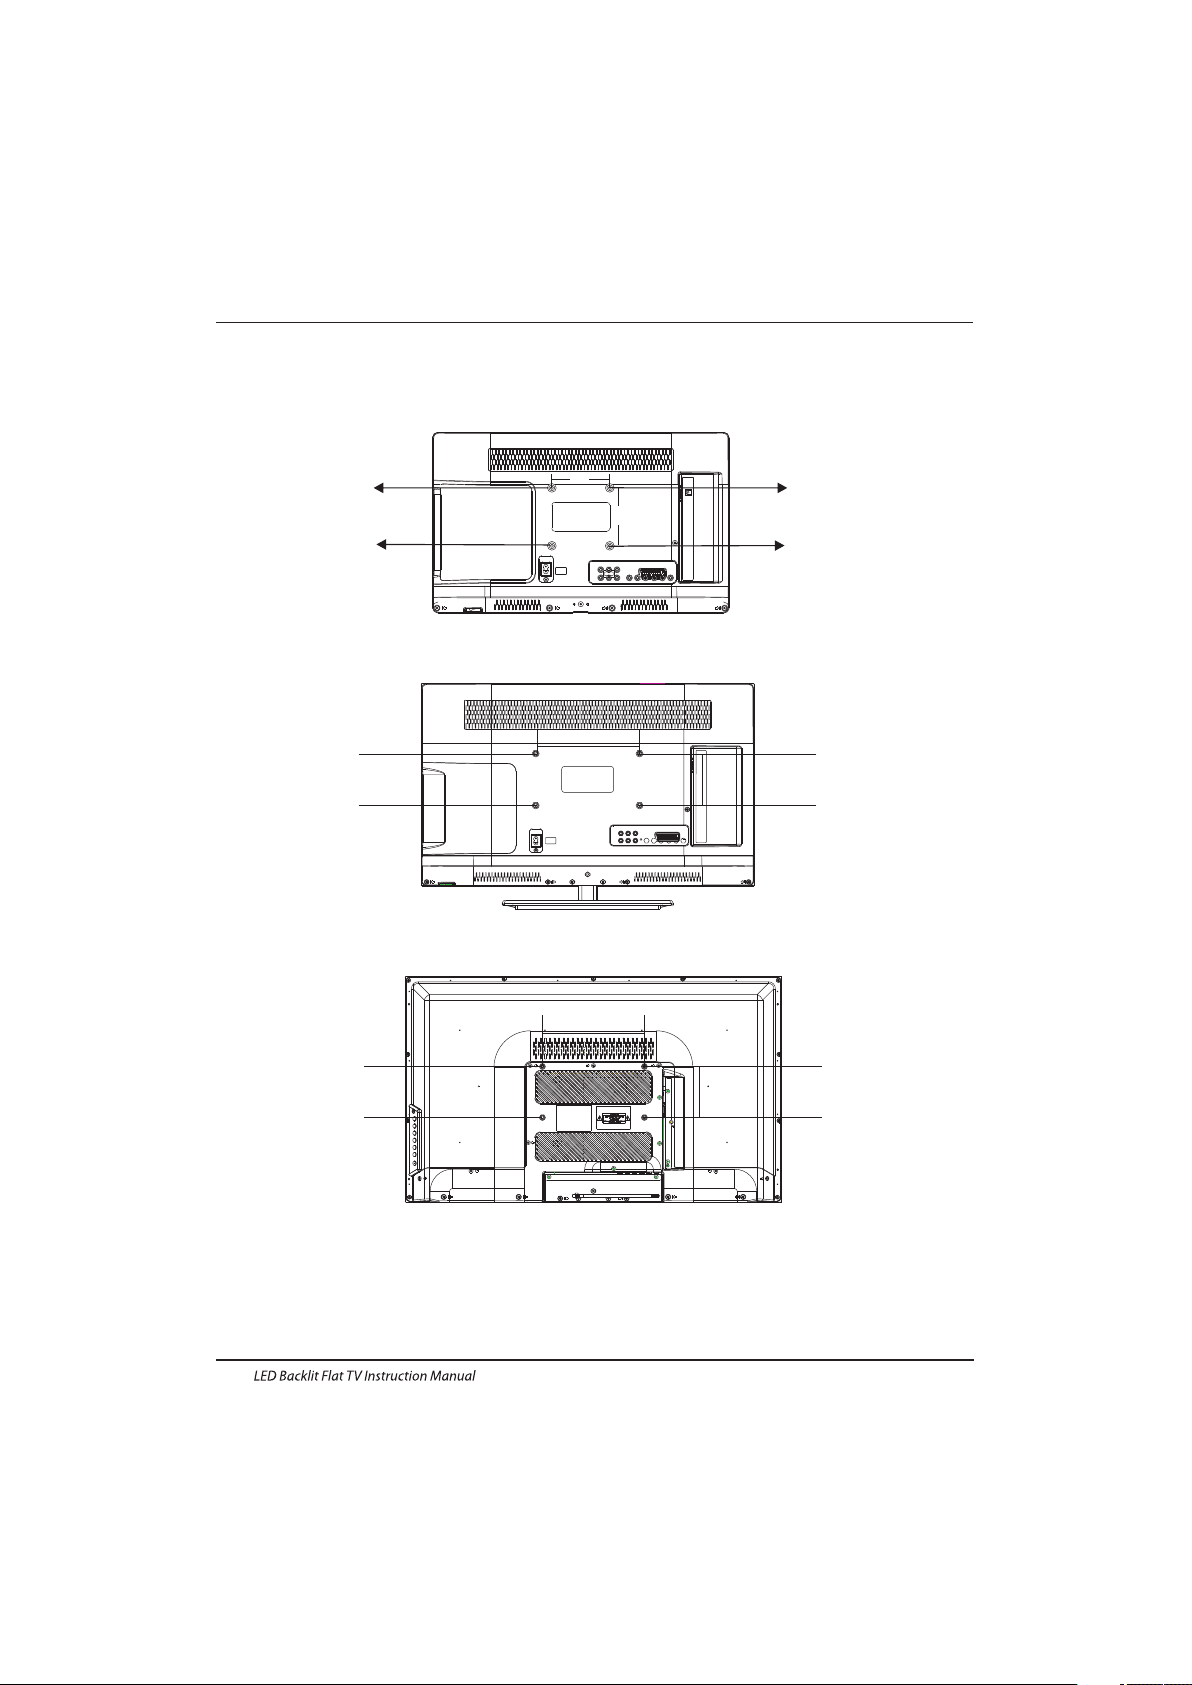
M4X5
M4X5
M4X5
M4X5
100m m
100m m
3.Use the four screws provided to fix the TV onto a wall mounting bracket (not included)
via the four VESA standard holes on the back of the television.
M4X5
M4X5
M4X5
M4X5
200 mm
100m m
M4X5
M4X5
M4X5
M4X5
200 mm
100m m
(22",24")
(28")
(32")
Page 11
1
2
3
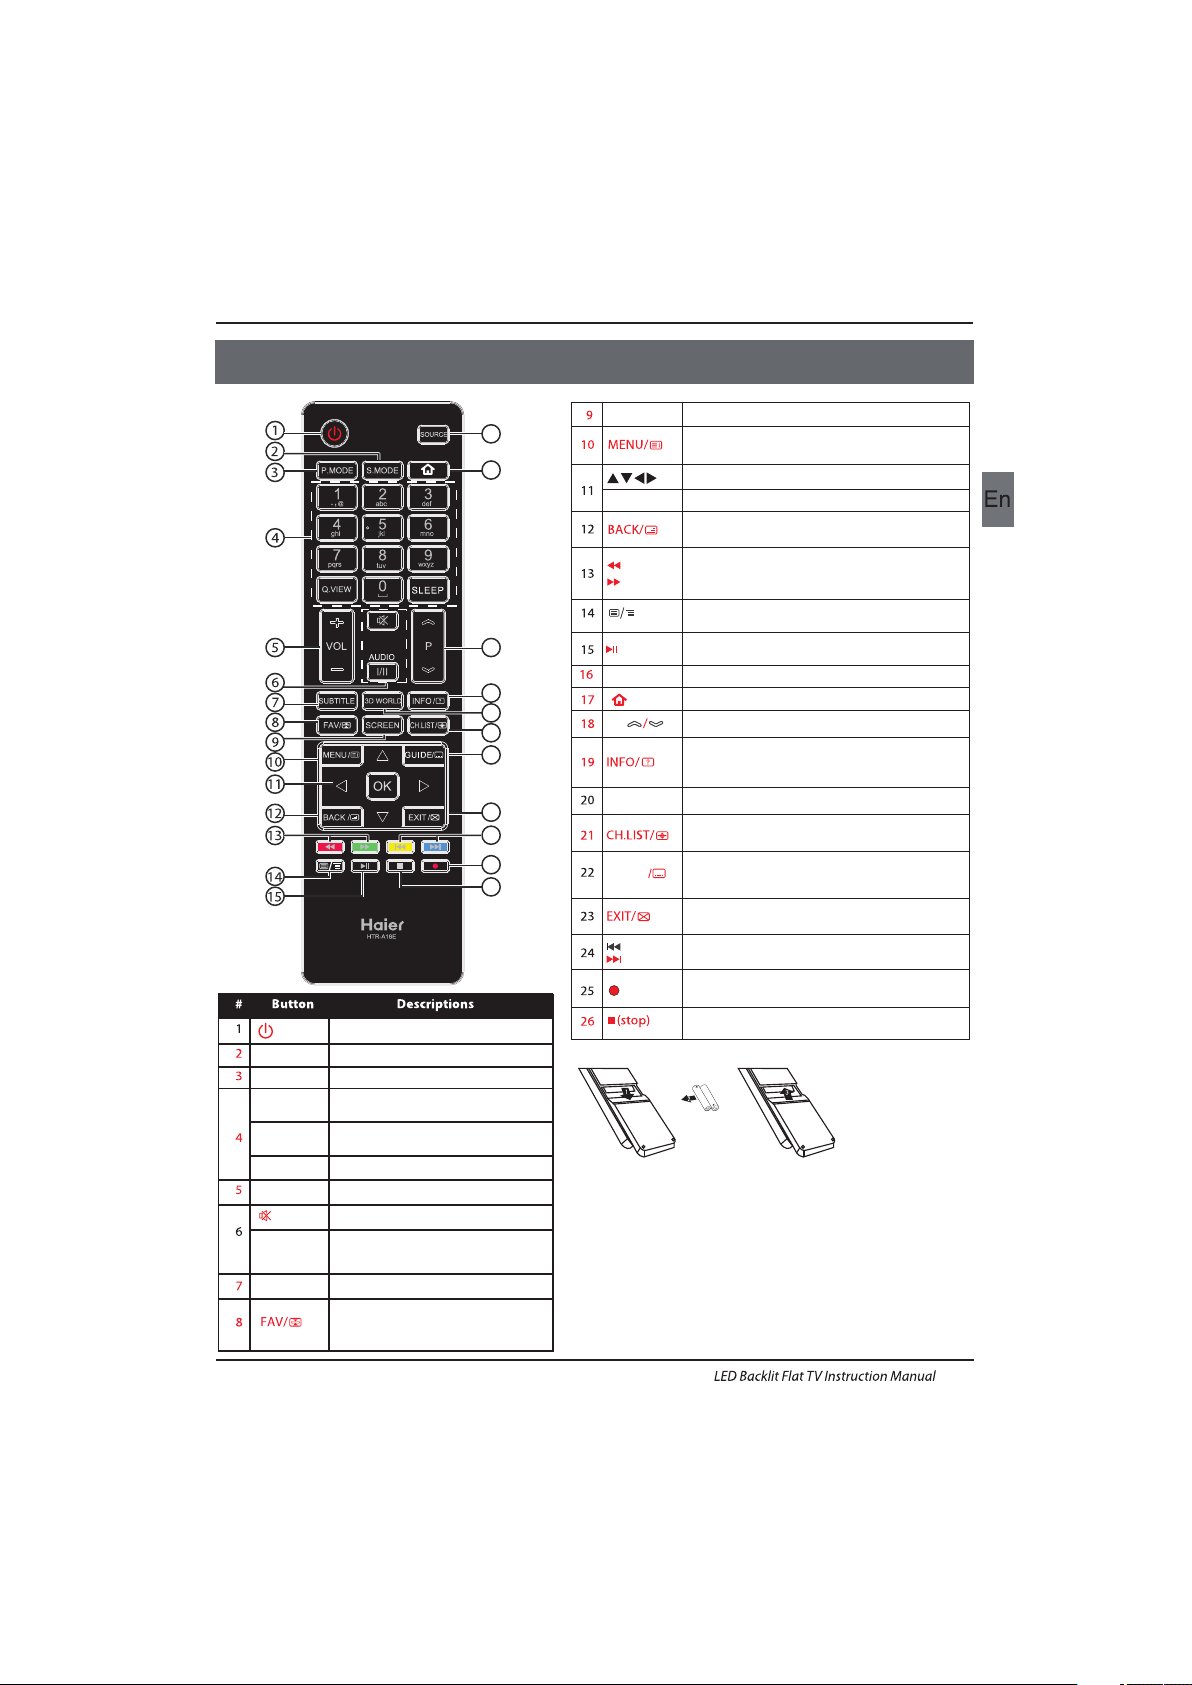
Remote control sensor.
Indicator LED:
RED: STAND BY.
Key board.
1
SOURCE
Display the input source menu.
MENU
Display main MENU.
3
4
CH+/CH-
In TV mode,press CH+ or CH- to change
the channel up and down.
In MENU, press CH+ or CH- to select items .
STANDBY
2
VOL+/VOL-
Adjust sound level.
In MENU,adjust the item that you selected.
5
EN-10
Introduction
Front control panel(22",24",28")
3
2
3030
1
≤8m
MENU
CH+
CH-
VOL+
VOL-
2
SOURCE
1
3
4
STANDBY
5
1
2
3
Remote control sensor.
Indicator LED:
RED: STAND BY.
Key board.
1
SOURCE
Display the input source menu.
MENU
Display main MENU.
3
4
CH+/CH-
In TV mode,press CH+ or CH- to change
the channel up and down.
In MENU, press CH+ or CH- to select items .
STANDBY
2
VOL+/VOL-
Adjust sound level.
In MENU,adjust the item that you selected.
5
3
2
3030
1
≤8m
SOU RCE
MEN U
CH+
CH-
VOL +
VOL -
STANDBY
1
2
3
4
5
Front control panel(32")
Page 12
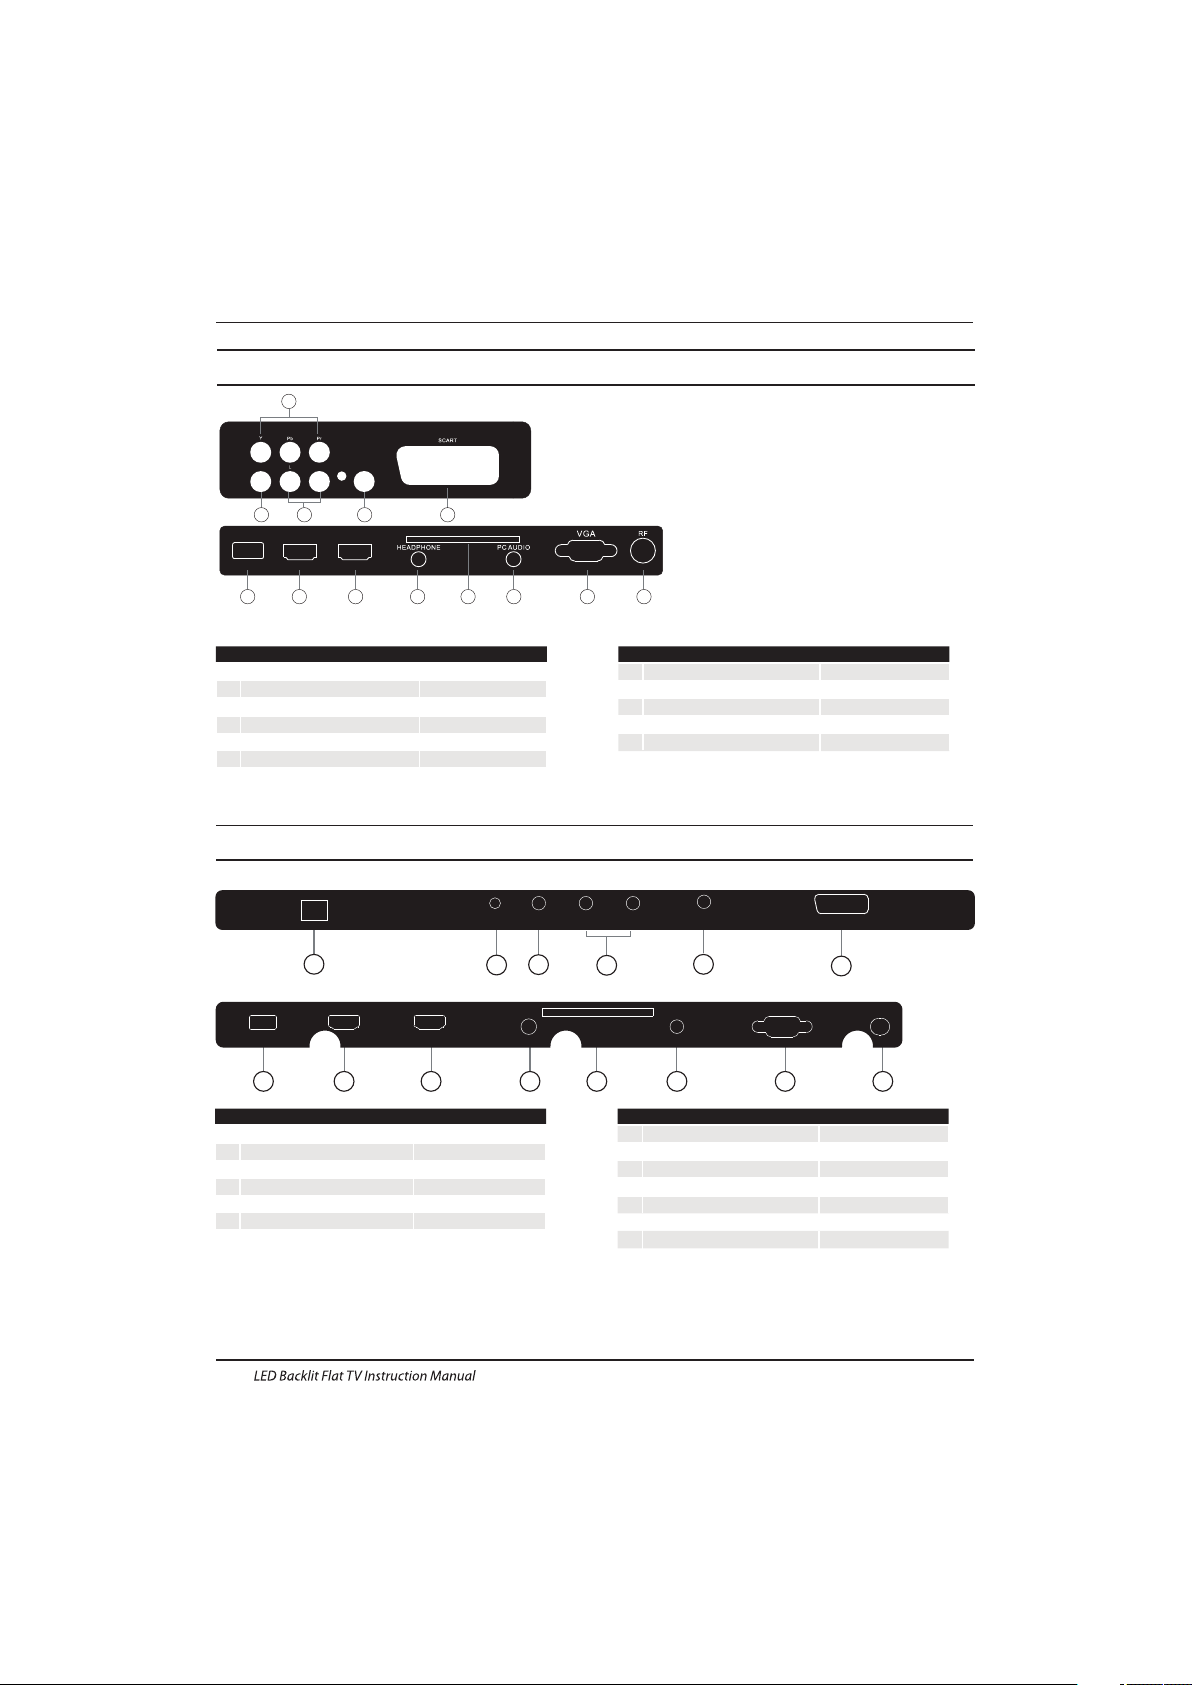
Rear/Side Sockets(22",24",28")
1
L/R AUDIO
2
input
3
4
input
5
input/output
input
VIDEO
6
input
SCART
USB
YPbPr
DIGITAL AUDIO OUTPUT(COAXIAL)
7
input
HDMI2(ARC)
digital audio output
8
9
HDMI1input
10
11
12
13
input
HEADPHONE
PC AUDIO
VGA
input
input
analogue audio output
COMMON INTERFACE(CI)
input
RF
DIGITAL AUDIO OUTPUT
(COAXIAL)
4
125
COMM ON INTE RFACE (C I)
USB
6
78910
111213
3
VIDEOR
HDMI2(ARC)
Rear/Side Sockets (32")
1
YPbYr
2
input
3
4
input
5
digital audio output
input
AC Power Source
6
input/output
DIGITAL AUDIO OUTPUT()COAXIAL
SCART
L/R AUDIO
VIDEO
7
input
USB
input
8
9
HDMI2(ARC)input
10
11
12
13
input
HDMI1
COMMON INTERFACE(CI)
PC AUDIO
input
analogue audio output
input
HEADPHONE
input
VGA
14
input
RF
Introduction
EN-11
23
1
4
6
5
789
1112131410
AC-IN PUT
100-2 40V~ 50 /60Hz
YPbP r
VID EO
LR
DIGITAL AUDIO OUTPUT
(COAXIAL)
SCA RT
USBHDM I2(AR C)HDM I1
HEA DPHON E
COM MON INT ERFACE (CI)
PC AUD IO
VGAR F
HDMI1
Page 13
Introduction
Connecting to your Haier TV(22",24",28")
EN-12
GRB
COM MON INT ERFACE (C I)
USB
CVB S, DVD Pl ayer or o ther
mac hine wi th YPbPr/YCbC r.
RY
W
Audio/Video machine
with HDMI interfaces
CVBS, DVD Player or other
machine with CVBS/S-Video.
G Green (Y)
B Blue (Pb/Cb)
W White(AUDIO-L )
R Red (AUDIO-R, Pr/Cr)
Y Yellow (VIDEO)
Amp lifie r
HDMI2(ARC)
DIGITAL AUDIO OUTPUT
(COAXIAL)
VIDEOR
HDMI1
Page 14
Audio/Video machine
with HDMI interfaces
RYW
CVBS, DVD Player or other
machine with CVBS/S-Video.
Introduction
Connecting to your Haier TV(32")
G Green (Y)
B Blue (Pb/Cb)
W White(AUDIO-L )
R Red (AUDIO-R, Pr/Cr)
Y Yellow (VIDEO)
Amp lifie r
CVB S, DVD Pl ayer or o ther
mac hine wi th YPbPr/YCbC r.
USBHD MI2(A RC)H DMI1
HEA DPHON E
COM MON INT ERFACE (CI)
PC AUD IO
VGAR F
GR
B
EN-13
AC-IN PUT
100-2 40V~ 50 /60Hz
YPbP r
VID EO
LR
DIGITAL AUDIO OUTPUT
(COAXIAL)
SCA RT
Page 15
EN-14
Introduction
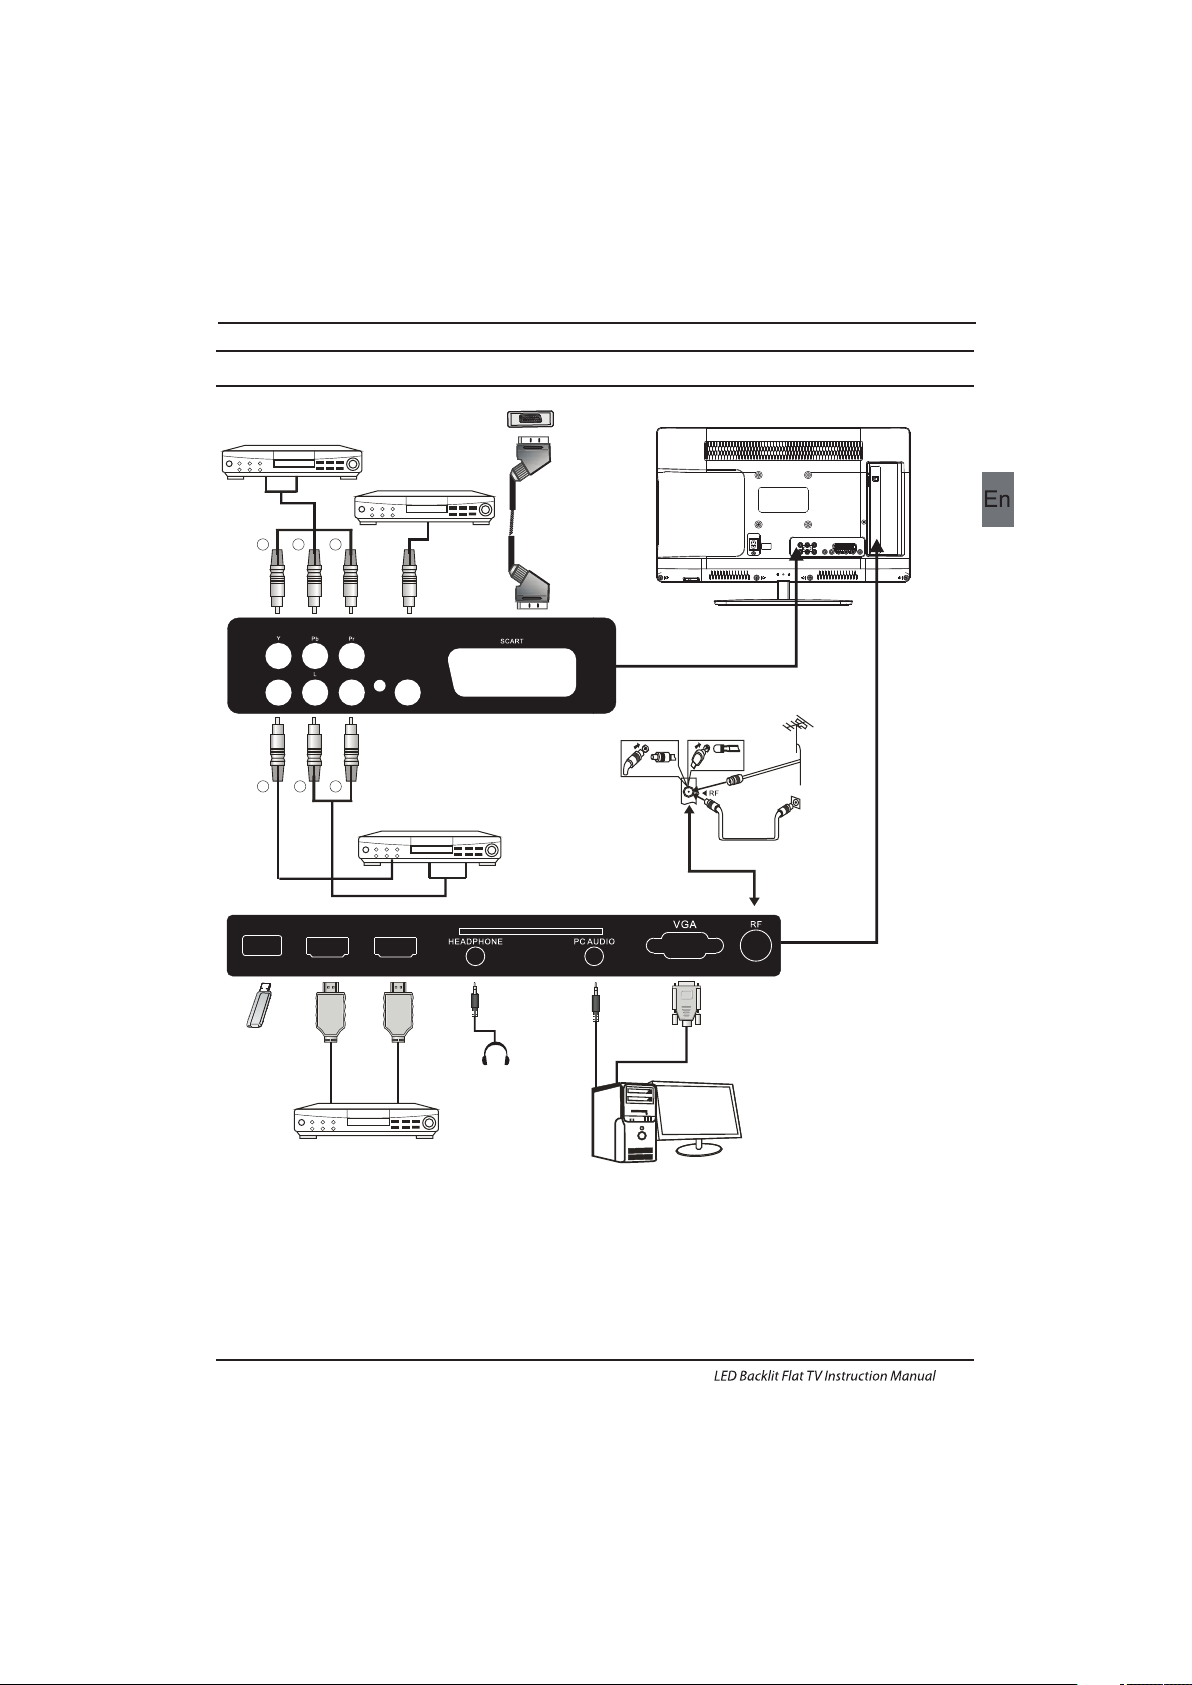
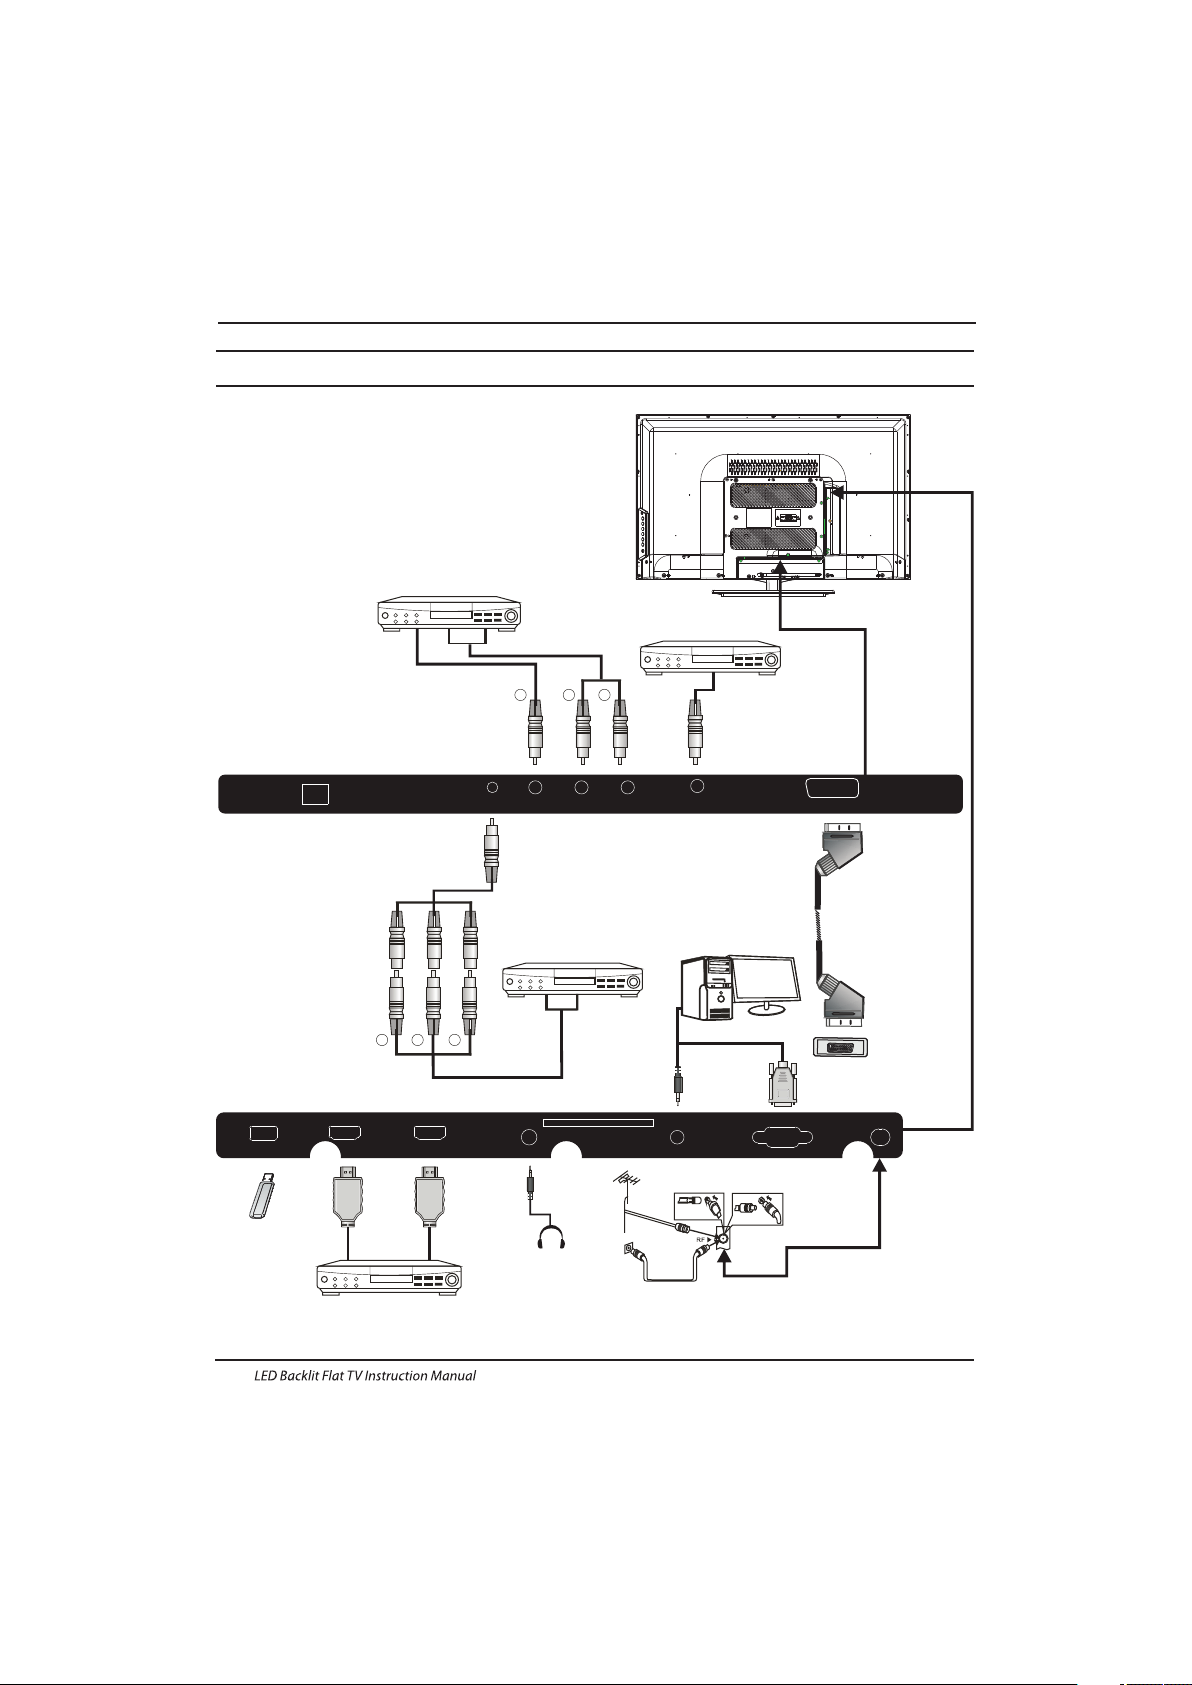
Connec ting a DV D player / S atell ite / cab le
set t op box rec eiver / games console / PC or
Lap top
The re are severa l optio ns to con necting a DVD
pla yer / Satellite or Cab le set top box receiver /
gam es cons ole / PC or L aptop to your TV.
Opt ion 1 SCA RT
Connec t a SCART cab le (not s uppli ed)
fro m the SCA RT sock et on the T V to the DV D
pla yer / Satellite or cab le set to p box rece iver or
gam es cons ol.
To select th e devic e connecte d with th e
SCA RT cable press the SO URCE butto n on the
rem ote and use th e keys to sele ct SCAR T
and p ress th e OK button.
Not e:- The TV will d efaul t to the SC ART
con necti on when t he TV is sw itche d on.
Opt ion 2 HDM I1/HD MI2
If th e devic e you want to conne ct to the T V
is sw itche d on, swi tch off the de vice fi rst.
Connec t a HDMI cable (no t suppl ied) from
the H DMI soc ket on th e TV to the D VD player /
Sat ellite or ca ble receiver or g ames conso l.
Swi tch on the dev ice you have just
con necte d to the TV
To select th e devic e connecte d with th e
HDM I cable p ress th e SOURCE button o n the
rem ote and use th e keys to sele ct HDMI a nd
pre ss the OK butt on.
Opt ion 3 AV Audi o Visual
(Yel low/W hite/ Red)
Mak e sure th at both T V and the d evice are
swi tched o ff before connecti ng.
Connec t the AV cab les (no t suppl ied) fr om
the Vi deo (yellow) an d Audio (whi te, red)
soc kets on t he TV to th e DVD player or gam es
con sole etc.
To select th e devic e connecte d with th e
cab le pres s the SOU RCE but ton on the
rem ote and use th e keys to sele ct AV and
pre ss the OK b utton.
Opt ion 4 COMP ONENT
(Green/Bl ue/Re d)+( White /Red)
Mak e sure th at both T V and the d evice are
swi tched o ff before connecti ng.
Connec t the cables (no t suppl ied) from th e
COMPONENT I N socke ts Y, P b, Pr (green,
blu e, red) and L-Audio-R ( white , red) on the TV
to th e DVD player or gam es cons ole etc.
AV
To select th e devic e connecte d with th e
cab le pres s the SOU RCE but ton on the
rem ote and use th e▼▲ key s to sele ct and
pre ss the OK butt on.
Opt ion 5 VGA (15p in Sub-D)
Connec t a VGA cable (n ot supp lied) f rom the
VGA s ocket o n the TV to t he PC / Lap top.
To select th e PC / Lapt op connect ed with t he
VGA c able pr ess the S OURCE b utton on the
rem ote and use th e keys to sele ct PC and
pre ss the OK butt on.
Not e VGA i s video o nly. For au dio fro m your
PC/ Lapto p you need to conne ct a sepa rate
cab le from t he PC Audio (3.5m m jack) t o the
hea dphon e socke t on you PC /Laptop (3 .5mm
jac k)
Opt ion 6 USB
Mos t USB sti cks can b e conne cted to y our TV
and s ome dig ital ca meras may al so work .
Connec t USB stick (not s uppli ed) or a US B
cab le (not s uppli ed) to th e TV.
To select th e USB dev ice connec ted to th e TV,
pre ss the SO URCE bu tton on the remot e and
use t he keys to sel ect USB and press the
OK bu tton.
Not e 2. Apple iPh ones an d iPods are not
com patib le with your TV.
Not e 3. When co nnect ing any d evice to the USB
con necti on, kee p the USB c able le ngth as s hort
as po ssibl e.
Opt ion 7
Opt ion 8
Compon ent
YPbPr
Not e1:On ly *.jp g , *.mp3 , * .txt , *. avi ,*. mp4 , fil es will
wor k, othe r file types are not gu aranteed a nd may not.
HEA DPHON E OUTPU T
is a di gital a udio conne ction used to
con nect au dio equ ipmen t, for examp le home
the atres and ot her dig ital Hi Fi syste ms over
sho rt distan ces. The signal is transmi tted over
eit her a coa xial ca ble wit h RCA con necto rs.
Mak e sure th at both T V and the d evice are
swi tched o ff before connecti ng.
Connec t the AV cab les (no t suppl ied) fr om
the soc ket on th e TV to the H ome Theater
sou nd system or d igita l HiFi system etc.
Ins ert th e plug of t he earp hone in to the headp hone
soc ket on th e TV. The TV speak ers are now muted.
Alt ernat ively you can als o plug in e xtern al spea kers if
req uired.
DIG ITAL AUDIO O UT(COAX IAL)
COAX IAL
COAX IAL
Connecting to your Haier TV
Page 16
EN-15
The comm on interface (CI) slot i s desig ned to
accept t he cond ition al Access (CA) Modul e and
Sma rt card in order to view the p ay TV
pro grammes an d addit ional s ervices.
Contac t your Commo n Inter face service provider
to ge t more informat ion abo ut the mo dules a nd
sub scrip tion.
Ple ase not ed that C A modul es and sm art cards
are n eithe r suppl ied nor o ption al accesso ries
fro m us.
COMMON INTERFACE
Introduction
Comm on Inte rfac e optio n.
CAM Removed
CAM Inserted
Cha nnel
Pic ture
Aud io
Clo ck
Set up
Loc k
Aut o Scan
Sig nal Inf ormat ion
Sof tware U pdate (USB)
Man ual Sca n
Pro gram Ed it
Com mon Int erfac e
Ret urnMo veOK
OK
MENU
Page 17
Pres s to turn t he TV on or o ff.
(Pow er)
S.M ODE
Pres s to sele ct the sound mode.
P.MODE
Pres s to sele ct the pict ure mod e.
0-9
Pres s to ente r a chann el numb er
or pa ssword.
Q.VI EW
Pres s to swit ch to the l ast vie wed
cha nnel.
SLE EP
Pres s to set th e sleep t imer.
VOL + /-
Pres s to adju st the vo lume le vel.
(Mu te)
Pres s to turn t he soun d on or off.
AUDI O(I/I I)
Pres s to sele ct Mon o,Nica m stere o
for AT V chann el.Se lect Au dio
lan guage f or DTV ch annel .
SUB TITLE
Press to turn th e subtitle on or off.
Pres s to open a f avori te chan nel
lis t.In te letex t mode, press to
hol d a page.
03 Remote Control
Remote Control
SCR EEN
Press to change picture aspect ratio.
Press to open the on -screen me nu.In teletext
mode, press to open t he INDEX page .
Press to naviga te the on-screen menu.
Press to confir m a sele ction.
OK
In tele text mode, press to enter mix mode.
(re verse)
(fo rward )
Press to fast for ward or reverse playb ack in
mult imedia mod e and ti meshift ( Red and
Green b utton in tele text mode)
mode.
Pres s to turn on/ off the te letext f unctio n,and
change TT X mode.
SOU RCE
Press to open the in put source li st.
No function.
P
Press to change t he channel.
Press to displa y the ch annel informati on.
In tele text mode, press to revea lthe hidde n
infor mation.
Press to open the ch annel list .In telete xt mode,
press to size the te letext.
3D WOR LD
No func tion.
Press to c lose the on-s creen menu.In tel etext
mode, press to hide t he text.
16
17
18
19
20
21
22
23
24
25
26
Press to select previo us or next file.(yel low and
blue bu tton in telet ext mode)
(previous)
(ne xt)
Press to stop multimed ia playbac k,stop tim eshift
in DTV mo de.
GUI DE
Press to displa y electron ic programme guide
in TV mod e. In teletex t mode,pres s to enter a
secondar y page.
(RE C)
Press to re cord the TV prog ram you are watc hing
in DTV mo de.
Press to play/p ause in multi media mode ,
time shift in DTV m ode.
(play/pause)
Insert Batterie s into the Remote Conto l
1. Remove the battery cover.
2. Inserting the 2 AAA 1.5V batteries making sure the polarity
(+ or -) of the batteries matches the polarity marks inside the unit.
3. Mount the battery cover. Replace with new batteries when the
TV set begins to show the following symptoms:Operation is
unsteady or erratic. Sometimes the TV set does not function
with Remote Control Unit.
Remark:
1) Alkaline Battery Recommeded.
2) Remove batteries when they are exhausted or if the remote
control is not to be used for long time.
EN-16
Page 18
E
TEXT
SELECTING A PAGE
DIRECTACCESS
TO THE ITEMS
INDEX
SUB CODE
HOLD
REVEAL
Press:
Youwill obtain :
TELETEXT
Enter the numbe r of the pa ge required using the 0 to 9 up/down. Example:
pag e 120, en ter 120. The nu mber is d isplayed top left, the counter tur ns and
the n the pag e is disp layed. Repeat t his ope ratio n to view another pag e. If
the counter contin ues to searc h, this m eans th at the page is not
tra nsmit ted. Selec t another numb er.
Coloured are as are displ ayed at the botto m of the sc reen. The 4 col oured
keys are u sed to acces s the items or correspon ding pa ges. The colo ured
areas flash whe n the item or the page is n ot yet available.
This ret urns to the co ntents page (usua lly pag e 100).
Press the button and ente r the 4-digit nu mber to ente r a secondary page.
To freeze the page.
To display or hide the concealed information (games solutions).
This is used to call or exit teletex t modes. The summary app ears wi th a list
of items that can b e accessed. Each item has a cor respo nding 3 d igit page
num ber.
Teletext is an information system broadcast by certain channels which can be consulted like
a newspaper. It also offers access to subtitles for viewers with hearing problems or who are
not familiar with the transmission language(cable networks, satellite channels, etc.)
Remote Control
EN-17
MIX
This will superimpose the teletext data on top of the TV pic ture. Press
button again to return to full text.
EXIT
Hide th e t el etex t.
SIZE
Sw itch the i mage to to p,b ot tom ,ful l.
Page 19
Operation
04 OPERATION
The First Time Setup screen will appear when the TV is first switched
on or reset to the factory setting.
Installation Guide
1).Press the ▼▲ buttons to navigate the menu and ◀▶buttons
to change the settings. Select your desired language ,Home/Shop
Mode to be displayed on the menu.
2). Press the ◀▶buttons to select AIR/Cable means DVB-T/DVB-C.
If you select DVB-C, you will select Full or Quick way to
scan.Also you can selec t Auto Scan mode. DTV+ATV or
DTV only, or ATV only.
Fir st Time Se tup
OSD L angua ge Engl ish
Mod e Setti ng Home M ode
Cou ntry Ge rmany
Sta rt
Aut o Scan DT V+ATV
Ant enna Type Air
Fir st Time Se tup
OSD L angua ge Engl ish
Mod e Setti ng Home M ode
Cou ntry Ge rmany
Sta rt
Aut o Scan DT V+ATV
Ant enna Type Cab le
Cab le Quic k
3). Channel tuning will commence. This operation
may take up to . The display will show
the progress of the tuning and the number of
channels found.
4). If you want to sk ip the DTV tuning, press the
MENU button to interrupt the tuning half way.
You will then go straight to ATV tuning.
5). After tuning is complete, the channels are
arranged in a preset order. If you wish to skip channels,
modify the preset order or rename
channels, select Programme Edit under the
Channel menu.
some minutes
1. 1) Auto Tuning (DVB-T)
1. CH ANNEL M ENU
1). Press the MENU button and then press the▼▲
buttons to select the CHANNEL menu and then press
the OK button or Right button.
2). Press the ▼▲ buttons to select Auto Scan and then
press the OK button.
DTV Digital TV
ATV Analogue TV (not used in UK)
In the UK to connec t to cable TV you will require the
appropriate cable TV's company's 'set top box' to be
connected to the TV. Please refer to the cable TV's
instructions manual for fur ther details.
EN-18
HOM E or Shop m odes
1.W hen the u nit is tu rn on for the very first tim e, it will show
Ini tiali zatio n set-u p menu. Afte r the OSD l angua ge is set , the
use r can cho ose bet ween "s hop mod e" and "h ome mod e".
Whe n the scr een shows the following sett ing men u and the
cur sor sta ys on the "hom e mode" c hoice, press ◀▶ to adj ust,
and " OK" to enter t he menu.
Sel ect the usage mo de?
sho p mode is for sh op usag e only.
Sho p mode
Hom e mode
If "S hop mod e" is cho osen, t he foll owing m enu wil l displ ayed.
Are you sure to chan ge to
Sho p mode?
OK
Can cel
Cho ose "OK " to enter the next p rompt m enu.
Home mode is the most energy mode.
OK
Can cel
Contin ue?
Cho ose "Ca ncel" to go back to t he Init ializ ation s et-up m enu,
and t he curs or will s tay at the "ho me mode " choic e. choose it to
go th e next me nu to cho ose the c ountr y.
Fir st Time Se tup
Page 20
Cha nnel
Pic ture
Aud io
Clo ck
Set up
Loc k
Aut o Scan
Sig nal Inf ormat ion
Sof tware U pdate (USB)
Man ual Sca n
Pro gram Ed it
Com mon Int erfac e
Ret urnMo veOK
OK
MENU
Operation
3). Press the ◀▶buttons to select Antenna Type to Air
means DVB-T.
5). In the Mode item, press the ◀▶buttons to select tune
mode: ATV / DT V / DTV + ATV. Press the▼button to select
Start to start.
6). Channel tuning will commence. This operation may take
up to . The display will show the progress of the
tuning and the number of channels found.
7). If you want to sk ip the DTV tuning, press the MENU
button to interrupt the tuning half way. You will then go
straight toATV tuning. You may repeat the above step if
you also want to skip the ATV tuning. An installation
reminder will appear the next time you turn on the TV,
if no channel is found.
8). After tuning is complete, the channels are arranged in a
preset order. If you wish to skip channels, modify the preset
order or rename channels, selec t Programme Edit under the
channel menu.
some minutes
Cha nnel
Pic ture
Aud io
Clo ck
Set up
Loc k
Sca nning C h12
Dig ital Ch annel s Found :
DTV: 3
Rad io: 0
Dat a: 0
Ana log Cha nnels F ound: 0
1.2 ) Auto Tuning (DVB-C)
1). Press the MENU button and then press the▼▲
buttons to select the CHANNEL menu and then
press the OK button.
2). Press the▼▲ buttons to select Auto Tuning and
then press the OK button,select Antenna Type to cable
mean DVBC.
3). Press the▼button and then press the◀▶▼▲buttons
to select the country you will operate the TV.
Cha nnel
Pic ture
Aud io
Clo ck
Set up
Loc k
Ant enna Typ e Air
Cou ntry Ge rmany
Mod e DTV+ATV
Sta rt
Cha nnel
Pic ture
Aud io
Clo ck
Set up
Loc k
Ant enna Typ e Cable
Cou ntry Ge rmany
Mod e DTV+ATV
Sta rt
Cha nnel
Pic ture
Aud io
Clo ck
Set up
Loc k
Qui ck
Ful l
Adv anced
4). In Country mode, press the ◀▶buttons to select the
country where you will operate the TV.
4). In the Mode menu, press the◀▶buttons to select ATV /
DTV / DTV + ATV.
6). Channel tuning will commence. This operation may
take up to The display will show the
progress of the tuning and the number of channels
found.
some minutes.
EN-19
5). Select start to enter the menu as below, to select
search mode.
▶
Ret urnMo veOK
OK
MENU
Ski p
MENU
Exi t
EXIT
Ret urnMo veOK
OK
MENU
Ret urnMo veOK
OK
MENU
Page 21
Cha nnel
Pic ture
Aud io
Clo ck
Set up
Loc k
Dig ital Sc an Ch5
Sta rt
Str ength 5 4
Operation
2. 1 )DTV Manu al Tuning (DVB-T)
All the channels including ATV, DTV and Radio
can be tuning by one time,if the Tune Type is
DTV+ATV .
All t he stored ch annel s will be d isapp ear aft er
aut o tunin g .
After auto tuning , the channel will skip to
the first DTV channel.
2). Press the▼▲ buttons to select DTV Manual Tuning
and then press the OK button,if you select Air in Auto
Scan, you will enter DVB-T manual scan menu.
4). Press the MENU button to return back to the
main menu.
5). Press the EXIT button to exit the menu.
2. 2 )DTV Manu al Tuning (DVB-C)
1). Press the MENU button and then press the▼▲
buttons to select the CHANNEL menu and then
press the OK button.
3). The DTV M anual Tuning screen will pop up.
Press the ◀▶ buttons to select the desired UHF channel
or press the OK button then input channel number. Select
Start to commence the search of that channel. When the
signal has been tuned, the picture and signal strength will
be displayed on the screen.
1). Press th e MENU button an d then press the
buttons to sele ct the CHA NNEL men u and then
press the OK butt on.If you sele ct Cable i n Auto scan ,you
will enter DVBC manual sca n menu.
▼▲
Cha nnel
Pic ture
Aud io
Clo ck
Set up
Loc k
Fre quenc y 47400 0K
Sym bol Rat e 6875K
Mod ulati on Auto
Sta rt
2). The DVB- C Manual Tuning sc reen will pop up.
Press the▼▲button s to select(Freque ncy /Sym bol
(ks/s/QAM Type ), press OK to input Frequ ency and s ymbol,
press ◀▶to chang e QAM type, press Star t to comme nce
the search of tha t channel. When the sig nal has been
tuned, the picture and signal stren gth will be disp layed
on the screen.
3). Press th e MENU button to retur n back to the
main menu.
4). Press th e EXIT button to exit th e menu.
3) ATV Manual tuning :
You can change the sound system, search the analog TV
channels and fine tune the channels , then storage the
channels you selected.
1. Press teletext red button to storage to channels
after manual tuning .
2. If the number save to is the same as the number
Current CH, when you press Red button,the save to
number will cover the Current CH number.
Sav e to 1
Sys tem BG
Cur rent CH 1
Sea rch
Fre quenc y 44.25 M Hz
Fin e tune
Save
ATV Manual Tuning
4). Prog ram edit:
Press the ▲or▼ Buttons to select Program Edit in the
Channel Menu. Then press the OK Button to enter the sub-
Menu. Then you will need to select the program you wish
to edit.
EN-20
7). If you want to sk ip the DTV tuning, press the MENU button to
interrupt the tuning half way. You will then go straight to
ATV tuning. You may repeat the above step if you also want to
skip the ATV tuning. An installation reminder will appear the
next time you turn on the TV,if no channel is found.
8). After tuning is complete, the channels are arranged in a
preset order. If you wish to skip channels, modify the preset
order or rename channels, selec t Programme Edit under
the channel menu.
Ret urnMo veOK
OK
MENU
Ret urnMo veOK
OK
MENU
Page 22

12
abc3def
4
ghi
5
jkl
6
mno
7
pqrs
8
tuv9wxyz
Operation
5). Comm on Interface
This menu can display the CI card' s information.
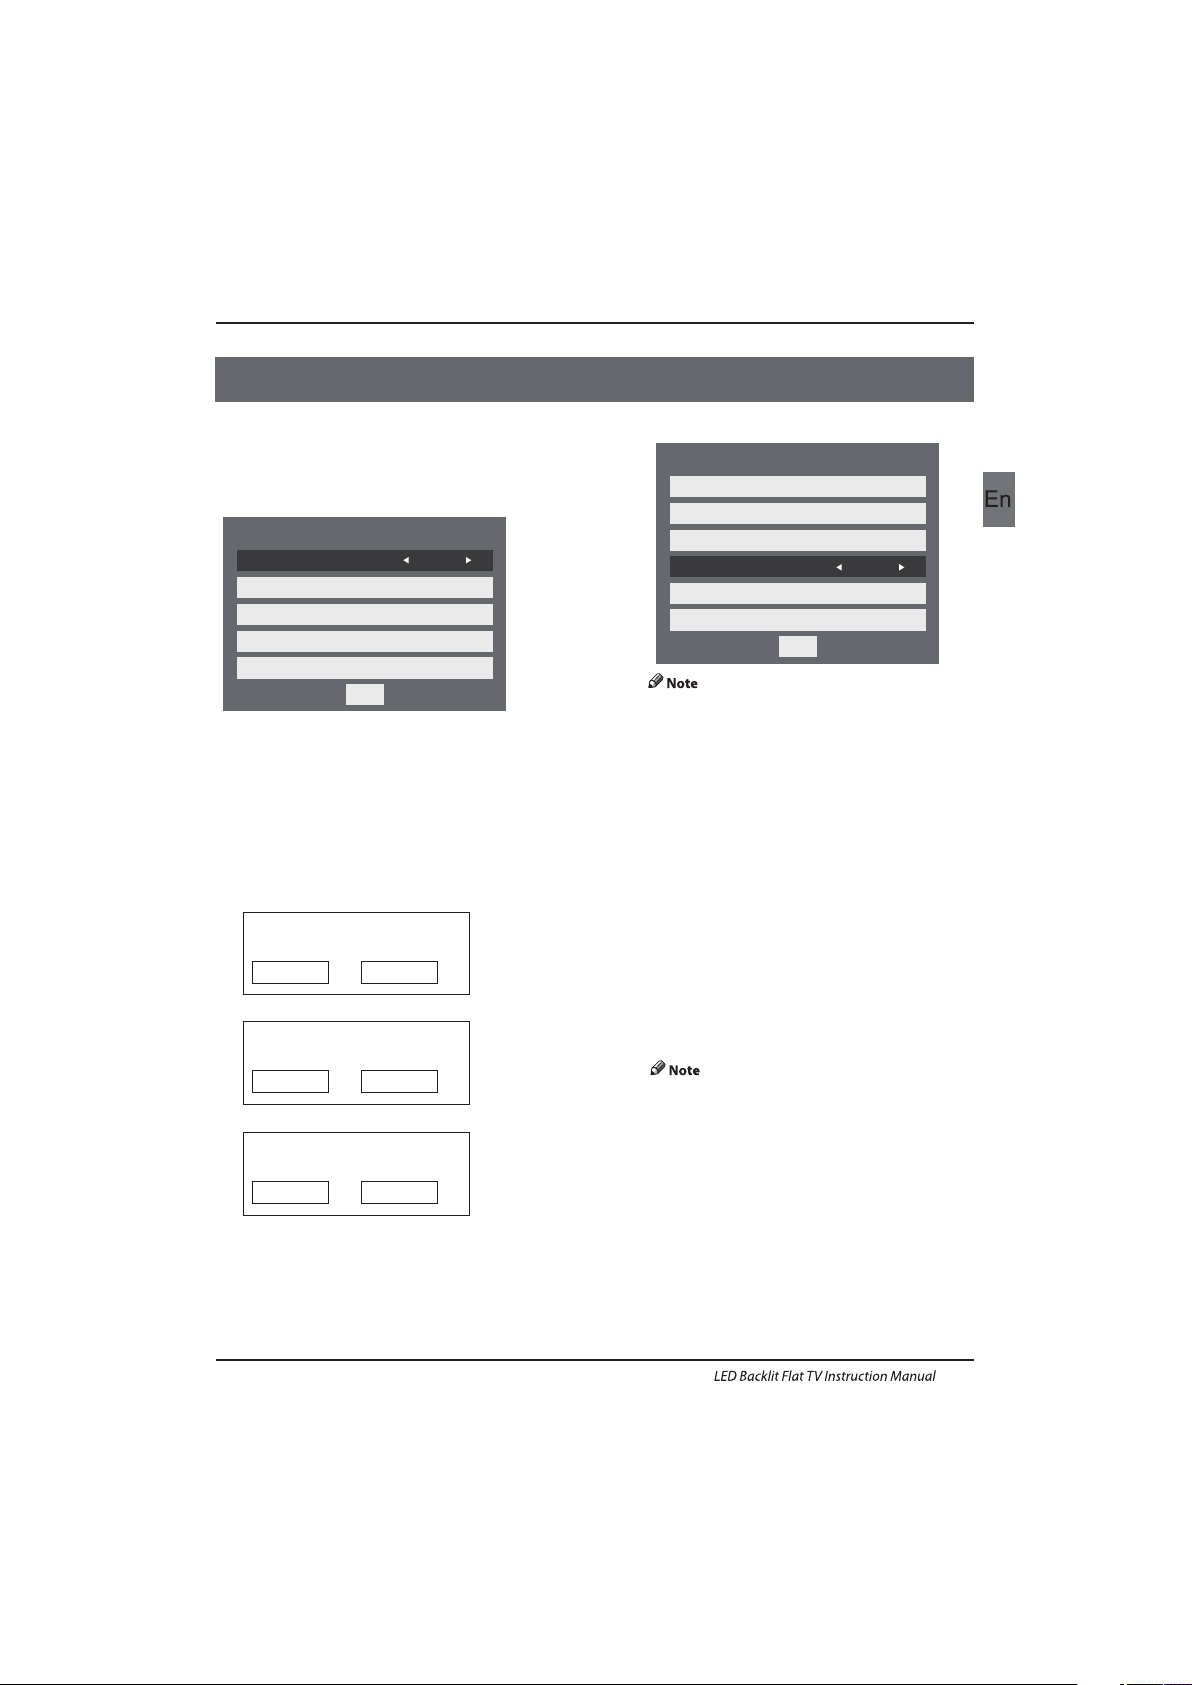
The second item of the MENU is PICTURE MENU.
You can adjust picture effect here, such as
contrast, brightness, etc.
Press ▼▲ to move, press to adjust.
◀▶
2. PI CTURE MENU
Cha nnel
Pic ture
Aud io
Clo ck
Set up
Loc k
Pic ture Mo de Stan dard
Med ium
Asp ect Rat io 16:9
Col or Temp
Bac kligh t 14
Bri ghtne ss 50
Con trast 4 5
Sha rpnes s 60
Col or 45
Tint 0
Med ium
Dyn amic Co ntras t
DNR
Nor mal
1).There are three colors temperature modes
can be selected normal, warm, cool.
2).PC Setting is available in PC mode only which
can adjust Horizontal position, vertical
position, size and phase.
3.AUDIO MENU
The third item of the MENU is the AUDIO MENU.
You can adjust the sound effect here such as
treble, bass, balance etc.
Press ▼▲ to move, press to adjust.◀▶
Cha nnel
Pic ture
Aud io
Clo ck
Set up
Loc k
Sou nd Mode S tanda rd
Treb le 0
Bas s 0
Bal ance 0
Aut o Volume O n
Sur round S ound Off
Aut o
Aud io Desc ripti on
Aud io Only
SPD IF
Off
001 The HI TS
003 U KTV Br’tl deas
004 f t h
005 I deal World
006 C olour bars1 00
001 K iss
002 S mash Hi ts!
003 K erran g!
002 TMF
Dele te
Pro gramm e Edit
DTV
DTV
DTV
DTV
DTV
DTV
Rad io
Rad io
Rad io
Move
Skip
Rena me
Favo rite
Delete: Press the Red Button to delete the channel you
highlighted.
SKIP: Press the Yellow Button to select the Skip function
and a SKIP icon will be displayed nex t to the program and
it will be skipped when changing the channel.
MOVE: Press the Green Button to highlight the select the
channel you want to move. An icon will display ahead the
channel number. Then press the ▼ / ▲ Buttons to a new
position and press the Green Button to confirm.
Rename: (For ATV only) Press the Blue Button for renaming
the channel. Press the number key circularly to enter a new
name and press the OK Button to confirm (the number key
as the following table).
FAV: Press the FAV Button (instead of color Buttons) to set
the favourite channel. (If you want to view the Favorite
Channel List you need to exit Program Edit Menu and then
press the FAV Button.)
6). S ignal I nformation (O nly for DTV )
Press the ▼ / ▲ Buttons to selec t the Signal Information
in the Channel Menu. Then press the OK Button to show the
related information of the current channel.
7). S oftware Updated (USB)
Press the ▼ or ▲ Buttons to select Software Update (USB)
in the Channel Menu. Then press the OK Button to update
software by using a USB. Follow the software upgrade
instructions provided with the soft ware.
Note: We recommend you perform a factory reset (refer to
Restore Factory Default in Setup menu) to ensure the unit
is successfully upgraded.
1.Auto volume: only available when the input
signal volume is too large or distortion.
2. Audio Only: set on to turn off the TV screen,
and then you can listen TV.
FAV
EN-21
Ret urnMo veOK
OK
MENU
Ret urnMo veOK
OK
MENU
Page 23
Operation
Cha nnel
Pic ture
Aud io
Clo ck
Set up
Loc k
Sle ep Timer O ff
Dat e 2010/ 04/30
On Tim e
f
Aut o Sleep O n
Time Z one
Of Ti me
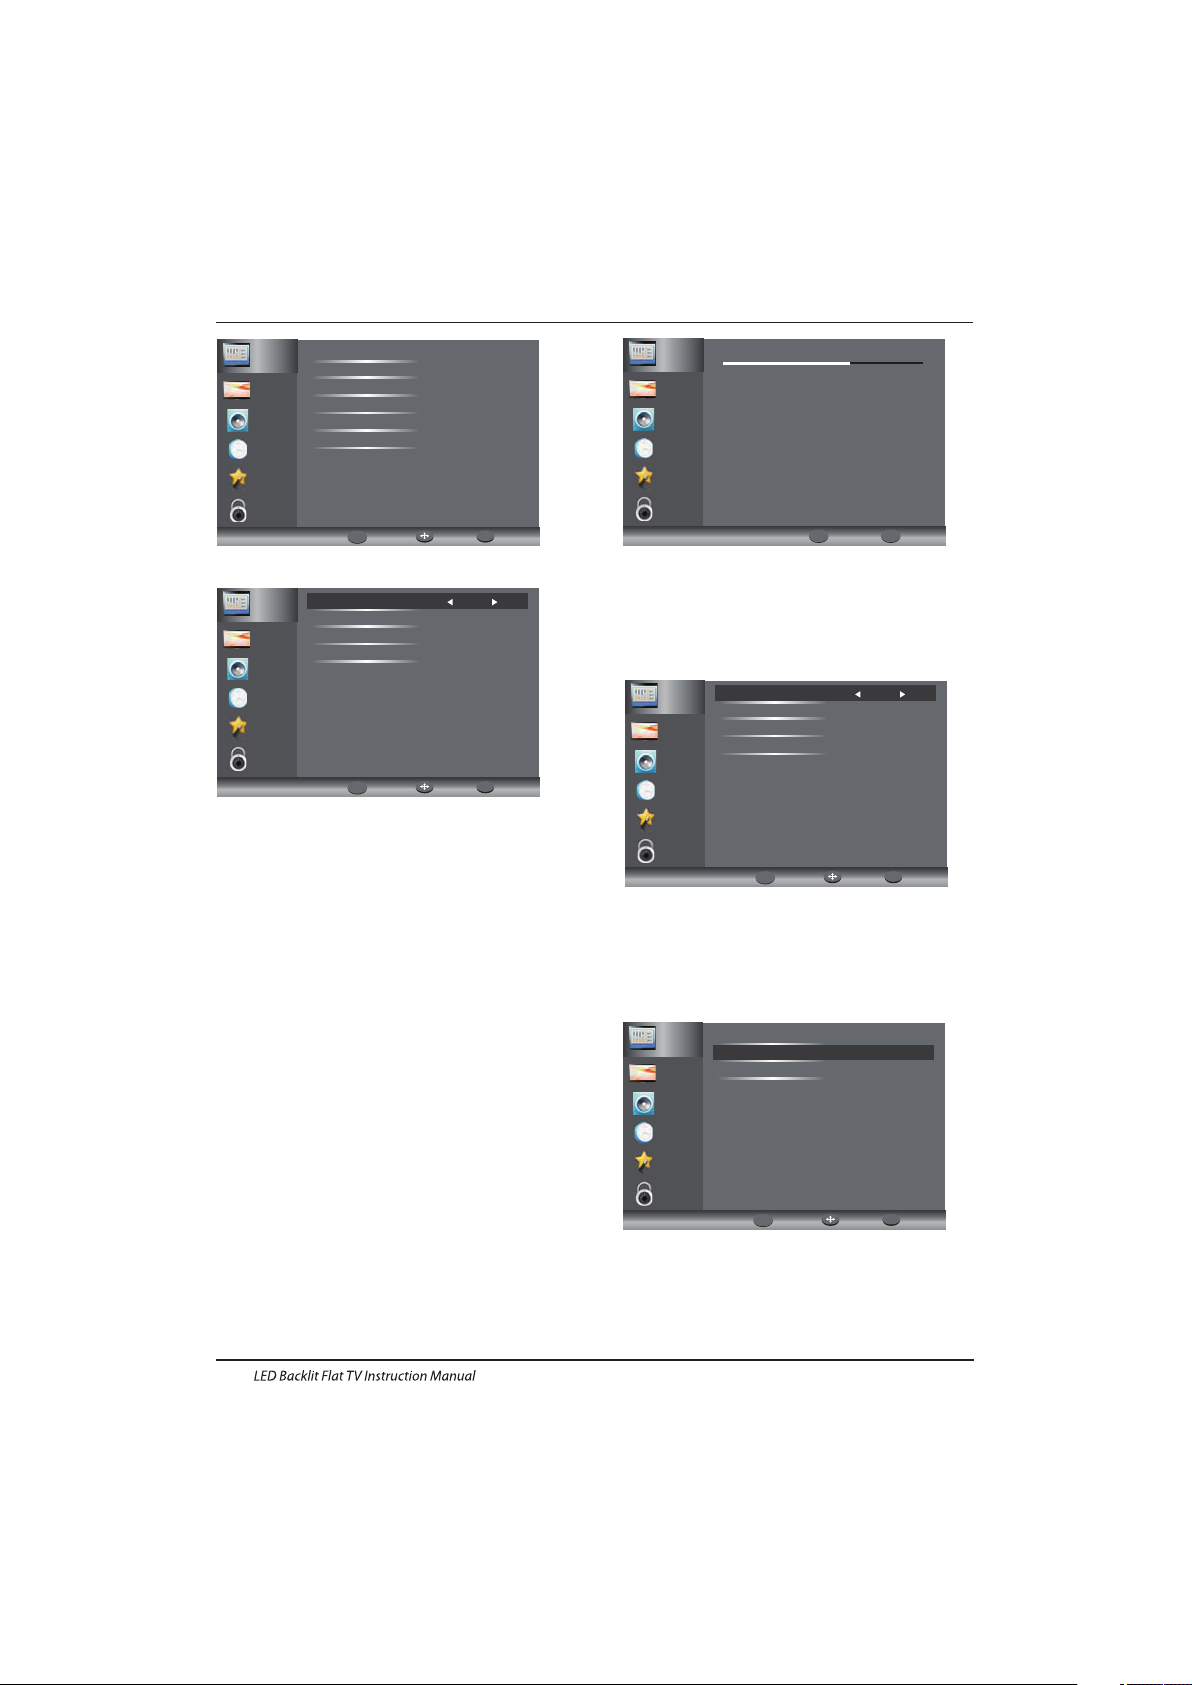
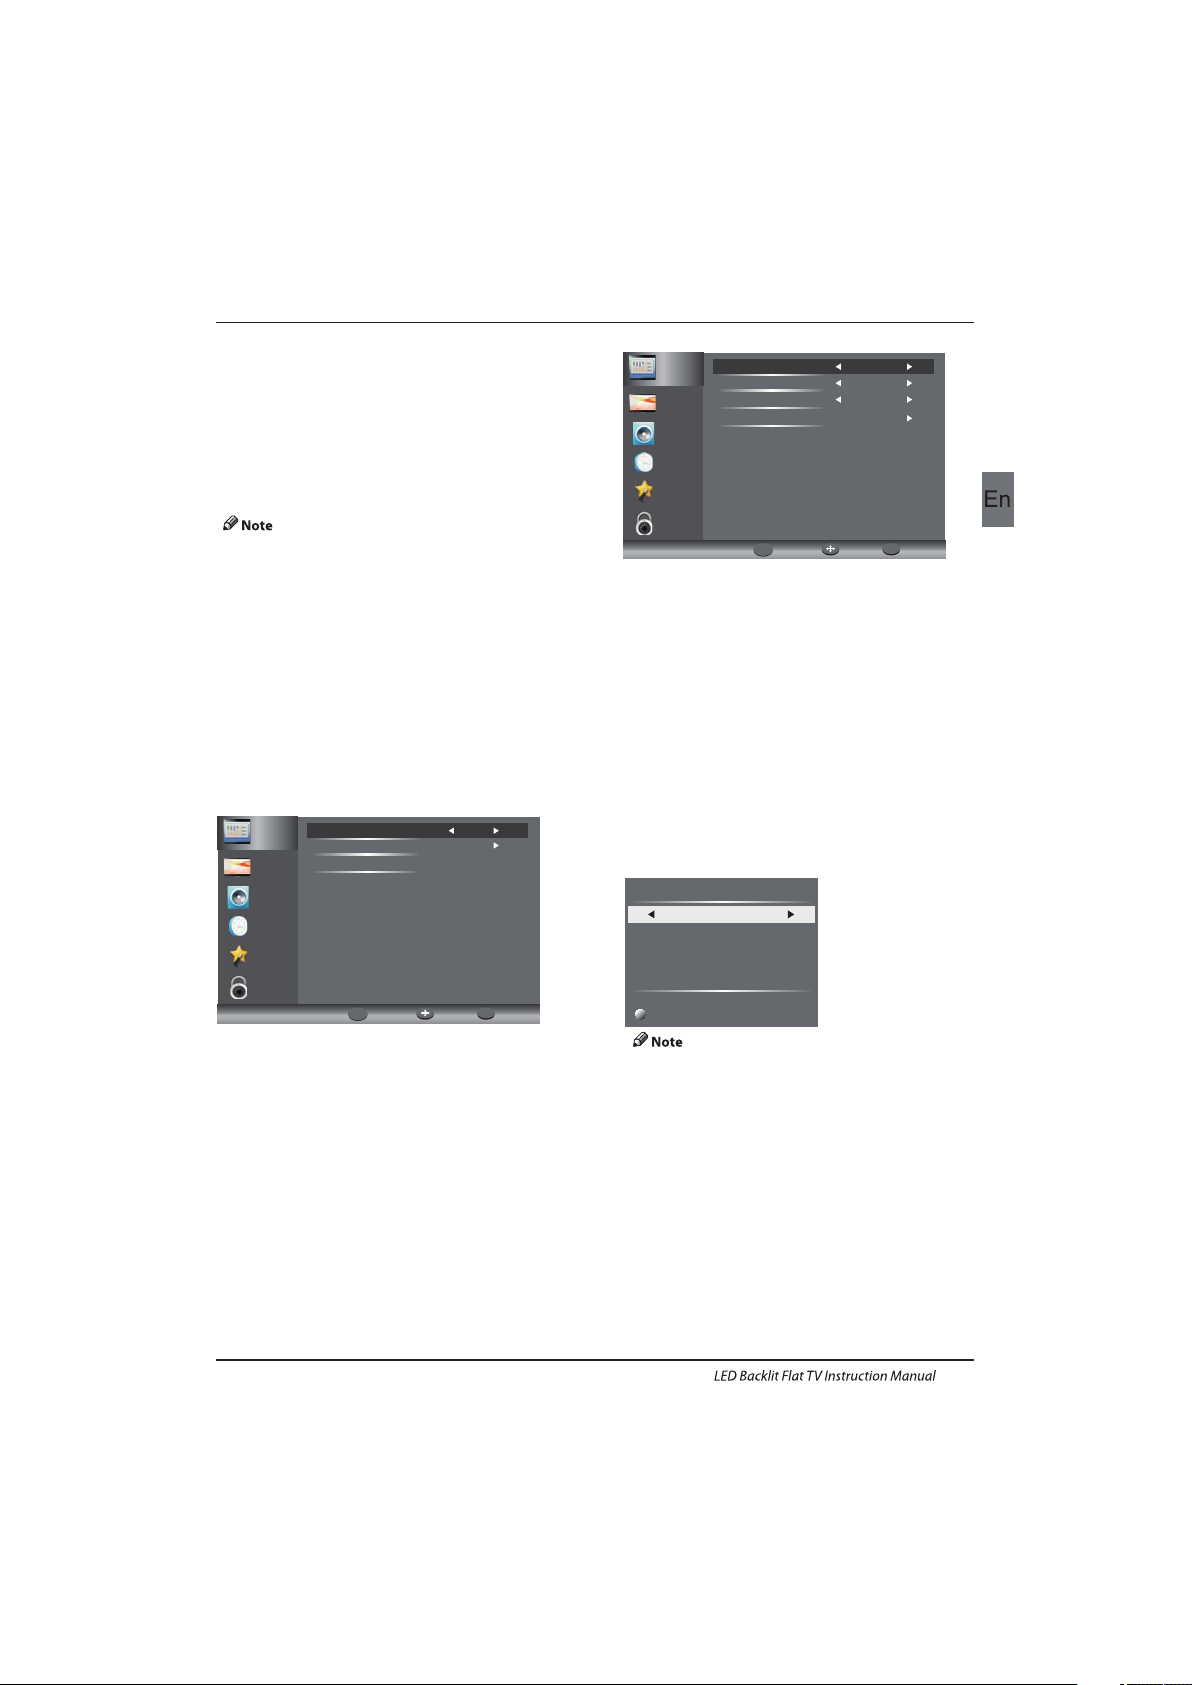
5.SETUP MENU
The fifth item of the MENU is the SETUP MENU. You can
adjust the OSD language, Audio language,Subtitle
language etc.
In PV R File system men u you can set up U SB
dis k for PVR.
Aut o Standby(4 hr)
1.I f after 4 hours from switc h on and no c hange s have
bee n made to t he TV, for ex ample n o chann el or vol ume
cha nges,the T V will st art the automatic p ower dow n
seq uence.
And p op-up window will a ppear o n screen.
Cha nnel
Pic ture
Aud io
Clo ck
Loc k
O E
A
Lan guage s
H
H O
O
SD La nguag engl ish
udi o
Sub title
Cou ntry Ge rmany
PVR
Fil e Syste m
Time shift R ecord T ime 1ho ur
Aut o Stand by(4h r) On(4 hours)
Mod e Setti ng ome Mo de
DMI C EC Cont roln
OSD Ti me ff
Res tore Fa ctory D efaul t
Set up
PVR S ettin gs
Mov e Left
Mov e Right
Sel ect
Exi t
OK
EXIT
File ManagerDevice List
Scheduled Record
6.LOCK MENU
The sixth item of the menu is the LOCK MENU
You can lock system, set password, block program
and set parental guidance Once you set the lock
system on you can not search the channels or
change any programs.
Res tore facto ry defaul t will cl ear all t he programs
and p asswo rd.
Cha nnel
Pic ture
Aud io
Clo ck
Ent er Pass word -- --
Ena ble Off
New P asswo rd ----
Cha nnel Lo cks
Par ental R ating N one
Set up
Loc k
The default pass word is 0000, If you forget the
password, you can use the super password:9443.
Channel Locks: Press ▼▲ to choose the
program ,press OK button to block
the program. If you want unblock the program,
pls enter the main menu , input the password,choose
the program,then press OK button again.
Parental Rating: Press ◀▶to choose rating.
Timeshift Record Time: To set the max Timeshift
Record Time.
Auto Standby (4hr) : To set the unit to standby
after any 4hours operation.
HDM I CEC Cntrol : To set CEC function to on or off.
OSD Time: Press ◄ or ► to select the menu
display time.
Res tore Fac tory Default
Press the ▼ or ▲ Buttons to select Restore Factor y
Default and press the OK Button to enter the first
Mod e Setting: To set Home mode or Shop mode.
setup. Once confirmed, all the settings will be
cleared. This should be used if you experience
any issues with your TV.
sta ndby. To over ride th e autom atic sh utdown press any
but ton on th e remote control.
2. To cancel the automatic power- down
On th e Optio n Menu se lect Au to stan dby(4 hr),The TV
scr een return s to the Optio n Menu an d Auto stand by
(4h r) opti on will d ispla y.
Auto sta ndby (4hr) O FF
Aft er 150 se conds t he TV wil l automati cally s witch to
The four th item of the menu is the CLOCK MENU
You can adjust the clock, power on/off time,
sleep timer etc .Press ▼▲ to move, press OK
to adjust.
To return to auto shutdown after 4 hours repeat the
above except use th e left arrow key to select on(4 hou rs).
Auto Sleep
If after 15 minutes there is no signal input, the TV will switch
off to Auto Sleep, when the Auto Sleep function is set to ON.
The clock time is automatically set when the TV is able to
receive DTV.
4.CLOCK MENU
EN-22
Ret urnMo veOK
OK
MENU
Ret urnMo veOK
OK
MENU
Ret urnMo veOK
OK
MENU
Page 24

Operation
PRO GRAM GU IDE
Record
Sche dule
Remi nder
201 0/04/ 29 02:1 9
001 N ine Dig ital NI NE MORN ING NEW S
002 N ine Dig ital NIN E MORNI NG NEWS
003 G O! TMZ
...
PRO GRAM GU IDE
001
Nin e Dig ital
01: 00-02 : NINE MORNING NEWS
-03:00 HE ELLEN DEGENERES S...
- HE VIEW
DAYS OF OUR LIVES
NTERTAINMENT TONIGHT
AGICAL TALES
HE SHAK
INE AFTERNOON NEWS
00
02: 00T
03: 00 0 4:00T
04:00 -05:00
05:00 -05:30E
05: 30-0 6:00M
06:00 -06:30T
06:30-0 7:00N
Record
Info rmati on
Serv ice
Remi nder
To see what is going to be broadcast after the current
program, press Yellow (Schedule) Button. To view a
different channel, use the ▲ or ▼ Buttons to highlight the
channel and then press the ◄ or ► Buttons. To exit the
EPG Menu, press the EPG or EXIT Button. Press it (Service)
again to return.
Please refer to the bottom of the EPG screen
for the basic remote control key functions.
Record
In EPG mode, press the Red Button on the remote control
to select a program to be recorded. You will then enter
Scheduled Record menu for record setting. (Refer to the
section of PVR file system.)
Please ensure a compatible Hard Disc Drive or USB
device is inser ted into the USB input to schedule
recordings. If your storage device is not compatible, you
If you have set a timed recording, your TV will automatically
turn on when the program is set to record and will
automatically turn off after the recording is complete.
During a timed recording however the picture and volume
will be mute (there will be no display), however the unit
will be on. You can press the STANDBY Button to turn the
picture and volume back on.
Reminder (Blue Button)
In the EPG Menu, press the BLUE Button to set a program
reminder. The below Reminder Menu will then be displayed
and you can use the ◄or ► Buttons to set the program
reminder details. You will be able to set reminder to occur
once, Daily or Weekly.
Fre quenc y
Cha nnel
Min ute
Hou r
Mon th
Dat e
Reminder
Off
The H ITS
0
17
Nov
19
17:03 1 9/11/2 004
OK
Sche dule Li st
You may press Red button to view the scheduled programs
list. Also you may delete the programs you have scheduled.
INFO (Gre en Button)
In the EPG Menu, press the GREEN Button to view more
information about the current program.
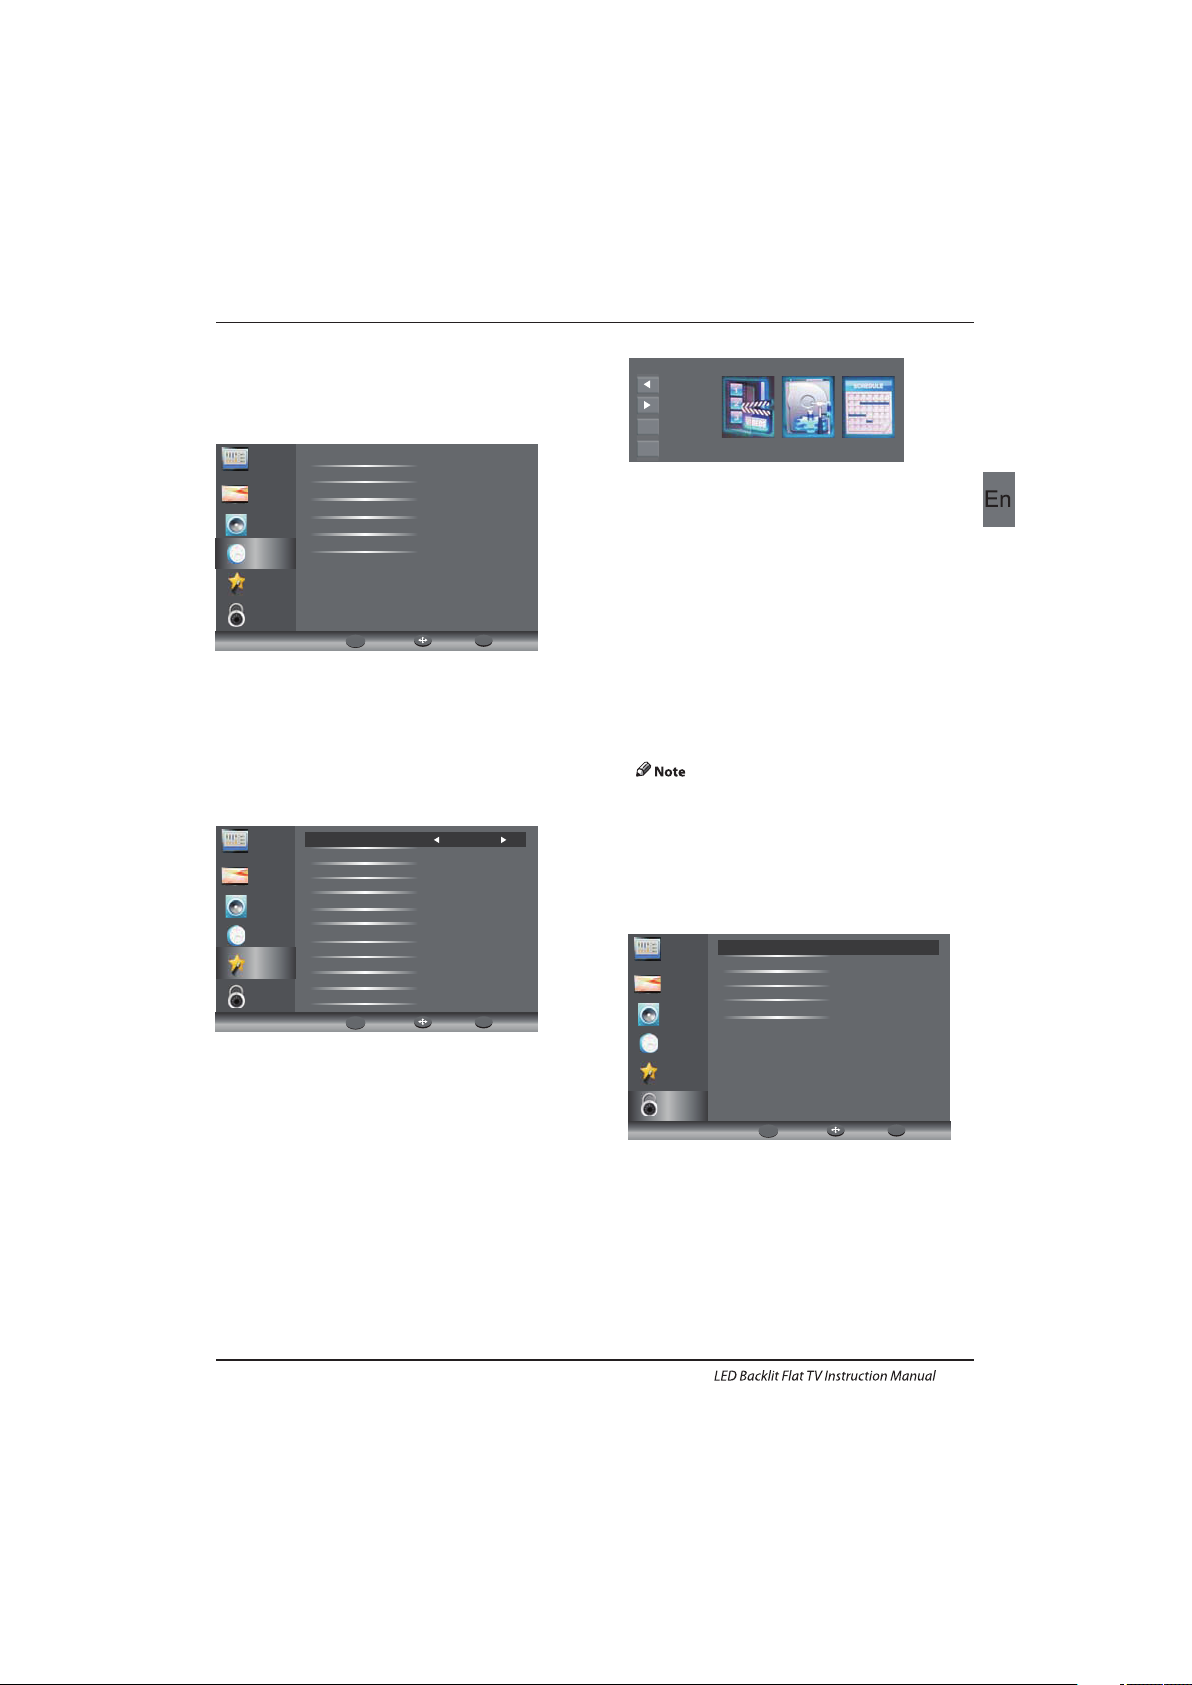
8.PVR File System (only for DTV )
Press Me nu Key,s elect s etup su bmenu .Press the ▼ or ▲
But tons to sele ct PVR File System, th en press the O K
But ton to enter sub-Menu an d then us e the ◄ or ►
But tons to scroll th rough the op tions.
The EPG (Electronic Programme Guide) Menu provides
you with detailed broadcast program information. Press
the EPG Button and a pop-up Menu will be displayed with
program information about the channel you are currently
watching. You will be able to see up to seven days of
program information. To view the next day or more use
the ▲ or ▼ Buttons to highlight the date and then press
the ◄ or ► Buttons to scroll through the available dates.
will be asked to format it. In Setup menu, enter the PVR File
System Menu Device List to format your device.
WARNING
When formatting the USB device it will delete all the files
stored on the USB device.
7.EPG Menu(Electronic Program Guide)
EN-23
Page 25

Dev ice Lis t
Device
Available Space
File System
Function
Move U p
Move D own
Sele ct
Retu rn
Exit
EXIT
EXI
T
OK
EXIT
MENU
Hot key
Form at
sda1
192 MB
FAT32
Operation
Sch edule d Recor d Setti ng List
Move U p
Move D own
Sele ct
Retu rn
Exit
EXIT
T
OK
EXIT
Hot Key
MENU
Sche duled R ecord
S
ced
Stan dby
Dele te One
Dele te All
EXIT
EXI
T
Function
Gro up
Fre quenc y
Cha nnel
1
2
3
4
5
6
7
8
9
10
11
12
13
14
15
16
0
Col ourba rs100
Duration
Dat e
Start Time
2004.12.25
18:17
00
:
30
Once
Off
Off
Off
Off
Off
Off
Off
Off
Off
Off
Off
Off
Off
Off
Off
Sch edule d Recor d: You may set t he sche duled record
Lis t here. And you may also dele te the sc hedul ed records
you h ave set.
Ent er the su b menu you may set th e record ing fre quenc y
as On ce, Daily, Weekly, Weekday, or off.
Rec ord the program:
1.Th e USB storag e size can be be tween
128 MB and 50 0GB in si ze, but fo r practical us e 2GB to
500 GB is recomm ended.
2. Video ma y become pixelated w hen Video
bit r ate is too low. This ca n be caused by conn ectin g a
USB e xtens ion cab le inst ead of pl uggin g the USB d irect ly
int o the TV.
3. No t all USB d evice s are compatibl e.
Bel ow is a lis t of recomme nded US B drives.
Mod els tha t are not l isted may be comp atible, but it is
not g uaran teed to work .
The U SB supp ort list are the same a s Timeshift f unction,
see t he followi ng page s for details.
Pla y the reco rding :
The p rogram reco rded on t he “US B”wil l be
saved in t he folder “USB record” on the
dev ice.
You can p lay it in P VR File Sy stem an d in File manager
sub menu.
Recording
Reco rded Tim e : 00 : 00 : 40
Avai lable Ti me : 25 Min ute
To reveal the menu press the REC Button again.
To stop recording, press the Stop Button.
You may also enter the Media Player Menu to view your
recorded programs via Movie mode.
To record the program you are currently watching press the
REC Button and a red REC icon will appear on the screen.
The record time/ length and remaining record time will be
displayed in the menu below.
Fil e Manag er
Move U p
Move D own
Sele ct
Retu rn
Exit
EXIT
OK
EXIT
Hot Key
MENU
Sche duled R ecord
S
ced
Stan dby
Play
Dele te One
Dele te All
Zoom
EXIT
EXI
T
Function
Current Playing File Into
Channel Name
Program Name
Recorded Time
Total Time
Description
BBC ONE
Olympics 2012
2012/08/09 11:44
00:08:06
Matt Baker and Clare Balding
present coverage of the eager...
UKTV Br’tldeas_Good Food Bites_20041119_161021.ts
BBC ONE_Olympics 2012_20120808_114427.ts
UKTV Br’tldeas_Good Food Bites_20041119_162019.ts
Dev ice List: This sub menu w ill lis t the USB d evice s
con necte d to the TV s et. You can se lect th e devic e and
the n press red bu tton to fo rmat th e USB dev ice.
PVR S ettin gs
Mov e Left
Mov e Right
Sel ect
Exi t
OK
EXIT
File ManagerDevice List
Scheduled Record
File Man ager: You may view all the recorded
programs here. Press blue key to play with full
screen.
Sch edule d Recor d - Group 1
Move U p
Move D own
Sele ct
Retu rn
Exit
EXIT
OK
EXIT
Hot Key
MENU
Adju st
Adju st
Setti ng Stat us
Setti ng Is Not I n Use
Frequ ency On ce
Chann el 6 Colo urbar s 100
Start T ime 200 4-12- 25
18:17
End Tim e 2004- 12-25
18:47
EN-24
Prepare to rec ord the p rogram:
Page 26

Operation
9.Time Shift
Press the But ton to pause t he program you are
wat ching to act ivate Time Sh ift fun ction . The b elow
men u will be d ispla yed. This M enu will auto disap pear
after several seconds.
▶
00:0 0:00
Avai lable Ti me
Cho ose the ▶ o ption a nd press OK to resu me playing, and a
whi te play icon will a ppear a t the rig ht of the s creen, whi ch
sho ws that time s hift is b eing pe rformed.
Whe n the men u disap peared,press the▶ b utton,th e menu
wil l appea r again . To stop time sh ifting, pr ess the S top But ton
or mo ve the curso r to select th e Stop op tion wh en the me nu
is on , and the n follow the p op-up g uide.
Ens ure the stor age dev ice used for recording is
ins erted into the USB In put on th e back of t he unit a nd is
com patib le for rec ordin g. If your storage dev ice is no t
com patib le, you wi ll be ask ed to for mat it. I n Setup m enu,
ent er the PV R File Sys tem submen u and sel ect Device
Lis t to format your de vice.
All t he func tions ( Play, FB, FF, Paus e and Sto p) in the menu
can o nly be pe rformed when t he menu i s on.
Rec ord file Playba ck
The H aier TV records the program on t he USB st ick in *. ts
for mat "Ti me Shif t". If another T V, PC, Laptop, DVD, or
any othe r devic e or peri pherals do n ot supp ort or
recognise t he *.ts ( time sh ift) fi le then i t will no t play.
"ts" is t he format used to b roadcast h igh-definitio n TV.
You can p lay "ts" fi les on a compu ter or la ptop with th e
cor rect so ftware. Re fer to the Int ernet o r or an IT
sup plier m ore informati on abou t the mos t appropri ate
sof tware .
Cau tion: H aier do es not ta ke any responsibil ity for a ny
sof tware d ownlo aded by a ny customer or retai ler and
may cont ain vir uses or for any malfun ction r esult ing of
ins talli ng the so ftware. The c ustom er uses i t at their
own r isk.
Ens ure the s torage device u sed to record i s inser ted into
the U SB Inpu t on the ba ck of the u nit and i s compa tible
for recording. If your sto rage devic e is not compa tible,
you will b e asked t o format it. Enter the P VR File Sy stem
men u and sel ect Device List to forma t your device.
Dur ing rec ording, only the Stop fun ction s is
availa ble.
There wil l be no record func tion, when th e chann el is
CI+ c hanne l.
There wil l be no Timeshi ft func tion when the
cha nnel is C I+ chan nel.
00:0 0:05
PlayPa useFBStopFF
00:0 0:00/ 04:13 :20
EN-25
Page 27

Operation
Press source key, a nd sele ct USB in s ource list , press OK but ton to enter the US B menu.
10.USB Player
Ple ase mak e sure that th e USB dev ice have plugged in th e slot. There are fou r type media item can b e selec ted, su ch as
pho to, musi c, Movi e, and text. S elect the t ype med ia item by pressi ng, press O K butto n to ente r the dis k selec tion me nu.◄►
Press theto sele ct the right dis k and folder,press OK to . Press Red but ton to back to t he
med ia type s electio n menu.
▼/▲
ent er the me dia fil es list
Sel ect the media fi le by pressi ng or , then the previ ew frame wil l pop up.Pres s the but ton to play th e media f ile
in fu ll scre en.When th e movie file i s playing,press th e ▼ button can d isplay the c ontrol bar.
◄►▼ ▲►
Pho to
USB 1/Pic
Sele ct
OK
Ente rExitExit
Quic k Menu
Medi a Pad
Bas ic Function
screen.
When photos are playing, press
Press”Play/Pause”key on the remote control to play or pause.
“ ▼”key on the remote control, a help bar will display under the
Press”Left”key on the remote control to read the previous photo.
Press”Right”key on the remote control to read the next photo.
press”stop”key to stop playing and return to the previous menu.
Press”up/down”key to Rotate the photo.
Press Blue
and Background Music(you may play music first).
key, you can enter Quick Menu to adjust Interval time,Repeat,slideshow effect,
Play/Pause
Prev.
Next
Stop
Rotate
Quick Menu
PHOTO
PHOTOMU SICTEXTMOVIE
Haie r Innov ation L ife
Usb2.0Move
Select
OK
EN-26
Page 28

Operation
MUSIC
When music are playing, press “” key to select toolbar.►
Basic Function
Other functions are similar to the PHOTO, Please refer to PHOTO options. ””””
The operations are similar to the PHOTO.Please refer to PHOTO options.””””
Basic Function
MOVIE
TEXT
Press”” to select previous / next page, Input the number key and OK to jump to the page you want.▼ /▲
FBLeft/Right”key on the remote control to select this function,press”ok”
key to to fast back. Press”PLAY”key to play normally.
:Press”
FFLeft/Right”key on the remote control to select this function,press”ok”
key to fast forward. Press”PLAY”key to play normally.
:Press”
Back ground musicLeft/Right”key on the remote control to select this function,press”ok”
key to turn on / off.
:Press”
Set ALeft/Right”key on the remote control to select this function,press”ok”
key to set A and B, the film will circulating play in the time of A to B.
:Press”
Zoom inLeft/Right”key on the remote control to select this function,press”ok”
key to enlarge picture.(if the document is larger than 1920x1080,this function is
unsupported.)
:Press”
Zoom outLeft/Right”key on the remote control to select this function,press”ok”
key to reduce picture.(This function does not support more than 1920x1080 HD video.)
:Press”
Select TimePress”Left/Right”key on the remote control to select this function,press”ok”
key to select the time to play.
:
EN-27
Prov ide lis t of majo r file types tha t play from a USB dev ice
Pho to .jpg file s
Audio .m p3
Video
.av i ,.mp4
Text .txt
Mus ic
.. 1/1
Sele ct
OK
Ente rExi tExit
Quic k Menu
Medi a Pad
Title:
Album :
Artis t:
Track
Year: 201 0-09- 30
1 / 2
10547 672
PLAY
00:00 :5300:00 :00
10547 672.m p3
14953 359.m p3
USB 1/Mus ic
Page 29

PictureAudio
Snow Noi se
ant enna po sitio n, directi on
or co nnect ion
Inspection Check
Inter ference
Noi se
ele ctron ic equi pment ,car/
mot orcyc le,fluorescent ligh t
Nor mal Pic ture
Mut e
Volume(che ck if mute is
activated or if the au dio sys tem
con necti ons are n ot correct )
No pi cture Mut e
Powe r cord is not in serted
Powe r switc h is not op ened
Contra st and br ightn ess/volu me
set up
Press stand by key on the remot e
con trol for i nspec ting
No colour Nor mal aud io Colou r control
Picture
breaking up
Nor mal aud io
or weak
ret une cha nnel
No colour
Noi se
TVsystem
Nor mal aud io
ant enna po sitio n, directi on
or co nnect ion
Trouble phenomenon Symptom
Gho st
Nor mal aud io
Cha nge asp ect to zo om
Ther e is blac k bar
on to p and bot tom
05 Trouble shooting
Trouble Shooting
EN-28
Page 30

Trouble Shooting
My TV does not display the picture
on my laptop / PC when connected.
Most PC's and laptops when connected with a VGA Plug (the
blue 15 pin plug on your PC or laptop) require you to press
some buttons on your key board to get a picture on a TV or
other external display. This is usually the F7 (Dell) or F4 (HP /
Samsung) or F5 ( Toshiba). On laptops, you have to press the
“Fn” key at the same time as the “F” key.
I have connected my PC/Laptop to
the TV and get a pic ture but no
sound. Why ?
The VGA cable only carries the video or picture information.
You need to connect a separate cable connected to the
earphone socket (3.5mm jack) on you PC/Laptop to the 3.5m
(PC Audio IN) socket on your TV. You will need to select “PC ”
using the Source button on your remote.
Alternatively connect your PC/Laptop using a HDMI cable if
you PC/Laptop has a HDMI connector. HDMI is both audio and
video.
The picture is not auto resizing
when changing channels.
Check that the TV picture Aspect R atio is set to 'Auto' on all
inputs ATV, DT V, SCART, HDMI 1, 2 etc.
To set the aspect ratio, (Auto, 4:3 or 16:9). Press Source button
start at ATV and repeat the sequence below for all input
sources ATV, DTV, SCAR T, HDMI 1 and 2 as each input source is
controlled separately.
Press TV M enu button
Press Right Arrow to access Picture sub menu
Press Down Arrow to select Aspect R atio
Selec t Auto
Press Exit
Repeat for all input sources.
I have just plugged in a DVD player
or another item into my TV and it
doesn't work.
This is applicable to any item of equipment plugged to the TV
1. Turn both TV & DVD player off (plugs out of the wall socket,
not standby).
2. Turn off any equipment connected to the SCART socket.
3. Disconnect the SCART plug from the TV.
4. Plug in and turn TV on
5. Plug in and turn DVD player on
6. Select HDMI from Source Menu
7. Press play on DVD player and check movie plays ok
NOTE: The SCART socket has priority over HDMI and it is
impor tant that the equipment connected to the SCART socket
on the TV is switched OFF (not in standby).
Please follow this information. If the advice works and the
DVD player works, the TV is OK it is just a bit confused.
Probably HDMI plugs have been removed and plugged back in
when the TV is switched on.
Never remove or plug in HDMI cables or any digital equipment
with the equipment switched on.
Always switch off all equipment when unplugging or
connecting any digital equipment.
Trouble Shooting
EN-29
Page 31

Trouble Shooting
Pic ture Br eaks in to Pixel s
A typ ical ex ample o f a recep tion problem inclu des the b reak up of p ictu res (pi xilat ion) or the pi cture f reezi ng,
som etime s there a re click ing or s queak ing sou nds or th e sound d rops ou t or there is NO re cepti on at all .
Your pi cture m ay brea k into pi xels due t o the dig ital vi deo sig nal dro pping. Th e signa l dropp ing may occur b ecaus e of
eit her pro blems w ith weak sign als (se e TV Aeri als) or i f you are c onnec ted by ca ble a weak cable signal . If the pr oblem
is we ak sign als, use a n ampli fier to s treng then th e signa l. A cabl e technician can help you in stall a n inlin e ampli fier or a
pre -amplifier. Thi s will bo ost you r signa l strength and fix the pixel p roble m.
If yo u are rece iving y our TV si gnal by s atellite, c heck yo ur dish h as not mo ved foll owing h igh win ds, or th at the si gnal is
blo cked by t rees. Tree s can be a pr oblem a s the TV si gnal ca n chang e depen ding if a t ree bet ween the s atell ite dis h and
sat ellit e is in bare o r in full l eaf.
Mis sing ch annel s
It ma y be that y ou find t hat the re are cha nnels m issin g, or you 're receiving channel s from the w rong re gion.
Som etime s the int eract ive ser vices ( red but ton) do esn't wo rk. This i s usual ly caus ed by wea k signa l, see TV Ae rials
TV Ae rials
Dig ital te rrestrial television (Fre eview ) comes to your T V via an ae rial, Th e old aer ial tha t was goo d for ana logue T V may
not w ork wel l for digi tal so ma y need up gradi ng. If you a re gett ing som e but not a ll of the d igita l chann els on DT V
(Fre eview ) for exa mple you get BBC1 , BBC2, C hannel 4 ,bu t not ITV or Chann el 5, thi s is usua lly bec ause you r aerial is a
nar row ban d type, a nd need s to be changed to a wid e band t ype.
Faul ty Lead s and Cab les
Che ck your T V. Are t he lead s at the ba ck - to the m ains, t he aeri al, the set-top bo x, the vi deo or DV D playe r or recor der
pro perly c onnec ted? SC ART lea ds are kn own to wo rk loos e over time and can re sult in b oth aud io and vi deo (pi cture )
pro blems. Either left o r right o r both au dio is mi ssing a nd the co lours a re poor or muddy looki ng. Push t he SCAR T
plu gs firm ly in, th is shou ld fix th e probl em.
HDM I plugs n eed to be p ushed i n firml y; it's only the l ast mil limetre tha t the con tacts m ake. Typi cally t he blac k plast ic
par t of the HDMI p lug sho uld be ver y clos e or touc hing th e body of t he TV or component.
Whe n plugg ing in any HDMI cables yo u may exp erien ce prob lems if t he HDMI c ables a re plugged in when the TV or the
oth er comp onent i s switc hed on. Alway s switc h off bot h the TV an d the com ponen t you are pl uggin g in. If yo u have
che cked th e plugs a nd sock ets, sw itch off the TV and whate ver you h ave plugged in to th e TV and then switc h them on
aga in.
I have c onnec ted my PC t o the TV. There i s no soun d.
If yo u conne ct your P C or Lapt op to the T V using a VG A (15 pin S ub D) cab le there i s no audi o, you need to co nnec t a
sep arate a udio ca ble to the TV fro m the PC or l aptop.
Unn atural C olour s and Fle sh Tone s
Unn atura l flesh t ones an d other colours co uld pre sent an other p roble m even in a n ew HDTV. This is due to th e TV
pic ture se tting s, whic h are optimi zed for a sh owroo m enviro nment . Fix this b y chang ing the p ictur e mode to n atura l in
the p ictur e menu. Fo r more pr ecisi on, try m anual ly sett ing the c olour, c ontra st and br ightn ess options in th e pictu re
men u.
Whi te Outl ines
Whi te outl ines ar ound ob jects a nd peop le gene rally a ppear e ither i f the TV sh arpne ss is set to ver y high, o r if your
tel evisi on set us es some e dge- enhan cemen t proces sing te chnol ogy. Go to t he picture m enu and a djust t he shar pness
til l the whi te outl ine dis appea rs. If ed ge-e nhanc ement i s enabl ed, try t o disab le it usi ng the se rvice m enu.
Cho ppy Video
At ti mes the v ideo mi ght become choppy. Whe n this ha ppens, c heck wh ether t he sign al is str ong eno ugh. If t he sign al
is st rong th e problem is with the cable operator. I f the sig nal str ength i s weak, t ry boo sting t he signal streng th with t he
hel p of an amp lifie r.
The p ictur e does no t fill th e scree n
Whe n conne cting P C's or la ptops t o the TV, the pic ture may n ot fill t he scre en. Che ck the di splay s ettin gs on you r PC or
lap top (W indows > S tart > Control Pa nel > App earance and P erson aliza tion > Di splay settings) an d selec t the bes t
res oluti on. On your TV select: - TV M enu > Pic ture > Se tting s and the n try AUTO, Z OOM1 or ZO OM2 for t he best d ispla y.
USB Co nnec tion
The U SB conn ectio n will wo rk with * .jpg (p hoto) a nd *.mp 3 (musi c) file s. Pleas e note th e TV d oes not r ecogn ize Appl e
iPh one, or i Pod's co nnect ed to the U SB conn ector o n the TV. The TV m ay play o ther fi les, bu t due to th e multi ple
dif ferent f ile for mats, t here is no guarant ee that t hese ot her fil e forma ts will w ork.
Trouble Shooting Digital TV Problems and possible Solutions.
EN-30
Page 32

Telev ision p icture qua lity:
Add ition al featu res:
NIC AM stereo so und system .
Dig itally int eract ive.
Dig ital text.
Dig ital vi deo broadc astin g (DVB) s ubtitles a vaila ble.
Auto set up.
Auto sca n for new channel s.
Now a nd next p rogramme g uide.
7 day e lectr onic programm e guide ( EPG).
Top up TV compatibl e.
CI sl ot.
Audio de scrip tion co mpati ble.
Sou nd qual ity:
Dig ital fe atures:
Standby Power
consumption
<0.30W
* The part specifications of this TV set provided here
are for reference only.
Difierences may occur as product technology is updated.
Design and specifications are subject to change without notice.
Scart Output description :
1. When current source is AT V/AV/SCART, scart output signal is ATV.
2. When current source is DTV, there will be no SCART output signal.
3. Other source have no SCART output signal.
Connec tivit y:
2 HDM I socke ts.
1 SCA RT socket.
PC in put soc ket.
Compon ent vid eo sock et.
Compos ite.
1 USB p ort.
1 Hea dphon e port.
1 por t.
COAX IAL
Sup ported Systems:PAL+SECAM
Sto rage chann el numb er: 100 0(DTV) ,100(ATV )
TV (RF): 75Ω Imba lance
AV Video-I nput:75Ω,1V-P,RCA
AV Audio- Input:20KΩ,5 00mB RMS
YPbPr/HDM I Video In put:4 80i, 48 0p, 576 i, 576p , 720p, 1 080i, 1 080p
DTV Tun er Decorder
DVB -T, DVB-C
16/ 32/64 /128/ 256 QAM modulat ion
/QP SK Modu latio n
MPE G2,MP EG4,H .264
FUL L HD
Int egrated di gital.
Scr een Size: 55 cm
Res oluti on 1920 x1080 p ixels 50Hz .
22" FULL HD 1080p Digital LED LCD TV
2 x 3 wat ts RMS power outp ut.
UHF /VHF tu ner;S leep ti mer;;Pictu re and te xtPare ntal Rating
Rem ote control bat terie s required 2 x AAA (i nclud ed).
VES A Mount S ize: 10 0 x 100 mm
Packag e Size ( WxHxD ): 616x 426x1 35mm
Set S ize (W xHxD) w ith Sta nd: mm
513 x355 x16 0
Set S ize (W xHxD) w ithou t Stand : mm513 x312x 42
Packag e weight : 4.1 k g
Set w eight w ithou t stand : 2.7 kg
Set w eight w ith sta nd: 2.9 kg
Specification
EN-31
06 Specification
Page 33

Specification
Specification
Telev ision p icture qua lity:
Add ition al featu res:
NIC AM stereo so und system .
Dig itally int eract ive.
Dig ital text.
Dig ital vi deo broadc astin g (DVB) s ubtitles a vaila ble.
Auto set up.
Auto sca n for new channel s.
Now a nd next p rogramme g uide.
7 day e lectr onic programm e guide ( EPG).
Top up TV compatibl e.
CI sl ot.
Audio de scrip tion co mpati ble.
Sou nd qual ity:
Dig ital fe atures:
Standby Power
consumption
<0.30W
* The part specifications of this TV set provided here
are for reference only.
Difierences may occur as product technology is updated.
Design and specifications are subject to change without notice.
Scart Output description :
1. When current source is AT V/AV/SCART, scart output signal is ATV.
2. When current source is DTV, there will be no SCART output signal.
3. Other source have no SCART output signal.
Connec tivit y:
2 HDM I socke ts.
1 SCA RT socket.
PC in put soc ket.
Compon ent vid eo sock et.
Compos ite.
1 USB p ort.
1 Hea dphon e port.
1
COAX IAL por t.
Sup ported Systems:PAL+SECAM
Sto rage chann el numb er: 100 0(DTV) ,100(ATV )
TV (RF): 75Ω Imba lance
AV Video-I nput:75Ω,1V-P,RCA
AV Audio- Input:20KΩ,5 00mB RMS
YPbPr/HDM I Video In put:4 80i, 48 0p, 576 i, 576p , 720p, 1 080i, 1 080p
DTV Tun er Decorder
DVB -T, DVB-C
16/ 32/64 /128/ 256 QAM modulat ion
/QP SK Modu latio n
MPE G2,MP EG4,H .264
FUL L HD
Int egrated di gital.
Scr een Size: 59 .9cm
Res oluti on 1920 x1080 p ixels 50Hz .
24" FULL HD 1080p Digital LED LCD TV
2 x 3 wat ts RMS power outp ut.
UHF /VHF tu ner;S leep ti mer;;Pictu re and textParenta l Ratin g
Rem ote control bat terie s required 2 x AAA (i nclud ed).
VES A Mount S ize: 10 0 x 100 mm
Packag e Size ( WxHxD ): m m650 x440x 135
Set S ize (W xHxD) w ith Sta nd: mm
568 x386x 160
Set S ize (W xHxD) w ithou t Stand : mm568 x344x 42
Packag e weight : 4.9 k g
Set w eight w ithou t stand : 3.5 kg
Set w eight w ith sta nd: 3.7 4kg
EN-32
Page 34

Specification
Telev ision p icture qua lity:
HD Re ady
Int egrated di gital.
Scr een Size: cm
70
Res oluti on 1366 x768 pi xels 50Hz.
28" HD Ready Digital LED LCD TV
Add ition al featu res:
NIC AM stereo so und system .
2 x 8wa tts RMS p ower output.
Dig itally int eract ive.
Dig ital text.
Dig ital vi deo broadc astin g (DVB) s ubtitles a vaila ble.
Auto set up.
Auto sca n for new channel s.
Now a nd next p rogramme g uide.
7 day e lectr onic programm e guide ( EPG).
Top up TV compatibl e.
CI sl ot.
Audio de scrip tion co mpati ble.
Sou nd qual ity:
Dig ital fe atures:
Standby Power
consumption
<0.30W
* The part specifications of this TV set provided here
are for reference only.
Difierences may occur as product technology is updated.
Design and specifications are subject to change without notice.
Scart Output description :
1. When current source is AT V/AV/SCART, scart output signal is ATV.
2. When current source is DTV, there will be no SCART output signal.
3. Other source have no SCART output signal.
Connec tivit y:
2 HDM I socke ts.
1 SCA RT socket.
PC in put soc ket.
Compon ent vid eo sock et.
Compos ite.
1 USB p ort.
1 Hea dphon e port.
1 por t.COAX IAL
Sup ported Systems:PAL+SECAM
Sto rage chann el numb er: 100 0(DTV) ,100(ATV )
TV (RF): 75Ω Imba lance
AV Video-I nput:75Ω,1V-P,RCA
AV Audio- Input:20KΩ,5 00mB RMS
YPbPr/HDM I Video In put:4 80i, 48 0p, 576 i, 576p , 720p, 1 080i, 1 080p
DTV Tun er Decorder
DVB -T, DVB-C
16/ 32/64 /128/ 256 QAM modulat ion
/QP SK Modu latio n
MPE G2,MP EG4,H .264
UHF /VHF tu ner;S leep ti mer;;Pictu re and te xtPare ntal Rating
Rem ote control bat terie s required 2 x AAA (i nclud ed).
VES A Mount S ize: 20 0 x 100 mm
Packag e Size ( WxHxD ): 810x 480x1 20mm
Set S ize (W xHxD) w ith Sta nd: 642 x435x 170mm
Set S ize (W xHxD) w ithou t Stand : 642x3 90x44 mm
Packag e weight : 6.5 k g
Set w eight w ithou t stand : kg5.0
Set w eight w ith sta nd: 5.3 k g
Specification
EN-33
Page 35

Specification
Telev ision p icture qua lity:
HD Re ady
Int egrated di gital.
Scr een Size: 81 cm
Res oluti on 1366 x768 pi xels 50Hz.
32" HD Ready Digital LED LCD TV
Add ition al featu res:
NIC AM stereo so und system .
2 x 8wa tts RMS p ower output.
Dig itally int eract ive.
Dig ital text.
Dig ital vi deo broadc astin g (DVB) s ubtitles a vaila ble.
Auto set up.
Auto sca n for new channel s.
Now a nd next p rogramme g uide.
7 day e lectr onic programm e guide ( EPG).
Top up TV compatibl e.
CI sl ot.
Audio de scrip tion co mpati ble.
Sou nd qual ity:
Dig ital fe atures:
Standby Power
consumption
<0.30W
* The part specifications of this TV set provided here
are for reference only.
Difierences may occur as product technology is updated.
Design and specifications are subject to change without notice.
Scart Output description :
1. When current source is AT V/AV/SCART, scart output signal is ATV.
2. When current source is DTV, there will be no SCART output signal.
3. Other source have no SCART output signal.
Connec tivit y:
2 HDM I socke ts.
1 SCA RT socket.
PC in put soc ket.
Compon ent vid eo sock et.
Compos ite.
1 USB p ort.
1 Hea dphon e port.
1 por t.COAX IAL
Sup ported Systems:PAL+SECAM
Sto rage chann el numb er: 100 0(DTV) ,100(ATV )
TV (RF): 75Ω Imba lance
AV Video-I nput:75Ω,1V-P,RCA
AV Audio- Input:20KΩ,5 00mB RMS
YPbPr/HDM I Video In put:4 80i, 48 0p, 576 i, 576p , 720p, 1 080i, 1 080p
DTV Tun er Decorder
DVB -T, DVB-C
16/ 32/64 /128/ 256 QAM modulat ion
/QP SK Modu latio n
MPE G2,MP EG4,H .264
UHF /VHF tu ner;S leep ti mer;;Pictu re and te xtPare ntal Rating
Rem ote control bat terie s required 2 x AAA (i nclud ed).
VES A Mount S ize: 20 0 x 100 mm
Packag e Size ( WxHxD ): 880x 550x1 37mm
Set S ize (W xHxD) w ith Sta nd: 738 .5x48 7.5x1 70mm
Set S ize (W xHxD) w ithou t Stand : 738.5 x443x 64mm
Packag e weight : 6.8 k g
Set w eight w ithou t stand : 4.7 kg
Set w eight w ith sta nd: 5.0 k g
Specifiction
EN-34
Page 36

Page 37

Bitte lesen Sie diese Bedienungsanleitung vor der Inbetriebnahme des
Geräts sorgfältig durch und bewahren Sie diese für späteres Nachschlagen
auf.
LCD-Fernseher mit LED-Hintergrundbeleuchtung
LE22M600CF
LE24M600CF
LE28M600C
LE32M600C
Page 38

01 Sicherheits- und Warnhinweise
VIDEOTEXT
17
KANALMENÜ18
Automa tisch er Kanalsuchlauf (D VB-T)18
Automa tisch er Kanalsuchlauf (D VB-C)19
DTV Man uelle r Kanalsuchlauf (DVB-T )
DTV Man uelle r Kanalsuchlauf (DVB- C)
ATV Manueller K anals uchla uf
20
20
20
22
Tonme nü
21
Zeitmenü
22
Ein stell ungsmenü
SPE RRMEN Ü
EPG-Menü (Elektronische Programmzeitschrift)
23
PVR-Dateisystem (nur DTV)
23
Vorbereitung der Aufnahme
24
22
Programm au fzeichnen
24
Aufnahme absp ielen
24
TimeShift
25
USB -Media-Player
26
Störungserkennung
05 Störungserkennung
30
Spezifikationen33
Willkommen
Wichtige Informationen
2
2
Sicherheitshinweise
Warnhinweise
3
4
Parameter
Standfuß montieren
02 Einleitung
5
7
Wandmontage
Seitliches Bedienfeld
8
10
TV-Anschlussfeld
11
Fernseher anschließen
Common Interface
12
15
Fernbedienung
03 Fernbedienung
16
Installation
04 Bedienungshinweise
18
Bil dmenü
21
Inhaltsverzeichnis
Inhaltsverzeichnis
Kanal bearbeiten
Common Inter face
20
21
HOTEL-MODUS
28
DE- 1 LCD-Fer nsehe r mit LED -Hin tergru ndbel eucht ung
Signalinformationen
21
Softwareaktualisierung (USB)21
06 Spezifikationen
Page 39

Vielen Dank, dass Sie sich für diesen
Diese Anleitung hilft Ihnen bei der Einstellung und Bedienung Ihres Fernsehers.
Vergewissern Sie sich zunächst, dass alle Zubehörteile mitgeliefert wurden:
22"/24"/28"/32" Zoll LED LCD-Fernseher entschieden haben.
LESEN SIE VOR DER VERWENDUNG DIE GESAMTE ANLEITUNG DURCH, UND BEWAHREN SIE SIE ZUR
SPÄTEREN VERWENDUNG AUF.
VORSICHT
Nun können Sie beginnen!
01 Sicherheits- und Warnhinweise
Sicherheits- und Warnhinweise
WILLKOMMEN
WICHTIGE INFORMATIONEN
STROMSCHLAGGEFAHR
NICHT ÖFFNEN
ZUR VERMEIDUNG VON STROMSCHLÄGEN ÖFFNEN SIE DAS GERÄTEGEHÄUSE NICHT. ES BEFINDEN SICH
KEINE VOM VERBRAUCHER WARTBAREN TEILE IM INNEREN DES GERÄTS. WENDEN SIE SICH MIT
PROBLEMEN UND FRAGEN ZUR WARTUNG AN DEN KUNDENDIENST.
DER BLITZ IM GLEICHSEITIGEN DREIECK BEDEUTET, DASS IM GERÄT HOCHSPANNUNGSGEFAHR BESTEHT.
DAS AUSRUFUNGSZEICHEN IM GLEICHSEITIGEN DREIECK BEDEUTET, DASS WICHTIGE WARTUNGS- UND
BEDIENUNGSHINWEISE IN DER BEDIENUNGSANLEITUNG GEFUNDEN WERDEN.
VORSICHT: ZUR VERMEIDUNG VON STROMSCHLAG UND FEUER SETZEN SIE DEN FERNSEHER
KEINER FEUCHTIGKEIT AUS. REINIGEN SIE DAS GERÄT UND DEN BILDSCHIRM NICHT MIT
SCHEUERMIT TELN; DAS FÜHRT ZU KRATZERN.
BIT TE BEACHTEN SIE: REPARIEREN SIE DAS GERÄT NICHT SELBST, DAS KANN ZU
VERLETZUNGEN UND SCHÄDEN AM GERÄT FÜHREN. WENDEN SIE SICH MIT WARTUNGS-
UND REPARATURARBEITEN STE TS AN DEN AUTORISIERTEN KUNDENDIENST.
De
LCD- Fernse her mit L ED-H interg rundb eleuc htung D E-2
22" Full HD 1080p Digitaler LED LCD-Fernseher
2 x AAA-Batterien für Fernbedienung
Benutzerhandbuch
Kurzanleitung
Standfuß
Garantiekarte
Schrauben
28" HD-Ready LED LCD-Fernseher
2 x AAA-Batterien für Fernbedienung
Benutzerhandbuch
Kurzanleitung
Standfuß
Garantiekarte
Schrauben
24" Full HD 1080p Digitaler LED LCD-Fernseher
2 x AAA-Batterien für Fernbedienung
Benutzerhandbuch
Kurzanleitung
Standfuß
Garantiekarte
Schrauben
32" HD-Ready LED LCD-Fernseher
2 x AAA-Batterien für Fernbedienung
Benutzerhandbuch
Kurzanleitung
YPbPr Verbindungskabel
Standfuß
Garantiekarte
Schrauben
Page 40

SICHERHEITSHINWEISE
Sicherheits- und Warnhinweise
Warnung: Zur Vermeidung von Feuer und
Stromschlag öffnen Sie nicht das
Gerätegehäuse. Es befinden sich keine vom
Verbraucher war tbaren Teile im Innern des
Gerätes. Wenden Sie sich mit Wartungs- und
Reparaturarbeiten stets an den autorisierten
Kundendienst.
Warnung: Zur Vermeidung von Feuer und
Stromschlag setzen Sie das Gerät nicht Regen
oder Feuchtigkeit aus.
Setzen Sie Netzteil und Gerät nicht Spritzwasser
oder Tropfwasser aus und stellen Sie keine mit
Wasser gefüllten Gegenstände (wie Vasen) auf
dem Gerät ab.
Schützen Sie das Gerät vor direkter
Sonneneinstrahlung und Hitze (Heizkörper,
Herd).
Blockieren Sie nicht die Ventilationsöffnungen,
sie werden zur Belüftung benötigt. Stellen Sie
das Gerät nicht auf einem Kissen, Sofa oder
ähnlichen Flächen ab.
Stellen Sie das Gerät nicht auf einem unstabilen
Wagen, Aufsteller, Stativ, Tisch oder einer
Halterung ab. Es kann herunterfallen und
Verletzungen und Schäden verursachen.
Stellen Sie keine schweren oder scharfkantigen
Gegenstände auf dem Gerät ab.
Ziehen Sie nach der Benutzung den
Netzstecker.
Entsorgen Sie Batterien umweltgerecht.
WARNUNG: Batterien oder Akkus dürfen nicht
übermäßiger Hitze ausgesetzt werden (direkte
Sonneneinstrahlung, Feuer usw.).
WARNUNG: Übermäßiger Schalldruck von
Ohrhörern oder Kopfhörern kann zu
Hörschäden führen.
VORSICHT: Bei elektrostatischer Aufladung
kann es zu Fehlfunktionen kommen und das
Gerät muss zurückgesetzt werden.
Dieses Symbol zeigt an, dass das Gerät nicht mit
dem Hausmüll entsorgt werden darf. Zur
Vermeidung von Gesundheits- und
Umweltschäden durch unkontrollierte
Entsorgung muss das Gerät recycelt werden.
Geben Sie das Gerät bitte an einer Sammelstelle
für Elektroaltgeräte ab oder wenden Sie sich an
Ihren Fachhändler.
DE- 3 LCD-Fer nsehe r mit LED -Hin tergru ndbel eucht ung
Page 41

Dim:515*320mm (不包括 底座)
Warnung
Dieser Fernseher wird mit Hochspannung
betrieben. Öffnen Sie nicht das Gerätegehäuse.
Wenden Sie sich mit Wartungs- und
Reparaturarbeiten stets an den autorisierten
Kundendienst.
Zur Vermeidung von Feuer und Stromschlag
setzen Sie das Gerät nicht Regen oder
Feuchtigkeit aus.
Warnung
Führen Sie keine Fremdkörper in das Gerät
ein, stoßen Sie es nicht stark an. Verschütten
Sie keine Flüssigkeiten auf Ihrem Fernseher.
Warnung
Blockieren Sie nicht die
Ventilationsöffnungen, sie werden zur
Belüftung benötigt.
Vorsicht
Vorsicht
Klemmen Sie das Netzkabel nicht unter dem
Fernseher ein.
Stehen Sie nicht auf dem Fernseher, lehnen Sie
sich nicht gegen den Fernseher, stoßen Sie ihn
nicht an. Achten Sie auch besonders auf Kinder.
Der Fernseher kann schwere Verletzungen und
Schäden verursachen, wenn er umfällt.
Vorsicht
Stellen Sie das Gerät nicht auf einem unstabilen
Wagen, Aufsteller, Stativ, Tisch oder einer
Halterung ab. Es kann herunterfallen und
Verletzungen und Schäden verursachen.
Vorsicht
Bei längerer Nichtbenutzung des Fernsehers
ziehen Sie bitte das Netzkabel ab.
Vorsicht
Wird der Fernseher eingebaut, so achten Sie bitte
auf die Mindestabstände. Hitzestau kann die
Lebensdauer Ihres Fernsehers verkürzen und ist
gefährlich.
Vorsicht
WARNHINWEISE
Sicherheits- und Warnhinweise
Mindestabstände
De
LCD- Fernse her mit L ED-H interg rundb eleuc htung D E-4
Page 42

INSTALLATION
ACHTUNG
* Stellen Sie den Fernseher vor direkter
Sonneneinstrahlung geschützt auf.
* Dunkelheit und Reflektionen auf dem
Bildschirm können zu einer Überforderung
der Augen führen. Weiche und indirekte
Beleuchtung wird für komfortables
Fernsehen empfohlen.
* Lassen Sie auf der Rückseite des Fernsehers
ausreichend Platz zur Ventilation.
* Vermeiden Sie besonders warme Standorte,
um einen Hitzestau im Gerät und vorzeitige
Schäden zu vermeiden.
* Decken Sie die Lüftungsöffnungen während
des Betriebs nicht ab.
Parameter
Ausstattungsmerkmale
4 NICAM;
5 TimeShift
3
HDMI- und SCART-Anschluss
Hohe Leuchtkraft, breiter Betrachtungswinkel
2
Nutzbar als Fernseher oder PC-Monitor
1
Bildschirm
2x3W
Analog RGB (PC) x1;
High-Definition Multimedia Interface (HDMI) x 2
Komposit-eingang x 1
PC Audio-eingang x1
YPbPr x 1
SCART x 1
22
CI x 1
USB-Port x 1
RF Co-Ax x 1
Komposit-Videoeingang >=350
YPbPr>=400
Kopfhörerausgang x 1
KOAXIAL x 1
Machen Sie sich nicht an Bauteilen im Fernsehgerät
oder an irgendwelchen anderen
Einstellungssteuerungen zu schaffen, die nicht in
diesem Handbuch beschrieben sind. Alle LED-
Fernsehgeräte sind elektrische
Hochspannungsgeräte.
Wenn Sie Staub oder Wassertropfen von dem
Bildschirm oder dem Gehäuse oder um die Knöpfe
oder Anschlüsse herum abwischen, sollte das
Stromkabel aus der Steckdose aus gesteckt sein.
Wischen Sie das Fernsehgerät mit einem weichen,
trockenen, staubfreien Tuch ab.
Trennen Sie während Gewittern das Stromkabel und
das Antennenkabel, um Schäden an Ihrem
Fernsehgerät und anderen angeschlossenen Geräten
zu vermeiden.
Alle Reparaturen sollten nur von qualifiziertem
Fernsehgeräte Servicepersonal durchgeführt werden.
02 Einleitung
Spannungsversorgung
Audio-Ausgangsleistung
(Klirrfaktor 7%)
Anschlüsse
Horizontale Auflösung
(TV-Zeilen)
Einleitung
DE- 5 LCD-Fer nsehe r mit LED -Hin tergru ndbel eucht ung
100 0 (DTV ), 100 (ATV )
Kanalspe icher
242832
100-240V~50/60Hz
38W
100-240V~50/60Hz
40W
100-240V~50/60Hz
41W
100-240V~50/60Hz
50W
2x3W2x8W2x8W
Page 43

UNTERSTÜTZTER MODUS
PC
3
5
1024x768
1280x1024
60
60
1
640x480
60
31.47
2
800x600
60
37.88
48.36
63.98
Auflösung
V. Freq. (kHz)H. Freq. (kHz)
4
1366x768
60
47.7
Einleitung
De
LCD- Fernse her mit L ED-H interg rundb eleuc htung D E-6
6
(nur für 22”, 24”)
60
66.64
1920x1080
Page 44

Montageanleitung für den Standfuß
Stellen Sie den Fernseher vor direkter Sonneneinstrahlung gesch ützt au f. Dunkelheit und Reflek tione n auf
dem B ildsc hirm können zu einer Über forderung der Augen führen. Weiche und indirekte Beleuchtung wird
für k omfor tables Fernsehen empfohlen. Lassen S ie auf de r Rückseite des Fernsehers ausreichend Platz zur
Ventilation.
Hinweis: Der TV-Standfuß ist nicht schwenkbar.Ve rmeid en Sie be sonde rs warme Standor te, um einen
Hitzestau im Gerät und vorzeitige Schäden zu vermeiden.
HINWEISE ZUR INSTALLATION
Einleitung
DE- 7 LCD-Fer nsehe r mit LED -Hin tergru ndbel eucht ung
1. Legen Sie den Fernseher mit dem Bildschirm auf
eine flache Arbeitsfläche. Legen Sie ein Tuch unter,
um den Bildschirm zu schützen. Setzen Sie den
Standfuß unten an.
2. Schrauben Sie den Standfuß von unten mit
den Schrauben fest an.
(22",24")
(28")
(32")
Page 45

WANDMONTAGE
2.Schrauben Sie die Halterung für den Standfuß
unten am Fernseher ab (bewahren Sie den
Standfuß für späteren Gebrauch auf ).
1.Legen Sie den Fernseher mit dem
Bildschirm auf eine flache Arbeitsfläche.
Legen Sie ein Tuch unter, um den
Bildschirm zu schützen.
Einleitung
Dieser Fernseher kann wie folgt an der Wand montiert werden:
De
LCD- Fernse her mit L ED-H interg rundb eleuc htung D E-8
(22",24")
(28")
(32")
Page 46

Einleitung
3.Schrauben Sie den Fernseher mit vier vorgesehenen Schrauben an eine VESA-Wandhalterung
(beides nicht mitgeliefert).
M4X5
M4X5
M4X5
M4X5
100m m
100m m
M4X5
M4X5
M4X5
M4X5
200 mm
100m m
M4X5
M4X5
M4X5
M4X5
200 mm
100m m
(22",24")
(28")
(32")
DE- 9 LCD-Fer nsehe r mit LED -Hin tergru ndbel eucht ung
Page 47

1
2
3
Sensor für Fernbedienung
Status-LED:
ROT: Stand-by-Modus
Funktionstasten
1
SOURCE
Eingangsquellen aufrufen.
MENU
Hauptmenü anzeigen.
3
4
CH+/CH-
Im TV-Modus schalten Sie mit CH+ oder CH-
zwischen den Kanälen auf und ab.
Im MENÜ wählen Sie mit CH+ oder CH- einen
Menüpunkt.
STANDBY
2
VOL+/VOL-
Lautstärke einstellen.
Im MENÜ stellen Sie den gewählten Menüpunkt ein.
5
Seitliches Bedienfeld(22",24",28")
Einleitung
Schaltet den Fernseher in den Standby-Betrieb.
3
2
3030
1
≤8m
MENU
CH+
CH-
VOL+
VOL-
2
SOURCE
1
3
4
STANDBY
5
SOU RCE
MEN U
CH+
CH-
VOL +
VOL -
STANDBY
1
2
3
4
5
3
2
3030
1
≤8m
1
2
3
Sensor für Fernbedienung
Status-LED:
ROT: Stand-by-Modus
Funktionstasten
1
SOURCE
Eingangsquellen aufrufen.
MENU
Hauptmenü anzeigen.
3
4
CH+/CH-
Im TV-Modus schalten Sie mit CH+ oder CH-
zwischen den Kanälen auf und ab.
Im MENÜ wählen Sie mit CH+ oder CH- einen
Menüpunkt.
STANDBY
2
VOL+/VOL-
Lautstärke einstellen.
Im MENÜ stellen Sie den gewählten Menüpunkt ein.
5
Schaltet den Fernseher in den Standby-Betrieb.
Seitliches Bedienfeld(32")
LCD- Fernse her mit L ED-H interg rundb eleuc htung D E-10
De
Page 48

TV-Anschlussfeld(22",24",28")
Einleitung
DIGITAL AUDIO OUTPUT
(COAXIAL)
4
125
COMM ON INTE RFACE (C I)
USB
6
78910
111213
3
VIDEOR
HDMI2(ARC)
HDMI1
1
YPbYr
2
3
4
5
Eingang
6
SCART
L/R AUDIO
VIDEO
7
HDMI2(ARC)
8
9
HDMI1
10
11
12
13
COMMON INTERFACE(CI)
PC AUDIO
Analog Audio Ausgang / Kopfhörerausgang
HEADPHONE
VGA
ANTENNE/Kabel
Eingang
Digital Audio Ausgang
Eingang
Eingang/Ausgang
Eingang
Eingang
Eingang
Eingang
Eingang
Eingang
TV-Anschlussfeld(32")
1
YPbYr
2
3
4
5
Digital Audio Ausgang
Eingang
DC Netzteil
6
SCART
L/R AUDIO
VIDEO
7
USB
8
9
HDMI2(ARC)
10
11
12
13
HDMI1
COMMON INTERFACE(CI)
PC AUDIO
Analog Audio Ausgang / Kopfhörerausgang
HEADPHONE
VGA
14
ANTENNE/Kabel
Eingang
Eingang
Eingang
Eingang/Ausgang
Eingang
Eingang
Eingang
Eingang
Eingang
Eingang
Eingang
DIGITALER AUDIOAUSGANG (KOAXIAL)
USB
Eingang
23
1
4
6
5
789
1112131410
AC-IN PUT
100-2 40V~ 50 /60Hz
YPbP r
VID EO
LR
DIGITAL AUDIO OUTPUT
(COAXIAL)
SCA RT
USBHDM I2(AR C)HDM I1
HEA DPHON E
COM MON INT ERFACE (CI)
PC AUD IO
VGAR F
DE- 11 LCD-Fe rnseh er mit LE D-Hi ntergr undbe leuch tung
DIGITALER AUDIOAUSGANG (KOAXIAL)
Page 49

GRB
COM MON INT ERFACE ( CI)
USB
RY
W
HDMI2(ARC)
DIGITAL AUDIO OUTPUT
(COAXIAL)
VIDEOR
HDMI1
Audio/Video Gerät
mit HDMI
G Grün (Y)
B Blau (Pb/Cb)
W Weiß (AUDIO-L )
R Rot (AUDIO-R, Pr/Cr)
Y Gelb (VIDEO)
Vers tärke r
CVB S, DVD- Playe r oder an deres
Ger ät mit YPbP r/YCbC r
CVBS, DVD-Player oder anderes
Gerät mit CVBS/S-Video
Anschließen des Haier Fernsehers(22",24",28")
LCD- Fernse her mit L ED-H interg rundb eleuc htung D E-12
Einleitung
De
Page 50

Anschließen des Haier Fernsehers(32")
Einleitung
RYW
USBHD MI2(A RC)H DMI1
HEA DPHON E
COM MON INT ERFACE (CI)
PC AUD IO
VGAR F
GR
B
AC-IN PUT
100-2 40V~ 50 /60Hz
YPbP r
VID EO
LR
DIGITAL AUDIO OUTPUT
(COAXIAL)
SCA RT
G Grün (Y)
B Blau (Pb/Cb)
W Weiß (AUDIO-L )
R Rot (AUDIO-R, Pr/Cr)
Y Gelb (VIDEO)
CVB S, DVD- Playe r oder an deres
Ger ät mit YPb Pr/YCbC r
Vers tärke r
CVBS, DVD-Player oder anderes
Gerät mit CVBS/S-Video
Audio/Video Gerät
mit HDMI
DE- 13 LCD-Fe rnseh er mit LE D-Hi ntergr undbe leuch tung
Page 51

Ans chlie ßen ein es DVD- Player s / Satel lits / Ka bel-S et-
Top-Box- Recei vers / ein er Spie lkons ole / ein es PCs
ode r Lapto ps.
Es gi bt mehrere Opti onen zu m Ansch ließe n eines D VD-
Players / Sat elliten- o der Kab el-Set-Top -Box-Receivers /
ein er Spie lkons ole / ein es PCs od er Lapt ops an Ih ren
Fernseher.
Opt ion 1 SCA RT
Sch ließe n Sie ein S CART-K abel (nic ht mitgeli efert )
übe r die SCA RT-Buc hse des Fernseh ers an de n DVD-
Player / S atelliten- od er Kabel-Set -Top- Box-Rece iver oder
die S pielk onsol e an.
Um da s mit dem S CART-K abel angesch losse ne Gerä t
aus zuwäh len, dr ücken S ie die SO URCE-Tas te auf de r
Fernbedie nung un d verwe nden Si e die Tasten ▼▲um
SCA RT ausz uwähl en.
Drü cken Si e sodan n auf die Taste OK .
Hin weis: D er Ferns eher wi rd stan dardmäßi g zum SCA RT-
Ans chlus s, wenn der Fer nsehe r einge schal tet ist .
Opt ion 2 HDM I1/HD MI2
Wenn das Gerät, mit d em Sie ei ne Verbindung
her stell en möch ten, einge schal tet ist, sch alten S ie das
Ger ät zuer st aus.
Sch ließe n Sie ein H DMI-K abel (nicht mi tgeli efert )
übe r die HDM I-Buc hse des Fernseh ers an de n DVD-P layer
/ Sat ellit en- oder Kabel-Re ceiver oder die S pielk onsol e
an.
Sch alten S ie das Ge rät ein , das Sie s oeben a n den
Fernseher a ngesc hloss en habe n.
Um da s mit dem H DMI-K abel angeschlos sene Ge rät
aus zuwäh len, dr ücken S ie die SO URCE-Tas te auf de r
Fernbedie nung un d verwe nden Si e die Tasten ▼▲, um
HDM I auszu wähle n. Drüc ken Sie s odann a uf die Taste O K.
Opt ion 3 AV Audi ovisu ell
(Ge lb/Wei ß/Rot )
Ste llen Si e siche r, dass sowohl der Fe rnseh er als au ch
das G erät vo r dem Anschl ießen a usges chaltet si nd.
Sch ließe n Sie die AV-Ka bel (ni cht mit gelie fert) ü ber
die Vi deo- (g elb) un d Audio - (weiß, rot) Buc hsen de s
Fernsehers an de n DVD-Player oder die Sp ielko nsole u sw.
an.
Um da s mit dem -Kab el ange schlo ssene G erät
aus zuwäh len, dr ücken S ie die SO URCE-Tas te auf de r
Fernbedie nung un d verwe nden Si e die Tasten ▼▲, um
AV auszuw ählen . Drück en Sie so dann au f die Taste OK .
Opt ion 4
(Grün/ Blau/ Rot) + ( Weiß/Rot )
Ste llen Si e siche r, dass sowohl der Fe rnseh er als au ch
das G erät vo r dem Anschl ießen a usges chaltet si nd.
Sch ließe n Sie die K abel (nicht mi tgeli efert ) über di e
COMPONENT- IN-Buchs en Y, P b, Pr (grü n, blau, rot) und L-
Audio-R (weiß, rot) des Fe rnseh ers an de n DVD-P layer
ode r die Spi elkon sole us w. an.
,
AV
Kom ponen t
Um da s mit dem -Kab el ange schlo ssene
Ger ät ausz uwähl en, drü cken Si e die SOU RCE-Tast e auf der
Fern bedie nung un d verwenden Si e die Tasten ▼ ▲, um
aus zuwäh len. Dr ücken S ie soda nn die Taste O K.
Opt ion 5 VGA (15p in Sub-D)
Sch ließe n Sie ein VGA-Kab el (nic ht mitg eliefert) über
die VG A-Buc hse des Fernseh ers an de n PC / Lapt op an.
Um de n mit dem VG A-Kabel ange schlo ssene n PC /
Lap top aus zuwäh len, dr ücken S ie die SO URCE-Tas te auf
der Fernbed ienun g und ver wende n Sie die Tasten
▼▲,
um PC a uszuw ählen . Drück en Sie so dann di e Taste O K.
Hin weis: VG A ist nur f ür Bild übertragun g. Für Audio über
Ihr en PC / Lap top müs sen Sie e in sepa rates K abel vom PC-
Audio (3 ,5mm Kl inke) a n die Kop fhöre rbuch se an Ihrem
PC / La ptop (3 ,5mm Kl inke) a nschl ießen .
Opt ion 6 USB
Ein G roßteil de r im Hand el erhä ltlic hen USB - Stick s
sin d mit Ihr em Fernseher kompa tibel, sow ie könn en
ein ige Dig italk amera s auch di rekt an gesch losse n werden.
Sch ließe n Sie ein en USB- Stick ( nicht m itgel iefer t)
ode r ein USB -Kabel (nich t mitgelie fert) a n den Fernse her
an.
Um da s an den Fernseher ang eschl ossen e USB-Gerät
aus zuwäh len, dr ücken S ie die SO URCE- Taste auf der
Fernbedie nung un d verwe nden Si e die Tasten ▼▲,um
USB a uszuw ählen . Drück en Sie so dann di e Taste O K.
Hin weis 2: iPho nes und i Pods von A pple si nd mit Ih rem
Fernseher nich t kompa tibel.
Hin weis 3: Wen n Sie ein b elieb iges Ge rät an de n USB-
Ans chlus s ansch ließe n möcht en, hal ten Sie die US B-
Kabellän ge so kur z wie mög lich.
Opt ion 7 KOPF HÖRER AUSGANG
Ste cken Si e den Stecke r des Kop fhörers in die
Kop fhöre rbuch se des Fer nsehe rs. Die
Fernsehlauts precher si nd jetz t stumm gesch altet .
Alt ernat iv könn en Sie au ch exte rne Lau tspreche r bei
Bed arf ansch ließe n.
Opt ion 8
ist e in digi taler Audi o-Ans chlus s, der verwe ndet
wird, um Audio-Ger äte anz uschließ en, zum B eispi el
Hei mkino und ande re digitale HiFi-Systeme. Das S ignal
wir d entweder ü ber ein K oaxia lkabel oder mi t Cinch-
Ans chlüs sen übe rtragen.
Ste llen Si e siche r, dass sowohl der Fe rnseh er als au ch
das G erät vo r dem Anschl ießen a usges chaltet si nd.
Sch ließe n Sie die AV-Ka bel (ni cht mit gelie fert) ü ber die
-Bu chse de s Fernsehers an d as Heim kino-
Sou ndsys tem ode r digitale H iFi-Anlage us w. an.
Kom ponen ten
YPbPr
Hinweis 1: Nur *.jpg, *.mp3, *.txt, *.avi,*.mp4
Dateien, andere Dateien können möglicherweise
nicht abgespielt werden.
DIG ITALER AUD IOAUSG ANG (KOAX IAL)
KOAX IAL
KOAX IAL
Anschließen des Haier
Fernsehers
Einleitung
LCD- Fernse her mit L ED-H interg rundb eleuc htung D E-14
De
Page 52

Der S chach t Commo n Inter face (C I) dien t der
Aufnah me des Condi tiona l Access Moduls (CAM )
und d er Smar tCard f ür Bezahlsender. Bitt e
wen den Sie s ich an Ih ren Die nstan bieter für
wei tere Information en. Bit te beac hten Sie, dass
CI- Modul e und Sma rtCards von uns nic ht
gel iefer t werde n.
COMMON INTERFACE
Einleitung
Warn ung
Sch alten S ie den Fer nsehe r aus, be vor Sie d as
Mod ul in den C ommon I nter face Sc hacht
ein schie ben.
Set zen Sie z unäch st das CI -Modu l und dan n die
Sma rtCar d im CI-S chach t an der Se ite des
Fern seher s ein.
Sch alten S ie den Fer nsehe r ein, di e
nac hsteh ende Me ldung w ird ang ezeigt, wen n
das C I-Mod ul erk annt wi rd. Warte n Sie ein en
Mom ent ab, bis die Kar te akti vier t ist.
Wähl en Sie im M ENU den U nterp unkt Ka näle au s und
nav igieren mit ▲▼ zur Ausw ahl opt ion Com mon
Int erfa ce.
Det ailli erte I nforma tione n zur ben utzte n CI-
Kar te werd en ange zeigt .
Drü cken Si e OK, um da s Kart enmen ü
auf zuruf en. Find en Sie de taill ierte Anleitungen
in de r Bedie nungs anlei tung de s Modul s.
Nac h dem Abz iehen d es Modu ls wird d ie
nac hsteh ende Me ldung a ngeze igt.
CI-S chach t
CI-M odul
Smar tCar d
CAM gefunden
CAM entfernt
Kan al
Bil d
Aud io
Uhr
Konf igurati on
Spe rre
Aut om. Suc hlauf
Sig nal-I nform ation en
Sof tware U pdate (USB)
Man uelle r Suchl auf
Kan äle bea rbeit en
Kar tensc hnitt stell e CI
AuswählenOK
OK
MENU
Zu rück
DE- 15 LCD-Fe rnseh er mit LE D-Hi ntergr undbe leuch tung
Page 53

Fernbedienung
03 Fernbedienung
Fern seher e in- ode r aussc halte n.
(Ei n/Aus )
S.M ODE
Kla ngmod us wähl en.
P.MODE
Bil dmodu s wähle n.
0-9
Kan alnum mer ode r Kennw ort
ein geben .
Q.VI EW
Rüc kkehr zum vo rheri gen Ka nal.
SLE EP
Sle eptim er eins telle n.
VOL + /-
Lau tstär ke eins telle n.
(St umm)
Ton ein - oder au sscha lten.
AUDI O(I/I I)
MON O, Nicam Ster eo für ATV -Kana l
wäh len. Au diosp rache für DT V-
Kan al eins telle n.
SUB TITLE
Unte rtitel ei n- oder auss chalten .
Lis te der Favo riten kanä le öffn en.
Im Vid eotex tmodu s Seite h alten
(ni cht umb lätte rn).
SCR EEN
Bildformat umschalten.
Bild schirmme nü anzeige n. Im Videotex tmodus
Inde x-Seite öf fnen.
Navigatio n im Bil dschirmmenü.
Auswa hl bestäti gen.
OK
Im Video textmodus Misc hmodus auf rufen.
(Rücklauf )
(Vo rlauf )
Schn elle Vorwär ts- oder Rüc kwärts- Wiedergabe
im Mult imedia- un d Times hift-Mo dus (rote und
grüne Farbtas te im Vide otextmo dus)
Vide otext ei n- oder au sschal ten und TT X-Modu s
umschal ten.
SOU RCE
Liste der Eing angsquellen anzeige n.
Keine Funktion.
P
Kana lwahl.
Anzeige von Ka nalinfor matione n.
Im Video textmodus verbo rgene
Info rmatione n anzeigen .
Kana lliste öff nen. Im Videot extmodu s
Schr iftgröße umscha lten.
3D WOR LD
Kein e Funkt ion.
Bild schirmme nü schließ en. Im Videote xtmodus
Text verb ergen.
16
17
18
19
20
21
22
23
24
25
26
Vorherige oder näch ste Datei wählen. (gelbe und
blau e Farbt aste im Videote xtmodus )
(vorherige)
(nä chste )
Mult imedia-Wi edergabe beenden, Times hift im
DTV- Modus been den.
GUI DE
Elek tronisch e Progr ammzeitschri ft im TV-Modus
anzeigen. I m V ideotextmodu s Unte rseite
aufr ufen.
(RE C)
Aktu elles Programm im DTV-Mod us aufzeichnen.
Wiede rgabe/Pause im Mul timedia-Modu s,
Times hift im DTV- Modus.
(Wiedergabe/
Pause)
Batte rien in die Fernbedienung einsetzen
1. Öffnen Sie das Batteriefach.
2. Setzen Sie 2 AAA 1,5-V-Batterien mit korrekter
Polarität ein, so wie im Batteriefach angezeigt.
3. Schließen Sie das Batteriefach wieder. Tauschen
Sie die Batterien aus, wenn die Reichweite der
Fernbedienung nachlässt.
Bitte beachten Sie:
1) Benutzen Sie Alkali-Batterien.
2) Bei längerer Nichtbenutzung oder wenn die
Batterien erschöpft sind, entnehmen Sie sie bitte
aus der Fernbedienung.
LCD- Fernse her mit L ED-H interg rundb eleuc htung D E-16
De
TasteBeschreibung
Page 54

INDEX
HOLD
REVEAL
VIDEOTEXT
Die Fa rbtas ten entsprechen den Far bmarkie runge n unten auf der Seite
und d ienen a ls Schn ellta sten zu m Aufrufen. Der farbig e Bereich blinkt,
wenn die Seite no ch nicht zur Verfügu ng steht.
Inhaltsverzeichn is aufr ufen (gewöhnlich Seite 100).
Mit dieser Taste halten Sie eine Seite, sie wird nicht umgeblättert.
Versteckte Informationen anzeigen oder verbergen (Spielauflösungen).
Videotext ist ein Informationssystem, das von einigen Sendern übertragen wird und wie eine
Zeitung aufgebaut ist. H ier haben Sie ebenfalls Untertitel für Hörgeschädigte
(Kabelnetzwerke, Satellitenkanäle usw.).
Fernbedienung
E
UNT ERCODE
Drü cken Si e die Taste und geben Sie den 4- stelligen Code zum Aufrufen
ein er Unterse ite ein .
MIX
Videotext und Fernsehbild werden überlager t. Mit erneutem
Tastendruck kehren Sie zur Textanzeige zurück.
EXIT
Videotext verbergen.
GRÖßE
Schriftgröße und Anzeige umschalten.
TEXT
SEITE WÄHLEN
Drücken Sie:
Sie haben folgende Funktion:
Mit 0 bis 9 und de n Navigationsta sten aufwä rts/abwärts rufen Sie die Seite
auf. Beispi el: Für Seite 120 g eben Si e 1-2-0 e in. Die N ummer w ird oben links
im Bi ld ange zeigt. Zum Aufrufen einer n euen Seite geben Sie die
ent sprechen de Numm er ein. I st die ge wählte Seite nich t vorhande n, so
läu ft die Seitenz ahl weiter.
Mit dieser Taste rufen S ie den Videot ext auf oder Sie verlassen i hn. Ein e
Lis te mit Me nüpun kten wird an gezeigt. J ede Seite hat eine 3-stellige
Num mer.
UNTERSEITEN DIREKT
AUFRUFEN
DE- 17 LCD-Fe rnseh er mit LE D-Hi ntergr undbe leuch tung
Page 55

BEDIENUNGSHINWEISE
04 BEDIENUNGSHINWEISE
Beim ersten Einschalten des Fernsehers oder nach der
Rückstellung zu den Werkseinstellungen wird das M enü zur
Erstinstallation angezeigt.
Installation
1)Drücken Sie ▼▲ zur Navigation des Menüs und ◄►
zum Ändern der Einstellungen. Wählen Sie die gewünschte
Sprache und den anzuzeigenden Modus Zu hause/Geschäft.
2). Drücken Sie ◄► zur Auswahl von Antenne/Kabel für
DVB-T/DVB-C.
3).Kanal suche beginnt. Dies kann bis zu
dauern. In der Anzeige sehen Sie den Fortschritt der Suche
und die Anzahl der gefundenen Kanäle.
4).Zum Überspringen der DTV-Kanalsuche drücken Sie
MENU. Damit gelangen Sie direkt zur ATV-Kanalsuche.
5).Nachdem die Suche abgeschlossen ist, werden die
Kanäle in einer vorgegebenen R eihenfolge angeordnet.
Wenn Sie Kanäle überspringen möchten, ändern Sie die
voreingestellte Reihenfolge oder nennen Sie die Kanäle
um, wählen Sie Programme bearbeiten im Kanalmenü aus.
einige Minuten
1. 1) Automatische Kanalsuche (DVB-T)
1. KANALMENÜ
1). Drücken Sie MENU und dann ▼▲ zur Auswahl des Menüs
KANAL, dann drücken Sie OK oder die Pfeiltaste rechts.
2). Selektieren Sie mit ▼▲ den automatischen Suchlauf,
dann drücken Sie OK.
DTV Digitalfernsehen
ATV Analogfernsehen
Haben Sie sich für DVB-C entschieden, so wählen Sie bitte
zwischen einem vollständigen Kanalsuchlauf oder einer
Schnellsuche.
Darüber hinaus können Sie entscheiden, ob die Suche
DTV+ATV einschließt oder nur DTV oder nur ATV.
Hinweis
Hinweis
Ers teinr ichtu ng
Men ü-Spr ache De utsch
Mod usein stell ung Zuh ause- Modus
Lan d Deuts chlan d
Sta rten
Aut om. Suc hlauf D TV+ATV
Ant ennen art Air
Ers teinr ichtu ng
Men ü-Spr ache De utsch
Mod usein stell ung Zuh ause- Modus
Lan d Deuts chlan d
Sta rten
Aut om. Suc hlauf D TV+ATV
Ant ennen art Kab el
Kab el Schn ell
Kan al
Bil d
Aud io
Uhr
Konf igurati on
Spe rre
Aut om. Suc hlauf
Sig nal-I nform ation en
Sof tware U pdate (USB)
Man uelle r Suchl auf
Kan äle bea rbeit en
Kar tensc hnitt stell e CI
HOM E- und Sh op-Modus
Bei m erste n Einsc halten des G eräts w ird das
Ers teins tellungs menü an gezeigt. N ach dem E inste llen de r
Bil dschi rmspr ache wä hlen Si e zwischen „Sh op-Modu s“ und
„Ho me-M odus“. Wird das Einstell ungsm enü ang ezeigt und
„Ho me-M odus“ i st mark iert, so dr ücken S ie◄► zum
Ein stell en und „OK“ zu m Aufru fen des Menü s.
Sel ect the usage mo de?
sho p mode is for sh op usag e only.
Sho p-Dem o
Privatn utzung
Bei Ausw ahl von „Sho p-Modus “ wird das folgende
Men ü angez eigt.
Are you sure to chan ge to
Sho p mode?
OK
Abb reche n
Wähl en Sie „OK“, um das nächst e Menü au fzuru fen.
Home mode is the most energy mode.
OK
Abb reche n
Contin ue?
Wähl en Sie „Abbrechen “, um in das Ers teinstellun gsmen ü
zur ückzu kehren; „Home-M odus“ bleibt m arkie rt. Mi t
Auswah l gelan gen Sie i n das näc hste Me nü, hier wäh len
Sie d as Land .
LCD- Fernse her mit L ED-H interg rundb eleuc htung D E-18
De
AuswählenOK
OK
MENU
Zu rück
Page 56

3). Im Kanalmenü können Sie den Empfangstuner
(Antenna Type) mittels◄►auswählen. Wählen Sie für
Antennenempfang DVB-T (Air).
1.2 ) Automatische Kanalsuche (DVB-C)
3). Drücken Sie ▼ und dann ◄►▼▲ zur Auswahl Ihres
Landes.
4).Drücken Sie ◄► zur Auswahl Ihres Landes.
5).Drücken Sie ◄► zur Auswahl des Tunermodus: ATV /
DTV / DTV + ATV. Drücken Sie
▼ um Suchlauf zu starten.
6).Kanalsuche beginnt. Dies kann bis zu
dauern. In der Anzeige sehen Sie den Fortschritt der Suche
und die Anzahl der gefundenen Kanäle.
7).Zum Überspringen der DTV-Kanalsuche drücken Sie
MENU. Damit gelangen Sie direkt zur ATV-Kanalsuche.
Wiederholen Sie den obigen Schritt, wenn Sie auch die
ATV-Kanalsuche überspringen möchten. Sie werden beim
nächsten Einschalten an die Installation erinner t, falls
noch kein Kanal eingestellt ist.
8).Nachdem der Suchlauf abgeschlossen ist, werden die
Kanäle in einer vorgegebenen Reihenfolge angeordnet.
Wenn Sie Kanäle überspringen möchten, ändern Sie die
voreingestellte Reihenfolge oder nennen Sie die Kanäle
um, wählen Sie Programme bearbeiten im Kanal menü aus.
einige Minuten
4). Drücken Sie ◄► zur Auswahl von ATV / DT V / DTV +
ATV.
6).Kanalsuchebeginnt. Dies kann bis zu
dauern. In der Anzeige sehen Sie den Fortschritt der Suche
und die Anzahl der gefundenen Kanäle.
7).Zum Überspringen der DTV-Kanalsuche drücken Sie
MENU. Damit gelangen Sie direkt zur ATV-Kanalsuche.
Wiederholen Sie den obigen Schritt, wenn Sie auch die
ATV-Kanalsuche überspringen möchten. Sie werden beim
nächsten Einschalten an die Installation erinner t, falls noch
kein Kanal eingestellt ist.
8).Nachdem die Suche abgeschlossen ist, werden die
Kanäle in einer vorgegebenen Reihenfolge angeordnet.
Wenn Sie Kanäle überspringen möchten, ändern Sie die
voreingestellte Reihenfolge oder nennen Sie die Kanäle
um, wählen Sie Programme bearbeiten aus dem Kanal
menü aus.
einige Minuten
BEDIENUNGSHINWEISE
1).Drücken Sie MENU und verwenden Sie ▼▲ zur
Selektierung des Menü punkts Kanal (Channel), dann
drücken Sie OK.
2).Selektieren Sie mit ▼▲ den automatischen Suchlauf,
dann drücken Sie OK. Wählen Sie als Empfangstuner
(Antenna Type) Kabel (DVB- C / Cable).
Kan al
Bil d
Aud io
Uhr
Konf igurati on
Spe rre
Ant ennen art Kab el
Lan d Deuts chlan d
Mod us DTV+ ATV
Sta rten
Kan al
Bil d
Aud io
Uhr
Konf igurati on
Spe rre
Sch nell
Voll bild
Erw eiter t
Kan al
Bil d
Aud io
Uhr
Konf igurati on
Spe rre
Ant ennen art Air
Lan d Deuts chlan d
Mod us DTV+ ATV
Sta rten
Kan al
Bil d
Aud io
Uhr
Konf igurati on
Spe rre
ÜbersichtBee nden
Suc he läuf t Ch12
Dig itale K anäle g efund en
DTV: 3
Rad io: 0
Dat en: 0
Ana loge Ka näle ge funde n: 0
5). Wählen Sie Start, um das nachstehende Menü aufzurufen,
hier wählen Sie den Suchmodus.
DE- 19 LCD-Fe rnseh er mit LE D-Hi ntergr undbe leuch tung
AuswählenOK
OK
MENU
Zu rück
MENUEXIT
AuswählenOK
OK
MENU
Zu rück
AuswählenOK
OK
MENU
Zu rück
Page 57

2. 1 )DTV Manu elle Ka nalsu che (DVB-T )
Alle Kanäle inklusive ATV, DTV und Radio können
gleichzeitig durchsucht werden, wenn DTV+ATV
selektiert wurde.
Alle bereits gespeicherten Programmplätze und ihre
Reihenfolge gehen nach der automatischen Suche verloren.
Der erste DTV-K anal wird angezeigt.
2). Selektieren Sie mittels ▼▲ den DTV Manuellen
Kanalsuchlauf und drücken dann OK. Wählen Sie Antenne (Air)
in Auto Scan, um das DVB-T Menü für die manuelle K analsuche
anzuzeigen.
4). Drücken Sie die Taste MENU, um zum Hauptmenü
zurückzukehren.
5). Drücken Sie die Taste EXIT, um das Menü zu verlassen.
2. 2 ) DT V Manuelle Kan alsuc he (DVB -C)
1). Drücken Sie MENU und wählen mittels ▼▲ den
Menüpunkt Kanal aus. Drücken Sie sodann OK.
3). Der DT V Bildschirm für die manuelle Suche wird
angezeigt.
Drücken Sie ◄► zur Auswahl des gewünschten
UHF-K anals oder drücken Sie OK zur Eingabe einer anderen
Kanalnummer. Wählen Sie Start, um mit der Kanalsuche zu
beginnen. Wenn das Signal gefunden wurde, wird das
Bild und die Signalstärke auf dem Bildschirm angezeigt.
1). Selek tieren Sie im ME NU mittels ▼▲ den Menüpun kt
Kan al (CHANNEL) . Drücke n Sie sodann OK. Wählen S ie
Kab el (Cable) in Aut o scan, um das DVB -C Menü fü r die
manuelle Kan alsuch e anzuzeigen.
2).Das ma nuelle E instellungsme nü DVB-C wird angezeigt.
Drücken Sie ▼▲ zu r Auswahl von (Frequenz/ Symbol)
ks/s/QAM-Typ, drück en Sie OK zur Eingabe vo n Frequenz
und Sy mbol, drücken Sie◀▶zum Umsch alten des QAM-
Typs, d rücken Sie Sta rt, um mit der Ka nalsuc he zu
beginne n. Wenn das Signal e ingeregelt wurde, werd en
das Bild un d die Signalst ärke auf dem Bildsc hirm
angezei gt.
3).Drücken Sie die Taste MENU, um zum Hauptmenü
zurückzukehren.
4).Drücken Sie die Taste EXIT, um das Menü zu
verlassen.
3) ATV Manuelle Kanalsuche
Stellen Sie das Tonsystem zur Suche nach Analogk anälen
ein, dann nehmen Sie die Feinabstimmung vor und
speichern Sie den gewählten Kanal.
1.Drücken Sie die rote Videotexttaste zum Speichern
eines manuell gesuchten Kanals.
2.Sofern Sie den Kanal auf einer Kanalnummer
speichern wollen, die bereits belegt ist, so
überschreiben Sie durch Drücken der roten Taste,
den vorhandenen Kanal.
4). Kanal bearbeiten
Drücken Sie ▲ oder ▼ zur Auswahl von Kanäle bearbeiten
im Menüpunkt K anal. Dann drücken Sie OK, um das
Untermenü aufzurufen. Hier wählen Sie den zu
bearbeitenden Kanal.
Hinweis
Hinweis
BEDIENUNGSHINWEISE
Kan al
Bil d
Aud io
Uhr
Konf igurati on
Spe rre
Fre quenz 4 74000 K
Sta rten
Sym bolra te 6875K
Mod ulato n Aut o
Spe icher n in 1
Sys tem BG
Str om CH1
Suc he
Fre quenz 4 4.25 MH z
Fei neins tellu ngen
Spei chern
ATV Manuelle Sendersuche
Kan al
Bil d
Aud io
Uhr
Konf igurati on
Spe rre
Dig itale r Suchl auf Ch5
Sta rten
Stä rke 54
LCD- Fernse her mit L ED-H interg rundb eleuc htung D E-20
De
AuswählenOK
OK
MENU
Zu rück
AuswählenOK
OK
MENU
Zu rück
Page 58

12
abc3def
4
ghi
5
jkl
6
mno
7
pqrs
8
tuv9wxyz
5). Comm on Interface
Das Menü zeigt Informationen der CI-Karte an.
Das zweite Menü ist das Bildmenü (PICTURE). H ier stellen
Sie das Bild ein, beispielsweise Kontrast, Helligkeit usw.
Drücken Sie ▼▲ zur Auswahl und zum Einstellen.
◀▶
2. Bi ldmen ü
1).Wählen Sie eine der Farbtemperaturen normal, warm,
kühl.
2).PC-Einstellung steht Ihnen nur im PC-Modus zur
Verfügung; die horizontale Position, vertikale Position,
Größe und Phase können eingestellt werden.
3.Tonmenü
Das dritte Menü betrifft den Ton.
Hier stellen Sie die Klangeffekte wie Höhen, Bässe, Balance
usw. ein.
Drücken Sie ▼▲ zur Auswahl und zum Einstellen.◀▶
Lösche n: Drücken Sie die rote Taste, um den markierten
Kanal zu löschen.
ÜBERSPRINGEN: Drücken Sie die gelbe Taste zur Auswahl
der Funktion, das SKIP-Symbol wird neben dem Kanal
angezeigt und er wird in der Kanalsuche übersprungen.
VERSCHIEBEN: Drücken Sie die grüne Taste, um den
markierten Kanal zu verschieben. Neben der Kanalnummer
wird das entsprechende Symbol angezeigt. Drücken Sie
nun ▼/▲ zur Wahl einer neuen Position und bestätigen Sie
mit der grünen Taste.
Umbenennen (N ur AT V) :Drücken Sie die blaue Taste, um
den Kanal umzubenennen. Mit den Zifferntasten geben Sie
den neuen Namen ein, dann drücken Sie OK zur
Bestätigung (benutzen Sie die Zifferntasten entsprechend
nachstehender Tabelle).
FAV: Drücken Sie FAV (anstatt einer Farbtaste), um Ihre
Favoritenkanäle einzustellen (zum Aufrufen der
Favoritenkanäle verlassen Sie die Kanalbearbeitung und
drücken dann FAV).
6). S ignal informat ionen ( nur DTV )
Drücken Sie ▼ / ▲ zur Auswahl der Signalinformationen
im Menü K anal. Dann drücken Sie OK zur Anzeige der
entsprechenden Informationen zum aktuellen Kanal.
7). S oftwareaktualisierun g (USB)
Drücken Sie ▼ oder ▲ zur Auswahl von
Softwareaktualisierung (USB) im M enü Kanal.
Dann drücken Sie OK zur Aktualisierung der Software über
USB. Folgen Sie den Anleitungen zur Aktualisierung der
Software auf dem Bildschirm. Bitte beachten Sie: Wir
empfehlen, eine Rücksetzung zu den Werkseinstellungen
durchzuführen (siehe Restore Factory Default im
Einstellungsmenü), damit gewährleistet ist, dass die
Aktualisierung erfolgreich verläuft.
1.Auto Volume (automatische Lautstärkeregelung) steht
Ihnen nur zur Verfügung, wenn die Lautstär ke des
Eingangssignals zu hoch oder das Signal verzerrt ist.
2.Nur Tonausgabe: Stellen Sie die Option "Ein" um den
Fernsehbildschirm auszuschalten, und nur den Ton zu
hören.
Hinweis
Hinweis
BEDIENUNGSHINWEISE
001 The HI TS
003 U KTV Br’tl deas
004 f t h
005 I deal World
006 C olour bars1 00
001 K iss
002 S mash Hi ts!
003 K erran g!
002 TMF
Lösc hen
Pro gramm bearbeiten
DTV
DTV
DTV
DTV
DTV
DTV
Rad io
Rad io
Rad io
Ausw ählen
Über sprin gen
UmzubenennenFa vorit e
FAV
Kan al
Bil d
Aud io
Uhr
Konf igurati on
Spe rre
Bil dmodu s Stand ard
Mit tel
Sei tenve rhält nis 16: 9
Far btemp eratu r Norma l
Hin tergr undbe leuch tung
14
Hel ligke it 50
Kon trast 4 5
Sch ärfe 60
Far be 45
Far bton 0
DNR M ittel
Dyn amisc her Kon trast
Kan al
Bil d
Aud io
Uhr
Konf igurati on
Spe rre
Tonmo dus Sta ndard
Höh en 0
Tief en 0
Bal ance 0
Aut omati sche La utstä rkena npass ung Ein
Sur round -Soun d Aus
SPD IF Auto matis ch
Aud iobes chrei bung
Nur Au dio Aus
DE- 21 LCD-Fe rnseh er mit LE D-Hi ntergr undbe leuch tung
AuswählenOK
OK
MENU
Zu rück
AuswählenOK
OK
MENU
Zu rück
Page 59

5.Einstellungsmenü
Das fünfte Menü ist das Einstellungsmenü. Hier stellen Sie die
Menüsprache, Audiosprache und Unter titelsprache ein.
Auto- St andby ( 4 Std.)
1.We nn 4 Stun den an de m TV-Ge rät kei ne Ände runge n
vorgen ommen werden, d.h. es
wir d kein Ka nal gew echse lt oder d ie Laut stärk e
ver änder t, geht d as Gerä t autom atisc h in den Ru hemodus.
Ein I nform ation sfenster ersc heint auf de m
Bil dschi rm um Sie d arübe r in Kenn tnis zu s etzen , dass
nac h 150 Sek unden d as Fernsehger ät sich
aut omati sch abs chaltet Um d as
aut omati sche Ab schal ten zu verhinde rn, drü cken Si e
irg endei ne Tast e auf der Fernbed ienun g.
6.SPERRMENÜ
Das sechste Menü ist das Sperrmenü (LOCK ). Hier sperren
Sie das System, stellen Sie ein Passwort ein, blockieren Sie
einen K anal und stellen Sie den Jugendschutz ein. Nach
dem Einstellen der Systemsperre können Sie keine Kanäle
mehr suchen oder umschalten.
Mit Restore Fact ory Default (R ückst ellun g auf
Werk seins tellu ngen) w erden alle K anäle und das
Passwort ge lösch t.
Das S tanda rd-Kennwort l autet 0 000; so llten S ie das
Ken nwort e inmal v ergessen , so benu tzen Sie das
Sup er-Ke nnwor t: 9443 .
Kanalspe rre: Drück en Sie ▼▲ z ur Auswahl d es Kana ls,
dan n drück en Sie OK , um ihn zu sperren. Zu m
Ent sperr en des Ka nals na vigie ren Sie in das H auptm enü,
geb en Sie da s Kennwort ein, wählen S ie den Ka nal und
drü cken Si e dann er neut OK .
Alt ersfreig abe: Drück en
Sie◀ ▶zur Auswah l der Bewertungss tufe.
Timeshift Record Time: Maximale Timeshift-Aufnahmedauer
einstellen.
Auto Standby (4hr ): Gerät nach 4 Stunden Betrieb
automatisch in den Stand-by-M odus schalten.
HDMI CEC Control: CEC-Funktion ein- oder ausschalten.
OSD Time: Drücken Sie ◄ oder ► zur Auswahl der
Anzeigendauer des Bildschirmmenüs.
Rücksetzen auf Werkseinstellungen
Drücken Sie ▼ oder ▲ zur Auswahl von Rücksetzen auf
Werkseinstellungen (Restore Factory Default) und drücken
Sie OK, um die Erstinstallation durchzuführen. Nach der
Bestätigung werden alle Einstellungen gelöscht. Benutzen
Sie diese Funktion nur bei Problemen mit dem Fernseher.
Moduseinstellung: H ier stellen Sie den Home- oder Shop-
Modus ein.
2. Zu r Deakt ivier ung der a utoma tisch en Abschal tung
wäh len Sie i m Menü Ei nstel lunge n Auto standby (4 hr), de r
Fern seher kehrt da nach zu d em Menüpunkt z urück u nd
Auto sta ndby (4hr) O FF wird ange zeigt.
Das vierte Menü betrifft die Zeit. Hier stellen Sie die Uhr, die
Ein- und Ausschaltzeit, Sleep -Timer usw. ein. Drücken Sie
▼▲ zur Auswahl und OK zum Einstellen.
Zur Rückkehr zur automatischen Abschaltung nach 4
Stunden wiederholen Sie die obigen Schritte, außer der
Auswahl von (4 Stunden) mit der linken Pfeiltaste.
Im Menü PVR-Dateisystem stellen Sie das USB-Laufwerk für
die PVR-Aufnahme ein.
Automatische Ab schaltung
Liegt für 15 Minuten kein Eingangssignal vor, so schaltet
sich der Fernseher automatisch ab, vorrausgesetzt die
Funktion ist aktiviert. Die Uhrzeit wird automatisch
eingestellt, wenn der Fernseher einen DT V-Kanal empfängt.
Hinweis
BEDIENUNGSHINWEISE
PVR -Eins tellu ngen
Nac h links
Nac h recht s
Sel ektie ren
Bee nden
OK
EXIT
Datei-ManagerGeräteliste
Geplante Aufnahme
Kan al
Bil d
Aud io
Uhr
Konf igurati on
Spe rre
Pas swort e ingeb en ----
Akt ivier en Aus
Neu es Pass wort -- --
Kan alspe rre
Alt ersfr eigab e Keine
Kan al
Bil d
Aud io
Uhr
Konf igurati on
Spe rre
Sle ep-Tim er
Dat um 2010 /04/30
Zei t AN
Aut omati sche Abs chalt ung
Zei tzone
Aus
Zei t AUS
Ein
Kan al
Bil d
Aud io
Uhr
Konf igurati on
Spe rre
Men ü-Spr ache De utsch
Aud io-Sp rache n
Zuh ause- Modus
HDM I-CEC -Steu erung E in
Aus
Unt ertit el
Lan d
Deu tschl and
PVR D ateis ystem
Time Shift Au fnahm ezeit 1 S tunde
Aut o Stand by(4S td) AN (4 St unden )
Mod usein stell ung
Men ü-Abs chalt zeit
Wer ksein stell ungen w ieder herst ellen
4. Zeitmenü
LCD- Fernse her mit L ED-H interg rundb eleuc htung D E-22
De
AuswählenOK
OK
MENU
Zu rück
AuswählenOK
OK
MENU
Zu rück
AuswählenOK
OK
MENU
Zu rück
Page 60

Zur A nzeige der n ächsten Se ndung d rücke n Sie die
gel be Taste (Planung ). Zur Anzeige an derer K anäle
mar kiere n Sie mit ▲ oder ▼ den K anal, d ann drü cken
Sie ◀o der ▶ . Zum Ver lassen des EPG -Menü s drück en
Sie E PG oder E XIT. Drücke n Sie die Taste erneu t, um
zur ückzu kehre n.
Unten im EPG-Menü werden die Tastenfunktionen
angezeigt.
Aufnahme
Im EPG-Modus drücken Sie die rote Taste zur Auswahl des
Programms, das Sie aufnehmen möchten. Hiermit rufen Sie
die Aufnahmeplanung auf (siehe Abschnitt
PVR-Dateisystem).
Achten S ie darauf, da ss sein e kompa tible Fe stpla tte
ode r ein USB -Spei cherm edium a m USB-Port
ang eschl ossen i st. Ist I hr Spei cherg erät nicht k ompat ibel,
so we rden Sie aufgefordert , es zu for matie ren. Im
Ein stell ungsm enü rufen Sie im PV R-Dateis ystem-Me nü
die G eräte liste zum For matie ren Ihr es Gerä ts auf.
WARNUNG
Beim Formatieren des USB-Speichermediums werden alle
vorhandenen Dateien gelöscht.
Haben Sie eine zeitgesteuerte Aufnahme eingestellt, so
schaltet sich der Fernseher automatisch ein, um das
Programm aufzuzeichnen; nach der Aufnahme schaltet er
sich wieder automatisch aus. Während der Aufnahme
werden Bild und Ton unterdrückt. Drücken Sie STANDBY
zur Wiedergabe von Bild und Ton.
Drücken Sie die rote Taste, um den Programmzeitplan
anzuzeigen. Sie können die eingestellten Programme
ebenfalls löschen.
INFO (grüne Taste)
Im EPG-Menü drücken Sie die grüne Taste, um weitere
Informationen zum aktuellen Programm anzuzeigen.
8.PVR-Dateisystem (nur DT V)
Drü cken Si e Menu un d wähle n Sie das U nterm enü.
Drü cken Si e ▼ oder ▲ zu r Auswahl von PVR -Dateisyste m,
dan n drück en Sie OK z um Aufrufen des U ntermenü s und
mit ◄ o der ► scroll en Sie du rch die Opti onen.
Das EPG-Menü (Elektronische Fernseh zeitschrif t) gibt
Ihnen eine detaillierte Übersicht über die Sendungen.
Drücken Sie EPG zur Anzeige eines Pop-up -Menüs mit
Programminformationen des aktuellen Senders. Ihnen
stehen bis zu 7 Tagen Vorschau zur Verfügung. Zur Anzeige
des nächsten Tages markieren Sie mit ▲ oder ▼ das
Datum, dann drücken Sie ◄ oder ►, um durch die Tage zu
scrollen.
Hinweis
Hinweis
Reminder (blaue Taste)
Im EPG-Menü drücken Sie die BLAUE Taste, um die
Programmerinnerung einzustellen. Das nachstehende
Erinnerungsmenü wird angezeigt und mit ◄ oder ►
stellen Sie die Erinnerung ein. Die Erinnerung kann einmal,
täglich oder wöchentlich eingestellt werden.
7. EPG-Menü (Elektronische Fernsehzeitschrift)
BEDIENUNGSHINWEISE
Pro gramm führe r
Aufnahme
Erin nerun g
001
Nin e Dig ital
01: 00-02 : NINE MORNING NEWS
-03:00 HE ELLEN DEGENERES S...
- HE VIEW
DAYS OF OUR LIVES
NTERTAINMENT TONIGHT
AGICAL TALES
HE SHAK
INE AFTERNOON NEWS
00
02: 00T
03: 00 0 4:00T
04:00 -05:00
05:00 -05:30E
05: 30-0 6:00M
06:00 -06:30T
06:30-0 7:00N
Fre quenz
Kan al
Min ute
Stu nde
Mon at
Dat um
Erinnerung
Aus
The H ITS
0
17
Nov
19
17:03 1 9/11/2 004
OK
Termin progr ammli ste
Pro gramm führe r
Aufnahme
Termin progr amme
Erin nerun g
201 0/04/ 29 02:1 9
001 N ine Dig ital NI NE MORN ING NEW S
002 N ine Dig ital NIN E MORNI NG NEWS
003 G O! TMZ
...
Information
Dienst
DE- 23 LCD-Fe rnseh er mit LE D-Hi ntergr undbe leuch tung
Page 61

Sch edule d Recor d: Hier s telle n Sie die Aufn ahmel iste ein.
Sie k önnen d ie eing estel lten Pro gramm e ebenf alls
lös chen.
Im Un terme nü stel len Sie d ie Häuf igkei t der Aufnah me
auf E inmal, Täglich, Wöc hentl ich, Wochentag s oder AUS e in.
Programm aufzeichnen :
Zur Aufn ahme de s Progra mms, das Sie g erade s ehen,
drü cken Si e REC; da s rote REC-Symb ol wird ange zeigt.
Aufnah mezei t und verble ibend e Aufnahme zeit werden
im Me nü unte n angezeig t.
Aufnah me absp ielen :
Das a uf dem US B-Spe icher mediu m aufge zeichnet e
Programm wird im Ordner „USB Record“ gespeic hert.
Die Wi edergabe k ann im PV R-Dat eisys tem und im
Unt ermen ü Dateiman ager er folge n.
Dev ice List: Das Unterm enü zei gt die US B-
Spe icher medie n an, die a m Fernseher ang eschl ossen
sin d. Wählen S ie das en tspreche nde Ger ät, dan n
format ieren Sie es m it der roten Taste.
File Man ager: H ier werden alle a ufgezeichne ten
Programme ange zeigt.Dr ücken S ie für di e
Voll bilda nsich t die bla ue Taste auf der Fe rnbed ienun g.
1.D ie USB Sp eiche rgröße kann zwis chen 12 8MB und
500 GB lieg en, abe r für den p raktischen G ebrauch
wird eine Größe von 2GB bis 500GB empfohlen.
2.D as Video k ann ver pixeln, falls die Bitrate zu
nie drig ei ngestellt ist. Dies k ann aufgrund der
Benutzung eines USB-Verlängerungskabels
erfolgen, wenn Sie das Speichermedium ni cht
direkt am USB-Port des Fernsehers anschli eßen.
3.Der Großteil im Handel erhält lichen USB-
Spe icher medie n sind ko mpati bel, allerdings läßt
sic h hierfür keine Garantie geben. Empfohlen sind
vor allem Hi-Speed Speichermedien mit hohen
Transferraten.
BEDIENUNGSHINWEISE
PVR -Eins tellu ngen
Nac h links
Nac h recht s
Aus wähle n
Bee nden
OK
EXIT
Datei-ManagerGeräteliste
Geplante Aufnahme
Dat ei-Ma nager
Hot key
Nach o ben
Nach u nten
Ausw ählen
Zurü ck
Been den
EXIT
OK
EXIT
MENU
Gepl ante Auf nahme
G
e
p
p
p
p
p
a
Stan dby
Wied ergab e
Ansi cht
EXIT
Eins l ösche n
Alle l ösche n
I
Funktion
Informationen zu der aktuellen Abspieldatei.
Kanalname
Programmname
Aufnahmezeit
Gesamtzeit
Beschreibung
BBC ONE
Olympics 2012
2012/08/09 11:44
00:08:06
Matt Baker and Clare Balding
present coverage of the eager...
UKTV Br’tldeas_Good Food Bites_20041119_161021.ts
BBC ONE_Olympics 2012_20120808_114427.ts
UKTV Br’tldeas_Good Food Bites_20041119_162019.ts
Gep lante Au fnahm e- Grup pe 1
Stat us-Ei nstel lung
Eins tellu ng wird n icht ve rwend et
Freq uenz Ei nmal
Kana l 6 Colou rbars 1 00
Star tzeit 2 004-1 2-25
18:1 7
Endz eit 200 4-12- 25
18:4 7
Hot key
Nach o ben
Nach u nten
Ausw ählen
Zurü ck
Been den
EXIT
OK
EXIT
MENU
Eins tellu ngen
Eins tellu ngen
Ger äteli ste
Gerät
Verfügbarer Speicherplatz
Dateisystem
sda1
192 MB
FAT32
Funktion
Form at
Hot key
Nach o ben
Nach u nten
Ausw ählen
Zurü ck
Been den
EXITE
X
T
OK
EXIT
MENU
Gep lante P rogra mmauf nahme n
Funktion
Gru ppe
Fre quenz
Kan al
1
2
3
4
5
6
7
8
9
10
11
12
13
14
15
16
0
Col ourba rs100
Dauer
Dat um
St art zei t
2004.12.25
18:17
00
:
30
Einm al
Aus
Aus
Aus
Aus
Aus
Aus
Aus
Aus
Aus
Aus
Aus
Aus
Aus
Aus
Aus
Gepl ante Auf nahme
e
a
Stan dby
Hot key
Nach o ben
Nach u nten
Ausw ählen
Zurü ck
Been den
EXIT
X
T
OK
EXIT
MENU
Eins l ösche n
Alle l ösche n
Aufnahme läuft
Aufn ahmez eit : 00 : 00 : 4 0
Verfü gbare Z eit : 25 Mi nute
Vorb ereit ung der Aufnahme:
Zum A nzeigen de s Menüs d rücke n Sie ern eut REC . Zum
Bee nden de r Aufnahme d rücke n Sie Sto pp. Alte rnati v
rufen Si e das Men ü Media P layer zur An zeige
aufgez eichn eter Pro gramme im Filmmodu s auf.
LCD- Fernse her mit L ED-H interg rundb eleuc htung D E-24
De
Page 62

Aufnah medatei wiede rgeben
Der H aier- Fernseher zeichn et das Progra mm im Format
*.t s auf dem U SB-Sp eiche rmedi um auf. Andere
Fernseher, PCs, Laptops, DVD -Player od er sons tige
Ger äte, wel che die * .ts Dat ei nich t unterstü tzen, könn en
die D atei ni cht wiedergeb en. „ts “ ist das Format von HD-
Fernseher n. Mit de r richt igen Soft ware könne n Sie „ts “
Dat eien au f einem Compute r oder La ptop wiede rgeben.
Im Interne t oder be i einem I T-Anbieter fin den Sie
wei tere Informat ionen z u geeigneter So ftware.
Achtun g: Haie r übern immt ke ine Veran twortun g für
her untergel adene S oftware; diese ka nn Viren und
Sch adpro gramme ent halte n. Die Be nutzu ng erfo lgt auf
eig ene Gef ahr und k ann die Kopier schut zrechte
ver letzen.
Für CI + Kanäle ha ben Sie k eine Aufnahme funkt ion.
Ihr S peich erger ät muss z ur Aufnahm e anges chlos sen
und k ompat ibel se in. Ist I hr Spei chergerä t nicht
kom patib el, so werden Sie aufgefordert, es zu
format ieren. Rufen Si e das PVR-Da teisystem-M enü auf
und w ählen S ie in der G erätelis te Ihr zu form atierend es
Ger ät.
Währe nd der Au fnahm e steht I hnen nu r die
Sto ppfun ktion z ur Verfü gung.
Hinweis
BEDIENUNGSHINWEISE
9.Time Shift
Drü cken Si e die , um das a ktuel le Progr amm
zu un terbrech en und di e Timeshift -Funkt ion zu ak tivie ren.
Das n achst ehend e Menü wi rd angezei gt. Nac h einig en
Sek unden w ird das M enü wie der aut omati sch
aus geble ndet.
▶
00:0 0:00
Verfü gbare Z eit
Wähl en Sie di e Optio n▶und drü cken Si e OK, um die
Aufnah me fort zuset zen; ei n weiße s Wiedergabesy mbol
wir d rechts im Bild zu m Hinweis au f die lau fende
Timesh ift-Funktion ang ezeig t.
Wenn d as Menü ausgeb lende t wird, drücken S ie▶ ,
um da s Menü wi eder an zuzei gen. Zu m Beend en der
Timesh ift-Funktio n drück en Sie Stopp o der wählen S ie
mit d em Cursor „Stop “ im Menü, dann folgen Sie den
Anl eitun gen im Pop-u p-Menü.
Ihr S peich erger ät muss z ur Aufnahm e anges chlos sen
und k ompat ibel se in. Ist I hr Spei cherg erät nicht k ompat ibel,
so we rden Sie aufgefordert , es zu for matie ren. Im
Ein stell ungsm enü rufen Sie das P VR-Da teisystem-
Unt ermen ü auf; hier w ählen Sie Ih r zu form atierend es
Ger ät in der G erätelis te.
All e Funkti onen ( Wiede rgabe, schnel ler Rüc klauf,
sch nelle r Vorl auf, Pau se und Stopp ) stehen nur b ei
akt ivier tem Menü zu r Verfüg ung.
Für CI + Kanäle ha ben Sie k eine Aufnahme funkt ion.
00:0 0:05
Wiede rgabePauseF BStoppFF
00:0 0:00/ 04:13 :20
DE- 25 LCD-Fe rnseh er mit LE D-Hi ntergr undbe leuch tung
Page 63

Drü cken Si e Sourc e und wählen S ie „USB “ in der Li ste der Q uelle n, dann d rücke n Sie OK zu m Aufrufen des US B-Men üs.
10. USB-Player
Das U SB-Sp eiche rmedi um muss a m Fernseher ang eschl ossen s ein. Wählen Sie zwische n Foto, Musik , und Text.
Wähl en Sie di e Art des Med iums mi t ◄►, dann dr ücken S ie OK zum Aufr ufen des Auswahlme nüs.
Film
Drü cken Si e ▼ / ▲ zur Auswah l des Ordner s und dan n OK zum Aufru fen der Dateiliste. Drü cken Si e die rote Taste, um zur
Med ienau swahl z urück zukeh ren.
Wähl en Sie di e Mediendatei mit ◄► oder ▼▲, die Vorsc hau wird ang ezeigt. Dr ücken S ie ► zur Wiedergab e als Vollb ild.
Bei Wi edergabe e iner Fil mdate i drück en Sie ▼ zu r Anzei ge der Steue relemente.
All gemei ne Funkt ionen
Währ end der A nsich t von Fotos drü cken Si e ▼ zur Anzeig e der Steuerele mente unten im Bi ld.
Drücken Sie Wiedergabe/Pause, um die Wiedergabe zu unterbrechen oder fortzusetzen.
Drücken Sie die linke Pfeiltaste, um das vorherige Foto anzuzeigen.
Drücken Sie die rechte Pfeiltaste, um das nächste Foto anzuzeigen.
Drücken Sie die linke/rechte Pfeiltaste zur Auswahl der Funktion, dann drücken Sie OK,
um die Wiedergabe zu beenden und in das vorherige Menü zurückzukehren.
Drü cken Si e die Pfeilt asten „auf wärts/a bwärt s“, um da s Foto zu dr ehen.
Drücken Sie die blaue Taste, um im Schnellmenü Intervallzeit, Wiederholung,
Diashoweffekte und Hintergrundmusik (muss zuerst eingestellt werden) einzustellen.
Wiedergabe/
Pause
Vorherige
Datei
Nächste
Datei
Stopp
Dre hen
Schnellmenü
FOTO
BEDIENUNGSHINWEISE
FOTOMusikTE XTFilm
Haie r Innov ation L ife
Usb2.0Auswäh len
Auswah l
OK
FOT O
USB 1/108 0
Ausw ahl
OK
Eing abeBee nden
Schn ellme nü
Medi a Pad
LCD- Fernse her mit L ED-H interg rundb eleuc htung D E-26
De
Exit
Page 64

MUSIK
Während der Musikwiedergabe drücken Sie ▼ zur Anzeige der Steuerelemente unten im Bild.
Allgemeine Funktionen
Die anderen Funktionen entsprechen den Beschreibungen im Abschnitt FOTO. Siehe Einzelheiten im
Abschnitt FOTO.
Die Funktionen entsprechen den Beschreibungen im Abschnitt FOTO. Siehe Einzelheiten im Abschnitt FOTO.
Allgemeine Funktionen
Film
TEXT
Drücken Sie
▼/▲ zur Auswahl der vorherigen/nächsten Seite. Mit den Zifferntasten und OK geben Sie die Seite
direkt ein.
Rücklauf: Drücken Sie die linke/rechte Pfeiltaste zur Auswahl der Funktion, dann drücken Sie OK, um
schnell zurückzuspulen. Drücken Sie die Wiedergabetaste, um die Normalwiedergabe fortzusetzen.
Schneller Vorlauf: Drücken Sie die linke/rechte Pfeiltaste zur Auswahl der Funktion, dann drücken Sie
OK, um schnell vorzuspulen. Drücken Sie die Wiedergabetaste, um zur Normalwiedergabe
zurückzukehren.
Hintergrundmusik: Drücken Sie die linke/rechte Pfeiltaste zur Auswahl der Funktion, dann drücken
Sie OK, um die Musik ein- oder auszuschalten.
A-B Wiederholung: Drücken Sie die linke/rechte Pfeiltaste zur Auswahl der Funktion, dann drücken
Sie OK, um die Punkte A und B der Wiederholungsschleife einzustellen.
Vergrößern: Drücken Sie die linke/rechte Pfeiltaste zur Auswahl der Funktion, dann drücken Sie OK,
um das Bild zu vergrößern (ist das Dokument größer als 1920x1080, so ist die Funktion nicht
unterstützt).
Verkleinern: Drücken Sie die linke/rechte Pfeiltaste zur Auswahl der Funktion, dann drücken Sie OK,
um das Bild zu verkleinern (diese Funktion unterstützt bis zu 1920x1080 HD-Video).
Zeit wählen: Drücken Sie die linke/rechte Pfeiltaste zur Auswahl der Funktion, dann drücken Sie OK,
um einen Zeitpunkt in der Datei zur Wiedergabe zu wählen.
BEDIENUNGSHINWEISE
Nac hsteh ende Da teity pen kön nen von eine m USB-S peich ermed ium wie derge geben werden;
Foto
Ton
Video
Text
.jpg Dateien
.mp3
.avi,.mp4
.txt
DE- 27 LCD-Fe rnseh er mit LE D-Hi ntergr undbe leuch tung
Mus ik
.. 1/ 1
Ausw ahl
OK
Eing abeBee nden
Schn ellme nü
Medi a Pad
Titel:
Album :
Künst ler:
Track
Jahr: 2 010-0 9-30
1 / 2
10547 672
Wiede rgabe
00:00 :5300:00 :00
10547 672.m p3
14953 359.m p3
USB 1/mp3
Exit
Page 65

1)A llgem eine Fun ktion en Hote l-Mod us
11.HOTEL-MODUS
Drücken Sie ◄/►
AUS (off ) Hotel-Modus deaktivieren.
AN (on) Hotel-Mo dus aktivie ren.
2)M ax. Lau tstär ke (Max Vol ume)
Hier stellen Sie die Lautstärkenbegrenzung ein.
Drücken Sie ◄/► zur Auswahl zwi schen 0 und 100.
Standardwert: 100
3)L autst ärken sperre (Vol ume Def ault Lo ck)
Drücken Sie ◄/►, um die Lautstä rke einzustellen:
Off : Die Systemla utstärke wi rd nicht auf den
Standardwert eingestellt.
AC Ctrl: Die Systemlaut stärke wird nach dem
Ausschalten auf „Default volume“ einges tellt.
Die ursprüngliche Lautstärke ist der Standardwert,
wenn der Fernseh er eingesch altet wird. Dies gilt
nicht, wenn sic h der Fern seher im Stand-by-Modus
befindet.
AC/RC Ctrl: Die Systeml autstärke wird nach dem
Ausschalten auf „Default volume“ einges tellt.
Die ursprüngliche Lautstärke ist der Standardwert,
wenn der Fernseh er eingesch altet wird, auch aus
dem Stand-by-Modus.
Der Standardwert is t „Off“.
4)L autst ärken begrenzung (D efaul t Volu me)
Drücken Sie ◄/► zum Einstelle n der
Standardlautstärke im Ho tel-Modus. Der
Standardwe rt ist „20“.
5)Syste meins tellu ng (Syst em Power O n)
Drücken Sie ◄/► zur Auswahl des Verhaltens beim
Einschalten:
Standby: De r Fernseher schaltet sich stets in den
Stand-by-Modus, wenn er eingeschaltet wird.
On: Der Fer nseher schaltet sich stets ein, wenn er
eingeschaltet wird.
6)T V-Men ü Anzei ge (OSD Me nu Display )
7)
Ein -/Aussch alter -Sper re (Power K ey Lock)
8)Be dienf eld-S perre ( Key Lock )
9)Fe rnbed ienungs-Sperre (Remot e Contro l Lock)
10) Signa lquel len-S perre ( Source Lock)
Drücken Sie zunächst Source, dann geb en Sie mit
den Zifferntasten „1001“ zum Aufrufen des Hotel-
Modus ein.
Last Status: Der Fernseher sch altet sich im letzten
Modus ein („On“ oder „Standby“). Der Fernseher
schaltet sich im gleic hen Modus wie zu vor ein.
Der Standardwert is t „Standby “.
Drü cken Si e ◄/► zur Aktivieru ng/De aktiv ierun g des OSD -
Men üs.
On: D as Eins tellu ngsme nü wird auf de m Bilds chirm
ang ezeig t.
Off: Das Einstell ungsm enü wird nic ht auf de m Bilds chirm
ang ezeig t.
Der S tanda rdwer t ist „On“.
Bit te beac hten Sie: Is t das OSD -Menü deakti viert („O ff“) , so
drü cken Si e „S ource“ + „10 01“, um das Ho tel-M odusm enü
auf zurufen.
Drü cken Si e ◄/► zum Einstelle n der Spe rre für den Ei n-
/Aussc halte r. Wähl en Sie:
Off: Die Fun ktion i st deak tivie rt.
Key pad: De r Ein-/ Aussc halter auf d em Gerä t ist ges perrt.
RC: D er Ein- /Auss chalter au f der Fernbedie nung is t
ges perrt.
Bot h: Ein- /Ausscha lter auf dem G erät un d auf der
Fernbedie nung si nd gesp errt.
Der S tanda rdwer t ist „Off “.
Ist a ls „Tastensperre “
„Be ide“ ge wählt , so wird zunä chst „Syst em eins chalten“
zu „Ein“ aktualisi ert.
Drü cken Si e ◄/► zur Aktivieru ng/De aktiv ierun g der
Tastensper re für Geräteta sten.
On: D as Bedi enfel d ist ges perrt.
Off: Das Bedie nfeld ist ni cht ges perrt
Der S tanda rdwer t ist „Off “.
Drü cken Si e ◄/► zur Aktivieru ng/De aktiv ierun g der
Tastensper re der Fer nbedi enung.
On: D ie Tasten der Fer nbedi enung s ind ges perrt.
Off: Die Taste n der Fernbedienun g sind ni cht ges perrt.
Der S tanda rdwer t ist „Off “.
Spe rre der Eing angsq uelle e ntsprech end der Ausw ahl
„De fault S ource “. Die Optio nen sin d „ein“ u nd „aus “.
Sta ndardein stell ung ist „aus “. Ist al s Stand ardquell e „DT V“
ode r „AT V“ gewä hlt und d ie „ Quell enspe rre“ is t auf „ei n“
ein geste llt, so s tellt sich d er „Sta ndardkanal“ nac h dem
ern euten E insch alten auf de n einge stell ten Kan al zurü ck.
BEDIENUNGSHINWEISE
Hotel-Modus
Aus
100
AC/RC
20
Standby
Ein
Aus
Aus
Aus
Aus
Aktiver Hotel-Modus
Lautstärken-Sperre
Max. Lautstärke
Voreingestellte Lautstärke
System-Einschaltung
Benutzermenü-Sperre
Ein-/Austasten-Sperre
Tastensperre
Fernbedienungs-Sperre
Eingangssignal-Sperre
AuswahlAnpassenBeenden
Wenn d ie Fernbedien ung ges perrt ist , könne n Sie Men u
und d en Zahl encod e 2580 au f der Fern bedie nung
ein geben , um die Sp erre au fzuhe ben.
Hinweis
LCD- Fernse her mit L ED-H interg rundb eleuc htung D E-28
De
MENU
Page 66

BEDIENUNGSHINWEISE
11) Stand ardquelle
Drü cken Si e ◄/► zur Ausw ahl der „Standardque lle“ na ch
dem E insch alten . Jede Ei ngang squel le kann g ewähl t
werden .Eing angsq uelle n:DTV /ATV/SCART/ YPbPr/PC/
HDM I1/HD MI2/AV/US B.
Sta ndardein stell ung ist „DTV“
12) Stand ardkanal
Ein stell en des St andardka nals na ch dem Ei nscha lten.
Die O ption s teht nu r zur Verf ügung, wenn als „Sta ndard quell e“
„DT V/ATV“ gew ählt is t.
13) Logo wählen
Ein stell en des Logos n ach dem E insch alten. Die O ption en
sin d:
„HS P Logo“: Der Fernseh er zeigt nac h dem Ein schal ten das
„HS P Logo“ an.
„Ho tel-Logo “: Der Fer nsehe r zeigt n ach dem E insch alten d as
vom U SB über tragene Lo go an.
„Ke ine“: D er Fernseher zeigt n ach dem E insch alten k ein
Logo an.
Sta ndardein stell ung ist „HSP L ogo“.
USB -über tragene s Logo
Sch ließe n Sie ein en USB- Stick am USB-Po rt des Fe rnseh ers
an.
Nac h dem Erk ennen d es USB- Geräts rufen Sie da s Media
Center auf.
Wähl en Sie „Foto“ und zeig en Sie da s aufzu nehme nde Bil d
an.
Drü cken Si e die „ge lbe Taste“ auf d er Fernb edien ung, um
das Logo a ufzun ehmen .
Das B ildforma t muss jp g/jpe g sein. D ie maxi male Größe d es
Bil des ist 1 28 KB.
14) Begrüßung
Ein stell en der „Begr üßung “ nach de m Einsc halte n.
Die O ption en sind : Aus/5 S ekund en/10 S ekund en/20
Sek unden .
Sta ndardein stell ung ist „Aus “
15) Begrüßung ak tuali sieren
Akt ualis ieren Sie di e „Begr üßung “ über ei n USB-G erät.
Dat ei-Sp ezifi katio nen:
Dat einam e: „hotel.txt“.
Enc oding : ANSI (H inweis: Datei format „Un icode“ ist n icht
kor rekt)
Sch riftzeiche n: 3 Zeilen, 3 0 Schri ftzei chen je Z eile.
USB -Klonen
Bit te beac hten Sie: Si e könne n diese Fu nktio n nur auf d em
gle ichen T V-Mod ell mit g leich er Soft ware-Ver sion be nutze n.
16) Backu p auf USB
Klo nen Sie A LLE TV- Einstell ungen a uf USB- Stick .
Zu de n TV-Einstell ungen g ehören: Ho tel-Logo, B egrüß ung,
Hot el-Mo dusei nstel lung, Bildsch irmme nüein stell ung und
Kanaldaten.
17) Wiederherstellun g von USB
Ste llen Si e die TV-Daten über US B-Sti ck wied er her.
Zu de n Daten gehö ren: Hotel-Logo, Begrüßung,
Hot el-Mo dusei nstel lung,
Bil dschi rmmen üeins tellu ng und Ka nalda ten.
18) Rücks tellung
Ste llen Si e alle Ei nstellun gen zu de n
Sta ndardwer ten im Ho tel-M odus zu rück.
19) Hotel -Modu s ausfü hren
Hot el-Mo dusei nstel lung du rchführen Hotel- Modus -
Bil dschi rmmen ü verla ssen.
DE- 29 LCD-Fe rnseh er mit LE D-Hi ntergr undbe leuch tung
Page 67

BildTon
verschneit ges tört
Ant ennen posit ion, -ausr ichtu ng
ode r -ansc hluss
Überprüfen
Störungen
ges tört
Ele ktronisc he Gerä te, Fahrzeug/
Mot orrad N eonli cht kön nen den
den E mpfan g stören
nor males Bild stummgeschaltet
Lau tstär ke (stu mmges chalt et oder
Audioa nschl üsse ni cht kor rekt)
kei n Bild
Kein Netzanschluss, Gerät ausgeschaltet,
Kontrast und Helligkeit/Lautstärke
einstellen.
Drücken Sie STANDBY auf der
Fernbedienung.
kei ne Farbe nor maler Ton Farbe im Bildm odus üb erprü fen
Bild verschwindet
nor maler Ton
ode r leise
Kanal neu ko nfigu rieren
kei ne Farbe
ges tört
Sch lecht es TV-Signal
nor maler Ton
Ant ennen posit ion, -ausr ichtu ng
ode r -ansc hluss
Problem
Schatten
nor maler Ton
Zoom-A nsich t änder n
Sie s ehen ei nen
sch warze n Balken
obe n und unt en.
Störungserkennung
05 Störungserkennung
stummgeschaltet
De
LCD- Fernse her mit L ED-H interg rundb eleuc htung D E-30
Page 68

Mei n Fernseher zeigt ni cht das B ild auf
mei nem Lap top/P C, wenn er
ein gesch altet i st.
Wenn S ie eine n VGA -Stec ker (bl aue 15- polig e Stecker an I hrem PC
ode r Lapto p) ange schlo ssen ha ben, is t es häuf ig erfo rderl ich, da ss Sie
an Ih rem PC/ Lapto p eine Ei nstellun g vorne hmen mü ssen, u m das Bil d
auf d em Fernsehbil dschi rm sehe n zu könn en. Lesen Si e ggf. in Ihrem
Han dbuch f ür Ihre n PC/La ptop nach. Fü r einig e Gerät e gelte n die
folgen den Tasten: F7 (Del l), F4 (H P / Samsu ng) ode r F5 (Toshiba) od er
pro bieren Sie d as glei chzeitig e Drück en von "Fn "-Taste un d "F"-Taste.
Ich h abe mei nen PC/ Lapto p an den
Fernseher a ngesc hloss en und em pfang e
ein B ild, ab er kein en Ton. Warum?
Das VG A-Kabel über trägt nur die Video- Bil dinforma tione n. Sie
müs sen ein s epara tes Kab el ansc hließ en, das m it dem
Kop fhöreran schlu ss (3,5 mm Klin ke) an Ihrem PC/Lap top und mit de r
3,5 m (PC Audio-IN) Buc hse an Ih rem Fern seher v erbun den ist . Sie
müs sen den " PC" aus wähle n, inde m Sie die S ource -Taste auf Ihr er
Fernbedie nung verwe nden. A ltern ativ sc hließ en Sie Ih ren PC/ Lapto p
mit e inem HD MI-Kabel an, wenn I hr PC/L aptop e inen HD MI-An schlu ss
bes itzt. H DMI übe rträgt sowohl Audio- a ls auch Video signa le.
und
Das B ild hat k eine au tomatisc he
Grö ßenan passu ng beim S ender wechsel.
Übe rprüf en Sie fü r alle Si gnalquel len ATV, DT V, SCART, HDMI 1 , 2 usw,
ob da s Fernsehbild -Seit enverh ältnis auf 'Auto' ein gestellt i st.. Um d as
Sei tenverhältn is (Auto, 4:3 o der 16: 9) einz ustel len, dr ücken S ie die
Taste Source auf Ih rer Fern bedie nung, b eginnend b ei ATV, und
wie derho len Sie d ie unte n besch riebe ne Eins tellunga ufg für alle
Sig nalqu ellen AT V, DT V, SCART, HDMI 1 u nd 2, da je de Eing angsq uelle
sep arat ge steuert wird. G ehen Sie vor wie folgt:
Drü cken Si e MENU au f Ihrer Fernbed ienun g und drü cken de n Pfeil nach
rec hts um zum Bil d-Unterm enü zu ge lange n.
Drü cken Si e den Pfeil na ch unten, um d en Menü punkt B ildforma t
aus zuwäh len.
Wähl en Sie Au to aus.
Drü cken Si e Ende.
Wieder holen S ie dies e Schri tte für a lle Sig nalqu ellen .
Ich h abe ger ade ein en DVD- Player bzw.
ein a nderes Ger ät an mei nen Fern seher
ang eschl ossen , und es fu nktio niert nicht.
Die s gilt fü r jedes G erät, dass S ie an Ihr en Fernseher ansch ließe n.
1.S chalt en Sie so wohl den Fern seher a ls auch d as externe Ger ät z.B.
DVD -Play er aus (z iehen S ie den Steck er aus de r Steckdos e / kein
Ber eitsc hafts modus ).
2.S chalt en Sie al le Gerä te aus, die an d er SCAR T-Buch se ange schlo ssen
sin d.
3.Trenn en Sie de n SCART- Steck er vom Fer nsehe r.
4.S tecke n Sie den Fe rnseh er-St ecker w ieder i n die Steckd ose und
sch alten S ie den Fer nsehe r ein.
5.S tecke n Sie den G eräte -Stec ker z.B. vom DVD- Player wie der in di e
Ste ckdos e und sch alten Sie da s Gerät e in.
6.Wä hlen Si e die Sig nalqu elle HD MI mitt els Fernbedie nung au s
(So urce) .
7.S tarten Sie die Wiede rgabe des Ge räts z. B. des DVD-P layer und prüfen
Sie, ob di e Filme ordnungsge mäß wie dergegeb en werden.
HIN WEIS: D ie SCAR T-Buch se ist ge genüb er dem HD MI-An schlu ss als
Sta ndard defi niert, daher i st es wic htig, dass alle ü ber SCA RT am
Fernseher ange schlo ssene n Geräte AUSGESCHALTET sind (nicht im
Ber eitsc hafts modus / S tecke r ziehe n).
Bit te beac hten Sie die sen Hin weis. Möglich e Ursac he des Problems
kann die Ent fernung/ erneu tes Anbrin gen des H DMI-S teckers se in
wäh rend de r fernseher im ei ngesc halte ten Zustand war.
Sch alten S ie Ihre n Fernseher imm er zunä chst au s und bri ngen Si e
nie mals ei n HDMI- Kabel im einge schal teten Zustand d es Ferns ehers a n
bzw. entfernen e s.
Sch alten S ie imme r alle Ge räte aus, wenn ein bel iebig es Digi talgerät
ent fernt oder a ngesc hloss en wird.
Fehlerbehebung
Störungserkennung
DE- 31 LCD-Fe rnseh er mit LE D-Hi ntergr undbe leuch tung
Page 69

Bil d zerle gt sich i n Pixel
Ein t ypisc hes Bei spiel f ür ein Em pfang sprob lem ste llt das A usein ander breche n von Bil dern (Pixilation) oder das E infri eren der
Bil der dar, m anchm al gibt e s Klick- o der qui etsch ende G eräusc he oder d er Ton fäll t aus ode r es gibt gar KEI NEN Em pfang. I hr
Bil d kann in Pixe l aufgru nd des di gital en Video signa lausf alls brechen. Die Si gnalau sfäll e könne n entwe der weg en der Probleme
mit s chwac hen Signalen (siehe TV-A ntenn en) auf trete n, oder w enn Sie per Ka bel mit e inem sc hwachen Ka bel-S ignal verbund en
sin d. Wenn das P roblem schw acher S ignal e auftr itt, ve rwend en Sie ei nen Vers tärke r, um das Si gnal zu ve rstär ken. Ei n Kabe l-
Techn iker k ann Ihn en bei de r Insta llati on eine s Inline- Verstä rkers o der Vorv erstä rkers h elfen . Dies wi rd Ihre Si gnals tärke s teige rn
und d as Pixel -Prob lem lös en.
Wenn S ie Ihr TV -Sign al über S atell it empf angen , prüfen Sie, o b sich Ihre Sc hüsse l nach st arkem Wind be wegt wu rde, oder ob das
Sig nal dur ch Bäum e block iert w urde. Bä ume kön nen ein P roblem veru rsach en, da si ch das TV -Sign al je nac hdem än dern ka nn, ob
ein B aum zwischen dem Sa tellit ensch üssel u nd dem Sa telli t ohne La ub oder d icht be laubt i st.
Fehl ende Ka näle
Vie lleicht stellen Sie fest , dass es K anäle f ehlen , oder da ss Sie di e Kanäle aus der falschen Region empf angen. Man chmal
fun ktion ieren d ie inter aktiv en Dien ste (ro te Tast e) nich t. Dies w ird durch ein schw aches S ignal v erurs acht, sieh e TV- Anten nen.
TV- Anten nen
Dig itale s terre stris ches Fer nsehe n (DVB-T ) komm t zu Ihre m Ferns ehgerät über eine Antenn e; eine a lte Ant enne, die für analoges
Fern sehen g ut war, br aucht e ventuell eine Aktualisierun g für digi tales F ernse hen. Wenn S ie imme r einig e, aber n icht al le der
dig itale n Kanäl e auf DT V (DVB-T ) erha lten, l iegt di es meis tens da ran, da ss die Antenn e ein sch maler B andtyp ist, und muss mit
ein em brei ten Ban dtyp ge wechs elt werd en.
Fehl erhaf te Leit ungen u nd Kabe l
Übe rprüf en Sie Ih ren Fern seher. S ind die Leitungen au f der Rüc kseite - an das Netz, die Ante nne, di e Set-Top-Box , den Vide o- oder
DVD -Play er oder R ecorder ri chtig a ngesc hloss en? SCA RT-Kab el sind d afür be kannt , dass si e sich mi t der Zei t locke rn und so wohl zu
Aud io- als a uch Vide o-(Bi ld)-P roblemen führe n. Entwede r linke s oder re chtes o der bei de Audios feh len, un d die Farb en sehe n arm
ode r schla mmig au s. Stecken Sie den Sca rt-St ecker f est ein , dies so ll das Pro blem be heben .
HDM I-Ste cker mü ssen fest eingesteckt we rden; e s ist nur d er letz te Mill imete r, der die K ontak te knüp ft. Typis cher weise soll das
sch warze P lastikteil des HDMI-Steck ers seh r nahe de m Fernseher-K örper o der der Komp onente sein oder ihn/sie ber ühren.
Bei m Einst ecken d er beli ebige n HDMI- Kabel k önnen P roble me auft reten, fal ls die HD MI-Ka bel ein geste ckt werd en, wen n der
Fern seher o der and ere Kom ponen te eing escha ltet is t. Scha lten Si e immer s owohl de n Fernseher als auch die Komponente aus, die
Sie e inste cken mö chten . Wenn S ie die St ecker u nd Stec kdose n überp rüft ha ben, sc halte n Sie den Fe rnseh er und al les, wa s Sie an
den Fe rnseh er ange schlo ssen ha ben, au s, und da nn scha lten Si e sie wie der ein .
Ich h abe mei nen PC an d en Ferns eher an gesch losse n. Es gib t keine n Ton.
Wenn S ie Ihre n PC oder L aptop a n den Fernseher über ein VGA ( 15 Pin D- Sub)- Kabel a ngesc hloss en habe n, und ke inen Ton hör en,
müs sen. Si e ein sep arate s Audio -Kabe l vom PC od er Lapt op an den Fe rnseh er ansc hließ en.
Unn atürl iche Far ben und H autfa rben
Unn atürl iche Ha uttön e und and ere Farb en könnten noch ein andere s Probl em auch i n einem n euen HDT V dars telle n. Dies
ges chieh t aufgrund d er Ferns ehbil deins tellu ngen, d ie für di e Umgeb ung ein es Ausst ellun gsrau ms opti mier t werden . Sie wer den
die ses Prob lem beh eben, i ndem Si e den Bil dmodu s in den na türli chen Modus im Bildm enü änd ern. Für m ehr Präz ision n ehmen S ie
ein e manue lle Ein stell ung der Fa rben- , Kontr ast- un d Helli gkeit-Op tione n im Bild menü vor.
Weiß e Umris se
Weiß e Ränder um Objekte und Per sonen e rsche inen in d er Rege l, wenn die Fer nsehs chärfe auf s ehr hoc h einge stell t ist, od er wenn
Ihr Fernsehgerät ei ne Verarb eitun gstec hnolo gie der K anten schär fung ve rwendet. Geh en Sie zu m Bildm enü und p assen S ie die
Sch ärfe an, bis die we iße Umr andun g versc hwindet. Wen n die Kan tensc härf ung akt ivier t ist, ve rsuch en Sie es , mit dem S ervice-
Men ü zu deak tivie ren.
Vide o flack ert
Zei tweis e könnte das Vid eo flac kern. We nn dies d er Fall is t, über prüfen S ie, ob da s Signa l stark g enug is t. Wenn das S ignal s tark is t,
lie gt das Pro blem be i dem Ka belne tzbet reiber. Wenn di e Signalst
ärk e zu schw ach ist , versuc hen Sie , die Sig nalst ärke mi t Hilfe e ines
Vers tärke rs zu ste igern .
Kei n Voll bild au f dem Bil dschi rm
Bei m Ansch luss ei nes PCs o der Lap tops an d en Ferns eher, fü llt das B ild mög liche rweis e nicht d en gesa mten Bi ldsch irm aus .
Übe rprüf en Sie di e Displ ayeins tellu ngen au f Ihrem P C oder La ptop ( Windo ws > Star t > Systemsteuerung > Darstellung und
Anp assun g > Displ ayeinstel lunge n) und wä hlen Si e die bes te Aufl ösung. Wähle n Sie auf I hrem Fer nsehe r: TV-M enü > Bil d >
Ein stell ungen , und dan n versu chen Si e AUTO, ZOOM 1 oder ZOOM2 für die bes te Anzei ge.
USB -Ansc hluss
Der U SB-An schlu ss funk tioni ert mi t *.jpg ( Foto)- u nd *.mp 3 (Musi k)-Da teien. Bitte bea chten S ie, das s der Fern seher d as iPho ne
ode r den iPod v on Appl e, die an d en USB- Ansch luss de s Fernse hers an gesch losse n sind, n icht er kennt . Der Fern seher k ann an dere
Dat eien wi ederg eben, aber aufgr und der v ielen v ersch ieden en Date iformaten , gibt es k eine Ga ranti e, dass d iese an deren
Dat eiformate f unkti onier en.
Problembehandlung bei dem Digitalfernsehen und möglich Lösungen
Störungserkennung
De
LCD- Fernse her mit L ED-H interg rundb eleuc htung D E-32
Page 70

Spezifikationen
*Änderu ng der Sp ezifi katio nen vor behal ten.
DIE A ngabe n diene n nur als R eferenz.
Änd erung von De sign un d Spezi fikationen vorb ehalten.
Scart-Ausgang:
1.Bei Quelle ATV/AV/SCART ist das Scart-Ausgangssignal ATV.
2.Bei Quelle DT V kein Scar t-Ausgangssignal.
3.Andere Quellen haben kein Scart-Ausgangssignal.
DE- 33 LCD-Fe rnseh er mit LE D-Hi ntergr undbe leuch tung
22" Full HD 1080p Digitaler LED LCD-Fernseher
06 Spezifikationen
Bil dqual ität:
NIC AM Stereo.
2 x 3 Watt RMS Aus gangs leist ung.
Dig ital inter aktiv.
Dig italtext .
Dig ital Video Broad casti ng (DVB) Unt ertitel ve rfüg bar.
Automa tische Ins talla tion.
Automa tisch e Kanal suche .
Ele ktron ische Fe rnseh zeits chrif t.
7 Tage Elekt ronische Fe rnseh zeits chrif t (EPG).
Top up TV-ko mpati bel.
CI- Schac ht.
Audiob eschreib ung kom patib el.
<0.30W
DTV-Tuner D ecoder
DVB -T, DVB-C
16/ 32/64 /128/ 256 QAM Modu latio n
MPE G2, MPE G4, H.2 64
/QP SK Modu latio n
2 x HDM I.
1 x SCA RT.
PC- Einga ng.
Vide o.
Kom posit .
1 x USB -Port .
1 x Kop fhöre rbuch se.
1 x .
Unt erstü tzte Systeme: PAL+ SEC AM
Kanalspe icher : 1000 (DTV ), 100 (ATV )
TV ( RF): 75 Ω a symme trisc h
AV Videoei ngang: 75 Ω, 1 V- P, RC A
AV Audioeing ang: 20 k Ω, 500 m RMS
YPbPr/HDM I Videoeing ang: 48 0i, 480 p, 576i, 576p, 720p, 10 80i, 10 80p
Kom ponen ten
KOAX IAL
V
Zus ätzliche Fu nktio nen:
Kla ngqua lität :
Dig itale Fu nktionen:
Leistungsaufnahme
Stand-by
Ans chlüs se:
UHF /VHF Tune r; Slee ptime r; ; Bi ld und Text
Fernbedie nung be nötig t 2 x AAA Batter ien (mi tgeli efert ).
VES A-Befest igung : 100 x 100 m m
616 x426x 135mm
mm
mm
Alt ersfreig abe
Paketgröße (BxHxT ):
Set -Größ e (BxHxT) mit Stan dfuß:
Set -Größ e (BxHxT) ohne Sta ndfuß :
Paketgewicht : 4.1 kg
Set -Gewicht mit S tandfuß: 2 .9 kg
Set -Gewicht ohn e Stand fuß: 2. 7 kg
513 x355x 160
513 x312x 42
FUL L HD
Int egrie rt digital.
Bil dschi rmdia gonal e: 55 cm
Auflös ung 192 0x108 0 Pixel 50 H z.
Page 71

Spezifikationen
*Änderu ng der Sp ezifi katio nen vor behal ten.
DIE A ngabe n diene n nur als R eferenz.
Änd erung von De sign un d Spezi fikationen vorb ehalten.
Scart-Ausgang:
1.Bei Quelle ATV/AV/SCART ist das Scart-Ausgangssignal ATV.
2.Bei Quelle DT V kein Scar t-Ausgangssignal.
3.Andere Quellen haben kein Scart-Ausgangssignal.
24" Full HD 1080p Digitaler LED LCD-Fernseher
Bil dqual ität:
NIC AM Stereo.
2 x 3 Watt RMS Aus gangs leist ung.
Dig ital inter aktiv.
Dig italtext .
Dig ital Video Broad casti ng (DVB) Unt ertitel ve rfüg bar.
Automa tische Ins talla tion.
Automa tisch e Kanal suche .
Ele ktron ische Fe rnseh zeits chrif t.
7 Tage Elekt ronische Fe rnseh zeits chrif t (EPG).
Top up TV-ko mpati bel.
CI- Schac ht.
Audiob eschreib ung kom patib el.
<0.30W
DTV-Tuner D ecoder
DVB -T, DVB-C
16/ 32/64 /128/ 256 QAM Modu latio n
MPE G2, MPE G4, H.2 64
/QP SK Modu latio n
2 x HDM I.
1 x SCA RT.
PC- Einga ng.
Video.
Kom posit .
1 x USB -Port .
1 x Kop fhöre rbuch se.
1 x .
Unt erstü tzte Systeme: PAL+ SEC AM
Kanalspe icher : 1000 (DTV ), 100 (ATV )
TV ( RF): 75 Ω a symme trisc h
AV Videoei ngang: 75 Ω, 1 V- P, RC A
AV Audioeing ang: 20 k Ω, 500 m RMS
YPbPr/HDM I Videoeing ang: 48 0i, 480 p, 576i, 576p, 720p, 10 80i, 10 80p
Kom ponen ten
KOAX IAL
V
Zus ätzliche Fu nktio nen:
Kla ngqua lität :
Dig itale Fu nktionen:
Leistungsaufnahme
Stand-by
Ans chlüs se:
UHF /VHF Tune r; Slee ptime r; ; Bi ld und Text
Fernbedie nung be nötig t 2 x AAA Batter ien (mi tgeli efert ).
VES A-Befest igung : 100 x 100 m m
650 x440x 135mm
mm
mm
Alt ersfreig abe
Paketgröße (BxHxT ):
Set -Größ e (BxHxT) mit Stan dfuß:
Set -Größ e (BxHxT) ohne Sta ndfuß :
Paketgewicht : 4.9 kg
Set -Gewicht mit S tandf uß: 3.7 4 kg
Set -Gewicht ohn e Stand fuß: 3. 5 kg
568 x386x 160
568 x344x 42
FUL L HD
Int egrie rt digital.
Bil dschi rmdia gonal e: 59.9 c m
Auflös ung 192 0x108 0 Pixel 50 H z.
LCD- Fernse her mit L ED-H interg rundb eleuc htung D E-34
De
Page 72

Spezifikationen
*Änderu ng der Sp ezifi katio nen vor behal ten.
DIE A ngabe n diene n nur als R eferenz.
Änd erung von De sign un d Spezi fikationen vorb ehalten.
Scart-Ausgang:
1.Bei Quelle ATV/AV/SCART ist das Scart-Ausgangssignal ATV.
2.Bei Quelle DT V kein Scar t-Ausgangssignal.
3.Andere Quellen haben kein Scart-Ausgangssignal.
DE- 35 LCD-Fe rnseh er mit LE D-Hi ntergr undbe leuch tung
28" HD Ready Digital-LED LCD-Fernseher
Bil dqual ität:
NIC AM Stereo.
2 x 8 Watt RMS Aus gangs leist ung.
Dig ital inter aktiv.
Dig italtext .
Dig ital Video Broad casti ng (DVB) Unt ertitel ve rfüg bar.
Automa tische Ins talla tion.
Automa tisch e Kanal suche .
Ele ktron ische Fe rnseh zeits chrif t.
7 Tage Elekt ronische Fe rnseh zeits chrif t (EPG).
Top up TV-ko mpati bel.
CI- Schac ht.
Audiob eschreib ung kom patib el.
<0.30W
DTV-Tuner D ecoder
DVB -T, DVB-C
16/ 32/64 /128/ 256 QAM Modu latio n
MPE G2, MPE G4, H.2 64
/QP SK Modu latio n
2 x HDM I.
1 x SCA RT.
PC- Einga ng.
Video.
Kom posit .
1 x USB -Port .
1 x Kop fhöre rbuch se.
1 x .
Unt erstü tzte Systeme: PAL+ SEC AM
Kanalspe icher : 1000 (DTV ), 100 (ATV )
TV ( RF): 75 Ω a symme trisc h
AV Videoei ngang: 75 Ω, 1 V- P, RC A
AV Audioeing ang: 20 k Ω, 500 m RMS
YPbPr/HDM I Videoeing ang: 48 0i, 480 p, 576i, 576p, 720p, 10 80i, 10 80p
Kom ponen ten
KOAX IAL
V
Zus ätzliche Fu nktio nen:
Kla ngqua lität :
Dig itale Fu nktionen:
Leistungsaufnahme
Stand-by
Ans chlüs se:
UHF /VHF Tune r; Slee ptime r; ; Bi ld und Text
Fernbedie nung be nötig t 2 x AAA Batter ien (mi tgeli efert ).
VES A-Befest igung : 200 x 100 m m
810 x480x 120mm
Alt ersfreig abe
Paketgröße (BxHxT ):
Set -Größ e (BxHxT) mit Stan dfuß:
Set -Größ e (BxHxT) ohne Sta ndfuß :
Paketgewicht :6.5 kg
Set -Gewicht mit S tandf uß: 5.3 kg
Set -Gewicht ohn e Stand fuß: 5. 0 kg
642 x435x 170mm
642 x390x 44mm
HD Re ady
Int egrie rt digital.
Bil dschi rmdia gonal e: 70 cm
Auflös ung 136 6x768 Pixel 50 Hz .
Page 73

Spezifikationen
*Änderu ng der Sp ezifi katio nen vor behal ten.
DIE A ngabe n diene n nur als R eferenz.
Änd erung von De sign un d Spezi fikationen vorb ehalten.
Scart-Ausgang:
1.Bei Quelle ATV/AV/SCART ist das Scart-Ausgangssignal ATV.
2.Bei Quelle DT V kein Scar t-Ausgangssignal.
3.Andere Quellen haben kein Scart-Ausgangssignal.
32" HD Ready Digital-LED LCD-Fernseher
Bil dqual ität:
NIC AM Stereo.
2 x 8 Watt RMS Aus gangs leist ung.
Dig ital inter aktiv.
Dig italtext .
Dig ital Video Broad casti ng (DVB) Unt ertitel ve rfüg bar.
Automa tische Ins talla tion.
Automa tisch e Kanal suche .
Ele ktron ische Fe rnseh zeits chrif t.
7 Tage Elekt ronische Fe rnseh zeits chrif t (EPG).
Top up TV-ko mpati bel.
CI- Schac ht.
Audiob eschreib ung kom patib el.
<0.30W
DTV-Tuner D ecoder
DVB -T, DVB-C
16/ 32/64 /128/ 256 QAM Modu latio n
MPE G2, MPE G4, H.2 64
/QP SK Modu latio n
2 x HDM I.
1 x SCA RT.
PC- Einga ng.
Vide o.
Kom posit .
1 x USB -Port .
1 x Kop fhöre rbuch se.
1 x .
Unt erstü tzte Systeme: PAL+ SEC AM
Kanalspe icher : 1000 (DTV ), 100 (ATV )
TV ( RF): 75 Ω a symme trisc h
AV Videoei ngang: 75 Ω, 1 V- P, RC A
AV Audioeing ang: 20 k Ω, 500 m RMS
YPbPr/HDM I Videoeing ang: 48 0i, 480 p, 576i, 576p, 720p, 10 80i, 10 80p
Kom ponen ten
KOAX IAL
V
Zus ätzliche Fu nktio nen:
Kla ngqua lität :
Dig itale Fu nktionen:
Leistungsaufnahme
Stand-by
Ans chlüs se:
UHF /VHF Tune r; Slee ptime r; ; Bi ld und Text
Fernbedie nung be nötig t 2 x AAA Batter ien (mi tgeli efert ).
VES A-Befest igung : 200 x 100 m m
880 x550x 137mm
Alt ersfreig abe
Paketgröße (BxHxT ):
Set -Größ e (BxHxT) mit Stan dfuß:
Set -Größ e (BxHxT) ohne Sta ndfuß :
Paketgewicht :6.8 kg
Set -Gewicht mit S tandf uß: 5.0 kg
Set -Gewicht ohn e Stand fuß: 4. 7 kg
738 .5x48 7.5x1 70mm
738 .5x44 3x64m m
HD Re ady
Int egrie rt digital.
Bil dschi rmdia gonal e: 81 cm
Auflös ung 136 6x768 Pixel 50 Hz .
LCD- Fernse her mit L ED-H interg rundb eleuc htung D E-36
De
Page 74

 Loading...