

Page 1
LE22M600CF
LE24M600CF
LE28M600C
LE32M600C
Please read this manual carefully before operating the unit,and keep it for
future reference.
Page 2

Welcome
Important Information
01 Safety Warnings
2
2
Safety notice
Warning and cautions
3
4
Main Parameter
Base Stand Assembly Instruction
02 Introduction
5
7
Wall Mounting Installation Guidelines
Front Control Panel
8
10
Rear/Side Sockets
11
Connecting to your Haier TV
Common Interface
12
15
Remote Control
03 Remote Control
16
Teletext
17
Installation Guide
04 Operation
18
CHANNEL MENU 18
Auto Tuning (DVB-T) 18
Auto Tuning (DVB-C) 19
DTV Manual Tuning (DVB-T)
DTV Manual Tuning (DVB-C)
ATV Manu al Tuning
20
20
20
PICTURE MENU 21
22
Audio MENU
21
Clock
MENU
22
SETUP MENU
LOCK MENU
EPG Menu(Electronic Program Guide)
23
PVR File System(only for DTV)
23
Prepare to record the program
24
22
Rec ord the program
24
Play the recordin g
24
Time shift
25
USB Player
26
Trouble shooting
05 Trouble shooting
28
Specification 31
Program edit
Common Interface
20
21
Signal Information
Software Updated(USB)
21
21
06 Specification
Page 3
Thanks for buying this 22"/24"/28"/32" LED LCD TV.This guide will help you set up and begin using your TV.
IMPOR
TANT INFORMATION
READ ALL INSTRUCTIONS BEFORE USE AND KEEP FOR FUTURE REFERENCE.
CAUTION
TO REDUCE THE RISK OF ELECTRIC SHOCK, DO NOT REMOVE COVER (OR BACK).NO USER SERVICEABLE PARTS INSIDE.
FOR ANY PROBLEMS, REFER SERVICING TO THE CUSTOMER HELP LINE. THERE IS A LIGHTNING ARROW SYMBOL IN
THE TRIANGLE: THIS SYMBOL INDICATES HIGH VOLTAGE IS PRESENT INSIDE. IT IS DANGEROUS TO MAKE ANY KIND OF
CONTACT WITH ANYINSIDE PART OF THIS PRODUCT.
THERE IS A EXCLAMATION MARK IN THE TRIANGLE: THIS SYMBOL ALERTS YOU THAT IMPORTANT LITERATURE
CONCERNING OPERATION AND MAINTENANCE HAS BEEN INCLUDED WITH THIS PRODUCT.
CAUTION:TO REDUCE THE RISK OF ELECTRIC SHOCK AND FIRE, DO NOT PUT THE TV SET NEAR
SOURCES OF HUMIDITY. DO NOT USE ANY ABRASIVE CLEANERS WHICH MAY SCRATCH OR DAMAGE
THE LCD SCREEN. AVOID CONTACT WITH OBJECTS THAT MAY SCRATCH THE LCD SCREEN.
NOTE: SERVICING THE UNIT YOURSELF IS UNAUTHORISED AND COULD LEAD TO INJURY OR PRODUCT
DAMAGE. REFER ALL SERVICING TO THE CUSTOMER HELPLINE.
Now you can get star
ted!
22" FULL HD 1080P Digital LED LCD TV
Remote control
Instruction Manual
Quick start guide
AAA ba x2ttery
01 Safety warnings
Warranty Card
24" FULL HD 1080P Digital LED LCD TV
Remote control
Instruction Manual
Quick start guide
AAA ba x2ttery
28" HD Ready Digital LED LCD TV
Remote control
Instruction Manual
Quick start guide
AAA ba x2ttery
Screws
32" HD Ready Digital LED LCD TV
Remote control
Instruction Manual
Quick start guide
AAA ba x2ttery
YPbPr Connect Cable
Screws
Screws
Screws
Warranty Card
Warranty Card
Warranty Card
Stand
Stand
Stand
Stand
Page 4
Safety notice
EN-3
CAUTION:When the apparatus was in
electrostatic circumstance, it maybe
malfunction and need to reset by user.
Page 5
Dim:515*320mm(不包括底座)
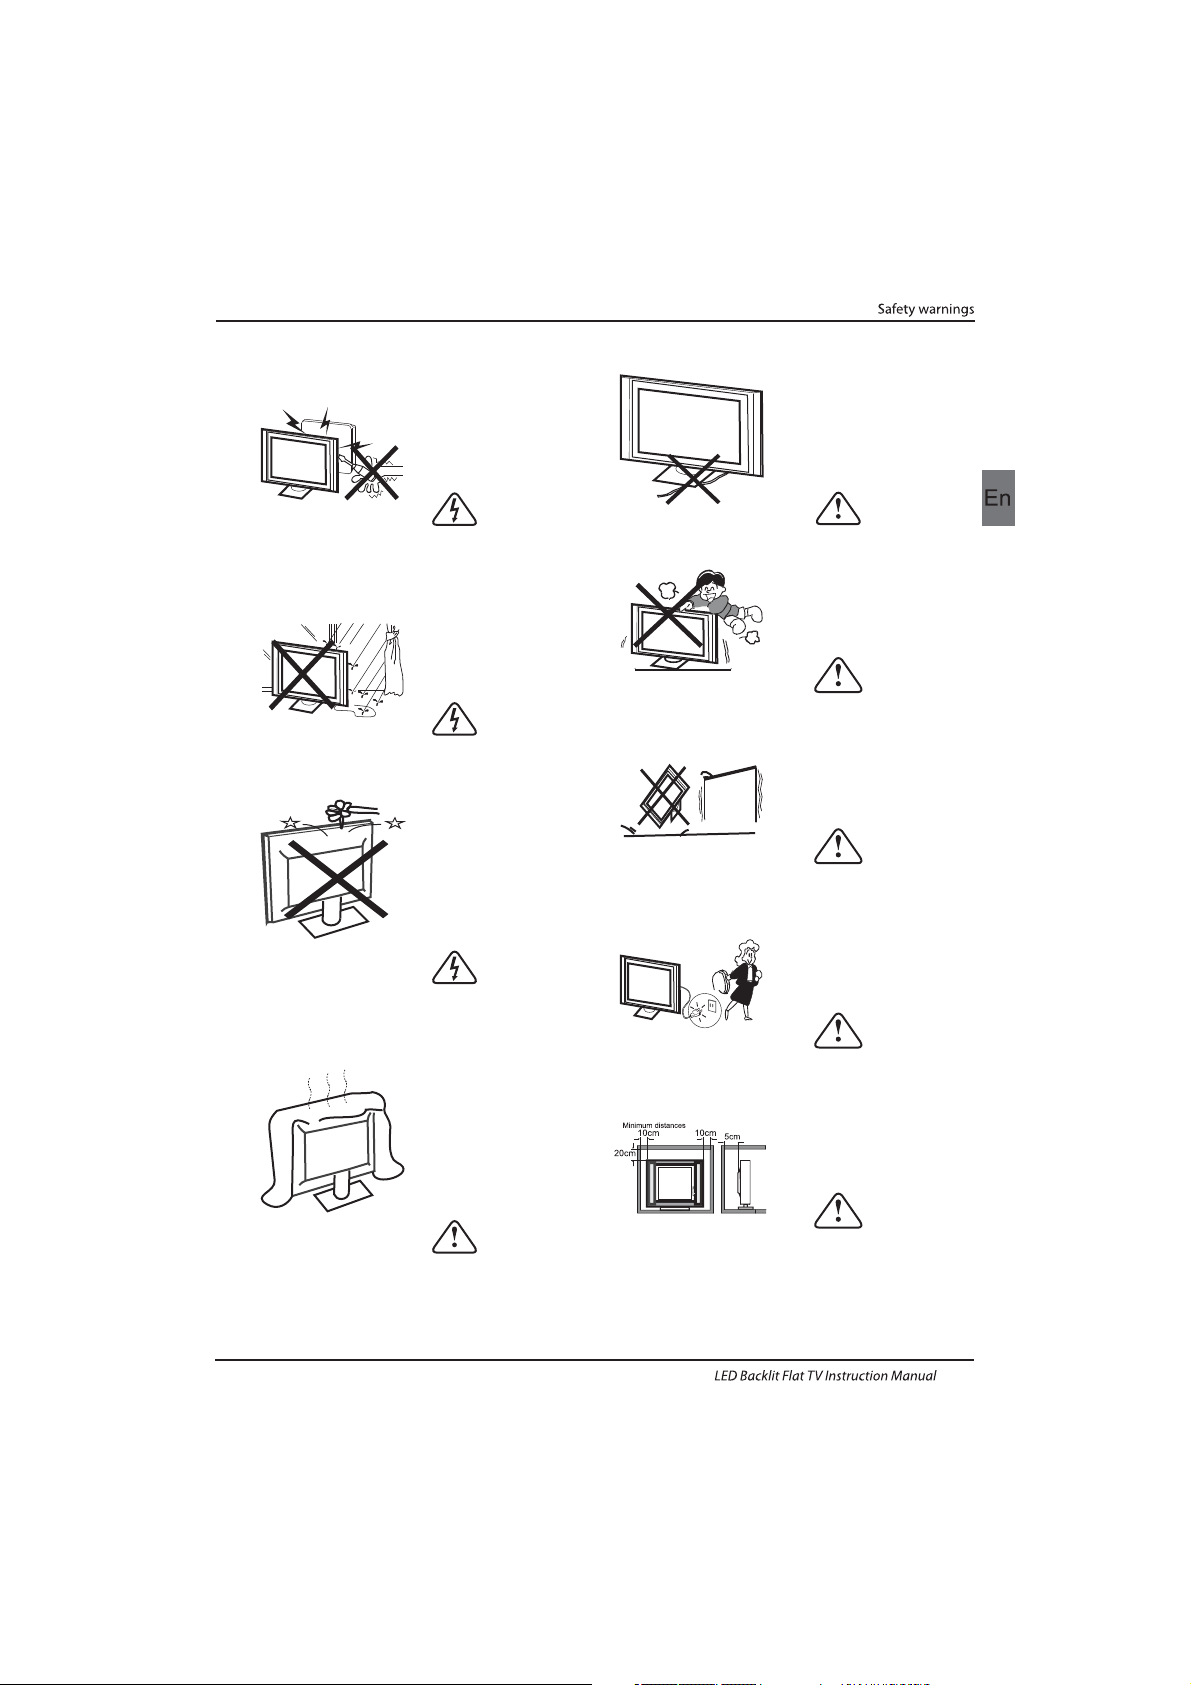
Warning
High voltages are used in the operation of this
television receiver. Do not remove the cabinet
back from your set. Refer servicing to qualified
service personnel.
Warning
To prevent fire or electrical shock hazard, do
not expose the television receiver to rain or
moisture.
Warning
Do not drop or push objects into the
television cabinet slots or openings. Never
spill any kind of liquid on the television
receiver.
Caution
Do not block the ventilation holes in the back
cover. Adequate ventilation is essential to
prevent failure of electrical components.
Caution
Do not trap the power supply cord under the
television receiver.
Caution
Never stand on, lean on, or suddenly push the
television or its stand. You should pay special
attention to children. Serious injury may result if
it should fall.
Caution
Do not place your television on an unstable cart,
stand, shelf or table. Serious injury to an
individual , and damage to the television, may
result if it should fall.
Caution
When the television receiver is not used for an
extended period of time, it is advisable to
disconnect the AC power cord from the AC
outlet.
Caution
If the television is to be built into a compartment
or similar enclosure, the minimum distances must
be maintained. Heat build-up can reduce the
service life of your television, and can also be
dangerous.
WARNING AND CAUTIONS
EN-4
Page 6
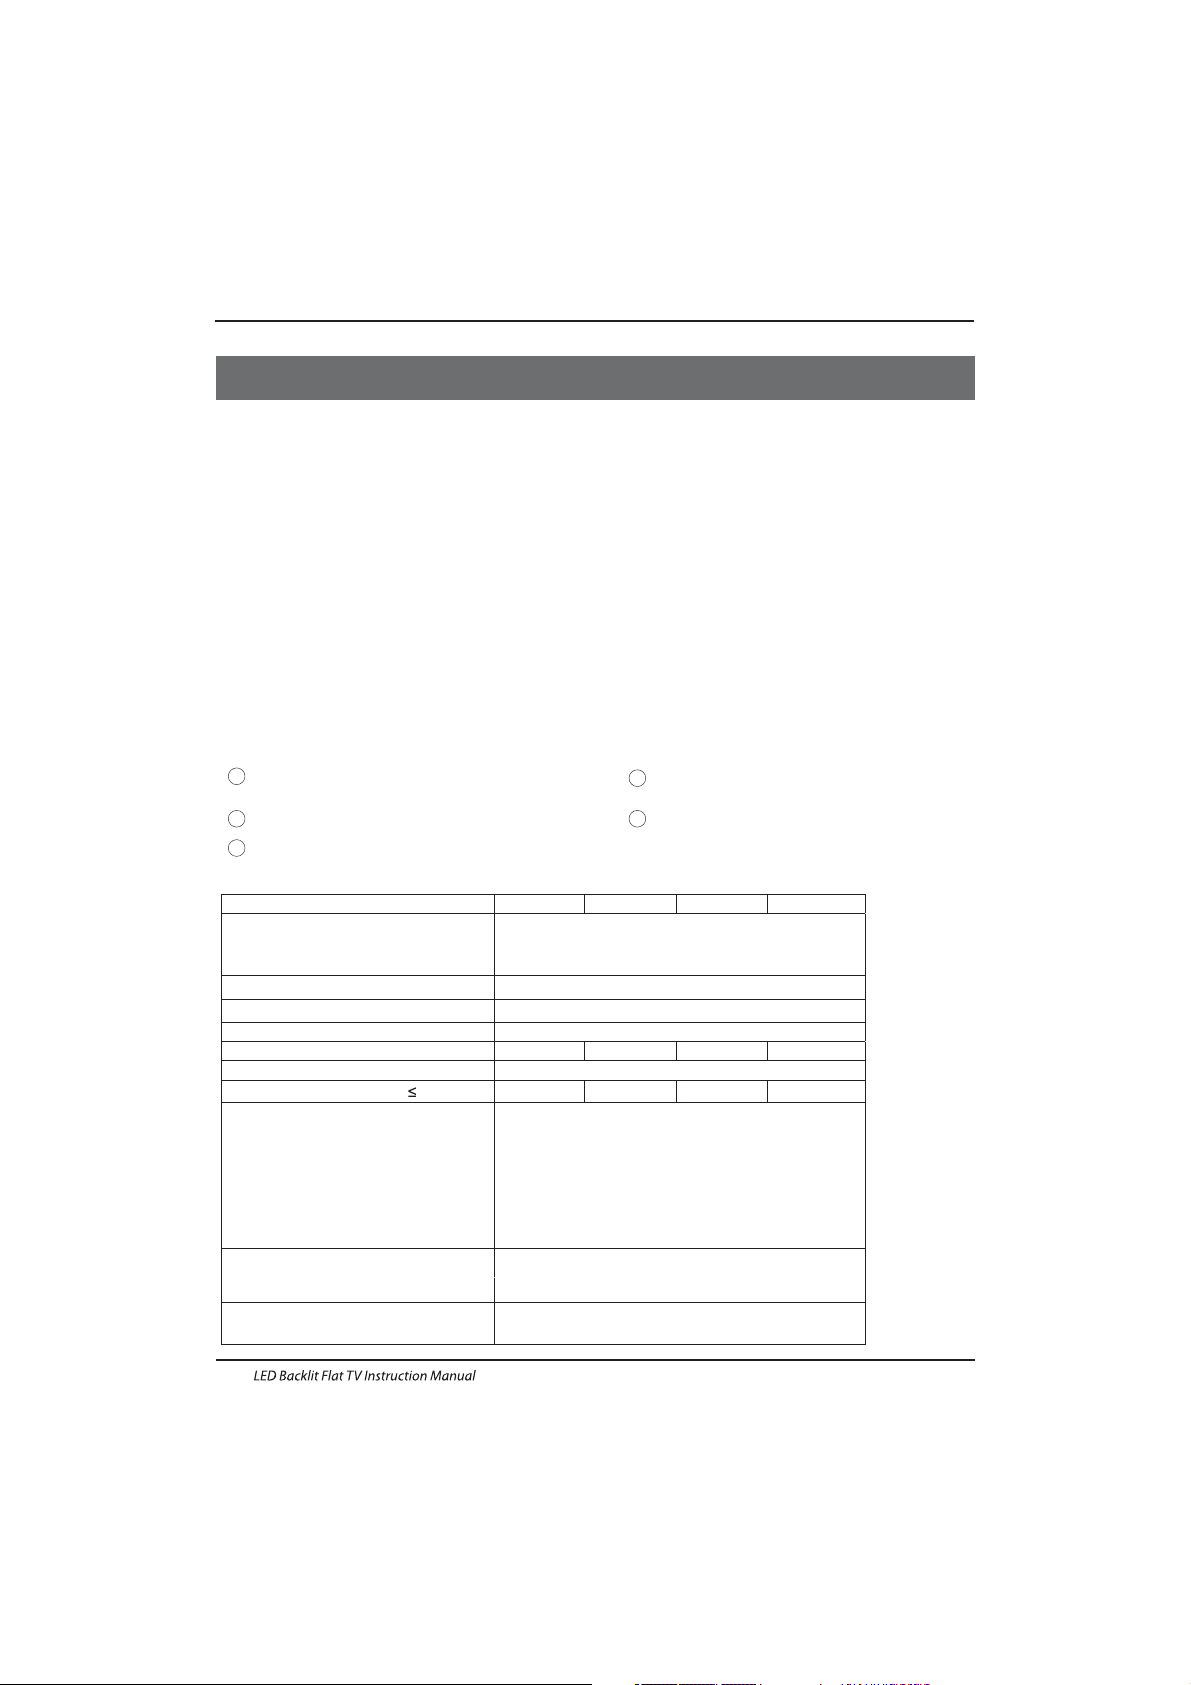
Panel
PAL-B/G ,I , D/K
PAL/SECAM/MPEG2/MPEG4/H.264
AC 100-240 V 50/60Hz
2x3W
Analog RGB(PC) x1; PC audio x1
High-Definition Multimedia Interface (HDMI) x 2
Composite Input x 1
YPbPr x 1
SCART Input x 1
22"
CI x 1
USB x 1
RF Co-Ax x 1
Composite video input >=350
YPbPr >=400
Headphone x 1
COAXIAL x 1
TV System
Video Signal System
Input Power Voltage
Power consumption
Standby Power consumption
Audio Output Power (THD 7%)
Signal Input
Signal output
Horizontal definition (TV line)
SECAM-B/G , D/K , L
<0.30W
DVB-T, DVB-C
INSTALLATIONCAUTION
*Locate the TV in the room where light does
not strike the screen directly.
*Total darkness or a reflection on the picture
screen can cause eyestrain. Soft and indirect
lighting is recommended for comfortable
viewing.
*Allow enough space between the TV and the
wall to permit ventilation.
*Avoid excessively warm locations to prevent
possible damage to the cabinet or premature
component failure.
*Do not cover the ventilation openings when
using theTV.
Main parameter
Main features
4 NICAM;
5 T ;ime-shift
3
HDMI interface and SCART
Inter face;
High luminance, wide viewing
angle;
2
Used as Television, display terminal,
PC display;
1
Never tamper with any components inside the
TV, or any other adjustment controls not
described in this manual. All LED-TV's are high
voltage electrical equipment.
When you clean dust or any water drops off the
SCREEN or CABINET or around any of the
buttons or connectors, the power cabled should
be removed from the power socket. Wipe the TV
with a soft, dry, dust free cloth.
During thunderstorms, unplug the power cable
and aerial / antenna cable to prevent damage to
your TV and any other devices connected to it.
All repairs to this TV should only be performed
by qualified TV service
personnel.
02 Introdution
Introduction
EN-5
1000(DTV);100(ATV)Storage channel number
24"
38W 40W
SCART Output x 1
28" 32"
41W 50W
2x3W
2x8W
2x8W
Page 7
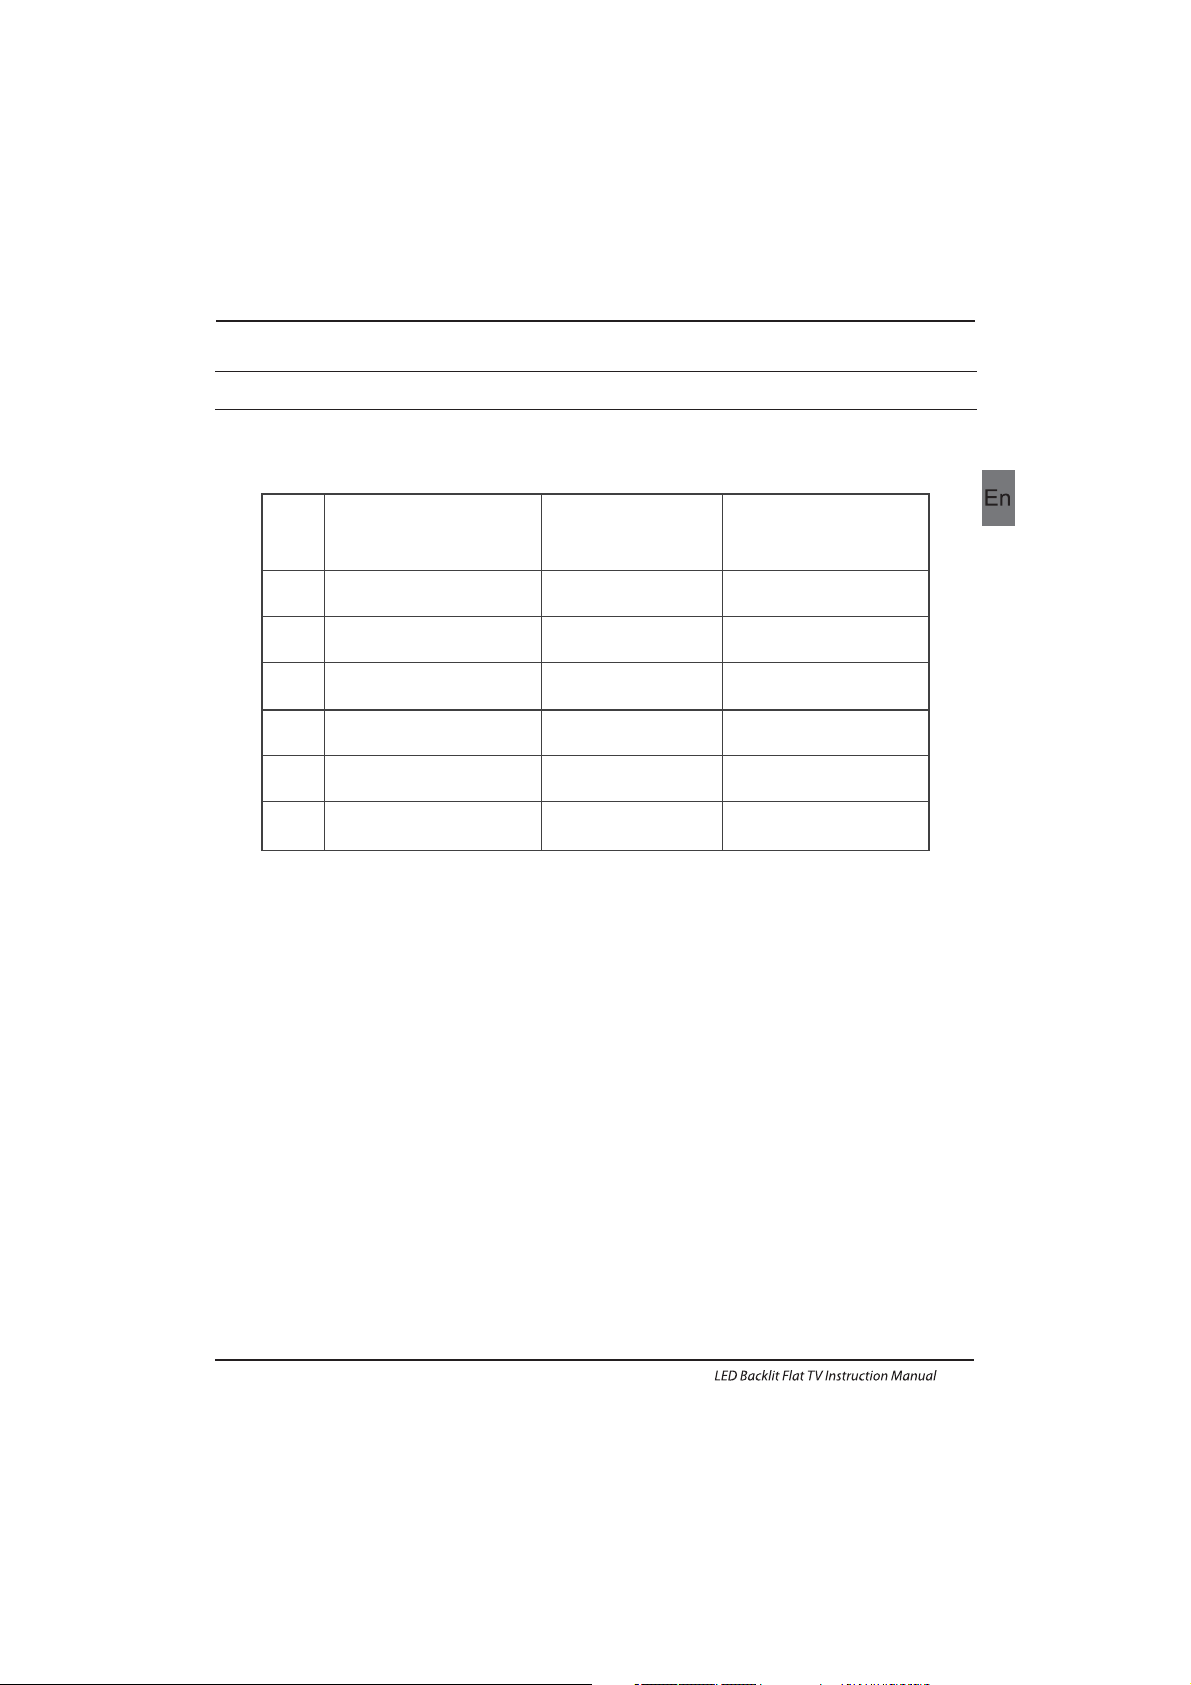
SUPPORTED MODE
PC
3
5
1024x768
1280x1024
60
60
1
640x480
60
31.47
2
800x600
60
37.88
48.36
63.98
RESOLUTION
V.Freq.(KHz) H.Freq.(KHz)
4
1366x768
60
47.7
Introduction
EN-6
6
1920x1080
60
66.64
(only for 22",24")
Page 8
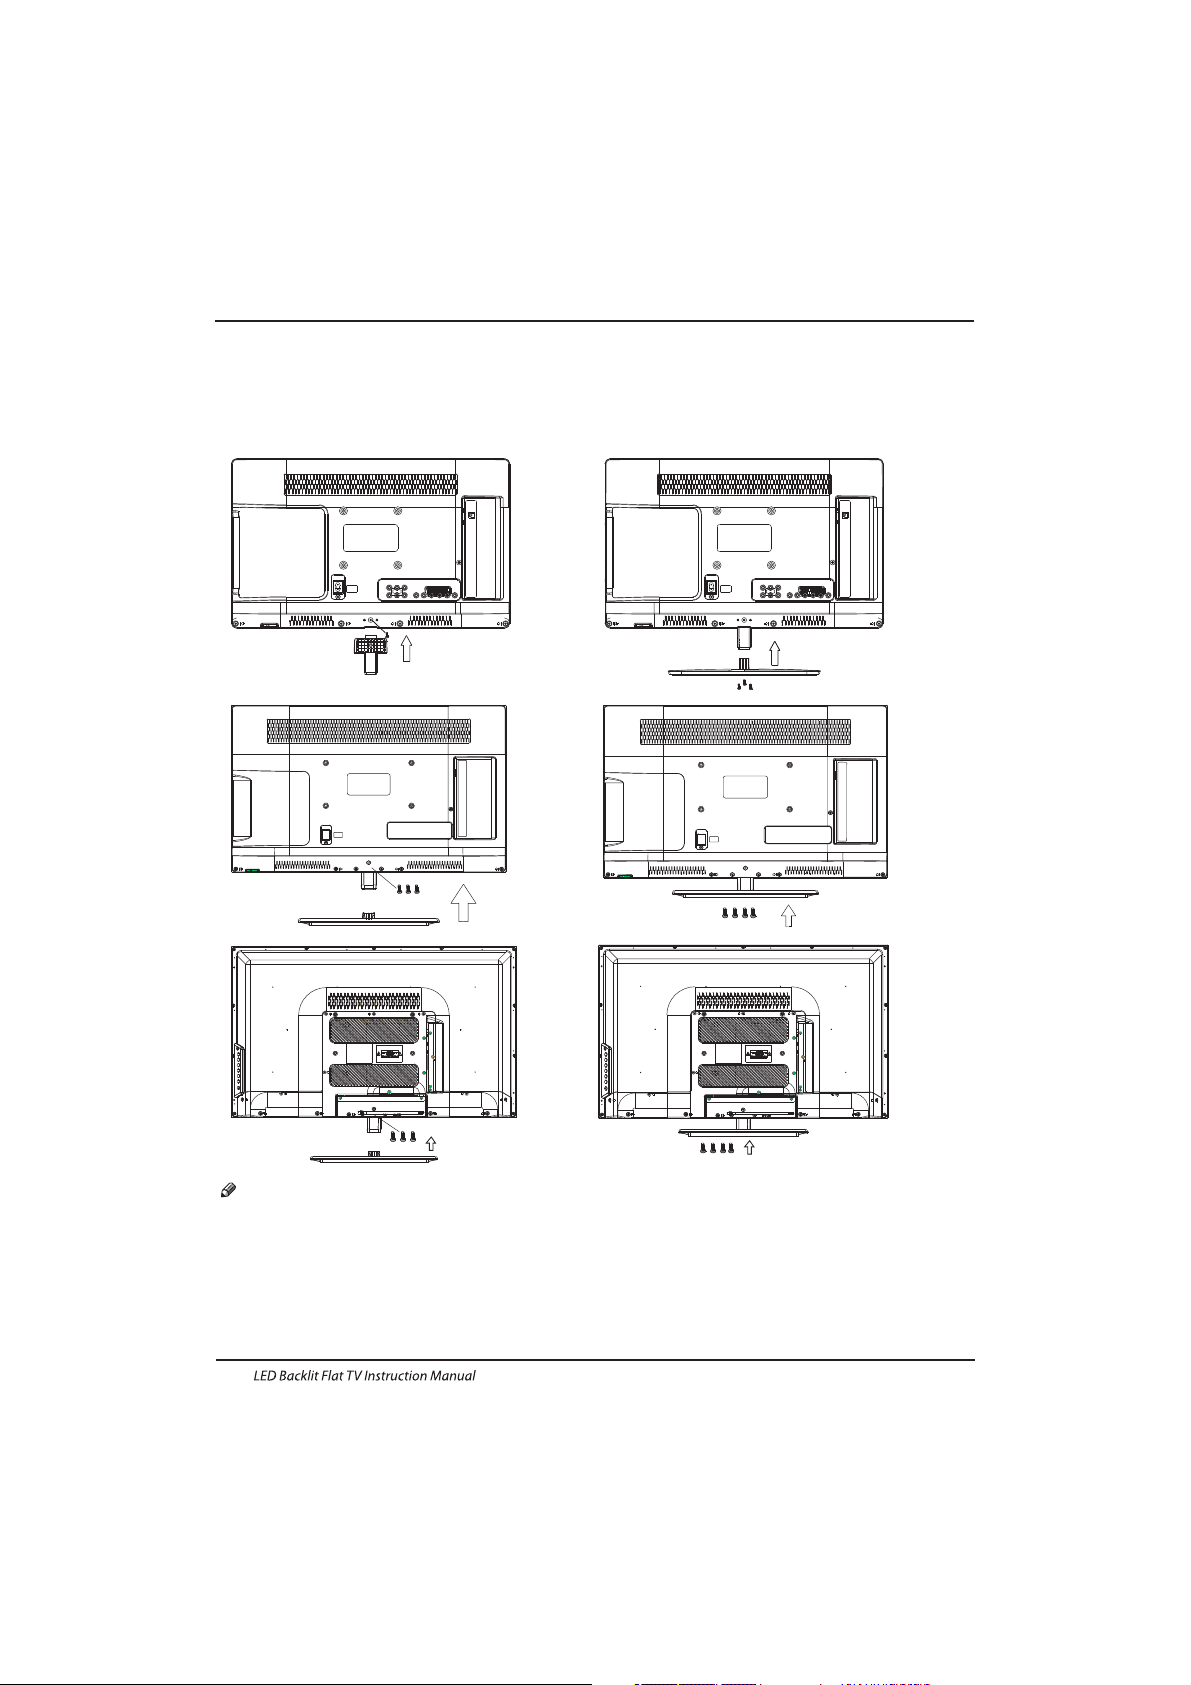
Base Stand Assembly Instruction
Locate the TV in a room where light does not strike the screen directly. Total darkness or a
reflection on the screen can cause eyestrain. Soft and indirect lighting is recommended for
comfortable viewing.
Allow enough space between the TV and the wall to permit ventilation.
Please do not attempt to rotate the TV on the stand.
Avoid excessively warm locations to prevent possible damage to the cabinet or premature
component failure.
INSTALLATION NOTES
Introduction
EN-7
2. Attach the stand base plate to the stand pole
by firmly tightening the supplied screw.
1.Place the TV with the display side down on a flat
surface.Use a cloth to protect the display.Position
the stand base plate onto the bottom of the stand
pole.
(22",24")
(28")
(32")
Page 9
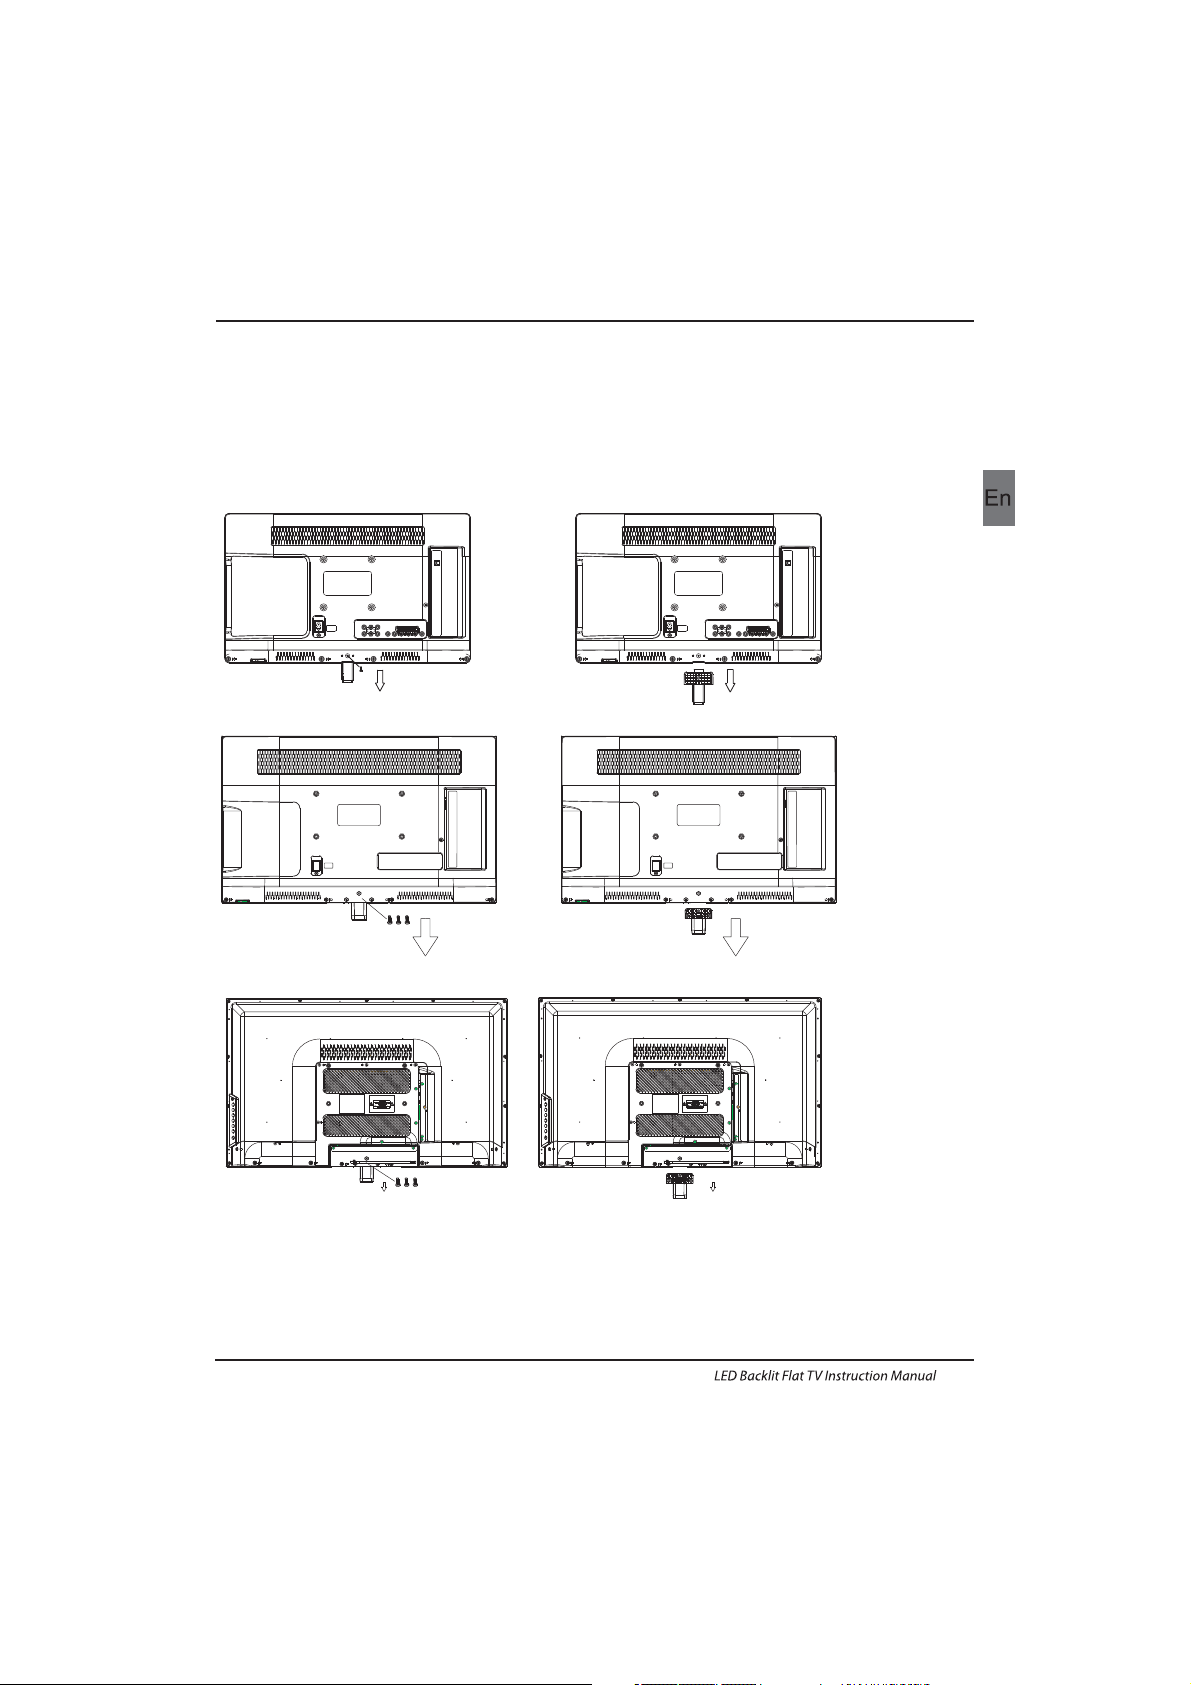
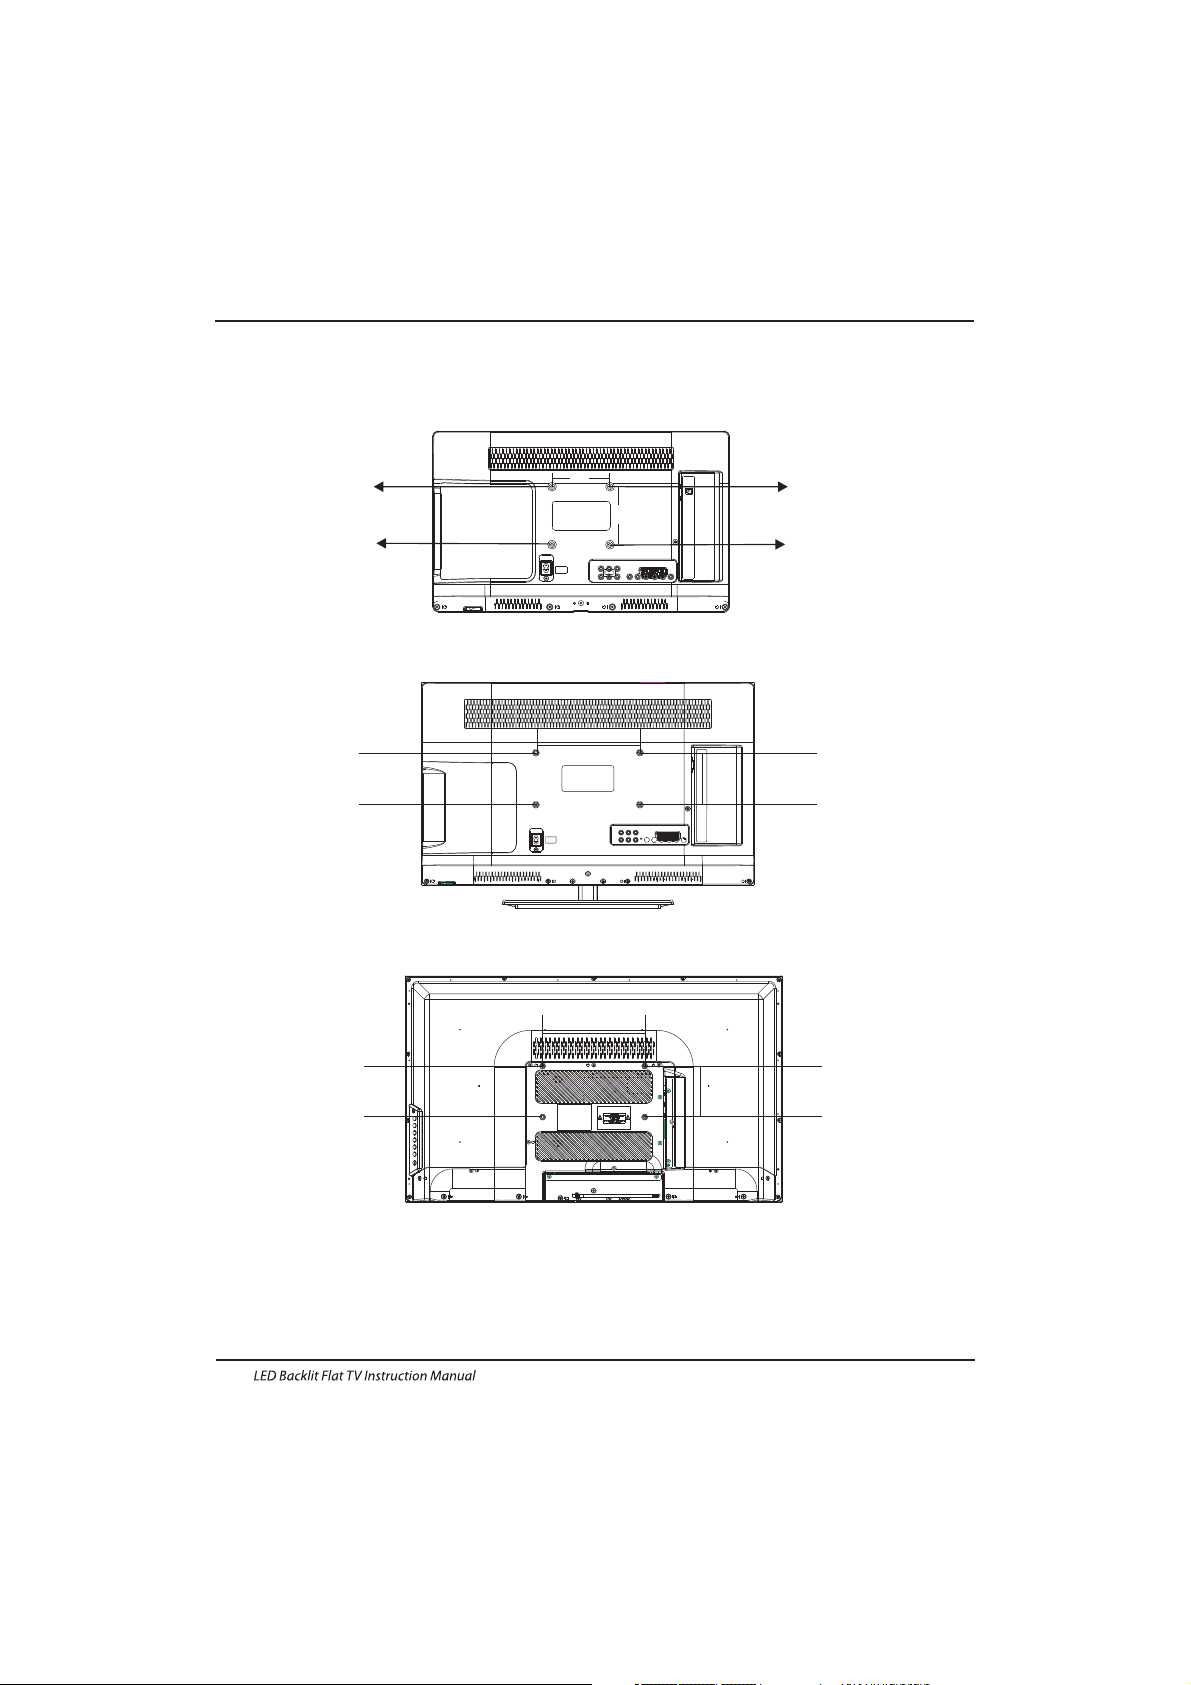
WALL MOUNTING INSTALLATION GUIDELINES
2.Remove the screws from the lower part of the
television, where the base joins to the TV, and take
away the stand (put the stand somewhere safe for
future use).
1.Place the LED LCD Television onto a solid
surface. Please place some soft material
over the front of the screen to protect it
from any damage.
Introduction
EN-8
This television can be wall mounted as follows:
(22",24")
(28")
(32")
Page 10
Introduction
EN-9
M4X5
M4X5
M4X5
M4X5
100mm
100mm
3.Use the four screws provided to fix the TV onto a wall mounting bracket (not included)
via the four VESA standard holes on the back of the television.
M4X5
M4X5
M4X5
M4X5
200mm
100mm
M4X5
M4X5
M4X5
M4X5
200mm
100mm
(22",24")
(28")
(32")
Page 11
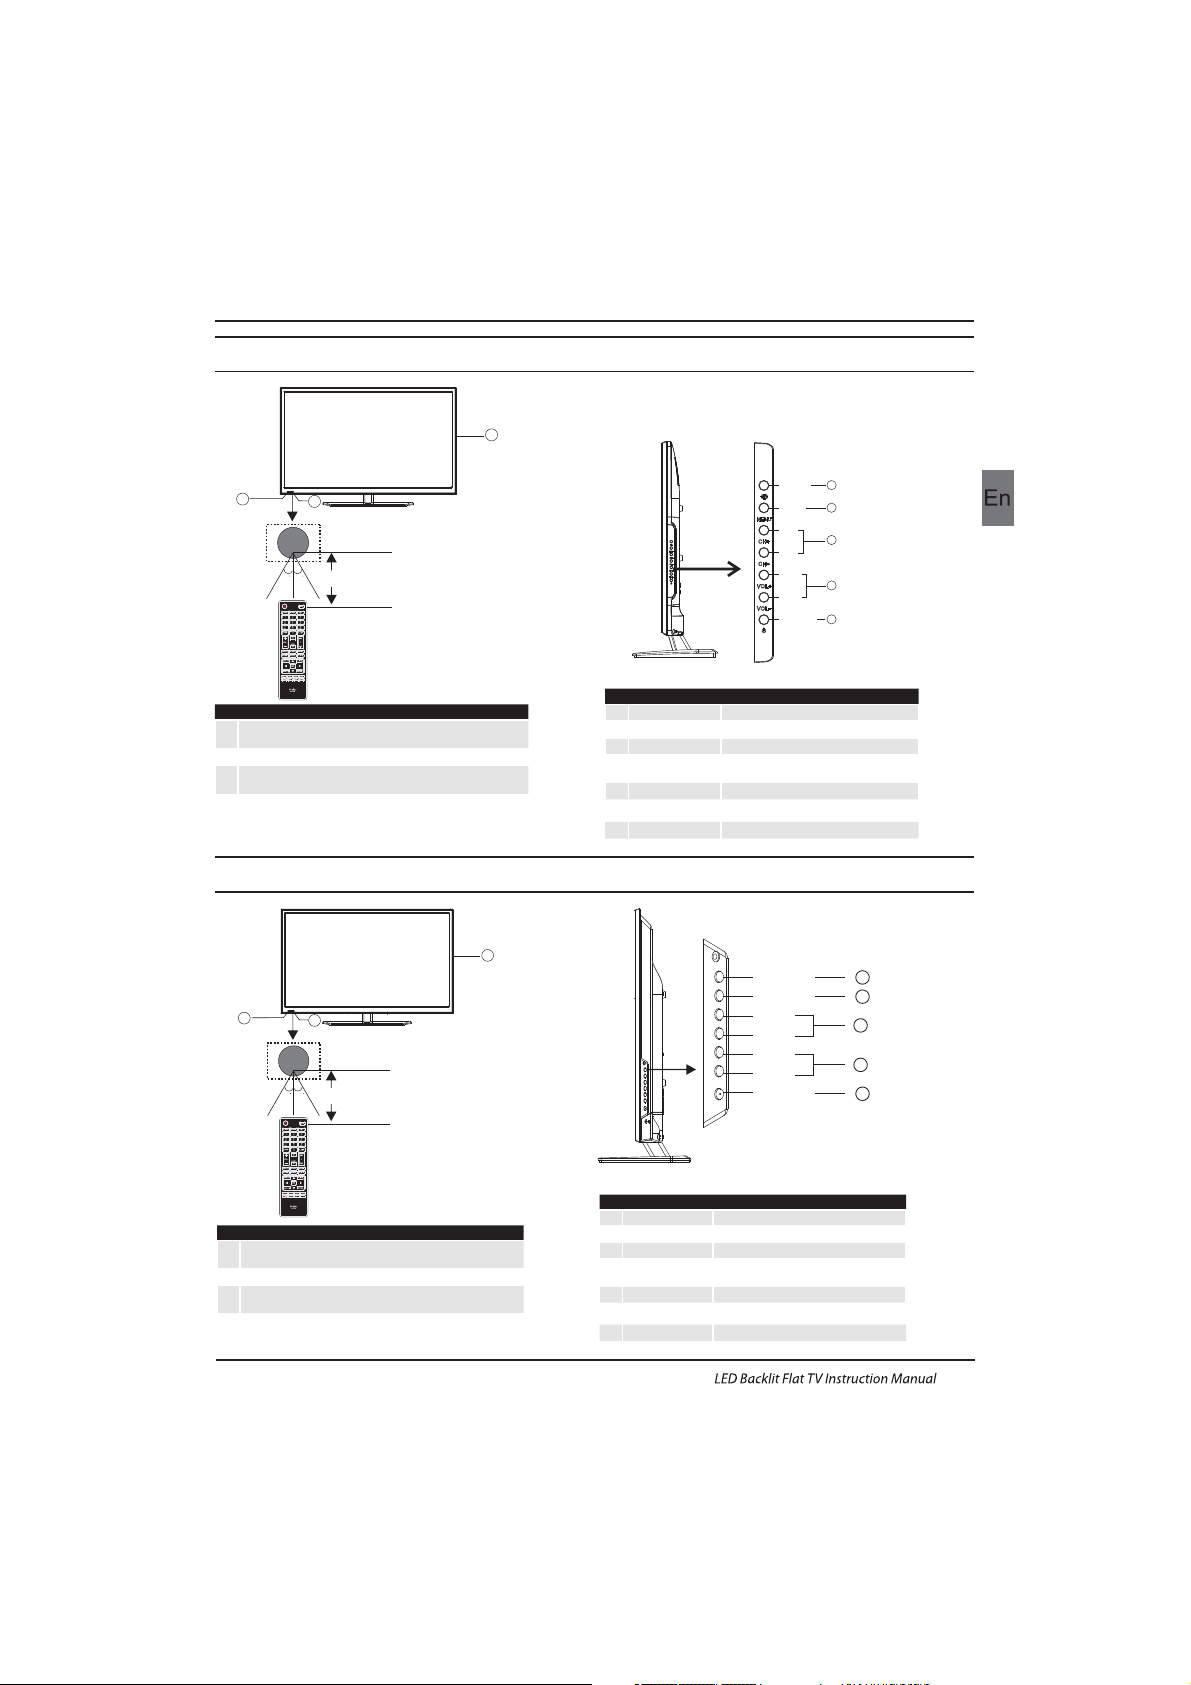
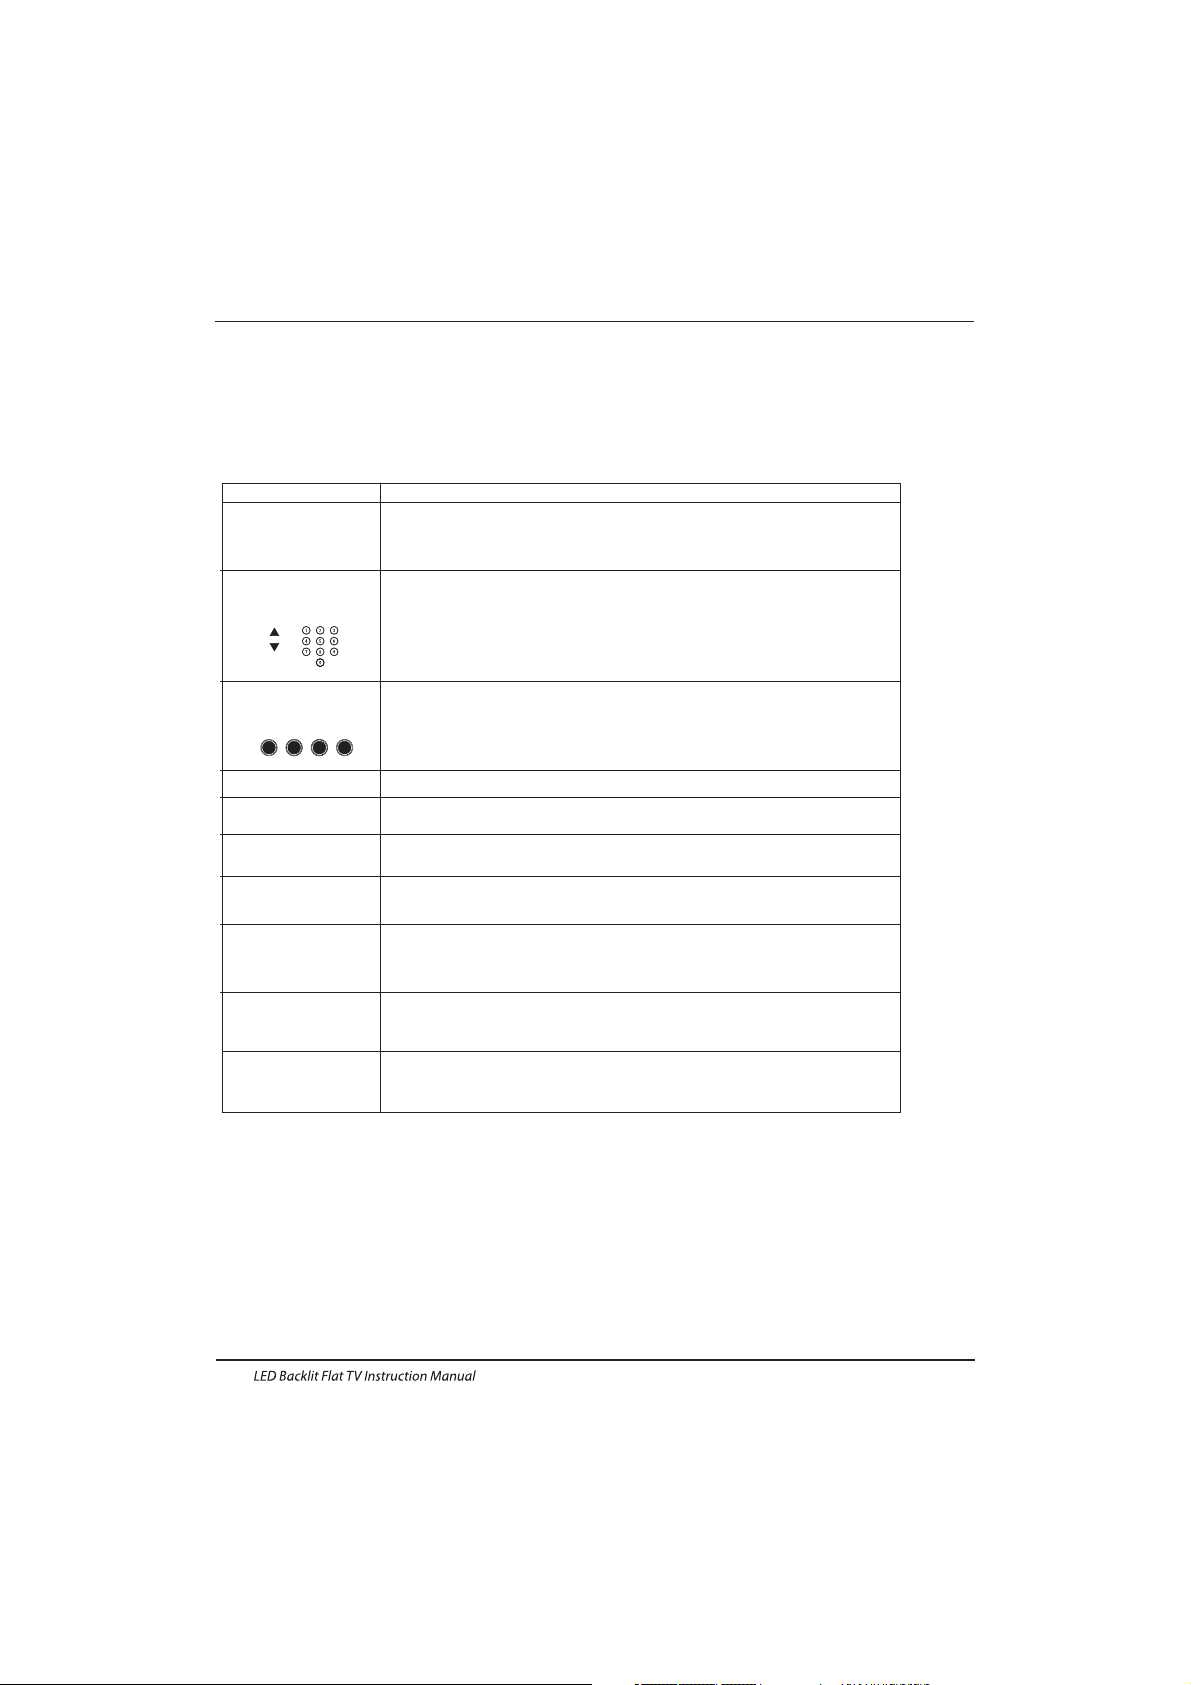
1
2
3
Remote control sensor.
Indicator LED:
RED: STAND BY.
Key board.
1
SOURCE
Display the input source menu.
MENU
Display main MENU.
3
4
CH+/CH-
In TV mode,press CH+ or CH- to change
the channel up and down.
In MENU, press CH+ or CH- to select items .
STANDBY
2
VOL+/VOL-
Adjust sound level.
In MENU,adjust the item that you selected.
5
EN-10
Introduction
Front control panel(22",24",28")
3
2
30 30
1
≤8m
MENU
CH+
CH-
VOL+
VOL-
2
SOURCE
1
3
4
STANDBY
5
1
2
3
Remote control sensor.
Indicator LED:
RED: STAND BY.
Key board.
1
SOURCE
Display the input source menu.
MENU
Display main MENU.
3
4
CH+/CH-
In TV mode,press CH+ or CH- to change
the channel up and down.
In MENU, press CH+ or CH- to select items .
STANDBY
2
VOL+/VOL-
Adjust sound level.
In MENU,adjust the item that you selected.
5
3
2
30 30
1
≤8m
SOURCE
MENU
CH+
CHVOL+
VOLSTANDBY
1
2
3
4
5
Front control panel(32")
Page 12
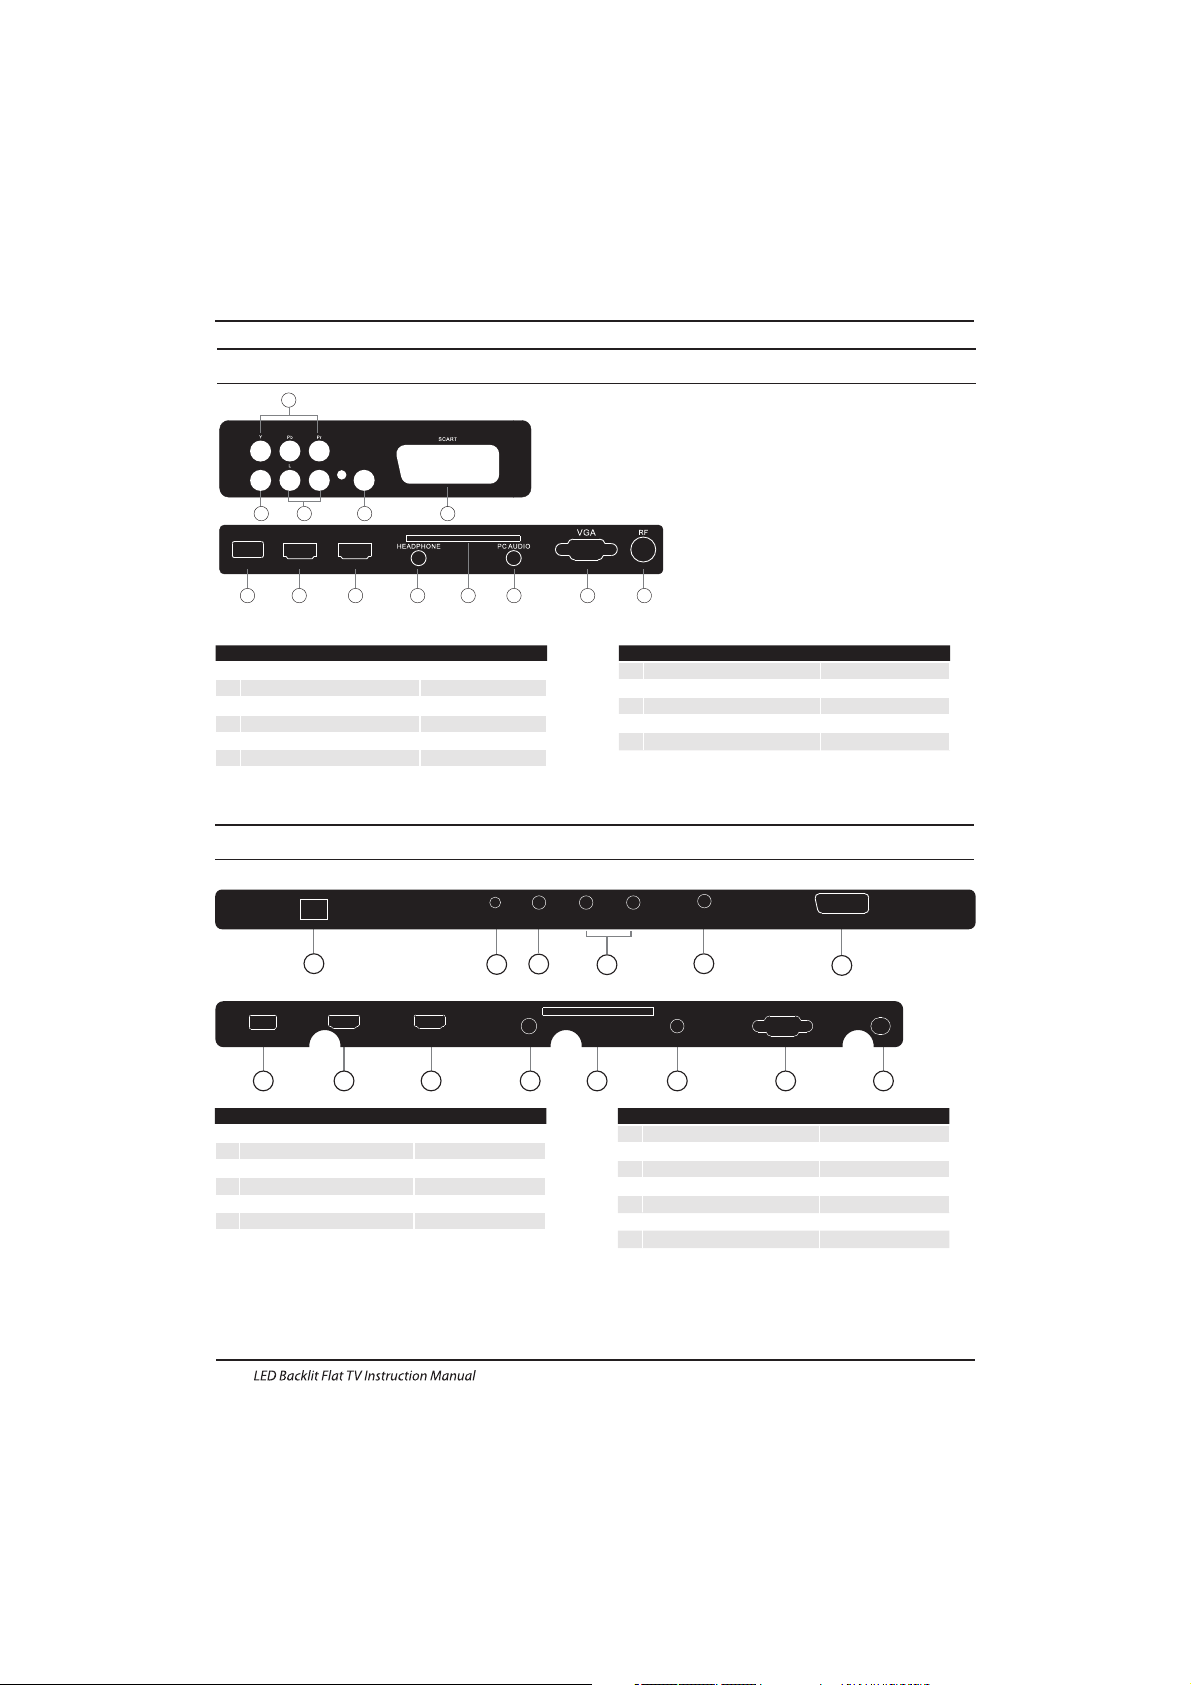
Rear/Side Sockets(22",24",28")
1
L/R AUDIO
2
input
3
4
input
5
input/output
input
VIDEO
6
input
SCART
USB
YPbPr
DIGITAL AUDIO OUTPUT(COAXIAL)
7
input
HDMI2(ARC)
digital audio output
8
9
HDMI1 input
10
11
12
13
input
HEADPHONE
PC AUDIO
VGA
input
input
analogue audio output
COMMON INTERFACE(CI)
input
RF
DIGITAL AUDIO OUTPUT
(COAXIAL)
4
1 2 5
COMM ON INTE RFACE (C I)
USB
6
7 8 9 10
11 12 13
3
VIDEO R
HDMI2(ARC)
Rear/Side Sockets (32")
1
YPbYr
2
input
3
4
input
5
digital audio output
input
AC Power Source
6
input/output
DIGITAL AUDIO OUTPUT( )COAXIAL
SCART
L/R AUDIO
VIDEO
7
input
USB
input
8
9
HDMI2(ARC) input
10
11
12
13
input
HDMI1
COMMON INTERFACE(CI)
PC AUDIO
input
analogue audio output
input
HEADPHONE
input
VGA
14
input
RF
Introduction
EN-11
2 3
1
4
6
5
7 8 9
11 12 13 1410
AC-INPUT
100-240V~ 50/60 Hz
YPbPr
VIDEO
LR
DIGITAL AUDIO OUTPUT
(COAXIAL)
SCART
USB HDMI2(ARC) HDMI1
HEADPHONE
COMMON INTERFACE(CI)
PC AUDIO
VGA R F
HDMI1
Page 13
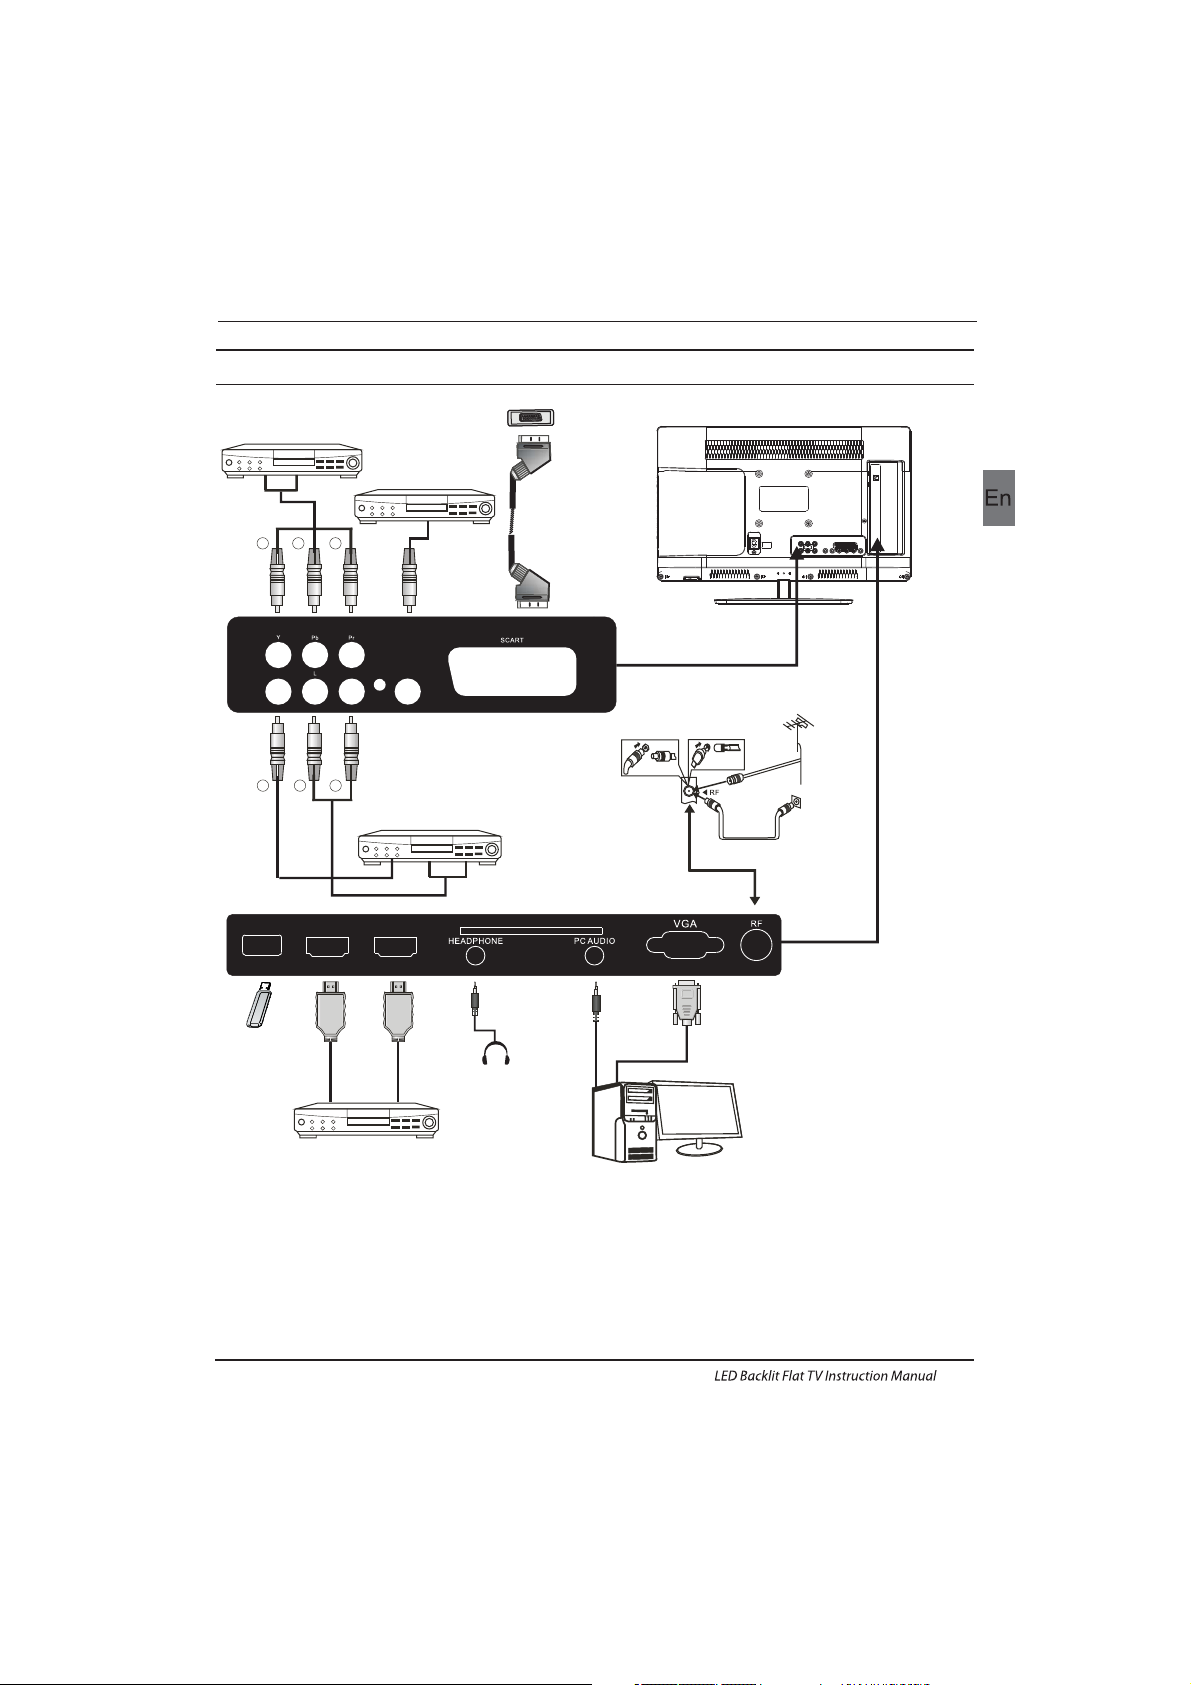
Introduction
Connecting to your Haier TV(22",24",28")
EN-12
GRB
COM MON INT ERFACE ( CI)
USB
CVBS, DVD P layer o r other
machine with YPbPr/YCbCr .
RY
W
Audio/Video machine
with HDMI interfaces
CVBS, DVD Player or other
machine with CVBS/S-Video.
G Green (Y)
B Blue (Pb/Cb)
W White(AUDIO-L )
R Red (AUDIO-R, Pr/Cr)
Y Yellow (VIDEO)
Amplifier
HDMI2(ARC)
DIGITAL AUDIO OUTPUT
(COAXIAL)
VIDEO R
HDMI1
Page 14
Audio/Video machine
with HDMI interfaces
RY W
CVBS, DVD Player or other
machine with CVBS/S-Video.
Introduction
Connecting to your Haier TV(32")
G Green (Y)
B Blue (Pb/Cb)
W White(AUDIO-L )
R Red (AUDIO-R, Pr/Cr)
Y Yellow (VIDEO)
Amplifier
CVBS, DVD P layer o r other
machine with YPbPr/YCbCr .
USB HDMI2(ARC) HDMI1
HEADPHONE
COMMON INTERFACE(CI)
PC AUDIO
VGA R F
GR
B
EN-13
AC-INPUT
100-240V~ 50/60 Hz
YPbPr
VIDEO
LR
DIGITAL AUDIO OUTPUT
(COAXIAL)
SCART
Page 15
EN-14
Introduction
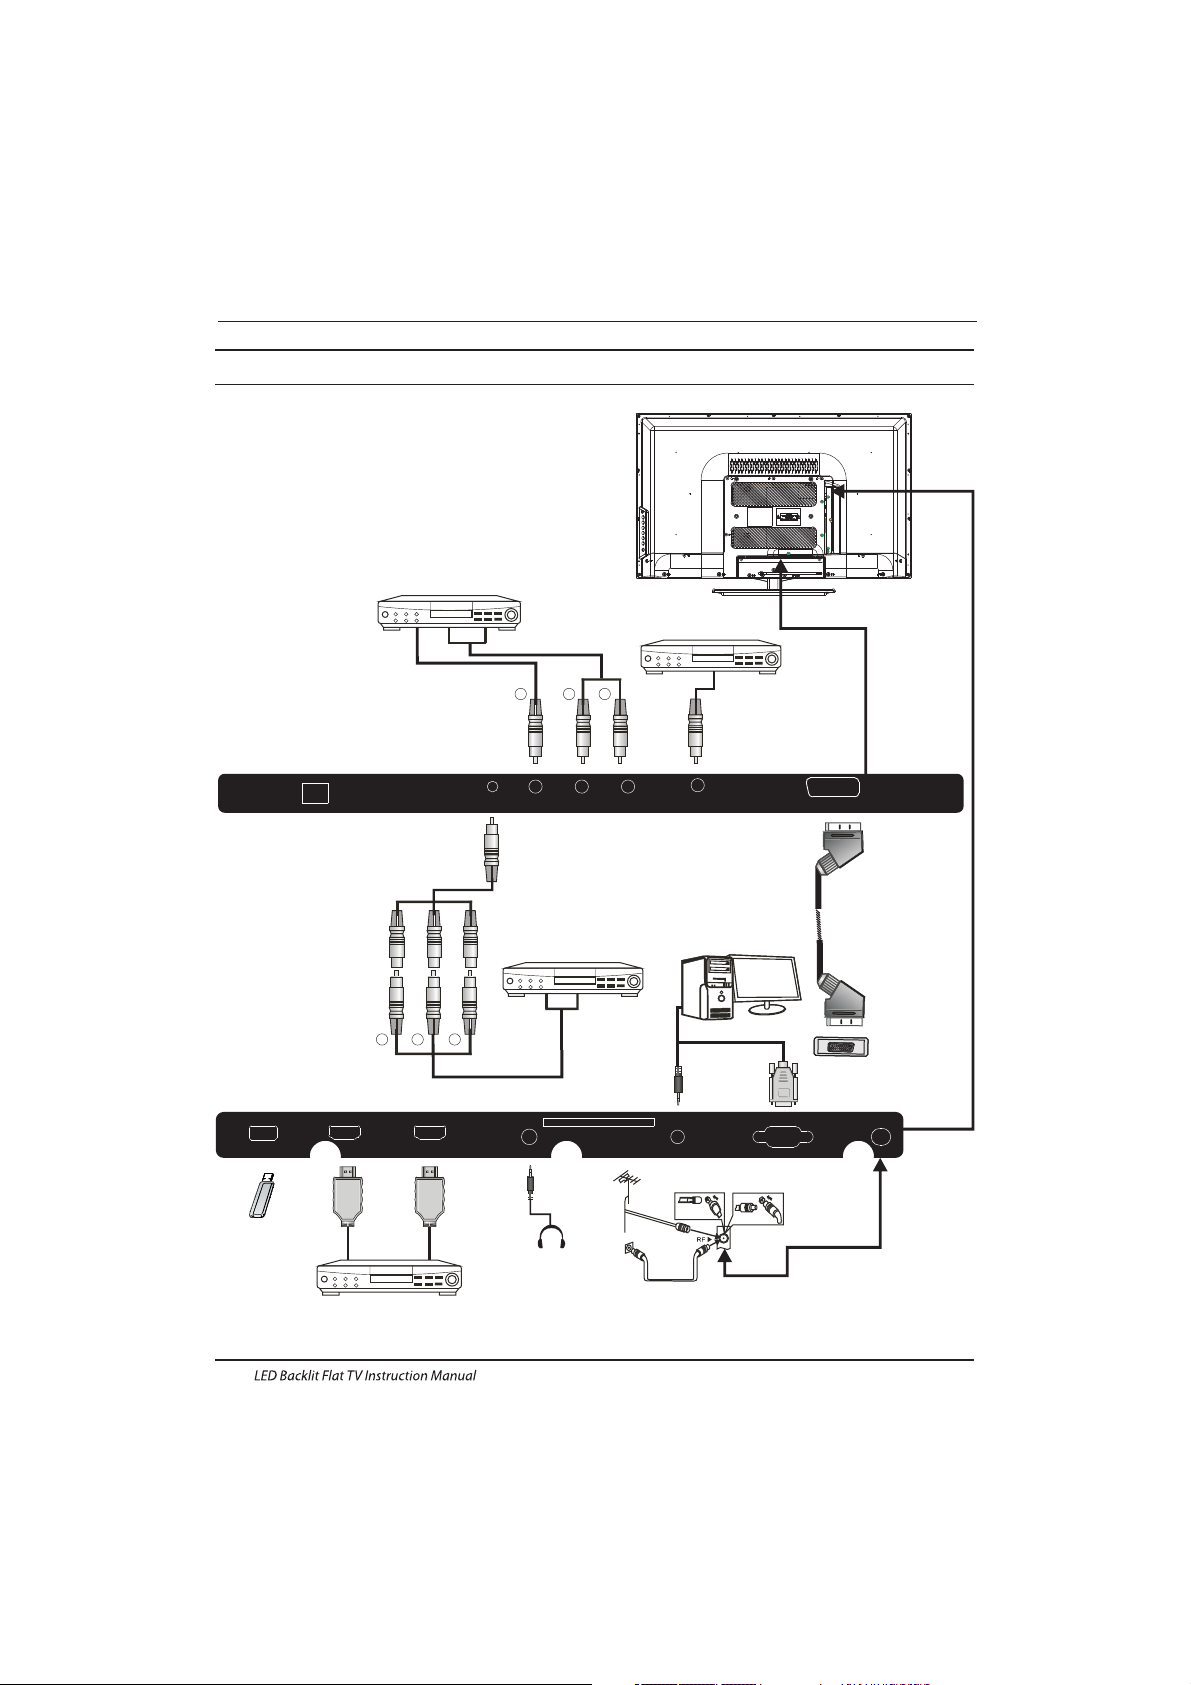
Connecting a DVD p layer / Sa tellite / cabl e
set t op box rec eiver / game s conso le / PC or
Laptop
The re are several op tions t o conne cting a D VD
pla yer / Satellite or Cable set top box rece iver /
games console / PC or Lap top to your TV.
Option 1 SCART
Connect a SC ART cable (not supplied)
from the SCART socket on the TV to the DVD
pla yer / Satellite or cable set top box receiver or
games consol.
To select the device connected with the
SCA RT cable press t he SOURCE butto n on the
remote and use the keys to sel ect SCART
and p ress th e OK button.
Note:- The TV will default to the SCART
connection when the TV is switched on.
Option 2 HDMI1/HDMI2
If th e device you want to connect to the TV
is sw itche d on, swi tch off the devi ce first.
Connect a HD MI cable (not supplied) from
the HDMI socket on the TV to the DVD player /
Satellite or cable receiver or games consol.
Swi tch on the device you have just
con necte d to the TV
To select the device connected with the
HDMI cable press the SOURCE button on t he
remote and use the keys to sel ect HDMI and
press the OK button.
Option 3 AV Audio Visual
(Yellow/White/Red)
Mak e sure th at both T V and the d evice are
switched off before connecting.
Connect the AV cables (not supplied) from
the Video (yellow) and Audio (white, red)
sockets on the TV to the DVD player or games
console etc.
To select the device connected with the
cable press the SOURCE button on the
remote and use the keys to sel ect AV and
pre ss the OK b utton.
Option 4 COMPONENT
(Green/Blue/Red)+(White/Red)
Mak e sure th at both T V and the d evice are
switched off before connecting.
Connect th e cable s (not supplied) from the
COMPONENT IN sockets Y, Pb, Pr (green,
blue, red) and L-Audio-R (white, red) on the TV
to th e DVD player o r games c onsol e etc.
AV
To select th e devic e connected with the
cab le pres s the SOU RCE but ton on the
rem ote and use th e▼▲ keys to select and
press the OK button.
Opt ion 5 VGA (15pin S ub-D)
Connect a VGA c able (n ot supplied) from the
VGA s ocket o n the TV to t he PC / Laptop.
To select th e PC / Lapt op connected with the
VGA c able pr ess the S OURCE b utton on the
rem ote and use th e keys to s elect PC and
press the OK button.
Not e VGA is vid eo only. For au dio fro m your
PC/Laptop you need to connect a separa te
cable from the PC Audio (3.5mm jack) to the
headphone socket on you PC/Laptop (3.5mm
jack)
Opt ion 6 USB
Most USB sticks can be connected to your TV
and s ome dig ital ca meras may al so work .
Connect USB stick (not supplied) or a USB
cable (not supplied) to the T V.
To select th e USB dev ice connected to the TV,
pre ss the SO URCE bu tton on the re mote an d
use t he keys to selec t USB and p ress th e
OK button.
Note 2. Apple iPhones and iPods are not
compatible with your TV.
Note 3. When connecting any device to the USB
connection, keep the USB cable length as short
as possible.
Opt ion 7
Opt ion 8
Component
YPbPr
Note1:Only *.jpg , *.mp3 , * .txt , *. avi ,*. mp4 , fil es will
wor k, othe r file type s are not guarantee d and may n ot.
HEADPHONE OUTPUT
is a di gital a udio connection used to
connect audio equipment, for example home
the atres and ot her dig ital HiFi systems o ver
sho rt distan ces. The sign al is tra nsmit ted over
either a coaxial cable with RCA connectors.
Mak e sure th at both T V and the d evice are
switched off before connecting.
Connect the AV cables (not supplied) from
the soc ket on th e TV to the H ome Thea ter
sou nd system or digital Hi Fi syste m etc.
Ins ert th e plug of t he earp hone into the headphone
soc ket on th e TV. The T V speak ers are n ow muted.
Alternatively you can also plug in external speakers if
required.
DIG ITAL AUDIO OUT(COAXIAL)
COAXIAL
COAXIAL
Connecting to your Haier TV
Page 16
EN-15
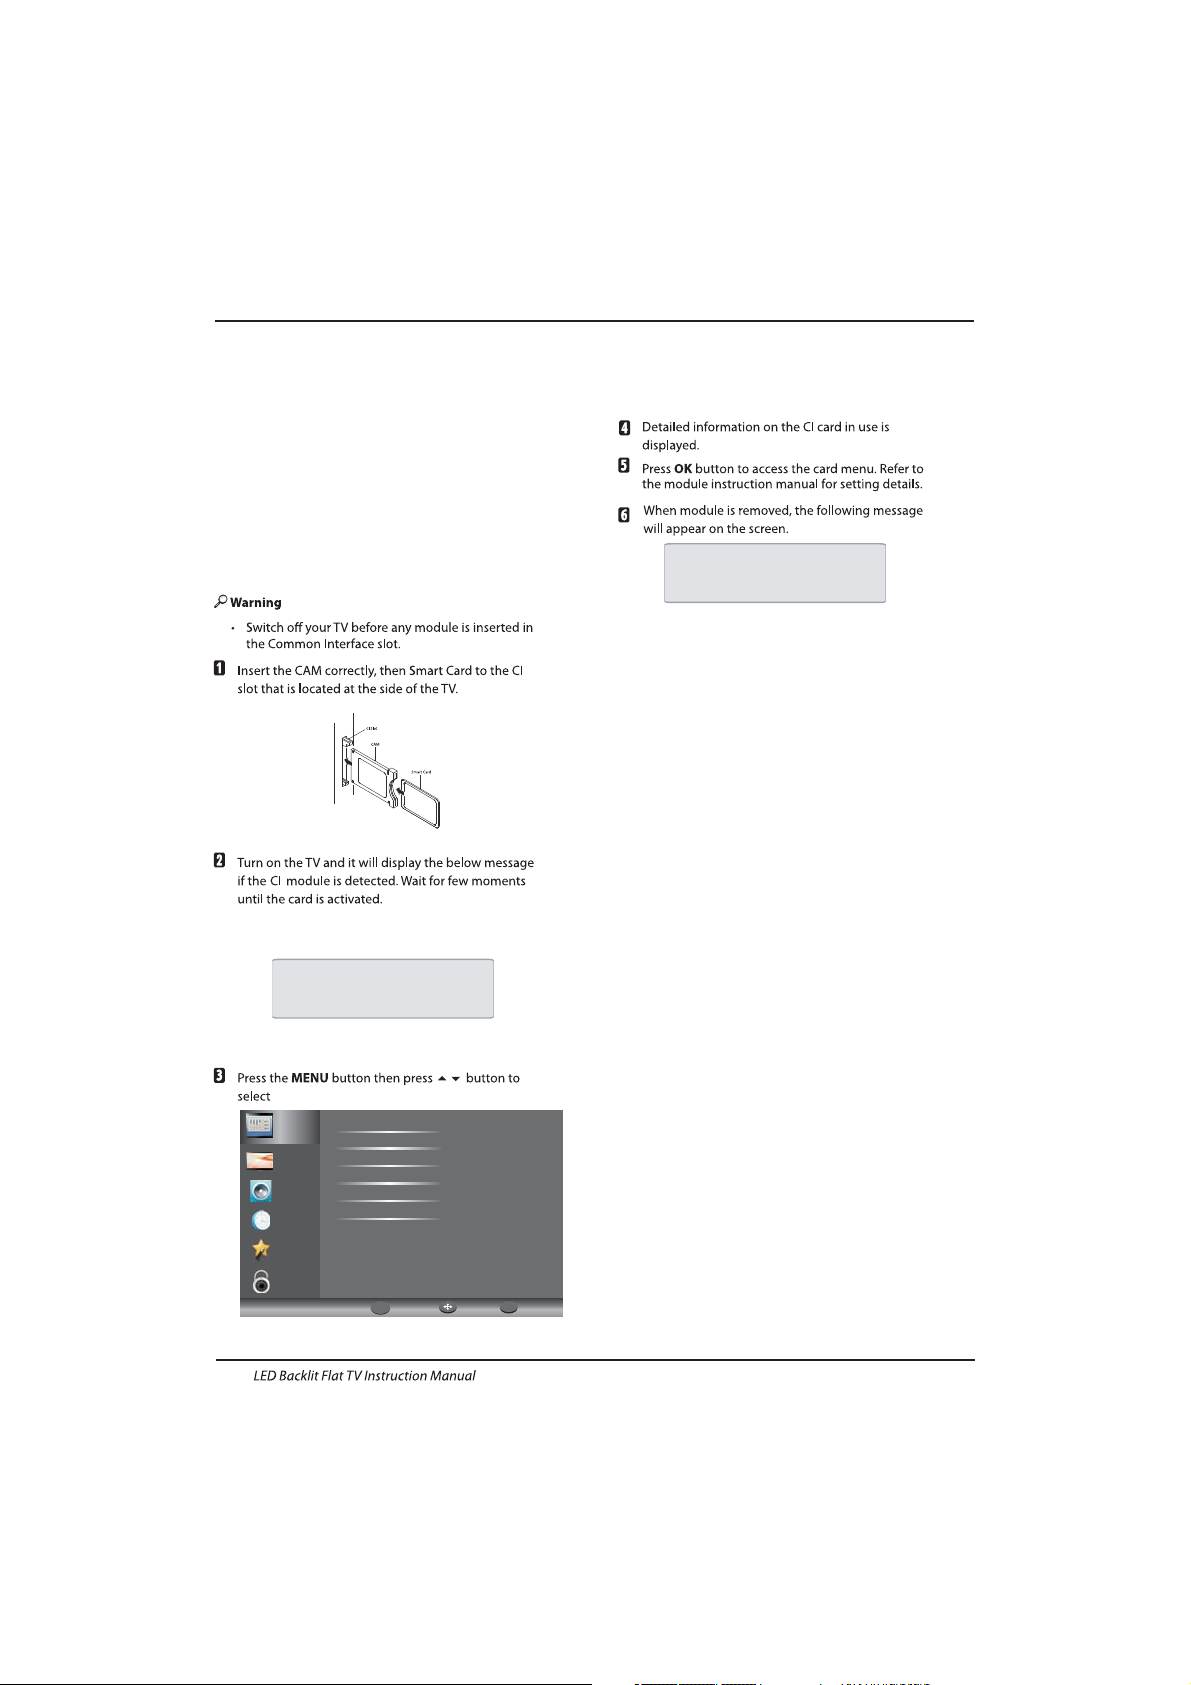
The common i nterface (CI ) slot is d esign ed to
accept the conditional Access (CA) Module and
Smart card in order to view the pay TV
programmes and additional services.
Contact your Common Interface service provider
to ge t more infor matio n about t he modu les and
subscription.
Please noted that CA modules and smart cards
are neither supplied nor optional accessories
from us.
COMMON INTERFACE
Introduction
Common Interface option.
CAM Removed
CAM Inserted
Channel
Picture
Audio
Clock
Setup
Lock
Aut o Scan
Signal Information
Software Update(USB)
Manual Scan
Program Edit
Common Interface
Return Move OK
OK
MENU
Page 17
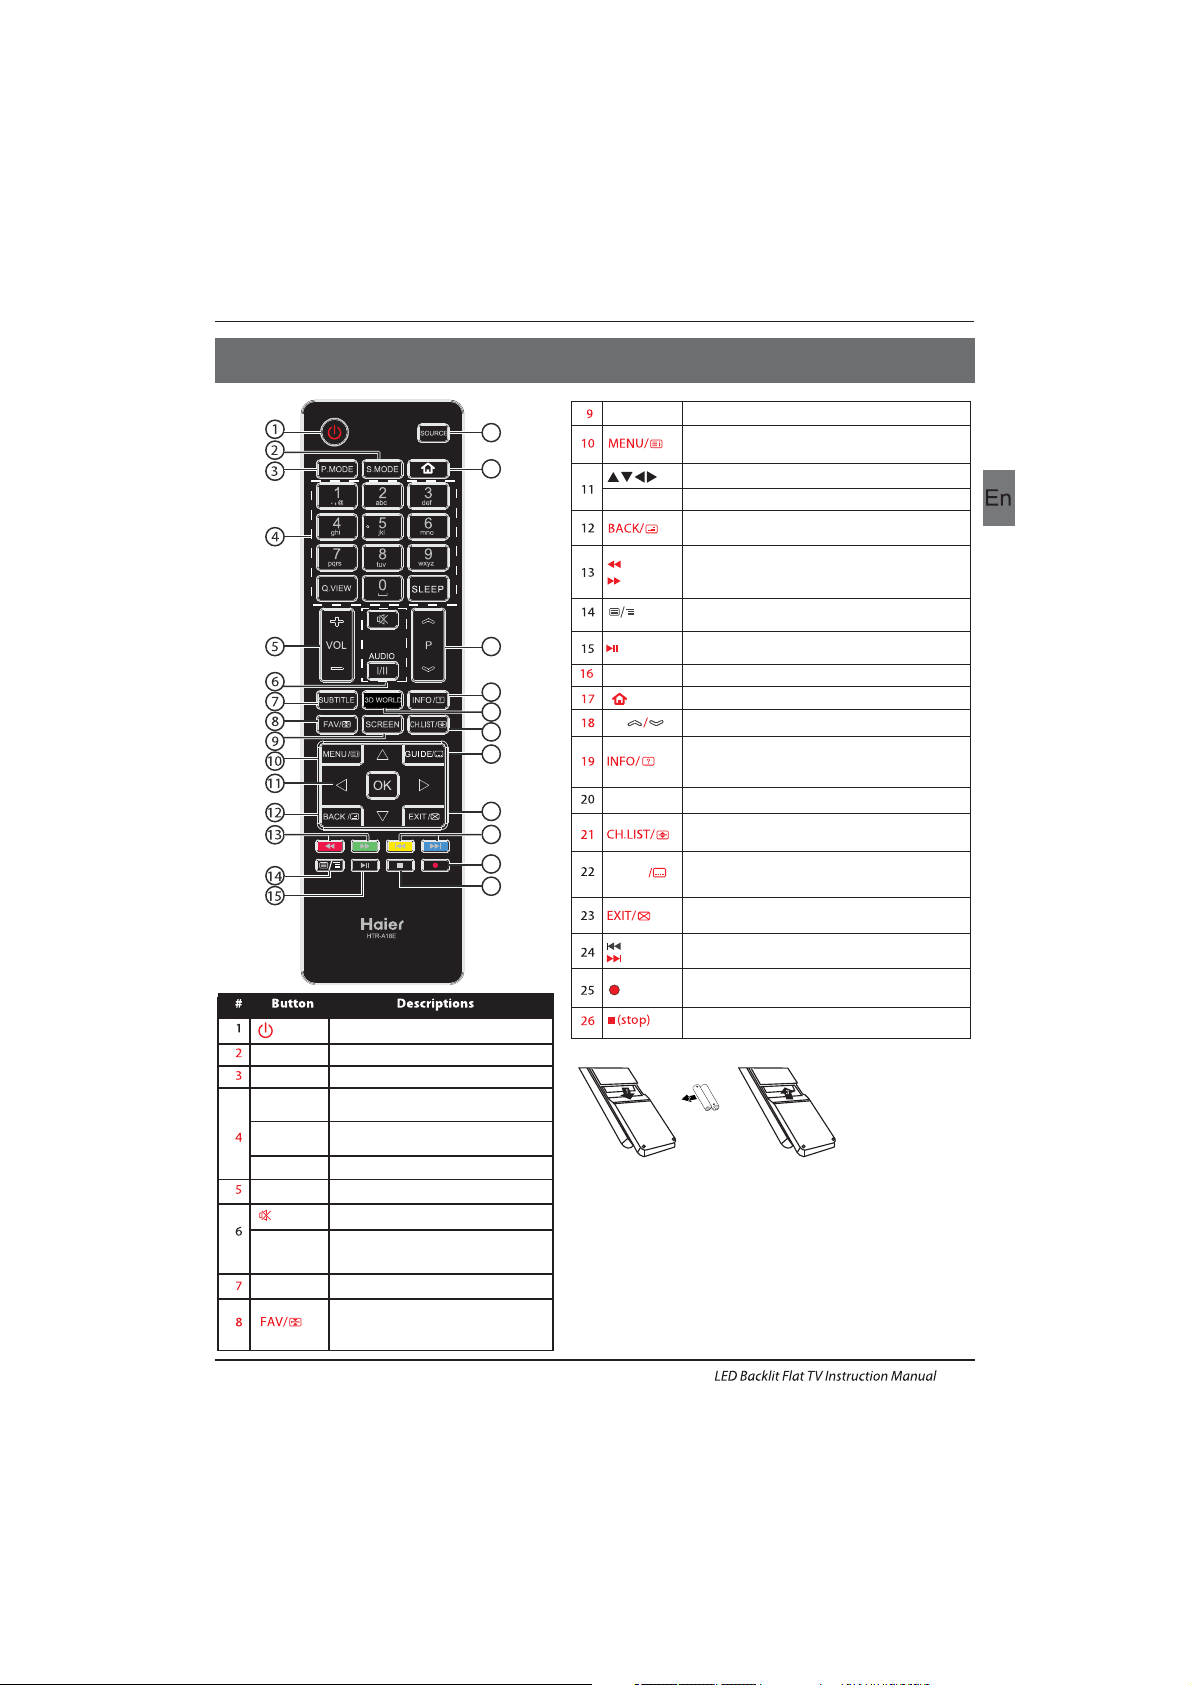
Pres s to turn t he TV on or o ff.
(Power)
S.MODE
Press to select the sound mode.
P.MODE
Pres s to sele ct the pict ure mod e.
0-9
Pres s to ente r a channel number
or password.
Q.VIEW
Pres s to swit ch to the l ast vie wed
channel.
SLEEP
Pres s to set th e sleep t imer.
VOL + /-
Pres s to adju st the vo lume le vel.
(Mute)
Press to turn the sound on or off.
AUDIO(I/II)
Pres s to sele ct Mon o,Nica m stere o
for ATV channel.Select Audio
language for DTV channel.
SUBTITLE
Press to turn the subtitle on or off.
Pres s to open a f avori te channel
list.In teletext mode,press to
hol d a page.
03 Remote Control
Remote Control
SCREEN
Press to change picture aspect ratio.
Press to open the on-screen menu.In teletext
mode,press to open the INDEX page.
Press to navigate the on-screen menu.
Press to confirm a selection.OK
In teletext mode,press to enter mix mode.
(reverse)
(forward)
Press to fast forward or reverse playback in
multimedia mode and timeshift (Red and
Green button in teletext mode)
mode.
Pres s to turn on/ off the te letext f unctio n,and
change TTX mode.
SOURCE
Press to open the input source list.
No function.
P
Press to change the channel.
Press to display the channel information.
In teletext mode,press to revealthe hidden
information.
Press to open the channel list.In teletext mode,
press to size the teletext.
3D WORLD
No function.
Press to close the on-screen menu.In teletext
mode,press to hide the text.
16
17
18
19
20
21
22
23
24
25
26
Press to select previous or next file.(yellow and
blue button in teletext mode)
(previous)
(next)
Press to stop multimedia playback,stop timeshift
in DTV mode.
GUIDE
Press to display electronic programme guide
in TV mode. In teletext mode,press to enter a
secondary page.
(REC)
Press to record the TV program you are watching
in DTV mode.
Press to play/pause in multimedia mode,
timeshift in DTV mode.
(play/pause)
Insert Batteries into the Remote Contol
1. Remove the battery cover.
2. Inserting the 2 AAA 1.5V batteries making sure the polarity
(+ or -) of the batteries matches the polarity marks inside the unit.
3. Mount the battery cover. Replace with new batteries when the
TV set begins to show the following symptoms:Operation is
unsteady or erratic. Sometimes the TV set does not function
with Remote Control Unit.
Remark:
1) Alkaline Battery Recommeded.
2) Remove batteries when they are exhausted or if the remote
control is not to be used for long time.
EN-16
Page 18
E
TEXT
SELECTING A PAGE
DIRECT ACCESS
TO THE ITEMS
INDEX
SUB CODE
HOLD
REVEAL
Press:
You will obtain :
TELETEXT
Enter the number of the page required using the 0 to 9 up/down. Example:
page 120, enter 120. The number is displayed top left, the counter turns and
then the page is displayed. Repeat this operation to view another page. I f
the counte r continues to s earch, this mean s that the page is not
transmitted. Select another number.
Coloured a re as are displayed a t the bot tom of the scree n. The 4 coloured
keys are used to access the items or corresponding pages. The coloured
areas flash when the item or the page is not yet available.
This returns to the contents page (usually page 100).
Press th e butto n and enter the 4- digit num ber to enter a sec ondary page.
To freeze the page.
To display or hide the concealed information (games solutions).
This is used to call or exit teletext modes. The summary appears with a lis t
of items that can be accessed. Each item has a corresponding 3 digit page
number.
Teletext is an information system broadcast by certain channels which can be consulted like
a newspaper. It also offers access to subtitles for viewers with hearing problems or who are
not familiar with the transmission language(cable networks, satellite channels, etc.)
Remote Control
EN-17
MIX
This will superimpose the teletext data on top of the TV picture. Press
button again to return to full text.
EXIT
Hide the teletext.
SIZE
Switch the image to top,bottom,full.
Page 19
Operation
04 OPERATION
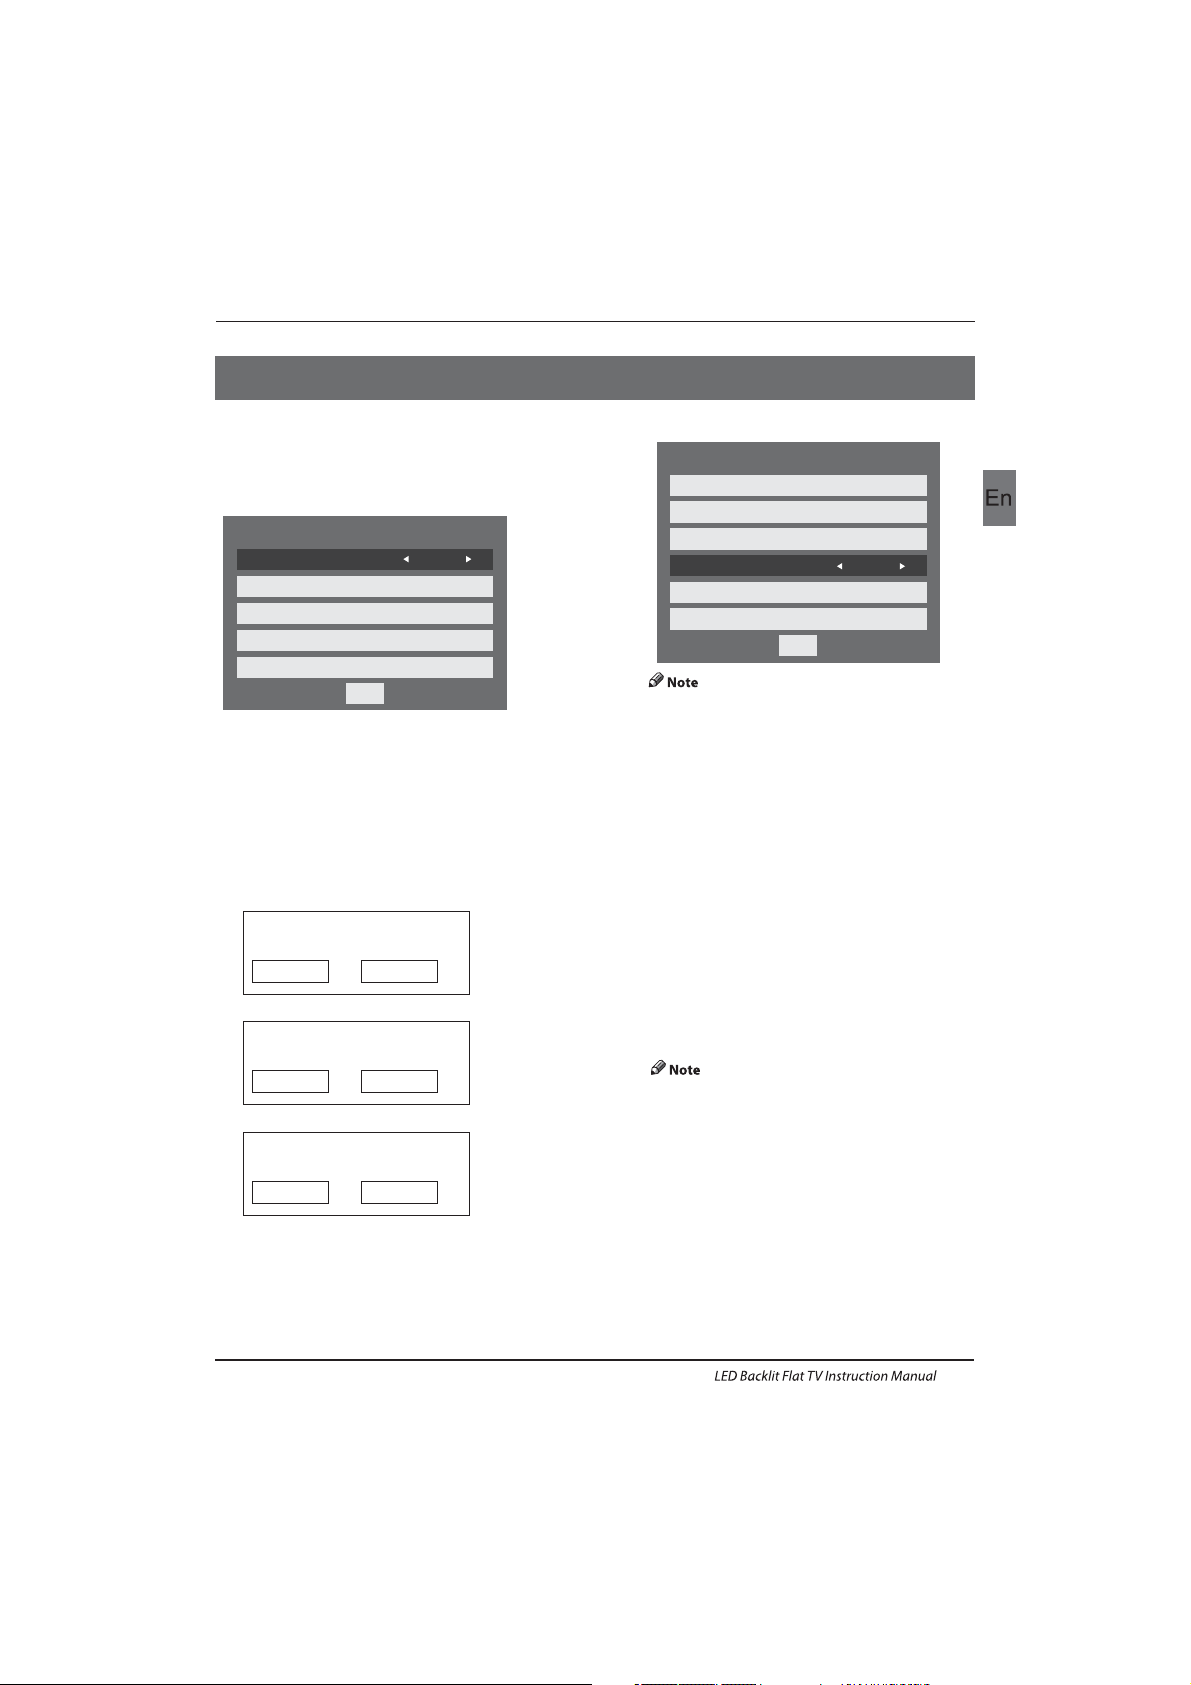
The First Time Setup screen will appear when the TV is first switched
on or reset to the factor y setting.
Installation Guide
1).Press the ▼▲ buttons to navigate the menu and ◀▶buttons
to change the settings. Select your desired language ,Home/Shop
Mode to be displayed on the menu.
2). Press the ◀▶buttons to select AIR/Cable means DVB-T/DVB-C.
If you select DVB-C, you will select Full or Quick way to
scan.Also you can select Auto Scan mode. DTV+ATV or
DTV only, or ATV only.
First Time Setup
OSD Language Engli sh
Mod e Setti ng Home M ode
Country Ger many
Start
Aut o Scan DT V+ATV
Antenna Type Air
First Time Setup
OSD L angua ge Engl ish
Mod e Setti ng Home M ode
Cou ntry Ge rmany
Start
Aut o Scan DT V+ATV
Ant enna Typ e Cable
Cab le Quic k
3). Channel tuning will commence. This operation
may take up to . The display will show
the progress of the tuning and the number of
channels found.
4). If you want to sk ip the DTV tuning, press the
MENU button to interrupt the tuning half way.
You will then go straight to ATV tuning.
5). After tuning is complete, the channels are
arranged in a preset order. If you wish to skip channels,
modify the preset order or rename
channels, select
Programme Edit under the
Channel menu.
some minutes
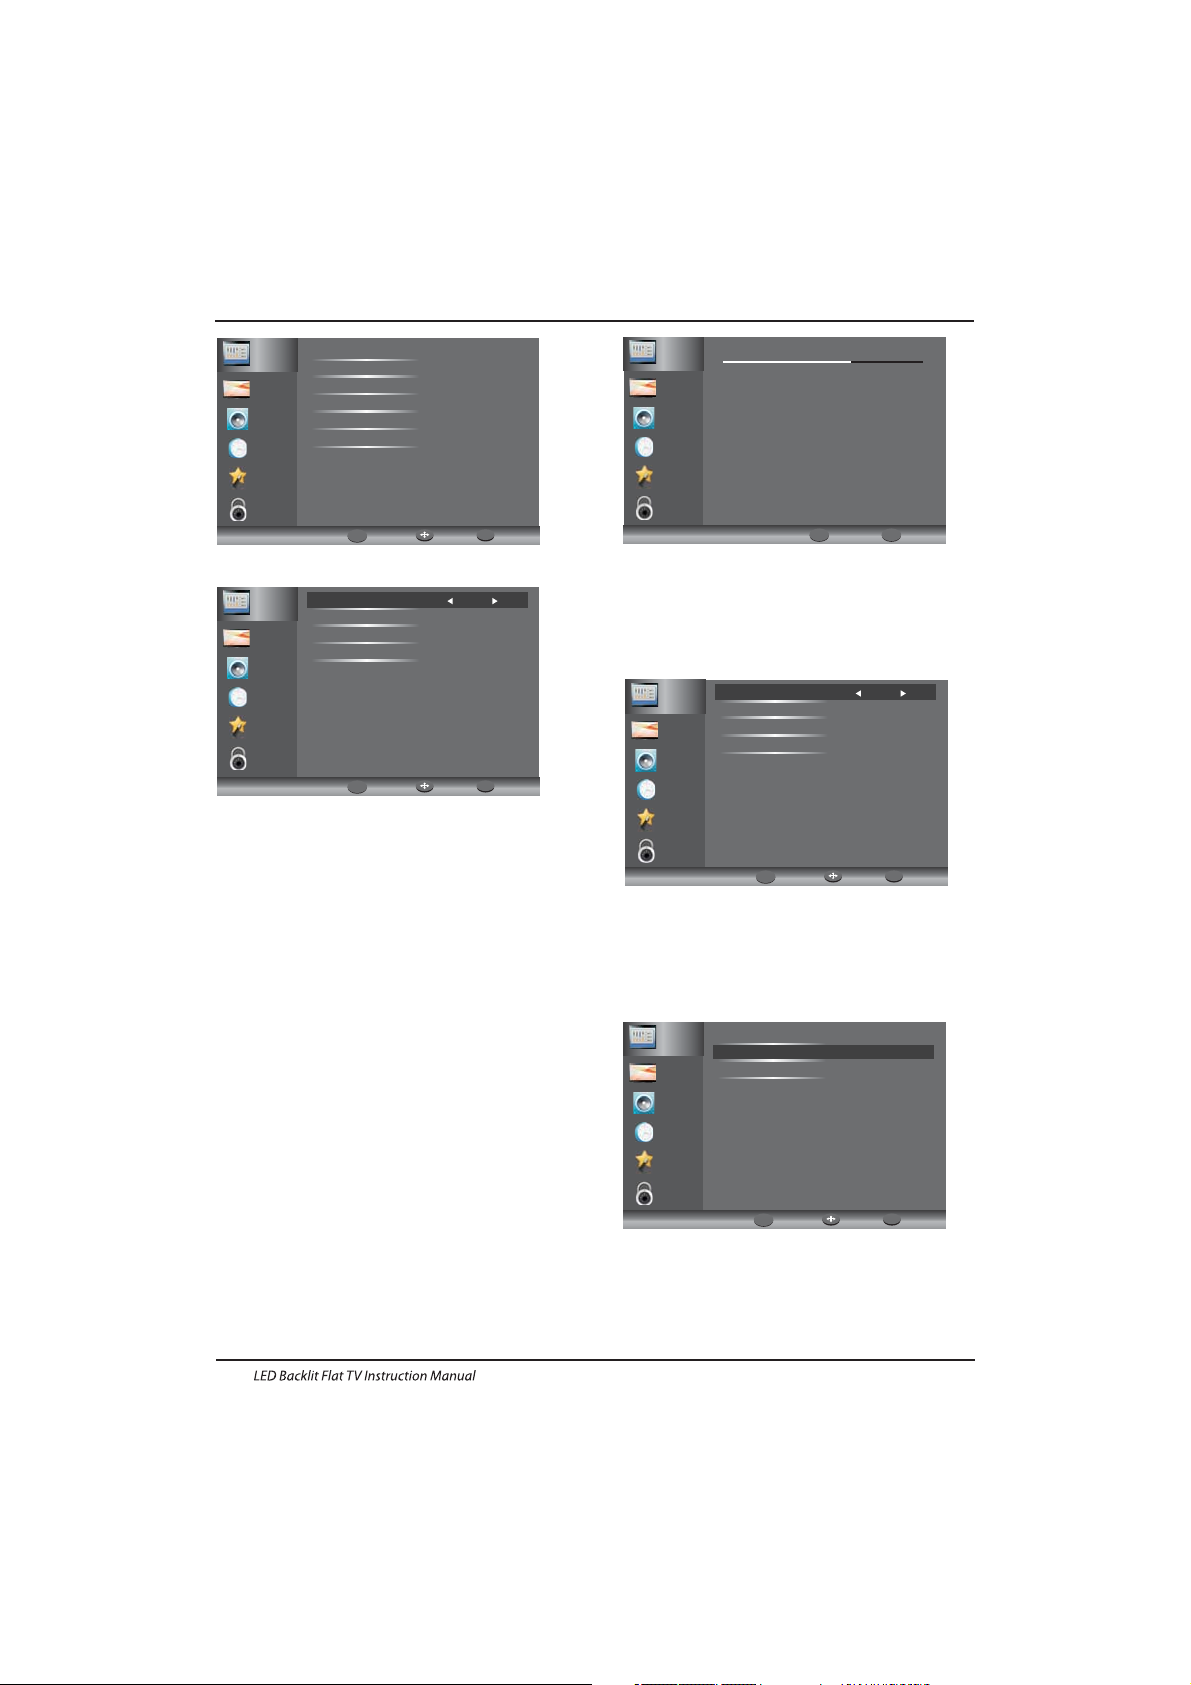
1. 1)Auto Tuning (DVB-T)
1. CHANNEL MENU
1). Press the MENU button and then press the▼▲
buttons to select the CHANNEL menu and then press
the OK button or Right button.
2). Press the ▼▲ buttons to select Auto Scan and then
press the OK button.
DTV Digital TV
ATV Analogue TV (not used in UK)
In the UK to connect to cable TV you will require the
appropriate cable TV 's company's 'set top box' to be
connected to the TV. Please refer to the cable TV's
instructions manual for further details.
EN-18
HOME or Shop modes
1.When the unit is turn on for the very first time, it will show
Initialization set-up menu. After the OSD language is set, the
user can choose between "shop mode" and "home mode".
When the screen shows the following setting menu and the
cursor stays on the "home mode" choice, press
◀▶ to adjust,
and " OK" to enter t he menu .
Select the usage mode?
sho p mode is for shop u sage on ly.
Shop mode
Hom e mode
If "Shop mode" is choosen, the following menu will displayed.
Are you sure to change to
Shop mode?
OK
Cancel
Choose "OK" to enter the next prompt menu.
Home mode is the most energy mode.
OK
Cancel
Continue?
Choose "Cancel" to go back to the Initialization set-up menu,
and the cursor will stay at the "home mode" choice. choose it to
go the next menu to choose the country.
First Time Setup
Page 20
Channel
Picture
Audio
Clock
Setup
Lock
Auto Scan
Signal Information
Software Update(USB)
Manual Scan
Program Edit
Common Interface
Return Move OK
OK
MENU
Operation
3). Press the ◀▶buttons to select Antenna Type to Air
means DVB-T.
5). In the Mode item, press the
◀▶buttons to select tune
mode: ATV / DT V / DTV + ATV. Press the
▼button to select
Start to start.
6). Channel tuning will commence. This operation may take
up to . The display will show the progress of the
tuning and the number of channels found.
7). If you want to sk ip the DTV tuning, press the MENU
button to interrupt the tuning half way. You will then go
straight toATV tuning. You may repeat the above step if
you also want to sk ip the ATV tuning. An installation
reminder will appear the next time you turn on the T V,
if no channel is found.
8). After tuning is complete, the channels are arranged in a
preset order. If you wish to skip channels, modify the preset
order or rename channels, select P
rogramme Edit under the
channel menu.
some minutes
Channel
Picture
Audio
Clock
Setup
Lock
Scanning Ch12
Digital Channels Found:
DTV: 3
Rad io: 0
Dat a: 0
Analog Channels Found: 0
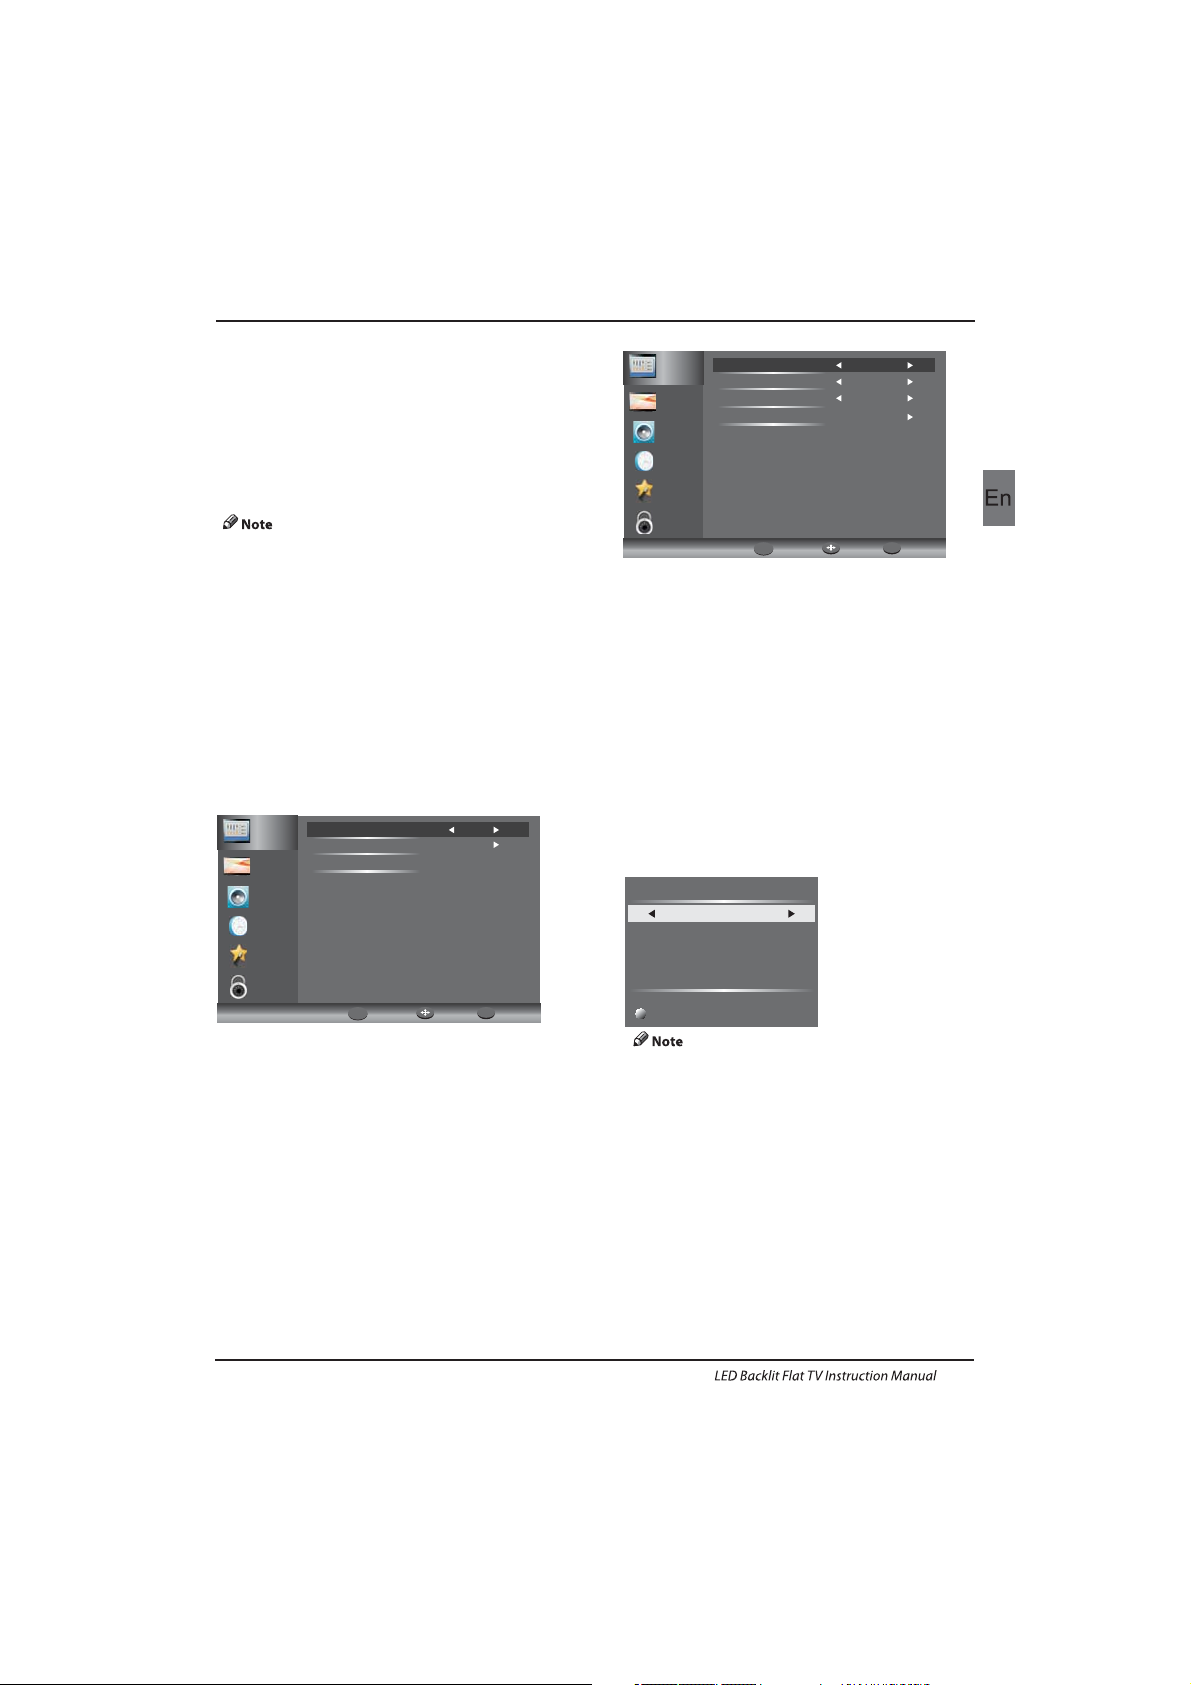
1.2 )Auto Tuning (DVB-C)
1). Press the MENU button and then press the▼▲
buttons to select the CHANNEL menu and then
press the OK button.
2). Press the▼▲ buttons to select Auto Tuning and
then press the OK button,select Antenna Type to cable
mean DVBC.
3). Press the▼button and then press the◀▶▼▲buttons
to select the country you will operate the TV.
Channel
Picture
Audio
Clock
Setup
Lock
Antenna Type Air
Cou ntry Ge rmany
Mod e DTV+ATV
Start
Channel
Picture
Audio
Clock
Setup
Lock
Antenna Type Cabl e
Cou ntry Ge rmany
Mod e DTV+AT V
Start
Channel
Picture
Audio
Clock
Setup
Lock
Quick
Full
Advanced
4). In Country mode, press the ◀▶buttons to select the
country where you will operate the TV.
4). In the Mode menu, press the
◀▶buttons to select ATV /
DTV / DTV + ATV.
6). Channel tuning will commence. This operation may
take up to The display will show the
progress of the tuning and the number of channels
found.
some minutes.
EN-19
5). Select start to enter the menu as below, to select
search mode.
▶
Return Move OK
OK
MENU
Skip
MENU
Exit
EXIT
Return Move OK
OK
MENU
Return Move OK
OK
MENU
Page 21
Channel
Picture
Audio
Clock
Setup
Lock
Digital Scan Ch5
Start
Strength 54
Operation
2. 1 )DTV Manual Tuning (DVB-T)
All the channels including ATV, DTV and Radio
can be tuning by one time,if the Tune Type is
DTV+ATV .
All t he stored ch annel s will be d isapp ear after
auto tuning .
After auto tuning , the channel will sk ip to
the first DTV channel.
2). Press the▼▲ buttons to select DTV Manual Tuning
and then press the OK button,if you select Air in Auto
Scan, you will enter DVB-T manual scan menu.
4). Press the MENU button to return back to the
main menu.
5). Press the EXIT button to exit the menu.
2. 2 )DTV Manual Tuning (DVB-C)
1). Press the MENU button and then press the▼▲
buttons to select the CHANNEL menu and then
press the OK button.
3). The DTV M anual Tuning screen will pop up.
Press the ◀▶ buttons to select the desired UHF channel
or press the OK button then input channel number. Select
Start to commence the search of that channel. When the
signal has been tuned, the picture and signal strength will
be displayed on the screen.
1). Press the MENU button a nd then press th e
buttons to select the CHANNEL menu and then
press the OK button.If you select Cable in Auto scan,you
will enter DVBC manual scan menu.
▼▲
Channel
Picture
Audio
Clock
Setup
Lock
Fre quenc y 47400 0K
Symbol Rate 6875K
Modulation Auto
Start
2). The DV B-C Manual Tuni ng screen will pop up.
Press the▼▲buttons to select(Frequency /Symbol
(ks/s/QAM Type ),press OK to input Frequency and symbol,
press ◀▶to change QAM type, press Sta rt to commence
the search of that channel. When the signal has been
tuned, the picture and signal strength will be displayed
on the scre en.
3). Press the MENU button to return back to t he
main menu.
4). Press the EXIT button to exit the menu.
3) ATV Manual tuning :
You can change the sound system, search the analog TV
channels and fine tune the channels , then storage the
channels you selected.
1. Press teletex t red button to storage to channels
after manual tuning .
2. If the number save to is the same as the number
Current CH, when you press Red button,the save to
number will cover the Current CH number.
Sav e to 1
Sys tem BG
Current CH1
Search
Frequency 44.25 MHz
Fin e tune
Save
ATV Manual Tuning
4). Program edit :
Press the ▲or▼ Buttons to selec t Program Edit in the
Channel Menu. Then press the OK Button to enter the subMenu. Then you will need to select the program you wish
to edit.
EN-20
7). If you want to sk ip the DTV tuning, press the MENU button to
interrupt the tuning half way. You will then go straight to
ATV tuning. You may repeat the above step if you also want to
skip the ATV tuning. An installation reminder will appear the
next time you turn on the TV,if no channel is found.
8). After tuning is complete, the channels are arranged in a
preset order. If you wish to skip channels, modify the preset
order or rename channels, select P
rogramme Edit under
the channel menu.
Return Move OK
OK
MENU
Return Move OK
OK
MENU
Page 22
12
abc3def
4
ghi
5
jkl
6
mno
7
pqrs
8
tuv9wxyz
Operation
5). Common I nterface
This menu can display the CI card' s information.
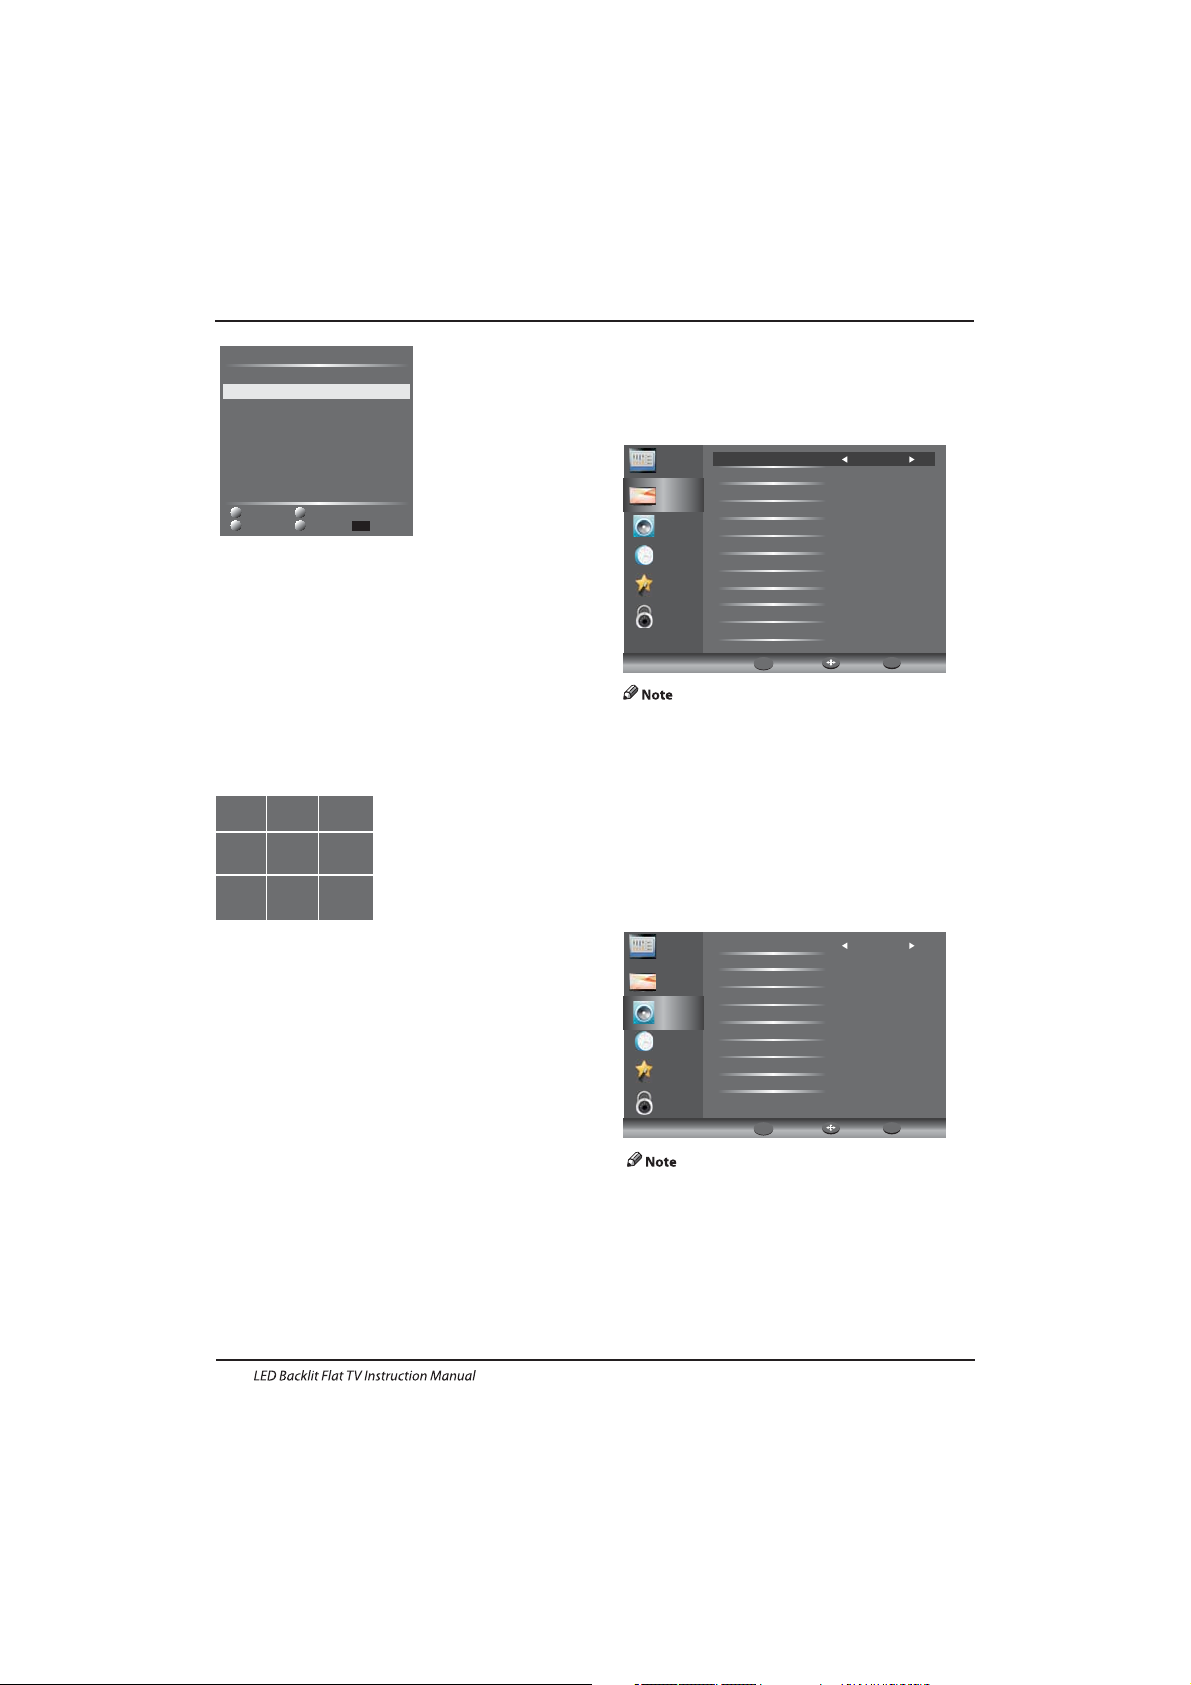
The second item of the MENU is PIC TURE MENU.
You can adjust picture effect here, such as
contrast, brightness, etc.
Press ▼▲ to move, press to adjust.
◀▶
2. PICTUREMENU
Channel
Picture
Audio
Clock
Setup
Lock
Pic ture Mo de Stan dard
Medium
Asp ect Rat io 16:9
Col or Temp
Bac kligh t 14
Bri ghtne ss 50
Con trast 4 5
Sharpness 60
Col or 45
Tint 0
Med ium
Dyn amic Co ntras t
DNR
Normal
1).There are three colors temperature modes
can be selected normal, warm, cool.
2).PC Setting is available in PC mode only which
can adjust Horizontal position, vertical
position, size and phase.
3.AUDIO MENU
The third item of the MENU is the AUDIO MENU.
You can adjust the sound effect here such as
treble, bass, balance etc.
Press ▼▲ to move, press to adjust.◀▶
Channel
Picture
Audio
Clock
Setup
Lock
Sound Mode Standard
Treb le 0
Bas s 0
Balance
0
Auto Volum e On
Surround
Sound Off
Auto
Audio
Description
Audio Only
SPD IF
Off
001 T he HITS
003 U KTV Br ’tlde as
004 f t h
005 I deal Wo rld
006 Colourbars100
001 K iss
002 S mash Hi ts!
003 K erran g!
002 T MF
Delete
Programme Edit
DTV
DTV
DTV
DTV
DTV
DTV
Radio
Radio
Radio
Move
Skip
Rename Favorite
Delete: Press the Red Button to delete the channel you
highlighted.
SKIP: Press the Yellow Button to select the Skip function
and a SKIP icon will be displayed next to the program and
it will be skipped when changing the channel.
MOVE: Press the Green Button to highlight the select the
channel you want to move. An icon will display ahead the
channel number. Then press the ▼ / ▲ Buttons to a new
position and press the Green Button to confirm.
Rename: (For ATV only) Press the Blue Button for renaming
the channel. Press the number key circularly to enter a new
name and press the OK Button to confirm (the number key
as the following table).
FAV: Press the FAV Button (instead of color Buttons) to set
the favourite channel. (If you want to view the Favorite
Channel List you need to exit Program Edit Menu and then
press the FAV Button.)
6). S ignal I nformation (Only fo r DTV)
Press the ▼ / ▲ Buttons to select the Signal Information
in the Channel Menu. Then press the OK Button to show the
related information of the current channel.
7). Software Updated (USB)
Press the ▼ or ▲ Buttons to select Software Update (USB)
in the Channel Menu. Then press the OK Button to update
software by using a USB. Follow the software upgrade
instructions provided with the software.
Note: We recommend you perform a factor y reset (refer to
Restore Factory Default in Setup menu) to ensure the unit
is successfully upgraded.
1.Auto volume: only available when the input
signal volume is too large or distortion.
2. Audio Only: set on to turn off the TV screen,
and then you can listen TV.
FAV
EN-21
Return Move OK
OK
MENU
Return Move OK
OK
MENU
Page 23
Operation
Channel
Picture
Audio
Clock
Setup
Lock
Sleep Timer Off
Dat e 2010/04/30
On
Time
f
Auto
Sleep On
Time
Zone
Of
Time
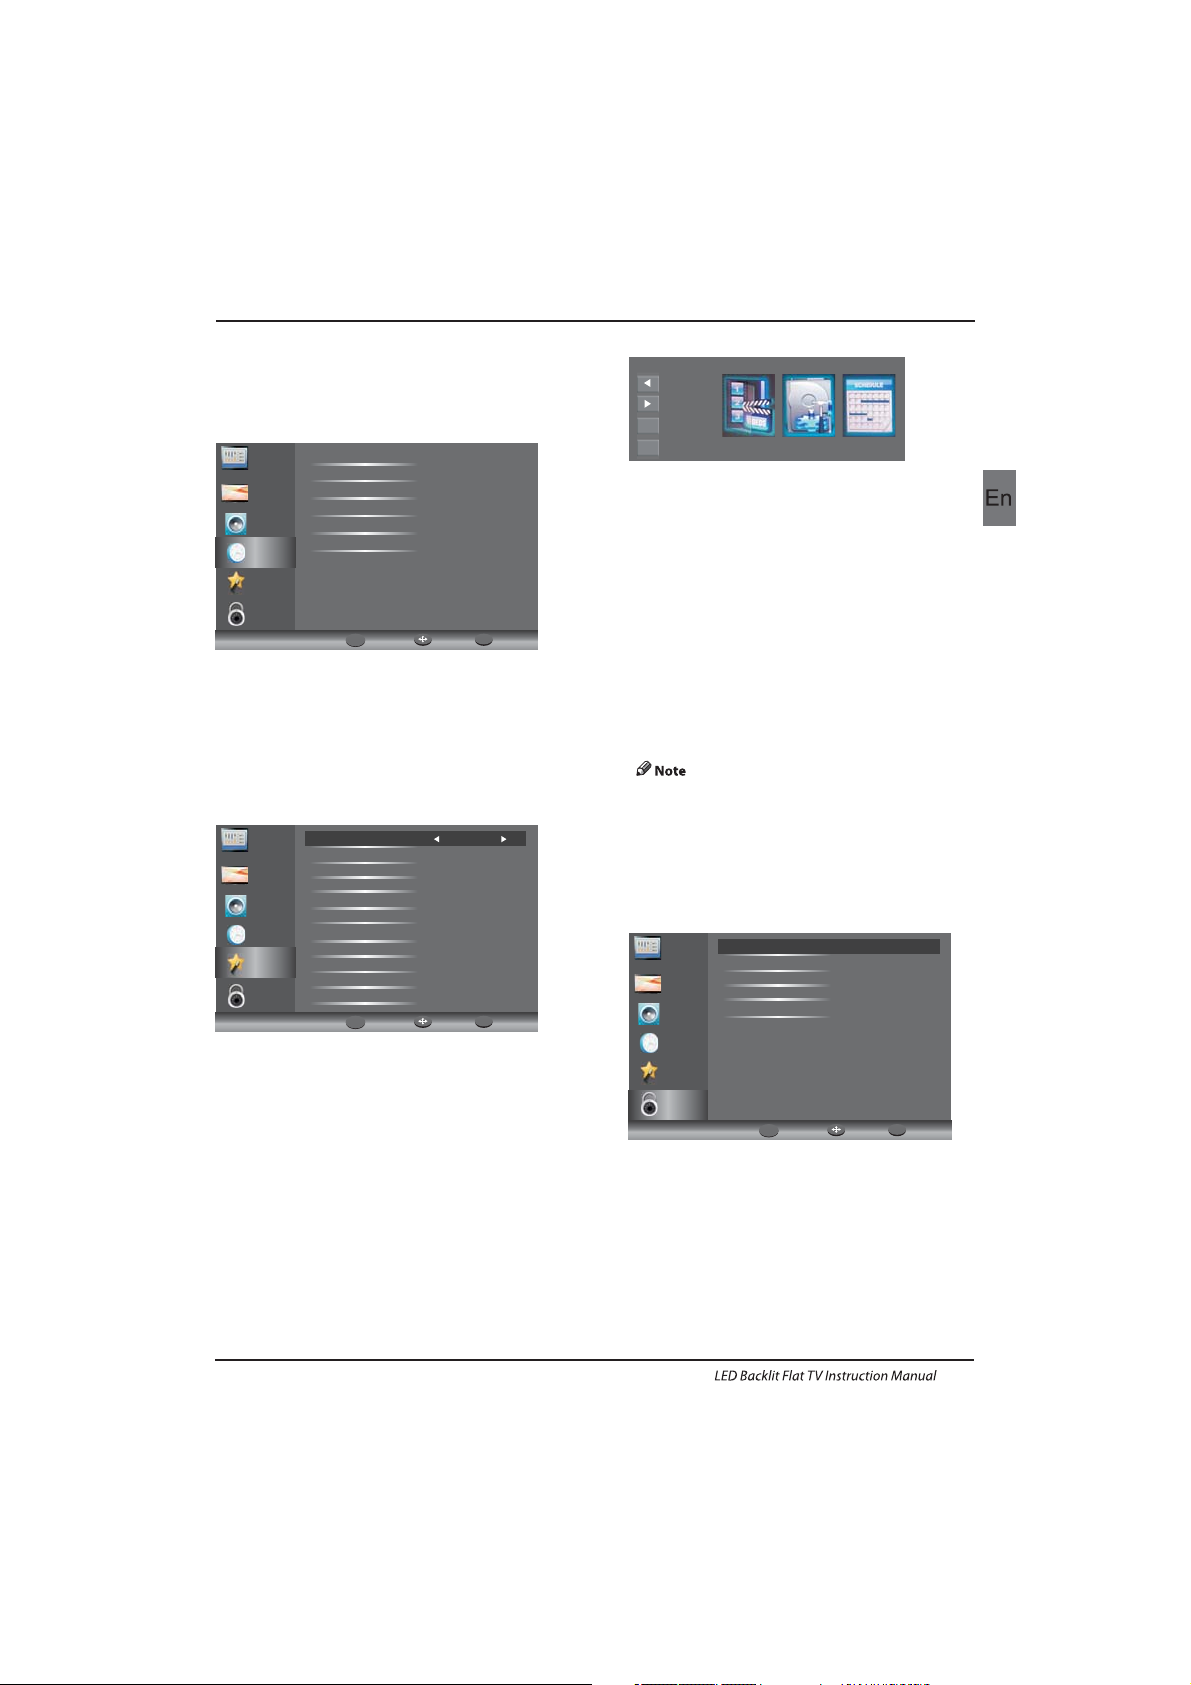
5.SETUP MENU
The fifth item of the MENU is the SE TUP MENU. You can
adjust the OSD language, Audio language,Subtitle
language etc.
In PV R File syste m menu you can s et up USB
dis k for PVR.
Auto Standby(4hr)
1.I f after 4 hours from switch on and no changes have
bee n made to t he TV, for ex ample n o chann el or vol ume
changes,the TV will start the automatic power down
sequence.
And pop-up window will appear on screen.
Channel
Picture
Audio
Clock
Lock
O E
A
Languages
H
H O
O
SD
Language nglish
udio
Sub title
Country Ger many
PVR
File System
Timeshift Record Time 1ho ur
Auto Standby(4hr) On( 4 hours)
Mode Setting ome Mode
DMI CEC Control n
OSD Time ff
Restore Factory Default
Setup
PVR Settings
Move Left
Move Right
Select
Exit
OK
EXIT
File Manager Device List
Scheduled Record
6.LOCK MENU
The sixth item of the menu is the LOCK MENU
You can lock system, set password, block program
and set parental guidance Once you set the lock
system on you can not search the channels or
change any programs.
Restore factory default will clear all the programs
and password.
Channel
Picture
Audio
Clock
Ent er Pass word -- -Ena ble Off
New P asswo rd ----
Cha nnel Lo cks
Par ental R ating N one
Setup
Lock
The default pass word is 0000, If you forget the
password, you can use the super password:9443.
Channel Locks: Press ▼▲ to choose the
program ,press OK button to block
the program. If you want unblock the program,
pls enter the main menu , input the password,choose
the program,then press OK button again.
Parental Rating: Press ◀▶to choose rating.
Timeshift Record Time: To set the max Timeshift
Record Time.
Auto Standby (4hr): To set the unit to standby
after any 4hours operation.
HDM I CEC Cntrol: To set CEC function to on or off.
OSD Time: Press ◄ or ► to select the menu
display time.
Res tore Fac tory Default
Press the ▼ or ▲ Buttons to select Restore Factory
Default and press the OK Button to enter the first
Mode Setting: To set Home mode or Shop mode.
setup. Once confirmed, all the settings will be
cleared. This should be used if you experience
any issues with your TV.
standby. To override the automatic shutdown press any
but ton on th e remote con trol.
2. To cancel the automatic power-down
On the Option Menu select Auto standby(4hr),The TV
screen returns to the Option Menu and Auto standby
(4hr) option will display.
Auto standby (4hr) OFF
After 150 seconds the TV will automatically switch to
The fourth item of the menu is the CLOCK MENU
You can adjust the clock, power on/off time,
sleep timer etc .Press ▼▲ to move, press OK
to adjust.
To return to auto shutdown after 4 hours repeat the
above except use the left arrow key to select on(4 hours).
Auto Sleep
If after 15 minutes there is no signal input, the T V will switch
off to Auto Sleep, when the Auto Sleep function is set to ON.
The clock time is automatically set when the TV is able to
receive DTV.
4.CLOCK MENU
EN-22
Return Move OK
OK
MENU
Return Move OK
OK
MENU
Return Move OK
OK
MENU
Page 24
Operation
PROGRAM GUIDE
Record
Schedule
Reminder
2010/04/29 02:19
001 N ine Dig ital NINE MORNING NEWS
002 N ine Dig ital NINE MORNING NEWS
003 G O! TMZ
...
PROGRAM GUIDE
001 Nine Digital
01:00-02: NINE MO RNI NG NEWS
-03:00 HE ELLEN DEGENERES S...
- HE VIEW
DAY S OF O UR LI VES
NTERTAINMENT TONIGH T
AGICAL TA LES
HE SHAK
INE AFTERNOON NEWS
00
02:00 T
03:00 04:00 T
04:00-05:00
05:00-05:30 E
05 :30 -0 6:00 M
06:00-06:30 T
06:30-07:00 N
Record
Information
Service
Reminder
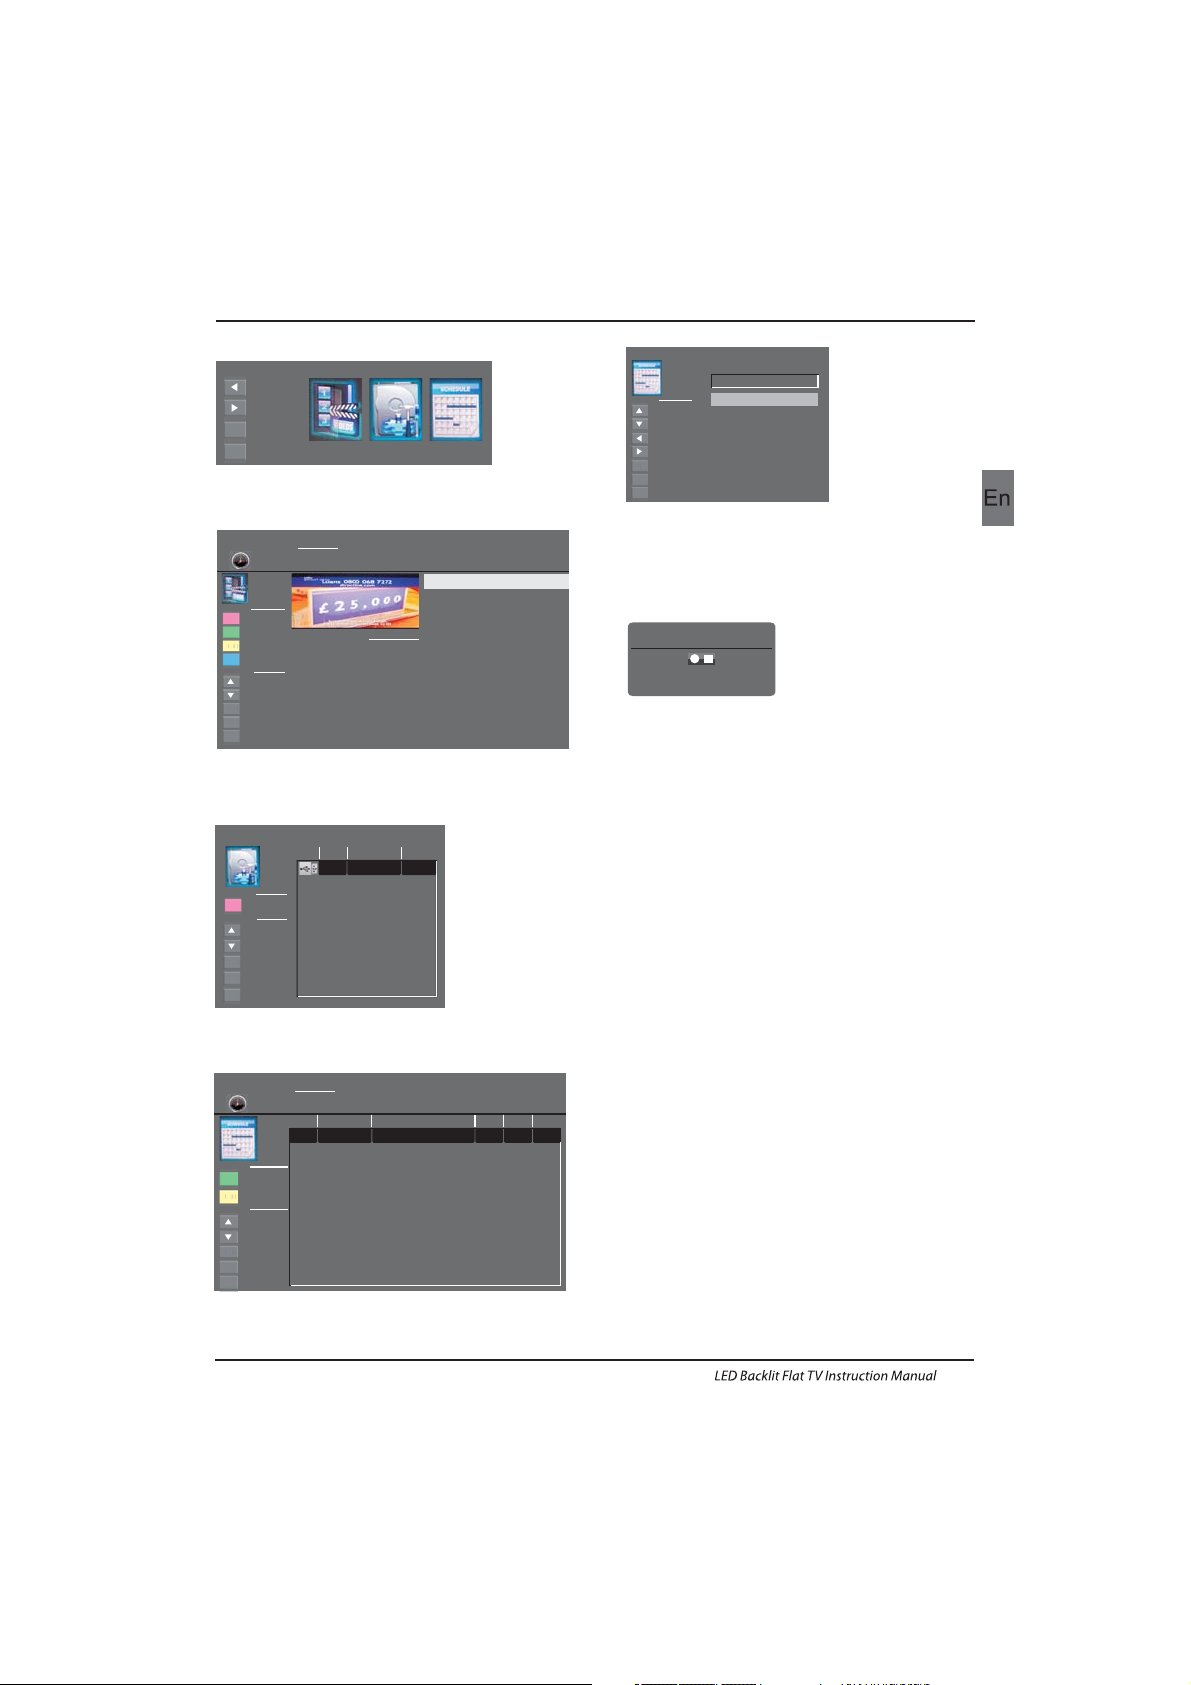
To see what is going to be broadcast after the current
program, press Yellow (Schedule) Button. To view a
different channel, use the ▲ or ▼ Buttons to highlight the
channel and then press the ◄ or ► Buttons. To exit the
EPG Menu, press the EPG or EXIT Button. Press it (Service)
again to return.
Please refer to the bottom of the EPG screen
for the basic remote control key functions.
Record
In EPG mode, press the Red Button on the remote control
to select a program to be recorded. You will then enter
Scheduled Record menu for record setting. (Refer to the
section of PVR file system.)
Please ensure a compatible Hard Disc Drive or USB
device is inserted into the USB input to schedule
recordings. If your storage device is not compatible, you
If you have set a timed recording, your TV will automatically
turn on when the program is set to record and will
automatically turn off after the recording is complete.
During a timed recording however the picture and volume
will be mute (there will be no display), however the unit
will be on. You can press the STANDBY Button to tur n the
picture and volume back on.
Reminder (Blue Button)
In the EPG Menu, press the BLUE Button to set a program
reminder. The below Reminder Menu will then be displayed
and you can use the ◄or ► Buttons to set the program
reminder details. You will be able to set reminder to occur
once, Daily or Weekly.
Frequency
Cha nnel
Minute
Hour
Month
Date
Reminder
Off
The H ITS
0
17
Nov
19
17:03 19/11/2004
OK
Schedule List
You may press Red button to view the scheduled programs
list. Also you may delete the programs you have scheduled.
INFO (Gre en Button)
In the EPG Menu, press the GREEN Button to view more
information about the current program.
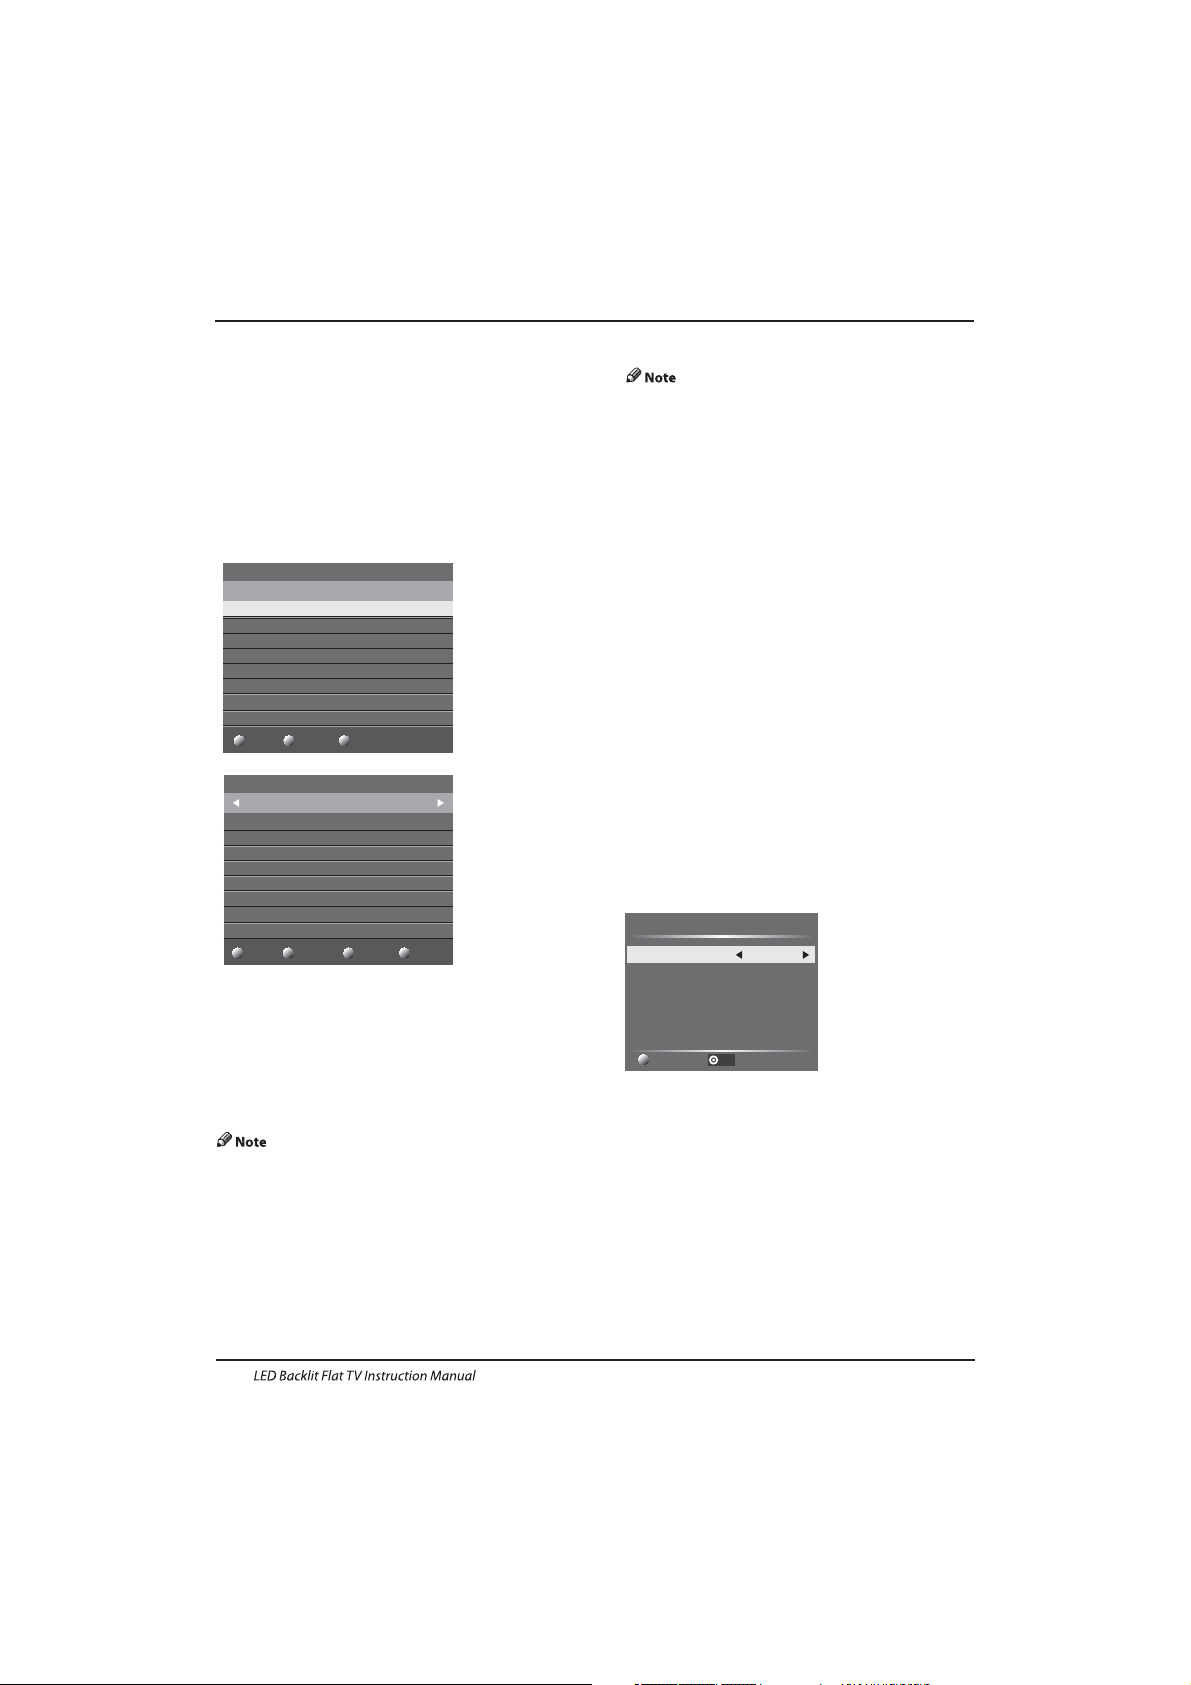
8.PVR File System (only for DTV)
Press Menu Key,select setup submenu.Press t he ▼ or ▲
But tons to select P VR File System, t hen pre ss the OK
But ton to enter s ub-Menu a nd then u se the ◄ or ►
But tons to scro ll thro ugh the o ption s.
The EPG (Electronic Programme Guide) Menu provides
you with detailed broadcast program information. Press
the EPG Button and a pop-up Menu will be displayed with
program information about the channel you are currently
watching. You will be able to see up to seven days of
program information. To view the next day or more use
the ▲ or ▼ Buttons to highlight the date and then press
the ◄ or ► Buttons to scroll through the available dates.
will be asked to format it. In Setup menu, enter the PVR File
System Menu Device List to format your device.
WARNING
When formatting the USB device it will delete all the files
stored on the USB device.
7.EPG Menu(Electronic Program Guide)
EN-23
Page 25
Dev ice Lis t
Device
Available Space
File System
Function
Move U p
Move D own
Select
Return
Exit
EXIT
EXI
T
OK
EXIT
MENU
Hot key
Format
sda1
192
MB
FAT32
Operation
Scheduled Record Setting List
Move U p
Move D own
Select
Return
Exit
EXIT
EXI
OK
EXIT
Hot Key
MENU
Scheduled Record
S
che
d
Standby
Dele te One
Delete All
EXIT
EXI
Function
Group
Frequency
Channel
1
2
3
4
5
6
7
8
9
10
11
12
13
14
15
16
0
Colourbars100
Duration
Date
Start Time
2004.12.25
18:17
00
:
30
Once
Off
Off
Off
Off
Off
Off
Off
Off
Off
Off
Off
Off
Off
Off
Off
Scheduled Record: You ma y set the s chedu led record
Lis t here. And you may a lso del ete the s chedu led record s
you h ave set.
Ent er the su b menu you may s et the recor ding frequ ency
as On ce, Daily, Weekly, Weekday, o r off.
Rec ord the prog ram:
1.Th e USB storag e size ca n be betw een
128 MB and 50 0GB in si ze, but fo r practic al use 2G B to
500GB is recommended.
2. Video may become pixelated when Video
bit r ate is too low. Th is can be c aused by con necting a
USB e xtens ion cab le inst ead of pl uggin g the USB d irect ly
int o the TV.
3. No t all USB d evice s are compat ible.
Bel ow is a lis t of recomme nded US B drive s.
Mod els tha t are not l isted may be c ompat ible, but it i s
not g uaran teed to work .
The U SB supp ort list are the sam e as Timeshif t function,
see the following pages for details.
Play the recording:
The p rogram record ed on the “US B”wil l be
saved in t he fold er “USB record ” on the
device.
You can p lay it in P VR File Sy stem an d in File mana ger
submenu.
Recording
Recorded Time : 00 : 00 : 4 0
Avai lable Ti me : 25 Min ute
To reveal the menu press the REC Button again.
To stop recording, press the Stop Button.
You may also enter the Media Player Menu to view your
recorded programs via Movie mode.
To record the program you are currently watching press the
REC Button and a red REC icon will appear on the screen.
The record time/ length and remaining record time will be
displayed in the menu below.
File Manager
Move U p
Move D own
Select
Return
Exit
EXIT
OK
EXIT
Hot Key
MENU
Scheduled Record
S
ced
Standby
Play
Delete One
Delete All
Zoom
EXIT
Function
Current Playing File Into
Channel Name
Program Name
Recorded Time
Total Time
Description
BBC ONE
Olympics 2012
2012/08/09 11:44
00:08:06
Matt Baker and Clare Balding
present coverage of the eager...
UKTV Br’tldeas_Good Food Bites_20041119_161021.ts
BBC ONE_Olympics 2012_20120808_114427.ts
UKTV Br’tldeas_Good Food Bites_20041119_162019.ts
Device List: This su b menu wi ll list t he USB de vices
connected to the TV set. You can select the device and
the n press red bu tton to form at the US B devic e.
PVR Settings
Mov e Left
Move Right
Select
Exit
OK
EXIT
File Manager Device List
Scheduled Record
File Manager: You may view all the recorded
programs here. Press blue key to play with full
screen.
Scheduled Record - Group 1
Move U p
Move D own
Select
Return
Exit
EXIT
OK
EXIT
Hot Key
MENU
Adjust
Adjust
Setting Status
Setti ng Is Not I n Use
Frequency Once
Chann el 6 Colo urbar s 100
Start T ime 200 4-12- 25
18:17
End Tim e 2004- 12-25
18:47
EN-24
Prepare to record the program:
T
T
Page 26
Operation
9.Time Shift
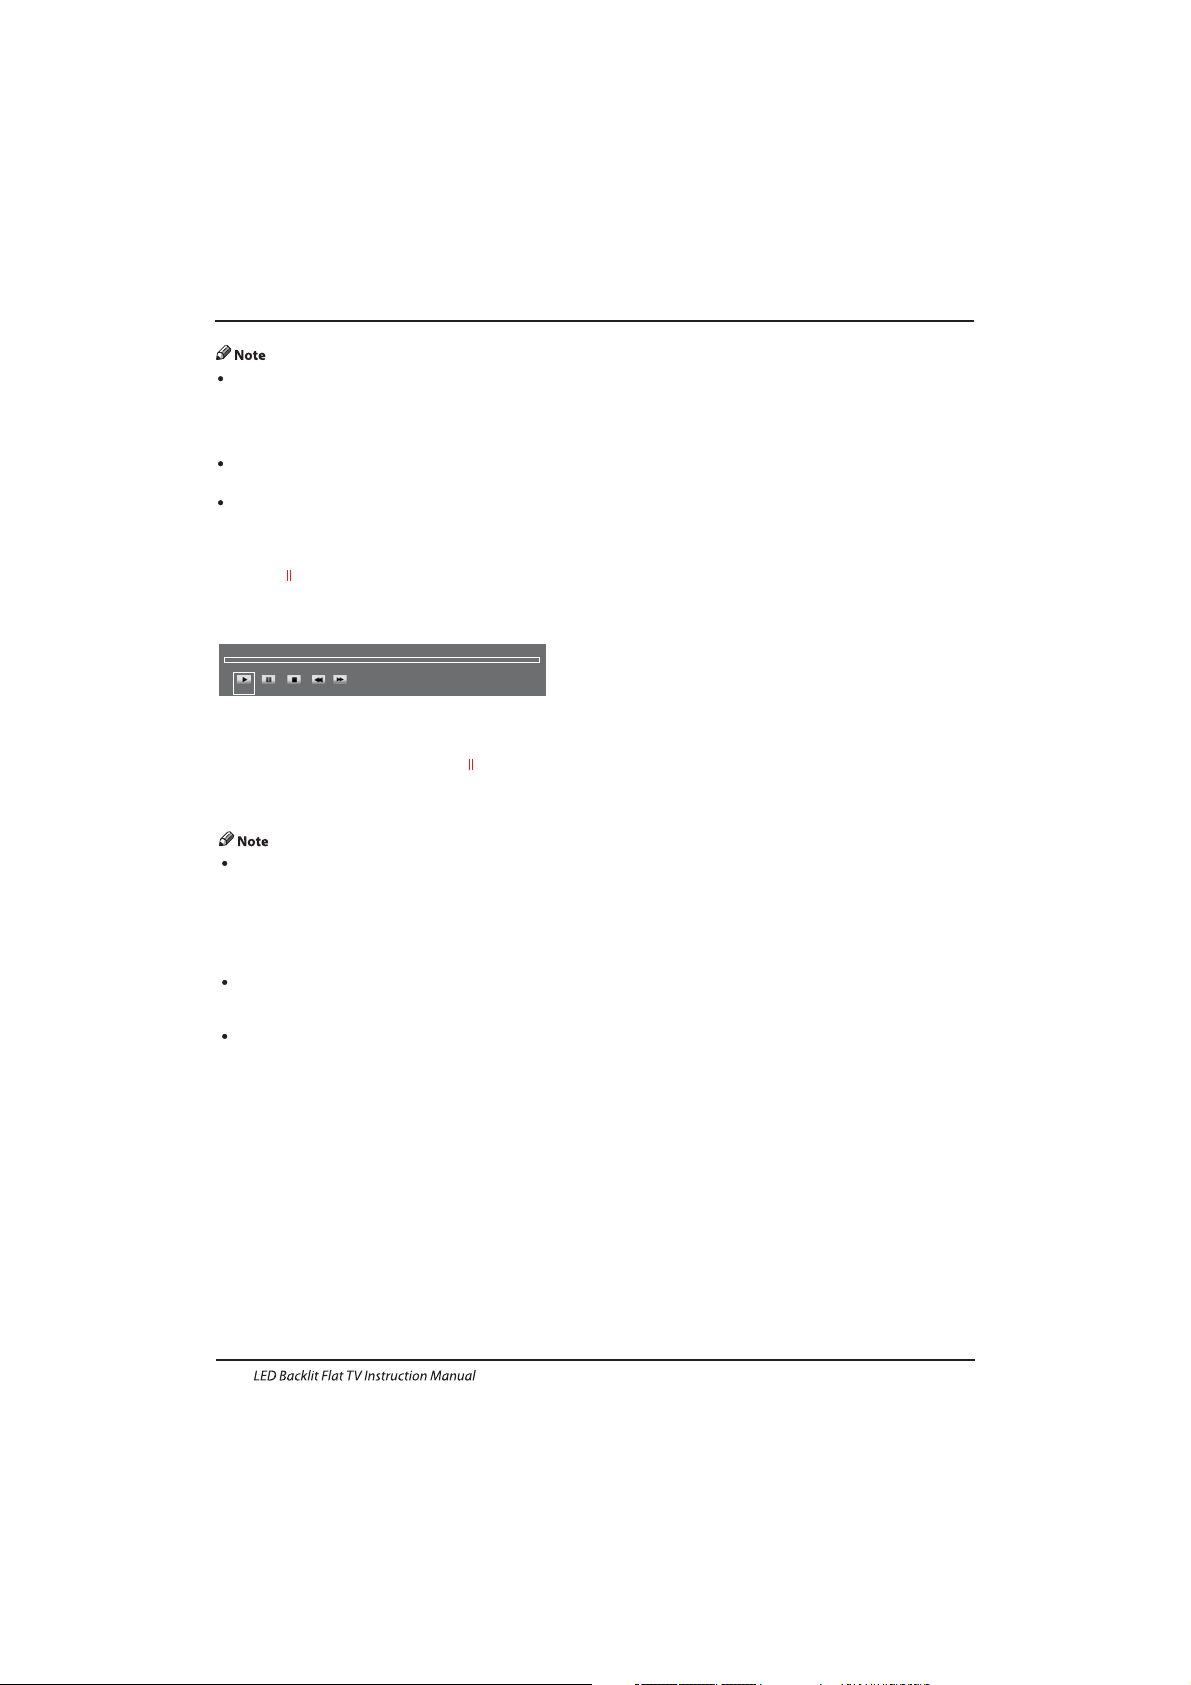
Press th e But ton to pause the p rogram you are
watching to activate Time Shift function. The below
menu will be displayed. This Menu will auto disappear
after several seconds.
▶
00:00:00
Available Time
Choose the ▶ option and press OK to res ume playin g, and a
white play icon will appear at the right of the screen, which
sho ws that time s hift is bei ng perfor med.
When the menu disappeared,press the▶ butto n,the m enu
will appear again. To stoptime shifting, press the Stop Button
or move the cursor to select the Stop option when the menu
is on , and the n follow the p op-up gui de.
Ensure the storage device used for recording is
ins erted into the USB I nput on t he back o f the uni t and is
com patib le for rec ordin g. If your sto rage de vice is not
com patib le, you wi ll be ask ed to for mat it. I n Setup m enu,
ent er the PV R File Sys tem submen u and sel ect Devic e
List to format your device.
All the functions (Play, FB, FF, Pause a nd Stop) in th e menu
can o nly be pe rformed w hen the m enu is on .
Record file Playback
The H aier TV reco rds the prog ram on th e USB sti ck in *.t s
for mat "Ti me Shif t". If an other T V, PC, Lap top, DVD, or
any other de vice or periph erals d o not sup port or
recogn ise the * .ts (ti me shif t) file the n it will n ot play.
"ts" is the format used to broadcast high-definition TV.
You can p lay "ts" fi les on a co mpute r or laptop with the
cor rect so ftware. Refe r to the In ternet or or an IT
supplier more information about the most appropriate
software.
Cau tion: H aier do es not ta ke any respo nsibi lity for any
sof tware d ownlo aded by a ny custome r or retaile r and
may contain viruses or for any malfunction resulting of
installing the software. The customer uses it at their
own r isk.
Ens ure the s torage device used to record is inserted into
the U SB Inpu t on the ba ck of the u nit and i s compa tible
for reco rding. If yo ur storage d evice i s not com patib le,
you will be asked to format it. Enter the PVR File System
menu and select Device List to format your device.
Dur ing rec ording, only the Stop fu nctions i s
available.
There wil l be no rec ord function ,when t he chan nel is
CI+ channel.
There will be no Timeshift function when the
channel is CI+ channel.
00:00:05
Play Pause FBStop FF
00:00:00/04:13:20
EN-25
Page 27
Operation
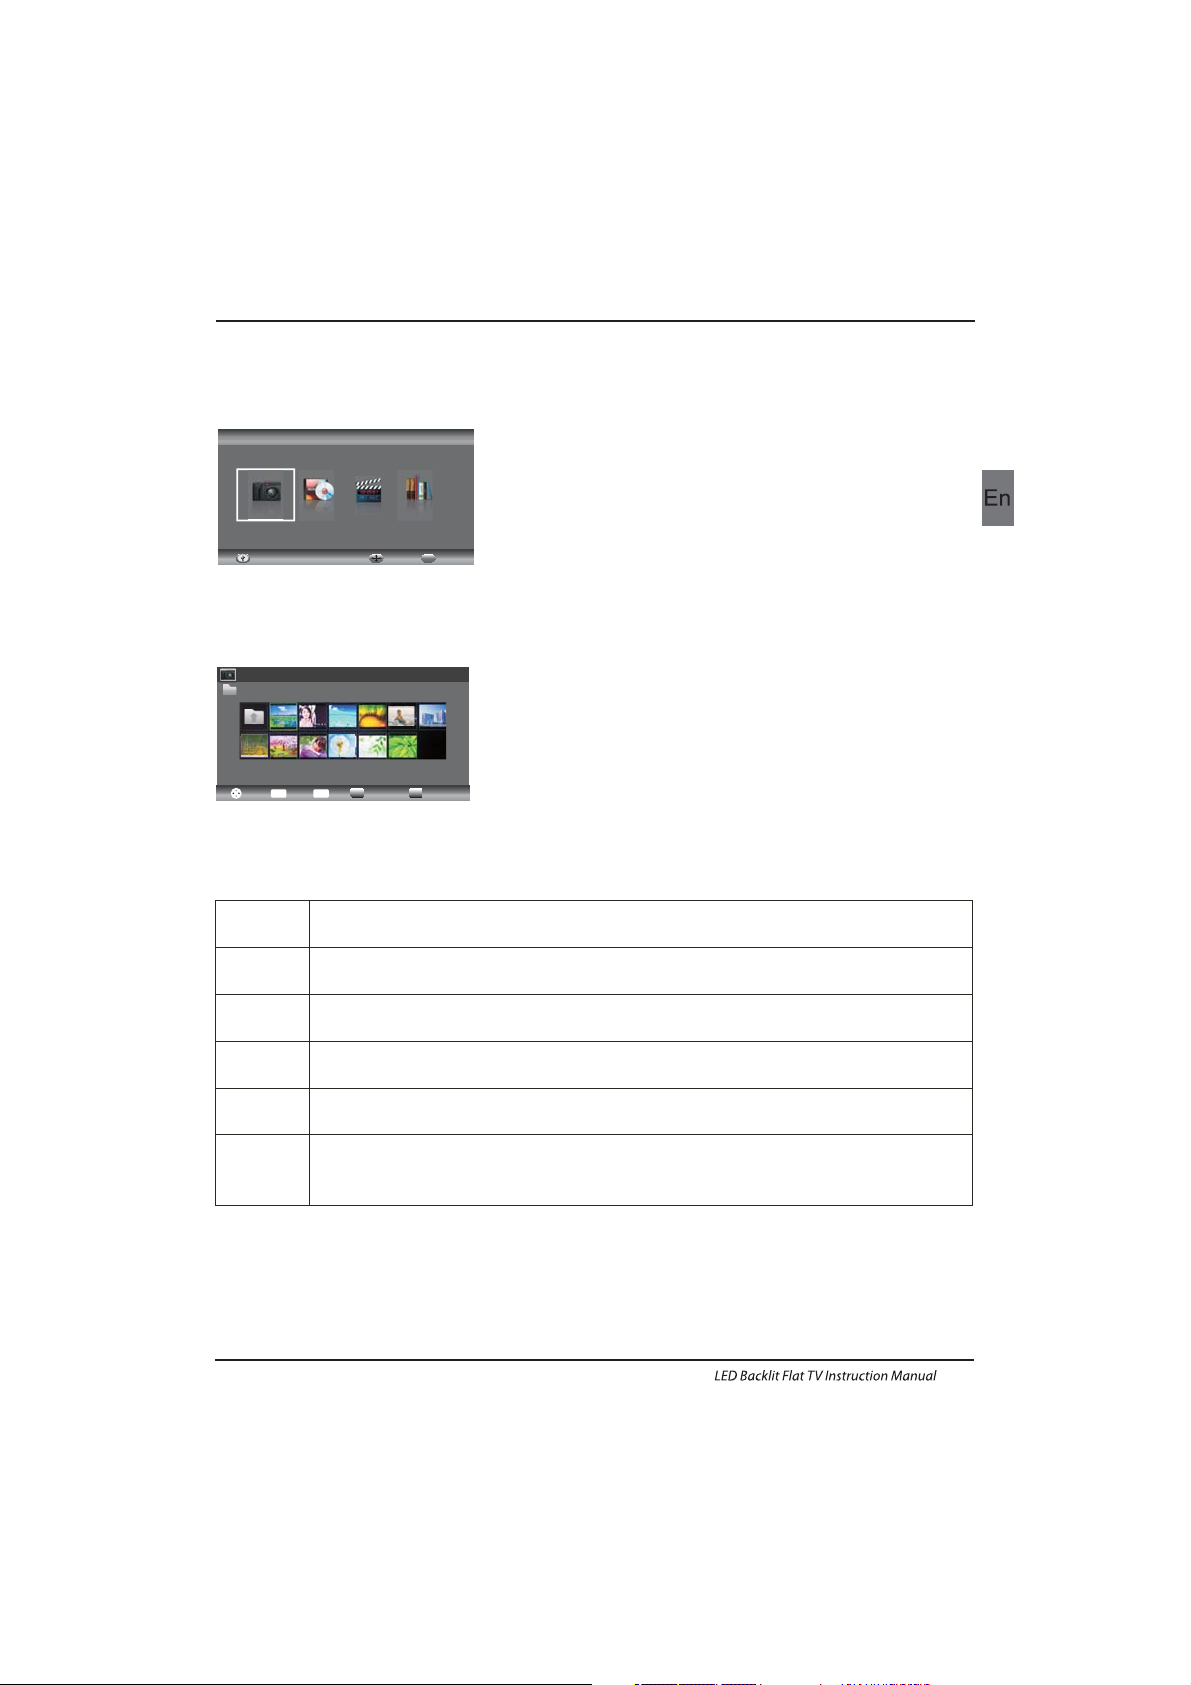
Press source key, and select USB in source list, press OK button to enter the USB menu.
10.USB Player
Please make sure that the USB device have plugged in the slot.There are fou r type me dia ite m can be se lecte d, such a s
photo, music, Movie, and text. Select the type media item by pressing , press OK button to e nter the dis k selec tion menu .◄►
Press the to select the right disk and folder,press OK to . Press Re d butto n to back to the
media type selection menu.
▼/▲ ent er the me dia files list
Select the media file by pressing or , th en the preview f rame will pop up.Pre ss the butt on to play the media file
in fu ll scre en.When th e movie f ile is pl aying,pr ess the ▼ button can display the control bar.
◄► ▼ ▲ ►
Photo
USB1/Pic
Select
OK
Enter ExitExit
Quick Menu
Media Pad
Basic Function
screen.
When photos are playing, press
Press”Play/Pause”key on the remote control to play or pause.
“ ▼”key on the remote control, a help bar will display under the
Press”Left”key on the remote control to read the previous photo.
Press”Right”key on the remote control to read the next photo.
press”stop”key to stop playing and return to the previous menu.
Press”up/down”key to Rotate the photo.
Press Blue
and Background Music(you may play music first).
key, you can enter Quick Menu to adjust Interval time,Repeat,slideshow effect,
Play/Pause
Prev.
Next
Stop
Rotate
Quick Menu
PHOTO
PHOTO MUSIC TEXTMOVIE
Haier Innovation Life
Usb2.0 Move Select
OK
EN-26
Page 28
Operation
MUSIC
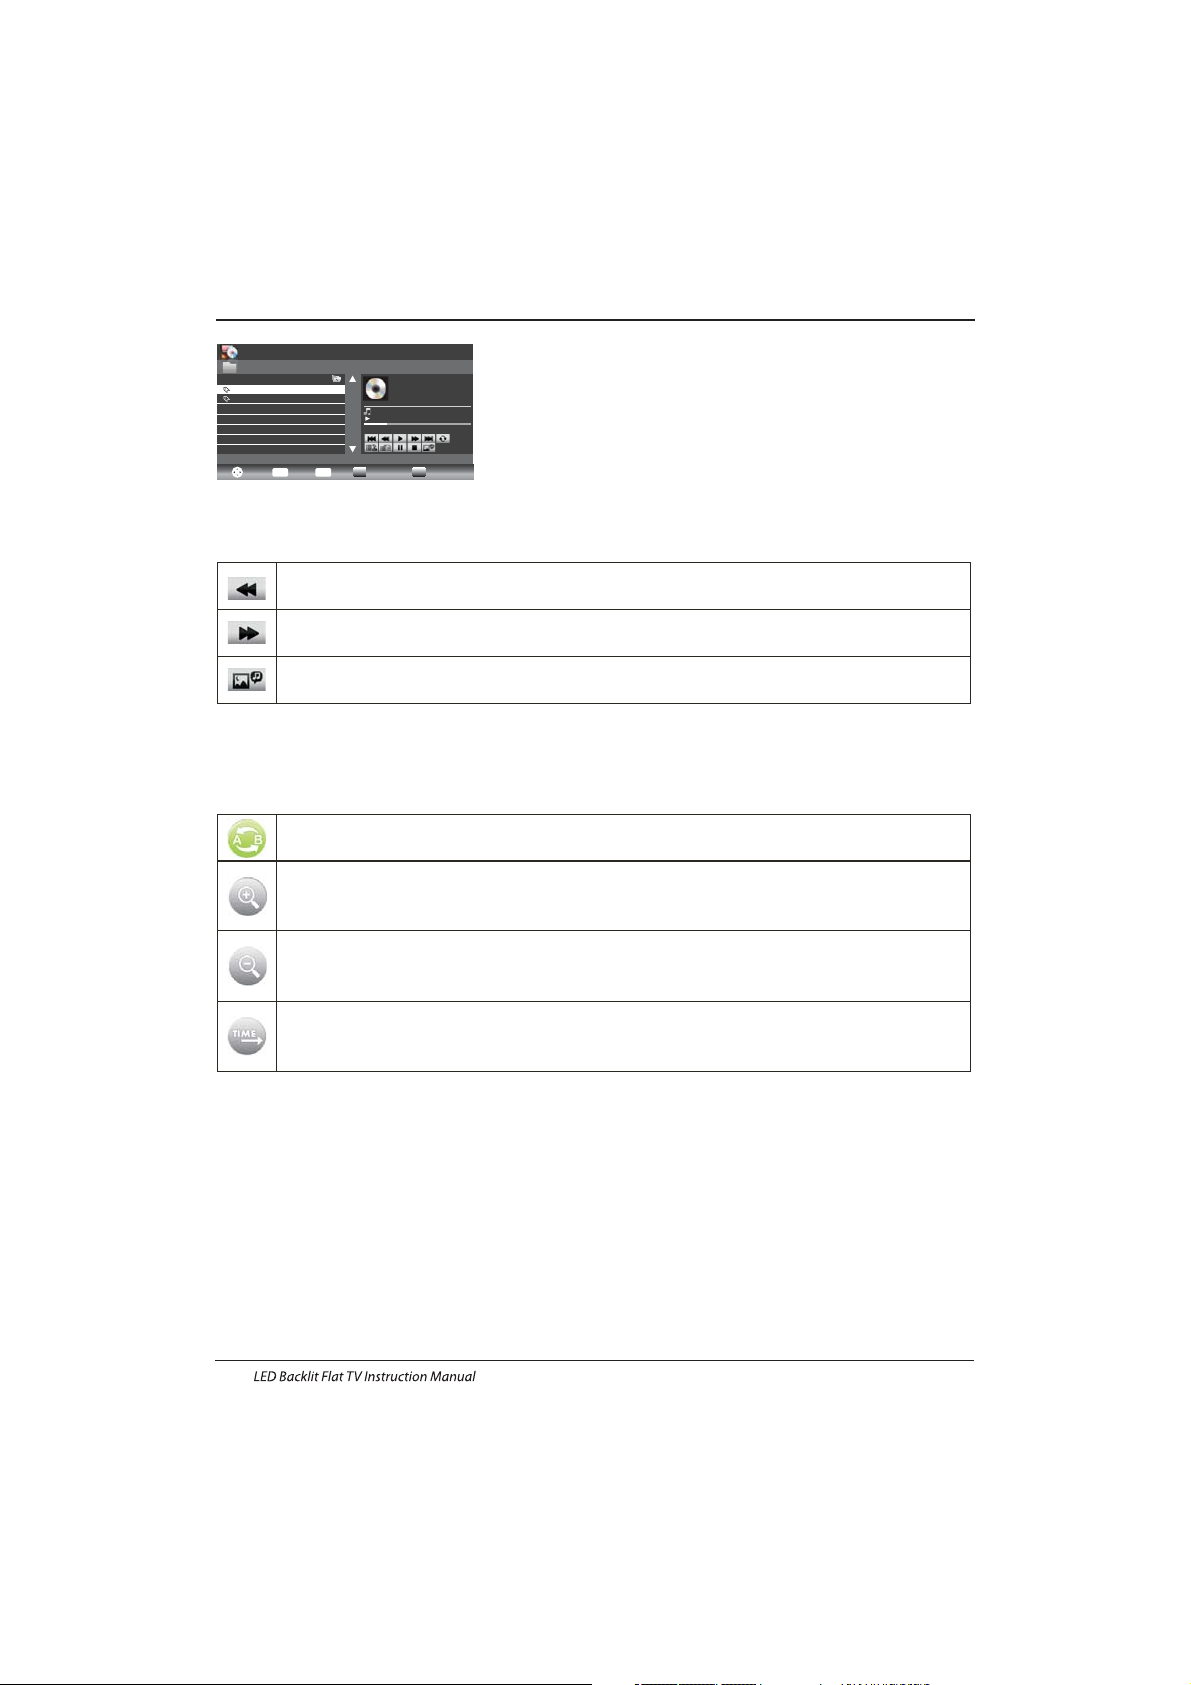
When music are playing, press “ ” key to select toolbar.
►
Basic Function
Other functions are similar to the PHOTO , Please refer to PHOTO options. ”” ””
The operations are similar to the PHOTO .Please refer to PHOTO options.”” ””
Basic Function
MOVIE
TEXT
Press” ” to select previous / next page, Input the number key and OK to jump to the page you want.
▼ /▲
FB Left/Right”key on the remote control to select this function,press”ok”
key to to fast back. Press
”PLAY”key to play normally.
:Press”
FF Left/Right”key on the remote control to select this function,press”ok”
key to fast forward. Press”PLAY”key to play normally.
:Press”
Back ground music Left/Right”key on the remote control to select this function,press”ok”
key to turn on / off.
:Press”
Set A Left/Right”key on the remote control to select this function,press”ok”
key to set A and B, the film will circulating play in the time of A to B.
:Press”
Zoom in Left/Right”key on the remote control to select this function,press”ok”
key to enlarge picture.(if the document is larger than 1920x1080,this function is
unsupported.)
:Press”
Zoom out Left/Right”key on the remote control to select this function,press”ok”
key to reduce picture.(This function does not support more than 1920x1080 HD video.)
:Press”
Select Time Press”Left/Right”key on the remote control to select this function,press”ok”
key to select the time to play.
:
EN-27
Provide list of major file types that play from a USB device
Pho to .jpg files
Audio .mp3
Video
.avi ,.mp4
Text .txt
Music
.. 1/1
Select
OK
Enter ExitExit
Quick Menu
Media Pad
Title:
Album:
Artist:
Track
Year: 2010-09-30
1 / 2
10547672
PLAY
00:00:53 00:00:00
10547 672.m p3
14953 359.m p3
USB1/Music
Page 29
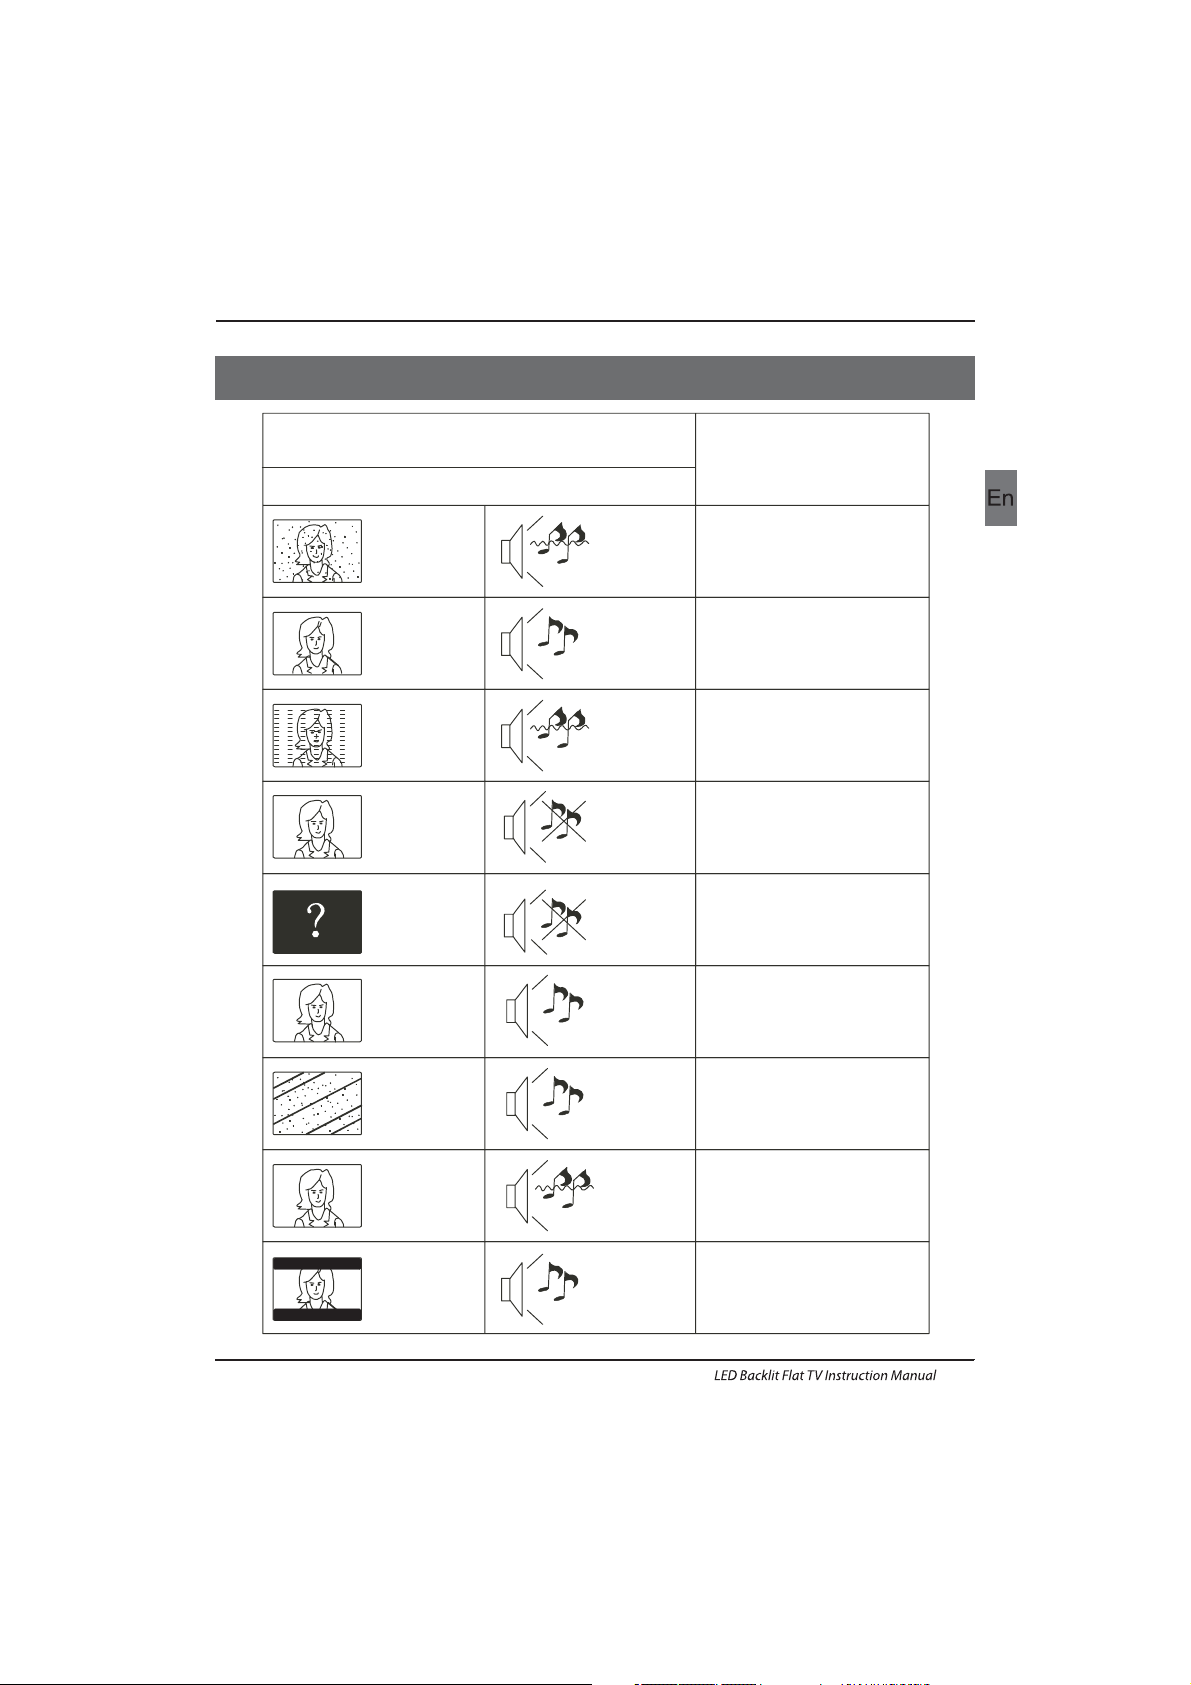
Picture Audio
Snow Noi se
antenna position, direction
or co nnect ion
Inspection Check
Inter ference
Noise
electronic equipment,car/
motorcycle,fluorescent light
Normal Picture
Mut e
Volume( check i f mute is
activ ated or if the a udio sy stem
con necti ons are n ot correct)
No pi cture Mute
Powe r cord is not in serted
Powe r switc h is not op ened
Contrast and brightness/volume
setup
Press st andby k ey on the remo te
con trol for i nspec ting
No colour Normal audio Colour control
Picture
breaking up
Normal audio
or weak
retune channel
No colour
Noise
TVsystem
Normal audio
antenna position, direction
or connection
Trouble phenomenon Symptom
Ghost
Normal audio
Change aspect to zoom
Ther e is blac k bar
on top and bottom
05 Trouble shooting
Trouble Shooting
EN-28
Page 30

Trouble Shooting
My TV does not display the picture
on my laptop / PC when connected.
Most PC's and laptops when connected with a VGA Plug (the
blue 15 pin plug on your PC or laptop) require you to press
some buttons on your key board to get a picture on a TV or
other external display. This is usually the F7 (Dell) or F4 (HP /
Samsung) or F5 (Toshiba). On laptops, you have to press the
“Fn” key at the same time as the “F” key.
I have connected my PC/Laptop to
the TV and get a picture but no
sound. Why ?
The VGA cable only carries the video or picture information.
You need to connect a separate cable connec ted to the
earphone socket (3.5mm jack) on you PC/Laptop to the 3.5m
(PC Audio IN) socket on your TV. You will need to select “PC”
using the Source button on your remote.
Alternatively connect your PC/Laptop using a HDMI cable if
you PC/Laptop has a HDMI connector. HDMI is both audio and
video.
The picture is not auto resizing
when changing channels.
Check that the TV picture Aspect Ratio is set to 'Auto' on all
inputs ATV, DTV, SCART, HDMI 1, 2 etc.
To set the aspect ratio, (Auto, 4:3 or 16:9). Press Source button
start at ATV and repeat the sequence below for all input
sources ATV, DTV, SCART, HDMI 1 and 2 as each input source is
controlled separately.
Press TV Menu button
Press Right Arrow to access Picture sub menu
Press Down Arrow to select Aspect Ratio
Select Auto
Press Exit
Repeat for all input sources.
I have just plugged in a DVD player
or another item into my TV and it
doesn't work.
This is applicable to any item of equipment plugged to the TV
1. Turn both TV & DVD player off (plugs out of the wall socket,
not standby).
2. Turn off any equipment connected to the SCART socket.
3. Disconnect the SCART plug from the TV.
4. Plug in and turn TV on
5. Plug in and turn DVD player on
6. Select HDMI from Source Menu
7. Press play on DVD player and check movie plays ok
NOTE: The SCART socket has priority over HDMI and it is
important that the equipment connected to the SCART socket
on the TV is switched OFF (not in standby).
Please follow this information. If the advice works and the
DVD player wor ks, the TV is OK it is just a bit confused.
Probably HDMI plugs have been removed and plugged back in
when the TV is switched on.
Never remove or plug in HDMI cables or any digital equipment
with the equipment switched on.
Always switch off all equipment when unplugging or
connecting any digital equipment.
Trouble Shooting
EN-29
Page 31

Trouble Shooting
Pic ture Br eaks in to Pixel s
A typical example of a rece ption p roble m inclu des the b reak up o f pictu res (pi xilat ion) or t he picture freezing,
sometimes there are clic king or s queak ing sounds or the sound drops out or th ere is NO reception at al l.
Your pi cture m ay brea k into pi xels due t o the dig ital vi deo sig nal dropping. The signal dropping may occur because of
either problems with weak si gnals ( see TV Ae rials ) or if you a re connected by cable a weak ca ble sig nal. If t he problem
is weak signals, use an amplifier to strengthen the signal. A cab le tech nicia n can hel p you ins tall an i nline a mplif ier or a
pre-amplifier. This will boost your signal strength and fix the pixel p roble m.
If you are receiving your TV signal by satellite, check your dish has n ot moved f ollow ing hig h winds , or that the si gnal is
blocked by trees. Trees can be a probl em as the T V signa l can cha nge depending if a tree be tween t he satel lite di sh and
satellite is in bare or in full leaf.
Missing channels
It ma y be that y ou find t hat the re are channels missing, or you're receiving channels from the wrong region.
Sometimes the intera ctive s ervi ces (red b utton ) doesn 't work . Thi s is usua lly cau sed by wea k signa l, see TV A erial s
TV Aerials
Digital terrestrial television (Freeview) comes to your TV via an aerial, The old aerial that was good for analogue T V may
not w ork wel l for digi tal so ma y need up gradi ng. If you a re gett ing som e but not a ll of the d igita l chann els on DT V
(Freeview) for example you get BBC1, BBC2, Channel 4 ,but not IT V or Cha nnel 5, t his is us ually b ecaus e your ae rial is a
nar row ban d type, a nd need s to be change d to a wide b and typ e.
Faulty Leads and Cables
Che ck your T V. Are t he lead s at the ba ck - to the m ains, the ae rial, t he set-top b ox, the vide o or DVD pl ayer or re corde r
properly connected? SCART leads are known to work loose over time and can re sult in b oth aud io and vi deo (pi cture )
problems. Either left or right or both audio is missing and the colours are poor or muddy looking. Push the SCART
plugs firmly in, this should fix the problem.
HDMI plugs need to be pushed in firmly; it's only the last millimet re that th e conta cts mak e. Typica lly the b lack pl astic
part of the HDMI plug should be very close or touching the body of the TV or component.
When plugging in any HDMI cables you may experience problems if the H DMI cab les are p lugge d in when t he TV or th e
other component is switched on. Always switch off both the TV and th e compo nent you a re plug ging in . If you ha ve
checked the plugs and sockets, switch off the TV and whatever you have plugged in to the TV and then switch them on
again.
I have connected my PC to the TV. There is no sound.
If you connect your PC or Laptop to the TV using a VGA (15 p in Sub D) c able th ere is no a udio, yo u need to c onnec t a
separate audio cable to the TV from the PC or laptop.
Unnatural Colours and Flesh Tones
Unnatural flesh tones and other colours could present another proble m even in a n ew HDTV. This is d ue to the T V
picture settings, which are optimized for a sho wroom e nviron ment. Fix th is by cha nging t he pict ure mod e to natural i n
the picture menu. For more precision, try manually setting the colour, contrast and brightness options in the picture
menu.
White Outlines
White outlines around objects and people generally appear either if the T V sharpness is set to very high, or if your
television set uses some edge-enhancement processing technology. Go to the picture menu and adjust the sharpness
till the white outline disappears. If edge-enhancement is enabled, try to disable it using the service menu.
Choppy Video
At times the video might become choppy. When this happens, check whether the signal is strong enough. If the signal
is strong the problem is with the cable operator. If the signal strength is weak, try boosting the signal strength with the
help of an amplifier.
The p ictur e does no t fill th e scree n
When connecting PC's or laptops to the TV, the picture may not fill the screen. Check the display settings on your PC or
laptop (Windows > Star t > Contro l Panel > Appearance and Personalization > Displ ay
settings) and select the best
resolution. On your TV select:- TV Menu > Picture > S ettings and then try AUTO, ZOOM1 or ZOOM2 for the best display.
USB Connection
The USB connection will work with *.jpg (photo) and *.mp3 (music) fil es. Ple ase not e the TV do es not recogniz e Apple
iPhone, or iPod's connected to the USB connector on the TV. The TV may play o ther fi les, but d ue to the m ultip le
different file formats, there is no guarantee that these other file fo rmats w ill wor k.
Trouble Shooting Digital TV Problems and possible Solutions.
EN-30
Page 32

Television picture quality:
Additional features:
NIC AM stereo so und sys tem.
Digitally interactive.
Dig ital text.
Digital video broadcasting (DVB) subtitles available.
Auto setup.
Auto sca n for new c hanne ls.
Now a nd next p rogramme g uide.
7 day electronic programme guide (EPG).
Top up TV compat ible.
CI sl ot.
Audio description compatible.
Sound quality:
Digital features:
Standby Power
consumption
<0.30W
* The part specifications of this TV set provided here
are for reference only.
Difierences may occur as product technology is updated.
Design and specifications are subject to change without notice.
Scart Output description :
1. When current source is AT V/AV/SCART, scart output signal is ATV .
2. When current source is DTV, there will be no SCART output signal.
3. Other source have no SCART output signal.
Connectivity:
2 HDMI sockets.
1 SCA RT socket .
PC input socket.
Component video socket.
Composite.
1 USB p ort.
1 Headphone port.
1 port.COAXIAL
Supported Systems:PAL+ SECA M
Sto rage chann el numb er: 1000( DTV),100(ATV)
TV(RF) :75Ω Imbalance
AV Video-Input:75Ω,1V-P,RCA
AV Audio-Input:20KΩ,500mB RMS
YPbPr/HDMI Video Input:480i, 480p, 576i, 576p, 720p, 1080i, 1080p
DTV Tuner Decorder
DVB -T, DVB -C
16/32/64/128/256 QAM modulation/QPSK Modulation
MPEG2,MPEG4,H.264
FUL L HD
Integrated digital.
Scr een Size: 55cm
Resolution 1920x1080 pixels 50Hz.
22" FULL HD 1080p Digital LED LCD TV
2 x 3 wat ts RMS power o utput .
UHF/VHF tuner;Sleep timer; ;Picture and textParental Rating
Remote control batteries required 2 x AAA (in clude d).
VES A Mount S ize: 10 0 x 100 mm
Package Size (WxHxD): 616x426x135mm
Set S ize (W xHxD) w ith Sta nd: mm513x355 x160
Set Size (WxHxD) without Stand: mm513x312x42
Package weight : 4.1 kg
Set w eight w ithou t stand : 2.7 kg
Set w eight w ith sta nd: 2.9 kg
Specification
EN-31
06 Specification
Page 33

Specification
Specification
Television picture quality:
Additional features:
NIC AM stereo so und sys tem.
Digitally interactive.
Dig ital text.
Digital video broadcasting (DVB) subtitles available.
Auto setup.
Auto sca n for new c hanne ls.
Now a nd next p rogramme g uide.
7 day electronic programme guide (EPG).
Top up TV compat ible.
CI sl ot.
Audio description compatible.
Sound quality:
Digital features:
Standby Power
consumption
<0.30W
* The part specifications of this TV set provided here
are for reference only.
Difierences may occur as product technology is updated.
Design and specifications are subject to change without notice.
Scart Output description :
1. When current source is AT V/AV/SCART, scart output signal is ATV .
2. When current source is DTV, there will be no SCART output signal.
3. Other source have no SCART output signal.
Connectivity:
2 HDMI sockets.
1 SCA RT socket .
PC input socket.
Component video socket.
Composite.
1 USB p ort.
1 Headphone port.
1 COAXIAL port.
Supported Systems:PAL+ SECA M
Sto rage chann el numb er: 1000( DTV),100(ATV)
TV(RF) :75Ω Imbalance
AV Video-Input:75Ω,1V-P,RCA
AV Audio-Input:20KΩ,500mB RMS
YPbPr/HDMI Video Input:480i, 480p, 576i, 576p, 720p, 1080i, 1080p
DTV Tuner Decorder
DVB -T, DVB -C
16/32/64/128/256 QAM modulation/QPSK Modulation
MPEG2,MPEG4,H.264
FUL L HD
Integrated digital.
Screen Size: 59.9cm
Resolution 1920x1080 pixels 50Hz.
24" FULL HD 1080p Digital LED LCD TV
2 x 3 wat ts RMS power o utput .
UHF/VHF tuner;Sleep timer; ;Picture and textPare ntal Rati ng
Rem ote contro l batte ries requi red 2 x AAA ( inclu ded).
VES A Mount S ize: 10 0 x 100 mm
Package Size (WxHxD): mm650x440x135
Set Size (WxHxD) with Stand: mm568x386x160
Set S ize (W xHxD) w ithou t Stand : mm568x344x42
Package weight : 4.9 kg
Set weight without stand: 3.5 kg
Set w eight w ith sta nd: 3.7 4kg
EN-32
Page 34

Specification
Television picture quality:
HD Ready
Integrated digital.
Screen Size: cm70
Resolution 1366x768 pixels 50Hz.
28" HD Ready Digital LED LCD TV
Additional features:
NIC AM stereo so und sys tem.
2 x 8wa tts RMS p ower output.
Digitally interactive.
Dig ital text.
Digital video broadcasting (DVB) subtitles available.
Auto setup.
Auto sca n for new c hanne ls.
Now a nd next p rogramme g uide.
7 day electronic programme guide (EPG).
Top up TV compat ible.
CI sl ot.
Audio description compatible.
Sound quality:
Digital features:
Standby Power
consumption
<0.30W
* The part specifications of this TV set provided here
are for reference only.
Difierences may occur as product technology is updated.
Design and specifications are subject to change without notice.
Scart Output description :
1. When current source is AT V/AV/SCART, scart output signal is ATV .
2. When current source is DTV, there will be no SCART output signal.
3. Other source have no SCART output signal.
Connectivity:
2 HDMI sockets.
1 SCA RT socket .
PC input socket.
Component video socket.
Composite.
1 USB p ort.
1 Headphone port.
1 port.COAXIAL
Supported Systems:PAL+ SECA M
Sto rage chann el numb er: 1000( DTV),100(ATV)
TV(RF) :75Ω Imbalance
AV Video-Input:75Ω,1V-P,RCA
AV Audio-Input:20KΩ,500mB RMS
YPbPr/HDMI Video Input:480i, 480p, 576i, 576p, 720p, 1080i, 1080p
DTV Tuner Decorder
DVB -T, DVB -C
16/32/64/128/256 QAM modulation/QPSK Modulation
MPEG2,MPEG4,H.264
UHF/VHF tuner;Sleep timer; ;Picture and textParental Rating
Rem ote contro l batte ries requi red 2 x AAA ( inclu ded).
VES A Mount S ize: 20 0 x 100 mm
Package Size (WxHxD): 810x480x120mm
Set Size (WxHxD) with Stand: 642x435x170mm
Set Size (WxHxD) without Stand: 642x390x44mm
Package weight : 6.5 kg
Set w eight w ithou t stand : kg5.0
Set w eight w ith sta nd: 5.3 k g
Specification
EN-33
Page 35

Specification
Television picture quality:
HD Ready
Integrated digital.
Screen Size: 81cm
Resolution 1366x768 pixels 50Hz.
32" HD Ready Digital LED LCD TV
Additional features:
NIC AM stereo so und sys tem.
2 x 8wa tts RMS p ower output.
Digitally interactive.
Dig ital text.
Digital video broadcasting (DVB) subtitles available.
Auto setup.
Auto sca n for new c hanne ls.
Now a nd next p rogramme g uide.
7 day electronic programme guide (EPG).
Top up TV compat ible.
CI sl ot.
Audio description compatible.
Sound quality:
Digital features:
Standby Power
consumption
<0.30W
* The part specifications of this TV set provided here
are for reference only.
Difierences may occur as product technology is updated.
Design and specifications are subject to change without notice.
Scart Output description :
1. When current source is AT V/AV/SCART, scart output signal is ATV .
2. When current source is DTV, there will be no SCART output signal.
3. Other source have no SCART output signal.
Connectivity:
2 HDMI sockets.
1 SCA RT socket .
PC input socket.
Component video socket.
Composite.
1 USB p ort.
1 Headphone port.
1 port.COAXIAL
Supported Systems:PAL+ SECA M
Sto rage chann el numb er: 1000( DTV),100(ATV)
TV(RF) :75Ω Imbalance
AV Video-Input:75Ω,1V-P,RCA
AV Audio-Input:20KΩ,500mB RMS
YPbPr/HDMI Video Input:480i, 480p, 576i, 576p, 720p, 1080i, 1080p
DTV Tuner Decorder
DVB -T, DVB -C
16/32/64/128/256 QAM modulation/QPSK Modulation
MPEG2,MPEG4,H.264
UHF/VHF tuner;Sleep timer; ;Picture and textParental Rating
Rem ote contro l batte ries requi red 2 x AAA ( inclu ded).
VES A Mount S ize: 20 0 x 100 mm
Package Size (WxHxD): 880x550x137mm
Set Size (WxHxD) with Stand: 738.5x487.5x170mm
Set Size (WxHxD) without Stand: 738.5x443x64mm
Package weight : 6.8 kg
Set w eight w ithou t stand : 4.7 kg
Set w eight w ith sta nd: 5.0 k g
Specifiction
EN-34
Page 36

Page 37

Bitte lesen Sie diese Bedienungsanleitung vor der Inbetriebnahme des
Geräts sorgfältig durch und bewahren Sie diese für späteres Nachschlagen
auf.
LCD-Fernseher mit LED-Hintergrundbeleuchtung
LE22M600CF
LE24M600CF
LE28M600C
LE32M600C
Page 38

01 Sicherheits- und Warnhinweise
VIDEOTEXT
17
KANALMENÜ 18
Automatischer Kanalsuchlauf (DVB-T) 18
Automatischer Kanalsuchlauf (DVB-C) 19
DTV Manueller Kanalsuchlauf (DVB-T)
DTV Manueller Kanalsuchlauf (DVB-C)
ATV Manueller Kanalsuchlauf
20
20
20
22
Tonmenü
21
Zeitmenü
22
Einstellungsmenü
SPERRMENÜ
EPG-Menü (Elektronische Programmzeitschrift)
23
PVR-Dateisystem (nur DTV)
23
Vorbereitung der Aufnahme
24
22
Programm aufzeichnen
24
Aufnahme abspielen
24
TimeShift
25
USB-Media-Player
26
Störungserkennung
05 Störungserkennung
30
Spezifikationen 33
Willkommen
Wichtige Informationen
2
2
Sicherheitshinweise
Warnhinweise
3
4
Parameter
Standfuß montieren
02 Einleitung
5
7
Wandmontage
Seitliches Bedienfeld
8
10
TV-Anschlussfeld
11
Fernseher anschließen
Common Interface
12
15
Fernbedienung
03 Fernbedienung
16
Installation
04 Bedienungshinweise
18
Bildmenü
21
Inhaltsverzeichnis
Inhaltsverzeichnis
Kanal bearbeiten
Common Interface
20
21
HOTEL-MODUS
28
DE-1 LCD-Fernseher mit LED-Hintergrundbeleuchtung
Signalinformationen
21
Softwareaktualisierung (USB) 21
06 Spezifikationen
Page 39

Vielen Dank, dass Sie sich für diesen
Diese Anleitung hilft Ihnen bei der Einstellung und Bedienung Ihres Fernsehers.
Vergewissern Sie sich zunächst, dass alle Zubehörteile mitgeliefert wurden:
22"/24"/28"/32" Zoll LED LCD-Fernseher entschieden haben.
LESEN SIE VOR DER VERWENDUNG DIE GESAMTE ANLEITUNG DURCH, UND BEWAHREN SIE SIE ZUR
SPÄTEREN VERWENDUNG AUF.
VORSICHT
Nun können Sie beginnen!
01 Sicherheits- und Warnhinweise
Sicherheits- und Warnhinweise
WILLKOMMEN
WICHTIGE INFORMATIONEN
STROMSCHLAGGEFAHR
NICHT ÖFFNEN
ZUR VERMEIDUNG VON STROMSCHLÄGEN ÖFFNEN SIE DAS GERÄTEGEHÄUSE NICHT. ES BEFINDEN SICH
KEINE VOM VERBRAUCHER WARTBAREN TEILE IM INNEREN DES GERÄTS. WENDEN SIE SICH MIT
PROBLEMEN UND FRAGEN ZUR WARTUNG AN DEN KUNDENDIENST.
DER BLITZ IM GLEICHSEITIGEN DREIECK BEDEUTET, DASS IM GERÄT HOCHSPANNUNGSGEFAHR BESTEHT.
DAS AUSRUFUNGSZEICHEN IM GLEICHSEITIGEN DREIECK BEDEUTET, DASS WICHTIGE WARTUNGS- UND
BEDIENUNGSHINWEISE IN DER BEDIENUNGSANLEITUNG GEFUNDEN WERDEN.
VORSICHT: ZUR VERMEIDUNG VON STROMSCHLAG UND FEUER SETZEN SIE DEN FERNSEHER
KEINER FEUCHTIGKEIT AUS. REINIGEN SIE DAS GERÄT UND DEN BILDSCHIRM NICHT MIT
SCHEUERMITTELN; DAS FÜHRT ZU KRATZERN.
BITTE BEACHTEN SIE: REPARIEREN SIE DAS GERÄT NICHT SELBST, DAS KANN ZU
VERLETZUNGEN UND SCHÄDEN AM GERÄT FÜHREN. WENDEN SIE SICH MIT WARTUNGSUND REPARATURARBEITEN STETS AN DEN AUTORISIERTEN KUNDENDIENST.
De
LCD-Fernseher mit LED-Hintergrundbeleuchtung DE-2
22" Full HD 1080p Digitaler LED LCD-Fernseher
2 x AAA-Batterien für Fernbedienung
Benutzerhandbuch
Kurzanleitung
Standfuß
Garantiekarte
Schrauben
28" HD-Ready LED LCD-Fernseher
2 x AAA-Batterien für Fernbedienung
Benutzerhandbuch
Kurzanleitung
Standfuß
Garantiekarte
Schrauben
24" Full HD 1080p Digitaler LED LCD-Fernseher
2 x AAA-Batterien für Fernbedienung
Benutzerhandbuch
Kurzanleitung
Standfuß
Garantiekarte
Schrauben
32" HD-Ready LED LCD-Fernseher
2 x AAA-Batterien für Fernbedienung
Benutzerhandbuch
Kurzanleitung
YPbPr Verbindungskabel
Standfuß
Garantiekarte
Schrauben
Page 40

SICHERHEITSHINWEISE
Sicherheits- und Warnhinweise
Warnung: Zur Vermeidung von Feuer und
Stromschlag öffnen Sie nicht das
Gerätegehäuse. Es befinden sich keine vom
Verbraucher wartbaren Teile im Innern des
Gerätes. Wenden Sie sich mit Wartungs- und
Reparaturarbeiten stets an den autorisierten
Kundendienst.
Warnung: Zur Vermeidung von Feuer und
Stromschlag setzen Sie das Gerät nicht Regen
oder Feuchtigkeit aus.
Setzen Sie Netzteil und Gerät nicht Spritzwasser
oder Tropfwasser aus und stellen Sie keine mit
Wasser gefüllten Gegenstände (wie Vasen) auf
dem Gerät ab.
Schützen Sie das Gerät vor direkter
Sonneneinstrahlung und Hitze (Heizkörper,
Herd).
Blockieren Sie nicht die Ventilationsöffnungen,
sie werden zur Belüftung benötigt. Stellen Sie
das Gerät nicht auf einem Kissen, Sofa oder
ähnlichen Flächen ab.
Stellen Sie das Gerät nicht auf einem unstabilen
Wagen, Aufsteller, Stativ, Tisch oder einer
Halterung ab. Es kann herunterfallen und
Verletzungen und Schäden verursachen.
Stellen Sie keine schweren oder scharfkantigen
Gegenstände auf dem Gerät ab.
Ziehen Sie nach der Benutzung den
Netzstecker.
Entsorgen Sie Batterien umweltgerecht.
WARNUNG: Batterien oder Akkus dürfen nicht
übermäßiger Hitze ausgesetzt werden (direkte
Sonneneinstrahlung, Feuer usw.).
WARNUNG: Übermäßiger Schalldruck von
Ohrhörern oder Kopfhörern kann zu
Hörschäden führen.
VORSICHT: Bei elektrostatischer Aufladung
kann es zu Fehlfunktionen kommen und das
Gerät muss zurückgesetzt werden.
Dieses Symbol zeigt an, dass das Gerät nicht mit
dem Hausmüll entsorgt werden darf. Zur
Vermeidung von Gesundheits- und
Umweltschäden durch unkontrollierte
Entsorgung muss das Gerät recycelt werden.
Geben Sie das Gerät bitte an einer Sammelstelle
für Elektroaltgeräte ab oder wenden Sie sich an
Ihren Fachhändler.
DE-3 LCD-Fernseher mit LED-Hintergrundbeleuchtung
Page 41

Dim:515*320mm(不包括底座)
Warnung
Dieser Fernseher wird mit Hochspannung
betrieben. Öffnen Sie nicht das Gerätegehäuse.
Wenden Sie sich mit Wartungs- und
Reparaturarbeiten stets an den autorisierten
Kundendienst.
Zur Vermeidung von Feuer und Stromschlag
setzen Sie das Gerät nicht Regen oder
Feuchtigkeit aus.
Warnung
Führen Sie keine Fremdkörper in das Gerät
ein, stoßen Sie es nicht stark an. Verschütten
Sie keine Flüssigkeiten auf Ihrem Fernseher.
Warnung
Blockieren Sie nicht die
Ventilationsöffnungen, sie werden zur
Belüftung benötigt.
Vorsicht
Vorsicht
Klemmen Sie das Netzkabel nicht unter dem
Fernseher ein.
Stehen Sie nicht auf dem Fernseher, lehnen Sie
sich nicht gegen den Fernseher, stoßen Sie ihn
nicht an. Achten Sie auch besonders auf Kinder.
Der Fernseher kann schwere Verletzungen und
Schäden verursachen, wenn er umfällt.
Vorsicht
Stellen Sie das Gerät nicht auf einem unstabilen
Wagen, Aufsteller, Stativ, Tisch oder einer
Halterung ab. Es kann herunterfallen und
Verletzungen und Schäden verursachen.
Vorsicht
Bei längerer Nichtbenutzung des Fernsehers
ziehen Sie bitte das Netzkabel ab.
Vorsicht
Wird der Fernseher eingebaut, so achten Sie bitte
auf die Mindestabstände. Hitzestau kann die
Lebensdauer Ihres Fernsehers verkürzen und ist
gefährlich.
Vorsicht
WARNHINWEISE
Sicherheits- und Warnhinweise
Mindestabstände
De
LCD- Fernse her mit L ED-H interg rundb eleuc htung D E-4
Page 42

INSTALLATION
ACHTUNG
* Stellen Sie den Fernseher vor direkter
Sonneneinstrahlung geschützt auf.
* Dunkelheit und Reflektionen auf dem
Bildschirm können zu einer Überforderung
der Augen führen. Weiche und indirekte
Beleuchtung wird für komfortables
Fernsehen empfohlen.
* Lassen Sie auf der Rückseite des Fernsehers
ausreichend Platz zur Ventilation.
* Vermeiden Sie besonders warme Standorte,
um einen Hitzestau im Gerät und vorzeitige
Schäden zu vermeiden.
* Decken Sie die Lüftungsöffnungen während
des Betriebs nicht ab.
Parameter
Ausstattungsmerkmale
4 NICAM;
5 TimeShift
3
HDMI- und SCART-Anschluss
Hohe Leuchtkraft, breiter Betrachtungswinkel
2
Nutzbar als Fernseher oder PC-Monitor
1
Bildschirm
2x3W
Analog RGB (PC) x1;
High-Definition Multimedia Interface (HDMI) x 2
Komposit-eingang x 1
PC Audio-eingang x1
YPbPr x 1
SCART x 1
22
CI x 1
USB-Port x 1
RF Co-Ax x 1
Komposit-Videoeingang >=350
YPbPr >=400
Kopfhörerausgang x 1
KOAXIAL x 1
Machen Sie sich nicht an Bauteilen im Fernsehgerät
oder an irgendwelchen anderen
Einstellungssteuerungen zu schaffen, die nicht in
diesem Handbuch beschrieben sind. Alle LEDFernsehgeräte sind elektrische
Hochspannungsgeräte.
Wenn Sie Staub oder Wassertropfen von dem
Bildschirm oder dem Gehäuse oder um die Knöpfe
oder Anschlüsse herum abwischen, sollte das
Stromkabel aus der Steckdose aus gesteckt sein.
Wischen Sie das Fernsehgerät mit einem weichen,
trockenen, staubfreien Tuch ab.
Trennen Sie während Gewittern das Stromkabel und
das Antennenkabel, um Schäden an Ihrem
Fernsehgerät und anderen angeschlossenen Geräten
zu vermeiden.
Alle Reparaturen sollten nur von qualifiziertem
Fernsehgeräte Servicepersonal durchgeführt werden.
02 Einleitung
Spannungsversorgung
Audio-Ausgangsleistung
(Klirrfaktor 7%)
Anschlüsse
Horizontale Auflösung
(TV-Zeilen)
Einleitung
DE-5 LCD-Fernseher mit LED-Hintergrundbeleuchtung
100 0 (DTV ), 100 (ATV )
Kanalspeicher
24 28 32
100-240V~50/60Hz
38W
100-240V~50/60Hz
40W
100-240V~50/60Hz
41W
100-240V~50/60Hz
50W
2x3W 2x8W 2x8W
Page 43

UNTERSTÜTZTER MODUS
PC
3
5
1024x768
1280x1024
60
60
1
640x480
60
31.47
2
800x600
60
37.88
48.36
63.98
Auflösung
V. Freq. (kHz) H. Freq. (kHz)
4
1366x768
60
47.7
Einleitung
De
LCD-Fernseher mit LED-Hintergrundbeleuchtung DE- 6
6
(nur für 22”, 24”)
60
66.64
1920x1080
Page 44

Montageanleitung für den Standfuß
Stellen Sie den Fernseher vor direkter Sonneneinstrahlung geschützt auf. D unkel heit un d Reflektionen auf
dem Bildschirm können zu einer Überforderung der Augen führen. Weiche und indirekte Beleuchtung wird
für komfortables Fernsehen empfohlen. Lassen Sie auf der Rückseite des Fernsehers ausreichend Platz zur
Ventilation.
Hinweis: Der TV-Standfuß ist nicht schwenkbar.Vermeiden Sie besonders warme Standorte, um einen
Hitzestau im Gerät und vorzeitige Schäden zu vermeiden.
HINWEISE ZUR INSTALLATION
Einleitung
DE-7 LCD-Fernseher mit LED-Hintergrundbeleuchtung
1. Legen Sie den Fernseher mit dem Bildschirm auf
eine flache Arbeitsfläche. Legen Sie ein Tuch unter,
um den Bildschirm zu schützen. Setzen Sie den
Standfuß unten an.
2. Schrauben Sie den Standfuß von unten mit
den Schrauben fest an.
(22",24")
(28")
(32")
Page 45

WANDMONTAGE
2.Schrauben Sie die Halterung für den Standfuß
unten am Fernseher ab (bewahren Sie den
Standfuß für späteren Gebrauch auf).
1.Legen Sie den Fernseher mit dem
Bildschirm auf eine flache Arbeitsfläche.
Legen Sie ein Tuch unter, um den
Bildschirm zu schützen.
Einleitung
Dieser Fernseher kann wie folgt an der Wand montiert werden:
De
LCD-Fernseher mit LED-Hintergrundbeleuchtung DE-8
(22",24")
(28")
(32")
Page 46

Einleitung
3.Schrauben Sie den Fernseher mit vier vorgesehenen Schrauben an eine VESA-Wandhalterung
(beides nicht mitgeliefert).
M4X5
M4X5
M4X5
M4X5
100mm
100mm
M4X5
M4X5
M4X5
M4X5
200mm
100mm
M4X5
M4X5
M4X5
M4X5
200mm
100mm
(22",24")
(28")
(32")
DE-9 LCD-Fernseher mit LED-Hintergrundbeleuchtung
Page 47

1
2
3
Sensor für Fernbedienung
Status-LED:
ROT: Stand-by-Modus
Funktionstasten
1
SOURCE
Eingangsquellen aufrufen.
MENU
Hauptmenü anzeigen.
3
4
CH+/CH-
Im TV-Modus schalten Sie mit CH+ oder CHzwischen den Kanälen auf und ab.
Im MENÜ wählen Sie mit CH+ oder CH- einen
Menüpunkt.
STANDBY
2
VOL+/VOL-
Lautstärke einstellen.
Im MENÜ stellen Sie den gewählten Menüpunkt ein.
5
Seitliches Bedienfeld(22",24",28")
Einleitung
Schaltet den Fernseher in den Standby-Betrieb.
3
2
30 30
1
≤8m
MENU
CH+
CH-
VOL+
VOL-
2
SOURCE
1
3
4
STANDBY
5
SOURCE
MENU
CH+
CHVOL+
VOLSTANDBY
1
2
3
4
5
3
2
30 30
1
≤8m
1
2
3
Sensor für Fernbedienung
Status-LED:
ROT: Stand-by-Modus
Funktionstasten
1
SOURCE
Eingangsquellen aufrufen.
MENU
Hauptmenü anzeigen.
3
4
CH+/CH-
Im TV-Modus schalten Sie mit CH+ oder CHzwischen den Kanälen auf und ab.
Im MENÜ wählen Sie mit CH+ oder CH- einen
Menüpunkt.
STANDBY
2
VOL+/VOL-
Lautstärke einstellen.
Im MENÜ stellen Sie den gewählten Menüpunkt ein.
5
Schaltet den Fernseher in den Standby-Betrieb.
Seitliches Bedienfeld(32")
LCD-Fernseher mit LED-Hintergrundbeleuchtung DE-10
De
Page 48

TV-Anschlussfeld(22",24",28")
Einleitung
DIGITAL AUDIO OUTPUT
(COAXIAL)
4
1 2 5
COMM ON INTE RFACE (C I)
USB
6
7 8 9 10
11 12 13
3
VIDEO R
HDMI2(ARC)
HDMI1
1
YPbYr
2
3
4
5
Eingang
6
SCART
L/R AUDIO
VIDEO
7
HDMI2(ARC)
8
9
HDMI1
10
11
12
13
COMMON INTERFACE(CI)
PC AUDIO
Analog Audio Ausgang / Kopfhörerausgang
HEADPHONE
VGA
ANTENNE/Kabel
Eingang
Digital Audio Ausgang
Eingang
Eingang/Ausgang
Eingang
Eingang
Eingang
Eingang
Eingang
Eingang
TV-Anschlussfeld(32")
1
YPbYr
2
3
4
5
Digital Audio Ausgang
Eingang
DC Netzteil
6
SCART
L/R AUDIO
VIDEO
7
USB
8
9
HDMI2(ARC)
10
11
12
13
HDMI1
COMMON INTERFACE(CI)
PC AUDIO
Analog Audio Ausgang / Kopfhörerausgang
HEADPHONE
VGA
14
ANTENNE/Kabel
Eingang
Eingang
Eingang
Eingang/Ausgang
Eingang
Eingang
Eingang
Eingang
Eingang
Eingang
Eingang
DIGITALER AUDIOAUSGANG (KOAXIAL)
USB
Eingang
2 3
1
4
6
5
7 8 9
11 12 13 1410
AC-INPUT
100-240V~ 50/60Hz
YPbPr
VIDEO
LR
DIGITAL AUDIO OUTPUT
(COAXIAL)
SCART
USB HDMI2(ARC) HDMI1
HEADPHONE
COMMON INTERFACE(CI)
PC AUDIO
VGA R F
DE-11 LCD-Fernseher mit LED-Hintergrundbeleuchtung
DIGITALER AUDIOAUSGANG (KOAXIAL)
Page 49

GRB
COM MON INT ERFACE ( CI)
USB
RY
W
HDMI2(ARC)
DIGITAL AUDIO OUTPUT
(COAXIAL)
VIDEO R
HDMI1
Audio/Video Gerät
mit HDMI
G Grün (Y)
B Blau (Pb/Cb)
W Weiß (AUDIO-L )
R Rot (AUDIO-R, Pr/Cr)
Y Gelb (VIDEO)
Verstärker
CVBS, DVD-Player oder anderes
Gerät mit YPbPr/YCbCr
CVBS, DVD-Player oder anderes
Gerät mit CVBS/S-Video
Anschließen des Haier Fernsehers(22",24",28")
LCD-Fernseher mit LED-Hintergrundbeleuchtung DE-12
Einleitung
De
Page 50

Anschließen des Haier Fernsehers(32")
Einleitung
RY W
USB HDMI2(ARC) HDMI1
HEADPHONE
COM MON INT ERFACE (CI)
PC AUDIO
VGA R F
GR
B
AC-INPUT
100-240V~ 50/60 Hz
YPbPr
VIDEO
LR
DIGITAL AUDIO OUTPUT
(COAXIAL)
SCART
G Grün (Y)
B Blau (Pb/Cb)
W Weiß (AUDIO-L )
R Rot (AUDIO-R, Pr/Cr)
Y Gelb (VIDEO)
CVBS, DVD-Player oder anderes
Gerät mit YPbPr/YCbCr
Verstärker
CVBS, DVD-Player oder anderes
Gerät mit CVBS/S-Video
Audio/Video Gerät
mit HDMI
DE-13 LCD-Fernseher mit LED-Hintergrundbeleuchtung
Page 51

Anschließen eines DVD-Players / Satellits / K abel- SetTop-Box- Recei vers / einer Spielkonsole / eines PCs
ode r Lapto ps.
Es gibt mehrere Optionen zum Anschließen eines DVDPlayer s / Satelliten- oder Kabel-Set-Top-Box-Receivers /
einer Spielkonsole / eines P Cs oder L aptop s an Ihre n
Fernseher.
Option 1 SCART
Schließen Sie ein SCART-Kabel (nicht mitgeliefert)
übe r die SCA RT-Buc hse des Fern seher s an den DV DPlayer / S atelliten- oder Kabel-Set-Top-Box-Receiver oder
die Spielkonsole an.
Um da s mit dem S CART-K abel ange schlossene Gerät
auszuwählen, drücken Sie die SOURCE-Taste auf der
Fernbedienung und verwenden Sie die Tasten ▼▲ um
SCART auszuwählen.
Drücken Sie sodann auf die Taste OK.
Hinweis: Der Fernseher wird standardmäßig zum SCARTAnschluss, wenn der Fernseher eingeschaltet ist.
Option 2 HDMI1/HDMI2
Wenn das Ge rät, mi t dem Sie e ine Verbi ndung
herstellen möchten, eingeschaltet ist, schalten Sie das
Ger ät zuer st aus.
Schließen Sie ein HDMI-Kabel (nicht mitgeliefert)
über die HDMI-Buchse des Fernsehers an den DVD-Player
/ Satelliten- oder Kabel-Receiver oder die Spielkonsole
an.
Sch alten S ie das Ge rät ein , das Sie s oeben a n den
Fernseher angeschlossen haben.
Um da s mit dem H DMI-Kabel angeschlossene Gerät
auszuwählen, drücken Sie die SOURCE-Taste auf der
Fernbedienung und verwenden Sie die Tasten ▼▲, um
HDMI auszuwählen. Drücken Sie sodann auf die Taste OK.
Option 3 AV Audiovisuell
(Gelb/Weiß/Rot)
Stellen Sie sicher, dass sowohl der Fernseher als auch
das Gerät vor dem Anschließen ausgeschaltet sind.
Schließen Sie die AV-Kabel (nicht mitgeliefert) über
die Video- (gelb) und Audio- (weiß, rot) Buchsen des
Fernsehers an den DVD-Player oder die Spielkonsole usw.
an.
Um da s mit dem -Kabe l angeschlossene Gerät
auszuwählen, drücken Sie die SOURCE-Taste auf der
Fernbedienung und verwenden Sie die Tasten ▼▲, um
AV auszuwählen. Drücken Sie sodann auf die Taste OK.
Option 4
(Grün/Blau/Rot) + (We iß/Ro t)
Stellen Sie sicher, dass sowohl der Fernseher als auch
das Gerät vor dem Anschließen ausgeschaltet sind.
Sch ließen Sie die Kabel (nicht mitgeliefert) über die
COMPONENT-IN-Buchsen Y, Pb, Pr (grün, blau, rot) und LAudio-R (weiß, rot) des Fernsehers an den DVD-Player
oder die Spielkonsole usw. an.
,
AV
Komponent
Um das mit dem -Kabel angeschlossene
Gerät auszuwählen, drücken Sie die SOURCE-Taste auf der
Fern bedie nung un d verwend en Sie di e Taste n ▼▲, um
auszuwählen. Drücken Sie sodann die Taste OK.
Opt ion 5 VGA (15pin S ub-D)
Sch ließen Sie ein VGA-Kabel (nicht mitgeliefert) über
die VG A-Buc hse des Fern seher s an den PC / L aptop a n.
Um de n mit dem VG A-Kabel angeschlossenen PC /
Laptop auszuwählen, drücken Sie die SOURCE-Taste auf
der Fern bedie nung un d verwe nden Si e die Tasten
▼▲,
um PC auszuwählen. Drücken Sie sodann die Taste OK.
Hinweis: VGA ist nur für Bildübertragung. Für Audio über
Ihr en PC / Lap top müs sen Sie e in sepa rates K abel vom PCAudio (3,5 mm Klin ke) an di e Kopfh örerb uchse a n Ihrem
PC / La ptop (3 ,5mm Klinke) anschließen.
Opt ion 6 USB
Ein G roßteil de r im Hand el erhält liche n USB -Sticks
sind mit Ihrem Fernseher kompatibel, sowie können
einige Digitalkameras auch direkt angeschlossen werden.
Sch ließen Sie einen USB-Stick (nicht mitgeliefert)
ode r ein USB -Kabel (n icht mi tgeli efert ) an den Ferns eher
an.
Um das an den Fernseher angeschlossene USB-Gerät
auszuwählen, drücken Sie die SOURCE-Taste auf d er
Fernbedienung und verwenden Sie die Tasten ▼▲,um
USB ausz uwähl en. Drü cken Si e sodan n die Taste OK.
Hinweis 2: iPhones und iPods von Apple sind mit Ihrem
Fernseher nicht kompatibel.
Hinweis 3: Wenn Sie ein beliebiges Gerät an den USBAnschluss anschließen möchten, halten Sie die USBKabellänge so kurz wie möglich.
Opt ion 7 KOPFHÖRERAUSGANG
Stecken Sie den Stecker des Kopfhörers in die
Kopfhörerbuchse des Fernsehers. Die
Fernsehlautsprecher sind jetzt stummgeschaltet.
Alternativ können Sie auch externe Lautsprecher bei
Bedarf anschließen.
Opt ion 8
ist ein digitaler Audio-Anschluss, der verwendet
wird, um Audio-Geräte anzuschließen, zum Beispiel
Hei mkino und a ndere digi tale HiFi-Syste me. Das Sign al
wir d entweder ü ber ein K oaxia lkabel od er mit Ci nchAnschlüssen übertragen.
Ste llen Sie sicher, dass sowohl der Fernseher als auch
das Gerät vor dem Anschließen ausgeschaltet sind.
Sch ließe n Sie die AV-Kabe l (nich t mitge liefert) über die
-Bu chse de s Fernsehe rs an das H eimkino -
Soundsystem oder digitale HiFi-Anlage usw. an.
Komponenten
YPbPr
Hinweis 1: Nur *.jpg, *.mp3, *.txt, *.avi,*.mp4
Dateien, andere Dateien können möglicherweise
nicht abgespielt werden.
DIG ITALER AUD IOAUSG ANG (KOAX IAL)
KOAXIAL
KOAXIAL
Anschließen des Haier
Fernsehers
Einleitung
LCD-Fernseher mit LED-Hintergrundbeleuchtung DE-14
De
Page 52

Der Schacht Common Interface (CI) dient der
Aufnahme des Conditional Access Moduls (CAM)
und der SmartCard für Bezahlsender. Bitte
wenden Sie sich an Ihren Dienstanbieter für
weitere Informationen. Bitte beachten Sie, dass
CI- Modul e und Sma rtCards von un s nicht
geliefert werden.
COMMON INTERFACE
Einleitung
Warnung
Schalten Sie den Fernseher aus, bevor Sie das
Mod ul in den C ommon I nter face Schac ht
einschieben.
Setzen Sie zunächst das CI-Modul und dann die
SmartCard im CI-Schacht an der Seite des
Fernsehers ein.
Schalten Sie den Fernseher ein, die
nachstehende Meldung wird angezeigt, wenn
das CI-Modul erkannt wird. Warten Sie einen
Moment ab, bis die Karte aktiviert ist.
Wählen Sie im MENU den Unterpunkt Kanäle aus und
navigieren mit ▲▼ zur Au swahl o ption Co mmon
Interface.
Detaillierte Informationen zur benutzten CIKarte werden angezeigt.
Drü cken Si e OK, um da s Kart enmen ü
aufzurufen. Finden Sie detaillierte Anleitungen
in der Bedienungsanleitung des Moduls.
Nac h dem Abz iehen d es Modu ls wird d ie
nachstehende Meldung angezeigt.
CI-Schacht
CI-Modul
SmartCard
CAM gefunden
CAM entfernt
Kanal
Bild
Audio
Uhr
Konfiguration
Sperre
Autom. Suchlauf
Signal-Informationen
Software Update(USB)
Manueller Suchlauf
Kanäle bearbeiten
Kartenschnittstelle CI
Auswählen OK
OK
MENU
Zurück
DE-15 LCD-Fernseher mit LED-Hintergrundbeleuchtung
Page 53

Fernbedienung
03 Fernbedienung
Fernseher ein- oder ausschalten.
(Ein/Aus)
S.MODE
Klangmodus wählen.
P.MODE
Bildmodus wählen.
0-9
Kanalnummer oder Kennwort
eingeben.
Q.VIEW
Rückkehr zum vorherigen Kanal.
SLEEP
Sleeptimer einstellen.
VOL + /-
Lautstärke einstellen.
(Stumm)
Ton ein- oder ausschalten.
AUDIO(I/II)
MON O, Nicam Ste reo für ATV-K anal
wählen. Audiosprache für DTVKanal einstellen.
SUBTITLE
Untertitel ein- oder ausschalten.
Liste der Favoriten kanäl e öffnen.
Im Videotextmodus Seite halten
(nicht umblättern).
SCREEN
Bildformat umschalten.
Bildschirmmenü anzeigen. Im Videotextmodus
Index-Seite öffnen.
Navigation im Bildschirmmenü.
Auswahl bestätigen.OK
Im Videotextmodus Mischmodus aufrufen.
(Rücklauf )
(Vorlauf)
Schnelle Vorwärts- oder Rückwärts-Wiedergabe
im Multimedia- und Timeshift-Modus (rote und
grüne Farbtaste im Videotextmodus)
Videotext ein- oder ausschalten und TTX-Modus
umschalten.
SOURCE
Liste der Eingangsquellen anzeigen.
Keine Funktion.
P
Kanalwahl.
Anzeige von Kanalinformationen.
Im Videotextmodus verborgene
Informationen anzeigen.
Kanalliste öffnen. Im Videotextmodus
Schriftgröße umschalten.
3D WORLD
Keine Funktion.
Bildschirmmenü schließen. Im Videotextmodus
Text verbergen.
16
17
18
19
20
21
22
23
24
25
26
Vorherige oder nächste Datei wählen. (gelbe und
blaue Farbtaste im Videotextmodus)
(vorherige)
(nächste)
Multimedia-Wiedergabe beenden, Timeshift im
DTV-Modus beenden.
GUIDE
Elektronische Programmzeitschrift im TV-Modus
anzeigen. Im Videotextmodus Unterseite
aufrufen.
(REC)
Aktuelles Programm im DTV-Modus aufzeichnen.
Wiedergabe/Pause im Multimedia-Modus,
Timeshift im DTV-Modus.
(Wiedergabe/
Pause)
Batterien in die Fernbedienung einsetzen
1. Öffnen Sie das Batteriefach.
2. Setzen Sie 2 AAA 1,5-V-Batterien mit korrekter
Polarität ein, so wie im Batteriefach angezeigt.
3. Schließen Sie das Batteriefach wieder. Tauschen
Sie die Batterien aus, wenn die Reichweite der
Fernbedienung nachlässt.
Bitte beachten Sie:
1) Benutzen Sie Alkali-Batterien.
2) Bei längerer Nichtbenutzung oder wenn die
Batterien erschöpft sind, entnehmen Sie sie bitte
aus der Fernbedienung.
LCD-Fernseher mit LED-Hintergrundbeleuchtung DE-16
De
Taste Beschreibung
Page 54

INDEX
HOLD
REVEAL
VIDEOTEXT
Die Fa rbtas ten entsprec hen den Farbmarkierun gen unten auf der Seite
und dienen als Schnelltasten zum Aufrufen. Der farbige Bereich blinkt,
wenn die Seite noch nicht zur Ver fügung steht.
Inhaltsverzeichnis aufrufen (gewöhnlich Seite 100).
Mit dieser Taste halten Sie eine Seite, sie wird nicht umgeblättert.
Versteckte Informationen anzeigen oder verbergen (Spielauflösungen).
Videotext ist ein Informationssystem, das von einigen Sendern übertragen wird und wie eine
Zeitung aufgebaut ist. Hier haben Sie ebenfalls Untertitel für Hörgeschädigte
(Kabelnetzwerke, Satellitenkanäle usw.).
Fernbedienung
E
UNTERCODE
Drü cken Si e die Taste und ge ben Sie d en 4-st ellig en Code zum Au frufen
einer Unterseite ein.
MIX
Videotext und Fernsehbild werden überlagert. Mit erneutem
Tastendruck kehren Sie zur Textanzeige zurück.
EXIT
Videotext verbergen.
GRÖßE
Schriftgröße und Anzeige umschalten.
TEXT
SEITE WÄHLEN
Drücken Sie:
Sie haben folgende Funktion:
Mit 0 bis 9 u nd den Navigationstasten aufwärts/abwärts rufen Sie die Seite
auf. Beispiel: Für Seite 120 geben Sie 1-2-0 ein. Die Nummer wird oben links
im Bild angezeigt. Zum Aufrufen einer neuen Seite geben Sie die
entsprechende Nummer ein. Ist die gewählte Seite nicht vorhanden, so
läuft die Seitenzahl weiter.
Mit dieser Taste rufen Sie den Videotext auf oder Sie verlassen ihn . Eine
Liste mit Menüpunkten wird angezeigt. Jede Seite hat eine 3-stellige
Nummer.
UNTERSEITEN DIREKT
AUFRUFEN
DE-17 LCD-Fernseher mit LED-Hintergrundbeleuchtung
Page 55

BEDIENUNGSHINWEISE
04 BEDIENUNGSHINWEISE
Beim ersten Einschalten des Fernsehers oder nach der
Rückstellung zu den Werkseinstellungen wird das Menü zur
Erstinstallation angezeigt.
Installation
1)Drücken Sie ▼▲ zur Navigation des Menüs und ◄►
zum Ändern der Einstellungen. Wählen Sie die gewünschte
Sprache und den anzuzeigenden Modus
Zuhause/Geschäft.
2). Drücken Sie ◄► zur Auswahl von Antenne/K abel für
DVB-T/DVB-C.
3).Kanal suche beginnt. Dies kann bis zu
dauern. In der Anzeige sehen Sie den For tschritt der Suche
und die Anzahl der gefundenen Kanäle.
4).Zum Überspringen der DT V-Kanalsuche drücken Sie
MENU. Damit gelangen Sie direkt zur ATV-K analsuche.
5).Nachdem die Suche abgeschlossen ist, werden die
Kanäle in einer vorgegebenen Reihenfolge angeordnet.
Wenn Sie Kanäle überspringen möchten, ändern Sie die
voreingestellte Reihenfolge oder nennen Sie die Kanäle
um, wählen Sie Programme bearbeiten im Kanalmenü aus.
einige Minuten
1. 1) Automatische Kanalsuche (DVB-T)
1. KANALMENÜ
1). Drücken Sie MENU und dann ▼▲ zur Auswahl des Menüs
KANAL, dann drücken Sie OK oder die Pfeiltaste rechts.
2). Selektieren Sie mit ▼▲ den automatischen Suchlauf,
dann drücken Sie OK.
DTV Digitalfernsehen
ATV Analogfernsehen
Haben Sie sich für DVB-C entschieden, so wählen Sie bitte
zwischen einem vollständigen Kanalsuchlauf oder einer
Schnellsuche.
Darüber hinaus können Sie entscheiden, ob die Suche
DTV+ATV einschließt oder nur DTV oder nur ATV.
Hinweis
Hinweis
Ersteinrichtung
Men ü-Spr ache De utsch
Moduseinstellung Zuh ause- Modus
Lan d Deutschland
Starten
Aut om. Suc hlauf D TV+ATV
Antennenart Air
Ersteinrichtung
Men ü-Spr ache De utsch
Mod usein stell ung Zuh ause- Modus
Lan d Deuts chlan d
Starten
Autom. Suchlauf DTV+AT V
Ant ennen art Kab el
Kab el Schnell
Kanal
Bild
Audio
Uhr
Konfiguration
Sperre
Aut om. Suc hlauf
Signal-Informationen
Software Update(USB)
Manueller Suchlauf
Kanäle bearbeiten
Kartenschnittstelle CI
HOME- und Shop-Modus
Beim ersten Einschalten des Geräts wird das
Ersteinstellungsmenü angezeigt. Nach dem Einstellen der
Bildschirmsprache wählen Sie zwischen „Shop-Modus“ und
„Home-Modus“. Wird das Einstellungsmenü angezeigt und
„Home-Modus“ ist markiert, so drücken Sie◄► zum
Einstellen und „OK“ zum Aufrufen des Menüs.
Select the usage mode?
sho p mode is for shop u sage on ly.
Shop-Demo
Privatnutzung
Bei Auswahl von „Shop-Modus“ wird das folgende
Menü angezeigt.
Are
you sure to change to
Shop mode?
OK
Abbrechen
Wähl en Sie „OK“, um das näc hste Me nü aufz urufen.
Home mode is the most energy mode.
OK
Abbrechen
Continue?
Wählen Sie „Abbrechen“, um in das Ersteinstellungsmenü
zurückzukehren; „Home-Modus“ bleibt markiert. Mit
Auswahl gelangen Sie in das nächste Menü, hier wählen
Sie d as Land .
LCD-Fernseher mit LED-Hintergrundbeleuchtung DE-18
De
Auswählen OK
OK
MENU
Zurück
Page 56

3). Im Kanalmenü können Sie den Empfangstuner
(Antenna Type) mittels◄►auswählen. Wählen Sie für
Antennenempfang DVB-T (Air).
1.2 )Automatische Kanalsuche (DVB-C)
3). Drücken Sie ▼ und dann ◄►▼▲ zur Auswahl Ihres
Landes.
4).Drücken Sie ◄► zur Auswahl Ihres Landes.
5).Drücken Sie ◄► zur Auswahl des Tunermodus: ATV /
DTV / DTV + ATV. Drücken Sie
▼ um Suchlauf zu starten.
6).Kanalsuche beginnt. Dies kann bis zu
dauern. In der Anzeige sehen Sie den Fortschritt der Suche
und die Anzahl der gefundenen Kanäle.
7).Zum Überspringen der DTV-Kanalsuche drücken Sie
MENU. Damit gelangen Sie direkt zur ATV-Kanalsuche.
Wiederholen Sie den obigen Schritt, wenn Sie auch die
ATV-Kanalsuche überspringen möchten. Sie werden beim
nächsten Einschalten an die Installation erinnert, falls
noch kein Kanal eingestellt ist.
8).Nachdem der Suchlauf abgeschlossen ist, werden die
Kanäle in einer vorgegebenen Reihenfolge angeordnet.
Wenn Sie Kanäle überspringen möchten, ändern Sie die
voreingestellte Reihenfolge oder nennen Sie die Kanäle
um, wählen Sie Programme bearbeiten im Kanal menü aus.
einige Minuten
4). Drücken Sie ◄► zur Auswahl von ATV / DTV / DTV +
AT V.
6).Kanalsuchebeginnt. Dies kann bis zu
dauern. In der Anzeige sehen Sie den Fortschritt der Suche
und die Anzahl der gefundenen Kanäle.
7).Zum Überspringen der DT V-Kanalsuche drücken Sie
MENU. Damit gelangen Sie direkt zur ATV-Kanalsuche.
Wiederholen Sie den obigen Schritt, wenn Sie auch die
ATV-Kanalsuche überspringen möchten. Sie werden beim
nächsten Einschalten an die Installation erinnert, falls noch
kein Kanal eingestellt ist.
8).Nachdem die Suche abgeschlossen ist, werden die
Kanäle in einer vorgegebenen Reihenfolge angeordnet.
Wenn Sie Kanäle überspringen möchten, ändern Sie die
voreingestellte Reihenfolge oder nennen Sie die Kanäle
um, wählen Sie Programme bearbeiten aus dem Kanal
menü aus.
einige Minuten
BEDIENUNGSHINWEISE
1).Drücken Sie MENU und verwenden Sie ▼▲ zur
Selektierung des Menü punkts Kanal (Channel), dann
drücken Sie OK.
2).Selektieren Sie mit ▼▲ den automatischen Suchlauf,
dann drücken Sie OK. Wählen Sie als Empfangstuner
(Antenna Type) Kabel (DVB-C / Cable).
Kanal
Bild
Audio
Uhr
Konfiguration
Sperre
Ant ennen art Kab el
Land Deuts chlan d
Mod us DTV+ ATV
Starten
Kanal
Bild
Audio
Uhr
Konfiguration
Sperre
Schnell
Vollbild
Erweitert
Kanal
Bild
Audio
Uhr
Konfiguration
Sperre
Antennenart Air
Land Deuts chlan d
Mod us DTV+ ATV
Starten
Kanal
Bild
Audio
Uhr
Konfiguration
Sperre
Übersicht Beenden
Suche läuft Ch12
Digitale Kanäle gefunden
DTV: 3
Radio: 0
Dat en: 0
Ana loge Ka näle ge funde n: 0
5). Wählen Sie Start, um das nachstehende Menü aufzurufen,
hier wählen Sie den Suchmodus.
DE-19 LCD-Fernseher mit LED-Hintergrundbeleuchtung
Auswählen OK
OK
MENU
Zurück
MENU EXIT
Auswählen OK
OK
MENU
Zurück
Auswählen OK
OK
MENU
Zurück
Page 57

2. 1 )DTV Manuelle Kanalsuche (DVB-T)
Alle Kanäle inklusive ATV, DTV und Radio können
gleichzeitig durchsucht werden, wenn DTV+ATV
selektiert wurde.
Alle bereits gespeicherten Programmplätze und ihre
Reihenfolge gehen nach der automatischen Suche verloren.
Der erste DTV-Kanal wird angezeigt.
2). Selektieren Sie mittels ▼▲ den DTV Manuellen
Kanalsuchlauf und drücken dann OK. Wählen Sie Antenne (Air)
in Auto Scan, um das DVB-T Menü für die manuelle Kanalsuche
anzuzeigen.
4). Drücken Sie die Taste MENU, um zum Hauptmenü
zurückzukehren.
5). Drücken Sie die Taste EXIT, um das Menü zu verlassen.
2. 2 ) DT V Manuelle Kanalsuche (DVB-C)
1). Drücken Sie MENU und wählen mittels ▼▲ den
Menüpunkt Kanal aus. Drücken Sie sodann OK.
3). Der DT V Bildschirm für die manuelle Suche wird
angezeigt.
Drücken Sie ◄► zur Auswahl des gewünschten
UHF-Kanals oder drücken Sie OK zur Eingabe einer anderen
Kanalnummer. Wählen Sie Start, um mit der Kanalsuche zu
beginnen. Wenn das Signal gefunden wurde, wird das
Bild und die Signalstärke auf dem Bildschirm angezeigt.
1). Selektieren Sie im MENU mittels ▼▲ den Menüpunkt
Kanal (CHANNEL). Drücken Sie sodann OK. Wählen Sie
Kabel (Cable) in Auto scan, um das DVB-C Menü für die
manuelle Kanalsuche anzuzeigen.
2).Das manuelle Einstellungsmenü DVB-C wird angezeigt.
Drücken Sie ▼▲ zur Auswahl von (Frequenz/Symbol)
ks/s/QAM-Typ, drücken Sie OK zur Eingabe von Frequenz
und Symbol, drücken Sie◀▶zum Umschalten des QAM-
Typs, drücken Sie Start, um mit der Kanalsuche zu
beginnen. Wenn das Signal eingeregelt wurde, werden
das Bild und die Signalstärke auf dem Bildschirm
angezeigt.
3).Drücken Sie die Taste MENU, um zum Hauptmenü
zurückzukehren.
4).Drücken Sie die Taste EXIT, um das Menü zu
verlassen.
3) ATV Manuelle Kanalsuche
Stellen Sie das Tonsystem zur Suche nach Analogkanälen
ein, dann nehmen Sie die Feinabstimmung vor und
speichern Sie den gewählten Kanal.
1.Drücken Sie die rote Videotexttaste zum Speichern
eines manuell gesuchten Kanals.
2.Sofern Sie den Kanal auf einer Kanalnummer
speichern wollen, die bereits belegt ist, so
überschreiben Sie durch Drücken der roten Taste,
den vorhandenen Kanal.
4). Kanal bearbeiten
Drücken Sie ▲ oder ▼ zur Auswahl von Kanäle bearbeiten
im Menüpunkt Kanal. Dann drücken Sie OK, um das
Untermenü aufzurufen. Hier wählen Sie den zu
bearbeitenden Kanal.
Hinweis
Hinweis
BEDIENUNGSHINWEISE
Kanal
Bild
Audio
Uhr
Konfiguration
Sperre
Frequenz 4740 00K
Starten
Symbolrate 68 75K
Mod ulato n Aut o
Spe icher n in 1
System BG
Str om CH1
Suche
Fre quenz 4 4.25 MH z
Feineinstellungen
Speichern
ATV Manuelle Sendersuche
Kanal
Bild
Audio
Uhr
Konfiguration
Sperre
Dig itale r Suchl auf Ch5
Starten
Stärke 54
LCD-Fernseher mit LED-Hintergrundbeleuchtung DE-20
De
Auswählen OK
OK
MENU
Zurück
Auswählen OK
OK
MENU
Zurück
Page 58

12
abc3def
4
ghi
5
jkl
6
mno
7
pqrs
8
tuv9wxyz
5). Common I nterface
Das Menü zeigt Informationen der CI-Karte an.
Das zweite Menü ist das Bildmenü (PICTURE). Hier stellen
Sie das Bild ein, beispielsweise Kontrast, Helligkeit usw.
Drücken Sie ▼▲ zur Auswahl und zum Einstellen.◀▶
2. Bildmenü
1).Wählen Sie eine der Farbtemperaturen normal, warm,
kühl.
2).PC-Einstellung steht Ihnen nur im PC-Modus zur
Verfügung; die horizontale Position, vertik ale Position,
Größe und Phase können eingestellt werden.
3.Tonmenü
Das dritte Menü betrifft den Ton.
Hier stellen Sie die Klangeffekte wie Höhen, Bässe, Balance
usw. ein.
Drücken Sie ▼▲ zur Auswahl und zum Einstellen.◀▶
Löschen: Drücken Sie die rote Taste, um den markierten
Kanal zu löschen.
ÜBERSPRINGEN: Drücken Sie die gelbe Taste zur Auswahl
der Funktion, das SKIP-Symbol wird neben dem Kanal
angezeigt und er wird in der Kanalsuche übersprungen.
VERSCHIEBEN: Drücken Sie die grüne Taste, um den
markierten Kanal zu verschieben. Neben der Kanalnummer
wird das entsprechende Symbol angezeigt. Drücken Sie
nun ▼/▲ zur Wahl einer neuen Position und bestätigen Sie
mit der grünen Taste.
Umbenennen (Nur ATV) :Drücken Sie die blaue Taste, um
den Kanal umzubenennen. Mit den Zifferntasten geben Sie
den neuen Namen ein, dann drücken Sie OK zur
Bestätigung (benutzen Sie die Zifferntasten entsprechend
nachstehender Tabelle).
FAV: Drücken Sie FAV (anstatt einer Farbtaste), um Ihre
Favoritenkanäle einzustellen (zum Aufrufen der
Favoritenkanäle verlassen Sie die Kanalbearbeitung und
drücken dann FAV).
6). S ignal informationen (nur DTV)
Drücken Sie ▼ / ▲ zur Auswahl der Signalinformationen
im Menü Kanal. Dann drücken Sie OK zur Anzeige der
entsprechenden Informationen zum aktuellen Kanal.
7). S oftware aktua lisie rung (U SB)
Drücken Sie ▼ oder ▲ zur Auswahl von
Softwareaktualisierung (USB) im Menü Kanal.
Dann drücken Sie OK zur Aktualisierung der Software über
USB. Folgen Sie den Anleitungen zur Aktualisierung der
Software auf dem Bildschirm. Bitte beachten Sie: Wir
empfehlen, eine Rücksetzung zu den Werkseinstellungen
durchzuführen (siehe Restore Factory Default im
Einstellungsmenü), damit gewährleistet ist, dass die
Aktualisierung erfolgreich verläuft.
1.Auto Volume (automatische Lautstärkeregelung) steht
Ihnen nur zur Verfügung, wenn die Lautstärke des
Eingangssignals zu hoch oder das Signal verzerrt ist.
2.Nur Tonausgabe: Stellen Sie die Option "Ein" um den
Fernsehbildschirm auszuschalten, und nur den Ton zu
hören.
Hinweis
Hinweis
BEDIENUNGSHINWEISE
001 T he HITS
003 UKTV Br’tldeas
004 f t h
005 I deal Wo rld
006 Colourbars100
001 K iss
002 S mash Hi ts!
003 K erran g!
002 T MF
Löschen
Programm bearbeiten
DTV
DTV
DTV
DTV
DTV
DTV
Radio
Radio
Radio
Auswählen
Überspringen
Umzubenennen Favorite
FAV
Kanal
Bild
Audio
Uhr
Konfiguration
Sperre
Bil dmodu s Stand ard
Mittel
Sei tenve rhält nis 16: 9
Farbtemperatur Nor mal
Hintergrundbeleuchtung
14
Helligkeit 50
Kon trast 4 5
Sch ärfe 60
Far be 45
Far bton 0
DNR M ittel
Dyn amisc her Kon trast
Kanal
Bild
Audio
Uhr
Konfiguration
Sperre
Tonmodus Standard
Höhen 0
Tief en 0
Balance
0
Aut omati sche La utstä rkena npass ung Ein
Surround-Sound
Aus
SPDIF
Automatisch
Audiobeschreibung
Nur Audio
Aus
DE-21 LCD-Fernseher mit LED-Hintergrundbeleuchtung
Auswählen OK
OK
MENU
Zurück
Auswählen OK
OK
MENU
Zurück
Page 59

5.Einstellungsmenü
Das fünfte Menü ist das Einstellungsmenü. Hier stellen Sie die
Menüsprache, Audiosprache und Untertitelsprache ein.
Auto- St andby ( 4 Std.)
1.We nn 4 Stunden an dem TV-Gerät keine Änderungen
vorgenommen werden, d.h. es
wird kein Kanal gewechselt oder die Lautstärke
verändert, geht das Gerät automatisch in den Ruhemodus.
Ein Informationsfenster erscheint auf dem
Bildschirm um Sie darüber in Kenntnis zu setzen, dass
nach 150 Sekunden das Fernsehgerät sich
automatisch abschaltet Um das
automatische Abschalten zu verhindern, drücken Sie
irgendeine Taste auf der Fernbedienung.
6.SPERRMENÜ
Das sechste Menü ist das Sperrmenü (LOCK). H ier sperren
Sie das System, stellen Sie ein Passwor t ein, blockieren Sie
einen Kanal und stellen Sie den Jugendschutz ein. Nach
dem Einstellen der Systemsperre können Sie keine Kanäle
mehr suchen oder umschalten.
Mit Res tore Fac tory Defa ult (Rü ckste llung a uf
Werkseinstellungen) werden alle Kanäle und das
Passwort gelöscht.
Das Standard-Kennwort lautet 0000; sollten Sie das
Kennwort einmal vergessen, so benutzen Sie das
Super-Kennwort: 9443.
Kanalsperre: Drücken Sie ▼▲ zur Aus wahl de s Kanals,
dan n drück en Sie OK , um ihn zu spe rren. Zum
Ent sperr en des Ka nals na vigie ren Sie in das H auptm enü,
geb en Sie da s Kennwort ein , wähle n Sie den K anal und
drücken Sie dann erneut OK.
Altersfreigabe: Drücken
Sie◀▶zur Auswahl der Bewertungsstufe.
Timeshift Record Time: Maximale Timeshift-Aufnahmedauer
einstellen.
Auto Standby (4hr): Gerät nach 4 Stunden Betrieb
automatisch in den Stand-by-Modus schalten.
HDMI CEC Control: CEC-Funktion ein- oder ausschalten.
OSD Time: Drücken Sie ◄ oder ► zur Auswahl der
Anzeigendauer des Bildschirmmenüs.
Rücksetzen auf Werkseinstellungen
Drücken Sie ▼ oder ▲ zur Auswahl von Rücksetzen auf
Werkseinstellungen (Restore Factory Default) und drücken
Sie OK, um die Erstinstallation durchzuführen. Nach der
Bestätigung werden alle Einstellungen gelöscht. Benutzen
Sie diese Funktion nur bei Problemen mit dem Fernseher.
Moduseinstellung: Hier stellen Sie den Home- oder ShopModus ein.
2. Zur Deaktivierung der automatischen Abschaltung
wählen Sie im Menü Einstellungen Auto standby (4hr), der
Fernseher kehrt danach zu dem Menüpunkt zurück und
Auto standby (4hr) OFF wir d angezeig t.
Das vierte Menü betrifft die Zeit. Hier stellen Sie die Uhr, die
Ein- und Ausschaltzeit, Sleep-Timer usw. ein. Drücken Sie
▼▲ zur Auswahl und OK zum Einstellen.
Zur Rückkehr zur automatischen Abschaltung nach 4
Stunden wiederholen Sie die obigen Schritte, außer der
Auswahl von (4 Stunden) mit der linken Pfeiltaste.
Im Menü PVR-Dateisystem stellen Sie das USB-Laufwerk für
die PVR-Aufnahme ein.
Automatische Abschaltung
Liegt für 15 Minuten kein Eingangssignal vor, so schaltet
sich der Fernseher automatisch ab, vorrausgesetzt die
Funktion ist aktiviert. Die Uhrzeit wird automatisch
eingestellt, wenn der Fernseher einen DTV-Kanal empfängt.
Hinweis
BEDIENUNGSHINWEISE
PVR-Einstellungen
Nac h links
Nach rechts
Selektieren
Beenden
OK
EXIT
Datei-Manager Geräteliste
Geplante Aufnahme
Kanal
Bild
Audio
Uhr
Konfiguration
Sperre
Pas swort e ingeb en ---Akt ivier en Aus
Neues Passwort ----
Kan alspe rre
Alt ersfr eigab e Keine
Kanal
Bild
Audio
Uhr
Konfiguration
Sperre
Sle ep-Tim er
Dat um 2010/04/30
Zei t AN
Aut omati sche Abs chalt ung
Zeitzone
Aus
Zei t AUS
Ein
Kanal
Bild
Audio
Uhr
Konfiguration
Sperre
Menü-Sprache Deu tsch
Audio-Sprachen
Zuhause-Modus
HDM I-CEC -Steu erung E in
Aus
Unt ertit el
Lan d
Deutschland
PVR D ateis ystem
Time Shift Au fnahm ezeit 1 S tunde
Auto Standby(4Std) AN (4 St unden)
Moduseinstellung
Menü-Abschaltzeit
Werkseinstellungen wiederherstellen
4. Zeitmenü
LCD-Fernseher mit LED-Hintergrundbeleuchtung DE-22
De
Auswählen OK
OK
MENU
Zurück
Auswählen OK
OK
MENU
Zurück
Auswählen OK
OK
MENU
Zurück
Page 60

Zur A nzeige der n ächst en Send ung drü cken Si e die
gelbe Taste (Planung). Zur Anzeige anderer Kanäle
markieren Sie mit ▲ oder ▼ den K anal, d ann drü cken
Sie ◀oder ▶ . Zum Verlassen des EPG-Menüs drücken
Sie E PG oder E XIT. Drücke n Sie die Taste er neut, u m
zurückzukehren.
Unten im EPG-Menü werden die Tastenfunktionen
angezeigt.
Aufnahme
Im EPG-Modus drücken Sie die rote Taste zur Auswahl des
Programms, das Sie aufnehmen möchten. Hiermit rufen Sie
die Aufnahmeplanung auf (siehe Abschnitt
PVR-Dateisystem).
Achten Sie darauf, dass seine kompatible Festplatte
ode r ein USB -Spei cherm edium a m USB-Por t
angeschlossen ist. Ist Ihr Speichergerät nicht kompatibel,
so we rden Sie auf geforder t, es zu fo rmati eren. I m
Einstellungsmenü rufen Sie im PVR-Dateisystem-Menü
die G eräte liste zum Forma tiere n Ihres G eräts auf.
WARNUNG
Beim Formatieren des USB-Speichermediums werden alle
vorhandenen Dateien gelöscht.
Haben Sie eine zeitgesteuerte Aufnahme eingestellt, so
schaltet sich der Fernseher automatisch ein, um das
Programm aufzuzeichnen; nach der Aufnahme schaltet er
sich wieder automatisch aus. Während der Aufnahme
werden Bild und Ton unterdrückt. Drücken Sie STANDBY
zur Wiedergabe von Bild und Ton.
Drücken Sie die rote Taste, um den Programmzeitplan
anzuzeigen. Sie können die eingestellten Programme
ebenfalls löschen.
INFO (grüne Taste)
Im EPG-Menü drücken Sie die grüne Taste, um weitere
Informationen zum aktuellen Programm anzuzeigen.
8.PVR-Dateisystem (nur DTV)
Drü cken Si e Menu un d wähle n Sie das U nterm enü.
Drücken Sie ▼ oder ▲ zur Auswahl von PVR-Dateisystem,
dan n drück en Sie OK z um Aufrufe n des Untermen üs und
mit ◄ oder ► scrollen Sie durch die Optionen.
Das EPG-Menü (Elektronische Fernsehzeitschrift) gibt
Ihnen eine detaillierte Übersicht über die Sendungen.
Drücken Sie EPG zur Anzeige eines Pop-up-Menüs mit
Programminformationen des aktuellen Senders. Ihnen
stehen bis zu 7 Tagen Vorschau zur Verfügung. Zur Anzeige
des nächsten Tages markieren Sie mit ▲ oder ▼ das
Datum, dann drücken Sie ◄ oder ►, um durch die Tage zu
scrollen.
Hinweis
Hinweis
Reminder (blaue Taste)
Im EPG-Menü drücken Sie die BLAUE Taste, um die
Programmerinnerung einzustellen. Das nachstehende
Erinnerungsmenü wird angezeigt und mit ◄ oder ►
stellen Sie die Erinnerung ein. Die Erinnerung kann einmal,
täglich oder wöchentlich eingestellt werden.
7. EPG-Menü (Elektronische Fernsehzeitschrift)
BEDIENUNGSHINWEISE
Programmführer
Aufnahme
Erinnerung
001 Nine Digital
01:00-02: NINE MO RNI NG NE WS
-03:00 HE ELLEN DEGENERES S...
- HE VIEW
DAY S OF O UR LI VES
NTERTAINMENT TONIGHT
AGICAL TAL ES
HE SHAK
INE AFTERNOON NEWS
00
02:00 T
03:00 04:00 T
04:00-05:00
05:00-05:30 E
05:30-06:00 M
06:00-06:30 T
06:30-07:00 N
Frequenz
Kan al
Minute
Stunde
Monat
Datum
Erinnerung
Aus
The H ITS
0
17
Nov
19
17:03 19/11/2004
OK
Terminprogrammliste
Programmführer
Aufnahme
Terminprogramme
Erinnerung
2010/04/29 02:19
001 N ine Dig ital NINE MORNING NEWS
002 N ine Dig ital NINE MORNING NEWS
003 G O! TMZ
...
Information
Dienst
DE-23 LCD-Fernseher mit LED-Hintergrundbeleuchtung
Page 61

Scheduled Record: Hier stellen Sie die Aufnahmeliste ein.
Sie können die eingestellten Programme ebenfalls
löschen.
Im Untermenü stellen Sie die Häufigkeit der Aufnahme
auf Einmal, Täglich, Wöchentlich, Wochentags oder AUS ein.
Programm aufzeichnen:
Zur Aufn ahme de s Progra mms, da s Sie ger ade seh en,
drü cken Si e REC; da s rote REC-S ymbol w ird angeze igt.
Aufnahmezeit und verbleibende Aufnahmezeit werden
im Me nü unte n angezeigt.
Aufnahme abspielen:
Das auf dem USB-Speichermedium aufgezeichnete
Programm wird im Ordner „USB Record“ gespeichert.
Die Wi edergabe k ann im PVR- Datei system und i m
Untermenü Dateimanager erfolgen.
Device List: Das Untermen ü zeigt die USBSpeichermedien an, die am Fernseher angeschlossen
sind. Wählen Sie das entsprechende Gerät, dann
formatieren Sie es mit der roten Taste.
File Manager: Hier werden alle aufgezeichneten
Programme angezeigt.Drücken Sie für die
Vollbildansicht die blaue Taste auf der Fernbedienung.
1.Die USB Speichergröße kann zwischen 128MB und
500 GB lieg en, abe r für den p raktischen Gebrauch
wird eine Größe von 2GB bis 500GB empfohlen.
2.D as Video k ann ver pixeln, falls die Bitrate zu
niedrig eingestellt ist. Dies kann aufgrund der
Benutzung eines USB-Verlängerungskabels
erfolgen, wenn Sie das Speichermedium nicht
direkt am USB-Port des Fernsehers anschließen.
3.Der Großteil im Handel erhältlichen USBSpeichermedien sind kompatibel, allerdings läßt
sic h hierfür keine Garantie geben. Empfohlen sin d
vor allem Hi-Speed Speichermedien mit hohen
Transferraten.
BEDIENUNGSHINWEISE
PVR-Einstellungen
Nac h links
Nach rechts
Auswählen
Beenden
OK
EXIT
Datei-Manager Geräteliste
Geplante Aufnahme
Datei-Manager
Hot key
Nach o ben
Nach unten
Auswählen
Zurück
Beenden
EXIT
OK
EXIT
MENU
Geplante Aufnahme
G
e
p
p
p
p
p
a
Standby
Wiedergabe
Ansicht
EXIT
Eins löschen
Alle löschen
Funktion
Informationen zu der aktuellen Abspieldatei.
Kanalname
Programmname
Aufnahmezeit
Gesamtzeit
Beschreibung
BBC ONE
Olympics 2012
2012/08/09 11:44
00:08:06
Matt Baker and Clare Balding
present coverage of the eager...
UKTV Br’tldeas_Good Food Bites_20041119_161021.ts
BBC ONE_Olympics 2012_20120808_114427.ts
UKTV Br’tldeas_Good Food Bites_20041119_162019.ts
Geplante Aufnahme- Gruppe 1
Status-Einstellung
Einstellung wird nicht verwendet
Freq uenz Ei nmal
Kana l 6 Colou rbars 1 00
Star tzeit 2 004-1 2-25
18:17
Endzeit 2004-12-25
18:47
Hot key
Nach o ben
Nach unten
Auswählen
Zurück
Beenden
EXIT
OK
EXIT
MENU
Einstellungen
Einstellungen
Geräteliste
Gerät
Verfügbarer Speicherplatz
Dateisystem
sda1
192
MB
FAT32
Funktion
Format
Hot key
Nach o ben
Nach unten
Auswählen
Zurück
Beenden
EXIT
X
T
OK
EXIT
MENU
Geplante Programmaufnahmen
Funktion
Gruppe
Frequenz
Kanal
1
2
3
4
5
6
7
8
9
10
11
12
13
14
15
16
0
Colourbars100
Dauer
Datum
Startzeit
2004.12.25
18:17
00
:
30
Einmal
Aus
Aus
Aus
Aus
Aus
Aus
Aus
Aus
Aus
Aus
Aus
Aus
Aus
Aus
Aus
Geplante Aufnahme
e
a
Standby
Hot key
Nach oben
Nach unten
Auswählen
Zurück
Beenden
EXIT
X
T
OK
EXIT
MENU
Eins löschen
Alle löschen
Aufnahme läuft
Aufn ahme zeit : 00 : 00 : 4 0
Verfügbare Zeit : 25 Minut e
Vorbereitung der Aufnahme:
Zum A nzeigen de s Menüs drü cken Si e erneu t REC. Zu m
Beenden der Aufnahme drücken Sie Stopp. Alternativ
rufen Sie da s Menü Me dia Pla yer zur Anze ige
aufgezeichneter Programme im Filmmodus auf.
LCD-Fernseher mit LED-Hintergrundbeleuchtung DE-24
De
I
E
Page 62

Aufnahmedatei wiedergeben
Der H aier- Fernsehe r zeichnet das Program m im Format
*.ts auf dem USB-Speichermedium auf. Andere
Fernseher, PCs, Laptops, DVD-Player oder sonstige
Geräte, welche die *.ts Datei nicht unterstützen, können
die D atei ni cht wieder geben . „t s“ ist da s Format v on HDFernse hern. M it der rich tigen S oftware können S ie „ts“
Dat eien au f einem Comp uter od er Lapt op wied ergeben.
Im Inte rnet od er bei ei nem IT-Anbi eter fi nden Si e
weitere Informationen zu geeigneter Software.
Achtung: Haier übernimmt keine Verantwortung für
heruntergeladene Software; diese kann Viren und
Schadprogramme enthalten. Die Benutzung erfolgt auf
eigene Gefahr und kann die Kopierschutzrechte
verletzen.
Für CI + Kanäle haben Sie keine Aufnahmefunktion.
Ihr Speichergerät muss zur Aufnahme angeschlossen
und kompatibel sein. Ist Ihr Speichergerät nicht
kompatibel, so werden Sie aufgefordert, es zu
formatieren. Rufen Sie das PVR-Dateisystem-Menü auf
und wählen Sie in der Geräteliste Ihr zu formatierendes
Gerät.
Währe nd der Au fnahm e steht I hnen nu r die
Stoppfunktion zur Verfügung.
Hinweis
BEDIENUNGSHINWEISE
9.Time Shift
Drü cken Si e die , u m das akt uelle Program m
zu unterbrechen und die Timeshift-Funktion zu aktivieren.
Das nachstehende Menü wird angezeigt. Nach einigen
Sekunden wird das Menü wieder automatisch
ausgeblendet.
▶
00:00:00
Verfü gbare Z eit
Wählen Sie die Option▶und d rücke n Sie OK, um di e
Aufnahme fortzusetzen; ein weißes Wiedergabesymbol
wir d rechts im Bi ld zum Hi nweis auf di e laufe nde
Timeshift-Funktion angezeigt.
Wenn das Menü ausgeblendet wird, drücken Sie▶ ,
um da s Menü wi eder an zuzei gen. Zu m Beend en der
Timeshift-Funktion drücken Sie Stopp oder wählen Sie
mit dem Cursor „Stop“ im Menü, dann folgen Sie den
Anleitungen im Pop-up-Menü.
Ihr Speichergerät muss zur Aufnahme angeschlossen
und kompatibel sein. Ist Ihr Speichergerät nicht kompatibel,
so we rden Sie auf geforder t, es zu fo rmati eren. I m
Einstellungsmenü rufen Sie das PVR-DateisystemUnt ermen ü auf; hier w ählen S ie Ihr zu format ieren des
Ger ät in der G erätelis te.
Alle Funktionen (Wiedergabe, schneller Rücklauf,
schneller Vorlauf, Pause und Stopp) stehen nur bei
aktiviertem Menü zur Verfügung.
Für CI + Kanäle haben Sie keine Aufnahmefunktion.
00:00:05
Wiedergabe Pause FBStopp FF
00:00:00/04:13:20
DE-25 LCD-Fernseher mit LED-Hintergrundbeleuchtung
Page 63

Drücken Sie Source und wählen Sie „USB“ in der Liste der Quellen, dann drücken Sie OK zum Aufrufen des USB-Menüs.
10. USB-Player
Das USB-Speichermedium muss am Fernseher angeschlossen sein. Wählen Sie zwischen Foto, Musik, und Text.
Wähl en Sie di e Art des Mediu ms mit ◄►, da nn drüc ken Sie O K zum Aufrufen des Au swahlmenüs.
Film
Drücken Sie ▼ / ▲ zur Auswa hl des Ordne rs und da nn OK zum A ufrufen de r Datei liste. Drü cken Si e die rote Taste, u m zur
Medienauswahl zurückzukehren.
Wählen Sie die Mediendatei mit ◄► oder ▼▲, die Vorschau wird angezeigt. Drücken Sie ► zur Wiedergabe als Vollbild.
Bei Wiedergabe einer Filmdatei drücken Sie ▼ zur Anzei ge der St euerelemente.
Allgemeine Funktionen
Währ end der A nsich t von Fotos drück en Sie
▼ zur A nzeig e der Steuer eleme nte unten im B ild.
Drücken Sie Wiedergabe/Pause, um die Wiedergabe zu unterbrechen oder fortzusetzen.
Drücken Sie die linke Pfeiltaste, um das vorherige Foto anzuzeigen.
Drücken Sie die rechte Pfeiltaste, um das nächste Foto anzuzeigen.
Drücken Sie die linke/rechte Pfeiltaste zur Auswahl der Funktion, dann drücken Sie OK,
um die Wiedergabe zu beenden und in das vorherige Menü zurückzukehren.
Drü cken Si e die Pfeilt asten „aufwä rts/abw ärts“, um das Fot o zu drehen.
Drücken Sie die blaue Taste, um im Schnellmenü Intervallzeit, Wiederholung,
Diashoweffekte und Hintergrundmusik (muss zuerst eingestellt werden) einzustellen.
Wiedergabe/
Pause
Vorherige
Datei
Nächste
Datei
Stopp
Drehen
Schnellmenü
FOTO
BEDIENUNGSHINWEISE
FOTO Musik TEXTFilm
Haier Innovation Life
Usb2.0 Auswählen Auswahl
OK
FOTO
USB1/1080
Auswahl
OK
Eingabe Beenden
Schnellmenü
Medi a Pad
LCD-Fernseher mit LED-Hintergrundbeleuchtung DE-26
De
Exit
Page 64

MUSIK
Während der Musikwiedergabe drücken Sie ▼ zur Anzeige der Steuerelemente unten im Bild.
Allgemeine Funktionen
Die anderen Funktionen entsprechen den Beschreibungen im Abschnitt FOTO. Siehe Einzelheiten im
Abschnitt FOTO.
Die Funktionen entsprechen den Beschreibungen im Abschnitt FOTO. Siehe Einzelheiten im Abschnitt FOTO.
Allgemeine Funktionen
Film
TEXT
Drücken Sie
▼/▲ zur Auswahl der vorherigen/nächsten Seite. Mit den Zifferntasten und OK geben Sie die Seite
direkt ein.
Rücklauf: Drücken Sie die linke/rechte Pfeiltaste zur Auswahl der Funktion, dann drücken Sie OK, um
schnell zurückzuspulen. Drücken Sie die Wiedergabetaste, um die Normalwiedergabe fortzusetzen.
Schneller Vorlauf: Drücken Sie die linke/rechte Pfeiltaste zur Auswahl der Funktion, dann drücken Sie
OK, um schnell vorzuspulen. Drücken Sie die Wiedergabetaste, um zur Normalwiedergabe
zurückzukehren.
Hintergrundmusik: Drücken Sie die linke/rechte Pfeiltaste zur Auswahl der Funktion, dann drücken
Sie OK, um die Musik ein- oder auszuschalten.
A-B Wiederholung: Drücken Sie die linke/rechte Pfeiltaste zur Auswahl der Funktion, dann drücken
Sie OK, um die Punkte A und B der Wiederholungsschleife einzustellen.
Vergrößern: Drücken Sie die linke/rechte Pfeiltaste zur Auswahl der Funktion, dann drücken Sie OK,
um das Bild zu vergrößern (ist das Dokument größer als 1920x1080, so ist die Funktion nicht
unterstützt).
Verkleinern: Drücken Sie die linke/rechte Pfeiltaste zur Auswahl der Funktion, dann drücken Sie OK,
um das Bild zu verkleinern (diese Funktion unterstützt bis zu 1920x1080 HD-Video).
Zeit wählen: Drücken Sie die linke/rechte Pfeiltaste zur Auswahl der Funktion, dann drücken Sie OK,
um einen Zeitpunkt in der Datei zur Wiedergabe zu wählen.
BEDIENUNGSHINWEISE
Nachstehende Dateitypen können von einem USB-Speichermedium wiedergegeben werden;
Foto
Ton
Video
Tex t
.jpg Dateien
.mp3
.avi,.mp4
.txt
DE-27 LCD-Fernseher mit LED-Hintergrundbeleuchtung
Musik
.. 1/1
Auswahl
OK
Eingabe Beenden
Schnellmenü
Media Pad
Titel:
Album:
Künstler:
Track
Jahr: 2 010-09-30
1 / 2
10547672
Wiedergabe
00:00:53 00:00:00
10547672.mp3
14953359.mp3
USB1/mp3
Exit
Page 65

1)Allgemeine Funktionen Hotel-Modus
11.HOTEL-MODUS
Drücken Sie ◄/►
AUS (off ) Hotel-Modus deak tivieren.
AN (on) Hotel-Modus aktivieren.
2)Max. Lautstärke (Max Volume)
Hier stellen Sie die Lautstärkenbegrenzung ein.
Drücken Sie ◄/► zur Auswahl zwischen 0 und 100.
Standardwert: 100
3)Lautstärkensperre (Volume Default Lock)
Drücken Sie ◄/►, um die Lautstärke einzustellen:
Off: Die Systemlautstärke wird nicht auf den
Standardwert eingestellt.
AC Ctrl: Die Systemlautstärke wird nach dem
Ausschalten auf „Default volume“ eingestellt.
Die ursprüngliche Lautstärke ist der Standardwert,
wenn der Fernseher eingeschaltet wird. Dies gilt
nicht, wenn sich der Fernseher im Stand-by-Modus
befindet.
AC/RC Ctrl: Die Systemlautstärke wird nach dem
Ausschalten auf „Default volume“ eingestellt.
Die ursprüngliche Lautstärke ist der Standardwert,
wenn der Fernseher eingeschaltet wird, auch aus
dem Stand-by-Modus.
Der Standardwert ist „Off“.
4)Lautstärkenbegrenzung (Default Volume)
Drücken Sie ◄/► zum Einstellen der
Standardlautstärke im Hotel-Modus. Der
Standardwert ist „20“.
5)Systemeinstellung (System Power On)
Drücken Sie ◄/► zur Auswahl des Verhaltens beim
Einschalten:
Standby: Der Fernseher schaltet sich stets in den
Stand-by-Modus, wenn er eingeschaltet wird.
On: Der Fernseher schaltet sich stets ein, wenn er
eingeschaltet wird.
6)TV-Menü Anzeige (OSD Menu Display)
7)Ein-/Ausschalter-Sperre (Power Key Lock)
8)Bedienfeld-Sperre (Key Lock)
9)Fernbedienungs-Sperre (Remote Control Lock)
10)Signalquellen-Sperre (Source Lock)
Drücken Sie zunächst Source, dann geben Sie mit
den Zifferntasten „1001“ zum Aufrufen des HotelModus ein.
Last Status: Der Fernseher schaltet sich im letzten
Modus ein („On“ oder „Standby“). Der Fernseher
schaltet sich im gleichen Modus wie zuvor ein.
Der Standardwert ist „Standby“.
Drücken Sie ◄/► zur Aktivierung/Deaktivierung des OSDMenüs.
On: Das Einstellungsmenü wird auf dem Bildschirm
angezeigt.
Off: Das Einstellungsmenü wird nicht auf dem Bildschirm
angezeigt.
Der Standardwert ist „On“.
Bit te beac hten Sie: Is t das OSD -Menü dea ktivi ert („ Off“), s o
drü cken Si e „S ource“ + „10 01“, um das Ho tel-M odusm enü
aufzurufen.
Drücken Sie ◄/► zu m Einstellen d er Sper re für den Ein-
/Ausschalter. Wählen Sie:
Off: Die Funkt ion ist d eakti viert.
Keypad: Der Ein-/Ausschalter auf dem Gerät ist gesperrt.
RC: Der Ein-/Ausschalter auf der Fernbedienung ist
gesperrt.
Both: Ein-/Ausschalter auf dem Gerät und auf der
Fernbedienung sind gesperrt.
Der Standardwert ist „Off“.
Ist als „Tastensperre“
„Beide“ gewählt, so wird zunächst „System einschalten“
zu „Ein“ aktualisiert.
Drücken Sie ◄/► zur Aktivierung/Deaktivierung der
Tastensperre für Gerätetasten.
On: D as Bedi enfel d ist ges perrt.
Off: Das Bedi enfeld ist n icht ge sperr t
Der Standardwert ist „Off“.
Drücken Sie ◄/► zur Aktivierung/Deaktivierung der
Tastensperre der Fernbedienung.
On: Die Tasten der Fernbedienung sind gesperrt.
Off: Die Tasten der Fernbedienung sind nicht gesperrt.
Der Standardwert ist „Off“.
Sperre der Eingangsquelle entsprechend der Auswahl
„Default Source“. Die Optionen sind „ein“ und „aus“.
Standardeinstellung ist „aus“. Ist als Standardquelle „DTV“
oder „ATV“ gewählt und die „Quellensperre“ ist auf „ein“
eingestellt, so stellt sich der „Standardkanal“ nach dem
erneuten Einschalten auf den eingestellten Kanal zurück.
BEDIENUNGSHINWEISE
Hotel-Modus
Aus
100
AC/RC
20
Standby
Ein
Aus
Aus
Aus
Aus
Aktiver Hotel-Modus
Lautstärken-Sperre
Max. Lautstärke
Voreingestellte Lautstärke
System-Einschaltung
Benutzermenü-Sperre
Ein-/Austasten-Sperre
Tastensperre
Fernbedienungs-Sperre
Eingangssignal-Sperre
Auswahl Anpassen Beenden
Wenn die Fernbedienung gesperrt ist, können Sie Menu
und den Zahlencode 2580 auf der Fernbedienung
eingeben, um die Sperre aufzuheben.
Hinweis
LCD-Fernseher mit LED-Hintergrundbeleuchtung DE-28
De
MENU
Page 66

BEDIENUNGSHINWEISE
11)Standardquelle
Drücken Sie ◄/► zur Auswahl der „Standardquelle“ nach
dem Einschalten. Jede Eingangsquelle kann gewählt
werden.Eingangsquellen:DTV/ATV/SCART/YPbPr/PC/
HDMI1/HDMI2/AV/USB.
Standardeinstellung ist „DTV“
12)Standardkanal
Einstellen des Standardkanals nach dem Einschalten.
Die Option steht nur zur Verfügung, wenn als „Standardquelle“
„DTV/ATV“ gewählt ist.
13)Logo wählen
Einstellen des Logos nach dem Einschalten. Die Optionen
sind:
„HSP Logo“: Der Fernseher zeigt nach dem Einschalten das
„HS P Logo“ an.
„Hotel-Logo“: Der Fernseher zeigt nach dem Einschalten das
vom USB übertragene Logo an.
„Keine“: Der Fernseher zeigt nach dem Einschalten kein
Logo an.
Standardeinstellung ist „HSP Logo“.
USB-übertragenes Logo
Schließen Sie einen USB-Stick am USB-Port des Fernsehers
an.
Nac h dem Erk ennen d es USB- Geräts ru fen Sie das Medi a
Center a uf.
Wählen Sie „Foto“ und zeigen Sie das aufzunehmende Bild
an.
Drücken Sie die „gelbe Taste“ auf der Fernbedienung, um
das Logo aufzunehmen.
Das Bildformat muss jpg/jpeg sein. Die maximale Größe des
Bildes ist 128 KB.
14)Begrüßung
Einstellen der „Begrüßung“ nach dem Einschalten.
Die Optionen sind: Aus/5 Sekunden/10 Sekunden/20
Sekunden.
Standardeinstellung ist „Aus“
15)Begrüßung aktualisieren
Aktualisieren Sie die „Begrüßung“ über ein USB-Gerät.
Datei-Spezifikationen:
Dateiname: „hotel.txt“.
Enc oding : ANSI (H inweis: Da teiforma t „U nicod e“ ist ni cht
korrekt)
Schriftzeichen: 3 Zeilen, 30 Schriftzeichen je Zeile.
USB-Klonen
Bitte beachten Sie: Sie können diese Funktion nur auf dem
gleichen TV-Modell mit gleicher Software-Version benutzen.
16)Backup auf USB
Klonen Sie ALLE TV-Einstellungen auf USB-Stick.
Zu den TV-Einstellungen gehören: Hotel-Logo, Begrüßung,
Hotel-Moduseinstellung, Bildschirmmenüeinstellung und
Kanaldaten.
17)Wiederherstellung von USB
Ste llen Si e die TV-Daten über U SB-St ick wie der her.
Zu den Daten gehören: Hotel-Logo, Begrüßung,
Hotel-Moduseinstellung,
Bildschirmmenüeinstellung und Kanaldaten.
18)Rückstellung
Stellen Sie alle Einstellungen zu den
Standardwerten im Hotel-Modus zurück.
19)Hotel-Modus ausführen
Hotel-Moduseinstellung durchführen Hotel-ModusBildschirmmenü verlassen.
DE-29 LCD-Fernseher mit LED-Hintergrundbeleuchtung
Page 67

Bild Ton
verschneit gestört
Antennenposition, -ausrichtung
oder -anschluss
Überprüfen
Störungen
gestört
Elektronische Geräte, Fahrzeug/
Motorrad Neonlicht können den
den E mpfan g stören
n or ma l es Bi ld stummgeschaltet
Lautstärke (stummgeschaltet oder
Audioanschlüsse nicht korrekt)
kein Bild
Kein Netzanschluss, Gerät ausgeschaltet,
Kontrast und Helligkeit/Lautstärke
einstellen.
Drücken Sie STANDBY auf der
Fernbedienung.
kei ne Farbe nor maler Ton Fa rbe im Bi ldmod us über prüfen
Bild verschwindet
normaler Ton
oder leise
Kanal neu konfigurieren
kei ne Farbe
gestört
Schlechtes TV-Signal
normaler Ton
Antennenposition, -ausrichtung
oder -anschluss
Problem
Schatten
normaler Ton
Zoom-Ansicht ändern
Sie sehen einen
schwarzen Balken
oben und unten.
Störungserkennung
05 Störungserkennung
stummgeschaltet
De
LCD-Fernseher mit LED-Hintergrundbeleuchtung DE-30
Page 68

Mein Fernseher zeigt nicht das Bild auf
meinem Laptop/PC, wenn er
eingeschaltet ist.
Wenn S ie eine n VGA -Stecker ( blaue 1 5-pol ige Ste cker an I hrem PC
oder Laptop) angeschlossen haben, ist es häufig erforderlich, dass Sie
an Ih rem PC/ Lapto p eine Ei nstellung vornehm en müss en, um da s Bild
auf d em Fernseh bilds chirm s ehen zu k önnen . Lesen Sie gg f. in Ihrem
Handbuch für Ihren PC/Laptop nach. Für einige Geräte gelten die
folgende n Taste n: F7 (De ll), F4 ( HP / Sams ung) od er F5 (Toshi ba) ode r
probieren Sie das gleichzeitige Drücken von "Fn"-Taste und "F"-Taste.
Ich habe meinen PC/Laptop an den
Fernseher angeschlossen und empfange
ein Bild, aber keinen Ton. Warum?
Das VGA-Kabel überträgt nur die Video- Bildinformationen. Sie
müssen ein separates Kabel anschließen, das mit dem
Kopfhöreranschluss (3,5mm Klinke) an Ihrem PC/Laptop und mit der
3,5 m (PC Audio-IN ) Buchs e an Ihre m Fernsehe r verbu nden is t. Sie
müs sen den " PC" aus wähle n, inde m Sie die S ource -Tast e auf Ihrer
Fernbedienung verwenden. Alternativ schließen Sie Ihren PC/Laptop
mit einem HDMI-Kabel an, wenn Ihr PC/Laptop einen HDMI-Anschluss
bes itzt. H DMI übe rträgt so wohl Aud io- als auc h Videos ignal e.
und
Das B ild hat k eine au tomatisc he
Größenanpassung beim Senderwechsel.
Übe rprüf en Sie fü r alle Si gnalquel len ATV, DT V, SCART, HDMI 1, 2 us w,
ob das Fernsehbild-Seitenverhältnis auf 'Auto' eingestellt ist.. Um da s
Seitenverhältnis (Auto, 4:3 oder 16:9) einzustellen, drücken Sie die
Taste Source auf Ihrer Fernbedienung, beginnend bei ATV, und
wiederholen Sie die unten beschriebene Einstellungaufg für alle
Sig nalqu ellen AT V, DTV, SCA RT, HDMI 1 u nd 2, da je de Eing angsq uelle
sep arat ge steuert w ird. Gehen S ie vor wie fol gt:
Drücken Sie MENU auf Ihrer Fernbedienung und drücken den Pfeil nach
rec hts um zum Bil d-Unt ermen ü zu gela ngen.
Drü cken Si e den Pfeil na ch unte n, um den M enüpu nkt Bil dform at
auszuwählen.
Wähl en Sie Au to aus.
Drücken Sie Ende.
Wiederholen Sie diese Schritte für alle Signalquellen.
Ich habe gerade einen DVD-Player bzw.
ein anderes Gerät an meinen Fernseher
angeschlossen, und es funktioniert nicht.
Die s gilt fü r jedes G erät, dass S ie an Ihren Fe rnseh er ansc hließen.
1.S chalt en Sie so wohl den Fernse her als a uch das e xterne Ge rät z.B.
DVD -Play er aus (z iehen S ie den Steck er aus de r Steck dose / ke in
Bereitschaftsmodus).
2.Schalten Sie alle Geräte aus, die an der SCART-Buchse angeschlossen
sind.
3.Trennen S ie den SC ART-Stecker vom Ferns eher.
4.Stecken Sie den Fernseher-Stecker wieder in die Steckdose und
schalten Sie den Fernseher ein.
5.S tecke n Sie den G eräte -Stec ker z.B. vom D VD-Pl ayer wi eder in die
Ste ckdos e und sch alten Sie da s Gerät e in.
6.Wählen Sie die Signalquelle HDMI mittels Fernbedienung aus
(Source).
7.S tarten Si e die Wiederg abe des G eräts z .B. des DVD-Pl ayer und prü fen
Sie, ob die Filme ordnungsgemäß wiedergegeben werden.
HINWEIS: Die SCART-Buchse ist gegenüber dem HDMI-Anschluss als
Sta ndard defini ert, dahe r ist es wi chtig, das s alle üb er SCAR T am
Fernseher angeschlossenen Geräte AUSGESCHALTET sind (nicht im
Ber eitsc hafts modus / S tecke r ziehe n).
Bitte beachten Sie diesen Hinweis. Mögliche Ursache des Problems
kann die Entfernung/erneutes Anbringen des HDMI-Steckers sein
während der fernseher im eingeschalteten Zustand war.
Sch alten S ie Ihre n Fernsehe r immer z unäch st aus un d bring en Sie
niemals ein HDMI-Kabel im eingeschalteten Zustand des Fernsehers an
bzw. ent fernen es.
Sch alten S ie imme r alle Ge räte aus, we nn ein be liebi ges Digita lgerät
entfernt oder angeschlossen wird.
Fehlerbehebung
Störungserkennung
DE-31 LCD-Fernseher mit LED-Hintergrundbeleuchtung
Page 69

Bil d zerle gt sich i n Pixel
Ein typisches Beispiel für ein Empfangsproblem stellt das Auseinanderbrechen von Bildern (Pixilat ion) od er das Ei nfrie ren der
Bilder dar, manchmal gibt es Klick- oder quietschende Geräusche oder der Ton fällt aus ode r es gibt g ar KEINEN Empfang. Ihr
Bild kann in Pixel aufgrund des digitalen Videosignalausfalls brechen. Die Signalausfälle können entweder wegen der Probleme
mit schwachen Signalen (siehe T V-Antennen) auftreten, oder wenn Sie per K abel mit ei nem schwac hen Kab el-Si gnal ve rbund en
sind. Wenn das Problem schwacher Signale auftritt, verwenden Sie einen Ve rstär ker, um das Sig nal zu verst ärken . Ein Kab elTechniker kann Ihnen bei der Installation eines Inline-Verstärkers od er Vorve rstär kers he lfen. Dies w ird Ihre Sig nalst ärke st eigern
und das Pixel-Problem lösen.
Wenn Sie Ihr TV-Signal über Satellit empfangen, prüfen Sie, ob sich Ih re Schü ssel na ch star kem Wind b ewegt w urde, od er ob das
Signal durch Bäume blockiert wurde. Bäume können ein Problem verursa chen, d a sich da s TV-Si gnal je n achde m änder n kann, o b
ein Baum zwischen dem Satellitenschüssel und dem Satellit ohne Laub ode r dicht b elaub t ist.
Fehlende Kanäle
Vielleicht stellen Sie fest, dass es Kanäle fehlen, oder d ass Sie d ie Kan äle aus d er fals chen Re gion empfa ngen. M anchmal
funktionieren die interaktiven Dienste (rote Taste) nicht. Dies w ird durc h ein sch wache s Signa l verur sacht, sie he TV-An tennen.
TV-Antennen
Digitales terrestrisches Fernsehen (DVB-T) kommt zu Ihrem Fernsehgerät über eine Antenne; eine alte Antenne, die für analoges
Fernsehen gut war, braucht eventuell eine Aktualisierung für digitales Fernsehen. Wenn Sie immer einige, aber nicht alle der
digitalen Kanäle auf DTV (DVB-T) erhalten, liegt dies meistens dara n, dass d ie Ante nne ein s chmal er Band typ ist , und mus s mit
einem breiten Bandtyp gewechselt werden.
Fehlerhafte Leitungen und Kabel
Überprüfen Sie Ihren Fernseher. Sind die Leitungen auf der Rückseit e - an das Ne tz, die A ntenne, die Set-Top-Box, den Video- oder
DVD-Player oder Recorder richtig angeschlossen? SCART-Kabel sind dafür b ekan nt, dass sie s ich mit d er Zeit lock ern und s owohl zu
Audio- als auch Video-(Bild)-Problemen führen. Entweder linkes oder rech tes ode r beide Audi os fehlen, u nd die Far ben seh en arm
oder schlammig aus. Stecken Sie den Scart-Stecker fest ein, dies soll das Problem beheben.
HDMI-Stecker müssen fest eingesteckt werden; es ist nur der letzte Mil limet er, der die Kon takte k nüpft . Typi scher weise sol l das
schwarze Plastikteil des HDMI-Steckers sehr nahe dem Fernseher-Körper oder der Komponente sein oder ihn/sie berühren.
Beim Einstecken der beliebigen HDMI-Kabel können Probleme auftreten, fa lls die H DMI-K abel ei ngest eckt we rden, we nn der
Fernseher oder andere Komponente eingeschaltet ist. Schalten Sie immer sowohl den Fernseher als auch die Komponente aus, die
Sie einstecken möchten. Wenn Sie die Stecker und Steckdosen überprüft haben, schalten Sie den Fernseher und alles, was Sie an
den Fernseher angeschlossen haben, aus, und dann schalten Sie sie wied er ein.
Ich habe meinen PC an den Fernseher angeschlossen. Es gibt keinen Ton.
Wenn S ie Ihre n PC oder L aptop a n den Fernse her übe r ein VGA (1 5 Pin D-Sub)-Kabel angeschlossen haben, und keinen Ton hören,
müssen. Sie ein separates Audio-Kabel vom PC oder Laptop an den Fernseher anschließen.
Unnatürliche Farb en und Ha utfarben
Unnatürliche Hauttöne und andere Farbe n könnt en noch e in ande res Prob lem auc h in eine m neuen HDTV darstellen. Dies
geschieht aufgrund der Fernsehbildeinstellungen, die für die Umgebung eines Ausstellungsraums optimiert werden. Sie werden
dieses Problem beheben, indem Sie den Bildmodus in den natürlichen Mod us im Bil dmenü ä ndern . Für meh r Präzis ion neh men Sie
eine manuelle Einstellung der Farben-, Kontrast- und Helligkeit-Optionen im Bildmenü vor.
Weiße Umrisse
Weiße Ränder um Objekte und Personen erscheinen in der Regel, wenn die Fernsehschärfe auf sehr hoch eingestellt ist, oder wenn
Ihr Fernsehgerät eine Verarbeitungstechnologie der Kantenschärfung ve rwen det. Ge hen Sie z um Bild menü un d passe n Sie die
Schärfe an, bis die weiße Umrandung verschwindet. Wenn die Kantenschärfung aktiviert ist, versuchen Sie es, mit dem ServiceMenü zu deaktivieren.
Video flackert
Zei tweis e könnte das Vi deo fla ckern . Wenn d ies der Fa ll ist, ü berprüfen Sie, ob das Signal stark genug ist. Wenn das Signal stark is t,
liegt das Problem bei dem Kabelnetzbetreiber. Wenn die Signalst
ärk e zu schw ach ist , versuc hen Sie , die Sig nalst ärke mi t Hilfe eines
Verstärkers zu steigern.
Kein Vollbild auf dem Bildschirm
Beim Anschluss eines PCs oder Laptops an den Fernseher, füllt das Bi ld mögl icher weise nic ht den ge samten Bil dschi rm aus.
Überprüfen Sie die Displayeinstellungen auf Ihrem PC oder Laptop (Wind ows > Start > Sy stems teuerung > Dars tellu ng und
Anpassung > Displayeinstellungen) und wählen Sie die beste Auflösung. Wählen Sie auf Ihrem Fernseher: TV-Menü > Bild >
Einstellungen, und dann versuchen Sie AUTO, ZOOM1 oder ZOOM2 für die beste Anzeige.
USB-Anschluss
Der USB-Anschluss funktioniert mit *.jpg (Foto)- und *.mp3 (Musik)-Dateien. Bitte beachten Sie, dass der Fernseher das iPhone
oder den iPod von Apple, die an den USB-Anschluss des Fernsehers angeschlossen sind, nicht erkennt. Der Fernseher kann andere
Dateien wiedergeben, aber aufgrund der vielen verschiedenen Dateifo rmate n, gibt es kei ne Gara ntie, d ass die se ande ren
Dateiformate funktionieren.
Problembehandlung bei dem Digitalfernsehen und möglich Lösungen
Störungserkennung
De
LCD-Fernseher mit LED-Hintergrundbeleuchtung DE-32
Page 70

Spezifikationen
*Änderung der Spezifikationen vorbehalten.
DIE Angaben dienen nur als Referenz.
Änderung von Design und Spezifikationen vorbehalten.
Scart-Ausgang:
1. Bei Quelle ATV/AV/SCART ist das Scart-Ausgangssignal ATV.
2. Bei Quelle DTV kein Scart-Ausgangssignal.
3. Andere Quellen haben kein Scart-Ausgangssignal.
DE-33 LCD-Fernseher mit LED-Hintergrundbeleuchtung
22" Full HD 1080p Digitaler LED LCD-Fernseher
06 Spezifikationen
Bildqualität:
NIC AM Stereo.
2 x 3 Watt RMS Ausgangsleistung.
Digital interaktiv.
Digitaltext.
Digital Video Broadcasting (DVB) Untertitel verfügbar.
Automatische Installation.
Automatische Kanalsuche.
Elektronische Fernsehzeitschrift.
7 Tage Elektronische Fernsehzeitschrift (EPG).
Top up TV-komp atibe l.
CI-Schacht.
Audiobeschreibung kompatibel.
<0.30W
DTV-Tuner Decoder
DVB-T, DVB-C
16/32/64/128/256 QAM Modulation
MPEG2, MPEG4, H.264
/QPSK Modulation
2 x HDM I.
1 x SCA RT.
PC-Eingang.
Video.
Komposit.
1 x USB -Port .
1 x Kop fhöre rbuch se.
1 x .
Unterstützte Systeme: PAL+ SECAM
Kanal speic her: 10 00 (DTV), 10 0 (ATV)
TV ( RF): 75 Ω a symme trisc h
AV Videoei ngang : 75 Ω, 1 V-P, RCA
AV Audioe ingan g: 20 kΩ, 5 00 m RMS
YPbPr/HDMI Videoeingang: 480i, 480p, 576i, 576p, 720p, 1080i, 1080p
Komponenten
KOAXIAL
V
Zusätzliche Funktionen:
Klangqualität:
Digitale Funktionen:
Leistungsaufnahme
Stand-by
Anschlüsse:
UHF /VHF Tune r; Slee ptime r; ; Bild un d Text
Fernbedienung benötigt 2 x AAA B atterien (mi tgeliefert).
VES A-Befestig ung: 10 0 x 100 mm
616x426x135mm
mm
mm
Altersfreigabe
Paketgröß e (BxHxT):
Set-Größe (BxHxT) mit Standfuß:
Set -Größ e (BxHxT) ohne Standfu ß:
Paketg ewicht: 4.1 kg
Set-Gewicht mit Standfuß: 2.9 kg
Set -Gewich t ohne St andfu ß: 2.7 kg
513x355x160
513x312x42
FUL L HD
Integriert digital.
Bildschirmdiagonale: 55 cm
Auflösun g 1920x 1080 Pixel 50 Hz.
Page 71

Spezifikationen
*Änderung der Spezifikationen vorbehalten.
DIE Angaben dienen nur als Referenz.
Änderung von Design und Spezifikationen vorbehalten.
Scart-Ausgang:
1. Bei Quelle ATV/AV/SCART ist das Scart-Ausgangssignal ATV.
2. Bei Quelle DTV kein Scart-Ausgangssignal.
3. Andere Quellen haben kein Scart-Ausgangssignal.
24" Full HD 1080p Digitaler LED LCD-Fernseher
Bildqualität:
NIC AM Stereo.
2 x 3 Watt RMS Ausgangsleistung.
Digital interaktiv.
Digitaltext.
Digital Video Broadcasting (DVB) Untertitel verfügbar.
Automatische Installation.
Automatische Kanalsuche.
Elektronische Fernsehzeitschrift.
7 Tage Elektronische Fernsehzeitschrift (EPG).
Top up TV-komp atibe l.
CI-Schacht.
Audiobeschreibung kompatibel.
<0.30W
DTV-Tuner Decoder
DVB-T, DVB-C
16/32/64/128/256 QAM Modulation
MPEG2, MPEG4, H.264
/QPSK Modulation
2 x HDM I.
1 x SCA RT.
PC-Eingang.
Video.
Komposit.
1 x USB -Port .
1 x Kop fhöre rbuch se.
1 x .
Unterstützte Systeme: PAL+ SECAM
Kanal speic her: 10 00 (DTV), 10 0 (ATV)
TV ( RF): 75 Ω a symme trisc h
AV Videoei ngang : 75 Ω, 1 V-P, RCA
AV Audioe ingan g: 20 kΩ, 5 00 m RMS
YPbPr/HDMI Videoeingang: 480i, 480p, 576i, 576p, 720p, 1080i, 1080p
Komponenten
KOAXIAL
V
Zusätzliche Funktionen:
Klangqualität:
Digitale Funktionen:
Leistungsaufnahme
Stand-by
Anschlüsse:
UHF /VHF Tune r; Slee ptime r; ; Bild un d Text
Fernbedienung benötigt 2 x AAA B atterien (mi tgeliefert).
VES A-Befestig ung: 10 0 x 100 mm
650x440x135mm
mm
mm
Altersfreigabe
Paketgröße (BxHxT):
Set-Größe (BxHxT) mit Standfuß:
Set -Größ e (BxHxT) ohne Standfu ß:
Paketg ewicht: 4.9 kg
Set-Gewicht mit Standfuß: 3.74 kg
Set -Gewich t ohne St andfu ß: 3.5 kg
568x386x160
568x344x42
FUL L HD
Integriert digital.
Bildschirmdiagonale: 59.9 cm
Auflösun g 1920x 1080 Pixel 50 Hz.
LCD-Fernseher mit LED-Hintergrundbeleuchtung DE-34
De
Page 72

Spezifikationen
*Änderung der Spezifikationen vorbehalten.
DIE Angaben dienen nur als Referenz.
Änderung von Design und Spezifikationen vorbehalten.
Scart-Ausgang:
1. Bei Quelle ATV/AV/SCART ist das Scart-Ausgangssignal ATV.
2. Bei Quelle DTV kein Scart-Ausgangssignal.
3. Andere Quellen haben kein Scart-Ausgangssignal.
DE-35 LCD-Fernseher mit LED-Hintergrundbeleuchtung
28" HD Ready Digital-LED LCD-Fernseher
Bildqualität:
NIC AM Stereo.
2 x 8 Watt RMS Ausgangsleistung.
Digital interaktiv.
Digitaltext.
Digital Video Broadcasting (DVB) Untertitel verfügbar.
Automatische Installation.
Automatische Kanalsuche.
Elektronische Fernsehzeitschrift.
7 Tage Elektronische Fernsehzeitschrift (EPG).
Top up TV-komp atibe l.
CI-Schacht.
Audiobeschreibung kompatibel.
<0.30W
DTV-Tuner Decoder
DVB-T, DVB-C
16/32/64/128/256 QAM Modulation
MPEG2, MPEG4, H.264
/QPSK Modulation
2 x HDM I.
1 x SCA RT.
PC-Eingang.
Video.
Komposit.
1 x USB -Port .
1 x Kop fhöre rbuch se.
1 x .
Unterstützte Systeme: PAL+ SECAM
Kanal speic her: 10 00 (DTV), 10 0 (ATV)
TV ( RF): 75 Ω a symme trisc h
AV Videoei ngang : 75 Ω, 1 V-P, RCA
AV Audioe ingan g: 20 kΩ, 5 00 m RMS
YPbPr/HDMI Videoeingang: 480i, 480p, 576i, 576p, 720p, 1080i, 1080p
Komponenten
KOAXIAL
V
Zusätzliche Funktionen:
Klangqualität:
Digitale Funktionen:
Leistungsaufnahme
Stand-by
Anschlüsse:
UHF /VHF Tune r; Slee ptime r; ; Bild un d Text
Fernbedienung benötigt 2 x AAA B atterien (mi tgeliefert).
VES A-Befestig ung: 20 0 x 100 mm
810x480x120mm
Altersfreigabe
Paketgröße (BxHxT):
Set-Größe (BxHxT) mit Standfuß:
Set -Größ e (BxHxT) ohne Standfu ß:
Paketgewicht:6.5 kg
Set-Gewicht mit Standfuß: 5.3 kg
Set -Gewich t ohne St andfu ß: 5.0 kg
642x435x170mm
642x390x44mm
HD Ready
Integriert digital.
Bildschirmdiagonale: 70 cm
Auflösun g 1366x 768 Pixe l 50 Hz.
Page 73

Spezifikationen
*Änderung der Spezifikationen vorbehalten.
DIE Angaben dienen nur als Referenz.
Änderung von Design und Spezifikationen vorbehalten.
Scart-Ausgang:
1. Bei Quelle ATV/AV/SCART ist das Scart-Ausgangssignal ATV.
2. Bei Quelle DTV kein Scart-Ausgangssignal.
3. Andere Quellen haben kein Scart-Ausgangssignal.
32" HD Ready Digital-LED LCD-Fernseher
Bildqualität:
NIC AM Stereo.
2 x 8 Watt RMS Ausgangsleistung.
Digital interaktiv.
Digitaltext.
Digital Video Broadcasting (DVB) Untertitel verfügbar.
Automatische Installation.
Automatische Kanalsuche.
Elektronische Fernsehzeitschrift.
7 Tage Elektronische Fernsehzeitschrift (EPG).
Top up TV-komp atibe l.
CI-Schacht.
Audiobeschreibung kompatibel.
<0.30W
DTV-Tuner Decoder
DVB-T, DVB-C
16/32/64/128/256 QAM Modulation
MPEG2, MPEG4, H.264
/QPSK Modulation
2 x HDM I.
1 x SCA RT.
PC-Eingang.
Video.
Komposit.
1 x USB -Port .
1 x Kop fhöre rbuch se.
1 x .
Unterstützte Systeme: PAL+ SECAM
Kanal speic her: 10 00 (DTV), 10 0 (ATV)
TV ( RF): 75 Ω a symme trisc h
AV Videoei ngang : 75 Ω, 1 V-P, RCA
AV Audioe ingan g: 20 kΩ, 5 00 m RMS
YPbPr/HDMI Videoeingang: 480i, 480p, 576i, 576p, 720p, 1080i, 1080p
Komponenten
KOAXIAL
V
Zusätzliche Funktionen:
Klangqualität:
Digitale Funktionen:
Leistungsaufnahme
Stand-by
Anschlüsse:
UHF /VHF Tune r; Slee ptime r; ; Bild un d Text
Fernbedienung benötigt 2 x AAA B atterien (mi tgeliefert).
VES A-Befestig ung: 20 0 x 100 mm
880x550x137mm
Altersfreigabe
Paketgröße (BxHxT):
Set-Größe (BxHxT) mit Standfuß:
Set -Größ e (BxHxT) ohne Standfu ß:
Paketgewicht:6.8 kg
Set-Gewicht mit Standfuß: 5.0 kg
Set -Gewich t ohne St andfu ß: 4.7 kg
738.5x487.5x170mm
738.5x443x64mm
HD Ready
Integriert digital.
Bildschirmdiagonale: 81 cm
Auflösun g 1366x 768 Pixe l 50 Hz.
LCD-Fernseher mit LED-Hintergrundbeleuchtung DE-36
De
Page 74

Page 75

Lisez attentivement ces instructions avant d'utiliser l'appareil ,
il vous guidera afin de profiter pleinement de votre téléviseur.
Conservez ce guide pour toute référence ultérieure.
LE22M600CF
LE24M600CF
LE28M600C
LE32M600C
Téléviseur écran plat LED
GUIDE D'UTILISATION
Page 76

Guide d'installation
04 Utilisation
18
Menu Chaîne 18
Recherche auto. des canaux numériques terrestres. 18
19
Interface Commune
20
20
22
Menu Horloge
22
Menu Option
22
Menu Verrouillage
Menu EPG (Guide Électronique des Programmes)
23
Enregistreur USB (PVR)
23
24
Enr egistrer l e programm e
24
Lecture d’un enregistrement
24
Lecture décalée
25
Lec ture USB
26
Assistance
05 Assistance
28
Bienvenue
Information importante
01 Avertissment de sécurité
2
2
Instruction de sécurité
Mise en garde
3
4
Caractéristiques
Installation du socle TV
02 Introduction
5
7
Installation avec support mural
Panneau de commande avant et latéral
8
10
Prises arrières
11
Connexion du téléviseur
Interface commune (CI+)
12
15
Présentation de la télécommande
03 Télécommande
16
Télétexte
17
Menu Son 21
21
Table des Matières
Table des Matières
Mise à jour
Menu image
21
21
FR-1 Téléviseur écran plat LED
20
20
Etat du signal(uniquement pour les
canaux numériques)
21
Spécification
06 Spécification
31
Configurer votre enregistrement
Recherche auto. des canaux numériques câblés.
Recherche manuelle des canaux terrestres.
Recherche manuelle des canaux câblés.
Recherche manuelle des canaux analogiques
Édition des chaînes
Page 77

Nous vous remercions d'avoir acheté ce téléviseur LCD LED 22"/24"/28"/32" . Ce guide va vous aider à régler
et utiliser votre téléviseur.
Commencez par vérifier le contenu de votre boîte avec la liste des pièces ci-dessous :
LISEZ ENTIÈREMENT CE MANUEL AVANT L'UTILISATION ET CONSERVEZ-LE POUR TOUTE RÉFÉRENCE ULTÉRIEURE
ATTENTION
01 Avertissements et mesures de sécurité
Avertissements et mesures de sécurité
BIENVENUE
INFORMATION IMPORTANTE
RISQUES D'ELECTROCUTION
NE PAS OUVRIR
Pour obtenir des performances optimales, consultez attentivement le présen t mode d'emploi, p uis rangez-le
dans un endroit facilement accessible pour pouvoir vous y reporter ultérieurement.
Les chiffres et les données communiqués au sujet de l'écran dans le présent mode d'em ploi pe uvent, suite a ux
innovations technologiques apportées, ne pas correspondre tout à fait aux car actér istiques de votre modèle.
Tout démontage, sans approbation préalable, du présent produit est strictement interdit, elle entrainerait
l'annulation de la garantie Haier.
pour éviter tout risque d'incendie, tenez bougies et autres sources de flammes ouvertes à
distance du produit en toutes circonstances.
Précaution:
Précauti on : afin d 'éviter tout r isque d 'incendie ou de dé charge électrique, n'installez
jamais votre téléviseur dans un lieu humide. Redoublez d'attention lorsque vo us mani pulez
l'écran pour ne pas le rayer par inadvertance ou l'endommager d'une autre façon. Veillez à
ne pas obstruer les orifices d'aération de votre téléviseur avec des journaux, nappes,
rideaux, etc
ATTENTION : La fiche électrique doit rester facilement accessible.
Consultez attentivement le présent mode d'emploi avant utilisation, puis rangez-le d ans un
endroit facilement accessible pour pouvoir vous y reporter ultérieuremen t.
FR
Téléviseur écran plat LED FR-2
Téléviseur num rique LCD 22" Full HD 1080p
Télécommande et 2 piles AAA
Guide d'utilisation
Guide de démarrage rapide
Socle du téléviseur
é
Carte de garantie
Vis
Téléviseur LCD 28" HD Ready
Télécommande et 2 piles AAA
Guide d'utilisation
Guide de démarrage rapide
Socle du téléviseur
Carte de garantie
Vis
Téléviseur num rique LCD 24" Full HD 1080p
Télécommande et 2 piles AAA
Guide d'utilisation
Guide de démarrage rapide
Socle du téléviseur
é
Carte de garantie
Vis
Téléviseur LCD 32" HD Ready
Télécommande et 2 piles AAA
Guide d'utilisation
Guide de démarrage rapide
Câble de connexion YPbPr
Carte de garantie
Vis
Socle du téléviseur
Page 78

INSTRUCTIONS DE SÉCURITÉ
Attention : Pour réduire le risque
d'électrocution, ne pas ouvrir le capot arrière.
Aucun des éléments internes ne peut être
réparé par l'utilisateur. Confiez l'entretien à un
technicien qualifié.
Attention : POUR REDUIRE LES RISQUES
D'INCENDIE OU D'ELECTROCUTION, N'EXPOSEZ
PAS CET APPAREIL A LA PLUIE OU A L'HUMIDITE.
N'exposez pas l'appareil au ruissellement ni à la
projection d'eau, et ne placez aucun objet
contenant un liquide (tel qu'un vase) au dessus
de l'appareil.
Éloignez le produit de la lumière directe du
soleil et de toute source de chaleur telle que
radiateurs ou poêles.
N'obstruez jamais les fentes d'aération. Les
fentes et ouvertures sur l'unité sont prévues
pour la ventilation. Ces fentes ne doivent jamais
être obstruées en plaçant l'appareil sur un
canapé, un tapis ou toute autre surface
similaire.
Ne placez pas cet appareil sur un chariot, un
support, un trépied ou une table instable.
L'appareil pourrait tomber, causant des
dommages ou des blessures.
Ne placez jamais d'objets lourds ou tranchants
sur le panneau ou le cadre.
Débranchez la prise de courant lorsque
l'appareil n'est pas utilisé.
AVERTISSEMENT : Les piles (pile ou batterie ou
bloc batterie) ne doivent pas être exposées à
une chaleur excessive telle que rayons du soleil,
feu, etc.
AVERTISSEMENT : L'utilisation d'un casque ou
d'écouteurs avec un volume sonore trop fort
peut causer une perte auditive.
Respectez l'environnement, lors du
changement de pile de votre télécommande.
Veillez les jeter dans les conteneurs appropriés.
ATTENTION : Si l'appareil a accumulé d es charges
électrostatiques, il se peut qu'il ne fonctionne pas
correctement, dans ce cas il faut le réinitialiser.
Ce symbole indique que ce produit ne doit pas
être mis au rebut avec les déchets ménagers et
ce dans tous les pays de l'Union Européenne. En
aidant à la récupération séparée, vous aidez à
garantir que les produits seront recyclés d'une
façon appropriée et ainsi à préserver les
ressources naturelles et à protéger
l'environnement et la santé humaine. Ramenez
donc cet appareil aux points de collecte
appropriées ou retournez-le au revendeur
auprès duquel vous l'avez acheté. Ainsi il sera
rec yclé et contribue à préser ver
l'environnement.
Avertissements et mesures de sécurité
FR-3 Téléviseur écran plat LED
ATTENTION
Ne modifiez aucun composant interne et bouton de
commande du téléviseur non décrit dans ce manuel. Tous les
téléviseurs à LED sont des équipements de haute tension
électrique.
Il faut débrancher le téléviseur avant de nettoyer de la
poussière ou des gouttes d'eau sur l'écran, du boîtier ou
autour de l'un des boutons ou des connecteurs.
Utilisez un chiffon doux et sec et non pelucheux pour essuyer
le téléviseur.
Pendant les orages, débranchez le câble d'alimentation et le
câble d'antenne pour éviter d'endommager votre téléviseur
et les autres appareils connectés.
Toutes les opérations de réparation de ce téléviseur ne
doivent être effectuées que par du personnel qualifié.
INSTALLATION
* Placez le téléviseur dans une pièce où la lumière ne frappe
pas directement sur l'écran.
* L'obscurité totale ou une réflexion sur l'écran peut provoquer
une fatigue visuelle. Un éclairage doux et indirect est
recommandé pour une visualisation confortable.
* Prévoyez suffisamment d'espace entre le téléviseur et le mur
pour permettre la ventilation.
* Évitez les endroits trop chauds pour éviter tout dommage
possible à l'enceinte ou une défaillance prématurée des
composants.
* Ce téléviseur peut être connecté à une prise secteur de 100240 volts. 50/60 Hz. Ne le branchez jamais sur une prise de
courant CC ou de n'importe quel autre type.
* Ne couvrez pas les fentes de ventilation lors de l'utilisation du
téléviseur.
Page 79

Dim:515*320mm(不包括底座)
Des hautes tensions dangereuses existent à
l'intérieur de cet appareil. Ne retirer pas le
panneau de sécurité à l'arrière du téléviseur.
Pour toute réparation, veuillez faire appel à un
technicien qualifié.
Avertissement
Pour prévenir tout risque d'incendie ou
d'électrocution, n'exposez pas cet appareil à
la pluie et à l'humidité.
Avertissement
N'introduisez pas d'objets étrangers par les
fentes des panneaux du téléviseur. Ne
renversez jamais de liquide sur le récepteur
du téléviseur .
Avertissement
Ne bloquez pas les fentes d'aération du
panneau arrière. L'aération est essentielle
pour éviter que les composants électriques
ne tombent en panne.
Attention
Ne coincez pas le cordon d'alimentation sous le
récepteur de télévision.
Attention
Ne montez jamais sur le téléviseur, ne vous
appuyez pas dessus et ne le poussez pas
brusquement sur son socle. Prêtez une attention
particulière aux enfants. Risque de blessures
graves en cas de chute.
Attention
Ne placez pas le téléviseur sur un chariot, une
étagère ou une table instable. Le téléviseur
risque de tomber et peut provoquer des
blessures graves et des dommages matériels
importants.
Attention
Débranchez le téléviseur du secteur s'il ne va pas
être utilisé pour une longue période.
Attention
Si le téléviseur est placé dans un compartiment
fermé, il faut veiller à respecter les distances
minimales. L'accumulation de chaleur réduit la
durée de vie de service de votre téléviseur et peut
aussi être dangereuse.
Attention
Avertissements et mise en garde
Distances minimales
Avertissements et mesures de sécurité
FR
Téléviseur écran plat LED FR-4
Page 80

Données principales
Caractéristiques
NICAM;
4
Time-shift
5
3
Interface HDMI et péritel
Une image homogène, un contraste contraste
dynamique jusqu'à 4 000 000:1, des noirs profonds
et des couleurs éclatantes.
2
Ecran de télévision, ou Ecran d'affichage
Ecran PC
1
Taille d'écran
PAL/SECAM/MPEG2/MPEG4/H.264
22
YPbPr >=400
Entrée vidéo composite >= 350
02 Introduction
Système TV
Système du signal vidéo
Tension d'entrée
Définition horizontale (lignes TV)
Introduction
PAL-B/G, I, D/K
SECAM-B/G, D/K, L
DVB-T, DVB-C
100-240V CA 50/60Hz
Consommation d'énergie
38W
Consommation électrique en veille
Puissance de sortie audio
(Taux de distorsion dynamique ≤ 7%)
<0.30W
2 x 3W
Signal d'entrée
1 RVB analogique (PC) ; 1 audio PC
2 Interface HDMI (High Definition Multimedia Interface)
1 Entrée
composite
1 YPbPr
1 Entrée Péritel
1 CI
1 USB
1 RF Co-Ax
signal de sortie
1 Prise casque audio
1
1
de sortie Péritel
Coaxial
FR-5 Téléviseur écran plat LED
Mémorisation des numéros des chaînes
1000 (DTV ),100 (AT V)
24 28 32
40W 41W 50W
2 x 3W 2 x 8W 2 x 8W
Page 81

Affichage supporté
PC
3
5
1024x768
1280x1024
60
60
1
640x480
60
31.47
2
800x600
60
37.88
48.36
63.98
RESOLUTION
V. Fréq. (KHz) H. Fréq. (KHz)
4
1366x768
60
47.7
Introduction
FR
Téléviseur écran plat LED FR-6
6
(Seulement pour 22”,24”)
60
66.64
1920x1080
Page 82

Installation du socle TV
REMARQUES SUR L'INSTALLATION
Placez le té lévis eur dan s une piè ce où la lumière ne frappe pas directement sur l'écran. L'obscurité
totale ou une réflexion sur l'écran peut provoquer une fatigue visuelle. Un éclairage doux et
indirect est recommandé pour une visualisation confortable.
Prévoyez suffisamment d'espace entre le téléviseur et le mur pour permettre la ventilation.
Évitez les endroits trop chauds pour éviter tout dommage possible à l'en ceinte ou une dé faillance
prématurée des composants.
S'il vous plaît ne pas tourner ce téléviseur! Son socle n'est pas pivotant.
Introduction
FR-7 Téléviseur écran plat LED
1. Placez le téléviseur sur une surface plane
avec l'écran orienté vers le bas. Utilisez un
chiffon pour le protéger. Localisez la base du
socle.
2. Fixez le socle TV en serrant les vis au
maximum.
(22",24")
(28")
(32")
Page 83

Installation avec support mural
2. Retirez les vis de la partie inférieure du
téléviseur, où le socle est fixé au téléviseur, et
enlevez le socle (rangez le socle dans un endroit
sûr pour une utilisation ultérieure).
1. Placez le téléviseur LCD LED sur une
surface solide. Mettez
souple à l'avant de l'écran pour le protéger
contre tout dommage.
une protection
Introduction
Ce téléviseur peut être accroché au mur en suivant la procédure suivante :
FR
Téléviseur écran plat LED FR-8
(22",24")
(28")
(32")
Page 84

Introduction
3. Utilisez les quatre vis fournies pour fixer le téléviseur sur un support mural (non inclus) par les
quatre trous VESA standard à l'arrière du téléviseur.
M4X5
M4X5
M4X5
M4X5
100mm
100mm
M4X5
M4X5
M4X5
M4X5
200mm
100mm
M4X5
M4X5
M4X5
M4X5
200mm
100mm
(22",24")
(28")
(32")
FR-9 Téléviseur écran plat LED
Page 85

1
2
3
Capteur de télécommande
Témoins
Rouge : veille
Panneau de commande latéral
1
SOURCE
Pour afficher le Menu Source
MENU
Pour ouvrir le Menu principal
3
4
CH+/CH-
En mode TV, appuyez sur CH+ ou CH- pour
passer au canal suivant ou précédent.
Dans MENU, appuyez sur CH+ ou CH- pour
sélectionner des fonctions.
VEILLE
2
VOL+/VOL-
Pour régler le niveau sonore.
Dans Menu, Vol- permet de valider la sélection.
5
Panneau frontal(22",24",28")
Introduction
MENU
CH+
CH-
VOL+
VOL-
2
SOURCE
1
3
4
STANDBY
5
3
2
30 30
1
≤8m
Panneau frontal(32")
SOURCE
MENU
CH+
CHVOL+
VOLSTANDBY
1
2
3
4
5
3
2
30 30
1
≤8m
1
2
3
Capteur de télécommande
Témoins
Rouge : veille
Panneau de commande latéral
1
SOURCE
Pour afficher le Menu Source
MENU
Pour ouvrir le Menu principal
3
4
CH+/CH-
En mode TV, appuyez sur CH+ ou CH- pour
passer au canal suivant ou précédent.
Dans MENU, appuyez sur CH+ ou CH- pour
sélectionner des fonctions.
VEILLE
2
VOL+/VOL-
5
Téléviseur écran plat LED FR-10
FR
Éteint ou allume le téléviseur, en mode veille.
Pour régler le niveau sonore.
Dans Menu, Vol- permet de valider la sélection.
Éteint ou allume le téléviseur, en mode veille.
Page 86

Introduction
Prises arrières/latérales(22",24",28")
1
YPbYr
2
3
4
5
Entrée
6
Sortie audio numérique (coaxial)
Péritel
Audio Gauche/Droite
Vidéo
7
USB
8
9
10
11
12
13
HDMI1
Common Interface (CI)
Audio PC
Sortie Casque audio Analogique
Headphone
Entrée VGA
ANT
Entrée
Sortie audio numérique
Entrée
Entrée/Sortie
Entrée
Entrée
Entrée
Entrée
Entrée
Entrée
DIGITAL AUDIO OUTPUT
(COAXIAL)
4
1 2
5
COMM ON INTE RFACE (C I)
USB
6
7 8 9 10
11 12 13
3
VIDEO R
HDMI2(ARC)
HDMI1
Prises arrières/latérales(32")
1
YPbYr
2
3
4
5
Sortie audio numérique
Entrée
Sources d'alimentation CC
6
Péritel
Audio Gauche/Droite
Vidéo
7
USB
8
9
HDMI2(ARC)
10
11
12
13
HDMI1
Common Interface (CI)
Audio PC
Sortie Casque audio Analogique
Headphone
Entrée VGA
14
ANT
Entrée
Entrée
Entrée
Entrée/Sortie
Entrée
Entrée
Entrée
Entrée
Entrée
Entrée
Entrée
2 3
1
4
6
5
7 8 9
11 12 13 1410
AC-INPUT
100-240V~ 50/60 Hz
YPbPr
VIDEO
LR
DIGITAL AUDIO OUTPUT
(COAXIAL)
SCART
USB HDMI2(ARC) HDMI1
HEADPHONE
COM MON INT ERFACE (CI)
PC AUDIO
VGA R F
HDMI2(ARC)
Entrée
FR-11 Téléviseur écran plat LED
Sortie audio numérique (coaxial)
Page 87

Appareil Audio/Vidéo avec interfaces HDMI
G Vert (Y)
B Bleu (Pb/Cb)
W Blanc (AUDIO-L)
R Rouge (AUDIO-R, Pr/Cr)
Y Jaune (VIDEO)
Ampli
Introduction
Téléviseur écran plat LED FR-12
CVBS, lecteur DVD ou autre
appareil équipé d'YPbPr/YCbCr
CVBS, lecteur DVD ou autre
appareil équipé de CVBS/S-Vidéo
Connexion à votre TV Haier(22",24",28")
FR
GRB
COM MON INT ERFACE ( CI)
USB
RY W
HDMI2(ARC)
DIGITAL AUDIO OUTPUT
(COAXIAL)
VIDEO R
HDMI1
Page 88

RY
W
USB HDMI2(ARC) HDMI1
HEADPHONE
COMMON INTERFACE(CI)
PC AUDIO
VGA R F
GR
B
AC-INPUT
100-240V~ 50/60 Hz
YPbPr
VIDEO
LR
DIGITAL AUDIO OUTPUT
(COAXIAL)
SCART
Appareil Audio/Vidéo avec interfaces HDMI
G Vert (Y)
B Bleu (Pb/Cb)
W Blanc (AUDIO-L)
R Rouge (AUDIO-R, Pr/Cr)
Y Jaune (VIDEO)
Ampli
Introduction
CVBS, lecteur DVD ou autre
appareil équipé d'YPbPr/YCbCr
CVBS, lecteur DVD ou autre
appareil équipé de CVBS/S-Vidéo
Connexion à votre TV Haier(32")
FR-13 Téléviseur écran plat LED
Page 89

Connexion d'un lecteur DVD / déco deur satel lite /
câb le / console de jeux / PC ou ord inate ur
portable
Il y a plusieurs options pour la connexion d'un
lec teur DV D / décodeur satellite ou par câble /
con sole de j eux / PC ou o rdinateu r portabl e à votre
téléviseur.
Option 1
Branchez un câble péritel (non fourni) de la
prise péritel du téléviseur au lecteur DVD / décod eur
satellite ou par câble ou console de jeux.
Pour sélectionner le dispositif connecté avec le
câble péritel, appuyez sur la touche SOURCE de la
télécommande et utilisez les touches ▼▲ pour
sélectionner SCART puis appuyez sur la touche OK.
Remarque : Le téléviseur se connecte par défaut au
péritel lorsqu’il est allumé.
Option 2 HDMI1/HDMI2
Ete ignez d ’abord l'appareil que vous souhaitez
connecter au téléviseur s’il est allumé.
Branchez un câble HDMI (non fourni) de la prise
HDMI du téléviseur au lecteur DVD / décodeur
satellite ou par câble ou console de jeux.
Allumez l'appareil que vous venez de connecter
au téléviseur .
Pour sélectionner le dispositif connecté avec le
câble HDMI, appuyez sur la touche SOURCE de la
télécommande et utilisez les touches ▼▲ pour
sélectionner HDMI puis appuyez sur la touche OK.
Option 3 AV Audio Visual
(Jaune/Blanc/Rouge)
Ete ignez le téléviseur et l'appareil avant de
procéder aux connexions.
Connectez les câbles AV (non fournis) des
connecteurs vidéo (jaune) et audio (blanc, rouge)
du téléviseur au lecteur DVD ou console de jeux etc.
Pour sélectionner le dispositif connecté avec le
câble AV, appuyez sur la touche SOURCE de la
télécommande et utilisez les touches ▼▲ pour
sélectionner AV puis appuyez sur la touche OK.
Option 4
(Vert/Bleu/Rouge) + (B lanc/Rouge)
Ete ignez le téléviseur et l'appareil avant de
procéder aux connexions.
Peritel
Component
Bra nchez l es câbl es (non four nis) de l ’ent rée
COMPONENT IN Y, Pb, Pr (vert, bleu, rouge) et LAudio-R (blanc, rouge) du téléviseur au lecteur DVD
ou co nsole d e jeux etc.
Opt ion 5 VGA (Sub-D 15 broch es)
Connecte z un câbl e VGA ( non fourni ) du conn ecteu r
VGA du téléviseur au PC/ordinateur portable.
Rem arque : VG A trans met uni quement de la vidéo. Pour
l'a udio de v otre PC/or dinateur p ortable vous dev ez
connecter un câble audio séparé du PC (connecteur 3,5
mm) à l a prise c asque d e votre PC/o rdina teur port able
(connecteur 3,5 mm)
Opt ion 6 USB
La plupart des clés USB peuvent être connectés à votr e
téléviseur et certains appareils photo numériques
peuvent aussi être compatibles.
Connecte z une clé U SB (non fourni e) ou un câ ble USB
(non fourni) au téléviseur.
Rem arque 2 : L’iPhon e et iPod d'Apple ne s ont pas
compatibles avec votre téléviseur.
Rem arque 3 : Lorsque vous connectez un dispositif
quelconque au port USB, essayez d’avoir un câble USB
aus si cour t que possi ble.
Opt ion 7
Opt ion 8
Pour sélectionner le dispositif connecté avec le
câble COMPONENT, appuyez sur la touche SOURCE
de la télécommande et utilisez les touches ▼▲
pour sélectionner YPbPr puis appuyez sur la
touche OK.
Pour sélectionner le PC/Portable connecté avec
le câble VGA, appuyez sur la touche SOURCE de la
télécommande et utilisez les touches ▼▲ pour
sélectionner PC puis appuyez sur la touche OK.
Pour sél ectionn er le dis posit if USB connect é à votre
tél évise ur, appuyez s ur la tou che SOU RCE de la
télécommande et utilisez les touches ▼▲ pour
sél ectionn er USB pu is appu yez sur la tou che OK.
est une connexion audio numérique utilisée
pour connecter un appareil audio sur de courtes distances
tel q ue , chaîn e Hi-Fi etc. Le signal est
transmis via un câble coaxial avec des connecteurs RCA.
Ete ignez le tél éviseur et l'appareil avant de procéder
aux connexions.
Connectez les câbles AV (non fournis) à par tir du
connecteur du téléviseur au cinédom ou chaîne
HiFi etc .
Rem arque 1 : S euls le s formats de f ichie r *.jpg , *.mp3, *.txt,
*.avi,*.mp4, sont acceptés.
COAXIAL
COAXIAL
Sortie casque audio
Sortie audio numérique (coaxial)
Hom e ciném a
Ins érez la f iche de l 'écouteu r dans la p rise ca sque du
téléviseur. Le son des haut-parleurs sera coupé. Vous
pouvez également connecter des enceintes externes si
nécessaire.
Connexion à votre TV Haier
Introduction
Téléviseur écran plat LED FR-14
FR
Page 90

Le logement de l'interface commune (CI) est
destiné à un module d'accès conditionnel (CAM)
et un e carte à puc e pour po uvoir rega rder des
programmes télé et des services supplémentaires
payant s. Contactez votr e
pour obtenir plus d'informations sur les modules
et l'abonnement. Notez que les modules CAM et
les c artes à puc e ne sont ni fou rnis ni d es
accessoires en option.
fournisseur d'accès
INTERFACE COMMUNE
Introduction
Avertissement
Eteignez votre téléviseur avant d'insérer un
module dans le logement d'interface commune
Eteignez correctement le CAM (module d'accès
conditionnel), puis la carte à puc e dans le l ogeme nt
CI qu i se trou ve sur le cô té du tél évise ur.
Allumez le téléviseur, le message ci-dessous
s'affiche si un module CAM est détecté.
Attendez quelques instants jusqu'à ce que la
carte soit activée.
Appuyez sur la touche MENU puis sur la touche ▲▼
pour sélectionner l'option Interface Commune.
Des i nform ation s détai llées s ur la car te CI en
cours d'utilisation seront affichées
Appuyez sur OK pour accéder au menu de la
carte. Reportez-vous au manuel d'utilisation du
mod ule pou r régle r les dét ails
Lor sque le m odule e st retiré, le m essag e
suivant apparaît sur l'écran.
LOGEMENT D'INTERFACE COMMUNE
CAM (module d'accès conditionnel)
Car te à puce
CAM inséré
CAM retiré
Chaîne
Image
Audio
Horloge
Configuration
Bloquer
Balayage automatique
Informations sur le signal
Mis e à jour logicielle (USB)
Scan manuel
Editer un programme
Interface commune
Retour Déplacer OK
OK
FR-15 Téléviseur écran plat LED
MENU
Page 91

Télécommande
03 Télécommande
Appuyez sur pour mettre le téléviseur
sous ou hors tension.
(Puissance)
S.MODE
P.MODE
0-9
Appuyez sur pour entrer un numéro de
ou mot de passe.
Q.VIEW
SLEEP
VOL + /-
(Mute)
AUDIO(I/II)
Appuyez sur pour sélectionner Mono,
Stéréo Nicam pour une ATV. Sélectionnez
la langue audio pour une DTV.
SUBTITLE
Appuyez sur pour activer ou désactiver le
sous-titre.
Appuyez sur pour ouvrir la liste des
chaînes favorites. En mode télétexte ,
appuyez sur pour figer une page.
SCREEN
Appuyez sur pour changer le rapport d'aspect de l'image.
Appuyez sur pour naviguer dans le menu à l'écran.
Appuyez sur pour confirmer la sélection.OK
En mode télétexte , appuyez sur pour passer en
mode mix.
(vers l' arrière)
(vers l'avant)
Appuyez sur pour la lecture rapide avant ou arrière
en mode multimédia et mode TimeShift (bouton
rouge et vert en mode télétexte )
Appuyez s ur pour ac tiver / désac tiver la fo nction
télétexte , et cha nger le mo de TT X .
SOURCE
Appuyez sur pour ouvrir la liste des sources d'entrée.
Pas de fonction.
P
Appuyez sur pour changer la chaîne.
Appuyez sur pour afficher les informations de la
chaîne.En mode télétexte, appuyez sur pour
révéler l'information cache.
Appuyez sur pour ouvrir la liste des chaînes. En mode
télétexte , appuyez sur pour tailler le télétexte.
3D WORLD
Pas de fonction.
Appuyez sur pour fermer le menu à l'écran. En mode
télétexte, appuyez sur pour masquer le texte.
16
17
18
19
20
21
22
23
24
25
26
Appuyez sur pour sélectionner le fichier précédent
ou suivant (Touchez le boutons jaune et bleu en mode
télétexte)
(précédent)
(Suivant)
Appuyez sur pour arrêter la lecture multimédia,
arrêter timeshift en mode DTV.
GUIDE
Appuyez sur pour afficher le guide électronique
des programmes en mode T V. En mode télétexte,
appuyez sur pour entrer dans une page secondaire.
(REC)
Appuyez sur pour enregistrer l'émission de
télévision que vous regardez en mode DTV.
Appuyez sur pour lecture / pause en mode
multimédia, timeshift en mode DTV .
(lecture / pause)
Insertion des piles dans la télécommande
1. Ouvrez le compartiment des piles.
2. Insérez 2 piles AAA 1,5 V en respectant les indications de polarité (+/-)
des piles à l'intérieur du compartiment.
3. Remettez le couvercle du compartiment des piles en place.
Remplacez par des piles neuves en cas de dysfonctionnement de
télécommande et que le téléviseur ne réponde pas à la télécommande.
Remarque:
1) Utilisation de piles alcalines conseillée.
2) Retirez les piles lorsqu'elles sont usées ou si la télécommande ne va
pas être utilisée sur une période prolongée.
Batterien erschöpft sind, entnehmen Sie sie bitte
aus der Fernbedienung.
Téléviseur écran plat LED FR-16
FR
Bouton Description#
Appuyez sur pour sélectionner le
mode sonore.
Appuyez sur pour sélectionner le
mode d'image.
Appuyez sur pour passer à la dernière
regardée.
Appuyez sur pour régler la minuterie
de sommeil.
Appuyez sur pour ajuster le niveau de volume.
Appuyez sur pour activer ou désactiver le son.
Appuyez sur pour ouvrir le menu à l' écran . En mode
télétexte, appuyez sur pour ouvrir la page "INDEX".
(arrêt)
Page 92

E
TEXTE
SÉLECTION D'UNE PAGE
ACCÈS DIRECT AUX
ÉLÉMENTS
INDEX
HOLD
REVEAL
Appuyez sur :
Vous obtenez
TÉLÉTEXTE
Ent rez le numéro de la page dési rée à l'aide de to uches 0 à 9 e t haut/bas.
Exemple: p age 120 , tapez 1 20. Le numéro est affiché e n haut à ga uche, le
compteur tourne, puis la page est affichée. Répétez cette opération pour
aff icher u ne autre page. Si le compteur continue à chercher, cela sign ifie
que la page n'est pas transmise. Sélectionnez un autre numéro.
Les touche s de couleur sont comme ell es sont a ffich ées en ba s de l'écran.
Les 4 touche s colorées per mette nt d'accéder a ux rubr iques o u aux pag es
correspondantes. Les zones colorées clignotent lorsque la rubrique ou la
page n'est pas encore disponible.
Cela renvoie à la p age som maire (généralement l a page 100)
Pour figer la page
Pour afficher ou masquer les informations cachées (solutions de jeux)
Il est utilisé pour appeler ou quitter le mode télétexte. Le sommaire
apparaît avec une liste d'éléments qui peuvent être accédés. Chaque
élé ment a un n uméro de page co rrespondante de 3 chiffres.
Le télétexte est un système d'information diffusé par certaines chaînes, qui se consulte comme
un journal. Il offre également l'accès aux sous-titrages pour les personnes malentendantes ou
qui ne sont pas familiers avec la langue de transmission (réseaux câblés, chaînes satellites, etc.)
Télécommande
SOUS CODE
App uyez sur la to uche et e ntrez u n nombre à 4 chi ffres p our pas ser à une
page secondaire.
MIX
Permet de superposer le télétexte au dessus de l'image. Appuyez de nouveau
pou r retourner à l’affichage du texte seulement.
EXIT
Masquer le télétexte.
Taille
Pla cer l'image en h aut, en b as, plein- écran.
FR-17 Téléviseur écran plat LED
Page 93

UTILISATION
04 UTILISATION
L'écran Première configuration s'affiche lorsque le
téléviseur est allumé pour la première fois ou suite à une
restauration des paramètres par défauts.
Guide d'installation
1). Utilisez les touches ▼▲ pour n aviguer da ns les me nus
et ◄► modifier les paramètres. Sélectionnez la langue de
votre choix du mode Home/Shop des menus.
2). Utilisez les touches ◄► pour sélectionner
AIR/Cable signifie DVB-T/DVB-C.
3).
L'écran affiche l'ét at
d'avancement de la recherche et le nombre de chaînes trouvées.
4 Si vous voulez igno rer la recherche DTV, appuyez sur la
touche MENU pour l'interrompre. Vous serez redirigez
directement à la recherche ATV.
5 Une fois la recherche terminée, les chaînes seront disposées
dans un ordre préétabli. Si vous souhaitez ignorer des chaînes,
modifier l'ordre des chaînes préréglées ou les renommer,
sélectionnez Programme Edit (Modifier les programmes)
dans le menu Channel.
La recherche des chaînes démarre. Cette opération peut
prendre quelques minutes.
).
).
1.1)Recherche auto. des canaux numériques terrestres.
1. ME NU Chaîne
1). Appuyez sur la touche MENU puis utilisez les touches
▼▲ pour sélectionner le menu puis appuyez sur
la touche OK ou la touche Droite.
Chaîne
2). Utilisez les touches ▼▲ pour sélectionner
puis appuyez sur OK.
recherche
automatique
DTV
ATV Télévision analogique (non utilisé au Royaume-Uni)
Télévision numérique (TNT)
Au Royaume-Uni vous aurez besoin d'un câble approprié de
la société "set top box" pour connecter le téléviseur. Pour en
savoir plus reportez-vous au manuel d'instructions du câble
télé. Si vous sélectionnez DVB-C, vous devez sélectionner Full
ou Quick pour effectuer une recherche.
Vous pouvez également sélectionner le mode Auto Scan.
DTV+ATV ou DTV uniquement, ou ATV uniquement.
Remarque
Remarque
Premier réglage de l’heure
Lan gue OSD Français
Rég lage du m ode Mod e Maiso n
Pay s Allema gne
Démarrer
Bal ayage a utoma tique D TV+ATV
Type d 'ante nne Air
Premier réglage de l’heure
Langue OSD Français
Rég lage du m ode Mod e Maiso n
Pay s All emagne
Démarrer
Bal ayage a utoma tique D TV+ATV
Type d'antenne Câbl e
Câb le Rapi de
Chaîne
Image
Audio
Horloge
Configuration
Bloquer
Balayage automatique
Informations sur le signal
Mis e à jour logicielle (USB)
Scan manuel
Edi ter un pr ogram me
Interface commune
Mod es HOME o u Shop
Lors de première mise en marche, l'appareil affiche le
men u de conf iguratio n initi ale. Un e fois la lang ue de
l'OSD est choisie, l'utilisateur peut choisir entre «
» et le « m ode mai son ». Lorsq ue l'éc ran aff iche
le menu de réglage suivant et le curseur reste sur le «
mode maison », utilisez les touches ◀▶ pou r régler et «
OK » po ur accéder au menu.
mode
magasin
Select the usage mode?
sho p mode is for shop u sage on ly.
Mode Magasin
Mode Maison
Si le « » est choisi, le menu suivant sera affiché.mode magasin
Are
you sure to change to
Shop mode?
OK
annuler
Sélectionnez « OK » pour a ccéder au menu s uivant.
Home
mode is the most energy mode.
OK
annuler
Continue?
Sélectionnez « Annul er » pour reto urner a u menu de
configuration initiale ; le curs eur reste su r le
« mode maison », le sélectionner pour accéder au
men u choix d u pays.
Téléviseur écran plat LED FR-18
FR
Retour Déplacer OK
OK
MENU
Page 94

3). Utilisez les touches ◄► pour sélectionner
signifie DVB-T.
type antenne
hertzien
5). Dans le mode , utilisez les touches ◄► pour
sélectionner le mode de recherche : ATV / DTV / DTV + ATV.
Appuyez sur la touche
▼ pour sélectionner pour lancer
la recherche.
Antenne
Démarrer
1.2)Recherche auto. des canaux numériques
câblés.
1).Appuyez sur la touche MENU puis utilisez les touches
▼▲ pour sélectionner le menu puis appuyez sur la
touche OK.
2)
.Utilisez les touches ▼▲ pour sélectionner
puis appuyez sur la touche OK,
pour cable signifie DVBC.
châine
Recherche
automatique sélectionner
Type d'antenne
3).Appuyez sur la touche ▼ puis utilisez les touches ◄►
▼▲ pour sélectionner le pays d'utilisation du téléviseur.
4).Dans le mode menu utilisez les touches ◄► pour
sélectionner ATV / DTV / DTV + ATV.
5).
Sélec tionnez Start pour entrer dans le menu ci- dessous,
pour sélectionner le mode recherche.
4). En mode utilisez les touches ◄► pour
sélectionner le pays d'utilisation du téléviseur.
Pays,
6).La recherche des chaînes démarre. Cette opération peut
prendre jusqu'à L'écran affiche l'état
d'avancement de la recherche et le nombre de chaînes
trouvées.
7).Si vous voulez ignorer la recherche DTV, appuyez sur la
touche MENU pour l'interrompre. Vous serez redirigez
directement à la recherche ATV. Vous pouvez répéter
l'étape ci-dessus si vous voulez également ignorer
recherche AT V. Un rappel d'installation apparaîtra la
prochaine allumez le téléviseur, si aucune
chaîne n'a été trouvée.
8).Une fois la recherche terminée, les chaînes seront
disposées dans un ordre préétabli. Si vous souhaitez
ignorer des chaînes, modifier l'ordre des chaînes
préréglées ou les renommer, sélectionnez Programme Edit
(Modifier les programmes) dans le menu .
quelques minutes.
fois que vous
Chaîne
Remarque
UTILISATION
6).
7).
8).
La recherche des chaînes démarre. Cette opération peut
prendre jusqu'à L'écran affiche l'état
d'avancement de la recherche et le nombre de chaînes
trouvées.
Si vous voulez ignorer la recherche DTV, appuyez sur la
touche MENU pour l'interrompre. Vous serez redirigez
directement à la recherche ATV. Vous pouvez répéter l'étape cidessus si vous voulez également ignorer AT V. Un
rappel d'installation apparaîtra la prochaine fois vous allumez
le téléviseur, si aucune chaîne n'a été trouvée.
Une fois la recherche terminée, les chaînes seront disposées
dans un ordre préétabli. Si vous souhaitez ignorer des chaînes,
modifier l'ordre des chaînes préréglées ou les renommer,
sélectionnez Programme Edit (Modifier les programmes) dans
le menu .
quelques
minutes.
la recherche
Chaîne
Chaîne
Image
Audio
Horloge
Configuration
Bloquer
Type d 'ante nne Air
Pay s Allema gne
Démarrer
Mod e DTV+AT V
Chaîne
Image
Audio
Horloge
Configuration
Bloquer
Recherche en cours Ch12
Canaux numériques trouvés:
DTV: 3
Radio: 0
Données: 0
Canaux analogiques trouvés: 0
Chaîne
Image
Audio
Horloge
Configuration
Bloquer
Type d 'ante nne Câb le
Pay s Franc e
Démarrer
Mod e DTV+AT V
Chaîne
Image
Audio
Horloge
Configuration
Bloquer
Rapide
Plein
Avancé
FR-19 Téléviseur écran plat LED
Retour Déplacer OK
OK
MENU
Passer
MENU
Quitter
EXIT
Retour Déplacer OK
OK
MENU
Retour Déplacer OK
OK
MENU
Page 95

2.1)Recherche manuelle des canaux terrestres.
2.2)Recherche manuelle des canaux câblés.
1). Appuyez sur la touche MENU puis utilisez les touches
▼▲ pour sélectionner le menu puis appuyez sur
la touche OK. Si vous sélectionnez Cable dans
, vous e ntrez dans le me nu recherche
manuelle DVBC.
Chaîne
recherche
automatique
3) Recherche manuelle des canaux analogiques
Vous pouvez changer le système de sonorisation pour
rechercher les chaînes de télévision analogiques puis
affiner les canaux sélectionnés.
1.Appuyez sur la touche télétexte rouge pour mémoriser
les chaînes après la recherche manuelle.
2.Si le numéro de chaîne enregistrée est le même que le
numéro de chaîne actuelle, lorsque vous appuyez sur le
bouton rouge, la sauvegarde portera le numéro de la
chaîne actuelle.
4). Édition des chaînes
Utilisez les touches ▲▼ pour sélectionner Program Edit
dans le menu . Appuyez ensuite sur la touche OK
pour accéder au sous-menu. Vous devez ensuite
sélectionner le programme que vous souhaitez modifier.
Chaîne
Remarque
Remarque
UTILISATION
Toute s les cha înes, y c ompris ATV, DTV et radio peuvent
être recherchées en une fois, si le type de recherche est
DTV + ATV.
Toutes les chaînes mémorisées seront effacées après
une recherche automatique.
Après la recherche automatique, le téléviseur se
la première chaîne de télévision
numérique (DTV).
positionne sur
1).Appuyez sur la touche MENU puis utilisez les
touches ▼▲ pour sélectionner le menu puis
appuyez sur la touche OK.
2).Utilisez les touches ▼▲ pour sélectionner DTV
pui s appuy ez sur la touc he OK, si
vous sélectionnez Air dans ,
vou s entrez dan s le menu recherche m anuel le DVB-T.
chaîne
Recherche manuelle
recherche automatique
3).L'écran DTV (recherche
manuelle DTV) s'affiche.
Utilisez les touches ◄► pour sé lecti onner l e canal
sou haité U HF ou app uyez sur la to uche OK p our ent rer
le numéro de canal. Sélectionnez Start pour lancer la
recherche dans ce canal. Lorsque le signal est accordé,
l'image et la force du signal sont affichées à l'écr an.
4).Appuyez sur la touche MENU pour retourner au
menu principal.
5).Appuyez sur la touche EXIT pour quitter le menu.
Recherche manuelle
2). L’écran « DVB- C Manual Tuning » (recherche manuelle
DVB-C) s’affiche. Utilisez les touches ▼▲ pour
sélectionner (Frequency /Symbol (ks/s/QAM Type),
appuyez sur OK pour entrer la fréquence et le symbole,
utilisez ◀▶pour changer le type QAM, appuyez sur Start
pour commencer la recherche dans ce canal. Lorsque le
signal est accordé, l’image et la force du signal sont
affichées à l’écra n.
3).Appuyez sur la touche MENU pour retourner au
menu principal.
4).Appuyez sur la touche EXIT pour quitter le menu.
Chaîne
Image
Audio
Horloge
Configuration
Bloquer
Bal ayage n uméri que Ch5
Démarrer
F
orce 54
Chaîne
Image
Audio
Horloge
Configuration
Bloquer
Fré quenc e 474000K
Démarrer
Sym boles d e débit 6 875K
Mod ulato n Aut o
Enr egist rer sou s 1
Sys tème BG
Courant CH1
Rechercher
Fréquence 44.25 MHz
Réglage fin
Sauver
ATV réglage manuel
Téléviseur écran plat LED FR-20
FR
Retour Déplacer OK
OK
MENU
Retour Déplacer OK
OK
MENU
Page 96

12
abc3def
4
ghi
5
jkl
6
mno
7
pqrs
8
tuv9wxyz
5). Interface Commune
Ce menu peut afficher des informations sur la carte CI.
Le second élément du MENU est le menu . Ce
menu permet de régler les paramètres de l'image tels que
contraste, luminosité, etc. Appuyez sur ▼▲ pour déplacer,
appuyez sur pour régler.
Image
◀▶
2. ME NU IMAGE
3. MENU SON
Le troisième élément du Menu principal est le Menu audio.
Ici vous pouvez régler l'effet sonore tel que les aigus, basses,
balance, etc.
Utilisez les touches ▼▲ pour se déplacer, appuyez sur
pour régler.
◀▶
FAV : Appuyez sur la touche FAV (au lieu des touches
couleur) pour choisir la chaîne préférée. (Pour afficher la
liste de chaînes favorites, vous devez quitter le menu
Program Edit et appuyer sur la touche FAV ).
6). Etat du signal ( cana ux numé riques uniquement)
Utilisez les touches ▼/▲ pour sélectionner
dans le menu . Appuyez sur la touche OK pour afficher
les informations cor respondantes à la chaîne actuelle.
Information signal
Chaîne
7). M ise à jour
1.Auto v olume : d ispon ible un iquement lorsque le
vol ume du si gnal d'ent rée est trop é levé ou prés ente
une distorsion.
2.Audio un iquem ent: régle z sur ON le i mage à l' écran
s'é teindra vo us pour rez uniqueme nt écouter l e son de
la télévision.
Remarque
Remarque
UTILISATION
Supprimer : Appuyez sur la touche Rouge pour supprimer la
chaîne que vous avez sélectionnée (mise en surbrillance).
Ignorer : Appuyez sur la touche Jaune pour sélectionner la
fonction I gnorer, un sy mbole I gnorer ser a affic hé à côté d u
pro gramme qui s era ign oré lors du ch angem ent de ch aîne.
Déplacer : Appuye z sur la to uche Ver te pour mett re en
surbrillance la chaîne sélectionnée que vous souhaitez
déplacer. Un symbole apparaît devant le numéro de la
chaîne. Utilisez les touches ▼/▲ pour att eindre un no uvell e
emplacement et appuyez sur la touche Verte pour confirmer.
Renommer : (Pour ATV u nique ment) A ppuyez sur la touch e
Bleue pour renommer la chaîne. Utilisez les touches
numériques pour entrer un nouveau nom et appuyez sur la
touche OK pour confirmer (les touches numériques selon le
tableau ci-dessous).
Utilisez les touches ▼/▲ pour sélectionner
(USB) dans le menu . Appuyez ensuite sur la
touche OK pour mettre à jour l e logiciel à l 'aide d 'un câb le
USB. Suivez les instructions fournies par le logiciel de mise à
jour. Remarque : Il est recomm andé d' effec tuer un e
restauration des paramètres par défaut (voir
le menu Setup) pour s'assurer que l'appareil est
correctement mis à jou r.
Mise à jo ur
logiciel Chaîne
Restaurer par
défaut dans
001 T he HITS
003 UKTV Br’tldeas
004 f t h
005 I deal Wo rld
006 C olour bars1 00
001 K iss
002 S mash Hi ts!
003 K erran g!
002 T MF
Effacer
Editer un programme
DTV
DTV
DTV
DTV
DTV
DTV
Radio
Radio
Radio
Déplacer
Passer
Renommer Préféré
FAV
Chaîne
Image
Audio
Horloge
Configuration
Bloquer
Mod e Image S tandard
Moyen
For mat 16: 9
Temp. c ouleu r Norma l
Rétroéclairage
14
Luminosité 50
Contraste 45
Net teté 60
Couleur 45
Teint e 0
DNR M oyen
Con trast e Dynam ique
Chaîne
Image
Audio
Horloge
Configuration
Bloquer
Mod e Son Standard
Aig u 0
Bas se 0
Balance
0
Volu me Auto Act iver
Surround
Sound Désa ctive r
SPDIF
Auto
Description audio
Audio uniquement Désac tiver
1).Il y a trois modes de température de couleur disponibles :
normal, chaud et froid.
2).Le réglage PC est disponible en mode PC uniquement
qui permet de régler la position horizontale, verticale, la
taille et la phase.
FR-21 Téléviseur écran plat LED
Retour Déplacer OK
OK
MENU
Retour Déplacer OK
OK
MENU
Page 97

5. MENU OPTION
Le cinquième élément du Menu principal est le Menu
configuration. Vous pouvez choisir la langue OSD,
la langue audio, la langue des sous-titres, etc.
Veille automatique (4hr)
1. Le téléviseur lance la séquence d'arrêt automatique, si
au bo ut de 4 heures de mise en marche aucun changement
n'est apporté, par exemple changement de chaîne ou de
volume.
Une fenêtre apparaîtra à l'écr an.
Au bout de 150 secondes, le téléviseur passe
automatiquement en mode veille. Appuyez sur une touche
quelque de la télécommande pour éviter l'arrêt automatique.
6. MENU VERROUILLAGE
Le sixième élément du Menu est le menu . Vous
pouvez verrouiller le système, définir un mot de passe,
verrouiller des programmes et définir le contrôle parental ;
une fois vous activez le système de verrouillage vous ne
pouvez pas rechercher des chaînes ou modifier des
programmes.
Horloge
La restauration des paramètres par défaut, efface tous
les programmes et mot de passe.
Timeshift Record Time (Cont rôle du direct ):
Veille Auto.
Pour régler la
durée maximale d'enregistrement différé (Timeshift).
Pour faire passe le téléviseur en veille
après 4 heures de fonctionnement.
HDMI CEC Control: Pour activer/désactiver la fonction CCE.
OSD Time: Utilisez les touches ◄ / ► pour sélectionner la
durée d'affichage d'un menu.
Utilisez les touches ▼ / ▲ pour sélectionner Restore Factory
Default et appuyez sur la touche OK pour accéder à la
première configuration. Une fois confirmée, tous les
paramètres seront effacés. Cela ne doit être utilisé que si
vous rencontrez des problèmes avec votre téléviseur.
Réglages du mode: Pour faire passe le téléviseur en mode
.maison ou magasin
Restaurer par défaut
2. Sélectionnez (4H) dans le menu Options
pour annuler l'arrêt automatique, le téléviseur retourne au
menu Options et l'option (4hr) s'affiche.
(4h r) OFF
Veille automatique
Veille automatique
Veille automatique
Le troisième élément du Menu est le menu . Vous
pouvez régler l'heure, l'heure de mise en marche/arrêt,
l'heure de veille automatique etc. Utilisez les touches ▼▲
pour se déplacer, appuyez sur OK pour régler.
Horloge
Dans le système de fichiers PVR, vous pouvez configurer le
disque USB pour PVR.
Pour retourner à l ’arrêt automatique après 4 heures, répétez ce
qui précède, en utilisant la touche Gauche pour sélectionner
« On » (4 heures).
Veille automatique
Si au bout de 15 minutes, il n'y a aucun signal d'entrée, le
téléviseur s'éteint et passe en Veille automatique (veille
automatique), si la fonction Veille automatique est activée.
L'heure est automatiquement réglée lorsque le téléviseur
peut recevoir des chaînes DTV.
Remarque
UTILISATION
Le mot de pa sse par d éfaut e st 0000 , si vous o ublie z le
mot d e passe, vou s pouve z utili ser le su per mot d e
pas se : 9443 .
Verrouillages chaîne : Utilisez ▼▲ pou r chois ir le
programme, appuyez sur la touche OK pour verrouiller
le pr ogramme. S i vous voule z déverrou iller u n
pro gramme, accéd ez au men u princ ipal, e ntrez le mot
de passe, choisissez un programme puis appuyez sur la
tou che OK. Évaluation parentale : Util isez le s touch es ◀
▶pour choisir une classification.
Chaîne
Image
Audio
Horloge
Configuration
Bloquer
Sleep Timer
Dat e 2010/04/30
Mis e en veil le auto matiq ue
Time
Zone
Désactiver
Alarme reveil
Arr et prog ramme
Activer
Image
Audio
Horloge
Configuration
Bloquer
Chaîne
Langue OSD French
langues audio
Allemagne
Mode Maison
Commande CEC HDMI Activer
Désactiver
Sous-titre
Pays
Système de fichiers PVR
Temps d'enregistrement Time Shift 1 heure
Mise en veille automatique (après 4h) sur (4 heures)
Réglage du mode
Délai OSD
Reinitialisation d'usine
Paramètres PVR
Déplacer vers la gauche
Déplacer vers la droite
Sélectionner
Sortie
OK
EXIT
Gestionnaire de
fichiers
Liste des
périphériques
Enregistrement
programmé
Image
Audio
Horloge
Configuration
Bloquer
Chaîne
Sai sir un mo t de pass e ---Act iver Dé sacti ver
Nouveau mot de passe ----
Verr ouill ages ch aîne
Éva luati on pare ntale Aucun
Téléviseur écran plat LED FR-22
FR
4. MENU Horloge
Retour Déplacer OK
OK
MENU
Retour Déplacer OK
OK
MENU
Retour Déplacer OK
OK
MENU
Page 98

Pour connaître les fonctions de base de la télécommande,
consultez la partie inférieure de l'écran EPG.
Enregistrer
En mode EPG, appuyez sur la touche Rouge de la
télécommande pour sélectionner un programme à
enregistrer. Vous accédez alors au menu
pour paramétrer les enregistrements.
(Reportez-vous à la section Système de fichiers PVR).
Enregistrements
programmés
7. Menu EPG (Guide Électronique des Programmes)
Remarque
Remarque
UTILISATION
Le menu EPG (Guide Électronique des Programmes) vous
fournit des informations détaillées sur les programmes
diffusés. Appuyez sur la touche EPG pour afficher un menu
avec des i nform ation s sur les p rogramme s de la cha îne
que vous regardez actuellement. Vous avez un maximum
de sept jours d'informations sur les programmes. Pour voir
les programmes du jour suivant ou d'après utilisez les
touches ▲ / ▼ pour mettre en surbrillance le jour, puis
utilisez les touches ◄ / ► pour faire défiler les dates
disponibles.
Pour voir le program me qui va ê tre diffus é après c elui en
cours, appuyez sur la touche jaune (programme). Pour
regarder une chaîne différente, utilisez les touches ▲/ ▼
pour mettre en surbrillance la chaîne, puis utilisez les
touches◀ / ►. Appuyez sur la touche EPG ou EXIT pour
qui tter le m enu EPG . Appuyez de n ouvea u (servic e) pour
retourner.
Veil lez à ce qu’un l ecteur de d isque d ur ou un ap pareil
USB s oit con necté a u port USB av ant de progr ammer d es
enregistrements. Si votre appareil de stockage n’est pas
com patib le, il vou s sera de mandé d e le form ater. Dans le
men u de conf iguratio n, accé dez au me nu list e des
périphériques du Système de fichiers PVR pour formater
votre appareil.
AVERTISSEMENT
Le forma tage de l 'appa reil USB sup prime tou s les
fichiers stockés sur l'appareil.
Si vous avez configuré un enregistrement programmé,
votre téléviseur s'allume automatiquement pour
enregistrer le programme et s'éteint automatiquement
une fois l'enre gistreme nt term iné. Pen dant un
enr egistrem ent progra mmé, il n'y aura p as d'im age et le
son s era coupé (pas d 'affi chage ), mais l 'appa reil sera
all umé. Vous p ouvez a ppuyer sur l a touch e STANDBY
pour allumer l'image et restaurer le volume.
Rappel (touche bleue)
Dan s le menu E PG, app uyez sur la to uche Bl eue pou r
déf inir un r appel d e programm e. Le menu
(Rappel) ci-dessous s'affiche alors et vous pouvez
utiliser les touches ◄ / ► pour r égler l es déta ils du
pro gramme de ra ppel. Vou s fixer le rap pel sur U ne fois,
Quotidien ou Hebdomadaire.
Rappel
Vous pouvez appuyer sur la touche Rouge pour afficher
la liste des programmes. Vous pouvez également
supprimer les programmes.
INFO (touche Verte)
Dan s le menu E PG, app uyez sur la to uche Ver te pour
aff icher p lus d'i nform ations sur l e programme en cours.
Utilisez les touches ▼/▲ pour
sélectionner PVR File System (système de fichiers PVR),
puis appuyez sur la touche OK pour accéder au sousmen u puis ut ilise z les tou ches
◄ / ► pour faire
parcourir les options.
8. Enregistreur USB (PVR)
Appuyez sur la touche Menu, sélectionnez le sousmenu configuration.
GUI DE DU PRO GRAMM E
Enregistrement
Calendrier
Rappel
2010/04/29 02:19
001 N ine Dig ital NINE MORNING NEWS
002 N ine Dig ital NINE MORNING NEWS
003 G O! TMZ
...
GUIDE DU PROGRAMME
Enregistrement
Informations
Rappel
001 Nine Digital
01:00-02: NINE MO RNI NG NEWS
-03:00 HE ELLEN DEGENERES S...
- HE VIEW
DAY S OF O UR LI VES
NTERTAINMENT TONIGH T
AGICAL TA LES
HE SHAK
INE AFTERNOON NEWS
00
02:00 T
03:00 04:00 T
04:00-05:00
05:00-05:30 E
05:30-06:00 M
06:00-06:30 T
06:30-07:00 N
Fréquence
Cha îne
Minute
Heure
Mois
Date
Rappel
Désactiver
The H ITS
0
17
Nov
19
17:03 19/11/2004
OK
Annexe Liste
Service
FR-23 Téléviseur écran plat LED
Page 99

Enregistrement programmé Ici: Vous pouvez configurer la
liste des enregistrements programmés. Et vous pouvez
également supprimer les enregistrements programmés
que vous avez définis.
Accédez au sous-menu pour fixer la fréquence
d'enregistrement
(une fois, quotidien,
hebdomadaire, jour de la semaine ou désactivé).
une fois, quotidien, hebdomadaire, jour
de la s emain e ou désa ctivé
Enr egist rer le pro gramm e :
Pour enregi strer u n programm e que vous reg ardez
actuellement appuyez sur la touche REC ; un symb ole
rouge REC s'affiche à l' écran . L’ heure d ’enregi strement /
dur ée et la du rée d’enregi strem ent restan te seront
affichées dans le menu ci-dessous.
Liste d'appareils: Ce sous-menu affiche la liste des
appareils USB connectés au téléviseur. Vous pouvez
sélectionner un appareil USB, puis appuyez sur la touche
Rou ge pour l e forma ter.
Gestionnaire de fichiers: Vous pouvez consulter
tous les programmes enregistrés ici.Appuyer sur la touche
de la télécommande pour un affichage pleins écran.bleue
UTILISATION
Lecture d’un enregistrement:
Le programme en registré s ur l'ap pareil USB s era
sau vegardé da ns le dos sier "U SB record".
1. La c apaci té de stockage USB p eut être com prise e ntre
128 e t 500 Go, mais p our des r aison s prati ques, il est
recomm andé d' utili ser 2 Go à 500 Go.
2. La v idéo ri sque de d eveni r pixélisé e si le déb it vidé o
est t rop fai ble. Cel a peut êt re dû à la co nnexion d'un
câble de rallonge USB au lieu d'une connexion directe
téléviseur via un câble USB
3. Les dispositifs USB ne sont pas tous compatibles. Voici
une liste des lecteurs USB recommandés.
Les modè les qui n e sont pa s listé s peuvent êt re
com patib les, mais ce n'es t pas gar anti.
La li ste de di sposi tifs USB sup portés es t la même q ue
celle de la fonction Timeshift (lecture décalée),
rep ortez -vous a ux page s suivante s pour pl us de dét ails.
Vous p ouvez l e lire dans le sou s-men u système de
fichiers PVR et Gestionnaire de fichiers.
au
Paramètres PVR
Déplacer vers la gauche
Déplacer vers la droite
Sélectionner
Sortie
OK
EXIT
Gestionnaire de
fichiers
Liste des
périphériques
Enregistrement
programmé
Gestionnaire de fichiers
Clès
Dépl acer ve rs le hau t
Dépl acer ve rs le bas
Sélectionner
Retour
Sortie
EXIT
OK
EXIT
MENU
Enregistrement programmé
e
g
Veille
Jouer
Zoom
Supprimer un
Supprimer tout
Fonction
Actuellement l'Informations sur le fichier Jouer
Nom de la chaîne
Nom du programme
Durée d'enregistrement
Temps total
Description
BBC ONE
Olympics 2012
2012/08/09 11:44
00:08:06
Matt Baker and Clare Balding
present coverage of the eager...
UKTV Br’tldeas_Good Food Bites_20041119_161021.ts
BBC ONE_Olympics 2012_20120808_114427.ts
UKTV Br’tldeas_Good Food Bites_20041119_162019.ts
Liste des appareils
Dispositif
L'espace disponible
Système de fichiers
sda1
192
MB FAT3 2
Fonction
Format
Clès
Déplacer vers le haut
Déplacer vers le bas
Sélectionner
Retour
Sortie
EXIT
X
T
OK
EXIT
MENU
Listes des enregistrements programmés
Fonction
Groupe
Fréquence
Canal
1
2
3
4
5
6
7
8
9
10
11
12
13
14
15
16
0
Colourbars100
Durée
Date
Heure de
démarrage
2004.12.25
18:17
00
:
30
Une fois
Clès
Déplacer vers le haut
Déplacer vers le bas
Sélectionner
Retour
EXIT
X
T
OK
MENU
Enregistrement programmé
e
g
Veille
Supprimer un
Supprimer tout
Désactiver
Désactiver
Désactiver
Désactiver
Désactiver
Désactiver
Désactiver
Désactiver
Désactiver
Désactiver
Désactiver
Désactiver
Désactiver
Désactiver
Désactiver
EXIT
Sortie
Enregistrement programmé- Groupe 1
Etat d u régla ge
Réglage n'est pas en cours d'utilisation
Fréq uence U ne fois
Cana l 6 Colou rbars 1 00
Heur e de déma rrage 2 004-1 2-25
18:17
Heur e de fin 20 04-12-25
18:47
Clès
Déplacer vers le haut
Déplacer vers le bas
Sélectionner
Retour
Sortie
EXIT
OK
EXIT
MENU
Ajuster
Ajuster
Enregistrement
Durée d'enregistrement : 00 : 00 : 40
Temps Disponible : 25 Minute
Configurer votre enregistrement
App uyez de nouveau sur l a touch e REC pou r affic her le
men u. Appuyez s ur la tou che STOP pou r arrêter
l’enregistrement. Vous pouvez également accéder au
men u Media P layer pour r egarder vo s programm es
enr egistrés v ia le mod e Film.
Téléviseur écran plat LED FR-24
FR
Page 100

9. Lecture décalée
Appuyez sur la touche our suspendre le programme
que vous regardez pour activer la fonction Time Shift.
Le menu ci -dessou s sera af fiché . Ce menu disp araît ra
automatiquement après quelques secondes.
▶II p
Lecture des fichiers enregistrés
Le télév iseur H aier en registre l e programm e sur la cl é
USB a u format "Time S hift" *.ts. Le fic hier ne s era pas l u si
le téléviseur, PC, ordinateur portable, lecteur DVD ou
autre appareil ne supporte pas ou ne reconnaît les
fic hiers * .ts (ti me shif t). "Ts" est l e format uti lisé po ur la
diffusion télévision haute définition. Vous pouvez lire
des f ichie rs au for mat "ts " sur un or dinat eur ou un
ordinateur portable en utilisant un logiciel approprié.
Che rchez s ur Internet ou c onsul tez un infor matic ien
pou r avoir une id ée sur le l ogici el le plu s approprié.
Attent ion : Hai er ne peu t pas êtr e tenu responsable des
log iciel s téléchargés par u n clien t ou un revend eur et
des v irus qu 'ils pe uvent cont enir et d e tout
dysfonctionnement résultant de leur installation. Le
cli ent est s eul respon sable e t utili se ces lo gicie ls à ses
propres risques.
Remarque
UTILISATION
Remarque
Utilisez▶et appuyez sur [OK] pour reprendre la lecture ; un
symbole blanc de lecture apparaît à droite d e l'écran
indiquant que le time shift est en cours.
Lorsque le menu disparaît, appuyez sur la touche ▶II pou r
afficher le menu. Pour arrêter l'enregistrement time shift,
appuyez sur la touche Stop ou déplacez le curseur pour
sélectionner l'option Stop lorsque le menu ci-dessus est
affiché et suivez les instructions qui s’affichent.
• Veillez à ce que l’appareil de stockage utilisé pour
enr egistrer s oit con necté à l ’ent rée USB situ ée à l’ar rière d u
téléviseur et qu’il est compatible pour l’enregistrement. Si
votre appareil de stockage n’est pas compatible, il vous sera
demandé de le formater. Dans le menu configuration,
accédez au sous-menu Système de fichiers PVR et
sélectionnez Liste de périphériques pour formater votre
appareil.
• Toutes les fonctions du menu (lecture, Retour rapide,
Avance rapide, Pause et S top) ne p euvent êtr e utili sées qu i
lorsque le menu est affiché.
• L’enregist rement Timeshift ne sera pas possible lorsque le
canal est CI+.
00:00:00
Temps Disponible
00:00:05
Jouer
Pause
FBDetener FF
00:00:00/04:13:20
•
enr egistrer s oit con necté à l ’ent rée USB situ ée à l’ar rière d u
téléviseur et qu’il est compatible pour l’enregistrement. Si
votre appareil de stockage n’est pas compatible, il vous
sera demandé de le formater. Accédez au menu système de
fichiers PVR et sélectionnez Liste de périphériques pour
formater votre appareil.
• Pendan t l’enreg istrement, seule la fonction Stop est
disponible.
Veillez à ce que l ’appareil de stockage utilisé pour
•
provient d'un module CI+.
L'enregistrement ne sera pas possible lorsque la chaîne
FR-25 Téléviseur écran plat LED
 Loading...