

Page 1

USER MANUAL
Automatic Drum
Washing Machine
HWD-D1200TXVE
HWD-D1200TXVEME
HWD-D1000TXVE
HWD-D1000TXVEME
Page 2

Table of contents
page no.
Before use
Parts .......................................................................................................... 1
Safety instructions ................................................................................. 2 - 4
Installation ............................................................................................ 5 - 6
Functions .............................................................................................. 7 - 8
Using the appliance
Programme selection ................................................................................. 9
Preparation .............................................................................................. 10
Using your appliance ........................................................................ 11 - 12
Other functions ....................................................................................... 13
Maintenance
Maintenance .................................................................................... 14 - 15
Trouble shooting ..................................................................................... 16
Technical specifications ............................................................................ 17
Page 3
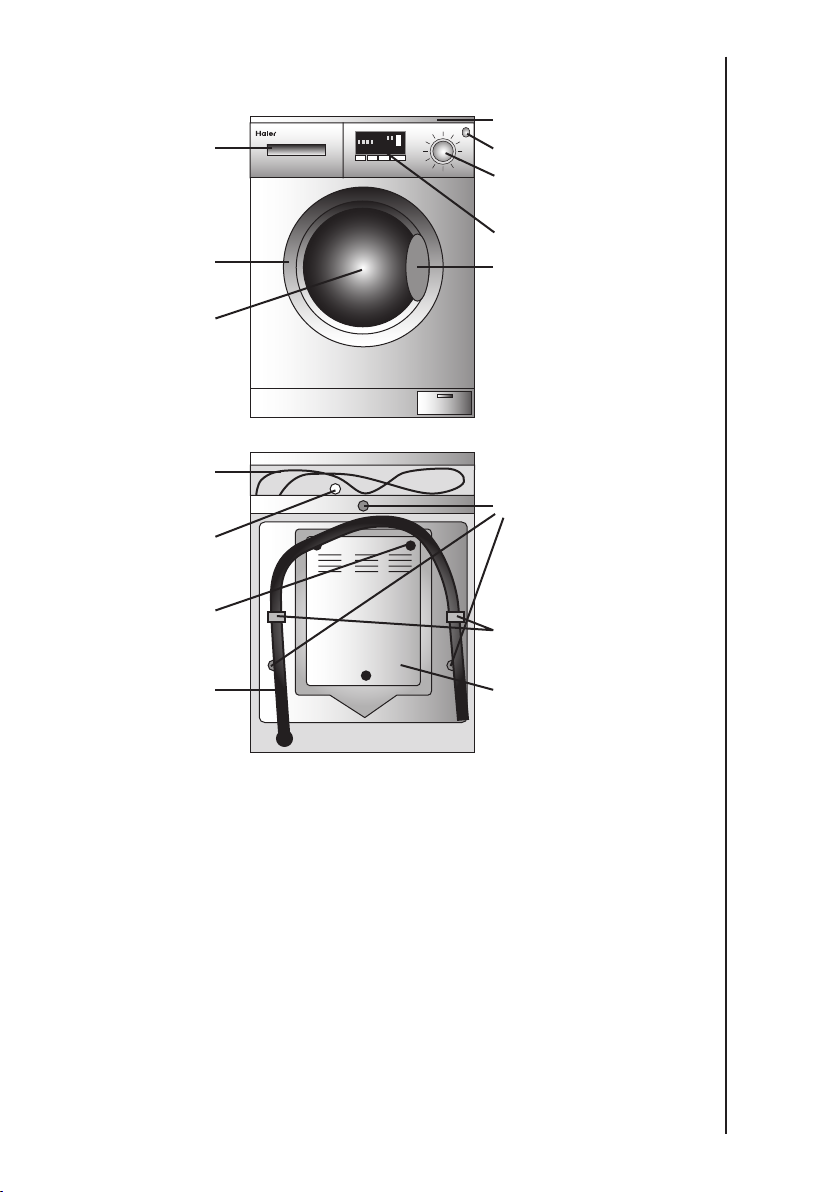
Parts
Detergent
dispenser
Door
Porthole
Power cable
Earthing terminal
Back plate
screws (3)
Drain hose
Top panel
Power button
Selection dial
Display
Door handle
Packing bolts (3)
Hose clip
Back plate
This diagram may vary slightly with the layout of the washing machine you
have just purchased due to technical improvements.
NOTICE
Please read these instructions carefully before using this appliance. The
instructions contain important information which will help you get the
best out of the appliance and ensure safe and proper installation, use and
maintenance.
KEEP THIS MANUAL
Keep this manual in a convenient location so you can refer to it to check safe
and proper use of the appliance. If you sell or give the appliance to someone
else, or leave it behind when you move house, make sure you also pass on
this manual so that the new owner can become familiar with the appliance
and safety warnings.
1
Page 4

Safety instructions
Using your appliance will be simple, but please make sure read the following
to get the best out of it and to ensure your own safety.
BEFORE SWITCHING THE APPLIANCE ON FOR THE FIRST TIME:
DO
✓ Ensure you connect the appliance directly to a domestic mains water
supply.
✓ Ensure that the appliance is situated on a firm level base.
✓ Ensure that the electrical system meets the requirement laid out in the
installation section of this document.
✓ Use a separate earthed socket for the power supply.
✓ Make sure that the plug is accessible.
✓ Make sure that the power cable is not caught under or in the appliance
and avoid damage to the power cable.
✓ Check that hose joints and connections are firm and no water can leak.
If joints are loose or there is leakage, turn off the tap and repair. Do not
use the washing machine until the hoses are properly fixed.
DO NOT
✗ Connect the appliance to the power supply until installation is
complete.
✗ Install the appliance outdoors or in a damp place. In the event of a
water leak allow the machine to dry naturally.
✗ Expose the appliance to heat sources or direct sunlight to prevent
plastic and rubber components from aging.
✗ Use an appliance with missing parts.
2
Page 5

DURING DAILY USE OF THE APPLIANCE
DO
✓ Unplug the appliance before carrying out any maintenance or repair.
✓ Hold the plug and not the electric cable when unplugging the washing
machine.
✓ Keep the door slightly open when not in use to prevent formation of
odours.
✓ After each wash programme, turn off the machine and switch it off at
the mains to save electricity and for safety. Wipe clean the lower part of
the porthole.
✓ Pull up zips and fix loose threads to prevent the items from being
entangled. If necessary, put small items into a net bag or pillow.
DO NOT
✗ Touch or use the appliance when barefoot or with wet or damp hands
or feet.
✗ Use flammable detergent or dry cleaning agent.
✗ Open the detergent drawer during the wash cycle.
✗ Use any flammable sprays in close vicinity to the appliance
✗ Remove or insert the plug in the presence of flammable gas
✗ Place heavy objects or sources of heat or damp on the top of the
appliance.
✗ Obstruct the ventilation openings at the base of the appliance.
✗ Attempt to repair the appliance yourself. Contact the manufacturer or
their approved service agent.
✗ Allow children or the infirm to play with the appliance or packing
materials, without adult supervision.
✗ Touch the porthole during the washing process – it gets hot!
✗ Force the door open. The door is fitted with a self-lock device and will
not open until 2-3 minutes after the washing machine stops.
✗ Open the door if the water level is visibly over the porthole.
✗ Use the appliance if the power cable is damaged. It must be replaced
by the manufacturer, its approved service agent or similarly qualified
persons in order to avoid a hazard.
✗ Wash foam rubber or sponge-like materials on a hot wash.
✗ Cover the appliance.
3
Page 6

Safety instructions
Electrical connection (UK ONLY)
For your safety please read the following information
Warning: This appliance must be earthed.
The appliance must be connected to a 220 volt 240 cycle AC supply by
means of a three pin socket, suitably earthed and should be protected by a
13 amp fuse.
The appliance is supplied with a standard 3 pin mains plug fitted with a 13
amp fuse. Should the fuse require replacement, it must be replaced with a
13 amp fuse approved to BS1362.
The plug contains a removable fuse cover that must be refitted when the
fuse is replaced. In the event of the fuse cover being lost or damaged, the
plug must not be used until a replacement cover has been obtained.
When disposing of the appliance the plug should be cut off as close to
the plug body as possible and the fuse should be removed to prevent an
electrical hazard. Dispose of the plug safely.
The use of adapters, multiple connectors and/or extension cables is not
recommended.
How to wire a 13 amp plug.
Important
The wires in the mains lead on this
appliance are coloured in accordance with
the following code:
Green and Yellow – Earth
Blue - Neutral
Brown - Live
As this may not correspond with your installation, proceed as follows:
The green and yellow wire must be connected to the terminal in the plug
which is marked with the letter E or with the earth symbol ~ or coloured
green and yellow,
The blue wire must be connected to the terminal marked N.
The brown wire must be connected to the terminal marked L.
4
Page 7

Installation
Caution: protective gloves should be warn
• Remove all the packing materials
(including the foam base) to prevent
vibration during use, as show in Fig. 1.
On opening, water drops may be visible
on the appliance. This is a normal
phenomenon.
• Check that the appliance is also supplied with the following:
User
manual
Quantity 1 1 1 1 3
• Remove the packing bolts as shown in
Fig. 2.
The packing bolts are designed for
support of internal components during
transit.
Before use:
1. Remove the back plate.
2. Remove the three packing bolts on
the back plate and take out the hose.
3. Replace the back plate.
4. Fill the holes left by the packing bolts
with the plastic plugs provided.
Attention: The packing bolts and hose
should be kept in a safe place for later
use.
Quality
certificate
1
Water
hose
2
Hose clip
Plastic
plugs
• Levelling the appliance
There are adjustable feet under the
bottom of the appliance. Before use,
the appliance should be adjusted, as
show in Fig. 3, so that it is level. This
will minimise vibrations and thus noise
during use. It will also reduce wear and
tear. We recommend using a spirit level
to level the appliance.
3
5
Page 8

Installation
Connecting the hose to the cold
water supply
1. Connect the nut on the water
inlet hose to the connector on
the water valve. Ensure all seals
are in place.
2. Tighten the nut to secure the
hose.
Drain hose
• The height of the drainage outlet must
be between 80-100cm. To prevent the
drain hose from dropping, attach it
using the drain hose clip at the back of
the washing machine.
• Use the hose clip to secure the end
of the drain hose and to prevent the
outflow of water. It is recommended
that the length of the drain hose is not extended by way of a hose extension.
In case of absolute need, we recommend that the extension has the same
diameter as the existing hose and does not exceed 250cm in length.
Water inlet hose nut
Water inlet valve connector
Note: The drain hose should not be underwater and should be securely fixed
and leak-free. When the drain hose is placed on the ground or the height
of the pipe is less than 80cm, the washing machine will continuously drain
while being filled (self-syphoning).
Connection to the power supply
Before connecting to the power supply, make sure that:
• The socket is suitable or the maximum power of the washing machine (for
safety, fuses in the power circuit should be rated for no less than 13A).
• The supply voltage should be within the values indicated on the
specifications page.
• The power supply socket and the plug of the washing machine should
be compatible. If they are not compatible, refer to a washing machine
technician or Haier designated service engineer for power cable replacement.
• The washing machine should be earthed and in compliance with applicable
law.
• Additional earthing cables should not be necessary if the socket and plug are
earthed.
• If required, an additional earthing cable should be installed on the upper
6
back of the washing machine and earthed.
Page 9

7
Cont r ol p a nel
A. Power button G. Start/Pause button
B. Programme selection dial H. button
C. D etergent distribution drawer I. Dry button
D. Spin speed setting button J. Extra rinse button
E. D isplay K. Delay button
F. Wash status indicator L. Wash temperature button
Fu n ct io n s
A. P ower button
Press this button to switch on the washing machine. Press it again to switch
it off.
B. Pro g r amme selection dial
Turn the dial clockwise or anti-clockwise to select the required programm e.
(Refer to Program me selection guide).
C. Detergen t distr ibut ion drawer
Programme descriptions are printed on the front of
the detergent distributor, there are three detergent
compartments numbered 1, 2, 3.
Box 1: Standard washing - extra-fast washing
Box 2: Softener
Box 3: Pre-washing detergent
D. Spin speed setting butto n
Touch this button to select the desired speed. Refer to page 10 for guidance
on spin speeds.
E. D isplay
Information such as rem aining wash time, tem perature and speed setting
and error messages are shown here.
F. W ash sta tus in dicato r
This light shows the stage of the cycle of the selected programm e.
C
KIJ H G
F E L A
B
1 2 3
D
WashRinse Spin Dry
Delay Extrarinse Dry Start/Pause
Time
Quickwash
Wool
Synthetics
Cotton&Linen
Prewash
Wash
Rinse
Spin
Dry
Iron
Air wash
Page 10

Functions
G. Start/Pause button
When the washing machine is connected to the power socket and a
programme is selected, touch this button to start operation. Touch this
button again during operation to pause the programme. The display screen
will flash and the machine will be paused. Press the button again and the
programme will continue.
H. button
Economy wash. This function automatically adjusts water consumption,
wash time and heating time.
The wash load range is:
Prewash: 1kg~6kg;
Cotton: 1kg~6kg;
Synthetic: 1kg~3kg;
Quick wash: 1kg~3kg;
Wash: 1kg~6kg;
Rinse: 1kg~6kg;
Spin: 1kg~6kg
I. Dry button
Touch this button, the corresponding light will come on and the appliance
will dry the laundry after the last spin cycle.
J. Rinse hold button
Rinse hold helps reduce the creasing and odours that occur when you leave
damp laundry in the appliance after the cycle has finished. The laundry
stays in the water from the last rinse until you deselect the rinse hold button
which will then start the spin programme to finish off the cycle.
K. Delay button
Touch this button and the washing machine will start operation after the
selected delay period. The corresponding indicator will go on. The delay
range is 0.5-24 hours. Each touch of this button increases the delay by half
an hour. After the delay is selected, press the Start/ Pause button to start
countdown (the time is displayed on the screen until the programme ends).
Note: The delay time must be longer than the programme time, otherwise
the washing machine will start the wash programme immediately.
L. Wash temperature button
Touch this button and the wash temperature will be displayed on the
screen. Select a suitable temperature according to the type of laundry. The
corresponding light will come on.
8
Page 11

Programme selection guide
1
Cotton & Linen
2
3
Synthetic fabrics
4
5
cotton, linen and
synthetic fabrics
6
Cotton, linen and
synthetic fabrics
7
Cotton, linen and
synthetic fabrics
8
Cotton, linen and
synthetic fabrics
9
Cotton, linen and
synthetic fabrics
10
Cotton, linen and
synthetic fabrics
11
Cotton, linen and
synthetic fabrics
Setting
Laundry
Prewash
Heavy-soiling
Cotton fabric
Synthetics
Wool
Wool fabrics
Quick Wash
Lightly-soiled
Wash
Rinse
Spin
Dry
Iron
Air wash
Default Setting
* 30°C 40°C
50°C 60°C 90°C
* 30°C 40°C
50°C 60°C 90°C
* 30°C 40°C
50°C 60°C
* 30°C 40°C *
* 30°C 40°C
* 30°C 40°C
50°C 60°C
*
*
The laundry is completely dry when the cycle is complete.
The laundry is completely dry when the cycle is complete.
Air refresh wash for small items that need a quick refresh
Default
Setting
1200rpm
40°C
1200rpm
40°C
1200rpm
40°C
1200rpm
40°C
40°C
1200rpm
40°C
1200rpm
Comp 1 Comp 2 Comp 3
*
(e.g. school uniforms)
Detergent
★
★
★
★
★
★
X O X
X X X
O
O X
O X
O X
O X
O X
★
NOTE: “O” indicates that softener can be added if need;
“★” indicates that detergent must be added;
“X” indicates that detergent must not added;
“*” indicates cold water.
1) The wash temperature indicates the maximum temperature.
2) The wash temperature refers to the maximum temperature.
The wash cycle times are intended as a guide only. The actually used time may
vary due to different water pressure, initial water temperature etc.
9
Page 12

Preparing for a cycle
Detergent selection
Only special low foam detergent should be used in automatic drum washing
machines. For blended or wool fabrics, special detergent should be used.
Dry cleaning solvent should not be used.
Caution: do not use too much detergent.
Laundry treatment
• Sort out clothes according to type and extent of dirt. There are three
types of clothes; cotton, synthetic and woollen (silk) fabrics.
• Separate white clothes from coloured clothes. If whites and coloureds are
combined for one load, make sure the coloureds are colourfast.
- Remove all objects from pockets that may cause damage to the
machine, such as keys and coins.
- Clothing with frayed edges or yarns should be put in a wash bag or
equivalent before washing.
- Repair damaged clothing, loose buttons or damaged zips and hooks
before washing.
- Bed sheets and tableware should be loosely loaded and not folded.
• This washing machine is for household use and designed for
mechanically washable clothes. When washing, separate clothes
according to their labels.
Wash load
10
Type Cotton Synthetic Delicate Quick
Max load 6 kg 3 kg 2 kg 3 kg
Spin speeds
Program
prewash 1000rpm 40°C 1200rpm 40°C
Cotton 1000rpm 40°C 1200rpm 40°C
Synthetic 800rpm 40°C 800rpm 40°C
Wool 800rpm 40°C 800rpm 40°C
Cashmere 400rpm 40°C 400rpm 40°C
Silk 400rpm 40°C 400rpm 40°C
Quick 1000rpm 40°C 1200rpm 40°C
Single Wash / / / /
Single Rinse 1000rpm 40°C 1200rpm 40°C
Single Spin / / / /
Single Drain / / / /
Default setting Default setting
speed Temperature speed Temperature
Page 13

Programme times
NO. Program Default time (minute)
1 Prewash 133
2 Cotton & Linen 116
3 Synthetic 72
4 Wool 60
5 QuickWash 12
6 Wash 61
7 Rinse 24
8 Spin 11
9 Dry 150
10 Iron 60
11 Air wash 30
Using your appliance
1. Loading
Open the door, put in the laundry piece by piece and then tightly close
the door.
Notes:
1)
Before the first run of the appliance it is advisable to run the machine
empty on a quick wash with no detergent to clean through the system.
2) Do not overload the washing machine.
• Overalls
• Blended fabric clothes (approx. 800g) • Underwear (approx. 70g)
• Woollen blankets (approx. 3000g) • Jeans (approx. 800g)
• Socks (blended fabrics approx. 50g) • Shirts (approx. 300g)
• Jackets (cotton approx. 800g) • Pyjamas (approx. 200g)
• Single bed sheets (cotton approx. 800g)
(cotton approx. 950g) • T-shirt (approx. 300g)
2. Adding detergent
Slide out the detergent drawer and add the required detergent and
softening agent into the correct places. Push back the drawer.
Caution:
1) Do not add liquid detergent to compartment 1 or 3.
2) On a prewash programme, detergent should be added to both
compartments 1 and 3. For other programmes, do not add detergent
to compartment 3.
3) Always refer to the clothing manufacturer’s guidelines prior to
washing.
11
Page 14

Using your appliance
3. Selecting washing programme
To get the best wash, an appropriate washing programme should be
selected according to the type of laundry.
4. Washing temperature settings
Set the washing temperature as required, otherwise set at position *
when a cold wash is acceptable.
5. Function selection buttons
Select functions as required (refer to the “Functions” section). Otherwise
keep all the buttons deselected.
6. Washing
Press the Start/Pause button and the washing machine will automatically
commence the selected wash cycle.
7. Finish
The washing machine will stop operation automatically when a wash
cycle ends and the “End” symbol will be displayed. Open the door and
take out the laundry. Then switch the machine off at the mains to save
electricity and for safety.
Hints for saving energy
12
During operation
1. Use a full wash load.
2. Do not overload the washing machine.
3. Prewash or soak heavily soiled clothes. Use a stain remover to remove the
worst stains. These actions reduce the need to wash garments at a high
temperature.
4. Reduce the amount of detergent or choose standard or delicate wash
programmes for lightly soiled clothes.
5. Choose the correct washing temperature. Choose the lowest
temperature setting appropriate for the load.
6. Do not use more detergent than required.
Page 15

Other functions
1. Control panel lock function:
To prevent children from accidentally changing the settings, the control panel can be
locked by pressing the “Temperature” and “Delay” buttons at the same time. After the
panel is locked, the sign “LOCK” and the remaining wash time will be displayed on the
LED alternately. Now all the function keys except the power switch are locked. Press the
key combination again to cancel this function.
2. Power-off memory function:
This machine has a power-off memory function. In the event of unintentional power
failure or if the power has to be cut during a programme cycle, the present cycle will be
saved and operation will resume when the power is switched on again.
3. Error display messages:
1:16 Remaining time 1 hour and 16 minutes.
0:01 Remaining time 1 minute.
60°C Wash temperature is 60°C.
--°C No heat (cold wash).
0 No Spin.
800 Spin speed 800r/min.
L--1 Manually selected code when laundry weight is less than 1kg.
L--A Manually selected code when drum is nearly full.
End Programme is finished.
Err1: Cause: Door is not shut properly.
Solution: Shut the door properly.
Err2: Cause: Drainage error, water not emptied within 4 minutes.
Solution: Clean the filter and check the drain hose for blockage. Take care on
Err3: Cause: Temperature sensor error.
Solution: Contact an approved service engineer.
Err4: Cause: Heating element error or laundry overload that leads to a failure to
Solution: Reduce load and then start washing again or contact an approved
Err5: Cause: Water level not met in 8 minutes.
Solution: Make sure that tap is turned on and water pressure is normal. If
Err6: Cause: dehumidification/ heating error.
Solution: Please contact an approved service engineer.
Err7: Cause: Motor overheat error.
Solution: Please contact an approved service engineer.
Err8: Cause: Water overflow
Solution: Please contact an approved service engineer.
Err9: Cause: Dryer temperature sensor error.
Solution: Please contact an approved service engineer.
Er10: Cause: Water level sensor error.
Solution: Please contact an approved service engineer.
Er12: Cause: Dryer water level sensor error.
Er13: Cause: Dryer heater error.
Solution: Please contact an approved service engineer.
Un6: Cause: Laundry is unevenly distributed.
Solution: Redistribute laundry to balance the drum. If the problem persists,
EUAr: Cause: Communication error.
Solution: Please contact an approved service engineer.
removing filter in case any water remains in the unit. If the error persists, please
contact an approved service engineer.
reach the set temperature within the specified time (This message is displayed
at the end of a programme).
service engineer.
problem still persists, please contact an approved service engineer.
Solution: Check whether clothes are dry or not and whether there is water still in
the drum. If so allow excess humidity to escape from the appliance and try the
drying cycle again. If the error persists please contact an approved service engineer.
please contact an approved service engineer.
13
Page 16

Maintenance
1. Turn off the water tap and pull out electricity plug after each wash. Open
the porthole to prevent formation of moisture and odours. If the washing
machine is left idle for a long period, drain the water in the machine and
replace the drain hose.
2. Unplug the machine during cleaning and maintenance. Use a soft
cloth dampened with soap liquid to clean the machine case and rubber
components. Do not use organic chemicals or corrosive solvents.
3. Clean the detergent distribution drawer
regularly. Swing out the drawer, flush it
clean with water and then replace it.
4. Clean the filter Cleaning methods (once a month)
14
1 2
1) Push out the outer cover (Fig. 1);
2) Screw out filter by turning counter clockwise (Fig. 2);
3) Flush clean with running water;
4) Replace the filter by turning clockwise and remount the cover (Fig. 3);
Caution: The filter must be in place, or it may lead to leakage.
3
Page 17

Maintenance
5. To prevent blockage to the water supply
by ingress of foreign substances, clean the
water inlet and inlet filter regularly.
6. If the machine is to be moved to a distant place, replace the vibration
absorbing locks (packing screws, rubber gaskets) removed before
installation to prevent damage as shown below.
Remove the lock cover
and take out the three
rubber plugs.
Insert the transit bolts. Insert the rubber gaskets.
Tighten with a spanner. Replace the back cover.
7. If the washing machine is left idle for a long period, pull out the electrical
plug and turn off the water tap. Open the door to prevent formation of
moisture and odours. Let the door open while not used.
15
Page 18

Trouble shooting
In the unlikely event of difficulties with your appliance please follow the trouble
shooting guide below. If the problem persists, contact an approved service
engineer. If an error code is displayed, please refer to the error code guide below.
Problem Possible cause How to correct the problem
The washing machine
fails to operate
Washing machine does
not fill with water
• Incorrect connection to
power supply
• Power failure
• Door is not properly closed
• Machine has not been
switched on
• Water tap is not turned on
• Water pressure is too low
• The inlet hose is kinked
• Water supply failure
• The programme selection
dial is not properly set
• The door is not properly
closed
• Check power supply.
• Check that door is properly
closed.
• Check that machine is on.
• Check water supply is to a
domestic mains supply and that
tap is fully open.
• Check that hoses are not bent
or crushed.
• Turn dial to correct position.
• Check that door is properly
closed.
The machine is
continuously filling and
draining
Drainage failure
Strong vibration during
spin cycle
Operation stops before
completion of the wash
cycle
Excessive foam in the
drum
Operation stops for a
period of time
• Drain hose is too low
• Drain hose is blocked
• End of drain hose is over
100cm above the floor
level
• Some packing fixing bolts
not removed
• Washing machine on an
uneven surface
• Machine is overloaded
• Water or electricity failure
• Washing machine is in
soaking cycle
• The detergent is not a low
foam type
• Excessive detergent has
been used
• Washing machine is in
anti-crease soaking cycle
• Washing machine gives an
error message
• Check that the height of the
drain hose is above 80cm
• Check drain hose
• Check packing bolts
• Use a spirit level to ensure the
appliance is level
• Reduce amount of laundry in
the appliance below the max
level
• Check power and water supply
• Check detergent type.
• Use less detergent
• Wait until cycle is complete.
• See error messages on previous
pages.
16
Page 19

17
M odel / Item HWD-D 1000T X VE/M E HWD-D1200 TXVE/M E
Power Source 22 0-2 40 V/ 50H z 220-240 V/ 50 Hz
Working C urrent
(M ax) (A)
10 10
Tap Water Pressure
(M Pa)
0. 03 P 1 0. 03 P 1
Washing Power (W) 20 0 20 0
Spinning Power ( W ) 350 450
M ax Load ( kg) 6 6
Spinning Speed ( M ax)
(r/m in)
10 00 12 00
Washing Procedure 11 11
Water Heating Power
(W )
10 00 10 00
Heating Power (W) 100 0 100 0
External Dimension
(H xDxW ) mm
85 0 x 590 x 595 850 x 5 90 x 595
Weight ( kg) 82 82
Washing N oise 54 . 3 54. 3
Spinning N oise 71. 8 71 . 8
Tech n i ca l sp eci-ca t io n
≤ ≤
≤ ≤
Page 20

We apologise for any inconvenience caused by minor inconsistencies in
these instructions, which may occur as a result of product improvement and
development.
The symbol on the product or on its packaging indicates that
this product may not be treated as household waste. Instead it should be
handed over to the applicable collection point for the recycling of electrical
and electronic equipment. By ensuring this product is disposed of correctly,
you will help prevent potential negative consequences for the environment
and human health, which could otherwise be caused by inappropriate waste
handling of this product. For more detailed information about recycling
this product, please contact your local council office, your household waste
disposal service or the shop where you purchased the product.
 Loading...