

Page 1
AUTOMATIC DRUM WASHING MACHINE
USER MANUAL
HW70-1482-F
Heavy
Temp.
Wash
Silk
Heavy
Temp.
Wash
Silk
Wool
Rinse
Speed
Synthetic
Memory
Spin
Auto
Cotton
Start/Pause
Delay
Strongwash
Soak
Pre-wash
Press and hold 2seconds
to set door unlocked
Sport wash
Delicate
Sport wash
Silent
Quick
Power
Spin
Self-clean
Page 2
Page 3
Page 4

Page 5

BEFORE USE
SAFETY INSTRUCTIONS
BEFORE SWITCHING THE APPLIANCE ON FOR THE FIRST TIME
DO ...
... Make sure that the transport bolt are removed.
... Use a separate earthed socket for the power supply.
... Make sure that the plug is accessible.
... Hold the plug and not the electric cable when
unplugging the power supply.
... Make sure that the fuses in the power circuit are rated
for 15A.
... Keep away from heat sources and direct sun light to
prevent plastic and rubber components from aging.
... Make sure that the power cord is not caught under or
in the appliance and avoid damage to the power cable.
... Check that hose joints and connections are fi rm and no
water can leak. If joints are loose or there is leakage, turn off the
water supply and refi x. Do not use the washing machine until the
hoses are properly fi xed.
DURING DAILY USE OF THE APPLIANCE
DO ...
... Pull up zips and fi x loose threads to prevent the items
from being entangled. If necessary, put small items into a net bag
or pillow.
... Turn off the machine after each wash program and
switch it off at the mains to save electricity and for safety. Wipe
clean the lower part of the porthole.
... Keep the door slightly open when the washing machine
is not in use to prevent formation of odours.
... Let the power cord be replaced by the manufacturer, his
service agent or other accordingly qualifi ed persons, in case it is
damaged.
... Ensure that the appliance is not used by persons
with reduced physical, sensory or mental capabilities, lack of
experience and knowledge without supervision or instruction by a
person responsible for their safety.
... Supervise children to ensure that they do not play with
the appliance.
DO NOT ...
... Touch or use the appliance when barefoot or with wet or
damp hands or feet.
... Use fl ammable detergent or dry cleaning agent.
... Use any fl ammable sprays in close vicinity to the
appliance.
... Remove or insert the plug in the presence of fl ammable
gas.
... Allow children or infi rm persons to play with the appliance
or packing materials.
... Install the appliance outdoors in a damp place, or in an
area which may be prone to water leaks such as under or near a
sink unit. In the event of a water leak allow the machine to dry
naturally.
... Place the washing machine directly on a carpet, or close
to a wall or furniture.
DO NOT ...
... Touch the washer door during the washing process - it
gets hot!
...Place heavy objects or sources of heat or damp on top
of the appliance.
... Hot wash foam rubber or sponge-like materials.
... Open the detergent distribution drawer during the wash
cycle.
... Force the washer door open. The door is fi tted with a
self-lock device and will open shortly after the washing procedure
is ended.
... Open the washer door if the water level is visibly over
the porthole.
... Cover the washing machine with plastic cover so that
inside dampness cannot be kept in.
5
Page 6
06
SE
BEFORE U
INSTALLATION
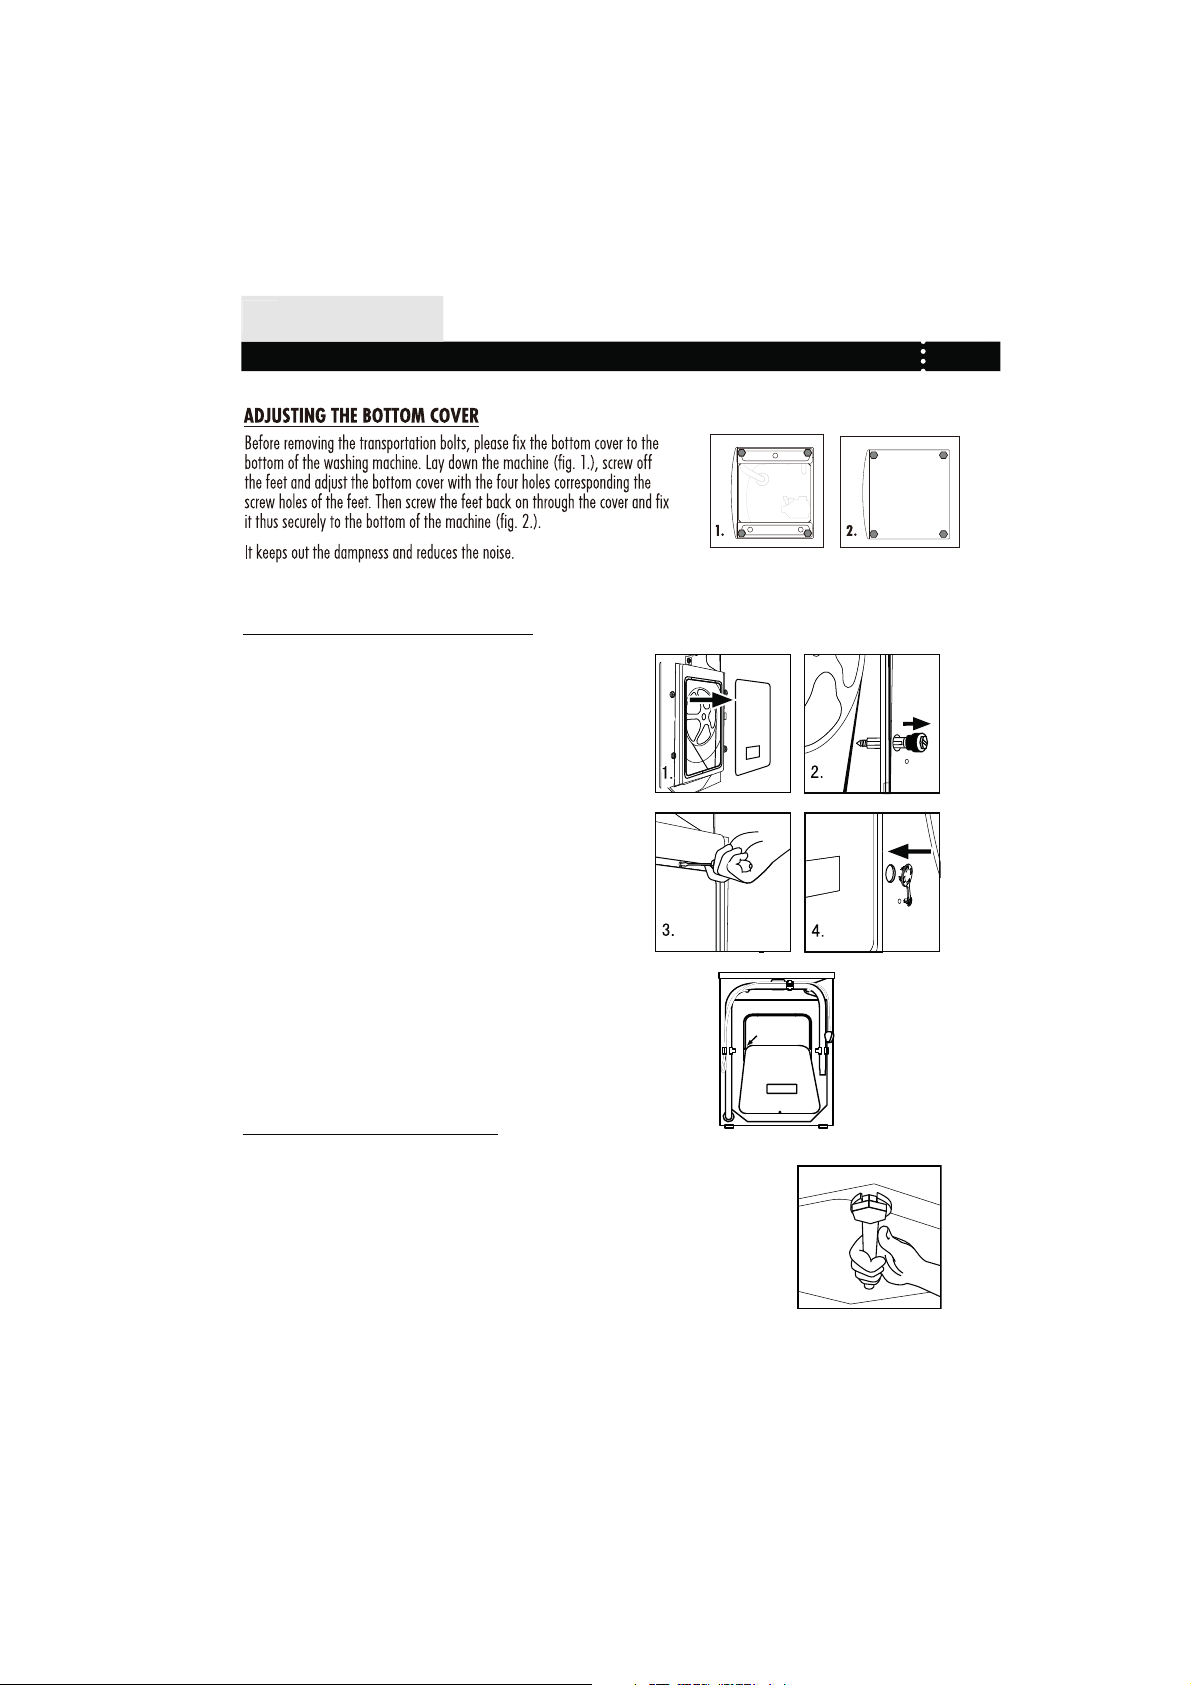
DISMANTLE THE TRANSPORTATION BOLTS
The transportation bolts are designed for clamping anti-vibration components
inside of the washing machine during the transportation process.
Remove the back cover.1.
Remove the four bolts on the rear side and take out the synthetic 2.
stabilisers from within the machine.
Replace the back cover.3.
Fill the holes left by the bolts with blanking plugs.4.
Note:
1.When you replace the back cover,the convexity must face
to outside, and you have to insert the back cover from the
two gaps as shown in fig.5.
2.Keep the transportation bolts and synthetic stabilisers
in a safe place for later use.
ADJUSTING THE WASHING MACHINE
5.
There are adjustable feet under the bottom of the washing machine. Before use, they should be
adjusted so that the machine is level. This will minimise vibrations and thus noise during use. It will also
reduce wear and tear. We recommend using a spirit level to level the appliance.The floor should be as
stable and flat as possible.
Page 7
BEFORE USE
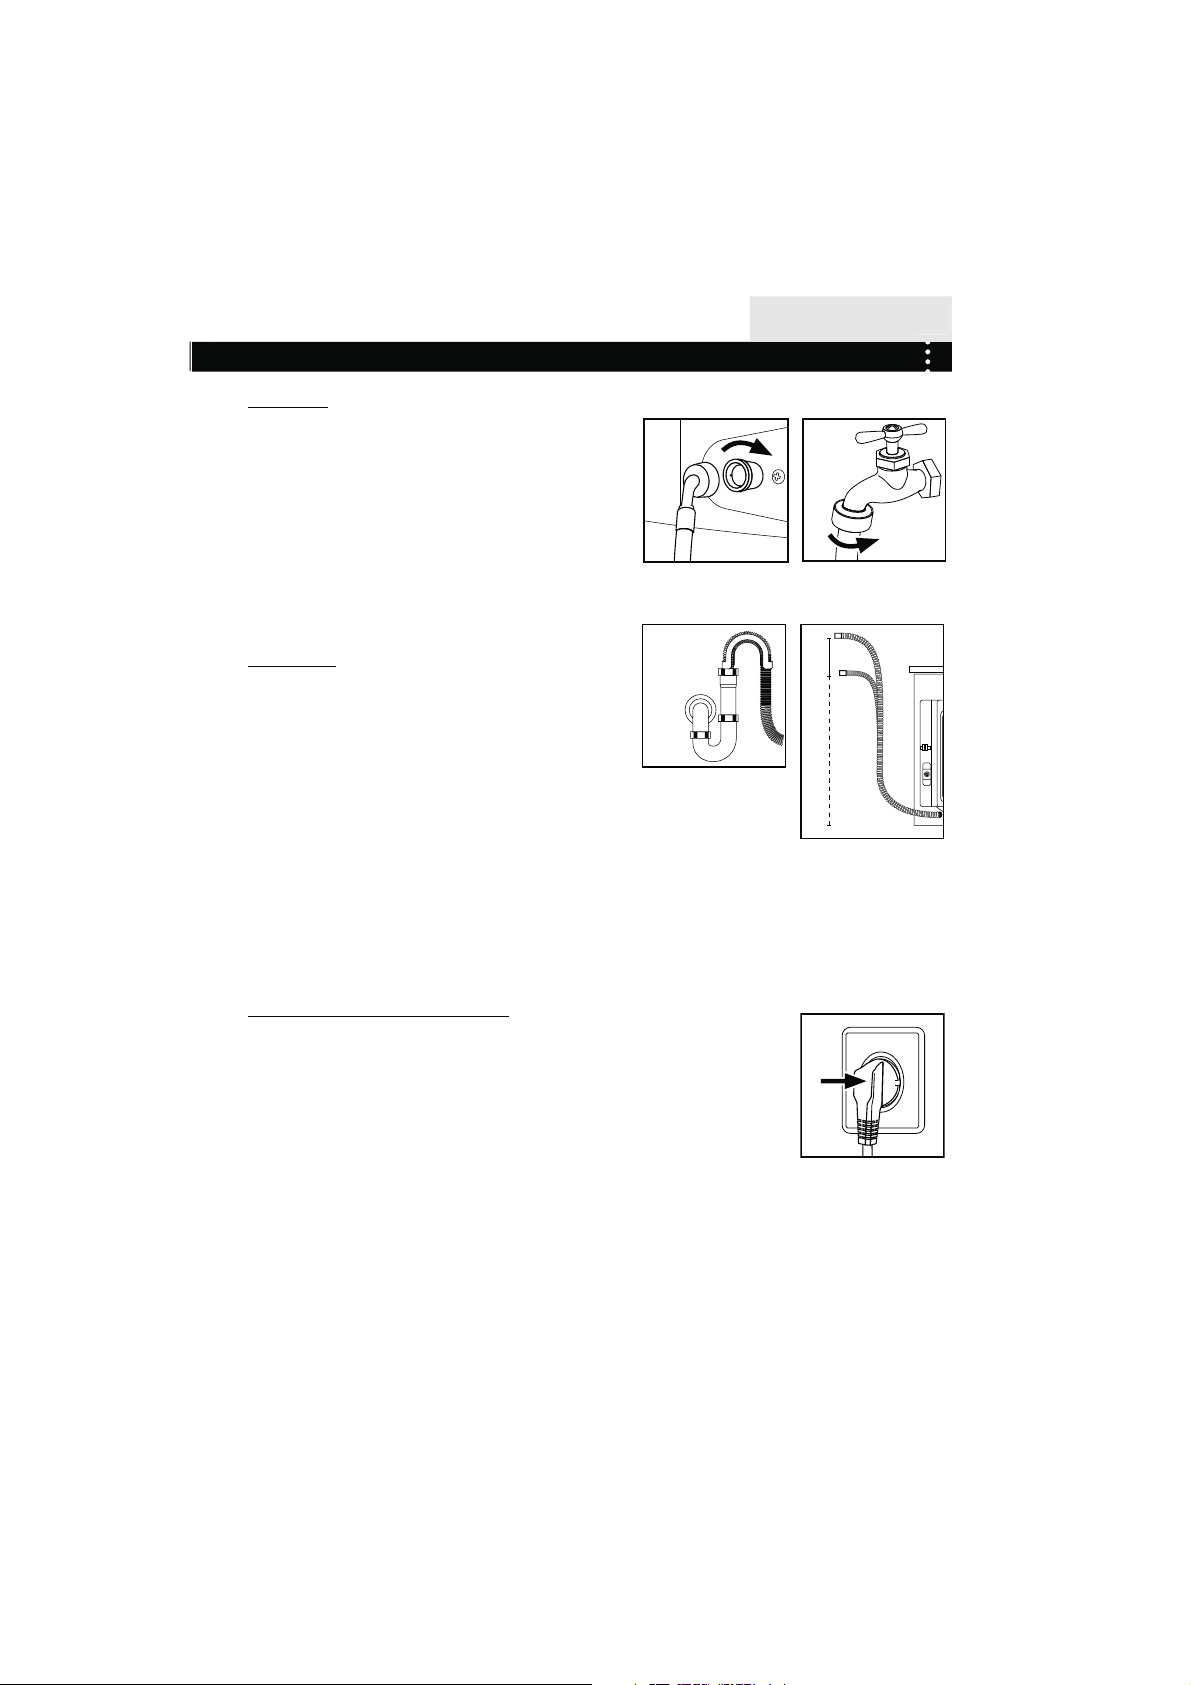
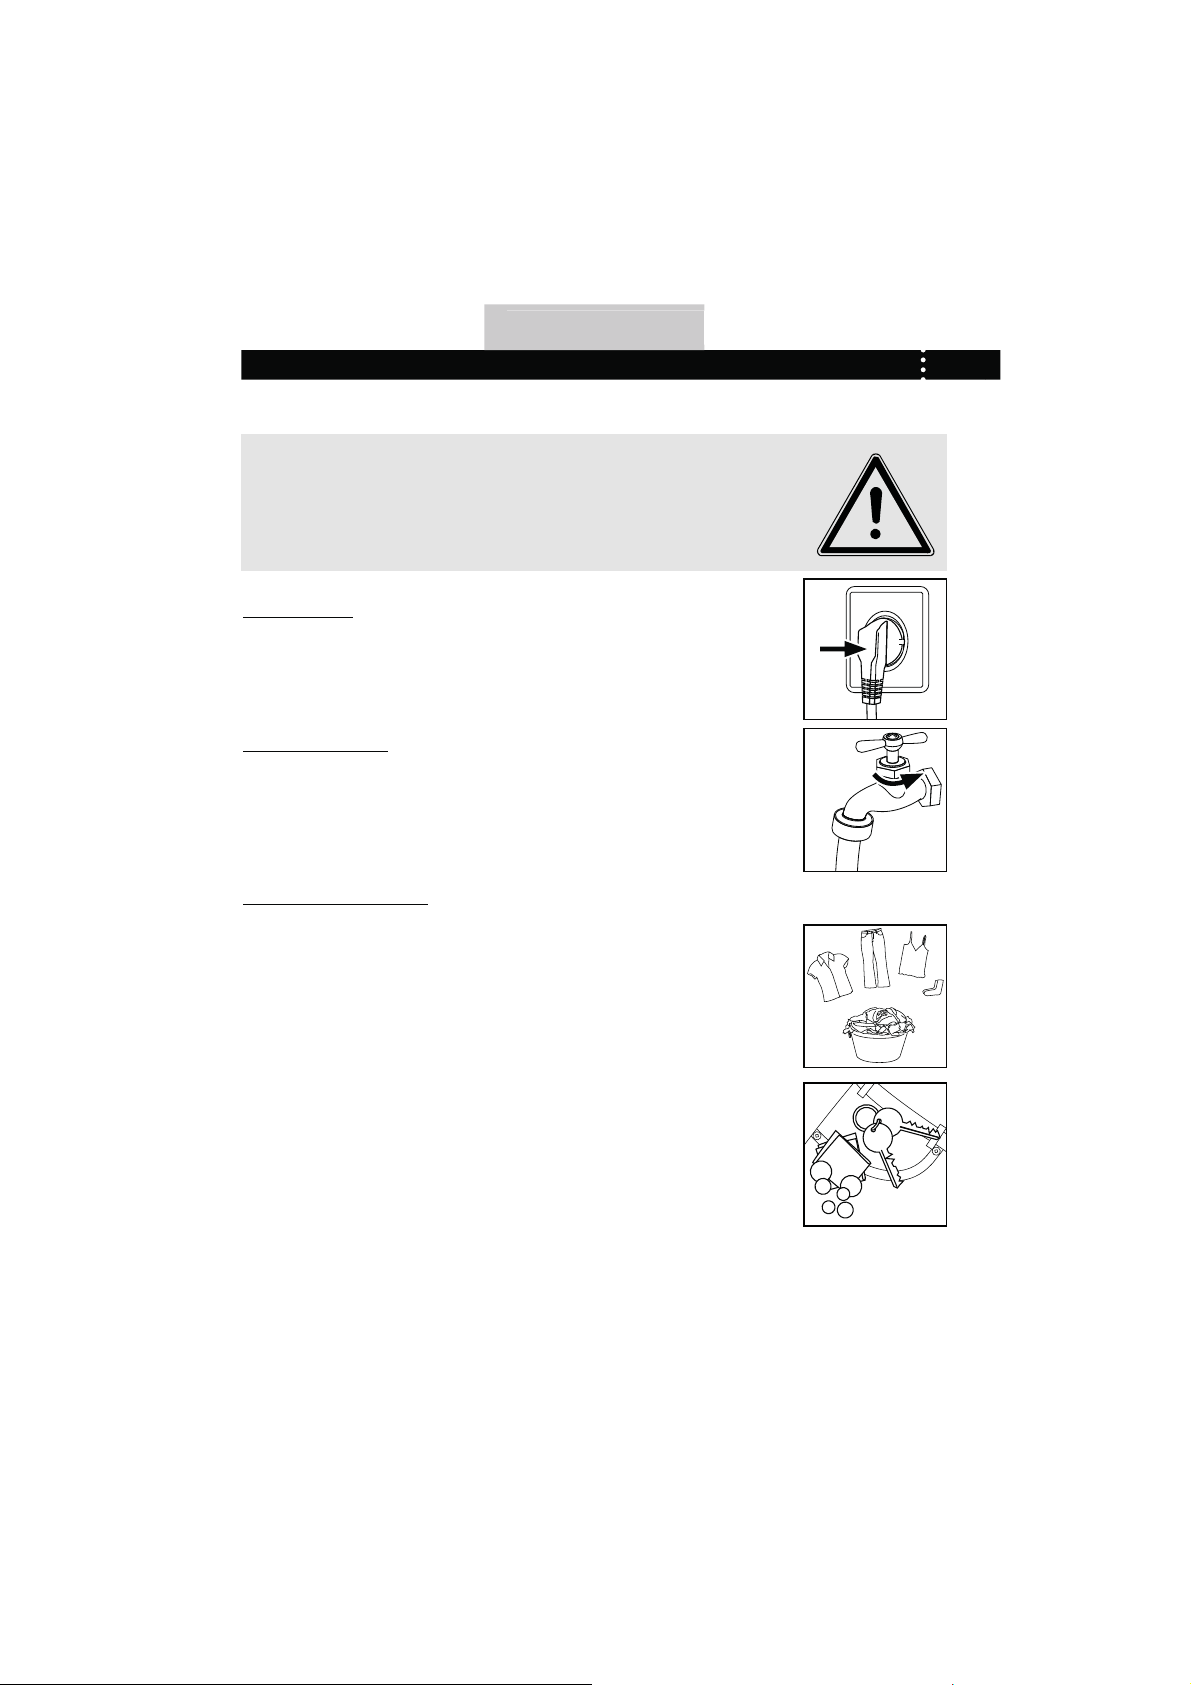
INLET HOSE
1. Connect the nut on the inlet hose to the connector on the water
valve.
2. Apply inlet hose to a water tap with cold, fresh water.
07
Note: Use the hose-set supplied with the appliance. Old
hose-sets should not be reused.
DRAIN HOSE
1. Use the drain hose bracket to keep the end of the drain hose retained
and prevent the outfl ow of water. Don't extend the length of the drain
hose; if an extended hose is required, please consult a serviceman.
2. The height of the drainage outlet must be 80-100 cm. Fix the drain
hose to the clip at the back of the washing machine to prevent it from
dropping off.
Note: The drain hose should not be submerged in water
and should be securely fixed and leak-free. If the drain hose is placed on the ground or if the pipe is at a
height of less than 80cm, the washing machine will continuously drain while being filled (self-siphoning).
CONNECTING TO THE POWER SUPPLY
Before connecting to the power supply, check:
¬ The socket is adequate for the maximum power of the washing machine
(For safety, fuses in the power circuit should be rated for no less than 15A).
¬ The voltage should meet the requirement.
¬ The power outlet should be capable of accepting the washing machine plug.
¬ Connect the machine to an earthed socket outlet.
1.
1.
2.
8 0 - 1 0 0cm
2.
Page 8
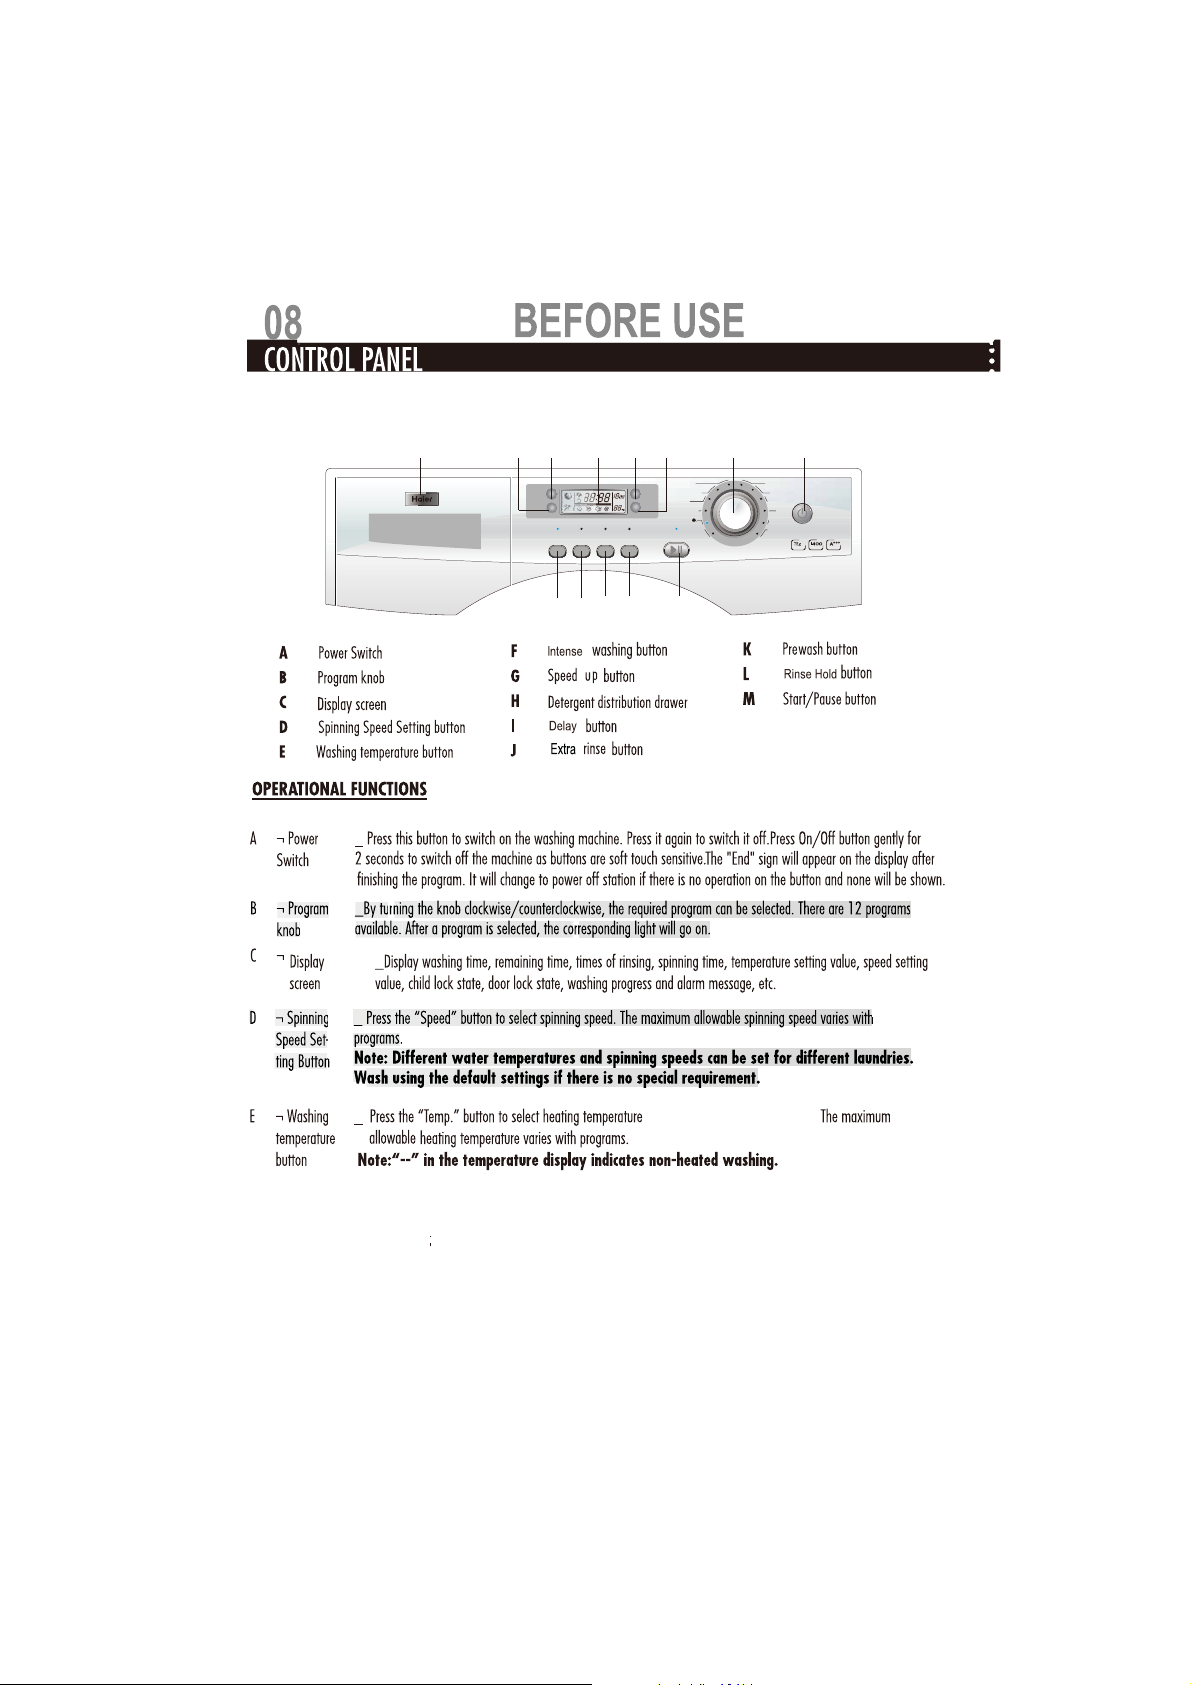
Intense
Speed Up
Delay Extra Rinse Prewash Rinse Hold
IJKL M
Cotton Daily Wash
Synthetic Sport 25'
Spin
Mix Express15'
Temp.
Delicate Jeans
Wool Baby Care
R
Hand Wash Spin/Drain
Start/Pause
ABEDCFGH
Power
é
Capacit
Énergie
trs/min
( --,20,30,40,50,60,70,80,90 ).
Page 9
Page 10
Page 11
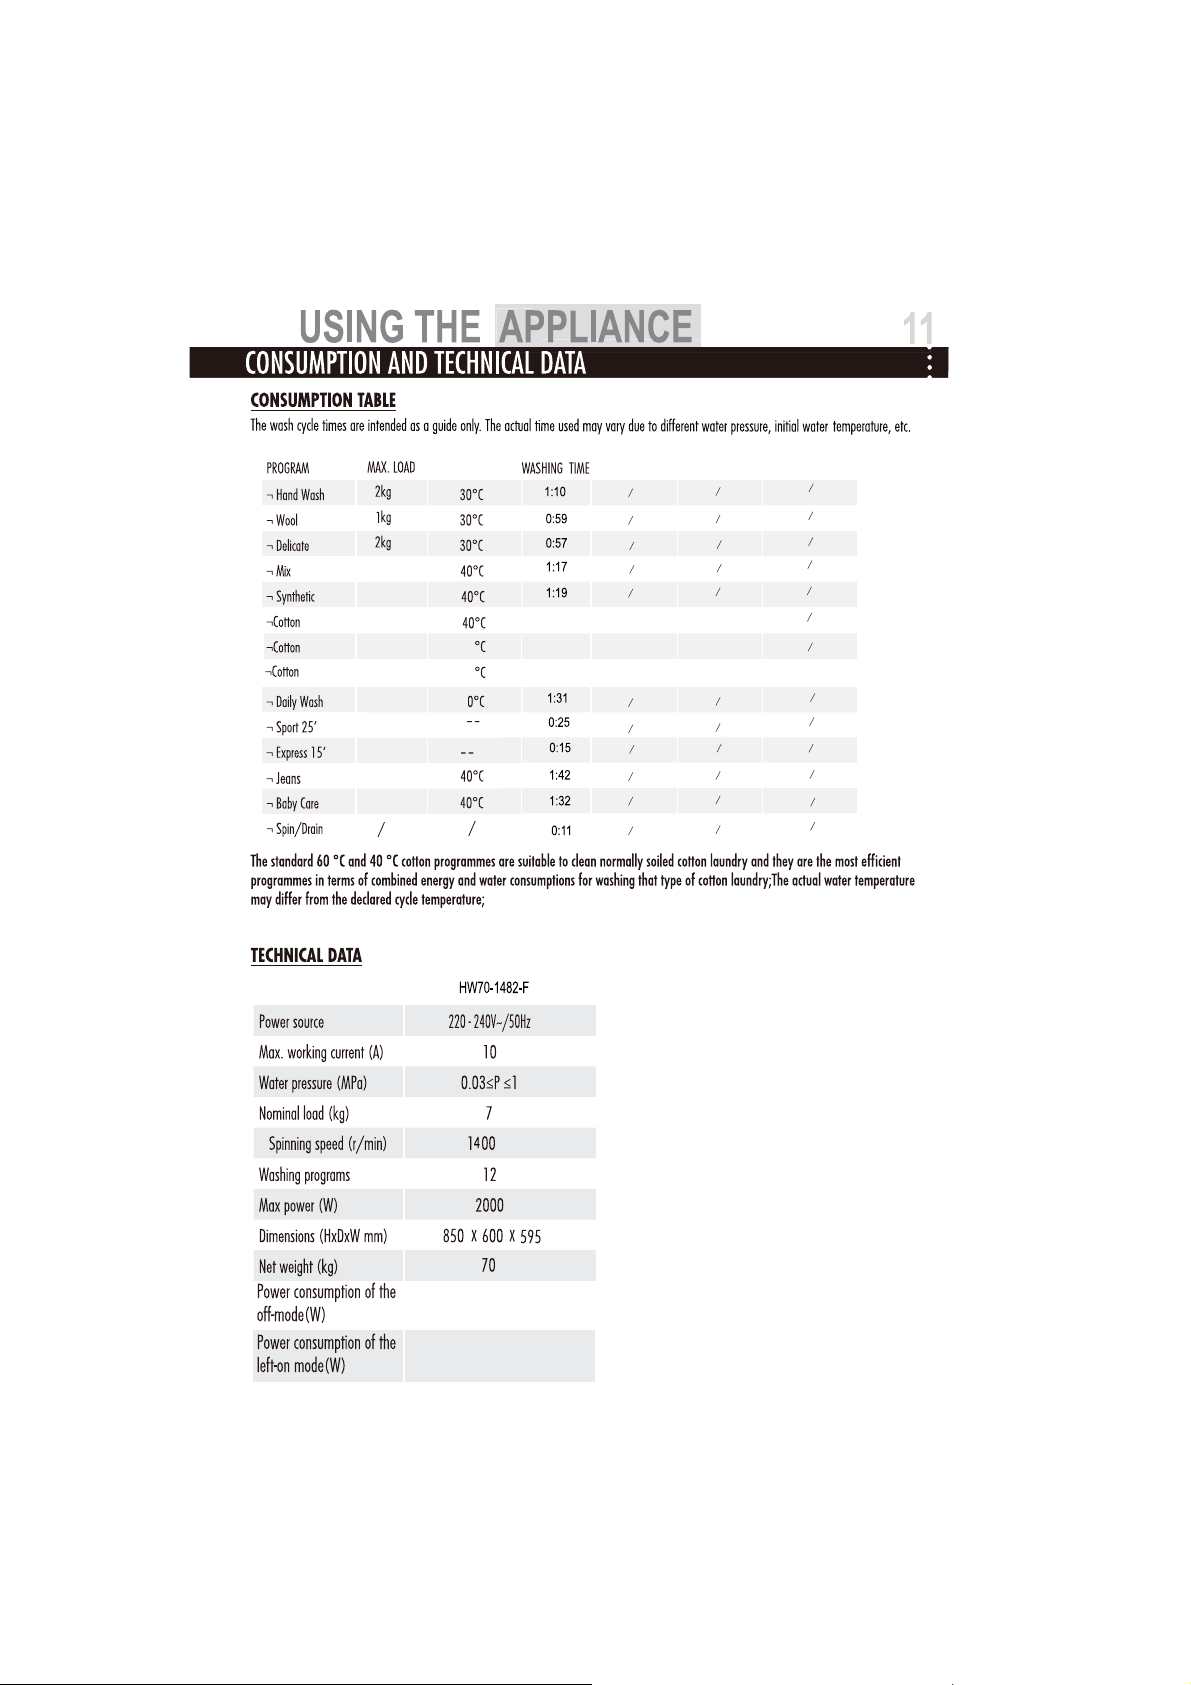
TEMPERATURE
ENERGY
CONSUMPTION
WATER
CONSUMPTION
5kg
3.5kg
*)
*)
*)
3.5kg
3.5kg
7kg
2:32 36.4L
60
60
2:52
2:52
0.625kWh
0.872kWh
0.868kWh
37.9L
50.8L
3.5kg
3.5kg
2kg
3.5kg
3.5kg
*)Energy Label Program Settings: 1. “Cotton+40°C+Intense+Max speed” ; 2. “Cotton+60°C+Intense+Max speed”
SPIN DRYING
PERFORMANCE
53%
0.48
0.48
Page 12
APPLIANCEUSING THE
WASHING METHODS
PLEASE NOTE
This washing machine is for domestic use only. If the machine is use for commercial purpose the guarantee
will not be valid anymore.Do not use it for purposes other than that for which it was designed. Follow the
instructions given on the label of each garment and wash only machine-washable garments.
POWER SUPPLY
Connect the washing machine to the power supply (220V to 240V~/50Hz).
WATER CONNECTION
Turn on the tap. The water must be clean and clear.
Note: Before use, check for leakage in the joints between the tap and the inlet hose
by turning on the tap.
PREPARING THE LAUNDRY
¬ Sort out clothes according to fabric (cotton, synthetics, wool or silk) and to how dirty they are.
¬ Separate white clothes from coloured ones. Wash them first by hand to check if they fade or run.
¬ Empty pockets(clips,coins,keys,etc.)and remove the harder decorative objects(e.g. brooches) to avoid
them entrying the drain pump and blocking.
Attention: Small parts (like buttons, etc) may lead to repair work which user has to
pay by themselves and can cause damage in the machine.
¬ Garments without hems, underwear, finely woven textile such as fine curtains are to be put into wash
bag (it is better not to wash them in a washing machine).
¬ Close zippers and hooks, make sure the buttons are sewn on tightly and place small items such as
socks, belts, bras, etc. in the wash bag.
Unfold large pieces of fabric such as bed sheets, bedspreads, etc.
¬
¬ Turn shirts inside out.
Page 13

Intense
Speed Up
Delay Extra Rinse Prewash Rinse Hold
hsaWyliaDnottoC
Spin
min
min
Temp.
time
time
R
Start/Pause
'52tropScitehtnyS
'51sserpxExiM
snaeJetacileD
eraCybaBlooW
niarD/nipShsaWdnaH
Page 14

Intense
Speed Up
Delay Extra Rinse Prewash Rinse Hold
Intense
Speed Up
Delay Extra Rinse Prewash Rinse Hold
Intense
Speed Up
Delay Extra Rinse Prewash Rinse Hold
hsaWyliaDnottoC
Spin
min
min
Temp.
time
time
min
min
time
time
min
min
time
time
Start/Pause
Spin
Temp.
R
Start/Pause
Spin
Temp.
R
Start/Pause
'52tropScitehtnyS
'51sserpxExiM
snaeJetacileD
eraCybaBlooW
R
niarD/nipShsaWdnaH
hsaWyliaDnottoC
'52tropScitehtnyS
'51sserpxExiM
snaeJetacileD
eraCybaBlooW
niarD/nipShsaWdnaH
hsaWyliaDnottoC
'52tropScitehtnyS
'51sserpxExiM
snaeJetacileD
eraCybaBlooW
niarD/nipShsaWdnaH
If it is not suitable to open the door,using the pole can open it,but it is not a normal way.
Page 15

USING THE
CARE CHART
APPLIANCE
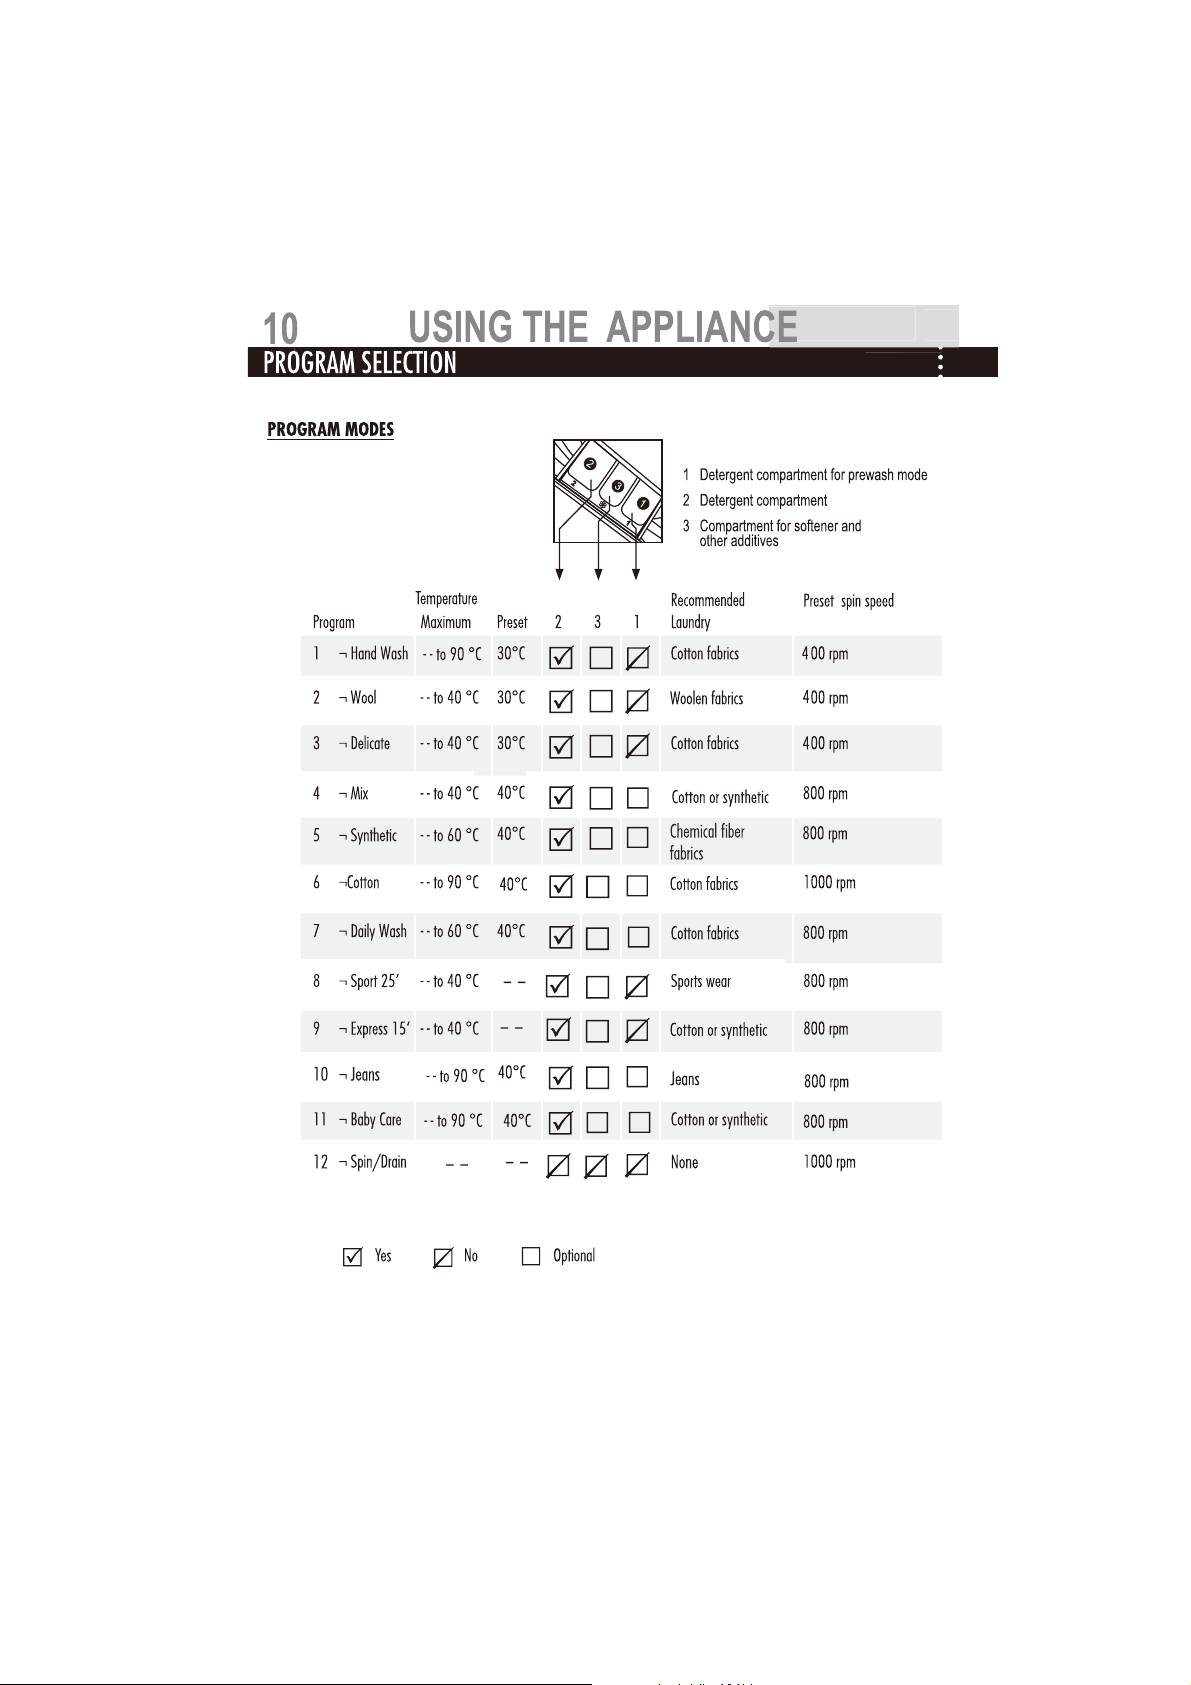
5
Resistant material
Delicate fabric
Washable at 95 °C
Washable at 60 °C
Washable at 40 °C
Washable at 30 °C
Hand wash
Dry clean only
Wool Seal
LOAD REFERENCE
Bed sheet (single) Cotton Approximately 800g
Blanket Wool Approximately 3000g
Blended fabric clothes / Approximately 800g
Jackets Cotton Approximately 800g
Bleachable in cold water
Do not bleach
Iron at 200 °C
Iron at 150 °C
Iron at 100 °C
Don't iron
Dry cleaning with any solvent
Dry cleaning with pericloride
Dry cleaning with aviation fuel
Don't dry clean
Dry fl at
Hung to dry
Dry on clothes hanger
Tumble dry, normal heat
Tumble dry, reduced heat
Don't tumble dry
Jeans / Approximately 800g
Overalls Cotton Approximately 950g
Ladies Pyjamas / Approximately 200g
Shirts / Approximately 300g
Socks Blended fabrics Approximately 50g
T-Shirts Cotton Approximately 300g
Underwear Blended fabrics Approximately 70g
Page 16

16
CLEANING & CARE
AFTER WASHING
Turn off the water supply and pull out electricity plug after each wash.
Open the washer door to prevent formation of moisture and odours. If
the washing machine is left idle for a long period, drain the water in
the machine and replace the drain hose.
1.
2.
CLEANING THE DETERGENT DRAWER
Clean the detergent distribution drawer regularly.
Swing out the drawer, flush it clean with water and then replace it.
2.
CLEANING THE MACHINE
Unplug the machine during cleaning and maintenance. Use a soft cloth
dampened with soap liquid to clean the machine case and rubber components. Do not use organic chemicals or corrosive solvents.
CLEANING THE FILTER
Clean the filter once a month:
1. Open the bottom cover.
2.Remove the filter by turning counterclockwise.
3.Flush the filter clean with running water.
4.Replace the filter by turning clockwise and
remount the cover.
Caution:
1.
2.
.
1
1.The filter must be in place, or it may lead to leakage.
2.Place a container under the drain pump filter, to collect
any excess water that may come out of the drain pump
when the filter is removed.
3.
4.
Page 17

Page 18

Page 19

MAINTENANCE
TROUBLESHOOTING
TROUBLESHOOTING
The following circumstances do not constitute problems. Do not contact the Service Center until the problem has been confi rmed.
PROBLEM CAUSES SOLUTIONS
Washing machine fails to
operate.
Washing machine cannot be
fi lled with water.
Machine is draining while
being fi lled.
Drainage failure. ¬ Drain hose is blocked.
Strong vibration while
spinning.
Operation stops before
completing wash cycle.
Operation stops for a period
of time.
Excessive foam in the
drum, which is spilled to the
distribution drawer.
Automatic adjustment of the
washing time.
Spinning fails ¬ Unbalance of the laundry _ Add clothes or run a spinning program again.
¬ Poor connection to the power supply.
¬ Power failure.
¬ The washer door is not properly closed.
¬ Machine has not been switched on.
¬ The "Start/Pause" button is not pressed.
¬ Water tap is not turned on.
¬ Water pressure is less than 0,03 Mpa.
¬ The inlet hose is kinked.
¬ Water supply failure.
¬ The program knob is not properly set.
¬ The washer door is not properly closed.
¬ The inlet hose fi lter is blocked.
¬ The height of the drain hose is below 80 cm.
¬ The drain hose is in water.
¬ Drain hose end is higher than 100 cm above
the fl oor level.
¬ The fi lter is blocked.
¬ Not all transportation bolts have been removed.
¬ Washing machine is located on an uneven
surface or is not level.
¬ Machine load is over Max load.
¬ Water or electricity failure. _ Check the power supply.
¬ Washing machine gives an error message.
¬ Washing machine is in soaking cycle?
¬ The detergent is not a low-foaming type or for
manual wash.
¬ Excessive use of detergent.
¬ The washing program duration will be adjusted _ This is normal and doesn't affect the
_ Check connection to the power supply.
_ Check the power supply.
_ Close the washer door properly.
_ Make sure the machine is switched on.
_ press the "Start/Pause" button.
_ Turn on the water tap.
_ Check water pressure.
_ Check the inlet hose.
_ Ensure the water supply.
_ Set the program knob properly.
_ Close the washer door properly.
_ Unblock the inlet hose fi lter.
_ Install drain hose within 80-100 cm of height.
_ Make sure the drain hose is not in water.
_ Unblock the drain hose.
_ Make sure the drain hose end is lower than
100 cm above fl oor level.
_ Unblock the fi lter.
_ Remove all transportation bolts.
_ Make sure the washing machine is on
an even surface and levelled.
_ Reduce amount of laundry in the drum.
_ Check display codes.
_ Press the rinse hood button or the Start/pause
button again to cancel it.
_ Check if your detergent is appropriate.
_ Reduce amount of detergent in the distribution
drawer.
functionality.
9
Page 20

0
AINTENANCE
Haier Europe – 115-123,
Avenue Charles de Gaulle –
92200 Neuilly-sur-Seine – France
+33 173 794 800
+33 147 383 471
het_france@haiereurope.com
Page 21

Page 22

Page 23

HAIER
4
Page 24

Page 25

Page 26

fig.3
Page 27

Page 28

s
p
p
A
e
A
g
f
08
Intensif
Rapide
Fin différée Rincage Prélavage Arrêt cuve pleine
Essorage
Temp.
Départ/Pause
neiditouQnotoC
’52tropSeuqitéhtnyS
Marche/Arrêt
’51sserpxEetxiM
snaeJtaciléD
Laine
R
Lavage
main
Bébé coton
Rinçage/
Essorage
Capacit
Énergie
é
trs/min
Touche Marche / Arrêt
Sélecteur programme
Affichage
Touche temps d’essorage
Touche température
Fonctions opérationnelle
¬ Touch
Marche /Arrêt
¬ Sélecteur
rogramme
ppuyez cette touche pour démarrer la machine. La même touche est utilisée pour l’arrêter. Pour cela, appuyez sur la
ouche sensitive pendant 2 secondes
S'il n'y a aucune opération sur bouton pendant 2 minutes , la machine bascule automatiquement à l'état éteint,
sans rien afficher.
Tournez dans le sens des aiguilles d’une montre ou dans le sens contraire des aiguilles d’une montre pour choisir le
programme désiré. Un nombre total de 12 programmes est proposé. Après avoir sélectionné un programme,
l’indicateur correspondant s’allume.
Afficha
’afficheur indique les fonctions suivantes: durée du programme, temps restant, temps de rinçage, temps d’essorage,
sélection température, sélection vitesse d’essorage, sécurité d’en
défauts machine avec codes d’erreurs.
Touche
vitesse d’
essorage
En appuyant successivement sur cette touche, la vitesse d’essorage désirée est choisie.
La vitesse d’essorage maximale pour les différents programmes est variable.
Remarque: pour les divers chargements de linge on peut choisir des températures et vitesses
d’essorage différentes. S’il n’y a pas des exigences particulières, utilisez les sélections par
défaut de la machine pour la température et la vitesse d’essorage.
tureTouche
tempéra
En appuyant successivement sur cette touche,la température désirée ( --,20,30,40,50,60,70,80,90 ).
peut être choisie. La température maximale pour les différents programmes est variable.
Remarque: „ –- „ sur l’afficheur signifie que le lavage à froid a été choisi.
Touche Intensif
Touche Rapide
Bac à lessive
Touche Fin différé
Touche Rincage
Touche Prélavage
Touche Anti-froissage
Touche Départ / Pause
ant, verouillage de la porte, deroulement du programme,
Page 29

9
Touche
F
Intensif
Touche
G
Rapide
H ¬ Boîte à
produits
¬Touche
I
Fin différé
J
En appuyant cette touche, la durée du lavage du programme choisi est prolongée ( particulièrement pour du linge tr`s sale).
En sélectionnant cette fonction, l’indicateur s’allume.Cette fonction peut être choisie en combinaison avec les programmes
et fonctions Coton, Synthétique, Mixte et Sport 25’. La fonction est activée en appuyant sur la touche avant le départ du
programme
En appuyant sur cette touche, la durée du lavage du programme choisi est réduite ( particulièrement pour votre linge quotidien ).
En sélectionnant cette fonction, l’indicateur s’allume.Cette fonction peut être choisie en combinaison avec les programmes
et fonctions Coton, Synthétique et Mixte . La fonction est activée en appuyant sur la touche avant le départ du programme
En ouvrant la boîte, il y a trois compartiments:
Compartiment 1: lessive pour le prélavage
Compartiment 2: lessive pour le lavage, trempage inclu
Compartiment 3: assouplissant, produit de tenue,amidon,etc.
2
2
3
1
1
L’utilisation d’un type de lessive dépend des températures de lavage, référez-vous au
manuel de votre lessive.
Appuyez cette touche pour choisir le fin différé désiré. Le temps choisi est indiqué sur l’afficheur. Le choix du fin
différé est de 0,5 à 24 heures avec des intervalles de 30 minutes. Le temps affiché indique la fin du programme de
lavage. Par exemple: 6:00 indique la fin du programme de lavage après 6 heures ( le temps du fin différé doit être
toujours plus long que la durée du programme de lavage). Le Fin différé ne peut pas être choisi pour le programme
Vidange / Essorage
Remarque: le temps du fin différé choisi doit être toujours plus long que la durée du programme de lavage. Si non, le
programme de lavage sera démarré de suite.
En appuyant ce bouton, le lave-linge lancera un rinçage supplémentaire. Chaque pression indiquera « P-1 », « P-2 »
ou « P-3 », ce qui équivaut à 1, 2 ou 3 rinçages supplémentaires. L’indicateur lumineux indiquera l’option sélectionnée
et clignotera pendant le rinçage. En cours de cycle, « P-1 », «P-2 » ou « P-3 » sera affiché alternativement avec le
temps de rinçage restant. Cet indicateur lumineux s’éteindra à la fin du rinçage supplémentaire.
K
L
M
Touche
Prélavage
Touche
Anti-froissage
¬ Touche
Départ/Pause
Appuyez cette touche pour choisir ou annuler le prélavage. Sélectionner le prélavage pour du linge très sale. Une fois la
fonction choisi, elle est indiquée sur l’afficheur. En appuyant une seconde fois sur la touche, la fonction est annulée et
l’indicateur sur l’afficheur s’éteint. Si le prélavage est sélectionné, le compartiment pour le prélavage de la boîte à produits
doit être rempli avec détergent . Si non, ce compartiment reste vide. Cette fonction peut être choisie en combinaison avec les
programmes et fonctions Coton, Synthétique, Bébé coton,Jeans,Mixte et Quotidien.
Appuyez cette touche pour choisir ou annuler cette fonction. Apres le dernier rinçage la machine ne va pas vidanger l’eau,
le linge reste dans l’eau et l’indicateur s’allume.. L’indication du temps restant s’arrête et reste inchangé sur l’afficheur.
Pour continuer le programme, appuyez à nouveau cette touche ou la touche Marche / Arrêt.. L’indicateur sur l’afficheur
s’éteint et la programme est repris.Les fonctions Anti-froissage et Départ différé ne peuvent pas être choisies en même
temps. La fonction Anti-froissage peut être choisie en combinaison avec les programmes
Express15’ et
Rinçage
.
En appuyant sur cette touche les programmes sont démarrés et l’indicateur correspondant s’allume et reste allumé pendant
toute la durée du programme. Si vous appuyez sur cette touche durant le déroulement du programme, le programme st
intérrompu et l’indicateur lumineux clignote.
Page 30

10
Programme
Température
Maxi-male
Valeur par
défaut
1 ¬ Lavage main - - to 90 °C 30°C
2 ¬ Laine - - to 40 °C 30°C
3 ¬ Délicat - - to 40 °C 30°C
4 ¬ Mixte - - to 40 °C
5 ¬ Synthétique - - to 60 °C
40°C
40°C
6 ¬ Coton - - to 90 °C 40°C
¬ Quotidien
7
8 ¬ Sport 25’ - - to 40 °C
- - to 60 °C 40°C
--- ---
2
2
2
3
2 3 1
Compartiment 1: lessive pour le prélavage
Compartiment 2: lessive pour le lavage, trempage
1
inclu
1
Compartiment 3: assouplissant, produit de tenue,
amidon,etc.
Textiles
Vitesse d’essorage par
défaut
Indication lavage main
sur les textiles
Linge en laine
400 trs/min
400 trs/min
Linge délicat 400 trs/min
Linge sale
Linge synthétique
Linge en Coton
Linge mixte sale
800 trs/min
800 trs/min
1000 trs/min
800 trs/min
Vêtements sport 800 trs/min
9 ¬ Express 15‘ - - to 40 °C
10 ¬ Jeans
Bébé coton
12
¬11
Rinçage/
¬
Essorage
- - to 90 °C
Yes No Optional
--- ---
40°C
40°C
Coton/Synthétique
Jeans
Coton/Synthétique
None
800 trs/min
trs/min
008C°09ot--
0 trs/min08
1000 trs/min
Page 31

¬
Lavage main
¬
Laine
¬
Délicat
¬
Mixte
¬
Synthétique
¬
Coton
¬
Coton
¬
Coton
¬
Quotidien
¬ Sport 25’
¬ Express 15‘
¬
Jeans
¬
Bébé coton
¬
Rinçage/
Essorage
Label énergétique Réglage programmes˖1. Coton +40°C +Intense+ Vitesse max
2. Coton +60
2kg
1kg
2kg
3.5kg
3.5kg
7kg
3.5kg
3.5kg
2kg
30°C
30°C
30°C
gk5
gk5.3
40°C
40°C
40°C
60°C
60°C
40°C
-- --
-- --
gk5.3
gk5.3
/
40°C
40°C
/
HW70-1482-F
1:10
0:59
0:57
1:17
1:19
2:32
2:52
2:52
1:31
0:25
0:15
24:1
32:1
0:11
°C
+Intense+ Vitesse max
/
/
/
/
/
0.625kWh
0.872kWh
0.868kWh
/
/
/
/
/
/
/
/
/
/
/
36.4L
37.9L
50.8L
/
/
/
/
/
/
/
/
/
/
/
/
53%
/
/
/
/
/
/
Poids Net (Kg)
Consommation énergétique
en mode(OFF)(W)
Consommation énergétique
en veille(ON)(W)
7
1400
12
x x
850 600
0.48
0.48
595
Page 32

Avant le lavage, il faut enlever les barrettes, les pièces de monnaie et d'autres pièces métalliques
similaires, pour éviter que la pompe de drainage soit bloquée par des composants.
Page 33

la lessive
de la lessive
de la lessive.
DE LA LESSIVE
une lessive
de lessive
LA LESSIVE
la lessive
Intense
Speed Up
Delay Extra Rinse Prewash Rinse Hold
hsaWyliaDnottoC
HW70-1482
Spin
min
min
Temp.
time
time
R
Start/Pause
'52tropScitehtnyS
'51sserpxExiM
snaeJetacileD
eraCybaBlooW
niarD/nipShsaWdnaH
Page 34

D
ale
t
o
«
g
L
e
la vitesse désirée apparaissent sur l’écran. Les
ù
«
la température désirée (
ù
e
.
g
4
UTILISATION DE L’APPAREIL
ÉGLAGE DE LA TEMPÉR
Appuyez de manière répétitive sur la touche de température de lavage
u robinet
GLAGE DE LA VITESSE D’ESSORAGE
Appuyez de manière répétitive sur la touche de sélection de la vitesse
nst
uctions relatives au choix de la température et de la vitesse d’essorage se
Fonctions »-«
Bandeau de commandes
»
r
8 et 9)
i
Intense
Speed Up
Delay Extra Rinse Prewash Rinse Hold
Intense
min
Speed Up
time
time
Delay Extra Rinse Prewash Rinse Hold
Spin
min
min
Temp.
time
time
min
R
Start/Pause
Spin
Temp.
R
Start/Pause
hsaWyliaDnottoC
'52tropScitehtnyS
'51sserpxExiM
snaeJetacileD
eraCybaBlooW
niarD/nipShsaWdnaH
hsaWyliaDnottoC
'52tropScitehtnyS
'51sserpxExiM
snaeJetacileD
eraCybaBlooW
niarD/nipShsaWdnaH
épa««
rogramme choisi.
ine son fonctionnement automatiquemen
juste après avoir fini le lavage. A la fin du lavage, l’inf
»
END »
rer
Intense
Speed Up
time
Delay Extra Rinse Prewash Rinse Hold
Spin
min
min
Temp.
time
R
Start/Pause
’affichera sur l’écran. Ensuite, ouvrez le hublot et sortez votre lin
APRÈS LE
d’éviter lafo
av
ationde mauvaises odeurs.Quand vous n’utilisez pas le
Q
.
CONSEILS POUR ÉCONOMISER DE
1. Chargezla machine au maximum.
2. Ne surchargez pas la machine
. Ne faites de prélavage que pour le linge très sale
4. Réduire la quantité de détergent ou choisir Express 15 ou programmes de lavage rapide pour un peu les vêtements souillés
5. Choisissez toujours une température adéquate. Les déter
ents contemporains sont efficaces à des températures en-dessous de
60°C. Ne choisissez pas des températures supérieures à 60°C que pour le linge très sale.
6.Conformez-vous aux doses prescrites sur les paquets de détergents pour ne pas utiliser de doses excessives.
CONSEIL:
Pour ajouter ou retirer des vêtements à cause de coupure de courant, assurez-vous que le niveau d'eau
dans le tambour est au dessous du bord inférieur du hublot, que la température de l'eau est inférieure à
50°C et que le tambour interne ne fonctionne pas, puis retirez le tuyau de vidange de son soutien et
maintenez- le en bas jusqu'à ce que l'eau n'est plus évacuée de la tuyauterie de vidange, replacez le
tuyau de vidange. Ouvrez la porte de filtrage en bas du lave-linge,et vous verrez un poteau de traction.
Sortez le câble de traction et tirez doucement vers le bas jusqu'à ce que vous entendez un bruit sourd,
la porte sera ouverte, vous pouvez maintenant ajouter ou retirer les vêtements. Ensuite,remettez le
poteau de traction et la porte de filtrage.
Si elle n'est pas apte à ouvrir la porte, en utilisant le pôle peut l'ouvrir, mais ce n'est pas une façon normale.
hsaWyliaDnottoC
'52tropScitehtnyS
'51sserpxExiM
snaeJetacileD
eraCybaBlooW
niarD/nipShsaWdnaH
Page 35

Page 36

1.
Page 37

ÉPLACEMENT DU L
.
es bouchons.
l
u
i vous déménagez il est conseilléde réinstallezles vis debridages,
ue vous avez retirées lors de l’installation de la machine
Enlevez l
2.Se
ez les vis avec une clé.
3. En
evezle couvercle postérie
4. Montez les éléments stabilisants et les vis de transpot.
5. Remontez le couvercle postérieu
Page 38

18
Codes d’erreurs et fonctions spéciales
Code
Err1 ¬ Fermeture porte incorrecte Fermer la porte correctement Mettre la machine en route
Err2 ¬ L’eau ne peut pas être vidangé dans un délai de
6 minutes
Err3 ¬ Erreur sonde de température Veuillez contacter le service après –vente
snoituloSsesuaC
Nettoyer le filtre.Examiner si le tuyau de vidange est obstrué ou bloqué.
Si l’erreur persiste toujours, veuillez contacter le service après –vente
Err4
Err5 ¬L’eau n’arrive pas à atteindre le niveau requis dans
Err8 ¬ L’eau dépasse le niveau de protection _ Veuillez contacter le service après –vente
EuAr
End ¬ Fin deuprogramme
UNb Erreur détection balourd
¬Sécurité enfant: après avoir démarré un programme, appuyez en même temps les touches Départ différé et Départ / Pause pour 3 secondes
– la sécurité enfant est activée. Toutes le touches et fonctions du bandeau de commande sont bloquées. En appuyant à nouveau sur les duex
touches en même temps, la sécurité enfant est annulée.
¬ SFonction Mémoire en cas de coupure de courant: dans le cas d’une coupure de l’alimentation électrique, le programme et les fonctions
sélectionnées sont mémorisées. Si l’alimentation électrique est rétablie, le programme va continuer à partir du point mémorisé lors de la coupure.
¬ Annullation d’un programme: appuyez sur la touche Départ / Pause etarrêter la machine par la touche Marche / Arrêt. Ainsi le
programme est automatiquement annulé et vous pouvez choisir un nouveau programme.
¬ Erreur élement chauffant
un délai de 8 minutes
¬La hauteur du tuyau de vidange est en dessous
de 80 cm
¬ Tuyau de vidange fixé dans l’eau
¬ Erreur indicateur de niveau d’eau
¬ Erreur de communication entre la platine
électronique principale et l’afficheur
Remarque: Lorsque le code d'erreur s'affiche au-dessus, nous vous suggérons de couper le courant et
redémarrer la machine de fonctionner à nouveau, si l'erreur existe toujours, s'il vous plaît contacter le
personnel de maintenance
Veuillez contacter le service après –vente
_
Verifiie si le robinet est bien ouvert.Verifier si la pression d’eau est
normale.Si l’erreur persiste toujours, veuillez contacter le service
après –vente
_ Installer le tuyau de vidange dans une hauteur entre 80 – 100 cm
_ S’assurer que le tuyau de vidange n’est pas fixé dans l’eau
etnev–sèrpaecivreselretcatnoczelliueV_ruetomtuaféD¬7rrE
etnev–sèrpaecivreselretcatnoczelliueV_01rE
_ Veuillez contacter le service après –vente
Ne pas laver des peu de linge. Débrancher la machine.Distribuer le linge
d’une manière symmétrique et redémarrer un programme d’essorage
Remarque: s’il se trouve beaucoup de mousse dans le tambour lors du cycle d’essorage, la machine va effectuer un arrêt pour proteger le moteur.
Pendant cet arrêt, la machine va proceder à une vidange pendant 90 secondes. Ce procédé est répeté pour 3 fois maximum. Si un
quatriéme procédé devient necessaire, la machine va terminer le programme sans effectuer le cycle d’essorage.
Page 39

Page 40

Haier Europe – 115-123,
Avenue Charles de Gaulle –
92200 Neuilly-sur-Seine – France
+33 173 794 800
+33 147 383 471
het_france@haiereurope.com
0020505574P
 Loading...