

Page 1
SERVICE MANUAL
HW70-1202D HW60-1202D
HW60-1002D HW50-1202D
SERVICE MANUAL
Order No.
Front Load Washing Machine
MODEL:HW70-1202D
HW60-1202D
HW60-1002D
HW50-1202D
WARNING
This service information is designed for experienced repair technicians only and is not designed for use by the general public. It does not
contain warnings or cautions to advise non-technical individuals of potential dangers in attempting to service a product. Products powered by
electricity should be serviced or repaired only by experienced professional technicians. Any attempt to service or repair the product or
products dealt with in this service information by anyone else could result in serious injury or death
Front Load Washing Machine
2011
Page 2

SERVICE MANUAL
HW70-1202D HW60-1202D
HW60-1002D HW50-1202D
Contents
Chapter 1 General Information ________________________________________________
1-1. General Guidelines_____________________________________________________
Chapter 2 Product Feature ___________________________________________________
2-1. Features _____________________________________________________________
2-2. Specification __________________________________________________________
Chapter 3 Matters needing attention ___________________________________________
3-1. Safety _______________________________________________________________
3-2. During Use ____________________________________________
Chapter 4 Operational Guidance ____________________________________________
Chapter 5 Program Introduction_____________________________________________
Chapter 6 Washing Mathods________________________________________________
6-1. Loading____________________________________________________________
6-2. Adding detergent ____________________________________________________
6-3. Selecting washing program ____________________________________________
Chapter 7 Appearance brief introduction _____________________________________
7-1. Name of parts _______________________________________________________
7-2. Net dimension_______________________________________________________
Chapter 8 Disassembly and Installation ______________________________________
8-1. Remove packing materials _____________________________________________
8-2. Dismantle packing bolts _______________________________________________
8-3. Adjusting the washing machine _________________________________________
Front Load Washing Machine
Page 3

SERVICE MANUAL
HW70-1202D HW60-1202D
HW60-1002D HW50-1202D
8-4. Joining the Inlet Hose to the Washing Machine _____________________________
8-5. Drainage Hose ______________________________________________________
8-6. Connecting to the Power Supply ________________________________________
Chapter 9 Wiring circuit and Self check ______________________________________
9-1. Wiring circuit ________________________________________________________
9-2. Self check __________________________________________________________
Chapter 10 Error Display and troubleshooting _________________________________
10-1. Error Display_______________________________________________________
10-2. Examination & Troubleshooting ________________________________________
10-2-1. Display nothing__________________________________________________
10-2-2. No water inletting ________________________________________________
10-2-3. No draining _____________________________________________________
10-2-4. Abnormal noise and vibration_______________________________________
10-2-5. Water leaking ___________________________________________________
Chapter 11 Maintenance ___________________________________________________
Front Load Washing Machine
Page 4

SERVICE MANUAL
HW70-1202D HW60-1202D
HW60-1002D HW50-1202D
Chapter 1 General Information
1-1. General Guidelines
When servicing,observe the original lead dress.If a short circuit is found, replace all parts which are
overheated or damaged by the short circuit.After servicing ,see to it that all the protective devices such as
insulation barriers ,insulation papers shields are properly installed .Confirm that the screws,parts and wiring
which were removed in order to service are put in the original positions, or whether there are the portions
which are deteriorated around the service places serviced or not. And be sure safety of that.
Front Load Washing Machine
Page 5
SERVICE MANUAL
HW70-1202D HW60-1202D
HW60-1002D HW50-1202D
Chapter 2 Product Feature
2-1. Features
(1). 320mm diameter porthole, door may be open at a 175 degrees.
Facilitate view of wash process, facilitate unloading and easy to use with large port.
(2). Class A energy-saving
Scientific design for tub can reduce the use of water heavy during washing, consequently upgrade the
energy efficiency class to A,also use scientific washing
(3). Multi-gear speed controller
According to different costuming
(4). Unique gasket design featuring no residual water hidden inside.
By the unique gasket
board.
(5). Delay time adjustive.
According to different costuming
washing machine can left no residual water hidden between outer drum and front
you can select corresponding spin speed from 0 to 1400 rpm.
you can select delay time from 0.5h to 24h.
Front Load Washing Machine
Page 6
SERVICE MANUAL
HW70-1202D HW60-1202D
HW60-1002D HW50-1202D
2-2. Specification
Energy labelling for electrical clothes washing machines for household use
Summary of Test Results
%xednI ycneiciffE ygrenE
Class
Low power mode Energy Consumption Kwh/year
Washing Performance
Class
mprdeeps nipS
HW60-1202D
gk)nottoc( yticapaC
raey/hwk noitpmusnoC ygrenE cirtcelE launnA
raey/hwKnoitpmusnoC ygrenE launnA latoT
% ecnamrofreP gniyrD nipS
6.0
54.51
A+
175.68
6.21
181.89
1.02
59%
C
1206
raey/L noitpmusnoC retaw launnA
LhsaW niaM
nimelcyc fo htgneL
Test Conditions
cinortcele:rellortnoc emmargorP
04,nottoc:emmargorp detseT ••••60• •,6.0kg,1200rpm• •intense
atlov ylppuS
Supply water: -measured temperature 15.5°C~16.0 °C
-measured hardness 240ppm
-measured pH-value 7.3~7.6
-hardness preparation IEC 60734 type B
reference
Detergent: -type
-amount
-batch/production date
-supplier
detergent
112g 86.2g 22.4g 3.36g
% 1 ± V 032:tset gnirud eg
%66.0ylppus rewop rof DHT
% 1 ± zH 05:tset gnirud ycneuqerf ylppuS
apK042erusserp-
8482.6
12.9
167
noitcurtsni s´rerutcafunam htiw ecnadrocca ni:noitallatsnI
C° 5.32~C°5.12:erutarepmet moor derusaeM
base detergent
IEC-A*
167-513(7-2010) SPB4.227-564 NO23576003
WfK WfK WfK
sodium
perborate
TAED
Textiles: -conditioned mass in kg 6.0kg
-average age (number of uses) 42
KfWreilppus-
-composition (number of pieces) 2sheet,8pillowcases,25towels
-number of strips partial lod• •3 full load• •6
Front Load Washing Machine
13-801rebmun hctab-:spirts tseT
APMEreilppus-
Page 7
SERVICE MANUAL
HW70-1202D HW60-1202D
HW60-1002D HW50-1202D
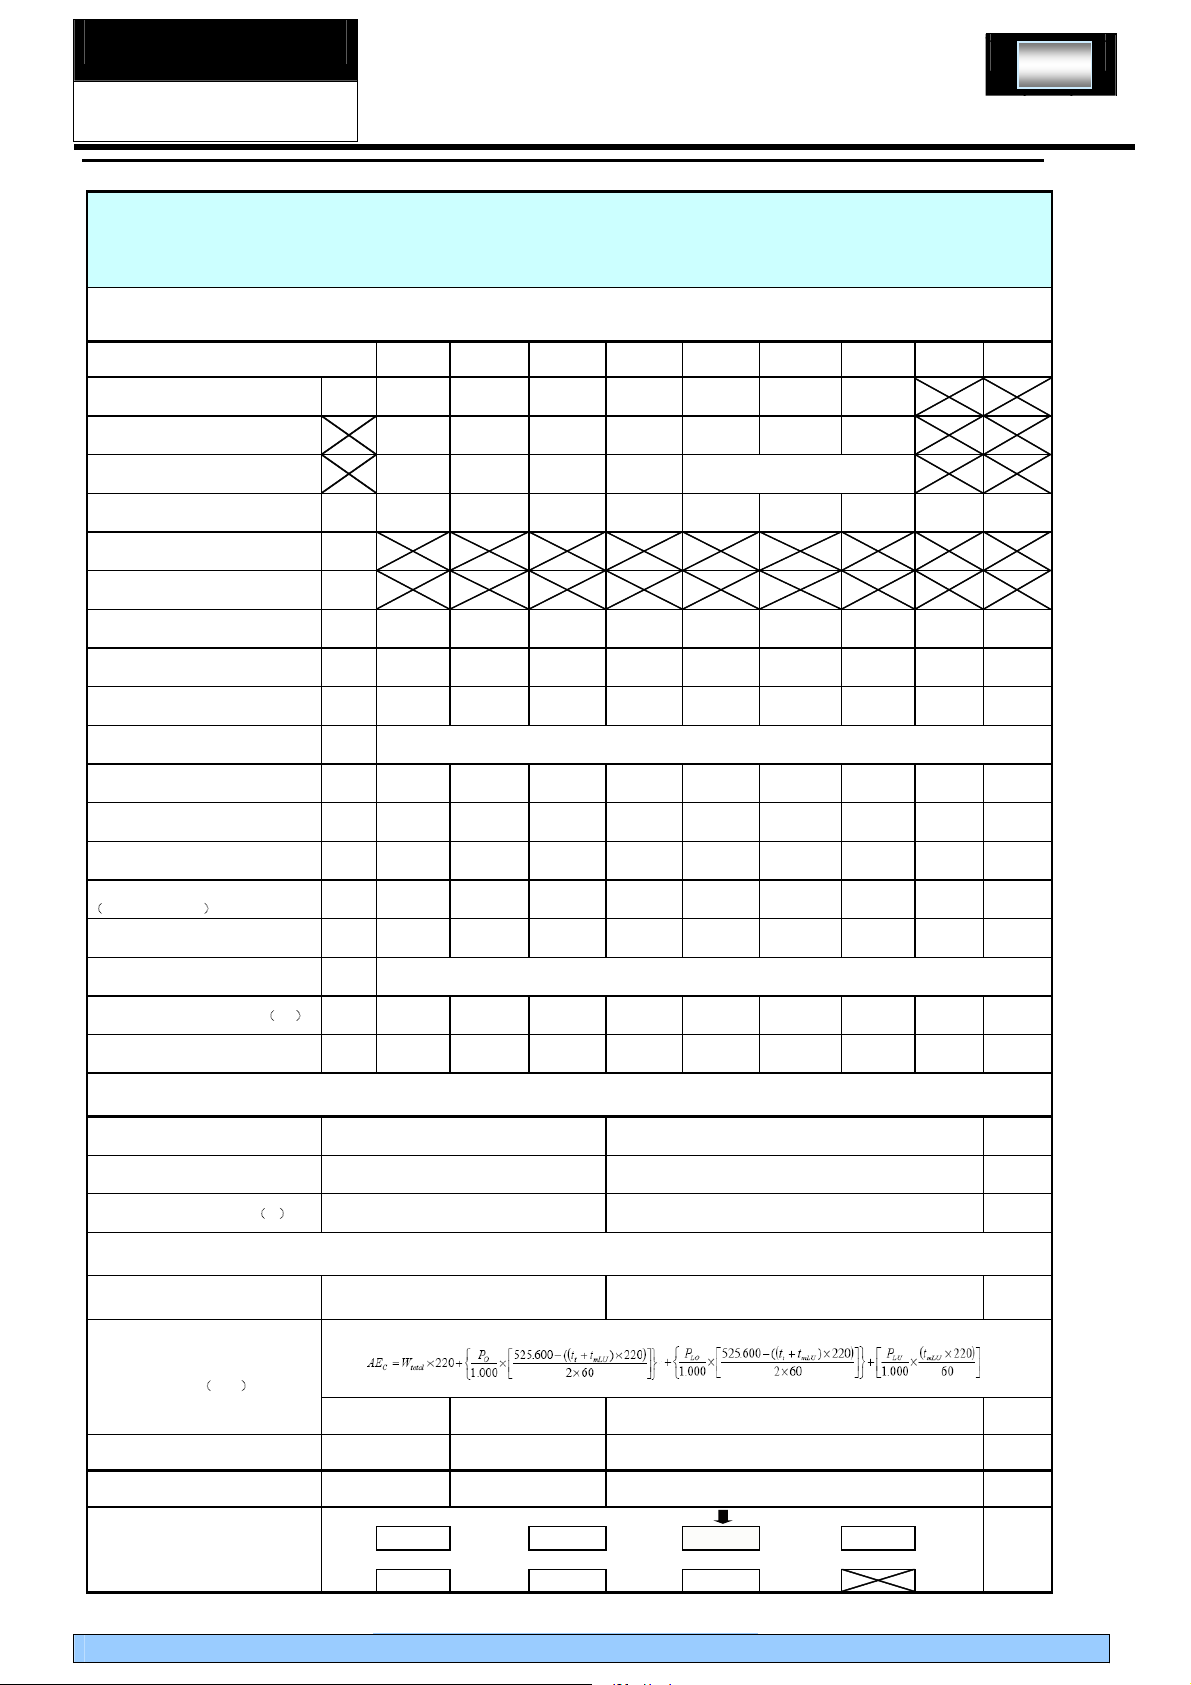
Energy labelling for electrical clothes washing machines for household use
Cycle data,parameters and results
Cycle:
data of cycle yr.m.d
HW60-1202D
1 2 345 6 7 Average
2011-2-14 2011-2-14 2011-2-15 2011-2-15 2011-2-16 2011-2-17 200-2-18
7
standard
deviation
Base Load
Measured Programme
Main wash cold water
consumption
Main wash hot water consumption L
Total hot water onsumption L
Total cold water onsumption L 31.8 33.8 33.5 34.4 45.4 46.5 44.5 38.6 6.537
Total water onsumption L 31.8 33.8 33.5 34.4 45.4 46.5 44.5 38.6 6.537
Unit water consumption L/kg 5.3 5.6 5.6 5.7 7.6 7.8 7.4 6.4 1.089
Annual water consumption for
total 220 cycles ((AWc))
Main wash duration min 123 144 123 144 145 140 140 137 9.764
Heating time min 12 21 11 22 22 23 23 19 5.273
Programme time min 152 171 153 171 174 174 174 167 10.000
Electrical energy consumption
for programme)
(
Total cold water correction energy kWh 0.006 0.007 0.007 0.007 0.009 0.018 0.014 0.010 0.005
Total hot water correction energy kWh
kWh 0.562 0.876 0.557 0.878 0.865 0.904 0.881 0.79 0.157
Part A Part B Part B Part A Full load Full load Full load
cotton 40℃ cotton60℃ cotton40℃ cotton60℃
L 10.6 11.2 11.3 11.4 15.1 15.7 15.1 12.9 2.255
L
8483
N/A
cotton60℃
Total energy consumption(
Unit energy consumption Kwh/kg 0.095 0.147 0.094 0.147 0.146 0.154 0.149 0.133 0.027
Wt) kWh 0.568 0.883 0.564 0.885 0.874 0.922 0.895 0.799 0.160
Energy consumption for single Low power mode in total 220 cycles
Energy consumption for (LU) kwh
Energy consumption for (LO) kwh
Energy consumption for (
O) kwh
=
=
=
0.08
3.06
3.07
Energy consumption for total 220 cycles
Energy consumption for
programme running
Annual energy consumption for
total 220 cycles (
AEc)
AEc
Energy consumption for SAEc kwh
Energy Efficiency Index
SAEc
EEI
Energy Efficiency Class
=Wt*220
=
=
=
A+++ A++ A+ A
175.68
181.89
333.70
54.5
kwh
kwh
%
B C D
Front Load Washing Machine
Page 8
SERVICE MANUAL
HW70-1202D HW60-1202D
HW60-1002D HW50-1202D
Energy labelling for electrical clothes washing machines for household use
Summary of Test Results
Class
Low power mode Energy Consumption Kwh/year
Washing Performance
Class
8
HW70-1202D
gk)nottoc( yticapaC
%xednI ycneiciffE ygrenE
raey/hwk noitpmusnoC ygrenE cirtcelE launnA
raey/hwKnoitpmusnoC ygrenE launnA latoT
% ecnamrofreP gniyrD nipS
mprdeeps nipS
7.0
48
A++
181.04
3.29
184.33
1.02
55%
C
1346
raey/L noitpmusnoC retaw launnA
LhsaW niaM
nimelcyc fo htgneL
Test Conditions
cinortcele:rellortnoc emmargorP
04,nottoc:emmargorp detseT ℃,60℃,1400rpm,intense,display2:38,2:58
ov ylppuS
22.5°C~23.6 °C
Supply water: -measured temperature 15.5°C~16.4 °C
-measured hardness 235ppm~250ppm
-measured pH-value 7.3~7.5
-hardness preparation IEC 60734 type B
reference
Detergent: -type
-amount 124 95.48 24.8 3.72
-batch/production date 296-779 SPB4.217-338 NO23576003
-supplier WfK WfK WfK
detergent
% 1 ± V 032:tset gnirud egatl
%56.0ylppus rewop rof DHT
% 1 ± zH 05:tset gnirud ycneuqerf ylppuS
9309.1
apK052~apK042erusserp-
base detergent
IEC-A*
15.4
181
sodium
perborate
noitcurtsni s´rerutcafunam htiw ecnadrocca ni:noitallatsnI
TAED
Textiles: -conditioned mass in kg 7.0kg
-average age (number of uses) 31
KfWreilppus-
-composition (number of pieces) 2sheet,12pillowcases,25towels
-number of strips partial lod:4 full load:7
Front Load Washing Machine
13-801rebmun hctab-:spirts tseT
APMEreilppus-
13-9-1102esu fo enildaed-
Page 9
SERVICE MANUAL
HW70-1202D HW60-1202D
HW60-1002D HW50-1202D
9
Energy labelling for electrical clothes washing machines for household use
HW70-1202D
Cycle data,parameters and results
Cycle:
data of cycle yr.m.d
Base Load
Measured Programme
Main wash cold water
consumption
Main wash hot water consumption L
Total hot water onsumption L
Total cold water onsumption L 41.0 41.6 39.7 39.9 47.6 41.3 45.1 42.3 2.933
Total water onsumption L 41.0 41.6 39.7 39.9 47.6 41.3 45.1 42.3 2.933
Unit water consumption L/kg 5.9 5.9 5.7 5.7 6.8 5.9 6.4 6.0 0.419
Annual water consumption for
total 220 cycles ((AWc))
Main wash duration min 116 137 117 137 137 138 138 131 10.212
L 12.5 13.0 13.2 12.5 18.8 18.7 18.9 15.4 3.218
L
1 2 345 6 7 Average
2011.04.11 2011.04.11 2011.04.12 2011.04.12 2011.04.13 2011.04.14 2011.04.15
Part A Part B Part B Part A Full load Full load Full load
cotton 40℃ cotton60℃ cotton40℃ cotton 60℃
9309
cotton60℃
standard
deviation
Heating time min 12 20 12 20 21 21 21 18 4.220
Programme time min 166 188 166 188 187 185 187 181 10.296
Electrical energy consumption
for programme)
(
Total cold water correction energy kWh 0.013 0.013 0.017 0.015 0.025 0.017 0.019 0.017 0.004
Total hot water correction energy kWh
Total energy consumption(
Unit energy consumption Kwh/kg 0.091 0.130 0.091 0.128 0.126 0.128 0.128 0.118 0.018
kWh 0.624 0.897 0.623 0.880 0.858 0.879 0.880 0.81 0.125
N/A
Wt) kWh 0.637 0.910 0.640 0.895 0.883 0.896 0.899 0.823 0.126
Energy consumption for single Low power mode in total 220 cycles
Energy consumption for (LU) kwh
Energy consumption for (LO) kwh
Energy consumption for (
O) kwh
=
=
=
0.05
1.61
1.63
Energy consumption for total 220 cycles
Energy consumption for
programme running
Annual energy consumption for
total 220 cycles (
AEc)
AEc
=Wt*220
=
181.04
184.33
kwh
kwh
Energy consumption for SAEc kwh
Energy Efficiency Index
Energy Efficiency Class
SAEc
EEI
A+++ A++ A+ A
=
=
380.70
48.4
%
B C D
Front Load Washing Machine
Page 10
SERVICE MANUAL
Energy labelling for electrical clothes washing machines for household use
Summary of Test Results
Class
Annual Electric Energy Consumption kwh/year
Low power mode Energy Consumption Kwh/year
Washing Performance
Class
10
HW50-1202D
gk)nottoc( yticapaC
%xednI ycneiciffE ygrenE
raey/hwKnoitpmusnoC ygrenE launnA latoT
% ecnamrofreP gniyrD nipS
mprdeeps nipS
5.0
53.46
A+
146.55
6.71
153.26
1.02
58%
C
1181
raey/L noitpmusnoC retaw launnA
LhsaW niaM
nimelcyc fo htgneL
Test Conditions
cinortcele:rellortnoc emmargorP
Tested programme:
THD for power supply
erusaeM ℃ ~ 24 ℃
Supply water: -measured temperature 16 ℃ ~ 16 ℃
-measured hardness 235 ppm ~ 255 ppm
-measured pH-value 7.3~7.6
-hardness preparation IEC 60734 type B
Detergent: -type
-amount
-batch/production date
-supplier
Cotton,standard,40℃/60℃,1200rpm,intense,
display2:28/2:48
% 1 ± V 032:tset gnirud egatlov ylppuS
0.66%
% 1 ± zH 05:tset gnirud ycneuqerf ylppuS
22:erutarepmet moor d
apK042erusserp-
reference
detergent
100 g 77.0 g 20.0 g 3.0 g
167-513(7-2010) SPB4.227-564
WfK
7370.0
10.9
152
noitcurtsni s´rerutcafunam htiw ecnadrocca ni:noitallatsnI
sodium perborate DEAT*A-CEI
NO23576003
WfKWfK
Textiles: -conditioned mass in kg 5.0kg
-average age (number of uses) 39
KfWreilppus-
-composition (number of pieces) 2sheet,6pillowcases,20towels
-number of strips partial lod:3 full load:5
Front Load Washing Machine
13-801rebmun hctab-:spirts tseT
APMEreilppus-
Page 11

SERVICE MANUAL
11
Energy labelling for electrical clothes washing machines for household use
HW50-1202D
Cycle data,parameters and results
Cycle:
data of cycle yr.m.d
Base Load
Measured Programme
Main wash cold water
consumption
Main wash hot water consumption L
Total hot water onsumption L
Total cold water onsumption L 27.7 27.6 27.2 29.6 41.7 39.9 40.8 33.5 6.890
Total water onsumption L 27.7 27.6 27.2 29.6 41.7 39.9 40.8 33.5 6.890
Unit water consumption L/kg 5.5 5.5 5.4 5.9 8.3 8.0 8.2 6.7 1.378
Annual water consumption for
total 220 cycles ((AWc))
Heating time min 10 17 10 18 18 18 18 16 3.823
L 9.2 9.1 8.9 9.6 13.3 13.2 13.3 10.9 2.184
L
1 2 345 6 7 Average
2011-4-18 2011-4-18 2011-4-19 2011-4-19 2011-4-20 2011-4-21 2011-4-22
Part A Part B Part B Part A Full load Full load Full load
cotton 40℃ cotton60℃ cotton40℃ cotton60℃
7370
cotton60℃
standard
deviation
Main wash duration min 125 144 124 147 144 144 145 139 9.967
Programme time min 152 171 151 174 73 173 173 152 36.441
Electrical energy consumption
for programme)
(
Total cold water correction energy kWh 0.006 0.007 0.008 0.009 0.009 0.011 0.011 0.009 0.002
Total hot water correction energy kWh
Total energy consumption(
Unit energy consumption Kwh/kg 0.102 0.144 0.103 0.147 0.146 0.145 0.146 0.133 0.021
kWh 0.505 0.712 0.505 0.725 0.721 0.715 0.718 0.66 0.104
N/A
Wt) kWh 0.511 0.719 0.513 0.734 0.730 0.726 0.729 0.666 0.105
Energy consumption for single Low power mode in total 220 cycles
Energy consumption for (LU) kwh
Energy consumption for (LO) kwh
Energy consumption for (
O) kwh
=
=
=
0.09
3.30
3.32
Energy consumption for total 220 cycles
Energy consumption for
programme running
Annual energy consumption for
total 220 cycles (
AEc)
AEc
=Wt*220
=
146.55
153.26
kwh
kwh
Energy consumption for SAEc kwh
Energy Efficiency Index
Energy Efficiency Class
SAEc
EEI
A+++ A++ A+ A
=
=
286.70
53.5
%
B C D
Front Load Washing Machine
Page 12

SERVICE MANUAL
HW70-1202D HW60-1202D
HW60-1002D HW50-1202D
Chapter 3 Matters needing attention
3-1. Safety
BEFORE SWITCHING THE APPLIANCE ON FOR THE FIRST TIME
DO ...
... Make sure that the transportation bolt(T1,T2&T3) are
removed.
... Use a separate earthed socket for the power supply.
... Make sure that the plug is accessible.
... Hold the plug and not the electric cable when
unplugging the power supply.
... Make sure that the fuses in the power circuit are rated
for 13A.
... Keep away from heat sources and direct sun light to
prevent plastic and rubber components from aging.
... Make sure that the power cord is not caught under or
in the appliance and avoid damage to the power cable.
... Check that hose joints and connections are firm and no
water can leak. If joints are loose or there is leakage,
turn off the water supply and refix. Do not use the
washing machine until the hoses are properly fixed.
12
DO NOT ...
... Touch or use the appliance when barefoot or with wet or
damp hands or feet.
... Use flammable detergent or dry cleaning agent.
... Use any flammable sprays in close vicinity to the
appliance.
... Remove or insert the plug in the presence of flammable
gas.
... Allow children or infirm persons to play with the appliance
or packing materials.
... Install the appliance outdoors in a damp place, or in an
area which may be prone to water leaks such as under or
n
ear a sink unit. In the event of a water leak allow the
machine to dry naturally.
... Place the washing machine directly on a carpet, or close to
a wall or furniture.
Front Load Washing Machine
Page 13

SERVICE MANUAL
HW70-1202D HW60-1202D
HW60-1002D HW50-1202D
DURING DAILY USE OF THE APPLIANCE
DO ...
... Pull up zips and fix loose threads to prevent the items
from being entangled. If necessary, put small items into
a net bag or pillow.
... Turn off the machine after each wash program and switch
it off at the mains to save electricity and for safety. Wipe
clean the lower part of the porthole.
... Keep the door slightly open when the washing machine is
not in use to prevent formation of odours.
... Let the power cord be replaced by the manufacturer, his
service agent or other accordingly qualified persons, in
case it is damaged.
... Ensure that the appliance is not used by
persons(including children) with reduced physical,
sensory or mental capabilities, lack of experience
and knowledge without supervision or instruction by a
person responsible
for their safety.
... Supervise children to ensure that they do not play with the appliance.
13
DO NOT ...
... Touch the washer door during the washing process - it
gets hot!
... Place heavy objects or sources of heat or damp on top of
the appliance.
... Hot wash foam rubber or sponge-like materials.
... Open the detergent distribution drawer during the wash
cycle.
... Force the washer door open. The door is fitted with a
self-lock device and will open shortly after the washing
procedure is ended.
... Open the washer door if the water level is visibly over the
porthole.
... Cover the washing machine with plastic cover so that
inside dampness cannot be kept in.
Front Load Washing Machine
Page 14

SERVICE MANUAL
_
HW70-1202D HW60-1202D
HW60-1002D HW50-1202D
Chapter 4 Operational Guidance
14
15'
Standard
eco
Program knob B Power Switch C Start/Pause button
A
Spinning Speed Setting buttonE Washing temperature button F Delay Button
D
Detergent distribution drawer H Display I Intense button J Extra rinse button
G
A ¬ Program
knob
_By turning the knob clockwise/counterclockwise, the required program
can be selected. There are 11 programs available. After a program is
Sport
Delicate
。
1000
C
90
。
C
60
800
。
400
C
40
。
C
30
selected, the corresponding light will go on.
B ¬ Power
Switch
_ Press this button to switch on the washing machine. Press it again to
switch it off.
HW60-1002D
C ¬ Start/Pause
Button
D ¬ Spinning
Speed
Setting
Button
E ¬ Washing
temperature
button
_ When the washing machine is connected to the power socket and a
program is selected, lightly touch this button to start operation. During a
wash cycle, touch it lightly ,operation will stop and the digits on the screen
start blinking. Touch it again to resume operation. To cancel a wash
program during a wash cycle, touch this button, when the digits on the
screen start blinking, press the Power switch, the program will be
cancelled.
Touch this button lightly to select the desired speed. When a speed is set,
it will be displayed on the indicator.
Note: Different water temperatures and spinning speeds can be set
for different laundries. Wash using the default settings if there is no
special requirement.
_ Touch this button lightly, the washing temperature will be displayed on
the indicator. Select a temperature according to the type of laundry.
Front Load Washing Machine
Page 15

SERVICE MANUAL
HW70-1202D HW60-1202D
HW60-1002D HW50-1202D
15
F ¬ Delay
Button
G ¬ Detergent
distribution
drawer
H ¬ Display _Information as remaining wash time and error messages will be shown
I ¬ Intense
button
_Touch this button lightly, the washing machine will start operation after a
period of time
and the corresponding indicator will go on. The range is 0.5-24 hours; each
touch of this
button increases a half hour. After the button is set, press the Start/Pause
button to start
countdown of the set time (the time is displayed on the screen until the
program ends).
Note:The delay time must be longer than the program time;otherwise,the
washing machine will start the wash program directly.
_Open the drawer, three compartments can be
seen:
Compartment 1: Prewash detergent
Compartment 2: Detergent for programs 1 to 10.
Compartment 3: Softener, conditioning agent, perfume, etc.
here.
Note: After power is switched on, the display will go on and the remaining
wash time decreases. As the water pressure and temperature may differ,
the remaining time maybe adjusted accordingly. When the laundry is not
balanced during spinning, the time may be automatically prolonged. These
are normal phenomena.
_If the laundry is heavily soiled, press this button before starting the
program. When the button is pressed, the washing time increases.
J ¬ Extra rinse
button
_Press this button, the washing machine will perform additional rinses.
Press the button once to select one additional rinse. The display will
show"P-1". Press the button repeatedly and the screen will display "P-2''or
"P-3'', indicating two or three additional selected rinses. The "extra rinse
light" is activated and flashes during the performance. "P-1/2/3" is
displayed alternating with the remaining time. The light turns off and the
display disappears when the extra rinse ends.
Front Load Washing Machine
Page 16

SERVICE MANUAL
HW70-1202D HW60-1202D
HW60-1002D HW50-1202D
Chapter 5 Program Introduction
HW70-1202D
HW50-1202D
HW60-1202D
16
HW60-1002D
400rpm
800 rpm
500rpm
400rpm
Front Load Washing Machine
1000 rpm
1000 rpm
1200 rpm
1200 rpm
1000 rpm
1000 rpm
Page 17

SERVICE MANUAL
HW70-1202D HW60-1202D
HW60-1002D HW50-1202D
Chapter 6 Washing Mathods
6-1. Loading
17
6-2. Adding detergent
6-3. Selecting washing program
Front Load Washing Machine
Page 18

SERVICE MANUAL
HW70-1202D HW60-1202D
HW60-1002D HW50-1202D
Chapter 7 Appearance brief introduction
7-1. Name of parts
18
Front Load Washing Machine
Page 19

SERVICE MANUAL
HW70-1202D HW60-1202D
HW60-1002D HW50-1202D
7-2. Net dimension
850
19
HW60-1202D HW60-1002D
(height :850 X width:595X depth:520)mm
HW50-1202D
(height:850 X width:595X depth:450)mm
HW70-1202D
(height:850X width:595 X depth:600)mm
Front Load Washing Machine
Page 20

SERVICE MANUAL
HW70-1202D HW60-1202D
HW60-1002D HW50-1202D
Chapter 8 Disassembly and Installation
8-1. Remove packing materials
20
8-2. Dismantle packing bolts
8-3. Adjusting the washing machine
Front Load Washing Machine
Page 21

SERVICE MANUAL
HW70-1202D HW60-1202D
HW60-1002D HW50-1202D
21
15
Front Load Washing Machine
Page 22

SERVICE MANUAL
HW70-1202D HW60-1202D
HW60-1002D HW50-1202D
Chapter 9 Wiring circuit and Self check
9-1. Wiring circuit
HW60-1202D HW60-1002D HW50-1202D
22
HW70-1202D
门锁
压力开关 加热管
P12
FUS E
fuse
2
1
FUS E
主洗阀
fuse
预洗阀 排水泵
P11
PA14
P13
温度传感器
2
1
电机
M9
R
M8
N
G
FA
L
FA1
FA3
N
L
PCB
MRL
MRN
MRC
2
2
2
1
1
1
M10
M5
M4
M1
M3
T
M6
M7
FUS E
Front Load Washing Machine
Page 23

SERVICE MANUAL
HW70-1202D HW60-1202D
HW60-1002D HW50-1202D
23
9-2. Self check
Self check
1.How to start
Press the “speed” and “intense” button at the same time, then put the plug in to the
socket, wait for about 3 seconds, the LED will display “TEST” and the model of the
machine ,then you can press “start/pause” to let washing machine start test function.
2. Test item
1) when the door switch is closed for three seconds, 88:88 will be displayed.
2) when the main wash valve allows water to let in for 3 seconds, 77:77 will be
displayed.
3) when the prewash valve allows water to let in for 3 seconds, 77:77 will be
displayed.
4) when the softy water valve allows water to let in for 3 seconds, 77:77 will be
displayed.
5) when the main wash valve, the prewash valve and also the softy water valve
allow water to let in for 3 seconds at the same time, 77:77 will be displayed.
6) Heater runs for ten seconds, 66:66 will be displayed.
7) the drain pump runs for about 1 mins, 55:55 will be displayed
8) the motor runs for 10 seconds with the spin speed 400rpm, then for ten seconds
with the spin speed 1000rpm, 44:44 will be displayed
Model selection
1.Press the extra rinse button and then put the plug in to the
socket at the same time for 4 seconds,
2.The default display shows
and it will enter the model-selection mode.
. Press the speed button to choose
till the needed
model.Then press the temperature key and the model can be stored. The model can
not be changed after storage.
3.If you want to change the model again after storage, you can cut off the NTC and
do the cycle adjustment.
4.Model HW60-1202D you should choose 1260
Model HW60-1002D you should choose 1060
Model HW50-1202D you should choose 1250
Model HW70-1202D you should choose 1270
5. Press On/Off button gently for 2 seconds to switch off the machine as buttons are
soft touch sensitive.
Front Load Washing Machine
Page 24

SERVICE MANUAL
Y
HW70-1202D HW60-1202D
HW60-1002D HW50-1202D
Chapter 10 Error Display and troubleshooting
10-1. Error Display
Error message:Door is not properly shut 20s after program is started.
Troubleshooting:
24
Pushing the door to Check Whether
Door is properly shut or not
Cut off the power and then turn on again.
Check the voltage between brown wire
and blue wire of door lock, is it between
AC 220-240V?
N
Check if the wire connecting door lock
and PCB is loose
N
Check the voltage between 12-3 and
12-12 of PCB, is it between AC
220-240V?
N
Y
Y
Shut the door properly
Door lock is broken and need replacing,
then make sure wire is connected
properly.
Connect the wire properly
Replace
PCB
Error message: Drainage error, water not emptied within 4 min.
Troubleshooting:
Check if water is emptied
N
Check if drain pump acts by touching
pump position
N
Cut off the power and choose spin
program to start ,then check the import
voltage of drain pump, is it between
AC 220-240 V?
N
Cut off power and pull out water level
pressure switch wire connection. Set
spin program to start. Check the export
voltage to drain pump, is it between AC
220-240V?
N
Replace PCB
Y
Cut off power and water level pressure switch wire
connection, measure the resistance of 11 and14 pin,
is it infinite? If not, it is water level pressure switch
failure and replaces it. If it is, then repair and check
PCB and wire as followed.
Check if drain pump or
Y
Y
Y
The wire between PCB
and drain pump is not
connected properly.
Replace the wire.
drain pipe is jammed,
And open the filter and
clean
Replace drain pump
Front Load Washing Machine
Page 25

SERVICE MANUAL
25
HW70-1202D HW60-1202D
HW60-1002D HW50-1202D
Error message:Temperature sensor is not properly connected or damaged (display at the end of a
program).
Troubleshooting:
Cut off power and measure the resistance
of temperature sensor by
it between 5-14k
Check if NTC is connected properly
Check the white wire and black wire of NTC,
are they connected well?
Disconnect the white wire and black wire
from PCB, and measure if the resistance
between white wire and black wire of PCB, is
it infinite?
multimeter, is
?
Y
Y
Y
N
N
N
N
Y
NTC exist open circuit. Replace it
Connect NTC well
Connect all wires well
Replace wire
Replace PCB
Error message:The heater may be broken
Troubleshooting:
Check if overload laundry. Reduce the laundry
Cut off power, check the resistance of
two pins of heater element by
multimeter, is it between 32-35
The control wire may be broken,
Otherwise the PCB must be broken;
Please replace the broken.
N
?
Y
Y
Heater element must
N
be broken, please
replace it
Front Load Washing Machine
Page 26

SERVICE MANUAL
HW70-1202D HW60-1202D
HW60-1002D HW50-1202D
Error message: The required water level is not reached within 8 min,
Troubleshooting:
26
Check if water is leaking from washer
bottom. Inlet pipe. drain pipe or
other pipe connection
N
Check if tap is closed or water
pressure is too low (usual
between0.2 -1 MPa)
N
Check if inlet valve is jammed
N
Draw out the dispenser and check if
water is entering
N
Turn on power, and set pre-wash
mode, then start. Check the import
voltage of electromagnetic valve by
multimeter is it between AC
220-240V?
Y
Connect it well.
Open the tap or wait for normal water
Y
Y
Y
Y
pressure to use
Clean inlet valve
Observe if the
height of drain pipe
not reach 80 cm. If
water level pressure
switch and the hose
is leaking gas
Electromagnetic valve must be broken, please
replace it.
N
Check if export voltage from PCB to
electromagnetic valve, is it between
AC 220-240V?
N
Replace PCB
Front Load Washing Machine
The wire connected PCB and inlet valve is not
properly. Please reconnect it or replace it.
Y
Page 27

SERVICE MANUAL
HW70-1202D HW60-1202D
HW60-1002D HW50-1202D
Error message. Motor overheat protection or is damaged.
Troubleshooting:
27
Cut off power and check if motor wires
are connected well
Y
Measure if the resistance of motor
binding by multimeter, is it as
followed?
5 -10
[0.755 /1.76 (at
20
C)]
;
N
8 -9[ / (at
20
C)]
;
Y
Pull out the wire connection of motor
and driving computer board. Then
check if circuit is open by multimeter
Y
Repair wires
Error message. Water level exceeds protection value.
N
Reconnect well
Put the motor in normal temperature
about ten minutes, and then test
again. If the resistance is natural, it
is caused by overheated protection.
Then check and deal with
overload, abnormal voltage. If not,
please replace motor
Troubleshooting:
Check if water switch hose and air collector
are jammed
N
Pull out water switch inserts and turn on
power, then set wash mode. while water
is entering at the position of 3/4 glass
window, check the resistance between 11
and 16, is it 0 ? Check the resistance
between 11and 14 ,is it infinite?
N
Without power ,connect inlet pipe to inlet
valve, then open the tap and observe if
water is entering in dispenser
N
Without starting but electrifying, measure
the import voltage of inlet valve, is it
between AC 220-240V?
Clean water switch hose and air
Y
Y
Y
Y
collector
Replace water pressure switch
Replace inlet valve
Replace PCB
Front Load Washing Machine
Page 28

SERVICE MANUAL
p
g
HW70-1202D HW60-1202D
HW60-1002D HW50-1202D
10-2. Examination & Troubleshooting
10-2-1. Display nothing
Troubleshooting:
Measure the power supply ,is it exists
220V-240V AC voltage
Y
N
28
Repair power supply
Is power switch on?
Y
Press power switch and check the
voltage between two pins of power
switch. Is there 220-240V AC
volta
e?
Y
Cut off power and check if plugs are
connected well by pulling the plug of
PCB.
Y
Check if power plug exists 220V-240V
AC voltage at the import pin
10-2-2. No water inletting
Troubleshooting:
Is the tap shut off or the water pressure
too low?
N
N
N
N
Y
Press the power switch
Make sure power supply cable
assembly is connected well and then
replace power switch.
Insert the plug well and test
Replace PCB
Open tap or wait for normal water
pressure
N
Check if water is leaking from washer
connection, especially between inlet pipe
and tap. to make sure of no bends.
N
Check if filter of electromagnetic valve
is jammed
N
Choose pre-wash program and start
Check if there is 220-240V at import
pin of electromagnetic valve
N
Is there open circuit between
electromagnetic valve and PCB?
N
Choose pre-wash program and start
then check if there is 220-240V at
ort pin of electromagnetic valve
ex
Y
Y
Y
Y
N
Reconnect inlet pipe.
Clean filter
Replace electromagnetic valve
Reconnect the wire
Replace PCB
Front Load Washing Machine
Page 29

SERVICE MANUAL
HW70-1202D HW60-1202D
HW60-1002D HW50-1202D
10-2-3. No draining
Troubleshooting:
29
Is the height of drain pipe too high?
N
Turn filter anticlockwise open and
check if filter is jammed
N
Check if hose-connecting cylinder to
pump is bent or jammed
N
Turn on power and choose spin
program to start. Measure if import
voltage of drain pump is 220-240V
N
Cut off and check if the connection
between drain pump and PCB is open
N
Y
Y
Y
Replace drain pump
Y
Replace the wire .
Y
Adjust the height of drainpipe to
80-100 cm
Clean and tighten filter clockwise.
Arrange hose and clean
Turn on and select spin program to start,
Measure export voltage of PCB to the
drain pump, is it 220-240V?
N
Replace
PCB
10-2-4. Abnormal noise and vibration
Troubleshooting:
Is the pack screws dismantled?
Y
Is there foreign material in the washer ?
N
Is washer in balance?
Y
Is belt loose or worn?
N
Remove belt and turn belt pulley by hand,
and then check if there is different noise
N
N
Y
N
Y
Dismantle the screws
Clean
Adjust adjustable feet
Replace it
Y
Dismantle triangle and
check the bearing. If it is
broken, replace it.
Turn on power and set spin program,
then start
noise from motor
check if there is different
Y
Replace motor
10-2-5. Water leaking
Front Load Washing Machine
Page 30

SERVICE MANUAL
HW70-1202D HW60-1202D
HW60-1002D HW50-1202D
Troubleshooting:
30
Check if water is leaking from the inlet pipe
or the tap
N
Is drain pipe broken
N
Check if there is foreign material nipped
between cushion of sight window and
sight window
N
Check if all tubes and tie-in is leaking
water, including the connecting of tube
and valve, dispenser, tube and dispenser,
outer cylinder-cushion of sight
window-hose and outer cylinder, drain
pump and gas valve
N
Is cushion of sight window broken?
N
Readjust it
Y
Y
Y
Y
Y
Replace drainpipe
Remove clothes
Reassemble or repair
Replace outer cylinder
Is water leaking from outer cylinder?
Front Load Washing Machine
Page 31

SERVICE MANUAL
HW70-1202D HW60-1202D
HW60-1002D HW50-1202D
Chapter 11 Maintenance
31
Front Load Washing Machine
Page 32

SERVICE MANUAL
HW70-1202D HW60-1202D
HW60-1002D HW50-1202D
32
CLOK
Front Load Washing Machine
Page 33

SERVICE MANUAL
HW70-1202D HW60-1202D
HW60-1002D HW50-1202D
33
7/6/5kg.
Front Load Washing Machine
Page 34

SERVICE MANUAL
HW70-1202D HW60-1202D
HW60-1002D HW50-1202D
34
Sincere Forever
Front Load Washing Machine
 Loading...