

Haier HRT18RCWB, HRT18RCPB Owners Manual
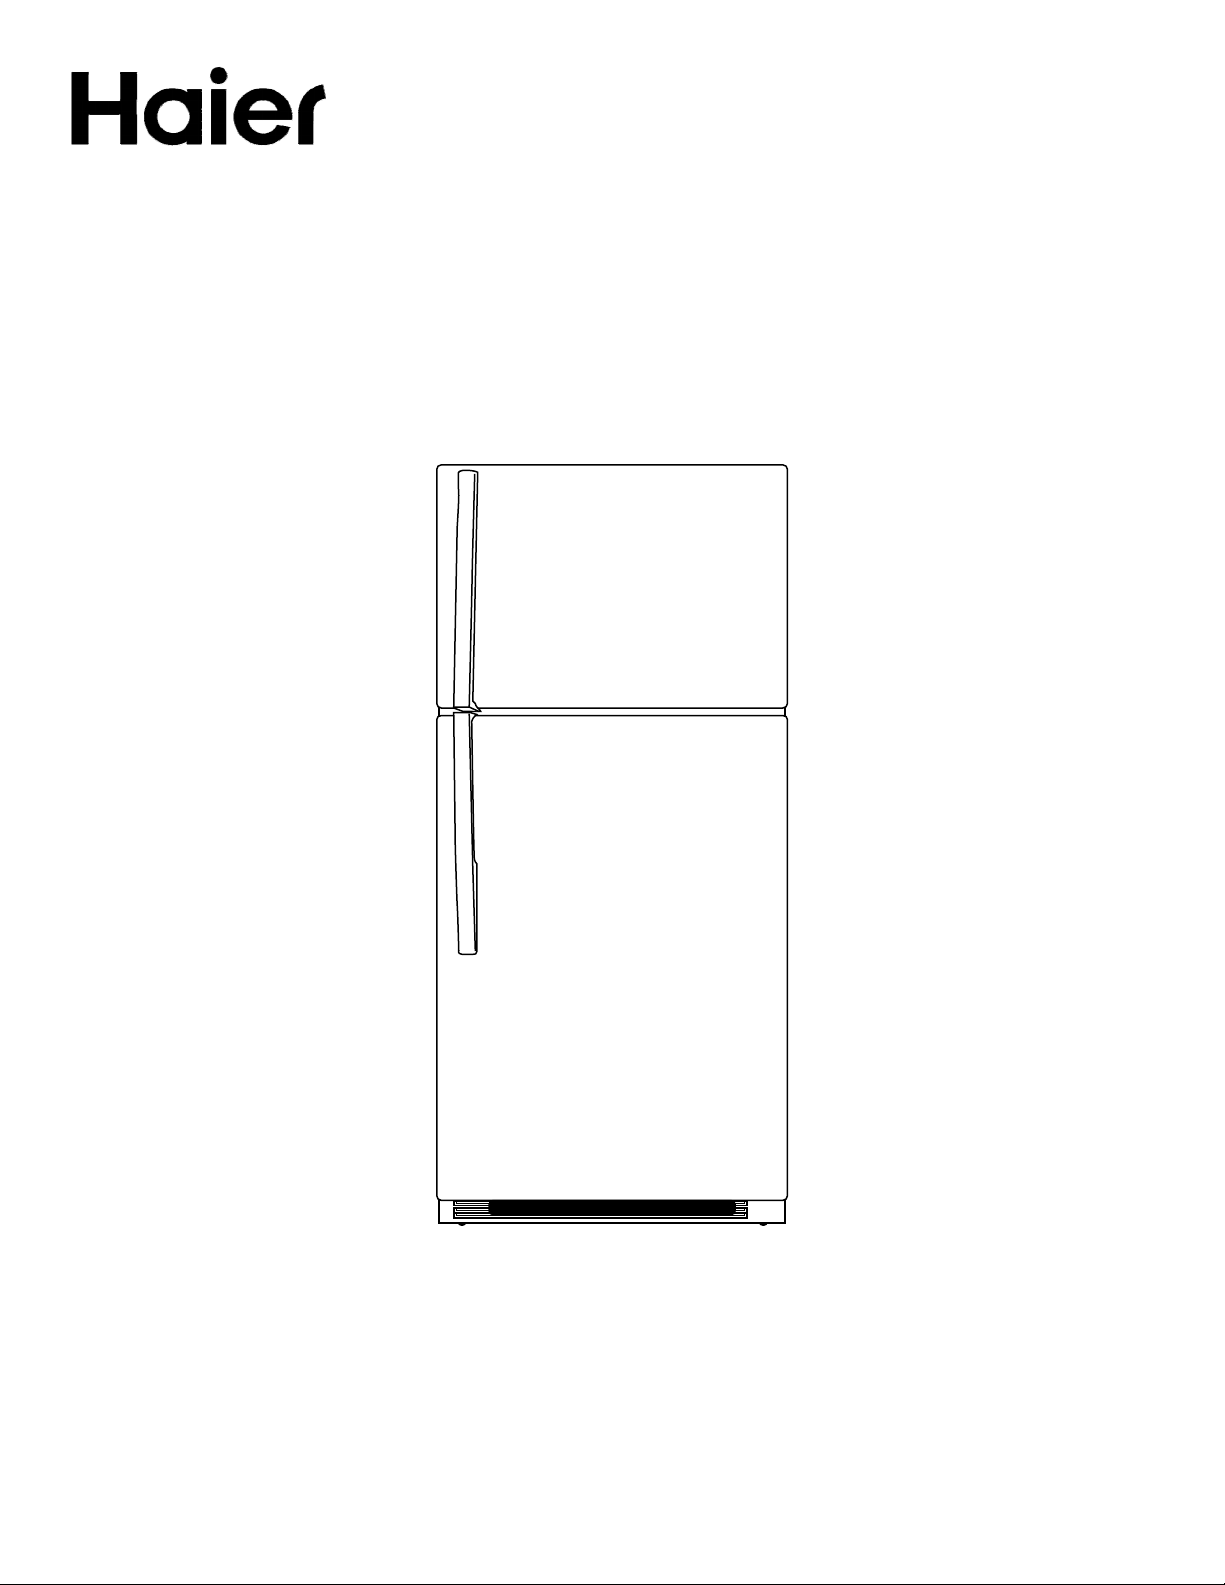
Frost-Free Top Mount
Refrigerator/Freezer
Réfrigérateur/congélateur sans
givre à compartiments superposes
Refrigerador/congelador sin
escarcha, de puertas horizontales
User Manual
Guide de l’Utilisateur
Manual del Usuario
Model
HRT Series
Design may vary by model number.
La configuration peut varier selon le numéro de modèle.
El diseño puede variar conforme al número de modelo.
P/N 0060517094 Rev E

TABLE OF CONTENTS
ENGLISH
SAFETY INFORMATION
Important Safety Instructions
SET UP & USE
Electrical Requirements
Installation Guide
Instructions for Unpacking
Parts Included
Accessories
Reversing the Doors
Door Handle Installation
Water Supply Installation
Features and Use
CLEANING & CARE
3-4
4
4-8
4
5
6
6
7
7
8
Proper Care and Maintenance
TROUBLESHOOTING & WARRANTY
Normal Operating Sounds
Troubleshooting
Customer Service
Limited Warranty
PRODUCT REGISTRATION
Thank you for purchasing your Haier product.
This easy-to-use manual will guide you in getting the
best use out of your product.
Remember to record the model and serial numbers.
They are on a label inside of the product.
Staple your receipt to your manual. You will need it to
obtain warranty service.
10-11
11
12-13
13
14
Model Number
Serial Number
Date of Purchase
IMPORTANT SAFETY INSTRUCTIONS
Your safety and the safety of others is very important.
We have placed important safety messages throughout this manual. Always read and obey these safety
ENGLISH
Safety messages are indicated by the safety symbol: This symbol will be accompanied by one of
the following safety indication terms and an explanation of the potential hazards that could cause death
or injury.
Safety Indication Terms Definitions:
DANGER
WARNING
CAUTION
You could be killed or seriously injured if you don’t immediately follow
instructions.
A potentially hazardous situation which, if not avoided, could result in death
or serious bodily injury
A potential hazardous situation which, if not avoided, may result in moderate
or minor injury.
WARNING
READ ALL INSTRUCTIONS BEFORE USING THIS APPLIANCE.
WHEN USING THIS APPLIANCE, ALWAYS EXERCISE BASIC SAFETY
PRECAUTIONS, INCLUDING THE FOLLOWING:
messages.
1. Use this appliance only for its intended purpose as described in this use and care manual.
2. This refrigerator must be properly installed in accordance with the installation instructions before it is
used. See Electrical Requirements in the Set Up & Use section.
3. This refrigerator should not be recessed or built-in an enclosed cabinet. It is designed for
freestanding installation only.
4. Never unplug your refrigerator by pulling on the power cord. Always grasp the plug firmly and pull
straight out from the outlet.
5. Repair or replace immediately all electric service cords that have become frayed or otherwise
damaged. Do not use a cord that shows cracks or abrasion damage along its length, at the plug or at
the connector end.
6. Do not touch cold surfaces in the freezer compartment, particularly when your hands are damp or
wet. Skin may adhere to these extremely cold surfaces.
7. Do not use any electrical device or any sharp instrument in defrosting your refrigerator.
8. Unplug your refrigerator before cleaning or making any repairs.
NOTE: If for any reason this product requires service, we strongly recommend that a qualified technician
perform service.
9. Do not operate your refrigerator in the presence of explosive fumes.
WARNING
RISK OF CHILD ENTRAPMENT. BEFORE YOU THROW
AWAY YOUR OLD REFRIGERATOR OR FREEZER, TAKE
OFF THE DOORS. LEAVE THE SHELVES IN PLACE SO
THAT CHILDREN MAY NOT EASILY CLIMB INSIDE.
PAGE 3 ● SAFETY INFORMATION
IMPORTANT SAFETY INSTRUCTIONS
CAUTION
DO NOT PLACE FINGERS OR HAND ON THE AUTOMATIC ICE MAKING MECHANISM WHILE THE
REFRIGERATOR IS PLUGGED IN. THIS WILL HELP PROTECT YOU FROM POSSIBLE INJURY AS WELL
AS PREVENT INTERFERENCE WITH MOVING PARTS OF THE EJECTOR MECHANISM AND THE
HEATING ELEMENT THAT RELEASES THE CUBES.
SAVE THESE INSTRUCTIONS
ELECTRICAL REQUIREMENTS
WARNING
ELECTRICAL REQUIREMENT - SHOCK HAZARD
Make sure there is a suitable power outlet. 115 Volt, 15 Amp, 3-prong (grounded) power outlet with
proper grounding to power the refrigerator.
Avoid the use of 3-prong adapters or cutting off the third grounding prong in order to accommodate
a 2-prong outlet. This is a dangerous practice since it provides no effective grounding for the
refrigerator and may result in death, fire or electrical shock.
ENGLISH
WARNING
USE OF EXTENSION CORDS - POTENTIAL SAFETY HAZARD
Avoid the use of an extension cord because of potential safety hazards under certain conditions. If it
is necessary to use an extensions cord, use only a 3-wire extension cord that has a 3-prong grounding
plug and a 3-prong outlet that will accept the plug. The marked rating of the extension cord must be
equal to or greater than the electrical rating of the appliance.
Do not use an extension cord longer than 12 ft.
Failure to follow these instructions may result in death, fire or electrical shock.
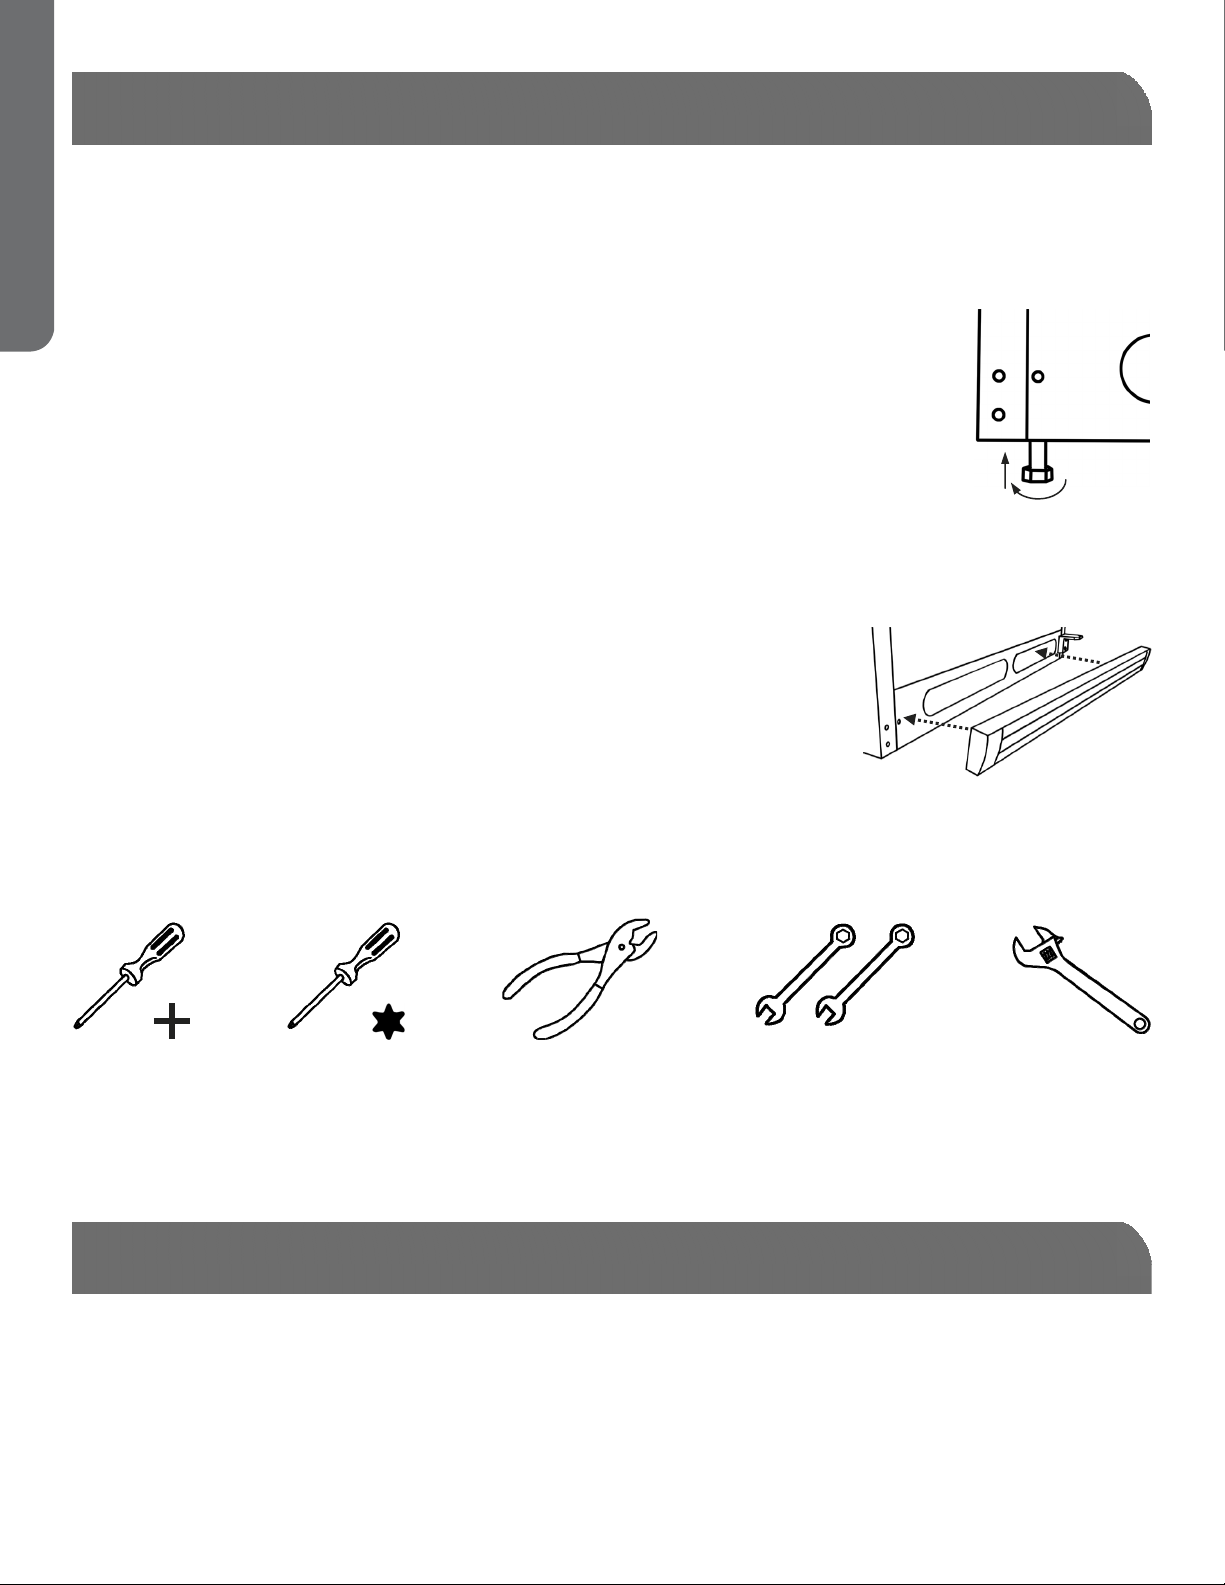
INSTALLATION GUIDE
INSTALLATION LIMITATIONS
Select a suitable location for the refrigerator on a hard, even surface away from direct sunlight or heat
source, e.g. radiators, baseboard heaters, cooking appliances, etc. Any floor unevenness should be
corrected with the leveling legs located on the front bottom corners of the refrigerator.
UNPACKING YOUR REFRIGERATOR
1. Remove all packaging material. This includes the corrugated base and all adhesive tape holding the
refrigerator accessories inside and outside. Retain foam block between doors if door swing reversal is
required.
2. Inspect and remove any remains of packing, tape or printed materials before powering on the
refrigerator.
3. If your refrigerator comes with a snack pan, remove the blue adhesive tape from the rear of the pan.
The pan will not slide in and out without removing the tape.
PAGE 4 ●SET UP & USE
INSTALLATION GUIDE CONT.
4. If your refrigerator comes with smooth or stainless steel doors, please remove the clear film before
turning it on for the first time. When removing film, do not pull the film straight down as this could
ENGLISH
result in misaligned doors.
5. It is normal for the freezer door to be positioned slightly higher than the top of the cabinet when the
refrigerator is first installed. This positioning is done at the factory to ensure gasket seals properly
once the door is weighted with food items.
LEVELING YOUR REFRIGERATOR
The cabinet must rest firmly on the floor.
The cabinet must sit level from side to side.
The cabinet must tilt slightly (¼”or 6mm) from front to back for the doors to seal
properly.
Turn the leveling legs to raise or lower the cabinet.
PROPER AIR CIRCULATION
To ensure your refrigerator works at the maximum efficiency it was designed for, you should install it
in a location where there is proper air circulation, plumbing and electrical connections. Your
refrigerator is not designed to operate in temperatures below 55°F (12°C)
or above 95°F (35°C).
Do not install your refrigerator in any location not properly insulated or
heated, e.g. garage, etc.
Keep out of direct sunlight and away from heating sources such as
radiators, heaters and cooking appliances.
The following are recommended clearances around the refrigerator:
Sides and Top ………. 1” (25mm) Back ………. 2” (50mm)
Front Grille
TOOLS NEEDED FOR INSTALLATION
DO NOT USE POWER TOOLS TO INSTALL DOOR HANDLES!
OVERTIGHTENING THE SCREWS COULD STRIP THE THREADS!
Phillips
Screwdriver
T25 Torx
Screwdriver
(Select Models)
Pliers
5/16 & 3/8
Wrenches
Or
Adjustable
Wrench
IF YOUR REFRIGERATOR COMES WITH A FACTORY-INSTALLED WATER VALVE AND TUBING, DO
NOT CONNECT A WATER SUPPLY TO THE WATER VALVE ON THE REAR OF THE REFRIGERATOR
UNTIL AN ICE MAKER IS INSTALLED.
PARTS INCLUDED
PARTS INCLUDED MAY DIFFER BASED ON UNIT PURCHASED.
ALL MODELS
2 handles
Front grille
4 handle mounting screws
Owner`s manual
PAGE 5 ●SET UP & USE
STAINLESS STEEL MODELS
Hex key (for handle installation)
ICE MAKER INSTALLED MODELS
Ice bucket
Water supply clamp
#8 screw
ACCESSORIES
The following accessories and more are available:
Ice Maker Kits* (Be prepared to specify refrigerator model when ordering)
* Excludes Non-Ice Maker Ready models
Freezer shelving
Replacement light bulbs
Replacement door logo badge
Plugs for door handle screw holes
To order accessories, call 1-877-337-3639 or visit us at www.haieramerica.com/support.
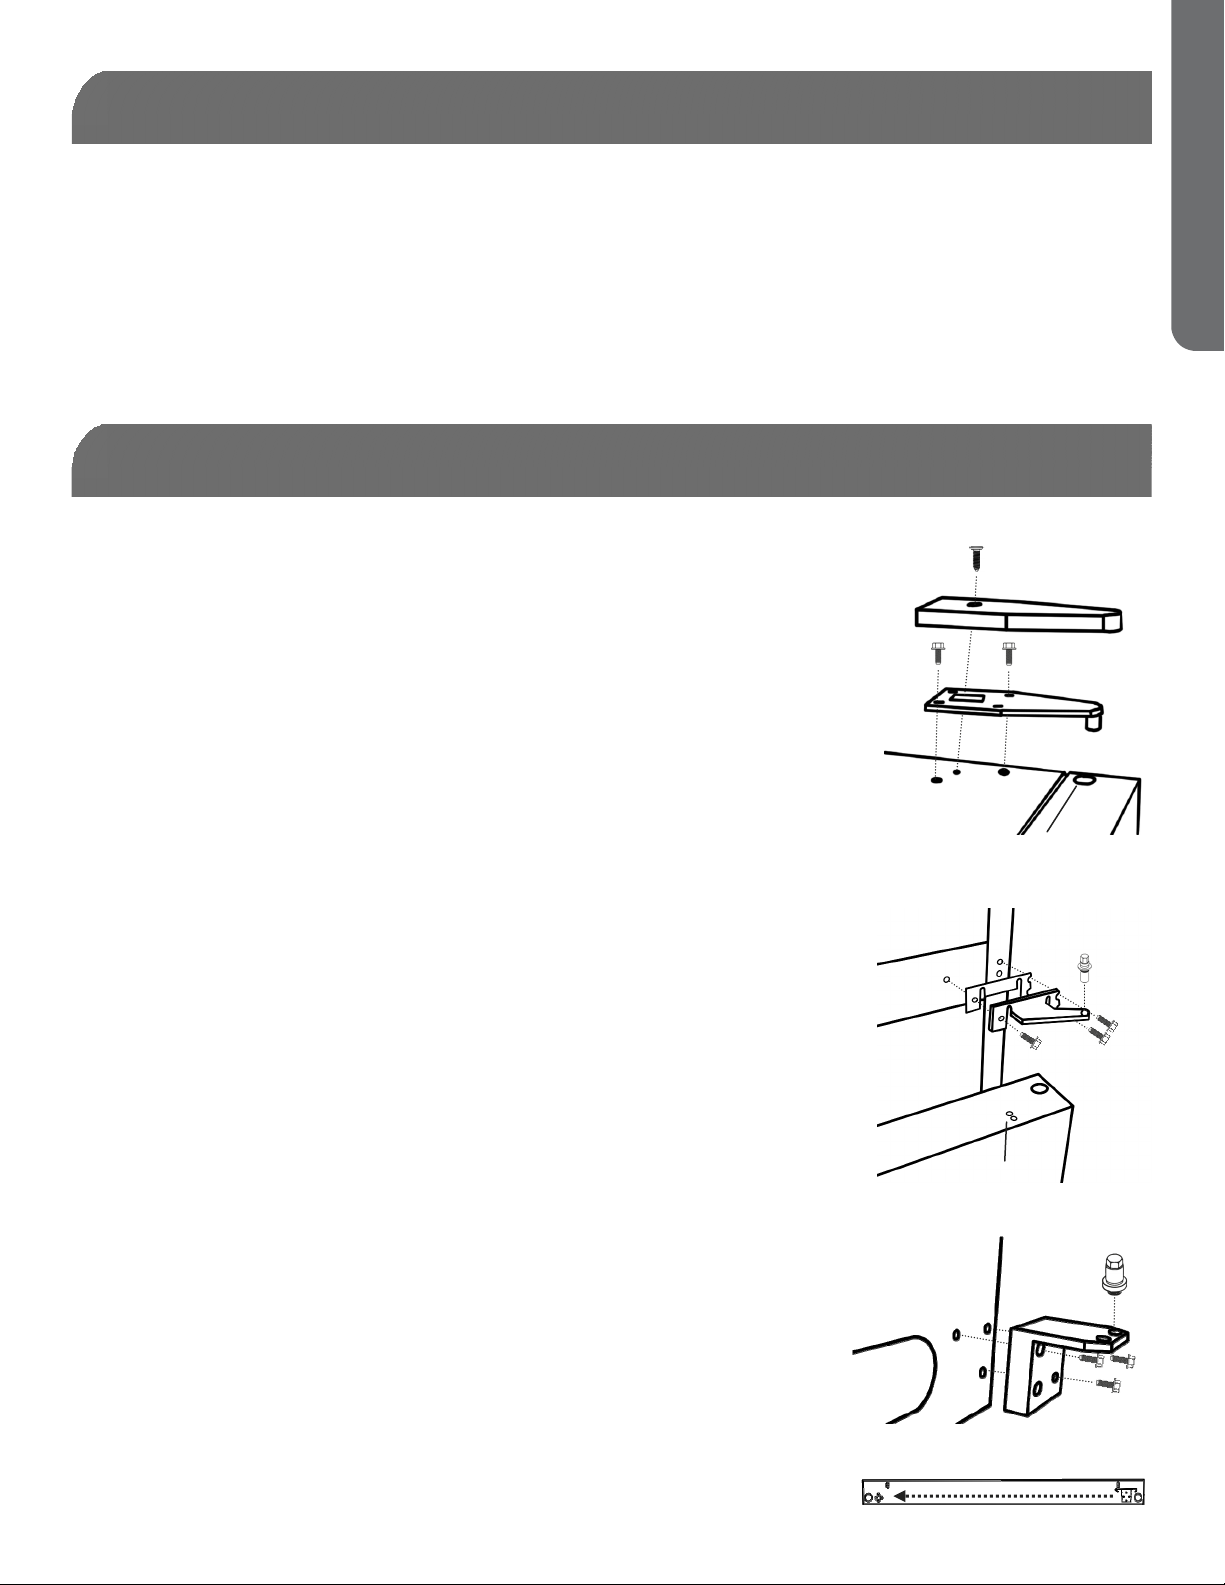
REVERSING THE DOORS
ENGLISH
DOOR REMOVAL/REVERSAL
NOTE: Fastener heads may vary depending on model.
1. Disconnect refrigerator from power supply.
2. Remove front grille (if already installed).
3. Remove top hinge cover and top hinge. Lift freezer door off center
hinge and set aside.
4. Unscrew center hinge pin. Be sure to retain plastic washer(s) for
reinstallation. Remove refrigerator door from bottom hinge and set
aside.
5. Use either a wrench or T25 Torx screwdriver to remove center hinge
and plastic spacer(s) by unscrewing center bolt, loosening side bolts
and sliding hinge to the center of the cabinet. Tighten bolts.
6. Remove the center bolt on the opposite side, loosen side bolts and
slide center hinge and spacers behind side bolts. Reinstall center bolt
and tighten side bolts.
7. Remove bottom hinge bolts and relocate bottom hinge to the opposite
side of the cabinet. Tighten bolts.
8. Unscrew bottom hinge pin, move to other hinge hole and tighten.
Top Hinge
Door Hinge Hole
Center Hinge
9. Relocate door stops (bottoms of both doors), hinge hole covers and
handle screw plugs (if reversing doors) on both doors to the opposite
side of the doors.
10. Place refrigerator door on bottom hinge pin. Align hinge hole in door
with hole in center hinge. Insert center hinge pin and tighten.
11. Place freezer door on center hinge pin and close.
12. Insert top hinge pin into hinge hole in top of freezer door. Align with
bolt holes in top of cabinet and tighten bolts. Replace top hinge cover.
13. Flip over front grille and reinstall.
14. See door handle instructions to remove and reinstall handles.
15. Reconnect refrigerator to power supply.
PAGE 6 ●SET UP & USE
Handle screw plugs
Bottom Hinge
Door Stop

DOOR HANDLE INSTALLATION
PLASTIC HANDLES
1. Remove door handles and screws from plastic bags.
ENGLISH
2. Place flared end of handle over pre-installed door face mounting screw. Slide handle down to secure it.
(Screw may need to be loosened slightly if handle is difficult to slide on).
3. Rotate door handle toward gap between doors.
4. Install screws from parts-included bag but do not tighten fully.
5. Repeat above steps for remaining door.
6. With both handles mounted, visually align handles, carefully open door and tighten screws.
2
STAINLESS STEEL HANDLES:
1. Remove door handles and hex key from freezer compartment
2. Place flared end of handle over mounting stud on face of door; align holes in flat end of handle with holes
on door edge
3. Install screws into flat end of handle
4. Use hex key to tighten set screw on flared end of handle, tighten until handle is flush with door then
tighten another half turn.
2
3
WATER SUPPLY INSTALLATION
IMPORTANT: This water supply installation is not covered under warranty by the refrigerator or ice maker
manufacturer(s). Follow these instructions carefully to minimize the risk of expensive water damage.
SUPPLIES REQUIRED FOR INSTALLATION:
Access to a household cold water line with water pressure between 20 psi and 120psi
A water supply line made of 1/4-inch outside diameter, copper tubing. Plastic is not recommended since it
greatly increases the potential for water leaks. To determine the length of the copper tubing needed, you
will need to measure the distance from the ice maker water valve at the back of the refrigerator to your
cold water pipe. Then add approximately 7 feet, so the refrigerator can be moved out for service.
PAGE 7 ●SET UP & USE

WATER SUPPLY INSTALLATION (CONT.)
A shutoff valve to connect the water supply line to your household water system
NOTE: Do not use a self-piercing type shutoff valve.
A compression nut and ferrule (sleeve) for connecting the water supply line to the ice maker inlet valve.
Do not install water supply tubing in areas where the temperature falls below freezing.
Connect the ice maker to a drinkable water source that is not connected to a water softening system.
Chemicals from the softener may damage the ice maker, causing it to malfunction.
INSTALLATION INSTRUCTIONS
1. Disconnect refrigerator from power supply.
2. Turn off water supply at shut off valve.
#8 Screw
ENGLISH
3. Connect copper water supply line to household water system.
4. Turn ON water supply and tighten any connections that leak.
5. Re-install rear access cover for compressor compartment.
6. Coil excess water supply line behind refrigerator, as shown below
and arrange coils so they do not vibrate or wear against other
surfaces. Use water tube clamp and #8 screw from the parts
included bag to secure water supply line to rear of refrigerator.
7. Reconnect refrigerator to power supply.
8. Turn icemaker ON by lowering wire control arm.
FEATURES AND USE
NOTE: All features not available on all models.
Air Flow Control
Water Supply
Clamp
Wire Control Arm
Freezer Door Shelves
Temperature
Control with
Interior Light
Full-Width Shelves
Crisper Humidity
Controls
Crisper Bins
Front Grille
Leveling Legs
Dairy Compartment
Full-Width Door Shelves
Diagram for instructional purposes only.
Design may vary by model number.
PAGE 8 ●SET UP & USE
FEATURES AND USE (CONT.)
STORAGE
In order for air to flow properly inside of your refrigerator, do not store items directly in front of the freezer
ENGLISH
fan tower vents, directly under the refrigerator vent or against the sides of the refrigerator compartment.
Position items toward the center of shelves.
Vents
Refrigerator Vent
CONTROLS
Allow 24 hours for adjustments.
The Refrigerator Temperature control should be set at “1 o’clock” and adjusted in small increments after
24 hours to achieve desired temperature.
The Freezer Temperature control should be set at “12 o’clock” and adjusted in small increments after 24
hours to achieve desired temperature.
Adjusting the refrigerator control will affect the freezer compartment as well.
Turning either control to “Off” or the lowest temperature setting does not disconnect the power supply
from the refrigerator.
Refrigerator Temperature Freezer Temperature Crisper
LIGHT COVERS (NOT ALL MODELS)
Freezer (Not All Models)
ICE MAKER (NOT ALL MODELS)
To stop the ice maker, lift the wire arm until it clicks and locks in the OFF
Mid-Level (Not All Models) Main Refrigerator (Not All Models)
Wire Control Arm
(raised) position. The ice maker turns OFF automatically when the ice
container is full.
NOTE: It takes approximately 24 hours for the ice maker to begin
producing ice. New plumbing may cause ice discoloration and
poor flavor. Discard ice made in the first 24 hours.
Water quality determines ice quality. Do not connect the ice maker to
water that is softened. Chemicals from a malfunctioning softener can
damage the ice maker.
Ice stored too long may develop an odd flavor. Empty the container and make sure the wire arm is in the
ON (lowered) position. The ice maker will then produce ice.
Keep the wire arm in OFF position until the refrigerator is connected to the water supply or whenever the
water supply is turned OFF.
IMPORTANT:
Do not wash the ice container in your dishwasher.
Be sure to stop the ice maker when cleaning the freezer or on vacation.
If the ice maker has to be turned OFF for a long period of time, turn the water supply valve to the closed
position.
PAGE 9 ●SET UP & USE
PROPER CARE AND MAINTENANCE
LIGHT BULB REPLACEMENT
WARNING
BEFORE CLEANING YOUR REFRIGERATOR,
ALWAYS UNPLUG IT FROM THE POWER
SOURCE. FAILURE TO HEED THIS WARNING
COULD RESULT IN INJURY OR DEATH FROM
ELECTRIC SHOCK.
NOTE: If your refrigerator is equipped with LED lighting
blocks, these lights are designed to last for the life of
the refrigerator, however, if the lights stop operating,
please contact a certified technician for replacement.
WARNING
ENGLISH
NOTE: Before using any cleaning products, be sure to
read the cleaning product manufacturer’s instructions
and warnings. This will help avoid personal injury or
damage to property.
INTERIOR CLEANING
Prepare a cleaning solution of 3-4 tablespoons of
baking soda mixed with warm water. Use a sponge or
soft cloth, dampened with the cleaning solution to
wipe the inside of your refrigerator.
Handle all glass parts with care at all times.
DO NOT USE WARM WATER TO CLEAN GLASS
SHELVES WHILE THEY ARE STILL COLD. GLASS MAY
BREAK WHEN EXPOSED TO SUDDEN TEMPERATURE
CHANGES OR IMPACT.
Do not attempt to wash any parts in a dishwasher.
Do not use harsh chemicals, ammonia, chlorine bleach,
concentrated detergent, solvents, abrasives or metal
scouring pads to clean your refrigerator, inside or out.
They can damage and/or discolor the refrigerator
finish.
EXTERIOR CLEANING
Use a clean, soft, lightly dampened cloth with kitchen
appliance wax or a mild detergent to clean the exterior
of the refrigerator.
Use a clean, soft, lightly dampened cloth with warm
soapy water to clean handles and trim. Use a clean, soft
towel to dry.
For stainless steel models, use a dry cloth and stainless
steel polish.
Door gaskets should be cleaned every three months
following the instructions for interior cleaning. Clean
gaskets will maintain a better seal than dirty gaskets.
Lightly apply petroleum jelly to the hinge side of the
gaskets to keep the gasket pliable and assure a good
seal.
Never use a dirty cloth to clean the exterior of the
refrigerator. Dirty cloths may leave residue on the
refrigerator that can damage the finish. Also, avoid the
use of harsh chemicals, ammonia, chlorine bleach,
concentrated detergent, solvents, abrasives or metal
scouring pads to clean the outside of the refrigerator.
BEFORE CHANGING A BULB, ALWAYS
UNPLUG UNIT FROM THE POWER SOURCE.
FAILURE TO HEED THIS WARNING COULD
RESULT IN INJURY OR DEATH FROM
ELECTRIC SHOCK.
INCANDESCENT LIGHT BULB REPLACEMENT GUIDE
Use the guide below to determine the appropriate bulb
for each fixture.
Upper Refrigerator Light - 40 Watt Daylight
Appliance Bulb w/ medium base (1 or 2, depending
on model)
Mid-Level Refrigerator Light - 25 Watt Appliance
Bulb w/ candelabra base
Freezer Light - 25 Watt Appliance Bulb w/ candelabra
base
LED LIGHT BULB REPLACEMENT GUIDE
Use the guide below to determine the appropriate bulb
for each fixture.
Upper Refrigerator Light - 5 Watt (or 40 Watt
Incandescent equivalent) LED Bulb with medium
base
Mid-Level Refrigerator Light - 1.2 Watt (or 25 Watt
Incandescent equivalent) LED Bulb w/ candelabra
base
Freezer Light - 1.2 Watt (or 25 Watt Incandescent
equivalent) LED Bulb w/ candelabra base
REPLACEMENT INSTRUCTIONS
1. In order to replace a light bulb, first unplug your
refrigerator from the power outlet.
2. After allowing the bulb to cool, turn bulb
counterclockwise in order to remove it from the
socket.
3. Screw a new bulb into the socket by turning the bulb
clockwise.
4. Plug in your refrigerator and open the door to check
that the bulb is working.
PAGE 10 ●CLEANING & CARE

PROPER CARE AND MAINTENANCE
POWER INTERRUPTIONS
In the event of a power interruption, unplug your
ENGLISH
refrigerator from the power source. Avoid opening
the doors until after power has been restored. Your
refrigerator will maintain a cold temperature for a
longer period of time if door opening is avoided or
kept to a minimum.
Once power has been restored, plug your
refrigerator back into the power source and inspect
food in the refrigerator for spoilage or thawing.
Cleaning your refrigerator after a prolonged power
outage is strongly recommended to avoid odors and
potential health hazards due to thawing.
NORMAL OPERATING SOUNDS
VACATION S
For long vacations or absences, unplug your
refrigerator and remove all food from it. Turn the
temperature control knob in the refrigerator section
to the OFF position and clean the refrigerator,
including the gaskets, according to the Proper Care
and Maintenance section. Leave the doors propped
open to allow air to circulate inside the refrigerator.
MOVING
Before moving your refrigerator, empty the food
from it and use adhesive tape to secure all loose
items such as shelves, door bins and racks, crispers
and pans, etc. and unplug it. Always move the
refrigerator in an upright position in order to avoid
damaging the sealed refrigerant system.
WHIRRING/BUZZING
There are multiple high-speed fans inside your
refrigerator which help it to maintain the
temperature you have selected. Whirring is common
when the refrigerator is first plugged in, when the
doors have been opened often or for an extended
period of time and when a large amount of food has
been added. It may also be heard when the ice maker
is ejecting ice into the ice bucket.
HUMMING
This is a common sounds that comes from the
compressor and is a part of making your refrigerator
run efficiently.
WHOOSHING
It is possible that you may hear a whooshing sound
when closing the doors. This is no cause for concern.
It is simply the pressure in refrigerator equalizing.
OTHER SOUNDS
There are lots of things going on in your refrigerator
at any given time. Additional sounds your may hear,
and possible causes include:
Gurgling is most likely due to the circulation of
refrigerant through the cooling coils.
Running water can be heard while the ice maker is
filling with water.
Sizzling or popping sounds can be frost melting
and falling onto the defrost heater during the
defrost cycle.
Clicking or chirping may be heard as the
compressor attempts to re-start.
Clicking may also be heard when the water valve
opens and closes to fill the ice maker.
Cracking or popping sounds may be from the
expansion and contraction of cooling coils during
and after the defrost cycle.
Also, when your refrigerator is first plugged in, the
foam insulation in the walls will cool and contract,
which can result in cracking or popping sounds
The defrost timer and thermostat control will click
as each cycles on and off.
You will also a hear a thump when ice drops into
the ice bucket.
PAGE 11 ●CLEANING & CARE
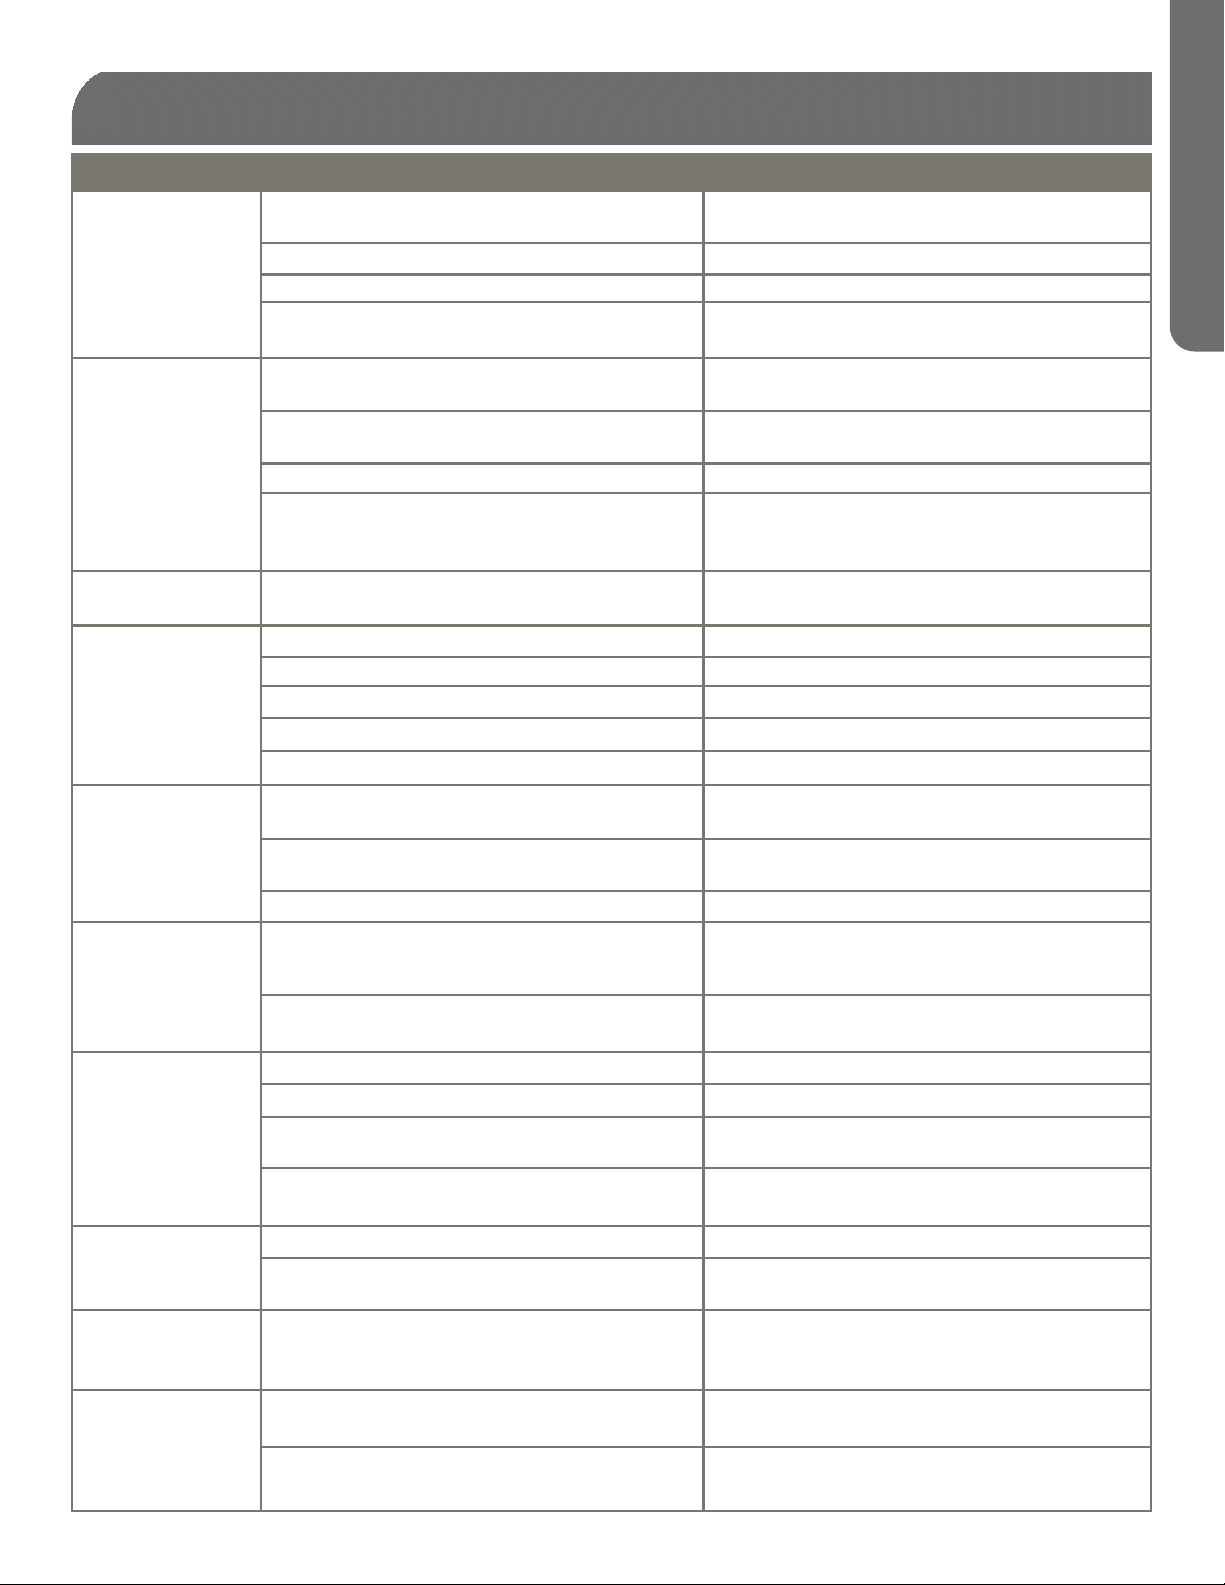
TROUBLESHOOTING
PROBLEM POSSIBLE CAUSES(S) SOLUTION
Refrigerator does
not run
Refrigerator or
freezer is too warm
Refrigerator or
freezer is too cold
Refrigerator runs
frequently or for
long periods of time
Temperature Control Knob is set to OFF Turn temperature knob clockwise to turn on
cooling system
Refrigerator is unplugged Plug power cord into power source
Breaker is tripped or turned off / Fuse is blown Reset / Turn on breaker or replace fuse
Refrigerator is in defrost mode Wait about 40 minutes for defrost cycle to end
and cooling system to re-start
Temperature control is not set low enough Turn temperature knob clockwise to adjust to a
lower temperature; allow 24 hours to adjust
Doors opened frequently or left open Keep door closed / Check that an obstruction
isn’t preventing door from closing
Warm food added recently Allow time for food and refrigerator to cool
Items are blocking proper air flow Store items only inside the trim of the glass
shelves; don’t place items against sides of the
compartments or directly in front of any vents
Temperature control is set too low Turn knob counter-clockwise to change to a
warmer setting; allow 24 hours to adjust
Normal when first plugged in Allow 24 hours for the refrigerator to cool down
Warm or large amounts of food added This is normal; allow 24 hours to adjust
Door is left open Ensure door is not being held open by an item
Hot weather or frequent openings This is normal; allow 24 hours to adjust
Temperature control set to coldest setting Adjust knob to a warmer setting
ENGLISH
Moisture on
exterior/interior of
refrigerator
Refrigerator
has an odor
Light does not
come on
Frost or ice crystals
on frozen food
Hot or warm air
from bottom of
refrigerator
Food freezing in
refrigerator
High humidity This is normal; Dry surface and adjust
temperature knob to slightly colder setting
Doors opened frequently or left open Keep door closed / Check that an obstruction
isn’t preventing door from closing
Open container of water in refrigerator Cover or seal container
Food is not sealed or packaged properly Re-seal packaging / Place an opened box of
baking soda in the refrigerator; replace every
three months
Interior needs to be cleaned Follow cleaning instructions in Proper Care and
Maintenance section
Refrigerator is unplugged Plug refrigerator in to power source
Bulb is loose Tighten bulb by turning clockwise
Bulb is burned out Follow instructions in Light Bulb Replacement
section
Not all models come with freezer or mid-level
light
Freezer door left open or opened frequently Keep freezer door closed as much as possible
Items blocking freezer air vents and preventing
proper air flow
Air flow coming from compressor during
Move items away from rear wall
This is normal
refrigeration process
Food placed too close the air vent Move items away from back and top of the
refrigerator
Temperature control knob set too low Turn knob counter-clockwise to change to a
warmer setting; allow 24 hours to adjust
PAGE 12 ●TROUBLESHOOTING & WARRANTY
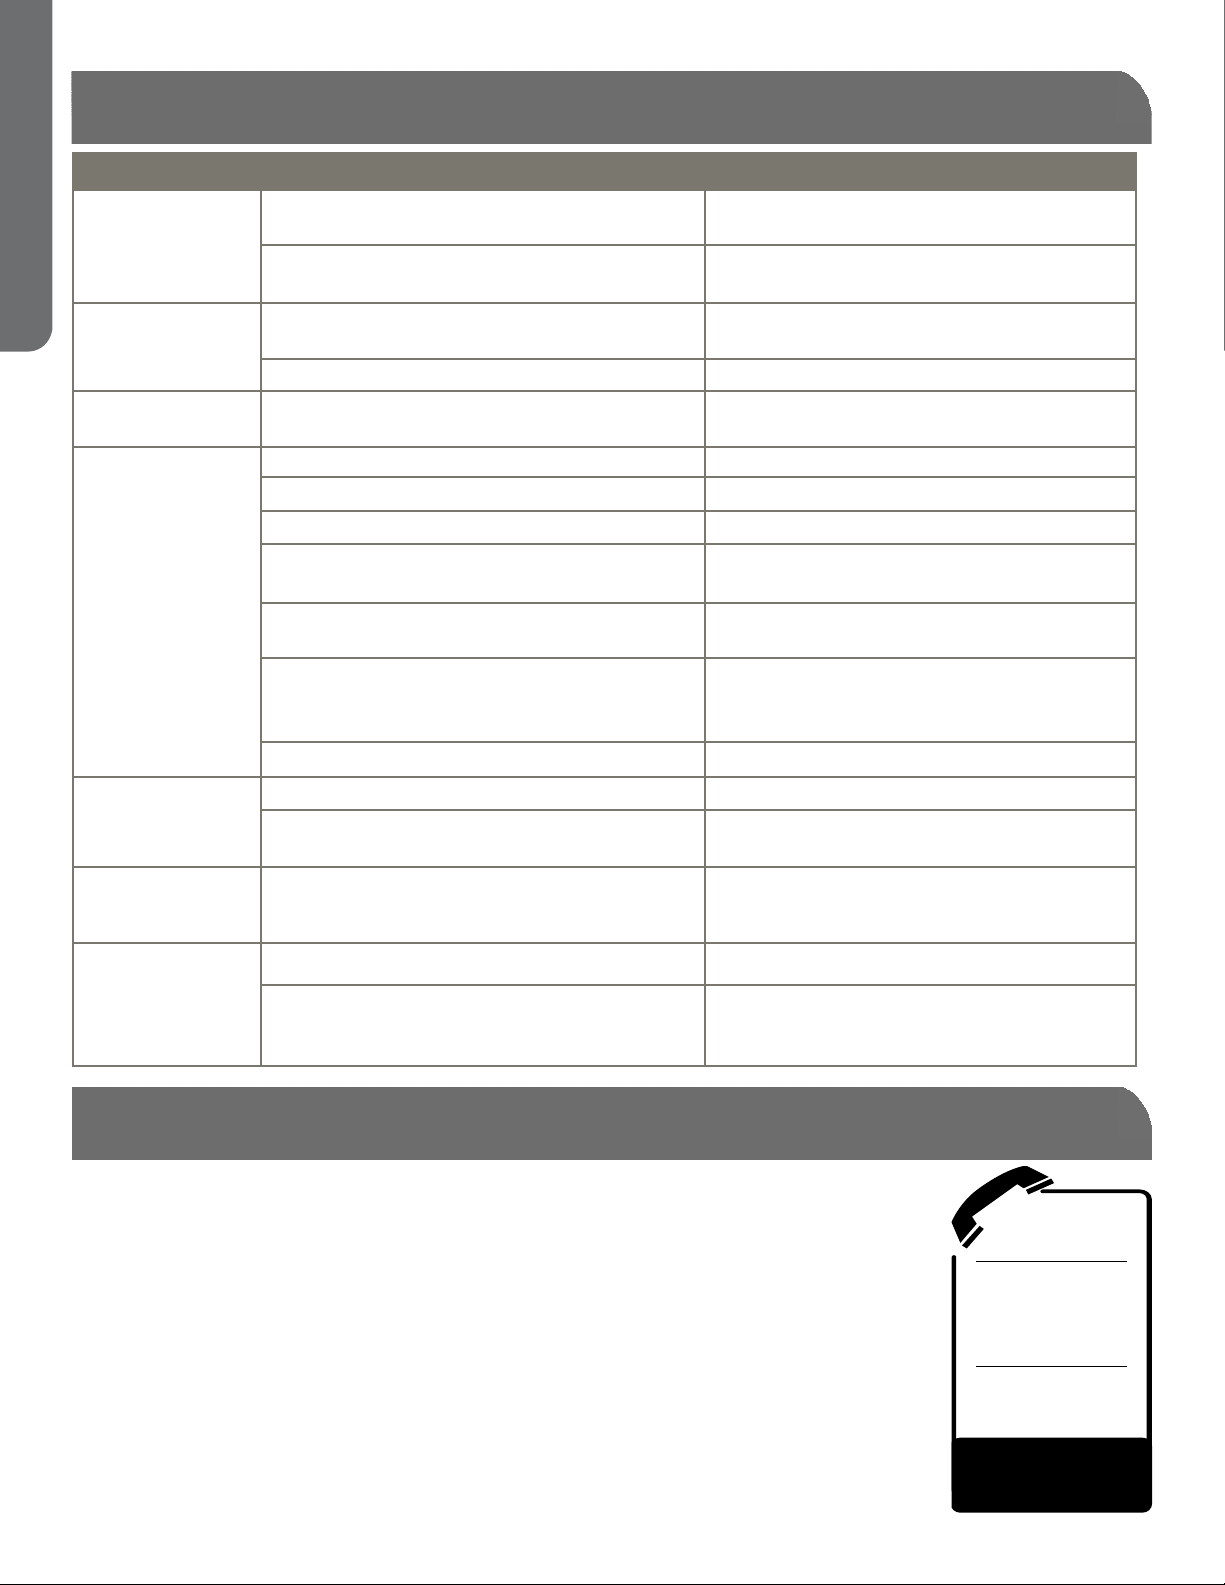
TROUBLESHOOTING
PROBLEM POSSIBLE CAUSES(S) SOLUTION
Freezer door pops
ENGLISH
open when closing
the refrigerator
door
Normal if freezer door closes afterwards on
its own
If freezer doesn’t close on its own after
popping open, adjust the leveling legs
This indicates a good seal if freezer door
closes on it own
See leveling legs feature instructions in
Installing Your Refrigerator section
Door does not
close properly
Vibration or
rattling
No ice produced Not all models come with an ice maker
Slow ice
production
Water leak in
freezer
compartment
Water leak under
refrigerator
Refrigerator isn’t level See leveling leg feature instructions in
Something is obstructing door closure Check for and remove obstructions
Refrigerator is not resting firmly on floor See leveling leg feature instructions in
Refrigerator is not plugged in Plug refrigerator into power source
Ice maker control arm is up (OFF position) Lower ice maker control arm
Ice maker is not plugged into electrical socket
at rear of freezer compartment
Water supply is turned off or disconnected Check that water supply line is connected to
Water valve is not connected to refrigerator
wiring harness
Water tubing connection(s) loose Check connections on rear of unit
Refrigerator is set to a warm setting Adjust to a colder setting
Water tubing is leaking or kinked Check tubing on rear of unit for leaks or
Fill tube is not aligned into fill cup on rear of
ice maker
Water tubing on rear of refrigerator is leaking Check tubing on rear of refrigerator
Water valve is leaking Disconnect refrigerator for power supply,
Installing Your Refrigerator section
Installing Your Refrigerator section
Plug ice maker into socket in rear of freezer
compartment
water valve and turned on
Disconnect refrigerator from power source,
remove rear access cover, plug valve into
wiring harness in bottom, rear compartment
kinks
Adjust tube to direct water into fill cup on
rear of ice maker
remove rear compartment cover, then
check water connections on water valve
CUSTOMER SERVICE
IMPORTANT
DO NOT RETURN THIS PRODUCT TO THE STORE
If you have a problem with this product, please contact the
Haier Customer Satisfaction Center at 1-877-337-3639.
DATED PROOF OF PURCHASE, MODEL # AND SERIAL #
REQUIRED FOR WARRANTY SERVICE
PAGE 13 ●TROUBLESHOOTING & WARRANTY
CUSTOMER
SERVICE
SERVICE DU
CENTRE DE
REPARATION
A LA CLIENTELE
SERVICIO
AL CLIENTE
Hotline
1-877-337-3639
 Loading...