

LCD TV
E4SFT5517
Please refer to the actual product
15.9952
INSTRUCTION MANUAL
Please read all the instructions carefully before using this TV,
and keep the manual for future reference.

CONTENTS
Important Safety Instructions 2
Additional Safety Information 3
Preparations 4
:KDWV,QFOXGHG
)URQW
View 5
Rear View 6
Wall Mounting 6
Remote Control 7
Connecting External Devices 8
TV SETUP 9
Turning On/Off Your TV 9
Initial Setup 9
Source 11
Channel Selection 11
V
olume A djustment and Mute Setup 11
Current Channel Information
Picture 12
Sound 14
Function 15
Time 17
Option 18
Lock 19
Channel 20
Network Setting
INTERNET 25
22
Parental C
Troubleshooting 31
FCC Notes 34
OTT APP Service 35
ontrol 29

IMPORTANT SAFETY INSTRUCTIONS
• Read these instructions – All the safety
and operating instructions should be read
before this product is operated.
• Keep these instructions – The safety
and operat ing instructions should b e
retained for future reference.
• Heed all warnings – All warnings o n
the appliance and in the operating
instructions should be adhered to.
• Follow all instructions – All operating
and use instructions should be followed.
• Do not use this apparatus near water
– The appliance should not be used near
water or moisture – for example, in a wet
basement or near a swimming pool, and
the like.
• Clean only with dry cloth.
• Do not block any ventilation openings.
Install in accordanc e with the
manufacturer’s instructions.
• Do not install near any heat sources such
as radiators, heat registers, stoves, or
other apparatus (including
that
produce heat.
• Do not defeat the s afet y purpose of
the polarized or grounding-type plug. A
polarized plug has two blades with one
wider than the other. A grounding-type
plug has two blades and a third grounding
prong. The wi d e b la d e or th e th ir d
prong are provided for your safety. If the
provided plug does not
into your outlet,
consult an electrician for replacement of
the obsolete outlet.
• Protect the power cord from being walked
on or pinched parti c ularly at plugs,
convenience receptacles, and the point
where they exit from the apparatus.
• Only use at tachments/acc e ssories
by the manufacturer.
• Use only with t he cart, s tand, tripod,
bracket, or table specified by the
manufacturer, or sold with the apparatus.
When a cart is used, use caution when
moving the cart/apparatus combination to
avoid injury from tip-over.
• Refer all servicing to qualified service
personnel. Servicing is required when
the apparatus has been damaged in any
way, such as the power-supply cord or
plug is damaged, liquid has been spilled
or objects have fallen into the apparatus,
the apparatus has been exposed to rain
or moisture, does not operate normally, or
has been dropped.
• Please keep the unit in a well-ventilated
environment.
WARNING: To reduce the risk of
or electric
shock, do not expose this apparatus to rain
or moisture. The apparatus should not be
exposed to dripping or splashing. Objects
with liquids, such as vases should not be
placed on apparatus.
WARNING: The batteries shall not be exposed
to excessive heat such as sunshine,
or the
like.
WARNI N G: The main plug is us ed as
disconnect device, the disconnect device shall
remain readily operable.
WARNIN G: To reduc e t he risk of electric
shock, do not remove cover (or back) as there
are no user-serviceable parts inside. Refer
servicing to
This lightning f las h wit h arrowhead
symbol within an equilateral triangle
is intended to alert t he u s er to
the presence of non-insulated “dangerous voltage”
within the product’s enclosure that may be o f
sufficient magnitude to constitute a risk of electric
shock.
T he exclamation point wit hin an
equilateral triangle is intended t o
alert the us er t o the presenc e of
important operating and maintenance instructions in
the literature accompanying the appliance.
This equipment is a Class II or double
insulat ed electrical appliance. It
has been designed in such a way
that it does not require a sa fe ty connection to
electrical earth.
personnel.
RISQUE DE CHOC ELECTRIQUE NE
PAS OUVRIR
• Unplug this apparatus during lightning
storms or when unused for long periods
of time.
2

ADDITIONAL SAFETY INFORMATION
To ensure reliable and safe operation of this equipment, please read carefully all the
instructions in this user guide, especially the safety information below.
Electrical Safety
• The TV set should only be connected to a main power supply with voltage that
matches the label at the rear of the product.
• To prevent overload, do not share the same power supply socket with too many other
electronic components.
• Do not place any connecting wires where they may be stepped on or tripped over.
• Do not place heavy items on them, which may damage the leads.
• Hold the main plug, not the wires, when removing from a socket.
• During a thunderstorm, or when not using the television for extended period of time,
turn off the power switch on the back of the television.
• Do not allow water or moisture to enter the TV or power adapter. Do NOT use in wet,
moist areas, such as bathrooms, steamy kitchens or near swimming pools.
• Pull the plug out immediately, and seek professional help if the main plug or cable
is damaged, liquid is spilt onto the set, if accidentally exposed to water or moisture,
if anything accidentally penetrates the ventilation slots or if the set does not work
normally.
• Do not remove the safety covers. There are no user serviceable parts inside. Trying
to service the unit yourself is dangerous and may invalidate the product’s warranty.
Qualiedpersonnelmustonlyservicethisapparatus.
• To avoid battery leakage, remove exhausted batteries from the remote control, or
when not using for long period.
• Donotbreakopenorthrowexhaustedbatteriesonare.
• Do not mix old and new batteries.
• DonotmixAlkaline,Standard (Carbon-Zinc) or Rechargeable (Nickel Cadmium) or
(NickelMetalHydride)batteries.
Physical Safety
• Do not block ventilation slots in the back cover. You may place the TV in a cabinet,
butensureatleast5cm(2'')clearanceallaround.
• Do not tap or shake the TV screen, or you may damage the internal circuits. Take
good care of the remote control.
• TocleantheTVuseasoftdrycloth.Donotusesolventsorpetroleumbaseduids.
• Do not install near any heat sources such as radiators, heat registers, stoves or other
apparatus(includingampliers)thatproduceheat.
• Do not defeat the safety purpose of the polarized or grounding-type plug. A polarized
plug has two blades with one wider than the other. A grounding type plug has two
blades and a third grounding prong, the wide blade, or the third prong is provided for
yoursafety.Iftheprovidedplugdoesnottintoyouroutlet,consultanelectricianfor
replacement of the obsolete outlet.
• Protect the power cord from being walked on or pinched particularly at plugs.
• Unplug the apparatus during lightning storms or when unused for long periods.
• Referallservicingtoaqualied service personnel. Servicing is required when the
apparatus has been damaged in any way, such as power-supply cord or plug is
damaged, liquid has been spilled, or objects have fallen into the apparatus, has been
exposed to rain or moisture, does not operate normally, or has been dropped.
• Please always connect your television to a power outlet with protective groud
connection.
3
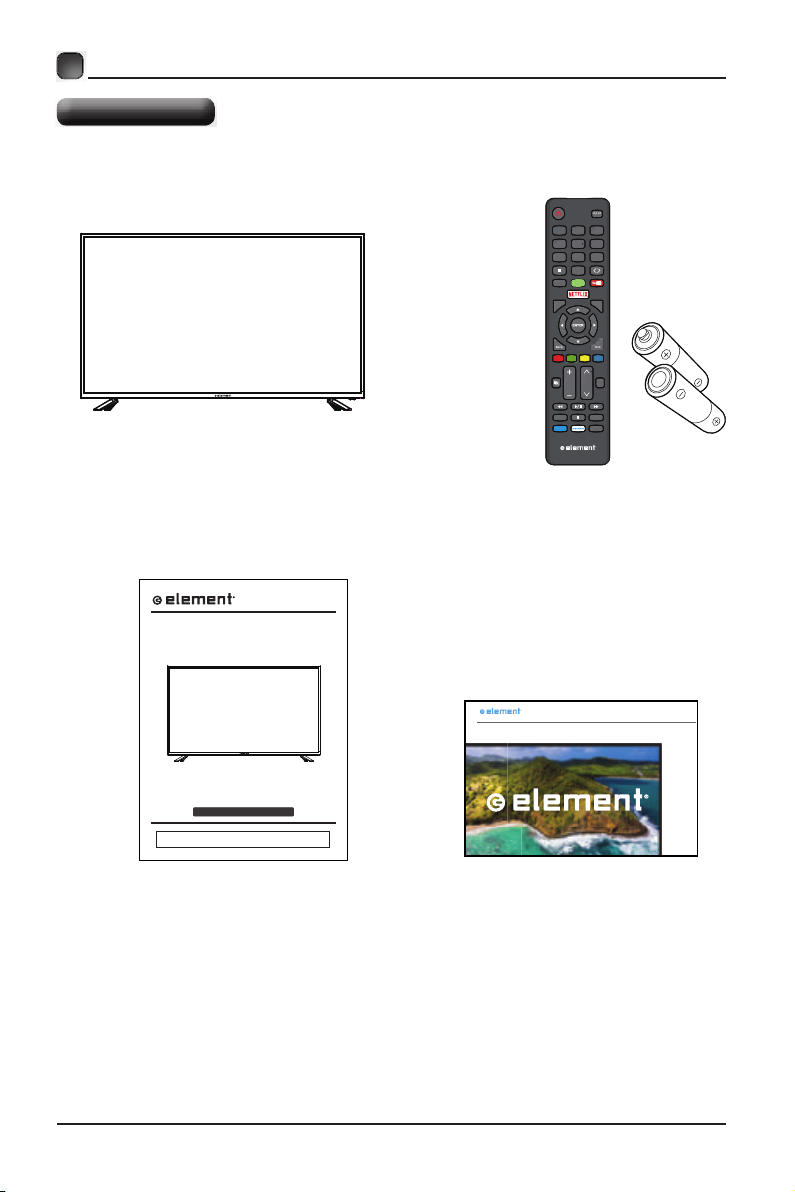
PREPARATIONS
What is Included?
Inpu t
3
1 2
5
6
4
7 8 9
0
List
HOME
Q.MENU
Menu
ExitBack
TTS
15.9952
VOL CH
INFO
MT
S/Audio
VUDU
CC
TV Set
LED TV
E4SFT5517
Please refer to the actual product
15.9952
Remote Control with Batteries
INSTRUCTION MANUAL
Please read all the instructions carefully before using this TV,
and keep the manual for future reference.
User Manual Quick Start Guide
QUICK START GUIDE
SMART TV
4
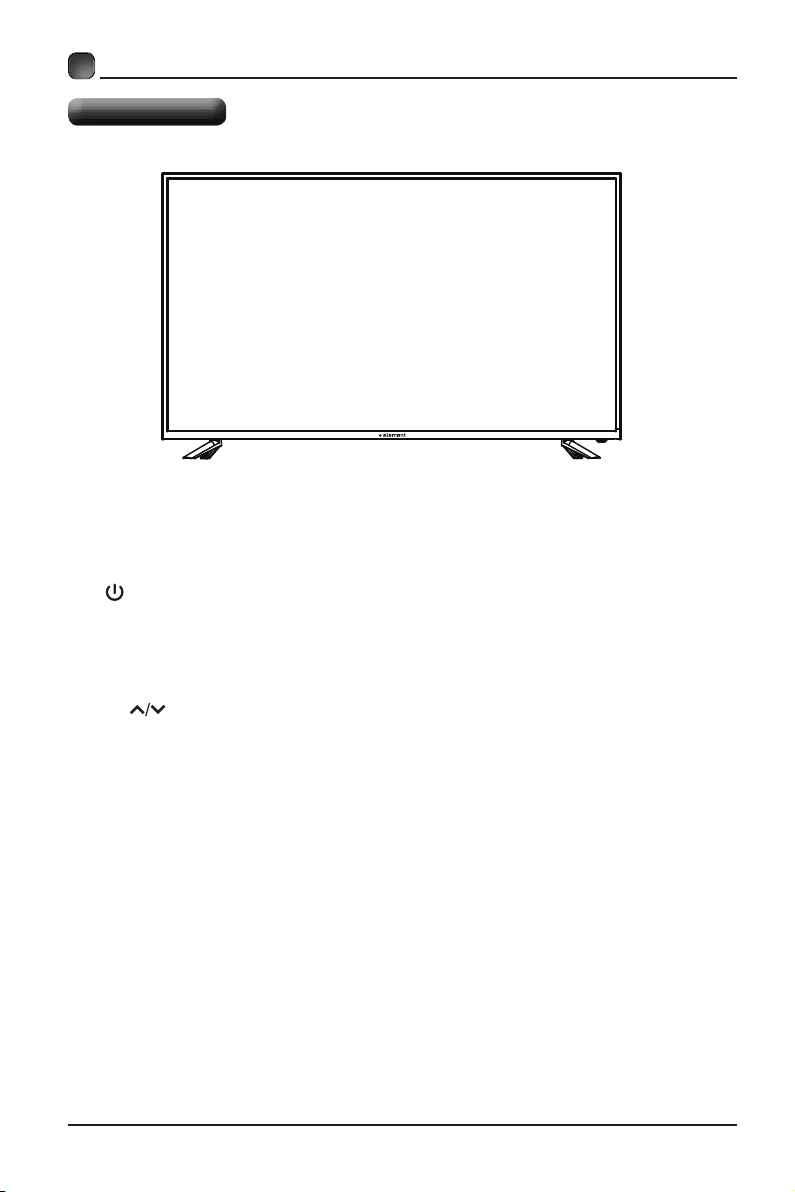
PREPARATIONS
Front View
•
Switch the TV between On / Standby mode.
• SOURCE
Press to select among different input signal sources.
• MENU
Display the OSD (on screen display) menu.
• CH
Press to select a channel.
• VOL +/-
Press to adjust the volume.
• LED
The LED light indicates when the TV is activated.
• IR
Infrared Receiver.
15.9952
5
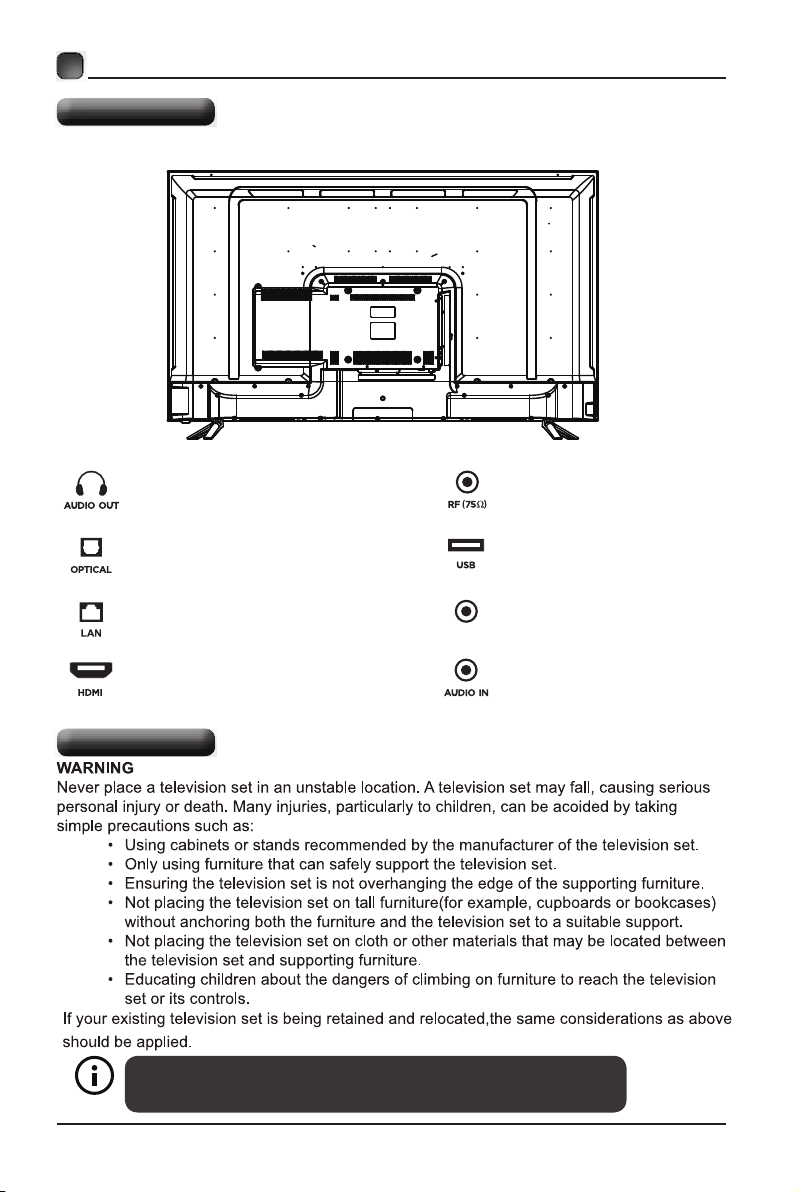
PREPARATIONS
Rear View
Headphone Output
Optical Output
LAN(RJ45)
HDMI Input
Wall Mounting
MINI YPBPR/AV
Antenna Input(75Ω VHF/UHF)
USB Input
MINI YPBPR/AV IN
Audio Input
Your new TV is heavy, please consult with professional wall
mount installer to perform this installation.
6
PREPARATIONS
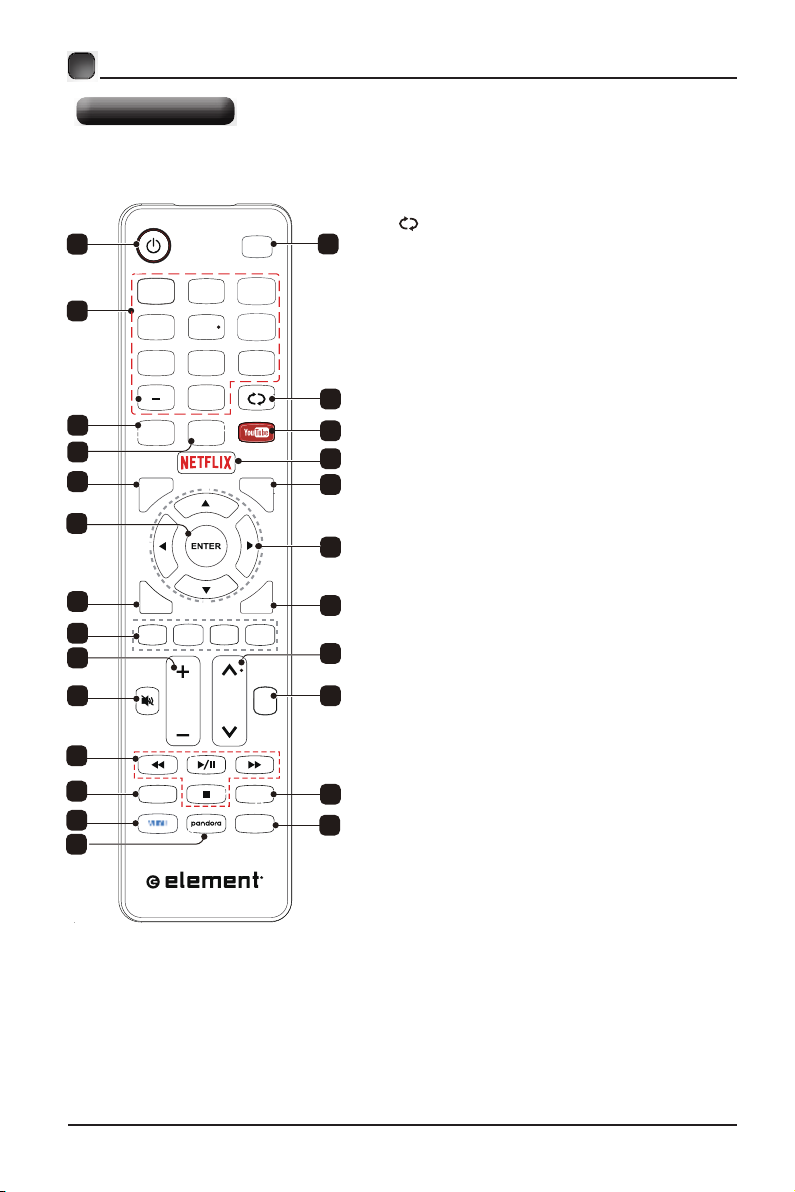
Remote Control
1
3
6
1 2
4
7 8 9
L
ist
7
9
Q.MENU
11
13
15
18
16
20
21
INFO
23
24
5
0
HOME
HOM E
VOL CH
In pu t
3
6
Menu
ExitBack
TTS
MTS/Audio
CC
1. POWER: Turn the TV on and off.
2. Input: This button is used to switch among
different sources, Select a source and press
ENTER button to confirm.
3. Digital Buttons(0-9, -): Directly select channel
with digital buttons.
4. Switch to the previous program.:
2
5. : If network connects, press this key
YouTube
to view YouTube directly.
6. List: Press it to show channel list and favorite
list on screen.
7. HOME: Press it to go to App home page.
8.
NETFLIX: If network connects, press this key
to view NETFLIX directly.
4
9. : Press this key to go to quick menu.Q.MENU
10. Menu: Display the main menu or exit the
5
8
10
current menu.
11. ENTER: Validation key.
12. Arrow buttons ����: Use to select
on-screen menu items and change men u values.
13. Back: Return.
12
14. Exit : Exit the menu.
Color buttons: It's used as it's showed
15.
14
in the Program Edit menu.
16. MUTE: Press this button to cut off the sound of
the TV set temporarily, press again to resume.
19
17. TTS (Text-To-Speech):Pree this button to
adjust TTS on or off .
17
18. : Press these buttons to adjust the
VOL -+/
volume.
19. :CH˄ /˅ Press these buttons to change
channel upward or downward.
20. Digital Media Player controlbutton:
22
25
Include play/pause, stop,
previous, next, backward, forward is
used in USB mode .
Please refer to relevnat instructions in
the section of multimed player.
21. INFO: Display the program information.
22.
MTS/Audio: In USB mode, press this
button to switch audio track when movie
is playing. In TV mode, press this button
to switch MTS or Audio Language.
23. VUDU:Press this button to select VUDU application.
24. Pandora: Press this button to select pandora
application.
25. CC: Press this button to adjust CC mode.
7
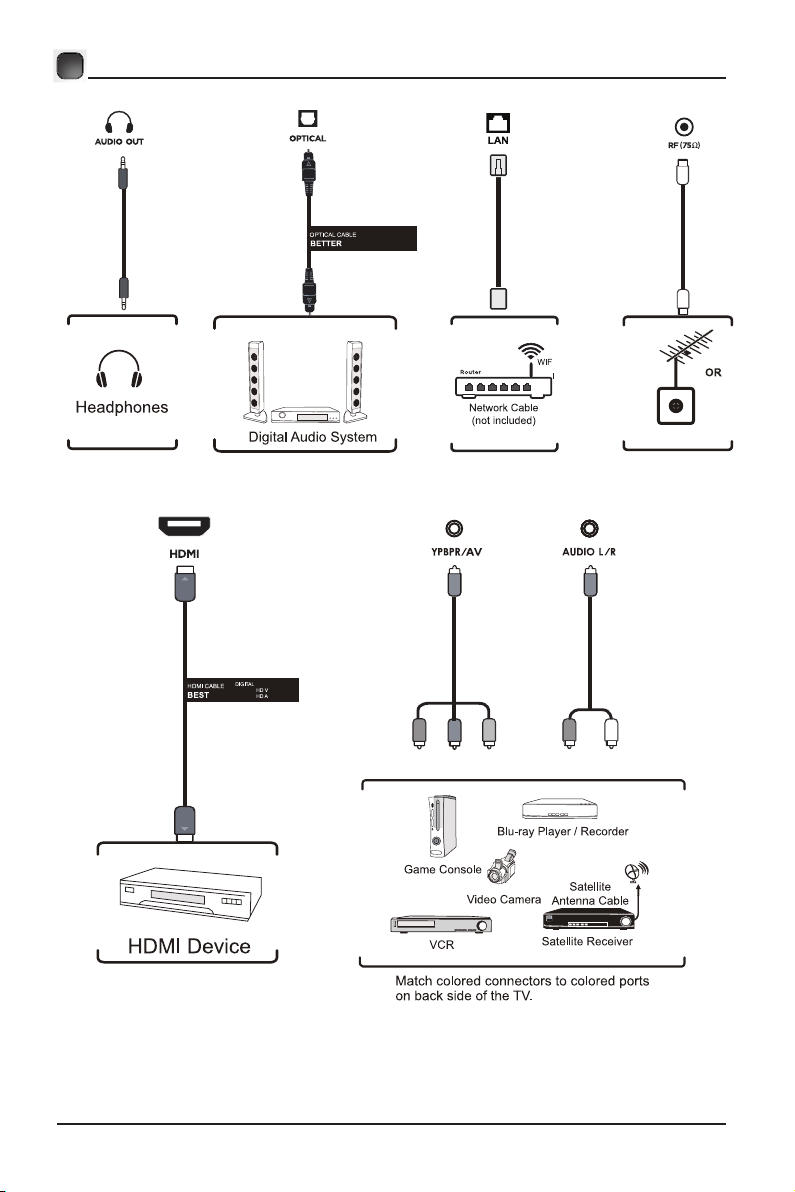
Connecting External Devices
8
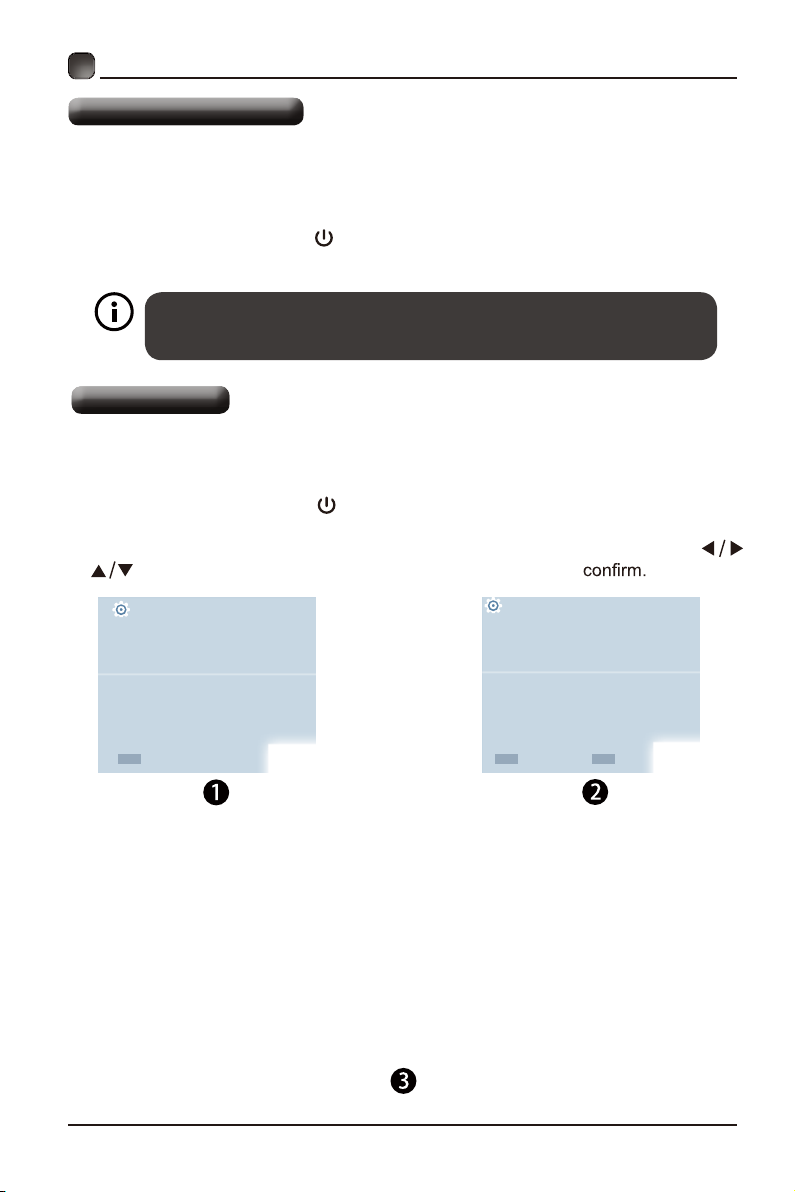
INITIAL SETUP
Turning On/Off Your TV
• Connect the power cord to the power socket after you have completed all the
physical connections. At this stage, the TV will enter Standby Mode and the blue
LED indicator will illuminate.
• In Standby Mode, press the
turn the TV on.
The POWER button on the main unit or on the remote control can only
switch the TV into standby. To completely turn off the TV, please disconnect
the power cord from the power socket.
Initial Setup
• Connect the power cord to the power socket after you have completed all the
physical connections. At this stage, the TV will enter Standby Mode and the red
LED indicator will illuminate.
• In Standby Mode, press the
turn the TV on. The red LED indicator will turn blue.
• The first time you turn the TV on, it will go into the Setup Wizard. Press
buttons to select your desired mode and press ENTER
button on the main unit or on the remote control to
button on the main unit or on the remote control to
OSD language
Config Menu language.
ENTER
Select
English
Español
French
Country
Select the country.
ENTER
Select
US
Mexico
Canada
BACK
Return
9
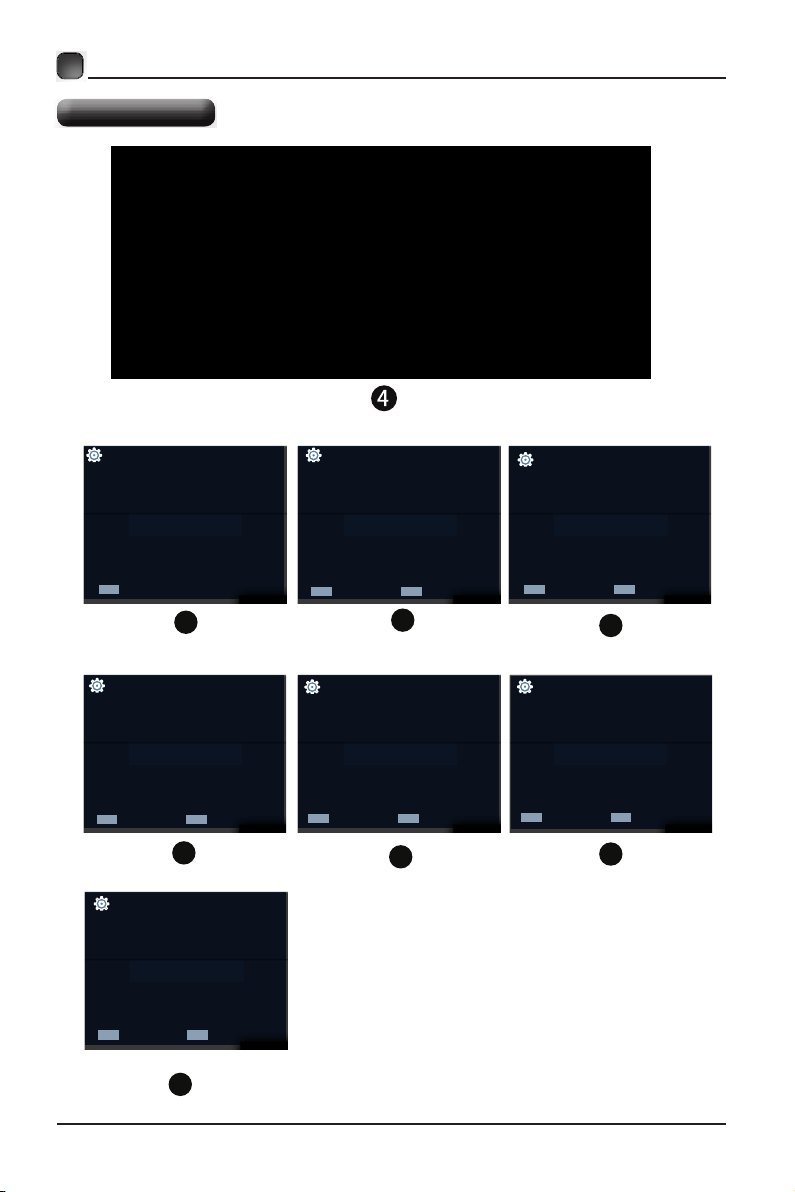
CUSTOMIZING TV SETTINGS
Initial Setup
Clock
Select to set the clock.
Auto
Manual
ENTER
Select
DST
Select Daylight saving time.
Select
ENTER
Network
Select network scan type.
Select
ENTER
WIFI
LAN
Home or Store
Select where you will use the TV.
Home
Store
YES
Skip
Return
BACK
6
BACK
Return
9
ENTER
Select
5
Network Configuration
Do you want to set Network?
Off
On
Select
BACK
Return
ENTER
8
BACK
Return
Time Zone
Select the time zone.
Pacific
Central
Eastern
ENTER
Select
BACK
7
Auto Search
Do you want to scan the channels?
Yes
Ship
10
BABCK
BACK
ENTER
Select
Return
Return
10
11
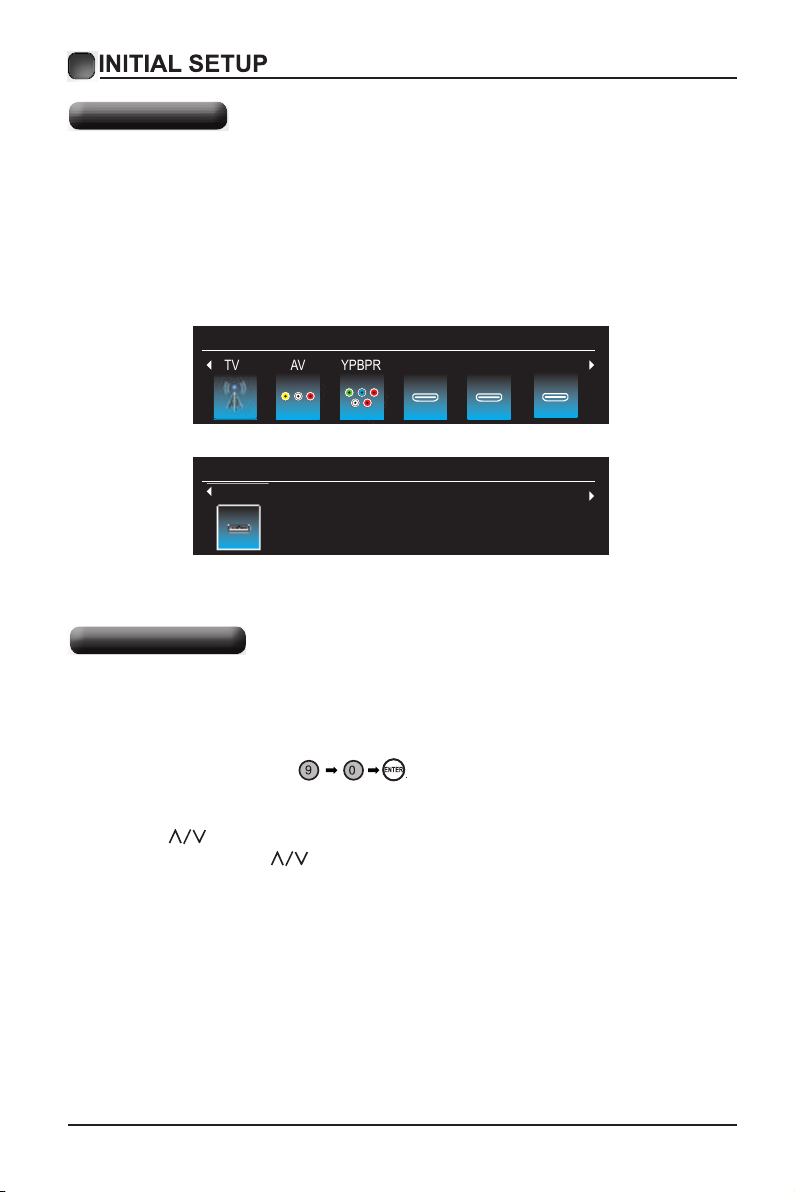
Source
1 Input Setup
Press Input key on the remote control to enter "INPUT SOURCE" menu. There are
these options for you to select: "TV", "AV","Component", "HDMI1", “HDMI2", “HDMI3",
“USB".
Use
/key to select a input source and press ENTER key to confirm.
Input Source
TV HDMI 2 HDMI 3AV YPBPR HDMI 1
Input Source
USB
USB
Channel Selection
2 Channels Selection
There are four ways to select channel:
1) Using number keys, and ENTER keys on the remote control
to select channel directly.
To select channel 90, press
When you use the number buttons, you can directly select channels that were either
erased or not memorized.
2) Using CH
When you press the CH
all the channels that the TV has memorized.
You will not see channels that were either erased or not memorized.
∧/∨ key on the remote control or on your TV to select channel.
∧/∨ key, the TV changes channels in sequence. You will see
11
 Loading...