

Page 1
important points on service, and flow chart for
inspecting and repairing the unit ......................... t
Appearance ....................................................... 2
Troubleshooting .................................................. 3
Operation ......................................................... 4-5
Remote control .................................................. 6-7
Technical specifications ................................... 8-9
Refrigerator system diagram .............................. t O
Schematic wiring diagram ................................. 1t
Exploded view and parts list .......................... 12-t7
This manual is for the use of technical personnel entrusted
with maintenance.
Widetech reserves the right to change this dehumidifier's
casing, circuit and parts without notice.
Date : 2007/04/27 Version " 1.0
Page 2
iMPORTANT POINTS ON SERVICE OPERATING SAFETY
Please follow these instructions careful|y:
• Unplug the unit to avoid any danger from electric shock before disassembling the unit for
repair.
• If there is any sound of the refrigerant circulating when in operation, avoid touching the
cooling coils.
• If you need to perform any welding or soldering, be sure you are in a well ventilated area.
• Only a qualified professional should perform any welding on the unit.
® When repairing the unit, the specifications listed in this manual must be strictly adhered
to when replacing any components.
• When replacing any electrical components they should be factory approved units.
• Be sure that any electrical components are properly wired and in place.
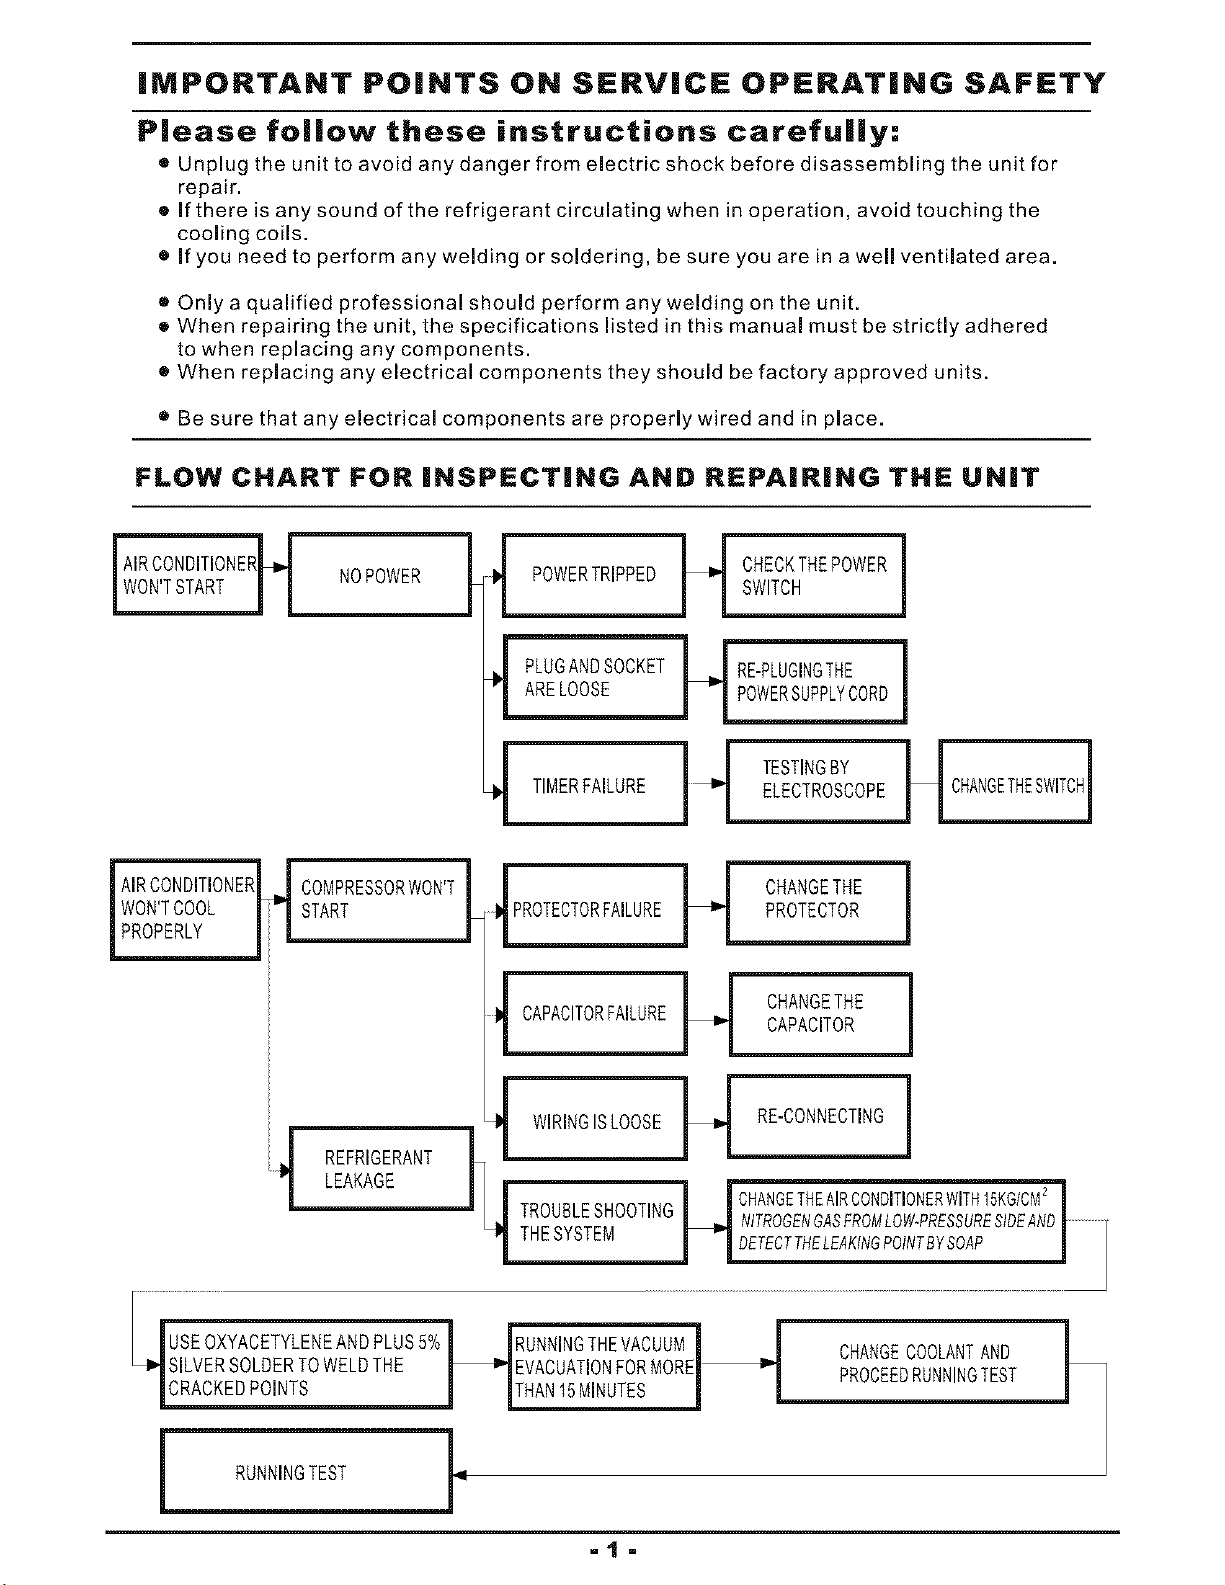
FLOW CHART FOR iNSPECTiNG AND REPAiRiNG THE UNiT
IAIROONDITIONERU
AIRCONDITIONER
WON'TCOOL
PROPERLY
J PLUGAN0S0ONETIjRE-PLUG,N GTNE
/ I/ _ST_NGBYH I
J COMPRESSORWON'T I I CHANGETHE
J REFR,CERANT
1 LEAKAGE_
_LL_I'tUU|INU _ J NITROGENGASFROMLOW-PRESSURESIDEAND_.............,
THESYSTEM
USEOXYACETYLENEANDPLUS5%
__SILVER SOLDERTOWELDTHE CHANGECOOLANTAND
I RUNNINGTEST I,_
-1-
Page 3
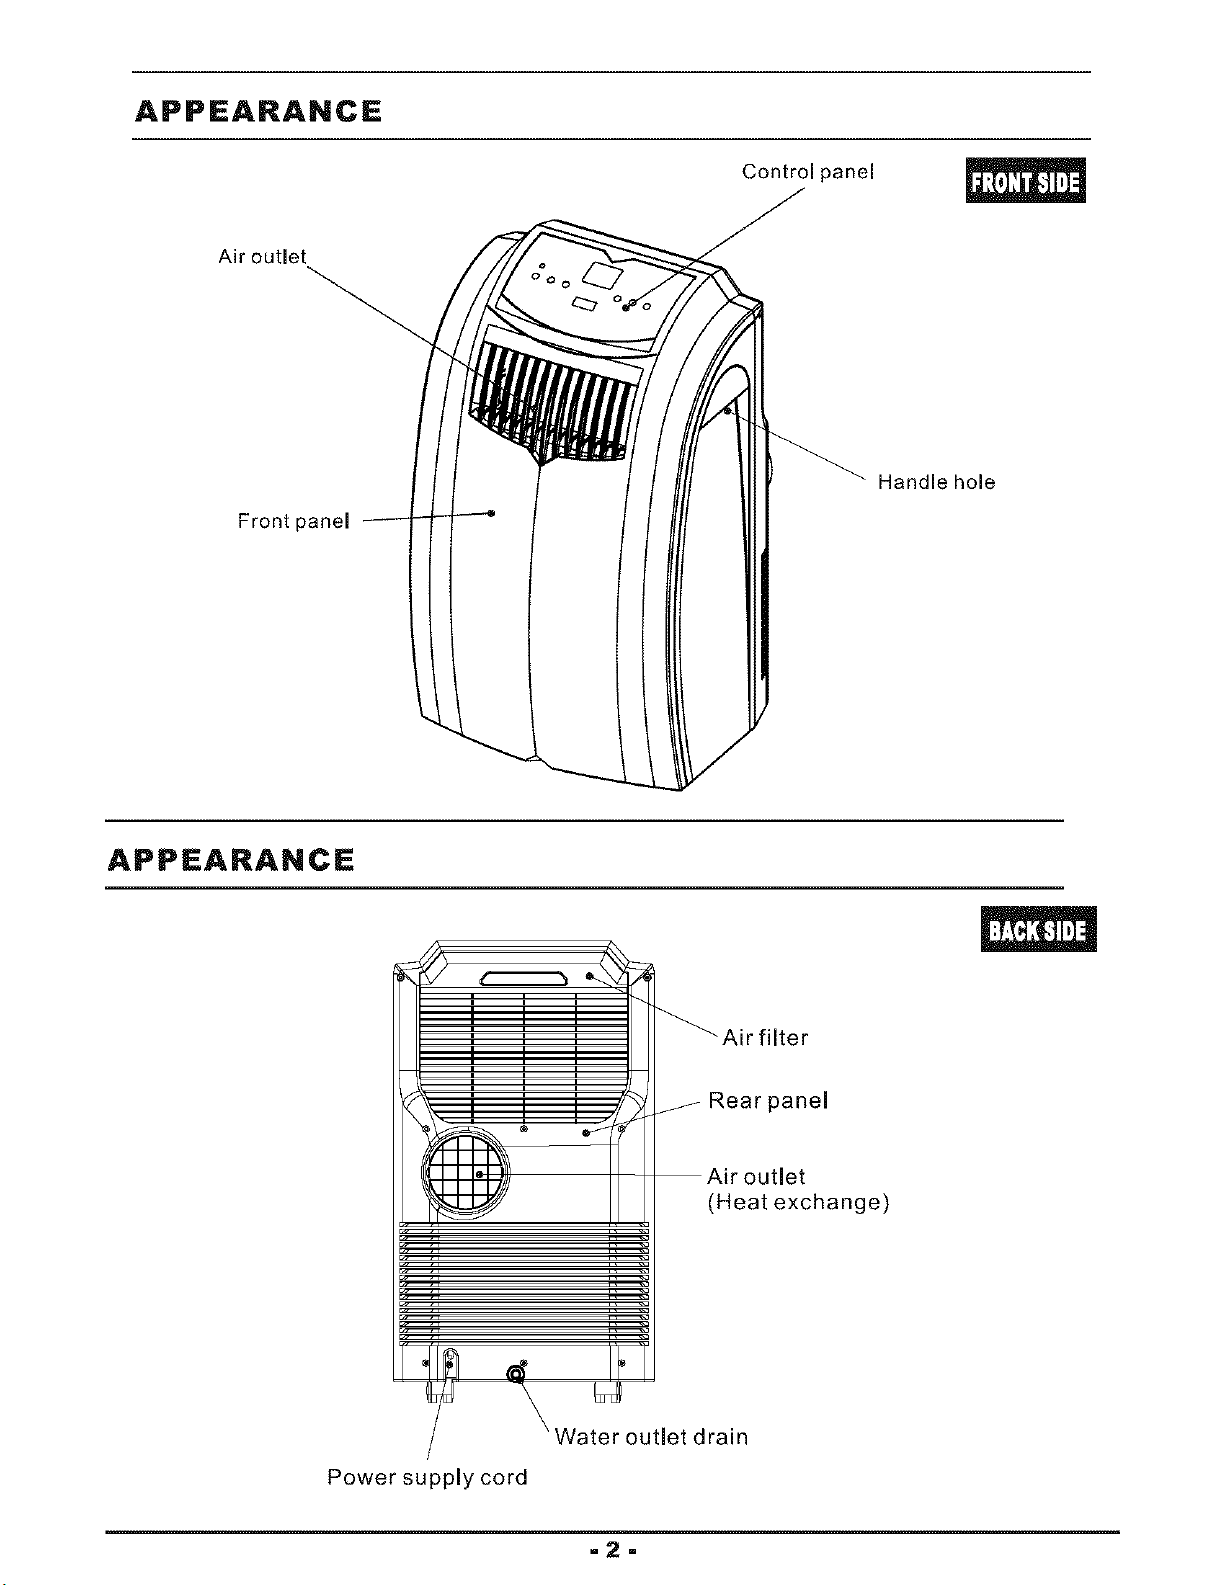
APPEARANCE
Air outlet
Front panel
Control panel
Handle hole
APPEARANCE
Water outlet
Rear panel
outlet
(Heat exchange)
drain
Power supply cord
-2-
Page 4

TROUBLESHOOTING
f Trouble Analysis
-If the protector trip or fuse is blown.
•Please wait for 3 minutes and start again,
protector device may be preventing unit
Does not run
Run a short while only
to work.
•If batteries in the remote controller exhausted.
•If the plug is not properly plugged•
-if the set temperature is close to
room temperature, you can low the
set temperature•
•Air outlet be blocked by obstacle.
Take the obstacle away.
Run but not cool
Do not run and water
full indicator lights
\
•If the door or window open.
•If there is other heater appliance work,
like heater or lamp, etc...
.The air filter is dirty, please clean it.
-Air outlet or intake be blocked.
•Set temperature is too high.
•Drain the water into a prepared container by
the drainage pipe on the rear panel of the unit.
If still doesn't work, please consult a qualified
technician.
=3-
Page 5

O P E RAT'| O N (Only HPR09XC7)
Indication symbols on LCD :
o
>_r< Cooling mode _= Highfanspeed
(_ Dehumidifymode _ Medfanspeed
&_ Fan only mode
,_ _ Low fan speed
88 F Display set temperature
Warning light
the machine will stop running
_._88h¢ Display timer setting of auto switch on/off
am
Power Control
The power control turns the unit on and off.
Warning Light &
Condensed water may accumulate in the unit. If
the internal tank becomes full, the Warning signal
in the LCD Display will light up and the unit will
not operate until the unit has been drained.
Mode Control
The Mode Control has 4 settings:
e Cool • Dehumidify e Fan ® Heating
The settings are adjusted with Mode Control
button. A light will indicate which setting is
currently being used.
o Cooling Mode
When cool mode is selected, "_i_" will show in the
LCD Display, During the cooling mode the air is
cooled end hot air is exhausted to the outside
through the exhaust tube. Adjust fan speed end
air temperature to suit your desired comfort level.
Note : The air exchange hoses must vent
outside the room when using cool mode,
• Dehumidify Mode
When Dehumidify mode is selected, "_" will show
in the LCD Display. Air is dehumidified as it passes
through the unit, without being in full cooling mode.
If room temperature is higher than 25 degree
Celsius fan speed can be adjusted; otherwise fan
speed is fixed to " Low".
Note:If the unit is to be used as a
dehumidifier, do not connect the exhaust hose
let the warm air return to the room.
Continuous drainage is then necessary.
• Fan Mode
When fan mode is selected, ",_ ", "_" or "_" will be
shown in the LCD Display, Air is circulated throughout
the room with no cooling.
Note: unit does not need to be vented in Fen mode
Fan Speed Control
The Fan Speed Control has 3 settings: High,
Medium, and Low.
Timer
Auto turn off:
With machine in running mode, press timer button for
setting timer control. Press ",_." or"Y" to select number
of hours you would like the unit to run before it
automatically shuts off.
Auto turn on:
With machine in stand by mode, press timer button for
setting timer control Press"_," or"V" to select number
of hours before the unit automatically starts running in
airconditioning mode.
Note:The time is adjustable between 1-24 hours,
Temperature controls
S Used for adjusting the thermostat.
® The default display is room temperature.
O In cooling mode, when " ,& "or " V " button is pressed,
the set temperature is displayed and may be adjusted.
After 15 seconds the display will revert back to room
temperature. Temperature is only adjustable in cool mode.
Note:By pressing both "A"/ "Y" buttons at the
same time for more than 3 seconds, the display will
toggle between Celsius and Fahrenheit.
After switching the air conditioner off, you must wait 3 minutes before switching it back on again.
-4 =
Page 6

O P E RATION (Only HPR09XH7)
Indication symbols on LCD :
o
>_r< Cooling mode _= Highfanspeed
d_ Dehumidifymode _ Medfanspeed
Fan only mode _ Low fan speed
Heating mode
88 F Display set temperature
Warning light
the machine will stop running
_ 88hl- Display tirner setting of auto switch on/off
am
Power Control
The power control turns the unit on and off.
Warning Light &
Condensed water may accumulate in the unit. If
the internal tank becomes full, the Warning signal
in the LCD Display will light up and the unit will
not operate until the unit has been drained.
• Fan Mode
When fan mode is selected, "._ ", "_" or "_" will be
shown in the LCD Display, Air is circulated throughout
the room with no cooling.
Note: unit does not need to be vented in Fan mode
• Heating Mode
When heating mode is selected, "O" will show in the
LCD Display. Heating is activated only when the
ambient temperature is below 27°C. In this mode, the
desired temperature can be set between 16 and 27°C.
Mode Control
The Mode Control has 4 settings:
e Cool • Dehumidify e Fan ® Heating
The settings are adjusted with Mode Control
button. A light will indicate which setting is
currently being used.
o Cooling Mode
When cool mode is selected, "_i_" will show in the
LCD Display, During the cooling mode the air is
cooled and hot air is exhausted to the outside
through the exhaust tube. Adjust fan speed and
air temperature to suit your desired comfort level,
Note : The air exchange hoses must vent
outside the room when using cool mode,
• Dehumidify Mode
When Dehumidify mode is selected, "all" will show
in the LCD Display. Air is dehumidified as it passes
through the unit, without being in full cooling mode.
If room temperature is higher than 25 degree
Celsius fan speed can be adjusted; otherwise fan
speed is fixed to " Low".
Note:If the unit is to be used as a
dehumidifier, do not connect the exhaust hose
let the warm air return to the room.
Continuous drainage is then necessary.
Note: When the device is in heating mode, both air
hoses must be connected and led outside.
Fan Speed Control
The Fan Speed Control has 3 settings: High,
Medium, and Low.
Timer
Auto turn off:
With machine in running mode, press timer button for
setting timer control. Press "_" or"_'" to select number
of hours you would like the unit to run before it
automatically shuts off.
Auto turn on :
With machine in stand by mode, press timer button for
setting timer control. Press "A" or"T'" to select number
of hours before the unit automatically starts running in
airconditioning mode.
Note:The time is adjustable between 1-24 hours.
Temperature controls
• Used for adjusting the thermostat.
® The default display is room temperature.
• in cooling mode, when " A "or " V " button is pressed,
the set temperature is displayed and may be adjusted.
After 15 seconds the display will revert back to room
temperature. Temperature is only adjustable in cool mode.
Note : By pressing both " A "/ " Y " buttons at the
same time for more than 3 seconds, the display will
toggle between Celsius and Fahrenheit,
After switching the air conditioner off, you must wait 3 minutes before switching it back on again.
=5-
Page 7

O P E RAT | O N (Only HPR09XC7)
Air Conditioner Remote Control
The functions work the same as your air conditioner's touch controls.
All key function can be accessed from the remote control.
CONTROL PANEL
On/Off
® Used for adjusting the timer and
temperature.
• The default display on control panel is
room temperature.
@:HIGH @:MED @:LOW
In running mode:
Auto switch off
In stand-by mode:
Auto switch on
Press ,,A- or"v" button
to adjust the time setting
for 1 hour interval.
\
• When "f\" or "v" key is pressed in
cool mode, the set temperature is
displayed and may be adjusted. After
15 seconds the display will revert back
to room temperature.
• Timer setting is available from 1-24 hours
by pressing the key "_-" on "v".
Press this button to change the
operation mode in the order of:
-->Cool--------> Dehumidify ---7
Fan <
Battery replacement : Remove the cover on the back of the remote control and insert the batteries with the
(+) and (-)poles pointing in the proper direction.
CAUTION _
Use only AAA or IEC R03 1.5V batteries.
Remove the batteries if the remote control is not used for a month or longer.
Do not attempt to recharge the supplied batteries.
A|l batteries should be replaced at the same time, do not mix old battery.
Do not dispose of the batteries in a fire as they may explode.
=6=
Page 8

O P E RAT|ON (Only HPR09XH7)
Air Conditioner Remote Control
The functions work the same as your air conditioner's touch controls.
All key function can be accessed from the remote control.
CONTROL PANEL
On/Off
® Used for adjusting the timer and
temperature.
• The default display on control panel is
room temperature.
@:HIGH @:MED @:LOW
In running mode:
Auto switch off
In stand-by mode:
Auto switch on
Press ,,A- or"v" button
to adjust the time setting
for 1 hour interval.
\
• When "f\" or "v" key is pressed in
cool mode, the set temperature is
displayed and may be adjusted. After
15 seconds the display will revert back
to room temperature.
• Timer setting is available from 1-24 hours
by pressing the key "_-" on "v".
Press this button to change the
operation mode in the order of:
--> CHOOl--------> Dehumidify ----1
eating _ Fan e ------J
Battery replacement : Remove the cover on the back of the remote control and insert the batteries with the
(+) and (-)poles pointing in the proper direction.
CAUTION _
Use only AAA or IEC R03 1.5V batteries.
Remove the batteries if the remote control is not used for a month or longer.
Do not attempt to recharge the supplied batteries.
A|l batteries should be replaced at the same time, do not mix old battery.
Do not dispose of the batteries in a fire as they may explode.
=7=
Page 9

TECHNICAL SPECIFiCATiONS
ITEM UNIT WAP-267DA
OUTER DIMENSION mm 435W*770H*430D
REFERENTIAL USING
AREA
m2 13-_19
RATED VOLTAGE V/Hz 115 / 60
COOLING CAPACITY B,T,U. 9000
DEHUMIDIFYING
CAPACITY
L/H 1.6
RUNNING CURRENT A 8.0
POWER W 900
CONSUMPTION
INDOOR AIR VOLUME M_/hr 320
MODEL 2R12S3R126A
INPUT
POWER W 740
OPERATING
COMPRESSOR CYCLE uF/V 35/250
PROTECTOR MRA98503 or MRA98706 or MRA98706-9090
LOCKED
ROTORAMPS A 6.9
MODEL LS-16T3-02
INDOOR OUTPUT
MOTOR POWER W 16
OPERATING
CYCLE uF/V 4.0/250
MODEL LS-53T1-4P
OUTDOOR OUTPUT
MOTOR POWER W 40
OPERATING
CYCLE uF/V 9.0!250
TURBINE
FAN MOTOR OUTPUT
MODEL WT-15T1-03
POWER W 2
CAPILLARY mm 2.6(O.D.)'1.6(I.D.)*1000(L)
EVAPORATOR 2R12S 15FPI
CONDENSER 2R16S21FPI
REFRIGERANT R-22/g 400
WEIGHT Kg 29
"8"
Page 10

TECHNICAL SPECIFiCATiONS
ITEM UNIT WAP-267DAH
OUTER DIMENSION mm 435W*770H*430D
REFERENTIAL USING
AREA
m2 13-_19
RATED VOLTAGE V/Hz 115/60
CAPACITY(Cooling/Heating) KW 2.6 / 2.6
DEHUMIDIFYING
CAPACITY
L/H 1.6
CURRENT(Cooling/Heating) A 8.0 ! 8.0
POWER CONSUMPTION
(Cooling/Heating) W 900 / 900
INDOOR AIR VOLUME M3/hr 320
MODEL 2R12S3R126A
INPUT
POWER W 740
OPERATING
COMPRESSORCYCLE uF/V 35/250
PROTECTOR MRA98503 or MRA98706 or MRA98706-9090
LOCKED
ROTORAMPS A 6.9
MODEL LS-16T3-02
INDOOR OUTPUT
MOTOR POWER W 16
OPERATING
CYCLE uF/V 4.0/250
MODEL LS-53T1-4P
OUTDOOR OUTPUT
MOTOR POWER W 40
OPERATING
CYCLE uF/V 9.0!250
TURBINE
FAN MOTOR OUTPUT
MODEL WT-15T1-03
POWER W 2
CAPILLARY mm 2.6(O.D.)'1.6(I.D.)*1000(L)
EVAPORATOR 3R12S 15FPI
CONDENSER 3R16S17FPI
REFRIGERANT R-22/g 460
WEIGHT Kg 30
"9"
Page 11

REFRIGERATOR SYSTEM DIAGRAM WAP-267DA
CAPILLARY
FILTER
n-
O
¢0
z
w
o
z
O
o
COMPRESSOR
_d
O
<::
0
n
w
REFRIGERATOR SYSTEM DIAGRAM WAP-267DAH
FILTER
CAPILLARY
COMPRESSOR
=t0=
Page 12
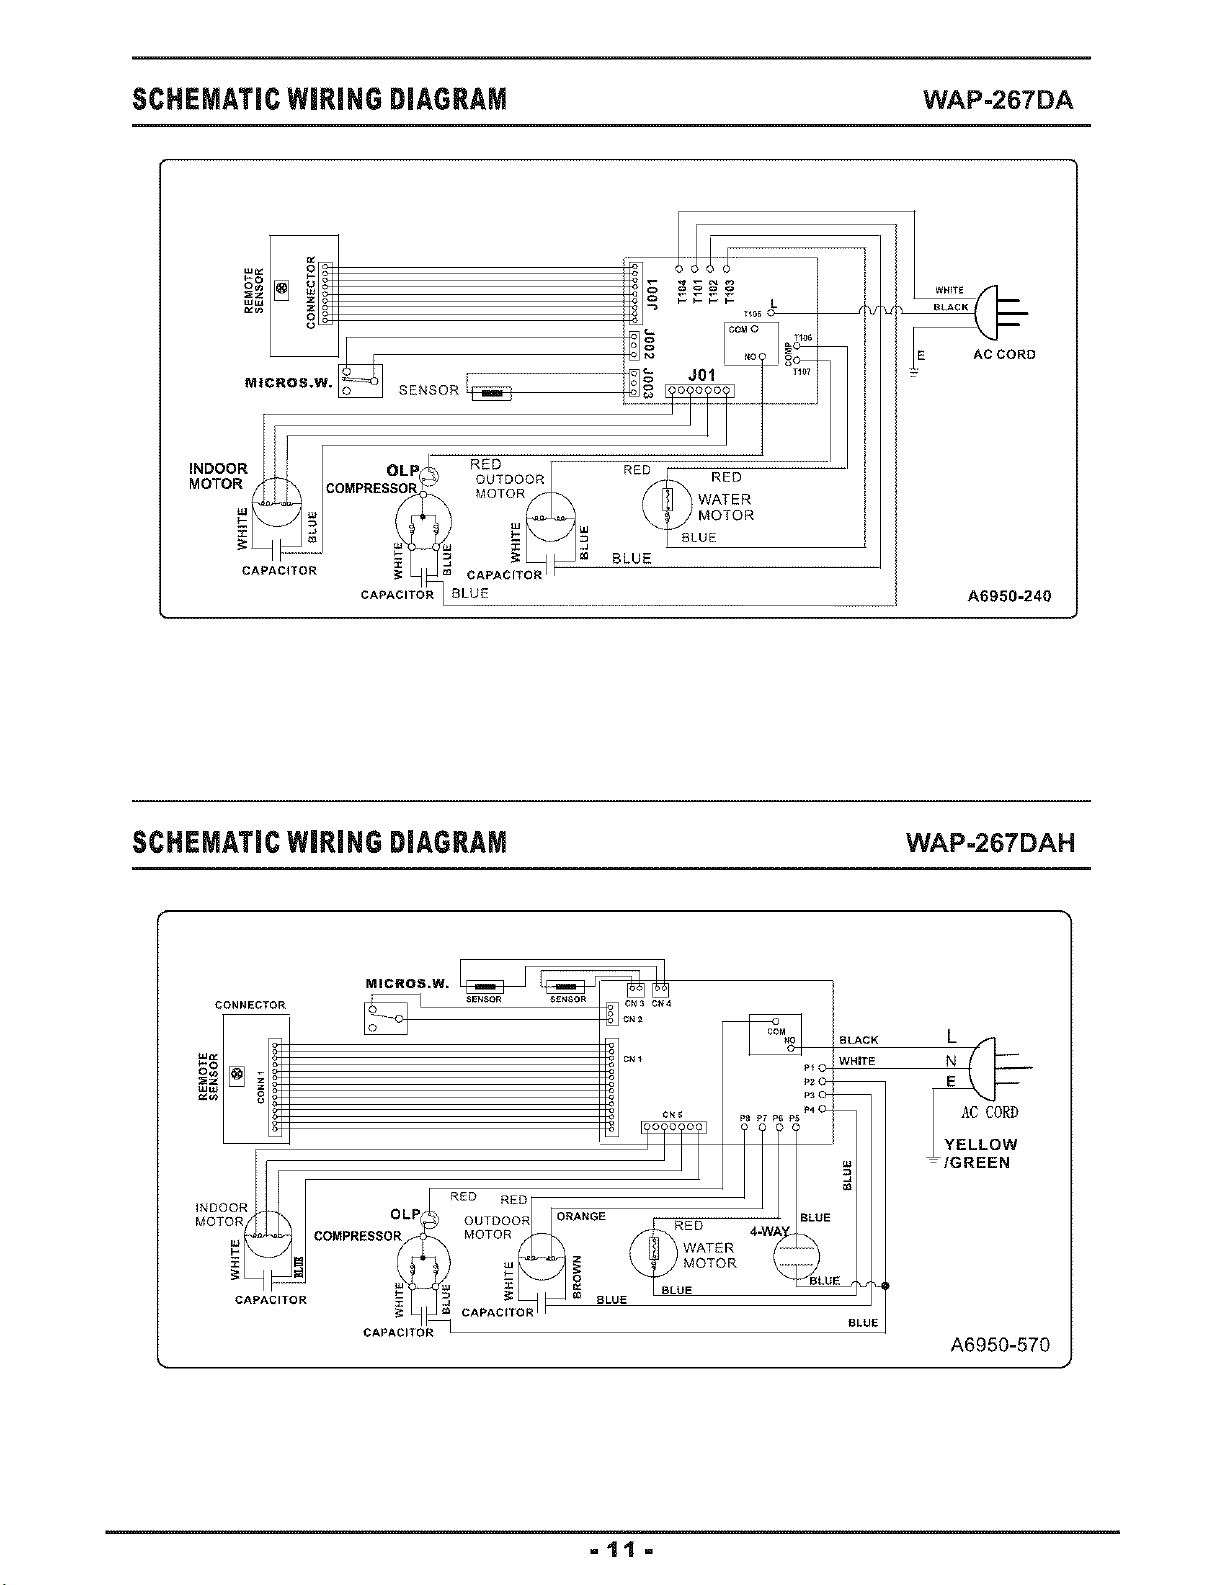
SCHEMATIC WIRING DIAGRAM WAP-267DA
T_0_L-_L
E AC CORD
MICROB.W. SENSOR i_
RED
WATER
MOTOR
BLUE
A6950-240
SCHEMATICWIRING DIAGRAM WAP=267DAH
MICROS.W.
CONNECTOR
OLP OUTDOOR O_NGE RED
COMPRESSOR MOTOR WATER
CAPACITOR _ _ _ = BLUE BLUE
REDRE
CAPACIT
CAPACITO_
CN _ C_4
C_ 2
z
_ )MOTOR
BLACK
WHITE
AC CORD
YELLOW
_/GREEN
BLUE
A6950-570
=tt =
 Loading...