

Page 1
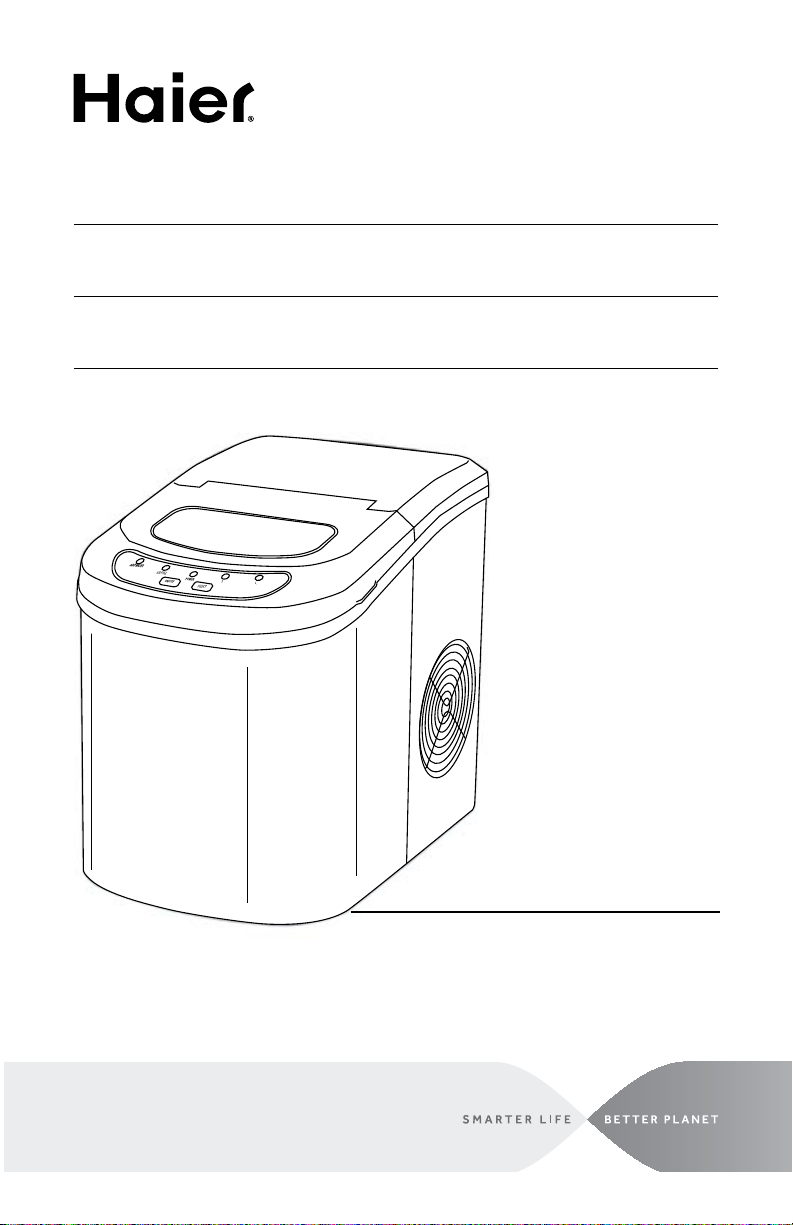
Portable Electronic Icemaker
Machine à glaçons électronique portable
Máquina de Hielo Eléctrica Portátil
User Manual
Guide de l’Utilisateur
Manual del Usuario Modelo
HPIM25SS HPIM25S
Page 2

English
IMPORTANT SAFEGUARDS
When using electrical appliances, basic safety
precautions should always be followed, including
the following:
1. Read all instructions carefully.
2. DANGER! To protect against risk of electric shock, do not immerse
cord, plug or any parts of the unit in water or other liquids.
3. Close supervision is necessary when using this appliance near
children. This appliance is not suitable for use by children.
4. Never leave an appliance unattended while in use.
5. Do not place an appliance on or near a hot gas or electric burner, or
in a heated oven. Do not place on top of any other appliance.
6. Do not let the power cord of an appliance hang over the edge
of a table or countertop or touch any hot surface.
7. Do not operate any electrical appliance with a damaged cord
or plug or after the appliance malfunctions or has been dropped
or damaged in any manner. If damage is suspected, contact the
nearest authorized service center for examination, repair or electrical
or mechanical adjustment.
8. Unplug from power outlet when not in use, before putting on or taking
off attachments, and before cleaning.
9. The use of accessory attachments that are not recommended by the
appliance manufacturer may cause fire, electric shock or injury.
10. Avoid contact with moving parts when the unit is in operation.
11. Never touch the cooling elements when the unit is in operation.
12. Do not use outdoors.
13. Do not use appliance for other than its intended use.
SAVE THESE INSTRUCTIONS
HOUSEHOLD USE ONLY
1
Page 3

English
UNPACKING YOUR ICE MAKER
1. Inspect and remove all packing materials. This includes the foam and any
adhesive tape both inside and outside of the unit.
2. Inspect and remove any remains of packing, tape, or printed materials before
powering on your Haier appliance.
WARNING
Please read this manual carefully before using.
Retain it for your future reference.
PRODUCT REGISTRATION
Keep for your records to obtain Warranty Service
Thank you for using our Haier product.
This easy-to-use manual will guide
you in getting the best use out of your
appliance.
Remember to record the model and
serial number. They are on a label in
back of the appliance.
Staple your receipt to your manual.
You will need it to obtain warranty service.
Please register online at www.prodregister.com/Haier.
__________________________
Model number
__________________________
Icemaker serial number
__________________________
Date of purchase
2
Page 4
English
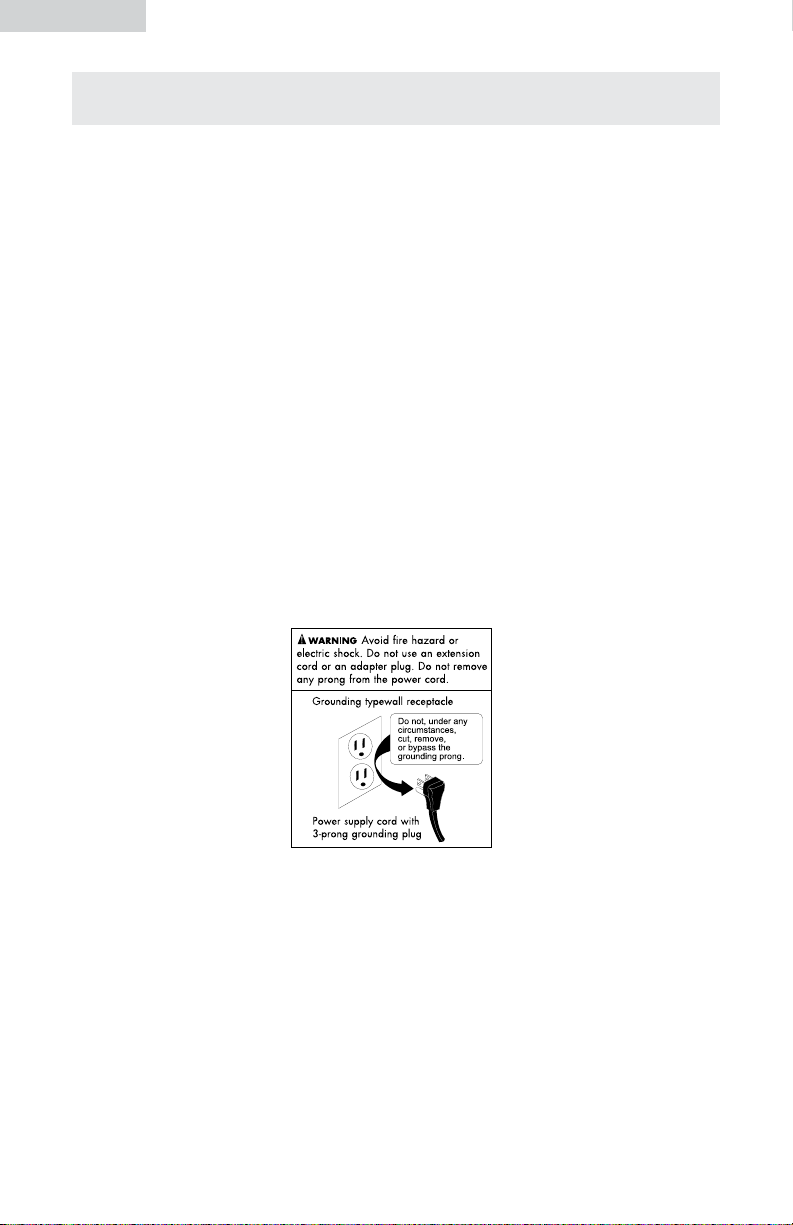
SAFETY INSTRUCTIONS
Electrical Requirements
Wiring and Grounding Instructions
This appliance must be plugged into at least a 15 AMP 110-115 VOLT 60 Hz
GROUNDED OUTLET. This appliance must be grounded. It is equipped with a 3wire cord having a grounding plug. The plug must be plugged into an outlet that
is properly installed and grounded.
WARNING! Improper use of grounded wire can result in the risk of electric
shock. Consult a physician if necessary. Do not attempt to
defeat this safety feature by modifying the plug.
Avoid the use of an extension cord because it may overheat and cause a risk of
fire. However, if it is necessary to use an extension cord:
A. Use only 3-wire extension cords with 3-blade grounding plug.
B. The marked rating of an extension cord must be be equal to or greater than
the rating of this appliance.
C. It should be positioned such that it does not drape over the counter or
tabletop where it can be pulled on by children intentionally.
Attempting any maintenance or cleaning:
To minimize the possibility of electric shock, unplug this appliance from the power
suply or disconnect at the household distribution panel by removing the fuse or
switching off the circuit breaker before attempting any maintenance or cleaning.
NOTE: Pressing the Power ON/OFF button to an off position does NOT
disconnect the appliance from the power supply.
3
Page 5
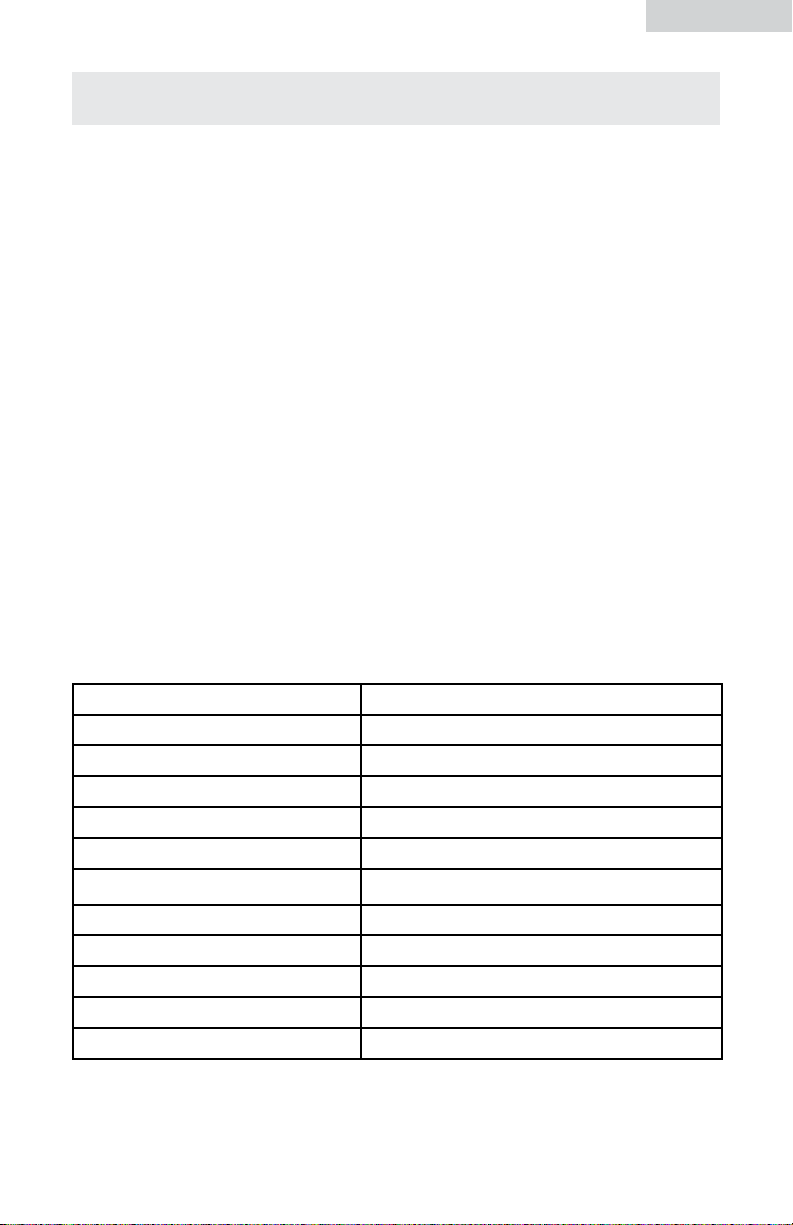
TABLE OF CONTENTS
Important Safeguards ............................................................ 1-2
Safety Instructions ......................................................................3
Parts and Accessories ............................................................. 5-6
Operating Instructions ................................................................7
Pre-Operating Instructions .................................................................7
Operating Instructions ....................................................................... 8
Operating Process............................................................................9
Cleaning and Maintenance ......................................................10
Troubleshooting Guide .............................................................11
Limited Warranty ......................................................................12
English
Specifications Model # HPIM25SS/S
Electrical Shock Protection Class 1
Power 115V/60Hz
Ice Making Current 1.5 A
Ice Harvest Current 2.0A
Refrigerant R134a/2.3 Oz.
Design Pressure
High Side 290 Psig
Low Side 88 Psig
Dimensions 9.5" x 14.1" x 12.9"
Weight 20.5 lbs.
Enclosure ABS plastic/Stainless Steel
4
Page 6

English
PARTS, FUNCTIONS AND FEATURES
1
3
5
67
1. Cover with transparent window
2. Water reservoir (Not shown)
3. Control panel
4. Water Drain Cap (Not Shown - Front Bottom of Unit)
5. Compressor cooling fan (Do not block air flow)
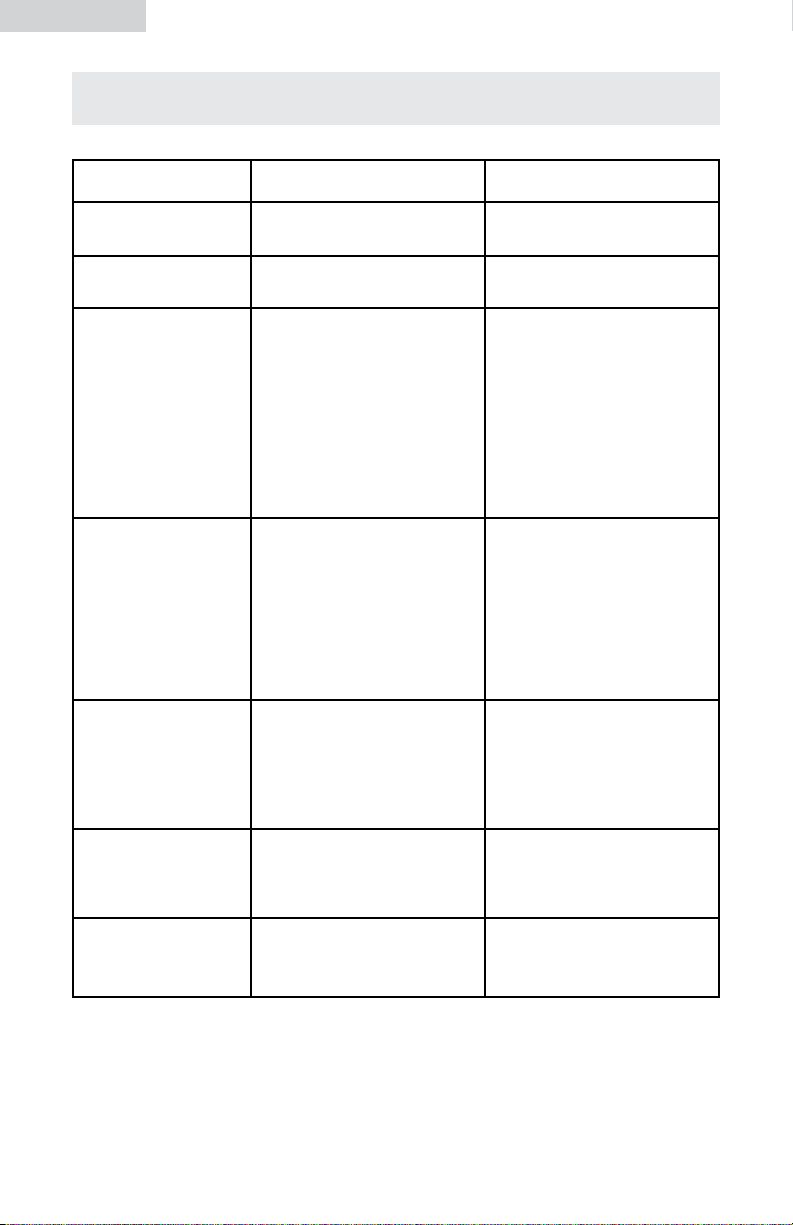
6. Ice shovel
7. Ice basket
5
Page 7
English
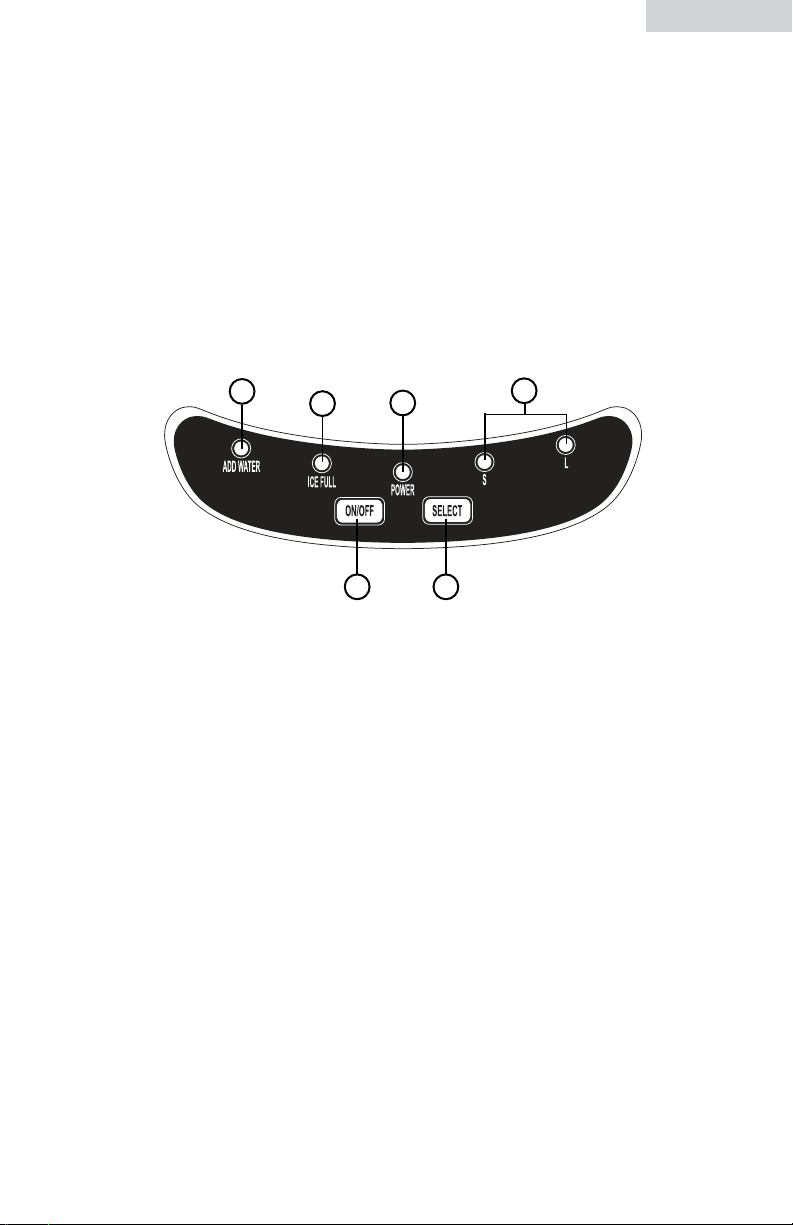
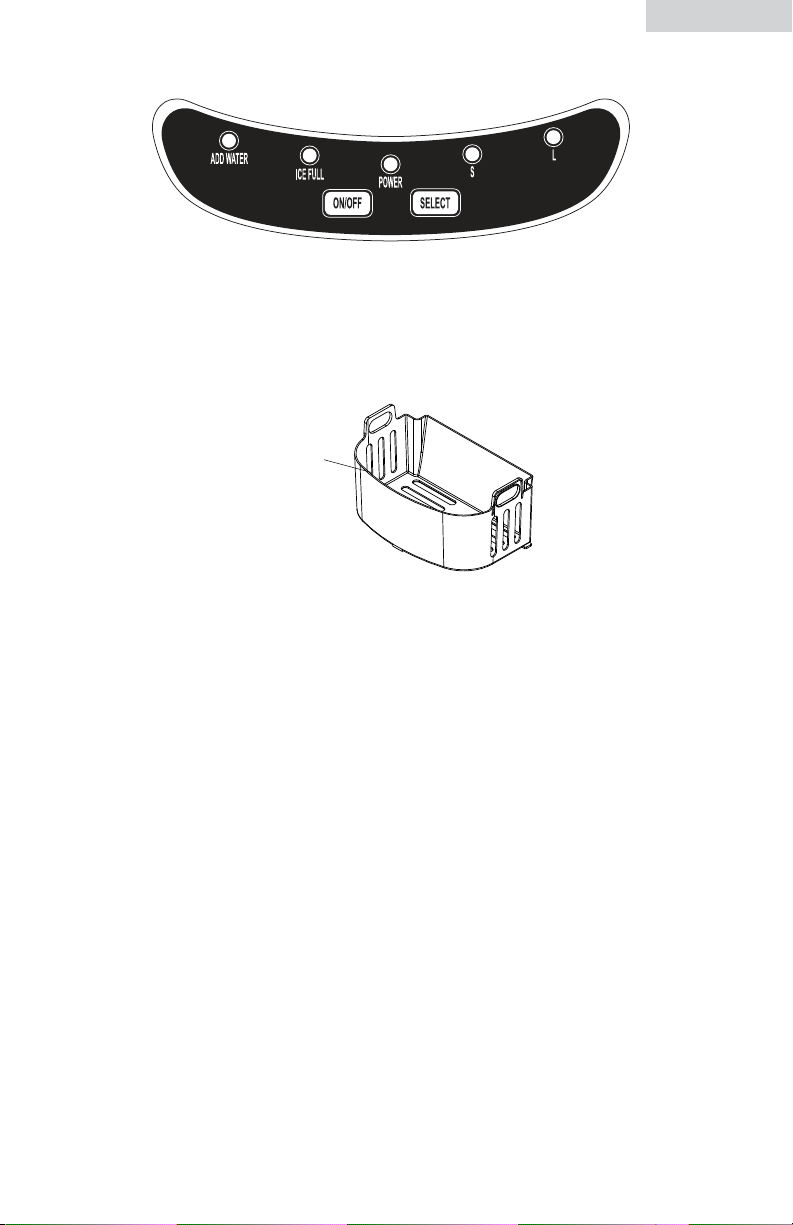
Control Panel: Easy to use, button function with LED indicators
A. Power ON LED indicator light
B. Power ON/OFF button
C. Ice cube SELECT SIZE button
D. Selected ice size LED light indicator displaying: SMALL, and LARGE ice
cubes to make
E. "ADD WATER" (Alerts that there is no water in the water reservoir), must
add water
F. "ICE FULL" LED indicator
E
F
A
B C
D
6
Page 8

English
OPERATING INSTRUCTIONS
This portable icemaker uses a fully automatic control system, with an advanced
microcomputer for easy and convenient ice making. Making ice is simple and
fast. Just add water, plug into an outlet, and press the ON button. You can
select one of the two ice cube sizes with the touch of a button. When first
turning on the unit or during icemaking cycles, the compressor will stay idle for 3
minutes, while energizing.
There are warning indicators that alert you to fill water when the reservoir is
empty and to remove ice when the storage basket is full. The icemaker also has
built-in safeguards that can limit accidental damage, automatically shutting down
the system when necessary.
Pre-Operating Instructions
Please read carefully.
1. The incline angle of the icemaker cabinet should not exceed 45˚
during transportation or use. Do not turn the icemaker upside down.
Doing so could cause the compressor or refrigerating system to operate
incorrectly. When the icemaker is moved or transported, please allow time
for the fluids in the compressor to settle. Before using the icemaker for the first
time, please wait 2 hours after the unit has been leveled and positioned in its
proper place.
2. Please ensure the icemaker is level and on a stable table or platform
to avoid malfunction.
3. The machine must be placed on a dry and level surface with sufficient
ventilation, far from heat sources such as ovens, heaters and corrosive gases.
Leave an 8-inch clearance on all sides of the icemaker for proper ventilation.
4. Do not fill the water reservoir with hot water. This may damage the icemaker.
It is best to fill the water reservoir with water of room temperature or lower.
7
Page 9
English
Operating Instructions
1. Open the top cover, take out the ice storage basket and fill the water reservoir
with drinkable (tap, purified or bottled) 2.3 quarts water to the level mark and
replace the ice storage basket.
Lift ice basket to add water
Make sure that the water level does not reach above the level mark or the
bottom of the ice storage basket. Close the top cover.
Note: During the operation process, if the level of water in the water reservoir
becomes too low, the machine will automatically stop operating and the
"Add Water" indicator will display on the LED.
2. Plug the unit into a grounded outlet. Push the ON / OFF button on the control
panel to turn on the machine.
3. Select the desired size of ice cube by pressing the S or L ice selector button.
S = Small ice cubes (Approx. 7 minutes)
L = Large ice cubes (Approx. 8 minutes)
The icemaker will start making ice soon after. The next cycle of 9 ice cubes
is complete (based on water temperature, ambient room temperature and
selected ice cube size).
Note: To stop the operation, press the ON/OFF button.
8
Page 10

English
Operating Process
1. Water is pumped from the water storage tank to the water box, which may
take up to 1 minute.
2. The icemaking cycle begins when the evaporator rods are dipped into the
water box. You will hear the compressor working.
3. It will take approximately 6-13 minutes for each icemaking cycle, depending
on the size selected & room temperature. The larger the size or higher room
temperature, the more time is needed to make the ice. After the cycle is
finished, the water box will tilt forward and the remaining water will flow
back into the water storage tank. The evaporator rods will then release the ice
cubes.
Note: If the room ambient temperature is below 60˚ F, then small ice cube
sizes are suggested to prevent ice cubes from fusing together.
4. Approximately 15 seconds later, the water box will tilt backwards and the ice
pusher will push the ice into the ice storage basket. After the water box flips
back to its original position, the next icemaking cycle will begin.
5. When the maximum capacity of ice cubes is collected and the ice obstructs
the infared sensor, the icemaker will automatically stop operating. The “ICE
FULL” LED indicator will light up.
If more ice is needed, remove the ice from the ice storage basket; then
replace the basket into the machine, making sure that the basket is placed
back to its original position. Note: When replacing the basket, ensure that the
infared sensor is not obstructed by the basket so that the machine operates
properly.
WARNING! Direct or reflected sunlight may cause the infrared sensor to
malfunction. If the unit doesn't stop, even with ice cubes
obstructing the sensor, move the unit out of the sunlight.
6. To continue making ice, check that there is water in the water storage tank. If
there is no water in the water storage tank, then no water will be pumped into
the water box, and the operation will stop. The "Add Water" LED display will
light up. Press the “OFF” button. Fill the water storage tank with water, and
then press the “ON” button for the icemaker to begin operating again. Allow
the refrigerant inside the compressor at least 3 minutes to settle before
restarting.
7. If the compressor stops for any reason such as water shortage, too much ice,
power off, etc., do not restart the machine right away.
Wait at least 3 minutes before restarting the machine.
9
Page 11

CLEANING AND MAINTENANCE
Before using your icemaker, it is strongly recommended that you clean the
icemaker thoroughly. Be sure to clean the icemaker regularly.
1. When cleaning, please make sure the power has been turned off and the
plug is disconnected from the outlet. When plugging or unplugging the unit
from the outlet, pull directly on the plug. Never pull on the power cord.
2. Remove the ice storage basket.
3. Drain remaining water from the unit by unplugging the drain plug
on the front bottom side. When cleaning is completed, the plug
must be properly inserted back onto the drain otherwise the
icemaker will leak.
4. Use a mild detergent diluted in warm water and wipe with a soft
towel or sponge.
Solvents, detergents and abrasives must never be
used for cleaning.
5. Wipe the inner parts, such as the ice storage basket, water reservoir, water
box, ice pusher, and evaporator rods.
English
6. The outside of the icemaker should be cleaned regularly with a mild
detergent solution, warm water, and a soft cloth.
7. Dry the interior and exterior with a soft cloth.
8. To begin making ice once the unit has been cleaned, pour clean water into
the water reservoir and fill up to the level line follow operating instructions.
Never tilt or place the icemaker on its side, otherwise you must wait
10 hours for compressor coolant to settle.
9. To ensure the cleanliness of the ice cubes, the water in the water storage tank
should be replaced every 24 hours.
10. When the machine is not in use or will not be used for an extended period
of time, pull out the drain plug at front bottom of the machine to empty the
remaining water in the water reservior completely. (Follow the instructions in
number 4 above.)
Drain Cap
Rubber Plug
Drain Spout
10
Page 12
English
TROUBLESHOOTING GUIDE
Problem Possible Causes Solution
“ADD WATER”
indicator light turns on.
There is no indication
on the control panel.
“Ice Full” and “Add
Water” indicators light
up simultaneously.
The “Ice Full” indicator
light is on.
The unit does not
operate.
Low water level or lack of water.
Disconnection of plug.
Electrical Power Surge
or
There may be air in the lines or
the lines are blocked. The water
tank cannot detect water level.
The ice basket is full
or
the ice basket is not full or no
ice in the basket.
Power is not being supplied
to the unit. The ambient
temperature or the water
temperature is too high.
Add water and the icemaker will
operate automatically.
Check that the plug is plugged
into the electrical outlet.
Turn off the icemaker, pull out
the electric plug, fill it with water
if needed, replace the plug and
then restart the unit.
or
Check if ice is blocking the ice
pusher. Turn off the unit; let the
ice melt and restart. Otherwise,
call Haier America Customer
Service.
Remove ice from the ice
storage basket to make more
or
hold down the "Select" button
for 5 seconds, the ice maker
will make ice for 10 cycles even
though the "Ice Full" indicator
is lit.
Plug the unit into a standard
110/120 Volt, 60 Hertz power
source. Please run the icemaker
in temperatures below 90°F
and/or pour colder water into
the water reservoir.
Ice blockage. No ice is
being made.
The icemaking cycle
seems normal but no ice
is produced.
Making ice takes too much time.
There is refrigerant leakage. A
pipe in the cooling system is
blocked.
Turn off the machine. Start the
machine after the ice block
melts. Or change the size
selector to small ice cubes.
Consult a qualified
technician or call Haier America
Customer Service.
Note: There is protective circuitry inside this icemaker to protect the circuitry from
overheating and the icemaker will automatically shut down to prevent
damage if activated. Please disconnect power cord and restart after 30
minutes of cooling down time.
For Haier America Customer Service, please call: 1-877-337-3639
11
Page 13

LIMITED WARRANTY
English
What is covered and for how long?
This warranty covers all defects in
workmanship or materials for a period of:
12 months for labor
12 months for parts (Functional Parts Only)
The warranty commences on the date of
item purchase. Customer shall provide Haier
with proof of the date of purchase and the
original receipt along with: brand, model
and serial number for verification prior to
any warranty service being provided.
Carry-In Service is available for selected
products at the discretion of Haier America.
EXCEPTIONS:
Commercial or Rental Use warranty
90 days for labor 90 days for parts
No other warranty applies.
What is covered.
1. The mechanical and electrical parts of the
appliance which serve the functional
purpose of this appliance are covered
for a period of 12 months or as stated
above. This includes all parts except
finish, trim and glass.
2. The limited warranty does not cover any
credit or refund for any loss or injury
caused by the product or defects to the
product including but not limited to
incidental or consequential damages.
What will be done?
1. Any mechanical or electrical part that
proves to be defective in normal usage
during the specified warranty period
will be repaired or replaced at Haier’s
discretion.
ALL WARRANTY SERVICE MUST BE
PROVIDED BY ONLY OUR FACTORY
SERVICE CENTERS, OR BY AN
AUTHORIZED HAIER CUSTOMER
TECHNICIAN.
If it is determined that repair is not
appropriate or replacement parts
are unavailable for repair, Haier will
exchange the product with a refurbished
or new product the same or similar to the
original at its discretion.
2. There will be no charge to the purchaser
for functional replacement parts and
labor on any covered items during the
initial 12- month period or as stated
above.
3. THIS WARRANTY COVERS APPLIANCES
WITHIN THE CONTINENTAL
UNITED STATES, PUERTO RICO AND
CANADA. IT DOES NOT COVER THE
FOLLOWING:
Damages from improper installation.
Damages incurred during shipping.
Defects other than manufacturing. Damage
from misuse, abuse, accident, alteration,
lack of proper care and maintenance
or incorrect current or voltage or acts of
God. Damage from other than household
use. Damage from service by other than
an authorized dealer or service center.
Decorative trims, glass or replaceable light
bulbs. Transportation and shipping costs.
Labor (after the initial 12 months). Credit
or Refund for products over 30 days past
date of purchase. Food loss for food spoiled
as a direct result of mechanical failure of
the product or of any delay in providing
service, repair, replacement. This limited
warranty doesn’t apply to refurbished
product or unit purchased as/like new or
second-hand. THIS LIMITED WARRANTY
IS GIVEN IN LIEU OF ALL OTHER
WARRANTIES, EXPRESSED OR INCLUDING
THE WARRANTIES OF MERCHANTABILITY
AND FITNESS FOR A PARTICULAR
PURPOSE. The remedy provided in this
warranty is exclusive and is granted in lieu
of all other remedies. This warranty does not
cover incidental or consequential damages,
so the above limitations may not apply to
you. Some states do not allow limitations on
how long an implied warranty lasts, so the
above limitations may not apply to you. This
warranty gives you specific legal rights, and
you may have other rights, which vary from
state to state.
Haier America
New York, NY 10018
If you need service, please first see the “Troubleshooting” section of the User Manual. After checking
“Troubleshooting,” additional help is available by calling Haier America Customer Service Hot Line 24
hours a day, 7 days a week. Please call 1-877-337-3639.
12
Page 14

Français
CONSIGNES DE SÉCURITÉ IMPORTANTES
Lors de l’utilisation d’appareils électriques certaines
précautions d’utilisation doivent être respectées, dont
les suivantes:
1. Lisez toutes les instructions attentivement.
2. DANGER! Afin de se protéger contre les éventuels risques de
décharge électrique n’immergez pas le cordon d’alimentation, la
fiche électrique ou toute autre pièce de l’unité dans l’eau ou tout
autre liquide.
3. Cet appareil, comme tout appareil électrique, ne devrait pas être
utilisé par des enfants. Faites tout particulièrement attention lorsque
vous utilisez l’appareil près d’enfants.
4. Ne laissez pas l’appareil sans surveillance lorsqu’il est en marche.
5. Ne placez pas l’appareil sur ou près d’une plaque chaude,
électrique ou à gaz ou un four allumé. Ne le posez pas sur un autre
appareil électroménager.
6. Ne laissez pas le cordon pendre à travers la table, le plan de travail
ou toucher des surfaces chaudes: cuisinière, réchaud, etc.
7. N’utilisez surtout pas un appareil dont le cordon d’alimentation ou la
fiche électrique est endommagé ou un appareil qui est défectueux ou
fonctionne mal. Retournez-le au service après-vente pour inspection,
réglage ou réparation par des professionnels.
8. Débranchez l’appareil avant de le désassembler, le ranger et le
nettoyer et lorsqu’il n’est pas utilisé.
9. L’utilisation d’accessoires non prévus pour être utilisés avec cet
appareil peut causer un incendie, décharge électrique des blessures.
10. Lorsque l’appareil est marche évitez contact avec les pièces mobiles.
11. Ne touchez jamais les éléments de refroidissement lorsque l’appareil
est en marche.
12. Ne pas utiliser à l’extérieur.
13. N’utilisez pas cet appareil pour d’autres fonctions que celles
prévues.
CONSERVEZ CES INSTRUCTIONS À
USAGE DOMESTIQUE UNIQUEMENT
1
Page 15

DÉBALLAGE DE VOTRE MACHINE À GLACE
1. Inspectez et enlevez tous les matériaux d’emballage, incluant la mousse et le
ruban adhésif à l’extérieur et à l’intérieur de l’appareil.
2. Inspectez et enlevez tous restes d’emballage, de ruban adhésif, de feuillet
d’information avant de mettre en marche votre appareil Haier.
AVERTISSEMENT
Veuillez lire ce manuel d’instructions attentivement avant l’utilisation.
Conservez-le pour référence future.
Français
ENREGISTREMENT DU PRODUIT
Gardez dans vos dossiers pour obtenir un service de garantie.
Merci d’avoir choisi et d’utiliser
un produit Haier. Ce guide facile
d’utilisation vous guidera et vous
aidera à obtenir les meilleurs
résultats possibles avec votre
machine à glaçons.
N’oubliez pas de noter les numéros
de modèle et de série de votre
appareil. Ils se trouvent sur une
étiquette à l’arrière de la machine à
glaçons.
Agrafez votre reçu de paiement à ce guide.
Vous en aurez besoin pour obtenir votre garantie.
Veuillez enregistrer votre produit en ligne à www.prodregister.com/haier
dans les 10 jours de l’achat.
Numéro du modèle
Icemaker serial number
Date d’achat
2
Page 16

Français
WARNINGS:
AVERTISSEMENT
INSTRUCTIONS DE SÉCURITÉ
Exigences Électriques
Instructions de filage et de mise à terre
Cet appareil doit être branché à une PRISE MISE À TERRE d’au moins 15 AMP
115 VOLT 60 Hz. Cet appareil doit être mis à terre. Il est muni d’un câble
d’alimentation à 3 fils avec une fiche mise à terre. La fiche doit être branchée à
une prise installée et mise à terre correctement.
Avertissement! Si la fiche n’entre pas dans la prise murale essayez dans
l’autre sens. Si cela ne marche toujours pas ne tentez rien,
contactez un électricien qualifié. N’essayez pas de régler le
problème vous-même.
Évitez d’utiliser une rallonge car elle risque de surchauffer et d’entraîner un risque
d’incendie. Cependant, si vous devez utiliser une rallonge:
A. Utilisez uniquement une rallonge à trois lames, avec trois trous.
B. Le voltage de la rallonge doit être au moins égal à celui de
l’appareil.
C. La rallonge ne doit pas pendre à travers la table ou le plan de
travail où les enfants peuvent tirer ou trébucher dessus.
Entretien et nettoyage:
Pour minimiser les risques de choc électriques, débranchez cet appareil de la
prise murale ou déconnectez le courant domestique en enlevant le fusible ou en
éteignant le disjoncteur avant toute tentative d’entretien ou de nettoyage.
N.B.: Le fait d’éteindre l’appareil en appuyant sur le bouton de mise en marche
3
Évitez les
décharges électriques et les incendies.
N’utilisez pas une rallonge ni un adaptateur. Ne retirez pas de lames de la fiche.
Cordon d’alimentation à
trois lames
Fiche de courant
reliée à la terre
(ON/OFF) NE DÉCONNECTE PAS l’appareil du courant.
Page 17

TABLE DES MATIERES
Mesures de protection importantes ...................................... 1-2
Consignes de sécurité .................................................................3
Pièces et accessoires ............................................................... 5-6
Instructions d’utilisation .............................................................7
Instructions préalables à l’utilisation ...................................................7
Instructions d’utilisation .....................................................................8
Mode d'opération ............................................................................9
Nettoyage et entretien .............................................................10
Guide de dépannage................................................................11
Garantie limitée ........................................................................12
Français
Spécifications Modèle # HPIM25SS/S
Protection contre les chocs électriques Classe 1
Alimentation 115 V/60 Hz
Courant pour la fabrication des glaçons 1.5 A
Courant pour la récolte des glaçons 2.0A
Produit réfrigérant R134a/2,3 oz
Pression nominale
Haute pression 290 psig
Basse pression 88 psig
Dimensions 9.5 po x 14.1 po x 12.9 po
Poids 20.5 lb
Composition du boîtier Plastique ABS/ Acier
inoxydable
4
Page 18

Français
PIÈCES, FONCTIONS ET CARACTÉRISTIQUES
1
3
5
67
1. Couvercle avec fenêtre transparente
2. Réservoir d’eau (absent de l’image)
3. Panneau de commande
4. Bouchon de vidange d’eau : Pour vidanger l’eau de glace
5. Ventilateur du compresseur (ne bloquez pas la circulation d’air)
6. Spatule à glace
7. Bac à glace
5
Page 19

Français
Tableau de commande : Facile à utiliser, avec touches et voyants DEL
A. Voyant DEL de mise en marche
B. Touche de mise en marche/arrêt
C. Touche de SÉLECTION DE LA TAILLE des glaçons
D. Le voyant DEL indiquant la taille sélectionnée affiche : Glaçons fabriqués
SMALL (petit) et LARGE (grand)
E. « ADD WATER » (Ajouter de l’eau – avertit que le réservoir d’eau est
vide); vous devez ajouter de l’eau
F. Voyant DEL « ICE FULL » (Bac plein)
E
F
A
B C
D
6
Page 20

Français
INSTRUCTIONS D’UTILISATION
Cette machine à glaçons portable utilise un système de contrôle
entièrement automatique avec une technique de pointe pour une
fabrication de glaçons facile et pratique. Faire des glaçons est simple et rapide.
Ajoutez de l’eau, branchez et appuyez sur le bouton ON. Le voyant lumineux
affichera la minuterie pour fabriquer 12 glaçons de la taille choisie. Lors de la
première mise en marche de l’appareil ou durant les cycles de fabrication des
glaçons le compresseur restera à l’arrêt pendant 2 minutes.
Des indicateurs vous indiquent lorsque le réservoir d’eau est vide et lorsque le
compartiment de stockage des glaçons est plein. La machine à glaçons possède
également des sécurités intégrées qui peuvent limiter les dommages accidentels
en arrêtant le système quand nécessaire.
Instructions de pré-utilisation
À lire attentivement.
1. Lors du transport l’angle d’inclinaison ne doit pas excéder 45 degrés. Ne
tournez pas la machine à l’envers cela peut causer un mauvais fonctionnement
du compresseur et du système de réfrigération. Lorsque la machine est bougée
ou transportée laissez aux liquides dans le compresseur le temps de se stabiliser. Attendez 10 heures après avoir installé la machine à glaçons avant de
l’utiliser pour la première fois.
2. La machine à glaçons doit être posée sur une surface plane ou une plate-forme
pour éviter qu’elle fonctionne mal.
3. La machine à glaçons doit être posée sur une surface plane et sèche loin de
toute source de chaleur, radiateurs ou corrosifs. Laissez 20 cm sur tous les
côtés de l’appareil pour une bonne ventilation.
4. Ne remplissez pas le réservoir d’eau avec de l’eau chaude. Cela risque
d’endommager la machine à glaçons. Il vaut mieux remplir le réservoir avec
de l’eau à température ambiante ou un peu plus froide.
7
Page 21

Instructions d’utilisation
1. Ouvrez le couvercle, retirez le compartiment de stockage des
glaçons et remplissez d’eau le réservoir d’eau avec de l’eau potable (eau du
robinet, purifiée ou en bouteille). Remettez le compartiment de stockage des
glaçons en place.
Versez l’eau au réservoir
Français
Assurez-vous que le niveau de l’eau n’atteint pas le fond du
compartiment de stockage des glaçons. Refermez le couvercle.
Remarque: Durant le processus d’utilisation si le niveau d’eau du
réservoir d’eau devient trop bas la machine arrêtera automatiquement de fonctionner et le témoin lumineux affichera “POUR/
VERSER”
2. Branchez l’appareil dans une prise murale. Appuyez sur le bouton ON/OFF
du tableau de commande pour mettre la machine en marche.
3. Appuyez sur S, L pour sélectionner la taille de glaçons désirée.
S = Petit (environ 7 minutes)
L = Gros (environ 8 minutes)
La machine commencera à fabriquer les glaçons peu de temps après. Le voy-
ant lumineux de la minuterie affichera le nombre de minutes restant jusqu’à ce
que le prochain cycle de 9 glaçons soit terminé (en fonction de la température
de l’eau, la température ambiante et la taille de glaçons choisie).
Remarque: Pour arrêter la fabrication appuyez de nouveau sur le bouton ON/
OFF.
8
Page 22

Français
Processus d’utilisation
1. L’eau est pompée du réservoir d’eau vers la boîte à eau, cela peut prendre
jusqu’à 48 secondes.
2. Le cycle de fabrication des glaçons commence quand les tiges de
l’évaporateur trempent dans la boîte à eau.
3. Chaque cycle de fabrication de glace dure environ 6 à 13 minutes,
dépendamment de la taille choisie et la température ambiante. Plus la taille
est grosse et plus la température ambiante est élevée, plus cela prend de
temps pour faire de la glace. Après que le cycle soit terminé la boîte à eau
s’inclinera vers l’avant et l’eau restante retournera dans le réservoir d’eau. Les
tiges de l’évaporateur libéreront alors les glaçons.
Remarque: Si la température ambiante est inférieure à 15° C il vaut
mieux faire des glaçons de petite taille pour les empêcher de
fusionner.
4. Après environ 15 secondes, la boîte à eau s’inclinera vers l’arrière et le
poussoir à glaçons poussera les glaçons dans le compartiment de stockage.
Après que la boîte à glaçons soit revenue à sa position d’origine le cycle de
fabrication de glaçons suivant commencera.
5. Lorsque la capacité maximale de glaçons est obtenue et que les glaçons
atteignent la sonde de température la machine à glaçons s’arrêtera
automatiquement. Le voyant lumineux affichera « FULL/PLEIN ». Retirez les
glaçons du compartiment de stockage. Remettez en suite le compartiment de
stockage à sa place en vous assurant que le compartiment est bien remis dans
sa position d’origine. Cela permettra de s’assurer que la sonde de
température est bien à sa place sous le compartiment de stockage et ainsi la
machine peut fonctionner normalement.
AVERTISSEMENT! Les rayons du soleil (soit direct ou reflétés) peuvent nuire
au capteur à infrarouge et causer un mauvais fonctionnement.
Si l’appareil ne s’arrête pas, même une fois que les
glaçons obstruent le capteur, déplacez l’appareil pour
qu’il ne soit plus au soleil.
6. Pour continuer à faire des glaçons, vérifiez qu’il y ait de l’eau dans le
réservoir d’eau. S’il n’y a pas d’eau dans le réservoir et qu’aucune eau n’est
pompée dans la boîte à eau le processus s’arrêtera et le voyant lumineux
affichera « POUR/VERSER ». Remplissez le réservoir d’eau avec de l’eau et
appuyez sur le bouton « ON » pour que l’appareil se remette en marche.
Accordez au moins 3 minutes au réfrigérant à l’intérieur du compresseur pour
se stabiliser avant de remettre en marche.
7. Si le compresseur s’arrête pour quelque raison que ce soit : manque d’eau,
trop de glaçons, pas de courant, etc. ne remettez pas la machine en marche
tout de suite. Attendez au moins 3 minutes avant de remettre la machine en
marche.
9
Page 23

Français
NETTOYAGE ET ENTRETIEN
Avant de vous servir de votre machine à glaçons, un nettoyage complet est
fortement recommandé. Assurez-vous de nettoyer la machine à glaçons
régulièrement.
1. Lors du nettoyage, veuillez vous assurer d’avoir coupé l’alimentation
et débranché l'appareil de la prise murale. Lorsque vous branchez ou
débranchez l’appareil de la prise murale, tenez directement la fiche. Ne tirez
jamais sur le cordon d’alimentation.
2. Retirez le bac à glaçons.
3. Videz l’eau accumulée en débouchant le bouchon du drain à l’avant,
au bas de l’appareil. Une fois le nettoyage terminé, le bouchon doit
être bien replacé sur le drain où la machine à glace coulera.
4. Utilisez un détergent doux dilué dans l'eau tiède et essuyez avec un
linge doux ou une éponge.
N’utilisez jamais de solvants, de détergents et d’abrasifs pour nettoyer
l’appareil.
5. Essuyez les éléments internes comme le bac à glaçons, le réservoir d’eau, le
compartiment à eau, le poussoir de glaçons et les tiges de l’évaporateur.
6. Les parois externes de la machine à glaçons devraient être nettoyées
régulièrement avec une solution de détergent doux, de l’eau tiède et un chiffon
doux.
7. Séchez l’extérieur et l’intérieur de l’appareil avec un linge doux.
8. Pour commencer à fabriquer des glaçons une fois l'appareil nettoyé, versez
de l'eau saine dans le réservoir d'eau jusqu’à la ligne, conformément aux
instructions d'utilisation.
N'inclinez ou ne placez jamais la machine à glaçons sur le côté.
Autrement, vous devrez attendre 10 heures pour que le liquide
refroidisseur du compresseur se stabilise.
9. Pour vous assurer d'obtenir des glaçons sains, l’eau du réservoir devrait être
remplacée toutes les 24 heures.
10. Lorsque la machine est pas utilisée, ou ne le sera pas pour une longue
période de temps, débouchez le bouchon du drain pour vider l’eau
accumulée complétement (suivre les instructions ci-haut).
Bec de vidange
Capuchon de caoutchouc
Bouchon de vidange
10
Page 24

Français
PROBLÈMES ET SOLUTIONS
Problème Causes possibles Solution
Le voyant lumineux
affiche “PAS D’EAU”
Il n’y a pas d’indication
sur le tableau de commande
Les voyants lumineux
affiche “FULL/PLEIN”
et “POUR/VERSER” en
même temps.
Le voyant lumineux
affiche “FULL/PLEIN”
L’appareil ne
fonctionne pas.
Il n’y a pas d’eau dans
le réservoir d’eau ou le
niveau d’eau est trop bas.
L’appareil n’est pas branché.
Il y a une pointe de courant
ou
Il y a peut-être un problème
avec les lignes. Le réservoir
d’eau ne peut pas détecter
le niveau d’eau.
Le compartiment de stockage des glaçons est plein
ou
Le panier à glace n’est pas
plein, ou il n’y a pas de
glace dans le panier.
L’appareil ne reçoit pas
de courant. La température
ambiante ou la température de l’eau est trop
élevée.
Ajoutez de l’eau et la machine se
mettra en marche automatiquement.
Vérifiez que l’appareil est bien branché dans la prise murale.
Éteignez la machine à glaçons.
Débranchez-la. Remplissez le réservoir d’eau avec de l’eau et rallumez
l’unité. Ou vérifiez si des glaçons bloquent le poussoir. Éteignez l’appareil.
Laissez la glace fondre et rallumez
l’appareil. Ou contactez le service
après-vente de Haier America.
Retirez les glaçons du compartiment
de stockage des glaçons pour en
faire plus
ou
hold down the "Select" button for 5
seconds, the ice maker will make ice
for 10 cycles even though the "Ice
Full" indicator is lit.
Branchez l’appareil dans une prise
standard 110/120 V, 60 Hz. Faites
fonctionner la machine à glaçons à
moins de 32°C et/ou mettez de l’eau
plus froide dans le réservoir.
Blocage de glaçons.
Aucun glaçon n’est
fabriqué.
Le cycle de fabrication
de glaçons semble normal mais aucun glaçon
n’est fabriqué.
La fabrication des glaçons
prend trop de temps.
Il y a une fuite de réfrigérant. Le système de réfrigération est bouché.
Arrêtez la machine. Arès la fonte du
bloc de glace remettez la machine
en marche. Ou changez la taille de
glaçons sélectionnée pour des petits
glaçons.
Contactez un technicien agréé ou
appelez le service
après-vente de Haier America.
Remarque: Il y a un système de circuits protecteur à l’intérieur de cette machine à glaçons
pour empêcher la surchauffe et la machine à glaçons s’éteindra automatiquement pour
éviter les dommages si activé. Débranchez l’appareil et rebranchez après 30 minutes pour
laisser à l’appareil le temps de refroidir. Contactez le service après-vente de Haier America
au 1-877-337-3639.
For Haier America Customer Service, please call: 1-877-337-3639
11
Page 25

GARANTIE LIMITÉE
Français
Ce qui est couvert et pour combien de
temps
Cette garantie couvre tous défauts de pièces
et main-d’œuvre pour une période de 12 mois
à compter de la date d’achat si vous êtes en
mesure de présenter une preuve d’achat (les
pièces fonctionnelles uniquement).
Cette garantie commence à la date d’achat du
produit. Les clients doivent montrer leur preuve
d’achat avec la date de l’achat et le reçu original avec la marque, le modèle et le numéro de
série pour des raisons de vérification avant que
tout service de garanti puisse être fourni. Un
service de réparation en magasin est disponible
pour certains produits, la discrétion d’Haier
America.
Exceptions: la garantie de l’appareil pour
usage commercial ou location de l’appareil est
de 90 jours à compter de la date d’achat.
Il n’y a pas d’autres garanties.
Ce qui est couvert :
1. Les pièces mécaniques et électriques qui ser-
vent au fonctionnement de cet
appareil pour une période de 12 mois. Cela
inclut toutes les pièces sauf le verre et les finitions.
2. La garantie limitée ne couvre pas les avoirs et
remboursements pour perte ou blessure causée
par le produit ou défauts du produits dont
mais pas limitées au dommages matériels,
économiques et secondaires.
Ce qui sera fait :
1. Haier réparera ou remplacera, à sa discré-
tion, toute pièce mécanique ou électrique
qui s’avère défectueuse en utilisation normale durant la période de garantie spécifiée. TOUT SERVICE DE GARANTIE SERA
FOURNI UNIQUEMENT PAR NOS CENTRES
DE SERVICE APRÈS-VENTE OU PAR UN
TECHNICIEN AGRÉÉ HAIER. S’il est déterminé
que la réparation n’est pas appropriée ou que
le remplacement des pièces n’est pas possible,
Haier échangera le produit avec un produit
remis à neuf ou un produit neuf identique ou
similaire à l’original, à sa discrétion.
2. L’acheteur n’aura rien à payer pour la main-
d’œuvre sur toute pièce durant la période
initiale de 12 mois et rien également pour les
pièces sur toutes les pièces couvertes pendant
la période initiale de 12 mois ou comme mentionné plus haut.
3. CETTE GARANTIE COUVRE LES APPAREILS
EN AMERIQUE CONTINENTALE (DANS LES
48 ETATS DES ETATS-UNIS), A PORTO RICO
ET AU CANADA. ELLE NE COUVRE PAS CE
QUI SUIT :
Les dommages dus à une mauvaise installation
ou un usage autre que celui spécifié.
Les dommages dus à une mauvaise utilisation,
un accident, une modification et un mauvais
entretien de l’appareil. Les dommages dus aux
catastrophes naturelles.
Une panne causée par l’accumulation de
morceaux de nourriture ou dépôt d’eau.
Un produit pris en charge et réparé par
quelqu’un d’autre ou ailleurs qu’au centre de
réparation agréé.
Les décorations, le verre et les ampoules remplaçables. La main-d’œuvre, les frais d’expédition et
le remplacement des pièces défectueuses au-delà
de la période des 12 mois. Les avoirs ou les
remboursements pour des produits achetés il y a
plus de 30 jours. La nourriture avariée comme
conséquence directe d’un problème mécanique
de l’appareil ou un retard dans le service, réparation ou remplacement de l’appareil.
Cette garantie limitée ne s’applique pas aux
produits remis à neuf ou aux produits achetés
d’occasion ou presque neufs. CETTE GARANTIE
LIMITÉE EST DONNÉE À LA PLACE DE TOUTE
AUTRE GARANTIE EXPRIMÉE, OU IMPLICITE
INCLUANT LES GARANTIES DE QUALITE
MARCHANDE ET DE COMPATIBILITE À UNE
FIN PARTICULIÈRE. Le recours offert dans cette
garantie est exclusif et est accordé à la place de
tout autre. Cette garantie ne couvre pas les dommages secondaires ou conséquents et donc les
limitations ci-dessus peuvent ne pas s’appliquer
pas à vous. Certains États n’autorisent pas les
limitations sur la durée d’une garantie donc les
limitations ci-dessus ne vous concernent peut-être
pas. Cette garantie vous donne des droits légaux
et il se peut que vous ayez d’autres droits qui
varient d’un État à l’autre.
Haier America
New York, NY 10018
Pour faire entretenir votre produit, entrez en contact avec s’il vous plaît la ligne directe de service à la
clientèle de Haier Amérique 24 heures sur 24, 7 jours par semaine. Aux Etats-Unis, appel 1-877-337-
3639.
12
Page 26

Español
PRECAUCIONES DE SEGURIDAD IMPORTANTES
Cuando se utilizan artefactos eléctricos, se deben
tomar precauciones de seguridad básicas, incluyendo
lo siguiente:
1. Lea todas las instrucciones con atención.
2. ¡PELIGRO! Con el fin de protegerse contra el riesgo de una
descarga eléctrica, no sumerja el cable, el enchufe, ni cualquier pieza
de la unidad en agua ni en ningún otro líquido.
3. Es necesaria una supervisión cuidadosa cuando este artefacto
sea utilizado cerca de un niño. Este artefacto no es apto para ser
utilizado por niños.
4. No deje nunca un electrodoméstico sin la adecuada atención cuando
está en funcionamiento.
5. No coloque un artefacto sobre o cerca de una llama, elemento
eléctrico o en un horno caliente. No lo coloque encima de otro
artefacto.
6. No permita que el cable de un artefacto cuelgue del borde de una
mesa o un mostrador, ni que toque superficies calientes.
7. No opere ningún artefacto eléctrico con el cable o enchufe dañados
o luego de que el artefacto no funcione correctamente o que se haya
caído o dañado de alguna manera. Si se sospecha una avería,
póngase en contacto con el lugar de reparaciones autorizado más
cercano para que realicen el examen, la reparación o el ajuste
mecánico o eléctrico necesarios.
8. Desenchufe la unidad del tomacorriente cuando no está en
funcionamiento, antes de poner o sacar complementos y antes de
limpiarla.
9. El uso de complementos accesorios no recomendados por el
fabricante del artefacto puede ocasionar incendios, descarga eléctrica
o daños.
10. Evite el contacto con partes móviles cuando la unidad está en
funcionamiento.
11. No toque nunca los elementos de enfriamiento cuando la unidad
está en funcionamiento.
12. No utilice el artefacto al aire libre.
13. No utilice al artefacto para otro uso que el previsto.
CONSERVE ESTAS INSTRUCCIONES
USO DOMÉSTICO ÚNICAMENTE
1
Page 27

DESEMBALAJE DE LA MÁQUINA DE HIELO
1. Revise y quite todos los materiales de embalaje. Esto incluye la espuma y la
cinta adhesiva de dentro y fuera de la unidad.
2. Revise y quite los restos de embalaje, cinta o materiales impresos antes de
enchufar su artefacto Haier.
ADVERTENCIA
Lea este manual con atención antes de usar la unidad.
Consérvelo para futuras consultas.
Español
REGISTRO DEL PRODUCTO
Conserve sus registros para obtener reparaciones con garantía.
Gracias por usar nuestro producto
Haier. Este manual fácil de usar le
guiará para que logre el mejor uso de
su producto.
Recuerde anotar los números de
modelo y de serie. Se encuentran
en una etiqueta en la parte posterior
del artefacto. Abroche su recibo al
manual.
Abroche su recibo al manual.
Lo necesitará para obtener el servicio de garantía.
Regístrese en línea en www.prodregister.com/Haier.
__________________________
Número de modelo
__________________________
Número de serie
__________________________
Fecha de compra
2
Page 28

Español
WARNINGS:
INSTRUCCIONES DE SEGURIDAD IMPORTANTES
Requisitos eléctricos
Instrucciones para el cableado y la descarga a tierra
Este aparato debe enchufarse en un tomacorriente de al menos 15 amperes 110115 voltios, 60 hz con conexión a tierra. Este artefacto debe tener conexión a
tierra. Está equipado con un cable de 3 hilos que cuenta con un enchufe a tierra.
El enchufe debe insertarse en un tomacorriente que se encuentre debidamente
instalado y con conexión a tierra.
¡ADVERTENCIA! El uso indebido del cable con descarga a tierra puede
representar un riesgo de descarga eléctrica. Consulte a un
electricista si es necesario. No haga caso omiso de esta
medida de seguridad modificando el enchufe.
Evite el uso de un cable de prolongación, ya que puede recalentarse y ocasionar
un riesgo de incendio. No obstante, si necesita usar un cable de prolongación:
A. Use solamente un cable de prolongación de 3 hilos con un enchufe con
descarga a tierra de 3 puntas.
B. Las especificaciones marcadas del cable de prolongación deben ser iguales
o mayores a la especificación eléctrica del artefacto.
C. Debe ser dispuesto de tal manera que no cuelgue de la encimera o de la
mesa para que no pueda ser tironeado por los niños intencionalmente.
ADVERTENCIA:
Cuando realice mantenimiento o limpieza:
Para minimizar la posibilidad de descargas eléctricas, desenchufe este artefacto
del suministro de energía o desconéctelo del panel de distribución del hogar
quitando el fusible o apagando el interruptor automático antes de intentar el
mantenimiento o la limpieza.
NOTA: Si presiona el botón Power ON/OFF (Encendido/Apagado) para
3
Evite los riesgos
de incendio o descarga eléctrica. No
utilice cable de prolongación o enchufe
adaptador. No quite ninguna clavija del
cable de energía.
Tomacorriente de pared con
descarga a tierra
Cable de suministro de energía
con enchufe con conexión a
tierra de tres clavijas
apagar, NO se desconecta el artefacto del suministro de energía.
Page 29

CONTENIDOS
Precauciones importantes de seguridad .............................. 1-2
Instrucciones de seguridad ........................................................3
Piezas y accesorios ................................................................. 5-6
Instrucciones de funcionamiento ...............................................7
Instrucciones para antes del funcionamiento ........................................7
Instrucciones de funcionamiento .........................................................8
Proceso de funcionamiento ...............................................................9
Limpieza y mantenimiento ......................................................10
Guía para la detección y solución de problemas ..................11
Garantía limitada .....................................................................12
Español
Especificaciones Modelo # HPIM25SS/S
Protección contra descargas eléctricas Clase 1
Alimentación 115V/60Hz
Corriente de la máquina de hielo 1.5 A
Corriente de la producción de hielo 2.0A
Refrigerante R134a / 2,3 onzas
Presión del diseño
Lado alto 290 Psig
Lado bajo 88 Psig
Dimensiones 9.5" x 14.1" x 12.9"
Peso 20.5 libras
Carcasa Plástico ABS/ Acero
inoxidable
4
Page 30

Español
PIEZAS, FUNCIONES Y CARACTERÍSTICAS
1
3
5
67
1. Tapa con ventana transparente
2. Depósito de agua (no se muestra)
3. Panel de control
4. Tapa de desagüe del agua: Para desagotar el agua de la máquina de hielo
5. Ventilador para enfriamiento del compresor (no bloquee el flujo de aire)
6. Pala para el hielo
7. Canasta para el hielo
5
Page 31

Español
Panel de control: Fácil de usar, funciones con botones con indicadores LED
A. Luz indicadora de encendido
B. Botón de Encendido y Apagado
C. Botón de SELECCIÓN del TAMAÑO de los cubos de hielo
D. El indicador LED del tamaño de cubos de hielo seleccionado muestra:
fabricación de cubos de hielo SMALL (PEQUEÑOS) y LARGE (GRANDES)
E. "ADD WATER" (AGREGAR AGUA): advierte que no hay agua en el depósito
de agua, debe agregar agua
F. Indicador LED "ICE FULL" (LLENO DE HIELO)
E
F
A
B C
D
6
Page 32

Español
INSTRUCCIONES OPERATIVAS
Esta máquina de hielo portátil utiliza un sistema de control
completamente automático, con una microcomputadora de avanzada para que
la fabricación de hielo resulte fácil y cómoda. Fabricar hielo es simple y rápido.
Simplemente agregue agua, enchufe en un
tomacorriente y presione el botón ON (ENCENDIDO). Puede
seleccionar uno de los tres tamaños de cubos de hielo con sólo tocar un botón.
El indicador luminoso mostrará el tiempo que falta para
producir 12 cubos de hielo del tamaño seleccionado. Cuando encienda la unidad por primera vez o durante los ciclos de fabricación
del hielo, el compresor estará inactivo durante 2 minutos, mientras recibe
energía.
Hay indicadores de advertencia que le avisan que debe agregar agua cuando
el depósito está vacío y que debe quitar el hielo cuando la canasta de almacenamiento está llena. La máquina de hielo también tiene protecciones de seguridad incorporadas que pueden limitar el daño accidental al detener el sistema
cuando es necesario.
Instrucciones para antes del funcionamiento
Lea con atención.
1. El ángulo de inclinación del gabinete de la máquina de hielo no debe superar
los 45º durante el transporte o el uso. No dé vuelta la máquina de hielo. Esto
podría ocasionar que el compresor o el sistema de refrigeración funcionen
de forma incorrecta. Cuando la máquina de hielo se cambia de lugar o se
la transporta, permita que los fluidos del compresor se asienten durante un
tiempo. Antes de usar la máquina de hielo por primera vez, espere 10 horas
después de que la unidad fue nivelada y ubicada en su lugar apropiado.
2. Asegúrese de que la máquina de hielo esté nivelada y sobre una mesa o
plataforma estable para evitar el mal funcionamiento.
3. La máquina debe ubicarse sobre una superficie seca y nivelada con suficiente
ventilación, alejada de las fuentes de calor tales como hornos, calefactores y
gases corrosivos. Deje un espacio libre de 8 pulgadas en todos los lados de
la máquina de hielo para que la ventilación sea apropiada.
4. No llene el depósito de agua con agua caliente, dado que esto puede dañar
la máquina de hielo. Es mejor llenar el depósito con agua a temperatura
ambiente o inferior.
7
Page 33

Español
Instrucciones operativas
1. Abra la tapa superior, saque la canasta de almacenamiento de hielo y llene
el depósito de agua con agua potable (corriente, purificada o embotellada)
hasta la marca de nivel y vuelva a colocar la canasta de almacenamiento de
hielo; o bien, vierta agua directamente a través de la abertura ubicada en el
medio de la canasta de almacenamiento de hielo.
Vierta el agua al depósito
Asegúrese de que el nivel de agua no pase por sobre la marca de nivel ni llegue
al fondo de la canasta de almacenamiento de hielo. Cierre la tapa superior.
Nota: Durante el proceso de funcionamiento, si el nivel de agua en el depósito
de agua baja demasiado, la máquina
automáticamente detendrá su funcionamiento y la pantalla mostrará “FILL
WATER” (LLENAR CON AGUA).
2. Enchufe la unidad en un tomacorriente con descarga a tierra. Presione el
botón ON/OFF (encendido/apagado) en el panel de control para encender
la máquina.
3. Seleccione el tamaño deseado del cubo de hielo presionando el botón selector de hielo S o L.
S = Cubos de hielo pequeños (Aproximadamente 7 minutos)
L = Cubos de hielo grandes (Aproximadamente 8 minutos)
La máquina de hielo comenzará entonces a fabricar el hielo. El temporiza-
dor con visor luminoso mostrará la cantidad de minutos que faltan para que
se termine de producir el siguiente ciclo de 9 cubos de hielo (según la temperatura del agua, la temperatura
ambiente de la habitación y tamaño seleccionado cubos de hielo).
Nota: Para detener el funcionamiento, presione el botón ON/OFF
(ENCENDIDO/APAGADO) nuevamente.
8
Page 34

Español
Proceso operativo
1. El agua se bombea del tanque de almacenamiento de agua a la caja de
agua, lo que puede llevar hasta 48 segundos.
2. Comienza el ciclo de fabricación de hielo cuando los vástagos del
evaporador se sumergen en la caja de agua. Oirá que el compresor
está en funcionamiento.
3. Toma aproximadamente entre 6 y 13 minutos cada ciclo de fabricación de
hielo, según el tamaño seleccionado y la temperatura ambiente. Cuanto
más grande sea el tamaño y más alta la temperatura ambiente, más tiempo
se necesitará para fabricar el hielo. Consulte el visor luminoso para conocer
el tiempo aproximado que lleva fabricar los cubos de hielo. Cuando finaliza
el ciclo, la caja de agua se inclina hacia adelante, y el agua restante fluye
nuevamente al tanque de almacenamiento de agua. Los vástagos del
evaporador liberarán entonces los cubos de hielo.
Nota: Si la temperatura ambiente es superior a 60 ºF, se recomienda la
fabricación de tamaños de cubos de hielo pequeños, para evitar que los
cubos de hielo se fundan y se unan.
4. Aproximadamente 15 segundos después, la caja de hielo se inclinará hacia
atrás y el impulsor del hielo empujará el hielo hacia la canasta de
almacenamiento del hielo. Cuando la caja de agua vuelve a su posición
original, comienza el siguiente ciclo de fabricación de hielo.
5. Cuando se junta la capacidad máxima de cubos de hielos y el hielo llega
al sensor de temperatura, la máquina de hielo detendrá su funcionamiento
automáticamente. El indicador luminoso “ICE FULL” (LLENO DE HIELO) se
encenderá. Si es necesario más hielo, quite el hielo de la canasta de
almacenamiento y entonces vuelva a colocar la canasta en la máquina,
asegurándose de que la canasta vuelva a la misma posición original. Nota:
Cuando vuelva a colocar la canasta, asegúrese de que el sensor de la
temperatura esté encima de la canasta, así máquina funciona correctamente.
¡ADVERTENCIA! La luz del sol directa o reflejada puede causar que el
sensor infrarrojo funcione incorrectamente. Si la unidad
no se detiene, incluso cuando los cubos de hielo obstruyen
el sensor, mueva la unidad de la luz del sol.
6. Para seguir fabricando hielo, verifique que haya agua en el tanque de
almacenamiento de agua. Si no hay agua en el tanque de almacenamiento
de agua, entonces no se bombeará agua hacia la caja de agua y se
detendrá el funcionamiento. El indicador luminoso “WATER EMPTY” (SIN
AGUA) se encenderá. Presione el botón “OFF” (APAGADO). Llene el
tanque de almacenamiento de agua con agua y presione el botón “ON”
(ENCENDIDO) para que la máquina de hielo comience a funcionar
nuevamente. Permita que el refrigerante que está dentro del compresor se
asiente durante al menos 3 minutos antes de reiniciar el funcionamiento.
7. Si el compresor se detiene por algún motivo, como por ejemplo falta de agua,
demasiado hielo, falta de energía, etc., no vuelva a encender la máquina
inmediatamente. Espere al menos 3 minutos antes de volver a encender la
máquina.
9
Page 35

Español
LIMPIEZA Y MANTENIMIENTO
Antes de utilizar la máquina de hielo, es muy recomendable limpiarla
minuciosamente. Asegúrese de limpiar la máquina de hielo con regularidad.
1. Durante la limpieza, asegúrese de que se haya apagado el suministro de
energía y que el enchufe esté desconectado del tomacorriente. Cuando
enchufe o desenchufe la unidad del tomacorriente, jale directamente del
enchufe. Nunca jale del cable de corriente.
2. Quite la canasta de almacenamiento de hielo.
3. Desagüe el agua restante de la unidad quitando el tapón de desagüe
del lado inferior delantero. Cuando se haya completado la limpieza,
el tapón debe insertarse adecuadamente en el desagüe para que la
máquina de hielo no gotee.
4. Utilice un detergente suave diluido en agua tibia y repase con una
toalla suave o esponja.
No deben utilizarse nunca solventes, detergentes ni abrasivos para
la limpieza.
5. Limpie las piezas interiores, tales como la canasta de almacenamiento de
hielo, el depósito de agua, la caja de agua, el impulsor del hielo y los
vástagos del evaporador.
6. La parte exterior de la máquina de hielo debe limpiarse con regularidad con
una solución de detergente suave, agua tibia y un paño suave.
7. Seque el interior y el exterior con un paño suave.
8. Para comenzar a fabricar hielo cuando se ha limpiado la unidad, vierta
agua limpia en el depósito de agua y llene hasta la línea de nivel. Siga las
instrucciones de funcionamiento.
No incline ni ubique nunca la máquina de hielo de costado, de
lo contrario, debe esperar 10 horas para que el refrigerante del
compresor se asiente.
9. Para garantizar la limpieza de los cubos de hielo, el agua del tanque de
almacenamiento de agua debe reemplazarse cada 24 horas.
10. Cuando la máquina no está en uso o no se va a usar durante un período
prolongado, retire el tapón de goma de la parte inferior delantera de la
unidad para vaciar completamente el resto de agua que pueda haber en
el depósito de agua. (Siga las instrucciones descritas anteriormente en el
número 4).
Pico de salida
del desagüe
Tapón de goma
Tapa de desagüe
10
Page 36

Español
TROUBLESHOOTING GUIDE
Problema Causas posibles Solución
La luz indicadora
“WATER EMPTY” (SIN
AGUA) se enciende.
No hay indicaciones
en el panel de
control.
Los indicadores
“Ice Full” (Lleno
de hielo) y “Fill
Water” (Llenar con
agua) se encienden
simultáneamente.
La luz indicadora “Ice
Full” (Lleno de hielo)
está encendida.
Nivel de agua bajo o
falta de agua.
La canasta de hielo está
llena.
No llega suministro de
energía a la unidad. La
temperatura ambiente
O
la temperatura del agua
son demasiado altas.
Preparar hielo lleva
demasiado tiempo
O
La canasta de hielo
no está llena o no hay
hielo en la canasta.
Agregue agua y la máquina de hielo
funcionará automáticamente.
Verifique que la unidad esté enchufada en
el tomacorriente eléctrico.
Apague la máquina de hielo, desenchúfela,
llene el depósito con agua de ser
necesario, vuelva a enchufarla y luego
vuelva a encender la unidad.
OVuelva a colocar la válvula de desagüe e
intente utilizar la unidad nuevamente. Puede
también controlar si hay hielo bloqueando
el impulsor del hielo. Apague la unidad;
deje que el hielo se derrita y vuelva a
encenderla. De lo contrario, llame al
servicio de atención al cliente de Haier.
Retire el hielo de la canasta de
almacenamiento del hielo para hacer más
O
Mantenga presionado el botón "Select"
(Seleccionar) por 5 segundos, la máquina
de hielo fabricará hielo por 10 ciclos
aunque el indicador “Ice Full” (Lleno de
hielo) esté encendido.
Enchufe la unidad en una fuente de
energía de 110/120 voltios, 60 Hertz.
Haga funcionar la máquina de hielo a
temperaturas inferiores a 90ºF y/o vierta
agua más fría en el depósito de agua.
Apague la máquina. Encienda la máquina
cuando se haya derretido el bloque de
hielo. O bien, cambie la posición del
selector del tamaño de los cubos de hielo
para que sean más pequeños.
Consulte a un técnico calificado o llame
al servicio de atención al cliente de Haier
America.
La unidad no
funciona.
Obstrucción del hielo.
No se está haciendo
ningún hielo.
El ciclo de hacer hielo
se parece normal
pero no se produce
ningún hielo.
El refrigerante gotea.
Una tubería del sistema
de enfriamiento está
bloqueada.
La fabricación del hielo
toma demasiada hora.
Hay salida refrigerante.
Un tubo en el sistema
de enfriamiento se
bloquea.
Nota: En el interior de la máquina de hielo hay circuitos de protección para evitar que los
circuitos se recalienten, de modo que cuando se activan, la unidad se apagará automáticamente para evitar daños. Se debe desconectar el cable de energía y volver a encender la
unidad después de 30 minutos de tiempo para enfriarse.
Para obtener servicio de atención al cliente de Haier America llame al:1877-337-3639
11
Page 37

GARANTÍA LIMITADA
Español
¿Qué se cubre y por cuánto tiempo?
Esta garantía brinda cobertura por todos los
defectos de mano de obra o en los materiales
por un período de:
12 meses por mano de obra, 12 meses por las
piezas (únicamente piezas funcionales)
La garantía comienza el día de la compra del
producto. Los clientes deben proporcionar a
Haier una prueba de la fecha de compra y el
recibo original junto con la marca, el modelo y
el número de serie para la verificación previa
a la provisión de servicios con garantía.
El servicios de reparaciones en el taller está
disponible para determinados productos,
seleccionados a discreción de Haier America.
EXCEPCIONES: Garantía en uso comercial o
de alquiler
90 días para la mano de obra
90 días para las piezas
No se aplica ninguna otra garantía.
Qué cubre.
1. Los repuestos mecánicos y eléctricos,
que sirven para un propósito funcional
de este artefacto, están cubiertos por un
período de 12 meses o como se estableció
previamente. Esto incluye todos los
repuestos, excepto las terminaciones, el
acabado y el vidrio.
2. La garantía limitada no cubre créditos o
reintegros por pérdidas o lesiones causados
por el producto o defectos del producto
incluyendo, entre otros, daños consecuentes
o fortuitos.
¿Qué se hará?
1. Los repuestos mecánicos o eléctricos que se
pruebe que son defectuosos durante el uso
normal y durante el período de garantía
especificado, se repararán o reemplazarán
según la discreción de Haier. TODOS LOS
SERVICIOS DE GARANTÍA DEBEN SER
PROPORCIONADOS ÚNICAMENTE POR
NUESTROS CENTROS DE REPARACIÓN
DE FÁBRICA, O POR UN TÉCNICO DE
ATENCIÓN A CLIENTES AUTORIZADO
POR HAIER. Si se determina que la
reparación no es adecuada o que los
repuestos para el reemplazo no están
disponibles para la reparación, Haier
cambiará el producto por uno nuevo
o reacondicionado en fábrica que sea
el mismo o similar al original según su
discreción.
2. El comprador no incurrirá en ningún gasto
por repuestos funcionales y mano de obra
de los ítems cubiertos durante el período
inicial de 12 meses o como se indicó
previamente.
3. ESTA GARANTÍA CUBRE LOS ARTEFACTOS
DENTRO DE LA PORCIÓN CONTINENTAL
DE LOS ESTADOS UNIDOS, CANADÁ Y
PUERTO RICO. NO BRINDA COBERTURA
EN LOS SIGUIENTES CASOS:
Daños por instalación incorrecta. Los daños
ocurridos durante el envío. Los defectos que no
sean defectos de fabricación. Daños causados
por el mal uso, abuso, los accidentes,
las alteraciones, la falta de atención y
mantenimiento apropiados, la corriente o
el voltaje incorrectos o los casos de fuerza
mayor. Daños causados por todo aquello que
no sea el uso hogareño. Daños causados por
otra reparación que no sea la brindada por un
vendedor autorizado o centro de reparaciones.
Terminaciones decorativas, vidrio o lámparas
de luz. Costos de transporte y envío. Mano
de obra (después de los 12 meses iniciales).
Crédito o reintegro por productos después de
los 30 días de la fecha de compra. Pérdidas
por los alimentos que se echan a perder a
causa de una falla mecánica del producto
o por cualquier retraso en la provisión de
servicios, reparación o reemplazo. Esta
garantía limitada no se aplica a productos
reacondicionados en fábrica o a unidades
adquiridas como nuevas o de segunda mano.
ESTA GARANTÍA LIMITADA SE OTORGA EN
LUGAR DE CUALQUIER OTRA GARANTÍA,
EXPRESADA O IMPLÍCITA INCLUYENDO
LAS GARANTÍAS DE COMERCIABILIDAD E
IDONEIDAD PARA UN FIN DETERMINADO.
El recurso provisto en esta garantía es
exclusivo y otorgado en lugar de cualquier
otro recurso. Esta garantía no cubre daños
fortuitos o consecuentes, de modo que las
limitaciones descritas anteriormente pueden
no aplicarse a su caso. Algunos estados no
permiten limitaciones en cuanto a la duración
de una garantía implícita, de modo que las
limitaciones descritas anteriormente pueden no
aplicarse a su caso Esta garantía le concede
derechos legales específicos, y usted puede
tener otros derechos, que varían de un estado
a otro.
Haier America
New York, NY 10018
Para hacer su producto mantener, entre en contacto con por favor la línea caliente del servicio de cliente de Haier América 24 horas al día, 7 días a la semana. En los E.E.U.U., llamada 1-877-337-3639.
12
Page 38

IMPORTANT
Do Not Return This Product To The Store
If you have a problem with this product, please contact the “Haier Customer
Satisfaction Center” at 1-877-337-3639.
DATED PROOF OF PURCHASE REQUIRED FOR WARRANTY SERVICE
IMPORTANT
Ne pas Réexpédier ce Produit au Magasin
Pour tout problème concernant ce produit, veuillez contacter le service des
consommateurs ‘Haier Customer Satisfaction Center’ au 1-877-337-3639.
UNE PREUVE D’ACHAT DATEE EST REQUISE POUR BENEFICIER DE LA GARANTIE.
IMPORTANTE
Si tiene algún problema con este producto, por favor contacte el “Centro de Servicio al
NECESITA UNA PRUEBA DE COMPRA FECHADA PARA EL SERVICIO DE LA GARANTIA
No regrese este producto a la tienda
Consumidor de Haier” al 1-877-337-3639 (Válido solo en E.U.A).
120V, 60 Hz
Made in China
Fabriqué en Chine
Hecho en China
Haier America
New York, NY 10018
Printed in China
Page 39

 Loading...