

Page 1
GB Instruction for use
Freezer
IT Istruzioni sull'uso del
English
congelatore
ES Instrucciones de uso del
congelador
DE Gebrauchsanweisung
Gefrierschrank
FR Instructions d'utilisation
Congélateur
NL Gebruiksaanwijzing voor
de vriezer
CS Návod k použití
Mraznička
PL Instrukcja obsługi
ItalianoEspañolDeutschFrançaisNederlandsČeskyPolskiEλληvIkά
zamrażarki
EL Οδηγίες χρήσης
καταψύκτη
Page 2

ELEMENTS
Thanks for purchasing a Haier Product
English
Please read these instructions carefully before using this appliance. The instructions contain important
information which will help you get the best out of the appliance and ensure safe and proper
installation, use and maintenance.
Keep this manual in a convenient place so you can always refer to it for the safe and proper use of the
appliance.
If you sell the appliance, give it away, or leave it behind when you move house, make sure you also pass
on this manual so that the new owner can become familiar with the appliance and safety warnings.
Page 3

INDEX
CAUTIONS ..................................................................................................................................................... 3
BEFORE USE .................................................................................................................................................6
FUNCTIONS ..................................................................................................................................................8
MAINTENACE .............................................................................................................................................14
TROUBLE-SHOOTING ..............................................................................................................................15
English
Page 4

CAUTIONS
Legend
Attention
English
Caution
Prohibit
Disposal
The presence of this symbol on the product, accessories or materials that goes with this information
indicates that at the end of its useful life the product or its electronic accessories (ex. charger, headset, USB
cable) should not be disposed with other household waste.
To prevent possible damage to the environment or human health from uncontrolled waste disposal, please
separate these items from other types of waste and recycle them. This will promote the sustainable reuse of
material resources.
Household users should contact either the retailer where they purchased the product or the relevant local
authorities to find out how they can take this item for environmentally safe recycling and safe. Business
users should contact their supplier and check the conditions of the purchase. This product and its electronic
accessories should not be mixed with other commercial waste.
Before use…
This appliance use AC power supply.
Please connect the appliance to normal voltage. In case of voltage fluctuation, the appliance may fail to start
up, the temperature controller or the compressor may be damaged or has abnormal voices. At this time,
please add proper stabilizer.
Three-hole socket must be used.
In any event, please ensure the socket is connected with ground wire and make no change on power cord
and plug. The power cord plug shall be attached firmly with the socket, otherwise it may cause a fire.After the
appliance is installed, the plug shall be easily accessible so that it can be detached in time in case of accidents.
Do not damage the power cord.
Do not pull the power cord to disconnect the plug. Please hold the plug to detach it directly from the socket.
The body of the appliance shall not press on the power cord and do NOT stamp on the power cord.
When the power cord is damaged:
When the power cord is damaged or the plug is worn, do not use. The worn or damaged power cord must
be replaced at the specified maintenance provider by the manufacturer or by the qualified personnel.
If a longer power cord is needed, the cross-sectional area of the added power cord shall not be less than
0.75 mm².
Keep ventilation openings, in the appliance enclosure or in the built-in structure, clear of
obstruction.
When flammable gas such as natural gas leaks:
Close the valve which leaks the gas. Open house door and window. DO NOT unplug/plug the power plug of
the appliance or other electrical appliances.
Be careful of frostbite
Do not touch the inside surface of the freezer storage compartment when in operation, especially with wet
hands as your hands may freeze onto the surface.
3
Page 5
CAUTIONS
When the appliance falls into disuse:
Keep the appliance away from fire to avoid accidents. Remove the door of the appliance (open the door
and hold it before removing the screws) to avoid children entering into the appliance and causing accident.
Send the appliance to the designated place for disposal.
Open the door by the handle.
Do not store or use gasoline or other inflammable materials in the vicinity of the freezer to avoid a fire.
Never store inflammables, explosives or highly corrosive acids, alkalis and other chemicals in the freezer.
Never store bottled beer or beverages in the freezer, as these will burst during freezing.
Do not use electrical appliances inside the food storage compartments of the appliance, unless they are
of the type recommended by the manufacturer.
Pay attention to your children
Children should be supervised to ensure that they do not play with the appliance.
Do not hang on the door to avoid personal injury as the door or the appliance may fall.
Make sure the hands or feet of the children do not enter holes and side seams of the metal parts such as the
compartment or the back of the appliance to avoid personal injury.
Do not place unstable articles (heavy objects, containers filled with water) on the top of the appliance, to
avoid personal injury caused by falling or electric shock caused by contact with water.
English
Keep away from water
Do not use water to spray on or flush the refrigerator, and do not place the refrigerator at wet place or the
place which is easy to be splashed with water to avoid the impact to the electric insulation performance of
the appliance or even electric shock or fire.
Do not damage the refrigerant circuit
Disassembly and alteration of the freezer must be authorized. Any agitated movement of the freezer may
damage the cooling pipes. Repair of the appliance must be performed by professional personnel.
Detach the power plug when:
Before cleaning and maintenance, or in case of failure of appliance or power off, please detach the power
plug of the refrigerator. When unplugging the appliance allow at least 5 minutes before restarting, as
frequent starting be damage the compressor.
This freezer is a household appliance for storing food only. Do not store blood, medicines, biological
products or other products in the appliance.
Keep ventilation openings, in the appliance enclosure or in the built-in structure, clear of obstruction.
This appliance is not intended for use by persons (including children) with reduced physical, sensory or
mental capabilities, or lack of experience and knowledge, unless they have been given supervision or
instruction concerning use of the appliance by a person responsible for their safety.
This appliance is intended to be used in household and similar applications such as
- staff kitchen areas in shops, oces and other working environments;
- farm houses and by clients in hotels, motels and other residential type environments;
- bed and breakfast type environments;
- catering and similar non-retail applications.
Energy Saving Tips
Install the appliance in a cool, dry room with adequate ventilation.
When installing the appliance, a space of at least 10cm must be kept above and around the freezer to ensure
adequate ventilation around the freezer.
Allow warm food to cool down before placing it in the appliance.
Do not keep the door of the appliance open for too long when putting food in or taking food out. The
shorter time, for which the door is open, the less ice will form in the freezer.
Clean the rear of the freezer regularly. Dust increases energy consumption.
Do not set temperature colder than necessary.
Do not cover air vent openings.
4
Page 6
English
CAUTIONS
Freezing and storage of fresh food
Food shall be stored with a space in between, which is good for refrigeration cycle.
Food shall be stored in different categories so that you can nd it more easily.
Food shall be sealed before stored in the freezer to avoid water loss and smell taint.
It’s optional to pack food before putting it in the freezer. The outside of the packing must be dry to avoid
bags sticking together. Packing materials should be odor-free, airtight, non poisonous and non-toxic.
We suggest to identify portion noting down information as follow:
Name of food
Weight of portion
Quantity (number of pieces)
Freezing date
Limit date of storage
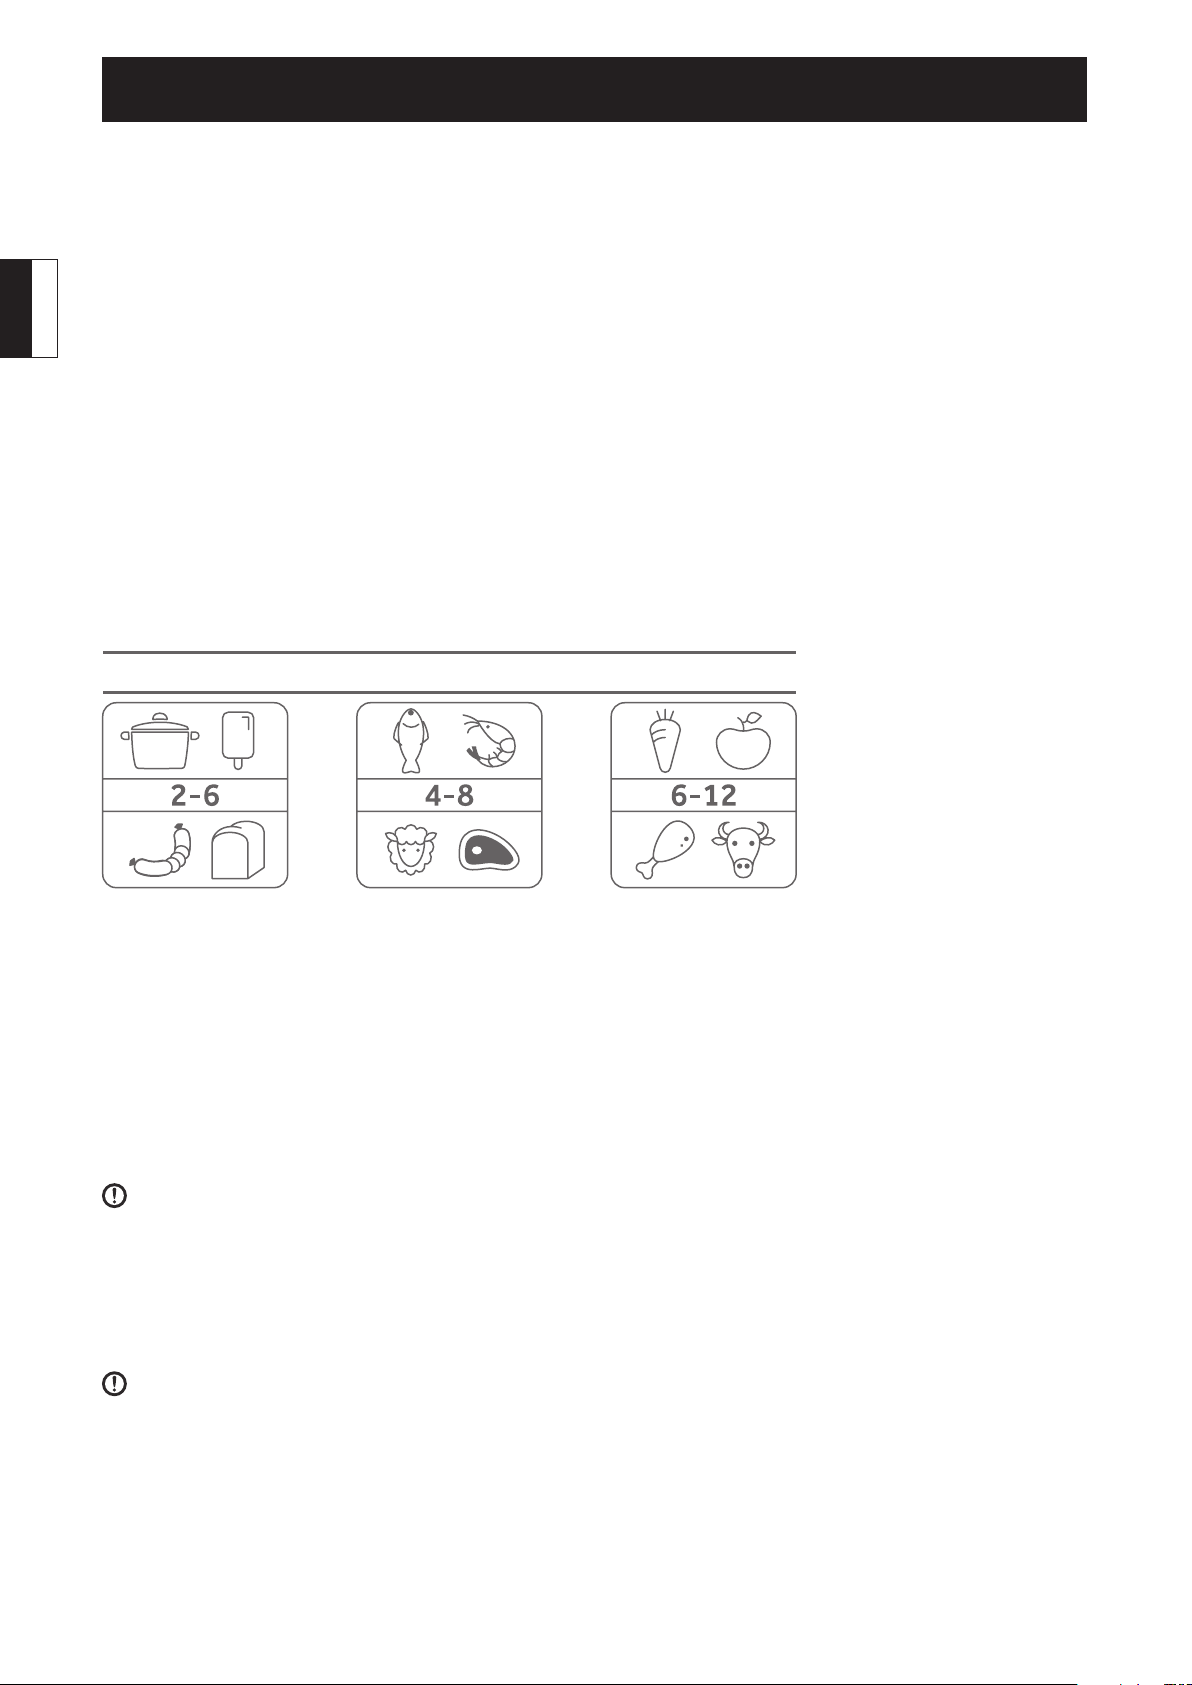
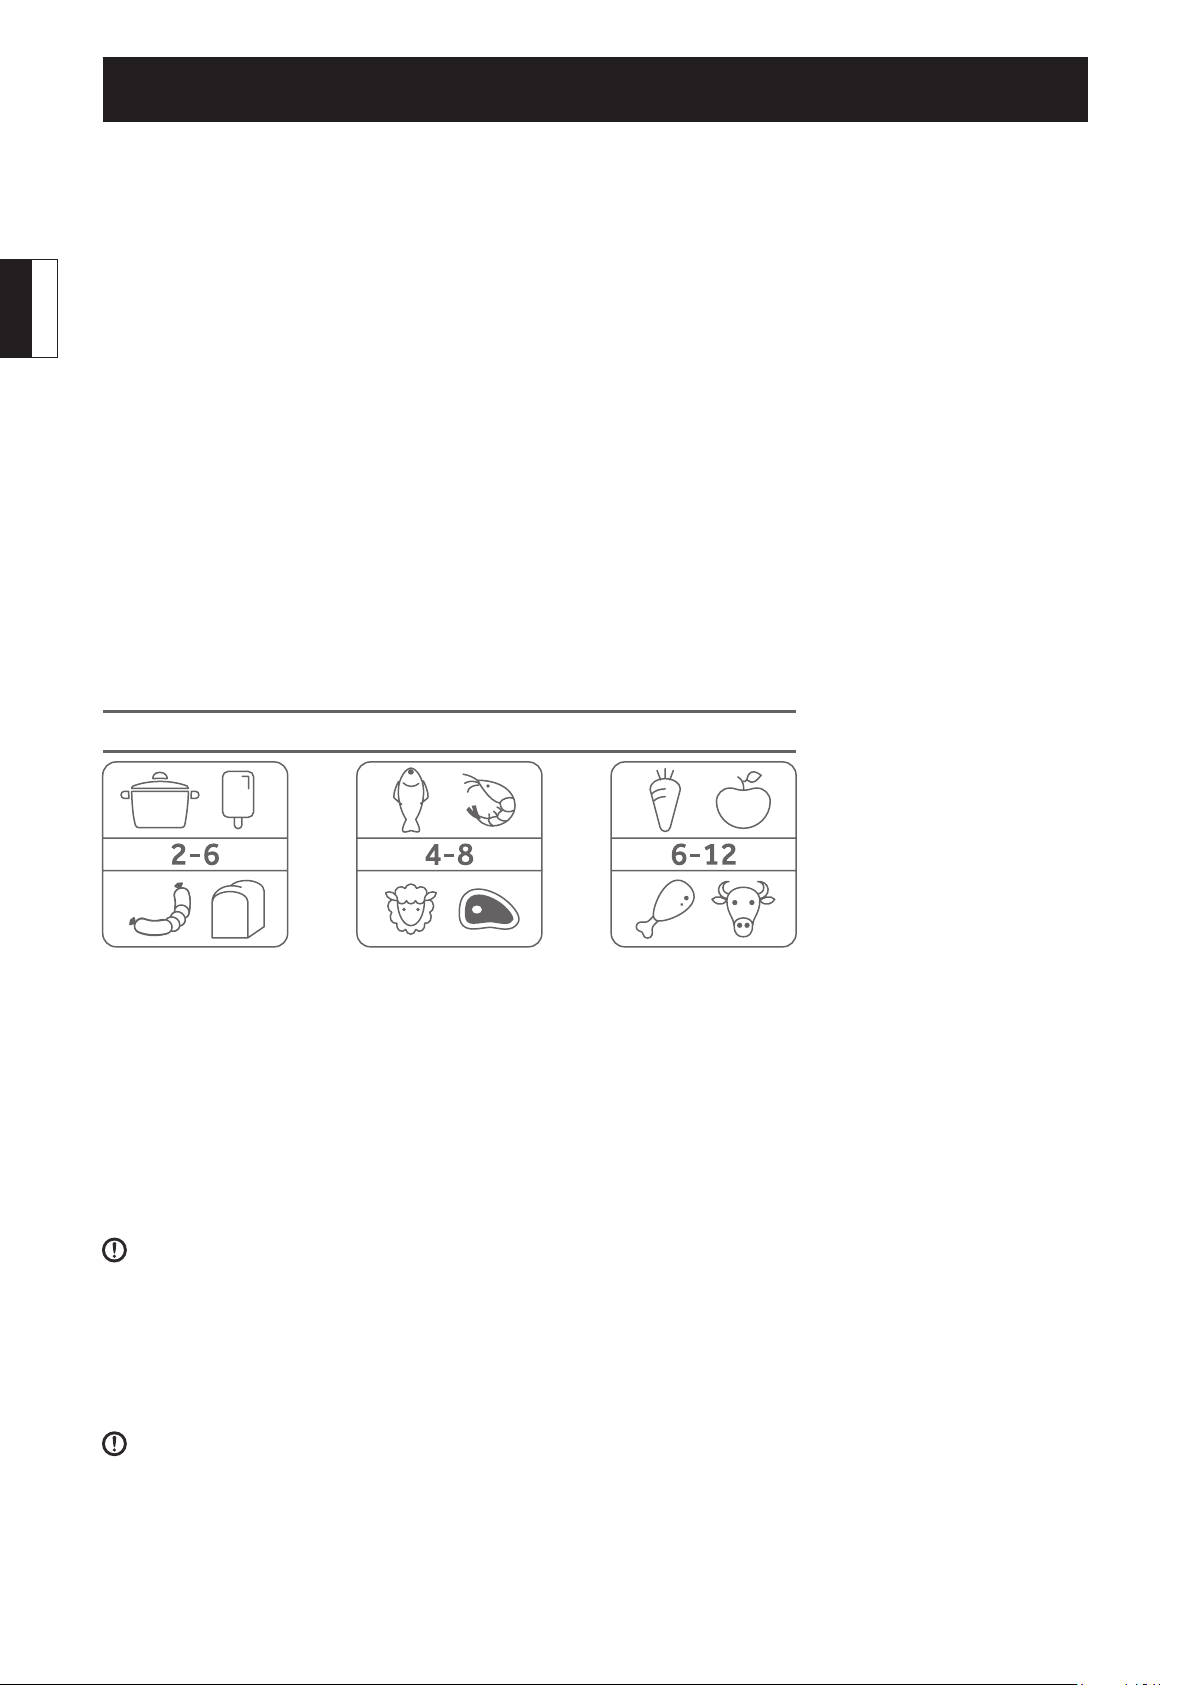
See the diagram inside the freezer for common food storage time limit:
PIZZA BOX
1. stew, ice cream, sausages, bread
2. Fish, shrimp, lamb, meat
3. Vegetables, fruits, poultry, beef
Food should be fresh, mature and of good quality.
Fresh vegetables and fruits must be frozen, if possible, immediately after harvest to maintain the most
nutrients, structure, texture, color and taste.
In case of meat and game, it is preferable to hang for a suciently long period before freezing.
Hot food should be cooled down to room temperature prior to placing it in the freezer.
Only take the required amount of food from the freezer. Defrosted food cannot be re-frozen unless it is
rst cooked, otherwise it may be less edible.
Avoid placing fresh food directly in contact with deep frozen food. Deep frozen food could defrost and may
not outlast the foreseen storage time.
To freeze very well, insert fast freezing function (see functions chapter) 2 hours before storing fresh food.
Do not load excessive quantities of fresh food in the freezer. It is better to refer to the freezing capacity of
the freezer.
Usually 24 hours are enough to bring the freezing process to an end. After this time, function will be
disabled automatically.
For freezing small quantity of food, it’s possible to stop the function manually after few hours to avoid
useless energy consumption.
5
Page 7

FROZEN-FOOD
BEFORE USE
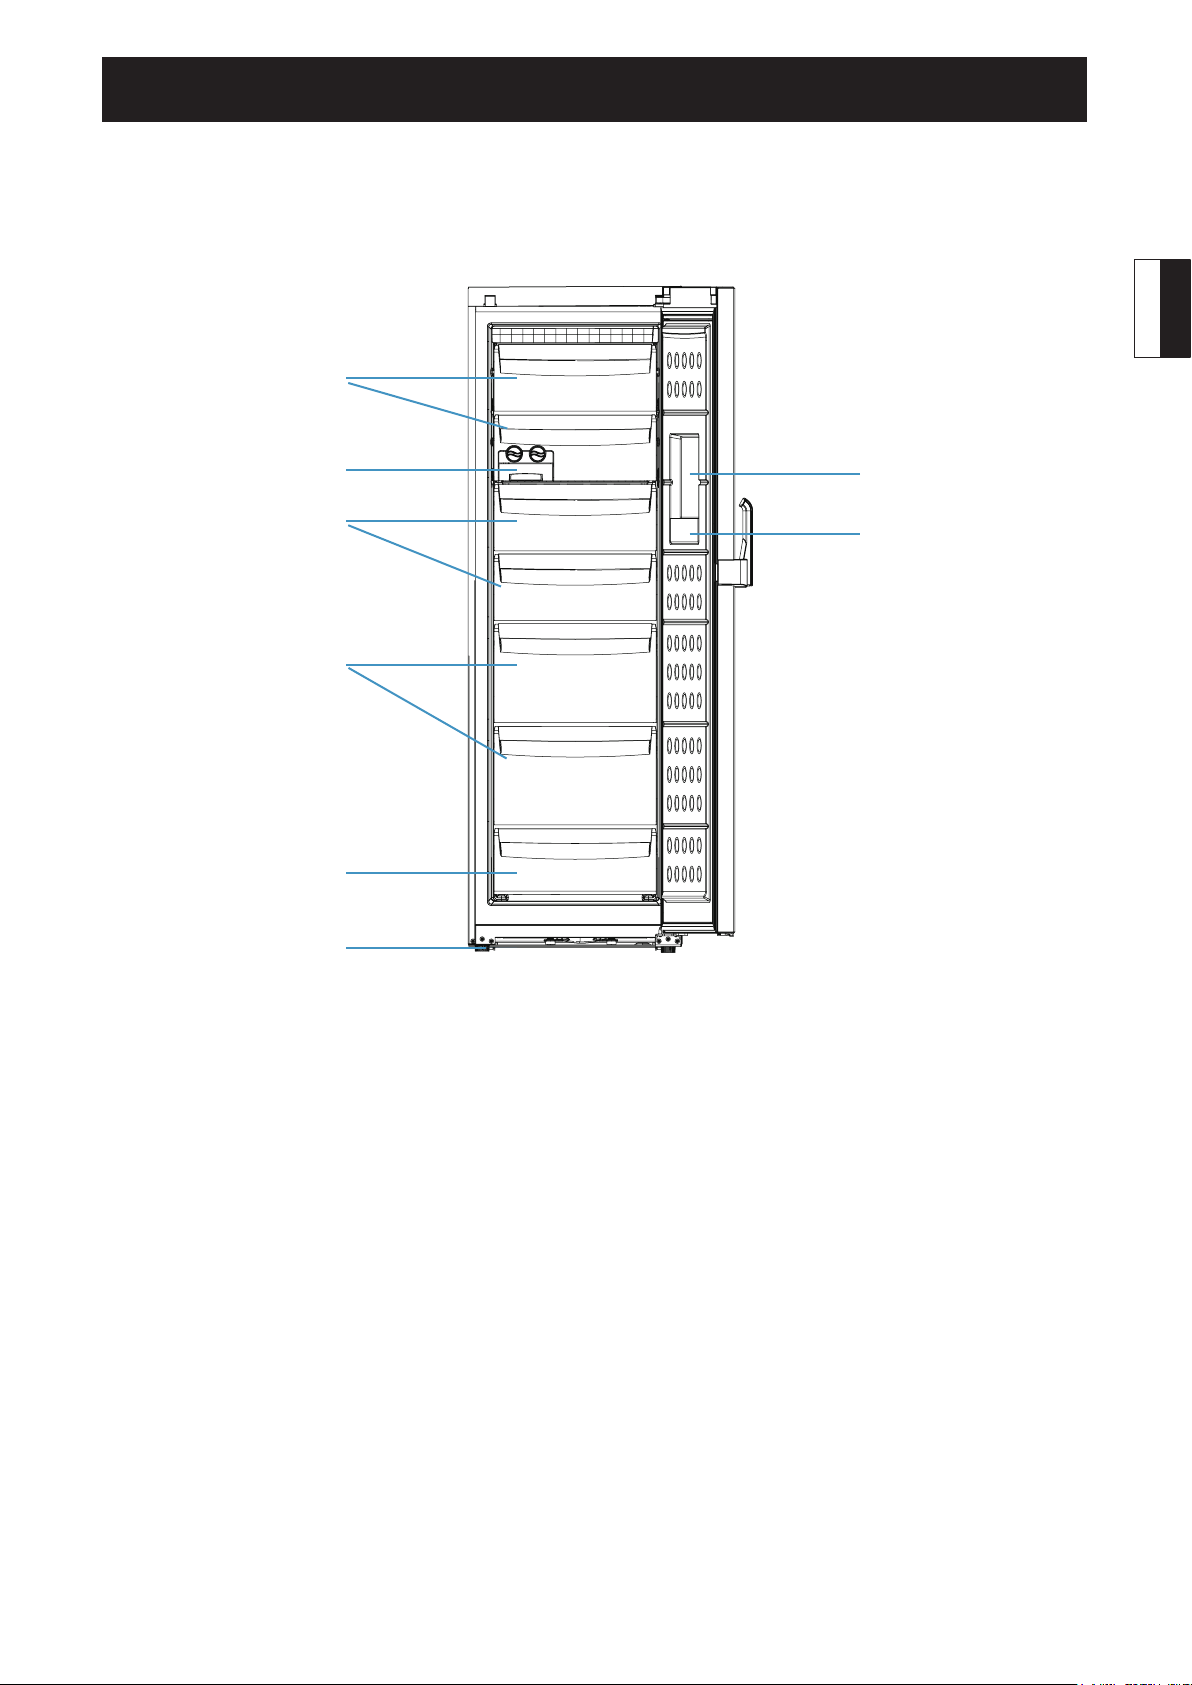
Description
This diagram may be slightly different from the layout of the freezer you have just purchased.
LID
LID
ICE MAKER
ICE MAKER
(option)
(option)
DRAWER
DRAWER
PIZZA BOX
PIZZA BOX
FROZEN-FOOD
CALENDAR
CALENDAR
English
SUPER STORE
SUPER STORE
SMALL D RAWER
SMALL DRAWER
ADJUST FEET
ADJUST FEET
(trasport grips at front, trasport castors at back)
(trasport grips at front, trasport castors at back)
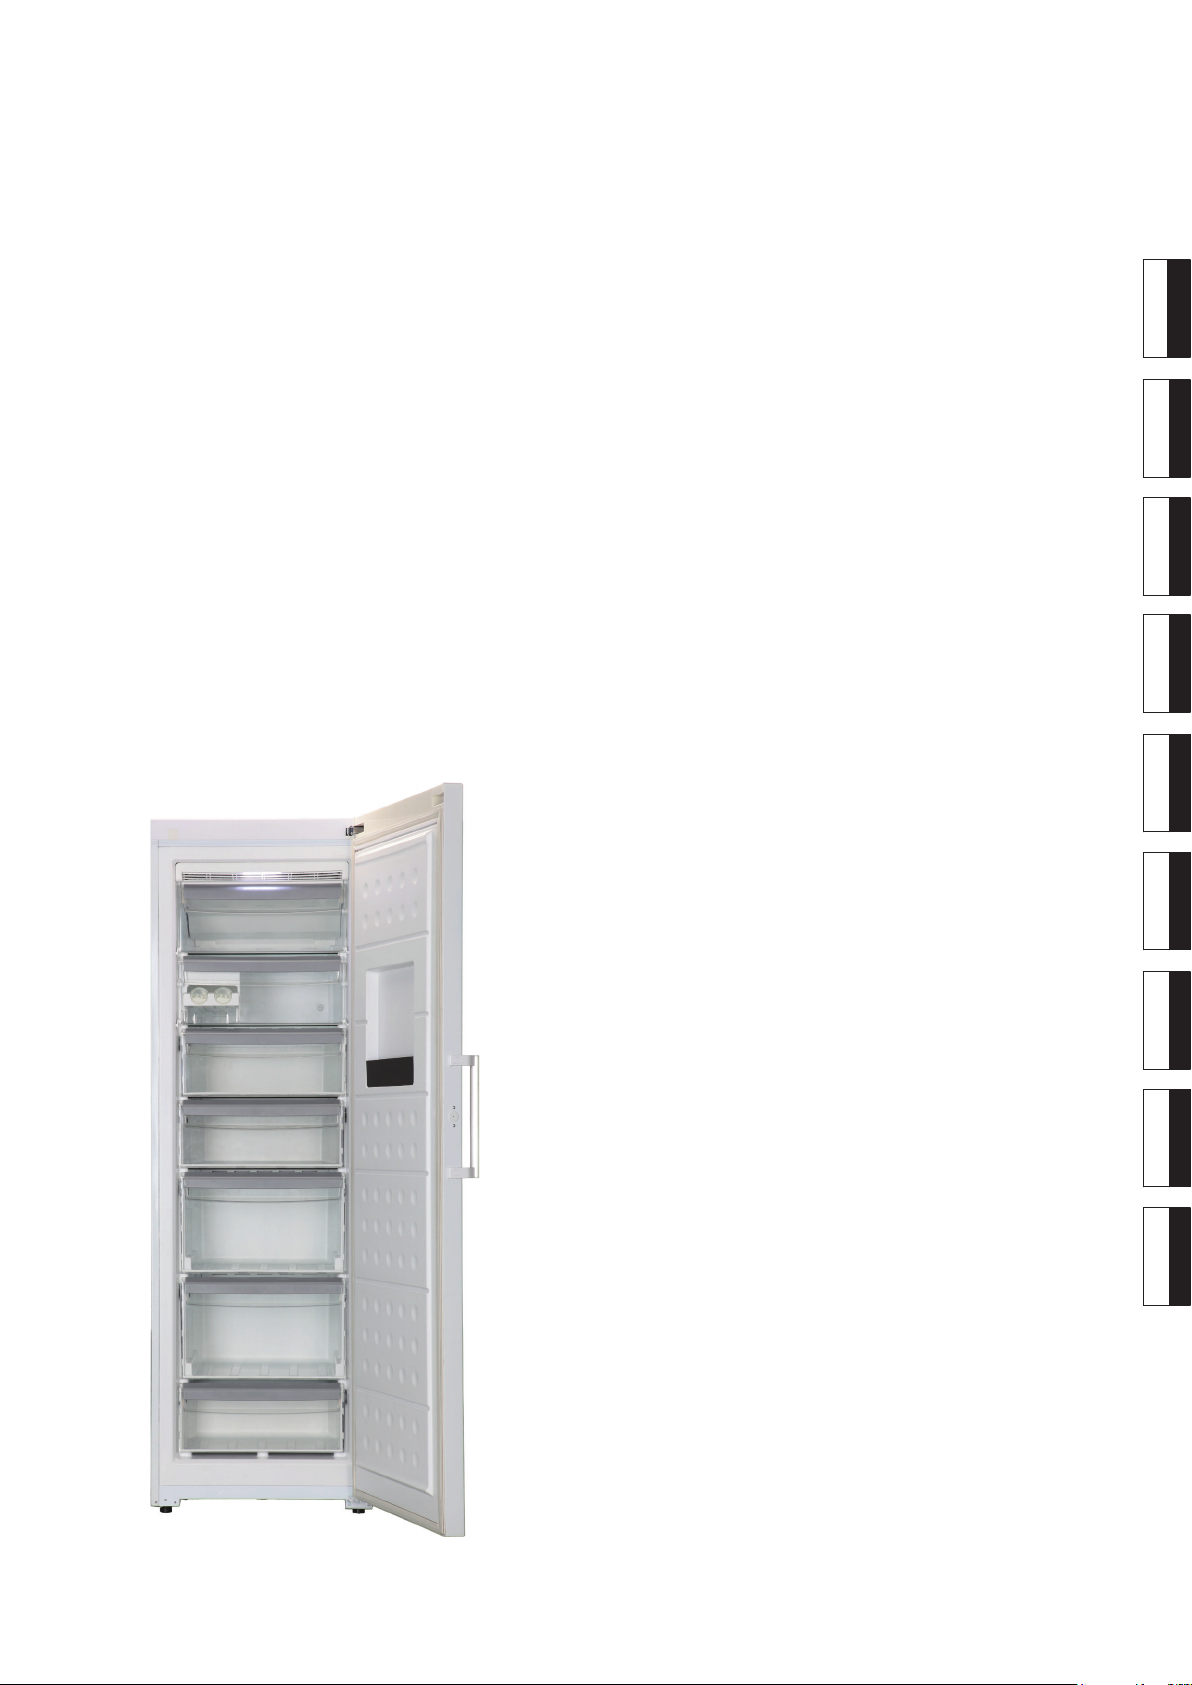
Large drawers, super stores and small drawer can be removed to increase freezer storage space.
6
Page 8

English
BEFORE USE
Placing Environment
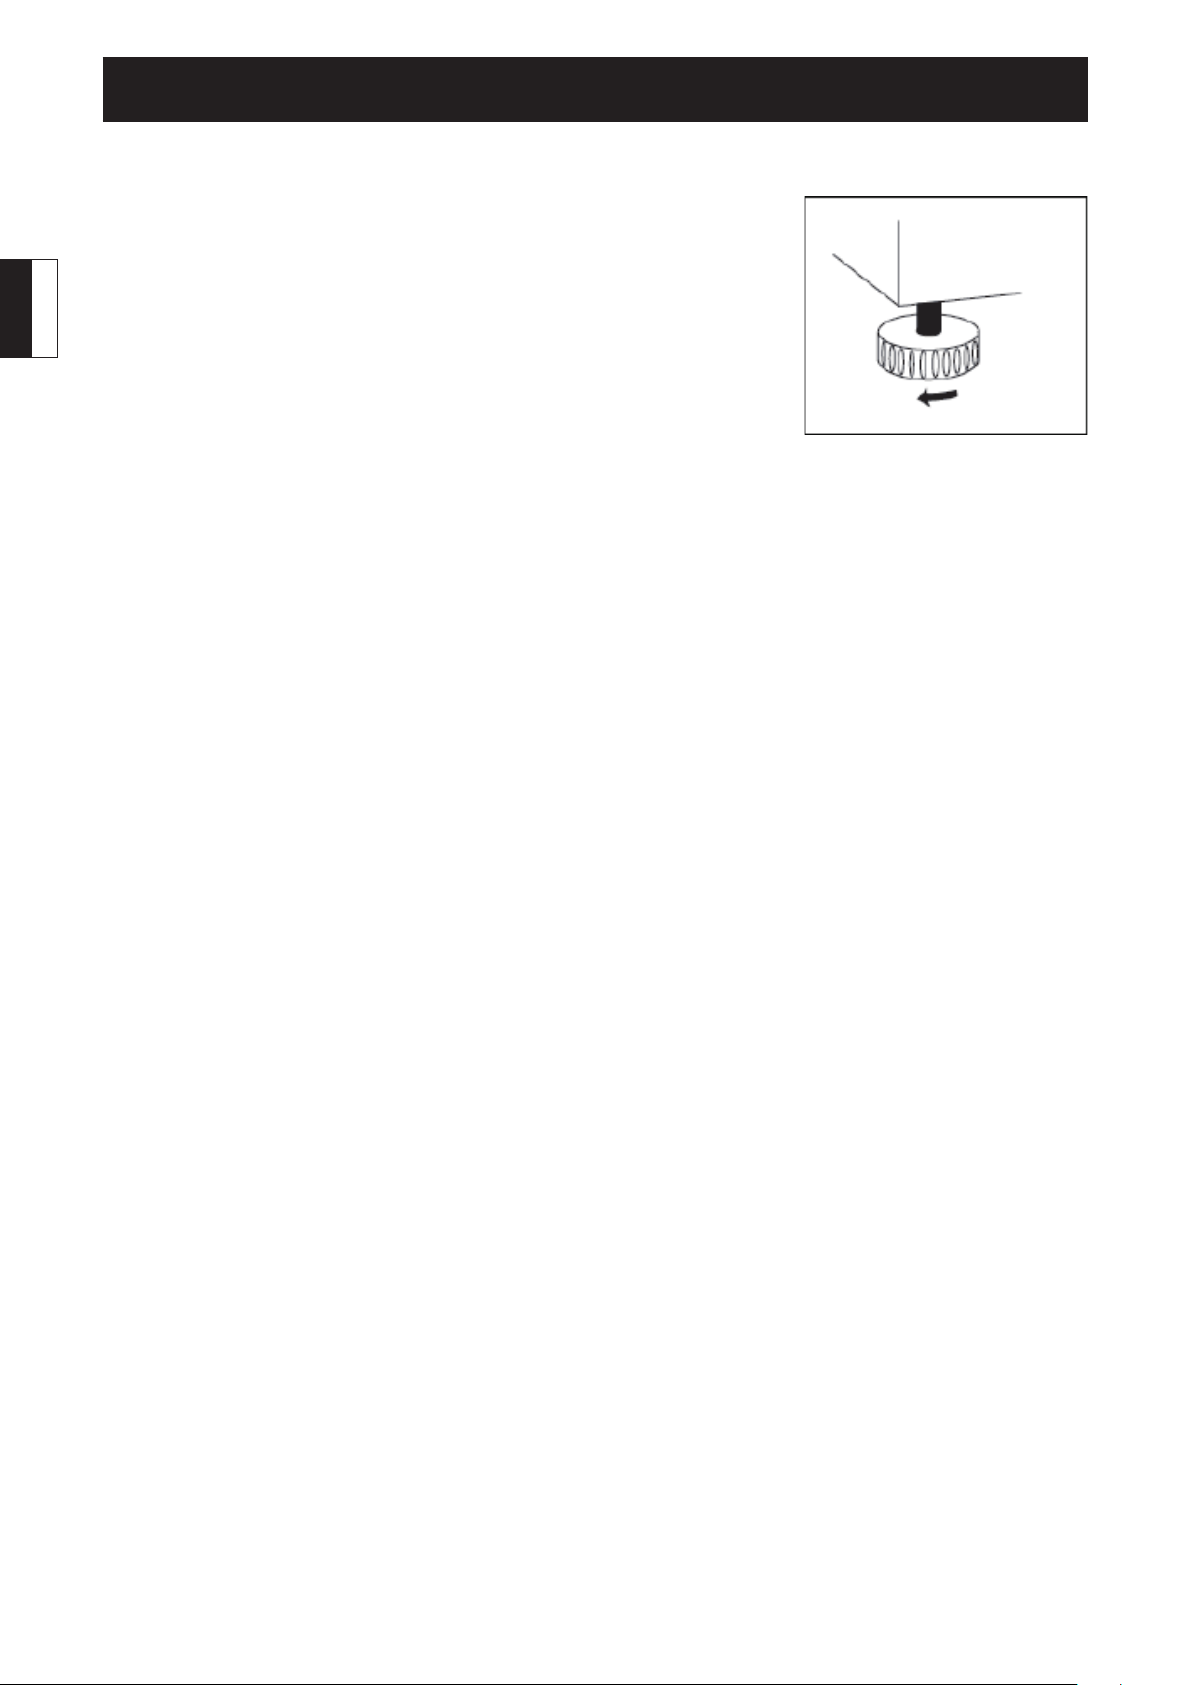
The freezer should be placed on a flat and solid surface. If the
appliance is placed on a pedestal, flat strong and fire-resistant
materials must be used. Never use the foam packing material
as a pedestal. If the freezer is slightly unstable, you can prolong
or shorten the adjustable foots of the freezer by turningthem
clockwise or counterclockwise to increase or decrease the height
of the freezer. Do not place the freezer under the direct sunlight or
in a place where it is exposedto heaters to ensure the performance
of the Freezer. Install the appliance in a well ventilated place and a space of at least 10cm must be
kept above and around the freezer.
Never place the freezer in a damp area or location where it may be splashed with water. Clean and
dry any water splashes and stains with soft cloth in time to prevent rust.
Do not place the freezer where the temperature is too low (under 5
or under the rain.
°C
). Do not keep freezer outside
Preparation prior to use
Remove all package parts, the foam base and the adhesive tape fixing accessories.
Place the freezer in a proper location (please refer to Placing Environment).
Clean the inside and outside of the freezer before use (please refer to Defrosting and Cleaning)
After the appliance has been leveled and cleaned, let it remain idle for at least 6h before switching
it on so as to ensure its normal running.
7
Page 9
FUNCTIONS
E
c
o
Chil
doc
z
.
o
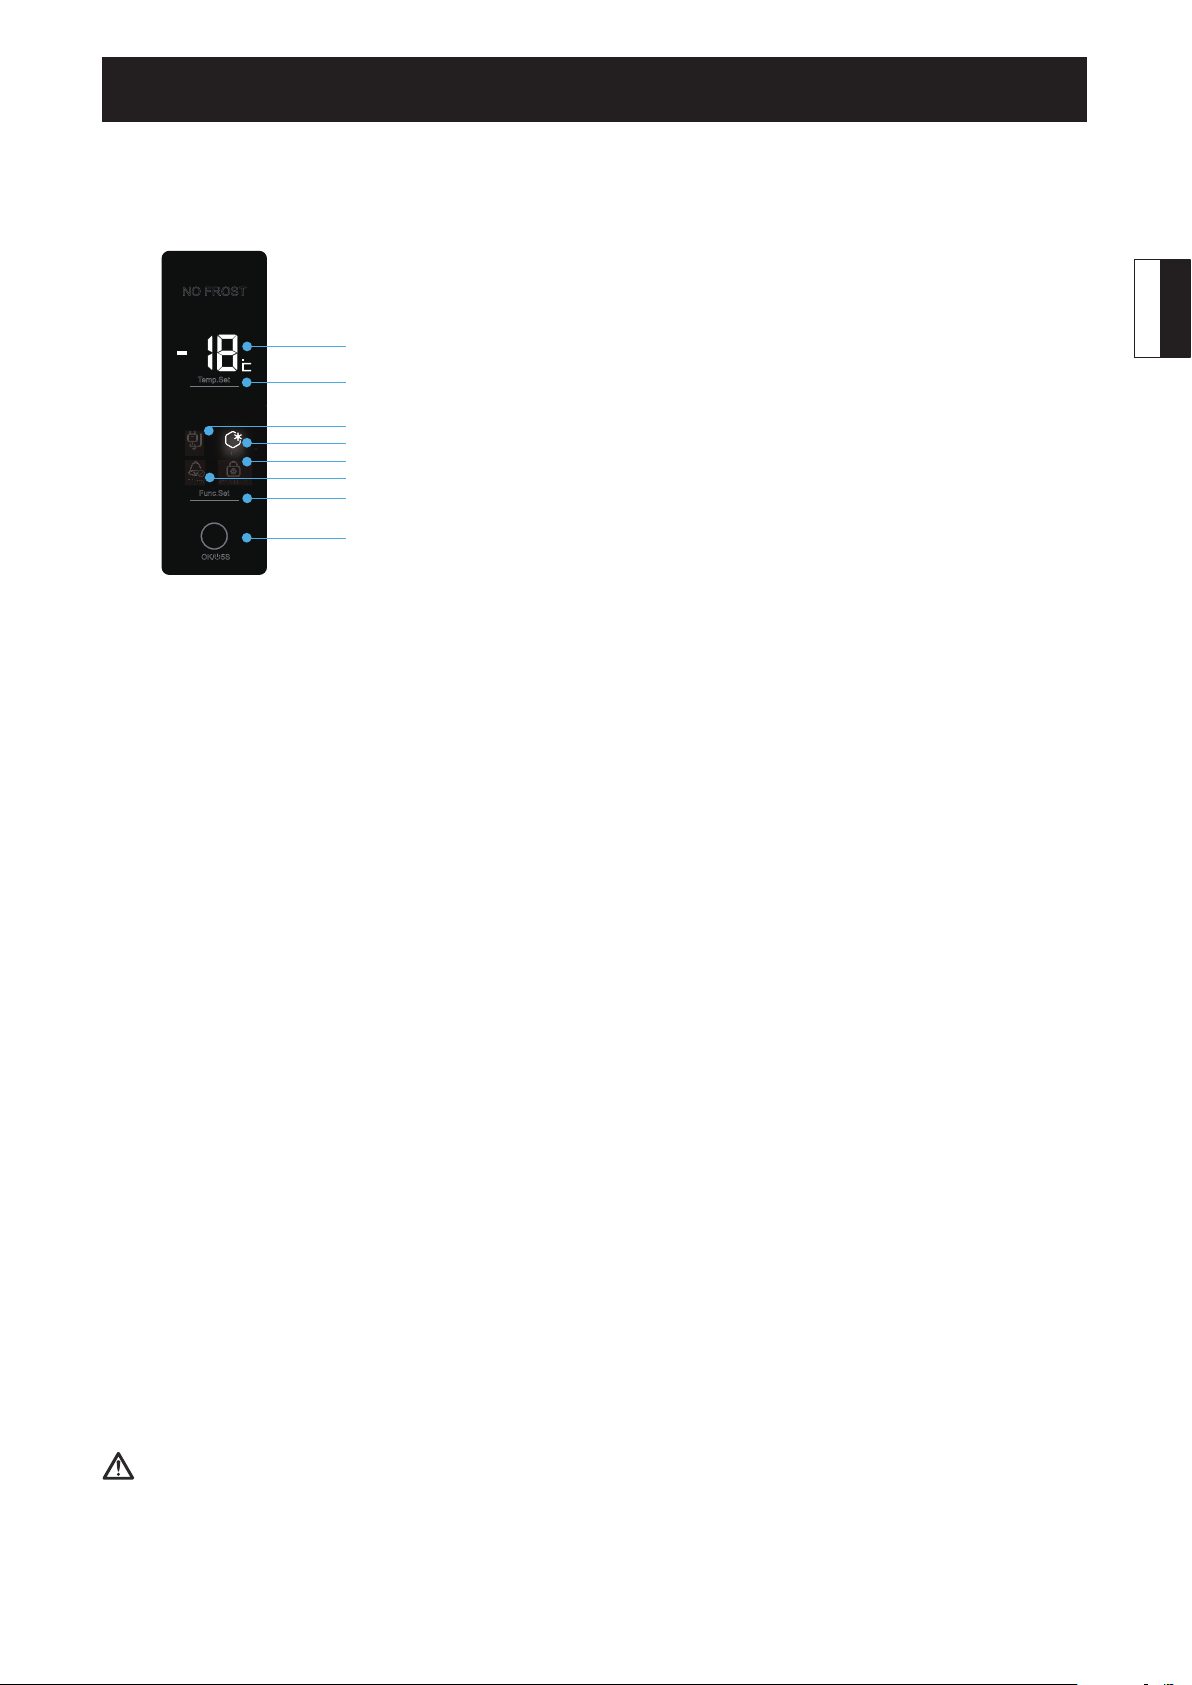
Controls panel
NO FROST
C Freezing temperature display icon
Temp.Set
C
A2
A2 Temperature setting button
D Eco function icon
E Fast freezing icon
Ala
Alarm
Eco
Func.Set
OK/ 5S
S.Frz .
S.
Child lock
D
E
G
F
A3
A4
G Child lock icon
F Alarm indicator icon
A3 Function selection button
(eco/ fast freezing/ alarm/child lock)
A4 OK button / Power button
Start-up
Insert the plug in the socket to switch on the freezer.
Display will show you code dF and it means that the freezer is in defrosting condition. After defrosting ,
display will show you code HH.
The alarm led F and acoustic signal will indicate that the temperature inside freezer is not suciently cold
for storage of foodstuffs. Pressing the button A3 to choose the “Alarm” function then press the button A4,
you can disable acoustic signal, but warning light will be on till freezer will reach the temperature of -12°C.
When display show the temperature of -12°C, alarm condition will stop automatically and freezer will be
ready for food storage.
English
Check the Controls Panel:
Touch any button on the display screen and check whether the temperature area and the selected icon can
be lightened.
Set temperature:
To set temperature, push the button A2. During temperature setting two numbers on display show the
point set in flashing mode. Additional pressing on this button modify the set-point in cycling and decreasing
mode from –14°C to –26°C.
If no action is done on the OK button within 5 sec, the set point will be stored automatically.
After the temperature is set, the two numbers on display come back to the freezer temperature visualization.
Manufacturer setting of temperature is -18°C.
Power function:
Press the button A4 for 5 sec to turn off the power of the freezer; do it again the power will be turned on.
Before any cleaning operation, make sure to disconnect the appliance from the power supply by pulling
out the plug, it isn’t enough to turn off the appliance pushing power button.
8
Page 10

FUNCTIONS
Freezer functions
English
FAST FREEZING:
activate fast freezing of fresh food.
The dedicate light E switches on to indicate that the function is on, and activation of the function is
achieved.
light will be on till function will be disabled.
For fast freezing a small amount of food, this function is recommended to be activated 2 hours before
inserting food; if you have a large amount of food to freeze at one time, it is recommended that the function
be activated 24 hours before inserting food Function will stop automatically after 24 hours or manually.
Power consumption will increase when this function is on.
FUNCTION ECO:
press the button A4, you can activate the function of energy saving, setting temperature within the range of
-18°C and -14°C. If the temperature has been set at -19°C or lower, it will be set automatically at -18°C when
the ECO function is on.
If this function is activated, led D will be on till the function will be unable.
You can press the button A3 to choose the “ECO” function, then press the button A4 to disable the function.
ECO function and Fast Freezing function can not be used simultaneously.
Child Lock:
press the button A4, the function will be on. Unlock: Touch any button on the screen, the display screen and
the child lock button will be lightened; press the button A3, the child lock button flickers; press the button
A4, the screen will be unlocked.
When the screen is locked, the button A2 is not effective; function selection is not available when pressing
the button A3; power can be turned off by press the button A4 for 5 sec.
Press the button A3 to choose the “S.FRZ” function, then press the button A4, you can
When the screen is unlocked, press the button A3 to choose the “ECO” function, then
When the screen is unlocked, press the button A3 to select the Child Lock function and then
Alarm signals
TEMPERATURE ALARM:
led F will indicate the temperature alarm. Display will show you code HH
After the screen is unlocked, press the button A3 to choose the “Alarm” function, then press the button A4,
it’s possible to stop acoustic sign, but alarm condition will continue till internal temperature will be colder
than -12°C.
DOOR ALARM:
intermittent buzzer. The alarm condition will stop by closing the door or by pressing button to select Alarm
function and pressing the OK button, but in this second case alarm condition will restart after 60 seconds if
door is still open. If the door is open for consecutive 7 minutes, the inner light will be off and there will be
continuous alarm.
FAULTY ALARM:
freezer, but there is no danger for temporary food preservation.
Code Ed on display together with alarm led F flashing and acoustic signal, will indicate a grave faulty
condition of freezer that must be switched off.
For both faulty conditions you must call after sales service as soon as possible.
If the door is left open for 60 seconds, the anomalous condition will be notified by
Code F4 on display together with alarm led F flashing will indicate a faulty condition of
if temperature inside freezer is over -8°C, an intermittent buzzer and the flashing
9
Page 11
FUNCTIONS
Insertion into a row of kitchen units
min.
min.
300cm
300cm
2
2
min.50
min.50
630
630
580
580
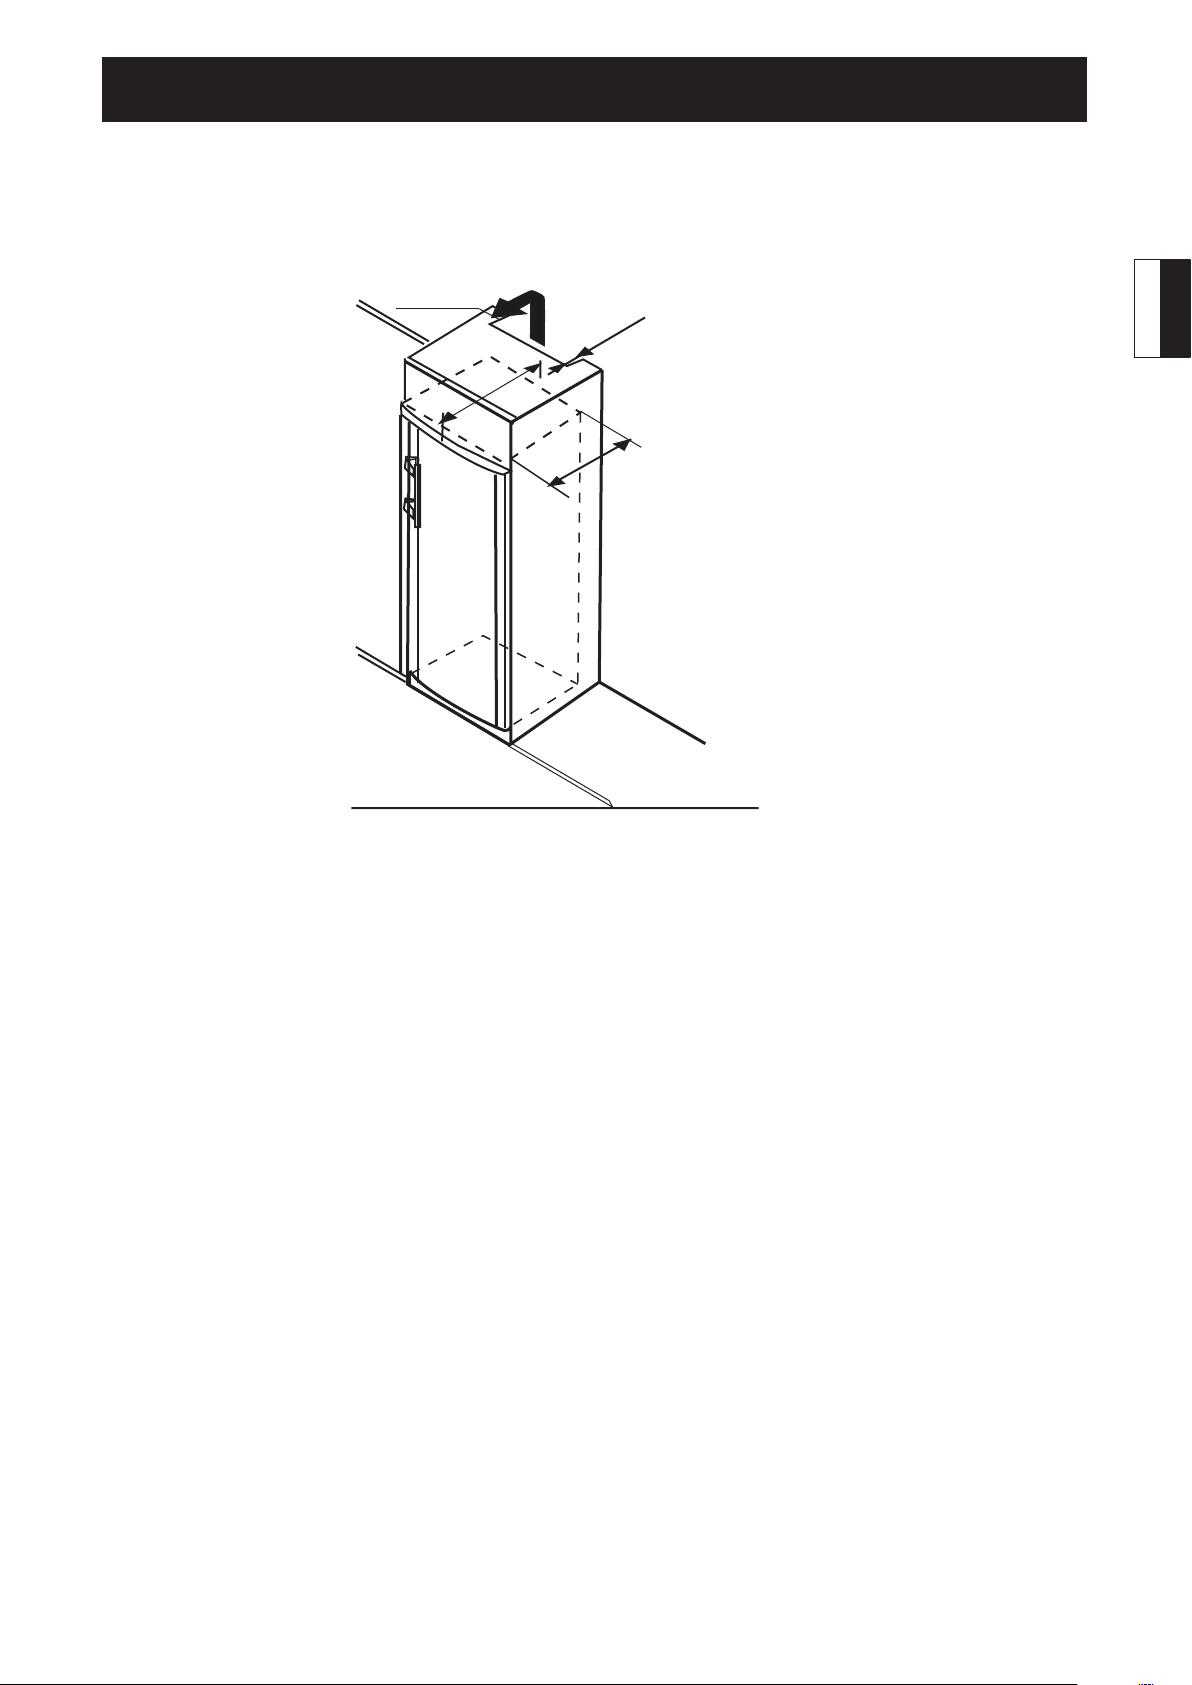
The appliance can be inserted into a row of kitchen units. To match the appliance to the height of
the row of the units, a suitable stack cabinet can be added. When inserting the appliance into a row
of standard kitchen units (max. depth 580 mm), the appliance can be installed directly next to the
kitchen unit. The appliance door projects relative to the front of the kitchen unit by 34mm at the
side and by 55mm in the middle of the appliance. It can be opened and closed perfectly as a result.
English
Important for the ventilation:
At the back of the stack cabinet, there has to be a ventilation duct of at least 50mm depth
throughout the width of the stack cabinet.
The ventilation space under the ceiling has to be at least 300cm².
The larger the ventilation space, the more energy-saving the appliance is in operation.
If the appliance is installed with the hinges next to a wall, the distance between appliance and wall
has to be at least 55mm. This corresponds to the projection of the handle when the door is open.
10
Page 12
FUNCTIONS
Use information
English
LID OPENING
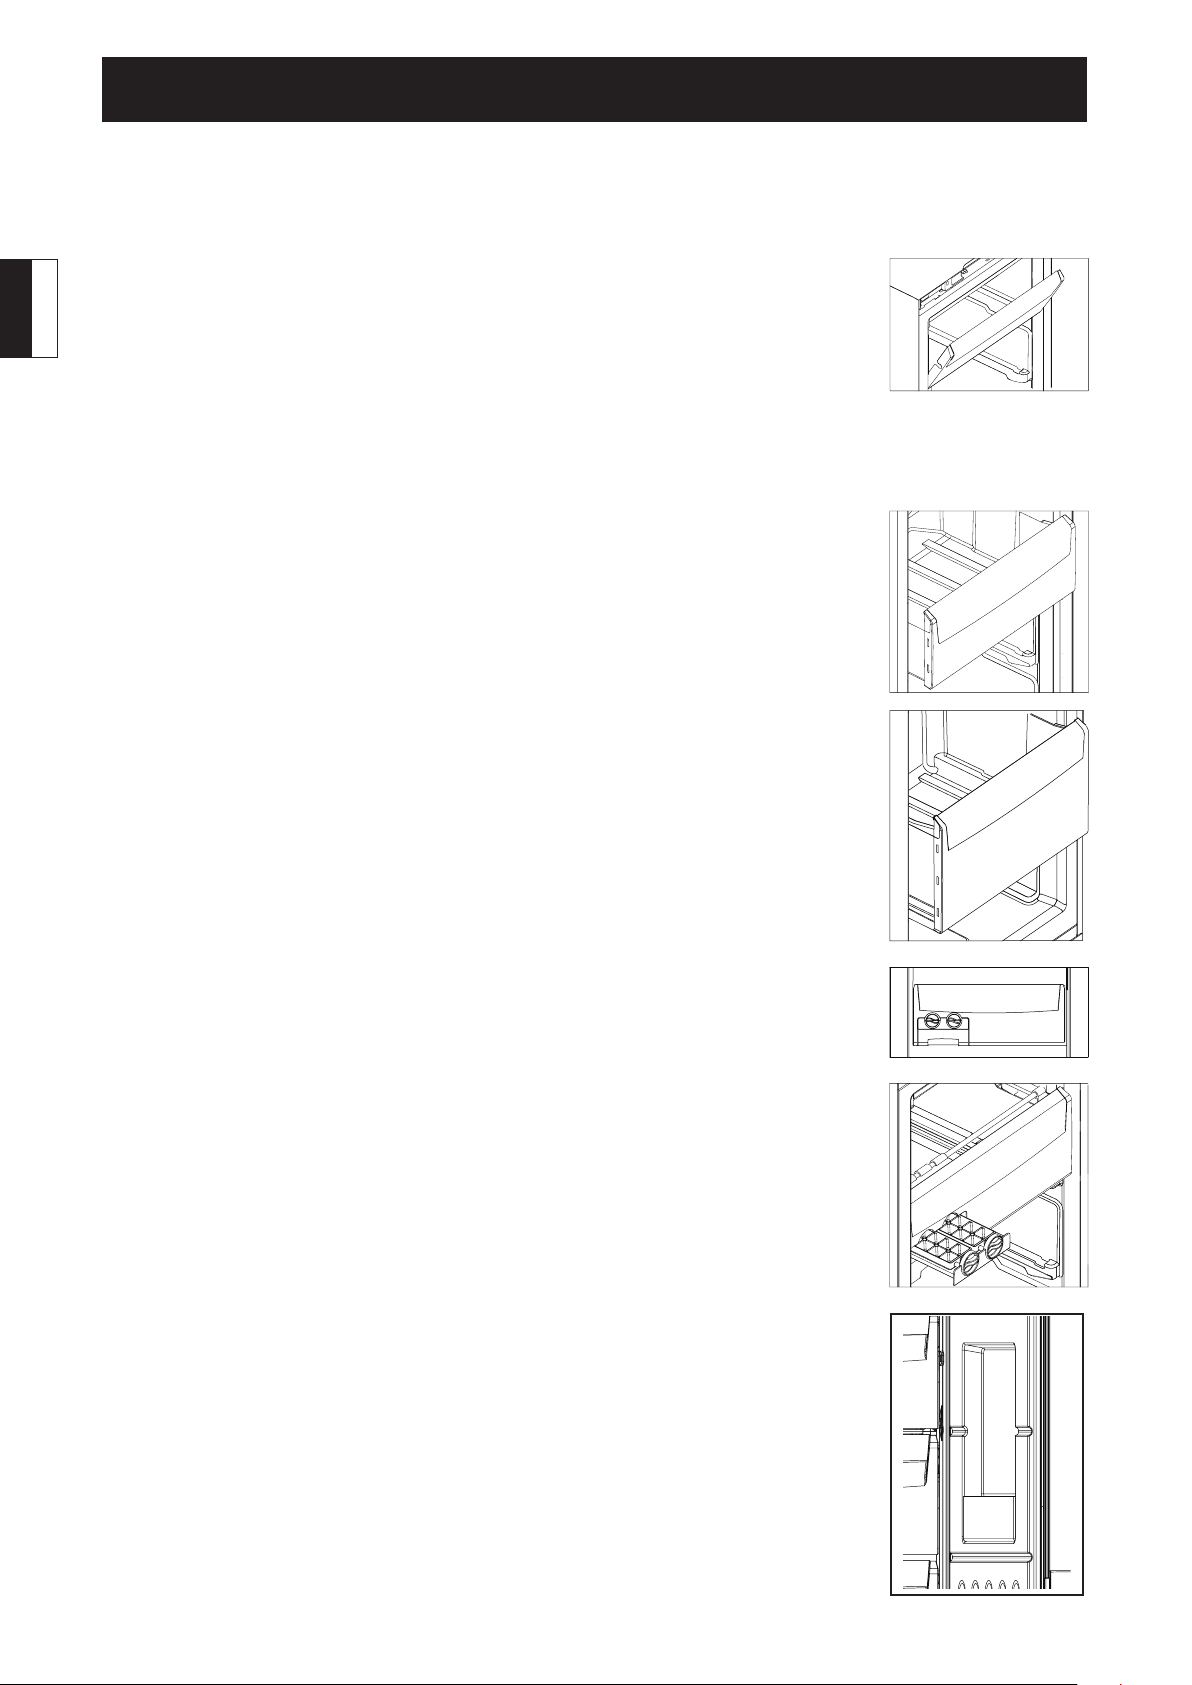
To open upper lids, lift them slightly and turn inside out.
Open the lid to put the food into the drawer.
Close the lid to avoid contact with the door.
The lid can be removed to increase storage space.
NOTE: Two layers in the upper are furnished with lids, but no food placement
is allowed in the front part of the glass plate; or otherwise lids may fail to be
closed, and if so, please check the food items, adjust their locations, and then
re-close the lids. Warning: check if the lids are closed before shutting the
door, and be sure to shut the door after the lids are properly closed so that no
squeezing on the lids may occur.
REMOVING DRAWERS
Pull the drawers out fully, then lift them up slightly in order to remove.
Drawers (except the bottom drawer) can be removed in order to obtain
increased storage space.
Slides available for some models.
SUPER STORE DRAWER
Pull super store drawer out fully. Lift and pull it out of telescopic guides.
NOTE: Some models of the large drawer are set with slide structure. Proper
way of drawer removing: rst, take the food away from it and push it to the
end; then lift its rear part and pull it out. Don’t lift the drawer up until it is
blocked, then it can be taken out easily; but if so failed , push it to the end
and repeat the steps again.
ICE CUBES PRODUCTION
Some models are equipped with an ice system including ice cube trays with
removal device and ice bin.
Remove ice trays
Clean and fill with waterRefit ice trays on its support.
Wait for a few hours for the ice to be ready, then turn the knobs to extract the
ice cubes.
The ice cubes will fall directly into the ice container.
Boxes on the door may contain a packed PIZZA with a thickness of less than
30mm or other thin packaged food.
Eutectics available for some models. You can also buy eutectics and put them
in the freezer, and the thickness of the eutectics shall be less than 30mm.
11
Page 13

FUNCTIONS
2B2A
6A 6B
3A
1C
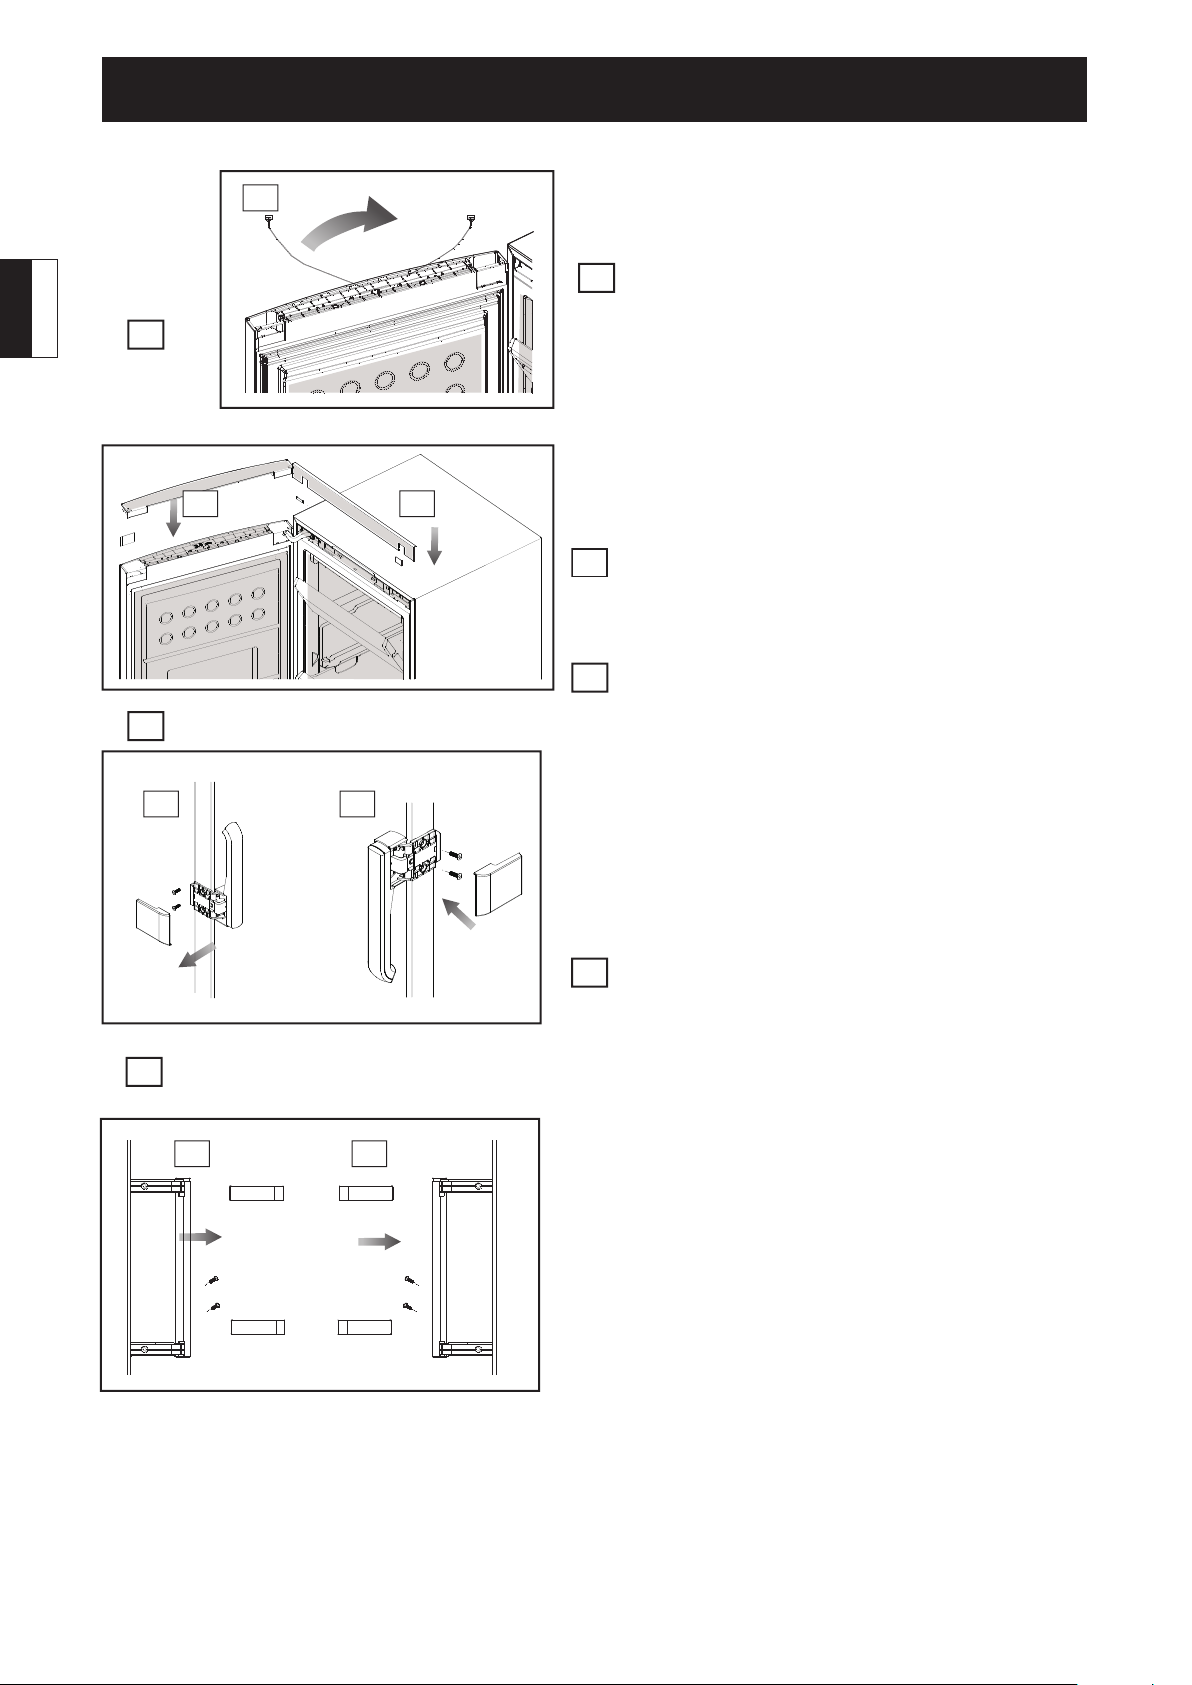
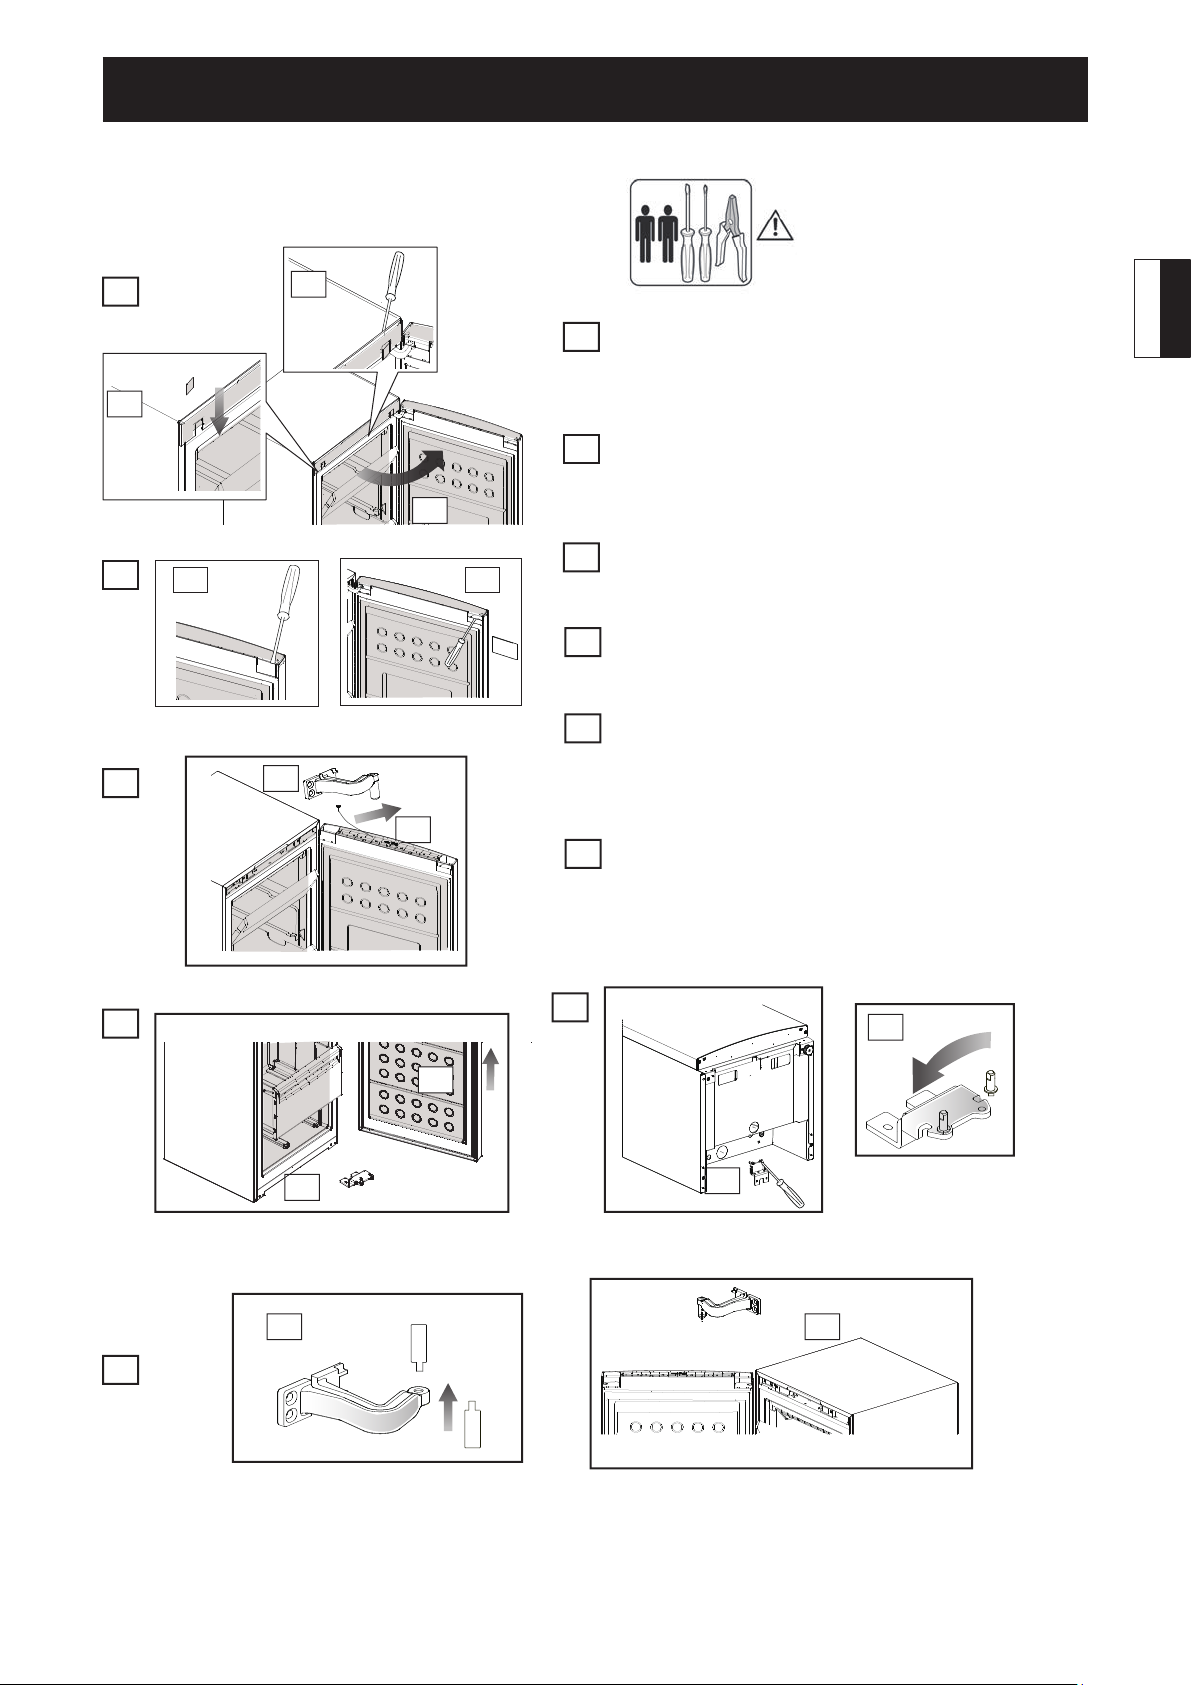
Door reversibility:
dismantling door from the right
1
1C
Disconnect power and empty the
appliance before you start the
operaon.
1B
2
3
3A
3B
1A
A. Open the door
1
B. Force downward to remove the two small covers respec-tively
on the left and right
C. Pry the front cover outward
A. Use a screwdriver to remove the small cover on the right of
2
the door body
B. Use a screwdriver to pry inward to remove the decorative
strips
A. Use a crosshead screwdriver loosen the hinge screws, Remove
3
2B2A
the upper hinge
B. Disconnect the wiring terminal
A Move the door body upward to remove the door body
4
B. Use a crosshead screwdriver to remove the lower hinge
A. Use wrenches or pliers to remove the hinge shaft, and fix it in
5
the hinge left hole.
B. Use a crosshead screwdriver to remove the screws on the left
of the cabinet body, and mount the screws, on the right side of
the cabinet. Mount the lower hinge on the left side.
A. Use a flat-headed screwdriver to pry off the screw plug on the
6
right of the door body.
B. Remove the upper hinge shaft and fix it reversely on the
hinge. Move the screw plug to the left side and plug the screw
hole.
English
5
5B
4
4A
5A
4B
6A 6B
6
12
Page 14
FUNCTIONS
7A
7A
English
7
8.1
A B
A. Connect the signal line in the door decora-
7
tive strip to the terminal in the hinge.
Clear up the harness and place it into the
decorative strip cover.
B. Fix the decorative strip and buckle its small
cover on the right side.
C. Close the cabinet upper front cover.
Insert the left and right small covers into the
7C7B
8.1
groove.
Direction for handle replacement: according
8
to the different configurations (The figure is
different).
Assist handle:
A. Use a flat-headed screwdriver to prise off
the handle upper cover. Remove the two
screws and then remove the handle.
B. Use a flat-headed screwdriver to pry off
the screw plug on the right of the door body.
Move the screw plug to the left side and plug
the screw hole. Fix the handle on the right
side and have it covered.
8.2
A B
8.2
Ordinary handle:
A. Use a flat-headed screwdriver to prise off
the handle upper cover. Remove the two
screws and then remove the handle.
B. Use a flat-headed screwdriver to pry off
the screw plug on the right of the door body.
Move the screw plug to the left side and plug
the screw hole.
C. Fix the handle on the right side and have it
covered.
13
Page 15
MAINTENACE
Defrosting and cleaning
DEFROSTING THE FREEZER: The freezer defrosts automatically. No manual operation is needed.
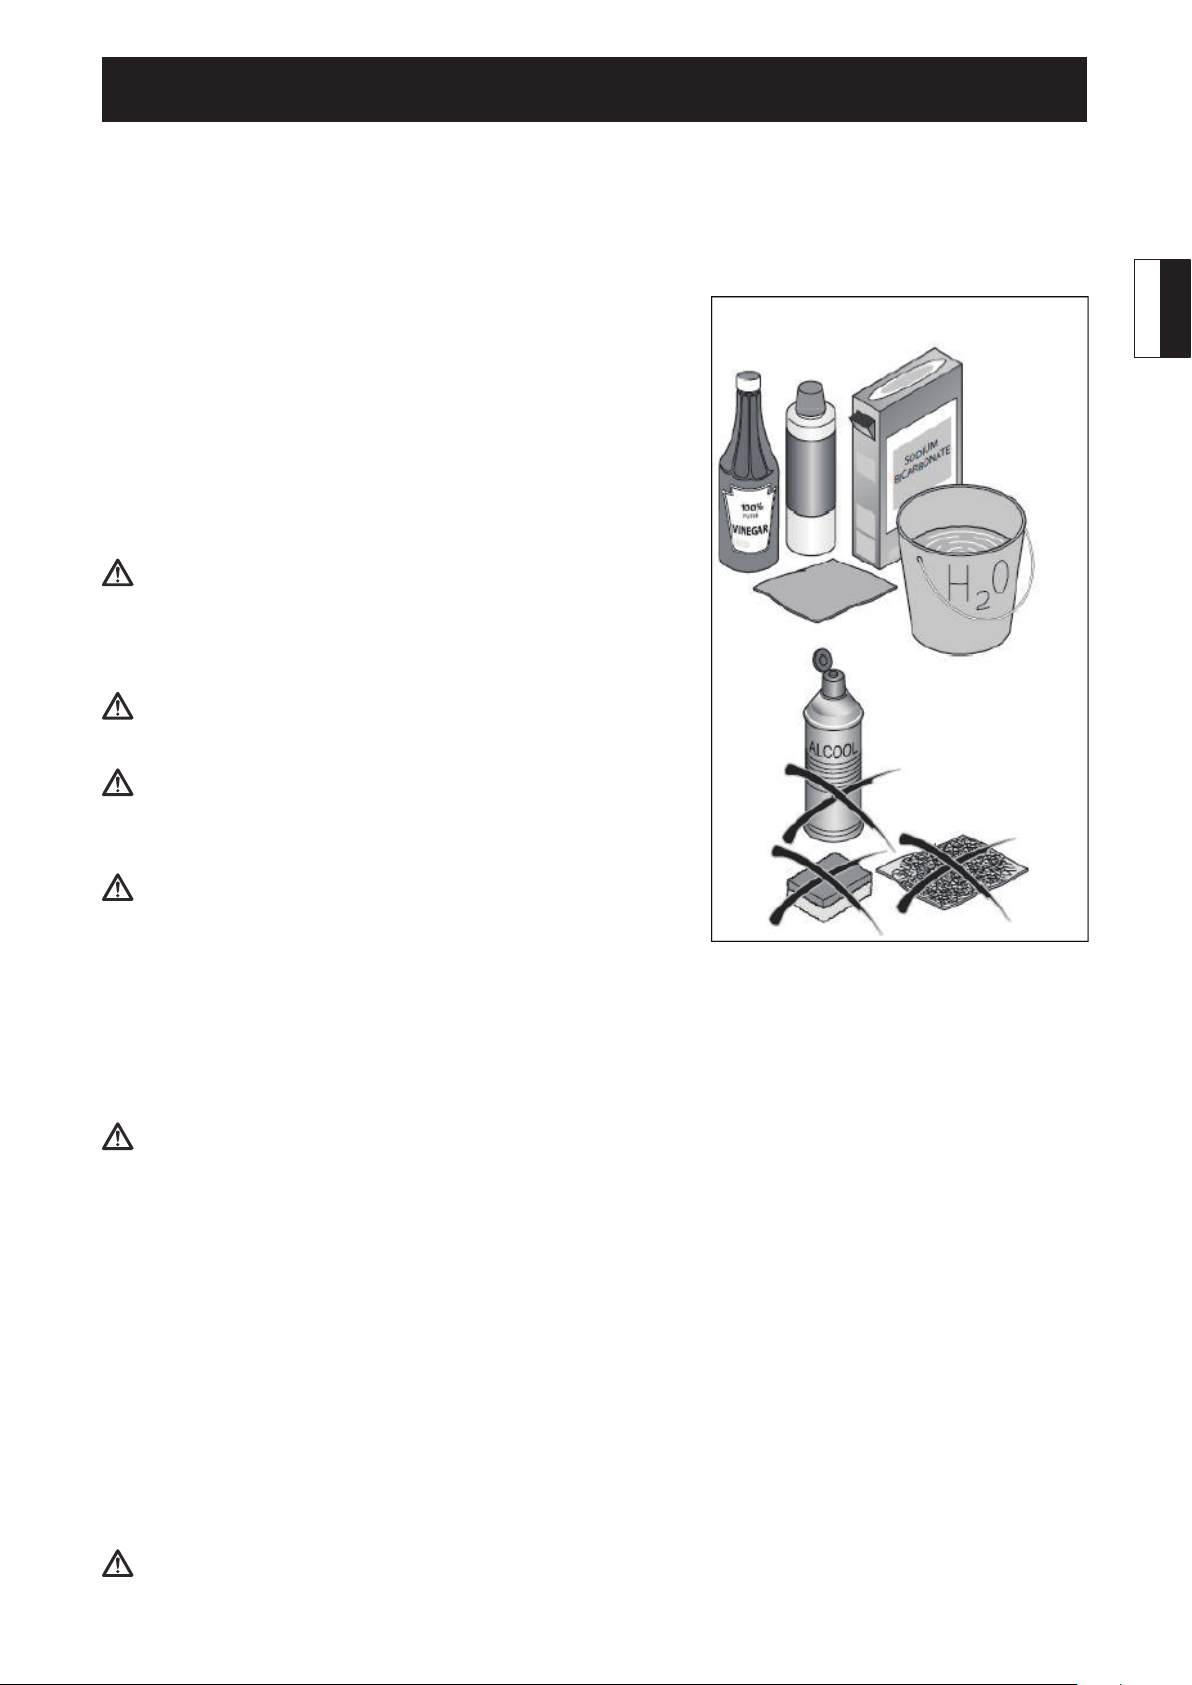
CLEANING: The appliance should be cleaned regularly to prevent
bad stored food odors.
Unplug the power cord before cleaning the freezer.
Clean the refrigerator with a soft cloth or sponge with warm water
(can be added with mild detergent).
Dry water droplets on the refrigerator surface with a dry cloth.
Always keep the door gasket clean.
The refrigerator is very heavy. When you are moving it for
cleaning or repair, take care not to damage the floor. Keep the
freezer upright during moving. Do not move the freezer by
rocking it to avoid damage to the floor.
Do not spray or flush the freezer with water to avoid impact
on its electrical insulation property.
Do not clean with hard brush, wire brush, detergent powder,
gasoline, amyl acetate, acetone and similar organic solutions,
warm water or acid or alkaline solutions.
When cleaning the display screen and other electrical
appliances, do use dry cloth.
English
Stopping use
If the freezer will not be used for an extended period, please unplug the power cord and clean it with the
method described above.
Keep the freezer door open to prevent any food remaining in the compartment from producing bad odors.
To ensure the service life of the appliance, it is recommended that the freezer not be turned off unless it
is necessary.
Moving the freezer
Detach the power plug and turn off the power.
Remove all food in the freezer.
Secure the drawers and other movable parts in the freezer with adhesive tape.
Close the door and secure with adhesive tape so that it will not be opened when moving.
Do not tilt the freezer more than 45 degrees (angle to vertical) to avoid damaging the refrigerating system
when moving the freezer.
Wrap the feet of the freezer to avoid scratching the floor. Never move the freezer forcefully Do not move the
freezer by its handle, lid or pipes to avoid property damage or personal injury.
Never place the refrigerating horizontally down.
14
Page 16
TROUBLE-SHOOTING
Before calling for service, please read the following troubleshooting table first. This can save both
your time and money. The table contains common problems except those caused by defects in
workmanship or material of the refrigerator.
English
PROBLEMS CAUSES SOLUTIONS
Freezer operation
This is normal for an automatic defrosting
freezer.
Check whether the plug, socket or fuse is
damaged. Turn on the power when they are
OK.
Press the power button to start up the freezer
again.
In this case, it is normal for freezer to run
longer.
Normally, it takes 8 to 12 hours for freezer to
totally cool down.
Warm air enters the freezer and causes it to
start frequently. Please do not open the door
too frequently.
Ensure the freezer is located on a level ground
and there is no food or container jarring the
door.
Set the temperature higher until a satisfactory
freezer temperature is obtained. It takes 24
hours for freezer temperature.
Clean or replace the door gasket. A leakage
gap ofdoor gasket can cause a longer running
time of freezer in order to maintain desired
temperature.
Clean the condenser.
The compressor does
not work
The freezer runs
frequently or runs for
too long period
Product is in defrosting cycle.
Freezer is not plugged into a
power outlet.
Product is turned OFF.
The indoor or outdoor
temperature is high.
The freezer has been
powered off for a period of
time.
The door is opened too
frequently or for a long
period at one time.
The door of the freezer is
not tightly closed.
The temperature setting is
too low.
The door gasket is
dirty, worn, cracked or
mismatched.
The condenser is dirty.
Too high temperature
Warm air will enter the refrigerator whenever
the door is opened. Try to open the door as less
frequently as possible.
Too high temperature
inside product
The door is opened too
frequently or for too long each
time.
Temperature is set too high.
The door is not closed
tightly.
Condenser is dirty.
Water / moisture / frost on outside surface of the freezer
Moisture accumulates
on the freezer’s
outside surface
Damp climate.
The door is not closed
tightly. This causes
condensation of cold air in
the freezer and the warm air
outside it.
This is normal in damp climate.
The moisture will decrease when the humidity
drops.
Reset the temperature.
Ensure the freezer is located on a level ground
and there is no food or container jarring the
door.
Clean the condenser.
Make sure the ground is at and no food or
containers reach out of the door; close the
door tightly.
15
Page 17
TROUBLE-SHOOTING
PROBLEMS CAUSES SOLUTIONS
Bad odors in the freezer
The inside of the
freezer is dirty
If you hear
Beeps
Abnormal sound
Slight sound similar to
that of owing water
Heating of cabinet
The inside of the refrigerator
needs leaning.
Food of strong odor is
stored in the freezer.
The freezer door is open.
The temperature in the
freezer is too high.
Some parts may be
damaged.
The freezer is not located on
a level place.
The freezer touches some
object around it.
This is the sound of the
refrigerating system.
The refrigerating system is
working refrigerating system.
Clean the internal of the refrigerator. (Please refer
to Defrosting and Cleaning)
Check whether the food is deteriorated. Take
out deteriorated food or food of strong odor
out of the freezer.
Close the door or silence the alarm manually.
The alarm is normal when it is rst started or
the food is stored for the rst time. You can
silence the alarm manually.
Contact the after-sale service personnel.
Adjust the feet to level the refrigerator.
Remove objects around it.
Normal.
This prevents condensation and is normal.
English
Nameplate
The nameplate is located inside the freezer compartment glued low down on the left side.
The nameplate provides important information about the appliance and must not be tampered
with or removed.
Valid capacity and rated power consumption shown on the nameplate is subject to relevant
standards.
16
Page 18

ELEMENTI
Grazie per aver acquistato un prodotto Haier.
Italiano
Prima di utilizzare l'apparecchio, leggere attentamente le istruzioni poiché contengono informazioni
importanti che consentiranno di trarne il massimo e garantiranno un'installazione, un utilizzo e una
manutenzione corretti e sicuri.
Tenere a portata di mano questo manuale per potervi fare riferimento in qualsiasi momento e utilizzare
l'apparecchio in modo corretto e sicuro.
Se il congelatore viene venduto, regalato o lasciato in occasione di un trasloco, assicurarsi di consegnare
il presente manuale al nuovo possessore in modo che possa acquisire familiarità con l'apparecchio e
conoscere le avvertenze sulla sicurezza.
Page 19

SOMMARIO
PRECAUZIONI ..............................................................................................................................................3
PRIMA DELL'USO ......................................................................................................................................... 6
FUNZIONI ...................................................................................................................................................... 8
MANUTENZIONE ......................................................................................................................................14
RISOLUZIONE DEI PROBLEMI ...............................................................................................................15
Italiano
Page 20
PRECAUZIONI
Legenda
Attenzione
Italiano
Precauzione
Divieto
Smaltimento
La presenza di questo simbolo sul prodotto, sugli accessori o sui materiali accompagnati dalle presenti
istruzioni indica che, al termine del suo ciclo di vita, il prodotto o i relativi accessori elettronici (caricabatteria,
cue, cavo USB) devono essere smaltiti separatamente dai normali riuti domestici.
Al ne di evitare danni all'ambiente o alla salute provocati da uno smaltimento non controllato dei riuti,
separare questi prodotti dagli altri tipi di riuti e riciclarli per promuovere allo stesso tempo il riutilizzo
sostenibile dei materiali.
Gli utenti domestici devono rivolgersi al rivenditore presso cui hanno acquistato il prodotto oppure alle autorità
locali competenti per ricevere informazioni su un come smaltire il prodotto in modo sicuro per l'ambiente. Gli
utenti aziendali devono contattare il proprio fornitore e vericare le condizioni di acquisto. Il presente prodotto
e i relativi componenti elettronici non devono essere smaltiti assieme agli altri riuti industriali.
Prima dell'uso…
Questo apparecchio utilizza l'alimentazione CA.
Collegare l'apparecchio alla tensione normale. In caso di uttuazioni di tensione, l'apparecchio potrebbe
non riuscire ad avviarsi e il regolatore di temperatura o il compressore potrebbero subire danneggiamenti o
presentare rumori anomali. In tale evenienza, aggiungere un adeguato stabilizzatore.
Utilizzare una presa a tre poli.
Assicurarsi che la presa sia collegata alla messa a terra e non modicare la spina o il cavo di alimentazione. La
spina del cavo di alimentazione deve essere collegata saldamente alla presa, in caso contrario vi è il rischio
di incendi. Una volta installato l'apparecchio, la spina deve essere facilmente accessibile in modo da poter
essere prontamente scollegata in caso di incidenti.
Non danneggiare il cavo di alimentazione.
Non tirare il cavo di alimentazione per staccare la spina. Aerrare direttamente la spina per staccarla dalla
presa.
EVITARE di calpestare il cavo di alimentazione o che questo venga schiacciato dall'apparecchio.
In caso di danni al cavo di alimentazione:
Se il cavo di alimentazione o la spina risultassero danneggiati o usurati, non utilizzarli. Il cavo di
alimentazione danneggiato o usurato deve essere sostituito dal produttore o da personale qualicato.
Se si necessita di un cavo di alimentazione più lungo, la sezione trasversale del cavo aggiuntivo non deve
essere inferiore a 0,75 mm².
Mantenere libere da ostruzioni le aperture di ventilazione nell’involucro dell’apparecchio o nella
struttura ad incasso.
In caso di perdite di gas inammabile come il gas metano:
Chiudere la valvola che perde gas e aprire la porta e le nestre dell'abitazione. NON collegare/scollegare la
spina di alimentazione dell'apparecchio o di altri apparecchi elettronici.
Pericolo di congelamento
Durante il funzionamento del congelatore, non toccare la supercie interna del vano di conservazione,
soprattutto con le mani bagnate perché potrebbero congelarsi toccando la supercie.
3
Page 21
PRECAUZIONI
In caso di disuso dell'apparecchio:
Tenere l'apparecchio lontano dalle amme per evitare incidenti. Rimuovere lo sportello (aprire lo
sportello e sorreggerlo prima di rimuovere le viti) per evitare il rischio di incidenti se dei bambini entrano
nell'apparecchio. Smaltire l'apparecchio nel luogo preposto.
Aprire lo sportello dalla maniglia.
Non conservare o utilizzare benzina o altre sostanze inammabili in prossimità del congelatore per
evitare il rischio di incendi.
Non conservare mai nel congelatore sostanze acide altamente corrosive, esplosive o inammabili,
alcaline e altre sostanze chimiche.
Non conservare mai nel congelatore bottiglie contenenti bevande perché potrebbero esplodere durante
il congelamento.
Non utilizzare apparecchi elettrici nei vani di conservazione degli alimenti, ad eccezione di quelli di tipo
consigliato dal produttore.
Prestare attenzione ai bambini
Sorvegliare i bambini, in modo da assicurarsi che non giochino con l'apparecchio.
Non appendersi allo sportello poiché questo o l'apparecchio potrebbero cadere con il rischio di lesioni personali.
Assicurarsi che i bambini non inseriscano mani o piedi nei fori o nelle giunture laterali delle parti in metallo
come il vano o il retro dell'apparecchio per evitare il rischio di lesioni personali.
Non poggiare sull'apparecchio oggetti poco stabili (oggetti pesanti, contenitori d'acqua) poiché potrebbero
cadere o rovesciarsi provocando lesioni personali o scosse elettriche.
Tenere lontano dall'acqua
Non spruzzare o rovesciare acqua nel congelatore per pulirlo. Non collocare l'apparecchio in ambienti
umidi o dove è facilmente raggiungibile da schizzi d'acqua per evitare che ciò inuisca sulle prestazioni
dell'isolamento elettrico o provochi scosse elettriche o incendi.
Non danneggiare il circuito del refrigeratore
Il disassemblaggio del congelatore ed eventuali modiche devono essere autorizzati. Qualsiasi movimento
brusco esercitato sul congelatore può danneggiare i tubi del sistema di rareddamento. L'apparecchio deve
essere riparato da personale qualicato.
Scollegare la spina di alimentazione:
Prima della pulizia e della manutenzione o in caso di spegnimento o guasti all'apparecchio. Dopo aver
scollegato l'apparecchio, attendere almeno 5 minuti prima di riavviarlo, poiché riavvii frequenti possono
danneggiare il compressore.
Questo congelatore è per uso domestico ed è destinato esclusivamente alla conservazione di alimenti.
Non conservare sangue, medicine, prodotti biologici o altri prodotti.
Mantenere libere da ostruzioni le aperture di ventilazione nell’involucro dell’apparecchio o nella struttura
ad incasso.
L'utilizzo di questo apparecchio non è idoneo per persone con capacità siche, sensoriali o mentali ridotte
(inclusi bambini) o senza un'adeguata esperienza e conoscenza del suo utilizzo, a meno che non vengano
sorvegliate o ricevano istruzioni da una persona responsabile della loro sicurezza.
Questo apparecchio è concepito per essere utilizzato in applicazioni domestiche e simili, quali:
- aree di ristoro in negozi, uci e altri ambienti lavorativi;
- agriturismi e camere in hotel, motel e altri ambienti di tipo residenziale;
- ambienti di tipo "bed and breakfast";
- catering e applicazioni simili di vendita non al dettaglio.
Consigli per il risparmio energetico
Installare l'apparecchio in una stanza fresca, asciutta e adeguatamente areata.
Lasciare uno spazio di almeno 10 cm sopra e intorno all'apparecchio, in modo da assicurare un'adeguata
ventilazione.
Lasciare rareddare gli alimenti caldi prima di inserirli nell'apparecchio.
Non tenere aperto lo sportello per troppo tempo quando si inseriscono o si prelevano gli alimenti dal
congelatore: minore è il tempo di apertura dello sportello, minore sarà la formazione di ghiaccio all'interno.
Italiano
4
Page 22
PRECAUZIONI
Pulire regolarmente la parte posteriore del congelatore. La presenza di polvere aumenta il consumo energetico.
Non impostare una temperatura più fredda del necessario.
Non coprire le aperture di ventilazione.
Italiano
Congelamento e conservazione di alimenti freschi
Lasciare un po' di spazio tra gli alimenti conservati per favorire il ciclo di refrigerazione.
Suddividere gli alimenti per categorie, in modo da trovarli più facilmente.
Chiudere ermeticamente gli alimenti prima di inserirli nel congelatore per evitare perdite di liquidi e cattivi odori.
È facoltativo confezionare gli alimenti prima di riporli nel congelatore. La parte esterna della confezione
deve essere asciutta per evitare che i sacchetti si attacchino gli uni agli altri. La confezione deve essere
composta da materiale inodore, a tenuta d'aria, non velenoso o tossico.
Per identicare gli alimenti, si consiglia di annotare sopra le seguenti informazioni:
Nome dell'alimento
Peso della porzione
Quantità (numero di pezzi)
Data di congelamento
Data di scadenza
Vedere all'interno del congelatore lo schema sul limite di conservazione degli alimenti più comuni:
VANO PIZZA
1. Zuppe, gelati, insaccati, pane
2. Pesce, gamberi, carne rossa e carne di agnello
3. Verdure, frutta, pollame, carne di manzo
Gli alimenti devono essere freschi, maturi e di buona qualità.
Frutta e verdura fresca devono essere congelati possibilmente subito dopo la raccolta per mantenere
inalterati gran parte delle sostanze nutritive, la composizione, la consistenza, il colore e il sapore.
Prima di congelare carne rossa e selvaggina, è preferibile lasciarla appesa per l'essicazione per un periodo di
tempo sucientemente lungo.
Attendere che gli alimenti caldi raggiungano la temperatura ambiente prima di riporli nel congelatore.
Estrarre dal congelatore solo la quantità necessaria poiché una volta scongelati, gli alimenti non possono
essere ricongelati se non previa cottura.
Evitare di mettere gli alimenti freschi a contatto diretto con quelli già congelati poiché questi ultimi
potrebbero scongelarsi e il periodo di conservazione previsto non sarebbe più valido.
Per congelare gli alimenti freschi al meglio, 2 ore prima dell'inserimento attivare la funzione di
congelamento rapido (vedere il capitolo sulle funzioni).
Non inserire nel congelatore una quantità eccessiva di alimenti freschi: vedere le informazioni sulla
capacità di congelamento dell'apparecchio.
Generalmente il processo di congelamento si conclude in 24 ore. Trascorso questo periodo, la funzione si
disattiva automaticamente.
Per congelare piccole quantità, è possibile interrompere manualmente la funzione dopo poche ore per
evitare un inutile consumo di energia.
5
Page 23
FROZEN-FOOD
PRIMA DELL'USO
Descrizione
Questa gura potrebbe risultare leggermente diversa dalla disposizione interna del congelatore acquistato.
Italiano
COPERCHI
MACCHINA PER
GHIACCIO
(opzionale)
CASSETTI PICCOLI
PIEDINI REGOLABILI
(maniglie sul davanti e rotelle sul retro)
ICE MAKER
(option)
CASSETTI
SUPER STORE
CESTONI
SMALL D RAWER
ADJUST FEET
(trasport grips at front, trasport castors at back)
LID
DRAWER
VANO PIZZA
PIZZA BOX
CALENDARIO
CALENDAR
ALIMENTI
CONGELATI
È possibile rimuovere i cassetti grandi, i cestoni e i cassetti piccoli per aumentare lo spazio di conservazione
del congelatore.
6
Page 24
Italiano
PRIMA DELL'USO
Ambiente di installazione
Il congelatore deve essere installato su una supercie piana e
solida. Se si utilizza una base, assicurarsi che sia realizzata con
materiali robusti e ignifughi e che la supercie sia piana. Non
utilizzare mai come base gli imballaggi in schiuma. Se il congelatore
è leggermente instabile, è possibile allungare o accorciare i piedini
regolabili ruotandoli in senso orario o antiorario per aumentare
o ridurre l'altezza dell'apparecchio. Non esporre il congelatore
alla luce diretta del sole e non installarlo in prossimità di radiatori
per non comprometterne le prestazioni. Installare l'apparecchio in un ambiente ben ventilato,
lasciando sopra e intorno a esso uno spazio di almeno 10 cm.
Non installare mai il congelatore in un ambiente umido o dove può essere raggiunto da schizzi
d'acqua. Pulire e asciugare subito schizzi d'acqua e macchie con un panno morbido per evitare la
formazione di ruggine.
Non installare il congelatore in ambienti con una temperatura troppo bassa (inferiore a 5°C). Non
lasciare il congelatore all'aperto o sotto la pioggia.
Preparazione prima dell'uso
Rimuovere tutto l'imballaggio, la base in schiuma e il nastro adesivo che ssa gli accessori.
Installare il congelatore in un luogo adeguato (consultare Ambiente di installazione).
Pulire la parte interna ed esterna del congelatore prima dell'uso (consultare Sbrinamento e pulizia).
Dopo aver posato a terra e pulito l'apparecchio, attendere almeno 6 ore prima di accenderlo per
assicurare il normale funzionamento.
7
Page 25

FUNZIONI
Pannello dei comandi
NO FROST
C Icona della temperatura del congelatore
Temp.Set
C
A2
A2 Pulsante di impostazione della temperatura
D Icona funzione ECO
E Icona Congelamento rapido
Ala
Alarm
Eco
Func.Set
OK/ 5S
S.Frz .
S.
Child lock
D
E
G
F
A3
A4
G Icona Blocco bambini
F Icona Allarme
A3 Pulsante di selezione delle funzioni
(ECO/congelamento rapido/allarme/blocco bambini)
A4 Pulsante OK/pulsante di alimentazione
Avvio
Inserire la spina nella presa per accendere il congelatore.
Sul display viene visualizzato il codice dF, a indicare che il congelatore è in fase di sbrinamento. Al termine di
questa operazione, sul display viene visualizzato il codice HH.
Il LED F di allarme e il segnale acustico indicano che la temperatura interna del congelatore non è
sucientemente bassa per conservare gli alimenti. Il segnale acustico può essere disabilitato premendo
il pulsante A3 per selezionare la funzione "Alarm" e successivamente il pulsante A4. Tuttavia la spia resta
accesa nché il congelatore non raggiunge la temperatura di -12°C.
Quando questa viene visualizzata sul display, la condizione di allarme cessa automaticamente e il
congelatore è pronto per la conservazione degli alimenti.
Italiano
Controllo del Pannello dei comandi:
Toccare un pulsante qualsiasi sullo schermo del display e controllare se l'area della temperatura e l'icona
selezionata si illuminano.
Impostazione della temperatura:
Premere il pulsante A2 per impostare la temperatura. Durante l'impostazione, i due numeri che lampeggiano
sul display indicano il valore raggiunto. Premendo ripetutamente il pulsante, tale valore viene modicato in
modo ciclico e decrescente da –14°C a –26°C.
Se entro 5 secondi non si preme il pulsante OK, viene ripristinato automaticamente il valore impostato.
Conclusa l'impostazione, sul display viene visualizzata nuovamente la temperatura del congelatore.
La temperatura predenita è -18°C.
Funzione di alimentazione:
Tenere premuto il pulsante A4 per 5 secondi per spegnere il congelatore; premendo di nuovo il pulsante il
congelatore viene acceso.
Prima di qualsiasi operazione di pulizia, assicurarsi di scollegare l'apparecchio dall'alimentazione
staccando la spina, poiché non è suciente spegnerlo premendo il pulsante di alimentazione.
8
Page 26

FUNZIONI
Funzioni del congelatore
Italiano
CONGELAMENTO RAPIDO:
pulsante A4 per attivare il congelamento rapido di alimenti freschi.
La spia E si accende a indicare la funzione è attiva.
La spia resta accesa nché la funzione è attiva.
Per il congelamento rapido di piccole quantità di alimenti, attivare la funzione 2 ore prima di inserire il cibo.
In caso di grandi quantità da congelare in una sola volta, attivare la funzione 24 ore prima. La funzione
viene disattivata automaticamente dopo 24 ore oppure manualmente. Quando questa funzione è attiva, il
consumo di corrente aumenta.
FUNZIONE ECO:
il pulsante A4 per attivare la funzione di risparmio energetico impostando una temperatura compresa tra
-18°C e -14°C. Quando la funzione ECO è attiva, se la temperatura è stata impostata su -19°C o su un valore
inferiore, verrà automaticamente portata a -18°C.
Quando la funzione è attiva, il LED D è acceso.
Premere il pulsante A3 per scegliere la funzione "ECO", quindi il pulsante A4 per disattivare la funzione.
Le funzioni ECO e Congelamento rapido non possono essere utilizzate contemporaneamente.
BLOCCO BAMBINI:
bambini, quindi il pulsante A4 per attivare la funzione. Sblocco: se viene toccato qualsiasi pulsante sullo
schermo, il display e il pulsante Blocco bambini si illuminano; premere il pulsante A3; il pulsante Blocco
bambini lampeggia; premere quindi il pulsante A4 per sbloccare lo schermo.
Quando lo schermo è bloccato, il pulsante A2 non è attivo; non è possibile scegliere una funzione premendo
il pulsante A3; il congelatore può essere spento tenendo premuto per 5 secondi il pulsante A4.
con lo schermo sbloccato, premere il pulsante A3 per scegliere la funzione "ECO", quindi
con lo schermo sbloccato, premere il pulsante A3 per selezionare la funzione Blocco
premere il pulsante A3 per selezionare la funzione "S.FRZ", quindi premere il
Segnalazione di allarme
ALLARME TEMPERATURA:
acustico intermittente e un led lampeggiante indicano l'allarme temperatura. Sul display viene visualizzato il
codice HH.
Dopo aver sbloccato lo schermo, premere il pulsante A3 per scegliere la funzione "Alarm", quindi premere il
pulsante A4. Ciò consente di interrompere il segnale acustico ma la condizione di allarme continua nché la
temperatura interna non scende sotto -12°C.
ALLARME SPORTELLO:
viene indicata attraverso un segnale acustico intermittente. La condizione di allarme si interrompe
chiudendo lo sportello oppure premendo il pulsante per selezionare la funzione Alarm e il pulsante OK.
Tuttavia, nel secondo caso, la condizione di allarme si riattiva dopo 60 secondi se lo sportello non viene
chiuso. Se lo sportello resta aperto per 7 minuti consecutivi, l'illuminazione interna si spegne e viene emesso
un segnale acustico continuo.
ALLARME GUASTO:
problemi nel congelatore. Tuttavia tale condizione non compromette la conservazione temporanea degli
alimenti.
Il codice Ed sul display insieme al LED F di allarme lampeggiante e al segnale acustico indicano la presenza
di problemi gravi nel congelatore, che quindi deve essere spento.
il codice F4 sul display e il LED F di allarme lampeggiante indicano la presenza di
se la temperatura interna del congelatore è superiore a -8°C, un segnale
se lo sportello viene lasciato aperto per 60 secondi, questa condizione anomala
Nell'uno e nell'altro caso, è necessario contattare il prima possibile il servizio di assistenza post-vendita.
9
Page 27

FUNZIONI
Inserimento in una sequenza di cucina componibile
min.
min.
300 cm
300cm
2
2
min.50
min.50
630
630
580
580
L'apparecchio può essere incassato nella sequenza di una cucina componibile. Anché si trovi
alla stessa altezza delle altre unità, è possibile impilare un mobile adatto. Quando l'apparecchio
viene inserito nella sequenza di una cucina componibile standard (profondità massima di 580
mm), può essere installato immediatamente accanto all'unità. La proiezione dello sportello
dell'apparecchio rispetto alla parte anteriore dell'unità è di circa 34 mm sul lato e di 55 mm al
centro dell'apparecchio. In tal modo può essere aperto e chiuso perfettamente.
Italiano
Importante per la ventilazione:
Sul retro del mobile impilato deve essere presente per tutta la sua larghezza un condotto di
ventilazione di almeno 50 mm.
Lo spazio per la ventilazione sotto il sotto deve essere di almeno 300 cm².
Più ampio risulta questo spazio, meno energia viene consumata dall'apparecchio durante il
funzionamento.
Se l'apparecchio viene installato con i cardini vicino alla parete, la sua distanza dalla parete deve
essere di almeno 55 mm (ossia la proiezione della maniglia quando viene aperto lo sportello).
10
Page 28

FUNZIONI
Informazioni sull'uso
Italiano
APERTURA DEL COPERCHIO
Per aprire i coperchi superiori, sollevarli leggermente tirandoli verso l'esterno.
Aprire il coperchio per riporre gli alimenti nel cassetto.
Chiudere il coperchio per evitare che tocchi lo sportello.
Il coperchio può essere rimosso per aumentare lo spazio di conservazione.
NOTA: due ripiani nella parte superiore sono provvisti di coperchi, ma gli
alimenti non devono essere collocati nella parte anteriore della lastra in vetro
onde evitare la chiusura non ermetica dei coperchi. Nel caso in cui i coperchi
non possano essere chiusi correttamente, vericare la posizione degli alimenti
e spostarli se necessario, quindi richiudere i coperchi. Attenzione: vericare
la corretta chiusura dei coperchi prima di chiudere lo sportello e assicurarsi
che quest'ultimo sia nella posizione di chiusura appropriata onde evitare una
pressione anomala sui coperchi.
RIMOZIONE DEI CASSETTI
Per rimuovere i cassetti, estrarli completamente, quindi sollevarli
leggermente.
I cassetti (fatta eccezione per quello inferiore) possono essere rimossi per
aumentare lo spazio di conservazione.
In alcuni modelli sono disponibili delle guide di scorrimento.
CESTONE
Estrarre completamente il cestone. Sollevarlo ed estrarlo dalle guide
telescopiche.
NOTA: alcuni modelli del cassetto grande sono stati realizzati con struttura
a scorrimento. Corretta rimozione del cassetto: per prima cosa, estrarre gli
alimenti e spingere il cassetto no in fondo; quindi, sollevare la parte posteriore
del cassetto ed estrarlo. Sollevare la parte posteriore del cassetto solo una volta
che questo si è bloccato in posizione; in tal modo la procedura di rimozione
sarà molto semplice. Se non è stata raggiunta la posizione corretta di blocco del
cassetto, spingerlo nuovamente no in fondo e ripetere la procedura.
PRODUZIONE DI CUBETTI DI GHIACCIO
Alcuni modelli sono dotati di un sistema per la produzione di ghiaccio che
include le vaschette per i cubetti di ghiaccio, un dispositivo per la rimozione e
un contenitore per il ghiaccio.
Rimozione delle vaschette per il ghiaccio
Pulire le vaschette per il ghiaccio, riempirle d'acqua e rimetterle sul relativo
supporto.
Attendere qualche ora che il ghiaccio sia pronto, quindi girare i pomelli per
estrarre i cubetti di ghiaccio.
Questi cadranno direttamente nell'apposito contenitore.
I vani sullo sportello possono contenere una PIZZA confezionata dallo
spessore inferiore a 30 mm oppure altri alimenti confezionati di spessore
sottile.
Per alcuni modelli sono disponibili accumulatori di freddo. È anche possibile
acquistare gli accumulatori di freddo e inserirli nel congelatore. Il loro
spessore deve essere inferiore a 30 mm.
11
Page 29
FUNZIONI
2B2A
6A 6B
3A
1C
Invertibilità dello sportello:
smontaggio dello sportello partendo da destra
Scollegare l'apparecchio e svuotarlo
prima di iniziare questa operazione.
1
1B
2
3
3A
1C
3B
1A
A. Aprire lo sportello.
1
B. Premere con forza verso il basso per rimuovere i due piccoli
coperchi che si trovano rispettivamente a destra e a sinistra.
C. Sollevare verso l'esterno il coperchio anteriore
A. Utilizzare un cacciavite per rimuovere il piccolo coperchio a
2
destra dello sportello.
B. Utilizzare un cacciavite per fare leva dall'interno e rimuovere
le strisce decorative.
A. Utilizzare un cacciavite a croce per allentare le viti dei cardini.
3
2B2A
Rimuovere il cardine superiore.
B. Scollegare il terminale del cablaggio.
A. Sollevare lo sportello per rimuoverlo.
4
B. Utilizzare un cacciavite a croce per rimuovere il cardine in
basso.
A. Utilizzare una chiave inglese o un paio di pinze per rimuovere
5
l'albero a cerniera, quindi ssarlo nel foro del cardine a sinistra.
B. Utilizzare un cacciavite a croce per rimuovere le viti del
congelatore a sinistra e montarle a destra dello stesso. Montare
il cardine inferiore sul lato sinistro.
A. Utilizzare un cacciavite a testa piatta per sollevare il tappo a
6
vite a destra sullo sportello.
B. Rimuovere l'albero a cerniera in alto, quindi montarlo al
contrario sul cardine. Spostare a sinistra il tappo a vite e inserirlo
nel foro apposito.
Italiano
4
5B
4A
5
4B
5A
6A 6B
6
12
Page 30

FUNZIONI
7A
7A
Italiano
7
8.1
A B
A. Collegare il lo del segnale nella striscia
7
decorativa dello sportello al terminale nel
cardine. Rimettere a posto la bardatura
posizionandola nel coperchio della striscia
decorativa.
B. Fissare la striscia decorativa e agganciare il
piccolo coperchio sul lato destro.
C. Chiudere il coperchio frontale superiore
7C7B
del congelatore. Inserire nella scanalatura i
piccoli coperchi di destra e sinistra.
Direzione di riposizionamento della
8
maniglia: in base alle diverse congurazioni
(l'immagine è diversa dal modello).
Intervento sulla maniglia:
8.1
A. Utilizzare un cacciavite a testa piatta
per fare leva e aprire la maschera che
ricopre la maniglia. Rimuovere le due viti e
successivamente la maniglia.
B. Utilizzare un cacciavite a testa piatta per
inserire il tappo a vite a destra dello sportello.
Spostare a sinistra il tappo a vite e inserirlo
nel foro apposito. Fissare la maniglia sul lato
destro e rimettere la maschera.
8.2
A B
8.2
Maniglia ordinaria:
A. Utilizzare un cacciavite a testa piatta per
far leva e sollevare il coperchio superiore
della maniglia. Rimuovere le due viti e
successivamente la maniglia.
B. Utilizzare un cacciavite a testa piatta
per sollevare il tappo a vite a destra sullo
sportello. Spostare a sinistra il tappo a vite e
inserirlo nel foro apposito.
C. Fissare la maniglia sul lato destro e
rimettere la maschera.
13
Page 31

MANUTENZIONE
Sbrinamento e pulizia
SBRINAMENTO DEL CONGELATORE: il congelatore si sbrina automaticamente. Non è necessaria alcuna
operazione manuale.
PULIZIA: l'apparecchio deve essere pulito regolarmente per evitare
odori provocati da una cattiva conservazione degli alimenti.
Scollegare il cavo di alimentazione prima di pulire il congelatore.
Italiano
Pulire il congelatore con panno morbido o una spugna e acqua
calda (è possibile aggiungere un detergente delicato).
Asciugare le gocce d'acqua sulla supercie del frigorifero con un
panno asciutto.
Tenere sempre pulite le guarnizioni dello sportello.
Il congelatore è molto pesante. In caso di pulizia o riparazione,
fare attenzione a non danneggiare lo sportello durante lo
spostamento dell'apparecchio. Durante lo spostamento, tenere
il congelatore in posizione verticale. Spostare il congelatore con
attenzione per evitare di danneggiare il pavimento.
Non spruzzare o rovesciare acqua sul congelatore per evitare
che ciò inuisca sulle proprietà di isolamento elettrico.
Non pulire l'apparecchio utilizzando una spazzola a setole
dure, una spazzola metallica, detersivo in polvere, benzina,
amilacetato, acetone e soluzioni organiche simili, acqua calda o
soluzioni acide o alcaline.
Durante la pulizia dello schermo del display e di altre
apparecchiature elettroniche, utilizzare un panno asciutto.
Interruzione dell'uso
Se si prevede di non utilizzare il congelatore per un periodo prolungato, scollegarlo e pulirlo seguendo la
procedura sopra descritta.
Lasciare aperto lo sportello del congelatore per evitare che eventuali residui di cibo nel vano producano
cattivi odori.
Per assicurare il buon funzionamento dell'apparecchio, si consiglia di non spegnere il congelatore a
meno che non sia necessario.
Spostamento del congelatore
Scollegare la presa e staccare l'alimentazione.
Rimuovere tutti gli alimenti dal congelatore.
Fissare con del nastro adesivo i cassetti e le altri parti rimovibili nel congelatore.
Chiudere lo sportello e ssarlo con del nastro adesivo per evitare che si apra durante lo spostamento.
Non inclinare il congelatore oltre i 45° (angolo in base alla verticale) per evitare di danneggiare il sistema del
refrigeratore durante lo spostamento.
Incartare i piedini del congelatore per evitare gra sul pavimento. Non forzare lo spostamento del
congelatore; non spostare il congelatore tenendolo per la maniglia, per il coperchio o per i tubi per evitare
danni o lesioni personali.
Non mettere mail il congelatore in posizione orizzontale.
14
Page 32

RISOLUZIONE DEI PROBLEMI
Prima di contattare l'assistenza, leggere la seguente tabella sulla risoluzione dei problemi, perché
può far risparmiare tempo e denaro. La scheda descrive i problemi più comuni, fatta eccezione per
quelli provocati da difetti di fabbricazione o da materiali del frigorifero.
Italiano
PROBLEMI CAUSE SOLUZIONI
Funzionamento del congelatore
Ciò è normale per un congelatore con
Il compressore non
funziona
Il congelatore si attiva
spesso o troppo
a lungo
Il prodotto si trova in fase di
sbrinamento. Il congelatore
non è collegato alla presa
elettrica.
Il prodotto è SPENTO.
La temperatura interna o
esterna è elevata.
Il congelatore è rimasto
spento per un periodo di
tempo.
Lo sportello viene aperto
troppo di frequente o viene
lasciato aperto troppo a
lungo.
Lo sportello del congelatore
non è chiuso bene.
La temperatura impostata è
troppo bassa.
La guarnizione dello
sportello non è quella giusta,
è sporca, danneggiata o
incrinata.
Il condensatore è sporco.
sbrinamento automatico.
Controllare che la spina, la presa o il fusibile
non siano danneggiati. Se sono IN BUONO
STATO, accendere l'apparecchio.
Premere il pulsante di accensione per avviare
di nuovo il congelatore.
In questo caso la prolungata attivazione del
congelatore è normale.
Generalmente, sono necessarie dalle 8 alle
12 ore per il completo rareddamento del
congelatore.
L'aria calda entra nel congelatore provocando
il suo frequente avvio. Non aprire lo sportello
frequentemente.
Assicurasi che il congelatore sia posizionato in
piano e che non ci siano alimenti o contenitori
che urtano lo sportello.
Impostare la temperatura a un livello più
alto nché il congelatore non raggiunge una
temperatura soddisfacente. Sono necessarie
24 ore per raggiungere la temperatura del
congelatore.
Pulire e riposizionare la guarnizione dello
sportello. Una guarnizione difettosa
può causare l'attivazione prolungata del
congelatore per mantenere la temperatura
desiderata.
Pulire il condensatore.
Temperatura troppo alta
Temperatura troppo
alta all'interno del
prodotto
15
Lo sportello viene aperto
troppo di frequente oppure
ogni volta viene lasciato aperto
per troppo tempo.
La temperatura viene
impostata su un valore
troppo alto.
Lo sportello non è chiuso
bene.
Il condensatore è sporco.
L'aria calda entra nel frigorifero ogni volta che
lo sportello viene aperto. Provare ad aprire lo
sportello il meno possibile.
Ripristinare la temperatura.
Assicurasi che il congelatore sia posizionato in
piano e che non ci siano alimenti o contenitori
che urtano lo sportello.
Pulire il condensatore.
Page 33

RISOLUZIONE DEI PROBLEMI
PROBLEMI CAUSE SOLUZIONI
Acqua/condensa/ghiaccio sulla supercie esterna del congelatore
La condensa si
accumula
sulla supercie esterna
del congelatore
Cattivi odori nel congelatore
È necessario inclinare la parte
La parte interna del
congelatore è sporca
interna del frigorifero.
Se il congelatore emette
lo sportello del congelatore è
aperto.
Un segnale acustico
Clima umido.
Lo sportello non è chiuso
bene. Questo può produrre
una condensa dell'aria
fredda del congelatore e
dell'aria calda proveniente
dall'esterno.
Nel congelatore vengono
conservati alimenti con forti
odori.
La temperatura all'interno
del congelatore è troppo
alta.
Alcune parti potrebbero
essere danneggiate.
Ciò è normale in un clima umido.
La condensa si riduce con l'abbassamento
dell'umidità.
Assicurarsi che il pavimento sia una supercie
piana e che non ci siano alimenti o contenitori
che toccano lo sportello. Chiudere bene lo
sportello.
Pulire la parte interna del congelatore (consultare
Sbrinamento e pulizia).
Controllare che gli alimenti non siano
deteriorati. Estrarre dal congelatore gli
alimenti deteriorati o che emanano cattivo
odore.
Chiudere lo spor tello oppure interrompere
manualmente il segnale acustico.
Il segnale acustico è normale al primo avvio
o quando gli alimenti vengono conservati
per la prima volta. È possibile interromperlo
manualmente.
Contattare il personale del servizio
post-vendita.
Italiano
Un rumore anomalo
Un suono leggero
simile a quello
dell'acqua che scorre
Calore dal congelatore
Il congelatore non è stato
posizionato su una supercie
piana.
Il congelatore tocca alcuni
oggetti che si trovano
intorno.
Si tratta del suono del sistema
di refrigerazione.
Il sistema di refrigerazione è in
funzione.
Regolare il piedino per mettere in piano il
congelatore.
Rimuovere gli oggetti che si trovano intorno a
esso.
Normale.
Ciò è normale perché evita la formazione della
condensa.
Targhetta
La targhetta si trova all'interno del vano del congelatore, attaccata in basso a sinistra.
Essa contiene informazioni importanti sull'apparecchio e quindi non va manomessa o rimossa.
La capacità e il consumo di energia nominale indicati sulla targhetta sono soggetti agli standard in
materia.
16
Page 34

ELEMENTOS
Gracias por comprar productos Haier
Español
Lea estas instrucciones con detenimiento antes de usar el aparato. La información contenida en las
instrucciones le servirá de ayuda para realizar una instalación correcta y segura y le indicará cómo darle
el mejor uso y mantenimiento posibles al aparato para obtener así su máximo provecho.
Guarde bien este manual para que pueda consultarlo siempre que lo necesite y asegurarse de que hace
un uso correcto del aparato.
En el caso de que venda, regale o abandone el aparato por cualquier motivo, asegúrese de que incluye
este manual con el producto para que el nuevo propietario pueda familiarizarse con las opciones y las
advertencias de seguridad del mismo.
Page 35

ÍNDICE
PRECAUCIONES ........................................................................................................................................... 3
INFORMACIÓN PRELIMINAR ................................................................................................................... 6
FUNCIONES .................................................................................................................................................. 8
MANTENIMIENTO .....................................................................................................................................14
SOLUCIÓN DE ANOMALÍAS ..................................................................................................................15
Español
Page 36

PRECAUCIONES
Símbolos
Atención
Español
Precaución
Prohibición
Desechado
La presencia de este símbolo en el producto, en los accesorios o en cualquier material que se proporcione
con esta información indica que al nal de su vida útil, el producto y sus accesorios electrónicos (por
ejemplo, cargador, auriculares, cable USB) no se deben desechar junto con los demás residuos domésticos.
Para evitar posibles efectos nocivos sobre el medio ambiente y la salud humana derivados de un vertido
incontrolado de residuos, separe estos elementos de los demás tipos de residuos y recíclelos. De este modo
promoverá la reutilización sostenible de los recursos materiales.
Cada usuario particular deberá ponerse en contacto con el comercio donde adquirió el producto o la
autoridad local competente para obtener la información necesaria para reciclar cada elemento de una forma
segura para el medio ambiente. En el caso de usuarios empresariales deberá ponerse en contacto con su
proveedor y comprobar las condiciones de compra. Este producto y sus accesorios electrónicos no se deben
mezclar con otros residuos comerciales.
Información preliminar...
Este aparato utiliza una fuente de alimentación de CA.
Conecte el aparato a un voltaje normal. En caso de uctuaciones del voltaje, es posible que el aparato no
arranque, que el control de temperatura o el compresor sufran daños, o que se produzcan ruidos anormales.
En este caso, añada un estabilizador adecuado.
Es necesario utilizar una toma de corriente adecuada.
En cualquier caso, asegúrese de que la toma de corriente está conectada a tierra y no realice ningún
cambio en el cable de alimentación ni en el enchufe. El enchufe del cable de alimentación se debe conectar
rmemente a la toma de corriente. De lo contrario, se podría producir un incendio. Una vez instalado el
aparato, es necesario poder acceder al enchufe fácilmente para poder desconectarlo en caso de que se
produzca algún incidente.
No dañe el cable de alimentación.
No tire del cable de alimentación para desconectar el enchufe. Sujete el enchufe para desconectarlo
directamente de la toma de corriente.
El cuerpo del aparato no debe presionar el cable de alimentación. NO aplaste el cable de alimentación.
Si se producen daños en el cable de alimentación:
Si el cable de alimentación está dañado o el enchufe está desgastado, evite su uso. El cable de alimentación
dañado o desgastado deberá ser reemplazado por el fabricante o por personal cualicado en el proveedor
de mantenimiento especicado.
Si es necesario utilizar un cable de alimentación más largo, la sección transversal del cable de alimentación
añadido no debe ser inferior a 0,75 mm².
Mantenga las aperturas de ventilación libres de obstrucciones en el recinto donde esté colocado
el aparato o en la estructura donde esté encastrado.
Si se producen fugas de gas inamable como, por ejemplo, gas natural:
Cierre la válvula donde se está produciendo la fuga de gas. Abra las ventanas y puertas de la casa. NO
conecte/desconecte el enchufe de alimentación del aparato ni otros aparatos eléctricos.
Peligro de congelación
No toque la supercie interior del compartimento de almacenamiento del congelador mientras el
congelador está en funcionamiento, especialmente con las manos húmedas ya que las manos se le podrían
congelar sobre la supercie.
3
Page 37

PRECAUCIONES
Si el aparato cae en desuso:
Mantenga el aparato alejado del fuego para evitar accidentes. Retire la puerta del aparato (abra la puerta
y sujétela antes de retirar los tornillos) para evitar que los niños accedan al aparato y sufran un accidente.
Envíe el aparato al lugar de eliminación designado.
Utilice el mango para abrir la puerta.
No almacene ni utilice gasolina ni ningún otro tipo de material inamable cerca del congelador para
evitar incendios.
No almacene nunca sustancias inamables, explosivos, ácidos altamente corrosivos, álcalis ni otros tipos
de productos químicos en el congelador.
No almacene nunca botellas de cerveza ni de otras bebidas en el congelador, ya que podrían explotar al
congelarse.
No utilice aparatos eléctricos en el interior de los compartimentos de almacenamiento de alimentos del
aparato, salvo que sean del tipo recomendado por el fabricante.
Preste atención a los niños
Deberá asegurarse de que los niños no juegan con el aparato.
Vigile que no se cuelguen de la puerta para evitar daños personales, ya que la puerta o el aparato se podrían caer.
Asegúrese de que las manos y los pies de los niños no se introducen en los oricios ni en las juntas laterales de
piezas metálicas como, por ejemplo, el compartimento o la parte trasera del aparato, para evitar daños personales.
No coloque objetos inestables (objetos pesados, recipientes llenos de agua) en la parte superior del aparato
para evitar los daños personales que se podrían producir por la caída de dichos objetos o por la descarga
eléctrica producida al contacto con el agua.
Mantenga el aparato alejado del agua
No utilice agua para pulverizar ni rociar el congelador y no coloque el congelador en un lugar húmedo o un
lugar donde sea sencillo que sea rociado de agua para evitar que esto afecte al rendimiento del aislamiento
eléctrico del aparato o incluso que se produzca una descarga eléctrica o un incendio.
No dañe el circuito refrigerante
El desensamblaje y la alteración del congelador son operaciones que deben ser autorizadas. Cualquier
movimiento de agitación del congelador podría dañar los tubos de refrigeración. La reparación del aparato
la debe realizar personal profesional.
Desconecte el enchufe de alimentación en las siguientes circunstancias:
Antes de llevar a cabo tareas de limpieza y mantenimiento, o en caso de que el aparato esté apagado o
de que se haya producido un fallo, desconecte el enchufe de alimentación del congelador. Cuando vaya a
desconectar el enchufe del aparato, espere al menos 5 minutos antes de volver a arrancarlo de nuevo, ya
que un arranque frecuente podría dañar el compresor.
Este congelador es un electrodoméstico destinado únicamente a almacenar alimentos. No almacene
sangre, medicinas, productos biológicos ni cualquier otro producto en el aparato.
Mantenga las aperturas de ventilación libres de obstrucciones en el recinto donde esté colocado el aparato o
en la estructura donde esté encastrado.
Este producto no está pensado para ser utilizado por personas (incluidos niños) con discapacidad mental,
sensorial o física, o bien por quienes no tienen experiencia o carecen de conocimiento, a menos que otra
persona responsable de su seguridad supervise su uso o le indique cómo debe hacerlo.
El uso previsto de este electrodoméstico es en hogares y lugares similares como
- zonas de cocina para personal de tiendas, ocinas y otros entornos laborales;
- viviendas en granjas y para clientes de hoteles, moteles y otros entornos residenciales;
- entornos de tipo pensión;
- catering y aplicaciones no minoristas parecidas.
Consejos para el ahorro de energía
Instale el aparato en una habitación seca y fresca con una ventilación adecuada.
Al instalar el aparato, mantenga un espacio de al menos 10 cm por encima y alrededor del congelador para
garantizar una ventilación adecuada alrededor del aparato.
Deje que los alimentos se enfríen antes de introducirlos en el aparato.
No deje la puerta del aparato abierta durante demasiado tiempo mientras introduce o saca alimentos.
Cuanto menos tiempo esté abierta la puerta, menos hielo se formará en el congelador.
Limpie la parte trasera del congelador de forma habitual. El polvo aumenta el consumo de energía.
No ajuste una temperatura superior a la necesaria.
No cubra las aperturas de ventilación.
Español
4
Page 38

Español
PRECAUCIONES
Congelación y almacenamiento de alimentos frescos
Los alimentos se deben almacenar manteniendo espacio entre los mismos, lo que benecia el ciclo de
refrigeración.
Los alimentos se deben almacenar en diferentes categorías, de modo que pueda encontrarlos de una forma
más sencilla.
Es necesario sellar los alimentos antes de almacenarlos en el congelador para evitar olores y pérdida de agua.
Es opcional empaquetar los alimentos antes de colocarlos en el congelador. La supercie exterior del
empaquetado debe estar seca para evitar que los envoltorios se peguen. Los materiales de los envoltorios
deben ser inodoros, herméticos, no venenosos y no tóxicos.
Le sugerimos que identique cada porción de alimento con la siguiente información:
Nombre del alimento
Peso de la porción
Cantidad (número de piezas)
Fecha de congelación
Fecha límite de almacenamiento
Consulte el diagrama del interior del congelador para conocer los límites de tiempo de almacenamiento de
alimentos habituales:
CAJA DE PIZZA
1. Guisos, helados, embutidos, pan
2. Pescado, gambas, cordero, carne
3. Verduras, frutas, pollo, ternera
Los alimentos deben ser frescos, estar maduros y ser de buena calidad.
Las frutas y verduras frescas se deben congelar, si es posible, justo después de su recolección para conservar
la mayoría de sus nutrientes, su estructura, su textura, su color y su sabor.
En el caso de la carne y las carnes de caza, es preferible esperar un período lo sucientemente prolongado
antes de congelarlas.
La comida caliente debe ser enfriada previamente a temperatura ambiente antes de colocarla en el congelador.
Saque solo la cantidad de alimento que necesite del congelador. Los alimentos descongelados no se
pueden volver a congelar, salvo que los cocine en primer lugar. De lo contrario, podrían ser menos comestibles.
Evite colocar alimentos frescos junto a alimentos que ya estén completamente congelados. Los alimentos ya
congelados pueden descongelarse y es posible que no aguanten el tiempo de almacenamiento previsto.
Para realizar un proceso de congelación correcto, active la función de congelado rápido (consulte el capítulo
sobre funciones) 2 horas antes de almacenar los alimentos frescos.
No introduzca grandes cantidades de alimentos frescos en el congelador. Le recomendamos que
consulte la capacidad de congelación del congelador.
En general, basta con 24 horas para completar el proceso de congelación. Transcurrido este tiempo, la
función se desactivará automáticamente.
Si va a congelar una pequeña cantidad de alimentos, es posible detener la función manualmente
transcurridas unas pocas horas para evitar un consumo de energía innecesario.
5
Page 39

FROZEN-FOOD
INFORMACIÓN PRELIMINAR
Descripción
Este diagrama podría ser ligeramente diferente al diseño del congelador que acaba de comprar.
LID
TAPA
Español
MÁQUINA DE HIELO
(opcional)
SUPERDEPÓSITO
CAJÓN PEQUEÑO
PIES AJUSTABLES
(asas de transporte en la parte frontal, ruedas de transporte en la parte posterior)
ICE MAKER
(option)
DRAWER
CAJÓN
SUPER STORE
SMALL D RAWER
ADJUST FEET
(trasport grips at front, trasport castors at back)
CAJA DE PIZZA
PIZZA BOX
CALENDARIO
CALENDAR
DE COMIDA
CONGELADA
Los cajones grandes, los superdepósitos y los cajones pequeños se pueden extraer para aumentar el espacio
de almacenamiento del congelador.
6
Page 40

Español
INFORMACIÓN PRELIMINAR
Lugar de emplazamiento
El congelador debe situarse sobre una supercie sólida y plana. Si
el aparato se coloca sobre un pedestal, deberá utilizar materiales
lisos, rmes y resistentes al fuego. No utilice nunca el material
de embalaje de espuma como pedestal. Si la estabilidad del
congelador es ligeramente deciente, puede alargar o acortar las
patas ajustables del congelador. Para ello, gírelas hacia la derecha o
hacia la izquierda para aumentar o reducir la altura del congelador.
No coloque el congelador bajo la luz directa del sol ni en un lugar
donde esté expuesto a elevadas temperaturas para garantizar el rendimiento óptimo del mismo.
Instale el aparato en un lugar bien ventilado y deje un espacio de al menos 10 cm por encima y
alrededor del congelador.
No coloque nunca el congelador en una zona húmeda ni en una ubicación donde pueda salpicarle
agua. Limpie y seque cualquier mancha y salpicadura de agua con un paño suave para evitar la
oxidación.
No coloque el congelador en un lugar donde la temperatura sea demasiado baja (por debajo de
°C
5
). No coloque el congelador en zonas exteriores ni bajo la lluvia.
Preparación antes del uso
Saque todas piezas del embalaje, la base de espuma y la cinta adhesiva que sujeta los accesorios.
Coloque el congelador en el lugar adecuado (consulte el capítulo Lugar de emplazamiento).
Limpie el interior y el exterior del congelador antes de utilizarlo (consulte el capítulo
Descongelación y limpieza).
Después de nivelar y limpiar el aparato, déjelo en reposo durante al menos 6 horas antes de
conectarlo para garantizar un funcionamiento normal.
7
Page 41

FUNCIONES
Panel de controles
NO FROST
C Icono de visualización de temperatura de congelación
Temp.Set
C
A2
A2 Botón de ajuste de temperatura
D Icono de función "ECO"
E Icono de congelado rápido
Ala
Alarm
Eco
Func.Set
OK/ 5S
S.Frz .
S.
Child lock
D
E
G
F
A3
A4
G Icono de bloqueo infantil
F Icono de indicador de alarma
A3 Botón de selección de función
(ECO/congelado rápido/alarma/bloqueo infantil)
A4 Botón OK/botón de encendido
Arranque
Introduzca el enchufe en la toma de corriente para conectar el congelador.
En la pantalla aparecerá el código dF que signica que el congelador está en estado de descongelación. Tras
la descongelación, en la pantalla aparecerá el código HH.
El indicador LED de alarma F y la señal acústica le indicarán que la temperatura en el interior del congelador
no es lo sucientemente baja como para almacenar alimentos. Pulse el botón A3 para elegir la función
“Alarm” (Alarma) y, a continuación, pulse el botón A4 para desactivar la señal acústica. No obstante, la luz de
advertencia seguirá encendida hasta que el congelador alcance una temperatura de -12 °C.
Cuando en la pantalla aparezca la temperatura de -12 °C, el estado de alarma se detendrá automáticamente
y el congelador estará listo para almacenar alimentos.
Español
Comprobación del panel de controles:
Toque cualquier botón de la pantalla y compruebe si la zona de temperatura y el icono seleccionado se
pueden iluminar.
Ajuste de la temperatura:
Para ajustar la temperatura, pulse el botón A2. Durante el ajuste de la temperatura, dos números en pantalla
mostrarán el punto de ajuste de forma intermitente. Pulse más veces este botón para modicar el punto de
ajuste de forma cíclica y descendente de –14 °C a –26 °C.
Si no realiza ninguna acción mediante el botón OK en 5 segundos, el punto de ajuste se almacenará
automáticamente.
Una vez ajustada la temperatura, los dos números de la pantalla volverán al modo de visualización de
temperatura del congelador.
El ajuste de temperatura del fabricante es -18 °C.
Función de encendido:
Pulse el botón A4 durante 5 segundos para apagar el congelador. Vuelva a pulsarlo para encender de nuevo
el congelador.
alimentación. Para ello, tire del enchufe; no es suciente con apagar el aparato pulsando el botón de encendido.
Antes de realizar cualquier tarea de limpieza, asegúrese de desconectar el aparato de la fuente de
8
Page 42

FUNCIONES
Funciones del congelador
Español
CONGELADO RÁPIDO:
continuación, pulse el botón A4 para activar la congelación rápida de alimentos frescos.
El indicador luminoso E se encenderá para indicar que la función está activada.
El indicador luminoso permanecerá encendido hasta que se desactive la función.
Para congelar rápidamente una pequeña cantidad de alimentos, se recomienda activar esta función 2 horas
antes de introducir los alimentos en el congelador. Si va a congelar una gran cantidad de alimentos a la vez,
se recomienda activar la función 24 horas antes de introducir los alimentos. La función se puede detener
manualmente o puede esperar a que se detenga automáticamente transcurridas 24 horas. El consumo de
energía aumentará mientras que la función se encuentre activada.
FUNCIÓN ECO:
continuación, pulse el botón A4 para activar la función de ahorro de energía y ajustar la temperatura en un
intervalo de entre -18 °C y -14 °C. Si la temperatura es de -19 °C o inferior, al activar la función ECO se ajustará
automáticamente a -18 °C.
Si esta función se encuentra activada, el indicador LED D estará encendido hasta que se desactive la función.
Puede pulsar el botón A3 para elegir la función “ECO” y, a continuación, pulsar el botón A4 para desactivar la
función.
La función "ECO" y la función de congelado rápido no se pueden utilizar a la vez.
Bloqueo infantil:
infantil y, a continuación, pulse el botón A4 para activar la función. Desbloqueo: toque cualquier botón de
la pantalla. La pantalla y el botón de bloqueo infantil se iluminarán. Pulse el botón A3 y el botón de bloqueo
infantil parpadeará. Pulse el botón A4, la pantalla quedará desbloqueada.
El botón A2 no funciona si la pantalla está bloqueada. La selección de funciones no estará disponible al
pulsar el botón A3. Para apagar el congelador, pulse el botón A4 durante 5 segundos.
con la pantalla desbloqueada, pulse el botón A3 para elegir la función “ECO” y, a
con la pantalla desbloqueada, pulse el botón A3 para seleccionar la función Bloqueo
pulse el botón A3 para elegir la función “S.FRZ” (Congelado rápido) y, a
Señales de alarma
ALARMA DE TEMPERATURA:
intermitente y el indicador LED F parpadeando le avisarán del estado de alarma. En la pantalla aparecerá el
código HH.
Una vez desbloqueada la pantalla, pulse el botón A3 para elegir la función “Alarm” (Alarma) y, a continuación,
pulse el botón A4. Puede detener la señal acústica, pero el estado de alarma continuará hasta que la
temperatura interna sea inferior a -12 °C.
ALARMA DE PUERTA:
mediante una alarma intermitente. El estado de alarma se detendrá si cierra la puerta o si pulsa el botón para
seleccionar la función "Alarm" (Alarma) y, a continuación, el botón OK. No obstante, en este segundo caso
el estado de alarma volverá a comenzar transcurridos 60 segundos si la puerta sigue abierta. Si la puerta
permanece abierta durante 7 minutos seguidos, la luz interior se apagará y se activará una alarma continua.
ALARMA DE FALLO:
indicarán un estado de fallo del congelador, pero no existe ningún peligro relacionado con la conservación
temporal de los alimentos.
El código Ed en la pantalla junto con el indicador LED de alarma F parpadeando y una señal acústica
indicarán un estado de fallo grave del congelador y deberá desconectar el aparato.
Si se produce cualquiera de estos dos estados de fallo, deberá llamar al servicio de posventa en cuanto le
sea posible.
si se deja la puerta abierta durante 60 segundos, este estado anómalo se noticará
el código F4 en la pantalla junto con el indicador LED de alarma F parpadeando
si la temperatura del interior del congelador es superior a -8 °C, la alarma
9
Page 43

FUNCIONES
Colocación del aparato en una la de muebles de cocina
Mín.
min.
300 cm²
300cm
2
Mín. 50
min.50
630
630
580
580
El aparato se puede colocar en una la de muebles de cocina. Para que el aparato se ajuste a la
altura de la la de muebles se puede añadir un armario para encastrarlo. Si coloca el aparato en una
la de muebles de cocina estándar (máx. profundidad 580 mm), el aparato se puede instalar justo
al lado del mueble de cocina. La puerta del aparato sobresale 34 mm por el lado y 55 mm en la
zona media del aparato con respecto al mueble de cocina. De este modo es posible abrir y cerrar la
puerta perfectamente.
Español
Importante para la ventilación:
En la parte trasera del armario debe haber un conducto de ventilación de al menos 50 mm de
profundidad que ocupe todo el ancho del armario.
El espacio de ventilación por debajo del techo debe ser de al menos 300 cm².
Cuanto mayor sea el espacio de ventilación, mayor será el ahorro de energía del aparato.
Si el aparato se instala con las bisagras cerca de una pared, la distancia entre el aparato y la pared
debe ser de al menos 55 mm. Esta medida se corresponde con la distancia que sobresale el mango
cuando la puerta está abierta.
10
Page 44

FUNCIONES
Información de uso
Español
APERTURA DE TAPAS
Para abrir las tapas superiores, levántelas ligeramente y tire de ellas hacia
afuera.
Abra la tapa para colocar alimentos en el interior del cajón.
Cierre la tapa para evitar el contacto con la puerta.
La tapa se puede extraer para aumentar el espacio de almacenamiento.
NOTA: las dos capas de la parte superior incorporan tapas, pero no se permite la
colocación de alimentos en la parte delantera de la placa de cristal, de lo contrario,
puede que las tapas no cierren. Si es el caso, compruebe los alimentos, ajuste su
ubicación y vuelva a cerrar las tapas. Advertencia: compruebe que las tapas están
cerradas antes de cerrar la puerta. Asegúrese de cerrar la puerta después de cerrar
las tapas correctamente para que no se produzca presión sobre estas.
EXTRACCIÓN DE CAJONES
Saque los cajones completamente y, a continuación, levántelos ligeramente
para extraerlos.
Los cajones (salvo los cajones inferiores) se pueden extraer completamente
para aumentar el espacio de almacenamiento.
Algunos modelos disponen de guías de deslizamiento.
SUPERDEPÓSITO
Saque el superdepósito completamente. Levántelo y sáquelo de las guías
telescópicas.
NOTA: algunos modelos del cajón grande incluyen una estructura deslizante.
Modo correcto de extraer el cajón: primero, saque los alimentos y empuje el
cajón hasta el fondo, después eleve la parte posterior y tire de él. No eleve el
cajón hasta que esté bloqueado, después podrá sacarlo fácilmente. Si no lo
consigue, empújelo hasta el fondo y vuelva a repetir los pasos.
PRODUCCIÓN DE CUBITOS DE HIELO
Algunos modelos están equipados con un sistema de producción de hielo
que incluye bandejas de cubitos de hielo con dispositivo de extracción y una
cubeta de hielo.
Extracción de las bandejas de hielo
Limpie y rellene de agua las bandejas de hielo. Vuelva a colocarlas en el
soporte.
Espere unas horas hasta que el hielo esté listo. A continuación, gire los
tiradores para extraer los cubitos de hielo.
Los cubitos de hielo caerán directamente al contenedor.
En los cajones de la puerta se pueden almacenar pizzas envasadas con un
grosor inferior a 30 mm u otro tipo de alimento envasado.
Algunos modelos disponen de placas eutécticas. Además, puede comprar
placas eutécticas y colocarlas en el congelador. El grosor de las placas
eutécticas debe ser inferior a 30 mm.
11
Page 45

FUNCIONES
2B2A
6A 6B
3A
1C
Inversión de puerta:
desmontaje de la puerta desde la derecha
Desconecte y vacíe el aparato antes
de comenzar la operación.
1
1B
2
3
3A
1C
3B
1A
A. Abra la puerta.
1
B. Presione con fuerza hacia abajo para extraer las dos pequeñas
cubiertas situadas a derecha e izquierda.
C. Extraiga la cubierta frontal haciendo palanca hacia afuera.
A. Utilice un destornillador para retirar la pequeña cubierta
2
situada en el lado derecho de la puerta.
B. Utilice un destornillador para hacer palanca hacia dentro y
retirar las tiras decorativas.
A. Utilice un destornillador de estrella para desenroscar los
3
2B2A
tornillos de la bisagra. Retire la bisagra superior.
B. Desconecte el terminal de cableado.
A. Tire de la puerta hacia arriba para extraerla.
4
B. Utilice un destornillador de estrella para retirar la bisagra
inferior.
A. Utilice una llave inglesa o unos alicates para retirar el eje de la
5
bisagra y colocarlo en el oricio izquierdo de bisagra.
B. Utilice un destornillador de estrella para retirar los tornillos
del lado izquierdo del cuerpo del armario y monte los tornillos
en el lado derecho del armario. Monte la bisagra inferior en el
lado izquierdo.
Español
A. Utilice un destornillador plano para retirar haciendo palanca
6
el tapón de tornillo situado en el lado derecho de la puerta.
B. Retire el eje de la bisagra superior y colóquelo al revés en
la bisagra. Mueva el tapón de tornillo hacia la izquierda e
introdúzcalo en el oricio de tornillo.
4
5
5B
4A
4B
5A
6A 6B
6
12
Page 46

FUNCIONES
7A
7A
Español
7
8.1
A B
A. Conecte la línea de señal de la tira
7
decorativa de la puerta al terminal de la
bisagra. Ordene el cable y colóquelo en la
cubierta de la tira decorativa.
B. Fije la tira decorativa y coloque la pequeña
cubierta del lado derecho.
C. Cierre la cubierta frontal superior del
armario. Introduzca las pequeñas cubiertas
7C7B
8.1
de la izquierda y la derecha en la ranura.
Cambio de la orientación del mango: en
8
función de las distintas conguraciones (la
gura es diferente).
Mango auxiliar:
A. Utilice un destornillador plano para extraer
haciendo palanca la cubierta superior. Retire
los dos tornillos y, a continuación, retire el
mango.
B. Utilice un destornillador plano para retirar
haciendo palanca el tapón de tornillo situado
en el lado derecho de la puerta. Mueva
el tapón de tornillo hacia la izquierda e
introdúzcalo en el oricio de tornillo. Coloque
el mango en el lado derecho y coloque la
cubierta.
8.2
A B
Mango normal:
8.2
A. Utilice un destornillador plano para extraer
haciendo palanca la cubierta superior. Retire
los dos tornillos y, a continuación, retire el
mango.
B. Utilice un destornillador plano para retirar
haciendo palanca el tapón de tornillo situado
en el lado derecho de la puerta. Mueva
el tapón de tornillo hacia la izquierda e
introdúzcalo en el oricio de tornillo.
C. Coloque el mango en el lado derecho y
coloque la cubierta.
13
Page 47

MANTENIMIENTO
Descongelación y limpieza
DESCONGELACIÓN DEL CONGELADOR: el congelador se descongela automáticamente. No es necesario
realizar ninguna operación manual.
LIMPIEZA: el aparato se debe limpiar de forma habitual para evitar
que se acumulen malos olores producidos por los alimentos.
Desconecte el cable de alimentación antes de limpiar el congelador.
Español
Limpie el congelador con un paño suave o una esponja y agua
templada (puede añadir un detergente suave).
Seque las gotas de agua de la supercie del congelador con un
paño seco.
Mantenga siempre limpia la junta de la puerta.
El congelador es un aparato muy pesado. Cuando vaya a
moverlo para limpiarlo o repararlo, tenga cuidado de no dañar el
suelo. Mantenga el congelador en vertical mientras lo mueve. No
mueva el congelador sacudiéndolo para no dañar el suelo.
No pulverice ni rocíe el congelador con agua para evitar que
esto afecte a su capacidad de aislamiento eléctrico.
No utilice para la limpieza cepillos duros, cepillos metálicos,
detergentes en polvo, gasolina, acetato de amilo, acetona ni
soluciones orgánicas similares, agua caliente, ácidos o soluciones
alcalinas.
Cuando limpie la pantalla u otros aparatos eléctricos, utilice
un paño seco.
Suspensión de uso
Si el congelador no se va a utilizar durante un amplio período de tiempo, desconecte el cable de
alimentación y limpie el aparato siguiendo el método descrito anteriormente.
Deje la puerta de congelador abierta para evitar que cualquier alimento que se haya quedado en algún
compartimento genere malos olores.
Para garantizar la vida útil del aparato, se recomienda no volver a encender el congelador hasta que sea
necesario.
Traslado del congelador
Apague el aparato y desconecte el cable de alimentación.
Saque todos los alimentos del congelador.
Asegure los cajones y otras partes móviles del congelador con cinta adhesiva.
Cierre la puerta y asegúrela con cinta adhesiva para que no se abra durante el traslado.
No incline el congelador más de 45 grados (con respecto a la vertical) para evitar daños en el sistema de
refrigeración durante el traslado del congelador.
Envuelva las patas del congelador para evitar rallar el suelo. Nunca mueva el congelador con demasiada fuerza.
No mueva el congelador tirando del mango, de la tapa o de los tubos para evitar daños materiales o personales.
Nunca coloque el congelador en posición horizontal mirando hacia abajo.
14
Page 48

SOLUCIÓN DE ANOMALÍAS
Antes de llamar al servicio técnico, consulte primero la siguiente tabla de soluciones de anomalías.
Esta acción puede ahorrarle tiempo y dinero. La tabla contiene los problemas más habituales, salvo
aquellos causados por defectos de materiales o fabricación del congelador.
Español
PROBLEMAS CAUSAS SOLUCIONES
Funcionamiento del congelador
Es normal en el caso de un congelador con
descongelación automática.
Compruebe si el enchufe, la toma de corriente
o el fusible están dañados. Si ha comprobado
que todos los elementos anteriores están bien,
encienda el aparato.
Pulse el botón de encendido para volver a
encender el congelador.
En este caso, es normal que el congelador se
ponga en marcha durante más tiempo.
Normalmente, el congelador tarda entre 8 y
12 horas en enfriarse totalmente.
El aire caliente entra en el congelador y hace
que se ponga en marcha con frecuencia. No
abra la puerta con demasiada frecuencia.
Asegúrese de que el congelador está colocado
a nivel del suelo y que no hay alimentos ni
recipientes obstaculizando la puerta.
Aumente la temperatura hasta obtener
la temperatura ideal para el congelador.
El congelador tarda 24 horas en lograr la
temperatura ideal.
Limpie o sustituya la junta de la puerta. Una sura
en la junta de la puerta puede provocar que el
congelador se ponga en marcha durante más
tiempo para mantener la temperatura deseada.
Limpie el condensador.
El compresor no
funciona
El congelador se pone
en marcha
frecuentemente o
se pone en marcha
durante
un largo período de
tiempo
El producto está en ciclo de
descongelación. El congelador
no está conectado a la toma
de corriente.
El producto está APAGADO.
La temperatura interior o
exterior es elevada.
El congelador ha estado
apagado durante un tiempo.
La puerta se abre con
demasiada frecuencia o se
ha quedado abierta durante
un largo período de tiempo.
La puerta del congelador no
cierra correctamente.
El ajuste de la temperatura
es demasiado bajo.
La junta de la puerta está
sucia, desgastada, agrietada
o desajustada.
El condensador está sucio.
Temperatura demasiado elevada
Temperatura
demasiado elevada
dentro del producto
Agua/humedad/escarcha en la supercie exterior del congelador
Se acumula humedad
en la supercie exterior
del congelador.
15
La puerta se abre con
demasiada frecuencia o se ha
quedado abierta durante un
largo período de tiempo.
Se ha ajustado una
temperatura demasiado
elevada.
La puerta no cierra
correctamente.
El condensador está sucio.
Clima húmedo.
La puerta no cierra
correctamente. Esto provoca
la condensación del aire
frío del congelador y el aire
caliente del exterior.
El aire caliente entra en el congelador siempre
que la puerta esté abierta. Intente abrir la puerta
con la menor frecuencia posible.
Reajuste la temperatura.
Asegúrese de que el congelador está colocado
a nivel del suelo y que no hay alimentos ni
recipientes obstaculizando la puerta.
Limpie el condensador.
Se trata de algo habitual en los climas húmedos.
La humedad del congelador se reducirá cuando
descienda la humedad del ambiente.
Asegúrese de que la supercie es plana y que
ningún recipiente o alimento sobresale de la
puerta. Cierre la puerta correctamente.
Page 49

SOLUCIÓN DE ANOMALÍAS
PROBLEMAS CAUSAS SOLUCIONES
Malos olores en el congelador
El interior del
congelador está sucio
Si escucha
Pitidos
Sonido anómalo
Sonido suave parecido
a agua uyendo
Es necesario limpiar el interior
del congelador.
Hay alimentos con fuertes
olores almacenados en el
congelador.
La puerta del congelador está
abierta.
La temperatura del
congelador es demasiado
elevada.
Algunas piezas podrían estar
dañadas.
El congelador no está colocado
en un lugar nivelado.
El congelador roza con
algunos objetos situados
alrededor de él.
Es el sonido del sistema de
refrigeración.
Limpie el interior del congelador. (Consulte el
capítulo Descongelación y limpieza.)
Compruebe si los alimentos se han
deteriorado. Saque los alimentos deteriorados
o con fuertes olores del congelador.
Cierre la puerta o silencie la alarma
manualmente.
La alarma es normal la primera vez que se
pone en marcha el congelador o al almacenar
alimentos por primera vez. Puede silenciar la
alarma manualmente.
Póngase en contacto con el personal del
servicio posventa.
Ajuste las patas para nivelar el congelador.
Retire los objetos situados alrededor del
congelador.
Es normal.
Español
Calentamiento del
cuerpo del congelador
El sistema de refrigeración está
en funcionamiento.
Esto evita la condensación y es normal.
Placa de identicación
La placa de identicación se encuentra en el interior del compartimento del congelador pegada en
la parte inferior izquierda.
La placa de identicación proporciona información importante acerca del aparato y no se debe
manipular ni retirar.
Los datos de capacidad válida y consumo de potencia medio que aparecen en la placa de
identicación se ajustan a las normas pertinentes.
16
Page 50

Elemente
Vielen Dank, dass Sie sich für ein Haier-Produkt entschieden haben.
Deutsch
Bitte lesen Sie diese Anweisungen sorgfältig durch, bevor Sie das Gefriergerät in Gebrauch nehmen. Die
darin enthaltenen wichtigen Informationen helfen Ihnen, das Gerät optimal zu nutzen und zu warten,
und es sicher und ordnungsgemäß zu installieren.
Bewahren Sie dieses Handbuch gut erreichbar auf, so dass Sie es zum sicheren und ordnungsgemäßen
Betrieb des Geräts jederzeit zu Rate ziehen können.
Wenn Sie das Gefriergerät verkaufen, verschenken oder bei einem Umzug zurücklassen, geben Sie
dieses Benutzerhandbuch unbedingt weiter, damit sich der neue Besitzer mit dem Gerät und den
Sicherheitshinweisen vertraut machen kann.
Page 51

Inhaltsverzeichnis
VORSICHT ...................................................................................................................................................... 3
VOR INBETRIEBNAHME............................................................................................................................. 6
FUNKTIONEN ...............................................................................................................................................8
WARTUNG ...................................................................................................................................................14
FEHLERBEHEBUNG ...................................................................................................................................15
Deutsch
Page 52

VORSICHT
Legende
Achtung
Deutsch
Vorsicht
Verboten
Entsorgung
Wenn ein in diesem Handbuch genanntes Gerät, Zubehör oder Material mit diesem Symbol gekennzeichnet
ist, darf das Gerät oder das elektronische Zubehör (z.B. Ladegerät, Kopfhörer, USB-Kabel) nach Ende der
Nutzungsdauer nicht zusammen mit anderem Haushaltsmüll entsorgt werden.
Um mögliche Umweltschäden oder eine gesundheitliche Beeinträchtigung anderer durch eine
unkontrollierte Abfallentsorgung zu vermeiden, trennen Sie diese Geräte bitte von anderem Müll und
recyceln Sie sie. Dadurch fördern Sie die nachhaltige Wiederverwendung von Ressourcen.
Privatkunden sollten sich entweder beim Händler, von dem sie das Gerät gekauft haben, oder bei der
örtlichen Behörde über eine umweltfreundliche Entsorgung und ein sicheres Recycling informieren.
Geschäftskunden sollten sich an ihren Lieferanten wenden und den Kaufvertrag prüfen. Dieses Gerät und
sein elektronisches Zubehör dürfen nicht zusammen mit gewerblichen Abfällen entsorgt werden.
Vor der Inbetriebnahme...
Dieses Gerät läuft mit Wechselstrom.
Schließen Sie es an ein Netz mit normaler Spannung an. Bei Spannungsschwankungen kann es vorkommen,
dass sich das Gerät nicht einschaltet, der Temperaturregler oder der Kompressor beschädigt wird oder
unnatürliche Geräusche zu hören sind. Installieren Sie in diesem Fall einen geeigneten Spannungskonstanthalter.
Es ist eine Zweiloch-Steckdose zu verwenden.
Achten Sie auf jeden Fall darauf, dass die Steckdose geerdet ist, und nehmen Sie keine Veränderungen
am Stromkabel und am Stecker vor. Der Netzstecker des Netzkabels muss fest in der Steckdose stecken,
andernfalls besteht Brandgefahr. Der Netzstecker sollte nach Aufstellung des Geräts leicht zugänglich sein,
so dass er im Störfall gezogen werden kann.
Beschädigen Sie das Stromkabel nicht.
Ziehen Sie den Netzstecker nie am Kabel aus der Dose. Fassen Sie immer direkt den Netzstecker, um ihn aus
der Dose zu ziehen.
Das Gehäuse des Gefrierschranks darf das Stromkabel NICHT eindrücken oder einquetschen.
Wenn das Stromkabel beschädigt ist:
Ein beschädigtes Stromkabel oder einen abgenutzten Netzstecker nicht benutzen. Das abgenutzte
oder beschädigte Stromkabel ist vom angegebenen Reparaturdienstleister, vom Hersteller oder einem
qualizierten Mitarbeiter auszutauschen.
Wenn ein längeres Stromkabel erforderlich ist, darf der Querschnitt der Verlängerung max. 0,75 mm² betragen.
Halten Sie die Belüftungsönungen im Gerätegehäuse oder im Geräteinneren frei.
Wenn entammbares Gas wie Erdgas entweicht:
Schließen Sie das Ventil, aus dem das Gas austritt. Önen Sie die Haustür und die Fenster. Stecken Sie den
Netzstecker des Gefriergerätes oder anderer elektrischer Geräte NICHT ein und ziehen Sie ihn NICHT heraus.
Schützen Sie sich vor Erfrierungen.
Berühren Sie die Innenseite des Gefrierfachs nicht, solange es in Betrieb ist, vor allem nicht mit feuchten
Händen, da sie auf der Oberäche festfrieren könnten.
3
Page 53

VORSICHT
Nach Ablauf der Gerätelebensdauer:
Schützen Sie das Gerät vor Feuer, um Unfälle zu vermeiden. Entfernen Sie die Gerätetür (önen Sie die Tür
und halten Sie sie fest, bevor Sie die Schrauben lösen), um zu verhindern, dass Kinder in das Gerät klettern
und verunglücken. Verbringen Sie das Gerät an eine entsprechende Entsorgungsstelle.
Önen Sie die Tür am Gri.
Lagern oder benutzen Sie kein Benzin oder andere brennbare Stoe in der Nähe des Gefrierschranks, um
Brände zu vermeiden.
Lagern Sie niemals brennbare oder explosive Stoe, stark ätzende Säuren, Alkalis oder andere
Chemikalien im Gefrierschrank.
Lagern Sie niemals Bier oder andere Getränke in Flaschen im Gefrierschrank, da diese während des
Gefriervorgangs platzen.
Verwenden Sie keine Elektrogeräte im Inneren des Gefrierfachs, außer diese sind speziell vom Hersteller
für diesen Zweck vorgesehen.
Achten Sie auf Ihre Kinder
Achten Sie darauf, dass Kinder nicht mit dem Gefrierschrank spielen.
Hängen Sie sich nicht an die Tür, um Verletzungen durch ein Herabfallen der Tür zu vermeiden.
Achten Sie darauf, dass Kinder nicht in Önungen und Seitennähte der Metallteile, z.B. im Gefrierfach oder
an der Geräterückseite, greifen. Sie könnten sich dabei verletzen.
Stellen Sie keine unstabilen Gegenstände (schwere Objekte, mit Wasser gefüllte Behälter) oben auf das Gerät,
um Verletzungen durch herabfallende Gegenstände oder Stromschläge durch Wasserkontakt zu vermeiden.
Vor Wasser schützen
Besprühen oder spülen Sie den Gefrierschrank nicht mit Wasser, und stellen Sie das Gerät nicht an einem
feuchten oder spritzwassergefährdeten Ort auf, um Schäden an der elektrischen Isolierung, Stromschläge
oder Feuer zu vermeiden.
Beschädigen Sie den Kühlmittelkreislauf nicht
Der Gefrierschrank darf nur mit Genehmigung auseinandergebaut und verändert werden. Heftige
Bewegungen des Gefriergeräts können die Kühlrohre beschädigen. Das Gerät darf nur von Fachpersonal
repariert werden.
Ziehen Sie den Netzstecker:
Vor Reinigung und Wartung, bei einem Geräteausfall oder Stromausfall. Warten Sie nach dem Ziehen das
Steckers min. 5 Minuten, bevor Sie das Gerät wieder einschalten, da ein häuges Starten den Kompressor
beschädigen kann.
Dieser Gefrierschrank ist ein Haushaltsgerät, das nur dem Lagern von Lebensmitteln dient. Lagern Sie
kein Blut, Medikamente, biologische oder andere Produkte im Gerät.
Halten Sie die Belüftungsönungen im Gerätegehäuse oder im Geräteinneren frei.
Dieses Gerät ist für Personen (einschl. Kinder) mit eingeschränkten physischen, sensorischen oder
psychischen Fähigkeiten nur dann geeignet, wenn eine angemessene Aufsicht oder ausführliche Anleitung
zur Benutzung des Geräts durch eine verantwortliche Person sichergestellt ist.
Dieses Gerät ist für die Verwendung im Haushalt oder ähnlichen Anwendungsbereichen gedacht, wie z. B.
- in Teeküchen in Geschäften, Büros und anderen Arbeitsplätzen;
- in landwirtschaftlichen Betrieben und von Kunden in Hotels, Motels und anderen Wohnbereichen;
- in Bed- and Breakfast-Hotels;
- beim Catering und anderen Anwendungsgebieten im Großhandel.
Energiespartipps
Stellen Sie das Gerät in einem kühlen, trockenen, ausreichend belüfteten Raum auf.
Stellen Sie den Gefrierschrank mit einem seitlichen und oberen Abstand von min. 10 cm auf, um eine
ausreichende Belüftung des Geräts zu gewährleisten.
Lassen Sie warme Speisen abkühlen, bevor Sie sie in den Gefrierschrank stellen.
Lassen Sie die Gerätetür nicht zu lange oen, wenn Sie Lebensmittel hineinstellen oder herausholen. Je
kürzer die Tür geönet ist, desto weniger Eis bildet sich im Gefrierschrank.
Deutsch
4
Page 54

VORSICHT
Reinigen Sie die Rückseite des Gefrierschranks regelmäßig. Staub erhöht den Energieverbrauch.
Stellen Sie die Temperatur nicht höher ein als notwendig.
Stellen Sie nichts auf die Belüftungsönungen.
Deutsch
Einfrieren und Aufbewahren von frischen Lebensmitteln
Um einen besseren Kühlkreislauf zu gewährleisten, sollte zwischen den einzelnen Lebensmitteln etwas Platz
gelassen werden.
Lagern Sie die Lebensmittel nach Kategorien, damit Sie sie besser nden.
Versiegeln Sie Lebensmittel vor dem Einfrieren, um Wasserverlust und Geruchsbildung zu vermeiden.
Lebensmittel müssen vor dem Einfrieren nicht notwendigerweise eingepackt werden. Die Außenseite
der Verpackungen muss trocken sein, damit sie nicht zusammenkleben. Verpackungsmaterialien sollten
geruchsfrei, luftdicht, ungiftig und nicht toxisch sein.
Zur Kennzeichnung des Gefrierguts empfehlen wir folgende Angaben:
Bezeichnung des Lebensmittels
Gewicht
Menge (Anzahl der Teile)
Einfrierdatum
Ablaufdatum
Informationen zu normalen Lagerzeiten für Lebensmittel nden Sie im Diagramm an der Innenseite des
Gefrierschranks:
Pizzafach
1. Eintopf, Eiscreme, Wurst, Brot
2. Fisch, Shrimps, Lamm, Fleisch
3. Gemüse, Obst, Geügel, Rind
Die Lebensmittel sollten frisch, reif und von guter Qualität sein.
Frisches Obst und Gemüse sollte möglichst sofort nach der Ernte eingefroren werden, um Nährstoe,
Struktur, Textur, Farbe und Geschmack zu erhalten.
Fleisch und Wild sollte vor dem Einfrieren ausreichend lange abgehangen werden.
Heiße Lebensmittel sollten auf Zimmertemperatur abgekühlt werden, bevor sie in den Gefrierschrank gelegt
werden.
Nehmen Sie nur die notwendige Menge an Lebensmitteln aus dem Gefrierschrank. Aufgetaute
Lebensmittel dürfen nicht wieder eingefroren werden, wenn sie nicht gekocht sind.
Legen Sie warme Lebensmittel nicht direkt auf tiefgefrorene Lebensmittel. Tiefgefrorene Lebensmittel
werden dadurch möglicherweise aufgetaut und überdauern so nicht die vorgesehene Aufbewahrungszeit.
Schalten Sie für ein gutes Gefrierergebnis 2 Stunden vor dem Einfrieren frischer Lebensmittel den
Schnellfroster ein (s. Kapitel Funktionen).
Legen Sie nicht zu viele frische Lebensmittel in den Gefrierschrank. Beachten Sie die Gefrierkapazität des
Geräts.
Der Gefriervorgang ist normalerweise nach max. 24 Stunden beendet. Nach dieser Zeit schaltet sich die
Funktion automatisch aus.
Bei kleinen Mengen Lebensmitteln kann die Funktion nach einigen Stunden manuell ausgeschaltet werden,
um Energie zu sparen.
5
Page 55

FROZEN-FOOD
VOR INBETRIEBNAHME
Beschreibung
Diese Abbildung kann sich von dem Gefriergerät, das Sie gekauft haben, leicht unterscheiden.
LID
Deckel
Deutsch
Eiswürfelbereiter
(optional)
Kleine Schublade
ICE MAKER
(option)
DRAWER
Schubladen
Superstore-
SUPER STORE
Schubladen
SMALL D RAWER
ADJUST FEET
Einstellfüße
(trasport grips at front, trasport castors at back)
(Transportgriffe auf der Vorderseite, Transportrollen auf der Rückseite)
Pizzafach
PIZZA BOX
Kalender für
CALENDAR
tiefgefrorene
Lebensmittel
Die großen und kleinen Schubladen sowie die Superstore-Schubladen können herausgenommen werden,
um den Nutzraum zu vergrößern.
6
Page 56

Deutsch
VOR INBETRIEBNAHME
Aufstellungsort
Das Gefriergerät sollte auf einem achen, stabilen Untergrund
aufgestellt werden. Falls das Gerät auf einem Sockel aufgestellt
wird, sind dafür ache, stabile und feuerfeste Materialien zu
verwenden. Verwenden Sie niemals die Styroporverpackung als
Sockel. Wenn der Gefrierschrank etwas wackelig steht, können Sie
die Einstellfüße herein- oder herausdrehen, indem Sie sie nach links
oder rechts drehen und so die Höhe des Gefrierschranks verändern.
Stellen Sie den Gefrierschrank nicht in direktem Sonnenlicht oder
in der Nähe von Heizkörpern auf, um die Gefrierleistung nicht zu beeinträchtigen. Stellen Sie
das Gerät an einem gut belüfteten Ort auf und achten Sie darauf, dass um das Gerät herum ein
Mindestabstand von 10 cm besteht.
Stellen Sie das Gerät niemals an einem feuchten, spritzwassergefährdeten Ort auf. Entfernen Sie
Spritzwasser und Flecken mit einem weichen Tuch, um Rost zu verhindern.
Stellen Sie das Gefriergerät nicht an einem Ort mit zu niedriger Temperatur (unter 5°C) auf. Lassen
Sie den Gefrierschrank nicht draußen oder im Regen stehen.
Inbetriebnahmevorbereitung
Entfernen Sie sämtliche Verpackungsteile, das Styroporteil und das Klebeband, mit dem die
Zubehörteile befestigt sind.
Stellen Sie den Gefrierschrank an einem geeigneten Ort auf (s. Aufstellungsort).
Reinigen Sie den Gefrierschrank vor der Inbetriebnahme von innen und außen (s. Abtauen und
Reinigen)
Lassen Sie das Gerät nach der Ausrichtung und Reinigung für min. 6 Stunden stehen, bevor Sie es
einschalten, um einen normalen Betrieb zu gewährleisten.
7
Page 57

FUNKTIONEN
Bedien- und Kontrollleiste
NO FROST
C Symbol Gefriertemperatur
A2 Temperatureinstelltaste
D Symbol Eco-Funktion
E Symbol Schnellfroster
G Symbol Kindersicherung
F Alarmanzeige
A3 Funktionswahltaste
(Eco/Schnellfroster/Alarm/Kindersicherung)
A4 OK-Taste / Ein-/Ausschalttaste
Ala
Alarm
Eco
Temp.Set
Func.Set
OK/ 5S
S.Frz .
S.
Child lock
C
A2
D
E
G
F
A3
A4
Inbetriebnahme
Stecken Sie den Netzstecker in die Steckdose, um den Gefrierschrank einzuschalten.
Auf dem Display zeigt der Code dF an, dass sich der Gefrierschrank in der Abtauphase bendet. Nach dem
Abtauen erscheint auf dem Display der Code HH.
Die Alarm-LED F und ein Warnton zeigen an, dass die Temperatur im Gefrierschrank für die Lagerung von
Lebensmitteln nicht ausreicht. Um den Warnton auszuschalten, wählen Sie die Funktion "Alarm" mit der Taste
A3 und drücken Sie dann die Taste A4. Die Warnlampe leuchtet jedoch weiterhin auf, bis der Gefrierschrank die
Temperatur von -12°C erreicht.
Wenn das Display eine Temperatur von -12°C anzeigt, erlischt der Alarm automatisch, und Sie können
Lebensmittel im Gefrierschrank lagern.
Deutsch
Bedien- und Kontrollleiste überprüfen:
Berühren Sie alle Tasten auf dem Display und prüfen Sie, ob der Temperaturbereich und das ausgewählte Symbol
aueuchten.
Temperatur einstellen:
Drücken Sie zur Temperatureinstellung die Taste A2. Während der Temperatureinstellung wird die eingestellte
Temperatur durch zwei blinkende Ziern auf dem Display angezeigt. Durch erneuten Druck auf diese Taste
können Sie den Sollwert absteigend von -14°C bis -26°C einstellen.
Wenn die OK-Taste innerhalb von 5 Sek. nicht gedrückt wird, wird der Sollwert automatisch gespeichert.
Wenn die Temperatur eingestellt ist, zeigen die beiden Ziern auf dem Display wieder die Temperatur des
Gefrierschranks an.
Werksseitig ist die Temperatur auf -18°C eingestellt.
Einschaltfunktion:
Halten Sie die Taste A4 5 Sekunden lang gedrückt, um den Gefrierschrank auszuschalten; schalten Sie ihn durch
erneutes Drücken der Taste wieder ein.
Bevor Sie das Gerät reinigen, ziehen Sie unbedingt den Netzstecker. Es reicht nicht aus, das Gerät über den
Ein-/Ausschalter auszuschalten.
8
Page 58

FUNKTIONEN
Gefrierfunktionen
Deutsch
SCHNELLFROSTER:
Schnellfrosterfunktion für frische Lebensmittel einschalten.
Die Lampe E leuchtet auf und zeigt an, dass die Funktion eingeschaltet ist.
Die Lampe leuchtet solange, bis die Funktion ausgeschaltet wird.
Zum Schockgefrieren kleiner Lebensmittelmengen sollte diese Funktion 2 Stunden vor dem Einfrieren aktiviert
werden; wenn Sie gleichzeitig große Mengen Lebensmittel einfrieren möchten, wird empfohlen, die Funktion 24
Stunden vor dem Einfrieren einzuschalten. Die Funktion schaltet sich nach 24 Stunden automatisch aus oder lässt
sich manuell abschalten. Wenn diese Funktion eingeschaltet ist, erhöht sich der Stromverbrauch.
ECO-FUNKTION:
Taste A4 können Sie nun die Energiesparfunktion einschalten, indem Sie die Temperatur auf -18°C bis -14°C
einstellen. Temperaturen von -19°C oder darunter werden in der ECO-Funktion automatisch auf -18°C eingestellt.
Solange diese Funktion eingeschaltet ist, leuchtet die D-LED.
Wählen Sie die Funktion "ECO" mit der Taste A3 und schaltet Sie sie mit der Taste A4 aus.
Die ECO- und die Schnellfroster-Funktion können nicht gleichzeitig aktiviert werden.
Kindersicherung:
schalten Sie die Funktion mit der Taste A4 ein. Entsperren: Berühren Sie eine beliebige Taste auf dem Bildschirm,
das Display und die Kindersicherungstaste leuchten auf; drücken Sie die Taste A3, die Kindersicherungstaste
blinkt; drücken Sie die Taste A4, um den Bildschirm zu entsperren.
Wenn der Bildschirm gesperrt ist, ist die Taste A2 nicht verfügbar; mit der Taste A3 können keine Funktionen
ausgewählt werden; der Strom lässt sich ausschalten, indem Sie für 5 Sek. auf die Taste A4 drücken.
Wählen Sie die Funktion "S.FRZ" mit der Taste A3. Mit der Taste A4 können Sie dann die
Entsperren Sie den Bildschirm und wählen Sie mit der Taste A3 die Funktion "ECO". Mit der
Entsperren Sie den Bildschirm, wählen Sie die Funktion "Child Lock" mit der Taste A3 und
Alarmsignale
TEMPERATURALARM:
unterbrochenen Summton und das Aufblinken der F-LED angezeigt. Auf dem Display erscheint der Code HH
Sie können den Warnton ausschalten, indem Sie den Bildschirm entsperren, mit der Taste A3 die Funktion "Alarm"
wählen und die Taste A4 drücken. Doch der Alarm hält weiter an, bis die Temperatur im Gefrierschrank unter
-12°C liegt.
TÜRALARM:
angezeigt. Die Alarmbedingung wird durch Schließen der Tür beendet, oder durch Auswahl der Funktion "Alarm"
und Drücken der OK-Taste. In diesem Fall ertönt der Warnton jedoch nach 60 Sekunden, wenn die Tür weiterhin
geönet bleibt. Wenn die Tür für 7 Minuten geönet bleibt, erlischt die Innenbeleuchtung und es ertönt ein
Daueralarm.
FEHLERALARM:
Gefrierschrank hin. Es besteht jedoch noch keine Gefahr für die eingefrorenen Lebensmittel.
Der Code Ed auf dem Display in Verbindung mit dem Aueuchten der Alarm-LED F und einem Warnton weisen
auf eine schwerwiegende Störung am Gefrierschrank hin. Das Gerät muss ausgeschaltet werden.
Rufen Sie in beiden Störungsfällen sobald wie möglich den Kundendienst.
Wenn die Tür für 60 Sekunden geönet ist, wird dies durch einen unterbrochenen Summton
Code F4 auf dem Display sowie das Aueuchten der Alarm-LED F weisen auf eine Störung am
wenn die Temperatur im Gefrierschrank -8°C übersteigt, wird dies durch einen
9
Page 59

FUNKTIONEN
Einbau in eine Küchenzeile
min.
min.
300 cm²
300cm
2
min.50
min.50
630
630
580
580
Das Gerät eignet sich zum Einbau in eine Küchenzeile. Mithilfe eines geeigneten Schranks kann das
Gerät der Höhe der Küchenzeile angepasst werden. Beim Einbau in eine Standard-Küchenzeile (max.
Tiefe 580 mm) kann das Gerät direkt neben der Kücheneinheit installiert werden. Die Gerätetür ragt
seitlich um 34 mm und in der Mitte um 55 mm über die Front der Kücheneinbauten hinaus. So lässt
sie sich hervorragend önen und schließen.
Deutsch
Wichtig für die Belüftung:
An der Rückseite des Schranks muss sich eine min. 50 mm tiefe Belüftungsönung über die
gesamte Breite des Schranks benden.
Der Belüftungsraum bis zur Decke muss min. 300 cm² betragen.
Je größer der Belüftungsraum, desto mehr Energie wird beim Betrieb des Geräts gespart.
Wenn das Gerät mit dem Scharnier zur Wand installiert wird, muss der Abstand zwischen Gerät und
Wand min. 55 mm betragen. Dies entspricht der Gribreite bei geöneter Tür.
10
Page 60

FUNKTIONEN
Gebrauchsanweisung
Deutsch
DECKEL ÖFFNEN
Heben Sie die oberen Deckel zum Önen leicht an und drehen Sie ihn von innen
nach außen.
Önen Sie den Deckel, um die Lebensmittel in die Schublade zu legen.
Schließen Sie den Deckel, um Türkontakt zu vermeiden.
Der Deckel kann entfernt werden, um den Nutzraum zu vergrößern.
HINWEIS: Die beiden Ebenen im oberen Teil sind mit Deckeln ausgestattet.
Es dürfen jedoch keine Lebensmittel im vorderen Teil der Glasplatte gelagert
werden, da die Deckel sonst möglicherweise nicht richtig schließen. Wenn dies
der Fall ist, prüfen Sie die einzelnen Nahrungsmittel, platzieren Sie sie um, und
schließen Sie die Deckel erneut. Achtung: Prüfen Sie die Deckel, bevor Sie die
Tür schließen, und stellen Sie sicher, dass die Tür verschlossen ist, nachdem die
Deckel richtig geschlossen wurden. So vermeiden Sie, dass Lebensmittel durch
die Deckel eingedrückt werden.
SCHUBLADEN ENTFERNEN
Ziehen Sie die Schubladen vollständig heraus und heben Sie sie leicht an.
Die Schubladen (außer der unteren Schublade) können entfernt werden, um den
Nutzraum zu vergrößern.
Für einige Modelle sind Schienen erhältlich.
SUPERSTORE-SCHUBLADE
Ziehen Sie die Superstore-Schublade vollständig heraus. Heben Sie sie an und
ziehen Sie sie aus den Teleskopschienen.
HINWEIS: Einige Modelle der großen Schublade sind mit einer Schiebefunktion
ausgestattet. So entfernen Sie die Schublade korrekt: Entfernen Sie die
Lebensmittel, und schieben Sie die Schublade bis zum Ende. Heben Sie nun den
hinteren Teil an, und ziehen Sie die Schublade heraus. Heben Sie die Schublade
nicht an, bevor sie blockiert. Erst dann kann sie ganz leicht entfernt werden. Ist
dies nicht der Fall, schieben Sie sie wieder bis zum Ende, und wiederholen Sie
diese Schritte.
EISWÜRFELBEREITER
Einige Modelle verfügen über ein Eissystem einschl. Eiswürfelfächern mit herausnehmbarem Eiswürfelbereiter und -behälter.
Nehmen Sie die Eisfächer heraus
Reinigen Sie sie und befüllen Sie sie mit Wasser. Schieben Sie die Eisfächer wieder
auf die Halterungen.
Lassen Sie das Wasser für einige Stunden gefrieren. Drehen Sie dann den Knopf,
um die Eiswürfel zu entnehmen.
Die Eiswürfel fallen direkt in den Eiswürfelbehälter.
In einem Fach in der Tür können eine verpackte, max. 30 mm dicke PIZZA oder
andere dünne, verpackte Lebensmittel aufbewahrt werden.
Für einige Modelle sind Kältespeicher (Eutetika) verfügbar. Sie können auch
gekaufte Kältespeicher in den Gefrierschrank geben. Sie dürfen max. 30 mm dick
sein.
11
Page 61

FUNKTIONEN
2B2A
6A 6B
3A
1C
Änderung des Türanschlags:
montieren Sie die Tür von der rechten Seite ab
1
1C
Ziehen Sie den Stecker und leeren Sie
das Gerät, bevor Sie mit den Arbeiten
beginnen.
1B
2
3
3A
3B
1A
A. Önen Sie die Tür
1
B. Nach unten drücken, um die beiden kleinen Abdeckungen
links und rechts zu entfernen
C. Vordere Abdeckung nach außen drücken
A. Entfernen Sie die kleine Abdeckung rechts an der Tür mit
2
einem Schraubenzieher
B. Mit einem Schraubenzieher nach innen drücken, um die
Zierleisten zu entfernen
A. Lösen Sie die Scharnierschrauben mit einem Kreuzschlitz-
3
2B2A
Schraubenzieher Entfernen Sie das obere Scharnier
B. Trennen Sie die Anschlussklemme
A Bewegen Sie die Tür nach oben, um sie zu entfernen
4
B. Lösen Sie das untere Scharnier mit einem KreuzschlitzSchraubenzieher
A. Bauen Sie die Scharnierwelle mit Schlüssel oder Zange aus
5
und befestigen Sie sie im linken Gewindeloch.
B. Lösen Sie die Schrauben links am Schrankgehäuse mit einem
Kreuzschlitz-Schraubenzieher und schrauben Sie die Schrauben
an der rechten Schrankseite ein. Montieren Sie das untere
Scharnier links.
A. Entfernen Sie die Verschlussschraube rechts an der Tür mit
6
einem Flachkopf-Schraubenzieher.
B. Entfernen Sie die obere Scharnierwelle und montieren
Sie sie anders herum am Scharnier. Befestigen Sie die
Verschlussschraube an der linken Seite am Schraubloch.
Deutsch
4
5
5B
4A
4B
5A
6A 6B
6
12
Page 62

FUNKTIONEN
7A
7A
Deutsch
7
8.1
A B
A. Verbinden Sie die Signalleitung in der
7
Zierleiste der Tür mit dem Anschluss im
Scharnier. Legen Sie den Kabelbaum in die
Abdeckung der Zierleiste.
B. Befestigen Sie die Zierleiste und klemmen Sie
die kleine Abdeckung an der rechten Seite ein.
C. Schließen Sie die obere vordere Abdeckung
des Schranks. Schieben Sie die kleinen
7C7B
8.1
Abdeckungen links und rechts in die Kerben.
Anleitung zum Griaustausch je
8
nach Konguration (unterschiedliche
Abbildungen).
Hilfsgri:
A. Drücken Sie die obere Griabdeckung mit
einem Flachkopf-Schraubenzieher heraus.
Entfernen Sie die beiden Schrauben und
dann den Gri.
B. Entfernen Sie mit einem FlachkopfSchraubenzieher die Verschlussschraube
rechts an der Tür. Befestigen Sie die
Verschlussschraube an der linken Seite am
Schraubloch. Montieren Sie den Gri an
der rechten Seite und befestigen Sie die
Abdeckung.
8.2
A B
Normaler Gri:
8.2
A. Die obere Griabdeckung mit einem
Flachkopf-Schraubenzieher herausdrücken.
Die beiden Schrauben und dann den Gri
entfernen.
B. Entfernen Sie die Verschlussschraube
rechts an der Tür mit einem FlachkopfSchraubenzieher. Befestigen Sie die
Verschlussschraube an der linken Seite am
Schraubloch.
C. Den Gri an der rechten Seite montieren
und die Abdeckung wieder anbringen.
13
Page 63

WARTUNG
Abtauen und Reinigen
ABTAUEN DES GEFRIERSCHRANKS: Der Gefrierschrank taut automatisch ab. Es ist kein manuelles Abtauen
erforderlich.
REINIGUNG: Das Gerät sollte regelmäßig gereinigt werden, um
schlechte Gerüche zu vermeiden.
Ziehen Sie den Netzstecker, bevor Sie den Gefrierschrank reinigen.
Reinigen Sie den Gefrierschrank mit einem weichen Tuch
oder Schwamm und warmem Wasser (evtl. mit einem milden
Reinigungsmittel).
Entfernen Sie Wassertropfen auf der Oberäche des Geräts mit
einem trockenen Tuch.
Halten Sie die Türdichtungen immer sauber.
Der Gefrierschrank ist sehr schwer. Wenn Sie ihn zu
Reinigungs- oder Reparaturzwecken bewegen müssen, achten
Sie darauf, den Fußboden nicht zu beschädigen. Bewegen Sie
den Gefrierschrank immer in aufrechter Position. Bewegen Sie
das Gerät nicht durch Schaukelbewegungen. Diese können den
Fußboden beschädigen.
Besprühen oder spülen Sie den Gefrierschrank nicht mit
Wasser, um die elektrische Isolierung nicht zu beeinträchtigen.
Reinigen Sie das Gerät nicht mit harten Bürsten, Drahtbürsten,
Reinigungspulver, Benzin, Amylazetat, Azeton oder ähnlichen
organischen Lösungen, warmem Wasser, Säure oder Alkali-Lösungen.
Deutsch
Reinigen Sie das Display und andere Elektrovorrichtungen nur
mit einem trockenen Tuch.
Außerbetriebnahme
Wenn der Gefrierschrank für längere Zeit nicht benutzt wird, ziehen Sie den Netzstecker und reinigen Sie das
Gerät wie bereits beschrieben.
Lassen Sie die Gefrierschranktür geönet, damit Lebensmittel, die sich noch im Gerät benden, keine
schlechten Gerüche bilden.
Um die Lebensdauer des Geräts zu gewährleisten, wird empfohlen, das Gerät nur auszuschalten, wenn
dies erforderlich ist.
Transport des Gefrierschranks
Ziehen Sie den Netzstecker und schalten Sie das Gerät aus.
Entnehmen Sie alle Lebensmittel.
Sichern Sie die Schubladen und andere bewegliche Teile im Gefrierschrank mit Klebeband.
Schließen Sie die Tür und sichern Sie sie mit Klebeband, damit sie sich beim Transport nicht önet.
Kippen Sie den Gefrierschrank um max. 45° (vertikaler Winkel), um zu vermeiden, dass das Kühlsystem
während des Transports beschädigt wird.
Umwickeln Sie die Füße des Gefrierschranks, um den Fußboden nicht zu beschädigen. Bewegen Sie den
Gefrierschrank niemals mit Gewalt. Bewegen Sie ihn nicht am Gri, dem Deckel oder den Rohren, um
Schäden am Gerät und Verletzungen zu vermeiden.
Legen Sie den Gefrierschrank niemals horizontal hin.
14
Page 64

FEHLERBEHEBUNG
Lesen Sie folgende Tabelle zur Fehlerbehebung durch, bevor Sie den Service rufen. Dies kann
Zeit und Geld sparen. Die Tabelle beschreibt übliche Probleme, mit Ausnahme jener, die durch
Verarbeitungs- oder Materialfehler verursacht werden.
Deutsch
PROBLEM URSACHE LÖSUNG
Gefrierbetrieb
Dies ist normal für einen Gefrierschrank mit
Der Kompressor
arbeitet nicht
Der Gefrierschrank
läuft häug oder zu
lange
Gerät bendet sich im
Abtauzyklus. Gefrierschrank
ist nicht an Netzstrom
angeschlossen.
Gerät ist AUSGESCHALTET.
Die Innen- oder
Außentemperatur ist zu hoch.
Der Gefrierschrank war für
einige Zeit ausgeschaltet.
Die Tür wurde zu häug
oder zu lange geönet.
Die Gefrierschranktür ist
nicht richtig geschlossen.
Die Temperatur ist zu niedrig
eingestellt.
Die Türdichtung ist
verschmutzt, abgenutzt,
gerissen oder sitzt nicht
richtig.
Der Kondensator ist
verschmutzt.
Abtauautomatik.
Prüfen Sie, ob der Netzstecker, die Steckdose
oder eine Sicherung defekt ist. Schalten Sie
den Strom ein, wenn sie in Ordnung sind.
Schalten Sie den Gefrierschrank über den Ein-/
Aus-Schalter wieder ein.
In diesem Fall laufen Gefrierschränke für
gewöhnlich länger.
Normalerweise benötigt ein Gefrierschrank 8
bis 12 Stunden, um vollständig abzukühlen.
Warme Luft gelangt in den Gefrierschrank,
wodurch dieser wiederholt startet. Önen Sie
die Tür nicht zu häug.
Achten Sie darauf, dass der Gefrierschrank
auf einer ebenen Fläche steht und keine
Lebensmittel oder Behälter die Tür versperren.
Stellen Sie eine höhere Temperatur ein, bis
eine zufriedenstellende Gefriertemperatur
erreicht ist. Die Gefriertemperatur ist erst nach
24 Stunden erreicht.
Reinigen oder wechseln Sie die Türdichtung.
Bei einer undichten Stelle in der Türdichtung
muss der Gefrierschrank möglicherweise
länger laufen, um die gewünschte Temperatur
zu halten.
Reinigen Sie den Kondensator.
Temperatur zu hoch
Temperatur im Gerät zu
hoch
Wasser/Feuchtigkeit/Frost an der Außenäche des Gefrierschranks
An der Außenseite
des Gefrierschranks
sammelt sich
Feuchtigkeit
15
Die Tür wurde zu häug oder
zu lange geönet.
Die Temperatur ist zu hoch
eingestellt.
Die Tür schließt nicht dicht.
Der Kondensator ist
verschmutzt.
Feuchtes Klima.
Die Tür schließt nicht dicht.
Dadurch kondensieren die
kalte Luft im Gefrierschrank
und die warme Außenluft.
Bei jedem Önen der Tür gelangt warme Luft in
den Gefrierschrank. Önen Sie die Tür so wenig
wie möglich.
Stellen Sie die Temperatur zurück.
Achten Sie darauf, dass der Gefrierschrank
auf einer ebenen Fläche steht und keine
Lebensmittel oder Behälter die Tür versperren.
Reinigen Sie den Kondensator.
In feuchtem Klima ist dies normal.
Die Feuchtigkeit nimmt ab, wenn die Luftfeuchte
sinkt.
Achten Sie darauf, dass der Boden eben ist
und keine Lebensmittel oder Behälter aus der
Tür ragen. Schließen Sie die Tür fest.
Page 65

FEHLERBEHEBUNG
PROBLEM URSACHE LÖSUNG
Schlechte Gerüche im Gefrierschrank
Der Innenbereich des
Gefrierschranks ist
verschmutzt.
Wenn Sie
Pieptöne hören,
Ungewöhnliche
Geräusche
Leises Geräusch,
ähnlich wie ießendes
Wasser
Der Innenbereich des
Gefrierschranks muss gereinigt
werden.
Es werden stark riechende
Lebensmittel im
Gefrierschrank aufbewahrt.
ist die Gefrierschranktür
geönet.
Die Temperatur im
Gefrierschrank ist zu hoch.
Möglicherweise sind einige
Teile defekt.
Der Gefrierschrank
steht nicht gerade.
Der Gefrierschrank berührt
umstehende Gegenstände.
Das ist das Geräusch des
Kühlsystems.
Reinigen Sie den Innenraum des Gefrierschranks.
(S. Abtauen und Reinigen)
Prüfen Sie, ob die Lebensmittel verdorben sind.
Nehmen Sie verdorbene oder stark riechende
Lebensmittel aus dem Gefrierschrank.
Schließen Sie die Tür oder schalten Sie den Alarm
manuell ab.
Der Alarm wird normalerweise bei der
Erstinbetriebnahme oder dem erstmaligen
Einfrieren von Lebensmitteln ausgelöst. Sie
können ihn manuell abschalten.
Wenden Sie sich an den Kundendienst.
Richten Sie den Gefrierschrank mithilfe der
Einstellfüße aus.
Entfernen Sie umstehende Gegenstände.
Normal.
Deutsch
Erwärmung des
Schranks
Das Kühlsystem arbeitet.
Dies verhindert Kondensation und ist normal.
Typenschild
Das Typenschild bendet sich unten links im Gefrierfach.
Das Typenschild enthält wichtige Informationen zum Gerät und darf nicht manipuliert oder
entfernt werden.
Fassungsvermögen und Stromverbrauch laut Typenschild unterliegen den geltenden Standards.
16
Page 66

ELEMENTS
Merci d'avoir choisi un produit Haier
Français
Lisez attentivement ces instructions avant de commencer à utiliser votre appareil. Elles contiennent
des informations importantes qui vous aideront à tirer le meilleur parti de votre appareil et à l'installer,
l'utiliser et l'entretenir correctement et en toute sécurité.
Conservez ce mode d'emploi à portée de main de façon à pouvoir le consulter chaque fois que
nécessaire.
Si vous vendez l'appareil, le donnez ou le laissez dans votre ancien domicile en cas de déménagement,
n'oubliez pas de remettre ce manuel à son nouveau propriétaire an qu'il puisse se familiariser avec le
fonctionnement de l'appareil et les avertissements de sécurité.
Page 67

INDEX
AVERTISSEMENTS ....................................................................................................................................... 3
AVANT UTILISATION .................................................................................................................................. 6
FONCTIONS .................................................................................................................................................. 8
MAINTENANCE ..........................................................................................................................................14
RESOLUTION DES PROBLEMES ............................................................................................................15
Français
Page 68

AVERTISSEMENTS
Légende
Attention
Français
Avertissement
Interdiction
Mise au rebut
La présence de ce symbole sur les produits, accessoires ou matériaux concernés par les présentes
instructions indique qu'à la n de sa durée de vie utile, le produit ou ses accessoires électroniques (ex.
chargeur, kit piéton, câble USB) ne doivent pas être éliminés avec les déchets domestiques.
L'élimination non maîtrisée des déchets pouvant porter préjudice à l'environnement ou à la santé humaine,
veuillez séparer ces articles des autres types de déchets et les recycler. Cette précaution contribuera à la
réutilisation durable des ressources matérielles.
Les particuliers sont invités à contacter le distributeur leur ayant vendu le produit ou à se renseigner auprès
de leur mairie pour connaître les décharges dans lesquelles le produit usagé doit être mis au rebut dans le
cadre de sa réutilisation et de la protection de l'environnement. Les entreprises sont invitées à contacter
leurs fournisseurs et à consulter les conditions de leur contrat de vente. Ce produit et ses accessoires
électroniques ne doivent pas être mélangés avec les autres déchets industriels.
Avant utilisation
Cet appareil est alimenté par du courant alternatif.
Connectez l'appareil à une tension normale. Toute uctuation de la tension peut empêcher le démarrage
de l'appareil, endommager le régulateur de température ou le compresseur, voire entraîner des bruits
anormaux. Dans ce cas, ajoutez le stabilisateur nécessaire.
Il convient d'utiliser des prises appropriées.
Assurez-vous que la prise est raccordée au l de terre et ne procédez à aucune modication du cordon
d'alimentation ou de la che. La che du cordon d'alimentation doit être solidement xée à la prise an
d'éviter tout risque d'incendie. Lors de l'installation de l'appareil, il convient de veiller à ce que la che soit
facilement accessible an de pouvoir la retirer rapidement en cas d'accident.
N'endommagez pas le cordon d'alimentation.
Ne tirez pas sur le cordon d'alimentation pour débrancher la che. Tenez fermement la che pour la
débrancher directement de la prise.
Le corps de l'appareil ne doit PAS coincer le cordon d'alimentation ni l'écraser.
En cas d'endommagement du cordon d'alimentation:
Si le cordon d'alimentation est endommagé ou si la che est usée, n'utilisez pas l'appareil. Le cordon
d'alimentation usé ou endommagé doit être remplacé auprès du fournisseur de maintenance spécique,
par le fabricant lui-même ou par une personne qualiée.
S'il est nécessaire d'utiliser un cordon d'alimentation plus long, la section que vous ajoutez ne doit pas être
inférieure à 0,75mm².
Les ouvertures de ventilation prévues dans le corps de l'appareil ou dans la structure encastrable
doivent être libres de toute obstruction.
En cas de fuite de gaz inammable, tel que du gaz naturel:
Fermez le robinet de gaz qui fuit. Ouvrez la porte et la fenêtre de la maison. NE débranchez/branchez PAS le
cordon d'alimentation de l'appareil ou d'autres appareils électriques.
Attention aux engelures
Ne touchez pas la surface intérieure du compartiment de stockage du congélateur lorsque celui-ci
fonctionne, en particulier avec les mains mouillées, car celles-ci pourraient adhérer à la surface et geler.
3
Page 69

AVERTISSEMENTS
Lorsque l'appareil tombe en désuétude:
Maintenez l'appareil à l'écart du feu pour éviter les accidents. Retirez la porte de l'appareil (ouvrez-la et
maintenez-la avant de retirer les vis) pour éviter que les enfants n'entrent dans l'appareil et ne causent un
accident. Expédiez l'appareil à l'endroit approprié pour sa mise au rebut.
Ouvrez la porte par la poignée.
N'entreposez pas et n'utilisez pas d'essence ni d'autres matériaux inammables à proximité du
congélateur an d'éviter un incendie.
N'entreposez jamais de produits inammables, d'explosifs ni d'acides, d'alcalins ou d'autres produits
chimiques hautement corrosifs dans le congélateur.
N'entreposez jamais de bière ni d'autres boissons en bouteille dans le congélateur, car celles-ci
éclateraient lors de la congélation.
N'utilisez pas d'appareils électriques à l'intérieur des compartiments de stockage des aliments de
l'appareil, sauf s'ils correspondent au type recommandé par le fabricant.
Portez une attention particulière aux enfants
Surveillez les enfants an de s'assurer qu'ils ne jouent pas avec l'appareil.
Ne vous pendez pas à la porte an d'éviter toute blessure provoquée par son décrochage ou la chute de l'appareil.
Pour éviter toute blessure, assurez-vous que les mains ou les pieds des enfants ne restent pas coincés dans les orices
et les joints latéraux des pièces métalliques, telles que le compartiment de congélation ou l'arrière de l'appareil.
Ne placez pas d'objets instables (objets lourds, récipients remplis d'eau) sur l'appareil, car leur chute ou les
chocs électriques causés par le contact avec de l'eau pourraient entraîner des blessures.
Tenez l'appareil à l'écart de l'eau
Ne vaporisez pas d'eau sur le congélateur et ne le rincez pas non plus. Ne placez pas le congélateur dans
un endroit humide ou propice aux éclaboussures car cela pourrait avoir un impact sur la performance de
l'isolation électrique de l'appareil, entraîner un choc électrique, voire déclencher un incendie.
N'endommagez pas le circuit réfrigérant
Tout démontage ou toute altération du congélateur doivent faire l'objet d'une autorisation. Tout
mouvement brusque du congélateur risque d'endommager les tuyaux de refroidissement. Toute réparation
de l'appareil doit être eectuée par un personnel qualié.
Débranchement de la che d'alimentation:
Il convient de débrancher la che d'alimentation du congélateur avant le nettoyage et l'entretien, ou en
cas de défaillance ou de mise hors tension de l'appareil. Une fois l'appareil débranché, attendez au moins
5minutes avant de le redémarrer, car des démarrages fréquents pourraient endommager le compresseur.
Ce congélateur est un appareil ménager destiné uniquement à la conservation d'aliments. Ne stockez
pas de sang, de médicaments, de produits biologiques ni d'autres produits dans l'appareil.
Les orices de ventilation prévus dans le corps de l'appareil ou dans la structure encastrable doivent être
libres de toute obstruction.
Cet appareil n'est pas destiné à être utilisé par des enfants, par des personnes aux capacités physiques,
sensorielles ou mentales réduites, ni par des personnes dénuées de l'expérience ou des connaissances
nécessaires, sauf si elles ont pu bénécier, par l'intermédiaire d'une personne responsable de leur sécurité,
d'une supervision ou d'instructions préalables concernant l'utilisation de l'appareil.
Cet appareil est prévu pour être utilisé dans des environnements domestiques ou dans des contextes
similaires tels que
- les espaces « cuisine » réservés au personnel dans les magasins, les bureaux et autres environnements
professionnels ;
- les fermes-auberges, les hôtels, les motels et d'autres environnements de type résidentiel quand l'appareil
est mis à disposition des clients ;
- les chambres d'hôtes et tout environnement semblable ;
- la restauration et la vente en gros.
Conseils pour économiser l'énergie
Installez l'appareil dans une pièce fraîche, sèche et bien aérée.
Lors de l'installation de l'appareil, veillez à laisser un espace d'au moins 10cm au-dessus et autour du
congélateur pour assurer une ventilation adéquate.
Laissez refroidir les aliments chauds avant de les entreposer dans l'appareil.
Ne laissez pas la porte de l'appareil ouverte trop longtemps lors du dépôt ou du retrait de nourriture. Une
ouverture prolongée de la porte favoriserait la formation de glace dans le congélateur.
Nettoyez régulièrement la partie arrière du congélateur. La poussière augmente la consommation d'énergie.
Ne réglez pas la température plus bas que nécessaire.
Ne couvrez pas les ouvertures d'aération.
Français
4
Page 70

Français
AVERTISSEMENTS
Congélation et conservation des aliments frais
Il convient d'espacer les aliments lors de leur stockage de façon à optimiser le cycle de réfrigération.
Il est conseillé de stocker les aliments en fonction de leur nature, an de les retrouver plus facilement.
Les aliments doivent être emballés dans des récipients étanches avant d'être stockés dans le congélateur
an d'éviter les fuites d'eau et les mauvaises odeurs.
Il n'est pas obligatoire d'emballer la nourriture avant de la placer dans le congélateur. L'extérieur de
l'emballage doit être sec pour éviter que les sacs n'adhèrent les uns aux autres. Les matériaux d'emballage
ne doivent pas dégager d'odeur; ils doivent être hermétiques et non toxiques.
Nous vous suggérons de marquer les portions congelées de la façon suivante:
Aliment
Poids de la portion
Quantité (nombre de pièces)
Date de congélation
Date limite de stockage
Reportez-vous au diagramme situé à l'intérieur du congélateur pour la limite de stockage habituel de la
nourriture:
COMPARTIMENT PIZZA
1. Ragoût, crème glacée, saucisses, pain
2. Poisson, crevettes, agneau, viande
3. Légumes, fruits, volaille, bœuf
Les aliments doivent être frais, mûrs et de bonne qualité.
Si possible, les fruits et les légumes frais doivent être congelés immédiatement après la récolte an de
préserver au maximum leurs nutriments, leur structure, leur texture, leur couleur et leur goût.
Dans le cas de la viande et du gibier, il est recommandé de les pendre pendant une période susamment
longue avant leur congélation.
Laissez refroidir les aliments chauds avant de les placer dans le congélateur.
Ne retirez du congélateur que la quantité nécessaire de nourriture. Un aliment décongelé ne peut être
recongelé que s'il est préalablement cuit, sans quoi il risque d'être moins comestible.
Evitez de placer des aliments encore frais au contact de produits surgelés. Les produits surgelés pourraient
en eet se décongeler ce qui réduirait leur durée de conservation.
Pour optimiser la congélation, activez la fonction de congélation rapide (voir chapitre Fonctions) 2heures
avant de congeler des aliments frais.
Ne placez pas une quantité excessive d'aliments frais dans le congélateur. Il est préférable de se référer à
la capacité de congélation du congélateur.
Habituellement, 24heures susent pour congeler intégralement la nourriture. Passé ce délai, la fonction se
désactive automatiquement.
En cas de congélation d'une petite quantité de nourriture, il est possible de désactiver la fonction
manuellement après quelques heures an d'éviter une consommation d'énergie inutile.
5
Page 71

FROZEN-FOOD
AVANT UTILISATION
Description
Ce schéma peut être légèrement diérent de la disposition du congélateur que vous venez d'acheter.
LID
PORTE
Français
MACHINE A GLACE
(option)
REGLAGE DES PIEDS
(poignée à l'avant, roulettes à l'arrière)
ICE MAKER
(option)
DRAWER
TIROIR
SUPER STORE
GRAND TIROIR
SMALL D RAWER
PETIT TIROIR
ADJUST FEET
(trasport grips at front, trasport castors at back)
COMPARTIMENT
PIZZA BOX
PIZZA
CALENDRIER
CALENDAR
DES ALIMENTS
SURGELES
Il est possible de retirer les grands tiroirs, les bacs et le petit tiroir pour augmenter l'espace de stockage du
congélateur.
6
Page 72

Français
AVANT UTILISATION
Environnement de l'appareil
Le congélateur doit être placé sur une surface plane et solide. Si
l'appareil est placé sur un piédestal, celui-ci doit être fabriqué avec
des matériaux plats, solides et résistants au feu. N'utilisez jamais
la mousse de l'emballage comme piédestal. Si le congélateur est
légèrement instable, ajustez la hauteur de ses pieds réglables
en les tournant dans le sens horaire ou antihoraire pour adapter
la hauteur de l'appareil. Pour garantir la bonne performance du
congélateur, ne l'exposez pas à la lumière directe du soleil et ne le
placez pas non plus dans un endroit soumis à des températures élevées. Installez l'appareil dans un
endroit bien ventilé avec un espace d'au moins 10cm au-dessus et autour du congélateur.
Ne placez jamais le congélateur dans un environnement humide ni dans un endroit exposé aux
éclaboussures. Nettoyez et séchez rapidement les éclaboussures et les taches avec un chion doux
pour empêcher la rouille.
Ne placez pas le congélateur dans un endroit soumis à une température trop basse (inférieure à
5°C). Ne placez pas le congélateur à l'extérieur ni sous la pluie.
Préparation avant utilisation
Retirez tous les emballages, la base de mousse et le ruban adhésif xant les accessoires.
Placez le congélateur dans un endroit approprié (voir chapitre Environnement de l'appareil).
Nettoyez les parties intérieure et extérieure du congélateur avant son utilisation (voir chapitre
Dégivrage et nettoyage)
Pour garantir un fonctionnement optimal, attendez au moins 6h pour brancher l'appareil après
l'avoir placé de niveau et nettoyé.
7
Page 73

FONCTIONS
Panneau de commande
NO FROST
C Icône d'achage de la température de congélation
Temp.Set
C
A2
A2 Touche de réglage de la température
D Icône du mode Eco
E Icône du mode de congélation rapide
Ala
Alarm
Eco
Func.Set
OK/ 5S
S.Frz .
S.
Child lock
D
E
G
F
A3
A4
G Icône du verrouillage enfant
F Icône de l'indicateur d'alarme
A3 Touche de sélection du mode
(éco, congélation rapide, alarme, verrouillage enfant)
A4 Touche OK / Touche de mise sous/hors tension
Démarrage
Insérez la che dans la prise pour mettre le congélateur sous tension.
L'écran ache le code dF, ce qui signie que le congélateur est en mode dégivrage. Après le dégivrage, l'écran
ache le code HH.
Le témoin d'alarme F et un signal sonore indiquent que la température intérieure du congélateur n'est pas
susamment basse pour le stockage des denrées alimentaires. Appuyez sur la toucheA3 pour choisir la
fonction «Alarm», puis sur la toucheA4 pour désactiver le signal sonore. Le témoin reste néanmoins allumé
tant que la température du congélateur n'a pas atteint -12°C.
Lorsque l'achage indique la température de -12°C, le mode d'alarme s'arrête automatiquement et le
congélateur est prêt pour le stockage des aliments.
Français
Contrôle du panneau de commande:
Appuyez sur n'importe quelle touche de l'écran d'achage et vériez si la plage de température et l'icône
sélectionnée s'allument.
Réglage de la température:
Pour régler la température, appuyez sur la touche A2. Pendant le réglage de la température, deux chires
clignotants indiquent la valeur de consigne. Appuyez à nouveau sur la touche pour modier la valeur de
consigne en mode cyclique décroissant de -14°C à -26°C.
Si vous n'appuyez pas sur la touche OK dans les 5secondes, la valeur de consigne sera automatiquement
enregistrée.
Une fois la température réglée, l'achage à deux chires indique de nouveau la température du congélateur.
L'appareil est réglé en usine sur -18°C.
Alimentation:
Appuyez sur la toucheA4 pendant 5secondes pour couper l'alimentation du congélateur; appuyez de
nouveau sur la touche pour le remettre sous tension.
Avant toute opération de nettoyage, veillez à débrancher l'appareil en retirant la che de la prise. Il ne
sut pas d'appuyer sur la touche de mise hors tension.
8
Page 74

FONCTIONS
Fonctions du congélateur
Français
CONGELATION RAPIDE:
toucheA4 pour activer la congélation rapide des aliments frais.
Le voyant E s'allume pour indiquer que la fonction est activée. L'activation de la fonction est terminée.
Le voyant reste allumé tant que la fonction n'est pas désactivée.
Pour la congélation rapide d'une petite quantité de nourriture, il est recommandé d'activer cette fonction
2heures avant la congélation des aliments. En cas de grandes quantités de nourriture à congeler en une
seule fois, il est recommandé d'activer la fonction 24heures avant leur congélation. La fonction s'arrête
automatiquement après 24heures ou peut être désactivée manuellement. La consommation électrique
augmente lorsque cette fonction est activée.
MODE ECO:
sur la toucheA4 pour activer la fonction d'économie d'énergie réglant la plage de température entre -18°C
et -14°C. Si la température a été précédemment réglée sur -19°C ou sur une température inférieure, elle est
automatiquement dénie sur -18°C lorsque la fonction ECO est activée.
Le voyant D reste allumé tant que cette fonction est activée.
Appuyez sur la toucheA3 pour sélectionner le mode «ECO», puis sur la toucheA4 pour le désactiver.
Les modes ECO et Congélation rapide ne peuvent pas être utilisés simultanément.
lorsque l'écran est déverrouillé, appuyez sur la toucheA3 pour choisir le mode «ECO», puis
Verrouillage enfant:
«Child lock», puis sur la toucheA4 pour activer la fonction. Déverrouillage: appuyez sur n'importe quelle
touche de l'écran. Celui-ci s'allume et la touche de verrouillage enfant s'éclaire. Appuyez sur la toucheA3, la
touche de verrouillage enfant scintille. Appuyez alors sur la toucheA4 pour déverrouiller l'écran.
Lorsque l'écran est verrouillé, la toucheA2 n'est pas active. Il n'est alors pas possible de sélectionner des
fonctions avec la toucheA3. Vous pouvez mettre l'appareil hors tension en appuyant sur la toucheA4
pendant 5secondes.
appuyez sur la toucheA3 et choisissez le mode «S.Frz», puis appuyez sur la
lorsque l'écran est déverrouillé, appuyez sur la toucheA3 pour choisir le mode
Signaux d'alarme
ALARME DE TEMPERATURE:
sonnerie intermittente retentit et le voyant F clignote pour signaler l'activation de l'alarme de température.
L'écran ache le code HH
Après avoir déverrouillé l'écran, appuyez sur la toucheA3 pour choisir le mode «Alarm», puis sur la
toucheA4. Il est possible d'arrêter le signal sonore, mais le mode d'alarme reste actif tant que la température
intérieure n'a pas atteint au moins -12°C.
ALARME D'OUVERTURE DE LA PORTE:
intermittente retentit. Le mode d'alarme s'interrompt lorsque vous fermez la porte ou que vous appuyez sur
la touche de sélection du mode d'alarme, suivie de la touche OK. Dans ce second cas, néanmoins, le mode
d'alarme redémarre après 60secondes si la porte est toujours ouverte. Si la porte reste ouverte pendant au
moins 7minutes, la lumière intérieure s'éteint et une alarme continue retentit.
ALARME D'ANOMALIE:
une anomalie au niveau du congélateur. Cette situation ne représente toutefois aucun danger pour la
conservation temporaire des aliments.
Le code Ed est aché à l'écran, le voyant d'alarme F clignote et un signal sonore retentit pour indiquer une
anomalie importante au niveau du congélateur, que vous devez impérativement éteindre.
Dans les deux cas, il convient de faire appel au service après-vente le plus rapidement possible.
si la température intérieure du congélateur est supérieure à -8°C, une
si la porte reste ouverte pendant 60secondes, une sonnerie
le code F4 est aché à l'écran et le voyant d'alarme F clignote pour indiquer
9
Page 75

FONCTIONS
Montage dans un bloc d'éléments de cuisine
min.
min.
300 cm²
300cm
2
min. 50
min.50
630
630
580
580
L'appareil peut être encastré dans un bloc d'éléments de cuisine. Pour adapter la hauteur de
l'appareil à celle de la rangée d'éléments, une structure encastrée appropriée peut être ajoutée.
Lors du montage de l'appareil dans une rangée d'éléments de cuisine standard ( profondeur
max. 580mm), l'appareil peut être installé directement à côté de l'élément de cuisine. La porte de
l'appareil doit dépasser la partie avant des éléments de cuisine (de 34mm sur les côtés et de 55mm
au centre de l'appareil). Cette installation permet d'ouvrir et de fermer parfaitement la porte.
Français
Remarque importante pour la ventilation:
Il convient de laisser un espace de ventilation d'au moins 50mm de profondeur sur toute la largeur
de l'élément, à l'arrière de celui-ci.
L'espace de ventilation sous le plafond doit être d'au moins 300cm².
Plus l'espace de ventilation est important, plus la consommation d'énergie est réduite lors de
l'utilisation de l'appareil.
Si ce dernier est installé avec les charnières côté mur, la distance entre l'appareil et le mur doit être
d'au moins 55mm. Cette distance correspond au dépassement de la poignée lors de l'ouverture de
la porte.
10
Page 76

FONCTIONS
Instructions d'utilisation
Français
OUVERTURE DES COUVERCLES
Pour ouvrir les couvercles supérieurs, il convient de les soulever légèrement
et de les faire basculer.
Ouvrez le couvercle pour placer la nourriture dans le tiroir.
Fermez le couvercle de façon à éviter son contact avec la porte.
Il est possible de retirer le couvercle pour augmenter la capacité de stockage.
REMARQUE : deux clayettes de la partie supérieure sont équipées de portes
mais vous ne devez pas placer de nourriture sur l'avant de la plaque en
verre. Cela pourrait empêcher la fermeture correcte des portes. Si c'est le cas,
veuillez vérier si de la nourriture gêne la fermeture, rangez votre nourriture
de façon à ne pas gêner la fermeture et refermez les portes. Avertissement :
vériez que les portes des clayettes soient fermées avant de fermer la porte
de l'appareil et veillez à ne fermer la porte de l'appareil qu'une fois les portes
des clayettes bien fermées an qu'elles ne subissent aucune pression.
RETRAIT DES TIROIRS
Tirez les tiroirs jusqu'à la butée, soulevez-les légèrement pour les enlever.
Les tiroirs (sauf le tiroir inférieur) peuvent être enlevés pour augmenter
l'espace de stockage.
Glissières disponibles pour certains modèles.
GRAND BAC
Tirez le grand bac jusqu'à la butée. Soulevez-le et retirez-le des glissières
télescopiques.
REMARQUE : sur certains modèles, le grand bac est équipé d'une structure
coulissante. Retirer les tiroirs correctement : retirez dans un premier temps
toute nourriture et poussez le tiroir à fond ; levez ensuite la partie arrière du
tiroir et tirez-le. Ne soulevez pas le tiroir avant qu'il ne soit bloqué, il s'enlèvera
facilement à ce moment-là ; si cela ne fonctionne pas, poussez à nouveau le
tiroir à fond et répétez ces étapes.
PRODUCTION DE GLAÇONS
Certains modèles sont équipés d'un système de production de glaçons à bacs
avec dispositif de retrait et bac à glace.
Retirez les bacs à glaçons.
Nettoyez-les et remplissez-les d'eau. Replacez les bacs à glaçons sur leur
support.
Attendez quelques heures pour que la glace se soit formée avant de tourner
les boutons pour extraire les glaçons.
Les glaçons tombent directement dans le container à glaçons.
Les compartiments de la porte peuvent contenir une PIZZA emballée d'une
épaisseur de moins de 30mm ou tout autre aliment emballé.
Eutectiques disponibles pour certains modèles. Il est également possible
d'acheter des eutectiques et de les placer dans le congélateur; leur épaisseur
doit être inférieure à 30mm.
11
Page 77

FONCTIONS
2B2A
6A 6B
3A
1C
Réversibilité de la porte:
Démontage de la porte côté droit
1
1C
Débranchez l'alimentaon et videz
l'appareil avant de commencer
l'opéraon.
1B
2
3
3A
3B
1A
A. Ouvrez la porte
1
B. Forcez vers le bas pour retirer les deux petits caches à gauche
et à droite
C. Soulevez le cache frontal vers l'extérieur
A. Utilisez un tournevis pour retirer le petit cache situé sur la
2
partie droite de la porte
B. Utilisez un tournevis pour faire levier vers l'intérieur et enlever
les bandes décoratives
A. Utilisez un tournevis cruciforme pour retirer les vis des
3
2B2A
charnières. Retirez la charnière supérieure
B. Débranchez la borne de câblage
A. Relevez légèrement la porte pour la démonter
4
B. Utilisez un tournevis cruciforme pour retirer la charnière
inférieure
A. Utilisez des clés ou des pinces pour enlever l'axe d'articulation,
5
puis le xer dans l'orice gauche de la charnière.
B. Utilisez un tournevis cruciforme pour retirer les vis situées à
gauche de l'armoire, puis insérez-les sur le côté droit. Montez la
charnière inférieure sur le côté gauche.
A. Utilisez un tournevis à tête plate pour enlever le bouchon
6
leté situé sur la partie droite de la porte.
B. Retirez l'axe d'articulation supérieur et xez-le de l'autre côté
sur la charnière. Placez le bouchon leté sur le côté gauche et
bouchez l'orice de la vis.
Français
4
5
5B
4A
4B
5A
6A 6B
6
12
Page 78

FONCTIONS
7A
7A
Français
7
8.1
A B
A. Connectez le l de transmission situé au
7
niveau de la bande décorative de la porte
à la borne de la charnière. Dégagez les ls
d'alimentation et placez-les derrière le cache
de la bande décorative.
B. Fixez la bande décorative et remettez son
cache du côté droit.
C. Fermez le cache frontal supérieur de
7C7B
8.1
l'armoire. Insérez les caches gauche et droit
dans la rainure.
Instructions pour le remplacement de
8
la poignée: selon conguration (dessin
diérent).
Poignée mécanique:
A. Utilisez un tournevis à tête plate pour
dévisser le cache supérieur de la poignée.
Retirez les deux vis, puis enlevez la poignée.
B. Utilisez un tournevis à tête plate pour
retirer le bouchon leté sur la droite de la
porte. Placez le bouchon leté sur le côté
gauche et bouchez l'orice de la vis. Fixez la
poignée sur le côté droit et recouvrez-la.
8.2
A B
Poignée classique:
8.2
A. Utilisez un tournevis à tête plate pour
dévisser le cache supérieur de la poignée.
Retirez les deux vis, puis enlevez la poignée.
B. Utilisez un tournevis à tête plate pour
enlever le bouchon leté situé sur la partie
droite de la porte. Placez le bouchon leté
sur le côté gauche et bouchez l'orice de la
vis.
C. Fixez la poignée sur le côté droit et
recouvrez-la.
13
Page 79

MAINTENANCE
Dégivrage et nettoyage
DEGIVRAGE DU CONGELATEUR: le congélateur dégivre automatiquement. Aucune opération manuelle n'est
nécessaire.
NETTOYAGE: l'appareil doit être nettoyé régulièrement pour
éviter les mauvaises odeurs de nourriture.
Débranchez le cordon d'alimentation avant de nettoyer le
congélateur.
Nettoyez le congélateur avec un chion doux ou une éponge
imbibée d'eau chaude (éventuellement avec un détergent doux).
Essuyez les gouttelettes d'eau sur la surface du congélateur à l'aide
d'un chion sec.
Assurez-vous que le joint de la porte reste toujours propre.
Le congélateur est très lourd. S'il doit être déplacé pour un
nettoyage ou une réparation, veillez à ne pas endommager le sol.
Maintenez le congélateur à la verticale pendant son déplacement.
Ne déplacez pas le congélateur en le balançant de droite à
gauche, vous risqueriez d'endommager le sol.
Ne vaporisez pas d'eau sur le congélateur et n'en utilisez pas
non plus pour le rincer pour éviter de réduire les performances de
son isolation électrique.
Ne nettoyez pas l'appareil avec une brosse dure, une brosse
métallique, du détergent en poudre, de l'essence, de l'acétate d'amyle,
de l'acétone ou toute autre solution organique similaire, de l'eau
chaude ou des solutions acides ou alcalines.
Français
Lors du nettoyage de l'écran d'achage et des autres appareils
électriques, utilisez toujours un chion sec.
Arrêt de l'utilisation
Si le congélateur ne doit pas être utilisé pendant une période prolongée, il convient de débrancher le cordon
d'alimentation et de nettoyer l'appareil comme décrit ci-dessus.
Maintenez la porte du congélateur ouverte pour éviter la formation de mauvaises odeurs dues à des
aliments restés stockés dans le compartiment de congélation.
Pour assurer une durée de vie prolongée de l'appareil, il est recommandé de n'éteindre le congélateur
qu'en cas d'absolue nécessité.
Déplacement du congélateur
Débranchez le cordon d'alimentation et mettez l'appareil hors tension.
Retirez tous les aliments du congélateur.
Fixez les tiroirs et les autres parties mobiles dans le congélateur avec du ruban adhésif.
Fermez et xez la porte avec du ruban adhésif an qu'elle ne puisse pas s'ouvrir lors du transport.
N'inclinez pas le congélateur à plus de 45degrés (par rapport à la verticale) pour éviter d'endommager le
système de réfrigération lors du déplacement du congélateur.
Enveloppez les pieds du congélateur pour éviter de rayer le sol. Ne forcez jamais lors du déplacement
du congélateur. Ne le déplacez pas non plus par sa poignée, ses couvercles ou ses tuyaux pour éviter les
dommages matériels ou corporels.
Ne placez jamais le congélateur à l'horizontale.
14
Page 80

Français
RESOLUTION DES PROBLEMES
Avant d'appeler le service après-vente, veuillez vous reporter au préalable au tableau de
dépannage ci-dessous. Vous gagnerez ainsi un peu de temps et ferez quelques économies. Le
tableau contient une liste des problèmes les plus fréquents, à l'exception des problèmes dus à des
défauts de fabrication ou de matériau.
PROBLEMES CAUSES SOLUTIONS
Fonctionnement du congélateur
Cette situation est normale pour un
congélateur à dégivrage automatique.
Vériez que la che, la prise ou le fusible n'est
pas endommagé. Mettez le produit sous
tension après avoir conrmé leur bon état de
fonctionnement.
Appuyez sur la touche d'alimentation pour
redémarrer le congélateur.
Le compresseur ne
fonctionne pas
Le produit est en cycle de
dégivrage. Le congélateur n'est
pas branché dans une prise de
courant.
Le produit est hors tension.
Le congélateur
fonctionne
souvent ou
trop longtemps
Température trop élevée
La température intérieure ou
extérieure est élevée.
Le congélateur a été mis
hors tension pendant un
certain temps.
La porte est ouverte trop
fréquemment ou trop
longtemps.
La porte du congélateur
n'est pas correctement
fermée.
La température réglée est
trop basse.
Le joint de la porte est sale,
usé, ssuré ou inadapté.
Le condenseur est sale.
Dans ce cas, il est normal que le congélateur
fonctionne plus longtemps.
Normalement, il faut 8 à 12heures au
congélateur pour refroidir intégralement.
L'air chaud pénètre dans le congélateur, ce qui
entraîne fréquemment son démarrage. Il est
conseillé de ne pas ouvrir la porte trop souvent.
Assurez-vous que le congélateur a été placé
sur une surface plane et qu'aucun aliment ou
récipient ne heurte la porte.
Augmentez la température jusqu'à
l'obtention d'une température de congélation
satisfaisante. Il faut 24heures pour atteindre la
température de congélation.
Nettoyez ou remplacez le joint de porte. Toute
fuite constatée au niveau du joint de la porte
peut prolonger la durée de fonctionnement
du congélateur dans le but de maintenir la
température souhaitée.
Nettoyez le condenseur.
Température trop
élevée
à l'intérieur du produit
15
La porte est ouverte trop
fréquemment ou trop
longtemps.
La température est trop
élevée.
La porte n'est pas fermée
hermétiquement.
Le condenseur est sale.
L'air chaud s'engouffre dans le congélateur à
chaque ouverture de la porte. Ouvrez la porte le
moins souvent possible.
Réinitialisez la température.
Assurez-vous que le congélateur a été placé
sur une surface plane et qu'aucun aliment ou
récipient ne heurte la porte.
Nettoyez le condenseur.
Page 81

RESOLUTION DES PROBLEMES
PROBLEMES CAUSES SOLUTIONS
Présence d'eau, d'humidité ou de givre sur la surface extérieure du congélateur
Environnement humide.
La porte n'est pas fermée
L'humidité s'accumule
sur la surface extérieure
du congélateur
hermétiquement, ce qui
provoque la condensation
de l'air froid dans le
congélateur et de l'air chaud
à l'extérieur.
Mauvaises odeurs dans le congélateur
L'intérieur du congélateur doit
L'intérieur du
congélateur est sale
être nettoyé.
Des aliments dégageant
une forte odeur sont stockés
dans le congélateur.
En cas de...
La porte du congélateur est
ouverte.
Bips sonores
La température dans le
congélateur est trop élevée.
Certaines pièces peuvent
être endommagées.
Une situation de cette nature est tout à fait
normale dans un environnement humide.
L'humidité sur l'appareil diminue avec l'humidité
du climat.
Assurez-vous que le sol est plat et qu'aucun
aliment ou récipient ne dépasse de la porte.
Fermez la porte hermétiquement.
Nettoyez l'intérieur du congélateur. (Voir chapitre
Dégivrage et nettoyage)
Vériez que la nourriture n'est pas avariée.
Retirez du congélateur les aliments avariés ou
dégageant une forte odeur.
Fermez la porte ou désactivez l'alarme
manuellement.
Le déclenchement de l'alarme est normal au
premier démarrage ou lors de la première
congélation d'aliments. L'alarme peut être
coupée manuellement.
Contactez le personnel du service après-vente.
Français
Bruit anormal
Léger bruit semblable à
celui de l'eau qui coule
Dégagement de
chaleur de l'armoire
Le congélateur n'est pas placé
sur
une surface plane.
Le congélateur est en
contact avec un autre
meuble ou objet.
Il s'agit du bruit du système de
réfrigération.
Le système de réfrigération
fonctionne.
Ajustez la hauteur des pieds pour mettre le
congélateur de niveau.
Retirez les objets autour de l'appareil.
Normal.
Cette situation est tout à fait normale et
empêche la condensation.
Plaque signalétique
La plaque signalétique est xée en bas à gauche, à l'intérieur du compartiment de congélation.
La plaque signalétique fournit des renseignements importants sur l'appareil et ne doit pas être
endommagée ni retirée.
La capacité valide et la consommation de puissance absorbée nominale indiquées sur la plaque
signalétique sont soumises aux normes correspondantes.
16
Page 82

ALGEMEEN
Dank u voor uw aankoop van een Haier-product
Nederlands
Lees de volgende instructies goed door voordat u het apparaat in gebruik neemt. De instructies bevatten belangrijke informatie waarmee u het apparaat optimaal kunt gebruiken en veilig en correct kunt
installeren, gebruiken en onderhouden.
Bewaar deze gebruiksaanwijzing op een gemakkelijk bereikbare plaats, zodat u deze altijd direct kunt
raadplegen om uw apparaat veilig en correct te kunnen blijven gebruiken.
Als u het apparaat doorverkoopt, weggeeft of achterlaat wanneer u verhuist, geef deze gebruiksaanwijzing dan aan de nieuwe eigenaar, zodat hij of zij vertrouwd kan raken met uw apparaat en de veiligheidswaarschuwingen.
Page 83

INHOUDSOPGAVE
WAARSCHUWINGEN ................................................................................................................................. 3
VOORDAT U DE VRIEZER IN GEBRUIK NEEMT ................................................................................... 6
FUNCTIES ...................................................................................................................................................... 8
ONDERHOUD .............................................................................................................................................14
PROBLEMEN OPLOSSEN ........................................................................................................................15
Nederlands
Page 84

WAARSCHUWINGEN
Legenda
Let op
Nederlands
Waarschuwing
Verbod
Huisafval
Dit symbool op het product, de accessoires of materialen bij deze informatie geeft aan dat het product of de
elektronische accessoires (bijv. oplader, headset, USB-kabel) niet mogen worden weggegooid bij ander huisaval.
Om mogelijke schade aan het milieu of de gezondheid als gevolg van ongereguleerde afvalverwerking
te voorkomen, moeten deze voorwerpen worden gescheiden van ander afval en worden gerecycled. Dit
bevordert het duurzame hergebruik van materiaalbronnen.
Huishoudelijke gebruikers dienen contact op te nemen met de winkelier van wie ze het product hebben
gekocht of met de plaatselijke autoriteiten voor informatie over hoe het voorwerp op een milieuvriendelijke
en veilige wijze kan worden verwerkt. Bedrijven dienen contact op te nemen met hun leverancier en de
voorwaarden van de aankoop na te gaan. Dit product en de bijbehorende elektronische accessoires mogen
niet worden gemengd met commercieel afval.
Voor gebruik...
Dit apparaat gebruikt een wisselstroomvoeding.
Sluit het apparaat aan op het normale voltage. Bij uctuaties in het voltage is het mogelijk dat het apparaat
niet wordt gestart of dat de temperatuurregelaar of de compressor beschadigd raakt of een ongewoon
geluid produceert. Gebruik een goede stabilisator.
Er moet een stopcontact met aarding worden gebruikt.
Zorg er altijd voor dat het stopcontact via de aardingsdraad is verbonden met de aarde en breng geen
wijzigingen aan de stroomkabel en de stekker aan. De stroomkabel dient stevig op het stopcontact te
zijn aangesloten om brandgevaar te beperken. Nadat het apparaat is geïnstalleerd, moeten de stekkers
gemakkelijk toegankelijk zijn zodat ze op tijd kunnen worden losgetrokken bij ongevallen.
Beschadig de stroomkabel niet.
Trek niet aan de stroomkabel om de stekker uit het stopcontact te halen. Houd de stekker zelf vast om deze
los van het stopcontact trekken.
De behuizing van het apparaat mag geen druk uitoefenen op de stroomkabel en er mag niet op de
stroomkabel worden gestapt.
Wanneer de stroomkabel is beschadigd:
Gebruik de stroomkabel niet wanneer deze is beschadigd of wanneer de stekker is versleten. De versleten of
beschadigde stroomkabel moet worden vervangen door de aangewezen onderhoudsleverancier, door de
fabrikant of door bevoegd personeel.
Als er een langere stroomkabel nodig is, mag de dwarsdoorsnede van de toegevoegde kabel niet minder
zijn dan 0,75 mm².
Houd de ventilatieopeningen in de behuizing van het apparaat of in de ingebouwde structuur
vrij van obstakels.
Bij lekkage van ontvlambaar gas zoals aardgas:
Sluit de kraan waaruit het gas lekt. Open deuren en ramen. Steek de stekker van het apparaat of van andere
elektrische apparaten niet in het stopcontact en verwijder deze ook niet.
Pas op voor bevriezing
Raak het binnenoppervlak van het bewaarcompartiment van de vriezer niet aan wanneer deze in gebruik is.
Dit is vooral belangrijk wanneer uw handen nat zijn en aan het oppervlak kunnen vastvriezen.
3
Page 85

WAARSCHUWINGEN
Wanneer het apparaat niet meer wordt gebruikt:
Houd het apparaat uit de buurt van vuur om ongevallen te voorkomen. Verwijder de deur van het apparaat
(open de deur, houd deze vast en verwijder de schroeven), om ongevallen met kinderen die in het apparaat
kruipen te voorkomen. Stuur het apparaat naar de aanwezen plek voor afvalverwerking.
Open de deur met de hendel.
Bewaar en gebruik geen benzine of andere ontvlambare stoen in de buurt van de vriezer om brand te
voorkomen.
Bewaar nooit ontvlambare stoen, explosieven of sterk corrosieve zuren/basen en andere chemische
stoen in de vriezer.
Bewaar geen essen bier of andere dranken in de vriezer aangezien deze kunnen barsten tijdens het
bevriezen.
Gebruik geen elektrische apparaten binnen de opslagcompartimenten in het apparaat, tenzij ze van een
door de fabrikant aanbevolen type zijn.
Let op uw kinderen
Kinderen mogen nooit spelen met het apparaat.
Hang niet aan de deur om persoonlijk letsel te voorkomen. De deur van het apparaat kan afbreken.
Zorg ervoor dat handen en voeten van kinderen niet in gaten en naden tussen metalen onderdelen komen,
zoals in het compartiment aan de achterzijde van het apparaat, om persoonlijk letsel te voorkomen.
Plaats geen instabiele voorwerpen (zware voorwerpen, bakken met water) boven op het apparaat, om
persoonlijk letsel door vallen of elektrische schokken als gevolg van contact met water te voorkomen.
Blijf uit de buurt van water
Spuit geen water op de vriezer en spoel deze niet door met water. Zet de vriezer niet op een natte locatie of
waar deze kan worden bespat met water, om te voorkomen dat de elektrische isolatie beschadigd raakt of
tot schokken of brand leidt.
Beschadig het koelmiddelcircuit niet
Demontage en aanpassing van de vriezer moet eerst worden geautoriseerd. Bij schuddende bewegingen
van de vriezer kunnen de koelleidingen beschadigd raken. Reparatie van het apparaat moet worden
uitgevoerd door professioneel personeel.
Haal de stekker in dit geval uit het stopcontact:
Voordat reinigings- of onderhoudswerkzaamheden worden uitgevoerd of bij storingen of uitschakeling,
dient u de stekker van de vriezer uit het stopcontact te halen. Wacht minstens 5 minuten nadat u de stekker
van het apparaat hebt verwijderd omdat bij vaak herhaaldelijk starten de compressor beschadigd kan raken.
Deze vriezer is een huishoudelijk apparaat dat alleen is bedoeld voor het bewaren van voedsel. Bewaar
geen bloed, medicijnen, biologische producten en andere producten in het apparaat.
Houd de ventilatieopeningen in de behuizing van het apparaat of in de ingebouwde structuur vrij van
obstakels.
Dit apparaat is niet bedoeld voor gebruik door personen (waaronder kinderen) met lichamelijke, zintuiglijke
of geestelijke beperkingen, of voor personen die niet beschikken over kennis of ervaring, tenzij zij onder
supervisie staan van een persoon die voor hun veiligheid verantwoordelijk is of van een dergelijk persoon
instructies hebben gekregen over het gebruik van het apparaat.
Dit apparaat is bedoeld voor huishoudelijk gebruik en voor soortgelijke omgevingen, zoals
- personeelskeukens in winkels, kantoren en andere werkomgevingen;
- boerderijen en bij gasten in hotels, motels en andere woonomgevingen;
- bed & breakfasts;
- catering en soortgelijke omgevingen.
Tips voor energiebesparing
Installeer het apparaat in een koele, droge ruimte met voldoende ventilatie.
Bij het installeren van het apparaat moet een ruimte van minstens 10 cm boven en rondom de vriezer
worden vrijgehouden om voor voldoende ventilatie rondom de vriezer te zorgen.
Laat warm voedsel afkoelen alvorens dit in de vriezer te plaatsen.
Laat de deur van het apparaat niet te lang open staan wanneer u er voedsel in plaatst of uithaalt. Hoe korter
de deur open blijft, hoe minder ijs zich ophoopt in de vriezer.
Maak de achterkant van de vriezer regelmatig schoon. Stof verhoogt het energieverbruik.
Zet de temperatuur niet lager dan nodig.
Bedek de luchtopeningen niet.
Nederlands
4
Page 86

WAARSCHUWINGEN
Invriezen en opslaan van vers voedsel
Laat ruimte open tussen etenswaren; dit is goed voor de koelcirculatie.
Nederlands
Plaats etenswaren per categorie, zodat u ze gemakkelijker kunt vinden.
Verpak etenswaren goed voordat u ze bewaart in de vriezer, om waterverlies en geuren te voorkomen.
Het verpakken van voedsel voordat u het in de vriezer plaatst, is optioneel. De buitenkant van de verpakking
moet droog zijn om te voorkomen dat zakken aan elkaar vriezen. Verpakkingsmateriaal moet geurvrij en
luchtdicht zijn en mag geen giftige stoen bevatten.
Wij adviseren het voedsel te identiceren door de volgende informatie op te schrijven:
Naam van het voedsel
Gewicht van de portie
Aantal (stuks)
Datum van invriezing
Houdbaarheidsdatum
Zie het diagram binnen in de vriezer voor houdbaarheidstermijnen van veelvoorkomende soorten voedsel:
PIZZADOOS
1. Stoofpot, ijs, worst, brood
2. Vis, garnalen, lam, vlees
3. Groenten, fruit, gevogelte, rundvlees
Het voedsel dient vers, rijp en van goede kwaliteit te zijn.
Verse groenten en fruit moeten indien mogelijk direct na het oogsten worden ingevroren om de
voedingsstoen, structuur, textuur, kleur en smaak zoveel mogelijk te behouden.
Bij vlees en wild is het beter dit enige tijd te laten hangen alvorens het in te vriezen.
Heet voedsel moet worden afgekoeld tot kamertemperatuur voordat u het in de vriezer mag plaatsen.
Haal slechts de hoeveelheid voedsel uit de vriezer die u nodig hebt. Ontdooid voedsel mag niet opnieuw
worden ingevroren tenzij het eerst wordt gekookt, omdat de smaak dan verloren gaat.
Voorkom dat u vers voedsel direct in contact met diepgevroren voedsel brengt. Ingevroren voedsel kan
hierdoor ontdooien, waardoor de verwachte bewaartijd mogelijk korter wordt.
Schakel om goed in te vriezen de snelvriesfunctie (zie het hoofdstuk over functies) 2 uur voordat u vers
voedsel plaatst in.
Plaats geen te grote hoeveelheden vers voedsel in de vriezer. Het is raadzaam om op de vriescapaciteit
van de vriezer te letten.
24 uur is meestal genoeg om het bevriezingsproces te beëindigen. Na deze tijd wordt de functie
automatisch uitgeschakeld.
Voor het invriezen van kleine hoeveelheden voedsel is het mogelijk de functie handmatig na enkele uren te
stoppen om onnodig energieverbruik te voorkomen.
5
Page 87

FROZEN-FOOD
VOORDAT U DE VRIEZER IN GEBRUIK NEEMT
Omschrijving
Dit diagram kan iets anders zijn dan de indeling van de vriezer die u hebt gekocht.
LID
DEKSEL
IJSSYSTEEM
ICE MAKER
(optioneel)
(option)
DRAWER
LADE
PIZZADOOS
PIZZA BOX
DIAGRAM VOOR
CALENDAR
INGEVROREN
VOEDSEL
Nederlands
SUPER STORE
SUPEROPSLAG
SMALL D RAWER
KLEINE LADE
ADJUST FEET
STELPOOTJES
(trasport grips at front, trasport castors at back)
(handgreep voor vervoer aan voorkant, wieltjes aan achterkant)
Grote lades, superopslagruimten en de kleine lade kunnen worden verwijderd om de opslagruimte in de
vriezer te vergroten.
6
Page 88

VOORDAT U DE VRIEZER IN GEBRUIK NEEMT
Omgeving van plaatsing
De vriezer moet op een plat en solide oppervlak worden geplaatst.
Nederlands
Als het apparaat op een verhoging wordt geplaatst, dienen vlakke,
sterke en brandbestendige materialen te worden gebruikt. Gebruik
nooit schuimmateriaal als verhoging. Als de vriezer instabiel is,
kunt u de stelpootjes van de vriezer langer of korter maken door
ze links- of rechtsom te draaien en de hoogte van de vriezer aan
te passen. Plaats de vriezer niet in direct zonlicht of in de buurt
van verwarmingselementen om ervoor te zorgen dat de vriezer
optimaal blijft presteren. Installeer de vriezer op een goed geventileerde plaats en houd een ruimte
van minstens 10 cm vrij boven en rondom de vriezer.
Plaats de vriezer nooit in een vochtige locatie of waar deze kan worden bespat met water. Verwijder
en droog waterspatten en vlekken tijdig met een zachte doek om roest te voorkomen.
Plaats de vriezer niet op een plaats waar de temperatuur te laag is (onder 5
buiten of in de regen.
°C
). Plaats de vriezer niet
Voorbereiding voor gebruik
Verwijder alle onderdelen van de verpakking, de schuimbasis en het plakband waarmee de
accessoires zijn bevestigd.
Plaats de vriezer op een goede locatie (zie Omgeving van plaatsing).
Maak de vriezer voorafgaand aan het gebruik van binnen en buiten schoon (zie Ontdooien en
reinigen)
Nadat het apparaat waterpas is geplaatst en gereinigd, moet het minstens 6 uur leeg blijven
voordat het wordt ingeschakeld om voor een normale werking te zorgen.
7
Page 89

FUNCTIES
Bedieningspaneel
NO FROST
Temp.Set
Eco
S.Frz .
S.
Ala
Alarm
Child lock
Func.Set
OK/ 5S
C
A2
D
E
G
F
A3
A4
C Weergavepictogram vriestemperatuur
A2 Toets voor temperatuurinstelling
D Pictogram ECO-functie
E Pictogram snelvriesfunctie
G Pictogram kinderslot
F Pictogram alarmindicator
A3 Functieselectietoets
(ECO/snelvries/alarm/kinderslot)
A4 OK-toets / Power-toets
Nederlands
Beginnen
Steek de stekker in het stopcontact om de vriezer in te schakelen.
Het scherm toont de code dF, wat betekent dat de vriezer wordt ontdooid. Na het ontdooien toont het
scherm de code HH.
Het alarmlampje F en het geluidssignaal geven aan dat de temperatuur in de vriezer niet laag genoeg is
voor het bewaren van voedsel. U kunt het geluidssignaal uitschakelen door op de A3-toets te drukken,
de functie Alarm te kiezen en daarna op de A4-toets te drukken. Het waarschuwingslampje blijft branden
totdat er een temperatuur van -12°C wordt bereikt.
Wanneer het scherm een temperatuur van -12°C toont, dan stopt de alarmconditie automatisch en kan er
voedsel worden bewaard in de vriezer.
Het bedieningspaneel bekijken:
Raak een toets op het scherm aan en kijk of het temperatuurgebied en het geselecteerde pictogram verlicht
kunnen worden.
Temperatuur instellen:
Druk op de A2-toets om de temperatuur in te stellen. Tijdens het instellen van de temperatuur wordt de
instelling aangegeven door twee knipperende cijfers. Als u nogmaals op de toets drukt, wordt de instelling
in cyclusmodus of in aopende modus gewijzigd van –14°C tot –26°C.
Als er gedurende 5 seconden geen actie wordt uitgevoerd met de OK-toets, dan wordt de instelling
automatisch opgeslagen.
Nadat de temperatuur is ingesteld, geven de twee cijfers op het scherm de temperatuur van de vriezer weer aan.
De fabrieksinstelling van de temperatuur is -18°C.
Power-functie:
Druk 5 seconden op de A4-toets om de vriezer uit te schakelen. Doe dit opnieuw om de vriezer weer in te
schakelen.
het apparaat met de power-toets is niet voldoende.
Voordat u het apparaat gaat reinigen moet u de stekker uit het stopcontact halen. Het uitschakelen van
8
Page 90

FUNCTIES
Vriezerfuncties
SNELVRIESFUNCTIE
snel invriezen van vers voedsel te activeren.
Nederlands
Het speciale lampje E gaat aan om aan te geven dat de functie is ingeschakeld.
Het lampje blijft branden totdat de functie wordt uitgeschakeld.
Voor het snel invriezen van een kleine hoeveelheid voedsel wordt aanbevolen de functie 2 uur actief te
laten zijn voordat u het voedsel plaatst. Als u een grote hoeveelheid voedsel tegelijk wilt invriezen, dan
wordt aanbevolen de functie 24 uur van tevoren in te schakelen. De functie wordt na 24 uur automatisch
uitgeschakeld en kan ook handmatig worden uitgeschakeld. Het stroomverbruik neemt toe wanneer de
functie is ingeschakeld.
ECO-functie:
en vervolgens op de A4-toets. Zo kunt u de energiebesparingsfunctie selecteren, waardoor de temperatuur
tussen -18°C en -14°C wordt ingesteld. Als de temperatuur was ingesteld op -19°C of lager, dan wordt deze
automatisch ingesteld op -18°C wanneer de ECO-functie is ingeschakeld.
Als deze functie is ingeschakeld, gaat lampje D branden totdat de functie wordt uitgeschakeld.
U kunt op de A3-toets drukken om de ECO-functie te selecteren en daarna op de A4-toets drukken om de
functie uit te schakelen.
De ECO- en snelvriesfuncties kunnen niet gelijktijdig worden gebruikt.
Kinderslot:
selecteren. Druk daarna op de A4-toets om de functie in te schakelen. Ontgrendelen: Raak een toets op het
scherm aan. Het display en de knop voor het kinderslot worden verlicht. Druk op de A3-toets. De knop voor
het kinderslot gaat knipperen. Druk op de A4-toets. Het scherm wordt ontgrendeld.
Wanneer het scherm is vergrendeld, is de A2-toets niet actief. Functieselectie is niet beschikbaar wanneer u
op de A3-toets drukt. Het apparaat kan worden uitgeschakeld door 5 seconden op de A4-toets te drukken.
Wanneer het scherm is ontgrendeld, drukt u op de A3-toets om de ECO-functie te selecteren
Wanneer het scherm is ontgrendeld, drukt u op de A3-toets om de kinderslotfunctie te
Druk op de A3-toets en kies de functie "S.FRZ". Druk daarna op de A4-toets om het
Alarmsignalen
TEMPERATUURALARM:
zoemsignaal en knippert lampje F om een temperatuuralarm aan te geven. Het scherm toont code HH.
Druk nadat het scherm is ontgrendeld op de A3-toets om de alarmfunctie te kiezen. Druk daarna op de
A4-toets. Het geluidssignaal kan worden uitgeschakeld, maar de alarmconditie blijft bestaan totdat de
temperatuur lager is dan -12°C.
DEURALARM:
onderbroken zoemsignaal. De alarmconditie stopt wanneer de deur wordt gesloten of wanneer op een
toets wordt gedrukt om de alarmfunctie te selecteren en daarna op de OK-toets wordt gedrukt. In het
tweede geval wordt de alarmconditie echter herhaald als de deur na 60 seconden nog steeds open staat.
Als de deur 7 minuten open blijft staan, dan wordt de interieurverlichting uitgeschakeld en klinkt er een
ononderbroken alarm.
DEFECTALARM:
de vriezer is, maar dat de tijdelijke houdbaarheid van het voedsel geen gevaar loopt.
Code Ed op het scherm samen met een knipperend alarmlampje F en een geluidssignaal geven aan dat er
een ernstig defect in de vriezer is en dat deze moet worden uitgeschakeld.
Bij beide defectcondities dient u zo snel mogelijk contact op te nemen met het servicecentrum.
Als de deur 60 seconden open blijft staan, dan wordt deze situatie aangegeven door het
Code F4 op het scherm en een knipperend alarmlampje F geven aan dat er een defect in
Als de temperatuur in de vriezer hoger is dan -8°C, dan klinkt er een onderbroken
9
Page 91

FUNCTIES
Plaatsing in een rij keukenunits
min.
min.
300 cm
300cm
2
2
min. 50
min.50
630
630
580
580
Het apparaat kan worden geplaatst in een rij keukenunits. Om het apparaat te laten passen in de
hoogte van de rij keukenunits kan een geschikte stapelkast worden toegevoegd. Als het apparaat
in een rij standaard keukenunits wordt geplaatst (max. diepte 580 mm), dan kan het apparaat
direct naast de keukenunit worden geïnstalleerd. De deur van het apparaat steekt, gezien vanuit de
voorzijde van de keukenunit, 34 mm aan de zijkant en 55 mm in het midden van het apparaat uit.
Hierdoor kan de deur perfect worden geopend en gesloten.
Nederlands
Belangrijk voor de ventilatie:
Aan de achterzijde van de stapelkast moet over de gehele breedte een ventilatieleiding met een
diepte van minstens 50 mm zijn.
De ventilatieruimte onder het plafond moet minstens 300 cm² zijn.
Hoe groter de ventilatieruimte, hoe meer energiebesparing het apparaat biedt tijdens de werking.
Als het apparaat wordt geïnstalleerd met de scharnieren naast een muur, dan moet de afstand
tussen het apparaat en de muur minstens 55 mm zijn. Dit correspondeert met de positie van de
hendel wanneer de deur open staat.
10
Page 92

FUNCTIES
Gebruiksinformatie
Nederlands
OPENING VAN DEKSEL
Open de bovendeksels door ze iets op te tillen en binnenstebuiten te draaien.
Open het deksel om voedsel in de lade te plaatsen.
Sluit het deksel om contact met de deur te vermijden.
Het deksel kan worden verwijderd om de opslagruimte te vergroten.
OPMERKING: twee lagen in het bovenste deel zijn voorzien van een afdekking.
Plaats geen voedsel op het voorste deel van de glasplaat, de afdekkingen
sluiten dan mogelijk niet meer volledig. Is dit wel het geval? Verplaats het
voedsel dan dusdanig dat de afdekkingen wel volledig kunnen worden
gesloten. Waarschuwing: controleer voor u de deur sluit of de afdekkingen
volledig zijn gesloten. Sluit de deur pas nadat alle afdekkingen volledig zijn
gesloten om druk op de afdekkingen te voorkomen.
LADEN VERWIJDEREN
Trek de laden volledig uit en til ze iets op om ze te verwijderen.
Laden (behalve de onderste lade) kunnen worden verwijderd om meer
opslagruimte te krijgen.
Voor sommige modellen zijn schuiven (rails) beschikbaar.
SUPEROPSLAGLADE
Trek de superopslaglade volledig uit. Til de lade op en trek deze uit de
uitschuifbare geleiders.
OPMERKING: bepaalde modellen lades zijn voorzien van een schuifsysteem.
De lade op de juiste wijze verwijderen: neem het voedsel uit de lade en duw
vervolgens de lade helemaal dicht. Til vervolgens de achterkant op en til de
lade uit het apparaat. Til de lade pas op als deze is vergrendeld. Pas dan kan
de lade eenvoudig worden verwijderd. Lukt dit niet, duw dan de lade weer
helemaal dicht en voer de stappen opnieuw uit.
PRODUCTIE VAN IJSBLOKJES
Sommige modellen zijn voorzien van een ijssysteem met ijsblokbakjes, een
verwijderingsapparaat en een opvangbak.
Verwijder de ijsblokbakjes
Reinig en vul met water. Plaats ijsblokbakjes terug op de steun.
Wacht enkele uren totdat het ijs klaar is en draai aan de knop om de ijsblokjes
eruit te halen.
De ijsblokjes vallen direct in de opvangbak.
In vakken in de deur kunnen verpakte pizza's met een dikte tot 30 mm of
andere soorten verpakt voedsel worden bewaard.
Voor sommige modellen zijn koude-accumulators beschikbaar. U kunt ook
koude-accumulators kopen en deze in de vriezer plaatsen. De dikte hiervan
mag niet meer zijn dan 30 mm.
11
Page 93

FUNCTIES
2B2A
6A 6B
3A
4
1C
Omkeerbaarheid van de deur:
deur van rechts verwijderen
1
1B
2
1C
1A
Sluit de stroomkabel af en maak het
apparaat leeg voordat u met deze
bewerking begint.
A. Open de deur
1
B. Duw omlaag om de twee kleine deksels aan respectievelijk de
linker- en rechterkant te verwijderen
C. Wrik het voordeksel naar buiten
A. Verwijder het kleine deksel aan de rechterkant van de
2
behuizing van de deur met een schroevendraaier
B. Verwijder de sierstroken door met een schroevendraaier naar
binnen te wrikken
A. Maak scharnierschroeven los met een
3
2B2A
kruiskopschroevendraaier. Verwijder het bovenste scharnier
B. Koppel de kabelaansluiting los
Nederlands
A Beweeg de behuizing van de deur naar boven om deze te
4
verwijderen
B. Verwijder het onderste scharnier met een
kruiskopschroevendraaier
A. Gebruik sleutels of tangen om de pen van het scharnier te
5
3
3A
3B
verwijderen en steek deze in het gat aan de linkerkant van de
scharnier.
B. Gebruik een kruiskopschroevendraaier om de schroeven uit
de linkerzijde van de behuizing van de kast te halen, en bevestig
deze schroeven aan de rechterzijde van de kast. Bevestig de
onderste scharnier aan de linkerzijde.
A. Gebruik een platkopschroevendraaier om de schroefplug aan
6
de rechterkant van de behuizing van de deur los te wrikken.
B. Verwijder de pen van het bovenste scharnier en bevestig
deze omgekeerd aan het scharnier. Verplaats de schroefplug
naar de linkerzijde en steek deze in het schroefgat.
5
5B
4A
4B
5A
6A 6B
6
12
Page 94

FUNCTIES
7A
7A
Nederlands
7
7C7B
8.1
8.1
A B
A. Sluit de signaallijn in de sierstrip aan
7
op de verbinding in het scharnier. Berg de
stroomdraad goed op en plaats deze in het
deksel van de sierstrook.
B. Bevestig de sierstrook en maak het kleine
deksel vast aan de rechterkant.
C. Sluit het bovenste voordeksel van de kast.
Plaats de kleine linker- en rechterdeksels in
de groef.
Aanwijzingen voor vervanging van de hendel:
8
volgens de verschillende conguraties (de
illustratie wijkt af).
Hulphendel:
A. Wrik het deksel van de hendel los met
een schroevendraaier. Verwijder de twee
schroeven en vervolgens de hendel.
B. Gebruik een schroevendraaier om de
schroefplug aan de rechterkant van de
behuizing van de deur los te wrikken.
Verplaats de schroefplug naar de linkerzijde
en steek deze in het schroefgat. Plaats de
hendel aan de rechterzijde en bedek deze.
8.2
A B
8.2
Gewone hendel:
A. Wrik het deksel van de hendel los met
een schroevendraaier. Verwijder de twee
schroeven en vervolgens de hendel.
B. Gebruik een schroevendraaier om de
schroefplug aan de rechterkant van de
behuizing van de deur los te wrikken.
Verplaats de schroefplug naar de linkerzijde
en steek deze in het schroefgat.
C. Plaats de hendel aan de rechterzijde en
bedek deze.
13
Page 95

ONDERHOUD
Ontdooien en reinigen
DE VRIEZER ONTDOOIEN: de vriezer wordt automatisch ontdooid. Er is geen handmatige tussenkomst vereist.
REINIGEN: het apparaat moet regelmatig worden gereinigd om
geur van etenswaren te voorkomen.
Sluit de stroomkabel af voordat u de vriezer reinigt.
Reinig de vriezer met een zachte doek of een spons met warm
water (eventueel met een mild reinigingsmiddel).
Droog waterdruppels op het oppervlak af met een droge doek.
Houd de pakking van de deur altijd schoon.
De vriezer is zeer zwaar. Let er bij het verplaatsen van het
apparaat voor reiniging of reparatie op dat u de vloer niet beschadigt.
Houd de vriezer rechtop tijdens het verplaatsen. Verplaats de vriezer
niet door te kantelen om schade aan de vloer te voorkomen.
Nederlands
Bespuit de vriezer niet met water en gebruik geen water om
de vriezer door te spoelen om schade aan de elektrische isolatie
te voorkomen.
Reinig niet met een harde borstel, staalborstel, reinigingspoeder,
benzine, pentylacetaat, aceton en vergelijkbare organische
oplossingen, of oplossingen met warm water of zuur of basen.
Gebruik een droge doek bij het reinigen van het scherm en
andere elektrische onderdelen.
Als het apparaat niet wordt gebruikt
Als het apparaat voor een langdurige periode niet zal worden gebruikt, sluit dan de stroomkabel af en reinig
het met een van de hierboven beschreven methodes.
Laat de deur van de vriezer open staan om te voorkomen dat voedselresten in het vak onaangename geuren
produceren.
Voor een optimale levensduur van het apparaat wordt aanbevolen het apparaat niet uit te schakelen
tenzij dit nodig is.
De vriezer verplaatsen
Verwijder de stekker en zet het apparaat uit.
Verwijder al het voedsel uit de vriezer.
Bevestig lades en andere bewegende onderdelen van de vriezer met plakband.
Sluit de deur en bevestig deze met plakband zodat deze niet worden geopend bij verplaatsingen.
Kantel de vriezer niet meer dan 45 graden wanneer deze wordt verplaatst, zodat het koelsysteem niet wordt
beschadigd.
Wikkel iets om de stelpootjes van de vriezer om krassen op de vloer te voorkomen. Gebruik nooit
overmatige kracht bij het verplaatsen van de vriezer. Verplaats de vriezer niet door aan de hendel, het deksel
of de buizen te trekken om schade en persoonlijk letsel te voorkomen.
Leg de vriezer nooit horizontaal neer.
14
Page 96

PROBLEMEN OPLOSSEN
Lees de volgende probleemoplossingstabel voordat u belt voor service. Dit kan u zowel tijd als
geld besparen. De tabel noemt veelvoorkomende problemen, behalve problemen die worden
veroorzaakt door productie- of materiaaldefecten in de vriezer.
Nederlands
PROBLEMEN OORZAKEN OPLOSSING
Werking van vriezer
Dit is normaal voor een automatisch
ontdooiende vriezer.
Kijk of de stekker, het stopcontact of de
zekering is beschadigd. Zet het apparaat aan
wanneer deze onderdelen in goede conditie
zijn.
Druk op de power-toets om de vriezer weer
op te starten.
In dit geval is het normaal dat de vriezer voor
langere tijd werkt.
Normaal gesproken duurt het 8 tot 12 uur
voordat de vriezer volledig is afgekoeld.
Warme lucht komt de vriezer binnen,
waardoor deze vaak aanslaat. Open de deur
niet te vaak.
Zorg dat de vriezer zich op een vlakke
ondergrond bevindt en dat de deur niet wordt
geblokkeerd door voedsel of verpakking.
Stel een hogere temperatuur in totdat de
gewenste vriezertemperatuur is bereikt. Het
bereiken van de vriezertemperatuur duurt 24
uur.
Reinig en vervang de deurpakking. Een
lekkage of opening in de deurpakking kan
ertoe leiden dat de vriezer langer werkt om de
gewenste temperatuur te behouden.
Reinig de condensator.
De compressor werkt
niet
De vriezer gaat
vaak of voor lange tijd
aan
Het product bevindt zich in
een ontdooiingscyclus. De
vriezer is niet aangesloten op
een stopcontact.
Het product is uitgeschakeld.
De binnen- of
buitentemperatuur is te hoog.
De vriezer is enige tijd
uitgeschakeld geweest.
De deur wordt te vaak of te
lang geopend.
De deur van de vriezer
wordt niet stevig gesloten.
De temperatuurinstelling is
te laag.
De pakking van de deur
is vervuild, versleten of
beschadigd of past niet
goed.
De condensator is vervuild.
Te hoge temperatuur
Te hoge temperatuur
in het product
Water / vocht / aanvriezing aan de buitenkant van de vriezer
Er hoopt zich vocht
op op het buitenste
oppervlak van de
vriezer
15
De deur wordt te vaak of te
lang per keer geopend.
De temperatuur is te hoog
ingesteld.
De deur is niet goed
gesloten.
De condensator is vervuild.
Vochtig klimaat.
De deur is niet goed
gesloten. Dit leidt ertoe dat
koude lucht in de vriezer en
de warme lucht erbuiten
condenseert.
Er komt warme lucht in de vriezer wanneer de
deur wordt geopend. Probeer de deur zo weinig
mogelijk te openen.
Stel de temperatuur opnieuw in.
Zorg dat de vriezer zich op een vlakke
ondergrond bevindt en dat de deur niet wordt
geblokkeerd door voedsel of verpakking.
Reinig de condensator.
Dit is normaal in een vochtig klimaat.
Het vocht neemt af wanneer de luchtvochtigheid
afneemt.
Zorg ervoor dat de ondergrond vlak is en
dat er geen etenswaren of verpakkingen uit
steken. Sluit de deur stevig.
Page 97

PROBLEMEN OPLOSSEN
PROBLEMEN OORZAKEN OPLOSSING
Onprettige geuren in de vriezer
Maak de binnenkant van de vriezer schoon. (Zie
Ontdooien en reinigen)
Controleer of het voedsel is bedorven.
Verwijder sterk ruikend bedorven voedsel uit
de vriezer.
De binnenkant van de
vriezer is niet schoon
De binnenkant van de vriezer
moet worden gereinigd.
Er ligt sterk ruikend voedsel
in de vriezer.
U hoort
De deur van de vriezer staat
open.
piepsignalen
ongewoon geluid
zacht geluid dat op
stromend water lijkt
De kast wordt warm Het koelsysteem werkt. Dit voorkomt condensatie en is normaal.
De temperatuur van de
vriezer is te hoog ingesteld.
Sommige onderdelen
kunnen beschadigd zijn.
De vriezer bevindt zich niet op
een vlakke ondergrond.
De vriezer raakt voorwerpen
eromheen aan.
Dit is het geluid van het
koelsysteem.
Sluit de deur of schakel het alarm handmatig uit.
Het alarm is normaal wanneer het apparaat
voor het eerst wordt ingeschakeld of wanneer
er voor het eerst voedsel wordt bewaard. U
kunt het alarm handmatig uitschakelen.
Neem contact op met het servicecentrum.
Pas de stelpootjes aan om de vriezer waterpas te
maken.
Verwijder objecten eromheen.
Dit is normaal.
Nederlands
Naamplaat
De naamplaat bevindt zich binnenin het vriezercompartiment aan de onderkant van de linkerzijde.
De naamplaat bevat belangrijke informatie over het apparaat. Deze moet intact worden gelaten en
mag niet worden verwijderd.
De capaciteit en het stroomverbruik die op de naamplaat worden genoemd zijn onderhevig aan de
relevante normen.
16
Page 98

PRVKY
Děkujeme za zakoupení výrobku společnosti Haier.
Česky
Než začnete zařízení používat, pročtěte si důkladně tyto pokyny. Tyto pokyny obsahují důležité
informace, které vám pomohou maximálně využít možnosti zařízení a zajistit jeho bezpečnou
asprávnou instalaci, používání aúdržbu.
Tuto příručku uschovejte na vhodném místě, abyste ji měli vždy kdispozici pro ověření bezpečného
asprávného použití zařízení.
Pokud zařízení prodáte, věnujete nebo ponecháte při stěhování na původním místě, předejte se
zařízením ituto příručku, aby se mohl nový majitel seznámit sjeho funkcí abezpečnostními pokyny.
Page 99

REJSTŘÍK
UPOZORNĚNÍ ............................................................................................................................................... 3
PŘED POUŽITÍM .......................................................................................................................................... 6
FUNKCE .......................................................................................................................................................... 8
ÚDRŽBA .......................................................................................................................................................14
ODSTRAŇOVÁNÍ PROBLÉMŮ ...............................................................................................................15
Česky
Page 100

UPOZORNĚNÍ
Legenda
Pozor
Upozornění
Česky
Zákaz
Likvidace
Přítomnost tohoto symbolu na produktu, příslušenství či materiálech, knimž náleží tyto informace,
znamená, že na konci životnosti se výrobek či jeho elektrické příslušenství (např. nabíječka, sluchátka, kabel
USB) nesmí likvidovat společně sjiným odpadem zdomácnosti.
Aby se zabránilo možné škodě na životním prostředí či lidském zdraví způsobené nekontrolovanou likvidací
odpadu, separujte tyto předměty od jiných typů odpadu arecyklujte je. Tím zajistíte šetrné opakované
použití materiálních zdrojů.
Spotřebitelé by se měli obrátit buď na maloobchod, ve kterém výrobek zakoupili, nebo na příslušné místní
úřady, které jim sdělí, jak mohou zajistit bezpečnou recyklaci neohrožující životní prostředí. Komerční
uživatelé by se měli obrátit na svého dodavatele ařídit se podmínkami prodeje. Tento výrobek včetně
elektronického příslušenství by neměl být likvidován sjiným komerčním odpadem.
Před použitím…
Toto zařízení využívá napájení střídavým elektrickým proudem.
Zařízení připojujte knormálnímu napětí. Vpřípadě kolísání napětí se zařízení nemusí rozběhnout, může
dojít kpoškození ovládání teploty či kompresoru, případně může být zařízení nadměrně hlučné. Vtakovém
případě použijte vhodný stabilizátor napětí.
Je nutné použít zásuvku se zdířkami pro tři vodiče.
Vkaždém případě zajistěte, aby byla zásuvka připojena kuzemňovacímu vodiči aneprovádějte žádné
úpravy napájecího kabelu azástrčky. Zástrčku napájecího kabelu je nutné zapojit do zásuvky pevně, jinak
může způsobit požár. Po instalaci zařízení je nutné zajistit snadný přístup kzásuvce, aby bylo možné ji
vpřípadě nehody kdykoliv odpojit.
Nepoškozujte napájecí kabel.
Při odpojování zástrčky netahejte za napájecí kabel. Uchopte přímo zástrčku aodpojte ji ze zásuvky.
Tělo zařízení nesmí tlačit na napájecí kabel apředevším na kabelu NESMÍ stát.
Pokud se napájecí kabel poškodí:
Pokud je napájecí kabel poškozený nebo zástrčka opotřebovaná, nepoužívejte je. Opotřebovaný či
poškozený napájecí kabel je třeba nahradit za nový uposkytovatele servisu stanoveného výrobcem nebo
kvalikovaným pracovníkem. Pokud je potřeba delší napájecí kabel, nesmí být plocha průřezu přidaného
napájecího kabelu menší než 0,75mm².
Větrací otvory vkrytu nebo ve vnitřní konstrukci zařízení nesmí být zakryté.
Vpřípadu úniku hořlavého plynu, například zemního plynu:
Zavřete ventil, kterým plyn uniká. Otevřete dveře aokna. NEODPOJUJTE ANI NEZAPOJUJTE toto ani jiná
elektrická zařízení.
Pozor na omrzliny
Během provozu se nedotýkejte vnitřních povrchů skladovacího prostoru mrazničky, především pokud máte
mokré ruce, protože může dojít kjejich přimrznutí kpovrchu.
3
 Loading...