


Counter Top, 4 Place Setting, Dishwasher
Lavavajillas para la encimera con capacidad para 4 cubiertos
User Manual
Manual del Usuario
HDC1804TW / TB/ TSS
Quality n Innovation n Style

English
IMPORTANT SAFETY INSTRUCTIONS
READ ALL INSTRUCTIONS BEFORE USE.
WARNING - To reduce the risk of fire, electric shock, or injury to persons when using your appliance, follow the basic precautions, including the following:
1.Read all of the instructions before using this appliance.
2.Use the dishwasher only for its intended function.
3 The manufacturer cannot be responsible for problems caused by ignoring these safety and caution instructions.
4.Use only detergents or wetting agents recommended for use in a dishwasher and keep them out of the reach of children.
5.This appliance must be properly installed in accordance with the installation instructions before it is used.
6.Never unplug your appliance by pulling on the power cord. Always grasp the plug firmly and pull straight out from the outlet.
7.Replace immediately worn power cords, loose plugs/power outlets.
8.Disconnect electrical power and water intake hose to dishwasher before cleaning or servicing.
9.If your old appliance is not being used, we recommend that you remove the door. This will reduce the possibility of danger to children.
10.Do not operate your appliance in the presence of explosive fumes.
11.Do not add or mix any flammable or explosive substances to the wash.
12.Dishwasher door must be closed during the operation of the machine.
13.Do not operate your appliance when parts are missing or parts are broken.
14.Do not abuse, sit on or stand on the door or dish rack of the dishwasher.
15.Do not use this appliance for commercial dishwashing purposes.
16.Do not wash plastic items unless they are marked “dishwasher safe “ or the equivalent. For plastic items not so marked, check the manufacturer’s recommendations.
17.Do not operate this appliance unless all enclosure panels are properly in place.
18.Do not tamper with controls.
19.When loading items to be washed:
A)locate sharp items so that they are not likely to damage the door seal, and
B)load sharp knives with the handles up to reduce the risk of cut-type injuries.
20.Do not touch the HEATING ELEMENT during or immediately after use.
21.To reduce risk of injury do not allow children to play in or on the appliance. Close supervision and observation needed when children are around the dishwasher
22.This appliance must be connected to proper electrical outlet with the correct electrical supply.
23.Proper grounding must be ensured to reduce the risk of shock and fire. DO NOT CUT OR REMOVE THE GROUNDING PLUG. If you do not have a three-prong electric receptacle outlet in the wall, have a certified electrician install the proper receptacle. The wall receptacle MUST be properly grounded.
24.Hydrogen gas may be produced if the water heater has not been used in more then 2
1

English
weeks. This could be explosive and can explode under certain circumstances. If this is the case, before using this appliance turn on all the hot faucets and let the hot water run for a few minutes. This will let the trapped hydrogen escape. During this process do not turn on an electric appliance, smoke, light a match/lighter or use a flame to avoid an accident, as hydrogen gas is flammable and can explode.
25.Do not repair or replace any part of the appliance or attempt any servicing unless specifically recommended in the user-repair instructions that you understand and have skills to carry out.
26.To reduce the risk or electric shock or fire, do not use extension cords or adapters to connect the unit to electrical power source.
27.Do not use this dishwasher outdoors.
SAVE THESE INSTRUCTIONS
HOUSEHOLD USE ONLY
unpacking your appliance
Unpacking
1.Inspect and remove all packing materials. This includes the foam and any adhesive tape both inside and outsiide of the unit.
2.Inspect and remove any remains of packing, tape, or printed materials before powering on your Haier appliance.
DANGER
Risk of child entrapment. Before you throw away your old appliance, take off the door so that children may
not easily get trapped inside. Also cut off power cord and detach all hoses
Product Registration
Thank you for purchasing our Haier product. This easy-to-use manual will guide you in getting the best use of your appliance.
Remember to record the model and serial number. They are on a label in back of the appliances.
Model number
Serial number
Date of purchase
Staple your receipt to your manual. You will need it to obtain warranty service.
Please register online at www.prodregister.com/Haier
2
English
Safety requirements
Electrical Requirements
Grounding Instructions
This appliance must be plugged into at least a 15 AMP 120 Volt 60 Hz Grounded Outlet. This appliance must be grounded. It is equipped with a 3-Wire cord having a grounding plug. The plug must be plugged into an outlet that is properly installed and grounded.
Warning! Improper use of the grounded wire can result in the risk of electric shock. Consult a qualified electrician if necessary. Do not attempt to defeat this safety feature by modifying the plug.
Avoid the use of an extension cord because it may overheat and cause a risk of fire. However, if it is necessary to use an extension cord:
A.Use only 3-wire extension cord with 3-blade grounding plug.
B.The marked rating of the extension cord must be equal to or greater than the rating of this appliance.
C.It should be positioned such that it does not drape over the counter or tabletop where it can be pulled by children or tripped over.


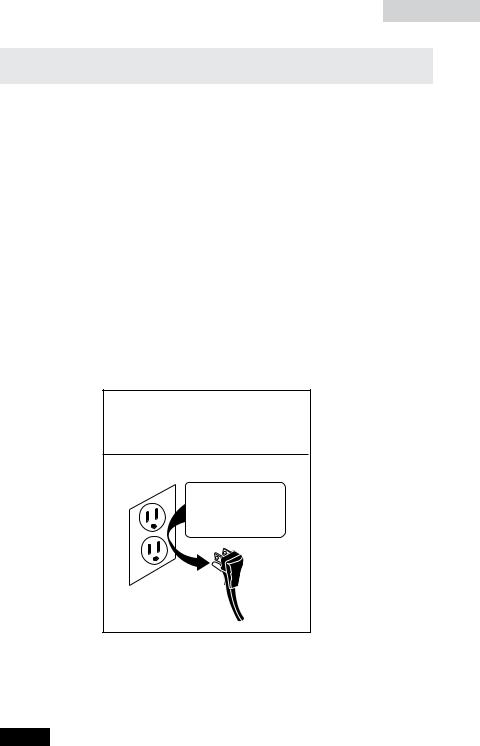
 Avoid fire hazard or electric shock. Do not use an extension cord or an adapter plug. Do not remove any prong from the power cord.
Grounding type
wall receptacle
Do not, under any circumstances,
remove, bypass the grounding prong.
Power supply cord with 3-prong grounding plug
Attempting any maintenance or cleaning:
To minimize the possibility of electric shock, unplug this appliance from the power supply or disconnect at the household electrical panel by removing the fuse or switching off the circuit breaker before attempting any maintenance or cleaning.
Note: Pressing the Power ON/OFF button to an off position does NOT disconnect the appliance from the power supply.
3

English |
|
table of contents |
|
IMPORTANT SAFETY INSTRUCTIONS. |
........................................... 1 |
GROUNDING INSTRUCTIONS........................................................ |
3 |
Technical Specification................................................................... |
4 |
PARTS AND FEATURES................................................................... |
5 |
Front................................................................................................. |
5 |
Back................................................................................................. |
6 |
INSTALLATION INSTRUCTIONS..................................................... |
7 |
Proper Location.................................................................................. |
7 |
Remove All Packing Materials.............................................................. |
7 |
Quick Faucet Adaptor Connection........................................................ |
8 |
Permanent Installation......................................................................... |
9 |
RECOMMENDATIONS FOR USE................................................... |
11 |
OPERATIONAL INSTRUCTIONS.................................................... |
15 |
Control Panel................................................................................... |
15 |
Operating Instructions....................................................................... |
15 |
CARE AND CLEANING GUIDE...................................................... |
18 |
Troubleshooting........................................................................... |
19 |
Warranty...................................................................................... |
20 |
|
Specification Table |
Model |
HDC1804TW / TB / TSS |
|
|
Power input |
1280W |
Outer dimension(LxWxH) |
22.6" x 18.9" x 17.2" |
|
|
Weight |
Approximately 50 LBS |
Max. water Consumption |
2.75 Gallons (10.4L) |
|
|
Water pressure |
0.03~1MPa |
Operation |
Automatic |
|
|
Detergent Capacity |
.42 Oz (12g) |
Plate Capacity |
4 Standard Place Settings |
4
English
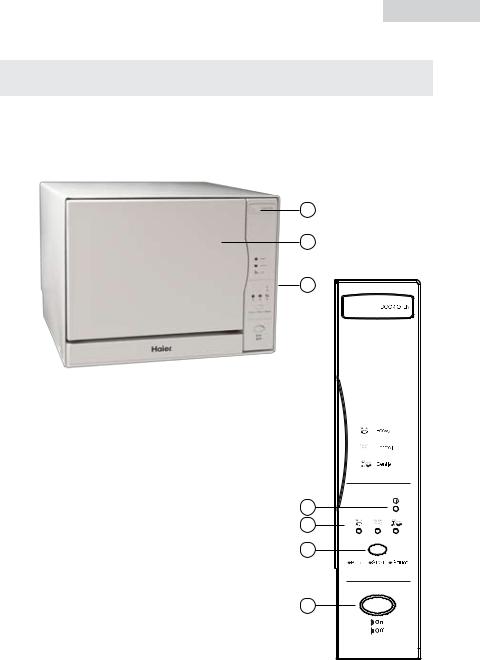
PARTS AND FEATURES
Front View
1
2
Control Panel
3 |
4 |
5 |
6 |
7 |
1. |
Door Release |
5. |
Program indicator lights |
2. |
Outer Door |
6. |
Program/Start/Pause button |
3. |
Control panel |
7. |
Power button (ON / OFF) |
4. |
Power indicator light |
|
|
5

English
PARTS AND FEATURES
Inside View |
Back View |
8
9
10
11 |
12 |
13 |
14 Quick Faucet Adapter
Drain Hose for Premanent Installation
15
16
17
18
8. |
Spray assembly |
14. |
Quick Faucet Adapter |
||
9. |
Filter assembly |
15. |
Quick connect fitting; Fits standard |
||
10. |
Rinse aid dispenser |
|
7/8" diameter faucets |
||
16. |
Red Pressure release button |
||||
11. |
Water intake Connector |
||||
|
|
(Inlet valve) |
17. |
Drain Hose for Premanent |
|
12. |
Drain Hose Connector |
|
Installation |
||
13. |
Power Cord |
18. |
Hose clamps (2) |
||
6 |
|
|
|
|
|
English
installation instructions
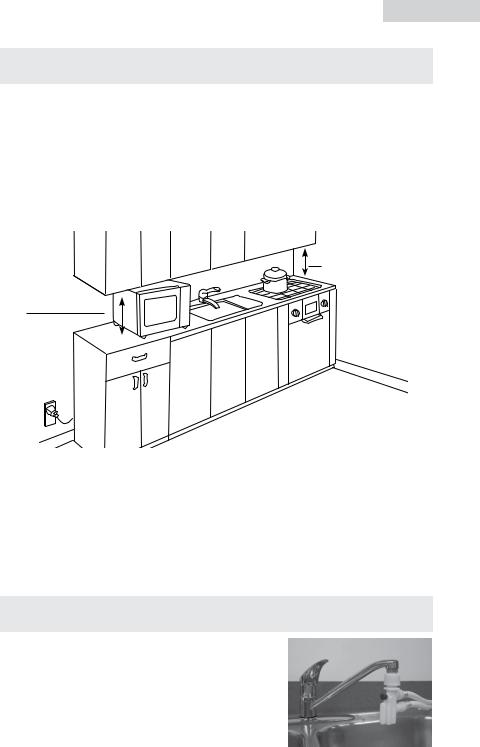
Proper location
1.First determine the best location for your new Countertop Dishwasher. It must be close to a 120 Volt (15 Amp) outlet and a sink with a water supply and drain.
2.The minimum height clearance required to install your dishwasher on a countertop surface with overhead cupboards/ Kitchen cabinets is 17.8” (45cm). This Space Saving Countertop Dishwasher is 17.2" in height.
Height between tabletop to Cabinet 17.8"
HDC1804 Dishwasher
Height 17.2"
NOTE:
•It is suggested that you place the dishwasher right next to the sink.
•Make sure there is an electrical power supply within easy reach of the machine. The power cord is 6 foot long.
•The dishwasher must be installed on a ‘solid’ level surface.
•To level the dishwasher, adjust the four legs under the dishwasher.
Remove All Packing Materials
Carefully; position the dishwasher on the counter top that you determined as your final location.
There are 2 types of Hook-ups; using the Quick Faucet Adapter Connection or Permanent installation.
The suggested way is to operate this Compact Dishwasher, with the Quick Connect Faucet Adapter.
Dishwasher Quick Connect Faucet Adapter with Drain, Pressure Release and Intake Water Hose.
7
English
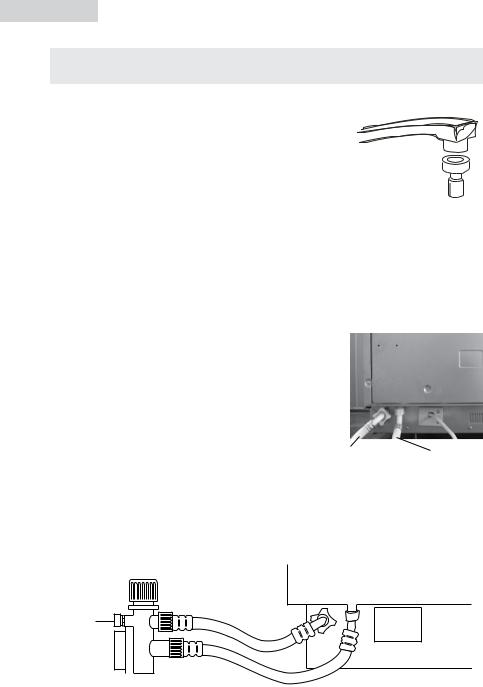
Quick Faucet adapter connection
The Quick Faucet Adapter easily connects to the sink faucet
A.First remove aerator from your faucet nozzle and attach the quick connect threaded adapter
to the faucet. The quick connect faucet adapter Faucet Water Connection allows easy snap-on/snap-off connection to 
standard (7/8” diameter) faucets.
B.Connect the dishwasher Quick Connect
Faucet Adapter to the faucet first to ensure the hose length fits the dishwasher’s selected location. Both hose end fittings must be
connected to the back of the dishwasher. The water intake and drain plastic fittings are each a unique design and made to easily fit the dishwasher to insure there is no mistake.
C.Water Intake Hose: Connect to the rear of the dishwasher using the large, 4-corner shaped wing nut.
D.Drain Hose: Connect to the rear of the dishwasher. It is suggested you use pliers to tighten but DO NOT over tighten.
E.With both hoses connected, make sure you can plug the power cord into a 120 volt, grounded AC outlet, then turn the dishwasher
so it is facing forward.
Water Intake Hose |
Drain |
F.Red Pressure Release Button: This red
button, located on the Quick Release Faucet Adapter, is used to release the water line pressure. When you first connect to the water faucet, you can press the red button to check the water is at the desired temperature or to use the faucet normally without removing the whole Quick Release Faucet Adapter.
Water Hose
Red Pressure
Release Button
G.With all the fittings connected, open the tap to test to make sure there are no leaks. Connect the A/C power cord and use the dishwasher as outlined in the manual.
8

English
H.When finished using the dishwasher, you need to close the water supply to the tap.
NOTE: The water intake hose is now pressurized.
Press the red pressure release button on the Quick Release Faucet Adapter, which will depressurize the water intake hose to easily remove without squirting water all around.
The Quick Release Faucet Adapter should then be disconnected from the faucet and stored for next use.
CAUTION: Do not let children disconnect the dishwasher. Close supervision of children is always important around appliances.
PERMANENT INSTALLATION
The permanent installation will require connecting the dishwasher to a permanent “HOT” water intake, usually tapped off from the sink’s hot water line. Also, the dishwasher’s grey drain hose (included) needs to be connected to a special sink drain pipe (not included) under the sink / counter.
We recommend that you Contact a qualified person to carry out the permanent installation. The dishwasher must be installed to meet all local codes and ordinances for electrical and plumbing connections.
Parts Needed for Permanent Installation
Intake Hose: You will need to purchase a standard 3/4" intake dishwasher hose and ttings to make a permanent installation.
Direct connect dishwasher tail pipe- You will need to purchase a dishwasher tail pipe designed to connect to a kitchen sink drain, and a matching hose clamp.
9
English
Drain hose: This unit has a special grey drain hose included. If you choose a permanent installation you must connect this hose to the dishwasher drain threaded connector. Use one hose clamp supplied.
Hose connections for permanent installation
|
Back of Dishwasher |
|
Sink Drain |
|
|
Change intake valve to standard |
|
|
3/4 inch dishwasher inlet hose |
Water Hose |
|
To the Sink HOT water pipe |
||
|
||
Special Grey |
|
|
DishwasherTail Pipe |
|
|
(Not Included) |
|
|
|
Grey "L" Hose to dishwasher |
|
Purchasedhoseclamp |
drain connector |
|
|
||
|
Place clamp here; insure no leakage |
Instruction: This should be done by a professional and qualified installer
1.Decide the best location to run the hoses under the sink. Make sure both hoses will reach before cutting into counter top.
2.The quick connect faucet adapter and hoses must be removed from the unit for both the intake and drain connections.
3.Change the intake hose to a 3/4 inch and secure tightly.
4.Using the special grey hose supplied, tighten hose to the drain connector.
5.Run both hoses below the sink and attach as a permanent installation for water intake and drainage. The special drain hose should be attached at one end to the dishwasher, at the other end to the sink tail pipe (not included), and secured at both ends with a clamp (one clamp provided).
NOTE:The intake hose should be connected to the HOT water pipe. The drain hose should be below the height of the base of the dishwasher.
6.Test the water connections to insure that there are no leaks
7.Connect dishwasher to a 120v household, grounded outlet.
10

English
Recommendations for use
Water, Pressure and temperature
For best operating results, incoming water should be HOT and the pressure should be between 0.03~1Mpa. Incoming water supply for the dishwasher is controlled by a ‘low water switch’ application, so if household water ceases, dishwasher will stop. We recommend for maximum efficiency and optimum results use HOT WATER ONLY.
How it works:
Your dishwasher cleans by spraying a mixture of hot clean water and detergent (under pressure) against the soiled surface of dishes. The water is pumped through a rotating spray arm, drained through a filter removing food and soiled particles and pumped back through the spray arm.
Soiled water is pumped out and replaced with clean water at the end of each cycle . For best cleaning results, the water temperature must be at least 120ªF. To prevent dishwasher damage, the temperature of the incoming water supply should not exceed 158ªF.
NOTE: Hard Water conditions will adversely affect the wash ability performance of your dishwasher. Hard water conditions will also contribute to “Lime” (white film substance) deposits and/or “Scaling” on the stainless steel surface of the dishwasher tub and “Heater Element” located in the sump underneath the removable filter screen. To assist in minimizing these conditions, it is recommended to periodically operate/ rinse the inside of the dishwasher (empty) using 1 cup of white vinegar (at least once a week) or special cleaning products that clean calcium and lime deposits.
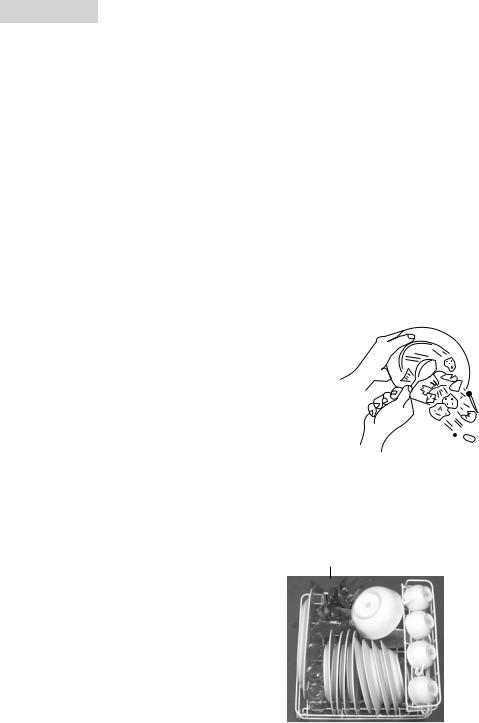
Preparing to wash dishes:
For best results, rinse the dishware and perform the following steps before loading:
•Discard big chunks of food from the plate.
•Remove oils and grease.
•Remove sticky and loosen burned-on, foods.
•Empty liquids such as juice, soup, soda, coffee or tea from glasses and cups.
11
English
Tips to avoid stains and films:
The following suggestions are recommended to prevent stains and films from dishware and utensils items:
•You must rinse all dishware, silverware, glassware and food containers right a way after use. Some citric based food products, coffee, tea and iron deposits in water can cause yellow or brown film on inside surfaces when left on for a long time and not rinsed immediately.
•Rinse off acid based liquid, such as vinegar or lemon juice right away.
This may cause discoloration over time to your plates, food containers or internal cabinet.
•Always check manufacturer’s recommendations before you start washing items.
•You must check your water hardness to see whether you need to use more or less detergent to wash. If water is extremely hard then it may be causing stains on items. You may need to use water softener.
•Do not overload the dishwasher.
•Avoid improper loading by overcrowding or nesting plates together.
•Make sure water temperature is at recommended temperature to wash dishware.
• Do not use too little detergent.
• Do not use old or damp powder detergent.
• Do not load aluminum utensils improperly.
Aluminum utensils can cause gray or black marks to porcelain utensils if they touch during the wash cycle.
Loading your Dishwasher
The dishwasher is designed for a standard “4 place setting”. Optimum capacity will allow for:
•4 Dinner Plates (The standard plate is 10-1/4" inches)
•4 Soup Plates
•4 Dessert dish
•4 Saucers Cutlery Basket
•4 Cups
•4 Teaspoons
•1 Oval platter
•2 Small serving dishes
•4 Glasses
•4 Soup Spoons
•4 Forks
•4 Knives
•4 Dessert Spoons
•2 Serving Spoons
• 1 |
Serving Fork |
Dish Rack |
• 1 |
Gravy ladle |
|
12

English
Cutlery Basket
Cutlery, small kitchen utensils and some plastic lids are best placed into the cutlery basket.
NOTE: The standard plate is 10 1/4 inches. For ease of loading/ unloading large size dinner plates from the dish rack, it may be necessary to (temporarily) remove the cutlery basket. When loading/ unloading is complete, return the cutlery basket to its original position.
How to load items:
•Locate sharp items so that they are not likely to damage the door seal.
•Load sharp knives with the handles up to reduce the risk of cut-type injuries
•Do not load plastic items unless they are marked “dishwasher safe” or the equivalent. For plastic items not so marked, check the manufacturer’s recommendations.
•Cups, glasses and bowls must have their openings facing downwards
•Do not load glasses over the dish rack pins. Glasses loaded over dish rack pins are not properly supported and are likely to get damaged.
•Arrange all items with recessed or curved sections on a slant to drain water away.
•Ensure cutlery are not nesting or stuck together. They need to be evenly spread out. Make sure the cutlery has not fallen through the basket and stopped the spray arm from rotating.
•tems with wooden or bone handles and items joined together with glue are unsuitable as they cannot withstand hot water.
Warning! To reduce the risk of injury, do not allow children to operate or play with the dishwasher.
Using the Right Detergent
Hard water and How much Detergent Should You Use
Follow the detergent manufacturer’s guidelines. The amount of detergent can depend if your water is ‘hard’ or ‘soft’.
Put the detegent into the pocket on the inner door. It will hold approximately 1/2 Oz. of detergent. Follow the detergent manufacturer's guidlines for further assistance.
The pocket for detergent
HARD WATER REQUIRES MORE DETERGENT TO GET DISHES CLEAN. SOFT WATER REQUIRES LESS DETERGENT TO GET DISHES CLEAN.
13
 Loading...