

Page 1
Dishwasher Installation
Instalación del lavavajillas
Installation du lave-vaisselle
Part # DW-7777-01
Quality • Innovation • Style
Page 2

English
TABLE OF CONTENTS
PAGE
SAFETY PRECAUTIONS ............................................................................. 2
Before Using Your Dishwasher .................................................................... 3
UNDER COUNTER DISHWASHER INSTALLATION INSTRUCTIONS
WHAT DO I NEED TO HAVE TO INSTALL THE DISHWASHER? .................5-10
Tools, parts & materials ..........................................................................5-6
Cabinet Requirements ............................................................................... 7
Cabinet Dimensions ................................................................................ 10
WHAT DO I NEED TO DO BEFORE I INSTALL THE DISHWASHER? .........11-19
Prepare cabinet ...................................................................................... 11
Prepare dishwasher ................................................................................. 15
HOW DO I INSTALL THE DISHWASHER? ................................................19-23
Connect dishwasher ................................................................................ 19
Secure dishwasher .................................................................................. 22
Install Cabinet Seal ................................................................................. 23
Install additional sound insulation ............................................................. 24
Check operation ..................................................................................... 25
1
Page 3

SAFETY PRECAUTIONS
Warning! – To reduce the risk of fire, electric shock, or injury to
persons, always exercise basic safety precautions, including the
following:
1. Read all instructions before using the appliance.
2. Use the dishwasher only for its intended function.
3. Use only detergents or rinse agents recommended for use in a dishwasher,
and keep them out of the reach of children.
4. When loading items to be washed:
1) Locate sharp items so that they are not likely to damage the door seal;
2) Load sharp knives with the handles up to reduce the risk of cut-type
injuries.
5. Do not wash plastic items unless they are marked “dishwasher safe” or
the equivalent. For plastic items not so marked, check the manufacturer’s
recommendations.
6. Do not touch the heating element during or immediately after use.
7. Do not operate the dishwasher unless all enclosure panels are properly in
place.
8. Do not tamper with controls.
9. Do not abuse, sit on, or stand on the door, lid, or dish racks of the
dishwasher.
10. To reduce the risk of injury ,do not allow children to play in or on the
dishwasher.
11. Under certain conditions, hydrogen gas may be produced in a hot water
system that has not been used for two weeks or more. HYDROGEN GAS
IS EXPLOSIVE. If the hot water system has not been used for such a period,
before using the dishwasher turn on all hot water faucet’s and let the water
flow from each for several minutes, This will release any accumulated
hydrogen gas. As the gas is flammable, do not smoke or use an open flame
during this time.
12. Remove the door or lid to the washing compartment when removing an old
dishwasher from service or discarding it.
English
Thank you for using our Haier product.
This easy-to-use manual will guide you
in getting the best performance from
your Haier Dishwasher.
Remember to record the model and
serial number. They are on a label in
the dishwasher.
Staple your receipt to your manual.
You will need it to obtain warranty service.
Model number
Serial number
Date of purchase
2
Page 4
English
BEFORE USING YOUR DISHWASHER
IMPORTANT: READ AND SAVE THESE INSTRUCTIONS
Doing so will:
• make installation easier.
• help you in the future if you have questions.
• help if you have an electrical inspection.
Call your dealer when you have questions or need service. When you call, you
will need the dishwasher model and serial numbers.
This is the safety alert symbol.
This symbol alerts you to potential hazards that may seriously injure you
and others.
All safety messages follow the safety alert symbol and either the word
“DANGER” or “WARNING”
DANGER
YOU CAN BE SERIOUSLY INJURED
IF YOU DO NOT FOLLOW
INSTRUCTIONS IMMEDIATELY.
WARNING
YOU CAN SERIOUSLY INJURED IF YOU
DO NOT FOLLOW INSTRUCTIONS.
All safety messages will tell you what the potential hazard is,
how to reduce the chance of injury and what can happen
if the instructions are not followed.
3
Page 5

YOU NEED TO
• Carefully open dishwasher door while someone grasps the rear of the
dishwasher. Remove shipping materials and lower rack. Close dishwasher
door. Latch the dishwasher door shut.
• Install this dishwasher as specified in these instructions.
• Have everything you need (tools, materials, parts) to properly install
dishwasher.
• Contact a qualified person to carry out installation. Installation must
be performed by a qualified service technician.The dishwasher must be
installed to meet all local codes and ordinances for electrical and plumbing
connections.
English
4
Page 6
English
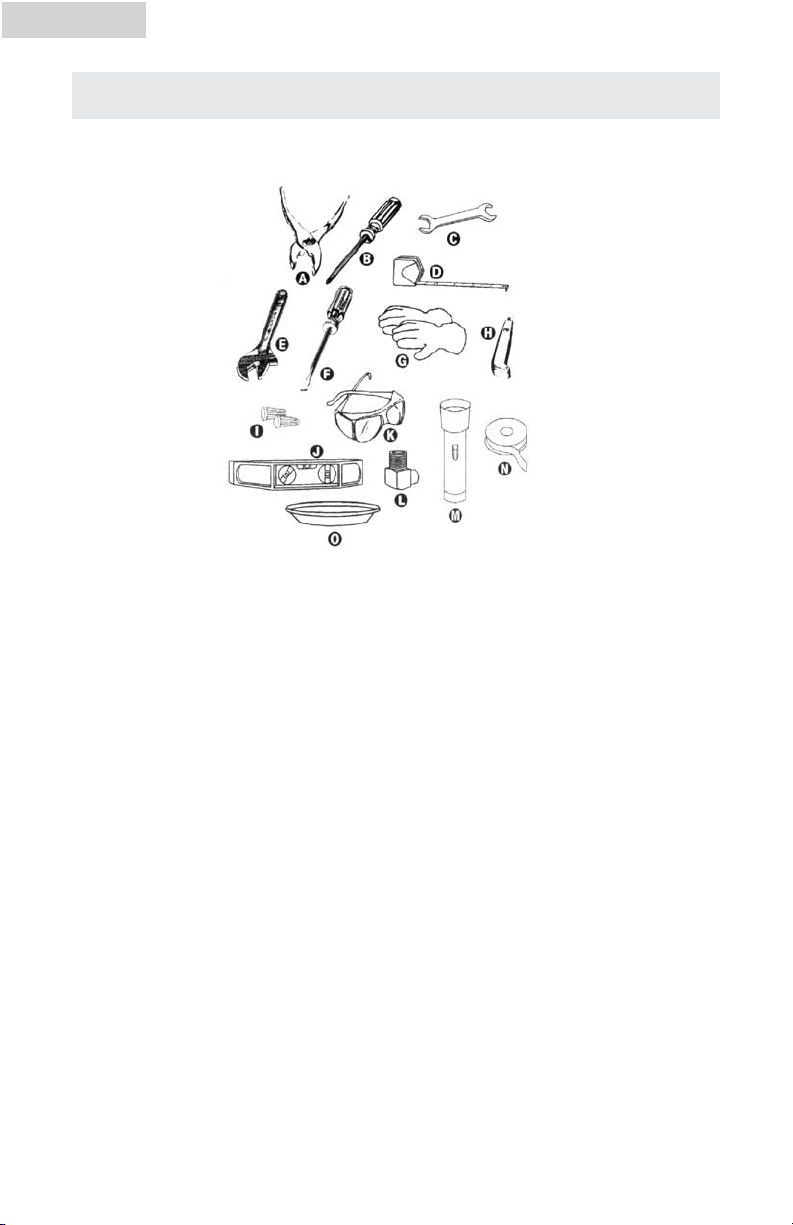
TOOLS AND MATERIALS NEEDED
ALL INSTALLATIONS
A. Pliers
B. Phillips screwdriver
C. ”open end wrench
D. Measuring tape or ruler
E. 10” adjustable wrench that opens to 1” (2.9cm)
F. Flat-blade screwdriver
G. Gloves
H. Utility knife
I. 2 twist-on wire connectors which are the proper size to connect your
household wiring to 16-gauge wiring in dishwasher
J. Small level
K. Safety glasses
L. 90º elbow with ” (0.9cm) N.P.T external threads on one end. (The other
end must fit your water supply line.)
M. Flashlight
®
N. Teflon
O. Shallow pan
P. Shim stock (if installed with built-up floor)
5
tape or pipe joint compound
Page 7
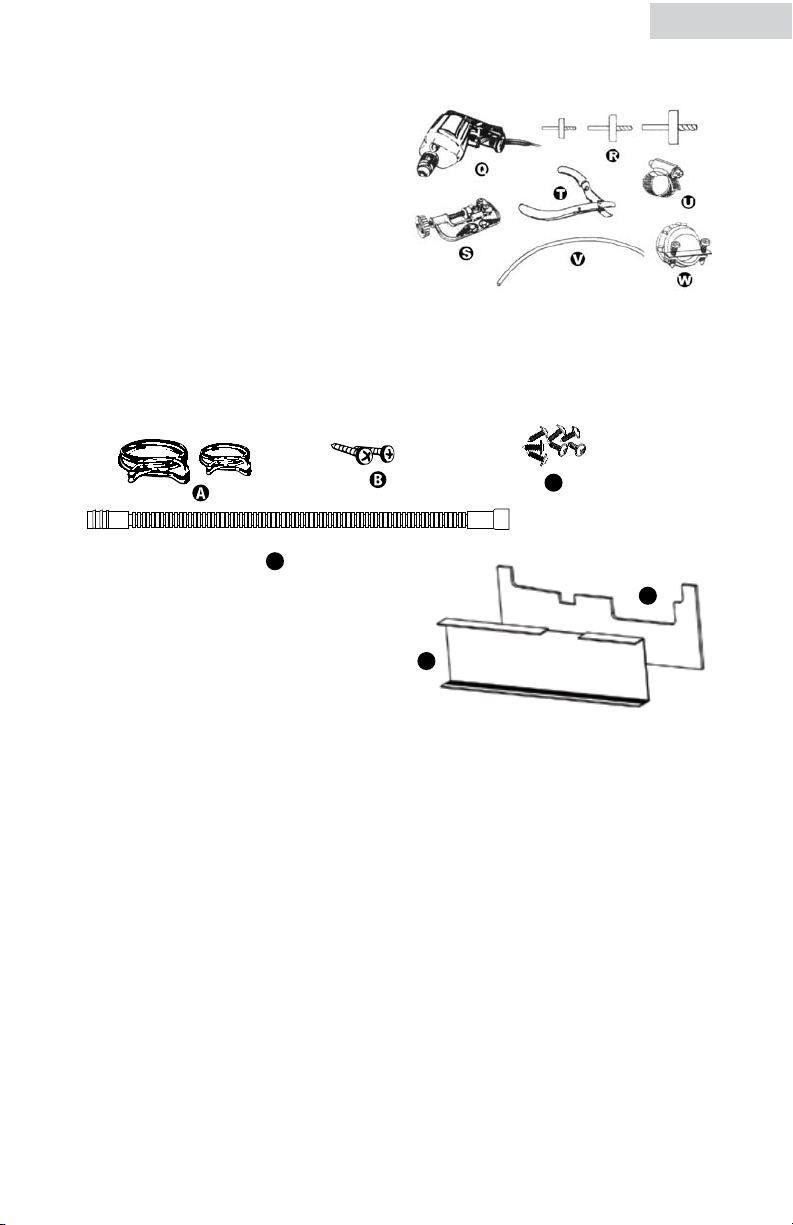
IN ADDITION FOR NEW INSTALLATIONS
English
IN ADDITION FOR NEW INSTALLATIONS
Q. Electric drill with
R.
”, ”and 1 ” hole saw bits
S. Small tubing cutter
T. Wire stripper
U. 1
”- 2” screw-type clamp if
connecting to waste-tee
V. Copper tubing (
” recommended) or flexible strainless steel braided fill line
W. Clamp connector or conduit connector to fit a
”(2.2cm) diameter hole
PARTS SUPPLIED
A. 2 drain hose clamps
1-large
1-small
E
F
D
C
Q. Electric drill with
R. ”, ”and 1” hole saw bits
S. Small tubing cutter
T. Wire stripper
U. 1”- 2” screw-type clamp if
connecting to waste-tee
V. Copper tubing (” recommended) or flexible strainless steel braided fill line
W. Clamp connector or conduit connector to fit a ”(2.2cm) diameter hole
English
PARTS SUPPLIED
A. 2 drain hose clamps
1-large
1-small
B. 2 Self-Tapping 4.2 X 18 Philip’s-head screws
C. 7 Self-Tapping 3.5 X 13 Philip’s-head screws
D. Drain hose
E. Sound pad (DWL3525, 4035 and 7075 models only)
F. Sound Mat (DWL4035 and 7075 models only)
Make sure all these parts are included.
6
Page 8
English
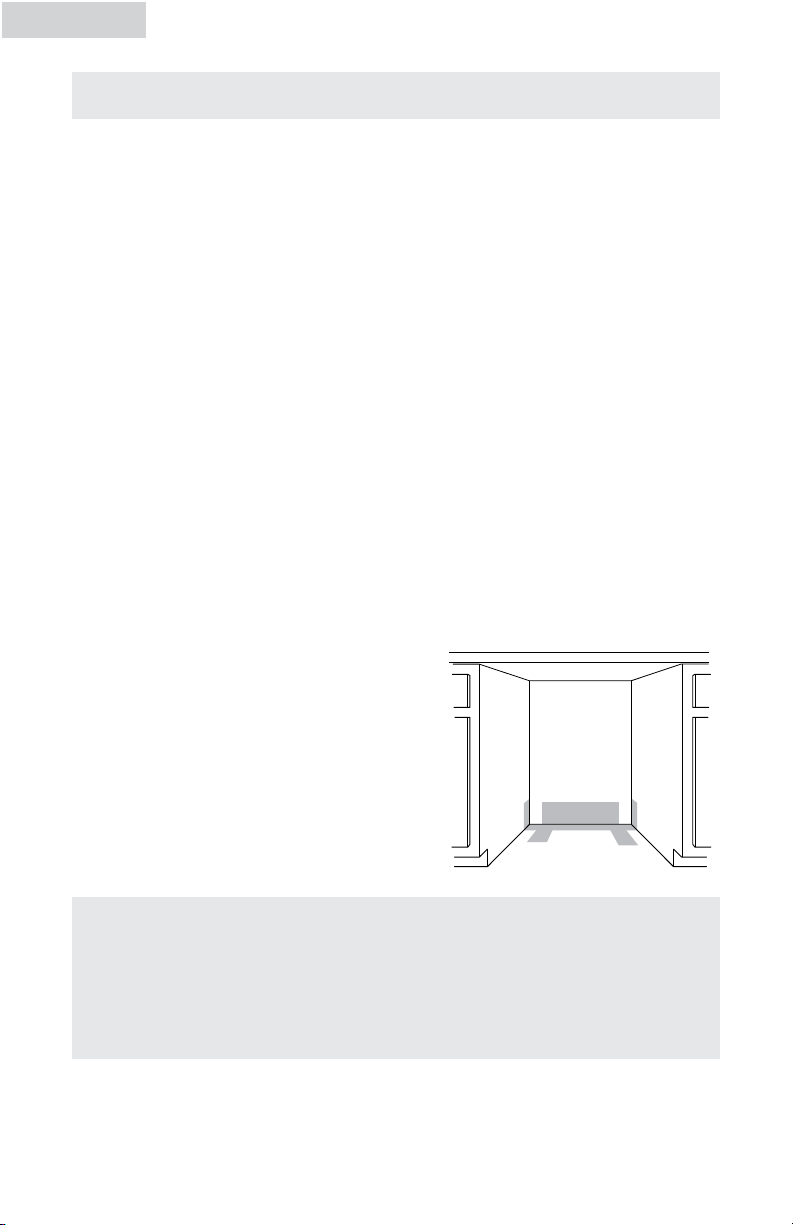
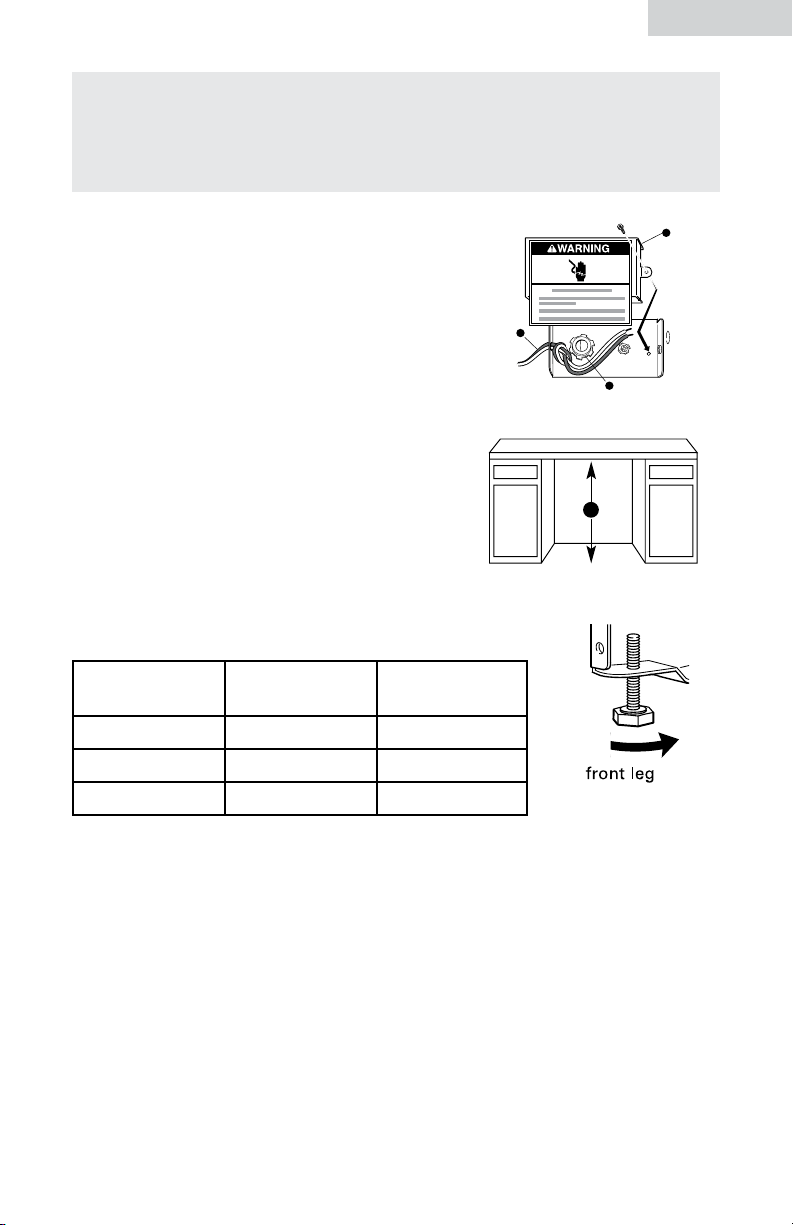
CABINET REQUIREMENTS
Do not run water drain lines or electrical wiring where they can interfere with or
contact dishwasher motor or legs.
The location where the dishwasher will be installed must provide clearance
between motor and flooring.
Do not install dishwasher over carpeted flooring.
Protect dishwasher and water lines leading to dishwasher against freezing.
Damage from freezing is not covered by the warranty.
CHECK LOCATION WHERE DISHWASHER WILL BE INSTALLED.
THE LOCATION MUST PROVIDE
• Easy access to water, electricity and drain.
• Convenient loading.
• Corner locations require a 2” (5.1cm)minimum clearance between the side of
the dishwasher door and wall or cabinet.
• Square opening for proper operation and appearance.
• Cabinet front perpendicular to floor.
• Level floor. If floor at front of opening is not level with floor at rear of opening,
shims may be needed to level dishwasher.
Note: Shims must be securely attached
to floor to prevent their movement when
dishwasher is being operated. If dishwasher
will be left unused for a period of time or
in a location where it may be subject to
freezing , have it winterized by authorized
service personnel. Make sure pipes, wires
and drain hose are within the shaded
area shown in diagram. See page 10 for
dimensions.
HELPFUL TIP:
If the floor at the cabinet opening is uneven (example:tile flooring only
part way into cabinet) you will need to take special care in measuring
dimensions and in leveling dishwasher.
7
Page 9
ELECTRICAL
It is the customer’s responsibility to contact a qualified electrician to ensure that
the electrical installation is adequate and conforms with all national and local
codes and ordinances.
You must have:
• 120-volt, 60Hz, AC-only, 15- or 20-amp.,fused electrical supply.
• COPPER WIRE ONLY.
We recommend:
• A time-delay fuse or circuit breaker.
• A separate circuit.
IF DIRECT-WIRING DISHWASHER
• Use flexible, armored or non-metallic sheathed copper
wire with grounding wire that meets the wiring
requirements for your home and local codes
and ordinances.
• Use strain relief method provided with house wiring
junction box or install a UL-listed/CSA-certified clamp connector to the house
wiring junction box. If using conduit, use a UL-listed/CSA-certified conduit
connector.
English
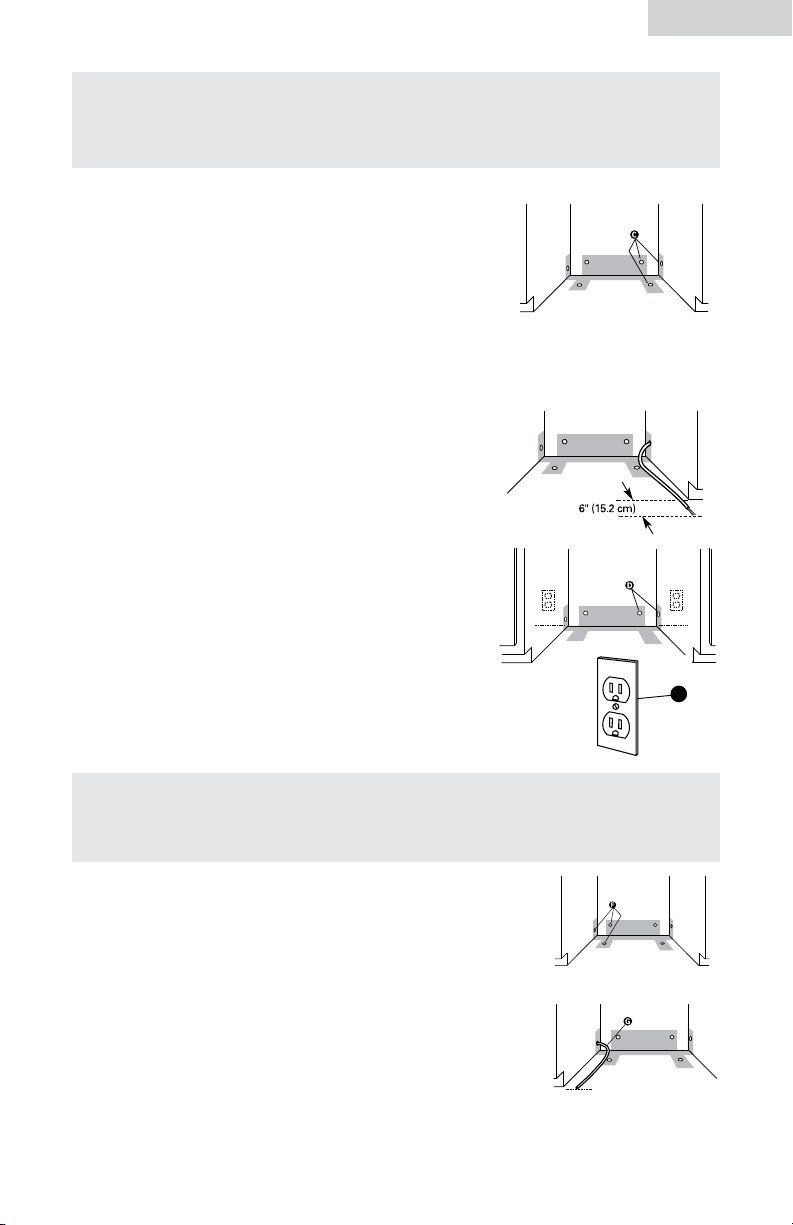
IF CONNECTING DISHWASHER WITH A POWER SUPPLY CORD
• Use a UL-listed, 16-gauge, three-conductor
power supply cord that meets
all local codes and ordinances. Maximum
length of the power supply cord is
6 feet (1.8m).
• A clamp connector to fit a ” (2.2cm)
diameter hole is required to secure power
supply cord to dishwasher terminal box.
• Power supply cord must plug into a mating
three-prong, grounded outlet located in the
cabinet next to the dishwasher opening.
Outlet must meet all local codes and
ordinances.
8
Page 10
English
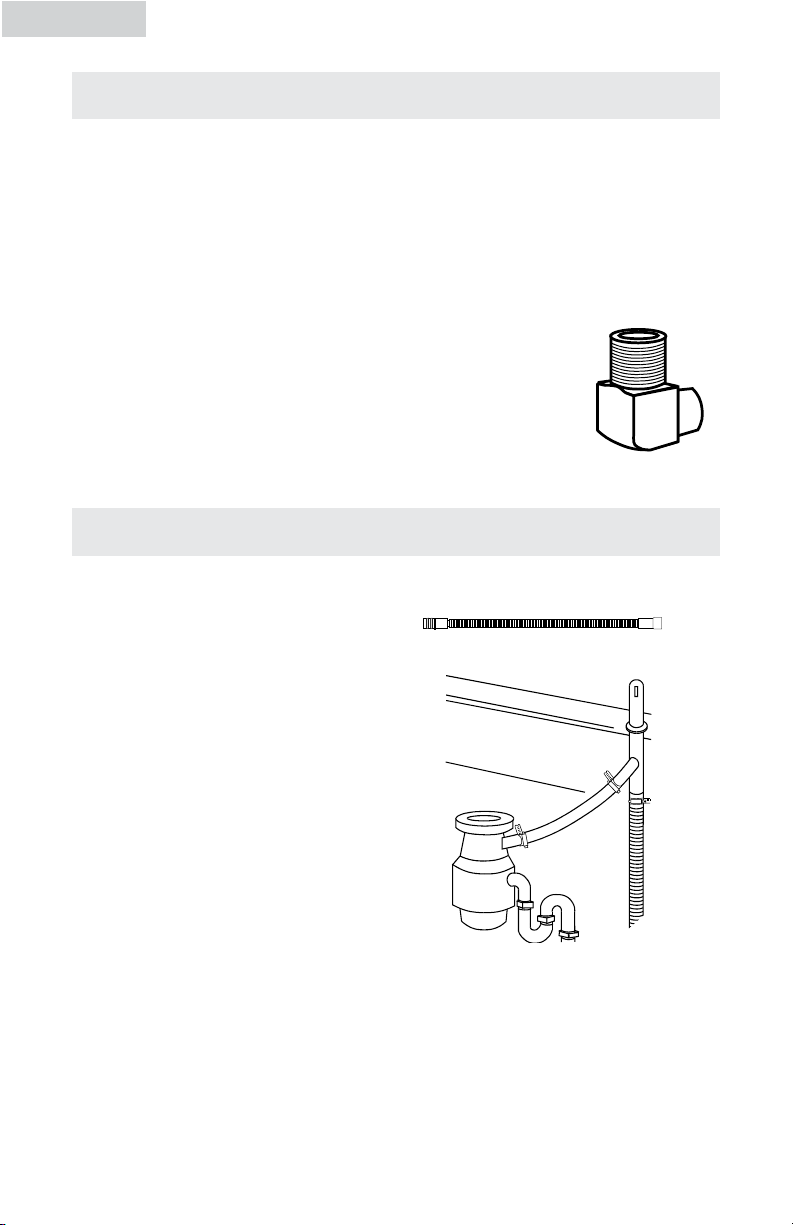
WATER
YOU MUST HAVE
• A hot water line with 20-120 psi (138-862 kPa) water pressure.
• Inlet water temperature 120º F(49º C) minimum at the dishwasher is
recommended.
• ” (0.9cm) O.D. tubing with compression fitting or flexible stainless steel
braided fill line (” (1.3cm) minimum plastic tubing is optional but not
recommended).
• A 90º elbow with ” (0.9cm) N.P.T. external pipe threads
on one end. Do not solder within 6”(15.2cm) from water inlet
valve.
DRAIN
YOU MUST HAVE
• Use the new drain hose supplied
with your dishwasher. If this is not
suitable, use a new drain hose
with a maximum length of 12
feet (3.7m) that meets all current
AHAM / IAPMO test standards,
is resistant to heat and detergent,
and fits the drain connector on
your dishwasher.
• Have a high drain loop 30 inches
(76.2cm) above the subfloor or
floor.
• Connect drain hose to waste tee
or disposer inlet above drain trap
in house plumbing and 20 inches
(50.8cm) minimum above the floor.
• Use an air gap in the drain line if the drain hose is connected to house
plumbing lower than 20 inches (50.8cm) above subfloor or floor.
• Use ” (1.3cm) minimum I.D. drain line fittings.
9
Page 11
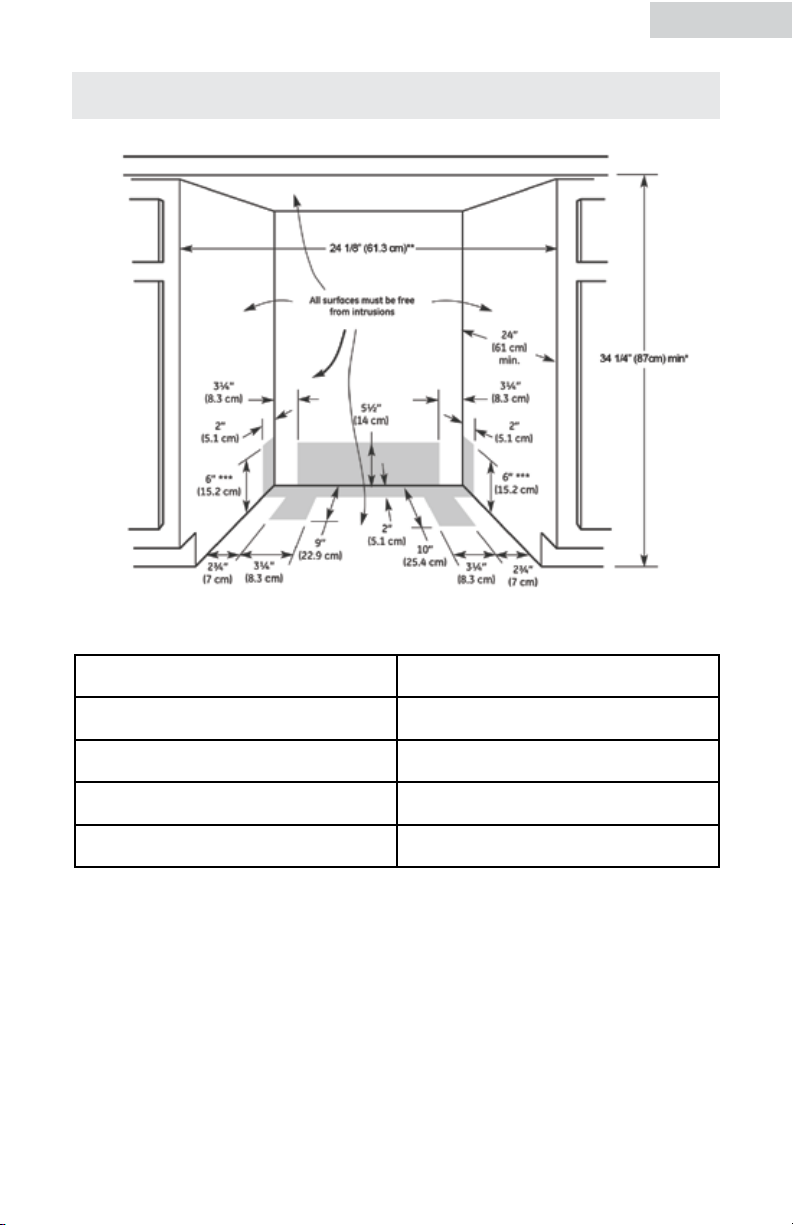
CABINET DIMENSIONS
English
Cut openings in shaded area of cabinet walls or floor as specified in chart:
OPENING FOR DIAMETER
Water line ” (1.3cm)
Drain line 1” (3.8cm)
Direct wire ” (1.9cm)
Power Supply Cord 1” (3.8cm)
* Measured from the lowest point on the underside of countertop. May be
reduced to 34 ” (86.7 cm) by removing adjustable foot from dishwasher.
** Minimum, measured from narrowest point of opening.
*** Maybe increased to 6” (17.5cm) if height of opening is 34” (87.6cm)
at lowest point.
10
Page 12
English
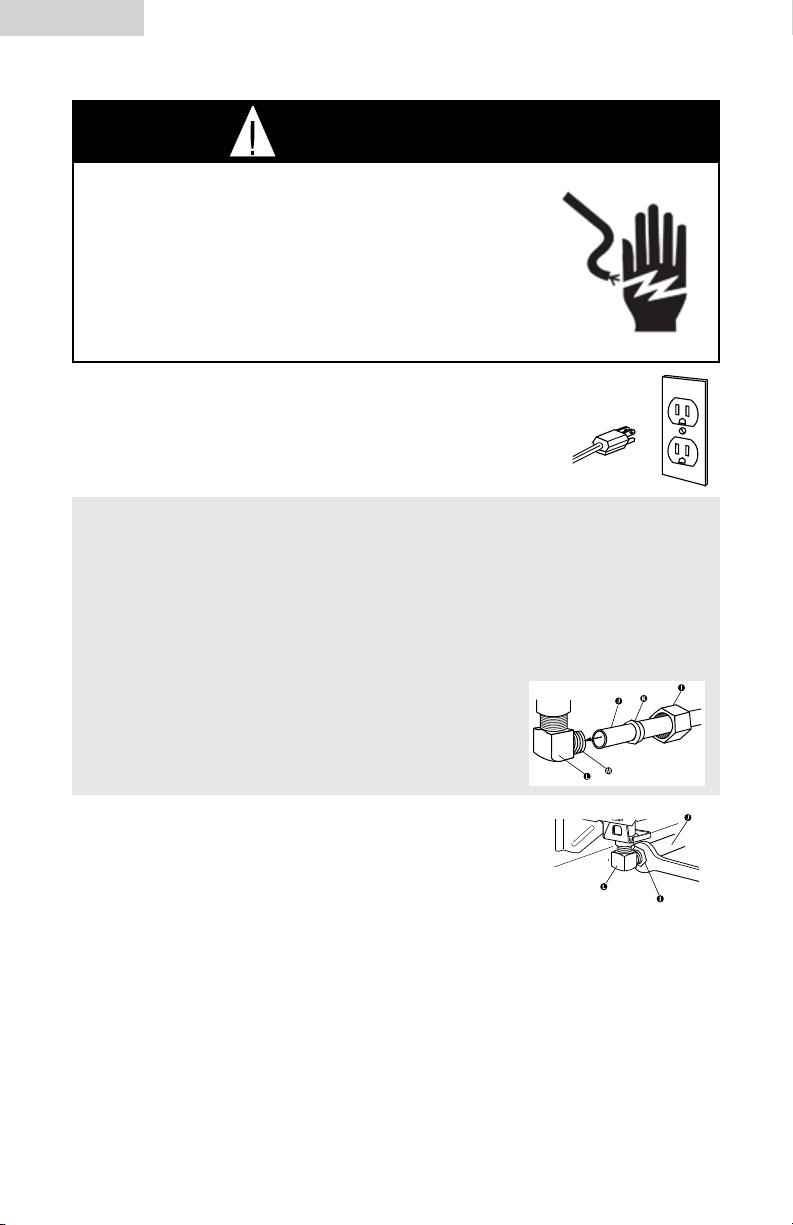
WARNING
Electrical Shock Hazard
Disconnect electrical power at the fuse box or circuit
breaker box before installing dishwasher.
Failure to do so can result in death or electrical shock.
Do not use an extension cord or adapter plus with this
appliance.
PREPARE CABINET
1. Disconnect the power supply. Turn water off. Put on gloves and safety
glasses.
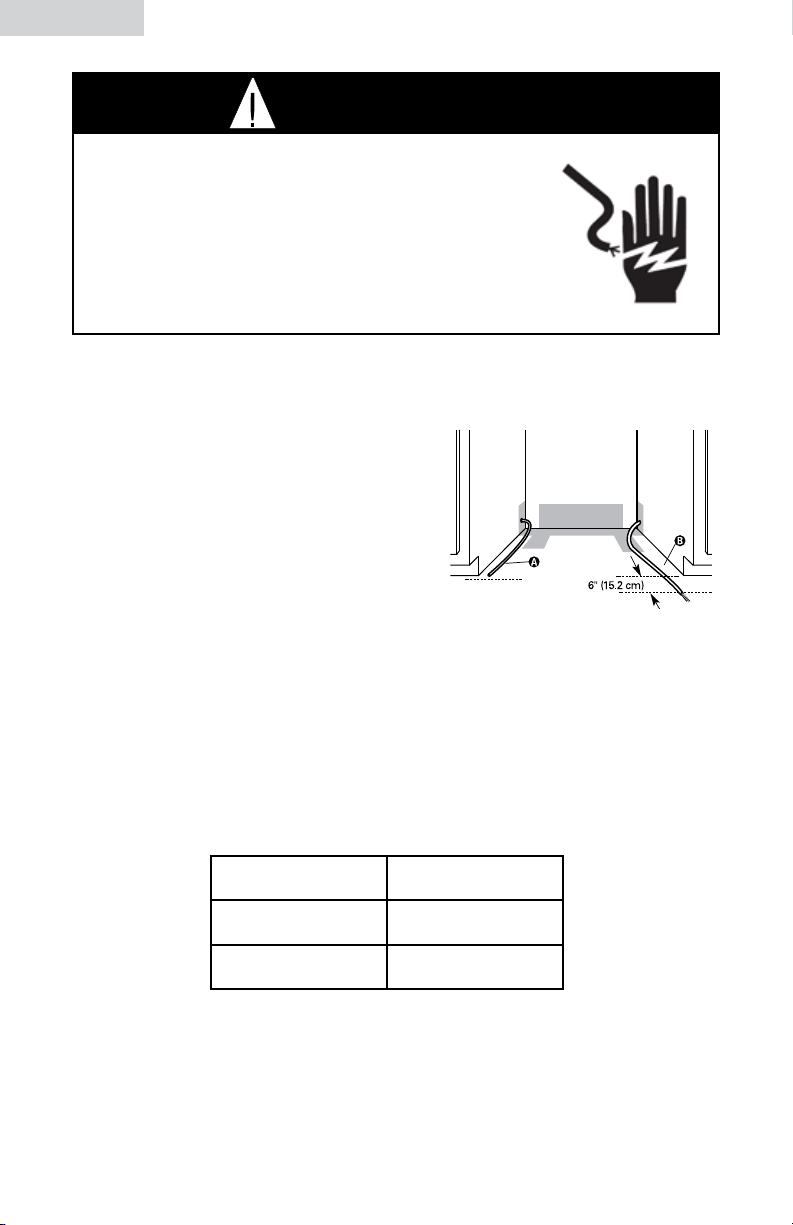
2. If you are replacing a dishwasher:
• Check that the water line “A” reaches to
the back left of opening where the water
connection will be made.
• Check that the direct line “B” reaches to the
back left of opening where the electrical
connection will be made.
If the water line and the direct wire reach into the opening far enough, go to step
10, page 13.
If you are installing a new dishwasher, complete all of the
following steps:
Electrical
Follow all national and local codes and ordinances for completing electrical
supply to cabinet.
If you are: Use steps:
Direct Wiring 3, 4 and 5
Using a power supply cord 3a and 4a
11
Page 13
HELPFUL TIP:
E
Wiring the dishwasher will be easier if you route wire
into the cabinet opening from the left side.
3. DIRECT WIRE METHOD:
Cut a ” (1.9cm) hole ”C” in right hand cabinet side,
rear or floor. Optional locations are shown. Wood
Cabinet: Sand hole until smooth.
3a. POWER SUPPLY CORD METHOD:
Cut a 1”(3.8cm) hole “D”in right-hand cabinet rear
or side. Optional locations are shown. Wood cabinet:Sand hole until smooth.
4. Run wire into house wiring junction box. Use strain relief method provided
with junction box. If no strain relief is provided, install
a UL-listed/CSA-certified clamp connector for flexibletype wire. If installing conduit, attach a UL-listed/CSAcertified conduit connector to junction box.
4a. Install a mating, three-prong, grounding-
type wall receptable “E”in the cabinet next to the
dishwasher opening. Go to step 6.
5. Run other end of wire through cabinet hole.
Cable must extend to the left front of cabinet
opening. Go to step 6.
English
Install a mating, three-prong, grounding-type wall
receptacle “E”in the cabinet next to the dishwasher
opening. Go to step 6.
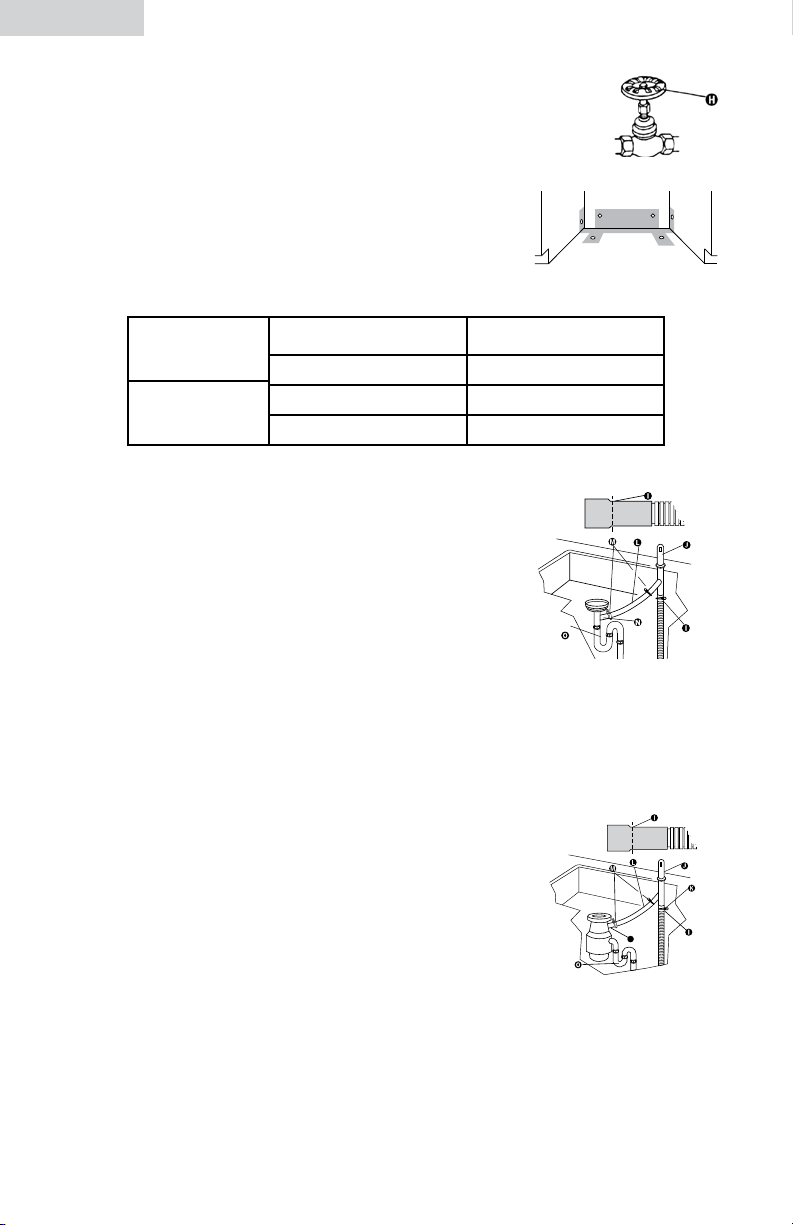
WATER LINE
HELPFUL TIP:
Routing the water line through the left side of
cabinet opening will make water connection easier.
6. Cut a 1/2”(1.3 cm) minimum hole “F” in left-hand
cabinet side,rear or floor. Optional locations are shown.
(The hole “F” is about 1-3/5” higher than hole “C” or
hole “D”)
7. Measure total length of copper tubing “G” required.
Attach copper tubing to water line with manual shutoff valve. Carefully feed copper tubing through hole in
cabinet (copper tubing will bend and kink easily) until
it is far enough into the cabinet opening to connect it to
dishwasher inlet on the front left of dishwasher.
12
Page 14
English
P
8. Turn shutoff valve “H” to “ON” position. Flush water into a
bucket to get rid of particles that may clog the inlet valve.
9. Turn shut-off valve to “OFF” position
DRAIN HOSE
10. Cut a 1-1/2” (3.8cm) diameter hole in cabinet wall
or floor on the side of the opening closest to the sink.
11. Connect drain hose to waste tee or waste disposer
following one of the following methods:
11a.
a waste disposer
no waste disposer
an air gap
no air gap* 11c.
an air gap 11b.
no air gap* 11d.
*An air gap is recommended
11a. WASTE DISPOSER & AIR GAP
1. Remove the disposer knockout plug. Cut end of drain
hose “I” if needed (do not cut ribbed section).
2. Attach drain hose to air gap “J” with large spring-type
clamp “K”. If the drain hose was cut, use a 1-1/2” to
2” (3.8 to 5 cm) screw-type clamp*.
3. Use a rubber hose *connector “L” with spring or screw-type clamps* “M” to
connect air gap to disposer inlet “N”. The connection “N” MUST be made
before drain trap “O” and at least 20” (50.8cm) above the floor where
dishwasher will be installed. Go to step 12.
11b. NO WASTE DISPOSER & AIR GAP
1. Cut end of drain hose “I” if needed (do not cut ribbed
section).
2. Attach drain hose to air gap “J” with large spring-
type clamp. If the drain hose was cut, use a 1-1/2” to
2” (3.8 to 5 cm) screw-type clamp*.
3. Use a rubber hose *connector “L” with spring or screw-type *clamps “M” to
connect air gap to waste tee “P”. This connection “P” MUST be made before
drain trap “O” and at least 20” (50.8 cm) above the floor where dishwasher
will be installed. Go to step 12.
* Parts available from local pumbing supply stores.
13
Page 15
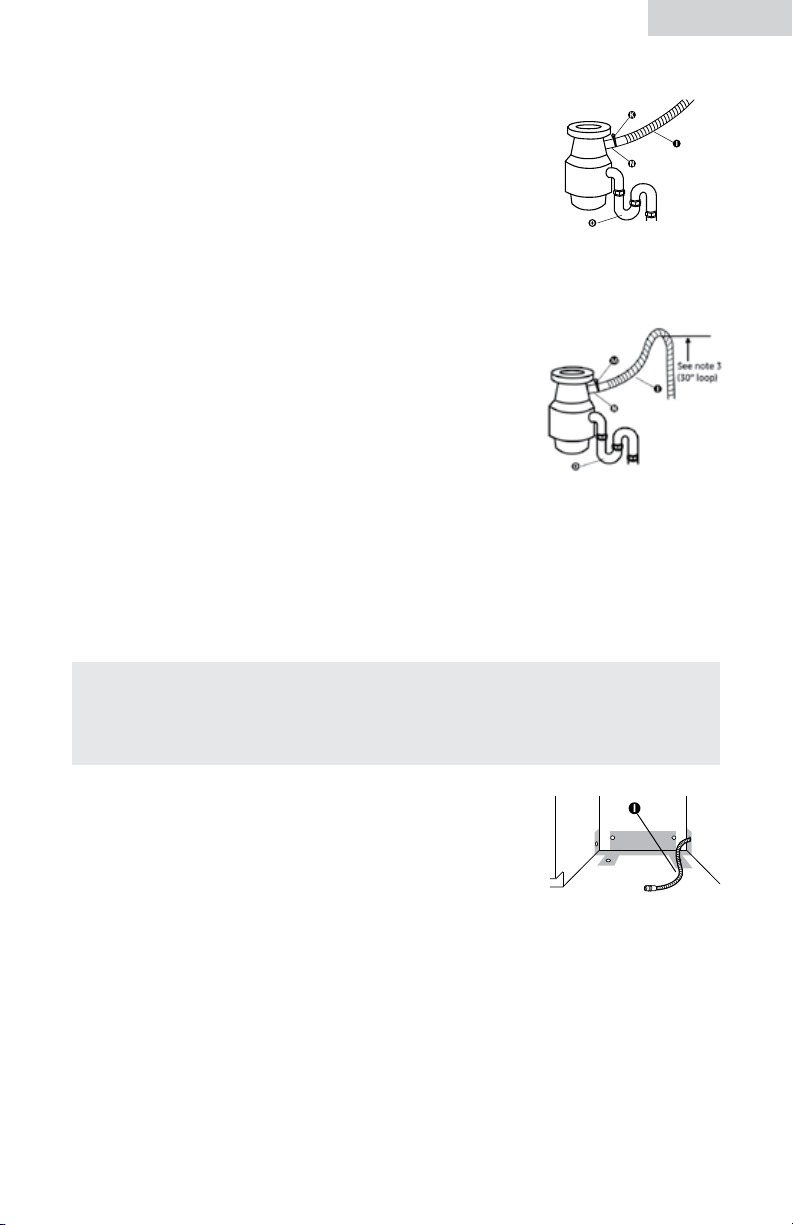
11c. WASTE DISPOSER - WITH NO AIR GAP
1. Remove the disposer knockout plug.
Do not cut end of drain hose.
2. Attach drain hose “I” to disposer inlet “N” with large
spring-type clamp “K”.
This connecting “N” MUST be made before drain trap
“O” and at least 20” (50.8 cm) above the floor where dishwasher will be
installed.
3. The drain hose must be looped up and securely fastened
to the underside of the counter before going to the drain.
Hose loop must be a minimum 30 inches (76.8cm)
above floor. (Go to step 12)
English
11d. NO WASTE DISPOSER - WITH NO AIR GAP
1. Cut end of drain hose “I” (do not cut ribbed section).
2. Attach drain hose to waste tee “P” with 1-1/2” to 2” (3.8 to 5 cm) screw-type
clamp* “M”. The connection “P” MUST be made before drain trap “O” and
at least 20” (50.8 cm) above the floor where dishwasher will be installed.
3. The drain hose must be looped up and securely fastened to the underside
of the counter before going to the drain. Hose loop must be a minimum 30
inches (76.8cm) above floor. (Go to Step 12)
HELPFUL TIP:
To reduce the vibration of the hose, keep the hose away from the
floor and the edge of the hole where it passes through the cabinet.
* Parts available from local plumbing supply stores.
Insert drain hose “I” into hole cut in cabinet and guide
toward the back center of opening where drain connection
will be made.
14
Page 16

English
A
B
C
A
D
E
F
F
G
PREPARE DISHWASHER
Tip Over Hazard
Do not use dishwasher until completely installed.
Do not push down on open door. Doing so can
result in serious injury.
EXCESSIVE WEIGHT HAZARD
Use two people to move and install dishwasher. Failure to
do so can result in back or other injury.
WARNING
WARNING
1. Grasp sides of dishwasher door and
place dishwasher on its back.
2. Remove two screws “A” attaching
access panel “B” and lower panel
“C” to dish- washer using a 1/4”
hex socket, nut driver or Philip’s
screwdriver. Remove panels and
set panels aside in a safe place.
Make sure that grounding clip “D” is
attached to the lower panel.
3. Apply pipe joint compound “E” to
90∞elbow fitting “F” and connect
fitting to water inlet valve “G”.
Tighten elbow until snug, making sure
that it faces to the rear.
15
Page 17
HELPFUL TIP:
H
I
J
K
Put cardboard under dishwasher until it is installed. The cardboard
will help protect floor during installation.
4. Remove terminal box cover “H”. Pull
appliance wires “I” through hole in terminal
box. Do not untie the knot in the wires.
If you are direct wiring: install a UL-listed/
CSA-certified clamp connector “J” to
the terminal box. If using conduit use a
UL-listed/CSA certified conduit connector. If
you are installing a power supply cord kit,
do so now and follow kit instructions.
5. Measure height of cabinet opening from
underside of countertop to floor where
dishwasher will be installed “K” (you
need the lowest point). Check chart for
that height opening. Put wheels “L” in the
required position. Turn both front leveler
legs to the same height.
English
Min Cutout
Height
Wheel Position
(See Illustration)
34” (86.4 cm) 1 10
34 1/4” (87 cm) 2 5
34 1/2” (87.6 cm) 3 0
If the minimum cutout height is less than
34” (86.4 cm), the adjustable legs can be
removed for additional clearance. This will
allow the dishwasher to fit into a 33 4/5”
(85.9 cm) high cutout, but the dishwasher
will be more difficult to move into position.
If the wheels are removed, protect the floor
when moving the dishwasher.
Number of Turns
on Front Leg
16
Page 18
English
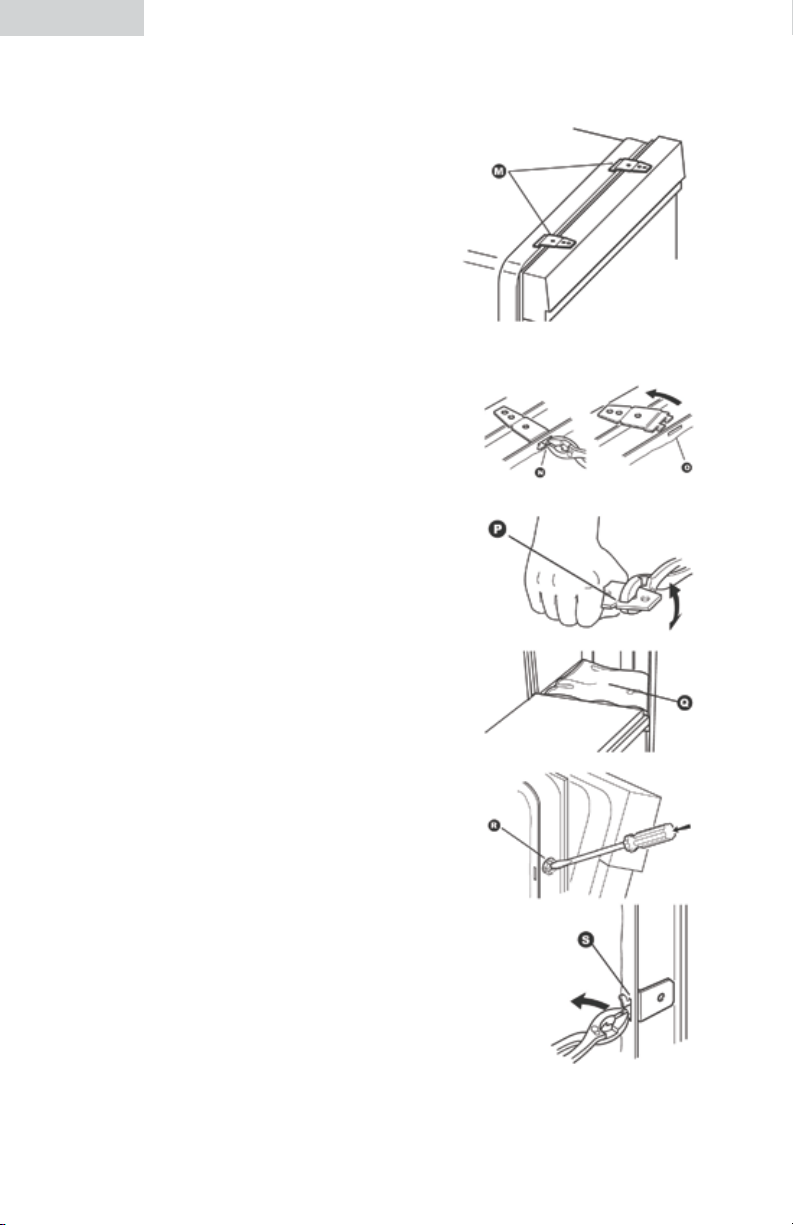
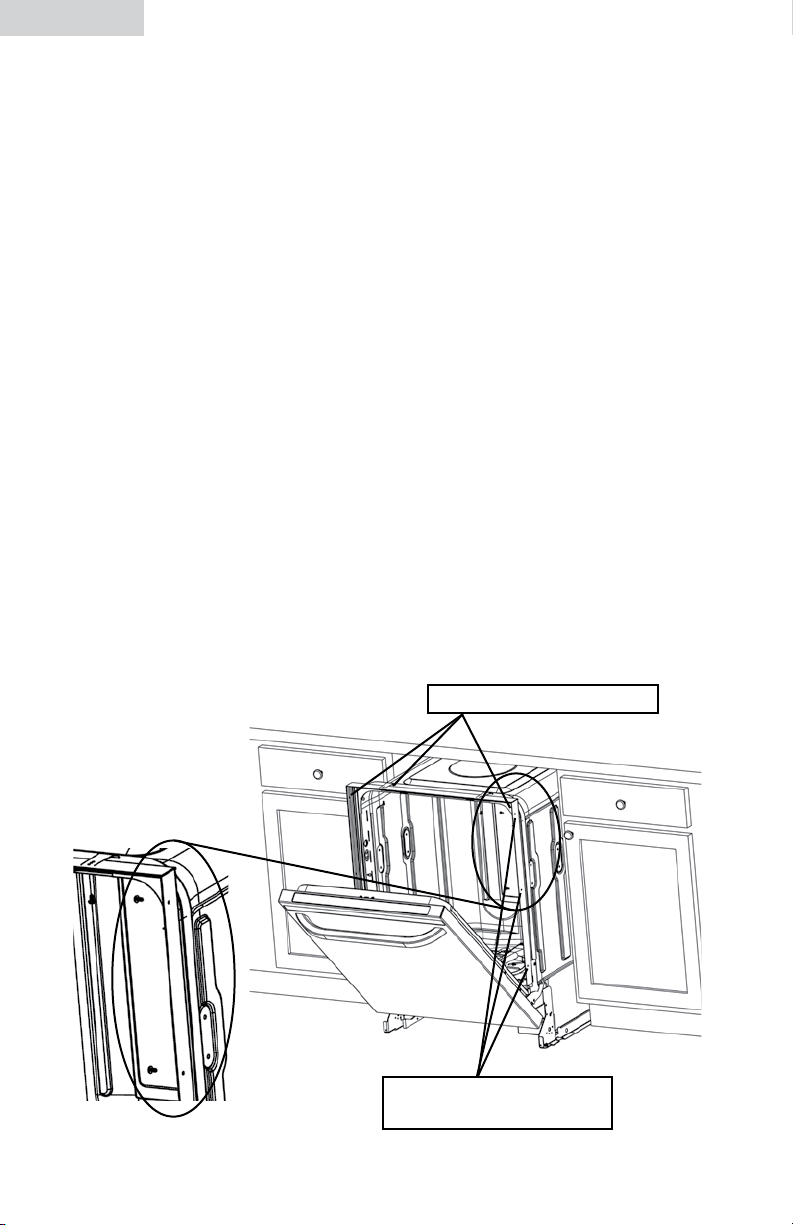
6. Stand dishwasher upright.
7. The dishwasher must be secured to the
cabinet. There are two brackets on top of
the dishwasher that usually can be attached
to the countertop. If this is not possible, the
brackets “M” may be moved to the sides of
the dishwasher.
If you are going to attach the dishwasher to
the countertop, skip to step 13.
If you are going to attach the dishwasher
to the sides of the cabinet, follow steps 8
through 12.
8. To remove the brackets from the top, flatten
tab “N” at back of brackets with pliers and
pull the brackets out of the slots “O”.
9. Break off the end of the bracket along the
scored line “P”.
10. Open dishwasher door and place towel
“Q” over pump assembly and spray arm
of dishwasher. This will prevent screws
from falling into pump area when securing
dishwasher to countertop.
11. Open dishwasher door and push the plastic
buttons “R” out of the side of the tub.
NOTE: Save the buttons to cover the holes
after dishwasher is installed.
12. Push bracket into slot “S” on the side of
dishwasher and bend tab in towards the side
of the dishwasher so that it keeps the bracket
in place.
17
Page 19
HELPFUL TIP:
34-1/4”
(87 cm)
min.
O
P
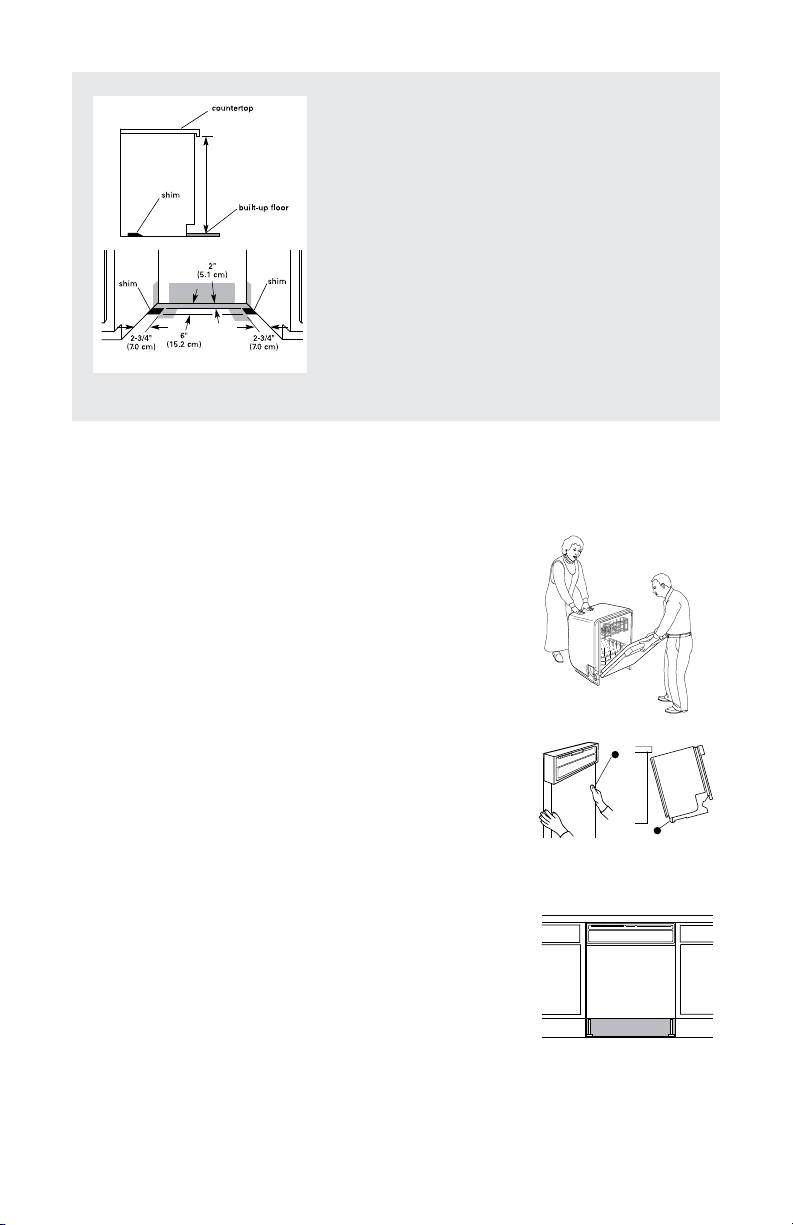
Built-up floors.
Measure height of opening from underside of
countertop to built-up floor. If the height is at least
34-1/4”(87cm) min., the dishwasher will fit into the
opening without modification to the countertop or
flooring.
Put wheels “L” in position 1 and turn the front
leveler legs until they are fully retracted. Add shims
as needed in the area shown to bring dishwasher
up to proper height. Note: Shims must be securely
attached to floor to prevent their movement when
the dishwasher is operated.
13. Check the door spring tension. With another person holding the dishwasher
to prevent it from tipping, open and close the door a few times. The door
should open and close easily.
To adjust the door spring tension, unhook the spring
“T” from the rear leg of the dishwasher. With a
5/16” nut divider or hex socket, remove the screw
“U” from the tensioner “V”. The screw can be put
into one of three holes “1”, “2”, “3”, in front leg of
dishwasher. The dishwasher is shipped with the screw
in the back hole.
If the door opened by itself, move the tensioner to
hole “2” or “3” and replace screw. Re-attach door
spring to the rear leg. Tensioners on both sides of
dishwasher should be secured at same holes.
14. Grasp the dishwasher door at the edges of the door
panel ”O”. Tilt dishwasher backwards on wheels “P”.
Move dishwasher close to cabinet opening. Do not
push on front of panel or on console- they may dent.
15. If dishwasher has a power supply cord, insert power
supply cord into hole cut into cabinet.
16. Check that water line is on the left side of opening
and drain hose is near the center of the hole in the
cabinet. If using direct wire, check that it is on the
right side of opening.
17. Carefully move dishwasher completely into cabinet
opening. Do not kink or pinch cropper tubing, drain
hose, power supply cord or direct wire between dishwasher and cabinet. Center the dishwasher in the
opening.
18
Page 20
English
Y
Z
BB
AA
CC
HELPFUL TIP: Built-up floors.
Tilt dishwasher backward to move into opening.
Once in position, support front of dishwasher by
lowering or shimming front feet.
18. Remove cardboard from under dishwasher.
HELPFUL TIP:
It is okay if dishwasher fits tightly into cabinet opening. Do not remove
insulation blanket- it reduces the sound level.
19. Align front of dishwasher door panel “Y” with cabinet doors
“Z”. You may need to adjust alignment to for the appropriate
appearance.
HELPFUL TIP:
Prop up one side of frame to hold dishwasher up
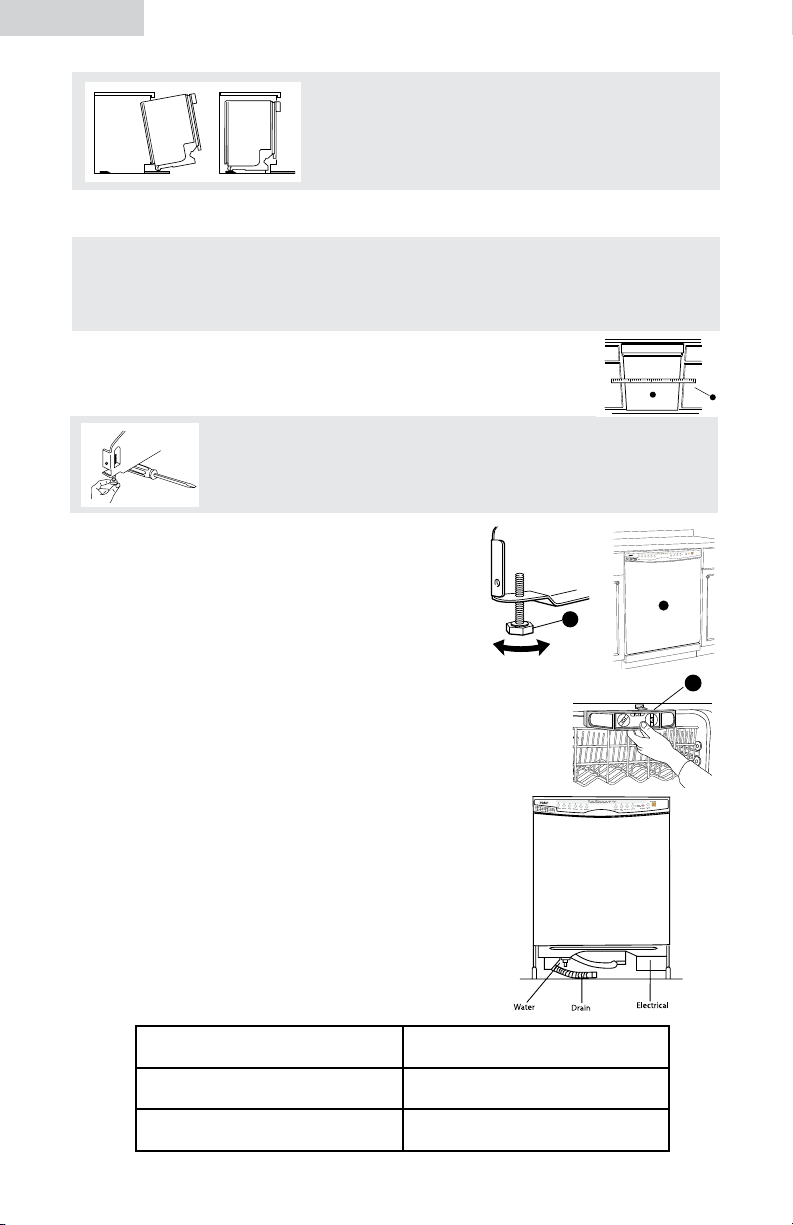
20. Check that leveling legs “AA” are firmly
against the floor. Close and latch the door,
and place level against the front panel “BB”.
Check that dishwasher is plumb. Adjust
leveling legs or add shims under rear wheels
until dishwasher is level. Note: Shims must
be securely attached to floor to prevent their movement
when the dishwasher is operated. Repeat for other side of
dishwasher. Place level against top front opening of tub
“CC”. Check that dishwasher is level from side to side. If
dishwasher is not level, adjust front legs up or down until
dishwasher is level.
off floor when adjusting front legs.
CONNECT DISHWASHER
Electrical connection
Check electrical requirements (see page 8). You must:
• Have the correct electrical supply and
recommended grounding method.
• Check that power supply is disconnected.
If you are: Use steps:
19
direct wiring 1-4
using a power supply cord 1a
Page 21

DIRECT WIRE METHOD
A
G
Black
WARNING
Electrical Shock Hazard
Electrically ground dishwasher. Connect ground wire to
green ground connector in terminal box. Do not use
an extension cord. Failure to ground dishwasher can
result in death, fire, or electrical shock.
1. Install strain relief and route direct wire so that it does not
touch dishwasher motor or lower part of dishwasher tub. Pull
direct wire “A” through hole in terminal box.
HELPFUL TIP:
Select the proper size twist-on connectors to connect your
household wiring to 16-gauge dishwasher wiring.
Insert wire ends into twist-on connector. Do not pre-twist
bare wire. Twist connector. Gently tug on wires to be
sure both are secured.
English
2. Connect the wire “B” as follows using twist-on
connectors “C” sized to connect direct wire to
16-gauge dishwasher wire:
From bare ground wire “D” into a U-shaped hook.
Wrap ground wire hook clock- wise around ground
connector “E” and under the washer “F”. Securely
tighten ground connector “E” and under the washer
“F”. Securely tighten ground connector “E”. Do not untie knot in the wires.
3. Tighten clamp connector or conduit connector screws “G”.
4. Reinstall terminal box cover “H” with wires inside
terminal box. Go to step 5. The cover must be outside the
box on the right side. Make sure no wires are pinched by
cover. Do not leave the box without the cover.
20
Page 22
English
1a. POWER SUPPLY CORD METHOD
WARNING
Electrical Shock Hazard
Plug into a grounded 3 prong outlet.
Do not remove ground prong.
Do not use an adapter.
Do not use an extension cord.
Failure to follow these instructions can result in death,
fire, or electrical shock.
Check that power supply cord does not touch dishwasher
motor or lower part of dishwasher tub. Go to step 5.
WATER CONNECTION
HELPFUL TIP:
Compression fittings:
1. Slide nut “I” about 1 inch (2.5 cm) onto copper tubing “J”.
2. Slide ferrule “K” onto the tubing. Do not position ferrule on the end of the
tubing.
3. Put the tubing into the elbow “L” as far as it will go.
4. Slide the nut and ferrule forward and start the
nut onto the elbow threads “M”. Be careful when
handling and positioning the copper tubing as it
bends and kinks easily.
5. To prevent vibration during operation, route the water
supply line so that it does not touch the dishwasher base,
frame or motor.
Make sure the water line stays within the shaded area
shown on page 7 when the dishwasher is installed in the cabinet.
With copper tubing “J” pushed into compression fitting as far as it will go, use an
adjustable wrench and tighten compression fitting nut “I” to elbow “L” on water
inlet valve.
6. Place Paper towel under elbow. Turn on water supply and check for leaks.
21
Page 23
DRAIN CONNECTION
A
7. To help minimize vibration noise, route drain
hose to avoid contact with motor. door springs,
water line, cabinet, flooring or the edge of the hole
where it passes though the cabinet. Do not remove
drain loop “N” from side of dishwasher.
8. Place the smaller drain hose clamp “N” onto the
small end of the drain hose “O”. Remove the plug
from the connector”P”.
9. Push the drain hose into the connector “P” up to
the rib “O” on the drain hose.
10. Use pliers to open clamp “N” and slide clamp
onto connector “P” between ribs “O” on connector.
SECURE DISHWASHER
WARNING
Tip Over Hazard
Do not use dishwasher until completely installed. Do
not push down on open door. Doing so can result in
serious injury.
English
1. Open dishwasher door and place towel “A”
over pump assembly and spray arm of dishwasher.
This will prevent screws from falling into pump area
when secure dishwasher to countertop.
2. Check that dishwasher is still level and centered.
3. Secure dishwasher to countertop with two, No.
ST4.2 x 18 Phillips-head screws “B”. The dishwasher
MUST be secured to keep it from tipping when door
is opened. Do not drop screws into bottom of the
dishwasher.
4. Open door about 3 inches (7.6 cm) and check
that space between inner door and tub is equal on
both sides. If spacing is not equal, loosen bracket
screws. If securing to sides of cabinet, replace the
plastic buttons “C”.
Check that top of door does not contact screws,
brackets, or countertop. If it does, dishwasher must
be lowered and re-elevated. Remove paper towel
from dishwasher.
22
Page 24
EnglishEnglish
INSTALLATION OF CABINET SEAL
1. The DWL 3525, 4035 and 7075 dishwasher models are equipped with a
dishwasher to cabinet seal that aids in dishwasher installation as well as noise
suppression.
2. Follow the installation instructions from the previous page with the following
exceptions:
To install the dishwasher in the cabinet opening slide the dishwasher into the
opening until it is positioned correctly both side to side and front to back. Using
the legs and rear wheels, shims if necessary, adjust the dishwasher up until the
top cabinet seal touches the underside of the countertop and the dishwasher is
level.
It may be necessary to trim the cabinet seal if it extends past the front of the
cabinet surface. To do this mark the seal at the trim point. Pull the dishwasher out
of the opening and remove the seal. Trim the seal using a utility knife or saw.
Reposition the dishwasher in the cabinet opening making sure it is in contact with
the bottom of the countertop, level and centered in the opening.
Screw the top seal to the bottom side of the counter top.
Predrill three holes into each side seal and cabinet. Screw each side seal to the
cabinet.
Check that the door does not contact any of the screws, seals or countertop. If it
does reposition and level the dishwasher so there is clearance.
dishwasher to cabinet seal
predrill 3 holes in each
side seal and cabinet
23
Page 25
EnglishEnglish
A
INSTALL ADDITIONAL SOUND INSULATION
1. The DWL3525, DWL4035 and the DWL7075 model dishwashers are
equipped with additional sound insulation. See the diagram at the lower left for
model specific sound insulation parts.
2. Orient the sound pad “D” as shown and insert it under the door. Push the
pad against the dishwasher frame. The top surface of the pad should be in
contact with the bottom of the dishwasher tub. Make sure the pad is not touching
nearby components.
3. Orient the sound mat “E” as shown and fold the sound mat at the top single
fold groove. Push the mat against the sound pad “D” and fold at one of the lower
fold grooves so the mat contacts the bottom of the dishwasher tub and the floor.
D
E
24
Page 26
English
CHECK OPERATION
1. Read the Use and Care Guard included with your dishwasher.
2. Check that all parts have been installed and no steps were skipped. Check
that you have all the tools you used.
3. At fuse box or circuit breaker, turn on electrical power supply to dishwasher.
Start dishwasher and allow it to complete the shortest wash cycle. After
the first two minutes, unlatch door, wait five
seconds, then open door. Check to see that
there is water in the bottom of the dishwasher
and that there are no water leaks.
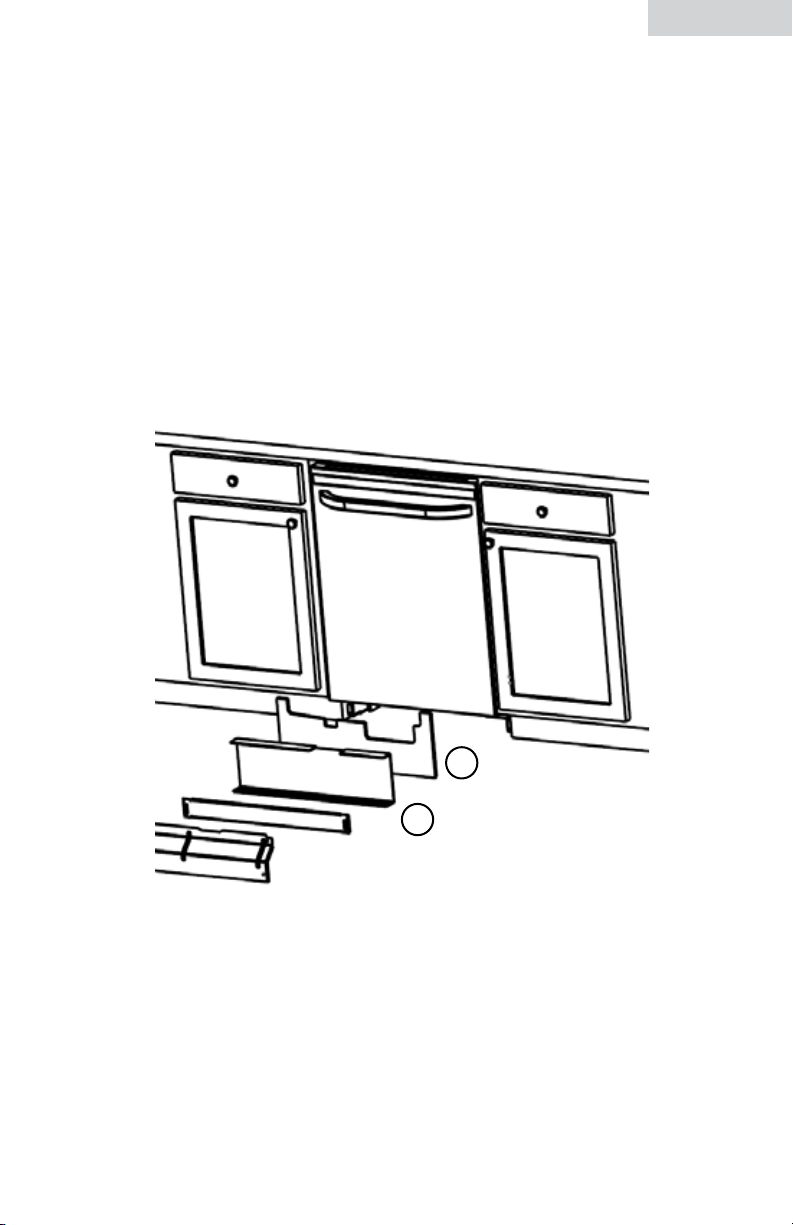
4. Check that grounding clip “A” is attached to
the lower panel. Place the lower panel “B”
behind the access panel “C”. Some models
have insulation “D” on the access panel which
must fall behind the insulation “E” on the lower
panel. Hold the two panels together and place
them against dishwasher leg.
Reinstall the screws through the holes in the
access panel and the slots in the lower panel.
Install right side screw first. Check that the
lower edge of the lower panel contacts the
floor. Tighten the screws.
If dishwasher does not operate:
• Has the circuit breaker tripped or the house fuse blown?
• Is the door closed tightly and latched?
• Has the cycle been set correctly to start the dishwasher?
• Is the water turned on?
25
Page 27

(DWL3025)
English
(DWL3525/4035/7075)
26
Page 28

English
27
Page 29

Español
ÍNDICE DE CONTENIDOS
PAGE
PRECAUCIONES DE SEGURIDAD ............................................................... 2
Antes de usar su lavavajillas ...................................................................... 3
INSTRUCCIONES DE INSTALACIÓN PARA LAVAVAJILLAS EMPOTRADO
QUÉ DEBO TENER PARA INSTALAR EL LAVAVAJILLAS..............................5-11
Herramientas, piezas y materiales ...........................................................5-6
Requisitos para el gabinete ....................................................................... 7
Dimensiones del gabinete ........................................................................ 11
QUÉ DEBO HACER ANTES DE INSTALAR EL LAVAVAJILLAS ................ 12-14
Preparar el gabinete ............................................................................... 12
Preparar el lavavajillas ............................................................................ 16
CÓMO INSTALO EL LAVAVAJILLAS ......................................................19-25
Conectar el lavavajillas ........................................................................... 21
Asegurar el lavavajillas ........................................................................... 24
Instale el sello de la cabina ...................................................................... 25
Instale el aislante sano adicional .............................................................. 26
Controlar el funcionamiento ..................................................................... 27
1
Page 30

Español
PRECAUCIONES DE SEGURIDAD
¡Advertencia! – Para reducir el riesgo de incendio, descarga
eléctrica o lesiones a las personas, siempre ponga en práctica las
precauciones de seguridad básicas, incluyendo las siguientes:
1. Lea todas las instrucciones antes de usar el artefacto.
2. Use el lavavajillas sólo para su función específica.
3. Use sólo detergentes o agentes de enjuague recomendados para el uso en
lavavajillas y manténgalos lejos del alcance de los niños.
4. Cuando cargue los objetos para lavar:
1) Ubique los objetos cortantes de manera tal que no sea probable que
dañen el sistema de cierre de la puerta;
2) Ubique los cuchillos filosos con los mangos hacia arriba para reducir el
riesgo de cortes.
5. No lave objetos plásticos a menos que tengan la indicación “para uso en
lavavajillas” o frase equivalente. En el caso de los objetos de plástico que no
cuenten con esta indicación, revise las recomendaciones del fabricante.
6.
No toque el elemento calentador durante el uso o inmediatamente después del uso
7. No ponga en funcionamiento el lavavajillas a menos que todos los paneles
de cerrado estén correctamente en su lugar.
8. No manipule indebidamente los controles.
9. No realice un mal uso ni se siente ni se pare sobre la puerta, la tapa o las
rejillas para vajilla del lavavajillas.
10. Para reducir el riesgo de lesiones, no permita que los niños jueguen con el
lavavajillas.
11. En ciertas condiciones, se puede producir gas hidrógeno en un sistema de
agua caliente que no ha sido usado durante dos semanas o más. EL GAS
HIDRÓGENO ES EXPLOSIVO. Si el sistema de agua caliente no ha sido
usado durante un período de esa magnitud, antes de usar el lavavajillas
abra los grifos de agua caliente y deje que fluya el agua de cada una de
ellas durante varios minutos. De esta manera se liberará el gas hidrógeno
que pueda estar acumulado. Debido a que el gas es inflamable, no fume ni
use una llama abierta durante este período.
12. Quite la puerta o la tapa del compartimiento de lavado cuando retire un
lavavajillas viejo o lo descarte.
.
Gracias por su compra de este
producto Haier. Este manual de fácil
consulta lo guiará para obtener el
Modelo #
mejor servicio de su lavaplatos.
Recuerde registrar aquí los números
de serie y modelo de la máquina.
Serie #
Los encontrará en una etiqueta en el
respaldo del lavaplatos.
Fecha de Compra
Adjunte aquí su recibe de compra.
Lo necesitará para obtener servicio de garantía.
2
Page 31

Español
ANTES DE USAR SU LAVAVAJILLAS
IMPORTANTE: LEA ESTAS INSTRUCCIONES Y CONSÉRVELAS
De esta manera:
• La instalación será más fácil.
• En el futuro le ayudará si tiene alguna pregunta.
• Le ayudará si hay una inspección eléctrica.
Llame a su proveedor si tiene alguna pregunta o necesita servicio de
mantenimiento. Cuando lo llame, deberá tener los números de modelo y de serie
del lavavajillas.
Éste es el símbolo de alerta de seguridad.
Este símbolo le advierte sobre peligros potenciales que pueden lesionarlo a usted
o a los demás gravemente.
Todos los mensajes de seguridad siguen al símbolo de alerta de
seguridad y tienen la palabra “PELIGRO” o “ADVERTENCIA”
(Vea a continuación).
PELIGRO
PUEDE RESULTAR GRAVEMENTE
LESIONADO SI NO SIGUE LAS
INSTRUCCIONES INMEDIATAMENTE.
ADVERTENCIA
PUEDE RESULTAR GRAVEMENTE LESIONADO SI
NO SIGUE LAS INSTRUCCIONES.
Todos los mensajes de seguridad le dirán cuál es el peligro potencial, cómo
reducir las posibilidades de lesiones y qué puede suceder si no se siguen las
instrucciones.
3
Page 32

Español
USTED DEBE
• Abrir la puerta del lavavajillas con cuidado mientras alguien sostiene la parte
de atrás del lavavajillas. Quitar los materiales de embalado y la rejilla inferior.
Cerrar la puerta del lavavajillas. Trabar la puerta del lavavajillas.
• Instalar el lavavajillas como se especifica en estas instrucciones.
• Contar con todo lo necesario (herramientas, materiales, piezas) para instalar el
lavavajillas correctamente.
• Ponerse en contacto con una persona calificada para que lleve a cabo la
instalación. La instalación debe ser realizada por un técnico de servicio de
mantenimiento calificado. El lavavajillas debe estar instalado de forma tal que
cumpla con todos los códigos y reglamentaciones locales en relación con las
conexiones eléctricas y de tuberías.
4
Page 33

HERRAMIENTAS Y MATERIALES NECESARIOS
TODAS LAS INSTALACIONES
A. Pinzas
B. Destornillador Phillips
Español
C. Llave fija de ”
D. Cinta métrica o regla
E. Llave inglesa de 10” que tenga una abertura potencial de entre 1 y ”
(2,9cm.)
F. Destornillador de punta plana
G. Guantes
H. Cuchillo de uso general
I. 2 conectores para enroscar, que tengan el tamaño apropiado para conectar
la instalación eléctrica de su casa con la instalación eléctrica del lavavajillas
calibre 16
J. Un nivel pequeño
K. Gafas de seguridad
L. Un codo de 90º con rosca externa (NPT) de ” (0,9cm) en un extremo. (El
otro extremo debe acoplarse con su suministro de agua.)
5
Page 34

English
IN ADDITION FOR NEW INSTALLATIONS
Q. Electric drill with
R.
”, ”and 1 ” hole saw bits
S. Small tubing cutter
T. Wire stripper
U. 1
”- 2” screw-type clamp if
connecting to waste-tee
V. Copper tubing (
” recommended) or flexible strainless steel braided fill line
W. Clamp connector or conduit connector to fit a
”(2.2cm) diameter hole
PARTS SUPPLIED
A. 2 drain hose clamps
1-large
1-small
E
F
D
C
Español
M. Linterna
N. Cinta de teflón® o compuesto para uniones de tuberías
O. Cacerola poco profunda
P. Provisión de cuñas (si se instala con sobrepiso)
ADEMÁS PARA INSTALACIONES
NUEVAS
Q. Taladro eléctrico con
R. brocas para sierra perforadora de
”, ” y 1”
S. Cortador de tubos pequeño
T. Pelacables
U. Abrazadera tipo tornillo de 1” - 2” si se conecta con conexión en T al
tubo de desperdicios
V. Tubería de cobre (se recomienda que sea de ”) o con línea de relleno
trenzada de acero inoxidable flexible
W. Conector de abrazadera o conector de conducto que se acople en un
agujero de ” (2,2cm.) de diámetro
PIEZAS QUE SE PROPORCIONAN
A. 2 abrazaderas para manguera de desagüe
1 grande
1 pequeña
B. 2 tornillos penetrantes de la Philip-pista 4.2 x 18
C. 7 tornillos penetrantes de la Philip-pista 3.5 X 13
D. Manguera de desagüe
E. Modelos de la pista de los sonidos (DWL3525, 4035 y 7075 solamente)
F. Sound Mat (DWL4035 and 7075 models only)
Asegúrese de que todas estas piezas estén incluidas.
6
Page 35

Español
REQUISITOS PARA EL GABINETE
No coloque tuberías de desagüe o instalaciones eléctricas en lugares en los que
puedan interferir con el motor o las patas del lavavajillas o tocarlos.
El lugar donde se instalará el lavavajillas debe permitir que quede espacio libre
entre el motor y el piso.
No instale el lavavajillas sobre pisos alfombrados.
Proteja el lavavajillas y las tuberías de agua conectadas al lavavajillas para que
no se congelen. Los daños producidos por congelamiento no están cubiertos por
la garantía.
REVISE EL LUGAR DONDE SE INSTALARÁ EL LAVAVAJILLAS. EL
LUGAR DEBE CUMPLIR CON LO SIGUIENTE
• Fácil acceso al agua, la electricidad y el desagüe.
• Carga conveniente
• Si se ubica en una esquina se necesita un área despejada con un mínimo de 2”
(5,1cm.) entre el costado de la puerta del lavavajillas y la pared o gabinete.
• Abertura cuadrada para un funcionamiento y apariencia adecuados.
• Frente del gabinete perpendicular al piso.
• Piso parejo. Si el piso adelante de la abertura no está al mismo nivel que el
piso en la parte de atrás de la abertura, puede ser necesario agregar cuñas
para nivelar el lavavajillas.
Nota: Las cuñas deben estar pegadas
cuidadosamente al piso para evitar que
se muevan cuando el lavavajillas esté
funcionando. Si el lavavajillas no será usado
durante un tiempo o en un lugar donde
pueda congelarse, haga que personal de
reparaciones autorizado lo acondicione
para el invierno. Asegúrese de que las
tuberías, cables y la manguera de desagüe
se encuentren en la zona sombreada como se
muestra en el diagrama. Consulte la página 10 para ver las dimensiones.
CONSEJO ÚTIL:
Si el piso en la abertura del gabinete es desparejo (por ejemplo: piso de
baldosas solamente en una parte cerca del gabinete) deberá tener especial
cuidado al medir las dimensiones y nivelar el lavavajillas.
7
Page 36

Español
ELECTRICIDAD
Es responsabilidad del usuario ponerse en contacto con un electricista calificado
para asegurarse de que la instalación eléctrica sea adecuada y cumpla con
todos los códigos y reglamentaciones nacionales y locales.
Usted debe tener:
• Suministro eléctrico de 120 voltios, 60Hz, sólo de corriente alterna, con
fusibles de amperio de 15 o de 20.
• SOLAMENTE CABLES DE COBRE.
Recomendamos:
• Un fusible retardador o interruptor automático.
• Un circuito separado.
SI SE REALIZA UNA INSTALACIÓN ELÉCTRICA DIRECTA PARA
EL LAVAVAJILLAS
• Use cable de cobre flexible, protegido o recubierto por
material no metálico con cable a tierra que cumpla con
los requisitos de instalación eléctrica de los códigos y
reglamentaciones locales.
• Use el método aliviador de tensión proporcionado con la caja de empalme de
cables de la casa o instale un conector de abrazadera con certificación UL y
CSA conectado con la caja de empalme de cables de la casa. Si usa un canal
de cables, use un conector para canal de cables con certificación UL y CSA.
CUANDO CONECTE EL LAVAVAJILLAS A UN CABLE DE
SUMINISTRO DE ENERGÍA
• Use un cable de suministro de energía
con certificación UL, calibre 16, de tres
conductores, que cumpla con todos los códigos
y reglamentaciones locales. La longitud máxima
del cable de suministro de energía es de 6 pies
(1,8m).
• Es necesario un conector de abrazadera que calce
en un agujero con un diámetro de ” (2,2cm.)
para asegurar el cable de suministro de energía a
la caja terminal del lavavajillas.
• El cable de suministro de energía debe enchufarse
en un tomacorriente con conexión a tierra con
tres entradas, ubicado en el gabinete al lado de
la abertura del lavavajillas. El tomacorriente debe
cumplir con todos los códigos y reglamentaciones
locales.
8
Page 37

Español
AGUA
USTED DEBE TENER
• Un suministro de agua caliente con una presión de agua de entre 20 y 120
libras por pulgada cuadrada (entre 138 y 862 kilopascales).
• Se recomienda que la temperatura mínima del agua que ingresa al lavaplatos
sea de 120º F (49º C).
• Tubería con diámetro exterior de ” (0,9cm) con ajuste de compresión o con
línea de relleno trenzada de acero inoxidable flexible (se
cuenta con la opción del tubo de plástico con un mínimo de
” (1.3cm), pero no es lo recomendable).
• Un codo de 90º con rosca externa (NPT) de ” (0.9cm)
en un extremo. No suelde a menos de 6” (15,2 cm.) de la
válvula de entrada de agua.
DESAGÜE
USTED DEBE
• Usar la manguera de desagüe
nueva que viene con su
lavavajillas. Si no es adecuada,
use una manguera de desagüe
nueva con una longitud máxima
de 12 pies (3,7 m.) que
cumpla todas las normas de
evaluación de los Fabricantes de
Electrodomésticos Estadounidenses
(AHAM, por sus siglas en inglés) y
de la Asociación Internacional de
Oficiales Plomeros y Mecánicos
(IAPMO, por sus siglas en inglés),
que sea resistente al calor y al
detergente y se acople al conector
de desagüe de su lavavajillas.
• Contar con un circuito de desagüe alto de 30 pulgadas (50,8cm.) por encima
de la base o suelo.
• Conectar la manguera de desagüe a la conexión en T al tubo de desperdicios
o a la entrada del triturador por encima del tubo de desagüe de las tuberías
de la casa y a 20 pulgadas (50,8cm.) como mínimo por encima del suelo.
9
Page 38

Español
• Usar un respiradero en la línea de desagüe si la manguera de desagüe está
conectada a tuberías de la casa a menos de 20 pulgadas (50,8cm.) por
encima de la base o suelo.
• Usar adaptadores para la línea de desagüe con un diámetro interno mínimo
de ” (1.3cm).
10
Page 39

DIMENSIONES DEL GABINETE
Español
Corte las aberturas en el área sombreada de las paredes o del piso del gabinete
según lo especificado en carta:
ABERTURA PARA DIÁMETRO
Suministro de agua ” (1.3cm)
Desagüe 1” (3.8cm)
Cable directo ” (1.9cm)
Cable de suministro de energía 1” (3.8cm)
* Medida desde el punto más bajo en la parte oculta de la encimera. Se puede
reducir a 34 ” (86.7 cm) sacándole las patas ajustables al lavavajillas.
** Medida mínima desde el punto más angosto de abertura.
*** Puede incrementarse a 6” (17,5cm.) si la altura de la abertura es
34” (87,6cm.) en el punto más bajo.
11
Page 40

Español
ADVERTENCIA
Peligro de Descarga Eléctrica
Desconecte la energía eléctrica en la caja de fusible o
interruptor automático antes de instalar el lavavajillas.
Si no se cumple con este paso se corre riesgo de muerte o
descarga eléctrica.
No utilice cable de prolongación ni enchufe adaptador con este artefacto.
PREPARAR EL GABINETE
1. Desconecte el suministro de energía. Desconecte el agua. Póngase guantes y
gafas de seguridad.
2. Si usted está reemplazando un
lavavajillas:
• Controle que el suministro de agua “A”
llegue hasta la parte posterior izquierda de
la abertura, donde se realizará la conexión
de agua.
• Controle que el suministro directo “B”
llegue hasta la parte posterior izquierda de la abertura, donde se realizará la
conexión eléctrica.
Si el suministro de agua y el cable directo llegan a la abertura, pase al paso 10,
página 13.
Si usted está instalando un lavavajillas nuevo, siga todos los
siguientes pasos:
Electricidad
Cumpla todos los códigos y reglamentaciones nacionales y locales para realizar
el suministro eléctrico al gabinete.
Si usted está: Pasos de uso:
Realizando una instalación
eléctrica directa
Usando un cable de
suministro de energía
112
3, 4 and 5
3a and 4a
Page 41

Español
E
CONSEJO ÚTIL:
La instalación eléctrica del lavavajillas será más fácil si usted ingresa el cable a
la abertura del gabinete desde el lado izquierdo.
3. MÉTODO PARA CABLE DIRECTO
Haga un agujero de ” (1,9cm.) “C” en el costado,
parte de atrás o piso del gabinete a la derecha.
Se muestran ubicaciones opcionales. Gabinete de
madera: Lije el agujero hasta que esté liso.
3a. MÉTODO PARA EL CABLE DE
SUMINISTRO DE ENERGÍA
Corte un agujero de 11/2 pulgadas (3,8cm) “D” en
la parte trasera o lateral del gabinete de la derecha.
Se muestran ubicaciones opcionales. Gabinete de
madera: lije el agujero hasta que esté liso.
Se muestran ubicaciones opcionales. Gabinete de
madera: Lije el agujero hasta que esté liso.
4. Pase el cable por la caja de conexiones
eléctricas de la casa. Use el método aliviador de
tensión provisto con la caja de conexiones. Si no se
proporciona aliviador de tensión, instale un conector
de abrazadera con certificación UL y CSA para el cable flexible. Cuando instale
un canal de cables, agregue un conector para canal de cables con certificación
UL y CSA a la caja de conexiones.
4a. Instale un receptáculo en la pared con conexión a tierra de tres entradas
“E” en el gabinete cerca de la abertura del lavavajillas. Pase al
paso 6.
5. Pase el otro extremo del cable por el agujero del gabinete. El
cable debe extenderse hasta la parte del frente a la izquierda de
la abertura del gabinete. Pase al paso 6.
13
Page 42

Español
SUMINISTRO DE AGUA
CONSEJO ÚTIL:
Si ubica el suministro de agua en la parte izquierda de la abertura
del gabinete, la conexión de agua será más fácil.
6. Haga un agujero mínimo de ” (1,3 cm.) “F” en el
costado, la parte de atrás o el piso del gabinete a la
izquierda. Se muestran las ubicaciones opcionales. (El
agujero “F” está aproximadamente 1-” más alto que el
agujero “C” o el agujero “D”)
7. Es necesario medir la longitud total de la tubería
de cobre “G”. Una la tubería de cobre al suministro
de agua con la válvula de cierre manual. Ingrese
cuidadosamente la tubería de cobre en el agujero en el
gabinete (la tubería de cobre se dobla y se tuerce con facilidad) hasta que esté
lo suficientemente dentro de la abertura del gabinete como para conectarla a la
entrada del lavavajillas en la parte delantera a la izquierda del lavavajillas.
8. Gire la válvula de cierre “H” a la posición “ON” (ENCENDIDO). Vierta agua
en un balde para deshacerse de las partículas que puedan obstruir la válvula de
entrada.
9. Gire la válvula de cierre a la posición “OFF” (APAGADO)
14
Page 43

MANGUERA DE DESAGÜE
P
10. Haga un agujero de 1-1/2” (3,8cm.) de diámetro
en la pared o el piso del gabinete del lado de la
abertura más cerca del fregadero.
11. Conecte una manguera de desagüe a una
conexión en T al tubo de desperdicios o triturador de basura con uno de los
siguientes métodos:
11a.
un triturador de
basura
sin triturador de
basura
un respiradero
sin respiradero* 11c.
un respiradero 11b.
sin respiradero* 11d.
*Se recomienda un respiradero
11a. TRITURADOR DE BASURA Y RESPIRADERO
1. Quite la tapa ciega del triturador. Corte un extremo
de la manguera de desagüe “I” si es necesario (no
corte la parte acanalada).
2. Una la manguera de desagüe al respiradero “J” con
la abrazadera grande tipo resorte “K”. Si se cortó la
manguera de desagüe, use una abrazadera tipo tornillo de
1- a 2”
(3,8 a 5cm.)*.
Español
3. Use un conector de manguera de goma* “L” con abrazaderas tipo resorte o
tornillo* “M” para conectar el respiradero a la entrada del triturador “N”. La
conexión “N” DEBE realizarse antes del tubo de desagüe “O” y al menos 20”
(50,8cm.) por encima del piso en el que se instalará el lavavajillas. Pase al
paso 12.
11b. SIN TRITURADOR DE BASURA & RESPIRADERO
1. Corte un extremo de la manguera de desagüe “I” si
es necesario (no corte la parte acanalada).
2. Una la manguera de desagüe al respiradero “J” con
la abrazadera grande tipo resorte. Si se cortó la
manguera de desagüe, use una abrazadera tipo tornillo de
1- a 2” (3,8 a 5cm.)*.
3. Use un conector de manguera de goma* “L” con abrazaderas tipo resorte o
tornillo* “M” para conectar el respiradero a la conexión en T al tubo de
desperdicios “P”. La conexión “P” DEBE realizarse antes del tubo de
15
Page 44

Español
desperdicios “O” y por encima del piso a entre 15-” (40cm.)
y 39-” (100cm.); al menos 20” (50,8cm.) por encima del
piso en el que se instalará el lavavajillas. Pase al paso12.
11c. TRITURADOR DE BASURA, SIN RESPIRADERO
1. Quite la tapa ciega del triturador. No corte el extremo de
la manguera de desagüe.
2. Una la manguera de desagüe “I” a la entrada del triturador “N” con la
abrazadera grande tipo resorte “K”. La conexión “N” DEBE realizarse antes
del tubo de desagüe “O” y al menos 20” (50,8cm.) por encima del piso en el
que se instalará el lavavajillas. Pase al paso 12.
La manguera de desagüe debe estar enroscada y fijada de
3.
manera segura debajo de la encimera antes de que se dirija
hacia el desagüe. La curva de la manguera debe estar al
menos 30 pulgadas (76.8cm) por encima del piso.
11d.
SIN TRITURADOR DE BASURA &
RESPIRADERO
1. Corte un extremo de la manguera de desagüe “I” (no corte la
parte acanalada).
2. Una la manguera de desagüe a la conexión en T al tubo de desperdicios “P”
con una abrazadera tipo tornillo* de 1- a 2” (3,8 a 5cm.) “M”. La conexión
“P” DEBE realizarse antes del tubo de desperdicios “O” y al menos
cm.) por encima del piso en el que se instalará el lavavajillas. Pase al paso 12.
3.
La manguera de desagüe debe estar enroscada y fijada de manera segura
debajo de la encimera antes de que se dirija hacia el desagüe. La curva de la
manguera debe estar al menos 30 pulgadas (76.8cm) por encima del piso.
* Piezas disponibles en las ferreterías locales.
20” (50,8
CONSEJO ÚTIL:
Para reducir la vibración de la manguera, manténgala alejada del piso y del
borde del agujero por el que pasa a través del gabinete.
Inserte la manguera de desagüe “I” en un agujero hecho en
el gabinete y diríjalo hacia el centro, atrás de la abertura
donde se realizará la conexión de desagüe.
PREPARAR EL LAVAVAJILLAS
ADVERTENCIA
Consejo en cuanto al peligro
No use el lavavajillas hasta que no esté completamente
instalado. No empuje hacia abajo sobre la puerta abierta.
De esta manera se expone a lesiones graves.
1
16
Page 45

Español
A
B
C
A
D
E
F
F
G
H
I
J
K
ADVERTENCIA
PELIGRO DE PESO EXCESIVO
Dos personas deben mover e instalar el lavavajillas. Si no se cumple
con este requisito se expone a lesiones en las espaldas o de otro tipo.
1. Tome los costados de la puerta del lavavajillas y ubique el
lavavajillas sobre su parte posterior.
2. Quite dos tornillos “A” que adhieren el panel de acceso “B”
y el panel inferior “C” al lavavajillas usando una llave de
dado hexagonal de
Phillips. Quite los paneles y ubique los paneles a un lado en
un lugar seguro. Asegúrese de que el sujetador para conexión
a tierra “D” esté unido al panel inferior.
3. Aplique compuesto para uniones de tuberías “E” al codo
de ajuste de 90º “F” y conéctelo a la válvula de entrada
de agua “G”. Ajuste el codo hasta que se amolde,
asegurándose de que esté de frente a la parte de atrás.
4. Quite la cubierta de la caja terminal “H”. Jale los cables del
artefacto “I” por el agujero en la caja terminal. No desate el
nudo en los cables.
Si usted está realizando una instalación eléctrica directa:
instale un conector de abrazadera con certificación UL y
CSA “J” en la caja terminal. Si usa un canal de cables,
use un conector para canal de cables con certificación UL
y CSA. Si está instalando un juego de cables de suministro
de energía, hágalo y siga las instrucciones del juego.
Ponga cartón debajo del lavavajillas hasta que lo instale. El cartón le ayudará a
”, un aprietatuercas o un destornillador
CONSEJO ÚTIL:
proteger el piso durante la instalación.
5. Mida la altura de la abertura del gabinete desde la parte inferior de la encimera
hasta el piso donde se instalará el lavavajillas “K” (usted necesita el punto más bajo).
Consulte el cuadro para obtener esa altura de la abertura. Verifique el cuadro para
obtener la altura de la abertura. Coloque las rueditas “L” en la posición requerida.
Gire las dos patas niveladoras delanteras hasta la misma altura.
Si la altura mínima de espacio es de menos de 34” (86,4cm.), pueden quitarse las
patas ajustables para que haya más espacio libre. Esto permitirá que el lavavajillas
entre en un espacio de 33 4/5” (85,9cm.) de altura, pero será más difícil ubicar el
lavavajillas en la posición correspondiente. Si se quitan las rueditas, proteja el piso
cuando mueva el lavavajillas.
Altura mínima de
corte
34” (86.4 cm) 1 10
34 1/4” (87 cm) 2 5
34 1/2” (87.6 cm) 3 0
Posición de las
rueditas (consulte
la ilustración)
Cantidad de
giros de la pata
delantera
17
Page 46

English
Español
6. Coloque el lavavajillas en posición vertical.
7. El lavavajillas debe asegurarse al gabinete.
Hay dos soportes en la parte superior del
lavavajillas que por lo general se fijan
a la encimera. Si esto no es posible, los
soportes “M” pueden ubicarse a los lados del
lavavajillas.
Si va a fijar el lavavajillas a la encimera,
vaya al paso 13.
Si va a fijar el lavavajillas a los lados del
gabinete, siga los pasos 8 a 12.
8. Para quitar los soportes de la parte superior,
aplane la lengüeta “N” de la parte posterior
de los soportes con pinzas y jale los soportes
para retirarlos de las ranuras “O”.
9. Separe el extremo del soporte por la línea
marcada “P”.
10. Abra la puerta del lavavajillas y ubique la
toalla “Q” sobre el montaje de la bomba
y el brazo rociador del lavavajillas. De
esta manera se evitará que caigan tornillos
al área de la bomba cuando asegura el
lavavajillas a la encimera.
11. Abra la puerta del lavavajillas y presione
los tarugos plásticos “R” para quitarlos del
costado de la tina.
NOTA: Conserve los tarugos para cubrir
los agujeros una vez que el lavavajillas esté
instalado.
12. Presione el soporte en la ranura “S” del
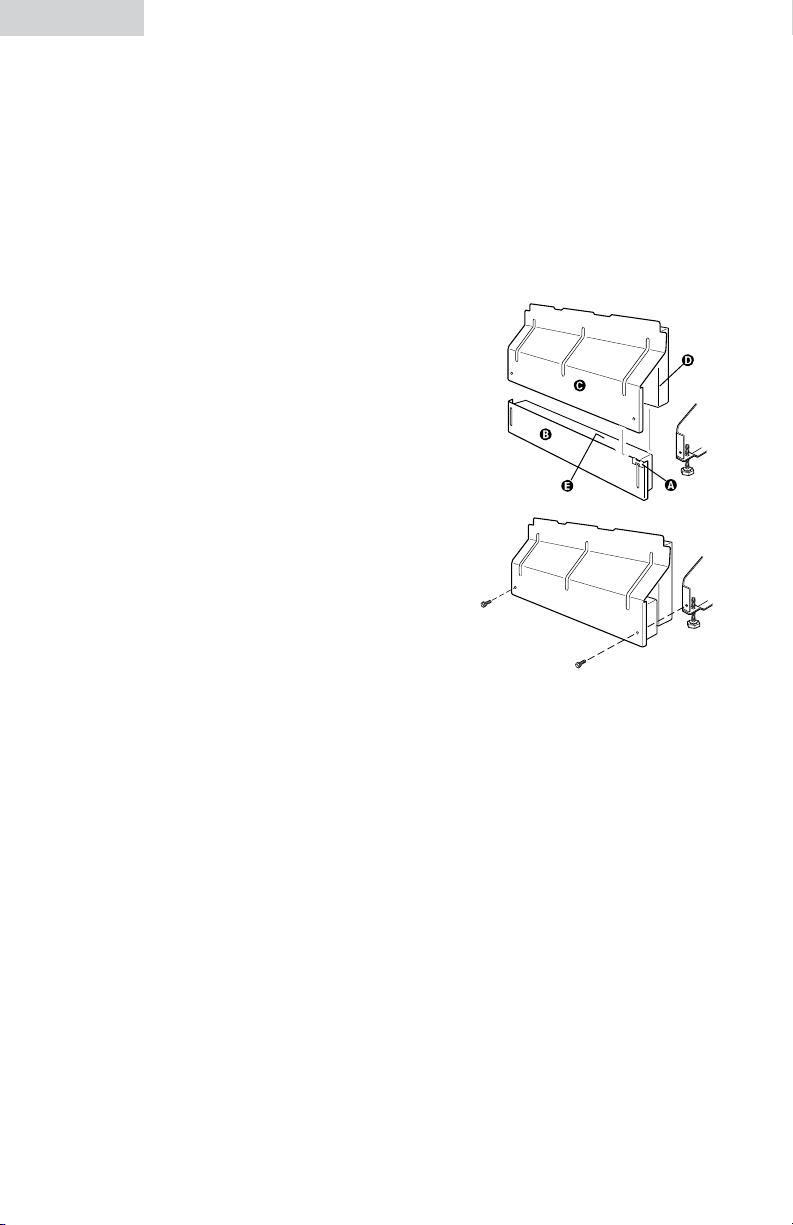
costado del lavavajillas y doble la lengüeta
hacia el costado del lavavajillas para que el
soporte se mantenga en su lugar.
18
Page 47

CONSEJO ÚTIL:
34-1/4”
(87 cm)
min.
O
P
Sobrepisos.
Mida la altura de la abertura desde la parte
inferior de la encimera hasta el sobrepiso. Si
la altura es de al menos
lavavajillas entrará en la abertura sin tener que
realizar modificaciones a la encimera o al piso.
Ponga las ruedas “L” en la posición 1 y gire
las patas niveladoras de adelante hasta que
estén completamente contraídas. Agregue
cuñas según sea necesario en el área que
se muestra para subir el lavavajillas hasta la
altura apropiada. Nota: Las cuñas deben estar
pegadas al piso para evitar que se muevan
cuando el lavavajillas esté funcionando. Las
cuñas deben estar pegadas al piso para evitar
que se muevan cuando el lavavajillas esté
funcionando.
13. Controle la tensión del resorte de la puerta.
Mientras otra persona sostiene el lavavajillas
para evitar que se incline, abra y cierre la
puerta algunas veces. La puerta debe abrirse y
cerrarse con facilidad.
Para ajustar la tensión del resorte de la puerta,
desenganche el resorte “T” de la pata trasera
del lavavajillas. Con una llave para tuercas o
llave de dado hexagonal de 5/16”, quite el
tornillo “U” del tensor “V”. El tornillo puede
colocarse en uno de los tres agujeros “1”,
“2”, “3”, en la pata delantera del lavavajillas.
El lavavajillas se envía con el tornillo en el
agujero trasero.
Si la puerta se abrió sola, pase el tensor
al agujero “2” o “3” y vuelva a colocar el
tornillo. Vuelva a fijar el resorte de la puerta a
la pata trasera. Los tensores a ambos lados del
lavavajillas deben asegurarse en los mismos
agujeros.
Español
34-1/4”(87cm) min., el
14. Tome la puerta del lavavajillas por los
bordes del panel de la puerta “O”. Incline
el lavavajillas hacia atrás sobre las ruedas
“P”. Acerque el lavavajillas a la abertura del
gabinete. No empuje el frente del panel o el
tablero, pueden abollarse.
19
Page 48

Español
Y
Z
15. Si el lavavajillas tiene un cable de suministro
de energía, inserte el cable de suministro
de energía en el agujero que se cortó en el
gabinete.
16. Controle que el suministro de agua esté del lado
izquierdo de la abertura y que la manguera de
desagüe esté cerca del centro del agujero en el
gabinete. Si usa un cable directo, controle que
esté en el lado derecho de la abertura.
17. Mueva el lavavajillas completamente hacia
dentro de la abertura del gabinete con cuidado.
No retuerza o apriete la tubería de cobre, la
manguera de desagüe, el cable de suministro de
energía o el cable directo entre el lavavajillas y
el gabinete. Centre el lavavajillas en la abertura.
CONSEJO ÚTIL:
Incline el lavavajillas hacia atrás para colocarlo
dentro de la abertura. Una vez que esté en
posición, apoye el frente del lavavajillas
bajando o acuñando las patas delanteras.
Sobrepisos.
18. Quite el cartón de debajo del lavavajillas.
CONSEJO ÚTIL:
Está bien que el lavavajillas quede con el lugar justo en la abertura del gabinete.
No quite la capa de aislamiento, ya que reduce el nivel de ruido.
19. Alinee la parte delantera del panel de la puerta del lavavajillas “Y” con las
puertas del gabinete “Z”. Puede ser necesario ajustar la alineación para que
la apariencia sea la apropiada.
20
Page 49

BB
AA
CC
20. Controle que las patas niveladoras “AA”
estén firmes contra el piso. Cierre y
trabe la puerta y ubique el nivel contra
el panel delantero “BB”. Controle que el
lavavajillas esté vertical. Ajuste las patas
de nivelación o agregue cuñas bajo las
ruedas de atrás hasta que el lavavajillas
esté nivelado. Nota: Las cuñas deben
estar pegadas al piso para evitar que se muevan cuando
el lavavajillas esté funcionando. Repita la operación
para el otro lado del lavavajillas. Ubique el nivel
contra la abertura de la parte delantera superior de
la tubería “CC”. Controle que el lavavajillas esté
nivelado de lado a lado. Si el lavavajillas no está
nivelado, ajuste las patas delanteras hacia arriba o
hacia abajo hasta que el lavavajillas esté nivelado.
CONECTAR EL LAVAVAJILLAS
Conexión Eléctrica
Revise los requisitos eléctricos (consulte
página 8).
Español
Usted debe:
• Tener el suministro eléctrico correcto y el
método de puesta a tierra recomendado.
• Controlar que el suministro de energía esté
desconectado.
Si usted está: Pasos de uso:
realizando una instalación eléctrica
directa
usando un cable de suministro de energía 1a
1-4
21
Page 50

Español
A
G
MÉTODO PARA CABLE DIRECTO
ADVERTENCIA
Peligro de descarga eléctrica
Lavavajillas con puesta a tierra eléctrica. Conecte el
cable de puesta a tierra con el conector de puesta a tierra
verde en la caja terminal. No use un cable prolongador.
Si no se realiza la puesta a tierra del lavavajillas se corre
riesgo de muerte, incendio o descarga eléctrica.
1. Instale el sujetacables y conecte el cable directo de forma tal que no toque
el motor del lavavajillas ni la parte inferior de la tina de la
unidad. Jale el cable directo “A” por el agujero en la caja de
conexiones.
CONSEJO ÚTIL:
Seleccione el tamaño apropiado de los conectores enroscables
para conectar la instalación eléctrica de su casa a la instalación
eléctrica del lavavajillas calibre 16.
Inserte los extremos del cable al conector enroscable. No tuerza
previamente el cable desnudo. Conector enroscable. Suavemente tire de los
cables para garantizar que estén seguros.
2. Conecte el cable “B” como se indica a continuación usando los conectores
para enroscar “C” con el tamaño apropiado para conectar el cable directo al
cable del lavavajillas calibre 16:
Desde un cable desnudo de puesta a tierra “D”
a un gancho con forma de U. Enrolle el cable de
puesta a tierra en el sentido de las agujas del reloj
alrededor del conector a tierra “E” y debajo de
la arandela “F”. Ajuste con firmeza el conector a
tierra “E”. Ajuste con firmeza el conector a tierra
“E”. No desate el nudo en los cables.
3. Ajuste el conector de abrazadera o tornillos del conector para
conductos portacables “G”.
Vuelva a instalar la tapa de la caja de conexiones “H” con los
4.
cables dentro de la caja de conexiones. Vaya al paso 5. La tapa
debe estar fuera de la caja en el lado derecho. Asegúrese de que la
tapa no apriete ningún cable. No deje la caja sin la tapa.
22
Page 51

1a. MÉTODO PARA EL CABLE DE SUMINISTRO DE ENERGÍA
ADVERTENCIA
Peligro de descarga eléctrica
Enchufe en un tomacorriente con conexión a tierra con tres
entradas. No quite la terminal para conexión a tierra.
No use un adaptador. No use un cable de prolongación.
Si no se cumple con estas instrucciones se corre riesgo de
muerte, incendio o descarga eléctrica.
Controle que el cable de suministro de energía no toque el
motor del lavavajillas o la parte de debajo de la tina del
lavavajillas. Pase al paso 5.
CONEXIÓN DE AGUA
CONSEJO ÚTIL:
Ajustes de compresión:
1. Deslice la tuerca “I” aproximadamente 1 pulgada (2,5cm.) en la tubería de
cobre “J”.
Español
2. Deslice la férula “K” en la tubería. No ubique la férula en el extremo de la
tubería.
3. Introduzca la tubería en el codo “L” tanto como se pueda.
4. Deslice la tuerca y la férula hacia adelante y comience a enroscar la tuerca
en la rosca del codo “M”. Tenga cuidado al manipular y poner en su lugar la
tubería de cobre, ya que se dobla y se tuerce con facilidad.
5. Para evitar la vibración durante el funcionamiento,
ubique el suministro de agua de forma tal que no toque la
base, la estructura o el motor del lavavajillas.
Asegúrese de que el suministro de agua permanezca
dentro de la zona sombreada como se muestra en la página 7 cuando se instale
el lavavajillas en el gabinete.
Con la tubería de cobre “J” insertada en el ajuste de
compresión tanto como es posible, use una llave inglesa y
acomode la tuerca del ajuste de compresión “I” con el codo
“L” en la válvula de entrada de agua.
6. Ubique una toalla de papel debajo del codo. Encienda el suministro de agua
y controle si existen filtraciones.
23
Page 52

A
Español
CONEXIÓN DE DESAGÜE
7. Para ayudar a minimizar los ruidos producidos por las
vibraciones, conecte la manguera de desagüe de manera tal
que no entre en contacto con el motor, los resortes de la puerta,
la línea de agua, el gabinete, el revestimiento del piso ni el
borde del agujero por el que entra al gabinete. No quite el
circuito de desagüe “N” del costado del lavavajillas.
8. Ubique la abrazadera más pequeña para la manguera
de desagüe “N” en el extremo pequeño de la manguera de
desagüe “O”. Quite el enchufe del conector “P”.
9. Empuje la manguera de desagüe dentro del conector “P”
hasta el reborde “O” en la manguera de desagüe.
10. Use pinzas para abrir la abrazadera “N” y deslizar la
abrazadera hacia el conector “P” entre los rebordes “O” hasta
el conector.
ADVERTENCIA
Consejo en cuanto al peligro
Do not use dishwasher until completely installed.
Do not push down on open door. Doing so can
result in serious injury.
ASEGURE EL LAVAVAJILLAS
1. Abra la puerta del lavavajillas y ubique la toalla “A” sobre
el montaje de la bomba y el brazo rociador del lavavajillas. De
esta manera se evita que los tornillos caigan en el área de la
bomba cuando asegure el lavavajillas a la encimera.
2. Controle que el lavavajillas esté todavía nivelado y centrado.
3. Encienda el suministro de energía eléctrica que va al
lavavajillas desde la caja de fusibles o interruptor automático.
Encienda el lavavajillas y permita que complete el ciclo de
lavado más corto. Después de los dos primeros minutos,
destrabe la puerta, espere cinco segundos y luego ábrala.
Controle que no haya agua en la parte inferior del lavavajillas
y que no haya pérdidas de agua.
4. Verifique que el sujetador de descarga a tierra “A” esté
asegurado al panel inferior. Ubique el panel inferior “B” detrás
del panel de acceso “C”. Algunos modelos tienen aislación “D”
en el panel de acceso, que debe estar detrás de la aislación
“E” del panel inferior. Sostenga los dos paneles juntos y
ubíquelos contra la
Vuelva a instalar los tornillos en los agujeros en el panel de
acceso y las ranuras del panel inferior. Instale primero el tornillo
del lado derecho. Verifique que el borde inferior
inferior esté en contacto con el piso. Ajus
24
pata del lavavajillas.
del panel
te los tornillos.
Page 53

Español
INSTALACIÓN DE SELLADO DE GABINETE
1. Los modelos de lavavajillas DWL 3525, 4035 y 7075 están equipados con
un sellado de gabinete que ayuda con la instalación del lavavajillas y con la
supresión del sonido.
2. Siga las instrucciones de instalación de la página previa con las siguientes
excepciones:
Para instalar el lavavajillas en la abertura del gabinete, deslícelo dentro de la
abertura hasta que esté posicionado correctamente de lado a lado y parte frontal
a posterior. Utilizando las patas y ruedas traseras, y cuñas si es necesario,
ajuste el lavavajillas hacia arriba hasta que la parte superior del sellado del
gabinete toque debajo de la encimera y el lavavajillas esté nivelado.
Puede ser necesario que deba recortar el sellado del gabinete si se extiende más
allá de la superficie del frente del gabinete. Para hacer esto marque el sellado
en el punto de recorte. Saque el lavavajillas de la abertura y quite el sellado.
Recorte el sellado utilizando un cuchillo de uso general o sierra.
Reposicione el lavavajillas en la abertura del gabinete asegurándose de que
esté en contacto con la parte inferior de la encimera, nivelado y centrado en la
abertura.
Atornille la parte superior del sellado a la parte inferior de la encimera.
Haga tres agujeros a cada lado del gabinete y sellado. Atornille cada lado del
sellado al gabinete.
Verifique que la puerta no toque ninguno de los tornillos, el sellado o la
encimera. Si esto ocurre, vuelva a posicionar y nivele el lavavajillas para que
exista una distancia suficiente.
Sellado entre el gabinete y el lavavajillas
Haga tres agujeros a cada
lado del gabinete y sellado
25
Page 54

English
A
Español
INSTALACIÓN DE AISLAMIENTO ACÚSTICO ADICIONAL
1. Los modelos de lavavajillas DWL3525, DWL4035 Y DWL7075 están
equipados con aislamiento acústico adicional. Vea el diagrama en la parte
inferior izquierda para las piezas de aislamiento acústico específicas para su
modelo.
2. Oriente la almohadilla acústica “D” como se muestra e insértela debajo de la
puerta. Empuje la almohadilla contra el marco del lavavajillas. La superficie
superior de la almohadilla debe estar en contacto con la parte inferior de
la tina del lavavajillas. Asegúrese de que la almohadilla no esté tocando
componentes cercanos.
3. Oriente la cubierta acústica “E” como se muestra y dóblela en la única ranura
de pliegue superior. Empuje la cubierta contra la almohadilla acústica “D” y
dóblela en una de las ranuras de pliegue inferiores para que la cubierta haga
contacto con la parte inferior de la tina del lavavajillas y el piso.
24
D
E
Page 55

CONTROLE EL FUNCIONAMIENTO
1. Lea la Guía para Uso y Cuidado que se incluye con su lavavajillas.
2. Controle que todas las piezas hayan sido instaladas y que no se haya
salteado ningún paso. Revise que tenga todas las herramientas que usó.
3. En la caja de fusibles o interruptor automático, encienda el suministro de
corriente eléctrica hacia el lavavajillas. Encienda el lavavajillas y permita que
complete el ciclo de lavado más corto. Después de los primeros dos minutos,
destrabe la puerta, espere cinco segundo y luego abra la puerta. Controle
que haya agua en la parte inferior del lavavajillas, que esté funcionando
correctamente y que no haya pérdidas de agua.
4. Asegúrese de que el sujetador para conexión
a tierra “A” esté unido al panel inferior. Ubique el
panel inferior “B” detrás del panel de acceso “C”.
Algunos modelos tienen aislamiento “D” en el
panel de acceso, que debe estar ubicado detrás
del aislamiento “E” en el panel inferior. Sostenga
los dos paneles juntos y ubíquelos contra la pata
del lavavajillas.
Vuelva a instalar los tornillos en los agujeros
en el panel de acceso y las ranuras en el panel
inferior. Instale el tornillo del lado izquierdo
primero. Controle que el borde inferior del panel
inferior esté en contacto con el piso. Ajuste los
tornillos.
English
Español
Si el lavavajillas no funciona:
• Saltó el interruptor automático o se quemaron los fusibles de la casa?
• La puerta está bien cerrada y trabada?
• Se dispuso correctamente el ciclo para encender el lavavajillas?
• Está abierto el suministro de agua?
25
Page 56

Español
(DWL3025)
26
(DWL3525/4035/7075)
Page 57

Español
27
Page 58

English
Français
TABLE DES MATIÈRES
PAGE
MESURES DE SÉCURITÉ............................................................................. 2
Avant d’utiliser votre lave-vaisselle .............................................................. 3
INSTRUCTIONS D’INSTALLATION D’UN LAVE-VAISSELLE ENCASTRÉ
CE DONT J’AI BESOIN POUR L’INSTALLATION DU LAVE-VAISSELLE ..........5-10
Outils, pièces et matériaux ......................................................................5-6
Exigences du meuble ................................................................................ 7
Dimensions du meuble ............................................................................. 10
CE QU’IL FAUT FAIRE AVANT L’INSTALLATION DU LAVE-VAISSELLE ........11-19
Préparation du meuble ............................................................................ 11
Préparation du lave-vaisselle .................................................................... 15
COMMENT INSTALLER LE LAVE-VAISSELLE? ..............................................19-23
Connexion du lave-vaisselle ...................................................................... 19
Fixer le lave-vaisselle ............................................................................... 22
Installation d’isolant acoustique supplémentaire .......................................... 23
Installation du scellant pour le meuble ....................................................... 24
Vérification du fonctionnement .................................................................. 25
1
Page 59

English
Français
MESURES DE SÉCURITÉ
Avertissement! – Pour réduire les risques d’incendie, de choc
électrique ou de blessures, il faut toujours exercer des mesures de
sécurité de base, incluant celles qui suivent :
1. Lire toutes les instructions avant l’utilisation de l’appareil.
2. Utiliser le lave-vaisselle seulement pour la fonction à laquelle il est destiné.
3. Utiliser seulement les détersifs et les agents de rinçage recommandés à l’usage dans
les lave-vaisselle, et les garder hors de la portée des enfants.
4. Lors du remplissage du lave-vaisselle :
1. Assurez-vous que les objets pointus ou coupants n’endommageront pas
le scellant de la porte;
2. Mettre les couteaux la pointe vers le bas pour éviter les coupures.
5. Ne pas laver les objets en plastique dans le lave-vaisselle à moins qu’il soit écrit
qu’ils vont au lave-vaisselle dessus. Pour les items de plastique qui n’ont pas cette
information, vérifiez avec le manufacturier.
6. Ne par toucher à l’élément chauffant pendant ou immédiatement après l’utilisation.
7. Ne pas faire fonctionner le lave-vaisselle à moins que tous les panneaux de cloison
soient bien en place.
8. Ne pas altérer les boutons de contrôle.
9. Ne pas abuser de, s’asseoir ou être debout sur la porte, le dessus ou les étagères du
lave-vaisselle.
10. Pour réduire les risques de blessures, ne jamais laisser les enfants jouer sur ou dans le
lave-vaisselle.
11. Sous certaines conditions, de l’hydrogène peut être produit dans un système d’eau
chaude qui n’a pas été utilisé pendant deux semaines ou plus. L’HYDROGÈNE EST
UN GAZ EXPLOSIF. Si votre système d’eau chaude n’a pas été utilisé pendant une
telle période, avant de faire fonctionner le lave-vaisselle, faites couler tous les robinets
d’eau chaude pendant quelques minutes pour évacuer l’hydrogène. Comme ce gaz
est inflammable, ne pas fumer ou avoir une flamme allumée pendant ce temps.
12. Enlever la porte ou le dessus du compartiment du lave-vaisselle lorsque vous vous
débarrassez d’un vieux lave-vaisselle.
Merci d’utiliser un produit Haier.
Ce manuel facile d’utilisation vous
guidera pour obtenir une performance
Numéro de modèle
maximale de votre lave-vaisselle.
Assurez-vous de prendre en note les
Numéro de série
numéros de modèle et de série. Ils se
retrouvent sur une étiquette à l’intérieur
Date d’achat
du lave-vaisselle.
Agrafez votre facture dans votre manuel.
Vous en aurez besoin pour obtenir un service de garantie.
2
Page 60

English
English
Français
AVANT D’UTILISER VOTRE LAVE-VAISSELLE
IMPORTANT : LIRE ET CONSERVER CES INSTRUCTIONS
Ce faisant :
• l’installation sera plus facile.
• vous aidera à l’avenir si vous avez des questions.
• vous aidera dans le cas d’une inspection électrique.
Appeler votre fournisseur si vous avez des questions ou besoin de réparations.
Lors de l’appel, vous aurez en main les numéros de modèle et de série.
Ceci est le symbole d’alerte de sécurité.
Ce symbole vous averti de dangers potentiels pouvant être la cause de blessures
graves pour vous ou pour les autres.
Tous les messages de sécurité suivent ce symbole d’alerte de sécurité et
le mot “DANGER” ou “AVERTISSEMENT”.
DANGER
VOUS RISQUEZ D’ÊTRE GRAVEMENT
BLESSÉ SI VOUS NE SUIVEZ PAS CES
INSTRUCTIONS IMMÉDIATEMENT.
WARNING
VOUS RISQUEZ D’ÊTRE GRAVEMENT BLESSÉ SI
VOUS NE SUIVEZ PAS CES INSTRUCTIONS.
Tous les messages de sécurité vous informeront du danger potentiel,
comment réduire les risques de blessures et ce qu’il peut arriver
si les instructions ne sont pas suivies.
3
Page 61

English
Français
English
VOUS DEVEZ:
• Ouvrir délicatement le lave-vaisselle pendant de quelqu’un d’autre tient
l’arrière de celui-ci. Retirez les matériaux de transport et l’étagère du bas.
Refermez et enclenchez la porte du lave-vaisselle.
• Installer le lave-vaisselle en suivant les instructions dans ce manuel.
• Avoir tout ce dont vous avez besoin (outils, matériaux, pièces) pour installer
le lave-vaisselle correctement.
• Contacter une personne qualifiée pour faire l’installation. L’installation doit
être faite par un technicien qualifié. Le lave-vaisselle doit être installé de
manière à répondre à tous les codes et règlementations locales pour les
connections électriques et la plomberie.
4
Page 62

English
Français
English
OUTILS ET MATÉRIAUX REQUIS
TOUTES LES INSTALLATIONS
A. Pinces
B. Tournevis étoile
C. Clé à fourche de 5/8po
D. Galon à mesurer ou règle
E. Clé à molette de 10po s’ouvrant jusqu’à 1 1/8po (2.9cm)
F. Tournevis plat
G. Gants
H. Couteau utilitaire
I. 2 connecteurs de fils vissable de la bonne dimension pour connecter le filage
de votre maison au filage de calibre 16 du lave-vaisselle.
J. Petit niveau
K. Lunettes de sécurité
L. Coude de 90° avec filetage extérieur N.P.T de 3/8po (0.9cm) d’une côté. (L’autre
côté doit pouvoir être connecté à votre tuyau d’approvisionnement en eau.)
M. Lampe de poche
N. Ruban Teflon® ou mastic à joint
O. Plat peu profond
P. Shim Stock (si l’installation est faite avec un plancher accumulé)
5
Page 63

English
English
IN ADDITION FOR NEW INSTALLATIONS
Q. Electric drill with
R.
”, ”and 1 ” hole saw bits
S. Small tubing cutter
T. Wire stripper
U. 1
”- 2” screw-type clamp if
connecting to waste-tee
V. Copper tubing (
” recommended) or flexible strainless steel braided fill line
W. Clamp connector or conduit connector to fit a
”(2.2cm) diameter hole
PARTS SUPPLIED
A. 2 drain hose clamps
1-large
1-small
E
F
D
C
Français
English
EN PLUS DE, POUR LES NOUVELLES INSTALLATIONS
Q. Perceuse électrique avec :
R. Forets 1/2po, 3/4po et 1 1/2po
S. Petit tailleur de tubes
T. Dénudeur à fil
U. Clamp à vis de 1 1/2po – 2po si
connecté à la vidange d’eau
V. Tuyau de cuivre (3/8po recommandé)
ou fil tressé flexible en inox
W. Connecteur de clamp ou de conduits faisant dans un trou de 7/8po (2.2cm)
de diamètre
PIÈCES FOURNIES
A. 2 clamp de tuyau de vidange
1 grosse
1 petite
B. 2 vis étoile No. ST4.2 X 18
C. Tuyau de vidange
D. Isolant acoustique (modèles DWL3525, 4035 et 7075 seulement)
E. Isolant acoustique (modèle DWL4035 et 7057 seulement)
6
Page 64

English
Français
English
EXIGENCES DU MEUBLE
Ne pas faire passer les tuyaux d’eau ou le filage électrique où ils peuvent
interférer ou entrer en contact avec les pattes ou le moteur du lave-vaisselle.
L’emplacement du lave-vaisselle doit fournir de l’espace entre le moteur et le
plancher.
Ne pas installer le lave-vaisselle sur un tapis.
Protéger le lave-vaisselle et les tuyaux d’alimentation et de vidange d’eau contre
le gel. Les dommages causés par le gel ne sont pas couverts par la garantie.
IFIER L’ENDROIT OÙ LE LAVE-VAISSELLE SERA INSTALLÉ. CET
ENDROIT DOIT FOURNIR
• Un accès facile à l’eau, l’électricité et au drainage.
• Un accès facile pour remplir le lave-vaisselle.
• Des coins ayant un espace de 2po (5.2cm) minimum entre la porte du lave-
vaisselle et le mur ou le meuble.
• Une ouverture carrée pour un fonctionnement et une apparence correcte.
• Un meuble perpendiculaire au plancher.
• Un plancher au niveau. Si le plancher à l’avant de l’ouverture n’est pas au
niveau avec le plancher à l’arrière de l’ouverture, des shims peuvent être
nécessaires pour mettre le lave-vaisselle au niveau.
Note: Les shims doivent être solidement fixés
au sol pour éviter leur mouvement
pendant que le lave-vaisselle
fonctionne. Si le lave-vaisselle sera
inutilisé pendant une période de
temps ou dans un endroit sujet au
gel, faites-le préparer pour l’hiver par
un technicien qualifié. Assurez-vous
que tous les tuyaux et le filage se
retrouvent dans la partie ombragé du
diagramme. Voir page 10 pour les
dimensions.
CONSEIL PRATIQUE
Si le plancher est inégal à l’ouverture (par exemple : les tuiles du plancher n’y
sont pas partout), vous devrez faire particulièrement attention en mesurant les
dimensions et en mettant le lave-vaisselle au niveau.
7
Page 65

English
Français
English
ÉLECTRIQUE
Il revient au consommateur de contacter un technicien qualifié pour assurer une
installation électrique adéquate et conforme avec toutes les règlementations
nationales et locales.
Vous devez avoir :
• Une alimentation en électricité de 120-volt, 60Hz, AC seulement, 15- ou
20Amp.
• FILAGE EN CUIVRE SEULEMENT.
Nous recommandons :
• Un fusible temporisé ou un disjoncteur.
• Un circuit séparé.
S’IL S’AGIT D’UNE CONNEXION À CÂBLAGE
DIRECT
• Utilisez un câble de cuivre flexible à gaine non-
métallique avec un fil de mise à terre qui est conforme
aux exigences de votre maison et aux règlementations locales.
• Utilisez un stabilisateur de tension fournie avec la boite de jonction de câblage
résidentiel ou installez un connecteur de clamp listé UL/certifié CSA à la boîte
de jonction. Si vous utilisez un conduit, utilisez un connecteur de conduit listé
UL/certifié CSA
S’IL S’AGIT D’UNE CONNEXION
AVEC UN FIL ÉLECTRIQUE
• Utilisez un fil d’alimentation de calibre 16,
à 3 conducteurs, listé UL qui est conformes
aux règlementations locales. La longueur
du fil ne devrait pas dépasser 6pi (1.8m).
• Un connecteur de clamp faisant dans
un trou de 7/8po (2.2cm) est requis
pour fixer le fil d’alimentation à la boite
électrique du lave-vaisselle.
• Le fil d’alimentation doit pouvoir être
branché à une prise électrique à trois branches, mise à terre, placé près du
meuble et de l’ouverture pour le lave-vaisselle. La prise doit être conforme aux
règlementations locales.
8
Page 66

English
Français
English
EAU
VOUS DEVEZ AVOIR
• Une alimentation en eau chaude d’une pression de 20-120psi (138-862kPa).
• Une entrée d’eau au lave-vaisselle avec une température minimale de 120°F
(49°C) est recommandée.
• Tuyaux O.D. de 3/8po (0.9cm) avec raccord à compression, ou une ligne
de remplissage en acier inoxydable (tuyau de plastique de 1/2po (1.3cm)
minimum est facultatif mais non recommandé.)
• Un coude de 90° avec filet externe N.P.T. de 3/8po (0.9cm)
d’un côté. Ne pas souder à moins de 6po (15.2cm) de la
valve de l’entrée d’eau.
DRAIN
VOUS DEVEZ AVOIR
• Utilisez le nouveau tuyau de
vidange fourni avec votre lavevaisselle. Si ce n’est pas adéquat,
utilisez un nouveau tuyau d’une
longueur maximale de 12pi
(3.7m) qui répond à tout les
standards AHAM / IAPMO,
résistant à la chaleur et au détersif
et qui peut être raccordé au
connecteur de vidange d’eau sur
votre lave-vaisselle.
• Ayez une boucle de vidange
30po (76.2cm) au-dessus du
plancher.
• Connectez le tuyau de vidange
au “T” de vidange ou à l’entrée du broyeur au dessus du siphon et au moins
20po (50.8cm) au dessus du plancher.
• Utilisez un entrefer dans la vidange si le tuyau est connecté à la plomberie
domestique à moins de 20po (50.8cm) du plancher.
• Utilisez des raccords I.D. d’au moins 1/2po (1.3cm)
9
Page 67

DIMENSIONS DU MEUBLE
English
Français
English
Faire une ouverture qui correspond à la partie ombragée dans le mur et le
plancher, tel que décrit dans le tableau:
OUVERTURE POUR DIAMÈTRE
Entrée d’eau ½ po (1.3cm)
Vidange d’eau 1 ½ po (3.8cm)
Fil direct ¾ po (1.9cm)
Fil d’alimentation 1 ½ po (3.8)
* Mesuré à partir du point le plus bas sous le comptoir. Peut être réduit à 33
7/8po (85cm) en enlevant la patte ajustable du lave-vaisselle.
** Minimum, mesuré au point le plus étroit
*** Peut être augmenté à 6 7/8po (17.5cm) si la hauteur de l’ouverture est de
34 ½ po (87.6cm) au point le plus bas
10
Page 68

Français
EnglishEnglish
ATTENTION
RISQUE DE CHOC ÉLECTRIQUE
Débranchez le courant électrique à la boîte à fusibles ou au
disjoncteur avant d’installer le lave-vaisselle.
Un manquement à ce niveau peut causer la mort ou un choc
électrique.
N’utilisez pas de rallonge ou d’adaptateur électrique avec
cet appareil.
PRÉPARATION DU MEUBLE
1. Débranchez le courant électrique et l’eau. Mettez vos gants et vos lunettes de
sécurité.
2. Si vous remplacez un lave-vaisselle:
• Assurez-vous que la ligne d’eau “A” se rend
jusqu’à l’arrière gauche de l’ouverture où
la connexion sera faite.
• Assurez-vous que la ligne directe “B” se
rend jusqu’à l’arrière gauche de l’ouverture
où la connexion sera faite.
Si la ligne d’eau et la ligne directe se rendent assez loin dans l’ouverture,
rendez-vous à l’étape 10, sur la page 13.
Si vous faites l’installation d’un nouveau lave-vaisselle, complétez
toutes les étapes qui suivent:
Électrique
Bien suivre toutes les règlementations locales and nationales pour compléter
l’alimentation en électricité au meuble.
Si vous: Suivez les étapes:
Éffectuez un branchement
directe
Utilisez un fil électrique 3a et 4a
11
3, 4 et 5
Page 69

Conseil Pratique:
E
Le filage du lave-vaisselle sera plus facile d’accès si vous faites passer les fils
par une ouverture dans le côté gauche du meuble.
3. MÉTHODE DE BRANCHEMENT DIRECT:
Percez un trou de 3/4po (1.9cm) “C”, dans le côté, le
plancher ou l’arrière du meuble, à droite. Les options
d’emplacement sont illustrées. Dans le cas d’un meuble
en bois, sablez le trou jusqu’à ce qu’il soit lisse.
3a. MÉTHODE PAR FIL ÉLECTRIQUE:
Percez un trou de 1½po (3.8cm) “D” dans le côté ou l’arrière du meuble, à
droite. Les options d’emplacement sont illustrées. Dans le cas d’un meuble en
bois, sablez le trou jusqu’à ce qu’il soit lisse.
4. Filez le fil jusqu’à la boîte de jonction
domestique. Utilisez le stabilisateur de tension fournie
avec la boîte. Si aucun stabilisateur de tension n’est
fourni, installez un connecteur listé UL/certifié CSA
pour le filage flexible. Si vous installez un conduit,
attachez un connecteur de conduit listé UL/certifié
CSA à la boîte de jonction.
4a. Installez une prise électrique pouvant accueillir
une fiche à trois branches mise à terre “E” dans le
meuble, au côté de l’ouverture pour le lave-vaisselle.
Sautez à l’étape 6.
Français
EnglishEnglish
5. Filez l’autre bout du fil à travers le trou. Le câble doit se
rendre jusqu’à l’avant gauche de l’ouverture du meuble. Sautez
à l’étape 6.
WATER LINE
HELPFUL TIP:
Routing the water line through the left side of
cabinet opening will make water connection easier.
6. Percez un trou d’au moins ½po (1.3cm) “F” dans le
côté, le plancher ou l’arrière du meuble, à gauche. Les
options d’emplacement sont illustrées. (Le trou “F” devrait
être environ 1 3/5po plus haut que le trou “C” ou “D”.)
7. Mesurez la longueur totale requise pour le tuyau de
cuivre « G ». Fixez le tuyau de cuivre à l’entrée d’eau à
l’aide d’un robinet d’arrêt manuel. Faire passer doucement
le tuyau de cuivre dans le trou (le cuivre peut facilement
s’abîmer) jusqu’à ce qu’il soit assez long pour être branché
à l’entrée d’eau à l’avant gauche du lave-vaisselle.
12
Page 70

P
Français
EnglishEnglish
8. Mettre le robinet d’arrêt manuel en position ouverte. Faites
couler de l’eau dans un sceau pour débarrasser le robinet
de particules pouvant le boucher.
9. Mettre le robinet en position fermée.
VIDANGE D’EAU
10. Percez un trou de 1 ½po (3.8cm) de diamètre dans
le mur ou le plancher du meuble sur le côté le plus
près de l’évier.
11. Branchez le tuyau de vidange d’eau au T de vidange ou au broyeur de
déchet en suivant l’une des méthodes suivante :
Avec un broyeur
Sans broyeur
Avec un entrefer 11a.
Sans entrefer* 11c.
Avec un entrefer 11b.
Sans entrefer* 11d.
* Un entrefer est recommandé
11a. AVEC UN BROYEUR ET UN ENTREFER
11. Retirez le bouchon à éjection. Coupez le bout de la
vidange d’eau, “I”, si nécessaire (ne coupez pas la
partie nervurée).
2. Fixez le tuyau de vidange d’eau à l’entrefer, “J”, avec
une grosse serre à ressort “K”. Si la vidange d’eau a
été coupée, utilisez une serre à vis de 1 ½po à 2po (3.8 à 5cm)*.
3. Utilisez un connecteur de tuyau de caoutchouc * “L” avec des serre à
ressort ou à vis * “M” pour connecter l’entrefer à l’entré “N” du broyeur.
La connexion “N” DOIT être fait avant le siphon “O” et au moins 20po
(50.8cm) au dessus du plancher où le lave-vaisselle sera installé. Sautez à
l’étape 12.
11b. SANS BROYEUR ET AVEC UN ENTREFER
1. Coupez le bout de la vidange d’eau, “I”, si
nécessaire (ne coupez pas la partie nervurée).
2. Fixez le tuyau de vidange d’eau à l’entrefer, “J”, avec
une grosse serre à ressort “K”. Si la vidange d’eau a
été coupée, utilisez une serre à vis de 1 ½po à 2po (3.8 à 5cm)*.
3. Utilisez un connecteur de tuyau de caoutchouc * “L” avec des serre à ressort
ou à vis * “M” pour connecter l’entrefer au “T” de vidange “P”. La connexion
“P“ DOIT être fait avant le siphon “O” et au moins 20po (50.8cm) au dessus
13
Page 71

Français
du plancher où le lave-vaisselle sera installé. Sautez à l’étape 12.
* pièces disponibles chez les quincailleries.
11c. AVEC BROYEUR SANS ENTREFER
1. Retirez le bouchon à éjection. Ne pas couper le bout de
la vidange d’eau.
2. Fixez le tuyau de vidange “I” à l’entre du broyeur “N” avec un grosse serre
à ressort “K”. La connexion “N” DOIT être fait avant le siphon “O” et au
moins 20po (50.8cm) au dessus du plancher où le
lave-vaisselle sera installé.
3. Le tuyau de vidange doit être solidement fixé au dessous
du comptoir avant de se rendre au drain. Cette boucle
doit être à un minimum de 30po (76.8cm) du plancher.
(Sautez à l’étape 12)
English
English
11d. SANS BROYEUR SANS ENTREFER
1. Coupez le bout de la vidange d’eau (sans couper la partie nervurée).
2. Fixez le tuyau de la vidange d’eau au “T” de vidange “P” à l’aide de serres
à ressort ou à vis de 1 1/2po à 2po (3.8 à 5cm)* “M”. La connexion “P”
DOIT être fait avant le siphon “O” et au moins 20po (50.8cm) au dessus du
plancher où le lave-vaisselle sera installé.
CONSEIL PRATIQUE :
Pour réduire les vibrations du tuyau, gardez-le éloigné du plancher
et du rebord du trou où il passe au travers du meu.
3. Le tuyau de vidange doit être solidement fixé au dessous
du comptoir avant de se rendre au drain. Cette boucle
doit être à un minimum de 30po (76.8cm) du plancher.
(Sautez à l’étape 12)
* pièces disponibles chez les quincailleries
Insérer le tuyau de vidange d’eau « I » dans le trou percé dans le meuble et
guidez-le au centre arrière de l’ouverture où la connexion de vidange d’eau
sera faite.
14
Page 72

EnglishEnglish
A
B
C
A
D
E
F
F
G
Français
PRÉPARATION DU LAVE-VAISSELLE
AVERTISSEMENT!
Risque de basculer
N’utilisez votre lave-vaisselle seulement lorsqu’il sera
en place définitivement Ne poussez pas vers le bas
lorsque vous ouvrez la porte. Une telle manœuvre
présente des risques de blessures graves.
AVERTISSEMENT!
DANGER DE POIDS EXCESSIF
Demandez l’aide de quelqu’un pour installer et déplacer un
lave-vaisselle, ou courrez des risques de blessures au dos ou autres.
1. Mettre le lave-vaisselle sur son dos,
en le tenant par les côtés près de la
porte.
2. Retirez les deux vis “A” qui fixent le
panneau d’accès “B” et le panneau
du bas “C” au lave-vaisselle à l’aide
d’un tournevis étoile. Retirez les
panneaux et les conserver. Assurez-
vous que l’attache de mise à terre
“D” est fixée sur le panneau du bas.
3. Appliquez du mastic à joint “E”
au coude à 90° “F” et connectez
le coude à la valve d’entre “G”.
Resserrez le coude en vous assurant
qu’il fasse face à l’arrière.
15
Page 73

CONSEIL PRATIQUE :
H
I
J
K
Mettre du carton sous le lave-vaisselle pendant l’installation
pour éviter d’abîmer le plancher.
4. Retirez le couvercle de la boîte électrique
“H“. Faire passer les fils “I“ par le trou dans
la boîte électrique. Ne pas défaire le nœud
dans les fils.
Si vous faites un branchement électrique
directe: installez un connecteur “J“ listé UL/
certifié CSA à la boîte électrique.
Si vous utilisez un conduit: utilisez un
connecteur de conduit listé UL/certifié CSA.
Si vous installez un kit de fil électrique,
installez-le en suivant les instructions fournies.
5. Mesurez la hauteur de l’ouverture du
plancher au dessous du comptoir “K”.
Vérifier le tableau pour cette hauteur.
Placez les roues “L” dans la position requise.
Tournez les deux pattes de nivellement à la
bonne hauteur.
EnglishEnglish
Français
Hauteur
minimale de
l’ouverture
Position des
roues (voir
l’illustration)
34po (86.4cm) 1 10
34 ¼po (87cm) 2 5
34 ½po (87.6 cm) 3 0
Si la hauteur minimale est de moins de 34po
(86.4cm), les pattes ajustables peuvent être
enlevées pour faire plus de place. Cela
permettra au lave-vaisselle de s’adapter
à un espace d’une hauteur de 33 4/5po
(85.9cm), mais le lave-vaisselle sera plus
difficile à placer en position finale. Si les
roues sont enlevées, protéger le plancher lors
du déplacement du lave-vaisselle.
Nombre de tours
sur les pattes
avant
16
Page 74

English
Français
6. Remettre le lave-vaisselle dans le bon sens.
7. Le lave-vaisselle doit être fixé au meuble. Deux
supports sont situés sur le dessus du lave-
vaisselle qui peuvent être fixés au dessous du
comptoir. Si ce n’est pas possible, les deux
supports “M” peuvent être déplacés aux côtés
du lave-vaisselle.
Si vous fixez le lave-vaisselle au dessous du
comptoir, sautez à l’étape 13.
Si vous fixez le lave-vaisselle par les côtés,
suivez les étapes 8 à 12.
8. Pour enlever les supports, aplatir la languette
“N” à l’arrière des supports avec des pinces
et les sortir des fentes “O”.
9. Casser le bout des supports le long de la ligne
“P”.
10. Ouvrez votre lave-vaisselle et placez-y une
serviette “Q” par dessus l’assemblage de la
pompe et du bras rotatif. Cette manœuvre
facilitera la récupération de vis qui
pourraient tomber pendant que pendant que
vous fixez le lave-vaisselle à la face interne
du meuble.
11. Ouvrir la porte du lave-vaisselle et ôter les
boutons “R” du côté de la cuve.
Note: Conserver les boutons pour recouvrir les
trous une fois le lave-vaisselle installé.
12. Faire passer le support dans la fente “S” sur
le côté du lave-vaisselle et pliez la languette
pour garder le support en place.
17
Page 75

34-1/4”
(87 cm)
min.
O
P
Français
CONSEIL PRATIQUE:
Plancher accumulé.
Mesurez la hauteur de l’ouverture à partir du dessous
du comptoir jusqu’au planché accumulé. Si la hauteur
est d’au moins 33 ¾po (84.5cm) le lave-vaisselle
pourra y être placé sans modifications au plancher ou
au comptoir.
Mettre les roues « L » en position 1 et tournez les
pattes de nivellement jusqu’à ce qu’elles soient
complètement rétractées. Ajoutez des cales au besoin
à l’endroit indiqué pour mettre le lave-vaisselle à
la hauteur nécessaire. N.B. : Les cales doivent être
fixées au sol pour prévenir leur mouvement pendant
le fonctionnement du lave-vaisselle.
13. Vérifiez la tension du ressort de la porte. Avec l’aide d’une autre personne qui
tient le lave-vaisselle fermement pour l’empêcher de basculer, ouvrez et fermez la
porte quelques fois. La porte devrait être facile à ouvrir et à fermer.
Pour ajuster la tension du ressort, décrochez le ressort “T” de la patte arrière du
lave-vaisselle. À l’aide d’une douille 5/16po, retirez la vis “U” du tendeur “V”.
La vis peut être placée dans un des trois trous “1”, “2” ou “3”, dans la patte
avant du lave-vaisselle. La vis est dans le trou arrière par défaut.
Si la porte s’ouvre seule, déplacez le tendeur au trou
« 2 » ou « 3 ». Refixez le ressort à la patte arrière. Les
tendeurs devraient être dans les mêmes trous sur les
deux côtés du lave-vaisselle.
14. Tenir le lave-vaisselle sur les côtés du panneau de la
porte « O ». Basculez le lave-vaisselle vers l’arrière
sur les roues « P ». Déplacez le lave-vaisselle près de
l’ouverture du meuble. Ne poussez pas sur le panneau
avant ou sur la console, ça pourrait les abîmer.
15. Si le lave-vaisselle a un fil électrique, insérez-le dans le
trou percé dans le meuble.
16. Assurez-vous que l’entrée d’eau est sur le côté gauche
de l’ouverture et que le tuyau de vidange d’eau est près
du centre du trou dans le meuble. Si vous utilisez un
filage directe, assurez-vous qu’il est sur le côté droit de
l’ouverture.
17. Poussez le lave-vaisselle complètement dans l’ouverture
délicatement, en prenant soins de ne pas coincer
le tuyau de cuivre, le tuyau de vidange d’eau, le fil
électrique ou le filage direct entre le lave-vaisselle et le
meuble. Centrez le lave-vaisselle dans l’ouverture.
18
Page 76

EnglishEnglish
Y
Z
BB
AA
CC
Français
CONSEIL PRATIQUE : Planchez accumulé.
Faites basculer le lave-vaisselle vers l’arrière pour
le déplacer dans l’ouverture. Une fois en position,
supportez l’avant du lave-vaisselle en abaissant les
pattes ou en y plaçant des cales.
18. Retirez le carton d’en dessous du lave-vaisselle.
CONSEIL PRATIQUE :
C’est correct si le lave-vaisselle est un peu serré dans le meuble. Ne retirez pas
l’isolant, il réduit le niveau sonore.
19. Alignez le panneau de la porte “Y” avec les portes d’armoire
“Z”. Vous aurez peut-être à ajuster l’alignement pour
l’apparence voulue.
CONSEIL PRATIQUE :
20. Assurez-vous que les pattes de nivellement
“AA” sont fermement sur le plancher. Fermez
et verrouillez la porte, et placez un niveau
contre le panneau avant “BB”. Assurez-vous
que le lave-vaisselle est d’aplomb. Ajustez les
pattes de nivellement ou ajoutez des cales
sous les roues arrière jusqu’à ce que le lave-
vaisselle soit au niveau. N.B. : Les cales doivent être fixées
solidement au plancher pour éviter tout mouvement durant le
fonctionnement du lave-vaisselle.
Calez un côté du lave-vaisselle lorsque vous
ajustez les pattes avant.
Répétez pour l’autre côté du lave-vaisselle. Placez le niveau sur
le dessus à l’avant de la cuve “CC”. Assurez-vous que le lavevaisselle est au niveau dans cette direction. S’il ne
l’est
pas, ajustez les pattes avant jusqu’à ce qu’il le soit.
CONNEXION DU LAVE-VAISSELLE
Branchement électrique
CVérifiez les prérequis électriques (voir page 8). Vous
devez :
• Avoir une alimentation en électricité et une méthode
de mise à terre adéquate
• Vérifiez que le courant est coupé.
Si vous utilisez: Suivez les étapes:
19
Branchement direct 1-4
fil électrique 1a
Page 77

English
Black
A
G
English
Français
MÉTHODE DE BRANCHEMENT DIRECT
AVERTISSEMENT
Risque de choc électrique
Mise à terre électrique du lave-vaisselle. Connectez
le fil de mise à terre au connecteur de mise à terre
vert dans la boîte électrique. Si le lave-vaisselle n’est
pas mis à terre, vous courrez des risques de mort,
d’incendie ou de choc électrique.
1. Installez le stabilisateur de tension et placez le fil d’alimentation de manière à
ce qu’il ne touche ni au moteur ni à la partie inférieure du lavevaisselle. Tirez directement le fil « A » à travers le trou dans la
boite électrique.
CONSEIL PRATIQUE:
Choisissez la bonne taille de marette pour vous connecter sur votre
système électrique. Le calibre du fil du lave vaisselle de 16. Insérez
le bout des 2 fils dans la marette. Ne tournez pas les 2 extrémités
des fils ensembles avant de les insérer dans la marette. Insérez
plutôt les deux bouts de fils délicatement dans la marette puis faites-
la tourner jusqu’à ce que les fils soient retenus fermement.
2. Connectez le fil « B » selon les directives en
utilisant des marettes de bonnes dimensions « C »
pour connecter le fil directement au fil de calibre
16 du lave-vaisselle :
Pliez le fil de mise à terre dénudé « D » en forme
de « U ». Enroulez le fil de mise à terre autour
du connecteur « E » et sous la rondelle « F » en
tournant dans le sens des aiguilles d’une montre.
Serrez de façon sécuritaire le connecteur de mise à
terre. Ne défaites pas le nœud dans les fils.
Fil d’alimentation Fil de la boite électrique
Blanc
Noir
Fil de mise a terre
Blanc
Noir
Connecteur de mise
à terre
3. Serrez le collier du connecteur ou du conduit du connecteur “G”.
4. Replacez le couvercle de la boite électrique « H » en mettant
les fils à l’intérieur de la boite électrique. Allez à l’étape 5. Le
couvercle doit être à l’extérieur de la boite et du bon côté.
Assurez-vous que les fils ne sont pas coincés sous le couvercle.
Ne laissez pas la boite électrique sans son couvercle.
20
Page 78

EnglishEnglish
Français
1A. BRANCHEMENT AVEC FIL ÉLECTRIQUE
AVERTISSEMENT
RISQUE DE CHOC ÉLECTRIQUE
Branchez le fil électrique dans une prise à trois branches.
N’enlevez pas la branche de mise à terre.
N’utilisez pas d’adaptateurs.
N’utilisez pas de rallonge.
Ne pas respecter ces instructions peut causer la mort, un
Assurez-vous que le fil du lave-vaisselle n’est pas en contact
avec le moteur de l’appareil ni avec la partie inférieure du
lave-vaisselle. Rendez-vous à l’étape 5.
CONNEXION DE L’EAU
1. Insérez le boulon “I” environ 1po (2.5 cm) à l’intérieur du tuyau de cuivre “J”.
2. Insérez l’embout “K” dans le tuyau. Ne le positionnez pas à une extrémité du
tuyau.
3. Placez le tuyau dans le coude ”L” aussi loin que possible
4. Poussez le boulon et l’embout vers l’avant et
commencez à visser le boulon sur le coude fileté “M”.
Soyez vigilants en manipulant et en plaçant le tube de
cuivre, compte tenu qu’il se plie et se tord facilement
incendie ou un choc électrique
CONSEIL PRATIQUE :
Raccords à compression
.
5. Pour prévenir les vibrations pendant l’utilisation de
l’appareil, faites passer le tuyau d’alimentation d’eau de
manière à ce qu’il ne touche ni le bas du lave-vaisselle, ni
le cadre ni le moteur.
Assurez-vous que la ligne d’eau passe dans la zone ombragée de l’illustration en
page 7 lorsque le lave-vaisselle sera placé dans le meuble.
Avec le tube de cuivre “J” poussé aussi loin que possible, serrez le boulon de
compression “I” au coude “L” sur la valve d’entrée d’eau.
6. Placez un papier absorbant sous le coude. Ouvrez l’alimentation d’eau et
vérifiez s’il y a fuite.
21
Page 79

CONNEXION DE LA VIDANGE D’EAU
A
7. Pour minimiser les risques de bruits de vibrations,
faites passer le tuyau de vidange d’eau de manière à
éviter tout contact avec le moteur, les ressors de porte,
la ligne d’eau, le meuble, le plancher ou le trou par
lequel il passe. N’enlevez pas la boucle “N” du tuyau
de vidange fixée sur le lave-vaisselle.
8. Placez un collier de compression plus petit “N” sur la
plus petite extrémité du tuyau de drainage “O“. Enlevez
le bouchon du connecteur “P”.
9. Poussez le connecteur de tuyau de vidange “P”
jusqu’à la nervure “O” du tuyau de vidange.
10. À l’aide de pinces, ouvrez la serre “N” et glissez-la
sur le connecteur “P” entre les nervures “O“ du connecteur.
AVERTISSEMENT
Risque de Basculer
N’utilisez votre lave-vaisselle seulement lorsqu’il sera en
place définitivement Ne poussez pas vers le bas lorsque
vous ouvrez la porte. Une telle manœuvre présente des
risques de blessures graves.
EnglishEnglish
Français
FIXER LE LAVE-VAISSELLE
1. Ouvrez votre lave-vaisselle et placez-y une serviette “A”
par dessus l’assemblage de la pompe et du bras rotatif.
Cette manœuvre facilitera la récupération de vis qui
pourraient tomber pendant que pendant que vous fixez le
lave-vaisselle à la face interne du meuble.
2. Assurez-vous que le lave-vaisselle est toujours bien centré
et bien au niveau.
3. Fixez le lave-vaisselle au comptoir en utilisant 2 vis
étoile No.ST4.2 x 18 “B”. Le lave vaisselle DOIT être fixé
au comptoir pour l’empêcher de basculer lorsque la porte
est ouverte. N’échappez pas de vis dans le fond du lavevaisselle.
4. Ouvrez la porte d’environ 3 pouces (7.6 cm) et vérifiez
l’espace entre l’intérieur de la porte et de la cuve sont à
égale distance de chaque côté. Si l’espace n’est pas égal,
dévissez légèrement les vis. Lorsque vous aurez stabilisé
l’appareil, remettez les capuchons blancs “C” sur les vis.
Assurez-vous que le haut de la porte n’entre pas en
contact avec des vis, des agrafes ou avec le dessus
du comptoir. Si c’est le cas, le lave-vaisselle doit être
abaissé et relevé. Retirez la serviette du lave-vaisselle.
22
Page 80

EnglishEnglish
Français
INSTALLATION DU JOINT D’ÉTANCHÉITÉ DU MEUBLE
1. Les modèles de lave-vaisselle DWL3525, DWL 4035 et le DWL7075 sont
munis d’un sceau d’étanchéité qui aide à l’installation du lave-vaisselle et à la
diminution du bruit.
2. Suivez les directives de la page précédente en considérant les exceptions suivantes:
Pour installer le lave-vaisselle dans son espace dans sous le comptoir, glissez
lentement le lave-vaisselle en place jusqu’à ce qu’il soit bien centré avant-arrière
et de chaque côté. Utilisez les roues arrière et les pattes avant, avec des cales
si nécessaire pour ajuster le niveau du lave-vaisselle à la hausse jusqu’à ce que
le sceau supérieur touche le dessus intérieur du meuble et que l’appareil soit au
niveau.
Il peut être nécessaire d’ajuster le sceau d’étanchéité du dessus du meuble s’il
dépasse le devant du comptoir. Pour ce faire, faites une marque sur ce sceau visà-vis la mesure désirée. Retirez le lave-vaisselle du comptoir et enlevez le sceau et
taillez-le à l’aide d’une lame ou d’une scie.
Replacez le lave-vaisselle dans l’ouverture sous le comptoir en vous assurant de
bien positionner l’appareil, bien centré et au niveau.
Vissez le sceau sur la face interne du dessus du comptoir.
Percez 3 trous dans chaque côté du sceau et du comptoir. Vissez chaque
sceau de côté au meuble.
La porte ne doit pas être en contact avec des vis, sceaux, ou le meuble. S’il y
a contact, rectifiez la situation en repositionnant le lave-vaisselle de manière à
avoir un espace libre tout autour de l’appareil.
23
Sceau d’étanchéité entre le lave-vaisselle et le meuble
Percez trois trous dans chaque sceau
d’étanchéité et côté du meuble
Page 81

A
Français
INTALLATION DE MATÉRIEL INSONORISANT SUPPLÉMENTAIRE
1. Les modèles de lave-vaisselle DWL3525, DWL 4035 et le DWL7075 sont
munis de matériel insonorisant supplémentaire. Voyez l’information spécifique
à votre modèle, sur la partie inférieur gauche.
2. Placez le coussin d’insonorisation « D » du bon sens tel qu’indiqué et insérez-
le sous la porte. Poussez le coussin contre le cadre du lave-vaisselle. La
surface supérieure du coussin doit être en contact avec le fond de la cuve du
lave-vaisselle. Assurez-vous qu’il ne touche pas aux composantes qui sont à
proximité.
3. Placez le matelas insonorisant « E » et pliez- le vis-à-vis la rainure supérieure.
Poussez-le contre le coussin « D » et pliez-le vis-à-vis la rainure inférieure, de
manière à ce qu’il touche au fond du lave-vaisselle et au plancher.
EnglishEnglish
D
E
24
Page 82

EnglishEnglish
Français
VÉRIFICATION AVANT L’UTILISATION
1. Lisez attentivement toutes les instructions et les mises en garde fournies avec
votre lave-vaisselle.
2. Assurez-vous que toutes les pièces sont bien installées, qu’aucune étape n’a
été contournée et que vous avez tous les outils que vous avez utilisés.
3. Dans la boite à fusibles ou disjoncteurs, rétablissez le courant vers le lavevaisselle. Démarrez votre lave-vaisselle et mettez en marche le plus court
des cycles de lavage. Après 2 minutes, déverrouillez la porte, attendez 5
secondes, puis ouvrez la porte. Vérifiez qu’il
y a de l’eau dans le fond du lave-vaisselle et
vérifiez pour des fuites possibles.
4. Vérifiez que l’agrafe de mise à terre “A”
est bien attachée au panneau inférieur.
Placez le panneau inférieur “B” derrière le
panneau d’accès “C”. Certains modèles ont
de l’isolation “D” sur le panneau d’accès qui
doit tomber derrière l’isolant “E” du panneau
inférieur. Tenez les 2 panneaux ensembles et
placez- les contre une patte du lave-vaisselle
Revissez les vis dans les trous du panneau
d’accès et fixez le panneau inférieur dans les
fentes. Vous devez faire en sorte que le bas du
panneau inférieur touche le sol. Vissez à droite
en premier. Serrez les vis.
Si le lave-vaisselle ne fonctionne pas:
• Est-ce qu’un fusible ou un disjoncteur ont sauté?.
• Est-ce que la porte est bien fermée et bien verrouillée?
• Est-ce que le cycle est bien programmé pour démarrer le lave-vaisselle?
• Est-ce que l’eau est disponible?
25
Page 83

EnglishEnglish
Français
¾ po
(1.9cm)
isolant
peut être
comprimé
(pas utilisé
sur tous les
modèles)
¾ po
(1.9cm)
isolant
peut être
comprimé
(pas utilisé
sur tous les
modèles)
Vue de Côté
(DWL3025)
(DWL3525/4035/7075)
Vue de l’arrière
33 7/8po
(86cm)
minimum
sans roues
33 7/8po
(86cm)
minimum
sans roués
26
Page 84

IMPORTANT
Do Not Return This Product To The Store
If you have a problem with this product, please contact the
“Haier Customer Satisfaction Center” at 1-877-337-3639.
DATED PROOF OF PURCHASE, MODEL # AND SERIAL #
REQUIRED FOR WARRANTY SERVICE
IMPORTANTE
No Devuelva Este Producto al Establecimiento Compra.
Si tiene problemas con este producto, por favor póngase en contacto con el “Centro
PARA EL SERVICIO DE GARANTÍA SE REQUIERE PRUEBA DE COMPRA, FECHADA, No. DE
Haier de Atención al Cliente” en el 1-877-337-3639.
MODELO Y No. DE SERIE
IMPORTANT
Ne pas Réexpédier ce Produit au Magasin
Pour tout problème concernant ce produit, veuillez contacter le service des
consommateurs ‘Haier Customer Satisfaction Center’ au 1-877-337-3639.
UNE PREUVE D’ACHAT DATEE EST REQUISE POUR BENEFICIER DE LA GARANTIE.
Made in China
Fabriqué en Chine
Hecho en China
Haier America
New York, NY 10018
Printed in China
v1: Issued September 2009
v2: Issued June 2010
Dishwasher Installation
© 2010 Haier America Trading, LLC. All Rights Reserved. 101019
 Loading...