

Page 1

Medical Device Manufacturing Enterprise License No.:
No. 20050143 license granted by Shandong Food and Drug Administration for
manufacturing medical devices
Registration No.:
No. 2580116 in 2008 approved by Shandong Food and Drug Administration for
manufacturing medical devices (updated)
This series of freezers is in conformity with the registration standard YZB/Lu
0174-2009.
Haier
Group
Haier
Group
Haier
Haier Group
Group
[Company name]:
[Registered address]:
[Manufacturing address]:
[Tel.]:
[Fax]:
[Postal code]:
Sincere
Sincere
Sincere
Sincere Forever
Forever
Forever
Forever
Certificate of Quality
Inspector:
Qingdao Haier Medical and Laboratory Products Co., Ltd.
Haier Industrial Park, Qianwangang Road, Economic and Technological
Development Zone, Qingdao
Haier Industrial Park, Qianwangang Road, Economic and Technological
Development Zone, Qingdao
0532-88936043
0532-88936010
266555
Special No.:0270500015
Version:1stversion in 2009
V98497
Medical
Medical
Medical
Medical Low-Temperature
Low-Temperature
Low-Temperature
Low-Temperature Freezer
Freezer
Freezer
Freezer Operating
Operating
Operating
Operating Instructions
DW-40L508
It applies to the storage of various articles at low temperature by the clinical,
medical, scientific research and inspection departments, etc.
Please read this manual carefully before use.
Please keep this manual for future reference.
It is only suitable for sale and use in Chinese Mainland.
Instructions
Instructions
Instructions
Page 2
Contents
Contents
Contents
Contents
Before use
Product
features ……………………………………… ... ..........................................
Components ……………………………………………………………… . 2
Safety
precautions …………………………… ... ………………………… ... ........
Precautions for handling …………………………………………… .. … ... 6
Precautions for use ……………………………………………………… .. 7
Start to use
Installation ……………………………………………………………… ... . 8
Use ………………………………………………………………… ... ......... 9
Temperature adjustment and setting ……………………………………… . 11
Display and alarm ……………………………………………… ... .............. 12
Remote alarm terminals.. ………………………………………………… .. 13
Maintenance and repair
Routine maintenance …………………………………………… ... .............. 14
Fault clearance.. ……………………………………………………… .. … . 15
Equipment scrapping …………………………………………………… .. 15
Rechargeable battery recycling …………………………………… ... ......... 16
Technical data
Specifications …………………………………………………………… .. 17
Refrigeration principle and circuit diagram ……………………………… . 17
Options …………………………………………………………………… . 18
After-sales service ………………………………………………………… 21
1
Product
Product
Product
Product features
features
features
features
3
It adopts computer control and digit al temperature display. The temperature of
computer display panel is adjustable within the range of +20 ℃ ~-45 ℃ and the
temperature for normal use should be within the range of -20
~-40
℃
.
℃
It has the function of power-on time delay protection.
It is equipped with an internationally famous compressor imported from another
country, achieving higher refrigerating capacity.
It is mainly used for the cryopreservation of blood, biomaterials, vaccines and
electronic components as well as the low temperature test of special materials,
etc.
It is suitable for the laboratories of blood banks, hospitals, quarantine stations,
colleges/universities, scientific research institutes and electronic & chemical
enterprises, etc.
The double-door structure allows for easier access.
Due to continuous product improvement, your Haier low-temperature freezer may
be slightly different from that shown in this manual, and we hereby apologize for
this.
The contents of this manual are subject to change without notice.
We
hereby promise to provide a complete set of “ 1+5 ” value-added services for you when
you require installation or maintenance service for any Haier product.
“ 1 ” : it means installation service will be done well only once.
“ 5 ” : it means 5 combined services:
a. Safety test service: we will perform safety test in electricity and make a thorough
explanation.
b. Explanation and instruction in use: we will explain and instruct you how to use and
maintain the products properly for a longer product life and energy saving.
c. Product maintenance: after installation or repair, we will help you perform maintenance
on the products to prolong their life, save energy and use them in a good manner.
d. One-stop service marketing: if you want to purchase other products, we will provide you
with one-stop service including on-site design, delivery, installation, maintenance and
repair.
e. Site cleaning service: we will clean the site after completing service.
We
appreciate your supervision on our service. If we do not fully keep our promise, please
make a complaint by calling 4006 999999. Once it is proved to be true, we will pay you
RMB100 as a bonus for doing so.
Haier
is
Haier
Haier
Haier is
looking
is
looking
is looking
looking forward
forward
forward
forward to
to
your
to
to your
participation!
your
participation!
your participation!
participation!
Please see the real product for its appearance, color or pattern.
It is prohibited to store those articles with strict temperature requirements such
as living creatures and flowers, etc.
Page 3
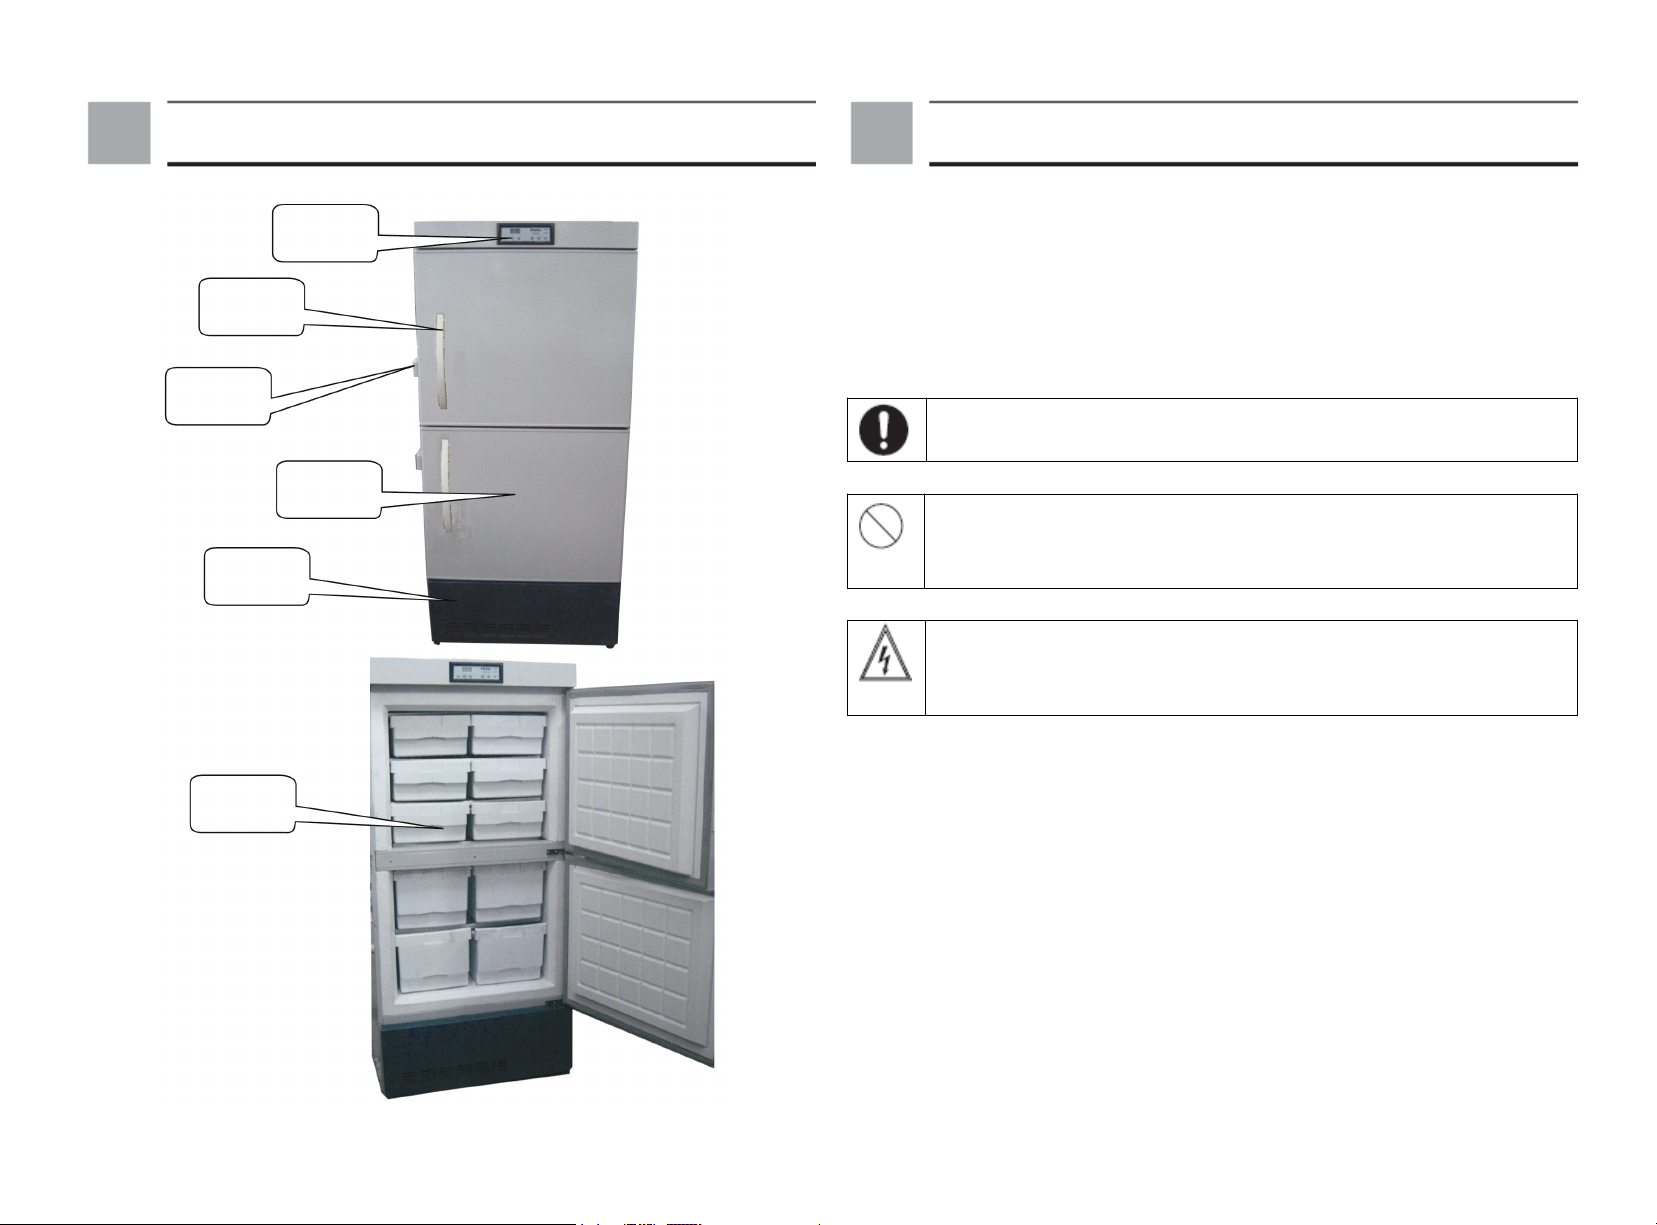
Components
Components
Components
Components Safety
Safety
Safety
Safety precautions
precautions
precautions
precautions
Handle
Door snap
close
Front cover of
compressor
compartment
Drawer
Control
panel
Outer door
Please always follow all important safety regulations in this manual; otherwise you
must take full responsibility for the consequences.
Please follow all precautions and regulations in this manual to avoid possible injury
of the user and any other person.
“ Caution ” , “ prohibition ” and “ warning ” signs are as follows:
The contents marked with this “ caution ” sign involve safety of both the
product and user and must be strictly followed.
The contents marked with this “ prohibition ” sign describe absolutely
prohibitory behaviors and must be strictly followed; otherwise the freezer
may be damaged or the user may be injured.
This sign is marked on the covers of high-voltage electric appliances to
avoid electric shock. These covers shall be removed by a qualified
engineer or maintainer.
Page 4
Safety
Safety
Safety
Safety precautions
precautions
precautions
precautions
Safety
Safety
Safety
Safety precautions
precautions
precautions
precautions
Please use special power supply (AC 220V~/50Hz) marked on the freezer’s
rating plate. If the voltage used is below 198V or above 242V , an automatic voltage
stabilizer of 4000W and above should be additionally installed. If power cord needs
to be extended, the extension cord must not be less than 2mm
2
in sectional area and
more than 3m in length. Using the power supply of any voltage or frequency other
than that marked on the rating plate may result in fire hazard or electric shock.
The freezer’s power cord is provided with a three-pin (grounded) plug which is
suitable for standard three-wire (grounded) socket. In any case, do not cut of remove
the grounding pin of power cord. Be sure to ensure firm connection and good contact
between the plug and socket; otherwise fire hazard may occur.
Please use a power socket with ground wire to avoid electric shock. If the power
socket is not grounded, be sure to ask a qualified technician to install grounding wire.
Never ground the freezer through gas pipe, water pipe, telephone line or lighting
arrester; otherwise it may result in electric shock or other dangers.
Never use the freezer in the open air. If it is exposed to rain, electric leakage or
electric shock may occur.
The freezer must be installed only by a qualified technician or maintainer;
otherwise electric shock or fire hazard may occur.
The freezer must be installed firmly on solid ground. In case of unfirm ground
or improper location, it may topple or cause personal injury.
Never install the freezer in a humid place or in a location exposed to
splash/spray water; otherwise electric leakage or electric shock may occur due to
lower insulation level.
Neither store inflammable, explosive or volatile substances in the freezer nor
use flammable spray near the freezer; otherwise explosion or fire hazard may occur.
Never store corrosive products such as acid and alkali in the freezer; otherwise
internal components or electric parts may be damaged.
Never insert any metal object such as iron nail or iron wire into any hole/gap or any
vent for internal air circulation; otherwise the contact between these objects and
moving parts may cause electric shock or personal injury.
If poisonous, harmful or radioactive substances are stored in it, please use the
freezer in a safe area. Improper use may be harmful to health or environment.
In case of leakage of inflammable gas such as coal gas, please close the valve
involved in gas leakage, open windows for exhaust ventilation and do not plug in or
unplug the freezer.
Be sure to disconnect the freezer from its power supply before carrying out any
repair or maintenance on the freezer in order to avoid electric shock or personal
injury.
Make sure that no drug or suspended particles in and around the freezer will be
breathed in at the time of repair or maintenance; otherwise they may result in health
hazard.
Never pour water directly onto the freezer; otherwise electric shock or short
circuit may occur.
The freezer must not be disassembled, repaired or modified by the user himself.
If an unauthorized person does so, fire hazard or personal injury may occur due to
improper operation.
In case of abnormal operation, please unplug the freezer. If the freezer goes on
operating under abnormal state, electric shock or fire hazard may occur.
If the freezer is left unused for a long time in an unsupervised area, please keep
children away from it and make sure that its doors cannot be fully closed.
If the freezer is turned off, it should be turned on again after at least 5 minutes to
avoid damage to the compressor or system. Be sure to unplug the freezer before
carrying out any repair or maintenance. Never roll or damage the power cord.
Equipment scrapping should be done by qualified persons. The doors should be
removed to avoid accidents such as suffocation.
When disconnecting the freezer’s plug from the power socket, please grasp it and
do not pull the power cord; otherwise electric shock or fire hazard due to short circuit
may occur.
Never touch any electrical component such as power plug or any switch with a
wet hand; otherwise electric shock may occur.
When turning it on again after power failure or power-off, be sure to check the
freezer’s settings. The change of settings may deteriorate those articles stored in the
freezer.
Do not put any container filled with water or any heavy object on the freezer. If
the container or heavy object drops, personal injury may occur; in addition, the water
may reduce the insulation level, resulting in electric leakage or electric shock.
Do not climb the freezer or put any article on the freezer; otherwise it may topple,
resulting in personal injury or damage to the freezer.
Page 5

Safety
Safety
Safety
Safety precautions
precautions
precautions
precautions
Precautions
Precautions
Precautions
Precautions for
for
for
for use
use
use
use
When closing a door, please hold its handle to prevent your fingers from being
pinched.
Do not store glass bottles or canned products in the freezer because frost crack
may occur and result in personal injury.
Do not touch any item stored in the freezer with a bare hand. Touching a frozen
item or the freezer’s inner wall with a bare hand may cause frostbite.
At the time of repair, wear a pair of gloves to avoid injury by a sharp edge or
corner.
If the freezer is to be left unused for a long time, pull out its power plug to avoid
electric shock, electric leakage or fire hazard resulting from the aging of power cord.
Put plastic bags out of the children’s reach because they may cause suffocation.
Precautions
Precautions
Precautions
Precautions for
for
handling
for
handling
for handling
handling
1. Before unpacking, a fork lift or bale clamping device may be used to move the
freezer.
If a fork lift is used to move the freezer, insert its fork into the bottom of wood
bottom bracket from both sides of the freezer.
If a bale clamping device is used to move the freezer, clamp the freezer from the
bottom of wood bottom bracket and only clamp both sides of the freezer.
2. After unpacking, the freezer can be moved by its castors.
Note: Never tilt the freezer more than 45 ° when moving it.
If the freezer is turned on for the first time or has not been used for a long time, its
rechargeable battery may at low charge level because it has been fully discharged.
This is not a fault. In this case, make the freezer operate continuously for about 6
days to fully charge the battery.
When the freezer is operating, the surface around the doorframe of shell may get
hot. This is not a fault. The reason is that anti-condensation pipes are installed around
the opening to prevent condensate from forming around the cabinet shell.
Make sure that the freezer’s internal temperature has been low enough before
putting articles in the freezer and the articles are put in the freezer in batches to
prevent temperature rise.
The displayed temperature of low-temperature freezer means the temperature at
the temperature-sensing probe in the preservation compartment. Sometimes it is
different from actual temperature in the center of preservation compartment, but it
will be gradually close to the actual temperature.
There is a through-hole on the freezer’s rear panel for leading out the test wire
inside the freezer. After leading out the test wire, be sure to stuff the test hole with
heat-insulating material again; otherwise the temperature inside the preservation
compartment will not be low enough and condensate may form around the outside of
through-hole.
Clean the freezer with diluted neutral detergent (undiluted detergent will damage
the plastic composition. Please refer to the detergent instructions for the dilution
method). Do not use a brush, acid, gasoline, soap powder, polishing powder or hot
water to clean the freezer because they may damage the painted surface and
plastic/rubber parts. The point we must pay special attention to is that any volatile
solvent such as gasoline should not be used on plastic/rubber parts.
After the freezer operates for a period of time, there will be a layer of frost on its
inner wall. Thick layer of frost will affect the freezer’s refrigerating effect and increase
power consumption. Therefore defrosting should be done by the provided scraper or the
defrosting key on the control panel when the thickness of frost reaches about 5mm.
Before defrosting, please take out all articles stored in the freezer and put them in
another freezer for preservation to avoid the deterioration of articles due to
temperature rise.
There are many cooling coils on the shelves. Therefore do not remove the frost on
the shelves with any sharp tool such as knife, ice chisel or screwdriver, etc. Be
careful not to scratch the evaporating pipes in the process of defrosting; otherwise the
freezer will be unable to work normally.
If the freezer is to be left unused for a long time, please disconnect it from the
power supply and turn off the battery switch.
Page 6

Installation
Installation
Installation
Installation
Use
Use
Use
Use
Installation environment
1. Ambient temperature: 5 ℃ ~28 ℃ ; maximum temperature 32 ℃ ; ideal temperature
18 ℃ ~25 ℃ ; if necessary, please use the air conditioning system.
2. Ambient humidity: less than 80% RH. If maximum working temperature is 32 ℃ ,
the ambient humidity should be less than 57% RH.
3. Avoid a lot of dust.
4. Avoid mechanical swing or vibration.
5. Altitude of the working position: less than 2000m.
6. Input voltage: 220V~ ± 10%.
* Notes:
1. The low-temperature freezer is relatively sensitive to ambient temperature, and
therefore it cannot operate normally if it is installed in any environment other than the
above-mentioned. In this case, please change the environment and then use the freezer.
2. It is prohibited to install the freezer in the open air. If the freezer is exposed to rain,
electric leakage or electric shock may occur.
Installation location
For normal operation and optimum performance, the freezer’s installation location
should meet the following requirements:
1. The freezer must not be installed in a narrow and enclosed space. The door body
of the room where the freezer is installed must not be smaller and lower than the
freezer and must ensure normal pass-through of the freezer to avoid difficulty in
repair in case of any fault; otherwise the freezer cannot be restored in time,
resulting in deterioration of the articles stored in the freezer.
2.
At
least
30cm
should
be
reserved
around the
freezer for ventilation
and
heat
dispersion.
3. The freezer must be installed on flat floor.
4. The freezer must be installed in a well-ventilated place without direct sunlight.
5. The freezer should not share a socket with any other device. Ensure firm
connection between the plug and the socket.
6. Do not twist or press the power cord.
7. If
the
power cord
needs
to be
extended, the extension cord
must be
of
220V~
and 15A.
8. Please check the working voltage before use and consider using a voltage
stabilizer of 3kw and above in those areas with unstable voltage to ensure normal
input voltage within 220V~ ± 10%.
9. The freezer must be grounded reliably.
10. If the power socket is equipped with ground wire, please check it for reliable
grounding before use.
If the power socket is not equipped with ground wire, be sure to ask a qualified
technician to install proper ground wire.
Installation
1. Remove all packing materials and tapes
Remove all packing materials and tapes for transport.
2. Adjust the legs
Clockwise turn the adjustable legs to extend them out and rest on the floor. Make
sure that the freezer is not moved when it is in use.
3. Grounding
Warning
Warning
Warning
Warning
Please use a power socket with ground wire. If the power socket is not grounded,
be sure to ask a qualified technician to install proper ground wire.
Never ground the freezer through gas pipe, water pipe, telephone line or lighting
arrester, etc.; otherwise electric shock may occur.
The power socket must be accessible after installation in order to disconnect the
power cord from the power socket in an emergency.
The freezer’s air vent must not be covered by anything.
Commissioning
Commissioning
Commissioning
Commissioning
When use the freezer for the first time, please follow the steps:
1. After installation, be sure to leave the freezer still for at least 24 hours before
turning it on.
2. When the freezer is empty, connect the power cord to a special socket of proper
specifications.
3. Turn on the rechargeable battery switch (it can be seen from the freezer’s back)
on the electric cabinet of compressor compartment at the top of freezer’s back. If
the switch is not turned on, low battery charge alarm will be given at the time of
test.
4. When alarm sound is heard, please press the “ Cancel buzz ” key to stop buzz.
5. Set the desired temperature: turn on the freezer without putting anything in the
freezer and observe the freezer for normal start and stop at least 24 hours. If so,
it means that the freezer’s performance is normal.
6. After confirming normal performance, put articles to be stored in the freezer.
Page 7

Use
Use
Use
Use
Caution
The freezer should be in the charge of a specially assigned person. He/she checks
and records the freezer’s running condition (every 2-4 hours). And, in case of a fault
or power failure, the temperature inside the freezer will rise. If the fault cannot be
cleared in a short time, please take out all articles stored in the freezer and put them
in another freezer meeting their temperature requirement to avoid deterioration.
Before putting articles to be stored in the freezer, make sure that the freezer’s
temperature range meets the temperature requirement of these articles. Otherwise
they may deteriorate because the freezer cannot reach the required temperature,
resulting in loss.
Due to the inertia of refrigeration, there is a certain difference between actually
displayed temperature and set temperature (the lower set temperature, the less
temperature difference and vice versa). It is normal.
Prohibition
All low-temperature freezers are storage equipment. It is strictly prohibited to put
too many relatively hot items in the freezer at a time; otherwise the compressor will
keep working for a long time without stop and be damaged easily and the
temperature will not reduce. Be sure to put articles in batches and make the
temperature inside the freezer reduce in steps to the desired temperature.
Do not accelerate defrosting by using any tool or method not approved by the
freezer’s manufacturer.
Do not damage the refrigerating loop.
Dot use any appliance not approved by the freezer’s manufacturer in the freezer.
Operation after power failure
The freezer can memorize the settings. In case of power failure, the freezer will still
operate with the parameters set before power failure when power supply resumes.
Temperature
Temperature
Temperature
Temperature adjustment
adjustment
adjustment
adjustment and
and
setting
and
setting
and setting
setting
The freezer’s temperature is set and
adjusted as follows:
1. Unlocking
When the “ Lock ” indicator lights up, all keys except the “ ” key are locked.
Press and hold the “ ” key for 5s, the display area for internal temperature will
show F0 and “ 0 ” will flash; then press the “ ” key, the display area for internal
temperature will show F1; finally press the “ Set ” key, the keyboard will unlock
and the display panel will show internal temperature. If any key is pressed in 10s,
the keyboard will automatically be locked.
2. Temperature setting
In initial power-on state, press the “ Set ” key, the display screen will show L0 and
“ 0 ” will flash; press this key again, the display screen will show the default
temperature setting (i.e. -30 ℃ ) and the second digit will flash. (If the freezer is
not used for the first time, the display screen will show the temperature set last
time) Adjust the freezer to the desired temperature by pressing the “ ” key to
switch the flashing digit and pressing the “ ” key to change the value of current
flashing digit, and then press the “ Set ” key to confirm and memorize the
temperature setting. Temperature setting range: (-20 ℃ ~-45 ℃ )
3. High temperature alarm setting
After unlocking, press the “ Set ” key, the display screen will show L0 and “ 0 ”
will flash; press the “ ” key, the display screen will show L1; press the “ Set ” key
again, the display screen will show the default temperature setting for high
temperature alarm with the second digit flashing (the default temperature setting
for high temperature alarm is internal temperature setting +10. Note: When
showing the temperature, the “ ” sign followed by digits means the “ + ” sign)
and then adjust the temperature setting by pressing the “ ” key to switch the
flashing digit and pressing the “ ” key to change the value and sign of current
flashing digit; after finishing setting, press the “ Set ” key to memorize the setting.
Temperature setting range for high temperature alarm: maximum displayed
temperature ≥ set temperature for high temperature alarm - set temperature ≥ 5 ℃ ;
otherwise use the default setting.
4. Low temperature alarm setting
After unlocking, the display screen will show L0 and “ 0 ” will flash. Press the
“ ” key twice, the display screen will show flashing L2; press the “ Set ” key, the
display screen will show the default temperature setting for low temperature
alarm with the second digit flashing (the default temperature setting for low
temperature alarm is internal temperature setting -10), and then adjust the
temperature setting by pressing the “ ” key to switch the flashing digit and
pressing the “ ” key to change the value of current flashing digit; after finishing
setting, press the “ Set ” key to memorize the setting. Temperature setting range
for low temperature alarm: minimum displayed temperature ≤ set temperature for
low temperature alarm - set temperature ≤ -5 ℃ ; otherwise use the default setting.
Page 8

Display
Display
Display
Display and
and
alarm
and
alarm
and alarm
alarm
Display
Display
Display
Display and
and
alarm
and
alarm
and alarm
alarm
Upon connecting to the power supply, the freezer will be on and the display screen
will show the freezer’s internal temperature.
Prompts for the working state of display panel:
“ Lock ” indicator: if the indicator lights up, it means that all keys are locked to
avoid misoperation.
“ Alarm ” indicator: if the indicator lights up or flashes, it means that a fault occurs.
Functions of keys:
Cancel buzz: in the locked or unlocked state, press the “ Cancel buzz ” key at the
time of alarm, the alarm sound will be cancelled and the visual alarm will not be
cancelled.
Alarm test: it is used to test normal working state of the alarm system and low
battery charge level. In the unlocked state, press this key, all the indicators will light
up, the buzzer will give an alarm and all digital tubes display “ 8 ” . In the locked state,
press this key at the time of alarm, corresponding fault alarm code will display.
Please identify the fault causes according to the table below.
Alarm State Fault
High
temperature
alarm
Low
temperature
alarm
Power-dow
n alarm
Over-high
ambient
temperature
Abnormal
sensor
Low
battery
charge
level
When the internal
temperature is higher
than the set temperature
for high temperature
alarm
When the internal
temperature is lower
than the set temperature
for low temperature
alarm
Power-down of the
freezer
Ambient temperature
above 38 ℃
Internal main sensor at
fault
Ambient temperature
sensor at fault
Insufficient battery
charge or the battery
switch is not on
code
E9 The indicator
E10 The indicator
/ The alarm
E14 The indicator
E6 The indicator
E0 The indicator
E5 The indicator
Indication Buzzer
flashes
flashes
indicator
flashes; black
screen and
actual internal
temperature
show alternately
flashes
flashes
flashes
flashes 3 times
When the freezer is
turned on for the first
time, the buzzer alarm
function is activated
after 5 hours according
to the default settings; in
normal operation, the
buzz alarm is given after
15min
the buzz alarm is given
after 30s
Buzz alarm
Note: If several alarms sound simultaneously, each fault code displays 3s.
Note:
Always turn on the battery switch before starting the freezer. The freezer will enter
normal working state and charge the battery upon connecting to an AC power supply
meeting its requirements. In case of AC power failure, the battery will energize the
display screen for normal display. When the voltage of battery reduces to less than a
specified value due to discharge, it will stop energizing the display screen and thus
the display screen will not display any longer. When the battery is able to supply
electricity normally, to completely cut off the freezer’s power supply, just pull out its
AC power cord and turn off its battery switch. Then the display screen will not
display any longer.
Time
setting
Time
setting
Time
Time setting
setting for
for
automatic
for
automatic
for automatic
automatic alarm
alarm
recovery
alarm
recovery
alarm recovery
recovery
At the time of alarm, press the “ Cancel buzz ” key on the display panel, buzz alarm
will be cancelled (remote alarm will not be cancelled).
If alarm conditions remain, the buzz alarm will automatically recover after a pause of
30min.
Remote
Remote
Remote
Remote alarm
alarm
terminals
alarm
terminals
alarm terminals
terminals
The remote alarm terminals are located in the compressor compartment at the back of
freezer . Alarm signals are sent by these terminals with carrying capacity of DC
30V,
2A.
Contact output:
In normal conditions, both ends of connecting wire of remote alarm terminals are
open circuit. In alarm conditions, both ends of connecting wire of remote alarm
terminals are closed circuit.
To use the remote alarm function, connect the circuit as shown in the figure below.
Note: The remote alarm function is limited to three alarm modes - high temperature
alarm, low temperature alarm and power-down alarm.
Page 9

Routine
Routine
Routine
Routine maintenance
maintenance
maintenance
maintenance
Fault
clearance
Fault
clearance
Fault
Fault clearance
clearance
Warning
To
avoid electric shock or personal injury, be sure to disconnect the freezer from power supply
before carrying out any repair or maintenance.
Make sure that no drug or suspended particles around the freezer will be breathed in at the
time of maintenance; otherwise they may result in health hazard.
Cleaning of the freezer
Clean the freezer once a month. Regular cleaning makes the freezer always brand-new.
Wipe off a little dust on the shell, inner compartments and all accessories of the freezer
with a dry cloth. If the freezer is very dirty, remove the dirt with a clean cloth and neutral
detergent, then wipe off the residual detergent with a wet cloth, and finally wipe the freezer
with a dry cloth. (Undiluted detergent may damage plastic parts. Please refer to the detergent
instructions for the dilution method.)
Never pour water onto the shell or into the preservation compartment of freezer; otherwise
the insulation layer may be damaged, resulting in faults.
The compressor and other mechanical parts are fully enclosed and require no lubrication.
Remove the frost or ice on the inner wall once a month.
Removal of frost on the inner wall
Frost usually forms on internal shelve, which may cause clearance between the cabinet body
and door seal and thus result in poor refrigerating effect.
along with the freezer for defrosting. The following procedure is the method of defrosting
through emptying the freezer.
Note: Do not use any tool with sharp edges or corners such as knife or screwdriver for
defrosting.
1. Take out all articles stored in the freezer and put them in another freezer or in a container
with freezing liquid carbon dioxide.
2. Turn off the power switch.
3. Open outer doors and leave them open for a period of time for defrosting.
4. Wipe off water at the bottom of cabinet body with a dry cloth.
5. After cleaning the cabinet body, turn on the freezer again.
6. Put back the articles in the sufficiently cooled freezer.
Or you may use the “ Defrost ” key to defrost: after unlocking the keyboard, press and hold the
“ Defrost ” key for 5s, the compressor will stop running. This key doesn ’ t have automatic return
function. Therefore it is necessary to press and hold it for 5s again after defrosting ends, and
the compressor will resume normal running.
Battery maintenance
When the low-temperature freezer keeps working continuously, please test the battery
charge level every 15 days (please refer to the section of alarm test function on Page 12 for the
test method). In case of low battery charge level, make sure that the battery switch is on and
the battery is charged. When the battery has been charged for consecutive 7 days, please retest
the battery charge level. In normal conditions, the battery charge should be full. If low battery
charge level remains, it is recommended to replace the rechargeable battery.
The battery with power-down alarm function is a consumable item with 3-year service life.
If the battery has been used for more than 3 years, it may not act at the time of alarm. It is
recommended to replace the battery earlier. Please contact a Haier after-sales service
technician for the battery replacement.
You
may use the ice scraper provided
If the freezer goes wrong, please check the following possible fault points before
asking for repair:
Failure to start
Is the connection of power supply normal? Is the main power switch on?
Is supply voltage too low?
Were many articles put in the freezer at a time?
Poor cooling
Is ambient temperature too high?
Are the doors closed tightly? (The frost between the cabinet body and the door
seal may reduce the sealing performance of doors)
Is the temperature setting correct?
Is the freezer away from direct sunlight?
Is the freezer close to a heat source?
Are the rubber hole cover and heat-insulating materials of test through-hole placed
correctly?
Were many uncooled items put in the freezer in past several hours? (In this case,
the problem is temporary.
You
may raise the set temperature and then gradually
reduce it after the freezer starts and stops normally in a short time.)
Noise
Is the freezer installed on solid ground?
Is the freezer’s shell contact with any object?
Has the freezer been leveled by adjusting its legs?
Is the freezer in low-temperature running state?
If the freezer ’ s internal temperature is relatively high due to many items in it,
sometime it make noises. The noise will lower with the reduction of temperature in
the preservation compartment.
Please check whether the noise is from the compressor (the compressor noise of
low-temperature equipment is louder than that of household appliances)
Knocking sound. It may be caused by rapid cooling and contraction of internal
components. In this case, please make the freezer’s temperature reduce gradually
without abrupt temperature reduction in a short time.
Equipment
Equipment
Equipment
Equipment scrapping
scrapping
scrapping
scrapping
Warning
If the freezer is left unused for a long time in an unsupervised area, please keep
children away from it and make sure that its doors cannot be fully closed. Equipment
scrapping should be done by qualified persons. Be sure to remove the doors to avoid
accidents such as suffocation.
Page 10

Rechargeable
Rechargeable
Rechargeable
Rechargeable battery
A
rechargeable battery is built in the freezer and is recyclable. When the battery’s
battery
battery
battery recycling
recycling
recycling
recycling
service life expires, please contact local battery recycling organizations for check or
proper disposal of the battery.
1. Position of the battery
The battery built-in the freezer is used for power-down alarm and located in the
electric cabinet.
Caution
There are high-voltage electrical components in the electric cabinet.
To
avoid electric shock, the cover of electric cabinet must be opened only by a
qualified engineer or maintainer.
2. Removal of the battery
1) Turn off the power switch and pull out the plug from the power socket.
2) Screw off the screws on the cover of electric cabinet with a screwdriver.
3) Pull out the battery’s connecting plug.
4) Remove the battery’s fixing clip and then take out the battery.
5) Recycle or properly dispose the battery as required.
Prohibition
When replacing the battery, make sure that the brown wire is connected to the
battery’s positive pole and the blue wire to the battery’s negative pole. Do not
misconnect; otherwise the charging circuit of computer board would be burned out
easily and the battery cannot be charged.
Specifications
Specifications
Specifications
Specifications
Technical data
Model Ambi
DW-4
0L508
ent
tempe
rature
( ℃ )
10~32
Classif
ication
of
electric
shockproof
protect
ion
I
Tempe
rature
range
( ℃ )
-20~-40490 220V~/5
Effe
ctive
volu
me
(L)
Rated
voltage/fr
equency
0Hz
Rat
ed
cur
rent
(A)
4.2 63
Inp
Wei
ut
ght
po
(Kg
we
)
r
(W
)
170 280 840 × 89
0
Mixe
d
refrig
erant
(g)
Overall
dimensi
ons
(D × W ×
H)(mm)
5 × 1860
Conn
ection
type
Y
Note: With ambient temperature at 25 ℃ , minimum temperature inside the freezer can
reach -40 ℃ .
Name
Qty.
Model
DW-40L508 1 1 1 1 2 2
Warranty
Card
Operating
Instructions
Plastic bag Ice scraper Thrust shelf Door handle
subassembly
Note: Thrust shelves are installed at the back of freezer to ensure a certain distance
between the freezer and wall.
Refrigeration
Refrigeration
Refrigeration
Refrigeration principle
Schematic
Schematic
Schematic
Schematic refrigeration
refrigeration
refrigeration
refrigeration diagram
principle
principle
principle and
diagram
diagram
diagram
and
circuit
and
circuit
and circuit
circuit diagram
diagram
diagram
diagram
Page 11

Refrigeration
Refrigeration
Refrigeration
Refrigeration principle
principle
principle
principle and
and
circuit
and
circuit
and circuit
circuit diagram
diagram
diagram
diagram
Options
Options
Options
Options
Options
Options
Options
Options
1. Temperature recorder
Ask a qualified technician or an after-sales maintainer to install the temperature recorder as follows:
1) Remove the cover plate of temperature recorder.
2) Install the temperature recorder in place and then fix it to the front panel with screws.
3) Remove the screws of electric cabinet in the compressor compartment and then connect the
connecting wires of temperature recorder respectively to the freezer’s live wire and neutral
wire.
4) Lead the sensor of temperature recorder in the freezer through internal sensor duct at the back
of compressor compartment. The sensor duct is from the sensor through-hole at the back of
freezer to the compressor compartment.
5) Disassemble the holder of internal temperature sensor in the cabinet, fix the recorder’s sensor
and internal temperature sensor together, seal the sensor hole on the cabinet body and install
the cover in place.
6) Bundle the connecting wires of recorder in the compressor compartment with cable clips.
7) Fix and restore the cover of electric cabinet and the left panel of compressor compartment
respectively with screws.
Warning
Before installing the temperature recorder, be sure to switch off the power supply; otherwise
electric shock or fire hazard may occur.
Installation
Installation
Installation
Installation and
In order to operate and use the recorder correctly, please operate as follows:
1)
You
2) Switch on the backup power supply, i.e. 9V DC battery in the upper left corner of recorder.
3) Change a piece of new recording paper (see the figure below).
4) Remove the plastic cap from the recording pen and close the recorder’s door.
Note: The recorder will not work until internal temperature reaches the recorder’s recording range.
Power
Power
Power
Power supply
When the freezer works, the recorder uses AC power supply in normal conditions. If AC power
supply goes wrong, the recorder’s LED indicator will flash to indicate abnormal power supply. And,
the recorder will go on recording internal temperature by using backup battery. Each backup battery
can support the recorder for about 30h (Note: In case of low battery charge level, replace the battery
in time to avoid corrosion of battery switch due to overdue replacement.
please turn off the battery switch when the freezer is not in use. Please install a backup battery in
place to ensure normal recording in case of power failure during normal use). The recorder’s LED
indicator will continuously flash until main power supply (AC power supply) is switched on and the
backup battery is replaced. In case of low backup battery charge level, the recorder’s LED indicator
will flash to indicate the need of battery replacement.
Repair
and
Repair
and
Repair
Repair and
and replacement
If the recorder’s green LED flashes, there are two checking methods:
and
running
and
running
and running
running
will see the recorder upon opening its door.
supply
supply
supply
replacement
replacement
replacement of
of
the
of
the
of the
the recorder
recorder
recorder
recorder ’
’
s
backup
’
s
backup
’ s
s backup
backup battery
battery
battery
battery
To
save battery charge,
Page 12

Options
Options
Options
Options
After-sales
After-sales
After-sales
After-sales service
service
service
service
1. Remove the backup battery (9V DC), if the LED goes out and the recorder stops working, it
means that the recorder’s main power supply goes wrong. In this case, please check for power
failure, short circuit and loose connecting wire, etc. If the main power supply is in good
condition after repair, the recorder will work normally. Then install the backup battery in place,
if the LED stops flashing, it means that the backup battery is normal; if the LED goes on
flashing, it means that the backup battery is at low charge level and needs replacement until
the green LED lights up and does not flash.
2. Remove the backup battery, if the LED goes on flashing and the recorder works normally, it
means that the main power supply is normal and the backup battery is at low charge level and
needs replacement until the green LED lights up and does not flash.
Change
Change
Change
Change of
of
recording
of
recording
of recording
recording paper
paper
paper
paper
Change the recording paper as follows:
1. Find out the “ Press ” button (3#) in the upper left corner on the recorder’s front panel.
2. Press and hold this button (3#) for about 1s until the recording pen starts moving towards the
left of recording paper.
3. When the recording pen entirely moves out of the recording paper, loosen the center bolt and
change the used recording paper with a piece of new recording paper by carefully aligning the
time line on the paper with the time slot on the panel (there is a small slot on the left of panel.
Please see the attached figure).
4. Retighten the center bolt, then press and hold the button (3#) to make the recording pen reset
and start recording temperature.
5. Check whether the recording pen writes well on the paper or not. If not, you may adjust its
beam to make the penpoint contact with the recording paper.
(Note: Do not damage the
penpoint and beam. If it is difficult to adjust, you may remove the beam with a screwdriver,
bend it with a little force and reinstall it in place by repeating the above operations).
6.
To
ensure the recorder’s accurate recording, please calibrate the recording pen after each paper
change as follows: press and hold the button (3#) until the recording pen moves out of the
recording paper, then press and hold the button (3#) again until the recording pen return to the
recording paper, at which time the pen will pause at the outmost temperature graduation mark
on the recording paper (this graduation mark is not necessarily with temperature value, but it
must be the outmost graduation mark). If the pen does not pause in this position, you may
adjust its position by using 1# or 2# arrow within 5s to make the penpoint align with the
outmost graduation mark. If you don ’ t finishing the adjustment of pen within 5s, please repeat
step 6.
Calibration
Calibration
Calibration
Calibration and
and
adjustment
and
adjustment
and adjustment
adjustment of
of
the
of
the
of the
the recorder
recorder
recorder
recorder
The recorder has been accurately adjusted before leaving the factory and will not be affected even if
power interruption. If it indeed needs adjustment, please do as follows:
1. Keep the freezer operating continuously and then make it record the temperature curve for at least
2h after it enters stable state (the fluctuation of displayed temperature is relatively regular).
2. Put a standard thermocouple in a bottle with about 100ml of 10% glycerite, and then put the
bottle and the recorder’s sensor together in the freezer (the recorder’s sensor must not be
contact with any solution).
3. The glycerite bottle with thermocouple is stored in the freezer for about 4h. When the
temperature of glycerite in the bottle is identical with the freezer’s internal temperature,
compare temperature values of the standard thermocouple and recorder, if they are not the
same, you may adjust the recorder’s recorded value by using the adjusting buttons on the left
(1#) or right (2#) of panel to make it in conformity with the thermocouple’s indicated value.
Note: The recording pen starts moving 5s after the button is released.
Note:
The
Note:
The
Note:
Note: The
The recorder
for
special
for
special
for
for special
special cases.
recorder
recorder
recorder has
cases.
cases.
cases.
has
already
has
already
has already
already been
been
calibrated
been
calibrated
been calibrated
calibrated before
before
leaving
before
leaving
before leaving
leaving the
the
factory;
the
factory;
the factory;
factory; do
do
do
do not
not
adjust
not
adjust
not adjust
adjust it
it
except
it
except
it except
except
The freezer is guaranteed for free by our company for one (1) year calculated from the date of
purchase (the invoice shall prevail). Main components (including compressor, condenser, evaporator,
main control panel and display panel) are guaranteed for free by our company for three (3) years.
Warranty card: when you need common consultation or repair, please contact our local
after-sales service center with both warranty card and purchase invoice on hand and keep the
warranty card properly.
Beware of
electric
shock!
There are
such
components
as control
board and
contactor,
etc. in the
electric
cabinet.
Label for protection against electric shock:
Warn the user not to open the electric
cabinet at random.
Before power-on, please turn on the
battery switch on the electric cabinet at
the back of freezer. If the freezer is to
be left unused for a long time, please
power off first, and then turn off the
battery switch.
Label for the use of rechargeable battery:
Describe the precautions for the use of
rechargeable battery
Rechargeable battery switch
Label for the rechargeable battery switch:
Show the position of rechargeable battery
switch
Grounding sign
Label for operation instructions and
precautions:
Instruct the user in operation and relevant
precautions
Operation Steps and Precautions for the Low-temperature Freezer
Unlocking
When the “ Lock ” indicator lights up, all keys except the “ ” key are
locked. Press and hold the “ ” key for 5s, the display area for internal
temperature will show F0 and “ 0 ” will flash; then press the “ ” key, the
display area for internal temperature will show F1; finally press the “ Set ”
key, the keyboard will unlock.
Temperature setting
In the unlocked state, press the “ Set ” key , the display screen will show L0
and “ 0 ” will flash; press this key again, the display screen will show the
former temperature setting with the second digit flashing. Adjust the
freezer to the desired temperature by pressing the “ ” key to switch
the flashing digit and pressing the “ ” key to change the value of current
flashing dig it, and then press the “ Set ” key to confirm and memorize the
temperature setting. Temperature setting range: (-20 ℃ ~-40 ℃ )
Precautions
1. After initial installation or movement, please adjust the legs and
make them rest on the floor to make sure that the freezer will not move
during use, then leave the freezer still for at least 24h before turning it on.
2. When using the freezer, maximumly control the room
temperature below 28 ℃ (If ambient temperature is above 32 ℃ , the
cooling efficiency will reduce rapidly. Also, if ambient temperature is
above 32 ℃ for a long time, the compressor will be damaged or its
service life will reduce. In this case, it is recommended to install an air
conditioner).
3. The freezer should use an independent power socket of the
carrying current above 16A and reliable grounding.
4. Before power-on, please turn on the battery switch on the electric
cabinet at the back of freezer. If the freezer is to be left unused for a long
time, please power off first, and then turn off the battery switch.
5. Maximumly control the time of each opening within 1min, and
wipe off all ice and water on the door seal before closing the freezer’s
doors to ensure high sealing performance.
6. To extend the freezer’s service life and reduce energy
consumption, it is recommended to set the temperature in the range of -20
℃ ~-40 ℃ on the premise that the safety of items in the freezer is
guaranteed.
7. The freezer is used for the storage of items at low temperature
and not used for quick freezing. It must not be forced to quickly freeze a
large quantity of hot products or large-volume liquid products.
8. If the freezer does not refrigerate in 2-3 hours after power on,
please unplug it and contact our after-sales service enter as soon as
possible.
9. In case of alarm or any other fault, please clear the fault
according to the prompts on the display panel. If there is no prompt or
you cannot clear the fault, please do not disassemble the freezer by
yourself but immediately contact our after-sales service center to ask a
qualified maintainer for fault clearance.
Fault codes are as follows:
High temperature
alarm
Low temperature
alarm
Over-high ambient
temperature alarm
______Haier Group customer service hotline (for the whole
country): 4006-999999
E9 Main sensor fault
alarm
E10 Ambient temperature
sensor fault alarm
E14 Low battery charge
level or battery
switch off
E6
E0
E5
 Loading...