

Haier DW12-PFE8 DISHWASHER Schematic
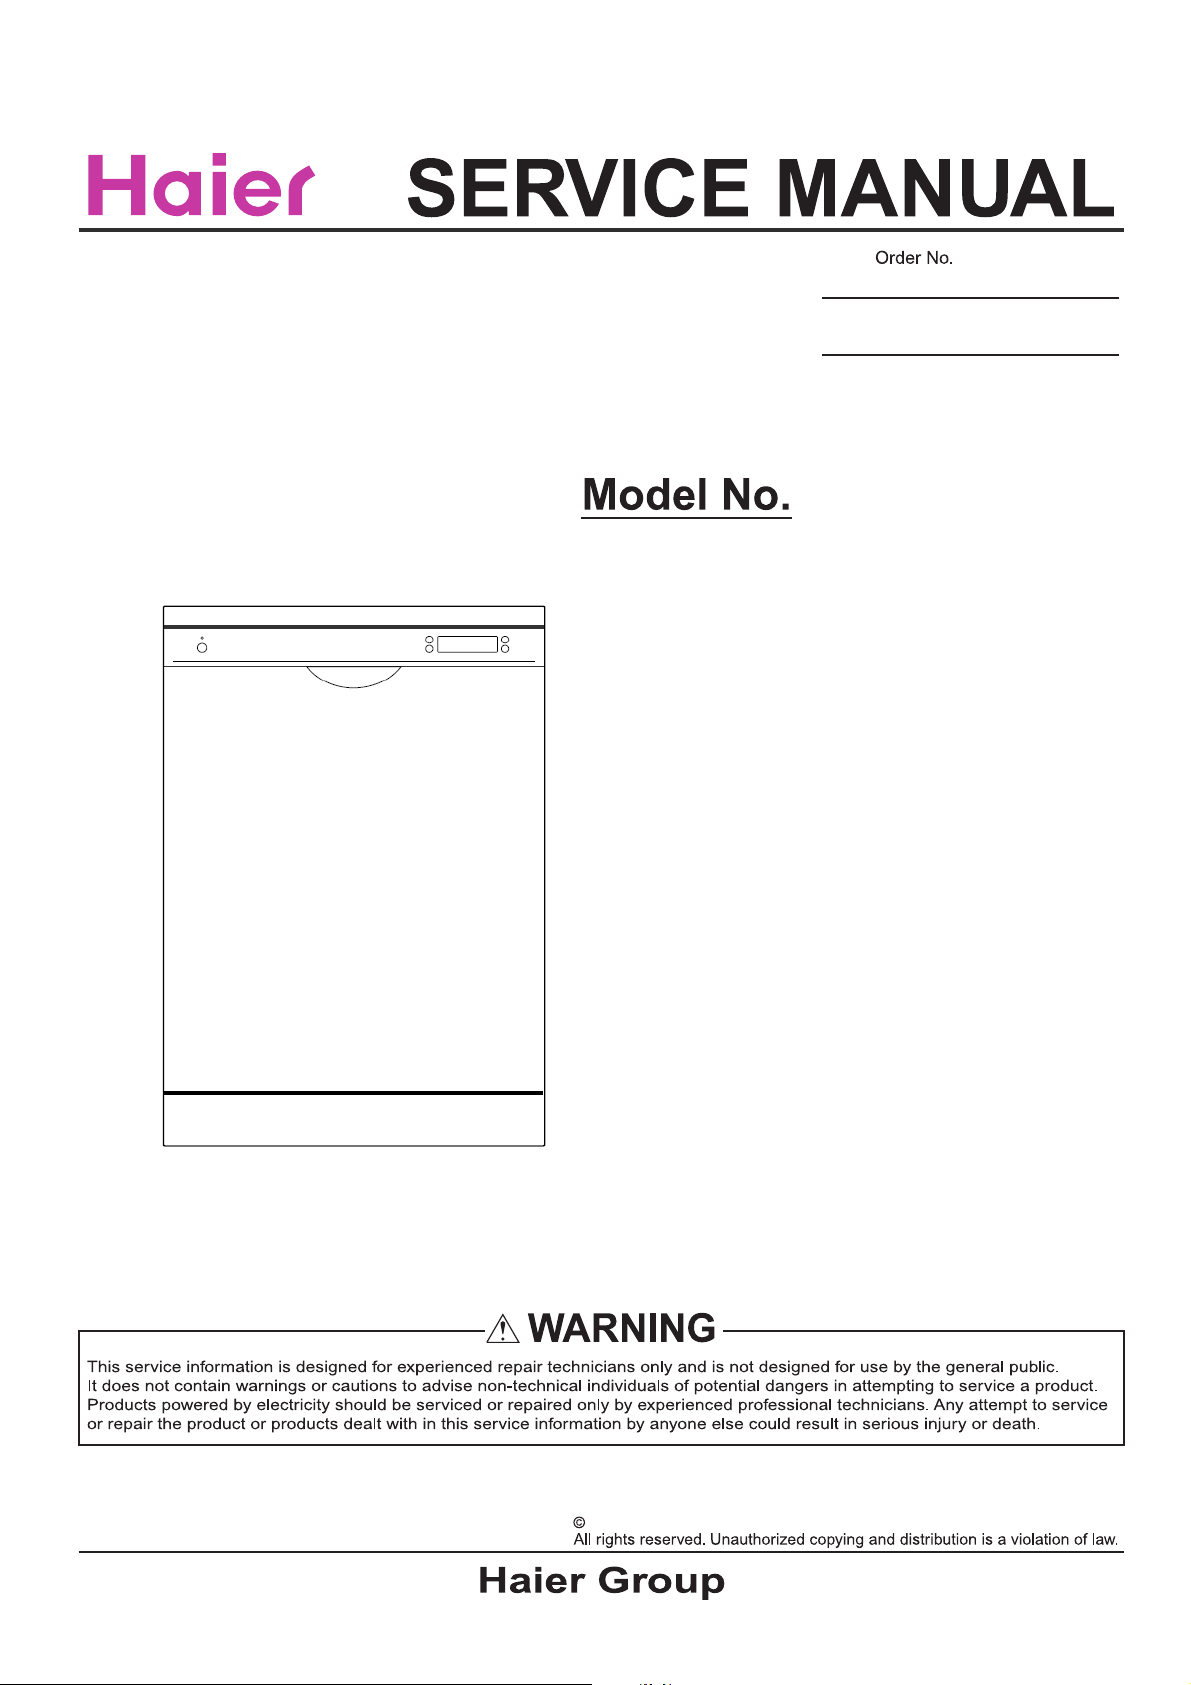
DW12-PFE8 Series
DW1004S001V0
DISHWAHSER
201 0(Qingdao Haier Dishwasher Co.,Ltd)

Service Manual
Model No:DW12-PFE8 Series
Issue
Rev.
Contents
1. FEATURES................................................................................................................................3
2. SERIAL LABEL.........................................................................................................................4
3.HOW TO READ THIS SERVICE MANUAL................................................................................5
4. SAFETY PRECAUTION............................................................................................................6
4-1.A
T TIME OF DELIVERY ............................................................................................................. 6
URING INSTALLATION............................................................................................................ 6
4-2.D
URING NORMAL USE ............................................................................................................. 6
4-3.D
F YOUR FAMILY INCLUDES CHILDREN....................................................................................... 6
4-4.I
F A FAULT OCCURS................................................................................................................. 7
4-5.I
HEN DISPOSING OF OLD APPLIANCES.................................................................................... 7
4-6.W
5. INSTALLATION.........................................................................................................................8
5-1.P
OSITIONING THE APPLIANCE.................................................................................................. 8
EVELING THE APPLIANCE....................................................................................................... 8
5-2.L
OLD WATER CONNECTION ..................................................................................................... 8
5-3.C
NTI-FLOODING PROTECTION ................................................................................................. 8
5-4.A
RAIN HOSE CONNECTION ...................................................................................................... 9
5-5.D
LECTRICAL CONNECTION...................................................................................................... 9
5-6.E
OOLS ................................................................................................................................. 10
5-7.T
OW TO REMOVE THE TOP OF YOUR DISHWASHER ................................................................. 11
5-8.H
DISSEMBLE AND ASSEMBLE PROCEDURE .............................................................................. 13
5-9.
6. PARTS AND FUNCTIONS ......................................................................................................22
6-1.C
LOSE-UP VIEW (CONTROL PANEL)........................................................................................ 22
ISHWASHER INTERIOR ........................................................................................................ 23
6-2.D
7. HOW TO LOAD THE SALT.....................................................................................................24
7-1.S
ALT.................................................................................................................................... 24
OADING THE SALT INTO THE CONTAINER............................................................................... 24
7-2.L
DJUSTING SALT CONSUMPTION ........................................................................................... 24
7-3.A
8. HOW TO LOAD RINSE AID....................................................................................................26
8-
1.RINSE AID ........................................................................................................................... 26
OADING THE RINSE AID........................................................................................................ 26
8-2.L
9. HOW TO LOAD DETERGENT................................................................................................27
9-1.
DETERGENT
OADING THE DETERGENT .................................................................................................... 27
9-2.L
........................................................................................................................ 27
1

Service Manual
Model No:DW12-PFE8 Series
Issue
Rev.
10.ARRANGING CROCKERY, GLASSES, ETC. IN THE DISHWASHER.................................28
10-1.H
10-2.H
10-3.S
10-4.K
OW TO USE THE LOWER RACK........................................................................................... 28
OW TO USE THE UPPER RACK ........................................................................................... 29
HELF
............................................................................................................................... 29
NIFE RACK ....................................................................................................................... 29
11.PROGRAMME OVERVIEW .................................................................................................... 30
12. TURNING ON THE APPLIANCE.......................................................................................... 32
12-1.S
12-2.E
12-3.S
12-4.I
12-5.C
12-6.U
12-7.U
12-8.L
12-9.D
12-10.R
WITCHING THE DISHWASHER ON....................................................................................... 32
ND OF WASHING PROGRAMME .......................................................................................... 32
WITCHING THE DISHWASHER OFF..................................................................................... 32
NTERRUPTING THE PROGRAMME ........................................................................................ 32
ANCELLING OR MODIFYING A CYCLE WHILE UNDERWAY...................................................... 33
SE OF "3 IN 1"/ COMBI-DETERGENT TABLETS .................................................................... 33
PPER RACK WASH ............................................................................................................ 34
OWER RACK WASH............................................................................................................ 34
ELAYED START PROGRAMMING ......................................................................................... 35
ESET DRAIN FUNCTION ................................................................................................... 35
13. HOW TO KEEP YOUR DISHWASHER IN SHAPE...............................................................36
14. CARE AND MAINTENANCE.................................................................................................37
14-1.O
14-2.D
14-3.R
14-4.F
14-5.S
VERALL CONDITION OF APPLIANCE .................................................................................... 37
ISHWASHER SALT ............................................................................................................. 37
INSE
-AID
.......................................................................................................................... 37
ILTERS ............................................................................................................................. 37
PRAY ARMS ...................................................................................................................... 37
15. MAINTENANCE SERVICES AND TROUBLE SHOOTING.................................................. 39
15-1.
MAINTENANCE SERVICES................................................................................................... 39
TROUBLE SHOOTING.......................................................................................................... 39
15-2.
15-3.T
15-4.A
ROUBLE DISPLAY CODE..................................................................................................... 42
NALYSIS OF THE COMMON BREAKDOWNS .......................................................................... 43
16. SELF-CHECK PROGRAM.................................................................................................... 54
16-1.
START............................................................................................................................... 54
16-2.P
16-3.
16-4.C
ROCESS .......................................................................................................................... 54
OTHERS............................................................................................................................ 54
ANCEL ............................................................................................................................. 55
17. TECHNICAL DATA................................................................................................................56
18. CIRCUIT DIAGRAM..............................................................................................................57
2

Service Manual
Model No:DW12-PFE8 Series
Issue
Rev.
1. Features
Brand HAIER
Model Product Code EAN NO. Appearance Colour Power Standard
DW12-PFE8AAA FA07X4E0000 6925777857401 White EUROPE TYPE
DW12-PFE8SAAA FA07X5E0000 6925777857418 Stainless Steel EUROPE TYPE
A grade for energy consumption of European standard EN50242.
A grade for washing efficiency of European standard EN50242.
A grade for drying efficiency of European standard EN50242.
Super-capacity for 12 settings.
With Aquastop.
Electronic control, 3 in 1 function, delayed start,reset drain function,upper rack wash and bottom
rack wash.
Conceal Heater.
Staniless Steel Filter.
Water softener for descaling
3
Service Manual
Model No:DW12-PFE8 Series
Issue
Rev.
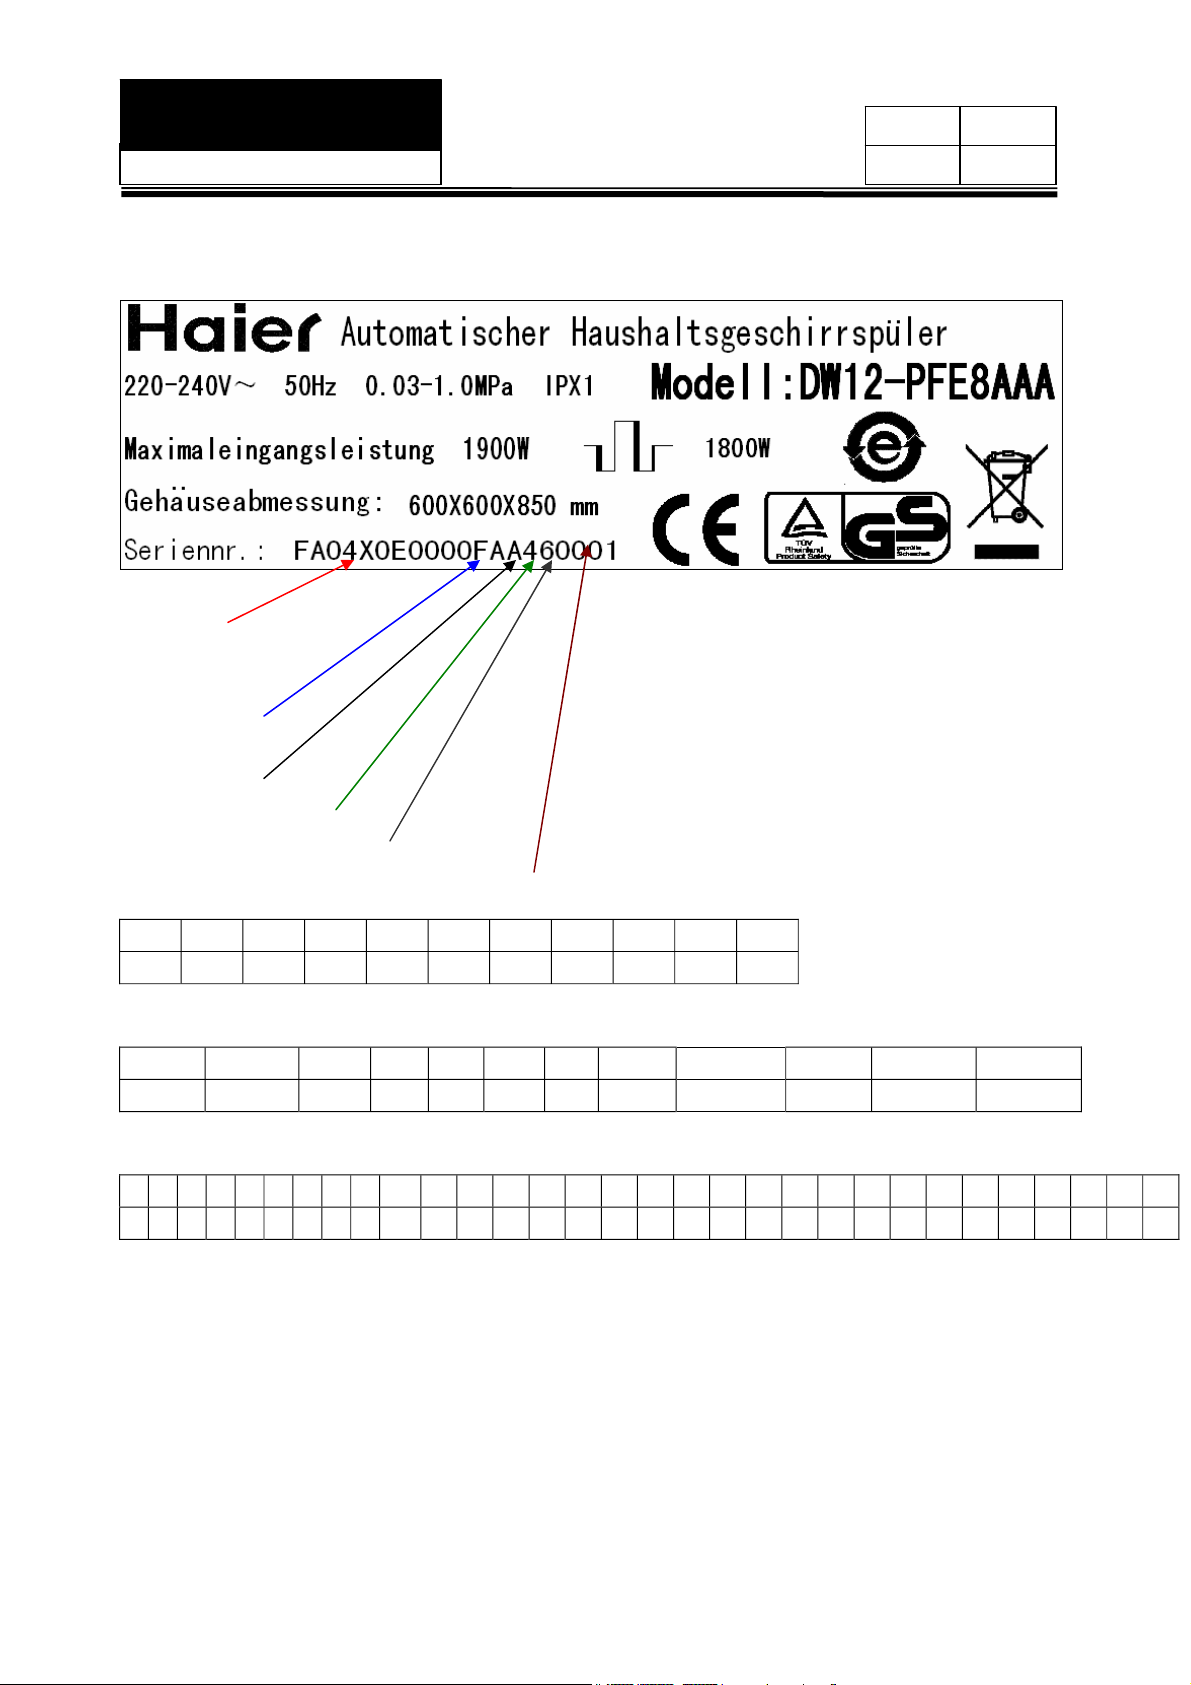
2. SERIAL LABEL
Serial label located on the top left hand side of the inner door panel.
Product Code(DW12-PFE8AAA: FA07X4E0000)
DW12-PFE8SAAA:FA07X5E0000
Dishwasher Line Code(FA)
Year(A)
Month(4)
Date(6)
Product number(0001)
Year
2010 2011 2012 2013 2014 2015 2016 2017 2018 2019 2020
A B C D E F G H J K L
Month
January February March April May June July August September October November December
1 2 3 4 5 6 7 8 9 A B C
Date
1 2 3 4 5 6 7 8 9 10 11 12 13 14 15 16 17 18 19 20 21 22 23 24 25 26 27 28 29 30 31
1 2 3 4 5 6 7 8 9 A B C D E F G H J K L M N P Q R S T U V W X
4
Service Manual
Model No:DW12-PFE8 Series
Issue
Rev.
3.How to read this Service Manual
The symbol on the product or on its packaging indicates that this product may not be
treated as household waste. Instead it shall be handed over to the applicable collection point for
the recycling of electrical and electronic equipment. By ensuring this product is disposed of
correctly, you will help prevent potential negative consequences for the environment and human
health, which could otherwise be caused by inappropriate waste handling of this product.
For more detailed information about recycling of this product, please contact your local city office,
your household waste disposal service or the shop where you purchased the product.
Warning:
A “warning” is used when there is danger of personal injury.
Caution:
A “caution” is used when there is danger that the reader, through incorrect manipulation, may
damage equipment, loose data, get an unexpected result or has to restart (part of) a procedure.
Notice:
A “notice” provides information that is not indispensable, but may nevertheless be valuable to the
reader.
5

Service Manual
Model No:DW12-PFE8 Series
Issue
Rev.
4. Safety precaution
4-1.At time of delivery
● Check packaging and dishwasher immediately for signs of transport damage. If the appliance is
damaged, do not put it into use but contact your supplier or customer service without delay.
● Please dispose of packaging materials properly.
4-2.During installation
● Ensure that the domestic wiring is properly earthed.
● Site the dishwasher and connect it up in accordance with the installation instructions.
● The dishwasher must not be connected to the electricity supply while installation
is being carried out.
● The mains electricity supply must conform to the details shown on the dishwasher nameplate.
● Do not connect the dishwasher to the electricity supply via an extension cable.
● After the appliance has been installed,the mains plug should still be easily accessible.
● During installation, the power supply cord must not be excessively or dangerously bent or
flattened.
● This appliance cannot be installed outdoor, not even if the area in which it is installed is covered
by a roof; it is also very dangerous to leave it exposed to the rain and elements.
4-3.During normal use
● The dishwasher must only be used by adults for the washing of household dishes
and cooking utensils.
● Do not place any heavy objects or stand on the door when it is open. The appliance could tip
forward.
● The water inside the dishwasher is not suitable for drinking.
● Do not use solvents of any kind inside your dishwasher. They could cause an explosion danger.
● Open the door very carefully if the dishwasher is operating. There is a risk of water squirting out.
● Do not touch the heating element during or after a wash cycle.
● Fundamental rules to follow when using the appliance:
- Never touch the dishwasher when barefoot or with wet hands or feet;
- We discourage the use of extension cords and multiple sockets;
- If the appliance is not operating properly or maintenance must be performed,
disconnect the appliance from the power supply.
4-4.If your family includes children
●This appliance is not intended for use by persons (including children) with reduced
physical,sensory or mental capcabilities, or lack of experience and knowledge,unless they have
been given supervision or instruction concerning use of the appliance by a person responsible for
their safety.
●Children should be supervised to ensure that they to not play with the appliance.
●Keep detergents out of the reach of children, who must also be kept away from the dishwasher
when it is open.
6
Service Manual
Model No:DW12-PFE8 Series
Issue
Rev.
4-5.If a fault occurs
● If the appliance malfunctions, turn off water supply to the appliance and disconnect the power
supply turn off and the plug from the wall socket. Then, consult the section entitled, "Fault
finding" .If you cannot solve the problem, contact a service center.
● Only specialised personnel are authorised to make repairs.
If the supply cord is damaged, it must be replaced by the manufacture, its service agent of
similarly qualified persons in order to avoid a hazard.
● To maintain the EFFICIENCY and SAFETY of this appliance,we recommend:
- call only the Service Centers authorized by the manufacturer, or the approved Service agents.
- always use original Spare Parts.
4-6.When disposing of old appliances
● Appliances which are no longer being used must be made inoperable by cutting the power
supply cord and removing the door lock.
● Take the appliance to a designated waste disposal center.
Warning
Children could get locked in the appliance (risk of suffocation) or get stuck in other
positions. Therefore:Remove the mains plug, cut the mains wire and set aside. Damage
the door lock so that the door can no longer be closed.
7
Service Manual
Model No:DW12-PFE8 Series
Issue
Rev.
5. Installation
5-1.Positioning the appliance
Positioning the appliance in the desired location. The back of the appliance should rest against
the wall, and the sides, along the adjacent cabinets or wall. The dishwasher is equipped with
water supply and drain hoses that can be positioned to the right or the left to facilitate proper
installation.
5-2.Leveling the appliance
Once the appliance is positioned, adjust the feet (screwing them in or out) to adjust the
dishwasher, making it level. The appliance should not be inclined more than 2°. If the appliance is
level, it will help ensure proper performance.
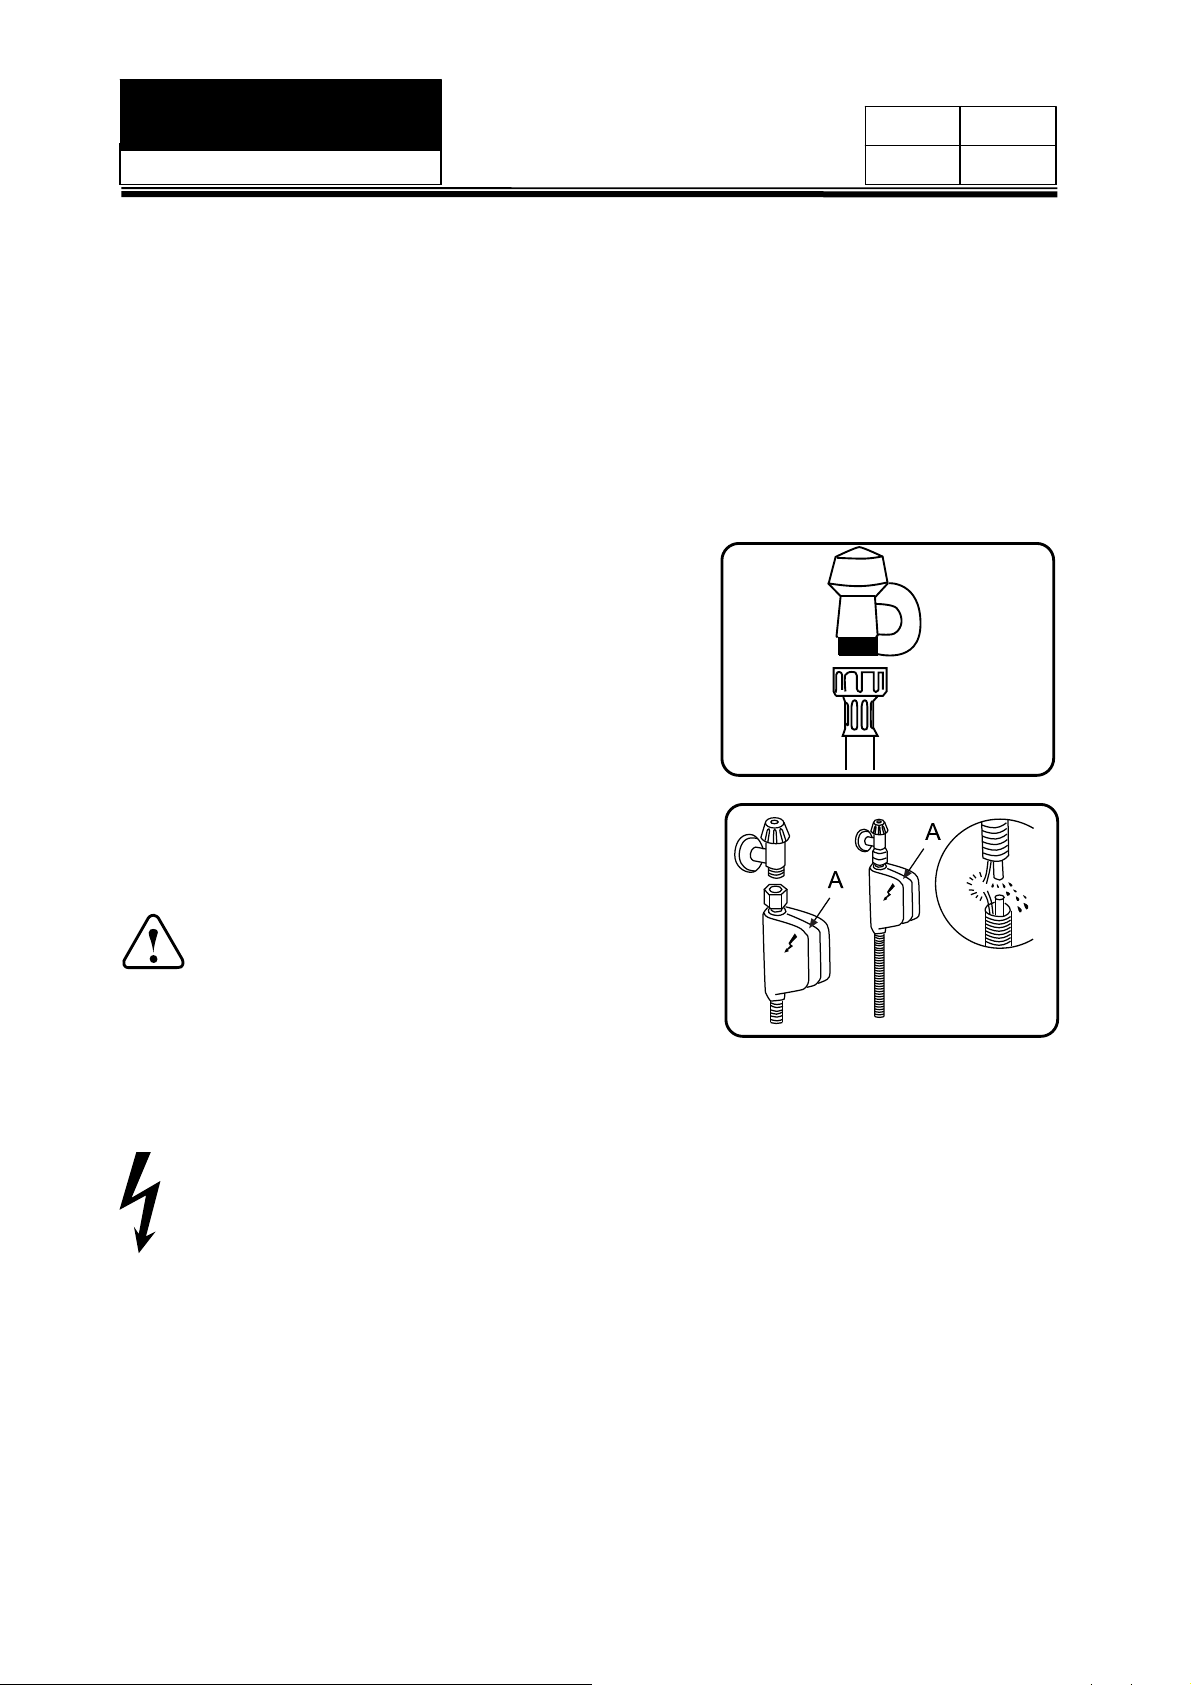
5-3.Cold water connection
Connect the water supply hose to a
threaded 3/4 (gas) connector, making sure
that it is fastened tightly in place (see fig.A).
If the water pipes are new or have not
been used for an extended period of time,
let the water run to make sure that the
water is clear and free of impurities. If this
precaution is not taken, there is a risk that
the water inlet can get blocked and damage
the appliance.
fig.A
Warning
The appliance is to be connected to the water mains
using new hose-sets and that old hose-sets should not
be reused.
Some models are fitted with an "Aquastop"water supply hose (see fig.B) in which the small filter is
already housed in the threaded end.
fig.B
WARNING:HAZARDOUS VOLTAGE!
Under no circumstance should the water inlet hose be cut as it contains live electrical parts.
5-4.Anti-Flooding protection
The dishwasher is equipped with a system that stops the supply of water in the event of a problem
with the water supply hose, or leaks within the unit, in order to prevent damage to your home. If
for any reason the box containing the electrical components happens to get damaged, turn off the
power supply and remove the plug for the appliance from the socket immediately. In order to
guarantee that the anti-flooding feature operates properly, the "A" box with water supply hose
must be attached to the water supply tap as shown in fig.B. No other type of connection is
acceptable.The water supply hose must not, under any circumstances, be cut,as it contains
8

Service Manual
Model No:DW12-PFE8 Series
Issue
Rev.
electrical parts which are live. If the length of the hose is not adequate to make a proper
connection, the hose must be replaced with one which is long enough. This hose is available
upon request from specialised retailers and approved service center.
5-5.Drain hose connection
Insert the drain hose into a drain pipe with a minimum diameter of 4cm, or let it run into the sink,
making sure to avoid bending or crimping it. If necessary, fit a siphon trap (U-bend) with a
connecting piece for the electrical drain hose (fig.C). The free end of the hose must be at a height
between 40 and 100 cm and must not be immersed in water.
max 100 cm
2m max
min 40 cm
fig.C
Attention:
The connecting piece for syphon trap (U-bend) must be securely fastened to the wall to
prevent the drain hose from moving and allowing water to spill outside the drain.
5-6.Electrical Connection
After making sure that the voltage and frequency values for the current in the home correspond to
those on the rating plate (located on the stainless steel inner door of the appliance) and that the
electrical system is correct for the maximum voltage on the rating plate, insert the plug into an
electrical socket which is earthed properly (the earthing of the appliance is a safety requirement
mandated by law).
Caution:
The dishwasher plug must be accessible even when the appliance is installed as a built-in
unit so that maintenance can be done safely.
9
Service Manual
Model No:DW12-PFE8 Series
Issue
Rev.
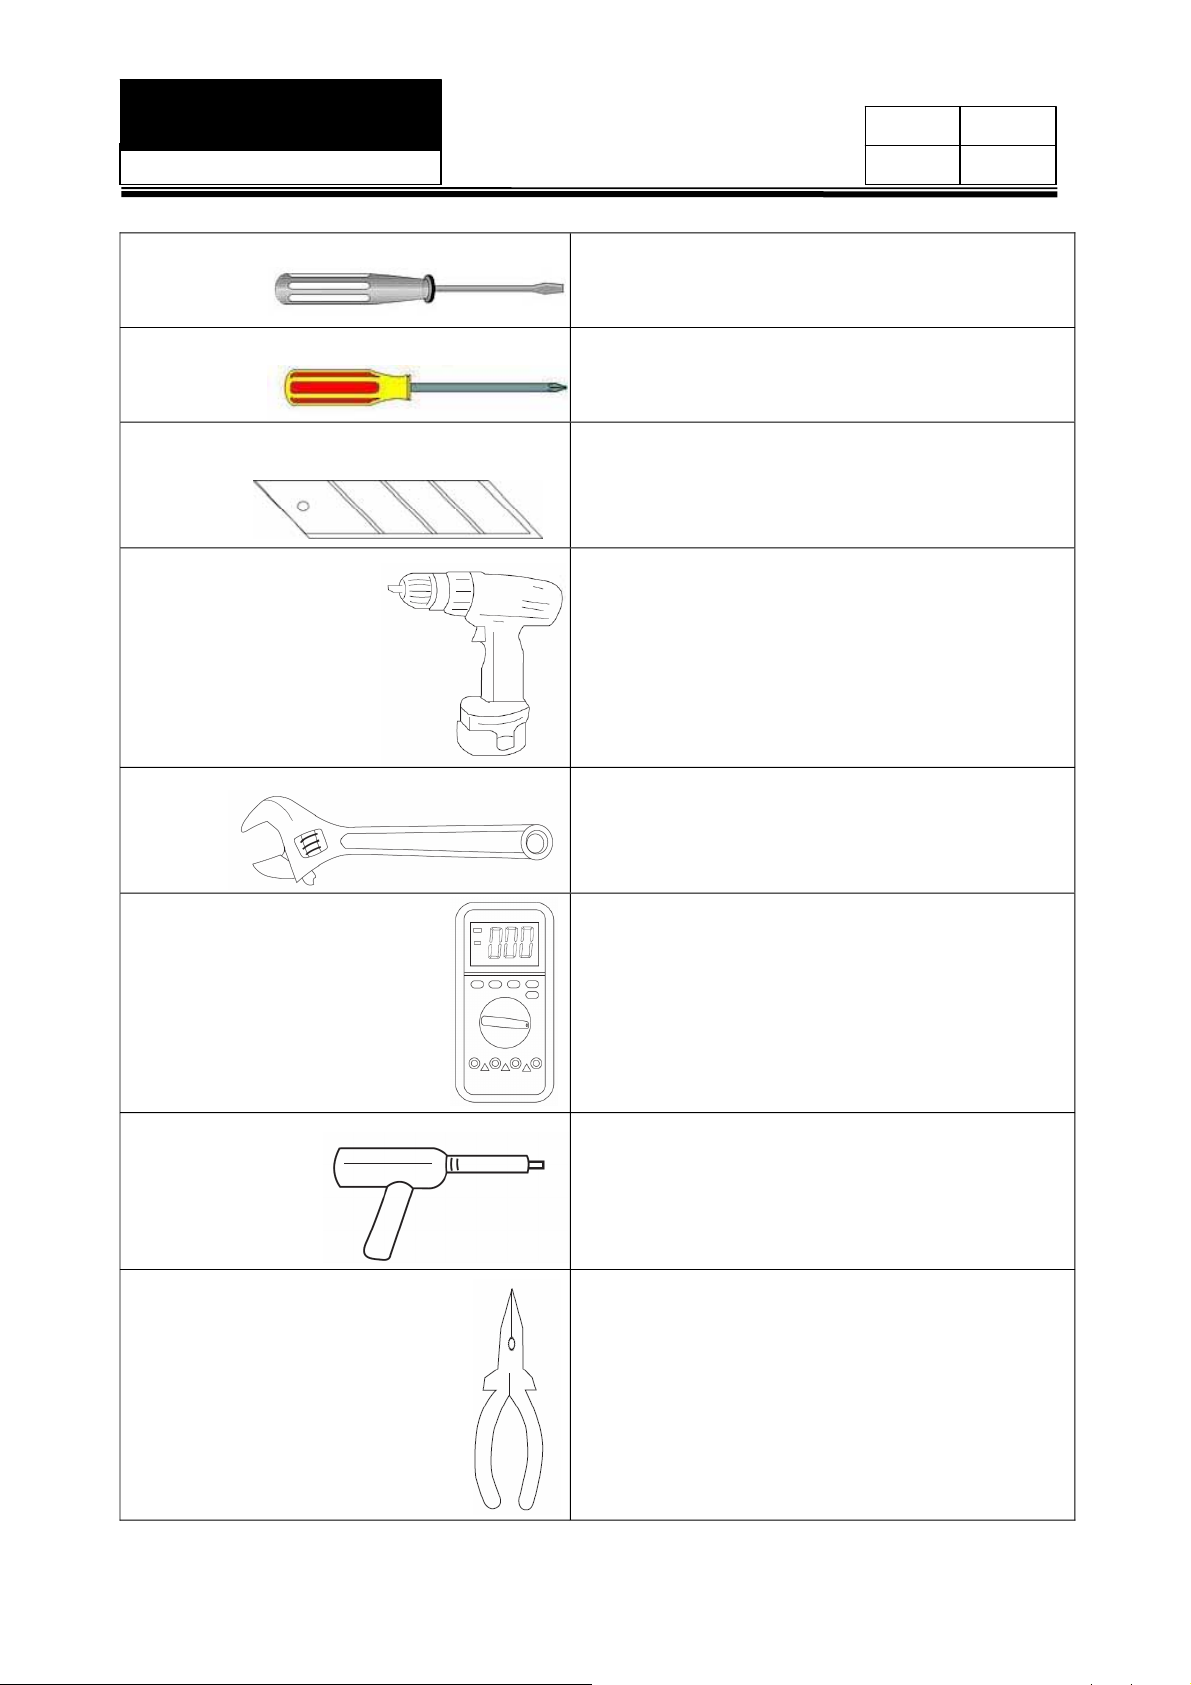
5-7.Tools
Screwdriver
Cross-Screwdriver
Blade
■ Dissemble and assemble for dishwasher
Components.
■ Dissemble and assemble for dishwasher
Components.
■ Unpacking.
Electric Drill
Spanner
Multimeter
Soldering iron
■ Drill holes while installation.
■ Combine the inlet hose.
■ Used for measuring the PCB and Display
Board.
■ Used for Jointing the PCB and Display
Board.
Pliers
■ Used for removing the pipe hoop and
Clips.
10
Service Manual
Model No:DW12-PFE8 Series
Issue
Rev.
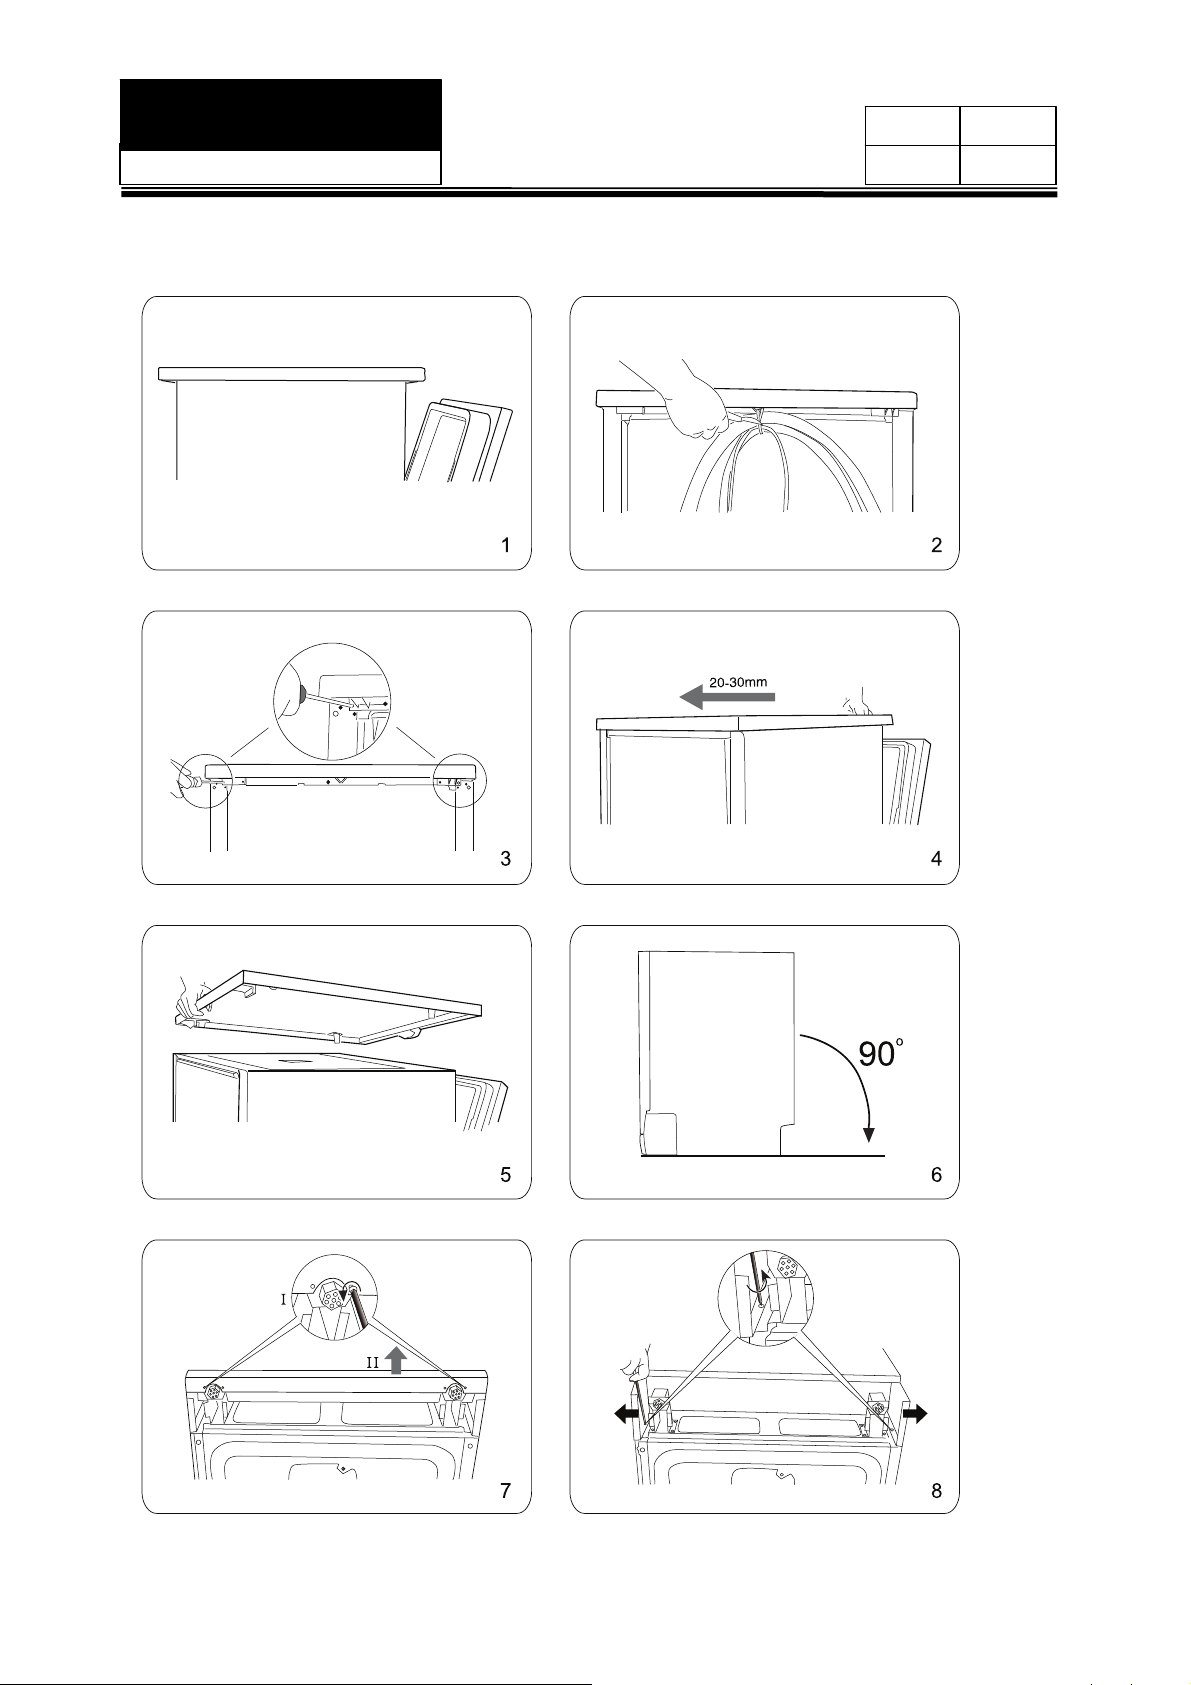
5-8.How to remove the top of your dishwasher
Freestanding dishwasher can also be used as built-in,according to following processes:
11
0120200050
Built In Dishwasher: fixing on top
Built In Dishwasher: fixing on side
Service Manual
Model No:DW12-PFE8 Series
Issue
Rev.
12
Service Manual
Model No:DW12-PFE8 Series
Issue
Rev.
5-9. Dissemble and assemble procedure
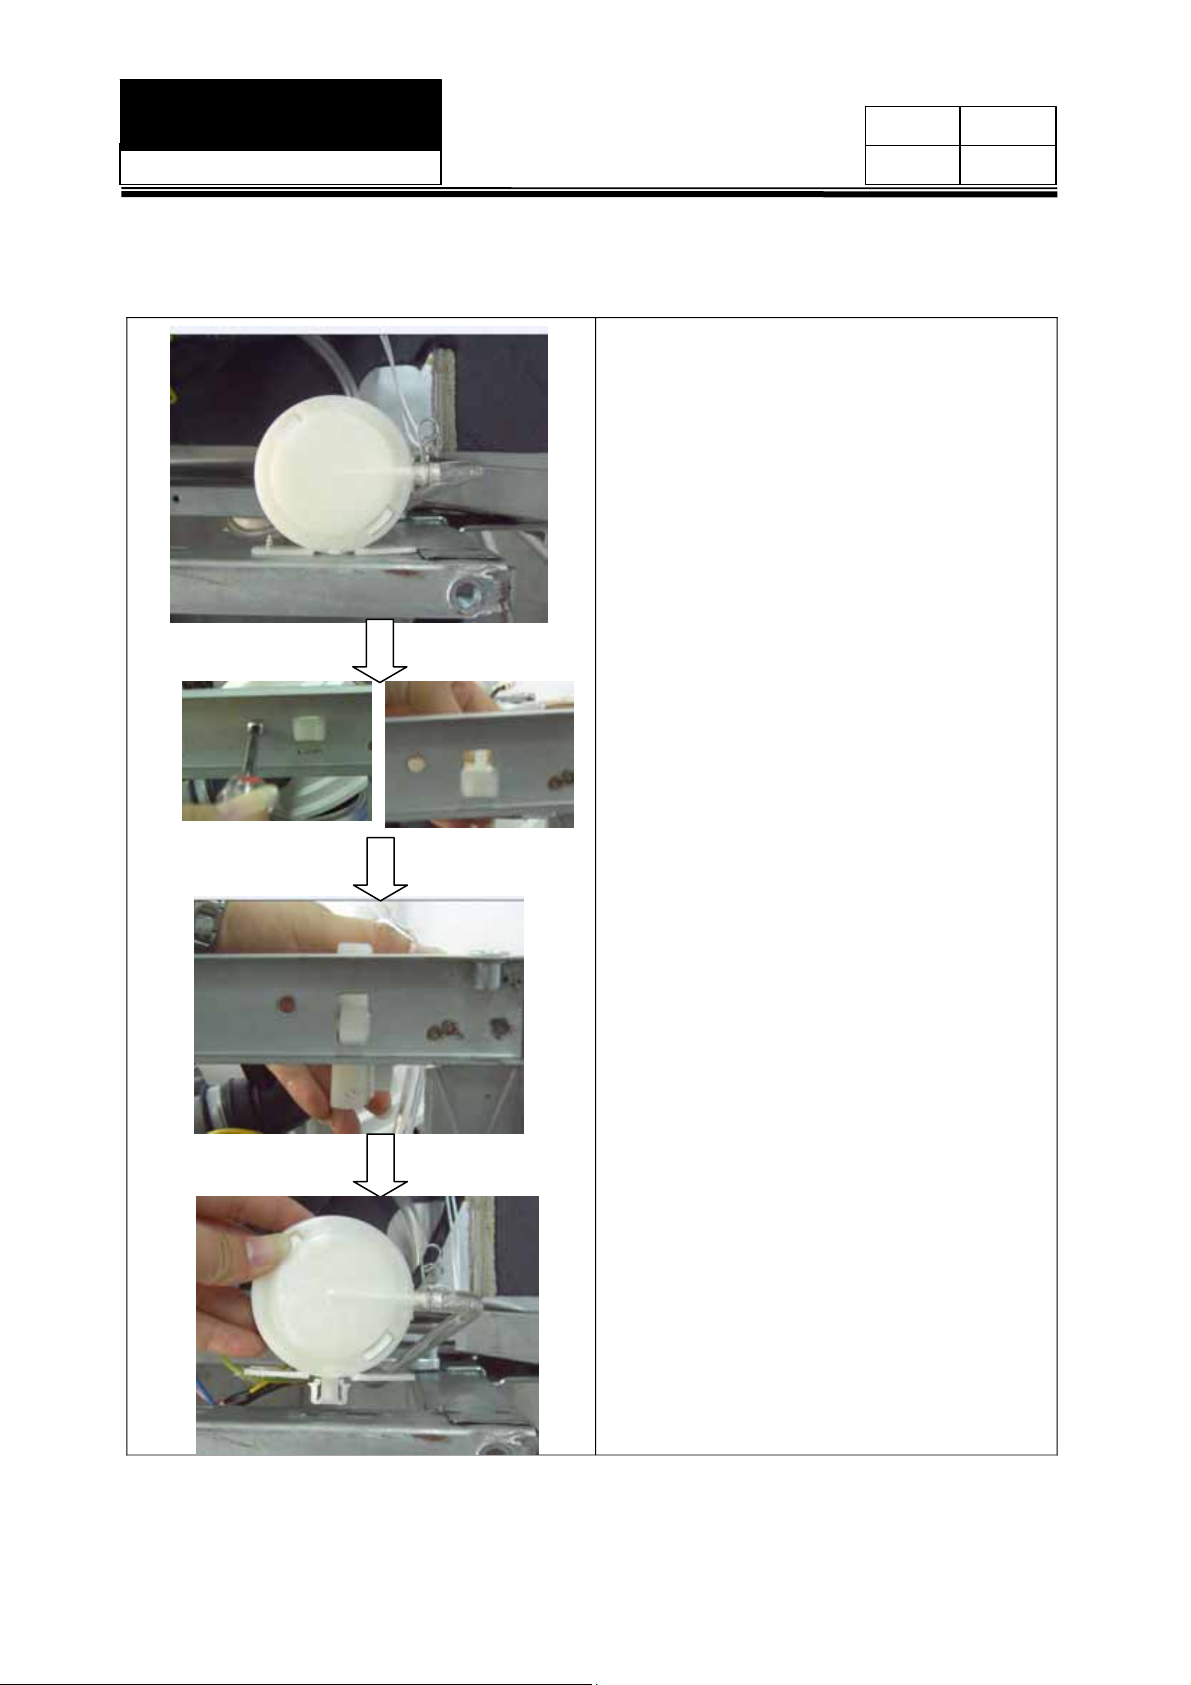
5-9-1. Water pressure switch disassembly
Water pressure switch locates in the
behind of the tub on the right and is fixed in
straight pole.
Put the guiding groove up until to the top
which is ringent.
Press the wedge of the water pressure
switch until it comes out of slot with hands.
13

Service Manual
Model No:DW12-PFE8 Series
Issue
Rev.
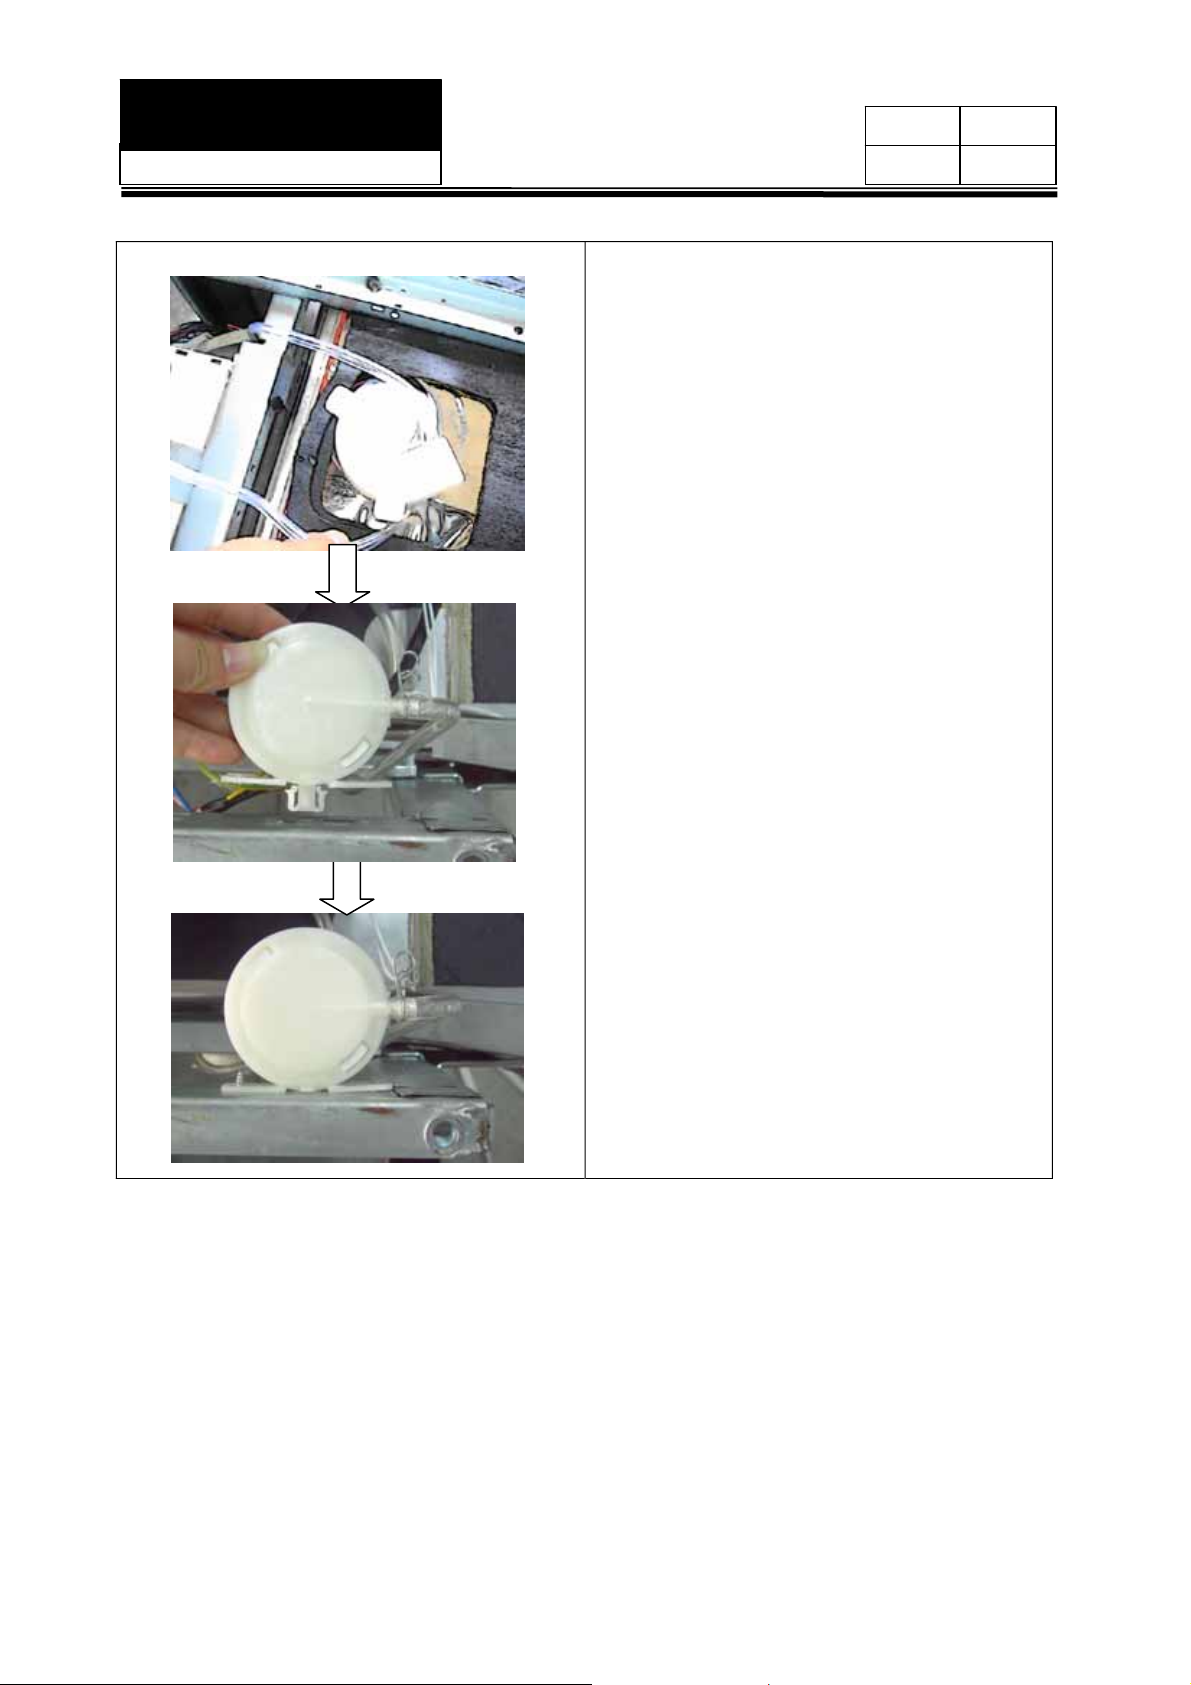
Press the pinchcock at full tilt with your
hands and then pull the pipe out.
With stand the raised parts of the 1/4S
quick connect termianl with thumb and then
pull it out.
Change the old water pressure switch into
a new one.
Insert cable line in, connection method is
just like the picture on the left.
14
Service Manual
Model No:DW12-PFE8 Series
Issue
Rev.
Connect the pipe together . Attention: pipe
must be put on the interspaces between
vent hole and the tub.
Put the pressure switch wedge into the
large ringent slot part and then push it
until to the slot bottom.
Put the pipe to the smaller ringent place of
its bottom and then the installation is
completed.
15

Service Manual
Model No:DW12-PFE8 Series
Issue
Rev.
5-9-2. Detergent dispenser disassembly
Open the door, disassemble the outer door
(Accord to the disassembly step)
Close the door, use screwdriver to drive the
6 screws of Detergent Dispenser off, pull
the wire out, then open the door, and get
the Detergent Dispenser off.
5-9-3. Baseboard disassembly
Lie the machine down, use ross-screwdriver
to drive two screws on baseboard off
Use screwdriver to push the baseboard off
the support foot, don’t put big force to avoid
break the stator.
16
Service Manual
Model No:DW12-PFE8 Series
Issue
Rev.
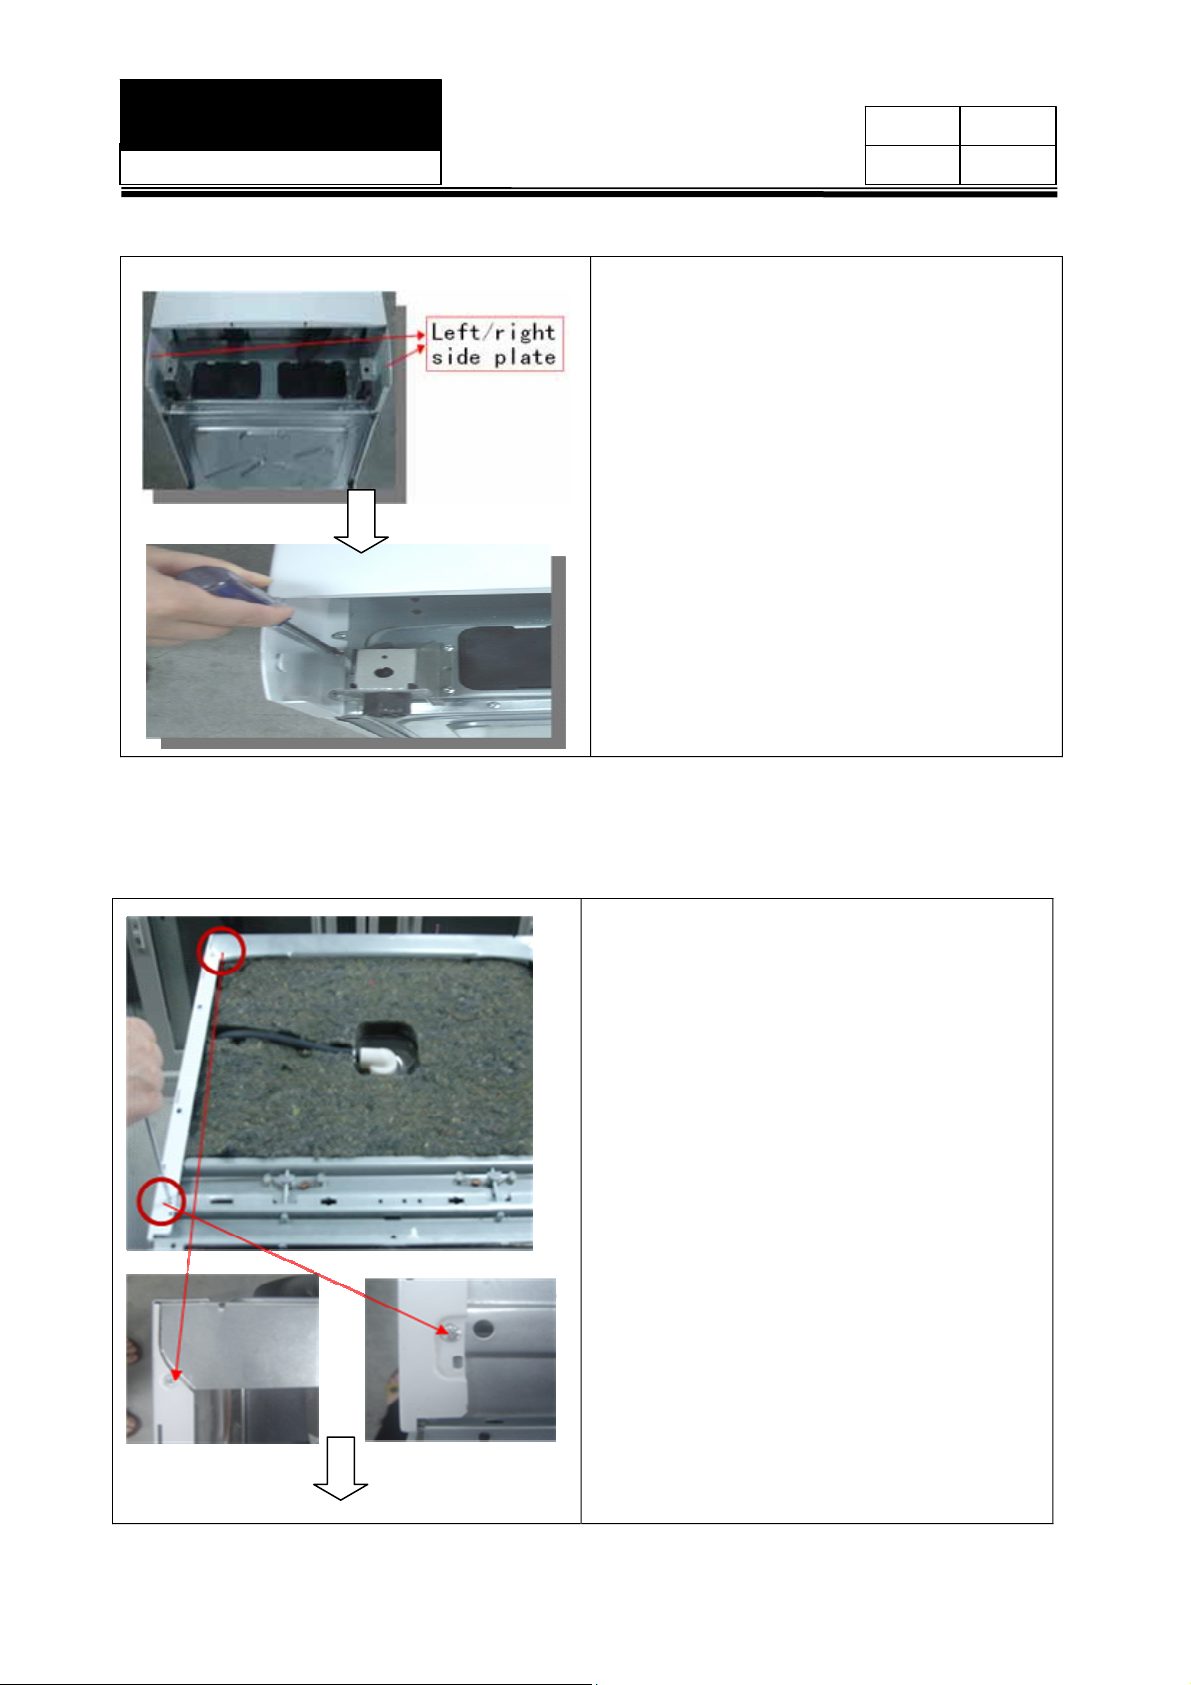
5-9-4. Left/right side plate and baseboard disassembly
Disassemble the baseboard(Pls find the pic
of baseboard)
Use cross-screwdriver to drive two screws
off the side panel
5-9-5.Side panel disassembly
Disassemble the Complete top(pls follow
the disassembly step), use the
cross-screwdriver to drive two screws which
are on left top of machine, off side panel
17
 Loading...