

Page 1
Page 2
Index
EN
Safety information
Not suitable for the dishwasher
How to keep your dishwasher in shape
Installation
How to remove the top of your dishwasher
Getting to know your dishwasher
How to load the salt
How to load rinse aid
How to load the detergent dispenser
Arranging crockery, glasses, etc. in the dishwasher
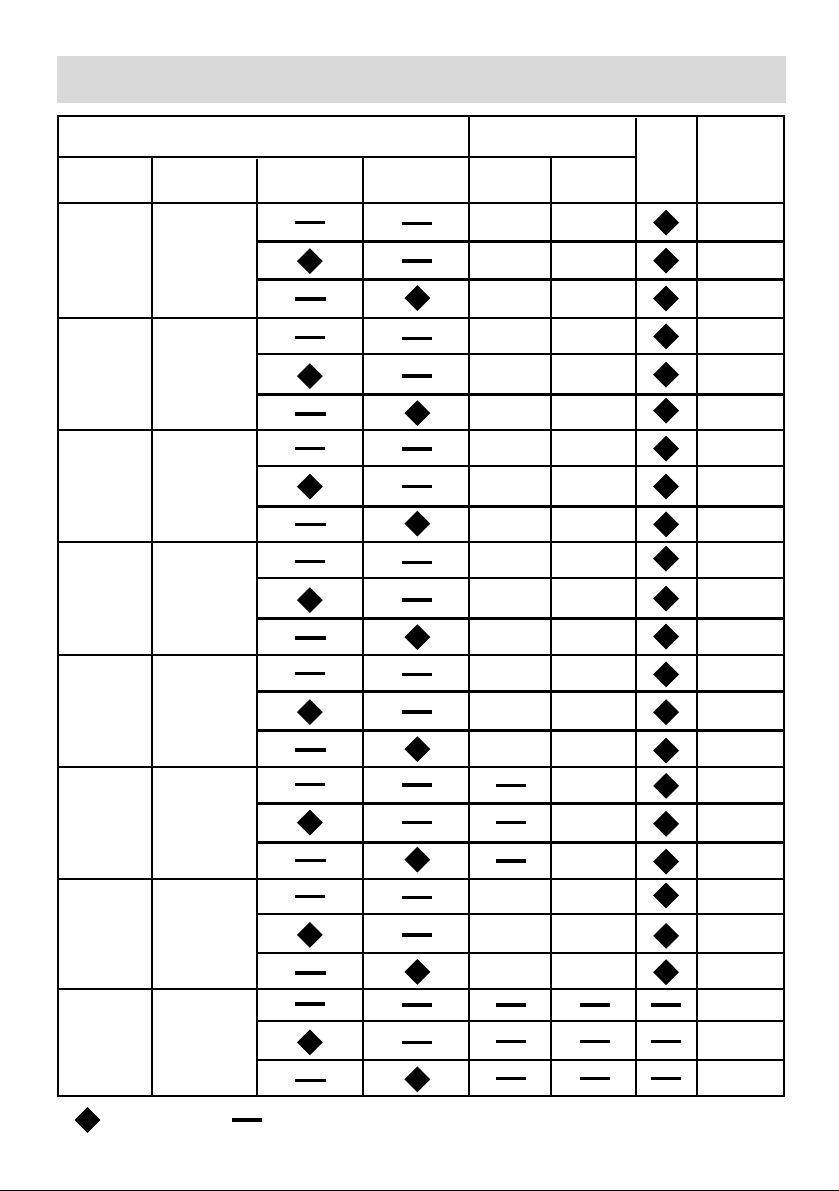
Programme overview
Consumption
Washing dishes
Care and maintenance
Trouble Shooting
Technical data
Important information
2
4
5
6
9
11
13
15
16
17
19
20
21
26
28
32
33
1
Page 3

Safety information
At time of delivery
Check packaging and dishwasher immediately for signs of transport damage. If
the appliance is damaged, do not put it into use but contact your supplier or
customer service without delay.
Please dispose of packaging materials properly.
During installation
Ensure that the domestic wiring is properly earthed.
Site the dishwasher and connect it up in accordance with the installation instructions.
The dishwasher must not be connected to the electricity supply while installation
is being carried out.
The mains electricity supply must conform to the details shown on the dishwasher
nameplate.
Do not connect the dishwasher to the electricity supply via an extension cable.
After the appliance has been installed,the mains plug should still be easily
accessible.
During installation, the power supply cord must not be excessively or dangerously
bent or flattened.
This appliance cannot be installed outdoor, not even if the area in which it is
installed is covered by a roof; it is also very dangerous to leave it exposed to
the rain and elements.
EN
During normal use
The dishwasher must only be used by adults for the washing of household dishes
and cooking utensils.
Do not place any heavy objects or stand on the door when it is open. The appliance
could tip forward.
The water inside the dishwasher is not suitable for drinking.
Do not use solvents of any kind inside your dishwasher. They could cause an
explosion danger.
Open the door very carefully if the dishwasher is operating. There is a risk of water
squirting out.
Do not touch the heating element during or after a wash cycle.
Fundamental rules to follow when using the appliance:
- Never touch the dishwasher when barefoot or with wet hands or feet;
- We discourage the use of extension cords and multiple sockets;
- If the appliance is not operating properly or maintenance must be performed,
disconnect the appliance from the power supply.
2
Page 4

EN
If your family includes children
This appliance is not intended for use by persons (including children) with reduced
physical,sensory or mental capcabilities, or lack of experience and knowledge,unless
they have been given supervision or instruction concerning use of the appliance
by a person responsible for their safety.
Children should be supervised to ensure that they to not play with the appliance.
Keep detergents out of the reach of children, who must also be kept away from
the dishwasher when it is open.
If a fault occurs
If the appliance malfunctions, turn off water supply to the appliance and disconnect
the power supply turn off and the plug from the wall socket. Then, consult the
section entitled, "Fault finding" .If you cannot solve the problem, contact a service
center.
Only specialised personnel are authorised to make repairs.
If the supply cord is damaged, it must be replaced by the manufacture, its service
agent of similarly qualified persons in order to avoid a hazard.
To maintain the EFFICIENCY and SAFETY of this appliance,we recommend:
- call only the Service Centers authorized by the manufacturer, or the approved
Service agents.
- always use original Spare Parts.
When disposing of old appliances
Appliances which are no longer being used must be made inoperable by cutting
the power supply cord and removing the door lock.
Take the appliance to a designated waste disposal center.
Warning:
Children could get locked in the appliance (risk of
suffocation) or get stuck in other positions. Therefore:
Remove the mains plug, cut the mains wire and set
aside. Damage the door lock so that the door can no
longer be closed.
3
Page 5

Not suitable for the dishwasher
EN
What you should not put into the dishwasher
Cutlery and tableware manufactured in whole or part from wood.They become faded
and unsightly in appearance.Furthermore,the adhesives that are used are not suitable
for the temperature that occur inside the dishwasher.Delicate decorative glassware
and vases,special antique or irreplaceable china. The decorative patterns on such
items will not be dishwasher-proof.
Plastic objects that are not resistant to hot water, copper and pewter utensils are
also not suitable. Decorative patterns printed or painted onto the surface of crockery,
glasses, etc.,aluminium and silver items tend to become discoloured or faded if
washed in the diswasher. Some types of glass can become opaque in appearance
after they have been washed many times in a dishwasher. Highly absorbent materials,
such as sponges and towels,should never be placed in the dishwasher.
Our recommendation
In future, only purchase table or kitchenware that has been confirmed as being
dishwasher-proof.
Important:
Dishes or cutlery that have been soiled by tobacco ash,
wax, Iubricating grease or paint, should not be put in the
dishwasher.
Damage to glassware and other dishes
Possible causes
Type of glass or manufacturing process
Chemical composition of detergent
Water temperature and duration of dishwasher programme.
Suggested remedy
Use glassware or porcelain dishes that have been marked ‘dishwasher-proof’ by
the manufacture.
Use a mild detergent that is described as ‘kind to dishes’. If necessary, seek further
information from detergent manufacturers.
Select a programme with a low temperature and a short duration as possible.
To prevent damage, take glass and cutlery out of the dishwasher as soon as
possible after the programme has ended.
4
Page 6

How to keep your dishwasher in shape
EN
After every wash
After every wash, turn off the water supply of the appliance and leave the door
slightly ajar so that moisture and odors are not trapped inside.
Remove the plug
Before cleaning or performing maintenance, always switch off the appliance, and
remove the plug from the socket. Do not run risks.
No solvents or abrasive cleaning products
To clean the exterior and rubber parts of the dishwasher, do not use solvents or
abrasive cleaning products. Rather, It is recommended that you use only a cloth
and warm soapy water.
To remove spots or stains from the surface of the interior, use a cloth dampened
with water and a little white vinegar, or cleaning product made specifically for
dishwashers.
Moving the appliance
If the appliance must be moved, try to keep it in a vertical position. If absolutely
necessary, it can be positioned on its back.
Seals
One of the factors that cause odors to form in the dishwasher is food that remains
trapped in the seals. Periodic cleaning with a damp sponge will prevent this from
occurring.
The door should not be left in the open position since this could present a tripping
hazard.
When you go on holiday
When you go on holiday, it is recommended that you run a wash cycle with the
dishwasher empty and then remove the plug from the socket, turn off the water
supply and leave the door of the appliance slightly ajar. This will help the seals last
longer and prevent odors from forming within the appliance.
5
Page 7
Installation
EN
Positioning the appliance
Positioning the appliance in the desired location. The back of the appliance should
rest against the wall, and the sides, along the adjacent cabinets or wall. The
dishwasher is equipped with water supply and drain hoses that can be positioned
to the right or the left to facilitate proper installation.
Levelling the appliance
Once the appliance is positioned, adjust the feet (screwing them in or out) to adjust
the dishwasher, making it level. The appliance should not be inclined more than
2˚. If the appliance is level, it will help ensure proper performance.
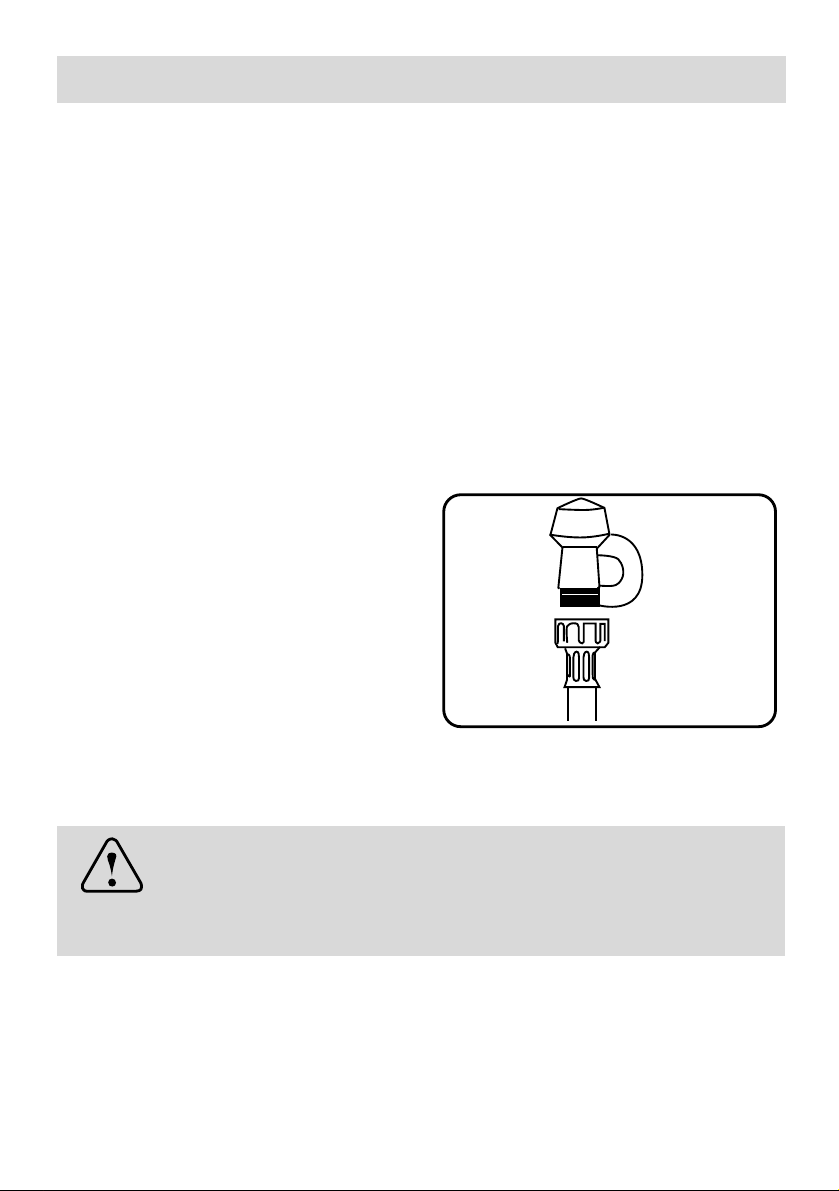
Cold water connection
Connect the water supply hose to a
threaded 3/4 (gas) connector, making sure
that it is fastened tightly in place (see fig.A).
If the water pipes are new or have not
been used for an extended period of time,
let the water run to make sure that the
water is clear and free of impurities. If this
precaution is not taken, there is a risk that
the water inlet can get blocked and damage
the appliance.
fig.A
Warning:
The appliance is to be connected to the water mains
using new hose-sets and that old hose-sets should not
be reused.
6
Page 8
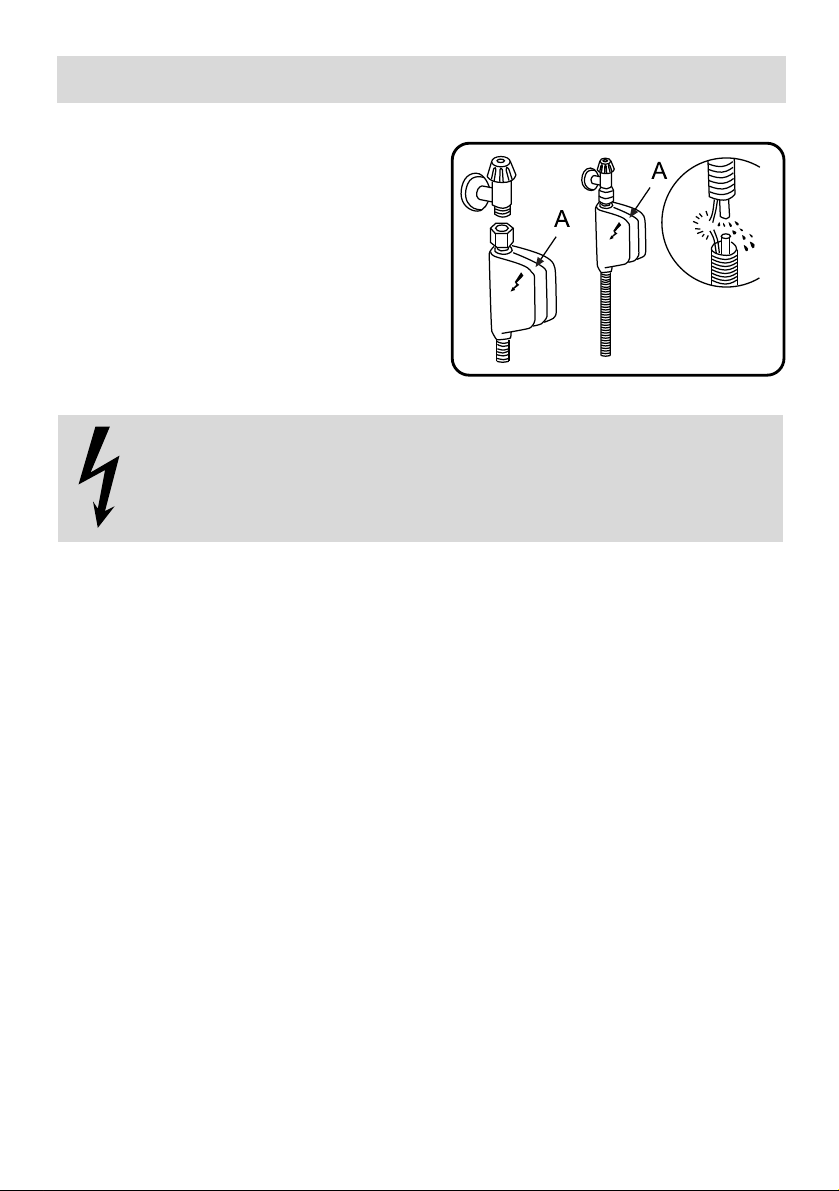
EN
Some models are fitted with an "Aquastop"
water supply hose (see fig.B) in which the
small filter is already housed in the
threaded end.
fig.B
WARNING:HAZARDOUS VOLTAGE!
Under no circumstance should the water inlet hose be cut as it
contains live electrical parts.
Anti-Flooding protection
Anti-Flooding protection
The dishwasher is equipped with a system that stops the supply of water in the
event of a problem with the water supply hose, or leaks within the unit, in order to
prevent damage to your home. If for any reason the box containing the electrical
components happens to get damaged, turn off the power supply and remove the
plug for the appliance from the socket immediately. In order to guarantee that the
anti-flooding feature operates properly, the "A" box with water supply hose must
be attached to the water supply tap as shown in fig.B. No other type of connection
is acceptable.The water supply hose must not, under any circumstances, be cut,
as it contains electrical parts which are live. If the length of the hose is not adequate
to make a proper connection, the hose must be replaced with one which is long
enough. This hose is available upon request from specialised retailers and approved
service center.
7
Page 9
EN
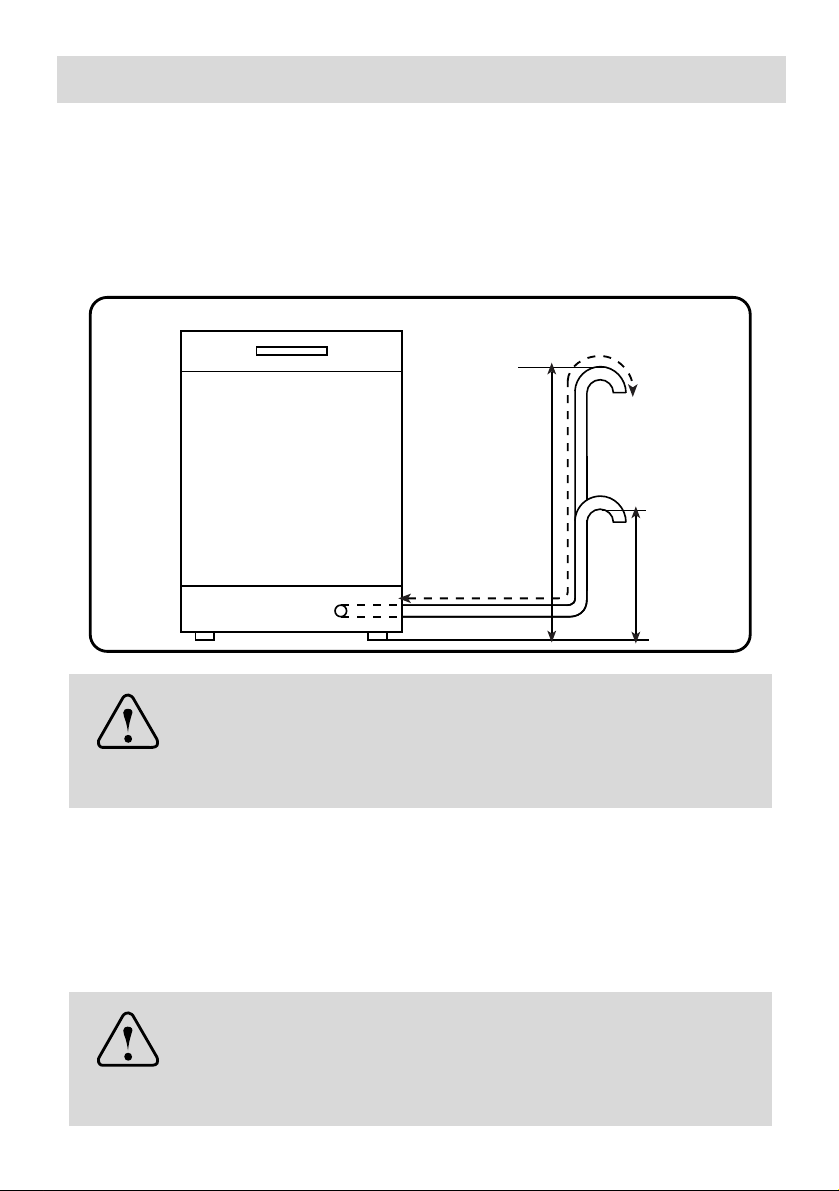
Drain hose connection
Insert the drain hose into a drain pipe with a minimum diameter of 4cm, or let it run
into the sink, making sure to avoid bending or crimping it. If necessary, fit a syphon
trap (U-bend) with a connecting piece for the electrical drain hose (fig.C). The free
end of the hose must be at a height between 40 and 100 cm and must not be
immersed in water.
max 100 cm
2m max
min 40 cm
fig.C
Attention:
The connecting piece for syphon trap (U-bend) must be
securely fastened to the wall to prevent the drain hose
from moving and allowing water to spill outside the drain.
Electrical Connection
After making sure that the voltage and frequency values for the current in the home
correspond to those on the rating plate (located on the stainless steel inner door
of the appliance) and that the electrical system is correct for the maximum voltage
on the rating plate, insert the plug into an electrical socket which is earthed properly
(the earthing of the appliance is a safety requirement mandated by law).
Caution:
The dishwasher plug must be accessible even when the
appliance is installed as a built-in unit so that maintenance
can be done safely.
8
Page 10
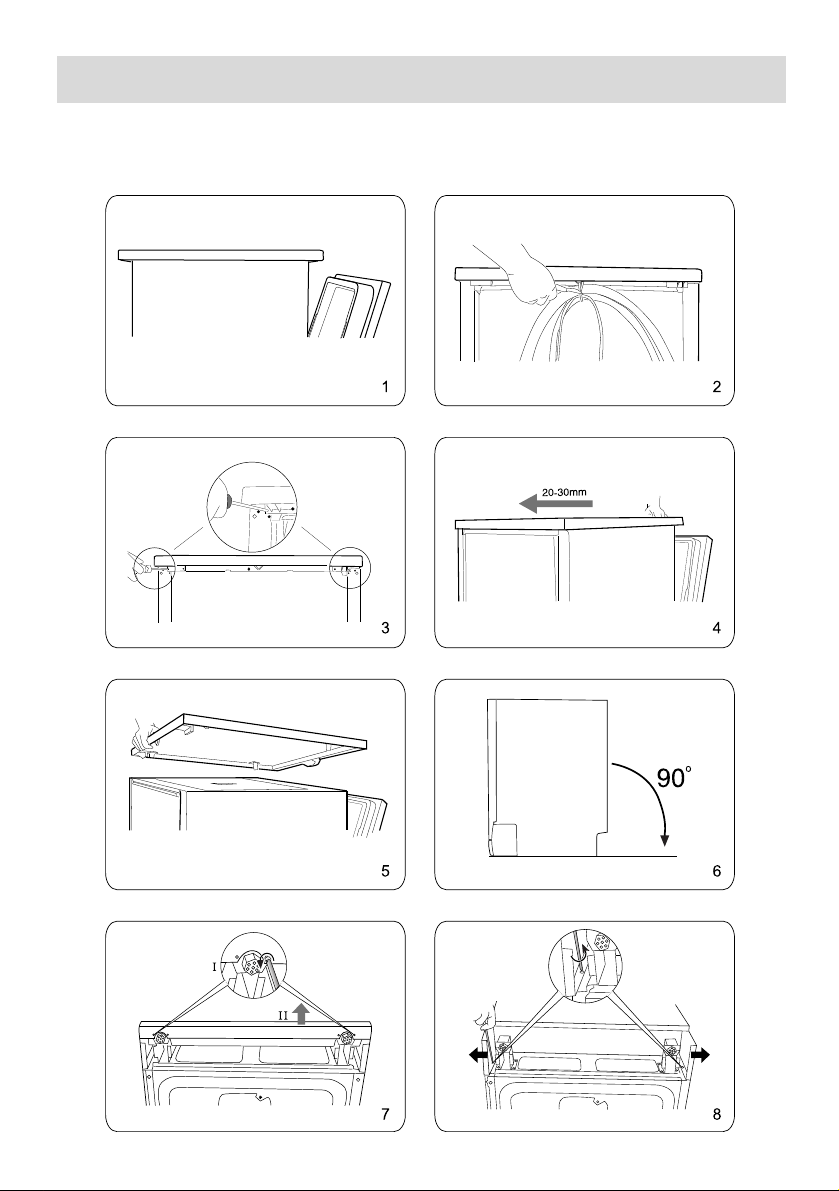
How to remove the top of your dishwasher
Freestanding dishwasher can also be used as built-in,
according to following processes:
EN
9
Page 11
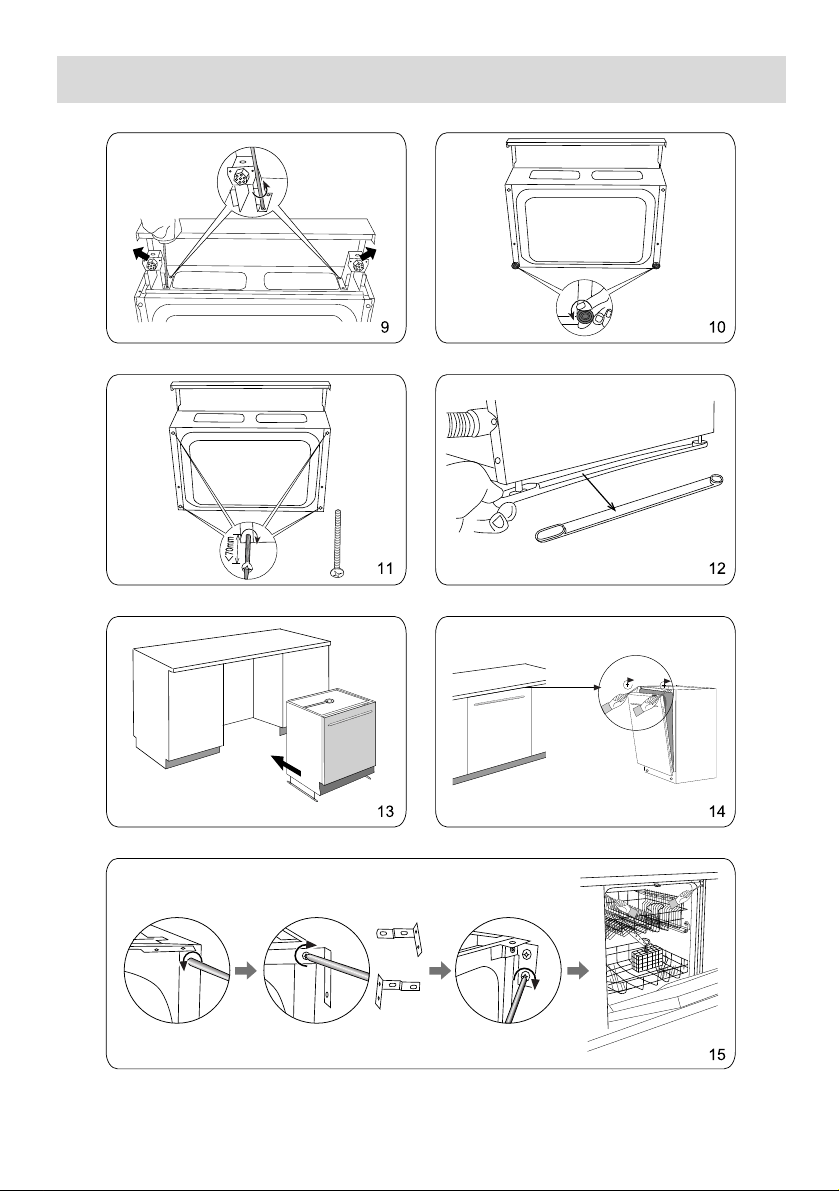
0120200050
Built In Dishwasher: fixing on top
EN
Built In Dishwasher: fixing on side
10
Page 12
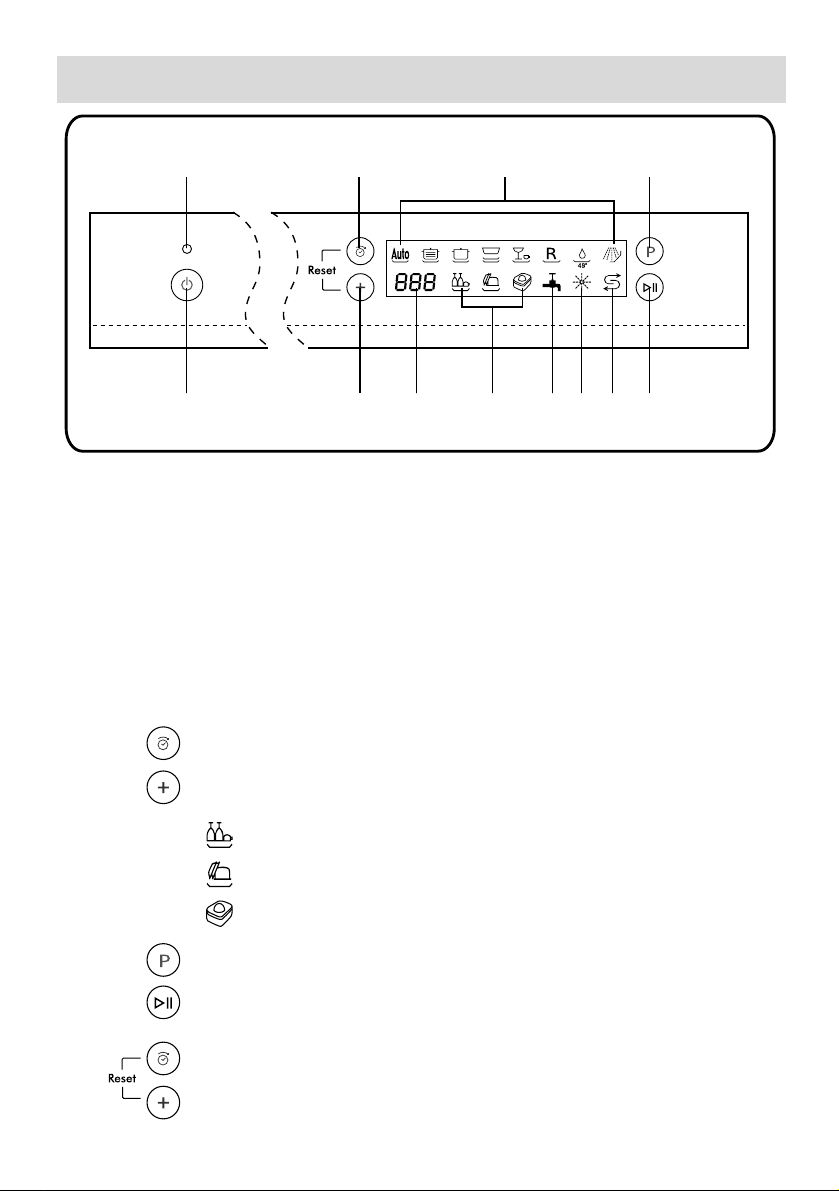
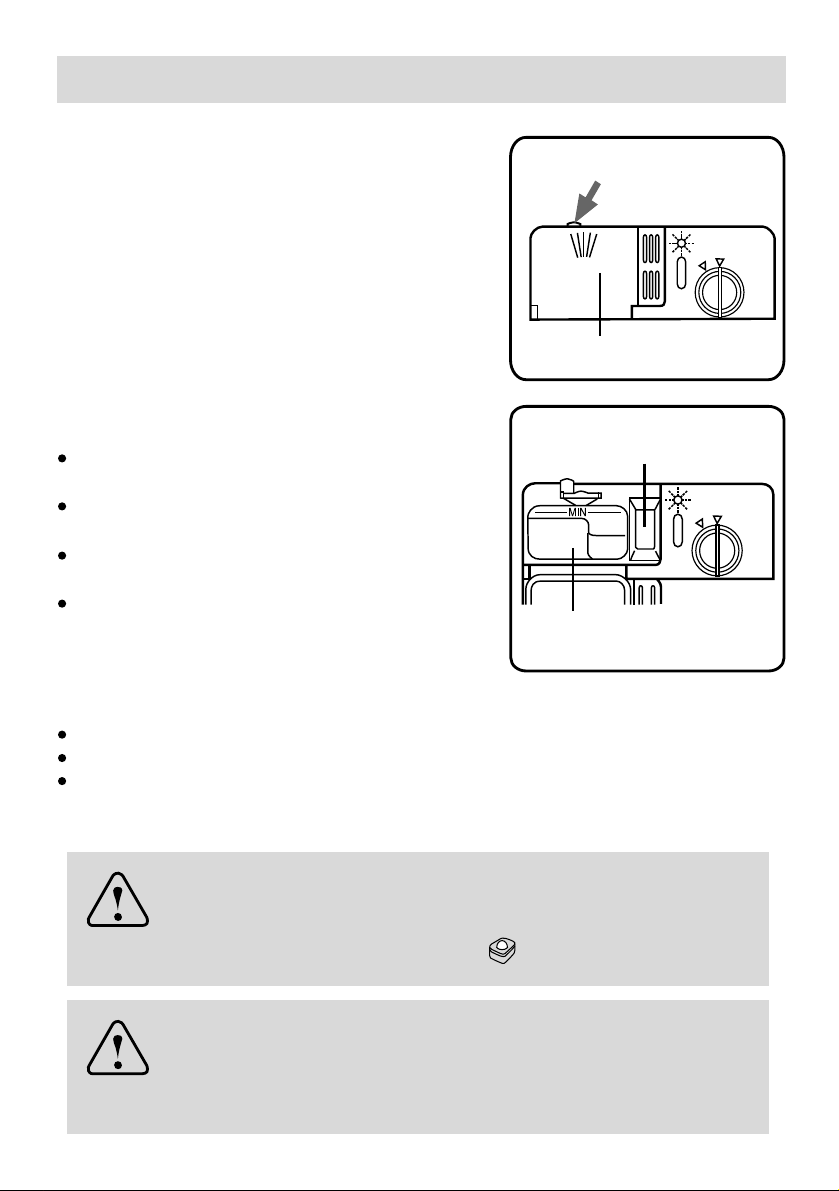
Getting to know your dishwasher
A C E K
EN
B D F G H I J L
ON-OFF Indicator
A
ON-OFF Button
B
Delay Start Button
C
Additional option Button
D
Programme symbols
E
Time-remaining Indicator
F
Function overview
Press this button to delay the start of programme.
Press this button to select the Additional option function.
Upper Rack Wash function
55o/65o70o55o50o45o40
Additional option symbols
G
Inlet Fault Indicator
H
Low Rinse Aid Indicator
I
Low Salt Indicator
J
Programme Button
K
Start/Pause Button
L
o
cold
11
Lower Rack Wash function
Combi-detergent tablets option
Press this button to select the programme.
Press this button to start or pause the programme.
Press this two buttons for 3 seconds to concel the programme.
Page 13
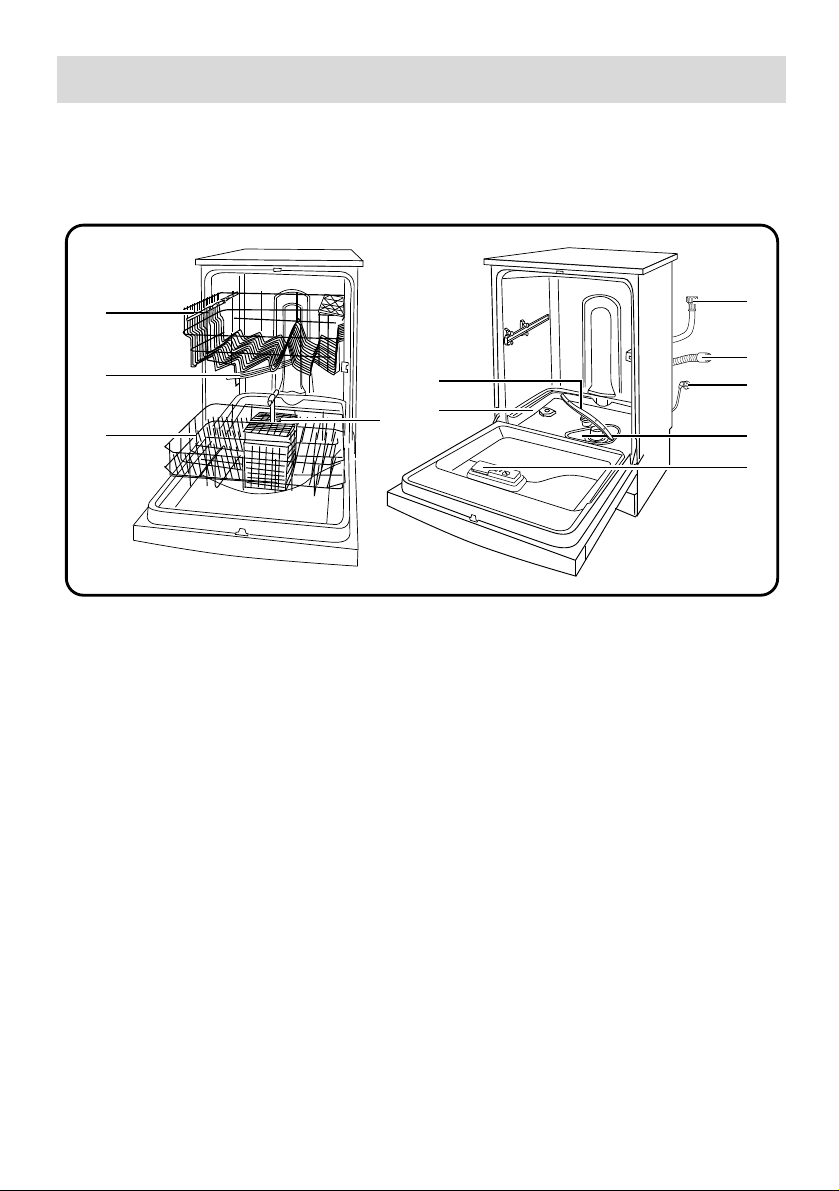
Dishwasher interior
EN
a
b
c
Upper Rack
a
Top Spray Arm
b
Lower Rack
c
Silverware Basket
d
Bottom Spray Arm
e
d
e
f
g
Water Inlet Hose
h
Drain Hose
Power Supply Cord
i
Washing Filter
j
Detergent and Rinse Aid Dispenser
k
g
h
i
j
k
Salt Container Cap
f
12
Page 14
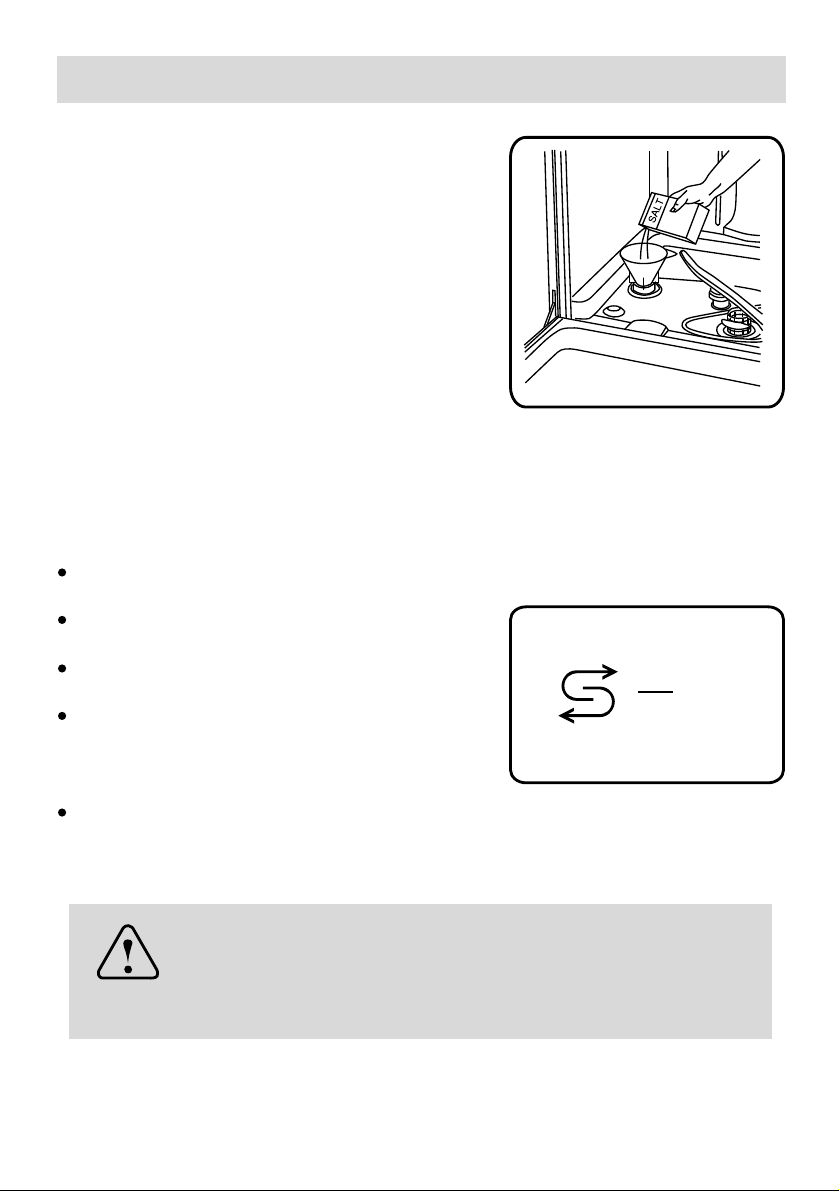
How to load the salt
EN
Salt
The hardness of the water varies from place to
place. If hard water is used in the dishwasher,
deposits will form on the dishes and utensils.
The appliance is equipped with a special softener
that uses a salt specifically designed to eliminate
lime and minerals from the water.
Loading the salt into the container
Always use salt intended for use with dishwashers.
The salt container is located beneath the lower rack and should be filled as follows:
When the low salt indicator “J” lights, you must
fill the salt.
Remove the lower rack and then unscrew and
remove the cap from the salt container;
If you are filling the container for the first time,
fill it with water;
Place the end of the funnel (supplied) into the
hole and introduce about 2 kg of salt. It is normal
for a small amount of water to come out of the
salt container.
Carefully screw the cap back on.
J
13
Important:
To prevent the formation of rust, load the salt just before
beginning a wash cycle.
Page 15
EN
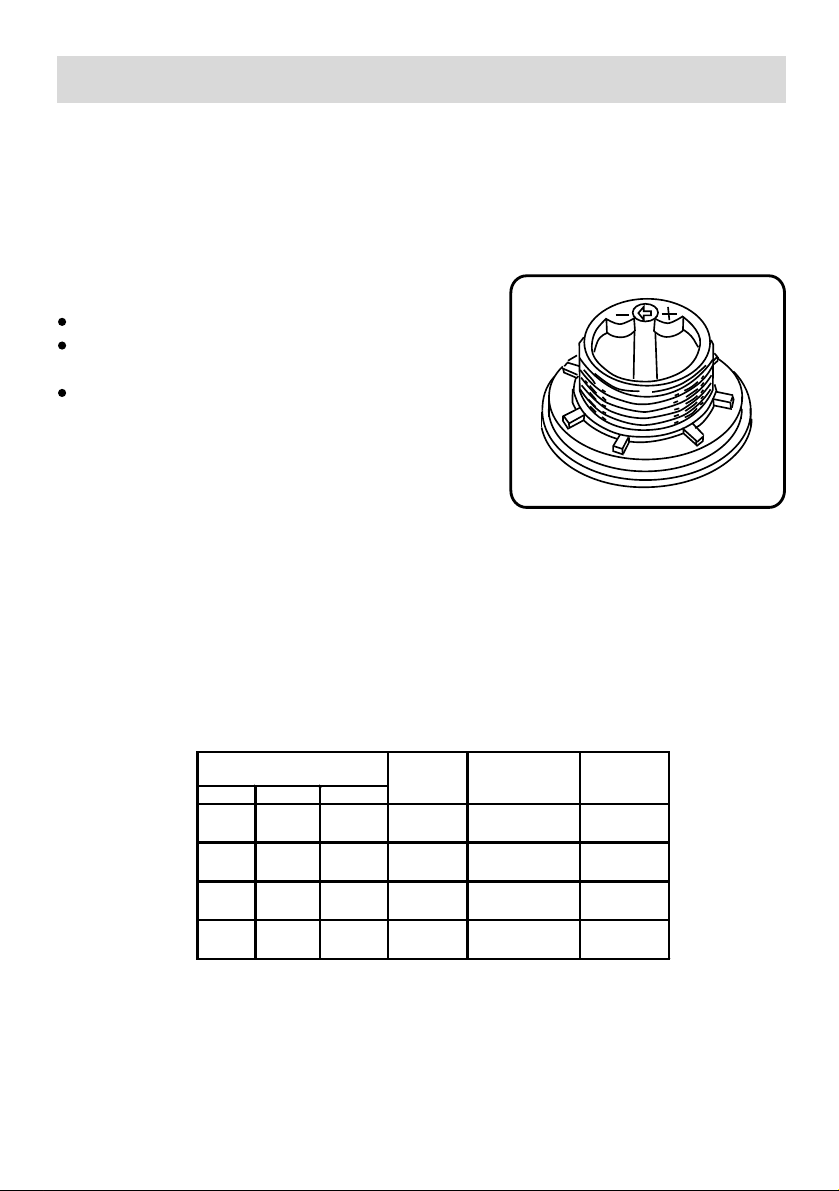
Adjusting salt consumption
The dishwasher is designed to allow for adjusting the amount of salt consumed
based on the hardness of the water used. This is intended to optimize and customize
the level of salt consumption so that it remains at a minimum.
To adjust salt consumption, proceed as follows:
Unscrew the cap from the salt container;
There is a ring on the container with an arrow on
it (see figure to the side).
If necessary, rotate the ring in an anticlockwise
direction from the "-" setting towards the "+"
sign, based on the hardness of the water being
used.
It is recommended that adjustments be made in accordance with the following
table:
Hardness of the water
ºdH ºfH °mmol/l
0 -10
10-25
25-50
>50
0-17
18-44
45-89
>89
0-1,7
1,8-4,4
4,5-8,9
>8,9
Selector
knob
position
MED
Salt
consumption
(grams/cycle)
/ 0 /
- 20 60
40 40
+ 60 25
Autonomy
(cycles/2 kg)
The default setting of the water softening system is -.
- If using multi-functional tablets fill the salt dispenser and set the adjuster to -; if
the hardness of the water is greater than 60ºfH, set it to +.
14
Page 16
How to load rinse ald
Rinse aid
This product makes dishes sparkle and helps them
to dry without spotting. The dispenser is located
on the inside panel of the door .When the low rinse
aid indicator " I "on the control panel and the
mechanical indicator " 1 " on the dispenser light,
you must load rinse aid.
Notice:
When using combi-detergent tablets,like "3 in 1", "4 in 1",
"5 in 1"... the rinse-aid is no longer useful.
Loading the rinse aid
EN
I
Regardless of the type of detergent dispenser
installed on your appliance, you must proceed as
indicated below when loading the rinse aid.
To open the dispenser, turn the "2" cap in an anticlockwise direction and then pour in the rinse aid,
making sure not to overfill. The amount of rinse
aid used for each cycle can be regulated by turning
the " 3" dose adjustor, located beneath the "2"
cap, with a screwdriver. There are 6 different
settings; the normal dosage setting is 3.
Important:
Proper dosage of the rinse aid improves drying. If drops
of water remain on the dishes or spotting occurs, the
dosage adjustor should be turned to a higher setting. If
the dishes have white streaks, turn the dosage adjustor
to a lower setting.
15
1
2
3
Page 17
How to load the detergent
Detergent
Detergent specifically intended for use with
dishwashers must be used. The dispenser must
be refilled before the start of each wash cycle
following the instructions provided in the
"Programme overview". The detergent dispenser
is located on the inside panel of the door.
EN
5
Loading the detergent
4
If you use normal detergent ...
To open the " 4 " cover on the dispenser, press
the "5" button.
The detergent for the wash cycle should be
poured into the " 6 " compartment.
The detergent for the pre-wash cycle should be
poured into the “ 7 ” compartment.
After the detergent has been placed in the
dispenser, close the cover and press down until
it clicks in place.
6
7
If you use "combi-detergent tablets" , like "3 in 1", "4 in 1", "5 in 1"...
To open the " 4 " cover on the dispenser, press the "5" button.
The "tablets" should be poured into the " 6 " compartment.
After the detergent has been placed in the dispenser, close the cover and press
down until it clicks in place.
Notice:
If you use "combi detergent tablets" , you have to select
combi-detergent tablets option function.
Notice:
To facilitate closing the cover, remove any excess
detergent on the edges of the dispenser.
16
Page 18
Arranging crockery, glasses, etc. in the dishwasher
Before placing the dishes in the dishwasher, remove larger food particles to prevent
the filter from becoming clogged, which results in reduced performance.
If the pots and pans have baked-on food that is extremely hard to remove, we
recommend that they are soaked before washed. This will eliminate the need for
extra wash cycles.
Pull out the rack to load the dishwasher.
EN
How to use the lower rack
We recommend that you place the most difficult to
clean items on the bottom rack: pots, pans, lids,
serving dishes and bowls, as shown in the figure
to the right.
It is preferable to place serving dishes and lids on
the sides of the racks in order to avoid blocking the
rotation of the top spray arm.
E1 E2 E3
fig.D
Pots, serving bowls, etc. must always be placed
face down(see fig.D).
Deep pots should be slanted to allow the water
to flow out.
Some models: the lower rack features fold down
tine rows (see fig.E) so that larger or more pots
and pans can be loaded.
The silverware basket can be doubled (see fig.F)
so that only one section may be used when the
silverware load is light. This also makes space
for additional pots and pans and it can also be
placed in the upper rack.
Silverware should be placed in the silverware
basket with the handles at the bottom; if the rack
has side baskets, the spoons should be located
individually into the appropriate slots. Especially
long utensils should be placed in the horizontal
position at the front of the upper rack.
17
fig.E
fig.F
Page 19
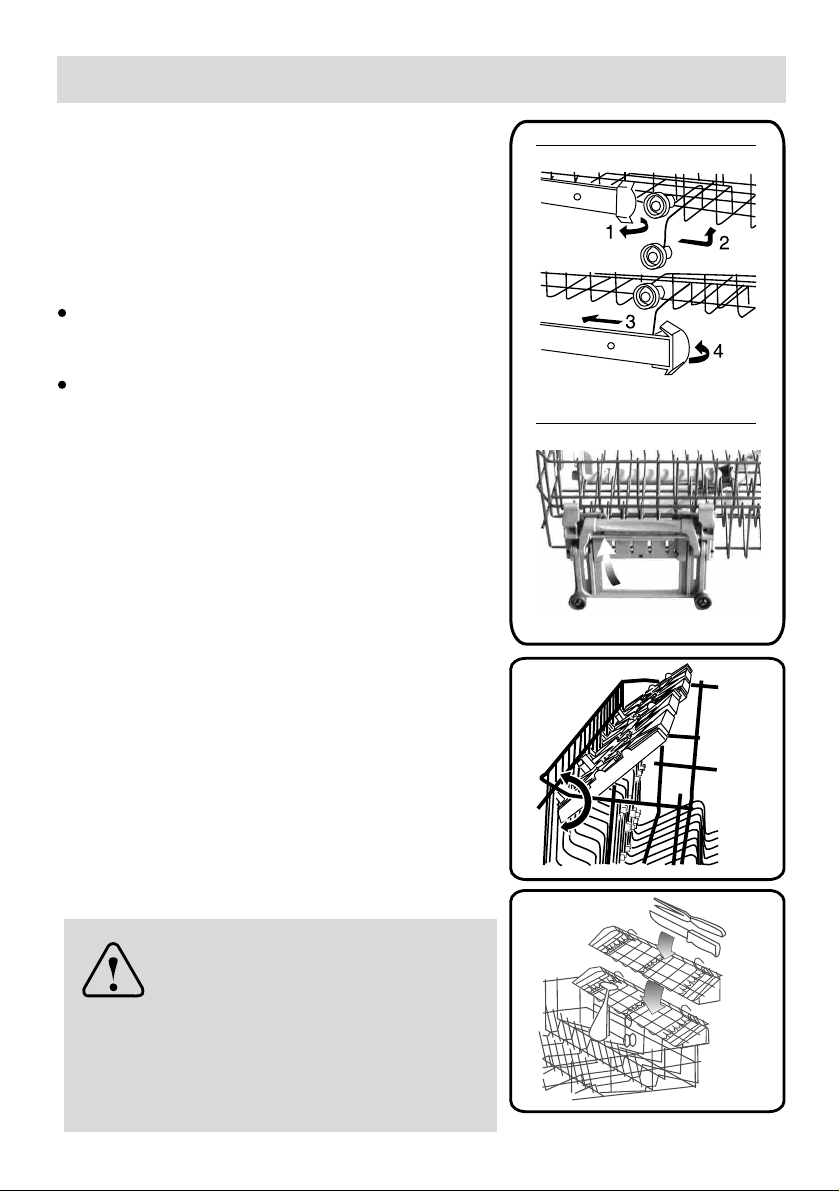
How to use the upper rack
The upper rack is designed to hold more delicate
and lighter dishware, such as glasses, cups and
saucers, plates, small bowls and shallow pans (as
long as they are not too dirty).
The dishes and cookware shall be arranged, so
that they do not get moved by the spray of water.
The upper rack can be adjusted for height by
using the knobs located on both sides of the rack
itself (see fig.G).
Adjust the upper basket to the higher level and you
have more space to accommodate those taller pans
and trays in the bottom basket.
Shelf
Lean tall glasses and those with long stems against
the shelf-not against other items to be washed.
Place glasses, cups and small bowls on the
additional cup rack. The additional cup rack can be
swivelled in or out as required(see fig.H).
EN
(Some models)
fig.G
Knife rack
The knife rack clips onto the side of the top basket,
giving you the freedom to wash your large sharp
knives separately and out of harm’s way (see fig.I).
Warning:
knives and other utensils with
sharp points must be loaded in
the basket with their points
down or placed in a horizontal
position.
fig.H
fig.I
18
Page 20
Programme overview
EN
Wash
programme
o
55o/65
Automatic
o
70
Intensive
o
55
Normal
o
50
Light
o
45
Glass
o
40
Rapid
Type of
crokery
Nondelicate
( e.g.china,
pots/pans,
cutlery, etc)
Mixed
( e.g.china,
pots/pans,
cutlery,
glasses,
etc)
Type of
food
remains
Soups,
casseroles,
sauces,
potatoes,
pasts, rice,
eggs,
roastor
fried food.
Soups,
potatoes,
pasta, rice,
eggs, roastor
fried food.
Coffee,
cakes,
milk,
sausage,
cold drinks,
salads
Amount
of food
remains
a lot
a little
Very
little
Condition
of food
remains
stuck
on hard
loosely
attached
loosely
attached
Description of cycle
Prewash with cold water.
Main wash at 55°C or 65°C.
1 or 2 rinses with cold water.
Rinse with hot water.
Drying.
Pre-wash with warm water.
Extended wash at 70°C.
Rinses with cold water.
Rinse with hot water.
Drying.
Pre-wash use cold water.
Extended wash at 55°C.
Rinse with cold water.
Rinse with hot water.
Drying.
Pre-wash use cold water.
Extended wash at 50°C.
Rinse with cold water.
Rinse with hot water.
Drying.
Wash at 45°C.
Rinse with warm water.
Hot rinse.
Drying.
Short wash at 40°C.
Hot rinse.
19
Green
cold
Soak
Soups,
potatoes,
pasta, rice,
eggs, roastor
fried food.
Rinse off if the dishes have
been stacked for several
days in the dishwasher prior
to washing.
Extended wash at 48°C.
Rinse with cold water.
Rinse with hot water.
Drying.
Short cold wash to prevent
food residue from drying
on the dishes .
Page 21
Consumption
EN
Tablets
YES
YES
YES
YES
YES
Additional options
Delayed start
YES
YES
YES
YES
YES
Upper rack
wash
Lower rack
wash
Prewash
5g
5g
5g
5g
5g
5g
5g
5g
5g
5g
5g
5g
5g
5g
Detergent
Main
Wash
25g
25g
25g
25g
25g
25g
25g
25g
25g
25g
25g
25g
25g
25g
Rinse
aid
Duration
in minutes
75-110
52-82
66-98
112
86
94
102
78
90
167*
118
135
92
72
5g
NO
YES
NO
selected unselected *EN50242 test with rinse aid setting 5
YES
YES
YES
5g
5g
5g
25g
15g
15g
15g
25g
25g
25g
82
32
28
30
108
88
98
12
8
10
20
Page 22
Washing dishes
EN
Programme selection
The most appropriate programme can be identified by comparing the type of crockery,
cutlery, etc., as well as the amount and condition of food remains, with the details
contained in the wash cycle table.The corresponding programme sequence, duration
and consumption details are shown in the right half of the overview. For example:
Use the "normal" programme for dishes and utensils which have plenty of food
remains stuck on hard.
o
55
Earn savings
If only a small number of dishes have been loaded into the dishwasher,selecting a
programme that operates at the next lowest temperature which should be sufficient.
Programme data
The stated programme data are based on standard operating conditions. The values
can vary considerably according to:
Different amounts of dishes
Temperature of mains water supply
Pressure of mains water supply
Ambient temperature
Fluctuations in mains voltage
Machine-related factors
(e.g. temperature, water volume,...)
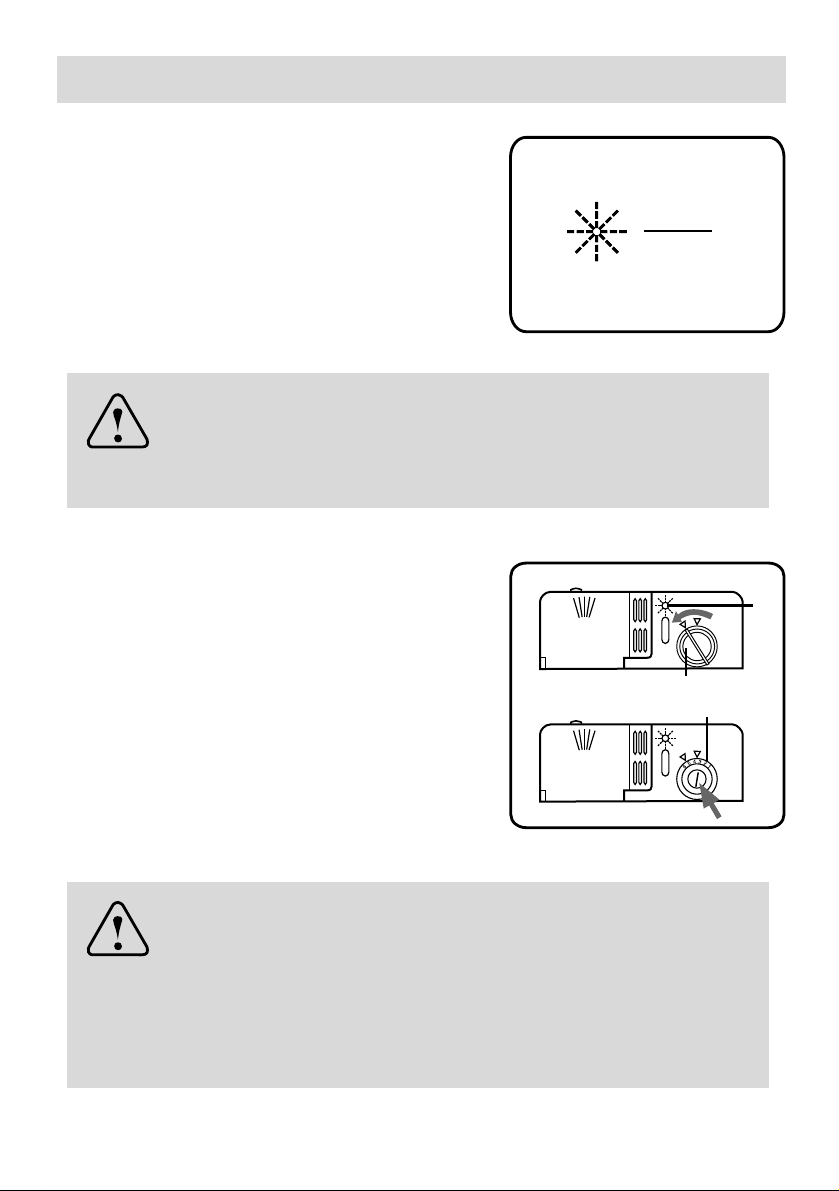
Switching the dishwasher ON
Load the appliance and turn on the tap.
Close the door, and set On-Off button "B" to On
then the On-Off indicator "A" light.
Press the programme button "K" to select the
programme you wish, and the corresponding
programme indicator "E" light.
Press the Start/Pause button "L", then the
dishwasher will start immediately, and the
corresponding programme indicator "E" blinks.
21
A
B
C E K
55o/65o70o55o50o45o40ocold
D F G H I J L
Page 23
EN
End of washing programme
Six beeps will indicate that the wash cycle has finished, the programme indicator
light and time- remaining indicator will display "0".
Switching the dishwasher OFF
Several minutes after the programme has ended:
Set On-Off button to Off
Open the door .
Remove dishes, etc. when they have cooled down.
Turn the water tap off.
Notice:
When the appliance is already underway press the Reset
button for 3 seconds, all of the settings will be cancelled.
Interrupting the programme
Open the door.
Caution! There is a risk of water squirting out from inside the appliance. Do
not open the door fully until spray arm has stopped rotating.
When you open the door, the dishwasher will beep ten times every thirty seconds
and the time-remaining indicator display "E1".
If the appliance has already heated up or the hot water was switched ON and
then the appliance door opened, leave the door ajar for several minutes and then
close. Otherwise, the appliance door may open due to expansion.
Close the door. After 30 seconds the programme will start from the point it was
interrupted.
Notice:
Interrupt or cancel a programme in progress ONLY when
absolutely necessary.
Cancelling or modifying a cycle while underway
A cycle that is underway can be modified if it has only been running for a short
time. Otherwise, the detergent may have already been used, and the appliance
may have already drained the wash water. If this is the case, the detergent dispenser
must be refilled ( see the paragraph entitled, “ Loading the detergent ”).
To modify a cycle that is already underway, follow the instructions contained in
the paragraph entitled "Reset drain function", and select the programme you wish
(see the paragraph entitled, "Switching the dishwasher ON").
22
Page 24
EN
Use of "3 in 1"/ Combi-Detergent Tablets
General Advice
1. Before using these products you should first check that the water hard-ness in
your supply is compatible with the use of these products as per the detergent
manufacturers instructions (on the product packaging).
2. These products should be strictly used according to the detergent manufacturers
instructions.
3. If you encounter problems when using "3 in1" products for the first time then
please contact the detergent manufacturers care line (the telephone number is
given on the product packaging).
Special Advice
When using combination products, the rinse-aid and salt lights are no longer useful.
It may be helpful to select the lowest possible setting for water hardness.
To select "Combi-Detergent tablets" function:
1. Close the door. Select the programme and then press the option button "D" until
the "Combi-Detergent tablets indicator" lights.
2. Press the Start/Pause button "L", then the dishwasher will start immediately, and
the programme indicator and the "Combi-Detergent tablets indicator" blinks.
To cancel "Combi-Detergent tablets" function:
Follow the "Cancelling or modifying a cycle while underway" instructions.
If you decide to switch to the use of a standard detergent system we advise that
you:
1. Refill both the salt and rinse aid compartments.
2. Switch the water hardness setting to the highest possible position and run for
three normal cycles without a load.
3. Readjust the water hardness setting again according to the conditions for your
region (For more information please refer to your instruction manual).
23
55o/65o70o55o50o45o40
o
cold
D G L
Page 25
EN
Warning:
Do not place the tablets in the tub or the cutlery basket
as this will result in poorer wash results. The tablets
should be placed in the detergent doser.
Notice:
The usage of 3 in 1 or similar tablets is forbidden when
Rapid Wash and Soak programmes are selected.
Upper rack wash
This function allows the dishwasher to wash dishes using only the upper rack if
there are not enough dishes for a full load. This will allow you to save on water and
energy consumption.
To select Upper rack wash:
1. Close the door. Select the programme and then press the Additional options
button until the "Upper rack wash indicator" lights.
2. Press the Start/Pause button "L", then the dishwasher will start immediately, and
the programme indicator and the "Upper rack wash indicator " will blink.
To cancel the Upper rack wash:
Follow the ‘Cancelling or modifying a cycle’ instructions.
Lower rack wash
This function allows the dishwasher to wash dishes using only the lower rack if there
are not enough dishes for a full load. This will allow you to save on water and energy
consumption.
To select Lower rack wash:
1. Close the door. Select the programme and then press the Additional options
button until the "Lower rack wash indicator" lights.
2. Press the Start/Pause button "L", then the dishwasher will start immediately, and
the programme indicator and the "Lower rack wash indicator" will blink.
To cancel the Lower rack wash:
Follow the "Cancelling or modifying a cycle while underway" instructions.
Note:
Please keep in mind that the amount of detergent should
also be adapted to the load.
24
Page 26

EN
Delayed start programming
You can delay the start of a programme from 1 hour up to 24 hours.
1. Close the door, switch the dishwasher ON.
2. Press programme button to choose the desired programme.
3. Press the Delayed Start button, the time-remaining indicator changes to "1h".
4. Press the Delayed Start button as many times as necessary until the numerical
display shows the required delay.
5. To cancel the time delay setting, pressing the Delayed Start button until the timeremaining indicator go out.
6. Press the Start/Pause button; the time-remaining indicator will blink and start to
count down. The programme will start when the delayed start indicator goes out
and the wash cycle will begin.
To cancel a delayed start programme in progress, follow the "Cancelling or modifying
a cycle while underway" instructions.
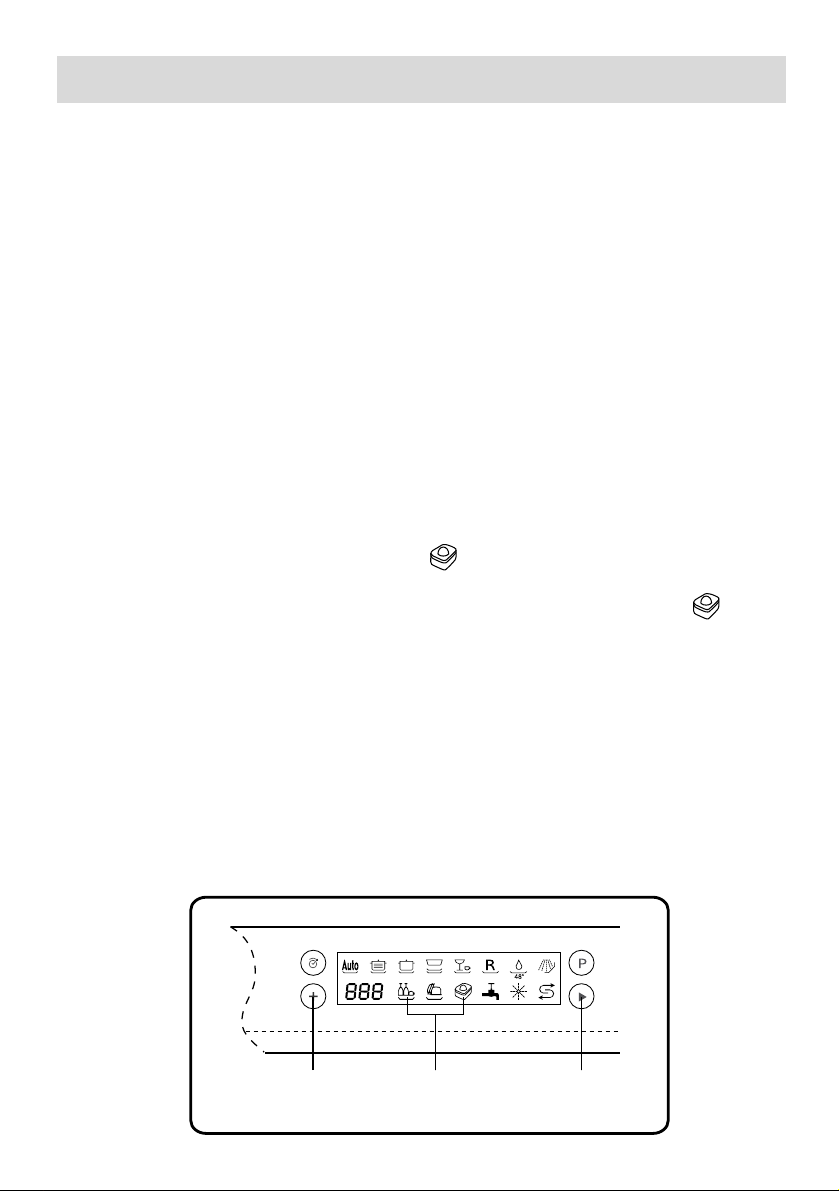
Reset drain function
You can use Reset drain function to stop the washing cycle under running by pressing
the Reset Button(both “C” and “D”) for 3 seconds to "Reset ", and the appliance will
stop after a few minutes drain phase.
25
Reset
C
55o/65o70o55o50o45o40ocold
D
Page 27
Care and maintenance
Regular inspection and maintenance of your appliance helps to prevent problems
from occurring.This saves time and aggravation.You should therefore carefully
inspect the inside of your dishwasher from time to time.
EN
Overall condition of appliance
Check that no grease or scale has accumulated on the inside of the dishwasher.
If you discover any deposits:
Clean the interior of the dishwasher thorughly with a dishwasher detergent solution.
Dishwasher salt
Check the LOW SALT indicator “ J ”. Top up with
salt, if required.
Rinse-aid
Check the LOW RINSE AID indicator “ I ”, on the
front panel. Top up with rinse-aid,if required.
Filters
The filters “ 8”,“ 9” prevent larger particles of food
in the water from reaching the pump.These particles
may occasionally block the filters.
When the appliance has finished washing, check
the filters for particles of food and, if required,
clean.
After undoing the coarse micro-filter “ 8 ” , the
filter unit “9” can be removed. Remove any
particles of food and rinse the filters under running
water.
Insert the filter unit “ 9 ” and tighten the coarse
micro-filter.
Notice:
Before cleaning, make sure that
the plug of the appliance has
been removed from the socket.
I J
8
9
26
Page 28
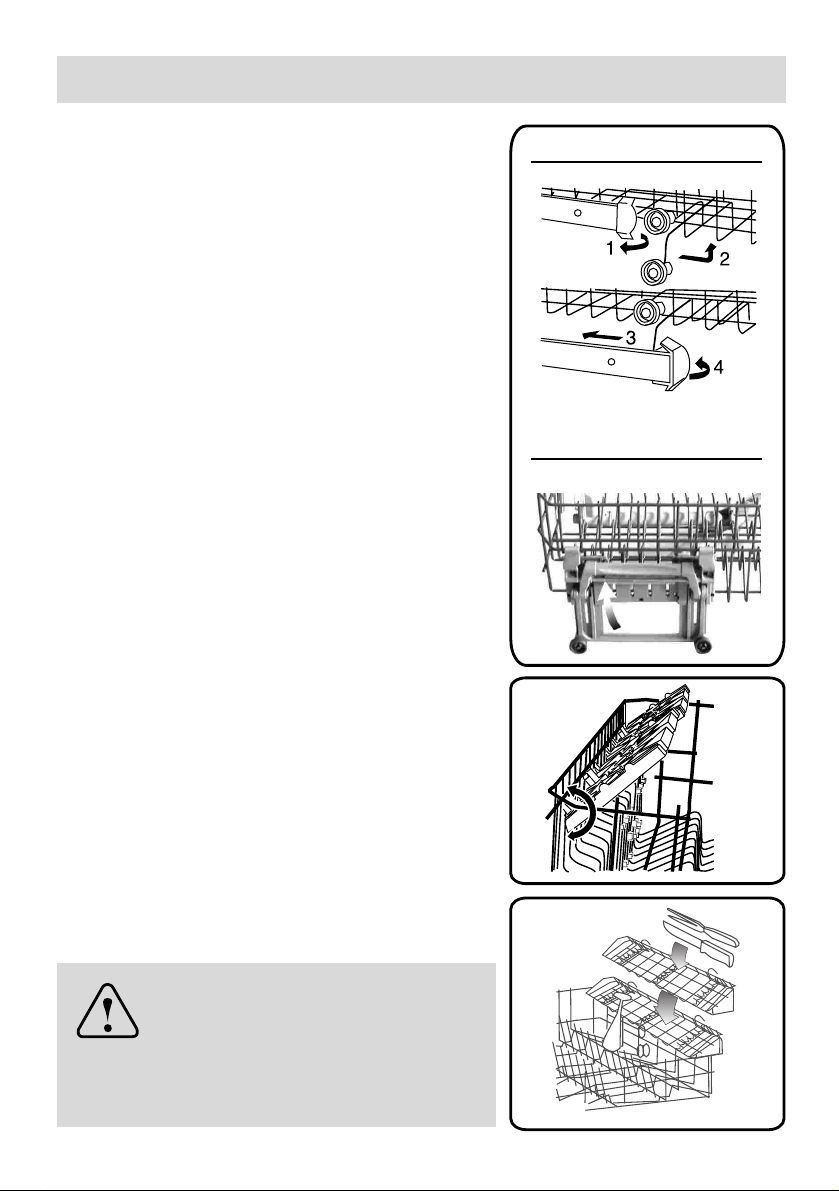
Spray arms
Lime and remnants of food in the washing water
can block the nozzles in the spray arms “ 10 ”
and “ 11 ” and the arm mountings.
Inspect the nozzles in the spray arms for blocked
holes due to remnants of food.
If necessary, pull the lower arm “ 11 ” upwards
and lift it off.
Unscrew the upper spray arm “ 10 ”.
Clean both spray arms under running water.
Refit the spray arms. Ensure that the lower arm
has locked into place and the upper one is
screwed tight.
Ensure that the power supply is turned off prior
to removal and cleaning of any internal pars.
EN
10
11
27
Page 29
Trouble Shooting
EN
Resolving minor problems yourself
Experience has shown that you can resolve most problems that rise during normal
daily usage yourself, without having to call out a service engineer.Not only does
this save costs,but it also means that the appliance is available for use again that
much sooner. The following list of common occurrences and their remedies should
help you identify the causes of most problems.
...when the appliance is switched on
Appliance does not start up
Fault with fuse in mains electricity supply.
Plug not inserted in wall socket.
Appliance door not closed properly.
Programme button has not been pressed.
Water tap not turned on.
Blocked strainer in water intake hose.
- The strainer is situated in the Aquastop or supply-hose connection.
Caution:
Do not forget that repairs should only be carried out by a
qualified specialist. Improper repairs can lead to
considerable equipment damage as well as danger to the
user.
...with the appliance itself
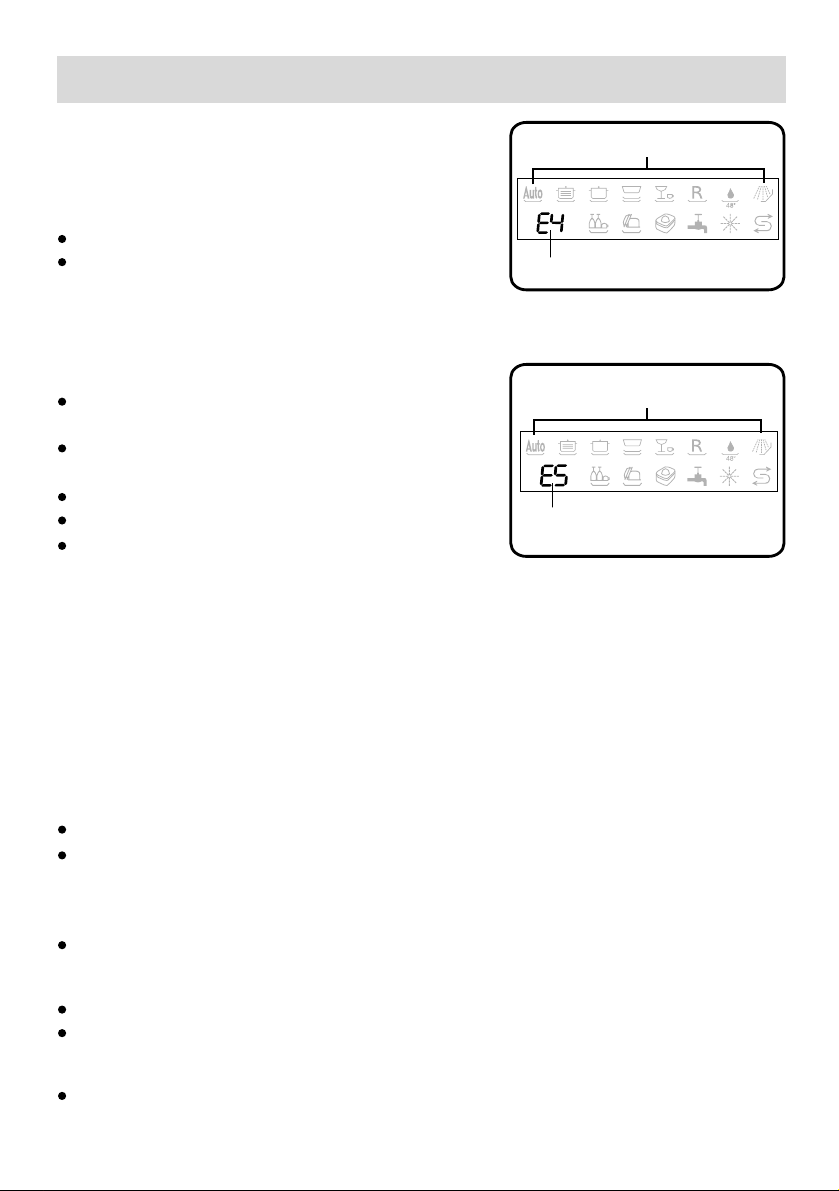
Error display on the time-remaining indicator.
When the buzzer emits 10 short warning signal
every 30 seconds, the time-remaining indicator
display "E1" and the programme indicator light.
Have you checked whether:
The door is closed properly.
When the buzzer emits 10 short warning signal
every 30 seconds, the time-remaining indicator
display "E3" and the programme indicator light.
Have you checked whether:
The drain hose is too low.
E
55o/65o70o55o50o45o40
F
E
55o/65o70o55o50o45o40
F
o
cold
o
cold
28
Page 30
EN
When the buzzer emits 10 short warning signals
E
every 30 seconds, the time-remaining indicator
display "E4" and the programme indicator light.
Have you checked whether:
55o/65o70o55o50o45o40
o
cold
The drain hose is crimped or bent.
The drain hose is too high.
F
When the buzzer emits 10 short warning signals every 30 seconds, the timeremaining indicator display "E5" and the programme indicator light.
Have you checked whether:
The water is turned on and the hose is connected
E
properly;
The water supply to the house is on and has
55o/65o70o55o50o45o40
o
cold
sufficient pressure;
The water supply hose is crimped or bent;
The filter for the water supply hose is clogged.
The drain hose is too low.
F
When the buzzer emits 10 short warning signals every 30 seconds and
the time remainingindicator display "E2","E6","E7","E8","E9","EA" or
"Eb", Contact the nearest authorized service center.
If you take all these checks and the dishwasher still does not function
or your dishwasher have any other error display, you can power the
dishwasher OFF, and wait a few minutes. You can power the dishwasher
on, try it again , if the dishwasher still does not function and/or the
problem persists, contact the nearest authorised service center and
provide them with the following information:
The nature of the problem.
The model type number (Mod...) And the serial number (S/N...), which are indicated
on the ratting plate located on the side of the inner part of the door.
Lower spray arm rotates with difficulty
Spray arm is blocked by small items or food remains.
Lid in detergent compartment cannot be closed
Detergent compartment has been overfilled.
Mechanism is clogged with remnants of detergent.
Remnants of detergent stuck inside dispenser
Compartment was damp when it was filled up with detergent. Compartment must
be dry before detergent is added.
29
Page 31

Water remains inside appliance after programme has ended
Blockage or kind in drainage hose.
Pump is jammed.
Filters are blocked.
The programme is still running. Wait for the programme to end .
...during washing
Unusual amount of foam is creased
Normal washing up liquid has been poured into the rinse-aid container.
Remove any spilled rinse aid with a cloth as it could otherwise lead to excessive
foaming during the next washing cycle.
Appliance stops suddenly while washing is taking place
Cut off electricity supply to appliance.
Water supply has been interrupted.
Knocking sound can be heared while washing is taking place
A spray arm is knocking against the dishes inside the appliance.
Rattling sound can be heared while washing is taking place
Crockery has not been stacked properly inside the appliance.
EN
Knocking sound coming from inlet valves
This is caused by the way the water pipes have been laid and it has no effect
upon the way the appliance functions. There is no remedy for this.
...with the dishes,cutlery, etc.
Remnants of food are stuck to the dishes, cutlery,etc.
Dishwasher was not loaded properly. Jets of water could not reach all parts of
the dishes, ect.
Too many items in the rack.
Items in the rack were touching each other.
Not enough detergent was added to dispenser.
Selected wash programme was not intensive enough.
Rotation of spray arm was obstructed by dishes, etc.
Nozzles in spray arm are blokcked by remnants of food.
Filters are blocked.
Filters have been incorrectly fitted.
Waste-water pump is jammed.
30
Page 32

Plastic items are discoloured
Not enough detergent was added to dispenser.
Detergent has insuffcient bleaching properties. Use a detergent containing a
chemical bleaching agent.
White stains are left on crockery, glasses have a milky appearance
Not enough detergent was added to dispenser compartment.
Amount of rinse-aid was set too low.
Although water is quite hard, no salt has been put in appliance.
Water softener was set too low.
Lid on salt container is not screwed tight.
If you used a phosphate-free detergent , try a detergent containing phosphates
and compare results.
Dishes,cultlery,etc.have not been dried
Selected programme did not include drying function.
Amount of rinse-aid was set too low.
Items were removed from dishwasher too soon.
Glasses have a dull appearance
Amount of rinse-aid was set too low.
EN
Tea stains or traces of lipstick have not been completely removed
Detergent does not have a sufficient bleaching effect.
Washing temperature was set too low.
Traces of rust on cutlery
Cutlery is not sufficiently rustproof.
Salt content in washing water is too high.
- Lid on salt container is not screwed tight.
- Too much salt was spilt while filling container.
Glasses become clouded and discoloured; coating cannot be wiped
off
Unsuitable detergent was used.
Glasses are not dishwasher-proof.
Smears left behind on glasses and cutlery; glasses have acquired a
metallic appearance
Amount of rinse-aid set too high.
31
Page 33

Technical data
EN
Width
Depth
Height
Capacity
Mains water pressure
Power voltage
Fuse
Total absorbed power
60 cm
60 cm
85 cm
12 standard place settings
See nameplate
See nameplate
13A
See nameplate
32
Page 34

Important information
EN
Notes on waste disposal
Old appliances still have some residual value. An environment-friendly method of
disposal will ensure that valuable raw materials can be recovered and used again.
When an appliance has reached the end of its working life,unplug it from the
mains.Cut through the mains cable and dispose of it together with the plug.
Destroy the door locking mechanism. This will ensure that children at play cannot
become locked inside and are not exposed to the risk of suffocation.
Your new appliance was protected by suitable packaging while it was on its way
to you. All materials used for this purpose are environment-friendly and can be
recycled. Please make a contribution to protecting the environment by disposing
of the packaging appropriately.
Do not allow children to play with any parts of the packaging. There is a risk of
suffocation by the cardboard boxes and the plastic wrapping.
Up-to -date information concerning options for disposal can obtained from your
retailer or local municipal administration.
Disposal
33
The symbol on the product or on its packaging indicates that
this product may not be treated as household waste. Instead it shall
be handed over to the applicable collection point for the recycling
of electrical and electronic equipment. By ensuring this product is
disposed of correctly, you will help prevent potential negative
consequences for the environment and human health, which could
otherwise be caused by inappropriate waste handling of this product.
For more detailed information about recycling of this product, please
contact your local city office, your household waste disposal service
or the shop where you purchased the product.
Page 35

EN
General information
Measures must be taken to ensure that built-under and built-in units that are
subsequently re-sited as free-standing appliances cannot topple over. This can
be achieved by bolting the dishwasher to the wall or fitting it under a continuous
work surface which is screwed to the adjacent cupboards.
Information on comparability tests implemented in
compliance with EN 50242
Appliance loaded in accordance with
standard specifications.
Example of loaded dishwasher: See Fig
1*2 and 3
Capacity: 12 place settings
Comparability programme: Light wash
Rinse-aid setting: 5
Detergent: prewash- 5g
mainwash- 25g
1 2
3
4 5
1 4 4 4 4 1
4 4 4 4
4 4 4 41
2 2 2
1 1
2 2 2
5
1 1
2 2 2
2 2 2
3 3 3 3
1 1
3 3 3 3
1 3 3 3 3 1
1
fig.1
fig.2 fig.3
When testing the washing performance ,it is required that the top wheel of upper
besket lies in the rolling way.
If the comparability tests do not comply fully with EN 50242, e.g., degree of soiling,
type of dishes and cutlery, etc., contact the appliance manufacturer before starting
the test.
34
Page 36

Inhaltsverzeichnis
DE
Sicherheitshinweise
Nicht geeignetes Geschirr
So halte ich das Gerät in Topform
Installation
Die Abdeckplatte des Geschirrspülers abbauen
Den Geschirrspüler kennen lernen
Füllen des Salzbehälters
Anwendung des Klarspülers
Spülmittel
Geschirr einordnen
Programmübersicht
Verbrauch
Geschirrspülen
Wartung und Pflege
Fehlersuche
Technische Daten
Wichtige Information
2
4
5
6
9
11
13
15
16
17
19
20
21
26
28
32
33
1
Page 37

Sicherheitshinweise
DE
Bei der Anlieferung
• Überprüfen Sie Verpackung und Geschirrspüler sofort auf Transportschäden.
Nehmen Sie ein beschädigtes Gerät nicht in Betrieb, sondem nehmen Sie
Rücksprache mit Ihrem Lieferanten oder Ihrem Kundendienst.
• Entsorgen Sie das Verpackungsmaterial bitte ordnungsgemäß.
Bei der lnstallation
• Stellen Sie sicher, dass das Schutzleitersystem der elektrischen Hausinstallation
vorschriftsmäßig installiert ist.
• Nehmen Sie Aufstellung und Anschluss nach der Installations-und
Montageanweisung vor.
• Bei der Installation muss der Geschirrspüler vom Netz getrennt sein.
• Elektrische Anschlussbedingungen und Angaben auf dem Typenschild des
Geschirrspülers müssen übereinstimmen.
• Benutzen Sie zum Anschluss niemals Verlängerungskabel.
• Nach dem Aufstellen des Gerätes muss der Stecker frei zugänglich sein.
• Das Netzkabel darf bei der Installation niemals zu stark oder in gefährlicher Weise
verbogen oder gequetscht werden.
• Das Gerät darf nicht im Freien aufgestellt werden, selbst wenn es unter einem
Dach steht; es ist außerdem gefährlich, den Geschirrspüler Witterungseinflüssen
einschließlich Regen auszusetzen.
Im täglichen Betrieb
• Der Geschirrspüler ist nur zum Spülen von Haushalts- und Kochgeschirr gedacht
und sollte nur von Erwachsenen benutzt werden.
• Setzen Sie sich nicht auf die geöffnete Tür; Stellen Sie auch keine schweren
Objekte auf die geöffnete Tür, das Gerät könnte kippen.
• Das Wasser im Spülraum ist kein Trinkwasser.
• Geben Sie kein Lösungsmittel in den Spülraum. Es besteht Explosionsgefahr!
• Die Tür während des Programmablaufs nur vorsichtig öffnen. Es besteht die Gefahr,
dass Wasser aus dem Gerät spritzt.
• Berühren Sie niemals die Heizelemente während oder nach einem Spülzyklus.
• Wichtige zu befolgende Regeln beim Gebrauch des Geschirrspülers:
- Berühren Sie das Gerät niemals wenn Sie barfuß sind oder nasse Hände bzw.
Füße haben;
- Benutzen Sie keine Verlängerungskabel oder Doppelstecker;
- Trennen Sie das Gerät stets von der Stromversorgung, wenn es nicht
vorschriftsmäßig funktioniert oder gewartet werden muss.
2
Page 38

DE
Bei Kindern im Haushalt
• Kinder oder behinderte Personen sollten dieses Gerät nicht ohne Beaufsichtigung
benutzen.
• Eine Beaufsichtung von Kindern bei der Benutzung des Gerätes ist erforderlich,
damit sie nicht mit dem Geschirrspüler spielen.
• Halten Sie Kinder von Spülmitteln und dem offenen Geschirrspüler fern.
Bei auftretenden Schäden
• Bei Störungen am Gerät müssen Sie immer sofort die Wasserversorgung abstellen
und den Stecker aus der Steckdose ziehen. Ziehen Sie dann den Abschnitt
"Fehlersuche" zu Rate. Wenn Sie das Problem nicht selbst lösen können, wenden
Sie sich bitte an den Kundendienst.
• Der Geschirrspüler darf nur von geschultem Fachpersonal repariert werden. Wenn
das Stromkabel beschädigt ist, muss es durch ein Spezialkabel ersetzt werden,
das beim Hersteller oder Ihrer Kundendienststelle erhältlich ist.
• Zur Erhaltung der LEISTUNGSFÄHIGKEIT und SICHERHEIT des Gerätes
empfehlen wir:
- Wenden Sie sich immer nur an die vom Hersteller empfohlenen Kundendienststellen
- Verwenden Sie immer nur Originalersatzteile.
Entsorgung
• Geräte, die entsorgt werden sollen, müssen vorher unbrauchbar gemacht werden,
indem das Stromkabel abgeschnitten und das Türschloss entfernt wird.
• Entsorgen Sie das Gerät ordnungsgemäß bei den dafür vorgesehenen
Recyclinghöfen.
Warnung:
Kinder könnten sich im Gerät einsperren
(Erstickungsgefahr) oder in andere Gefahrensituationen
geraten.
Deshalb: Netzstecker ziehen, Netzkabel durchtrennen
und beseitigen.
Türschloss zerstören, so dass die Tür nicht mehr schließt.
3
Page 39

Nicht geeignetes Geschirr
DE
Nicht in Ihrem Geschirrspüler reinigen sollten Sie:
Besteck-und Geschirrteile aus Holz. Sie laugen aus und werden unansehnlich; auch
sind die verwendendeten Kleber nicht für die auftretenden Temperaturen geeignet.
Empfindliche Dekorgläser und Vasen, spezielles antikes oder handbemaltes Geschirr;
deren Dekore sind nicht spülmaschinenfest.
Nicht geeignet sind außerdem heißwasserempfindliche Kunststoffteile, Kupfer-und
Zinngeschirr. Bedruckte oder gemalte Dekorationen auf Geschirr oder Glas,
Aluminium- und Silberteile können beim Spülen zum Verfärben und Verblassen
neigen. Auch einige Glastypen können nach vielen Spülgängen trüb werden.
Außerdem gehören sich voll saugende Materialien, wie Schwämme und Tücher,
nicht in den Geschirrspüler.
Empfehlung:
Achten Sie darauf, nur das als spülmaschinenfest gekennzeichnete Geschirr im
Geschirrspüler zu reinigen.
Hinweis:
Geschirrteile, die mit Asche, Wachs, Schmierfett oder
Farbe verunreinigt sind, dürfen nicht in den Geschirrspüler.
Glas- und Geschirrschäden
Ursachen:
• Glasart und Glasherstellungsverfahren.
• Chemische Zusammensetzung des Reinigers.
• Wassertemperatur und Programmdauer des Spülprogramms.
Empfehlung:
• Gläser und Porzellan verwenden, das vom Hersteller als spülmaschinenfest
gekennzeichnet ist.
• Reiniger verwenden, der als geschirrschonend gekennzeichnet ist; notfalls beim
Reinigerhersteller nachfragen.
• Programm mit möglichst geringer Temperatur und kurzer Programmdauer wählen.
• Um Beschädigungen zu vermeiden, Glas und Besteck nach Programmende
möglichst schnell aus dem Geschirrspüler nehmen.
4
Page 40

So halte ich das Gerät in Topform
DE
Nach jedem Spülgang
Drehen Sie nach jedem Spülgang den Wasserhahn zu (nicht bei Geräten mit
Aquastop) und lassen Sie die Tür lhres Geschirrspülers angelehnt, um die Bildung
von Feuchtigkeit oder Gerüchen im Geräteinnern zu vermeiden.
Stecker aus der Steckdose ziehen
Ziehen Sie vor jeder Reinigung bzw. vor Wartungsarbeiten den Stecker aus der
Steckdose.
Keine Lösungs- oder Scheuermittel verwenden
Reinigen Sie die äußeren Gehäuseteile des Gerätes weder mit Lösungs-noch mit
Scheuermitteln, sondern mit einer warmen,milden Seifenlauge.
Eventuelle Flecken auf den inneren Gehäuseteilen sind mit einem mit Wasser und
etwas Essig angefeuchteten Tuch oder mit einem Spezialreiniger für Geschirrspüler
zu entfernen.
Bei einem Umzug
Bei einem Umzug sollte das Gerät möglichst aufrecht transportiert werden, im Notfall
kann es auf die Rückseite gelegt werden.
Dichtungen
Eine der Ursachen für die Entstehung von Gerüchen im Innern des Gerätes sind
Speisereste, die sich in den Dichtungen festsetzen. Die Dichtungen sollten demnach
regelmäßig mit einem feuchten Schwamm gereinigt werden.
Die Tür darf nicht in weit geöffneter Position verbleiben, da ein Verletzungsrisiko
besteht.
Vor den Ferien
Bei längerer Abwesenheit, empfehlen wir einen Spülgang im Normalprogramm mit
Reiniger bei leerem Gerät durchlaufen zu lassen. Danach den Netzstecker aus der
Steckdose ziehen und den Wasserhahn zudrehen.
Lassen Sie die Gerätetür angelehnt. Sie schonen dadurch nicht nur die Dichtungen,
sondern vermeiden auch die Bildung von Gerüchen.
5
Page 41

Installation
DE
Aufstellen
Stellen Sie das Gerät an der gewünschten Stelle auf. Das Gerät kann mit den
Seitenteilen oder mit der Rückseite an angrenzende Möbelteile oder an der Wand
angelehnt werden. Der Geschirrspüler ist mit Zulauf- und Ablaufschläuchen
ausgestattet, die je nach den Installationsgegebenheiten, sowohl nach rechts als
auch nach links geleitet werden können.
Waagerechte Aufstellung
Richten Sie das Gerät mittels der Stellfüße eben und waagerecht aus. An den
Stellfüßen befinden sich Schrauben. Durch Anziehen oder Lösen dieser Schrauben
können Sie die Höhe des Gerätes einstellen. Das Gerät darf auf keinen Fall eine
Neigung von mehr als 2° aufweisen. Eine korrekte Aufstellung gewährleistet eine
korrekte Betriebsweise des Gerätes.
Anschluss an die Kaltwasserleitung
Schließen Sie den Zulaufschlauch
mittels einer 3/4 Gewindeverbindung
an die Kaltwasserleitung an und
ziehen Sie die Mutter fest an (siehe
Abb. A).
Sollte es sich um neue Leitungen
handeln oder um Leitungen, die
längere Zeit nicht benutzt wurden,
dann lassen Sie das Wasser so
lange laufen, bis es ganz klar ist.
Eventuelle Schmutzreste könnten zu
einer Verstopfung der Zulaufleitung
und zu Schäden am Gerät führen.
Abb.A
Warnung:
Verwenden Sie für den Wasseranschluss den mitgelieferten
neuen Anschlussschlauch. Alte Anschlüsse dürfen nicht
mehr benutzt werden.
6
Page 42

DE
Einige Modelle sind mit einem “Aquastop”
- Wasserschlauch ausgestattet (siehe Abb.
B), in dem bereits schon ein Sieb im
Gewindeteil untergebracht ist.
Gefährliche Spannung
Abb.B
Überlaufschutz
Der Geschirrspüler ist mit einem System ausgestattet, dank dessen bei einem
eventuellen Schaden am Wasserzulaufschlauch oder bei Leckstellen im lnnern des
Gerätes sofort die Wasserzufuhr unterbrochen wird. Dadurch werden Schäden in
lhrer Wohnung vermieden.
Sollte das Gehäuse, das stromführende Teile enthält, aus irgendwelchen Gründen
beschädigt werden, ist der Netzstecker sofort aus der Steckdose zu ziehen. Um
eine ordnungsgemäße Funktionsweise des Überlaufschutzes zu garantieren, muss
das Gehäuse "A" mit dem Wasserzulaufschlauch ausschließlich in der Stellung wie
in Abb.B veranschaulicht, angeschlossen werden.
Der Zulaufschlauch darf auf keinen Fall durchgeschnitten werden, da er stromführende
Teile enthält.
Sollte der Schlauch zu kurz sein, muss er durch einen anderen Schlauch von
geeigneter Länge ersetzt werden. Einen solchen Schlauch können Sie bei einem
Fachhändler oder Ihrer Kundendienststelle erhalten oder bestellen.
7
Page 43

DE
Anschluss des Abwasserschlauches
Führen Sie den Ablaufschlauch in eine Ablaufleitung mit einem Durchmesser von
mindestens 4 cm oder legen Sie ihn in das Spülbecken. Falls erforderlich, verwenden
Sie das mitgelieferte Kunststoffteil für den Syphonanschluss und um den Schlauch
nicht zu knicken oder einzuklemmen (Abb. C). Das Schlauchende muss in einer
Höhe von 40cm bis 100cm liegen und darf nicht in Wasser eingetaucht sein.
max 100 cm
2m max
min 40 cm
Abb.C
Achtung:
Das mitgelieferte Kunststoffteil muss fest an der Mauer befestigt
werden, um zu vermeiden, dass der Ablaufschlauch abrutscht
und so das Wasser außerhalb des Ablaufrohres abläuft.
Elektroanschluss
Das Gerät nur an 230V Wechselstrom über eine vorschriftsmäßig installierte
Steckdose mit Schutzleitung anschliessen. Angaben über Netzspannung, Stromart
und die erforderliche Absicherung sind dem Typenschild zu entnehmen. Das
Typenschild ist auf der Innenseite der Tür angebracht (die Erdung des Gerätes wird
vom Gesetz vorgeschrieben).
Warnung:
Bei unterbaufähigen oder integrierbaren Geräten, muss
der Anschlussstecker des Geschirrspülers frei zugänglich
sein, so dass die Instandhaltung gefahrlos vorgenommen
werden kann.
8
Page 44

Die Abdeckplatte des Geschirrspülers abbauen
Der Geschirrspüler kann auch eingebaut werden. Befolgen
Sie dazu folgende Anweisungen:
DE
9
Page 45

0120200050
Einbau –Geschirrspüler: Befestigung oben
DE
Einbau –Geschirrspüler: Befestigung seitlich
10
Page 46

Den Geschirrspüler kennen lernen
A C E K
DE
55o/65o70o55o50o45o40
B D F G H I J L
Anzeige ON – OFF
A
Taste ON – OFF
B
Taste Zeitvorwahl
C
Taste Zusätzliche Optionen
D
Anzeige Programme
E
Anzeige Restlaufzeit
F
Überblick Funktionsweise
Drücken Sie diese Taste um die Zeitvorwahl zu starten.
Drücken Sie diese Taste um Zusätzliche Optionen zu wählen.
Option: Nur oberer Korb
Anzeige Zusätzliche Optionen
G
Anzeige Fehler Wasserzulauf
H
Anzeige Klarspüler nachfüllen
I
Anzeige Salz nachfüllen
J
Taste Programmwahl
K
Taste Start / Pause
L
o
cold
11
Option: Nur unterer Korb
Option: Multitabs (Alles-in-1 Tabs)
Drücken Sie diese Taste um das gewünschte Programm zu wählen.
Drücken Sie diese Taste um das Programm zu starten oder zu unterbrechen.
Drücken Sie diese beiden Tasten, um das Programm abzubrechen.
Page 47

Innenraum des Geschirrspülers
DE
a
b
c
a
Oberer Korb
b
Oberer Sprüharm
c
Unterer Korb
d
Besteckkorb
e
Unterer Sprüharm
d
e
f
Wasserzulaufschlauch
g
Abwasserschlauch
h
Netzkabel
i
Filtereinsatz
j
Behälter Reiniger und Klarspüler
k
g
h
i
j
k
f
Deckel Salzbehälter
12
Page 48

Füllen des Salzbehälters
DE
Salz
Die Wasserhärte variiert von Ort zu Ort. Je höher
die Wasserhärte, desto höher der Kalkgehalt im
Wasser. Hartes Wasser im Geschirrspüler
verursacht Ablagerungen auf dem Geschirr;
deshalb muss ein Spezialsalz verwendet werden.
Einfüllen des Salzes in den Behälter
Verwenden Sie bitte nur Spezialsalz für Geschirrspüler.
Der Salzbehälter befindet sich unter dem unteren Korb und wird wie folgt gefüllt:
Wenn die Anzeige “J” leuchtet, muss Salz
nachgefüllt werden.
Nehmen Sie den unteren Korb heraus und
schrauben und schrauben Sie den Deckel des
Behälters ab.
Wenn der Salzbehälter zum ersten Mal gefüllt
wird, muss er zuerst mit Wasser gefüllt werden.
Füllen Sie mit Hilfe des mitgelieferten Trichters
ca. 2kg Salz ein. Dabei tritt etwas Wasser aus
dem Salzbehälter aus.
Schrauben Sie den Deckel des Salzbehälters
wieder zu.
J
13
Achtung:
Um Rostbildung zu vermeiden, füllen Sie das Salz am
besten kurz vor einem kompletten Spülgang ein.
Page 49

DE
Einstellen des Salzverbrauchs
Der Geschirrspüler ist für das Einstellen des Salzverbrauchs je nach Härtebereich
des Wassers vorbereitet, so dass der Salzverbrauch auf ein notwendiges Minimum
optimiert und individuell gestaltet werden kann.
Zum Einstellen verfahren Sie bitte wie folgt:
Schrauben Sie den Deckel des Salzbehälters ab.
Auf dem Behälter befindet sich ein Ring mit einem
Pfeil (siehe Abb.).
Wenn nötig, drehen Sie den Ring entgegen dem
Uhrzeigersinn von "-" zu "+" je nach Wasserhärte.
Wir empfehlen, das Einstellen nach folgender Tabelle vorzunehmen:
Autonomie
(Zyklen/
pro 2 kg)
°dH
0 -10
10-25
25-50
>50
Wasserhärte
°fH
0-17
18-44
45-89
>89
°mmol/l
0-1,7
1,8-4,4
4,5-8,9
>8,9
Wählereinstellung
MED
Salzverbrauch
(gr/pro Zyklus)
/ 0 /
- 20 60
40 40
+ 60 25
Der Entkalker wurde werkseitig auf - eingestellt.
Sollten Sie Multifunktionstabs verwenden, empfiehlt es sich,den Salzbehälter doch
zu füllen und ihn auf - einzustellen, oder auf +, wenn der Härtegrad Ihres Wassers
60°fH übersteigt.
14
Page 50

Anwendung des Klarspülers
Klarspüler
Die Verwendung des Klarspülers lässt das
Geschirr schneller trocknen und verleiht ihm
strahlenden Glanz. Der Behälter für den Klarspüler
befindet sich auf der Innenseite der Tür.
Wenn die Anzeige “I” auf der Bedienblende und
die mechanische Anzeige “1” am Behälter für
Klarspüler aufleuchten, muss Klarspüler
nachgefüllt werden.
Achtung:
Wenn Sie Alles-in-1 Tabs verwenden, wie “3 in 1”, “4 in 1”,
“5 in 1” … benötigen Sie keinen Klarspüler mehr.
Einfüllen des Klarspülers
Schrauben Sie den Deckel "2" des
Klarspülerbehälters entgegen dem Uhrzeigersinn
ab und füllen Sie den Behälter mit Klarspüler.
Achten Sie darauf, dass der Klarspüler nicht
überläuft.
Der Klarspüler kann durch Einstellen (mittels
eines Schraubenziehers) des Reglers "3" dosiert
werden. Dieser befindet sich unter dem Deckel
"2".
Es sind 6 verschiedene Einstellungen möglich.
Ab Werk ist der Regler auf Pos. 3 voreingestellt.
DE
I
1
2
3
15
Wichtig:
Die richtige Dosierung des Klarspülers ermöglicht ein
optimales Trocknen. Sollten auf dem Geschirr nach dem
Spülen Wassertropfen oder Flecken sichtbar sein, so
muss der Regler höher eingestellt werden.Sollten auf
dem Geschirr weiße Streifen hinterbleiben, muss der
Regler niedriger eingestellt werden.
Page 51

Spülmittel
DE
Reiniger
Benutzen Sie bitte spezifische Reiniger für
Geschirrspüler.
Füllen Sie den Reiniger vor Beginn jedes
Spülgangs gemäß den Anweisungen des
Abschnitts "Programmübersicht" ein.
Der Behälter für den Reiniger befindet sich auf
der Innenseite der Tür.
5
4
Einfüllen des Reinigers
Bei normalem Reiniger
• Drücken Sie die Taste "5", um den Deckel "4"
des Behälters zu öffnen.
• Füllen Sie den Reiniger für den Spülgang in das
Fach "6" ein.
• Den Reiniger für das Programm Vorspülen füllen
Sie in das Fach "7" ein.
• Drücken Sie nach dem Einfüllen des Reinigers
den Deckel bitte so zu, dass er einrastet.
Wenn Sie Alles-in-1 Tabs, wie “3 in 1”, “4 in 1”, “5 in 1” …, benutzen
• Drücken Sie die Taste "5", um den Deckel "4" des Behälters zu öffnen.
• Die Tabs müssen in das Fach “6” gelegt werden.
• Danach schließen Sie den Deckel so, dass er einrastet.
6
7
Achtung:
Wenn Sie Alles-in-1 Tabs benutzen, wählen Sie die
zusätzliche Option für Alles-in-1 Tabs.
Achtung:
Um den Deckel richtig schließen zu können, entfernen
Sie bitte eventuelle Reinigerreste aus den Ecken und
Kanten.
16
Page 52

Geschirr einordnen
Bevor Sie das Geschirr einordnen, sollten Sie: Grobe Speisereste entfernen, damit
der Filtereinsatz durchlässig und die Betriebseigenschaften Ihres Gerätes erhalten
bleiben. Töpfe mit eingebrannten Speiseresten einweichen um einen zusätzliche
Spülzyklus zu vermeiden.
Um das Geschirr einzuordnen, ziehen Sie den oberen bzw. unteren Korb heraus.
DE
Verwendung des unteren Korbs
Es wird empfohlen das schwieriger zu reinigende
Geschirr in den unteren Korb einzuordnen: Töpfe,
Pfannen, Servierplatten und Teller (siehe
Abbildung rechts).
Die großen Geschirrteile an den Rand einordnen,
so dass die Drehung des oberen Sprüharmes
nicht behindert wird.
E1 E2 E3
Abb.D
Töpfe, Pfannen, Servierteller usw. immer mit
der Öffnung nach unten einordnen, damit sich
kein Wasser ansammeln kann(Abb.D).
Größe Töpfe sollten schräg einsortiert werden
, damit das Wasser besser ablaufen kann.
Einige Modelle: die Zacke des unteren Ständer
soll versetzt, um mehrere oder größere Teller
oder Pfanne laden zu können (Abb.E).
Der Besteckkorb kann zweigeteilt werden (Abb.
F).Haben Sie wenig Besteck, gewinnen Sie so
mehr Platz für andere Geschirrteile.
Besteck immer mit dem Griff nach unten
einsetzen, lange Besteckteile in den vorderen
Bereich (Sprüharm muss frei bleiben).
17
Abb.E
Abb.F
Page 53
Verwendung des oberen Korbs
Sortieren Sie in den oberen Korb das empfindliche
und leichte Geschirr wie Gläser, Tee- und
Kaffeetassen, Untertassen und Teller, flache
Schüsseln, leicht verschmutzte flache Töpfe und
Pfannen.
• Sortieren Sie das Geschirr so ein, dass es durch
den Wasserstrahl nicht umgeworfen werden
kann.
• Der obere Korb ist höhenverstellbar (siehe Abb.
G).
Stellen Sie den Oberkorb in die höhere Position
um mehr Platz für höhere Teller und größeres
Geschirr im unteren Korb zu haben.
Etagere
Stellen Sie Gläser und Glaswaren mit längerem
Stiel darauf, um das Berühren mit anderem
Geschirr zu vermeiden.
Stellen Sie kleine Gläser und Tassen sowie kleine
Schüsseln auf das zusätzliche Tassenregal, das
dem Bedarf entsprechend ein- oder
ausgeschwenkt werden kann (siehe Abb. H).
DE
(Einige Modelle)
Abb.F
Abb.G
Messerablage
Die Messerablage ist speziell für lange Messer
und Gabeln konstruiert.
Bringen Sie die Messerablage in die richtige
Position des Obergestells an und legen Sie die
langen Messer und Gabeln auf die Messerablage
zur Reinigung(Siehe Abb.I).
Achtung:
Messer oder andere spitze
Gegenstände müssen mit der Spitze
nach unten in den Besteckkorb oder
waagerecht eingeordnet werden.
Abb.H
Abb.I
18
Page 54

Programmübersicht
DE
Spül-
programme
o
55o/65
Automatik-
programm
o
70
Intensiv-
programm
o
55
Normal
o
50
Leicht
Programm
(EN50242)
o
45
Glas
o
40
ExpressSchnell-
programm
Öko
Programm
cold
Vorspülen
(Einweichen)
Geschirrtyp
Unempfindliches
Geschirr
(z.B.
Porzellan,
Schüsseln,
Besteck,
etc.)
Gemischt
(z.B.
Porzellan,
Schüsseln,
Besteck,
Tassen und
Gläser, etc.)
Art der
Speisereste
Menge der
Speisereste
Zustand der
Speisereste
Suppen,
Aufläufe,
Soßen,
Kartoffeln,
viel
Stark
angetrocknet
Teigwaren,
Reis, Eier,
Gebratenes
Suppen,
Aufläufe,
Soßen,
Kartoffeln,
Teigwaren,
Reis, Eier,
Gebratenes
wenig
Leicht
angetrocknet
Kaffee,
Kuchen,
Milch,
Wurst, kalte
Getränke,
Salate
Suppen,
Aufläufe,
Soßen,
Kartoffeln,
Teigwaren,
Reis, Eier,
Gebratenes
sehr
wenig
Leicht
angetrocknet
Wenn das Geschirr über
mehrere Tage bis zum
Spülen im Geschirrspüler
aufbewahrt wird.
Programmbeschreibung
Vorspülen mit kaltem Wasser.
Hauptspülgang bei 55°C oder 65°C.
1 oder 2mal Nachspülen mit kaltem
Wasser.
Klarspülen mit heißem Wasser.
Trocknen.
Vorspülen mit warmem Wasser.
Hauptspülgang bei 70°C.
Nachspülen mit kaltem Wasser.
Klarspülen mit heißem Wasser.
Trocknen.
Vorspülen mit kaltem Wasser.
Hauptspülgang bei 55°C.
Nachspülen mit kaltem Wasser.
Klarspülen mit heißem Wasser.
Trocknen.
Vorspülen mit kaltem Wasser.
Hauptspülgang bei 50°C.
Nachspülen mit kaltem Wasser.
Klarspülen mit heißem Wasser.
Trocknen.
Spülgang bei 45°C.
Nachspülen mit warmem Wasser.
Klarspülen mit heißem Wasser
Trocknen.
Kurzprogramm bei 40°C.
Klarspülen mit heißem Wasser.
Hauptspülgang bei 48°C
Nachspülen mit kaltem Wasser.
Klarspülen mit heißem Wasser
Trocknen
Kurzes Spülprogramm mit kaltem
Wasser um das Antrocknen der
Speisereste zu vermeiden.
19
Page 55

Verbrauch
DE
3 in 1
Ja
Ja
Ja
Ja
Ja
Zusätzliche Optionen
Zeitvorwahl
Ja
Ja
Ja
Ja
Ja
Oberer Korb
Unterer Korb
Reiniger
Vorspülen
5g
5g
5g
5g
5g
5g
5g
5g
5g
5g
5g
5g
5g
5g
Hauptspülgang
25g
25g
25g
25g
25g
25g
25g
25g
25g
25g
25g
25g
25g
25g
Klarspüler
Dauer in
Minuten
75-110
52-82
66-98
112
86
94
102
78
90
167*
118
135
92
72
Nein
Ja
Nein
zutreffend nicht zutreffend
Ja
Ja
Ja
5g
5g
5g
5g
*EN 50242 Vergleichsprüfungen mit Klarspülereinstellung 5
25g
15g
15g
15g
25g
25g
25g
82
32
28
30
108
88
98
12
8
10
20
Page 56

Geschirr spülen
DE
Programmauswahl
Je nach Geschirrart und Menge bzw. Zustand der Speisereste suchen Sie aus der
Programmübersicht das notwendige Programm aus.
Den zugehörigen Programmablauf und die jeweiligen Programmdaten finden Sie
direkt nach der Programmübersicht.
Zum Beispiel:
Für gemischtes Geschirr mit vielen und stark angetrockneten Speiseresten benötigen
Sie das Programm Normal .
o
55
Spartipp
Bei wenig beladener Maschine genügt häufig ein Programm, das bei niedrigerer
Temperatur spült.
Programmdaten
Die angegebenen Programmdaten beziehen sich auf Normalbedingungen:
Sie können variieren, abhängig von:
einer unterschiedlichen Geschirrmenge
der Temperatur des Wassers
dem Wasserleitungsdruck
der Umgebungstemperatur
den Netzspannungstoleranzen
den maschinenbezogenen Toleranzen
(z.B. Temperatur, Wassermenge,…)
Gerät einschalten
Geschirr einsortieren und den
Wasserhahn öffnen.
Schließen Sie die Tür und drücken Sie
die Taste On-Off “B”. Die Anzeige OnOff "A" leuchtet auf.
Drücken Sie die Taste Programmwahl
“K” um das gewünschte Programm zu
wählen, und die entsprechende
Programmanzeige “E” leuchtet auf.
Drücken Sie die Taste Start/Pause “L”,
der Geschirrspüler startet sofort und die
entsprechende Programmanzeige blinkt.
21
A
B
C E K
55o/65o70o55o50o45o40ocold
D F G H I J L
Page 57

DE
Programmende
• Sechs akustische Signaltöne zeigen das Ende des Spülprogramms an. Die Anzeige
Restlaufzeit zeigt "0".
Gerät ausschalten
Einige Minuten nach Programmende:
• Gerät mit der Taste ON-OFF ausschalten
• Tür öffnen.
• Geschirr nach dem Abkühlen entnehmen
• Wasserhahn zudrehen
Achtung:
Bei einem gestarteten Programm: Durch Drücken der
Taste RESET für 3 Sekunden werden alle eingestellten
Optionen gelöscht.
Programm unterbrechen
• Tür vorsichtig öffnen, es besteht die Gefahr, dass Wasser aus dem Gerät spritzt.
Erst dann die Tür vollständig öffnen, wenn sich der Sprüharm nicht mehr dreht.
• Wird die Tür geöffnet, ertönt alle 30 Sekunden jeweils 10 Mal ein akustischer
Signalton. Die Anzeige Restlaufzeit zeigt “E1”.
• Bei Warmwasseranschluss oder wenn die Maschine bereits aufgeheizt hat und
die Gerätetür geöffnet wurde, die Tür erst einige Minuten anlehnen und dann
schließen. Andernfalls kann durch Expansion die Gerätetür aufspringen.
• Um den Programmablauf fortzusetzen, Tür schließen, das Gerät startet automatisch.
Achtung:
Unterbrechen oder löschen Sie ein bereits gestartetes
Programm nur, wenn es unbedingt notwendig ist.
Unterbrechung oder Änderung eines Spülprogramms
Ein bereits gestartetes Spülprogramm kann nur geändert werden, wenn es erst
kurze Zeit in Betrieb ist. Andernfalls kann das Spülmittel bereits aufgebraucht sein
bzw. der Geschirrspüler hat das Spülwasser schon abgepumpt. In einem solchen
Fall muss der SpülmittelbehäIter neu aufgefüllt werden (siehe Abschnitt “Spülmittel
einfüllen“).
Um ein bereits begonnenes Spülprogramm zu ändern, betätigen Sie die Taste
ON-OFF “B” für mehrere Sekunden. Alle Einstellungen werden dann aufgehoben.
Zur Einstellung eines neuen Spülprogramms folgen Sie den Anweisungen im
Abschnitt “Gerät einschalten”).
22
Page 58

DE
Der Gebrauch von “3 in 1” Tabs
Allgemeines
1. Abhängig von der Wasserhärte in Ihrer Gemeinde, muss zuerst geprüft warden,
ob der Gebrauch dieser Produkte sinnvoll ist. Hierfür lesen Sie sorgfältig die
Beipackzettel oder wenden sich an die Produkthersteller.
2. Halten Sie sich beim Gebrauch der “3 in 1” Tabs strikt an die Gebrauchsanleitung
des Herstellers.
3. Bei Problemen mit diesen Produkten wenden Sie sich an den Kundendienst des
Herstellers.
Vorsicht
Wenn Sie “3 in 1” Tabs verwenden, brauchen Sie keinen Klarspüler und kein
Spezialsalz mehr. Nehmen Sie bei der Wasserhärte die kleinstmögliche Einstellung
vor.
Auswählen der Tab-Funktion
1. Schließen Sie die Tür. Wählen die das gewünschte Programm und drücken Sie
anschließend die Taste “D” bis die zusätzliche Option “Alles-in-1” Tabs
leuchtet.
2. Drücken Sie die Taste Start/Pause“L”, der Geschirrspüler startet und die zwei
oben genannten Anzeigen blinken.
Löschen der Tab-Funktion
Siehe Kapitel Unterbrechung oder Änderung eines Spülprogramms.
Wenn Sie wieder einen normalen Reiniger verwenden wollen, müssen Sie:
1. Salz und Klarspüler in die entsprechenden Behälter einfüllen.
2. Bei der Wasserhärte die größtmögliche Einstellung vornehmen und drei normale
Spülgänge ohne Geschirr durchlaufen lassen.
3. Die der Wasserhärte in Ihrer Gemeinde entsprechende Einstellung vornehmen
und den Geschirrspüler wieder normal starten.
55o/65o70o55o50o45o40
o
cold
D G L
23
Page 59

DE
Warnung:
Tabs gehören nicht in den Besteckkorb. Die Tabs müssen
in den Behälter für den Reiniger gelegt werden.
Achtung:
3 in 1 Tabs können im Schnellprogramm oder Einweichen
nicht verwendet werden.
Option: Nur oberer Korb
Wenn nicht genügend Geschirr für eine komplette Ladung da ist, können Sie mit
dieser Option nur den oberen Korb benutzen und somit Wasser und Energie
sparen.
Auswählen der Option: Nur oberer Korb:
1. Schließen Sie die Tür. Wählen Sie das gewünschte Programm und drücken Sie
anschließend die Taste “D” bis die zusätzliche Option Nur oberer Korb
leuchtet.
2. Drücken Sie die Taste Start/Pause “L”, der Geschirrspüler startet und die zwei
oben genannten Anzeigen blinken.
Löschen der Option: Nur oberer Korb
Siehe Kapitel Unterbrechung oder Änderung eines Spülprogramms.
Option: Nur unterer Korb
Wenn nicht genügend Geschirr für eine komplette Ladung da ist, können Sie mit
dieser Option nur den unteren Korb benutzen und somit Wasser und Energie
sparen.
Auswählen der Option: Nur unterer Korb:
1. Schließen Sie die Tür. Wählen die das gewünschte Programm und drücken Sie
anschließend die Taste “D” bis die zusätzliche Option Nur unterer Korb
leuchtet.
2. Drücken Sie die Taste Start/Pause “L”, der Geschirrspüler startet und die zwei
oben genannten Anzeigen blinken.
Löschen der Option: Nur unterer Korb
Siehe Kapitel Unterbrechung oder Änderung eines Spülprogramms.
Achtung:
Denken Sie daran auch die Menge des Reinigers der
Beladung anzupassen.
24
Page 60
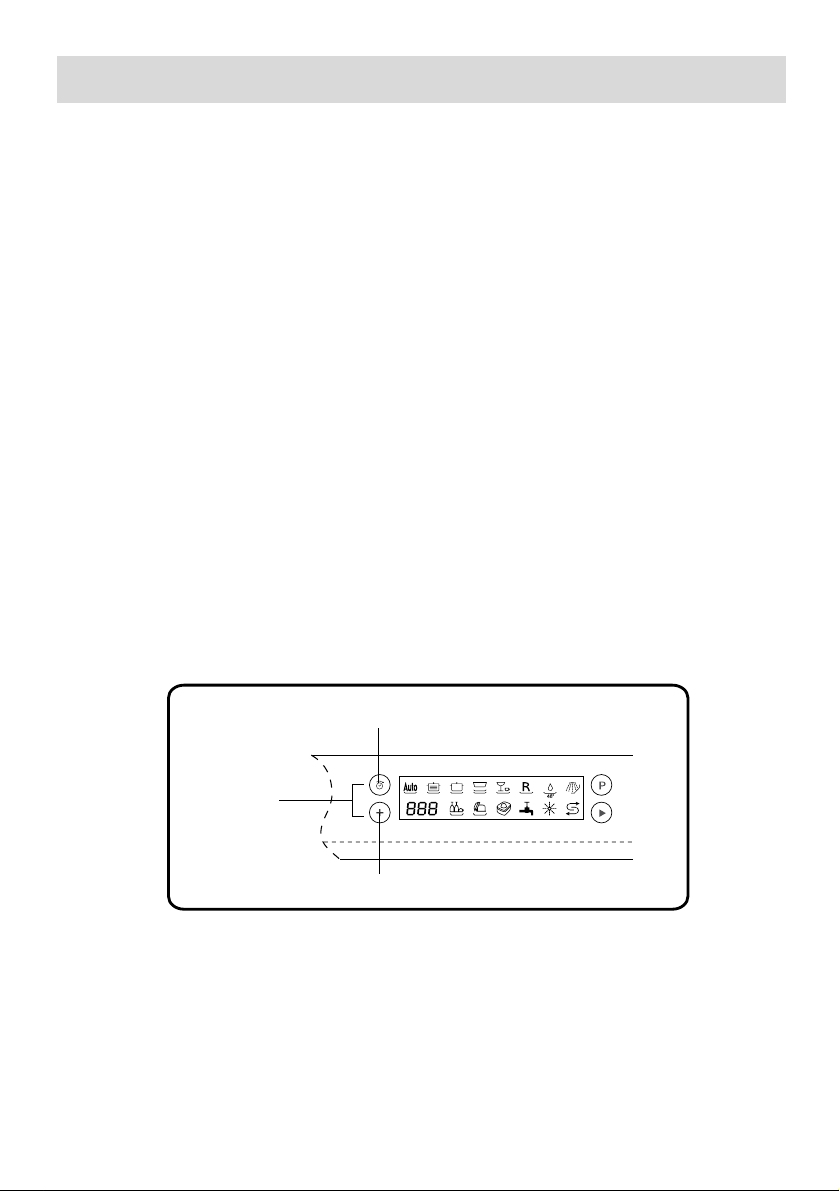
DE
Zeitvorwahl
Sie können den Programmstart in Stundenschritten bis zu “24” Stunden verzögern
1. Schließen Sie die Tür. Schalten Sie den Geschirrspüler ein.
2. Drücken Sie die Taste Programmwahl um das gewünschte Programm zu wählen.
3. Drücken Sie die Taste Zeitvorwahl; die Anzeige Restlaufzeit zeigt “1”.
4. Drücken Sie die Taste Zeitvorwahl so oft, bis die gewünschte Zeit auf der Anzeige
erscheint.
5. Zum Löschen der eingestellten Zeit, drücken Sie die Taste Zeitvorwahl so oft,
bis die Anzeige Restlaufzeit erlischt.
6. Drücken Sie die Taste Start/Pause; die Anzeige Restlaufzeit blinkt und die Zeit
läuft. Das Programm startet zum eingestellten Zeitpunkt.
Löschen der Zeitvorwahl:
Siehe Kapitel Unterbrechung oder Änderung eines Spülprogramms.
RESET Funktion
Ein bereits begonnenes Programm kann durch das gleichzeitige
Betätigen der "RESET" - Tasten “C” and “D”gestoppt werden. Die
beiden Tasten müssen mindestens für 3 Sekunden gleichzeitig betätigt
werden; nach dem Abpumpen des Wassers, beendet das Gerät das
Programm automatisch.
25
Reset
C
55o/65o70o55o50o45o40ocold
D
Page 61

Wartung und Pflege
Regelmäßige Kontrolle und Wartung Ihrer Maschine hilft Fehler zu vermeiden, bevor
sie auftreten. Dies spart Zeit und Ärger. Deshalb sollten Sie von Zeit zu Zeit einen
aufmerksamen Blick in Ihren Geschirrspüler werfen.
DE
Gesamtzustand der Maschine
• Spülraum auf Ablagerungen von Fett und Kalk überprüfen. Finden sich solche
Ablagerungen, dann:
• Maschine mit Spezialreiniger gründlich durchspülen
Spezialsalz
Kontrollieren Sie die Anzeige Salz nachfüllen “J”
regelmäßig und füllen Sie bei Bedarf Salz ein.
Klarspüler
Kontrollieren Sie die Anzeige Klarspüler nachfüllen
“I” regelmäßig und füllen Sie bei Bedarf Klarspüler
ein.
I J
Filter
Die Filter "8" und "9"halten grobe Verunreinigungen
im Spülwasser von der Pumpe fern. Diese
Verunreinigungen können die Siebe gelegentlich
verstopfen
Nach jedem Spülgang die Filter auf Rückstände kontrollieren und gegebenenfalls
reinigen.
Nehmen Sie zuerst den Mikrofilter -8 heraus
und dann den Filter -9 .
Reste entfernen und Siebe unter fließendem
Wasser reinigen .
Anschließend den Filter "9"und dann den
Mikrofilter wieder einsetzen .
Achtung:
Vor jeder Reinigung den Stecker
aus der Steckdose ziehen.
8
9
26
Page 62

Sprüharme
Kalk und Verunreinigungen aus dem Spülwasser
können Düsen und Lagerungen der Sprüharme
“10” und “11” verstopfen.
• Austrittsdüsen der Sprüharme auf Verstopfungen
durch Speisereste kontrollieren.
• Wenn nötig den unteren Spüharm “11”
abschrauben und nach oben abziehen.
• Oberen Sprüharm “10” abschrauben.
• Beide Sprüharme unter fließendem Wasser
reinigen.
• Sprüharme wieder einsetzen bzw. festschrauben.
Stellen Sie sicher, dass der Stecker aus der
Steckdose gezogen ist, bevor Sie
Reinigungsarbeiten am Geschirrspüler vornehmen.
DE
10
11
27
Page 63

Fehlersuche
DE
Kleine Fehler selbst beheben
Erfahrungsgemäß lassen sich die meisten Fehler, die im täglichen Betrieb auftreten,
von Ihnen selbst beheben, ohne dass Sie den Kundendienst rufen müssen. Dies
erspart natürlich Kosten und stellt sicher, dass der Geschirrspüler schnell wieder
zur Verfügung steht. Die nachfolgende Übersicht soll Ihnen dabei helfen, die Ursachen
von auftretenden Fehlern zu finden.
Störungen.beim Einschalten
Das Gerät startet nicht
• Sicherung im Haus ist nicht in Ordnung.
• Gerätestecker nicht eingesteckt.
• Gerätetür nicht richtig geschlossen.
• Programmtaste nicht gedrückt.
• Wasserhahn nicht geöffnet.
• Sieb am Wasserzulaufschlauch verstopft.
-Das Sieb befindet sich am Anschluss des Aquastops bzw. des Zulaufschlauches
Achtung:
Denken Sie daran: Reparaturen dürfen nur von einem
Fachmann durchgeführt werden. Durch unsachgemäße
Reparaturen können erhebliche Schäden und Gefahren für
den Benutzer entstehen.
Störungen am Gerät
Störungsanzeige Programmrestlaufzeit:
Wenn 10 akustische Signaltöne alle 30 Sekunden
ertönen, die Anzeige Restlaufzeit zeigt “E1” und
die Programmanzeige leuchtet.
Prüfen Sie ob:
• die Tür richtig geschlossen ist.
Wenn 10 akustische Signaltöne alle 30 Sekunden
ertönen, die Anzeige Restlaufzeit zeigt “E3” und
die Programmanzeige leuchtet.
Prüfen Sie ob:
• der Ablaufschlauch zu tief ist.
E
55o/65o70o55o50o45o40
F
E
55o/65o70o55o50o45o40
F
o
cold
o
cold
28
Page 64

DE
Wenn 10 akustische Signaltöne alle 30 Sekunden
E
ertönen, die Anzeige Restlaufzeit zeigt “E4” und die
Programmanzeige leuchtet.
Prüfen Sie ob:
55o/65o70o55o50o45o40
o
cold
• der Wasserablaufschlauch eingeklemmt oder
verbogen ist.
• der Ablaufschlauch zu hoch ist.
Wenn 10 akustische Signaltöne alle 30 Sekunden ertönen, die Anzeige Restlaufzeit
zeigt “E5” und die Programmanzeige leuchtet. Prüfen Sie ob:
die Wasserversorgung aufgedreht und der
Schlauch richtig angeschlossen ist.
die Wasserversorgung des Hauses in Ordnung
ist und genügend Druck hat.
der Wasserversorgungsschlauch eingeklemmt
oder verbogen ist.
der Filter für den Wasserversorgungsschlauch
blockiert ist.
der Ablaufschlauch zu tief ist.
Wenn 10 akustische Signaltöne alle 30 Sekunden ertönen, die Anzeige
Restlaufzeit zeigt “E2”,"E6","E7","E8","E9","EA" oder "Eb", kontaktieren
Sie den Kundendienst.
Falls nach Durchführung all dieser Überprüfungen der Geschirrspüler
weiterhin eine Störung anzeigt: schalten Sie das Gerät aus, warten
einige Minuten und schalten wieder ein. Sollten Sie den Fehler nicht
beheben können, dann rufen Sie den Kundendienst an und halten
folgende Angaben bereit:
F
E
55o/65o70o55o50o45o40
F
o
cold
Art der Störung
Modellnummer ( Mod. ...) und Seriennummer (S/N . ...), ersichtlich auf dem seitlich
an der Innentür angebrachten Typenschild.
Unterer Sprüharm dreht sich schwer.
Sprüharm durch Kleinteile oder Speisereste blockiert
Reinigerdeckel lässt sich nicht schließen.
Dossierbehälter überfüllt
Mechanismus durch verklebte Reinigerreste blockiert
Reinigerreste kleben nach dem Spülen im Dosierbehälter
Dosierbehälter war beim Einfüllen feucht, Reiniger nur in trockenen Behälter
einfüllen
29
Page 65

NachProgrammende bleibt Wasser im Gerät stehen
• Der Abwasserschlauch ist verstopft oder geknickt.
• Die Abwasserpumpe ist blockiet.
• Filter sind verstopft.
• Das Programm ist noch nicht beendet. Programmende abwarten.
…beim Spülen
Ungewöhnliche Schaumbildung
• Normales Handspülmittel im Behälter für Klarspüler.
• verschütteter Klarspüler kann beim nächsten Spülgang zu übermäßiger
Schaumbildung führen, deshalb danebengelaufenes Klarspülmittel mit einem
Lappen entfernen.
Gerät bleibt während des Spülens stehen
• Stromzufuhr unterbrochen.
• Wasserzulauf unterbrochen.
Schlagendes Geräusch beim Spülen
• Sprüharm schlägt an Geschirrteile.
Klapperndes Geräusch beim Spülen
• Geschirr nicht richtig eingeordnet.
DE
Schlagendes Geräusch der Füllventile
• Wird durch die Verlegung der Wasserleitung verursacht und bleibt ohne
Auswirkung auf die Maschinenfunktion.
...am Geschirr
Es bleiben Speisereste am Geschirr kleben
• Das Geschirr war falsch eingeordnet. Das Wasser konnte die Oberfläche nicht
treffen.
• Der Geschirrkorb war überfüllt.
• Die Geschirrteile waren übereinander.
• Zu wenig Reiniger eingefüllt.
• Zu schwaches Spülprogramm gewählt.
• Sprüharm konnte sich nicht drehen, weil ein Geschirrteil im Wege stand.
• Die Sprüharmdüsen sind durch Speisereste verstopft.
• Siebe sind verstopft.
• Siebe sind falsch eingesetzt.
• Abwasserpumpe ist blockiert
30
Page 66

DE
Auf Kunststoff- und Plastikteilen entstehen Verfärbungen
• Zu wenig Reiniger eingefüllt.
• Der Reiniger hat eine zu geringe Bleichwirkung. Reiniger mit Sauerstoffbleiche
verwenden.
Weiße Flecken am Geschirr, die Gläser bleiben milchig
• Zu wenig Reiniger eingefüllt.
• Klarspülermenge zu gering eingestellt.
• Trotz hoher Wasserhärte kein Spezialsalz eingefüllt.
• Enthärtungsanlage zu niedrig eingestellt.
• Der Deckel des Salzbehälters ist nicht fest zugedreht.
• Anstelle eines phosphatfreien Reinigers, einen phosphathaltigen Reiniger
ausprobieren und Ergebnisse vergleichen.
Geschirr ist nicht trocken
• Programm ohne Trocknen gewählt.
• Klarspülermenge zu niedrig eingestellt.
• Geschirr zu früh ausgeräumt
Gläser bekommen stumpfes Aussehen
• Klarspülermenge zu niedrig eingestellt
Tee oder Lippenstiftreste sind nicht vollständig entfernt
• Der Reiniger hat eine zu geringe Bleichwirkung.
• Zu geringe Spültemperatur gewählt
Rostspuren am Besteck
• Besteck nicht ausreichend rostbeständig.
• Salzgehalt im Spülwasser zu hoch.
- Deckel des Salzbehälters nicht fest zugedreht.
- Beim Salznachfüllen zu viel Salz verschüttet
Gläser werden stumpf und verfärben sich, die Beläge können nicht
entfernt werden
• Ungeeigneten Reiniger eingefüllt.
• Gläser nicht spülmaschinenfest
Auf Gläsern und Besteck verbleiben Schlieren, Gläser bekommen ein
metallisches Aussehen
• Menge des Klarspülers zu hoch eingestellt
31
Page 67

Technische Daten
DE
Breite
Tiefe
Höhe
Fassungsvermögen
Wasserdruck
Betriebsspannung
Maximale Stromstärke
Leistung
60 cm
60 cm
85 cm
12 Maßgedecke
siehe Typenschild
siehe Typenschild
13A
siehe Typenschild
32
Page 68

Wichtige Infomation
DE
Hinweis zur Entsorgung
Altgeräte sind kein wertloser Abfall. Durch umweltgerechte Entsorgung können
wertvolle Rohstoffe wiedergewonnen werden.
Bei ausgedienten Geräten Netzstecker ziehen. Netzkabel durchtrennen und mit
dem Stecker entfernen. Türschloss zerstören. Sie verhindern damit, dass sich
spielende Kinder einsperren und in Lebensgefahr kommen.
Ihr neues Gerät wurde auf dem Weg zu ihnen durch eine Verpackung geschützt.
Alle eingesetzten Materialien sind umweltverträglich und wieder verwertbar. Bitte
helfen Sie mit und entsorgen Sie die Verpackung umweltgerecht.
Verpackung und ihre Teile nicht spielenden Kindern überlassen. Es besteht
Erstickungsgefahr durch Faltkartons und Folien.
Über aktuelle und umweltgerechte Entsorgungswege informieren Sie sich bitte bei
Ihrem Fachhändler oder bei Ihrer Gemeindeverwaltung.
Entsorgung
Das Symbol auf dem Produkt oder auf seiner Verpackung zeigt
an, dass dieses Produkt nicht als Haushaltsabfall betrachtet werden
darf. Stattdessen muss es zum nächstgelegenen Entsorgungs- oder
Wiederverwertungszentrum für elektrische und elektronische Bauteile
gebracht werden. Indem man sicherstellt, dass dieses Produkt richtig
entsorgt wird, können negative Konsequenzen für das Klima und die
menschliche Gesundheit verhindert werden, die durch die nicht
angebrachte Entsorgungsbehandlung dieses Produktes verursacht
werden könnten. Für ausführlichere Informationen über die Entsorgung
und Wiederverwertung dieses Produktes, setzen Sie sich mit der
lokalen Gemeindeverwaltung, dem in Ihrem Wohnbereich zuständigen
Entsorgungs-und Wiedervewertungsunternehmen oder dem
Fachhändler von dem das Produkt gekauft wurde, in Verbindung.
33
Page 69

Allgemeines
Unterbaufähige bzw. integrierbare Geräte, die nachträglich als Standgeräte
aufgestellt werden, müssen gegen Umkippen gesichert werden, z.B. durch
Verschraubungen an der Wand oder durch Einbau unter einer durchgehenden
Arbeitsplatte, die mit den Nachbarschränken verschraubt ist.
Hinweise für Vergleichsprüfungen nach EN 50242
DE
Einordnung nach Normvorgabe
Einordungsbeispiel: siehe Abb. 1,2 und 3
Fassungsvermögen: 12 Maßgedecke
Vergleichsprogramm: ECO-Programm
Klarspülereinstellung: 5
Reiniger: Vorspülen - 5g
Hauptspülgang -25g
1 2
3
4 5
1 4 4 4 4 1
4 4 4 4
4 4 4 41
2 2 2
1 1
2 2 2
5
1 1
2 2 2
2 2 2
3 3 3 3
1 1
3 3 3 3
1 3 3 3 3 1
Abb.1
1
Abb.2 Abb.3
Wenn die Spülleistung getestet wird, muss das obere Rad des oberen Korbes in
der Schiene liegen.
Im Falle von Abweichungen von den Vergleichsprüfungen nach EN 50242, z.B.
Anschmutzungen, Geschirr-und Besteckart usw., ist vor Testbeginn mit dem
Gerätehersteller Kontakt aufzunehmen.
34
Page 70

Index
FR
Consignes de sécurité
Vaisselle inadéquate
Comment maintenir votre lave-vaisselle en bon état de fonctionnement
Installation
Comment enlever le plan de fermeture du lave-vaisselle
Faire connaissance avec votre lave-vaisselle
Comment remplir le réservoir de sel
Comment remplir le distributeur de liquide de rinçage?
Comment remplir le distributeur de détergent
Comment remplir votre lave-vaisselle
Tableau des programmes
Consommation
Laver la vaisselle
Nettoyage et entretien
Détection des pannes
Caractéristiques techniques
Remarques
2
4
5
6
9
11
13
15
16
17
19
20
21
26
28
32
33
1
Page 71

Consignes de sécurité
FR
A la livaison
• Vérifiez immédiatement l'emballage et le lave-vaisselle pour voir s'ils présentent
des dégâts dus au transport. Ne mettez jamais un appareil endommagé en service,
prévenez votre fournisseur ou votre service après-vente.
• Veuillez vous débarrasser des matériaux d'emballage conformément à la
réglementation applicable.
Lors de l'installation
• Vérifiez que le circuit de mise à la terre du secteur de la maison a été posé
conformément à la réglementation.
• Installez et branchez l'appareil conformément à la notice d'installation et de montage.
• Pendant toute la durée de l'installation, le lave-vaisselle doit être maintenu débranché
du secteur.
• Les données de branchement électriques indiquées sur la plaque signalétique
du lave-vaisselle et celles du secteur doivent concorder.
• N'intercalez jamais de rallonge entre la fiche mâle du lave-vaisselle et la prise
femelle du secteur.
• Une fois l'appareil installé, sa fiche mâle doit demeurer accessible.
• Au cours de l'installation, assurez-vous que le cordon d'alimentation n'est pas plié
ou écrasé de façon excessive, ce qui pourrait être dangereux.
• Cet appareil ne peut pas être installé à l’exterieur; pas même si le domaine est
couvert par un toit; il est également très dangereux de le laisser exposé à la pluie
et aux éléments.
Utilisation quotidienne
• Le lave-vaisselle doit être utilisé exclusivement par des adultes, pour laver de la
vaisselle et des ustensiles de cuisson.
• Ne vous asseyez et ne montez jamais sur la porte ouverte. L'appareil pourrait
basculer.
• L'eau contenue dans le compartiment de lavage n'est pas potable.
• Ne rajoutez jamais de solvants dans le compartiment de lavage. Risque d'explosion.
• Pendant le déroulement du programme, ouvrez prudemment la porte. De l'eau
risque en effet d’ètre projetée hors de l'appareil.
• Ne touchez en aucun cas la résistance pendant ou après un cycle de lavage.
• Règles fondamentales à suivre en utilisant l'appareil:
- Ne touchez jamais le lave-vaisselle à pieds-nus ou avec les mains ou les pieds
humides;
- N’utilisez pas des rallonges et des multiprises;
- Si l'appareil ne fonctionne pas correctement ou si l'entretien doit être effectué,
débranchez l'appareil.
2
Page 72

FR
Prudence avec les enfants
• Cet appareil n'est pas conçu pour être utilisé par des enfants ou des personnes
handicapées sans qu'une surveillance soit assurée.
• Il est recommandé de tenir les jeunes enfants sous contrôle afin d'éviter qu'ils
ne jouent avec le lave-vaisselle.
• Conservez les détergents hors de portée des enfants. Tenez les enfants à l'écart
du lave-vaisselle lorsque celui-ci est ouvert.
Si le lave-vaisselle est tombé en panne
• Si le lave vaisselle ne fonctionne pas, fermez le robinet d'arrivée d'eau et débranchez
l'appareil. Puis, consultez le chapitre intitulé “Détection des pannes”. Si vous ne
pouvez résoudre le problème par vous-même, adressez-vous à un Service Après vente.
• Les réparations doivent être réalisées exclusivement par du personnel spécialisé.Si
le cordon d'alimentation est endommagé, il doit être remplacé par un câble spécial
ou de montage disponible auprès du fabricant ou Service Après-vente.
• Afin de garantir l'EFFICACITÉ et la SÉCURITÉ de l'appareil, nous vous conseillons:
- De toujours vous adresser à un Service Après-vente agrée par le fabricant.
- De toujours utiliser des pièces d'origine.
Mise au rebut de l’appareil
• Pour la mise au rebut, rendez les appareils inutilisables en sectionnant le câble
d'alimentation et en démontant le verrou de la porte.
• Débarrassez-vous de l'appareil en respectant la réglementation.
Avertissement:
Des enfants pourraient s'enfermer dans l'appareil (risque
d'asphyxie) ou se mettre dans d'autres situations
dangereuses.
Pour cela: retirez la prise de secteur, coupez le câble
de secteur et mettez-le de côté. Détruisez la fermeture
de la porte en sorte que la porte ne ferme plus.
3
Page 73

Vaisselle inadéquate
FR
Nous déconseillons de laver au lave-vaisselle
Les pièces de couvert et de vaisselle en bois car elles se délavent et leur aspect
se dénature avec le temps; les colles à bois qu'elles contiennent ne sont pas non
plus adaptées aux températures régnantes dans le lave-vaisselle. N'y lavez pas
non plus les verres et vases à décors délicats, en particulier les pièces de vaisselle
anciennes impossibles à renouveler. Ces décors anciens n'ont pas été prévus pour
le lave-vaisselle.
Autres pièces inadaptées: pièces en plastiques sensibles à l'eau très chaude,
vaisselle en cuivre et en étain. Les décors en verre, les pièces en aluminium et en
argent peuvent se décolorer et pâlir au lavage en lave-vaisselle. Certaines variétés
de verre peuvent s'opacifier après quelques passages dans l'appareil. Par ailleurs,
les matériaux très absorbants comme les éponges et serviettes ne sont pas lavables
au lave-vaisselle.
Recommandation:
N’achetez désormais que de la vaisselle dont le fabricant confirme son adéquation
au lave-vaisselle.
Remarque:
Ne lavez jamais au lave-vaisselle les pièces de vaisselles
salies par des cendres, de la cire, de la graisse minérale
ou de la peinture.
Verres et vaisselle endommagés
Causes:
• La nature et le processus de fabrication du verre.
• La composition chimique du détergent.
• La température de l'eau et la durée du programme sur le lave-vaisselle.
Recommandation
• Utilisez des verres et de la porcelaine déclarés inaltérables au lave-vaisselle par
son fabricant.
• Utilisez un détergent dont l'emballage mentionne qu'il ménage la vaisselle. Consultez
les fabricants de détergent.
• Sélectionnez un programme de courte durée et ayant la plus basse température
possible.
• Pour empêcher qu'ils s'endommagent, sortez les verres et les couverts du lave vaisselle le plus rapidement possible une fois le programme terminé.
4
Page 74

Comment maintenir votre lave-vaisselle en
FR
bon état de fonctionnement
Après chaque lavage
Après chaque lavage, fermez le robinet d'arrivée d'eau et laissez la porte légèrement
entrouverte, de façon à libérer les moisissures et les odeurs susceptibles de se
former à l'intérieur de l'appareil.
Débrancher l'appareil
Débranchez toujours l'appareil avant de procéder aux opérations de nettoyage ou
d'entretien. Ne prenez aucun risque.
Éviter les solvants et les produits d'entretien abrasifs
Pour le nettoyage de l'extérieur et des parties en caoutchouc de l'appareil, n'utilisez
en aucun cas de solvants ou de produits d'entretien abrasifs. Utilisez un chiffon
imbibé d'une solution d'eau chaude et de savon.
Pour enlever les taches ou salissures présentes sur la surface intérieure de votre
appareil, utilisez un chiffon que vous tremperez dans une solution d'eau et de
vinaigre blanc, ou un produit d'entretien spécifique pour lave-vaisselle.
Comment déplacer votre appareil
Si vous devez déplacer votre appareil, veillez à le laisser dans la position verticale.
Si cela est absolument nécessaire, il peut éventuellement être posé sur le dos.
Joints
La présence de résidus d'aliments dans les interstices des joints du lave-vaisselle
constitue l'un des facteurs influençant la formation d'odeurs à l'intérieur de celuici.
Nettoyez régulièrement les joints avec une éponge pour éviter cet inconvenient.
La porte ne doit rester ouverte en grand angle, cela représente un danger de se
faire coinçer les mains ou les doigts.
Absence prolongée
En cas d'absence prolongée, il est conseillé de lancer un cycle de lavage à vide,
de débrancher l'appareil, de fermer le robinet d'arrivée d'eau et de laisser la porte
de l'appareil légèrement entrouverte. Cette précaution permet d'allonger la durabilité
des joints et empêche la formation de mauvaises odeurs à l'intérieur du lavevaisselle.
5
Page 75

Installation
FR
Comment installer l'appareil
Installez l'appareil à l'endroit souhaité. Le dos de l'appareil doit reposer contre le
mur et les parois latérales doivent être parallèles aux parois du meuble adjacent
ou du mur. Le lave-vaisselle est équipé de tuyaux d'alimentation et de vidange de
l'eau. Ces tuyaux peuvent être installés à droite ou à gauche, pour faciliter l'installation
correcte de l'appareil.
Comment mettre l'appareil au niveau
Dès que l'appareil est mis en place, réglez les pieds du lave-vaisselle en les vissant
ou en les dévissant jusqu'à ce que l'appareil soit au niveau. Dans tous les cas,
l'appareil doit présenter une inclinaison inférieure à 2°. Une mise à niveau correcte
de l'appareil est un gage de garantie pour des résultats satisfaisants.
Raccordement à l'arrivée d'eau froide
Raccordez le tuyau d'arrivée d'eau froide
à un connecteur • (gaz) fileté et assurezvous qu'il est solidement fixé (voir fig.A).
Si les conduits d'eau sont neufs ou n’ont
pas été utilisés pendant une longue
période, faites couler l'eau pour vous
assurer qu'elle est propre et dépourvue
d'impuretés. En ne prenant pas cette
précaution, vous courez le risque de
boucher le conduit d'arrivée d'eau et
d'endommager l'appareil.
fig.A
Avertissement
L’appareil doit être rattaché à une arrivée d’eau par un
ensemble de tuyaux neufs, l’utilisation de tuyaux déjà
utilisés est fortement déconseillée.
6
Page 76

Quelques modèles sont équipés avec
un tuyau Aquastop (voir fig. B). Un
petit filtre d’eau est déjà inclu dans la
partie fileté du raccord.
FR
Tension dangereuse
fig.B
Protection contre les risques d'inondation
Votre lave-vaisselle est équipé d'un dispositif qui coupe l'arrivée d'eau lorsqu'un
problème survient au niveau du tuyau d'alimentation ou en cas de fuite à l'intérieur
de l'appareil, afin d'éviter que ces incidents ne provoquent des dégâts à votre
habitation. Si, pour une raison quelconque, le boîtier renfermant les composants
électriques est endommagé, débranchez immédiatement l'appareil. Afin de garantir
le fonctionnement correct du dispositif de protection contre les inondations, il est
nécessaire que le boîtier “A” traversé par le tuyau d'alimentation soit fixé au robinet
d'arrivée d'eau comme illustré dans la fig. B. Seul ce type de raccordement est
valable. Ne sectionnez en aucun cas le tuyau d'alimentation car il contient des
composants électriques sous tension. Si la longueur du tuyau est insuffisante pour
garantir un raccordement correct, remplacez-le par un tuyau de longueur appropriée.
Vous pouvez vous procurer ce tuyau auprès de revendeurs spécialisés ou d'un
Service Après-vente agréé.
7
Page 77

FR
Raccordement du tuyau de vidange
Introduisez le tuyau de vidange dans une conduite de vidange d'un diamètre de
4cm minimum, ou déposez-le directement dans l'évier en veillant à ce qu'il ne soit
ni plié ni écrasé. Utilisez le support en plastique prévu à cet effet, fourni avec
l'appareil (voir fig. C). L'extrémité libre du tuyau doit se trouver à une hauteur
comprise entre 40 et 100cm et ne doit pas être immergé dans l'eau.
max 100 cm
2m max
min 40 cm
fig.C
Avertissement:
Le support en plastique doit être solidement fixé au mur
pour éviter que le tuyau ne se déplace et que de l'eau
ne se répande au sol.
Branchement électrique
Après vous être assuré que la tension d'alimentation et la fréquence de votre
habitation correspondent à celles figurant sur la plaque signalétique (située sur la
paroi intérieure en acier inoxydable de la porte de votre appareil), et que l' installation
électrique est prévue pour supporter la tension maximale indiquée sur la plaque
signalétique, introduisez la fiche dans une prise du secteur correctement reliée à
la masse (la mise à la terre de l'appareil est obligatoire aux termes de la loi).
Avertissement:
La prise du lave-vaisselle doit être accessible même
quand l'appareil est encastré pour que la maintenance
puisse être faite en toute sécurité.
8
Page 78

Comment enlever le plan de fermeture du lave-vaisselle
Ce lave-vaisselle peut être installé dans une cuisine
intégrée selon la procédure ci-dessous.
FR
9
Page 79

0120200050
Lave-vaisselle encastrable: fixation sur la partie haute
FR
Lave-vaisselle integrable: fixation sur la partie laterale
10
Page 80

Faire connaissance avec votre lave-vaisselle
A C E K
FR
B D F G H I J L
Indicateur marche/arrêt
A
Interrupteur marche/arrêt
B
Interrupteur départ différé
C
Interrupteur options additionnelles
D
Symboles des programmes
E
Indicateur du temps restant
F
Aperçu des fonctions
Appuyez sur ce bouton pour différer le départ du programme.
Appuyez sur ce bouton pour sélectionner une des options additionnelles.
Fonction de lavage du panier supérieur.
55o/65o70o55o50o45o40
Symboles des options additionnelles
G
Indicateur d’erreur de l’entrée d’eau
H
Indicateur aide de rinçage insuffisante
I
Indicateur de sel insuffisant
J
Interrupteur programmes
K
Interrupteur marche/pause
L
o
cold
11
Fonction de lavage du panier inférieur
Option d’utilisation de tablettes multifonctionnelles
Appuyez sur ce bouton pour sélectionner le programme désiré.
Appuyez sur ce bouton pour démarrer ou interrompre le programme.
Appuyez sur ces deux touches pour annuler le programme.
Page 81

Descriptif de l’intérieur de votre lave-vaisselle
FR
a
b
c
étagère supérieure
a
bras d’aspersion supérieur
b
panier inférieur
c
panier à couverts
d
bras d’aspersion inférieur
e
d
e
f
tuyau d’entrée d’eau
g
tuyau d’écoulement d’eau
h
cordon d’alimentation électrique
i
filtre de lavage
j
récipients pour le détergent et l’aide de rinçage
k
g
h
i
j
k
réservoir pour le sel
f
12
Page 82

Comment remplir le réservoir de sel
FR
Le sel
Le degré de dureté de l'eau varie d'un endroit
à l'autre. Si l'eau qui alimente votre lave-vaisselle
est dure, des dépôts se formeront sur la vaisselle
et sur les ustensiles de caisson.
Cet appareil est équipé d'un système
d'adoucissement spécial qui utilise un sel
spécialement conçu pour éliminer le calcaire et
les minéraux présents dans l'eau.
Comment remplir le sel?
Utilisez exclusivement du sel spécial pour lave-vaisselle.
Le réservoir de sel est situé en dessous du panier inférieur et doit être rempli de
la manière suivante:
Si l’indicateur “J” clignote il faut remplir le
réservoir de sel.
Enlevez le panier inférieur, puis dévissez le
bouchon du distributeur de sel et enlevez-le.
Si vous remplissez le réservoir de sel pour la
première fois, remplissez-le d'eau.
Placez l'extrémité de l'entonnoir (fourni) dans
l'orifice et versez 2kg de sel environ. Il est
normal qu'une petite quantité d'eau s'échappe
du distributeur de sel.
Revissez soigneusement le bouchon.
J
13
Important:
Afin d'éviter la formation de rouille, remplissez le
distributeur de sel juste avant de lancer un cycle de
lavage.
Page 83
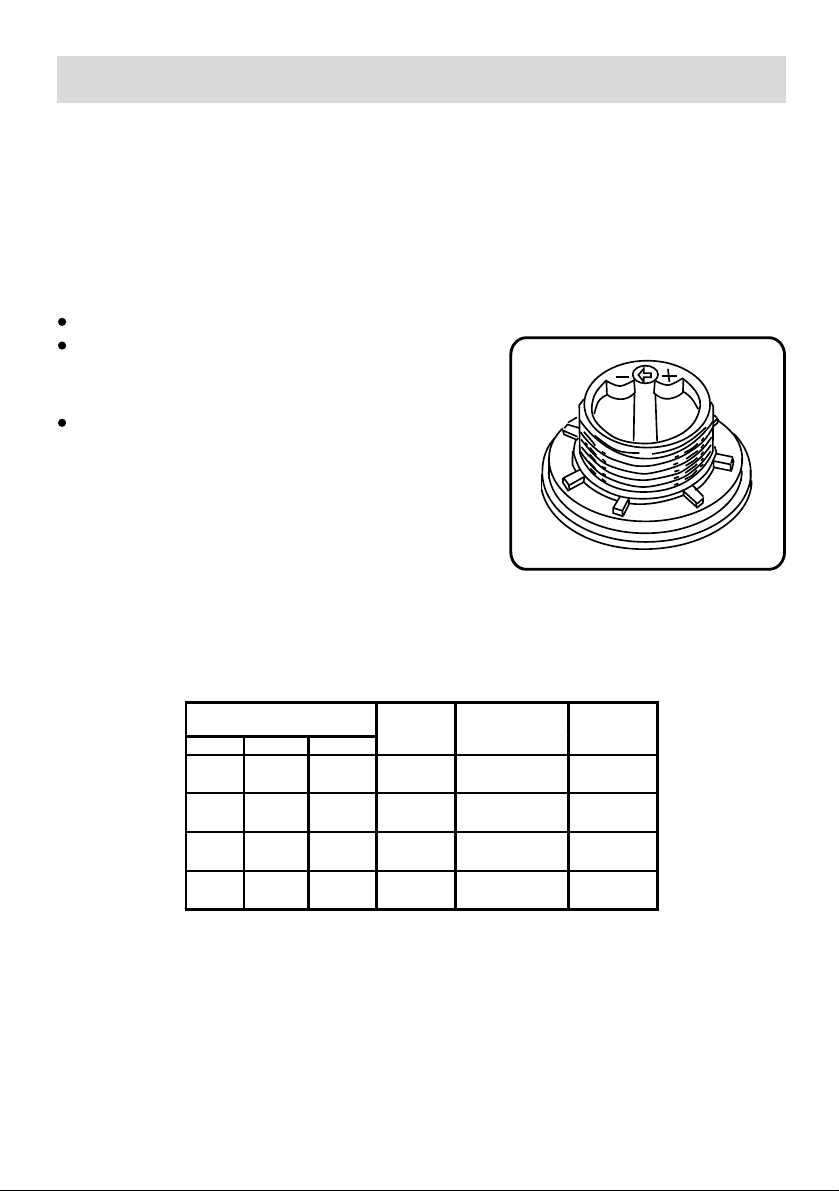
FR
Réglage de la quantité de sel
Le lave-vaisselle est conçu de manière à ce que vous puissiez régler la quantité
de sel nécessaire, en fonction du degré de dureté de l'eau de votre habitation. Ceci,
afin de permettre d'optimiser et d'adapter la quantité de sel utilisée lors de chaque
lavage en limitant celle-ci au minimum. Adressez-vous à votre société locale de
distribution de l'eau pour connaître la classe de dureté de votre zone.
Pour régler la quantité de sel nécessaire, procédez de la façon suivante:
Dévissez le bouchon du réservoir de sel.
Le réservoir de sel est doté d'une rondelle sur
laquelle figure une flèche (voir la figure cicontre).
Au besoin, tournez la rondelle dans le sens
inverse des aiguilles d'une montre, de la position
"-" vers la position "+", en fonction du degré de
dureté de l'eau.
Il est recommandé de faire le réglage en fonction du tableau ci-dessous:
Dureté de l’eau
ºdH ºfH °mmol/l
0 -10
10-25
25-50
>50
0-17
18-44
45-89
>89
0-1,7
1,8-4,4
4,5-8,9
>8,9
Position
sélecteur
Consommation
sel
(grammes/cycle)
/ 0 /
- 20 60
MED
+ 60 25
40 40
Autonomie
(cycles/2Kg)
-L'adoucisseur est réglé en usine sur -.
En cas d'utilisation de pastilles multifonction remplissez tout de même le réservoir
de sel et réglez sur -;si la dureté de I'eau dépasse 60 °fH, réglez sur +.
14
Page 84

Comment remplir le distributeur de liquide de rinçage?
Liquide de rinçage
Ce produit permet de faire briller votre vaisselle et
facilite le séchage sans laisser de traces. Le
distributeur de liquide de rinçage est situé sur la
paroi intérieure de la porte.
Remplissez-le lorsque l’indicateur de niveau de
liquide de rinçage “I” et l’indicateur “1” sur le
distributeur clignotes.
Remarque importante:
Si vous utilisez des tablettes Tout-en-1, le liquide de
rincage n’est plus necessaire.
Remplir le distributeur de liquide de
rinçage
Pour ouvrir le distributeur de liquide de rinçage,
tournez le bouchon "2" dans le sens inverse des
aiguilles d'une montre et remplissez le distributeur
en veillant à ne pas faire déborder le liquide. Vous
pouvez régler la quantité de liquide de rinçage
nécessaire en tournant la vis de réglage "3", située
en dessous du bouchon "2", à l'aide d'un tournevis.
Il existe 6 positions de réglage; la position 3
correspond à la quantité normale.
FR
I
1
2
3
15
Importante:
Une quantité de liquide de rinçage correctement dosée
améliore le séchage. Si vous constatez des gouttes d'eau
ou des taches sur votre vaisselle, il convient de régler le
dosage sur une position supérieure.
Si les assiettes présentent des striures blanches, réglez
le dosage sur une position inférieure.
Page 85

Comment remplir le distributeur de détergent
FR
Détergent
Utilisez exclusivement un détergent spécial pour
lave-vaisselle. Remplissez le distributeur de
détergent avant de lancer un nouveau cycle de
lavage, en respectant les instructions fournies
dans le "Tableau des programmes." Le
distributeur de détergent est situé sur la paroi
intérieure de la porte.
5
4
Remplir le distributeur de détergent
• Pour ouvrir le couvercle "4" du distributeur,
appuyez sur la touche "5".
• Versez le détergent destiné au cycle de lavage
dans le compartiment "6".
• Versez le détergent destiné au prélavage dans
le compartiment "7".
• Dès que vous avez rempli le distributeur de
détergent refermez le couvercle et appuyez
jusqu'à ce que vous entendiez un déclic.
6
Utilisation de tablettes multifonctionnelles "tout-en-1"
• Pour ouvrir le couvercle "4" du distributeur, appuyez sur la touche "5".
• Mettez la tablette dans le compartiment "6".
• Dès que vous avez mis la tablette dans le distributeur de détergent refermez le
couvercle et appuyez jusqu'à ce que vous entendiez un déclic.
7
Attention:
Si vous utilisez des tablettes Tout-en-1, sélectionner
l’option "utilisation de tablettes"
Attention:
Afin de pouvoir refermer aisément le couvercle, nettoyez
les bords de celui-ci en éliminant toute trace de detergent.
16
Page 86

Comment remplir votre lave-vaisselle
Avant de ranger la vaisselle dans votre lave-vaisselle, éliminez tous les résidus
d'aliments pour éviter que le filtre ne se bouche, ce qui compromettrait les résultats
de lavage. Si des aliments carbonisés et par conséquent très difficiles à détacher
sont présents dans le fond de vos cocottes et casseroles, faites-les tremper avant
de les laver au lave-vaisselle. Ceci permettra de ne pas effectuer de cycles de
lavage supplémentaires. Tirez le panier vers vous afin de faciliter le chargement
de la vaisselle.
FR
Comment utiliser le panier inférieur
Nous vous conseillons de ranger les articles nécessitant
un lavage plus puissant sur le panier inférieur: cocottes,
casseroles, couvercles, plats de service et saladiers,
comme représenté dans la figure de droite.
Il est recommandé de ranger les plats de service et
les couvercles sur les côtés du panier afin de ne pas
entraver la rotation du bras d'aspersion supérieur.
E1 E2 E3
fig.D
fig.E
Rangez toujours les cocottes, saladiers, etc. en les retournant (voir la fig.D).
Rangez les cocottes profondes en les inclinant pour permettre à l'eau de s'écouler.
Quelques modèles: les particularités de support
inférieures replient des rangées de dent (voir la fig.E)
sont pour que plus grand ou plus de vaissailles
puissent être chargé.
Le panier à couverts peut être réduit de moitié (voir
la fig.F), ce qui permet de n'utiliser qu'une des deux
sections lorsque la quantité de couverts est peu
importante. Dans ce cas, vous disposez de plus
d'espace pour ranger des cocottes ou des casseroles
supplémentaires. Vous pouvez également placer le
panier à couverts dans le panier supérieur.
Rangez les couverts dans le panier à couverts en
positionnant le manche vers le bas; si le panier
dispose de paniers latéraux, disposez chaque cuillère
dans les fentes prévues à cet effet. Les ustensiles
particulièrement longs doivent être rangés à
l'horizontal, dans la partie avant du panier supérieur.
17
fig.F
Page 87

Comment utiliser le panier
supérieur
Le panier supérieur est conçu pour recevoir de
la vaisselle plus fragile et légère telle que verres,
tasses à café et à thé, saucières, de même que
des assiettes, de petits bols et des casseroles
peu profondes (si elles ne sont pas trop sales.)
• Installez la vaisselle et les ustensiles de cuisson
de façon à ce qu'ils ne puissent être déplacés
par le jet d'eau.
• Le panier supérieur peut être réglé en hauteur
(voir la fig. G).
Ajustez le panier supérieur à un niveau plus haut
et vous aurez plus d'espace pour charger des
casseroles et plats plus grands dans le panier.
L'étagère
Appuyez les verres hauts et les verres à pied
contre le bord de l'étagère, pas contre la vaisselle.
Les verres, les tasses et les grands bols se
rangent sur l'étagère du haut.
Vous pouvez faire basculer l'étagère dans les
deux sens(voir la fig. H).
FR
(Quelques modèles)
fig.G
Etagère à couteaux
Les agrafes de support de couteau sur le côté
du panier supérieur vous permettent de laver les
grands couteaux pointus séparément et vous
évitent de vous blesser (voir la fig.I).
Attention:
Des couteaux et d'autres
ustensils avec les points
pointus doivent être chargés
dans le panier avec leurs points
vers le bas ou être placés dans
une position horizontale.
fig.H
fig.I
18
Page 88

Tableau des programmes
FR
Programme
de lavage
o
55o/65
Lavage
Automatique
o
70
Lavage
Intensif
o
55
Lavage
Normal
o
50
Lavage léger
(EN50242)
o
45
Verres
o
40
Lavage
Rapide
Lavage
écologique
cold
Trempage
froid
Type de
vaisselle
Résistante
(par ex.
porcelaine,
casserole,
couverts,
verres, etc.)
Mixte
(par ex.
porcelaine,
casserole,
couverts,
verres, etc)
Type de
résidus
Quantité
de résidus
alimentair
es
Etat des
résidus
alimentaires
Soupes,
soufflés.
sauces,
pommes de
Grande
Trés
adhérents
terre,pâtes,
riz, oeufs,
plats rôtis
Soupes,
soufflés.
sauces,
pommes de
terre,pâtes,
riz, oeufs,
plats rôtis
Faible
Peu
adhérents
Café,
gâteaux,
lait,
charcuterie,
boissons
froides,
salades
Soupes,
soufflés.
sauces,
pommes de
terre,pâtes,
riz, oeufs,
plats rôtis
Très
faible
Peu
adhérents
Passer la vaisselle sous le
robinet si elle doit séjourner
plusieurs jours dans le lavevaisselle avant le lavage.
Description du cycle
Prélavage à l'eau froide.
Lavage prolongé à 55° ou 65°C.
1 ou 2 rinçages à l'eau froide.
Rinçage à l'eau chaude.
Séchage.
Prélavage à l'eau chaude.
Lavage prolongé à 70°C.
Rinçage à l'eau froide.
Rinçage à l'eau chaude.
Séchage.
Prélavage à l'eau froide.
Lavage prolongé à 55°C.
Rinçage à l'eau froide.
Rinçage à l'eau chaude.
Séchage
Prélavage à l'eau froide.
Lavage prolongé à 50°C.
Rinçage à l'eau froide.
Rinçage à l'eau chaude.
Séchage
Lavage à 45°C.
Rinçage à l'eau froide.
Rinçage à l'eau chaude.
Séchage
Lavage rapide à 40°C.
Rinçage à l'eau chaude.
Séchage
Lavage prolongé à 48°C.
Rinçage à l'eau froide.
Rinçage à l'eau chaude.
Séchage
Lavage rapide à froid pour
éviter que des résidus
d'aliments ne sèchent sur la
vaisselle.
19
Page 89

Consommation
FR
Options additionnelles
3 en 1
Oui Oui
Oui Oui
Oui Oui
Oui Oui
Oui Oui
Départ
différé
Panier
sup.
Panier
inf.
Détergent
Prélavage
5g
5g
5g
5g
5g
5g
5g
5g
5g
5g
5g
5g
5g
5g
Lavage
prolongé
25g
25g
25g
25g
25g
25g
25g
25g
25g
25g
25g
25g
25g
25g
Liquide de
rinçage
Durée en
minutes
75-110
52-82
66-98
112
86
94
102
78
90
167*
118
135
92
72
Non
Oui Oui
Non
selectionné pas selectionné*
Oui
Oui
5g
5g
5g
5g
Essais comparatifs selon EN 50242
avec réglage du liquide de rinçage: 5
25g
15g
15g
15g
25g
25g
25g
82
32
28
30
108
88
98
12
8
10
20
Page 90

Laver la vaisselle
FR
Sélection du programme
Le type de vaisselle, la quantité et l’état des résidus alimentaires vous permettent,
en consultant le tableau des programmes de déterminer celui dont vous avez besoin.
Le déroulement du programme et les données qui lui correspondent se trouvent à
droite du tableau des programmes.
Exemple:
En présence de vaisselle mixte comportant de nombreux résidus alimentaires très
adhérents, vous aurez besoin du programme"Normal" .
o
55
Conseil économie
Si le lave-vaisselle est peu chargé, le programme immédiatement inférieur suffit
bien souvent.
Données de programme
Les données de programme énoncées se réfèrent à des conditions normales.
Les valeurs peuvent changer considérablement selon les paramètres suivants:
Quantités variables de vaisselle
Température d’arrivée de l’eau
Pression dans les conduites d’eau
Température ambiante
Variations de la tension secteur
Tolérances propres au lave-vaisselle (par ex.
la température, la quantité d’eau...)
Mise en service de l’appareil
Chargez l’appareil et ouvrez le robinet d’eau.
Fermez la porte. Appuyez sur la touche
Marche/Arret “B” et l’indicateur Marche/Arret
“A” s’allume.
Appuyez sur la touche “K” pour selectionner
le programme désiré et l’indicateur
correspondant “E” s’allume.
Appuyez sur le bouton marche/arrêt L, le lavevaisselle se mettra en marche immédiatement
et l’indicateur correspondant clignote.
21
A
B
C E K
55o/65o70o55o50o45o40ocold
D F G H I J L
Page 91

FR
Fin du programme
Six signaux sonores indiquent la fin du programme. L'indicateur du temps restant
s'éteindra.
Mise hors service de l’appareil
Quelques minutes après la fin du programme:
• Eteignez l’appareil en appuyant sur l’interrupteur Marche/Arret.
• Ouvrez la porte.
• Une fois la vaisselle refroidie, retirez-la.
• Fermez le robinet d’eau.
Interruption d’un programme
• Ouvrez la porte. Attention, il se peut que l’eau éclabousse et coule de l’appareil.
Attendez que le bras d’ aspersion se soit immobilisé avant d’ouvrir la porte en
grand.
• Si la porte est ouverte,un signal sonore retentit 10 fois toutes les 30 secondes.
L’indicateur du temps restant change sur l’affichage “E1”.
• Si le lave-vaisselle est raccordé à l’eau chaude ou s’il a déjà chauffé et que vous
avez ouvert la porte, laissez-la d’abord entrebaillée quelques minutes puis refermez la. Sinon elle risque de s’ouvrir toute seule sous l’effet de la dilatation.
• Fermez la porte. Après 30 secondes le programme commencera à partir du point
ou'il a été interrompu.
Remarque:
Interrompez ou effacez un programme seulement si cela
est absolument nécessaire.
Annulation ou modification d’un programme en cours
• Un cycle en cours ne peut être modifié que s’il a été lancé peu de temps avant.
Si tel n’est pas le cas, il se peut que le détergent ait déjà été utilisé et que l’appareil
ait déjà effectué la vidange de l’eau de lavage. Dans ce cas, il est nécessaire de
remplir à nouveau le distributeur de détergent (voir le paragraphe intitulé “Comment
remplir le distributeur de détergent”).
• Si vous souhaitez modifier un cycle en cours, suivez les instructions de "Remise
à zéro de l’écoulement" et tous les réglages seront annulés. Pour régler un nouveau
cycle, suivez les instructions contenues dans le paragraphe ”Mise en service de
l’appareil”.
22
Page 92

FR
Utilisation de tablettes multifonctionnelles "3 en 1"
Remarques générales
• Avant d’utiliser ce genre de tablettes, assurez-vous que le degré de dureté de
votre eau est compatible avec un tel produit. Les degrés compatibles se trouvent
sur l’emballage des tablettes.
• Ces produits doivent êtres utilisés selon les instructions du fabricant.
• Si vous rencontrez des problèmes lors de votre première utilisation d’un produit
" 3 en 1 " contactez l’assistance téléphonique du fabriquant (le numéro se trouve
sur l’emballage).
Conseil:
Lors de l’utilisation de tablettes " 3 en 1 ", l’ajout de sel et d’aide de rinçage n’est
pas nécessaire.
Sélectionner l’option “utilisation de tablettes”:
• Fermez la porte. Appuyez sur la touche d’options D jusqu’à ce que l’indicateur
d’utilisation de tablettes s’allume.
• Appuyez sur le bouton marche/arrêt L, le lave-vaisselle se mettra en marche
immédiatement et les indicateurs de programme et d’utilisation de tablettes
clignotent.
Annuler l’option " utilisation de tablettes "
Suivez les instructions d’annulation d’un programme en cours.
Si vous décidez d’utiliser un détergent classique, nous vous recommandons :
• Remplissez les récipients de sel et d’aide de rinçage.
• Ajustez la sélection du degré de dureté de l’eau au maximum et faites marcher
l’appareil pendant 3 cycles normaux sans charge.
• Réajustez la sélection du degré de dureté de l’eau à celle qui correspond à votre
région. (Pour plus d’informations, consultez votre notice d’emploi.)
55o/65o70o55o50o45o40
o
cold
D G L
23
Page 93

FR
Attention:
Ne placez pas les tablettes ailleurs dans la machine que dans
le récipient pour détergent. La conséquence sera un lavage
médiocre.
Remarque:
L’utilisation de tablettes 3 en 1 ou de produits similaires est
interdit lorsque vous sélectionnez les programmes lavage
rapide et trempage.
Lavage du panier supérieur
Cette fonction vous permet de laver de la vaisselle en utilisant seulement le panier
supérieur si vous n’avez pas assez de vaisselle pour une charge complète. Cela
vous permettra d’économiser de l’eau ainsi que de l’énergie.
Sélectionner la fonction de lavage du panier supérieur
• Fermez la porte. Sélectionnez le programme désiré puis appuyez sur la touche
option additionnelle jusqu’à ce que l’indicateur de lavage du panier supérieur
s’allume.
• Appuyez sur le bouton marche/arrêt, l’appareil se mettra immédiatement en route
et l’indicateur de programmes ainsi que l’indicateur de lavage du panier
supérieur clignotent.
Annuler l’option " lavage du panier supérieur "
Suivez les instructions d’annulation d’un programme en cours.
Lavage du panier inférieur
Cette fonction vous permet de laver de la vaisselle en utilisant seulement le panier
inférieur si vous n’avez pas assez de vaisselle pour une charge complète. Cela
vous permettra d’économiser de l’eau ainsi que de l’énergie.
Sélectionner la fonction de lavage du panier inférieur
• Fermez la porte. Sélectionnez le programme désiré puis appuyez sur la touche
option additionnelle jusqu’à ce que l’indicateur de lavage du panier inférieur
s’allume.
• Appuyez sur le bouton marche/arrêt, l’appareil se mettra immédiatement en route
et l’indicateur de programmes ainsi que l’indicateur de lavage du panier
inférieur clignotent.
Annuler l’option " lavage du panier inférieur "
Suivez les instructions d’annulation d’un programme en cours.
Remarque:
Pensez à adapter la quantité de détergent en utilisant
ces fonctions.
24
Page 94

FR
Programmer un départ différé
Vous pouvez différer le départ d’un programme de 1 à 24 heures.
• Fermez la porte et allumez l’appareil.
• Sélectionnez le programme désiré.
• Appuyez sur l’interrupteur départ différé, l’indicateur du temps restant indique "1".
• Appuyez sur l’interrupteur départ différé autant de fois nécessaires jusqu’à ce qu’il
affiche le temps désiré.
• Pour annuler l’option de départ différé, appuyez sur l’interrupteur de départ différé
jusqu’à ce que l’indicateur de temps restant s’éteigne.
• Appuyez sur le bouton départ/pause, l’indicateur de temps restant clignote et
commence un compte à rebours. Le programme commencera lorsque l’indicateur
de fin différé s’éteint et le cycle de lavage commence.
Annuler l’option " départ différé "
Suivez les instructions d’annulation d’un programme en cours.
Remise à zéro de l’écoulement (RESET)
Vous pouvez utiliser cette option pour arrêter le cycle de lavage en cours en appuyant
le bouton de remise à zéro (boutons C et D) pendant 3 secondes et l’appareil
s’arrêtera quelques minutes plus tard, après l’écoulement d’eau.
25
Reset
C
55o/65o70o55o50o45o40ocold
D
Page 95

Nettoyage et entretien
Un contrôle et un entretien régulier de votre machine aideront à anticiper les pannes.
Vous économiserez de l’argent et de l’énervement. Pour cette raison, examinez de
temps en temps soigneusement l’intérieur de votre lave-vaisselle.
FR
Etat général de l’appareil
• Vérifiez si le compartiment de lavage présente des dépôts de graisse
et de tartre. Si vous trouvez de tels dépôts:
• Lavez la machine à fond avec du détergent.
Sel spécial
Contrôlez l’indicateur de manque de sel “J” .
Rajoutez du sel spécial si nécessaire.
Liquide de rinçage
Sur le bandeau, vérifiez l’indicateur “ 11 ” de
remplissage du liquide de rinçage. Rajoutez-en
le cas échéant.
I J
Filtres
Les filtres“8”,”9” empêchent les souillures
grossières contenues dans l’eau de rinçage de
s’approcher de la pompe. Ces souillures peuvent
parfois boucher les filtres.
Après chaque rinçage, vérifiez si les filtres
présentent des résidus alimentaires; le cas
échéant, nettoyez-les.
Après avoir détaché le microfiltre “8“ , vous
pouvez extraire l’ensemble filtrant “9”. Enlevez
les résidus puis nettoyez les filtres sous l’eau
courante.
Remettez l’ensemble filtrant “9” en place puis
remettez le microfiltre.
Remarque importante:
Avant le nettoyage, assurez-vous que
la prise d'appareil a été enlevée de la
douille.
8
9
26
Page 96

Les bras d’aspersion
Le tartre et les impuretés en suspension dans
l’eau de vaisselle peuvent boucher les buses;
les dépôts risquent, eux, de bloquer les bras
d’aspersion “10” et “11”.
• Vérifiez si des résidus alimentaires bouchent
les buses de sortie des bras pivotants
d’aspersion.
• Le cas échéant, soulevez le bras rotatif inférieur
“11”.
• Dévissez le bras rotatif supérieur “10”.
• Nettoyez les bras sous l’eau du robinet.
• Faites réencranter le bras rotatif inférieur et
revissez le bras rotatif supérieur.
Avant le nettoyage, assurez-vous que la prise
d'appareil a été enlevée de la douille.
FR
10
11
27
Page 97

Détection des pannes
FR
Remédier soi-même aux petites pannes
L’expérience montre que la plupart des dérangements survenant à l’usage quotidien
peuvent être supprimés sans avoir à appeler le service après-vente.
Ceci économise évidemment des frais et remet rapidement l’appareil en bon
fonctionnement. Le récapitulatif ci-après vous aidera à trouver les causes des
dérangements.
Dérangements...
... à la mise en service
L’appareil ne démarre pas
• Fusibles de la maison grillés.
• Fiche mâle de l’appareil débranchée de la prise secteur.
• Porte de l’appareil incorrectement fermée.
• Touche de programmation pas enfoncée.
• Robinet d’eau pas ouvert.
• Filtre du flexible d’arrivée d’eau bouché.
Le crible se trouve sur le raccord de l’Aquastop et du flexible d’arrivée d’eau.
Attention:
Les réparations ne doivent être effectuées que par un
spécialiste. Des réparations inexpertes s’assortissent d’un
risque de dégâts considérables et peuvent mettre en danger
la vie de l’utilisateur.
... sur l’appareil
Affichage d'erreur sur l'indicateur du temps restant
Un signal sonore retentit 10 fois toutes les 30
secondes; l’indicateur du temps restant change
sur l’affichage “E1” et l’indicateur des programmes
est allumé.
Vérifier si:
• la porte est fermée correctement
Un signal sonore retentit 10 fois toutes les 30
secondes; l’indicateur du temps restant change
sur l’affichage “E3” et l’indicateur des programmes
est allumé.
Vérifier si:
• le tuyau de vidange est dispos
E
55o/65o70o55o50o45o40
F
E
55o/65o70o55o50o45o40
F
o
cold
o
cold
28
Page 98

FR
Un signal sonore retentit 10 fois toutes les 30
secondes; l’indicateur du temps restant change sur
E
l’affichage “E4” et l’indicateur des programmes est
allumé.
55o/65o70o55o50o45o40
o
cold
Vérifier si:
• le tuyau de vidange n'est ni écrasé ni plié.
• le tuyau de vidange est disposé trop haut.
F
Un signal sonore retentit 10 fois toutes les 30 secondes; l’indicateur du temps restant
change sur l’affichage “E5” et l’indicateur des programmes est allumé. Vérifier si:
• le robinet d'arrivée d'eau est ouvert et que le
tuyau d'alimentation est raccordé correctement
E
• l'alimentation en eau de votre habitation n'a pas
été coupée et que la pression est suffisante ;
55o/65o70o55o50o45o40
o
cold
• le tuyau d'alimentation n'est ni écrasé ni plié;
• le filtre du tuyau d'alimentation n'est pas obstrué.
• le tuyau de vidange est disposé trop bas.
F
Un signal sonore retentit 10 fois toutes les 30 secondes; l’indicateur
du temps restant change sur l’affichage “E2”,"E6","E7","E8","E9","EA"
ou "Eb" et l’indicateur des programmes est allumé, adressez-vous à
votre Service Après-vente.
Si tous ces contrôles sont réalisés et que toutefois l’erreur persiste,
veuillez mettre hors service le lave-vaisselle. Attendez quelques minutes
et remettez-le en service. Si le lave-vaisselle ne fonctionne toujours
pas et/ou que le problème persiste, adressez-vous à votre Service
Après-vente le plus proche en indiquant
• le type de panne ;
• le type d'appareil et le numéro du modèle (Mod...) ainsi que le numéro de série
(S/N...),qui figurent sur la plaque signalétique située sur la paroi intérieure de la
porte.
Le bras d’aspersion inférieur tourne difficilement
• Bras bloqué par des couverts ou par des résidus alimentaires.
Le couvercle du compartiment à détergent refuse de se fermer
• Compartiment de dosage excessivement rempli.
• Mécanisme bloqué par des restes de détergent collés
Après le lavage, des restes de détergent collent dans le réservoir de dosage
• Le réservoir de dosage était mouillé au moment où vous l’avez rempli. Ne versez
le détergent que dans le réservoir sec.
29
Page 99

FR
L’eau ne s’écoule pas à l’égout en fin de programme
• Flexible de vidange bouché ou plié.
• Pompe de vidange bloquée.
• Les filtres sont bouchés.
• Le programme n’est pas encore terminé. Attendez la fin du programme.
... lors du lavage
Production inhabituelle de mousse
• Présence de liquide pour la vaisselle dans le dispositif de dosage du liquide de
rinçage.
• Du produit de rinçage répandu peut conduire à une formation excessive de mousse
lors du processus de rinçage suivant, c’est pourquoi enlevez le produit de rinçage
répandu avec un chiffon.
L’appareil s’arrête pendant le lavage
• Coupure de courant.
• Alimentation en eau coupée.
Bruits de percussion pendant le lavage
• Le bras pivotant d’aspersion percute des pièces de la vaisselle.
Cliquetis pendant le lavage
• La vaisselle n'a pas été placée correctement à l'intérieur de l'appareil
Les vannes de remplissage émettent un bruit de claquement
• Ceci est dû au tracé de la conduite d’eau domestique et n’influe aucunement sur
le fonctionnement de la machine. Aucun remède possible.
Avec les plats, couverts..
Des résidus alimentaires adhèrent contre la vaisselle
• Panier excessivement rempli de vaisselle.
• Les pièces de vaisselle se touchent.
• Vous n’avez pas mis assez de détergent.
• Vous avez choisi un programme de lavage pas assez puissant.
• Une pièce de vaisselle a empêché la rotation du bras pivotant d’aspersion.
• Des résidus alimentaires obstruent les buses du bras pivotant d’aspersion.
• Les filtres sont bouchés.
• Filtres incorrectement installés.
• Pompe de vidange bloquée
30
Page 100

FR
Les pièces en plastique se décolorent
• Vous n’avez pas versé assez de détergent.
• Le détergent a un effet blanchisant insuffisant. Utilisez un détergent avec agent
de blanchiment chloré.
Des taches en partie blanches demeurent sur la vaisselle. Les verres
ont un voile laiteux
• Vous n’avez pas versé assez de détergent.
• Quantité de liquide de rinçage réglée trop faible.
• Vous n’avez pas versé de sel spécial dans l’appareil bien que l’eau soit très dure.
L’adoucisseur d’eau est réglé trop bas.
• Vous n’avez pas correctement vissé le couvercle du réservoir de sel.
• Si vous avez utilisé un détergent sans phosphate, essayez-un au phosphate.
La vaisselle ne sèche pas
• Vous avez choisi un programme sans séchage.
• Vous avez réglé le liquide de rinçage sur une trop faible quantité.
• Vous avez sorti la vaisselle trop tôt.
Les verres n’étincellent pas
• Vous avez réglé le liquide de rinçage sur une trop faible quantité.
Des traces de thé ou du rouge à lèvres ne sont pas complètement enlevées
• Le détergent a un effet blanchissant insuffisant.
• Température de lavage réglée trop basse.
Traces de rouille sur les couverts
• Les couverts ne sont pas suffisamment inoxydables.
• Teneur en sel excessive dans l’eau de lavage.
- Couvercle du réservoir de sel pas vissé à fond.
- Vous avez répandu trop de sel lors du remplissage de son réservoir.
Les verres prennent un voile opaque et décolorent
• Vous avez versé un détergent inapproprié.
• Ces verres ne sont pas lavables au lave-vaisselle.
Les verres et les couverts présentent des stries; les verres prennent un
aspect métallique
• Le dosage du liquide de rinçage est réglé trop élevé.
31
 Loading...