

Page 1
Dishwasher
DW12-EFET
Instructions for Use
en de fr it es pt nl
Page 2

Page 3

Index
en
Safety i n fo rm ati o n
Installation
How to remove the top of your dishwasher
Getting to know your dishwasher
How to fill the salt container and the rinse aid dispenser
How to fill the detergent dispenser
Not suitable for the dishwasher
Arranging crockery, glasses, etc. in the dishwasher
Programme overview
Washing dishes
How to keep your dishwasher in shape
Care and maintenance
Fault finding
Technical data
Important information
2
4
6
7
8
10
11
12
14
16
18
19
20
24
24
1
Page 4

Safety information
At time of delivery
Check packaging and dishwasher immediately for signs of transport damage. If the appliance is
damaged, do not put it into use but contact your supplier or customer service without delay.
Please dispose of packaging materials properly.
During installation
Site the dishwasher and connect it up in accordance with the installation instructions.
The dishwasher must not be connected to the electricity supply while installation is being carried out.
Ensure that the domestic wiring is properly earthed.
The mains electricity supply must conform to the details shown on the dishwasher nameplate.
Do not connect the dishwasher to the electricity supply via an extension cable.
Built-under and built-in appliances should always be installed under a continuous work surface which
is attached to the adjacent cupboards, in order to ensure that the appliance is entirely stable.
After the appliance has been installed,the mains plug should still be easily accessible.
The plastic housing on the water inlet contains an electrica lly oper ated valve .Th e co nnecting wires are
inside the inlet hose.Do not cut through this hose and do not immerse the plastic housing in water.
During installation, the power supply cord must not be excessively or dangerously bent or flattened.
en
During normal use
The dishwasher must only be used by ad ults for t he wa s hing of ho usehold dishes and coo k ing utens ils .
This appliance cannot be installed outdoor, not even if the area in which it is installed is covered by a
roof; it is also very dangerous to leave it exposed to the rain and elements.
Do not place any heavy objects or stand on the door when it is open. The appliance could tip forward.
The water inside the dishwasher is not suitable for drinking.
Do not use solvents of any kind inside your dishwasher. They could cause an explosion danger.
Open the door very carefully if the dishwasher is operating. There is a risk of water squirting out.
Do not touch the heating element during or after a wash cycle.
Fundamental rules to follow when using the appliance:
- Never touch the dishwasher when barefoot or with wet hands or feet;
- We discourage the use of extension cords and multiple sockets;
- If the appliance is not operating properly or maintenance must be performed, disconnect the
appliance from the power supply.
2
Page 5
If your family inclu d es children
The appliance is not intended for use by young children or infirm persons without supervision.
Young children should be supervised to ensure that they do not play with the appliance.
Keep deter gent s out of t he r each of c hildr en, who m ust als o be k ept aw ay fr om the dis hwas her
when it is open.
If a fault occurs
If the appliance m alfunc t ions , t urn off water supply to t he a pplianc e and disconnect the plug f r om
the wall socket. Then, consult the section entitled, "Finding fault" .If you cannot solve the problem,
contact a service center.
Only specialised personnel are authorised to make repairs.
If the supply cord is damaged, it must be replaced by the manufacture, its service agent of similarly
qualified persons in order to avoid a hazard.
To maintain the EFFICIENCY and SAFETY of this appliance,we recommend:
- call only the Service Centers authorized by the manufacturer.
- always use original Spare Parts.
When disposing of old appliances
Appliances which are no longer being used must be made inoperable by cutting the power supply
cord and removing the door lock.
Take the appliance to a designated waste disposal center.
en
Dangerous voltage
Warning
Children could get locked in the appliance (risk of suffocation)
or get stuck in other positions. Therefore: Remove the mains
plug, cut the mains wire and set aside. Damage the door lock so
that the door can no longer be closed.
3
Page 6
Installation
en
Positioning the appliance
Positioning the appliance in the desired location. The back should r es t against the wall behind it, and the
sides , along the adja cent ca binet s or wall. The d ish wash er is equ ipp ed wi th w ater supp ly an d dr ain
hoses that can be positioned to the right or the left to facilitate proper installation.
Levelling the appliance
Once the appliance is positioned, adjust the feet (screwing them
in or out) to adjust the dishwasher, making it level. In any case,
the appli anc e s hou ld not be inc lined more than 2˚. If the appliance is level, it will help ensure proper performance.
Cold wat er connectio n
Connect the water suppl y hose to a t hr eaded 3 / 4 ( gas ) c onnect or,
making sure that it is fastened tightly in place (see fig.A).
Some models are fit ted with an "Aqua st op" water s upply hose
(see fig.B) in which the small filter is already housed in the
threaded end.
If the water pipes are new or have not been used for an extended per iod of t im e, let the wat er run to mak e sure t hat t he
water is c lea r a nd free of i m purities. If this p r eca u t ion is not taken,
there is a risk that the water inlet can get blocke d and damage
the appliance.
fig.A
fig.B
Warning
The appliance is to be connected to the water mains using new hosesets and that old hose-sets should not be reused.
Anti-Flooding protection (for some models)
The dishwasher is equipped with a system that stops the supply of water in the event of a problem with the water
supply hose, or leaks within the unit, in order to prevent damage to your home. If for any reason the box
containing the e lectri cal c ompon ents ha ppen s to get da mage d, r emove the plu g f or the appl iance from the
socket immediately. In order to guarantee that the anti-flooding feature operates properly, the "A" box with water
supply hose must be attached to the water su pply tap as shown in fig.B. No other type of con nection is acceptab le.
The water supply hose must not, under any circumstances, be cut, as it contains electrical parts which are live.
If the length of the hose is not adequate to make a proper connection, the hose must be replaced with one which
is long enough. This hose is available upon request from specialised retailers and service center.
4
Page 7

en
Drain hose co nnect ion
Insert the drain hose into a drain pipe with a minimum diameter of 4cm, or let it run into the sink, making
sure to avoid bending or crimping it. If necessary, fit a syphon trap (U-bend) with a connecting piece for
the drain hose ( fig.C) . The free end of the hose m us t be at a heig ht between 40 and 100 cm and must not
be immerse d i n w at e r.
fig.C
Attention:
The connecting piece for syphon trap (U-bend) must be solidly
fastened to the wall to prevent the drain hose from moving and
allowing water to spill outside the drain.
Electrical Co nn ection
After making sure that the voltage and frequenc y v alues for the current in the home correspond to those
on the rat ing plate ( locate d on the stainl ess steel inne r door of the ap plianc e) and that t he elec tric al
system is correc t f or the max imum v olt age on t he r ating plate, insert the plug into an ele ctri c al soc ket
which is earthed properly (the earthing of the appliance is a safety requirement mandated by law).
If the electrical socket to which the appliance must be connected is not appropriate for the plug, replace
the whole cable, rather than using adaptors or the like as they could cause overheating and burns.
Caution:
The dishwasher plug must be accessible even when the appliance
is installed as a built-in unit so that maintenance can be done safely.
5
Page 8
How to remove the top of your dishwasher
Freestand ing dishw asher can also be used as built-in ,
according to following processes:
en
6
Page 9
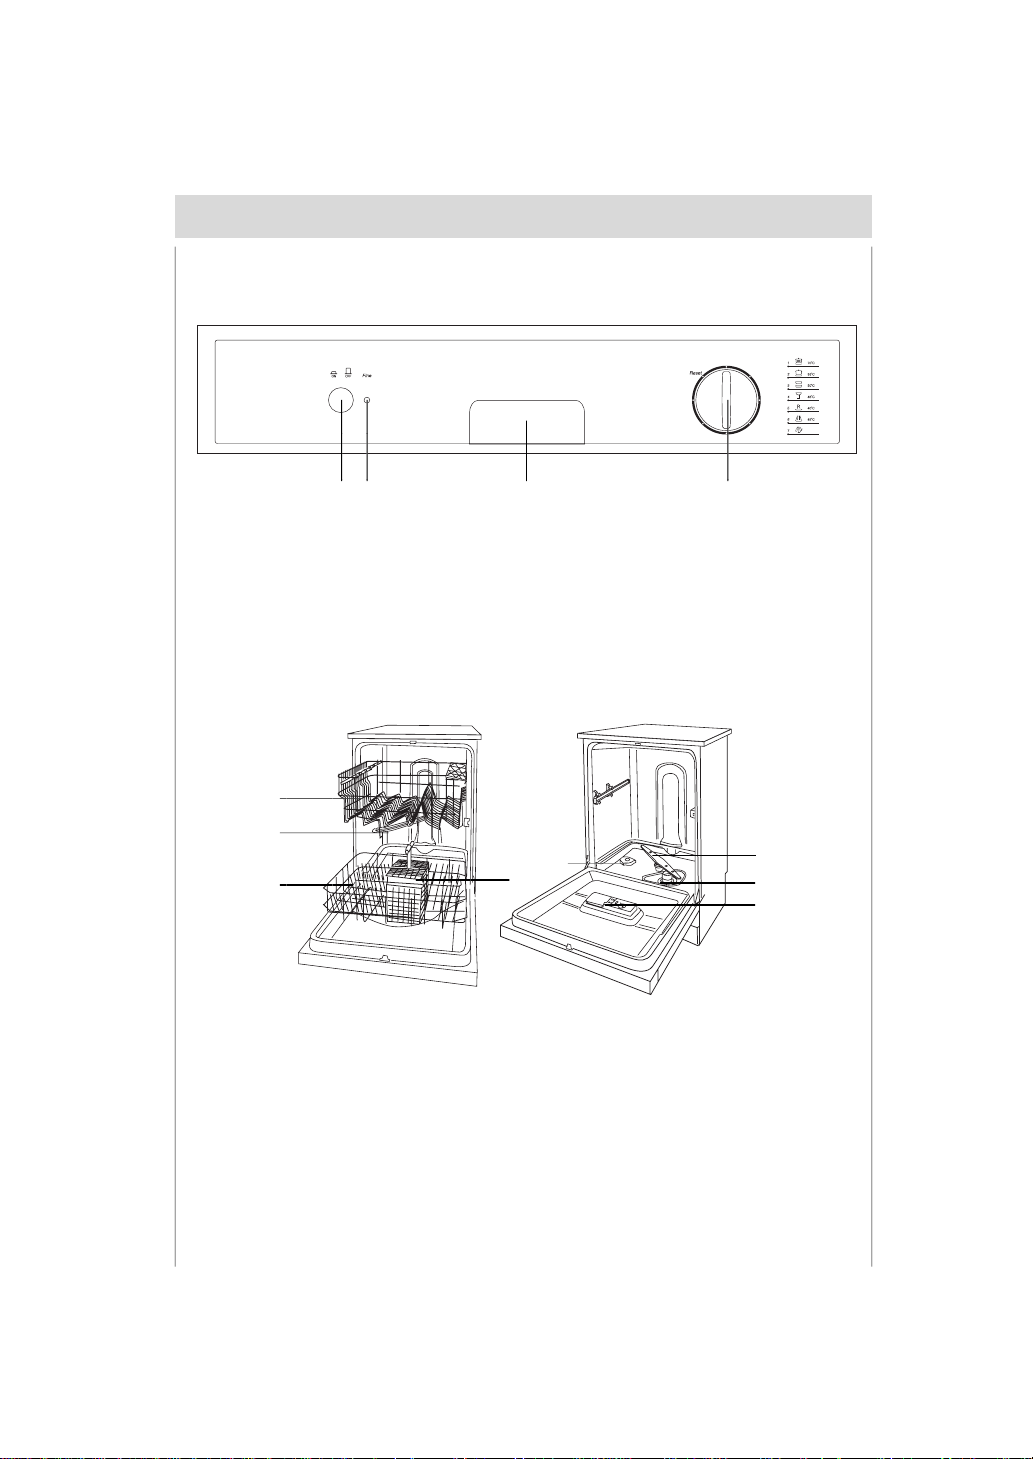
Getting to know your dishwasher
Close-up view (control panel)
AB C D
C
A
ON-OFF Button
"Fine" Light
B
Dishwasher in terio r
a
Handle For Opening Door
Knob For Selecting Cycle
D
en
1
2
7
6
3
4
5
c
b
Upper Rack
a
Lower Rack
b
c
Top Spray Arm
d
Silverware Basket
f
d
e
Bottom Spray Arm
Salt Container Cap
f
Washing Filter
g
Detergent and Rinse Aid Dispenser
h
e
g
h
7
Page 10
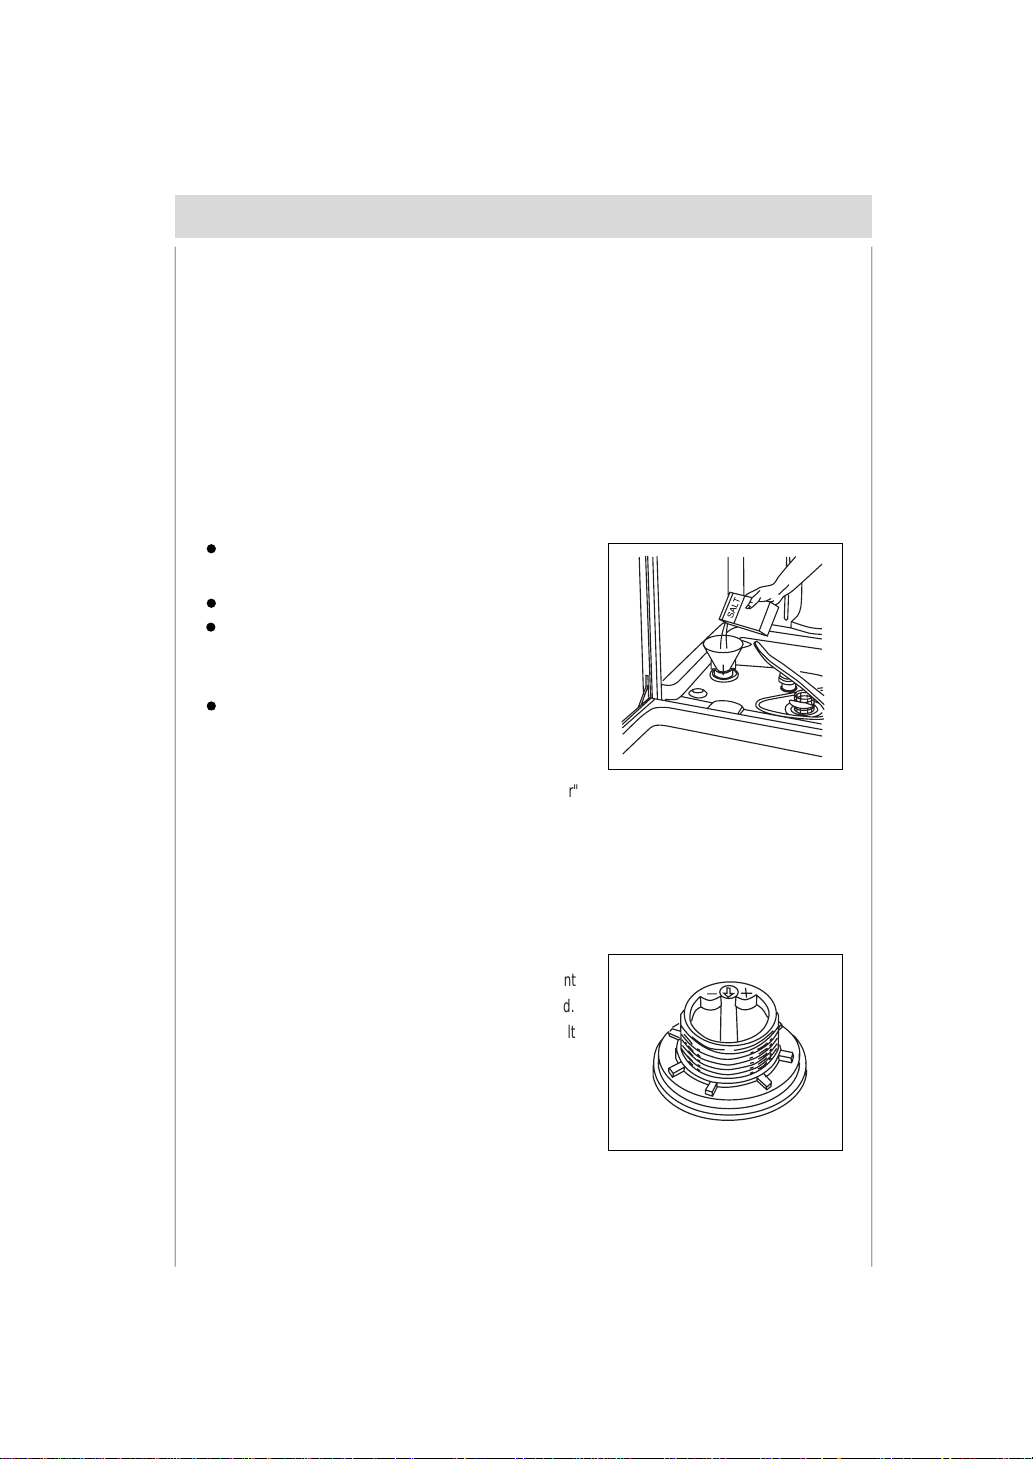
How to fill the salt container and the rinse aid dispenser
en
Salt
The hardness of the water varies from place to place. If hard water is used in the dishwasher, deposits
will form on the dishes and utensils.
The appliance is equipped with a special so ftener that uses a sa lt specifically designed to elimina t e lim e
and minerals from the water.
Loading the salt into the container
Always use salt intended for use with dishwashers.
The salt container is located beneath the lower rack and should be filled as follows:
Remove the lower rac k and t hen unscrew a nd r em ov e t he
cap from the salt container;
If you are filling the container for t he f ir st t ime, fill it w it h w a ter;
Place the end of the funnel (supplied) into the hole and intr oduce abou t 2 kg of salt. I t is nor mal for a s mall amou nt of
water to come out of the salt container.
Carefully screw the cap back on.
The salt container must be filled when the "low salt indicator"
(located on the control panel) lights.
To prevent the formation of rust, load the salt just befor e
beginning a wash cycle.
Adjusting salt consumption
The dishwasher is designed to allow for adjusting the amount
of salt consumed based on the hardness of the water used.
This is intended to optimiz e an d c us t omize t he l ev el of s alt
consumption so that it remains at a minimum.
To adjust salt consumption, proceed as follows:
8
Page 11
en
Unscrew the cap from the salt container;
There is a ring on the container with an arrow on it (see figure to the side).
If necessary, r otate the ring in an anticlock wi s e direction f r om the " - " setting towards the " + " sign,
based on the hardness of the water being used.
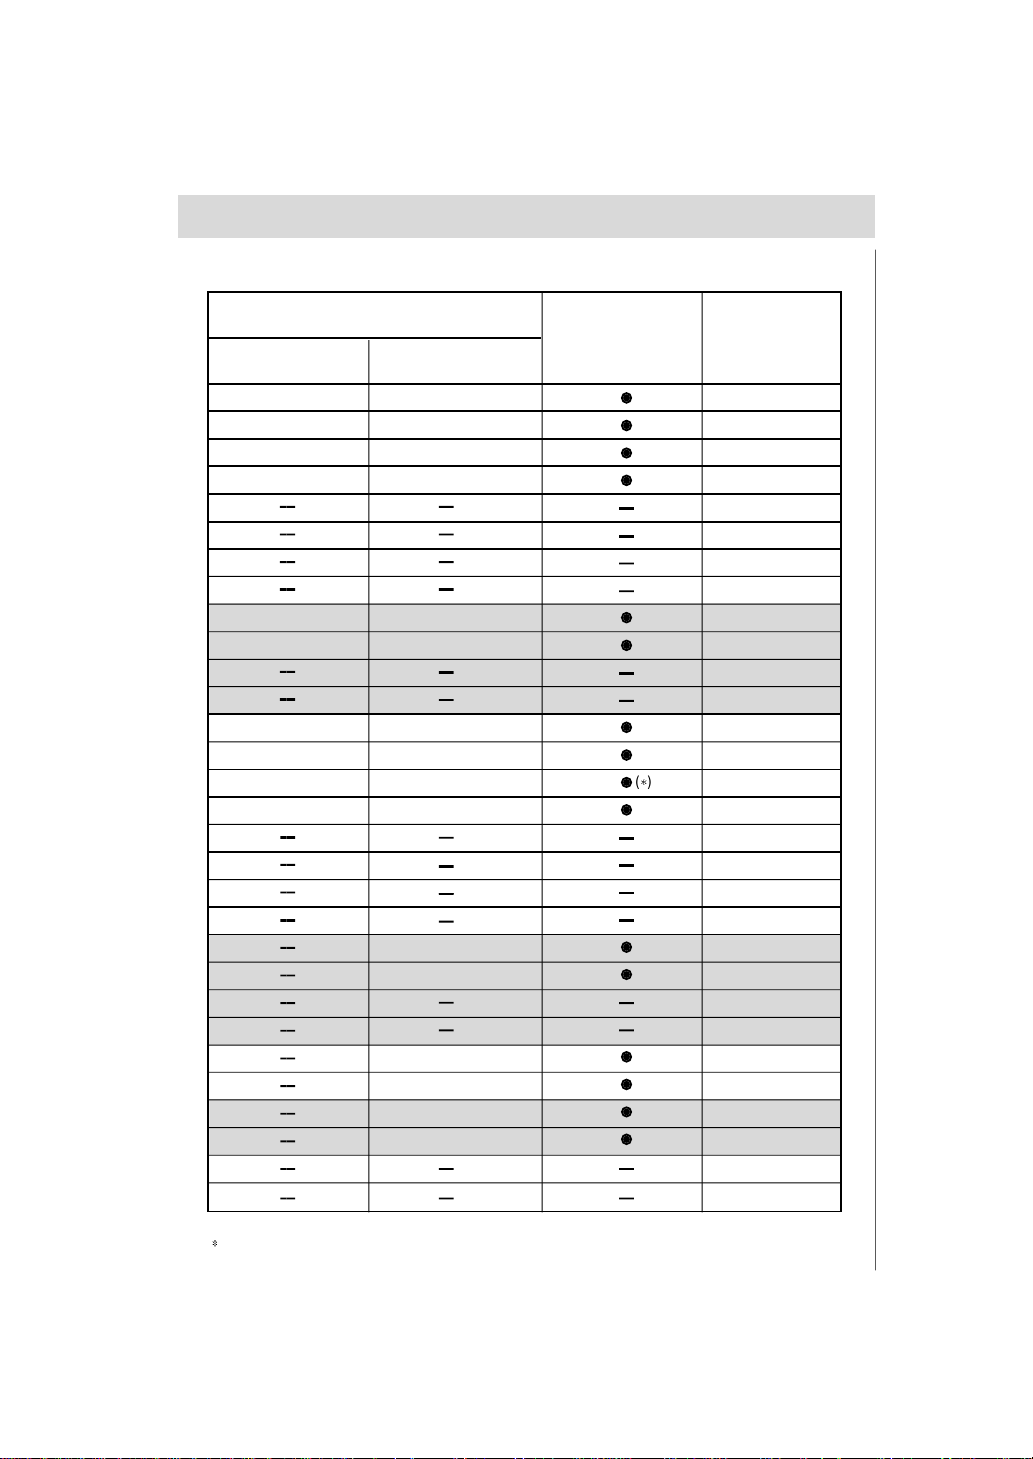
It is recommended that adjustments be made in accordance with the following table:
Water Hardness
Salt
consumption
(Grams/cycle)
Level
1
2
3
4
Clarke
degrees
14
0
ºdH
mmol/l
Selector
position
Rinse aid
This product makes dishes sparkle and helps them to dry without spotting. The dispenser is located on
the inside panel of the door .
Autonomy
(cycles/2kg)
Loading the rinse aid
Regardless of the type of detergent dispenser installed on your
applianc e, you m ust pr oceed as indic ated belo w wh en loadi ng the
rinse aid.
To open the dispenser, t urn the " 1 " cap in an anti-cloc kwis e dire c-
tion and then pou r in the r inse aid, m aking sure not t o overf ill. The
amount of rinse aid used for each cycle can be regulated by turning
the "2" dose adjustor, loc ated bene ath the "1" cap, with a screwdriver.
There are 6 different settings; the normal dosage setting is 3.
Important
Proper dosage of the rinse aid improves drying.
If drops of water remain on the dishes or spotting occurs, the dosage adjustor should be turned to a higher setting.
If the dishes have white streaks, turn the dosage adjustor to a lower setting.
1
2
9
Page 12
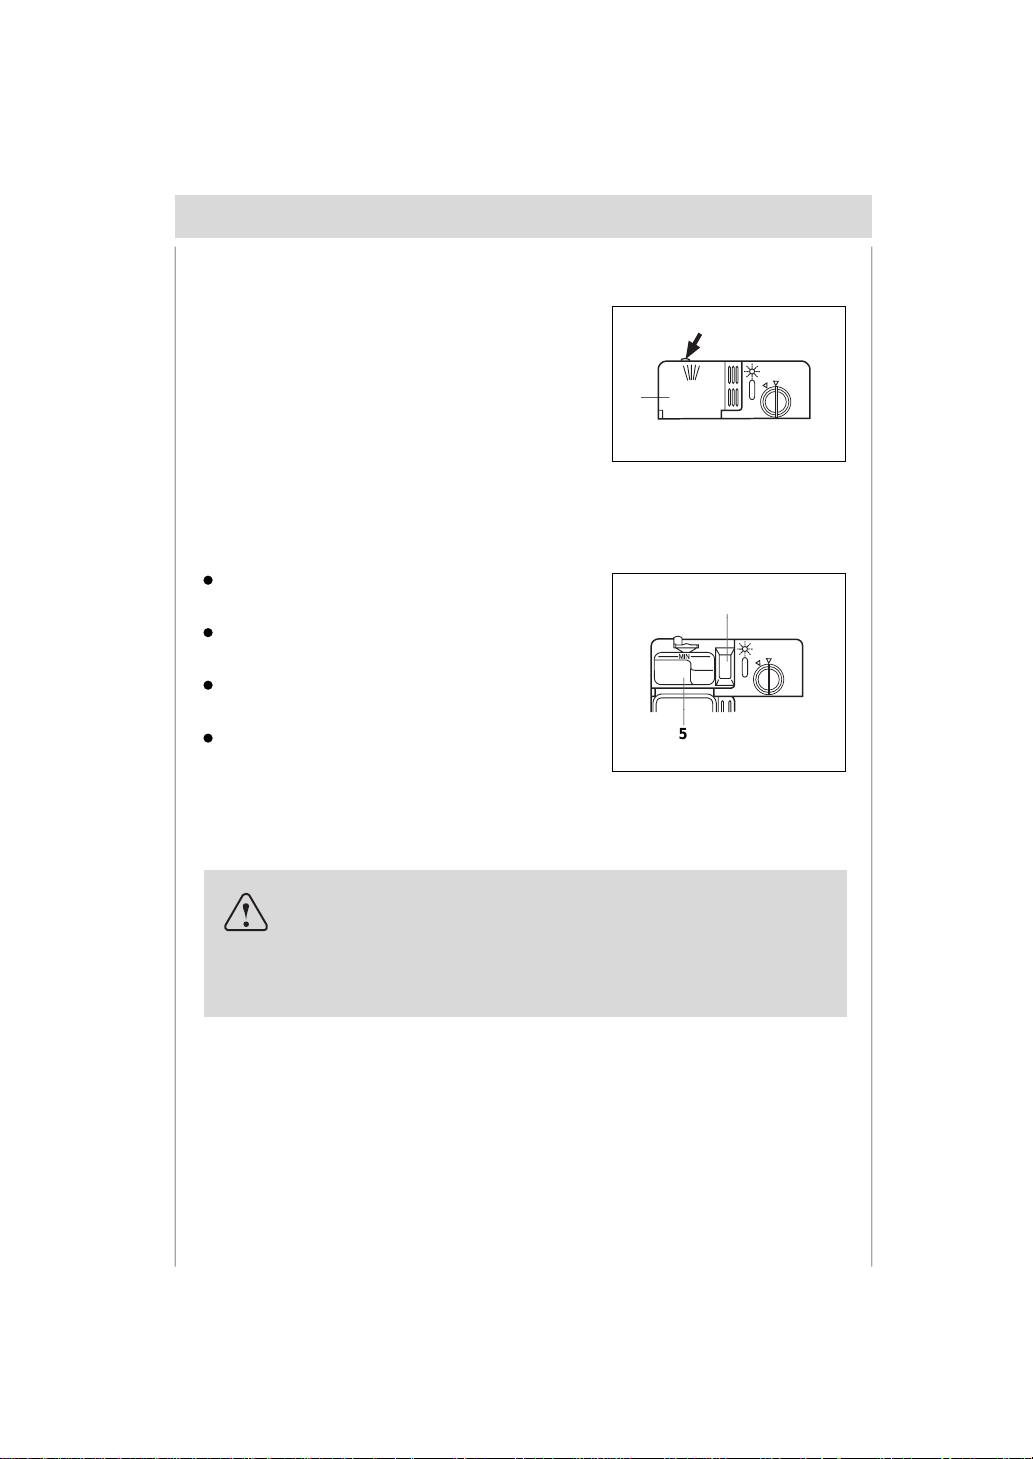
How to fill the detergent dispenser
Detergent
Detergent specifically intended for use with dishwashers
must be used. The dispenser must be refilled before the st art
of each wash cycle following the instructions provided in the
"Programme overview". The detergent dispenser is located
on the inside panel of the door.
Loading the detergent
To open the " 3" cover on the dispenser, press the "4"
button.
The detergent for the wash cycle should be poured into
the " 5" compartment.
The detergent for the pre-wash cycle should be poured
into the “ 6” compartment.
After the detergent has been placed in the dispenser,
close the cover and press down until it clicks in place.
en
4
3
6
5
Notice:
To facilitate closing the cover, remove any excess detergent on
the edges of the dispenser.
10
Page 13
Not suitable for the dishwasher
en
What you should not put into the dishwasher
Cutlery and t ab lewar e m anuf a c t ur ed in who le or part f r om wood .T hey bec om e f aded and unsightly in
appearanc e.Furt hermor e,the adhe siv es that are us ed are not s uitable for t he temper ature that occur
inside the dishwasher.Delicate decorative glassware and vases, special antique or irreplac eable china.
The decorative patterns on such items will not be dishwasher-proof.
Plastic obj ects tha t are not resis tan t to h ot wat er , copp er a nd p ewter ut ens ils are al so no t sui tab le.
Decorative patterns printed or paint ed onto t he s urface of crocker y, glas ses, etc.,aluminium and silver
items tend t o bec om e disc olour ed or faded if was hed in the diswasher. S om e types of glass c an becom e
opaque in app ear ance a fter t hey have b een wa shed many times in a di shwa sher . Highl y absorb ent
materials, such as sponges and towels,should never be placed in the dishwasher.
Our recommendation
In future, only purchase table or kitchenware that has been confirmed as being dishwasher-proof.
Important
Dishes or cutlery that have been soiled by tobacco ash, wax,
Iubricating grease or paint, should not be put in the dishwasher.
Damage to glassw are and other dishes
Possible causes
type of glass or manufacturing process
chemical composition of detergent
water temperature and duration of dishwasher programme.
Suggested remedy
Use glassware or por celain dishes that have been marked ‘d ishwa sher-pr oof’ by the manuf acture .
Use a mild detergent that is described as ‘kind to dishes’. If necessary, seek further inform ation from
detergent manufacturers.
Select a programme with a low temperature and a short duration as possible.
To prevent damage, take glass and cutlery out of the dishwasher as soon as possible after the
programme has ended.
11
Page 14
Arranging crockery, glasses, etc. in the dishwasher
Before placing the dishes in the dishwasher, remove larger food particles to prevent the filter from becoming clogged, which results in reduced performance.
If the pots and pans have baked-on food that is extremely hard to remove, we recommend that they are
soaked before washed. This will eliminate the need for extra wash cycles.
Pull out the rack to load the dishwasher.
Load for 12 Standard Settings
How to use the lower rack
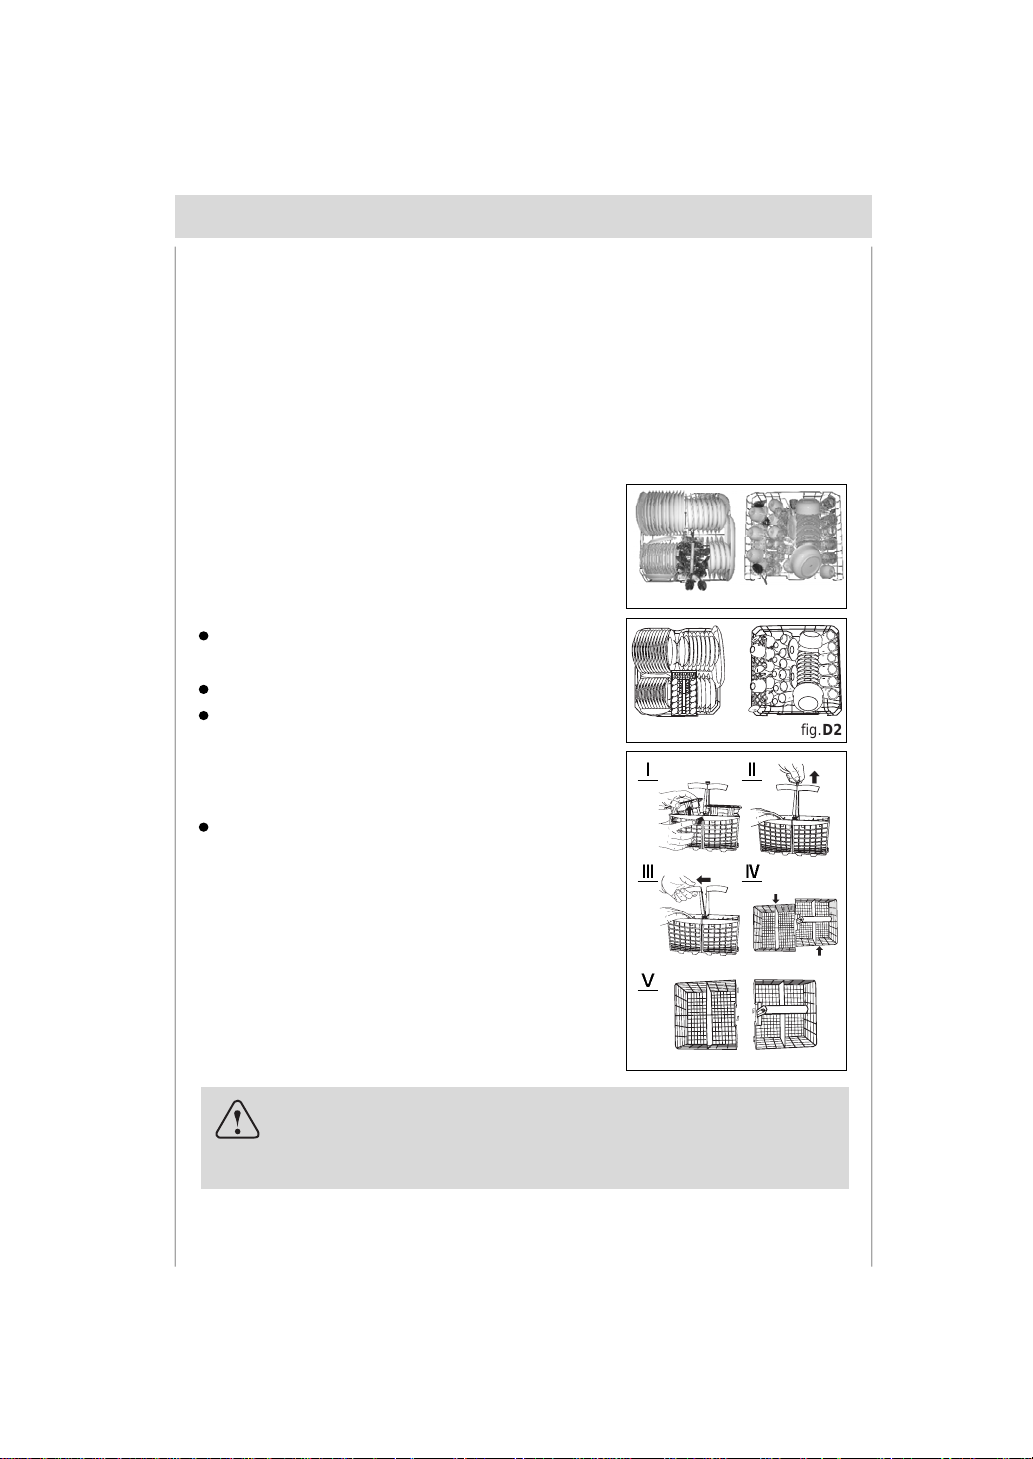
We recommend t hat you place the most dif f ic ult to clean item s on
the bottom r ack: pots, pans, lids , ser ving dishes and bo wls, as
shown in the figure to the right.
It is preferable to place serving dishes and lids on the sides of the
racks in order to avoid blocking the rotation of the top spray arm.
Pots, serving bowls, et c. m ust alw ays be plac ed fac e down.
(see fig.D)
Deep pots should be slanted to allow the water to flow out.
The silverware basket can be doubled (see fig.E) so that only
one sec tion may be us ed when the sil ver ware l oad is light .
This also makes s pac e for addit ional pots and pan s and it can
also be placed in the upper rack.
Silverware should be placed in the s ilver war e bas ke t with the
handles a t the bot tom ; i f the rac k h as s i de baskets , t he s p oon s
should be located indivi dually into t he appr opriate s lots. Es pecially long utensils should be placed in the horizontal position at the front of the upper rack.(see fig.E)
(for EN 50242 test s )
en
fig.D1
fig.D2
12
fig.E
Warning
Knives and other utensils with sharp points must be loaded in the
basket with their points down or placed in a horizontal position.
Page 15
How to use the upper rack
The upper r ack is des igned to ho ld more delic ate and lighter
dishware, such as glasses, cups and saucers, plates, small
bowls and shallow pans (as long as they are not too dirty).
Position t he dis hes and cook ware s o that they do not get
moved by the spray of water.
The upper rack can be adjusted for height by using t he knobs
located on both sides of the rack itself (see fig.F).
Adjust the upper basket to the hi gh er level and you h av e
more space to acco m mo d ate those tal ler pa ns and trays in
the bottom basket.
Shelf
Lean tall glasses and thos e with long stems against the shelfnot against other items to be washed.
Place glasses , cups and s m all bowls on t he additional cup rack.
The additional cup rack ca n be s wivel led in o r out as req uired
(see fig.G).
en
fig.F
fig.G
13
Page 16
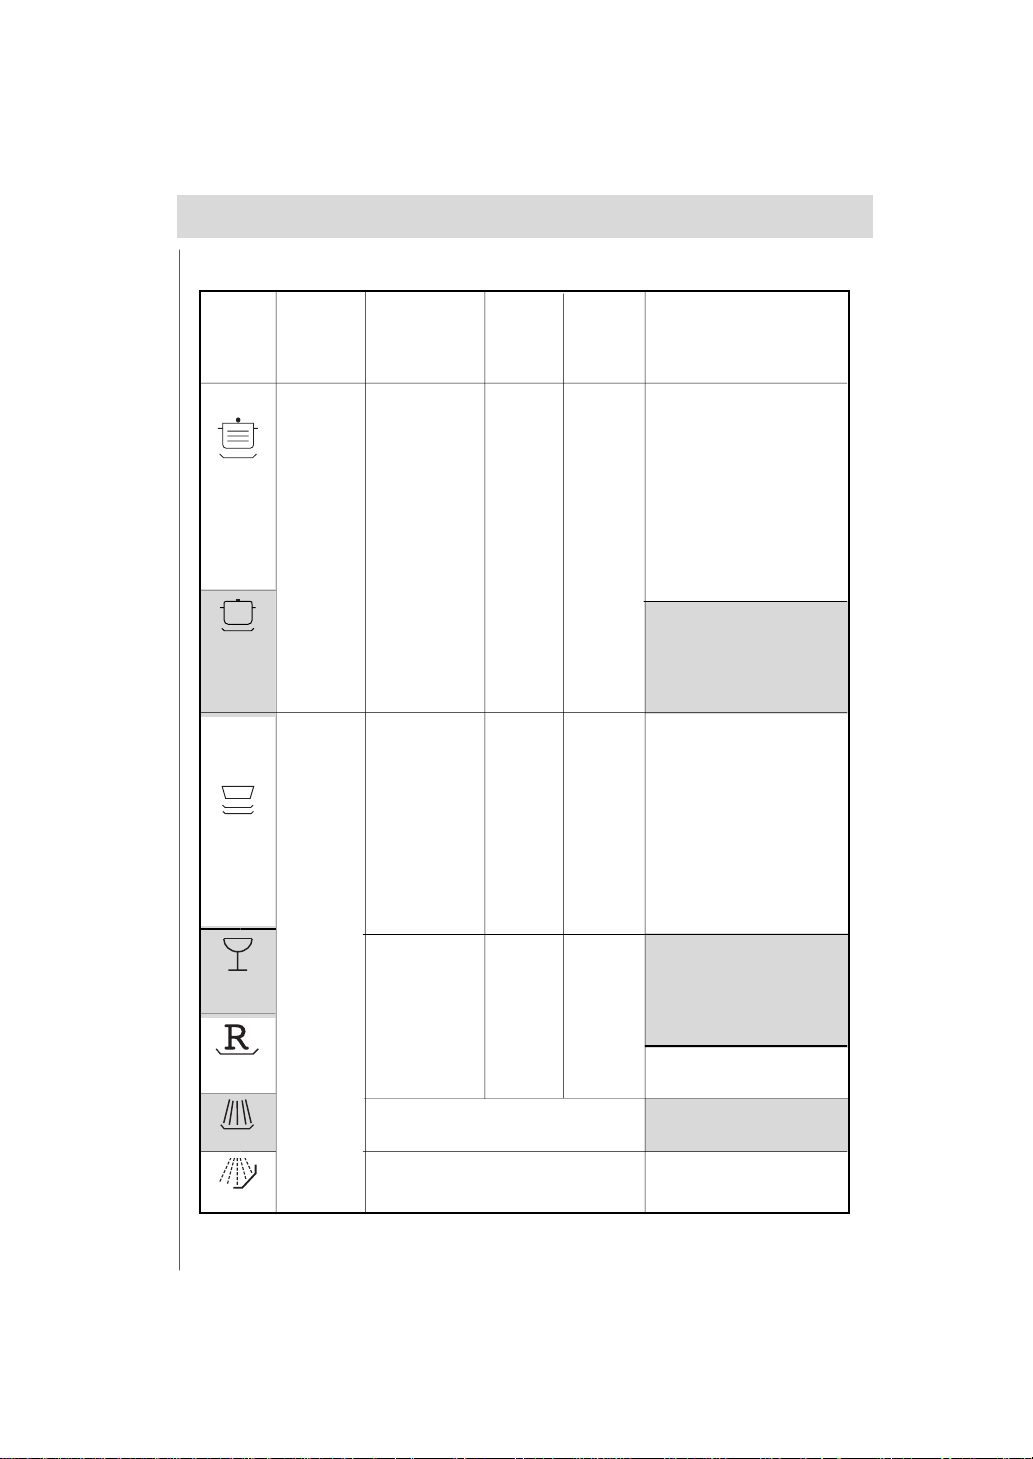
Programme overview
en
Wash
programme
Intensive
Wash
Normal
Wash
Light Wash
(EN50242)
Type of
crokery e.g.
china, pots/
pan s,
cutiery,
glasses, etc
Nondelicate
Type of
food
remains
Soups,
casseroles,
sauces,
potatoes,
pasts, rice,
eggs, roast or
fried food.
Soups,
potatoes,
pasta, rice,
eggs, roast or
fried food.
Amount of
food
remains
a lot
a little
Condi-
tion of
food
remains
stuck
on hard
loosely
attached
Description of cycle
Pre-wash with hot water.
Extended wash at 70°C.
Rinses with cold water.
Rinse with hot water.
Drying.
Pre-wash use cold water.
Extended wash at 55°C.
Rinse with cold water.
Rinse with hot water.
Drying.
Pre-wash use cold water.
Extended wash at 50°C.
Rinse with cold water.
Rinse with hot water.
Drying.
Wash at 45°C.
Glass ware
Mixed
Coffee,cakes,
milk, sausage,
cold drinks,
salads
Very little
loosely
attached
Rapid wash
For dishes that need to be rinsed and
Rinse
Soak
14
dried only.
Rinse off if the dishes have been
stacked for several days in the dishwasher prior to washing.
Rinse with cold water.
Hot rinse.
Drying.
Short wash at 40°C.
Cold rinse.
Hot rinse at 65°C.
Drying.
Short cold wash to prevent food residue from
drying on the dishes .
Page 17
en
5g
5g
10g
10g
5g
5g
5g
5g
5g
5g
Detergent
Rinse Aid
Extended WashPrewash
25g
15g
20g
15g
25g
15g
25g
20g
25g
20g
25g
15g
15g
10g
15g
10g
( )
Duration in
minutes
112’
94’
132’
114’
112’
94’
132’
114’
102’
90’
102’
90’
132’
122’
162’
152’
132’
122’
162’
152’
92’
82’
92’
82’
31’
29’
55’
49’
12’
12’
( ) EN50242 test with rinse aid setting 5
15
Page 18
Washing dishes
en
Program me selectio n
The most appropriate programme can be identified by comparing the t ype of crockery, cutlery , et c., as
well as the amount and condition of food remains, with the details contained in the wash cycl e table.The
corresponding pr ogr am m e s equen ce, durat ion and c onsum ption details ar e s hown in the right half of the
overview. For example:
Use the “Normal W ash” programme for dishes and ut ensils which hav e plenty of food remains stuck
on hard.
Earn savings
If only a small nu mber of dis hes have b een l oaded int o the dis hwas her,s elec tin g a pr ogr amme t hat
operates at the next lowest temperature will usually be sufficient.
Programme data
The stated programme data are based on standard operating conditions. The values can vary considerably according to:
different amounts of dishes
temperature of mains water supply
pressure of mains water supply
ambient temperature
fluctuations in mains voltage
machine-related factors (e.g. temperature, water volume,...)
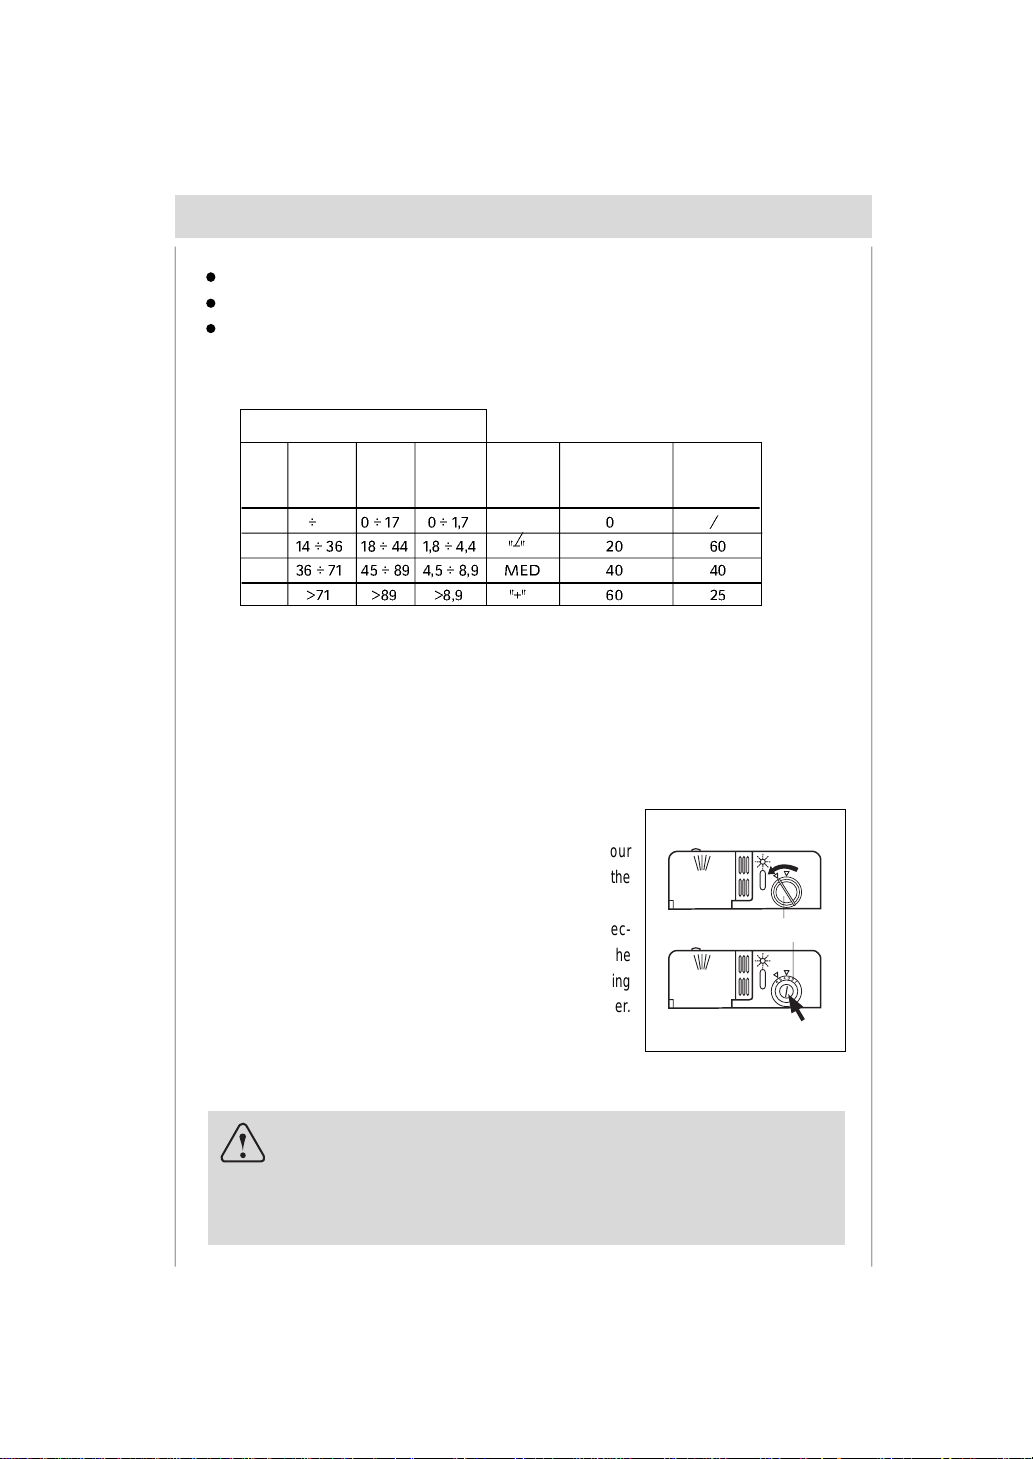
Turning on the Appliance
Starting a wash cycle...
Make sure that the plug for the appliance is inserted into the wall socket.
Make sure that the water supply is turned on to full pressure.
Load the dishwasher .
Pour in the detergent.
Press the ON-OFF button, and the “Fine” light will turn on.
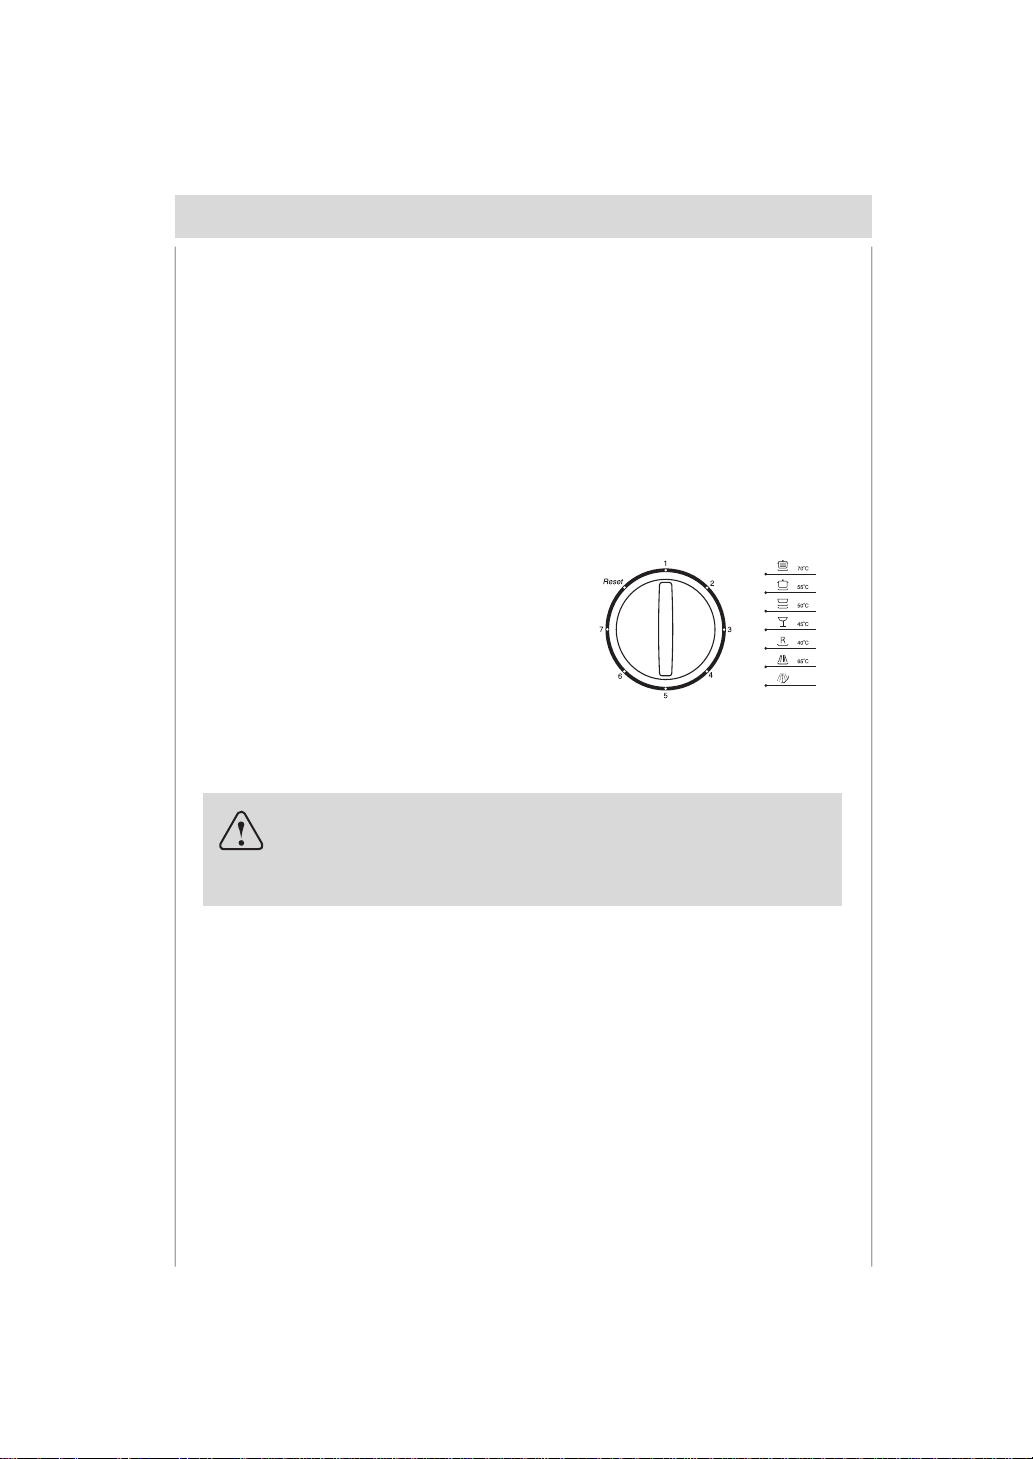
Turn the knob located on the right of the control panel until the number or symbol for the cycle setting
is aligued with the refrence mark (see the section entitled, program overview).If the knob r ightly
aligned with the refrence mark you want to choose, you must turn the knob to with the mark of
“Reset” .Then back to first step.
After five seconds the “Fine” light will turn off, the wash cycle will begin.
16
Page 19
en
At the end of the wash cycle...
When the buzzer constant ly beep s six times, the “Fine” light will turn on and the cycle has finished. Turn off
the appliance using the ON-OFF button, turn off the water supply and open the door of the dishwasher.
Wait a few minutes bef or e unlo ading t he dis hwash er to avoid handling the dishes and utens ils while
they are still hot and more susceptible to breakage. They will also dry better.
Cancelling or modifying a wash cycle setting...
A cycle that is underway can only be modified if it has been running for a short time. Otherwise, the
detergent may hav e alrea dy bee n used, an d the a pplian ce m ay hav e already dr ained the was h
water. If this is th e case, th e detergent d ispenser m ust be refil led (see the p aragraph e ntitled,
"Loading the Detergent").
Rotate the knob to the mark of “Reset” then select
right programme.
1
2
3
4
5
6
7
Notice
Do not place the tablets in the tub or the cutlery basket as this will
result in poorer wash results. The tablets should be placed in the
detergent doser.
17
Page 20

How to keep your dishwasher in shape
en
After Every Wash
After every wash, turn off the water supply (not necessa r y for models with “Aquastop” ) to the appliance
and leave the door slightly ajar so that moisture and odors are not trapped inside.
Remove the plug
Before cleaning or performing maintenance, always remove the plug from the socket. Do not run risks.
No solvent s or Abrasive Clean in g P rodu cts
To clean the exte rior and rubb er pa rt s of th e d ishw ash er, do not use solv ents or abra siv e cle anin g
products. Rather, use only a cloth and warm soapy water.
To remove spots or stains from the surface of the interior, use a cloth dampened with water and a little
while vinegar, or cleaning product made specifically for dishwashers.
Moving the Appliance
If the appliance mus t be moved, t r y to k eep it in a v er tic al position. If a bs olut ely n ec essary, it c an be
positioned on its back.
Seals
One of the factors that cause odors to form in the dishwasher is food that remains trapped in the seals.
Periodic cleaning with a damp sponge will prevent this from occurring.
The door should not be left in the open position since this could present a tripping hazard.
When You Go on Holiday
When you go on holiday, it is recommended that you run a wash cycle with the dishwasher empty and
then rem ove the plu g fr om the s ocket , turn of f the wate r s upply and l eave the door of the appl ia nce
slightly ajar. This will help the seals last longer and prevent odors from forming within the appliance.
18
Page 21
Care a nd maintenance
Regular inspection and m aintenance of your applia nce helps to pre vent pr oblem s fr om o ccu rring. This
saves time and aggravation.You should therefore caref ully inspect t he inside of your dishwasher from
time to time.
en
Overall condition of appliance
Check that no grease or scale has accumulated on the inside of the dishwasher.
If you discover any deposits:
- Clean the interior of the dishwasher thorughly with a detergent solution.
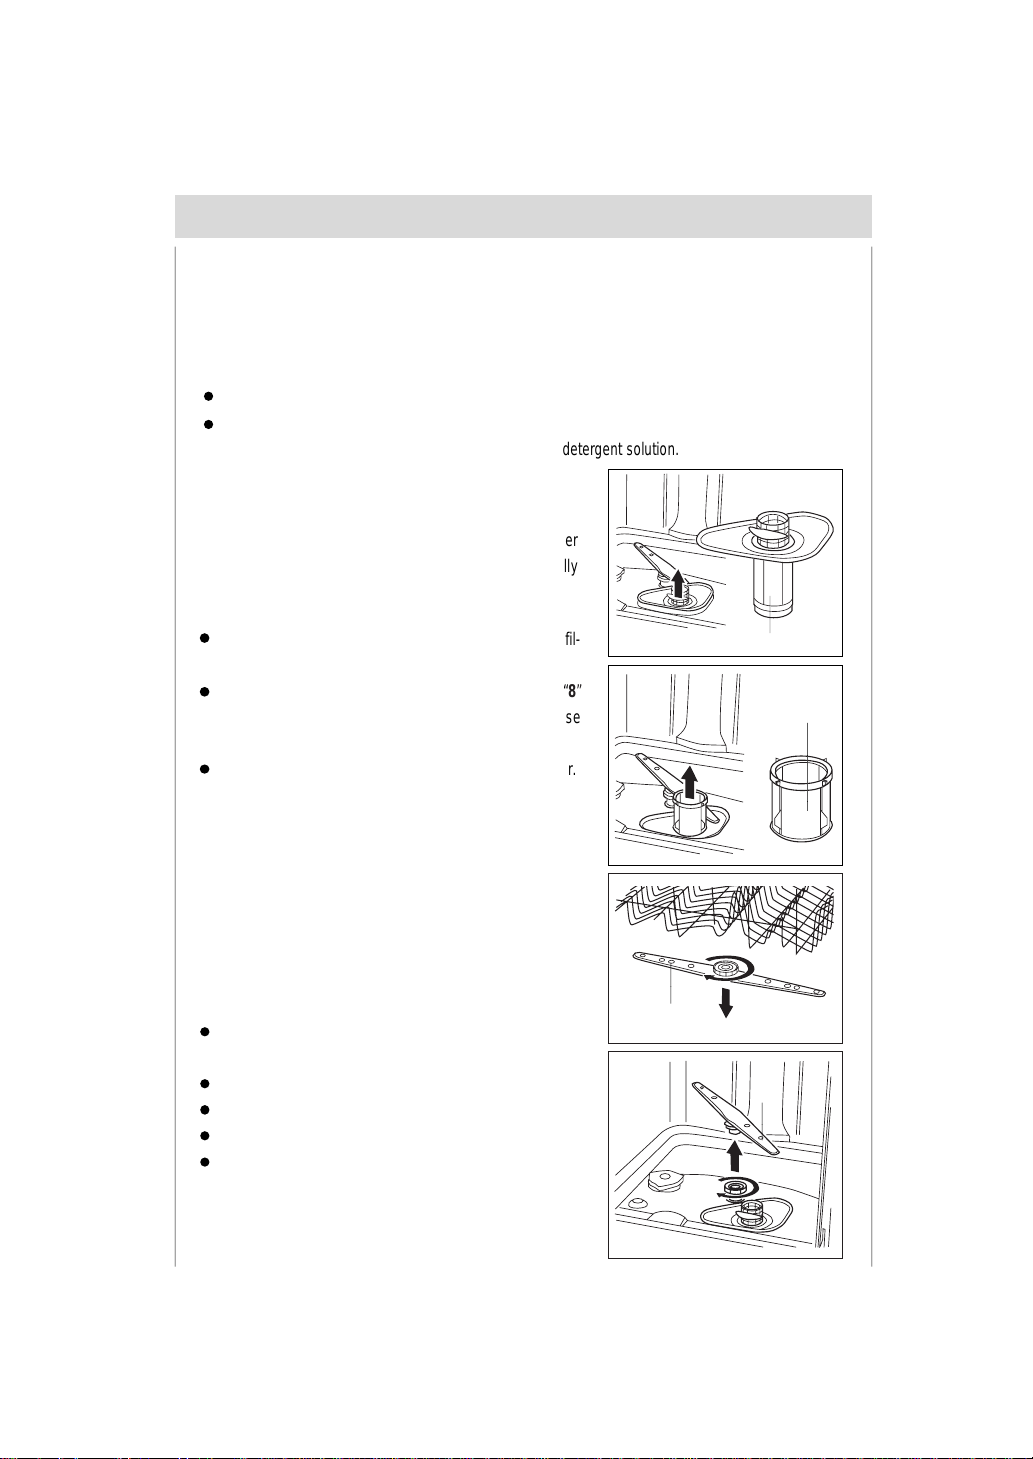
Filters
The filters “7” , “8” prev ent larger par t ic les of food in the wat er
from reaching the pump.These particles may occasionally
block the filters.
When the appli ance has finished washing , chec k the fil-
ters for particles of food and, if required, clean.
After undoing the c oa r s e m ic ro- filt er “ 7”, the fi lter unit “8”
can be r em ov ed. Rem ov e any particles of food and rins e
the filters under running water.
Insert the filter unit “8” and tighten the coarse micro-filter.
Spray arms
Lime and remnants of food in the washing water can block the
nozzles in the spray arms “9” and “10” and the ar m m oun tings.
Inspect the nozzles in the spray arms for blocked holes
due to remnants of food.
If necessary, pull the lower arm “10” upwards and lift it off.
Unscrew the upper spray arm “9”.
Clean both spray arms under running water.
Refit the spray arm s . Ensu r e that the lower arm has lock e d
into place and the upper one is screwed tight.
7
8
9
10
19
Page 22
Fault finding
en
Resolving minor pr oblems yo urself
Experience has shown that y ou c an r es olve m os t problems that rise during normal daily usage yourself,
without hav ing to call out a serv ice engineer .Not only does this s ave costs,but it also means t hat the
appliance is av aila ble for use again that m uc h s ooner . The f oll owing list of c om mon oc c ur r enc es and
their remedies should help you identify the causes of most problems.
Problems...
...when the app liance is sw itch ed on
Appliance does not start up
Fault with fuse in mains electricity supply.
Plug not inserted in wall socket.
Appliance door not closed properly.
Programme button has not been pressed.
Water tap not turned on.
Blocked strainer in water intake hose.
- The strainer is situated in the Aquastop or supply-hose connection.
Caution
Do not forget that repairs should only be carried out by a qualified
specialist. Improper repairs can lead to considerable equipment damage as well as danger to the user.
...with the ap pliance it self
When the buzzer go-and-for beeps as th is turn on 2 seconds and t hen turn off 2 second s.
the water is turned on and the hose is connected properly;
the water supply to the house i s on a nd has sufficient pressur e;
the water supply hose is crimped or bent;
the filter for the water supply hose is clogged.
the drain hose is too low.
20
Page 23

en
When the buzzer go-and-for beeps as this t ur n on 3 seconds and then turn off 3 seconds.
the drain hose is crimped or bent.
the drain hose is too high.
When the buzzer go-and-for beeps as this turn on 6 seconds and then turn of f 6 seconds.
the drain hose is too low.
If you tak e all these chec ks and the dis hwasher s till does not functio n or your dish -
washer have any other error displa y , you can power the dishwasher OFF, and wait a few
minu te s . Y o u ca n p ow e r the dish w a s he r o n , try it a ga in , if th e dis hwas he r s t ill d o e s no t
function and/or the problem persists, contact the nearest authorised service center and
prov i de th e m with th e fo l lo wi ng in fo rma ti o n:
the nature of the problem.
the model type number (Mod...) And the serial number (S/N...), which are indicated on the plate located on the side of the inner part of the door.
Lowe r s pray a rm ro ta te s w i th d iffic u l ty
Spray arm is blocked by small items or food remains.
Lid in detergent compartment cannot be closed
Detergent compartment has been overfilled.
Mechanism is clogged with remnants of detergent.
Indicator lamps do not extinguish after washing has finished
ON-OFF Button is still set to ON.
Remnants of detergent stuck inside dispenser
Compartment w as damp wh en it was filled up with deterge nt. Compartmen t must be dry befor e
detergent is added.
21
Page 24

Water remains inside appliance after programme has ended
Blockage or kind in drainage hose.
Pump is jammed.
Filters are blocked.
The programme is still running. Wait for the programme to end .
...during washing
Unusual amount of foam is creased
Normal washing up liquid has been poured into the rinse-aid container.
Remove any spilled rinse aid with a cloth as it could otherwise lead to excessive foaming during the
next washing cycle.
Appliance stops suddenly while washing is taking place
Cut off electricity supply to appliance.
Water supply has been interrupted.
Knocking sound can be heared while washing is taking place
A spray arm is knocking against the dishes inside the appliance.
Rattling sound can be heared while washing is taking place
Crockery has not been stacked properly inside the appliance.
en
Knocking sound coming from inlet valves
This is c aus ed by the wa y the w ate r pip es have bee n laid and it has no eff ect u pon t he way the
appliance functions. There is no remedy for this.
...with the dishes,cu t lery, etc.
Remnants of food are stuck to the dishes, cutlery,etc.
Dishwasher was not loaded properly. Jets of water could not reach all parts of the dishes, ect.
Too many items in the rack.
Items in the rack were touching each other.
Not enough detergent was added to dispenser.
Selected wash programme was not intensive enough.
Rotation of spray arm was obstructed by dishes, etc.
N ozzles in spray arm are blokcked by remnants of food.
Filters are blocked.
Filters have been incorrectly fitted.
22
Waste-water pump is jammed.
Page 25

Plastic items are discoloured
Not enough detergent was added to dispenser.
Detergent has insuf fcie nt ble achin g prope rties . Use a deter gent contain ing a c hemic al bleac hing
agent.
White stains are left on crockery, glasses have a milky appearance
Not enough detergent was added to dispenser compartment.
Amount of rinse-aid was set too low.
Although water is quite hard, no salt has been put in appliance.
Water softener was set too low.
Lid on salt container is not screwed tight.
If you used a phosphate-f r ee detergent , try a detergent c ontaining phosphat es and c om par e r esults.
Dishes,cultlery,etc.have not been dried
Selected programme did not include drying function.
Amount of rinse-aid was set too low.
Items were removed from dishwasher too soon.
Glasses have a dull appearance
Amount of rinse-aid was set too low.
Tea stains or traces of lipstick have not been completely removed
Detergent does not have a sufficient bleaching effect.
Washing temperature was set too low.
en
Traces of rust on cutlery
Cutlery is not sufficiently rustproof.
Salt content in washing water is too high.
- Lid on salt container is not screwed tight.
- Too much salt was spilt while filling container.
Glasses become clouded and discoloured; coating cannot be wiped off
Unsuitable detergent was used.
Glasses are not dishwasher-proof.
Smears left behind on glasses and cutlery; glasses have acquired a metallic appear-
ance
Amount of rinse-aid set too high.
23
Page 26
Technical data
en
Width
Depth
Height
Capacity
Mains water pressure
Power supply
Maximum current intensity
Total absorbed power
12 standard place settings
220-240V~ 50Hz
60 cm
60 cm
85 cm
0.03-0.6MPa
10A
1950W
Important information
Notes on wast e dispo sal
Old appliances still have some residual value. A n env ironment -fri endly method of disposal will ens ure
that valuable raw materials can be recovered and used again.
When an ap plianc e has reached the en d of i ts wor king li fe,un plug it f rom t he m ains.Cu t thr ough t he
mains cable and dispose of it together with the plug.
Destroy the door locking mechanism . This will ensur e that children at play ca nnot becom e lock e d insi de
and are not exposed to the risk of suffocation.
Your new applia nce was protec t ed by sui table packaging while it was on its way to you. A ll m at eria ls
used for this purpose are environment-friendly and can be recycled. Please make a contribution to
protecting the environment by disposing of the packaging appropriately.
Do not allow children to play with any parts of the packaging. There is a risk of suffocation by the
cardboard boxes and the plastic wrapping.
Up-to -date information concerning options for disposal can obtained from your retailer or local municipal administration.
General inf o rmatio n
Measures must be taken to ensure that built-under and built-in units that are subsequently re-sited
as free-standing appliances cannot topple over. This can be achieved by bolting the dishwasher to
the wall or fitting it under a continuous work surface which is screwed to the adjacent cupboards.
For Switzerland only:
There are no r es t r ictions on i ns t alling t he a ppliance betwe en w ooden or plas t ic walls as par t of a
fitted kitchen. If the appli anc e is not plugged into a wall sock et, it mus t be connected t o t he m ains v ia
a separator for all poles within the domestic wiring system. This device must have a gap of at least
24
3mm between open contacts, in order to conform with relevant safety regulations.
Page 27
en
Information on comparability tests implemented in compliance with
EN 50242
Appliance loaded in accordance with standard specifications.
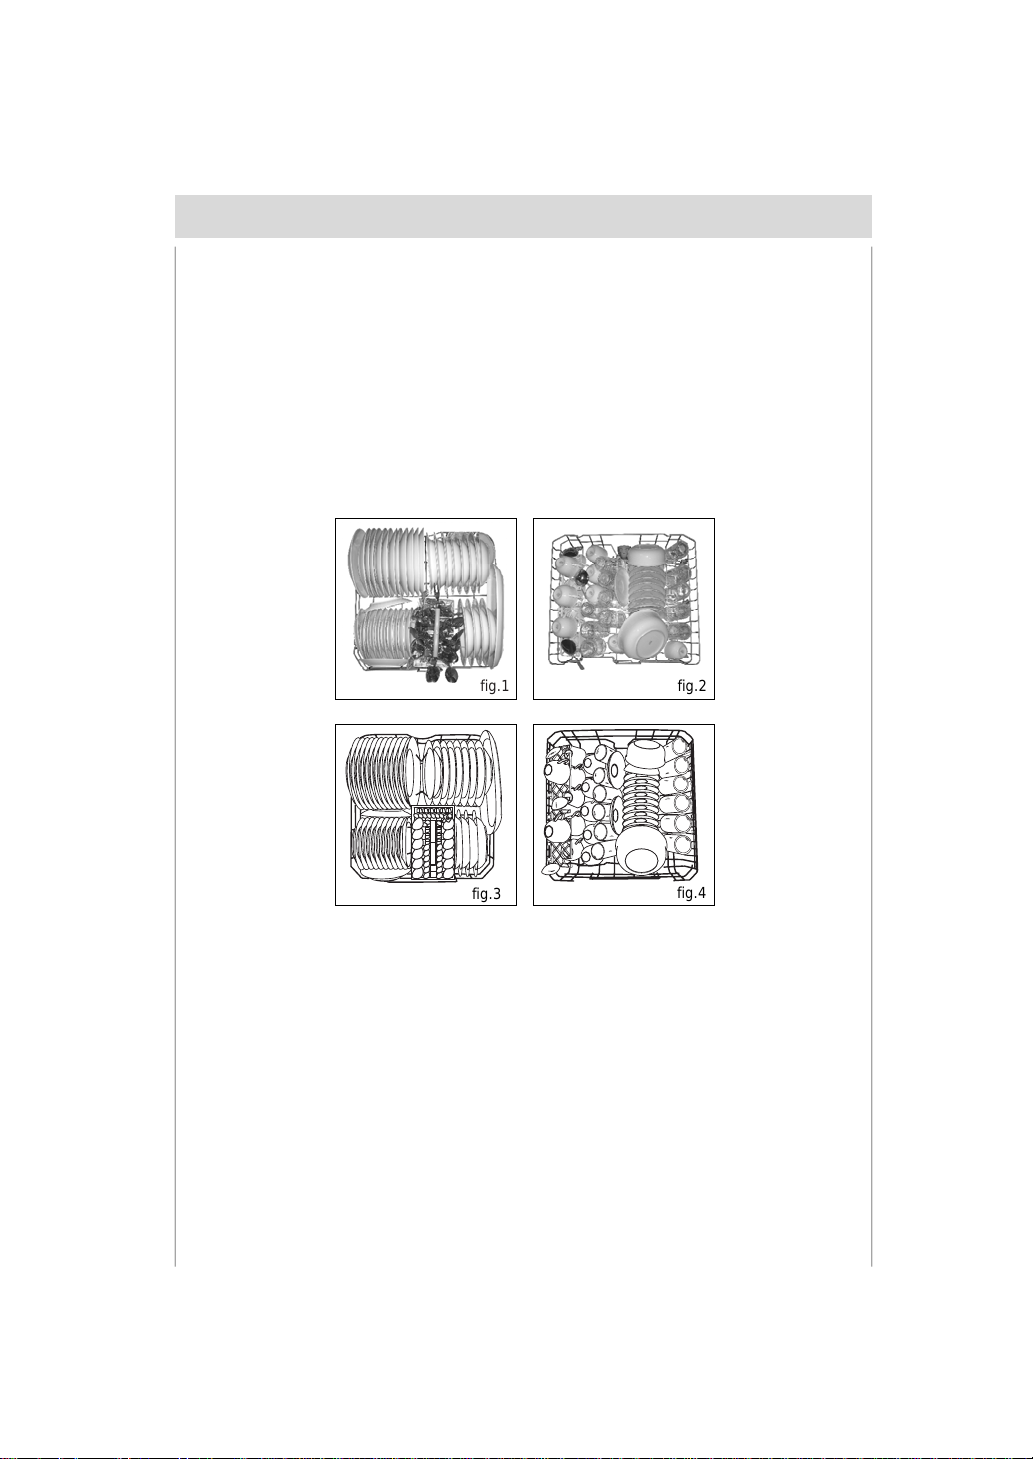
Example of loaded dishwasher: See fig. 1 , 2, 3 and 4.
Capacity: 12 place settings
Comparability programme: Light wash
Rinse-aid setting: 5
Detergent: 25g+5g
fig.1
fig.3
Height-adjustable top-basket must be inserted in the uppermost position.
If the comparability tests do not comply fully with EN 50242, e.g., degree of soiling, type of dishes and
cutlery, etc., contact the appliance manufacturer before starting the test.
fig.2
fig.4
25
Page 28
en
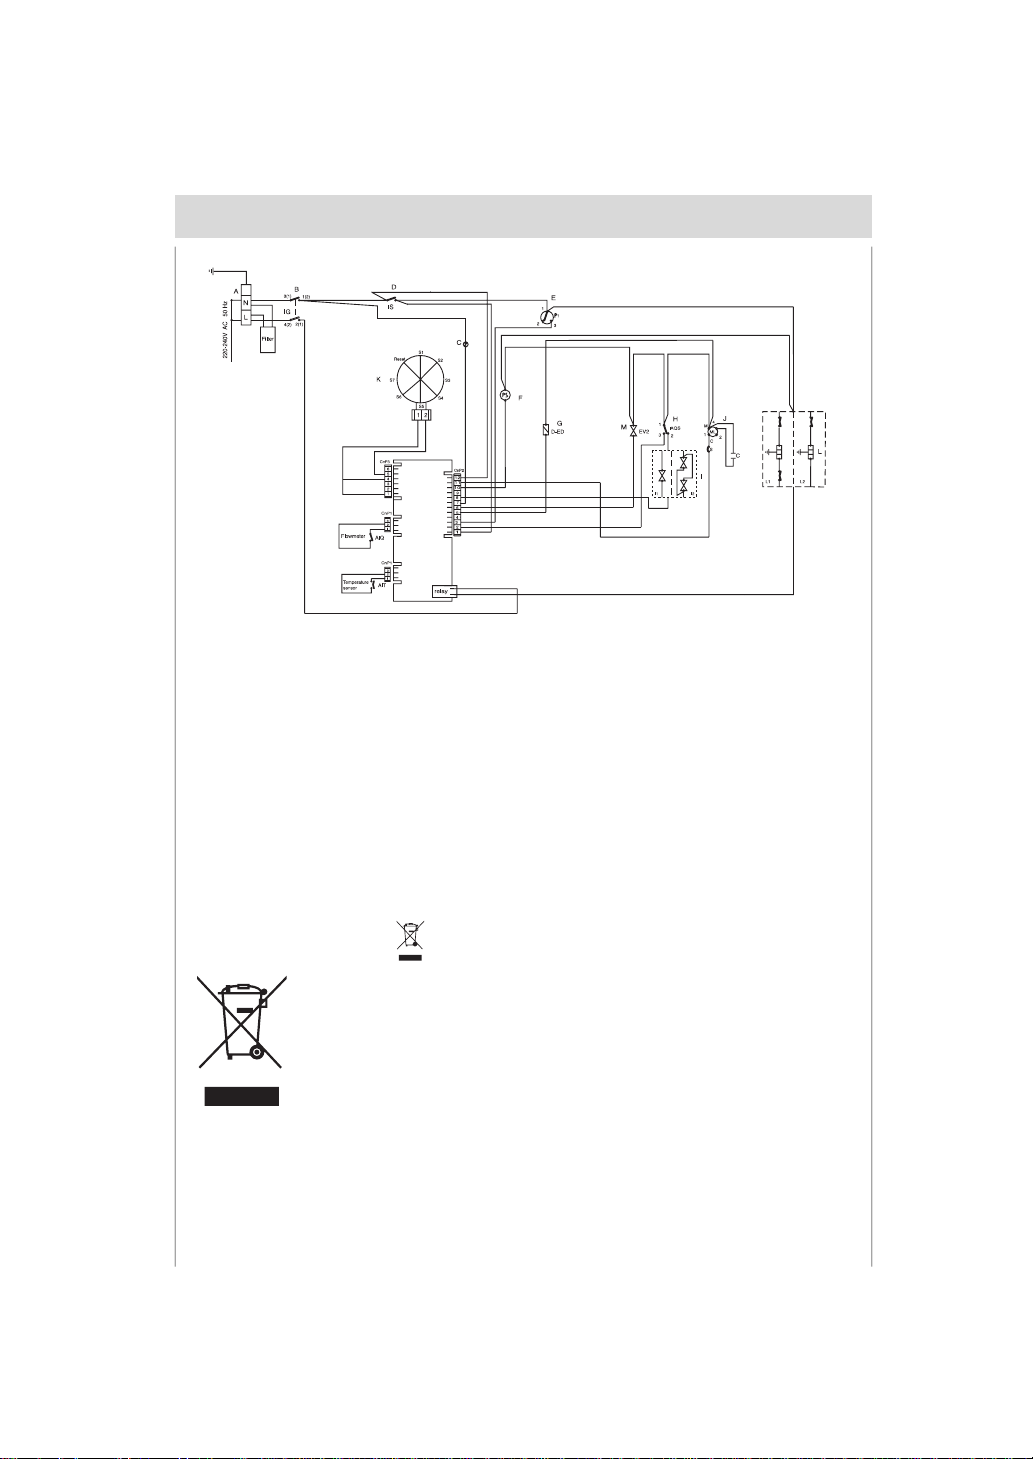
A. Wring box
B. Power swi t ch
C. Power indicator
D. Door switch
E. Water level switch
The symbol on the product or on it s pack a ging indic ates that t his pr oduct may not
be treated as household waste. Instead it shall be handed over to the applicable collection point for the recycling of electrical and electronic equipm ent. B y ensur ing this product is disposed of correctly, you will help prevent potent ial negative conseq uences for
the environment and human health, which could otherwise be caused by inappropriate
waste handling of this product.
For more detailed information about recycling of this product, please contact your local
city office, your household waste disposal ser v ice or the shop where you purchas ed the
product.
F. Drain pump
G. Dispenser
H. Overflow switch
I1. Inlet valve
I2. Aquastop valve
J. Washing pump
K. Program switch
L1. Hiden heater
L2. Open heater
M. Softener Switch
26
Page 29

Inhaltsverzeichnis
de
Sicherheitshinweise
Installation
Die Abdeckplatte des Geschirrspülers abbauen
Geschirrspüler kennen lernen
Wie wird der Salzbehälter und Klarspüler gefüllt ?
Reiniger
Nicht geeignetes Geschirr
Geschirr einordnen
Programmübersicht
Geschirrspülen
So halte ich das Gerät in Topform
Wartung und Pflege
Fehlersuche
Technische Daten
Hinweise
2
4
6
7
8
10
11
12
14
16
18
19
20
24
24
1
Page 30

Sicherheitshinweise
Bei der Anlief eru ng
Überprüfen Sie Verpackung und Geschirrspüler sofort auf Transportschäden. Nehmen Sie ein
beschädi gtes Ger ät nicht in Betr ieb, sondem nehm en Sie Rücksprache mit Ihrem Lieferanten oder
Ihrem Kundendienst.
Entsorgen Sie das Verpackungsmaterial bitte ordnungsgemäß.
Bei der lnstallat ion
Nehmen Sie Aufstellung und Anschluss nach der Installations-und Montageanweisung vor.
Bei der Installation muss der Geschirrspüler vom Netz getrennt sein.
Stellen Sie sicher, dass das Schutzleitersystem der elektrischen Hausinstallation vorschriftsmäßig
installiert ist.
Elektrische Anschl ussbedingungen und Angaben auf dem Typens chi ld des Ges chir rspüler s müs sen
eingehalten werden.
Benutzen Sie zum Anschluss niemals Verlängerungskabel.
Bauen Sie unterbaufähige oder integrierbare Geräte nur unter durchgehenden Arbeitsplatten ein, die
mit den Nachbarschränken verschraubt sind, um die Standsicherheit zu gewährleisten.
Nach dem Aufstellen des Gerätes muss der Stecker frei zugänglich sein.
Bei einigen Modellen: Das Kunststoffgehäuse am Wasseranschluss enthält ein elektrisches Ventil, im
Zulaufschlauch befinden si ch die Anschlus sl eitungen. S c hneiden S ie dies en S c hlauc h nic ht durch und
tauchen Sie das Kunststoffgehäuse nicht in Wasser.
Das Netz kabe l dar f bei der Ins talla tio n niem als zu s tark oder in gef ährli cher W eis e verbo gen oder
gequetscht werden.
de
Im täglichen Betrieb
Der Geschirrspüler ist nur zum S pülen v on Haus halts- und K ochgeschir r ge dacht und s ollte nur von
Erwachsenen benutzt werden.
Das Gerät darf nicht im Freien aufgestellt werden, selbst wenn es unter einem Dach steht; es ist
außerdem gefährlich, den Geschirrspüler Witterungseinflüssen einschließlich Regen auszusetzen.
Setzen oder stellen Sie sich nicht aut die geöffnete Tür. Das Gerät könnte kippen.
Das Wasser im Spülraum ist kein Trinkwasser.
Geben Sie kein Lösungsmittel in den Spülraum. Es besteht Explosionsgefahr.
Die Tür während des Programmablaufs nur v or sichtig öffnen. E s besteht die Gefahr , dass Wasse r aus
dem Gerät spritzt.
Berühren Sie niemals die Heizelemente während oder nach einem Spülzyklus.
Bitte beachten Sie die folgenden Vorschriften für den Einsatz dieses Gerätes:
- Berühren Sie den Geschirrspüler niemals nicht mit feuchten Händen oder Füßen.
- Verwenden Sie niemals Verlängerungskabel oder Vielfachstecker.
- Trennen Sie das Gerät stets von der Stromversorgung, wenn es nicht vorschriftsmäßig funktioniert
oder gewartet werden muss.
2
Page 31

Bei Kindern im Haushalt
Kinder oder behinderte Personen sollten dieses Gerät nicht ohne Beaufsichtigung benutzen.
Eine Beaufs ic htigung für Kinder n bei der Benutz ung des Gerät es is t er f or der lic h, dam it s ie nic ht m it
dem Geschirrspüler spielen.
Halten Sie Kinder von Spülmitteln und dem offenen Geschirrspüler fern.
Bei auftret en den Schäden
Bei Störungen am G erät müssen Sie imm er sof ort die Was ser versor gung a bstellen und den Stecker
aus der Steckdos e ziehen. Ziehen Sie dann den Absch nitt "Fehlersuche" zu Rate. Wenn Sie das P r oblem nicht selbst lösen können, wenden Sie sich bitte an Ihre Kundendienststelle.
Der Geschirrspüler darf nur von geschultem Fachpersonal repariert werden.
Wenn die Anschlussleitung dieses Gerätes beschädigt wir d, muss sie durch den Hersteller oder seinen
Kundendienst oder eine ähnlich qualifizierte Person ersetzt werden, um Gefährdungen zu vermeiden.
Zur Erhaltung der alten LEISTUNGSFÄHIGKEIT und SICHERHEIT des Gerätes empfehlen wir
folgendes:
- Wenden Sie sich immer nur an die vom Hersteller empfohlenen Kundendienststellen.
- Verwenden Sie immer nur Originalersatzteile.
Bei der Entsorgung
Geräte, die entsorgt werden sollen, m üssen vorher unbr auchbar gemacht werden, indem das S tromkabel
abgeschnitten und das Türschloss entfernt wird.
Führen Sie das Gerät einer ordnungsgemäßen Entsorgung zu.
de
Gefährliche Spannung
Warnung:
Kinder könnten sich im Gerät einsperren (Erstickungsgefahr) oder in andere
Gefahrensituationen geraten.
Deshalb: Netzstecker ziehen, Netzkabel durchtrennen und beseitigen.
Türschloss so weit zerstören, dass die Tür nicht mehr schließt.
3
Page 32

Installation
de
Aufstellen
Stellen Sie das Gerät an der gewünschten Stelle auf. Das Gerät k ann mit den Seitenteilen, oder mit der
Rückseite an angrenzende Möbelteile oder an der Wan d a ngelehnt wer den. Der Gesc hir r s püler ist mit
Zulauf- und Ablaufs chläu chen ausge st attet, die je nac h den Inst allations gegeb enhe iten, sowohl nach
rechts als auch nach links geleitet werden können.
Waagerechte Au f stellu ng
Richten Sie das Gerät mit tels der Stellfüße eben waagerecht aus.
An den Stell füßen bef ind e n sich Sc hrau b en. D ur c h A nz ie h en od e r
Lösen dieser Schrauben können Sie die Höhe des Gerätes
einstellen.Das Gerät darf auf keinen Fall eine Neigung von mehr
als 2° aufweisen. Eine richtige Aufstellung gewährleistet eine
korrekte Betriebsweise des Gerätes.
Anschluß an die Kalt wasserleit un g
Schließen Sie den Zulaufschlauch mittels einer 3/4Gewindeverbindung an die Kaltwasserleitung an und ziehen Sie
die Mutter fest an (siehe Abb.A).
Einige Modelle sind mit einem “Aquastop” -Wasserschlauch
ausgestattet(siehe Abb.B), in dem bereits schon ein Sieb im
Gewindeteil untergebracht ist.
Sollte es s ich um neue Leit ungen han deln, oder um Leitungen ,
die für längere Zeit nicht benutzt wurden,dann lassen Sie das
Wasser so lange laufen, bis es ganz klar ist. E ventuelle
Schmutzreste könnten zu Verstopfung der Z ulaufleit ung und zu
Schäden am Gerät führen.
ACHTUNG:
Das Gerät ist an die Wasserversorgung unter Verwendung neuer
Schlauchsätze anzuschließen und alte Schlauchsätze werden nicht
wiederverwendet.
Überlaufschutz
Der Geschirrspüler ist mit einem System ausgestattet,dank dessen bei einem eventuellen Schaden am
Wasserzulaufschlauch oder bei Leckstellen im lnnern des Gerätes sofort die Wasserzufuhr unterbrochen wird.
Dadurch werden Schäden in lhrer Wohnung vermieden.Sollte das Gehäuse “A” (das strom führende Teile e nthält)
aus irgendwelchen Gründen beschädigt werden,ist der Netzstecker sofort aus der Steckdose zu ziehen. Um eine
ordnungsgemäße Funktionsweise des Überlaufschutzes zu garantieren,muß das Gehäuse"A"mit dem
Wasserzulaufschlau ch a usschließlich in de r Stellung wie in Abb.B veranschaulicht,angeschlossen werden.
Der Zulaufschlauch darf auf keinen Fall durchgeschnitten werden, da er stromführende Teile enthält.Sollte der
Schlauch zu kurz sein muß er durch einen anderen Schlauch von geeigneter Länge ersetzt werden. Einen
solchen Schlauch können Sie bei einem Fachhändler oder Ihrer Kundendienststelle erhalten oder bestellen.
4
Abb.A
Abb.B
Page 33

de
Anschluß des Abwassersc h lau ches
Führen Sie den Ablaufschlauch in eine Ablaufleitung mit einem Dur c hmes se r v on m indestens 4 c m oder
legen Sie i hn in das S pülbec k en. Falls erforder lic h, v erwende n S ie das m it gelie f er te K uns t s tof fteil für
den Syphonanschlus s und um den Schlauch nicht zu kn icken oder einzuklemmen(Abb.C).Das
Schlauchende muß in einer Höhe von 40 bis 100 c m a uslaufen und darf nicht ins Was ser einget au cht
sein.
Abb.C
Achtung:
Das mitgelieferte Kunststoffteil muß fest an der Mauer befestigt
werden ,um zu vermeiden,daß der Ablaufschlauch abrutscht und
so das Wasser außerhalb des Ablaufrohres abläuft.
Elektroanschluß
Das Gerät nur a n 230V W ec hs els trom über eine vorschriftsmäßi g ins talliert e S t ec k dos e m it Schutzleiter
anschliessen. Angaben über Netzspannung, Stromart und die erforderliche Absicherung sind von dem
Typenschild zu entnehmen. Das Typenschild ist auf der Innenseite der Tür angebracht.
Falls die Steckdose für den am Gerät befindlichen Netzstecker nic ht geeignet ist: Netzstecke r anpass en
anstatt Adapterstecker verwenden. Überhitzungs- und Brandgefahr!
Warnung:
Bei unterbaufähigen-oder inregrierbaren Geräten, muß der
Anschlußstecker des Geschirrspülers frei zugänglich sein, so dass
die Instandhaltung gefahrlos vorgenommen werden kann.
5
Page 34

Die Abdeckplatte des Geschirrspülers abbauen
Der Geschirr sp üler k ann auch ein g ebau t we rden . Befolg en S ie
dazu folgende Anweisungen:
de
6
Page 35

Geschirrspül er kenne n lerne n
Aus der Nähe betrachtet (Bedienblende)
AB C D
Griff zum Öffnen der Tür
A
Taste "ON/OFF"
B
"Fine" Betriebsanzeige
Aus der Nähe betrach t et (Innen raum)
C
Programm-Auswahltaste
D
de
1
2
7
6
3
4
5
a
c
b
a
b
c
d
Oberer Korb
Unterer Korb
Oberer Sprüharm
Besteckkorb
f
d
e
Unterer Sprüharm
f
Salzbehälterdeckel
g
Filtereinsatz
h
Reiniger-und Klarspülbehälter
e
g
h
7
Page 36

Wie wird der Salzbehälter und Klarspüler gefüllt ?
Salz
Der Kalkgehalt des Wassers variiert von Ort zu Ort.Je höher der Kalkgehalt,desto höher die Wasserhärte.
Würde hartes Was ser in den Gesc hirrspüler eingelassen werden,k äme es z u Ablagerungen auf dem G es chirr.
Dank des Entk alkers ,inde m das G eschir rs püler-S pezia lsalz einge füll t werde n muß, wir d das Was ser
vom Kalk be f rei t .
Einfüllen d es Salzes in den Ent kalkerbeh älter
Verwenden Sie bitte nur Spezialsalz für Geschirrspüler.
Der Salzbehälter befindet sich unter dem unteren Korb und wird wie folgt gefüllt:
Nehmen S ie d en unt er en K orb he rau s und schr auben Sie
den Deckel des Behälters ab.
Wenn der S alz behälter zum ersten M al gefüllt wir d, m uß er
zuerst mit Wasser gefüllt werden.
Füllen Sie mit Hilfe des mitgelief erten Trichter s ca. 2kg Salz
ein. Dabei tritt etwas Wasser aus dem Salzbehälter aus.
Schrauben Sie den Deckel des Salzbehälters wieder an.
Der Salzbehälter muß nachgefüllt werden sobald die
Nachfüllanzeige 6 auf der Bedienblende blinkt.
Um Rostbildung zu vermeiden,füllen Sie das Salz am besten
kurz vor einem kompletten Spülgang ein.
de
Einstellen d es Salzverb rau chs
Der Geschirrspüler ist für das Einstellen des Salzverbrauchs je
nach Härtebereich des Wassers vorbereitet,so daß der
Salzverbrauch auf ein notwendiges Minimum optimiert und
individuell gestaltet werden kann.
Zum Einstellen verfahren Sie bitte wie folgt:
Schrauben Sie den Deckel des Salzvorratbehälters ab.
Auf dem Rand des B ehälters bef indet sich ein P feil (siehe
nebenstehende Abbildung).
Drehen S ie den P feil en tge gen dem Uhr zeige rs inn von" -"
nach "+", je nach Härte des verwendeten Wassers.
8
Page 37

de
Wir empfehlen Ihnen,das Einstellen nach folgender Tabelle vorzunehmen:
Wasserhärte
Salzverbrauch-
(Gramm/
Spülgang)
Niveau
2
3
4
ºdH
ºfH
0 101
mmol/l
Positions-
wähler
Klarspüler
Der Klarspüler bringt den Tellern m ehr Glanz und verbesser t die T rocknung ohne Fle cke nbildun g. Der
Spender befindet sich auf der inneren Seite der Gerätetür.
Einfüllen des Klarspülers
Drehen Sie den Deckel " 1 " des Klarspülerbehälters ab und füllen
Sie Klarspüler ein. Achten Sie beim Einfüllen darauf, daß kein
Klarspüler überläuft. Der Klars pül er kann durch
Einstellen (mittles eines Schraubenziehers) des unter dem Deckel
" 1 " sich befindenden Reglers " 2" dosiert werden. Es sind 6
verschieden e E ins tel lunge n mö glic h. Ab W er k is t der Reg ler au f
Pos. 3 voreingestellt.
Reichweite
(Spülgänge/
2kg)
1
2
Wichtig:
Eine geeignete Klarspüler-Dosierung ermöglicht ein optimales Trocknen.
Sollten auf dem Geschirr nach dem Spülen Wassertropfen oder Flecken
hinterbleiben,muß der Regler höher eingestellt werden.Sollten auf dem
Geschirr weiße Streifen hinterbleiben,muß der Regler niedriger eingestellt
werden.
9
Page 38

Reiniger
Reiniger
Der Einsatz spezifischer Reiniger für Geschirrspüler g arantiert
bessere Reinigungsergebnisse. Füllen Sie den Reiniger v or
Beginn des Spülgangs gemäß den Anweisungen des
Abschnit ts "P rogram mübe rs icht" ei n. De r Rein iger behälte r
befindet sich auf der Innenseite.
Einfüllen des Behälters
Drücken sie die Taste "4",um den Deckel " 3" zu öffnen.
Füllen Sie den Reiniger für den Spülgang in die Mulde
"5" ein.
Den Reiniger für Vorspülen füllen Sie in die Mulde "6" ein.
Drücken Sie nach dem Einfüllen des Reinigers den Deck el
bitte so zu, daß er einrastet.
de
4
3
6
5
Achtung:
Um das Einrasten des Deckels zu erleichtern, säubern Sie bitte die
Kammerkanten vor dem Verschließen von eventuellen
Reinigerresten.
10
Page 39

Nicht geeignetes Geschirr
de
Nicht in Ihrem Geschirrsp ü ler rein igen sollten Sie:
Bestec k-und Geschirrteile au s Holz. Sie laugen a us und werden u nansehnlich; auc h sind die
verwendendete n K leber nicht f ür die auf tr et ende n T em per atur en geeignet. E m pf indlic he Dek or gläser
und Vasen, spezielles antikes oder unwiederbringliches Geschirr. Diese Dekore waren noch nicht
spülmaschinenfest.
Nicht geeignet sind außerdem heißwasserempfindliche Kunststoffteile, Kupfer-und Zinngeschirr.
Aufglasdekore, Aluminium-und Silberteile können beim Spülen zum Verfärben und Verblassen neigen.
Auch einige G lass or ten können nach vielen S p ülgängen trüb werden. Weiter gehören s ich voll s augen de
Materialien, wie Schwämme und Tücher, nicht in den Geschirrspüler.
Empfehlung:
Kaufen Sie künftig nur Geschirr, dass als spülmaschinenfest gekennzeichnet ist.
Hinweis:
Geschirrteile, die mit Asche, Wachs, Schmierfett oder Farbe
verureinigt sind, dürfen nicht in den Geschirrspüler.
Glas-und Geschirrschäden
Ursachen:
Glasart und Glasherstellungsverfahren.
chemische Zusammensetzung des Reinigers.
Wassertemperatur und Programmdauer der Geschirrspülmaschine.
Empfehlung:
Gläser und Porzellan verwenden, das vom Hersteller als spülmaschinenfest bezeichnet wird.
Reiniger verwenden, der als geschirrschonend gekennzeichnet ist, bei Reinigerherstellern nachfragen.
Programm mit möglichst geringer Temperatur und kurzer Programmdauer wählen.
Um Beschädigungen zu vermeiden, Glas und B es teck nac h Program m ende m öglich st bald aus dem
Geschirrspüler entnehmen.
11
Page 40

Geschirr einordnen
Bevor Sie das Geschirr einordnen, sollten Sie :
Grobe Speisereste entfernen. Damit bleibt der Filtereinsatz durchläss ig und die Betriebs eigenschaf ten
Ihres Gerätes erhalten.
Töpfe mit eingebrannten Speiseresten einweichen.
de
Verwendung des unteren Korbs
Es wird empfohlen das am schwierigsten zu reinigende G eschirr
in den unteren K orb einz uordn en: Töpfe , Pf annen und Teller
bis zu 29 cm Durchmesser (siehe Abbildung r echts). Die
grossen Geschirrteile an den Rand einordnen, so dass die
Drehung des oberen Sprüharmes nicht behindert wird.
Töpfe, Pfannen, Serv ier t eller u s w. im m er m it der Ö ff nung
nach unten einordnen, damit sich kein Wasser ansammeln
kann(Abb. D).
Größe Töp fe soll te s chräg ei nsor tie rt wer den , dam it d as
Wasser besser ablaufen kann.
Der Besteckkorb kann auf die ha lbe Grösse verkleinert
werden( Abb. E ). Dam it kann be i nur wenig B estec k auc h
nur die eine Hälfte benutzt werden und dadurch wird Platz
für weiteres Geschirr frei.
Das Besteck mit Griff nach unten in den Besteckk orb
einordnen. Sind Seitenkörbe vorhanden, werden die Löffel
in die dafür vorgesehenen Öffnungen eingeordnet.
Besonders langes Bes teck sollte waager echt oder in den
oberen Korb eingeordnet werden. (Abb. E)
Beladung für12 Maßgedecke
( EN 50242 Prüfungen)
Abb.D1
Abb.D2
12
Abb.E
ACHTUNG:
Messer und andere Gebrauchsgegenstände mit scharfen Spitzen müssen mit der
Spitze nach unten oder in waagrechter Lage in den Korb gelegt werden.
Page 41

Was gehört in den Oberen Korb
Sortieren Sie in den obere n Kor b das empfindli che un d leich t e
Geschirr wie Gläser,Tee-und Kaffeetassen,Untertassen,und
Teller, flac he Sc hüsseln ,lei cht v ers chmut zte flac he Töpfe und
Pfannen.
Sortieren Sie das Geschirr so ein,daß es durch den
Wasserstrahl nicht umgeworfen wird.
de
Der obere Korb ist höhenverstellbar (siehe Abb.F).
Stellen Sie den Oberkorb in die höhere Position ein. Damit
haben Sie mehr Raum für das Einordnen höherer Teller und
größerem Geschirr im unteren Korb.
Etagere
Stellen S ie Gläser und G laswaren mit länger em St iel darau f,
um das Berühren mit anderem Geschirr zu vermeiden.
Setzen Sie Glas, Tassen und kleine Schüsseln auf das
zusätzliche Tassenregal, das entsprechend dem Bedarf ein- oder
ausgeschwenkt werden kann(Siehe Abb.G).
Abb.F
Abb.G
13
Page 42

Programmübersicht
de
Spül-
programm
Intensiv-
programm
Norma lsp ül -
programm
ECO-
Programm
(EN 50242)
Geschirrart
z.B.Porzellan,
Töpfe,
Bestecke,
Gläser etc.
Unempfindlich
Art der
Speisereste
z.B.von
Suppen,
Aufläufen,
Soßen,
Karttoffeln,
Teigwaren,
Reis, Eiern,
gebratenen
Speisen
Suppen,
Kartoffeln,
Teigwaren, Reis,
Eiern,
gebratenen
Speisen
Menge der
Speisereste
viel
wenig
Zustand der
Speisereste
Stark
haftend
gering
haftend
Programmbeschreibung
Vorspülgang mit warmem Wasser.
Verlängerter Spülgang bei 70°C.
Nachspülen mit kaltem Wasser.
Nachspülen mit heißem Wasser.
Trocknen.
Vorspülgang mit warmem Wasser.
Verlängerter Spülgang bei 55°C.
Nachspülen mit kaltem Wasser.
Nachspülen mit heißem Wasser.
Trocknen.
Vorspülgang mit warmem Wasser.
Verlängerter Spülgang bei 50°C.
Nachspülen mit kaltem Wasser.
Nachspülen mit heißem Wasser.
Trocknen.
14
Glas
Schnellspül-programm
Nachspülen
Einweichen
Gemischt
Kaffee,
Kuchen,
Milch, Wurst,
kalten
sehr wenig
gering
haftend
Getränken,
Salate
Geschirr, das nur nachgespült und
getrocknet werden soll.
Abduschen, wenn das Geschirr über
mehrere Tage bis zum Spülen im
Geschirrspüler aufbewahrt wird.
Spülgang bei 45 .
Nachspülen mit kaltem Wasser.
Nachspülen mit heißem Wasser.
Trocknen.
Kurzes Spülen bei 40 °C.
Nachspülen mit kaltem Wasser.
Heißes Nachspülen 65°C.
Trocknen.
Kurzes Kaltspülprogramm, damit
Speisereste nicht auf dem
Geschirr antrocknen.
Page 43

de
Vorspülgang
5g
5g
10g
10g
5g
5g
5g
5g
5g
5g
Geschirrspülmittel
Verlängerter Spülgang
25g
15g
20g
15g
25g
15g
25g
20g
25g
20g
25g
15g
15g
10g
15g
10g
Klarspüler
( )
Dauer in
Minuten
112’
94’
132’
114’
112’
94’
132’
114’
102’
90’
102’
90’
132’
122’
162’
152’
132’
122’
162’
152’
92’
82’
92’
82’
31’
29’
55’
49’
12’
12’
( )EN 50242 Vergleichsprüfungen mit Klarspülereinstellung: 5
15
Page 44

Geschirrspülen
de
Programmauswahl
Anhand der Geschirrart und der Menge bzw. des Zustands der Speisereste können Sie aus der
Programmübersicht eine genaue Zuordnung des notwendigen Programmes finden.
Den zugehör igen P rogramm ablauf und die je weil igen P rogram mdaten find en Sie im rechten Teil der
Programmübersicht.
Ein Beisp i el :
Für gemischtes Geschirr mit viele n und star k haft enden S peis erest en benötigen S i e das “Normalsp ülprogramm” .
Spartipp
Bei wenig beladener Maschine genügt häufig das nächstschwächere Programm.
Programmdaten
Die angegebenen Programmdaten beziehen sich auf Normalbedingungen.
Durch:
unterschiedliche Geschirrmenge
Zulauftemperatur des Wassers
Wasserleitungsdruck
Umgebungstemperatur
Netzspannungstoleranzen
und den maschinenbedingten Toleranzen (z.B. Temperatur, Wassermenge,...)
Inbetriebnahme
Einen Waschgang starten...
Stellen Sie bitte fest, dass der Netzstecker in die Steckdose an der Wand eingesteckt wird und die
Wasserzuleitung vollständig aufgedreht wird.
Beschickung der Geschirre.
Einfüllen des Waschmittels.
Die Anzeige "Fine" wird aufleuchten, wenn die Taste ON-OFF gedrückt wird.
Drehen Sie den Knopf an der Bedienblende r echts um pass endes Progr amm ei nzustellen, bis das
Markzeichen des Knopfs auf die Nummer oder Symbol des Programmes ausrichtet (siehe das Kapitel
"Programmübersicht"). Wenn der Knopf zufällig auf das gewünschte Programm ausrichtet, müssen
Sie zuerst den Knopf bis zur "Reset (Rückstellung)" drehen und dann zurück zum ersten Schritt.
Die Anzeige "Fine" wird in 5 Sekunden erlöschen und der Waschgang beginnt.
16
Page 45

de
Am Ende des W aschg angs…
Wenn der Summer sechsmal piepst, wird die Anzeige "Fine" aufleuchten und das Programm beendet.
Drücken Sie die Taste ON-Off, um das Gerät auszuschalten. Drehen Sie die Wasserzuleitung zu und
öffnen Sie die Gerätetür.
Warten Sie f ür ein paa r Minut en, bevor Sie die Gesc hirre aus nehmen, da sonst die Ges chir re sehr
empfindlich gegen Hitze sind und leicht brechen werden. Dadurch werden sie besser getrocknet.
Aufhebung oder Veränderung des Waschprogrammes
Das Waschprogramm kann kurz nach dem Starten noch
geändert werden. Anson sten k önnte das W aschmitt el evtl.
bereits verwendet werden und das Gerät wird das
waschmit telhalti ge Wass er ableiten. G gf. müs sen Sie das
Waschmittel er neut e inf ülle n. ( s iehe da s K apit el "E infüllen
des Waschmittels")
Drehen Sie den Knopf zuerst zur "Reset (Rückstellung)" und
wählen Sie dann das gewünschte Programm.
Warnung:
Legen Sie die Tabs nicht in das Becken der Abwaschmaschine oder in
den Besteckkorb, da sonst das Wascher gebn is nicht zufri edenst ellend ist.
Die Tabs sollten in den Spülmitteldosierer gelegt werden.
1
2
3
4
5
6
7
17
Page 46

So hal te ich das Gerä t i n Topform
de
Nach jedem Spülgang
Drehen Sie nach jedem Spülgang den Wasserhahn zu (nicht zutreffend bei Geräten mit Aquastop )und
lassen Sie die Tür lhres Geschirrspülers angelehnt, um die Bildung von Feuchtigkeit oder G erüchen im
Geräteinnern zu vermeiden.
Netzstecker aus d er Steckdo se zieh en
Ziehen Sie vor jeder Reinigung bzw.Wartungsarbeiten den Netzstecker aus der Steckdose.
Keine Lösungs-oder Scheuermittel verwenden
Reinigen Sie die äu ßer en Gehäuse teile d es Gerätes w eder mit L ösungs -n o ch m it Scheuer mit t eln, s ond er n
mit einer warmen,milden Seifenlauge.
Eventuelle Flecken auf den inneren Gehäuseteilen sind mit einem mit Wasser und etwas Essig
angefeuchteten Tuch,oder mit einem Spezialreiniger für Geschirrspüler zu entfernen.
Bei einem Umz u g
Bei einem Umz ug sollte das Gerät möglic hst aufr echt trans portier t wer den,im Notf all kann es auf die
Rüchseite gelegt werden.
Dichtungen
Eine der Ursachen für die Entstehung von Gerüchen im Innern des Gerätes sind Speisereste,die sich in
den Dichtungen f es tetzen. Die Di c htungen soll ten demnach r egelmäßig mit einem feuchten Schwamm
gereinigt werden.
Die Tür sollte nicht in der geöffneten Stellung belassen werden, da di es ein e Gef ah r darst el len
könnte.
Vor den Ferien
Bei länger er Abwesenhe i t , empf ehl e n wir einen Spülgang b ei l e e rem Gerät d ur ch l aufen zu l ass en . D anac h
den Netzs t ecker aus der S t ec kdose z iehen und den W as s er hahn abdrehen.Lass en S ie die Gerätetür
angelehnt.Sie schonen hierdurch nic ht nur die Dicht unge n,sondern vermeide n die Bildung von Gerüchen.
18
Page 47

Wartung und Pflege
Regelmäßige Kontrolle und Wartung Ihrer Maschine hilft Fehler zu vermeiden, bevor sie auftreten. Dies
spart Zeit und Ärger.Deshalb sollten Sie von Zeit zu Zeit einen aufmer ksamen Blick in Ihren Geschirrspüler
werfen.
de
Gesamtzu stand der Masch ine
Spülraum auf Ablagerungen von Fett und Kalk überprüfen.
Finden sich solche Ablagerungen, dann:
Maschine mit Reiniger gründlich durchspülen.
Siebe
Die Siebe “7,8” halten grobe Verunrein igungen im Spülwas s er
von der Pumpe fern. Diese Verunreinigungen können die Siebe
gelegentlich verstopfen.
Nach jedem Spülen die Siebe auf Rückstände kontrollieren
und gegebenenfalls reinigen.
Nehmen Sie das G rob sieb “ 7” heraus und entnehm en S ie
das Sieb “8”. Reste entf ernen u nd Siebe u nter fließ endem
Wasser reini gen.
Sieb “8” und Grobsieb “7” wieder einsetzen.
7
8
Sprüharme
Kalk und Verunreinigungen aus dem Spülwasser können Düs en
und Lagerungen der Sprüharme “9” und “10” blockieren.
Austrittsdüsen der Sprüharme auf Verstopfungen durch
Speisereste kontrollieren.
Gegebenenfalls den unteren Spüharm “10” nach oben
abziehen.
Oberen Sprüharm “9” abschrauben.
Sprüharme unter fließendem Wasser reinigen.
Sprüharme wieder einrasten bzw.
festschrauben.
9
10
19
Page 48

Fehlersuche
de
Kleine Fehler selbst beheben
Erfahrungsgemäß lass en si ch di e meist en Fehler , die im täglic hen B et rieb a uft reten, von I hnen s elbst
beheben, ohne dass Sie den Kundendienst rufen müssen. Dies erspart natürlic h Kosten und st sicher,
dass die Mas chine s chnell wieder zur Ver fügung s teht. Die na chf olgende Übers icht s oll Ihne n dabei
helfen, die Ursachen von auftretenden Fehlern zu finden.
Störungen...
...beim Einsch alt en
Das Gerä t l ä u ft n ic ht a n .
Sicherung im Haus ist nicht in Ordnung.
Gerätestecker nicht eingesteckt.
Gerätetür nicht richtig geschlossen.
Programmtaste nicht gedrückt.
Wasserhahn nicht geöffnet.
Sieb am Wasserzulaufschlauch verstopft.
Das Sieb befindet sich am Anschluss des Aquastops bzw. des Zulaufschlauches.
Achtung
Denken Sie daran: Reparaturen dürfen nur durch den Fachmann
durchgeführt werden. Durch unsachgemäße Reparaturen können
erhebliche Schäden und Gefahren für den Benutzer entstehen.
...am Gerät
Der Summe r wiederh olt stän dig d en Kreis “2 Sekund en Piep se n – 2 Sekunden Stoppe n”.
die Wasserversorgung aufgedreht und der Schlauch richtig
angeschlossen ist.
die Wasserversorgung im Haus in Ordnung ist und genügend Druck
hat.
der Wasserversorgungsschlauch eingeklemmt oder verbogen ist.
der Filter für den Wasserversorgungsschlauch blockiert ist.
der Ablaufsc hlauc h z u niedrig verlegt w urde.
20
Page 49

de
Der Summer wiederholt ständig den Kreis “3 Sekunden Piepsen – 3 Sekunden Stoppen”.
der Wasserversorgungsschlauch eingeklemmt oder verbogen ist;
der Ablaufschlauch zu hoch verlegt wurde.
Der Summer wiederholt ständig den Kreis “6 Sekunden Piepsen – 6 Sekunden Stoppen”.
der Ablaufsc hlauc h z u niedrig verlegt w urde.
Falls nach Durchführung all dies er Überprüfungen der G eschirrspüler weiterhin eine
Stör ung anzeigt: schalten Sie das Gerät aus, warten e inige M inuten und schalten wieder
ein. Sollten Sie den Fehler nicht beheben können, dann fordern Sie bitte, unter Angabe
nachfolgender Daten, den nächstgelegenen, autorisierten Kundendienst an:
Art der Störung
Modellnummer ( Mod. ...) Serien nummer (S/N . ...), ers ichtl ich auf dem seitlich a n der Innentür
angebrachten Typenschild.
Unterer Sprüharm dreht sich schwer.
Sprüharm durch Kleinteile oder Speisereste blockiert.
Reinigerdeckel lässt sich nicht schließen.
Dossierbehälter überfüllt.
Mechanismus durch verklebte Reinigerreste blockiert.
Kontrollanzeigen gehen nach dem Spülen nicht aus.
Hauptschalter noch eingeschaltet.
Reinigerreste kleben nach dem Spülen im Dosierbehälter.
Dosierbehälter war beim Einfüllen feucht, Reiniger nur in trockenen Behälter einfüllen.
21
Page 50

Nach Programmende bleibt Wasser im Gerät stehen
Der Abwasserschlauch ist verstopft oder geknickt.
Die Abwasserpumpe ist blockiert.
Siebe sind verstopft.
Das Programm ist noch nicht beendet. Programmende abwarten.
...beim Sp ülen
Ungewöhnliche Schaumbildung
Handspülmittel in der Klarspülerzugabe.
verchütteter Klarspüler kann beim nächst en Spülgang zu überm äßiger Schaumbildung f ühren, deshalb
danebengelaufenes Klarspülmittel mit einem Lappen entfernen.
Gerät bleibt während des Spülens stehen
Stromzufuhr unterbrochen.
Wasserzulauf unterbrochen.
Schlagendes Geräusch beim Spülen
Sprüharm schlägt an Geschirrteile.
Klapperndes Geräusch beim Spülen
Geschirrteile nicht richtig eingeordnet.
de
Schlagendes Geräusch der Füllventile
Is t durch die Verlegung der Wasserleit ung verursacht und bleibt ohne Aus wirkung auf die
Maschinenfunktion. Abhilfe ist nicht möglich.
...am Geschirr
Es bleiben teilweise Speisereste am Geschirr kleben
Das Geschirr war falsch eingeordnet, Wasserstrahlen konnten die Oberfläche nicht treffen.
Der Geschirrkorb war überfüllt.
Die Geschirrteile sind aneinander gelegen.
Zu wenig Reiniger eingefüllt.
Zu schwaches Spülprogramm gewählt.
Spüharmdrehung behindert, weil ein Geschirrteil im Wege stand.
Die Sprüharmdüsen sind durch Speisereste verstopft.
Siebe sind verstopft.
Siebe falsch eingesetzt.
Abwasserpumpe blockiert.
22
Page 51

Auf Kunststoffteilen entstehen Verfärbungen
Zu wenig Reiniger eingefüllt.
Der Reiniger hat eine zu geringe Bleichwirkung. Reiniger mit Chlorbleiche verwenden.
Es bleiben teilweise weiße Flecken am Geschirr, die Gläser bleiben milchig
Zu wenig Reiniger eingefüllt.
Klarspülermenge zu gering eingestellt.
Trolz hoher Wasserhärte kein Spezialsalz eingefüllt.
Enthärtungsanlage zu niedrig eingestellt.
Der Deckel des Salzbehälters ist nicht fest zugedreht.
Wurde phosphatfreier Reiniger verwendet, zum Vergleich phosphathaltigen Reiniger ausprobieren.
Geschirr wird nicht trocken
Programm ohne Trocknung gewählt.
Klarspülermenge zu niedrig eingestellt.
Geschirr zu früh ausgeräumt.
Gläser bekommen stumpfes Aussehen
Klarspülermenge zu niedrig eingestellt.
Tee od e r L ip pe ns ti ftres te s i n d ni ch t vo ll s tän di g en tfern t
Der Reiniger hat eine zu geringe Bleichwirkung.
Zu geringe Spültemperatur gewählt.
de
Rostspuren am Besteck
Besteck nicht ausreichend rostbeständig.
Salzgehalt im Spülwasser zu hoch.
- Deckel des Salzbehälters nicht fest zugedreht.
- Beim Salznachfüllen zu viel Salz verschüttet.
Gläser werden stumpf und verfärben sich, die Beläge sind nicht abzuwischen
Ungeeigneten Reiniger eingefüllt.
Gläser nicht spülmaschinenbeständig.
Auf Gläsern und Besteck verbleiben Schlieren, Gläser bekommen metallisches
Aussehen
Klarspülerzugabemenge zu hoch eingestellt.
23
Page 52

Technische Daten
de
Breite
Tiefe
Höhe
Fassungsvermögen
Anschluß-Wasserdruck
Betriebsspannung
Maximale Stromstärke
Leistung
12 Maßgedecke
220-240V~ 50Hz
60 cm
60 cm
85 cm
0.03-0.6MPa
10A
1950W
Hinweise
Hinweis zur Entsorgung
Altger äte sind kein wer tlose r A bfall! Dur ch u mwel tger echte Ent sorgu ng könn en we rtv olle R oh stoff e
wiedergewonnen werden.
Bei ausgedienten Geräten Netzsteck er z iehen. Net z ka bel dur c htrennen und m it dem S tecke r entfernen.
Türverschluss zerstören. Sie verhindern damit , dass sich s pielende Kinder einsperren und i n Lebensgef ahr
kommen.
Ihr neues Gerät wurde auf dem Weg zu ihnen durch die Verpackung geschützt.
Alle einges etzten Mat erialie n sind umwe ltv ertr äglich un d wieder verwer tbar. Bitte helf en S ie mit und
entsorgen Sie die Verpackung umweltgerecht.
Verpackung und ihre Teile nicht spielenden Kindern überlassen.
Erstickungsgefahr durch Faltkartons und Folien.
Über aktuelle Entsorgungswege informieren Sie sich bitte bei Ihrem Fachhändler oder bei Ihrer
Gemeindeverwaltung.
Allgemeines
24
Unterbau-und integrierte Geräte, die nachträglich als Standgerät aufgestelt werden, müssen gegen
Umkippen g es ic her t wer den, z . B . dur ch Verschr aubungen an der W a nd oder dur c h E inbau unter
einer durchgehenden Arbeitsplatte, die mit den Nachbarschränken verschraubt ist.
Nur für Schweiz-Ausführung:
Das Gesrät k ann ohne w eiteres zwisc h en Holz-oder Kuns tstoff wände in ei ne Küchenze ile e ingebaut
werden. Wenn das Gerät nicht über S tecker angeschlossen wird, muss zur E rfüllung der einschlägigen
Sicherheitsvorschriften installationsseitig eine allp olige Trenn vor richt ung mit einer Ko ntaktöf fnung
von mind. 3mm vorhanden sein.
Page 53

Hinweise für V ergleichspr üf ung en nach EN 50242
Einordnung nach Normvorgabe
Einordungsbeispiel: siehe Abb. 1 , 2 , 3 und 4
Fassungsvermögen: 12 Maßgedecke
Vergleichsprogramm: ECO-Programm
Klarspülereinstellung: 5
Geschirrspülmittel: 25g+5g
de
Abb.1
Abb.3
Bei höhenverstellbarem Oberkorb muß der Oberkorb in die die obere Stellung eingesetzt werden.
Im Falle von Abweichungen von den Vergleichsprüfungen nach EN 50242, z.B.
Anschmutzungen, Geschirr-und Bes teckart usw., ist v or Tes t beginn m it dem Gerä t eherstell er Kont akt
aufzunehmen.
Abb.2
Abb.4
25
Page 54

de
A. Kabelbox
B. Betriebsschalter
C. Betriebsanzeige
D. Türschalter
E. Druckschalter
F. Motor Ablaufpumpe
G. Waschmittel-und Klarspülbehälter
H. Überlaufschalter
I1. Einlassventil
Das Sym bol auf dem Pr oduk t ode r seine r V erpac kun g weis t dar auf hin, da ss
dieses Produkt nicht als normaler Haushaltsabfall zu behandeln ist, sondern an einem
Sammelpunkt für das Recycling von elektrischen und elektronischen Gerä ten abgegeben
werden muss. Durch Ihren Beitrag zum korrekten Entsorgen dieses Produkts schützen
Sie die Umwelt und die Gesundheit Ihrer Mi tmenschen. Umwelt un d Gesundh eit werden
durch falsches Entsorgen gefährdet.
Weitere Informationen über das Recycling dieses Produkts erhalten Sie von Ihrem
Rathaus, Ihrer Müllabfuhr oder dem Geschäft, in dem Sie das Produkt gekauft haben.
I2. Aquastop Einlassventil
J. Motor Waschpumpe
K. Programm-Auswahltaste
L1. Versteckter Heizkörper
L2. Offener Heizkörper
M. Schalter des Enthärters
26
Page 55

Inhaltsverzeichnis
fr
Consignes de sécurité
Installation
Comment enlever le plan de fermeture du lave-vaisselle
Faire connaissance avec votre lave-vaisselle
Comment remplir le réservoir de sel et liquide de rinçage?
Détergent et liquide de rinçage
Vaisselle inadéquate
Comment remplir votre lave-vaisselle
Tableau des programmes
Laver la vaisselle
Comment maintenir votre lave-vaisselle en bon état de fonctionnement
Nettoyage et entretien
Détection des pannes
Caractéristiques techniques
Remarques
2
4
6
7
8
10
11
12
14
16
18
19
20
24
24
1
Page 56

Consignes de sécurité
A la livaison
Vérifiez immédiat ement l'e mball age et le lave-v aiss elle pour v oir s'ils pésentent des dég âts dus au
transport. Ne mettez jamais un appareil endommagé en servic e, prévenez votre f ourni sseur ou votre
service après-vente.
Veuillez vous débarrasser des matériaux d'emballage conformément à la réglementation applicable.
Lors de l'installat io n
Installez et branchez l'appareil conformément à la notice d'installation et de montage.
Pendant toute la durée de l'installation, le lave-vaisselle doit être maintenu débranché du secteur.
Vérifiez que le circuit de mise à la terre du secteur de la maison a été posé conformément à la
réglementation.
Les donnée s de br anc hement él ectr iques indiqué es s ur la pla que s ignalét ique du lav e-v aiss elle et
celles du secteur doivent concorder.
N'intercalez jamais de rallonge entre la fiche mâle du lave-vaisselle et la prise femelle du secteur.
Pour ass urer la s tabilit é v er t ic ale néc es s aire au lav e- v ais selle, n 'ins t allez l' appar eil encastr able que
sous un plan de travail continu vissé aux meubles voisins.
Une fois l'appareil installé, sa fiche mâle doit demeurer accessible.
Sur certains modè les s eulem ent: Le bo îtier en pl ast ique v oisin à la pris e d'eau c ontient une v anne
électrique; dans le flexible d'ar rivée se trouv ent les lig nes de br anch ement élec t rique. Ne sect ionnez
jamais ce flexible, ne plongez jamais le boîtier en plastique dans l'eau.
Au cours de l'installation, assurez-vous que le cordon d'alimentation n'est pas plié ou écrasé de façon
excessive, ce qui pourrait être dangereux.
fr
Utilisation quotidienne
Le lave-vaisselle doit être utilisé exclusivement par des adultes, pour laver de la vaisselle et des
ustensiles de cuisson.
Cet appareil n' est pas conç u pour êtr e utilisé par des enfant s ou de s pers onnes handi capée s sans
qu'une surveillance soit assurée.
Ne vous asseyez et ne montez jamais sur la porte ouverte. L'appareil pourrait basculer.
L'eau contenue dans le compartiment de lavage n'est pas potable.
Ne rajoutez jamais de solvants dans le compartiment de lavage. Risque d'explosion.
Pendant le dérou leme nt du p rogr amme, ou vre z p rude mment la p orte. De l'eau risque en e f fet d'être
projetée hors de l'appareil.
Ne touchez en aucun cas la résistance pendant ou après un cycle de lavage.
Règles essentielles qu'il convient d'observer au moment d'utiliser l'appareil:
- Ne touchez jamais le lave-vaisselle lorsque vous êtes pieds nus ou lorsque vos mains ou vos pieds
sont mouillés.
- L'utilisation de rallonges et de prises multiples est à proscrire ;
- Si l'appareil ne fonctionne pas correctement ou si l'entretien doit être effectué, débranchez l'appar eil.
2
Page 57

Pruden ce avec les enf ants
Cet appareil n' est pas conç u pour êtr e utilisé par des enfant s ou de s pers onnes handi capée s sans
qu'une surveillance soit assurée.
Il est recommandé de tenir les jeunes enfants sous contrôle afin d'éviter qu'ils ne jouent avec le lavevaisselle.
Conservez les déter gent s hors de portée des enfants . Tene z les enf ants à l'éc art du lav e-v aisselle
lorsque celui-ci est ouvert.
Si le lave-vaisselle est tom bé en pann e
Si le lave vaisselle ne fonctionne pas, fermez le robinet d'arrivée d'eau et débranchez l'appareil. Puis,
consul tez le c hapit re int itul é “Dét ec tion des pann es” . Si v ous ne po uvez rés oudr e le pr oblèm e par
vous-même, adressez-vous à un Service Après-vente.
Les réparations doivent être réalisées exclusivement par du per sonnel spécialisé.
Si le câble d’alimentation est endommagé, le remplacement doit être seulem ent effectué par le contructeur,
son service technique agrée ou par du personnel qualifié, afin d’eviter des dangers eléctriques.
Afin de garantir l'EFFICACITÉ et la SÉCURITÉ de l'appareil, nous vous conseillons :
- de toujours vous adresser à un Service Après-vente agrée par le fabricant.Toujours utiliser des
pièces d'origine.
- Demander toujours l’utilisation de pièces détachées originales.
fr
Mise au rebut de l’appareil
Pour la mise au rebut, rendez les appar eils inutilisables en s ec t ionnant le câble d'alim ent ation et en
démontant le verrou de la porte.
Débarrassez-vous de l'appareil en respectant la réglementation.
Tension dangereuse
Avertissement:
Des enfans pourraient s'enfermer dans l'appareil (risque d'asphyxie) ou se
mettre dans d'autres situations dangereuses.
Pour cela: reti rez la prise de secteur, coupez le câble de secteur et mettez-le
de côté.Détruisez la fermeture de la porte en sorte que l a porte ne ferme plus.
3
Page 58

Installation
Commen t inst aller l'ap pareil
Installez l ' app ar ei l à l 'en dr oi t s o uhai t é. L e d os d e l 'a pp a rei l d oit reposer co n tre le m ur e t l es p ar ois l at ér ale s
doivent être parallèles aux parois du meuble adjacent ou du mur. Le lave-vais se lle est équipé de tuyaux
d'alim ent atio n e t de v idan ge de l 'eau . Ce s tuy aux peu vent êtr e in st allé s à d roit e o u à ga uch e, pour
faciliter l'installation correcte de l'appareil.
Commen t mettr e l'app areil au niveau
Dès que l'appareil est mis en plac e, réglez les pieds du lav e-vais selle
en les vissant ou en les dévissant jusqu'à ce que l'appareil soit au
niveau. Dans tous les cas, l'appareil doit présenter une inclinaison
inférieure à 2°. Une mi se à niveau correcte de l'appare il est un gage
de garantie pour des résultats satisfaisants.
Raccord emen t à l'arrivée d'eau f roide
Raccordez le tuyau d'ar rivée d'eau froide à un connecteur 3/ 4 (gaz)
fileté et assurez-vous qu'il est solidement fixé (voir fig.A). Quelques
modèles sont équipés avec un tuyau Aquastop (voir fig.B). Un petit
filtre d’eau est déjà inclu dans la partie fileté du raccord.
Si les conduits d'eau sont neufs ou n’ont pas été utilis és pendant
une longue période, faites couler l'eau pour vous assurer qu'elle
est propr e et dép ourv ue d'im pur etés. En ne prena nt pas cett e
précaution, vous cour ez le r isque de bouc her le co nduit d'arrivée
d'eau et d'endommager l'appareil.
fig.A
fig.B
fr
Avertissement:
L’appareil doit être connecté au tuyau d’eau principal en utilisant les nouveaux tuyaux
flexibles et les anciens tuyaux flexibles ne doivent pas être utilisés de nouveau.
Protectio n contre les risq ues d'in ondat io n
Votre lave-vaisselle est équipé d'un dispositif qui cou pe l'ar rivée d'eau lorsqu'un problème s urvi ent au
niveau du tuyau d'alim entation ou en cas de f uite à l'intérieur de l'appareil, afin d'éviter que ces inc idents
ne provoquent des dégâts à vot re habitation. Si, pour une raison quelc onque, le boît ier renf erman t les
composants électriques est endommagé, débranchez mmédiatement l'appareil. Afin de garantir le
fonctionnement correct du dispositif de protection contre les inondations, il est nécessaire que le boîtier
“A” traversé par le tuyau d'alimentation soit fixé au robinet d'arrivée d'eau comme illustré dans la fig.B.
Seul ce ty pe de racc ordem ent est v alable. Ne sec tionn ez en aucun c as le tuy au d'alim enta tion c ar il
contient des composants électriques sous tension. Si la longueur du tuyau est insuffisante pour garantir
un raccordem ent cor rect, remplac ez- le par un tuyau de long ueur appropr iée. Vous pouvez vous procurer ce tuyau auprès de revendeurs spécialisés ou d'un Service Après-vente agréé.
4
Page 59

fr
Raccordement du tuyau de vidange
Introduisez le tuyau de vidange dans une conduite de vidange d'un diamètre de 4cm minimum, ou
déposez-le directement dans l'évier en veillant à ce qu 'il ne soit ni plié ni éc rasé. Ut ilisez le support en
plastique prévu à cet effet, fourni avec l'appareil (voir fig. 3). L'extrémité libre du tuyau doit se trouver à
une hauteur comprise en tre 40 et 100c m et ne doit pas être im m er gé dans l'eau. Si nécessaire utilisez le
support en plastique fourni avec l'appareil pour créer un syphone (voir fig. C).
fig.C
Avertissement:
Le support en plastique doit être solidement fixé au mur pour éviter
que le tuyau ne se déplace et que de l'eau ne se répande au sol.
Branchemen t élect riqu e
Après vous être assuré que la tension d'alimentation et la fréquence de votre habitation correspondent
à celles figurant sur la plaque signalétique (située sur la paroi intérieure en acier inoxydable de la porte
de votre app areil ), et que l' i nstallatio n élect r ique es t prévue pour s u pporter la tension maximale indiquée
sur la plaque signalétique, introduisez la fiche dans une pr is e du se cteur c or r ec tement reliée à la masse
(la mise à la terre de l'appareil est obligatoire aux termes de la loi).
Si la prise du secteur et la fiche de l'appa reil ne s on t pas de même type, remplacez la fiche. N'utilisez en
aucun cas de rallonges ou autres. Risque de surchauffe et feu!
Avertissement:
La prise du lave-vaisselle doit être accessible même quand l'appareil
est encastré pour que la maintenance puisse être faite en toute
sécurité.
5
Page 60

Comment enlever le plan de fermeture du lave-vaisselle
Le lave-vaisselle et aussi intégrable. Su ivez pour ce la les
indications suivantes:
fr
6
Page 61

Faire connaissance avec votre lave-vaisselle
Premier plan (b andeau de co mmand e)
7
AB C D
C
A
Touche"Marche/Arrêt"
Voyant "Fine"
B
Premier plan (l'intérieur)
Poignée d'ouverture de la porte
Bouton de sélection du cycle
D
fr
1
2
3
4
6
5
a
c
b
Panier supérieur
a
Panier inférieur
b
Bras d'aspersion supérieur
c
Panier à couverts
d
f
d
e
Bras d'aspersion inférieur
Bouchon du réservoiar à sel
f
g
Filtre de lavage
Distributeur de détergent et de liquide
h
de rinçage
e
g
h
7
Page 62

Comment remplir le réservoir de sel et Liquide de rinçage ?
Sel
Le degré de dureté de l'eau varie d'un endroit à l'autre. Si l'eau qui alimente votre lave-vaisselle est dure, des dépôts
se formeront sur la vaisselle et sur les ustensiles de cuisson.
Cet appareil est équipé d'un système d'adoucissement spécial qui utilis e un sel spécialement conç u pour éliminer le
calcaire et les m inéraux présents dans l'eau.
Comment remplir l'adoucisseur
Utilisez exclusivement du sel spécial pour lave-vaisselle. Le réservoir de sel est situé en dessous du panier inférieur
et doit être rempli de la manière suiv ant e :
Enlevez le panier inférieur, puis dév is s ez le bouc hon du
distributeur de s el et enlevez-le.
Si vous remplissez le réservoir de sel pour la première fois,
remplissez-le d'eau.
Placez l'extrém it é de l'entonnoir ( f ourni) dans l'orific e et v ers ez
2kg de sel envi ron . Il est nor mal qu'un e peti te qu an ti té d' eau
s'échappe du dis t ribut eur de sel.
Revissez soigneusement le bouchon.
Remplis sez le rés ervoi r de sel uni quem ent lor sque l’ indic ate ur de
niveau de sel (s it ué s ur le bandeau de commande) clignote.
Afin d'éviter la formation de rouille, remplissez le distributeur de sel
juste ava n t de lancer un cycle de lavage.
fr
Réglage de la quantité de sel
Le lave-vaisselle est c onçu de manière à ce q ue vous puissiez régler
la quantité de sel nécessaire, en fonction du degré de dureté de
l'eau de votre habitation. Ceci, afin de permettre d'optimiser et
d'adapter la quantité de sel utilisé e lors d e chaque l avage en limitant
celle-ci au minimum. Adressez-vous à votre société locale de distribution de l'eau pour connaître la classe de dureté de votre zone.
Pour régler la quantité de sel nécessaire, procédez de la façon
suivante :
8
Page 63

Dévissez le bouchon du réservoir de sel.
Le réservoir de s el es t dot é d'une rondelle sur l aquelle figure une flèc he (v oir la figure c i-c ont re).
Au besoin, tournez la rondelle dans le sens inverse des aiguilles d'une montre, de la position "-" vers la position
"+", en fonc t ion du degré de dureté de l'ea u.
Il est recommandé de faire le réglage en fonction du tableau ci-dessous:
Durété de l'eau
Niveau
1
2
3
4
ºfH
0 10
ºdH
mmol/l
Position
sélécteur
MED
Consommation sel
(grammes/cycle)
Autonomie
(cycles/2kg.)
Liquide de rinçage
Ce produit donne du bril lant à la vaissell e et évite les traces d’eau au séchage. Le r és er v oir es t situé sur
le panneau intérieur de la porte de l’appareil.
Comment remplir le distributeur de liquide
fr
de rinçage
Pour ouvrir l e dist r ibuteur de li qu ide de rin ç ag e, tournez le bouchon
"1" dans le sens inverse des aiguill es d'une m ontre et rem pliss ez
le distributeur en v eillan t à ne pa s fair e débor der le liquide. Vous
pouvez régler la quantité de liquide de rinçage nécessaire en
tournant la vis de r é glage "2", si tuée en dessous du bou c hon "1", à
l'aide d'un tournevis. Il existe 6 positions de réglage; la position 3
correspond à la quantité normale.
Remarque importante :
Une quantité de liquide de rinçage correctement dosée améliore le séchage.
Si vous constatez des gouttes d'eau ou des taches sur votre vaisselle, il
convient de régler le dosage sur une position supérieure.
Si les assiettes présentent des striures blanches, réglez le dosage sur une
position inférieure.
1
2
9
Page 64

Détergent et liquide de rinçage
Détergent
Utilisez exclusivement un détergent s péc ial pour lav e-vaisse lle. Remplis se z le distr ibuteur de détergent
avant de lancer un nouve au cy cle de lav age, en respectant les ins tructio ns four nies dans le "Tableau
des programmes." Le distributeur de détergent est situé sur la paroi intérieure de la porte.
Comm ent remplir le distributeur de
détergent
4
fr
Pour ouvrir le couvercle "3" du distributeur , appuyez sur
la touche "4".
Versez le détergent destiné au cycle de lavage dans le
compartiment "5".
Versez le détergent destiné au prélavage dans le
compartiment “6”.
Dès que vous ave z rem pli le di str ibuteur de d éte rgen t,
refermez le couvercle et appuyez jusqu'à ce que vous
entendiez un déclic.
3
5
Avertissement :
Afin de pouvoir refermer aisément le couvercle, nettoyez les bords
de celui-ci en éliminant toute trace de détergent.
6
10
Page 65

Vaisselle in adéquate
fr
Nous déconseillo n s de laver au lave- vais selle :
Les pièc es de couv ert de v aiss elle en bo is c ar elles s e délav ent et le ur as pect s e dénatur e avec le
temps; les c olles à bois qu'elles contiennent ne s ont pas non plus adapt ées aux tem péra t res ré gnant
dans le lav e- v ais s elle. N'y lav ez pas non plus les v er r es et v as es à déc or s délic at s , en particulier les
pièces de vaisselle anciennes impossibles à renouveler. Ces décors anciens n'ont pas été prévus pour
le lave-vaisselle.
Autres pièces inadaptées: pièces en plastiques sensibles à l'eau très chaude, vaisselle en cuivre et en
étain. Les décors en verre, les pièces en alum inium et en argent peuvent se décolorer et pâlir au lav age
en lave-vaisselle. Certaines variétés de verre pe uvent s'opacifier apr ès quelques passages dans l'appareil.
Par ailleurs , les m atér iaux t r ès abs or bants c omme les épon ges et s er v iett es ne s ont pas lavabl es au
lave-vaisselle.
Recommandation
N’achetez désormais que de la vaisselle dont le fabricant confirme son adéquation au lave-vaisselle.
Remarque:
Ne lavez jamais au lave-vaisselle les pièces de vaisselles salies par
des cendres, de la cire, de la graisse minérale ou de la peinture.
Verres et vaisselle endommagés
Causes:
Nature et processus de fabrication du verre.
Composition chimique du détergent.
Température de l'eau et durée du programme sur le lave-vaisselle.
Recommandation:
Utilisez des verres et de la porcelaine déclarés inaltérables au lave-vaisselle par son fabricant.
Utilisez un détergent dont l'emballage mentionne qu'il ménage la vaisselle. Consultez les fabricants
de détergent.
Sélectionnez un programme de courte durée et ayant la plus basse température possible.
Pour empê cher qu'i ls s 'endo mm agent , sor tez l es v erres et le s c ouvert s du lave -vais sell e le pl us
rapidement possible une fois le programme terminé.
11
Page 66

Comment remplir votre lave-vaisselle
Avant de ranger la vaisselle dans votre lave-vaisselle, éliminez tous les résidus d'aliments pour évit er que le filtre ne
se bouche, ce qui compromettrait les résultats de lavage.
Si des aliments carbonisés et par conséquent très difficiles à détacher sont présents dans le f ond de v os cocottes et
casseroles, faites-les tremper avant de les laver au lave-vaisselle. Ceci permettra de ne pas effectuer de cycles de
lavage supplémentaires.
Tirez le panier v ers v ous af in de f ac ilit er le chargement de la v ais s elle.
Capacité pour 12 couverts standard
Commen t utiliser le p anier inférieu r
Nous vous conseillons de ranger les articles nécessitant un lavage
plus puissant sur le panier inférieur : cocottes, casseroles, couvercles,
plats de service et saladiers, comme représenté dans la figure de droite.
Il est recommandé de ranger les plats de service et les couvercles sur
les côtés du panier afin d e ne pas entra ver la rotat ion du bras
d'aspersion s upérieur.
Rangez toujours les co cottes, saladiers, e tc. en l e s retournant (voir
la fig.D).
Rangez les cocottes profondes en les inclinant pour permettre à
l'eau de s'écoul er.
Le panier à couverts peut être réduit de moitié (voir la fig.E), ce
qui permet de n'uti lise r qu ' une de s d eux se ctions lorsque la q uantité
de couve r ts es t peu i mpor tan te. Dans ce cas , vo us di spo sez de
plus d 'espace p our ran ger des co cottes ou des ca sserol es
supplémentaires. Vous pouvez également placer le panier à
couverts dans le panier supérieur.
Rangez les c ouv ert s dans le pani er à couverts en positionnant la
manche vers le bas; si le panier dispose de paniers latéraux,
disposez chaque cuill ère dans les f ent es prévues à cet ef f et . Les
ustensiles particulièrement longs doivent être rangés à l'horizontal,
dans la partie av ant du panier supérieur. (v oir la fig.E)
(EN 50242)
fig.D1
Panier inférieur
fig.D2
fr
fig.E
Avertissement:
Les couteaux et d’autres outils pointus doivent être mis dans le panier
avec leur point vers le bas ou placés horizontalement.
12
Page 67

Commen t utiliser le pan ier supérieu r
Le panier supérieur est conç u pou r recevoir de la vaissell e plu s
fragile et légère t elle que verres, tas ses à café et à thé,
saucières , de mêm e que des ass iettes, de petit s bols et des
casseroles peu profondes (si elles ne sont pas trop sales).
Installez la vaisselle et les ustensiles de cuisson de façon à
ce qu'ils ne puissent être déplacés par le jet d'eau.
Le panier supérieur peut être réglé en hauteur (voir la fig.F).
Ajustez le p ani er sup érieu r à u n n iveau pl us h aut et vous
aurez plus d'espace pour charger des casseroles et plats
plus grands dans le panier.
L'étagère
Appuyez les verres hauts et les verres à pied contre le bord de
l'étagère, pas contre la vaisselle.
Les verres, les tasses et les grands bols se rangent sur l 'étagère
du haut . Vous pouv ez fai re ba sc uler l' étagèr e dan s les deux
sens(voir la fig.G).
fr
fig.F
fig.G
13
Page 68

Tableau des programmes
fr
Programme
de lavage
Lavage
intensif
Lavage
Normal
Lavage
léger
(EN50242)
Type de
vaisselle Par
ex.Porcelaine,
casseroles,
couverts,
verres,etc.
Résistante
Type de
résidus
alimentaires,
par ex.de
Soupes,
soufflés.
sauces,
pommes de
terre,pâtes, riz,
oeufs, plats
rôtis
Soupes,
pommes de
terre,pâtes, riz,
oeufs, plats
rôtis
Quantité
de résidus
alimentaires
Grande
Faible
Etat des
résidus
alimentaires
Trés
adhérents
Peu
adhérents
Description du cycle
Prélavage à l'eau chaude.
Lavage prolongé à 70°C.
Rinçage à l'eau froide.
Rinçage à l'eau chaude.
Séchage.
Prélavage à l'eau chaude.
Lavage prolongé à 55°C.
Rinçage à l'eau froide.
Rinçage à l'eau chaude.
Séchage.
Prélavage à l'eau chaude.
Lavage prolongé à 50°C.
Rinçage à l'eau froide.
Rinçage à l'eau chaude.
Séchage.
14
Verres
Programme Rapid
Rinçages
Trempage
Mixte
Café,
gâteaux, lait,
charcuterie,
boissons
froides,
salades
Vaisselle à rincer et à sécher
uniquement.
Passer la vaisselle sous le robinet si elle
doit séjourner plusieurs jours dans le
lave-vaisselle avant le lavage.
Très faible
Peu
adhérents
Lavage à 45°C.
Rinçage à l'eau froide.
Rinçage à l'eau chaude.
Séchage.
Lavage rapide à 40°C.
Rinçage à l'eau chaude.
Rinçage à l’eau chaude à 65°C.
Séchage.
Lavage rapide à froid pour éviter
que des résidus d'aliments ne
sèchent sur la vaisselle.
Page 69

fr
5g
5g
10g
10g
5g
5g
5g
5g
5g
5g
Détergent
Liquide de
Lavage prolongéPrélavage
25g
15g
20g
15g
25g
15g
25g
20g
25g
20g
25g
15g
15g
10g
15g
10g
rinçage
( )
Durée en
minutes
112’
94’
132’
114’
112’
94’
132’
114’
102’
90’
102’
90’
132’
122’
162’
152’
132’
122’
162’
152’
92’
82’
92’
82’
31’
29’
55’
49’
12’
12’
( ) Essais comparatifs selon EN 50242 avec réglage du liquide de rinçage: 5
15
Page 70

Laver la vaiss e lle
fr
Sélection du programme
Le type de vais sell e, la quanti té et l ’é tat de s rés idus al imen tai res vous per mett ent, en c onsul tant le
tableau des programmes de déterminer celui dont vous avez besoin.
Le déroulement du programme et les données qui lui correspondent se trouv ent à droite du tableau des
programmes.
Exemple:
En présen ce de vais sel le m ixte c ompo rtant de n ombr eux rés idus alim entair es tr ès ad hér ents , vou s
aurez besoin du programme “Lavage Normal” .
Conseil économie
Si le lave-vaisselle est peu chargé, le programme immédiatement inférieur suffit bien souvent.
Données d e programm e
Les données de programme énoncées ci-après se réfèrent à des conditions normales.
Les paramètres suivants:
Quantités variables de vaisselle
Température d’arrivée de l’eau
pression dans les conduites d’eau
Température ambiante
ariations de la tension secteur
Et les tolérances propres au lave-vaisselle (par ex. la température, la quantité d’eau...)
Mise en service de l’app areil
Démarrage d’u n cycle de lavag e
Assurez-vous que l’appareil est correctement branché sur le secteur.
Vérifiez que le robinet d’arrivée d’eau est ouvert au maximum.
Chargez le lave-vaisselle.
Mettez le détergent.
Appuyez sur la touche Marche/Arrêt, le voyant «Fine» s’allume.
Choisissez le programme adapté au chargement à laver en tournant le programmateur, qui se trouve
à droite du panneau de commande, et alignez celui-ci sur le marque du programme souhaité. Si le
programmateur est justement aligné sur le marque du programm e souhaité, t ournez le progr ammateur
jusqu’à la position «Reset» et puis retournez au point de départ.
Après 5 secondes, le voyant «Fine» s’éteint et le cycle de lavage démarre.
16
Page 71

fr
A la fin du cycle de lavage
Un signal s onor e ind ique la fin du c y cle ( 6 bips s onor es ) , le v oy ant «F ine» s ’allum e. A ppuy ez s ur le
bouton «ON - O FF »( Marc he/ A rrêt ), fer mez le rob inet d’ar r iv ée d’eau et ent r eou v r ez la por t e du lavevaisselle. Attendre quelques minutes avant de sortir les vaisselles qui sont encore chaudes. Les
vaisselles sécheront ainsi encore mieux.
Arrêter ou modifier un cycle en cours
Un cycle en cours de fonctionnement ne peut être modifié que s’il a démarré depuis peu. Dans le
cas contraire le pr odu it de lavage peut déjà avoir été utilisé et l’eau de lavage vidan gée. Il f aut alors
recharger le bac à produit (cf. la section «Comment remplir le distributeur de détergent»).
Tournez le programmateur à la position «Reset»,
choisissez ensuite le programme souhaité.
Avertissement:
Ne posez pas les tablettes dans le panier à couverts, cela donnera
un résultat insatisfaisant au lavage. Posez les tablettes dans le doseur
de détergent.
1
2
3
4
5
6
7
17
Page 72

Comment maintenir votre lave-vaisselle en bon état de fonctionnement
Après chaqu e lavage
Après chaque lavage, ferm ez le r obinet d 'arr ivée d'eau et laissez la por t e légèr eme nt ent rou vert e, de
façon à libérer les moisissures et les odeurs susceptibles de se former à l'intérieur de l'appareil.
Débrancher l'appareil
Débranchez t oujou rs l'appar eil avant de procéder aux opé rations de nettoyage ou d'entr et ien. Ne prenez
aucun risque.
Éviter les solvant s et les prod uits d'en tretien abrasif s
Pour le nettoyage d e l'ex t érie ur et d es p arties en c aout ch ouc de l'appareil, n'utilis ez en auc un c as de
solvants ou de produits d'entretien abr asifs. Utilisez un chiffon imbibé d'une solution d'eau chaude et de
savon.
Pour enlever les taches ou salis sures pr ésen tes sur la su rface in t érieure de votr e appar eil, utilisez un
chiff on qu e vo us tr em pere z da ns u ne s olut ion d'ea u et de v ina ig re b lanc , ou u n prod uit d ' entre tie n
spécifique pour lave-vaisselle.
Commen t déplacer vot re ap pareil
Si vous devez déplacer votre appareil, veillez à le laisser d ans la posit ion verticale. S i cela est absolument
nécessaire, il peut éventuellement être posé sur le dos.
fr
Joints
La prés enc e de r és idus d'aliments dans les int er s tic es des joints du la v e- v ais s elle c ons t itue l'un des
facteurs influençant la formation d'odeurs à l'intérieur de celui-c i. Nettoyez régulièr em ent les joints avec
une éponge pour éviter cet inconvénient.
Ne laissez pas la porte ouverte puisqu’elle risque de vous trébucher.
Absence pro lo ngée
En cas d'absence prolongée, il est conseillé de lancer un cycle de lavage à vide, de débrancher l'appareil,
de fermer le robinet d'ar rivée d'eau et de lais ser la porte de l'app ar eil légèr ement entr ouver te. Cette
précaution per m et d'a llonger la durabilité des j oint s e t em pêc he la format ion d e m auv aises odeur s à
l'intérieur du lave-vaisselle.
18
Page 73

Nettoyage et entretien
Un contr ôle et un ent r etien régulier de votre mach ine aider ont à antic i p er les pannes . Vous éc onomiser ez
de l’argent et de l ’énervem ent. Pour cette raison, ex am inez de temps en t em ps so igneusement l’intér ieur
de votre lave-vaisselle.
Etat général de l’appareil
Vérifiez si le compartiment de lavage présente des dépôts de graisse et de tartre.
Si vous trouvez de tels dépôts:
Lavez la machine à fond avec du détergent.
Filtres
Les filtres “7,8” empêchent les souillures grossières contenues
dans l’eau de rinçage de s’approcher de la pompe.
Ces souillures peuvent parfois boucher les filtres.
Apès chaq ue ri nçage , v érifi ez s i les fi ltres prés ent ent de s
résidus alimentaires;le cas échéant, nettoyez-les.
Après avoir détaché le microfiltre “7” , vous pouvez extraire
l’ensemble filtrant “8”. Enlevez les résidus puis nettoyez les
filtres sous l’eau courante.
Remettez l’ens emble filtr ant “8” en place puis r emettez le
microfi lt re “7”.
7
8
fr
Bras pivotant s d’aspersio n
Le lartre et les impuretés en suspension dans l’eau de vaisselle
peuvent boucher les buses; les dépôts risquent, eux, de bloquer
les bras pivotants d’aspersion “9” et “10”.
Vérifiez si des résidus alimentaires bouchent les buses de
sortie des bras pivotants d’aspersion.
Le cas échéant, soulevez le bras rotatif inférieur “10”.
Dévissez le bras rotatif supérieur “9”.
Nettoyez les bras rotatifs sous l’eau du robinet.
Faites réencranter le bras rotatif inférieur et revissez le bras
rotatif supérieur.
9
10
19
Page 74

Déte c t ion des pannes
Remédier soi- mêm e aux petites p an nes
L’expérience montre que la plupart des dérangements survenant à l’usage quotidien peuvent être
supprimés sans avoir à ap peler l e servic e aprè -vent e. Ceci éc onomise év idemm ent des f rais et remet
rapidement l’appareil en bon fonctionnement. Le récapitulatif ci-après vous aidera à trouver les causes
des dérangements
Dérangements...
...à la mise en service
L’appareil ne démarre pas
Fusibles de la maison grillés.
Fiche mâle de l’appareil débranchée de la prise secteur.
Porte de l’appareil incorrectement fermée.
Touche de programmation pas enfoncée.
Robinet d’eau pas ouvert.
Filtre du flexible d’arrivée d’eau bouché.
- Le crible se trouve sur le raccord de l’Aquastop et du flexible d’arrivée d’eau.
Attention
Les réparations ne doivent être effectuées que par un spécialiste.
Des réparations inexpertes s’assortissent d’un risque de dégâts
considérables et peuvent mettre en danger la vie de l’utilisateur.
fr
...sur l’appar eil
Quand le signal sonore émet le signal suivant, un bip de 2 secondes suivi par 2 secondes
de silence et ainsi de suite.
le robinet d'a rriv ée d' eau est ouvert et que le t uy au d'al im entation
est raccordé c orrec t em ent ;
l'alimentat ion en eau de votre habit at ion n'a pas été coupée et que
la pression est suffisante ;
le tuyau d'alimentation n'est ni écrasé ni plié;
le filtre du t uy au d'alimentation n' es t pas obs t rué.
le tuyau de vidan ge es t dis pos é t rop bas .
20
Page 75

fr
Quand le signal sonore émet le signal suivant, un bip de 3 secondes suivi par 3 secondes
de silence et ainsi de suite.
le tuyau de vidange n'est ni écrasé ni plié.
le tuyau de vidan ge es t dis pos é t rop haut
Quand le signal sonore émet le signal suivant, un bip de 6 secondes suivi par 6 secondes
de silence et ainsi de suite.
le tuyau de vidan ge es t dis pos é t rop bas .
Si toutes ces contrôles sont realisés et toute fois l’erreur persisterait, veuillez mettre
hors service le lave-vaisselle. Attendez quelques minu tes et remettez-le en service. Si le
lave-vaisselle ne fonctionne toujours pas et/ou que le probléme persiste, adressez-vous
à votre Service Après-vente le plus proche en indiquant :
le type de panne ;
le type d'appareil et le numéro du modèle (Mod...) ainsi que le numéro de série (S/N...),qui figurent
sur la plaque signalétique située sur la paroi intérieure de la porte.
.
Le bras pivotant d’aspersion inférieur tourne difficilement
Bras bloqué par des couverts ou par des résidus alimentaires
Le couvercle du compartiment à détergent refuse de se fermer
Compartiment de dosage excessivement rempil.
Mécanisme bloqué par des restes de détergent collés.
Les indicateurs de contrôle ne s’éteignent pas après le lavage
Interrupteur principal encore en service.
Après le lavage, des restes de détergent collent dans le réservoir de dosage
Le réservoir de dosage était mo uillé au m oment où v ous l ’avez rempli. Ne versez le dét ergen t que
dans le réservoir sec.
21
Page 76

L’eau ne s’écoule pas à l’égout en fin de programme
Flexible de vidange bouché ou plié.
Pompe de vidange bloquée.
Les filtres sont bouchés.
Le programme n’est pas encore terminé. Attendez la fin du programme.
...Lors du lavage
Production inhabituelle de mousse
Présence de liquide pour la vaisselle dans le dispositif de dosage du liquide de rinçage.
Du produit de rinçage répandu peut conduire à une formation excessive de mousse lors du processus de rinçage suivant, c’est pourquoi enlevez le produit de rinçage répandu avec un chiffon.
L’appareil s’arrête pendant le lavage
Coupure de courant.
Alimentation en eau coupée.
Bruits de percussion pendant le lavage
Le bras pivotant d’aspersion percute des pièces de la vaisselle.
Cliquets pendant le lavage
Pièces de vaisselle incorrectement rangées.
fr
Les vannes de remplissage émettent un bruit de claquement
Ceci est dû au tracé de la conduite d’eau domestique et n’influe aucunement sur le fonctionnement
de la machine. Aucun remède possible.
...vaisselle m al lavée
Des résidus alimentaires adhèrent contre la vaisselle
Vaisselle mal rangée, les jets d’eau n’ont pas pu atteindre ses surfaces.
Panier excessivement rempli de vaisselle.
Les pièces de vaisselle se touchent.
Vous n’avez pas mis assez de détergent.
Vous avez choisi un programme de lavage pas assez puissant.
Une pièce de vaisselle a empêché la rotation du bras pivotant d’aspersion.
Des résidus alimentaires obstruent les buses du bras pivotant d’aspersion.
Les filtres sont bouchés.
Filtres incorrectement installés.
Pompe de vidange bloquée.
22
Page 77

Les pièces en plastique se décolorent
Vous n’avez pas versé assez de détergent.
Le déte rgent a un ef fet blanc his ant ins uffi sant. Utili sez un dét er gent av ec ag ent de blan chim ent
chloré.
Des taches en partie blanches demeur ent sur la vaisselle. Les verres ont un voile
laiteux
Vous n’avez pas versé assez de détergent.
Quantité de liquide de rinçage réglée trop faible.
Vous n’avez pas versé de sel spécial dans l’appareil bien que l’eau soit très dure.
L’adoucisseur d’eau est réglé trop bas.
Vous n’avez pas correctement vissé le couvercle du réservoir de sel.
Si vous avez utilisé un détergent sans phosphate, essayez-un au phosphate.
La vaisselle ne sèche pas
Vous avez choisi un programme sans séchage.
Vous avez réglé le liquide de rinçage sur une trop faible quantité.
Vous avez sorti la vaisselle trop tôt.
Les verres n’étincellent pas
Vous avez réglé le liquide de rinçage sur une trop faible quantité.
fr
Les traces de thé ou rouge à lèvres ne sont pas complètement enlevées
Le détergent a un effet blanchissant insuffisant.
Température de lavage réglée trop basse.
Traces de rouille sur les couverts
Couverts imparfaitement inoxydables.
Teneur en sel de l’eau de lavage excessive.
- Couvercle du réservoir de sel pas vissé à fond.
- Vous avez répandu trop de sel lors du remplissage de son réservoir.
Les verres prennent un voile opaque et décolorent.
Les revêtements indésirables refusent de partir
Vous avez versé un détergent inapproprié.
Ces verres ne sont pas lavables au lave-vaisselle.
Les verres et le s couvert s présentent de s str ies, les verre s prennent un aspe ct
métallique
Le dosage du liquide de rinçage est réglé trop élevé.
23
Page 78

Caractéristiques techniques
fr
Largeur
Profondeur
Hauteur
Capacité
Pression de l'eau dans les conduits
Tension d'al imentation
Intensité maximale du courant
Puissance absorbée totale
12 couverts standard
220-240V~ 50Hz
60 cm
60 cm
85 cm
0.03-0.6MPa
10A
1950W
Remarques
Remarque co ncernan t la mise au rébu t
Les appareils usagés ne sont pas des déchets dénués de valeur. Une mise au rébut respectueuse de
l’environnement permet de récupérer de précieuses matières premières.
Lorsque l’ancien appareil a fini de servir, débranchez sa f iche mâle de la prise de courant, sect ionnez
son câble d’alimentation puis retirez-le avec la fiche.
Détruisez la serrure de la porte. Vous éviterez ainsi que les enfants ne s’enferment accidentellement à
l’intérierur de l’appareil et risquent leur vie.
Pour vous par v enir, c et appareil a ét é c onditionné dans un emballage des t iné à le protéger. Tou s les
matériaux constitutifs de l’emballage sont compatibles avec l’environnement et recyclables.
Aidez-nous à éliminer l’emballage dans le respect de l’environnement.
Ne laissez pas les enfants jouer avec l’emballage et les pièces qui le constituent.
Ils risquent de s’étouffer dans les cartons pliants et les feuilles plastiques.
Pour obtenir les coordonnées du centre de recyclage où rapporter l’ancien appareil et l’emballage,
veuillez consulter votre revendeur ou l’administration de votre municipalité.
Généralités
24
Les appareils intégrés installés sous un plan de travail doivent être protégés du renversement, par
exemple en les vis sa nt au mur ou en les ins tallant s ous un plan de travail continu vissé aux m euble s
voisins.
Version pour la Suisse seulement:
l’appareil s’encastre simplement entre les parois en bois ou en plastique constitutives d’une cuisine
intégrée. Si l’appareil n’est pas relié au s ecteur pa r une fich e mâle, il f aut, pour sat isfaire aux prescriptions de sécurité en vigueur, installer côté secteur un disposit if de co upure tous pôles présentant
une ouverture d’au moins 3mm entre contacts.
Page 79

Remarques co ncern ant les essais co mp arat ifs selon E N 50242
Rangement de la vaisselle selon cette norme
Exemple de rangement: fig. 1, 2, 3 et 4
Contenance: 12 couverts standard
Programme utilisé pour la comparaison: Lavage léger
Réglage du liquide de rinçage: 5
Détergent: 25g+5g
fr
fig.1
fig.3
Si le panier supérieur est réglable en hauteur, installez-le dans la position supérieure.
S’il existe des dév iat ions par r appor t aux ess ais compar at ifs selon EN 50242 portant s ur, p ar e x., le
degré de sal iss ure, l e type de vaiss elle et d e cou ver t, con tac tez l e fa brican t de l’ap pare il a van t le
commencement des tests.
fig.2
fig.4
25
Page 80

fr
A. Boîte cablage
B. Interrupteur Marche-Arrêt
C. Voyant d’alimentation
D. Interrupteur porte
E. Interrupteur niveau d'eau
F. Pompe de vidange
G. Réservoir de sel et liquide de rincage
H. Interrupteur débordement
Le symbole sur le produit ou son emballage indique que ce produit ne peut être
traité comme déchet ménager. Il doit plutôt être r emis au point de ram assage concerné,
se chargeant du recyclage du matér iel électr ique et élec tronique. En vous assurant
que ce produit est éliminé correctement, vous favorisez la prévention des
conséquences négatives pour l’environnement et la santé humaine qui, sinon, seraient
le résultat d’un traitement inapproprié des déchets de ce produit.
Pour obtenir plus de dét ails sur le rec yclage de c e prod uit , veuillez pren dre cont act
avec le bu reau municip al de votr e rég ion, v otre s erv ice d’él imin atio n des déche ts
ménagers ou le magasin où vous avez acheté le produit.
I1. Vanne admission d'eau
I2. Aquastop vanne admission d'eau
J. Pompe de cyclage
K5. Programmateur
L1. Réchauffeur interne
L2. Réchauffeur externe
M. Interrupteur d'adoucisseur
26
Page 81

Indice
it
Instruções de Segurança
Instalação
Cómo se remove a cubertura de sua lava-louça
A sua nova máquina de lavar loiça
Adiçao de sal e adicionar abrilhantador
Detergente
Loiça não apropriada
Introduzir a loiça na máquina
Tabela de progra m a s
Lavagem da Loiça
Como manter a sua máquina em forma
Manutenção e tratameento
Pesquisa de Anomalias
Características técnicas
Indicações
2
4
6
7
8
10
11
12
14
16
18
19
20
24
24
1
Page 82

Instruçõ es de Segurança
No acto da entrega
Verifique imediatament e, se a em balagem e a m áquina de lav ar loiç a apresentam danos caus ados
pelo transporte. Não ponha a funcionar uma máquina danificada e contacte com o seu fornecedot.
Proceda à reciclagem do material de embalagem de acordo com a legislação em vigor.
Na instalação
Proceda à instalação e ligação da máquina, de acordo com as instruções de instalação e montagem.
Durante a instalação, a máquina deve estar desligada da rede eléctrica.
Certifique-se de que o sistema de protecçã o de terr a da instalação eléc tric a da su a ca sa foi efectuad o
de acordo com as normas em vigor.
As condições da ligação eléctrica têm que coincidir com as indicvações da chapa de características.
Para a ligação, nunca utilize cabos de extensão.
As máquinas de embutir ou de integrar só devem ser instaladas sob um tampo de bancada corrido e
aparafusado aos armários, para garantir maior estabilidade.
Depois de instalada a máquina, a respectiva ficha deve ser de fácil acesso.
Em alguns modelos:
A caixa de plástico na ligação da água dispõe de uma válvula eléctrica e na mangueira de admissão
encontr am- se os cabos de ligaç ão. Não c orte a m angueir a e não m ergulh e a caix a de plás tico em
água.
Durante a instalação, o cabo de alimentação não deve ser dobrado ou achatado de forma excessiva
ou perigosa;
it
No funcionamento diário
A máquina apenas dev e se r utilizada por adultos para a lav agem de loi ç a domés tica e ut ensílio s de
cozinha.
Este aparelho não deve ser inst alado no ex terior, ain da que o loc al esteja protegido por um telhado;
também é perigoso deixá-lo exposto à chuva e aos agentes atmosféricos.
Não se sentar ou apoiar na porta aberta. A máquina pode tombar.
A água existente dentro da máquina não á água potável.
Não colocar produtos solventes dentro da máquina. Perigo de explosão.
Durante o programa de lav agem abrir a por ta apenas com mui to cuidad o. Existe o perigo de a água
saltar para fora da máquina.
Não toque na resistência durante ou após um ciclo de lavagem.
Após a instalação, deverá ser possível aceder facilmente à ficha de alimentação.
Regras fundamentais relativas à utilização do aparelho:
- Nunca toque na máquina de lavar loiça descalço ou com as mãos ou os pés molhados.
- Não é aconselhável a utilização de extensões e tomadas múltiplas.
- Se o aparelho não estiver a funcionar devidam ente ou necessi tar de manutenção, des ligue- o da rede
eléctrica.
2
Page 83

Famílias com crian ças
O aparelho não se destina a s er utili zado por crianças pequenas ou por pessoas inapt as sem supervisã o.
As crianças pequenas devem ser vigiadas a fim de garantir que não brinquem com o aparelho.
Mantenha os detergentes fora do alcance das crianças e mantenha estas últimas afastadas da
máquina de lavar loiça quando esta estiver aberta.
Em caso de anmalia
Se o ap arel ho não f un cion ar d evi dam ente, fec he a á gu a e r etir e a f ic ha da toma da . De s egui da ,
consulte a secção intitulada "Pesquisa de Anomalias". Se não conseguir resolver o problema, contacte
um centro de assistência.
Apenas o pessoal técnico especializado está autorizado a efectuar reparações.
Se o cabo de ligaçao el éct rica es tiver danfic ado, est ar obrigaç ao s ubstit uado para o fabr icante , ou
serviço tecnico ou pessoas qualificados, para evitar perigo eléctrico.
Para manter a EFICÁCIA e a SEGURANÇA deste aparelho, recomendamos:
- contacte apenas os Centros de Assistência autorizados pelo fabricante.
- utilize sempre peças sobresselentes originais
Para a reciclagem
Os spar elhos s em m ais us o dev em s er f eitos inut ili z áv eis , par a is to c or t ar o c abo d e alimentação e
romper o sistema de bloqueio da porta.
Levar a máquina para um entro de reciclagem autorizado.
it
Voltagem perigosa
Aviso:
As crianças podem ficar presas no aparelho (perigo de asfixia) ou
provocar outras situações inconvenientes.
Por essa razão: retire a ficha da tomada de rede, corte o cabo de
alimentação e elimine-o. Destrua o fecho da porta de forma a que ela
não se possa fechar.
3
Page 84

Instalação
it
Posicionar o aparelho
Posicione o aparelho no local desejad o. A par te t raseira deve rá ficar virada par a a par ede e as partes
laterais a o longo do s ar m ár ios ou da parede adjacente. A m áquina de lav ar loiça es tá equipada c om
mangueiras de entrada e descarga da água que podem ser posic ionadas à dir eita ou à esquer da para
facilitar uma instalação adequada.
Nivelar o aparelho
Uma vez posicionado o aparelho, ajuste os pés (enros cando- os pa ra dentro ou para fora) da máquina
de lavar loiça até esta ficar devidamente nivelada. Em qualquer dos casos, o aparelho não deveré ficar
com uma inclinação superior a 2° . Um aparelho nivelado ajuda a garantir um desempenho adequado.
Ligação da água f ria
Ligue a mangueira de abasteciment o de água fria a um conect or
roscado (gás) de 3/4 e certifique-se de que o aperta devidamente
(ver a fig.A).
Alguns modelos son ajustados com una mangueira de
abastecimento de águ a com "Aquast op" ( ver a fig.B) onde lo f iltro
pequeno es já colocado em laextremidad linhada.
Se os tubos da água forem novos ou não tiverem sido utilizados
por um perí odo prolongado, deixe a água corr er para se c er tificar
de que ela sai limpa e sem impurezas. Se não tomar esta
precaução, correrá o r isc o de a ma ngueir a de entrada da água
ficar obstruída e de danificar aparelho.
fig.A
Atenção:
O novo tubo da água deve ser colocado na fonte
da água. Não pode usar o velho tubo da água.
Protecção an t i-inund ação
A máquina de lavar loiça está equipada com um sistem a que interr om pe a entrada da água em caso de
problemas com a mangueira de abasteci m ento ou em cas o de fugas no interior do aparelho, de modo a
evitar danos na sua residência. Se, por qualquer razão, a caixa dos co mponentes eléctricos f or danificada,
retire im edia tamen te a fi cha d o ap arel ho da tom ada. A fim de gar antir o fu ncio name nto cor rect o do
sistema anti-inundação, a caixa "A" da mangueira de abastecimento deve ser ligada à torneira da água
conforme indicado na fig.B. Nenhum out r o tipo de ligação é aceitável. A m angueir a de abastecimento de
água não deve, em nenhuma circunstancia, ser cortada, dado que contém partes eléctricas activas. Se
o comprimento da mangueira não permitir uma ligação adequada, substitua-a por uma suficientemente
comprida. Esta mangueira está disponível mediante pedido endereçado aos distribuidores e centros de
assistência especializados.
4
fig.B
Page 85

it
Ligação da man gueira de descarg a
Insira a m angueir a de desc arga num tubo de desc ar ga c om um diam et r o m ínimo de 4 c m ou deixe-a
orientada para a b anca , evitand o dobr á-l a ou t or cê-la. Utiliz e o suporte de plás tico es pec ial for neci do
com o aparelho (ver a fig. C). A extremidade livre da mangueira deve ficar a uma altura compreendida
entre 40 e 100 cm e não deve ser mergulhada em água.
fig.C
Atenção:
O suporte de plástico especial da mangueira deve ser solidamente
fixo à parede para evitar que a mangueira de descarga se desloque
e que a água transborde para fora do tubo de descarga.
Ligação eléct rica
Depois de se certificar de que os valores relativos à voltagem e à frequência da corrente da casa
correspondem aços especificados na chapa de caract erísticas (localiz ada na porta int erior de ao inoxidável
do aparelho) e de que o sis t em a eléc tr ico é adequ ado à voltagem m áx im a es pec if ic ada na c hapa de
caracterí s ticas , ins ir a a f ic ha num a t om ada eléc t r ic a dev idam ente ligada à ter r a ( a ligação à t er r a do
aparelho é obrigatória por lei).
Se a tomada eléc trica à qual o aparelh o deve s er ligado não for apropr iada para a fic ha, subs titua a
ficha em vez de utilizar um adaptador, dado que tal poderá originar um sobr eaquecimento e queimad uras.
Advertência:
Se o aparelho se instalar como uma contruída-inferior entidade, a
ficha da electricidade deve ser utilizada com facilidade para garantir
a reparação segura no futuro.
5
Page 86

Cómo se remove a cubertura de sua lava-louça
La máquina de lavar loiça pode aunque se coloca de forma empotrada.
Faça confor me as figuras seg uin tes:
it
6
Page 87

A sua nova máquina de lavar loiça
Vista detalh ada (painel d e co ntrolo)
AB C D
C
A
Botão ON-OFF
B
Indicador "END"
Vista detalh ada (int erior)
Puxador da porta
Selector do ciclo
D
it
1
2
7
6
3
4
5
a
c
b
a
Cesto superior
b
Cesto inferior
c
Braço aspersor superior
d
Cesto de utensílios de prata
f
d
e
Braço aspersor inferior
Tampa do compartimento do sal
f
Filtro de lavagem
g
Compartimento do detergente
h
do abrilhantador
e
g
h
7
Page 88

Adiçao de sal e adicionar abrilhantador
Sal
O grau de dureza da água varia de local para local. Se a água que utiliza na máquina for dura, formar-
se-ão depósitos na loiça e nos utensílios.
O aparelho es t á equi pado com um amac iador es pec ial que utiliz a um s al es pec ific amen t e c onc ebido
para eliminar o calcário e os minerais da água.
Deitar o sal no amaciado r
Utilize sempre sal próprio par a m áquinas de lavar loiç a. O compartimento do sal est á loc ali z ado debaixo
do cesto inferior e deve ser enchido da seguinte forma:
Retire o cesto inferior e, de seguida, desenrosque e
remova a tampa do compartimento do sal;
Se estiver a encher o compar t imento pel a prim eir a vez,
encha-o com água;
Coloque a ex t remidade do funil (for nec ido) no ori f íc io e
introduza cerca de 2 kg d e sal. É nor mal que u ma pequena
quantidade de água saia do compartimento do sal.
Coloque cuidadosamente a tampa no lugar.
Encha o compartimento do sal quando o indicador d e " pouco
sal" (localizado no painel de controlo) se acender.
Para evitar a formação de ferrugem, coloque o sal
imediatamente antes do início do ciclo de lavagem.
it
Ajustar o consumo de sal
A máquina de lavar loiça foi concebida para p ermitir o ajuste
do consumo de sal de acordo com o grau de dureza da á gua.
Tal visa optimizar e adapt ar o ní v el de consumo de s al por
forma a reduzi-lo ao mínimo. A tabela dos serviços
municipalizados indica- lhe o gr au de dur eza da água da sua
área de residência.
Para ajustar o consumo de sal, proceda da seguinte forma:
8
Page 89

Desenrosque a tampa do compartimento do sal.
O compartimento possui um anel com uma seta (ver a figura ao lado).
Se necessario, rode o anel no sentido contrário ao dos ponteiros do rélogio,partinda da definição “-”
para o sinal “+”, consoante o grau de dureza da água.
É recomendável que os ajustes sejam feitos de acordo com o tabela seguinte:
Dureza da água
it
Nivel
2
3
4
mmol/l
ºdH
ºfH
0 101
Posição
selector
Consumo sal
(gramas/ciclo)
Autonomia
(ciclos/2kg)
Abrilhantador
Este pr oduto de ixa a loi ça br ilha nt e e per mit e q ue ela seq ue s em m anch as. O c om parti ment o es tá
situado no painel int er ior da p orta e deverá ser novamente enchido ao fim de c ada 80 ciclo s de l avagem.
Deitar o abrilh antad or
Para abrir o compar timento, rode a tampa "1" no sentido contrário
ao dos p ont eir os d o relógio e , d e s egui d a, a di ci on e o a brilhantador,
tendo o cuidado de não encher o compartimen to em d emas ia. A
quant idade de a bril ha ntado r ut ili zado par a cad a ci clo po de s er
regulada rodando o doseador "2", localizado sob a tampa "1", com
uma chave de f endas . Existem 6 definições dif er entes; a definição
normal de dosagem é 3.
1
2
Importante
Uma dosagem adequada do abrilhantador melhora o processo de secagem.
Se a loiça ficar com gotas de água ou manchas, rode o doseador para uma
definição mais elevada.
Se a loiça ficar com riscas brancas, rode o doseador para uma definição
mais baixa.
9
Page 90

Detergente
Detergente
Utilize detergentes específicos para máquinas de lavar loiça.
Encha novamente o compartimento antes do início de cada
ciclo de lavagem, conforme as instruçães fornecidas na
"Tabela d e p r ogr am as ". O c om par t im ento es t á s it uado no
painel interior da porta.
Deitar o detergen te
it
4
3
Para abrir a tampa " 3" do compartimento, prima o botão
" 4 ".
Deite o detergente r elativo ao c iclo de la vagem no
compartimento " 5 ".
Deite o deter gent e re lativ o ao c iclo d e pr e-lav agem no
compartimento " 6 ".
Depois de deitar o detergente no com par timent o, f ec he a
tampa e prima-a até ela encaixar com um estalido.
5
Aviso:
Para fechar a tampa mais facilmente, retire qualquer excesso de
detergente dos rebordos do compartimento.
6
10
Page 91

Loiça não apropriada
it
Não lavar na máquin a as seguin tes peças d e loiça:
Talheres e outras peças de madei ra, pois f icar ão es br anquiçad as e com mau aspecto; também as c olas
aplicadas não são prór ias par a as temperat ur as atingidas dentro da máquina. Copo s decorados e jarros
delicatos , espec ialm ent e antigu ida des ou l oiça irr epar ável. E stas decor ações não são r esis tente s à
lavagem na máquina.
Também não apropriadas sã o peç as d e arte s ens í veis à água quente, bem como loiça de c obre e de
estanho. Elementos decorativos em vidro, peças em alumíni o e prat a podem perder a cor e as desorações
desvanecerem-se. Mesmo algumas qualidades de vidro podem, após muitas lavagens, tornar-se opacas.
Também não apropriados são materiais absorventes, como esponjas e panos.
Recom endação:
De futuro, compre apenas loiça própria para ser lavada na máquina.
Nota
Peças de loiça, sujas com cinza, cera, lubrificantes ou tinta, não
devem ser lavadas na máquina.
Danos nos vidros e na loiça
Causas:
Tipo e processo de fabrico do vidro.
Composição química do detergente.
Temperatura da água e duração do programa de lavagem.
Recomendações:
Utilizar recipient es de v idr o e por celanas r ecom endadas pelo fabricant e com o próprias para lav ar na
máquina de loiça.
Utilizar deter gent e assinalado como não prejudicial para a loiça.Consul tar o fabricant e do detergente.
Utulizar, se possível, programas com temperaturas mais baixas e mais curtos.
Para se ev itarem pos sív eis dano s em copos e t alher es, es tes de vem ser r etirados pouc o tempo
depois de terminado o programa.
11
Page 92

Introduzir a loiça na máquina
Antes de introduzir a loiça na máquina, elim ine os resíduos maiores pa ra evit ar que o filt r o fique entupido,
situação passível de originar uma diminuição do rendimento.
Se tiver utilizado os tachos e as panelas na preparação de alimentos extremamente difíceis de remover,
deixe-os de molho ant es de os lavar. Tal eliminará a necessidad e de ciclos de lavagem extra. Puxe o cesto
para fora para facilit ar a introdução da loiça na máquina.
it
Como utilizar o cesto inferio r
Recomendamos que coloque as peças mais dif íc eis de lavar
no cesto inferior: tachos, panelas, tampas, travessas e terrinas,
conforme indicado na figura da direita.
É preferível colocar as travessas e as tampas na part e lateral
dos cestos de modo a evitar bloquear a rotação do braço
aspersor superior.
Tachos, terrinas, etc. devem s er se m pre colocados vi r ados
para baixo (ver a fig.D).
Os tachos fundos devem ficar inclinados para permitir que
a água escorra.
O cesto d os t alhe res pode ser dupli cad o (v er a fi g.E ) de
forma a que apenas uma secção p ossa ser utilizada quando
o número de talheres for reduzi do. Isto per m it e c r i ar espaço
para tachos e panelas adicionais. Es te ces to também pode
ser colocado no cesto superior.
Os talheres devem ser colocados no respectivo cesto com os
cabos para baixo; se o cesto possuir cestos laterais, a s colheres
devem ser colocadas individualmente nas respectivas ranhuras.
Utensílios particular mente com pr idos dev em ser c oloca dos
na posição horizontal, na parte frontal do cesto superior.
Carga para 12 talh eres standar d
EN 50242
)
(
fig.D1
fig.D2
fig.E
Atenção:
facas e outras peças com pontiagudo devem ser colocadas para
baixo ou num local horizontal.
12
Page 93

Como utilizar o cesto superio r
LO cesto s uper ior f o i c onc ebido para a loiça m ais delicada e
leve como, por exemplo, copos, chávenas de café e chá,
molheiras, bem como pratos, tigelas pequenas e panelas p ouco
profundas (desde que não estejam demasiado sujas).
Coloque os pratos e os ut ens ílios de coz inha de forma a que
não possam ser deslocados pelo jacto de água.
Podia ajustar a altura da estante alta com os parafusos nos
dois lados. (ver a fig.F)
Depois de ajustar a posição do cesto superi or para um nível
mais alto, vo cê deixar á maior es paço para o cest o baixo
com o fim de pôr lá os tachos mai s co m p r idos, pratos, etc.
A prateleira bascu lan te
Copos de pé alto ou copos grandes devem ficar apoiados nesta
prateleira e não noutras peças de loiça.
Copos,cháv enas e pequenas taças podem ser ar r um adas na
prateleira basculante.A prateleira basculante pode ser levan tada
ou baixada,em função das necessidades. (ver a fig.G)
it
fig.F
fig.G
13
Page 94

Tabela de programas
it
Programas
de
lavagem
Intensivo
Lavagem
Normal
Lavagem
ligira
(EN50242)
Tipo de loiça
por ex.
Porcelana,
tachos,
talheres,
copos,etc.
Não
delicada
Tipe de
restos de
alimentos
P.ex.de
Sopas, souflés
molhos,
batatas,
massas, arroz,
ovos, assados
Sopas,
batatas,
massas,arroz,
ovos, assados
Quantidade
de restos
Muita
Pouca
Estado
dos restos
Muito
agarrados
Pouco
agarrados
Descrição do Ciclo
Pré-lavagem com água quente.
Lavagem prolongada a 70°C.
Pré-lavagem com água fria.
Enxaguamento com água quente.
Secagem.
Pré-lavagem com água quente.
Lavagem prolongada a 55°C.
Pré-lavagem com água fria.
Enxaguamento com água quente.
Secagem.
Pré-lavagem com água quente.
Lavagem prolongada a 50°C.
Pré-lavagem com água fria.
Enxaguamento com água quente.
Secagem.
14
Misturada
Lavagem rápida
Lavagem de Vidro s
Molho
Misturada
Café,
bolos, leite,
salsichas,
bebidas frias,
saladas
Louça que apenas precisa de ser
enxaguada e seca.
Duche,quando a loiça fem que ficar
na máquina durante vários dias.
Muito
pouca
Pouco
agarrados
Lavagem a 45°C.
Enxaguamento com água fria.
Enxaguamento com água quente.
Secagem.
Lavagem breve a 40° C.
Enxaguamento a frio.
Enxaguamento com água quente a 65°C.
Secagem.
Breve lavagem a frio para evitar
a secagem dos resíduos na loiça.
Page 95

it
Prélavagem
5g
5g
10g
10g
5g
5g
5g
5g
5g
5g
Detergente
Lavagem prolongada
25g
15g
20g
15g
25g
15g
25g
20g
25g
20g
25g
15g
15g
10g
15g
10g
Abrilhantador
( )
Duração
em min
112’
94’
132’
114’
112’
94’
132’
114’
102’
90’
102’
90’
132’
122’
162’
152’
132’
122’
162’
152’
92’
82’
92’
82’
31’
29’
55’
49’
12’
12’
( ) Ciclo de teste conforme EN50242 com regulator de abrilhantador al nivel: 5
15
Page 96

Lavagem da Loiça
it
Selecção d o Programm a
Consider ando o tipo de loiça, a quantidade e a situação dos restos de comida, encont rará na tab ela
adequado à lavagem pretendida.
Na parte inf er ior da tabela encont r ara in dicações s obr e a ev olução do progr am a e os respectiv os dado s.
Um exemplo:
Loiça de vários tipos, com muit os restos de com ida bem a garrados, pode s er l avada c om o p rograma
“Lavagem Normal” .
Conselho para poupar energia
Em caso de máquina com pouca carga, é, muitas vezes, suficiente o programa mails fraco.
Dados dos Programas
Os dados apresentados sobre os programas referem-se a condições normais. Devido a
diferentes apresentados de loiça,.
temperatura de entrada de água,
pressão da água,
temperatura ambiente,
tolerâncias na tensão da rede e
tolerâncias condicionadas pelas máquinas(por ex.temperatura, quantidade de água)
Comece a Aplicação
Começando um circlo de lavagem...
Tenha certeza que a tomada para a aplicação é inserida na cova de parede.
Tenha certeza que o abastecimento de água é virado em para pressur cheio.
Carregue a lavadora de louça.
Aflua o detergente.
Aperte o ON-OFF botão, e a luz de “Fine” virará em.
Vire a maçaneta localizada à direit a do painel de controle até o número ou s ímbolo pelo c ic lo fixar é
aligued c om o r ef r enc e m ar que ( v eja a s eç ão intitulada, av aliaç ão de progr am a) . S e a m aç anet a
alinhou justamente com a marca de refrence que você quer escolher, você tem que virar a maçaneta
para “Reset”. Então volte para primeiro passo.
Cinco segundos depois, a luz de “Fine” virará fora, o ciclo de lavagem começará.
16
Page 97

it
Ao término do ciclo de lavag em...
Quando a cigarr a c ons tantemente buz inar seis vezes , a luz de “E nd” vir ar á fora e o ciclo terminou. Vire
fora a aplic ação que usa o O N-OFF bot ão v ire fora o aba steciment o de água e abra a po rta da lav ad ora
de louça. E s pere al guns at as antes de descarregar a lavadora de louça para e v it ar manipulação os
pratos e utens í lios en quant o eles ainda tiv er em calor e m ais s us c et ível a quebr a. E les tam bém v ão
bem não durável.
Cancela ou co rrege o program a de circlo de Lavagem ...
Um ciclo que é underway só pode ser modificado se tiver cor r ido pouco tempo par a. Caso contrário, o
detergente já pode ter sido usado, e a aplicação já pode ter escoado a água de lavagem. Se este for
o caso, o dis pensado r de deter gente dev e ser reenchido ( vê o par ágrafo intitu lad o, “Car regand o o
Detergente” ).
Vire o Macaneta até “Reset”, escolha o programa que
você prefere depois.
1
2
3
4
5
6
7
Aviso:
Não coloque as pastilhas na cuba ou no cesto dos talheres pois, se
o fizer, a lavagem não será feita correctamente. As pastilhas devem
ser colocadas no local do detergente.
17
Page 98

Como manter a sua máquina em forma
it
Após cada lavag em
Após cada lavagem, feche a água e deixe a porta entreaberta de modo a que a humidade e os odores
não fiquem retidos no interior do aparelho.
Retirar a ficha
Antes de qual quer oper aç ão de limpeza o u m anut enç ão, r et ir e s emp re a fic ha da tomada. Nã o c orr a
riscos.
Solventes o u produt os de limp eza ab rasivos
Não utilize solventes ou produtos de limpeza abrasivos para limpar o exterior e as partes de borracha
da máquina. Utilize um pano e água morna e sabão.
Para eliminar m anc has da su perfíc ie interior, ut ilize um pano e mbebido em água e um pouco de vi nagre
branco ou, ent?o, um produto de limpeza específico para máquinas de lavar loiça.
Deslocar o aparelh o
Se tiver de des loc ar o apa relh o, te nte man tê-lo na p osição ver tical. P oderá d eslo cá-lo c om a p arte
traseira virada para baixo, se tal for absolutamente necessário.
Tampões
Um dos fa ctor es qu e orig inam a fo rmaç ão de od ores na m áquin a é a acumul ação de resí duos nos
tampões. Uma limpeza periódica com uma esponja impedirá que tal aconteça.
Por causa do perigo de rasteira, a porta não pode estar aberta.
Quando for de férias
Quando for d e f ér ia s , ex ec ute um c ic l o de lavagem c om a m áquina vaz ia e, depois, ret ir e a f ic ha d a
tomada, feche a água e deixe a porta do aparelho entreaberta. Tal ajudará a aumentar a durabilidade
dos tampões e a evitar a formação de odores no interior do aparelho.
18
Page 99

Manutenção e tratameento
O control o e a manu tenç ão re gular da s ua máq uina pod e ev itar o a par ecim ento de an omal ias. Is to
poupa tempo e abor rec ime ntos. P or i sso , de t em pos a tempo s, dev e dar um pouco de at enç ão à s ua
máquina.
it
Estado geraal da máquina
Verificar se existem dep ósitos d e gordu ra e de calcá rio no i nt erior da máqu ina. Se est es depósit os
existirem, então:
Lavar bem a máquina com detergente.
Filtros
Os filtros “7,8” m antêm af as tados da bomba os res íduos de
maior dimensão, existentes na á gua. E stes re síduo s po dem
simplesmente entupir os filtros.
Depois de cada lavagem, verificar os filt ros e, se ne cessário,
limpá-los.
Soltando o filtro grosso “ 7” , poderá retirar o gr upo de filtr os
“8”. Remover então os re stos de comid a e lavar os filtro s
sob água corrente.
Recolocar o grupo de filt ro s “8” e recolocar o filt ro gros so
“7”.
7
8
Braço aspersor
Calcário e sujidades da água de lavagem podem bloquear os
injectores e os apoios dos braços aspersores “9” e “ 10 ”.
Verificar, se os injectores dos braços aspersores estão
obstruidos com restos de comida.
Se necessário, desmontar o braço inferior “ 10 ” puxandoo para cima.
Desapertar o braço superior “ 9 ”.
Lavar os braços aspersores sob a água corrente.
Voltar a encaixar e aparafusar os braços aspersores.
9
10
19
Page 100

Pesquisa de Anomalias
it
Eliminação d e pequ enas ano m alias
Com a experiència, m uit as das anom alias su r gidas no funcionamento diár io p odem ser eliminad as , sem
necessidade de rec or rer aos s er v iç os de as s is t ênc ia. I s to poupa, natur alm ent e, dinheiro e garante a
disponibili dade im ediata da máquin a. A s indicações que se seguem ajuda rão a enc ontrar as causas
das anomalias.
Anomalias...
...ao ligar a máqu ina
A máquina não funciona
Os fusíveis domésticos não estão em condições.
A ficha da máquina não está ligada à tomada.
A porta da máquina não está correctamente fechada.
A tecla do programa não está premida.
A torneira da água não está aberta.
Filtro entupido na mangueira de entrada de água.
- O filtro encontra-se na ligação do sistema de Aquastop ou na mangueira de admissão de água.
Importante
As reparações só devem ser efectuadas por um técnico. As
reparações indevidas podem acarretar danos e perigos
consideráveis para o utilizador.
...na máqu ina
The buzzer go-and-for beeps as this turn on 2 seconds and then turn off 2 seconds.
a torneira da água está aberta e se a m angueira est´á dev i dam ente colocada;
tem água em cas a e se esta poss ui uma pressão suficiente;
a mangueira de abas tecimento de água está torcida ou dobrada;
o filtro da mangueir a de abastecimento de água está obstruído.
a mangueira de des carga se coloc ado na posi
20
ção inferior.
 Loading...