

Page 1
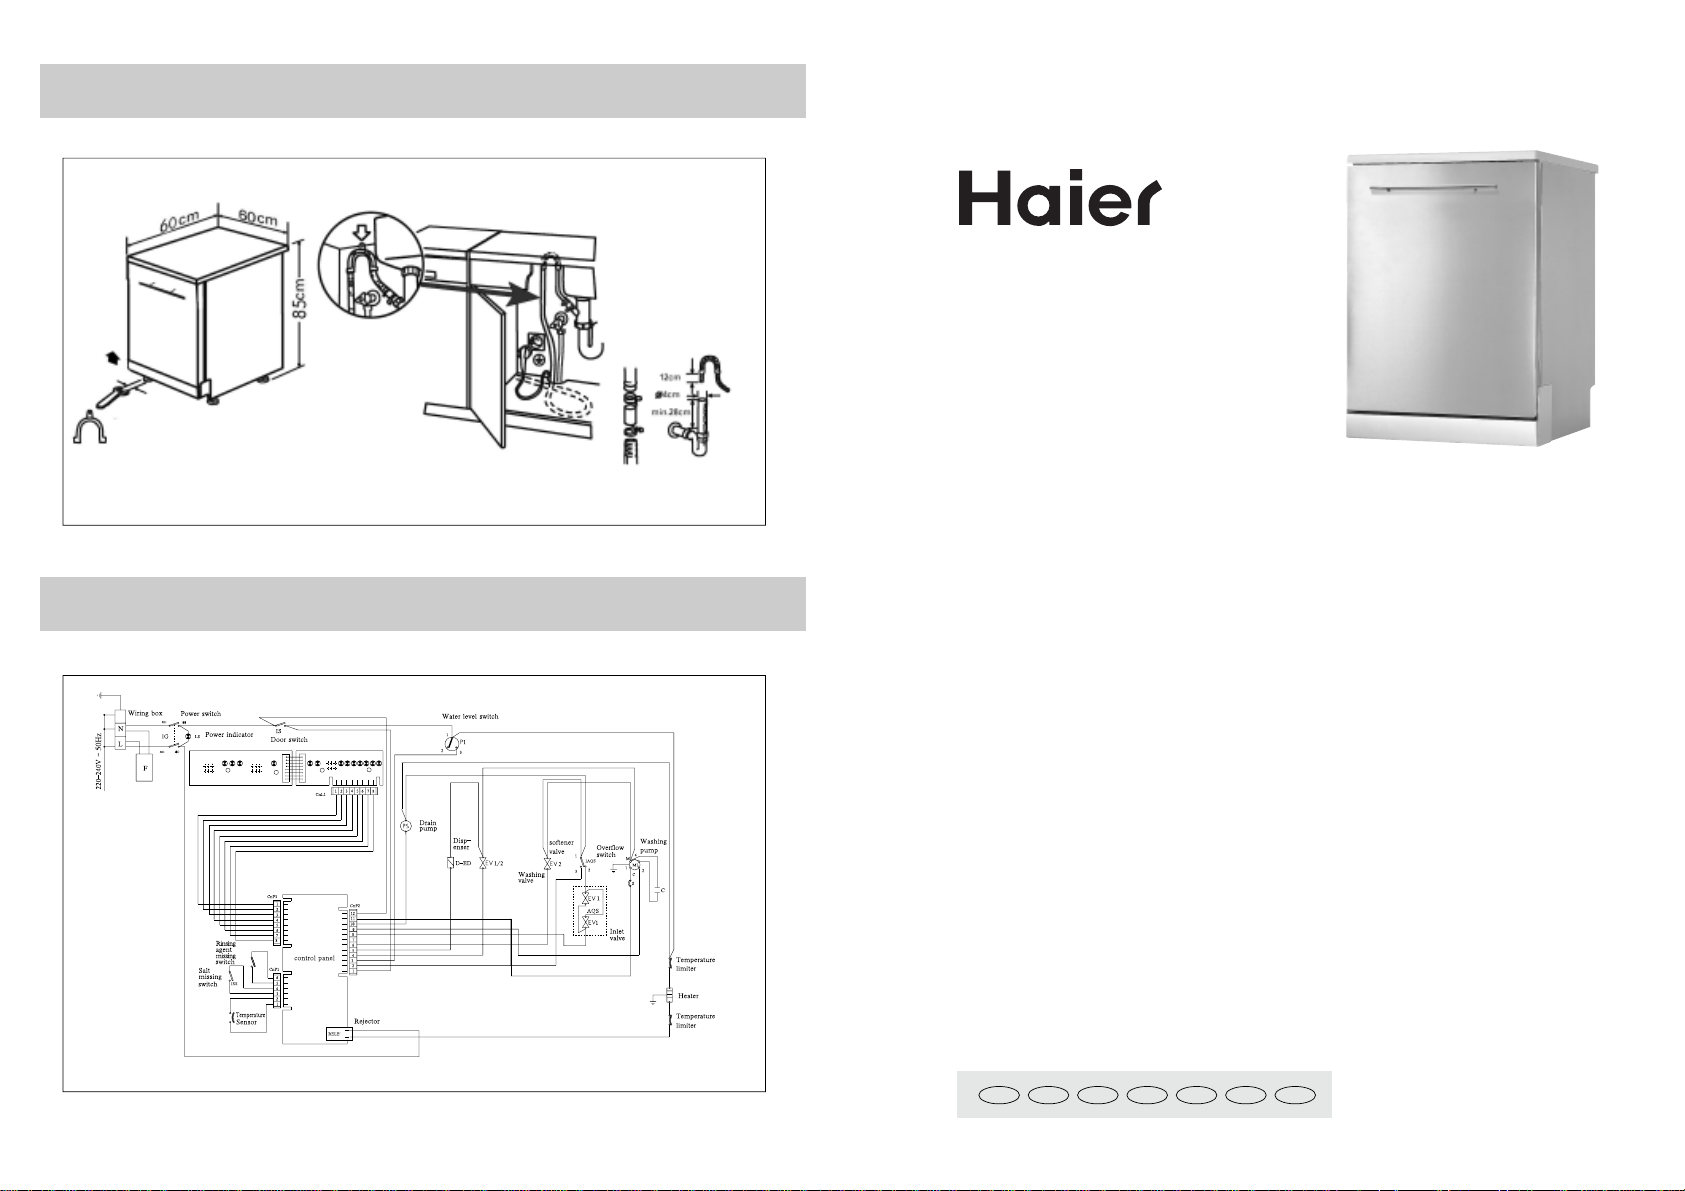
Installation
Diagram
Domestic Dishwasher
DW12-CFE S
DW12-CFE SS
GB DE FR IT ES PT NL
0120504589
Page 2
Safety Is a Good Habit to Get Into
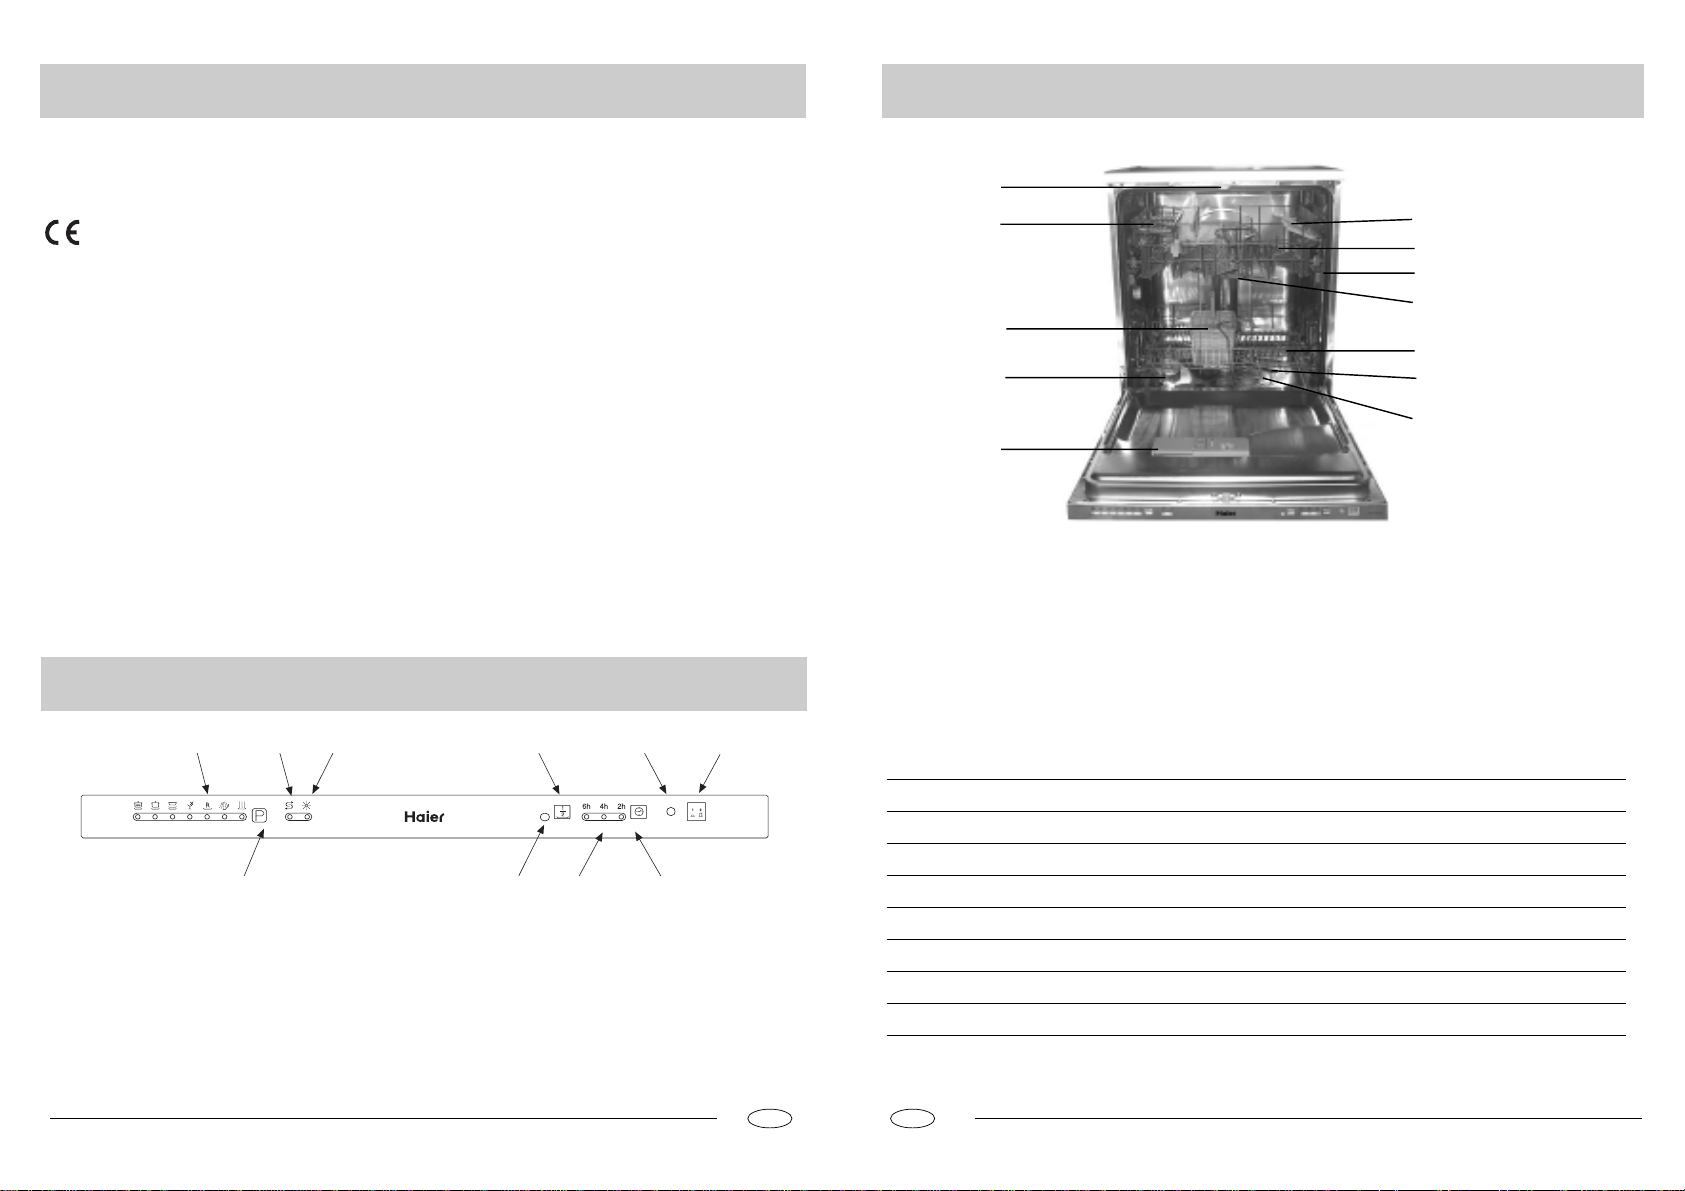
Close-up View (Interior)
NOTICE
Carefully read the instructions contained in this manual, as they
provide important information which is essential to safe and proper
installation, use and maintenance of the appliance.
This appliance complies with the following EEC
directives:
- 73/23/EEC of 19 February 1973 (Low Voltage) and subse
quent modifications;
- 89/336/EEC of 3 May 1989 (Electromagnetic Compatibility)
and subsequent modifications.
- Carefully dispose of the packing material.
- After removing the packing, check to make sure that the appli ance is not damaged. If in doubt, contact a qualified professional.
- The dishwasher must only be used by adults for the washing of
household dishes and cooking utensils.
- The appliance is not intended for use by young children or
inform persons without supervision.
- Young children should be supervised to ensure that they do
not play with the appliance.
- Keep detergents out of the reach of children, who must also
be kept away from the dishwasher when it is open.
- This appliance cannot be installed outdoors, not even if the
area in which it is installed is covered by a roof; it is also very
dangerous to leave it exposed to the rain and elements.
- Do not touch the heating element during or after a wash cycle.
- Do not lean or sit on the door when it is open as this could
over turn the dishwasher.
Close-up View (control panel)
- If the appliance malfunctions, turn off water supply to the appli ance and disconnect the plug from the wall socket. Then, con sult the section entitled, "Troubleshooting". If you cannot solve
the problem, contact a service centre.
- Only specialised personnel are authorised to make repairs.
- Appliances which are no longer being used must be made
inoperable by cutting the power supply cord and removing
the door lock.
- If the supply cord is damaged, it must be replaced by a special
cord or assembly available from the manufacturer or its ser vice agent.
- After installation, the power plug must be accessible.
- Fundamental rules to follow when using the appliance:
* Never touch the dishwasher when barefoot or with wet hands
or feet;
* We discourage the use of extension cords and multiple
sockets;
* During installation, the power supply cord must not be exces sively or dangerously bent or flattened;
* If the appliance is not operating properly or maintenance must
be performed, disconnect the appliance from the power
supply.
To maintain the EFFICIENCY and SAFETY of this appliance,we
recommend:
- call only the Service Centers authorized by the manufacturer.
- always use original Spare Parts
L
K
V
J
I
J
L
H
A Cup Rack
B Upper Rack
C Rack Height Adjustor
D Top Spray Arm
E Lower Rack
F Bottom Spray Arm
A
B
C
D
E
F
G
G Washing Filter
H Detergent and Rinse Aid Dispenser
I Salt Container Cap
J Silverware basket
K Knife rack
L Third Sprayer
A
ON-OFF light
B
"HALF LOAD" button
C
Low rinse aid indicator light
D
Low salt indicator light
E
D
HG
F
G
H
I
J
I
Cycle indicator lightON-OFF button
Cycle select button
"HALF LOAD" indicator light
Delay indicator light
Delay select button
BCEF
J
A
Technical characteristics
60 cm
60 cm
85 cm
0.03-0.6MPa
220-240V~ 50Hz
2150W
GB
Width
Depth
Height
Capacity
Mains water pressure
Power voltage
Total absorber power
GB
12 standard place settings
.2..1.
Page 3
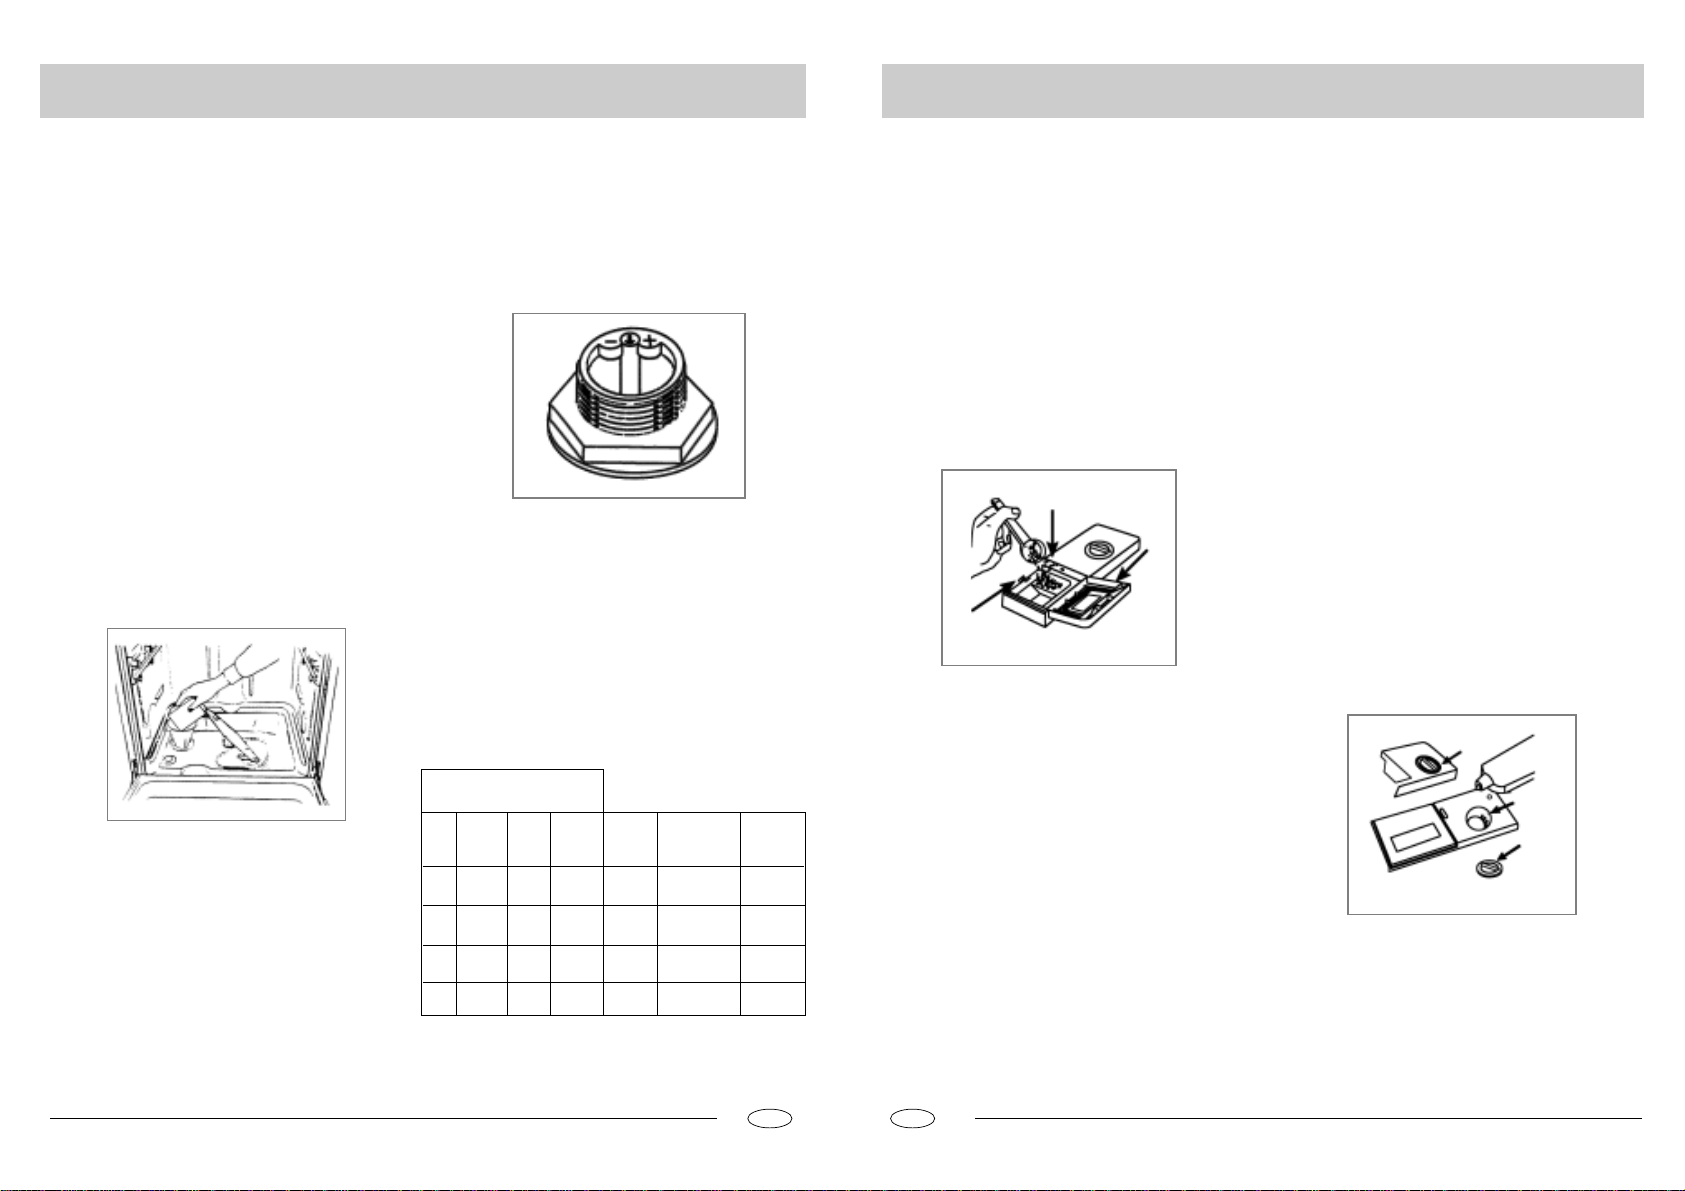
Salt
Detergent and Rinse Aid
Salt
The hardness of the water varies from place to place. If hard
water is used in the dishwasher, deposits will form on the dishes
and utensils.
The appliance is equipped with a special softener that uses a salt
specifically designed to eliminate lime and minerals from the water.
Loading the Salt into the Softener
Always use salt intended for use with dishwashers.
The salt container is located beneath the lower rack and should
be filled as follows:
- Remove the lower rack and then unscrew and remove the cap
from the salt container;
- If you are filling the container for the first time, fill it with water;
- Place the end of the funnel (supplied) into the hole and intro duce about 2 kg of salt. It is normal for a small amount of water
to come out of the salt container.
- Carefully screw the cap back on.
The salt container must be filled when the "low salt" indicator
light (located on the control panel), comes on.
To prevent the formation of rust, load the salt just before beginning a wash cycle.
Adjusting Salt Consumption
The dishwasher is designed to allow for adjusting the amount of
salt consumed based on the hardness of the water used. This is
intended to optimize and customize the level of salt consumption
so that it remains at a minimum.
To adjust salt consumption, proceed as follows:
- Unscrew the cap from the salt container;
- There is a ring on the container with an arrow on it (see figure to
the side),
- If necessary, rotate the ring in an anticlockwise direction from
the "-" setting towards the "+" sign, based on the hardness of
the water being used.
It is recommended that adjustments be made in accordance
with the following schema:
Water Hardness
Clarke
Level
degrees
014 MNT
1
2
3
PSTN QRUV QIRUIV
ºdH
mmol/l
MNIT
NIUQIQNUQQNQPS
Selector
position
L
=?J?
jba
Salt
consumption
(Grams/cycle)
Autonomy
(cycles/2kg)
OM
QM
Detergent
Detergent specifically intended for use with dishwashers must
be used. The dispenser must be refilled before the start of each
wash cycle following the instructions provided in the "Wash Cycle
Table". The detergent dispenser is located on the inside panel
the door.
Rinse Aid
This product makes dishes sparkle and helps them to dry without spotting. The dispenser is located on the inside panel of the
door and should be filled after every 80 wash cycles (or when
the "low rinse aid" indicator light comes on for those models
with this feature).
Loading the detergent
To open the "A" cover on the dispenser, press the "B" button.
The detergent for the wash cycle should be poured into the "C"
compartment.
After the detergent has been placed in the dispenser, close the
cover and press down until it clicks in place.
C
A
Loading the Rinse Aid
Regardless of the type of detergent dispenser installed on your
appliance, you must proceed as indicated below when loading
the rinse aid.
To open the dispenser, turn the "C" cap in an anti-clockwise
direction and then pour in the rinse aid, making sure not to overfill.
The amount of rinse aid used for each cycle can be regulated by
turning the "F" dose adjustor, located beneath the "C" cap, with
a screwdriver. There are 6 different settings; the normal dosage
setting is 3.
Important
Proper dosage of the rinse aid improves drying.
B
Notice: To facilitate closing the cover, remove any ex-
If drops of water remain on the dishes or spotting occurs,
the dosage adjustor should be turned to a higher setting.
If the dishes have white streaks, turn the dosage adjustor
to a lower setting.
C
cess detergent on the edges of the dispenser.
F
C
LM
SM
QM
4
[UV[TN [UIV
SM?H?
GB
OR
GB
.4..3.
Page 4
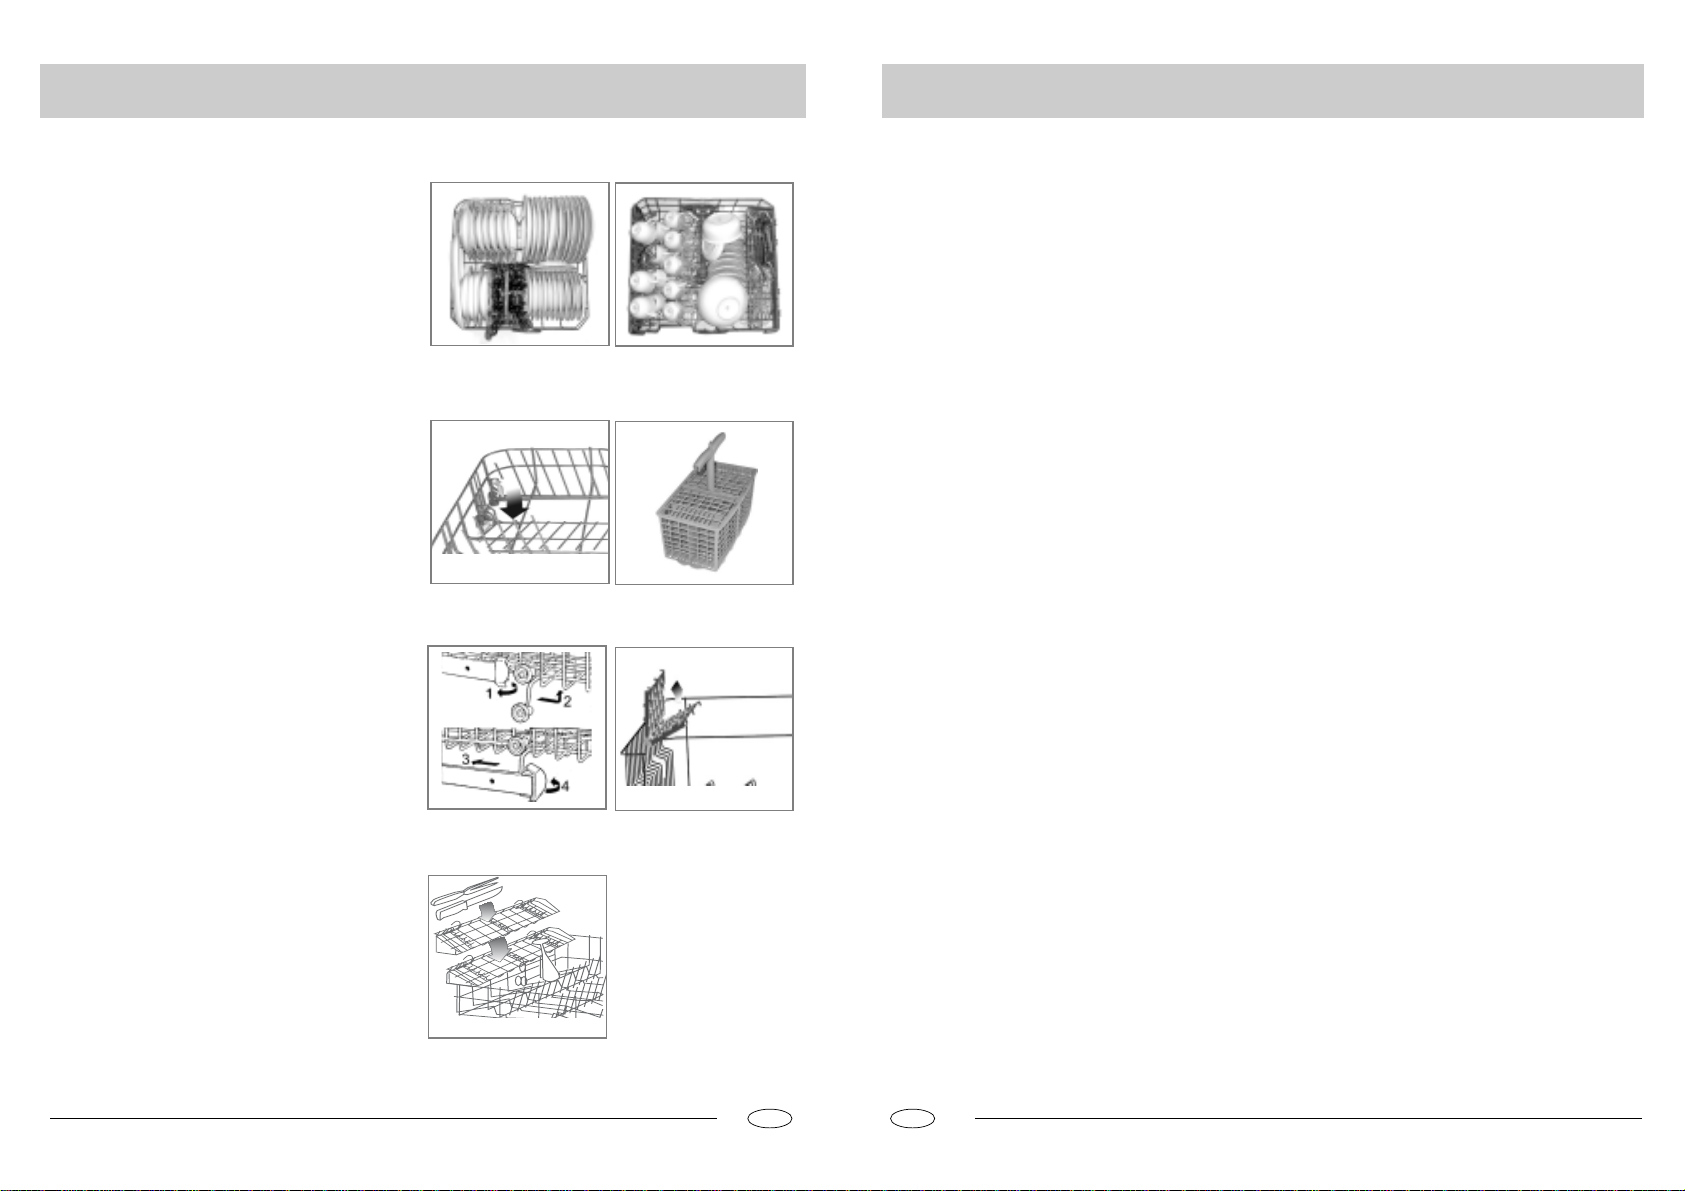
Loading the Dishwasher
Starting the Appliance
Before placing the dishes in the dishwasher, remove larger food
particles to prevent the filter from becoming clogged, which results in reduced performance.
If the pots and pans have baked-on food that is extremely hard to
remove, we recommend that they are soaked before washed. This
will eliminate the need for extra wash cycles.
Pull out the rack to load the dishwasher.
How to use the lower rack
We recommend that you place the most difficult to clean items on
the bottom rack: pots, pans, lids, serving dishes and bowls, as
shown in the figure to the right.
It is preferable to place serving dishes and lids on the sides of the
racks in order to avoid blocking the rotation of the top spray arm.
- Pots, serving bowls, etc. must always be placed face down.
- Deep pots should be slanted to allow the water to flow out.
- The lower rack features fold down tine rows (see fig.A) so that
larger or more pots and pans can be loaded.
- The silverware basket can be doubled (see fig.B) so that only
one section may be used when the silverware load is light. This
also makes space for additional pots and pans and it can also be
placed in the upper rack.
- Silverware should be placed in the silverware basket with the
handles at the bottom; if the rack has side baskets, the spoons
should be located individually into the appropriate slots. Espe cially long utensils should be placed in the horizontal position at
the front of the upper rack.
How to use the upper rack
The upper rack is designed to hold more delicate and lighter
dishware, such as glasses, cups and saucers, plates, small bowls
and shallow pans (as long as they are not too dirty).
- Position the dishes and cookware so that they do not get moved
by the spray of water.
The upper rack can be adjusted for height by using the knobs located on both sides of the rack itself (see fig.C).
Adjust the upper basket to the higher level and you have more
space to accommodate those taller pans and trays in the bottom
basket.
Shelf
Lean tall glasses and those with long stems against the shelf-not
against other items to be washed.
Place glasses, cups and small bowls on the additional cup rack.
The additional cup rack can be swivelled in or out as required(see
fig.D).
Knife rack
The knife rack clips onto the side of the top basket, giving you the
freedom to wash your large sharp knives separately and out of
harm’s way (see fig.E).
Lower Rack
Upper Rack
Load for 12 Standard Settings (for IEC-EN 50242 tests)
fig.A
fig.C
fig.B
fig.D
fig.E
Starting a wash cycle
After having completed all of the installation steps in the preceding paragraphs, turn on the water to the unit, partially open the
door of the dishwasher, and press the ON-OFF button "A" located on the control panel. The "B" indicator light will come on.
At this point, the appliance is on and ready to be programmed.
Setting and Starting a wash Cycle
Choose the desired cycle by pressing the cycle selection button
"G". Each time it is pressed, one of the cycle indicator lights "F"
will come on in succession.
Choose the wash cycle you feel is most appropriate for the type
of dishes that need washing (consult the wash cycle table contained in this manual, especially when first using the appliance).
Close the door and after a few seconds, a short acoustic signal
will sound indicating that the wash cycle has begun and cannot
be modified. If necessary, read the paragraph entitled, "Cancelling or modifying a cycle while underway. "The end of the cycle
will be signalled by a double acoustic sound, and the indicator
light "F" will begin to blink.
Cancelling or modifying a cycle while underway...
Premise: A cycle that is underway can only be modified if it has
only been running for a short time.
Otherwise, the detergent may have already been used, and the
appliance may have already drained the wash water. If this is
the case, the detergent dispenser must be refilled (see the paragraph entitled, "Loading the Detergent").
To change the cycle currently underway, open the door and press
the ON-OFF button "A",follow the instructions contained in the
paragraph entitled, "Starting a wash cycle","Setting and Starting a Wash Cycle".
To set a new wash cycle, follow the instructions contained in the
paragraph entitled, "Setting and Starting a Wash Cycle."
If you forget to load some of the dishes...
The wash cycle can be interrupted by opening the door carefully
(in order to avoid being sprayed by hot water). When the door is
closed again, the cycle will automatically restart at the point where
it left off.
At the end of the wash cycle...
The end of the cycle will be indicated by a double acoustical
signal and the blinking of the "F" indicator light. Open the door,
turn off the appliance using the ON/OFF switch and turn off the
water supply to the unit. Wait a few minutes before removing the
dishes so as to avoid handling them while still hot (when they
are more susceptible to breakage) and to get better drying results.
Setting The Start Delay Time
Open the door of the dishwasher partially. If the "J" button is
pressed (see, Close-up View" Control Panel"). The start time for
the wash cycle can be delayed for 2,4,6,8,10 or 12 hours.
Each time the button is pressed, the "I" light will blink indicating
the length of the delay.
After selecting the delay time, the wash cycle can be set, as
explained in "Starting a wash cycle..." , close the door and at this
point the delay period will begin to count down. During this period the delay indicator light (I) will come on. At the end of the
delay time, the indicator will turn off and the cycle will start.
NOTE:
a) During the delay period, none of the settings can be modified.
If necessary, they can be cancelled by pressing cycle selector
"G" for about 5 seconds.
b) If the power to the appliance goes off or the door is opened
during the delay period, the clock will stop the countdown. It will
start again when the power has come back on, or when the door
has been closed.
Wash Cycle Adjustment Buttons
1/2 Load Button
This button (see" Close-up View-Control Panel", letter "C") makes
it possible to wash dishes using only the upper rack if there are
not enough dishes for a full load, This will allow you to save on
water and electrical energy.
It cannot be used with the heavy duty wash cycles.
GB
GB
.6..5.
Page 5
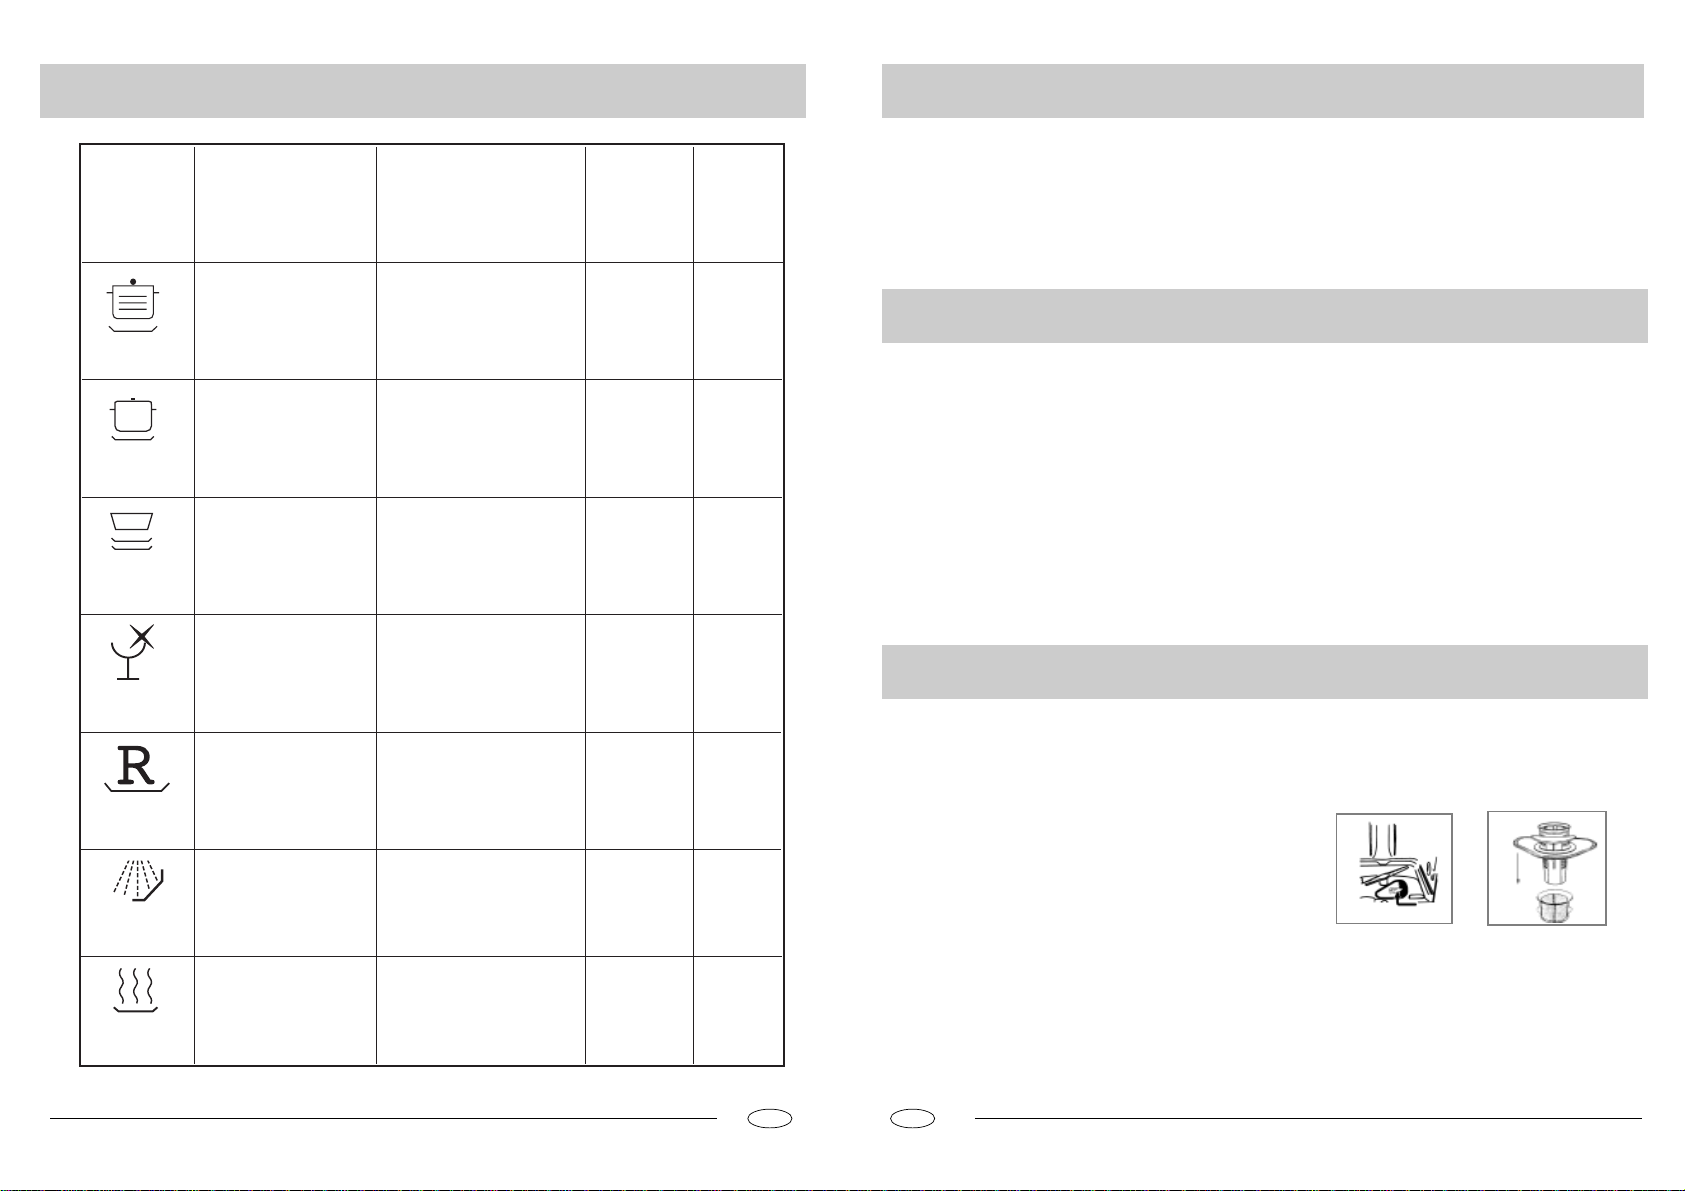
Wash Cycle Table
Energy Saving Tips
Cycle
Heavy Duty
Normal Wash
Light Wash
(IEC-EN50242)
Glassware
Rapid Wash
Soak
Heat wash
Cycle
Selection
Information
Very dirty dishes,
pots and pans. (Not
to be used with delicate items)
Normal dirty dishes,
pots and pans. Standard daily cycle.
Normal dirty dishes,
pots and pans without
dried on residue.
Economic, fast cycle to
be used for items which
are sensitive to higher.
Run immediately after
dishes are used.
Economic, fast cycle to
be used to on not very
dirty dishes right after
they are used. No drying cycle.
Pre-wash of dishes,
pots and pans while
waiting for the load to
be completed after the
subsequent meal.
The cycle of heat washing and dry tableware.
Description of Cycle
Pre-wash with hot water.
Extended wash at 70K
Rinses with cold water.
Rinse with hot waterK
Drying.
Prewash use cold water.
Extended wash at 55.
Rinse with cold water.
Rinse with hot water.
Drying.
Pre-wash with cold water.
Extended wash at 50K
Rinse with cold water.
Rinse with hot waterK
Drying.
Wash at 60.
Rinse with warm water.
Hot rinse.
Drying.
Short wash at 40.
Cold rinse.
Short cold wash to prevent
food residue from drying on
the dishes K
Heat washing.
Detergent Rinse Aid
30g
30g
5g+25g
15g
ERF
15g
-It is important to try and run the dishwasher when it is fully
loaded in order to save on energy. In order to prevent odors
from forming and food from caking onto the dishes, you can run
the soak cycle.
-Choose the right wash cycle: the choice of cycle depends on
the type of dishware, cookware and utensils being washed and
how dirty they are.
How to keep Your Dishwasher in Shape
After Every Wash
After every wash, turn off the water supply to the appliance and
leave the door slightly ajar so that moisture and odors are not
trapped inside.
Remove the plug
Before cleaning or performing maintenance, always remove the
plug from the socket. Do not run risks.
No solvents or Abrasive Cleaning Products
To clean the exterior and rubber parts of the dishwasher, do not
use solvents or abrasive cleaning products. Rather, use only a
cloth and warm soapy water.
To remove spots or stains from the surface of the interior, use a
cloth dampened with water and a little while vinegar, or cleaning
product made specifically for dishwashers.
Cleaning and Special Maintenance
Filter Assembly
For best performance and results, the filter assembly must be
cleaned.
The filter efficiently removes food particles from the wash water,
allowing it to be recirculated during the cycle. For this reason, it
is a good idea to remove the larger food particles trapped in the
filter after each wash cycle by rinsing the "A" semi-circular filter
and cup under running water. To remove the filter assembly,
pull on the cup handle in an upward direction. The entire filter
assembly (made up of the "A" semicircular filter and the "B" fine
filter) should be cleaned at least once a month. To clean the
filter and the fine filter, use a cleaning brush. Then, reassemble
the filter parts as shown in the figures below and inset the entire
assembly in the dishwasher, positioning in its seat and pressing
downward.
The dishwasher must never be used without the filters. Improper
replacement of the filters may reduce performance of the appliance and damage dishes and utensils.
-Use the right amount of detergent: if you use too much detergent,
the result will not be cleaner dishes, but, rather, a greater negative impact on the environment.
-There is no advantage in rinsing dishes, cookware and utensils
before placing them in the dishwasher.
When You Go on Holiday
When you go on holiday, it is recommended that you run a wash
cycle with the dishwasher empty and then remove the plug from
the socket, turn off the water supply and leave the door of the
appliance slightly ajar. This will help the seals last longer and
prevent odors from forming within the appliance.
Moving the Appliance
If the appliance must be moved, try to keep it in a vertical position.
If absolutely necessary, it can be positioned on its back.
Seals
One of the factors that cause odors to form in the dishwasher is
food that remains trapped in the seals. Periodic cleaning with a
damp sponge will prevent this from occurring.
Cleaning the Spray Arms
It may happen that food particles become encrusted on the
sprayer arms and block the hole (see "Close up view [interior]" ,
letters D-F ). Check the sprayer arms periodically and clean them
when needed.
A
B
Cleaning the Water Inlet Filter
Periodically clean the water inlet filter located on the outlet of the
water supply tap.
After turning off the water tap, unscrew the end of the water supply hose, remove the filter and clean it carefully under running
water. Then, return the filter to its place and tighten the water
supply hose back into position.
GB
GB
.8..7.
Page 6
Troubleshooting
Installation
It may occur that the dishwasher does not function or does not
function properly. Before calling for assistance, Iet us see what
can be done first: have you forgotten to press one of the buttons
or to perform an essential operation?
The Dishwasher Does Not Start
Have you checked whether:
- the plug is pushed into the socket correctly;
- the power is on in the house;
- the door is closed properly;
- the ON-OFF switch is on "ON";
- the water supply is turned on.
The Dishwasher Does Not Load Water
Have you checked whether:
- the water is turned on and the hose is connected properly;
- the water supply to the house is on and has sufficient pressure;
- the water supply hose is crimped or bend;
- the filter for the water supply hose is clogged.
The Dishwasher Does Not Drain
Have you checked whether:
- the drain hose is crimped or bend.
Lime Deposits or a White Film Form on the Dishes
Have you checked whether:
- the lid to the salt container is closed properly;
- the rinse aid dosage is correct.
The symbol on the product or on its packaging indicates that this product may not be treated
as household waste. Instead it shall be handed over
to the applicable collection point for the recycling
of electrical and electronic equipment. By ensuring
this product is disposed of correctly, you will help
prevent potential negative consequences for the
environment and human health, which could otherwise be caused by inappropriate waste handling of
this product.
Error Messages
The dishwasher is equipped with a safety system that is able to
detect operating problems and malfunctions. These malfunctions
are signalled by the rapid blinking of one of the "F" program LEDs.
Only in the case where the indicator light for the soak cycle (see
table for cycles) blinks rapidly should you cancel the cycle as
described in the section entitled, "Changing a Cycle while Underway." Then check to make sure that there is water in the mains
and that the tap is turned on. If the message continues, call for
technical assistance, indicating which message appeared.
If any of the other indicator lights begins to blink rapidly, turn off
the appliance and call for technical assistance, indicating which
light began to blink.
If, despite all these checks, the dishwasher still does not function
and/or the problem persists, contact the nearest authorised service centre and provide them with the following information:
- the nature of the problem;
- the model type number (Mod...) And the
serial number (S/N...), which are indicated on the plate located
on the side of the inner part of the door.
Never call on unauthorised technicians and refuse to allow
parts to be installed that are not original spare parts.
For more detailed information about recycling of this product,
please contact your local city office, your household waste disposal service or the shop where you purchased the product.
Positioning the Appliance
Positioning the appliance in the desired location. The back should
rest against the wall behind it, and the sides, along the adjacent
cabinets or wall. The dishwasher is equipped with water supply
and drain hoses that can be positioned to the right or the left to
facilitate proper installation.
Levelling the Appliance
Once the appliance is positioned, adjust the feet (screwing them
in or out) to adjust the dishwasher, making it level. In any case,
the appliance should not be inclined more than 2˚. If the appliance is level, it will help ensure proper performance.
Cold Water Connection
Connect the cold water supply hose to a threaded 3/4 (gas)
connector, making sure that it is fastened tightly in place (see fig.
2).
Some models are fitted with an "Aquastop" water supply hose
(see fig.1) in which the small filter is already housed in the threaded
end.
If the water pipes are new or have not been used for an extended
period of time, let the water run to make sure that the water is
clear and free of impurities. If this precaution is not taken, there is
a risk that the water inlet can get blocked and damage the appliance.
Hot Water Connection
The water supply to the appliance can also be connected to the
house's hot water line (centralised system, heating system), as
long as it does not exceed a temperature of 60
In this case,the wash cycle time will be shortened by about 15
minutes and the wash efficiency slightly reduced.
The connection must be made to the hot water line following the
same procedures as those for the connection to the cold water
line.
fig.1
.
fig.2
Anti-Flooding Protection
The dishwasher is equipped with a system that stops the supply
of water in the event of a problem with the water supply hose, or
leaks within the unit, in order to prevent damage to your home. If
for any reason the box containing the electrical components happens to get damaged, remove the plug for the appliance from
the socket immediately. In order to guarantee that the anti-flood-
ing feature operates properly, the "A" box with water supply hose
must be attached to the water supply tap as shown in Fig .1. No
other type of connection is acceptable.
The water supply hose must not, under any circumstances, be
cut, as it contains electrical parts which are live. If the length of
the hose is not adequate to make a proper connection, the hose
must be replaced with one which is long enough. This hose is
available upon request from specialised retailers and service
centres.
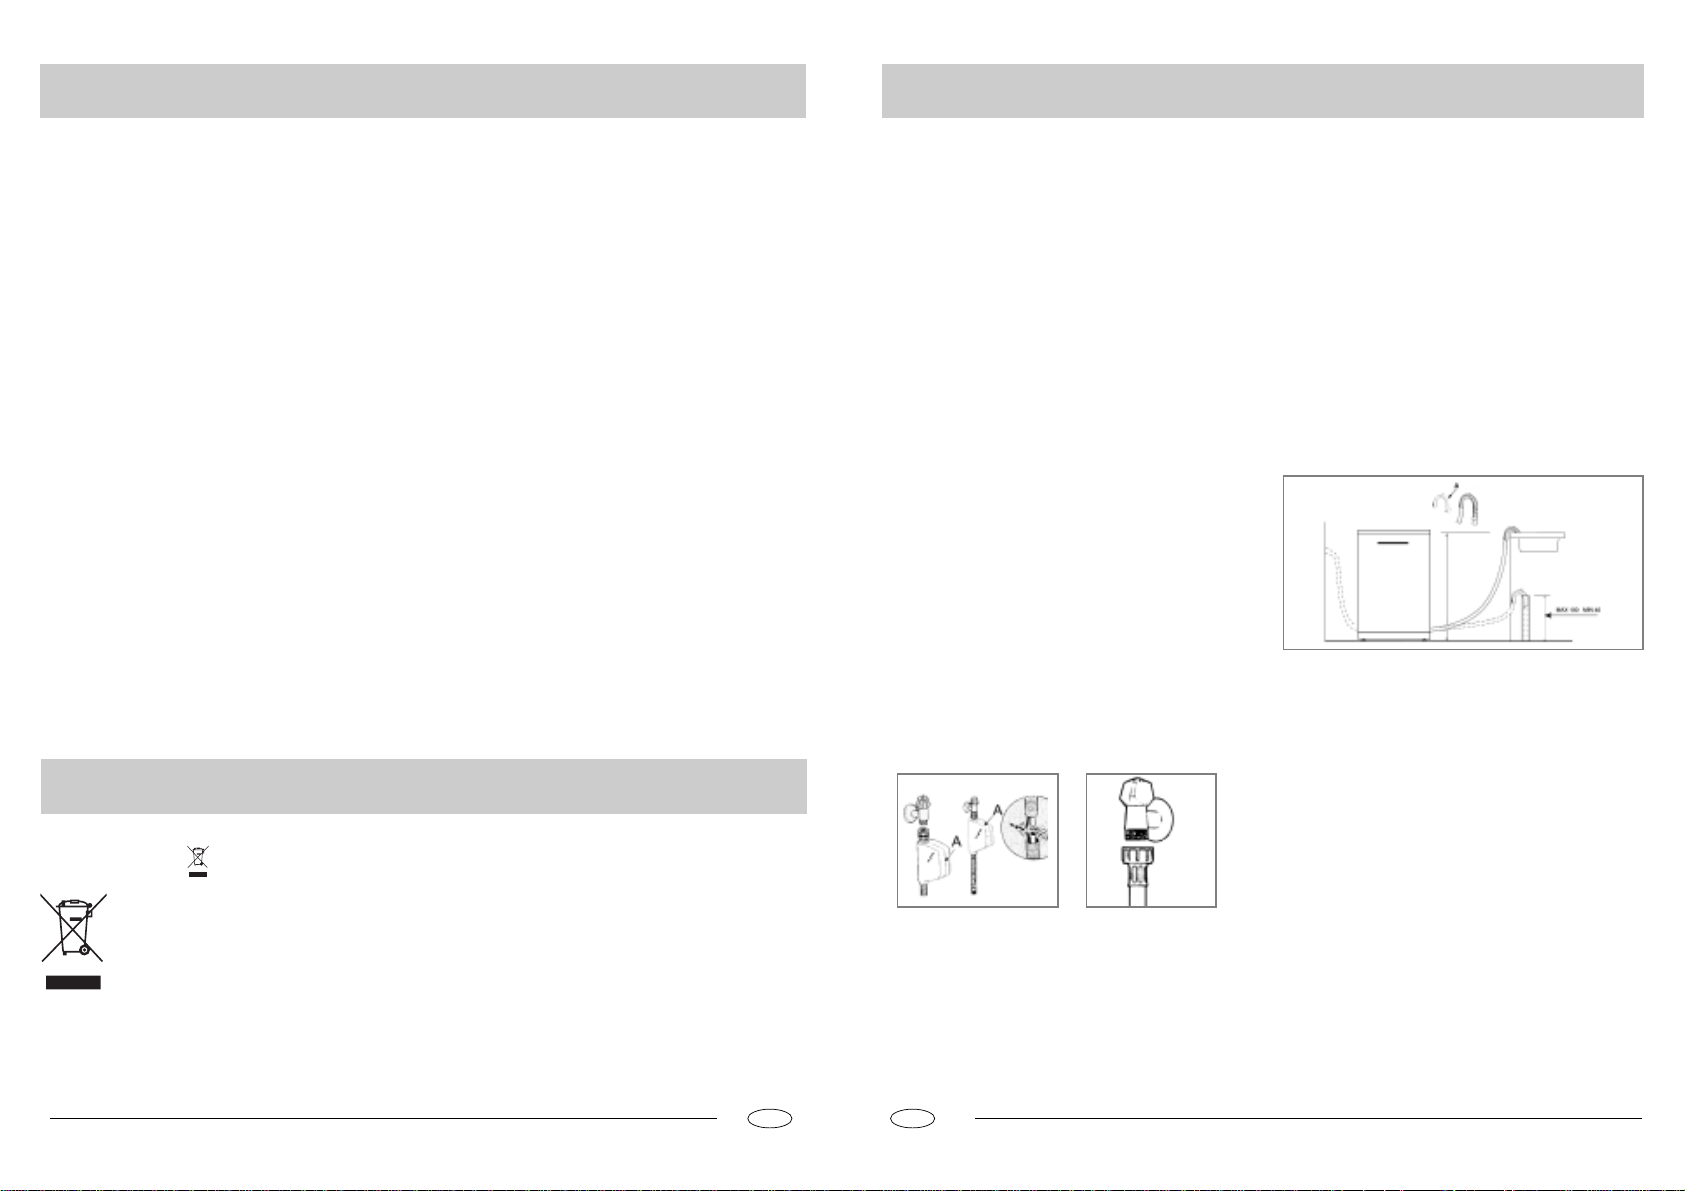
Drain Hose Connection
Insert the drain hose into a drain pipe with a minimum diameter
of 4cm, Or let it run into the sink, making sure to avoid bending
or crimping it. Use the special plastic support that comes with
the appliance (see fig.3). The free end of the hose must be at a
height between 40 and 100 cm and must not be immersed in
water.
fig.3
Attention:
The special plastic hose support must be solidly fastened to the
wall to prevent the drain hose from moving and allowing water to
spill outside the drain.
Electrical Connection
After making sure that the voltage and frequency values for the
current in the home correspond to those on the rating plate
(located on the stainless steel inner door of the appliance) and
that the electrical system is correct for the maximum voltage on
the rating plate, insert the plug into an electrical socket which is
earthed properly (the earthing of the appliance is a safety requirement mandated by law).
If the electrical socket to which the appliance must be connected
is not appropriate for the plug, replace the plug, rather than using adaptors or the like as they could cause overheating and
burns.
Caution:
The dishwasher plug must be accessible even when the appliance is installed as a built-in unit so that maintenance can be
done safety.
GB
GB
.10..9.
Page 7

Die Sicherheit-Eine gute Gewohnheit und unsere Verpflichtung
Aus der Nähe betrachtet (Innenraum)
HINWEIS
Lesen Sie bitte die Bedienungsanleitung aufmerksam durch, da sie
wichtige Angaben über die Installation, Anwendung und Wartung des
Gerätes enthält.
Dieses Gerät entspricht den folgenden EU-Richtlinien:
- 73/23/EWG vom 19. Februar 1973 (Niedrigspannung) sowie
späteren Änderungen;
- 89/336/EWG vom 3. Mai 1989 (EMV) sowie späteren
Änderungen.
- Bitte sorgen Sie für eine vorschriftsmäßige Entsorgung des
Verpackungsmaterials.
- Kontrollieren Sie das Gerät nach dem Auspacken auf
Transportschäden. Im Zweifelsfalle wenden Sie sich bitte an einen
qualifizierten Techniker.
- Der Geschirrspüler ist nur zum Spülen von Haushalts- und
Kochgeschirr gedacht und sollte nur von Erwachsenen benutzt
werden.
- Bitte beachten Sie die folgenden Vorschriften für den Einsatz
dieses Gerätes:
* Berühren Sie den Geschirrspüler niemals mit feuchten Händen
oder Füßen;
* Verwenden Sie niemals Verlängerungskabel oder Vielfachstecker;
* Das Stromversorgungskabel darf bei der Installation niemals zu
stark oder in gefährlicher Weise verbogen oder gequetscht
werden;
* Trennen Sie das Gerät stets von der Stromversorgung, wenn
es nicht vorschriftsmäßig funktioniert oder gewartet werden
muss.
Aus der Nähe betrachtet (Schalterblende)
- Halten Sie Kinder von Spülmitteln und dem offenen
Geschirrspüler fern.
- Das Gerät darf nicht im Freien aufgestellt werden, selbst wenn
es unter einem Dach steht; es ist außerdem gefährlich, den
Geschirrspüler Witterungseinflüssen einschließlich Regen
auszusetzen.
- Berühren Sie niemals die Heizelemente während oder nach
einem Spüldurchgang.
- Lehnen Sie oder setzen Sie sich niemals auf die offene Tür, da
der Geschirrspüler sonst umkippen könnte.
- Bei Störungen am Gerät müssen Sie immer sofort die
Wasserversorgung zum Gerät abstellen und den Stecker aus
der Steckdose ziehen. Ziehen Sie dann den Abschnitt "Stö rungssuche" zu Rate. Wenn Sie das Problem nicht selbst lösen
können, wenden Sie sich bitte an Ihre Kundendienststelle.
- Der Geschirrspüler darf nur von geschultem Fachpersonal
repariert werden.
- Ausgediente Geräte müssen vorher durch Durchtrennen des
Stromkabels und Entfernen des Türschlosses unbrauchbar
gemacht werden.
- Das Gerät muss derart aufgestellt werden, dass der Stecker
erreichbar bleibt.
- Bei Aufstellen auf einem Teppich darf dieser nicht die Türö
ffnung behindern.
- Wenn das Stromkabel beschädigt ist, muss es durch ein
Spezialkabel ersetzt werden, das beim Hersteller oder Ihrer
Kundendienststelle erhältlich ist.
L
K
V
J
I
J
H
A Auflage von Teetasse
B Oberer Korb
C Höhenverstellung des Korbes
D Oberer Sprüharm
E Unter Korb
F Unterer Sprüharm
L
A
B
C
D
E
F
G
G Filtereinsatz
H Reiniger-und Klarspülbehälter
I Salzbehälterdeckel
J Stäbchenkorb
K Messerhalter
L Dritter Sprüharm
A
ON-OFF Betriebskontrollampe
B
C
Taste "HAIF LOAD"
Klarspülernachfüllanzeige
D
Salznachfüllanzeige
E
D
HG
F
G
H
I
J
I
SpülprogrammanzeigeleuchteON-OFF Taste
Programm wahlknopf
“Halbe Ladung” Anzeigebeleuchtung
Anzeigebeleuchtung für Verzögerung
Wahlknopf, Startzeitvorwahl
BCEF
J
A
Technische Daten
60 cm
60 cm
85 cm
12 Maßgedecke
220-240V~ 50Hz
2150W
DE
Breite
Tiefe
Höhe
Fassungsvermgen
Anschluß-Wasserdruck 0.03-0.6MPa
Betriebsspannung
Leistung
DE
.12..11.
Page 8

Salz
Reiniger-und Klarspüler
Salz
Der Kalkgehalt des Wassers variiert von Ort zu Ort.Je höher der
Kalkgehalt,desto höher die Wasserhärte.Wü rde hartes Wasser
in den Geschirrspüler eingelassen werden,käme es zu
Ablagerungen auf dem Geschirr.
Dank des Entkalkers,in den das Geschirrspüler-Spezialsalz
eingefüllt werden muß,wird das Wasser vom Kalk befreit.
Einfüllen des Salzes in den Entkalker
Verwenden Sie bitte nur Spezialsalz für Geschirrspfüler.
Der Salzbehälter befindet sich unter dem Unteren Korb und wird
wie folgt gefüllt:
- Nehmen Sie den unteren Korb heraus und schrauben Sie den
Deckel des Behälters ab.
- Wenn der Salzbehälter zum ersten Mal gefüllt wird,muß er zuent
mit Wasser gefüllt werden.
- Füllen Sie mit Hilfe des Trichters ca.2kg Salz ein. Dabei tritt
etwas Wasser aus dem Salzbehälter aus.
- Schrauben Sie den Deckel des Salzbehälters wieder an.
Der Salzbehälter muß nuch gefüllt werden sobald die auf der
Schalterblende befindende Nachfüllanzeige aufleuchtet.
Um Rostbildung zu vermeiden,füllen Sie das Salz am besten kurz
vor einem kompletten Spülgang einzu.
Einstellen des Salzverbrauchs
Der Geschirrspüler ist für das Einstellen des Salzverbrauchs je
nach Härtebereich des Wassers vorbereitet,so daß der
Salzverbrauch auf ein notwendiges Minimum optimiert und
individuell gestaltet werden kann.
Zum Einstellen verfahrenn Sie bitte die folgt:
-Schrauben Sie den Stöpsel des Salzvorratbehälters ab.
-Auf dem Rand des Behälters befindet sich ein Pfeil(siehe
nebenstehende Abbildung).
-Drehen Sie den Pfeil entgegen dem Uhrzeigersinn von"-"nach
"+",je nach Härte des verwendeten Wassers.
Wir empfehlen,die Einstellen nach dem folgenden Schema
vorzunehmen:
Wasserhärte
Niveau
ºfH
010 MNT MNIT
1
2
ORRM QRUV QIRUIV
3
ºdH
mmol/l
NIUQIQNUQQNMOR
Positionswähler
L
=?J?
jba
Salzverbrauch(gramm/
spülgang)
Reichweite
(Spulgange/2
kg)
OM
QM
Reiniger
Der Einsatz spezifischer Reiniger für Geschirrspüler garantiert
bessere Reinigungsergebinsse.Füllen Sie den Reiniger vor
Beginn des Spülgangs gemäß den Anweisungen des
Abschnitts"Programm-Tabelle"ein.Der Reinigerbanälter befindet
sich auf der Innenseite.
Klarspüler
Die Verwendung des Klarspülers fördert das Trocknen und
verleiht lhrem Geschirr strahlenden Glanz.Der Klarspülers
befindet sich im Türinnern und muß nach ungefähr jeweils 80
Spülgängen neu aufgefüllt werden;(bei den mit einer
Nachfüllanzeige bestückten Modellen wird der Klarspülers
eingefüllt,wenn die entsprechende Kontrolleuchte aufleuchtet).
Einfüllen des Behälters
Drücken sie die Taste"B",um den Deckl"A"zu öffnen.füllen Sie
den Reiniger für den Spülgang ist Mulde"C"ein.Nach Drücken
Sie nach dem Einfüllen des Reinigers den Deckel bitte so zu,
daß er einrastet.
C
A
B
Achtung:Um das Einrasten des Deckels zu erleichtern
säubern Sie bitte die Kammerkanten vor dem Verschließen
von eventuellen Reinigerresten.
LM
SM
QM
Einfüllen des Klarspülers
Drehen Sie den Deckel"C"des Klarspülerbehälters ab und füllen
Sie Klarspülerbehälters Sie bei Einfüllen darauf, daß kein
Klarspüler überlauft. Der Klarspüler kann durch Regulieren
(mittles eines Schraubenziehers)des unter dem
Deckel"C"befindenden Reglers "F"dosiert werden.Es sind 6
verschiedene Einstellungen möglich,normalerweise ist er auf
Pos. 3 voreingestellt.
Wichtig:
Eine geeignete Klarspüler-Dosierung ermöglicht ein optimales
Trocknen.
Sollten auf dem Geschirr nach dem Spülen Wassertropfen oder
flecken hinterbleiben,muß der Dosierer höhere eingestellt
werden.Sollten auf dem Geschirr weiße Streifen hinterbleiben,
muß der Dosierer niedrigere eingestellt werden.
C
F
C
4
[UV[RM [UIV
SM?H?
DE
OR
DE
.14..13.
Page 9

Einsortieren des Geschirrs
Inbetriebnahme des Gerätes
Entfernen Sie die gröbsten Speisereste,bevor Sie das Geschirr in
die Körbe einsortieren,damit der Filter nicht von dem verstopft,
was die Reinigungskraft herabsetzen würde.Stark verschmutzte
Töpfe und Pfannen mit angetrockneten Speiseresten sollten vorher
eingeweicht werden.Sie vermeiden hierdurch,Spülgänge
wiederholen zu müssen.Ziehen Sie die Körbe ganz heraus,Sie
erleichtern sich hierdurch das Einsortieren des Geschirrs.
Was gehört in den Unteren Korb
Sortieren Sie in den Unteren Korb Geschirr wie:
Töpfe,Deckel,flache und tiefe Teller,wie auf den Abbildungen
veranschaulicht.
Servuerteller und große Deckel sollten an den Seiten des Korbes
einsortiert werden,und zwar so,daß der obere Sprüharm nicht
blockiert wird.
- Töpfe,Salatschüsseln usw. müssen immer umgedreht,d.h.mit
dem Boden nach oben gelegt werden;
- Größe Töpfe sollte schräg einsortiert werden, damit das Wasser
besser ablaufen kann;
- Die Zacke des unteren Ständer soll versetzt, um mehrere oder
größere Teller oder Pfanne laden zu können (siehe Abb.A).
- Der Besteckkorb kann zweigeteilt werden (siehe Abb.B ).
Ist nur wenig Besteck zu spüllen kann somit eine Korbhälfte
entfernt werden.Sie gewinnen hierdurch Platz für lhre Töpfe;
außerdem kann er so auch in den Oberen Korb gestellt werden.
- Sortieren Sie das Besteck Griffen mit nach unten in den
Besteckkorb.Ist der Besteckkorb seitlich mit Schlitzen versehen,
sollten Teelöffel einzeln in diese Schlitze eingesteckt. werden
Besonders langes Besteck sollte vorne in den Oberen Korb
eingelegt werden.
Was gehört in den Oberen Korb
Sortieren Sie in den Oberen Korb das empfindliche und leichte
Geschirr wie Gläser,Tee-und Kaffeetassen,Untertassen,undTeller,
flache Schüsseln,leicht verschmutzte flache Töpfe und Pfannen.
- Sortieren Sie das Geschirr so ein,daß es durch den Wasserstrahl
nicht umgeworfen wird.
Der Oberen Korb ist höhenverstellbar (siehe Abb.C ).
Richten Sie den Oberkorb zur höheren Höhe ab, dass Sie mehren
Raum für Unterbringung höherer. Teller und Tablette in dem
Unterkorb haben.
Regal
Stellen Sie das Glas und andere Waren mit längerem Stiel darauf,
um das Stören anderer Waren zu vermeiden.
Setzen Sie Glas, Tasse und kleinen Schüssel auf den zusätzlichen
Tassenregal, der nach dem Wunsch des Kunden ausgebaut oder
eingebaut ist. (Siehe Abb.D)
Messerhalter
Der Messerhalter ist speziell für lange Messer und Gabeln
konstruiert.
- Bringen Sie den Messerhalter in der richtigen Position des
Obergestells an, und legen Sie die langen Messer und Gabeln
auf dem Messerhalter zur Reinigung. (Siehe Abb.E)
Unterer Korb Oberer Korb
12Maßgedecke
Abb.A
Abb.C
Abb.E
Abb.B
Abb.D
DE
Ein Spülprogramm starten
Nachdem Sie alle vorstehend aufgeführten Installationsschritte
durchgeführt haben, drehen Sie den Wasserhahn ganz auf;
drücken Sie dann auf die Ein-Aus (A) auf dem Bedienfeld. Die
Anzeigeleuchte "B" leuchtet auf. Der Geschirrspüler ist nun
eingeschaltet; Sie müssen jedoch noch ein paar Sekunden
warten, bis Sie den Spülablauf programmieren können.
Spülprogramm einstellen und starten
Drücken Sie den Arbeitsgangwahlknopf “G”, um das gewünschte
Programm zu wählen. Einmal drücken Sie, beleuchtet die
entsprechende Programmanzeigebeleuchtung. “F” beleuchtet
auch hintereinander.
Wählen Sie bitte das nach Ihrer Meinung am richtigsten
Spülprogramm (Insbesondere wenn Sie zum ersten Mal die
Vorrichtung bedienen,schlagen Sie bitte die
Spülprogrammtabelle in der Anweisung nach).
Schließen Sie bitte die Tür ab. Nach einigen Minuten wird ein
kurzes akustisches Signal ertoenen. Das zeigt, dass das
Spülprogramm schon begonnen hat und kann nicht mehr
modifiziert werden. Wenn es nötig ist, schlagen Sie bitte
“Unterbrechung oder Änderung des Spülprogramms nach Start
des Spülablaufs” nach. Die Beendung des Spülprogramms wird
durch einen doppelten akustischen Schall signalisiert werden.
Und die Anzeigebeleuchtung “F” wird blinken.
Unterbrechung oder Änderung eines Spülprogramms
nach Start des Spülablaufs
Voraussetzung: Ein bereits gestartetes Spülprogramm kann nur
geändert werden, wenn es nur kurze Zeit in Betrieb ist.
Andernfalls kann das Spülmittel bereits aufgebraucht sein bzw.
hat der Geschirrspüler schon das Spülwasser abgelassen. In
einem solchen Fall muss der Spülmittelbeh?lter neu aufgefüllt
werden (siehe Abschnitt "Spülmittel eingeben").
Um ein bereits gestartetes Spülprogramm zu ändern, öffnen Sie
zuerst die Tür und drücken Sie dann die Ein-Aus Taste "A" und
behalten Sie etwa 5 Sekunden. Wenn das Programm abbestellt
wird, wird die Geschirrspülmaschine einen kurzen akustischen
Schall emittieren. Und die endsprechende Anzeigelampe wird
erlöschen.
Um ein neues Spülprogramm einzustellen, befolgen Sie bitte die
Anweisung im Absatz “Spülprogramm einstellen und starten”.
Wenn Sie vergessen, einige von den Schüsseln zu
bepacken...
Durch die Öffnung der Tür sorgfältig kann das Spülprogramm
unterbrecht werden (Vermeiden Sie die Sprühung von heissem
Wasser). Wenn die Tür wieder abgeschlossen wird, fängt das
Programm automatisch wieder an.
DE
Nach Ablauf des Spülprogramms
Nach Ablauf des Spülprogramms ist ein sechsmaliger Signalton
zu hören, um anzuzeigen dass der Spülablauf beendet ist; die
Spülprogrammleuchte (F) wird ausgeschaltet. Schalten Sie die
Taste Ein-Aus aus. Drehen Sie den Wasserhahn zu und öffnen
Sie die Tür. Warten Sie ein paar Minuten, bevor Sie das Geschirr
ausladen, da es zu Beginn noch sehr heiß ist. In diesem Zustand
kann das Geschirr wesentlich leichter zerbrechen. Außerdem
trocknet das Geschirr so besser.
Einstellung der Startverzögerungszeit
Öffnen Sie die Tür von der Geschirrspülmaschine teilweise, wenn
der Knopf “J” gedrückt ist (Sehen Sie “Näheausblick der
Steuertafel”). Die Startzeit für das Spülprogramm kann für 2,4,6,
8,10 oder 12 Stunden verzögert werden.Jedes Mal drücken Sie
den Knopf, blinken dann die Licht “I” und zeigt die Länge der
Verzögerung an.
Nach der Wahl der Verzögerungszeit, können Sie dann das
Spülprogramm einstellen. Die Bedienungsweise wird in
“Einstellung des Spülprogramms...”erklärt.
Dort wird ein kurzes akustisches Signal klingt und wird die
Verzögerungzeit beginnen. unten zu zählen. Während dieser
Periode wird die Verzögerungsanzeigelampe(I) blinken. Am Ende
der Verzögerungszeit wird die Anzeige stoppt. und das Programm
starten wird .
Achtung:
a) Während der Verzögerungsperiode, kann keine Einstellung
modifiziert werden. Wenn es nötig ist, können Sie den
Programmwahlknopf “G” für gegen 5 Sekunden drücken, um das
Programm abzubestellen.
b) Wenn während der Verzögerungsperiode der Strom
ausgeschaltet ist oder die Tür geöffnet ist, wird der Count-down
stoppen. Wenn der Strom wieder eingeschaltet ist oder die Tür
abgeschlossen ist, wird er wieder beginnen.
Tasten zur Spülprogrammeinstellung
Taste für halbe Ladung
Mit dem Knopf (Sehen Sie “Näheausblick der Steuertafel”,
Buchstabe “C”) können Sie nur das Obergestell verwenden, wenn
es nicht so viele Schuesseln für eine ganze Ladung gibt. Das
kann Ihnen ermöglichen, das Wasser und die Elektroenergie
einzusparen.Das kann nicht benutzt werden, wenn Sie das
Starkspülprogramm wählen.
.16..15.
Page 10

Programmtabelle
Energiespartips
Programm
Starkspülpro
gramm
Normal
Programm
Verkürztes
Programm
(IEC-EN 5MOQOF
Schonprogr.
fürGläser
Schnellspül
programm
Einweichen
Heißes Spülen
Hinweise zur Wahl des
Programmes
Stark verschmutztes
Geschirr,sowie Pfannen und
Töpfe(nicht geeignet für
empfindliches Geschirr).
Normal verschmutztes
Geschirr,Töpfe und
Pfannen.Programm für den
täglichen Abwasch.
Normal verschmutztes
Geschir und Töpfe ohne
angetrocknete Speisereste.
Kurzes Sparprogram für
temperaturempfindliches,
Sofort nach dem Gebrauch
zu reinigendes Geschirr.
Sparprogramm für nicht
stark verschmutztes
Geschirr sofort nach dem
Gebrauch. Kein
Trockenprogram.
Kurzes Abspülen des
Geschirrs und der Topfe,die
später gereinigt werden
sollen.
Das Programm von heißem
Spülen und Trocken des
Tischgeschirrs
Beschreibung des
Spülgangs
Vorspülgang mit warmem Wasser.
Verlängerter Spülgang bei 70.
Nachspülen mit kaltem Wasser.
Nachspülen mit heißem Wasser.
Trocknen.
Zweite Vorwäsche mit kaltem Wasser.
Verlängerter Spülgang bei 55.
Nachspülen mit kaltem Wasser.
Nachspülen mit heißem Wasser.
Trocknen.
Vorspülgang mit kaltem Wasser.
Verlängerter Spülgang bei 50.
Nachspülen mit kaltem Wasser.
Nachspülen mit heißem Wasser.
Trocknen.
Spülgang bei 60.
Mit warmem Wasser klarspülen.
Nachspülen mit heißem Wasse.
Trocknen.
Kurzes Spülen mit 40 °C.
Klarspülen.
Kurzes Kalt-Abspülen,um das
Trocknen von Speiseresten zu
vermeiden.
Heißes Spülen
Reinigungsmittel
30g
30g
5g+25g
15g
15g
Spülmittel
ERF
- Schalten Sie den Geschirrspüler erst ein,wenn er voll beladen
ist.Sie sparen hierdurch wertvolle Energie.Schalten Sie evtl.
das Einweichprogram ein,um Geruchsbildung oder ein
Antrocknen der Speisereste zu vermerden.
- Wählen Sie das geeignete Programm: Die Wahl des Programms
hängt von der Art des Geschirrs und dessen
Verschmutzungsgrad ab.
So halte ich das Gerät in Topform
Nach jedem Spülgang
Drehen Sie nach jedem Spülgang den Wasserhahn zu und
lassen Sie die Tür lhres Geschirrspülers angelehnt,um die
Bildung von Feuchtigkeit oder Gerüchen im Geräteinnern zu
vermeiden.
Netzstecker aus der Steckdose ziehen
Ziehen Sie vor jeder Reinigung bzw.Wartungsarbeiten den
Netzstecker aus der Steckdose.
Keine Lösungs-oder Scheuermittel verwenden
Reinigen Sie die äußeren Gehäuseteile des Gerätes weder mit
Lösungs-noch mit Scheuermitteln,sondern mit einer warmen,
milden Seifenlauge.
Eventuelle Flecken auf den inneren Gehäuseteilen sind mit
einem mit Wasser und etwas Essig angefeuchteten Tuch,oder
mit einem Spezialreinigerl für Geschirrspüler zu entfernen.
Reinigung und Pflege
Filter
Um optimale Spülergebinisse zu gewährleisten, sind die Filter
regelmäßig zu reinigen.
Die Spüllauge wird dank der Filter von Speiseresten befreit,das
Wasser wird gereinigt wieder in Umlauf gebracht,Aus diesem
Grunde sollten die im Filtereinsatz und im halbrunden Filter "A"
zurückgehaltenen groben Speisereste nach jedem
Spülprogramm unter fileßendem Wasser gereinigt werden.
Ziehen Sie den Filtereinsarz am Griff nach oben heraus,
Mindestens einmal monatlich sind sämtliche Filter,d.h. der Filter "A" und der Mikrofilter "B" gründich zu reinigen.
Reinigen Sie Ietztere mit Hilfe eines Reinigungsbürste.
Setzen Sie dann die zwei Teile,wie in der untenstehenden.
Der Geschirrspüler darf niemals ohne Filter benutzt werde.Das
unsachgemäße Einsetzen der Filter kann das
Reinigungsergebnis beeinträchtigen oder das Gerät oder
Geschirr beschädigen.
- Dosieren Sie die richtige Reinigungsmittelmenge :
Durch Einfüllen von zu viel Reiniger wird Ihr Geschirr nicht
sauberer,Sie belasten hierdurch nur die Umwelt.
- Es ist nicht nötig,das Geschirr vor dem Einsortieren abzusp
Bei einem Umzug
Bei einem Umzug sollte das Gerät möglichst aufrecht transportiert
werden,im Notfall kann es die Rüchseite gelegt werdenal.
Dichtungen
Eine der Ursachen für die die Entstehung von Gerüchen im Innern
des Gerätes sind Speisereste,die sich in den Dichtungen
festetzen. Die Dichtungen sollten demnach regelmäßig mit
einem feuchten Schwamm gereinigt werden.
Vor den Ferien
Bei längerer Abwesenheit,empfehlen wir einen Spülgang bei
leerem Gerät durchlaufen zu lassen;danach den Netzstecker aus
der Steckdose zu ziehen und den Wasserhahn abzudrehen.
Lassen Sie die Gerätetür angelent.Sie schonen hierdurch nicht
nur die Dichtungen,sondern vermeiden die Bildung von Gerüche.
Reinigung der Sprüharme
Die Löcher bzw .Schlitze der Sprüharme könnten durch
Speisereste verstopft werden,kontrollieren und reinigen Sie auch
diese regelmäßig (siehe Abschnitt"Aus der Nähe betrachtet"
(Innenteile)Buchstabe D-F).
A
B
Reinigung des Wassereinlassfilters
Reinigen Sie periodisch den Wassereinlassfilter (Sehen Sie das
Abbild), der auf dem Auslass des Wasserhahns legt.
Nach der Schließung des Wasserhahns drehen Sie das Ende
des Wasserschlauchs heraus.
Entfernen Sie den Filter und reinigen Sie ihn vorsichtig mit
auflaufendem Wasser. Dann setzen Sie den Filter und den
Wasserschlauch zurück.
ülen.
DE
DE
.18..17.
Page 11

Gibt's ein Problem?
Installation
Bevor Sie bei einer eventuellen Störung oder schlechten Leistung
des Gerätes den Kundendienst anfordern,Kontrollieren Sie bitte,
ob Sie bei Einschalten des Gerätes nichts etwas vergessen
haben.
Der Geschirrspüler startet nicht
Bitte kontrollieren Sie,ob :
der Netzsecker korrekt in die Steckdose eingesteckt wurde;
kein Stromausfall herrscht;
die Tür richtig geschlossen wurde;
die EIN-AUS-Taste auf "EIN" steht;
der Wasserhahn aufgedreht wurde.
Der Geschirrspüler Lädt kein Wasser
Bitte kontrollieren Sie,ob :
der Wasserhahn aufgedreht und korrekt am Schlauch
angeschlossen wurde;
die Wasserzufuhr unterbrochen bzw;
der Druck zu niedrig ist;
der Schlauch eingeklemmt ist;
der Zufuhrschlauch-Filter verstopft ist.
Das Wasser läuft nich ab
Bitte kontrollieren Sie,ob :
der Ablaufschlauch eingeklemmt ist.
Es bleiben Kalkflecken auf dem Geschirr zurück
Bitte kontrollieren Sie,ob :
der Stöpsel des Salzbehälters richtig geschlosssen wurde;
der Dosierer des Klarspülers korrekt reguliert wurde.
Das Symbol auf dem Produkt oder seiner
Verpackung weist darauf hin, dass dieses
Produkt nicht als normaler Haushaltsabfall zu
behandeln ist, sondern an einem Sammelpunkt
für das Recycling von elektrischen und
elektronischen Geräten abgegeben werden
muss. Durch Ihren Beitrag zum korrekten
Entsorgen dieses Produkts schützen Sie die
Umwelt und die Gesundheit Ihrer Mitmenschen.
Umwelt und Gesundheit werden durch falsches
Entsorgen gefährdet.
Fehlermeldungen
Die Geschirrspülmaschine ist mit einem Sicherungssystem
ausgerustet, das die Operationsprobleme und
Fehlfunktionenerkennnen kann. Die Fehlfunktionen sind durch
das schnelle Anblinzeln von einem der “F” Programm LEDs
signalisiert. Nur wenn die Anzeigebeleuchtung für
Einweichenprogramm (Sehen Sie Tabelle für Programme) schnell
anblinzelt, sollen Sie nach der Beschreibung im Abschnitt
“Änderung des Programms nach Start des Spülablaufs” das
Programm abstellen. Dann checken und sichern Sie, dass es
Wasser in der Leitung gibt und der Wasserhahn schon angedreht
ist. Wenn die Fehlmeldung noch bleibt, rufen Sie bitte für
technische Hilfe an und zeigen Sie bitte die Fehlmeldung an.
Wenn andere Anzeigebeleuchtung schnell blinzelt, machen Sie
das Apparat aus. Rufen Sie bitte für technische Hilfe an und zeigen
Sie bitte an, welche Beleuchtung bilnkt.
Sollte lhr Geschirrspüler trotz aller Kontrollen nicht funktioneren,
odr sie den Fehler nicht beheben können,dann fordern Sie bitte,
unter Angabe nachfolgender Daten,den nächstgelegenen,
autorisierten Kundendienst an:
- Art der Störung
- Kennnummer des Modells(Mod...)Seriennummer (S/N...),
ersichtlich auf dem schild an der Innenseite der Tür angebrachten
Typenschild .
Lassen Sie die Fehler niemals durch nicht autorisiertes Personal beheben und verweigern Sie die Installation von
Ersatzteilen,wenn es sich nicht um Originalteile handelt.
Weitere Informationen über das Recycling dieses Produkts
erhalten Sie von Ihrem Rathaus, Ihrer Müllabfuhr oder dem
Geschäft, in dem Sie das Produkt gekauft haben.
DE
Aufstellen
Stellen Sie das Gerät an der gewünschten Stelle auf.Das Gerät
kann mit den Seitenteilen, oder mit der Rückseite an angrenzende
Möbelteile oder an der Wand angelehnt werden.Der
Geschirrspüler ist mit Zufuhr-und Ablaufschläuchen bestückt ,
die,je nach den Installationsgegebenheiten,sowohl nach rechts
als auch nach links geleitet werden können.
Nivellieren
Richten Sie das Gerät mittels der Stellfüße eben waagerecht aus.
An den Stellfüßen befinden sich Schrauben; durch Anziehen oder
Lösen dieser Schrauben können Sie,die Höhe des Gerätes,das
Gerät darf auf keinen Fall eine Neigung von mehr als 2
aufweisen.Ein Korrektes Nivellierung gewährleistet eine korrekte
Betriebsweise des Gerätes.
Anschluß an die Kaltwasserleitung
Schließen Sie den Zufuhrschlauch mittels einer 3/4
Gewindeverbindung an die Kaltwasserleitung an und ziehen Sie
die Mutter fest an (siehe Abb.2).
Einige Modelle sind mit einem “Aquastop” Wasserschlauch
ausgestattet(siehe Abb.1), in dem der kleine Filter schon im
eingefädelte Ende untergebracht ist.
Sollte es sich um neue Leitungen handeln,oder um Leitungen,
die für längere Zeit nicht benutzt wurden,dann lassen Sie das
Wasser so lange laufen,bis es ganz klar ist,eventuelle
Schmutzreste könnten zu Verstopfung der Zufuhrleitung führen,
und zu Schäden am Gerät führen.
Anschluß an die Warmwasserleitung
Das Gerät kann auch an eine Warmwasserleitung angeschlossen
werden,solange die Wassertemperatur 60 c nicht überschreitet.
In diesem solchen Fall wird das Spülprogramm um ca.15 Minuten
verkürzt und die Reinigungswirkung etwas verringert.
Der Anschluß an die Warmwasserleitung erfolgt auf dieselbe
Weise wie der an die Kaltwasserleitung.
Abb.1 Abb.2
Überlaufschutz
Der Geschirrspüler ist mit einem System aussgestattet,dank
dessen bei einem eventullen Schaden am Wasserzulaufschlauch
oder bei Leckstellen im lnnern des Gerätes sofort die
Wasserzufuhr unterbrochen wird,wodurchäden in Wassersch
lhrer Wohnung vermieden werden.Sollte das Gehäuse (das
stromführende Teile enthält) aus irgendwelchen Gründen
beschädigt werden,ist der Netzstecker sofort aus der Steckdose
zu ziehen.
DE
Um eine ordnungsgemäße Funktionsweise des
Überschwemmungsschutzes zu garantieren,muß das
Gehäuse"A"mit dem Wasserzufuhrschlauch ausschließlich in der
Stellung wie in Abb.1 veranschlauchlicht,angeschlossen werden.
Der Zulaufschlauch darf auf keinen Fall durchgeschnitten
werden,da er stromführende Teile enthält.Sollte der Schlauch
zu kurz sein muß er durch einem anderen Schlauch von
geeigneter Länge ersetzt werden,Einen solchen Schlauch
können Sie bei einem Fachhändler oder Ihrer Kundendienststelle
erhalten oder bestellen.
Anschluß des Abwasserschlauches
Stecken Sie den Ablaufschlauch in eine Ablaufleitung mit einem
Durchmesser von mindestens 4 cm,oder legen Sie ihn in das
Spülbecken; verwenden Sie die mittgelieferte Spezial Krümmung
aus Plastik(siehe Abb.3), um den Schlauch nicht zu knicken oder
einzuklemmen.Das Schlauchende muß in einer Höhe40 bis 100
cm ,auslaufen und darf nicht im Wasser eingetaucht sein.
Abb.3
Achtung:
Die Spezialkrümmung aus Plastik muß fest an der Mauer befestigt
werden ,um zu vermeiden,daß der Ablaufaschlauch abrutscht,
und so das Wasser außerhalb des Ablaufrohres abläuft.
Elektroanschluß
Stecken Sie den Netzstecker in eine mit einer leistungsfähigen
Erdung versehene Steckdose (die Gewährleistung der Sicherheit
durch eine Erdung der Anlage ist gesetzlich vorgeschrieben),
nachdem Sie sich vergewissert haben,daß die Spannungs-und
Frequenzwerte der Netzleitung mit den auf dem Typenschild auf
der Innenseite der Tür angegebenen Werten übereinstimmt und
daß die Kapazität des Stromkreises,an die das Gerät
angeschlossen wird,der auf dem Typenschild angegebenen
Strom-Bedarfsspitze des Gerätes entspricht.
Sollte sich die Steckdose,an die das Gerät angeschlossen
werden soll,für den an dem Gerät befindenden Netzstecker nicht
eignen,Soll der Letzterer mit einem geeigneten Netztecker ersetzt
werden,anstatt Adapterstecker oder ähnliches zurückzugreifen,
die durchbrennen oder sich Überhitzung könnten.
Warnung:
Sofern die Vorrichtung als eine Eingebaut-Einheit installiert ist,
muß der Anschlussstecker von der Geschirrspülmaschine
zugreifbar sein, so dass die Instandhaltung gefahrlos machen
kann.
.20..19.
Page 12

La sécurité est une habitude qu'il est bon de cultiver
Premier plan de l'intérieur
AVIS
Nous vous invitons à lire attentivement les instructions contenues
dans ce manuel car elles vous fourniront des informations
importantes pour installer, utiliser et entretenir votre appareil de
façon correcte et en toute sécurité.
Cet appareil est conforme aux directives CEE :
- 73/23/EEC du 19 février 1973 (Basse tension) et
modifications successives ;
- 89/336/EEC du 3 mai 1989 (Compatibilité électromagnétique)
et modifications successives.
- Déballez l'appareil avec soin.
- Ensuite, assurez-vous qu'il n'a pas été endommagé pendant le
transport. En cas de doute, adressez-vous à un professionnel
qualifié.
- Le lave-vaisselle doit être utilisé exclusivement par des adultes,
pour laver de la vaisselle et des ustensiles de cuisson.
- Cet appareil n'est pas conçu pour être utilisé par des enfants
ou des personnes handicapées sans qu'une surveillance soit
assurée.
- Il est recommandé de tenir les jeunes enfants sous contrôle
afin d'éviter qu'ils ne jouent avec le lave-vaisselle.
- Conservez les détergents hors de portée des enfants. Tenez
les enfants à l'écart du lave-vaisselle lorsque celui-ci est ouvert.
- Cet appareil ne peut être installé en extérieur, même si la zone
est protégée par un toit. Il est également très dangereux de
l'exposer à la pluie et aux éléments atmosphériques.
- Ne touchez en aucun cas la résistance pendant ou après un
cycle de lavage.
- Ne vous appuyez pas et ne vous asseyez jamais sur la porte du
lave-vaisselle car l'appareil pourrait basculer.
- Si le lave-vaisselle ne fonctionne pas, fermez le robinet d'arrivée
d'eau et débranchez l'appareil. Puis, con- sultez le chapitre intitulé
"Diagnostic rapide". Si ne pouvez résoudre le problème par vous même, adressez-vous à un Service Après-vente.
- Les réparations doivent être réalisées exclusivement par du per
sonnel spécialisé.
- Pour la mise au rebut, rendez les appareils inutilisables en
sectionnant le câble d'alimentation et en démontant le verrou de
la porte.-
- Si le cordon d'alimentation est endommagé, il doit être remplacé
par un cable spécial ou de montage disponible auprès du fabricant
ou du Serv- vice Après-vente.
- La prise du secteur doit toujours être accessible, même après que
l'appareil a été installé.
- Règles essentielles qu'il convient d'observer au moment d'utiliser
l'appareil :
* Ne touchez jamais le lave-vaisselle lorsque vous êtes pieds nus
ou lorsque vos mains ou vos pieds sont mouillés ;
* L'utilisation de rallonges et de prises multiples est à proscrire ;
* Au cours de l'installation, assurez-vous que le cordon
d'alimentation n'est pas plié ou écrasé de façon excessive, ce qui
pourrait être dangereux ;
* Si l'appareil ne fonctionne pas correctement ou si l'entretien doit
être effectué, débranchez l'appareil.
Afin de garantir l'EFFICACITÉ et la SÉCURITÉ de l'appareil, nous
vous conseillons :
- de toujours vous adresser à un Service Après-vente agréé par le
fabricant. - always use original Spare Parts
L
K
V
J
I
J
L
H
A Support de Tasse
B Panier supérieur
C Réglage de la hauteur du panier
D Bras d'aspersion supérieur
E Panier inférieur
F Bras d'aspersion inférieur
A
B
C
D
E
F
G
G Filtre de lavage
H Distributeur de détergent et de liquide de rinçage
I Bouchon du réservoir à sel
J Panier d'argenterie
K Etagère à couteaux
L Troisième bras d'aspersion
Premier plan (bandeau de commande)
D
Bouton ON-OFF
A
Voyant ON-OFF
B
Bouton "Half Load"
C
Voyant manque de produit de rinçage
D
Voyant manque de produit de sel
E
HG
F
G
H
I
J
I
Voyant programmes
Bouton sélection programmes
Voyant "HALF LOAD"
Voyant délai
Bouton sélection départ différé
BCEF
J
A
Caractéristiques techniques
FR
Largeur
Profondeur
Hauteur
Capacité
Pression de l'eau dans les conduits
Tension d'alimentation
Puissance absorbée totale
FR
12 couverts standard
.22..21.
60 cm
60 cm
85 cm
0.03-0.6MPa
220-240V~ 50Hz
2150W
Page 13

S e l
Détergent et liquide de rinçage
Sel
Le degré de dureté de l'eau varie d'un endroit à l'autre. Si l'eau
qui alimente votre lave-vaisselle est dure, des dépôts se formeront
sur la vaisselle et sur les ustensiles de cuisson.
Cet appareil est équipé d'un système d'adoucissement spécial
qui utilise un sel spécialement conçu pour éliminer le calcaire et
les minéraux présents dans l'eau.
Comment remplir l'adoucisseur
Utilisez exclusivement du sel spécial pour lave-vaisselle. Le
distributeur de sel est situé en dessous du panier inférieur et doit
être rempli de la manière suivante :
- Dégagez le panier inférieur, puis dévissez le bouchon du
distributeur de sel et retirez-le ;
- Si vous remplissez le distributeur de sel pour la première fois,
remplissez-le d'eau ;
- Placez l'extrémité de l'entonnoir (fourni) dans l'orifice et versez
2 kg de sel environ. Il est normal qu'une petite quantité d'eau
s'échappe du distributeur de sel.
- Revissez soigneusement le bouchon.
Réglage de la quantité de sel
Le lave-vaisselle est conçu de manière à ce que puissiez régler
la quantité de sel nécessaire, en fonction du degré de dureté de
l'eau de votre habitation. Ceci, afin de permettre d'optimaliser et
d'adapter la quantité de sel utilisée lors de chaque lavage en
limitant celle-ci au minimum. Adressez-vous à votre société locale de distribution de l'eau pour connaître la classe de dureté
de votre zone.
Pour régler la quantité de sel nécessaire, procédez de la façon
suivante :
- Dévissez le bouchon du distributeur de sel;
- Le distributeur de sel est doté d'une bague sur laquelle figure
une flèche (voir la figure ci-contre).
- Au besoin, tournez la bague dans le sens inverse des aiguilles
d'une montre, de la position "-" vers le signe "+", en fonction du
degré de dureté de l'eau.
Détergent
Utilisez exclusivement un détergent spécial pour lave-vaisselle.
Remplissez le distributeur de détergent avant de lancer un
nouveau cycle de lavage, en respectant les instructions fournies
dans le "Tableau des cycles de lavage." Le distributeur de
détergent est situé sur la paroi intérieure de la porte.
Comment remplir le distributeur de détergent
Pour ouvrir le couvercle "A" du distributeur, appuyez sur la touche "B". Versez le détergent destiné au cycle de lavage dans le
compartiment "C".
Dès que vous avez rempli le distributeur de détergent, refermez
le couvercle et appuyez jusqu'à ce que vous entendiez un déclic.
C
A
B
Liquide de rinçage
Ce produit permet de faire briller votre vaisselle et facilite le
séchage sans laisser de traces. Le distributeur de liquide de
rinçage est situé sur la paroi intérieure de la porte. Remplissezle au bout de 80 lavages (ou lorsque le voyant de niveau de
liquide de rinçage s'allume - sur les modèles qui en sont équipés).
Comment remplir le distributeur de liquide de rinçage
Pour ouvrir le distributeur de liquide de rinçage, tournez le
couvercle "C" dans le sens inverse des aiguilles d'une montre
et remplissez le distributeur en veillant à ne pas faire déborder
le liquide. Vous pouvez régler la quantité de liquide de rinçage
nécessaire en tournant la vis de réglage "F", située en dessous
du couvercle "C", à l'aide d'un tournevis. Il existe 6 positions de
réglage ; la position 3 correspond à la quantité normale.
Remarque importante
Une quantité de liquide de rinçage correctement dosée améliore
le séchage. Si vous constatez des gouttes d'eau ou des taches
sur votre vaisselle, il convient de régler le dosage sur une position supérieure.
Si les assiettes présentes des striures blanches, réglez le dosage sur une position inférieure.
Remplissez le distributeur de sel uniquement lorsque le voyant
de "niveau de sel" (situé sur le bandeau de commande) est
allumé.
Afin d'éviter la formation de rouille, remplissez le distributeur de
sel juste avant de lancer un cycle de lavage.
Si consiglia di effettuare le regolazioni in base al seguente
schema:
Durété de l'eau
L
=?J?
MED
Consommation
sel
(grammes/cycle)
OM
QM
SM?H?
Autonomie
(cycles/2kg.)
Niveau
fH
º
010 MNT MNIT
1
2
ORRM QRUV QIRUIV
3
4
mmol/l
ºdH
NIUQIQNUQQNMOR
[UV[RM [UIV
Position
sélécteur
FR
C
Avertissement :
Afin de pouvoir refermer aisément le couvercle, nettoyez les bords
de celui-ci en éliminant toute trace de détergent.
LM
SM
QM
OR
FR
.24..23.
F
C
Page 14

Comment remplir votre lave-vaisselle
Comment mettre l'appareil sous tension
Avant de ranger la vaisselle dans votre lave-vaisselle, éliminez
tous les résidus d'aliments pour éviter que le filtre ne se bouche,
ce qui compromettrait les résultats de lavage.
Si des aliments carbonisés et par conséquent très difficiles à
détacher sont présents dans le fond de vos cocottes et casseroles,
faites-les tremper avant de les laver au lave-vaisselle. Ceci
permettra de ne pas effectuer de cycles de lavage supplémentaires.
Tirez le panier vers vous afin de faciliter le chargement de la
vaisselle.
Comment utiliser le panier inférieur
Nous vous conseillons de ranger les articles nécessitant un lavage plus puissant sur le panier inférieur : cocottes, casseroles,
couvercles, plats de service et saladiers, comme représenté dans
la figure de droite.
Il est recommandé de ranger les plats de service et les couvercles
sur les côtés du panier afin de ne pas entraver la rotation du bras
d'aspersion supérieur.
- Rangez toujours les cocottes, saladiers, etc. en les retournant.
- Rangez les cocottes profondes en les inclinant pour permettre à
l'eau de s'écouler.
- Les particularités de support inférieures replient des rangées de
dent (voir la fig.A) sont pour que plus grand ou plus de vaissailles
puissent être chargé.
- Le panier à couverts peut être réduit de moitié (voir la fig.B), ce
qui permet de n'utiliser qu'une des deux sections lorsque la quantité
de couverts est peu importante. Dans ce cas, vous disposez de
plus d'espace pour ranger des cocottes ou des casseroles
supplémentaires. Vous pouvez également placer le panier à
couverts dans le panier supérieur.
- Rangez les couverts dans le panier à couverts en positionnant le
manche vers le bas; si le panier dispose de paniers latéraux,
disposez chaque cuillère dans les fentes prévues à cet effet. Les
ustensiles particulièrement longs doivent être rangés à l'horizontal,
dans la partie avant du panier supérieur.
Comment utiliser le panier supérieur
Le panier supérieur est conçu pour recevoir de la vaisselle plus
fragile et légère telle que verres, tasses à café et à thé, saucières,
de même que des assiettes, de petits bols et des casseroles peu
profondes (si elles ne sont pas trop sales).
- Installez la vaisselle et les ustensiles de cuisson de façon à ce
qu'ils ne puissent être déplacés par le jet d'eau.
Le panier supérieur peut être réglé en hauteur (voir la fig.C).
Ajustez le panier supérieur à un niveau plus haut et vous aurez
plus d'espace pour charger des casseroles et plats plus grands
dans le panier.
L'étagère
Appuyez les verres hauts et les verres à pied contre le bord de
l'étagère, pas contre la vaisselle.
Les verres, les tasses et les grands bols se rangent sur l'étagère
du haut. Vous pouvez faire basculer l'étagère dans les deux sens
(voir la fig.D).
Etagère à couteaux
Les agrafes de support de couteau sur le côté du panier supérieur
vous permet de laver les grands couteaux pointus séparément et
pour éviter de faire du mal aux gens (voir la fig.E).
Panier inférieur
Panier supérieur
Capacité pour 12 couverts standard
fig.A
fig.C
fig.E
fig.B
fig.D
Lancer un cycle de lavage
Après avoir terminé toutes les étapes d'installation dans les
paragraphes précédents,ouvrir l’alimentation d'eau, ouvrir
partiellement la porte du lave-vaisselle et appuyer sur le bouton
Marche/Arrêt "A" localisé sur le panneau de commande. La
voyant "B" s'allume. À ce point, l'appareil est branché et prêt
pour programmer.
Configurer et lancer un cycle de lavage
Choisir le cycle désiré en appuyant sur le bouton de choix de
cycle "G". Chaque fois il est appuyé, un des voyants de cycle
"F" s'allume. Choisir le cycle lavage que vous trouvez approprié
en fonction du type desvaisselles à laver (consultez la table de
cycle lavage dans ce manuel, surtout pour la première fois
d’utilisation). Fermer la porte et après quelques secondes, un
signal acoustique court sonnera indiquant que le cycle lavage a
commencé et qui ne peut pas être modifié. Si nécessaire, lisez
le paragraphe avec le titre "Annulation ou modification d'un cycle
en voie de fonction" La fin du cycle sera signalée par un son
acoustique double et le voyant "F" clignotera.
Annulation ou modification d'un cycle au cours de
fonctionnement de la machine...
Prémisse : Un cycle en marche peut seulement être modifié
seulement s'il a marché depuis un temps relativement court.
Autrement, le détergent devrait avoir déjà été utilisé et l'appareil
aurait pu déjà drainer l'eau. Si c'est le cas, le distributeur de
détergent doive être rempli à nouveau (voir le paragraphe avec
le titre "le Chargement du Détergent").
Pour changer le cycle en cours de fonctionnement, ouvrer la
porte, appuyer sur le bouton Marche/Arrêt "A" et respecter les
instructions dans le paragraphe intitulé "Lancer un cycle de
lavage","Régler et lancer un cycle de lavage".
Si vous avez oublié de charger des pièces à laver
Le cycle lavage peut être interrompu en ouvrant la porte (éviter
d’être pulvérisé par l'eau chaude). Quand la porte est fermée de
nouveau, le cycle se reprendra automatiquement au point où il
s'est arrêté.
À la fin du cycle de lavage
La fin du cycle sera indiquée par une signe acoustique double et
le clignotant de la lampe-témoin "F". Ouvrez la porte, éteignez
l'appareil avec l’interrupteur "ON-OFF" et éteignez l'alimentation
en eau. Attendez quelques minutes avant de sortir les plats afin
d'éviter la chaleur (quand ils sont plus susceptibles à faire tomber
les vaisseilles) et améliorer le résultat de sécheresse.
Régler le temps du retard de commencement
Ouvrez la porte du lave-vaisselle partiellement. Si le bouton “J”
est appuyé (voir la Vue de Gros plan “le Panneau de commande”).
Le temps de commencement pour le cycle peut être retardé de
2,4,6,8,10 ou 12 heures. Chaque fois le bouton est appuyé, la
lumière “I” s’allumera en indiquent le temps de retard. Après la
sélection du temps de retard, le cycle peut être mis en service,
comme expliqué dans “Lancer un cycle de lavage...” Fermer la
porter, il y aura un signal sonore court et à ce point le compte à
rebours se déclenchera. Pendant cette période la lampe-témoin
de retard (I) clignotera. à la fin du temps de retard, l'indicateur
s’arrêtera de clignoter et le cycle commencera.
NOTE:
a) Pendant la période de retard, aucune configuration ne peut
être modifiée. Si nécessaire, ils peuvent être annulés en appuyant
sur le sélecteur de cycle urgent "G" pendant environ 5 secondes.
b) Si la puissance de l'appareil s’éteind ou la porte est ouverte
pendant la période de retard, l'horloge s’arrêtera. Il commencera
de nouveau quand la puissance reviendra, ou quand la porte
sera fermée.
Boutons d'Ajustement de Cycle lavage
Bouton de 1/2 Chargement
Ce bouton (voir "Premier plan (bandeau de commande)", lettre
"C") permet de laver des plats employant seulement le support
supérieur s'il n'y a pas assez de plats pour un chargement
complet,
Cela vous permettra d’économiser l'énergieélectrique et de l’eau.
Il ne peut pas être utilisé pour tâche lavage lourde des cycles.
FR
FR
.26..25.
Page 15

Tableau des cycles de lavage
Conseils pour économiser l'énergie
Cycle
Lavage intensif
Lavage normal
Lavage léger
(IEC-EN50242)
Verres
Lavage court
Trempage
Chauffe-plat
Sélection du cycle
Informations
Plats, cocottes et casseroles très sales (à ne pas
utiliser avec de la vaisselle
fragile)
Plats, cocottes et casseroles normalement sales.
Cycle de lavage quotidien.
Plats normalement sales
Casseroles et poêles restes
de nourritures desséchés.
Économique, cycle de lavage
rapide pour des articles ne
supportant pas les
températures élevées. à
utiliser pour de la vaisselle peu
sale, juste après utilisation.
Économique, cycle de lavage
rapide à utiliser pour de la
vaisselle peu sale, juste après
utilisation. N° cycle de
séchage.
Prélavage de plats, de
cocottes et de casseroles en
attendant de remplir le lavevaisselle avec la vaisselle du
repas suivant.
Cycle chauffe-plat.
Description du cycle
Prélavage à l'eau chaude.
Lavage prolongé à 70°C.
Rinçage à l'eau froide.
Rinçage à l'eau chaude.
Séchage.
Le deuxième prélavage utilise de
l’eau froide.
Lavage prolongé à 55°C.
Rinçage à l'eau froide.
Rinçage à l'eau chaude.
Séchage.
Prélavage à l'eau froide.
Lavage prolongé à 50°C.
Rinçage à l'eau froide.
Rinçage à l'eau chaude.
Séchage.
Lavage à 60°C.
Rincer avec de l’eau tiède.
Rincer à chaud.
Séchage.
Lavage rapide à 40°C.
Rinçage à l'eau froide.
Lavage rapide à froid pour éviter
que des résidus d'aliments ne
sèchent sur la vaisselle.
Rinçage chaud.
Détergent Liquide de
30g
30g
5g+25g
15g
rinçage
ERF
15g
FR
- Il est important de tester et de faire fonctionner votre
lave-vaisselle lorsque celui-ci est plein, afin d'économiser
l'énergie. Pour éviter que des odeurs ne se dégagent et que
des aliments ne sèchent sur la vaisselle à laver, vous pouvez
utiliser un cycle à froid.
- Sélectionnez le cycle de lavage le mieux approprié : ce choix
dépend du type de vaisselle et d'ustensiles de cuisson à laver
ainsi que de leur degré de salissure.
- Utilisez la quantité de détergent adéquate : une quantité de
détergent trop importante ne garantit pas un meilleur résultat de
lavage. En outre, l'impact sur l'environnement n'en sera que plus
négatif.
- Ne rincez pas la vaisselle et les utensiles de cuisson avant de
les ranger dans le lave-vaisselle, car cela est inutile.
Comment maintenir votre lave-vaisselle en bon état de fonctionnement
Après chaque lavage
Après chaque lavage, fermez le robinet d'arrivée d'eau et laissez
la porte légèrement entrouverte, de façon à libérer les
moisissures et les odeurs susceptibles de se former à l'intérieur
de l'appareil.
Débrancher l'appareil
Débranchez toujours l'appareil avant de procéder aux opérations
de nettoyage ou d'entretien. Ne prenez aucun risque.
Éviter les solvants et les produits d'entretien abrasifs
Pour le nettoyage de l'extérieur et des parties en caoutchouc de
l'appareil, n'utilisez en aucun cas de solvants ou de produits
d'entretien abrasifs. Utilisez un chiffon imbibé d'une solution
d'eau chaude et de savon.
Pour enlever les taches ou salissures présentes sur la surface
intérieure de votre appareil, utilisez un chiffon que vous
tremperez dans une solution d'eau et de vinaigre blanc, ou un
produit d'entretien spécifique pour lave-vaisselle.
Comment déplacer votre appareil
Si vous devez déplacer votre appareil, veillez à le laisser dans
la position verticale. Si cela est absolument nécessaire, il peut
éventuellement être posé sur le dos.
Joints
La présence de résidus d'aliments dans les interstices des joints
du lave-vaisselle constitue l'un des facteurs influençant la formation d'odeurs à l'intérieur de celui-ci. Nettoyez régulièrement
les joints avec une éponge pour éviter cet inconvénient.
Absence prolongée
En cas d'absence prolongée, il est conseillé de lancer un cycle
de lavage à vide, de débrancher l'appareil, de fermer le robinet
d'arrivée d'eau et de laisser la porte de l'appareil légèrement
entrouverte. Cette précaution permet d'allonger la durabilité des
joints et empêche la formation de mauvaises odeurs à l'intérieur
du lave-vaisselle.
Nettoyage et précautions particulières en matière d'entretien
Montage du filtre
Pour obtenir des résultats de lavage satisfaisants, il est important
que le filtre soit propre.
Le filtre recueille efficacement les particules d'aliments présentes
dans l'eau de lavage et permet de réutiliser celle-ci au cours du
cycle de lavage. C'est pourquoi il est recommandé de débarrasser
le filtre des grosses particules d'aliments après chaque cycle de
lavage. Pour ce faire, rincez le filtre semi-circulaire et le godet (A) à
l'eau courante. Pour démonter le filtre, tirez sur la poignée du godet
en la tirant vers le haut. Le groupe filtre (constitué du filtre semicirculaire (A) et du filtre à petits grains (B)) doit être nettoyé au moins
une fois par mois. Pour le nettoyer le filtre et le filtre à petits grains,
utilisez une brosse de nettoyage. Remontez ensuite les différents
éléments comme illustré dans les figures ci-dessous et installez à
nouveau le groupe filtre à l'intérieur du lave-vaisselle, en le
positionnant dans son logement et en appuyant vers le bas.
N'utilisez jamais le lave-vaisselle sans avoir préalablement installé
les filtres. Un montage incorrect des filtres peut nuire aux résultats
de lavage de l'appareil et endommager la vaisselle et les ustensiles
de cuisson.
FR
Comment nettoyer les bras d'aspersion
Il peut arriver que des particules d'aliments s'incrustent dans
les bras d'aspersion et bloquent les orifices (voir "Premier plan
[intérieur]", lettres D-F ). Contrôlez régulièrement les bras
d'aspersion et nettoyez-les lorsque cette opération s'avère
nécessaire.
A
B
Nettoyer le filtre d’entrée d’eau
Vous devez nettoyer régulièrement le filtre d’entrée d’eau situé
à la sortie du robinet(voir illustration)
Après avoir fermé le robinet, ouvrez le sommet du tuyau d’entrée
d’eau, sortez le filtre et nettoyez-le dans l’eau attentivement.
Et puis remettez le filtre et bien serrez le tuyau d’eau.
.28..27.
Page 16

Diagnostic des pannes
Installation
Il se peut que votre lave-vaisselle ne fonctionne pas ou fonctionne
de manière incorrecte. Avant de contacter votre Service Aprèsvente, contrôlez d'abord les points suivants: n'avez-vous pas
oublié de presser l'une des touches ou bien d'effectuer une
opération fondamentale?
Le lave-vaisselle ne démarre pas Contrôlez que :
- la fiche est correctement introduite dans la prise du secteur ;
- il n'y a pas de coupure de courant ;
- la porte est fermée correctement ;
- la touche ON-OFF est sur "ON" ;
- le robinet d'eau est ouvert.
Le lave-vaisselle ne charge pas l'eau
Contrôlez que :
- le robinet d'arrivée d'eau est ouvert et que le tuyau
d'alimentation est raccordé correctement ;
- l'alimentation en eau de votre habitation n'a pas été coupée et
que la pression est suffisante ;
- le tuyau d'alimentation n'est ni écrasé ni plié;
- le filtre du tuyau d'alimentation n'est pas obstrué.
La vaisselle n'est pas propre
Contrôlez que :
- le robinet d'arrivée d'eau est ouvert et que le tuyau
d'alimentation est raccordé correctement ;
- l'alimentation en eau de votre habitation n'a pas été coupée et
que la pression est suffisante ;
- le tuyau d'alimentation n'est ni écrasé ni plié ;
- le filtre du tuyau d'alimentation n'est pas obstrué.
La vidange de l'eau ne s'effectue pas
Contrôlez que :
- le tuyau de vidange n'est ni écrasé ni plié.
Le symbole sur le produit ou son emballage
indique que ce produit ne peut être traité comme
déchet ménager. Il doit plutôt être remis au point
de ramassage concerné, se chargeant du
recyclage du matériel électrique et électronique.
En vous assurant que ce produit est éliminé
correctement, vous favorisez la prévention des
conséquences négatives pour l’environnement et
la santé humaine qui, sinon, seraient le résultat
d’un traitement inapproprié des déchets de ce
produit.
Messages d'erreur
Le lave-vaisselle est équipé d'un système de sécurité qui est capable de détecter des problèmes d'exploitation et des défaillances.
Les défaillances sont signalées par le clignotant rapide d'un LED
"F".Seulement dans le cas où la lampe-témoin pour le cycle de
tremper (voir la table pour des cycles) clignote, vous devez
rapidement annuler le cycle comme décrit dans la section avec
le titre "le Changement d'un Cycle En voie de Fonctionnement."
Alors vérifiez pour vous assurer qu'il y a de l'eau dans la conduite
maîtresse et que le robinet est ouvert. Si le message continue,
appelez à l'aide technique, et indiquez quel message a apparu.
Si n'importe quelle des autres lampes-témoins commence à
clignoter rapidement, éteingnez l'appareil et appeler à l'aide
technique, indiquez quelle lumière a clignoté.
Il y a des dépôts de calcaire ou un film blanchatre sur
la vaisselle
Contrôlez que :
- le bouchon du distributeur de sel est fermé correctement ;
- la quantité de liquide de rinçage est suffisante.
Si, après tous ces contrôles, le lave-vaisselle ne fonctionne
toujours pas et/ou que le probléme persiste, adressez-vous à votre
Service Après- vente le plus proche en indiquant :
- le type de panne ;
- le type d'appareil et le numéro du modèle (Mod...) ainsi que le
numéro de série (S/N...),qui figurent sur la plaque signalétique
située sur la paroi intérieure de la porte.
Ne faites jamais appel à des techniciens non agréés et exigez
toujours qu'il soit fait usage de pièces d'origine.
Pour obtenir plus de détails sur le recyclage de ce produit, veuillez
prendre contact avec le bureau municipal de votre région, votre
service d’élimination des déchets ménagers ou le magasin où
vous avez acheté le produit.
FR
Comment installer l'appareil
Installez l'appareil à l'endroit souhaité. Le dos de l'appareil doit
reposer contre le mur et les parois latérales doivent être parallèles
aux parois du meuble adjacent ou du mur. Le lave-vaisselle est
équipé de tuyaux d'alimentation et de vidange de l'eau. Ces tuyaux
peuvent être installés à droite ou à gauche, pour faciliter
l'installation correcte de l'appareil.
Comment mettre l'appareil de niveau
Dès que l'appareil est mis en place, réglez les pieds du lavevaisselle en les vissant ou en les dévissant) jusqu'à ce que
l'appareil soit de niveau. Dans tous les cas, l'appareil doit
présenter une inclinaison non supérieure à 2°„. Une mise à niveau
correcte de l'appareil est un gage de garantie pour des résultats
satisfaisants.
Raccordement à l'arrivée d'eau froide
Raccordez le tuyau d'arrivée d'eau froide à un connecteur 3/4
(gaz) fileté et assurez-vous qu'il est solidement fixé (voir Fig.2).
Si les conduits d'eau sont neufs ou ont été utilisés pendant une
longue période, faites couler l'eau pour vous assurer qu'elle est
propre et dépourvue d'impuretés. En ne prenant pas cette
précaution, vous courez le risque de boucher le conduit d'arrivée
d'eau et d'endommager l'appareil.
Raccordement à l'arrivée d'eau chaude
Le robinet d'arrivée d'eau de l'appareil peut également être
raccordé au dispositif de distribution d'eau chaude de votre habitation (système de chauffage central), à condition que la
température ne dépasse pas 60°C .
Dans ce cas, la durée du cycle de lavage sera réduite de 15
minutes environ et l'efficacité du lavage sera légèrement
inférieure.
Le raccordement à l'arrivée d'eau chaude doit s'effectuer de la
même façon que pour le raccordement à l'arrivée d'eau froide.
fig.1
fig.2
Protection contre les risques d'inondation
Votre lave-vaisselle est équipé d'un dispositif qui coupe l'arrivée
d'eau lorsqu'un problème survient au niveau du tuyau
d'alimentation ou en cas de fuite à l'intérieur de l'appareil, afin
d'éviter que ces incidents ne provoquent des dégâts à votre
habitation. Si, pour une raison quelconque, le boîtier renfermant
les composants électriques est endommagé, débranchez
FR
immédiatement l'appareil. Afin de garantir le fonctionnement
correct du dispositif de protection contre les inondations, il est
nécessaire que le bo?tier "A" traversé par le tuyau d'alimentation
soit fixé au robinet d'arrivée d'eau comme illustré dans la Fig.1.
Seul ce type de raccordement est valable. Ne sectionnez en
aucun cas le tuyau d'alimentation car il contient des composants
électriques sous tension. Si la longueur du tuyau est insuffisante
pour garantir un raccordement correct, remplacez-le par un tuyau
de longueur appropriée. Vous pouvez vous procurer ce tuyau
auprès de revendeurs spécialisés ou d'un Service Après-vente
agréé.
Raccordement du tuyau de vidange
Introduisez le tuyau de vidange dans un conduit de drainage
d'un diamètre de 4cm minimum, ou déposez-le directement dans
l'évier en veillant à ce qu'il ne soit ni plié ni écrasé. Utilisez le
support en plastique prévu à cet effet, fourni avec l'appareil (voir
Fig. 3). L'extrémité libre du tuyau doit se trouveré une hauteur
comprise entre 40 et 100 cm et ne doit pas être immergé dans
l'eau.
fig.3
Attention:
Le support en plastique doit être solidement fixé au mur pour
éviter que le tuyau ne se déplace et que de l'eau ne se répande
au sol.
Branchement électrique
Après vous être assuré que la tension d'alimentation et la
fréquence de votre habitation correspondent à celles figurant
sur la plaque signalétique (située sur la paroi intérieure en acier
inoxydable de la porte de votre appareil), et que l' installation
électrique est prévue pour supporter la tension maximale indiquée
sur la plaque signalétique, introduisez la fiche dans une prise du
secteur correctement reliée à la masse (la mise à la terre de
l'appareil est obligatoire aux termes de la loi).
Si la prise du secteur et la fiche de l'appareil ne sont pas de
même type, remplacez la fiche. N'utilisez en aucun cas de
rallonges ou autres qui risqueraient de provoquer une surchauffe
et des brûlures.
Caution:
La prise de lave-vaisselle doit être accessible même quand
l'appareil est installé comme une unité incorporée pour que la
maintenance puisse être faite sécuritairement.
.30..29.
Page 17

La sicurezza, una buona abitudine
Vista da vicino (Interno)
AVVISO
Leggere con attenzione le istruzioni contenute nel presente
manuale, in quanto contengono informazioni
importanti per una sicura e corretta installazione, per l'uso e la
manutenzione dell'apparecchiatura.
Questo elettrodomestico è conforme alle seguenti
direttive CEE:
- 73/23/EEC del 19 febbraio 1973 (bassa tensione) e successivi
emendamenti;
- 89/336/EEC del 3 maggio 1989 (compatibilità
elettromagnetica) e successivi emendamenti.
- Smaltire con attenzione il materiale d'imballaggio.
- Dopo avere eliminato l'imballo, verificare che l'elettrodomestico
non sia danneggiato. In caso di dubbi, contattare il personale
qualificato.
- La lavastoviglie deve essere utilizzata esclusivamente da persone
adulte per il lavaggio di stoviglie e utensili da cucina.
- Regole fondamentali da seguire quando si utilizza
l'elettrodomestico:
* Non toccare mai la lavastoviglie a piedi scalzi o con mani o piedi
bagnati;
* Evitare l'impiego di prolunghe o di doppie prese;
Durante l'installazione, il cavo di alimentazione non deve essere
eccessivamente o pericolosamente piegato o schiacciato
Vista da vicino (quadro comandi)
D
* Se l'apparecchio non funziona in maniera corretta, oppure prima
di eseguire la manutenzione, scollegare l'alimentazione elettrica.
- Tenere i detersivi fuori dalla portata dei bambini ed evitare che
si avvicinino alla lavastoviglie quando lo sportello è aperto.
- Questo apparecchio non può essere installato all'aperto,
nemmeno in aree coperte da un tetto; inoltre è molto pericoloso
lasciarlo esposto agli agenti atmosferici.
- Non toccare la resistenza durante o dopo un ciclo di lavaggio.
- Non appoggiarsi o sedersi sullo sportello aperto, perché ciò
potrebbe causare il ribaltamento della lavastoviglie.
- In caso di malfunzionamento, chiudere il rubinetto di
alimentazione dell'acqua e scollegare la spina dalla presa di
corrente. Poi, consultare la sezione intitolata "Soluzione dei
problemi". Se non è possibile risolvere il problema, contattare
un centro assistenza.
- Solo il personale specializzato è autorizzato a fare riparazioni.
- Gli elettrodomestici che non possono più essere utilizzati, devono
essere resi inutilizzabili tagliando il cavo di alimentazione e
togliendo la chiusura dello sportello.
- Occorre posizionare la lavastoviglie in modo che la spina sia
accessibile.
- In caso di installazione su pavimento rivestito di moquette, questa
non deve ostruire l'apertura dello sportello della lavastoviglie.
- Se il cavo di alimentazione è danneggiato, deve essere sostituito
da un cavo speciale o da un'unità reperibile presso il produttore
o un agente per l'assistenza.
BCEF
A
L
K
V
J
I
J
L
H
A Rastrelliera per tazze
B Cestello superiore
C Regolazione altezza cestello
D Irroratore superiore
E Cestello inferiore
F Irroratore inferiore
A
B
C
D
E
F
G
G Filtro lavaggio
H Contenitore detersivo e brillantante
I Tappo contenitore sale
J Cesto per argenteria
K Scaffali per coltelli
L Terzo aspersore
Tasto ON-OFF
A
Lampada spia ON-OFF
B
Tasto "HALF LOAD"
C
Spia di soluzione di risciacquatura bassa
D
Lampada spia mancanza sale
E
HG
F
G
H
I
J
I
Lampade spia programmi
Pulsante selezione programmi
Lampada spia mezzo carico
Spia rinvio
Pulsante selezione ritardo avviamento
J
Caratteristiche tecniche
Larghezza
Profondità
Altezza
Capacità
Pressione dell'acqua da
Tensione di potenza
Potenza assorbita totale
IT
IT
.32..31.
12 coperti standard
220-240V~ 50Hz
60 cm
60 cm
85 cm
0.03-0.6MPa
2150W
Page 18
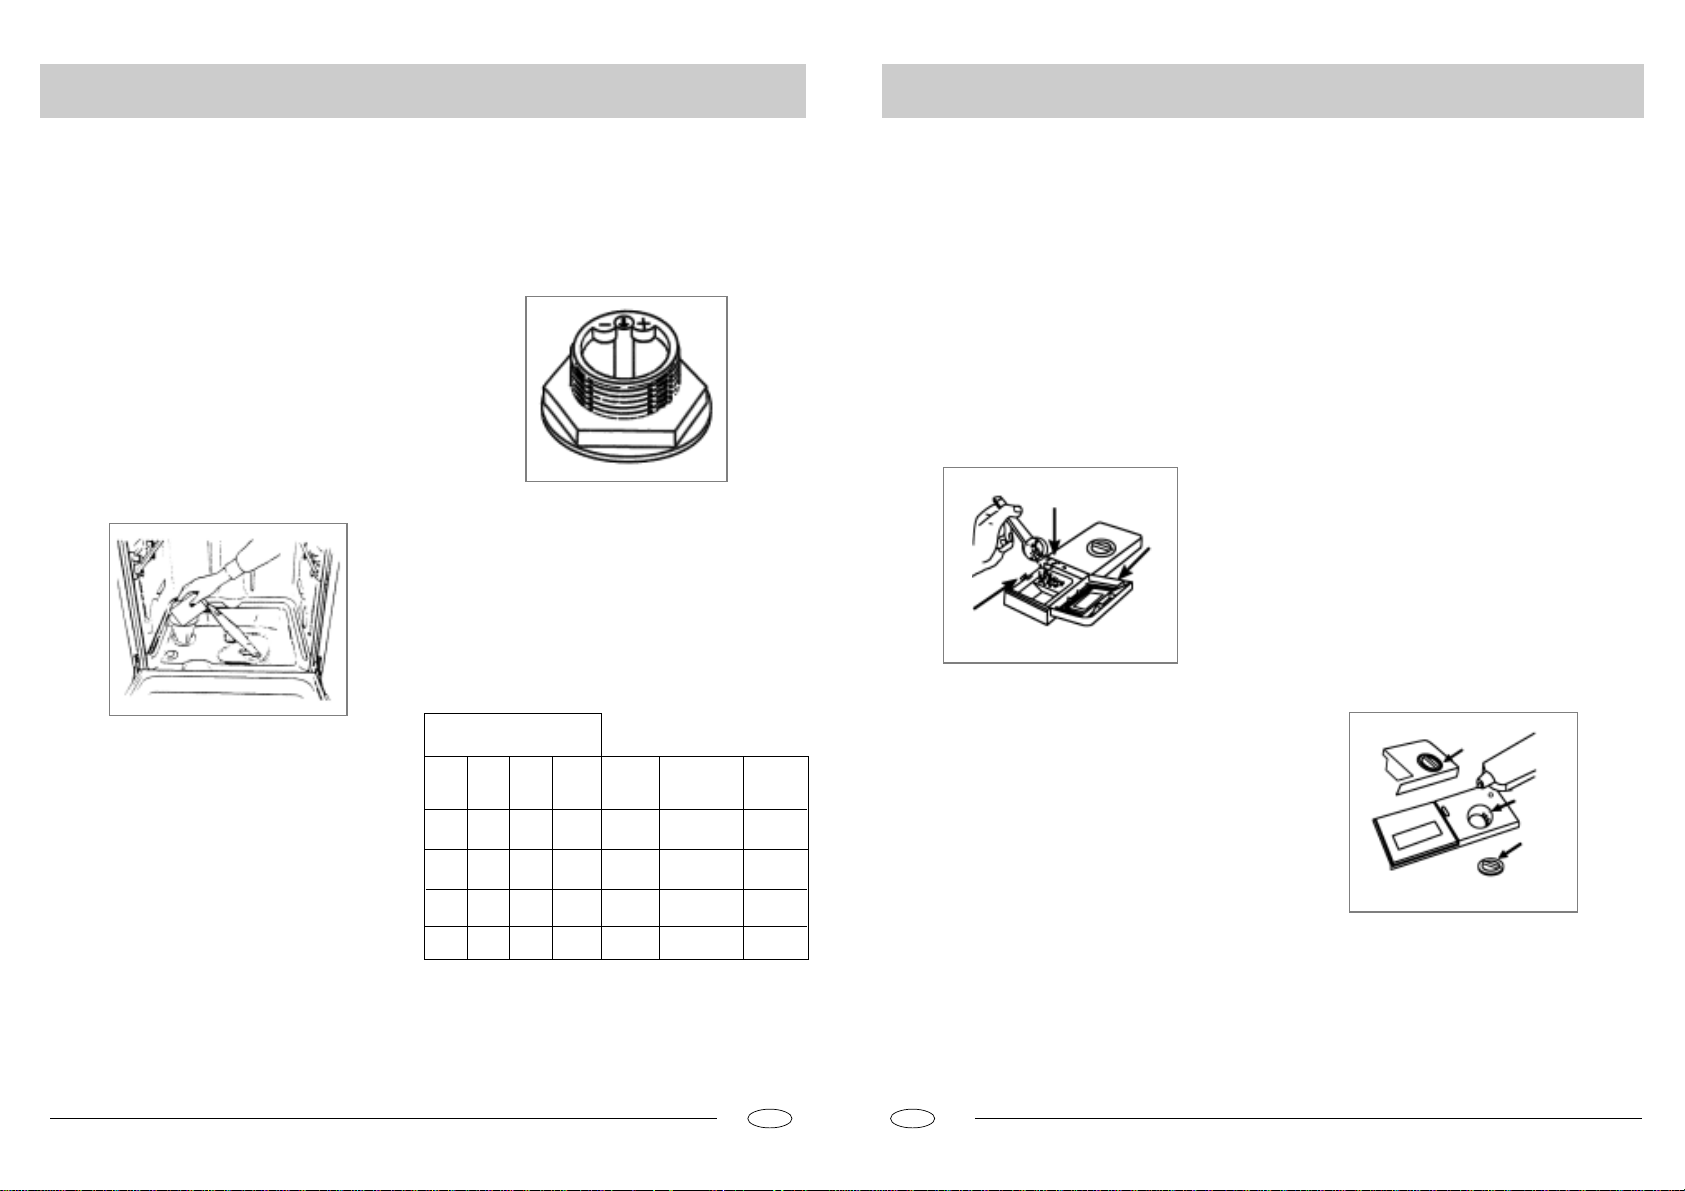
Sale
Detersivo e brillantante
Sale
La durezza dell'acqua varia da luogo a luogo. Se la lavastoviglie
funziona con acqua dura, su piatti e utensili si formano dei depositi.
Questo elettrodomestico è dotato di un addolcitore speciale che
utilizza un sale appositamente studiato per eliminare calcare e
sali minerali dall'acqua.
Inserimento del sale nell'addolcitore
Utilizzare esclusivamente sale per lavastoviglie. Il contenitore del
sale si trova sotto al cestello inferiore e deve essere riempito nel
modo seguente:
- Estrarre il cestello inferiore e svitare e togliere il coperchio del
contenitore del sale;
- Prima di inserire il sale per la prima volta, riempire il contenitore
con acqua;
- Posizionare l'estremità dell'imbuto (in dotazione) nel foro e
inserire circa 2 kg di sale. è normale che fuoriesca una piccola
quantità di acqua dal contenitore.
- Riavvitare con attenzione il tappo.
Remplissez le distributeur de sel uniquement lorsque le voyant
de "niveau de sel" (situé sur le bandeau de commande) est
allumé.
- Per impedire la formazione di ruggine, inserire il sale subito
prima dell'inizio di un ciclo di lavaggio.
Regolazione del consumo del sale
La lavastoviglie è predisposta per la regolazione del quantitativo di
sale consumato in base alla durezza dell'acqua disponibile. Ciò
permette di migliorare e personalizzare il livello di consumo del
sale, riducendolo al minimo.
Per regolare il consumo di sale, procedere nel modo seguente:
- Svitare il tappo del contenitore del sale;
- Sul collo del contenitore è presente un anello con una freccia
(vedi figura precedente).
- Se necessario, ruotare l'anello in senso antiorario, dal simbolo " " verso il simbolo "+", in base alla durezza dell'acqua.
Per eseguire le regolazioni, si consiglia vivamente di consultare
la seguente tabella.
Durezza dell’acqua
Livello
1
2
º
fH
ºdH
010 MNT
mmol/l
MNIT
NIUQIQNUQQNMOR
Posizione
selettore
L
=?J?
Consumo sale
(grammi/ciclo)
Autonomia
(cicli/2kg.)
LM
OM
SM
Detersivo
Utilizzare esclusivamente detersivi per lavastoviglie. Il contenitore
deve essere riempito prima dell'inizio di ciascun ciclo di lavaggio,
seguendo le istruzioni contenute nella "Tabella dei cicli di
lavaggio". Il contenitore del detersivo si trova nel pannello interno
dello sportello.
Inserimento del detersivo
Per aprire il coperchio "A" del contenitore, premere il pulsante
"B". Il detersivo per il ciclo di lavaggio deve essere inserito nello
scomparto "C".
Dopo avere inserito il detersivo, chiudere il coperchio premendolo
fino a sentire un clic.
C
A
B
Nota: per semplificare la chiusura del coperchio, eliminare
eventuali residui di detersivo in eccesso dal
contenitore.
Brillantante
Questo prodotto rende i piatti brillanti e ne facilita l'asciugatura
senza macchie. Il contenitore si trova nel pannello interno dello
sportello e deve essere riempito dopo circa 80 cicli di lavaggio.
Inserimento del brillantante
Per aprire il contenitore del brillantante, ruotare il tappo "C" in
senso antiorario quindi aggiungere il brillantante, prestando
attenzione a non farlo fuoriuscire.
Il quantitativo di brillantante utilizzato per ciascun ciclo di lavaggio
può essere regolato ruotando l'apposito dosatore "F", posizionato
sotto al coperchio "C", con un cacciavite. Vi sono 6 diverse
impostazioni; quella che prevede un dosaggio normale è la numero
3.
Importante: il corretto dosaggio del brillantante migliora
l'asciugatura delle stoviglie.
Se sulle stoviglie rimangono gocce di acqua o macchie, occorre
regolare il dosatore su un'impostazione superiore. Se invece le
stoviglie presentano striature bianche, regolare il dosatore su
un'impostazione inferiore.
C
F
C
3
ORRM QRUV QIRUIV
4
[UV[RM [UIV
MED
QM
SM?H?
QM
OR
IT
IT
.34..33.
Page 19

Caricamento delle stoviglie
Come avviare la macchina
Prima di inserire i piatti nella lavastoviglie, eliminare i residui
alimentari più grossi per evitare di intasare il filtro e ridurre le
prestazioni dell'elettrodomestico.
Se i residui alimentari presenti su pentole e padelle sono
particolarmente difficili da eliminare, consigliamo di lasciarli in
ammollo prima di procedere al lavaggio. Ciò evita di dovere
effettuare ulteriori cicli di lavaggio. Estrarre il cestello per
semplificare il caricamento della lavastoviglie.
Come riempire il cestello inferiore
Si consiglia di disporre sul cestello inferiore le stoviglie
maggiormente sporche: pentole, padelle, coperchi, piatti e
contenitori di portata, come illustrato nella figura a destra.
Si consiglia di posizionare i piatti di portata e i coperchi sui fianchi
dei cestelli per evitare di bloccare la rotazione del braccio aspersore
superiore.
- Pentole e ciotole devono essere poste sempre rivolte verso il
basso.
- Le pentole più grosse devono essere inclinate per facilitare lo
scolo dell'acqua.
- Il cestello inferiore è equipaggiato con griglia piegabile verso il
basso (vedi Fig.A) in modo che batteria da cucina più grande
o più numerosa possa essere caricata.
- Il cestello delle posate può essere scomposto (vedi Fig.B) in
modo da utilizzarne solo una sezione quando il carico di posate
è limitato. In questo modo ci sarà più spazio per altre pentole e
tegami sul cestello inferiore.
- Sistemare le posate nell'apposito cestello con il manico rivolto
verso il basso; se nel cestello vi sono contenitori laterali per le
posate, i cucchiai devono essere posizionati individualmente negli
appositi contenitori. Gli utensili particolarmente lunghi devono
essere posti in posizione orizzontale nella parte anteriore del
cestello superiore.
Come riempire il cestello superiore
Il cestello superiore è predisposto per stoviglie più delicate e
leggere, come bicchieri, tazze da caffè e tè, piattini, piatti e coppette,
oltre che piccole padelle (purché non eccessivamente sporche).
Posizionare i piatti e le pentole in modo che non vengano mossi
dallo spruzzo dell'acqua.
L'altezza del cestello superiore può essere regolata usando le
manopole laterali (vedi Fig.C).
Aggiustare il cestello superiore al livello più alto e ci sarà più spazio
per altre pentole e piatti sul cestello inferiore.
supporto
Appogiare I bicchieri alti e stoviglie con manico lungho su scaffale,
anzi che sui altiri stoviglie da lavare (vedi Fig.D)
scaffali per coltelli
questo scaffale e situato a fianco dello scaffale superiore£¨si
possono separare I coltelli grandi e taglienti a lavare indipendente
per evitare I eventuali danneggiamenti (vedi Fig.E)
Cestello inferiore Cestello superiore
Capacità 12 coperti standard
fig.A
fig.C
fig.E
fig.D
IT
fig.B
Avviare un Ciclo di Lavaggio
Dopo avere completato tutti i passi di installazione nel paragrafo
precedente, aprire il rifornimento d’acqua all’apparecchio, aprire
parzialmente la porta della lavastoviglie, e premere il tasto ONOFF “A” che si trova sul pannello di controllo. La spia “B”
illuminerà. A questo punto, l’apparecchio è attivo e pronto ad
essere programmato.
Impostare ed Avviare un Ciclo di Lavaggio
Selezionare il ciclo desiderato facendo premere il tasto di
selezione del ciclo “G”. Ogni volta che viene premuto, una delle
spie del ciclo “F” illuminerà di seguito. Selezionare il ciclo di
lavaggio considerato più appropriato per il tipo di piatti da lavare
(consultare la tabella di ciclo di lavaggio contenuta nel presente
manuale, sopratutto quando l’apparecchio venga usato per la
prima volta).
Chiudere la porta e dopo alcuni minuti, suonerà un breve segnale
acustico indicando che il ciclo di lavaggio è già avviato e non è
più modificabile. Se sia necessario, vedi il paragrafo
intitolato “Cancellare o modificare un ciclo durante il lavaggio.”
La fine del ciclo sarà segnata da un doppio suono acustico, e la
spia “F” comicierà a lampeggiare.
Cancellare o modificare un ciclo durante il lavaggio…
Premessa: Un ciclo in funzione può essere modificato solo
quando non venga attivato per un piriodo lungo.
Altrimenti, il detersivo può essere già usato e l’acqua di lavaggio
può essere già scaricata dalla lavastoviglie.
Se sia una situazione del genere, il dispensatore di detersivo
deve essere riempito di nuovo (vedi il paragrafo intitolato
“Caricare il Detersivo”)
A modificare il ciclo attualmente in funzione, aprire la porta,
premere il tasto di ON-OFF“A”.Quando il ciclo viene cancellato,
verrà emesso un breve segnale acustico dalla lavastoviglie e la
spia relativa sarà spenta. A configurare un nuovo ciclo di lavaggio,
seguire le istruzioni contenute nel paragrafo intitolato“Avvare un
Ciclo di Lavaggio” .
Se alcuni piatti sono stati dimenticati…
Il ciclo di lavaggio può essere interrotto facendo aprire
attentamente la porta (allo scopo di evitare lo spruzzo
d’acqua calda). Quando la porta è di nuovo chiusa, il ciclo
comincierà automaticamente dal punto dove si è interrotto.
IT
Alla fine del ciclo di lavaggio...
La fine del ciclo sarà indicata da un dobbio segnale acustico e
dal lampeggiamento della spia “F”. Aprire la porta, tenere spento
l’apparecchio tramite l’interruttore ON-OFF e tenere chiuso il
rifornimento d’acqua all’apparecchio. Aspettare alcuni minuti
prima di rimuovere i piatti per evitare di tenerli quando sono
ancora caldi (quando sono più suscettibile di essere rotti) e per
avere un effetto migliore di ascuigamento.
Configurare il tempo di rinvio dell’avvio
Aprire la porta della lavastoviglie parzialmente. Se il tasto “J”
viene premuto (vedi “Visione da vicino -Pannello di Controllo”). Il
tempo d’avvio per il ciclo di lavaggio può essere rinviato 2,4,6,8,
10 o 12 ore. Ogni volta che il tasto venga premuto, la spia “I”
lampeggia indicando la lunghezza di rinvio. Dopo quando il tempo
di rinvio viene selezionato, il ciclo di lavaggio può essere
configurato, come spiegato in “Avviare un ciclo di lavaggio...”
Chiudere la porta, ed a questo momento il tempo di rinvio
comincia a contare.
Durante questo periodo, la spia di rinvio (I) viene accesa. Alla
fine del tempo di rinvio, la spia viene spenta) ed il ciclo viene
avviato.
Nota bene:
a) Durante il periodo di rinvio, nessuna configurazione può essere
modificata. Se sia necessario, può essere cancellato facendo
premere il selezionatore di ciclo “G” per circa 5 secondi.
b) Se l’alimentazione dell’apparecchio sia interrotta o la porta
sia aperta durante il periodo di rinvio, l’orologio smette di contare.
Comincia di nuovo quando l’alimentazione è rifornita o quando
la porta è chiusa.
Tasti di Aggiustamento del Ciclo di
Lavaggio
Tasto di 1/2 Carico
Questo tasto (vedi “Vista da vicino (quadro comandi)”, lettera
“C”) rende possiblile lavare i piatti usando solo il cestello superiore
se non ci siano abbastanza piatti per un carico pieno. Tale
funzione vi permette di risparmiare acqua e elettricità. Non può
essere usata con un ciclo di lavaggio d’impegno pesante.
.36..35.
Page 20

Tabellal programmi
Consigli per risparmiare
Ciclo
Lavaggio Intensivo
Lavaggio Normale
Lavaggio leggero
(IEC-EN50242)
Stoviglie delicate
Lavaggio Veloce
Ammollo
Scaldapiatti
Tipo di Carico
Piatti, pentole e padelle
molto sporchi.
(Non indicato per stoviglie
delicate)
Piatti, pentole e padelle
normalmente sporchi.
Piatti normalmente sporchi.
Lavaggio standard quotidiano
Ciclo veloce ed economico,
da utilizzare con stoviglie
sensibili alle alte
temperature, subito dopo
l'utilizzo.
Ciclo veloce ed economico,da
utilizzare con stoviglie non
particolarmente sporche,
subito dopo l'utilizzo. Nessun
ciclo di asciugatura.
Prelavaggio di piatti, pentole
e padelle in attesa di
completare il carico della
lavastoviglie.
Indicato per riscaldare o
solo risciacquare qualsiasi
tipo di stoviglie.
Descrizione del ciclo Detersivo
Pre-lavaggio con acqua calda.
Lavaggio prolungato a 70°C.
Risciacquo con acqua fredda.
Risciacquo con acqua calda.
Asciugatura.
Viene usata acqua fredda per il secondo
prelavaggio.
Lavaggio prolungato a 55°C.
Risciacquo con acqua fredda.
Risciacquo con acqua calda.
Asciugatura.
Pre-lavaggio con acqua fredda.
Lavaggio prolungato a 50°C.
Risciacquo con acqua fredda.
Risciacquo con acqua calda.
Asciugatura.
Lavaggio a 60°C.
Risciacquo con acqua fredda.
Risciacquo con acqua calda.
Asciugatura.
Lavaggio breve a 40°C.
Risciacquo freddo.
Breve lavaggio freddo per
evitare che i residui di cibo
possano incrostarsi sulle
stoviglie.
Risciacquo caldo.
30g
30g
5g+25g
15g
15g
Brillantante
ERF
- E' importante attivare la lavastoviglie possibilmente a pieno
carico per ottimizzare I consumi; per evitare che nel fratempo si
formino cattivi odori e incrostazioni, potete utilizzare il cicli
ammollo.
- Scegliete il programma adeguato:la scelta del pragramma
dipende dal tipo di stoviviglie da lavare e dal loro grado di sporco.
Come tenere in forma la lavastoviglie
Dopo ogni lavaggio
Dopo ogni lavaggio chiudete il rubinetto dell'acqua e lasciate
socchiusa la porta in modo che non ristagnino ne' umidita' , ne'
cattivi odori.
Staccare la spina
Prima di fare qualsiasi pulizia o manutenzione , staccare sempre
la spina dalla presa:
non correte alcun pericolo.
Niente solventi ne' abrasivi
Per pulire l'esterno e le parti in gomma della lavastoviglie non
occorre usare ne' solventi ne' abrasivi ma solo un panno imbevuto
di acqua tiepida e sapone.
Per eliminare eventuali macchina sulla superfice della vasca,
utilizzare un panno imbevuto di acqua ed un po' di aceto bianco o
prodotto specifico per la pulizia della lavastoviglie.
Pulizia e manutenzioni particolari
Gruppo del filtro
Per migliorare prestazioni e risultati, si consiglia di pulire il gruppo
del filtro, che consente di trattenere le particelle di cibo rimaste
nell'acqua di lavaggio e, di conseguenza, di riutilizzarla durante il
ciclo. Per questo motivo si consiglia di eliminare i residui di cibo
più grossi rimasti nel filtro dopo ogni ciclo di lavaggio,
risciacquando il filtro e la tazza semicircolare (A) sotto l'acqua
corrente. Per estrarre il gruppo del filtro, tirare l'apposita maniglia
verso l'alto. L'intero gruppo del filtro (costituito dal filtro
semicircolare (A) e dal filtro fine (B)) deve essere pulito almeno
una volta al mese. Pulire il filtro e il filtro fine servendosi di una
spazzola. Poi rimontare le parti del filtro come illustrato nelle figure seguenti e reinserire l'intero gruppo nella lavastoviglie,
posizionandolo nell'apposito alloggiamento e premendo verso il
La lavastoviglie non deve mai essere utilizzata senza i filtri.
L'inserimento incorretto dei filtri può ridurre le prestazioni della
lavastoviglie e danneggiare piatti e utensili basso.
- Dosate la giusta quantita' di detersivo: se eccedete con il
quantitativo di detersivo non otterrete stoviglie piu' pulite, ma
solamente un maggioe impatto ambietale.
- Non è più vantaggioso risciacquare i piatti, la batteria da cucina
e gli utensili prima di caricarli nella lavastoviglie.
In caso di trasloco
In caso di trasloco possibilmente mantenete l'apparecchio in
posizione verticale; se fosse necessario , inclinatela sul lato
posteriore.
Le guarnizioni
Uno dei fattori responsabili del ristagno di Odori all'interno della
lavastoviglie e' rappresentato dai residui di cibo che rimangono
nelle guarnizioni. Bastera' pulire peridicamente con una spugnetta
inumidita.
Se partire per le vacanze
Quando andate in vacanza, e' consigliabile fare un lavaggio a
vuoto, dopodiche' staccare la spina, chiudere il rubinetto di ingresso
acqua e lasciare socchiusa la porta; le guarnizioni dureranno piu
a lungo ed all'interno non si formeranno odori sgradevoli.
Pulizia dei bracci aspersori
A volte capita che residui alimentari rimangano incrostati sui bracci
aspersori e blocchino i fori (vedi "L'interno della lavastoviglie",
lettere D-F). Controllare periodicamente i bracci aspersori e pulirli,
se necessario.
A
B
Controlla il filtro d'immissione d'acqua
Pulisci periodicamente il filtro d'immissione d'acqua (guarda la
figura) situato sullo scarico del rubinetto del rifornimento d'acqua.
Dopo avere chiuso il rubinetto d'acqua, svita la fine del tubo di
rifornimento d'acqua, rimuovi il filtro e lo pulisci attentamente sotto
l'acqua corrente. E poi, rimetti il filtro al suo posto originale e
stringi il tubo di rifornimento d'acqua al suo posto.
IT
IT
.38..37.
Page 21

C'e' qualche problema?
Installazione
Può succedere che la lavastoviglie non funzioni o non funzioni
correttamente. Prima di contattare l'assistenza, cercare di
risolvere personalmente i problemi: non è stato premuto uno dei
tasti o non è stata eseguita un'operazione fondamentale?
La lavastoviglie non parte
Controllare che:
- la spina sia inserita correttamente nella presa;
- vi sia corrente nella casa;
- lo sportello sia chiuso correttamente;
- il tasto ON-OFF sia su "ON";
- il rubinetto dell'acqua sia aperto.
La lavastoviglie non carica l'acqua
Controllare che:
- il rubinetto dell'acqua sia aperto e il tubo attaccato
correttamente;
- l'acqua arrivi alla casa e abbia pressione sufficiente;
- il tubo di alimentazione dell'acqua non sia schiacciato o piegato;
- il filtro del tubo di alimentazione non sia intasato.
La lavastoviglie non scarica l'acqua
Controllare che:
- il tubo di scarico non sia schiacciato o piegato.
Sulla superficie delle stoviglie si formano residui
calcarei o una pellicola bianca
Controllare che:
- il coperchio del contenitore del sale sia chiuso correttamente;
- il dosaggio del brillantante sia corretto.
Il simbolo sul prodotto o sulla confezione
indica che il prodotto non deve essere considerato
come un normale rifiuto domestico, ma deve
essere portato nel punto di raccolta appropriato
per il riciclaggio di apparecchiature elettriche ed
elettroniche. Provvedendo a smaltire questo
prodotto in modo appropriato, si contribuisce a
evitare potenziali conseguenze negative per
l’ambiente e per la salute, che potrebbero derivare
da uno smaltimento inadeguato del prodotto.
Messaggi di errori
La lavastoviglie è equipaggiata con un sistema di sicurezza col
quale si riesce a scoprire i problemmi operativi ed i
malfunzionamenti. Questi malfunzionamenti sono segnalati da
un rapido lampeggiamento di una delle spie LED di
programmazione “F”. Solo nel caso quando la spia per il ciclo
d’ammollo (vedi la tabella per i cicli) lampeggia rapidamente,
bisogna cancellare il ciclo come descritto nella sezione intitolata
“Modificare un Ciclo in Funzione.” E poi, verificare che ci sia
l’acqua nella rete ed il rubinetto sia tenuto aperto. Se il messaggio
continua, chiedere l’assistenza tecnica, indicando il messaggio
esistente.
Se qualsiasi altra spia comincia a lampeggiare rapidamente,
spegnere l’apparecchio e chiedere l’assistenza tecnica, indicando
quale indicatore comincia a lampeggiare.
Qualora, nonostante questi controlli, la lavastoviglie non funzioni
e/o il problema persista, contattare il centro di assistenza
autorizzato più vicino e fornire le seguenti informazioni:
- il tipo di problema;
- il numero del modello (Mod...) e il numero di serie (S/N...), indicati
nella targhetta sul fianco della parte interna dello sportello.
Non ricorrere mai a tecnici non autorizzati e non permettere
l'installazione di ricambi non originali.
Per informazioni più dettagliate sul riciclaggio di questo prodotto,
contattare l’ufficio comunale, il servizio locale di smaltimento rifiuti
o il negozio in cui è stato acquistato il prodotto.
Posizionamento della lavastoviglie
Sistemare la lavastoviglie nella posizione desiderata. La parte
posteriore dovrebbe essere appoggiata ad una parete e i fianchi
ai mobili o alle pareti adiacenti. La lavastoviglie è dotata di tubi di
alimentazione e scarico che possono essere posizionati a destra
o a sinistra per semplificare una corretta installazione
dell'elettrodomestico.
Livellamento della lavastoviglie
Dopo avere posizionato la lavastoviglie, regolare l'altezza dei
piedini (avvitandoli o svitandoli) per livellarla. In ogni caso, la
lavastoviglie non deve essere inclinata più di 2°. Un corretto
livellamento della lavastoviglie, contribuisce ad aumentarne le
prestazioni.
Allacciamento dell'acqua fredda
Attaccare il tubo flessibile per l'acqua fredda ad un connettore
filettato 3/4 (gas) e verificare che sia collegato correttamente (vedi
Fig.2).
Se le tubazioni dell'acqua sono nuove o non sono state utilizzare
per un lungo periodo di tempo, lasciare scorrere l'acqua per essere
certi che sia pulita e priva di impurità. Questa precauzione
consente di evitare il rischio di bloccare e danneggiare il tubo di
alimentazione della lavastoviglie.
Allacciamento dell'acqua calda
La lavastoviglie può essere collegata anche alla conduttura
domestica dell'acqua calda (sistema centralizzato, impianto di
riscaldamento), purché la temperatura non superi i 60°C.
In questo caso, la durata del ciclo di lavaggio diminuisce di circa
15 minuti e l'efficienza del lavaggio risulta leggermente ridotta.
Eseguire l'allacciamento all'acqua calda seguendo le stesse procedure descritte per il collegamento alle condutture dell'acqua
fredda.
fig.1
fig.2
Protezione anti-allagamento
La lavastoviglie è dotata di un sistema che blocca l'alimentazione
dell'acqua qualora venga riscontrato un problema al tubo di
alimentazione, oppure qualora si verifichino perdite all'interno
dell'apparecchio, per prevenire ulteriori danni all'appartamento.
Qualora, per qualsiasi ragione, la scatola contenente i componenti
elettrici risulti danneggiata, staccare immediatamente la spina
della lavastoviglie dalla presa. Per un corretto funzionamento
del dispositivo anti-allagamento, la scatola "A" con il tubo di
alimentazione deve essere attaccata al rubinetto come illustrato
nella Fig. 1. Non è accettabile nessun altro tipo di collegamento.
Il tubo di alimentazione dell'acqua non deve essere tagliato per
nessun motivo, dal momento che contiene componenti elettrici
sotto tensione. Qualora la lunghezza del tubo non sia adatta
all'allacciamento desiderato, il tubo deve essere sostituito con
un altro di lunghezza adeguata. Tale tubo può essere richiesto
presso i rivenditori e i centri di assistenza specializzati.
Allacciamento del tubo di scarico
Inserire il tubo di scarico in una tubazione di scarico con diametro
minimo di 4cm, oppure appoggiarlo al lavandino, evitando di
piegarlo o di schiacciarlo, utilizzando l'apposito supporto speciale
in plastica in dotazione con la lavastoviglie (vedi Fig.3).
L'estremità libera del tubo deve essere ad un'altezza compresa
tra 40 e 100 cm e non deve essere immersa nell'acqua.
fig.3
Attenzione:
l'apposito supporto in plastica deve essere fissato saldamente
alla parete per evitare che il tubo di scarico si muova e l'acqua
fuoriesca.
Collegamento elettrico
Dopo avere verificato che i valori di tensione e frequenza della
corrente domestica corrispondano a quelli della targhetta
nominale (posta sulla parte interna in acciaio inox dello sportello
della lavastoviglie) e che l'impianto elettrico possa supportare la
tensione massima riportata sulla targhetta, inserire la spina in
una presa elettrica correttamente messa a terra (la messa a terra
dell'apparecchio è un requisito di sicurezza imposto per legge).
Se la presa elettrica a cui deve essere collegato l'apparecchio
non è adatta alla spina, sostituire la spina invece di utilizzare
adattatori o dispositivi analoghi che potrebbero causare
surriscaldamenti e bruciature.
Attenzione:
La spina della lavastoviglie deve essere accessibile anche
quando l’apparecchio è installato come una parte incassata in
modo che la manutenzione possa essere fatta con sicurezza.
IT
IT
.40..39.
 Loading...