


Installation
DW12-AFM3
DW12-AFM3ME
DW12-AFM3S
Diagram
GB DE FR IT ES PT NL
0120503771
Safety Is Very Important
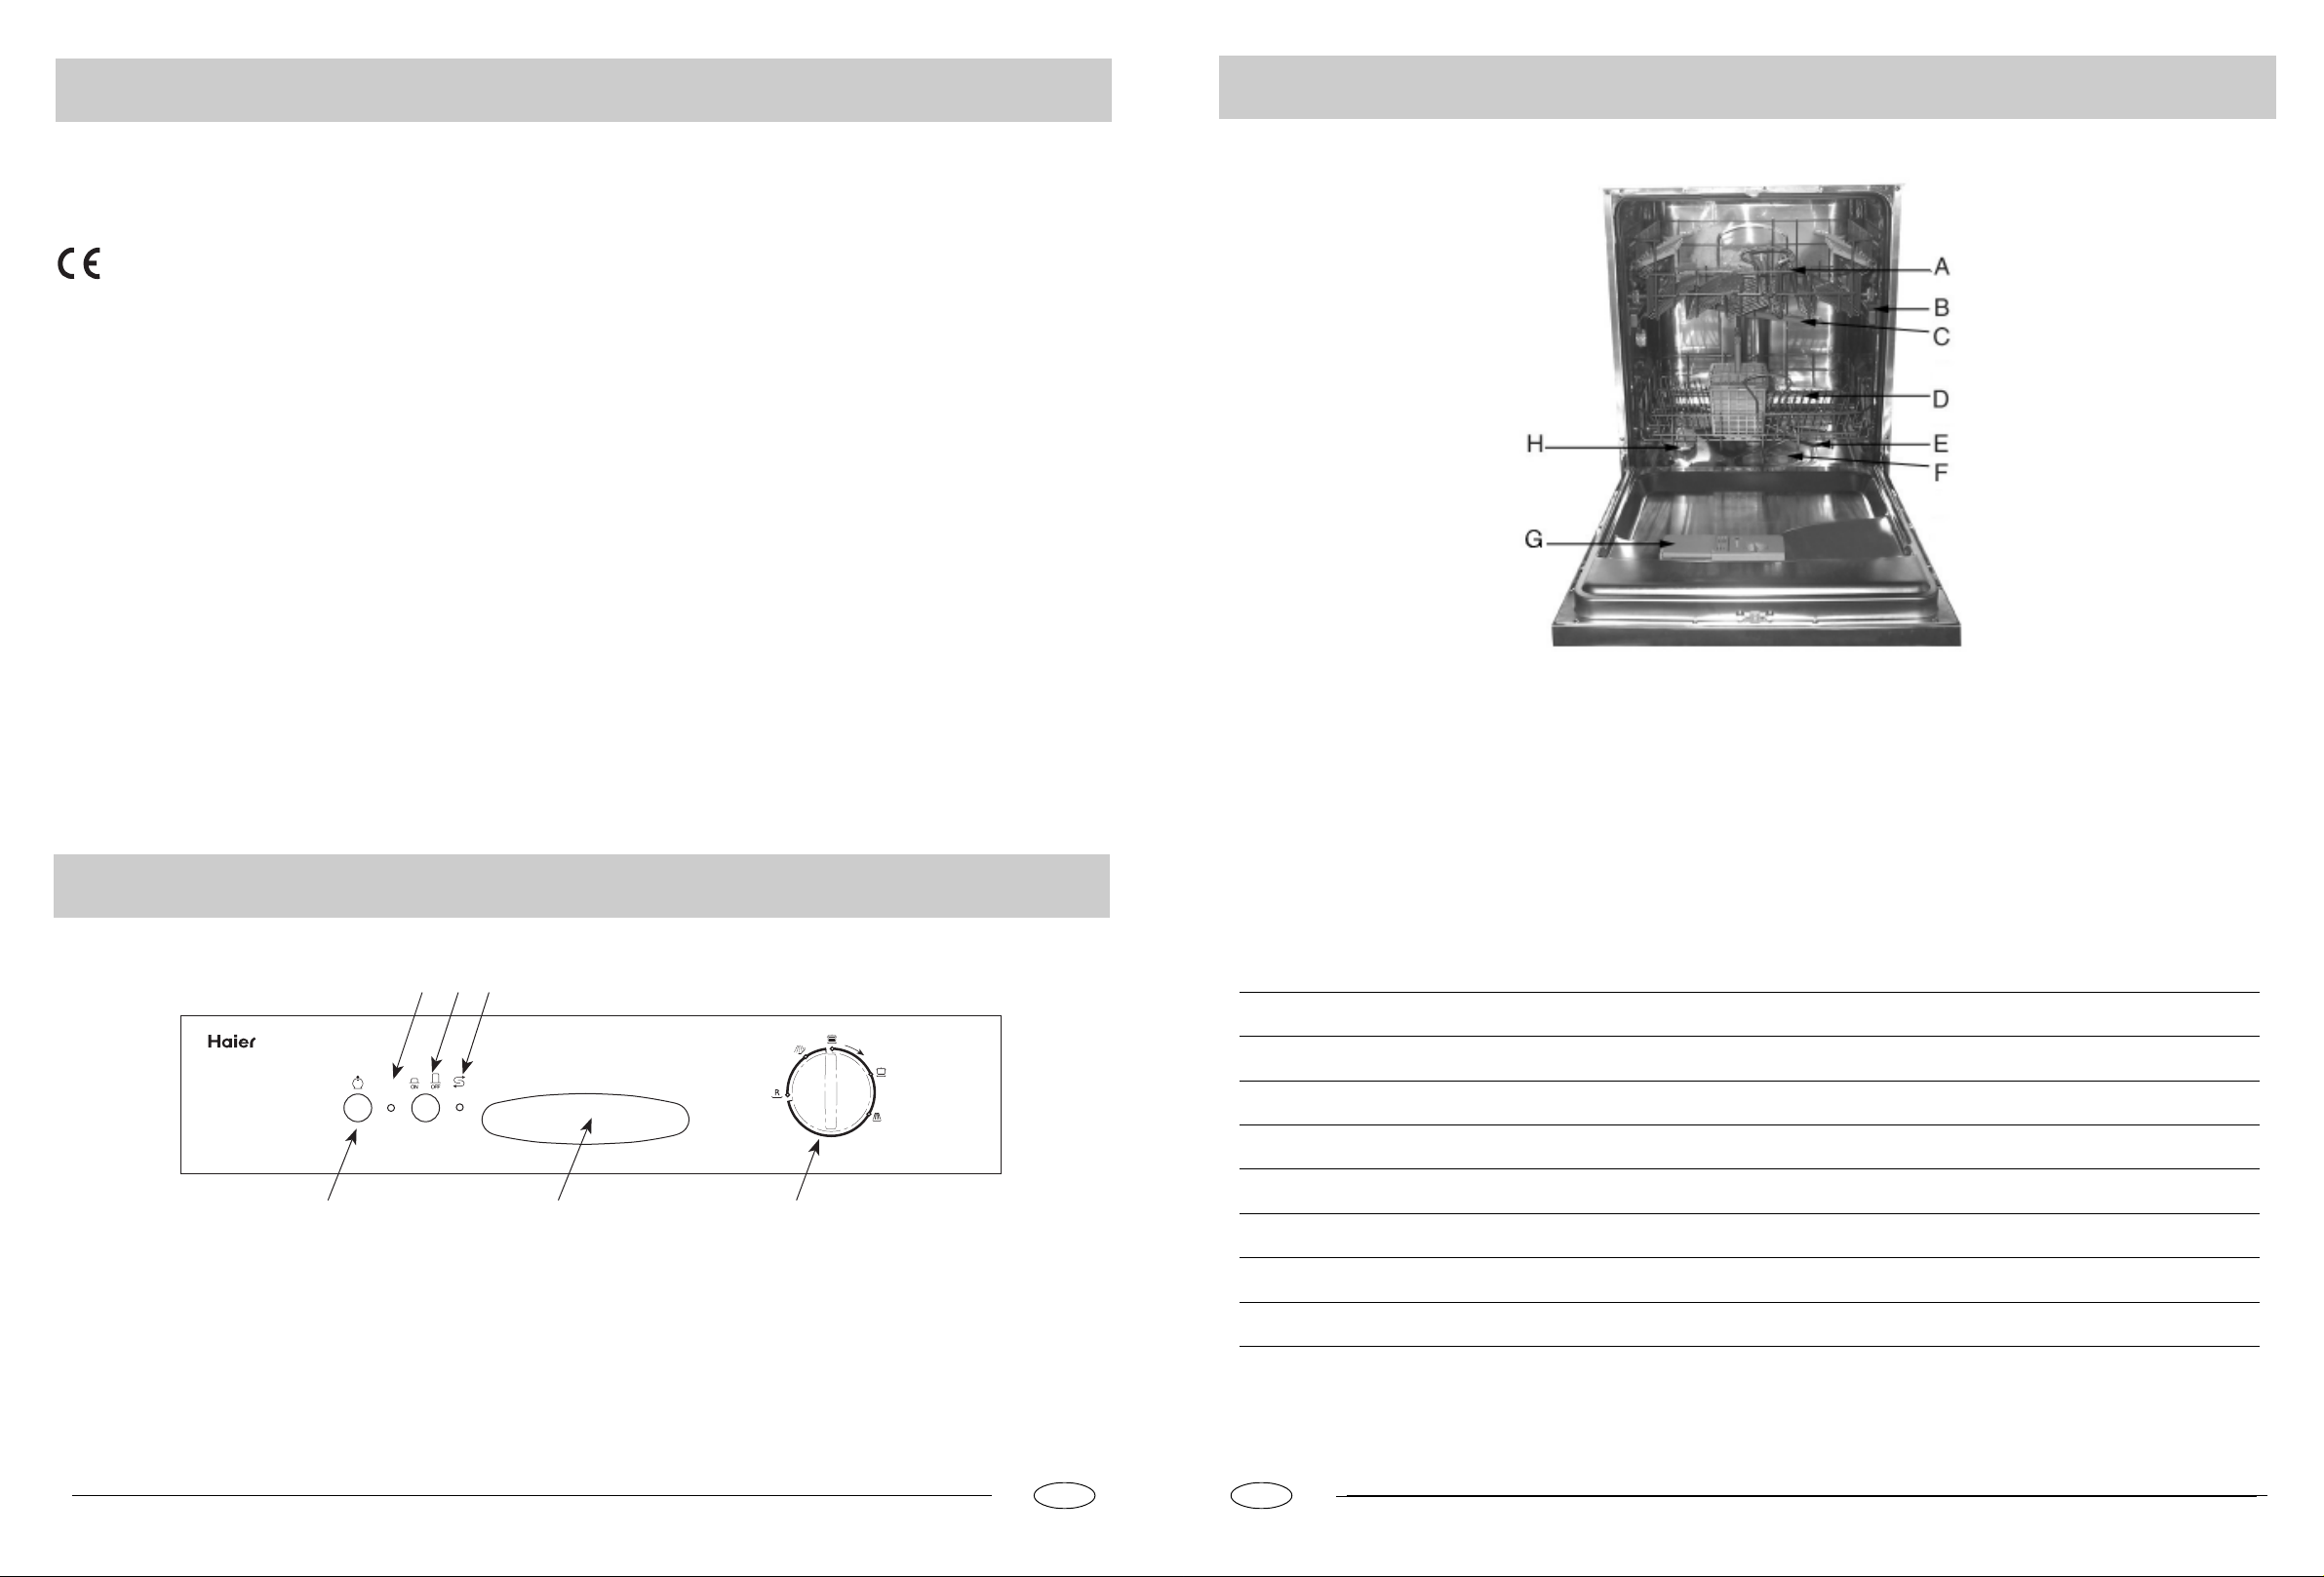
Close-up View (Interior)
NOTICE
Carefully read the instructions contained in this manual, as they
provide important information which is essential to safe and proper
installation, use and maintenance of the appliance.
This appliance complies with the following EEC
directives:
-73/23/EEC of 19 February 1973 (Low Voltage) and subsequent modifications;
- 89/336/EEC of 3 May 1989 (Electromagnetic Compatibility)
and subsequent modifications.
- Carefully dispose of the packing material.
- After removing the packing, check to make sure that the appli ance is not damaged. If in doubt, contact a qualified professional.
- The dishwasher must only be used by adults for the washing of
household dishes and cooking utensils.
- The appliance is not intended for use by young children or
inform persons without supervision.
- Young children should be supervised to ensure that they do
not play with the appliance.
- Keep detergents out of the reach of children, who must also
be kept away from the dishwasher when it is open.
- This appliance cannot be installed outdoors, not even if the
area in which it is installed is covered by a roof; it is also very
dangerous to leave it exposed to the rain and elements.
- Do not touch the heating element during or after a wash cycle.
- Do not lean or sit on the door when it is open as this could
over turn the dishwasher.
- If the appliance malfunctions, turn off water supply to the appli ance and disconnect the plug from the wall socket. Then, con sult the section entitled, "Troubleshooting." If you cannot solve
the problem, contact a service centre.
- Only specialised personnel are authorised to make repairs.
- Appliances which are no longer being used must be made
inoperable by cutting the power supply cord and removing
the door lock.
- If the supply cord is damaged, it must be replaced by the
manufacture, its service agent of similarly qualified persons in
order to avoid a hazard.
- After installation, the power plug must be accessible.
- Fundamental rules to follow when using the appliance:
* Never touch the dishwasher when barefoot or with wet hands
or feet;
* We discourage the use of extension cords and multiple
sockets;
* During installation, the power supply cord must not be exces sively or dangerously bent or flattened;
* If the appliance is not operating properly or maintenance must
be performed, disconnect the appliance from the power
supply.
To maintain the EFFICIENCY and SAFETY of this appliance,we
recommend:
- call only the Service Centers authorized by the manufacturer.
- always use original Spare Parts
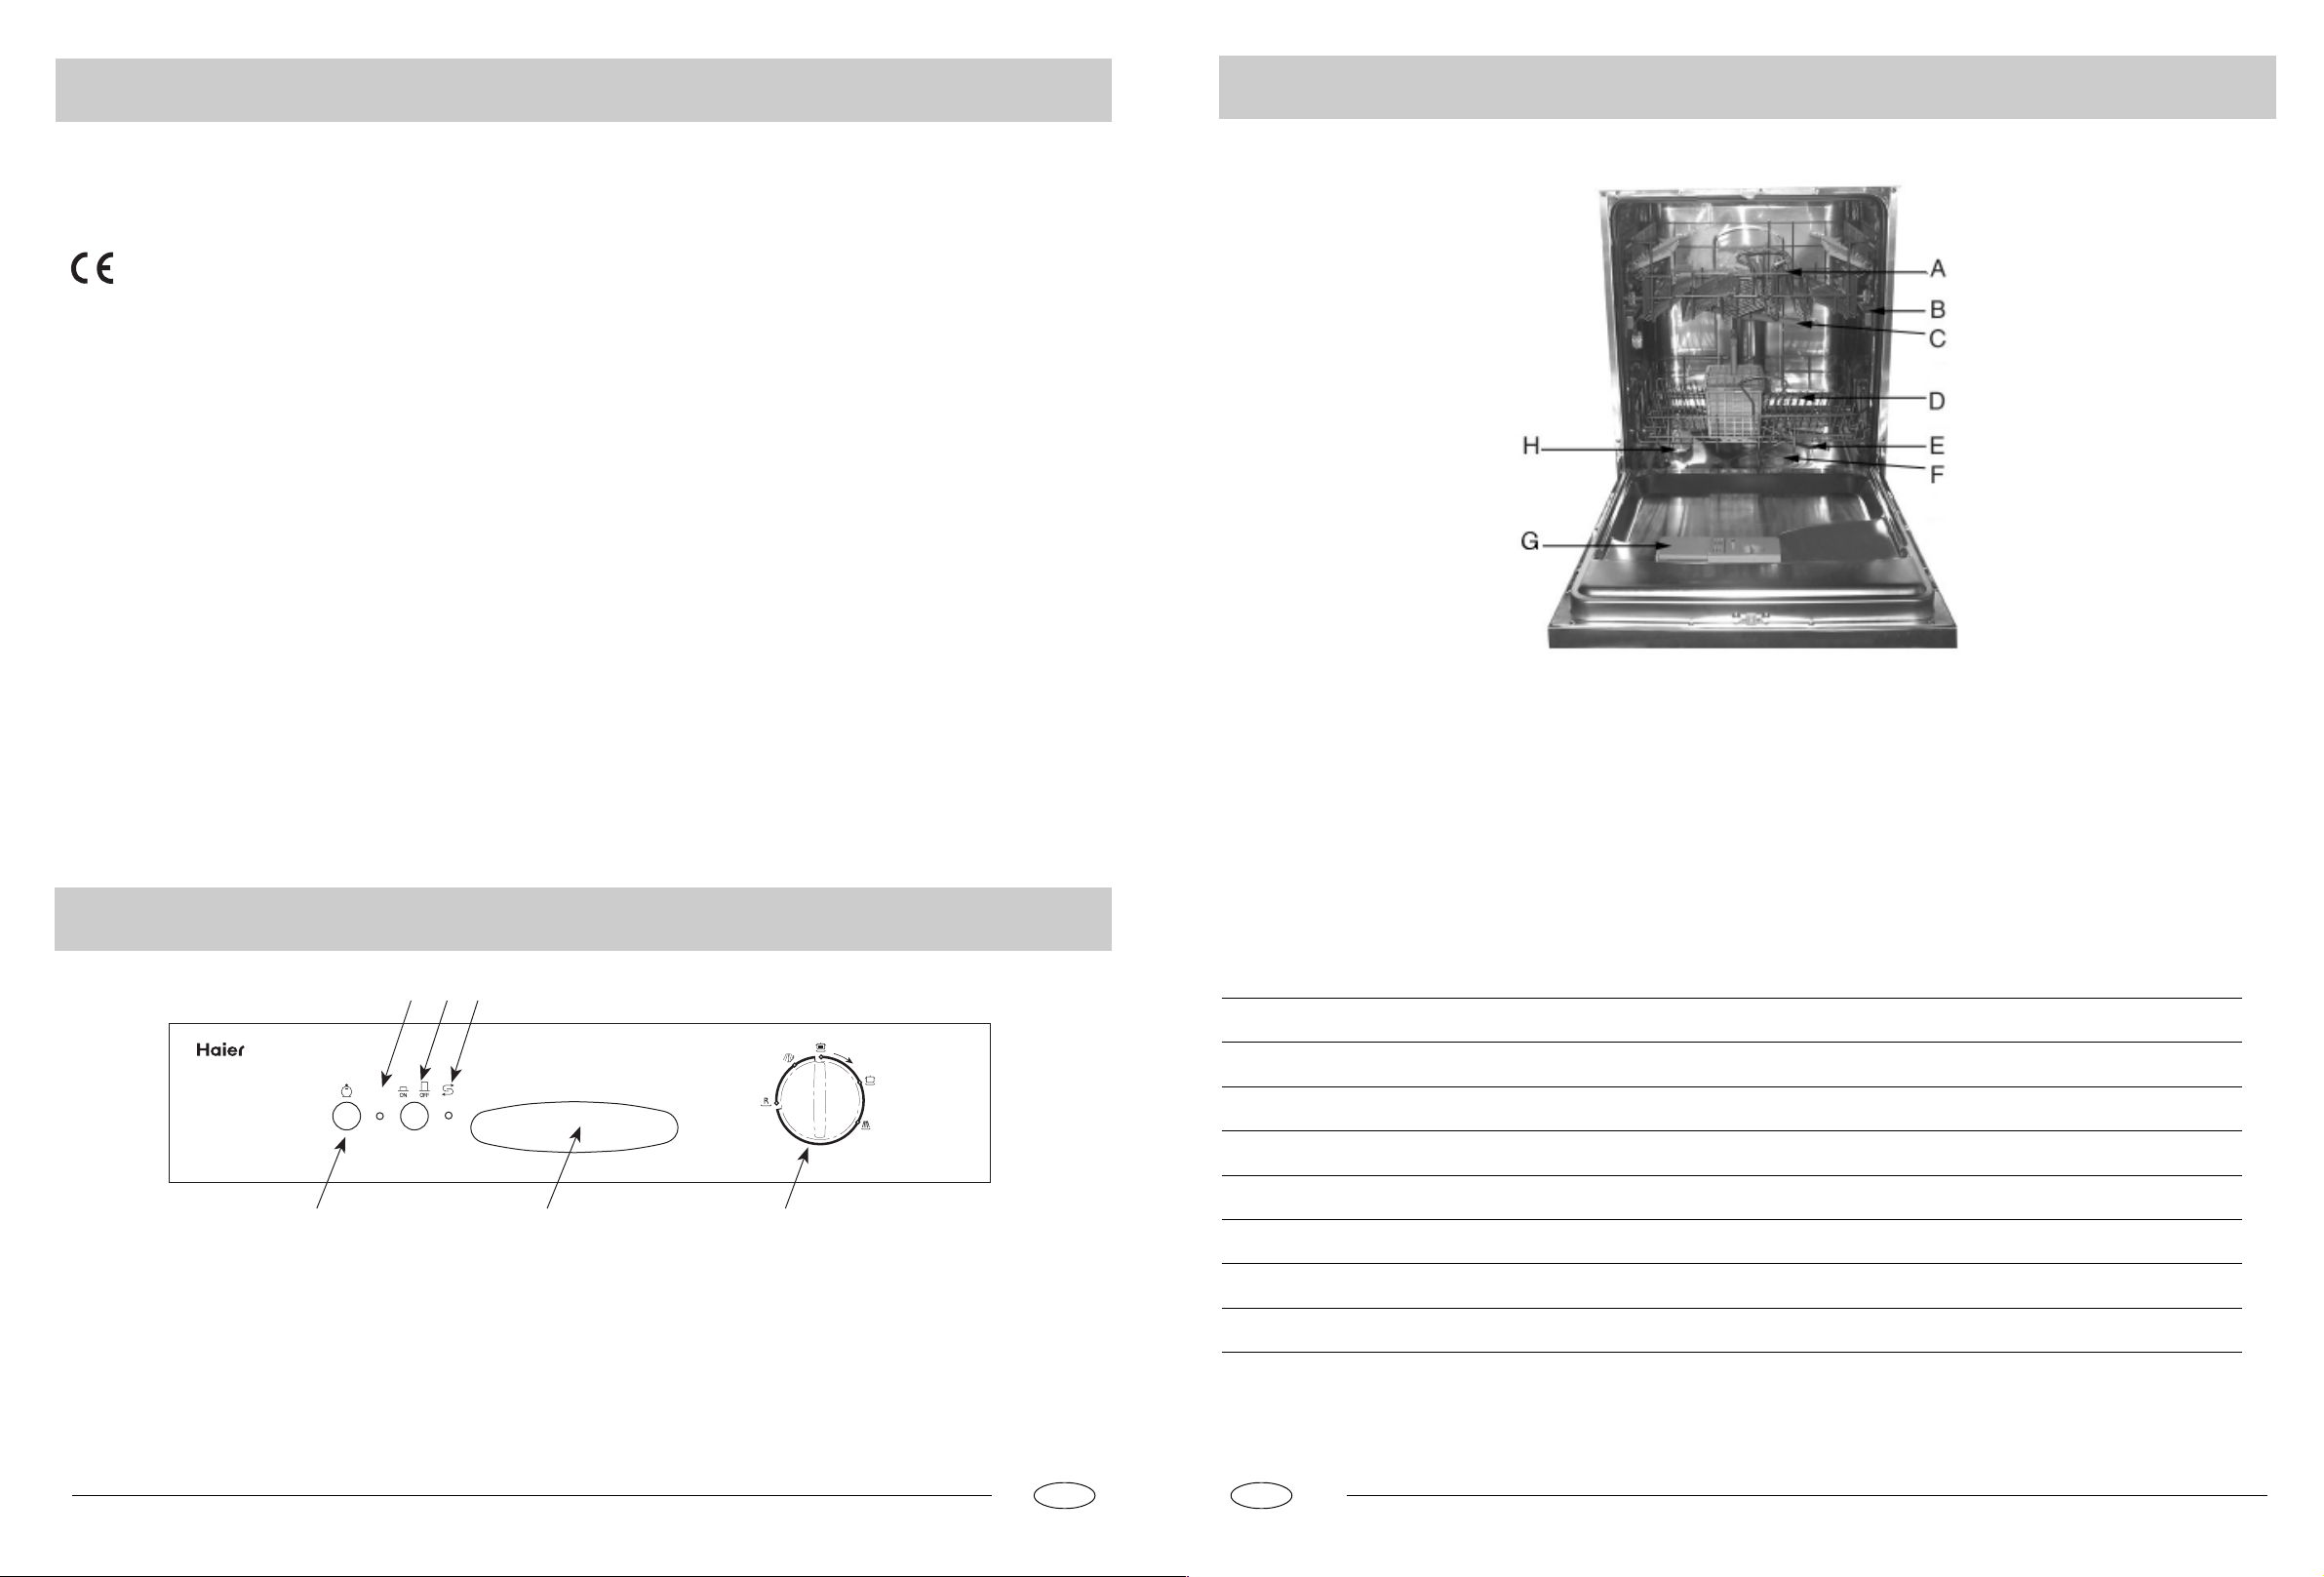
Upper Rack
A
Rack Height Adjustor
B
Top Sprayer Arm
C
Lower Rack
D
E
Bottom Sprayer Arm
F
Washing Filter
G
Detergent and Rinse Aid Dispenser
H
Salt Container Cap
Close-up View (Control Panel)
A B C
DE F
ON-OFF Light
A
ON-OFF Button
B
Low Salt Indicator Light
C
"Eco" Button
D
E
Handle For Opening Door
Knob For Selecting Cycle
F
Technical Characteristics
Width
Depth
Height
Capacity
Mains water pressure
Power voltage
Total absorber power
60 cm
60 cm
85 cm
12 standard place settings
0.03-0.6 MPa
220-240V~ 50Hz
2100W
GB
GB
.2..1.
Salt
Detergent and Rinse Aid
Salt
The hardness of the water varies from place to place. If hard
water is used in the dishwasher, deposits will form on the dishes
and utensils.
The appliance is equipped with a special softener that uses a salt
specifically designed to eliminate lime and minerals from the water.
Loading the Salt into the Softener
Always use salt intended for use with dishwashers.
The salt container is located beneath the lower rack and should
be filled as follows:
- Remove the lower rack and then unscrew and remove the cap
from the salt container;
- If you are filling the container for the first time, fill it with water;
- Place the end of the funnel (supplied) into the hole and intro duce about 2 kg of salt. It is normal for a small amount of water
to come out of the salt container.
- Carefully screw the cap back on.
Adjusting Salt Consumption
The dishwasher is designed to allow for adjusting the amount of
salt consumed based on the hardness of the water used. This is
intended to optimise and customise the level of salt consumption
so that it remains at a minimum.
To adjust salt consumption, proceed as follows:
Detergent
Detergent specifically intended for use with dishwashers must
be used. The dispenser must be refilled before the start of each
wash cycle following the instructions provided in the "Wash Cycle
Table." The detergent dispenser is located on the inside panel
the door.
Loading the detergent
To open the "A" cover on the dispenser, press the "B" button.
The detergent for the wash cycle should be poured into the "C"
compartment.
After the detergent has been placed in the dispenser, close the
cover and press down until it clicks in place.
B
Rinse Aid
This product makes dishes sparkle and helps them to dry without spotting. The dispenser is located on the inside panel of the
door and should be filled after every 80 wash cycle (or when the
rinse aid indicator light comes on for models with this feature).
Loading the Rinse Aid
To open the dispenser, turn the "C" cap in an anti-clockwise
direction and then pour in the rinse aid, making sure not to overfill.
The amount of rinse aid used for each cycle can be regulated by
turning the "F" dosage adjuster, located beneath the "C" cap,
with a screwdriver. There are 6 different settings; the normal
dosage setting is 3.
Important
Proper dosage of the rinse aid improves drying.
If drops of water remain on the dishes or spotting occurs, the
dosage adjuster should be turned to a higher setting.
If the dishes have white streaks, turn the dosage adjuster to a
lower setting.
The salt container must be filled when the "low salt" indicator
light appears on the control panel.
To prevent the formation of rust, load the salt just before beginning a wash cycle.
- Unscrew the cap from the salt container;
- There is a ring on the container with an arrow on it (see figure).
- If necessary, rotate the ring in the anticlockwise direction from
the "-" setting towards the "+" sign, based on the hardness of
the water being used.
It is recommended that adjustments be made in accordance with
the following scheme:
Water Hardness
Clarke
Level
degrees
014 MNT MNIT
1
2
PSTN QRUV QIRUIV
3
ºdH
mmol/l
NIUQIQNUQQNQPS
Selector
position
L
=?J?
jba
Salt
consumption
(Grams/cycle)
OM
QM
Autonomy
(cycles/2kg)
LM
SM
QM
A
C
NOTE: To facilitate closing the cover, remove any excess detergent on the edges of the dispenser.
C
F
4
[UV[TN [UIV
SM?H?
OR
GB
GB
.4..3.
Loading the Dishwasher
Turning on the Appliance
Before placing the dishes in the dishwasher, remove larger food
particles to prevent the filter from becoming clogged, which results
in reduced performance.
If the pots and pans have baked-on food that is extremely hard to
remove, we recommend that they are soaked before washed. This
will eliminate the need for extra wash cycles.
Pull out the rack to load the dishwasher.
How to use the lower rack
We recommend that you place the most difficult to clean items on
the bottom rack: pots, pans, lids, serving dishes and bowls, as
shown in the figure to the right.
It is preferable to place serving dishes and lids on the sides of the
racks in order to avoid blocking the rotation of the top spray arm.
- Pots, serving bowls, etc. must always be placed face down.
- Deep pots should be slanted to allow the water to flow out.
- The silverware basket can be doubled (see fig.A) so that only
one section may be used when the silverware load is light. This
also makes space for additional pots and pans and it can also be
placed in the upper rack.
- Silverware should be placed in the silverware basket with the
handles at the bottom; if the rack has side baskets, the spoons
should be located individually into the appropriate slots. Espe cially long utensils should be placed in the horizontal position at
the front of the upper rack.
How to use the upper rack
The upper rack is designed to hold more delicate and lighter
dishware, such as glasses, cups and saucers, plates, small bowls
and shallow pans (as long as they are not too dirty).
- Position the dishes and cookware so that they do not get moved
by the spray of water.
The upper rack can be adjusted for height by using the knobs located on both sides of the rack itself (see fig.B).
Adjust the upper basket to the higher level and you have more
space to accommodate those taller pans and trays in the bottom
basket.
Shelf
Lean tall glasses and those with long stems against the shelf-not
against other items to be washed.
Place glasses, cups and small bowls on the additional cup rack.
The additional cup rack can be swivelled in or out as required(see
fig.C).
Lower Rack Upper Rack
Load for 12 Standard Settings
3
fig.A
fig.C
4
2
fig.B
Starting a wash cycle
- Make sure that the plug for the appliance is inserted into the wall
socket.
- Make sure that the water supply is turned on to full pressure.
- Load the dishwasher (see the section entitled, "Loading the
Dishwasher").
- Pour in the detergent (see the section entitled, "Salt, Detergent
and Rinse Aid").
- Turn the knob located on the right of the control panel in
clockwise direction until the number or symbol for the cycle set ting is aligned with the reference mark (see the section entitled,
"Wash Cycle Table").
- Press the ON-OFF button, and the ON-OFF light will turn on. At
this point, the wash cycle will begin.
If you forget to load some of the dishes
The wash cycle can be interrupted by pressing the ON-OFF button.
You can then load additional dishes and turn the appliance back
on. The cycle will start where it left off.
At the end of the wash cycle
When the knob stops turning and is aligned with a STOP mark
(see figure), the cycle has finished. Turn off the appliance using
the ON-OFF button, turn off the water supply and open the door
of the dishwasher.
Wash Cycle Adjustment Buttons
"ECO" Button
This button (see "Close-up View - Control Panel", letter "D" ) is
used for normal dirty dishes, pots and pans. It is a standard daily
cycle.
Wait a few minutes before unloading the dishwasher to avoid
handling the dishes and utensils while they are still hot and more
susceptible to breakage. They will also dry better.
Cancelling or modifying a wash cycle setting
A cycle that is underway can only be modified if it has been running for a short time. Otherwise, the detergent may have already
been used, and the appliance may have already drained the wash
water. If this is the case, the detergent dispenser must be refilled
(see the paragraph entitled, "Loading the Detergent").
Press the ON-OFF button, and the ON light will turn off. Rotate
the knob in clockwise direction to the desired cycle setting (see
the section entitled: Starting a wash cycle?F. Then, turn the
dishwasher back on using the ON-OFF button.
GB
GB
.6..5.
Energy Saving Tips
Wash Cycle Table
- It is important to try and run the dishwasher when it is fully
loaded to save on energy. In order to prevent odors from form ing and food from caking onto the dishes, you can run the soak
cycle.
- Choose the right wash cycle: the choice of cycle depends on
the type of dishware, cookware and utensils being washed and
how dirty they are.
How to Keep Your Dishwasher in Shape
- Use the right amount of detergent: if you use too much detergent,
the result will not be cleaner dishes, but, rather, a greater nega tive impact on the environment.
-There is no advantage in rinsing dishes, cookware and utensils
before placing them in the dishwasher.
Cycle
Intensive
Wash
Intensive
Wash
(EN50242)
Normal
Wash
Normal
Wash
Eco
Button
Cycle Selection Information
Very dirty dishes, pots and
pans (not to be used with
delicate items).
Very dirty dishes, pots and
pans. (not to be used with
delicate items)
Normally dirty dishes, pots
and pans. Standard daily
cycle.
Normally dirty dishes, pots
and pans. Standard daily
cycle.
Description of
Cycle
Pre-wash with hot water.
Extended wash at 60K
Rinse with cold water.
Rinse with hot waterK
Drying.
Pre-wash with hot water.
Extended wash at 55K
Rinse with cold water.
Rinse with hot waterK
Drying.
Extended wash at 60K
Rinse with cold water.
Rinse with hot waterK
Drying.
Extended wash at 55K
Rinse with cold water.
Rinse with hot waterK
Drying.
Detergent
30g
25+5g
25g
25g
Rinse
Aid
ERF
After Every Wash
After every wash, turn off the water supply to the appliance and
leave the door slightly ajar so that moisture and odors are not
trapped inside.
Remove the Plug
Before cleaning or performing maintenance, always remove the
plug from the socket.
No Solvents or Abrasive Cleaning Products
To clean the exterior and rubber parts of the dishwasher, do not
use solvents or abrasive cleaning products. Use only a cloth
and warm soapy water.
To remove spots or stains from the surface of the interior, use a
cloth dampened with water and a little white vinegar, or a cleaning product made specifically for dishwasher.
Moving the Appliance
If the appliance must be moved, try to keep it in the vertical position.
If absolutely necessary, it can be positioned on its back.
Seals
One of the factors that cause odors to form in the dishwasher is
food that remains trapped in the seals. Periodic cleaning with a
sponge will prevent this from occurring.
When You Go on Holiday
When you go on holiday, it is recommended that you run a wash
cycle with the dishwasher empty and then remove the plug from
the socket, turn off the water supply and leave the door of the
appliance slightly ajar. This will help the seals last longer and prevent odors from forming within the appliance.
Rinse
Rinse
Rapid Wash
Soak
For dishes that need to be
rinsed and dried only.
For dishes that need to be
rinsed and dried only.
Economic,fast cycle to be used
to on not very dirty dishes right
after they are used. No drying
cycle.
Pre-wash of dishes, pots and
pans while waiting for the
load to be completed after
the subsequent meal.
Rinse with hot water at 60K
Rinse with cold water.
Drying.
Rinse with hot water at 55K
Rinse with cold water.
Drying.
Wash at 55
Cold Rinse
Short cold wash to prevent
food residue from drying on
the dishes K
.
KK
K
KK
15g
GB
GB
.8..7.
Cleaning and Special Maintenance
Installation
Filter Assembly
For best performance and results, the filter assembly must be
cleaned.
The filter efficiently removes food particles from the wash water,
allowing it to be recirculated during the cycle. For this reason, it
is a good idea to remove the larger food particles trapped in the
filter after each wash cycle by rinsing the "A" semi-circular filter
and cup under running water. To remove the filter assembly, pull
on the cup handle in an upward direction. The entire filter assembly (made up of the "A" semicircular filter and the "B" fine filter)
should be cleaned at least once a month. To clean the filter and
the fine filter, use a cleaning brush. Then, reassemble the filter
parts as shown in the figures below and inset the entire assembly in the dishwasher, positioning in its seat and pressing
downward.
The dishwasher must never be used without the filters. Improper
replacement of the filters may reduce performance of the appliance and damage dishes and utensils.
Troubleshooting
It may occur that the dishwasher does not function properly or at
all. Before calling for assistance, Iet us see what can be done
first: Have you forgotten to press one of the buttons or to perform an essential operation?
The Dishwasher Does Not Start
Have you checked whether:
- the plug is pushed into the socket correctly;
- the power is on in the house;
- the door is closed properly;
- the ON-OFF switch is on "ON";
- the water supply is turned on.
The Dishwasher Does Not Load Water
Have you checked whether:
- the water is turned on and the hose is connected properly;
- the water supply to the houses on and has sufficient pressure;
- the water supply hose is crimped or bent;
- the filter for the water supply hose is clogged.
The Dishes Are Not Clean
Have you checked whether:
- the water is turned on and the hose is connected properly;
- the water supply to the house is on and has sufficient pressure;
- the water supply hose is crimped or bent;
- the filter for the water supply hose is clogged.
Cleaning the Spray Arms
It may happen that food particles become encrusted on the
sprayer arms and block the hole (see "Close up view [interior]" ,
letters C-E ). Check the sprayer arms periodically and clean them
when needed.
A
B
Cleaning the Water Inlet Filter
Periodically clean the water inlet filter located on the outlet of the
water supply tap.
After turning off the water tap, unscrew the end of the water supply hose, remove the filter and clean it carefully under running
water. Then, return the filter to its place and tighten the water
supply hose back into position.
The Dishwasher Does Not Drain
Have you checked whether:
- the drain hose is crimped or bent.
Lime Deposits or a White Film Form on the Dishes
Have you checked whether:
- the lid to the salt container is closed properly;
- the rinse aid dosage is correct.
If, despite all these checks, the dishwasher still does not function
and/or the problem persists, contact the nearest authorised service agent and provide them with the following information:
- the nature of the problem;
- the model type number (Mod...) and the serial number (S/N...),
which are indicated on the plate located on the side of the inner
part of the door.
Never call on unauthorised technicians and refuse to allow
parts to be installed that are not original spare parts.
Positioning the Appliance
Position the appliance in the desired location. The back should
rest against the wall behind it, and the sides, along the adjacent
cabinets or wall. The dishwasher is equipped with water supply
and drain hoses that can be positioned to the right or the left to
ensure correct installation.
Levelling the Appliance
Once the appliance is positioned, adjust the feet (screwing them
in or out) to adjust the dishwasher, making it level. The appliance
should not be inclined more than 2. If the appliance is level, it
will help ensure proper performance.
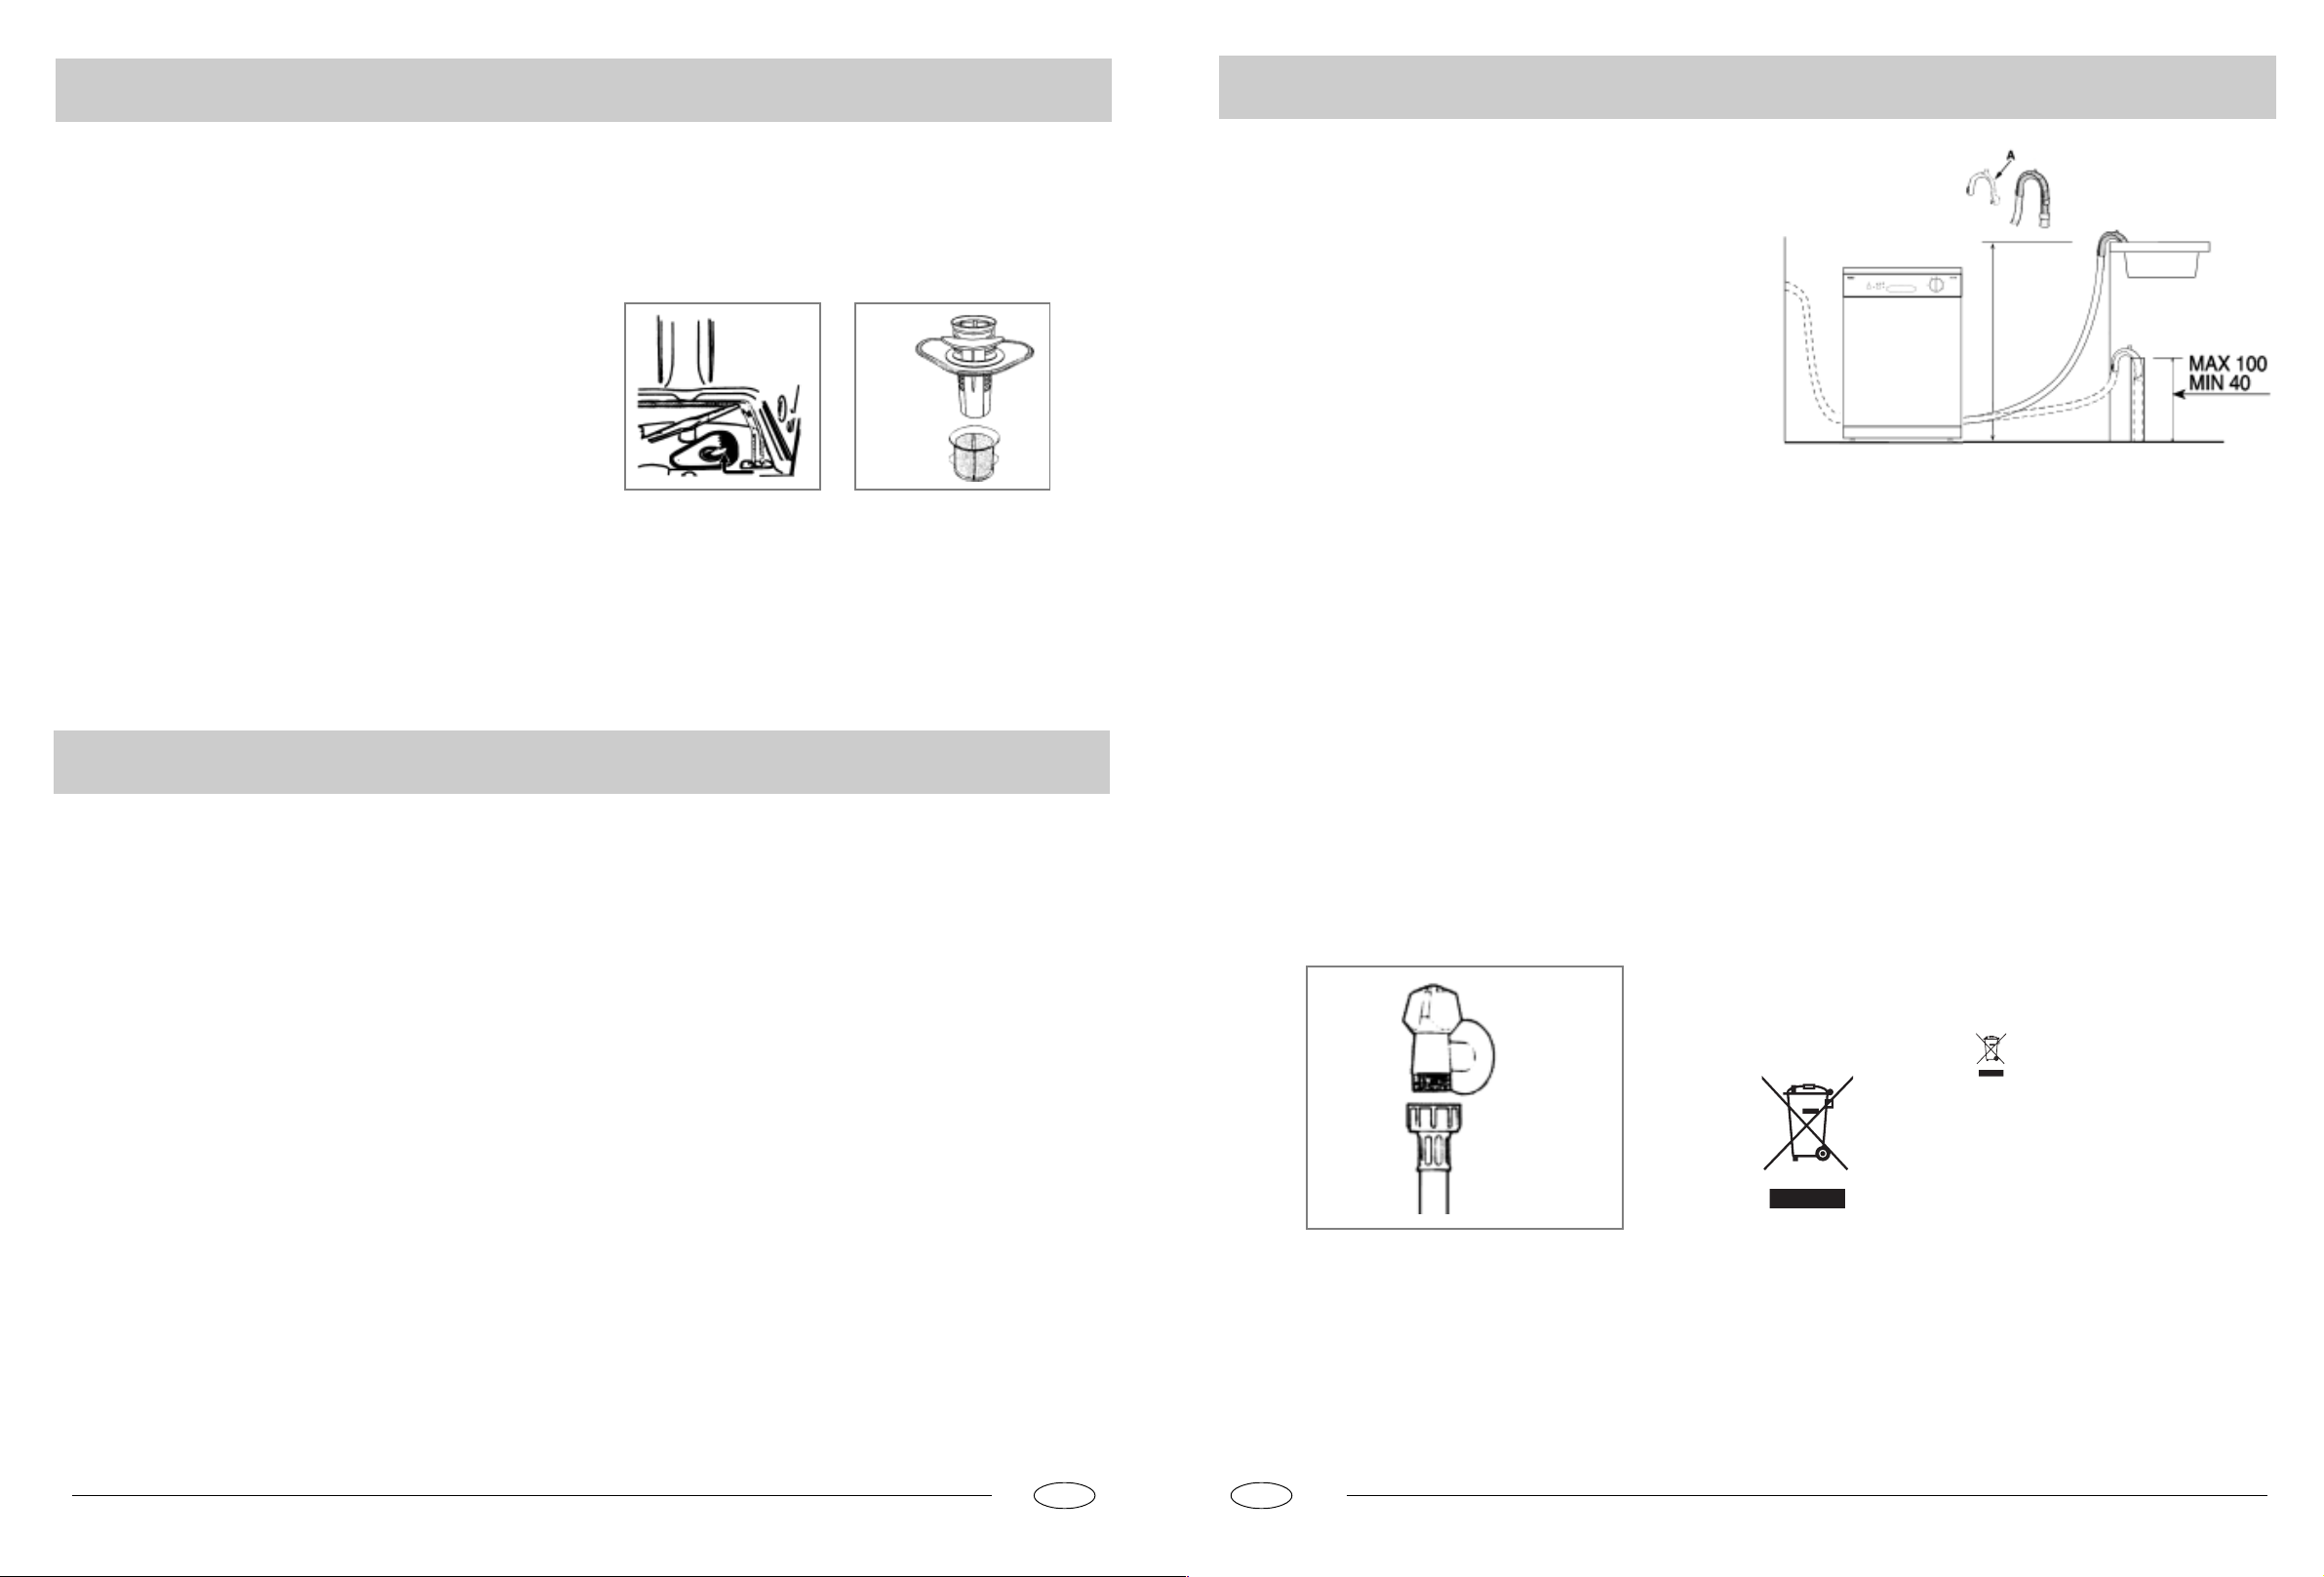
Cold Water Connection
Connect the cold water supply hose to a threaded 3/4 (gas) connector and make sure that it is fastened tightly in place (see fig.
1).
If the water pipes are new or have not been used for an extended
period of time, let the water run to make sure that the water is
clear and free of impurities. If this precaution is not taken, there is
a risk that the water inlet can get blocked and damage the
appliance.
Hot Water Connection
The water supply to the appliance can also be connected to the
house's hot water line (centralised system, heating system), as
long as it does not exceed a temperature of 60.
In this case, the wash cycle time will be shortened by about 15
minutes and the wash efficiency slightly reduced.
The connection must be made to the hot water line following the
same procedures as those for the connection to the cold water
line.
fig.1
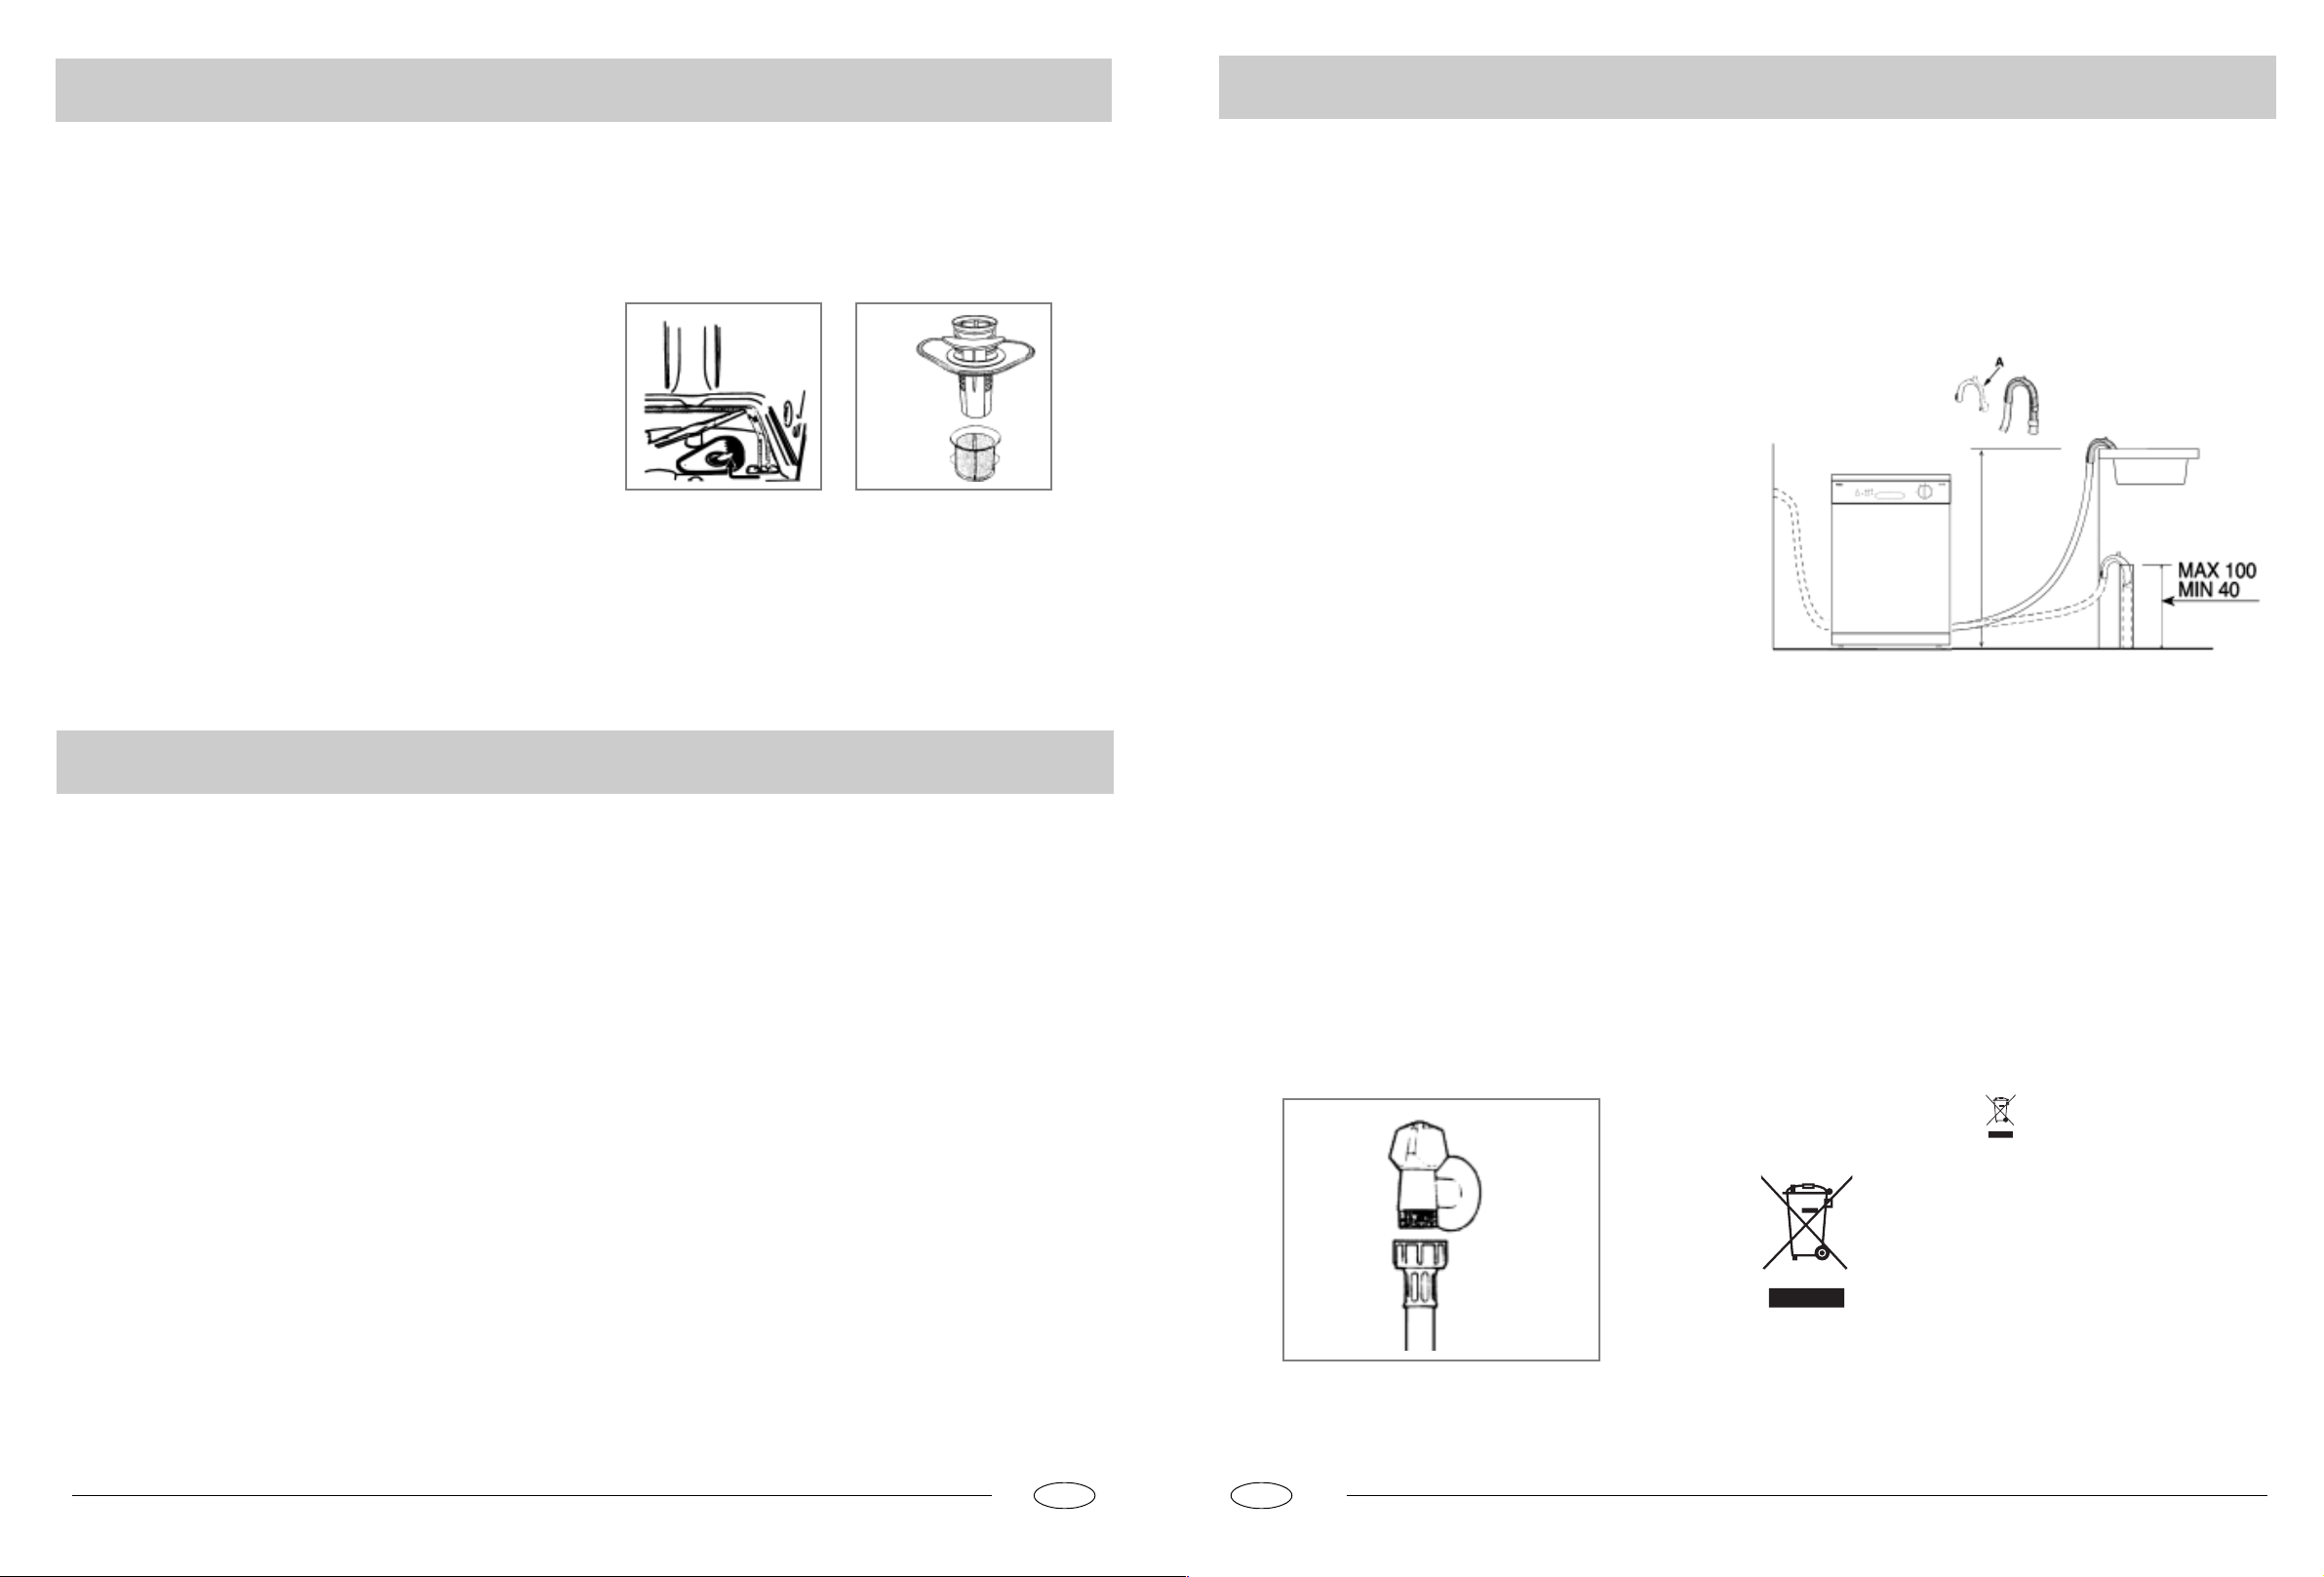
Drain Hose Connection
Insert the drain hose into a drain pipe with a minimum diameter
of 4cm, or let it run into the sink, making sure to avoid bending or
crimping it. Use the special plastic support that comes with the
appliance (see fig.2). The free end of the hose must be at a height
between 40 and 100 cm and must not be immersed in water.
fig.2
Attention:
The special plastic hose support must be solidly fastened to the
wall to prevent the drain hose from moving and allowing water to
spill outside the drain.
Electrical Connection
After making sure that the voltage and frequency values for the
current in the home correspond to those on the rating plate
(located on the stainless steel inner door of the appliance) and
that the electrical system is sized for the maximum voltage on
the rating plate, insert the plug into an electrical socket which is
earthed properly (the earthing of the appliance is a safety requirement mandated by law).
If the electrical socket to which the appliance must be connected
is not appropriate for the plug, replace the plug, rather than using
adaptors or the like as they could cause overheating and burns.
The symbol on the product or on its packaging indicates that this product may not be treated
as household waste. Instead it shall be handed over
to the applicable collection point for the recycling
of electrical and electronic equipment. By ensuring
this product is disposed of correctly, you will help
prevent potential negative consequences for the
environment and human health, which could otherwise be caused by inappropriate waste handling of
this product.
For more detailed information about recycling of this
product, please contact your local city office, your
household waste disposal service or the shop where
you purchased the product.
GB
GB
.10..9.
Gute Sicherheit ist eine Gewohnheitssache
HINWEIS
Lesen Sie bitte die Bedienungsanleitung aufmerksam durch, da
sie wichtige Angaben über die Installation, Anwendung und Wartung
des Gerätes enthält.
Dieses Gerät entspricht den folgenden EURichtlinien:
- 73/23/EWG vom 19. Februar 1973 (Niedrigspannung) sowie
späteren Änderungen;
- 89/336/EWG vom 3. Mai 1989 (EMV) sowie späteren
Änderungen.
- Bitte sorgen Sie für eine vorschriftsmäßige Entsorgung des
Verpackungsmaterials.
- Kontrollieren Sie das Gerät nach dem Auspacken auf
Transportschäden. Im Zweifelsfalle wenden Sie sich bitte an einen
qualifizierten Techniker.
- Der Geschirrspüler ist nur zum Spülen von Haushalts- und
Kochgeschirr gedacht und sollte nur von Erwachsenen benutzt
werden.
- Bitte beachten Sie die folgenden Vorschriften für den Einsatz
dieses Gerätes:
* Berühren Sie den Geschirrspüler niemals mit feuchten Händen
oder Füßen;
* Verwenden Sie niemals Verlängerungskabel oder Vielfachstecker;
* Das Stromversorgungskabel darf bei der Installation niemals zu
stark oder in gefährlicher Weise verbogen oder gequetscht
werden;
* Trennen Sie das Gerät stets von der Stromversorgung, wenn
es nicht vorschriftsmäßig funktioniert oder gewartet werden
muss.
- Halten Sie Kinder von Spülmitteln und dem offenen
Geschirrspüler fern.
- Das Gerät darf nicht im Freien aufgestellt werden, selbst wenn
es unter einem Dach steht; es ist außerdem gefährlich, den
Geschirrspüler Witterungseinflüssen einschließlich Regen
auszusetzen.
- Berühren Sie niemals die Heizelemente während oder nach
einem Spüldurchgang.
- Lehnen Sie oder setzen Sie sich niemals auf die offene Tür, da
der Geschirrspüler sonst umkippen könnte.
- Bei Störungen am Gerät müssen Sie immer sofort die
Wasserversorgung zum Gerät abstellen und den Stecker aus
der Steckdose ziehen. Ziehen Sie dann den Abschnitt "Stö rungssuche" zu Rate. Wenn Sie das Problem nicht selbst lösen
können, wenden Sie sich bitte an Ihre Kundendienststelle.
- Der Geschirrspüler darf nur von geschultem Fachpersonal
repariert werden.
- Ausgediente Geräte müssen vorher durch Durchtrennen des
Stromkabels und Entfernen des Türschlosses unbrauchbar
gemacht werden.
- Das Gerät muss derart aufgestellt werden, dass der Stecker
erreichbar bleibt.
- Bei Aufstellen auf einem Teppich darf dieser nicht die Türö
ffnung behindern.
- Wenn die Anschlussleitung dieses Gerätes beschädigt wird, muss
sie durch den Hersteller oder seinen Kundendienst oder eine
ähnlich qualifizierte Person ersetzt werden, um Gefährdungen
zu vermeiden.
Innenansicht
A
Oberkorb
B
Korbhöheneinstellung
C
Oberer Sprüharm
D
Unterkorb
Unterer Sprüharm
E
F
Spülfilter
G
Behälter für Reinigungsmittel und Klarspüler
H
Deckel, Regeneriersalz
Ansicht, Bedienfeld
DE F
Betriebsanzeige ON-OFF
A
Taste ON-OFF
B
Leuchte, zu wenig Regeneriersalz
C
A B C
"Eco" Knopf
D
Türgriff
E
Knopf für Programmwahl
F
DE
Technische Daten
Breite
Tiefe
Höhe
Fassungsvermögen
Leitungswasserdruck
Betriebsspannung
Gesamtstromaufnahme
DE
60 cm
60 cm
85 cm
12 Maßgedecke
0.03-0.6 MPa
220-240V~ 50Hz
2100W
.12..11.
S a l z
Spülmittel und Klarspüler
Regeneriersalz
Die Härte des Wassers ist von Ort zur Ort unterschiedlich. Wenn
hartes Wasser für Ihren Geschirrspüler verwendet wird, können
sich kalksteinartige Ablagerungen auf dem Geschirr bilden.
Das Gerät verwendet einen speziellen Wasserenthärter mit einem
Salz, das Kalkstein und Mineralien aus dem Wasser entfernt.
Salz in Wasserenthärter geben
Verwenden Sie stets Regeneriersalz für Geschirrspüler. Der
Salzbehälter befindet sich unter dem Unterkorb. Er muss wie folgt
gefüllt werden:
- Nehmen Sie den Unterkorb heraus und schrauben Sie den
Deckel vom Salzbehälter ab;
- Wenn Sie den Behälter das erste Mal füllen, füllen Sie ihn
mit Wasser;
- Setzen Sie das Ende des mitgelieferten Trichters in die Öffnung
und füllen Sie etwa 2 kg Salz ein. Es ist normal, dass eine
kleine Menge Wasser aus dem Salzbehälter fließt.
- Schrauben Sie den Deckel wieder auf.
Salzverbrauch einstellen
Der Regeneriersalzverbrauch kann an diesem Geschirrspüler auf
die Härte des verwendeten Wassers eingestellt werden. Dadurch
wird der Regeneriersalzverbrauch optimiert und genau auf den
Verbrauch abgestimmt, so dass er so niedrig wie möglich ist.
Zur Einstellung der Regeneriersalzmenge gehen Sie wie folgt vor:
- Schrauben Sie den Deckel vom Salzbehälter ab;
- Am Behälterhals befindet sich ein Ring mit einem Pfeil (siehe
obere Abbildung).
- Drehen Sie ggf. den Ring gegen den Uhrzeigersinn von der "-"
Markierung Richtung "+", je nach Wasserhärte.
Spülmittel
Verwenden Sie stets nur speziell für Geschirrspüler entwickelte
Spülmittel. Füllen Sie den Behälter vor Beginn eines jeden
Spülprogramms und folgen Sie dabei den in der
"Spülprogrammtabelle" gegebenen Anweisungen. Der
Spülmittelbehälter befindet sich an der Türinnenseite.
Spülmittel eingeben
Öffnen Sie den Deckel "A" des Behälters und drücken Sie auf
die Taste "B". Geben Sie das Spülmittel füπr das Spülprogramm
in den Behälter "C".
Nach dem Einfüllen des Spülmittels schließen Sie den Deckel
durch Drücken bis zum Einrasten.
B
Klarspüler
Der Klarspüler sorgt dafür, dass das gespülte Geschirr glänzt
und ohne Fleckenbildung trocknet. Der Behälter befindet sich
an der Türinnenseite und muss nach etwa 80 Spüldurchgängen
aufgefüllt werden.
Klarspüler einfüllen
Öffnen Sie den Behälter, indem Sie den Deckel "C" gegen den
Uhrzeigersinn drehen. Füllen Sie genügend Klarspüler nach,
ohne den Behälter zu überfüllen.
Die für jedes Programm erforderliche Klarspülermenge können
Sie regulieren, indem Sie den Dosierer "F" unter dem Deckel
"C" mit einem Schraubendreher verstellen. Es sind 6
verschiedene Einstellungen möglich; die Einstellung für eine
normale Dosierung ist 3.
Wichtig: Die richtige Dosierung des Klarspülers verbessert
die Trocknungsergebnisse.
Wenn Wassertropfen auf dem Geschirr verbleiben oder eine
Fleckenbildung auftritt, muss eine höhere Dosiereinstellung
gewählt werden. Wenn das Geschirr weiße Streifen zeigt,
müssen Sie eine niedrigere Dosiereinstellung wählen.
Der Salzbehälter muss gefüllt werden, wenn die Warnleuchte
zur Anzeige eines niedrigen Salzstandes (auf dem Bedienfeld)
aufleuchtet.
- Zur Verhütung von Rostbildung füllen Sie das Salz erst
kurz vor Beginn eines Spülprogramms ein.
Wir empfehlen, für diese Einstellungen die nachfolgende Tabelle
zu Rate zu ziehen.
Wasserhärte
Niveau
ºfH
010 MNT MNIT
1
2
ORRM QRUV QIRUIV
3
4
ºdH
mmol/l
NIUQIQNUQQNMOR
[UV[RM [UIV
Positionswähler
L
=?J?
jba
Salzverbrauch(gramm/
spülgang)
OM
QM
SM?H?
Reichweite
(Spulgange/2
kg)
LM
SM
QM
OR
A
C
Hinweis: Um den Deckel leichter schließen zu können,
entfernen Sie das überschüssige Spülmittel von
den Behälterkanten.
C
F
DE
DE
.14..13.

Geschirrspüπler beladen
Gerät einschalten
Bevor Sie die Maschine mit Geschirr laden, entfernen Sie zunächst
alle gröberen Speisereste, um eine Filterverstopfung zu vermeiden,
die die Spülleistung verschlechtern würde.
Festgebackene Speisereste an Töpfen und Pfannen sind sehr
schwer zu entfernen; wir empfehlen daher ein Einweichen solcher
Teile vor dem Spülen. Dadurch werden zusätzliche Spüldurchläufe
überflüssig. Ziehen Sie den Korb heraus, um das Laden des
Geschirrspülers zu erleichtern.
Benutzung des Unterkorbs
Wir empfehlen, dass Sie die am schwierigsten zu spülenden Teile
auf den Unterkorb laden: Töpfe, Pfannen, Deckel, Serviergeschirr
und Schösseln (siehe Abbildung rechts).
Es ist außerdem empfehlenswert, Serviergeschirr und Deckel an
den Seiten des Korbs aufzustellen, damit sie nicht die Drehung
des oberen Sprüharms behindern können.
- Töpfe, Servierschüsseln usw. mössen immer mit der Unterseite
nach oben geladen werden.
- Es können zwei Besteckkörbe eingesetzt werden (siehe Abb.A)
so dass bei wenig Besteck einer der Besteckkörbe
herausgenommen werden kann. Dies schafft Platz für zusä tzliche Töpfe und Pfannen im Unterkorb.
- Stellen Sie das Besteck mit den Griffen nach unten in den
Besteckkorb. Wenn dieser Korb mit Seitenkörben versehen ist,
werden die Löffel einzeln in die entsprechenden Fächer gegeben.
Besonders lange Teile mössen waagerecht vorne in den
Oberkorb gelegt werden.
Benutzung des Oberkorbs
Alle kleineren, leichteren oder empfindlicheren Teile wie Gläser,
Kaffee- und Teetassen, Untertassen, Teller, kleine Schüsseln und
niedrige Pfannen kommen in den Oberkorb, falls sie nicht zu
schmutzig sind.
Laden Sie das Geschirr immer so ein, dass es nicht durch das
sprühende Wasser verschoben wird.
Die Höhe des Oberkorbes ist an den seitlichen Knöpfen einstellbar
(siehe Abb.B).
Richten Sie den Oberkorb zur höheren Höhe ab, dass Sie mehren
Raum für Unterbringung höherer Teller und Tablette in dem
Unterkorb haben.
Regal
Lehnen Sie bitte die lange Gläser und die Gegenstände mit langem
Stiel an anderen Gegenständen zu waschen.
Das zusätzliche Tassegestell kann in oder aus drehen, wenn es
nötig ist (siehe Abb.C).
Unterkorb
Beladung mit 12 Maßgedecken
Abb.A
Abb.C
3
Oberkorb
2
4
Abb.B
Ein Spülprogramm starten
- Stellen Sie sicher, dass der Gerätestecker in der Wandsteckdose
steckt.
- Kontrollieren Sie, dass der Wasseranschluss voll geöffnet ist.
- Laden Sie den Geschirrspüler (siehe Abschnitt "Geschirrspüπler
beladen ").
- Füllen Sie das Spülmittel ein (siehe Abschnitt "Salz,
Spülmittel und Klarspüler").
- Drehen Sie den Knopf auf der rechten Seite des Bedienfeldes
nach rechts auf die gewünschte Programmnummer oder das
entsprechende Symbol (siehe Abschnitt "Spülprogrammtabelle").
- Drücken Sie die Taste ON-OFF; die entsprechende Anzeige
leuchtet auf. Das Spülprogramm wird gestartet.
Haben Sie ein Teil vergessen?
Das Spülprogramm kann durch erneutes Drücken auf die Taste
ON-OFF unterbrochen werden. Zusätzliches Geschirr kann
eingeladen und das Gerät neu gestartet werden. Das Programm
läuft wieder an dem Punkt an, an dem es unterbrochen wurde.
Ende des Spülprogramms
Sobald sich der Einstellknopf nicht mehr dreht und die Position
STOP erreicht hat (siehe Abbildung), ist das Programm beendet.
Schalten Sie das Gerät mit der Taste ON-OFF ab, schließen Sie
den Wasserhahn und Öffnen Sie die Tür des Geschirrspülers.
Abrichtungsknopfen vom Wäscheprogramm
"ECO" Knopf
Der Knopf ist (Siehe "Ansicht, Bedienfeld ", Buchstabe "D") für
normale schmutzige Schüsseln, Pötte und Pfannen verwendet.
Es ist ein standardes tägliches Programm.
Warten Sie ein paar Minuten, bevor Sie das Geschirr ausladen,
da es zu Beginn noch sehr heiß ist. In diesem Zustand kann das
Geschirr wesentlich leichter zerbrechen. Außerdem trocknet das
Geschirr so besser.
Unterbrechung oder Änderung eines Spülprogramms
Voraussetzung: Ein bereits gestartetes Spülprogramm kann nur
geändert werden, wenn es erst kurze Zeit in Betrieb ist.
Andernfalls kann das Spülmittel bereits aufgebraucht sein bzw.
der Geschirrspüler das Spülwasser schon abgelassen haben. In
einem solchen Fall muss der Spülmittelbehälter neu aufgefüllt
werden (siehe Abschnitt "Spülmittel eingeben").
Drücken Sie die Taste ON-OFF; die Anzeige ON leuchtet auf.
Drehen Sie den Knopf im Uhrzeigersinn bis zum gewünschten
Spülprogramm (siehe Abschnitt "Ein Spülprogramm starten").
Schalten Sie das Gerät mit der Taste ON-OFF wieder an.
DE
DE
.16..15.
Energiespartipps
Spülprogrammtabelle
- Am besten lassen Sie den Geschirrspüler laufen, wenn er voll
beladen ist, um Energie zu sparen. Um eine Geruchbildung und
ein Festbacken von Speiseresten zu vermeiden, können Sie das
Kaltspülprogramm verwenden.
- Wählen Sie das richtige Spülprogramm. Die Wahl hängt von
der Art des zu spülenden Geschirrs usw. und auch vom Grad
der Verschmutzung ab.
So bleibt Ihr Geschirrspüler in Form
- Verwenden Sie immer die richtige Spülmittelmenge. Wenn Sie
zuviel Spülmittel verwenden, wird das Geschirr nicht sauberer,
Sie belasten nur die Umwelt stärker.
- Es bringt keinen Vorteil, das Geschirr, Töpfe, Besteck usw. vor
dem Laden in den Geschirrspüler vorzuspülen.
Programm
Starkspülprogramm
Starkspülprogramm
(EN50242)
Normal
spülen
Normal spülen
Eco
Knopf
Informationen zur
Programmwahl
Stark verschmutztes Geschirr,
Töpfe und Pfannen (nicht
zusammen mit empfindlichem
Geschirr spülen).
Stark verschmutztes Geschirr, Töpfe
und Pfannen (nicht zusammen mit
empfindlichem Geschirr spülen).
Geschirr, Töpfe und Pfannen normal verschmutzt. Tägliches Standard-Spülprogramm.
Geschirr, Töpfe und Pfannen normal verschmutzt. Tägliches Standard-Spülprogramm.
Programmbeschreibung
Vorspülgang mit warmen wasser
Vorspülgang Spülgang bei 60.
Nachspülen mit kaltem Wasser.
Nachspülen mit heißem Wasser.
Trocknen.
Vorspülgang mit warmen wasser
Vorspülgang Spülgang bei 55.
Nachspülen mit kaltem Wasser.
Nachspülen mit heißem Wasser.
Trocknen.
Vorspülgang Spülgang bei 60.
Nachspülen mit kaltem Wasser.
Nachspülen mit heißem Wasser.
Trocknen.
Vorspülgang Spülgang bei 55.
Nachspülen mit kaltem Wasser.
Nachspülen mit heißem Wasser.
Trocknen.
Geschirrspülmittel
30g
25+5g
25g
25g
Klarspüler
ERF
Nach jedem Spüldurchlauf
Drehen Sie den Wasserhahn nach jedem Spüldurchlauf zu und
lassen Sie die Tür leicht geöffnet, damit Feuchtigkeit und
Gerüche aus dem Geschirrspüler entweichen können.
Ziehen Sie den Stecker heraus
Vor dem Reinigen oder der Durchführung von Wartungsarbeiten
muss der Stecker immer aus der Steckdose gezogen werden.
Vermeiden Sie alle unnötigen Risiken.
Verwenden Sie keine Lösungs- oder Scheuermittel
Verwenden Sie zum Reinigen der Außen- und Gummiteile des
Geschirrspülers keine Lösungs- oder Scheuermittel. Verwenden
Sie stets nur ein Tuch und warme Seifenlauge.
Um Flecken von der Oberfläche im Innenraum zu entfernen,
verwenden Sie am besten ein mit Wasser und ein wenig Essig
befeuchtetes Tuch oder ein Spezialreinigungsmittel für
Geschirrspüler.
Umstellen des Geschirrspülers
Versuchen Sie, den Geschirrspüler aufrecht zu halten, wenn Sie
ihn umstellen wollen. Wenn dies absolut unumgänglich ist, kann
er auf die Rückseite gelegt werden.
Dichtungen
Eine der Ursachen für eine Geruchbildung im Geschirrspüler sind
in den Dichtungen zurückgebliebene Speisereste. Ein
regelmäßiges Reinigen mit einem Schwamm kann als Vorbeugung
dienen.
Bei längerer Abwesenheit
Wenn Sie länger abwesend sind, wird empfohlen, vorher ein
Spüprogramm mit leerer Maschine durchzuführen; ziehen Sie dann
den Stecker aus der Steckdose, drehen Sie den Wasserhahn zu
und lassen Sie die Tür des Geschirrspülers leicht geöffnet. Die
Dichtungen halten so länger; außerdem wird eine Geruchbildung
im Geschirrspüler vermieden.
Spülen
Spülen
Schnellspül
programm
Einweichen
Für Geschirr, das nur klargespült
und getrocknet werden soll.
Für Geschirr, das nur klargespült
und getrocknet werden soll.
Sparprogramm für nicht stark
verschmutztes Geschirr sofort
nach dem Gebrauch. Kein
Trockenprogram.
Vorspülen von Geschirr, Töpfen
und Pfannen, während man
darauf wartet, dass die Maschine
nach der nächsten Mahlzeit
vollgeladen wird.
Vorspülgang Spülgang bei 60
Nachspülen mit heißem Wasser.
Trocknen.
Vorspülgang Spülgang bei 55.
Nachspülen mit heißem Wasser.
Trocknen.
Kurzes Spülen mit 55 °C.
Klarspülen.
KurzsKalt-Abspülen,das
Trocknen von Speiseresten
zu vermeiden .
.
15g
DE
DE
.18..17.
Reinigung und Wartung
Installation
Filtergruppe
Zur Gewährleistung der optimalen Leistung und Ergebnisse muss
die Filtergruppe saubergehalten werden.
Die Filtergruppe sorgt für ein wirksames Ausfiltern von
Speiseresten aus dem Spülwasser, das so während des
Spülprogramms umlaufen kann. Aus diesem Grunde sollten Sie
gr??ere Speisereste, die sich am Filter festsetzen, nach jedem
Spüldurchlauf entfernen, indem Sie das halbrunde Filterelement
und den Behälter (A) unter fließendem Wasser ausspülen. Zum
Ausbau der Filtergruppe ziehen Sie am Behältergriff nach oben.
Die gesamte Filtergruppe (bestehend aus dem halbrunden Filter
(A) und dem Feinfilter (B)) muss mindestens einmal pro Monat
gereinigt werden. Verwenden Sie zum Reinigen des Filters
einschließlich des Feinfilters eine Zahnbürste. Setzen Sie dann
die Filterteile gemäß nachstehender Abbildung wieder zusammen
und bauen Sie die ganze Baugruppe wieder in den Geschirrspüler
ein. Setzen Sie die Filtergruppe in der Maschine ein und drücken
Sie sie nach unten.
Der Geschirrspüler darf niemals ohne die Filter betrieben werden.
Ein unsachgemäßer Austausch der Filter kann die
Leistungsfähigkeit des Gerätes beeinträchtigen und das Geschirr
beschädigen.
Fehlerbehebung
Es kann vorkommen, dass der Geschirrspüler nicht richtig oder
überhaupt nicht funktioniert. Bevor Sie einen Mechaniker oder
den Kundendienst anrufen, überprüfen Sie selbst die Maschine.
Vielleicht haben Sie vergessen, einen der Knöpfe zu drücken
oder einen wichtigen Schritt durchzuführen?
Der Geschirrspüler lässt sich nicht starten
überprüfen Sie, ob:
- der Stecker richtig in der Steckdose sitzt;
- der Rest des Haushalts Strom hat;
- die Tür richtig geschlossen ist;
- der Schalter ON-OFF auf "ON" steht;
- die Wasserversorgung aufgedreht ist.
Der Geschirrspüler füllt sich nicht mit Wasser
überprüfen Sie, ob:
- die Wasserversorgung aufgedreht und der Schlauch richtig
angeschlossen ist;
- die Wasserversorgung im Haus in Ordnung ist und genügend
Druck hat;
- der Wasserversorgungsschlauch eingeklemmt oder verbogen
ist;
- der Filter des Wasserversorgungsschlauchs verstopft ist.
Das Geschirr wird nicht sauber
überprüfen Sie, ob:
- die Wasserversorgung aufgedreht und der Schlauch richtig
angeschlossen ist;
Reinigung der Sprüharme
Es kann vorkommen, dass sich Speisereste an den Sprüharmen
verkrusten und die Düsen zusetzen (siehe Abbildung Innenraum,
Buchstaben C-E). Prüfen Sie die Sprüharme regelmäßig und
reinigen Sie sie, wenn erforderlich.
A
B
Reinigung des Wassereinlassfilters
Reinigen Sie periodisch den Wassereinlassfilter , der auf dem
Auslass des Wasserhahns legt. Nach der Schließung des
Wasserhahns drehen Sie das Ende des Wasserschlauchs heraus.
Entfernen Sie den Filter und reinigen Sie ihn vorsichtig mit
auflaufendem Wasser. Dann setzen Sie den Filter und den
Wasserschlauch zurück.
- die Wasserversorgung im Haus in Ordnung ist und genügend
ruck hat;
- der Wasserversorgungsschlauch eingeklemmt oder verbogen
ist;
- der Filter des Wasserversorgungsschlauchs verstopft ist.
Das Spülwasser läuft nicht ab
überprüfen Sie, ob:
- der Ablassschlauch eingeklemmt oder verbogen ist.
Kalksteinflecken oder weißer Film auf dem Geschirr
überprüfen Sie, ob:
- der Deckel des Salzbehälters richtig geschlossen ist;
- die richtige Klarspülermenge verwendet wird.
Wenn die Störung nach den vorstehend beschriebenen Kontrollen
weiterhin bestehen bleibt oder erneut auftritt, rufen Sie bitte Ihre
nächste Kundendienststelle an. Halten Sie folgende Informationen
bereit:
- Art des Problems;
- Modelltypnummer (Mod...) und Seriennummer (S/N...), die auf
dem Schild an der Seite des Innenteils der Tür zu finden sind.
Lassen Sie niemals Arbeiten von nicht autorisierten
Arbeitskräften durchführen und stellen Sie sicher, dass nur
Originalersatzteile verwendet werden.
DE
Aufstellen des Geschirrspülers
Stellen Sie den Geschirrspüler an der gewünschten Stelle auf.
Die Rückseite sollte an einer Wand stehen; die Seiten an
danebenstehenden Schränken. Der Geschirrspüler ist mit
Wasserversorgungs- und Ablassschläuchen ausgestattet, die zur
Erleichterung der Installation wahlweise rechts oder links
angebracht werden können.
Nivellieren der Maschine
Wenn der Geschirrspüler an der gewünschten Stelle aufgestellt
ist, stellen Sie die Füße ein (nach unten oder oben), bis die
Maschine gerade steht. Auf keinen Fall darf der Geschirrspüler
um mehr als 2 Grad geneigt sein. Eine gute Nivellierung der
Maschine wirkt sich positiv auf ihre Leistungen aus.
Kaltwasseranschluss
Schließen Sie den Kaltwasserschlauch an einem 3/4 (Gas-)Anschluss an und stellen Sie sicher, dass er gut gesichert ist
(siehe Abb. 1).
Wenn die Wasserleitungen neu sind oder lange Zeit nicht benutzt
wurden, lassen Sie das Wasser eine Zeitlang laufen, bis es klar
ist und keine Unreinheiten aufweist. Ohne diese
Vorsichtsmaßnahme besteht die Gefahr, dass der Wassereinlass
blockiert und das Gerät beschädigt wird.
Heißwasseranschluss
Die Wasserversorgung zum Geschirrspüler kann auch am
Heißwassersystem des Haushalts angeschlossen werden
(Zentralheizung), solange die Temperatur 60°C nicht
überschreitet.
In einem solchen Fall wird die Spülprogrammzeit um etwa 15
Minuten verkürzt und die Spülleistung leicht herabgesetzt.
Der Anschluss an die Heißwasserleitung muss nach dem gleichen
Verfahren wie für die Kaltwasserleitung durchgeführt werden.
Abb.1
DE
Anschluss des Ablassschlauchs
Schieben Sie den Ablassschlauch in ein Ablassrohr mit mindestens
4 cm Durchmesser oder lassen Sie das Wasser in das Spülbecken
ablaufen. Stellen Sie sicher, dass der Schlauch nicht verbogen
oder eingeklemmt ist. Verwenden Sie die spezielle
Kunststoffhalterung, die mit dem Geschirrspüler geliefert wird
(siehe Abb.2). Das freie Ende des Schlauchs muss mindestens
40 bis 100 cm hoch liegen und darf nicht in Wasser eingetaucht
sein.
Abb.2
Achtung:
Die spezielle Kunststoffhalterung für den Schlauch muss
sicher an der Wand befestigt werden, damit sich der
Ablassschlauch nicht bewegen und das Wasser ohne
Verspritzen ablaufen kann.
Elektrischer Anschluss
Stellen Sie zunächst sicher, dass die Spannungs- und
Frequenzwerte in Ihrem Haushalt mit denen auf dem Typenschild
(auf der Stahlinnentür des Gerätes) übereinstimmen und dass die
Stromversorgung der Höchstspannung auf dem Typenschild
entspricht. Stecken Sie dann den Stecker in eine vorschriftsmäßig
geerdete Steckdose. (Die Erdung des Gerätes ist gesetzlich
vorgeschrieben).
Wenn sich die Steckdose, an der das Gerät angeschlossen werden
soll, nicht für den Stecker eignet, tauschen Sie am besten den
Stecker aus, anstatt Zwischenstecker zu verwenden, die überhitzen
und Brandstellen verursachen können.
Das Symbol auf dem Produkt oder seiner
Verpackung weist darauf hin, dass dieses Produkt
nicht als normaler Haushaltsabfall zu behandeln
ist, sondern an einem Sammelpunkt für das Recycling von elektrischen und elektronischen Geräten
abgegeben werden muss. Durch Ihren Beitrag zum
korrekten Entsorgen dieses Produkts schützen Sie
die Umwelt und die Gesundheit Ihrer Mitmenschen.
Umwelt und Gesundheit werden durch falsches
Entsorgen gefährdet.
Weitere Informationen über das Recycling dieses
Produkts erhalten Sie von Ihrem Rathaus, Ihrer
Müllabfuhr oder dem Geschäft, in dem Sie das
.20..19.
Produkt gekauft haben.
 Loading...