

Page 1

Catalog Number 8544
Sigma 900 Composite Sampler
INSTRUMENT MANUAL
© Hach Company, 2003. All rights reserved. Printed in the U.S.A. eac 07/03 2ed
Page 2

Visit http: //www.hach.com
Page 3

Table of Contents
Section 1 Specifications..................................................................................................................................... 5
Section 2 General Information.......................................................................................................................... 7
2.1 Instrument Description ........................................................................................................................................ 7
2.2 Interface Connectors........................................................................................................................................... 7
2.2.1 Receptacle Caps ....................................................................................................................................... 7
2.3 Front Panel .......................................................................................................................................................... 8
2.3.1 Keypad and Display................................................................................................................................... 8
2.3.2 Humidity Indicator ...................................................................................................................................... 8
2.4 Safety Information ............................................................................................................................................... 9
2.4.1 Use of Hazard Information....................................................................................................................... 10
2.4.2 Precautionary Labels............................................................................................................................... 10
2.4.3 Hazardous Locations ............................................................................................................................... 10
2.4.4 Confined Space Entry ............................................................................................................................. 11
2.4.5 Definition of Confined Space ................................................................................................................... 12
Section 3 Installation......................................................................................................................................... 13
3.1 Unpacking the Instrument ................................................................................................................................. 13
3.2 Selecting the Installation Site ............................................................................................................................ 13
3.3 Mounting the Sampler ....................................................................................................................................... 14
3.4 Attaching the Intake Line................................................................................................................................... 14
3.4.1 Vinyl Intake Tubing................................................................................................................................... 14
3.4.2 Teflon-Lined Polyethylene Intake Line ..................................................................................................... 14
3.5 Setting Up the Intake Line and Strainer ............................................................................................................ 15
3.6 Choosing Bottles ............................................................................................................................................... 15
3.7 Installing the Full Bottle Shut-Off ...................................................................................................................... 15
3.8 Power Connections ........................................................................................................................................... 16
3.9 12 V dc.............................................................................................................................................................. 17
3.10 Auxiliary Connection ....................................................................................................................................... 17
Section 4 Operation........................................................................................................................................... 21
4.1 Keypad and Key Functions................................................................................................................................ 21
4.2 Tips and Techniques for Programming the Instrument ..................................................................................... 22
4.3 Setting the Time and Date ................................................................................................................................ 23
4.4 Bottle Setup Mode ............................................................................................................................................ 23
4.5 Explanations of Program Messages ................................................................................................................. 24
4.6 Data Logging..................................................................................................................................................... 25
4.7 Manual Mode .................................................................................................................................................... 25
4.7.1 Manually Operating the Sample Pump .................................................................................................... 25
4.8 Measurements Triggered by Liquid Levels or Flow........................................................................................... 26
4.9 Programming the Sampler for Level Control ..................................................................................................... 27
4.10 Other Displayed Messages ............................................................................................................................. 27
4.11 Flow Proportional Operation ........................................................................................................................... 28
4.11.1 How to Calculate Pulses/Counts ........................................................................................................... 28
Page 3
8544TOC.fm Table of Contents
Page 4

Table of Contents
Section 5 Maintenance ..................................................................................................................................... 33
5.1 Cleaning the Sampler ....................................................................................................................................... 33
5.1.1 Cleaning the Sampler Housing................................................................................................................ 33
5.1.2 Cleaning the Sample Bottles ................................................................................................................... 33
5.1.3 Cleaning the Intake Tubing and Pump Tubing ......................................................................................... 33
5.1.4 No Lubrication Required .......................................................................................................................... 33
5.2 Pump Tubing Maintenance................................................................................................................................ 33
5.3 Upgrades, Repairs, General Maintenance ........................................................................................................ 33
5.4 Electrostatic Discharge (ESD) Considerations.................................................................................................. 33
5.5 Internal Maintenance Items............................................................................................................................... 33
5.6 Removing and Opening the Controller.............................................................................................................. 33
5.7 Re-installing the Bottom Panel.......................................................................................................................... 34
5.8 Internal Desiccant Module ................................................................................................................................ 35
5.9 Circuit Board Identification ............................................................................................................................... 35
5.10 Motor/Gear Box............................................................................................................................................... 36
5.11 Internal Case Humidity Indicator..................................................................................................................... 36
5.12 Internal Case Humidity Indicator..................................................................................................................... 36
5.13 Memory Battery .............................................................................................................................................. 36
Section 6 Contact Information for U.S.A. & Outside Europe................................................................... 37
Section 7 Contact Information for Europe ................................................................................................... 38
Section 8 Limited Warranty ............................................................................................................................. 39
Section 9 Parts and Accessories................................................................................................................... 41
Appendix A Programming Flow Chart ................................................................................................................. 43
Program Flow Chart ......................................................................................................................................... 43
Appendix B Batteries and Chargers .................................................................................................................... 45
Lead-Acid (Gel Cell) Batteries .......................................................................................................................... 45
Nickel-Cadmium Batteries ................................................................................................................................ 46
Appendix C Exploded View Drawings ................................................................................................................. 47
Exploded View (1 of 6) ..................................................................................................................................... 47
Exploded View (2 of 6) ..................................................................................................................................... 48
Exploded View (3 of 6) ..................................................................................................................................... 49
Exploded View (4 of 6) ..................................................................................................................................... 50
Exploded View (5 of 6) ..................................................................................................................................... 51
Exploded View (6 of 6) ..................................................................................................................................... 52
Page 4
Table of Contents
8544TOC.fm
Page 5

Section 1 Specifications
Specifications are subject to change without notice.
Controller Dimensions
Pump/Controller Housing
Sample Pump
Pump Body Impact/corrosion resistant, glass reinforced Delrin
Vertical Lift
Sample Transport Velocity 61 mm/sec. (2 ft/sec.) minimum, at 4.6 m (15 ft) vertical lift in a 3/8 in. ID intake tube
Pump Flow Rate 60 mL/sec at 0.91 m (3 ft) vertical lift in a 3/8 in. ID intake tube
Sample Volume Programmed in milliliters, in one mL increments from 10 to 9999 mL
Sample Volume Repeatability
Sampling Modes Supports 1 bottle. Composite Time, Composite Flow, and Level Actuation
Interval Between Samples
Intake Purge
Control Panel
Height: 34 cm (13.5 in.), Width 28 cm (11 in.), Depth 20.3 cm (8 in.) without wall
bracket, 33 cm (13 in.) deep with wall bracket
High impact injection molded ABS: submersible, watertight, dust tight, corrosion
and ice resistant; NEMA 4X, 6
High speed peristaltic, dual roller, with 9.53 ID x 15.9 mm OD (3/8 in. x 5/8 in.)
medical grade silicone rubber pump tube.
8.23 m (27 ft) maximum. Remote pump option recommended for lifts from 6.7 to
10.7 m (22 to 35 ft)
From 0.3 to 6.7 m (1 to 22 ft) vertical lift +/-5 mL typical for a 100 mL sample (+/5%)
Selectable in single increments from 1 to 9999 flow pulses (momentary contact
closure 25 msec. or 5-12 V dc pulse; 4-20 mA interface optional), or 1 to 9999
minutes in one minute increments.
Air purged automatically before and after each sample; duration automatically
compensated for varying intake line lengths.
18 key, 31 function membrane switch keypad with 18 character alphanumeric, liquid
crystal display. Self prompting/menu driven program.
Internal Clock Indicated real time and date; 0.007% time base accuracy
Programmable Delay Programmable sampler start time/date
Manual Sample Initiates a sample collection independent of program process
Records program start time and date, stores up to 400 sample collection
Data Logging
Automatic Shutdown
Intake Tubing
Intake Strainers
Power Requirements
ac Power Backup
Internal Battery
Overload Protection 5 amp dc line fuse; ac power pack; internal 1 amp ac line fuse
Temperature Range
times/dates, all program entries, operational status including number of minutes or
pulses to next sample, bottle number, number of samples collected, number
remaining, sample identification number.
Composite Mode: After preset number of samples have been delivered to
composite container, from 1 to 9999 samples, or upon full container.
6.4 mm (1/4 in.) and 9.5 mm (3/8 in.) ID vinyl to 9.5 mm (3/8 in.) ID Teflon-lined
polyethylene with protective outer cover
Choice of Teflon and 316 stainless construction, and all 316 stainless steel in
standard size and low profile for shallow depth applications
12 V dc-supplied by optional ac power converter or battery. Average current draw
with pump running: 2.25 amps dc, without pump running: 4 mA dc
Rechargeable 6 amp-hour gel lead acid battery takes over automatically with ac
line power failure. Integral trickle charger maintains battery at full charge
1.5 V dc lithium battery; maintains program logic and real time clock for five years.
Internal battery current draws less than 40 micro amps
General use: 0° to 50° C (32° to 122° F). LCD display operated from –10° to 70° C;
Storage –40° to 80° C
Page 5
8544specs.fm Specifications
Page 6

Visit http: //www.hach.com
Page 7

Section 2 General Information
2.1 Instrument Description
The instrument is designed to automatically collect and preserve samples
from a liquid source. The sampler is suitable for collection of conventional and
toxic pollutants and suspended solids.
The sampler collects samples on either a timed cycle basis, or in proportion to
flow when used in conjunction with a flow meter (flow meter connected to the
auxiliary connector). In the timed cycle mode, the interval between samples is
controlled by an integral quartz crystal clock. The sample interval may be set
from 1 to 9999 minutes, in one minute increments.
In the flow proportional mode, via an external flow meter, the interval between
samples may be set from 1 to 9999 flow pulses, in one pulse increments.
where each pulse represents a specific flow volume interval.
The number of minutes or flow intervals remaining unit the next sample is
shown on the control display. The program can be delayed by entering the
desired starting time and date on the sampler keypad.
The sampler utilizes a high speed peristaltic pump, for collection of the
sample liquid. The pump body is constructed of impact and corrosion
resistant plastic. Tubing is held firmly in place by the pump body haves-no
clamps are required. The intake line is air purged before and after each
sample. The duration of the pre and post sample purge automatically
compensates for different intake line lengths. The pump tubing is 0.95 cm
(3/8
in.) ID X 0.32 cm (1/8 in.) wall medical grade silicone rubber. Although
the pump is capable of vertical lifts up to 8.2 m (27 ft), lifts greater than 6.7 m
(22 ft) are not recommended unless the Remote Pump option is utilized. The
pump produces a sample transport velocity of 1 mps (3.3 fps) at 1 m (3 ft)
vertical lift. The sample is under pumped flow at all times from the source
stream to the sample container, thereby keeping solids in suspension.
2.2 Interface Connectors
2.2.1 Receptacle Caps
The interface connectors are located on the left side of the controller housing.
The sampler comes standard with two interface receptacles:
• 12 V dc (Power Input)
• Auxiliary (Multi-purpose input/output port)
Interface receptacles are covered with push-on receptacle caps. These caps
protect the connector pins from dirt and moisture and should be attached to
any receptacle not in use.
Page 7
8544intro.fm General Information
Page 8

Section 2
Figure 1 Interface Connectors
1
2
1. 12 V dc 2. Auxiliary
2.3 Front Panel
The front panel consists of the keypad, liquid crystal display, and the internal
case humidity indicator (
2.3.1 Keypad and Display
The sampler controller is equipped with a 24 character alphanumeric liquid
crystal display which automatically steps the user through the program
settings.
2.3.2 Humidity Indicator
The internal case humidity indicator (Cat. No. 2660) turns pink when the
internal case humidity exceeds 60 percent.
The sampler is equipped with an internal desiccant module (Cat. No. 8849) to
absorb any humidity trapped in the case during final assembly. Under normal
operating conditions, this desiccant provides long-term protection against
condensed moisture inside the case.
Replacement of the internal desiccant module is only necessary if the
indicator turns pink. See to
Figure 2).
section 5.8 on page 35 for details.
Page 8
Front Panel
8544intro.fm
Page 9
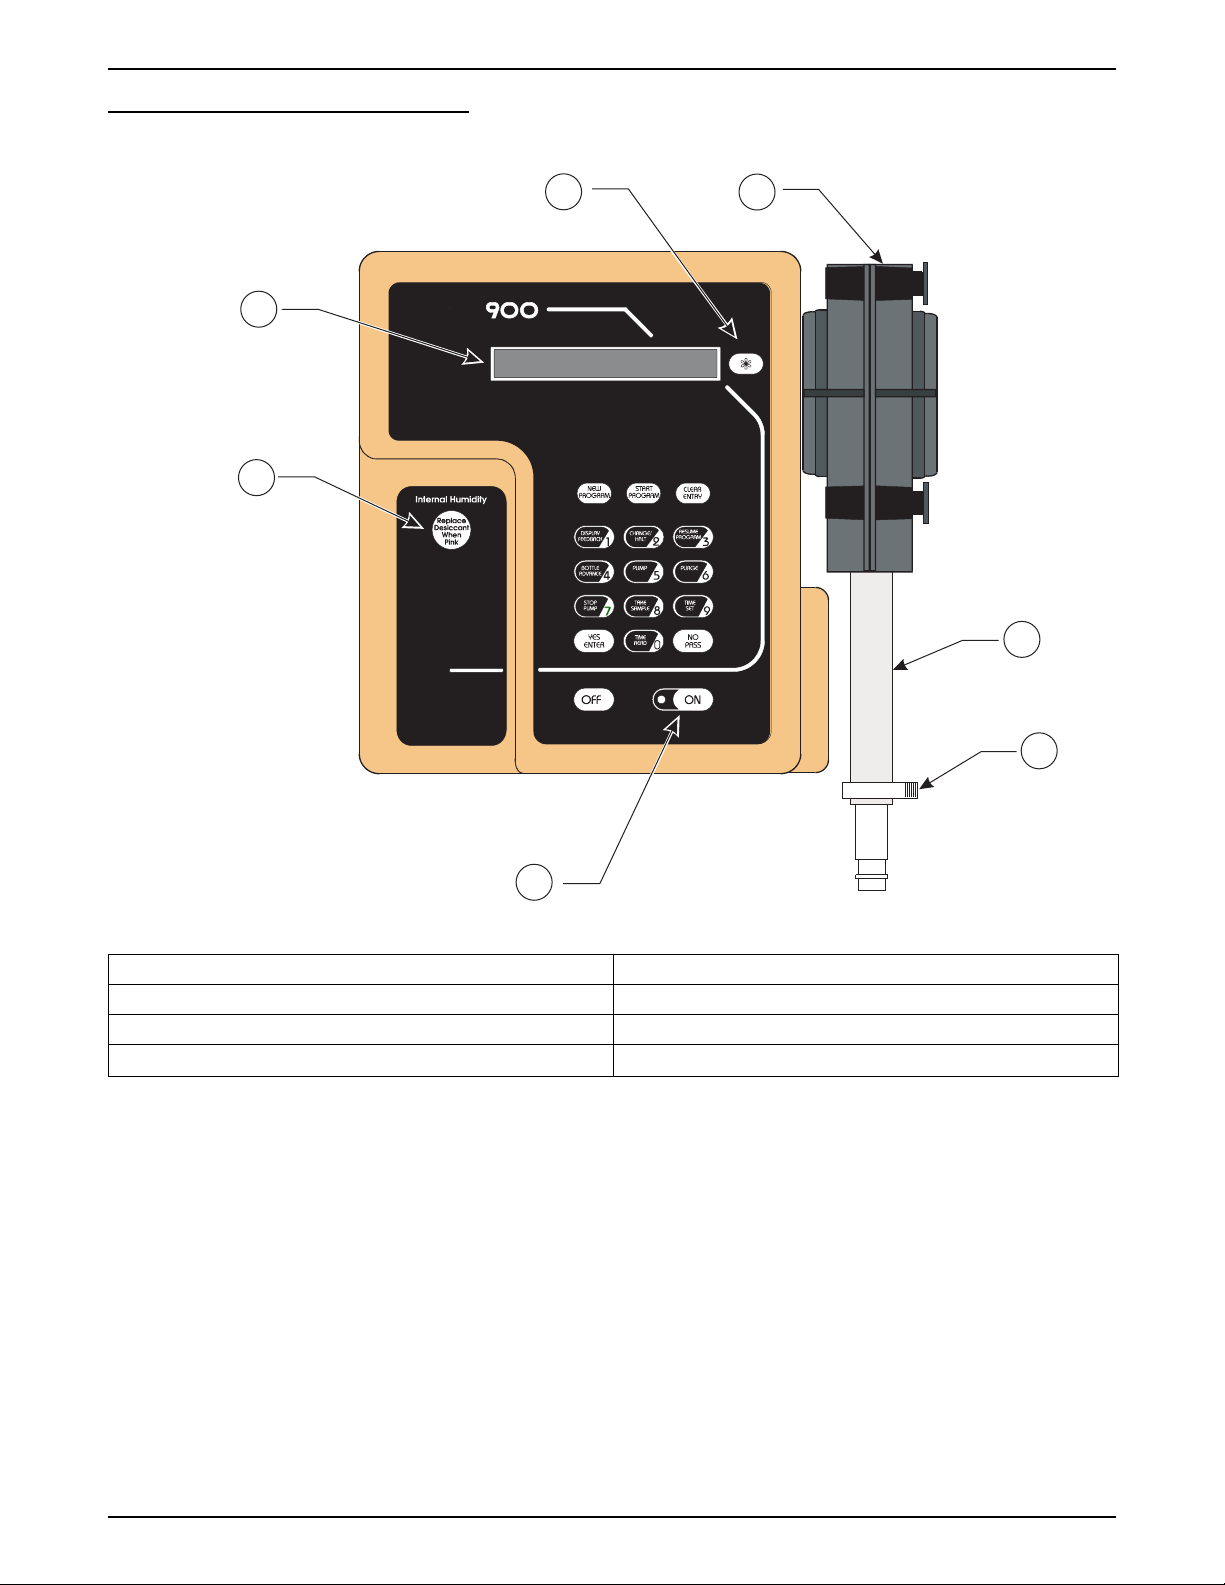
Figure 2 900 Composite Sampler
Section 2
1
7
6
2
3
4
5
1. Function Key 5. Power On Indicator LED
2. Peristaltic Pump 6. Desiccant Indicator
3. Peristaltic Pump Tubing 7. 24-character Alphanumeric Liquid Crystal Display
4. Tubing Clamp
2.4 Safety Information
Please read this entire manual before unpacking, setting up, or operating this
instrument.
Pay particular attention to all danger and caution statements. Failure to do so
could result in serious injury to the operator or
To ensure the protection provided by this equipment is not impaired, do not
use or install this equipment in any manner other than that which is specified
in this manual.
damage to the equipment.
Page 9
8544intro.fm Safety Information
Page 10

Section 2
2.4.1 Use of Hazard Information
If multiple hazards exist, this manual will use the signal word (Danger,
Caution, Note) corresponding to the greatest
DANGER
Indicates a potentially or imminently hazardous situation which, if not avoided, could result in
death or serious injury.
CAUTION
Indicates a potentially hazardous situation that may result in minor or moderate injury.
NOTE
Information that requires special emphasis.
2.4.2 Precautionary Labels
This symbol, if noted on the instrument, references the instruction manual for operation
and/or
safety information.
Read all labels and tags attached to the instrument. Personal injury or
damage to the instrument could occur if not
hazard.
observed.
This symbol, when noted on a product enclosure or barrier, indicates that a risk of electrical shock
and/or electrocution exists and indicates that only individuals qualified to work with hazardous voltages
should open the enclosure or remove the barrier.
This symbol, when noted on the product, identifies the location of a fuse or current limiting device.
This symbol, when noted on the product, indicates that the marked item can be hot and should not be
touched without care.
This symbol, when noted on the product, indicates the presence of devices sensitive to Electro-static
Discharge and indicates that care must be taken to prevent damage to them.
This symbol, when noted on the product, identifies a risk of chemical harm and indicates that only
individuals qualified and trained to work with chemicals should handle chemicals or perform
maintenance on chemical delivery systems associated with the equipment.
This symbol, if noted on the product, indicates the need for protective eye wear.
This symbol, when noted on the product, identifies the location of the connection for Protective Earth
(ground).
2.4.3 Hazardous Locations
The 900 Composite Sampler is not approved for use in hazardous locations
as defined in the National Electrical Code.
Page 10
Safety Information
DANGER
Although some Hach products are designed and certified for installation in
hazardous locations as defined by the National Electrical Code, many Hach
products are not suitable for use in hazardous locations. It is the responsibility
of the individuals who are installing the products in hazardous locations to
determine the acceptability of the product for the environment. Additionally, to
ensure safety, the installation of instrumentation in hazardous locations must be
per the manufacturer's control drawing specifications. Any modification to the
instrumentation or the installation is not recommended and may result in life
threatening injury and/or damage to facilities.
8544intro.fm
Page 11

Section 2
DANGER
Bien que certains produits Hach soient conçus et certifiés pour être installés
dans des endroits dangereux tels que définis par le National Electric Code, de
nombreux produits Hach ne conviennent pas pour de tels endroits. Il relève de la
responsabilité des personnes qui placent les produits dans des endroits
dangereux de déterminer s'ils sont adaptés à cet environnement. En outre, à des
fins de sécurité, le placement de machines dans des endroits dangereux doit
s'effectuer dans le respect des consignes des schémas de contrôle du fabricant.
Toute modification apportée aux machines ou tout déplacement de celles-ci est
déconseillé, car susceptible de provoquer des accidents matériels et/ou
corporels.
PELIGRO
Aunque algunos productos Hach están diseñados y homologados para su
instalación en entornos peligrosos, entendidos éstos conforme a la definición
del “National Electrical Code” (Reglamento Eléctrico Nacional), muchos de los
productos Hach no son aptos para su utilización en lugares peligrosos. Es
responsabilidad de quienes instalen los productos en entornos peligrosos el
asegurarse de la idoneidad de dichos productos para este tipo de entorno.
Además, para garantizar la seguridad, la instalación de los instrumentos en
lugares peligrosos deberá realizarse conforme a las especificaciones del plano
del fabricante. Se desaconseja cualquier modificación de los instrumentos o de
la instalación, ya que podría provocar lesiones corporales graves, e incluso
fatales, y/o daños materiales a los equipos.
2.4.4 Confined Space Entry
GEFAHR
Einige Hach-Produkte sind für den Einbau in explosionsgefährdeten Bereichen
gemäß den Festlegungen des National Electrical Code speziell geprüft und
zugelassen. Dies gilt jedoch keineswegs für das gesamte Hach-Produktangebot.
Die Entscheidung, ob ein Produkt für den Einsatz in explosionsgefährden
Bereichen geeignet ist oder nicht, bleibt in die Verantwortung des jeweiligen
Installateurs gestellt. Im Interesse der Sicherheit ist es zudem erforderlich, dass
ein etwaiger Einbau des Geräts in explosionsgefährdeten Bereichen genau nach
den Steuerungsanlagen-Zeichnungen des Herstellers erfolgt. Von der Vornahme
von Änderungen an meß- bzw. regeltechnischen Geräten bzw. abweichender
Installation wird dringend abgeraten, da hierdurch lebensbedrohliche Personenund/oder Sachschäden verursacht werden können!
PERICOLO
Nonostante alcuni prodotti Hach, siano predisposti e certificati per
l'installazione in ambienti pericolosi, come previsto dal Codice Normativo
Nazionale che concerne l'elettricità, è sconsigliabile utilizzare prodotti Hach in
ambienti considerati pericolosi. E' diretta responsabilità della persona che
installa lo strumento in un luogo ritenuto “pericoloso” appurare se lo strumento
è compatibile con tale ambiente. Inoltre, per maggior sicurezza, l'installazione
dello strumento in ambienti pericolosi deve seguire le specifiche di
progettazione del produttore. Si deve evitare qualunque manomissione allo
strumento o all'installazione, tali modifiche possono rappresentare una
minaccia per la vita delle persone e creare guasti.
Important Note: The following information is provided to guide users of 900
Composite Samplers on the dangers and risks associated with entry into confined
spaces.
On April 15, 1993, OSHA's final ruling on CFR 1910.146, Permit Required
Confined Spaces, became law. This new standard directly affects more than
250,000 industrial sites in the United States and was created to protect the
health and safety of workers in confined spaces.
Page 11
8544intro.fm Safety Information
Page 12

Section 2
2.4.5 Definition of Confined Space
A Confined Space is any location or enclosure that presents or has the
immediate potential to present one or more of the following conditions:
• An atmosphere with less than 19.5% or greater than 23.5% oxygen
and/or more than 10 ppm Hydrogen Sulfide (H
• An atmosphere that may be flammable or explosive due to gases, vapors,
mists, dusts, or fibers
• Toxic materials which upon contact or inhalation, could result in injury,
impairment of health, or death
Confined spaces are not designed for human occupancy. They have restricted
entry and contain known or potential hazards.
Examples of confined spaces include manholes, stacks, pipes, vats, switch
vaults, and other similar locations.
Standard safety procedures must always be followed prior to entry into
confined spaces and/or locations where hazardous gases, vapors, mists,
dusts, or fibers may be present.
S)
2
Before entering any confined space check with your employer for procedures
related to confined space entry.
Page 12
Safety Information
8544intro.fm
Page 13
Section 3 Installation
DANGER
Only qualified personnel should conduct the installation tasks described in this
section of the manual
3.1 Unpacking the Instrument
Remove the sampler from the shipping carton and inspect it for any damage.
Contact Hach Customer Service at 1-800-227-4224 if any items are missing
or damaged.
3.2 Selecting the Installation Site
The sampler is completely self-contained and may be located indoors or
outdoors without protection, between 0 to 50 °C (32 to 120 °F). Follow the
guidelines below and
and prevent cross-contamination between samples.
• Install the sampler as close to the source as site conditions permit. This
will increase pump tube life and optimize overall sampler performance.
• Mount the sampler to a stable flat surface using the wall mounting
bracket, Cat. No. 3596 (
• Install the sampler above the sample source, with the intake tubing
sloping downward to the sample.
Figure 3 to allow complete drainage of the intake line
Figure 4).
• Make sure the tubing is free of kinks or loops.
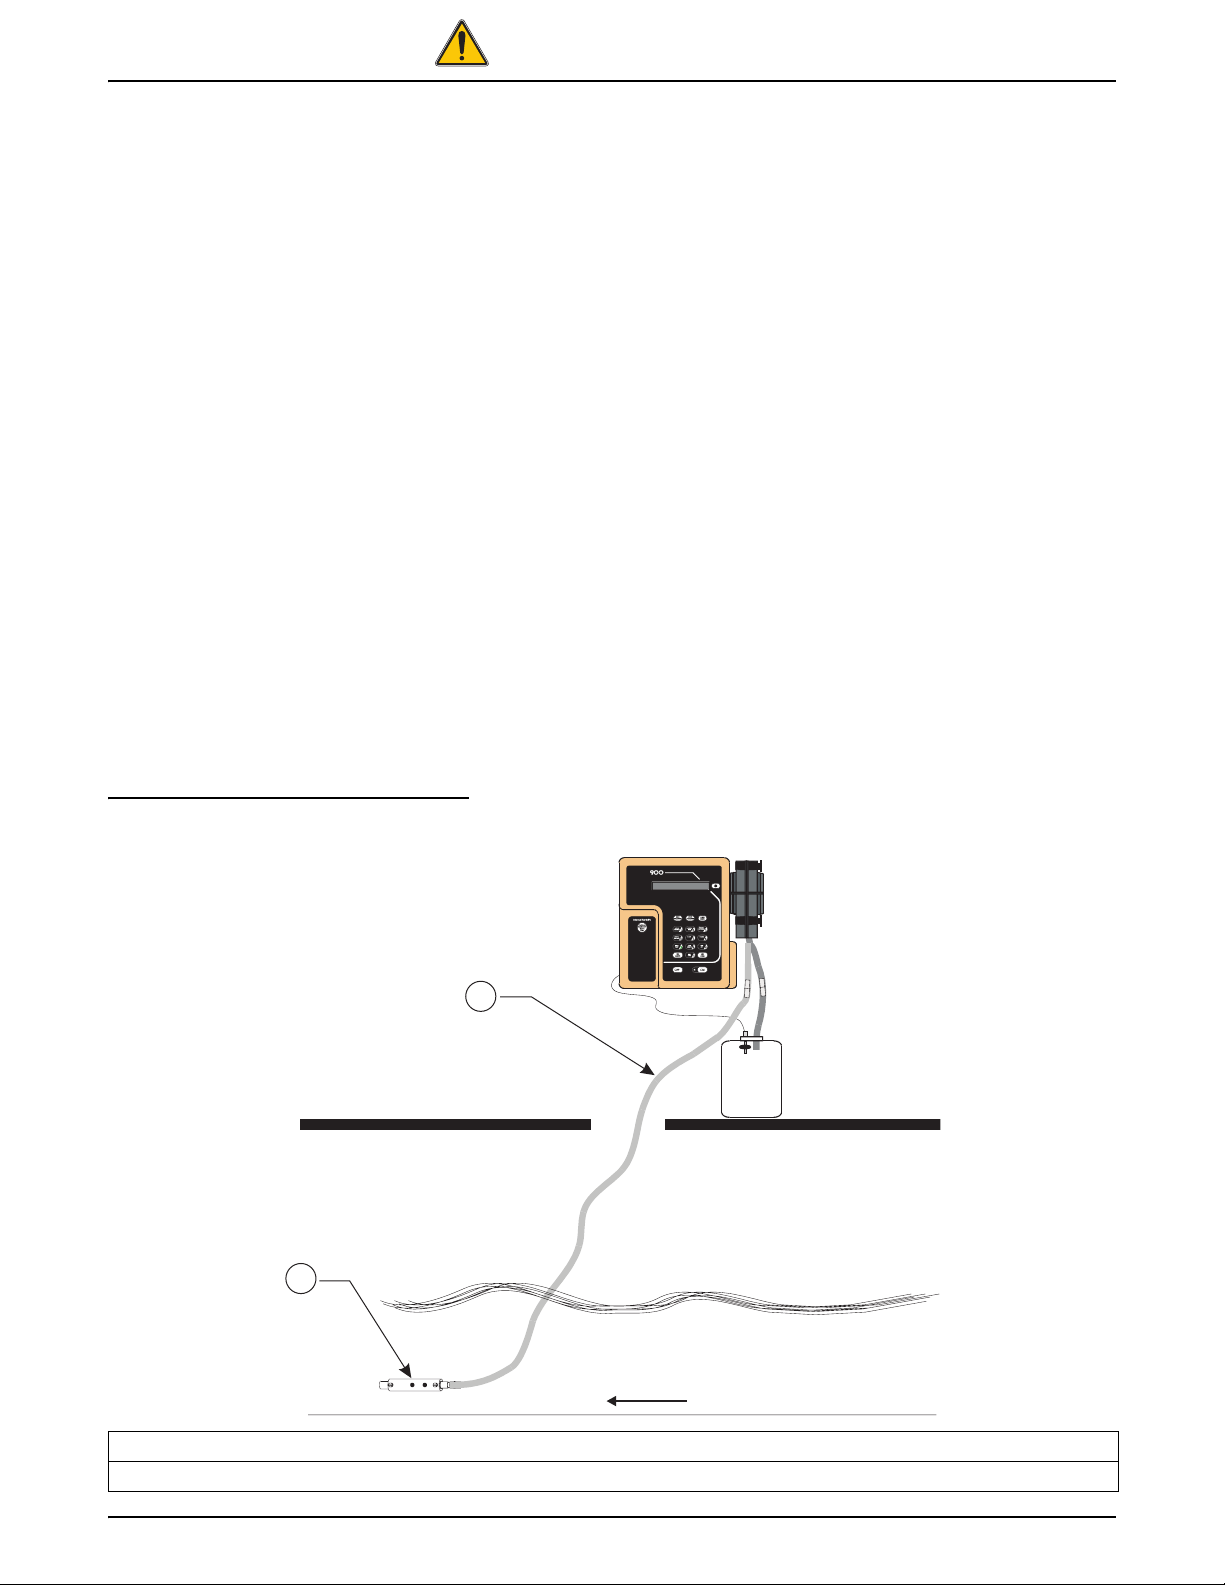
Figure 3 Placement of the Sampler
1
2
Flow
1. Slope tubing down to source (no loops, kinks, or excess tubing).
2. Locate strainer in an area of turbulent and well-mixed flow.
Page 13
8544install.fm Installation
Page 14
Section 3
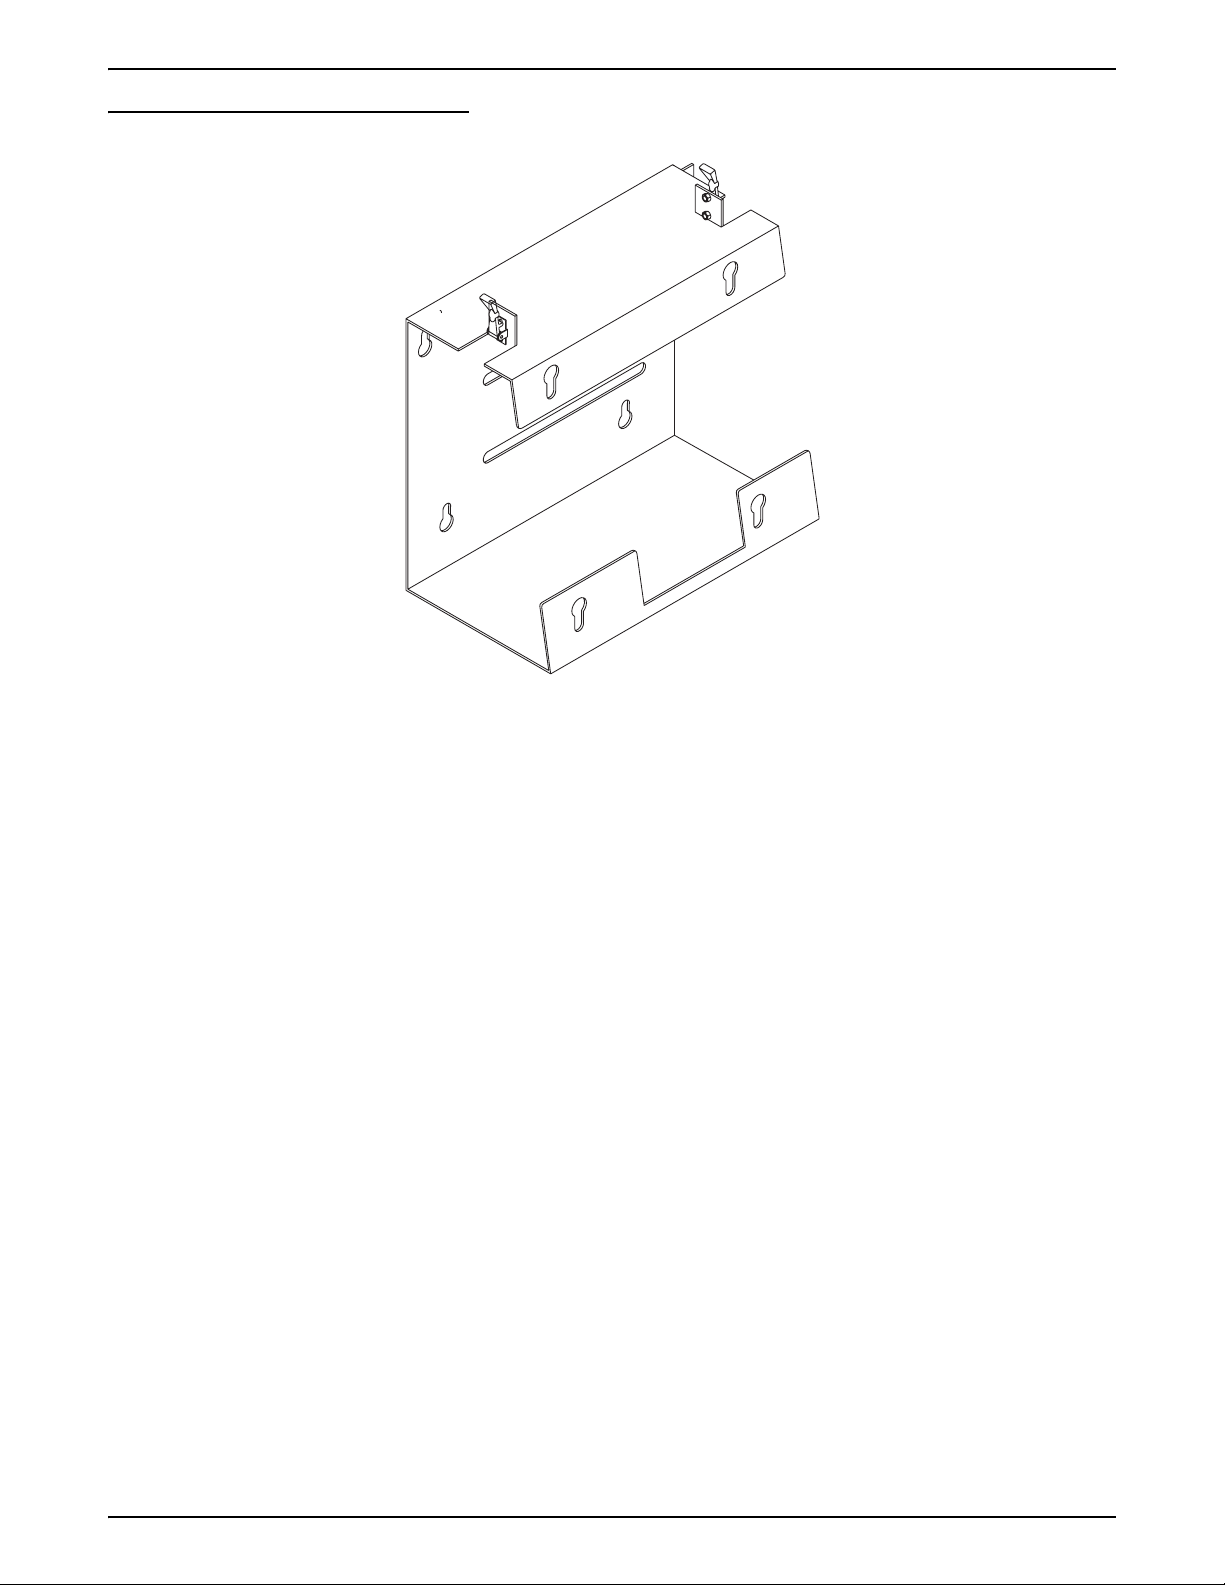
Figure 4 Wall Mount Bracket
3.3 Mounting the Sampler
Attach the wall mount bracket to a stable panel or wall (Figure 4). Mount the
bracket so the sample display and keypad are easily accessible. Mount the
sampler to the wall bracket using the four screws provided.
3.4 Attaching the Intake Line
3.4.1 Vinyl Intake Tubing
1. Push one end of the clear flexible PVC (vinyl) tube to the tapered end of
the intake strainer, until the tube is within 0.635 cm (¼ in.) of the solid
white Teflon strainer body.
2. Push the other end of the vinyl tube on to the stainless steel fitting
connector end that points away from the pump control housing.
3.4.2 Teflon-Lined Polyethylene Intake Line
The Connection Kit for Teflon-lined Tubing (Cat. No. 2186) contains two
identical assemblies, one for connecting the Teflon-lined tubing to the
stainless steel tubing connector and the other for connecting the intake
strainer.
1. Place the stainless steel hose clamp over the stainless steel fitting until it
abuts the shoulder of the tubing connector. Secure with a tubing clamp.
Page 14
Mounting the Sampler
2. Push the stainless steel fitting into the Teflon-lined tubing until it abuts the
shoulder of the stainless steel fitting.
3. Slide the stainless steel hose clamp over the silicone tubing, then push
the silicone tubing over the stainless steel fitting on the liquid sensor.
8544install.fm
Page 15

4. Slide the tubing clamp over the silicone tubing until it is over the stainless
steel fitting on the liquid sensor. Tighten to secure.
5. Repeat the procedure for the intake strainer.
3.5 Setting Up the Intake Line and Strainer
For each sampling location, the intake line should be as short as practical,
and be free of any sharp bends, coils, or loops. Install the intake line with a
downward slope from the sampler to the sample source because:
• This will assure the complete drainage of the intake line when it is air-
purged before and after each sample, and will help to prevent crosscontamination of the individual samples.
• Complete drainage is important in freezing conditions, as any liquid slugs
that remain could freeze and plug the line.
Place the sample intake and strainer in the mainstream of the sampling
source, in an area of turbulent and well-mixed flow.
Also, take in account the vertical location of the intake. A position too near the
surface may yield excess lighter materials, while a position too near the
bottom may yield excess heavy materials. The constituents of interest must
be considered when positioning the intake strainer.
Section 3
3.6 Choosing Bottles
A broad range of bottle configurations are available for the 900 Composite
Sampler. Refer to
Size Material
9.5 L (3 gal) Polyethylene
11.4 L (2.5 gal) Glass
15.1 (4 gal) Polyethylene
20.1 L (5.5 gal) Polyethylene
22.7 L (6 gal) Polyethylene
3.7 Installing the Full Bottle Shut-Off
Install the optional full bottle shut-off into the bottle cap using the attached
rubber grommet. Install the full bottle shut-off connector to the mating plug
which is attached tot he sampler back panel. Insert the sample tubing into the
cap of the bottle.
Page 15
8544install.fm Setting Up the Intake Line and Strainer
Page 16
Section 3
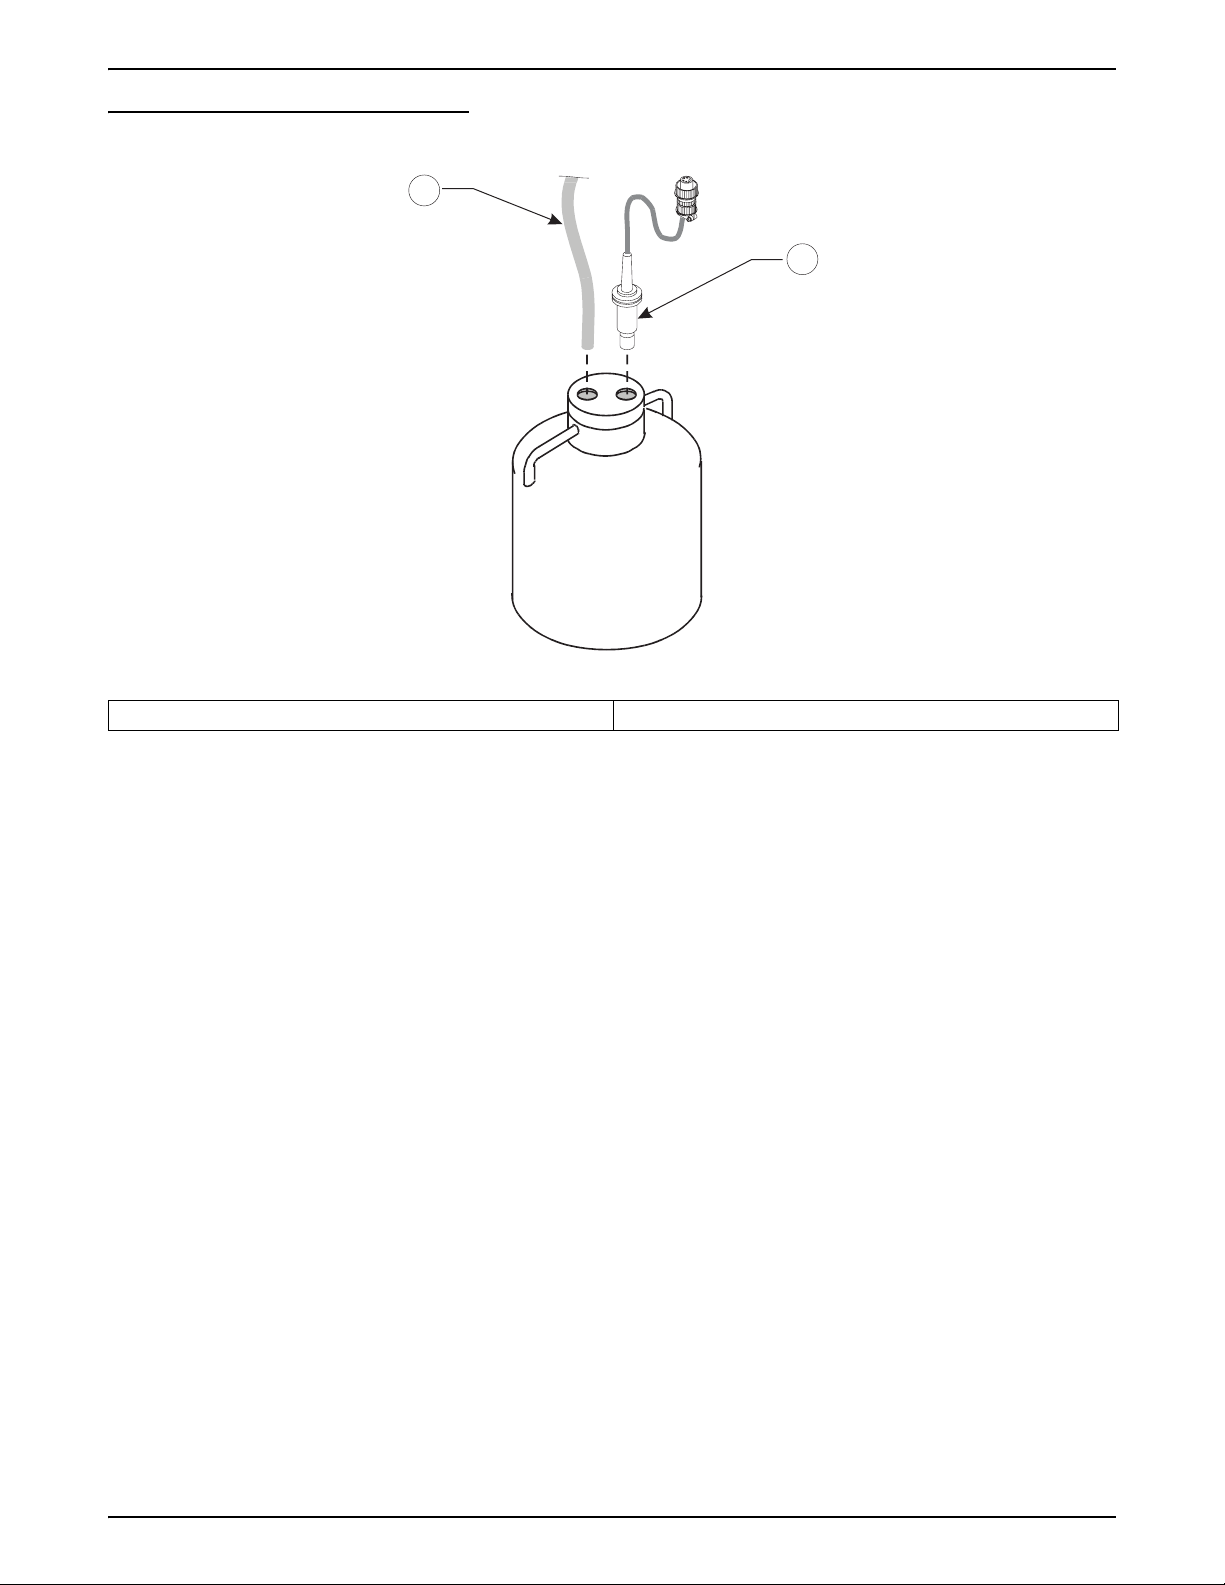
Figure 5 Full Bottle Shut-off
1
2
1. Sample Tubing 2. Full Bottle Shut-off
3.8 Power Connections
The sampler controller operated on 12 V dc which is supplied by an optional
ac/dc power converter and/or battery.
Note: Make sure both rubber holddowns are attached to the clips at
each end of the power supply.
The power supply (or battery) is placed in the compartment located directly
behind the controller. Pull the rubber hold-downs up and over the clips at each
end of the power supply (or battery) to hold it in place.
The short 2-pin cable on the power supply (or battery) connects the controller
receptacle labeled 12 V dc.
Batteries available from the manufacturer include a lead-acid gel battery, and
nickel-cadmium (Ni-Cad) battery (Cat. No. 1416). The 120 V ac to 12 V dc
power converter (Cat. No. 1440) includes a built-in lead-acid battery charger.
The Power Converter (Cat. No. 1443) contains a charger for Ni-Cad batteries.
230 V ac and 12 V dc power converters (Cat. No. 1441) are also available but
do not come equipped with a built-in battery charger. Stand-alone, wall mount
chargers are also available. See APPENDIX for details on batteries and
battery charging.
Important: Whenever electricity is present, there is a possibility of electrical
shock. Before connecting the sampler to an ac power source, the following
safety precautions should be taken:
Page 16
Power Connections
• Check the power source to make sure that it satisfies the ac power
requirements of the sampler.
• Make sure that all electrical installations and connections are in
accordance with national and local electrical codes.
8544install.fm
Page 17

3.9 12 V dc
Section 3
• Before performing any maintenance, disconnect the sampler from the
power source.
• Do not attempt to make any connection or otherwise handle the electrical
components of the sampler when connected to ac line power if the
immediate area is wet, or if hands or clothing are wet.
• If the circuit breaker or fuse in the ac power source is tripped, determine
the cause before restoring power to the sampler.
• Make sure the power circuit is grounded and protected with a Ground
Fault Interrupter (GFI).
This connection is for supplying power to the sampler controller electronics.
Power is normally supplied to the sampler controller electronics from either a
battery or a power supply located in the pocket directly behind the sampler
controller housing.
In the event of a power outage, an optional 12 V dc battery backup is available
(Cat. No. 1803). This power backup maintains power to the sampler when ac
power fails.
Tabl e 1 12 V dc Connector Pin Assignments
Pin Signal Description
A ground
B 12 to 17 V dc unregulated
3.10 Auxiliary Connection
The auxiliary interface connector is a general purpose input/output port. Each
signal is described in
Tabl e 2 Auxiliary Pin Assignments
Pin Signal Description Wire Color Purpose Rating
A 12 V dc White
B ground Blue
C Flow Pulse Input Ye l l o w
This pin can be used to power an external device or flow meter. Must
be used in conjunction with Pin B (ground).
Connected to dc ground and is isolated from the earth ground found
in the ac power line.
With the sampler is in Flow Proportional mode and connected to an
external flow meter, a 5 to 12 V dc input pulse lasting at least 25
milliseconds will cause the sampler to decrement one count. The
sampler is capable of accumulating from 1 to 9999 input pulses.
The 12 V dc line found on Pin A can be used directly with a simple
contact closure to Pin C or an external 5 to 12 V dc pulse may be
applied providing the ground side of the external signal is connected
to the sampler ground at Pin B. This count is actuated at the
beginning of the input signal (the leading edge of the pulse).
Tab l e 2 .
13.8 V dc
nominal
5 to 17 V dc
pulse with
duration of
at least
25 ms.
Page 17
8544install.fm 12 V dc
Page 18

Section 3
Table 2 Auxiliary Pin Assignments
Pin Signal Description Wire Color Purpose Rating
This line is held at 5 V dc inside the sampler. When shorted to
ground (Pin B), a signal is sent to the microprocessor inside the
sampler causing it to “wake up” and begin or resume the sampling
Liquid Level
D
Actuator/Auxiliary
Control Input
E Special Output Red
Program Complete
F
Output
Black
Green
program. It can be used in conjunction with a simple level float switch
to actuate the sampler when liquid id present or to take over after a
second sampler had finished its program. It may also be used with
any device (such as pH meter) which produces a dry contact output
to control the sampler in response to some user defined condition
(i.e. high or low pH); must be used in conjunction with Pin B
(ground).
Normally at 0 V dc, this line switches to 12 V dc upon any of the
selected event described in SECTION, PROGRAMMING.
Normally an open circuit, this line switches to ground for 90 seconds
at the conclusion of the sampling program. Used to “wake up”
another sampler to take over sampling or to signal an operator or
datalogger upon the completion of the sampling program.
Contact Closures
The sampler controller is capable of accumulating 1 to 9999 contact closures.
Each contact closure output from a flow meter represents a specific flow
volume.
24 V dc
(max) at
100 mA
(max)
N/A
N/A
Note: The sampler provides 12 V dc on Pin A of the Auxiliary Receptacle and this voltage is pulsed back to Pin C each time the contact closes on the external flow meter. The external flow meter must provide a dry contact closure.
Note: Older model 4–20 mA
interfaces (Cat. No. 913) require
correct loop polarity to properly
work. The newer generation
(Cat. No. 2020 series) interfaces are
not sensitive to loop polarity.
Some flow meters have an adjustable output, i.e. one contact closure for
every 100, 500, 1000, 10, 000 gallons of flow, etc., while others have a fixed
output. In either case, the contact closure signal is sent more frequently for
high flow rates, and less frequently for low flow rates. The sample frequency
will increase as the flow rate increases and likewise, will decrease as the rate
of flow decreases, thus taking samples in proportion to flow rate.
To connect the sampler to a flow meter, use Signal Cable (Cat. No. 940 or
540). To connect another brand of flow meter, use the Open-ended Signal
Cable (Cat. No. 941 or 541). A contact closure input signal corresponds to
Pins A and C on the Flow Meter/Auxiliary receptacle, and signal cable
connector. The signal cable wires are white and yellow respectively. Polarity is
not important unless the same closure signal is sent to more than one
sampler.
4–20 mA Input
An optional interface unit is available (Cat. No. 2021) which converts a
4–20 mA flow meter output into a 12 V dc pulses. At 20 mA (100% flow rate),
the interface sends ten pulses per minute; at 4 mA (0% flow rate), the
interface sends zero pulses.
The interface has a 0.9 m (3 ft) cable with connector on one end, and a 3 m
(10 ft) cable with two open wire leads on the other. Insert the connector into
the sampler receptacle labeled “AUXILIARY”, located on the left side of the
control housing. For the 3 m (10 ft) cable, the wire with clear insulation is
POSITIVE (+) and the wire with black insulation is NEGATIVE (–).
Page 18
Auxiliary Connection
8544install.fm
Page 19

Figure 6 4–20 mA Interface and Pulse Duration Input
(+)
(-)
For details on programming the sampler for flow proportional operation, refer
to SECTION.
Splitter Interface
This splitter interface (Cat. No. 939) can be used if access to more than one of
the Auxiliary Receptacle functions is required simultaneously. Connecting the
interface to the 6-pin connector on the sampler provides three additional
connectors for use. Two or more interfaces may be connected in series to
allow for as many connections as desired.
Figure 7 Splitter Interface
Section 3
To Auxillary Connector
Page 19
8544install.fm Auxiliary Connection
Page 20

Visit http: //www.hach.com
Page 21

Section 4 Operation
4.1 Keypad and Key Functions
Figure 8 shows the 18-position keypad and 24-character alphanumeric
display.
Button Function
ON Energizes Sampler
OFF De-energizes sampler and halts program in progress
Initiates the sampling program and resets all counts to zero (including datalogger).
START PROGRAM
NEW PROGRAM Allows input of new sample program...programming choices appear on display.
YES/ENTER
NO/PASS
CLEAR ENTRY
DISPLAY FEEDBACK Displays program status and a review of the program.
CHANGE/HALT
RESUME PROGRAM Causes the program to continue from the point at which it is halted.
BOTTLE ADVANCE Feature not available with this model.
PUMP (Manual Mode) Pumps sample liquid (pump forward) when held. Pump stops when released.
PURGE (Manual Mode) Purges sample liquid (pump reverse) when held. Pump stops when released.
STOP PUMP (Manual Mode)
TAKE SAMPLE Initiates sample cycle independent of program.
TIME SET Allows setting real time and date
TIME READ
* (asterisk)
When the START PROGRAM button is pressed, all recorded data (program entries and
collected sample times/dates) are erased from memory. Always download recorded data
before pressing START PROGRAM.
Causes a positive response when a question appears on display; accepts new programmed
value or previously entered value.
Causes a negative response when a question appears on display; in standby state, the
software revision number is displayed.
Erases program value shown on display; when held for two seconds, permits enable/disable
of level actuation/auxiliary control.
Stops sampler program and places in standby state. When started, press this key prior to
making any program change and before pressing keys 4, 5, 6, 7, 8, 9, and NEW PROGRAM.
Stops pump when using PUMP LOCK (see *). When held for 3 seconds (with sampler in a
standby state), permits selection of other languages.
Causes real time and date to appear on display. When held for 3 seconds, display indicated
time and date each sample was taken (or missed).
During programming, causes program to back-step. After CHANGE/HALT, allows altering of
bottle parameters (container volume, etc.). After CHANGE/HALT, provides review of
parameters (i.e. number of bottles, volume of bottle(s), line length, etc.). After PUMP/PURGE,
(manual mode) activates PUMP LOCK. Pump runs forward (KEY 5) or reverse (KEY 6)
without holding key. KEY 7 stops the pump.
Page 21
8544operations.fm Operation
Page 22

Section 4
Figure 8 Front Panel
4.2 Tips and Techniques for Programming the Instrument
• The instrument beeps each time a key is pressed.
• After the ON button is presses, the display will show one of the following
messages: "Program Halted", "Program Running", "Program Complete",
or "Ready to Start".
• The program status changes to Program Complete when sampling is
complete and there are no samples to be taken or the optional full bottle
shut-off is actuated.
• When the program is stopped (an no changes to the program settings
were made while it was stopped), pressing the
prompt to resume the previously running program (an retain all logged
data) or Start From Beginning (and clear all logged data).
• When programming the instrument, pressing the * key causes the display
to back up to the previous field.
START PROGRAM key will
Page 22
Tips and Techniques for Programming the Instrument
8544operations.fm
Page 23

4.3 Setting the Time and Date
Before programming the sampler for the first time, check the real time clock
and date settings.
Section 4
Note: When setting the time and
date, the
back up to the previously flashing
character.
* key causes the display to
1. Check the real-time clock and date settings by pressing TIME/READ. The
display will show the time and date for several seconds:
10:35 AM 24OCT00
2. If the time or date are not correct, press TIME/SET. The time and date will
appear on the display, with the hour flashing.
3. Press the appropriate numerical key(s) for the correct hour. When the
correct hour flashes on the display, press
YES. This will cause the minutes
to flash on the display.
4. Using the same procedure, select the correct minutes and press YES. The am/pm indicator will flash.
5. If the desired indicator is flashing on the display, press YES. If the desired
indicator is not flashing, press
to
flash.
NO. This will cause the other indicator
6. Press YES. The month will begin to flash. Select the correct day, month
and year using the same procedure as you used to set the time.
7. After the correct year has been entered, the display will read
"Synchronize Time-enter at Time
display will read "Clock is Now Set
". Pressing YES will start the clock. The
".
4.4 Bottle Setup Mode
When programming the sampler for the first time, you must first access the
bottle setup mode which contains set-up information such as the units for
bottle volume (milliliters and gallons) and the bottle volume.
To access the Bottle Setup Mode, the sampler must be in standby state, the
program cannot be in progress or "running". The sampler is in standby state
when the display indicated any one of the following: "Ready to Start",
"Program Complete", or "Program Halted". If the display reads "Program
Running", press the
CHANGE/HALT key. This will halt the program, thus
placing the sensor in the “Program Halted” standby state.
1. With the sampler in standby state, press the * key. The display will read “Enter units for bottle volume, milliliters?”.
2. Press NO to cause other volume units to appear. When the desired units
appear on the display, press
YES.
3. The display will show "Volume = _ _ _ _ _ mL" (or "Volume = _ _ _ _ _
Gallons
"), whichever was chosen in the previous step.
4. Enter the volume for the individual sample bottle by pressing the
numerical keys.
5. Press YES to accept the volume.
This completes the bottle setup entries and the sampler is ready to program.
Page 23
8544operations.fm Setting the Time and Date
Page 24

Section 4
4.5 Explanations of Program Messages
Item
Number
Message Description of Message
1 READY TO START Indicates that a program is ready to start. To start, press START PROGRAM.
2 PROGRAM HALTED Indicates the sampling program has been interrupted.
Indicates that a program is in process. Keys 0, 1 and 2 are the only active keys while a
3 PROGRAM RUNNING
program is running. If running, halt the program (press HALT PROGRAM) before entering
a new program.
4 PROGRAM COMPLETE
RE-ENTER PROGRAM,
5
DEPRESS *
This message is displayed after program completion. To repeat the program, press
START PROGRAM. Press NEW PROGRAM to enter a different program.
When the sampler is on, this message will appear if the sampler was turned off during
program entry.
This is the first message in the programming sequence. If selected, the sampler will
6 PROGRAM DELAY
start only after the delay period elapses. A YES response causes message 6a to appear
on the display.
6a 10:35 AM 21JUL03
A time and date are displayed when YES is pressed in response to message 6. The
example to the left signifies 10:35 in the morning, on October 24, 2000.
If selected, the sampler will operate on a timed cycle basis. Press YES to prompt the
7 TIMED MODE
user to enter the number of minutes desired for the time interval between samples.
Press NO to prompt the question described in item 8.
7a INTV = _ _ _ _MIN Enter the value for the interval between samples (in minutes).
Press YES, the cause the sampler to operate on a flow proportional basis. It will prompt
8 FLOW MODE?
the you to enter the number of flow signals that you want the sampler to count down
between samples. Press
NO to prompt the question in item 7.
Enter the value for the number of pulses (counts) that you want to accumulate between
8a INTV = _ _ _ _CNTS
samples. To determine the appropriate number, refer to the programming instructions
for flow proportional operation in section 4.11.
Press NO to retain the previously entered program entries for all remaining programming
9 OTHER CHANGES
steps, and return to the "Ready to Start" standby state. Press
YES to change the
previously programmed entries for all items 10 through 16.
This message appears if only one bottle is entered for the total number of bottles in the
YES to the "Continuous Mode?" prompt to take samples at
NO to cause the display to read
10
COMPOSITE MODE,
CONTINUOUS MODE
parameter entry mode. Press
the programmed interval. The program will terminate only with a full bottle when using
the full bottle float switch (Cat. No. 8847). Press
"samples = _ _ _". This permits you to enter the desired number of samples, after which
the program will terminate.
11 CHANGE VOLUME?
12 SAMPLE VOL = _ _ _
13 CALIBRATE VOL?
Press NO to retain the sample volume from the previous program (programming items
13, a–h are skipped), and the display will prompt the message in item 14.
Enter the desired sample volume (in mL) to be delivered to the sample container each
time a sample is initiated.
This message appears after you enter sample volume. If greater volume accuracy is
desired, press
YES. Press NO to skip the calibration and go to the next step.
When YES is pressed the sampler will pump to collect one sample. The pump will first
13a READY TO PUMP?
pre-purge the intake line, draw sample liquid, and then post-purge.
Before pressing YES, pull the pump tubing off of the fitting where it enters the sampler
housing and place a graduated cylinder at the sample discharge point.
After pressing YES in response to item 13a, the pump will pre-purge the intake line and
begin pumping liquid into the graduated container. When the desired volume has been
13b STOP AT MARK
delivered, press STOP PUMP. The pump will then purge the intake tubing. The sampler
will hold the time to deliver the desired sample volume in memory. This timed volume is
repeated for subsequent samples.
Page 24
Explanations of Program Messages
8544operations.fm
Page 25

Section 4
Item
Number
13c TRY AGAIN?
14 ENTER ID# Enter an optional identification number if desired.
15
Message Description of Message
If STOP PUMP was pressed before or after the desired rinse time, press YES to initiate
NO to view item 16.
DISPLAY FEEDBACK.
SETUP COMPLETE,
READY TO START
another rinse cycle. Press
This message indicates that all programming steps have been completed. Press START
PROGRAM
operating status, press
When you press START PROGRAM, all recorded data are erased from memory. Always
download recorded data before pressing START PROGRAM.
to begin. The display will read "Program Running". To review the program
4.6 Data Logging
The sampler records the time and date that each sample was collected, up to
400 samples. It also records the time and date of up to 24 missed samples.
1. To access information, the sampler must be in the "Program Halted" or "Program Complete" standby state.
2. Press TIME/READ for two seconds. The display will read "Samples Ta ke n" .
3. To display the time/date for each sample, press YES. To advance to the
next sample time/date, press
YES again–and so forth, until all are given.
4. To exit this routine, press NO. The time and date of any missed samples
are displayed after collected samples.
The sampler memory incorporates the “wrap around” method of data storage.
That is, when the memory becomes full, the oldest stored data (sample
number, time/date) are dropped as new data are received. The data logger
retains the 400 most recent times/dates for the collected samples.
4.7 Manual Mode
4.7.1 Manually Operating the Sample Pump
1. To manually operate the pump, place the sampler in standby state. The
sampler is in standby state when the display reads "Ready to Start",
"Program Halted", or "Program Complete".
2. To operate the pump, press either the PUMP or PURGE key. This will
cause "Manual Mode - Pump/Purge/Clear" to appear on the display.
Pressing the
direction as long as the key is held. Pressing the
pump to run in the reverse (purge) direction.
3. To run the pump continuously in either direction without having to hold
down the
"Lock-Pump/Purge" to appear on the display. Then press either
or
PURGE.
PUMP key causes the pump to run in the forward (sample)
PUMP or PURGE keys, press the * key. This will cause
PURGE key causes the
PUMP
4. To stop the pump, press STOP PUMP or turn the sampler off with the OFF
key. Pressing
8544operations.fm Data Logging
STOP PUMP returns the display to "Pump/Purge/Clear".
Page 25
Page 26

Section 4
5. To exit the manual mode, press CLEAR ENTRY. This returns the sampler
to the standby state.
While the sampler is in standby, a sample cycle can be initiated by pressing
the
TAKE SAMPLE key.
4.8 Measurements Triggered by Liquid Levels or Flow
The sampler can operate in any one of three control modes, using an external
controlling device (i.e. Liquid Level Actuator, Cat. No. 943, or an external flow
meter). In any of the three modes, the sampler remains in a standby state until
liquid at the sample source reaches a predetermined level. This feature may
be also used to access the setup of the storm water monitoring program, First
Flush. The three modes are described below:
Mode 1
The instrument collects a sample within the first minute that the liquid rises to
the predetermined level. After the first sample is taken, the sample interval
automatically resets to the programmed interval.
If the liquid falls below the predetermined level, the sampler continues
to
collect samples at the programmed time or flow interval, until the
program
ends.
Mode 2
The instrument collects a sample within the first minute that liquid rises to the
predetermined level. After the first sample is taken, the sample interval
automatically resets to the programmed interval. The sample program ends if
liquid falls below the predetermined level. If the liquid again rises to the
predetermined level, a sample is taken within the first minute and the interval
automatically resets to the programmed time or flow interval.
Mode 3
When the liquid rises to a predetermined level, a sample is not taken
immediately. A sample is taken only when liquid is at or above the
predetermined level and after the programmed sample interval has elapsed.
The interval between samples counts down and resets even when the liquid
level is below the predetermined (actuation) level. This mode is used to
synchronize sample collection with a real-time clock when sampling in the
time mode.
Page 26
Measurements Triggered by Liquid Levels or Flow
8544operations.fm
Page 27

4.9 Programming the Sampler for Level Control
Put the sampler in a standby state (i.e. "Program Halted", "Ready To Start" or
"Program Complete") hold
display to read
"Level Control?". The following messages may be displayed in
the level control program:
CLEAR ENTRY for two seconds. This will cause the
Section 4
Item
Number
1 LEVEL CONTROL
2 LEVEL START?
3 LEVEL START/STOP
4 SAMPLE ON LEVEL?
Message Description of Message
If you press NO, SPECIAL OUTPUT? will appear on the display. If you press YES, the
display shows item 2.
If you press YES, the sampler operates as described in Mode 1. If you press NO, the
display shows item number 4.
If you press YES, the sampler operates as described in Mode 2. If you press NO, the
display shows item number 5.
If you press YES, the sampler operates as described in Mode 3. If you press NO, the
display shows item number 1.
Note: In addition to the liquid level actuator, a Multi-purpose Half cable (Cat. No. 941
or 541) may be used to connect the sampler to any controlling device which
produces a dry contact closure upon a predetermined conditions. For example, a
pH meter with adjustable high/low set points can be used to control sampler
operation in any of the three level/auxiliary control modes.
4.10 Other Displayed Messages
Message Description of Message
YES/NO or * TO
BACKUP
WHILE RUNNING, KEY
0 - 1 - 2 ONLY
REVIEW RESULTS?
REVIEW PROGRAM?
LOW BATTERY This message indicates that the external battery is low and requires recharging.
This message appears if a key other than YES or NO is pressed and the displayed message is
followed by a question mark while in the Parameter Entry, Programming Running, or Time Set
modes.
This message appears if a key other than 0, 1, or 2 is pressed while the program is running. The
program must be halted (press the
Bottle Advance, Pump, Purge, Take Sample, New Program, etc.
This message appears if DISPLAY FEEDBACK is pressed and the sample program has been halted.
A YES response will cause the sample program results to appear. A NO response causes REVIEW
PROGRAM?
If you press the YES key, all programmed settings will appear on the display. Pressing the NO key
will place the sampler back into the standby state.
to appear.
2 key) before any manual operations are performed, such as
MEMORY POWER LOW This message indicates that the internal lithium battery is low and needs to be replaced.
PROGRAM STOPPED
DUE TO FULL BOTTLE
BOTTLE IS FULL
FULL BOTTLE or
PROGRAM HALTED
DUE TO FULL BOTTLE
8544operations.fm Programming the Sampler for Level Control
During composite mode, this message appears upon a full bottle condition. The program cannot
be restarted until the composite container is emptied and the float switch is in the lowered position.
If your instrument is programmed for single container composite sampling, this message appears
START PROGRAM key is pressed and the float switch is not in the lowered position. Because
if the
the same circuit path is used for the composite full bottle float switch (composite mode) and
bottle indicator (multiple bottle mode), this message will also appear if the START PROGRAM key
#1
is pressed with the sampler programmed for single container composite with the distributor
assembly in place, and the arm in the #1 bottle position. To correct this situation, remove the
distributor, install the composite container retainer, and press the
The full bottle float switch is in the raised position due to a full composite container. To resume the
program, exchange the full container with an empty one. With the float switch in the lowered
position, the program will resume within one minute.
START PROGRAM key.
Page 27
Page 28

Section 4
4.11 Flow Proportional Operation
4.11.1 How to Calculate Pulses/Counts
4.11.1.1 Flow Proportional Sampling Intervals—Using External Pulses
The sampler is equipped to receive either a momentary dry contact closure or
a +5 to +12 V dc pulse from a flow meter, where each pulse represents a
known flow increment.
For example, if the flow meter is set to send a flow pulse for every 1000
gallons of measured flow and the sampler can count 1 to 9999 flow pulses
between sample intervals, the sampler can be programmed to receive 10
pulses between samples to take one sample for every 10,000 gallons of liquid
flow.
To determine the number of flow pulses between sample intervals, determine
the total number of samples (represented by n in the following examples) to
be collected, and the period of time over which they are to be collected. Also
know the total flow, Q, during the sampling program. The following two-step
method should be useful for determining the value for
during setup.
INTV = _ _ _ _ CNTS
1. Determine f, where f represents the flow increment between samples and
n represents the total number of samples to be collected.
Q
f
----=
n
2. Multiply the flow increment between samples, f, by the pulse frequency
output of the flow meter (i.e. 1 pulse per 100 gallons, 1 pulse per 1,000
gallons, etc.). If the pulse frequency output of the flow meter is not known,
consult the flow meter manufacturer.
Note: The final result is not necessarily a whole number. You must round off the result
to the nearest whole number.
Example 1
You want to collect 35 samples over a 24-hour period. The total expected flow
over this period is 235,000 gallons. The flow meter pulse frequency is
one
pulse for every 100 gallons.
1. Determine the flow increment between samples:
Q
f
235,000 gallons
----
----------------------------------------- - 6,714 gallons/sample== =
n
35 samples
2. Multiply the flow increment, f, by the pulse frequency output of the flow meter.
Page 28
Flow Proportional Operation
1 pulse
6,714 gallons/sample
------------------------------
× 67.14 pulse/sample=
100 gallons
Therefore, the value for INTV = _ _ _ _ CNTS is 67.
(67.14 is rounded off to 67.)
Example 2
You want to collect 24 samples over an 8-hour period. The total expected flow
over this 8-hour period is 85,000 gallons. The flow meter pulse frequency
output is one pulse for every 50 gallons.
8544operations.fm
Page 29

Section 4
1. Determine the flow increment between samples:
Q
f
2. Multiply the flow increment, f, by the pulse frequency output of the flow meter.
3,542 gallons/sample
Therefore, the value for INTV = _ _ _ _ CNTS is 71.
Example 3
You want to collect 48 samples over a 16-hour period. The total expected flow
over this period is 1,750,000 gallons. The flow meter pulse frequency output is
one pulse for every 1,000 gallons.
1. Determine the flow increment between samples:
f
2. Multiply the flow increment, f, by the pulse frequency output of the flow meter.
85,000 gallons
----
-------------------------------------- - 3,542 gallons/sample== =
n
24 samples
Q
1,750,000 gallons
----
---------------------------------------------- - 36,458 gallons/sample== =
n
48 samples
1 pulse
---------------------------
× 70.84 pulse/sample=
50 gallons
1 pulse
36,458 gallons/sample
-----------------------------------
× 36.458 pulses/sample=
1,000 gallons
Therefore, the value for INTV = _ _ _ _ CNTS is 36.
Flow Proportional Sampling, External—Using 4–20 mA Signal Converted to Pulses, Flow Signal Interface
The Flow Signal Interface (Cat. No. 2020) is an optional 4–20 mA interface
that converts 4–20 mA current signals (from a flow meter) to 12
V dc pulses.
At 20 mA, the interface transmits ten 12-volt pulses per minute. As the current
signal decreases, the 12 V pulses decrease proportionally. Typically, users
collect a certain number of samples over a given period of time when
sampling in proportion to the flow rate.
To calculate the number of 12 V dc output pulses between samples,
determine the total number of samples (represented by n in the following
examples) that you want to collect, and the period of time over which you want
to collect them. Use the three-step method presented below to determine the
“Total Count” value that you will enter while programming the Setup section of
the sampler.
1. Calculate Q, where Q is the average flow rate (during the sampling program) divided by the maximum flow rate. (The maximum flow rate corresponds to the 20 mA output of the flow meter.)
2. Calculate t, where t is defined as a/n; n is the total number of samples collected over a given period of time; and a represents time in minutes, over which n samples are collected.
3. Multiply Q x t. Enter the result in the programming step:
INTV = _ _ _ _ CNTS.
Note: The product of Q x t is not necessarily a whole number. You must round off the
result to the nearest whole number.
Page 29
8544operations.fm Flow Proportional Operation
Page 30

Section 4
Use the following examples to help you determine the value that you need to
enter when programming for sampling based on counts.
Example 1
You want to collect 24 samples over a 24-hour period on a 4–20 mA flow
proportional basis.
Average Flow Rate = 3.5 mgd (average flow rate over the 24-hour period)
Maximum Flow Rate = 10 mgd
a = 1440 minutes
1. Calculate Q.
Average Flow Rate
Q
------------------------------------------------------
Maximum Flow Rate
3.5 mgd
--------------------- 0.35 mgd===
10 mgd
2. Calculate t.
a
t
1440 min
-- -
------------------------------ 60 min/sample== =
n
24 samples
3. Multiply Q x t.
0.35 mgd 60 min/sample× 21=
Therefore, the value entered for INTV = _ _ _ _ CNTS is 21.
Example 2
You want to collect 48 samples over a 24-hour period on a 4–20 mA flow
proportional basis.
Average Flow Rate = 1.75 mgd (average flow rate over the 24-hour period)
Maximum Flow Rate = 3 mgd
a = 1440 minutes
1. Calculate Q.
Average Flow Rate
Q
------------------------------------------------------
Maximum Flow Rate
1.75 mgd
------------------------ - 0.583 mgd===
3 mgd
2. Calculate t.
a
t
1440 min
-- -
------------------------------ 3 0 min/sample== =
n
48 samples
3. Multiply Q x t.
0.583 mgd 30 min/sample× 17.5=
Therefore, the value entered for INTV = _ _ _ _ CNTS is 18.
Page 30
Flow Proportional Operation
Example 3
You want to collect 96 samples over a 24-hour period on a 4–20 mA flow
proportional basis.
Average Flow Rate = 0.52 mgd (average flow rate over the 24-hour period)
Maximum Flow Rate = 2 mgd
a = 1440 minutes
1. Calculate Q.
Average Flow Rate
Q
------------------------------------------------------
Maximum Flow Rate
0.52 mgd
------------------------ - 0.26 mgd===
2.0 mgd
8544operations.fm
Page 31

2. Calculate t.
a
t
1440 min
-- -
------------------------------ - 15 min/sample== =
n
96 samples
3. Multiply Q x t.
Section 4
0.26 mgd 15 min/sample× 3.9=
Therefore, the value entered for INTV = _ _ _ _ CNTS is 4.
Example 4
You want to collect 32 samples over an 8-hour period.
Average Flow Rate = 70 gpm (average flow rate over the 8-hour period)
Maximum Flow Rate = 210 gpm
a = 480 minutes
1. Calculate Q.
Average Flow Rate
Q
------------------------------------------------------
Maximum Flow Rate
70 gpm
---------------------- - 0.33 gpm===
210 gpm
2. Calculate t.
a
t
480 min
-- -
------------------------------ - 15 min/sample== =
n
32 samples
3. Multiply Q x t.
0.33 mgd 15 min/sample× 4.9=
Therefore, the value entered for INTV = _ _ _ _ CNTS is 5.
Example 5
It is desired to collect 30 samples over a 2-day period.
Average Flow Rate = 0.25 cfs (average flow rate over the 48-hour period)
Maximum Flow Rate = 1 cfs
a = 2,880 minutes
1. Calculate Q.
Average Flow Rate
Q
------------------------------------------------------
Maximum Flow Rate
0.25 cfs
-------------------- - 0.25 cfs===
1 cfs
2. Calculate t.
a
t
2,880 min
-- -
------------------------------ - 96 min/sample== =
n
30 samples
3. Multiply Q x t.
0.25 cfs 96 min/sample× 24=
Therefore, the value entered for INTV = _ _ _ _ CNTS is 24.
You will notice from the previous five examples that the average and
maximum flow rate can be expressed in any units, i.e. mgd, gpm, cfs, etc.
However, express the average and maximum flow rate in the same units for
any given situation.
Page 31
8544operations.fm Flow Proportional Operation
Page 32

Visit http: //www.hach.com
Page 33

Section 5 Maintenance
DANGER
Only qualified personnel should conduct the installation tasks described in this
section of the manual
5.1 Cleaning the Sampler
5.1.1 Cleaning the Sampler Housing
The interior and exterior sampler housing may be cleaned with a damp
sponge and mild detergent. Do not use abrasive cleaners.
5.1.2 Cleaning the Sample Bottles
Clean the bottles using a brush and water with mild detergent, followed by a
fresh water rinse and a diluted water rinse. Glass bottles may also be
autoclaved.
5.1.3 Cleaning the Intake Tubing and Pump Tubing
Clean the tubing by pumping water with mild detergent or other cleaning
solution through the tubing, using the peristaltic pump in Manual Pump Mode.
Press the
5.1.4 No Lubrication Required
The 900 Composite Sampler does not require routine lubrication. Do not
lubricate the pump tube with petroleum jelly, silicone grease, oil, or any other
lubricant, as this will substantially reduce the life of the pump tube and roller
assembly.
MANUAL MODE soft key.
5.2 Pump Tubing Maintenance
5.3 Upgrades, Repairs, General Maintenance
5.4 Electrostatic Discharge (ESD) Considerations
5.5 Internal Maintenance Items
The following item requires access to the inside of the case for repairs:
• Internal desiccant module
• RAM memory battery
5.6 Removing and Opening the Controller
CAUTION Always power the unit OFF and then disconnect all cables from the 900 Composite sampler before removing the controller.
To remove the controller from the controller center section:
1. Turn the unit off by pressing the OFF key.
2. Disconnect and remove all cables to the controller housing, including the
distributor/full bottle shutoff cable.
3. Disconnect all tubing.
Page 33
8544Maintenance.fm Maintenance
Page 34

Section 5
4. Place the controller, face down, on a cloth-covered workbench to prevent
scratching the front panel.
5. Inside the Center Section, remove the four screws that fasten the Controller.
6. Lift the Center Section off the controller.
7. Remove the 17 screws from around the perimeter of the controller
back
panel.
8. Carefully pull open the bottom panel and let the attached connectors swing out of the way.
9. If necessary for the repair being performed, unplug the appropriate
connectors. Always note each connector location before unplugging
anything. Re-installing a plug into the wrong connector can cause
extensive damage.
Note: The front panel gasket has a light coating of grease to help assure a watertight
seal. Do not contaminate the grease or gasket area with dirt or debris during
servicing. Always replace the gasket if it is damaged or missing. Never
reassemble the case without the gasket properly installed.
5.7 Re-installing the Bottom Panel
Note: Always follow the procedure below when re-installing the 900 bottom panel.
Improper panel installation may result in damage to the instrument.
1. Hand tighten each nut until it makes contact with the panel.
2. Tighten the nuts in sequence shown in Figure 9 to 5 in.-lb (0.56 N-m).
3. Repeat the tightening procedure in the same sequence to 10 in.-lb
(1.13
N-m).
Figure 9 Tightening the Nuts on the Bottom Panel
110 2
9
17
8
11
3
12
4
13
Page 34
Re-installing the Bottom Panel
16
5
7
15
14
6
8544Maintenance.fm
Page 35

5.8 Internal Desiccant Module
The Internal Desiccant Module (Cat. No. 787) consists of a
moisture-absorbent material inside a poly bag. If the humidity indicator on the
front panel turns pink, replace the module and the back panel perimeter
gasket. The desiccant module is located under the CPU board.
Note: The desiccant module cannot be recharged by heating. Do not attempt to
the desiccant module in an oven to remove the moisture as this could be a
bake
fire hazard.
5.9 Circuit Board Identification
Figure 10 shows the 900 Composite Sampler circuit board, including:
• Placement of all connectors
• EPROM location
• Lithium Memory Battery
• Desiccant Module installation
Section 5
Figure 10 Circuit Board Description
10
9
8
7
blk
shld
wht
1
900 Main Circuit Board
2
3
4
5
6
rd
blk
Page 35
8544Maintenance.fm Internal Desiccant Module
Page 36

Section 5
1. Desiccant module slides under circuit board 6. J5 Distributor/Full Bottle Shut-off
2. J8 LCD Display 7. J2 12 V dc
3. J6 Auxiliary 8. J3 Fuse
4. J1 Liquid Sensor 9. J4 Motor
5. Lithium Memory Battery 10. J9 Keypad
5.10 Motor/Gear Box
The motor/gear box requires no regular maintenance. The special formulation
gears are self lubricating and require no oil or grease.
5.11 Internal Case Humidity Indicator
After replacing the desiccant module and re-sealing the case, the Internal
Case Humidity indicator disc (Cat. No. 2660) should return to its original blue
color. Replace the indicator disc if it fails to return to blue after replacing the
desiccant module. To replace the indicator disc, remove the bottom panel that
is held in place by a small clip and screw.
5.12 Internal Case Humidity Indicator
5.13 Memory Battery
The humidity indicator is located on the left front side of the controller. If the
humidity indicator is blue, the desiccant is dry. If the indicator turns pink or
white, inspect the electronics housing for seal failure and replace the
desiccant module.
Random Access Memory (RAM) is a very reliable data storage medium for
microprocessor applications. However, RAM requires power at all times. If
power is removed, the data stored in the RAM chip is lost. Therefore, you
cannot power the RAM chips from the 900 Composite Sampler power supply
because you would lose data and program settings every time you unplugged
the power cord. A separate battery located inside the sampler controller is
provided to power the RAM chips and the real-time clock. The memory
battery keeps the program entries and logged sample data alive inside the
RAM memory when the main power fails or is removed for transport or
replacement.
The 900 Composite Sampler memory battery consists of a 1.5 V dc Lithium
cell. The battery is soldered to the main circuit board.
Should the memory battery voltage fall too low to properly maintain the
program settings, a warning:
the battery. The 900 Composite Sampler utilizes a very small amount of
energy from the memory battery during normal operation. The service life of
the batteries in this application is typically five years.
MEMORY POWER LOW will alert you to replace
Page 36
Motor/Gear Box
8544Maintenance.fm
Page 37

Section 6 Contact Information for U.S.A. & Outside Europe
Ordering Information for the U.S.A.
By Telephone:
(800) 635-4567
By Fax:
(970) 461-3915
Ordering information by E-mail:
orders@hach.com
Information Required
• Hach account number (if available)
• Your name and phone number
• Purchase order number
• Brief description or model number
By Mail:
Hach Company
P.O. Box 389
Loveland, Colorado 80539-0389
U.S.A
• Billing address
• Shipping address
• Catalog number
• Quantity
Ordering Information for Outside the U.S.A. and Europe
Hach Company maintains a worldwide network of dealers and distributors. To locate the
representative nearest you, send E-mail to intl@hach.com or visit www.hach.com.
Technical Support
Technical and Customer Service Department personnel are eager to answer questions about our
products and their use. In the U.S.A., call 1-800-635-1230. Outside the U.S.A. and Europe, send
E-mail to intl@hach.com.
Repair Service
Authorization must be obtained from Hach Company before sending any items for repair. Please
contact the Hach Company Service Center serving your location.
Hach Company
P.O. Box 389
Loveland, Colorado, 80539-0389 U.S.A.
Telephone: 1-800-635-1230 or (970) 669-3050
Fax: (970) 669-2932
Contact Information for U.S.A. & Outside Europe
Page 37
Page 38

Section 7 Contact Information for Europe
For technical support, repair service, and ordering information please refer to the contact information below for your
specific country. For additional information, visit www.hach-lange.com.
Austria
Dr. Bruno Lange Ges. MBH
Industriestraße 12
A - 3200 Obergrafendorf
Tel. +43 (0)27 47 74 12
Fax +43 (0)27 47 42 18
info@hach-lange.at
Belgium
Dr. Lange
Motstraat 54
B-2800 Mechelen
Tel. +32 (0)15 42 35 00
Fax +32 (0)15 41 61 20
info@hach-lange.be
Denmark
Dr. Lange Danmark A/S
Jernhoolmen 34-40
DK-2650 Hvidovre
Tel. +45 (0)36 77 29 11
Fax +45 (0)36 77 49 11
info@hach-lange.dk
France
Hach Lange
Hach SAS
33 Rue du Ballon
F-93165 Noisy Le Grand
Tel. +33 (0)1 48 15 80 80
Fax +33 (0)1 48 15 80 00
info@hach-lange.fr
Italy
Dr. Bruno Lange s.r.I.
Via Riccione, 14
I-20156 Milano
Tel. +39 02 39 23 14-1
Fax +33 02 39 23 14-39
info@hach-lange.it
Poland
Hach Lange sp.zo.o.
ul. Opolska 143 a
PL-52-013 Wroclaw
Tel. +48 71 3 42 10 -81
Fax +48 71 3 42 10-79
info@hach-lange.pl
The Netherlands
Dr. Lange Nederland B.V.
Laan an Westroijen 2a
NL-4003 AZ Tiel
Tel. +31 (0) 3 44 63 11 30
Fax +31 (0) 3 44 63 11 50
info@hach-lange.nl
Spain/Portugal
Hach Lange S.L.U.
c/ Araba, 45. Apdo. 220
E-20800 Zarauz/Guipùzcoa
Tel. +34 9 43 89 43 79
Fax +34 9 43 13 02 41
info@hach-lange.es
Germany
Dr. Bruno Lange GmbH
& CO. KG
Willstätterstr. 11
D-40549 Düsseldorf
Tel. +49 (0)2 11 52 88-0
Fax +49 (0)2 11 52 88-143
info@hach-lange.de
Great Britain
Hach Lange LTD
Lennox Road
Basingstoke
Hampshire, RG22 4AP
Tel. +44 (0)12 56 33 34 03
Fax +44 (0)12 56 33 07 24
info@hach-lange.co.uk
Contact Information for Europe
Page 38
Sweden
Hach Lange AB
Vinthundsvägen 159A
S-128 62 Sködal
Tel. +46 (0)8 7 98 05 00
Fax +46 (0)8 7 98 05 03
info@hach-lange.se
Switzerland
Dr. Bruno Lange AG
Juchstrasse 1
CH-8604 Hegnau
Tel. +41(0)1 9 45 66 10
Fax +41(0)1 9 45 66 76
info@hach-lange.ch
Page 39

Section 8 Limited Warranty
Hach Company warrants its products to the original purchaser against any defects that are due to faulty
material or workmanship for a period of *one year* from date of shipment unless otherwise noted in the
product manual.
The sc100 Controller is warranted for two years from the date of shipment.
In the event that a defect is discovered during the warranty period, Hach Company agrees that, at its
option, it will repair or replace the defective product or refund the purchase price, excluding original
shipping and handling charges. Any product repaired or replaced under this warranty will be warranted
only for the remainder of the original product warranty period.
This warranty does not apply to consumable products such as chemical reagents; or consumable
components of a product, such as, but not limited to, lamps and tubing.
Contact Hach Company or your distributor to initiate warranty support. Products may not be returned
without authorization from Hach Company.
Limitations
This warranty does not cover:
• Damage caused by acts of God, natural disaster, labor unrest, acts of war (declared or undeclared),
terrorism, civil strife or acts of any governmental jurisdiction
• Damage caused by misuse, neglect, accident or improper application or installation
• Damage caused by any repair or attempted repair not authorized by Hach Company
• Any product not used in accordance with the instructions furnished by Hach Company
• Freight charges to return merchandise to Hach Company
• Freight charges on expedited or express shipment of warranted parts or product
• Travel fees associated with on-site warranty repair
This warranty contains the sole express warranty made by Hach Company in connection with its
products. All implied warranties, including without limitation, the warranties of merchantability and fitness
for a particular purpose, are expressly disclaimed.
Some states within the United States do not allow the disclaimer of implied warranties and if this is true
in your state the above limitation may not apply to you. This warranty gives you specific rights, and you
may also have other rights that vary from state to state.
This warranty constitutes the final, complete, and exclusive statement of warranty terms and no person
is authorized to make any other warranties or representations on behalf of Hach Company.
Limitation of Remedies
The remedies of repair, replacement or refund of purchase price as stated above are the exclusive
remedies for the breach of this warranty. On the basis of strict liability or under any other legal theory, in
no event shall Hach Company be liable for any incidental or consequential damages of any kind for
breach of warranty or negligence.
Limited Warranty
Page 39
Page 40

Visit us at www.hach.com
Page 41

Section 9 Parts and Accessories
Description Part Number
3-way Splitter Assembly........................................................................................................................................ 939
4–20 mA Interface, 10 ft Cable............................................................................................................................ 2021
900 Series Peristaltic Pump Tubing, 15 ft ...................................................................................................... 4600-15
900 Series Peristaltic Pump Tubing, 50 ft ...................................................................................................... 4600-50
900 Series Peristaltic Pump Tube Insert ............................................................................................................. 8888
All Weather Refrigerated Cabinet, 115 V ac ....................................................................................................... 3548
Anchor Kit ........................................................................................................................................................... 8935
Cascade Sampling for 25-ft Cable ...................................................................................................................... 2817
Desiccant Bag (1 pillow)...................................................................................................................................... 8849
Distributor Arm, 2-and 4-bottle Sampling............................................................................................................ 8846
Distributor Arm, 8-bottle Sampling ...................................................................................................................... 8845
Distributor Arm, 24-bottle Sampling .................................................................................................................... 8844
Door Assembly.................................................................................................................................................... 8702
Flow-thru Module ................................................................................................................................................ 2471
Humidity Indicator ............................................................................................................................................... 2660
Instrument Manual .............................................................................................................................................. 8837
Lid Assembly with Latch...................................................................................................................................... 8968
Multi-purpose Full Cable, 10 ft .............................................................................................................................. 940
Multi-purpose Full Cable, 25 ft .............................................................................................................................. 540
Multi-purpose Half Cable, 10 ft.............................................................................................................................. 941
Multi-purpose Half Cable, 25 ft.............................................................................................................................. 541
O-ring, Main Seal ................................................................................................................................................ 8606
Pump Tubing, 15 ft, For all distributors and 800 series peristaltic pumps ...................................................... 3866-15
Pump Tubing, 50 ft, For all distributors and 800 series peristaltic pumps ...................................................... 3866-50
Strainer, All 316 Stainless Steel, 6.0 in. long x 0.406 in. OD .............................................................................. 2071
Strainer, All 316 Stainless Steel, 7.94 in. long, x 1.0 in. OD ............................................................................... 2070
Strainer, Stainless Steel, 3.9 in. long x 0.406 in. OD .......................................................................................... 4652
Strainer, Teflon®/Stainless Steel, 5.5 in. long x 0.875 in. OD................................................................................ 926
Strainer, Teflon/Stainless Steel, 11.0 in. long x 0.875 in. OD................................................................................ 903
Synchronizing Sampling for 25-ft Cable .............................................................................................................. 2818
Teflon-Lined Connection Kit ................................................................................................................................ 2186
Teflon-lined Tubing, 3/8 in., 10 ft ............................................................................................................................ 921
Teflon-lined Tubing, 3/8 in., 25 ft ............................................................................................................................ 922
Teflon-lined Tubing, 3/8 in., 100 ft .......................................................................................................................... 925
Vinyl Intake Tubing, 3/8 in., 25 ft ............................................................................................................................ 920
Vinyl Intake Tubing, 3/8 in., 100 ft .......................................................................................................................... 923
Vinyl Intake Tubing, 3/8 in., 500 ft .......................................................................................................................... 924
Part Number
Sampler Bottle Type
2.5 gal. Glass 6559 8847 8838 3527 N/A N/A N/A
Composite
Multiple
Bottle
8544parts.fm Parts and Accessories
3 gal. Poly. 1918 8847 8838 3527 N/A N/A N/A
6 gal. Poly. 6494 8847 8838 N/A N/A N/A N/A
(24) 1 L Poly. 737 N/A N/A N/A 1511 1322 8841
(24) 350 ml Glass 732 N/A N/A N/A 1511 1056 8841
(8) 2.3 L Poly. 657 N/A N/A N/A 1511 1322 8842
(8) 1.9 L Glass 1118 N/A N/A N/A 1511 1322 8842
(4) 3 gal. Poly. 2315 N/A N/A N/A N/A N/A 8843
(4) 2.5 gal. Glass 2317 N/A N/A N/A N/A N/A 8843
(2) 2.5 gal. Glass 2318 N/A N/A N/A N/A N/A 8843
(2) 3 gal. Poly 2316 N/A N/A N/A N/A N/A 8843
Bottle
Full Bottle
Shut-Off
Tube
Support
Extension
Tube
Bottle
Tray/Positioner
Retainer Distributor
Page 41
Page 42

Visit http: //www.hach.com
Page 43

Appendix A Programming Flow Chart
Program Flow Chart
Ready to Start Program Halted Program Complete
Bottle Setup - Press \
Press
NEW
PROGRAM
key
to start here
Enter units for bottle volume (ML or Gal)
Enter bottle volume (in specified units)
If previously entered parameters are desired for another (new) program, it is not
necessary to re-enter the parameters. Simply press the NEW PROGRAM key and start
here:
Program Delay?
NO
Timed Mode?
YES
YES
Set Time Interval Between Samples
Other Changes?
YES
Composite Mode?
YES
Continuous Mode?
NO
Set # of Samples
YES
Sample Volume = XXXX
YES
Calibrate Volume?
YES
Ready to Pump?
YES
Stop at Mark
Try Again?
YES
Change Volume?
NO
YES
NO
Enter I.D. # XXXX
Set Hour, Minute, AM/PM, Month/Day/Year
NO
NO
Set-up Complete - Ready To Start
(Float switch across pinsB&DontheAUXconnector)
NO
NO
Ready to
Flow Mode?
YES
Set Flow Interval Between Samples
Liquid Level Control
Start
Program
Halted
Press and hold the
CLEAR ENTRY key
for 5 seconds
Level Control (Y/N)
Program
Complete
Set-up Complete - Ready To Start
Page 43
8544apdx_pulsecounts.fm Programming Flow Chart
Page 44

Visit http: //www.hach.com
Page 45

Appendix B Batteries and Chargers
Lead-Acid (Gel Cell) Batteries
Lead-acid batteries are designed to prevent electrolyte leakage from the
terminals or case. The electrolyte is suspended in a gel, which ensures safe,
efficient operation in any position. Gel cells are classified as “Non-Spillable”
and meet all requirements of the International Air Transport Association.
Maintenance
These lead-acid batteries are maintenance-free.
Note: The use of chargers other than those provided by manufacturor for use with these batteries is not recommended and may damage the battery or shorten its life.
Charging
The lead-acid cells are designed to be fully charged in 22 to 24 hours using a
lead-acid battery charger. Do not exceed 24
hours or you may damage or
shorten the life of the battery. The charge rate is 500 mA dc.
Temperature
At higher temperatures, the electrical capacity that can be taken out of a
battery increases. At lower temperatures, the electrical capacity that can be
taken out of a battery decreases. However, excessive heat destroys batteries.
Avoid placing batteries near heat sources of any kind. To maximize battery
life, operated the battery at an ambient temperature of 20 °C (70 °F). The
permissible operating temperature range is -15 to 50 °C, however, use in the
5
to 35 °C temperature range is recommended.
Storage
Store lead-acid batteries in a cool, dry place. Their low self-discharge rate and
excellent charging characteristics permit storage for up to one year without
loss of efficiency or appreciable deterioration of battery performance.
At room temperature the self-discharge rate of lead-acid batteries is
approximately 3% of rated capacity per month. The self-discharge rate will
vary as a function of ambient storage temperature.
Figure 1 on page 45 shows the storage self-discharge characteristics of lead-
acid batteries at various ambient temperatures. Table 3 on page 46 shows
recommended storage times for lead-acid batteries.
Figure 1 Battery Discharge Characteristics
Gel Cell Self Discharge Characteristics
100%
80%
60%
40%
20%
Remaining Capacity
0%
0369
Storage Time (months)
8544apdx_batteries.fm Batteries and Chargers
12
15 18
0 °C
10 °C
20 °C
30 °C
40 °C
Page 45
Page 46

Appendix B
Tabl e 3 Lead-Acid Battery Storage Recommendations
Nickel-Cadmium Batteries
Nickel-cadmium batteries provide superior power capabilities when used at
low temperatures. They also perform a higher number of charge/discharge
cycles than lead-acid batteries.
Maintenance
Nickel-cadmium cells are of a sealed construction. They contain no free
electrolyte, and in most cases require no service or maintenance other
than recharging.
Note: The use of chargers other than those provided by the manufacturor for use with these batteries is not recommended and may damage the battery or shorten its life.
Charging
Charge new nickel-cadmium batteries prior to use due to their self-discharge
rate.
Nickel-cadmium cells are designed to be fully charged using a nickelcadmium battery charger within 14 to 16 hours. Do not exceed 16 hours or
you may damage or shorten the life of the battery. The charge rate is 400 mA
dc.
Storage Temperature
0 to 20 °C 12 months
21 to 30 °C 9 months
31 to 40 °C 5 months
41 to 50 °C 2.5 months
Maximum Recommended
Storage Time
Storage
At room temperature, the self discharge rate of nickel-cadmium batteries can
be as high as 2% per day. When charged cells have been stored for a long
period of time, or at an elevated temperature, a change starts to take place in
the negative probe. The structure changes so that it is less reactive than a
fresh cell. This structure will return to normal after one or two
charge/discharge cycles. Batteries that have been stored for extended
periods of time (longer than one week) should be fully charged prior to use.
Nickel-cadmium cells can be stored for extended periods of time, in either a
charged or discharged condition, without significant degradation in their
performance. However, after long storage periods, the battery pack may
require a few charge/discharge cycles to restore its full capacity.
Table 4 Nickel-Cadmium Battery Storage Recommendations
Storage Temperature
20 to 30 °C 9 months
30 to 40 °C 5 months
over 40 °C 3 months
Maximum Recommended
Storage Time
Page 46
Batteries and Chargers
8544apdx_batteries.fm
Page 47

Appendix C Exploded View Drawings
Exploded View (1 of 6)
1
2
3
6
4-5
Item Number Description QTY Part Number
1 Pump Assembly 1 1075
2 Overlay 1 906
3 Pump Tube Insert 1 2441
4 Hex Nut 4 SE 403
5 Threadlock 4 SE 957
6 Flat Washer 4 SE 400
Page 47
8544apdx_engdraw.fm Exploded View Drawings
Page 48

Appendix C
Exploded View (2 of 6)
1
2
3
6
Item Number Description QTY Part Number
1 Latch 1 2279
2 Keypad Cable Assembly 1 8586
3 Screw 6 SE 340
4 CPU PCB Assembly 1 8921
5 900 Controller Cover 1 8611
6 PCB Shield Plate 1 8624
4
5
Page 48
Exploded View Drawings
8544apdx_engdraw.fm
Page 49

Exploded View (3 of 6)
29
28
26-27
25
24
23
22
21
20
Appendix C
1
2
3
4
19
18
Item
Number
1 900 Controller Case 1 8619 16 O-ring Lubricant 1 SE 1048
2 Hex Nut 4 SE 701 17 Mounting Plate 1 2547
3 Screw/Threadlock (SE 957) 2 SE 747 18 Auxiliary Cable Assembly 1 8913
4 PCB Assembly 1 8538 19 Connector Cap 1 2859
5 Screw 2 SE 747 20 Screw 12 SE 229
6 Threadlock 2 SE 957 21 Slow Blow Fuse, 5A, 250 V 1 8753
7 Ultrasonic Sensor Gasket 1 8609 22 O-ring 1 3321
8 Retainer Plate 1 2548 23 Fuse Holder, 5 x 20 mm 1 3320
9 Retainer Plate Gasket 1 2550 24 O-ring 1 3319
10 Hex Nut 1 SE 701 25 Fuse Mounting Plate 1 8540
11 Humidity Indicator Overlay 1 4319 26 Mounting Plate Gasket 1 2556
12 Retainer Plate 1 2554 27 O-ring Lubricant 1 SE 1048
13 O-ring Lubricant 1 SE 1048 28 Mounting Plate 1 2555
14 Retainer Plate Gasket 1 2557 29 Fuse Holder Cable Assy. 1 3146
15 Mounting Plate 1 2549
17
15-16
14
12-13
Description QTY
11
Part
Number
10
Item
Number
8
9
Description QTY
Number
5-6
7
Part
Page 49
8544apdx_engdraw.fm Exploded View Drawings
Page 50

Appendix C
Exploded View (4 of 6)
1
2
3
4
5
6
Item
Number
1 5 Amp Fuse Label 1 8537 6 Hex Nut (tighten to 16 in./lb) 17 SE 301
2 Overlay 1 8807 7 Distributor Cable Assembly 1 8539
3 Screw 1 SE 343 8 900 Controller Cover 1 8611
4 Desiccant Bag 1 8849 9 Lock Nut 1 8783
5 Lock Washer 17 SE 302 10 O-ring Main Seal 1 8606
Description QTY
Part
Number
Item
Number
Description QTY
10
9
8
7
Part
Number
Page 50
Exploded View Drawings
8544apdx_engdraw.fm
Page 51

Exploded View (5 of 6)
8
Appendix C
21
22
1
3
4
5
6-7
2
8
9
10
11
12
13
14
15
16
17
19-20
1
Item
Number
Description QTY
Part
Number
Item
Number
Description QTY
Number
1 Gearbox Assembly 1 8910 12 Screw 1 SE 214
2 Motor Cable Assembly 1 8859 13 Lock Washer 1 SE 208
3 Screw 1 SE 229 14 Desiccant Card Bracket 1 2594
4 Internal Power Cable Assy. 1 8917 15 Humidity Indicator Card 1 2660
5 Connector Mounting Plate 1 2555 16 Retainer Plate Gasket 1 2557
6 Mounting Plate Gasket 1 2556 17 Retainer Plate 1 2554
7 O-ring Lubricant 1 SE 1048 18 Adhesive 1 SE 1062
8 Screw 4 SE 244 19 Screw 4 SE 738
9 Bracket 1 8898 20 Threadlock 4 SE 957
10 Display Assembly 1 8911 21 Connector Cap 1 2660
11 Screw 4 SE 105 22 Threadlock 1 SE 957
Part
Page 51
8544apdx_engdraw.fm Exploded View Drawings
Page 52

Appendix C
Exploded View (6 of 6)
9
1
11
10
Insert wires into
motor terminals from
gearbox side. Solder
wires directly to motor
terminals—snip any
excess wire as
necessary.
(2 PLCS)
8
Item Number Description Part Number
1 CPU PCB Assembly 8921
2 Distributor (J5) —
3 Auxiliary (J6) —
4 Pin 2 (J3) —
5 Power (J2) —
6 Cable Assembly Fuse Holder 3146
7 Fuse Holder, 5 x 20 mm 3320
8 Gearbox Assembly 8910
9 Motor Cable Assembly 8859
10 Keypad (J9) —
2
4
7
6
5
3
Page 52
Exploded View Drawings
8544apdx_engdraw.fm
 Loading...