

Page 1

16900-08
Digital Titrator
Model 16900
© Hach Company, 1980-2006. Digital Titrator manufactured under U.S. patent 4,086,062. jk/dk June 2006 24 ed
All rights reserved.
Page 2

2
Page 3

TABLE OF CONTENTS
SPECIFICATIONS.................................................................................................................... 7
OPERATION..........................................................................................................................9
GENERAL DESCRIPTION ................................................................................................... 11
1.1 Introduction ....................................................................................................................... 11
1.1.1 Following a Procedure for the First Time................................................................ 12
1.2 Step-By-Step ..................................................................................................................... 13
1.3 Helpful Hints..................................................................................................................... 18
1.3.1 To Reuse a Partially Emptied Cartridge .................................................................. 18
1.3.2 To Calculate Titrant Volume Used........................................................................... 18
1.3.3 To Fill Your Own Titration Cartridges..................................................................... 18
1.3.4 Verifying Technique................................................................................................. 19
1.4 Adapting a Buret Titration to the Digital Titrator ............................................................. 22
1.5 Using PermaChem
1.6 Safety................................................................................................................................. 24
TITRATION PROCEDURES ..........................................................................................27
®
Powder Pillows................................................................................ 23
ACID-BASE
Acid Determination................................................................................................................. 29
Base Determination................................................................................................................. 31
ACIDITY
Methyl Orange Method ........................................................................................................... 35
Phenolphthalein (Total) Method.............................................................................................. 37
ALKALINITY
Phenolphthalein and Total Method ......................................................................................... 41
AMMONIA, HIGH RANGE (Ammonium Hydroxide)
Ammonia Titration Procedure................................................................................................. 49
CARBON DIOXIDE
Using Sodium Hydroxide........................................................................................................ 55
CHELANT, FREE
Using Magnesium Chloride .................................................................................................... 59
CHELANT, TOTAL
Using Bismuth Nitrate............................................................................................................. 63
3
Page 4

TABLE OF CONTENTS, continued
CHLORIDE
Mercuric Nitrate Method ........................................................................................................ 67
Silver Nitrate Method ............................................................................................................. 68
CHLORINE, FREE AND TOTAL
DPD-FEAS Method................................................................................................................ 75
CHLORINE, TOTAL
Iodometric Method (1 to 400 mg/L as Cl
Iodometric Method (20 to 70,000 mg/L as Cl
CHLORINE, FREE
Amperometric Forward Titration............................................................................................ 87
CHLORINE, TOTAL
Amperometric Back Titration................................................................................................. 93
CHLORINE, TOTAL
Amperometric Forward Titration.......................................................................................... 105
CHROMATE
Using Sodium Thiosulfate .................................................................................................... 113
Using Sodium Thiosulfate) ................................. 79
2
Using Sodium Thiosulfate) .......................... 82
2
HARDNESS DECISION TREE........................................................................................... 119
HARDNESS, CALCIUM
Using EDTA.......................................................................................................................... 121
HARDNESS, TOTAL
Using EDTA.......................................................................................................................... 127
HARDNESS, TOTAL, SEQUENTIAL
Sequential Titration Procedure (Limited Sample)................................................................ 135
HYPOCHLORITE (Bleach)
Iodometric Method ............................................................................................................... 143
IRON
®
Using the TitraVer
Titration Cartridge ............................................................................... 147
NITRITE
Using Ceric Standard Solution ............................................................................................. 151
4
Page 5

TABLE OF CONTENTS, continued
OXYGEN, DISSOLVED
Azide Modification of Winkler Method................................................................................ 155
Using a 300-mL BOD Bottle ................................................................................................ 155
Using a 60-mL BOD Bottle .................................................................................................. 157
SALINITY
Using Mercuric Nitrate.......................................................................................................... 161
SULFITE
Using Iodate-Iodide............................................................................................................... 163
TURBIDITY STANDARDS
Preparing Turbidity-Free Water ............................................................................................ 167
VOLATILE ACIDS
Using Sodium Hydroxide...................................................................................................... 173
APPENDIX A
ACCURACY CHECK AND STANDARD ADDITIONS.................................................... 177
GENERAL INFORMATION .........................................................................................189
REPLACEMENT PARTS AND ACCESSORIES ................................................................ 191
HOW TO ORDER................................................................................................................. 193
REPAIR SERVICE................................................................................................................ 194
WARRANTY ........................................................................................................................ 195
5
Page 6

6
Page 7

SPECIFICATIONS
Digital Titrator
Delivery: 800 digits/mL or 0.00125 mL/digit
Accuracy*: ± 1% for readings over 100 digits. (Uncertainty of
readings is 1 digit. Most samples require more than 100 digits.)
Weight: 132 g (4.7 oz.)
Cartridges for the Digital Titrator
Volume: 13 mL
Number of tests: Most reagents are formulated to provide 100
typical titrations; the number may vary depending on sample
concentration.
Weight (full): 56.75 g (2 oz.)
* Overall method accuracy includes, in addition to the Digital Titrator, other sources of error controlled
by the analyst. The other sources of error include: sampling, sample volume, dilution (if required), end
point detection, reagent quality, and interferences.
7
Page 8

8
Page 9

OPERATION
DANGER
Handling chemical samples, standards, and reagents can be dangerous. Review the necessary
Material Safety Data Sheets and become familiar with all safety procedures before handling
any chemicals.
DANGER
La manipulation des échantillons chimiques, étalons et réactifs peut être dangereuse. Lire les Fiches
de Données de Sécurité des Produits (FDSP) et se familiariser avec toutes les procédures de sécurité
avant de manipuler tous les produits chimiques.
PELIGRO
La manipulación de muestras químicas, estándares y reactivos puede ser peligrosa. Revise las fichas
de seguridad de materiales y familiarícese con los procedimientos de seguridad antes de manipular
productos químicos.
GEFAHR
Das Arbeiten mit chemischen Proben, Standards und Reagenzien ist mit Gefahren verbunden.
Es wird dem Benutzer dieser Produkte empfohlen, sich vor der Arbeit mit sicheren Verfahrensweisen
und dem richtigen Gebrauch der Chemikalien vertraut zu machen und alle entsprechenden
Materialsicherheitsdatenblätter aufmerksam zu lesen.
PERIGO
A manipulação de amostras, padrões e reagentes químicos pode ser perigosa. Reveja a folha dos
dados de segurança do material e familiarize-se com todos os procedimentos de segurança antes
de manipular quaisquer produtos químicos.
9
Page 10

10
Page 11
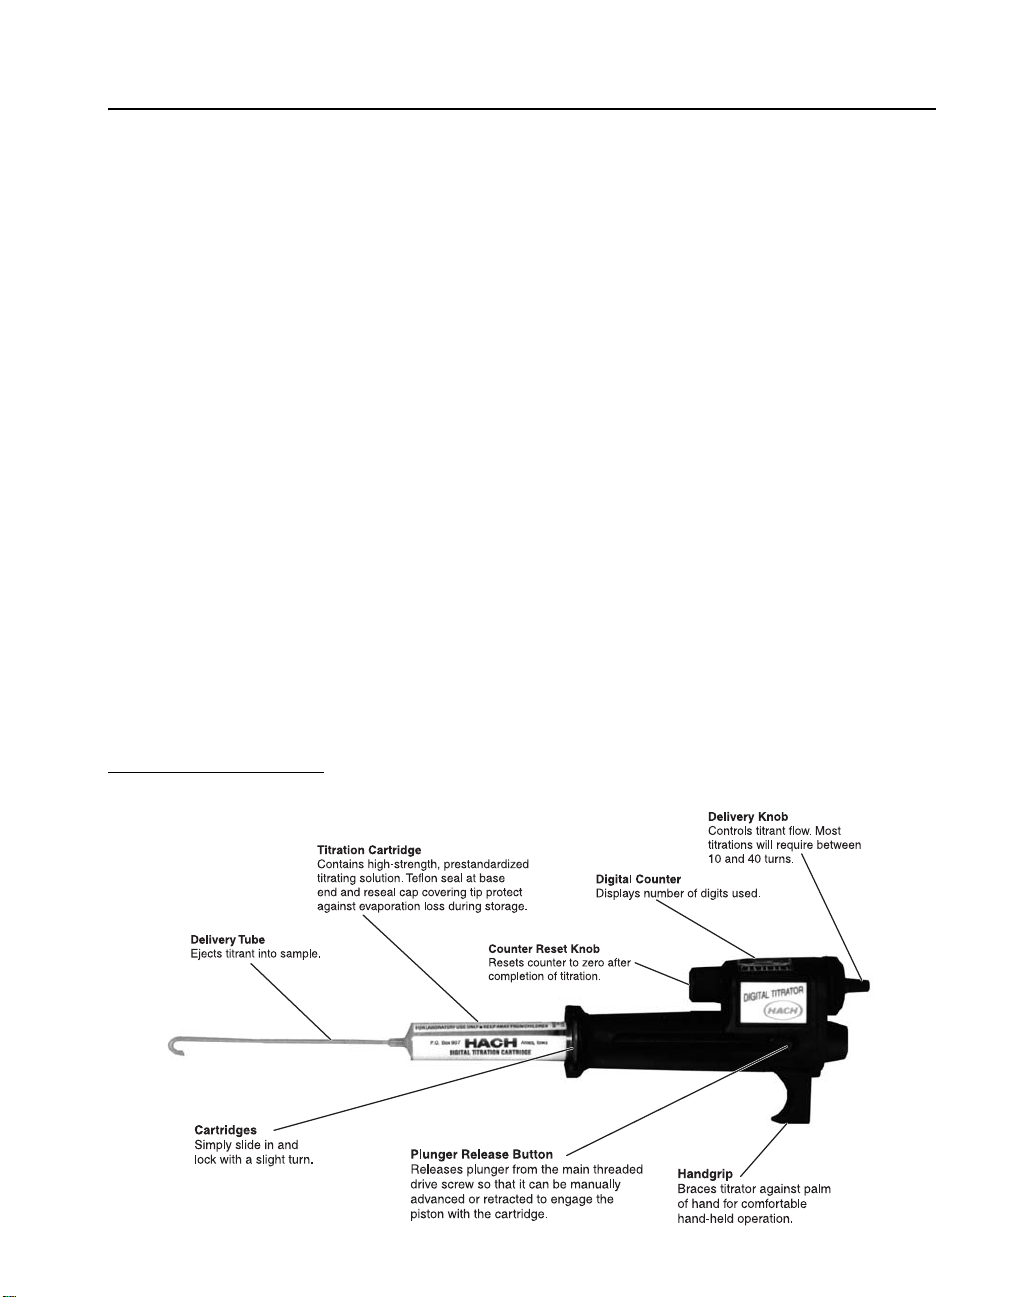
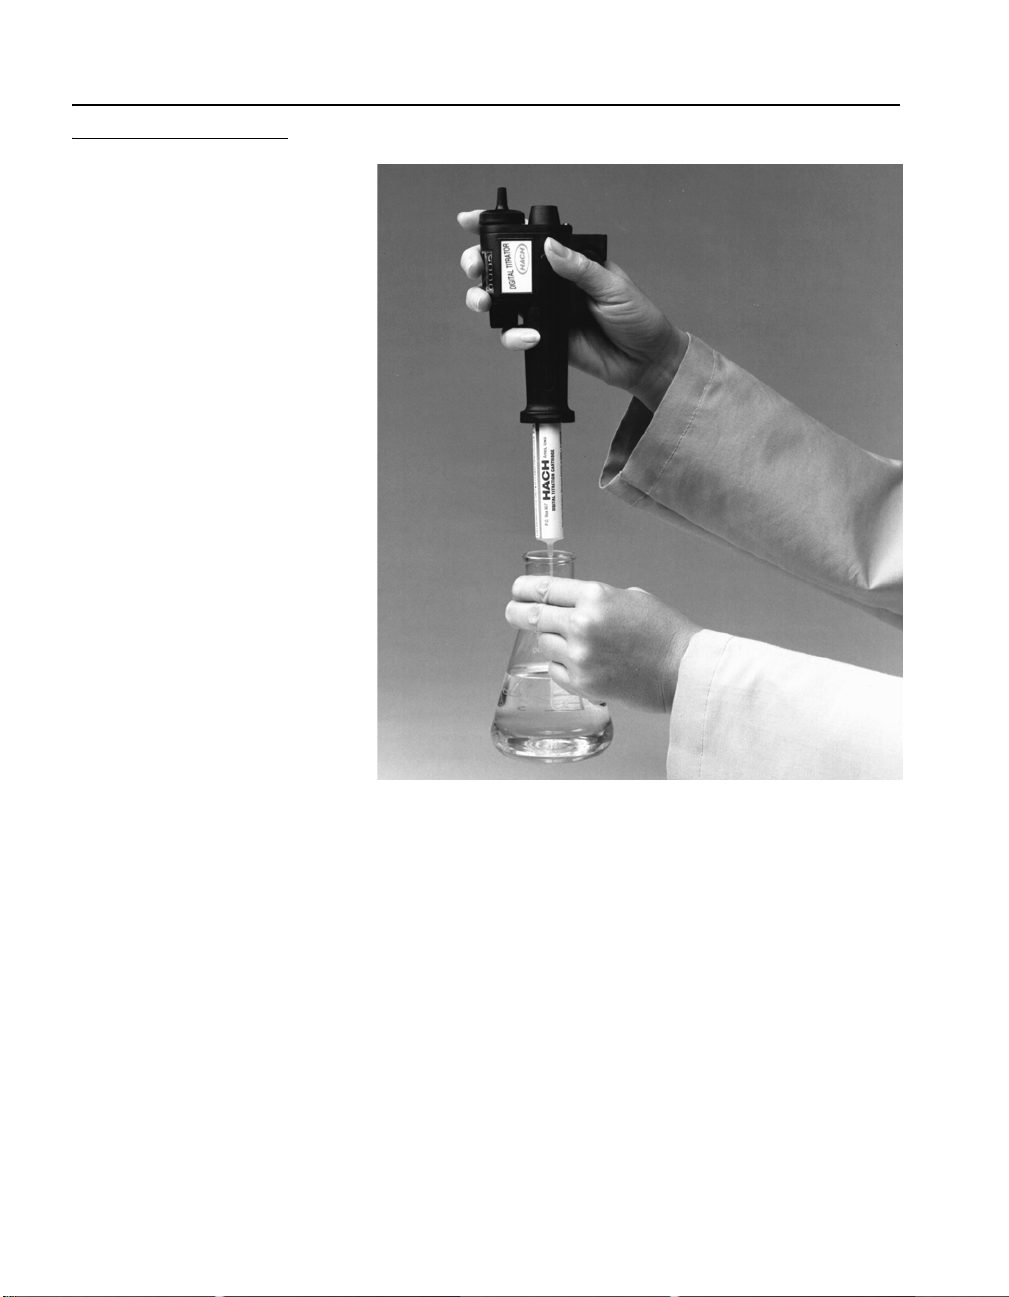
GENERAL DESCRIPTION
1.1 Introduction
Hach’s Digital Titrator is a new concept in titrimetric analysis. It
is a precision dispensing device fitted with compact cartridges
that contain concentrated titrants. Accurate titrations are made
without the bulk and fragility of conventional burets.
A main drive screw in the Digital Titrator controls a plunger
which forces the concentrated titrant from a titration cartridge in a
carefully regulated flow. The titrator body is constructed of
precision-molded, heavy-duty, chemical- and impact-resistant
acetal plastic. Accuracy is rated at ± 1% or better for a titration of
more than 100 digits. For titrations less than 100, accuracy is ± 1
digit.
Titration solutions (titrants) are packaged in disposable
polypropylene or Kynar
neoprene seals and polyethylene resealable closures to cover the
cartridge tips. Each cartridge contains approximately 13 mL of
titrating solution, enough for 50–100 average titrations. Titrant
solutions are typically controlled to ± 0.5% concentration with
normality and tolerances listed on the label. Titrant
concentrations are designed for titrations of 10 to 40 turns
(100 to 400 digits) of the delivery knob. For the most commonly
used concentration ranges, the digits appearing in the counter
window correspond to the sample concentration.
®
containers with Teflon-covered
Figure 1 Hach Digital Titrator
11
Page 12

GENERAL DESCRIPTION, continued
Both portable and fixed-position titrations are possible with the
Digital Titrator. The instrument has a grip for hand-held operation
or it can be clamped to a TitraStir
for stationary setups. See Figure 1.
Each Digital Titrator comes with five delivery tubes and a
methods manual, which covers the most commonly tested
parameters and the corresponding titrant cartridges. Right-angle
(ninety-degree) delivery tubes for stationary setups are available
as an optional accessory.
1.1.1 Following a Procedure for the First Time
Each method is divided into five sections: Procedure, Accuracy
Check, Interferences, Summary of Method, and Reagents and
Apparatus. For more information about how to select a procedure
or for answers to chemical questions, see Hach’s Water Analysis
Handbook (literature 8376). For more information about chlorine
measurement, also see the technical booklet titled, Current
Technology of Chlorine Analysis for Water and Wastewater
(literature 7019).
The Procedure details how to perform the method step-by-step.
To select the appropriate sample volume and titration cartridge
based on expected sample concentration, use the tables provided
in each procedure. If the expected sample concentration is not
known, start with one of the smaller sample volumes and
determine its approximate concentration. Retest with the
appropriate sample size.
®
Stir Plate or laboratory stand
The ranges in the table overlap to offer more flexibility. In most
procedures, the number of digits used for each concentration
range will be 100 to 400 digits.
To determine the actual concentration of the sample, use the
correct digit multiplier for the sample volume and titration
cartridge used.
Throughout the procedure, the notes will provide
additional information.
The Accuracy Check provides a way to verify the results and
determine if interferences are present. It also provides a method
for checking the performance of reagents, the Digital Titrator and
the operator’s technique. Further information is provided in
Appendix A, Accuracy Check and Standard Additions.
12
Page 13
GENERAL DESCRIPTION, continued
The Interferences section identifies common interferences
causing inaccurate results and describes how to eliminate their
effects. The interference levels are based on the sample volume
that has 1.0 as the digit multiplier. Higher interference levels may
be tolerated if a smaller sample is used.
The Summary of Method section discusses the chemical
reaction taking place and information that applies to the
entire procedure.
The Reagents and Apparatus list concludes the procedure. All
the items required to perform the test are listed first and are
available from Hach. The items listed in the notes or interferences
sections are included in the optional listings.
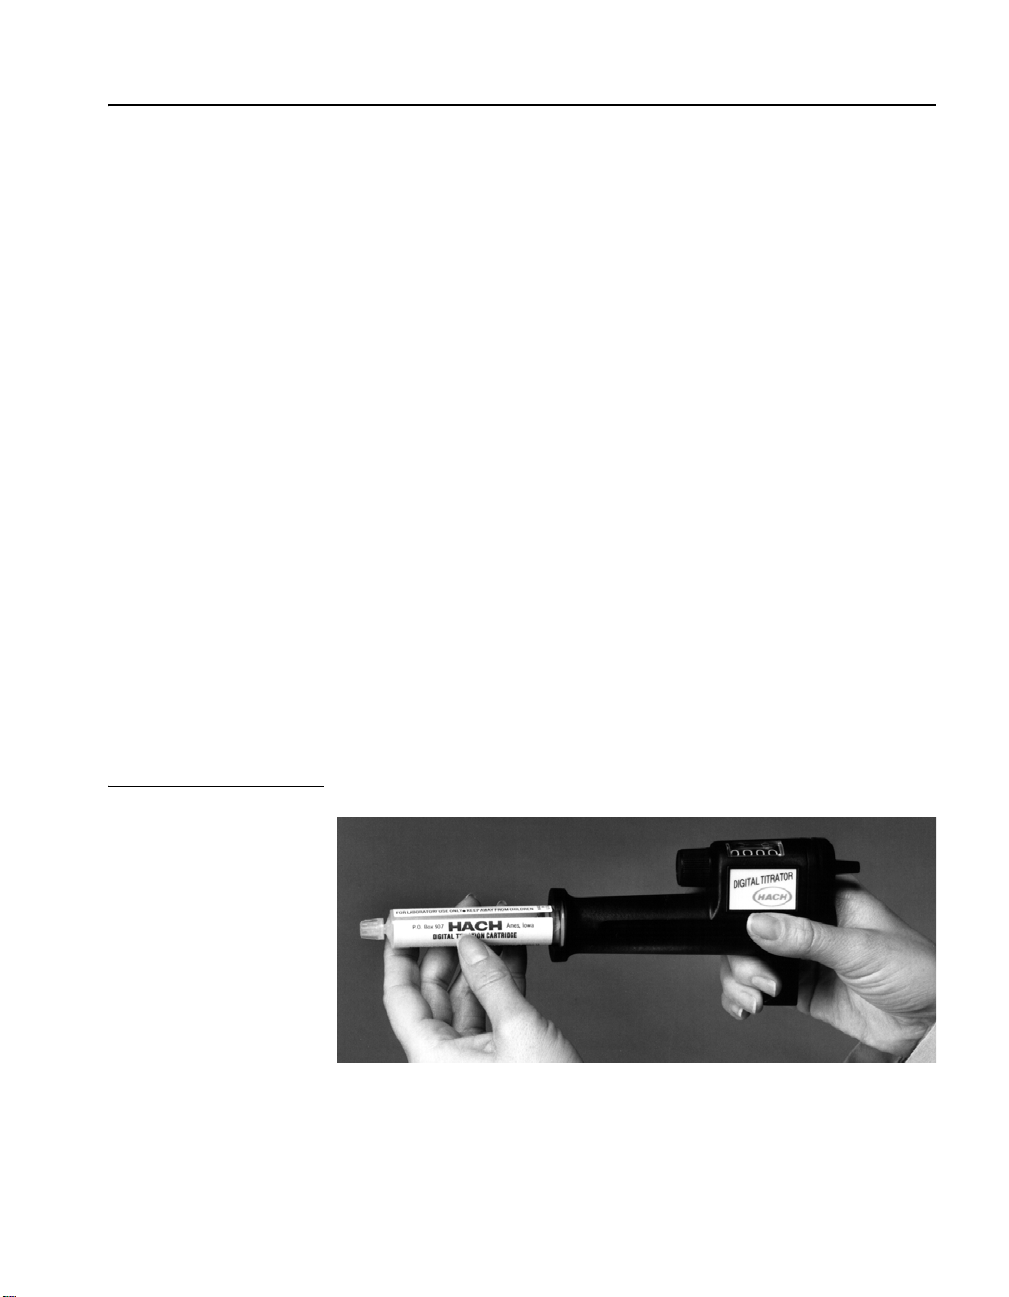
1.2 Step-By-Step
1. Select a sample volume and titration cartridge corresponding
to the expected sample concentration from the table given in
each procedure.
If the expected sample concentration is not known, start with
one of the smaller sample volumes and determine its
approximate concentration. Retest with the appropriate
sample size.
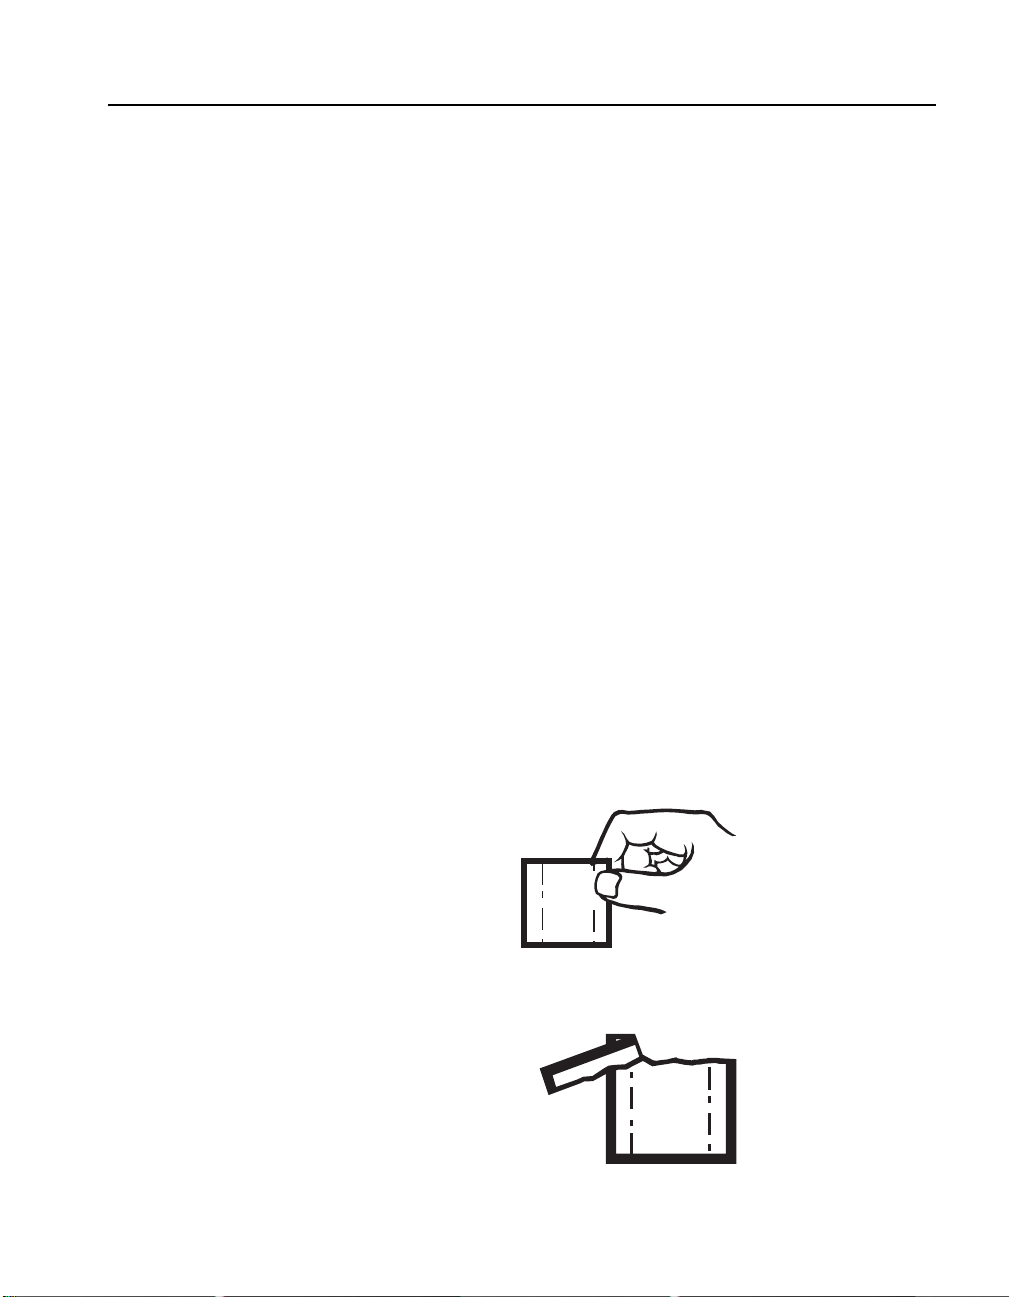
2. Slide the cartridge into the titrator receptacle and lock in
position with a slight turn. See Figure 2.
Figure 2 Sliding the Cartridge into Place
3. Remove the polyethylene cap and insert a clean delivery tube
into the end of the cartridge until it is tight. See Figure 3. Use
a straight tube with a hook at the end for hand-held titrations;
use a 90° tube with a hook at the end for stationary setups.
13
Page 14
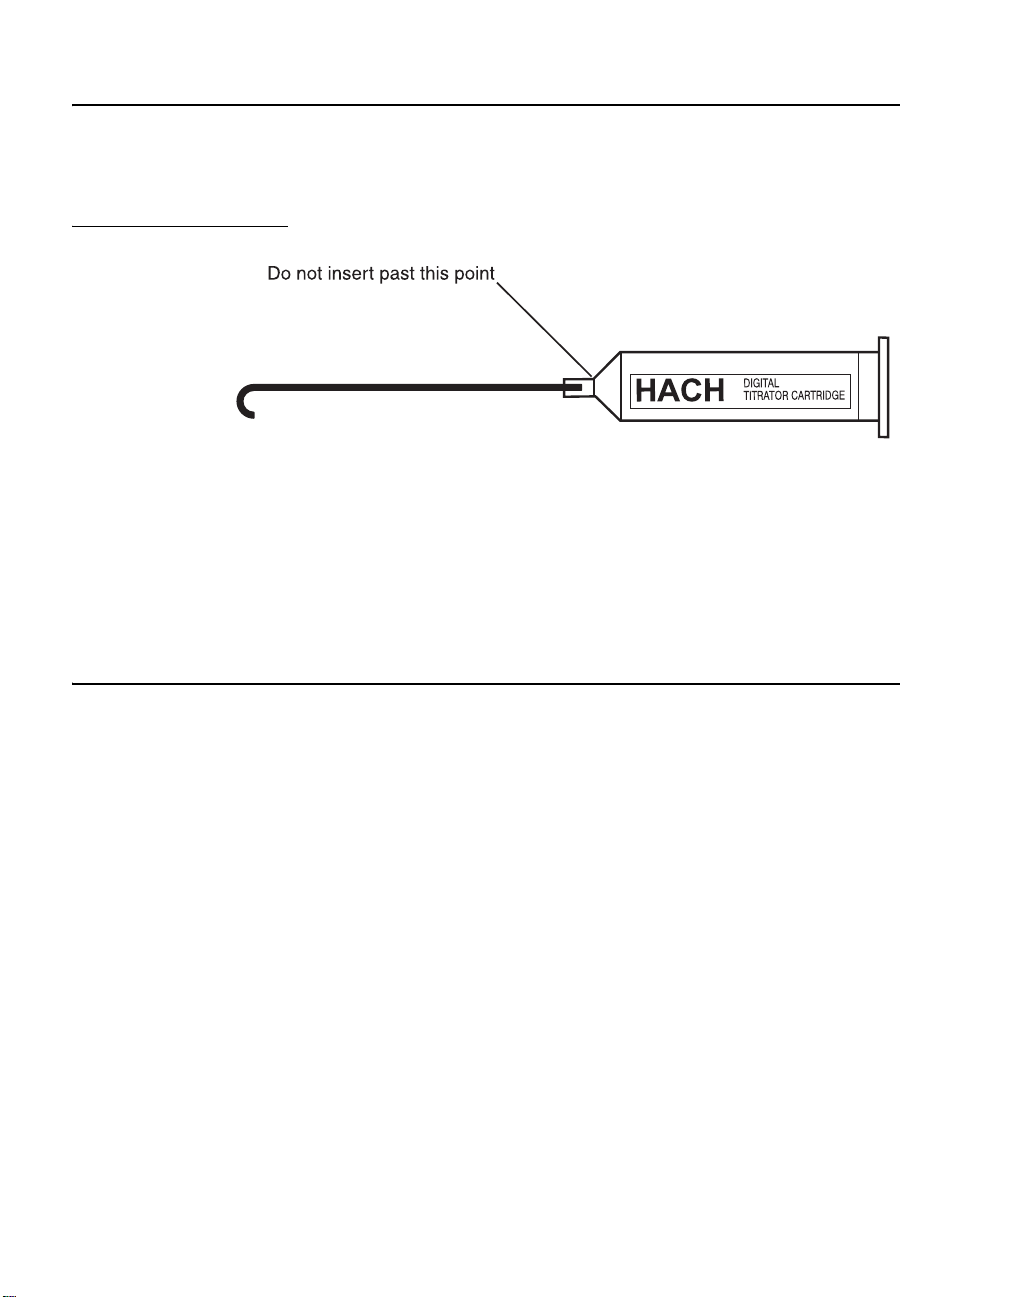
GENERAL DESCRIPTION, continued
Do not insert tube past cartridge extension; see illustration
below. In some instances, it might be necessary to remove a
small burr on the leading edge of the tube before insertion.
Figure 3 Inserting the Delivery Tube
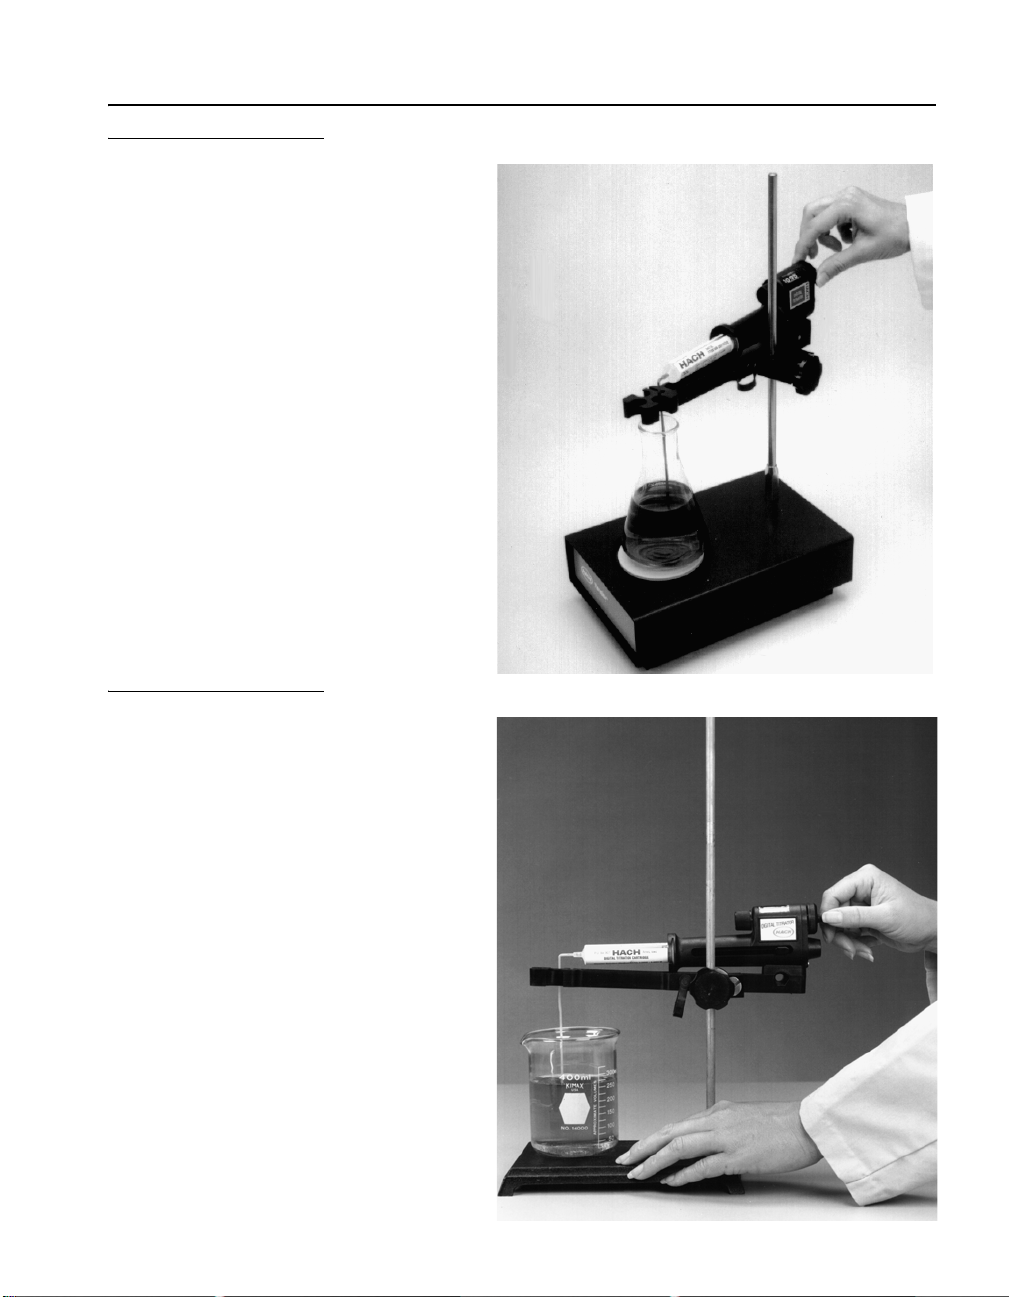
4. For stationary titrations, use a TitraStir Stir Plate or a clamp
holder and clamp to attach the titrator to a laboratory stand.
See Figure 4 and Figure 5.
The TitraStir Stir Plate holds the Digital Titrator during the
titration and also stirs the sample at a constant speed, leaving
the analyst free to detect the end point. When a TitraStir Stir
Plate is used, substitute or add the following
Optional Apparatus.
APPARATUS
Quantity Required
Description Per Test Unit Cat. No.
Delivery Tubes, 90° with hook for TitraStir® Stir Plate........... 1 ............. 5/pkg .......... 41578-00
Flask, Erlenmeyer, 125 mL....................................................... 1 ............... each .............. 505-43
Flask, Erlenmeyer, 250 mL....................................................... 1 ............... each .............. 505-46
Stir Bar, 28.6 x 7.9 mm............................................................. 1 ...............each.......... 20953-52
TitraStir
TitraStir
®
Stir Plate, 115 Vac....................................................1 ............... each .......... 19400-00
®
Stir Plate, 230 Vac....................................................1 ............... each .......... 19400-10
5. To start titrant flowing and flush the delivery tube, hold the
tip of the cartridge up. Advance the plunger release button to
engage the piston with the cartridge (push the button in and
toward the cartridge). Do not expel solution when pushing the
piston toward the cartridge. Turn the delivery knob until air is
expelled and several drops of solution flow from the tip. As
you turn the knob a drive screw pushes a piston against the
cartridge seal and forces liquid out through the delivery tube.
Then use the counter reset knob to turn the digital counter
back to zero and wipe the tip. The tip can be rinsed with
deionized water rather than wiped, if desired.
14
Page 15
GENERAL DESCRIPTION, continued
Figure 4 Using the TitraStir® Stir Plate
Figure 5 Using a Laboratory Stand
15
Page 16
GENERAL DESCRIPTION, continued
Figure 6 Titrating the Sample
6. Use the smallest appropriate graduated cylinder or pipet to
measure the sample volume from the given table. Transfer the
sample into a 125-mL or 250-mL Erlenmeyer flask. Dilute to
the appropriate total volume with deionized water
if necessary.
Note: Sample volume measurements and dilutions (if required) must be
made accurately. However, final total volume of titrated solution is
not critical.
7. Add the necessary reagents to the sample and swirl to mix.
8. Immerse the delivery tube tip in the solution and swirl the
flask while titrating. Titrate by turning the delivery knob.
Keep turning the knob and swirling the sample until the end
point is reached. Record the number of digits that appear in
the digital counter window. See Figure 6.
16
Page 17

GENERAL DESCRIPTION, continued
Note: The number of digits required will usually range from 100 to 400.
In nearly all of the procedures if the digits required is less than 100
or more than 400, an alternate sample volume or titrant cartridge
should be used.
Note: Inaccurate results will occur if the delivery tube tip is held out of
the solution rather than under the solution surface.
9. Calculate the concentration of your sample by using the
following formula:
Digits Required Digit Multiplier× Sample Concentration=
Where:
Digits Required = the number that appeared in the digital counter
window in Step 8.
Digit Multiplier = the number from the table given in the procedure.
It takes into account the sample dilution and titrant strength.
10. After completing testing for the day, press the plunger release
button and manually retract the plunger into the body of the
titrator. Remove the cartridge. Remove the delivery tube and
reseal the cartridge with the polyethylene cap. See Figure 7.
Figure 7 Retracting the Plunger
11. Discard or clean the delivery tube immediately after use. To
clean, force water, then air, into the tube opening with a
syringe or wash bottle.
17
Page 18

GENERAL DESCRIPTION, continued
1.3 Helpful Hints
1.3.1 To Reuse a Partially Emptied Cartridge
1. With the plunger fully retracted, attach cartridge to
the titrator.
2. Press the plunger release; then manually push the plunger
against the cartridge seal.
3. Attach a delivery tube. Hold the tip of the cartridge up. Eject
air and a few drops of titrant, zero the counter, and wipe
the tip.
4. Titrate as usual.
1.3.2 To Calculate Titrant Volume Used
Normalities of many Hach titration cartridge solutions have been
designed so that the number of digits used in a titration
corresponds to the sample concentration in mg/L. To determine
the volume used in mL, divide the Digital Titrator reading by 800.
1.3.3 To Fill Your Own Titration Cartridges
Cartridges may be cleaned and refilled, or new empty cartridges,
Cat. No. 14495-01, can be purchased from Hach Company. See
Figure 8. When preparing to refill old cartridges, push the
cartridge seal out of the cartridge with air pressure applied
through the tip. Cap the tip, fill with solution and reinsert the
cartridge seal using care to avoid wrinkling the Teflon sheath.
Filling also can be accomplished at the tip with a syringe.
Figure 8 Digital Titrator Cartridges
18
Page 19

GENERAL DESCRIPTION, continued
1.3.4 Verifying Technique
Whenever procedures are changed or new equipment is used, it is
helpful to run a sample of known concentration. This technique
will confirm the operator is following the procedure correctly and
the new equipment is working properly. One objective important
to Hach Company is making our tests self-verifying. This means
Hach makes the tools available so the operator can check their
own work for accurate results without relying on an outside lab
or chemist.
For most of the tests in this manual, Table 1 on page 20 lists each
procedure, the suggested standard, the volume of standard
needed, the titration cartridge used, and the number of expected
digits when the test is performed correctly. The suggested
standards are Voluette
possible because of their superior accuracy and stability.
To use titration standards follow these steps:
1. Select the procedure of interest and order the appropriate
standard. Use the given catalog numbers.
2. Measure the volume of standard to be used as the sample in
the procedure using a TenSette
®
or PourRite™ Ampules whenever
®
Pipet or Class A pipet.
3. Perform the procedure as written, adding deionized water
as necessary.
4. After titrating, the required number of digits should
approximately equal the expected digits.
Call Hach Technical and Customer Service (1-800-227-4224) for
additional help.
19
Page 20

GENERAL DESCRIPTION, continued
.
Table 1 Titration Standards
Procedure
(Parameter)
Acid-Base:
Standard Description
(Cat. No.)
0.500 N H
(2121-26) 1.0
2SO4
Volum e o f
Standard
Acid
Base 0.500 N Na
2CO3
(14278-10)
Acidity 0.500 N H2SO4 (2121-26) 0.1
Alkalinity 0.500 N Na
Calcium*:
mg/L CaCO
3
10,000 mg/L CaCO
G.d.h. 10,000 mg/L CaCO
(14278-10) 0.1
2CO3
(2187-10)
3
3
(2187-10)
Carbon
10,000 mg/L CO
(14275-10) 0.2
2
Dioxide
Chloride 12,500 mg/L Cl (14250-10) 0.1
(mL)
5.0
1.0
5.0
1.0
1.0
0.1
1.0
0.2
1.0
2.0
0.1
1.0
1.0
Titration Cartridge
(Cat. No.)
1.600 N NaOH
(14379-01)
8.00 N NaOH
(14381-01)
1.600 N H2SO4
(14389-01)
8.00 N H2SO4
(14391-01)
0.1600 N NaOH
(14377-01)
1.600 N NaOH
(14379-01)
0.1600 N H2SO4
(14388-01)
1.600 N H2SO4
(14389-01)
0.0800 M EDTA
(14364-01)
0.800 M EDTA
(14399-01)
0.1428 M EDTA
(14960-01)
0.714 M EDTA
(14959-01)
0.3636 N NaOH
(14378-01)
3.636 N NaOH
(14380-01)
0.2256 N Hg(NO
3)2
(14393-01)
0.2256 N AgNO
3
(14396-01)
1.128 N AgNO
3
(14397-01)
2.256 N Hg(NO
)2
3
(921-01)
Expected
Digits
250
250
250
250
250
250
250
250
100
100
112
112
100
125
125
250
125
20
Page 21

GENERAL DESCRIPTION, continued
Table 1 Titration Standards (Continued)
Procedure
(Parameter)
Standard Description
(Cat. No.)
Chlorine ~50 mg/L Cl2
(14268-20)
(see certificate)
~25 mg/L Cl
(26300-20)
Chromate 1000 mg/L Cr
(2231 mg/L CrO
(14664-42)
Hardness:
mg/L CaCO
10,000 mg/L CaCO3 (2187-10)
3
G.d.h. 10,000 mg/L CaCO
Iron 50 mg/L Fe
(14254-10)
1000 mg/L Fe
(2271-42)
Oxygen,
Dissolved****
Sulfite 5000 mg/L SO
10 mg/L as DO
(401-1 1)
3
Volum e o f
Standard
(mL)
2.0
Titration Cartridge
(Cat. No.)
0.02256 N Na
(24091-01)
2
0.5
0.00564 N FEAS
(22923-01)
1.0 0.2068 N Na2S2O3
)
4
0.1
(22676-01)
0.0800 M EDTA
(14364-01)
0.1
0.0800 M CDTA
(14402-01)
1.0
0.800 M EDTA
(14399-01)
1.0
0.800 M CDTA
(14403-01)
(2187-10) 0.2
3
0.1428 M EDTA
(14960-01)
1.0
0.714 M EDTA
(14959-01)
10.0
0.0716 M TitraV er
(20817-01)
10.0
0.716 M TitraVer
(20818-01)
100
0.2000 N Na
(22675-01)
200
2.00 N Na
2S2O3
(14401-01)
(22674-10) 1.0 0.3998 N KIO
(14961-01)
2S2O3
2S2O3
–
KI
3
Expected
Digits
varies**
varies***
223
100
100
100
100
112
112
200
100
500
100
250
* One to two drops of Magnesium Standard Solution (10 g/L as CaCO
) must be added to get a sharp
3
end point. These added drops will not change the results.
** The expected digits equal the volume of standard times the concentration on the certificate (e.g., 2 mL
x 50 mg/L = 100 digits).
*** The expected digits equals the volume of standard times the concentration on the certificate times the
constant, 4. (Example: 0.5 mL x 50 mg/L x 4 = 100 digits)
**** Add one Sulfamic Acid Powder Pillow to the volume of standard and follow Steps 10 to 12 in the
Dissolved Oxygen Procedure. It is not necessary to add the first two reagents.
21
Page 22

GENERAL DESCRIPTION, continued
1.4 Adapting a Buret Titration to the Digital Titrator
Adapt any standard titration procedure using a buret to the Digital
Titrator by using the following procedure.
1. Determine the approximate number of digits required. The
Digital Titrator dispenses 1 mL per 800 digits on the counter.
Using the following equation, determine the digits required
for your buret method.
Digits Required
NtmLt800××
-------------------------------------- -=
N
c
Where:
Nt = Normality of buret titrant
mLt = milliliters of buret titrant required for an average titration
= Normality of Digital Titrator cartridge
N
c
2. If the number of digits required is within the range of 70 to
350, you can use the procedure as written, substituting the
Digital Titrator directly for the buret. Or, if the number of
digits is outside of this range, make the
following modifications:
a. If the number of digits required is more than 350, reduce
the sample size to save titrant.
b. If the number of digits required is less than 70, increase
the sample size to increase precision.
c. If the sample size is altered, adjust the amount of
buffering or indicating reagents by the same proportion.
3. When using the Digital Titrator for your buret method, note
the number of digits required for a sample titration. To
convert the digits required to the equivalent number of
milliliters if the buret method was used, calculate:
N
c
Equivalent Buret Milliliters Digits Required
----------------------
×=
800 x N
t
If the sample size was changed, adjust the equivalent buret
milliliters accordingly. If the sample size was increased, reduce
the equivalent buret milliliters; if the sample size was reduced
increase the equivalent buret milliliters. Multiply the equivalent
22
Page 23
GENERAL DESCRIPTION, continued
buret milliliters by any normally used factors to calculate
concentration in oz/gal, g/L, etc.
Example: Adapt a buret procedure, which normally requires
about 20 mL of a 0.4 N titrant, to the Digital Titrator. Try an 8.0 N
titration cartridge. The first equation above gives:
Digits Required
0.4 20× 800×
------------------------------------- 80 0 di g its==
Because this would use excessive titrant, reduce the sample size
to one fourth its normal size to reduce the digits required to 200,
well within the recommended range.
Upon completion of the titration using the smaller sample size,
calculate the equivalent buret milliliters by the second equation
above. If 205 were the digits required:
Equivalent Buret Milliliters
Multiply the 5.13 mL by 4 to account for the reduction in sample
size to give the true equivalent buret milliliters of 20.5 mL. If the
buret method called for multiplying the number of milliliters of
titrant by a factor to calculate the concentration of a sample
component, then multiply 20.5 by that factor.
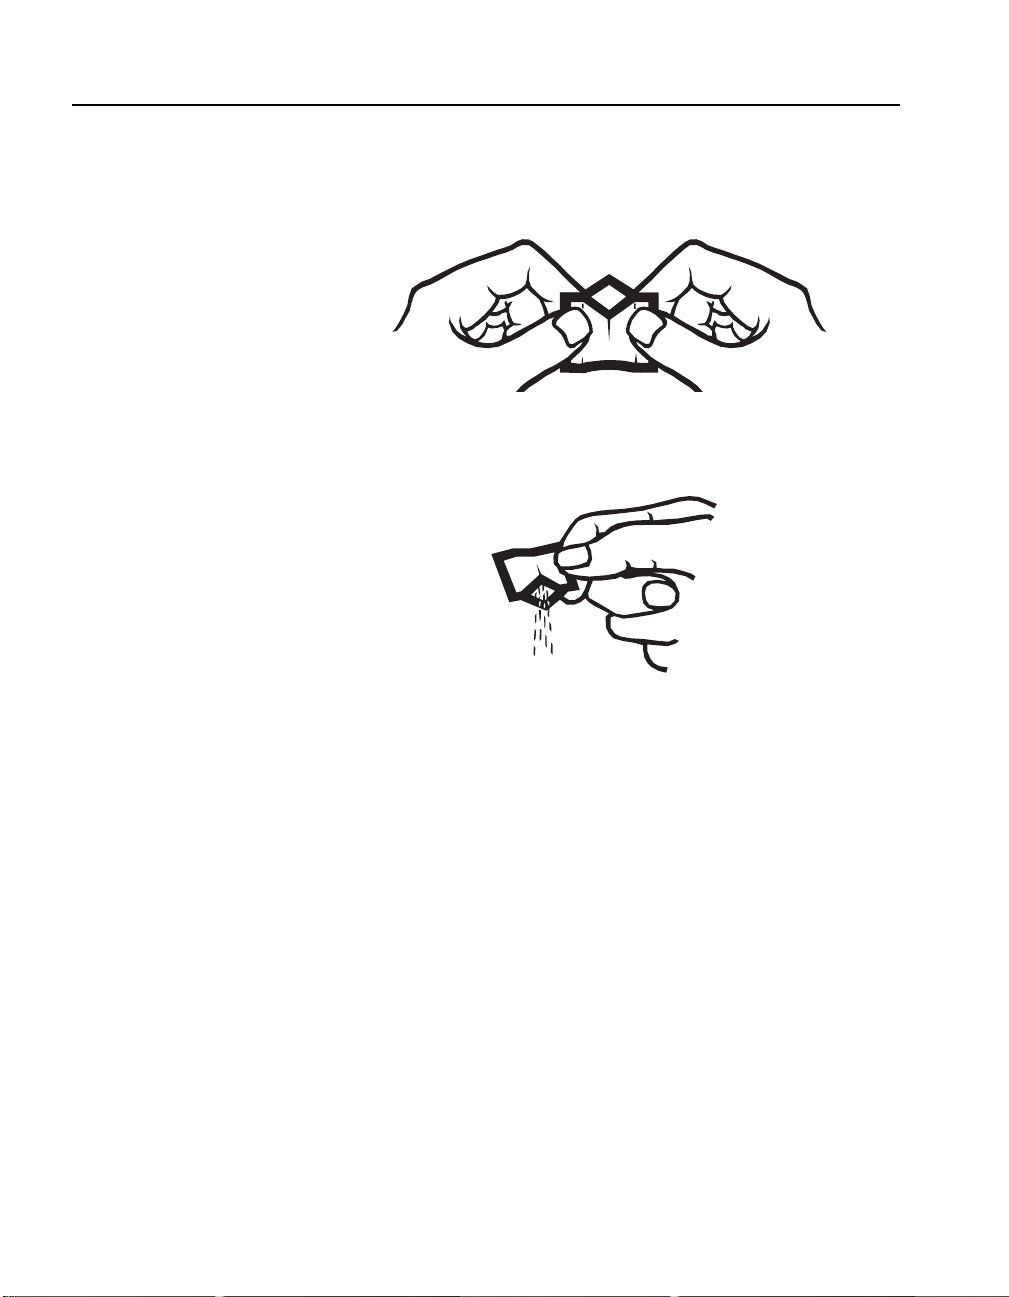
1.5 Using PermaChem® Powder Pillows
1. Tap the PermaChem on a hard surface to collect the
powdered reagent in the bottom.
8.0
205 8.0×
------------------------ 5. 1 3 mL==
800 0.4×
2. Tear across on the dotted pillow line marked “TEAR”
holding the pillow away from your face.
23
Page 24
GENERAL DESCRIPTION, continued
3. Using two hands, Push both sides toward each other until
thumbs and forefingers form a diamond. Make sure to Crease
the foil pack, so that it forms a spout.
4. Pour the pillow contents into the sample. The polyfilm lining
is specially formulated to deliver all the powder necessary for
accurate results (no tapping on the vessel edge is necessary).
1.6 Safety
Safety is the responsibility of each individual when performing
analysis procedures, and the analyst must develop and maintain
good safety habits. Because many of the procedures in this
methods handbook use potentially hazardous chemicals and
apparatus, it is important that the analyst practice good laboratory
techniques to minimize accidents. The following paragraphs
present several techniques applicable to water analysis in the
laboratory and in the field. They are not all inclusive, of course,
nor do they apply only to the procedures provided in this
handbook. They are general in nature but emphasize practices
that are often key factors in personal injury incidents.
• Read labels carefully. Never remove the label from a reagent
container. When preparing a reagent or standard solution, be
sure to label the container clearly and date it.
• A Material Safety Data Sheet (MSDS) comes with each
reagent. This sheet contains helpful information on first aid,
24
Page 25

GENERAL DESCRIPTION, continued
spill and disposal procedures, and precautionary measures
and should be read before using the product.
• Warning labels also appear on some of the apparatus used
with the test procedures.
• Wear protective clothing when handling chemicals that cause
irritation or burns. Eye protection in particular is important to
guard against spattering and splashes from accidental spills
when caustic materials are being used.
• Use tongs or finger cots when transferring apparatus that
is hot.
• Use mechanical pipetters: Mouth pipetting could result in
accidentally ingesting dangerous chemicals. Make a habit of
using mechanical pipet fillers for all pipetting. This will avoid
mistakes that could cause serious injury.
• Use special care with dangerous chemicals and apparatus.
• Follow the test procedure steps carefully and observe all
precautionary measures. It is good practice to read the entire
procedure carefully before beginning the procedure. Use
safety equipment, such as pipet fillers, protective clothing,
and ventilating hoods, appropriate for the test being
conducted. Wipe up all spills promptly. Do not smoke or eat
in an area where toxic or irritating chemicals are used. Use
reagents and apparatus only as they were meant to be used
and use them only as directed in the test procedure. Do not
use damaged labware and malfunctioning equipment.
25
Page 26

26
Page 27

TITRATION PROCEDURES
27
Page 28

28
Page 29
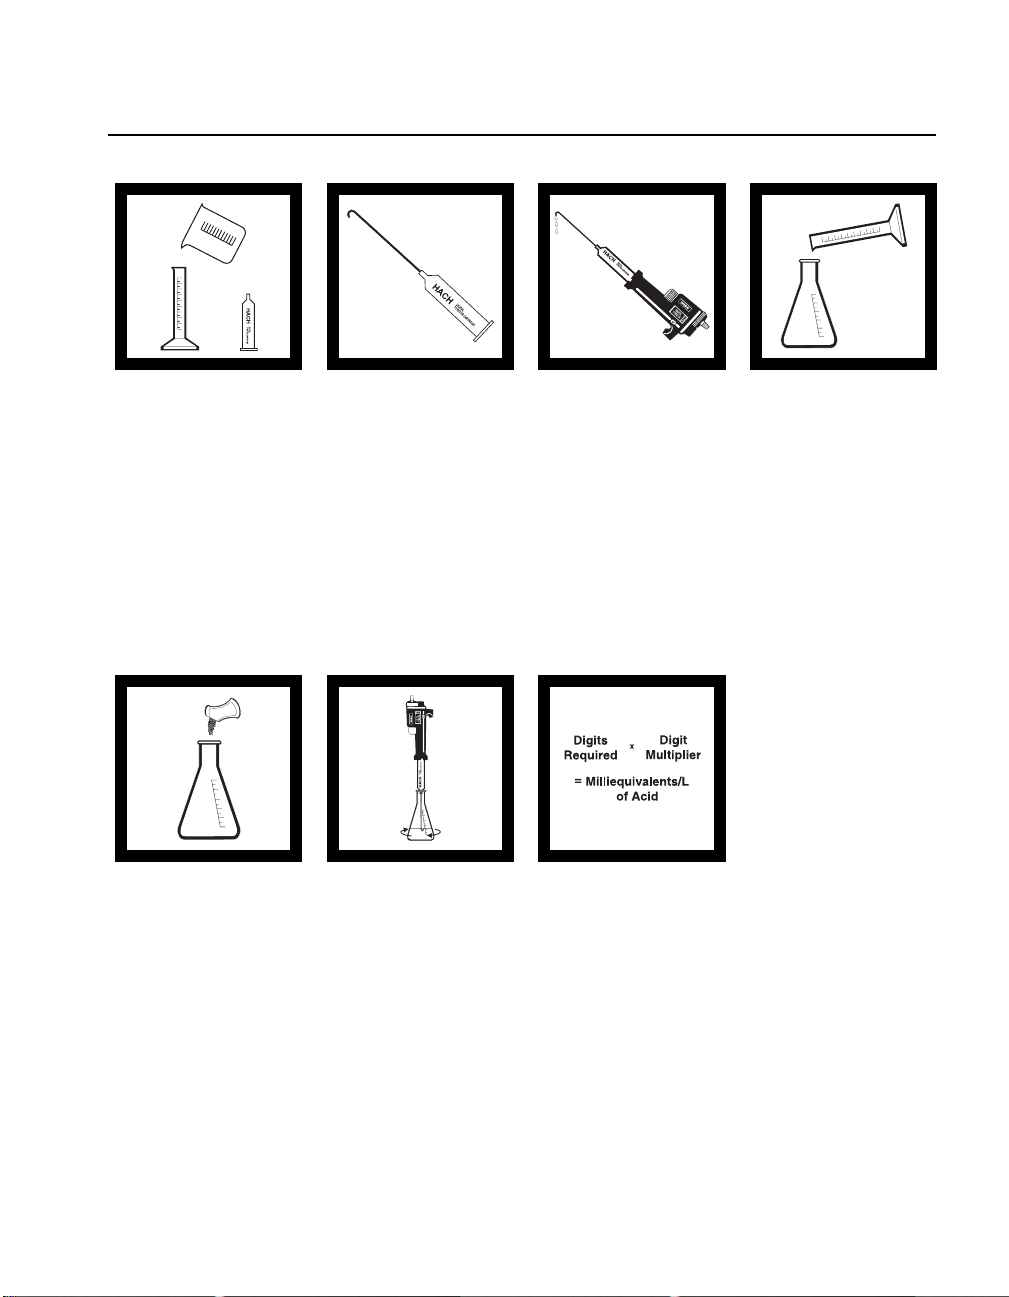
ACID-BASE (10 to 4000 mg/L as meq/L)
Acid Determination
Method 8200
1. Select the sample
volume corresponding to
the expected acid
concentration in
milliequivalents (meq)/L
or normality (N) from
Table 1.
Note: See Sampling and
Storage following these
steps.
5. Add the contents of
one Phenolphthalein
Indicator Powder Pillow
and swirl to mix. The
solution should be
colorless.
Note: Four drops of
Phenolphthalein Indicator
Solution may be
substituted for the
Phenolphthalein Indicator
Powder Pillow.
2. Insert a clean
delivery tube into the
appropriate Sodium
Hydroxide Titration
Cartridge. Attach
the cartridge to the
titrator body. See
General Description,
Step-by-Step, for
assembly instructions.
6. Place the delivery
tube tip into the solution
and swirl the flask while
titrating with sodium
hydroxide until a light
pink color forms and
persists for 30 seconds.
Record the number of
digits required.
3. Flush the delivery
tube by turning the
delivery knob to eject a
few drops of titrant.
Reset the counter to zero
and wipe the tip.
Note: For added
convenience use the
®
TitraStir
General Description,
Step 3 in Step-by-Step.
Stir Plate. See
7. Calculate:
Digits Required x
Digits Multiplier =
Milliequivalents per Liter
of Acid
Note: To determine the
normality of the sample,
divide the milliequivalents
per liter obtained by 1000.
4. Use a graduated
cylinder or pipet to
measure the sample
volume from
Table 1 . Transfer the
sample into a clean
250-mL Erlenmeyer
flask. Dilute to about the
100-mL mark with
deionized water, if
necessary.
29
Page 30

ACID-BASE, continued
Tabl e 1
Range meq/L Range N
Sample
Volume (mL)
Titration
Cartridge
1-4 0.001-0.004 100 1.6 N NaOH
1.6 N H
4-10 0.004-0.01 50 1.6 N NaOH
1.6 N H
10-40 0.01-0.04 100 8 N NaOH
8 N H
8 N HCl
20-80 0.02-0.08 50 8 N NaOH
8 N H
8 N HCl
50-200 0.05-0.2 20 8 N NaOH
8 N H
8 N HCl
100-400 0.1-0.4 10 8 N NaOH
8 N H
8 N HCl
200-800 0.2-0.8 5 8 N NaOH
8 N H
8 N HCl
500-2000 0.5-2 2 8 N NaOH
8 N H
8 N HCl
1000-4000 1-4 1 8 N NaOH
8 N H
8 N HCl
2SO4
2SO4
2SO4
2SO4
2SO4
2SO4
2SO4
2SO4
2SO4
Catalog
Number
14379-01
14389-01
14379-01
14389-01
14381-01
14391-01
14390-01
14381-01
14391-01
14390-01
14381-01
14391-01
14390-01
14381-01
14391-01
14390-01
14381-01
14391-01
14390-01
14381-01
14391-01
14390-01
14381-01
14391-01
14390-01
Digit
Multiplier
0.02
0.04
0.1
0.2
0.5
1.0
2.0
5.0
10.0
30
Page 31

ACID-BASE, continued
Base Determination
1. Select the sample
volume corresponding to
the expected base
concentration in
milliequivalents/L or
normality from Ta b l e 1.
5. Add the contents of
one Phenolphthalein
Indicator Powder Pillow
and swirl to mix. The
solution should be a
pink color.
Note: Four drops of
Phenolphthalein Indicator
Solution may be
substituted for the
Phenolphthalein Indicator
Powder Pillow.
2. Insert a clean
delivery tube into the
appropriate
Hydrochloric Acid or
Sulfuric Acid Titration
Cartridge. Attach the
cartridge to the titrator
body. See General
Description Section,
Step-by-Step, for
assembly instructions,
if necessary.
6. Titrate with 8.00 N
hydrochloric acid or
sulfuric acid until the
solution is colorless.
Record the number of
digits required.
3. Flush the delivery
tube by turning the
delivery knob to eject a
few drops of titrant.
Reset the counter to zero
and wipe the tip.
Note: For added
convenience use the
TitraStir Stir Plate. See
General Description,
Step 3 in Step-by-Step.
7. Calculate:
Digits Required x
Digit Multiplier =
Milliequivalents per Liter
of Base
Note: To determine the
normality of the sample,
divide the milliequivalents
per liter obtained by 1000.
4. Use a graduated
cylinder or pipet to
measure the sample
volume from Table 1 .
Transfer the sample
into a clean 250-mL
Erlenmeyer flask. Dilute
to about the
100-mL mark with
deionized water,
if necessary.
31
Page 32

ACID-BASE, continued
Sampling and Storage
Accuracy Check
Interferences
Collect samples in clean plastic or glass bottles. Fill completely
and cap tightly. Minimize agitation or prolonged exposure to air.
Sample may be stored at least 24 hours by cooling to 4 °C (39 °F)
or below if they cannot be analyzed immediately. Warm to room
temperature before analyzing.
Using a clean Class A 20.00 mL pipet, transfer 20.00 mL 0.100 N
NaOH Standard Solution (for base determination) or 20.00 mL
0.100 N Sulfuric Acid Standard Solution (for acid determination)
to a clean 250-mL Erlenmeyer flask. Dilute to about 100 mL with
deionized water.
Follow the procedure for base determination using 8.00 N HCl or
H
NaOH Titration Cartridge. About 200 digits of titrant should
be required.
Highly colored or turbid samples may mask the color change at
the end point. Use a pH meter for these samples.
Titration Cartridge or for acid determination using 8.00 N
2SO4
Summary of Method
A measured amount of sample is treated with a colorimetric
indicator and then titrated with a strong acid or base. The amount
of titrant used is directly proportional to the milliequivalents of
acid or base in the sample. These titrations also can be performed
using a pH meter instead of a colorimetric indicator. In this case,
titrate to pH 7 or to the pH required.
REQUIRED REAGENTS
(varies with sample characteristics)
Description Cat. No.
Acid Determination Reagent Set (about 100 tests)
1-10 meq/L includes: (1) 942-99, (1) 14379-01 .......................................................24459-00
10-4,000 meq/L includes: (1) 942-99, (1) 14381-01 ................................................24460-00
32
Page 33

ACID-BASE, continued
REQUIRED REAGENTS, continued
Description Unit Cat. No.
Hydrochloric Acid Titration Cartridge, 8.00 N..............................................each .......14390-01
Phenolphthalein Indicator Powder Pillows ..............................................100/pkg ...........942-99
Sodium Hydroxide Titration Cartridge, 1.600 N ...........................................each .......14379-01
Sodium Hydroxide Titration Cartridge, 8.00 N .............................................each .......14381-01
Sulfuric Acid Titration Cartridge, 1.600 N ....................................................each .......14389-01
Sulfuric Acid Titration Cartridge, 8.00 N ......................................................each .......14391-01
Water, deionized...............................................................................................4 L ...........272-56
REQUIRED APPARATUS
Digital Titrator................................................................................................each .......16900-01
Flask, Erlenmeyer, 250-mL............................................................................each .......... 505-46
Select one or more based on sample concentration:
Cylinder, graduated, 5-mL .............................................................................each ...........508-37
Cylinder, graduated, 10-mL ...........................................................................each ...........508-38
Cylinder, graduated, 25-mL ...........................................................................each ...........508-40
Cylinder, graduated, 50-mL ...........................................................................each ...........508-41
Cylinder, graduated, 100-mL .........................................................................each ...........508-42
OPTIONAL REAGENTS
Phenolphthalein Indicator Solution, 5 g/L ............................................. 100 mL*...........162-32
Sodium Hydroxide Standard Solution, 0.100 N..................................... 1000 mL...........191-53
*
Sulfuric Acid Standard Solution, 0.100 N.............................................1000 mL
...........202-53
OPTIONAL APPARATUS
Bottle, wash, poly, 500-mL ............................................................................each ...........620-11
Clamp, 2-prong, extension, 38-mm................................................................each .......21145-00
Clamp Holder .................................................................................................each ...........326-00
Demineralizer Assembly, 473-mL .................................................................each .......21846-00
Delivery Tubes, with 180° hook...................................................................5/pkg .......17205-00
Delivery Tubes, 90° with hook for TitraStir
Pipet, volumetric, Class A, 1-mL...................................................................each .......14515-35
Pipet, volumetric, Class A, 2-mL...................................................................each .......14515-36
Pipet, volumetric, Class A, 5-mL...................................................................each .......14515-37
Pipet, volumetric, Class A, 10-mL.................................................................each .......14515-38
Pipet, volumetric, Class A, 20-mL.................................................................each .......14515-20
Pipet, volumetric, Class A, 50-mL.................................................................each .......14515-41
Pipet, volumetric, Class A, 100-mL...............................................................each .......14515-42
Support Ring Stand ........................................................................................each ...........563-00
TitraStir
TitraStir
* Contact Hach for larger sizes.
®
Stir Plate, 115 Vac .........................................................................each .......19400-00
®
Stir Plate, 230 Vac .........................................................................each .......19400-10
®
Stir Plate ..............................5/pkg .......41578-00
33
Page 34

34
Page 35

Methods 8201 and 8202
ACIDITY (10 to 4000 mg/L as CaCO
)
3
Methyl Orange and Phenolphthalein (Total) Methods
Methyl Orange Method Method 8201
1. Select a sample
volume and a Sodium
Hydroxide (NaOH)
Titration Cartridge
corresponding to the
expected acidity
concentration as mg/L
calcium carbonate
(CaCO
Note: See Sampling and
Storage following
these steps.
) from Table 1.
3
(mg/L as CaCO3)
500-2000
1000-4000
Range
10-40
40-160
100-400
200-800
2. Insert a clean
delivery tube into the
titration cartridge.
Attach the cartridge to
the titrator body. See
General Description,
Step-by-Step for
assembly instructions,
if necessary.
Sample
Volum e
(mL)
100
25
100
50
20
10
3. Turn the delivery
knob to eject a few drops
of titrant. Reset the
counter to zero and wipe
the tip.
Note: For added
convenience use the
®
TitraStir
General Description,
Step 3 in Step-by-Step.
Tabl e 1
Titration
Cartridge
(N NaOH)
0.1600
0.1600
1.600
1.600
1.600
1.600
Stir Plate. See
Catalog
Number
14377-01
14377-01
14379-01
14379-01
14379-01
14379-01
4. Use a graduated
cylinder or pipet to
measure the sample
volume from Table 1.
Transfer the sample
into a clean 250-mL
Erlenmeyer flask. Dilute
to about the
100-mL mark with
deionized water, if
necessary.
Note: Minimize agitation
because dissolved gases
in the sample such as
carbon dioxide, hydrogen
sulfide and ammonia may
be lost and cause
inaccurate results.
Digit
Multiplier
0.1
0.4
1.0
2.0
5.0
10.0
35
Page 36

ACIDITY, continued
5. Add the contents of
one Bromphenol Blue
Indicator Powder Pillow
and swirl to mix.
Note: Six drops of
Bromphenol Blue Indicator
Solution may be
substituted in this step.
6. Place the delivery
tube tip into the solution
and swirl the flask while
titrating with sodium
hydroxide from yellow
to blue-violet (pH 3.7).
Record the number of
digits required.
Note: A solution of one pH
3.7 Buffer Powder Pillow
and one Bromphenol Blue
Indicator Powder Pillow in
50 mL of deionized water
is recommended as a
comparison for
determining the proper
end point color.
7. Calculate:
Digits Required x
Digit Multiplier =
mg/L as CaCO3
Methyl Orange Acidity
36
Page 37

ACIDITY, continued
Phenolphthalein (Total) Method Method 8202
1. Measure a second
portion of the sample
selected from step 1 on
page 35 into a clean
250-mL Erlenmeyer
flask. Dilute to about the
100-mL mark with
deionized water, if
necessary.
2. Add the contents of
one Phenolphthalein
Indicator Powder Pillow
and swirl to mix.
Note: Four drops of
Phenolphthalein Indicator
Solution may be
substituted for the
Phenolphthalein Indicator
Powder Pillow.
Sampling and Storage
3. Titrate with sodium
hydroxide from
colorless to a light pink
color that persists for 30
seconds. Record the
number of digits
required.
Note: A solution of one pH
8.3 Buffer Powder Pillow
and one Phenolphthalein
Powder Pillow in 50 mL
of deionized water is
recommended as a
comparison for
determining the proper
end point color.
4. Calculate:
Digits Required x
Digit Multiplier =
mg/L as CaCO
Phenolphthalein Acidity
3
Collect samples in clean plastic or glass bottles. Fill completely
and cap tightly. Minimize agitation or prolonged exposure to air.
Samples may be stored at least 24 hours by cooling to 4 °C
(39 °F) or below if they cannot be analyzed immediately. Warm to
room temperature before analyzing.
Accuracy Check
Standard Additions Method
This accuracy check should be performed when interferences are
suspected or to verify analytical technique.
®
1. Snap the neck off an Acidity Voluette
Ampule Standard,
0.500 N.
37
Page 38

ACIDITY, continued
Interferences
2. Use a TenSette® Pipet to add 0.1 mL of standard to the sample
titrated in step 6 for methyl orange acidity or step 3 for
phenolphthalein acidity. Resume titration back to the same
end point. Note the number of digits required.
3. Repeat using two more additions of 0.1 mL. Titrate to the end
point after each addition.
4. Each 0.1 mL addition of standard should require 25 additional
digits of 1.600 N titrant or 250 digits of 0.1600 N titrant. If
these uniform increases do not occur, refer to Appendix A,
Accuracy Check and Standard Additions.
• Highly colored or turbid samples may mask the color change
at the end point. Use a pH meter for these samples.
• Chlorine may interfere with the indicators. Add one drop of
0.1 N Sodium Thiosulfate to eliminate this effect.
Summary of Method
• To determine the phenolphthalein acidity of samples
containing hydrolyzable metals such as iron, manganese or
aluminum, use the following procedure:
a. Adjust the sample in step 1 for phenolphthalein acidity to
pH 4.0 or less (if necessary) by using the Digital Titrator
with an acid titration cartridge of identical normality to
the Sodium Hydroxide Titration Cartridge used. Record
the number of digits of acid added to lower the pH.
b. Add five drops of 30% Hydrogen Peroxide Solution and
boil the solution for 2-5 minutes.
c. Cool to room temperature. Titrate following the
Phenolphthalein Procedure steps 2 and 3. Subtract the
number of digits of acid added to lower the pH from the
number of digits required in step 3 of the Phenolphthalein
Procedure. Continue with step 4.
Bromphenol blue (pH 3.7) or phenolphthalein (pH 8.3) indicator
is used to titrate the sample with sodium hydroxide to a
38
Page 39

ACIDITY, continued
colorimetric end point. Bromphenol blue gives a better end point
than methyl orange indicator. Titration to pH 3.7 determines
strong mineral acidity (also referred to as methyl orange acidity),
whereas the pH 8.3 phenolphthalein end point includes weaker
acid species as well, and represents the total acidity. The results
are expressed in mg/L as calcium carbonate (CaCO
specified pH.
REQUIRED REAGENTS
(varies with sample characteristics)
Description Unit Cat. No.
Acidity Reagent Set (about 100 tests) ..........................................................................22728-00
Includes: (1) 942-99, (1) 14377-01, (1) 14379-01, (1) 14550-99
Bromphenol Blue Powder Pillows ...........................................................100/pkg .......14550-99
Phenolphthalein Powder Pillows ..............................................................100/pkg ...........942-99
Sodium Hydroxide Titration Cartridge, 0.1600 N .........................................each .......14377-01
Sodium Hydroxide Titration Cartridge, 1.600 ..............................................each .......14379-01
Water, deionized...............................................................................................4 L...........272-56
) at a
3
REQUIRED APPARATUS
Digital Titrator................................................................................................each .......16900-01
Flask, Erlenmeyer, 250-mL............................................................................each ...........505-46
Select one or more based on sample concentration:
Cylinder, graduated, 10-mL ...........................................................................each ...........508-38
Cylinder, graduated 25-mL ............................................................................each ...........508-40
Cylinder, graduated 50-mL ............................................................................each ...........508-41
Cylinder, graduated, 100-mL .........................................................................each ...........508-42
OPTIONAL REAGENTS
Acidity Standard Solution, Voluette® Ampules,
0.500 N H
Bromphenol Blue Indicator Solution ............................................. 100 mL MDB .......14552-32
Buffer Powder Pillows, pH 3.7...................................................................25/pkg .......14551-68
Buffer Powder Pillows, pH 8.3...................................................................25/pkg ...........898-68
Hydrogen Peroxide Solution, 30%................................................. 200 mL MDB ...........144-45
Phenolphthalein Indicator Solution, 5 g/L ................................... 100 mL MDB* ...........162-32
Sodium Thiosulfate Standard Solution, 0.1 N.............................. 100 mL MDB* ...........323-32
* Contact Hach for larger sizes.
, 10 mL...........................................................................16/pkg .......14330-10
2SO4
39
Page 40

ACIDITY, continued
OPTIONAL APPARATUS
Description Unit Cat. No.
Bottle, wash, poly, 500-mL............................................................................ each........... 620-11
Clamp, 2-prong extension, 38-mm ............................................................... each....... 21145-00
Clamp Holder................................................................................................. each........... 326-00
Demineralizer Assembly, 473-mL................................................................. each....... 21846-00
Delivery Tubes, with 180° hook .................................................................. 5/pkg....... 17205-00
Delivery Tubes, 90° with hook for TitraStir
Hot Plate, 3½-inch circular, 115 V ................................................................ each....... 12067-01
Hot Plate, variable control, 4-inch circular, 230 V ........................................ each....... 12067-02
Pipet, TenSette
Pipet Tips for 19700-01 TenSette
®
, 0.1 to 1.0 mL ..................................................................... each.......19700-01
®
Pipet................................................... 50/pkg....... 21856-96
Pipet, volumetric, Class A, 10-mL ................................................................each....... 14515-38
Pipet, volumetric, Class A, 20-mL ................................................................each....... 14515-20
Pipet, volumetric, Class A, 25-mL ................................................................each....... 14515-40
Pipet, volumetric, Class A, 50-mL ................................................................each....... 14515-41
Pipet, volumetric, Class A, 100-mL ..............................................................each....... 14515-42
Pipet Filler, safety bulb.................................................................................. each.......14651-00
sens
ion™1 Basic Portable pH Meter with electrode ...................................each....... 51700-10
Support Ring Stand........................................................................................ each...........563-00
TitraStir
TitraStir
Vo l u e t t e
®
Stir Plate, 115 Vac......................................................................... each....... 19400-00
®
Stir Plate, 230 Vac......................................................................... each....... 19400-10
®
Ampule Breaker Kit ...................................................................... each.........21968-0
®
Stir Plate.............................. 5/pkg.......41578-00
40
Page 41

ALKALINITY (10 to 4000 mg/L as CaCO
Phenolphthalein and Total Method
Method 8203
)
3
1. Select the sample
volume and Sulfuric
Acid (H
Cartridge corresponding
to the expected
alkalinity concentration
as mg/L calcium
carbonate (CaCO
Table 1.
Note: See Sampling and
Storage following
these steps.
) Titration
2SO4
) from
3
Range
(mg/L as CaCO
10-40
40-160
100-400
200-800
500-2000
1000-4000
2. Insert a clean
delivery tube into the
titration cartridge.
Attach the cartridge to
the titrator body. See
General Description,
Step-by-Step for
assembly instructions,
if necessary.
Sample
)
Volum e (mL)
3
100
25
100
50
20
10
3. Turn the delivery
knob to eject a few drops
of titrant. Reset the
counter to zero and wipe
the tip.
Note: For added
convenience use the
®
TitraStir
General Description,
Step 3 in Step-by-Step.
Tabl e 1
Titration
Cartridge
(H
0.1600
0.1600
1.600
1.600
1.600
1.600
2SO4
)
Stir Plate. See
Catalog
Number
14388-01
14388-01
14389-01
14389-01
14389-01
14389-01
4. Use a graduated
cylinder or pipet to
measure the sample
volume from Table 1 .
Transfer the sample
into a clean 250-mL
Erlenmeyer flask. Dilute
to about the
100-mL mark with
deionized water, if
necessary.
Digit
Multiplier
0.1
0.4
1.0
2.0
5.0
10.0
41
Page 42

ALKALINITY, continued
5. Add the contents of
one Phenolphthalein
Indicator Powder Pillow
and swirl to mix.
Note: A solution of one pH
8.3 Buffer Powder Pillow
and one Phenolphthalein
Powder Pillow in 50 mL of
deionized water is
recommended as a
comparison for
determining the proper
end point color.
Note: Four drops of
Phenolphthalein Indicator
Solution may be
substituted for the
Phenolphthalein Indicator
Powder Pillow.
6. If the solution turns
pink, titrate to a
colorless end point.
Place the delivery tube
tip into the solution and
swirl the flask while
titrating with sulfuric
acid. Record the number
of digits required.
Note: If the solution is
colorless before titrating
with sulfuric acid, the
Phenolphthalein (P)
Alkalinity is zero; proceed
with step 8.
7. Calculate:
Digits Required x
Digit Multiplier =
mg/L CaCO3 P Alkalinity
8. Add the contents of
one Bromcresol GreenMethyl Red Indicator
Powder Pillow to the
flask and swirl to mix.
Note: Four drops of
Methyl Purple Indicator
Solution may be
substituted for the
Bromcresol Green-Methyl
Red Indicator Powder
Pillow. Titrate from green
to a gray end point (pH
5.1).
Note: Four drops of
Bromcresol Green-Methyl
Red Indicator Solution
may be substituted for the
Bromcresol Green-Methyl
Red Indicator Powder
Pillow.
42
Page 43

ALKALINITY, continued
9. Continue the
titration with sulfuric
acid to a light greenish
blue-gray (pH 5.1), a
light violet-gray (pH
4.8), or a light pink (pH
4.5) color, as required by
the sample composition;
see Table 2. Record the
number of digits
required.
Note: A solution of one
Bromcresol Green-Methyl
Red Powder Pillow and
one pillow of the
appropriate pH buffer in
50 mL of deionized water
is recommended as a
comparison for judging the
proper end point color. If
the pH 3.7 end point is
used, use a Bromphenol
Blue Powder Pillow
instead of a Bromcresol
Green-Methyl Red and
titrate to a green end
point.
10. Calculate:
Total Digits Required x
Digit Multiplier =
mg/L as CaCO3 Total
(T or M) Alkalinity
Note: Carbonate,
bicarbonate and hydroxide
concentrations may be
expressed individually
using the relationships
shown in Table 3.
Note: meq/L Alkalinity =
mg/L as CaCO
÷ 50.
3
Tabl e 2
Sample Composition
Alkalinity about 30 mg/L
Alkalinity about 150 mg/L
Alkalinity about 500 mg/L
Silicates or Phosphates present
Industrial waste or complex system
43
End
Point
pH 4.9
pH 4.6
pH 4.3
pH 4.5
pH 4.5
Page 44

ALKALINITY, continued
Sampling and Storage
Collect samples in clean plastic or glass bottles. Fill completely
and cap tightly. Avoid excessive agitation or prolonged exposure
to air. Samples should be analyzed as soon as possible after
collection but can be stored at least 24 hours by cooling to 4 °C
(39 °F) or below. Warm to room temperature before analyzing.
Alkalinity Relationship Table
Total alkalinity primarily includes hydroxide, carbonate and
bicarbonate alkalinities. The concentration of these alkalinities in
a sample may be determined when the phenolphthalein and total
alkalinities are known (see Table 3).
Table 3 Alkalinity Relationship
Row Result of Titration
1
2
3
4
5
Phenolphthalein
Alkalinity = 0
Phenolphthalein
Alkalinity equal to T otal
Alkalinity
Phenolphthalein
Alkalinity less than one
half of Total
Alkalinity
Phenolphthalein
Alkalinity equal to one
half of Total Alkalinity
Phenolphthalein
Alkalinity greater than
one half of Total
Alkalinity
Hydroxide
Alkalinity
is equal to:
00Total
Total Alkalinity 0 0
0 2 times the
0 Total Alkalinity 0
2 times the
Phenolphthalein
minus Total
Alkalinity
Carbonate Alkalinity
is equal to:
Phenolphthalein
Alkalinity
2 times the
difference between
Total and
Phenolphthalein
Alkalinity
Bicarbonate
Alkalinity
is equal to:
Alkalinity
Total Alkalinity minus
two times
Phenolphthalein
Alkalinity
To use the table follow these steps:
a. Does the phenolphthalein alkalinity equal zero? If yes,
use Row 1.
0
b. Does the phenolphthalein alkalinity equal total
alkalinity? If yes, use Row 2.
44
Page 45

ALKALINITY, continued
For example:
A sample has 170 mg/L as CaCO
250 mg/L as CaCO
hydroxide, carbonate and bicarbonate alkalinities?
The phenolphthalein alkalinity does not equal 0 (it is 170 mg/L),
see step a.
The phenolphthalein alkalinity does not equal total alkalinity
(170 mg/L vs. 250 mg/L), see step b.
c. Multiply the phenolphthalein alkalinity by 2.
d. Select Row 3, 4, or 5 based on comparing the result of
step c with the total alkalinity.
e. Perform the required calculations in the appropriate row,
if any.
f. Check your results. The sum of the three alkalinity types
will equal the total alkalinity.
phenolphthalein alkalinity and
3
total alkalinity. What is the concentration of
3
The phenolphthalein alkalinity multiplied by 2 = 340 mg/L, see
step c.
Because 340 mg/L is greater than 250 mg/L, select Row 5, see
step d.
The hydroxide alkalinity is equal to: (see step e).
340 – 250 = 90 mg/L hydroxide alkalinity
The carbonate alkalinity is equal to:
250 – 170 = 80
80 x 2 = 160 mg/L carbonate alkalinity
The bicarbonate alkalinity equals 0 mg/L.
Check: (see step f).
90 mg/L hydroxide alkalinity + 160 mg/L carbonate alkalinity +
0 mg/L bicarbonate alkalinity = 250 mg/L
The above answer is correct; the sum of each type equals the total
alkalinity.
45
Page 46

ALKALINITY, continued
Accuracy Check
Standard Additions Method
This accuracy check should be performed when interferences are
suspected or to verify analytical technique.
1. Snap the neck off an Alkalinity Standard Solution Voluette
2. Use a TenSette
3. Repeat, using two more additions of 0.1 mL. Titrate to the
4. Each 0.1 mL addition of standard should require 25
®
Ampule, 0.500 N.
®
Pipet to add 0.1 mL of standard to the
sample titrated in Steps 6 or 9. Resume titration back to the
same end point. Record the number of digits needed.
end point after each addition.
additional digits of 1.600 N titrant or 250 digits of 0.1600 N
titrant. If these uniform increases do not occur, refer to
Appendix A, Accuracy Check and Standard Additions.
Interferences
Summary of Method
• Highly colored or turbid samples may mask the color change
at the end point. Use a pH meter for these samples.
• Chlorine may interfere with the indicators. Add one drop of
0.1 N Sodium Thiosulfate to eliminate this interference.
The sample is titrated with sulfuric acid to a colorimetric end
point corresponding to a specific pH. Phenolphthalein alkalinity
is determined by titration to a pH of 8.3, as evidenced by the color
change of phenolphthalein indicator, and indicates the total
hydroxide and one half the carbonate present. M (methyl orange)
or T (total) alkalinity is determined by titration to a pH between
3.7 and 5.1, and includes all carbonate, bicarbonate
and hydroxide.
46
Page 47

ALKALINITY, continued
REQUIRED REAGENTS
(varies with sample characteristics)
Description Unit Cat. No
Alkalinity Reagent Set (about 100 tests) ......................................................................22719-00
Includes: (1) 942-99, (1) 943-99, (1) 14388-01, (1) 14389-01
Bromcresol Green-Methyl Red Powder Pillows......................................100/pkg ...........943-99
Phenolphthalein Powder Pillows ..............................................................100/pkg ...........942-99
Sulfuric Acid Titration Cartridge, 1.600 N ....................................................each .......14389-01
Sulfuric Acid Titration Cartridge, 0.1600 N ..................................................each .......14388-01
Water, deionized...............................................................................................4 L ...........272-56
REQUIRED APPARATUS
Digital Titrator................................................................................................each .......16900-01
Flask, Erlenmeyer, 250-mL............................................................................each ...........505-46
Select one or more based on sample concentration:
Cylinder, graduated, 10-mL ...........................................................................each ...........508-38
Cylinder, graduated, 25-mL ...........................................................................each ...........508-40
Cylinder, graduated, 50-mL ...........................................................................each ...........508-41
Cylinder, graduated, 100-mL .........................................................................each ...........508-42
OPTIONAL REAGENTS
Alkalinity Standard Solution Voluette® Ampules,
0.500 N Na
Bromcresol Green-Methyl Red Indicator Solution ........................ 100 mL MDB.......23292-32
Bromphenol Blue Indicator Solution ............................................. 100 mL MDB .......14552-32
Bromphenol Blue Powder Pillows ...........................................................100/pkg .......14550-99
Buffer Powder Pillows, pH 3.7...................................................................25/pkg .......14551-68
Buffer Powder Pillows, pH 4.5...................................................................25/pkg ...........895-68
Buffer Powder Pillows, pH 4.8...................................................................25/pkg ...........896-68
Buffer Powder Pillows, pH 5.1...................................................................25/pkg ...........897-68
Buffer Powder Pillows, pH 8.3...................................................................25/pkg ...........898-68
Methyl Purple Indicator Solution................................................... 100 mL MDB .......21934-32
Phenolphthalein Indicator Solution, 5 g/L ................................... 100 mL MDB* ...........162-32
Sodium Thiosulfate Standard Solution, 0.1 N................................ 100 mL MDB...........323-32
* Contact Hach for larger sizes.
, 10-mL ........................................................................16/pkg .......14278-10
2CO3
47
Page 48

ALKALINITY, continued
OPTIONAL APPARATUS
Description Unit Cat. No
Bottle, wash, poly, 500-mL............................................................................ each........... 620-11
Clamp, 2-prong extension, 38-mm ................................................................ each....... 21145-00
Clamp Holder................................................................................................. each........... 326-00
Demineralizer Assembly, 473-mL................................................................. each....... 21846-00
Delivery Tubes, with 180° hook .................................................................. 5/pkg....... 17205-00
Delivery Tubes, 90° with hook for TitraStir
®
Pipet, TenSette
Pipet Tips for 19700-01 TenSette
0.1 to 1.0 mL ...................................................................... each.......19700-01
®
Pipet................................................... 50/pkg....... 21856-96
Pipet, volumetric, Class A, 10-mL ................................................................each....... 14515-38
Pipet, volumetric, Class A, 20-mL ................................................................each....... 14515-20
Pipet, volumetric, Class A, 25-mL ................................................................each....... 14515-40
Pipet, volumetric, Class A, 50-mL ................................................................each....... 14515-41
Pipet, volumetric, Class A, 100-mL ..............................................................each....... 14515-42
Pipet Filler, safety bulb.................................................................................. each.......14651-00
sens
ion™1 Basic Portable pH Meter with electrode ...................................each....... 51700-10
Support Ring Stand........................................................................................ each...........563-00
TitraStir
TitraStir
Vo l u e t t e
®
Stir Plate, 115 Vac......................................................................... each....... 19400-00
®
Stir Plate, 230 Vac......................................................................... each....... 19400-10
®
Ampule Breaker Kit ...................................................................... each.......21968-00
®
Stir Plate.............................. 5/pkg.......41578-00
48
Page 49

Method 10222
AMMONIA, HIGH RANGE (Ammonium Hydroxide)
5 to 35% (50 to 350 g/L) as NH3 or 5 to 60% (50 to 600 g/L) as NH4OH
Acid Titration Method
For use with Digital Titrator Test Kit, Model NI-HRDT (Cat. No. 29304-00)
Scope and Application: For determining high levels of aqua ammonia (ammonium hydroxide) in
solutions used for chloramination of drinking water, for determining aqua ammonia feed pump rates or
applications requiring the determination of high concentrations (g/L) of aqua ammonia.
CAUTION:
Handling chemical samples, standards, and reagents can be dangerous. Review the Material Safety
Data Sheets before handling chemicals. Wear eye protection and protective gloves when sampling.
Measuring Hints and General Test Information
• Wash all labware between tests. Contamination may alter test results. Rinse with clean
water (preferably deionized water).
• Hach recommends that reagent accuracy and analyst technique be checked using a
standard solution. Use the Ammonium Hydroxide solution listed on page 53 and follow
the procedure in the Accuracy Check section on page 52.
Ammonia Titration Procedure
To ensure accurate results, read carefully before proceeding.
1. Insert a clean
delivery tube into the
8.00 N Sulfuric Acid
Titration Cartridge.
Attach the cartridge to
the titrator body.
Note: See section 1.2 on
page 13 for assembly
instructions.
2. Flush the delivery
tube by turning the
delivery knob to eject a
few drops of titrant.
Reset the counter to zero
and wipe the tip.
Note: For added
convenience use the
TitraStir
section 1.2, step 4 on
page 14.
®
Stir Plate. See
3. Fill a clean 125-mL
Erlenmeyer flask to
about the 75-mL mark
with deionized water.
49
Select sample
volume
4. Select a sample
volume for the expected
concentration range
from Table 1–Table 4 on
page 51.
Note: See Sampling and
Storage following these
steps.
Page 50

AMMONIA, HIGH RANGE (Ammonium Hydroxide), continued
5. Attach a clean tip to
the pipettor and collect
100-µL (0.100 mL) of
the aqua ammonia
sample.
Note: Alternatively, use a
TenSette
19700-01) with a clean tip.
Note: Review the
instructions supplied with
the 100-µL pipettor before
using. Depress the
plunger to the first stop
and release to fill with
sample.
®
Pipet (Cat. No.
6. Dispense the sample
below the liquid level in
the flask. Dispense
another 100 µL of
sample into the flask
(200 µL sample size).
For other sample sizes,
repeat until the required
sample volume from
step 4 has been added.
Note: Review the
instructions supplied with
the 100-µL pipettor before
using. Depress the
plunger to the first stop to
fill; depress the plunger
completely to dispense.
Find Digit
Multiplier
7. Add 1 mL (one full
dropper) of Wide Range
pH Indicator Solution to
the flask.
8. Swirl to mix. The
solution will turn purple.
9. Place the delivery
tube tip into the solution.
Swirl the flask while
titrating with the sulfuric
acid titrant until the
solution color changes
from purple to orangered. Record the number
of digits used.
10. Find the digit
multiplier from Ta b l e 1–
Table 4 on page 51.
11. Calculate:
Digits Used x
Digits Multiplier =
concentration.
Note: See example on
page 51.
50
Page 51

AMMONIA, HIGH RANGE (Ammonium Hydroxide), continued
Example
A bulk solution of aqua ammonia was delivered to a facility and
was expected to have a concentration of 19 percent (19% NH
portion of the sample was titrated to confirm the concentration.
The sample volume from Table 1 was found to be 0.2 mL
(200 µL). The acid titration procedure was followed and 218
digits were used to reach the endpoint. The digit multiplier from
Table 1 was found to be 0.085. The concentration of ammonia
was found to be 18.5 percent:
% NH3218 digits 0.085×=
% NH
18.5%=
3
Tables for Sample Volume and Digit Multiplier
Find the expected sample concentration from one of the tables for
ammonia (% or g/L) or ammonium hydroxide (% or g/L) and
then find the corresponding sample volume and Digit Multiplier:
Table 1 Ammonia (Percent)
). A
3
Expected % NH
5–15
10–35
Expected g/L NH
50–150
100–350
Expected % NH
5–15
10–30
25–60
Expected g/L NH
50–150
100–300
250–600
3
3
Table 3 Ammonium Hydroxide (Percent)
OH Sample Volume (mL) Digit Multiplier
4
Table 4 Ammonium Hydroxide (g/L)
OH Sample Volume (mL) Digit Multiplier
4
Sample Volume (mL) Digit Multiplier
0.5
0.2
Table 2 Ammonia (g/L)
Sample Volume (mL) Digit Multiplier
0.5
0.2
1
0.5
0.2
1
0.5
0.2
0.034
0.085
0.34
0.85
0.035
0.070
0.175
0.35
0.70
1.75
51
Page 52

AMMONIA, HIGH RANGE (Ammonium Hydroxide), continued
Sampling and Storage
Collect samples in clean glass bottles and cap tightly. Store in a
cool place. Analyze as soon as possible.
Interferences
Other strong bases such as sodium hydroxide and potassium
hydroxide will cause a positive interference in the test. Other
alkaline substances, such as carbonates, will also react with the
strong acid titrant. The amounts of these compounds should be
insignificant in aqua ammonia solutions, however, and will not
affect test results. High levels of alkalinity in the dilution water
will cause high results. Be sure to use deionized water in step 3.
Accuracy Check
1. Fill an Erlenmeyer flask with approximately 75 mL of
deionized water.
2. Use a Class A 1.0-mL pipet to transfer 1.0 mL of a
10% ammonium hydroxide solution to the flask.
Precision
3. Add 1 mL (one full dropper) of Wide Range pH Indicator
Solution to the flask. The solution will turn a purple color.
4. Titrate the sample using the Digital Titrator to the red-orange
endpoint with 8.00 N sulfuric acid. The titration should use
270–300 digits of 8.00 N sulfuric acid to reach the endpoint.
Note: If the number of digits used to reach the endpoint does not fall
within the 270–300 digit range, make sure that the dilution water
does not contain excess alkalinity and that the 1.0 mL of ammonium
hydroxide is measured accurately. Ammonium hydroxide solutions
that are left open to the atmosphere will lose ammonia over time and
will give low results. Store the solutions in tightly-capped bottles.
In a single laboratory using an ammonium hydroxide solution of
9.71%, a single operator obtained a standard deviation of
± 0.1% as NH
OH.
4
52
Page 53

AMMONIA, HIGH RANGE (Ammonium Hydroxide), continued
Summary of Method
Ammonia exists in water as ammonium hydroxide. The
hydroxide ions are titrated with sulfuric acid to a colorimetric end
point corresponding to a pH value between 4.4 and 6.2. The
hydroxide concentration is directly proportional to the volume of
acid titrant used.
REQUIRED REAGENTS
Description Cat. No.
HR Aqua Ammonia Reagent Set (about 100 tests).......................................................29305-00
Includes: (1) 14391-01, (1) 23293-32
Sulfuric Acid Titration Cartridge, 8.00 N................................................each .......14391-01
Wide Range pH Indicator Solution.................................................... 100 mL.......23293-32
Water, deionized...............................................................................................4 L ...........272-56
REQUIRED APPARATUS
Digital Titrator Assembly...............................................................................each .......16900-01
Delivery Tubes, J hook .................................................................................5/pkg .......17205-00
Flask, Erlenmeyer, 125-mL............................................................................each .......... 505-43
Pipettor, 100 µL..............................................................................................each .......22753-00
Pipettor Tips, for 22753-00 ........................................................................10/pkg .......22754-10
OPTIONAL REAGENTS AND APPARATUS
Ammonium Hydroxide Solution, 10%..................................................... 500 mL.......14736-49
Bottle, sampling, square glass 118 mL ........................................................3/pkg .......21631-03
Bottle, wash, poly, 500-mL ............................................................................each ...........620-11
Demineralizer Bottle, 473-mL .......................................................................each .......21846-00
Delivery Tubes, 90° with hook for TitraStir
Gloves, chemical resistant, size 9–9½*...........................................................pair .......24101-04
Goggles, safety ...............................................................................................each .......25507-00
Hypochlorite, HR (Bleach) Digital Titrator Kit .............................................each .......26871-00
Notebook, field...............................................................................................each .......20918-00
Pipet, TenSette, 0.1–1.0 mL ...........................................................................each .......19700-01
Pipet, volumetric, Class A, 1.0 mL ................................................................each .......14515-35
Pipet Bulb.......................................................................................................each .......14651-00
Pipet Tips, for TenSette Pipet 19700-01 ....................................................50/pkg .......21856-96
Tech Board with built-in calculator................................................................each .......27473-00
TitraStir
TitraStir
®
Stir Plate, 115 VAC .......................................................................each .......19400-00
®
Stir Plate, 230 VAC .......................................................................each .......19400-10
Pipettor Tips, for 22753-00 ....................................................................1000/pkg .......22754-00
* Other sizes available.
®
Stir Plate ..............................5/pkg .......41578-00
53
Page 54

54
Page 55

CARBON DIOXIDE (10 to 1000 mg/L as CO
Using Sodium Hydroxide
ç
1. Select a sample size
and a Sodium Hydroxide
(NaOH) Titration
Cartridge corresponding
to the expected carbon
dioxide (CO
concentration; see
Ta bl e 1.
Note: See Sampling and
Storage following
these steps.
)
2
2. Insert a clean
delivery tube into the
titration cartridge.
Attach the cartridge to
the titrator body. See
General Description,
Step-by-Step for
assembly instructions if
necessary.
3. Turn the delivery
knob to eject a few drops
of titrant. Reset the
counter to zero and wipe
the tip.
Note: For added
convenience use the
®
TitraStir
General Description,
Step 3 in Step-by-Step.
Stir Plate. See
Method 8205
)
2
4. Collect a water
sample directly into the
titration flask by filling
to the appropriate mark.
Note: Minimize agitation
because carbon dioxide
may be lost.
Note: For most accurate
results, check the
calibration of the
Erlenmeyer flask by
measuring the proper
volume in a graduated
cylinder. Mark the proper
volume on the flask with a
permanent marker.
Range
(mg/L as CO2)
10-50
20-100
100-400
200-1000
Sample
Volum e (mL)
200
100
200
100
Tabl e 1
Titration
Cartridge
(N NaOH)
0.3636
0.3636
55
3.636
3.636
Catalog
Number
14378-01
14378-01
14380-01
14380-01
Digit
Multiplier
0.1
0.2
1.0
2.0
Page 56

CARBON DIOXIDE, continued
5. Add the contents of
one Phenolphthalein
Indicator Powder Pillow
and mix.
Note: Four drops of
Phenolphthalein Indicator
Solution may be
substituted for the
Phenolphthalein Indicator
Powder Pillow.
Note: If a pink color forms,
no carbon dioxide is
present.
6. Place the delivery
tube tip into the solution
and swirl the flask
gently while titrating
with sodium hydroxide
from colorless to a light
pink color that persists
for 30 seconds. Record
the number of digits
required.
Sampling and Storage
7. Calculate:
Total Digits Required x
Digit Multiplier = mg/L as
CO2
Collect samples in clean plastic or glass bottles. Fill completely
and cap tightly. Avoid excessive agitation or prolonged exposure
to air. Analyze samples as soon as possible after collection. If
immediate analysis is not possible, the samples may be stored for
at least 24 hours by cooling to 4 °C (39 °F) or below. Before
analysis, warm the samples to room temperature.
Accuracy Check
Standard Additions Method
This accuracy check should be performed when interferences are
suspected or to verify analytical technique.
1. Snap the neck off a Carbon Dioxide Standard Solution
Voluette
®
Ampule, 10,000 mg/L CO2.
56
Page 57

CARBON DIOXIDE, continued
2. Use a TenSette® Pipet to add 0.1 mL of standard to the
sample titrated in step 6. If using 0.3636 N titrant, use 1.0 mL
of standard. Resume titration back to the same end point.
Record the number of digits required.
3. Repeat, using additions of 0.2 mL and 0.3 mL (2.0 and 3.0).
Titrate to the same end point after each addition.
4. Each addition of standard should require 50 additional digits
of titrant. If these uniform increases do not occur, refer to
Appendix A, Accuracy Check and Standard Additions.
Interferences
• Other acid components in the sample will be titrated and
interfere directly in this determination.
• Sodium hydroxide standard solutions tend to lose strength
slowly with age and should be checked periodically by
titrating a known standard. Check the solution frequently
(monthly) by titrating 50 mL of Potassium Acid Phthalate
Standard Solution, 100 mg/L CO
Indicator Solution. The titration should require 5.00 mL of
titrant. If the volume required for this titration is greater than
5.25 mL, discard the sodium hydroxide and replace it with a
fresh supply.
, using Phenolphthalein
2
Summary of Method
Acidity due to carbon dioxide in a sample is titrated with sodium
hydroxide to a phenolphthalein end point. Strong acids are
assumed to be absent or of insignificant concentration. Request
Hach’s Water Analysis Handbook, Publication 8376, to obtain
additional information on carbon dioxide determinations.
57
Page 58

CARBON DIOXIDE, continued
REQUIRED REAGENTS
(varies with sample characteristics)
Description Unit Cat. No.
Carbon Dioxide Reagent Set (about 100 tests) ............................................................22727-00
Includes: (1) 942-99, (1) 14378-01, (1) 14380-01
Phenolphthalein Powder Pillows ............................................................. 100/pkg...........942-99
Sodium Hydroxide Titration Cartridge, 0.3636 N......................................... each....... 14378-01
Sodium Hydroxide Titration Cartridge, 3.636 N........................................... each....... 14380-01
Water, deionized...............................................................................................4 L........... 272-56
REQUIRED APPARATUS
Digital Titrator ............................................................................................... each.......16900-01
Select one or more based on sample concentration:
Flask, Erlenmeyer, 250 mL............................................................................ each........... 505-46
Flask, Erlenmeyer, 125 mL............................................................................ each........... 505-43
OPTIONAL REAGENTS
Carbon Dioxide Standard Solution Voluette® Ampules,
10,000 mg/L as CO
Phenolphthalein Indicator Solution, 5 g/L....................................100 mL MDB*.......... 162-32
Potassium Acid Phthalate Standard Solution, 100 mg/L as CO
Potassium Acid Phthalate Standard Solution, 400 mg/L as CO
, 10 mL .................................................................. 16/pkg.......14275-10
2
.............100 mL.......... 2261-42
2
.............500 mL......... 1885-49
2
OPTIONAL APPARATUS
Clamp, 2-prong extension, 38 mm ................................................................ each.......21145-00
Clamp Holder................................................................................................. each........... 326-00
Delivery Tubes, with 180° hook .................................................................. 5/pkg....... 17205-00
Delivery Tubes, 90° with hook for TitraStir
Pipet, TenSette
Pipet Tips for 19700-01 TenSette
®
, 0.1 to 1.0 mL ..................................................................... each.......19700-01
®
Pipet................................................... 50/pkg....... 21856-96
Pipet Filler, safety bulb .................................................................................. each ....... 14651-00
sens
ion™1 Basic Portable pH Meter with electrode ...................................each....... 51700-10
Support Ring Stand........................................................................................ each...........563-00
®
TitraStir
TitraStir
Vo l u e t t e
* Contact Hach for larger sizes.
Stir Plate, 115 Vac......................................................................... each....... 19400-00
®
Stir Plate, 230 Vac......................................................................... each....... 19400-10
®
Ampule Breaker Kit ...................................................................... each.......21968-00
®
Stir Plate.............................. 5/pkg.......41578-00
58
Page 59

CHELANT, FREE (0 to 20.0 mg/L as CaCO
Using Magnesium Chloride
Method 8352
)
3
1. Insert a clean
delivery tube into the
Magnesium Chloride
Titration Cartridge.
Attach the cartridge to
the titrator body. See
General Description,
Step-By-Step, for
assembly instructions.
2. Hold the Digital
Titrator with the
cartridge tip pointing up.
Turn the delivery knob
until a few drops of
titrant are expelled.
Reset the counter to zero
and wipe the tip.
Note: For added
convenience use the
TitraStir
General Description, Step
3 in Step-by-Step.
®
Stir Plate. See
3. Use a graduated
cylinder to measure the
100 mL of sample into a
125-mL Erlenmeyer
flask.
Note: Filter sample if
necessary. If sample is
boiler water or highly
alkaline, refer to
Interferences following
these steps.
4. Using the 1-mL
calibrated dropper, add
2 mL of Hardness 1
Buffer Solution to the
flask and swirl to mix.
59
Page 60

CHELANT, FREE, continued
5. Add the contents of
one ManVer
Hardness Indicator
Powder Pillow to the
flask and swirl to mix. If
the solution turns blue,
free chelant is present.
Proceed to step 6. If the
solution turns red, a
deficiency of chelant
exists.
Note: Four drops of
ManVer Hardness
Indicator Solution or a 0.1
g scoop of ManVer 2
Hardness Indicator
Powder may be
substituted in this step.
®
2
Accuracy Check
6. Place the delivery
tube tip into the solution.
While swirling the flask,
titrate until a red-violet
color appears. Record
the number of digits
required.
7. Calculate:
Digits Required x 0.10
= mg/L Free Chelant
(as CaCO3)
Note: The results may be
expressed as mg/L tetrasodium EDTA (digits
required x 0.38 = mg/L as
Na
EDTA).
4
Standard Additions Method
This accuracy check should be performed when interferences are
suspected or to verify analytical technique.
1. Use a TenSette
®
Pipet to add 0.4 mL of 0.035 N EDTA
Standard Solution to the solution titrated in step 6. Resume
titration back to the same end point. Record the number of
digits required.
2. Each 0.4 mL addition of standard should require 70
additional digits of 0.0800 M titrant. If this increase does not
occur, refer to Appendix A, Accuracy Check and Standard
Additions.
60
Page 61

CHELANT, FREE, continued
Interferences
• If chelant residual in boiler water is being analyzed, adjust
the pH before adding the Hardness 1 Buffer Solution
as follows:
a. To another 100-mL sample, add 2 drops of
Phenolphthalein Indicator Solution.
b. Counting the drops, add 5.25 N Sulfuric Acid Standard
Solution one drop at a time until the solution changes
from pink to colorless. Discard this sample.
c. To the actual 100-mL sample, add the same number of
drops of 5.25 N Sulfuric Acid Standard Solution before
adding the buffer in step 4.
• Orthophosphate causes a slow end point. Polyphosphate must
be absent for accurate results.
• All apparatus must be scrupulously clean and rinsed
frequently with acid and deionized water to remove any
hardness present on the plastic or glass.
Summary of Method
• Run reagent blanks occasionally, using deionized or distilled
water in place of the sample. Subtract the value of the blank
from the sample value before recording the final answer.
Chelant residual is determined by titration with a standard
solution of magnesium chloride at pH 10. The end point is
determined by a color change from blue to red-violet.
61
Page 62

CHELANT, FREE, continued
REQUIRED REAGENTS
Description Unit Cat. No.
Hardness 1 Buffer Solution......................................................... 100 mL MDB..............424-32
®
ManVer
Magnesium Chloride Titration Cartridge, 0.0800 M..................................each..........20625-01
REQUIRED APPARATUS
Cylinder, graduated, 100-mL......................................................................each .............. 508-42
Digital Titrator ............................................................................................ each .......... 16900-01
Flask, Erlenmeyer, 125 mL.........................................................................each.............. 505-43
OPTIONAL REAGENTS
EDTA Standard Solution, 0.035 N ............................................. 100 mL MDB .......... 23499-32
ManVer
ManVer
Phenolphthalein Indicator Solution, 5 g/L................................. 100 mL MDB
Sulfuric Acid Standard Solution, 5.25 N .................................... 100 mL MDB............2449-32
Water, deionized............................................................................................4 L.............. 272-56
OPTIONAL APPARATUS
Clamp, 2-prong extension, 38 mm..............................................................each..........21145-00
Clamp Holder..............................................................................................each.............. 326-00
Clippers (shears), 7.25 inch ........................................................................each.......... 23694-00
Delivery Tubes, with 180° hook ...............................................................5/pkg.......... 17205-00
Delivery Tubes, 90° with hook for TitraStir
Filter Paper, folded, 12.5 cm................................................................. 100/pkg ............ 1894-57
Flask, Erlenmeyer, 250 mL.........................................................................each.............. 505-46
Funnel, analytical, poly, 65 mm..................................................................each............ 1083-67
Pipet, TenSette
Pipet Tips for 19700-01 TenSette
Spoon, measuring, 0.5 gram .......................................................................each.............. 907-00
Support Ring Stand.....................................................................................each .............. 563-00
TitraStir
TitraStir
2 Hardness Indicator Powder Pillows...................................100/pkg.............. 851-99
®
2 Hardness Indicator Powder....................................................113 g.............. 280-14
®
2 Hardness Indicator Solution ...................................100 mL MDB*..............425-32
*
............. 162-32
®
Stir Plate........................... 5/pkg .......... 41578-00
®
, 0.1 to 1.0 mL ..................................................................each .......... 19700-01
®
Pipet................................................50/pkg.......... 21856-96
®
Stir Plate, 115 Vac......................................................................each .......... 19400-00
®
Stir Plate, 230 Vac......................................................................each .......... 19400-10
* Contact Hach for larger sizes.
62
Page 63

CHELANT, TOTAL (0 to 40.0 mg/L as Na
Using Bismuth Nitrate
EDTA)
4
Method 8350
1. Insert a clean
delivery tube into the
Bismuth Nitrate Titration
Cartridge. Attach the
cartridge to the titrator
body. See General
Description, Step-ByStep, for assembly
instructions.
2. Hold the Digital
Titrator with the
cartridge tip pointing up.
Turn the delivery knob
until a few drops of
titrant are expelled.
Reset the counter to zero
and wipe the tip.
Note: For added
convenience use the
TitraStir
General Description,
Step 3 in Step-by-Step.
®
Stir Plate. See
3. Use a graduated
cylinder to measure the
50 mL of clear sample
into a 125-mL
Erlenmeyer flask.
Note: Filtration is required
for turbid samples.
4. Add the contents of
one Ascorbic Acid
Powder Pillow to the
flask and swirl to mix.
63
Page 64

CHELANT, TOTAL, continued
5. Add the contents of
one Methylthymol Blue
Powder Pillow to the
flask and swirl to mix.
Interferences
6. If the solution in the
flask is yellow, add one
drop of 5.25 N Sulfuric
Acid Standard Solution.
If the solution is blue,
add 5.25 N Sulfuric Acid
Standard Solution
dropwise until the
solution changes to
yellow. Add one
additional drop.
7. Place the delivery
tube tip into the solution.
While swirling the flask,
titrate with the Bismuth
Nitrate until the color
changes from yellow to
blue-green. Record the
number of digits
required.
Note: Titrate slowly as the
end point is approached.
Note: For best results,
determine a reagent
blank. Use 50 mL of
deionized water in step 3.
Subtract the number of
digits required for the
reagent blank from the
number of digits required
for titrating the sample.
8. Calculate the final
concentration:
Digits Required x 0.188
= Total Chelant (as mg/L
Na4EDTA)
Interference from ferric iron (Fe3+) is minimized by adding
ascorbic acid. The end point should by approached slowly in
samples containing ferric iron because the iron decreases the
sharpness of the color change.
Summary of Method
Total chelant is determined by titrating an acid sample with
bismuth nitrate the presence of methylthymol blue indicator. The
end point is signaled by a color change from yellow to
blue-green.
64
Page 65

CHELANT, TOTAL, continued
REQUIRED REAGENTS
Description Unit Cat. No.
Ascorbic Acid Powder Pillows..............................................................100/pkg ..........14577-99
Bismuth Nitrate Titration Cartridge, 0.0200 M.......................................... each ..........24345-01
Methylthymol Blue Indicator Powder Pillows ........................................50/pkg ..........22847-99
Sulfuric Acid Standard Solution, 5.25 N.....................................100 mL MDB ............2449-32
REQUIRED APPARATUS
Cylinder, graduated, poly, 100 mL............................................................. each ............1081-42
Delivery Tubes, 90° with hook for TitraStir
Digital Titrator............................................................................................ each ..........16900-01
Flask, Erlenmeyer, 125 mL ........................................................................ each ..............505-43
Stir Bar, analytical, Teflon-coated, 50 mm................................................. each ..........20953-55
TitraStir
TitraStir
®
Stir Plate, 115 Vac ..................................................................... each ..........19400-00
®
Stir Plate, 230 Vac ..................................................................... each ..........19400-10
OPTIONAL REAGENTS
Water, deionized........................................................................................... 4 L ..............272-56
OPTIONAL APPARATUS
Clamp, 2-prong extension, 38 mm ............................................................ each ..........21145-00
Clamp Holder ............................................................................................. each ..............326-00
Clippers (shears), 7.25 inch........................................................................ each ..........23694-00
Delivery Tubes, with 180° hook................................................................5/pkg ..........17205-00
Filter paper, folded, 12.5 cm .................................................................100/pkg ............1894-57
Flask, Erlenmeyer, 250 mL ........................................................................ each ..............505-46
Funnel, analytical, poly, 65 mm ................................................................. each ............1083-67
®
Stir Plate ...........................5/pkg ..........41578-00
65
Page 66

66
Page 67

CHLORIDE
Mercuric Nitrate and Silver Nitrate Methods
Mercuric Nitrate Method (10 to 8000 mg/L as Cl
Methods 8206 and 8207
–
) Method 8206
1. Select the sample
volume and Mercuric
Nitrate Titration
Cartridge corresponding
to the expected chloride
concentration from
Table 1.
Range
(mg/L as Cl-)
10-40
40-160
100-400
200-800
500-2000
1000-4000
2000-8000
2. Insert a clean
delivery tube into the
titration cartridge.
Attach the cartridge to
the titrator body. See
General Description
Section, Step-by-Step,
for assembly
instructions if necessary.
Tabl e 1
Sample
Volum e
(mL)
100
25
100
50
20
10
5
(N Hg(NO
3. Turn the delivery
knob to eject a few drops
of titrant. Reset the
counter to zero and wipe
the tip.
Note: For added
convenience use the
®
TitraStir
General Description,
step 3 in Step-by-Step.
Titration
Cartridge
0.2256
0.2256
2.256
2.256
2.256
2.256
2.256
Stir Plate. See
Number
)
3)2
14393-01
14393-01
Catalog
921-01
921-01
921-01
921-01
921-01
4. Use a graduated
cylinder or pipet to
measure the sample
volume from Table 1 .
Transfer the sample into
a clean 250-mL
Erlenmeyer flask. Dilute
to about the 100-mL
mark with deionized
water, if necessary.
Note: See following
these steps.
Digit
Multiplier
0.1
0.4
1.0
2.0
5.0
10.0
20.00
67
Page 68

CHLORIDE, continued
5. Add the contents of
one Diphenylcarbazone
Powder Pillow and swirl
to mix.
Note: Results will still be
accurate if a small
amount of the powder
does not dissolve.
6. Place the delivery
tube tip into the solution
and swirl the flask while
titrating with mercuric
nitrate from a yellow to
light pink color.
Record the number of
digits required.
7. Calculate:
Digits Required x
Digit Multiplier =
mg/L Chloride
Note: Results may be
expressed as mg/L
sodium chloride by
multiplying the mg/L
chloride by 1.65.
Note: meq/L Chloride =
-
mg/L Cl
÷ 35.45.
Silver Nitrate Method (10 to 10000 mg/L as Cl–) Method 8207
1. Select the sample
volume and Silver
Nitrate Titration
Cartridge corresponding
to the expected chloride
concentration from
Table 2.
2. Insert a clean
delivery tube into the
titration cartridge.
Attach the cartridge to
the titrator body. See
General Description
Section, Step-by-Step,
for assembly
instructions if necessary.
3. Turn the delivery
knob to eject a few drops
of titrant. Reset the
counter to zero and wipe
the tip.
Note: For added
convenience use the
®
TitraStir
General Description,
Step 3 in Step-by-Step.
Stir Plate. See
4. Use a graduated
cylinder or pipet to
measure the sample
volume from Table 2 .
Transfer the sample into
a clean 250-mL
Erlenmeyer flask. Dilute
to about the 100-mL
mark with deionized
water, if necessary.
68
Note: See following
these steps.
Page 69

CHLORIDE, continued
Tabl e 2
Range
(mg/L as Cl-)
10-40
25-100
100-400
250-1000
1000-4000
2500-10000
5. Add the contents of
one Chloride 2 Indicator
Powder Pillow and swirl
to mix.
Note: Results will still be
accurate if a small
amount of the powder
does not dissolve.
Sample
Volum e
(mL)
100
40
50
20
5
2
(N AgNO
6. Place the delivery
tube tip into the solution
and swirl the flask while
titrating with silver
nitrate from a yellow to
red-brown color.
Record the number of
digits required.
Titration
Cartridge
)
3
0.2256
0.2256
1.128
1.128
1.128
1.128
7. Calculate:
Digits Required x
Digit Multiplier =
mg/L Chloride
Note: Results may be
expressed as mg/L
sodium chloride by
multiplying the mg/L
chloride by 1.65.
Catalog
Number
14396-01
14396-01
14397-01
14397-01
14397-01
14397-01
Digit
Multiplier
0.1
0.25
1.0
2.5
10.0
25.0
Sampling and Storage
Note: meq/L Chloride =
-
mg/L Cl
÷ 35.45.
Collect at least 100 to 200 mL of sample in a clean glass or
polyethylene container. Samples may be stored up to 7 days
before analysis.
69
Page 70

CHLORIDE, continued
Accuracy Check
Standard Additions Method
This accuracy check should be performed when interferences are
suspected or to verify analytical technique.
®
1. Snap the neck off a Chloride Standard Solution Voluette
–
Ampule, 12,500 mg/L Cl
®
2. Use a TenSette
sample after titration in step 6. Resume titration back to the
same end point. Record the number of digits required.
3. Repeat, using additions of 0.2 and 0.3 mL. Titrate to the end
point after each addition.
4. Each 0.1 mL addition of standard should require 12.5
additional digits of 2.256 N titrant, 25 digits of 1.128 N
titrant, or 125 digits of 0.2256 N titrant. If these uniform
increases do not occur, refer to Appendix A, Accuracy Check
and Standard Additions.
Pipet to add 0.1 mL of standard to the
.
Interferences Using the Mercuric Nitrate Method
• Chromate, ferric iron, and sulfite in excess of 10 mg/L
interfere with this method.
• Eliminate sulfite interference by adding three drops of
hydrogen peroxide, 30%, in step 4.
• Remove sulfide interference by adding the contents of one
Sulfide Inhibitor Reagent Powder Pillow to about 125 mL of
sample, mixing for one minute, and filtering through a folded
filter paper.
• Iodide and bromide interfere directly and titrate as chloride.
• Neutralize strongly alkaline or acid samples to a pH of 2 to 7
with 5.25 N Sulfuric Acid Standard Solution or 5.0 N Sodium
Hydroxide Standard Solution. Determine the amount of acid
or base necessary in a separate sample because pH electrodes
will introduce chloride into the sample.
70
Page 71

CHLORIDE, continued
Interferences Using the Silver Nitrate Method
• Iron in excess of 10 mg/L masks the end point.
• Orthophosphate in excess of 25 mg/L will precipitate
the silver.
• Sulfite in excess of 10 mg/L interferes. Eliminate sulfite
interference by adding three drops of 30% hydrogen peroxide
in step 4.
• Remove sulfide interference by adding the contents of one
Sulfide Inhibitor Reagent Powder Pillow to about 125 mL of
sample, mixing for one minute, and filtering through a folded
filter paper.
• Cyanide, iodide, and bromide interfere directly and titrate
as chloride.
• Neutralize strongly alkaline or acid samples to a pH of 2 to 7
with 5.25 N Sulfuric Acid Standard Solution or 5.0 N Sodium
Hydroxide Standard Solution. Determine the amount of acid
or base necessary in a separate sample because pH electrodes
will introduce chloride into the sample.
Summary of the Mercuric Nitrate Method
When using Mercuric Nitrate Standard Solution, the sample is
titrated under acid conditions in the presence of
diphenylcarbazone indicator. Upon addition of a slight excess of
mercuric ion, a pink-purple complex is formed with the indicator,
signaling the end point.
Summary of the Silver Nitrate Method
The sample is titrated with Silver Nitrate Standard Solution in the
presence of potassium chromate (from the Chloride 2 Indicator
Powder). The silver nitrate reacts with the chloride present to
produce insoluble white silver chloride. After all the chloride has
been precipitated, the silver ions react with the excess chromate
present to form a red-brown silver chromate precipitate, marking
the end point of the titration.
Request Hach’s Water Analysis Handbook, Publication 8376, to
obtain additional information on chloride determinations.
71
Page 72

CHLORIDE, continued
REQUIRED REAGENTS FOR THE MERCURIC NITRATE METHOD
Description Unit Cat. No.
Mercuric Nitrate Chloride Reagent Set (about 100 tests) ............................................ 22726-00
Includes: (2) 836-46, (1) 921-01, (1) 14393-01
Diphenylcarbazone Reagent Powder Pillows .......................................... 100/pkg...........836-99
Mercuric Nitrate Titration Cartridge, 0.2256 N............................................. each....... 14393-01
Mercuric Nitrate Titration Cartridge, 2.256 N............................................... each........... 921-01
Water, deionized...............................................................................................4 L........... 272-56
REQUIRED REAGENTS FOR THE SILVER NITRATE METHOD
Silver Nitrate Chloride Reagent Set (about 50 tests).................................................... 22880-00
Includes: (2) 1057-66, (1) 14396-01, (1) 14397-01
Chloride 2 Indicator Powder Pillows......................................................... 50/pkg......... 1057-66
Silver Nitrate Titration Cartridge, 0.2256 N .................................................. each....... 14396-01
Silver Nitrate Titration Cartridge, 1.128 N.................................................... each....... 14397-01
Water, deionized...............................................................................................4 L........... 272-56
REQUIRED APPARATUS FOR THE MERCURIC NITRATE METHOD AND
SILVER NITRATE METHOD
Clippers, for opening pillows......................................................................... each...........968-00
Digital Titrator ............................................................................................... each.......16900-01
Flask, Erlenmeyer, 250-mL ...........................................................................each........... 505-46
Select one or more based on sample concentration:
Cylinder, graduated, 10-mL........................................................................... each...........508-38
Cylinder, graduated, 25-mL........................................................................... each...........508-40
Cylinder, graduated, 50-mL........................................................................... each...........508-41
Cylinder, graduated, 100-mL......................................................................... each...........508-42
OPTIONAL REAGENTS
Chloride Standard Solution, 1000 mg/L Cl-.............................................500 mL...........183-49
®
Chloride Standard Solution Voluette
12,500 mg/L Cl
-
, 10-mL......................................................................... 16/pkg....... 14250-10
Hydrogen Peroxide, 30%, ACS ................................................................200 mL...........144-45
Sodium Hydroxide Standard Solution, 5.0 N .................................100 mL MDB......... 2450-32
Sulfide Inhibitor Powder Pillows ............................................................. 100/pkg.........2418-99
Sulfuric Acid Standard Solution, 5.25 N ........................................100 mL MDB.........2449-32
Ampules,
72
Page 73

CHLORIDE, continued
OPTIONAL APPARATUS
Description Unit Cat. No.
Bottle, wash, poly, 500-mL ............................................................................each ...........620-11
Clamp, 2-prong extension, 38-mm ................................................................each .......21145-00
Clamp Holder .................................................................................................each ...........326-00
Demineralizer Assembly, 473-mL .................................................................each .......21846-00
Delivery Tubes, with 180° hook...................................................................5/pkg .......17205-00
Delivery Tubes, 90°
Filter Paper, folded, 12.5 cm ....................................................................100/pkg .........1894-57
Funnel, poly, 65-mm ......................................................................................each.........1083-67
Pipet, TenSette
Pipet Tips for 19700-01 TenSette
Pipet, volumetric, Class A, 2-mL...................................................................each .......14515-36
Pipet, volumetric, Class A, 5-mL...................................................................each .......14515-37
Pipet, volumetric, Class A, 10-mL.................................................................each .......14515-38
Pipet, volumetric, Class A, 20-mL.................................................................each .......14515-20
Pipet, volumetric, Class A, 25-mL.................................................................each .......14515-40
Pipet, volumetric, Class A, 50-mL.................................................................each .......14515-41
Pipet, volumetric, Class A, 100-mL...............................................................each .......14515-42
Pipet Filler, safety bulb...................................................................................each .......14651-00
sens
ion™1 Basic Portable pH Meter with electrode....................................each .......51700-10
Support Ring Stand ........................................................................................each ...........563-00
TitraStir
TitraStir
Voluette
®
Stir Plate, 115 Vac .........................................................................each .......19400-00
®
Stir Plate, 230 Vac .........................................................................each .......19400-10
®
Ampule Breaker Kit.......................................................................each .......21968-00
with hook for TitraStir® Stir Plate...............................5/pkg .......41578-00
®
, 0.1 to 1.0 mL......................................................................each .......19700-01
®
Pipet ...................................................50/pkg .......21856-96
73
Page 74

74
Page 75

CHLORINE, FREE AND TOTAL (0 to 3.00 mg/L as Cl
DPD-FEAS Method
Method 8210
)
2
1. Insert a clean
delivery tube into a
0.00564 N Ferrous
Ethylenediammonium
Sulfate (FEAS) Titration
Cartridge. Attach the
cartridge to the titrator
body. See General
Description, Step-byStep, for assembly
instructions, if necessary.
5. Place the delivery
tube tip into the solution
and swirl the flask while
immediately titrating
with FEAS to a colorless
end point. Record the
number of digits
required.
Note: Complete the
titration rapidly.
2. Turn the delivery
knob to eject a few drops
of titrant. Reset the
counter to zero and wipe
the tip.
Note: For added
convenience use the
TitraStir
General Description,
Step 3 in Step-by-Step.
®
Stir Plate. See
6. Calculate:
Digits Required x 0.01 =
mg/L Free Chlorine
3. Pipet 25.0 mL of
sample into a 50-mL
Erlenmeyer flask.
7. If total residual chlo-
rine is desired, return to
step 3 and substitute a
DPD Total Chlorine
Powder Pillow in step 4.
Wait three minutes before titrating. Continue
with step 5. The results
will be expressed as
mg/L total chlorine.
mg/L Total Chlorine mg/L Free Chlorine =
mg/L Combined Chlorine
4. Add the contents of a
DPD Free Chlorine
Powder Pillow to the
sample and swirl to mix.
Note: Accuracy is
unaffected if a small
portion is undissolved.
Note: See Sampling and
Storage following
these steps.
75
Page 76

CHLORINE, FREE AND TOTAL, continued
Sampling and Storage
Chlorine in water is easily lost. Therefore, start chlorine
determinations immediately after sampling, avoiding excessive
light and agitation. Do not store samples.
Accuracy Check
Standard Additions Method
This accuracy check should be performed when the analyst
suspects interferences or to verify analytical technique.
1. Snap the neck off a Chlorine Standard Solution
PourRite™ Ampule.
®
2. Use a TenSette
standard, respectively, to three 25-mL samples. Mix
each well.
3. Analyze each sample as described in the procedure.
4. Each 0.1-mL addition of standard should require
approximately 20 digits. Check the certificate enclosed with
the PourRite Ampules to obtain the exact concentration. To
determine the exact number of digits required for each
0.2-mL addition, multiply the exact concentration times the
volume of the addition in mL times four. (Example: 50 mg/L
x 0.1 mL x 4 = 20 digits.) If these uniform increases do not
occur, refer to Appendix A, Accuracy Check and
Standard Additions.
Pipet to add 0.10 mL, 0.20 and 0.30 mL of
Interferences
Higher room temperatures tend to lead to higher free chlorine
residual due to reaction of chloramines. Higher room
temperatures also result in increased color fading. If the sample
contains more than 250 mg/L alkalinity or 150 mg/L acidity as
CaCO
may instantly fade. To overcome this interference, adjust the pH
of a separate 25-mL sample to a 6 to 7 pH by adding 1 N Sulfuric
Acid Standard Solution or 1 N Sodium Hydroxide Standard
Solution in small increments and using a pH meter. Record the
amount of acid or base required. Add this amount of acid or base
to the sample to be tested and proceed with step 4.
, the sample may not develop the full amount of color or it
3
76
Page 77

CHLORINE, FREE AND TOTAL, continued
Bromine, iodine, ozone, and oxidized forms of manganese and
chromium will also react and read as chlorine. To compensate for
the effects of manganese, Mn
drops of Potassium Iodide, 30 g/L to 25 mL of sample. Mix and
wait one minute. Add three drops of Sodium Arsenite, 5 g/L and
mix. Analyze this solution as described above. (If chromium is
present, allow exactly the same reaction period in step 7 with the
DPD for both analyses.) Subtract the result from the original
analysis to correct for the interference.
Summary of Method
The DPD-FEAS method provides a titrimetric procedure for
determining free available chlorine and for estimating free and
combined chlorine fractions present together. The magenta
species, resulting from the oxidation of DPD by chlorine, is
destroyed quantitatively by titration with ferrous
ethylenediammonium sulfate and the volume of titrant required to
reach a colorless end point is proportional to the chlorine
concentration. Total residual chlorine may also be determined by
this test.
4+
, or chromium, Cr6+, add three
77
Page 78

CHLORINE, FREE AND TOTAL, continued
REQUIRED REAGENTS
Description Unit Cat. No.
Free and Total Chlorine Reagent Set (about 100 tests) ................................................24453-00
Includes: (1) 14064-99, (1) 14070-99, (1) 22923-01
DPD Free Chlorine Powder Pillows, 25 mL.........................................100/pkg..........14070-99
DPD Total Chlorine Powder Pillows, 25 mL........................................100/pkg.......... 14064-99
Ferrous Ethylenediammonium Sulfate Titration Cartridge, 0.00564 N .....each .......... 22923-01
REQUIRED APPARATUS
Digital Titrator ............................................................................................ each .......... 16900-01
Flask, Erlenmeyer, 50-mL ..........................................................................each..............505-41
Pipet, volumetric, Class A, 25-mL .............................................................each .......... 14515-40
Pipet Filler, safety bulb...............................................................................each .......... 14651-00
OPTIONAL REAGENTS
Chlorine Standard Solution, PourRite™ Ampules,
50-75 mg/L Cl
Potassium Iodide Solution .......................................................... 100 mL MDB..............343-32
Sulfuric Acid Standard Solution, 1.000 N .................................. 100 mL MDB............1270-32
Sodium Hydroxide Standard Solution, 1.000 N ......................... 100 mL MDB............1045-32
Sodium Arsenite Solution........................................................... 100 mL MDB............1047-32
, 2-mL.........................................................................20/pkg.......... 14268-20
2
OPTIONAL APPARATUS
Clamp, 2-prong, extension.......................................................................... each .......... 21145-00
Clamp Holder..............................................................................................each.............. 326-00
Delivery Tubes, with 180° hook ...............................................................5/pkg.......... 17205-00
Delivery Tubes, 90° with hook for TitraStir
Pipet, TenSette
Pipet Tips for 19700-01 TenSette
®
, 0.1 to 1.0 mL ..................................................................each .......... 19700-01
®
Pipet................................................50/pkg.......... 21856-96
PourRite™ Ampule Breaker.......................................................................each .......... 24846-00
Support Ring Stand.....................................................................................each .............. 563-00
TitraStir
TitraStir
®
Stir Plate, 115 Vac......................................................................each .......... 19400-00
®
Stir Plate, 230 Vac......................................................................each .......... 19400-10
®
Stir Plate........................... 5/pkg .......... 41578-00
78
Page 79

CHLORINE, TOTAL
Method 8209
Iodometric Method (1 to 400 mg/L as Cl
1. Select the sample
volume and Sodium
Thiosulfate Titration
Cartridge corresponding
to the expected chlorine
concentration from
Table 1.
2. Insert a clean
delivery tube into the
titration cartridge.
Attach the cartridge to
the titrator body. See
General Description,
Step-by-Step, for
assembly instructions, if
necessary.
Using Sodium Thiosulfate)
2
3. Flush the delivery
tube by turning the
delivery knob to eject a
few drops of titrant.
Reset the counter to zero
and wipe the tip.
Note: For added
convenience use the
®
TitraStir
General Description,
Step 3 in Step-by-Step.
Tabl e 1
Stir Plate. See
4. Use a clean
graduated cylinder to
take a water sample.
Pour sample into a clean
125- or 250-mL
Erlenmeyer flask. Dilute
to about the 100-mL
mark with deionized
water.
Note: See Sampling and
Storage following
these steps.
Range
(mg/L Cl
1-4
2-8
5-20
10-40
20-80
50-200
100-400
)
2
Sample
Volume (mL)
100
50
20
10
5
2
1
Titration
Cartridge
(N Na
2S2O3
0.02256
0.02256
0.02256
0.02256
0.02256
0.02256
0.02256
79
)
Catalog
Number
24091-01
24091-01
24091-01
24091-01
24091-01
24091-01
24091-01
Digit
Multiplier
0.01
0.02
0.05
0.10
0.20
0.50
1.00
Page 80

CHLORINE, TOTAL, continued
5. Add 2 Droppers
(2 mL) Acetate Buffer
Solution, pH 4 and swirl
to mix.
9. Continue the
titration until the
solution changes from
dark blue to colorless.
Record the number of
digits required.
6. Clip open the end of
one Potassium Iodide
Powder Pillow. Add the
contents to the flask.
Swirl to mix.
10. Calculate:
Digits Required x Digit
Multiplier = mg/L Total
Chlorine (Cl2)
Note: These procedures
can be used to check
iodine and bromine
concentrations if chlorine
is not present. Multiply the
test result (in mg/L
chlorine) by 3.58 or 2.25,
respectively, to accurately
express the iodine or
bromine content of your
sample.
7. Place the delivery
tube tip into the solution
and swirl the flask while
titrating with sodium
thiosulfate until the
solution is a pale yellow.
8. Add one dropper of
starch indicator solution
and swirl to mix. A dark
blue color will develop.
80
Page 81

CHLORINE, TOTAL, continued
Sampling and Storage
Collect at least 200 mL of sample in a clean glass or polyethylene
container. Analyze on site or as soon as possible after collection.
Accuracy Check
Standard Additions Method
Perform this accuracy check when you suspect interferences or to
verify analytical technique.
1. Snap the neck off a Chlorine Standard Solution
PourRite™ Ampule.
2. Use a TenSette
standard to three aliquots of sample of the same volume as
used in the procedure.
3. Analyze each sample as described in the procedure.
4. Each 0.2-mL addition of standard should require
approximately 10 digits of the titration cartridge solution.
Check the certificate enclosed with the PourRite Ampules to
obtain the exact concentration. To determine the exact
number of digits required for each 0.2-mL addition, multiply
the exact concentration times the volume of the addition in
mL. (Example: 50 mg/L x 0.2 mL = 10 digits.) If these
uniform increases do not occur, refer to Appendix A,
Accuracy Check and Standard Additions.
®
Pipet to add 0.2 mL, 0.4 mL, and 0.6 mL of
81
Page 82

CHLORINE, TOTAL, continued
Iodometric Method (20 to 70,000 mg/L as Cl2 Using Sodium Thiosulfate)
1. Select the sample
volume and Sodium
Thiosulfate Titration
Cartridge corresponding
to the expected chlorine
concentration from
Table 2.
Range
(mg/L Cl2)
20-80
50-200
100-400
250-1000
500-2000
2000-9000
(0.2-0.9%)
5000-18,000
(0.5-1.8%)
10,000-35,000
(1.0-3.5%)
20,000-70,000
(2.0-7.0%)
2. Insert a clean
delivery tube into the
titration cartridge.
Attach the cartridge to
the titrator body. See
General Description,
Step-by-Step, for
assembly instructions,
if necessary.
Sample
Volum e (mL)
25
10
5
2
1
4
2
1
0.5
3. Flush the delivery
tube by turning the
delivery knob to eject a
few drops of titrant.
Reset the counter to zero
and wipe the tip.
Note: For added
convenience use the
TirtaStir
apparatus. See General
Description, Step 3 of
Step-by-Step.
Tabl e 2
Titration
Cartridge
(N Na
2S2O3
0.113
0.113
0.113
0.113
0.113
2.00
2.00
2.00
2.00
®
stirring
)
Catalog
Number
22673-01
22673-01
22673-01
22673-01
22673-01
14401-01
14401-01
14401-01
14401-01
4. Use a pipet or
graduated cylinder to
measure the sample
volume from Table 2 .
Transfer the sample into
a 125-mL Erlenmeyer
flask and dilute to about
the 50-mL mark with
deionized water.
Digit
Multiplier
0.2
0.5
1
2.5
5
22.2
44.3
88.7
177
82
Page 83

CHLORINE, TOTAL, continued
5. Add the contents of
one Dissolved Oxygen 3
Powder Pillow.
Note: Normally the
addition of the powder
pillow will lower the pH to
4 or less. If the sample
size is large and highly
alkaline, verify the solution
pH is 4 or less with a pH
meter or pH paper before
proceeding.
6. If you are using the
2.00 N titration
cartridge, add the
contents of one
Potassium Iodide
Powder Pillow (Cat. No.
20599-96) to the flask
and swirl to mix.
If you are using the
0.113 N titration
cartridge, add the
contents of one
Potassium Iodide
Powder Pillow (Cat. No.
1077-99) to the flask and
swirl to mix.
7. Place the delivery
tube tip into the solution
and swirl the flask while
titrating with sodium
thiosulfate until the
solution is a pale yellow.
8. Add one dropperful
of starch indicator
solution and swirl to
mix. A dark blue color
will develop.
9. Continue the
titration until the
solution changes from
dark blue to colorless.
Record the number of
digits required.
10. Calculate:
Digits Required x Digits
Multiplier = mg/L Total
Chlorine (Cl2)
To convert the above
results to the equivalent
percent chlorine (Cl
divide by 10,000.
),
2
83
Page 84

CHLORINE, TOTAL, continued
Accuracy Check
Standard Additions Method
This accuracy check is applicable only for the 0.113 N titration
cartridge. Perform it when interferences are suspected or to
verify analytical technique.
1. Snap the neck off a Chlorine Standard Solution
PourRite Ampule.
2. Use a TenSette Pipet (or glass pipet) to add 1.0 mL, 2.0 mL,
and 3.0 mL of standard to three samples of the same volume
as used in the procedure.
3. Analyze each sample as described in the procedure.
4. Each 1.0-mL addition of standard should require
approximately 10 digits of the 0.113 N titration cartridge.
Check the certificate enclosed with the PourRite Ampules to
obtain the exact concentration. To determine the exact
number of digits required for each 1.0-mL addition, multiply
the exact concentration times the volume of the addition in
mL. Divide this by five. For example: (50 mg/L x 1.0 mL) ÷ 5
= 10 digits. If these uniform increases do not occur, refer to
Appendix A, Accuracy Check and Standard Additions.
Summary of Method
Total chlorine concentration equals the concentration of the free
and the combined forms of chlorine. Free chlorine reacts readily
with ammonia to form combined chlorine such as
monochloramines. When potassium iodide is added to a sample
containing chlorine at a pH less than 8, free iodine is liberated in
direct proportion to the amount of total chlorine present. The
iodine is then titrated with sodium thiosulfate.
84
Page 85

CHLORINE, TOTAL, continued
REQUIRED REAGENTS (For Using the 0.02256 N Titration Cartridge)
Description Unit Cat. No.
Acetate Buffer Solution, pH 4........................................................ 100 mL MDB .......14909-32
Potassium Iodide Powder Pillows............................................................100/pkg .........1077-99
Starch Indicator Solution.............................................................. 100 mL MDB* ...........349-32
Sodium Thiosulfate Titration Cartridge, 0.02256 N ......................................each .......24091-01
REQUIRED REAGENTS (For Using the 0.113 N Titration Cartridge)
Chlorine Reagent Set, 20-2,000 mg/L (about 100 tests)...............................................22725-00
Includes: (1) 349-32, (1) 987-99, (1) 1077-99, (1) 22673-01
Dissolved Oxygen 3 Powder Pillows .......................................................100/pkg ...........987-99
Potassium Iodide Powder Pillows............................................................100/pkg .........1077-99
Sodium Thiosulfate Titration Cartridge, 0.113 N ..........................................each .......22673-01
Starch Indicator Solution.............................................................. 100 mL MDB* ...........349-32
Water, deionized...............................................................................................4 L...........272-56
REQUIRED REAGENTS (For Using the 2.00 N Titration Cartridge)
Chlorine Reagent Set, 2,000-70,000 mg/L (about 100 tests) .......................................24448-00
Includes: (1) 349-32, (1) 987-99, (2) 14401-01, (2) 20599-96
Dissolved Oxygen 3 Powder Pillows .......................................................100/pkg ...........987-99
Potassium Iodide Powder Pillows..............................................................50/pkg .......20599-96
Sodium Thiosulfate Titration Cartridge, 2.00 N ............................................each .......14401-01
Starch Indicator Solution.............................................................. 100 mL MDB* ...........349-32
Water, deionized...............................................................................................4 L...........272-56
REQUIRED APPARATUS
Clippers, for opening pillows .........................................................................each ...........968-00
Digital Titrator................................................................................................each .......16900-01
Flask, Erlenmeyer, 125 mL ............................................................................each ...........505-43
Pipet Filler, 3-valve ........................................................................................each .......12189-00
Select one or more based on sample concentration:
Pipet, serological, 1 mL..................................................................................each ...........532-35
Pipet, volumetric, Class A, 1 mL ...................................................................each .......14515-35
Pipet, volumetric, Class A, 2 mL ...................................................................each .......14515-36
Pipet, volumetric, Class A, 4 mL ...................................................................each .......14515-04
Pipet, volumetric, Class A, 5 .........................................................................each .......14515-37
Pipet, volumetric, Class A, 10 mL .................................................................each .......14515-38
Pipet, volumetric, Class A, 25 mL .................................................................each .......14515-40
* Contact Hach for larger sizes.
85
Page 86

CHLORINE, TOTAL, continued
OPTIONAL REAGENTS
Description Unit Cat. No.
Chlorine Standard Solution, PourRite™ Ampules,
50-75 mg/L as Cl
OPTIONAL APPARATUS
Clamp, 2-prong, extension, 38 mm................................................................ each.......21145-00
Clamp Holder................................................................................................. each........... 326-00
Cylinder, graduated, 5 mL ............................................................................. each........... 508-37
Cylinder, graduated, 10 mL ........................................................................... each...........508-38
Cylinder, graduated, 25 mL ........................................................................... each...........508-40
Delivery Tubes, with 180° hook .................................................................. 5/pkg....... 17205-00
Delivery Tubes, 90° with hook for TitraStir
Pipet, TenSette
Pipet Tips for 19700-01 TenSette
pH Paper, 1-11 pH ............................................................................... 5 rolls/pkg........... 391-33
PourRite™ Ampule Breaker.......................................................................... each....... 24846-00
sens
ion™1 Basic Portable pH Meter with electrode ...................................each....... 51700-10
Support Ring Stand........................................................................................ each...........563-00
®
TitraStir
TitraStir
Stir Plate, 115 Vac......................................................................... each....... 19400-00
®
Stir Plate, 230 Vac......................................................................... each....... 19400-10
, 2 mL........................................................................ 20/pkg....... 14268-20
2
®
Stir Plate.............................. 5/pkg.......41578-00
®
, 0.1 to 1.0 mL ..................................................................... each.......19700-01
®
Pipet................................................... 50/pkg....... 21856-96
86
Page 87

CHLORINE, FREE (0 to 1000 µg/L as Cl
Amperometric Forward Titration
USEPA Accepted for Reporting*
Method 10024
)
2
1. Assemble the
Amperometric Digital
Titrator System
according to the
instructions in the
Amperometric Titrator
Instruction Manual.
2. Install the 0.00564 N
Phenylarsine Oxide
(PAO) cartridge. Flush
the Digital Titrator
delivery tube by turning
the delivery knob to
eject a few drops of
titrant. Reset the counter
to zero and wipe the tip.
Note: When a new probe
is placed in service or
when the probe has not
been used recently,
prepare it according to the
Probe Stabilization
instructions in the
Amperometric Titrator
Instruction Manual.
3. With minimum
agitation, measure
200 mL of sample with a
clean graduated cylinder.
Transfer the sample to a
clean 250-mL beaker
containing the 50-mm
stirring bar supplied
with the system.
Note: An improper stirring
bar size can result in
volatilization of chlorine,
instability of readings and
loss of sensitivity.
4. Add 1 mL of
pH 7 Phosphate
Buffer Solution.
Note: If the sample pH is
between 6.5 and 7.5 it is
not necessary to add the
buffer.
* Procedure is equivalent to Standard Methods for the Examination of Water and Wastewater (18th ed.)
4500 Cl D for drinking water.
87
Page 88

CHLORINE, FREE, continued
5. Place the beaker on
the TitraStir
and immerse the tips of
the probe and delivery
tube in the solution. The
probe's platinum wires
must be submerged.
Turn on the stirring
motor.
®
Stir Plate
6. Note the LED
reading on the
Amperometric Titrator.
Unlock the BIAS control
and adjust the BIAS
control knob until a
reading between 0.50-
0.60 is obtained. Lock
the BIAS control.
Note: The bias adjustment
controls the slope of the
titration curve. The actual
instrument reading is not
important; but rather the
change in the readings as
the titration proceeds. The
adjustment need not be
precise.
7. Using the Digital
Titrator delivery knob,
dispense the PAO titrant
Solution in 5-10 digit
increments while noting
the LED reading.
Note: If the chlorine
content of the sample is
high, add titrant at a faster
rate; only the end point of
the titration and the
volume of titrant used at
the end point are of
concern. For example, if
the chlorine content is
approximately 500 µg/L,
up to 300 digits of 0.00564
N PAO could be added at
once. As the end point is
approached, dispense in
small increments.
Note: If excess reductant
such as sulfite, bisulfite or
sulfur dioxide is present in
the sample, the LED
readings will not decrease
and may even increase.
This indicates that no free
chlorine is present in the
sample
8. As the end point of
the titration is
approached, record the
LED readings along
with the corresponding
digits displayed on the
Digital Titrator counter.
Near the titration end
point, add 2 to 5 digits of
titrant; wait a few
seconds for a stable
reading and record.
88
Page 89

CHLORINE, FREE, continued
Meter Reading
End
Point
Digits
9. Continue the
titration, recording at
least three points on the
downward sloping curve
and at least three points
after the end point has
been reached. The latter
points will have little
change in the LED
readings.
Figure 1
Sample Plot
10. Using linear graph
paper, plot the recorded
readings from the
Amperometric Titrator
on the vertical axis and
the corresponding
Digital Titrator digits on
the horizontal axis.
Draw the two best
intersecting lines
through the points; see
Figure 1. Determine the
number of digits at the
intersection of the lines;
this is the end point.
11. Calculate the µg/L
free chlorine:
Digits at End Point x 1.25
= µg/L free chlorine as
Cl
2
Meter Reading
89
End
Point
Digits
Page 90

CHLORINE, FREE, continued
Accuracy Check
Standard Additions Method*
1. Snap the top off a Chlorine Standard Solution PourRite™
Ampule. Note the certificate value of the standard in mg/L.
2. Split a fresh sample into two 200-mL portions.
3. Using a TenSette
standard to one portion and swirl to mix. This is the
spiked sample.
4. Analyze both the sample and spiked sample and record the
chlorine concentration of each.
5. Calculate the theoretical concentration of the spiked sample:
Theoretical concentration
Where:
Cu = measured concentration of sample, in mg/L (µg/L divided by 1000)
Vu = volume of sample in mL
C
= concentration of chlorine standard (mg/L, certificate value)
s
Vs = volume of standard added in mL
®
Pipet, add from 0.1 to 0.5 mL of the
(CuVu)CsVs×()+×
----------------------------------------------------------=
VuVs+
6. Calculate the percent spiked recovery:
% Spike Recovery
---------------------------------------------------------------------------------------------------------------------- Theoretical concentration calculated, in mg/L
Spiked sample result, in mg/L
100×=
Example:
Sample result (Cu) = 120 µg/L or 0.120 mg/L
Spiked sample result = 185 µg/L or 0.185 mg/L
Volume Sample (Vu) = 200 mL
Volume Standard (V
Chlorine Standard (Cs) = 68.1 mg/L
Theoretical concentration
% Spike recovery
) = 0.2 mL
s
0.185 mg/L
----------------------------- -
0.188 mg/L
(0.120 200) (68.1 0.2)×+×
----------------------------------------------------------------------- - 0.188 mg/L==
200 0.2+
100 = 98%×=
Ideally, the percent recovery should be 100%. Generally, results
from 80-120% recovery are considered acceptable.
* The standard additions technique is not applicable for samples containing excess reducing agents such
as sulfur dioxide, sulfite, or bisulfite.
90
Page 91

CHLORINE, FREE, continued
Precision
In a single laboratory, using a standard solution of 338 µg/L
chlorine, a single operator obtained a standard deviation of
± 5.2 µg/L chlorine.
Detection Limit
With good operator technique, the estimated detectable
concentration is approximately 15 µg/L chlorine using
0.00564 N PAO.
Sampling and Storage
Chlorine is rapidly lost from water. Avoid exposure to sunlight or
other strong light. Avoid excessive agitation. Analyze
samples immediately.
Interferences
• Silver ions poison the electrode.
• Copper ions interfere.
Summary of Method
• Interferences are sometimes found in highly turbid water and
those containing surface active agents.
• Oxidized manganese and other oxidizing reagents give
positive interferences.
• Some uncertainty in the end point may be observed with
samples containing high organic content.
• Samples containing excess reducing agents, such as sulfur
dioxide, sulfite, and bisulfite do not contain free chlorine and
can not be titrated under the conditions of the test.
• Highly buffered samples or extreme sample pH may exceed
the buffering capacity of the buffer reagent. If necessary, add
additional buffer and check pH of sample prior to titration.
In the amperometric forward titration procedure for free chlorine,
a small electrical current is applied across two identical platinum
electrodes. No current can flow between the electrodes unless a
91
Page 92

CHLORINE, FREE, continued
substance that can be oxidized at the anode and a substance that
can be reduced at the cathode are both present. In the case of the
free chlorine titration with phenylarsine oxide (PAO), chlorine is
reduced at the cathode to chloride due to the addition of PAO and
PAO is oxidized from the +3 oxidation state to the +5 oxidation
state at the anode. Prior to the end point of the titration, both free
chlorine and chloride are present in solution; allowing current to
flow, even with a very small applied potential. At the end point,
no free chlorine remains and the solution cannot conduct even if
excess PAO titrant is added. The end point is defined when no
change in current occurs, signaling all free chlorine has
been reacted.
REQUIRED REAGENTS
Description Unit Cat. No.
Phenylarsine Oxide Solution, 0.00564 N Digital Titrator Cartridge ............. each.........1999-01
Phosphate Buffer Solution, pH 7 ....................................................100 mL MDB.......21553-32
REQUIRED APPARATUS
Amperometric Titrator Assembly.................................................................. each....... 19299-00
Digital Titrator ............................................................................................... each.......16900-01
Beaker, low-form, 250 mL............................................................................. each........... 500-46
Cylinder, graduated, 250 mL ......................................................................... each........... 508-46
Delivery Tubes, 90° with hook .................................................................... 5/pkg....... 41578-00
Probe Assembly, Amperometric Titrator....................................................... each.......19390-00
Stir Bar, octagonal, Teflon-coated, 50.8 x 7.9 mm ........................................ each....... 20953-55
TitraStir
TitraStir
®
Stir Plate, 115 Vac......................................................................... each....... 19400-00
®
Stir Plate, 230 Vac......................................................................... each....... 19400-10
OPTIONAL REAGENTS
Chlorine Standard Solution PourRite™ Ampules,
50-75 mg/L Cl
, 2 mL ............................................................................ 20/pkg.......14268-20
2
Water, deionized...............................................................................................4 L........... 272-56
OPTIONAL APPARATUS
Pipet, TenSette® 0.1 to 1.0 mL ...................................................................... each.......19700-01
®
Pipet Tips for 19700-01 TenSette
PourRite™ Ampule Breaker.......................................................................... each....... 24846-00
Standard Methods for the Examination of Water
and Wastewater, 19th edition...................................................................... each....... 22708-00
Pipet................................................... 50/pkg....... 21856-96
92
Page 93

CHLORINE, TOTAL (6 to 1000 µg/L as Cl
Amperometric Back Titration
USEPA Accepted for Reporting*
Phase 1: Adjusting the Electrode Response Slope
Method 10025
) For wastewater
2
1. Assemble the
Amperometric Digital
Titrator System
according to the
instructions in the
Amperometric Titrator
Instruction Manual.
2. Install the Standard
Iodine Titrant Cartridge,
0.028 N. Flush the
Digital Titrator delivery
tube by turning the
delivery knob to eject a
few drops of titrant.
Reset the counter to zero
and wipe the tip.
Note: When a new probe
is used or the probe has
not been used recently,
prepare it according to the
Probe Stabilization
instructions in the
Amperometric Titrator
Instruction Manual.
3. Using a graduated
cylinder, measure 200
mL of deionized water
into a clean 250-mL
beaker. Place the
50-mm stirring bar
supplied with the system
into the beaker.
Note: An improper size
stirring bar can result in
volatilization of iodine,
instability of readings and
loss of sensitivity.
4. Add 1 mL of pH 4
Acetate Buffer and the
contents of one
Potassium Iodide Pillow.
* Procedure is equivalent to USEPA method 330.2 and Standard Methods for the Examination of Water
and Wastewater (17th ed.) 4500-Cl C for wastewater.
93
Page 94

CHLORINE, TOTAL, continued
5. Place the beaker on
the TitraStir
and immerse the tips of
the probe and delivery
tube in the solution. The
probe's platinum wires
must be submerged.
Turn on the stirring
motor.
®
Stir Plate
6. Using the Digital
Titrator delivery knob,
add 50 digits of Standard
Iodine Titrant Solution.
Phase 2: Standardization of the Iodine Titrant
1. Set-up the
Amperometric Digital
Titrator System as in
Phase 1: Adjusting the
Electrode Response
Slope if it has not
already been done. Reset
the Digital Titrator
counter to zero and wipe
the tip.
2. Using a graduated
cylinder, measure 200
mL of deionized water
into a clean 250-mL
beaker. Place the 50-mm
stirring bar supplied
with the system into the
beaker.
Note: An improper size of
stirring bar can result in
volatilization of iodine,
instability of readings and
loss of sensitivity.
7. Note the LED
reading on the
Amperometric Titrator.
Unlock the BIAS control
and adjust the BIAS
control knob until a
stable reading between
0.50-0.60 is obtained.
Lock the BIAS control.
3. Using a Class A
pipet, transfer 1.00 mL
of 0.00564 N Sodium
Thiosulfate Solution to
the beaker. Swirl to mix.
Note: Alternatively, use
0.00564 N Phenylarsine
Oxide (PAO), Cat. No.
1999, instead of
thiosulfate.
8. Remove the probe
arm from the beaker and
rinse the platinum wires
with deionized water.
Adjustment of the
electrode response slope
is complete.
4. Add 1 mL of pH 4
Acetate Buffer Solution
and the contents of one
Potassium Iodide
Powder Pillow.
94
Page 95

CHLORINE, TOTAL, continued
5. Place the beaker on
the TitraStir Stir Plate
and immerse the tips of
the probe and delivery
tube in the solution. The
probe's platinum wires
must be submerged.
Turn on the stirring
motor.
6. Note the LED
reading on the
Amperometric Titrator.
It should read 0.00
± 0.05. DO NOT adjust
the BIAS control.
7. Using the Digital
Titrator delivery
knob, dispense 100
digits of Standard Iodine
Titrant Solution and note
the LED reading.
8. Continue dispensing
titrant in 5-10 digit
increments while noting
the LED reading. Record
at least 3 points (null
current values and
Digital Titrator reading),
before the end point is
reached. After the end
point of the titration
(nominal 160 digits),
record the increasing
LED readings along
with the corresponding
digits displayed on the
Digital Titrator counter.
Add 5-10 digits of
titrant; wait a few
seconds for a stable
reading and record it.
Stop adding titrant when
the LED readings
exceed 0.60.
Note: LED readings
above 0.60 will be
excessively noisy.
95
Page 96

CHLORINE, TOTAL, continued
T
Meter Reading
End Point
Digits
9. Using linear graph
paper, plot the recorded
readings from the
Amperometric Titrator
on the vertical axis and
the corresponding
Digital Titrator digits on
the horizontal axis.
Draw the two best
intersecting lines
through the points
plotted. See Figure 1.
Determine the number
of digits at the
intersection of the lines.
This is the standard end
point.
Figure 1
Back Amperometric
itration Graph
10. Record the
standard end point digits
value. This value will be
used in calculation of the
sample chlorine
concentration.
Note: The iodine titrant
concentration is
approximately 0.0282 N,
which relates to 160 digits
needed to titrate 1.00 mL
of 0.00564 N Thiosulfate.
If the calculated end point
is greater than 160 digits,
this indicates the Standard
Iodine Titrant is weaker
than when packaged.
Discard the Standard
Iodine Titrant cartridge if
the calculated
standardization end point
is greater than 200 digits.
11. Locate the
appropriate multiplier
based on the standard
end point in Table 1 on
page 99. The multiplier
is used in Phase 3:
Titration of Sample for
Total Residual Chlorine.
Interpolation between
values in the table is not
necessary.
96
Page 97

CHLORINE, TOTAL, continued
Phase 3: Titration of Sample for Total Residual Chlorine
1. Set-up the
Amperometric Digital
Titrator System as in
Phase 1: Adjusting the
Electrode Response
Slope if it has not
already been done. Reset
the Digital Titrator
counter to zero and wipe
the tip.
2. Place a clean 50-mm
stirring bar supplied
with the system into a
clean 250-mL beaker.
Using a Class A pipet,
transfer 1.00 mL of
0.00564 N Sodium
Thiosulfate Solution to
the a beaker. Add 1 mL
of pH 4 Acetate Buffer
Solution to the beaker.
Note: An improper size
stirring bar can result in
volatilization of chlorine,
instability of readings and
loss of sensitivity.
Alternatively, use 0.00564
N Phenylarsine Oxide
(PAO), Cat. No. 1999,
instead of thiosulfate.
3. With minimum
agitation, measure
200 mL sample with a
clean graduated cylinder
and transfer the sample
to the beaker. Swirl to
mix the reagents with
sample.
Note: Steps 2-3 can be
performed at the sampling
site thereby "fixing" the
sample for later analysis.
Pipet 1.00 mL of 0.00564
N Sodium Thiosulfate and
add 1.0 mL of Acetate
Buffer into a clean, dry
glass sampling bottle (e.g.
BOD bottle). At the
sample site, measure
200 mL of sample with a
graduated cylinder and
transfer to the sampling
bottle. Swirl to mix. Before
analysis, quantitatively
transfer the entire
contents of the sampling
bottle to the 250-mL
beaker. Minimize delay
between sampling and
analysis (1 hour
maximum) to prevent
decomposition of
thiosulfate in the sample.
4. Place the beaker on
the TitraStir Stir Plate
and immerse the tips of
the probe and delivery
tube in the solution. The
probe's platinum wires
must be submerged.
Turn on the stirring
motor.
97
Page 98

CHLORINE, TOTAL, continued
5. Add the contents of
one pillow of Potassium
Iodide Reagent to the
beaker and allow the
powder to dissolve.
6. Note the LED
reading on the
Amperometric Titrator.
It should read 0.00
± 0.05. DO NOT adjust
the BIAS control.
7. Using the Digital
Titrator delivery knob,
dispense the Standard
Iodine Titrant Solution
in 5-10 digit increments
while noting the LED
reading. Record at least
3 points (null current
values and Digital
Titrator reading), before
end point is reached.
8. After the end point
of the titration is
reached, record the
increasing LED readings
along with the
corresponding digits
displayed on the Digital
Titrator counter. Add
5-10 digits of titrant;
wait a few seconds for a
stable reading and
record. Stop the titrant
addition when the LED
readings exceed 0.60.
Note: LED readings
above 0.60 will be
excessively noisy. With
samples containing
excess de-chlorinating
agents, such as sulfur
dioxide, sulfite or bisulfite,
the titration end point
(number of digits) will be
greater than the number of
digits obtained during the
standardization. It is not
necessary to continue the
titrant addition if the
number of digits used in
the sample titration
exceeds that calculated
for the standardization end
point. This indicates that
no free or combined
chlorine is present in the
sample.
98
Page 99

CHLORINE, TOTAL, continued
9. Using linear graph
paper, plot the recorded
readings from the
Amperometric Titrator
on the vertical axis and
the corresponding
Digital Titrator digits on
the horizontal axis.
Draw the two best
intersecting lines
through the points
plotted. See Figure 1 on
page 96. Determine the
number of digits at the
intersection of the lines.
This is the sample end
point.
10. Calculate the µg/L
total chlorine:
[Digits (Standard End
Point) - Digits (Sample
End Point)] x Multiplier
= µg/L Cl
(Multiplier is from
Phase 2.)
Example: Standard EP =
160 digits
Multiplier = 6.25
Sample EP = 150 digits
µg/L total chlorine =
[160 - 150] x 6.25 =
10 x 6.25 = 63 (round up)
Note: To preserve the
strength of the iodine
titrant solution, always
remove the delivery tube
from the Digital Titrator
cartridge and replace the
cap when not in use.
Protect the iodine titrant
solution from direct
sunlight.
2
Table 1
Digits
(standard end point)
160 6.25
165 6.06
170 5.88
175 5.71
180 5.56
185 5.40
190 5.26
195 5.13
200 5.00
Multiplier
99
Page 100

CHLORINE, TOTAL, continued
Sampling and Storage
Chlorine is rapidly lost from water. Avoid exposure to sunlight or
other strong light. Avoid excessive agitation. Analyze samples
immediately or fix the sample by pre-addition of standard
thiosulfate and buffer as indicated in Phase 3: Titration of Sample
for Total Residual Chlorine. The fixing procedure should be used
for brief transportation delays—not for storage of samples.
Accuracy Check
Standard Additions Method*
Snap the top off a Chlorine Standard Solution PourRite™
Ampule. Note the certificate value of the standard in mg/L.
1. Split a fresh sample into two 200-mL portions.
2. Using a TenSette
standard to one portion and swirl to mix. This is the
spiked sample.
3. Analyze each sample as described above and record the
chlorine concentrations.
®
Pipet, add from 0.1 to 0.5 mL of the
4. Calculate the theoretical concentration of the spiked sample:
Theoretical concentration
CuVu×()CsVs×()+
---------------------------------------------------------- -=
VuVs+
Where:
Cu = measured concentration of sample, in mg/L (µg/L divided by 1000)
Vu = volume of sample in mL
= concentration of chlorine standard (mg/L, certificate value)
C
s
Vs = volume of standard added in mL
5. Calculate the percent spiked recovery:
% Spike recovery
* Standard additions is not applicable for samples containing excess reducing agents such as sulfur
dioxide, sulfite, or bisulfite.
---------------------------------------------------------------------------------------------------------------------- Theoretical concentration calculated, in mg/L
Spiked sample result, in mg/L
100
100×=
 Loading...