

Page 1
PNEG-914
Installation and Operation
of Flex-Flo
Model 220, 300, 350, 500 and HR
Installation and Owner’s Manual
PNEG-914
Date: 02-04-11
Page 2

2 PNEG-914 Flex-Flo
Page 3

Table of Contents
Contents
Chapter 1 Safety .................................. ................... ................... .................... ................... ......................................5
Safety Guidelines ... ... ... ... .......................................................................................................................5
General Safety Statement ......................................................................................................................6
Chapter 2 Decals .................................... .................................................... ............................................................8
Chapter 3 Introduction ........................................................................................................................................10
Applications ............................... ............................................. ..............................................................10
Background ................................................................................ ..........................................................10
Building Safety .....................................................................................................................................10
Installation Sequence ................................ ... .... ... ... ... .... ... ... ... .... ... ... ....................................................10
Chapter 4 Flex-Flo Specifications (English/Metric) ..........................................................................................11
The Feed Tank Connections ................................................................................................................11
Chapter 5 Installation ..........................................................................................................................................15
Boot and Transfer Plate Installation .....................................................................................................15
Slide Gate Installation ..........................................................................................................................16
Inspection/Clean-Out Plate Installation ................................................................................................17
Restrictor Adjustment ...........................................................................................................................18
Straight-Through Tandem Installation ..................................................................................................19
Auger Tubing .......................... ... ... .... .......................................... ... ... ... ... .... ..........................................20
Cementing Procedure ......................................... ... ... .... ... ... ... .... ... ... ... ... .... ... ... ....................................22
Outlet Holes . ... ... .... ... ... ... .... .......................................... .......................................................................22
Drop Kit Installation ..............................................................................................................................23
Kwik-Attach Drop Kit Installation ............................................................ .... ... ... ... .... ... ... ... ... .................24
Power Unit and Control Unit .................................................................................................................25
Auger ...................................... ................ ................ ................ ................ ................. .............................28
Auger Installation .................................................................................................................................28
Extension Hopper Installation ...... .... ... ... ... ... .... ... ... ... .... ... ... ... .... ... ... ....................................................30
Operation Guidelines ...... .... ... ... .......................................... ... .... ... ... ....................................................32
Chapter 6 Parts List .............................................................................................................................................35
Flex-Flo Feed Line Components ..........................................................................................................36
Direct Drive Power Unit Assemblies ....................................................................................................37
Model 220 Unloader and Anchor Assembly .........................................................................................40
Model 300, 350 and HR Unloader and Anchor Assembly ....................................................................41
Model 500 Unloader and Anchor Assembly .........................................................................................42
Direct Drive and Tube Anchor ..............................................................................................................43
Belt Drive and Tube Anchor .................................................................................................................44
Model 220, 300 and 350 Control Unit (FLX-4496) ..................... ... ... .......................................... ... .......46
Flex-Flo Control Unit (FLX-5015) .........................................................................................................48
Belt Drive Power Unit ...........................................................................................................................50
Direct Drive Power Unit ........................................................................................................................51
Drop Kit/Kwik-Attach Drop Kit ..............................................................................................................52
Unloader Switch ...................................................................................................................................53
Micro Drop Tube Switch/Proximity Switch ....................................... ... ... .... ... ... ... .... ... ... ... ... .... ... ... .......54
PNEG-914 Flex-Flo 3
Page 4

Table of Contents
Chapter 7 Wiring Diagrams .................................................................................................................................55
FLX-4496 or FLX-5015 Factory Wiring Diagram ............ ... ... ... .......................................... ... .... ... ... ... ...55
Wiring Diagram for Extension Flex-Flo Using Smart-Flex Control .......................................................56
Wiring Diagram for Extension Flex-Flo Using Two (2) FLX-4496 Controls ..........................................57
Flex-Flo Control with 220 Volt 24 Hour Time Clock .............................................................................58
Flex-Flo Control with Proximity Switch (AP-1002) ...............................................................................59
Flex-Flo Control with Proximity Switch (AP-2983) ...............................................................................60
Flex-Flo Control with Drop Tube Switch or Hopper Level Switch .........................................................61
Flex-Flo Control with Smart IR Sensor (FLX-4951) .............................................................................62
Chapter 8 Warranty ....................................... .............................................................. .........................................63
4 PNEG-914 Flex-Flo
Page 5
1. Safety
DANGER
WARNING
CAUTION
NOTICE
This is the safety alert symbol. It is used to alert you
to potential personal injury hazards. Obey all safety
messages that follow this symbol to avoid possible
injury or death.
WARNING indicates a hazardous situation which, if not
avoided, could result in death or serious injury.
CAUTION, used with the safety alert symbol, indicates a
hazardous situation which, if not avoided, could result in
minor or moderate injury.
NOTICE is used to address practices not related to
personal injury.
DANGER indicates a hazardous situation which, if not
avoided, will result in death or serious injury.
Safety Guidelines
This manual contains information that is important for you, the owner/operator, to know and understand.
This information relates to protecting personal safety and preventing equipment problems. It is the
responsibility of the owner/operator to inform anyone operating or working in the area of this equipment
of these safety guidelines. To help you recognize this information, we use the symbols that are defined
below. Please read the manual and pay attention to these sections. Failure to read this manual and its
safety instructions is a misuse of the equipment and may lead to serious injury or death.
PNEG-914 Flex-Flo 5
Page 6

1. Safety
General Safety Statement
Our foremost concern is your safety and the safety of others associated with grain handling equipment.
This manual is to help you understand safe operating procedures and some problems which may be
encountered by the operator and other personnel.
As owner and/or operator, you are responsible to know what requirements, hazards and precautions exist
and inform all personnel associated with the equipment or in the area. Safety precautions may be required
from the personnel. Avoid any alterations to the equipment, which may produce a very dangerous
situation, where SERIOUS INJURY or DEATH may occur.
Electrical Safety
An adequate and safe power supply to the Flex-Flo System unit is essential for safety. A competent and
qualified electrician must undertake all electrical wiring. All wiring is to be installed in accordance with all
local and National Standards and Regulations relevant to your country and region.
Electrical safety devices, emergency stops and main isolators are recommended with the Flex-Flo System
and are essential for safety. This should be installed as indicated in the enclosed installation instructions
and in accordance with the relevant codes and directives.
User’s Manual
This manual contains information and instructions essential to the safe installation and use of the
Flex-Flo System. Read this manual thoroughly before attempting any installation or use of the
Flex-Flo System. Keep this manual with the Flex-Flo System or in a location where it can be readily
accessed. Failure to read this manual and its safety instructions is a misuse of the equipment.
Correct Uses of the Flex-Flo System
The Flex-Flo System is designed for the sole purpose of conveying granular or powdered agricultural
animal feed. Use of the system in any other way is a misuse of the system and may endanger the h ealth
and safety.
Only genuine AP/Cumberland parts are to be used in the installation and use of the Flex-Flo System.
Use of other non-genuine parts is a misuse of the system and may lead to dangerous situations imperilling
the safety and health of you and others.
This system is not designed for use in atmospheres where there is a risk of explosion. Use in such an
environment is prohibited. If in doubt contact your dealer or the GSI group.
Safety Guards
The Flex-Flo System contains many moving and electrical parts, which will cause serious injury or death
if touched. Guards are placed on the machine to protect you. Operating the machine at any time with
guards removed or incorrectly fitted is a serious misuse of the machine and endangers safety.
Safety in Handling the Flex-Flo System
The Flex-Flo drive unit weighs 48 lbs. (22 kgs). All precautions should be taken when lifting and or moving
the unit. Ideally mechanical lift equipment should be used. If manual handling is necessary assistance
should be sought from other people.
6 PNEG-914 Flex-Flo
Page 7

1. Safety
CE Compliance
In accordance with European Union Directives, GSI has made every effort to ensure that this product
complies with the essential requirements of the machinery directive, the low voltage directive and the
electromagnetic compatibility directive. As such, we have declared conformity and affixed the CE mark.
Our declaration relates only to genuine GSI Flex-Flo Systems installed as intended by GSI. We cannot
and do not declare conformity for any modifications, additions or any systems whatsoever operating on or
with GSI products that are not supplied by GSI or are in any way outside the control of GSI.
Safety in Maintenance
The Flex-Flo System is designed to keep maintenance to a minimum, however, some repairs will be
necessary in the course of the life of the system. Do not attempt any repairs on the system unless you are
competent to do so. Remember that the Flex-Flo operates under automatic control and will start without
warning. Never attempt any work on the Flex-Flo System without first isolating the drive unit from
the main power and locking the isolator so that only you can turn the power back ON. Follow all
guidelines given in the maintenance section of this manual.
Before restarting the Flex-Flo System, make sure that all electrical enclosures are locked closed and all
guards and other safety measures are correctly fitted. If in any doubt, contact your dealer or the GSI group
for assistance.
Dust
Under normal working conditions little or no dust should be created by the Flex-Flo System. However,
some dust may be created, which may be harmful to your health if inhaled. To prevent this, wear a suitable
type dust mask.
Noise
Noise is not generally a hazard associated with the Flex-Flo System. Excessive noise may indicate a
problem with the machines. Tests on this machine indicate noise levels at a position one meter from the
drive unit and 1.6 meters above the ground do not exceed 70 dBa, continuous “A” weighted sound
pressure or 63 Pa, instantaneous “C” weighted sound pressure.
Sound Signs and Warnings
The following pages show you exactly where the safety and warning decals should be placed on the
Flex-Flo System. If a decal is missing or unreadable, please contact your dealer or the GSI group, for a
free replacement.
For guidance or assistance on any issues relating to the safe use of the Flex-Flo System,
Contact:
GSI Group
1004 E. Illinois St.
Assumption, IL. 62510
Phone: 1-217-226-4421
PNEG-914 Flex-Flo 7
Page 8
2. Decals
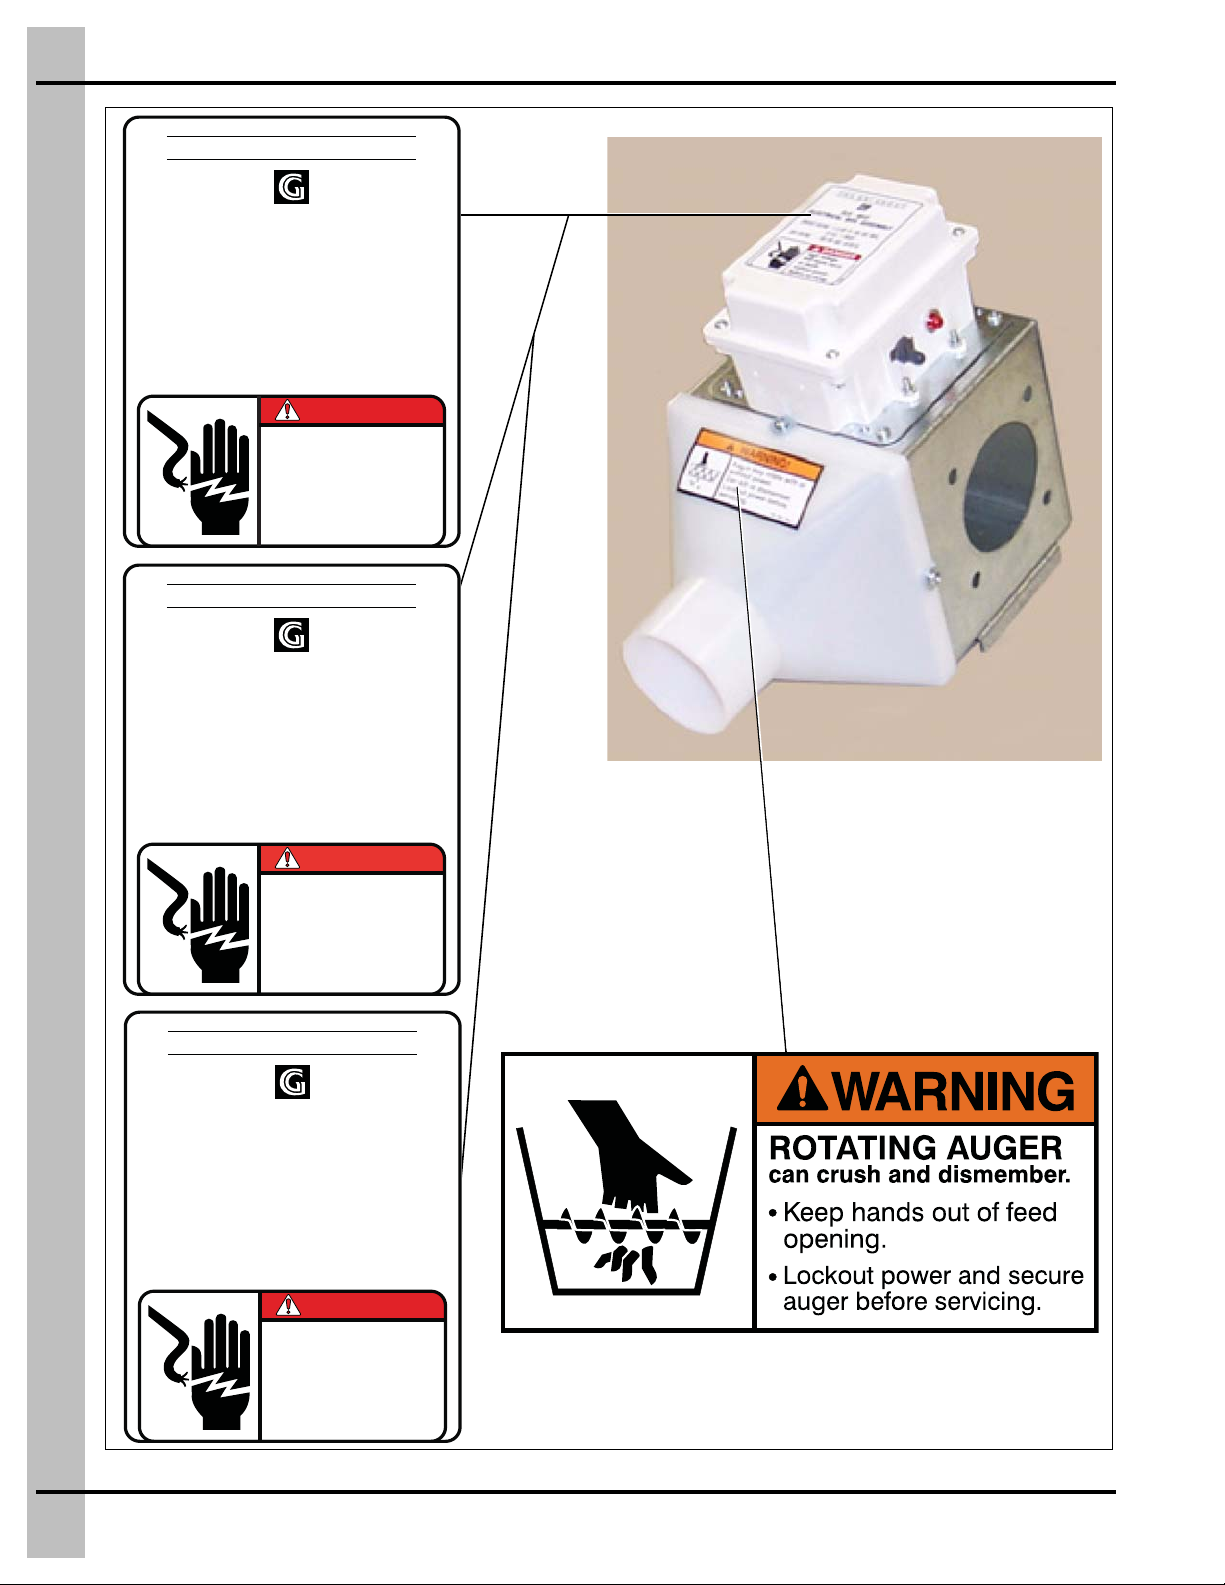
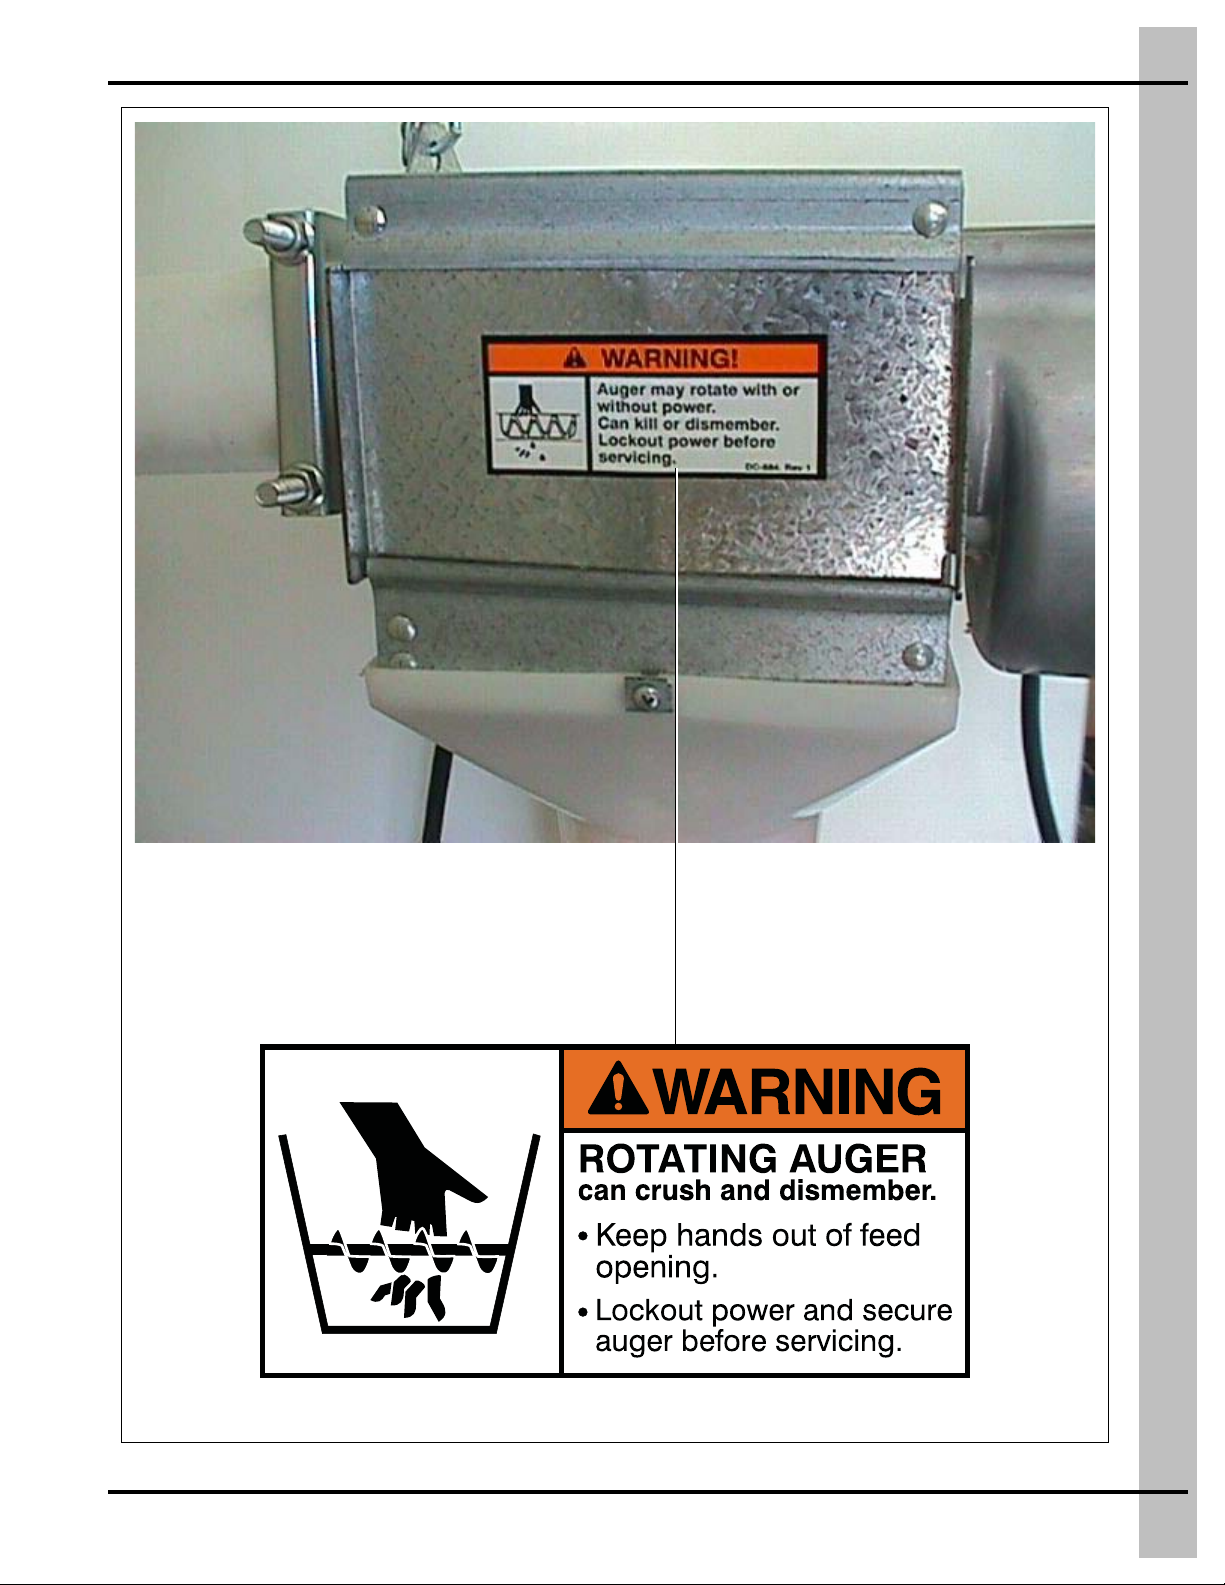
DC-884
DANGER
DANGER
DC-1239
THE GSI GROUP
FLX-4511
ELECTRICAL BOX ASSEMBLY
CONTACT RATING: 1 HP @ 120 VAC MAX.,
25 FLA, 1 PHASE
COIL RATING: 120 VAC, 50/60 Hz.
High Voltage.
Will cause injury
or death.
Lockout power
before servicing.
DANGERDANGER
THE GSI GROUP
FLX-4512
ELECTRICAL BOX ASSEMBLY
CONTACT RATING: 1-1/2 HP @ 240 VAC MAX.,
25 FLA, 1 PHASE
COIL RATING: 208-240 VAC, 50/60 Hz.
DANGER
High Voltage.
Will cause injury
or death.
Lockout power
before servicing.
THE GSI GROUP
FLX-4512-3
ELECTRICAL BOX ASSEMBLY
CONTACT RATING: 1-1/2 HP @ 240 VAC MAX.,
25 FLA, 3 PHASE
COIL RATING: 280-240 VAC, 50/60 Hz.
DANGER
High Voltage.
Will cause injury
or death.
Lockout power
before servicing.
DC-1238
DC-1238-2-3
8 PNEG-914 Flex-Flo
Page 9
2. Decals
DC-884
PNEG-914 Flex-Flo 9
Page 10
3. Introduction
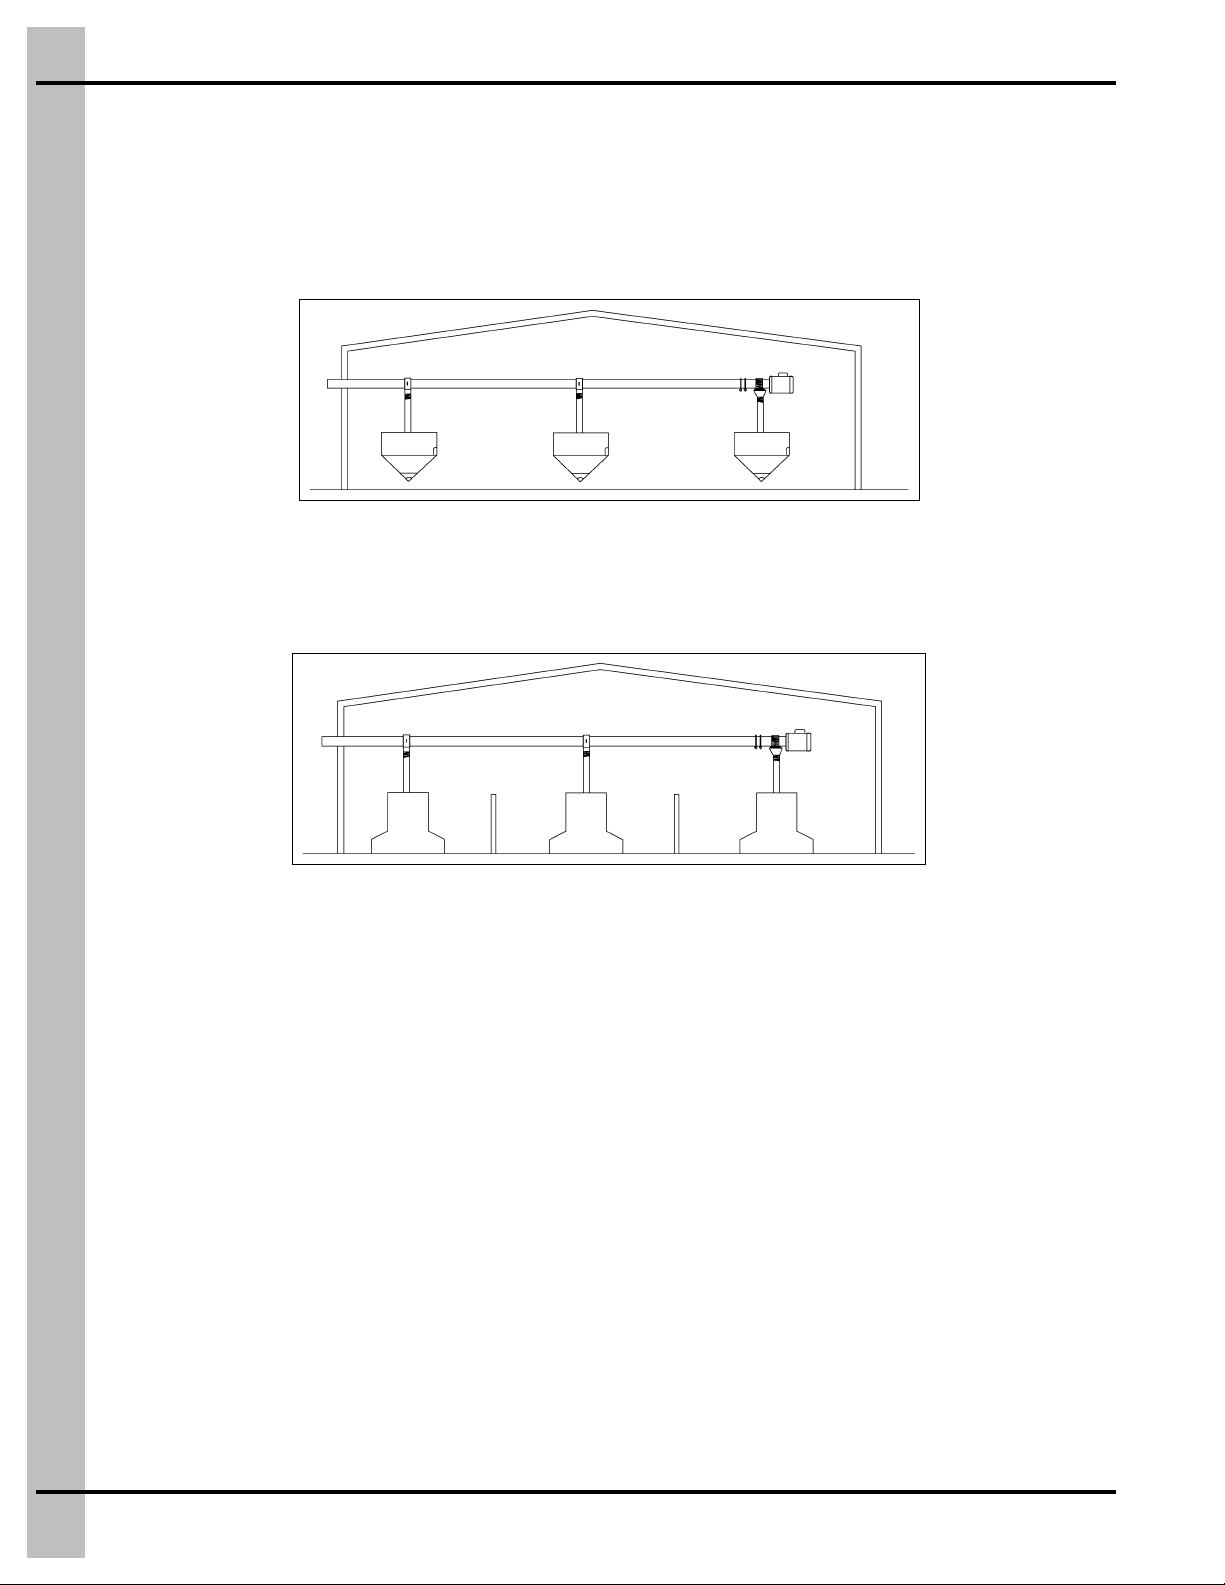
Applications
In poultry application, Flex-Flo Fill System conveys feed from bulk feed tank to hoppers inside the po ultry
building as shown in Figure 3A. Other feed systems (i.e. cycle plus, chain feeder etc.) take the feed from
the hopper to the desired locations in the building. On this layout, hopper level switches may be placed in
more than one hopper to assure that no hopper empties before the control unit hopper requires feed.
(All switches must be wired in parallel so that any one switch can start the system.)
Figure 3A Poultry Application Layout
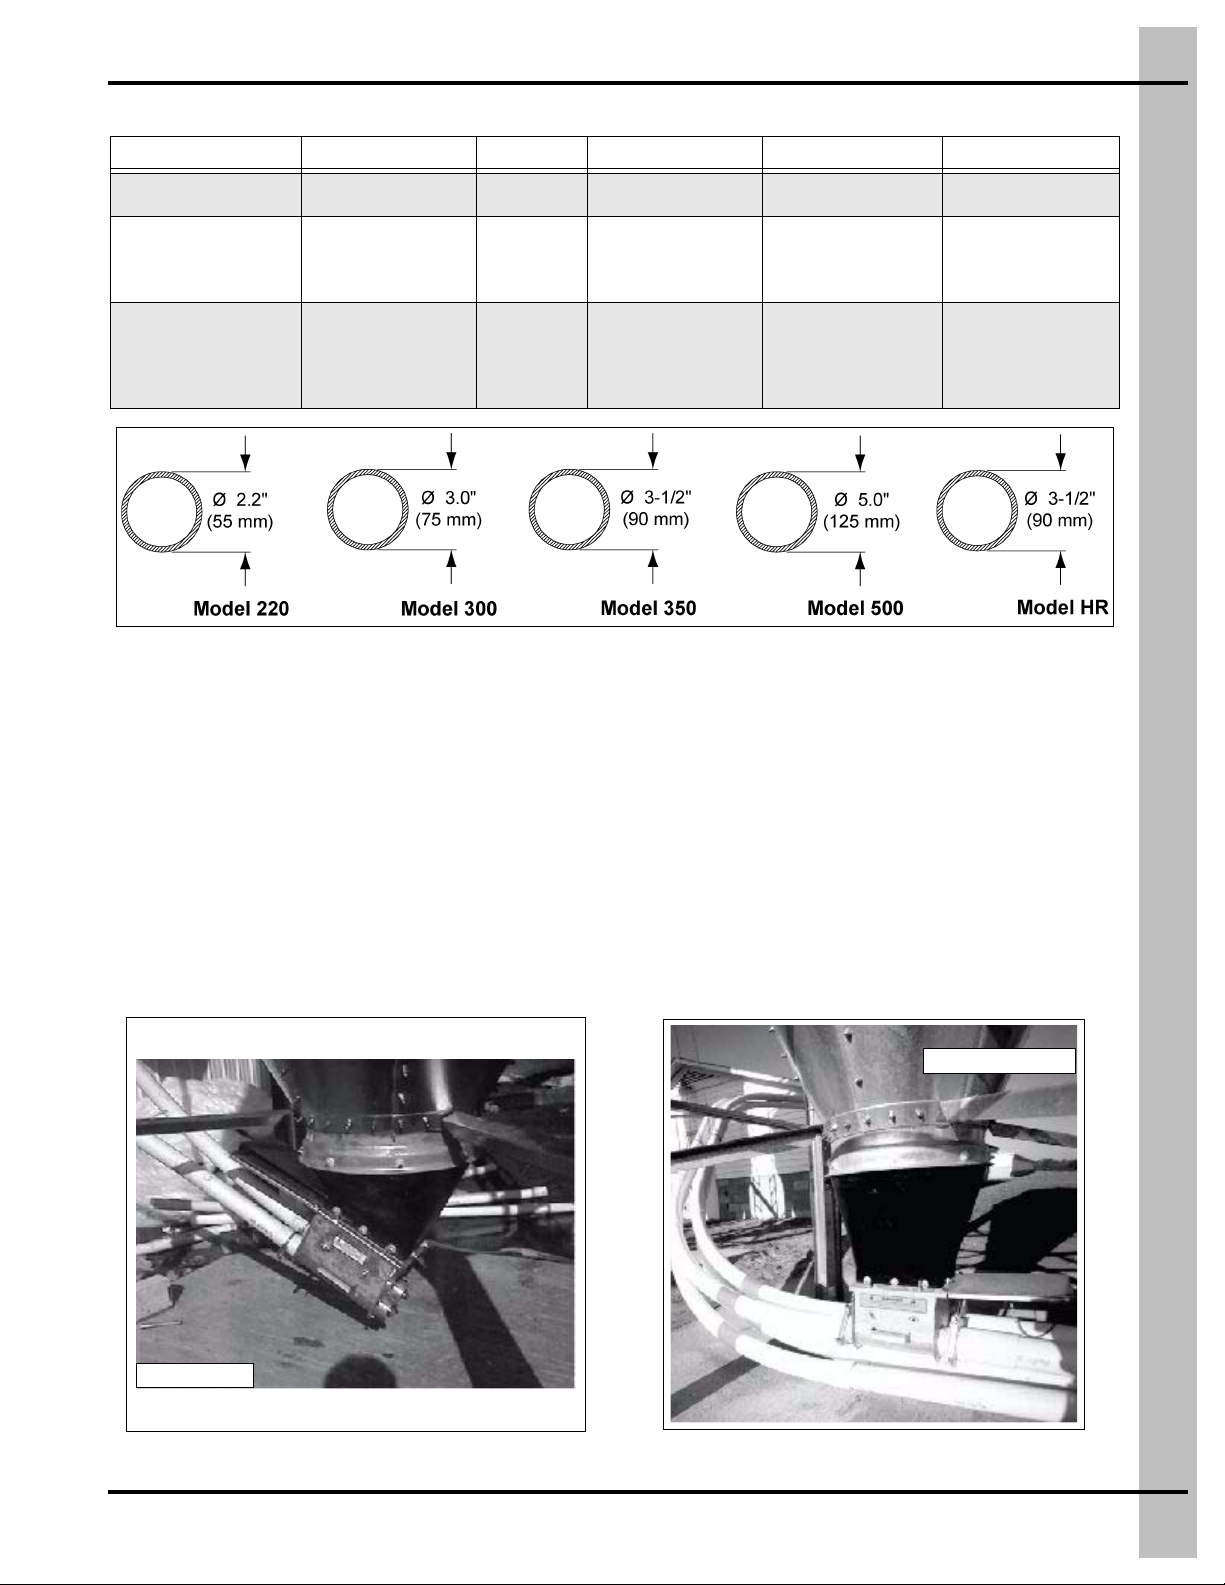
In swine applications, Flex-Flo Fill System conveys feed from bulk feed tanks to each individual fe ede r
(i.e. S.S. hog feeder, drop feeder etc.) directly as shown in
consumed. A feed level control is installed at the end to shut off the system after all feeders are filled.
Figure 3B
. It is at this location that feed is being
Figure 3B Swine Application Layout
Background
The Flex-Flo Fill System consists of a combination of PVC tubes and preformed PVC elbows. A special
PVC cement is used to connect the tubes and elbows. The PVC tubes are available in four (4) different
sizes. The PVC tube contains a rotating auger which conveys the feed to the different outlet holes.
The auger is driven by a direct drive power unit or a belt drive power unit.
Building Safety
If you are intending to install the Flex-Flo System at high levels and/or suspended from a building
structure, it is important that you check the structural integrity of the building to carry the additional load.
For information on the imposed loads on the building by the Flex-Flo System, please contact the dealer or
the GSI group.
Installation Sequence
This manual outlines the recommended order for the installation of the Flex-Flo System. Following this
guideline will provide the safest and easiest method of installation. Above all, connection of the system
to the electrical mains should be the final stage of installation. Failure to observe this could lead to a
fatal accident.
10 PNEG-914 Flex-Flo
Page 11
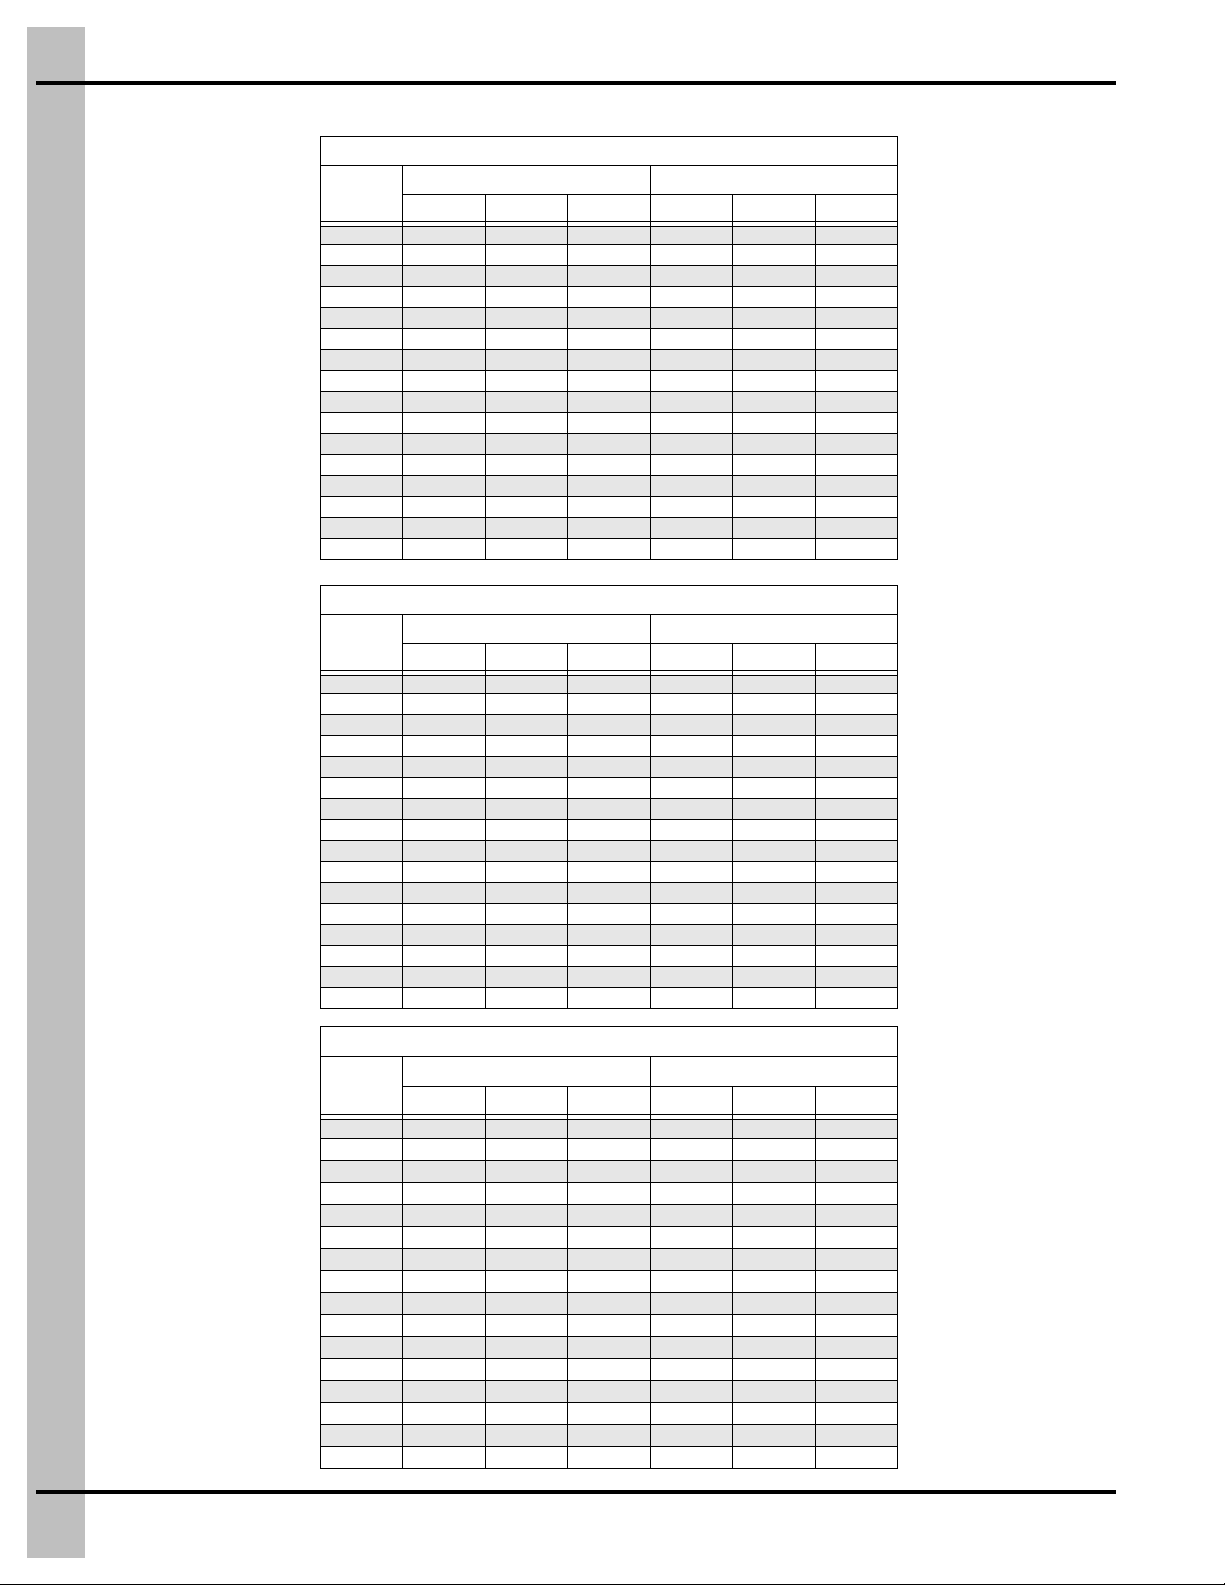
Auger Tube Diameter
30° Unloader
Straight unloader
Carrying Capacity based
on 40 lbs./cubic ft.
Maximum Particle Size
and Feed Type
4. Flex-Flo Specifications (English/Metric)
Flex-Flo Systems Specifications
Model 220 Model 300 Model 350 Model 500 Model HR
2.2"
55 mm
15 lbs./min
7 kg/min
900 lbs./hr
420 kg/hr
1/8" (3.175 mm) x
1/2" (12.7 mm) Long
Maximum Moisture
Content 18%
3"
75 mm
50 lbs./min
22 kg/min
3000 lbs./hr
1400 kg/hr
Crumble Type
Feed Mash
3-1/2"
90 mm
100 lbs./min
45 kg/min
6000 lbs./hr
2700 kg/hr
Shelled Corn or Pellets
3/16" (4.76 mm) x
1/2" (12.7 mm)
Ground Corn
5"
125 mm
220 lbs./min
100 kg/min
13200 lbs./hr
6000 kg/hr
Larger Feed Fragments
Like Shelled Corn or
Pellets 3/8" (9.52 mm) x
1" (25.4 mm) Long
High Moisture Shelled
Corn (up to 27%) or
Ground Feed. 3/8"
(9.52 mm) Diameter x
3/4" (19.05 mm) Long
3-1/2"
90 mm
50 lbs./min
22 kg/min
3000 lbs./hr
1400 kg/hr
Figure 4A
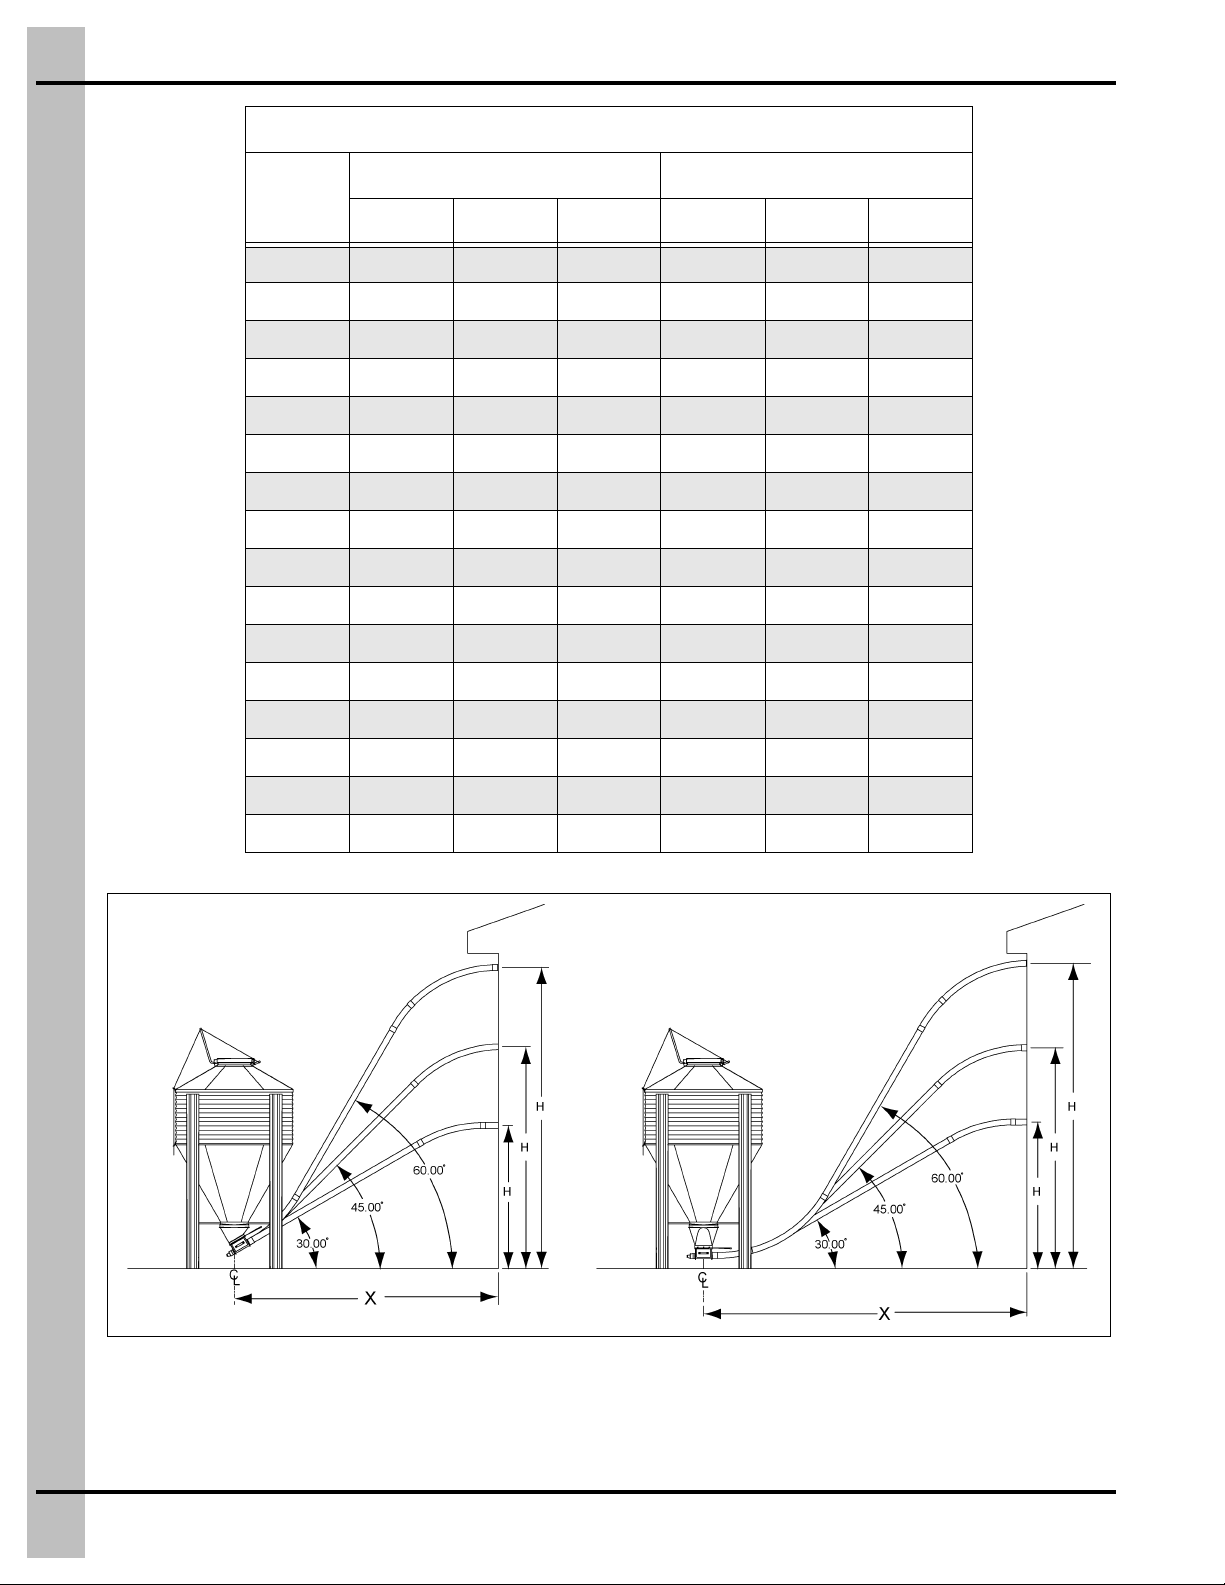
The Feed Tank Connections
Feed Tank Orientation
Positioning the feed tank in line with the Flex-Flo System will provide the most trouble-free operation possible.
Avoid unnecessary elbows and curves to ease system installation. A feed tank with a 30° unloader is
generally required to be at least 10-1/2' (3.2 m) away from the building. With a straight un loa der, the tank
will be approximately 4' (1.22 m) farther away from the building in order to make auger tube connections.
The reference points are based upon the height where the system enters the building. Different unloaders
with various elbows and curves used provide different entrance opportunitie s. The distanc es are ach ie ved
by modifying and adjusting the elbows and tubing as needed. See tables
on Page 13
(Metric) for tank placement recommendations.
on Page 12
(English) or see tables
PNEG-914 Flex-Flo 11
Figure 4B
Figure 4C
Page 12
4. Flex-Flo Specifications (English/Metric)
Tank Centerline to Building Entrance Distance “X” from Given Height “H” (English)
Model 220 with 10' Radius Elbows
“H” (ft.)
5.0 10.5 - - 15.0 - -
6.0 12.5 11.0 - 17.0 - -
7.0 14.0 12.0 - 18.5 17.0 -
8.0 16.0 13.0 - 20.0 18.0 -
9.0 17.5 14.0 - 22.0 19.0 -
10.0 19.5 15.0 - 23.5 20.0 -
11.0 21.0 16.0 14.5 25.5 21.0 19.5
12.0 23.0 17.0 15.0 27.0 22.0 20.0
13.0 24.5 18.0 16.0 29.0 23.0 21.0
14.0 26.5 19.0 16.5 30.5 24.0 21.5
15.0 28.0 20.0 17.0 32.5 25.0 22.0
16.0 30.0 21.0 17.5 34.0 26.0 22.5
17.0 31.5 22.0 18.0 36.0 27.0 23.0
18.0 33.5 23.0 18.5 37.5 28.0 23.5
19.0 35.0 24.0 19.5 39.5 29.0 24.0
20.0 37.0 25.0 20.0 41.0 30.0 25.0
“H” (ft.)
5.0 9.0 - - 12.0 10.0 -
6.0 10.5 8.0 7.5 13.5 11.0 10.0
7.0 12.0 9.0 8.0 15.5 12.0 11.0
8.0 14.0 10.0 8.5 17.0 13.0 11.5
9.0 15.5 11.0 9.0 19.0 14.0 12.0
10.0 17.0 12.0 9.5 20.0 15.0 12.5
11.0 19.0 13.0 10.0 22.5 16.0 13.0
12.0 20.5 14.0 11.0 23.5 17.0 13.5
13.0 22.5 15.0 11.5 26.0 18.0 14.0
14.0 24.0 16.0 12.0 27.0 19.0 15.0
15.0 26.0 17.0 12.5 29.5 20.0 15.5
16.0 27.5 18.0 12.5 30.5 21.0 16.0
17.0 29.5 19.0 13.5 33.0 22.0 16.5
18.0 31.0 20.0 14.0 34.5 23.0 17.0
19.0 33.0 21.0 15.0 36.0 24.0 17.5
20.0 34.5 22.0 15.5 37.5 25.0 18.5
“X” for 30° Boot (ft.) “X” for Straight Boot (ft.)
30° 45° 60° 30° 45° 60°
Model 500 with 6' Radius Elbow
“X” for 30° Boot (ft.) “X” for Straight Boot (ft.)
30° 45° 60° 30° 45° 60°
Model 220, 300, 350 and HR with 5' Radius Elbow
“H” (ft.)
5.0 9.0 - - 12.0 10.0 -
6.0 10.5 8.0 7.5 13.5 11.0 10.0
7.0 12.0 9.0 8.0 15.5 12.0 11.0
8.0 14.0 10.0 8.5 17.0 13.0 11.5
9.0 15.5 11.0 9.0 18.5 14.0 12.0
10.0 17.0 12.0 9.5 20.5 15.0 12.5
11.0 19.0 13.0 10.0 22.0 16.0 13.0
12.0 20.5 14.0 11.0 24.0 17.0 13.5
13.0 22.5 15.0 11.5 25.5 18.0 14.0
14.0 24.0 16.0 12.0 27.5 19.0 15.0
15.0 26.0 17.0 12.5 29.0 20.0 15.5
16.0 27.5 18.0 12.5 31.0 21.0 16.0
17.0 29.5 19.0 13.5 32.5 22.0 16.5
18.0 31.0 20.0 14.0 34.5 23.0 17.0
19.0 33.0 21.0 15.0 36.0 24.0 17.5
20.0 34.5 22.0 15.5 38.0 25.0 18.5
“X” for 30° Boot (ft.) “X” for Straight Boot (ft.)
30° 45° 60° 30° 45° 60°
12 PNEG-914 Flex-Flo
Page 13
4. Flex-Flo Specifications (English/Metric)
Figure 4D Equipment Orientation Charts
Tank Centerline to Building Entrance Distance “X” from Given Height “H” (Metric)
Model 220 with 10' Radius Elbows
“H” (m)
1.52 3.20 - - 4.57 - -
1.83 3.81 3.35 - 5.18 - -
2.13 4.27 3.66 - 5.64 5.18 -
2.44 4.88 3.96 - 6.10 5.49 -
2.74 5.33 4.27 - 6.71 5.79 -
3.05 5.94 4.57 - 7.16 6.10 -
3.35 6.40 4.88 4.42 7.77 6.40 5.94
3.66 7.01 5.18 4.57 8.23 6.71 6.10
3.96 7.47 5.49 4.88 8.84 7.01 6.40
4.27 8.08 5.79 5.03 9.30 7.32 6.55
4.57 8.53 6.10 5.18 9.91 7.62 6.71
4.88 9.14 6.40 5.33 10.36 7.92 6.86
5.18 9.60 6.71 5.49 10.97 8.23 7.01
5.49 10.21 7.01 5.64 11.43 8.53 7.16
5.79 10.67 7.32 5.94 12.04 8.84 7.32
6.10 11.28 7.62 6.10 12.50 9.14 7.62
“H” (m)
1.52 2.74 - - 3.66 3.05 -
1.83 3.20 2.44 2.29 4.11 3.35 3.05
2.13 3.66 2.74 2.44 4.72 3.66 3.35
2.44 4.27 3.05 2.59 5.18 3.96 3.51
2.74 4.72 3.35 2.74 5.79 4.27 3.66
3.05 5.18 3.66 2.90 6.10 4.57 3.81
3.35 5.79 3.96 3.05 6.86 4.88 3.96
3.66 6.25 4.27 3.35 7.16 5.18 4.11
3.96 6.86 4.57 3.51 7.92 5.49 4.27
4.27 7.32 4.88 3.66 8.23 5.79 4.57
4.57 7.92 5.18 3.81 8.99 6.10 4.72
4.88 8.38 5.49 3.81 9.30 6.40 4.88
5.18 8.99 5.79 4.11 10.06 6.71 5.03
5.49 9.45 6.10 4.27 10.52 7.01 5.18
5.79 10.06 6.40 4.57 10.97 7.32 5.33
6.10 10.52 6.71 4.72 11.43 7.62 5.64
“X” for 30° Boot (m) “X” for Straight Boot (m)
30° 45° 60° 30° 45° 60°
Model 500 with 6' Radius Elbow
“X” for 30° Boot (m) “X” for Straight Boot (m)
30° 45° 60° 30° 45° 60°
PNEG-914 Flex-Flo 13
Page 14
4. Flex-Flo Specifications (English/Metric)
Model 220, 300, 350 and HR with 5' Radius Elbow
“X” for 30° Boot (m) “X” for Straight Boot (m)
“H” (m)
30° 45° 60° 30° 45° 60°
1.52 2.74 - - 3.66 3.05 -
1.83 3.20 2.44 2.29 4.11 3.35 3.05
2.13 3.66 2.74 2.44 4.72 3.66 3.35
2.44 4.27 3.05 2.59 5.18 3.96 3.51
2.74 4.72 3.35 2.74 5.64 4.27 3.66
3.05 5.18 3.66 2.90 6.25 4.57 3.81
3.35 5.79 3.96 3.05 6.71 4.88 3.96
3.66 6.25 4.27 3.35 7.32 5.18 4.11
3.96 6.86 4.57 3.51 7.77 5.49 4.27
4.27 7.32 4.88 3.66 8.38 5.79 4.57
4.57 7.92 5.18 3.81 8.84 6.10 4.72
4.88 8.38 5.49 3.81 9.45 6.40 4.88
5.18 8.99 5.79 4.11 9.91 6.71 5.03
5.49 9.45 6.10 4.27 10.52 7.01 5.18
5.79 10.06 6.40 4.57 10.97 7.32 5.33
6.10 10.52 6.71 4.72 11.58 7.62 5.64
Figure 4E Equipment Orientation Charts
14 PNEG-914 Flex-Flo
Page 15
5. Installation
Improper installation methods of the hardware may cause permanent damage and
possible breakage of the boot.
CAUTION
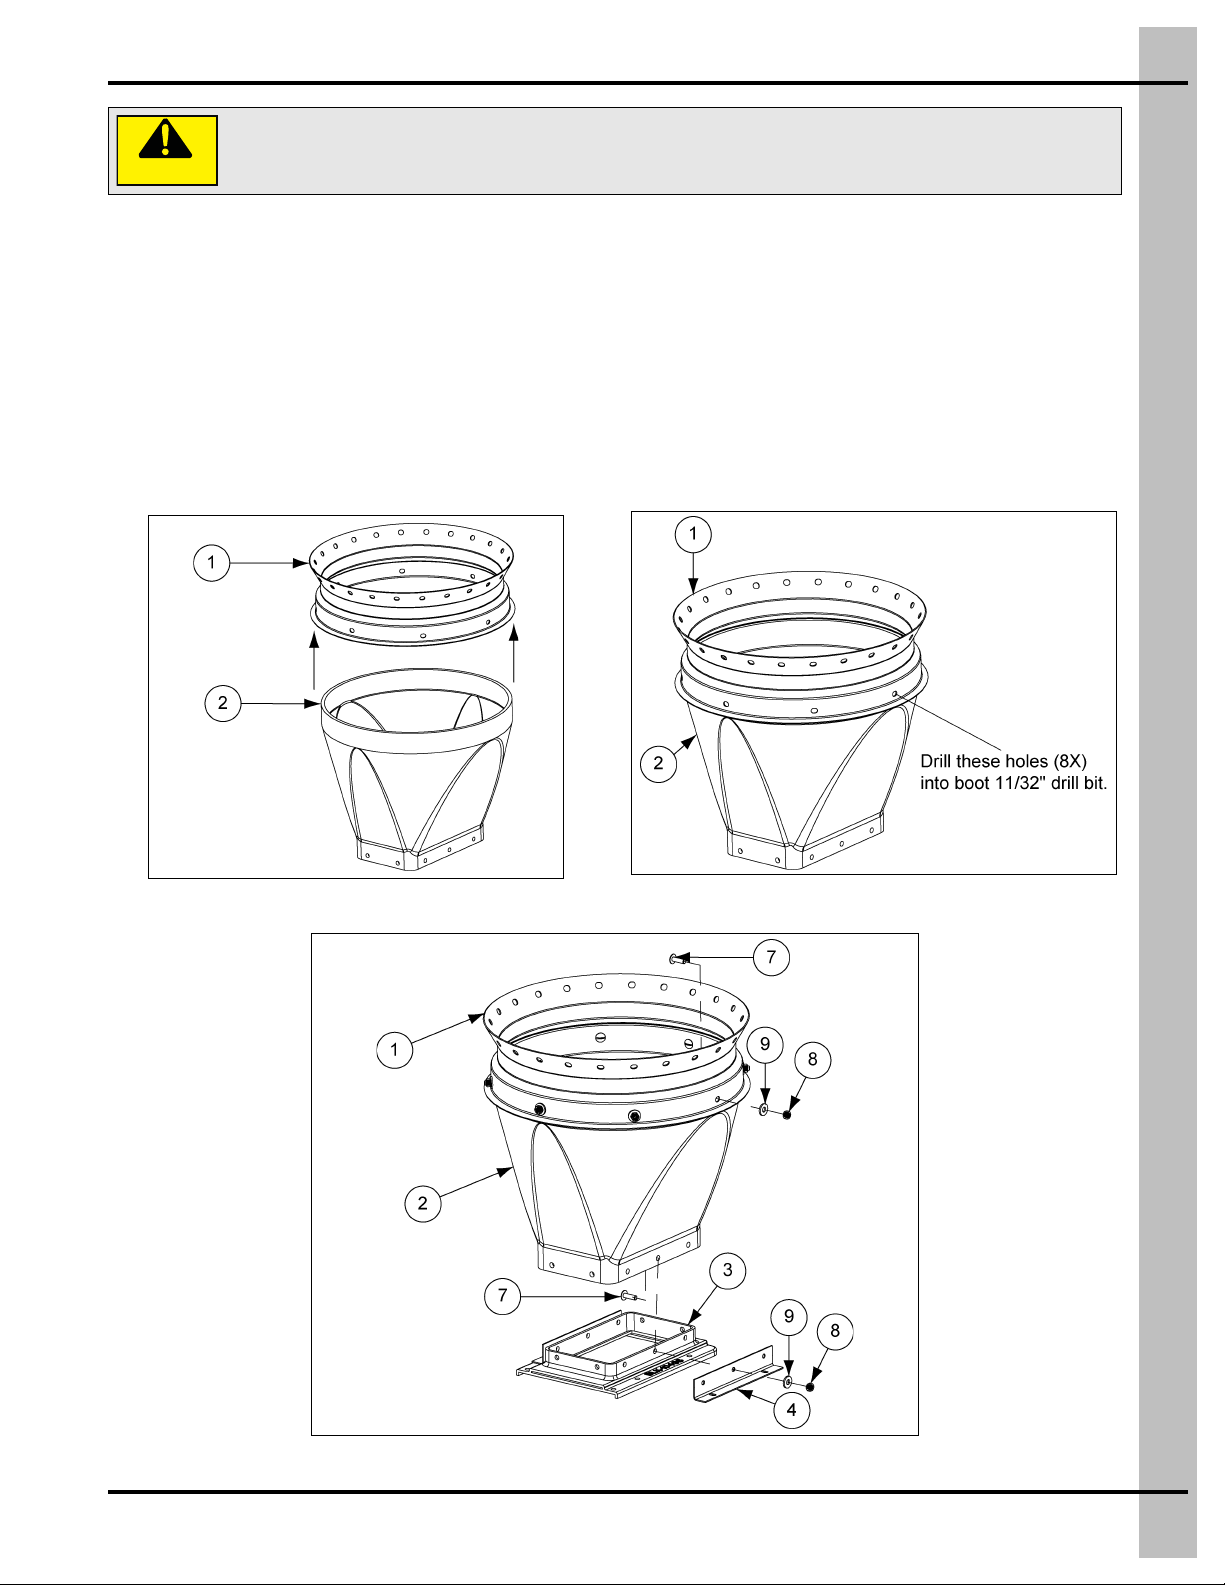
Boot and Transfer Plate Installation
NOTE: Installation of the boot is the same whether the tank has the standard collar or the Sure-Flo Feed
Flow Control.
Slide the boot as far as possible into the tank collar or the Sure-Flo Feed Flow Control opening.
(See Figure 5A.) Align the boot with the Flex-Flo System that will be installed. Using the holes in the collars
for guides, drill eight (8) 11/32" holes into the boot rim. (See Figure 5B.)
Mount the boot to the collar with the hardware provided. Bolt the transfer plate and unloader braces to the
boot as shown. See Figure 5C for proper usage and assembly direction of hardwa re for mounting the boot
and the transfer plate. All connections should be tightened until they are “snug”.
Figure 5A
Figure 5B
Figure 5C
PNEG-914 Flex-Flo 15
Page 16
5. Installation
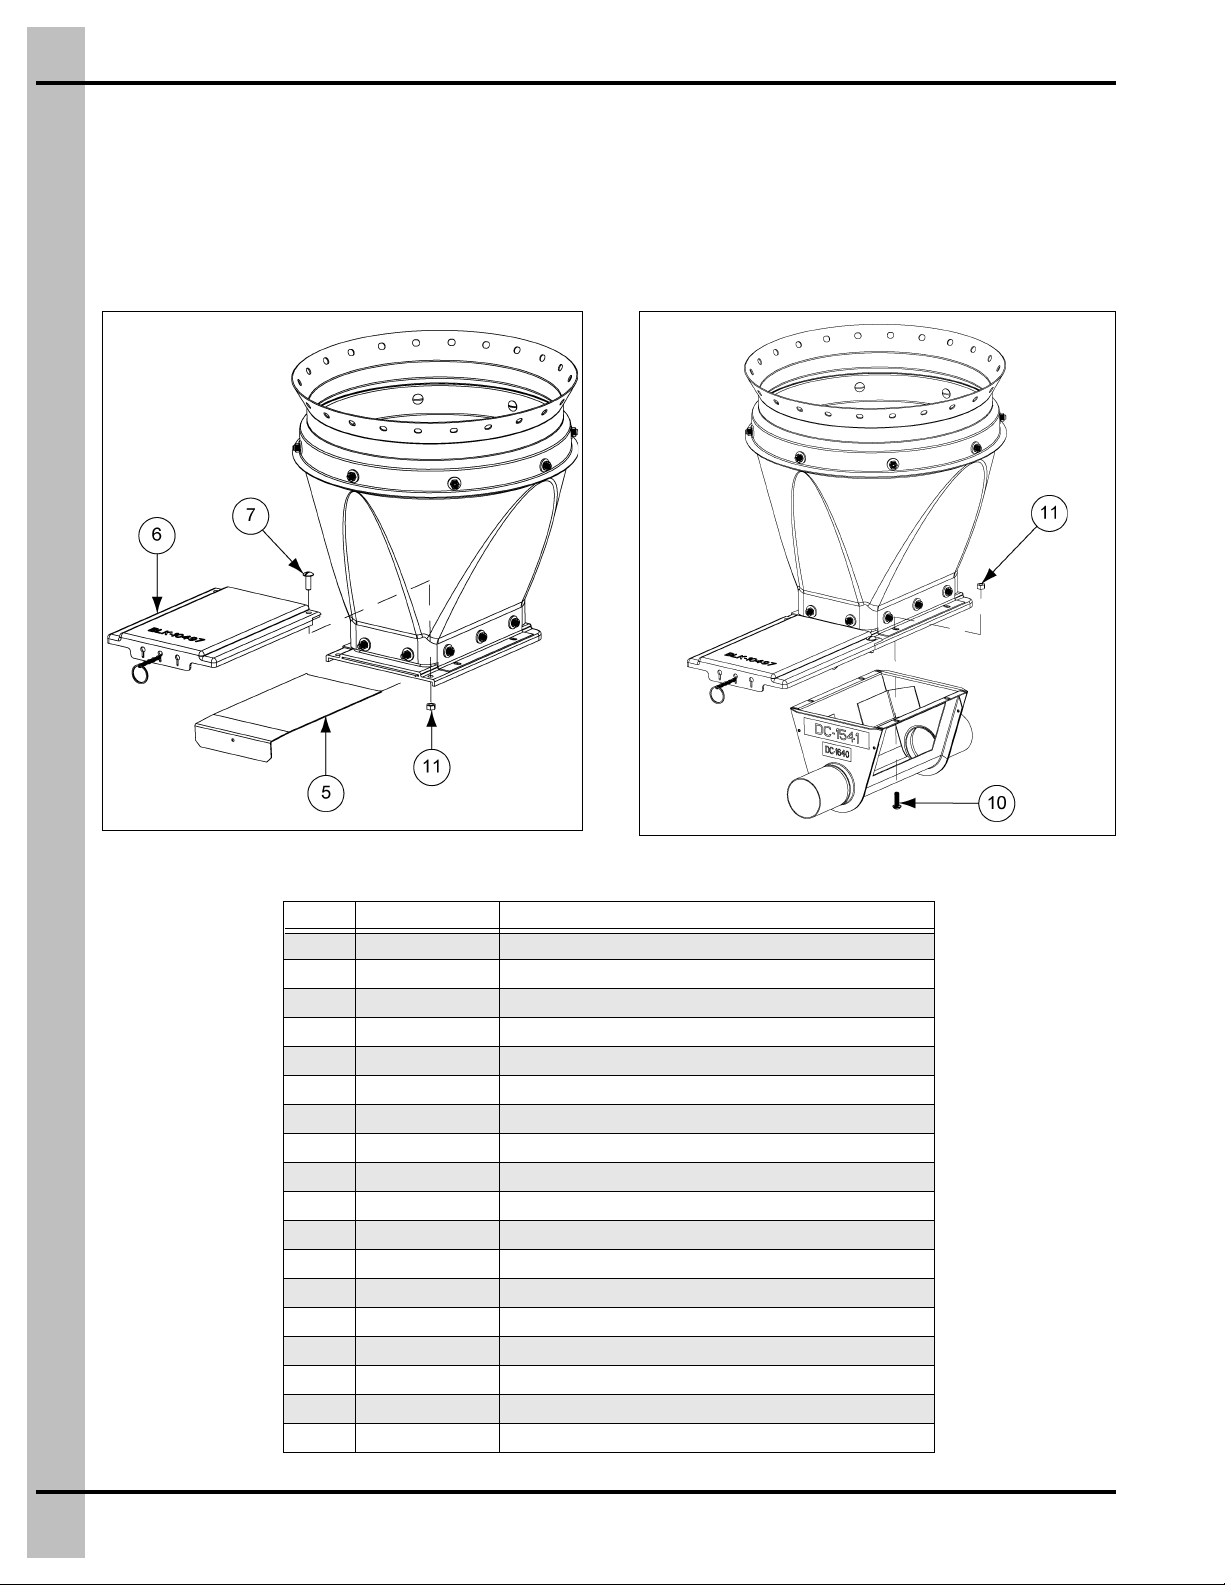
Slide Gate Installation
Insert the slide into the transfer plate. The slide must be in its operating position prior to attaching the slide
shield to the transfer plate. Use two (2) 5/16"-18 x 1" truss head tap bolts to mount the slide shield.
(See Figure 5D.)
Bolt unloader to transfer plate/unloader brace assembly as shown in Fig ure 5E. Note orientation of t hese
bolts. (See Figure 5E.)
Figure 5D
Ref # Part # Description
1 BLK-10488 16" 67°, 16" Hopper Collar, (24 Holes)
1 BLK-10489 16" 60° Hopper Collar, (24 Holes)
1 BLK-11463 16" 60° Hopper Collar (27 Holes)
1 BLK-12342 16" 60° Hopper Collar (18 Holes)
2 FLX-2194 16" 30° Black Plastic Boot
2 FLX-2194C 16" 30° Clear Plastic Boot
2 FLX-2195 16" Straight Black Plastic Boot
2 FLX-2195C 16" Straight Clear Plastic Boot
2 FLX-4869 16" Double Straight Black Boot
3 BLK-10496 Transfer Plate
4 FLX-4819 Unloader Brace
5 FLX-4782 Slide Gate
6 BLK-10497 Slide Gate Shield
7 S-4336 5/16" x 1" Truss Head Machine Screw
8 S-4337 5/16"-18 Nylon Insert Nut
9 S-4338 5/16" Nylon Washer
10 S-8328 Screw, MS 5/16"-18 x 1" RHS ZN Grade 2
11 S-396 Hex Nut 5/16"-18 YDP Grade 2
Figure 5E
16 PNEG-914 Flex-Flo
Page 17
5. Installation
Inspection/Clean-Out Plate Installation
Once the installation of the auger tubes and auger is complete, insert the inspection/clean-out plate or the
optional unloader switch.
The inspection/clean-out plate is to be installed per the following instructions: (See Figure 5F.)
1. Back off both wing nuts to the stud ends.
2. Slide the plate onto the lower side of the unloader opening.
3. Move the plate first against the side of the unloader then upward toward the top of the unloader.
4. Tighten the wing nuts while holding the plate steady.
Figure 5F Clean-Out Plate Installation
PNEG-914 Flex-Flo 17
Page 18
5. Installation
Feed Tank Collar
The standard bulk feed tank is supplied with a 16'' (40.64 cm) hopper opening . If needed, 2 2'' (55.88 cm)
hopper openings are also available. Consult the dealer for specific ordering instructions.
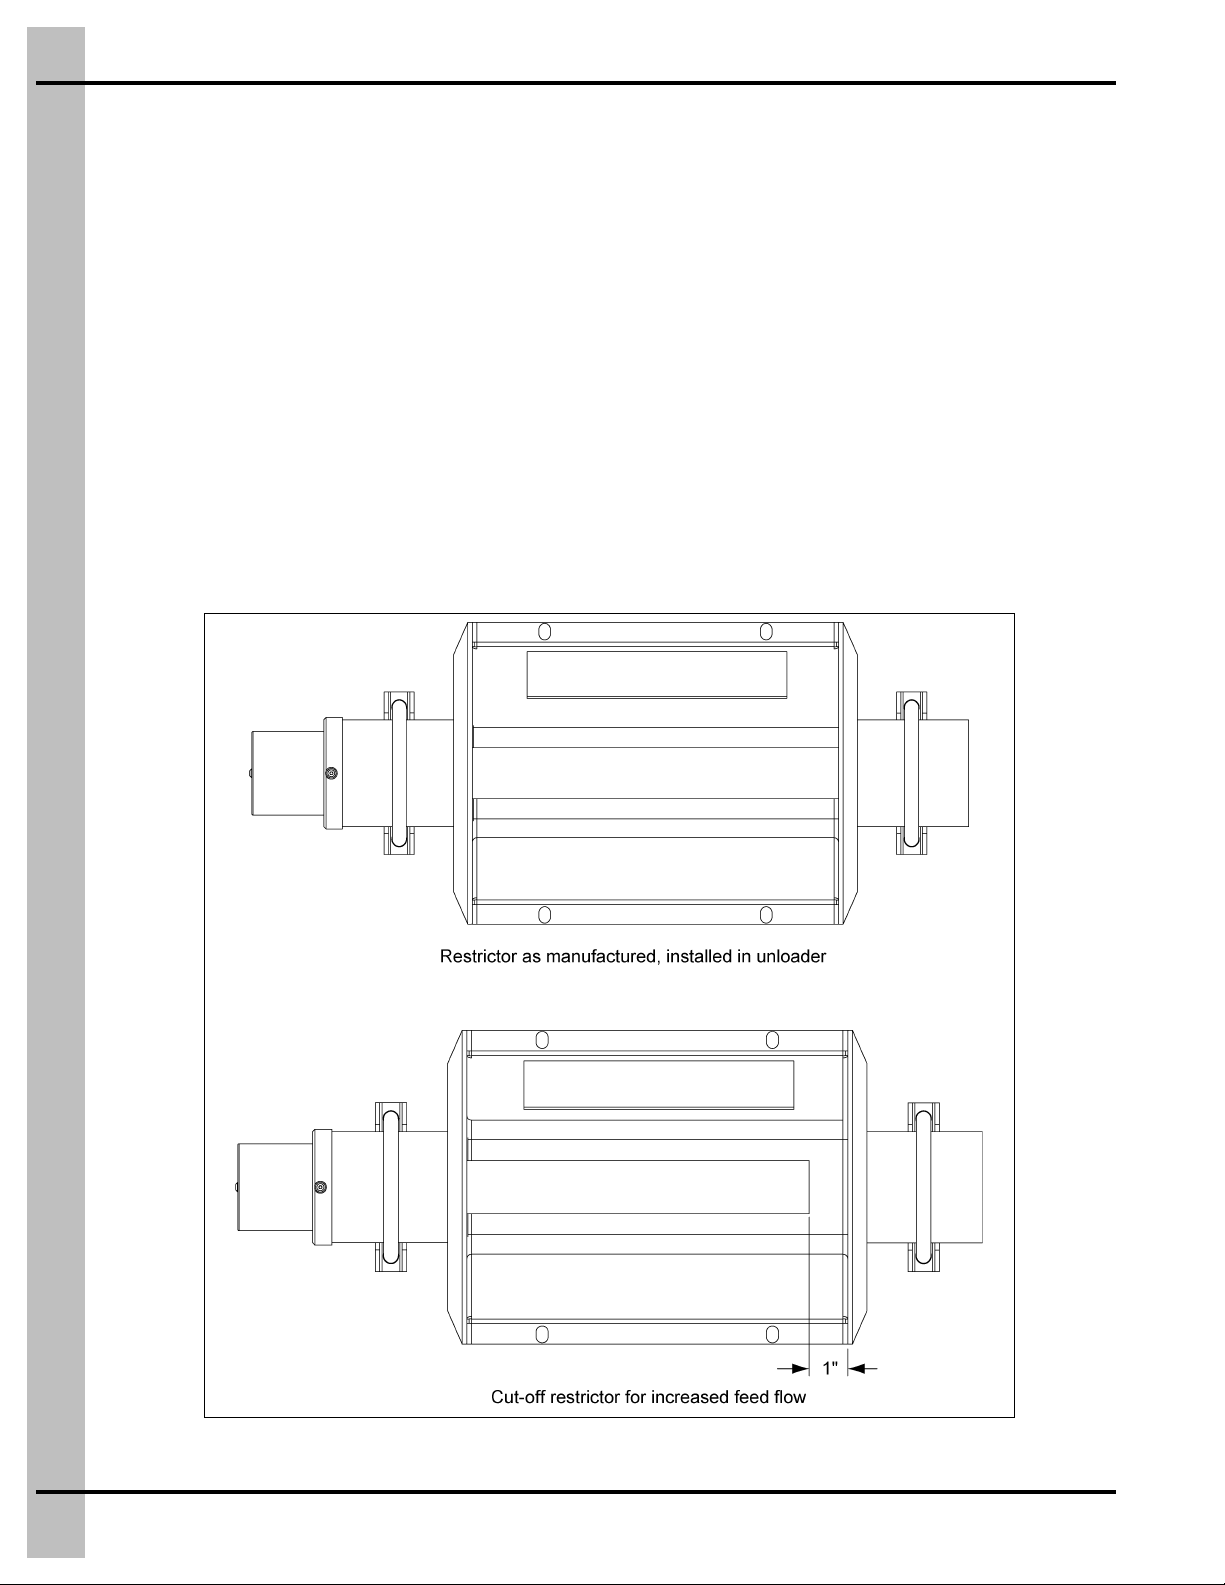
Restrictor Adjustment
The restrictor may be adjusted to allow more feed flow. Do not modify the restrictor until the system is
completely operational and the auger has been polished by running feed through the system.
Instructions:
1. Remove the restrictor tube from the unloader.
2. Cut 1" (2.5 cm) from the restrictor. (See Figure 5G.)
3. Install the restrictor and the bearing assembly into the unloader.
4. Test the feed flow.
5. If the desired feed flow rate is not attained, repeat the above procedure until the desired rate
is reached.
Figure 5G Restrictor Adjustment
18 PNEG-914 Flex-Flo
Page 19
5. Installation
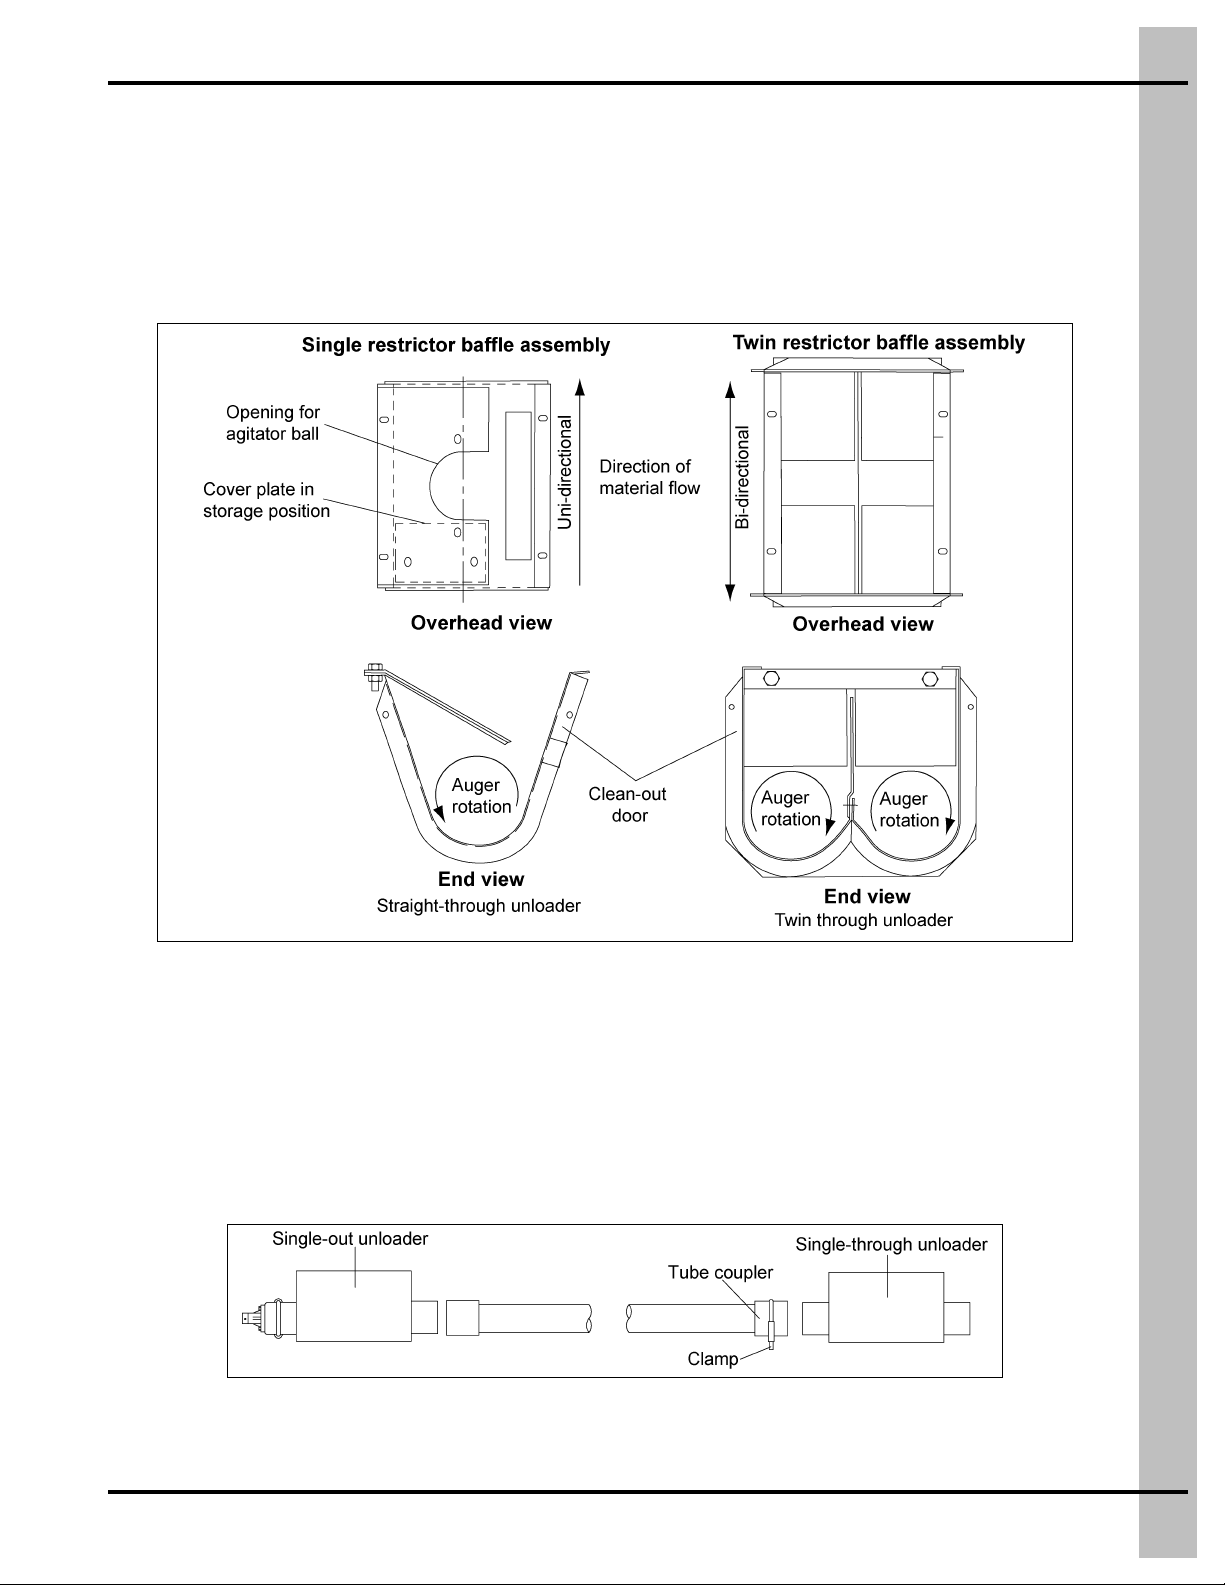
Straight-Through Tandem Installation
The straight-through tandem system should be installed the same as a single tank system with the
following exceptions:
1. Mount the boots on both tanks and the single or twin-out unloader as instructed.
2. Install baffle plate (FLX-4310) in the single-through unloader as shown in Figure 5H. The twin
unloader baffle is factory installed as shown in Figure 5H.
Figure 5H
3. Slide the belled end of a straight tube onto the unloader outlet on the first tank. Hold the straight
tubing in the desired mounting position. Mark and cut the straight tube at the point where the tube
and the inlet of the straight-through unloader inlet intersect.
4. Slip the appropriate tube coupler over the cut end of the straig ht tube. Position the straight tube in its
operating location. Slide and clamp the tube coupler over the straight-through unloader inlet.
(See Figure 5I.)
NOTE: The coupler should be equally distributed between the tubing and the unloader inlet.
Figure 5I Tandem System Installation
5. Feed the auger through the single/twin-out unloader to the rest of the system and anchor as instructed.
PNEG-914 Flex-Flo 19
Page 20
5. Installation
Auger Tubing
Auger Tubing Installation
The auger tubing is one of the most important parts of the Flex-Flo Fill System. Proper installation is very
important. Dry fit ALL parts before cementing or clamping. Once the complete system is fitting properly,
cement or clamp the entire system.
The following steps are to be performed in the exact order shown:
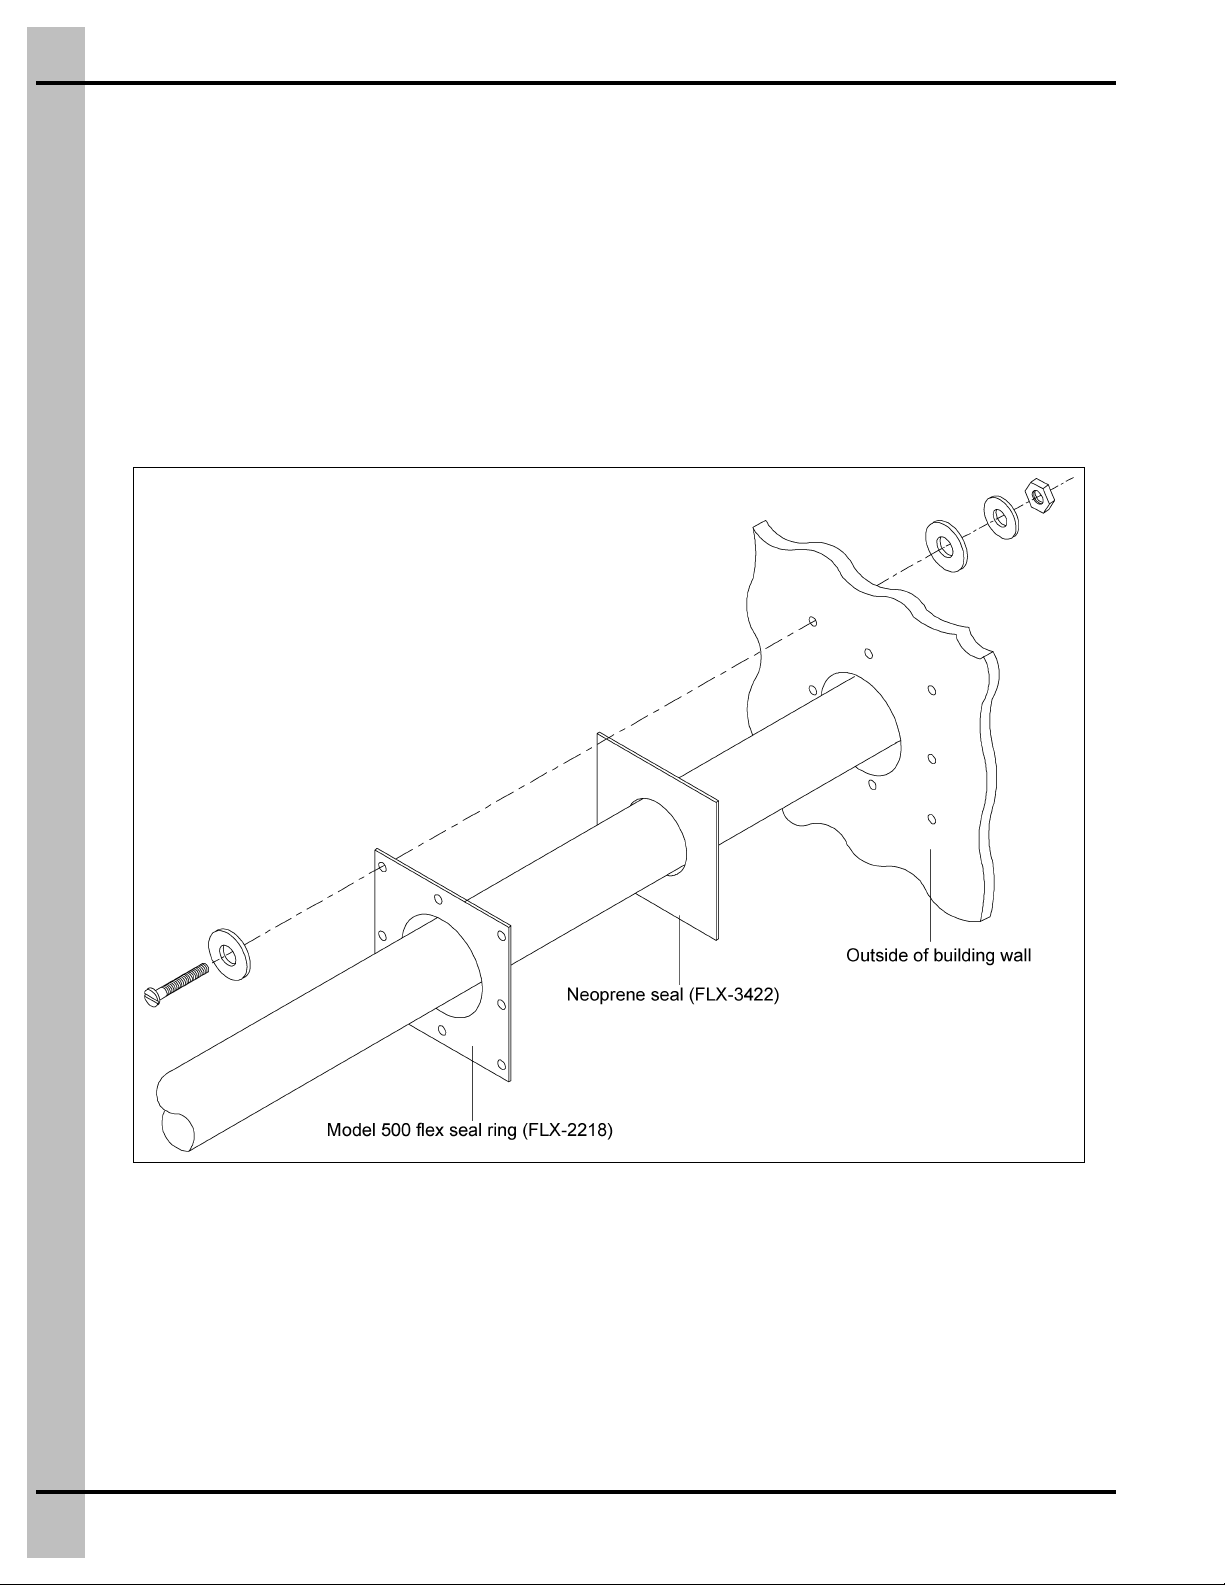
1. Establish the entry point where the auger tube will enter the building. Once the entry point is
determined, cut a hole large enough to accommodate the tubing. A seal ring and a neoprene seal
are provided to seal the excess area between the tube and the hole in the building. The seal ring and
the neoprene seal shall be installed as shown in Figure 5J.
Figure 5J Seal Ring and Neoprene Seal Installation
2. Slide the elbow tubing through the hole in the building. Establish and cut (if necessary) the elbow at
the desire length to ensure that the auger tubing will be horizontal. See Figure 5K on Page 21 for
proper cutting dimensions of the elbows at specific degree angles.
3. Fit and clamp a second elbow around the unloader outlet.
4. Slide the non-belled end of the straight tubing into the belled end of the “building” elbow. Hold the
straight tubing in the desired mounting position. Mark and cut the “unloader” elbow at th e point where
it and the straight tubing intersect.
20 PNEG-914 Flex-Flo
Page 21

5. Installation
5' (1.524 m) Radius
15° Elbow - 15-3/4" (40.005 cm)
45° Elbow - 47-1/4" (120.015 cm)
30° Elbow - 31-1/2" (80.01 cm)
6' (1.829 m) Radius
15° Elbow - 20-3/16" (51.276 cm)
45° Elbow - 60-1/2" (153.67 cm)
30° Elbow - 40-5/16" (102.394 cm)
10' (3.048 m) Radius
15° Elbow - 32" (81.28 cm)
45° Elbow - 96" (243.84 cm)
30° Elbow - 64" (162.56 cm)
Auger Tubing Installation (Continued)
5. Remove the non-belled end of the straight tubing from the “building” elbow. Slide the belled end of
the straight tubing over the freshly cut end of the “unloader” elbow. Mark and cut the straight tubing
(as needed) so that it will fit inside the belled end of the “building” elbow.
6. Dry fit all of the outside tubing to ensure correct installation. Once satisfied, glue or clamp the tubing
together as per the instructions in the section titled cementing procedure on Page 22.
7. When the auger tubing between the unloader and the building is 15' (4.57 m) or longer, the tubes
should be supported.
8. Locate and cut the outlet holes needed in the remaining straight tubes. For the exact size of outlet
holes, see section titled outlet holes on Page 22. Once ALL of the outlet holes are made and the
tubing is dry fitted, glue or clamp the tubes together per the instructions in the section entitled
cementing procedure on Page 22.
9. Suspend the auger tubes and elbows from the ceiling at least once every four feet (4'). If horizontal
elbows are used, support them in at least two (2) places. Chain and lag screws are provided in each
suspension kit. The tubes should be kept as straight and level as possible.
NOTE: Align all outlet holes in proper functional positions prior to gluing the tube joints together.
PNEG-914 Flex-Flo 21
Figure 5K Cutting Chart for 45° Elbow
Page 22

5. Installation
Cementing Procedure
Flex-Flo Systems have specially formulated PVC tubing. For strong tube connections, apply the PVC
solvent cement per the instructions as follows:
1. Square tube ends and remove all burrs and dirt.
2. Check dry fit of tubes. The smaller end of the first tube should easily slide one-third of the way into
the belled end of the second tube. The first tube end should be snug in the second tube o nce it is all
the way in.
3. When the temperature is below 40°F (4°C) or above 85°F (29°C), consult PVC solvent
cement container.
4. Apply a liberal coat of cement in the belled end. Avoid puddling inside.
5. Apply a liberal coat of cement on the smaller end, leaving no voids.
6. Assemble parts quickly. CEMENT MUST BE FLUID. If not fluid, re-coat both parts.
7. Push the smaller end into the belled end using a quarter turning motion until the small end bottoms.
8. Hold tubes together for 30 seconds, wipe off excess cement with cloth. Completed joints should not
be disturbed until they have cured enough to withstand handling.
Keep container closed when not in use.
Outlet Holes
Establish where the outlet drops are to be. Once this is done, cut holes for the outlet drops.
for hole size recommendations. If total drop-out is necessa ry, it is recommended that th e holes are cut using
a saber saw or hacksaw. When carry-over is desired, it is recommended that the outlet holes are cut with
a holesaw.
Figure 5L Outlet Hole Cutting Chart
See Figure 5L
Model
220 1-1/2'' (38 mm) 1-1/2'' (38 mm)
300 2-1/2'' (63 mm) 2-1/2'' (63 mm)
350 3'' (76 mm) 3'' (76 mm)
500 4'' (102 mm) 4'' (102 mm)
HR 3'' (76 mm) 2-1/2'' (63 mm)
22 PNEG-914 Flex-Flo
Full Drop Carry-over
Variable “A” Variable “B”
Page 23

5. Installation
Drop Kit Installation
1. Wrap the rotary slide over the outlet hole and around the auger tube. Position the slides with
cut-out facing in the same direction for all drops so that the slides will operate the same when the
ropes are pulled.
2. Thread the rope through the ends of the rotary slide as shown in Figure 5M and tie the slide ends
together so that the ends of the rope are the same length.
Figure 5M Drop Kit Installation
3. Slide rope through molded guide holes in drop halves.
4. Position the drop halves around the rotary slide and attach both halves together with the hardware
provided as shown in Figure 5N.
Figure 5N
5. Test the rotary slide. Pull on one rope at a time. Check the rotary slide to be sure it is centere d over
the outlet hole.
6. Slide the rotary slide to its open position by pulling the appropriate rope. Mark the short rope end at
the point where it enters the guide hole. Tie a knot on the rope at the mark. The location of the knot
will show at a glance if the slide is open or closed.
PNEG-914 Flex-Flo 23
Page 24

5. Installation
Drop Kit Installation (Continued)
7. Thread the short rope end through the red ball and tie a knot in the rope to hold the ball in place.
Install the green ball the same way on the other rope end.
8. Apply a small amount of PVC cement around the drop to prevent it from moving around on the
auger tube.
9. Two (2) screws are supplied for attaching an optional drop tube. (See Figure 5N on Page 23.)
Use both screws to attach the drop tube securely to the drop kit.
Kwik-Attach Drop Kit Installation
Figure 5O Drop Kit Installation
1. Snap the slide around the tube over the outlet hole. (See Figure 5O.)
2. Fasten the housing to the tube using two (2) hose clamps. Make sure the outlet hole is in the middle
of the housing.
3. Slide can be rotated from side to side to open and close the drop kit.
24 PNEG-914 Flex-Flo
Page 25

5. Installation
The safety switch on the control unit is provided as a backup switch in case the
hopper level or the drop tube switch does not operate properly. This switch is
not intended to be used for controlling the Flex-Flo System, but as a safety
backup switch only.
Power Unit and Control Unit
CAUTION
Flex-Flo offers two (2) different types of power units, direct drive unit and belt drive power unit, along with
the control unit. Installation instructions are provided with each power unit.
Horsepower requirements are based on length, type of Flex-Flo System installed, number of turns,
tandem systems etc. Table below shows maximum line lengths for Flex-Flo Systems plus maximum
lengths for extensions hopper installing, using various power units.
Reduction of the maximum line lengths in the chart should be allowed for if the system’s incline is greater
than 45° and/or the rise of the system is higher than 8' (2.44 m). For each additional 90° (2 elbows) used
beyond chart, reduce the maximum line length for each drive unit by 30' (9.14 m). For each straight-out
to straight-through tandem system, decrease the maximum line length for each drive unit size by
50' (15.24 m).
Figure 5P
Maximum Line Length
Motor
Size
1/3 HP 150' 180' - - - -
0.246 kW 46 m 91 m - - - - - 1/2 HP 250' 300' 300' 80' 80' 30' 65' 30' 50'
0.373 kW 24 m 38 m 38 m 24 m 38 m 9 m 20 m 7.6 m 12.7 m
3/4 HP - - 400' 150' 150' 90' 90' 50' 50' 25' 25' 90' 90'
0.559 kW - - 46 m 56 m 27 m 38 m 20.3 m 25.4 m
1 HP - - 200' 245' 150' 185' 100' 100' 50' 65' 150' 180'
0.746 kW - - 61 m 75 m 46 m 56 m 38.1 m 457 m
1-1/2 HP - - - - - - 150' 180' 75' 90' - The maximum length is for a system with three (3) elbows.
Model 220
Maximum
Length
Maximum
Extension
Extension
Pitch
Model 300 Model 350 Model 500 Model HR
Maximum
Length
Maximum
Extension
Maximum
Length
Maximum
Extension
Maximum
Length
Dry Feed Stuffs
Moisture Levels
below 18%
Maximum
Extension
Maximum
Length
Level from 18%-27%
Maximum
Extension
High-Moisture
Systems Moisture
Maximum
Length
Maximum
Extension
- -
PNEG-914 Flex-Flo 25
Page 26

5. Installation
Direct Drive Power Unit/Control Unit
1. Bolt the tube anchor to the control unit body with a flat washer on each of the four (4) 5/16'' x 3/4" bolts.
See Figure 5Q
(
2. Slide the driver assembly onto the power unit drive shaft. Place the 5/16" hex socket bolt (supplied
with the driver assembly) into the untapped hole of the driver through the drive shaft and tight en the
bolt into threaded portion of the driver.
3. Mount the control unit to the gearbox unit with four (4) 5/16'' x 3/4'' bolts and four (4) flat washers,
which are supplied with the power unit. (See Figure 5R.)
for more details.)
Figure 5Q Assembly of Tube Anchor to the Control Unit
4. The control unit and power unit require hard wiring. The supply line wires into L1 and L2/N of the relay
in the control unit. The motor leads wire into the M1 an d M2 of t he relay in th e control u nit. Auxiliary
switch is wired into the male and female spade terminal of the control unit. (See Wiring Diagrams on
Pages 55-62.)
5. Slide and clamp a tube coupler on the tube anchor.
6. Attach the power/control unit to the Flex-Flo tubing.
7. Suspend power/control unit firmly from the ceiling as shown in Figure 5S. Support holes are provided
on the power unit and the control unit.
Figure 5R Assembly of the Control Unit
to the Dive Unit
26 PNEG-914 Flex-Flo
Figure 5S Direct Drive/Power Unit
Page 27

5. Installation
Belt Drive Power/Control Unit
1. Bolt the tube anchor to the control unit body with a flat washer on each of the four (4) 5/16'' x 3/4''
bolts. (See Figure 5Q on Page 26 for more details.)
2. Insert the driver shaft through the bearing assembly. The bearing mounting plate should be mou nted
in between. Tighten the set screw on the bearing down to the shaft.
3. Bolt the two (2) mounting brackets together with the four (4) bolts and washers provided.
4. Attach the motor support assembly to the control unit with the four (4) bolts alre ady in the mounting
bracket and belt guard. Secure with the four (4) lock washers and hex nuts provided. If necessary,
motor orientation can be reversed by rotating the motor mount 180°.
5. Slide and clamp a tube coupler on the anchor.
Figure 5T Belt Drive/Power Unit
6. Mount the motor onto the motor mount base with four (4) bolts and washers.
7. Mount the belt pulleys. The two (2) pulleys must be positioned in line with each other to prevent from
binding the belt.
8. Install the belt.
9. Adjust the belt tension by extending and retracing the two (2) mounting brackets. Resecure the bolts
after adjustment.
10. Install belt guard cover.
11. Attach the power/control unit to the Flex-Flo tubing.
12. Suspend the power/control unit firmly from the ceiling using the chains provided.
13. The control unit and the power unit must be wired as shown in the
14. Install the auger.
PNEG-914 Flex-Flo 27
Wiring Diagrams on Pages 55-62.
Page 28

5. Installation
Stretch flex auger
Single feed tank: 2" (50 mm) per 50' (15 m) of length
Tandem feed tank: 4" (100 mm) per 50' (15 m) of length
Auger
The auger should be handled with great care. Do not install the auger until the kinks have been removed.
The kink may be removed by straightening the auger. A kink may cause extensive wear on the system
and premature part replacement. In the event that the kink cannot be removed by straightening, the kink
must be cut-out and the auger welded. (See brazing recommendations in Figure 5X on Page 29.)
Figure 5U
Auger Installation
Two (2) persons are required to install the auger. One person fee ds the auger into the tubing while the other
makes sure the auger is not damaged. Make sure n o metal wires or loose ends enter the system.
1. The auger must be fed into the Flex-Flo System through the unloader. Remove the anchor from the
unloader. Remove the control unit cover plate as well.
2. Feed the auger carefully into the Flex-Flo System through the unloader. Remove the anchor from the
unloader and remove the control unit cover plate.
3. Push the auger in until it reaches the control unit at the other end. Fasten the end of the auger to the
clamp pin in the control unit driver assembly. Tighten the 5/16" hex head cap screw holding the auger
lock clamp pin to 23 ft-lbs. If the auger end is not in the appropriate orientation for connection, the
driver assembly may be rotated by turning the motor drive shaft.
4. Pull and release the free end of the auger gently a few times. This action should relax the auger into
its natural position.
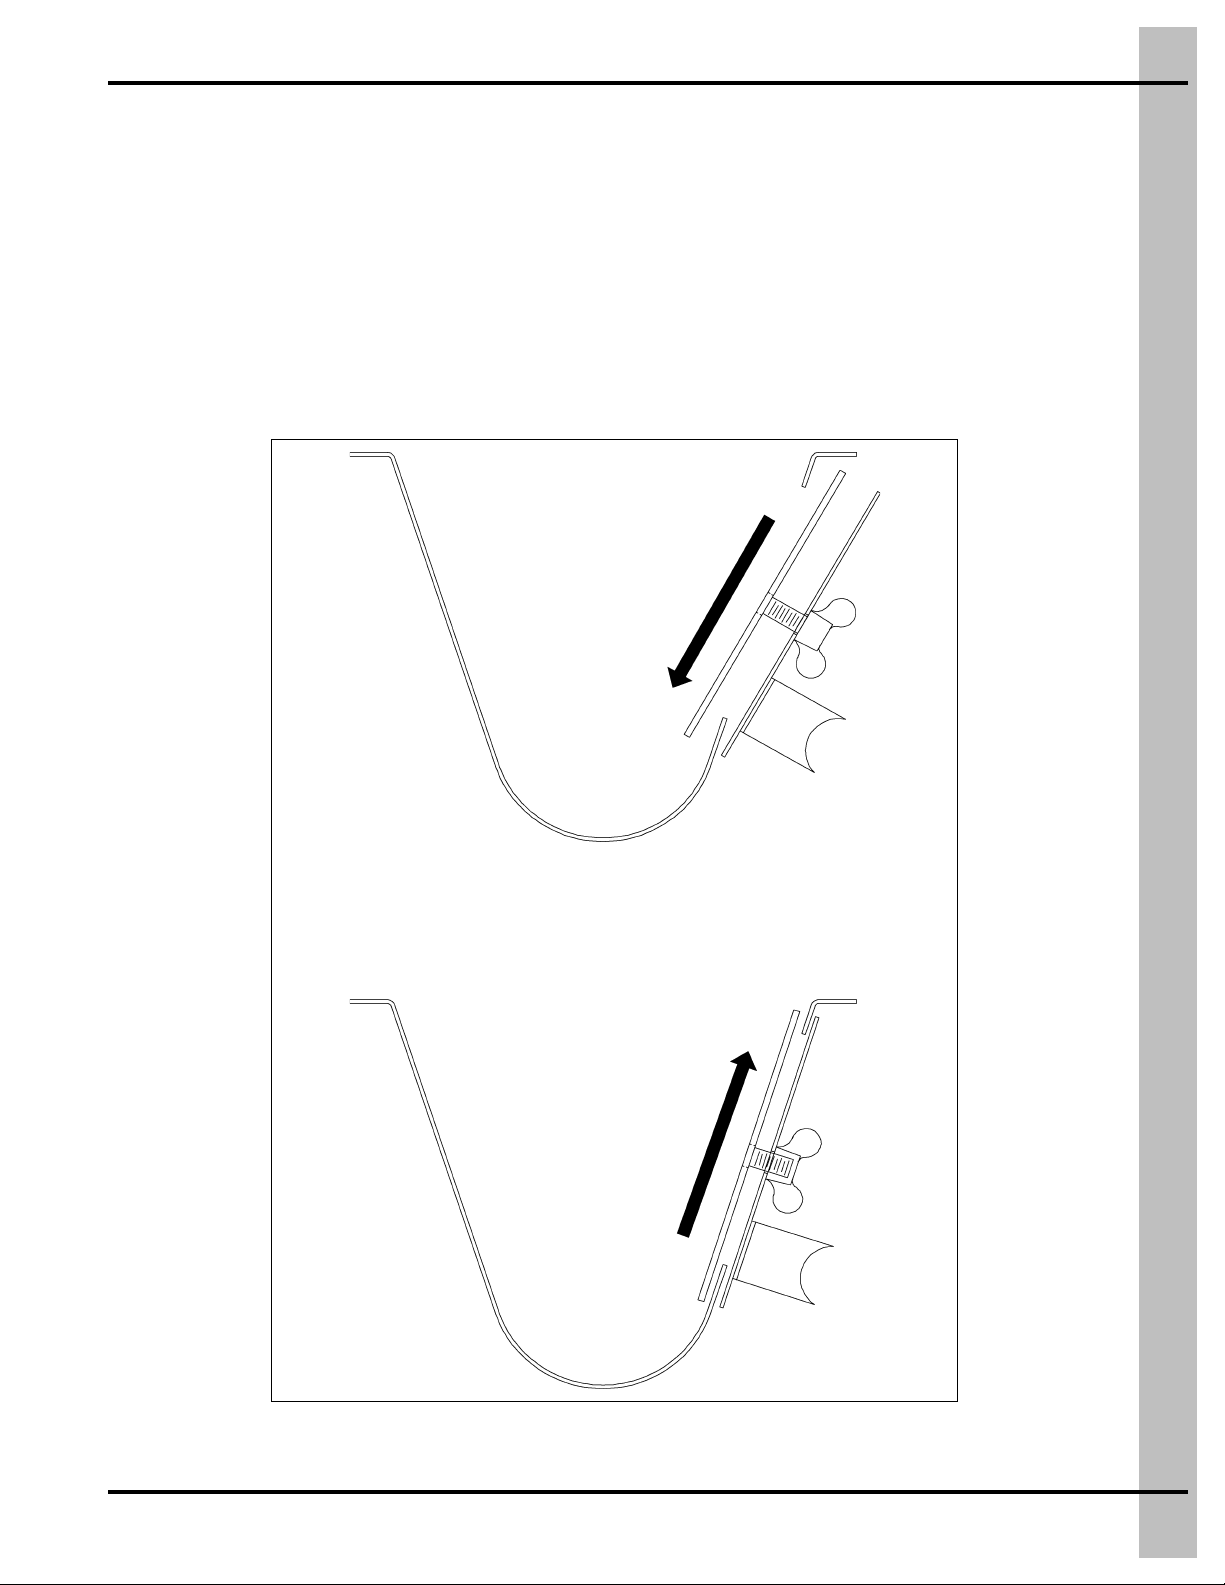
5. A certain mechanical stress must be applied when installing the auger; therefore stretching the auger
is very important. This is performed by drawing the auger out of the tubing. An important factor is the
total system length. The auger should be drawn out of the tubing 2'' (5 cm) for every 50' (15 m) of
length for single feed tanks. For tandem systems, stretch the auger 4" (10 cm) for every 50' (15 m)
of length.
6. While the auger is in the relaxed state, mark the auger at the unloader inlet.
28 PNEG-914 Flex-Flo
Figure 5V Stretching the Auger
Page 29

5. Installation
Auger Installation (Continued)
7. Draw the auger out of the tubing as far as required. Measure the length between the mark and the
unloader inlet. Mark the auger again at the unloader inlet when properly stretched. (See Figure 5V
on Page 28.) Stretching the auger too far will cause premature wear at the inside bends of the
PVC tubing. Stretching the auger not far enough will cause premature wear at th e ou tsid e be nds of
the PVC tubing.
8. For ease of trimming the auger, pull the auger out an additional 8'' (20 cm) past the mark and
clamp it at the unloader. This clamping releases tension at the mark and thus eases cutting.
(See Figure 5W.)
9. Twist the unloader anchor into the auger and clasp the auger end in the clamp pin.
10. Mount the anchor in the unloader.
11. Place the cannonball inside the unloader.
12. Mount the cover on the control unit.
13. Place the inspection/clean-out plate in the unloader.
Figure 5W Cutting the Auger
Brazing the Auger
1. Make sure both ends are cleaned.
2. Position the auger in an angle iron and clasp it securely to align it for brazing. (See Figure 5X.)
3. Braze both ends together. Use a bronze flux-coated rod. Make sure the auger does not get too hot
which might cause the auger to warp.
4. After the brazing is performed, the joint should be allowed to air cool.
5. Once the auger has cooled, install the auger with the brazed joint closer to the power unit.
Figure 5X Brazing the Auger
PNEG-914 Flex-Flo 29
Page 30

5. Installation
Extension Hopper Installation
1. To ease the installation, mount the extension hopper top section to the Flex-Flo tubing.
NOTE: A. Slide the tube clamp on the hopper tube anchor prior to attaching it to the tubing.
B. Make certain when mounting the power unit and the tubing that they are attached to the
access slide side. When mounted in this orientation, the incoming auger is positioned as
far away as possible to allow the upper control switch to operate properly.
2. Suspend the top section from the ceiling as shown in Figure 5Y. Support holes are provided on the
top section for mounting. When mounting, make allowance for f uture adjustments of the top section
after the bottom section has been connected.
NOTE: Any additional support given to the extension hopper makes for a more solid system and is
desirable. Take special care if or when the support is modified that the operation of the system
and the ability to do a general maintenance are not hindered.
3. Mount the unloader under the control unit. The control unit should be assembled together prior to
mounting. This assembly includes the driver assembly. Suspend the control unit firmly from the
ceiling. Support holes are provided on the tube anchor.
Figure 5Y Extension Hopper
4. Fasten the end of the auger to the anchor in the control unit driver assembly. Tighten the 5/16"
hex head cap screw holding the auger lock clamp pin to 23 ft-lbs. If the auger end is not in the
appropriate orientation for connection, the driver assembly may be rotated by either turning the motor
shaft with a wrench or by turning the large pulley to rotate the driver assembly.
5. Remove the anchor assembly and the rear access panel from the bottom section of the extension
hopper. Mount the bottom section to the top section with 1/4"-20 machine screws provided with
the hopper. The bottom section may be mounted in three (3) various directions. (See Figure 5Z
on Page 31.)
30 PNEG-914 Flex-Flo
Page 31

Extension Hopper Installation (Continued)
5. Installation
Figure 5Z Extension Mounting Directions
Figure 5AA Extension System
6. Install the auger for the system that is connected from the tank(s) to the extensio n hopper. In stall as a
standard system. The auger for the second part of the system should connect to th e power/control unit
at the other end.
7. Clamp the auger ends to their applicable anchors and mount the bearing assemblies in place.
PNEG-914 Flex-Flo 31
Page 32

5. Installation
8. The extension unit switch should actuate prior to “bottoming out” when pressed in and return back to
its original position after it is released.
Figure 5AB
Operation Guidelines
1. Open the unloader slide completely for the delivery system operation except on tandem system.
2. Do not operate the Flex-Flo System empty. Utilize a time clock with the system whenever
possible because:
A. It lessens short cycling by operating on a set schedule versus on demand.
B. It prohibits the system from running excessively when empty if the tank should go dry. When the
optional unloader switch is used, it should be wired so that if the feed tank goes empty the power
unit will stop.
3. The time clock should be programmed to start the Flex-Flo System often. By running the system
often, long running periods are eliminated and the feeders are kept full. When the Flex-Flo System
is used for filling poultry feeders, a time clock should be utilized to ensure that all feeders are filled
at the same time. The Flex-Flo System will have a better opportunity to keep up. Position the hopper
level control low in the last hopper.
4. A safety switch is provided on the control unit to trip out the motor in the event that feed is packed
inside. If feed does get packed, dislodge the feed from the drop tube and clean-out the inside of the
control unit which will allow the switch to close. The hopper level control needs to maintain vertical
positioning to keep the paddle swinging freely. Check the adjustment regularly. The control unit
safety switch does not replace the hopper level control.
5. When the Flex-Flo System is used to convey high-moisture feed, the auger line should be completely
emptied after each running to prevent feed from jamming in the tubes.
6. Operate the manual outlets several times each week to free them of feed debris.
7. The restrictor on the unloader anchor controls the feed that is flowing into the auger. When starting
a new system, the restrictor should be installed at full length and flush with the front of the unloader.
Permit the system to polish out the inside of the tubing before modifying the feed flow. When the
restrictor tube is in the unloader, maximum restriction is reached. When increased feed flow is
desired, the length of the restrictor tube should be decreased.
32 PNEG-914 Flex-Flo
Page 33

5. Installation
8. When a multi-story building is supplied by one auger solely, obtain total drop-out at each outlet.
A time clock MUST be utilized to ensure that all of the feeders are filled at the same time. In the last
hopper on every level, install a hopper level control.
9. With the straight-through tandem system, open only one tank slide at a time when feeding. Operating
the system with both unloader slides open is not recommended since horsepower consumption
increases considerably.
Wire Size by Type
Minimum Allowable Wire Size
Motor HPFull Load
Amps
1/2 4.9 12 12 10
3/4 6.9 12 12 10
1 8.0 12 12 10
1-1/2 10.0 12 12 10
In Cable, Conduit or Earth Overhead in Air
Type: R, T, W
Type: RH,
RHW, THW
Bare and Covered
Conductors
Copper conductors, 1 phase 230V, 3% voltage drop.
In case of conductors supplying several motors on one circuit, the wire size is determined by taking 125%
of the full load current of the largest motor and 100% for all others.
Wire Size by Length of Run
Length of Run - Ft. (m)
Motor 50 75 100 150 200 250 300 350 400 500 600 700 800 900 1000
Size (15) (22.5) (30) (45) (60) (75) (90) (105) (120) (150) (180) (210) (240) (270) (300)
1/2 HP 12 12 12 12 12 12 12 12 12 10 10 8 8 8 8
3/4 HP121212121212121010888666
1 HP 12 12 12 12 12 10 10 8 8 8 6 6 6 6 6
1-1/2 HP12121210108886666444
NEC Sec. 225-6/: Conductors in overhead spans must be at least #10 for spans up to 50' and #8
for longer.
PNEG-914 Flex-Flo 33
Page 34

NOTES
34 PNEG-914 Flex-Flo
Page 35

1. Flex-Flo Feed Line Components
2. Direct Drive Power Unit Assemblies
3. Model 220 Unloader and Anchor Assembly
4. Model 300, 350 and HR Unloader and Anchor Assembly
5. Model 500 Unloader and Anchor Assembly
6. Direct Drive and Tube Anchor
7. Belt Drive and Tube Anchor
8. Model 220, 300 and 350 Control Unit (FLX-4496)
9. Flex-Flo Control Unit (FLX-5015)
10. Belt Drive Power Unit
6. Parts List
11. Direct Drive Power Unit
12. Drop Kit/Kwik-Attach Drop Kit
13. Unloader Switch
14. Micro Drop Tube Switch/Proximity Switch
PNEG-914 Flex-Flo 35
Page 36

6. Parts List
Flex-Flo Feed Line Components
Ref # Model 220 Model 300 Model 350 Model 500 Model HR Description
1 BLK-10847 BLK-10847 BLK-10847 BLK-10847 BLK-10847 16" 45° Hopper Extension Kit w/ Collar
1 BLK-10587 BLK-10587 BLK-10587 BLK-10587 BLK-10587 22"-16" 60° Hopper Extension Kit w/ Hopper Collar
1 BLK-10591 BLK-10591 BLK-10591 BLK-10591 BLK-10591 22"-16" 67° Hopper Extension Kit w/ Hopper Collar
3 FLX-2194 FLX-2194 FLX-2194 FLX-2194 FLX-2194 16" 30° Black Plastic Boot
3 FLX-2194C FLX-2194C FLX-2194C FLX-2194C FLX-2194C 16" 30° Clear Plastic Boot
N/S FLX-2195 FLX-2195 FLX-2195 FLX-2195 FLX-2195 16" Straight Black Plastic Boot
N/S FLX-2195C FLX-2195C FLX-2195C FLX-2195C FLX-2195C 16" Straight Clear Plastic Boot
4 FLX-4408 FLX-2243 FLX-2178 FLX-2943 FLX-4773 Single-Out Unloader (No Anchor)
N/S FLX-3937 FLX-2586 FLX-2181 FLX-4743 FLX-4772 Twin-Out Unloader (No Anchor)
5 PVC-1004 PVC-1005 PVC-1006 PVC-1007 PVC-1006 10' PVC Straight Tube
6 PVC-1101 PVC-1001 PVC-1002 PVC-1003 PVC-1002 45° Elbow, 5' Radius (PVC-1003 is 6' Radius)
6 PVC-1000 45° Elbow, 10' Radius
7 S-4694 S-4694 S-4694 S-4694 S-4694 #2 Weldless Chain
7 S-7313 S-7313 S-7313 S-7313 S-7313 Eye Screw 1/4"-20 x 3-1/2" ZN (Open Eye Screw)
8 FLX-2432 FLX-2433 FLX-2434 FLX-2435 FLX-2434 Drop Kit
9 FLX-2425 FLX-2425 FLX-2427 FLX-2429 FLX-2427 12' Drop Tube
10 FLX-2426 FLX-2426 FLX-2428 FLX-2430 FLX-2428 6' Telescoping Drop Tube
11 FLXA-1520 FLXA-2390 FLXA-2710 FLXA-3800 FLXA-2390 Flex-Flo Auger
12 FLX-4682E FLX-4684E FLX-4686E FLX-2542 FLX-4687E Extension Unit
13 FLX-2537 FLX-2538 FLX-2539 FLX-2540 FLX-2539 PVC Tube Coupler
14 See Direct Drive Power Unit Assembly Part Numbers on Pages 37-39.
N/S 012-1 012-1 012-1 012-1
N/S 034-1 034-1 034-1 034-1
N/S 100-1 100-1 100-1 100-1
15 FLX-4496 FLX-4496 FLX-4496 FLX-4497 FLX-4496 Direct Drive Control Unit, 220V
N/S FLX-4179 FLX-4179 FLX-4179 FLX-4179 Belt Drive Control Unit (No Motor)
16 FLX-2427 FLX-2427 FLX-2427 FLX-2429 FLX-2427 12' Drop Tube
17 FLX-2428 FLX-2428 FLX-2428 FLX-2430 FLX-2428 6' Telescoping Drop Tube
1/2 HP Belt Drive Motor, 110/220V, 1 PH, 60 Hz,
Farm Duty (5/8" Shaft)
3/4 HP Belt Drive Motor, 110/220V, 1 PH, 60 Hz,
Farm Duty (5/8" Shaft)
1 HP Belt Drive Motor, 110/220V , 1 PH, 60 Hz, 1750
RPM (5/8" Shaft)
36 PNEG-914 Flex-Flo
Page 37

Direct Drive Power Unit Assemblies
6. Parts List
PNEG-914 Flex-Flo 37
Page 38

6. Parts List
Direct Drive Power Unit Assemblies Parts List
Direct Drive Power Unit Gearbox Orientation
Part #
Typ e A Typ e B
FLX-4873 FLX-4873R DDPU, 250 RPM, 1/2 HP, 3 PH, 60 Hz, 208-230/460V
FLX-4867 FLX-4867R DDPU, 441 RPM, 1 HP, 3 PH, 60 Hz, 208-230/460V
FLX-4754 FLX-4754R DDPU, 298 RPM, 1 HP, 3 PH, 50 Hz, 190/380V
FLX-4645 FLX-4645R DDPU, 250 RPM, 1 HP, 3 PH, 50 Hz, 190/380V
FLX-4632 FLX-4632R DDPU, 250 RPM, 1 HP, 3 PH, 60 Hz, 208-230/460V
FLX-4355 FLX-4355R DDPU, 358 RPM, 1-1/2 HP, 3 PH, 60 Hz, 600V
FLX-4043 FLX-4043R DDPU, 358 RPM, 1 HP, 3 PH, 60 Hz, 208-230/460V (E.P.)
FLX-4041-1PH FLX-4041-1PHR DDPU, 358 RPM, 1/2 HP, 1 PH, 60 Hz, 208-230/240V (E.P.)
FLX-3911 FLX-3911R DDPU, 358 RPM, 1 HP, 3 PH, 60 Hz, 600V
FLX-3671 FLX-3671R DDPU, 368 RPM, 1-1/2 HP, 3 PH, 50 Hz, 190-380/440V
FLX-3670 FLX-3670R DDPU, 368 RPM, 1 HP, 3 PH, 50 Hz, 190/380V
FLX-3661 FLX-3661R DDPU, 368 RPM, 1-1/2 HP, 1 PH, 50 Hz, 110/220V
FLX-3652 FLX-3652R DDPU, 539 RPM, 1 HP, 3 PH, 60 Hz, 208-230/460V
FLX-3644 FLX-3644R DDPU, 156 RPM, 1 HP, 3 PH, 60 Hz, 208-230/460V
FLX-3641 FLX-3641R DDPU, 441 RPM, 1-1/2 HP, 1 PH, 60 Hz, 115/230V
FLX-3640-60 FLX-3640-60R DDPU, 441 RPM, 1 HP, 1 PH, 60 Hz, 115/230V
FLX-3640-50 FLX-3640-50R DDPU, 368 RPM, 1 HP, 1 PH, 50 Hz, 110/220V
FLX-3632 FLX-3632R DDPU, 368 RPM, 1/2 HP, 3 PH, 50 Hz, 190/380V
FLX-3555 FLX-3555R DDPU, 358 RPM, 1-1/2 HP, 3 PH, 60 Hz, 208-230/460V
FLX-3552 FLX-3552R DDPU, 358 RPM, 1 HP, 3 PH, 60 Hz, 208-230/460V
FLX-3549BA FLX-3549BAR DDPU, 358 RPM, 1/2 HP, 3 PH, 60 Hz, 208-230/460V
FLX-3549 FLX-3549R DDPU, 358 RPM, 1/2 HP, 3 PH, 60 Hz, 208-230/460V
FLX-3546 FLX-3546R DDPU, 358 RPM, 1/3 HP, 3 PH, 60 Hz, 230/460V
FLX-3543BA FLX-3543BAR DDPU, 358 RPM, 3/4 HP, 3 PH, 60 Hz, 208-230/460V
FLX-3543 FLX-3543R DDPU, 358 RPM, 3/4 HP, 3 PH, 60 Hz, 208-230/460V
FLX-3535 FLX-3535R DDPU, 296 RPM, 1-1/2 HP, 3 PH, 50 Hz, 190-380/440V
FLX-3534 FLX-3534R DDPU, 296 RPM, 1 HP, 3 PH, 50 Hz, 190/380V
FLX-2933-60 FLX-2933-60R DDPU, 64 RPM, 1/3 HP, 1 PH, 60 Hz, 115/230V
FLX-2462 FLX-2462R DDPU, 358 RPM, 1-1/2 HP, 1 PH, 60 Hz, 115/230V
FLX-2461-60 FLX-2461-60R DDPU, 358 RPM, 1 HP, 1 PH, 60 Hz, 115/230V
FLX-2460-60 FLX-2460-60R DDPU, 358 RPM, 3/4 HP, 1 PH, 60 Hz, 115/230V
FLX-2460-50 FLX-2460-50R DDPU, 296 RPM, 3/4 HP, 1 PH, 50 Hz, 110/220V
FLX-2459-60 FLX-2459-60R DDPU, 358 RPM, 1/2 HP, 1 PH, 60 Hz, 115/230V
FLX-2459-50 FLX-2459-50R DDPU, 296 RPM, 1/2 HP, 1 PH, 50 Hz, 115/230V
FLX-2458-60 FLX-2458-60R DDPU, 358 RPM, 1/3 HP, 1 PH, 60 Hz, 110/220V
C2000203 C2000203R DDPU, 84 RPM, 1/2 HP, 1 PH, 50 Hz, 115/230V
07101557-60 07101557-60R DDPU, 250 RPM, 1/2 HP, 1 PH, 60 Hz, 115/230V (CU)
07101481-60 07101481-60R DDPU, 250 RPM, 1/3 HP, 1 PH, 60 Hz, 115/230V (CU)
Description
38 PNEG-914 Flex-Flo
Page 39

Direct Drive Power Unit Assemblies Parts List (Continued)
Direct Drive Power Unit Gearbox Orientation
Part #
Type A Type B
07100643-60 07100643-60R DDPU, 64 RPM, 1/2 HP, 1 PH, 60 Hz, 115/230V
07099366-60 07099366-60R DDPU, 358 RPM, 1/2 HP, 1 PH, 60 Hz, 115/230V (CU)
07098924-50 07098924-50R DDPU, 368 RPM, 1/2 HP, 1 PH, 50 Hz, 115/230V (CU)
07097965-60 07097965-60R DDPU, 358 RPM, 3/4 HP, 1 PH, 60 Hz, 115/230V (CU)
07097744-60 07097744-60R DDPU, 358 RPM, 1/2 HP, 1 PH, 60 Hz, 115/230V (CU)
07097374-60 07097374-60R DDPU, 358 RPM, 1/3 HP, 1 PH, 60 Hz, 115/230V (CU)
7100693 7100693R DDPU, 735 RPM, 3/4 HP, 3 PH, 60 Hz, 208-230/460V (CU)
7099968 7099968R DDPU, 84 RPM, 1/3 HP, 3 PH, 50 Hz, 190/380V
7099342 7099342R DDPU, 358 RPM, 3/4 HP, 3 PH, 60 Hz, 208-230/460V (CU)
7099341 7099341R DDPU, 358 RPM, 1/2 HP, 3 PH, 60 Hz, 208-230/460V (CU)
7099340 7099340R DDPU, 358 RPM, 1/3 HP, 3 PH, 60 Hz, 230/460V (CU)
7099298 7099298R DDPU, 368 RPM, 3/4 HP, 3 PH, 50 Hz, 190/380V (CU)
7099263 7099263R DDPU, 368 RPM, 1/2 HP, 3 PH, 50 Hz, 190/380V (CU)
7099247 7099247R DDPU, 735 RPM, 3/4 HP, 3 PH, 50 Hz, 230/380/440V (CU)
7098894 7098894R DDPU, 716 RPM, 3/4 HP, 1 PH, 60 Hz, 115/230V (CU)
7098423 7098423R DDPU, 441 RPM, 1/3 HP, 1 PH, 50 Hz, 115/230V (CU)
7098422 7098422R DDPU, 368 RPM, 1/3 HP, 3 PH, 50 Hz, 190/380V (CU)
FLX-3582-50 FLX-3582-50R DDPU, 129 RPM, 1/2 HP, 1 PH, 50 Hz, 115/230V
FLX-3582-60 FLX-3582-60R DDPU, 156 RPM, 1/2 HP, 1 PH, 60 Hz, 115/230V
FLX-3593 FLX-3593R DDPU, 156 RPM, 1/2 HP, 3 PH, 60 Hz, 230/460V
FLX-3928-50 FLX-3928-50R DDPU, 129 RPM, 3/4 HP, 1 PH, 50 Hz, 110/220V
FLX-3928-60 FLX-3928-60R DDPU, 156 RPM, 3/4 HP, 1 PH, 60 Hz, 115/230V
FLX-3634-50 FLX-3634-50R DDPU, 129 RPM, 1 HP, 1 PH, 50 Hz, 110/220V
FLX-3634-60 FLX-3634-60R DDPU, 156 RPM, 1 HP, 1 PH, 60 Hz, 115/230V
FLX-3635 FLX-3635R DDPU, 156 RPM, 1-1/2 HP, 1 PH, 60 Hz, 115/230V
FLX-2672-60 FLX-2672-60R DDPU, 250 RPM, 1/3 HP, 1 PH, 60 Hz, 115/230V
FLX-2673-60 FLX-2673-60R DDPU, 250 RPM, 1/2 HP, 1 PH, 60 Hz, 115/230V
FLX-2674-50 FLX-2674-50R DDPU, 209 RPM, 3/4 HP, 1 PH, 50 Hz, 110/220V
FLX-2674-60 FLX-2674-60R DDPU, 250 RPM, 3/4 HP, 1 PH, 60 Hz, 115/230V
FLX-3589-50 FLX-3589-50R DDPU, 368 RPM, 1/3 HP, 1 PH, 50 Hz, 115/230V
FLX-3589-60 FLX-3589-60R DDPU, 441 RPM, 1/3 HP, 1 PH, 60 Hz, 115/230V
FLX-3590-50 FLX-3590-50R DDPU, 368 RPM, 1/2 HP, 1 PH, 50 Hz, 115/230V
FLX-3590-60 FLX-3590-60R DDPU, 441 RPM, 1/2 HP, 1 PH, 60 Hz, 115/230V
FLX-3591-50 FLX-3591-50R DDPU, 368 RPM, 3/4 HP, 1 PH, 50 Hz, 110/220V
FLX-3591-60 FLX-3591-60R DDPU, 441 RPM, 3/4 HP, 1 PH, 60 Hz, 115/230V
FLX-3603 FLX-3603R DDPU, 441/364 RPM, 3/4 HP, 3 PH, 50/60 Hz, 190/380V
FLX-3631 FLX-3631R DDPU, 368 RPM, 1/3 HP, 3 PH, 50 Hz, 190/380V
FLX-3633 FLX-3633R DDPU, 368 RPM, 3/4 HP, 3 PH, 50 Hz, 190/380V
FLX-3653 FLX-3653R DDPU, 539 RPM, 1-1/2 HP, 3 PH, 60 Hz, 208-230/460V
Description
6. Parts List
PNEG-914 Flex-Flo 39
Page 40

6. Parts List
Model 220 Unloader and Anchor Assembly
Ref # Part # Description Qty
1 FLX-4331 Model 220 Flex-Flo Single through Unloader Body Assembly 1
2 BLK-11137A Transfer and Slide Gate Kit 1
3 FLX-2217 Model 220, 300, 350 Flex Seal Ring 1
4 FLX -3422 Neoprene Seal 1
5 FLX-4239 Clean-Out Plate Assembly 1
6 S-4490 2-1/4" Tube Clamp Model 220 2
7 FLX-4646 Model 220/EP Anchor and Bearing Assembly 1
8 00404238 Iron Ball 3" Hollow - 1-1/2 # 1
9 FLX-3938 Model 220 Flex-Flo Twin Unloader Body Assembly 1
10 FLX-2195 16" Straight Black Plastic Boot 1
10 FLX-2195C 16" Straight Clear Plastic Boot 1
1 1 FLX-2194 16" 30º Black Plastic Boot 1
11 FLX-2194C 16" 30º Clear Plastic Boot 1
40 PNEG-914 Flex-Flo
Page 41

Model 300, 350 and HR Unloader and Anchor Assembly
6. Parts List
Ref #
1 FLX-2195 16" Straight Black Plastic Boot FLX-2195 16" Straight Black Plastic Boot
1 FLX-2195C 16" Straight Clear Plastic Boot FLX-2195C 16" Straight Clear Plastic Boot
2 FLX-2194 16" 30° Black Plastic Boot FLX-2194 16" 30° Black Plastic Boot
2 FLX-2194C 16" 30° Clear Plastic Boot FLX-2194C 16" 30° Clea r Plas tic Boot
N/S FLX-4869 16" Double Straight Black Boot FLX-4869 16" Double Straight Black Boot
3 BLK-11137A Transfer and Slide Gate Kit BLK-11137A Transfer and Slide Gate Kit
4 00404238 Iron Ball 3" Hol low - 1-1/2 # 00404238 Iron Ball 3" Hollow - 1-1/2 #
5 FLX-4239 Clean-Out Plate Assembly FLX-4239 Clean-Out Plate Assembly
6 S-4320 3" Tube Clamp S-4319 3-1/2" Tube Clamp
7 FLX-4648 Model 300 Anchor and Bearing Assembly FLX-4650 Model 350 Anchor and Bearing Assembly
8 FLX-4669
9 S-9186 3-1/4" Tube Clamp Model 300 S-4443 4" Tube Clamp Model 350
10 FLX-2217 Model 220, 300, 350 Flex Seal Ring FLX-2217 Model 220, 300, 350 Flex Seal Ring
11 FLX-3422 Neoprene Seal FLX-3422 Neoprene Seal
12 FLX-4671B
13 FLX-4819 Unloader Brace FLX-4819 Unloader Brace
Part # Description Part # Description
Model 300 Model 350
Model 300 Flex-Flo Single through
Unloader Body Assembly
Model 300 Flex-Flo Twin through
Unloader Body Assembly
FLX-2053
FLX-2116B
Model 350 Flex-Flo Single through
Unloader Body Assembly
Model 350 Flex-Flo Twin through
Unloader Body Assembly
PNEG-914 Flex-Flo 41
Page 42

6. Parts List
Model 500 Unloader and Anchor Assembly
Ref # Part # Description Qty
1 FLX-2065 Model 500 Flex-Flo Single through Unloader Body Assembly 1
2 S-4494 5-1/2" Tube Clamp Model 500 1
3 FLX-2218 Model 500 Flex Seal Ring 1
4 FLX-3422 Neoprene Seal 1
5 FLX-4239 Clean-Out Plate Assembly 1
6 FLX-2192 Model 500 Anchor and Bearing Assembly 1
7 BLK-11137A Transfer and Slide Gate Kit 1
8 FLX-2095 4"-5" Control Unit Seal 1
9 FLX-2194 16" 30º Black Plastic Boot 1
9 FLX-2194C 16" 30º Clear Plastic Boot 1
10 FLX-2195 16" Straight Black Plastic Boot 1
10 FLX-2195C 16" Straight Clear Plastic Boot 1
42 PNEG-914 Flex-Flo
Page 43

Direct Drive and Tube Anchor
6. Parts List
Ref # Part # Description
FLX-2699 220 D.D. Driver and Tube Anchor
FLX-2696 300 D.D. Driver and Tube Anchor
FLX-2697 350 D.D. Driver and Tube Anchor
FLX-2698 500 D.D. Driver and Tube Anchor
1 FLX-4572 Model 300 Direct Drive Spindle
1 FLX-4575 Model 350 Direct Drive Spindle
1 FLX-2975 Model 500 Belt and Direct Drive Spindle
2 FLX-4571 Model 300/350 Auger Lock Clamp Pin
2 FLX-2974 Model 500 Auger Lock Clamp Pin
3 S-6481 5/16''-18 x 1-1/2'' Hex Socket Cap Screw Model 300 and 350
3 S-6483 5 /16''-18 x 2-1/2'' Hex Socket Cap Screw Model 500
4 FLX-2316 Model 220 Tube Anchor Plate
4 FLX-2317 Model 300 Tube Anchor Plate
4 FLX-2318 Model 350 Tube Anchor Plate
4 FLX-2319 Model 500 Tube Anchor Plate
5 S-845 Flat Washer 5/16" USS SAE YDP Grade 2
6 S-396 1/4''-20 Hex Nut
7 S-4490 2-1/4'' Tube Clamp Model 220
7 S-9186 3-1/4'' Tube Clamp Model 300
7 S-4443 4'' Tube Clamp Model 350
7 S-4494 5-1/2'' Tube Clamp Model 500
8 FLX-2634 Model 300 Tube Spacer
9 FLXDF-1183 Drop Feed Control Anchor Package
10 FLX-4543 Auger Lock 220 Direct Drive
11 FLX-2685 Model 220 Direct Drive Anchor Washer
12 S-8039 Bolt, 1/4"-20 x 1-1/4'' Socket Head
PNEG-914 Flex-Flo 43
Page 44

6. Parts List
Belt Drive and Tube Anchor
44 PNEG-914 Flex-Flo
Page 45

Belt Drive and Tube Anchor Parts List
Ref # Part # Description
FLX-2695 220 B.D. Driver and Tube Anchor
FLX-2692 300 B.D. Driver and Tube Anchor
FLX-2693 350 B.D. Driver and Tube Anchor
FLX-2694 500 B.D. Driver and Tube Anchor
1 FLX-4578 Model 300 Belt Driver
1 FLX-4579 Model 350 Belt Driver
2 FLX-4571 Model 300/350 Auger Lock Clamp Pin
3 S-6481 Bolt, SHCS 5/16"-18 x 1-1/2" Model 300
3 S-6482 Bolt, SHCS 5/16"-18 x 1-3/4" Type B Cup Point Model 350
4 FLX -2979 Model 220 and 500 Belt Driver
5 FLX-4543 Auger Lock 220 Belt Drive
6 S-845 Flat Washer 5/16" USS SAE YDP Grade 2
6. Parts List
7 S-8039 Bolt, 1/4"-20 x 1-1/4'' Socket Head
8 FLX-2316 Model 220 Tube Anchor Plate
8 FLX-2317 Model 300 Tube Anchor Plate
8 FLX-2318 Model 350 Tube Anchor Plate
8 FLX-2319 Model 500 Tube Anchor Plate
9 S-845 Flat Washer 5/16" USS SAE YDP Grade 2
10 S-396 Hex Nut 5/16"-18 YDP Grade 2
11 S-4490 2-1/4'' Tube Clamp Model 220
11 S-9186 3-1/4" Tube Clamp Model 300
11 S-4443 4" Tube Clamp Model 350
11 S-4494 5-1/2'' Tube Clamp Model 500
12 FLX-2634 Model 300 Tube Spacer
13 FLX-2975 Model 500 Belt and Direct Drive Spindle
14 FLX-2974 Model 500 Auger Lock Clamp Pin
15 S-4312 Set Screw 5/16"-18 x 1/2 " Square Head BK Cup Point
PNEG-914 Flex-Flo 45
Page 46

6. Parts List
Model 220, 300 and 350 Control Unit (FLX-4496)
46 PNEG-914 Flex-Flo
Page 47

6. Parts List
Model 220, 300 and 350 Control Unit (FLX-4496) Parts List
Ref # Part # Description Qty
1 FLX-2017 Powerhead Drop 1
2 DC-884 Decal, Rotating Auger Hazard 2
3 FLX-4260 Model 220, 300, 350 Control Unit Body 1
4 AP-2213 Retaining Clip 4
5 S-4694 Chain #2 Weldless 1
6 S-3383 Hook #41 S-Hook 1-1/2" Long 3
7 FLX-5015-LB Flex-Flo Control Unit 1
8 FLX-4516 Electrical Box Bottom Drilled 1
9 FLX-4561 4 x 6 Electrical Box Gasket 1
10 FLX-4569 Back Plate, 4 x 6 Control Box 1
11 FLX-5017 Bracket, T erminal Block Mounting 1
12 FLX-5040
13 FLX-4517 Electrical Box Lid w/ Decal 1
14 FLX-4560 Electrical Box Lid 4 x 6 1
15 DC-2117 Decal, Flex-Flo Control 220V 1
16 S-995 Screw, MS #10-24 x 1" SS 4
17 S-7931 Hex Nut #10-24 SS 4
18 FLX-4620 Relay, Bracket f/ FLX-4619 1
19 FLX-4619 Relay, 4 Pole, ST, N.O., 240V 1
20 DC-1515 Decal, 208V/230V 3 PH Wire Label 1
21 S-7604 Light 250V Sealed Red Pilot 1
22 S-7707 Safety Limit Switch 1
23 S-6142 Switch, DPST ON-OFF Toggle 1
24 70-0129 Boot Switch Weather-Proof 1
25 S-8823 Screw, TCS23 #8-32 x 3/8" HWHS ZN Green 1
26 S-8183
27 S-8686 Screw, TCSF #6-32 x 3/8" PHP ZN 2
28 FLX-4522 Control Unit Base Assembly 1
29 FLX-2380 Small Diaphram Retainer 1
30 FLX-4410
31 FLX-4510 Control Unit Base - Sealed 1
32 S-849 Hex Nut #10-24 ZN Grade 2 4
33 S-3674 Flat Washer #10 x 7/32" I.D. x 1/2" O.D. x 18 Gauge SAE ZN Grade 2 4
34 S-2010
35 DC-2124 Decal, ETL/Intertek Mark 1
36 S-6622
37 S-280 Screw, SDS #10-16 x 5/8" HWH ZN 5
38 S-7621
39 FLX-4261 Control Box Access Door 1
40 DC-850 Decal, European Certification 1
Terminal Block Assembly for Flex-Flo Control Unit 1
Screw, MS #6-32 x 3/8" PHP ZN 6
Diaphram Assembly 1
Nylock Nut #10-24 ZN Grade 2 4
ON-OFF Back Plate 1
Screw, TCSF #10-32 HWH ZN 3/4" 4
PNEG-914 Flex-Flo 47
Page 48

6. Parts List
Flex-Flo Control Unit (FLX-5015)
48 PNEG-914 Flex-Flo
Page 49

6. Parts List
Flex-Flo Control Unit (FLX-5015) Parts List
Ref # Part # Desc ription Qty
1 FLX-4516 Electrical Box Bottom Drilled 1
2 FLX-4561 4 x 6 Electrical Box Gasket 1
3 FLX-4569 Back Plate, 4 x 6 Control Box 1
4 FLX-5017 Bracket, Terminal Block Mounting 1
5 FLX-5040 Terminal Block Assembly for Flex-Flo Control Unit 1
6 FLX-4517 Electrical Box Lid w/ Decal 1
7 S-995 Screw, MS #10-24 x 1" SS 4
8 S-7931 Hex Nut #10-24 SS 4
9 S-6142 Swi tch, DPST ON -OFF Toggle 1
10 70-0129 Boot Switch Weather-Proof 1
11 S-6622 ON-OFF Back Plate 1
12 FLX-4620 Relay, Bracket f/ FLX-4619 1
13 FLX-4619 Relay, 4 Pole, ST, N.O., 240V 1
14 DC-1515 Decal, 208V/230V 3 PH Wire Label 1
15 S-7604 Light 250V Sealed Red Pilot 1
16 S-7707 Safety Limit Switch 1
17 S-8823 Screw, TCS23 #8-32 x 3/8" HWHS ZN Green 1
18 S-8183 Screw, MS #6-32 x 3/8" PHP ZN 6
19 S-8686 Screw, TCSF #6-32 x 3/8" PHP ZN 2
20 FLX-4522 Control Unit Base Assembly 1
21 S-3674 Flat Washer #10 x 7/32" I.D. x 1/2 O.D. x 18 Gauge SAE ZN Grade 2 4
22 S-2010 Nylock Nut #10-24 ZN Grade 2 4
23 DC-2124 Decal, ETL/Intertek Mark 1
PNEG-914 Flex-Flo 49
Page 50

6. Parts List
Belt Drive Power Unit
Ref # Part # Description
FLX-4179 14'' Belt Drive Power Unit (Less Motor)
1 FLX-2986 Belt Guard Cover
2 S-4307 5/8" I.D. Locking Collar
3 S-7149 Bolt, HHTB 5/16"-18 x 1-3/4" ZN Grade 5
4 S-6242 2.7" A-Belt Single Groove Pulley (5/8" Bore)
5 BLK-11086 AX51 Gripnotch Belt
6 S-6240 14'' A-Belt Single Groove Pulley
7 FLX-2987 Belt Guard Back
8 S-280 Screw, SDS #10-16 x 5/8" HWH ZN
9 FLX-2734S Flex-Flo Anchor Bearing Assembly with Set Screw
10 FLX-5043 Inner Belt Drive Motor Bracket
11 S-4309 1/4''-20 x 5/8'' Allen Head Bol t
12 S-8426 Square Key 3/16" x 1" Long
13 S-845 Flat Washer 5/16" USS SAE YDP Grad e 2
14 S-396 Hex Nut 5/16"-18 YDP Gr ade 2
15 S-7299 Bolt, HHTB 5/16"-18 x 2-1/2" ZN Grade 2
16 FLX-5042 Outer Belt Drive Motor Bracket
17 S-1147 Split Lock Washer 5/16" ZN
18 S-4275 Bolt, HHTB 5/16"-1 8 x 3/4" ZN Grade 5
19 S-6236 Eye Bolt 5/16"-18 x 2-1/8" (w/ Nut)
22 013-1 Motor, 1/3 HP, 1 PH, 110/220V, 60 Hz, Farm Duty (5/8" Shaft)
22 012-1 Motor, 1/2 HP, 1 PH, 110/220V, 60 Hz, Farm Duty (5/8" Shaft)
22 034-1 Motor, 3/4 HP, 1 PH, 110/220V, 60 Hz, Farm Duty (5/8" Shaft)
22 100-1 Motor, 1 HP, 1 PH, 60 Hz, 110/220V, 1750 RPM (5/8" Shaft)
22 112-1 Motor, 1-1/2 HP, 1 PH, 60 Hz, 110/220V, 1750 RPM (5/8" Shaft)
23 S-6381 Black Strain Relief
50 PNEG-914 Flex-Flo
Page 51

Direct Drive Power Unit
6. Parts List
Ref # Part # Description
1 FLX-4763 Motor, 1/3 HP, 1 PH, 60 Hz, 115/230V, 1725 RPM
1 FLX-4764 Motor, 1/2 HP, 1 PH, 60 Hz, 115/230V, 1725 RPM
1 FLX-4765 Motor, 3/4 HP, 1 PH, 60 Hz, 115/230V, 1725 RPM
1 FLX-4766 Motor, 1 HP, 1 PH, 60 Hz, 115/230V, 1725 RPM
1 FLX-2473 Motor, 1-1/2 HP, 1 PH, 60 Hz, 115/230V, 1725 RPM
2 FLX-4275 Pinion Gear for Gear Reducer, 1/3, 1/2 and 3/4 HP
2 FLX-4276 Pinion Gear for Gear Reducer, 1 and 1-1/2 HP
2 FLX-4542 Pinion Gear for Gear Reducer 1 or 1-1/2 HP
2 FLX-2983 Pinion Gear for Gear Reducer, 1/3 HP
2 FLX-2973 Gear Reducer Pinion Gear 1 HP
3 FL X-4277(R) * Gearbox, 358 RPM w/o Pinion Gear
3 FLX-4400(R) * Gearbox, 156 RPM w/o Pinion Gear
3 FL X-4403(R) * Gearbox, 250 RPM w/o Pinion Gear
3 FLX-4405(R) * Gearbox, 441 RPM w/o Pinion Gear
3 FL X-4406(R) * Gearbox, 539 RPM w/o Pinion Gear
N/S FL X-4 358 Adapter Plate Aluminum C-Face
N/S FLX-4407 1 Phase P.U. Oil and Hardware
* NOTE: To order a gearbox with the opposite orientation (rotated 180°), add an “R” to the end of these
part numbers.
PNEG-914 Flex-Flo 51
Page 52

6. Parts List
Drop Kit/Kwik-Attach Drop Kit
Drop Kit Parts List Kwik-Attach Drop Kit Parts List
Ref # Part # Description
FLX-2432 Model 220 Drop Kit (Nylon)
FLX-2433 Model 300 Drop Kit (Nylon)
FLX-2434 Model 350 Drop Kit (Nylon
FLX-2435 Model 500 Drop Kit (Nylon)
1 S-280 Screw, SDS #10-16 x 5/8" HWH ZN
2 FLX-2441 Gree n Indicator Ball
3 FLX-220 Model 220 Drop Half
3 FLX-300 Model 300 Drop Half
3 FLX-350 Model 350 Drop Half
3 FLX-500 Model 500 Drop Half
4 S-8174 Screw, MS #10-24 x 5/8" HWHS SS
5
6 CW-2008 #4 Solid Braided Utility Cord
7 FLX-2437 Model 220 Nylon Slide
7 FLX-2438 Model 300 Nylon Slide
7 FLX-2439 Model 350 Nylon Slide
7 FLX-2440 Model 500 Nylon Slide
8 S-7931 Hex Nut #10-24 SS
9 FLX-2442 Red Indicator Ball
Model 220, 300, 350, 500 10'
Straight T ube
Ref # Part # Description
APCD-109
AP-2276
APCD-110
AP-2277
1 APCD-058
1 AP-1764 Kwik-Attach M300 Drop Kit Slide
2 PVC-1004
2 PVC-1005
3 AP-0583
3 AP-0584
4 APCD-059
4 AP-1763
Kwik-Attach Drop Kit for
Model 220/236 (Single)
Kwik-Attach Drop Kit for
Model 300 (Single)
Kwik-Attach Drop Kit for
Model 220/236 (Box of 10)
Kwik-Attach Drop Kit for
Model 300 (Box of 10)
Shut Off Slide for Kwik-Attach
Model 220
Model 220 PVC Flex-Flo Tube,
10' (3 Meters) w/ Belled End
Model 300 PVC Flex-Flo Tube,
10' (3 Meters) w/ Belled End
Hose Clamp, Stainless Steel
1-3/4" - 2-3/4"
Hose Clamp, Stainless
Steel 3"-4"
Main Housing for Kwik-Attach
Model 220 Drop Kit
Main Housing for Kwik-Attach
Model 300 Drop Kit
52 PNEG-914 Flex-Flo
Page 53

Unloader Switch
6. Parts List
Ref # Part # Description Qty
1 FLX-4157A Back Plate , Unloader Switch Assembly 1
2 FLX-4410 Diaphragm Assembly 1
3 FLX-2380 Small Diaphragm Retainer 1
4 S-849 Hex Nut 10-24 Grade 2 1
5 FLX-4158A Cover Plate Assembly for Switch 1
6 S-3558 3/8" Washer EPDM Steel Backed 1
7 S-4301 Wing Nut 5/16"-18 ZN Grade 2 1
8 FLX-4159 Unloader Switch Housing 1
9 S-3674 Flat Washer #10 x 7/32" I.D. x 1/2" O.D. x 18 Gauge TSAE ZN Grade 2 1
10 S-2010 Nylock Nut #10-24 ZN Grade 2 2
11 07097327 Micro Switch Spring Bracket 1
12 FLX-3493 Control Unit Switch Bracket 1
13 FLX-2128 Boot Switch 1
14 S-7319 Screw, MS #6-32 x 7/8" R.H. Side ZN Grade 2 1
15 S-6144 Hex Nut 6-32 Grade 2 1
16 E160-1074 Ring Terminal #10 Insulated 1
17 WR-16GRN-YLW Wire 16 Gauge Green/Yellow Stranded 1' 1
18 FLX-2690 Electrical Box Gasket 4 x 4 1
19 FLX-2689 Electrical Box Lid 1
20 DC-1088 Decal, Flex-Flo Control Unit 1
21 S-995 Screw, MS #10-24 x 1" PHP SS 1
22 S-7931 Hex Nut #10-24 SS 1
23 BX-302 Box, 13-3/4" x 5-1/2" x 5-1/2" 200C FPF (Not Shown) 1
PNEG-914 Flex-Flo 53
Page 54

6. Parts List
Micro Drop Tube Switch/Proximity Switch
Micro Drop Tube Switch Parts List
Ref # Part # Description Qty
AP-0990 Plastic Drop Tube Switch, 110/220V
1 FLX-3489 Micro Switch Box Assembly Wired N.C. 1
2 S-7621 Screw, SDS #10-16 x 1" HWH ZN Grade 2 6
3 FLX-3448 Drop Tube Switch Baffle Plate 1
4 FLX-3451 Drilled Drop Tube Housing 1
Proximity Switch Parts List
Ref # Part # Description Qty
1 FLX-2425
2 FLXDF-1172 Capacitive Proximity Switch N.C. 20-250 VAC 1
3 S-7906 1/2'' Cord Connector 1
Drop Tube, 3" I.D. x 12' (3.65 Meters)
1
54 PNEG-914 Flex-Flo
Page 55

FLX-4496 or FLX-5015 Factory Wiring Diagram
7. Wiring Diagrams
PNEG-914 Flex-Flo 55
Page 56

7. Wiring Diagrams
Wiring Diagram for Extension Flex-Flo Using Smart-Flex Control
56 PNEG-914 Flex-Flo
Page 57

7. Wiring Diagrams
Wiring Diagram for Extension Flex-Flo Using Two (2)
FLX-4496 Controls
PNEG-914 Flex-Flo 57
Page 58

7. Wiring Diagrams
Flex-Flo Control with 220 Volt 24 Hour Time Clock
58 PNEG-914 Flex-Flo
Page 59

Flex-Flo Control with Proximity Switch (AP-1002)
7. Wiring Diagrams
PNEG-914 Flex-Flo 59
Page 60

7. Wiring Diagrams
Flex-Flo Control with Proximity Switch (AP-2983)
60 PNEG-914 Flex-Flo
Page 61

7. Wiring Diagrams
Flex-Flo Control with Drop Tube Switch or Hopper Level Switch
PNEG-914 Flex-Flo 61
Page 62

7. Wiring Diagrams
Flex-Flo Control with Smart IR Sensor (FLX-4951)
62 PNEG-914 Flex-Flo
Page 63

8. Warranty
9101239_1_CR_rev7.DOC (revised July 2009)
GSI Group, LLC Limited Warranty
The GSI Group, LLC (“GSI”) warrants products which it manufactures to be free of defects in materials and workmanship
under normal usage and conditions for a period of 12 months after sale to the original end-user or if a foreign sale,
14 months from arrival at port of discharge, whichever is earlier. The end-user’s sole remedy (and GSI’s only obligation)
is to repair or replace, at GSI’s option and expense, products that in GSI’s judgment, contain a material defect in materials
or workmanship. Expenses incurred by or on behalf of the end-user without prior written authorization from the GSI
Warranty Group shall be the sole responsibility of the end-user.
Warranty Extensions:
The Limited Warranty period is extended for the following products:
Product Warranty Period
Performer Series Direct Drive Fan Motor 3 Years
AP Fans and Flooring
Cumberland
Feeding/Watering
Systems
Grain Systems Grain Bin Structural Design 5 Years
Grain Systems
Farm Fans
Zimmerman
All Fiberglass Housings Lifetime
All Fiberglass Propellers Lifetime
Feeder System Pan Assemblies 5 Years **
Feed Tubes (1-3/4" and 2.00") 10 Years *
Centerless Augers 10 Years *
Watering Nipples 10 Years *
Portable and Tower Dryers 2 Years
Portable and Tower Dryer Frames and
Internal Infrastructure †
5 Years
* Warranty prorated from list price:
0 to 3 years - no cost to end-user
3 to 5 years - end-user pays 25%
5 to 7 years - end-user pays 50%
7 to 10 years - end-user pays 75%
** Warranty prorated from list price:
0 to 3 years - no cost to end-user
3 to 5 years - end-user pays 50%
† Motors, burner components
and moving parts not included.
Portable dryer screens included.
Tower dryer screens not included.
GSI further warrants that the portable and tower dryer frame and basket, excluding all auger and auger drive components,
shall be free from defects in materials for a period of time beginning on the twelfth (12
and continuing until the sixtieth (60
th
) month from the date of purchase (extended warranty period). During the extended
th
) month from the date of purchase
warranty period, GSI will replace the frame or basket components that prove to be defective under normal conditions
of use without charge, excluding the labor, transportation, and/or shipping costs incurred in the performance of this
extended warranty.
Conditions and Limitations:
THERE ARE NO WARRANTIES THAT EXTEND BEYOND THE LIMITED WARRANTY DESCRIPTION SET FORTH
ABOVE. SPECIFICALLY, GSI MAKES NO FURTHER WARRANTY OF ANY KIND, EXPRESS OR IMPLIED,
INCLUDING, WITHOUT LIMITATION, WARRANTIES OF MERCHANTABILITY OR FITNESS FOR A PARTICULAR
PURPOSE OR USE IN CONNECTION WITH: (I) PRODUCT MANUFACTURED OR SOLD BY GSI OR (II) ANY ADVICE,
INSTRUCTION, RECOMMENDATION OR SUGGESTION PROVIDED BY AN AGENT, REPRESENTA TIVE OR
EMPLOYEE OF GSI REGARDING OR RELATED TO THE CONFIGURATION, INSTALLATION, LAYOUT, SUITABILITY
FOR A PARTICULAR PURPOSE, OR DESIGN OF SUCH PRODUCTS.
GSI shall not be liable for any direct, indirect, incidental or consequential damages, including, without limitation, loss of
anticipated profits or benefits. The sole and exclusive remedy is set forth in the Limited Warranty, which shall not exceed
the amount paid for the product purchased. This warranty is not transferable and applies only to the original end-user. GSI
shall have no obligation or responsibility for any representations or warranties made by or on behalf of any dealer, agent
or distributor.
GSI assumes no responsibility for claims resulting from construction defects or unauthorized modifications to products
which it manufactured. Modifications to products not specifically delineated in the manual accompanying the equipment at
initial sale will void the Limited Warranty.
This Limited Warranty shall not extend to products or parts which have been damaged by negligent use, misuse, alteration,
accident or which have been improperly/inadequately maintained. This Limited Warranty extends solely to products
manufactured by GSI.
Prior to installation, the end-user has the responsibility to comply with federal, state and local codes which apply to the
location and installation of products manufactured or sold by GSI.
PNEG-914 Flex-Flo 63
Page 64

This equipment shall be installed in accordance with
the current installation codes and applicable
regulations which should be carefully followed in all
cases. Authorities having jurisdiction should be
consulted before installations are made.
Copyright © 2011 by Group
Printed in the USA
1004 E. Illinois St.
Assumption, IL 62510-0020
Phone: 1-217-226-4421
Fax: 1-217-226-4420
www.gsiag.com
 Loading...