

Page 1

PNEG-297
Chi-Town Heater
Installation and Operation Manual
PNEG-297
Date: 12-07-10
Page 2

Check List
1. All wire connections
2. Ignitor gap - 1/8"
3. Pipe train tightness and gas leaks
4. Flame probe adjusted
5. Fuse in place, extra fuse provided
6. Reset lock out after 30 second flame out
7. Indicator light
8. Pressure gauge
9. Regulator adjusted
10. Solenoid valve operates correctly
11. Unit cycles ON to OFF
12. Burns evenly around ring
13. All decals and serial number tag
14. Aesthetic appearance
15. Manual
Tester Signature: _____________________
Date: ______________________________
Model #: ___________________________
2 PNEG-297 Chi-Town Heater
Page 3

Table of Contents
Contents
Chapter 1 Introduction ..........................................................................................................................................4
Chapter 2 Safety .....................................................................................................................................................5
Safety Guidelines .................................................................................................................................. 5
Chapter 3 Safety Decals ........................................................................................................................................6
Roof Damage Warning and Disclaimer ................................................................................................. 6
Chapter 4 Specifications .......................................................................................................................................9
Heater Specifications ............................................................................................................................ 9
Chapter 5 Installation ..........................................................................................................................................10
Heater Installation ............................................................................................................................... 10
Fuel Connection .................................................................................................................................. 10
Propane Vapor Models ....................................................................................................................... 11
Natural Gas Models ............................................................................................................................ 11
Electrical Connection .......................................................................................................................... 11
Standard Heater - Second Heater Installation ........................................................ ... ... ... ... .... ... ... ... ... 13
Chapter 6 Installation and Operating .................................................................................................................14
Bin Configuration ................................................................................................................................. 14
Plenum Temperatures ......................................................................................................................... 14
Chapter 7 Operating Instructions ......................... .................................................... ..........................................15
Heater Operation ................................................................................................................................. 15
BTU’s per Gauge Pressure (PSI) - Propane Models Approximate ..................................................... 16
BTU’s per Gauge Pressure (PSI) - Natural Gas Models Approximate ............. ... .... ... ... ... ... .... ............ 17
Chapter 8 Heater Service ....................................................................................................................................18
Chapter 9 Wiring Diagram ...................................................................................................................................19
Standard Heater Wiring ....................................................................................................................... 19
Chapter 10 Schematic Diagram ..........................................................................................................................20
Standard Heater Schematic .............................................................................................................. 20
Chapter 11 Time Delay Operation ......................................................................................................................21
Time Delay Reset (HH-1089E) Operation ......................................................................................... 21
Chapter 12 Troubleshooting - Guide ..................................................................................................................22
Chapter 13 Parts List ...........................................................................................................................................23
Gas Heater Parts (HF-7385) ....................................................... ... .......................................... ......... 24
Control Box Parts (HF-8084) ............................................................................................................. 26
Pipe Train Parts (HF-7712 and HF-7713) ......................................................................................... 28
Chapter 14 Warranty ............................................................................................................................................31
PNEG-297 Chi-Town Heater 3
Page 4

1. Introduction
Thank you for choosing a GSI product. It is designed to give excellent performance and service for
many years.
This manual describes the operation of the Chi-Town Heater. It is designed for low to medium temperature
grain conditioning and is ideal for the aeration of rice, popcorn or other select grains. It is designed to be
used with propane vapor or natural gas.
Our foremost concern is your safety and the safety of others associated with this equipment. We want
to keep you as a customer. This manual is to help you understand safe operating procedures and some
problems which may be encountered by the operator and other personnel.
As owner and/or operator, it is your responsibility to know what requirements, hazards and precautions
exist, and to inform all personnel associated with the equipment or in the area. Safety precautions may be
required from the personnel. Avoid any alterations to the equipment. Such alterations may p roduce a very
dangerous situation where SERIOUS INJURY or DEATH may occur.
This equipment shall be installed in accordance with the current installation codes and applicable
regulations which should be carefully followed in all cases. Authorities having jurisdiction should be
consulted before installations are made.
4 PNEG-297 Chi-Town Heater
Page 5
2. Safety
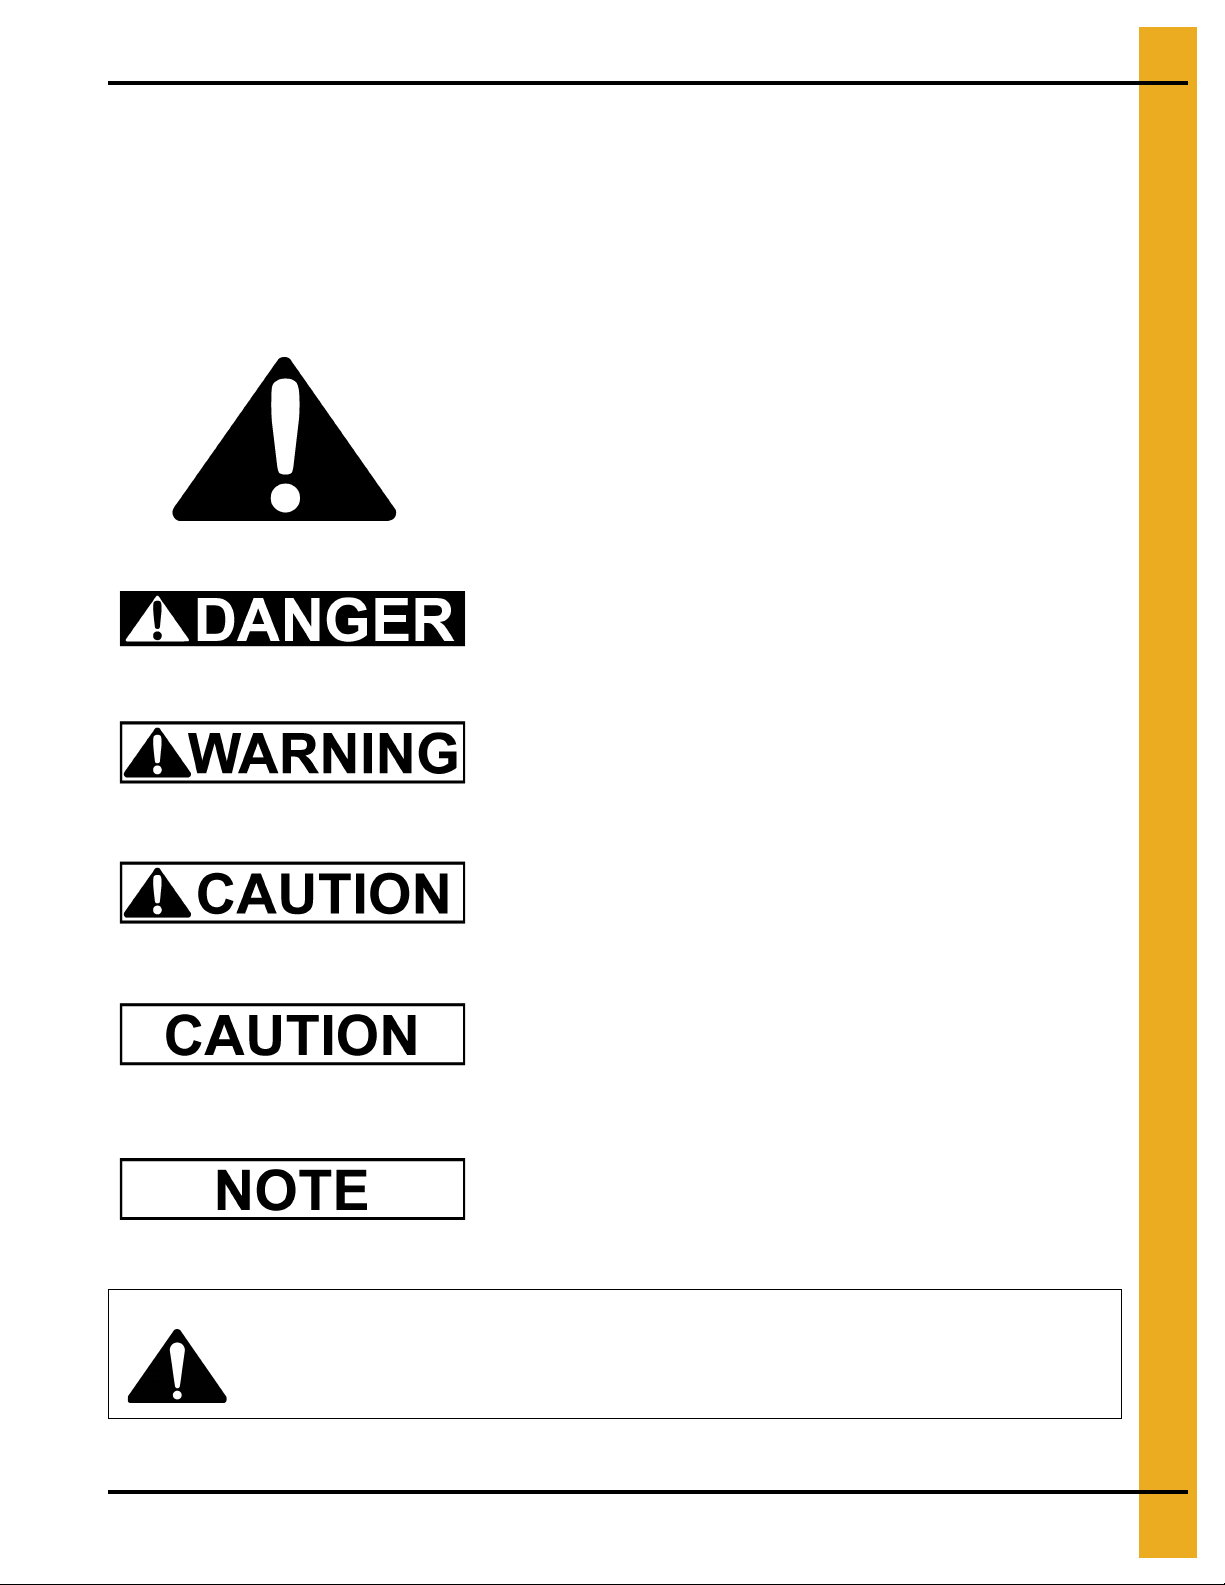
This is the safety alert symbol. It is used to alert you
to potential personal injury hazards. Obey all safety
messages that follow this symbol to avoid possible
injury or death.
WARNING indicates a potentially hazardous situation
which, if not avoided, could result in death or serious injury.
CAUTION indicates a potentially hazardous situation which,
if not avoided, may result in minor or moderate injury.
CAUTION used without the safety alert symbol indicates a
potentially hazardous situation which, if not avoided, may
result in property damage.
NOTE indicates information about the equipment that you
should pay special attention.
DANGER indicates an imminently hazardous situation
which, if not avoided, will result in death or serious injury.
Personnel operating or working around electric fans should read this manual. This
manual must be delivered with the equipment to its owner. Failure to read this manual
and its safety instructions is a misuse of the equipment.
WARNING! BE ALERT!
Safety Guidelines
This manual contains information that is important for you, the owner/operator, to know and understand.
This information relates to protecting personal safety and preventing equipment problems. It is the
responsibility of the owner/operator to inform anyone operating or working in the area of this equipment
of these safety guidelines. To help you recognize this information, we use the symbols that are defined
below. Please read the manual and pay attention to these sections. Failure to read this manual and its
safety instructions is a misuse of the equipment and may lead to serious injury or death.
PNEG-297 Chi-Town Heater 5
Page 6
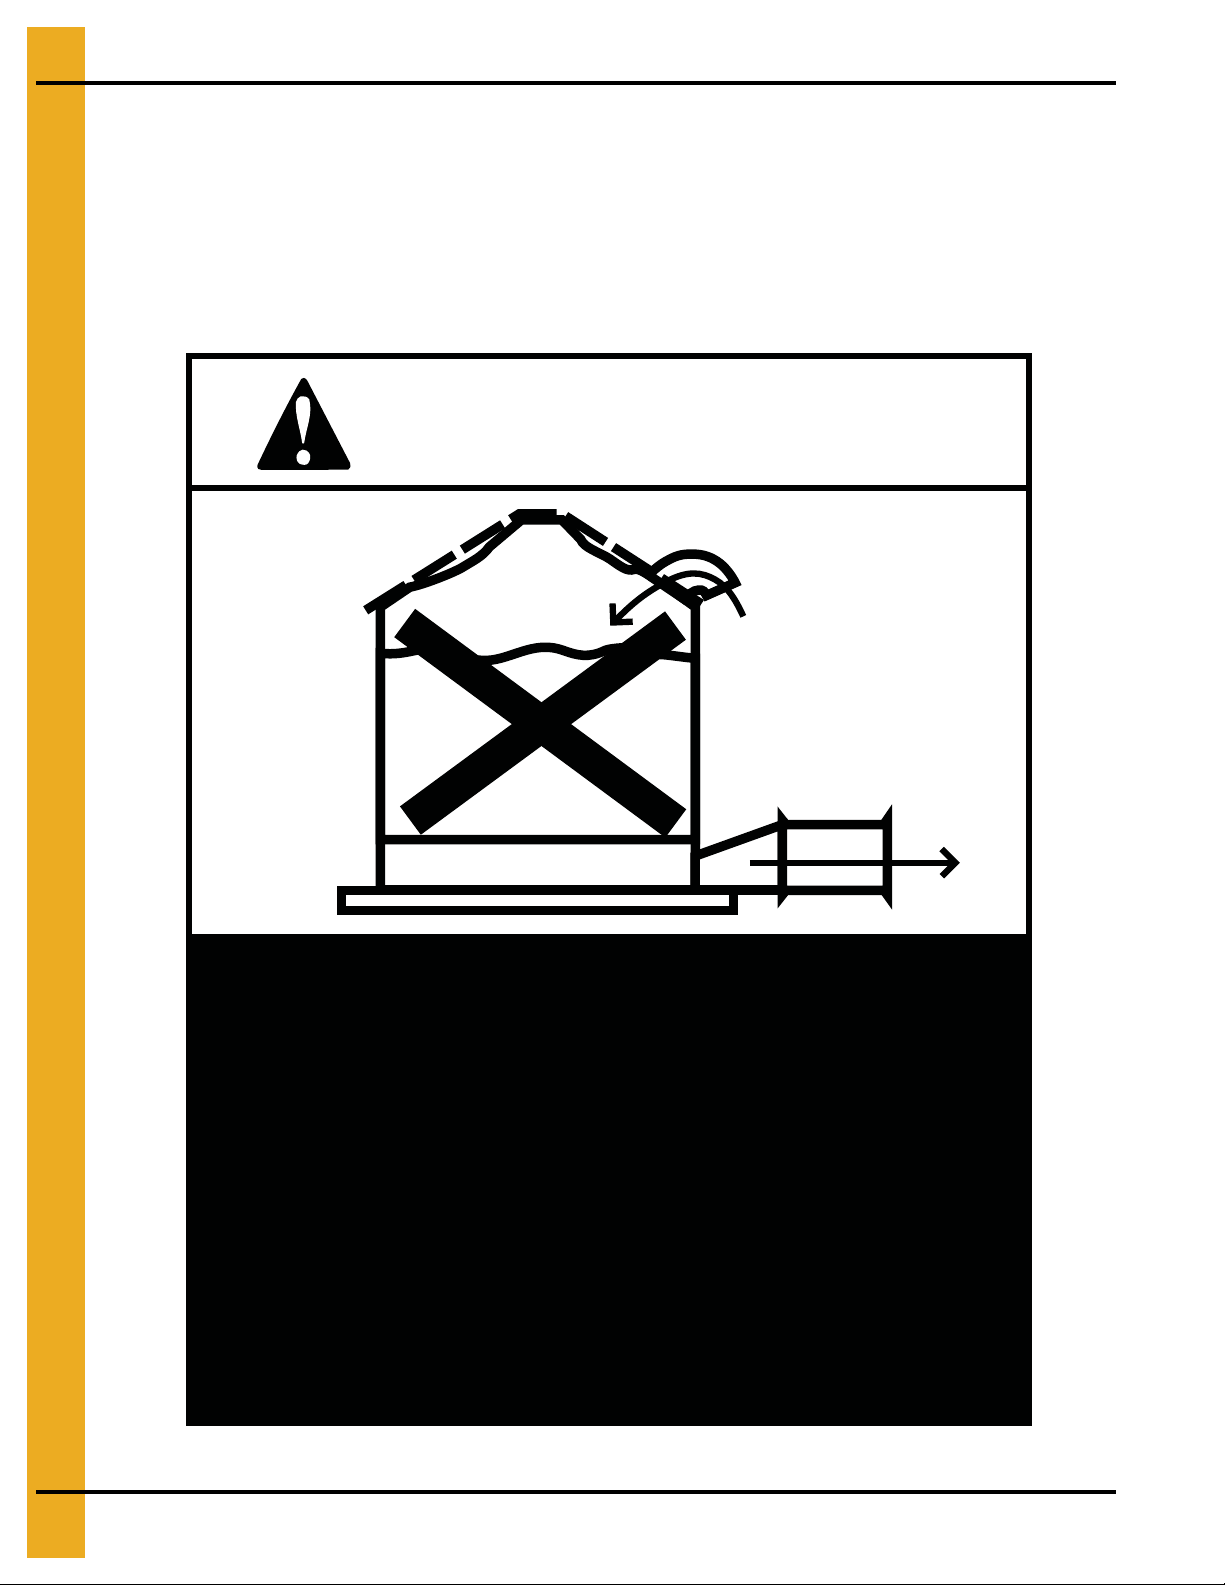
3. Safety Decals
CAUTION!
Excessive vacuum (or pressure) may
damage roof. Use positive aeration
system. Make sure all roof vents are
open and unobstructed. Start roof
fans when supply fans are started.
Do not operate when conditions exist
that may cause roof vent icing.
DC-969
The manufacturer does not warrant any roof damage caused by excess ive v acuum or internal
pressure from fans or other air moving systems. Adequate ventilation and/or “makeup air”
devices should be provided for all powered air handling systems. The manufacturer does not
recommend the use of downward flow systems (suction). Severe roof damage can result from
any blockage of air passages. Running fans durin g high humidity/cold weather conditions can
cause air exhaust or intake ports to freeze.
Roof Damage Warning and Disclaimer
6 PNEG-297 Chi-Town Heater
Page 7
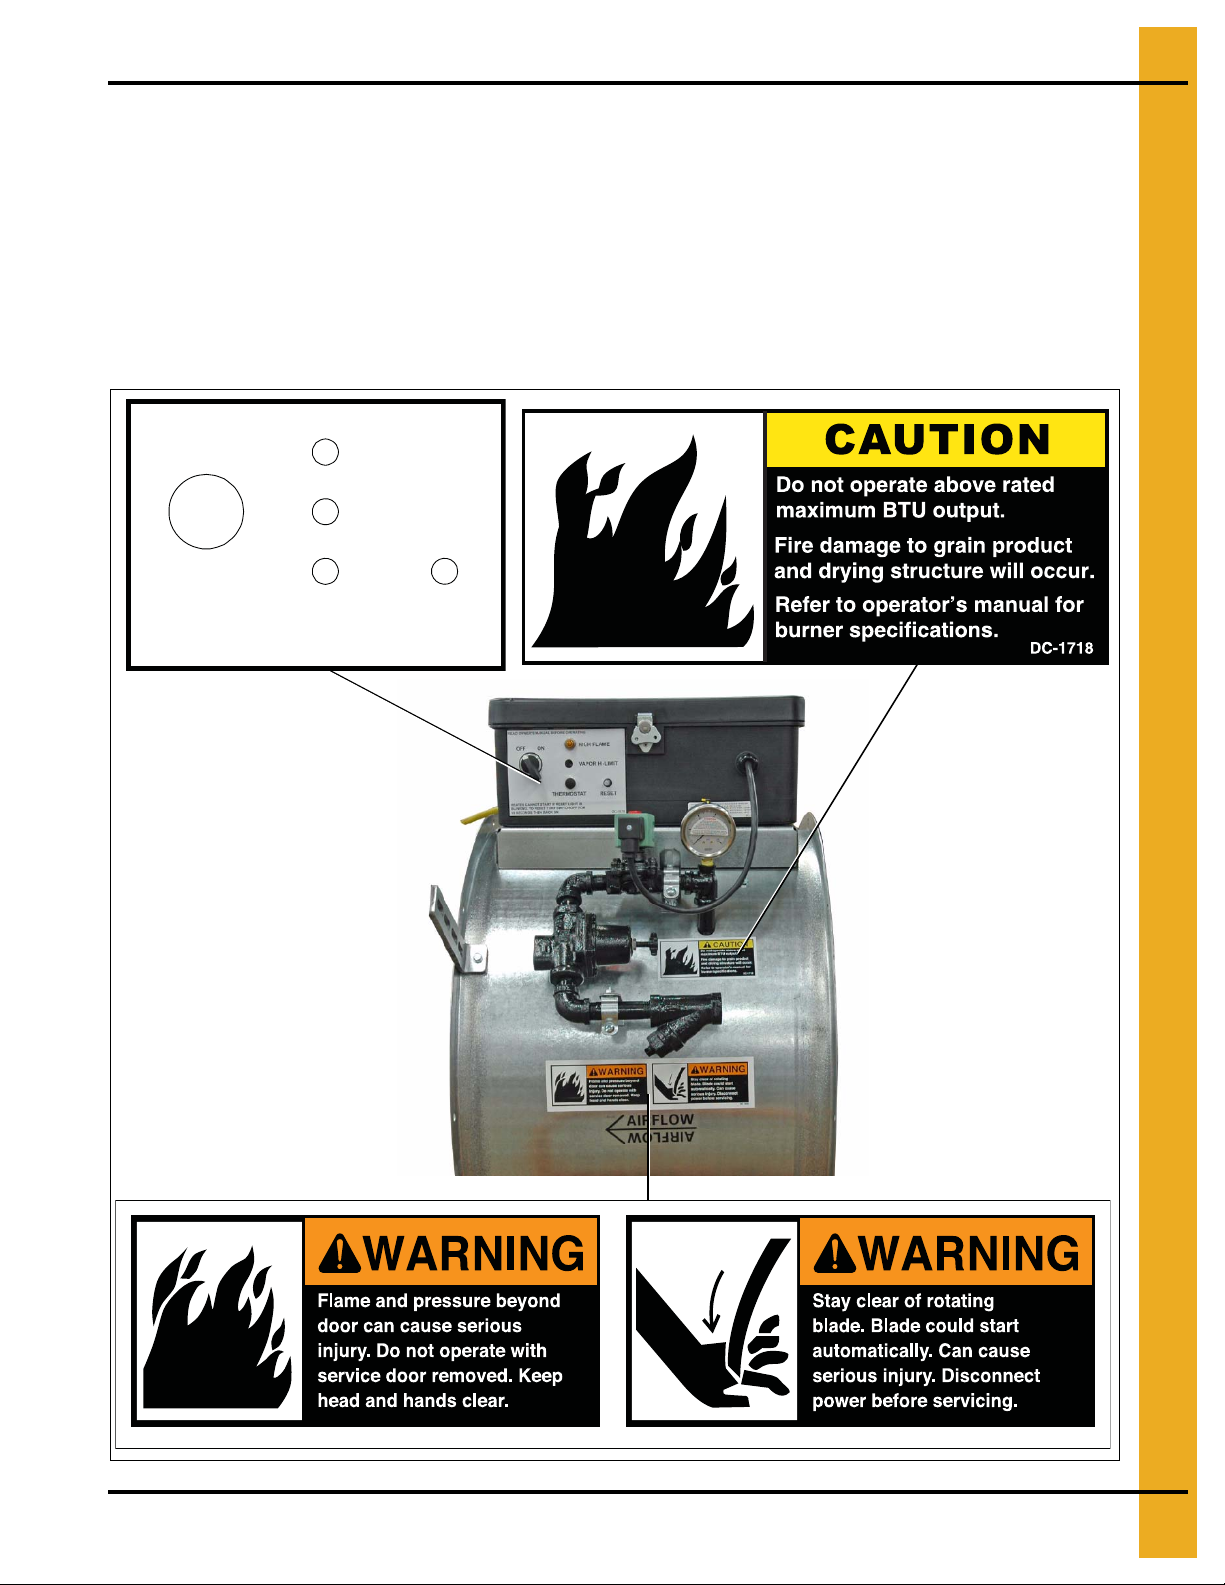
3. Safety Decals
OFF ON
HIGH FLAME
VAPOR HI-LIMIT
THERMOSTAT RESET
READ OWNERS MANUAL BEFORE OPERATING
DC-1878
HEATER CANNOT START IF RESET LIGHT IS
BLINKING. TO RESET TURN SWITCH OFF FOR
10 SECONDS THEN BACK ON.
GSI Group recommends contacting the local power company and having a representative survey the
installation so the wiring is compatible with their system and adequate power is supplied to the unit. Safety
decals should be read and understood by all people in the grain handling area.
If a decal is damaged or is missing, contact:
GSI Decals
1004 E. Illinois St.
Assumption, IL. 62510
Phone: 1-217-226-4421
A free replacement will be sent to you.
PNEG-297 Chi-Town Heater 7
DC-1559
Page 8
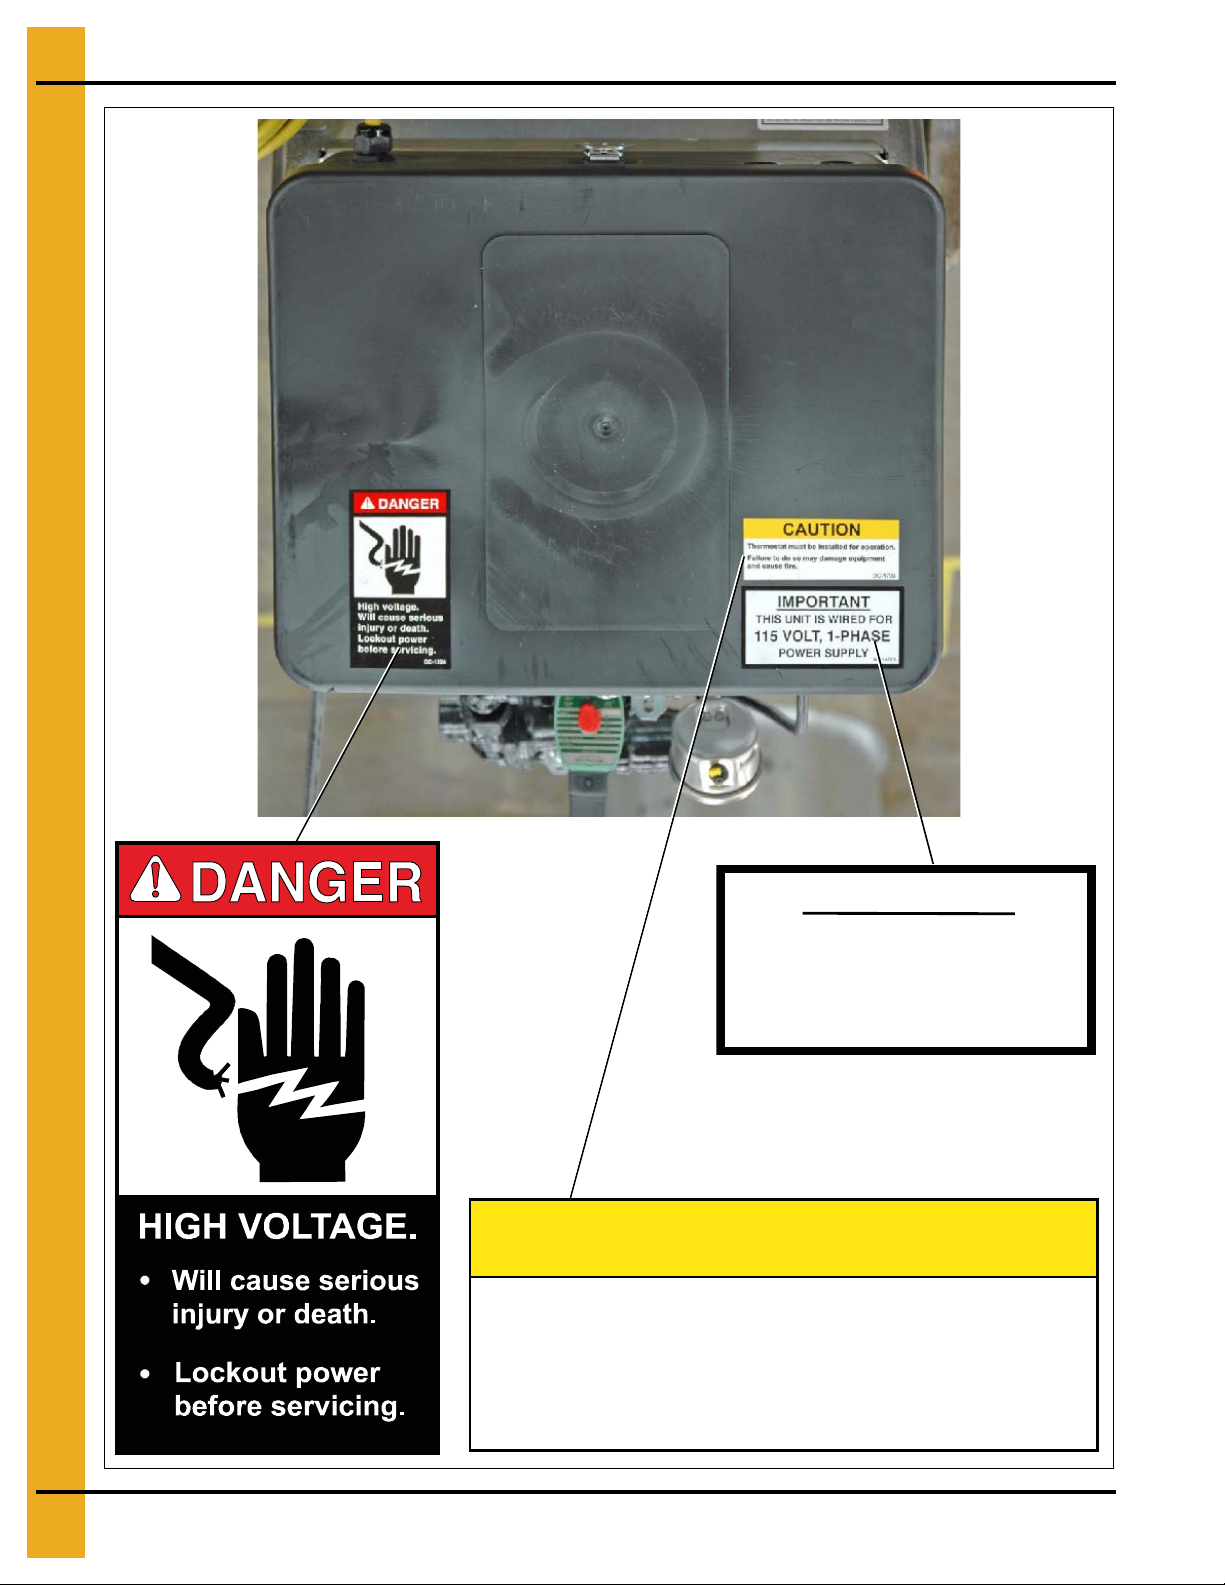
3. Safety Decals
IMPORTANT
THIS UNIT IS WIRED FOR
115 VOLT, 1-PHASE
POWER SUPPLY
420-1422-5
DC-1224
CAUTION
Thermostat must be installed for operation.
Failure to do so may damage equipment
and cause fire.
8 PNEG-297 Chi-Town Heater
DC-1702
Page 9
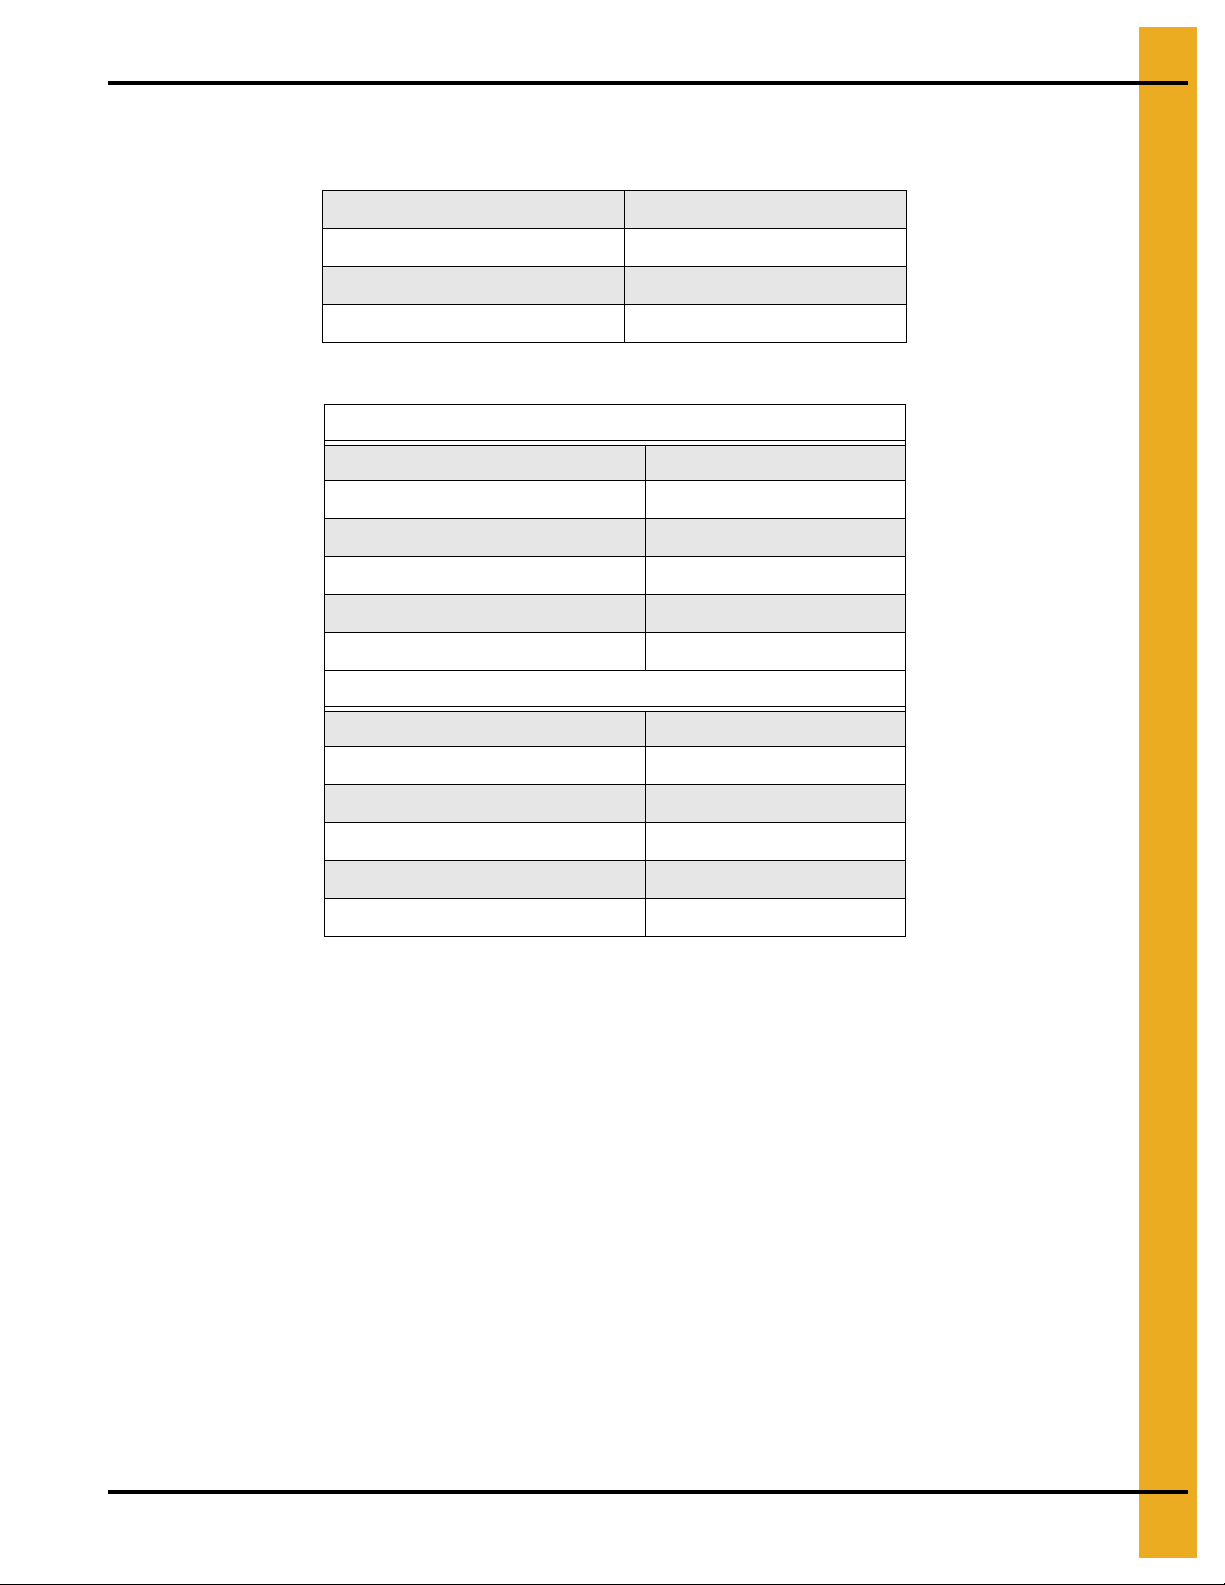
Heater Specifications
Inside Diameter 25-7/8"
Bolt Circle Diameter 27-3/16"
Maximum Fuel Flow (CFH) 475
Minimum Operating Pressure (PSI) 1
Maximum Operating Pressure (PSI) 15
Minimum Supply Line (inches) 1/2
4. Specifications
Common Measurements
Length 18"
Weight 1 10 Lbs.
All Models
Propane Vapor
Orifice (inches) 5/32
BTU Rating at Maximum Pressure 1,100,000
Natural Gas
Orifice (inches) 7/32
Maximum Fuel Flow (CFH) 1083
Minimum Operating Pressure (PSI) 1
Maximum Operating Pressure (PSI) 8
Minimum Supply Line (inches) 3/4
BTU Rating at Maximum Pressure 1,100,000
PNEG-297 Chi-Town Heater 9
Page 10
5. Installation
Heater Installation
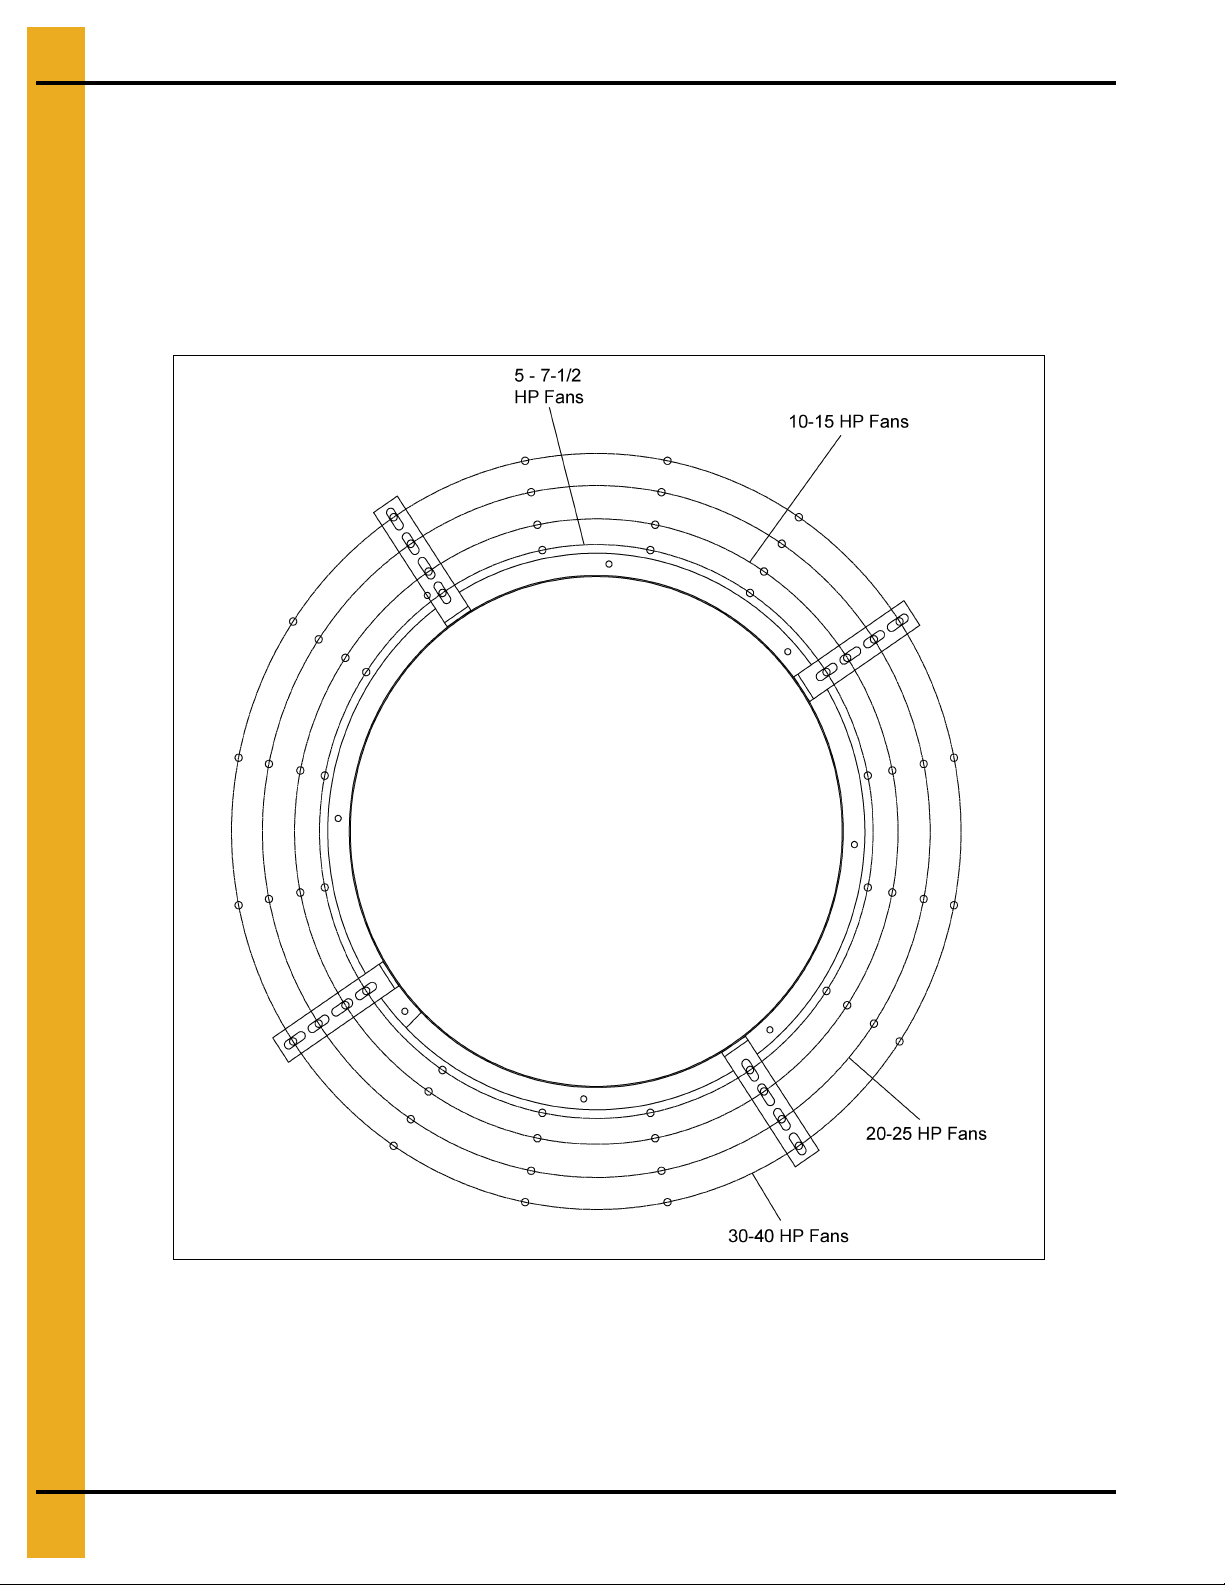
1. Install three (3) mounting brackets on fan as indicated by the arrows shown in Figure 5A.
Install loosely.
2. Set heater in place and install four (4) mounting bracket.
3. Level heater and tighten mounting brackets.
4. Attach heater to mounting brackets using 1/4" bolts and nuts.
Figure 5A Heater Mounting Brackets Illustration
Fuel Connection
IMPORTANT: Do not use propane tanks which h ave previously been used for ammonia unless they have
been purged according to procedures of the National LP Association. Investigate to be sure
that the fuel supply system complies with all local codes for LP gas installations.
10 PNEG-297 Chi-Town Heater
Page 11

5. Installation
Always disconnect and lock out power before working on or around heater.
Propane Vapor Models
1. Propane vapor models are designed to run directly off of supply tank or from a separate
external vaporizer.
2. Run proper size line (see specifications on Page 9) to pipe train on heater. Have a qualified gas
service person inspect installation to be sure everything is installed according to local codes
and ordinances.
3. After installation is complete check all connections for leaks.
Natural Gas Models
1. Natural gas models are similar to vapor models, but have a larger orifice to accommodate lower
pressure, sometimes found with natural gas.
2. Run proper size line (see specifications on Page 9) to pipe train on heater. Have a qualified gas
service person inspect installation to be sure everything is installed according to local codes
and ordinances.
3. After installation is complete check all connections for leaks.
Electrical Connection
Standard electrical safety practices and codes should be used when working with a heater. Refer to the
National Electric Code Standard Handbook by the National Fire Protection Association. A qualified
electrician should make all wiring installations.
1. Connect power cord to fan control box.
2. Make field connections in fan box as shown in Figure 5B on Page 12.
IMPORTANT: Heater must be interlocked with fan for safe operation.
3. Connect deluxe thermostat control (optional) as shown in Figure 5B on Page 12.
IMPORTANT: Thermostat must be installed for safe operation.
IMPORTANT: Heater must be interlocked with fan for safe operation.
Heater Power Connection
1. Connect power cord to fan control box.
2. Make field connections in fan box as shown in Figure 5B on Page 12.
3. Connect deluxe thermostat control as shown in Figure 5B on Page 12.
IMPORTANT: Thermostat must be installed for safe operation.
PNEG-297 Chi-Town Heater 11
Page 12

5. Installation
Figure 5B Heater Wiring Installation on a Fan Unit
12 PNEG-297 Chi-Town Heater
Page 13

5. Installation
Standard Heater - Second Heater Installation
Two (2) standard heaters may be connected to one grain drying system and wired so they cycle tog ether.
One of the heaters should have a thermostat connected to it as per the installation instructions. That
heater will be referred to as the primary. The other heater (without the thermostat) will be referred to as
the secondary.
1. Install relay base (TD-100283) in primary heater control box.
2. Connect wire between terminal 13 on relay base to terminal 6 on terminal strip in primary heater.
3. Connect wire between terminal 14 on relay base to terminal 3 on terminal strip in primary heater.
4. Run two (2) wires (18 gauge) between primary and secondary heater.
5. Connect wires to terminals 5 and 9 (points A and B) on relay base in primary heater.
6. Connect wire from terminal 9 in primary to terminal 5 (point F) in secondary unit.
7. Connect wire from terminal 5 in primary to terminal 8 (point G) in secondary unit.
8. Install relay (TD-100282) in relay base.
Follow these additional steps for HIGH-LOW units.
1. Install relay base (TD-100283) in master heater control box.
2. Connect wire between terminal 13 (point E) on relay base to green wire from HIGH-LOW thermostat
in master unit. Do not disconnect other wires from green wire 3. Connect wire between terminal 14
on relay base to terminal 14 on other relay base in master heater.
3. Run two (2) wires (18 gauge) between master and slave heater.
4. Connect wires to terminals 5 and 9 (points C and D) on relay base in master heater.
5. Connect wire from terminal 9 in master to terminal 6 (point H) in slave unit.
6. Connect wire from terminal 5 in master to cycle solenoid and red light in slave unit. Do not connect
wire to side of cycle solenoid and light that are connected to terminal.
Figure 5C Standard Heater - Second Heater Relay Connection
PNEG-297 Chi-Town Heater 13
Page 14

6. Installation and Operating
Bin Configuration
Figure 6A
IMPORTANT: When mounting two (2) heaters on a bin it is imperative that they be situated as in
Figure 6A. Plenum thermostat must be to the right of primary heater and primary heater
must be to the right of secondary heater.
Plenum Temperatures
IMPORTANT: Do not exceed plenum temperatures listed in table below.
Operating Temperature Table
Low T e mpe r ature
Batch
Corn
Rice
Beans and
Wheat
5°-20° above
Ambient Temperature
5°-10° above
Ambient Temperature
5°-20° above
Ambient Temperature
NOTE: This table is not intended as a drying guide. It should be used as a reference for setting maximum
plenum temperature for safe operation.
High Temperature Batch
Dry No Stirring
120° 140° 160°
100° 100° Not Recommended
110° 120° Not Recommended
High Temperature
with Stirring
Continuous Flow
(Recirculating)
14 PNEG-297 Chi-Town Heater
Page 15

7. Operating Instructions
Heater Operation
1. Thermostat must be wired into heater control box for heater to operate.
2. Open all manual shut off valves to heater unit.
3. Start fan. This will supply power to heater.
4. Turn thermostat dial to its highest setting.
5. Turn heater toggle switch to ON.
6. Heater should now be lit. If not, check to see that all gas is on and thermostat is wired in.
7. Watch thermometer on plenum and when it reaches desired temperature turn thermosta t back slowly
until heater cycles OFF.
8. Gas pressure should be adjusted so burner is on 75% of the time. (See charts on Page 14.)
9. Watch plenum temperature as burner goes through a few cycles to be sure it is operating properly.
Figure 7A Propane Vapor Pipe Train
PNEG-297 Chi-Town Heater 15
Page 16

7. Operating Instructions
BTU’s per Gauge Pressure (PSI) - Propane Models Approximate
Operating Pressure (PSI)
1234567891012 14 15
294,339 416,382 509,709 588,678 658,075 720,293 777,725 832,764 880,624 930,877 1,019,418 1,100,780 1,136,675
Gauge Pressure (PSI) Required to Maintain Temperatures (Approximate)
Fan Model
10 HP
15 HP
20 HP
25 HP
Static
Pressure
2 1 2 4 5 8 10 14
3 1 2 3 5 7 9 12
4 1 2 3 4 6 8 12
5 1 2 3 4 5 7 9
2236812- 323581214413479145124681014
3 2 4 7 12 - - 4 2 4 7 10 15 - 5 2 4 6 10 14 - 6 2 3 6 9 12 - 33612---43610---535914- --
20 30 40 50 60 70 80
Heat Rise °F
625814- -4 3 7 12 - - - -
30 HP
40 HP
6 3 6 10 - - - 8 3 5 9 14 - - -
10 2 4 6 9 14 - -
4512----649----84814----
10 3 6 10 15 - - -
16 PNEG-297 Chi-Town Heater
Page 17

7. Operating Instructions
BTU’s per Gauge Pressure (PSI) - Natural Gas Models Approximate
Operating Pressure (PSI)
12345678
397,280 562,640 688,480 793,520 888,160 973,440 1,051,440 1,126,320
Gauge Pressure (PSI) Required to Maintain Temperatures (Approximate)
Fan Model
10 HP
15 HP
20 HP
25 HP
Static
Pressure
2 1 1 2 3 4 6 7
3 1 1 2 3 4 5 7
4 1 1 2 3 4 5 6
5 1 1 2 2 3 4 5
212357- 3123458412345751223568
3 1 3 4 6 - - 4 1 2 4 6 8 - 5 1 2 4 6 8 - 6 1 2 3 5 7 - 3246---4236---52358---
20 30 40 50 60 70 80
Heat Rise °F
62357--4 2 4 7 - - - -
30 HP
40 HP
6 2 4 6 - - - 8 2 3 5 7 - - -
10 1 2 4 5 7 - -
436----635----8248----
102358- --
PNEG-297 Chi-Town Heater 17
Page 18

8. Heater Service
Always disconnect and lock out power before working on or around heater.
All heaters are constructed of durable weather-resistant materials, so a minimum amount of service should
be required. Before the unit is started for the first time each season there are a few items that need to be
checked out. All damaged parts should be repaired or replaced.
1. Disconnect and lock out power to fan and heater. Open control box lid and inspect all components
for moisture, vibration or rodent damage. Inspect and tighten all loose terminal connections. Replace
any damaged wiring.
2. Remove burner orifice tube and inspect for dirt or foreign material. Clean out if necessary.
3. Inspect holes in burner ring for possible corrosion or plugging with dirt or rust. Clean if necessary.
4. Be sure primary air inlet screen is intact and clean for proper burn.
5. Check perforated ring on natural gas models to be sure it is clean and no holes are plugged.
6. Inspect flame probe and ignitor and adjust or replace if necessary.
18 PNEG-297 Chi-Town Heater
Page 19

Standard Heater Wiring
9. Wiring Diagram
NOTE: Move transformer wire from terminal 5 to 8 for continuous spark.
PNEG-297 Chi-Town Heater 19
Page 20

10. Schematic Diagram
Standard Heater Schematic
NOTE: Move transformer wire from terminal 5 to 8 for continuous spark.
20 PNEG-297 Chi-Town Heater
Page 21

11. Time Delay Operation
Time Delay Reset (HH-1089E) Operation
The electronic time delay will indicate the operating condition of the heater through the LED light shown
in Figure 11A. This light should be on the exterior control panel of the heater when the unit is installed
correctly. This light is very helpful in identifying the status of the flame probe (open or closed) and will
indicate a lock out condition.
Start-Up
The light should be ON when the ON/OFF switch is set to ON. This indicates that the heater has power
and the flame probe is closed. The gas solenoid should open and ignitor should spark. The light will remain
on until the flame probe opens. The light should go OFF if flame is established within the 30 second trial
for ignition.
If flame is not present or the probe does not open, then the light will blink continuously after the 30 second
time period. It will blink continuously until the heater is reset.
Turn power OFF for 10 second to reset a lock out condition. The light will stop blinking after the 10 second
time period. The heater cannot be restarted if the light is blinking continuously.
Thermostat Cycle
The heater thermostat will cycle the gas solenoid OFF when temperature is reached. The flame probe
should cool to a closed condition when this occurs. The thermostat will also cool to a closed condition with
a drop in plenum temperature. The thermostat closure is a call for heat and the normal start-up for the
time delay begins again.
A condition can occur where the thermostat can call for heat before the flame probe cools to a closed
condition. The light ON the time delay will flash once at thermostat closure and remain OFF until the flame
probe closes again. The heater will not operate until this “closed” condition of both switches is achieved.
Light Status Indication
Flame probe is closed.
ON
OFF
BLINKING
Time delay in 30 second trial for
ignition period.
Normal operation with flame present.
Flame probe open. Thermostat closed.
Normal operation with no flame present.
Flame probe open. Thermostat open.
Lock out: Flame probe closed after
30 second.
To reset: Turn power OFF. Wait
10 second. Turn power ON.
Figure 11A Flame Probe Light ON Time Delay
PNEG-297 Chi-Town Heater 21
Page 22

12. Troubleshooting - Guide
Trouble Probable Cau se Check-out Procedure
Burner will not fire. No gas
pressure on gauge.
No ignition spark.
Burner will not fire. No gas
pressure on gauge. Constant
ignition spark.
Burner will not fire. Gas pressure
on gauge. No ignition spark.
1. Heater not wired.
2. Fan not running. 2. Fan contactor must be energized for heater to run.
3. Blown fuse. 3. Visually check fuse.
4. Bad ON/OFF switch.
5. Housing high-limit switch. 5. Reset switch. Check for power on terminals 1 and 8.
6. Thermostat open.
7. Flame probe open.
1. Electronic time delay. 1. Time delay is in lock out or not receiving power.
2. Gas supply.
1. Loose wire.
2. Ignitor/spark plug.
3. Ignition transformer/wire.
1. Visually check fan control box to see if wires
are connected.
4. Check ON/OFF switch contact block for proper
installation and continuity. Check for power on
terminals 1 and 8.
6. Plenum temperature above set point temperature or
open circuit.
7. Remove wires from flame probe and check with ohm
meter. Probe should be closed when cold.
2. Make sure all valves are open to heater and gas tank is
not empty.
1. Check for power on terminals 2 and 5. Look for loose
wires or incorrect wiring.
2. Turn gas OFF to heater. Check gap on ignitor. Check
porcelain for any sign of cracks. Remove plug wire from
spark plug/ignitor. Carefully holding wire by insulation.
Try to get an arc between end of wire and heater
housing (or other wire using 2 pole transformer).
3. Turn gas OFF to heater. If no spark present after
checking ignitor, remove wire from ignition transformer.
Check for spark at ignition transformer with an insulated
screwdriver. Spark shoul d jum p a mi ni mu m 1/ 4" ga p .
Replace transformer if no spark is established, replace
the ignition wires.
1. Check for gas at burner. If no gas, remove pipe train and
check orifice and burner ring for blockage.
2. Check to be sure flame probe is in good condition and is
located in flame. Flame probe contacts should open
when probe gets hot.
4. See that flame burns continuous and is not intermittent.
On ring burners be sure flame burns completely
around ring.
5. Have tank and lines checked by a qualified gas
service man.
Burner will not fire or fires for
30 second and locks out. Gas
pressure on gauge. Spark is ON.
1. Plugged orifice.
2. Flame probe.
3. Incorrect supply voltage. 3. Voltage to heater must be 110V AC.
4. Regulator set too low.
5. Moisture in fuel.
22 PNEG-297 Chi-Town Heater
Page 23

1. Gas Heater Parts (HF-7385)
2. Control Box Parts (HF-8084)
3. Pipe Train Parts (HF-7712 and HF-7713)
13. Parts List
PNEG-297 Chi-Town Heater 23
Page 24

13. Parts List
Gas Heater Parts (HF-7385)
24 PNEG-297 Chi-Town Heater
Page 25

Gas Heater (HF-7385) Parts List
Ref # Part # Description Qty
1 HF-7147 Chi-Town Burner Weldment 1
2 HF-7157 Outer Air Deflector 1
3 HF-7158 Inner Air Deflector 1
4 HF-7159 Burner Mounting Bracket 4
5 HF-7160 Outer Air Deflector Bracket 4
6 HF-7373 Ignitor Pair: Chi-Town R.H. and L.H. 1
7 HF-7375 Chi-Town Ignitor Bracket 2
8 HF-7636 Burner Pipe Band: Chi-Town 1
9 HF-8028 Flame Probe Bracket - Chi-Town w/ GFS 1
10 HF-8080 Wrapper Chi-Town Heater 1
11 HH-3977 Flame Switch N/ Closed 3/8"-24 1
N/S S-1101 Bolt, HHCS 1/4"-20 x 1/2" ZN Grade 2 1
13. Parts List
N/S S-3611 Flange Nut 5/16"-18 YDP Grade 2 8
N/S S-456 Hex Nut 3/8"-16 YDP Grade 5 2
N/S S-6606 Flange Bolt 5/16"-18 x 3/4" ZN Grade 5 8
N/S S-7215 Flange Nut 1/4"-20 ZN 17
N/S S-845 Flat Washer 5/16" USS SAE YDP Grade 2 8
N/S S-8680 Flange Bolt 1/4"-20 x 3/4" ZN Grade 5 16
N/S S-9303 Flange Bolt 3/8"-16 x 1-1/2" Grade 8 1
N/S S-9345 Hex Nut 3/8"-24 SS 1
N/S D02-0026 Bushing, 1/2" Plastic 3
N/S D03-0247 Tie, Wire 5" Panduit # Plate 1-1/2 M-M 15
N/S DC-113 Decal, Air Flow 1
N/S DC-1559 Decal, Warning: DC-1225/DC-1227 1
N/S DC-1718 Decal, Warning Heater Fire 1
N/S HF-7377 Bushing, Dravo 9/16" Chi-Town 2
N/S HF-7758 Adapter Plate GRP: 26" Heater 1
PNEG-297 Chi-Town Heater 25
Page 26

13. Parts List
Control Box Parts (HF-8084)
26 PNEG-297 Chi-Town Heater
Page 27

13. Parts List
Control Box (HF-8084) Parts List
Ref # Part # Description Qty
1 90-0009 Light Oil Tight 1/4" TAB 120V Amber 1
2 D03-0696 Farm Fans Control Box Latch 2
3 DC-108 Decal, High-Limit Button 1
4 DC-1878 Decal: Heater Standard w/ Reset 1
5 E240-1107 Connector, T.B., 12 Pole, 10A, 12 Gauge 0.16667
6 FH-1058 Fuse Block 0.5
7 FH-1059 5 Amp Fuse 2
8 FH-1309 Lock Nut 1/2" with Pipe Threads 2
9 FH-1310 Cord Connector, HEYCO #3231 2
10 FH-6634 Guard, ITT Blackburn Ground Lug ADR-6 2
11 HF-7696 Switch 2 Position Selector: Lever 1
12 HF-7697 Bracket Standard Term Strip 1
13 HF-7698 Backing Plate - Heater Controls 1
14 HF-7718 Axial Heater Box - CNC OPS 1
15 HF-8077 Connector, Terminal Block 8 Pole w/ Slides 1
16 HH-1089E Switch, Reset - Time Delay Electr 1
17 HH-1093-GRP GRP - Transformer 2 Pole Ignition 1
18 TFC-0048 Disconnect 1/4 Insulation Female CSA 4
N/S DC-1891 Decal, Terminal Label - HH-1089E 1
N/S PNEG-1530 HH-1089E Wiring Instructions 1
N/S S-9111 Screw, TCSF #6-32 x 3/4" PHP ZN 1
N/S HH-2833 Plug 1/2" Diameter Plastic Hole 1
N/S 006-1363-8 Sealing Washer 0.85 I.D. Black 1
N/S 069-1376-8 Co ver, Control Box Lid - Poly Blank 1
N/S 090-1699-9 Rivet, Poe 1/8 Diameter x 0.775 Long Arsm 0.501-0.625 Grip Range 4
N/S 090-1701-3 Screw, MS #10-24 x 1/2" PHS ZN 4
N/S 090-1705-4 Screw, MS #8-32 x 3/8" Phillips PHSEMS 4
N/S 420-1422-5 Decal, 115 Volt 1 Phase 1
N/S D02-0039 Wire Tie Anchors 6
N/S D03-0247 Tie, Wire 5" Panduit # Plate 1-1/2 M-M 35
N/S DC-1224 Decal, Danger High Voltage (LG) 1
N/S DC-1254 Decal, Ground Lug 24 per Sheet 0.05
N/S DC-1702 Decal, Caution Use TSTAT w/ Heater 1
N/S DC-1879 Decal, Standard Heater Wiring w/ Reset 1
N/S DC-889 Decal, Danger High Voltage 1
N/S E105-1110 Wire Kit - Chi-Town in Black Box 1
N/S LABEL-STD Wire Labels Standard Heater CB 1
N/S PNEG-297 Manual, Heater GSI Chi-Town 1
N/S S-2786 Screw, TCSF #8-32 x 3/8" PHP ZN 3
N/S S-3674 Flat Washer #10 x 7/32" I.D. x 1/2" O.D. x 18 Gauge TSAE ZN Grade 2 2
N/S S-7192 Screw, TCSF #8-32 x 5/8" PHP ZN 4
PNEG-297 Chi-Town Heater 27
Page 28

13. Parts List
Pipe Train Parts (HF-7712 and HF-7713)
28 PNEG-297 Chi-Town Heater
Page 29

13. Parts List
Pipe Train (HF-7712 and HF-7713) Parts List
Ref # Part # Description Qty
1 D08-0022 Gauge, Pressure 0-15# Bottom Mount Liquid Filled 1
2 HF-1026 Pipe Train Bracket: VA Heaters 2
3 HH-1096 Clamp, 1/2" Conduit 2
4 056-2222-0 Valve, Solenoid 1/2" NPT 115V Din 1
5 HF-7161 Chi-Town Orifice Pipe: 9.00" 1
6 HF-7714 Orifice (1/2) Drilled 11/64" 1
7 HH-1077 Regulator, 1/2" E-75 1
8 HH-1251 Strainer, 1/2" Y 250# WOG SCH 80 Black 1
9 HH-2029 Nipple, 1/2" x 1-1/2" SCH 40 Black 3
10 S-3853 Tee, 1/2" x 1/4" x 1/2" SCH 40 Black 1
11 THH-4061 Nipple, 1/2" x 3-1/2" SCH 40 Black 1
12 THH-4071 Elbow, 1/2"-90° SCH 40 Black 2
N/S THH-4128 Nipple, 1/2" x 2" SCH 40 Black 1
N/S DC-1461 Decal, Tag Attention Pressure Gauges Paper Tag Telling to Punch 1
N/S S-1101 Bolt, HHCS 1/4"-20 x 1/2" ZN Grade 2 2
N/S S-3611 Flange Nut 5/16"-18 YDP Grade 2 2
N/S S-6606 Flange Bolt 5/16"-18 x 3/4" ZN Grade 5 2
N/S S-7215 Flange Nut 1/4"-20 ZN 2
PNEG-297 Chi-Town Heater 29
Page 30

NOTES
30 PNEG-297 Chi-Town Heater
Page 31

14. Warranty
9101239_1_CR_rev7.DOC (revised July 2009)
GSI Group, LLC Limited Warranty
The GSI Group, LLC (“GSI”) warrants products which it manufactures to be free of defects in materials and workmanship
under normal usage and conditions for a period of 12 months after sale to the original end-user or if a foreign sale,
14 months from arrival at port of discharge, whichever is earlier. The end-user’s sole remedy (and GSI’s only obligation)
is to repair or replace, at GSI’s option and expense, products that in GSI’s judgment, contain a material defect in materials
or workmanship. Expenses incurred by or on behalf of the end-user without prior written authorization from the GSI
Warranty Group shall be the sole responsibility of the end-user.
Warranty Extensions:
The Limited Warranty period is extended for the following products:
Product Warranty Period
Performer Series Direct Drive Fan Motor 3 Years
AP Fans and Flooring
Cumberland
Feeding/Watering
Systems
Grain Systems Grain Bin Structural Design 5 Years
Grain Systems
Farm Fans
Zimmerman
All Fiberglass Housings Lifetime
All Fiberglass Propellers Lifetime
Feeder System Pan Assemblies 5 Years **
Feed Tubes (1-3/4" and 2.00") 10 Years *
Centerless Augers 10 Years *
Watering Nipples 10 Years *
Portable and Tower Dryers 2 Years
Portable and Tower Dryer Frames and
Internal Infrastructure †
5 Years
* Warranty prorated from list price:
0 to 3 years - no cost to end-user
3 to 5 years - end-user pays 25%
5 to 7 years - end-user pays 50%
7 to 10 years - end-user pays 75%
** Warranty prorated from list price:
0 to 3 years - no cost to end-user
3 to 5 years - end-user pays 50%
† Motors, burner components
and moving parts not included.
Portable dryer screens included.
Tower dryer screens not included.
GSI further warrants that the portable and tower dryer frame and basket, excluding all auger and auger drive components,
shall be free from defects in materials for a period of time beginning on the twelfth (12
and continuing until the sixtieth (60
th
) month from the date of purchase (extended warranty period). During the extended
th
) month from the date of purchase
warranty period, GSI will replace the frame or basket components that prove to be defective under normal conditions
of use without charge, excluding the labor, transportation, and/or shipping costs incurred in the performance of this
extended warranty.
Conditions and Limitations:
THERE ARE NO WARRANTIES THAT EXTEND BEYOND THE LIMITED WARRANTY DESCRIPTION SET FORTH
ABOVE. SPECIFICALLY, GSI MAKES NO FURTHER WARRANTY OF ANY KIND, EXPRESS OR IMPLIED,
INCLUDING, WITHOUT LIMITATION, WARRANTIES OF MERCHANTABILITY OR FITNESS FOR A PARTICULAR
PURPOSE OR USE IN CONNECTION WITH: (I) PRODUCT MANUFACTURED OR SOLD BY GSI OR (II) ANY ADVICE,
INSTRUCTION, RECOMMENDATION OR SUGGESTION PROVIDED BY AN AGENT, REPRESENTA TIVE OR
EMPLOYEE OF GSI REGARDING OR RELATED TO THE CONFIGURATION, INSTALLATION, LAYOUT, SUITABILITY
FOR A PARTICULAR PURPOSE, OR DESIGN OF SUCH PRODUCTS.
GSI shall not be liable for any direct, indirect, incidental or consequential damages, including, without limitation, loss of
anticipated profits or benefits. The sole and exclusive remedy is set forth in the Limited Warranty, which shall not exceed
the amount paid for the product purchased. This warranty is not transferable and applies only to the original end-user. GSI
shall have no obligation or responsibility for any representations or warranties made by or on behalf of any dealer, agent
or distributor.
GSI assumes no responsibility for claims resulting from construction defects or unauthorized modifications to products
which it manufactured. Modifications to products not specifically delineated in the manual accompanying the equipment at
initial sale will void the Limited Warranty.
This Limited Warranty shall not extend to products or parts which have been damaged by negligent use, misuse, alteration,
accident or which have been improperly/inadequately maintained. This Limited Warranty extends solely to products
manufactured by GSI.
Prior to installation, the end-user has the responsibility to comply with federal, state and local codes which apply to the
location and installation of products manufactured or sold by GSI.
PNEG-297 Chi-Town Heater 31
Page 32

This equipment shall be installed in accordance with
the current installation codes and applicable
regulations which should be carefully followed in all
cases. Authorities having jurisdiction should be
consulted before installations are made.
Copyright © 2010 by GSI Group
Printed in the USA
GSI Group
1004 E. Illinois St.
Assumption, IL 62510-0020
Phone: 1-217-226-4421
Fax: 1-217-226-4420
www.gsiag.com
 Loading...