

Page 1
2002 Top Dry Service School
GSI / Top Dry
2002 Service School Manual
PNEG-1263
1
Page 2

2002 Top Dry Service School
Contents
Safety Pages..........................4
Product Updates...................5
Software Revisions..............10
Technical Data....................17
Software Diagnostics..........21
Warranty.............................27
2
Page 3

2002 Top Dry Service School
3
Page 4
Safety
2002 Top Dry Service School
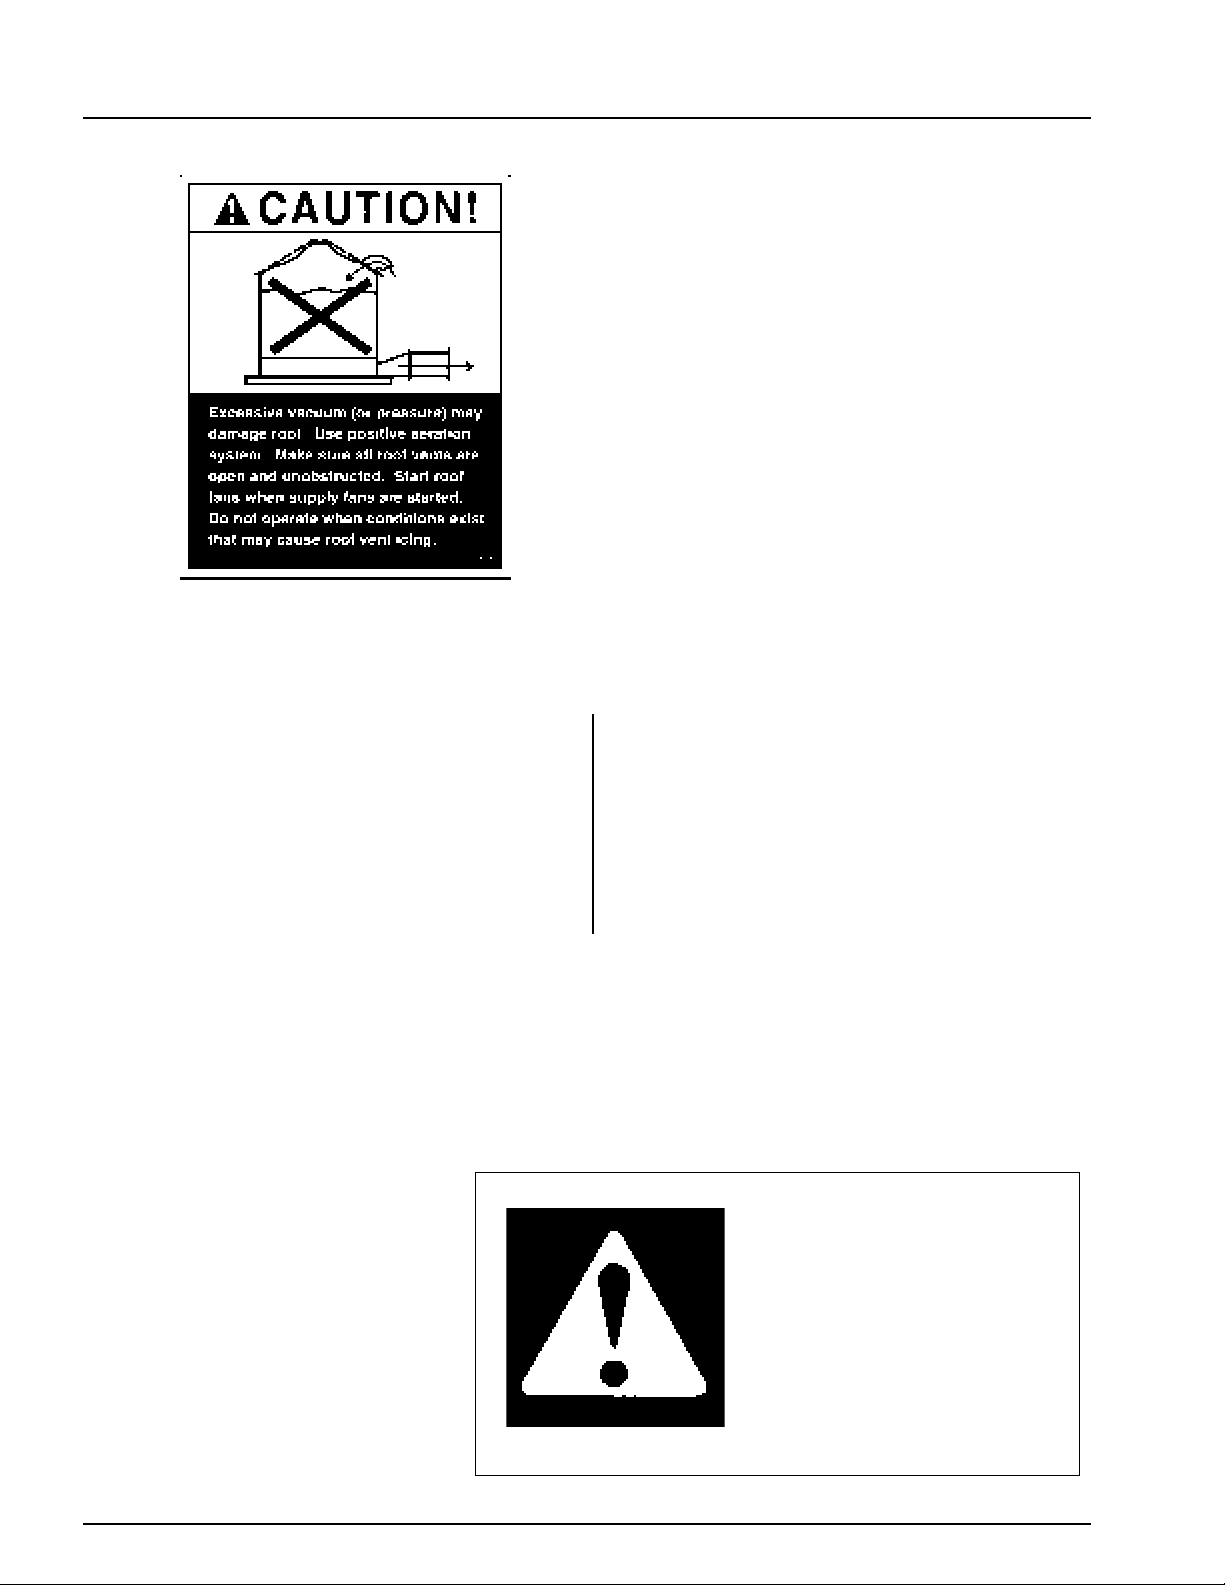
Roof Damage Warning and Disclaimer
GSI DOES NOT WARRANT ANY ROOF DAMAGE
CAUSED BY EXCESSIVE VACUUM OR INTERNAL
PRESSURE FROM FANS OR OTHER AIR MOVING
SYSTEMS. ADEQUATE VENTILATION AND/OR
"MAKEUP AIR" DEVICES SHOULD BE PROVIDED
FOR ALL POWERED AIR HANDLING SYSTEMS.
GSI DOES NOT RECOMMEND THE USE OF DOWNWARD FLOW SYSTEMS (SUCTION). SEVERE
ROOF DAMAGE CAN RESULT FROM ANY
BLOCKAGE OF AIR PASSAGES. RUNNING FANS
DURING HIGH HUMIDITY/COLD WEATHER CONDITIONS CAN CAUSE AIR EXHAUST OR INTAKE
PORTS TO FREEZE.
Operating Instructions
The principal concern of the GSI Group, Inc. ("GSI")
is your safety and the safety of others associated
with grain handling equipment. This manual is written to help you understand safe operating procedures, and some of the problems that may be encountered by the operator or other personnel.
The symbol shown is used to call your
attention to instructions concerning your
personal safety. Watch for this symbol; it points out important safety precautions. It means "ATTENTION",
"WARNING", "CAUTION", and
"DANGER". Read the message and
be cautious to the possibility of personal injury or death.
As owner and/or operator, it is your responsibility to know what requirements, hazards and precautions exist, and to inform all personnel associated with the equipment, or who are in the fan area.
Avoid any alterations to the equipment. Such alterations may produce a very dangerous situation,
where serious injury or death may occur.
Safety Alert Symbol
WARNING! BE ALERT!
Personnel operating or working
around electric fans should read this
manual. This manual must be
delivered with the equipment to its
owner. Failure to read this manual
and its safety instructions is a misuse
of the equipment.
4
Page 5
Safety
2002 Top Dry Service School
Grain Systems, Inc.
recommends contacting your
local power company, and
having a representative
survey your installation so
the wiring is compatible with
their system, and adequate
power is supplied to your
unit.
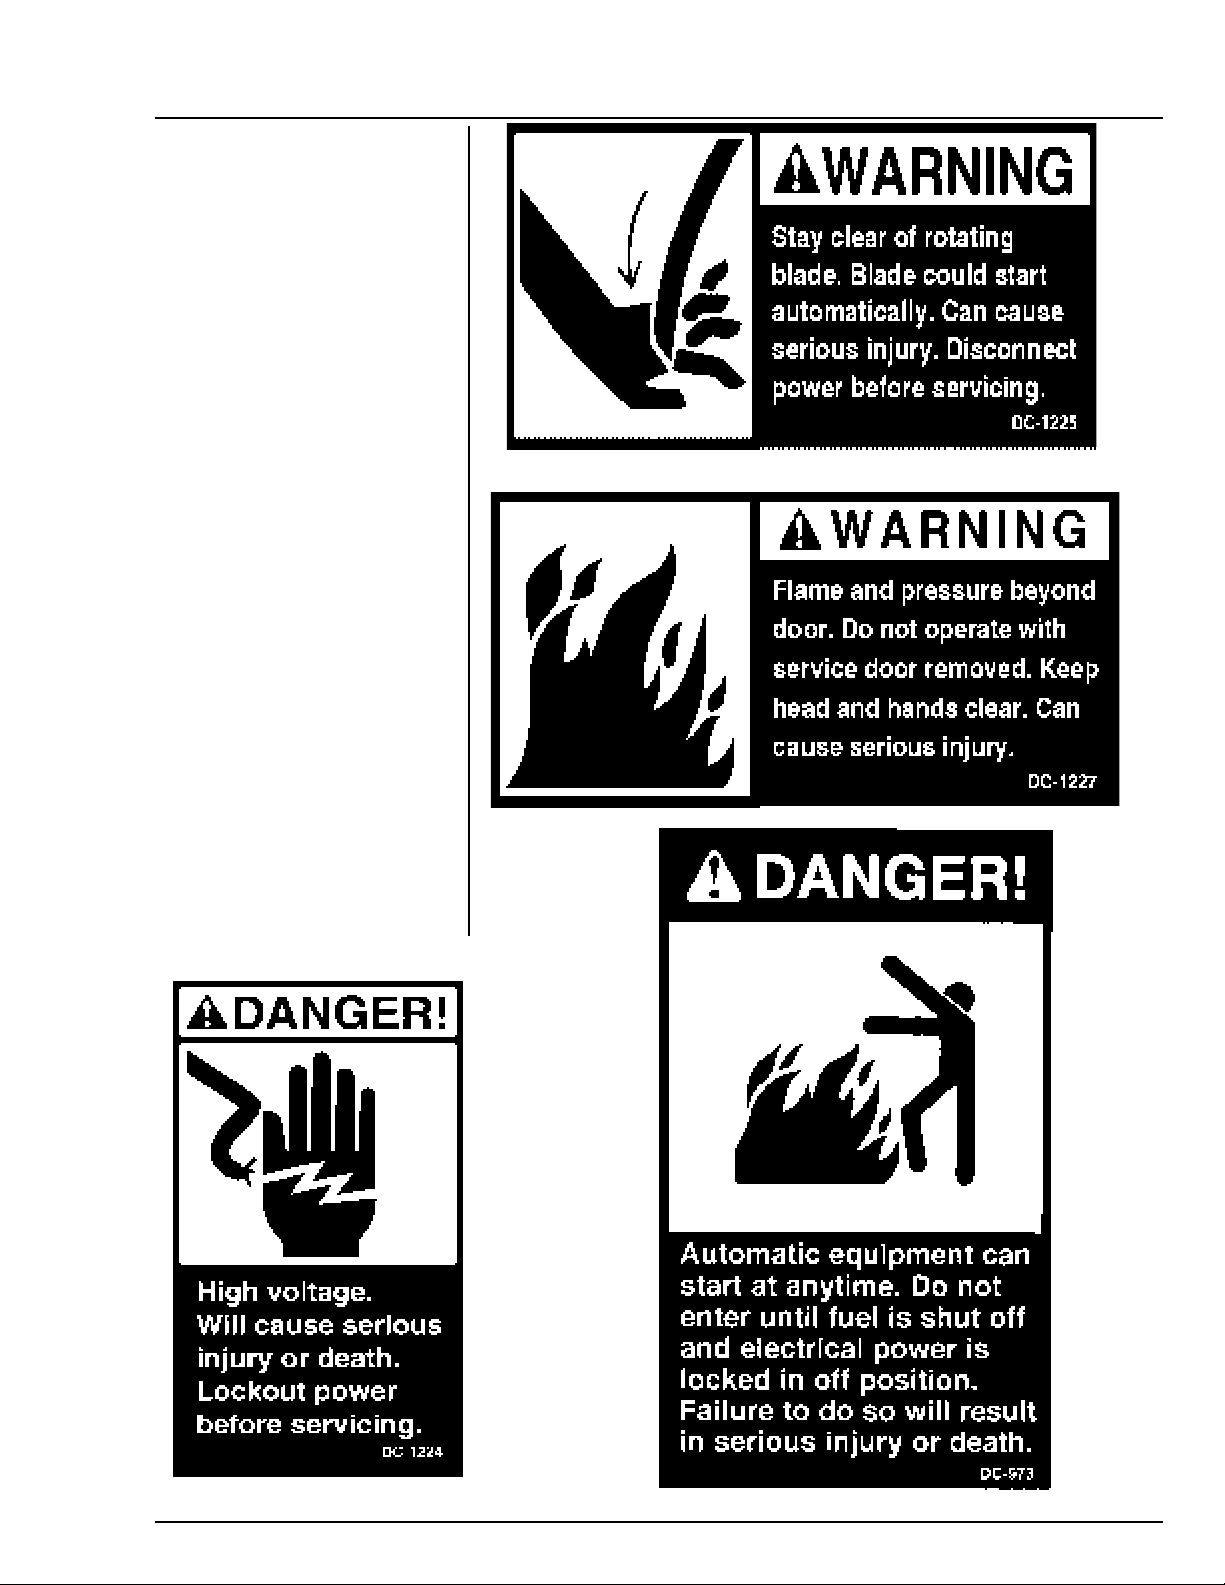
Safety decals should be read
and understood by all people in the
grain handling area. The rotating
blade, fire warning decals and
voltage danger decal must be dis-
played on the fan can. The bot-
tom right decal should be present
on the inside bin door cover of the
two ring door, 24" porthole door
cover and the roof manway cover.
If a decal is damaged or is
missing contact:
Grain Systems, Inc.
1004 E. Illinois St.
Assumption, IL 62510
217-226-4421
A free replacement will be sent to
you.
5
Page 6

Safety
1. Read and understand the operating manual before trying to operate the
dryer.
2. Power supply should be OFF for service of electrical components. Use
CAUTION in checking voltage or other procedures requiring power to
be ON.
3. Check for gas leaks at all gas pipe connections. If any leaks are detected, do not operate the dryer. Shut down and repair before further
operation.
4. Never attempt to operate the dryer by jumping or otherwise bypassing
any safety devices on the unit.
5. Set pressure regulator to avoid excessive gas pressure applied to burner
during ignition and when burner is in operation. Do not exceed maxi-
mum recommended drying temperature.
6. Keep the dryer clean. Do not allow fine material to accumulate in the
plenum or drying chamber.
READ THESE INSTRUCTIONS
BEFORE OPERATION AND SERVICE
SAVE FOR FUTURE REFERENCE
2002 Top Dry Service School
Use Caution in the
Operation of this
Equipment
The design and manufacture of this
dryer is directed toward operator
safety. However, the very nature
of a grain dryer having a gas burner,
high voltage electrical equipment and
high speed rotating parts, does
present a hazard to personnel, which
can not be completely safeguarded
against, without interfering with ef-
ficient operation and reasonable ac-
cess to components.
Use extreme caution in working
around high speed fans, gas-fired
heaters, augers and auxiliary convey-
ors, which may start without warn-
ing when the dryer is operating on
automatic control.
7. Use CAUTION in working around high speed fans, gas burners, augers
and auxiliary conveyors which START AUTOMATICALLY.
8. Do not operate in any area where combustible material will be drawn into
the fan.
9. Before attempting to remove and reinstall any propellor, make certain to
read the recommended procedure listed within the servicing section of
the manual.
10. Clean grain is easier to dry. Fine material increases resistance to airflow
and requires removal of extra moisture.
This product is intended for the use of grain handling only. Any other
use is considered a misuse of the product.
Some edges of the product components can be sharp. It is recom-
mended that each component of this product be examined to deter-
mine if there are any safety considerations to be taken. Any and all
necessary personal protective equipment should be worn at all tines
when handling, assembling, installing and operation of the product
and/or components.
Guards are removed for illustration purpose only. All guardsmust be
KEEP THE DRYER CLEAN
DO NOT ALLOW FINE
MATERIAL TO ACCUMULATE
IN THE PLENUM CHAMBER
OR SURROUNDING THE OUT-
SIDE OF THE DRYER
Continued safe, dependable opera-
tion of automatic equipment de-
pends, to a great degree, upon the
owner. For a safe and dependable
drying system, follow the recommen-
dations within this manual, and make
it a practice to regularly inspect the
operation of the unit for any devel-
oping problems or unsafe conditions.
Take special note of the safety pre-
cautions listed above before attempt-
ing to operate the dryer.
6
Page 7
Product Updates
2002 Top Dry Service School
GSI / Top Dry
Product Updates
* Duct Work - See PNEG-1089
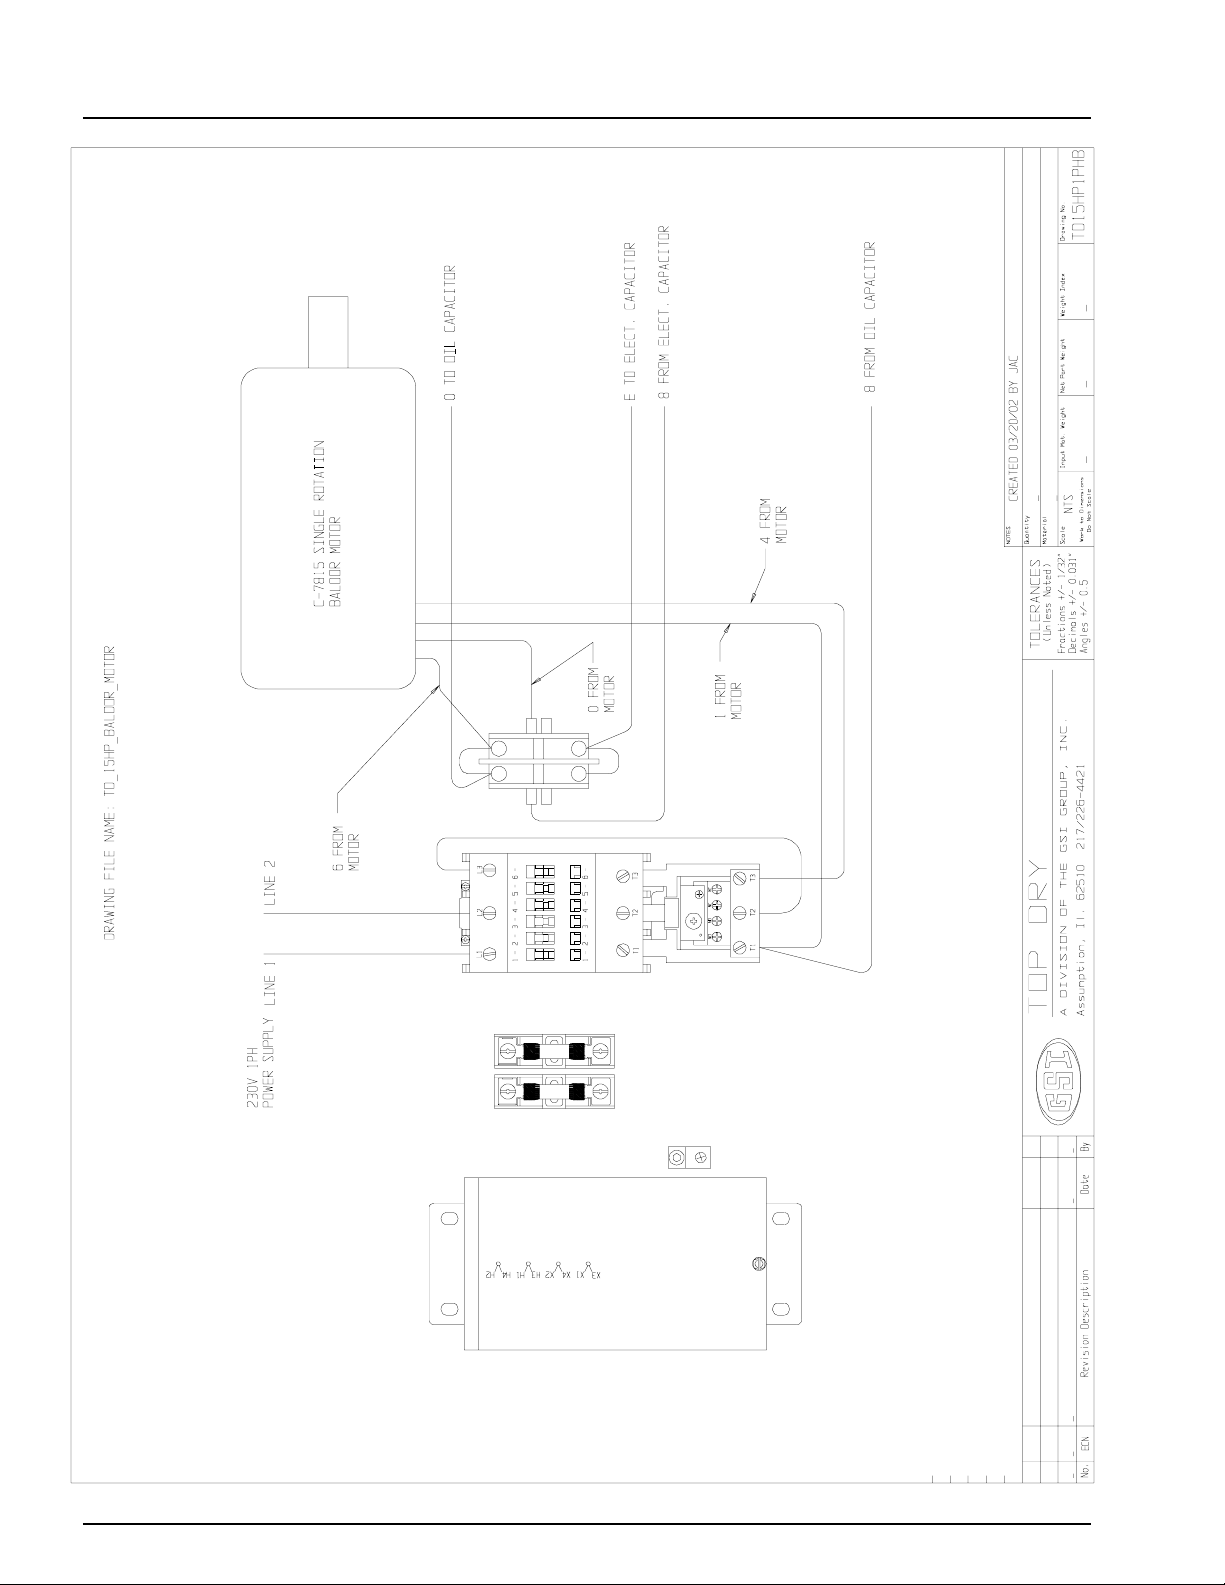
* 15HP 1PH Baldor Single Rotation Motor
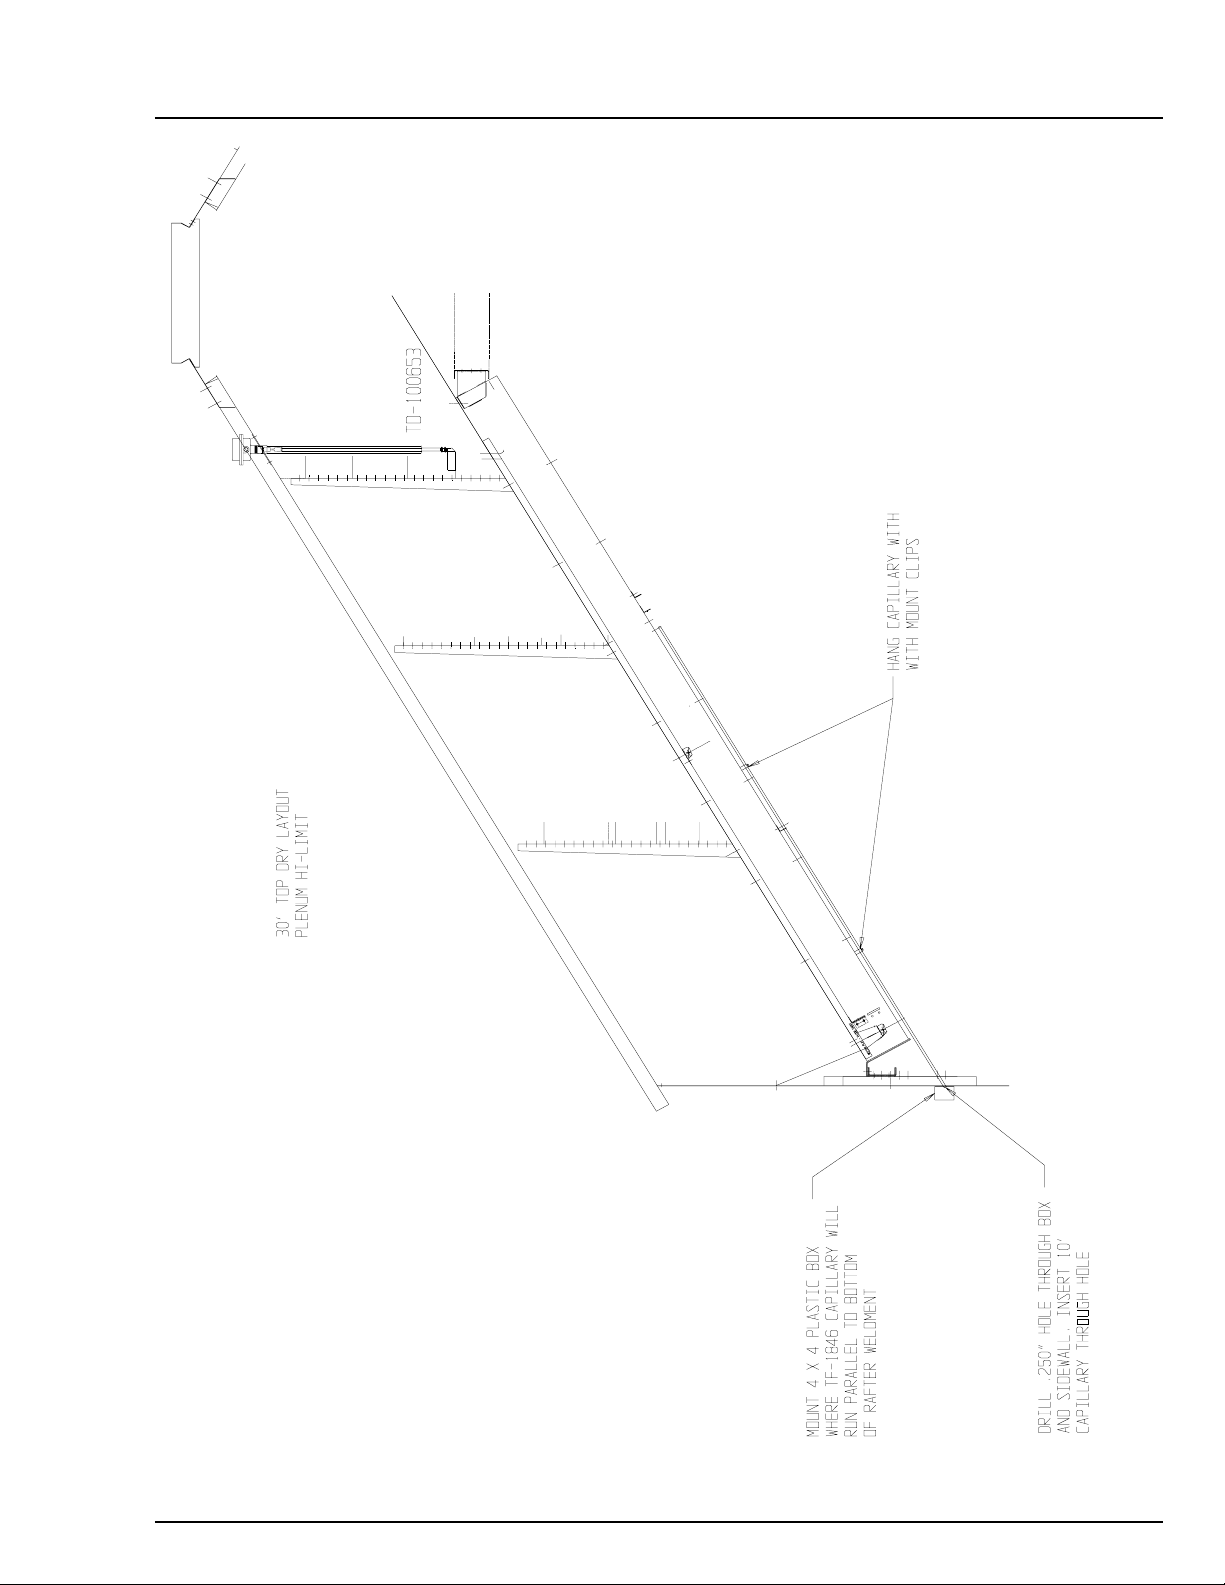
* Plenum Hi-Limit \ Grain Hi-Limit
7
Page 8
15 HP 1PH Baldor
2002 Top Dry Service School
8
Page 9
Plenum Hi-Limit
2002 Top Dry Service School
9
Page 10

Grain Hi-Limit
2002 Top Dry Service School
10
Page 11

Software revisions
p
N
2002 Top Dry Service School
Network Autoflow Display Board Software Revisions
VERSION: 2.13
1) Added software for Watchdog
*********************************************************************
VERSION: 2.12 RELEASE DATE: Sept 7, 2001
HEATER VERS – 1.09 IO VERS – 1.07
1) Increased the speed at which a "BIN HI OVERFLOW" warning is given which also brings up the correct warning on 2 wire
installs. We started using
3 wires with version 1.02 January of 1998
2) When cool down mode is entered, the fans will not start unless in the "AUTO" or "ON" position. This includes the drying fans
and the aeration fan.
*********************************************************************
VERSION: 2.11 RELEASE DATE: October 27, 2000
1) Burner differential would not stay at 1 deg F when the dryer was turn off, using 2.10, now it does.
2) When grain reaches the Storage Chamber Rotary Switch, the dryer will enter a "Cool Down Mode". The fan will run and cool
thegrain for 10 minutes before
shutting down due to a Storage Chamber Full error.
3) When grain falls away from the Wet Supply Rotary Switch, the dryer will enter a "Cool Down Mode" after the fill system shut
off. The fan will run and
cool the grain for 10 minutes before shutting down due to a No Wet Supply error.
4) When the Dry & Hold switch is placed in the "On" position the dryer will enter a "Cool Down Mode" for 20 minutes before
stopping. This only happens at
the end of the dry cycle.
5) Corrected a problem with the Fans Off Delay. If there is time on this delay, the fans and heaters will shut off during the unload
cycle, after the unload cycle
is complete the delay counts down. The fans and heaters will not start again until the delay has reached zero.
6) Corrected a problem with the Time Until Load Off percentage set in the set-up mode. Now, in Auto batch only, the Fill Systems
will shut off if grain has not
reached the dry chamber high level rotary switch within the set percentage of the dry timer is completed. Example: 1 hr dry
time, 50% Time Until Load off.
The fill systems will shut off regardless of rotary switch status after 30min has expired.
7) Corrected a problem with th e Refill Delay. Now, in Au to batch On ly. The R efill Delay begins to count down after the unload
cycle is completed. If grain
has not reached the drying chamber low level rotary switch before this delay reaches zero, a dry chamber empty error is given.
*********************************************************************
VERSION: 2.10 RELEASE DATE: Sept 11, 2000
1) Changed the Minimum Burner Differential to 1 Deg Fahrenheit
2) Fixed the problem where the burner was not shutting off when the Dry & Hold switch was placed in the "On" position, the Dry
Cycle was complete, and the
Dryer was in the Cool Cycle. Now, when the Dry & Hold switch is placed in the "On" position, and the Dry Cycle is complete,
the dryer will shut the burner
off and will cool for the amount of time on the Cool Timer before stopping.
3) Fixed a problem where the dryer was not shutting down with an "Out of Grain" error when the Wet Supply Rotary Switch was
exposed. Now when the Wet
Supply Rotary Switch is exposed, the Fill #1, and Fill #2 delay will count down and shut off Fill System #1 & #2, then the dryer
will shut down with an "Out
of Grain" error. If there is still grain against the Low Level Rotary Switch, the dryer can be restarted by pressing the Stop switch
to clear the error, turning
the Load Auger switch to the "Off" position, and pressing the Start switch. When the Start switch is pressed the screen will say
"Press <Enter> to Dry
Remaining Grain". If the <enter> button is pressed the dryer will restart. NOTE: If the Load Auger switch is left in the "Auto"
osition an "Out of Grain"
error will be given on startup.
*********************************************************************
VERSION: 2.09 RELEASE DATE: May 15, 2000
1.) Selection screen for On-Off burner. This cannot be used in conjunction with diesel burner.
OTE: Must change heater software also. Use following version number or higher: Heater ==> 1.09
*********************************************************************
VERSION: 2.08 RELEASE DATE: May 12, 2000
1.) Changed the burner differential setup screen to correctly display Celsius temperatures.
2.) Now only a year above 2000 may be entered upon setting the date.
3.) Burner differential is now greater than 1 and less than 10 degrees.
*********************************************************************
VERSION: 2.07 RELEASE DATE : April 25, 2000
1.) Changed the checksum method for the network to help insure data integrity.
2.) Force aeration fan to start before drying fans start, unless aeration switch is in off position.
3.) Load systems cannot start for five seconds after start of system.
11
Page 12

Software revisions
VERSION: 2.03 RELEASE DATE: October 27, 1999
***** NOTE: This software originated from 1.06 and is intended to fix version 2.00.*****
1) Added diesel option which if selected pulses the igniter relay on for about 1/2second after power to burner is on.
2) Took out option for modem string until it is needed.
3) Added safeties for thermistor shorts and opens.
4) By holding in on the HELP switch while turning on power you may check for proper wiring of the control panel switches and for correct operation of
keypad.
5) Made hour meter active. Reset it by holding in on the HOURS key while turning on the power. Press HOURS key to view.
6) Moisture control light flashes in temp hold mode.
7) Added software to indicate to the user that the DUMP switch is not in the AUTO position.
8) If the DRY & HOLD switch is in the ON position the dryer now goes through the cool cycle before shutting down. The cool timer is displayed while this is
happening. (Changed to a set 20 minutes in 2.11)
9) Changed software so the dryer won't shutdown while changing model number on the dryer.
10) The user can no longer go into EXTENDED SETUP while the dryer is running.
11) The warning of BIN HIGH PRESSURE LIMIT is now active high - in other words it must get 12VDC on pin J2-20 in order to give a shutdown.
*********************************************************************
VERSION: 2.02 RELEASE DATE: October 7, 1999
1) Changed the "Batch percentage off" selection screen to a screen which allows you to enter a time (just like any other timer) at which the dryer will shut off
loading in the DRY TIME. The timer is called the BATCH FILL TIME.
*********************************************************************
VERSION: 2.01 RELEASE DATE: October 4, 1999
1) Attempted to fix the problem of grain setpoint changing by itself.
2) Fixed problem of batch dryer always shutting down with a "DRYING CHAMBER EMPTY" warning. A delay called the "REFILL TIMER" allows the
dryer to fill back up.
*********************************************************************
VERSION: 2.00 RELEASE DATE: January 6, 1999
1) Fixed hour timer so dryer will now show running time of dryer.
2) Changed the way the dryer shut down when using the dry and hold switch, now it will cool the grain using the cool timer before it shuts down to prevent heat
buildup of grain past the grain temp set points thereby causing a shutdown condition. Works in Autoflow and AutoBatch modes.
3) Fixed the clock to properly roll over in the year 2000.
4) Added a user batch count and user timer independent from the Total batch and Total time allowing monitoring of different users drying grain or different
fields for comparison of drying time.
5) Added a test procedure for the keypad. Turning all of the control switches to the right (on position) and holding in the stop switch while turning on the
control power activates it. User can now test each individual keypad switch for malfunction or stuck keys. (Taken out in 2.03)
6) Added control switch testing by pressing and hold the plenum and grain switches in while turning on the control power. This will allow the user to test for
failed switches or computer failure to detect switch position changes. (Changed in 2.03 to turn power on with Help key depressed)
7) Removed garbage displayed when user selected to view total running time and total batches.
8) Added a check to make sure the dump switch is always in the Auto posistion. Otherwise if left in manual close will cause the dryer never to dump.
9) Fixed several bugs that were reported to use by users and dealers.
10) I added the ability to reset the Total Dryer running time by pressing the HOUR and RESET button together and turn on the dryer.
11) Removed watchdog option in Extended setup mode since watchdog has not been implemented yet.
12) Changed the wording to some of the error messages concerning the rotary switches to help eliminate some confusion of which switch was at fault.
13) Moisture control light will now flash to give a visual indication that the dryer is in temperature hold.
*********************************************************************
VERSION: 1.06 RELEASE DATE: November, 98
1.) Fixed dryer so the grain hi limit occurs at 20 F above the grain temp setpoint.
2.) Made timeout on the open/close of the actuator 20 seconds instead of 15 seconds. This extra time was added to compensate for the weaker batteries taking
longer to close the chutes.
*********************************************************************
VERSION: 1.05 RELEASE DATE: September, 98
1.) Made the out of grain timer active.
*********************************************************************
VERSION: 1.04 RELEASE DATE: July, 98
1.) The application of 12v to terminal number j1-20 will shutdown the dryer and give an indication that the bin is full due to the high level of static pressure
within."BIN AIR PRESSURE LIM" will be displayed on screen's top line until the user corrects the problem. (Originally looked for lack of 12v, fixed in
2.00)
2.) Corrected the hour meter problem.
3.) Changed how the dry timer is displayed: Now when the dry timer goes to zero it will begin counting upward at the user set time as long as the dryer remains
in temp hold.
*********************************************************************
VERSION: 1.03 RELEASE DATE: March, 98
1.) Added software to allow the aeration fan to continue running even if there was a dryer shutdown. The aeration fan BYPASS mode must be selected under
setup.
*********************************************************************
VERSION: 1.02 RELEASE DATE: Jan, 98
1.) The Bin high limit rotary switch is monitored in both states to insure that a switch failure has not taken place. If both switches are in the same state a switch
failure is reported.
*********************************************************************
VERSION: 1.01 RELEASE DATE: NO OFFICIAL DATE ASSIGNED
1.) Added burner differential adjustment to be set at master under extended setup.
2.) Gary Woodruff's software for holding the fans off during a portion of the dry cycle. This is adjusted under delays.
3.) Attempted to make the dryer dry remaining grain when a wet supply empty error takes place.
4.) Added software to display a negative incrementing counter, where the dry timer used to be, during temp hold. (Changed in 1.04)
*********************************************************************
2002 Top Dry Service School
12
Page 13

Software revisions
2002 Top Dry Service School
VERSION: 1.00 RELEASE DATE: SEPTEMBER 16, 1997
1.) We changed resistor number 107 on the display board from 10K to 3.0K to allow the contrast to work without resetting the
computer.
2.). Put in a contrast adjustment for the display. While turning the control power on, hold in on the screens key, and this will enter
the contrast adjustment mode. Now use the UP/DOWN arrow keys to adjust. If the screen is solid black press the down arrow
key, if nothing appears on the screen press the up arrow keys. NOTE: You cannot hold in on the UP/DOWN arrow keys to
adjust, you must continue to press and then release them or nothing will happen.
3.) Put Software in for 3
*********************************************************************
VERSION: 0.05 RELEASE DATE: 1996
This was the first version released for customer operation. This particular version could only control 2 Fan and Heaters
rd
Fan and Heater.
NOTE: remember to always do a hard reboot after installing new software to the display board or the IO
board. Shut off all gas valves when installing new software in all burners.
13
Page 14

Software revisions
2002 Top Dry Service School
Series 2000 Autoflow Heater Software Changes
SOFTWARE: SERIES 2000 AUTOFLOW HEATER BOARD
VERSION: 1.10
DATE CHANGED: MAY 15, 2000
RELEASE DATE: MAY 15, 2000
1.) Added software for watchdog.
NOTE: This must be used with display version 2.13.
*********************************************************************
SOFTWARE: SERIES 2000 AUTOFLOW HEATER BOARD
VERSION: 1.09
DATE CHANGED: MAY 15, 2000
RELEASE DATE: MAY 15, 2000
1.) Provided On-Off burner option.
*********************************************************************
SOFTWARE: SERIES 2000 AUTOFLOW HEATER BOARD
VERSION: 1.08
DATE CHANGED: MAY 12, 2000
RELEASE DATE: MAY 12, 2000
1.) Fixed software to correctly display celsius temperatures.
2.) Increased the hysteresis of the air switch to avoid
unnecessary shutdowns.
*********************************************************************
SOFTWARE: SERIES 2000 AUTOFLOW HEATER BOARD
VERSION: 1.07
DATE CHANGED: APRIL 25, 2000
RELEASE DATE: APRIL 25, 2000
1.) Changed the way the check sum works.
2.) No longer allow the grain temp setpoint to be changed here.
*********************************************************************
SOFTWARE: SERIES 2000 AUTOFLOW HEATER BOARD
VERSION: 1.06
DATE CHANGED: MARCH 30, 2000
RELEASE DATE: MARCH 30, 2000
14
1.) Made airswitch active for all fans/heaters.
Page 15

Software revisions
2002 Top Dry Service School
*********************************************************************
SOFTWARE: SERIES 2000 AUTOFLOW HEATER BOARD
VERSION: 1.05
DATE CHANGED: DECEMBER,1999
RELEASE DATE: DECEMBER,1999
1.) Made a selection for diesel burner. Ignition relay
is pulsed on after burner starts to reset diesel module.
*********************************************************************
SOFTWARE: SERIES 2000 AUTOFLOW HEATER BOARD
VERSION: 1.04
RELEASE DATE: September, 1998
1.) Changed software so the ignitor comes on when the burner
initially attempts to light and then it goes off about
five seconds later and we try to sense flame then.
*********************************************************************
SOFTWARE: SERIES 2000 AUTOFLOW HEATER BOARD
VERSION: 1.03
RELEASE DATE: Jan, 1998
1.) Fixed software so that if slave loses contact with
master everything shuts down accordingly.
*********************************************************************
SOFTWARE: SERIES 2000 AUTOFLOW HEATER BOARD
VERSION: 1.02
RELEASE DATE: DECEMBER 17, 1997
1.) The master now sends the plenum temperature differential
to the fan/heaters as a byte on the network.
*********************************************************************
SOFTWARE: SERIES 2000 AUTOFLOW HEATER BOARD
VERSION: 1.01
RELEASE DATE: DECEMBER 1997
1.) Changed software so plenum temperature decides which temperature
scale the heater software is on. This fixes a problem of the
plenum temperature going to 86F and stopping.
*********************************************************************
15
Page 16

Software revisions
SOFTWARE: SERIES 2000 AUTOFLOW HEATER BOARD
VERSION: 1.00
RELEASE DATE: OCTOBER 20, 1997
1.) When the three fan autoflow was introduced some of the rural
drying centers were having problems dealing with copious
amounts of initation current. The other problem complicating
this precarious situation is that all fans must start
simultaneously in order to prevent the last fan from rotating
backwards. In order to deal in the most efficient manner with
both of the above stated problems we implemented a soft start
scenario which provides a 66% reduction in startup current.
*********************************************************************
SOFTWARE: SERIES 2000 AUTOFLOW HEATER BOARD
VERSION: 0.05
RELEASE DATE: 1996
2002 Top Dry Service School
THIS WAS THE FIRST VERSION RELEASED FOR CUSTOMER OPERATION.
NOTE: remember to always do a hard reboot after installing new software to the display board or the IO
board. Shut off all gas valves when installing new software in all burners.
Current Top Dry Software
Top Dry Series 2000 Autoflow-
Display Computer Board – Version 2.13
Heater Computer Board – Version 1.10
Input / Output Board – Version 1.07
Top Dry Series 2000 Batch Heater-
Series 2000 Batch – version .30
16
Page 17

2002 Top Dry Service School
* Top Dry Sidewall Gauges
* Top Dry Stiffener Gauges
* Fan Blade Data
Technical Data
GSI / Top Dry
Technical data
17
Page 18

Technical Data
NOMINAL DIA. NUMBER OF RINGS Sidewall Sidewall Sidewall Sidewall Sidewall Sidewall Sidewall Sidewall Sidewall Sidewall Sidewall
OF SIDEWALL (Ft) OF SIDEWALL Base Ring Ring #2 Ring #3 Ring #4 Ring #5 Ring #6 Ring #7 Ring #8 Ring #9 Ring #10 Ring #11
18 5 20ga 20ga 20ga 20ga 20ga
18 6 20ga 20ga 20ga 20ga 20ga 20ga
18 7 20ga 20ga 20ga 20ga 20ga 20ga 20ga
21 5 20ga 20ga 20ga 20ga 20ga
21 6 20ga 20ga 20ga 20ga 20ga 20ga
21 7 20ga 20ga 20ga 20ga 20ga 20ga 20ga
21 8 18ga 20ga 20ga 20ga 20ga 20ga 20ga 20ga
24 5 20ga 20ga 20ga 20ga 20ga
24 6 20ga 20ga 20ga 20ga 20ga 20ga
24 7 18ga 20ga 20ga 20ga 20ga 20ga 20ga
24 8 18ga 18ga 20ga 20ga 20ga 20ga 20ga 20ga
24 9 17ga 18ga 18ga 20ga 20ga 20ga 20ga 20ga 20ga
24 10 17ga 17ga 18ga 18ga 18ga 20ga 20ga 20ga 20ga 20ga
27 5 18ga 18ga 18ga 20ga 20ga
27 6 18ga 18ga 18ga 18ga 20ga 20ga
27 7 18ga 18ga 18ga 18ga 18ga 20ga 20ga
27 8 17ga 18ga 18ga 18ga 18ga 18ga 20ga 20ga
27 9 17ga 17ga 18ga 18ga 18ga 18ga 18ga 20ga 20ga
27 10 17ga 17ga 17ga 18ga 18ga 18ga 18ga 18ga 20ga 20ga
2002 Top Dry Service School
30 5 18ga 18ga 18ga 18ga 20ga
30 6 18ga 18ga 18ga 18ga 18ga 20ga
30 7 17ga 18ga 18ga 18ga 18ga 18ga 20ga
30 8 17ga 17ga 18ga 18ga 18ga 18ga 18ga 20ga
30 9 17ga 17ga 17ga 18ga 18ga 18ga 18ga 18ga 20ga
30 10 16ga 17ga 17ga 17ga 18ga 18ga 18ga 18ga 18ga 20ga
30 11 16ga 17ga 17ga 17ga 17ga 18ga 18ga 18ga 18ga 18ga 20ga
36 5 17ga 18ga 18ga 18ga 20ga
36 6 17ga 18ga 18ga 18ga 18ga 20ga
36 7 16ga 17ga 18ga 18ga 18ga 18ga 20ga
36 8 16ga 16ga 17ga 18ga 18ga 18ga 18ga 20ga
36 9 16ga 16ga 16ga 17ga 18ga 18ga 18ga 18ga 20ga
36 10 15ga 16ga 16ga 16ga 17ga 18ga 18ga 18ga 18ga 20ga
36 11 14ga 15ga 15ga 16ga 16ga 17ga 18ga 18ga 18ga 18ga 20ga
Top Dry Sidewall Gauges
18
Page 19

Technical Data
2002 Top Dry Service School
NOMINAL DIA. NUMBER OF RINGS Stiffener Stiffener Stiffener Stiffener Stiffener Stiffener Stiffener Stiffener Stiffener Stiffener Stiffener
OF SIDEWALL (Ft) OF SIDEWALL Base Ring Ring #2 Ring #3 Ring #4 Ring #5 Ring #6 Ring #7 Ring #8 Ring #9 Ring #10 Ring #11
18 5 14ga 16ga 16ga 16ga
18 6 14ga 16ga 16ga 16ga
18 7 12ga 14ga 16ga 16ga 16ga
21 5 14ga 16ga 16ga 16ga
21 6 14ga 16ga 16ga 16ga
21 7 12ga 14ga 16ga 16ga 16ga
21 8 12ga 14ga 16ga 16ga 16ga
24 5 14ga 16ga 16ga 16ga
24 6 12ga 14ga 16ga 16ga
24 7 12ga 14ga 16ga 16ga 16ga
24 8 12ga 14ga 12ga 16ga 16ga
24 9 10ga 12ga 12ga 14ga 14ga 16ga
24 10 8ga 10ga 12ga 14ga 16ga 16ga
27 5 14ga 16ga 16ga 16ga
27 6 12ga 14ga 16ga 16ga
27 7 12ga 14ga 16ga 16ga 16ga
27 8 12ga 12ga 14ga 16ga 16ga
27 9 10ga 12ga 14ga 16ga 16ga 16ga
27 10 8ga 10ga 12ga 14ga 16ga 16ga
30 5 12ga 14ga 16ga 16ga
30 6 12ga 14ga 16ga 16ga
30 7 12ga 12ga 14ga 16ga 16ga
30 8 10ga 12ga 14ga 16ga 16ga
30 9 10ga 12ga 12ga 14ga 16ga 16ga
30 10 8ga 10ga 12ga 14ga 16ga 16ga
30 11 8ga 10ga 12ga 12ga 14ga 16ga 16ga
36 5 12ga 14ga 16ga 16ga
36 6 12ga 12ga 14ga 16ga
36 7 10ga 12ga 14ga 14ga 16ga
36 8 10ga 12ga 12ga 14ga 16ga
36 9 8ga 10ga 12ga 14ga 14ga 16ga
36 10 8ga 10ga 12ga 12ga 14ga 16ga
36 11 8ga 8ga 10ga 12ga 14ga 14ga 16ga
Top Dry Stiffener Gauges
19
Page 20

Technical Data
2002 Top Dry Service School
20
Page 21

Software Diagnostics
2002 Top Dry Service School
GSI / Top Dry
Software Diagnostics
* Series 2000 Batch Fan & Heater
* Series 2000 Autoflow Display
* Series 2000 Autoflow Fan & Heater
21
Page 22

Software Diagnostics
Series 2000 Batch Fan / Heater
2002 Top Dry Service School
Initializing the Novram
• Turn the Control Power “ off “.
• Hold down the Program Temperature
switch.
• Turn the Control Power switch “on “
with the Program Temperature switch
held down.
• Press the Increase switch until 7 is on
the display.
• Press the Program Temperature switch
again.
• You have two seconds to depress the
Increase or Decrease switches at the
same time.
• The NOVRAM has been initialized.
NOTE: The computer has now been cleared of all
memory, including the type of dryer it is and all
Set-up variables.
22
Page 23

2002 Top Dry Service School
Software Diagnostics
Series 2000 Batch Fan / Heater
Programming Set-up Variables
• Turn the Control Power “ off “
• Turn the Control Power switch “ on “
with the Program Temperature switch
held down.
• Press the Increase switch until 3 is on
the display.
• Press the Program Temperature switch
again.
•C or no C will bill displayed.
• Use the Increase or Decrease switch to
toggle between C or no C.
C - Hi-Lo cycling heater
no C - On/Off cycling heater
• When the correct selection is on the
screen press the Program Temperature switch again.
•H or no H will be displayed.
• Use the Increase or Decrease switch to
toggle between H or no H.
H - Humidity sensor present
no H - No humidity sensor
present
• When the correct selection is on the
screen press the Program Temperature
switch again.
•F or C will be displayed.
• Use the Increase or Decrease switch to
toggle between F or C.
F - Temperatures displayed in
Fahren- heit.
C-Temperatures displayed in
Celsius.
• When the correct selection is on the
screen press the Program Temperature
switch again.
•L or no L will be displayed.
• Use the Increase or Decrease switch
to toggle between L or no L.
L - The dryer will advance to
the Cool cycle when the Dry
timer has reached zero and the
Grain temperature set point
has been met.
noL - The dryer will advance
to the Cool cycle when either
the Dry timer has reached zero
or the Grain temperature set
point has been met.
• When the correct selection is on the
screen press the Program Temperature
switch again.
23
Page 24

Software Diagnostics
2002 Top Dry Service School
Series 2000 Batch Fan / Heater
CAUTION: DO NOT ATTEMPT BELOW PROCEDURE WITH GAS LINE CONNECTED.
Diagnostic Mode
• Turn the Control Power “ off “.
• Hold down the Program Temperature switch.
• Turn the Control Power switch “on “
with the Program Temperature switch
held down.
• Press the Increase switch until 8 is on
the display.
• Press the Program Temperature switch
again.
• Press the Program Dry time switch to
engage the Fan starter-Fan will be
displayed.
• Press the Increase switch to make the
ignitor spark-IN will be displayed.
• Press the Program Temperature switch
to open the LP and Main Solenoid- LP
will be displayed.
• Press the Start switch to open the
Cycle solenoid -CS will be displayed.
• Turn the control power “off” to exit
the Diagnostic mode.
24
Page 25

Software Diagnostics
2002 Top Dry Service School
Series 2000 Autoflow Display
Keypad Test
• Turn the Control Power “off”.
• Turn the Control Power switch “on”
with the Help Switch pressed.
• The Keypad Switches can now be tested.
Control Switch Tests
• Turn the Control Power “off” .
• Turn the Control Power switch “on”
with the Plenum and Grain Switches pressed.
• The Control Switches can now be tested.
25
Page 26

Software Diagnostics
2002 Top Dry Service School
Series 2000 Autoflow Fan / Heater
CAUTION: DO NOT ATTEMPT BELOW PROCEDURE WITH GAS LINE CONNECTED.
Diagnostic Mode
• Turn the Control Power “ off “.
• Hold down the Program Temperature switch.
• Turn the Control Power switch “on “
with the Program Temperature switch
held down.
• Press the Program Dry time switch to
engage the Fan Starter.
• Press the Program Temperature switch
to start theIgnitor.
• Press the Hours x 1000 switch to open
the Ssolenoid.
• Turn the control power “off” to exit
the Diagnostic mode.
26
Page 27

2002 Top Dry Service School
THE GSI GROUP, INC. ("GSI") WARRANTS ALL PRODUCTS MANUFACTURED BY GSI TO
BE FREE OF DEFECTS IN MATERIAL AND WORKMANSHIP UNDER NORMAL USAGE
AND CONDITIONS FOR A PERIOD OF TWELVE MONTHS AFTER RETAIL SALE TO THE
ORIGINAL END USER OF SUCH PRODUCTS. GSI'S ONLY OBLIGATION IS, AND
PURCHASER'S SOLE REMEDY SHALL BE FOR GSI, TO REPAIR OR REPLACE, AT GSI'S
OPTION AND EXPENSE, PRODUCTS THAT, IN GSI'S SOLE JUDGMENT, CONTAIN A MATERIAL DEFECT DUE TO MATERIALS OR WORKMANSHIP. ALL DELIVERY AND SHIPMENT CHARGES TO AND FROM GSI'S FACTORY WILL BE PURCHASER'S RESPONSIBILITY. EXPENSES INCURRED BY OR ON BEHALF OF THE PURCHASER WITHOUT PRIOR
WRITTEN AUTHORIZATION FROM AN AUTHORIZED EMPLOYEE OF GSI SHALL BE THE
SOLE RESPONSIBILITY OF THE PURCHASER.
EXCEPT FOR THE ABOVE STATED EXPRESS LIMITED WARRANTIES, GSI MAKES NO WARRANTY
OF ANY KIND, EXPRESSED OR IMPLIED, INCLUDING, WITHOUT LIMITATION, WARRANTIES OF
MERCHANTABILITY OR FITNESS FOR A PARTICULAR PURPOSE OR USE IN CONNECTION WITH
(i) PRODUCT MANUFACTURED OR SOLD BY GSI OR (ii) ANY ADVICE, INSTRUCTION, RECOMMENDATION OR SUGGESTION PROVIDED BY AN AGENT, REPRESENTATIVE OR EMPLOYEE OF GSI REGARDING OR RELATED TO THE CONFIGURATION, INSTALLATION, LAYOUT, SUITABILITY FOR A
PARTICULAR PURPOSE, OR DESIGN OF SUCH PRODUCT OR PRODUCTS.
IN NO EVENT SHALL GSI BE LIABLE FOR ANY DIRECT, INDIRECT, INCIDENTAL OR CONSEQUENTIAL DAMAGES, INCLUDING, WITHOUT LIMITATION, LOSS OF ANTICIPATED PROFITS OR
BENEFITS. PURCHASER'S SOLE AND EXCLUSIVE REMEDY SHALL BE LIMITED TO THAT STATED
ABOVE, WHICH SHALL NOT EXCEED THE AMOUNT PAID FOR THE PRODUCT PURCHASED. THIS
WARRANTY IS NOT TRANSFERABLE AND APPLIES ONLY TO THE ORIGINAL PURCHASER. GSI
SHALL HAVE NO OBLIGATION OR RESPONSIBILITY FOR ANY REPRESENTATIVE OR WARRANTIES MADE BY OR ON BEHALF OF ANY DEALER, AGENT OR DISTRIBUTOR OF GSI.
GSI ASSUMES NO RESPONSIBILITY FOR FIELD MODIFICATIONS OR ERECTION DEFECTS WHICH
CREATE STRUCTURAL OR STORAGE QUALITY PROBLEMS. MODIFICATIONS TO THE PRODUCT
NOT SPECIFICALLY COVERED BY THE CONTENTS OF THIS MANUAL WILL NULLIFY ANY PRODUCT WARRANTY THAT MIGHT HAVE BEEN OTHERWISE AVAILABLE.
THE FOREGOING WARRANTY SHALL NOT COVER PRODUCTS OR PARTS WHICH HAVE BEEN
DAMAGED BY NEGLIGENT USE, MISUSE, ALTERATION OR ACCIDENT. THIS WARRANTY COVERS
ONLY PRODUCTS MANUFACTURED BY GSI. THIS WARRANTY IS EXCLUSIVE AND IN LIEU OF
ALL OTHER WARRANTIES EXPRESS OR IMPLIED. GSI RESERVES THE RIGHT TO MAKE DESIGN
OR SPECIFICATION CHANGES AT ANY TIME.
PRIOR TO INSTALLATION, PURCHASER HAS THE REPONSIBILITY TO RESEARCH AND COMPLY WITH ALL FEDERAL, STATE AND LOCAL CODES WHICH MAY APPLY TO THE LOCATION AND
INSTALLATION
27
Page 28

2002 Top Dry Service School
28
June 18th, 2002
 Loading...