

Page 1

DGBF I E PNLCZ
Bedienungsanleitung (2...19)
Operating Manual (20...37)
Mode d’emploi (38...55)
Istruzioni per l’uso (56...73)
Instrucciones de uso (74...91)
Manual de instruções (92...109)
Bedieningshandleiding (110...127)
Návod k obsluze (128...145)
CZ
D
GB
F
I
E
P
NL
Page 2

2
Sicherheitshinweise
·Der Anschluss und die Montage elektrischer Geräte darf nur durch eine Elektrofachkraft erfolgen.
· Eingriffe und Veränderungen am Gerät führen zum Erlöschen des Garantieanspruches.
· Beachten Sie Ihre nationalen Vorschriften und die jeweiligen Sicherheitsbestimmungen.
·Die äusseren Anschlussklemmen lassen den Anschluss von festen und flexiblen Leitern bis 10 mm
2
zu.
· Es dürfen keine flexiblen Leitungen mit einem Leitungsquerschnitt ≤ 1 mm
2
angeschlossen werden.
Allgemeine Hinweise
· Ausschaltbefehle haben Vorrang vor Einschaltbefehlen.
· Bei korrekter Spannungsversorgung ist das Display hinterleuchtet und es werden die Punkte
zwischen der Stunden- und Minutenanzeige (SS:MM) permanent angezeigt. Die Punkte blinken bei
Spannungsunterbrechung.
· Ohne Spannungsversorgung erlischt die Schaltstellungsanzeige nach 2 Minuten.
· Die komplette Displayanzeige blinkt wenn ein Batteriewechsel innerhalb der nächsten 2 Wochen
erforderlich wird.
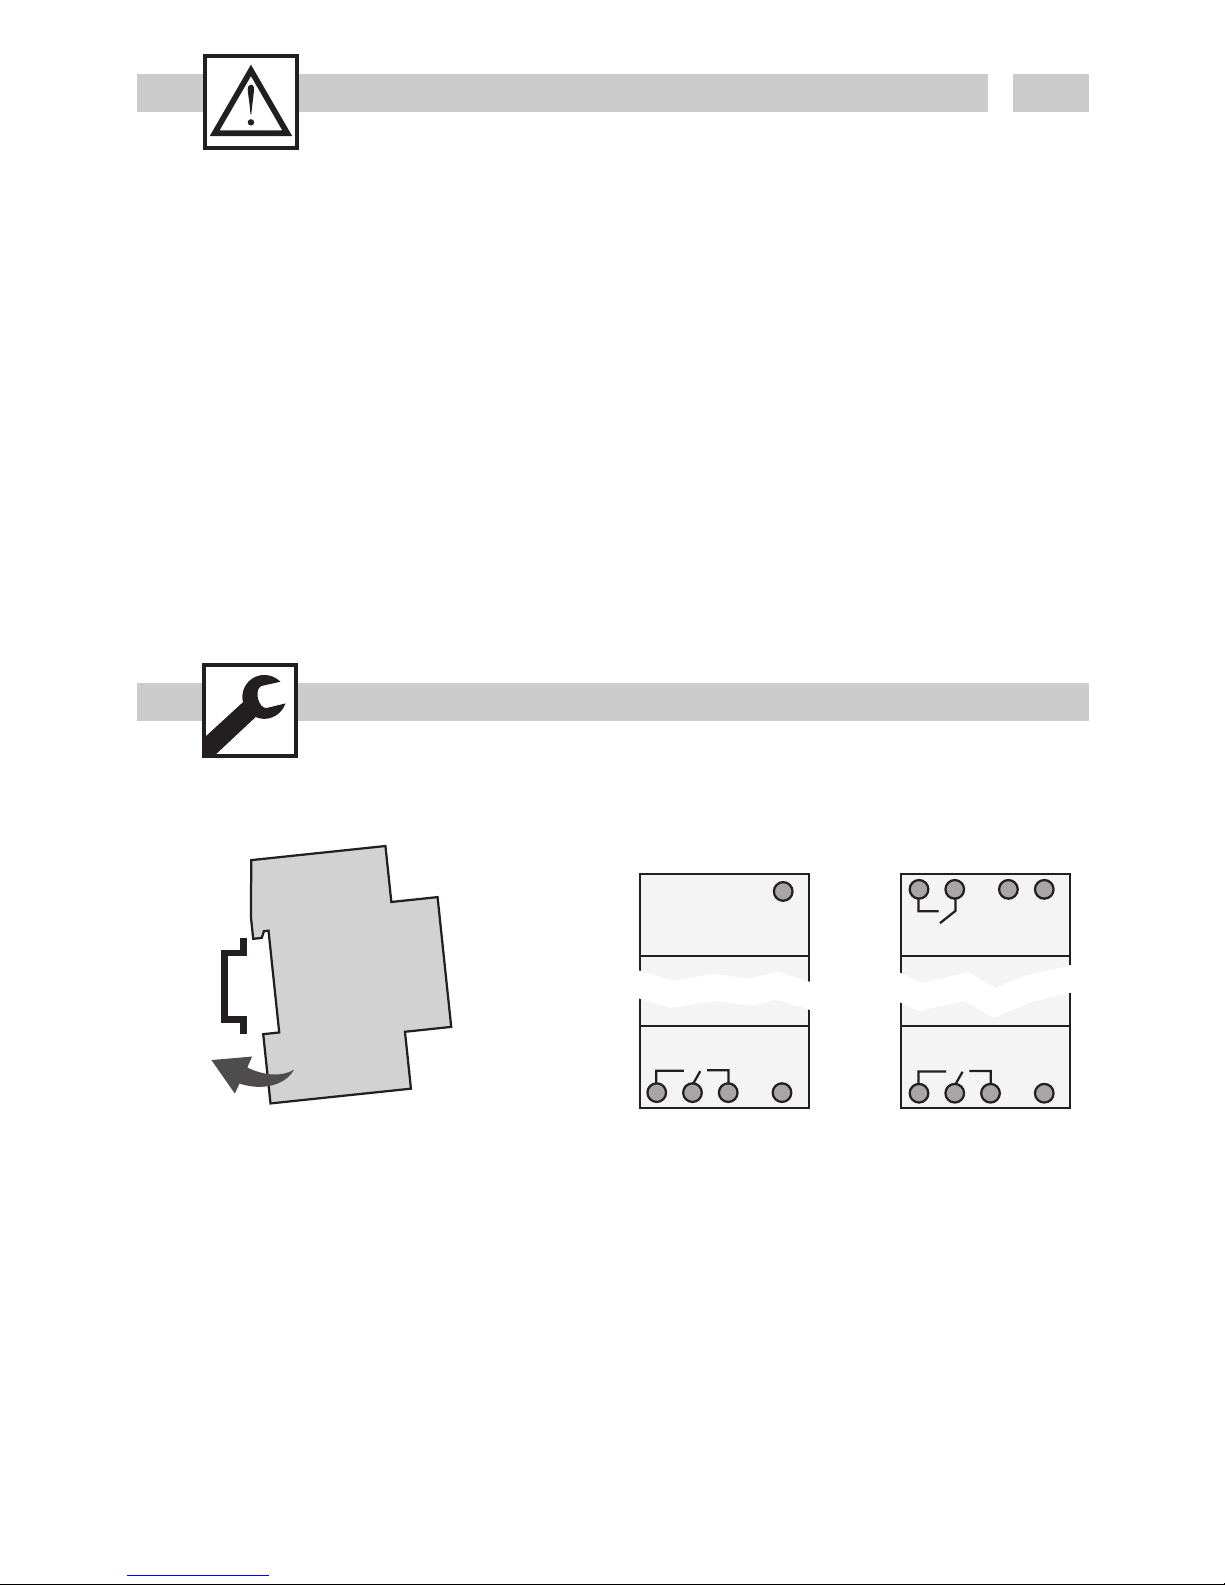
Montage auf DIN-Schiene Anschlussplan
567
L
123
N
56
L
123
N
S
C1
C2
C1
Page 3
OK
reset
3
D
MENU
16121824
Res.
1
A
F
B
C
D
E
G
I
J
K
M
C1
15:26:38
H
L
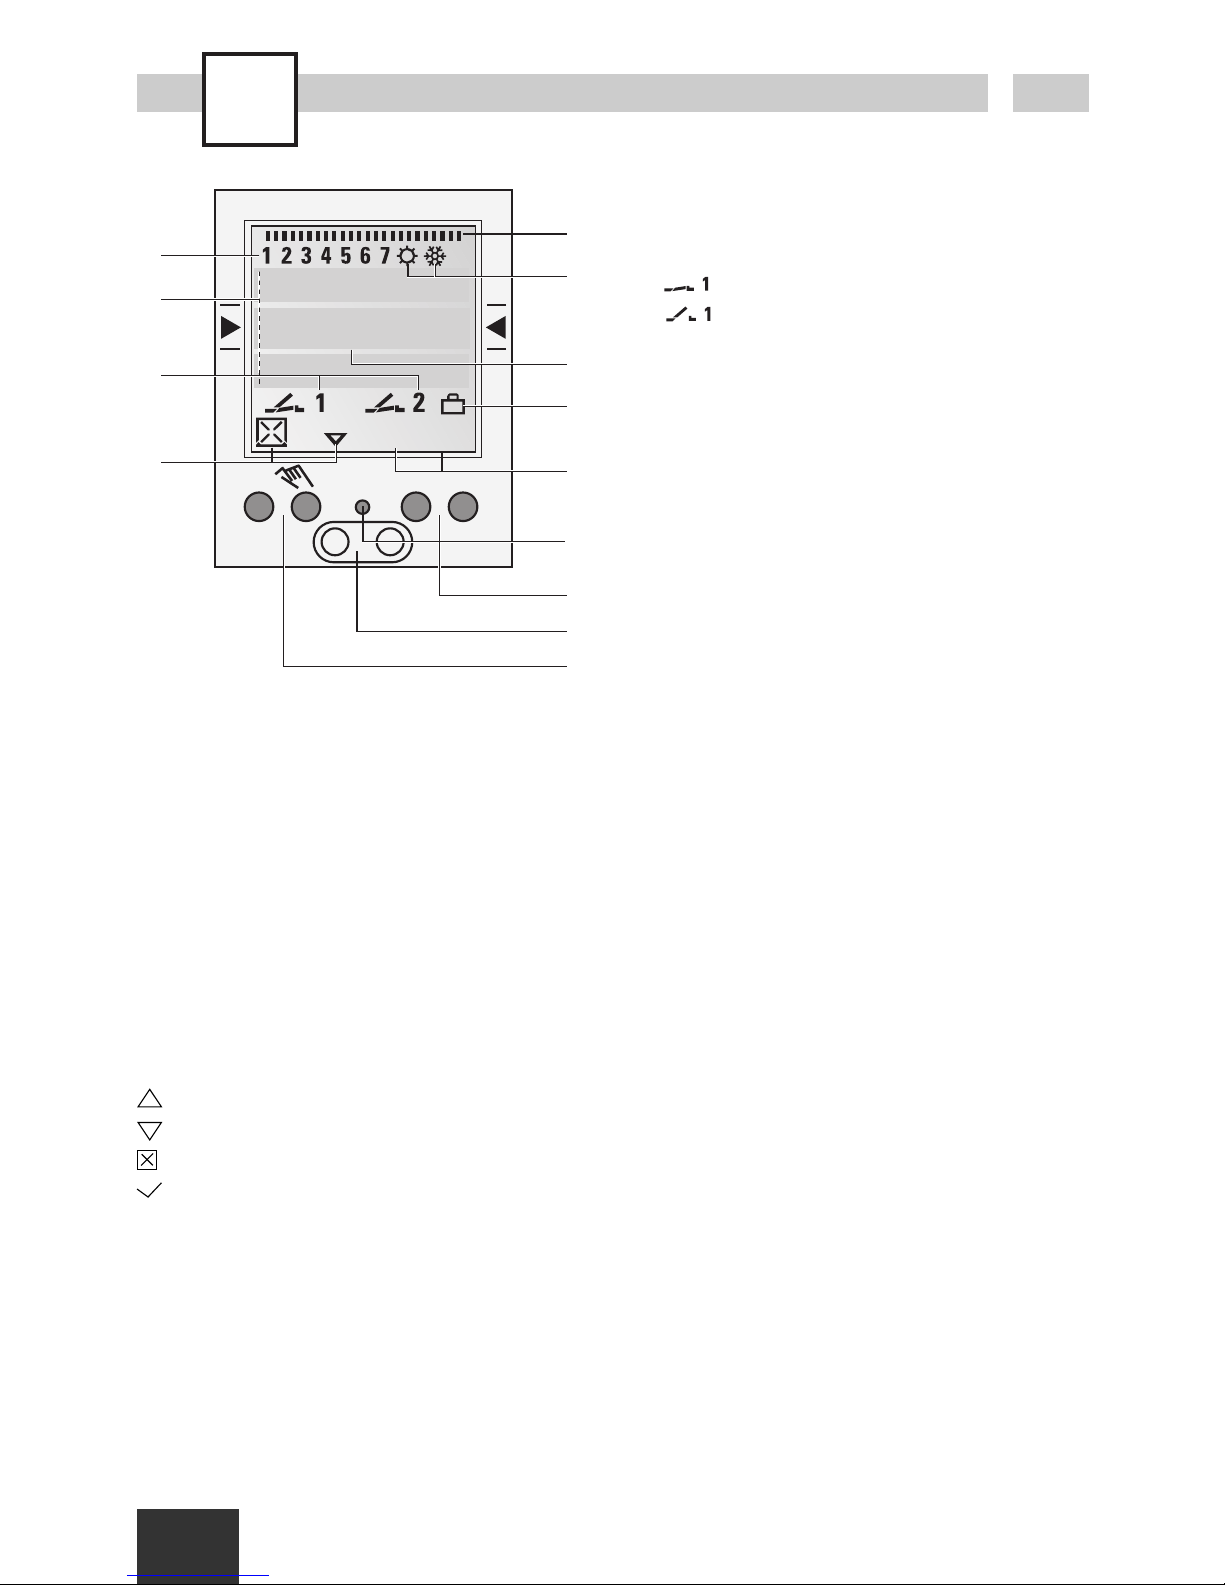
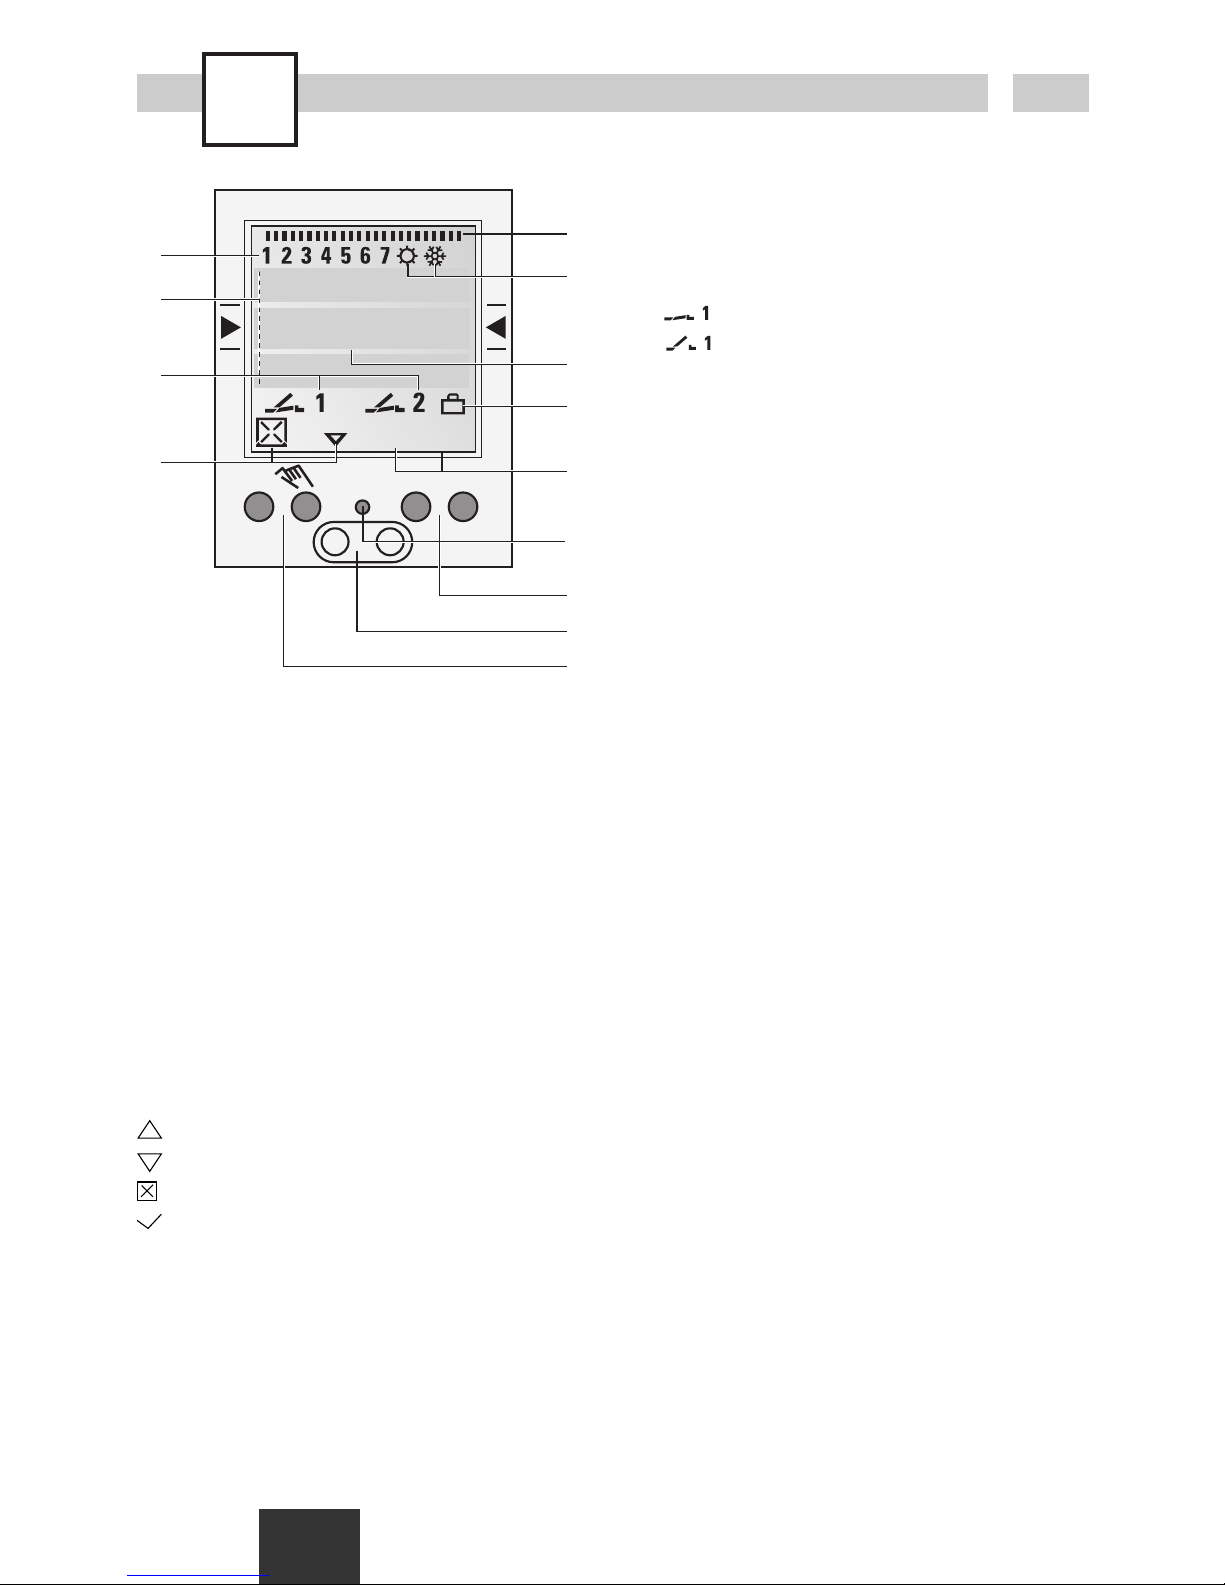
Display
A Funktionsanzeigen der beiden linken Tasten
B Kanalzustandsanzeigen
= Kanal 1 EIN
= Kanal 1 AUS
Kanal 1 = C1, Kanal 2 = C2
C 3 Kommunikationszeilen für Zeitanzeige,
Menüpunkte, Eingabeaufforderungen etc.
D Wochentaganzeige
E Übersicht Tages-Schaltprogramm
F Anzeige Sommer-/Winterzeit
G Betriebsspannung (permanente Punkte)
Gangreservebetrieb (Punkte blinken)
H Anzeige Ferienbetrieb
I Funktionsanzeigen der beiden rechten
Tasten
Tasten/Schnittstellen
J Reset
Bei einem Reset bleiben die Programme
erhalten. Es muss Datum und Uhrzeit neu
eingestellt werden. Resettaste mit einem
stumpfen Gegenstand (Kugelschreiber)
betätigen.
K Rechte Tasten
L Infrarot-Schnittstelle
M Linke Tasten mit Handschalterfunktion im
Automatikbetrieb
Allgemein
· Die mittlere Kommunikationszeile zeigt den
zur Auswahl stehenden Menüpunkt. Bei einer
Bestätigung mit OK wird dieser aktiviert.
· Blinkende Texte oder Symbole erfordern eine
Eingabe.
·Erfolgt innerhalb von 2 Minuten keine
Eingabe kehrt die Uhr in den Auto-Mode
zurück.
Funktionsanzeigen der beiden linken Tasten:
im Menü nach oben blättern
im Menü nach unten blättern
Auswahl/Vorschlag verwerfen
Auswahl/Vorschlag annehmen
+ Kurz Drücken = +1
Lang Drücken (ca. 2 sec) = +5
- Kurz Drücken = -1
Lang Drücken (ca. 2 sec) = -5
Funktionsanzeigen der beiden rechten Tasten:
MENU Verlassen des Automatikbetriebes und
Einstieg in den Programmiermodus
ESC Kurz Drücken = einen Schritt zurück
Lang Drücken (ca. 2 sec) = Zurück in
den Automatikbetrieb
OK Auswahl treffen und übernehmen
EDT Änderungswunsch im Lesen-Mode
N Befehl nicht ausführen
J Befehl ausführen
DEL Löschen
Page 4
1.
4
ESC
OK
DEUTSCH
ENGLISH
FRANCAIS
OK
12H 24H
LANGUAGE
DATETIME
ESC OK
OK
CZECH
DEUTSCH
ENGLISH
ESC OK
ESC
MENU
16121824
1
C1
15:26:38
Res.
MENU
Info
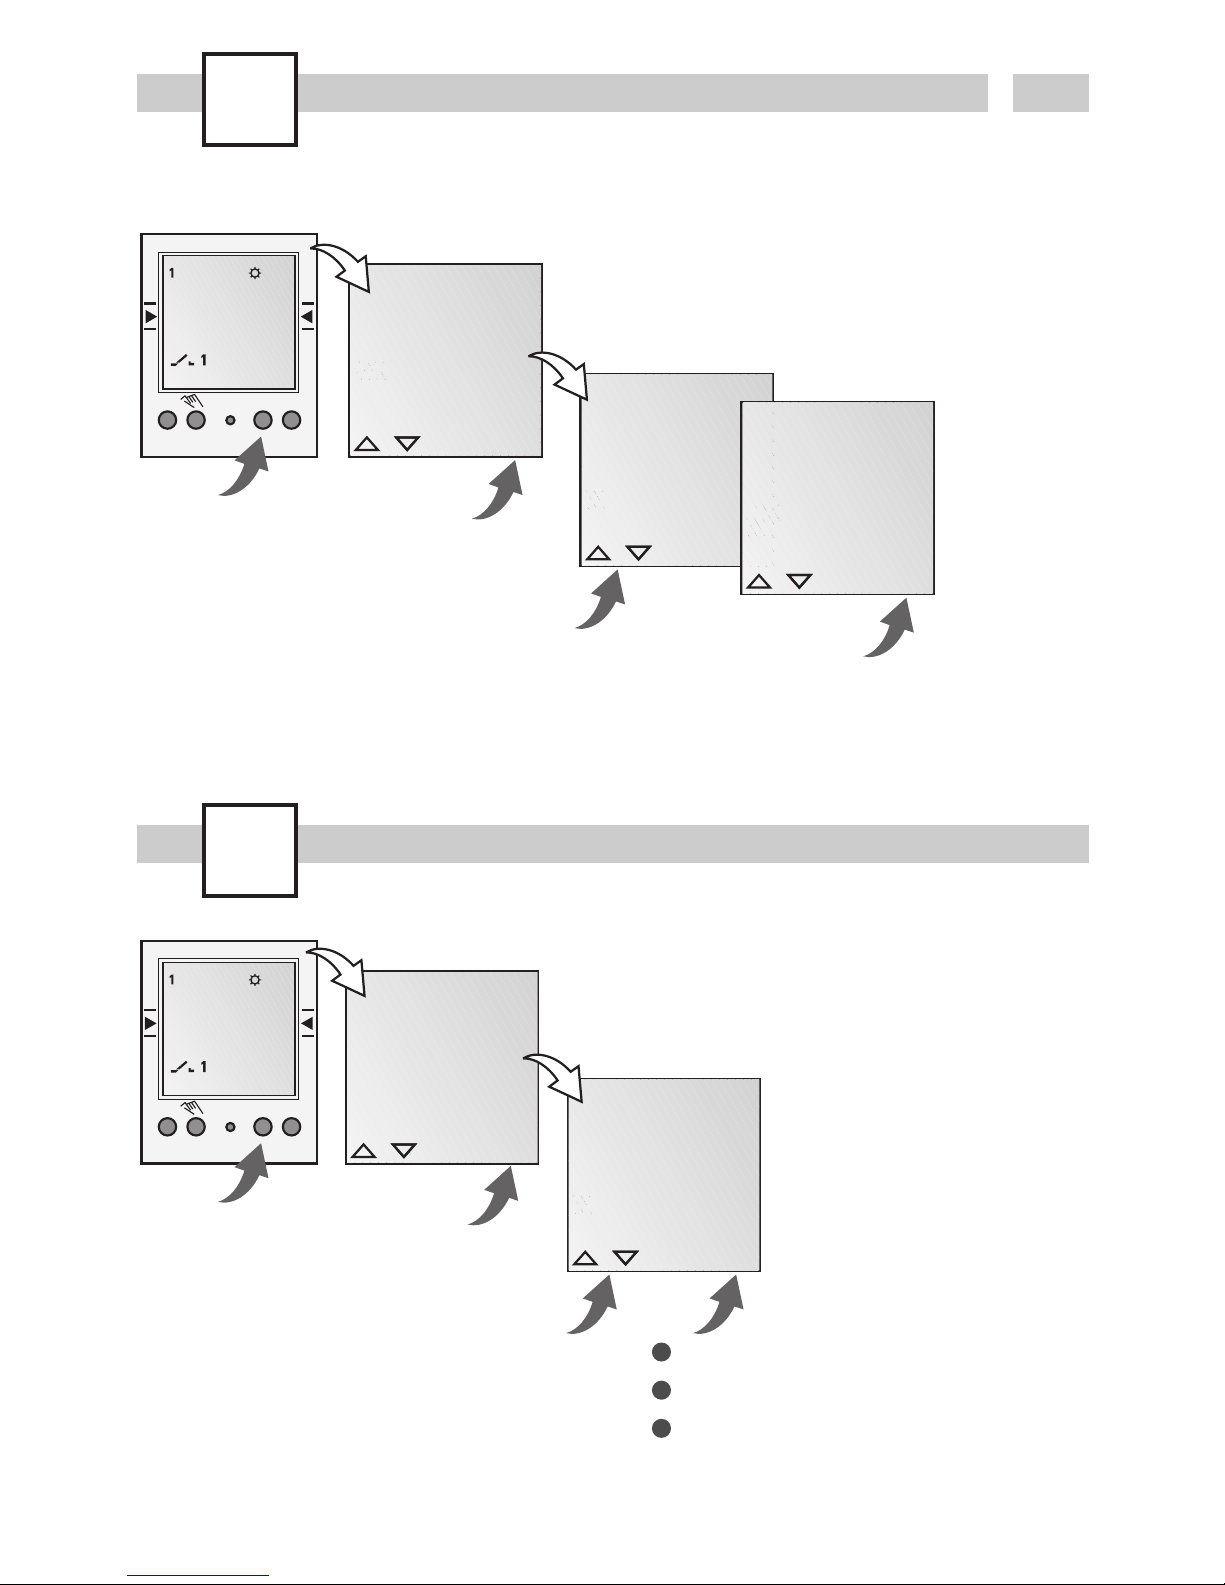
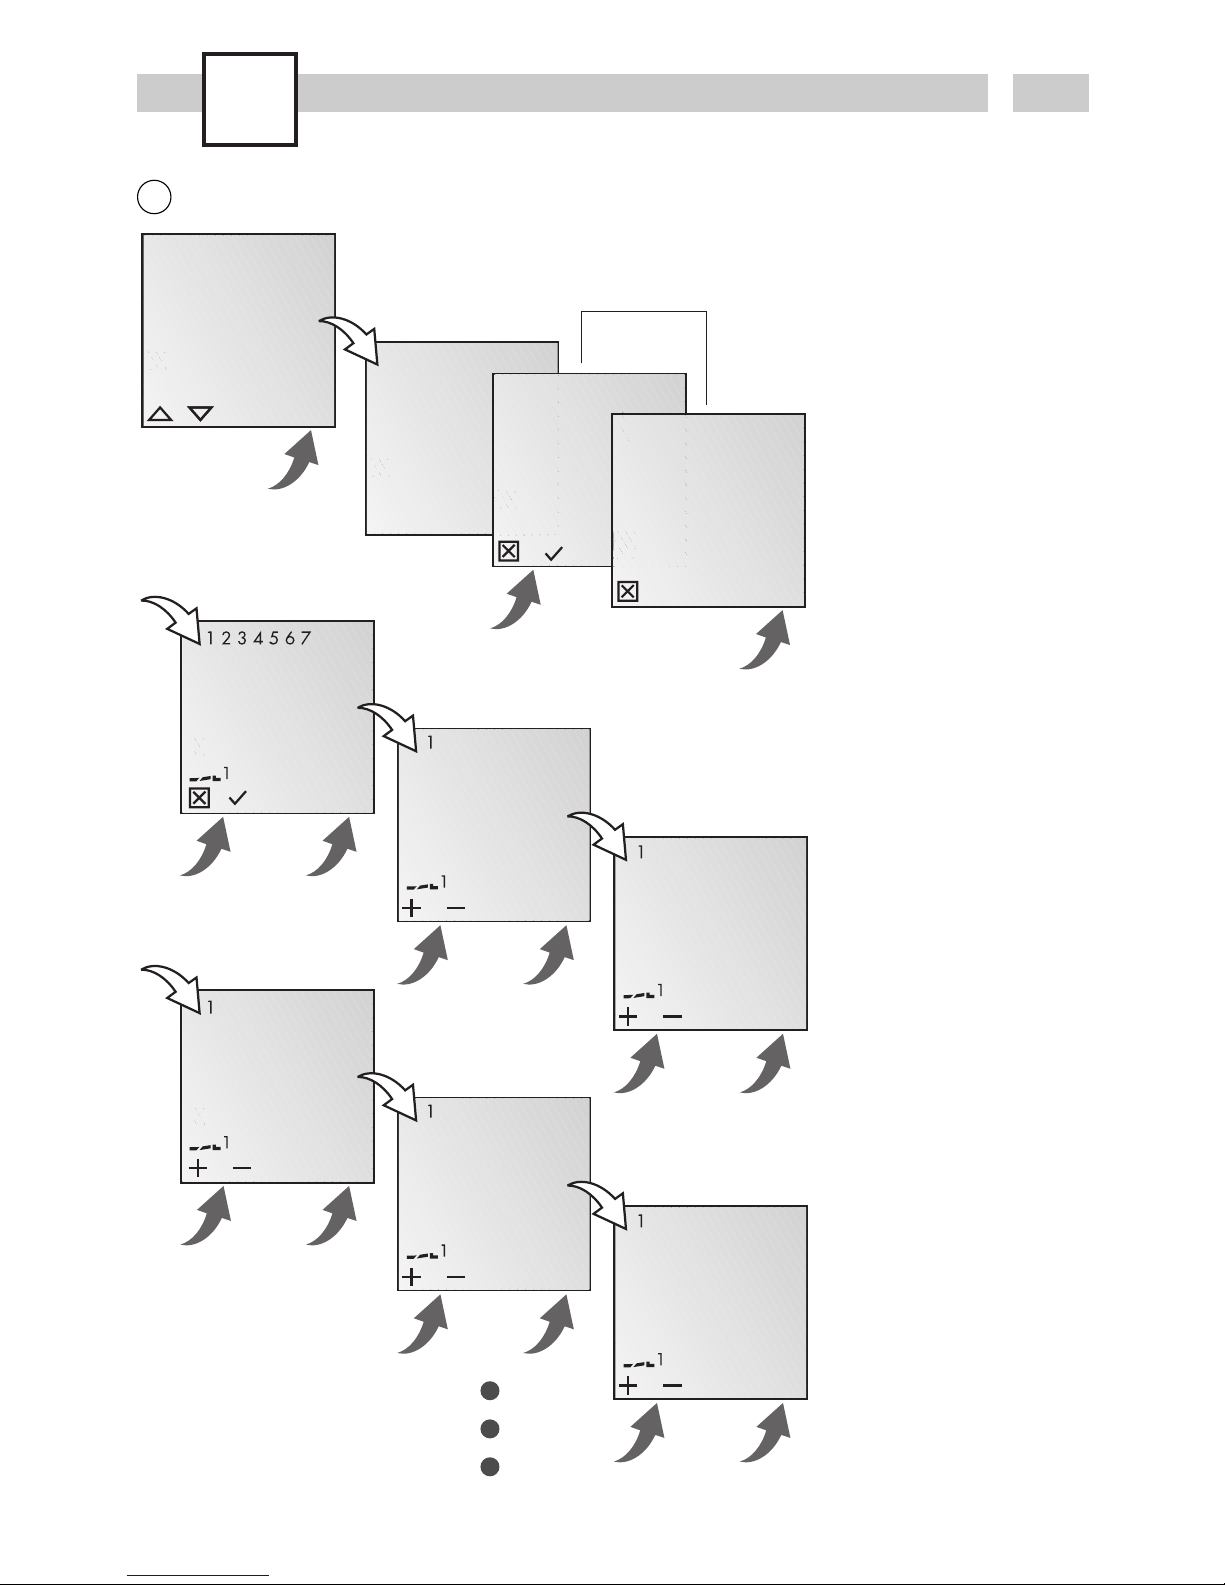
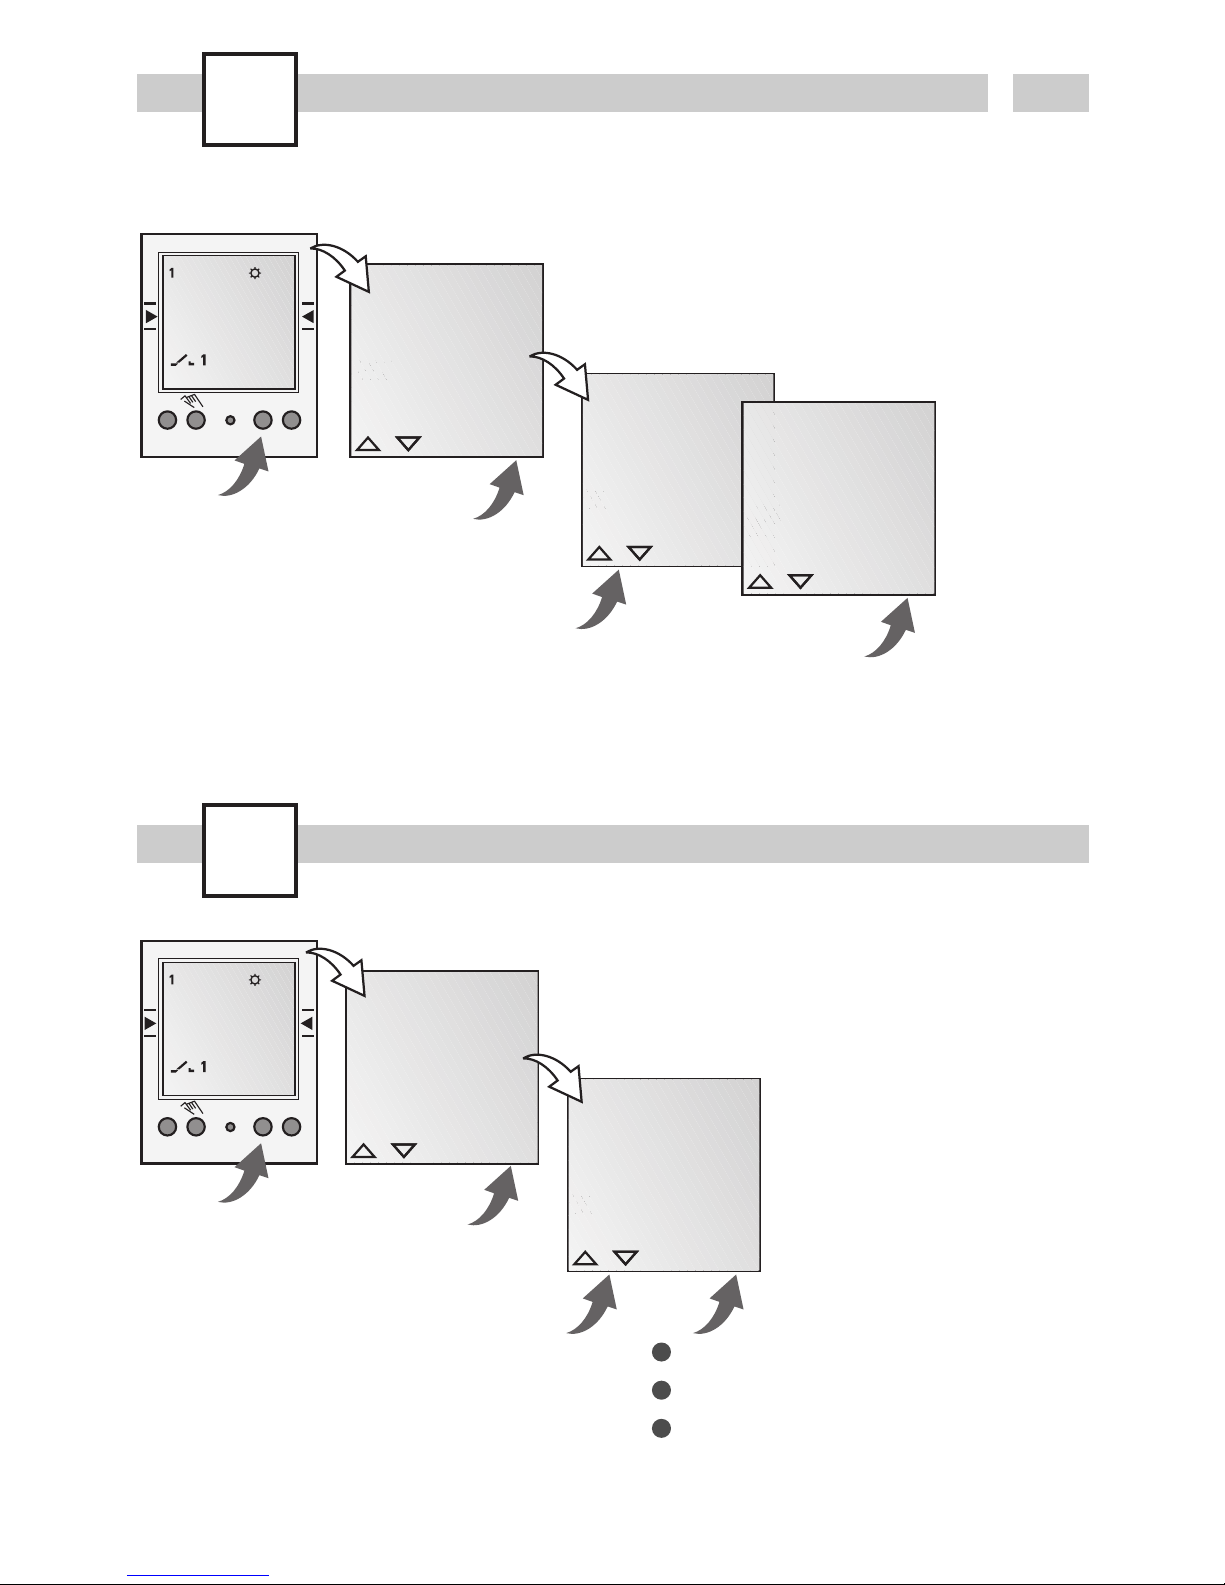
Im Auslieferungszustand befindet sich die
Zeitschaltuhr im Auto Mode mit voreingestellter
Uhrzeit, Datum und Menüsprache Englisch.
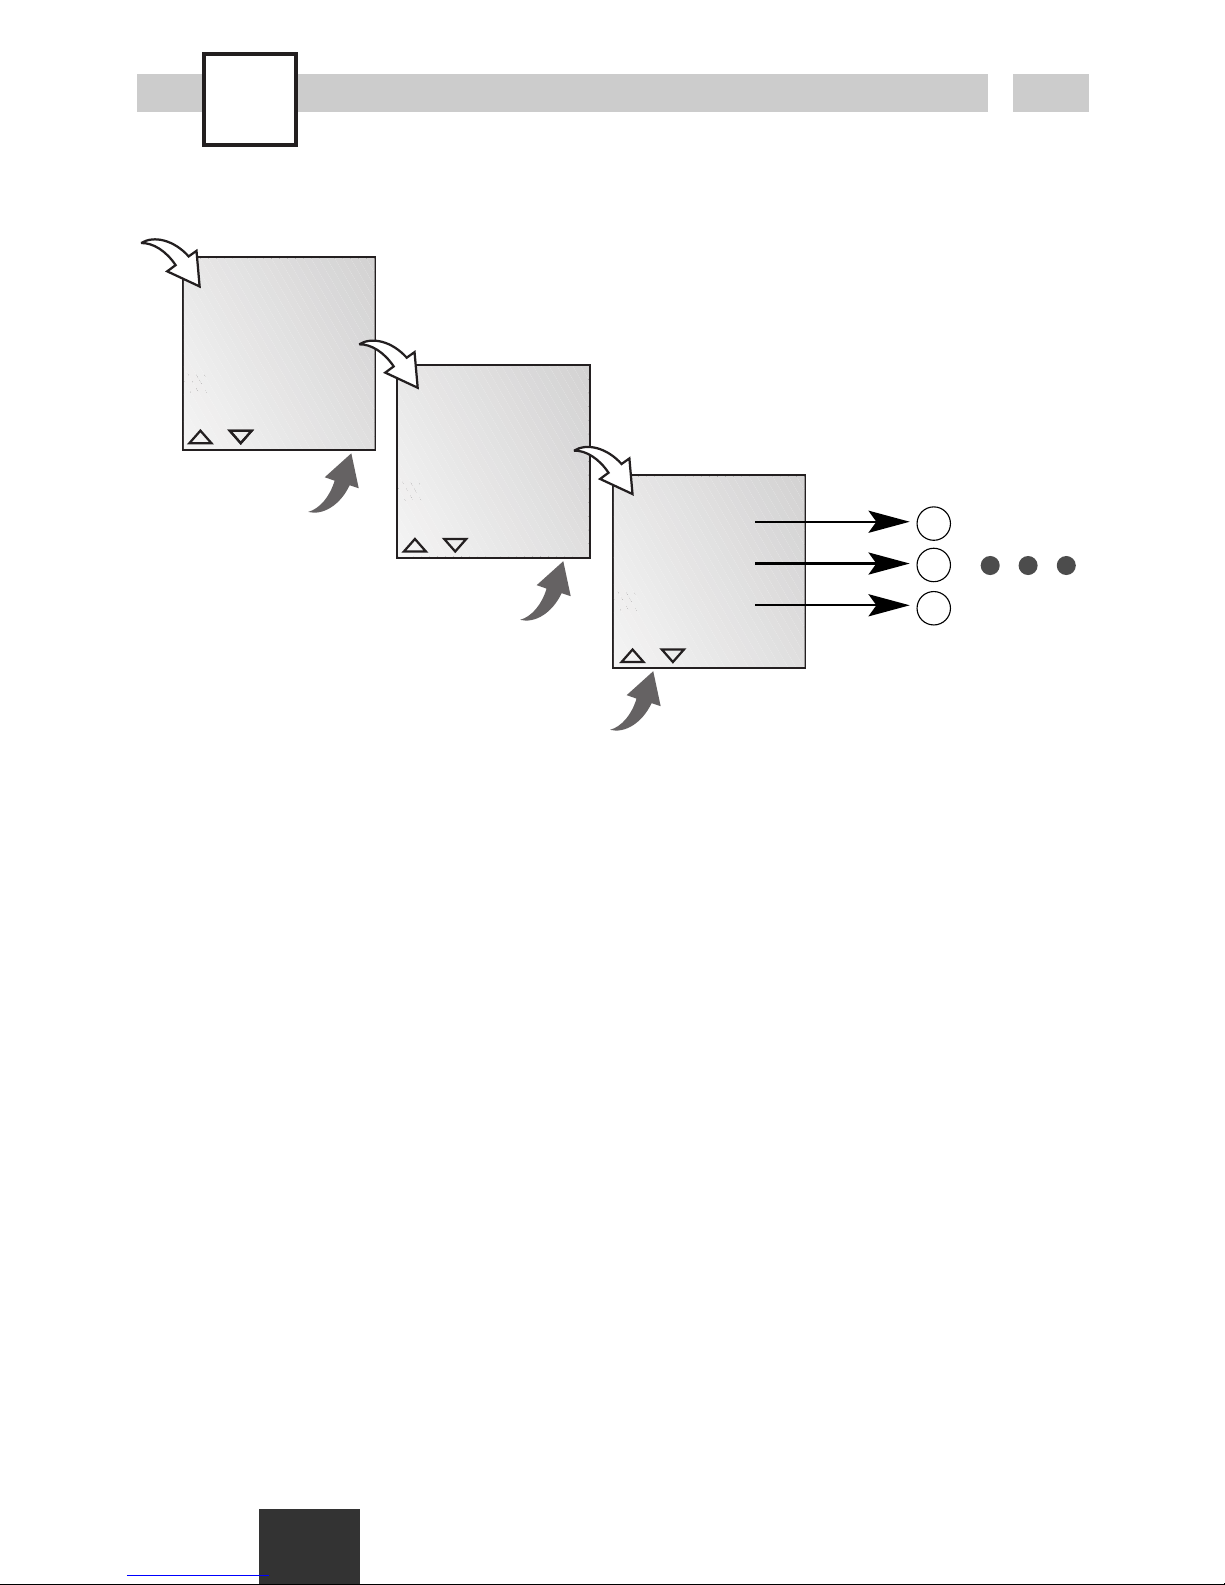
Erstinbetriebnahme - Wahl der Menüsprache
Prog.
MENU
16121824
1
C1
15:26:38
Res.
DAT/ZEIT
PROGRAMM
SO WI
MENU
OK
LESEN
NEU
LOESCHEN
ESC OK
ESC OK
Page 5
Prog.
5
D
OK
ZYKLUS
EIN/AUS
IMPULS
ESC OK
OK
FERIEN
WOECHENT
OK
LESEN
NEU
LOESCHEN
ESC OK
ESC OK
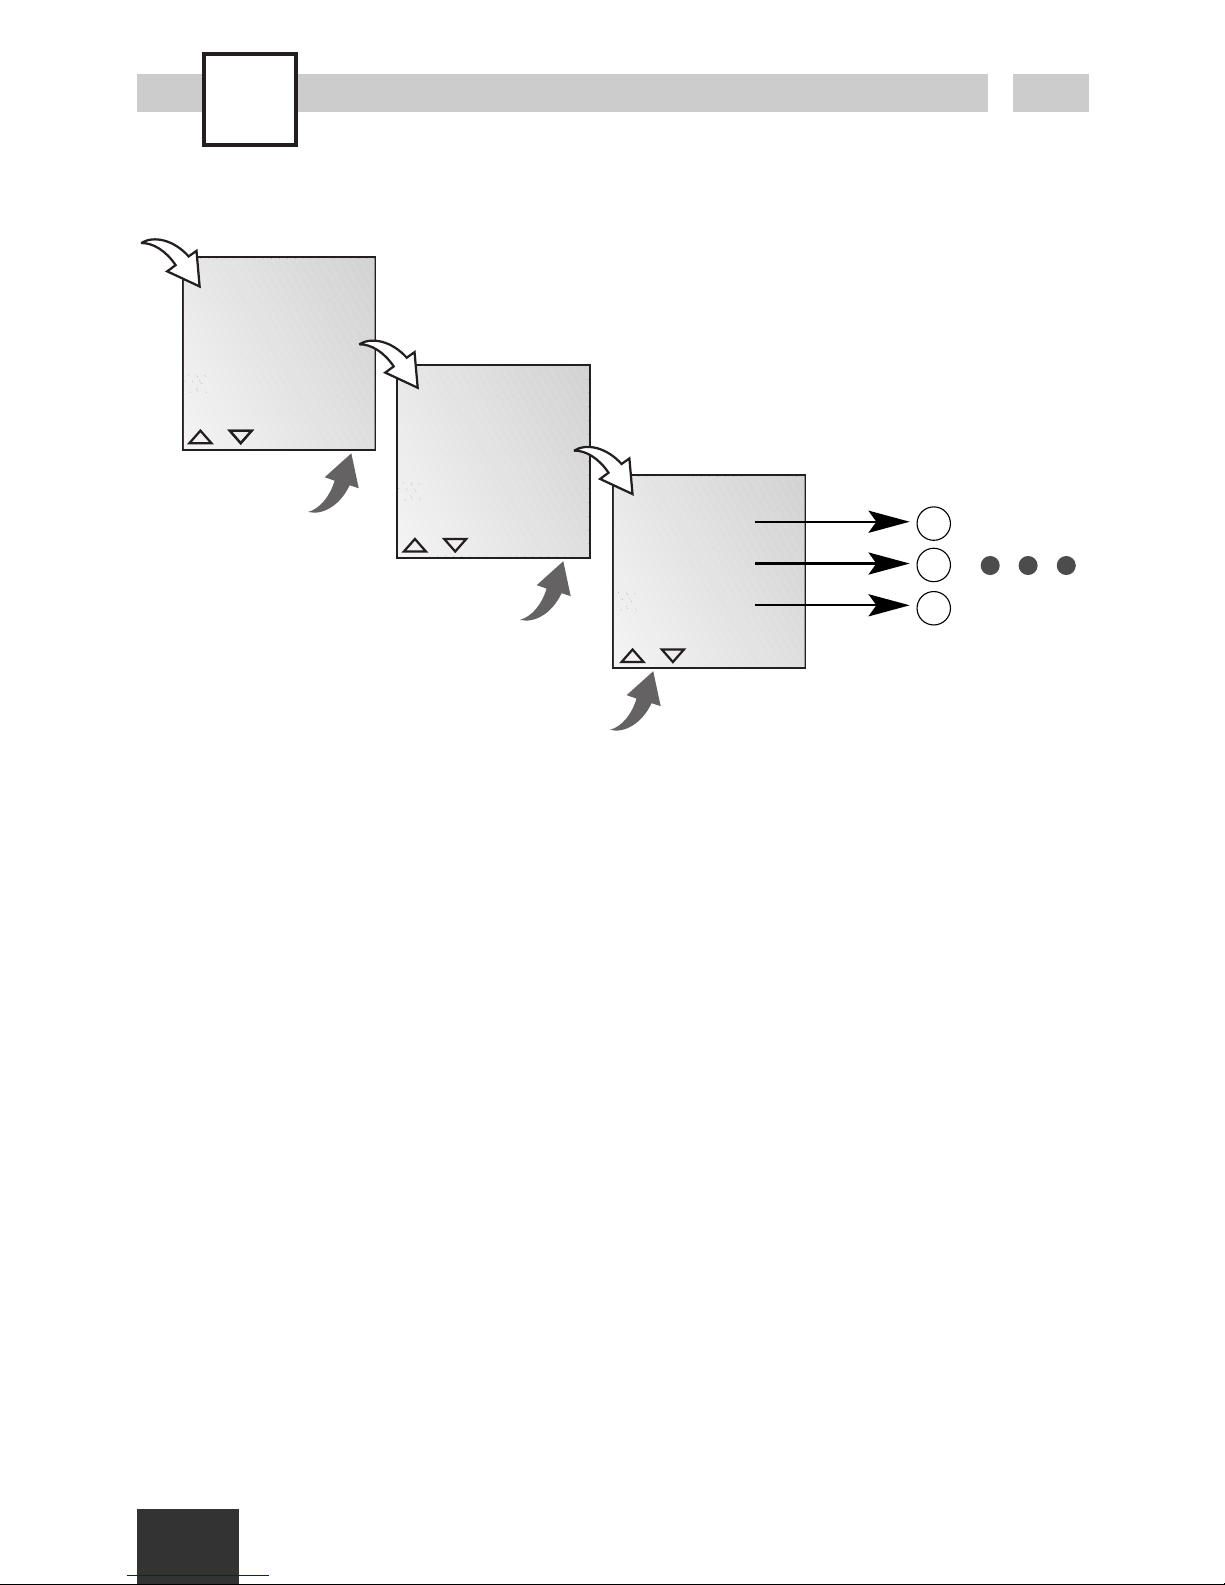
Wochenprogramm
Info
Die Schaltuhr besitzt 50
Speicherplätze.
Unter dem Menüpunkt
FERIEN kann ein datumsbezogenes Programm
erstellt werden.
(siehe Ferienprogramm)
A
C
B
Page 6
Prog.
6
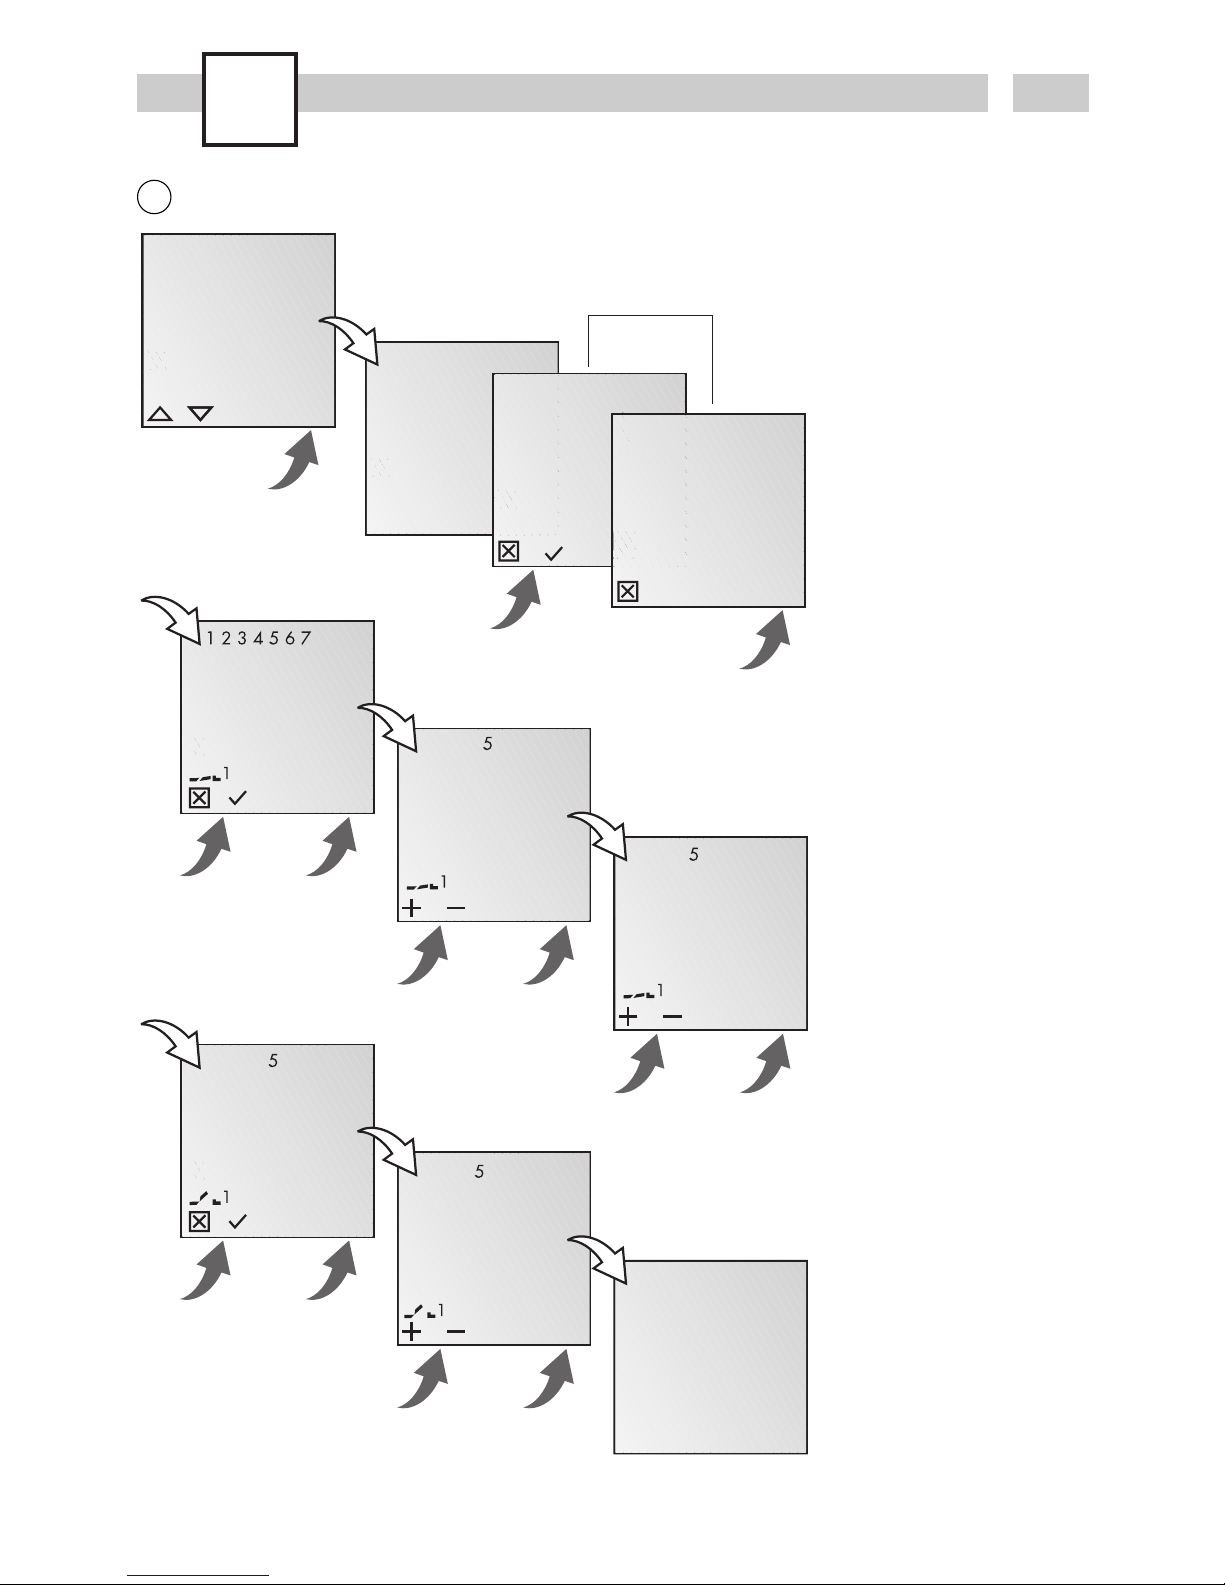
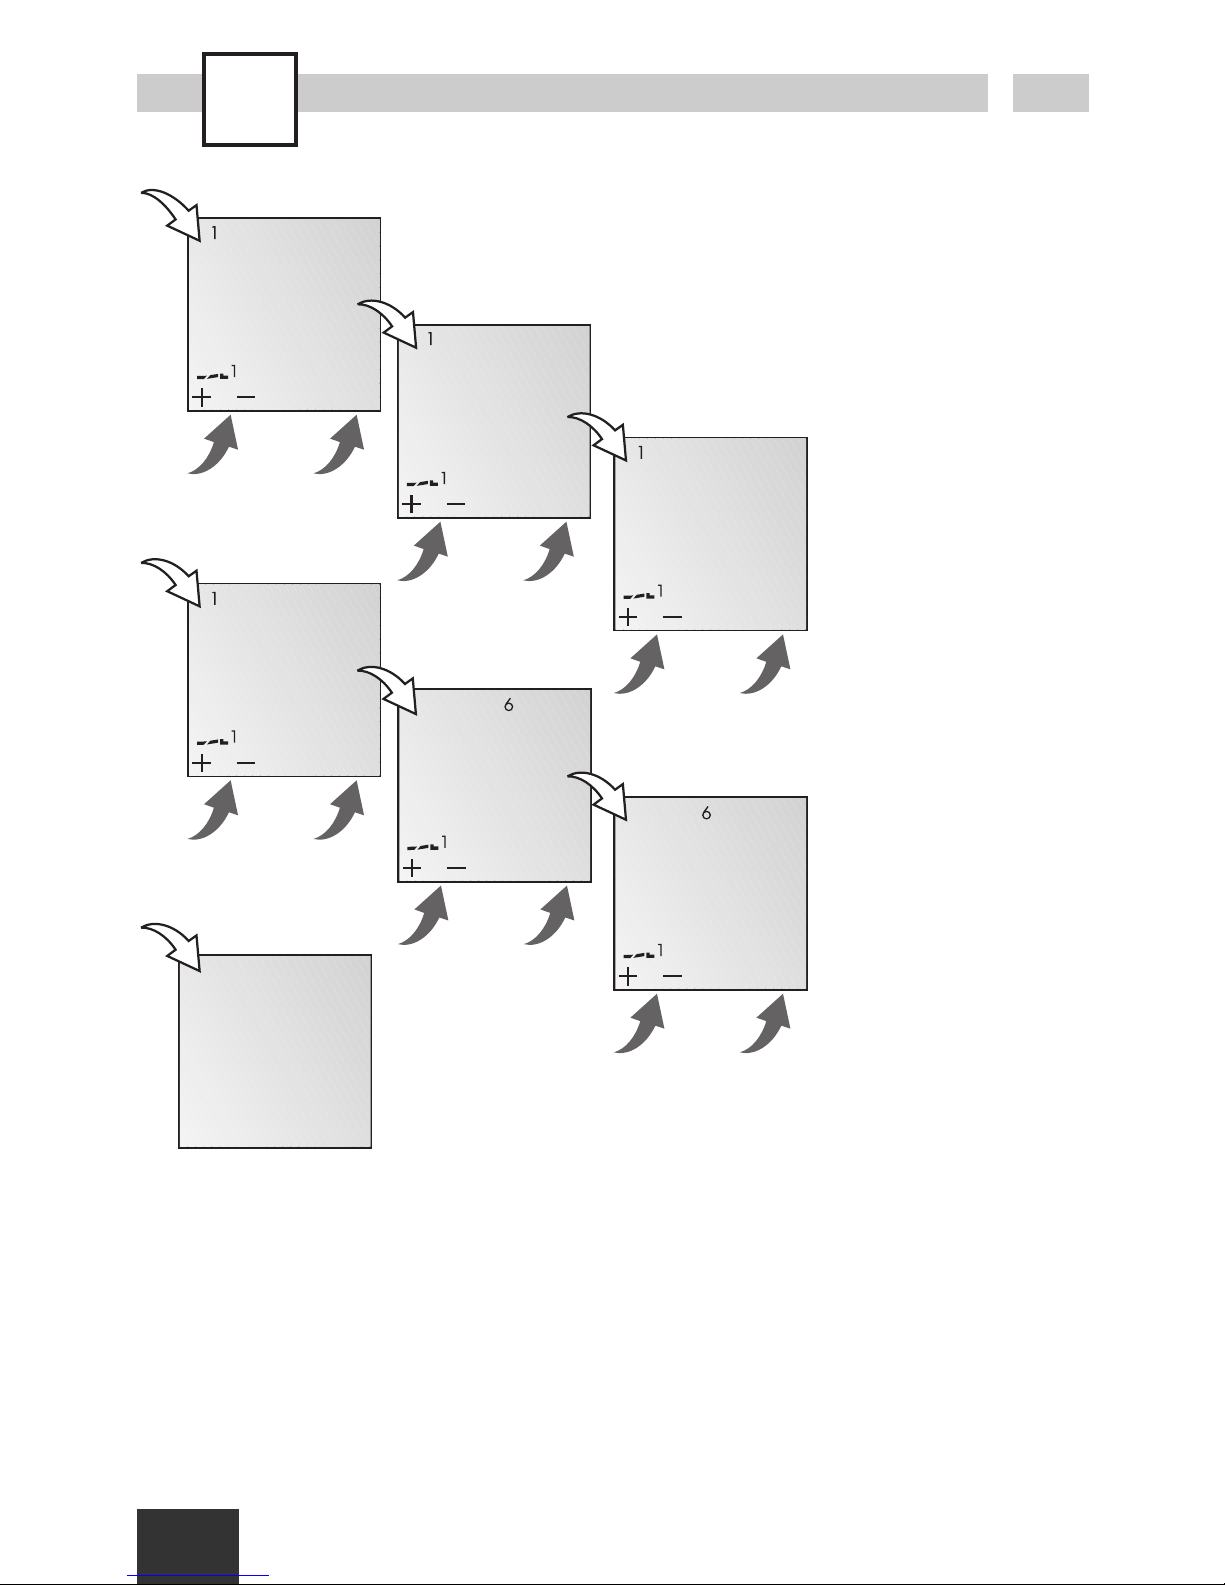
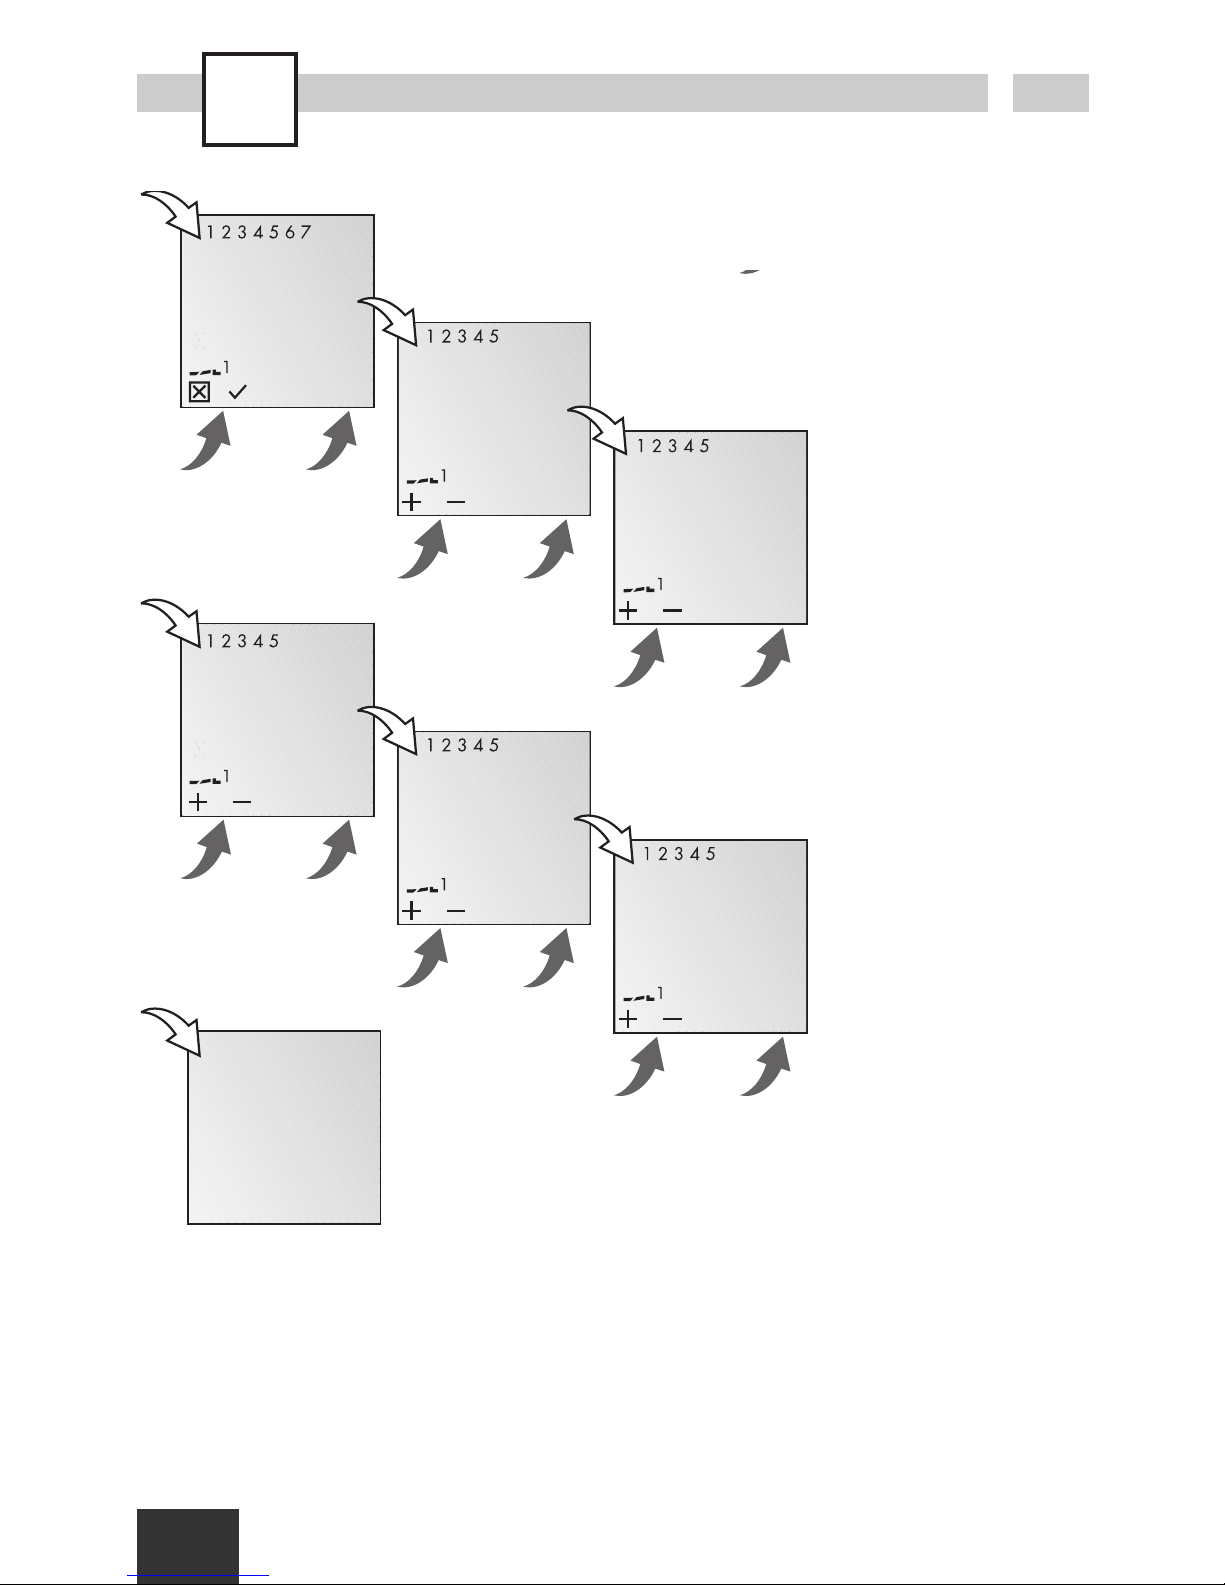
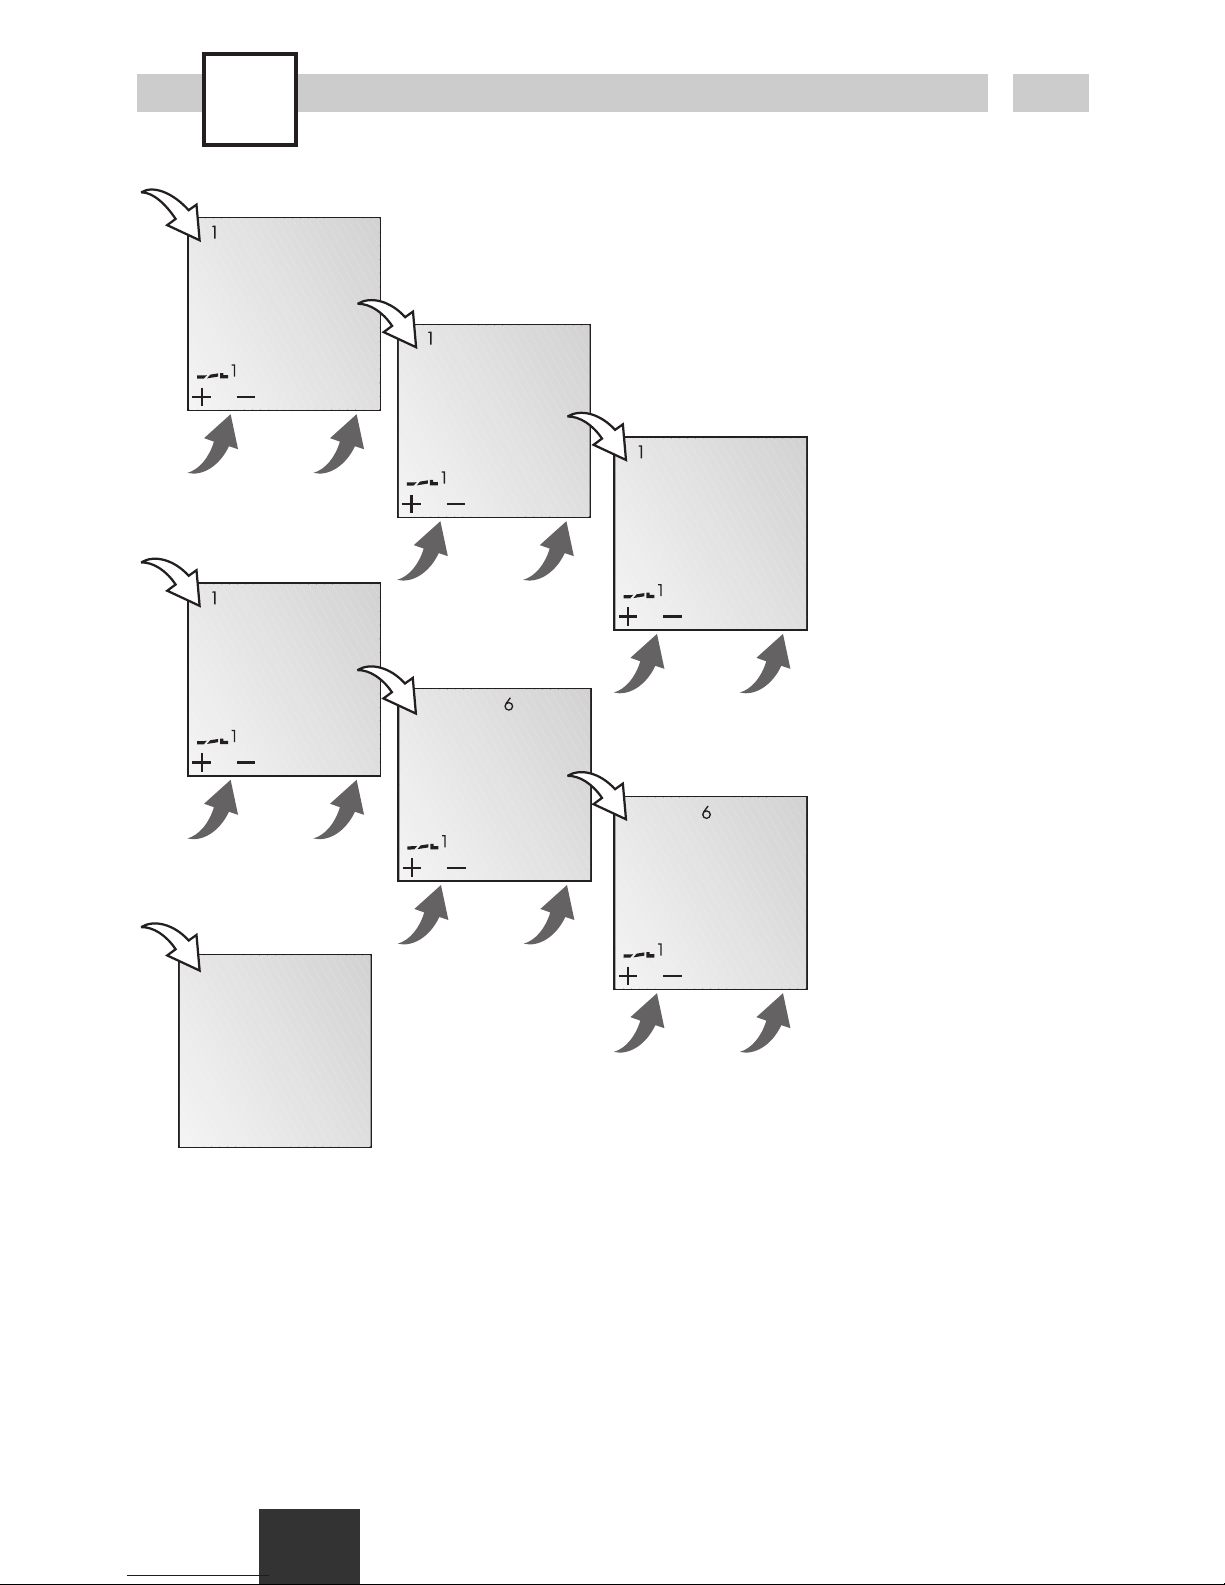
Beispiel
EIN-Befehl für Kanal 1 um
15.00 Uhr. AUS-Befehl um
18:00 Uhr.
· EIN/AUS wählen und
mit OK bestätigen.
· Es werden kurz die
freien Speicherplätze
angezeigt.
· Kanal auswählen und
mit OK bestätigen.
·Tagesblock oder Einzeltag (freie Blockbildung)
auswählen und mit OK
bestätigen.
·Stunde für EIN-Befehl
eingeben (+/-) und mit
OK bestätigen.
·Minute für EIN-Befehl
eingeben (+/-) und mit
OK bestätigen.
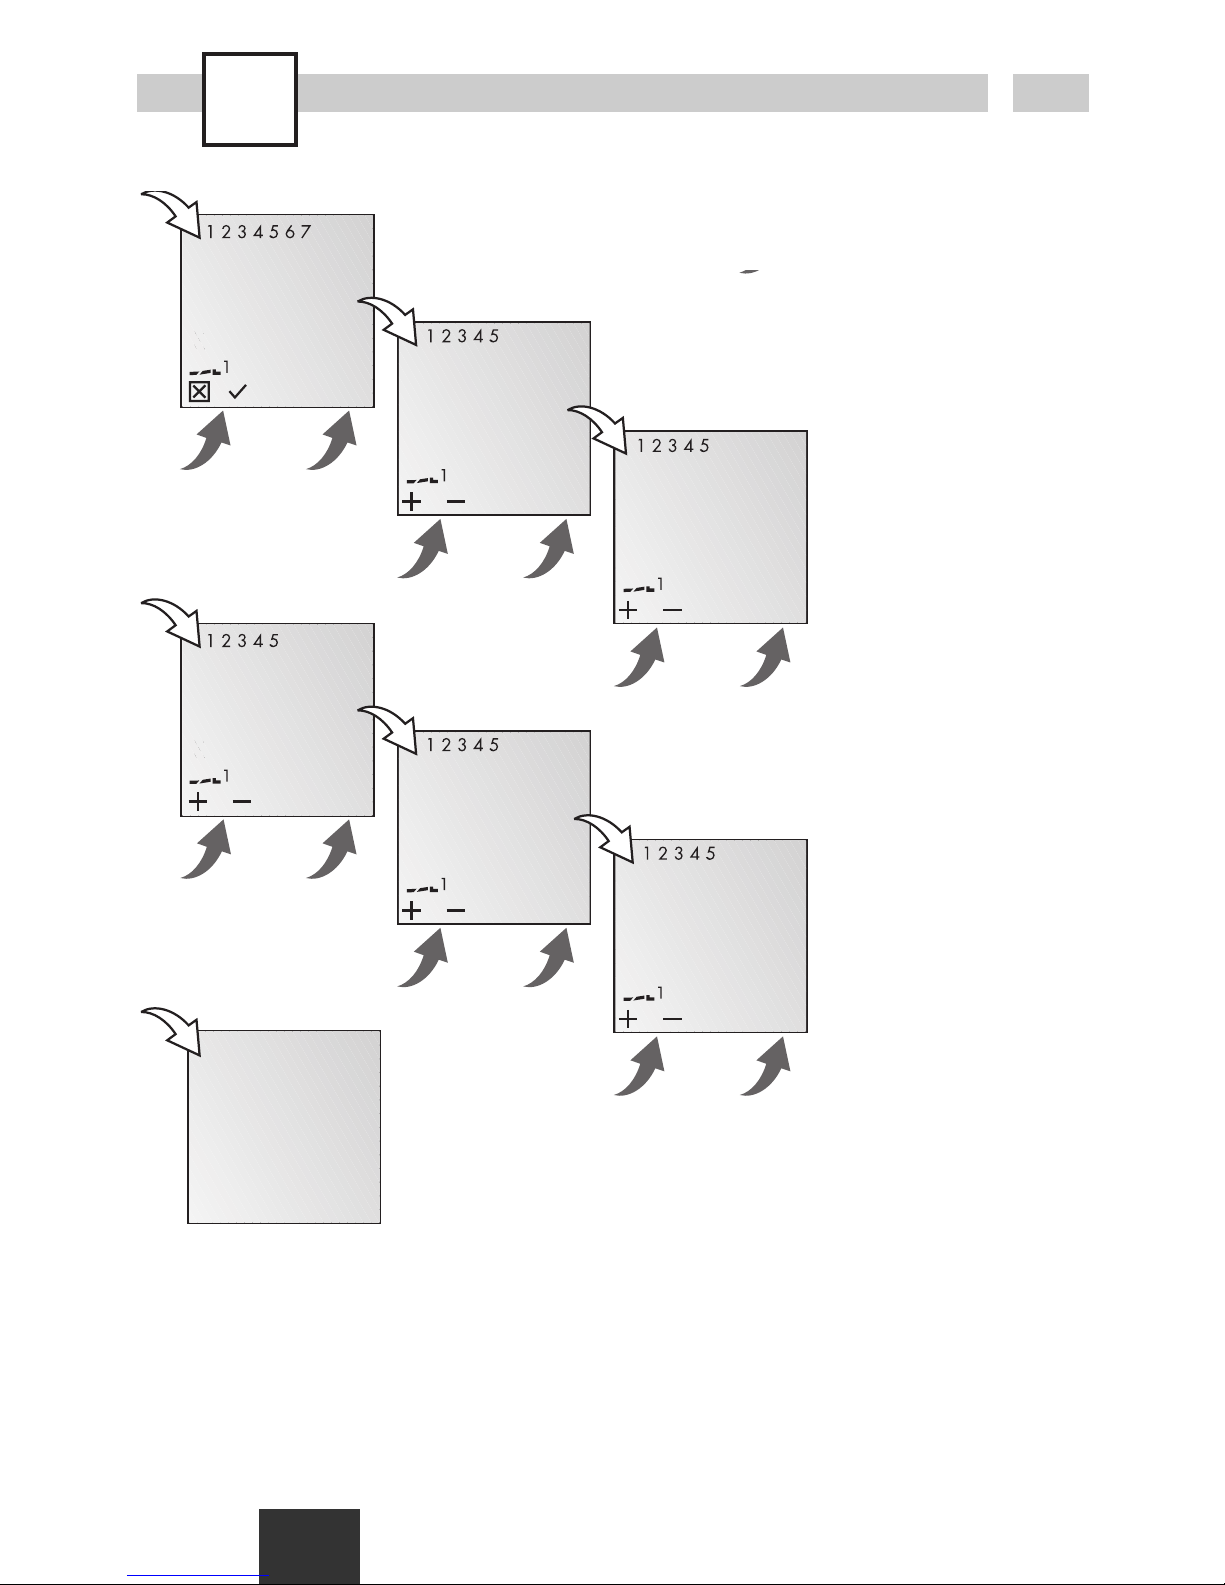
·Stunde für AUS-Befehl
eingeben (+/-) und mit
OK bestätigen.
·Minute für AUS-Befehl
eingeben (+/-) und mit
OK bestätigen.
·Programm wird
gespeichert.
·Programm springt in die
Auswahl LESEN, NEU,
LOESCHEN. Es können
nun weitere Programme
erstellt werden.
OK
FREI 50
OK
ZYKLUS
EIN/AUS
IMPULS
ESC OK
OK
AUSWAHL
KANAL
I
ESC
OK
AUSWAHL
KANAL
I
ESC OK
STUNDEN
00
KAN EIN
ESC OK
OK
AUSWAHL
TAG
KAN EIN
ESC OK
MINUTEN
15:00
KAN EIN
ESC OK
MINUTEN
18:00
KAN AUS
ESC OK
OK
STUNDEN
00
KAN AUS
ESC OK
SICHERN
P01 P02
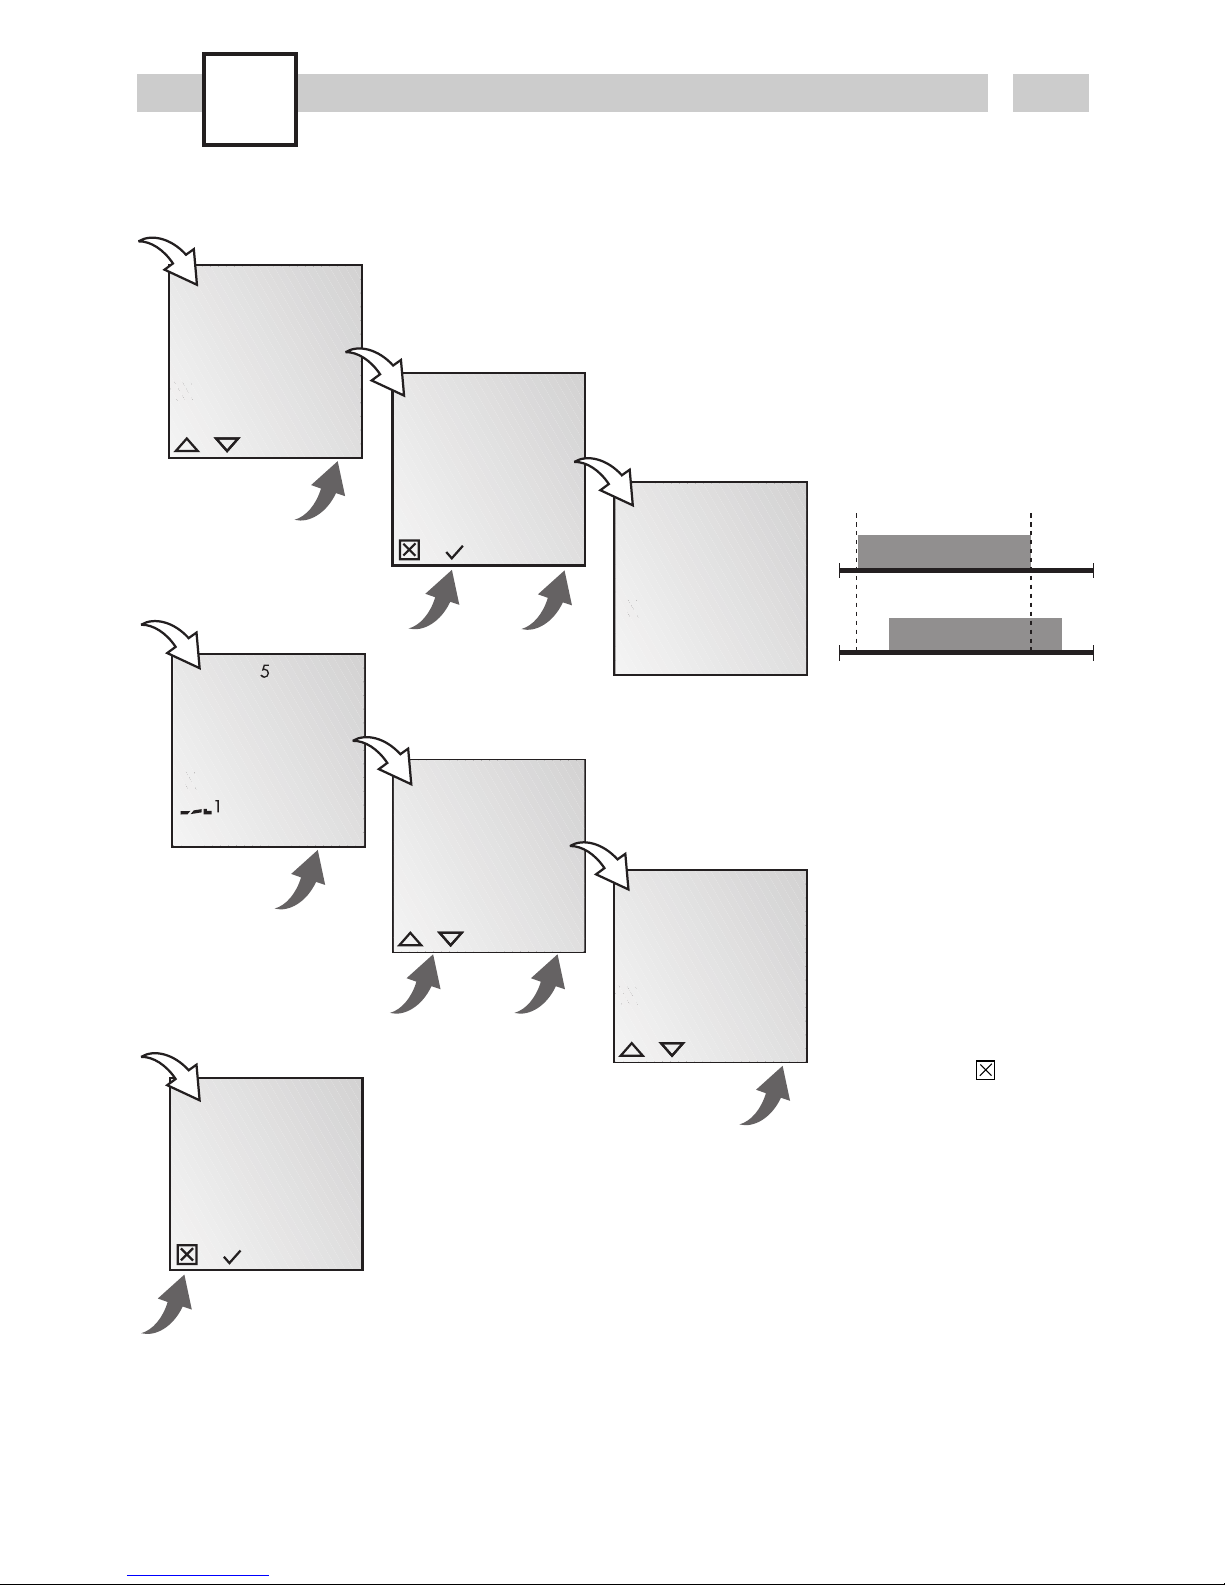
EIN/AUS-Programmierung
A
nur bei 2-Kanal
Page 7
Prog.
7
D
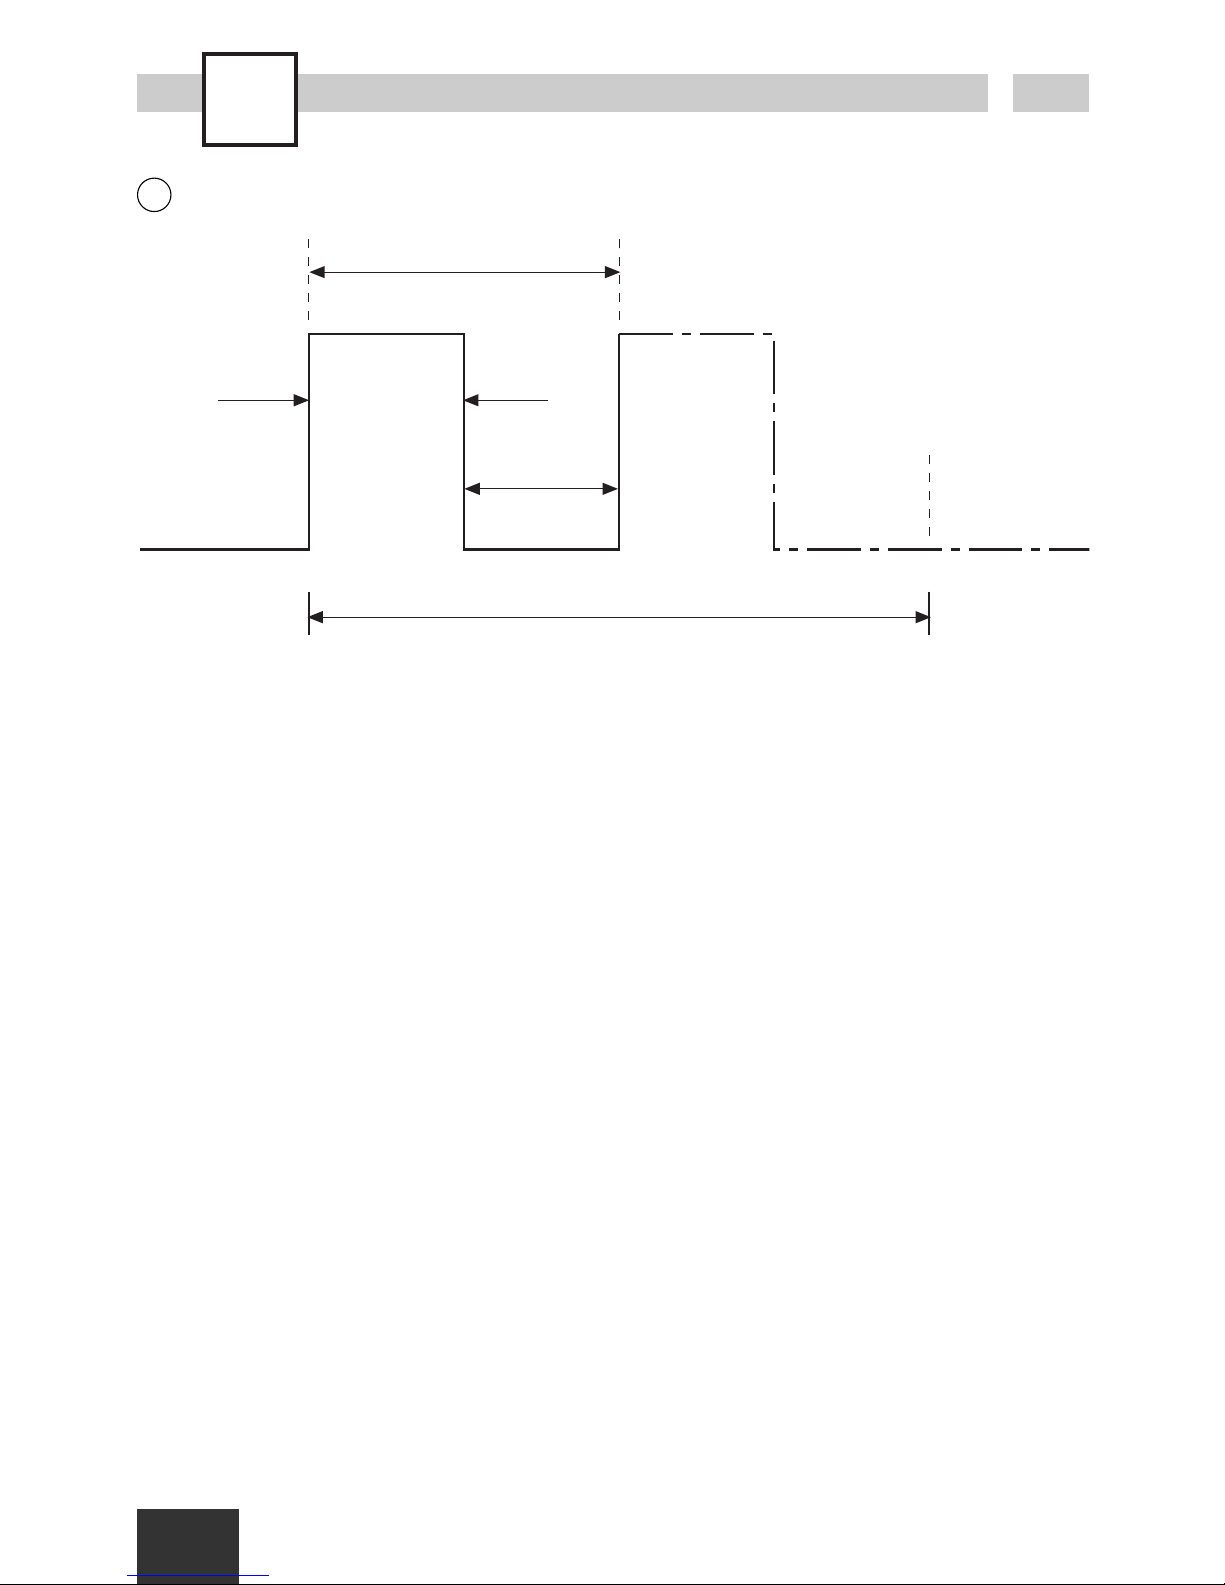
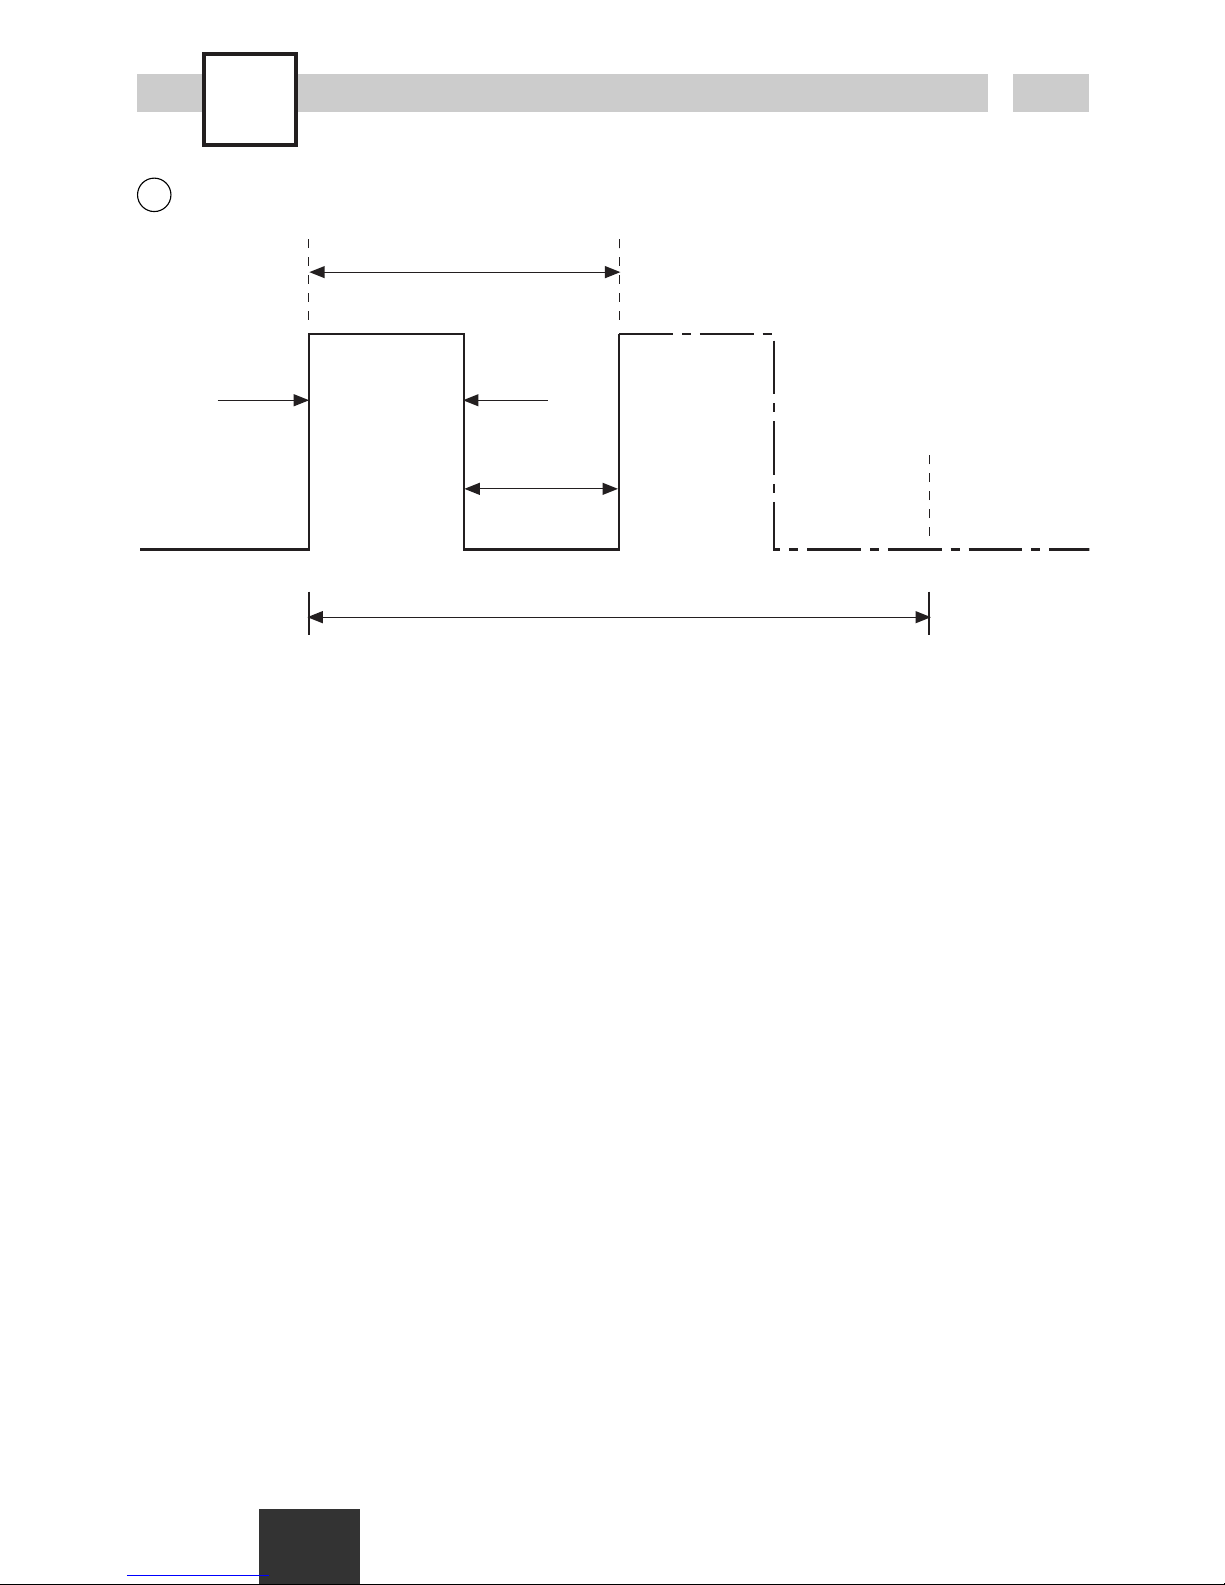
Zyklus-Programmierung
9.00 h 17.00 h
Dauer
Pause
Zyklusdauer
Startzeit
Kanal AUSKanal EIN
Ein Zyklus-Schaltbefehl besteht aus: · Startzeit
· Dauer = EIN-Schaltdauer
· Periode = EIN-Schaltdauer + Pause)
· Zyklusdauer = Zeitspanne zwischen Kanal EIN und
Kanal AUS
Info
Die Zeitdauer zwischen Startzeit und Endzeit darf nicht kleiner als die Periodendauer sein.
Ein Verschachteln von Zyklusprogrammen ist unzulässig.
Beispiel
Es wird von Montag 9.00 Uhr an beginnend, alle 60 Minuten für 10 Minuten eingeschaltet bis Freitag
19.00 Uhr.
Startzeit Montag 9.00 Uhr
EIN-Schaltdauer 10 Min.
Zyklusdauer 60 Min.
Endzeit Freitag 19.00 Uhr
B
Periode
Page 8
Prog.
8
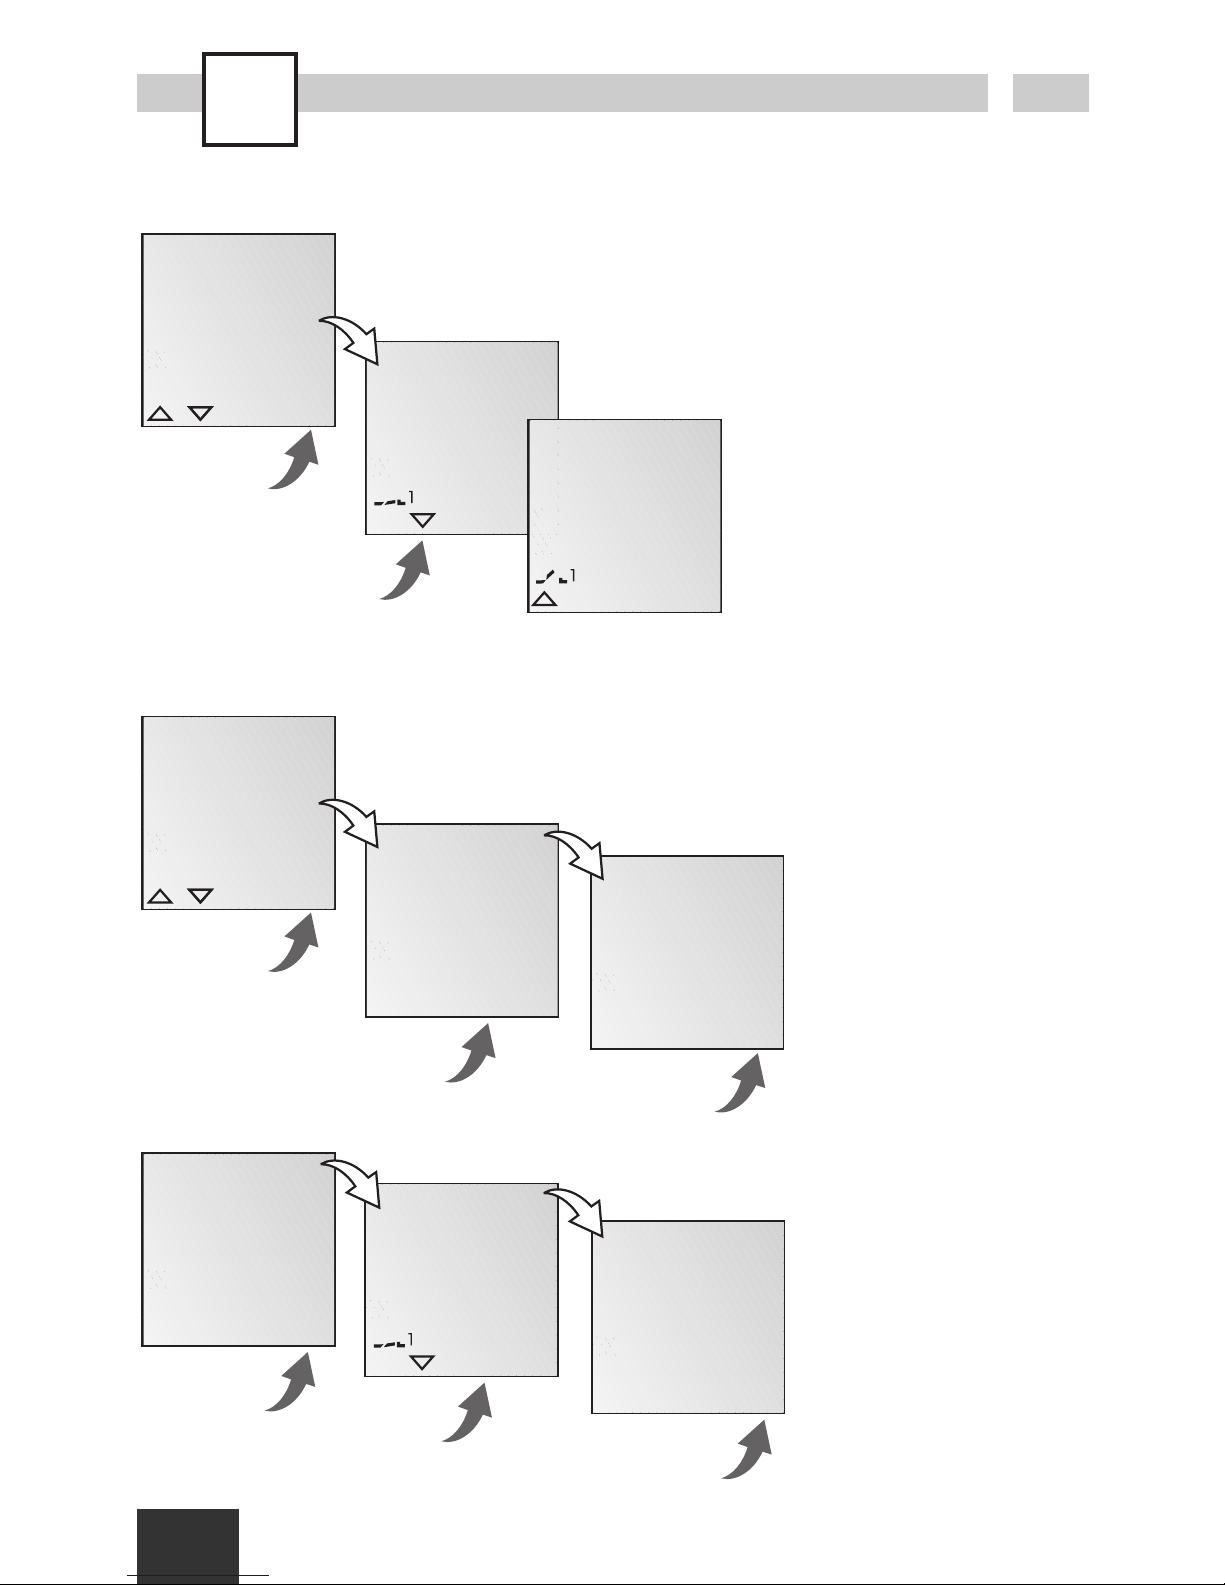
Beispiel
Gartenbewässerung: jeden
2. Tag zwei Stunden wässern. EIN-Befehl für Kanal
1 um 04.00 Uhr.
AUS-Befehl um 06:00 Uhr.
· ZYKLUS wählen und mit
OK bestätigen.
· Es werden kurz die
freien Speicherplätze
angezeigt.
· Kanal auswählen und
mit OK bestätigen.
·Tagesblock oder Einzeltag (freie Blockbildung)
auswählen und mit OK
bestätigen.
·Stunde für EIN-Befehl
eingeben (+/-) und mit
OK bestätigen.
·Minute für EIN-Befehl
eingeben (+/-) und mit
OK bestätigen.
·Periode:
Tage, Stunden, Minuten
oder Sekunden eingeben und mit OK
bestätigen.
OK
FREI 50
OK
IMPULS
ZYKLUS
EIN/AUS
ESC OK
OK
AUSWAHL
KANAL
I
ESC
OK
AUSWAHL
KANAL
I
ESC OK
STUNDEN
00
KAN EIN
ESC OK
OK
AUSWAHL
TAG
KAN EIN
ESC OK
MINUTEN
04:00
KAN EIN
ESC OK
PERIODE
2
TAG EIN
ESC OK
OK
PERIODE
0
TAG EIN
ESC OK
PERIODE
2:00
STUNDEN
ESC OK
Zyklus-Programmierung
B
nur bei 2-Kanal
Page 9
9
D
Prog.
STUNDEN
00
KAN AUS
ESC OK
PERIODE
02:00
MINUTEN
ESC OK
DAUER
0
TAG
ESC OK
DAUER
2:00
STUNDEN
ESC OK
DAUER
02:00
MINUTEN
ESC OK
SICHERN
P04
MINUTEN
06:00
KAN AUS
ESC OK
· Dauer für EIN-Befehl:
Tage, Stunden, Minuten
oder Sekunden eingeben und mit OK
bestätigen.
·Tagesblock oder Einzeltag (freie Blockbildung)
auswählen und mit OK
bestätigen.
·Stunde für AUS-Befehl
eingeben (+/-) und mit
OK bestätigen.
·Minute für AUS-Befehl
eingeben (+/-) und mit
OK bestätigen.
·Programm wird
gespeichert.
·Programm springt in die
Auswahl LESEN, NEU,
LOESCHEN. Es können
nun weitere Programme
erstellt werden.
Page 10
Prog.
10
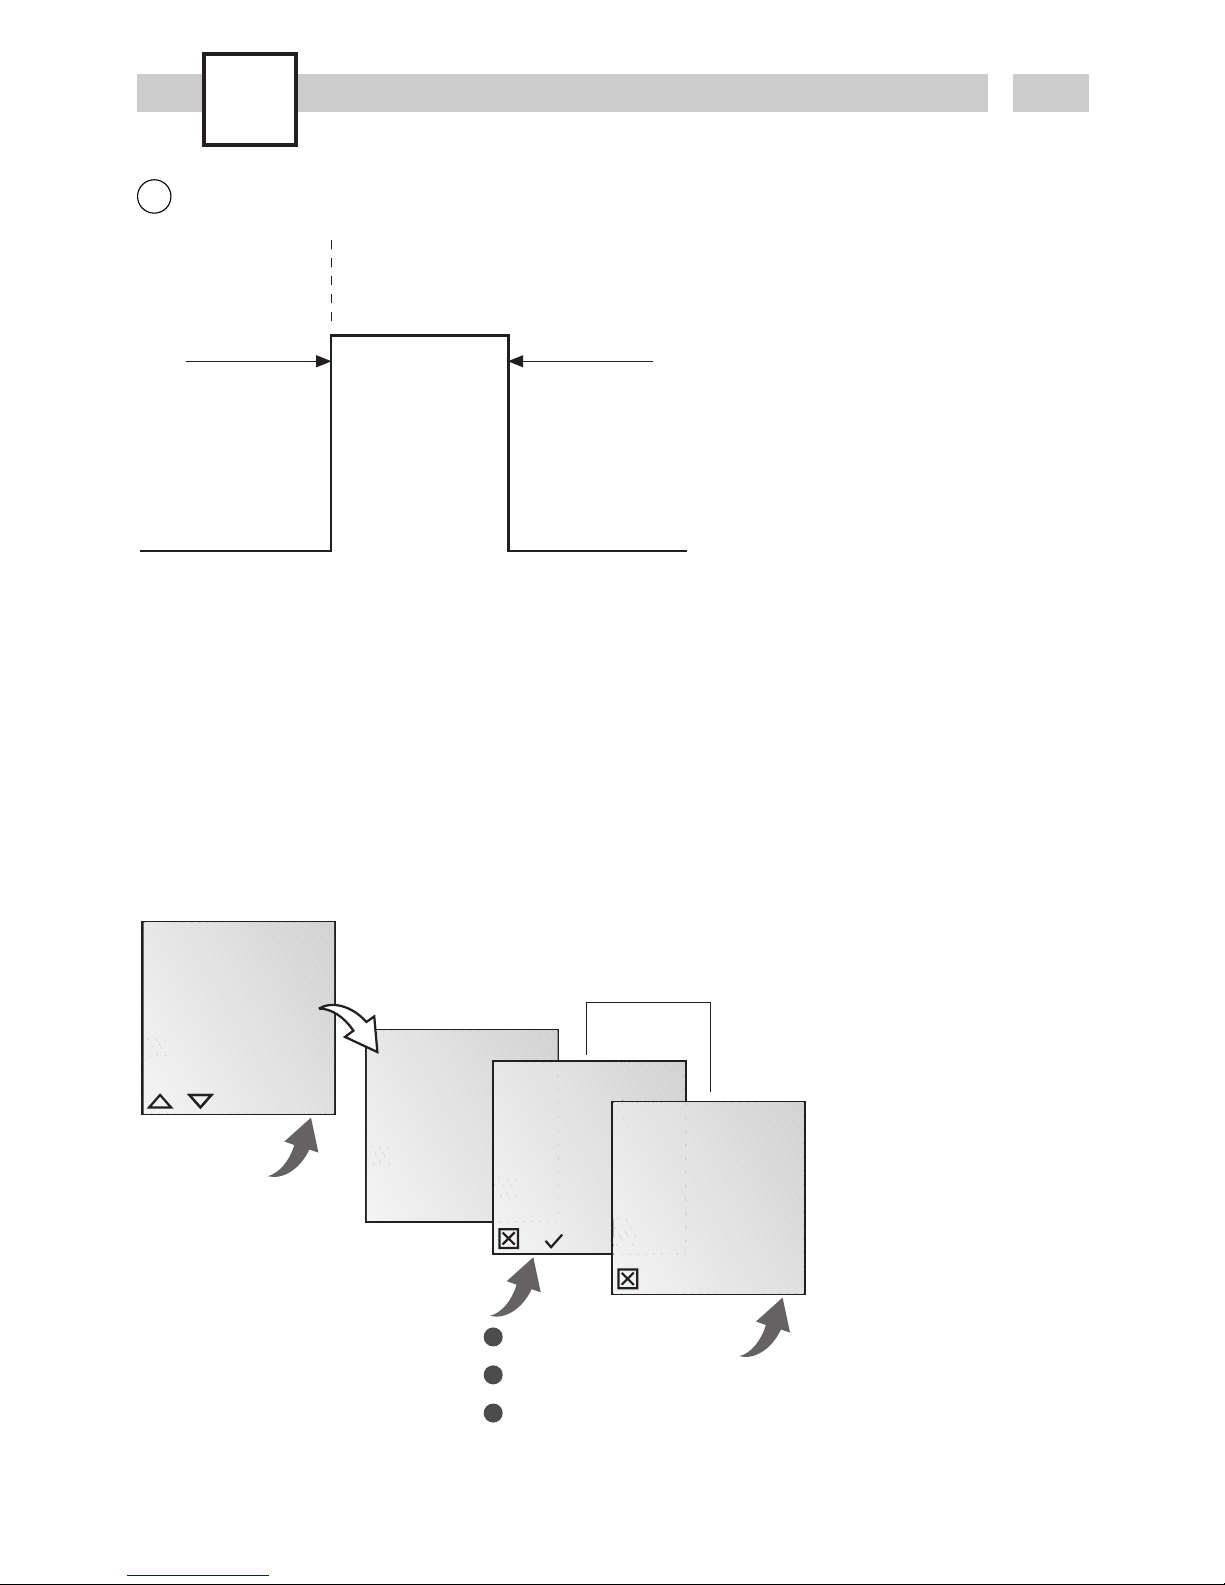
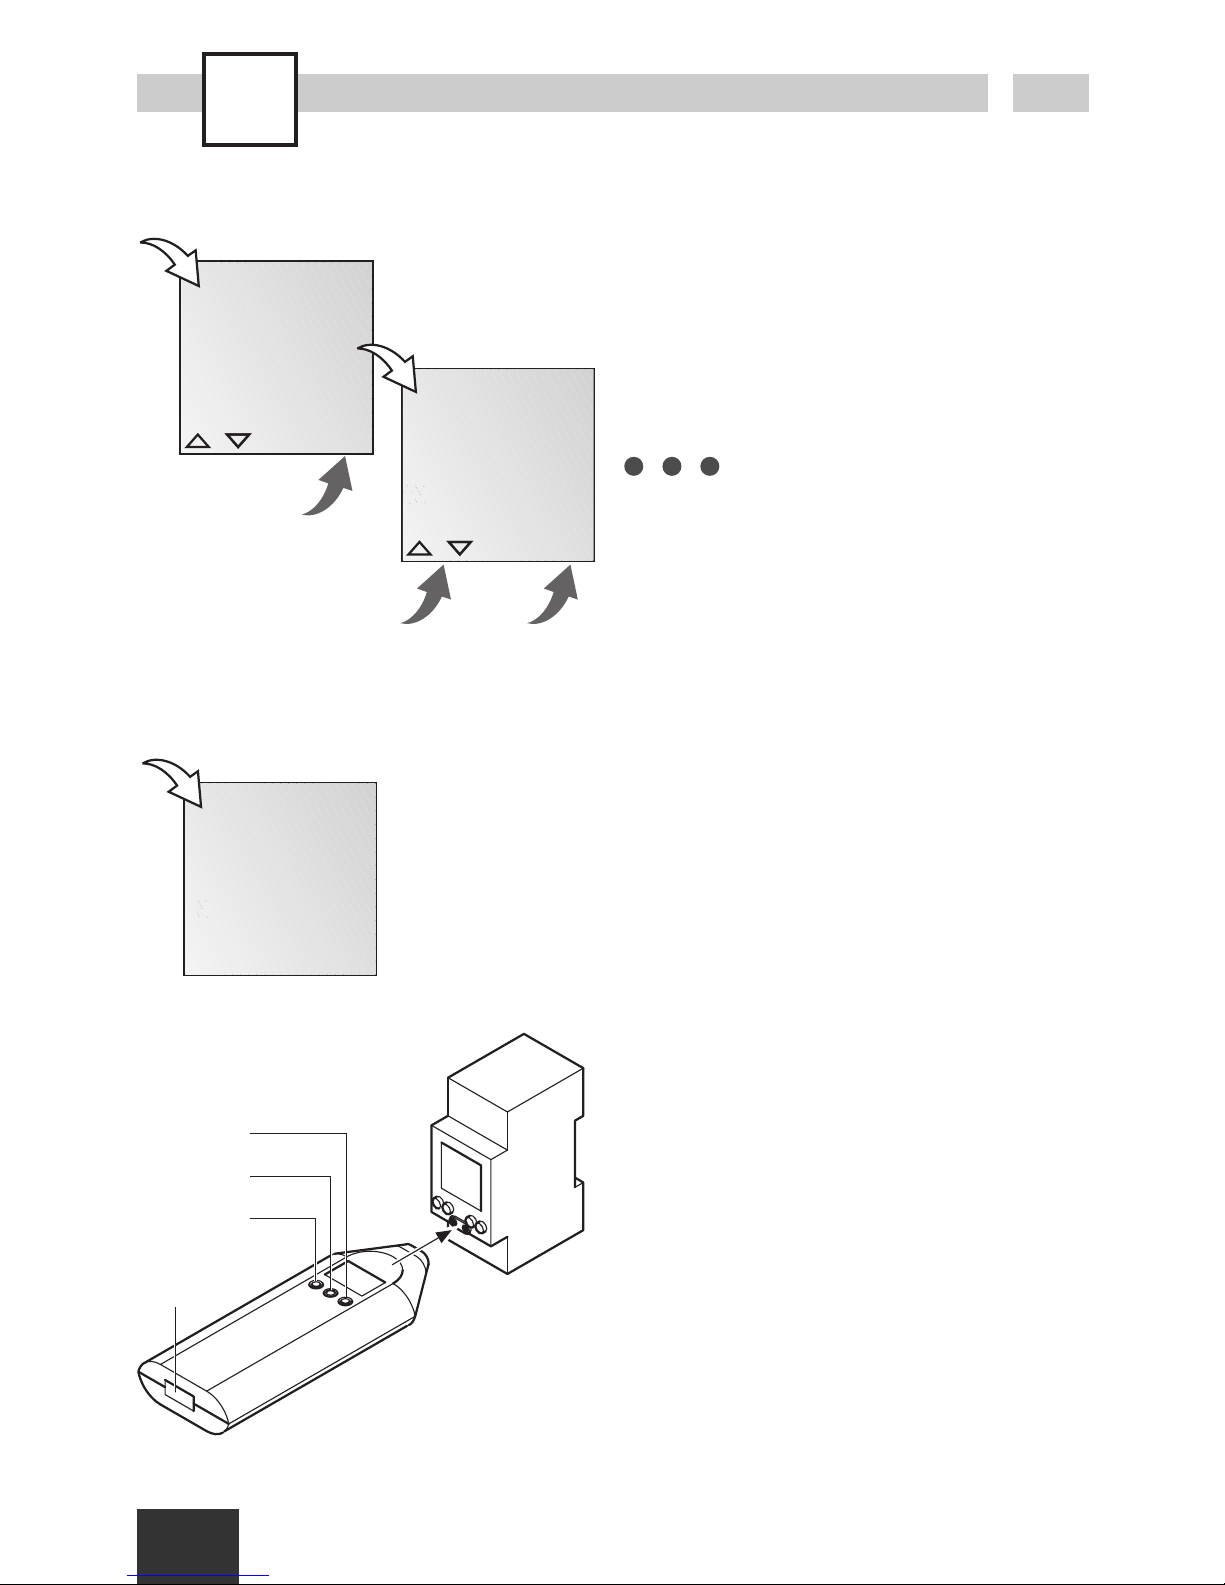
Impuls-Programmierung
9.00 h
Dauer
Startzeit
Ein Impuls-Schaltbefehl besteht aus: · Startzeit
· Dauer = EIN-Schaltdauer
kürzeste EIN-Schaltdauer = 2 sec
Beispiel
Startzeit Montag bis Freitag 9.00 Uhr
EIN-Schaltdauer 10 Sek.
C
OK
FREI 50
OK
EIN/AUS
IMPULS
ZYKLUS
ESC OK
OK
AUSWAHL
KANAL
I
ESC
OK
AUSWAHL
KANAL
I
ESC OK
AUSWAHL
Beispiel
Montag bis Freitag täglich
EIN-Befehl für Kanal 1um
15.00 Uhr. EIN-Schaltdauer 1 Stunde.
·IMPULS wählen und mit
OK bestätigen.
· Es werden kurz die
freien Speicherplätze
angezeigt.
· Kanal auswählen und
mit OK bestätigen.
nur bei 2-Kanal
Page 11
Prog.
11
D
·Tagesblock oder Einzeltag (freie Blockbildung)
auswählen und mit OK
bestätigen.
·Stunde für EIN-Befehl
eingeben (+/-) und mit
OK bestätigen.
·Minute für EIN-Befehl
eingeben (+/-) und mit
OK bestätigen.
· Dauer für EIN-Befehl:
Tage, Stunden, Minuten
oder Sekunden eingeben und mit OK
bestätigen.
·Programm wird
gespeichert.
·Programm springt in die
Auswahl LESEN, NEU,
LOESCHEN. Es können
nun weitere Programme
erstellt werden.
ESC OK
STUNDEN
00
KAN EIN
ESC OK
OK
AUSWAHL
TAG
KAN EIN
ESC OK
MINUTEN
15:00
KAN EIN
ESC OK
SICHERN
P05
OK
DAUER
0
TAG
ESC OK
DAUER
01:00
STUNDEN
ESC OK
DAUER
01:00
MINUTEN
ESC OK
Page 12

OK
ZYKLUS
EIN/AUS
IMPULS
ESC OK
OK
WOECHENT
FERIEN
OK
LESEN
NEU
LOESCHEN
ESC OK
ESC OK
OK
FREI 50
AUSWAHL
KANAL
I
ESC OK
AUSWAHL
KANAL
I
ESC
OK
MONAT
01
ANFANG
ESC OK
OK
AUSWAHL
TAG
KAN EIN
ESC OK
MONAT
01
ENDE
ESC OK
OK
TAG
08:01
ANFANG
ESC OK
TAG
08:01
ENDE
ESC OK
Prog.
12
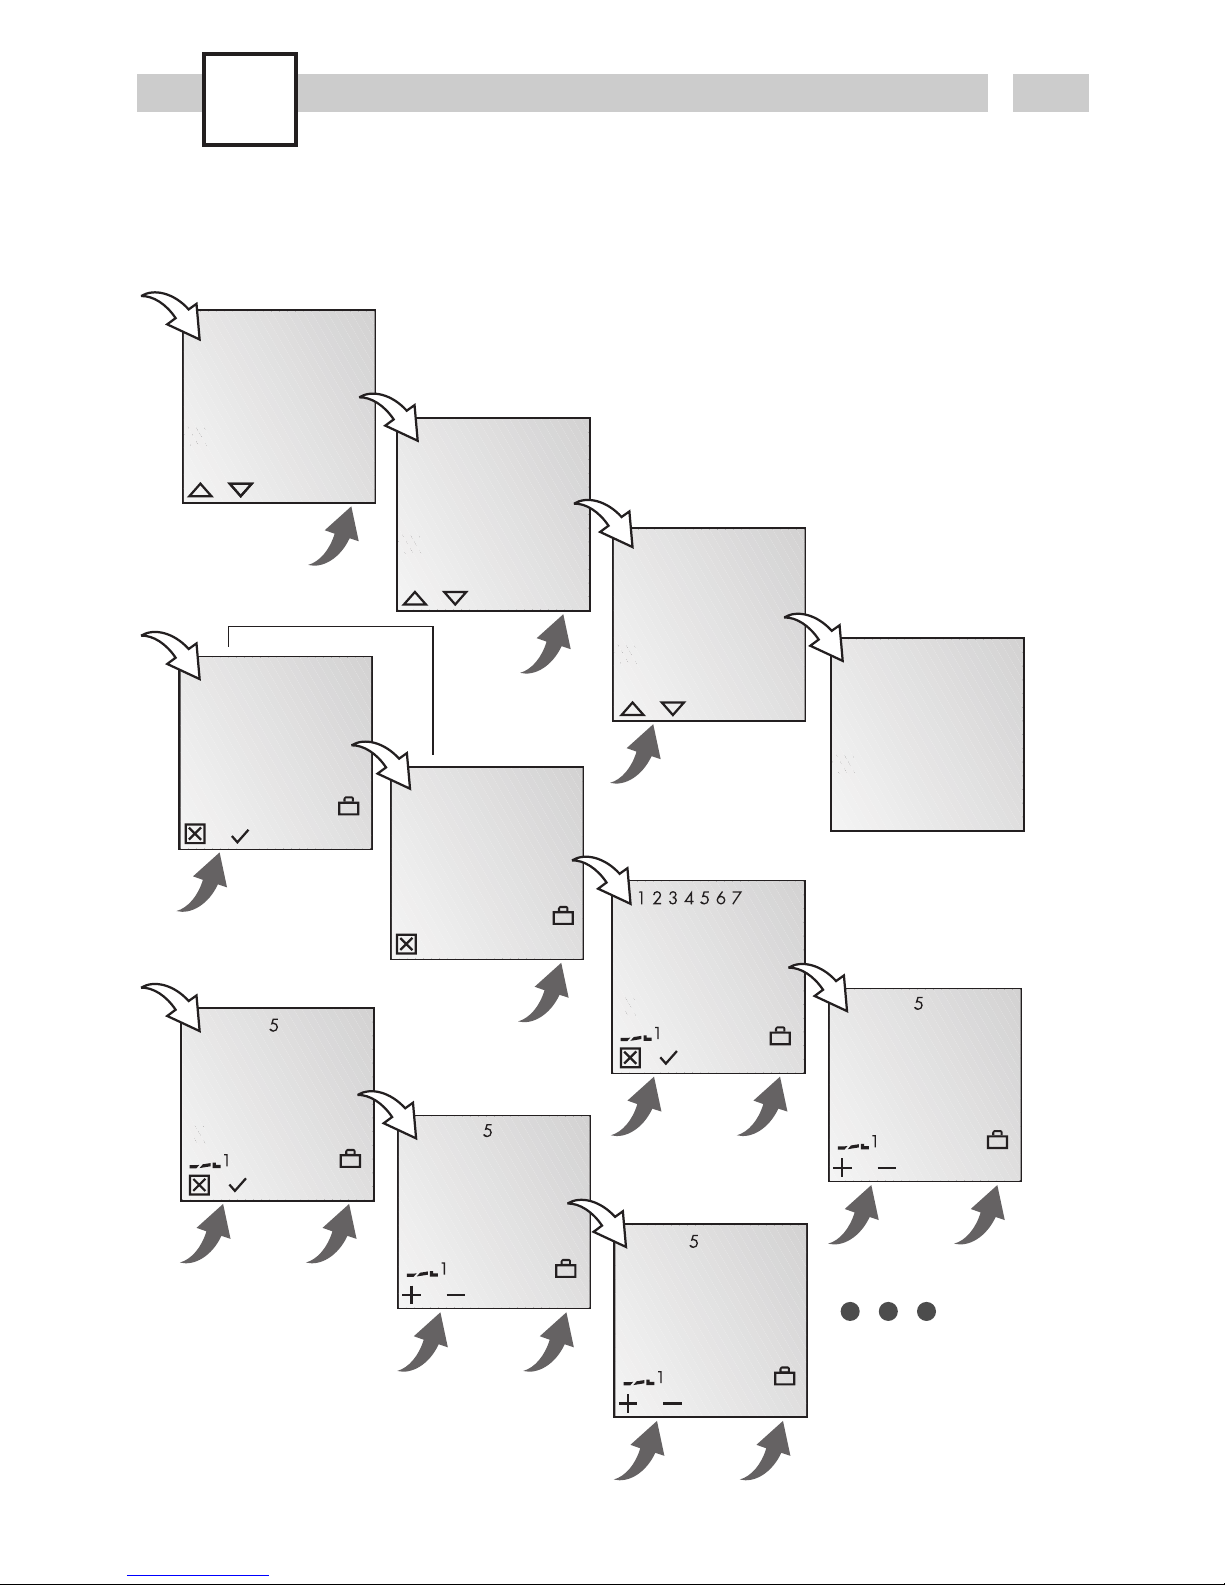
Ferienprogramm
Info
Es ist nur die Eingabe eines Datumbereiches
möglich.
Werden mehrere Programme eingegeben, gilt für
alle Schaltbefehle im Ferienprogramm das zuletzt
eingegebene Datum bzw. Datumsbereich.
nur bei 2-Kanal
Das Ferienprogramm wird
jedes Jahr ausgeführt
wenn keine Veränderung
programmiert wird.
Page 13
13
D
Prog.
OK
EIN P01
15:00
HH:MM
OK
LOESCHEN
LESEN
NEU
ESC OK
EDT OK
OK
AUS P02
18:00
HH:MM
EDT OK
Programm anschauen, bearbeiten
Info
· Mit ▼ ▲ kann durch
die Programmschritte
geblättert werden.
·Durch Drücken von EDT
kann das jeweilige
Programm bearbeitet
werden. Die Vorgehensweise entspricht dem
Anlegen eines neuen
Programmes.
Info
·Es besteht die
Möglichkeit mit J alle
Programme zu löschen
·Durch Drücken von N
können einzelne
Programme gelöscht
werden.
OK
LOESCHEN
ALLE
OK
NEU
LOESCHEN
LESEN
ESC OK
JN
OK
SICHER
JN
OK
EIN P01
15:00
HH:MM
DEL OK
OK
LOESCHEN
ALLE
JN
OK
SICHER
JN
Alle Programme löschen
Einzelne Programme löschen
Info
Beim Löschen einzelner
Programme werden alle
dazugehörigen Programmschritte gelöscht (z.B. P01
EIN und P02 AUS) oder das
komplette Zyklusprogramm.
Page 14
14
OK
JAHR
2004
ESC OK
MONAT
2004:03
ESC OK
TAG
2004:03:25
ESC OK
OK
SPRACHE
DAT/ZEIT
PROGRAMM
ESC OK
MINUTEN
13:45
ESC OK
OK
STUNDEN
13
ESC OK
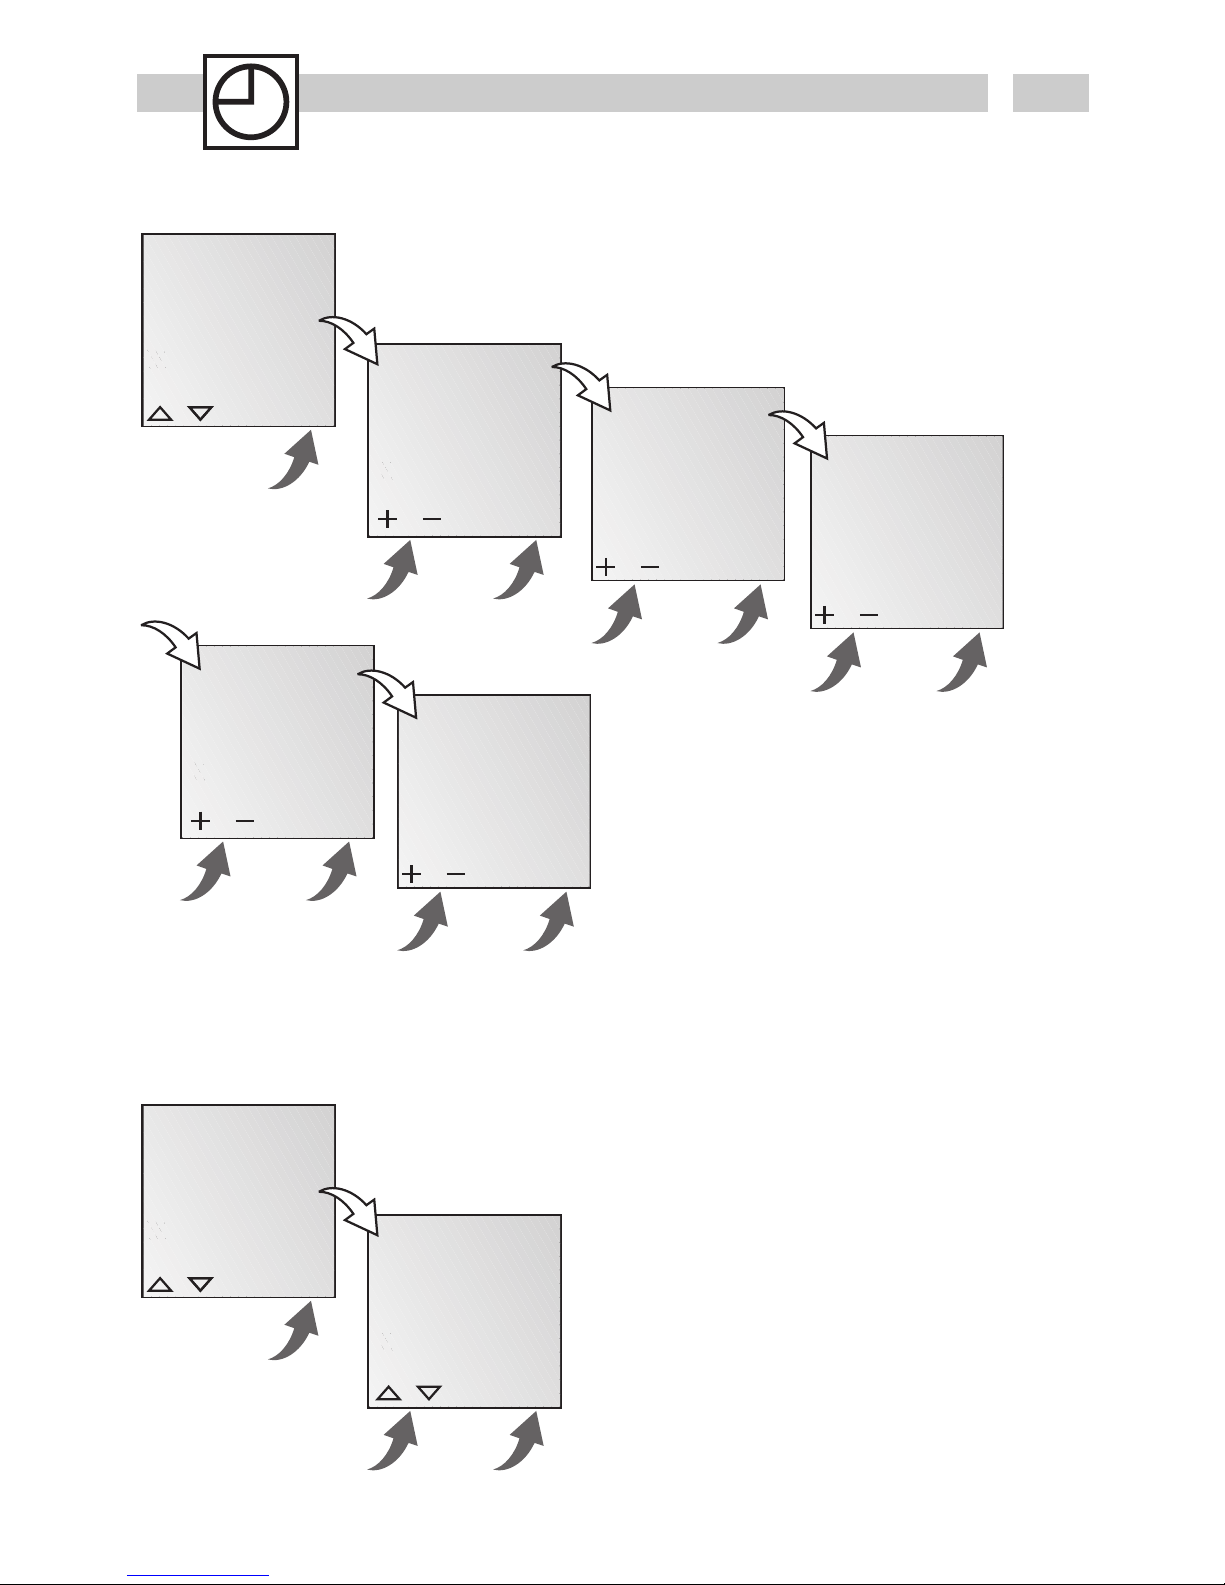
Datum und Uhrzeit einstellen
OK
AM PM
24 H
ESC OK
OK
ZUFALL
12H 24H
SPRACHE
ESC OK
AM/PM- (12-Stunden-) bzw. 24-Stunden-Anzeige einstellen
Info
Datum und Uhrzeit sind werksseitig
voreingestellt.
Page 15
15
OK
KAL
AUTO
NEIN
ESC OK
OK
PROGRAMM
SO WI
KONFIG
ESC OK
SO START
03
MONAT
ESC OK
OK
NEIN
KAL
AUTO
ESC OK
SO START
03:21
TAG
ESC OK
WI START
10
MONAT
ESC OK
WI START
10:31
TAG
ESC OK
SO WI
2103:3110
KAL
ESC OK
Umschaltung Sommer-/Winterzeit
Info
Folgende Einstellungen
sind möglich:
AUTO
werksseitige Voreinstellung der gesetzlichen
Vorgabe. Diese wird automatisch für jedes Jahr neu
berechnet.
NEIN
keine Umschaltung
KAL
Programmierung. Dazu
muss das Startdatum der
Sommerzeit und der
Winterzeit eingegeben
werden. Die werksseitige
Voreinstellung wird überschrieben.
Die programmierte
Sommer-/Winterzeit wird
automatisch für jedes Jahr
neu berechnet.
Die Umschaltung erfolgt
am gleichen eingegebenen Wochentag in der
gleichen Woche des
Monats.
Beispiel
21.03. Start Sommerzeit
31.10. Start Winterzeit
D
Page 16
RND
16
ESC
ZUFALL
OK
KONFIG
ZUFALL
12H 24H
ESC OK
OK
OK
ZUFALL
MENU
OK
ZUFALL
MENU
DAT/ZEIT
PROGRAMM
SO WI
ESC OK
OK
KONFIG
ZUFALL
12H 24H
ESC OK
ESC
ZUFALL
OK
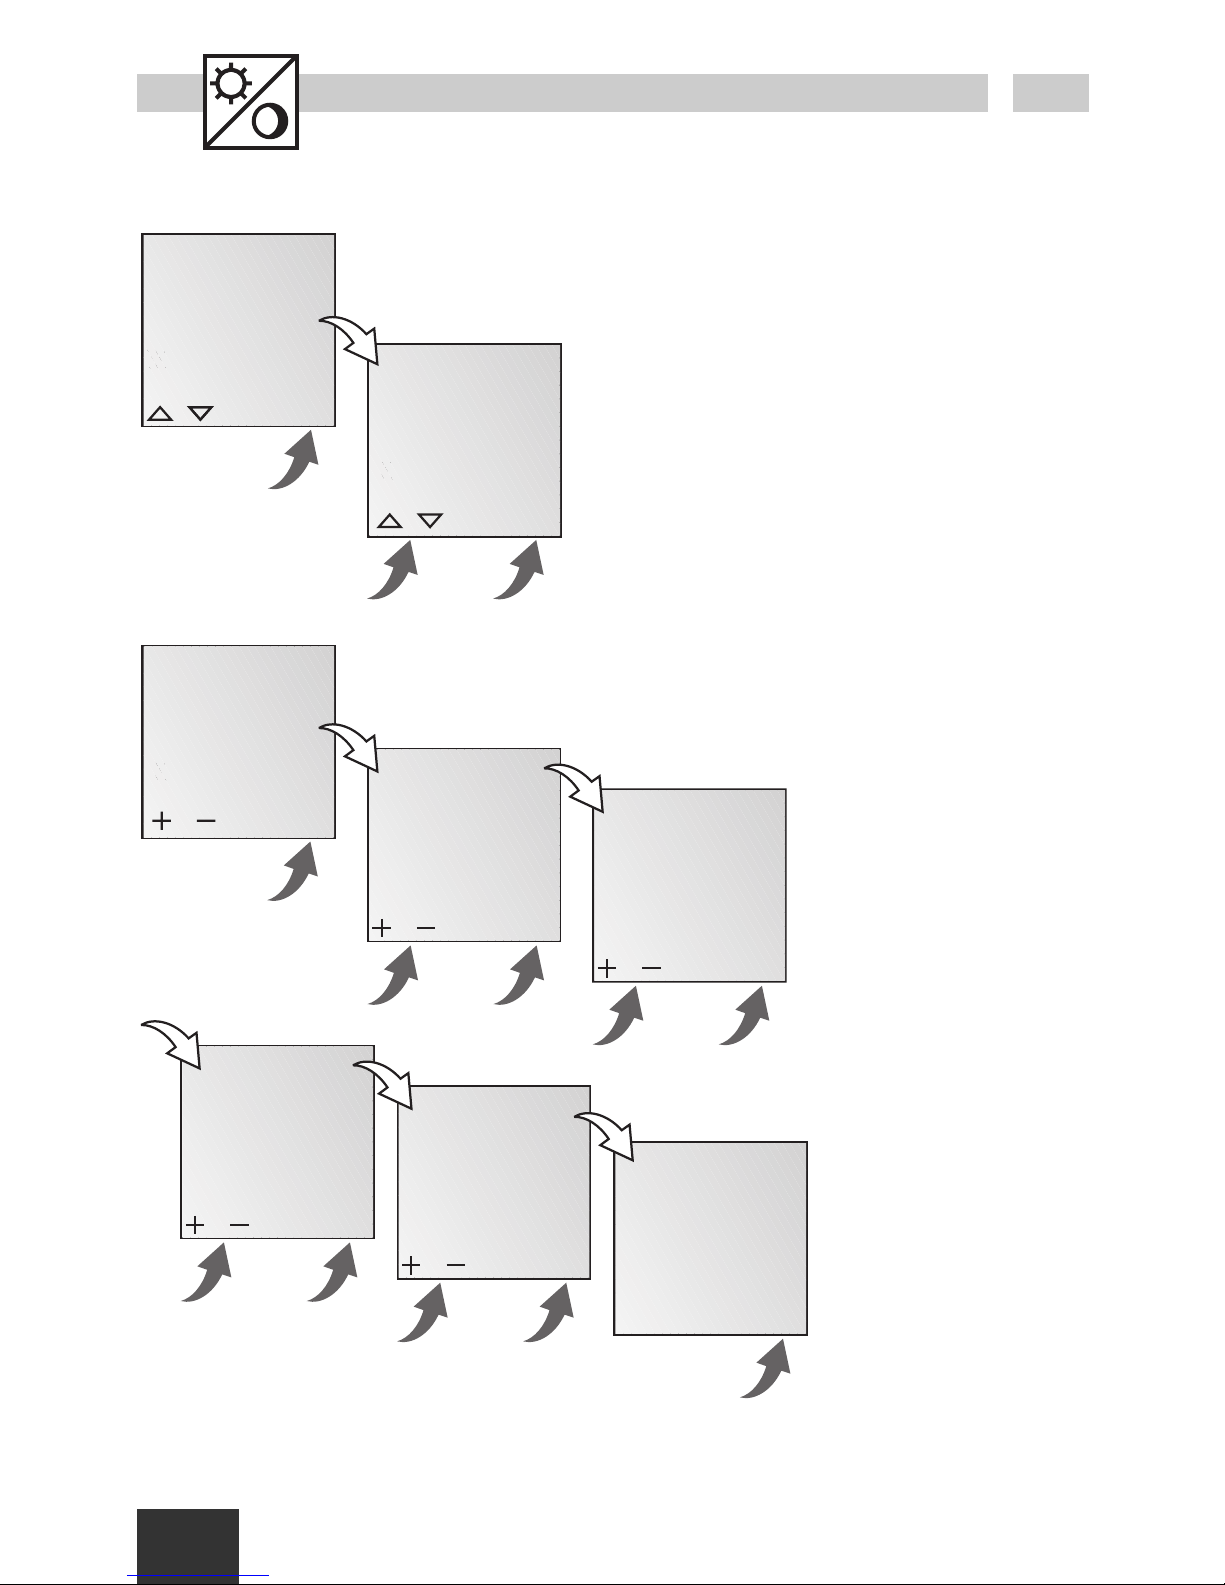
Zufallsschaltprogramm
Info
Durch Wählen von ZUFALL
wird ein Zufallsschaltprogramm gestartet. Der
programmierte Einschaltbefehl wird dabei um
einen variablen (zufälligen)
Zeitraum von 0 - 30 Minuten verzögert.
Beenden Zufallsschaltprogramm:
· ZUFALL wird im Display
angezeigt.
·MENU drücken.
·PROGRAMM auswählen und mit OK
bestätigen.
· ZUFALL auswählen und
mit OK bestätigen.
· Beenden des Programms mit .
· Danach befindet sich
die Uhr wieder im AutoMode.
7:00 20:00
7:30 20:30
EIN
EIN
Page 17
config
17
D
OK
TAXIMODE
ESC
Taximodus
Info
Über die IR-Schnittstelle können mit einem taxxi-Modul
Programme ausgetauscht werden. Dazu muss sich das Gerät
im TAXIMODE befinden und an Spannung anliegen.
Über ESC kann der TAXIMODE beendet werden.
in
prog
out
RS232
taxxi-Modul
prog =Programmauswahl
in =Programm einlesen
out =Programm auslesen
· Mit prog Programm-Nummer auswählen.
· Je nachdem ob ein Programm ein- oder aus-
gelesen werden soll in oder out drücken.
· taxxi-Modul senkrecht über die IR-Scnittstelle
halten.
· Nochmaliges Drücken von in bzw. out startet
die Übertragung.
· Eine Fehlerhafte Übertragung wird durch Er2
angezeigt. Zurück durch Drücken von prog.
SO WI
KONFIG
ZUFALL
OK
EXT IN
TAXIMODE
ESC OK
ESC OK
Konfiguration
Page 18
18
OK
AUSWAHL
KANAL
I
ESC
OK
OK
ABLAUF T
EXT HAND
ESC OK
OK
TAXIMODE
EXT IN
ESC OK
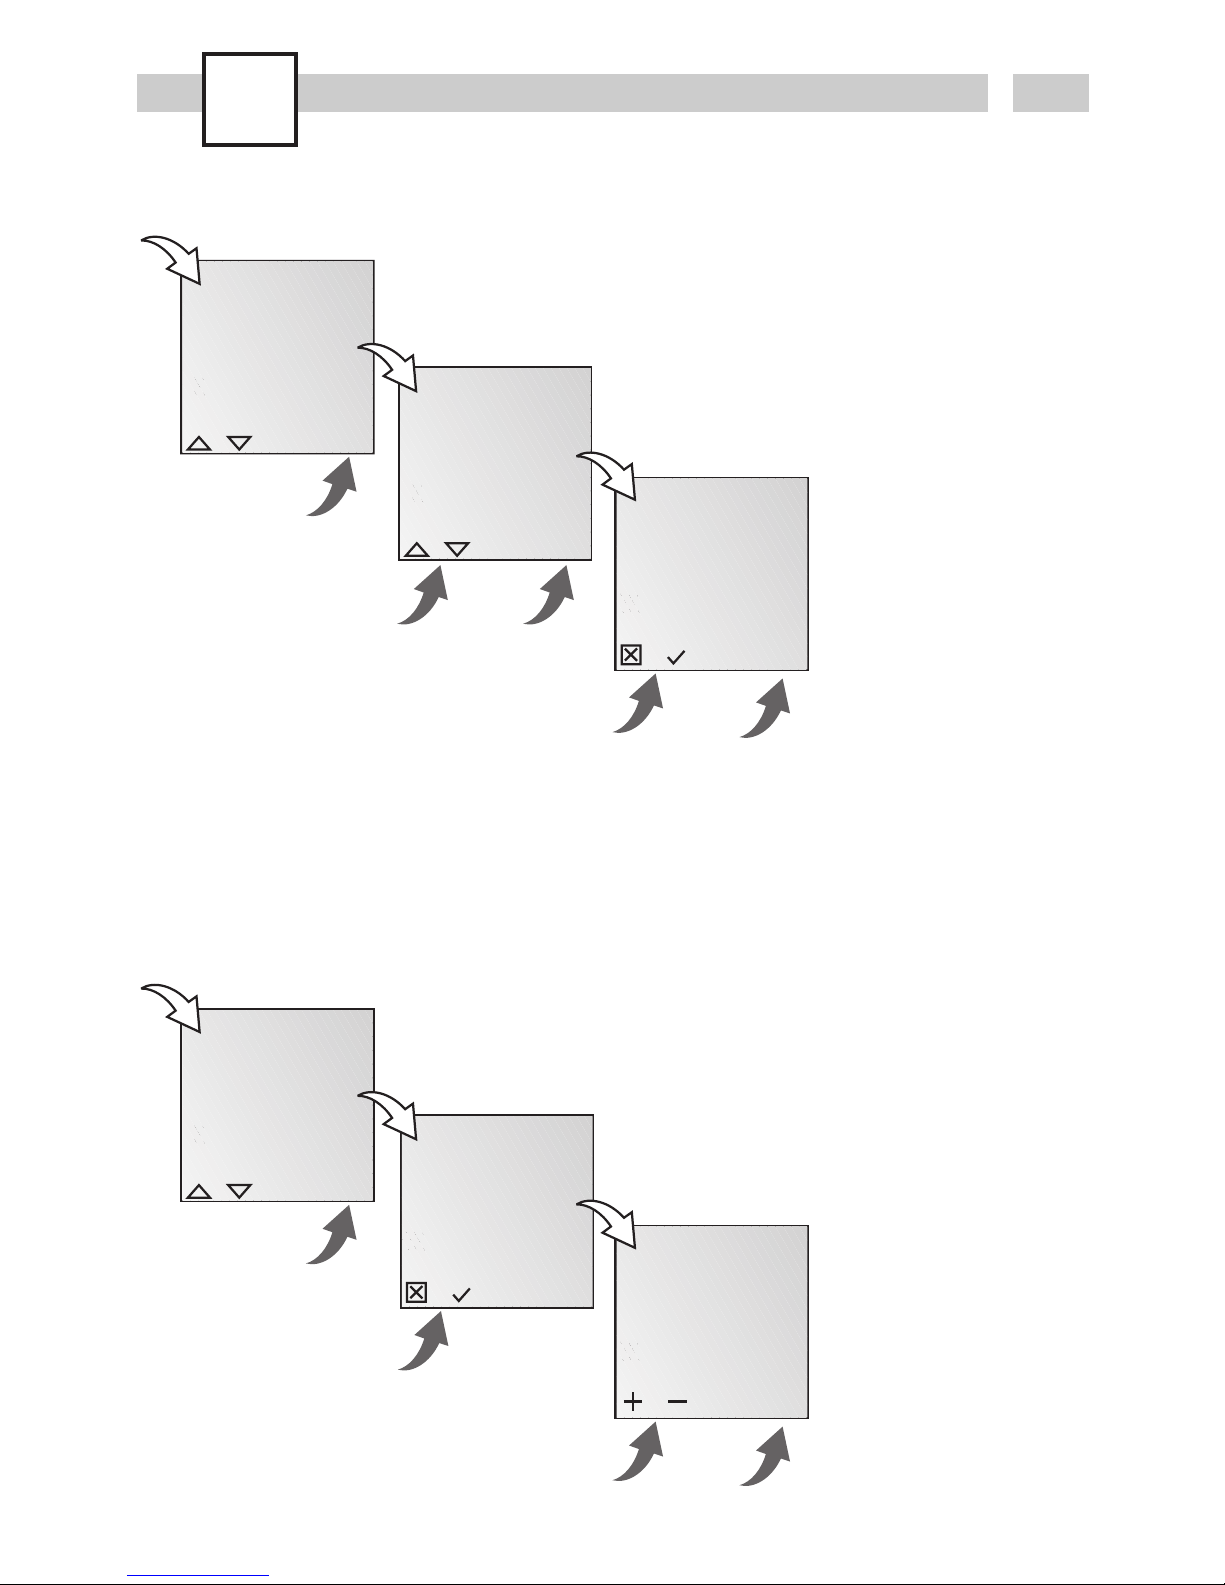
Externer Eingang - Handschalter
Info
Durch Wählen von EXT
HAND wird einem
externen Taster ein entsprechender Kanal zugeordnet.
Bei Betätigung des Tasters
wird ein Schaltbefehl ausgeführt, der bis zur nächsten Betätigung des
Tasters bzw. zum nächsten
automatischen
Schaltbefehl gilt.
Beispiel:
Externer Taster betätigen.
Licht EIN bis zum nächsten
programmierten AUSBefehl oder AUS-Befehl
durch erneutes Betätigen
des Handschalters.
OK
AUSWAHL
KANAL
I
ESC
OK
OK
MINUTEN
07:30
ESC
OK
OK
EXT HAND
ABLAUF T
ESC OK
Externer Handschalter - Ablauftimer (max. 20 Minuten)
Info
Durch Wählen von ABLAUF
T wird die Zeit für einen
Ablauftimer eingestellt.
Diese wird durch Betätigen
eines externen Tasters
gestartet.
Durch nochmaliges Betätigen des Tasters wird der
Ablauftimer erneut bei “0”
gestartet.
Bei erneutem Wählen von
ABLAUF T wird die Zeit auf
“0” zurückgesetzt.
config
Page 19
19
D
MENU
16121824
1
C1
15:26:38
FIX ON:
FIX OFF:
AUTO: (keine Anzeige) programmierte Schaltzeiten
FIX
FIX
Res.
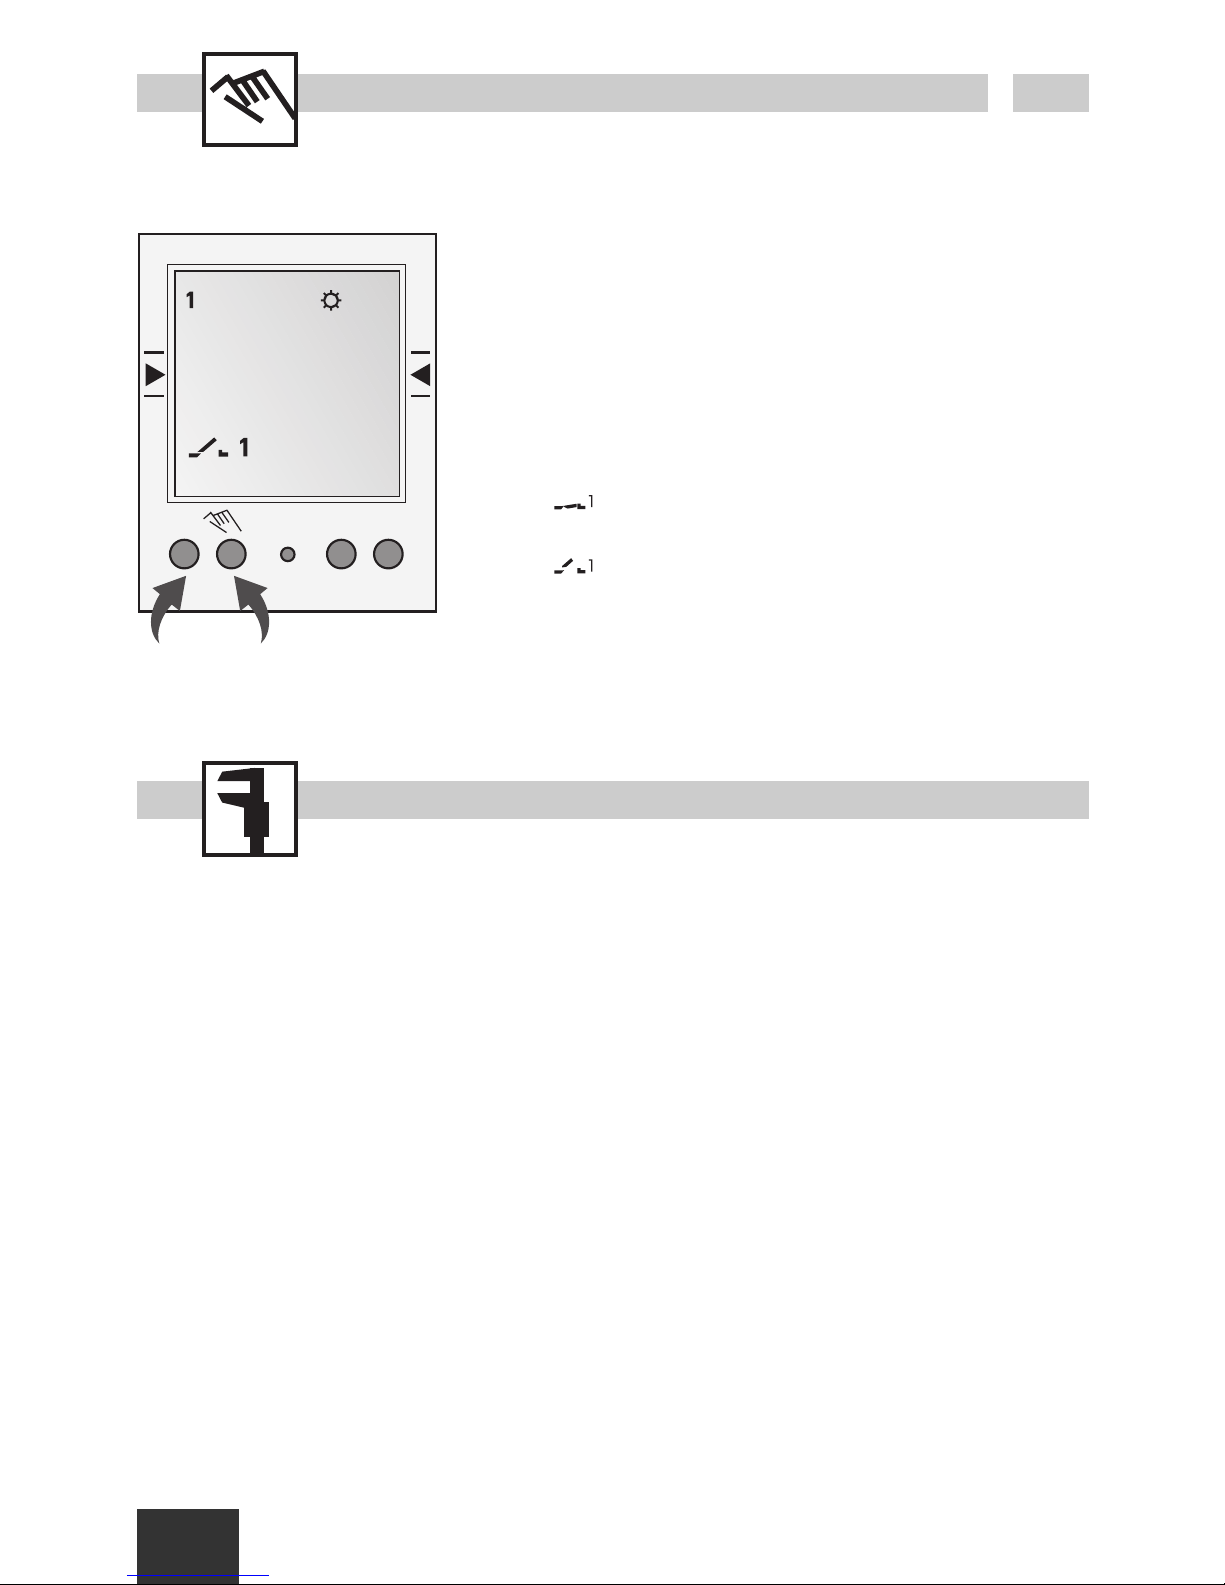
Betriebsart
Info
Linke Taste = Kanal 1
Rechte Taste = Kanal 2 (nur bei 2-Kanal-Version)
1 x Drücken = FIX ON = Dauer EIN
2 x Drücken = FIX OFF = Dauer AUS
3 x Drücken = zurück in Auto Mode
Technische Daten
Maße H x B x T (mm) 45 x 35 x 60
Gewicht g (ca.) 170
Anschlußspannung siehe Geräteaufdruck
Leistungsaufnahme 5 VA
Schaltleistung
- ohmsche Last
(VDE, IEC) 16 A/250 V AC
- induktive Last
cos ϕ 0.6 8 A/250 V AC
- Glühlampenlast 1000 W
Schaltausgang potentialfrei
Schaltkontakte 1 bzw. 2 Wechsler
Umgebungstemperatur -25°C bis +55°C
Schutzklasse II
Ganggenauigkeit typ ±2.5 s/Tag
bei 20°C
Gangreserve 3 Jahre ab Werk
bei +20°C
Kürzeste Schaltzeit 1 Min.
Speicherplätze 50
Blockbildung von
Wochentagen feste/freie Wahl
Schaltzustandsanzeige ja
Plombierbar ja
Page 20
20
Safety precautions
· The connection and installation of electrical devices may only be carried out by a qualified
electrician.
·Interventions in and changes to the device result in the voiding of the warranty claim.
· Observe your national regulations and the respective safety provisions.
· Fixed and flexible conductors of up to 10 mm
2
may be attached to the external terminal clips.
· Flexible cables with a cross-section ≤ 1 mm
2
should not be attached.
General information
· Deactivation commands take priority over activation commands.
· If the power supply is correct, the dots shown between the hours and minutes (HH:MM) are
displayed permanently. The dots flash if the power supply is interrupted.
· If there is no power supply, the position indicator display goes out after 2 minutes.
· The whole display flashes if the battery needs to be changed within the next 2 weeks.
Installation on DIN rail Terminal diagram
567
L
123
N
56
L
123
N
S
C1
C2
C1
Page 21
21
GB
OK
reset
MENU
16121824
Res.
1
A
F
B
C
D
E
G
I
J
K
M
C1
15:26:38
H
L
Display
A Function displays of the two left-hand
buttons
B Channel status displays
= Channel 1 ON
= Channel 1 OFF
Channel 1 = C1, Channel 2 = C2
C 3 communication lines for time display,
menu items, entry prompts etc.
D Day-of-week display
E Overview of daily switching program
F Display of summer/winter time
G Operating voltage (permanently lit dots)
Reserve power operation (dots flash)
H Holiday mode display
I Function displays of the two right-hand
buttons
Buttons
J Reset
The programs are retained in the case of a
reset. The date and time must be set again.
Press reset button with a blunt object (pen).
K Right-hand buttons
L Infrared interface
M Left-hand buttons with manual switch
function in Automatic mode
General information
· The middle communication line shows the
selectable menu item. If confirmed with OK,
this item is activated.
· Flashing texts or symbols require an entry.
· If no entries are made within the next
2 minutes, the clock reverts to Auto mode.
Function displays of the two left-hand
buttons:
scroll up in menu
scroll down in menu
Select/reject suggestion
Select/accept suggestion
+Pressing briefly = +1
Pressing long (approx. 2 sec) = +5
-Pressing briefly = -1
Pressing long (approx. 2 sec) = -5
Function displays of the two right-hand
buttons:
MENU Exits the Automatic mode and enters
the Programming mode
ESC Pressing briefly = one step back
Pressing long (approx. 2 sec) = return
to Automatic mode
OK Make selection and apply
EDT Change request in Read mode
NO Do not execute command
YES Execute command
DEL Delete
Page 22
1.
22
ESC
OK
DEUTSCH
ENGLISH
FRANCAIS
OK
12H 24H
LANGUAGE
DATETIME
ESC OK
OK
DEUTSCH
ENGLISH
FRANCAIS
ESC OK
ESC
MENU
16121824
1
C1
15:26:38
Res.
MENU
Info
In the delivered state the time switch is in the
Auto mode with a preset time, date and the
menu language English.
Initial start-up - selection of menu language
Prog.
MENU
16121824
1
C1
15:26:38
Res.
DATETIME
PROGRAM
DAYLIGHT
MENU
OK
REVIEW
NEW
DELETE
ESC OK
ESC OK
Page 23
23
GB
Prog.
OK
CYCLE
ON/OFF
PULSE
ESC OK
OK
HOLIDAY
WEEKLY
OK
REVIEW
NEW
DELETE
ESC OK
ESC OK
Weekly program
Info
The time switch has 50
memory spaces.
A date-related program
can be produced under
the HOLIDAY menu item.
(see holidays program)
A
C
B
Page 24

Prog.
24
Example
ON command for channel
1 at 3 pm. OFF command
at 6 pm.
· Select NEW program
and confirm with OK.
· The free memory spaces
are briefly displayed.
· Select channel and
confirm with OK.
· Select day block or
individual day (block
formation as desired)
and confirm with OK.
· Enter hour for ON
command (+/-) and
confirm with OK.
· Enter minute for ON
command (+/-) and
confirm with OK.
· Enter hour for OFF
command (+/-) and
confirm with OK.
· Enter minute for OFF
command (+/-) and
confirm with OK.
·Program is saved.
·Program jumps to
selection REVIEW, NEW,
DELETE. Now additional
programs can be
created.
OK
FREE 50
OK
CYCLE
ON/OFF
PULSE
ESC OK
OK
SELECT
CHANNEL
I
ESC
OK
SELECT
CHANNEL
I
ESC OK
HOURS
00
CHL ON
ESC OK
OK
SELECT
DAY
CHL ON
ESC OK
MINUTES
15:00
CHL ON
ESC OK
MINUTES
18:00
CHL OFF
ESC OK
OK
HOURS
00
CHL OFF
ESC OK
SAVED
P01 P02
ON/OFF programming
A
only with 2-channel version
Page 25
25
GB
Prog.
Cycle programming
9.00 h 17.00 h
Length
Pause
Cycle length
Start time
Channel OFFChannel ON
A cycle switching command consists of: · Start time
· Length = ON switching period
· Period = ON switching period + pause)
· Cycle length = Length of time between channel ON and
channel OFF
Info
The time period between the start and end times must not be less than the period length.
An interlacing of cycle programs is not permitted.
Examples
The device is switched on for 10 minutes every 60 minutes between Monday 9.00 am and Friday
7.00 pm.
Start time Monday 9.00 am
ON switching period 10 min.
Cycle length 60 min.
End time Friday 7.00 pm
B
Period
Page 26

Prog.
26
Example
Garden watering: Water
for two hours every 2nd
day. ON command for
channel 1 at 4.00 am. OFF
command at 6.00 am.
· Select CYCLE and
confirm with OK.
· The free memory spaces
are briefly displayed.
· Select channel and
confirm with OK.
· Select day block or
individual day (block
formation as desired)
and confirm with OK.
· Enter hour for ON
command (+/-) and
confirm with OK.
· Enter minute for ON
command (+/-) and
confirm with OK.
·Period:
Enter days, hours,
minutes or seconds and
confirm with OK.
OK
FREE 50
OK
PULSE
CYCLE
ON/OFF
ESC OK
OK
SLECT
CHANNEL
I
ESC
OK
SELECT
CHANNEL
I
ESC OK
HOURS
00
CHL ON
ESC OK
OK
SELECT
DAY
CHL ON
ESC OK
MINUTES
04:00
CHL ON
ESC OK
PERIOD
2
DAY ON
ESC OK
OK
PERIOD
0
DAY ON
ESC OK
PERIOD
2:00
HOURS
ESC OK
Cycle programming
B
only with 2-channel version
Page 27
27
GB
Prog.
HOURS
00
CHL OFF
ESC OK
PERIOD
02:00
MINUTES
ESC OK
DURATION
0
DAY
ESC OK
DURATION
2:00
HOURS
ESC OK
DURATION
02:00
MINUTES
ESC OK
SAVED
P04
MINUTES
06:00
CHL OFF
ESC OK
·Period of ON command:
Enter days, hours,
minutes or seconds and
confirm with OK.
· Select day block or
individual day (block
formation as desired)
and confirm with OK.
· Enter hour for OFF
command (+/-) and
confirm with OK.
· Enter minute for OFF
command (+/-) and
confirm with OK.
·Program is saved.
·Program jumps to
selection REVIEW, NEW,
DELETE. Now additional
programs can be
created.
Page 28

Prog.
28
Pulse programming
9.00 h
Length
Start time
A pulse switching command consists of: · Start time
· Length = ON switching period
Shortest ON switching period = 2 sec
Example
Start time Monday to Friday 9.00 am
ON switching period 10 sec.
C
OK
FREE 50
OK
ON/OFF
PULSE
CYCLE
ESC OK
OK
SELECT
CHANNEL
I
ESC
OK
SELECT
CHANNEL
I
ESC OK
SELECT
Example
Monday to Friday daily
ON command for channel
1 at 3.00 pm. ON switching
period 1 hour.
·Select PULSE and
confirm with OK.
· The free memory spaces
are briefly displayed.
· Select channel and
confirm with OK.
only with 2-channel version
Page 29
29
GB
Prog.
· Select day block or
individual day (block
formation as desired)
and confirm with OK.
· Enter hour for ON
command (+/-) and
confirm with OK.
· Enter minute for ON
command (+/-) and
confirm with OK.
·Period of ON command:
Enter days, hours,
minutes or seconds and
confirm with OK.
·Program is saved.
·Program jumps to
selection REVIEW, NEW,
DELETE. Now additional
programs can be
created.
ESC OK
HOURS
00
CHL ON
ESC OK
OK
SELECT
DAY
CHL ON
ESC OK
MINUTES
15:00
CHL ON
ESC OK
SAVED
P05
OK
DURATION
0
DAY
ESC OK
DURATION
01:00
HOURS
ESC OK
DURATION
01:00
MINUTES
ESC OK
Page 30
OK
CYCLE
ON/OFF
PULSE
ESC OK
OK
WEEKLY
HOLIDAY
OK
REVIEW
NEW
DELETE
ESC OK
ESC OK
OK
FREE 50
SELECT
CHANNEL
I
ESC OK
SELECT
CHANNEL
I
ESC
OK
MONTH
01
START
ESC OK
OK
SELECT
DAY
CHL ON
ESC OK
MONTH
01
END
ESC OK
OK
DAY
08:01
START
ESC OK
DAY
08:01
END
ESC OK
Prog.
30
Holidays program
Info
Only a date range can be entered.
If several programs are entered, the last date or
range of dates entered applies for all switching
commands in the holidays program.
only with 2-channel
version
The holiday program is run
every year unless changes
are programmed in.
Page 31

31
GB
Prog.
OK
ON P01
15:00
HH:MM
OK
DELETE
REVIEW
NEW
ESC OK
EDT OK
OK
OFF P02
18:00
HH:MM
EDT OK
View, edit program
Info
·The program steps can
be scrolled through
with ▼ ▲.
· The respective program
can be edited by
pressing EDT.
The procedure is the
same as when creating
a new program.
Info
· It is possible to delete all
programs with YES
· By pressing NO,
individual programs
can be deleted.
OK
DELETE
ALL
OK
NEW
DELETE
REVIEW
ESC OK
YES NO
OK
CONFIRM
YESNO
OK
ON P01
15:00
HH:MM
DEL OK
OK
DELETE
ALL
YES NO
OK
CONFIRM
YESNO
Delete all programs
Delete individual programs
Info
When deleting individual
programs, all associated
program steps are deleted
(e.g. P01 ON and P02 OFF)
or the entire cycle
program is deleted.
Page 32

32
OK
YEAR
2004
ESC OK
MONTH
2004:03
ESC OK
DAY
2004:03:25
ESC OK
OK
LANGUAGE
DATETIME
PROGRAM
ESC OK
MINUTES
13:45
ESC OK
OK
HOURS
13
ESC OK
Set date and time
OK
AM PM
24H
ESC OK
OK
DAYLIGHT
12H 24H
LANGUAGE
ESC OK
Set AM/PM (12-hour-) or 24-hour display
Info
The date and time are preset at the factory.
Page 33

33
GB
OK
CALIBRAT
AUTO
NO
ESC OK
OK
PROGRAM
DAYLIGHT
12H 24H
ESC OK
SU START
03
MONTH
ESC OK
OK
NO
CALIBRAT
AUTO
ESC OK
SU START
03:21
DAY
ESC OK
WI START
10
MONTH
ESC OK
WI START
10:31
DAY
ESC OK
SU WI
2103:3110
CALIBRAT
ESC OK
Switchover for summer/winter time
Info
The following settings are
possible:
AUTO
Factory presetting of the
legal specification. This is
automatically recalculated
for each year.
NO
No switchover
CALIBRAT
Programming. The start
date of the summer time
and winter time must be
entered for this purpose.
The factory presetting is
overwritten.
The programmed
summer/ winter time is
automatically recalculated
for each year.
The changeover takes
place on the same
specified day of the week
in the same week of each
month.
Example
03/21 Start summer time
10/31 Start winter time
Page 34

RND
34
ESC
RANDOM
OK
CONFIG
RANDOM
12H 24H
ESC OK
OK
OK
RANDOM
MENU
OK
RANDOM
MENU
DATETIME
PROGRAM
DAYLIGHT
ESC OK
OK
CONFIG
RANDOM
12H 24H
ESC OK
ESC
RANDOM
OK
Random switching program
Info
A random switching
program is started by
selecting RND.
The programmed activation command is delayed
in such instances by a
variable (random) period of
time of 0-30 minutes.
Ending the random
switching program:
· RND appears on the
display.
·Press MENU.
· Select PROGRAM and
confirm with OK.
· Select RND and confirm
with OK.
· End the program
with .
· The clock will then return
to auto mode.
7:00 20:00
7:30 20:30
ON
ON
Page 35

35
GB
config
OK
TAXIMODE
ESC
Taxi mode
Info
Programs can be replaced via the IR interface using a taxxi
module. For this purpose, the device must be in TAXIMODE and
must be energised.
TAXIMODE can be ended via ESC.
in
prog
out
RS232
taxxi module
prog =program selection
in =import program
out = export program
· Use prog to select a program number.
·Press in or out depending on whether a
program is to be imported or exported.
· Hold taxxi module vertically above the
IR interface.
·Pressing in or out again starts the transfer.
· Er2 indicates that problems occurred during
the transfer. Go back by pressing prog.
DAYLIGHT
CONFIG
RANDOM
OK
EXT I/P
TAXIMODE
ESC OK
ESC OK
Configuration
Page 36

36
OK
SELECT
CHANNEL
I
ESC
OK
OK
COUNT
EXT O/R
ESC OK
OK
TAXIMODE
EXT I/P
ESC OK
External input – manual switch
Info
An appropriate channel is
assigned to an external
button by selecting EXT
O/R.
When the button is
pressed, a switching
command is issued and
remains in effect until the
button is next pressed or
the next automatic
switching command is
issued.
Example:
Press external button.
Light ON until the next
programmed OFF
command or an OFF
command issued by again
pressing the manual
switch.
OK
SELECT
CHANNEL
I
ESC
OK
OK
MINUTES
07:30
ESC
OK
OK
EXT O/R
COUNT
ESC OK
External manual switch – process timer (max. 20 minutes)
Info
The time for the process
timer is set by selecting
COUNT. This is started by
pressing an external
button.
The process time is started
again from “0” by pressing
the button again.
The time is reset to “0” by
again selecting COUNT.
Page 37

37
GB
MENU
16121824
1
C1
15:26:38
FIX ON:
FIX OFF:
AUTO: (keine Anzeige) programmierte Schaltzeiten
FIX
FIX
Res.
Operating mode
Info
Left-hand button = Channel 1
Right-hand button = Channel 2 (only with
2-channel version)
Pressing 1 x = FIX ON = continuous ON
Pressing 2 x = FIX OFF = continuous OFF
Pressing 3 x = return to Auto mode
Technical Data
Dimensions H x W x D 45 x 35 x 60 mm
Weight g (approx.) 170
Supply voltage see imprint on device
Power consumption 5 VA
Switching capacity
- ohmic load
(VDE, IEC) 16 A/250 VAC
- inductive load
cos
ϕ 0.6 8 A/250 VAC
- Incandescent
lamp load 1,000 W
Switching output potential-free
Switch contacts 1 or 2 changeover
contact(s)
Ambient temperature -13°F to 131°F (25°C
to +55°C)
Protection class II
Accuracy typ. ±2.5 s/day
at 68°F (20°C)
Reserve power 3 years from factory
at +20°C (20°C)
Shortest switching time 1 min.
Memory spaces 50
Block formation of
day of the week fixed/free selection
Switching status
display yes
Sealable yes
(no display) programmed switching times
Page 38

38
Consignes de sécurité
· Le branchement et le montage d’appareils électriques ne peut être réalisé que par un électricien spécialisé.
· Les interventions et des modifications apportées sans notre aval à l’appareil entraînent la nullité de la
garantie.
·Respectez la réglementation locale en vigueur et observez les consignes de sécurité spécifiques.
· Les bornes de raccordement extérieures tolèrent le raccordement de fils conducteurs rigides ou
souples de jusqu’à 10 mm
2
de section.
·Ne pas raccorder de conducteurs de section ≤ 1 mm
2
.
Consigne générale
· Commandes de déclenchements ont priorité sur les commandes d’enclenchement.
· Quand l’alimentation est correcte les deux points entre l’affichage de l’heure et des minutes
(hh:min min) appareissent continuellement . Les points clignotes lors de la disparition de la tension.
· Sans alimentation l’affichage disparait après 2min.
· Le display complet clignotte quand la batterie doit être remplacée dans les 2 semaines.
Montage sur une barre DIN Schéma de branchement
567
L
123
N
56
L
123
N
S
C1
C2
C1
Page 39

39
F
OK
reset
MENU
16121824
Res.
1
A
F
B
C
D
E
G
I
J
K
M
C1
15:26:38
H
L
Affichage
A Affichage des fonctions des deux touches de
gauche
B Affichage de l’état du canal
= Canal 1 ON
= Canal 1 OFF
Canal 1 = C1, canal 2 = c2
C 3 lignes de communication pour l’affichage
du temps, points de menu, demande
d’entrée, etc.
D Affichage jour de la semaine
E Aperçu programmation des jours
F Affichage heure d’été/d’hiver
G Tension de service (points permanents)
Fonctionnement sur la réserve
(points clignotants)
H Affichage mode vacances
I Affichage des fonctions des deux touches de
droite
Touches/Interface
J Reset
La reset conserve les programmes. Date et
heure doivent de nouveau être entrées.
Actionner la touche de reset avec un objet
obtus (stylo bille).
K Touches de droite
L Interface infrarouge
M Touches de gauche avec fonction de
commutateur manuel en mode automatique
Généralités
· La ligne de communication du milieu
n’indique que le point de menu au choix.
Celui-ci est activé avec une confirmation par
OK.
·Textes et symboles requièrent une entrée.
· Si dans les 2 min il n’y a pas une entrée de
donnés la minuterie se remets en mode auto.
Affichage des fonctions des deux touches de
gauche:
Monter dans le menu
Descendre dans le menu
Refuser choix/proposition
Accepter choix/proposition
+ Appui court = +1
Appui long (env. 2 s) = +5
- Appui court = -1
Appui long (env. 2 s) = -5
Affichage des fonctions des deux touches de
droite:
MENU Quitter le mode automatique pour le
mode programmation
ESC Appui court = un pas en arrière
Appui long (env. 2 s) = retour au
mode automatique
OK Valider le choix
EDT Souhait de modification en mode
lecture
NON Ne pas exécuter l’ordre
OUI Exécuter l’ordre
DEL Effacer
Page 40

40
1.
ESC
OK
DEUTSCH
ENGLISH
FRANCAIS
OK
12H 24H
LANGUAGE
DATETIME
ESC OK
OK
ENGLISH
FRANCAIS
ESPANIOL
ESC OK
ESC
MENU
16121824
1
C1
15:26:38
Res.
MENU
Information
Lors de la livraison, l’horloge de commutation
est en mode Auto avec heure et date
préréglées, interface utilisateur en anglais.
Première mise en route – choix de la langue
Prog.
MENU
16121824
1
C1
15:26:38
Res.
DATE HMP
PROGRAMM
HEUR E H
MENU
OK
REVISION
NOUVEAU
SUPPRIM.
ESC OK
ESC OK
Page 41

41
F
Prog.
OK
CYCLE
ON/OFF
IMPULSIO
ESC OK
OK
VACANCES
HEBDO
OK
REVISION
NOUVEAU
SUPPRIM
ESC OK
ESC OK
Programme hebdomadaire
Information
L’horloge de commutation
possède 50 pas de
programme.
Dans la rubrique de menu
VACANCES, un programme
relatif à la date peut être
créé. (voir le programme
vacances)
A
C
B
Page 42

42
Prog.
Exemple
Ordre ON pour le canal 1 à
15h00.
Ordre OFF à 18h00.
· Sélectionner ON/OFF et
confirmer en appuyant
sur OK.
· Les pas de programmation libres sont
brièvement montrés.
· Choisir le canal et
confirmer avec OK.
· Choisir un bloc de jours
ou un jour simple (libre
formation des blocs) et
confirmer avec OK.
· Entrer l’heure pour un
ordre ON (+/-) et
confirmer avec OK.
· Entrer la minute pour un
ordre ON (+/-) et
confirmer avec OK.
· Entrer l’heure pour un
ordre OFF (+/-) et
confirmer avec OK.
· Entrer la minute pour un
ordre OFF (+/-) et
confirmer avec OK.
· Le programme est
mémorisé.
· Le programma passe au
choix REVISION,
NOUVEAU, SUPPRIM. De
nouveau programmes
peuvent maintenant être
crées.
OK
LIBRE 50
OK
CYCLE
ON/OFF
IMPULSIO
ESC OK
OK
SELECT
CANAL
I
ESC
OK
SELECT
CANAL
I
ESC OK
HEURES
00
CAN ON
ESC OK
OK
SELECT
JOUR
CAN ON
ESC OK
MINUTES
15:00
CAN ON
ESC OK
MINUTES
18:00
CAN OFF
ESC OK
OK
HEURES
00
CAN OFF
ESC OK
SAUVEGAR
P01 P02
Programmation ON/OFF
A
uniquement auprès
du canal
Page 43

43
F
Prog.
Programmation de cycle
9.00 h 17.00 h
Durée
Pause
Durée de cycle
Date de
démarrage
Canal OFFCanal ON
Un ordre de commutation de cycle est composé de :
· Date de démarrage
· Durée = durée de commutation ON
· Période = durée de commutation ON + pause)
· Durée de cycle = plage de temps entre le canal ON et
le canal OFF
Information
La durée entre le temps de démarrage et le temps de fin ne doit pas être inférieure à la durée de
période. Une imbrication de programmes de cycles n’est pas autorisée.
Exemple
Le programme est mis en marche du lundi 9h00, toutes les 60 minutes pour 10 minutes, jusqu’au
vendredi 19h00.
Date de démarrage - lundi 9h00
Durée de commutation ON 10 min
Durée de cycle 60 min
Date de fin - vendredi 19h00
B
Période
Page 44

OK
LIBRE 50
OK
IMPULSIO
CYCLE
ON/OFF
ESC OK
OK
SELECT
CANAL
I
ESC
OK
SELECT
CANAL
I
ESC OK
HEURES
00
CAN ON
ESC OK
OK
SELECT
JOUR
CAN ON
ESC OK
MINUTES
04:00
CAN ON
ESC OK
PERIODE
2
JOUR ON
ESC OK
OK
PERIODE
0
JOUR ON
ESC OK
PERIODE
2:00
HEURES
ESC OK
44
Prog.
Exemple
Irrigation de jardin :
tous les 2 jours, irriguer
pendant deux heures.
Ordre ON pour le canal 1
à 4h00. Ordre OFF à 6h00.
· Sélectionner CYCLE et
confirmer en appuyant
sur OK.
· Les pas de programmation libres sont
brièvement montrés.
· Choisir le canal et
confirmer avec OK.
· Choisir un bloc de jours
ou un jour simple (libre
formation des blocs) et
confirmer avec OK.
· Entrer l’heure pour un
ordre ON (+/-) et
confirmer avec OK.
· Entrer la minute pour un
ordre ON (+/-) et
confirmer avec OK.
·Période:
entrer les jours, heures,
minutes ou secondes et
confirmer en appuyant
sur OK.
Programmation de cycle
B
uniquement auprès
du canal
Page 45

45
F
Prog.
HEURES
00
CAN OFF
ESC OK
PERIODE
02:00
MINUTES
ESC OK
DUREE
0
JOUR
ESC OK
DUREE
2:00
HEURES
ESC OK
DUREE
02:00
MINUTES
ESC OK
SAUVEGAR
P04
MINUTES
06:00
CAN OFF
ESC OK
·Durée pour l’ordre ON:
entrer les jours, heures,
minutes ou secondes et
confirmer en appuyant
sur OK.
· Choisir un bloc de jours
ou un jour simple (libre
formation des blocs) et
confirmer avec OK.
· Entrer l’heure pour un
ordre OFF (+/-) et
confirmer avec OK.
· Entrer la minute pour un
ordre OFF (+/-) et
confirmer avec OK.
· Le programme est
mémorisé.
· Le programma passe au
choix REVISION,
NOUVEAU, SUPPRIM. De
nouveau programmes
peuvent maintenant être
crées.
Page 46

46
Prog.
Programmation d’impulsions
9.00 h
Durée
Date de
démarrage
Un ordre de commutation
d’impulsions est composé de : · Date de démarrage
· Durée = Durée de commutation ON
Durée de commutation ON la plus courte = 2 s
Exemple
Date de démarrage – du lundi au vendredi 9h00
Durée de commutation ON 10 s
C
OK
LIBRE 50
OK
ON/OFF
IMPULSIO
CYCLE
ESC OK
OK
SELECT
CANAL
I
ESC
OK
SELECT
CANAL
I
ESC OK
SELECT
Exemple
Du lundi au vendredi,
quotidiennement ordre ON
pour le canal 1 à 15h00.
Durée de commutation ON
1 heure.
· Sélectionner IMPULSIO
et confirmer en
appuyant sur OK.
· Les pas de programmation libres sont
brièvement montrés.
· Choisir le canal et
confirmer avec OK.
uniquement auprès
du canal
Page 47

47
F
Prog.
· Choisir un bloc de jours
ou un jour simple (libre
formation des blocs) et
confirmer avec OK.
· Entrer l’heure pour un
ordre ON (+/-) et
confirmer avec OK.
· Entrer la minute pour un
ordre ON (+/-) et
confirmer avec OK.
·Durée pour l’ordre ON:
entrer les jours, heures,
minutes ou secondes et
confirmer en appuyant
sur OK.
· Le programme est
mémorisé.
· Le programma passe au
choix REVISION,
NOUVEAU, SUPPRIM. De
nouveau programmes
peuvent maintenant être
crées.
ESC OK
HEURES
00
CAN ON
ESC OK
OK
SELECT
JOUR
CAN ON
ESC OK
MINUTES
15:00
CAN ON
ESC OK
SAUVEGAR
P05
OK
DUREE
0
JOUR
ESC OK
DUREE
01:00
HEURES
ESC OK
DUREE
01:00
MINUTES
ESC OK
Page 48

48
OK
CYCLE
ON/OFF
IMPULSIO
ESC OK
OK
HEBDO
VACANCES
OK
REVISION
NOUVEAU
SUPPRIM
ESC OK
ESC OK
OK
LIBRE 50
SELECT
CANAL
I
ESC OK
SELECT
CANAL
I
ESC
OK
MOIS
01
DEBUT
ESC OK
OK
SELECT
JOUR
CAN ON
ESC OK
MOIS
01
FIN
ESC OK
OK
JOUR
08:01
DEBUT
ESC OK
JOUR
08:01
FIN
ESC OK
Prog.
Programme de vacances
Information
Seule l’entrée d’une plage de dates est possible.
Si plusieurs programmes sont entrés, la plage de
dates ou la date entrée en dernier est applicable
à tous les ordres de commutation dans le
programme de vacances.
uniquement auprès
du canal
Le programme de
vacances est exécuté tous
les ans si aucun changement n’est programmé.
Page 49

49
F
Prog.
OK
ON P01
15:00
HH:MM
OK
SUPPRIM.
REVISION
NOUVEAU
ESC OK
EDT OK
OK
OFF P02
18:00
HH:MM
EDT OK
Visualiser et modifier un programme
Information
· Il est possible de
parcourir les pas du
programme avec ▼ ▲ .
· EDT permet de modifier
le programme affiché.
La procédure correspond
à la création d’un
nouveau programme.
Information
· La touche OUI permet
d’effacer tous les
programmes.
· La touche NON permet
d’effacer tous des
programmes individuels.
OK
SUPPRIM.
TOUT
OK
NOUVEAU
SUPPRIM.
REVISION
ESC OK
OUI NON
OK
CONFIRM
OUINON
OK
ON P01
15:00
HH:MM
DEL OK
OK
SUPPRIM.
TOUT
OUI NON
OK
CONFIRM
OUINON
Effacer tous les programmes
Effacer des programmes individuels
Information
Quand on efface un
program, tous les pas de
programmation de ce
programme seront effacés
(p.e. P01 enclenché et P02
déclenché) ou le programme de cycles intégral.
Page 50

50
OK
ANNEE
2004
ESC OK
MOIS
2004:03
ESC OK
JOUR
2004:03:25
ESC OK
OK
LANGUE
DATE HMP
PROGRAMM
ESC OK
MINUTES
13:45
ESC OK
OK
HEURES
13
ESC OK
Réglage de la date et de l’heure
OK
AM PM
24H
ESC OK
OK
HEUR E H
12H 24H
LANGUE
ESC OK
Mode AM/PM (12-heures), resp. 24 heures
Information
La date et l’heure sont programmées en usine.
Page 51

51
F
OK
CALIBRER
AUTO
NON
ESC OK
OK
PROGRAMM
HEUR E H
12H 24H
ESC OK
ETE DEBUT
03
MOIS
ESC OK
OK
NON
CALIBRER
AUTO
ESC OK
ETE DEBUT
03:21
JOUR
ESC OK
HIV DEBUT
10
MOIS
ESC OK
HIV DEBUT
10:31
JOUR
ESC OK
ETE HIV
2103:3110
CALIBRER
ESC OK
Commutation heure d’été/d’hiver
Information
Les réglages suivants sont
possibles :
AUTO
Programmation au niveau
de l’usine des dates
officielles. Celles-ci sont
recalculées automatiquement pour chaque année.
NON
Pas de changement
d’heure.
CALIBRER
Programmation. Il faut
pour ce entrer les dates de
changement d’heure pour
l’été et l’hiver.
La programmation faite à
l’usine est écrasée.
Les heures d’été et d’hiver
sont recalculées automatiquement pour chaque
année.
La commutation est
réalisée le même jour de la
semaine entrée dans la
même semaine du mois.
Exemple
21.03. Début heure d’été
31.10. Début heure d’hiver
Page 52

52
RND
ESC
ALEATOIRE
OK
CONFIGUR
ALEATOIRE
12H 24H
ESC OK
OK
OK
ALEATOIRE
MENU
OK
ALEATOIRE
MENU
DATE HMP
PROGRAMM
HEUR E H
ESC OK
OK
CONFIGUR
ALEATOIRE
12H 24H
ESC OK
ESC
ALEATOIRE
OK
Programme de commutation aléatoire
Information
La sélection de la rubrique
ALEATOIRE permet de
démarrer un programme
de commutation aléatoire.
L’ordre de commutation
de mise en circuit
programmée est ici
retardé d’une période
variable (aléatoire) de 0 à
30 minute(s).
Quitter le programme de
commutation aléatoire :
· ALEATOIRE est affiché
sur l’écran.
· Appuyer sur MENU.
· Sélectionner PROGRAMM
et confirmer en
appuyant sur OK.
· Sélectionner ALEATOIRE
et confirmer en
appuyant sur OK.
·Quitter le programme
avec .
·L’horloge retourne
ensuite en mode
automatique.
7:00 20:00
7:30 20:30
ON
ON
Page 53

53
F
config
OK
TAXIMODE
ESC
Mode Taxi
in
prog
out
RS232
Module taxxi
prog =sélection de programme
in = lire le programme
out =extraire le programme
· Sélectionner le numéro de programme avec
prog.
· Selon qu’un programme doit être lu ou
extrait, appuyer sur in ou sur out.
·Tenir le module taxxi à la verticale au-dessus
de l’interface IR.
· Appuyer de nouveau sur in ou out pour
démarrer la transmission.
· Un échec de transmission est indiqué par
l’affichage de Er2. Retour en appuyant sur
prog.
HEUR E H
CONFIGUR
ALEATOIR
OK
ENT EXT
TAXIMODE
ESC OK
ESC OK
Configuration
Information
Avec un module taxxi, des programmes peuvent être
échangés par l’intermédiaire de l’interface IR. A cet effet,
l’appareil doit se trouver en TAXIMODE et être sous tension.
Il est possible de quitter le TAXIMODE en appuyant sur ESC.
Page 54

config
54
OK
SELECT
CANAL
I
ESC
OK
OK
DECOMPTE
FORCAGE
ESC OK
OK
TAXIMODE
ENT EXT
ESC OK
Entrée externe – commutateur manuel
Information
Sélectionner FORCAGE et
un canal correspondant
est affecté à un
commutateur externe.
Actionner le bouton pour
exécuter un ordre de
commutation qui est
valable jusqu’au prochain
actionnement du bouton,
respectivement jusqu’au
prochain ordre de commutation automatique.
Exemple:
actionner le bouton
externe. Eclairage ON
jusqu’à l’ordre OFF suivant
programmé ou ordre OFF
en actionnant de nouveau
le commutateur manuel.
OK
SELECT
CANAL
I
ESC
OK
OK
MINUTES
07:30
ESC
OK
OK
FORCAGE
DECOMPTE
ESC OK
Commutateur externe – minuterie (20 minutes maximum)
Information
Sélectionner DECOMPTE
pour régler le délai d’une
minuterie (timer). Cette
dernière est démarrée par
l’actionnement d’un
bouton externe.
Lors d’un nouvel actionnement du bouton, la
minuterie est de nouveau
démarrée à « 0 ».
Lorsque la rubrique
DECOMPTE est de nouveau
sélectionnée, le temps est
remis sur « 0 ».
Page 55

55
F
MENU
16121824
1
C1
15:26:38
FIX ON:
FIX OFF:
AUTO: (keine Anzeige) programmierte Schaltzeiten
FIX
FIX
Res.
Mode de fonctionnement
Information
Touche gauche = canal 1
Touche droite = canal 2 (seulement pour la
version à deux canaux)
Appuyer 1 fois = FIX ON = Continuellement
enclenché
Appuyer 2 fois = FIX OFF = Continuellement
déclenché
Appuyer 3 fois = retour au mode Auto
Données techniques
Cotes H x L x P (mm) 45 x 35 x 60
Poids g (env.) 170
Tension d’alimentation voir indication sur
l’appareil
Puissance consommée 5 VA
Puissance
- charge résistive
(VDE, IEC) 16 A/250 V AC
- charge inductive
cos
ϕ 0.6 8 A/250 V AC
- charge de l’ampoule 1000 W
Sortie de commutation sans potentiel
Contacts de
commutation 1 resp. 2
Contact inverseur
Température de
fonctionnement de -25°C à +55°C
Catégorie de protection II
Précision de
fonctionnement env. ±2.5 s/jour
à 20°C
Réserve d’autonomie 3 ans à la sortie
d’usine à +20°C
Temps de commutation
minimum 1 mn
Pas de programmation 50
Création de blocs de jour choix
fixe/libre
Affichage de l’état oui
Plombable oui
(pas d’affichage) Temps de commutation programmés
Page 56

56
Informazioni di sicurezza
· Il collegamento e il montaggio delle apparecchiature elettriche devono essere effettuate solamente
da un elettricista qualificato.
·Interventi e modifiche sull’apparecchio comportano la cessazione del diritto di garanzia.
·Osservare le prescrizioni nazionali e le corrispondenti normative sulla sicurezza.
· I morsetti esterni sono previsti per il collegamento di conduttori rigidi e flessibili fino a 10 mm
2
.
· È vietato collegare conduttori flessibili con un diametro del conduttore ≤ 1 mm
2
.
Informazioni generali
·I comandi di spegnimento hanno la priorità su quelli di accensione.
· Se l'orologio viene alimentato, i punti tra l'indicazione dell'ora e dei minuti (SS:MM) vengono
visualizzati in modo permanente. I punti lampeggiano in caso di interruzione dell'alimentazione .
· In caso di mancanza di alimentazione, l'indicatore posizione di commutazione si spegne dopo
2 minuti.
·L'intero display lampeggia quando è necessario cambiare le pile entro le successive 2 settimane.
Montaggio sulla guida DIN Schema di collegamento
567
L
123
N
56
L
123
N
S
C1
C2
C1
Page 57

57
I
OK
reset
MENU
16121824
Res.
1
A
F
B
C
D
E
G
I
J
K
M
C1
15:26:38
H
L
Display
A Segnalazioni di entrambi i tasti sinistri
B Segnalazione dello stato del canale
= Canale 1 ON
= Canale 1 OFF
Canale 1 = C1, Canale 2 = C2
C 3 linee di comunicazione per l’indicazione
dell’ora, le opzioni di menu, le richieste di
input, ecc...
D Indicazione del giorno della settimana
E Visione del programma di commutazione
giornaliero
F Indicazione periodo estivo/invernale
G Tensione di funzionamento
(punti permanenti)
Funzionamento di riserva (i punti
lampeggiano)
H Visualizzazione funzionamento feriale
I Segnalazioni di entrambi i tasti destri
Tasti/Interfaccia
J Reset
In caso di reset i programmi vengono
memorizzati. Bisogna impostare di nuovo la
data e l’ora. Azionare il pulsante di reset
con un oggetto spuntato (penna a sfera).
K Tasti destri
L Interfaccia a luce infrarossa
M Tasti sinistri con funzione di interruttori
manuali durante il funzionamento automatico
Generale
· La linea di comunicazione centrale indica
l’opzione di menu a disposizione. Questa
viene attivata in caso di conferma con OK.
·I testi o i simboli lampeggianti richiedono un
input.
· Se entro 2 minuti non si verifica alcuna
immissione di dati, l'orologio ritorna alla
modalità automatica.
Segnalazioni di entrambi i tasti sinistri:
scorrere in alto nel menu
scorrere in basso nel menu
Rifiutare una scelta/proposta
Accettare una scelta/proposta
+Premere per poco = +1
Premere a lungo (circa 2 sec) = +5
-Premere per poco = -1
Premere a lungo (circa 2 sec) = -5
Segnalazioni di entrambi i tasti destri:
MENU Abbandono del funzionamento
automatico e accesso alla modalità di
programmazione
ESC Premere per poco = indietro di un livello
Premere a lungo (circa 2 sec) =
ritorno al funzionamento automatico
OK Selezionare una scelta ed eseguirla
EDT Apporto di modifiche nella modalità
di lettura
NO Non eseguire un comando
SI Eseguire un comando
DEL Elimina
Page 58

58
1.
ESC
OK
DEUTSCH
ENGLISH
FRANCAIS
OK
12H 24H
LANGUAGE
DATETIME
ESC OK
OK
ESPANIOL
ITALIANO
NEDERLAN
ESC OK
ESC
MENU
16121824
1
C1
15:26:38
Res.
MENU
Informazione
Alla consegna, il timer si trova in modalità
automatica con ora, data e lingua inglese
preimpostate.
Avviamento iniziale – Scelta della lingua
Prog.
MENU
16121824
1
C1
15:26:38
Res.
DATA ORA
PROGR
ORA LEG
MENU
OK
REVIS
NUOVO
CANCELLA
ESC OK
ESC OK
Page 59

59
I
Prog.
OK
CICLO
ON/OFF
IMPULSO
ESC OK
OK
VACANZA
SETT
OK
REVIS
NUOVO
CANCELLA
ESC OK
ESC OK
Programma settimanale
Informazione
Il timer dispone di 50 spazi
di memoria.
Alla voce di menu
VACANZA è possibile
creare un programma che
prende in considerazione
le date.
(Vedere il programma
feriale)
A
C
B
Page 60

60
Prog.
Esempio
Comando ON per canale 1
alle ore 15:00. Comando
OFF alle ore 18:00.
·Scegliere ON/OFF e
confermare con OK.
·Vengono visualizzate
brevemente gli spazi di
memoria liberi.
·Scegliere il canale e
confermare con OK.
·Vengono visualizzate
brevemente gli spazi di
memoria liberi.
·Scegliere il canale e
confermare con OK.
·Inserire le ore per il
comando ON (+/-) e
confermare con OK.
·Inserire i minuti per il
comando ON (+/-) e
confermare con OK.
·Inserire le ore per il
comando OFF (+/-) e
confermare con OK.
·Inserire i minuti per il
comando OFF (+/-) e
confermare con OK.
· Il programma viene
memorizzato.
· Il programma passa alla
scelta REVIS, NUOVO,
CANCELLA. Adesso
possono essere creati
altri programmi.
OK
LIBERO 50
OK
CICLO
ON/OFF
IMPULSO
ESC OK
OK
SELEZ
CANALE
I
ESC
OK
SELEZ
CANALE
I
ESC OK
ORE
00
CH ON
ESC OK
OK
SELEZ
GIORNO
CH ON
ESC OK
MINUTI
15:00
CH ON
ESC OK
MINUTI
18:00
CH OFF
ESC OK
OK
ORE
00
CH OFF
ESC OK
SALVATO
P01 P02
Programmazione ON/OFF
A
solo con 2 canali
Page 61

61
I
Prog.
Programmazione del ciclo
9.00 h 17.00 h
Durata
Pausa
Durata ciclo
Tempo di
avviamento
Canale OFFCanale ON
Un comando di commutazione
di ciclo è costituito da: · Tempo di avviamento
· Durata = Durata di commutazione ON
· Periodo = Durata di commutazione ON + pausa
· Durata ciclo = Intervallo temporale tra canale ON e
canale OFF
Informazione
La durata tra tempo di avviamento e tempo di terminazione non deve essere inferiore alla durata
del periodo. Non è ammesso un annidamento di programmi ciclo.
Esempio
Inizia dal lunedì alle ore 9:00 fino al venerdì alle ore 19:00 e ogni 60 minuti viene attivato per 10
minuti.
Tempo di avviamento lunedì ore 9.00
Durata di commutazione ON 10 min.
Durata ciclo 60 min.
Tempo di terminazione venerdì ore 19:00
B
Periodo
Page 62

62
Prog.
Esempio
Irrigazione del giardino:
bagnare per due ore ogni
2 giorni. Comando ON per
canale 1 alle ore 04:00.
Comando OFF alle ore
06:00.
·Scegliere CICLO e
confermare con OK.
·Vengono visualizzate
brevemente gli spazi di
memoria liberi.
·Scegliere il canale e
confermare con OK.
·Scegliere un insieme di
giorni o il singolo giorno
(libera creazione di un
insieme) e confermare
con OK.
·Inserire le ore per il
comando ON (+/-) e
confermare con OK.
·Inserire i minuti per il
comando ON (+/-) e
confermare con OK.
·Periodo:
Immettere i giorni, le ore,
i minuti o i secondi e
confermare con OK.
OK
LIBERO 50
OK
IMPULSO
CICLO
ON/OFF
ESC OK
OK
SELEZ
CANALE
I
ESC
OK
SELEZ
CANALE
I
ESC OK
ORE
00
CH ON
ESC OK
OK
SELEZ
GIORNO
CH ON
ESC OK
MINUTI
04:00
CH ON
ESC OK
PERIODO
2
GIORNO ON
ESC OK
OK
PERIODO
0
GIORNO ON
ESC OK
PERIODO
2:00
ORE
ESC OK
Programmazione del ciclo
B
solo con 2 canali
Page 63

63
I
Prog.
ORE
00
CH OFF
ESC OK
PERIODO
02:00
MINUTI
ESC OK
DURATA
0
GIORNO
ESC OK
DURATA
2:00
ORE
ESC OK
DURATA
02:00
MINUTI
ESC OK
SALVATO
P04
MINUTI
06:00
CH OFF
ESC OK
· Durata per il comando
ON:
Immettere i giorni, le ore,
i minuti o i secondi e
confermare con OK.
·Scegliere un insieme di
giorni o il singolo giorno
(libera creazione di un
insieme) e confermare
con OK.
·Inserire le ore per il
comando OFF (+/-) e
confermare con OK.
·Inserire i minuti per il
comando OFF (+/-) e
confermare con OK.
· Il programma viene
memorizzato.
· Il programma passa alla
scelta REVIS, NUOVO,
CANCELLA. Adesso
possono essere creati
altri programmi.
Page 64

64
Prog.
Programmazione impulso
9.00 h
Durata
Tempo di
avviamento
Un comando di commutazione
di impulso è costituito da: · Tempo di avviamento
· Durata = Durata di commutazione ON
Tempo di commutazione più breve = 2 sec
Esempio
Tempo di avviamento da lunedì a venerdì ore 09:00
Durata di commutazione ON 10 sec
C
OK
LIBERO 50
OK
ON/OFF
IMPULSO
CICLO
ESC OK
OK
SELEZ
CANALE
I
ESC
OK
SELEZ
KANALE
I
ESC OK
SELEZ
Esempio
Da lunedì a venerdì
giornalmente
Comando ON per canale 1
alle ore 15:00. Tempo di
commutazione ON 1 ora.
·Scegliere IMPULSO e
confermare con OK.
·Vengono visualizzate
brevemente gli spazi di
memoria liberi.
·Scegliere il canale e
confermare con OK.
solo con 2 canali
Page 65

65
I
Prog.
·Scegliere un insieme di
giorni o il singolo giorno
(libera creazione di un
insieme) e confermare
con OK.
·Inserire le ore per il
comando ON (+/-) e
confermare con OK.
·Inserire i minuti per il
comando ON (+/-) e
confermare con OK.
· Durata per il comando
ON:
Immettere i giorni, le ore,
i minuti o i secondi e
confermare con OK.
· Il programma viene
memorizzato.
· Il programma passa alla
scelta REVIS, NUOVO,
CANCELLA. Adesso
possono essere creati
altri programmi.
ESC OK
ORE
00
CH ON
ESC OK
OK
SELEZ
GIORNO
CH ON
ESC OK
MINUTI
15:00
CH ON
ESC OK
SALVATO
P05
OK
DURATA
0
GIORNO
ESC OK
DURATA
01:00
ORE
ESC OK
DURATA
01:00
MINUTI
ESC OK
Page 66

66
OK
CICLO
ON/OFF
IMPULSO
ESC OK
OK
SETT
VACANZA
OK
REVIS
NUOVO
CANCELLA
ESC OK
ESC OK
OK
LIBERO 50
SELEZ
CANALE
I
ESC OK
SELEZ
CANALE
I
ESC
OK
MESE
01
INIZIO
ESC OK
OK
SELEZ
GIORNO
CH ON
ESC OK
MESE
01
FINE
ESC OK
OK
GIORNO
08:01
INIZIO
ESC OK
GIORNO
08:01
FINE
ESC OK
Prog.
Programma feriale
Informazione
È possibile solamente l’immissione di uno spazio
temporale.
Se vengono immessi più programmi, per tutti i
comandi di commutazione nel programma
feriale vale la data o l’intervallo temporale
immessi per ultimi.
solo con 2 canali
Se non vengono programmate alcune modifiche, il programma feriale
viene realizzato ogni anno.
Page 67

67
I
Prog.
OK
ON P01
15:00
HH:MM
OK
CANCELLA
REVIS
NUOVO
ESC OK
EDT OK
OK
OFF P02
18:00
HH:MM
EDT OK
Controllare il programma, modificare
Informazione
· Con ▼ ▲ si può
scorrere nei passi di
programma.
·Premendo EDT si può
modificare il corrispondente programma. La
modalità di procedimento corrisponde a
quella per la creazione
di un programma.
Informazione
· Esiste la possibilità di
eliminare tutti i
programmi con SI
·Premendo NO è
possibile cancellare i
singoli programmi.
OK
CANCELLA
TUTTO
OK
NUOVO
CANCELLA
REVIS
ESC OK
SI NO
OK
SICURO
SINO
OK
ON P01
15:00
HH:MM
DEL OK
OK
CANCELLA
TUTTO
SI NO
OK
SICURO
SINO
Eliminare tutti i programmi
Eliminare i singoli programmi
Informazione
Con lo spegnimento
dei singoli programmi,
verranno eliminate
anche le relative fasi di
programma (es. P01 ON
e P02 OFF) oppure l'intero
programma di ciclo.
Page 68

68
OK
ANNO
2004
ESC OK
MESE
2004:03
ESC OK
GIORNO
2004:03:25
ESC OK
OK
LINGUA
DATA ORA
PROGR
ESC OK
MINUTI
13:45
ESC OK
OK
ORE
13
ESC OK
Impostare la data e l’ora
OK
AM PM
24H
ESC OK
OK
ORA LEG
12H 24H
LINGUA
ESC OK
Impostare l’ora da 24 ore o in modalità AM/PM (12 ore)
Informazione
La data e l’ora sono già preimpostate.
Page 69

69
I
OK
CALIBRA
AUTO
NO
ESC OK
OK
PROGR
ORA LEG
AM/PM/24
ESC OK
EST INIZIO
03
MESE
ESC OK
OK
NO
CALIBRA
AUTO
ESC OK
EST INIZIO
03:21
GIORNO
ESC OK
INV INIZIO
10
MESE
ESC OK
INV INIZIO
10:31
GIORNO
ESC OK
EST INV
2103:3110
CALIBRA
ESC OK
Commutazione del periodo estivo/invernale
Informazione
Sono possibili le seguenti
impostazioni:
AUTO
preimpostazione in
fabbrica secondo le
prescrizioni legali. Questa
viene effettuata automaticamente sempre per
ogni anno.
NO
nessuna commutazione
CALIBRA
Programmazione. Bisogna
inserire la data di inizio del
periodo estivo e di quello
invernale.
La preimpostazione di
fabbrica viene sovrascritta.
Il periodo estivo/invernale
viene calcolato automaticamente sempre per ogni
anno.
La commutazione avviene
lo stesso giorno della
settimana inserito nella
stessa settimana del mese.
Esempio
21.03. Inizio periodo
estivo
31.10. Inizio periodo
invernale
Page 70

70
RND
ESC
CASUALE
OK
CONFIG
CASUALE
12H 24H
ESC OK
OK
OK
CASUALE
MENU
OK
CASUALE
MENU
DATA ORA
PROGR
ORA LEG
ESC OK
OK
CONFIG
CASUALE
12H 24H
ESC OK
ESC
CASUALE
OK
Programma di commutazione casuale
Info
Informazione
Scegliendo CASUALE viene
avviato un programma di
commutazione casuale. Il
comando di commutazione
programmato viene quindi
ritardato di un intervallo
temporale variabile
(casuale) di 0-30 minuti.
Terminazione programma
di commutazione casuale:
· CASUALE viene
visualizzato sul display.
·Premere MENU.
·Scegliere PROGR e
confermare con OK.
·Scegliere CASUALE e
confermare con OK.
·Terminazione del
programma con .
·Successivamente l’ora si
trova di nuovo in
modalità automatica.
7:00 20:00
7:30 20:30
ON
ON
Page 71

71
I
config
OK
TAXIMODE
ESC
Modalità taxi
Informazione
Mediante l’interfaccia IR è possibile sostituire dei programmi
con un modulo taxxi. A tale scopo l’apparecchio deve trovarsi
in TAXIMODE e deve essere collegato alla tensione.
Mediante ESC è possibile uscire dalla TAXIMODE.
in
prog
out
RS232
Modulo taxxi
prog = scelta programma
in = caricare programma
out =leggere programma dalla memoria
· Con prog selezionare il numero di programma.
·Premere in oppure out a seconda che un
programma deve essere caricato e letto dalla
memoria.
·Tenere il modulo taxxi verticalmente
attraverso l’interfaccia IR.
·Premendo nuovamente in oppure out viene
avviata la trasmissione.
· Una trasmissione difettosa viene visualizzata
mediante Er2. Indietro premendo prog.
ORA LEG
CONFIG
CASUALE
OK
ING EST
TAXIMODE
ESC OK
ESC OK
Configurazione
Page 72

config
72
OK
SELEZ
CANALE
I
ESC
OK
OK
COUNT DW
COM EXT
ESC OK
OK
TAXIMODE
ING EST
ESC OK
Interruttore manuale di uscita esterna
Informazione
Premendo COM EXT viene
attribuito un relativo
canale a un tasto esterno.
Premendo il tasto viene
eseguito un comando di
commutazione che vale
fino al successivo azionamento del tasto o fino al
successivo comando automatico di commutazione.
Esempio:
Premere il tasto esterno.
Luce ON fino al successivo
comando OFF programmato oppure comando
OFF premendo nuovamente l’interruttore manuale.
OK
SELEZ
CANALE
I
ESC
OK
OK
MINUTI
07:30
ESC
OK
OK
COM EXT
COUNT DW
ESC OK
Timer di svolgimento con interruttore manuale esterno (max 20 minuti)
Informazione
Scegliendo COUNT DW
viene impostato il tempo
per un timer di svolgimento.
Questo viene avviato premendo un tasto esterno.
Premendo nuovamente il
tasto, il timer di svolgimento
viene avviato di nuovo da
“0”.
Scegliendo nuovamente
COUNT DW il tempo viene
reimpostato su “0”.
Page 73

73
I
MENU
16121824
1
C1
15:26:38
FIX ON:
FIX OFF:
AUTO: (keine Anzeige) programmierte Schaltzeiten
FIX
FIX
Res.
Modalità di funzionamento
Informazione
Tasto sinistro = canale 1
Tasto destro = canale 2 (solo nella
versione a 2 canali)
Premere 1 volta = FIX ON = fix on
Premere 2 volte = FIX OFF = fix off
Premere 3 volte = ritorno alla modalità
automatica
Dati tecnici
Dimensioni H x L x P 45 x 35 x 60 mm
Peso in gr. (circa) 170
Tensione di alimentazione vedere la targhetta
dell’apparecchio
Consumo di energia 5 VA
Potere di apertura
- carico ohmico
(VDE, IEC) 16 A/250 V AC
- carico induttivo
cos
ϕ 0.6 8 A/250 V AC
- Carico della
lampada 1000 W
Uscita di commutazione a potenziale zero
Contatti di 1 o 2 contatti di
commutazione commutazione
Temperatura di
funzionamento da -25°C fino a +55°C
Classe di isolamento II
Precisione tipo ±2.5 s/giorno
a 20°C
Riserva di carica 3 anni franco
stabilimento
a +20°C
Tempo di commutazione
minimo 1 min.
Spazi di memoria 50
Creazione dell’insieme
di giorni della settimana scelta libera/fissa
Indicazione dello stato
di commutazione si
Piombabile si
(nessuna indicazione)
tempi di commutazione programmati
Page 74

74
Instrucciones de seguridad
· La instalación y conexión de equipos eléctricos debe llevarse a cabo únicamente por electricistas
profesionales.
· Cualquier manipulación o modificación efectuada en la unidad invalidará los derechos de garantía.
·Tenga en cuenta la legislación nacional y las correspondientes disposiciones en seguridad.
· Los bornes externos permiten la conexión de cables rígidos y flexibles de hasta 10 mm
2
.
· No se recomienda la conexión de cables flexibles de sección ≤ 1 mm
2
.
Indicaciones generales
· Los comandos OFF tiene preferencia sobre los comandos ON.
· Si la alimentación de tensión es correcta, los puntos entre hora y minuto (HH:MM) se muestran
permanentemente. Al interrumpirse la tensión, los puntos parpadean.
· Sin alimentación de tensión, la indicación del modo operativo se apaga pasados 2 minutos.
· Si parpadea todo el display, significa que será necesario un cambio de batería en las próximas dos
semanas.
Montaje en carril DIN Esquema de conexión
567
L
123
N
56
L
123
N
S
C1
C2
C1
Page 75

75
E
OK
reset
MENU
16121824
Res.
1
A
F
B
C
D
E
G
I
J
K
M
C1
15:26:38
H
L
Pantalla
A Funciones de las teclas de la izquierda
B Estado de los canales
= Canal 1 ON
= Canal 1 OFF
Canal 1 = C1, Canal 2 = C2
C 3 líneas de texto para la hora, las opciones
de menú, la entrada de datos, etc.
D Día de la semana
E Cronograma
F Símbolos horario verano/invierno
G Funcionamiento con red (puntos fijos)
Reserva de marcha (puntos parpadeando)
H Indicación modo de vacaciones
I Funciones de las teclas de la derecha
Teclas/Interfaz
J Reset
Los programas se conservan al realizar un
"reset". Debe ajustarse de nuevo la fecha y la
hora. Accione el pulsador "reset" con un
objeto sin punta afilada (bolígrafo).
K Teclas de la derecha
L Interfaz de infrarrojos
M Teclas de la izquierda con función manual
en modo automático.
Generalidades
· La línea de texto central muestra la opción
de menú seleccionable. Si se confirma con
OK, se activa la función.
· Si un texto o símbolo parpadea, significa que
es necesario introducir datos.
·Si no se realiza ninguna entrada pasados
2 minutos, el reloj vuelve al modo automático.
Funciones de las teclas de la izquierda:
navegación por el menú (arriba)
navegación por el menú (abajo)
Seleccionar/rechazar opción
Seleccionar/aceptar opción
+ Pulsación corta = +1
Pulsación prolongada (aprox. 2s) = +5
- Pulsación corta = -1
Pulsación prolongada (aprox. 2s) = -5
Funciones de las teclas de la derecha:
MENU Fin del modo automático e inicio del
modo de programación
ESC Pulsación corta = un paso atrás
Pulsación prolongada (2 s) = vuelta
al modo automático
OK Seleccionar y aceptar la opción
EDT Edición en el modo lectura
NO No ejecutar acción
SI Ejecutar acción
DEL Borrar
Page 76

76
1.
ESC
OK
DEUTSCH
ENGLISH
FRANCAIS
OK
12H 24H
LANGUAGE
DATETIME
ESC OK
OK
FRANCAIS
ESPANIOL
ITALIANO
ESC OK
ESC
MENU
16121824
1
C1
15:26:38
Res.
MENU
Nota
El interruptor horario se suministra preajustado
en modo automático, fecha, hora, e idioma de
menú inglés.
Primera puesta en servicio – Selección de idioma
Prog.
MENU
16121824
1
C1
15:26:38
Res.
FECH HOR
PROGRAMA
VERA INV
MENU
OK
REVISAR
NUEVO
BORRAR
ESC OK
ESC OK
Page 77

77
E
Prog.
OK
CICLO
ON/OFF
IMPULSO
ESC OK
OK
VACACION
SEMANAL
OK
REVISAR
NUEVO
BORRAR
ESC OK
ESC OK
Programa semanal
Nota
El interruptor horario
dispone de 50 posiciones
de memoria.
La opción de menú
VACACION permite
configurar un programa
para unas fechas
específicas. (ver programa
de vacaciones)
A
C
B
Page 78

78
Prog.
Ejemplo
Comando ON para canal 1
a las 15:00 h. Comando
OFF a las 18:00 h.
· Seleccionar ON/OFF y
confirmar con OK.
· La pantalla muestra las
posiciones de memoria
libres.
· Seleccione el canal y
confirme con OK.
· Seleccione varios días o
un solo día (combinación de días libre) y
confirme con OK.
·Introduzca la hora para
el comando ON (+/-) y
confirme con OK.
·Introduzca los minutos
para el comando ON
(+/-) y confirme con
OK.
·Introduzca la hora para
el comando OFF (+/-) y
confirme con OK.
·Introduzca los minutos
para el comando OFF
(+/-) y confirme con
OK.
· El programa se guarda.
· El programa salta a la
selección REVISAR,
NUEVO, BORRAR.
A partir de ahora se
pueden crear más
programas.
OK
LIBRE 50
OK
CICLO
ON/OFF
IMPULSO
ESC OK
OK
SELEC
CANAL
I
ESC
OK
SELEC
CANAL
I
ESC OK
HORAS
00
CAN ON
ESC OK
OK
SELEC
DIA
CAN ON
ESC OK
MINUTOS
15:00
CAN ON
ESC OK
MINUTOS
18:00
CAN OFF
ESC OK
OK
HORAS
00
CAN OFF
ESC OK
GUARDADO
P01 P02
Programación ON/OFF
A
sólo con 2 canales
Page 79

79
E
Prog.
Programación de ciclos
9.00 h 17.00 h
Duración
Pausa
Duración del ciclo
Hora de inicio
Canal OFFCanal ON
Un comando de ciclo se compone de: · Hora de inicio
· Duración = Duración ON
· Período = Duración ON + pausa
· Duración del ciclo = Intervalo de tiempo entre canal ON y
canal OFF
Nota
El intervalo entre la hora de inicio y la hora de fin no puede ser inferior a la duración del período.
No se pueden programar ciclos dentro de programas de ciclo.
Ejemplos
De lunes 9:00 h a viernes 19:00 h, el equipo se conecta cada 60 minutos durante 10 minutos.
Hora de inicio lunes 9:00 h
Duración ON 10 min.
Duración del ciclo 60 min.
Hora de fin viernes 19:00 h
B
Período
Page 80

80
Prog.
Ejemplo
Riego de jardines: regar
cada dos días durante dos
horas. Comando ON para
canal 1 a las 04:00 h.
Comando OFF a las 06:00 h.
· Seleccionar CICLO y
confirmar con OK.
· La pantalla muestra las
posiciones de memoria
libres.
· Seleccione el canal y
confirme con OK.
· Seleccione varios días o
un solo día (combinación de días libre) y
confirme con OK.
·Introduzca la hora para
el comando ON (+/-) y
confirme con OK.
·Introduzca los minutos
para el comando ON
(+/-) y confirme con
OK.
·Período:
introducir los días, horas,
minutos o segundos y
confirmar con OK.
OK
LIBRE 50
OK
IMPULSO
CICLO
ON/OFF
ESC OK
OK
SELEC
CANAL
I
ESC
OK
SELEC
CANAL
I
ESC OK
HORAS
00
CAN ON
ESC OK
OK
SELEC
DIA
CAN ON
ESC OK
MINUTOS
04:00
CAN ON
ESC OK
PERIODO
2
DIA ON
ESC OK
OK
PERIODO
0
DIA ON
ESC OK
PERIODO
2:00
HORAS
ESC OK
Programación de ciclos
B
sólo con 2 canales
Page 81

81
E
Prog.
HORAS
00
CAN OFF
ESC OK
PERIODO
02:00
MINUTOS
ESC OK
DURACION
0
DIA
ESC OK
DURACION
2:00
HORAS
ESC OK
DURACION
02:00
MINUTOS
ESC OK
GUARDADO
P04
MINUTOS
06:00
CAN OFF
ESC OK
· Duración del comando
ON: introducir los días,
horas, minutos o
segundos y confirmar
con OK.
· Seleccione varios días o
un solo día (combinación de días libre) y
confirme con OK.
·Introduzca la hora para
el comando OFF (+/-) y
confirme con OK.
·Introduzca los minutos
para el comando OFF
(+/-) y confirme con
OK.
· El programa se guarda.
· El programa salta a la
selección REVISAR,
NUEVO, BORRAR.
A partir de ahora se
pueden crear más
programas.
Page 82

82
Prog.
Programación de impulsos
9.00 h
Duración
Hora de inicio
Un comando de impulso se compone de: · Hora de inicio
· Duración = Duración ON
duración mínima de ON = 2 seg.
Ejemplo
Hora de inicio de lunes a viernes 9:00 h
Duración ON 10 seg.
C
OK
LIBRE 50
OK
ON/OFF
IMPULSO
CICLO
ESC OK
OK
SELEC
CANAL
I
ESC
OK
SELEC
CANAL
I
ESC OK
SELEC
Ejemplo
Diario, de lunes a viernes
Comando ON para canal 1
a las 15:00 h. Duración ON
1 hora.
· Seleccionar IMPULSO y
confirmar con OK.
· La pantalla muestra las
posiciones de memoria
libres.
· Seleccione el canal y
confirme con OK.
sólo con 2 canales
Page 83

83
E
Prog.
· Seleccione varios días o
un solo día (combinación de días libre) y
confirme con OK.
·Introduzca la hora para
el comando ON (+/-) y
confirme con OK.
·Introduzca los minutos
para el comando ON
(+/-) y confirme con
OK.
· Duración del comando
ON: introducir los días,
horas, minutos o
segundos y confirmar
con OK.
· El programa se guarda.
· El programa salta a la
selección REVISAR,
NUEVO, BORRAR.
A partir de ahora se
pueden crear más
programas.
ESC OK
HORAS
00
CAN ON
ESC OK
OK
SELEC
DIA
CAN ON
ESC OK
MINUTOS
15:00
CAN ON
ESC OK
GUARDADOS
P05
OK
DURACION
0
DIA
ESC OK
DURACION
01:00
HORAS
ESC OK
DURACION
01:00
MINUTOS
ESC OK
Page 84

84
OK
CICLO
ON/OFF
IMPULSO
ESC OK
OK
SEMANAL
VACACION
OK
REVISAR
NUEVO
BORRAR
ESC OK
ESC OK
OK
LIBRE 50
SELEC
CANAL
I
ESC OK
SELEC
CANAL
I
ESC
OK
MES
01
INICIO
ESC OK
OK
SELEC
DIA
CAN ON
ESC OK
MES
01
FIN
ESC OK
OK
DIA
08:01
INICIO
ESC OK
DIA
08:01
FIN
ESC OK
Prog.
Programa de vacaciones
Nota
Sólo se puede programar un único rango de
fechas.
Si se introducen varios programas, a todos los
comandos del programa de vacaciones se aplica
la última fecha introducida, o bien el último
rango de fechas introducido.
sólo con 2 canales
El programa de vacaciones
se ejecuta cada año,
salvo se modifique la
programación.
Page 85

85
E
Prog.
OK
ON P01
15:00
HH:MM
OK
BORRAR
REVISAR
NUEVO
ESC OK
EDT OK
OK
OFF P02
18:00
HH:MM
EDT OK
Visualizar y editar programas
Nota
· Los pasos del programa
pueden ser visualizados
con ▼ ▲ .
·Para editar el programa
correspondiente pulse
EDT. El procedimiento
es el mismo que en la
creación de un nuevo
programa.
Nota
· Pulsando SI se borran
todos los programas
·Para borrar determinados programas
individuales, pulse NO.
OK
BORRAR
TODO
OK
NUEVO
BORRAR
REVISAR
ESC OK
SI NO
OK
CONFIRM
SINO
OK
ON P01
15:00
HH:MM
DEL OK
OK
BORRAR
TODO
SI NO
OK
CONFIRM
SINO
Borrar todos los programas
Borrar programas individuales
Nota
Al eliminar un programa,
se eliminarán todos los
pasos de programa
correspondientes (p.ej.,
P01 ON y P02 OFF) , o bien
el programa de ciclo
completo.
Page 86

86
OK
ANO
2004
ESC OK
MES
2004:03
ESC OK
DIA
2004:03:25
ESC OK
OK
IDIOMA
FECH HOR
PROGRAMA
ESC OK
MINUTOS
13:45
ESC OK
OK
HORAS
13
ESC OK
Ajuste de fecha/hora
OK
AM PM
24H
ESC OK
OK
VERA INV
12H 24H
IDIOMA
ESC OK
Seleccionar AM/PM- (12 horas) o modo 24 horas
Nota
La fecha y la hora se preajustan en fábrica.
Page 87

87
E
OK
CALIBRAR
AUTO
NO
ESC OK
OK
PROGRAMA
VERA INV
12H 24H
ESC OK
VER INICIO
03
MES
ESC OK
OK
NO
CALIBRAR
AUTO
ESC OK
VER INICIO
03:21
DIA
ESC OK
INV INICIO
10
MES
ESC OK
INV INICIO
10:31
DIA
ESC OK
VER INV
2103:3110
CALIBRAR
ESC OK
Cambio de horario verano/invierno
Nota
Puede seleccionarse una
de las siguientes opciones:
AUTO
Preajuste de fábrica de
acuerdo con la normativa
vigente. Se recalcula cada
año automáticamente.
NO
Sin cambio.
CALIBRAR
Programación. Debe
introducirse la fecha de
inicio del horario de
verano y la del horario de
invierno. El preajuste de
fábrica se sobreescribe.
El horario de verano /
invierno se recalcula cada
año automáticamente.
La conmutación se realiza
el mismo día introducido
de la misma semana del
mes.
Ejemplo
21.03. Inicio horario de
verano
31.10. Inicio horario de
invierno
Page 88

88
RND
ESC
ALEATORI
OK
CONFIGUR
ALEATORI
12H 24H
ESC OK
OK
OK
ALEATORI
MENU
OK
ALEATORI
MENU
FECH HOR
PROGRAMA
VERA INV
ESC OK
OK
CONFIGUR
ALEATORI
12H 24H
ESC OK
ESC
ALEATORI
OK
Programa aleatorio
Nota
Al seleccionar la opción
ALEATORI se iniciará un
programa de temporización aleatoria. Con esta
opción activada, el
comando ON programado
se retrasa por un período
variable (aleatorio) de
entre 0 y 30 minutos.
Finalizar el programa
aleatorio:
· El display muestra
ALEATORI.
· Pulsar MENU.
· Seleccionar PROGRAMA
y confirmar con OK.
· Seleccionar ALEATORI y
confirmar con OK.
· Finalizar el programa
con .
·A continuación, el reloj
vuelve al modo automático.
7:00 20:00
7:30 20:30
ON
ON
Page 89

89
E
config
OK
MODOTAXI
ESC
Modo taxi
Nota
La interfaz de infrarrojos permite el intercambio de programas
con el módulo taxxi. Para ello, el aparato debe estar en
MODOTAXI y la tensión debe estar conectada.
Con ESC se puede finalizar el MODOTAXI.
in
prog
out
RS232
Módulo taxxi
prog = selección de programa
in =importar programa
out = exportar programa
· Seleccionar el número de programa con prog.
· Pulsar in para importar, o bien out para
exportar un programa.
· Situar el módulo taxxi en un ángulo de 90º
respecto de la interfaz de infrarrojos.
·Volver a pulsar in o bien out para iniciar la
transmisión de datos.
·Si se produce cualquier error de transmisión,
se muestra Er2. Volver pulsando la tecla prog.
VERA INV
CONFIGUR
ALEATORI
OK
ENT EXT
MODOTAXI
ESC OK
ESC OK
Configuración
Page 90

config
90
OK
SELEC
CANAL
I
ESC
OK
OK
CTAATRAS
EXT OVRD
ESC OK
OK
MODOTAXI
ENT EXT
ESC OK
Entrada externa – mando manual
Nota
Seleccionando EXT OVRD,
se puede asignar un canal
a un pulsador externo.
Al accionar el pulsador se
ejecuta un comando que
sigue activo hasta que se
accione de nuevo el
pulsador, o bien hasta
que se ejecute el siguiente
comando automático.
Ejemplo:
Accionar el pulsador
externo.
Luz ON hasta el siguiente
comando OFF programado, o bien hasta que se
ejecute el comando OFF
accionando de nuevo el
pulsador.
OK
SELEC
CANAL
I
ESC
OK
OK
MINUTOS
07:30
ESC
OK
OK
EXT OVRD
CTAATRAS
ESC OK
Mando manual externo – temporizador de cuenta atrás (máx. 20 minutos)
Nota
Seleccionando CTAATRAS
se puede programar el
tiempo de un temporizador de cuenta atrás.
El tiempo se inicia
accionando el pulsador
externo.
Al accionar el pulsador de
nuevo, el temporizador se
inicia otra vez.
Al seleccionar de nuevo
CTAATRAS, el tiempo se
vuelve a poner en "0".
Page 91

91
E
MENU
16121824
1
C1
15:26:38
FIX ON:
FIX OFF:
AUTO: (keine Anzeige) programmierte Schaltzeiten
FIX
FIX
Res.
Funcionamiento
Nota
Tecla izquierda = canal 1
Tecla derecha = canal 2 (sólo en la versión
con 2 canales)
Si se pulsa 1 vez
= FIX ON = Encendido permanente
Si se pulsa 2 veces
= FIX ON = Apagado permanente
Si se pulsa 3 veces
= vuelve al modo Auto
Datos técnicos
Dimensiones Al x An x L 45 x 35 x 60 mm
Peso aproximado 170 g.
Tensión de alimentación véase impresión
del equipo
Consumo de potencia 5 VA
Potencia de corte
- carga óhmica
(VDE, IEC) 16 A/250 V AC
- carga inductiva
cos ϕ 0.6 8 A/250 V AC
- Carga incandescente 1000 W
Salida libre de potencial
Tipo de contactos 1 o 2 conmutadores
Temperatura ambiente de -25°C a +55°C
Clase de protección II
Precisión ±2.5 s/día
a 20°C
Reserva de marcha 3 años a partir de
la salida de fábrica
a +20°C
Maniobra mínima 1 min.
Posiciones de memoria 50
Formación de bloques
de días de la semana fija/libre elección
Visualización estado
de canales sí
Precintable sí
(no muestra ningún símbolo)
Según horas de conmutación programados
Page 92

92
Notas de segurança
·A ligação e montagem de aparelhos eléctricos deve ser efectuada por um electricista.
·Intervenções ou modificações do aparelho têm como consequência o caducar do direito de garantia.
· Observar os regulamentos nacionais e as respectivas normas de segurança.
· Os terminais exteriores permitem a ligação de condutores fixos de flexíveis até 10 mm
2
.
· Não é permitido ligar condutores fixos com uma secção ≤ 1 mm
2
.
Notas gerais
· As ordens para desligar têm prioridade sobre as ordens para ligar.
·Em caso de uma alimentação de tensão correcta os pontos entre a indicação das horas e minutos
(SS:MM) serão indicados de modo contínuo. Em caso de uma falha de tensão os pontos piscarão.
· Sem alimentação de tensão o mostrador de comutação apaga-se após 2 minutos.
·O mostrador completo pisca, se for preciso mudar as pilhas dentro das próximas 2 semanas.
Montagem em calha DIN Esquema de ligação
567
L
123
N
56
L
123
N
S
C1
C2
C1
Page 93

93
P
OK
reset
MENU
16121824
Res.
1
A
F
B
C
D
E
G
I
J
K
M
C1
15:26:38
H
L
Mostrador
A Indicadores de funcionamento dos dois
botões do lado esquerdo
B Indicadores do estado dos canais
= Canal 1 ON
= Canal 1 OFF
Canal 1 = C1, Canal 2 = C2
C 3 linhas de comunicação para a indicação
do tempo, os pontos do menu, linhas de
comando etc.
D Indicador do dia de semana
E Esquema do programa de comutação diária
F Indicador da hora de Verão/Inverno
G Tensão de serviço (pontos contínuos)
Modo de reserva de marcha
(pontos piscam)
H Indicação do modo de férias
I Indicadores de funcionamento dos dois
botões do lado direito
Botões/Interface
J Reinicializar
Ao reinicializar todos os programas serão
guardados. Tem de se voltar a definir a data
e a hora. Carregar o botão de reinicializar
com um objecto sem ponta (esferográfica).
K Botão direito
L Interface de infra-vermelhos
M Botão esquerdo com função manual em
Generalidades
·A linha de comando central indica apenas o
ponto do menu a escolher. Em caso de
confirmação com OK este será activado.
·O texto a piscar ou símbolos exigem um
comando.
· Caso não se efectue nenhuma introdução
dentro de 2 minutos, o relógio volta para o
modo automático.
Indicadores de funcionamento dos dois
botões do lado esquerdo:
Folhear no menu para cima
Folhear no menu para baixo
Rejeitar a selecção/proposta
Aceitar selecção/proposta
+Premir pouco tempo = +1
Premir mais tempo (cerca 2 seg.) = +5
-Premir pouco tempo = +1
Premir mais tempo (cerca 2 seg.) = +5
Indicadores de funcionamento dos dois
botões do lado direito:
MENU Sair do modo automático e entrar no
modo de programação
ESC Premir pouco tempo
= um passo para trás
Premir mais tempo (cerca 2 seg.)
= Voltar para o modo automático
OK Escolher e aceitar a selecção
EDT Alteração no modo de leitura
NA Não efectuar o comando
SIM Efectuar o comando
DEL Apagar
Page 94

94
1.
ESC
OK
DEUTSCH
ENGLISH
FRANCAIS
OK
12H 24H
LANGUAGE
DATETIME
ESC OK
OK
NEDERLAN
PORTUGES
CZECH
ESC OK
ESC
MENU
16121824
1
C1
15:26:38
Res.
MENU
Informação
No fornecimento, o temporizador encontra-se
configurado em automático com a hora, a data
e a língua do menu em inglês predefinidos.
Primeira utilização – Selecção da língua do menu
Prog.
MENU
16121824
1
C1
15:26:38
Res.
DATA HORA
PROGRAMA
HORADIA
MENU
OK
REVER
NOVO
APAGAR
ESC OK
ESC OK
Page 95

95
P
Prog.
OK
CICLO
ON/OFF
PULSO
ESC OK
OK
FERIAS
SEMANAL
OK
REVER
NOVO
APAGAR
ESC OK
ESC OK
Programa semanal
Informação
O temporizador dispõe de
50 passos de programação.
Sob o ponto de menu
FERIAS pode-se criar um
programa relacionado a
uma data.
(veja programa de férias)
A
C
B
Page 96

96
Prog.
Exemplo
Comando ON para o
canal 1 para as 15.00 h.
Comando OFF para as
18.00 h.
· Escolher o ON/OFF e
confirmar com OK.
·Por um curto período de
tempo mostram-se as
memórias livres.
· Escolher o canal e
confirmar com OK.
· Escolher o calendário
diário ou dia individual
(escolha livre do
calendário) e confirmar
com OK.
·Introduzir a hora para o
comando ON (+/-) e
confirmar com OK.
·Introduzir o minuto para
o comando ON (+/-) e
confirmar com OK.
·Introduzir a hora para o
comando OFF (+/-) e
confirmar com OK.
·Introduzir o minuto para
o comando OFF (+/-) e
confirmar com OK.
·O programa será
gravado.
·O programa muda para
selecção REVER, NOVO,
APAGAR. Agora podem
ser criados mais
programas.
OK
LIVRE 50
OK
CICLO
ON/OFF
PULSO
ESC OK
OK
SELECCAO
CANAL
I
ESC
OK
SELECCAO
CANAL
I
ESC OK
HORA
00
CAN ON
ESC OK
OK
SELECCAO
DIA
CAN ON
ESC OK
MINUTOS
15:00
CAN ON
ESC OK
MINUTOS
18:00
CAN OFF
ESC OK
OK
HORA
00
CAN OFF
ESC OK
GUARDADO
P01 P02
Programação ON/OFF
A
apenas em caso
de 2 canais
Page 97

97
P
Prog.
Programação do ciclo
9.00 h 17.00 h
Duração
Pausa
Duração do ciclo
Tempo de inicio
Canal OFFCanal ON
Um comando de comutação de ciclo tem: · Tempo de inicio
· Duração = ON-Duração de comutação
· Período = ON-Duração de comutação +
Pausa)
· Duração do ciclo = Período de tempo entre canal ON
e canal OFF
Informação
O tempo a decorrer entre o tempo de inicio e tempo de fim não pode ser inferior à duração do
periodo. Não é permitido uma ramificação dos programas de ciclo.
Exemplos
O aparelho é ligado a partir de segunda-feira 9 horas de 60 em 60 minutos por 10 minutos até
sexta-feira às 19 horas.
Tempo de inicio segunda-feira 9.00 horas
LIGAR-Duração de comutação 10 min.
Duração do ciclo 60 min.
Fim sexta-feira 19.00 horas
B
Periodo
Page 98

98
Prog.
Exemplo
Rega do jardim: dia sim dia
não, regar durante duas
horas Comando ON para o
canal 1 para as 04.00 h.
Comando OFF para as
06.00 h.
· Escolher o CICLO e
confirmar com OK.
·Por um curto período de
tempo mostram-se as
memórias livres.
· Escolher o canal e
confirmar com OK.
· Escolher o calendário
diário ou dia individual
(escolha livre do
calendário) e confirmar
com OK.
·Introduzir a hora para o
comando ON (+/-) e
confirmar com OK.
·Introduzir o minuto para
o comando ON (+/-) e
confirmar com OK.
·Período:
Introduzir dias, horas,
minutos ou segundos e
confirmar com OK.
OK
LIVRE 50
OK
PULSO
CICLO
ON/OFF
ESC OK
OK
SELECCAO
CANAL
I
ESC
OK
SELECCAO
CANAL
I
ESC OK
HORA
00
CAN ON
ESC OK
OK
SELECCAO
DIA
CAN ON
ESC OK
MINUTOS
04:00
CAN ON
ESC OK
PERIODO
2
DIA ON
ESC OK
OK
PERIODO
0
DIA ON
ESC OK
PERIODO
2:00
HORA
ESC OK
Programação do ciclo
B
apenas em caso
de 2 canais
Page 99

99
P
Prog.
HORA
00
CAN OFF
ESC OK
PERIODO
02:00
MINUTOS
ESC OK
DURACAO
0
DIA
ESC OK
DURACAO
2:00
HORA
ESC OK
DURACAO
02:00
MINUTOS
ESC OK
GUARDADO
P04
MINUTOS
06:00
CAN OFF
ESC OK
· Duração do comando
ON: Introduzir dias,
horas, minutos ou
segundos e confirmar
com OK.
· Escolher o calendário
diário ou dia individual
(escolha livre do
calendário) e confirmar
com OK.
·Introduzir a hora para o
comando OFF (+/-) e
confirmar com OK.
·Introduzir o minuto para
o comando OFF (+/-) e
confirmar com OK.
·O programa será
gravado.
·O programa muda para
selecção REVER, NOVO,
APAGAR. Agora podem
ser criados mais
programas.
Page 100

100
Prog.
Programação por impulsos
9.00 h
Duração
Tempo de inicio
Um comando de comutação por impulsos tem: · Tempo de inicio
· Duração = ON-Duração de comutação
ON-Duração de comutação
mínima = 2 segundos
Exemplo
Tempo de inicio segunda-feira a sexta-feira 9.00 horas
ON-Duração de comutação 10 seg.
C
OK
LIVRE 50
OK
ON/OFF
PULSO
CICLO
ESC OK
OK
SELECCAO
CANAL
I
ESC
OK
SELECCAO
CANAL
I
ESC OK
SELECCAO
Exemplo
Diariamente de segundafeira a sexta-feira
Comando ON para o canal
1 para as 15.00 h. ONDuração de comutação
1 hora.
·Escolher o PULSO e
confirmar com OK.
·Por um curto período de
tempo mostram-se as
memórias livres.
· Escolher o canal e
confirmar com OK.
apenas em caso
de 2 canais
 Loading...