

Page 1

DGBF I E PNLCZ
Bedienungsanleitung (2...9)
Operating Manual (10...17)
Mode d’emploi (18...25)
Istruzioni per l’uso (26...33)
Instrucciones de uso (34...41)
Manual de instruções (42...49)
Bedieningshandleiding (50...57)
Návod k obsluze
(58...65)CZ
D
GB
F
I
E
P
NL
http://waterheatertimer.org/Intermatic-timers-and-manuals.html#Talento-400
Page 2
2
Sicherheitshinweise
· Der Anschluß und die Montage elektrischer Geräte darf nur durch eine Elektrofachkraft erfolgen.
· Eingriffe und Veränderungen am Gerät führen zum Erlöschen des Garantieanspruches.
· Beachten Sie Ihre nationalen Vorschriften und die jeweiligen Sicherheitsbestimmungen.
·Die äusseren Anschlussklemmen lassen den Anschluß von festen und flexiblen Leitern bis 10 mm
2
zu.
· Es dürfen keine flexiblen Leitungen mit einem Leitungsquerschnitt ≤ 1 mm
2
angeschlossen werden.
Allgemeine Hinweise
· Ausschaltbefehle haben Vorrang vor Einschaltbefehlen.
· Bei korrekter Spannungsversorgung werden die Punkte zwischen der Stunden- und Minutenanzeige
(SS:MM) permanent angezeigt. Die Punkte blinken bei Spannungsunterbrechung.
· Ohne Spannungsversorgung erlischt die Schaltstellungsanzeige nach 2 Minuten.
· Die komplette Displayanzeige blinkt wenn ein Batteriewechsel innerhalb der nächsten 2 Wochen
erforderlich wird.
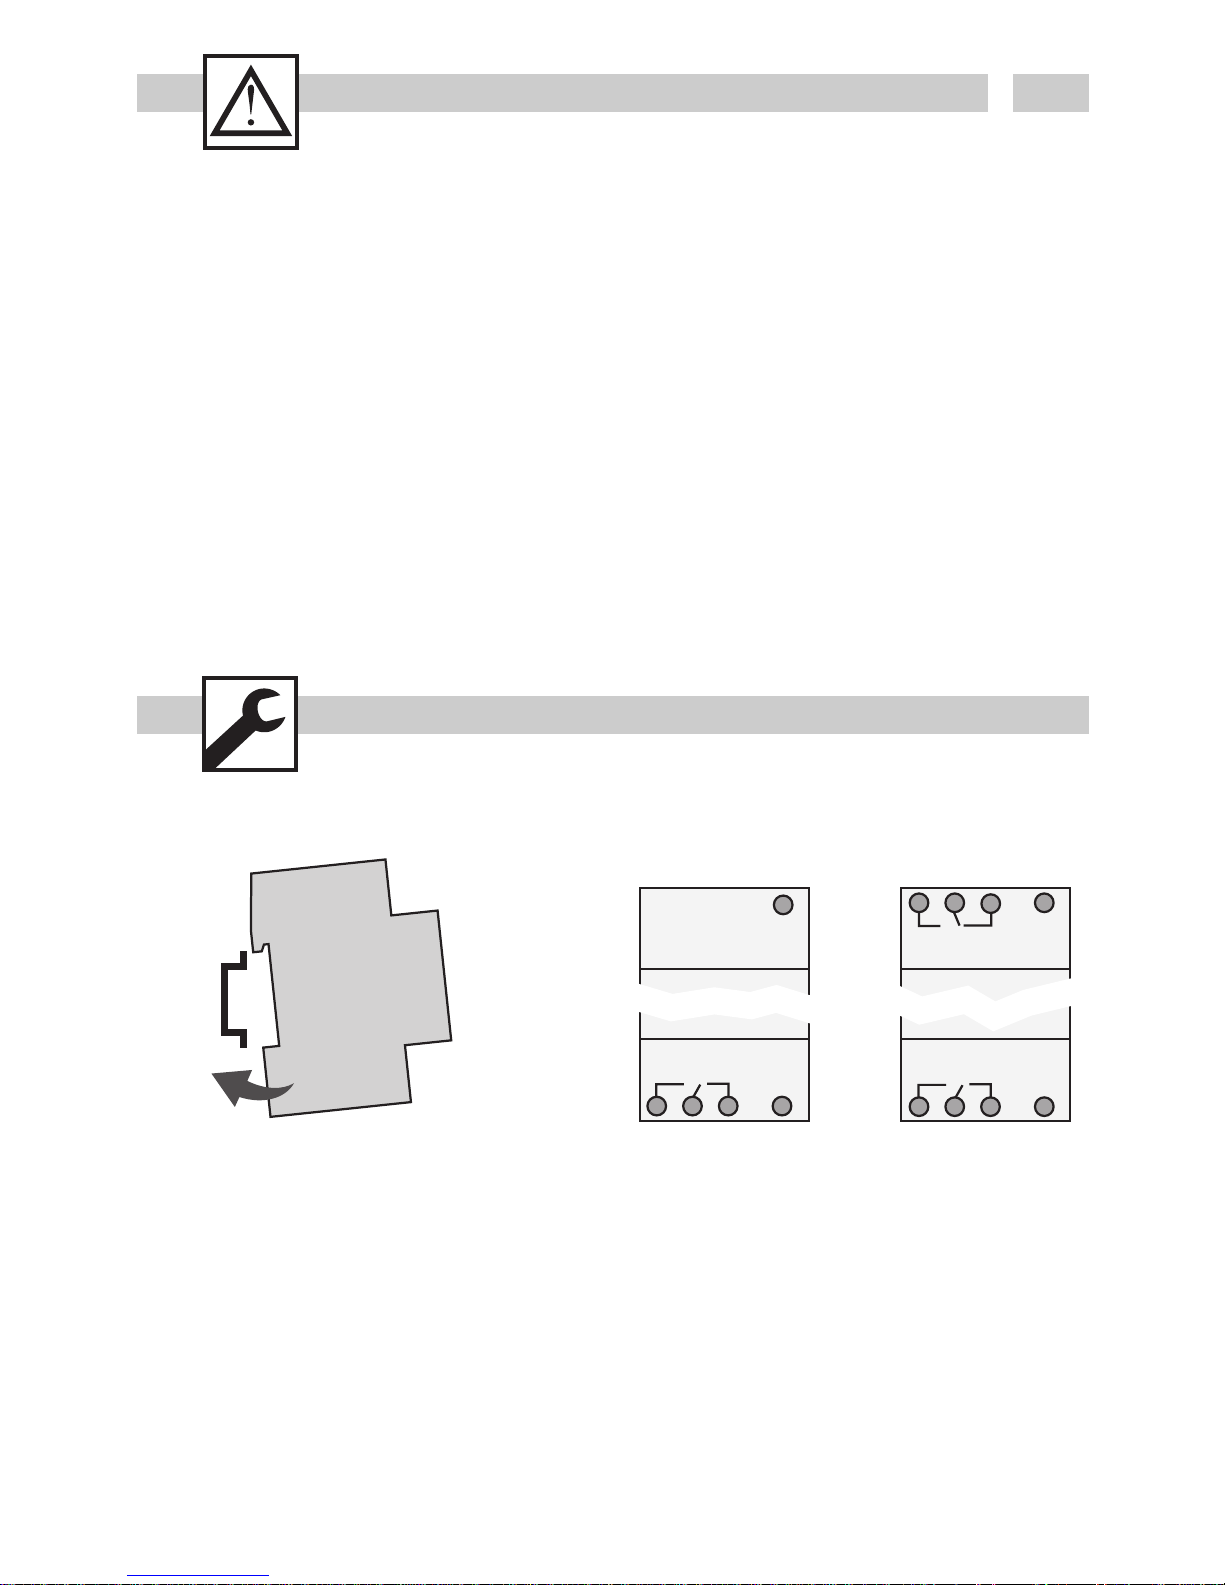
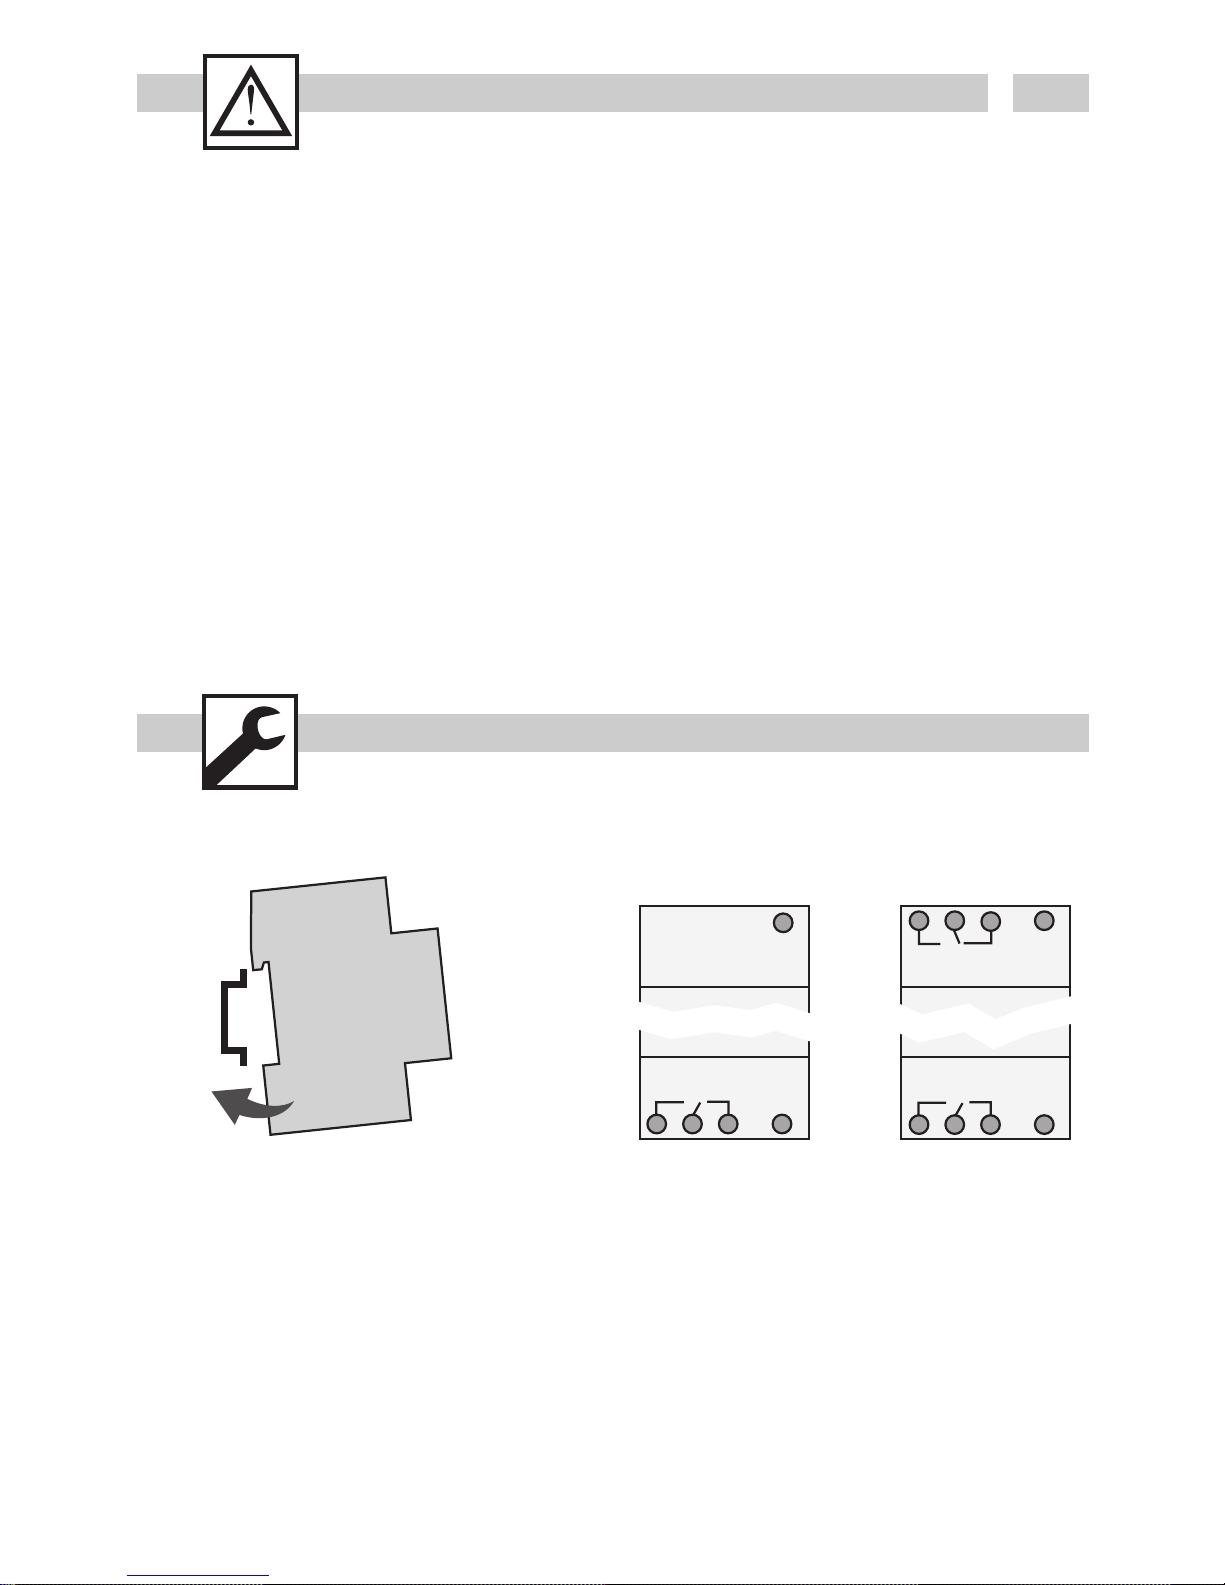
Montage auf DIN-Schiene Anschlussplan
567
L
123
N
56
L
123
N
C1
C2
C1
Page 3
OK
reset
3
D
MENU
16121824
Res.
1
A
F
B
C
D
E
G
H
I
J
K
C1
15:26:38
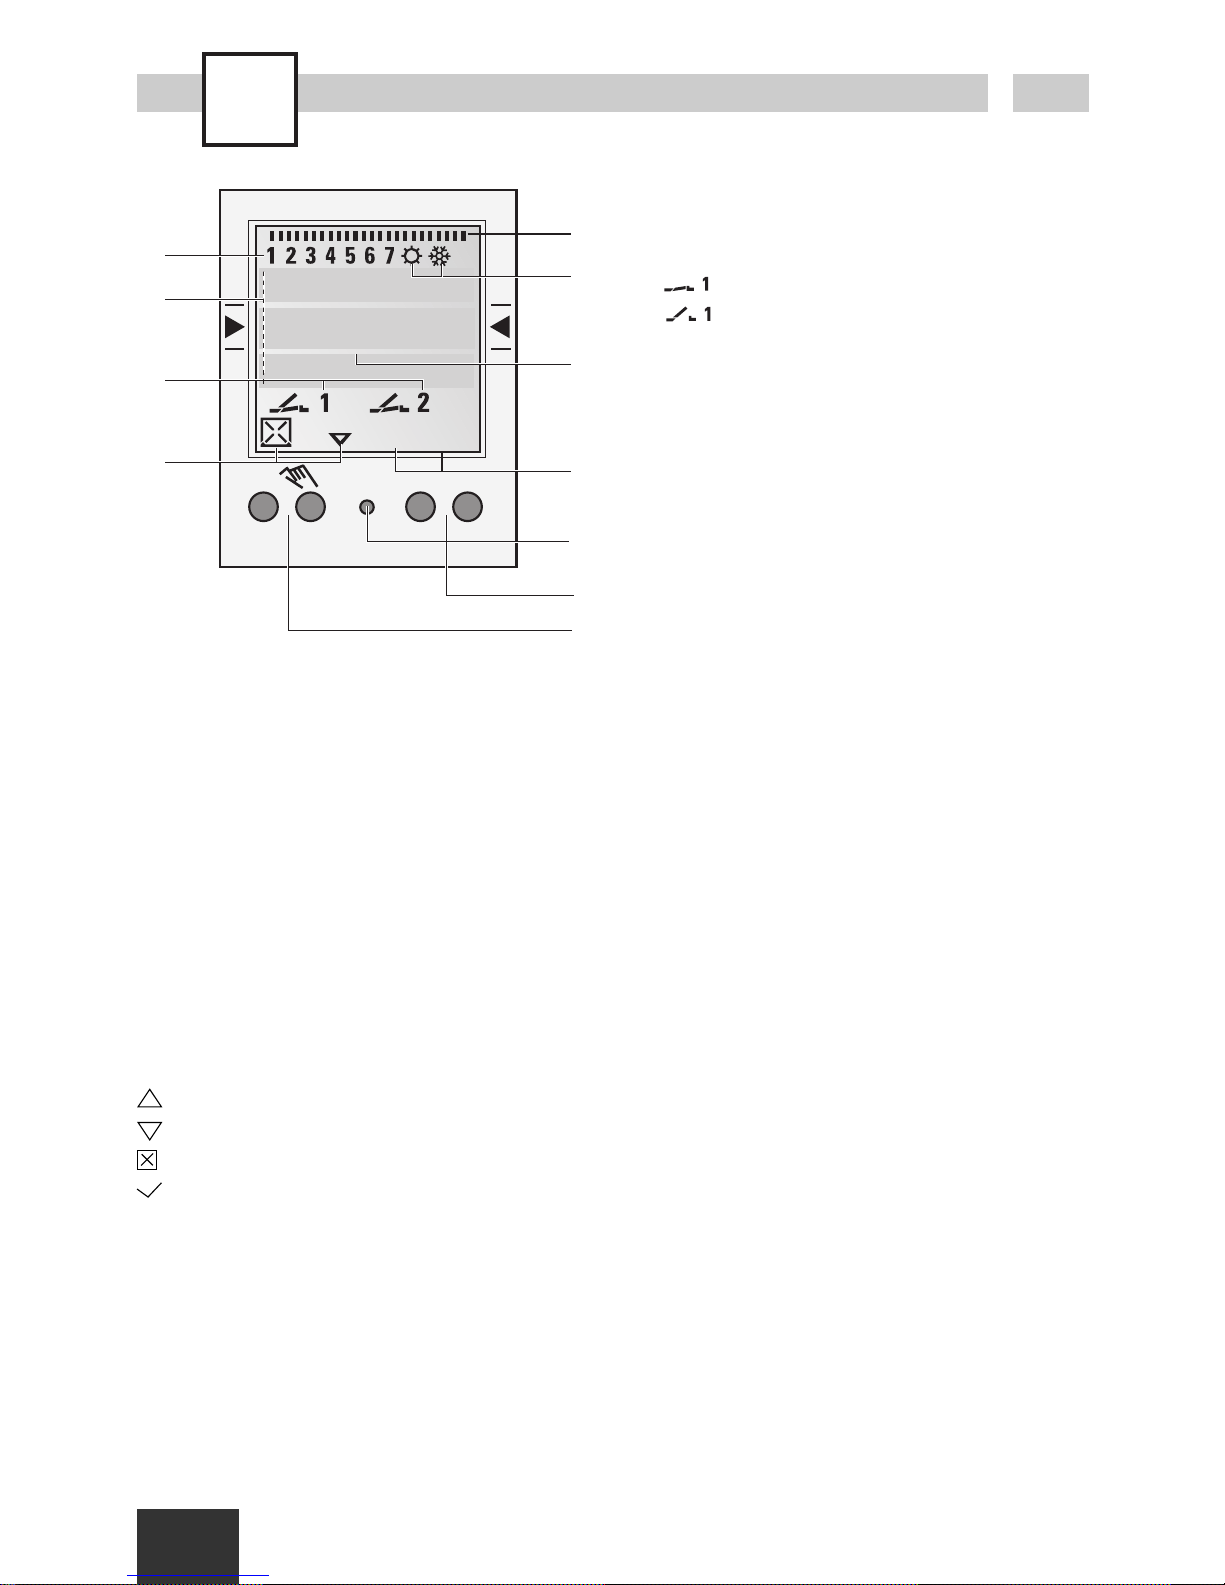
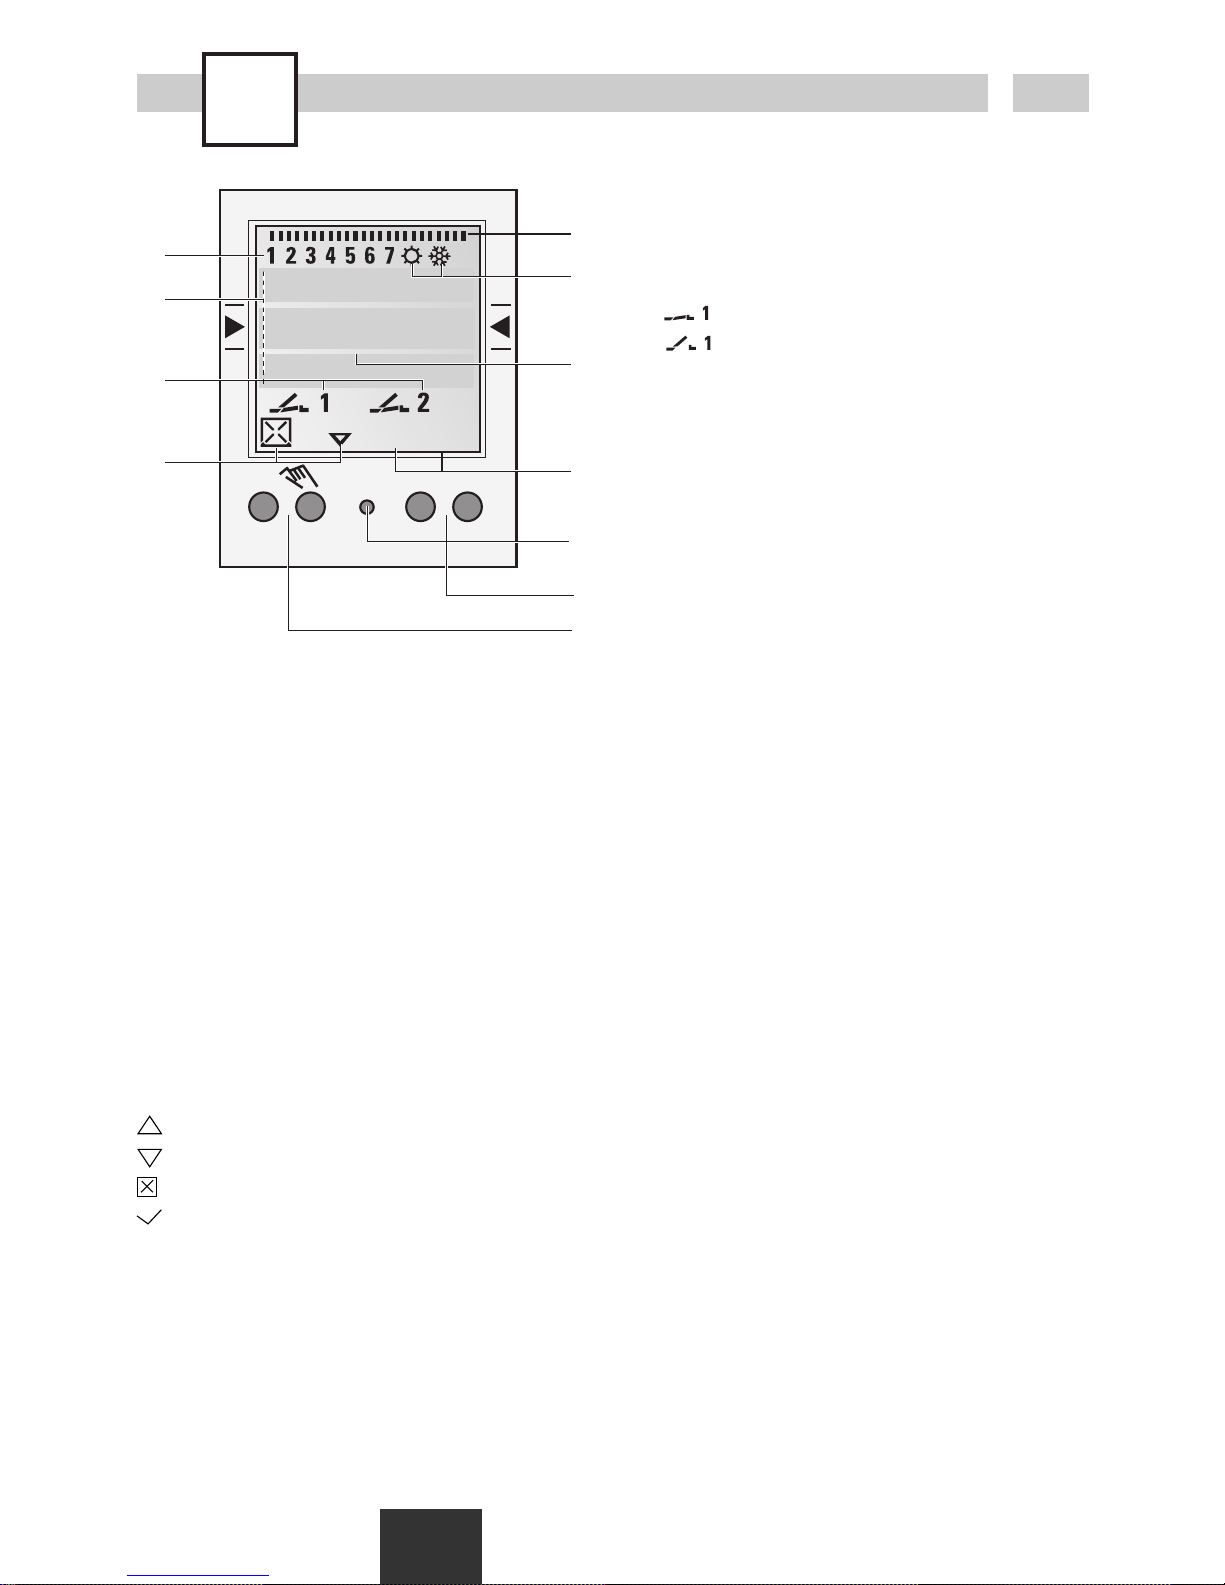
Display
A Funktionsanzeigen der beiden linken Tasten
B Kanalzustandsanzeigen
= Kanal 1 EIN
= Kanal 1 AUS
Kanal 1 = C1, Kanal 2 = C2
C 3 Kommunikationszeilen für Zeitanzeige,
Menüpunkte, Eingabeaufforderungen etc.
D Wochentaganzeige
E Übersicht Tages-Schaltprogramm
F Anzeige Sommer-/Winterzeit
G Betriebsspannung (permanente Punkte)
Gangreservebetrieb (Punkte blinken)
H Funktionsanzeigen der beiden rechten
Tasten
Tasten
I Reset
Bei einem Reset bleiben die Programme
erhalten. Es muss Datum und Uhrzeit neu
eingestellt werden. Resettaste mit einem
stumpfen Gegenstand (Kugelschreiber)
betätigen.
J Rechte Tasten
K Linke Tasten mit Handschalterfunktion im
Automatikbetrieb
Allgemein
· Die mittlere Kommunikationszeile zeigt den
zur Auswahl stehenden Menüpunkt. Bei einer
Bestätigung mit OK wird dieser aktiviert.
· Blinkende Texte oder Symbole erfordern eine
Eingabe.
·Erfolgt innerhalb von 2 Minuten keine
Eingabe kehrt die Uhr in den Auto-Mode
zurück.
Funktionsanzeigen der beiden linken Tasten:
im Menü nach oben blättern
im Menü nach unten blättern
Auswahl/Vorschlag verwerfen
Auswahl/Vorschlag annehmen
+ Kurz Drücken = +1
Lang Drücken (ca. 2 sec) = +5
- Kurz Drücken = -1
Lang Drücken (ca. 2 sec) = -5
Funktionsanzeigen der beiden rechten Tasten:
MENU Verlassen des Automatikbetriebes und
Einstieg in den Programmiermodus
ESC Kurz Drücken = einen Schritt zurück
Lang Drücken (ca. 2 sec) = Zurück in
den Automatikbetrieb
OK Auswahl treffen und übernehmen
EDT Änderungswunsch im Lesen-Mode
N Befehl nicht ausführen
J Befehl ausführen
DEL Löschen
Page 4

1.
4
ESC
OK
DEUTSCH
ENGLISH
FRANCAIS
OK
12H 24H
LANGUAGE
DATETIME
ESC OK
OK
CZECH
DEUTSCH
ENGLISH
ESC OK
ESC
MENU
16121824
1
C1
15:26:38
Res.
MENU
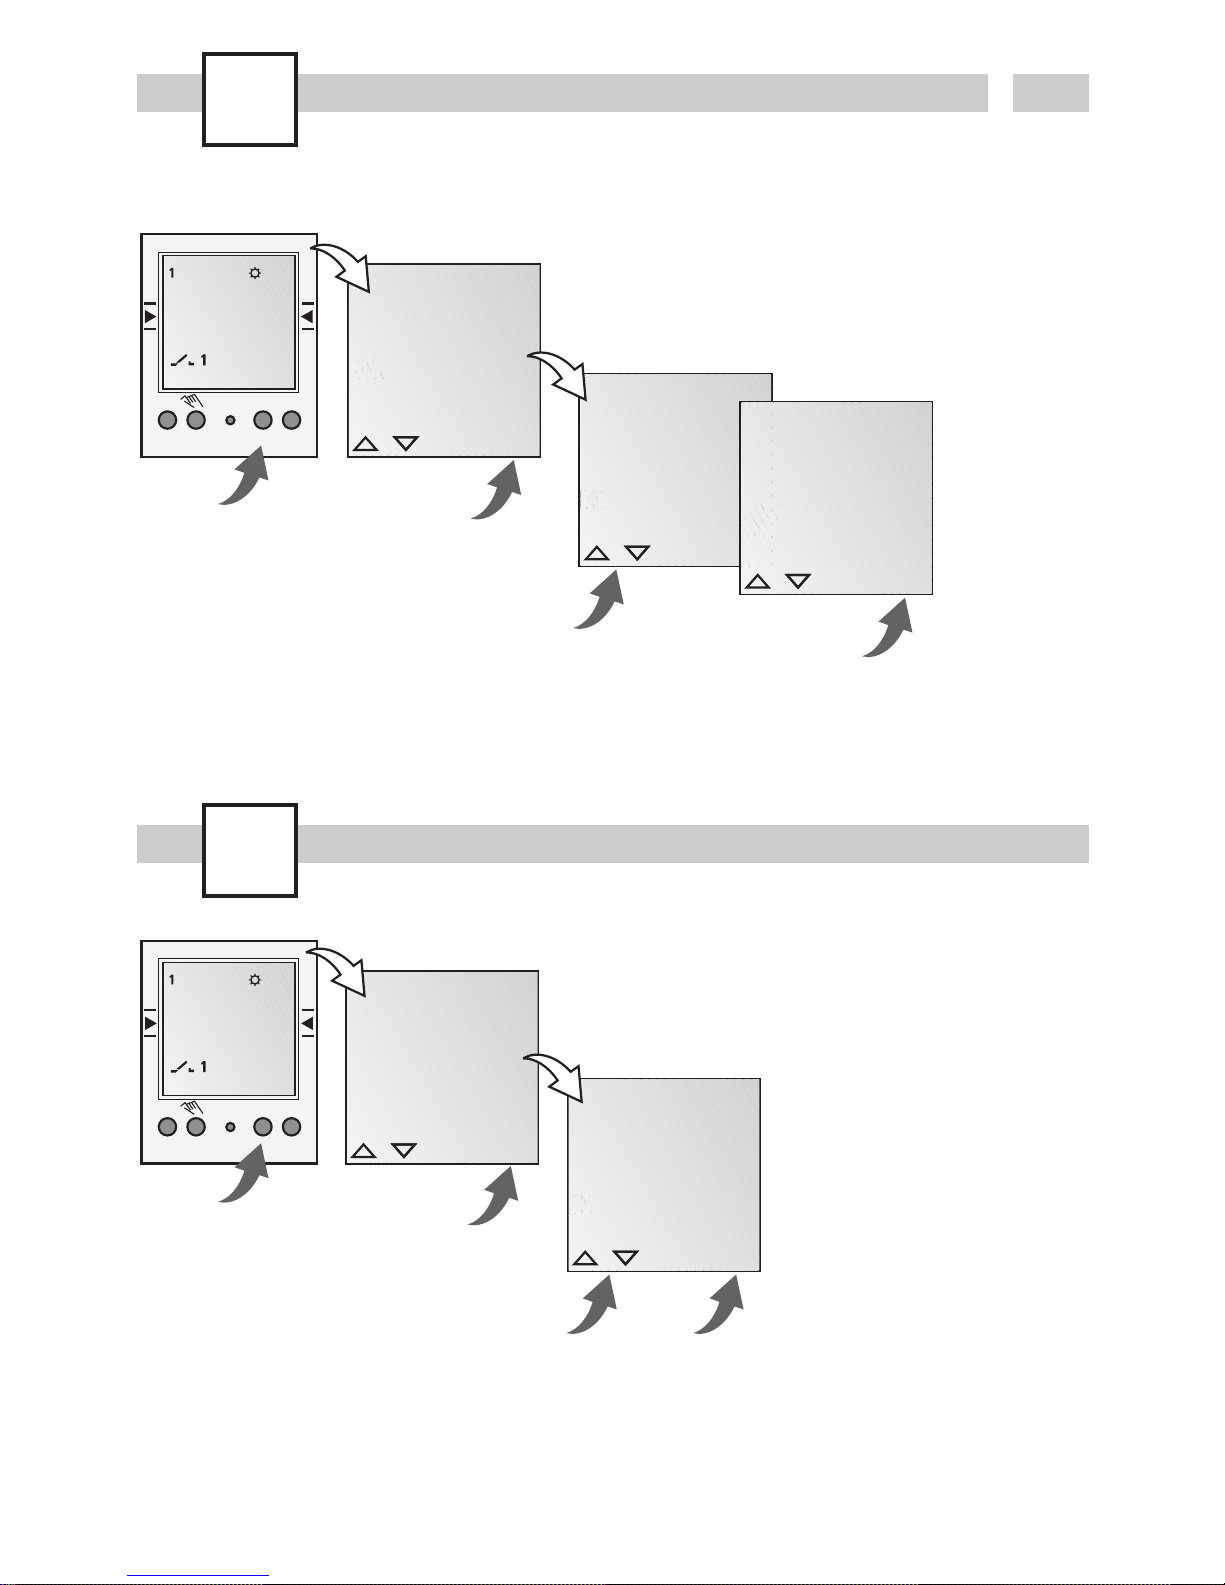
Info
Im Auslieferungszustand befindet sich die
Zeitschaltuhr im Auto Mode mit voreingestellter
Uhrzeit, Datum und Menüsprache Englisch.
Erstinbetriebnahme - Wahl der Menüsprache
Prog.
MENU
16121824
1
C1
15:26:38
Res.
DAT/ZEIT
PROGRAMM
SO WI
MENU
OK
LESEN
NEU
LOESCHEN
ESC OK
ESC OK
Page 5
Prog.
5
D
STUNDEN
00
KAN EIN
ESC OK
OK
AUSWAHL
TAG
KAN EIN
ESC OK
MINUTEN
15:00
KAN EIN
ESC OK
MINUTEN
18:00
KAN AUS
ESC OK
OK
STUNDEN
00
KAN AUS
ESC OK
SICHERN
P01 P02
OK
FREI 50
OK
LESEN
NEU
LOESCHEN
ESC OK
OK
KANAL
AUSWAHL
I
ESC
OK
KANAL
AUSWAHL
I
ESC OK
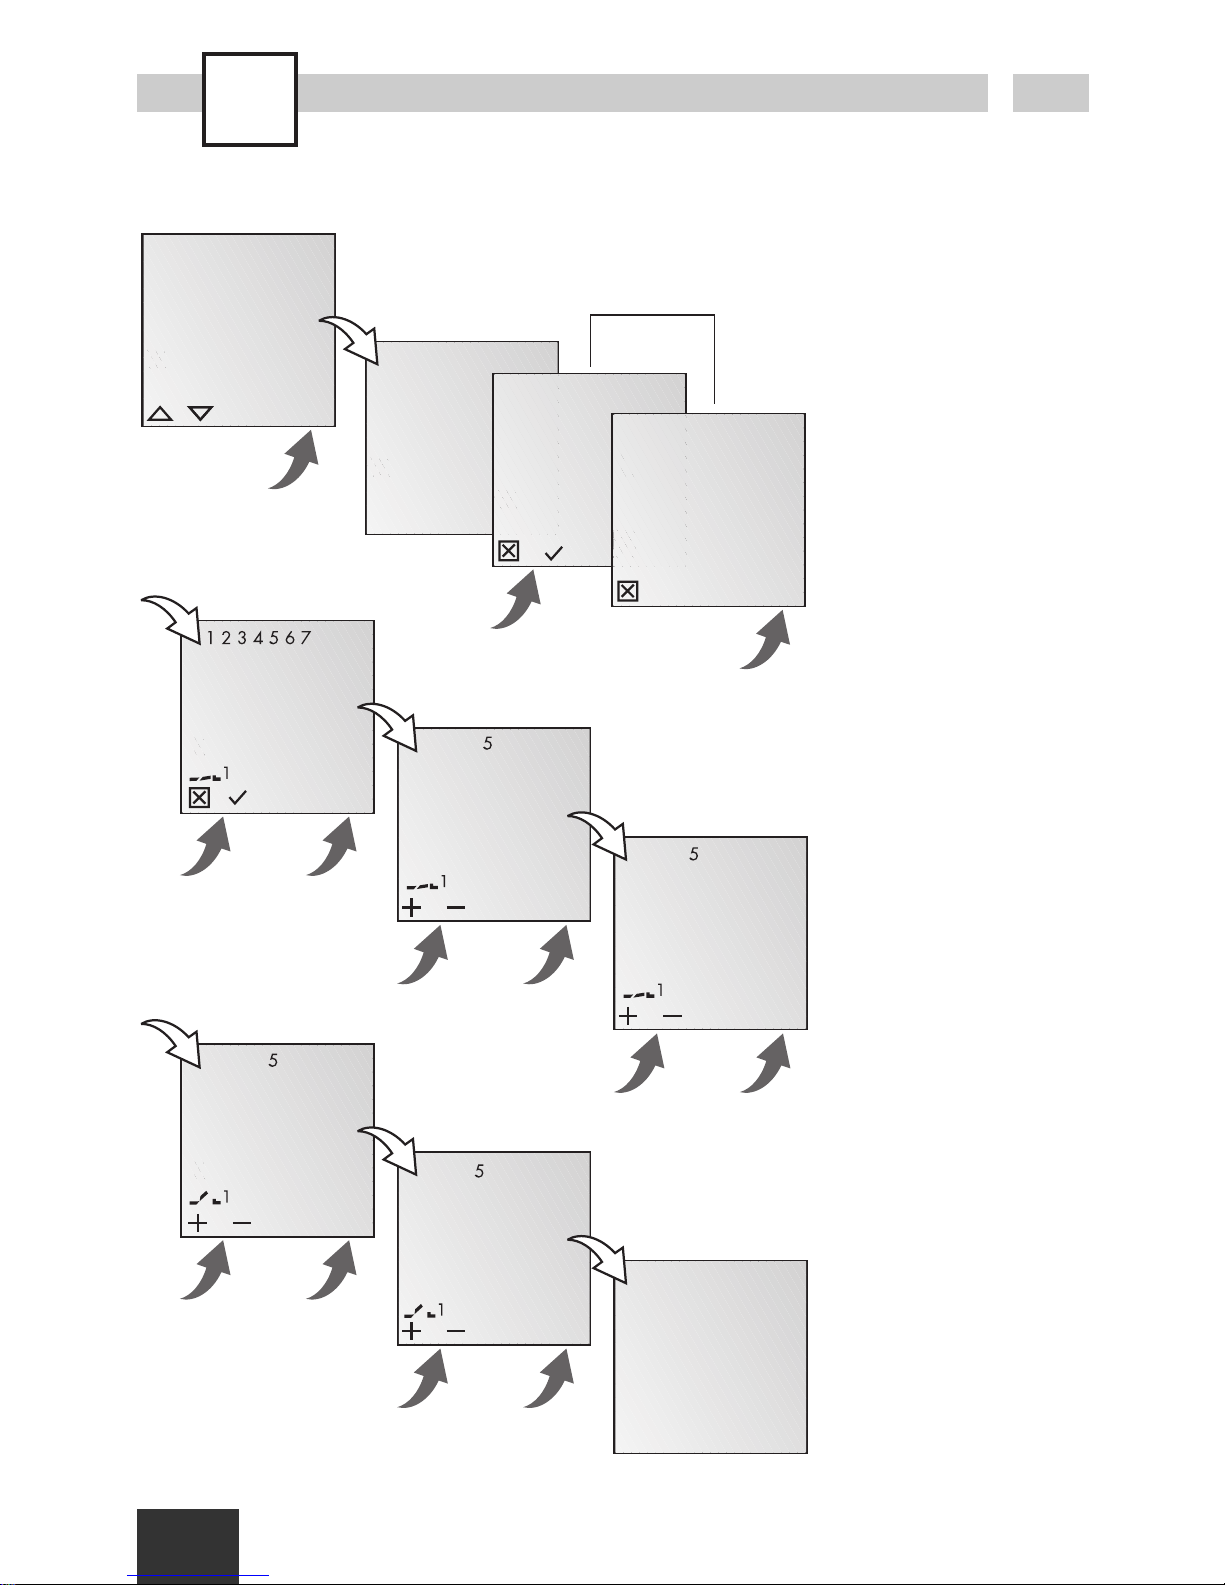
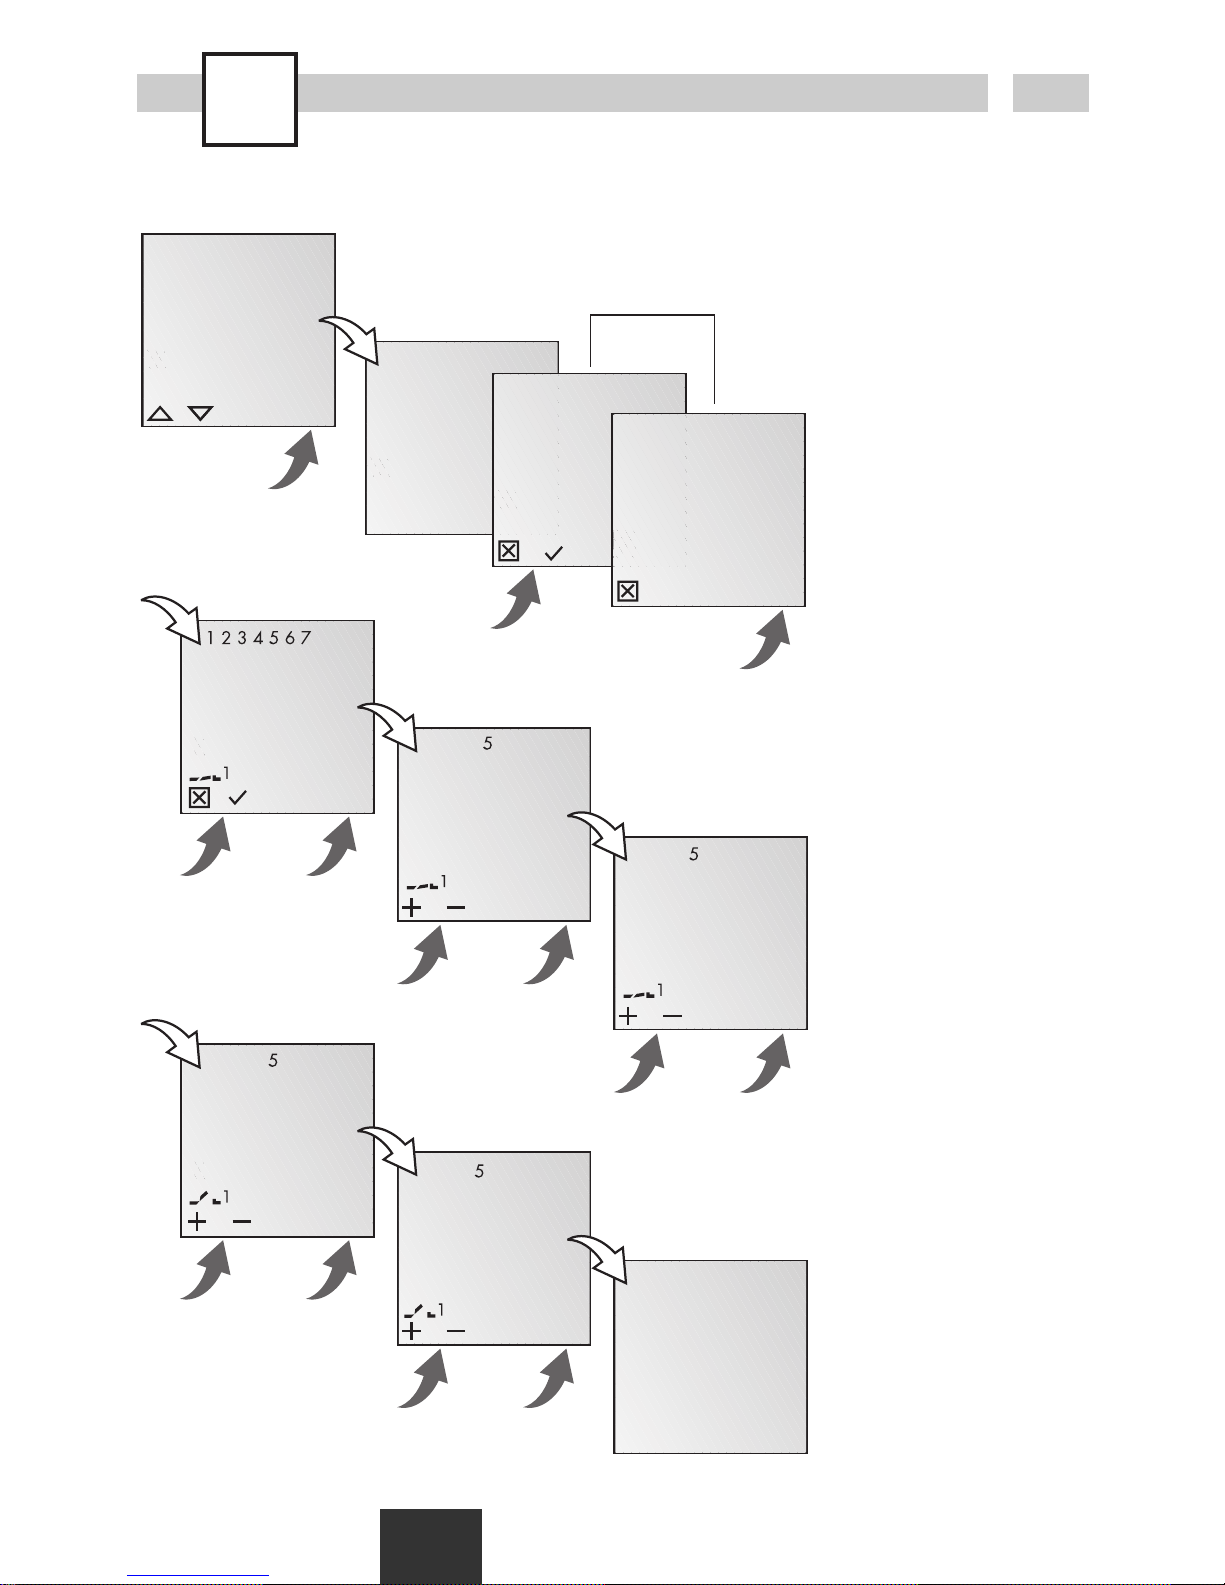
Neues Programm
Info
Die Schaltuhr besitzt 50
Speicherplätze.
Beispiel
EIN-Befehl für Kanal 1 um
15.00 Uhr. AUS-Befehl um
18:00 Uhr.
·Programm NEU wählen
und mit OK bestätigen.
· Es werden kurz die
freien Speicherplätze
angezeigt.
· Kanal auswählen und
mit OK bestätigen.
·Tagesblock oder Einzeltag (freie Blockbildung)
auswählen und mit OK
bestätigen.
·Stunde für EIN-Befehl
eingeben (+/-) und mit
OK bestätigen.
·Minute für EIN-Befehl
eingeben (+/-) und mit
OK bestätigen.
·Stunde für AUS-Befehl
eingeben (+/-) und mit
OK bestätigen.
·Minute für AUS-Befehl
eingeben (+/-) und mit
OK bestätigen.
·Programm wird
gespeichert.
·Programm springt in die
Auswahl LESEN, NEU,
DEL. Es können nun
weitere Programme
erstellt werden.
nur bei 2-Kanal
Page 6
Prog.
6
OK
EIN P01
15:00
HH:MM
OK
LOESCHEN
LESEN
NEU
ESC OK
EDT OK
OK
AUS P02
18:00
HH:MM
EDT OK
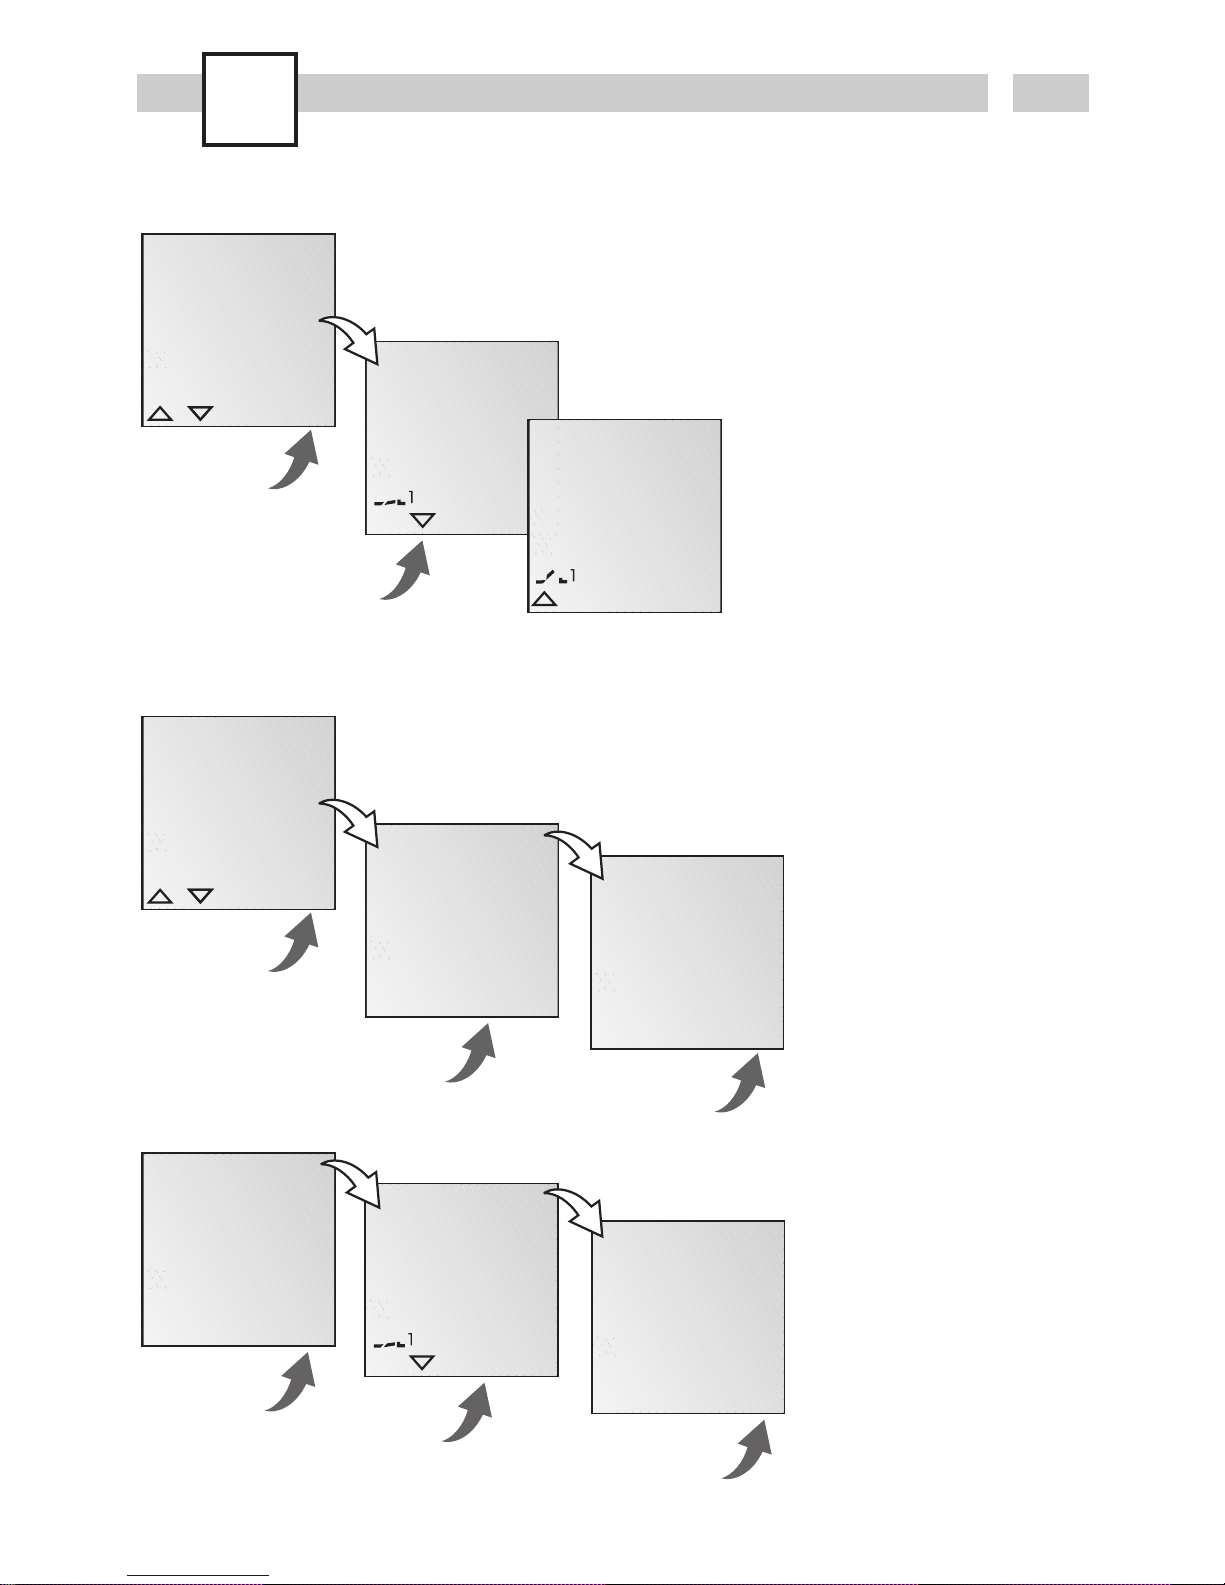
Programm anschauen, bearbeiten
Info
· Mit ▼ ▲ kann durch
die Programmschritte
geblättert werden.
·Durch Drücken von EDT
kann das jeweilige
Programm bearbeitet
werden. Die Vorgehensweise entspricht dem
Anlegen eines neuen
Programmes.
Info
·Es besteht die
Möglichkeit mit J alle
Programme zu löschen
·Durch Drücken von N
können einzelne
Programme gelöscht
werden.
OK
LOESCHEN
ALLE
OK
NEU
LOESCHEN
LESEN
ESC OK
JN
OK
SICHER
JN
OK
EIN P01
15:00
HH:MM
DEL OK
OK
LOESCHEN
ALLE
JN
OK
SICHER
JN
Alle Programme löschen
Einzelne Programme löschen
Info
Beim Löschen einzelner
Programme werden alle
dazugehörigen Programmschritte gelöscht (z.B. P01
EIN und P02 AUS).
Page 7

7
D
OK
JAHR
2004
ESC OK
MONAT
2004:03
ESC OK
TAG
2004:03:25
ESC OK
OK
SPRACHE
DAT/ZEIT
PROGRAMM
ESC OK
MINUTEN
13:45
ESC OK
OK
STUNDEN
13
ESC OK
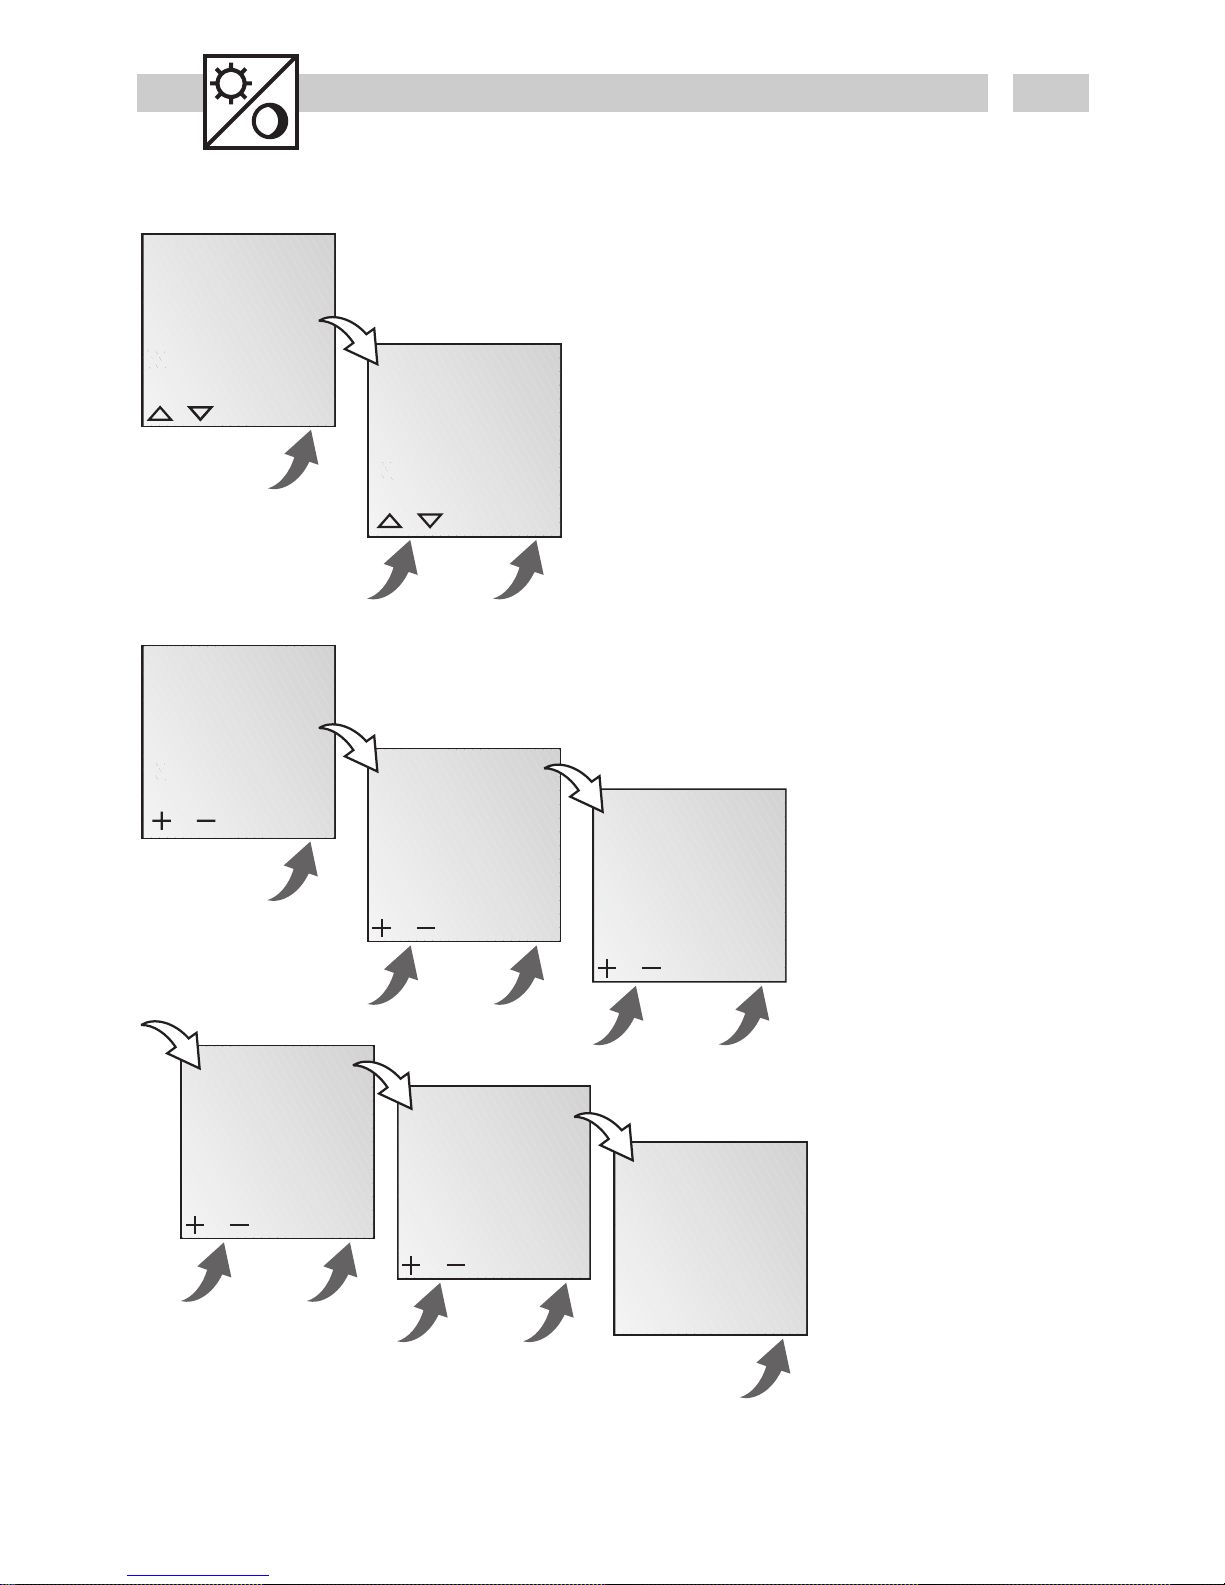
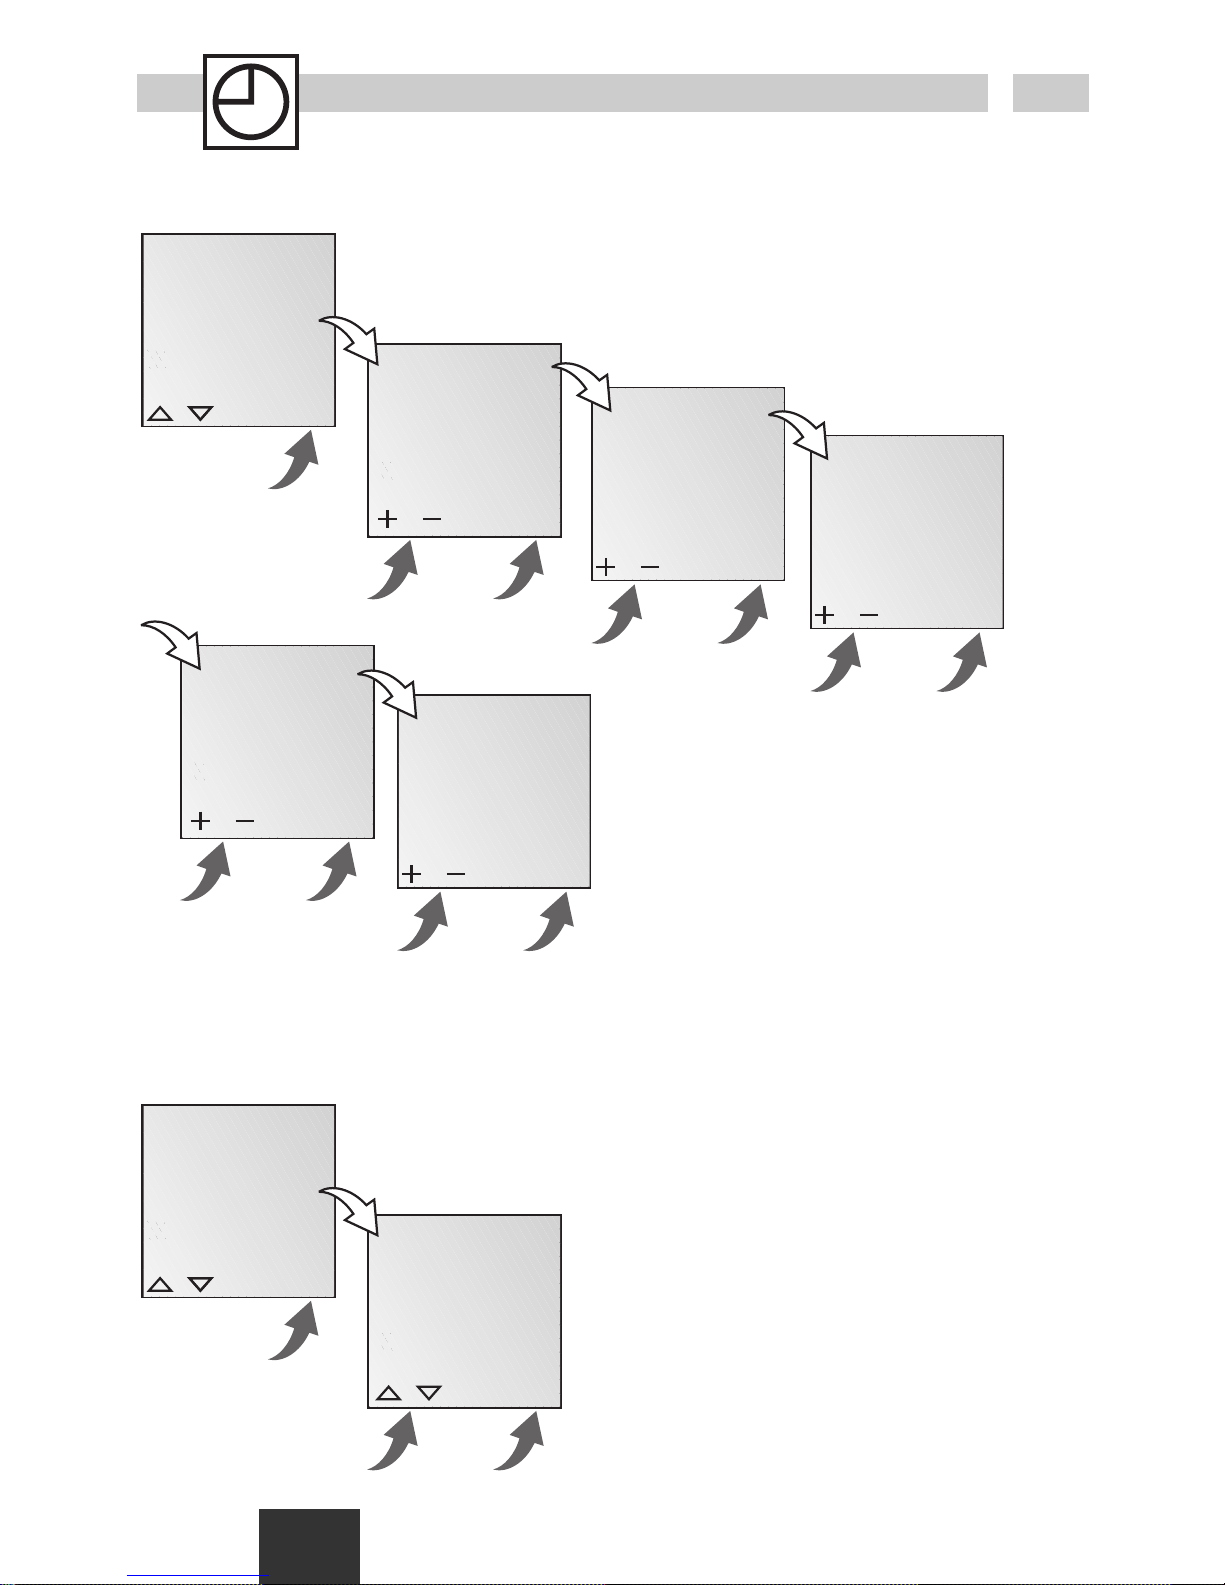
Datum und Uhrzeit einstellen
OK
AM PM
24 H
ESC OK
OK
SO WI
12H 24H
SPRACHE
ESC OK
AM/PM- (12-Stunden-) bzw. 24-Stunden-Anzeige einstellen
Info
Datum und Uhrzeit sind werksseitig
voreingestellt.
Page 8
8
OK
KAL
AUTO
NEIN
ESC OK
OK
PROGRAMM
SO WI
12H 24H
ESC OK
SO START
03
MONAT
ESC OK
OK
NEIN
KAL
AUTO
ESC OK
SO START
03:21
TAG
ESC OK
WI START
10
MONAT
ESC OK
WI START
10:31
TAG
ESC OK
SO WI
2103:3110
KAL
ESC OK
Umschaltung Sommer-/Winterzeit
Info
Folgende Einstellungen
sind möglich:
AUTO
werksseitige Voreinstellung der gesetzlichen
Vorgabe. Diese wird automatisch für jedes Jahr neu
berechnet.
NEIN
keine Umschaltung
KAL
Programmierung. Dazu
muss das Startdatum der
Sommerzeit und der
Winterzeit eingegeben
werden. Die werksseitige
Voreinstellung wird überschrieben.
Die programmierte
Sommer-/Winterzeit wird
automatisch für jedes Jahr
neu berechnet.
Die Umschaltung erfolgt
am gleichen eingegebenen Wochentag in der
gleichen Woche des
Monats.
Beispiel
21.03. Start Sommerzeit
31.10. Start Winterzeit
Achtung
Während der Umschaltung
von Sommer- zu Winterzeit bzw. umgekehrt
dürfen keine Veränderungen an der Uhr vorgenommen werden!
Page 9
9
D
MENU
16121824
1
C1
15:26:38
FIX ON:
FIX OFF:
AUTO: (keine Anzeige) programmierte Schaltzeiten
FIX
FIX
Res.
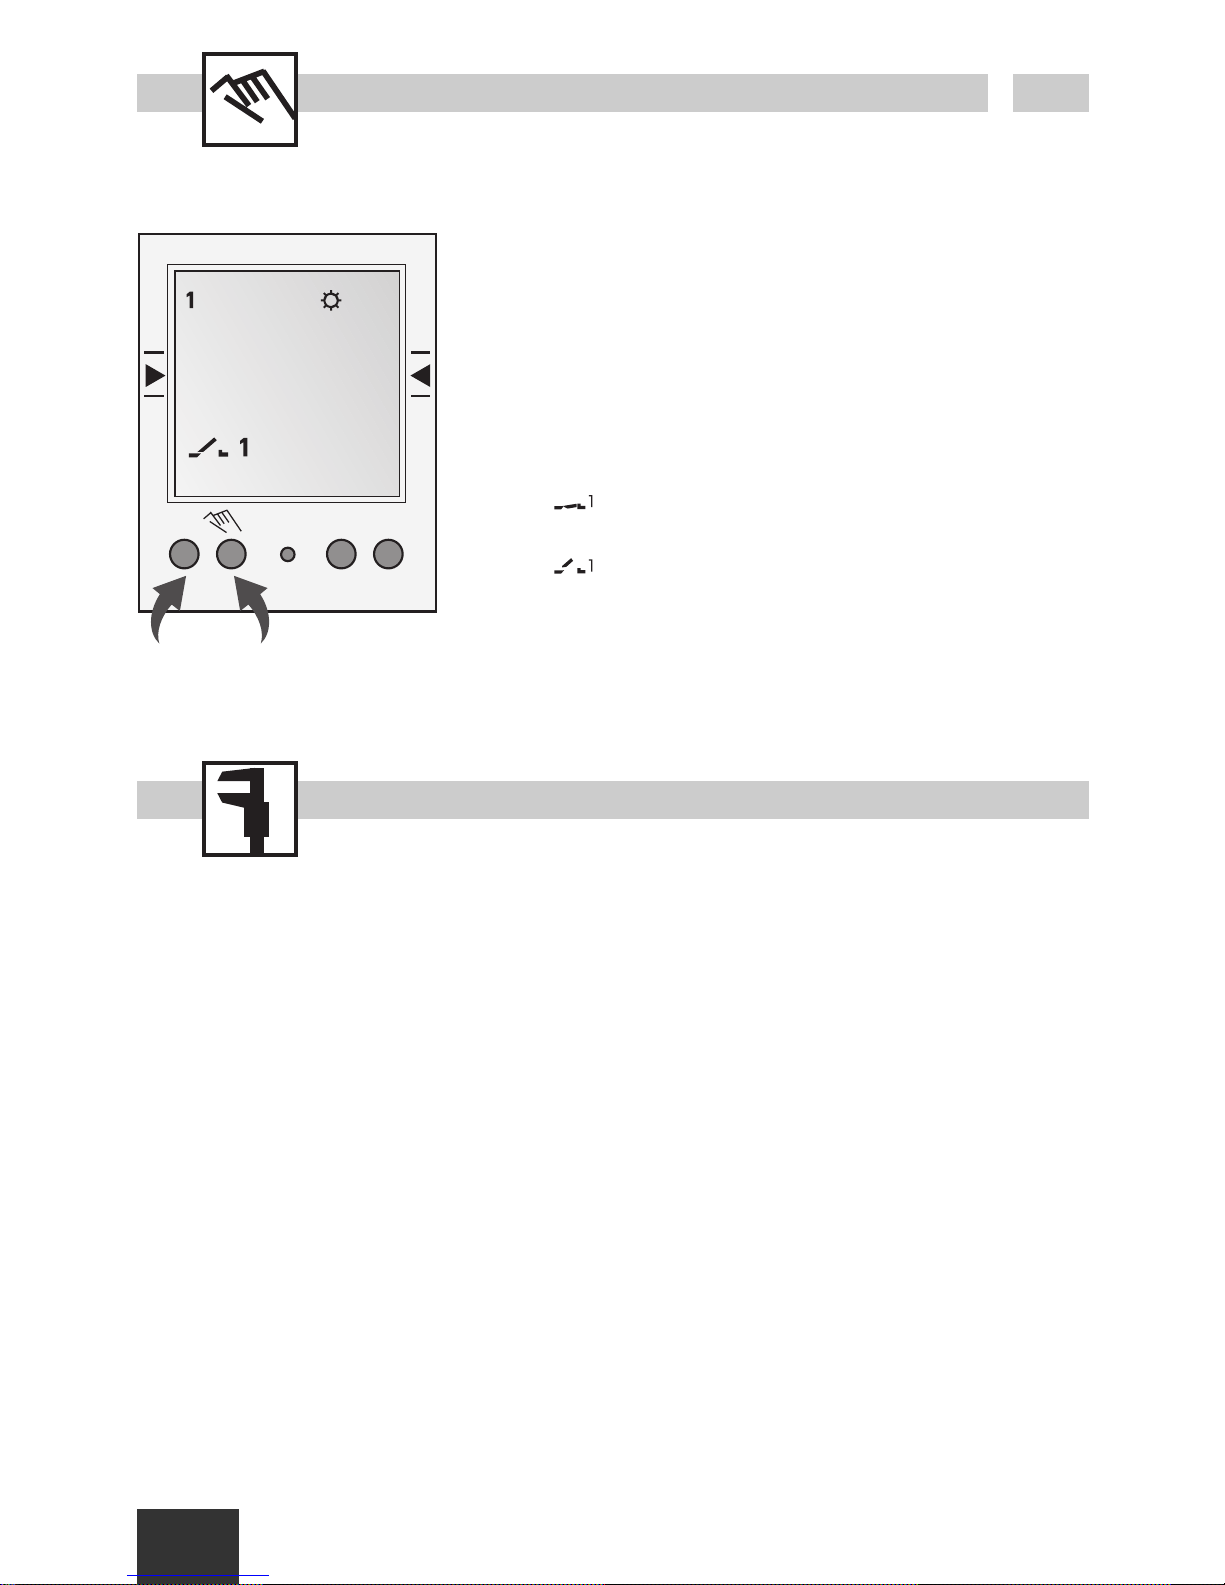
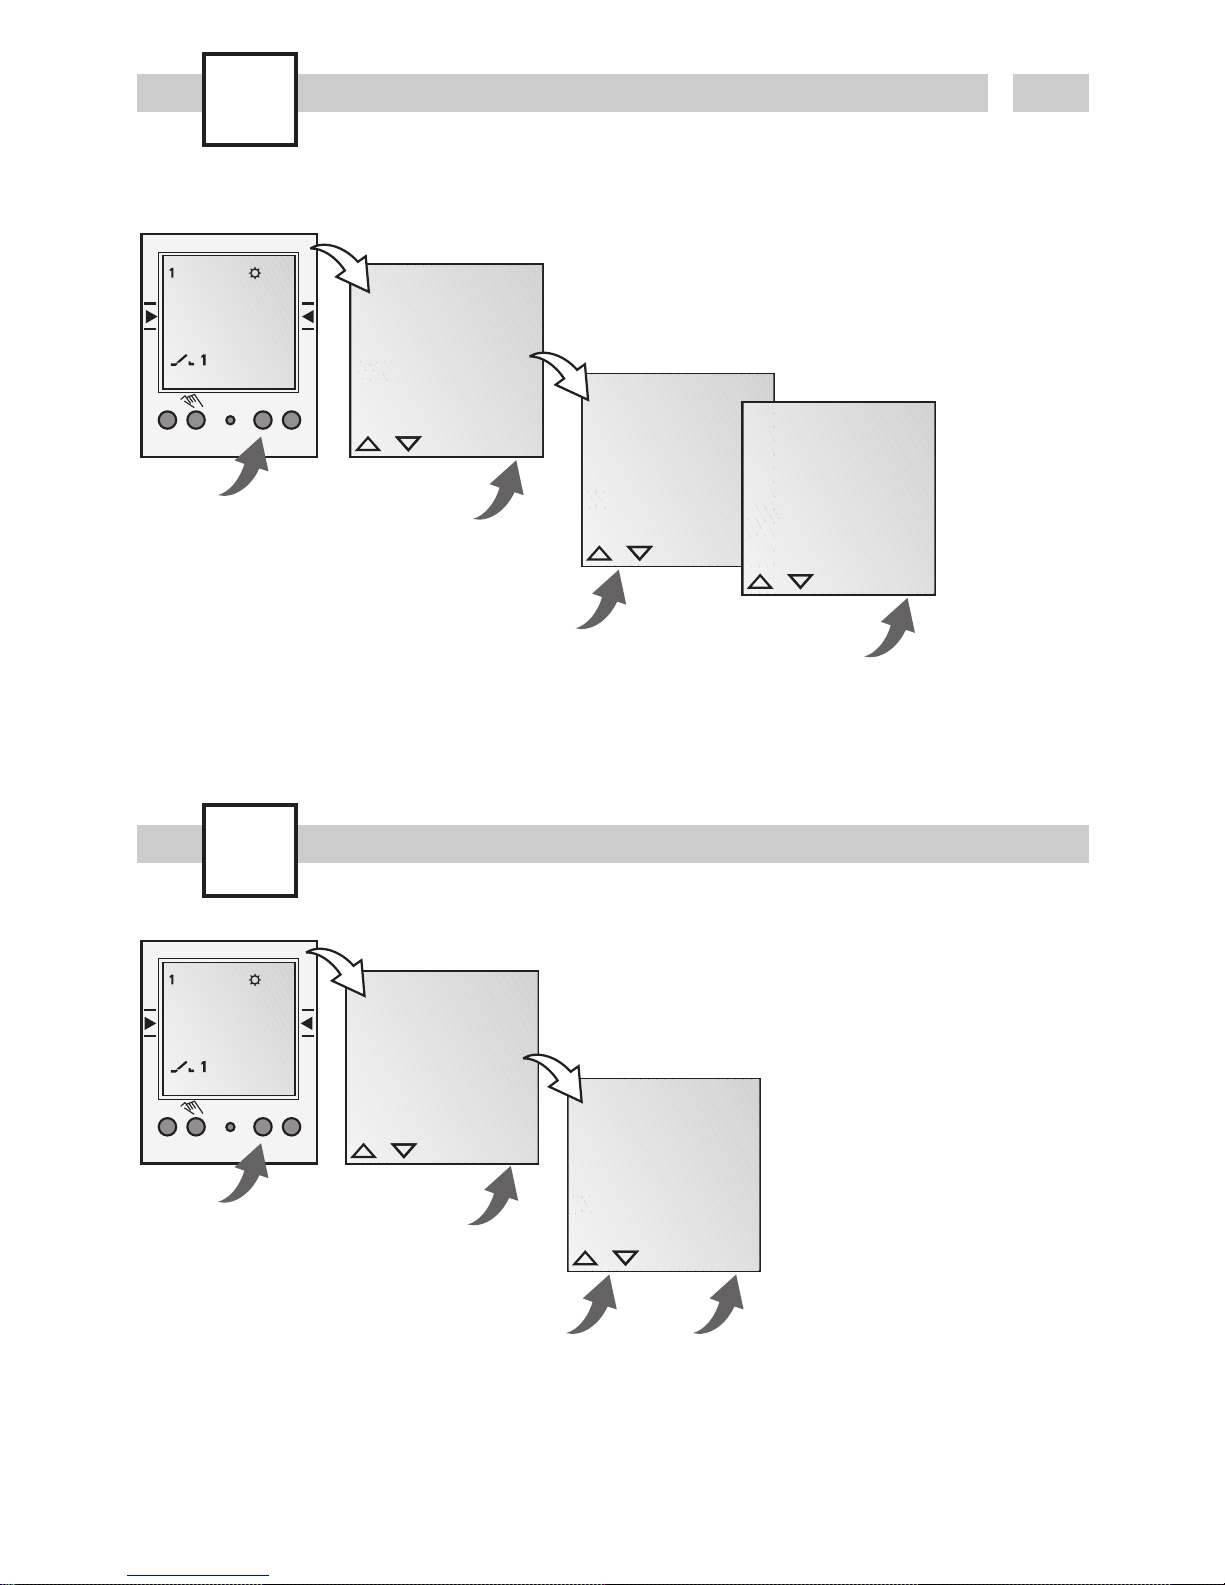
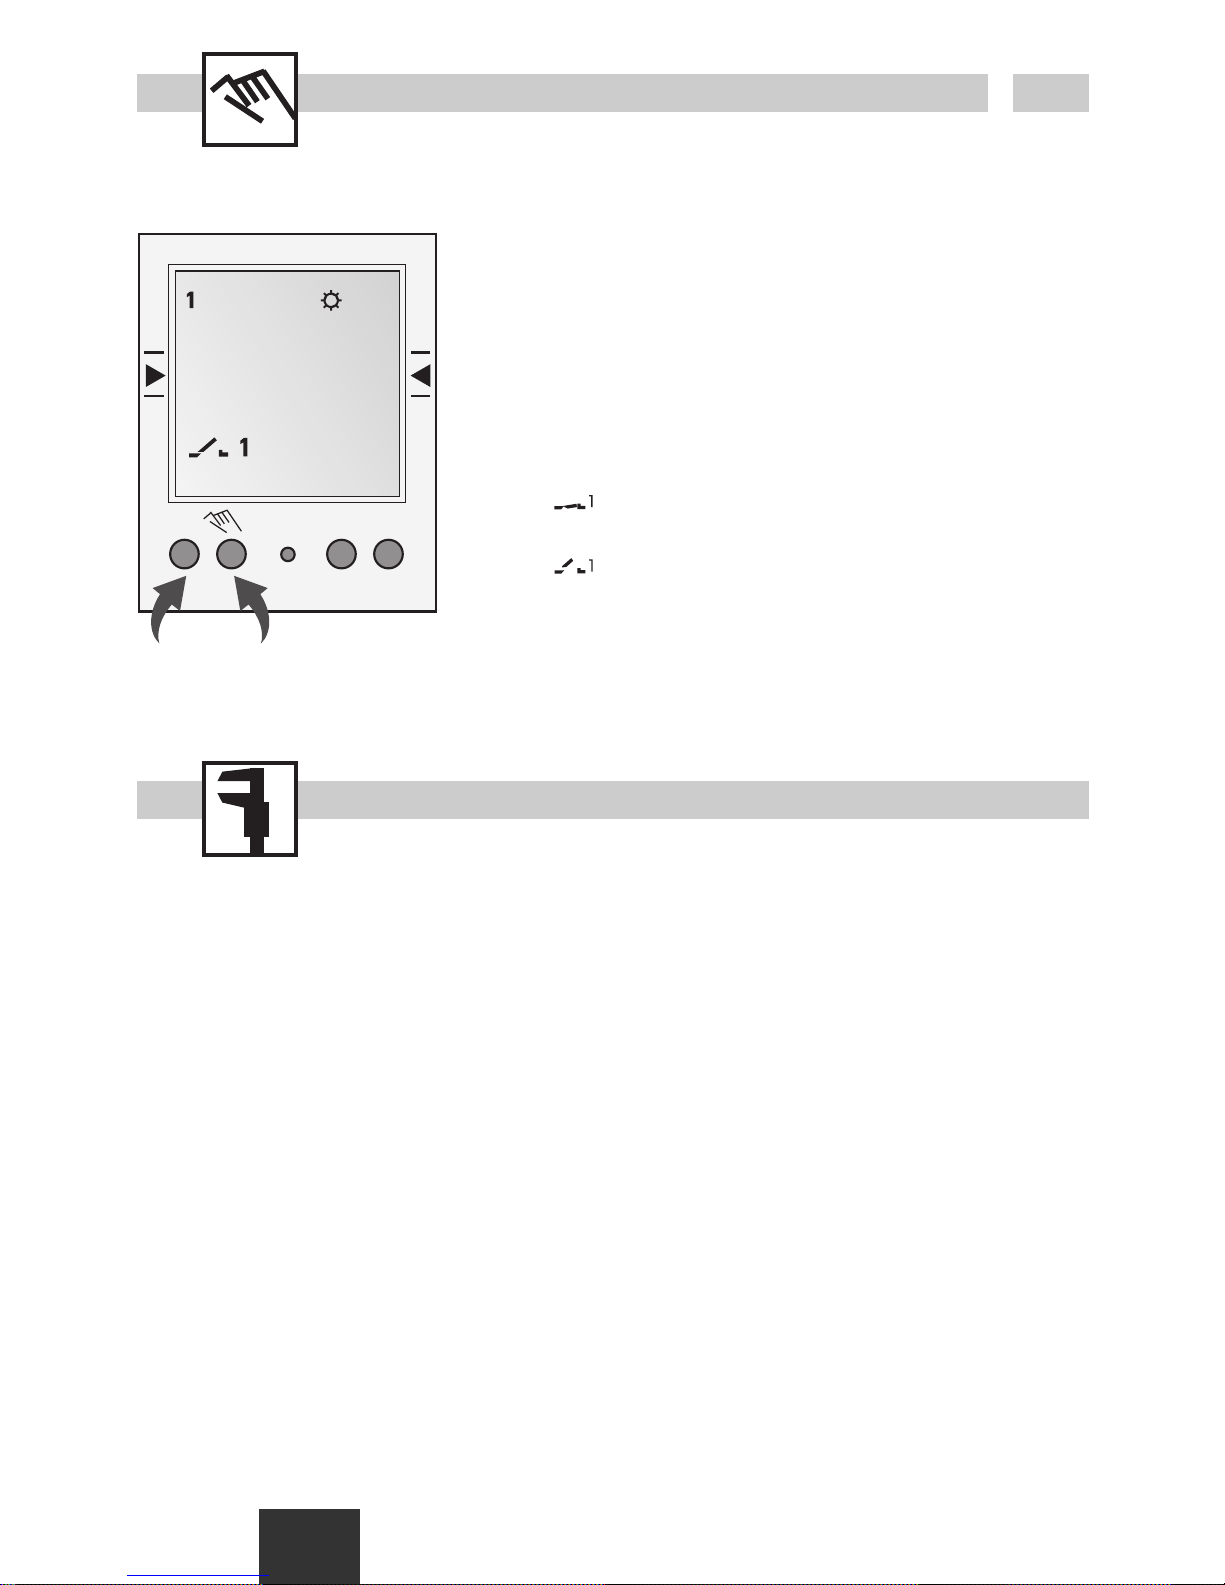
Betriebsart
Info
Linke Taste = Kanal 1
Rechte Taste = Kanal 2 (nur bei 2-Kanal-Version)
1 x Drücken = FIX ON = Dauer EIN
2 x Drücken = FIX OFF = Dauer AUS
3 x Drücken = zurück in Auto Mode
Technische Daten
Maße H x B x T (mm) 45 x 35 x 60
Gewicht g (ca.) 170
Anschlußspannung siehe Geräteaufdruck
Leistungsaufnahme 5 VA
Schaltleistung
- ohmsche Last
(VDE, IEC) 16 A/250 V AC
- induktive Last
cos ϕ 0.6 8 A/250 V AC
- Glühlampenlast 1000 W
Schaltausgang potentialfrei
Schaltkontakte 1 bzw. 2 Wechsler
Umgebungstemperatur -25°C bis +55°C
Schutzklasse II
Ganggenauigkeit typ ±2.5 s/Tag
bei 20°C
Gangreserve 3 Jahre ab Werk
bei +20°C
Kürzeste Schaltzeit 1 Min.
Speicherplätze 50
Blockbildung von
Wochentagen feste/freie Wahl
Schaltzustandsanzeige ja
Plombierbar ja
Page 10

10
Safety precautions
· The connection and installation of electrical devices may only be carried out by a qualified
electrician.
·Interventions in and changes to the device result in the voiding of the warranty claim.
· Observe your national regulations and the respective safety provisions.
· Fixed and flexible conductors of up to 10 mm
2
may be attached to the external terminal clips.
· Flexible cables with a cross-section ≤ 1 mm
2
should not be attached.
General information
· Deactivation commands take priority over activation commands.
· If the power supply is correct, the dots shown between the hours and minutes (HH:MM) are
displayed permanently. The dots flash if the power supply is interrupted.
· If there is no power supply, the position indicator display goes out after 2 minutes.
· The whole display flashes the battery needs to be changed for up to 2 weeks to warn that.
Installation on DIN rail Terminal diagram
567
L
123
N
56
L
123
N
C1
C2
C1
Page 11

11
GB
OK
reset
MENU
16121824
Res.
1
A
F
B
C
D
E
G
H
I
J
K
C1
15:26:38
Display
A Function displays of the two left-hand
buttons
B Channel status displays
= Channel 1 ON
= Channel 1 OFF
Channel 1 = C1, Channel 2 = C2
C 3 communication lines for time display,
menu items, entry prompts etc.
D Day-of-week display
E Overview of daily switching program
F Display of summer/winter time
G Operating voltage (permanently lit dots)
Reserve power operation (dots flash)
H Function displays of the two right-hand
buttons
Buttons
I Reset
The programs are retained in the case of a
reset. The date and time must be set again.
Press reset button with a blunt object (pen).
J Right-hand buttons
K Left-hand buttons with manual switch
function in Automatic mode
General information
· The middle communication line shows the
selectable menu item. If confirmed with OK,
this item is activated.
· Flashing texts or symbols require an entry.
· If no entries are made within the next
2 minutes, the clock reverts to Auto mode.
Function displays of the two left-hand
buttons:
scroll up in menu
scroll down in menu
Select/reject suggestion
Select/accept suggestion
+Press briefly = +1
Press and hold (approx. 2 sec) = +5
-Press briefly = -1
Press and hold (approx. 2 sec) = -5
Function displays of the two right-hand
buttons:
MENU Exits the Automatic mode and enters
the Programming mode
ESC Press briefly = one step back
Press and hold (approx. 2 sec) = return
to Automatic mode
OK Make selection and apply
EDT Change request in Read mode
NO Do not execute command
YES Execute command
DEL Delete
Page 12
12
1.
ESC
OK
DEUTSCH
ENGLISH
FRANCAIS
OK
12H 24H
LANGUAGE
DATETIME
ESC OK
OK
DEUTSCH
ENGLISH
FRANCAIS
ESC OK
ESC
MENU
16121824
1
C1
15:26:38
Res.
MENU
Info
In the delivered state the time switch is in the
Auto mode with a preset time, date and the
menu language English.
Initial start-up - selection of menu language
Prog.
MENU
16121824
1
C1
15:26:38
Res.
DATETIME
PROGRAM
DAYLIGHT
MENU
OK
REVIEW
NEW
DELETE
ESC OK
ESC OK
Page 13

13
GB
Prog.
HOURS
00
CHL ON
ESC OK
OK
SELECT
DAY
CHL ON
ESC OK
MINUTES
15:00
CHL ON
ESC OK
MINUTES
18:00
CHL OFF
ESC OK
OK
HOURS
00
CHL OFF
ESC OK
SAVED
P01 P02
OK
FREE 50
OK
REVIEW
NEW
DELETE
ESC OK
OK
CHANNEL
SELECT
I
ESC
OK
CHANNEL
SELECT
I
ESC OK
New program
Info
The time switch has 50
memory spaces.
Example
ON command for channel
1 at 3 pm. OFF command
at 6 pm.
· Select NEW program
and confirm with OK.
· The free memory spaces
are briefly displayed.
· Select channel and
confirm with OK.
· Select day block or
individual day (block
formation as desired)
and confirm with OK.
· Enter hour for ON
command (+/-) and
confirm with OK.
· Enter minute for ON
command (+/-) and
confirm with OK.
· Enter hour for OFF
command (+/-) and
confirm with OK.
· Enter minute for OFF
command (+/-) and
confirm with OK.
·Program is saved.
·Program jumps to
selection REVIEW, NEW,
DELETE. Now additional
programs can be
created.
only with 2-channel version
Page 14

14
Prog.
OK
ON P01
15:00
HH:MM
OK
DELETE
REVIEW
NEW
ESC OK
EDT OK
OK
OFF P02
18:00
HH:MM
EDT OK
View, edit program
Info
·The program steps can
be scrolled through
with ▼ ▲.
· The respective program
can be edited by
pressing EDT.
The procedure is the
same as when creating
a new program.
Info
· It is possible to delete all
programs with YES
· By pressing NO,
individual programs
can be deleted.
OK
DELETE
ALL
OK
NEW
DELETE
REVIEW
ESC OK
YES NO
OK
CONFIRM
YESNO
OK
ON P01
15:00
HH:MM
DEL OK
OK
DELETE
ALL
YES NO
OK
CONFIRM
YESNO
Delete all programs
Delete individual programs
Info
When deleting individual
programs, the corresponding program steps
are deleted (e.g. P01 ON
and P02 OFF).
Page 15
15
GB
OK
YEAR
2004
ESC OK
MONTH
2004:03
ESC OK
DAY
2004:03:25
ESC OK
OK
LANGUAGE
DATETIME
PROGRAM
ESC OK
MINUTES
13:45
ESC OK
OK
HOURS
13
ESC OK
Set date and time
OK
AM PM
24H
ESC OK
OK
DAYLIGHT
12H 24H
LANGUAGE
ESC OK
Set AM/PM (12-hour-) or 24-hour display
Info
The date and time are preset at the factory.
Page 16

16
OK
CALIBRAT
AUTO
NO
ESC OK
OK
PROGRAM
DAYLIGHT
12H 24H
ESC OK
SU START
03
MONTH
ESC OK
OK
NO
CALIBRAT
AUTO
ESC OK
SU START
03:21
DAY
ESC OK
WI START
10
MONTH
ESC OK
WI START
10:31
DAY
ESC OK
SU WI
2103:3110
CALIBRAT
ESC OK
Switchover for summer/winter time
Info
The following settings are
possible:
AUTO
Factory presetting of the
published calendar dates.
This is automatically
recalculated for each year.
NO
No switchover
CALIBRAT
Programming. The start
date of the summer time
and winter time must be
entered for this purpose.
The factory presetting is
overwritten.
The programmed
summer/ winter time is
automatically recalculated
for each year.
The changeover takes
place on the same
specified day of the week
in the same week of each
month.
Example
03/21 Start summer time
10/31 Start winter time
Page 17
17
GB
MENU
16121824
1
C1
15:26:38
FIX ON:
FIX OFF:
AUTO: (keine Anzeige) progra
m
FIX
FIX
Res.
Operating mode
Info
Left-hand button = Channel 1
Right-hand button = Channel 2 (only with
2-channel version)
Press 1 x = FIX ON = continuous ON
Press 2 x = FIX OFF = continuous OFF
Press 3 x = return to Auto mode
Technical Data
Dimensions H x W x D 45 x 35 x 60 mm
Weight g (approx.) 170
Supply voltage see imprint on device
Power consumption 5 VA
Switching capacity
- ohmic load
(VDE, IEC) 16 A/250 VAC
- inductive load
cos
ϕ 0.6 8 A/250 VAC
- Incandescent
lamp load 1,000 W
Switching output potential-free
Switch contacts 1 or 2 changeover
contact(s)
Ambient temperature -13°F to 131°F (25°C
to +55°C)
Protection class II
Accuracy typ. ±2.5 s/day
at 68°F (20°C)
Reserve power 3 years from factory
at +20°C (20°C)
Shortest switching time 1 min.
Memory spaces 50
Block formation of
day of the week fixed/free selection
Switching status
display yes
Sealable yes
(no display) programmed switching times
Page 18
18
Consignes de sécurité
· Le branchement et le montage d’appareils électriques ne peut être réalisé que par un électricien spécialisé.
· Les interventions et des modifications apportées sans notre aval à l’appareil entraînent la nullité de la
garantie.
·Respectez la réglementation locale en vigueur et observez les consignes de sécurité spécifiques.
· Les bornes de raccordement extérieures tolèrent le raccordement de fils conducteurs rigides ou
souples de jusqu’à 10 mm
2
de section.
·Ne pas raccorder de conducteurs de section ≤ 1 mm
2
.
Consigne générale
· Commandes de déclenchements ont priorité sur les commandes d’enclenchement.
· Quand l’alimentation est correcte les deux points entre l’affichage de l’heure et des minutes
(hh:min min) appareissent continuellement . Les points clignotes lors de la disparition de la tension.
· Sans alimentation l’affichage disparait après 2min.
· Le display complet clignotte quand la batterie doit être remplacée dans les 2 semaines.
Montage sur une barre DIN Schéma de branchement
567
L
123
N
56
L
123
N
C1
C2
C1
Page 19
19
F
OK
reset
MENU
16121824
Res.
1
A
F
B
C
D
E
G
H
I
J
K
C1
15:26:38
Affichage
A Affichage des fonctions des deux touches de
gauche
B Affichage de l’état du canal
= Canal 1 ON
= Canal 1 OFF
Canal 1 = C1, canal 2 = c2
C 3 lignes de communication pour l’affichage
du temps, points de menu, demande
d’entrée, etc.
D Affichage jour de la semaine
E Aperçu programmation des jours
F Affichage heure d’été/d’hiver
G Tension de service (points permanents)
Fonctionnement sur la réserve
(points clignotants)
H Affichage des fonctions des deux touches de
droite
Touches
I Reset
La reset conserve les programmes. Date et
heure doivent de nouveau être entrées.
Actionner la touche de reset avec un objet
obtus (stylo bille).
J Touches de droite
K Touches de gauche avec fonction de
commutateur manuel en mode automatique
Généralités
· La ligne de communication du milieu
n’indique que le point de menu au choix.
Celui-ci est activé avec une confirmation par
OK.
·Textes et symboles requièrent une entrée.
· Si dans les 2 min il n’y a pas une entrée de
donnés la minuterie se remets en mode auto.
Affichage des fonctions des deux touches de
gauche:
Monter dans le menu
Descendre dans le menu
Refuser choix/proposition
Accepter choix/proposition
+ Appui court = +1
Appui long (env. 2 s) = +5
- Appui court = -1
Appui long (env. 2 s) = -5
Affichage des fonctions des deux touches de
droite:
MENU Quitter le mode automatique pour le
mode programmation
ESC Appui court = un pas en arrière
Appui long (env. 2 s) = retour au
mode automatique
OK Valider le choix
EDT Souhait de modification en mode
lecture
NON Ne pas exécuter l’ordre
OUI Exécuter l’ordre
DEL Effacer
Page 20
20
1.
ESC
OK
DEUTSCH
ENGLISH
FRANCAIS
OK
12H 24H
LANGUAGE
DATETIME
ESC OK
OK
ENGLISH
FRANCAIS
ESPANIOL
ESC OK
ESC
MENU
16121824
1
C1
15:26:38
Res.
MENU
Information
Lors de la livraison, l’horloge de commutation
est en mode Auto avec heure et date
préréglées, interface utilisateur en anglais.
Première mise en route – choix de la langue
Prog.
MENU
16121824
1
C1
15:26:38
Res.
DATE HMP
PROGRAMM
HEUR E H
MENU
OK
REVISION
NOUVEAU
SUPPRIM.
ESC OK
ESC OK
Page 21
21
F
Prog.
HEURES
00
CAN ON
ESC OK
OK
SELECT
JOUR
CAN ON
ESC OK
MINUTES
15:00
CAN ON
ESC OK
MINUTES
18:00
CAN OFF
ESC OK
OK
HEURES
00
CAN OFF
ESC OK
SAUVEGAR
P01 P02
OK
LIBRE 50
OK
REVISION
NOUVEAU
SUPPRIM.
ESC OK
OK
CANAL
SELECT
I
ESC
OK
CANAL
SELECT
I
ESC OK
Nouveau programme
Information
L’horloge de commutation
possède 50 pas de
programme.
Exemple
Ordre ON pour le canal 1 à
15h00.
Ordre OFF à 18h00.
·Choisir programme
NOUVEAU et confirmer
avec OK.
· Les pas de programmation libres sont
brièvement montrés.
· Choisir le canal et
confirmer avec OK.
· Choisir un bloc de jours
ou un jour simple (libre
formation des blocs) et
confirmer avec OK.
· Entrer l’heure pour un
ordre ON (+/-) et
confirmer avec OK.
· Entrer la minute pour un
ordre ON (+/-) et
confirmer avec OK.
· Entrer l’heure pour un
ordre OFF (+/-) et
confirmer avec OK.
· Entrer la minute pour un
ordre OFF (+/-) et
confirmer avec OK.
· Le programme est
mémorisé.
· Le programma passe au
choix REVISION,
NOUVEAU, SUPPRIM. De
nouveau programmes
peuvent maintenant être
crées.
uniquement auprès
du canal
Page 22

22
Prog.
OK
ON P01
15:00
HH:MM
OK
SUPPRIM.
REVISION
NOUVEAU
ESC OK
EDT OK
OK
OFF P02
18:00
HH:MM
EDT OK
Visualiser et modifier un programme
Information
· Il est possible de
parcourir les pas du
programme avec ▼ ▲ .
· EDT permet de modifier
le programme affiché.
La procédure correspond
à la création d’un
nouveau programme.
Information
· La touche OUI permet
d’effacer tous les
programmes.
· La touche NON permet
d’effacer tous des
programmes individuels.
OK
SUPPRIM.
TOUT
OK
NOUVEAU
SUPPRIM.
REVISION
ESC OK
OUI NON
OK
CONFIRM
OUINON
OK
ON P01
15:00
HH:MM
DEL OK
OK
SUPPRIM.
TOUT
OUI NON
OK
CONFIRM
OUINON
Effacer tous les programmes
Effacer des programmes individuels
Information
Quand on efface un
program, tous les pas de
programmation de ce
programme seront effacés
(p.e. P01 enclenché et P02
déclenché).
Page 23

23
F
OK
ANNEE
2004
ESC OK
MOIS
2004:03
ESC OK
JOUR
2004:03:25
ESC OK
OK
LANGUE
DATE HMP
PROGRAMM
ESC OK
MINUTES
13:45
ESC OK
OK
HEURES
13
ESC OK
Réglage de la date et de l’heure
OK
AM PM
24H
ESC OK
OK
HEUR E H
12H 24H
LANGUE
ESC OK
Mode AM/PM (12-heures), resp. 24 heures
Information
La date et l’heure sont programmées en usine.
Page 24

24
OK
CALIBRER
AUTO
NON
ESC OK
OK
PROGRAMM
HEUR E H
12H 24H
ESC OK
ETE DEBUT
03
MOIS
ESC OK
OK
NON
CALIBRER
AUTO
ESC OK
ETE DEBUT
03:21
JOUR
ESC OK
HIV DEBUT
10
MOIS
ESC OK
HIV DEBUT
10:31
JOUR
ESC OK
ETE HIV
2103:3110
CALIBRER
ESC OK
Commutation heure d’été/d’hiver
Information
Les réglages suivants sont
possibles :
AUTO
Programmation au niveau
de l’usine des dates
officielles. Celles-ci sont
recalculées automatiquement pour chaque année.
NON
Pas de changement
d’heure.
CALIBRER
Programmation. Il faut
pour ce entrer les dates de
changement d’heure pour
l’été et l’hiver.
La programmation faite à
l’usine est écrasée.
Les heures d’été et d’hiver
sont recalculées automatiquement pour chaque
année.
La commutation est
réalisée le même jour de la
semaine entrée dans la
même semaine du mois.
Exemple
21.03. Début heure d’été
31.10. Début heure d’hiver
Page 25

25
F
MENU
16121824
1
C1
15:26:38
FIX ON:
FIX OFF:
AUTO: (keine Anzeige) progra
m
FIX
FIX
Res.
Mode de fonctionnement
Information
Touche gauche = canal 1
Touche droite = canal 2 (seulement pour la
version à deux canaux)
Appuyer 1 fois = FIX ON = Continuellement
enclenché
Appuyer 2 fois = FIX OFF = Continuellement
déclenché
Appuyer 3 fois = retour au mode Auto
Données techniques
Cotes H x L x P (mm) 45 x 35 x 60
Poids g (env.) 170
Tension d’alimentation voir indication sur
l’appareil
Puissance consommée 5 VA
Puissance
- charge résistive
(VDE, IEC) 16 A/250 V AC
- charge inductive
cos
ϕ 0.6 8 A/250 V AC
- charge de l’ampoule 1000 W
Sortie de commutation sans potentiel
Contacts de
commutation 1 resp. 2
Contact inverseur
Température de
fonctionnement de -25°C à +55°C
Catégorie de protection II
Précision de
fonctionnement env. ±2.5 s/jour
à 20°C
Réserve d’autonomie 3 ans à la sortie
d’usine à +20°C
Temps de commutation
minimum 1 mn
Pas de programmation 50
Création de blocs de jour choix
fixe/libre
Affichage de l’état oui
Plombable oui
(pas d’affichage) Temps de commutation programmés
Page 26

26
Informazioni di sicurezza
· Il collegamento e il montaggio delle apparecchiature elettriche devono essere effettuate solamente
da un elettricista qualificato.
·Interventi e modifiche sull’apparecchio comportano la cessazione del diritto di garanzia.
·Osservare le prescrizioni nazionali e le corrispondenti normative sulla sicurezza.
· I morsetti esterni sono previsti per il collegamento di conduttori rigidi e flessibili fino a 10 mm
2
.
· È vietato collegare conduttori flessibili con un diametro del conduttore ≤ 1 mm
2
.
Informazioni generali
·I comandi di spegnimento hanno la priorità su quelli di accensione.
· Se l'orologio viene alimentato, i punti tra l'indicazione dell'ora e dei minuti (SS:MM) vengono
visualizzati in modo permanente. I punti lampeggiano in caso di interruzione dell'alimentazione .
· In caso di mancanza di alimentazione, l'indicatore posizione di commutazione si spegne dopo
2 minuti.
·L'intero display lampeggia quando è necessario cambiare le pile entro le successive 2 settimane.
Montaggio sulla guida DIN Schema di collegamento
567
L
123
N
56
L
123
N
C1
C2
C1
Page 27

27
I
OK
reset
MENU
16121824
Res.
1
A
F
B
C
D
E
G
H
I
J
K
C1
15:26:38
Display
A Segnalazioni di entrambi i tasti sinistri
B Segnalazione dello stato del canale
= Canale 1 ON
= Canale 1 OFF
Canale 1 = C1, Canale 2 = C2
C 3 linee di comunicazione per l’indicazione
dell’ora, le opzioni di menu, le richieste di
input, ecc...
D Indicazione del giorno della settimana
E Visione del programma di commutazione
giornaliero
F Indicazione periodo estivo/invernale
G Tensione di funzionamento
(punti permanenti)
Funzionamento di riserva (i punti
lampeggiano)
H Segnalazioni di entrambi i tasti destri
Tasti
I Reset
In caso di reset i programmi vengono
memorizzati. Bisogna impostare di nuovo la
data e l’ora. Azionare il pulsante di reset
con un oggetto spuntato (penna a sfera).
J Tasti destri
K Tasti sinistri con funzione di interruttori
manuali durante il funzionamento
automatico
Generale
· La linea di comunicazione centrale indica
l’opzione di menu a disposizione. Questa
viene attivata in caso di conferma con OK.
·I testi o i simboli lampeggianti richiedono un
input.
· Se entro 2 minuti non si verifica alcuna
immissione di dati, l'orologio ritorna alla
modalità automatica.
Segnalazioni di entrambi i tasti sinistri:
scorrere in alto nel menu
scorrere in basso nel menu
Rifiutare una scelta/proposta
Accettare una scelta/proposta
+Premere per poco = +1
Premere a lungo (circa 2 sec) = +5
-Premere per poco = -1
Premere a lungo (circa 2 sec) = -5
Segnalazioni di entrambi i tasti destri:
MENU Abbandono del funzionamento
automatico e accesso alla modalità di
programmazione
ESC Premere per poco = indietro di un
livello
Premere a lungo (circa 2 sec) =
ritorno al funzionamento automatico
OK Selezionare una scelta ed eseguirla
EDT Apporto di modifiche nella modalità
di lettura
NO Non eseguire un comando
SI Eseguire un comando
DEL Elimina
Page 28

28
1.
ESC
OK
DEUTSCH
ENGLISH
FRANCAIS
OK
12H 24H
LANGUAGE
DATETIME
ESC OK
OK
ESPANIOL
ITALIANO
NEDERLAN
ESC OK
ESC
MENU
16121824
1
C1
15:26:38
Res.
MENU
Informazione
Alla consegna, il timer si trova in modalità
automatica con ora, data e lingua inglese
preimpostate.
Avviamento iniziale – Scelta della lingua
Prog.
MENU
16121824
1
C1
15:26:38
Res.
DATA ORA
PROGR
ORA LEG
MENU
OK
REVIS
NUOVO
CANCELLA
ESC OK
ESC OK
Page 29

29
I
Prog.
ORE
00
CH ON
ESC OK
OK
SELEZ
GIORNO
CH ON
ESC OK
MINUTI
15:00
CH ON
ESC OK
MINUTI
18:00
CH OFF
ESC OK
OK
ORE
00
CH OFF
ESC OK
SALVATO
P01 P02
OK
LIBERO 50
OK
REVIS
NUOVO
CANCELLA
ESC OK
OK
SELEZ
CANALE
I
ESC
OK
SELEZ
CANALE
I
ESC OK
Nuovo programma
Informazione
Il timer dispone di 50 spazi
di memoria.
Esempio
Comando ON per canale 1
alle ore 15:00. Comando
OFF alle ore 18:00.
·Scegliere il programma
NUOVO e confermare
con OK.
·Vengono visualizzate
brevemente gli spazi di
memoria liberi.
·Scegliere il canale e
confermare con OK.
·Scegliere un insieme di
giorni o il singolo giorno
(libera creazione di un
insieme) e confermare
con OK.
·Inserire le ore per il
comando ON (+/-) e
confermare con OK.
·Inserire i minuti per il
comando ON (+/-) e
confermare con OK.
·Inserire le ore per il
comando OFF (+/-) e
confermare con OK.
·Inserire i minuti per il
comando OFF (+/-) e
confermare con OK.
· Il programma viene
memorizzato.
· Il programma passa alla
scelta REVIS, NUOVO,
CANCELLA. Adesso
possono essere creati
altri programmi.
solo con 2 canali
Page 30

30
Prog.
OK
ON P01
15:00
HH:MM
OK
CANCELLA
REVIS
NUOVO
ESC OK
EDT OK
OK
OFF P02
18:00
HH:MM
EDT OK
Controllare il programma, modificare
Informazione
· Con ▼ ▲ si può
scorrere nei passi di
programma.
·Premendo EDT si può
modificare il corrispondente programma. La
modalità di procedimento corrisponde a
quella per la creazione
di un programma.
Informazione
· Esiste la possibilità di
eliminare tutti i
programmi con SI
·Premendo NO è
possibile cancellare i
singoli programmi.
OK
CANCELLA
TUTTO
OK
NUOVO
CANCELLA
REVIS
ESC OK
SI NO
OK
SICURO
SINO
OK
ON P01
15:00
HH:MM
DEL OK
OK
CANCELLA
TUTTO
SI NO
OK
SICURO
SINO
Eliminare tutti i programmi
Eliminare i singoli programmi
Informazione
Con lo spegnimento
dei singoli programmi,
verranno eliminate
anche le relative fasi di
programma (es. P01 ON
e P02 OFF).
Page 31

31
I
OK
ANNO
2004
ESC OK
MESE
2004:03
ESC OK
GIORNO
2004:03:25
ESC OK
OK
LINGUA
DATA ORA
PROGR
ESC OK
MINUTI
13:45
ESC OK
OK
ORE
13
ESC OK
Impostare la data e l’ora
OK
AM PM
24H
ESC OK
OK
ORA LEG
12H 24H
LINGUA
ESC OK
Impostare l’ora da 24 ore o in modalità AM/PM (12 ore)
Informazione
La data e l’ora sono già preimpostate.
Page 32

32
OK
CALIBRA
AUTO
NO
ESC OK
OK
PROGR
ORA LEG
AM/PM/24
ESC OK
EST INIZIO
03
MESE
ESC OK
OK
NO
CALIBRA
AUTO
ESC OK
EST INIZIO
03:21
GIORNO
ESC OK
INV INIZIO
10
MESE
ESC OK
INV INIZIO
10:31
GIORNO
ESC OK
EST INV
2103:3110
CALIBRA
ESC OK
Commutazione del periodo estivo/invernale
Informazione
Sono possibili le seguenti
impostazioni:
AUTO
preimpostazione in
fabbrica secondo le
prescrizioni legali. Questa
viene effettuata automaticamente sempre per
ogni anno.
NO
nessuna commutazione
CALIBRA
Programmazione. Bisogna
inserire la data di inizio del
periodo estivo e di quello
invernale.
La preimpostazione di
fabbrica viene sovrascritta.
Il periodo estivo/invernale
viene calcolato automaticamente sempre per ogni
anno.
La commutazione avviene
lo stesso giorno della
settimana inserito nella
stessa settimana del mese.
Esempio
21.03. Inizio periodo
estivo
31.10. Inizio periodo
invernale
Page 33

33
I
MENU
16121824
1
C1
15:26:38
FIX ON:
FIX OFF:
AUTO: (keine Anzeige) progra
m
FIX
FIX
Res.
Modalità di funzionamento
Informazione
Tasto sinistro = canale 1
Tasto destro = canale 2 (solo nella
versione a 2 canali)
Premere 1 volta = FIX ON = fix on
Premere 2 volte = FIX OFF = fix off
Premere 3 volte = ritorno alla modalità
automatica
Dati tecnici
Dimensioni H x L x P 45 x 35 x 60 mm
Peso in gr. (circa) 170
Tensione di alimentazione vedere la targhetta
dell’apparecchio
Consumo di energia 5 VA
Potere di apertura
- carico ohmico
(VDE, IEC) 16 A/250 V AC
- carico induttivo
cos
ϕ 0.6 8 A/250 V AC
- Carico della
lampada 1000 W
Uscita di commutazione a potenziale zero
Contatti di commutazione 1 o 2 contatti di
commutazione
Temperatura di
funzionamento da -25°C fino a +55°C
Classe di isolamento II
Precisione tipo ±2.5 s/giorno
a 20°C
Riserva di carica 3 anni franco
stabilimento
a +20°C
Tempo di commutazione
minimo 1 min.
Spazi di memoria 50
Creazione dell’insieme
di giorni della settimana scelta libera/fissa
Indicazione dello stato
di commutazione si
Piombabile si
(nessuna indicazione)
tempi di commutazione programmati
Page 34

34
Instrucciones de seguridad
· La instalación y conexión de equipos eléctricos debe llevarse a cabo únicamente por electricistas
profesionales.
· Cualquier manipulación o modificación efectuada en la unidad invalidará los derechos de garantía.
·Tenga en cuenta la legislación nacional y las correspondientes disposiciones en seguridad.
· Los bornes externos permiten la conexión de cables rígidos y flexibles de hasta 10 mm
2
.
· No se recomienda la conexión de cables flexibles de sección ≤ 1 mm
2
.
Indicaciones generales
· Los comandos OFF tiene preferencia sobre los comandos ON.
· Si la alimentación de tensión es correcta, los puntos entre hora y minuto (HH:MM) se muestran
permanentemente. Al interrumpirse la tensión, los puntos parpadean.
· Sin alimentación de tensión, la indicación del modo operativo se apaga pasados 2 minutos.
· Si parpadea todo el display, significa que será necesario un cambio de batería en las próximas dos
semanas.
Montaje en carril DIN Esquema de conexión
567
L
123
N
56
L
123
N
C1
C2
C1
Page 35

35
E
OK
reset
MENU
16121824
Res.
1
A
F
B
C
D
E
G
H
I
J
K
C1
15:26:38
Pantalla
A Funciones de las teclas de la izquierda
B Estado de los canales
= Canal 1 ON
= Canal 1 OFF
Canal 1 = C1, Canal 2 = C2
C 3 líneas de texto para la hora, las opciones
de menú, la entrada de datos, etc.
D Día de la semana
E Cronograma
F Símbolos horario verano/invierno
G Funcionamiento con red (puntos fijos)
Reserva de marcha (puntos parpadeando)
H Funciones de las teclas de la derecha
Teclas
I Reset
Los programas se conservan al realizar un
"reset". Debe ajustarse de nuevo la fecha y la
hora. Accione el pulsador "reset" con un
objeto sin punta afilada (bolígrafo).
J Teclas de la derecha
K Teclas de la izquierda con función manual
en modo automático.
Generalidades
· La línea de texto central muestra la opción
de menú seleccionable. Si se confirma con
OK, se activa la función.
· Si un texto o símbolo parpadea, significa que
es necesario introducir datos.
·Si no se realiza ninguna entrada pasados
2 minutos, el reloj vuelve al modo automático.
Funciones de las teclas de la izquierda:
navegación por el menú (arriba)
navegación por el menú (abajo)
Seleccionar/rechazar opción
Seleccionar/aceptar opción
+ Pulsación corta = +1
Pulsación prolongada (aprox. 2s) = +5
- Pulsación corta = -1
Pulsación prolongada (aprox. 2s) = -5
Funciones de las teclas de la derecha:
MENU Fin del modo automático e inicio del
modo de programación
ESC Pulsación corta = un paso atrás
Pulsación prolongada (2 s) = vuelta
al modo automático
OK Seleccionar y aceptar la opción
EDT Edición en el modo lectura
NO No ejecutar acción
SI Ejecutar acción
DEL Borrar
Page 36

36
1.
ESC
OK
DEUTSCH
ENGLISH
FRANCAIS
OK
12H 24H
LANGUAGE
DATETIME
ESC OK
OK
FRANCAIS
ESPANIOL
ITALIANO
ESC OK
ESC
MENU
16121824
1
C1
15:26:38
Res.
MENU
Nota
El interruptor horario se suministra preajustado
en modo automático, fecha, hora, e idioma de
menú inglés
Primera puesta en servicio – Selección de idioma
Prog.
MENU
16121824
1
C1
15:26:38
Res.
FECH HOR
PROGRAMA
VERA INV
MENU
OK
REVISAR
NUEVO
BORRAR
ESC OK
ESC OK
Page 37

37
E
Prog.
HORAS
00
CAN ON
ESC OK
OK
SELEC
DIA
CAN ON
ESC OK
MINUTOS
15:00
CAN ON
ESC OK
MINUTOS
18:00
CAN OFF
ESC OK
OK
HORAS
00
CAN OFF
ESC OK
GUARDADO
P01 P02
OK
LIBRE 50
OK
REVISAR
NUEVO
BORRAR
ESC OK
OK
CANAL
SELEC
I
ESC
OK
CANAL
SELEC
I
ESC OK
Nuevo programa
Nota
El interruptor horario
dispone de 50 posiciones
de memoria.
Ejemplo
Comando ON para canal 1
a las 15:00 h. Comando
OFF a las 18:00 h.
· Seleccione programa
NUEVO y confirme con
OK.
· La pantalla muestra las
posiciones de memoria
libres.
· Seleccione el canal y
confirme con OK.
· Seleccione varios días o
un solo día (combinación de días libre) y
confirme con OK.
·Introduzca la hora para
el comando ON (+/-) y
confirme con OK.
·Introduzca los minutos
para el comando ON
(+/-) y confirme con
OK.
·Introduzca la hora para
el comando OFF (+/-) y
confirme con OK.
·Introduzca los minutos
para el comando OFF
(+/-) y confirme con
OK.
· El programa se guarda.
· El programa salta a la
selección REVISAR,
NUEVO, BORRAR.
A partir de ahora se
pueden crear más
programas.
sólo con 2 canales
Page 38

38
Prog.
OK
ON P01
15:00
HH:MM
OK
BORRAR
REVISAR
NUEVO
ESC OK
EDT OK
OK
OFF P02
18:00
HH:MM
EDT OK
Visualizar y editar programas
Nota
· Los pasos del programa
pueden ser visualizados
con ▼ ▲ .
·Para editar el programa
correspondiente pulse
EDT. El procedimiento
es el mismo que en la
creación de un nuevo
programa.
Nota
· Pulsando SI se borran
todos los programas
·Para borrar determinados programas
individuales, pulse NO.
OK
BORRAR
TODO
OK
NUEVO
BORRAR
REVISAR
ESC OK
SI NO
OK
CONFIRM
SINO
OK
ON P01
15:00
HH:MM
DEL OK
OK
BORRAR
TODO
SI NO
OK
CONFIRM
SINO
Borrar todos los programas
Borrar programas individuales
Nota
Al eliminar un programa,
se eliminarán todos los
pasos de programa
correspondientes (p.ej.,
P01 ON y P02 OFF).
Page 39

39
E
OK
ANO
2004
ESC OK
MES
2004:03
ESC OK
DIA
2004:03:25
ESC OK
OK
IDIOMA
FECH HOR
PROGRAMA
ESC OK
MINUTOS
13:45
ESC OK
OK
HORAS
13
ESC OK
Ajuste de fecha/hora
OK
AM PM
24H
ESC OK
OK
VERA INV
12H 24H
IDIOMA
ESC OK
Seleccionar AM/PM- (12 horas) o modo 24 horas
Nota
La fecha y la hora se preajustan en fábrica.
Page 40

40
OK
CALIBRAR
AUTO
NO
ESC OK
OK
PROGRAMA
VERA INV
12H 24H
ESC OK
VER INICIO
03
MES
ESC OK
OK
NO
CALIBRAR
AUTO
ESC OK
VER INICIO
03:21
DIA
ESC OK
INV INICIO
10
MES
ESC OK
INV INICIO
10:31
DIA
ESC OK
VER INV
2103:3110
CALIBRAR
ESC OK
Cambio de horario verano/invierno
Nota
Puede seleccionarse una
de las siguientes opciones:
AUTO
Preajuste de fábrica de
acuerdo con la normativa
vigente. Se recalcula cada
año automáticamente.
NO
Sin cambio.
CALIBRAR
Programación. Debe
introducirse la fecha de
inicio del horario de
verano y la del horario de
invierno. El preajuste de
fábrica se sobreescribe.
El horario de verano /
invierno se recalcula cada
año automáticamente.
La conmutación se realiza
el mismo día introducido
de la misma semana del
mes.
Ejemplo
21.03. Inicio horario de
verano
31.10. Inicio horario de
invierno
Page 41

41
E
MENU
16121824
1
C1
15:26:38
FIX ON:
FIX OFF:
AUTO: (keine Anzeige) progra
m
FIX
FIX
Res.
Funcionamiento
Nota
Tecla izquierda = canal 1
Tecla derecha = canal 2 (sólo en la versión
con 2 canales)
Si se pulsa 1 vez
= FIX ON = Encendido permanente
Si se pulsa 2 veces
= FIX ON = Apagado permanente
Si se pulsa 3 veces
= vuelve al modo Auto
Datos técnicos
Dimensiones Al x An x L 45 x 35 x 60 mm
Peso aproximado 170 g.
Tensión de alimentación véase impresión
del equipo
Consumo de potencia 5 VA
Potencia de corte
- carga óhmica
(VDE, IEC) 16 A/250 V AC
- carga inductiva
cos ϕ 0.6 8 A/250 V AC
- Carga incandescente 1000 W
Salida libre de potencial
Tipo de contactos 1 o 2 conmutadores
Temperatura ambiente de -25°C a +55°C
Clase de protección II
Precisión ±2.5 s/día
a 20°C
Reserva de marcha 3 años a partir de
la salida de fábrica
a +20°C
Maniobra mínima 1 min.
Posiciones de memoria 50
Formación de bloques
de días de la semana fija/libre elección
Visualización estado
de canales sí
Precintable sí
(no muestra ningún símbolo)
Según horas de conmutación programados
Page 42

42
Notas de segurança
·A ligação e montagem de aparelhos eléctricos deve ser efectuada por um electricista.
·Intervenções ou modificações do aparelho têm como consequência o caducar do direito de garantia.
· Observar os regulamentos nacionais e as respectivas normas de segurança.
· Os terminais exteriores permitem a ligação de condutores fixos de flexíveis até 10 mm
2
.
· Não é permitido ligar condutores fixos com uma secção ≤ 1 mm
2
.
Notas gerais
· As ordens para desligar têm prioridade sobre as ordens para ligar.
·Em caso de uma alimentação de tensão correcta os pontos entre a indicação das horas e minutos
(SS:MM) serão indicados de modo contínuo. Em caso de uma falha de tensão os pontos piscarão.
· Sem alimentação de tensão o mostrador de comutação apaga-se após 2 minutos.
·O mostrador completo pisca, se for preciso mudar as pilhas dentro das próximas 2 semanas.
Montagem em calha DIN Esquema de ligação
567
L
123
N
56
L
123
N
C1
C2
C1
Page 43

43
P
OK
reset
MENU
16121824
Res.
1
A
F
B
C
D
E
G
H
I
J
K
C1
15:26:38
Mostrador
A Indicadores de funcionamento dos dois
botões do lado esquerdo
B Indicadores do estado dos canais
= Canal 1 ON
= Canal 1 OFF
Canal 1 = C1, Canal 2 = C2
C 3 linhas de comunicação para a indicação
do tempo, os pontos do menu, linhas de
comando etc.
D Indicador do dia de semana
E Esquema do programa de comutação diária
F Indicador da hora de Verão/Inverno
G Tensão de serviço (pontos contínuos)
Modo de reserva de marcha
(pontos piscam)
H Indicadores de funcionamento dos dois
botões do lado direito
Botões
I Reinicializar
Ao reinicializar todos os programas serão
guardados. Tem de se voltar a definir a data
e a hora. Carregar o botão de reinicializar
com um objecto sem ponta (esferográfica).
J Botão direito
K Botão esquerdo com função manual em
modo automático
Generalidades
·A linha de comando central indica apenas o
ponto do menu a escolher. Em caso de
confirmação com OK este será activado.
·O texto a piscar ou símbolos exigem um
comando.
· Caso não se efectue nenhuma introdução
dentro de 2 minutos, o relógio volta para o
modo automático.
Indicadores de funcionamento dos dois
botões do lado esquerdo:
Folhear no menu para cima
Folhear no menu para baixo
Rejeitar a selecção/proposta
Aceitar selecção/proposta
+Premir pouco tempo = +1
Premir mais tempo (cerca 2 seg.) = +5
-Premir pouco tempo = +1
Premir mais tempo (cerca 2 seg.) = +5
Indicadores de funcionamento dos dois
botões do lado direito:
MENU Sair do modo automático e entrar no
modo de programação
ESC Premir pouco tempo
= um passo para trás
Premir mais tempo (cerca 2 seg.)
= Voltar para o modo automático
OK Escolher e aceitar a selecção
EDT Alteração no modo de leitura
NA Não efectuar o comando
SIM Efectuar o comando
DEL Apagar
Page 44

44
1.
ESC
OK
DEUTSCH
ENGLISH
FRANCAIS
OK
12H 24H
LANGUAGE
DATETIME
ESC OK
OK
NEDERLAN
PORTUGES
CZECH
ESC OK
ESC
MENU
16121824
1
C1
15:26:38
Res.
MENU
Informação
No fornecimento, o temporizador encontra-se
configurado em automático com a hora, a data e
a língua do menu em inglês predefinidos.
Primeira utilização – Selecção da língua do menu
Prog.
MENU
16121824
1
C1
15:26:38
Res.
DATA HORA
PROGRAMA
HORADIA
MENU
OK
REVER
NOVO
APAGAR
ESC OK
ESC OK
Page 45

45
P
Prog.
HORA
00
CAN ON
ESC OK
OK
SELECCAO
DIA
CAN ON
ESC OK
MINUTOS
15:00
CAN ON
ESC OK
MINUTOS
18:00
CAN OFF
ESC OK
OK
HORA
00
CAN OFF
ESC OK
GUARDADO
P01 P02
OK
LIVRE 50
OK
REVER
NOVO
APAGAR
ESC OK
OK
CANAL
SELECCAO
I
ESC
OK
CANAL
SELECCAO
I
ESC OK
Programa novo
Informação
O temporizador dispõe de
50 passos de programação.
Exemplo
Comando ON para o
canal 1 para as 15.00 h.
Comando OFF para as
18.00 h.
· Escolher o programa
NOVO e confirmar com
OK.
·Por um curto período de
tempo mostram-se as
memórias livres.
· Escolher o canal e
confirmar com OK.
· Escolher o calendário
diário ou dia individual
(escolha livre do
calendário) e confirmar
com OK.
·Introduzir a hora para o
comando ON (+/-) e
confirmar com OK.
·Introduzir o minuto para
o comando ON (+/-) e
confirmar com OK.
·Introduzir a hora para o
comando OFF (+/-) e
confirmar com OK.
·Introduzir o minuto para
o comando OFF (+/-) e
confirmar com OK.
·O programa será
gravado.
·O programa muda para
selecção REVER, NOVO,
APAGAR. Agora podem
ser criados mais
programas.
apenas em caso
de 2 canais
Page 46

46
Prog.
OK
ON P01
15:00
HH:MM
OK
APAGAR
REVER
NOVO
ESC OK
EDT OK
OK
OFF P02
18:00
HH:MM
EDT OK
Ver programa, modificar
Informação
· Com ▼ ▲ pode-se
folhear através dos
passos do programa.
· Ao premir o EDT pode-se
modificar o respectivo
programa.
O procedimento é igual
ao da criação dum
programa novo.
Informação
· Existe a possibilidade
com SIM de apagar
todos os programas
· Ao premir NA podem
ser apagados
programas individuais.
OK
APAGAR
TUDO
OK
NOVO
APAGAR
REVER
ESC OK
SIM NA
OK
CERTEZA
OK
ON P01
15:00
HH:MM
DEL OK
OK
APAGAR
TUDO
OK
CERTEZA
SIMNA
SIM NA
SIMNA
Apagar todos os programas
Apagar programas individuais
Informação
Ao apagar os programas
individuais, os passos
correspondentes do
programa serão apagados
(por ex. P01 ON e P02 OFF).
Page 47

47
P
OK
ANO
2004
ESC OK
MES
2004:03
ESC OK
DIA
2004:03:25
ESC OK
OK
LINGUA
DATAHORA
PROGRAMA
ESC OK
MINUTOS
13:45
ESC OK
OK
HORA
13
ESC OK
Acertar a data e a hora
OK
AM PM
24H
ESC OK
OK
HORADIA
12H 24H
LINGUA
ESC OK
Acertar AM/PM- (12 horas) ou indicação de 24 horas
Informação
A data e a hora estão predefinidas de fábrica.
Page 48

48
OK
CALIBRAR
AUTO
NO
ESC OK
OK
PROGRAMA
HORADIA
12H 24H
ESC OK
VER INICIO
03
MES
ESC OK
OK
NO
CALIBRAR
AUTO
ESC OK
VER INICIO
03:21
DIA
ESC OK
INV INICIO
10
MES
ESC OK
INV INICIO
10:31
DIA
ESC OK
VER INV
2103:3110
CALIBRAR
ESC OK
Mudança hora de Verão/Inverno
Informação
As seguintes definições
são possíveis:
AUTO
predefinido de fábrica
de acordo com a lei. Esta
será calculada de novo
todos os anos.
NO
sem mudança
CALIBRAR
Programação. Para tal, a
data de início da hora de
Verão e de Inverno tem de
ser introduzida.
A predefinição de fábrica
será escrita por cima.
A hora de Verão/Inverno
será calculada automáticamente de novo todos os
anos.
A comutação acontecerá
no mesmo dia da semana
introduzido, na mesma
semana do mês.
Exemplo
21.03. Início hora Verão
31.10. Início hora Inverno
Page 49

49
P
MENU
16121824
1
C1
15:26:38
FIX ON:
FIX OFF:
AUTO: (keine Anzeige) progra
m
FIX
FIX
Res.
Modo operativo
Informação
Botão esquerdo = Canal 1
Botão direito = Canal 2 (apenas na versão
de 2 canais)
Premir 1 vez = FIX ON = Ligado
permanente
Premir 2 vezes = FIX OFF = Desligado
permanente
Premir 3 vezes = voltar para o modo
automático
Dados técnicos
Medidas A x L x P (mm) 45 x 35 x 60
Peso g (cerca) 170
Tensão nominal veja no aparelho
Potência absorvida 5 VA
Potência de comutação
- carga resistiva em
ohms (VDE, IEC) 16 A/250 V CC
- carga indutiva
cos
ϕ 0.6 8 A/250 V CC
- carga de lâmpada 1000 W
Saída de comutação sem potência
Contactos de comutação 1 ou 2 inversores
Temperatura ambiente -25°C a +55°C
Classe de protecção II
Precisão de marcha tipo ±2.5 s/dia
a 20°C
Reserva de marcha 3 anos após a saída
da fabrica a +20°C
Tempo de comutação
mais curto 1 min.
Memórias 50
Criação de blocos
diários selecção livre/fixa
Indicador do estado
de comutação sim
Possível de selar sim
(nenhuma indicação)
Horas de liga/desliga programadas
Page 50

50
Veiligheidsinstructies
·Elektrische apparatuur mag alleen door een geschoolde elektromonteur worden aangesloten en
gemonteerd.
· Door ingrepen en veranderingen aan het apparaat vervalt het recht op garantie.
· Houdt u aan de landelijke voorschriften en de geldende veiligheidsbepalingen.
· Op de aansluitklemmen aan de buitenkant kunnen vaste en flexibele geleiders tot 10 mm
2
worden
aangesloten.
· Er mogen geen flexibele draden met een aderdoorsnede ≤ 1 mm
2
worden aangesloten.
Algemene aanwijzingen
·Uitschakelcommando’s hebben voorrang op inschakelcommando’s.
· Bij correcte spanningsvoorziening worden de punten tussen de uren en minuten (UU:MM)
aangeduid. De punten knipperen bij onderbreking van de stroom.
· Zonder spanning erlischt de schakelaanduiding na 2 minuten.
· De complete displayaanduiding knippert wanneer binnen 2 weken de batterrijen vervangen
moeten worden.
Montage op DIN-rail Aansluitschema
567
L
123
N
56
L
123
N
C1
C2
C1
Page 51

51
NL
OK
reset
MENU
16121824
Res.
1
A
F
B
C
D
E
G
H
I
J
K
C1
15:26:38
Display
A Functieaanduidingen van de beide
linkertoetsen
B Kanaalstatusindicatie
= Kanaal 1 AAN
= Kanaal 1 UIT
kanaal 1 = C1, kanaal 2 = C2
C 3 communicatieregels voor tijdweergave,
menupunten, invoeropdrachten etc.
D Weergave van weekdag
E Overzicht van dagschakelprogramma
F Weergave van zomer-/wintertijd
G Bedrijfsspanning (puntjes branden
permanent)
Loopreservemodus (puntjes knipperen)
H Functieaanduidingen van de beide
rechtertoetsen
Toetsen
I Reset
Bij een reset blijven de programma's
behouden. De datum en de tijd moeten
opnieuw worden ingesteld. Druk met een
stomp voorwerp (zoals een balpen) op de
reset-toets.
J Rechtertoetsen
K Linkertoetsen met handschakelaarfunctie in
automatische modus
Algemeen
· De middelste communicatieregel toont de
menuoptie die kan worden geselecteerd.
Deze kan men activeren door hem met OK te
bevestigen.
· Knipperende teksten of symbolen betekenen
dat er iets moet worden ingevoerd.
·Volgt er binnen 2 minuten geen ingave, keert
de klok terug naar de auto-mode.
Functieaanduidingen van de beide
linkertoetsen
in het menu omhoog bladeren
in het menu omlaag bladeren
selectie/voorstel annuleren
selectie/voorstel aannemen
+ kort indrukken = +1
lang indrukken (ca. 2 sec) = +5
- kort indrukken = -1
lang indrukken (ca. 2 sec) = -5
Functieaanduidingen van de beide
rechtertoetsen
MENU Automatische modus verlaten en
overschakelen op de programmeermodus
ESC Kort indrukken = een stap terug
Lang indrukken (ca. 2 sec) = terug
naar de automatische modus
OK Selectie aangeven en bevestigen
EDT Gewenste wijziging tijdens leesmodus
NEE Commando niet uitvoeren
JA Commando uitvoeren
DEL Wissen
Page 52

52
1.
ESC
OK
DEUTSCH
ENGLISH
FRANCAIS
OK
12H 24H
LANGUAGE
DATETIME
ESC OK
OK
ITALIANO
NEDERLAN
PORTUGES
ESC OK
ESC
MENU
16121824
1
C1
15:26:38
Res.
MENU
Info
Bij aflevering staat de tijdschakelklok in de
Auto Mode: de tijd en datum staan op de fabrieksinstelling en
de menutaal is standaard ingesteld op Engels.
Eerste ingebruikstelling - Menutaal selecteren
Prog.
MENU
16121824
1
C1
15:26:38
Res.
DAT TIJD
PROGRAM
ZO WI
MENU
OK
LEZEN
NIEUW
DELETE
ESC OK
ESC OK
Page 53

53
NL
Prog.
UREN
00
KAN AAN
ESC OK
OK
SELECTIE
DAG
KAN AAN
ESC OK
MINUTEN
15:00
KAN AAN
ESC OK
MINUTEN
18:00
KAN UIT
ESC OK
OK
UREN
00
KAN UIT
ESC OK
OPGESI
P01 P02
OK
VRIJ 50
OK
LEZEN
NIEUW
DELETE
ESC OK
OK
KANAAL
SELECTIE
I
ESC
OK
KANAAL
SELECTIE
I
ESC OK
Nieuw programma
Info
De schakelklok heeft 50
geheugenlocaties.
Voorbeeld
Inschakelcommando voor
kanaal 1 om 15:00 uur.
Uitschakelcommando om
18:00 uur.
· Kies NIEUW programma
en bevestig met OK.
· De vrije geheugenlocaties
worden kort getoond.
· Selecteer het kanaal en
bevestig met OK.
· Selecteer een dagenblok of een
afzonderlijke dag (vrije
blokindeling) en
bevestig met OK.
·Voer het uur in voor het
inschakelcommando (+/-)
en bevestig met OK.
·Voer de minuten in voor
het inschakelcommando
(+/-) en bevestig met OK.
·Voer het uur in voor het
uitschakelcommando
(+/-) en bevestig met OK.
·Voer de minuten in voor
het uitschakelcommando
(+/-) en bevestig met OK.
·Het programma wordt
opgeslagen.
·Het programma springt
naar de optie LEZEN,
NIEUW, DELETE. U kunt
nu nog meer programma's aanmaken.
alleen bij kanaal 2
Page 54

54
Prog.
OK
AAN P01
15:00
HH:MM
OK
DELETE
LEZEN
NIEUW
ESC OK
EDT OK
OK
UIT P02
18:00
HH:MM
EDT OK
Programma bekijken, bewerken
Info
·Met ▼ ▲ kunt u door
de programmastappen
bladeren.
· Door op EDT te drukken
kunt u het actuele
programma bewerken.
De desbetreffende
procedure is hetzelfde
als de procedure voor
het aanmaken van een
nieuw programma.
Info
·Met JA kunt u alle
programma's wissen.
· Door op NEE te
drukken, kunt u losse
programma's wissen.
OK
DELETE
ALLEMAAL
OK
NIEUW
DELETE
LEZEN
ESC OK
JA NEE
OK
BEVEST
OK
AAN P01
15:00
HH:MM
DEL OK
OK
DELETE
ALLEMAAL
OK
BEVEST
JANEE
JANEE
JA NEE
Alle programma's wissen
Losse programma's wissen
Info
Bij het wissen van
afzonderlijke programma’s
worden alle daarbij
behorende programmastappen gewist
(bijv. P01 AAN en P02 UIT).
Page 55

55
NL
OK
JAAR
2004
ESC OK
MAAND
2004:03
ESC OK
DAG
2004:03:25
ESC OK
OK
TAAL
DAT TJID
PROGRAM
ESC OK
MINUTEN
13:45
ESC OK
OK
UREN
13
ESC OK
Datum en tijd instellen
OK
AM PM
24H
ESC OK
OK
ZO/WI
12H 24H
TAAL
ESC OK
AM/PM- (24 uurs) resp. 24-uurs weergave instellen
Info
De datum en de tijd zijn bij aflevering al
ingesteld.
Page 56

56
OK
KALIBER
AUTO
NEE
ESC OK
OK
PROGRAM
ZO WI
12H 24H
ESC OK
ZO START
03
MAAND
ESC OK
OK
NEE
KALIBER
AUTO
ESC OK
ZO START
03:21
DAG
ESC OK
WI START
10
MAAND
ESC OK
WI START
10:31
DAG
ESC OK
ZO WI
2103:3110
KALIBER
ESC OK
Omschakeling zomer-/wintertijd
Info
De volgende instellingen
kunnen worden uitgevoerd:
AUTO
Fabrieksinstelling van de
wettelijke omschakeltijden
en -data. Dit wordt automatisch voor elk jaar
opnieuw berekend.
NEE
Geen omschakeling
KALIBER
Programmering. Hiervoor
moeten de startdata van
de zomertijd en van de
wintertijd worden ingevoerd.
De fabrieksinstelling wordt
dan overschreven.
De geprogrammeerde
zomer-/wintertijd wordt
automatisch elk jaar
opnieuw berekend.
De omschakeling volgt op
dezelfde ingegeven dag in
dezelfde week van de
maand.
Voorbeeld
21-03. Start zomertijd
31-10. Start wintertijd
Page 57

57
NL
MENU
16121824
1
C1
15:26:38
FIX ON:
FIX OFF:
AUTO: (keine Anzeige) progra
m
FIX
FIX
Res.
Bedrijfsmodus
Info
Linkertoets = kanaal 1
Rechtertoets =kanaal 2 (alleen bij 2-kanaals
versie)
1 x indrukken = FIX ON = duur AAN
2 x indrukken = FIX OFF = duur UIT
3 x indrukken = terug naar Auto Mode
Technische gegevens
Afmetingen H x B x D 45 x 35 x 60 mm
Gewicht g (ca.) 170
Aansluitspanning zie opdruk op
apparaat
Opgenomen vermogen 5 VA
Schakelvermogen
- ohmse belasting
(VDE, IEC) 16 A/250 V AC
- inductieve belasting
cos ϕ 0.6 8 A/250 V AC
- Gloeilampenbelasting 1000 W
Schakeluitgang potentiaalvrij
Schakelcontacten 1 resp. 2 wissel
Omgevingstemperatuur -25°C tot +55°C
Veiligheidscategorie II
Loopnauwkeurigheid typ. ±2,5 s/dag
bij 20°C
Loopreserve 3 jaar af fabriek
bij +20°C
Kortste schakeltijd 1 min.
Geheugenlocaties 50
Blokindeling van
weekdagen vaste/vrije keus
Schakelmodusaanduiding ja
Verzegelbaar ja
(geen weergave) geprogrammeerde schakeltijden
Page 58

58
Bezpečnostní pokyny
· Připojování a montáž elektrických přístrojů může provádět jen kvalifikovaný elektrikář.
· Zásahy a změny přístroje vedou ke zrušení nároku na záruku.
· Dodržujte vaše národní předpisy a příslušné bezpečnostní vyhlášky.
· Vnější připojovací svorky umožňují připojení pevných a ohebných vodičů do 10 mm
2
.
· Nesmí být připojena žádná ohebná vedení s průřezem ≤ 1 mm
2
.
Všeobecná upozornění
· Pokyny k vypnutí mají přednost před pokyny k zapnutí.
· Při správném napětí bude dvojtečka mezi hodinami a minutami stále zobrazena.
· Pokud dvojtečka bliká, byla přerušena dodávka proudu.
· Při výpadku napájení se ukazatel vypíná po 2 minutách.
· Celý displej bliká v případě, že je nutná výměna baterie, a to do dvou týdnů.
Montáž na lištu DIN Schéma zapojení
567
L
123
N
56
L
123
N
C1
C2
C1
Page 59

59
CZ
OK
reset
MENU
16121824
Res.
1
A
F
B
C
D
E
G
H
I
J
K
C1
15:26:38
Displej
A Kontrolky funkce obou levých tlačítek
B Ukazatelé stavu kanálů
= kanál 1 ZAP
= kanál 1 VYP
kanál 1 = C1, kanál 2 = C2
C 3 komunikační řádky pro ukazatel času,
body menu, požadavky zadávání atd.
D Ukazatel dne v týdnu
E Přehled spínacího programu dne
F Ukazatel zimního/letního času
G Provozní napětí (dvojtečka mezi časovými
údaji)
Záložní provoz chodu (blikající dvojtečka)
H Kontrolky funkce obou pravých tlačítek
Tlačítka
I Reset
Při resetu zůstanou programy zachovány.
Znovu musí být zadány datum a přesný čas.
Tlačítko Reset stisknout tupým předmětem
(kuličkovým perem).
J Pravá tlačítka
K Levá tlačítka s funkcí ručního ovládání v
automatickém provozu
Obecně
· Střední komunikační řádek zobrazuje bod
menu k příslušnému výběru. Bude aktivován
po stisknutí tlačítka OK.
· Blikající texty nebo symboly vyžadují
provedení zadání.
· Pokud nenásleduje do 2 minut žádné zadání,
vrátí se hodiny zpět do režimu Auto.
Kontrolky funkce obou levých tlačítek:
listování v menu směrem nahoru
listování v menu směrem dolů
odmítnutí výběru/návrhu
přijmutí výběru/návrhu
+ krátce stisknout = +1
dlouze stisknout (cca 2 s) = +5
- krátce stisknout = -1
dlouze stisknout (cca 2 s) = -5
Kontrolky funkce obou pravých tlačítek:
MENU opuštění automatického provozu a
vstup do režimu programování
ESC krátce stisknout = jeden krok zpět
dlouze stisknout (cca 2 s) = zpět do
automatického provozu
OK Vybrat a potvrdit
EDT požadovaná změna v režimu čtení
NE neprovést instrukci
ANO provést instrukci
DEL Vymazat
Page 60

60
1.
ESC
OK
DEUTSCH
ENGLISH
FRANCAIS
OK
12H 24H
LANGUAGE
DATETIME
ESC OK
OK
PORTUGES
CZECH
DEUTSCH
ESC OK
ESC
MENU
16121824
1
C1
15:26:38
Res.
MENU
Info
Ve stavu při dodávce se spínací hodiny nachází
v režimu Auto s přednastaveným přesným
časem, datem a menu v anglickém jazyce.
První uvedení do provozu - výběr jazyka nabídky funkcí
Prog.
MENU
16121824
1
C1
15:26:38
Res.
DAT CAS
PROGRAM
L Z CAS
MENU
OK
SOUHRN
NOVY
ZRUSIT
ESC OK
ESC OK
Page 61

61
CZ
Prog.
HODINY
00
KAN ZAP
ESC OK
OK
VYBRAT
DEN
KAN ZAP
ESC OK
MINUTY
15:00
KAN ZAP
ESC OK
MINUTY
18:00
KAN VYP
ESC OK
OK
HODINY
00
KAN VYP
ESC OK
ULOZENO
P01 P02
OK
VOLNE 50
OK
SOUHRN
NOVY
ZRUSIT
ESC OK
OK
KANAL
VYBRAT
I
ESC
OK
KANAL
VYBRAT
I
ESC OK
Nový program
Info
Spínací hodiny mají 50
paměťových míst.
Příklad
Instrukce ZAP pro kanál 1
v 15.00 hod. Instrukce VYP
v 18:00 hod.
· Zvolit program NOVY a
potvrdit OK.
· Budou krátce zobrazena
volná paměťová místa.
· Zvolit kanál a potvrdit
OK.
· Zvolit několik nebo
jeden den (volné
vytváření uskupení) a
potvrdit OK.
· Zadat hodinu pro
instrukci ZAP (+/-) a
potvrdit OK.
· Zadat minuty pro
instrukci ZAP (+/-) a
potvrdit OK.
· Zadat hodinu pro
instrukci VYP (+/-) a
potvrdit OK.
· Zadat minuty pro
instrukci VYP (+/-) a
potvrdit OK.
· Program bude uložen.
· Program skočí do výběru
SOUHRN, NOVY, ZRUSIT.
Nyní mohou být
vytvořeny další
programy.
pouze u
dvoukanálové verze
Page 62

62
Prog.
OK
ZAP P01
15:00
HH:MM
OK
ZRUSIT
SOUHRN
NOVY
ESC OK
EDT OK
OK
VYP P02
18:00
HH:MM
EDT OK
Prohlédnutí, upravení programu
Info
· ▼ ▲ lze listovat
jednotlivými
programovými kroky.
· Po stisknutí EDT může
být upraven aktuální
program. Postup
odpovídá vytváření
nového programu.
Info
· Pomocí ANO lze
vymazat všechny
programy
· Po stisknutí NE mohou
být vymazány
jednotlivé programy.
OK
ZRUSIT
VSE
OK
NOVY
ZRUSIT
SOUHRN
ESC OK
ANO NE
OK
POTVRD
OK
ZAP P01
15:00
HH:MM
DEL OK
OK
ZRUSIT
VSE
OK
POTVRD
ANONE
ANO NE
ANONE
Vymazání všech programů
Vymazání jednotlivých programů
Info
Při mazání jednotlivých
programů budou všechny
s ním související programové kroky také zrušeny
(např. P01 ZAP a P02 VYP).
Page 63

63
CZ
OK
ROK
2004
ESC OK
MESIC
2004:03
ESC OK
DEN
2004:03:25
ESC OK
OK
JAZYK
DAT CAS
PROGRAM
ESC OK
MINUTY
13:45
ESC OK
OK
HODINY
13
ESC OK
Nastavení data a přesného času
OK
DOP ODP
24 H
ESC OK
OK
L Z CAS
CAS FORM
JAZYK
ESC OK
Nastavení zobrazení AM (dopoledne)/PM (odpoledne) 12 hodin popř. 24 hodin
Info
Datum a přesný čas jsou předběžně nastaveny
z továrny.
Page 64

64
OK
PREPOCET
AUTO
NE
ESC OK
OK
PROGRAM
L Z CAS
CAS FORM
ESC OK
LT START
03
MESIC
ESC OK
OK
NE
PREPOCET
AUTO
ESC OK
LT START
03:21
DEN
ESC OK
ZM START
10
MESIC
ESC OK
ZM START
10:31
DEN
ESC OK
LT ZM
2103:3110
PREPOCET
ESC OK
Přepínání zimního/letního času
Info
Jsou možná následující
nastavení:
AUTO
předběžné nastavení
zákonných údajů z
továrny. Toto bude automaticky nově vypočítáno
pro každý rok.
NE
bez přepínání
PREPOCET
programování. K tomu
zadat datum přechodu na
letní a zimní čas.
Předběžné nastavení z
továrny bude přepsáno.
Naprogramovaný letní/
zimní čas bude automaticky nově vypočítán
pro každý rok.
Přepínání se uskutečňuje
ve stejný zadaný den v
týdnu ve stejném týdnu v
měsíci.
Příklad
21.03. přechod na letní čas
31.10. přechod na zimní
čas
Page 65

65
CZ
MENU
16121824
1
C1
15:26:38
FIX ON:
FIX OFF:
AUTO: (keine Anzeige) progra
m
FIX
FIX
Res.
Druh režimu
Info
Levé tlačítko = kanál 1
Pravé tlačítko = kanál 2 (jen u 2kanálové
verze)
1 x stisknout = FIX ZAP = Trvale zapnuto
2 x stisknout = FIX VYP = Trvale vypnuto
3 x stisknout = zpět do režimu Auto
Technické parametry
Rozměry v x š x h (mm) 45 x 35 x 60
Hmotnost v g (cca) 170
Napájecí napětí viz potisk na přístroji
Příkon 5 VA
Spínací výkon
- ohmické zatížení
(VDE, IEC) 16 A/250 V AC
- indukční zatížení
cos
ϕ 0.6 8 A/250 V AC
- zatížení žárovek 1000 W
Spínací výstup bezpotenciálový
Spínací kontakty 1 popř. 2
přepínací kontakty
Teplota prostředí -25°C až +55°C
Třída ochrany II
Přesnost chodu typ ±2.5 s/den
při 20°C
Rezerva chodu 3 roky ze závodu
při +20°C
Nejkratší spínací doba 1 min.
Paměťová místa 50
Vytváření uskupení
dnů v týdnu pevný/volný výběr
Zobrazení polohy
spínače ano
Možnost
zaplombování ano
(bez indikace) běží naprogramované spínání
FIX ZAP:
FIX VYP:
Page 66

Page 67

Page 68

80.10.1051.7/06/01
 Loading...