

Page 1

To avoid re, shock, or death, turn off power at circuit breaker and test that power is off •
before wiring.
Read instructions completely before installation and retain for future reference.•
Observe all national and local electrical and safety codes.•
Disconnect power when servicing or changing loads.•
Alterations or modications to the device will void the warranty.•
For outdoor locations, rain-tight or wet location conduit hubs that comply with the re-•
quirements of UL 514B Conduit, Tubing, and Cable Fittings, must be used.
GM40AV Series General Purpose
Electromechanical Commercial Time Switches
To avoid re, shock, or death, turn off power at the circuit breaker and test that 1.
power is off before wiring.
Open door and remove the interior protective cover by releasing the spring 2.
latch (see gure 1 below).
Remove the printed circuit board by releasing the spring latch holding the bot-3.
tom of the board (see gure 2 below).
Select knockouts to be used. Remove the inner 1/2” knockout by inserting a 4.
athead screwdriver in the slot and carefully punch the knockout loose. Remove slug. If 3/4” knockout is required, remove the outer ring with pliers after
removing the 1/2” knockout. Smooth edge with knife, if necessary.
Place the enclosure in the desired mounting location, and mark the three 5.
mounting holes (refer to Figure 3 below for dimensions). Install the top screw
rst with one of the supplied spacers, and then hang the enclosure by the keyhole. Drive the remaining two screws at the bottom of the enclosure through
the mounting holes while passing each screw through one of the supplied
spacers and in to the wall.
Connect conduit hubs to conduit before connecting the hubs to the enclosure. 6.
After inserting hubs into enclosure, carefully tighten hub lock nut. Do not overtorque.
Replace printed circuit board making sure to engage spring latch at the bot-7.
tom of PCB.
Wire in accordance with national and local electrical and safety codes (see 8.
wiring diagrams on page 3).
Grounding: Terminate all ground wires to the ground lug inside the case at the 9.
bottom of the enclosure.
Replace interior protective cover. 10.
INSTALLATION INSTRUCTIONS
ELECTRICAL RATINGS
N.O. Contacts:
40A Resistive @ 120~277VAC
1HP, 16FLA, 90LRA @ 120VAC
2HP, 12FLA, 52LRA @ 208~277VAC
30A Ballast @ 120VAC
20A Ballast @ 277VAC
15A Tungsten @ 120VAC
300VA Pilot Duty 120~240VAC
N.C. Contacts:
30A Resistive @ 120~277VAC
1HP, 12FLA, 30LRA @ 120VAC
2HP, 10FLA, 30LRA @ 240VAC
2A Tungsten @ 120VAC
10A Ballast @ 277VAC
WIRING CONNECTIONS:
Screw box lug terminals
ENVIRONMENTAL RATINGS:
Operating Temperature Range:
–40°F to 131°F (–40°C to 55°C)
Operating Humidity:
10 - 95% RH, non-condensing
ENCLOSURE DIMENSIONS:
8.795” x 6.631” x 2.935”
(H x W x D)
SHIPPING WEIGHT:
2 lbs.
AGENCY APPROVALS:
UL Listed
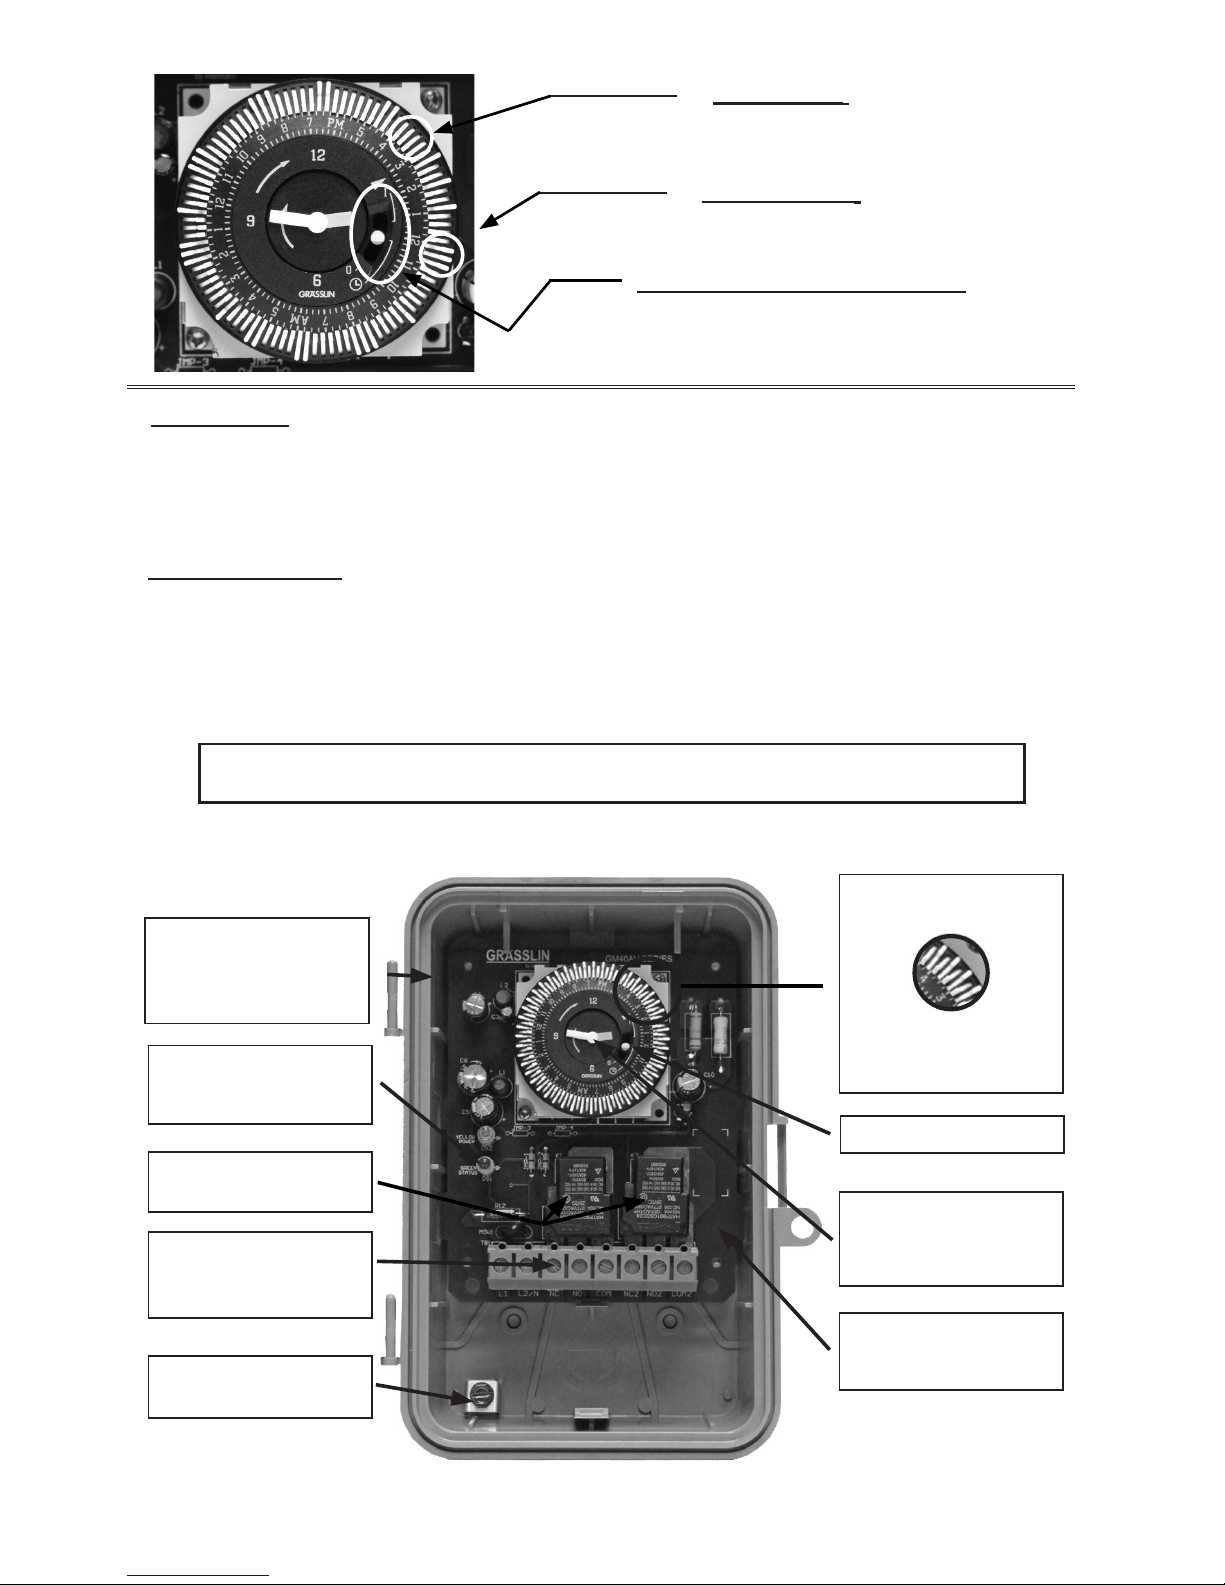
SETTING THE CLOCK TIME
Rotate the program dial gradually clockwise until the time of day on the outer
dial is nearly aligned with the triangle marker at the 2 o’clock position. Then set
time to the minute by rotating minute hand clockwise until the time of day (and
AM or PM) on the outer dial is aligned with the triangle marker on the inner dial.
NOTICE! Do not rotate the dial or minute hand counter-clockwise. Doing
so will damage the timer.
SETTING ON/OFF TIMES
Move the white tab (tripper) on the outer dial outward at the start of the desired
ON period. Move each adjacent tab outward until the desired OFF time is
reached.
(See illustrations on page 2)
PROGRAMMING INSTRUCTIONS
Figure 3 - Rear View of Enclosure
with mounting hole dimensions
6-1/8”
2-1/2”
Figure 2 - PCB LatchFigure 1 - Spring Latch
Interior
Protective
Cover
Timer Mechanism
WARNING
Page 2
TRIPPERS IN
Relays: OFF - Green Status LED: OFF
(Normally-open contacts open)
TRIPPERS OUT
Relays: ON - Green Status LED: ON
(Normally-open contacts closed)
MANUAL OVERRIDE OPERATION
With the manual switch in the middle position, the GM40AV is in
automatic mode and will switch at the programmed times.
In the upper position “I”, the load is continuously ON.
In the lower position, “O”, the load is continuously OFF.
Moisture Resistant
Conformal Coated
Board
40 Amp
Rated Contacts
Automatic Voltage Selection From 120 VAC to 277 VAC
Captive Trippers
Can’t Be Lost
Independently
Adjustable Trippers at
15 Minute Intervals
Real Time Clock Face
for faster and easier
time setting
Manual Override Switch
Large Screw Terminals
for Easy Wiring
up to #8 AWG
Large Ground Lug
Termination
New UL Type 3R
Enclosure for
Indoor or Outdoor
Installation
Yellow and Green
LED Lights Indicate
Power and Status
SPECIFIERS GUIDE
APPLICATION
The GM40AV Series Time Controls are universal, electronic time switches designed for general purpose commercial applications. The control operates on any AC voltage from 120VAC to 277VAC. The mechanism is mounted in
an enclosure and has been designed for the control of lighting, heating, air conditioning, pumps, motors, or general
electrical circuits in residential, commercial, industrial and agricultural facilities.
Furnish and install an Intermatic GM40AV Auto-Volt Series with 24 hour mechanical timer. The Auto-Volt input voltage range shall be 120VAC to 277VAC. All units shall incorporate two isolated sets of SPDT contacts that are each
rated at 40A, 2 HP @ 277V. LED indicators shall provide Power and Status feedback. Enclosure shall be UL Type
3R, suitable for indoor or outdoor installation
.
2
Interior protective cover and door not shown
Page 3

GM40AV SERIES TERMINAL DESIGNATIONS
GM40AV SERIES TYPICAL WIRING DIAGRAMS
COM2NO 2NC 2COMNONCL 2/NL 1
T
TIMER
When the GM40AV is used to control a single phase 120 VAC
load, connect a jumper wire (J1) between L1 and COM.
When the GM40AV is used to control a single phase 240 VAC
load, connect a jumper wire (J1) between L1 and COM and
connect a second jumper wire (J2) between L2 and COM2.
When the GM40AV is used to control two single phase 120
VAC loads, connect a jumper wire (J1) between L1 and COM
and connect a second jumper wire (J2) between COM and
COM2.
NOTICE! Make sure that the combined amperage of Load 1
and Load 2 do not exceed the limits of the feed circuit.
When the GM40AV is used to control two single phase 277
VAC loads, connect a jumper wire (J1) between L1 and COM
and connect a second jumper wire (J2) between COM and
COM2.
NOTICE! Make sure that the combined amperage of Load 1
and Load 2 does not exceed the limits of the feed circuit.
COM2NO 2NC 2NONCL 2/NL 1
T
TIMER
L N
120VAC
COM
LOAD
J1
COM2NO 2NC 2NONCL 2/NL 1
T
TIMER
L1 L2
240VAC
COM
LOAD
#1
J1
J2
NO 2NC 2NONCL 2/NL 1
T
TIMER
L N
120VAC
COM
LOAD
#1
LOAD
#2
J1
J2
COM2
NO 2NC 2NONCL 2/NL 1
T
TIMER
L N
277VAC
COM
LOAD
#1
LOAD
#2
J2
J1
COM2
120 VAC One Load
240 VAC One Load
120 VAC Two Loads
277 VAC Two Loads
This Time Switch is designed to control one or two single phase loads. Do Not use to directly control
three phase loads. Consult a qualied electrician if you are required to control three phase equipment.
3
The circuit conductors shall have an ampacity not •
less than the maximum total load to be controlled.
For all connections, use min. 8 AWG wire for 40 A •
loads or 10 AWG for 30 A loads, min. 90 oC (194
o
F) rating.
Over current protection shall have an interrupting •
rating sufcient for the application control circuit
voltage and the total load current of the equipment
being controlled.
A fuse or circuit breaker shall be connected in •
series with each ungrounded conductor (and shall
be able to simultaneously open each conductor).
Jumper wires are not included.•
NOTICE
WARNING
Page 4

4
GM40AV SERIES TROUBLESHOOTING GUIDE
PROBLEM: LOAD (Lights/Pumps/Motors, etc) will NOT turn ON or OFF
Some terminals in the Time Switch may be energized even if the yellow and green LED •
indicators are OFF.
Check all terminals and wires with an appropriate voltage checker before touching.•
Verify that all wiring connections are correct. (Refer to wiring diagrams on page 3)1.
Check the YELLOW Power LED. If ON, it indicates that power is applied to the GM40AV.2.
Slide the Manual Override Switch to the upper [ON] position. If wired for use, the loads con-3.
nected to terminals (NO) or (NO2) should turn ON.
NOTE: Check for correct voltage at terminals (NO) and/or (NO2).
Slide the Manual Override Switch to the lower [OFF] position. If wired for use, the loads con-4.
nected to terminals (NO) or (NO2) should turn OFF.
NOTE: Check that there is no voltage detected at terminals (NO) and/or (NO2).
Verify that the trippers are correctly positioned for the desired ON and OFF times. Slide the 5.
Manual Override Switch to the middle position for automatic time switching.
LIMITED ONE YEAR WARRANTY
If within the warranty period specied, this product fails due to a defect in material or workmanship, Intermatic
Incorporated will repair or replace it, at its sole option, free of charge. This warranty is extended to the original
purchaser only and is not transferable. This warranty does not apply to: (a) damage to units caused by accident,
dropping or abuse in handling, acts of God or any negligent use; (b) units which have been subject to unauthorized
repair, opened, taken apart or otherwise modied; (c) units not used in accordance with instructions; (d) damages
exceeding the cost of the product; (e) sealed lamps and/or lamp bulbs, LED’s and batteries; (f) the nish on any
portion of the product, such as surface and/or weathering, as this is considered normal wear and tear; (g) transit
damage, initial installation costs, removal costs, or reinstallation costs.
INTERMATIC INCORPORATED WILL NOT BE LIABLE FOR INCIDENTAL OR CONSEQUENTIAL DAMAGES.
SOME STATES DO NOT ALLOW THE EXCLUSION OR LIMITATION OF INCIDENTAL OR CONSEQUENTIAL
DAMAGES, SO THE ABOVE LIMITATION OR EXCLUSION MAY NOT APPLY TO YOU. THIS WARRANTY IS IN
LIEU OF ALL OTHER EXPRESS OR IMPLIED WARRANTIES. ALL IMPLIED WARRANTIES, INCLUDING THE
WARRANTY OF MERCHANTABILITY AND THE WARRANTY OF FITNESS FOR A PARTICULAR PURPOSE,
ARE HEREBY MODIFIED TO EXIST ONLY AS CONTAINED IN THIS LIMITED WARRANTY, AND SHALL BE OF
THE SAME DURATION AS THE WARRANTY PERIOD STATED ABOVE. SOME STATES DO NOT ALLOW
LIMITATIONS ON THE DURATION OF AN IMPLIED WARRANTY, SO THE ABOVE LIMITATION MAY NOT
APPLY TO YOU.
This warranty service is available by either (a) returning the product to the dealer from whom the unit was purchased, or (b) completing a warranty claim on line at www.intermatic.com. This warranty is made by: Intermatic
Incorporated Customer Service/7777 Winn Rd., Spring Grove, Illinois 60081-9698 / 815-675-7000
http://www.intermatic.com
WARNING
 Loading...