


WET & DRY
HANDHELD
VACUUM CLEANER
VCH 6130
en
________________________________________________________
A
B
C
D
2
E
F
G
L
K
2
H I
J
M N O P Q
2

SAFETY AND SET-UP ______________________
Please read this instruction manual thoroughly
before using this appliance. Follow all the
safety instructions to avoid damage caused by
improper use.
Keep this instruction manual for future reference.
Should this appliance be given to a third party,
then the instruction manual must also be handed
over.
7
Use the vacuum cleaner for its intended purpose only.
The vacuum is intended for household use
only.
7
Remove the protective foils and packaging
material before use.
7
Before initial usage make sure the mains voltage and current match the information on the
rating label of the appliance.
7
Only use the vacuum cleaner with the power
adapter indoors.
7
Never touch the power adapter with moist or
wet hands.
7
Never submerge the motor unit, the power
adapter or the power cable in water or other
liquids during cleaning or operation. Never
hold the motor unit under running water or
any other liquid.
Should the unit happen to fall into water,
unplug the power adapter immediately if connected to the power supply and have the unit
examined by an expert before further use.
7
Danger of suffocation! Keep all packaging
materials away from children, especially small
children.
7
Please contact your local authority in regard
to disposal and recycling in your area.
7
Use only the original components or those
recommended by the manufacturer.
7
The appliance should not be used by the following persons, including children: those with
limited physical, sensory or mental capabilities or those with a lack of experience and
knowledge. This does not apply to the latter
if they were instructed in the use of the appliance or if they use it under the supervision of
a person responsible for their safety. Children
should always be supervised to ensure that
they do not play with the appliance.
7
Never open the appliance under any circumstance. No warranty claims are accepted for
damage caused by improper handling.
7
Never use the appliance if it or the power
adapter is visibly damaged.
7
Ensure that the power adapter is accessible at
all times.
7
Unplug the vacuum cleaner from the power
before cleaning or when the unit is not in use.
7
Our GRUNDIG Household Appliances meet
all the applicable safety standards; thus if the
appliance or power adapter is damaged, it
must be repaired or replaced by the dealer, a
service centre or a similarly qualified and authorized service person to avoid any danger.
Faulty or unqualified repair work may cause
danger and risk to the user.
7
Shield the power adapter from extreme heat,
direct sunlight, wetness and dust.
7
Do not expose the appliance to direct sunlight
or another heat source whilst charging.
7
Do not unplug the power adapter by pulling
the cable and do not wrap the cable around
the unit.
7
Lay the power cable so that it cannot be
pulled or tripped over unintentionally.
7
Only use the power adapter with this handheld vacuum cleaner. Do not attempt to
charge other devices with this power adapter
under any circumstances.
7
Do not insert any objects into the unit and do
not cover it up.
7
Take care that the ventilation slots I are not
covered during usage.
7
Do not use the vacuum cleaner to clean up
the following: any sharp objects (e.g. broken
glass), smoldering and burning objects (e.g.
hot ashes, lit cigarettes), solvents or flammable
liquids.
7
Keep the unit away from eyes and hair while it
is being used.
7
Do not use the vacuum cleaner when it is still
connected to the power adapter.
ENGLISH
11

SAFETY AND SET-UP ______________________
7
Do not use the unit without the collection container or filter.
7
Let the unit cool down sufficiently before storage.
7
Should the batteries leak, take care that the
leaked acid does not come into contact with
your skin.
7
The appliance batteries must be removed and
disposed of in an environmentally friendly
manner by a qualified expert.
12 ENGLISH

AT A GLANCE ____________________________
Dear customer,
Congratulations on the purchase of your new
GRUNDIG handheld vacuum cleaner
VCH 6130.
Please read the following user notes carefully to
ensure you can enjoy your quality GRUNDIG
product for many years to come.
A responsible approach!
GRUNDIG focuses on contractually agreed social working conditions with fair wages for both
internal employees and suppliers,
as well as on the efficient use of
raw materials with continual
waste reduction of several tonnes of plastic each
year – and availability of at least 5 years for all
accessories.
For a future worth living.
For a good reason. Grundig.
Special Features
7
wet & dry function
7
powerful 7.2 V
7
LED light enhances visibility while cleaning
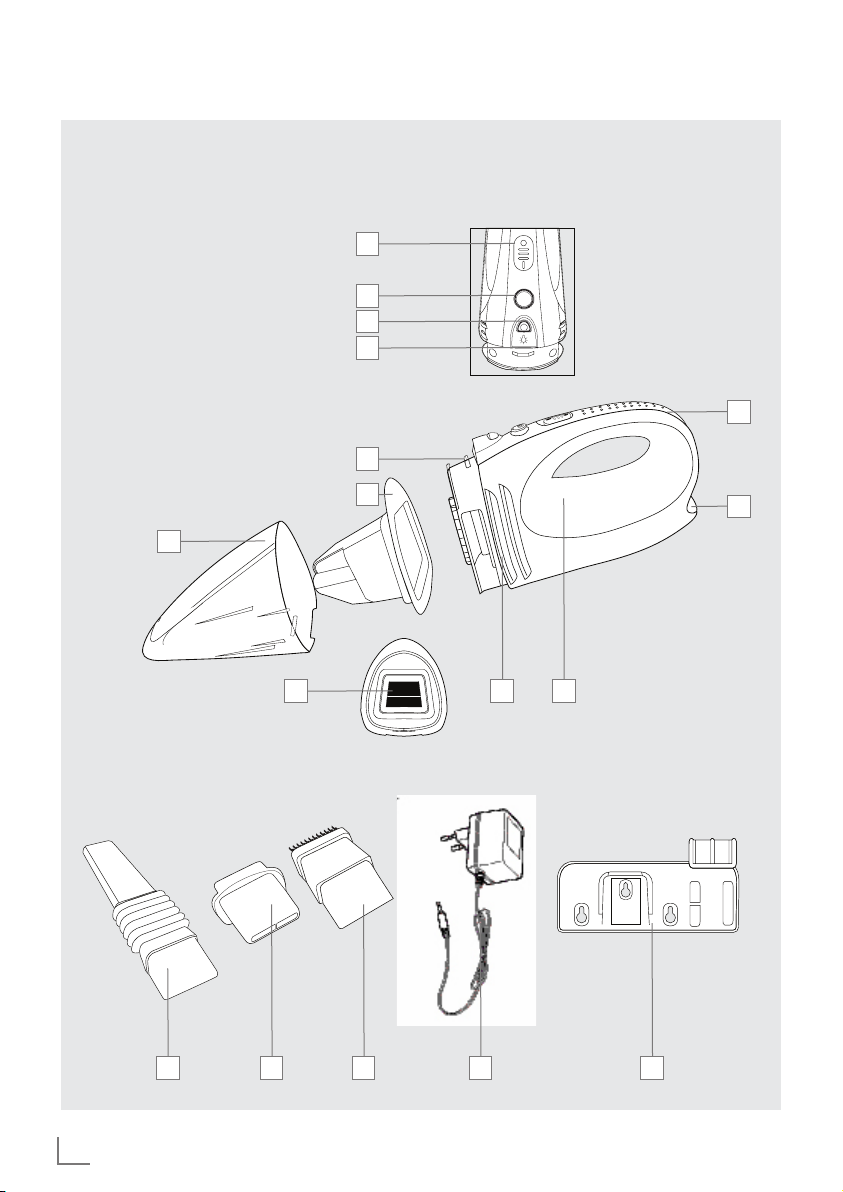
Control, parts and accessories
See the figure on page 2.
A
On/Off switch O/I
B
Release button
C
Light button
D
Light
E
Locking mechanism
F
Filter nozzle
G
Container
H
Sponge filter
I
Ventilation slots
J
Motor unit
K
Adapter cable port
L
Charge indicator
M
Crevice tool
N
Wet nozzle
O
Brush attachment
P
Power adapter
Q
Wall rack
ENGLISH
13

OPERATION ________________________________
Wall rack installation
Notes
7
Install the wall rack Q near an appropriate
power outlet, this allows you to charge the
unit hassle-free.
7
Make sure that the nearest power outlet is
reachable by the power adapter P.
7
Leave sufficient free space above the wall
rack so you can easily place the vacuum
cleaner on the rack.
7
Install the wall rack out of the reach of children.
7
Screws and dowels are included.
1 Install the wall rack Q at the desired wall
position.
2 Mark boreholes for the three screws.
Caution
7
Make sure that you do not drill over wiring,
cables or water pipes!
3 Drill the boreholes and insert dowels.
4 Secure the wall rack Q with three screws.
Charging the batteries
1 Insert the adapter cable P in the port K of
the motor unit J.
2 Connect the power adapter P to an
appropriate power outlet.
– The charge indicator L lights up blue and
will be off after the battery is fully charged.
– The vacuum cleaner must be turned off
while charging.
– The vacuum cleaner is fully charged after
approx 14 hours and the operating time is
7 to 10 minutes.
Notes
7
Only recharge the batteries when they are
nearly empty. This increases the batteries
lifespan.
7
Charge the batteries at a room temperature
between 0°C and 37°C.
7
To increase the battery’s lifespan, charge
the batteries completely before the first use
for approx .16 hours and discharge it again
completely.
7
The maximum charging time is 24 hours and
may not be exceeded.
14 ENGLISH

OPERATION ________________________________
Dry vacuum cleaning
1 Insert the filter nozzle F into the container G
and the sponge filter H into the filter nozzle
F
.
2 Place the container G on the motor unit J so
that the lock E clicks in audibly.
3 If necessary, connect the crevice tool M or
brush attachment O to the container G.
4 To turn on, move the On/Off switch A in
position I.
5 To turn off, move the On/Off switch A in
position 0.
Wet vacuum cleaning
1 Insert the filter nozzle F into the container G.
2 Place the container G on the motor unit J so
that the lock E clicks in audibly.
3 Connect the wet nozzle N to the container G.
4 To turn on, move the On/Off switch A in
position I.
5 To turn off, move the On/Off switch A in
position 0.
6 Empty the container G immediately after wet
vacuum cleaning.
Notes
7
If the area to be cleaned is poorly lit, push the
light button C to turn on the light D. Use the
same button to turn off the light.
7
The capacity of the container G is 0.5L
for dry vacuum cleaning and 0.15L for wet
vacuum cleaning. Observe the MAX marker
for liquids on the container G.
7
The sponge filter H is not used for wet vacuum cleaning.
7
Do not vacuum dry and wet dust simultaneously. Empty the container G between dry
and wet vacuuming.
ENGLISH
15

INFORMATION ____________________________
Cleaning and care
1 Push the release button B and remove the
container G.
2 Pull the sponge filter H by the strap from the
filter nozzle F.
3 Remove the filter nozzle F.
4 Empty the container G.
5 Rinse the container G, sponge filter H and
filter nozzle F under running water.
6 Use a damp rag and a mild cleaning agent
for the motor unit J and the wall rack Q.
Caution
7
Never submerge the motor unit in water.
7
Do not use aggressive or abrasive cleaning
agents, benzine, solvents, chemically treated
rags or other cleaning agents.
7 Dry all components after cleaning.
Notes
7
Clean the unit after every use.
7
To store and charge the vacuum cleaner,
place it in the wall rack. Ensure that the container G is empty.
7
Place the nozzles in the appropriate slots on
the wall rack.
Environmental note
This product has been made from high-quality
parts and materials which can be re-used and
recycled.
Therefore, do not dispose of the
device and the built-in rechargeable
batteries along with normal
household waste at the end of its
service life. Take it to a collection
point for recycling of electrical and
electronic equipment where the batteries are
taken out of the device and disposed of
separately. This is indicated by this symbol on
the product, in the operating manual and on the
packaging.
Please find out about collection points operated
by your local authority.
Help protect the environment by recycling used
products.
Technical data
This product complies with the European Directives 2004/108/EC, 2009/125/EC and
2006/95/EC.
Power supply
Adapter
Operating voltage: 230V~, 50Hz
Output voltage: 9V 200mA
Vacuum cleaner
Operating voltage: Ni-MH Battery 7.2V
16 ENGLISH
Subject to change without prior notice!

www.grundig.com
72011 908 0900
 Loading...