

Page 1
VACUUM CLEANER
VCC 4350 A
ENGLISH
EN
Page 2

Page 3
________________________________________________________
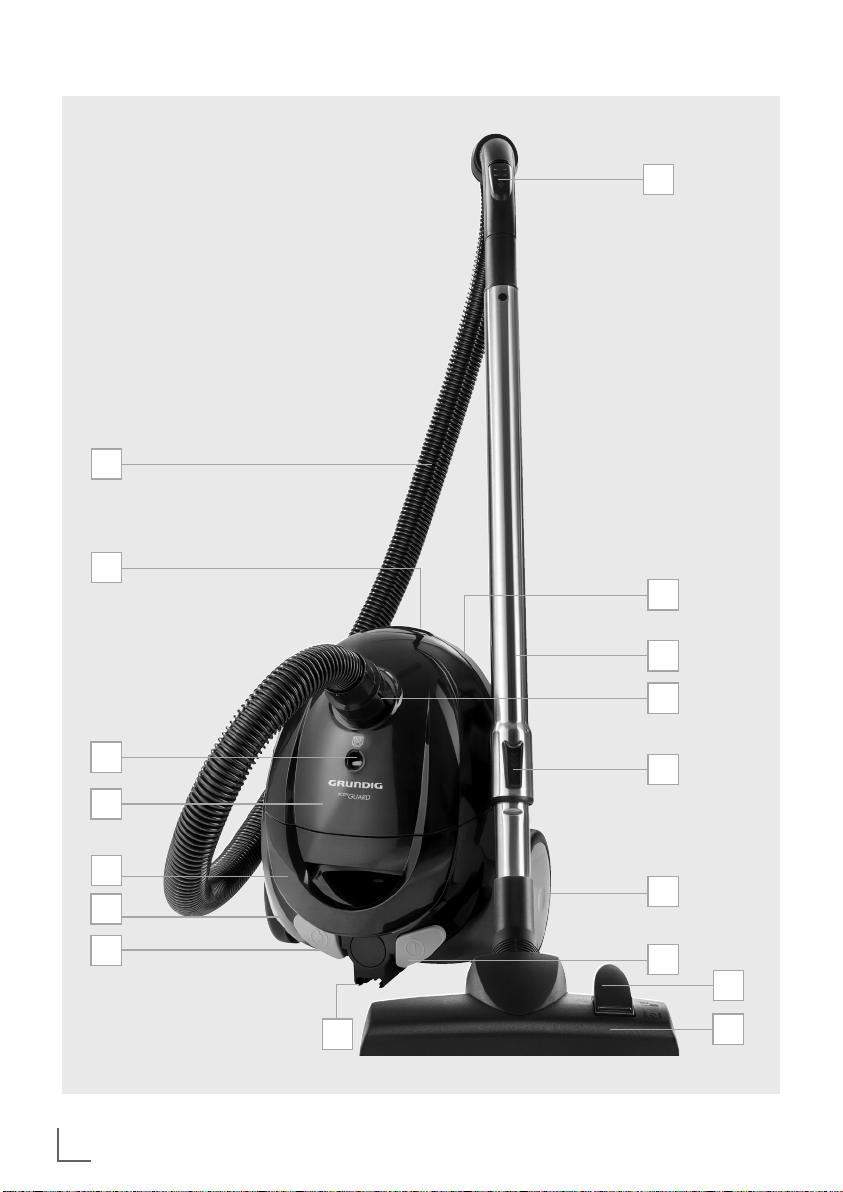
A
Q
P
B
C
D
O
N
M
L
K
E
F
G
H
J
3
I
Page 4

SAFETY
_____________________________________________
Please read this manual completely before using your appliance!
Follow all the safety instructions
to avoid damage caused by improper use!
Please retain this user manual for
further reference. This manual
shall also be supplied with the
appliance when the appliance is
handed over to a third person.
This appliance is intended for
▪
household use only. Warranty
shall be void when the appliance is used for industrial or
commercial purposes.
Please observe these instruc-
▪
tions to prevent damage and
risks due to improper use.
Do not clean wet surfaces and
▪
vacuum wet objects with this appliances.
Do not use this appliance in wet
▪
areas.
Do not use this appliance with
▪
wet hands.
This appliance is intended for
▪
cleaning dirt and dust particles.
Do not attempt to vacuum large
objects that can damage the appliance by blocking it.
Do not use the appliance to
▪
vacuum cigarette butts, fireplace
ashes or matchsticks. These objects may cause fire.
This appliance is not intended
▪
for cleaning persons or animals.
Do not insert anything through
▪
the suction clearance of the appliance. Always keep the suction
clearance open.
Do not hold the appliance up-
▪
right while vacuuming.
Do not roll the appliance over its
▪
power cord.
Do not close a door over the
▪
power cord.
Do not pull the power cord
▪
round sharp edges and do not
squash it.
If you move the appliance to an-
▪
other room, always disconnect
the power cord and carry the
appliance by the handle.
Never carry the appliance by
▪
pulling its power cord.
Never operate the appliance
▪
without the dust container or filter.
Replace the dust bag when the
▪
indicator illuminates in red.
4
ENGLISH
Page 5

SAFETY
_____________________________________________
Always pull out the power cord
▪
before cleaning or carrying out
any maintenance on the appliance.
Whenever possible, insert the
▪
power cord plug directly into
the socket. Avoid using extension cables or multipoint connectors.
Pull out the power plug after
▪
use. Do not disconnect the plug
by pulling on the cable.
Never use the appliance if there
▪
is visible damage on the appliance or on the power cord. This
also applies if the appliance
has accidentally become wet.
Please contact a service centre
in this case.
Our GRUNDIG Household Ap-
▪
pliances meet all the applicable
safety standards; thus if the appliance or the power cord is
damaged, it must be replaced
by the dealer, a service centre
or a similarly qualified and authorised service person to avoid
any danger arising. Faulty or unqualified repair work may cause
danger and risk to the user.
Always keep the appliance
▪
away from children.
This appliance can be used
▪
by children aged from 8 years
and above and persons with
reduced physical, sensory or
mental capabilities or lack of experience and knowledge if they
have been given supervision or
instruction concerning use of the
appliance in a safe way and understand the hazards involved.
Children shall not play with the
appliance. Cleaning and user
maintenance shall not be made
by children without supervision.
Do not open the appliance un-
▪
der any circumstances. No warranty claims are accepted for
damage resulting from improper
handling.
ENGLISH 5
Page 6

OVERVIEW
________________________________________
Dear Customers,
Congratulations on your purchase of your new
vacuum cleaner VCC 4350 A.
Read the following user notes carefully to
ensure full enjoyment of your quality GRUNDIG
product for many years to come.
Responsible approach!
GRUNDIG focusses on contractually agreed social working conditions with fair wages for both
inter nal employees and suppliers.
We also attach great importance
to the efficient use of raw materials with continuous waste reduction of sev eral
tonnes of plastic every year. Furthermore, all
our accessories are available for at least 5
years.
For a future worth living.
For a good reason. Grundig.
Controls and parts
See the figure on page 3.
A
Suction control
B
Lower body
C
Metal telescopic tube
D
Flexible hose adapter
E
Height setting switch
F
Wheel
G
On/Off button
H
Multi-floor brush switch
I
Multi-floor brush
J
Brush parking position
K
Power cord rewind button
L
Rear cover
M
Carrying handle
N
Dust container cover
O
Dust bag full indicator
P
Dust container button
Q
Flexible hose
Accessories
Crevice tool
6
ENGLISH
Page 7

OPERATION
_______________________________________
Preparation
Your appliance is provided with a dust bag. The
appliance is ready for use when all parts are
installed together.
1 Insert the flexible hose Q with the flexible
contact into the inlet on the main body of the
appliance until it latches in.
Note
■ To remove the flexible hose
release buttons buttons on the flexible hose
adapter D and then pull out the hose.
2 Insert the end of the flexible hose to the metal
telescopic tube C.
Note
■ To adjust the length of the metal telescopic
tube C, push and hold the height setting
switch E and slide the tube out or in as
required. Release the height setting switch E
and make sure that the tube clicks into place.
Q
press the side
Note
■ Install all snap-on elements by pushing and
rotating to each other and remove them by
pulling and rotating.
Usage of multi-floor brush in two
different positions
Brush part shall be out while cleaning hard
surfaces and parquet floors.
Brush part shall be inside while cleaning carpets
and rugs.
Crevice tool
This accessory is suitable for removing dust
from bookcases, curtains, window frames and
upholstered furniture.
3 Insert the multi-floor brush or crevice tool into
the lower end of the metal telescopic tube C.
ENGLISH 7
Page 8

OPERATION
_______________________________________
Switching on and off
1 Pull the power cord out to a suitable length.
Caution
■ The maximum cable length is indicated by
a red mark. Never try to pull out the power
cord beyond the red mark.
2 Plug the power cord plug into the wall socket.
3 Switch on the appliance by pressing
button G.
4 Press On/Off button G to turn off the
appliance after using it and remove the
power cord from the outlet.
Caution
■ Never unplug the appliance when it is in use.
On/Off
Rewinding the power cord
1 Unplug the appliance.
2 Hold the power cord with one hand and press
and hold the cord rewinding button K.
3 Rewind the power cord carefully.
Suction control
The suction control A is located on the handle
and can be operated with your thumb. When
the control A is fully closed, the maximum suction power is reached.
However, in some cases it is advisable to have
less suction power, such as when cleaning
sensitive materials, upholstery or shag pile
carpets. Open the suction control if and when
required.
Caution
■ As rewinding in high speed may cause
unexpected cord movements, be careful when
you are rewinding the power cord by pressing
on the cord rewinding button K.
8
ENGLISH
Page 9

INFORMATION
___________________________________
Dust bag full indicator
Dust bag full indicator O will provide a warning
when the suction power is reduced when the
thin pores of the dust bag are blocked by thin
dust. It shall also indicate if a big object blocks
the hose or suction clearance.
Replacing dust bag
1 Unplug the appliance.
2 Open the dust container cover
on the dust container button P and lifting the
cover.
3 Pull out the filter holder.
by pressing
N
5 Insert a new dust bag in the holder.
6 Close the dust container cover N.
Note
■ You should use dust bags from Swirl®, Type Y
05® or Menalux®, Type 1840 for VCC 4350 A.
Caution
■ Do not use the appliance without the dust
bag. Dust container cover cannot be closed
without installing the dust bag.
Note
■ Even if the dust bag does not appear full,
vacuuming very fine dust such as flour or
plaster may block the pores instantly and
reduce the suction power. You shall replace
the dust bag even if it appears to be empty in
this case. Always replace the dust bag every
6 months even if it is not filled in order to
prevent foul odors.
Caution
■ Your appliance is equipped with a system that
prevents closing of the front cover when the
dust bag is not inserted. Please check whether
the dust bag is inserted if the front cover
cannot be closed.
4 Dispose of the dust bag.
Caution
■ Do not attempt to empty and re-use the dust
bag.
ENGLISH 9
Page 10

INFORMATION
___________________________________
Replacement or cleaning of the
filter
Caution
■ Install the dust bag and filter before operating
the appliance; otherwise motor may be
damaged.
Cleaning the filter of the dust
container (motor protection
filter)
1 Open the dust container cover N by pressing
on the dust container button P.
2 Pull out the dust bag from the bracket.
3 Pull out the filter.
Clean the exhaust air fan filter
1 Remove the filter bracket by pressing on the
release button (on the rear of the appliance).
2 Remove the filter from filter bracket.
3 Shake out the filter and wash with hot soapy
water, rinse carefully and leave to air dry.
Caution
■ Do not wash the filter in washing machine or
dry with an hair dryer.
■ Make sure that the filter is completely dried
before installing it in the appliance.
4 Replace all parts carefully to their positions.
Note
■ Dust container filter shall be replaced every
six months or when required.
■ Exhaust air filter shall be replaced every six or
nine months or when required.
■ Washing the filter frequently may cause wear
of the filter.
4 Shake out the filter and wash it with hot soapy
water, rinse carefully and leave to air dry.
Caution
■ Do not wash the filter in washing machine or
dry with a hair dryer.
■ Make sure that the filter is completely dried
before installing it in the appliance.
5 Place a new filter in the bracket if required.
6 Replace or change the dust bag.
ENGLISH
10
Page 11

INFORMATION
___________________________________
Parking Feature
You can store your appliance by using less
space when your appliance is in one of below
parking positions.
Troubleshooting
If you have problems with your appliance, these
problems (reduced suction power, abnormal
noise or breakdown) may be caused by blocked
vacuuming tools or faulty electrical parts.
1 Check whether the vacuuming tools are
blocked.
2 Check dust bag and motor protection filter.
3 Contact your dealer or GRUNDIG service
center if the appliance still cannot be
operated.
Storage
■ If you do not intend to use the appliance for a
long time, please store it carefully.
■ Please make sure that the appliance is
unplugged, cooled down and totally dry.
■ Store the appliance in a cool and dry place.
■ Keep the appliance out of the reach of
children.
Note
■ You may install the hook part behind the brush
elbow to the parking seat on the rear of your
appliance when you need a break during
usage.
ENGLISH 11
Page 12

INFORMATION
___________________________________
Environmental information
This product is manufactured with high-quality
parts and materials which can be reused and
recycled.
Therefore, do not dispose of the
product with normal household waste
at the end of its service life. Take it to
a collection point for the recycling of
electrical and electronic equipment.
product, in the operating manual and on the
packaging.
Please find the closest collection points operated
by your local authority.
Help protect the environment by recycling used
products.
This is indicated by this symbol on the
Technical specifications
This product conforms to the European
directives 2004/108/EC, 2006/95/EC,
2009/125/EC, 2010/30/EU and
2011/65/EU.
Power supply
220-240 V~ 50/60 Hz
Power
Maximum 800 W
Nominal 700 W
Energy efficiency class
A
Dust capacity
2.0 L
Usage radius
8m
Net weight
3.9 kg
Technical and design modification rights are reserved.
ENGLISH
12
Page 13

Grundig Intermedia GmbH
Beuthener Strasse 41
D–90471 Nürnberg
www.grundig.com
72011 908 0700 15/27
 Loading...