

Grundig Stenorette St 3230, Steno-Cassette 30 Instructions Manual

Stenorette St 3230
Steno-Cassette 30
ENGLISH
www.grundig-gbs.com
Stenorette St 3230
__________________________________________________________
ProMic 800 FX
TELEPHONE
TELEPHONE
ac 9V-10V
~
ac 9V-10V
~
ac 9V-10V
FFWD
STOP
START
REW
GRUNDIG
GRUNDIG
GRUNDIG
~
TELEPHONE
HEADSET
HEADSET
HEADSET
MICROPHONE IO
MICROPHONE IO
MICROPHONE IO
ǵ
ǵ
FOOT CONTROL
FOOT CONTROL
FOOT CONTROL
Stenorette St 3230
__________________________________________________________
0
ac 9V-10V
ac 9V-10V
ac 9V-10V
GRUNDIG
GRUNDIG
GRUNDIG
TELEPHONE
TELEPHONE
~
~
~
TELEPHONE
HEADSET
HEADSET
HEADSET
MICROPHONE IO
MICROPHONE IO
MICROPHONE IO
FOOT CONTROL
FOOT CONTROL
FOOT CONTROL
SPEED
BACKSPACE
L
LETTER
MODE
S
SEARCH MODE
C
CORR/
COUNTER STOP
EJECT
REWIND
0 5 101520253
teno-Cassette 30
S
SEARCH
FFWD PLAY
tenorette
S
S
t 3230
STOP
TONE
VOLUME
ERASE/
PHONE REC
POWER
SPEAKER/
EAR
Stenorette St 3230
__________________________________________________________
FFWD
STOP
START
REW
ProMic 800 FX

1
3 Brief Instructions
3 Steno-cassette compartment, counter reset
3 Recording and control functions on the microphone
3 Text marks
3 Storing end and info marks
3 Playback
4 Fast forward, rewind, search
4 Erase
4 S-, L-, C- buttons
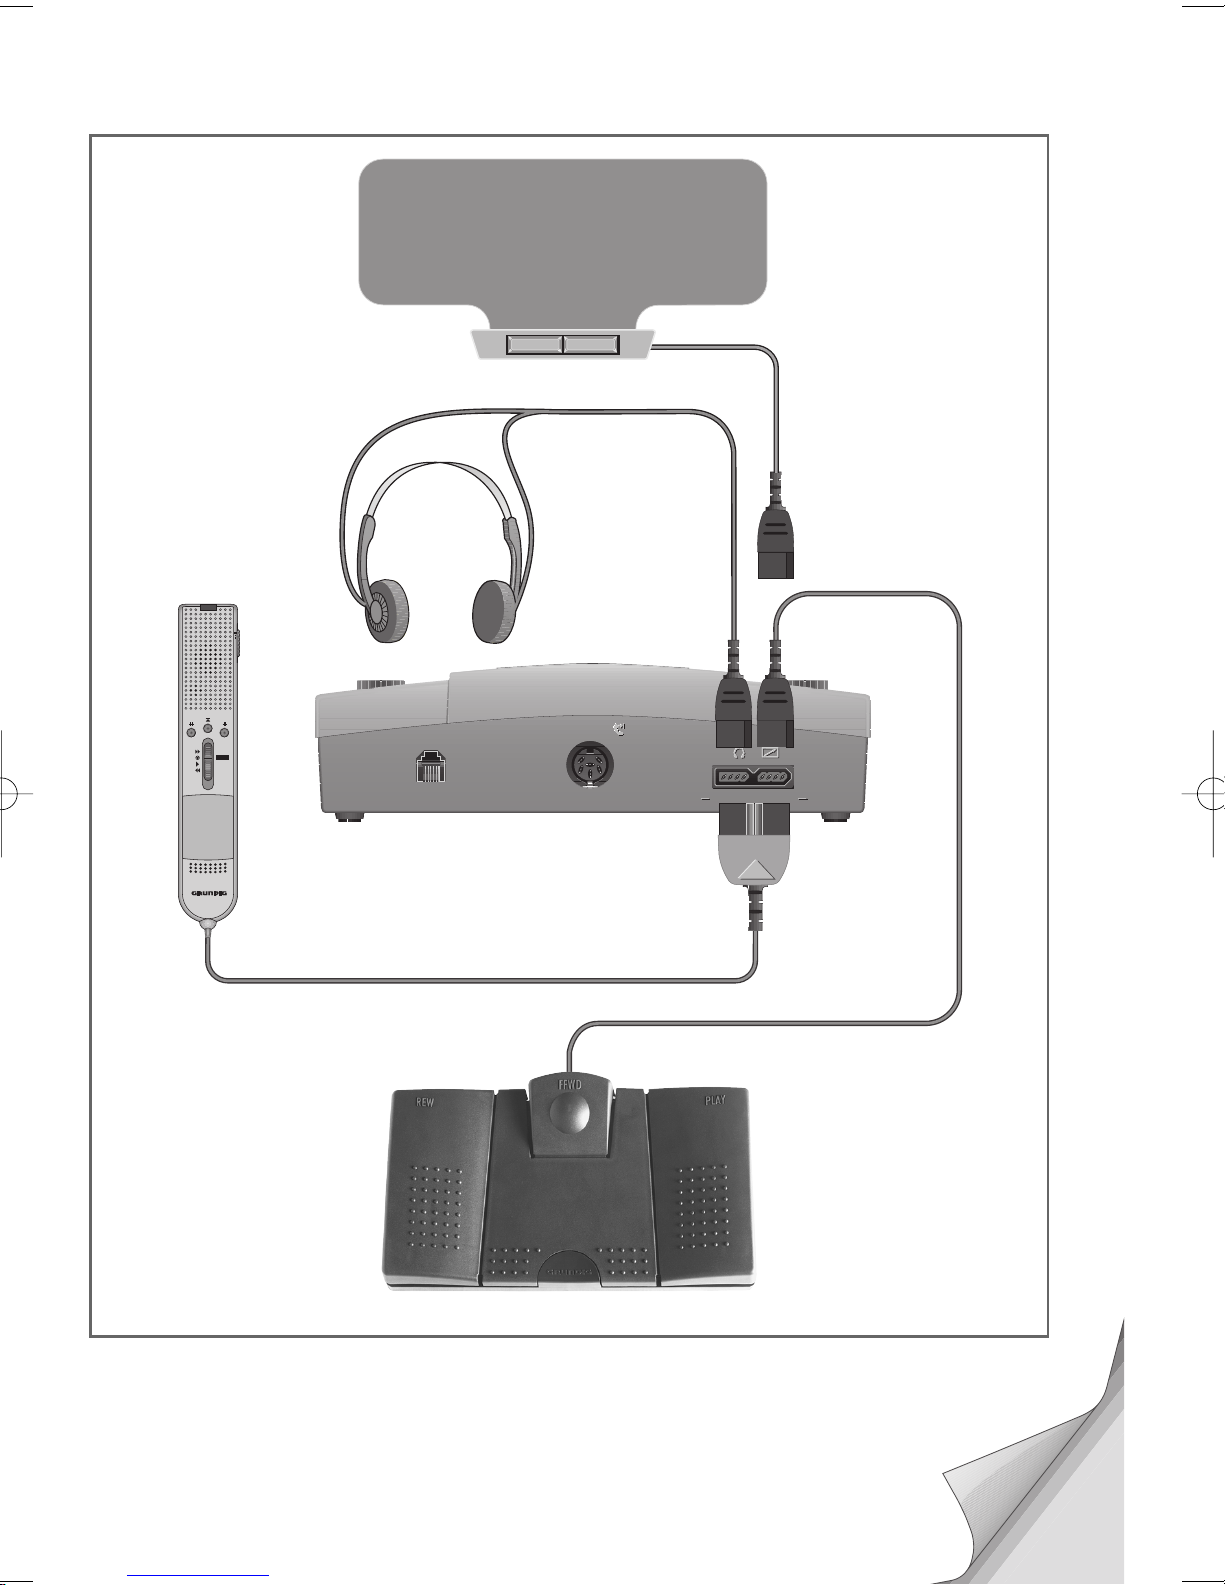
5 Preparation
5 Suitable location
5 Mains unit 682 connection
5 Turning the machine on and off
5 Connecting accessories
6 Information Display
6 Display explanation
6 Switchable display modes
7 Recording Dictations
7 Microphone recording sensitivity
7 Recording
7 Repeating short text passages
7 Making corrections after a dictation
8 Tape end and tape end switch-off
8 Conference recording with the microphone
8 Interrupting a dictation
9 Recording telephone calls
10 Text Marks
10 End mark
10 Info mark
11 Index mark
11 Examples of end and info marks
12 Dictation Count
12 Storing end and info marks
12 Counter reset
13 Playback and Search Modes
13 Playback of all recordings, searching for end and info marks
13 Playback and searching for letters
13 Playback and searching for info recordings
CONTENTS
___________________________________________________________________________
ENGLISH

2
14 How to use the Microphone
15 How to use the 536 foot control
15 Starting and stopping using the 536 foot control
15 Fast forward and short rewind using the 536 foot control
16 Search Function
16 Searching for end and info marks
17 Care and Maintenance
17 Housing
17 Parts that come into contact with the tape
17 What You should Know
18 Technical Data
18 Accessories
19 Warranty, Service, Sales
The features indicated by Grundig apply only when using original Grundig accessories.
Defects due to the use of accessories which are not original Grundig accessories or which
do not comply with the legal regulations or the corresponding standards lead automatically
to the expiration of any guarantee rights.
CONTENTS
___________________________________________________________________________

3
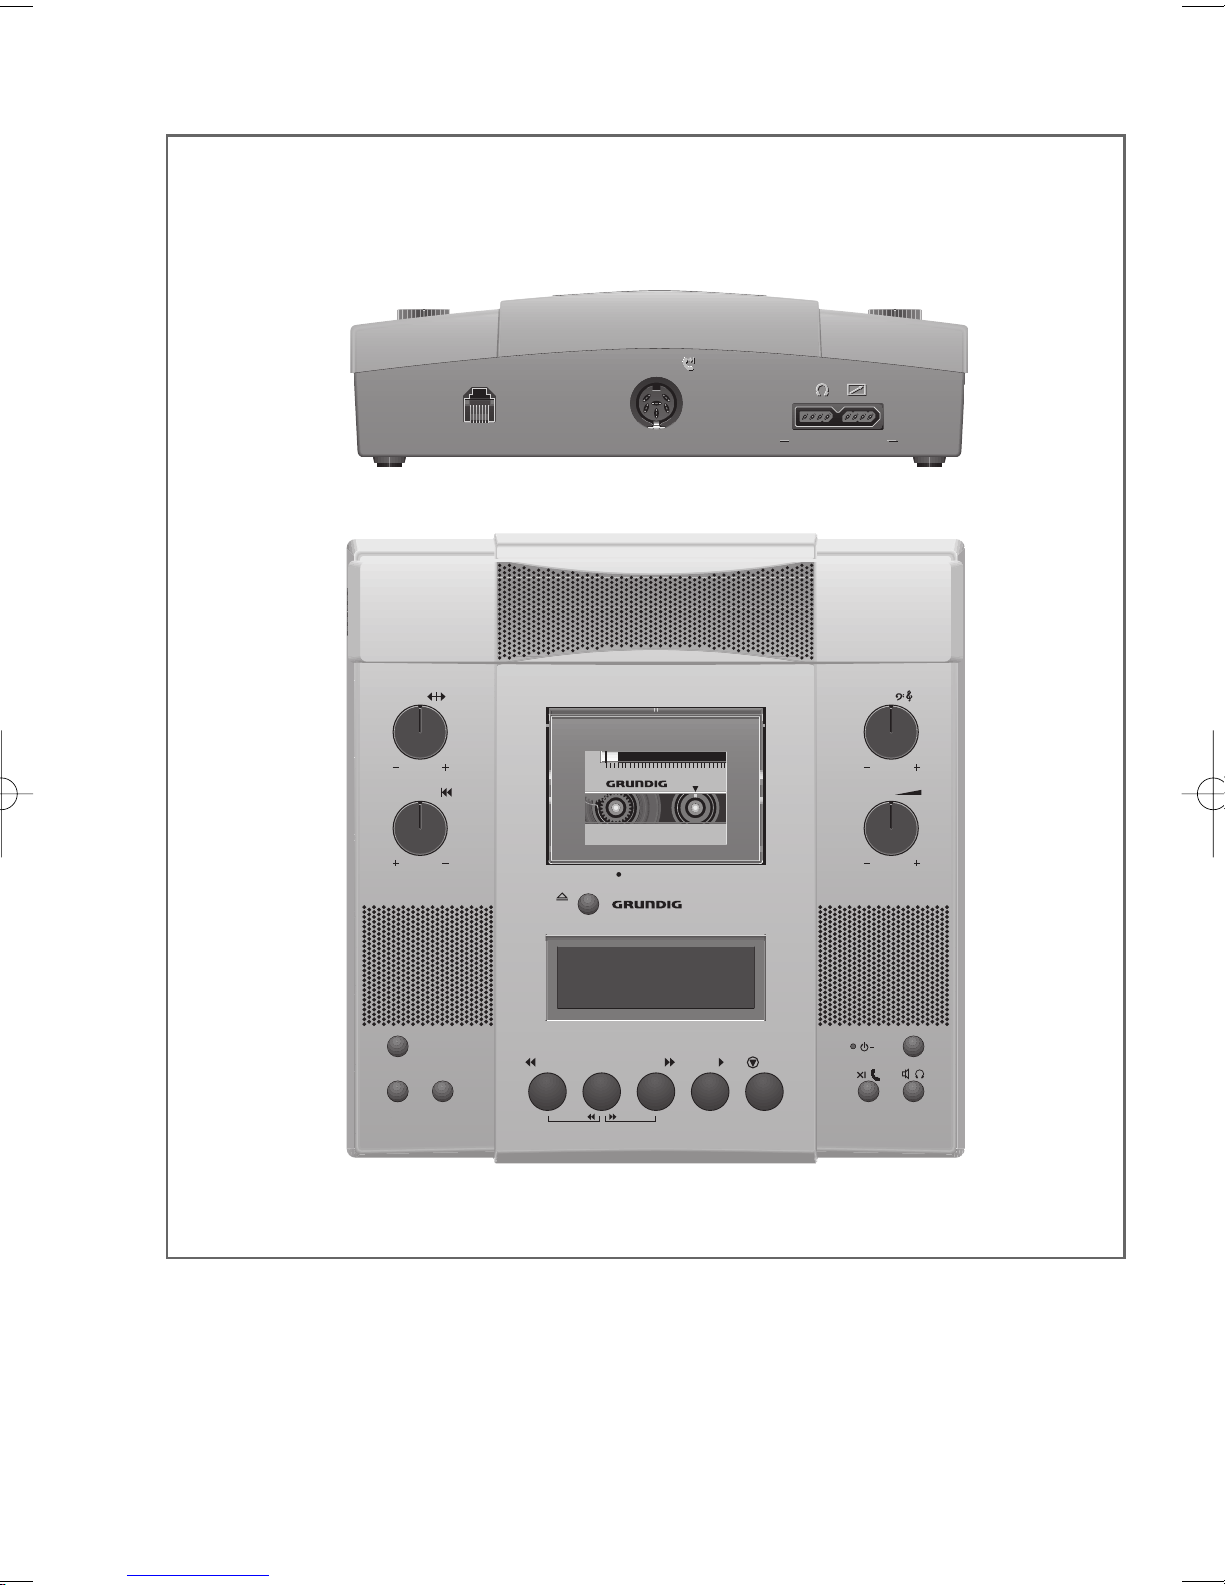
Ǽ Turn the machine on and off: press the »POWER« button.
Steno-cassette compartment, counter reset
ɟ In Stop position, press the »EJECT« button.
– The cover opens slowly and the counter is reset to zero (0).
Insert the steno-cassette with its open side and the labelling visible into the stenocassette compartment.
Close the steno-cassette compartment by pressing on its cover until it locks in place.
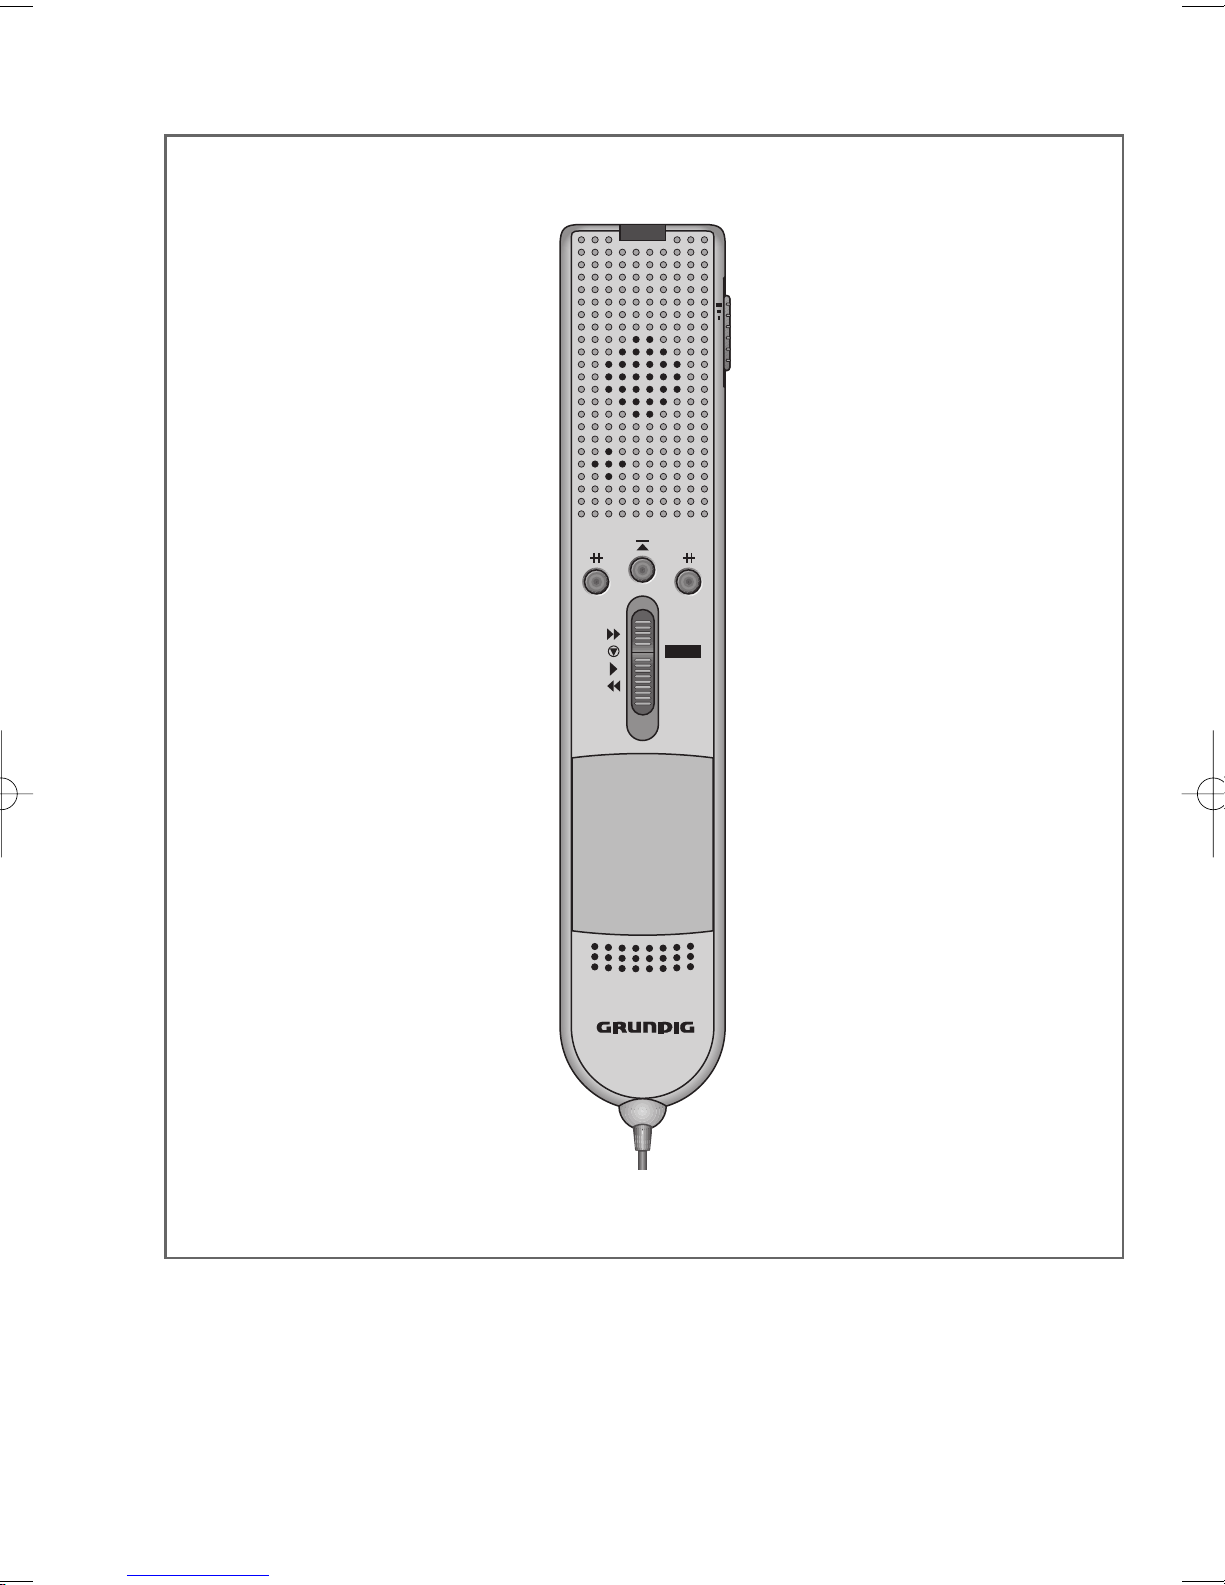
Recording and control functions on the microphone
–
ļ To record: press the »–ļ« button.
Ł Start to record: move the slide-switch to the »Ł START« position.
To pause during recording: move the slide-switch to the » STOP« position.
ĵĵ To end a recording:
move the slide-switch briefly to the »
ĵĵ
REW« or »ŁŁFFWD« position;
then to the » STOP« position.
ĵĵ Short rewind: move the slide-switch to the »ĵĵ REW« position.
ŁŁ Fast forward: move the slide-switch to the »
ŁŁ
FFWD« position.
Text marks
II--- End mark: briefly press the II-» I I---« button during recording.
Info mark: during recording or while the machine is paused, press »II---« until you hear
the info signal.
Index mark: briefly press the »II---« button during playback.
Storing end and info marks
Insert a recorded steno-cassette that has not been rewound into the tape compartment.
ɟ If the steno-cassette has not been removed from the compartment since recording,
press the »EJECT« button to open the compartment and then close the compartment
by hand.
ĵĵ Press the »REWIND« button.
Playback
ŀ / y To playback using the speaker in the machine: press the
»SPEAKER/EAR« button stet (
ё
).
ŀ / y To playback using headset accessories: click the
»SPEAKER/EAR« button up (Ծ).
ı Press the »PLAY« button to start playback.
Press the »STOP« button to stop playback.
Iĵĵ Use the »BACKSPACE« rotary adjuster to set the backspace time from + “unlimited”
(same as rewind) to – “minimum”.
ľ-I-ı Use the »SPEED« rotary adjuster to set the playback speed. The adjuster locks in its
middle position (normal speed). When a microphone ist connected, this adjuster has
no function.
BRIEF INSTRUCTIONS
______________________________________________________
ENGLISH

4
| Change the volume using the »VOLUME« rotary adjuster.
ɼɦ Change the tone using the »TONE« rotary adjuster.
Fast forward, rewind, search
ŁŁ Fast forward: press the »FFWD« button.
ĵĵ Rewind: press the »REWIND« button.
Stop: press the »STOP« button.
Search forward: press the and »SEARCH« button and »FFWD« button together.
Search backward: press the »SEARCH« button and »REWIND« button together.
Abort search: press thee »STOP« button.
Erase
XI ʒ Press and hold the »ERASE/PHONE REC« button and then simultaneously press the
ĵĵ/ŁŁ »REWIND« button or the »FFWD« button.
S-, L-, C- buttons
S Switching between search modes:
– LETTER INFO = searching for end and info marks,
– LETTER = searching only for letters,
– INFO = searching only for infos.
Repeatedly press the »SEARCH MODE« button until the desired mode is shown in the
display.
L Switching between display modes:
– current tape position,
– remaining letter time,
– remaining total dictation time.
Repeatedly press the »LETTER MODE« button until the desired information is shown
in the display.
C Available correction time:
briefly press the »CORR/COUNTER STOP« button. Then rewind the tape to the
beginning of the text passage to be corrected.
Counter stop
Press the »CORR/COUNTER STOP« button for more than 2 seconds.
Re-activate counter
Briefly press the »CORR/COUNTER STOP« button.
BRIEF INSTRUCTIONS
______________________________________________________
 Loading...