

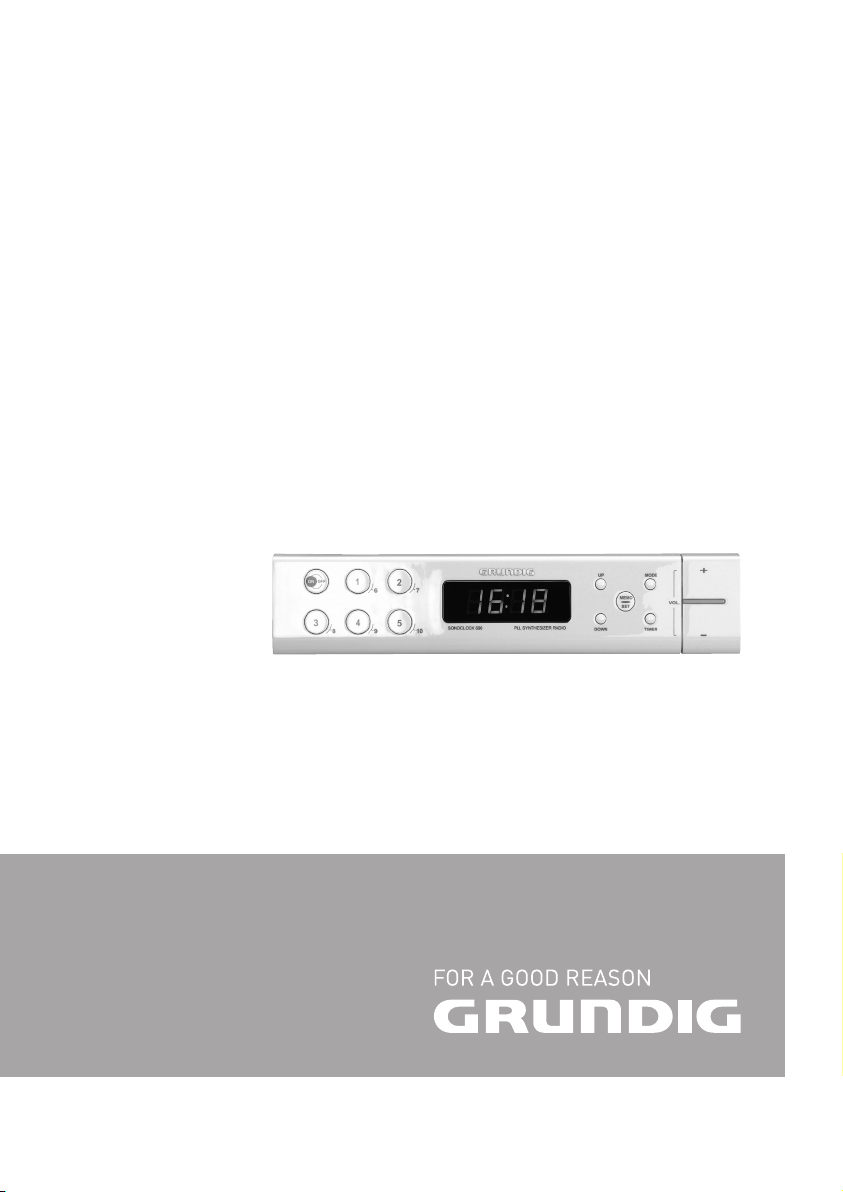
ELECTRONIC CLOCK RADIO
Sonoclock 890
ENGLISH
_______________________________________________________________________________
ON OFF
1 2
543
6 7
8 9 10
UP MODE
DOWN TIMER
VOL.
MEMO
SET
ON/OFF
1...5
6...10
MEMO
UP
SET
DISPLAY TIMER
DOWN
MODE
+ VOL. –
3

_______________________________________________________________________________
ENGLISH 11 - 16
4

SAFETY AND INFORMATION
7
This device is designed for the playback of audio
signals. Any other use is expressly prohibited.
7
Make sure there is adequate ventilation when positioning the device. There must be a free space of at
least 10 cm behind the device. Do not place objects
on the ventilation slots. Do not cover the device with
newspapers, table cloths, curtains, etc.
7
Only use the device in a moderate climate.
7
Protect the device from moisture (water drops or
splashes). Do not place any vessels such as vases
on the device. These may be knocked over and spill
fluid on the electrical components, thus presenting
a safety risk.
7
Do not place any objects such as burning candles
on the device.
7
When deciding where to place the device, please
note that furniture surfaces are covered by various
types of varnish and plastic, most of which contain
chemical additives. These additives can corrode the
device supports, leaving residues on the furniture surfaces which can be difficult or impossible to remove.
7
Do not use any cleaning agent, as this may damage
the casing. Clean the device with a clean, dry cloth.
7
Never open the device casing. Warranty claims are
excluded for damage resulting from improper handling.
7
If malfunctions occur due to static electricity charges
or fast transient (burst), reset the device. To do this,
pull out the power plug and connect it again after a
few seconds.
Technical data
This product fulfils the European directives
2004/108/EC, 2006/95/EC, 2009/125/EC and
2011/65/EU.
Current supply:
230 Volt, 50/60 Hz
Output:
DIN 45324, 10% THD 800 mW
Frequency range:
FM 87.5 ...108.0 MHz
Dimensions and weight:
W x H x L 276 x 60 x 150 mm
Weight 1.25 kg
Technical and optical modifications reserved!
Environmental note
with normal domestic waste at the end of its service life.
Take it to a collection point for the recycling of electrical and electronic equipment. This is indicated by this
symbol on the product, in the operating manual and on
the packaging.
Please consult your local authorities to learn the nearest
collection point.
Help protect the environment by recycling used products.
_______________________________
This device is noise-suppressed
according to the applicable EU
directives.
This product has been manufactured
with high quality parts and materials
which can be reused and are suitable for recycling.
Therefore, do not dispose the product
ENGLISH
11

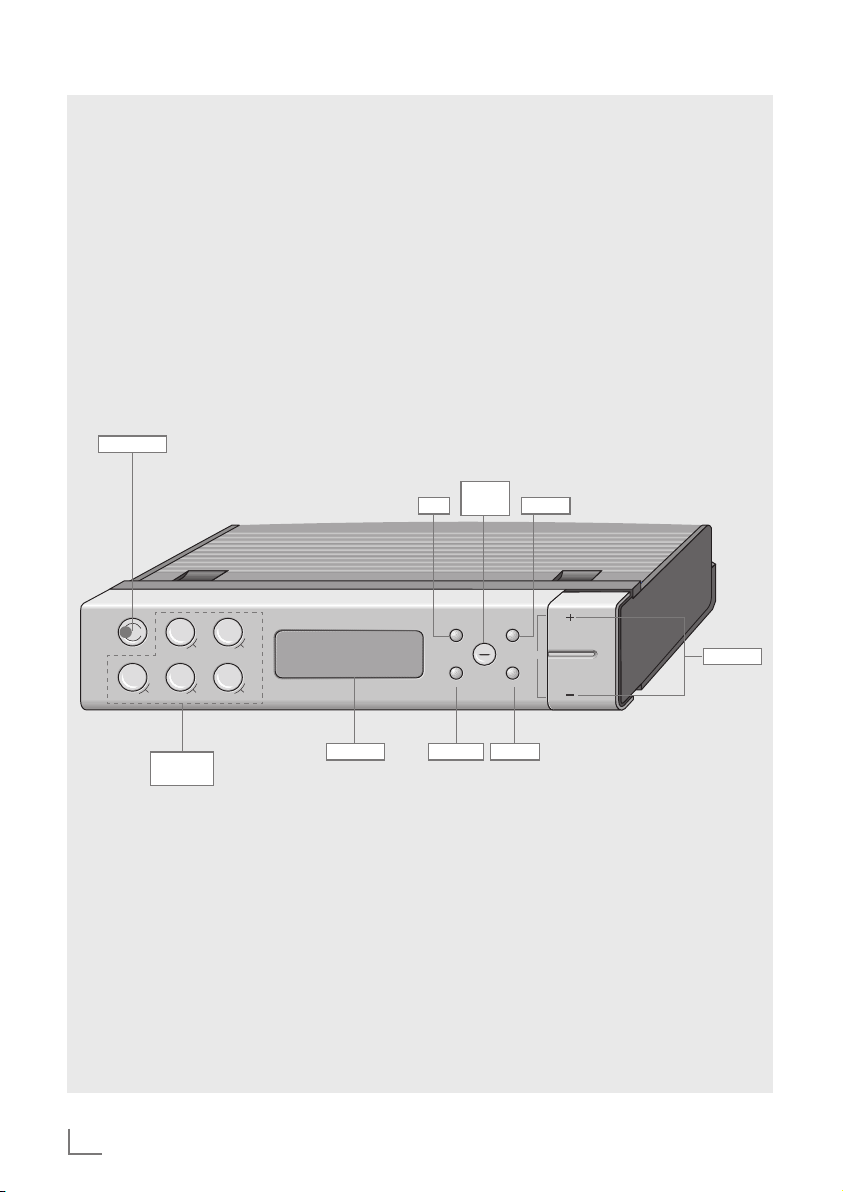
OVERVIEW
_____________________________________________________________
See the figure on page 3.
ON/OFF Switching on/off;
terminates alarm for the day;
terminates the alarm timer.
1...5
6...10
Display Displays various information
UP/DOWN Device switched on: to set
MEMO SET Device activated: saves the
Channel positions, press once
for channel position 1 … 5,
press twice for channel position 6 … 10.
such as station frequency,
volume, time, station name,
alarm time, alarm timer.
the radio station manually or
automatically;
device switched off: to set the
time and the alarm time
radio station at a channel position when installing;
device switched off: to
set the time, hold down
»MEMO SET« and set the
time with »UP« or » DOWN«.
MODE Device switched on: switches
the display from the radio station frequency or radio station
name to the time;
device switched off: to set
the alarm time, press and
hold down »MODE« and set
the alarm time with »UP« or
»DOWN«;
to set the alarm type.
TIMER To set the alarm timer, press
and hold down » TIMER« and
set the alarm timer with »UP« or
»DOWN«.
+ VOL. – For setting the volume.
Back of the device
Ü Mains cable.
Projectile antenna.
Bottom of the device
Battery compartment for
the back-up battery.
12
ENGLISH

CURRENT SUPPLY
__________________________________________________
Connecting the mains cable
Note:
7
Check if the mains voltage on the type plate (on
the back of the device) corresponds to the local
mains voltage.
7
If this is not the case, contact your dealer.
1 Insert the mains cable in the socket (230 V~,
50/60 Hz).
Caution:
7
The device is connected to the mains with the
power cord. Pull out the power cord when you
want to completely disconnect the device from
the mains.
7
Unplug the mains plug to disconnect the device
from the mains. Make sure the power plug is
easily accessible during operation and not hindered by other objects.
Insert back-up battery
If there is a power failure, the clock time and alarm
time of the device are saved by the back-up battery.
Radio mode and alarm mode cannot be used, however, the display is not illuminated.
1 Open the battery compartment by pressing the mar-
ked surface and pushing the cover to the side.
ONOFF
1 2
6 7
543
8 9 10
2 Insert a battery (9 V block, type 6F22).
3 Close the battery compartment.
Note:
7
We recommend that you replace the back-up
battery after approximately 1 year.
7
Do not expose the batteries to extreme heat,
caused for example by direct sunlight, heaters
or fire.
7
Remove the battery when it is used up, or when
the device is disconnected from the mains for an
extended period of time.
7
There is no liability for damage resulting from
flat batteries.
Environmental note
7
Batteries, including those which are heavy
metal-free, may not be disposed of along with
household waste. Please ensure the environmentally sound disposal of the used batteries,
e.g. via public collection locations. Find out
about the legal regulations which apply to you.
ENGLISH
13

ONOFF
1 2
543
6 7
8 9 10
UP MODE
DOWN TIMER
VOL.
UP MODE
DOWN TIMER
VOL.
MEMO
SET
ONOFF
1 2
543
6 7
8 9 10
INSTALLATION AND SETTINGS ________________
Setting up the device
The speaker for the device is located at the bottom of
the device.
To optimise the sound, mount the device holder on the
bottom of the device.
ONOFF
1 2
8 9 10
UP MODE
6 7
543
DOWN TIMER
MEMO
SET
VOL.
1 Click the device
holder in place in
the recesses on the
bottom of the
device.
Mounting the device under the counter
The fixing screws can be found in the side compartment of the packing.
1 Mark the locations
for four mounting
screws.
2 Screw the device
holder on with four
screws.
3 Insert the device in
the holder.
Note:
7
To remove the device, press the snap-catch at
the back and remove by pulling forward.
Setting radio stations
There are 10 channel positions available for radio stations.
1 Switch on the device with »ON/OFF«.
2 Begin station search by pressing and holding down
»UP« or »DOWN«.
– The search stops, as soon as a radio station with a
sufficiently strong signal is found.
– If RDS information is transmitted by the station cur-
rently set, »f« appears in the display and after a
short time the station name appears in place of
the frequency.
Note:
7
You can also set the frequency step-by-step
(50 kHz) by briefly pressing »UP« or »DOWN«.
Only 100 kHz steps are shown in the display.
3 Save radio station by pressing »MEMORY«
(»P -« flashes in the display ), select the desired channel position within 8 seconds with »1 … 10 « and
confirm with »MEMO SET«.
– »1 … 10« press once for channel positions
1 … 5, twice for channel positions 6 … 10.
– Display: the channel position is shown briefly, and
then the frequency.
4 To set further radio stations, repeat this procedure
starting at pt. 2.
Note:
7
If no channel position is selected within 8 seconds, the device interrupts the setting procedure.
Start again at pt. 3.
Setting the time automatically
1 Select a channel position with an RDS station to au-
tomatically set the time.
– The display »¥ « flashes, the current time is set by
the RDS time signal. This process may last a few minutes.
– If an RDS time signal was received, the indicator
»¥« is illuminated.
Note:
7
If the time is not automatically set, select another
channel position with an RDS station by pressing
»1 … 10«, »¥« flashes in the display.
7
If your device cannot automatically set the time,
you can enter the time manually.
Setting the time manually
1 Switch off device with »ON/OFF«.
– In the display, »12:00« flashes.
2 Press »MEMO SET« and hold down.
3 Set the time with »UP« or »DOWN«.
– When »UP« or »DOWN« are held down, the
time can be set more quickly.
4 Release »MEMO SET«.
ENGLISH
14

INSTALLATION AND SETTINGS ________________
Switching automatic update on/off
The automatic update of the time can be switched off
and then on again.
1 Switch on the device with »ON/OFF«.
2 Press »MEMO SET« and hold down.
– The indicator »¥« disappears, the update function
is switched off.
3 Press »MEMO SET« again and hold it down.
– The indicator »¥ « flashes. The time will be updat-
ed the next RDS time signal is received.
RADIO MODE
_________________________________________________________
Radio reception
When your device is switched off, the current time is
shown in the display.
Each time a button is pressed, the display of your device is illuminated for 10 seconds.
1 Switch on the device with »ON/OFF«.
– The channel position appears in the display, short-
ly thereafter the station frequency.
– The previous channel position is automatically se-
lected.
2 Select channel position with the »1 … 10« buttons.
– »1 … 10 « once Press once for channel positions
1 … 5, twice for channel positions 6 … 10.
3 Switch off device with »ON/OFF«.
– In the display, »GOOD BYE« appears briefly, and
then the current time.
Adjusting the volume
1
Adjust the volume
with »+ VOL .« or »VOL . –«.
Calling up information
The display on your device supplies information about
the current time or the station frequency. The station
name is shown for RDS stations.
1
Call up the desired
information with »MODE«.
ENGLISH
15

ALARM MODE
________________________________________________________
Setting the alarm time and type
You can enter an alarm time and select between two
different alarm types.
Setting the alarm time
1 Switch off device with »ON/OFF«.
– Display: current time.
2 Enter the alarm time by pressing and holding down
the »MODE« button.
– Display: the set alarm time and type of alarm
(»§« or »e«).
3 Set the desired alarm time with »UP« or »DOWN«.
4 Release »MODE«.
Alarm with radio station
Your device is equipped with a dynamic signal tone;
this means the volume of the radio station becomes increasingly louder as it plays.
1 Switch on the device with »ON/OFF«.
2 Select channel position with the »1 … 10« buttons.
3 Switch off device with »ON/OFF«.
4 Select the alarm type by pressing »MODE« until
»§« (= alarm with radio station) shows in the display.
– The device switches to alarm time and switches off
again after 60 minutes.
– While the alarm sounds, »§« flashes in the dis-
play.
Alarm with signal tone
Your device is equipped with a dynamic signal tone;
this means the volume of the signal tone becomes increasingly louder as it sounds.
1 Switch off device with »ON/OFF«.
2 Select the alarm type by pressing »MODE« until
»e« (= alarm with signal tone) shows in the display.
– The device switches to the alarm time; the signal
tone becomes increasingly louder. The signal
tone is switched off after a maximum of 60 minutes.
– While the alarm sounds, »e« flashes in the dis-
play.
Checking the alarm time
You can check the alarm time without blocking the
alarm function.
1 Switch off device with »ON/OFF«.
2 Press »MODE«.
– Display: Alarm type and alarm time.
Cancelling alarm for the day
1 Cancel alarm with »ON/OFF«.
– The alarm function is cancelled for the rest of the
day, the alarm sounds on the following day at the
same time.
Switching off alarm function
1 Switch off device with »ON/OFF«.
2 Press »MODE« until neither the display »§« nor
»e« are illuminated.
– The alarm function is switched off, but the alarm
times are saved.
Note:
7
To re-activate the alarm function, press »MODE«.
TIMER MODE
__________________________________________________________
Alarm timer
You can program your device so that it reminds you
with a signal tone. The setting can be operational
whether the device is switched on or off.
1 Press »TIMER« and hold down.
– Display: »00 MIN« (minimum set time).
ENGLISH
16
2 Enter the reminder time with »UP« or »DOWN« (in
1 minute intervals of 00 to 300 minutes).
– The display »TIMER« flashes.
– After the set time has elapsed, the signal tone
sounds.
Note:
7
The function can be prematurely ended by pressing »TIMER« and holding for 3 seconds.
3 Switch off signal tone with »ON/OFF«.

Grundig Intermedia GmbH
Beuthener Strasse 41
90471 Nürnberg
www.grundig.com
72010 761 5000 13/05
 Loading...