

Page 1

PORTABLE
DAB RADIO
RP 6402 DAB
ǵ
Page 2

ENGLISH
SAFETY, INFORMATION
_____________________
Safety
To ensure that this device provides you with long-term satisfaction and
enjoyment, please observe the following instructions.
This device is designed for the playback of audio signals.
Any other use is expressly prohibited.
Protect the device from moisture (water drops or splashes). Do not place any
vessels such as vases on the device. These may be knocked over and spill
fluid on the electrical components, thus presenting a safety risk. Do not
place any naked flames such as candles on the device.
When deciding where to place the device, please note that furniture
surfaces are covered by various types of varnish and plastic, most of which
contain chemical additives. These additives can corrode the device supports, leaving residues on the furniture surfaces which can be difficult or
impossible to remove.
Do not use any cleaning agent, as this may damage the casing. Clean the
device with a clean, damp leather cloth.
Never open the device casing. No warranty claims are accepted for
damage caused by incorrect handling.
The type plate is located on the bottom of the device.
Note
Prolonged use of earphones can damage your hearing.
Environmental note
This product has been made from high-quality parts and materials which
can be re-used and recycled.
Therefore, do not throw the product away with normal household waste at
the end of its life. Take it to a collection point for recycling electrical and
electronic devices. This is indicated by this symbol on the product, in the
operating manual and on the packaging.
Please find out about collection points operated by your local authority.
Help protect the environment by recycling used products.
2
Page 3
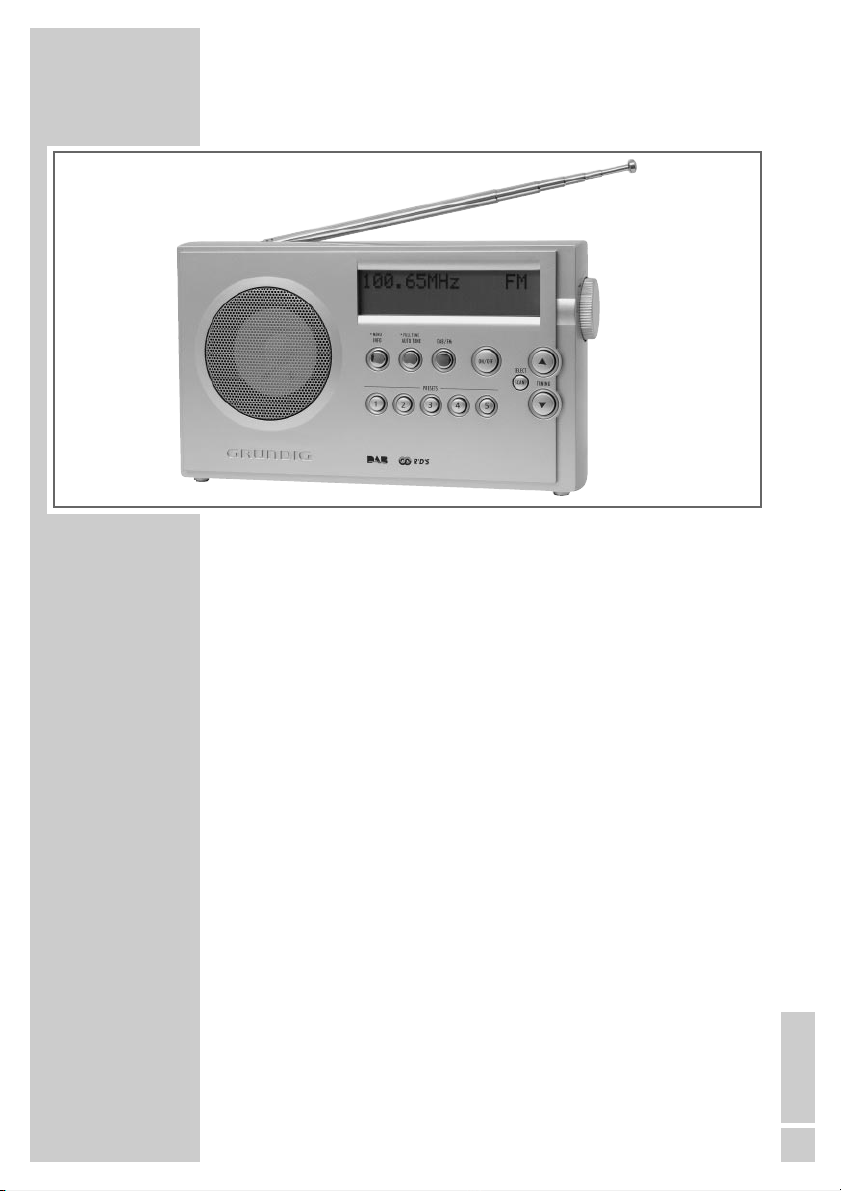
OVERVIEW
____________________________________________
Controls
Front
ON/OFF Switches the device on and off.
DAB/FM Switches between the DAB and FM (VHF) input sources.
•FULL TUNE In DAB mode: press briefly to activate the “local”
AUTO TUNE station search (Band III, 11B - 12D), hold down to
activate the full station search (Band III, 5A - 13F).
•MENU In DAB mode: press briefly to select various DAB
INFO station information; hold down longer to open the
DAB menu.
In FM mode: calls up RDS information.
SELECT In DAB mode: choose settings and look for
SCAN secondary service components.
A
TUNING
PRESETS Preset buttons for storing DAB stations.
1 ... 5
Display LC display.
S
In FM mode: starts the automatic station search;
for tuning DAB and FM stations manually.
ENGLISH
3
Page 4
OVERVIEW
____________________________________________
6 VDC
1000 mA
Top:
Antenna Telescopic antenna for DAB and FM reception.
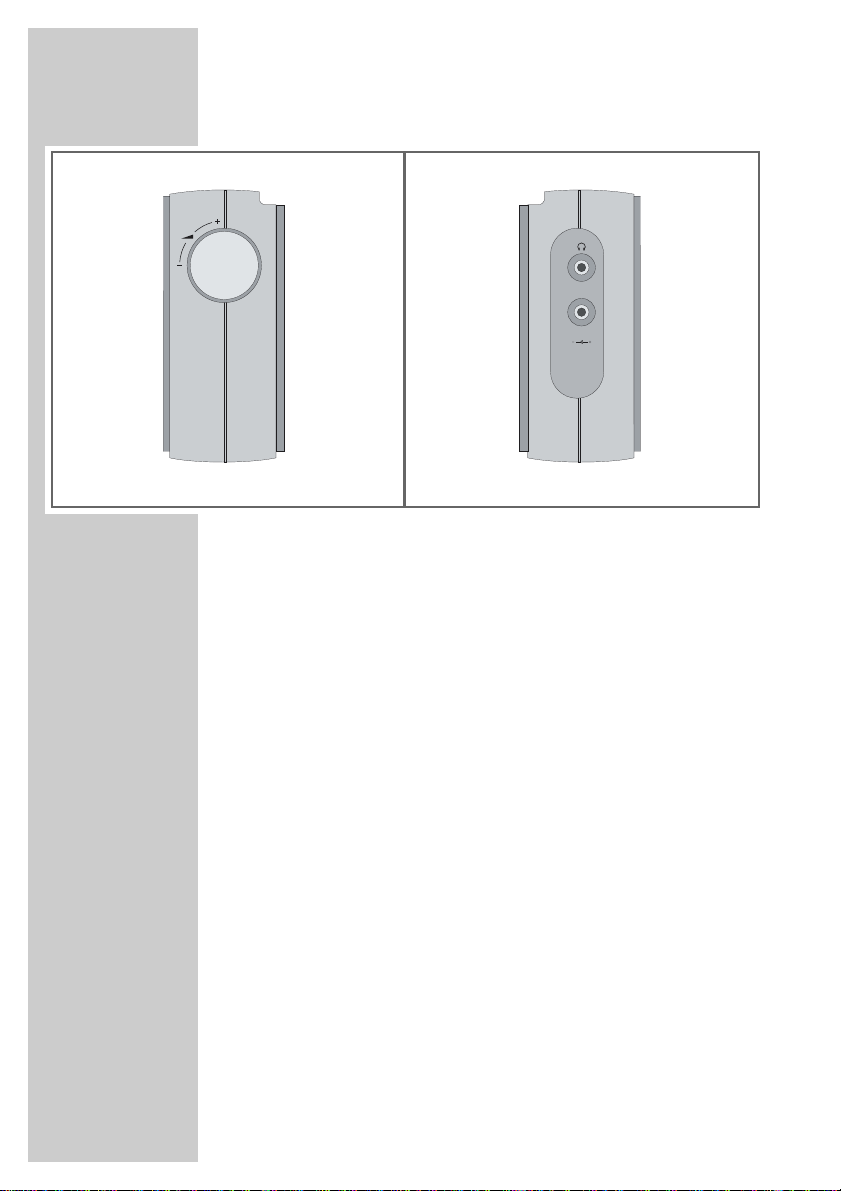
Right side of device
– z + Volume control dial.
Left side of device
0 Earphone socket (3.5 mm stereo socket);
automatically switches off the loudspeaker.
DC 6V 1000 mA Connection socket for mains adapter supplied,
Ω
input voltage 6V (1000 mA).
Back of device
Batteries Compartment for batteries (4 x 1.5 V, LR20/AM1/
D-Size)
4
Page 5

4 x 1.5 V (LR 20, AM1, D)
6 VDC
1000 mA
4 x 1.5 V (LR 20, AM1, D)
OVERVIEW
____________________________________________
Power supply
Battery operation
1 Open the battery compartment on the back of the device by pressing
the marking and opening the lid.
2 Insert the batteries (4 x 1.5 V, LR20/AM1/D-Size).
Notes:
The lifetime of the batteries with every day usage (at normal volume)
is approximately 30 hours. Therefore use a mains supply whenever
possible and only use the batteries when you have to.
Take out the batteries when you know that the device will not be used
for a long period of time. The manufacturer accepts no liability for
damage resulting from leaking batteries.
Environmental note:
Batteries, including those which contain no heavy metal, should not be
disposed of with household waste. Please dispose of used batteries in
an environmentally responsible manner. Find out about the legal
regulations which apply in your area.
Mains operation (with 6 V/1000 mA adapter)
Check if the mains voltage on the mains adapter type plate corresponds to
your local mains supply. The only way to disconnect the device from the
mains supply is to unplug the adapter.
1 Plug the adapter cable into the »DC 6 V 1000 mA « socket
on the left of the device.
2 Plug the adapter into the mains socket.
– The batteries in the compartment are switched off.
Ω
ENGLISH
5
Page 6

DAB
Digital Radio
Scanning... 2
ˇˇˇˇˇˇˇˇˇ
BR B5 aktuell
Bayern
Scanning... 8
ˇˇˇˇˇˇˇˇˇˇˇˇˇˇˇˇ
SETTINGS
______________________________________________
Searching for and saving DAB stations
Your device has a DAB (Digital Audio Broadcasting) input source which
enables crystal-clear radio reception in CD quality, i.e. without hissing or
crackling.
DAB stations are combined into ensembles (multiplexes) at regional and
national levels. An ensemble contains several stations broadcast on the
same frequency. One individual station can combine other secondary
service components such as live broadcasts or foreign language news.
DAB stations are broadcast on Band III (174.928-239.200 MHz,
5A - 13F).
When the device is used in DAB mode for the first time it performs an
automatic station search (“local function”) (display: briefly »DAB Digital
Radio«, then »Scanning...«). During the search, the first line shows the
number of stations found, and the second shows the search scale. At the
end of the search, you will hear the first station in alphanumerical order
(A to Z, 0 to 9). If no stations are found, »Station not available«
appears in the display. The display then changes to a manual station
search.
Automatic station search
The device has two automatic station search modes.
1 Press »•FULL TUNE AUTO TUNE« briefly.
– Display: »Scanning...«.
– The device searches for new stations on the bands reserved for local
stations (11B - 12D). New stations are added to the station list.
2 Hold down »•FULL TUNE AUTO TUNE« until »Scanning...«
appears in the display.
– The device searches the entire DAB band for new stations. New
stations are added to the station list.
œStation order æ
œ5A 174.92MHz æ
ˇˇˇ []
7B 190.64MHz
6
Manually searching for stations
If the automatic station search is not successful, you can search for DAB
stations manually.
1 Press »•MENU INFO« until »œStation order æ« appears on
the display.
2 Press »
3 Select the frequency with »
A TUNING S« to select »œManual tune æ« and press
»SELECT SCAN« to confirm.
– Display: »œ5A 174.92MHz æ«.
A TUNING S« and press »SELECT
SCAN« to confirm.
– Display: e.g. »7B 190.64MHz« and »ˇˇˇ []«.
– New stations are added to the list and can be selected with
»A TUNING S«.
Page 7

œStation order æ
Alphanumeric
œFav station æ
Galaxy
Preset 3 saved
SETTINGS
______________________________________________
Sorting stations
After the station search, the station list can be arranged in four different
ways.
1 Press »•MENU INFO« until »
display.
2 Press »
3 Make the setting with »A TUNING S« and press »SELECT
œStation orderæ« to confirm the option.
– Display: »Alphanumeric«, above a list of options:
– »œFav station æ«: The device automatically sorts 10 favourite
stations (display »♥«) at the beginning of the station list, depending
on the time they are listed to.
– »œAlphanumeric æ«: All stations are sorted alphanumerically
(default setting).
– »œActive station æ«: Active stations are listed first, stations that
are not active are shown with a question mark after being selected.
– »œPrune stations æ«: Stations that are not active are removed
from the station list.
SCAN« to confirm.
œStation order æ« appears in the
Storing DAB stations on the preset buttons
1 Search for the DAB station as described.
2 To save stations, press the preset button »1 ... 5« until »Preset 3
saved« for example appears in the display.
3 To store more stations, repeat steps 1 and 2 as many times as neces-
sary.
Note:
If you save more than 5 stations, the stations saved previously are
overwritten.
œDRC value æ
Setting Dynamic Range Control (DRC)
When you activate Dynamic Range Control (DRC), you can hear quiet
sounds better in a loud environment.
1 Press »•MENU INFO« until »
display.
2 Press »
3 To select the value (»DRC 1/2« or »DRC 1«), press »A TUNING
A TUNING S« to select »œDRC valueæ« and press
»SELECT SCAN« to confirm.
– Display: e.g. »DRC 0« (Dynamic Range Control off).
œStation order æ« appears in the
S« and then »SELECT SCAN« to confirm.
Note:
The station must support DRC.
ENGLISH
7
Page 8

100.60MHz ST FM
VILRADIO ST RDS
100.60MHz ST FM
Preset 2 saved
SETTINGS
______________________________________________
Searching for and saving FM stations
Automatic station search
1 Press »A TUNING S« briefly.
2 Press »SELECT SCAN«.
– Display: The automatic search stops at the next station up or down
(depending on whether you first press »
signal.
– If RDS information is transmitted by the broadcaster, then the device
saves the station name. If programme or title information is sent, this
appears after a short while as ticker text.
Tuning stations manually
1 To move the frequency up in steps, briefly press »A TUNING S«
several times.
– The frequency goes up or down in 50 kHz steps.
or
press »A TUNING S« and hold it down.
– The frequency changes up or down in the rapid run-through.
Storing FM stations on the preset buttons
1 Search for the FM station as described.
2 To save stations, keep pressing the preset button »1 ... 5« until
»Preset 2 saved« appears in the display.
3 To store more stations, repeat steps 1 and 2 as many times as neces-
sary.
Note:
If you save more than 5 stations, the stations saved previously are overwritten.
A« or »S«) with a strong
œFactory reset æ
8
Restoring the default settings (Reset)
(only in DAB mode)
This function enables you to reset all the custom settings back to the
default settings (DAB and FM stations are deleted).
1 Press »•MENU INFO« until »
display.
2 Press »
3 Press »SELECT SCAN« to reset the device.
A TUNING S« to select »œFactory reset æ« and
press »SELECT SCAN« to confirm.
– Display: »Press SELECT to confirm reset...«.
œStation order æ« appears in the
Page 9

Now tuning...
Now tuning...
OPERATION
__________________________________________
General information
Switching on and off
1 Press »ON/OFF« to switch the device on and off.
– The device switches on with the DAB or FM station last selected.
Selecting the input source
1 Select the input source (DAB or FM) with »DAB/FM«.
– Display: »Now tuning...« (DAB) or »FM«.
Adjusting the volume
1 Use the dial »– z +« on the right of the device to adjust the volume.
Listening with headphones or earphones
1 Insert the headphone or earphone plug (3.5 mm, stereo) into the »0«
jack on the left of the device.
– The loudspeaker of the device is automatically switched off.
DAB operation
Selecting the DAB input source
1 Press »DAB/FM« to select DAB as the input source.
– Display: briefly »Now tuning...«, then the most recently selected
DAB station.
Rock Antenne
œGalaxy æ
Station
not available
Selecting stations
At the end of the search, the DAB stations are arranged a list in alphanumerical order (listed A to Z, 0 to 9).
1 Scroll through the station list by repeatedly pressing »ATUNING S«.
2 Press »SELECT SCAN« when you find the station you want.
– Display: briefly, »Now tuning...«.
– The radio station is then played.
Note:
If »Station not available« appears in the display after you
select the station, move the device to a better position for reception;
alternatively, this station is no longer available due to a change of location.
ENGLISH
9
Page 10

Radio Galaxy
12:04 10-10-2005
Radio Galaxy
12D 229.07MHz
Radio Galaxy
Black Crowes - H
Radio Galaxy
Rock Music
OPERATION
__________________________________________
Selecting stored stations
1 Select the preset number by pressing the station buttons »1 ... 5«.
– The station is played.
Checking the signal strength (only in DAB mode)
You can check the signal strength of the station being listened to.
1 Press »SELECT SCAN« briefly.
– The signal level.
2 Press »SELECT SCAN« to return to the station display.
Displaying DAB station information
1 To select station information, press »•MENU INFO« repeatedly.
– The following information appears successively in the display:
– Date and time. »<Time/Date>« appears if no information is
available.
– Band and frequency, e.g. »12D 229.07MHz«.
– Bit rate and audio format (stereo or mono).
– Reference to signal interference, e.g. »Signal error 2« (at opti-
mum signal »Signal error 0«).
– Name of the artist, track name, telephone numbers, internet address-
es, information, etc. as ticker text. This information is supported by the
station. An empty space appears if this information is not available.
– Programme types such as »Rock Music« or »Classical
Music«. »<None>« appears if no information is available.
– The name of the current station’s DAB ensemble (multiplex).
Radio Galaxy
Bayern
v1.30.1.10-6
œSw version æ
10
Displaying the software version
1 Press »•MENU INFO« until »œStation order æ« appears on
the display.
2 Press »
ATUNING S« to select »œSw versionæ«.
– Display: e.g. »v1.30.1.10-6«.
Page 11

100.60MHz ST FM
OPERATION
__________________________________________
FM mode
Selecting the FM input source
1 Press »DAB/FM« to select FM as the input source.
– Display: »FM« and the frequency, soon followed by the station name
of RDS stations.
Selecting stored stations
1 Select the preset number by pressing the station buttons »1 ... 5«.
– The station is played.
Stereo and mono reception
The device has an auto mode, which switches automatically between stereo
and mono depending on the reception signal.
ANTENNE ST RDS
EW RADICALS - YO
ANTENNE RDS
Pop Music
ANTENNE ST RDS
13:02 10-10-2005
ANTENNE ST RDS
100.60MHz TP
Displaying RDS station information
If the DVD receiver receives an RDS station, the station name appears in the
display. Then station and track information appear as ticker text. Various
RDS information can then be displayed, if available.
1 To select station information, press »•MENU INFO« repeatedly.
– The following information appears successively in the display:
– Programme types such as »Pop Music« or »Classical
Music«. »<Programme Type>« appears if no information is
available.
– Date and time. »<Time/Date>« appears if no information is
available.
– Frequency, e.g. »100.60MHz« and audio format (stereo or mono).
»TP« also appears if the station offers traffic announcements.
– Reference to signal interference, e.g. »Signal error 2« (at opti-
mum signal »Signal error 0«).
ENGLISH
11
Page 12

INFORMATION
This device is noise-suppressed according to the applicable EU directives.
This product fulfils the European directives 89/336/EEC, 73/23/EEC and
93/68/EEC.
This device conforms to the safety regulation DIN EN 60065 (VDE 0860)
and therefore the international safety regulation IEC 60065.
_____________________________________
Technical data
Power supply
Battery operation 4 x 1.5 V, LR20/AM1/D-Size
Mains operation 6 V (1000 mA) mains adapter, DC
Output 700 mW 10% THD
Antennas
Telescopic antenna DAB and FM (VHF)
Frequency bands
DAB Band III 174.928 ... 239.200 MHz
FM (VHF) 87.5 ... 108 MHz
Sockets
DC socket Ø 5.5 mm, 6 V (1000 mA)
Head/earphone jack Ø 3.5 mm stereo, 2 x 32 Ω impedance
Dimensions and weight
W x H x D 235 mm x 134 mm x 61 mm
Weight approx. 850 g
(5A - 13F)
12
Technical and design modifications reserved
Page 13

Grundig Multimedia B.V. • Atrium, Strawinskylaan 3105 • NL-1077 ZX Amsterdam •
http://www.grundig.com
 Loading...