

Page 1
MAN SHAVER
MS 6640
MS 8640
MS 9640
de
en
pt
pl
da
sv
no
fi
Page 2

2
_________________________________________________________
Page 3
3
_________________________________________________________
E
A
G
H
B
D
D
C
J
F
Page 4

4
_________________________________________________________
Page 5

5
_________________________________________________________
DEUTSCH 6 - 20
ENGLISH 21 - 33
PORTUGUÊS 34 - 46
POLSKI 47 - 59
DANSK 60 - 72
SVENSKA 73 - 85
NORSK 86 - 98
SUOMI 99 - 111
Page 6

ENGLISH
21
SAFETY
_______________________________________________
Please note the following when
starting up the appliance:
7
This appliance is intended for
domestic use only.
7
This appliance is intended to be
used to shave human facial hair.
Any other use is explicitly out of
the question.
7
Never use the appliance
in the bath, shower or over
a washbasin full of water.
7
Never immerse the appliance
in water.
7
For mains operation, plug the
mains adapter cable into the
appliance first, then plug the
en.qxdmains adapter into the
socket.
7
After use, switch off the
appliance, disconnect the mains
adapter then disconnect the
mains adapter cable.
7
Never store the unit with the
mains adapter cable connected.
7
Do not wind the mains adapter
cable around the appliance.
7
Do not start up the appliance if
the appliance, the foils or the
blade blocks are visibly
damaged.
7
Do not expose the appliance to
direct sunlight or temperatures
above 60° C.
7
Do not use the appliance
outdoors or near aerosol
products or in released oxygen.
7
To avoid the transfer of germs,
the appliance should be used by
one person only.
7
Keep the appliance out of reach
of children.
7
You must never open up the
appliance. All rights to claim
under the guarantee are
invalidated for damage caused
by improper interventions.
Page 7

22
ENGLISH
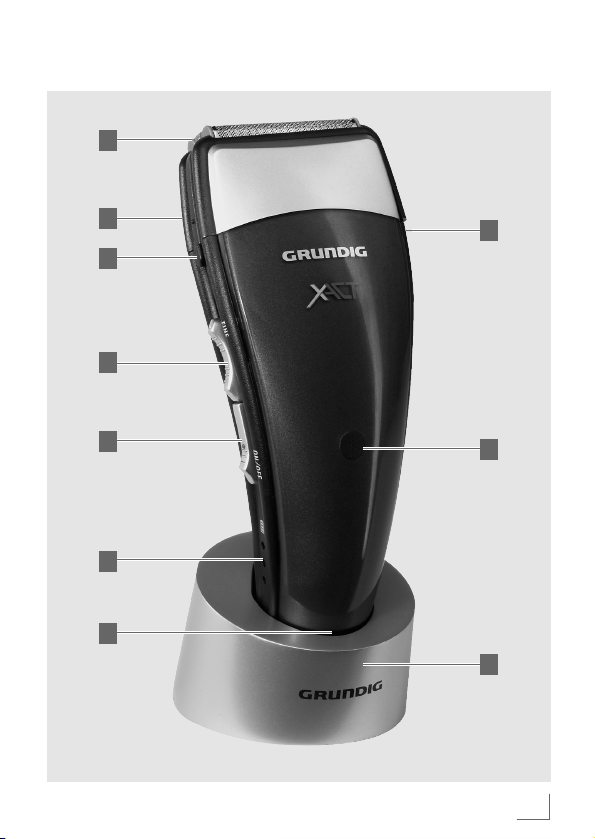
AT A GLANCE
_____________________________________
Fold open page 2 to clearly see the
diagrams at all times.
Controls
Slide switch for switching on
and off.
Slide switch for extending out
the front detail trimmer for
problem zones.
Red LED indicator slowly
flashes during charging.
Flashes quickly in
rechargeable battery mode
if the battery charge becomes
weak.
Side fastening pushbuttons for
removing the cutting head.
Double cutting head with dual
foil and central trimmer.
Long hair cutter
(rear of appliance).
F
E
D
C
B
A
Connection socket for the
mains adapter cable (MS
6640, MS 8640 and MS
9640) or for docking onto the
charging station (MS 8640
and MS 9640 only).
Three green LED indicators
(MS 8640 and MS 9640
only). Indicate the charge
status of the rechargeable
battery. Flash alternately
in mains mode.
Accessories
Mains adapter.
Charging station (MS 8640
and MS 9640 only).
Cleaning brush.
Storage case (MS 8640 and
MS 9640 only).
L
K
J
I
H
G
Page 8

ENGLISH
23
POWER SUPPLY
_________________________________
Running on rechargeable
batteries …
If run with the installed rechargeable nickel metal hydride batteries,
use the supplied mains adapter
as a charger.
Switch off the appliance before
charging.
Check whether the mains voltage
given on the rating plate of the
mains adapter supplied matches
the local mains voltage.
The appliance is not disconnected
from the power supply until the
mains adapter is disconnected.
... MS 6640
1 Insert the mains adapter cable
in socket ; plug in the mains
adapter plug.
– During charging the red LED
indicator flashes slowly.
– The red LED indicator
remains constant
if the rechargeable batteries
are fully charged.
C
C
G
... MS 8640 und 9640
1 Use the socket to dock the
appliance into the charging
station.
2 Plug the mains adapter cable
into the corresponding socket
of the charging station;
plug the mains adapter plug
into the socket.
– During charging the red LED
indicator flashes slowly.
– The red LED indicator
remains constant
if the rechargeable batteries
are fully charged.
– During charging the green
LED indicators gradually
light up.
– All three indicators are lit
if the rechargeable batteries
are fully charged.
Note
7
MS 8640 and MS 9640 can also
each be directly charged via the
socket on the appliance.
G
H
C
C
G
Page 9

24
ENGLISH
POWER SUPPLY
_________________________________
Note
7
Fully charge the batteries (approx
75 minutes) before using for the
first time or if the batteries have
not been used for a long time.
7
If you switch the appliance on
while it is charging, charging is
stopped.
7
The ambient temperature should
be between 5°C and 40°C.
7
When fully charged (charging
time approx 75 minutes)
the appliance runs for approx
60 minutes. It is advisable not to
charge the rechargeable batteries
after each use. Do not recharge
the batteries until they are
completely dead. This extends
their life. Avoid daily charging.
7
The red LED indicator flashes,
quickly during battery mode, if
the batteries need recharging. At
the same time, none of the green
LED indicators are lit anymore
(MS 8640 and MS 9640 only).
H
C
Page 10

ENGLISH
25
Important
7
Only use the appliance next to a
water connection if it is in battery
mode, never in mains mode.
POWER SUPPLY
__________________________________
Mains mode
(with the mains adapter)
The appliance has automatic,
worldwide functioning,
voltage conversion for 100 – 240 V,
50/60 Hz. Check whether the
mains voltage given on the rating
plate of the mains adapter supplied
matches the local mains voltage.
The appliance is not disconnected
from the power supply until the
mains adapter is disconnected.
1 Insert the cable of the mains
adapter in the socket .
2 Plug in the mains adapter plug.
– The installed batteries are swit-
ched off.
– LED indicator flashes
slowly. The green LED
indicators flash alternately
(MS 8640 and MS 9640
only).
H
C
G
Page 11

26
ENGLISH
USE
___________________________________________________
Face shave
1 Remove the plastic cover.
Important
7
Ensure the foils and blade blocks
are not damaged. Replace
damaged parts before shaving.
2 Switch on the appliance by
pressing the slide switch
downwards.
3 Tauten the skin with your free
hand and, with slow and gentle
movements, pass the appliance
against the direction of the
beard growth. Hold the
appliance at an angle of 90° to
the skin. Ensure both foils are in
contact with the skin.
4 Do not exert a strong pressure
as this could damage the foils.
A
5 If necessary, use the slide switch
to extend out the front detail
trimmer.
Note
7
Use the detail trimmer to shave
difficult to reach parts of the face,
e.g. under the nose.
6 After use, retract the front
detail trimmer using the slide
switch .
7 Switch off the appliance at the
switch and replace the plastic
cover .
A
B
Page 12

ENGLISH
27
USE
___________________________________________________
Trimming using
the long hair cutter
The long hair cutter cuts longer hair
on the face and neck, as well as a
beard, moustache or sideburns.
1 Switch on the appliance by
pressing the slide switch
downwards.
2 Push up the long hair cutter
(rear of the appliance) until it
latches into place.
3 After use, push the long hair
cutter back down again.
F
A
4 Switch off the appliance with the
switch .
Note
7
To spare the rechargeable
batteries, always place the long
hair cutter in the Off position
when it is not needed.
A
Page 13

28
ENGLISH
CLEANING AND CARE
__________________________
General
Regular cleaning is necessary
to ensure the appliance retains its
good performance and always
achieves optimum results. Clean the
housing with a soft cloth and mild
soap. Do not use cleaning agents.
Cleaning with water
1 Switch off the appliance and
remove the mains adapter cable
from the socket . Remove the
cutting head by pressing on the
side fastening pushbuttons .
2 Switch on the appliance (battery
mode) and run lukewarm water
over the blade blocks and
removed cutting head.
Note
7
Avoid contact of the appliance
housing with water.
D
G
3 After cleaning, switch off the
appliance and leave it to dry.
The replace the cutting head.
Ensure it latches into place on
both sides.
Cleaning with the brush
The enclosed brush should be used
to clean the appliance after every
three times it is wet cleaned.
1 Switch off the appliance and
remove the mains adapter
cable. Remove the cutting head.
Page 14

ENGLISH
29
CLEANING AND CARE
__________________________
2 Use the brush to carefully
remove hairs from the blade
blocks, the inside of the cutting
head and the housing. Clean the
long hair cutter in the Off
position.
Note
7
After several shaves the blade
blocks should be pulled upwards
and off their holders and cleaned
separately. Then push the blade
blocks back onto their holders
from above.
3 Clean the foils with soft tissue
paper.
Important
7
When cleaning the foils it is
possible to destroy them. Exert a
gentle pressure only.
4 After cleaning, push on the
cutting head so that it latches
into place on both sides.
Important
7
To ensure smooth operation
the foil frame must sit precisely
in the cutting head. Never
remove the foils from the frame.
Useful tips
7
Keep the appliance clean and
dry at all times.
7
Carefully wash and dry your face
before shaving.
7
The foils and blade heads
should be replaced after 12
to 18 months at the latest.
The best fit result is achieved by
replacing them simultaneously
(see page 30).
Page 15

30
ENGLISH
CLEANING AND CARE
__________________________
Storage
If you are not going to be using the
appliance for a lengthy time, please
store it carefully.
1 The appliance must be switched
off and completely dry.
2 Store the appliance in the
storage case provided (MS
8640 and MS 9640 only)
in a cool, dry place.
3 Ensure the appliance is kept out
of reach of children.
Replacing the cutting head
You can replace the cutting head,
or more precisely the foil frame
element and both blade blocks.
The correct spare part kit code
MSR 64. Ask your local specialist.
1 Switch off the appliance and if
necessary remove the mains
adapter cable from the socket
. Remove the cutting head by
pressing on the side fastening
pushbuttons .
2 Pull the blade blocks upward
and off their holders.
D
G
Page 16

ENGLISH
31
CLEANING AND CARE
__________________________
3 Remove the foil frame element
from the holder by
simultaneously pressing inwards
both side plastic clamps in the
cutting head and pushing the
holder away to the back.
4 Place the new blade blocks on
their holders.
5 Push the new foil frame element
precisely into the holder until the
side plastic clamps latch into
place on both sides.
Note
7
After inserting the foil frame there
is a risk of destruction. Exert
extremely gentle pressure only.
6 After replacing the blades, push
on the cutting head so that it
latches into place on both sides.
Page 17

32
ENGLISH
Environmental
information
This product has been made from
high-quality materials and parts,
which are suitable for recycling
and can be reused.
Therefore, at the end of its life,
the product must not be disposed
of in the normal domestic waste but
must be taken to a collection point
for recycling electrical and electronic appliances. This is indicated
by the following symbol on the
product, in the instructions for use
or on the packaging.
Please contact your local authority
to find out where your local
collection points are.
Reusing and recycling old
appliances is an important
contribution to protecting our
environment.
INFORMATION
____________________________________
Page 18

ENGLISH
33
INFORMATION
____________________________________
This product fulfils
the European Directives
89/336/EEC and
73/23/ EEC.
Technical specifications
Power supply
Rechargeable batteries: Ni-MH
Mains adapter
Weight (WEEE)
MS 6640: 307 g
MS 8640/9640: 377 g
Ni-MH
Subject to technical and visual changes!
Guarantee
The guarantee does not cover
wearing parts such as the cutting
foils, blade block or long hair
cutter or defects, which have
an insignificant effect on the
appliance's value or fitness for use.
The guarantee is invalidated if the
appliance is damaged, opened or
improperly used.
Washable
Page 19

Grundig Multimedia B.V.
Atrium, Strawinskylaan 3105 • NL-1077 ZX Amsterdam • http://www.grundig.com
 Loading...