

Page 1
Audio Service Manual
MPAXX MP 150
GDL90..
Zusätzlich erforderliche Unterlagen für den Komplettservice
Additionally required Service Documents for the Complete Service
Service
Manual
Sicherheit
Safety
Materialnr./Part No.
72010 800 0000
Materialnummer/Part Number 72010 771 0500
Änderungen vorbehalten/Subject to alteration • Printed in Germany FD
E-BS 37 0700 • 8002/8012; 8005/8015; 8006/8016
http://www.grundig.com
Grundig Service
Hotline Deutschland...
Technik:
TV
TV
SAT
VCR/LiveCam
HiFi/Audio
Car Audio
Telekommunikation
Planatron
Ersatzteil-Verkauf: ...Mo.-Fr. 8.00-19.00 Uhr
(8.00-22.00 Uhr)
...Mo.-Fr. 8.00-18.00 Uhr
Fax:
Telefon:
Fax:
0180/52318-41
0180/52318-49
0180/52318-48
0180/52318-42
0180/52318-43
0180/52318-44
0180/52318-45
0180/52318-51
0180/52318-99
0180/52318-40
0180/52318-50
Page 2

Allgemeiner Teil / General Section
MP
AXX
MP150
Es gelten die Vorschriften und Sicherheitshinweise gemäß dem Service Manual "Sicherheit",
Materialummer 72010 800 0000, sowie zusätzlich die eventuell abweichenden, landesspezifischen Vorschriften!
Ķ Inhaltsverzeichnis
Seite
Allgemeiner Teil ............................ 1 - 2 … 1 - 6
Messgeräte / Messmittel ........................................................... 1 - 2
Technische Daten ...................................................................... 1 - 2
Ausbauhinweise ........................................................................ 1 - 3
Bedienhinweise ......................................................................... 1 - 4
Schaltpläne und
Druckplattenabbildungen ............. 2 - 1 … 2 - 7
Schaltpläne ................................................................................ 2 - 1
Platinenabbildungen .................................................................. 2 - 5
Oszillogramme ........................................................................... 2 - 7
Explosionszeichnung
und Ersatzteilliste ...................................... 3 - 1
The regulations and safety instructions shall be
valid as provided by the "Safety" Service Manual,
part number 72010 800 0000, as well as the
respective national deviations.
ķ Table of Contents
Page
General Section ............................. 1 - 2 … 1 - 8
Test Equipment / Aids ............................................................... 1 - 2
Technical Data ........................................................................... 1 - 2
Disassembly Instructions .......................................................... 1 - 3
Operating Hints ......................................................................... 1 - 6
Circuit Diagrams
and Layouts of the PCB................ 2 - 1 … 2 - 7
Circuit Diagram .......................................................................... 2 - 1
Layout of the PCBs .................................................................... 2 - 5
Oscillogrammes ......................................................................... 2 - 7
Exploded View and
Spare Parts List .......................................... 3 - 1
Allgemeiner Teil
Messgeräte / Messmittel
DC-Voltmeter, Oszilloskop, Frequenzzähler
Beachten Sie bitte das GRUNDIG Messtechnik-Programm, das Sie
unter folgender Adresse erhalten:
Grundig AG, Geschäftsbereich Instruments Test- und Messsysteme, Würzburger Str. 150, D-90766 Fürth
Tel.: 0911 / 703-4118; Fax: 0911 / 703-4130, eMail: instruments@grundig.de, Internet: http:\\www.grundig-instruments.de
Technische Daten
MPAXX
Kartenschächte ........................ 2 x für MultiMediaCards/ROS Cards
Anschlüsse .................................................. Kopfhörer 3,5mm Klinke
USB-Schnittstelle für Verbindung zum PC
externes Netzteil
Stromversorgung ........................................ 2x 1,5V Mignon LR6 AA
(Spieldauer bis zu 14 Stunden)
Größe (H x B x L) ...................................................20 x 110 x 70mm
Gewicht (ohne Batterien) ............................................................ 90g
MultiMediaCard (Karte mit Flashspeicher)
Größe (H x B x L) ....................................................1,4 x 24 x 32mm
Gewicht ...................................................................................... 1,5g
Schockfestigkeit ...................................................................... 1000g
Wiederbeschreibbarkeit ................... über 100.000 mal beschreibbar
General Section
Test Equipment / Aids
DC Voltmeter, Oscilloscope, Frequency Counter
Please note the Grundig Catalog "Test and Measuring Equipment"
obtainable from:
Technical Data
MPAXX
Card shafts ............................... 2 x for MultiMediaCards/ROS Cards
Connections ................................................. 3.5mm headphone jack
USB interface for connection to a PC
external power supply unit
Power Supply .............................................. 2x 1.5V Mignon LR6 AA
(playing time up to 14 hours)
Dimensions (H x W x D) ......................................... 20 x 110 x 70mm
Weight (less batteries) ................................................................ 90g
MultiMediaCard (Card with flash memory)
Dimensions (H x W x D) .......................................... 1.4 x 24 x 32mm
Weight ........................................................................................ 1.5g
Resistance to shocks: ............................................................. 1000g
Re-recordability ................... can be re-recorded over 100,000 times
ROS Card (Record on Silicon, ROM Karte)
Physikalische Eigenschaften wie MultiMediaCard
Systemvoraussetzungen (Minimum)
Windows: PC mit WIN95/98/NT4.0, 5MB freier HD, Grafik
800x600x256 Farben
MacOS: Mac mit USB-Schnittstelle ab System 8.6
1 - 2 GRUNDIG Service
ROS Card (Record on Silicon, ROM Card)
Physical characteristics same as with MultiMediaCard
System Requirements (minimum)
Windows: PC with WIN95/98/NT4.0, 5MB free HD, grafic
800x600x256 colours
MacOS: Mac with USB interface from system 8.6 on
Page 3
MP
AXX
MP150 Allgemeiner Teil / General Section
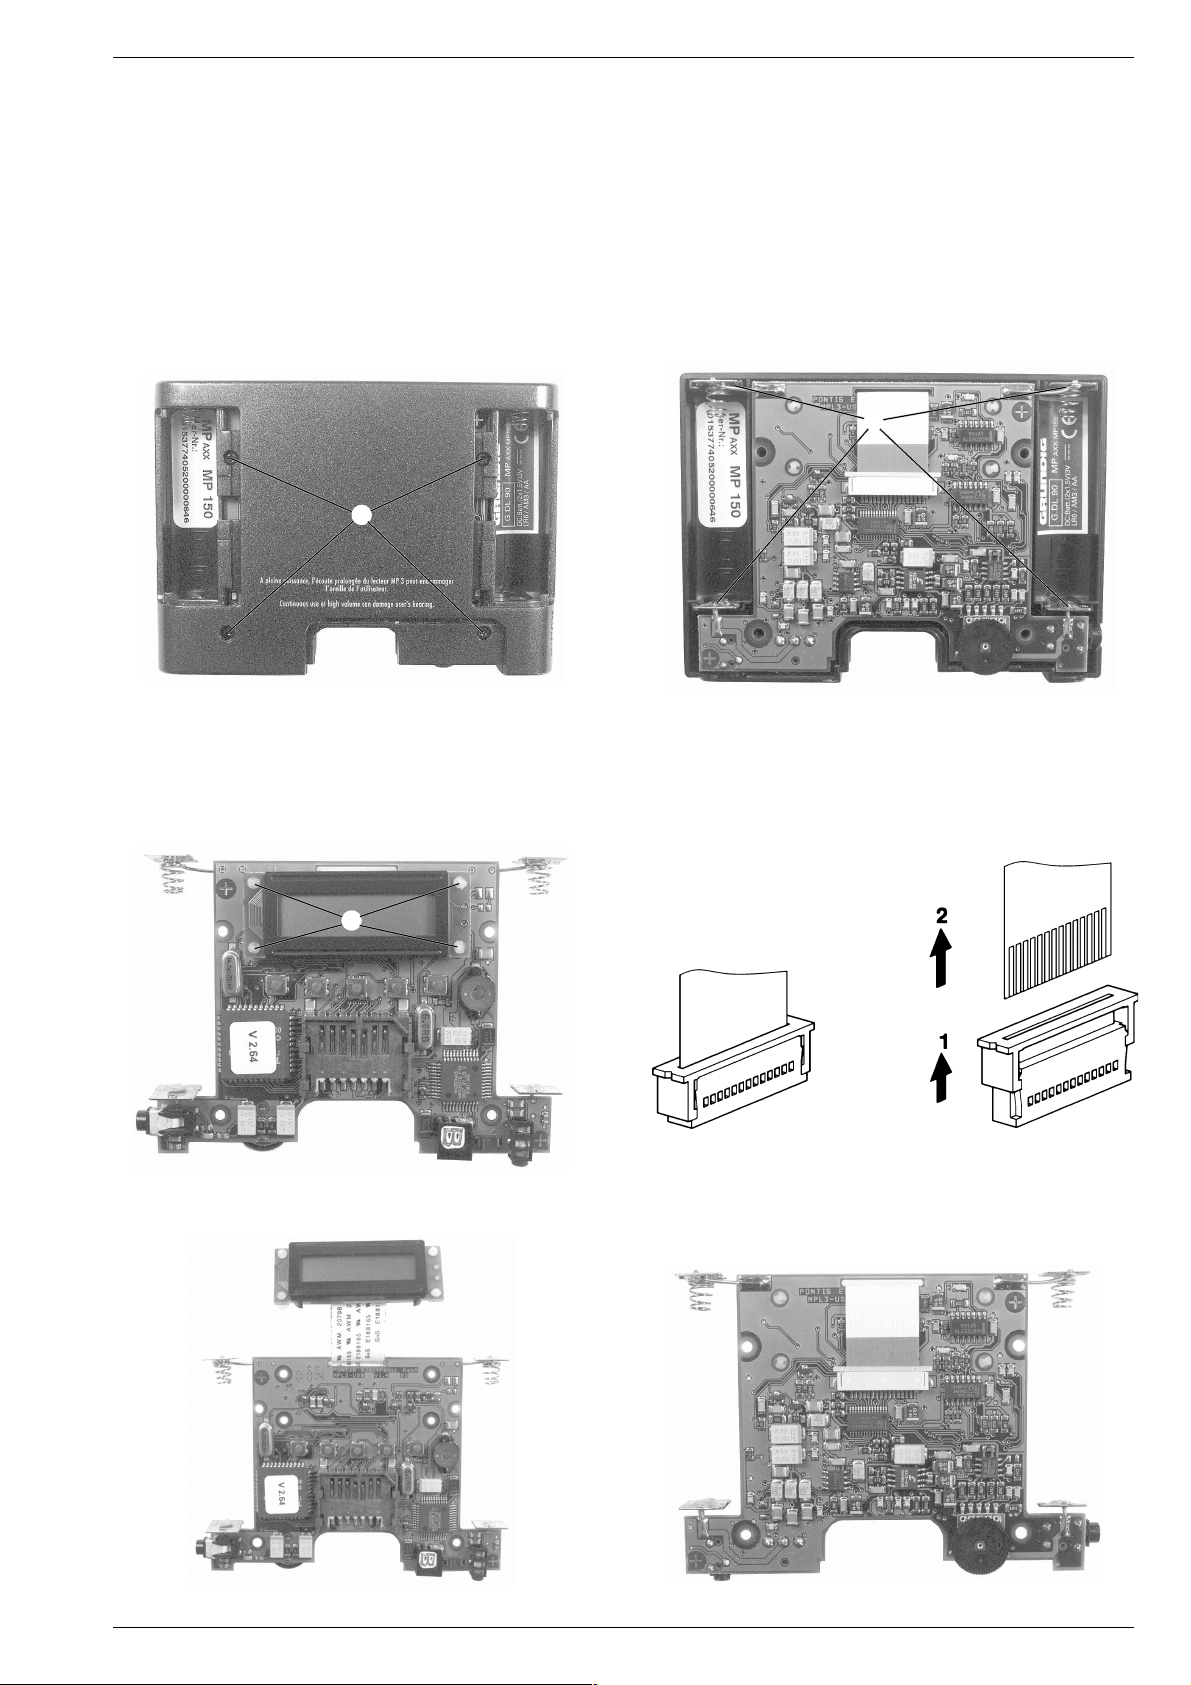
Ausbauhinweise
1. Öffnen des Gehäuses
- Beide Batteriefachdeckel ausrasten.
- Card-Abdeckung abnehmen.
- 4 Schrauben A (Fig. 1) herausschrauben und die Rückwand
abnehmen.
2. Leiterplatte
- MultiMediaCards entnehmen.
- Leiterplatte entnehmen, dabei die Daten-Buchse aus dem Gehäuse
ausrasten.
- Beim Einbau darauf achten, dass die Batteriekontakte in deren
Führungen B (Fig. 2) eingesetzt werden.
A
Disassembly Instructions
1. Opening the cover
- Disengage both battery compartment lids.
- Remove the card cover.
- Undo 4 screws A (Fig. 1) and remove the back cover.
2. Printed Circuit Board (PCB)
- Remove the MultiMediaCards.
- Remove the PCB, therefore disengage the data socket out of the
front cover.
- When reassembling take care to move the battery contacts in their
guides B (Fig. 2).
B
Fig. 1
3. Display
- Leiterplatte ausbauen (Pkt. 2).
- 4 Displayhalter C (Fig. 3) ausrasten.
- Bei Bedarf Flexprinthalter öffnen (Fig. 4) und Flexprint abziehen.
C
Fig. 3 Fig. 4
Fig. 2
3. Display
- Remove the PCB (para 2).
- Disengage 4 display holder C (Fig. 3).
- If necessary open the flexprint holder (Fig. 4) and pull out the
flexprint.
GRUNDIG Service
1 - 3
Page 4
Allgemeiner Teil / General Section
MP
AXX
MP150
Bedienhinweise Dieses Kapitel enthält Auszüge aus der Bedienungsanleitung. Weitergehende Informationen entnehmen Sie bitte der
Bedienungsanleitung, deren Materialnummer Sie in der Ersatzteilliste finden.
DEUTSCH
MP3 PLAYER MPAXX 150
Der MP3 Player MPAXX ist ein neues, portables Abspielgerät für
digitale Musik, die nach dem MP3-Standard komprimiert wurde.
Er ist vollkommen unempfindlich gegen Erschütterungen und leicht
zu bedienen. Die Musik wird von wechselbaren und wiederbeschreibbaren Speicherkarten, den MultiMediaCards, wiedergegeben. Diese Karten sind klein, leicht und dennoch sehr robust.
Es gibt auch eine fertig bespielte, schreibgeschützte Variante dieser Karte, die ROS-card (Record on Silicon).
Das Verfahren, Musik im MP3-Format abzuspeichern, hat sich vor
allem im Internet als Standard etabliert. Zahlreiche Websites bieten
gegen Bezahlung oder kostenlos MP3-Musikdateien zum
Download an. Die auf der Festplatte Ihres PCs gespeicherten MP3Dateien werden mit Hilfe des beiliegenden Adapterkabels über die
USB Schnittstelle auf die MultiMediaCards Ihres MP
den.
Als Zubehör ist die Card Station erhältlich, mit deren Hilfe Sie
MultiMediaCards beschreiben können, ohne den MP3 Player an
den PC anzuschließen. Die Card Station wird mit der parallelen
Schnittstelle verbunden, über die der Datentransfer wesentlich
schneller abläuft.
Diese Bedienungsanleitung beschreibt, wie Sie den MP3 Player
betriebsbereit machen.
_____________________
AXX 150 gela-
DEUTSCH
3
HINWEISE
Umwelthinweis
MultiMediaCard/ROS-card
6
_________________________________________________
Die Batterien – auch schwermetallfreie – dürfen nicht im Hausmüll entsorgt werden. Verbrauchte Batterien müssen in die Altbatteriesammelgefäße bei Handel und öffentlich-rechtlichen
Entsorgungsträgern gegeben werden.
Achten Sie darauf, daß die elektrischen Kontakte auf der Unterseite
der MultiMediaCard keiner starken mechanischen Beanspruchung
ausgesetzt werden.
Die Karten sind unempfindlich gegen Schmutz und Feuchtigkeit,
dürfen aber nur in trockenem und sauberem Zustand in den
MP3 Player eingeschoben werden.
Wir empfehlen, die MultiMediaCard im Kartenhalter aufzubewahren.
Entfernen Sie MultiMediaCards niemals während des Beschreibens,
d. h. während des Downloads der Daten vom PC auf die
MultiMediaCard. Dies könnte zu Schäden an der MultiMediaCard
führen.
Für solche Schäden kann keine Gewährleistung übernommen
werden.
VORBEREITEN
__________________________________________
Software installieren
Auf der beiliegenden CD-ROM befindet sich der USB-Treiber und
die Software LED für Windows 98/2000 und MacOS, mit deren
Hilfe Sie Musikdateien von Ihrem PC auf MultiMediaCards laden
können.
Die Windows-Version dieser Software enthält zusätzlich eine 30Tage-Demoversion eines Encoders. Mit diesem Encoder können Sie
Musik von Audio-CDs in das MP3-Format umwandeln. Wenn Sie
den Encoder nach der 30tägigen Frist weiterverwenden möchten,
müssen Sie einen Licence key erwerben, der Ihre Demo-Version in
eine Vollversion umwandelt.
Diesen Licence key können Sie mit dem beiliegenden Formular
oder unter www.cydanza.com erwerben
Installation für PC:
1 Buchse »Data« des MP3 Players und die USB Schnittstelle des
PC´s mit dem beiliegenden Adapterkabel verbinden.
2 PC einschalten. Der Treiber für den MPAXX Player wird verlangt.
3 Beiliegende CD-ROM einlegen und die Datei »MP3PUSB.INF
aus dem Verzeichnis.»Windows\Driver\MP
Der Treiber wird installiert.
AXX150« wählen.
4 Installieren Sie die L.E.D. Software auf Ihren PC.
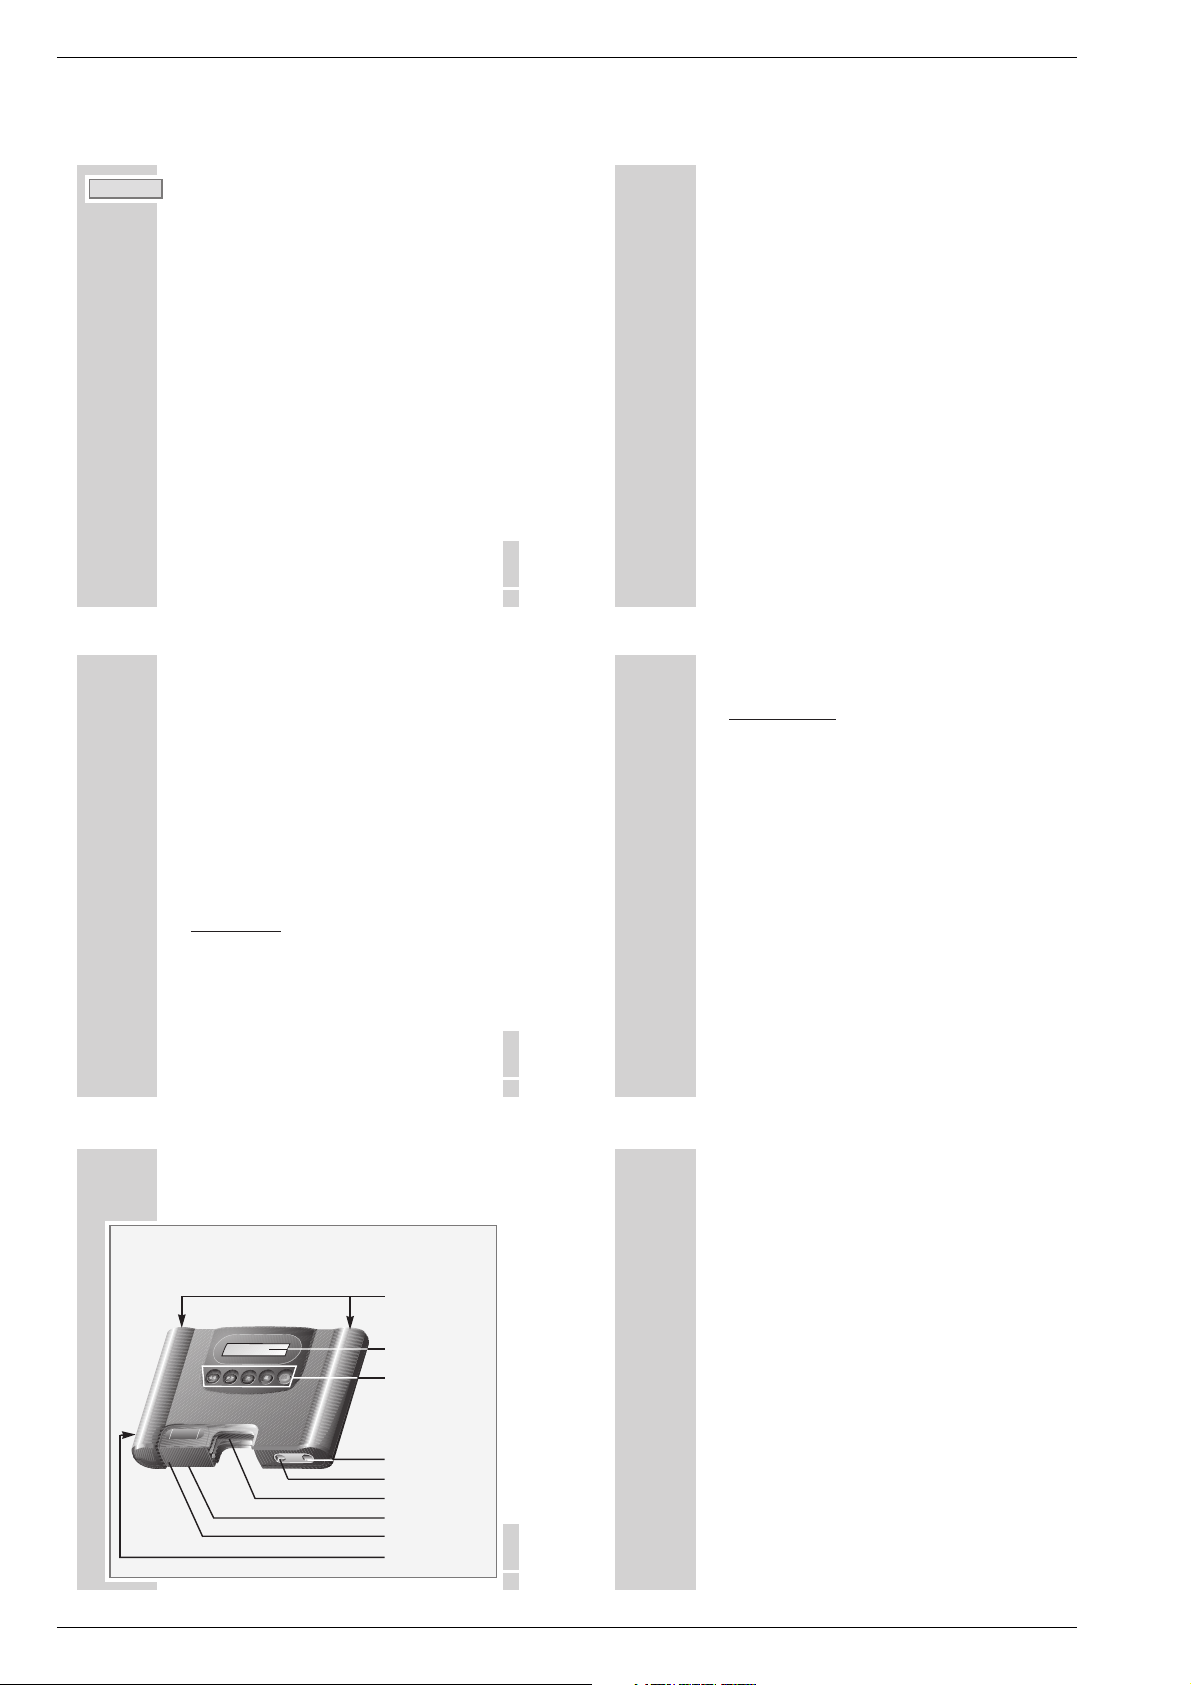
Vorbereiten
_______________________________________________
Die Bedienelemente
Batteriefächer
Display
Bedientasten
USB Schnittstelle
Netzteilanschluss
Kartenschächte
Lautstärke
Card-Abdeckung
Kopfhöreranschluss
DEUTSCH
7
DEUTSCH
9
Vorbereiten
Macintosh Computer:
Bei der Installation der Software L.E.D. für Mac werden die nötigen
USB-Treiber automatisch geladen.
8
VORBEREITEN
_______________________________________________
Hinweise:
Informationen über die beiliegende Software entnehmen Sie
bitte dem Handbuch der Software, das Sie auf der CD finden.
Das Handbuch ist im PDF-Format auf der CD gespeichert.
Zum Lesen des Handbuches, benötigen Sie das Programm
Acrobat Reader.
Sollte Acrobat Reader noch nicht auf Ihrem PC installiert sein,
können Sie das Programm von der beiliegenden CD installieren.
Auf unserer Website http://www.grundig.de bzw.
http://www.grundig.com können Sie weitere Informationen
abrufen.
____________________________________________
Batterien einlegen
1 Beide Batteriefächer an der Rückseite des MP3-Players öffnen.
2 Batterien einlegen (Typ Mignon, z.B. LR6 AM-3 oder AA, 2 x
1,5 V). Dabei Polung beachten.
Hinweis:
Die Batterieanzeige im Display (nur im Stop-Modus) zeigt den
Ladezustand der Batterien (schwarz = volle Batterien, weiß =
leere Batterien) an.
MultiMediaCards/ROS-cards einlegen
1 Kartenschachtabdeckung nach links schieben.
2 MultiMediaCards/ROS-cards mit der abgeschrägten Seite
nach vorne in einen der beiden Kartenschächte einschieben.
3 Kartenschachtabdeckung schließen.
Hinweise:
Wenden Sie beim Einschieben der Karten keine Gewalt an.
Leichter Druck ist ausreichend.
Der MP3 Player erkennt selbsttätig, ob eine oder zwei Karten
eingeschoben wurden.
Ein gemischter Betrieb mit einer MultiMediaCard und einer
ROS-card ist ebenfalls möglich. Der MP3 Player erkennt, sofern
10
vorhanden, den Kartentitel und zeigt diesen im Display an.
1 - 4 GRUNDIG Service
Page 5

MP
AXX
MP150 Allgemeiner Teil / General Section
WIEDERGABE
Einschalten
1
»ß« drücken.
Im Display erscheint der Softwarestand und danach die Anzahl
und Spielzeit der Titel, z.B. »T04 07:53 «
Wiedergabe/Pause
»Q« drücken. Die Wiedergabe beginnt.
1
Im Display erscheint der Name, die Nummer (z.B T01) und die
abgelaufene Spielzeit des Titels.
2 »Q« nocheinmal drücken.
Die Wiedergabe wird unterbrochen.
Im Display erscheint »PAUSE «.
___________________________________________
3 »Q« nocheinmal drücken. Die Wiedergabe wird fortgesetzt.
Index vorwärts/schneller Vorlauf
1
»X« während der Wiedergabe kurz drücken. Das nächste
Musikstück wird angewählt.
Durch mehrmaliges kurzes Drücken von »X« kann der
gewünschte Titel (auch über zwei MultiMediaCards/ROS
Cards) angewählt werden (vorwärtsblättern).
2 »X« während der Wiedergabe durch längeres Drücken auf
Suchlauf schalten. Im Display erscheint die exakte abgelaufene
Zeit des Titels.
Der Kopfhörer wird stummgeschaltet.
WIEDERGABE
_____________________________________________
Zusatzfunktionen der Wiedergabe
1 Während der Wiedergabe »ß« drücken.
Das Menü »Choose a Mode « erscheint im Display.
Die gewünschte Funktion wird durch Drücken der entsprechen-
den Taste unter der Abkürzung gewählt. Die getroffenen Einstellungen bleiben auch nach dem Ausschalten gespeichert.
Choose a Mode:
PM IF OS TB BACK
PPMM
(Play-Mode)
Im Menü »Play-Mode« können Sie verschiedene Funktionen für die
Wiedergabe wählen:
1 »Y« drücken. Das Menü »Play Mode« erscheint.
OFF
OFF
OFFOFF
RS
RA
BACKKL
SH
2 Gewünschte Funktion aufrufen (siehe nächste Seite).
DEUTSCH
11
DEUTSCH
13
WIEDERGABE
Index rückwärts/ schneller Rücklauf
1
Während der Wiedergabe »Y« kurz drücken.
Das aktuelle Musikstück beginnt von vorne.
Durch mehrmaliges kurzes Drücken von »Y« kann der
gewünschte Titel (auch über zwei MultiMediaCards/ROScards) angewählt werden (rückwärtsblättern).
2 Während der Wiedergabe durch längeres Drücken von »Y«
auf Suchlauf schalten. Im Display erscheint die exakte abgelaufene Zeit des Titels.
Der Kopfhörer stummgeschaltet.
Stop
1
Während der Wiedergabe »H« drücken.
Wählen der MultiMediaCards/ROS-cards
Während der Wiedergabe »H« drücken.
1
2 Durch wiederholtes Drücken von »H« kann die Wiedergabe
zwischen den MultiMediaCards/ROS-cards gewechselt werden.
Ausschalten
»H« länger drücken.
1
Hinweis:
12
Der MP3 Player schaltet sich selbsttätig aus, wenn er länger als
30sec. nicht benützt wird.
WIEDERGABE
RA (repeat all)
Sobald die eingelegten MultiMediaCards/ROS Cards abgespielt
sind, beginnt die Wiedergabe von neuem.
Mit »Y« Funktion einschalten (ON) bzw. ausschalten (OFF).
RS (Repeat single)
Das aktuelle Musikstück wird ständig wiedergegeben.
Mit »X« Funktion einschalten (ON) bzw. ausschalten (OFF).
SH (Shuffle)
Die Titel werden in zufälliger Reihenfolge wiedergegeben.
Mit »Q« Funktion einschalten (ON) bzw. ausschalten (OFF).
KL (Key Lock)
Sperrt die Tasten gegen unbeabsichtigtes Drücken.
Funktion einschalten: »H« drücken (Anzeige ON).
Funktion ausschalten: »Y« und danach »H« drücken
(Anzeige OFF).
Hinweis:
Menü »Play Mode« mit »ß« verlassen.
Das Menü »Choose a Mode« erscheint. Menü mit »ß« ver-
lassen oder weitere Funtionen des Menüs »Choose a Mode «
14
anwählen. (siehe nächste Seite).
_____________________________________________
_____________________________________________
OFFOFF
AC
PR
GRUNDIG Service
WIEDERGABE
IIFF
Die Bitrate des laufenden Titels erscheint im Display.
1 »X« drücken. Die Bitrate wird angezeigt,
z.B. »BR: 128000 Bit/s «
2 Menü mit »ß« verlassen oder weitere Funtionen des Menüs
»Choose a Mode « anwählen.
OOSS
Im Menü »Operating Settings« können Sie verschiedene
Sonderfunktionen der Wiedergabe wählen:
OFF
OFF
RE
PR (Program)
Spielt die Titel in der in der Programmlist festgelegten Reihenfolge
ab. Ermöglicht auch das mehrmalige Abspielen von Titeln, z.B.
Titel 1, 2, 3, 2, 5, 1 usw.
Mit »Y« Funktion einschalten (ON) bzw. ausschalten (OFF).
Hinweis:
Diese Funktion ist nur verfügbar, wenn der MP
steht. Ist diese Funktion gewählt, erscheint nach dem Einschalten des MP
zeit (z.B. P12 14:38).
_____________________________________________
(Information)
(Operating Settings)
BACK
AXX 150 auf Stop
AXX 150 die Anzeige des Programms und der Spiel-
DEUTSCH
15
WIEDERGABE
AC (Auto Cue)
Nach Beenden des aktuellen Titels schaltet der MP
tisch auf Pause.
Mit »X« Funktion einschalten (ON) bzw. ausschalten (OFF).
RE (Resume)
Speichert beim Ausschalten des MP
Titel und die Abspielposition. Beim Einschalten schaltet der
MP
AXX 150 an dieser Position auf Pause.
Mit »Q« Funktion einschalten (ON) bzw. ausschalten (OFF).
Menü mit »ß« verlassen oder weitere Funtionen des Menüs
»Choose a Mode « anwählen.
16
_____________________________________________
AXX 150 autom-
AXX 150 die aktuelle Karte, den
1 - 5
Page 6

Allgemeiner Teil / General Section
MP
AXX
MP150
WIEDERGABE
TB (Treble/Bass)
Höhen (Treble) und Bässe (Bass) können verändert werden.
Die Einstellungen bleiben auch nach dem Ausschalten gespeichert.
_____________________________________________
1 »H« drücken. Das Tonmenü erscheint.
00
00
T- T+B- B+
BACK
2 Bässe mit »Y« oder »X« einstellen.
Der Einstellbereich reicht von »-9« bis »09« .
3 Höhen mit »Q« oder »H« einstellen.
Der Einstellbereich reicht von »-9« bis »09« .
4 Menü mit »ß« verlassen oder weitere Funtionen des Menüs
»Choose a Mode« anwählen.
DEUTSCH
17
DOWNLOAD
MP3 Player und PC verbinden
1 Buchse »Data« des MP3 Players und die USB Schnittstelle des
PC´s mit dem beiliegenden Kabel verbinden.
Hinweis:
Entfernen Sie MultiMediaCards niemals während des Beschreibens. Im schlimmsten Fall kann dies dazu führen, daß die
MultiMediaCard unbrauchbar wird!
Verbinden Sie den MP3 Player niemals mit einer seriellen
Schnittstelle. Dies kann zur Zerstörung des MP3 Players führen.
Einschalten
»ß« drücken.
1
Im Display.erscheint der Softwarestand und danach die Anzahl
und Spielzeit der Titel, z.B. »T04 07:53 « und danach
»DOWNLOAD: WAIT«.
2 Beginnen Sie mit der Übertragung der Daten.
Hinweis:
Beachten Sie dazu die Beschreibung der Software.
18
____________________________________________
Operating Hints This chapter contains excerpts from the operating instructions. For further particulars please refer to the user instruction
the part number of which is indicated in the spare parts list.
ENGLISH
MP3 PLAYER MPAXX 150
____________________
NOTES
_____________________________________________________
The MPAXX MP3 Player is a new, portable replay device for digital
music that has been compacted in accordance with the MP3 norm.
It is completely insensitive to shaking and easy to operate. The
music is replayed using replaceable and re-recordable memory
cards called MultiMediaCards. These cards are small and lightweight, but nevertheless very robust.
A pre-recorded, read-only version of this card also exists, called
the ROS Card (Record on Silicon).
The procedure of recording music in the MP3 format has established itself as a standard, particularly on the Internet. Numerous
Websites offer MP3 music files for downloading, either for a fee or
without charge. The MP3 files stored on the hard drive of your PC
are loaded onto the MultiMediaCards of your MP
help of the accompanying adapter cable via the USB interface.
The Card Station is available as an accessory with which you can
record on MultiMediaCards, without needing to attach the MP3
Player to the PC. The Card Station is connected with the parallel
interface, by which the data transfer proceeds considerably more
rapidly.
This Operating Manual describes how to make the MP3 Player
ready for operation.
PREPARATIONS
________________________________________
AXX 150 with the
Installing the software
On the accompanying CD ROM, you will find the USB driver and
the software LED for Windows 98/2000 and MacOS, which you
can use to load music files from your PC to MultiMediaCards.
The Windows version of this software additionally contains a 30day demo version of an encoder. With this encoder you can convert music from audio CDs to
MP3 format. If you want to continue to use the encoder after the
30-day period, you have to acquire a licence key which converts
your demo version into a full version.
You can acquire this licence key using the accompanying form or
at www.cydanza.com.
PC installation:
1 Use the supplied adapter cable to link the »Data « socket of
the MP3 Player and the USB interface of the PC.
2 Switch on PC. The driver for the MPAXX Player will be asked for.
3 Insert the accompanying CD ROM and select the
»MP3USB.INF« from the directory »Windows\
Driver\MP
AXX150«. The driver will be installed.
4 Install the L.E.D. software on your PC.
ENGLISH
3
MultiMediaCard/ROS Card
Take care that the electrical contacts on the bottom side of the
MultiMediaCard are not subjected to any severe mechanical stresses.
While the cards themselves are insensitive to dirt and moisture,
they are not to be inserted into the MP3 Player unless they are both
dry and clean.
We recommend that each MultiMediaCard be stored in the card
holder.
Never remove MultiMediaCards during the recording process, e.g.
while data is being downloaded from the PC onto the MultiMedia
Card. This could lead to damage to the MultiMediaCard.
No warranty can be offered against this kind of damage.
6
PREPARATIONS
Macintosh computer:
The required USB drivers will be automatically loaded when the
software L.E.D. for Mac is installed.
Notes:
Information regarding the accompanying software can be
found in the software manual which is located on the CD.
The booklet is stored in PDF format on the CD.
You will need the program Acrobat Reader in order to read the
manual.
If Acrobat Reader has not yet been installed on your PC, you
can install the program from the accompanying CD.
You can call up further information from our Website
http://www.grundig.de or http://www.grundig.com.
________________________________________
ENGLISH
7
8
1 - 6 GRUNDIG Service
Page 7

MP
AXX
MP150 Allgemeiner Teil / General Section
PREPARATIONS
________________________________________
The operating elements
Battery chambers
Display
Operating buttons
USB interface
Power mains connection
Card shafts
Volume
Card covering
Headphones connection
PLAYBACK
Switching on
1
Playback/Pause
1
2 Press »Q« once again.
3 Press »Q« once again. Playback is resumed.
Index forward/fast forward
1
2 Switch on »X« during playback by pressing and holding
_______________________________________________
Press »ß«.
The software status appears in the display, and after it the number and playing time of the title, for example »T04 07:53 «.
Press »Q«. Playback begins.
The name, the number (for example, T01) and the elapsed
playing time of the title appear in the display.
Playback is interrupted.
»PAUSE « appears in the display.
Briefly press »X« during replay. The next music title is selected.
The desired title (also when using two MultiMediaCards/ROS
Cards) can be selected through repeated brief pressing of
»X« (forward selection).
Search. The exact elapsed playing time of the title appears in
the display.
The headphones are muted.
ENGLISH
9
ENGLISH
11
PREPARATIONS
________________________________________
Inserting the batteries
1
Open both battery chambers on the rear side of the MP3 Player.
2 Insert the batteries (Mignon type, i.e. UM-3 or AA, 2 x 1.5 V).
Ensure correct polarity when inserting the batteries.
Inserting the MultiMediaCards/ROS Cards
1 Push card shaft covering to the left.
2 Insert the MultiMediaCards/ROS Cards with the bevelled side
forward into one of the two card shafts.
3 Close the card shaft cover.
Notes:
Do not apply any force when inserting the cards. Light pressure
is sufficient.
The MP3 Player recognises on its own whether one or two
cards have been inserted.
Mixed operation with one MultiMediaCard and one ROS Card
is also possible. The MP3 Player recognises the card title, when
one exists, and presents it in the display.
10
PLAYBACK
Index reverse/fast reverse
1
2 Switch on the search mode during playback by pressing and
Stop
1
Selecting the MultiMediaCards/ROS Cards
1
2 The playback between the MultiMediaCards/ROS Cards can be
Switching off
1
12
_______________________________________________
Briefly press »Y« during replay. The current music title starts
from the beginning.
The desired title (also when using two MultiMediaCards/ROS
Cards) can be selected through repeated brief pressing of
»Y« (reverse selection).
holding »Y«. The exact elapsed playing time of the title
appears in the display
The headphones are muted.
Press »H« during playback.
Press »H« during playback.
changed back and forth through repeated pressing of »H«.
Press »H« longer.
Note:
The MP3 Player shuts itself off when it is not used for longer
than 30 sec.
Choose a Mode:
PM IF OS TB BACK
OFFOFF
RS
RA
GRUNDIG Service
PLAYBACK
_______________________________________________
Additional Functions of Playback
1 Press »ß« during playback.
The menu »Choose a Mode « appears in the display.
The desired function is selected by pressing the corresponding
button under the abbreviation. The settings which have been
made will also be kept after switching off.
PPMM
(Play Mode)
You can select a variety of functions for the playback in the menu
»Play Mode«:
1
P
ress »Y«. The menu »Play Mode« appears in the display.
OFF
OFF
BACKKL
SH
2 Call up the desired function (see the following page).
ENGLISH
13
PLAYBACK
RA (repeat all)
As soon as the inserted MultiMediaCards/ROS Cards have been
played, the playback starts again from the beginning.
With »Y«, one switches the functions on (ON) and off (OFF).
RS (Repeat single)
The current music title is repeated indefinitely.
With »X«, one switches the functions on (ON) and off (OFF).
SH (Shuffle)
The titles are played back in random sequence.
With »Q«, one switches the functions on (ON) and off (OFF).
KL (Key Lock)
Locks the buttons against accidental pressing.
Switching on function: Press »H« (display, ON).
Switching off function: »press Y« and then »H« (display, OFF).
14
_______________________________________________
Note:
Leave the »Play Mode« menu with »ß«.
The menu »Choose a Mode« appears. Leave the m enu w ith
»ß « or select further menu functions using »Choose a
Mode«, see next page.
1 - 7
Page 8

Allgemeiner Teil / General Section
MP
AXX
MP150
PLAYBACK
OFFOFF
AC
PR
PLAYBACK
00
_______________________________________________
IIFF
(Information)
The bit rate of the current title appears in the display.
1 Press »X«. The bit rate is displayed,
for example »BR: 128000 Bit/s «.
2 Exit the menu with »ß« or select further menu functions using
»Choose a Mode «.
OOSS
(Operating Settings)
In the »Operating Settings« menu, you can select different special
functions for playback:
OFF
OFF
BACK
RE
PR (Program)
The titles in the program list will be played in the following order.
A title can be played several times, for example, titles 1, 2, 3, 2,
5, 1 etc.
»Y« switches the function on or off.
Note:
This function is only available if the MP
function is selected, the program and the play time (e.g. P12
14:38) appear on the display after the MP
switched on.
AXX 150 is at stop. If this
AXX 150 has been
_______________________________________________
TTBB
(Treble/Bass)
Treble and Bass can be changed.
1 Press »H«. The sound menu appears.
The settings will also be kept after switching off.
00
T- T+B- B+
BACK
2 Set the basses with »Y« or »X«.
The setting range varies from »-9« to »09«.
3 Set the trebles with »Q« or »H«.
The setting range varies from »-9« to »09«.
4 Leave the menu with »ß« or select further menu functions using
»Choose a Mode«.
ENGLISH
15
PLAYBACK
AC (Auto Cue)
Nach Beenden des aktuellen Titels schaltet der MP
tisch auf Pause.
Mit »X« Funktion einschalten (ON) bzw. ausschalten (OFF).
RE (Resume)
Speichert beim Ausschalten des MP
Titel und die Abspielposition. Beim Einschalten schaltet der
MP
Mit »Q« Funktion einschalten (ON) bzw. ausschalten (OFF).
Menü mit »ß« verlassen oder weitere Funtionen des Menüs
»Choose a Mode « anwählen.
16
DOWNLOADING
_______________________________________________
AXX 150 autom-
AXX 150 die aktuelle Karte, den
AXX 150 an dieser Position auf Pause.
______________________________________
Connecting MP3 Player with the PC
1 Connect the MP3 Player »Data« jack to the USB interface of
the PC using the accompanying serial cable.
Note:
Never remove MultiMediaCards during downloading. At the
very worst, this can result in the MultiMediaCard becoming
unusable!
Switching on
Press »ß«.
1
The software status appears in the display, followed by the
number and playing time of the title, e.g. »T04 07:53 « and
then »DOWNLOAD: WAIT«.
2 Begin the transfer of data.
Note:
Follow the description of the software while doing so.
ENGLISH
17
18
1 - 8 GRUNDIG Service
Page 9

MP
AXX
MP150 Schaltplan und Druckplattenabbildungen / Circuit Diagram and Layouts of PCB MP
Schaltplan und Druckplattenabbildungen / Circuit Diagram and Layouts of PCB
3V
MMC-Card connection
X1
1
VPP
2
CMD
3
VSS1
4
VDD
5
CLK
6
VSS2
7
DAT0
MMC_RA1
CMD_MMC
CLK_MMC
DATA_MC
GND
GND
R13
2.2K
C51
10pF
C32
10pF
R52
100R
C20
100nF
R14
100R
R7
100R
R12
100R
GND
GND
VCC
GND
3V
R17
2R2
+
C42
10uF
3 4
C33
10pF
C21
10pF
IC7B
74LV14
VCC
VCC
IC7C
74LV14
DATA_MAS
3V
R40
3.3K
3V
R18
3.3K
56
74HC125
IC4D
VCC
GND
CMD
RXD0 Data line from µC to MMC RXD0
12 11
13
-ENTRAMAS
Reset generation
R1
27K
+
C46
10uF
TXD0 MMC-Clock
for Data transmission
µC-MMC / MMC-MAS
3V
VCC
R59
10K
R60
100R
-RESET
IC7A
1 2
74LV14
C49
10pF
GND
Ŋm
GND
ǻ
1
2
3
7
6
5
IC11
A0
A1
A2
WP
SCL
SDA
24LC02B
VCC
GND
AXX
MP150 Schaltplane und Druckplattenabbildungen / Circuit Diagram and Layouts of PCB
C1
GND
22pF
C2
GND
22pF
RESET
-PLAY
-STOP
-MODE
-FF
CMD
8
VCC
C62
100nF
4
GND
DISP_EN
SUSPEND
-CS_USB
-FR
COMP
-WR
-RD
14.7456MHz
CLK_MAS
IC4A
74HC125
QU1
VCC
GND
TXD0
PUP
-DEMAND
CMD
1
21
20
3V
35
10
2
3
4
5
6
7
8
9
11
13
14
15
16
17
18
19
1
12
23
TS87C51RC2-LCBx
Microcontroller
IC1
X1
X2
EA/VP
RESET
P1.0/T2
P1.1/T2X
P1.2
P1.3
P1.4
P1.5
P1.6
P1.7
P3.0/RXD
P3.1/TXD
P3.2/INT0
P3.3/INT1
P3.4/T0
P3.5/T1
P3.6/WR
P3.7/RD
NC1
NC2
AD0/P0.0
AD1/P0.1
AD2/P0.2
AD3/P0.3
AD4/P0.4
AD5/P0.5
AD6/P0.6
AD7/P0.7
A8/P2.0
A9/P2.1
A10/P2.2
A11/P2.3
A12/P2.4
A13/P2.5
A14/P2.6
A15/P2.7
ALE/P
PSEN
VCC
GND
NC3
NC4
3V
VCC3
-EN_VCC
PWR_ON
-ENTRAMAS
EN_VIN
I2CC
CLEAR
I2CD
-INT_USB
ALE
VCC
3V
100nF
D0
D1
D2
D3
D4
D5
D6
D7
43
42
41
40
39
38
37
36
24
25
26
27
28
29
30
31
33
32
44
C3
100nF
22
23
GND
34
L7
10uH
C56
+
10uF
C57
DC/DC converter
and audio processor
DC-CONNECTOR
X4
X2
1
X3
1
2
X10
1
X7
1
2
VIN
1
2
3
CON1
HEADER 2
CON1
HEADER 2
3V
VBAT
VBAT/2
VIN
3V
GND
PUP
SMLVT3V3
GND
D9
VCC2
3V
R38
10K
R36
100K
10BQ015
VCC2 VCC
3V3V
R35
100K
GND
GND
D1
C63
47nF
+
C44
10uF
SI2305
GND
Q1
Q2
BSS138
C11
+
T495V107001C
VCC2
3V
C10
10uF
GND
T494V107006AS
ǵ
+
VCC3
3V
R70
3.3K
C31
3V
CLKDATA
Clock for Data
DATA_MAS
Data line from
MMC to MAS
L2
Ŋ˳
DT3316-22uH
C30
+
T494V107006AS
-RESET
transmission
MMC to MAS
D2
10BQ015
C45
+
10uF
I2CC
I2CD
Ƕ
Ǻ
ǹ
DCEN
CLKDATA
GND
PWR_ON
40 39
WSEN PUP
43
CLK_MAS
I2CD
I2CC
GND
GND
CLKI
32
SIC
31
SII
30
SID
26
SOC
4
I2CD
3
I2CC
14
PR
15
PCS
1
TE
2
POR
7
DCEN
12
DCSO
13
VSENS
11
DCSG
MAS3507D-P-F10(PQFP44)
GND
IC5
R20
WRDY
10K
SOD
SOI
CLKO
PI0
PI1
PI2
PI3
PI4
PI8
PI12
PI13
PI14
PI15
PI16
PI17
PI18
PI19
RTW
RTR
EOD
XVDD
XVSS
AVDD
AVSS
VDD
VSS
C13
10uF
+
SUP_AN
4.7uH
C50
100nF
R21
2.4K
L1
GND-A
C12
10uF
3V
VCC3
3V
GND-A
R19
+
2.4K
+
C38
TAJD157M006
C52
820pF
VBAT/
GND-A
2
6
7
C35
820pF
RIGHT
2
3
5
4
1
P1
RK10J12R_C
R9
3.3K
R10
3.3
K
GND-A
GNDREF
+
LEFT
GNDREF
C7
10uF
GND-A
C4
100nF
1
2
3
4
R15
4.7K
VCC2
3V
VCC2
3V
VCC2
3V
IC10
SDATA
SCLK
LRCK
MCLK
CS4331-KS
Audio-DAC
AOUTR
AOUTL
AGND
GND-A
UA+
5
8
7
6
C54
100nF
SUP_AN
GND
SUP_AN
C65
100nF
S1
STERN
3V
GND-A
PUP
Ƿ
SOD_DACSOD_DAC
24
SOI_DAC
25
MCLK
38
37
36
35
34
33
27
23
22
21
20
19
18
17
16
10
9
8
41
28
29
42
44
5
6
R61
VCC
R75
10K
DEMAND
ǽ
GND
C19
+
10uF
C18
+
10uF
C15
+
10uF
Ǹ
GND
10K
IC4B
74HC125
5 6
4
3V
C28
1nF
3V
C26
1nF
3V
C16
1nF
VCC_MAS
Ǽ
R76
10K
GND
L3
4.7uH
L4
4.7uH
L6
4.7uH
GRUNDIG Service 2 - 1 GRUNDIG Service 2 - 2
Page 10

Schaltplan und Druckplattenabbildungen / Circuit Diagram and Layouts of PCB MP
AXX
MP150 Schaltplan und Druckplattenabbildungen / Circuit Diagram and Layouts of PCB MP
AXX
MP150
Battery measurement
Keys
VCC2
3V
GND
T3
GND
T1
GND
T4
GND
T2
GND
T5
GND
-PLAY
-STOP
-FF
-FR
R37
47K
R39
4.7K
VCC
R78
R79
14
7
R72
10K
R73
33R
IC7G
VCC
GND
74LV14
0R
0R
BSS84
Q5
R77
2.2K
C64
100nF
GNDGND
100nF
IC4C
9 8
74HC125
10
IC7E
11 10
74LV14
VCC
C43
GND
R71
10K
Q7
BC817
R82
12 K
GND
VIN
-PLAY
-STOP
-FF
-FR
DCEN
-EN_VCC
CLEAR
EN_VIN
-MODE
Q3
BC817
GNDGND
IRLML6302
Q4
VCC
C47
100nF
GND
GND
GND
BSS138
Q6
C29
100nF
3V
IC4E
14
VCC
7
GND
74HC125
C37
100nF
COMP
-WR
-RD
DISP_EN
D0
D1
D2
D3
D4
D5
D6
D7
3V
3V
Display connector
VCC
VCC2
VCC
R27 10K
R28 10K
R29 10K
R30 10K
R31 10K
R32 10K
R33 10K
R34 10K
+5V
R50
10K
R51
1.2K
GND
DISP_EN
+5V
D0
D1
D2
D3
D4
D5
D6
D7
GND
D0
D1
D2
D3
D4
D5
D6
D7
V0
-WR (DISP_RS)
-RD (DISP_R/-W)
ST4
1
2
3
4
5
6
7
8
9
10
11
12
13
14
PFC_CON
LEFT
GNDREF
RIGHT
Audio amplifier
R4
47K
RIGHT
R81
GNDREF
R5
47K
LEFT
USB-Port
X5
MJ-A18
1,5V
1,5V
1,5V
0R
1,5V
USB controller
-INT_USB
C58
C59
VCC
3V
IC7F
74LV14
QU3
6MHz
ALE_USB
-RD
-WR
22
23
26
25
28
10
11
15
16
19
20
12
IC2
XTAL1
XTAL2
D+
D-
A0
ALE
CS
RD
WR
EOT
RESET
SUSPEND
PDIUSBD12
R11
10K
C48 470pF
IC7D
9 8
74LV14
CLKOUT
DMREQDMACK
VOUT3.3
VCC
GND
D0
D1
D2
D3
D4
D5
D6
D7
INT
GL
Ŋɨ
D0
1
D1
2
D2
3
D3
4
D4
6
D5
7
D6
8
D7
9
-INT_USB
14
21
13
1718
27
24
C61
5
100nF
3V
VCC
C6
470nF
+
D3
BAR43
BAS16
C60
10uF
D8B
GND
VCC
+5V
3V
C22
470nF
GND
10K
GND
22pF
GND
22pF
R66 0R
R67 0R
13 12
VCC
3V
VCC
3V
D+
D-
R
1
L
7
L11 742792042
L12 74279215
L13 74279215
C40
+
TAJD157M006
C39
+
TAJD157M006
R64
1M
GND
R2
1K
GND
GND
R8
1K
R62 18R
R63 18R
R65
1M
L9
1.5uH
L5
1.5uH
L10
C17
10nF
D+_uC
D-_uC
C27
10nF
1
2
3
MX345GLB
ALE
-CS_USB
-RD
-WR
-RESET
SUP_AN
X6
SUSPEND
1
2
3
C9 56pF
U1
R3 68K
3V
8
+
-
2
3
5
6
+
+
-
-
4
TDA1308T
1,5V
1,5V
R6 68K
R68
10K
3V
VCC
R69
Charge pump for LCD power supply
GND-A
1.5uH
GND-A
GND-A
C8 56pF
GND-A GND-A
2 - 3 GRUNDIG Service 2 - 4 GRUNDIG Service
Page 11

MP
AXX
MP150 Schaltplan und Druckplattenabbildungen / Circuit Diagram and Layouts of PCB MP
AXX
MP150 Schaltplane und Druckplattenabbildungen / Circuit Diagram and Layouts of PCB
Die Leiterplatte ist eine Multilayerplatte mit 3 Leiterbahnebenen:
Abbildung A zeigt die Bestückung und die Leiterbahnen der oberen Ebene + die Leitbahnen der mittleren Ebene.
Abbildung B zeigt ergänzend zu Abbildung A die Leiterbahnen der mittleren und unteren Ebene.
Abbildung C zeigt die Bestückung und die Leiterbahnen der unteren Ebene + die Leitbahnen der mittleren Ebene.
Abbildung D zeigt ergänzend zu Abbildung C die Leiterbahnen der mittleren und oberen Ebene.
Für die tatsächliche Bauteilbestückung ist der Schaltplan maßgebend!
A
0
@
9
6
The PCB is a multi layer PCB with 3 layers:
Figure A shows the upper layer and its components + the centre layer.
Figure B shows in addition to figure A the centre and the lower layer.
Figure C shows the lower layer and its components + the centre layer.
Figure D shows in addition to figure C the middle and the upper layer.
The circuit diagram is relevant for the actual component assembly!
B
VIN
3V
VCC2
3V
VCC3
3V
3
4
5
7
1
2
8
DC
!
VCC
3V
SUP_AN
3V
GRUNDIG Service 2 - 5 GRUNDIG Service 2 - 6
Page 12

MP
Ƕ
CLKDATA
Clocksignal von MultiMediaCard
zum Audioprozessor
Clock signal from MultiMediaCard
to audio processor
AXX
MP150 Schaltplan und Druckplattenabbildungen / Circuit Diagram and Layouts of PCB
Oszillogramme / Oscillogrammes
DATA_MAS
ǵ
Datensignal von MultiMediaCard
zum Audioprozessor
Data signal from MultiMediaCard
to audio processor
SOI_DAC
Ǹ
Clocksignal von Audioprozessor
zum D/A-Wandler
Clock signal from audio processor
to D/A converter
DEMAND
ǽ
Interrupt Signal vom Audioprozessor zum µController
Interrupt signal from audio
processor to µController
CLKDATA
Ƕ
Clocksignal von MultiMediaCard
zum Audioprozessor
Clock signal from MultiMediaCard
to audio processor
I2CC (I2C-Clock)
ǹ
RES (Reset signal)
Ŋm
Signal nur beim Einschalten
des Gerätes
Signal is only present during
switching on
I2CD (I2C-Daten/Data)
Ǻ
Ladungspumpe 3V -> 5V
Ŋɨ
charge pump 3V -> 5V
SOD_DAC
Ƿ
Datensignal von Audioprozessor
zum D/A-Wandler
Data signal from audio processor
to D/A converter
CLK_MAS (Clock Signal)
ǻ
MCLK (Clock Signal)
Ǽ
DC/DC Converter Signal 3V
Ŋ˳
2 - 7 GRUNDIG Service
Page 13

3 - 1 GRUNDIG Service
Ersatzteilliste
Explosionszeichnung und Ersatzteilliste / Exploded View and Spare Parts List MP
ǵ
1
Spare Parts List
7 / 2000
MATERIAL-NR. / PART NO.: 75509 410 8600
BESTELL-NR. / ORDER NO.: GDL9086 MAGIC GREEN
POS. NR. ABB. MATERIAL-NR. ANZ. BEZEICHNUNG DESCRIPTION
POS. NO. FIG. PART NUMBER QTY.
72011 847 2200 M-P 150 MPAXX MAGIC GREEN M-P 150 MPAXX MAGIC GREEN
0001.000 1 75955 016 7900 GEH.-OBERTEIL HOUSING TOP
0002.000 1 75955 016 8000 GEH.-BODEN HOUSING BOTTOM
0003.000 1 75955 016 2100 SCHIEBER GRUEN SLIDER GREEN
0004.000 1 75955 016 2200 TASTEN SET SCHWARZ KEYS SET BLACK
0005.000 1 75955 016 8100 TASTE GRUEN KEY GREEN
0007.000 1 75955 016 8200 2 TUER BATTERIE DOOR BATTERY
0008.000 75955 016 1600 DISPLAY MIT KABEL BT21603 DISPLAY WITH CABLE BT6120
0009.000 75955 016 1700 2 BATTERIEKONTAKT + /5224 BATTERYCONTACT + /5224
0010.000 75955 016 1800 2 BATTERIEKONTAKT - /5202 BATTERYCONTACT - /5202
0012.000 75955 016 2700 BODENTEIL KARTENHALTER BOTTOM PART CARD HOLDER
0013.000 75955 016 2800 OBERTEIL KARTENHALTER UPPER PART CARD HOLDER
0015.000 75955 016 3600 MMC-CARD (32MB) MMC-CARD (32MB)
0020.000 75955 016 8300 DATENKABEL USB DATA CABLE USB
0022.000 75955 016 8400 SOFTWARE CD GRUNDIG VERSION SOFTWARE CD GRUNDIG VERSION
d©
TAUSCHGERAET EXCHANGE SET
NACH DER GARANTIE AFTER THE GUARANTEE AN
EINZELREPARATUR MOEGLICH INDIVIDUAL REPAIR IS POSSIBLE
M-P 150 MPAXX
AUDIO
1
5
1
4
7
72010 761 8000 BEDIENUNGSANLEITUNG D/GB/F/I/NL INSTRUCTION MANUAL D/GB/F/I/NL
72010 761 8100 BEDIENUNGSANLEITUNG E/P/DK/S/FIN INSTRUCTION MANUAL E/P/DK/S/FIN
72010 771 0500 SERVICE MANUAL D/GB SERVICE MANUAL D/GB
POS. NR. MATERIAL-NR. BEZEICHNUNG
POS. NO. PART NUMBER DESCRIPTION
D 00001 75955 016 0100 DIODE 10BQ015
D 00002 75955 016 0100 DIODE 10BQ015
D 00003 75955 016 3700 DIODE BAR43
D 00008 83092 100 1600 SMD DIODE BAS16 AV215 -G8
D 00009 75955 016 3800 DIODE SMLVT3V3
IC 00001 75955 016 3900 IC TS87C51RC2ZZZLCBR
IC 00002 75955 016 7000 IC PDIUSBD12PW
IC 00004 83051 801 2500 IC 74HC125
IC 00007 75955 016 0600 IC 74LV14
IC 00010 75954 020 9300 IC CS 4331-KS
IC 00011 75955 016 7200 IC 24LC02B PROG.KPL MP150
L 00001 75955 016 0700 SPULE 4,7UH
L 00002 75955 016 0900 SPULE 22UH
L 00002 75955 016 0700 SPULE 4,7UH
L 00004 75955 016 0700 SPULE 4,7UH
L 00005 75955 016 1000 SPULE 1,5UH
L 00006 75955 016 0700 SPULE 4,7UH
L 00007 75955 016 0800 SPULE 10UH
L 00009 75955 016 1000 SPULE 1,5UH
L 00010 75955 016 1000 SPULE 1,5UH
L 00011 75955 016 7300 SMD SPULE 2800OHM(180MHZ)
L 00012 75955 016 7400 SMD SPULE 160OHM(550MHZ)
L 00013 75955 016 7400 SMD SPULE 160OHM(550MHZ)
Es gelten die Vorschriften und Sicherheitshinweise
gemäß dem Service Manual "Sicherheit", Mat.-Nummer 72010 800 0000, sowie zusätzlich die eventuell
abweichenden, landesspezifischen Vorschriften!
POS. NR. MATERIAL-NR. BEZEICHNUNG
POS. NO. PART NUMBER DESCRIPTION
P 00001 75955 016 2600 POTI MIT KNOPF 10KOHM X2
Q 00001 75955 016 7500 SMD TRANS SI2305DS
Q 00002 75955 016 7600 SMD TRANS BSS138
Q 00003 83010 028 4800 SMD TRANS BC848A
Q 00005 75955 016 7800 SMD TRANS BSS84
Q 00006 75955 016 7600 SMD TRANS BSS138
Q 00007 83010 028 4800 SMD TRANS BC848A
QU 00001 75955 016 1100 QUARZ 14,7456MHZ
QU 00003 75955 016 7700 QUARZ 6,0MHZ
T 00001 75955 016 1200 SMD TASTER 7914J002000
T 00002 75955 016 1200 SMD TASTER 7914J002000
T 00003 75955 016 1200 SMD TASTER 7914J002000
T 00004 75955 016 1200 SMD TASTER 7914J002000
T 00005 75955 016 1200 SMD TASTER 7914J002000
U 00005 75954 020 9400 IC TDA 1308T/N1
X 00004 75955 016 1300 DC-BUCHSE/JACK
X 00005 75955 016 1400 KLINKENBUCHSE 2,5MM/DATEN
X 00006 75955 016 1500 KLINKENBUCHSE 3,5MM
The regulations and safety instructions shall be valid
!
as provided by the "Safety" Service Manual, part
( ! )
number 72010 800 0000, as well as the respective
national deviations.
ÄNDERUNGEN VORBEHALTEN / SUBJECT TO ALTERATION
KOPFHOERER/EAR PHONE
2
7
3
AXX
MP150
 Loading...