

Grundig Meglio series, Meglio GLED2211HDV/W, Meglio GLED3211HDV/W Instruction Manual


CONGRATULATIONS
Congratulations on the purchase of your GRUNDIG MEGLIO TV. The following instructions will assist
you in operating each of the models in the MEGLIO range.
You may already be familiar with using a similar unit, but please take the time to read the instructions
relevant for your model.
Your safety is very important. Please ensure you read the “Safety Instructions” before you operate this
unit.
The MEGLIO range has been designed to give you many years of trouble-free service. In the unlikely
event that your product fails to work normally, please call one of our qualified service engineers on the
toll free warranty line - 1800 509 394 (Australia wide).

CONTENTS
UNPACKING ..................................................................................................................................... 1
TV STAND INSTALLATION.................................................................................................................. 2
WALL MOUNT BRACKET INSTALLATION ........................................................................................... 3
VIEW OF THE TV AND FUNCTIONS ................................................................................................... 4
REMOTE CONTROL........................................................................................................................... 7
INSTALLATION AND CONNECTION ................................................................................................. 10
BASIC OPERATIONS ........................................................................................................................ 11
TELETEXT ....................................................................................................................................... 12
MAIN MENU OPERATIONS ............................................................................................................. 13
CHANNEL MENU ....................................................................................................................... 13
PICTURE MENU ......................................................................................................................... 15
SOUND MENU........................................................................................................................... 16
TIME MENU (IN TV MODE ONLY) ............................................................................................... 17
L
OCK MENU
................................................................................................................................. 18
SETUP MENU ............................................................................................................................ 20
EPG MENU ..................................................................................................................................... 23
DTV RECORDING ............................................................................................................................ 25
MULTI-MEDIA OPERATION ............................................................................................................. 26
PC ...................................................................................................................................................27
DVD PLAYER OPERATION ............................................................................................................... 28
TROUBLESHOOTING ....................................................................................................................... 31
SPECIFICATIONS ............................................................................................................................. 32
DISPLAY MODES (VGA ONLY) ......................................................................................................... 34
SAFETY INSTRUCTIONS .................................................................................................................. 36
WARRANTY .....................................................................................................................................37

- 1 -
UNPACKING
The following items will be included with the purchase of a MEGLIO TV. Please refer to the model
numbers outlined below for your specific accessories. If any items are missing from the below list,
please contact the warranty line on 1800 509 394.
LED LCD TV
Remote Control
Operation Manual
DC Adaptor & Power Cord
(GLED2211HDV/W only)
RCA Cable
RF Input Adaptor Lead
(GLED2211HDV/W only)
12V Cigarette Adapter
(GLED2211HDV/W only)
Screws 3 x 10 mm
(GLED3211HDV/W only)
Screws 3 x 18 mm
(GLED3211HDV/W only)
- 2 -
INSTALLATION NOTES
Connect your TV to Mains Power (AC 100-240 Volts, 50/60). Only connect this TV to Mains
Power that matches the power specifications (AC 100-240 Volts, 50/60) of this TV.
Locate the TV in the room where light does not directly strike the screen.
Total darkness or a reflection on the picture screen can cause eyestrain. Soft and indirect
lighting is recommended for comfortable viewing.
Allow enough space between the TV and the wall to permit ventilation.
Avoid excessively warm locations to prevent damage to the cabinet or component failure.
Do not cover the ventilation openings when using the TV.
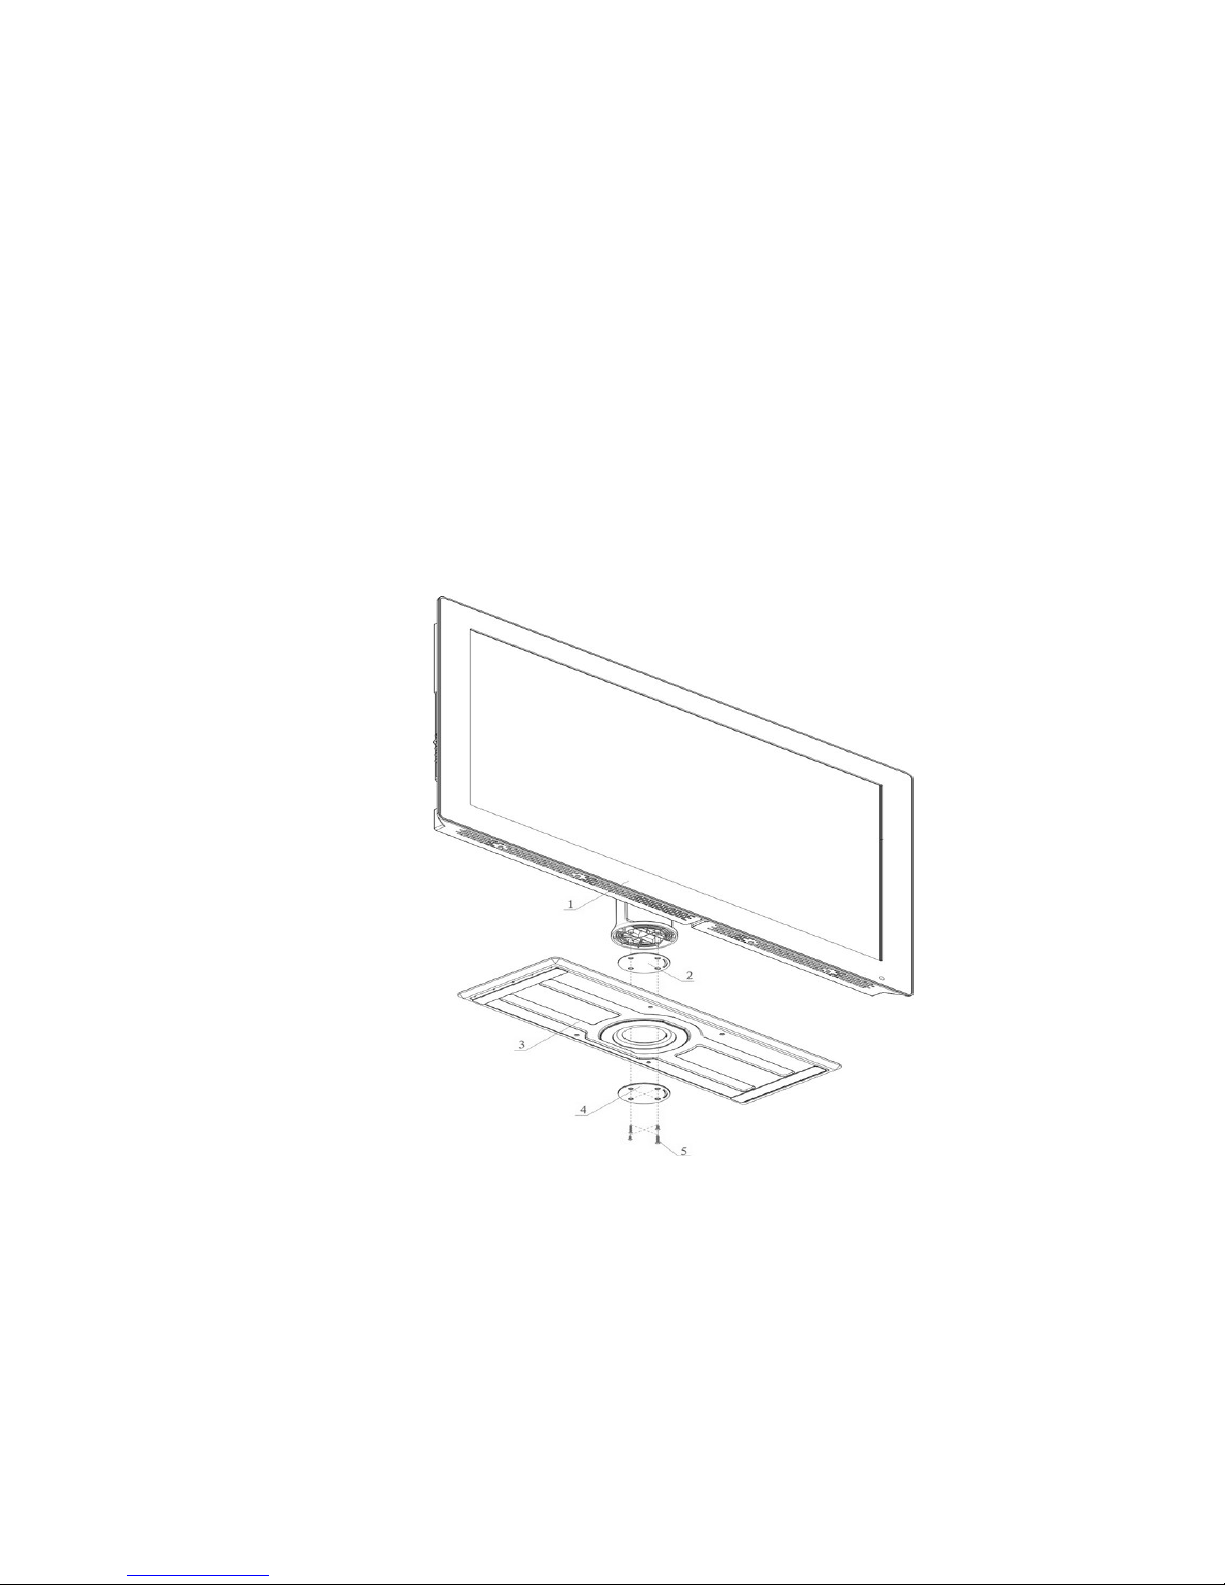
TV STAND INSTALLATION
Please see the below instructions of how to connect your stand to your TV:
Part Name
1. Main unit 2. Washer #1 3. Stand base 4. Washer #2 5. Screws
Assembly Instructions
1. Place washer #1, above the Stand base, and washer #2 below the stand base, ensuring that the screw
holes are matched up.
2. Use four of the screws supplied (2 Screws 3 x 10mm, 2 x Screws 3 x 18mm) to fasten the washer
and stand to the main unit.
3. Rotate the base slightly to confirm it is rotatable and assembled well.
- 3 -
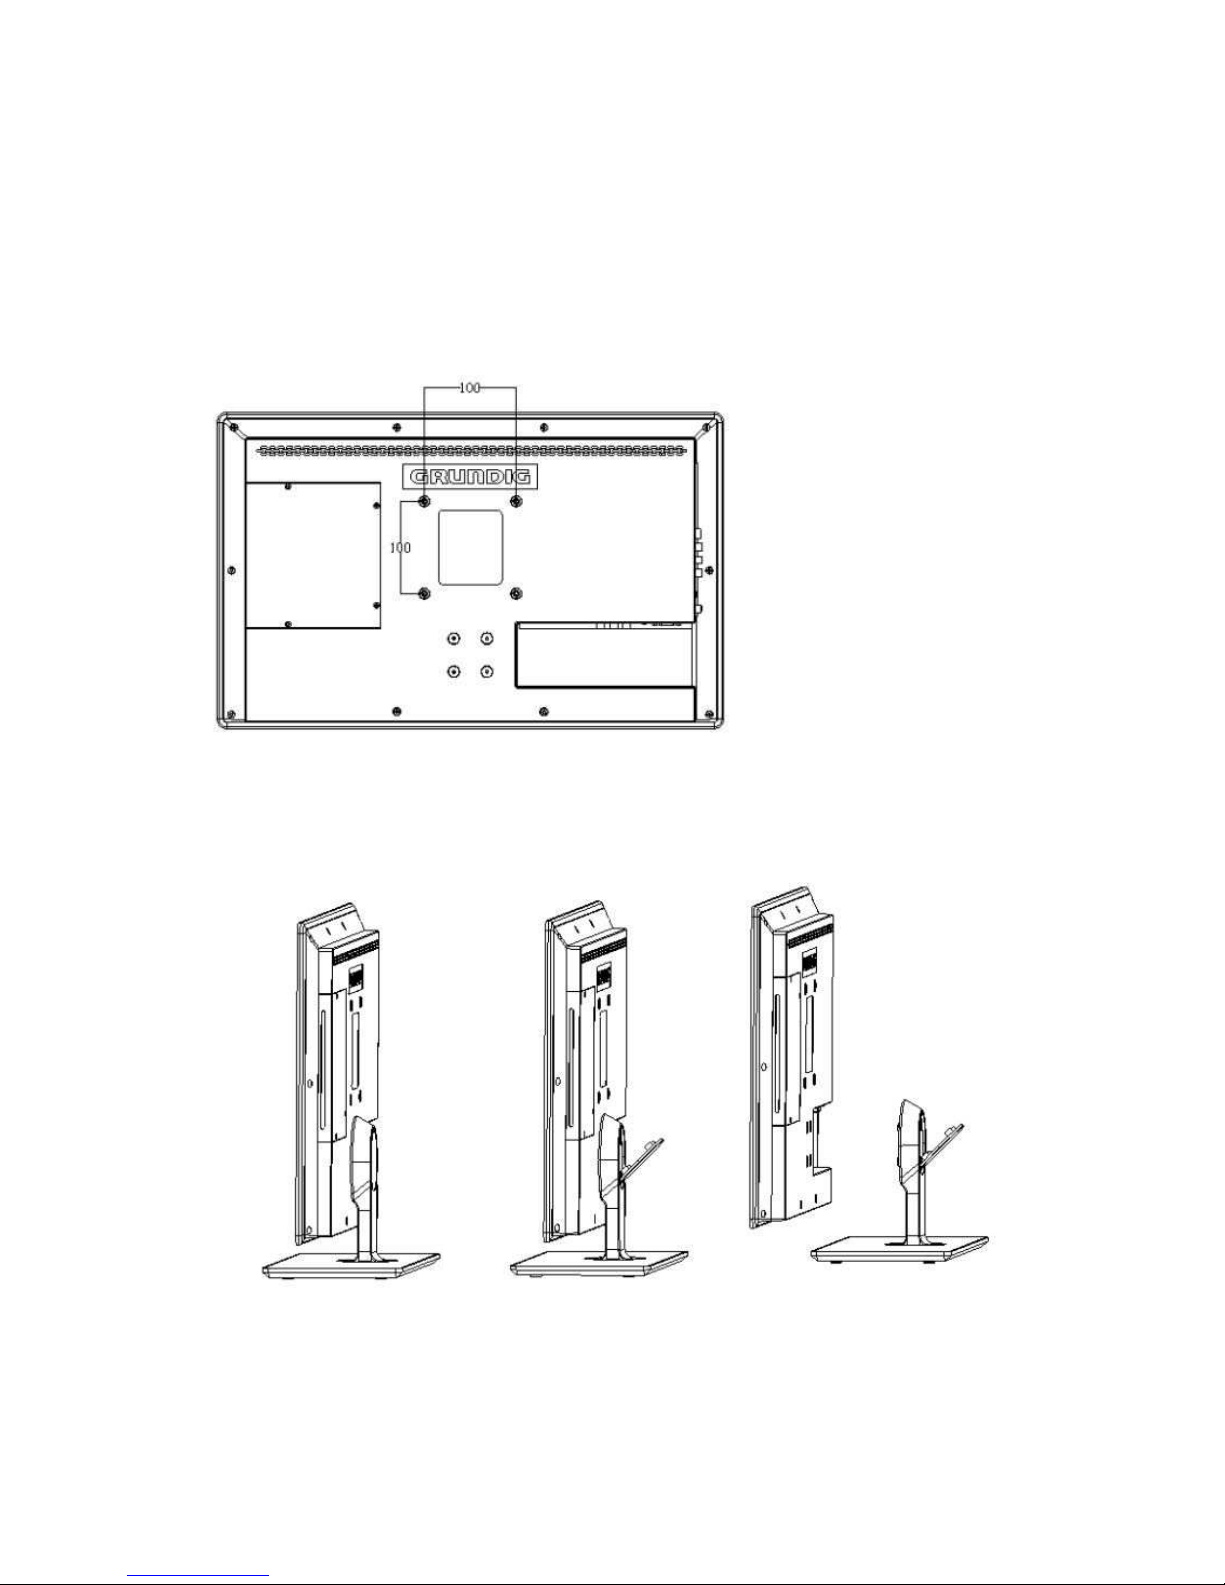
WALL MOUNT BRACKET INSTALLATION
This TV is VESA Standard wall mountable. Please see below image of the 4 VESA standard holes
(GLED2211HDV/W - 100mm x 100mm) (GLED3211HDV - 200mm x 100mm). The wall mount bracket and
screws are not included with your TV. The wall bracket may be purchased from your local retailer. To attach
your bracket use the 4 holes provided to screw your bracket to your TV. Please note that you will also have
to remove the base stand and neck.
Before mounting your TV onto wall you need to remove the stand from your TV. Open the plastic stand cap
as shown in the middle picture below. Then unscrew the four stand screws. Once these have been
removed you can now remove the stand as shown in the last picture.
- 4 -
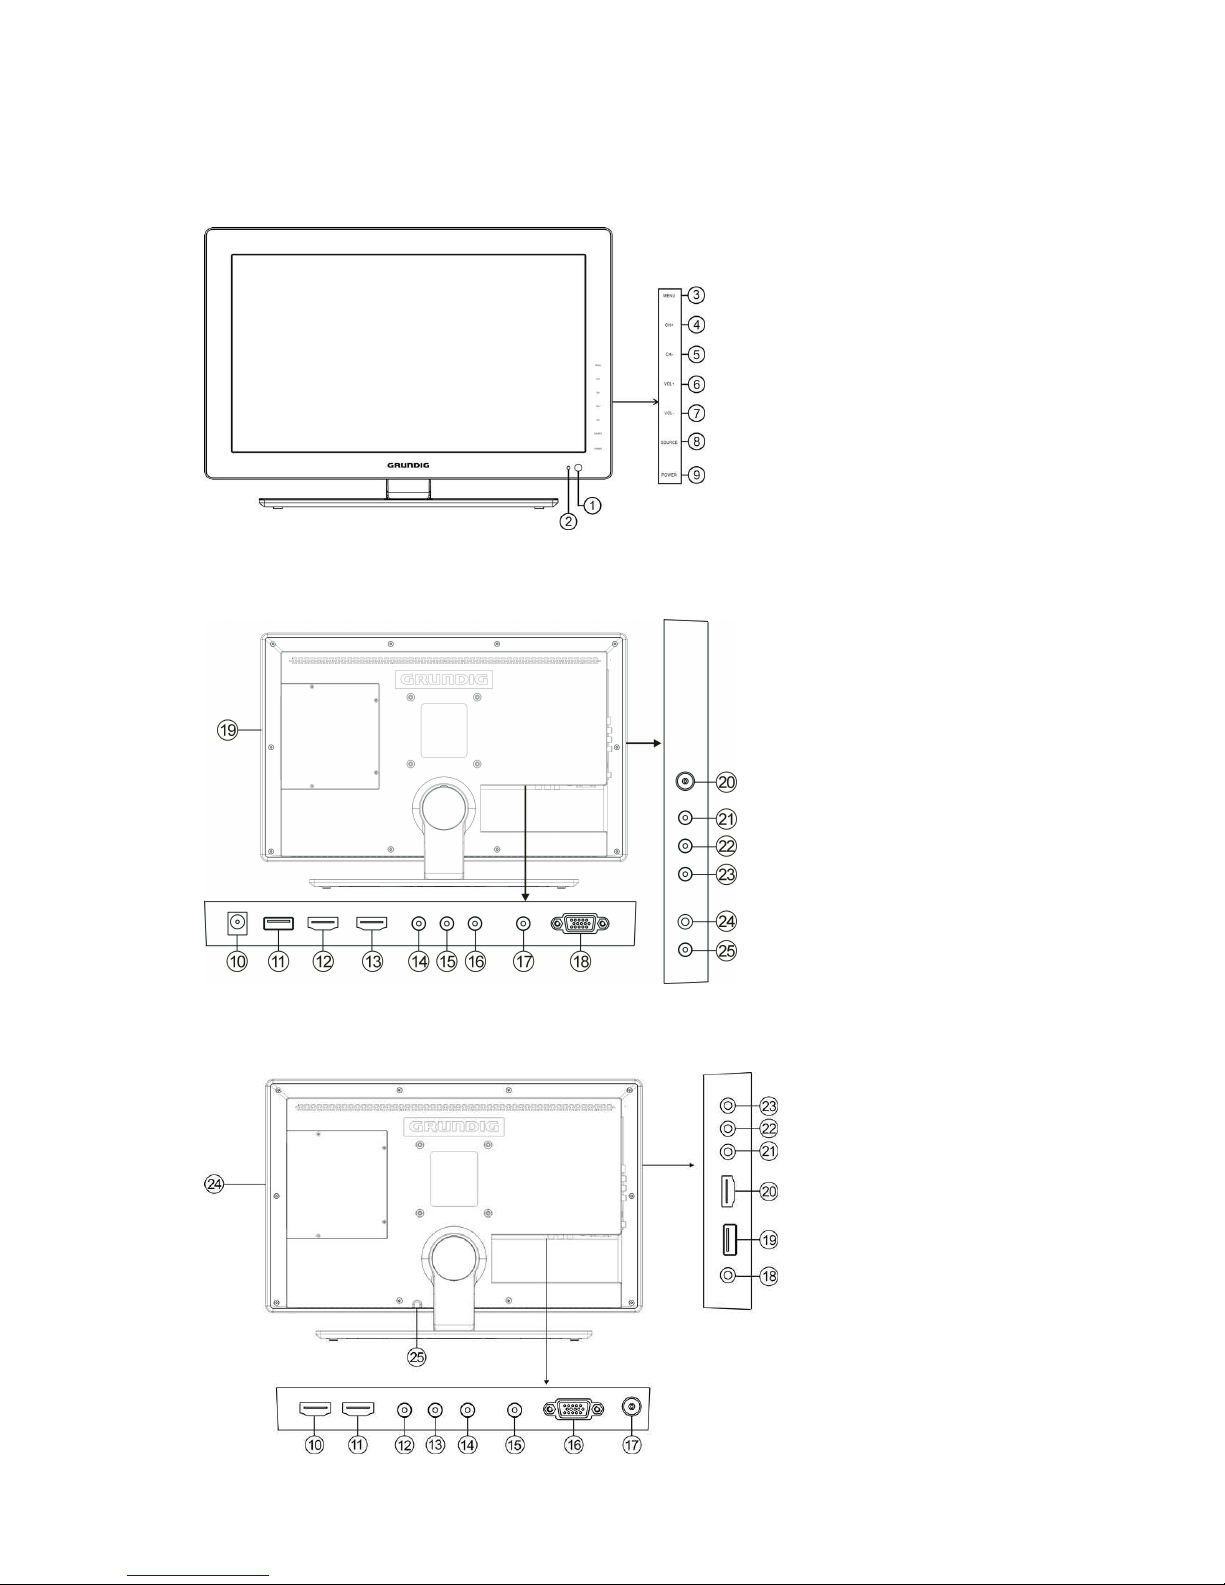
VIEW OF THE TV AND FUNCTIONS
Front View
Back View (GLED2211HDV/W)
Back View (GLED3211HDV/W)

- 5 -
TV KEY FUNCTIONS
1. Remote Sensor
Receives the remote signals from the remote
control.
2. Power Indicator
In Power On Mode the indicator will turn Blue. In
Standby mode the indicator will turn Red. The
LED will blip when receiving remote control or
touch panel commands.
3. MENU
Touch MENU to enter the Main Menu.
4. CH+
Touch CH+ to scroll upwards through the channel
list.
5. CH-
Touch CH- to scroll downward through the
channel list.
6. VOL+
Touch VOL+ to increase the volume level.
7. VOL-
Touch VOL- to decrease the volume level.
Note: In main Menu, touch Vol+/- to change a
sub-Menu. Touch CH+/- to enter the sub-Menu
and then touch it repeatedly to select the item
you want to adjust or set. Touch VOL+/- to enter
the particular item and then adjust or change the
setting.
8. SOURCE
Touch SOURCE repeatedly to select the Input
source, and then touch Vol+ to confirm.
9. Power
Touch POWER to turn on or turn off the TV.
GLED2211HDV/W:
10. DC Input
The DC Input allows you to connect your DC 12
Volt power supply.
11. USB Input
The USB Input enables you to insert your USB &
play/view DivX, MPEG, MP4, MOV, AVI, MKV,
12. HDMI1 Input
The HDMI Input allows you to connect your HDMI
Cable for greater definition.
13. HDMI2 Input
The HDMI Input allows you to connect your HDMI
Cable for greater definition.
14. Y Input
The Y Input must be connected for a component
connection.
15. Pb Input
The Pb Input must be connected for a component
connection.
16. Pr Input
The Pr Input must be connected for a component
connection.
17. PC Audio IN
The PC Audio Input allows you to connect your TV to
your PC to use as a monitor and enable the sound for
movies etc.
18. VGA Input
The VGA Input allows you to connect your TV to your
PC to use as a monitor or view movies.
19. DVD Disc Slot
The DVD Disc Tray allows you to load your DVD Disc
for playback.
20. RF IN
To connect the external aerial.
21. Audio Input
The AV Audio Input (Left) must be connected with
the white cable for a composite connection.
22. Audio Input
The AV Audio Input (Right) must be connected with
the red cable for a composite connection.
23. CVBS Video Input
The CVBS Input must be connected with the yellow
cable in both composite & component connections.
24. Headphone Output
To connect headphones for private listening.
25. Coaxial Output
The Coaxial Out allows you to connect the TV to your
surround sound system.

- 6 -
WMV, JPEG, BMP, WMA, MP3, AC3, AAC files.
GLED3211HDV/W:
10. HDMI1 Input
The HDMI Input allows you to connect your
HDMI Cable for greater definition.
11. HDMI2 Input
The HDMI Input allows you to connect
your HDMI Cable for greater definition.
12. Y Input
The Y Input must be connected for a
component connection.
13. Pb Input
The Pb Input must be connected for a
component connection.
14. Pr Input
The Pr Input must be connected for a
component connection.
15. PC Audio IN
The PC Audio Input allows you to connect
your TV to your PC to use as a monitor and
enable the sound for movies etc.
16. VGA Input
The VGA Input allows you to connect your TV
to your PC to use as a monitor or view
movies.
17. RF IN
To connect the external aerial.
18. Coaxial Output
The Coaxial Out allows you to connect the TV
to your surround sound system.
19. USB Input
The USB Input enables you to insert your USB
& play/view DivX, MPEG, MP4, MOV, AVI,
MKV, WMV, JPEG, BMP, WMA, MP3, AC3,
AAC files.
20. HDMI3 Input
The HDMI Input allows you to connect your
HDMI Cable for greater definition.
21. CVBS Video Input
The CVBS Input must be connected with the
yellow cable in both composite & component
connections.
22. Audio Input (R)
The AV Audio Input (Right) must be connected
with the RED cable for a composite connection.
23. Audio Input (L)
The AV Audio Input (Left) must be connected with
the white cable for a composite connection.
24. DVD Disc Slot
The DVD Disc Tray allows you to load your DVD
Disc for playback.
25. AC Input (AC110~~~~240V 50/60Hz)
- 7 -
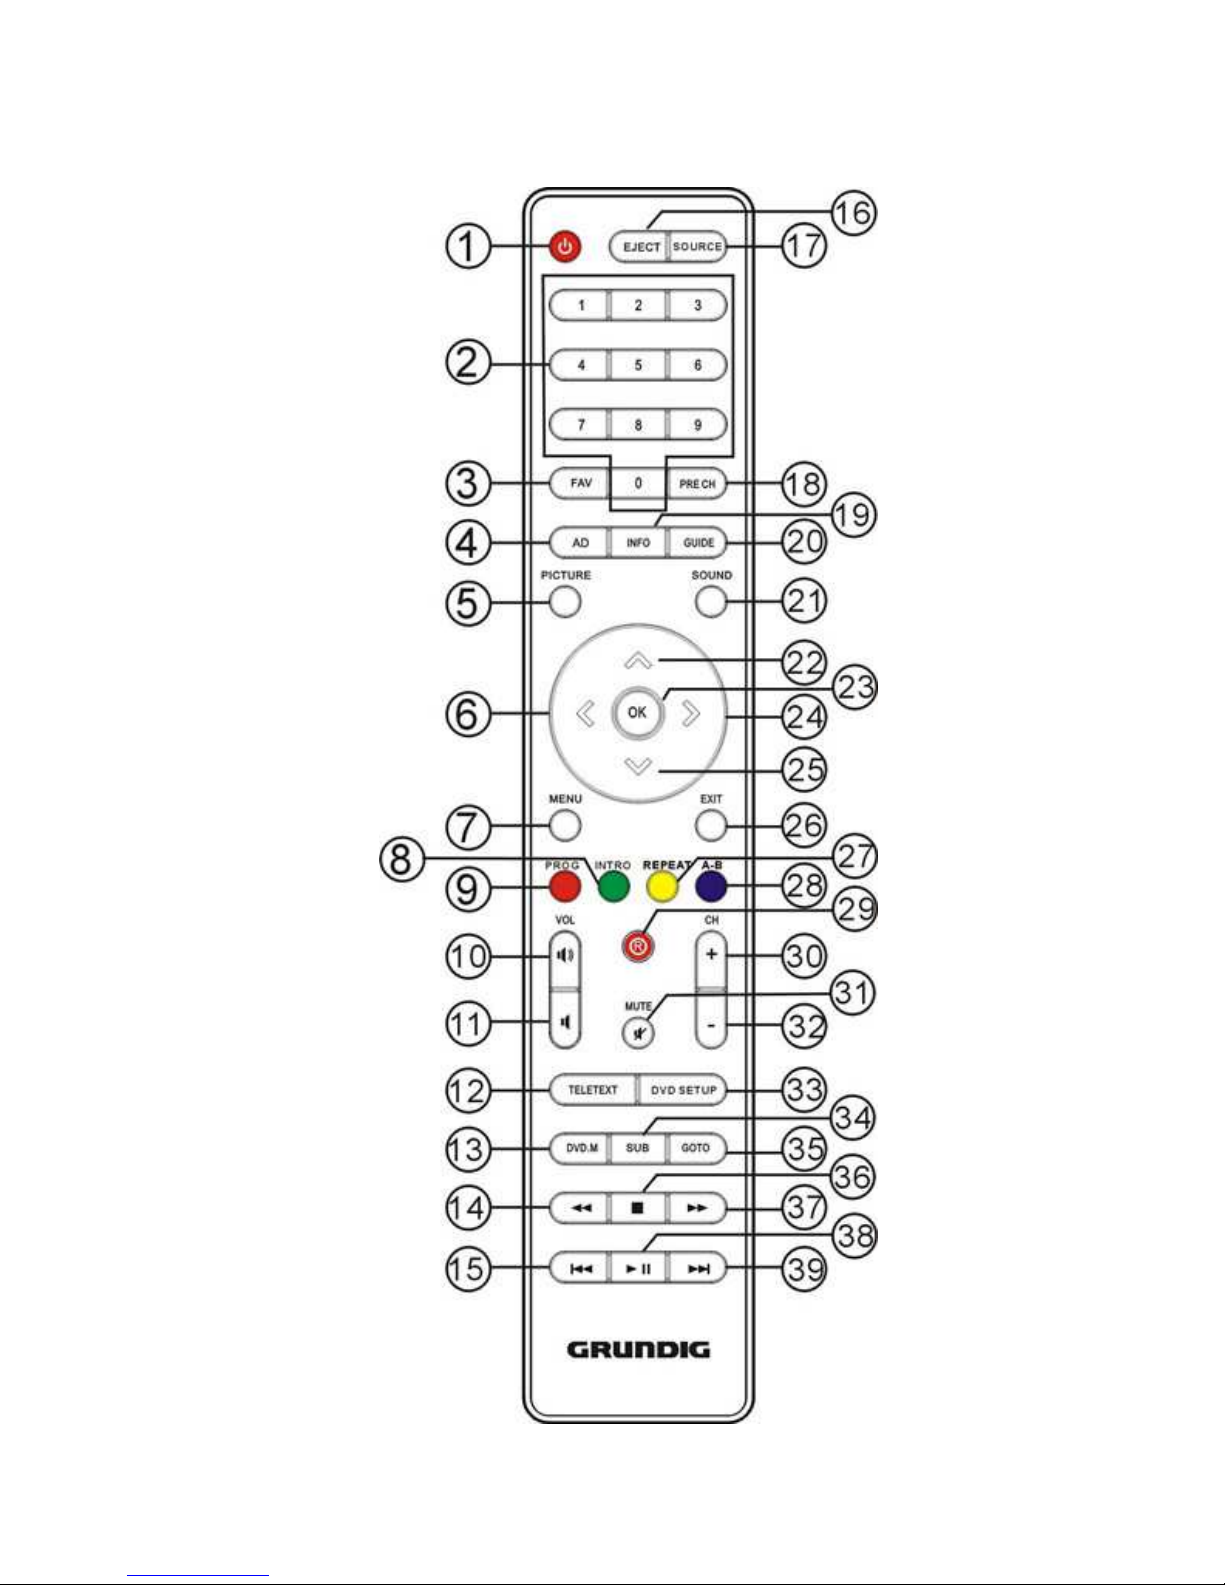
REMOTE CONTROL

- 8 -
REMOTE CONTROL KEY FUNCTIONS
1. STANDBY Button: Press this button to switch the TV on or off.
2. NUMERIC Buttons: Press these buttons to select a channel or select a page or select a track number in DVD
mode.
3. FAV Button: Press this button to display the Favourite Channel list you set. In Programme Edit mode, press
FAV Button to set the Favourite Channel list.
4. AD Button: Press this button to turn ON or OFF the Audio Description function. In DVD mode press this
button to switch audio language.
5. PICTURE Button: Press this button to enter the picture mode.
6. LEFT NAVIGATION Button: Press this button to scroll up through the Menus, or to decrease the volume
level.
7. MENU Button: Press this button to view the Main Menu.
8. INTRO/GREEN Button: Press this button to play the first 10 seconds of each track in DVD mode, or to
display green subject in Teletext mode or sub-Menus.
9. RED/PROG Button: Press this button to enter program setting in DTV mode, display red subject in Teletext
mode and sub-Menus.
10. VOL+ Button: Press this button to increase the volume level.
11. VOL- Button: Press this button to decrease the volume level.
12. Teletext Button: Press this button to enter the Teletext Menu.
13. DVD.M Button: Press this button to display the DVD Disc Menu.
14. REWIND Button: Press this button to rewind play in DVD mode.
15. SKIP BACKWARDS Button: Press this button to go back to the previous chapter.
16. EJECT Button: Press this button to eject your disc from DVD mode.
17. SOURCE Button: Press this button to show the Source list.
18. PRE CH Button: Press this button to return to the previous channel viewed.
19. INFO Button: Press this button to view the current program information in TV mode, or the Disc
information in DVD mode. Press it again to make it disappear.
20. EPG Button: Press this button to display the Electronic Program Guide.
21. SOUND Button: Press this button to select through the different sound modes selections.
22. UP NAVIGATION Button: Press this button to scroll up through the Menus, or to scroll upwards through the
channel list.
23. OK Button: Press the OK Button to confirm settings. Or press it to show the Channel List in TV mode.
24. RIGHT NAVIGATION Button: Press the Right arrow to scroll up through the Menus, or to increase the
volume level.

- 9 -
25. DOWN NAVIGATION Button: Press this button to scroll up through the Menus, or to scroll downwards
through the channel list.
26. EXIT Button: Press this button to exit Menu settings.
27. YELLOW /REPEAT Button: Press this button to repeat play, or to display yellow subject in Teletext or in the
sub-Menu.
28. BLUE/A-B Button: Press this button to repeat A-B playback or display blue subject in Teletext or in the
sub-Menu.
29. RECORD Button: Press this button to record a TV program.
30. CH+ Button: Press this button to scroll upwards through the channel list.
31. MUTE Button: Press this button to turn off and on the sound, only.
32. CH- Button: Press this button to scroll downwards through the channel list.
33. DVD SETUP Button: Press this button to display the Set Up Menu in DVD mode. Press it again to exit DVD
setup menu.
34. SUB Button: Press this button to turn ON or OFF the subtitle feature. In DVD mode press this button to
switch subtitle language.
35. GOTO Button: Press this button to enter GOTO feature in DVD mode, or select a subpage in the Teletext
Menu.
36. STOP Button: Press this button to stop play in DVD mode and stop recording in or T ime shift PVR mode.
37. FAST FORWARD Button: Press this button to fast forward play in DVD mode and Fast Forward recording in
or Time shift PVR mode.
38. PLAY/PAUSE Button: Press this button in DVD mode to pause or play in DVD mode and Play Pause
recording in or Time shift PVR mode.
39. SKIP FORWARD Button: Press this button to skip to the next chapter in DVD mode and Skip Forward
recording in or Time shift PVR mode.
 Loading...