

Grundig KMP8650S operation manual
KITCHEN MACHINE
KMP 8650 S
DENLENDAFRFITRNOESSVRO
HR

F
E
D
G
C
B
H
I
J
A
NOPQ
M
K
L
3

DEUTSCH 05-14
ENGLISH 15-24
FRANÇAIS 25-34
TÜRKÇE 35-44
ESPAÑOL 45-54
ROMÂNA 55-64
HRVATSKI 65-74
NEDERLANDS 75-84
DANSK 85-94
SUOMI 95-104
NORSK 105-114
SVENSKA 115-124
4

SICHERHEIT _______________________________
Dieser Abschnitt enthält
Sicherheitsanweisungen, die
beim Schutz vor Personen- und
Sachschäden helfen.
Bei Nichtbeachtung dieser
Anweisungen erlischt die gewährte Garantie.
Bewahren Sie die
Bedienungsanleitung zum späteren Nachschlagen auf. Sollte
das Gerät an Dritte weitergegeben werden, muss diese
Bedienungsanleitung ebenfalls
mit ausgehändigt werden.
Dieses Gerät erfüllt die inter-
▪
nationalen Sicherheitsstandards.
Dieses Gerät kann von Kin-
▪
dern und Personen mit eingeschränkten körperlichen,
sensorischen oder mentalen
Fähigkeiten oder ohne spezielles Wissen oder Erfahrung
verwendet werden, sofern sie
beaufsichtigt werden oder die
Anweisungen zum sicheren
Umgang mit dem Produkt und
dessen potenzielle Gefahren
verstehen.
Kinder dürfen das Gerät nicht
▪
benutzen.
Dieses Gerät ist nur für den pri-
▪
vaten Gebrauch im Haushalt
bestimmt und ist nicht für den
professionell-gastronomischen
Einsatz geeignet. Es darf nicht
für den gewerblichen Gebrauch verwendet werden.
Kinder dürfen mit dem Gerät
▪
nicht spielen.
Halten Sie das Gerät von Kin-
▪
dern fern.
Reinigung und Nutzerwar-
▪
tung dürfen nicht von Kindern
durchgeführt werden.
Reinigen Sie das Gerät in
▪
Übereinstimmung mit den Anweisungen im Abschnitt „Reinigung“.
Verwenden Sie das Produkt
▪
nicht, falls Netzkabel, Zubehör oder Gerät selbst beschädigt sind. Wenden Sie sich
dann an einen autorisierten
Serviceanbieter.
Nur das Original- und vom
▪
Hersteller empfohlenes Zubehör verwenden.
Nicht versuchen, das Gerät zu
▪
demontieren.
DEUTSCH 5

SICHERHEIT _______________________________
Verwenden Sie das Gerät
▪
in Übereinstimmung mit den
Mengen- und Nutzungsanweisungen im Abschnitt
„Maximale Mengen und Verarbeitungszeiten“ der Bedienungsanleitung.
Verwenden Sie immer die
▪
Schutzabdeckung, damit beim
Mischen, Kneten und Quirlen
keine Verletzungen auftreten.
Das Gerät und dessen Zube-
▪
hör nicht auf oder in der Nähe
von heißen Oberflächen betreiben oder platzieren.
Das Gerät nicht mit heißen Le-
▪
bensmitteln benutzen.
Die Stromversorgung muss mit
▪
den Angaben am Typenschild
des Gerätes übereinstimmen.
Verwenden Sie das Gerät mit
▪
einer geerdeten Steckdose.
Das Gerät nicht mit einem Ver-
▪
längerungskabel verwenden.
Berühren Sie Stecker und
▪
Gerät nicht mit feuchten oder
nassen Händen.
Netzstecker immer aus der
▪
Steckdose ziehen; nach der
Benutzung des Gerätes, vor
der Reinigung des Gerätes,
bevor der Raum verlassen
wird oder wenn ein Fehler
auftritt. Netzstecker nicht am
Kabel aus der Steckdose ziehen.
Ziehen Sie vor der Reinigung,
▪
Demontage und Auswechslung von Zubehör den Netzstecker und warten Sie, bis
das Gerät vollständig zum
Stillstand gekommen ist.
Das Gerät und sämtliche Zu-
▪
behörteile nach der Reinigung
gründlich trocknen, bevor sie
mit der Stromversorgung verbunden werden und bevor
Teile abgenommen oder angebracht werden.
Das Gerät nicht für Zwecke
▪
benutzen, für die es nicht bestimmt ist.
Gerät, Netzkabel sowie Netz-
▪
stecker nicht in Wasser oder
andere Flüssigkeiten tauchen.
6 DEUTSCH
Falls Sie die Verpackungsma-
▪
terialien aufheben möchten,
bewahren Sie sie außerhalb
der Reichweite von Kindern
auf.

AUF EINEN BLICK _________________________
Sehr geehrte Kundin, sehr geehrter Kunde,
herzlichen Glückwunsch zum Erwerb Ihrer neuen
GRUNDIG Küchenmaschine KMP 8650 S.
Bitte lesen Sie die folgenden Anweisungen
aufmerksam, um sicherzustellen, dass Sie Ihr
Qualitätsprodukt von GRUNDIG viele Jahre benutzen können.
Verantwortungsbewusstes
Handeln!
GRUNDIG setzt intern wie auch
bei unseren Lieferanten auf vertraglich zugesicherte soziale
Arbeitsbedingungen mit fairem
Lohn, auf effizienten Rohstoffeinsatz
bei stetiger Abfallreduzierung von
mehreren Tonnen Plastik pro Jahr – und auf mindestens 5 Jahre Verfügbarkeit sämtlichen
Zubehörs.
Für eine lebenswerte Zukunft.
Grundig.
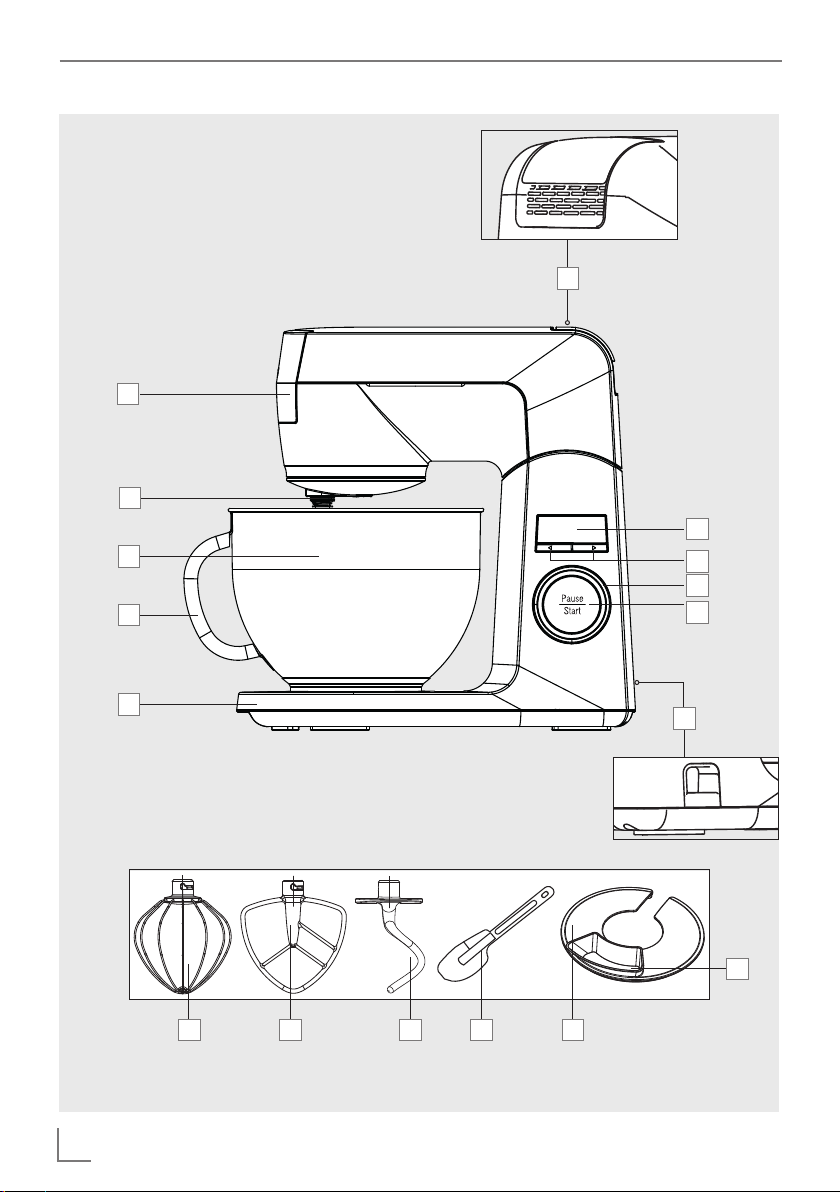
Bedienelemente
Beachten Sie hierzu die Abbildungen auf Seite 3.
A
Schüsselbasis
B
Schüsselgriff
C
Schüssel
D
Zubehörmontagepunkt
E
Anschlussstelle für zusätzliches Zubehör
F
Taste zum Anheben des oberen Gehäuses
G
LED-Display
H
Zeiteinstellung
I
Geschwindigkeitsregler
J
Pause-/ Start-Taste
K
Kabelfach
L
Einfüllöffnung
M
Spritzschutz
N
Spatel
O
Knethaken
P
Rührhaken
Q
Schneebesen
DEUTSCH 7
BETRIEB __________________________________
Erste Verwendung
1 Entfernen Sie das gesamte
Verpackungsmaterial, entsorgen Sie das
Verpackungsmaterial gemäß Ihren örtlichen
Bestimmungen.
2 Reinigen Sie das Gerät vor dem ersten Einsatz
– lesen Sie dazu den Abschnitt „Reinigung
und Pflege“.
Vorgesehene Verwendung
Dieses Gerät ist nur für den privaten Gebrauch
▪
bestimmt. Es darf nicht gewerblich eingesetzt
werden.
Das Gerät nicht für Zwecke benutzen, für die
▪
es nicht bestimmt ist.
Zubehör
Schneebesen
Zur Zubereitung leichter Lebensmittel (Sahne,
Schlagsahne, Eischnee usw.).
Knethaken
Zum Kneten von zähflüssigem Teig, wie Brotteig,
sowie zum Beimengen weiterer Zutaten (Rosinen,
Fruchtstücke, Schokoladenstücke usw.).
Rührhaken
Zum Vermischen von Zutaten, deren Konsistenz
der von Kuchenteig ähnelt.
Spritzschutz
Aus Sicherheitsgründen sollten Sie den
Spritzschutz bei Betrieb stets verwenden.
Q
O
P
M
Installation und Bedienung
Stellen Sie das Gerät aufrecht auf einen stabilen,
ebenen und trockenen Untergrund.
Warnung:
Achten Sie vor jedem Wechseln von Zubehör
▪
darauf, dass der Netzstecker gezogen und
der Geschwindigkeitsregler I auf die Position
„0“ eingestellt ist.
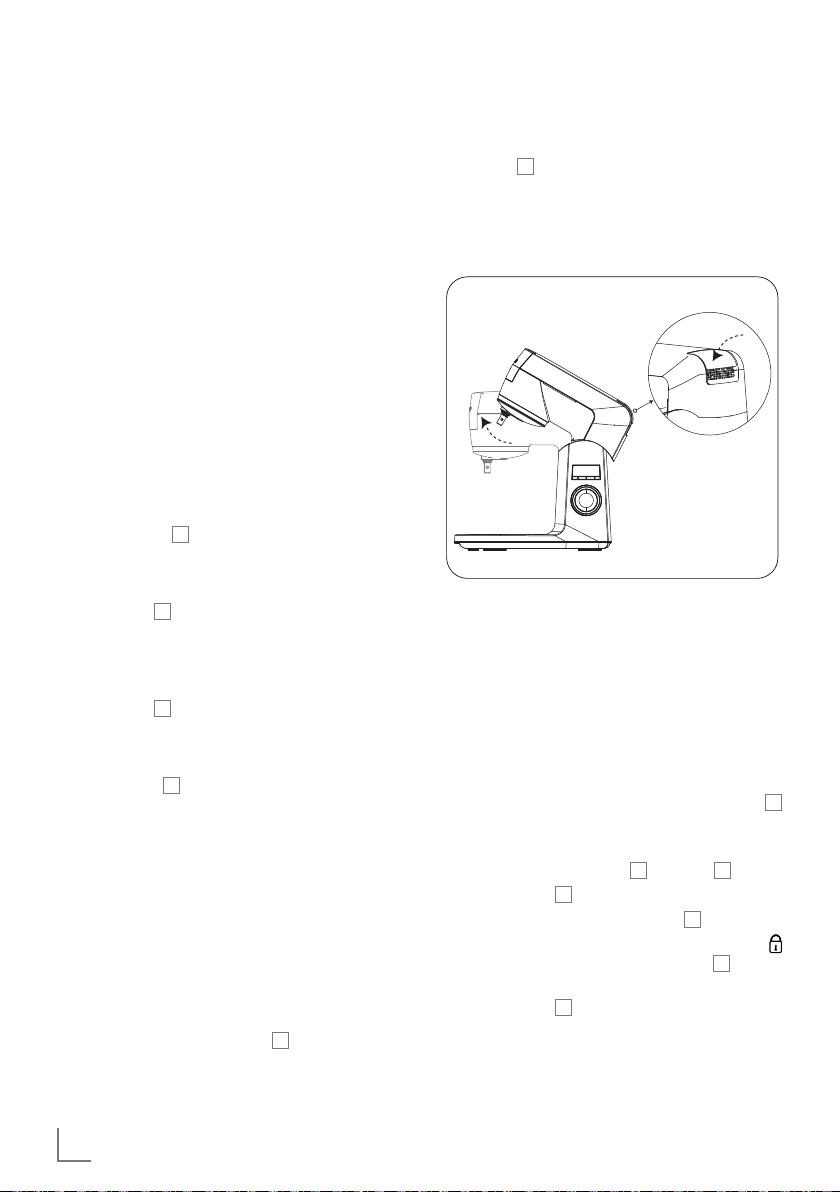
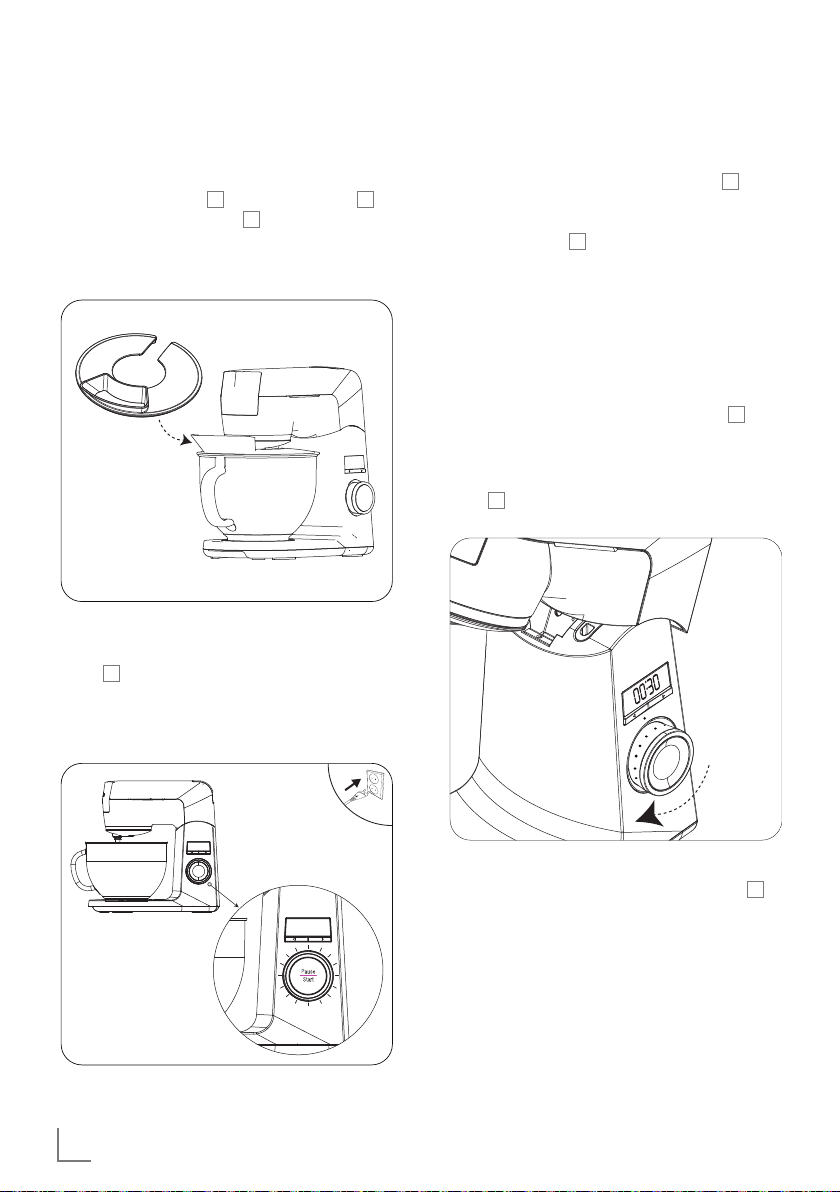
Oberes Gehäuse anheben
Halten Sie die Taste zum Anheben des oberen
Gehäuses F gedrückt und heben Sie das obere
Gehäuse.
– Das Gehäuse wird in der Höhe verriegelt,
wenn Sie ein Klickgeräusch hören.
Warnung:
Fahren Sie erst fort, nachdem Sie ein Klick-
▪
geräusch gehört haben. Das obere Gehäuse
könnte sonst herunterfallen und Verletzungen
verursachen.
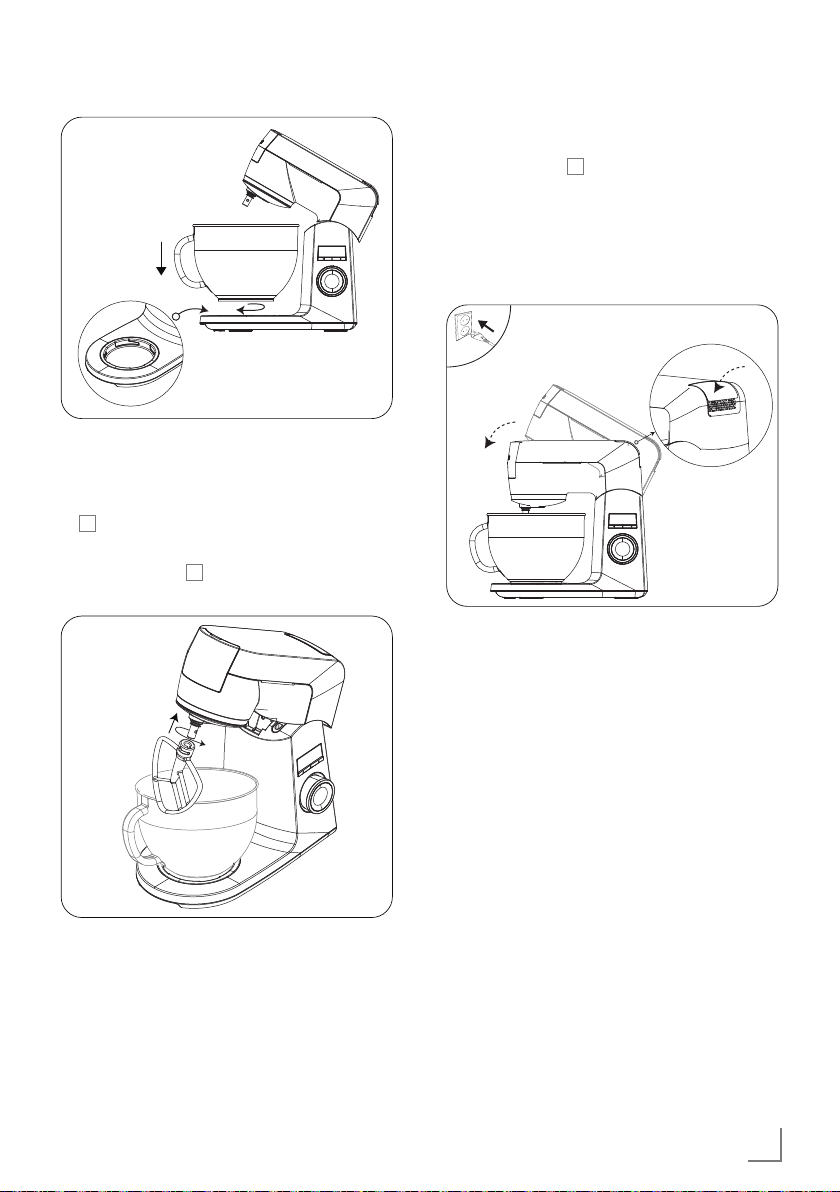
Schüssel anbringen
Hinweis
Stellen Sie beim Anbringen der Schüssel
▪
sicher, dass sich das obere Gehäuse in der
höheren Position befindet.
1 Halten Sie die Schüssel C am Griff B, um sie
an der Basis A zu befestigen.
2 Wenn die Riegel der Schüssel C vollständig
eingesetzt sind, drehen Sie sie in Richtung
und befestigen Sie sie in ihrer Basis A.
3 Geben Sie die zu verarbeitenden Zutaten in
die Schüssel A.
C
8 DEUTSCH
BETRIEB __________________________________
Oberes Gehäuse absenken
1 Drücken Sie die Taste zum Anheben des obe-
ren Gehäuses F; dann leicht nach unten drücken, um das Gehäuse wieder in eine horizontale Position zu bringen.
1
2
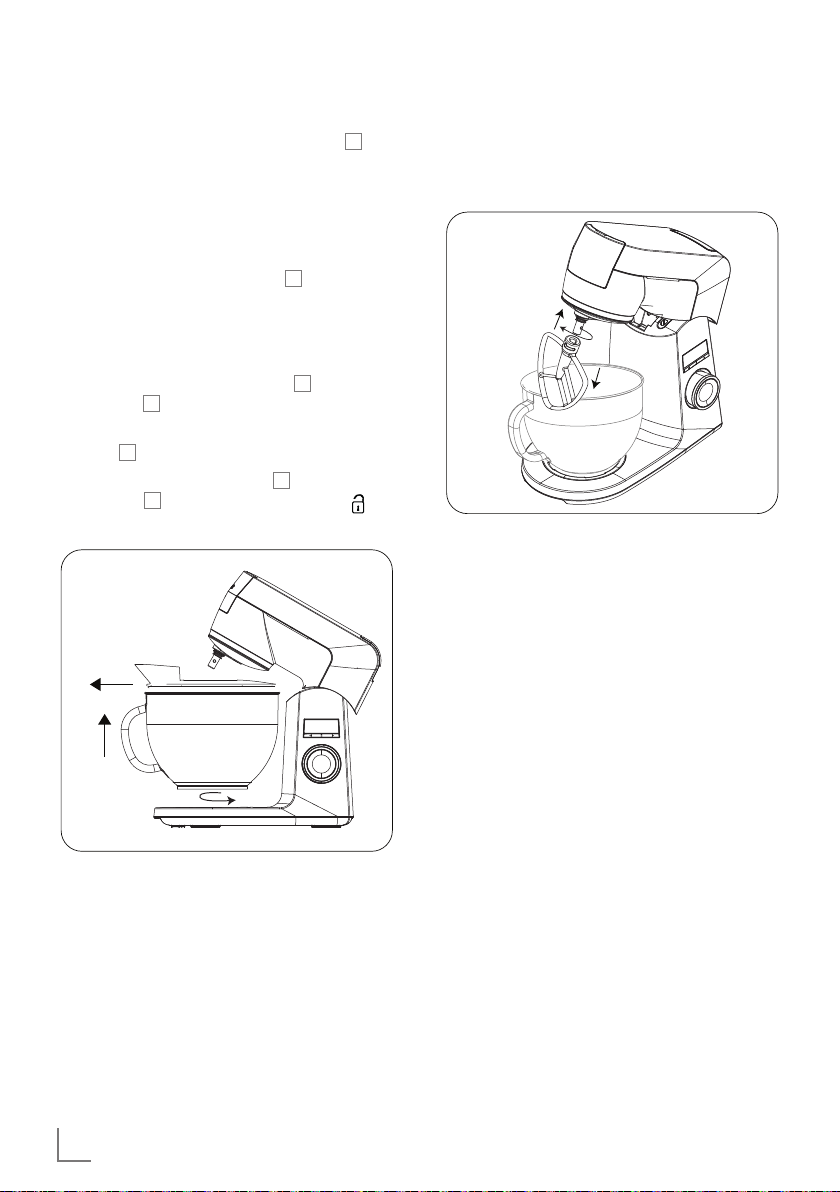
Zubehör anbringen
1 Bringen Sie das Zubehör so an, dass die Kerbe
direkt am Riegel des Zubehörmontagepunktes
D
ausgerichtet ist.
2 Drehen Sie das Zubehör zur Befestigung am
Montagepunkt D gegen den Uhrzeigersinn.
– Das obere Gehäuse rastet hörbar ein.
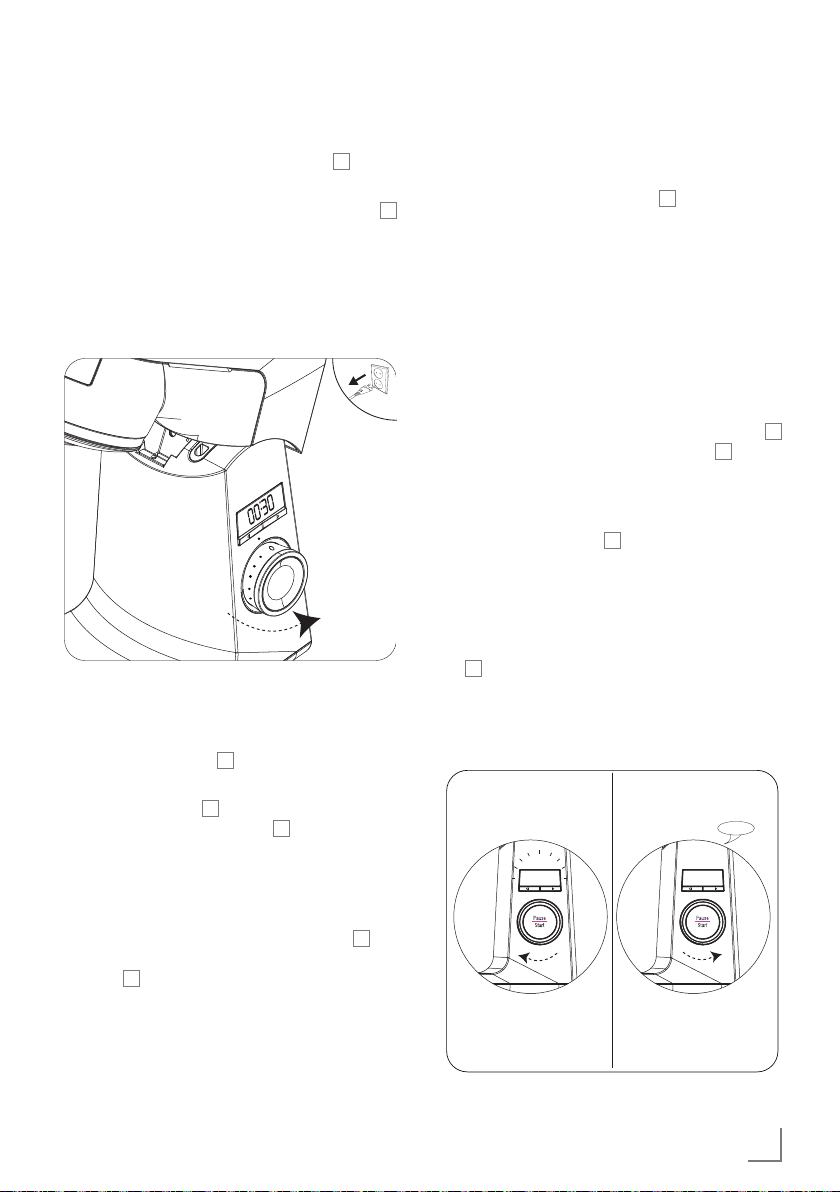
2 Schließen Sie das Netzkabel an.
1
2
Warnung:
Vergewissern Sie sich, dass das Zubehör rich-
▪
tig sitzt.
DEUTSCH 9
BETRIEB __________________________________
Bedienung
Hinweis
Bringen Sie vor Inbetriebnahme des Gerätes
▪
den Spritzschutz M an der Schüssel Can.
Über die Einfüllöffnung L können Sie Zutaten
hinzugeben, ohne das obere Gehäuse anheben zu müssen.
1 Schließen Sie das Netzkabel an.
– Die Leuchten des Geschwindigkeitsreglers
I
blinken.
– 00:00 wird an der LED-Anzeige ange-
zeigt.
Hinweis
Das Gerät wechselt in den automatischen
▪
Energiesparmodus, wenn es länger als 3 Minuten nicht arbeitet. Das LED-Display G schaltet sich aus. Sie können mit dem Vermischen
beginnen oder das Gerät mit den Tasten der
Zeiteinstellung H neu starten.
Warnung
Ihr Gerät ist mit einer Funktion ausgestattet, die
▪
durch langsames Starten verhindert, dass die
zu vermischenden Zutaten herausspritzen.
2 Beginnen Sie mit der Verarbeitung, indem
Sie das Gerät in Betrieb nehmen, während der Geschwindigkeitsregler I auf
Position „1“ eingestellt ist. Erhöhen Sie die
Geschwindigkeit dann stufenweise.
– Die Leuchte des Geschwindigkeitsregler
I
bleibt eingeschaltet.
10 DEUTSCH
00:00
Warnung
Bringen Sie den GeschwindigkeitsreglerI in
▪
Position „0“, wenn während des Betriebs der
Strom ausfällt oder das Gerät getrennt wird.
Wenn die Stromversorgung wiederhergestellt bzw. das Gerät wieder angeschlossen
wird, beginnt es erneut mit dem ersten Schritt.
Wurde das Gerät während des Betriebs gestoppt, startet es nicht neu, bis Sie den Regler
auf die Position „0“ einstellen. Drehen Sie den
Geschwindigkeitsregler nach links, um die gewünschte Geschwindigkeitsstufe auszuwählen.
BETRIEB __________________________________
Hinweis
Die Verarbeitungszeit wird während des Be-
▪
triebs in Sekunden im LED-Display G angezeigt.
3 Stellen Sie den Geschwindigkeitsregler I
nach Abschluss der Verarbeitung erneut auf
die Position „0“ ein.
4 Sobald das Zubehör vollständig zum Stillstand
gekommen ist, sollten Sie den Netzstecker ziehen und das obere Gehäuse anheben.
Pausemodus
Sie können den Betrieb des Gerätes jederzeit mit
der Pause-/ Start-Taste J anhalten/starten.
Das Gerät stoppt den Betrieb, wenn Sie die
Pause-/ Start-Taste J drücken. Dabei stoppt
auch der Timer im LED-Display G.
Der Timer fährt fort, sobald Sie das Gerät wieder
starten
Der Timer kann maximal auf 09:59
▪
(Minuten:Sekunden) eingestellt werden. Nach
Ablauf wird er automatisch zurückgesetzt. Sie
können den Timer erneut aktivieren, indem Sie
den Geschwindigkeitsregler I auf die Position
„0“ einstellen und das Gerät in Betrieb nehmen. Drehen Sie den Geschwindigkeitsregler
nach links, um die gewünschte Geschwindigkeitsstufe auszuwählen.
Timer
Bei Rezepten, die eine bestimmte Quirl-/Rühr-/
Knetdauer erfordern, empfiehlt sich die TimerFunktion.
1 Stellen Sie über Tasten der Zeiteinstellung H
im unteren Bereich des LED-Displays G die gewünschte Verarbeitungszeit ein und nehmen
Sie das Gerät in Betrieb.
– Bei Ablauf der eingestellten Zeit erlischt
das LED-Display G und ein Signalton wird
ausgegeben. Das Gerät schaltet sich automatisch ab.
2 Wenn Sie die Verarbeitung erneut starten
möchten, müssen Sie den Timer zurücksetzen, indem Sie den Geschwindigkeitsregler
I
auf „0“ einstellen. Drehen Sie den
Geschwindigkeitsregler nach links, um die
gewünschte Geschwindigkeitsstufe auszuwählen.
Bip
00:45
00:00
Hinweise
Wenn Sie den Geschwindigkeitsregler I auf
▪
die Position „0“ einstellen, zeigt die LED-Anzeige G des Timers automatisch 00:00.
1 2
DEUTSCH 11
BETRIEB __________________________________
Hinweise
Halten Sie Tasten der Zeiteinstellung H zum
▪
schnellen Erhöhen von Minuten und Sekunden
gedrückt.
Sie können eine Zeit von maximal 09:59
▪
(Minuten:Sekunden) einstellen.
Setzen Sie den Zähler auf 00:00, indem Sie
▪
den Geschwindigkeitsregler I auf die Position „0“ einstellen.
Schüssel entfernen
1 Entfernen Sie den Spritzschutz M von der
Schüssel C.
2 Heben Sie das obere Gehäuse an, indem Sie
Taste F drücken.
3 Entfernen Sie die Schüssel C, indem Sie sie
am Griff B halten und in die Position drehen.
1
Zubehör entfernen
Entfernen Sie das Zubehör, indem Sie es leicht
nach oben drücken und im Uhrzeigersinn drehen.
1
2
3
Kabel verbergen
1 Vor der Reinigung Gerät abschalten und
Netzstecker ziehen.
2 Dank der Einrollfunktion wird das Kabel auto-
matisch in das Fach im Inneren des Gerätes
gezogen, nachdem Sie kurz daran ziehen.
3
2
12 DEUTSCH
INFORMATIONEN _________________________
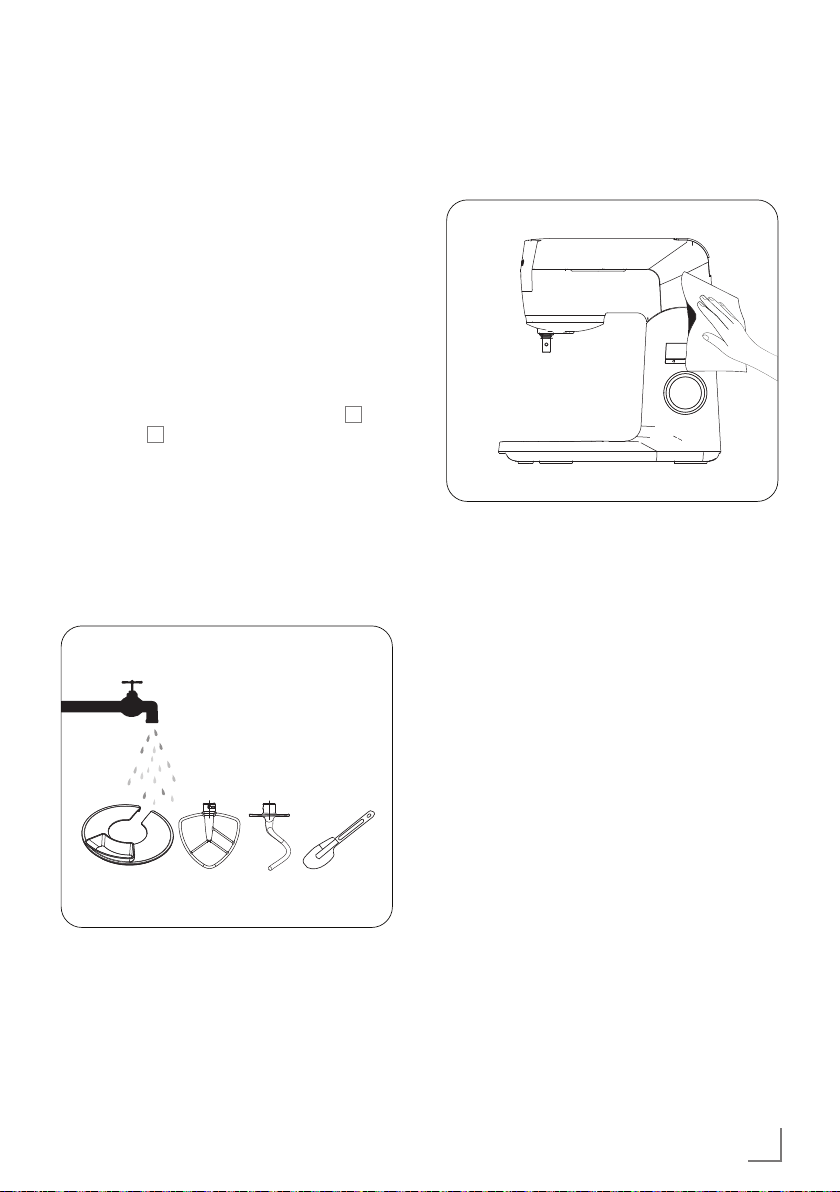
Reinigung
Warnung
Reinigen Sie das Gerät niemals mit Benzin,
▪
Lösungsmitteln, Scheuermitteln, Metallgegenständen, harten Bürsten oder ähnlichen Hilfsmitteln.
1 Vor der Reinigung Gerät abschalten und
Netzstecker ziehen.
2 Warten, bis das Gerät vollständig abgekühlt
ist.
3 Reinigen und trocknen Sie das Zubehör vor
dem Verstauen.
Reinigen Sie Zubehör, Spritzschutz M und
▪
Schüssel C mit etwas Spülmittel und einem
Schwamm.
Sie können Schüssel und Schneebesen im Ge-
▪
schirrspüler reinigen.
Warnung
Reinigen Sie andere Zubehör nicht in der Spül-
▪
maschine.
Reinigen Sie die Außenseite des Gerätes mit
▪
einem leicht angefeuchteten Tuch und etwas
Spülmittel.
Warnung
Gerät und Netzteil nicht in Wasser oder an-
▪
dere Flüssigkeiten eintauchen und nicht unter
Wasser abspülen.
Hinweise
Trocknen Sie sämtliche Teile nach dem Reini-
▪
gen mit einem weichen Tuch, bevor Sie die
Maschine wieder benutzen.
Unmittelbar nach dem Gebrauch lässt sich das
▪
Gerät einfacher reinigen.
Aufbewahrung
Lagern Sie das Gerät sorgfältig, wenn Sie es
▪
längere Zeit nicht benutzen sollten.
Achten Sie darauf, dass der Netzstecker ge-
▪
zogen und das Gerät vollständig trocken ist.
Netzkabel nicht um das Gerät wickeln.
▪
Kühl und trocken lagern.
▪
Halten Sie das Gerät von Kindern fern.
▪
Handhabung und Transport
Transportieren Sie das Gerät in seiner Origi-
▪
nalverpackung. Die Verpackung schützt das
Gerät vor Beschädigungen.
DEUTSCH 13
INFORMATIONEN _________________________
Legen Sie keine schweren Gegenstände auf
▪
dem Gerät oder der Verpackung ab. Andernfalls könnte das Gerät beschädigt werden.
Falls das Gerät herunterfällt, ist es möglicher-
▪
weise nicht mehr funktionsfähig oder weist
dauerhafte Schäden auf.
Entsorgung von Altgeräten:
Dieses Produkt erfüllt die Vorgaben der EU-WEEEDirektive (2012/19/EU). Das Produkt wurde mit
einem Klassifizierungssymbol für elektrische und
elektronische Altgeräte (WEEE) gekennzeichnet.
Dieses Gerät wurde aus hochwertigen
Materialien hergestellt, die wiederverwendet und recycelt werden können.
Entsorgen Sie das Gerät am Ende sei-
ner Einsatzzeit nicht mit dem regulären
Hausmüll; geben Sie es stattdessen bei einer
Sammelstelle zur Wiederverwertung von elektrischen und elektronischen Altgeräten ab. Ihre
Stadtverwaltung informiert Sie gerne über geeignete Sammelstellen in Ihrer Nähe.
Einhaltung von RoHS-Vorgaben:
Das von Ihnen erworbene Produkt erfüllt die
Vorgaben der EU-RoHS Direktive (2011/65/EU).
Es enthält keine in der Direktive angegebenen gefährlichen und unzulässigen Materialien.
Informationen zur Verpackung
Die Verpackung des Produkts wurde
gemäß unserer nationalen
Gesetzgebung aus recyclingfähigen
Materialien hergestellt. Entsorgen Sie
die Verpackungsmaterialien nicht mit dem
Hausmüll oder anderem Müll. Bringen Sie sie zu
einer von der Stadtverwaltung bereitgestellten
Sammelstelle für Verpackungsmaterial.
Technische Daten
Spannungsversorgung:
220 – 240 V Wechselspannung, 50 – 60 Hz
Leistung: 1000 W
Technische und optische Änderungen vorbehalten!
Service und Ersatzteile
Unsere Geräte werden nach den neuesten
technischen Erkenntnissen entwickelt, produziert
und geprüft. Sollte trotzdem eine Störung
auftreten, so bitten wir Sie, sich mit Ihrem
Fachhändler bzw. mit der Verkaufsstelle in
Verbindung zu setzen. Sollte dies nicht möglich
sein, wenden Sie sich bitte an das GRUNDIG
Service-Center unter folgenden Kontaktdaten:
TELEFON: 0911 / 590 597 29
(Montag bis Freitag von 8.00 bis 18.00 Uhr)
Telefax: 0911 / 590 597 31
E-Mail: service@grundig.com
http://www.grundig.com/de-de/support
Unter den obengenannten Kontaktdaten erhalten
Sie ebenfalls Auskunft über den Bezug möglicher
Ersatz- und Zubehörteile.
GRUNDIG
Kundenberatungszentrum
Montag bis Freitag von 8.00 bis 18.00 Uhr
Deutschland : 0911 / 590 597 30
Österreich : 0820 / 220 33 22 *
* gebührenpflichtig (0,145 €/Min. aus dem
Festnetz,
Mobilfunk: max. 0,20 €/Min.)
14 DEUTSCH
Haben Sie Fragen?
Unser Kundenberatungszentrum steht Ihnen
werktags stets von 8.00 - 18.00 Uhr zur
Verfügung.

SAFETY ___________________________________
This section contains safety instructions that will help protect
from risk of personal injury or
material damage.
Failure to follow these instructions voids any granted warranty.
Retain the operating instruc-
▪
tions for later consultation. If
the appliance is transferred to
a third party, these operating
instructions must likewise be
handed over.
This appliance complies
▪
with the international safety
standards.
This appliance may be used
▪
by people whose physical,
perceptive or mental skills are
impaired or who are inexperienced or not knowledgeable
about the appliance as long
as they are supervised or informed and made understood
the safe use of the appliance
and the encountered dangers.
Children must not use the ap-
▪
pliance.
This appliance is only in-
▪
tended for private use in the
household and is not suitable
for professional use in the restaurant sector. It may not be
used for commercial use.
Children must not play with
▪
the appliance.
Keep the appliance out of the
▪
reach of children.
Cleaning and user mainte-
▪
nance cannot be performed
by children.
Clean the appliance in ac-
▪
cordance with the instructions
given in the "Cleaning" section.
Do not use it if the power
▪
cable, accessories or the appliance itself is/are damaged.
Contact an authorised service.
Only use the original acces-
▪
sories, or accessories recommended by the manufacturer.
Do not attempt to dismantle
▪
the appliance.
Use the appliance in accord-
▪
ance with the amount and
usage instructions given in
"Maximum amount and processing times" section of the
user manual.
ENGLISH 15

SAFETY ___________________________________
Always use the protective
▪
cover against the risk on injury
when blending, kneading and
whisking for safety reasons.
Do not operate or place this
▪
appliance or its parts on or
near hot surfaces.
Do not use the appliance for
▪
hot food.
Your mains power supply
▪
should comply with the information supplied on the rating
plate of the appliance.
Use the appliance with a
▪
grounded outlet.
Do not use the appliance with
▪
an extension cable.
Do not touch the plug of the
▪
appliance with damp or wet
hands.
After cleaning, dry the ap-
▪
pliance and all accessories
before connecting it to mains
supply and before attaching
the accessories.
Do not use the appliance for
▪
purposes for which it is not intended.
Do not immerse the appliance,
▪
the power cable, or the power
plug in water or any other liquid.
If you keep the packaging ma-
▪
terials, store them out of the
reach of children.
Always pull the mains plug
▪
from the socket; after the use
of the appliance, before the
cleaning of the appliance,
before leaving the room or if
a fault occurs. Do not pull the
mains plug from the socket
using the cable.
Unplug the appliance before
▪
cleaning, disassembly, accessory replacement and wait for
it to stop completely.
16 ENGLISH
AT A GLANCE _____________________________
Dear Customer,
Congratulations on purchasing the GRUNDIG
Kitchen Machine KMP 8650 S.
Please read the following user guide carefully to
ensure that you have many years of enjoyment
from your quality Grundig product at home.
Responsible trading!
Both internally and for suppliers,
GRUNDIG insists on contractually
guaranteed social working conditions with fair wages, efficient use
of raw materials with continuous
reduction in waste of several
tonnes of plastic each year - and at least 5 years'
availability for all accessories.
For a future worth living.
Grundig.
Operating elements
Please see the illustrations on page 3.
A
Bowl base
B
Bowl handle
C
Bowl
D
Accessory mounting point
E
Additional accessory inlet
F
Button to lift upper body
G
LED display
H
Time setting buttons
I
Speed adjustment knob
J
Pause/Start button
K
Cable hiding bay
L
Feeding chute
M
Splash guard
N
Spatula
O
Dough Hook
P
Beater
Q
Whisker
ENGLISH 17
OPERATION ______________________________
Initial use
1 Take out all packaging and label materials
and dispose of them in accordance with the
applicable local regulations.
2 Clean the appliance before initial use (Refer
to "Cleaning and care" section).
Intended use
This appliance has been designed for domes-
▪
tic use only. It should not be used commercial
purposes.
Do not use the appliance for anything other
▪
than its intended use.
Accessories
Whisker
Used to prepare light foods such as cream,
whipped cream and eggs.
Dough hook
Used to knead doughs that contain thick ingredients, such as bread dough, and to blend additional ingredients (raisins, fruit chips, chocolate chips
etc.) with the dough.
Beater
Used to blend ingredients that have the consistency of cake batter.
Splash guard
For safety reasons, you must definitely use this accessory when blending.
Q
O
P
M
Installation and operating
Place the appliance vertically on a stable, level
and dry surface.
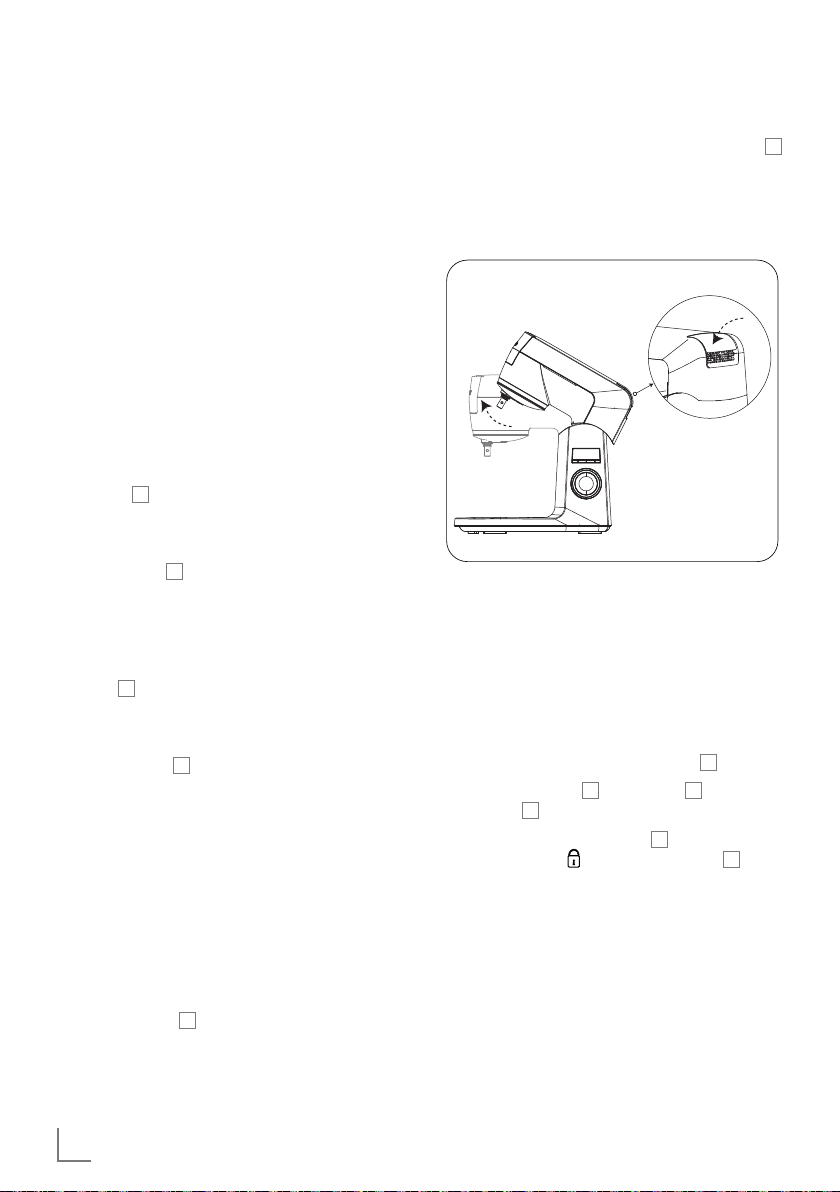
Lifting the upper body
Press and hold the button to lift the upper body F
and lift the body up.
– The body will be locked aloft when you
hear a click.
Warning:
Do not continue until you hear the click. The
▪
upper body may fall down and cause injuries.
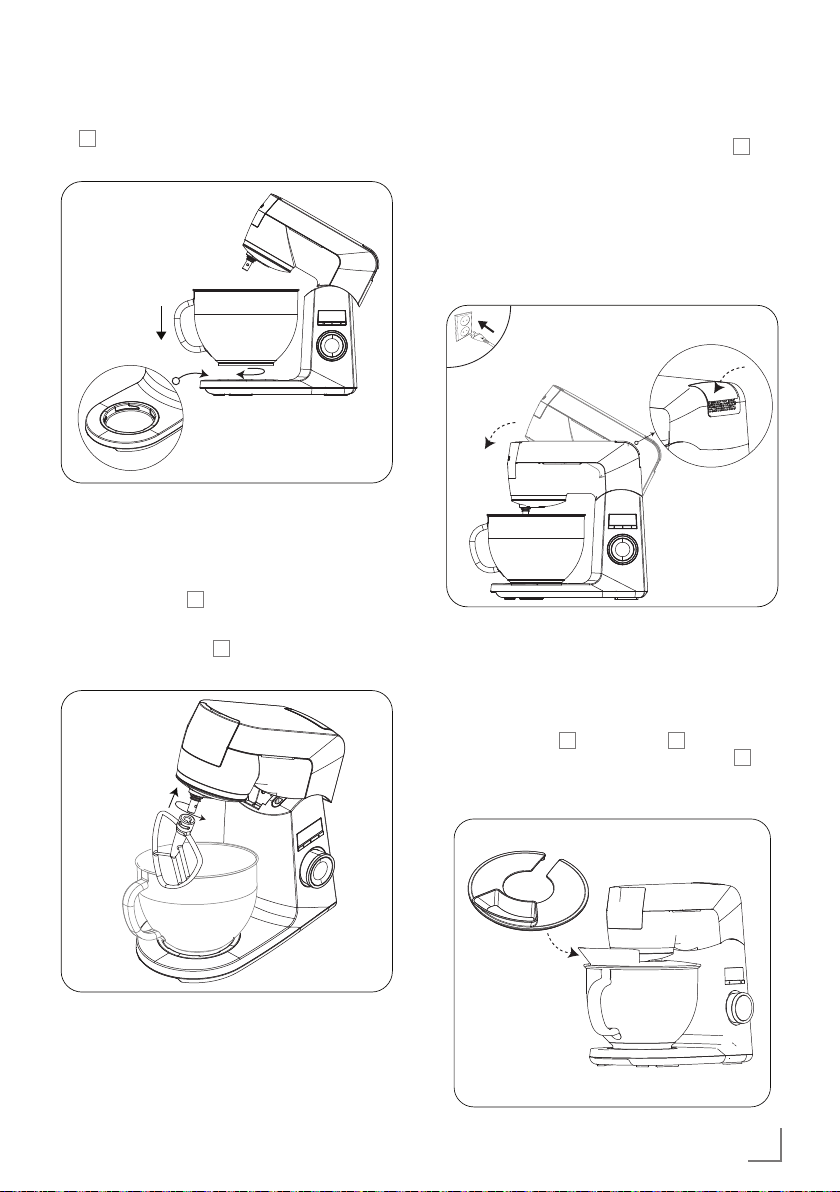
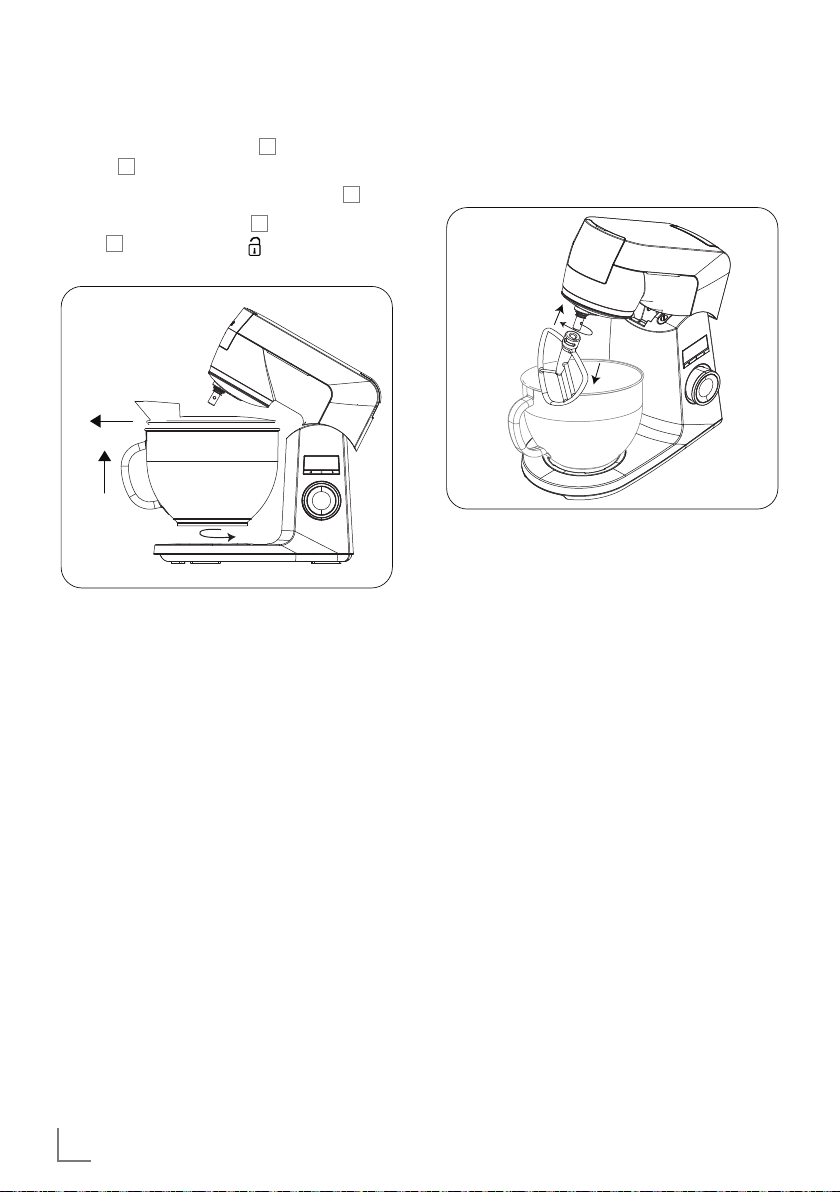
Attaching the bowl
Note:
Make sure that the upper body is in the higher
▪
position when attaching the bowl C.
1 Hold the handle B of the bowl C to fix it into
its base A.
2 When the tabs of the bowl C are fully seated,
turn it towards and fix it in its base A.
Warning:
In all installation procedures, make sure that
▪
the appliance is unplugged and the speed adjustment knob I is in “0” position.
18 ENGLISH
OPERATION ______________________________
3 Put the ingredients to be processed in the bowl
C
.
1
2
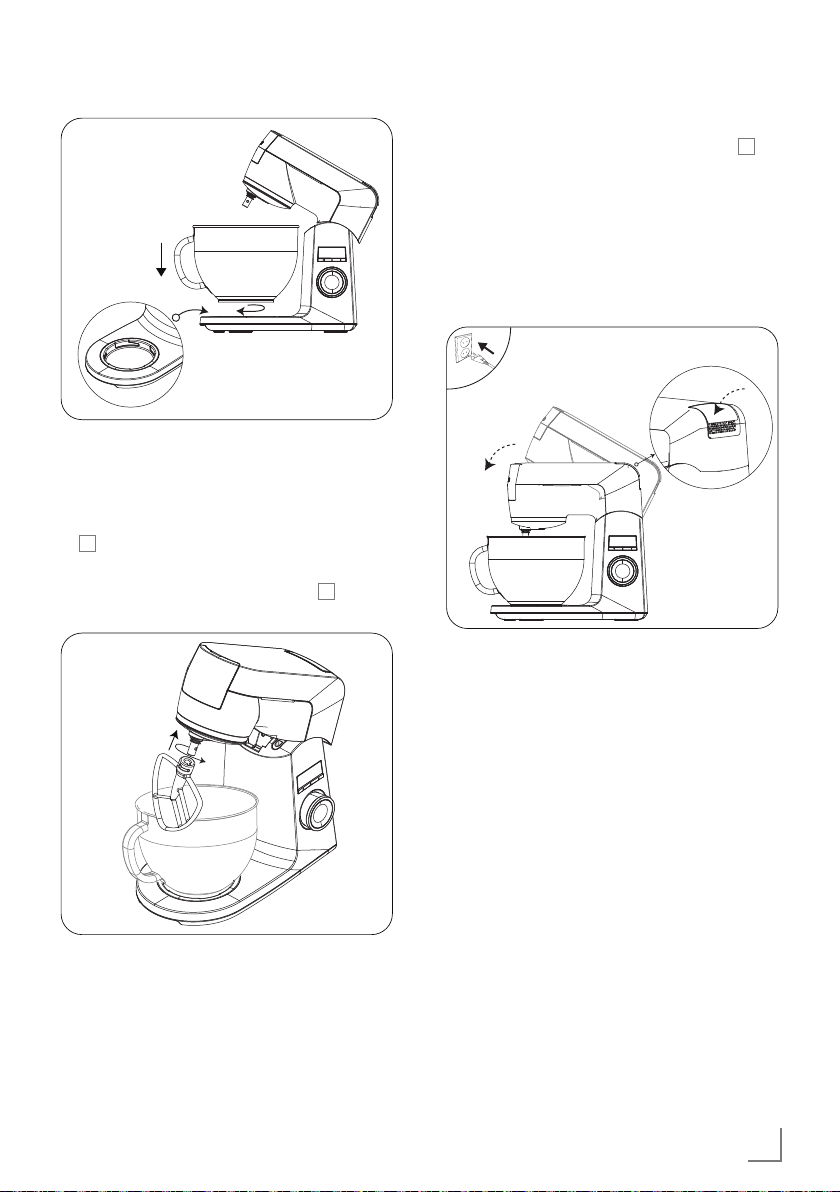
Attaching the accessories
1 Place the accessory so that its notch comes
right on the tab located at the accessory
mounting point D.
2 Rotate the accessory anti-clockwise to fix it to
the mounting point D.
1
2
Closing the upper body
1 Press the button to lift the upper body F and
press downwards slightly to bring the body
into horizontal position again.
– The upper body will be fixed in place
when you hear the click.
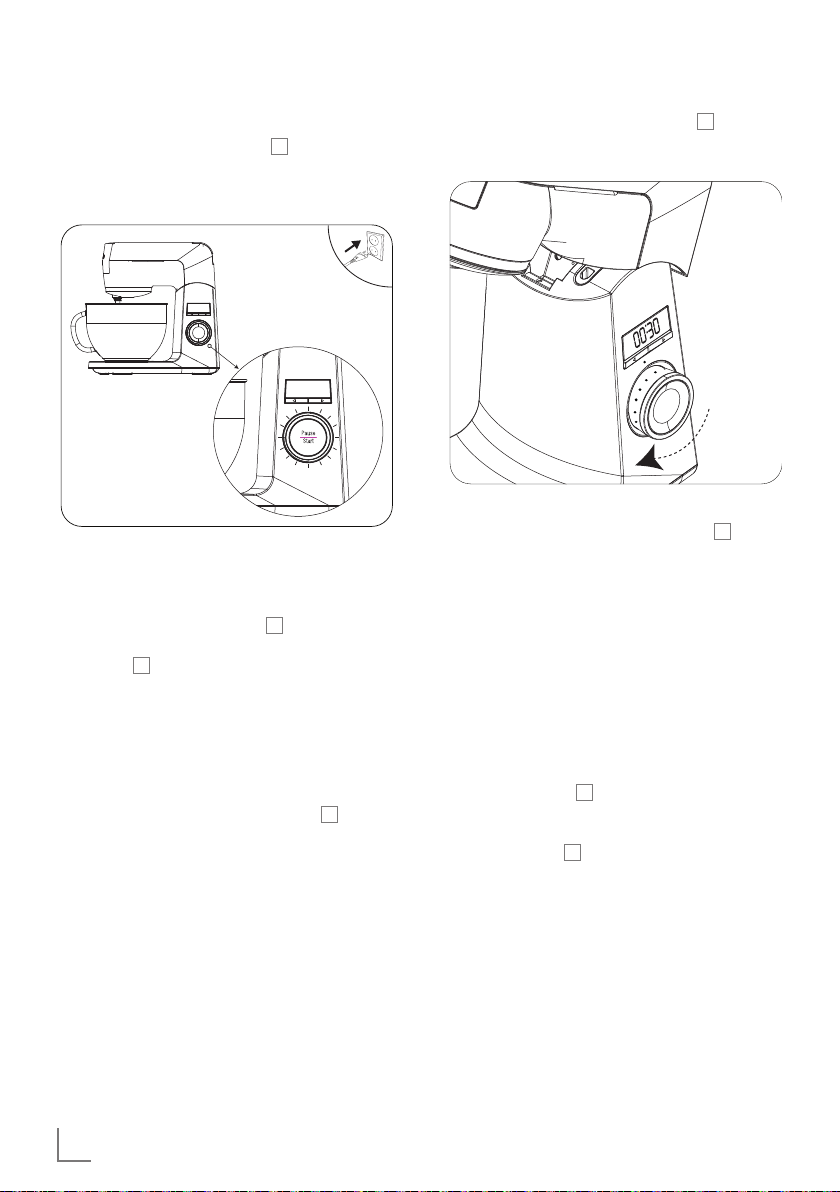
2 Plug in the appliance.
Operation
Note:
Before operating the appliance, place the
▪
splash guard M on the bowl C. You can add
ingredients through the feeding chute Lwithout lifting the upper body.
Warning:
Make sure that the accessory is fully seated
▪
in place.
ENGLISH 19
OPERATION ______________________________
1 Plug in the appliance.
– Speed adjustment knob I lights will flash.
– 00:00 will be displayed on the LED
display.
00:00
Note:
The appliance will switch to the auto power
▪
saving mode if it is not operated for more than
3 minutes. The LED display G will turn off. You
can start stirring or press one of the time setting
buttons H to start the appliance again.
Warning:
Your appliance is equipped with slow start
▪
technology to prevent the ingredients to be
blended from splashing around.
2 To start processing, operate the appliance
with the speed adjustment knob I starting
with "1" position and gradually increase the
speed.
– The speed adjustment knob I light will
remain on.
Warning:
Move the speed adjustment knob I to “0”
▪
position when there is a power outage while
the appliance is operating or when it is unplugged. When the power is restored and
the appliance is plugged in, start from the 1st
step again. The appliance, which has stopped
during operation will not start again until you
move it to “0” position. Turn the speed regulator to the left in order to select the desired
speed level.
Note:
The processing time will be displayed in seconds
on the LED display G during operation.
3 When the process is done, turn the speed ad-
justment knob I to "0" position again.
20 ENGLISH

OPERATION ______________________________
4 When the accessory has completely stopped,
unplug the appliance and lift the upper body.
Pause mode
You can press Pause/Start button J at any moment during operation to pause/start the operation of the appliance.
The device will stop operating when you press
Pause/Start button J. Time counting on the LED
display G will also stop.
The time counting will resume when you activate
the speed adjustment knob I again.
Notes:
When you move the speed adjustment knob
▪
I
to “0” position, the LED display G of the
time counter will automatically show 00:00.
Maximum counting time of the counter is
▪
09:59 (minute-second). It will automatically
be reset when it exceeds this value. You need
to move the speed adjustment button I to “0”
position and operate it to activate the counter
again. Turn the speed regulator to the left in
order to select the desired speed level.
1 Use the time setting buttons H at the lower
section of the LED display G to set the desired
processing time and operate the appliance.
– When the set time elapses, the LED display
G
light will go off and an audible warning
will be heard. The device will turn off
automatically.
2 To start processing again, you must set the
speed adjustment knob I to "0" position to reset the counter. Turn the speed regulator to the
left in order to select the desired speed level.
Bip
00:45
1 2
Notes:
Press and hold the time setting buttons H to
▪
fast forward minutes and seconds.
The maximum time you can set is 09:59 (min-
▪
ute-second).
You can move the speed adjustment knob I
▪
to “0” position to set the counter to 00:00.
00:00
Counter
You can use the counter function especially for
▪
your recipes that require a specific whisking/
blending/kneading duration.
ENGLISH 21
OPERATION ______________________________
Removing the bowl
1 Remove the splash guard M from the mixing
bowl C.
2 Lift the upper body by pushing button F.
3 Remove the mixing bowl C by holding its han-
dle B and rotating it to .
1
3
2
Removing the accessory
To remove the accessory, slightly press upwards
and rotate it clockwise.
1
2
3
Hiding the cable
1 Switch off and unplug the appliance.
2 Thanks to the pull-and-release technology, the
cable will be automatically pulled to the hiding bay inside the appliance when you pull
and release the cable.
22 ENGLISH
INFORMATION ___________________________
Cleaning
Warning:
Never use gasoline, solvents or abrasive
▪
cleaning agents, metal objects or hard brushes
to clean the appliance.
1 Switch off and unplug the appliance.
2 Wait for the appliance to cool down com-
pletely.
3 Wash and dry the accessories before storing
the appliance.
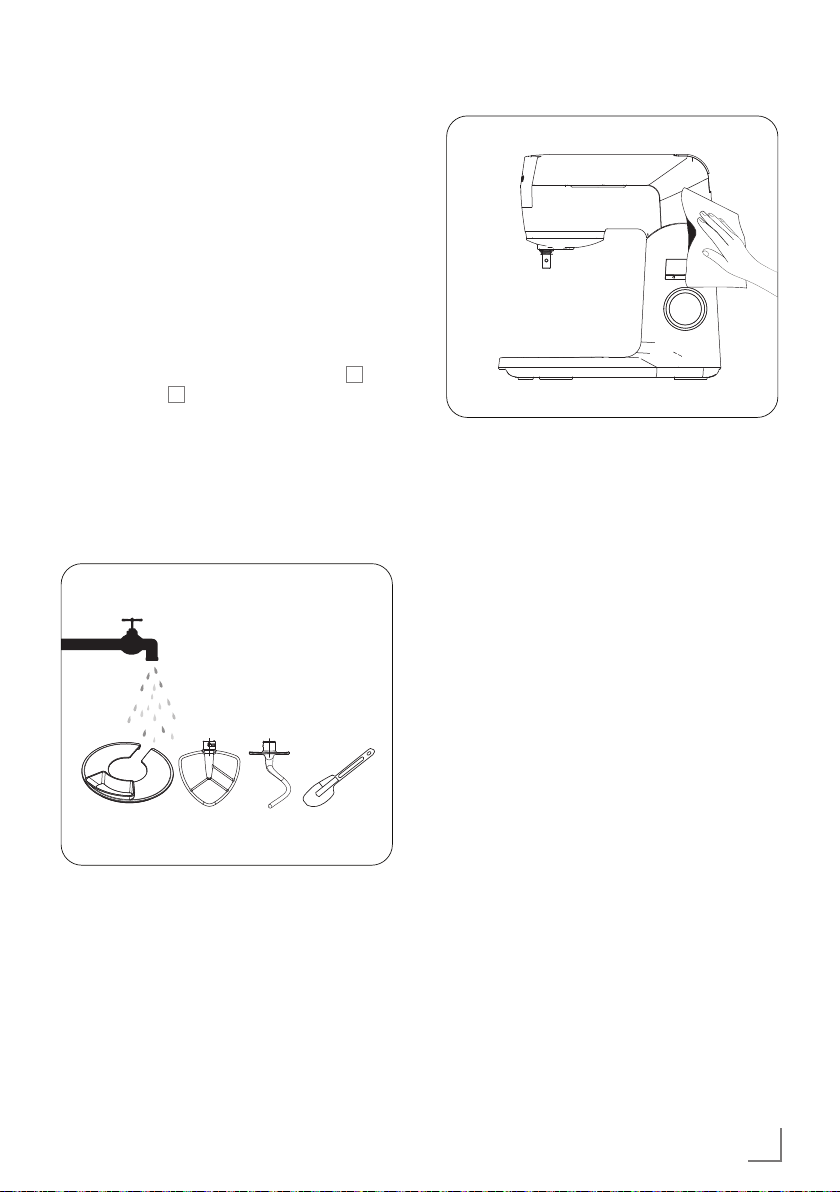
Clean the accessories, splash guard M and
▪
mixing bowl C with a little amount of washing
liquid and a sponge.
You can wash the bowl and the whisker in
▪
your dishwasher.
Warning:
Do not wash other accessories in dishwasher.
▪
Warning:
Do not immerse the body or the power cord in
▪
water or other liquids and do not wash them
under water.
Notes:
Dry all parts with a soft towel before starting to
▪
use the appliance after cleaning it.
It is recommended to clean the appliance right
▪
after using it.
Use a damp cloth and a small amount of
▪
washing liquid to clean the outer surface of
the appliance.
Storage
If you do not intend to use the appliance for a
▪
long time, please store it carefully.
Make sure that the appliance is unplugged
▪
and totally dry.
Do not wind the power cord around the ap-
▪
pliance.
Store it in a dry and cool place.
▪
Keep the appliance out of the reach of chil-
▪
dren.
ENGLISH 23

INFORMATION ___________________________
Handling and transportation
During handling and transportation, carry
▪
the appliance in its original packaging. The
packaging of the appliance protects it against
physical damages.
Do not place heavy loads on the appliance
▪
or on the packaging. The appliance may get
damaged.
Dropping the appliance may render it non-op-
▪
erational or cause permanent damage.
Compliance with the WEEE
Directive and Disposing of the
Waste Product:
This product complies with EU WEEE Directive
(2012/19/EU). This product bears a classification symbol for waste electrical and electronic
equipment (WEEE).
This product has been manufactured
with high quality parts and materials
which can be reused and are suitable
for recycling. Do not dispose of the
waste product with normal domestic
and other wastes at the end of its service life. Take
it to the collection center for the recycling of electrical and electronic equipment. Please consult
your local authorities to learn about these collection centers.
Technical data
Power supply: 220-240V~ 50-60Hz
Power: 1000 W
Technical and design modifications reserved!
Compliance with RoHS Directive
The product you have purchased complies with
EU RoHS Directive (2011/65/EU). It does not
contain harmful and prohibited materials specified in the Directive.
Package information
Packaging materials of the product are
manufactured from recyclable materials in accordance with our National
Environment Regulations. Do not dispose of the packaging materials together with the
domestic or other wastes. Take them to the packaging material collection points designated by
the local authorities.
24 ENGLISH

SÉCURITÉ _________________________________
Cette section contient des
consignes de sécurité qui permettent de se prémunir contre
les risques de dommages corporels ou de dégâts matériels.
Le non-respect de ces consignes
annule la garantie.
Veuillez conserver le manuel
▪
d’utilisation pour toute référence ultérieure. Si l’appareil
est remis à un tiers, veuillez
également remettre le présent
manuel à son nouveau propriétaire.
Cet appareil est conçu selon
▪
les normes internationales de
sécurité.
Cet appareil peut être utilisé
▪
par les personnes aux capacités physiques, sensorielles
ou mentales réduites ou qui
manquent d’expérience et
de connaissances concernant
l’appareil, à condition qu’elles
soient supervisées ou qu’elles
aient reçues les consignes
concernant l’utilisation sûre
de l’appareil et assimilées les
dangers encourus.
Le présent appareil est destiné
▪
à un usage domestique privé
uniquement et ne convient
pas à une utilisation professionnelle dans le secteur de la
restauration. Il ne doit pas être
utilisé à des fins commerciales.
Ne laissez pas les enfants
▪
jouer avec l’appareil.
Tenez l’appareil hors de la
▪
portée des enfants.
Le nettoyage et l’entretien par
▪
l’utilisateur ne peuvent être
effectués par des enfants.
Nettoyez l’appareil en confor-
▪
mité avec les instructions de la
section « Nettoyage ».
Ne l’utilisez jamais si le câble
▪
d’alimentation, les accessoires ou l’appareil lui-même
présentent des dommages.
Contactez un service agréé.
Utilisez uniquement les acces-
▪
soires d’origine, ou des accessoires recommandés par le
fabricant.
N’essayez pas de démonter
▪
l’appareil.
Ne laissez pas les enfants uti-
▪
liser l’appareil.
FRANÇAIS 25

SÉCURITÉ _________________________________
Utilisez l’appareil au respect
▪
des quantités et des instructions fournies dans la section
« Quantités maximales et
temps d’utilisation » du manuel d’utilisation.
Pour des raisons de sécurité,
▪
utilisez toujours le couvercle
de protection pour prévenir
tout risque de blessure pendant le mixage, le pétrissage
et le fouettage.
Ne faites pas fonctionner l’ap-
▪
pareil et ne le placez pas, ainsi
que ses composants, à proximité des surfaces chaudes.
Ne placez pas d’aliments
▪
chauds dans l’appareil.
Assurez-vous que votre source
▪
d’alimentation électrique est
conforme aux informations
spécifiées sur la plaque signalétique de votre appareil.
Utilisez l’appareil avec une
▪
prise de terre.
N’utilisez pas l’appareil avec
▪
une rallonge.
Ne touchez jamais à la fiche
▪
de l’appareil avec les mains
humides ou mouillées.
Le présent appareil est destiné
▪
à un usage domestique privé
uniquement et ne convient
pas à une utilisation professionnelle dans le secteur de la
restauration. Il ne doit pas être
utilisé à des fins commerciales.
Débranchez l’appareil avant
▪
le nettoyage, le démontage
ou le remplacement des accessoires et attendez qu’il soit
complètement à l’arrêt.
Après le nettoyage, séchez
▪
l’appareil et tous ses composants avant de le brancher
au secteur et d’y monter les
accessoires.
Évitez d’utiliser l’appareil à
▪
des fins autres que celles prévues.
Ne plongez pas l’appareil,
▪
le câble d’alimentation ou la
prise d’alimentation électrique
dans de l’eau ou tout autre liquide.
Si vous conservez les maté-
▪
riaux d’emballage, tenez-les
hors de la portée des enfants.
26 FRANÇAIS

APERÇU __________________________________
Chère cliente, cher client,
Nous vous félicitons pour avoir acheté le robot
de cuisine GRUNDIG KMP 8650 S.
Veuillez lire attentivement le guide d’utilisation de
la balance pour pouvoir profiter de la qualité de
votre appareil Grundig pendant de nombreuses
années à venir à domicile.
Commerce responsable !
Que ce soit en interne ou dans les
rapports avec ses fournisseurs,
GRUNDIG met l’accent sur des
conditions de travail sociales
contractuellement garanties avec
des salaires justes, sur l’utilisation
efficace de matériaux bruts avec une constante
réduction des déchets de plusieurs tonnes de
plastique chaque année – et sur une disponibilité
d’au moins 5 ans de tous les accessoires.
Pour un avenir digne d’être vécu.
Grundig.
Éléments fonctionnels
Veuillez vous reporter aux illustrations en page 3.
A
Logement du bol
B
Poignée du bol
C
Bol
D
Point de montage d’accessoires
E
Entrée pour accessoire supplémentaire
F
Bouton d’ouverture du corps
G
Affichage LED
H
Boutons de réglage de l’heure
I
Bouton de réglage de la vitesse
J
Bouton Démarrer / Pause
K
Compartiment de rangement du câble
L
Trémie d’alimentation
M
Couvercle de protection
N
Spatule
O
Accessoire de pétrissage de pâte
P
Mixeur
Q
Batteur
FRANÇAIS 27

FONCTIONNEMENT _______________________
Première utilisation
1 Retirez tous les emballages et étiquettes de
l’appareil et jetez-les conformément à la règlementation locale en vigueur.
2 Nettoyez l’appareil avant sa première utilisa-
tion (Reportez-vous à la rubrique « Nettoyage
et entretien ».
Utilisation prévue
Le présent appareil a été conçu à des fins do-
▪
mestiques uniquement. Il ne doit pas être utilisé
à des fins commerciales.
N’utilisez pas l’appareil à des fins autres que
▪
celles prévues.
Accessoires
Batteur
Utilisé pour préparer les plats légers comme la
crème, la crème fouettée et les œufs.
Accessoire de pétrissage de pâte
Utilisé pour pétrir les pâtes contenant des ingrédients épais, tels que la pâte à pain, et pour mélanger les ingrédients supplémentaires (raisins,
morceaux de fruits, morceaux de chocolat, etc.)
Mixeur
Utilisé pour mélanger les ingrédients qui présentent la consistance d’une pâte à gâteau.
Couvercle de protection
Pour des raisons de sécurité, vous devez obligatoirement utiliser cet accessoire pendant le
mélange.
Q
O
P
M
Installation et fonctionnement
Installez l’appareil à la verticale, sur une surface
stable, équilibrée et sèche.
Levage du corps supérieur
Appuyez longuement sur le bouton d’ouverture
du corps F et levez le corps de l’appareil.
– Le corps sera maintenu en suspension au
retentissement d’un clic.
Avertissement:
Ne poursuivez pas la procédure lorsque vous
▪
entendez le clic. Le corps supérieur peut tomber et provoquer des blessures.
Installation du bol
Remarque:
Assurez-vous que le corps supérieur est à la
▪
position la plus élevée lors de l’installation du
bol C.
1 Tenez la poignée B du bol C pour installer
ce dernier dans son habitacle A.
2 Lorsque les languettes du bol C sont complè-
tement emboîtées, tournez en direction de
et installez le bol dans son habitacle A.
3 Placez les ingrédients à mixer dans le bol C.
Avertissement:
pendant toutes les procédures d’installation,
▪
assurez-vous que l’appareil est débranché et
que le bouton de réglage de la vitesse I est
à la position « 0 ».
28 FRANÇAIS
FONCTIONNEMENT _______________________
Fermeture du corps supérieur
1 Appuyez sur le bouton d’ouverture F du
corps supérieur et appuyez légèrement vers
le bas pour ramener le corps à la position
horizontale.
1
2
Montage des accessoires
1 Placez l’accessoire de sorte que l’encoche
s’installe parfaitement dans la languette qui se
trouve au point de montage de l’accessoire
D
.
2 Tournez l’accessoire dans le sens antihoraire
pour le fixer au point de montage D.
– Le corps est parfaitement installé lorsque
vous entendez le son d’un clic.
2 Branchez l’appareil.
1
2
Avertissement:
Assurez-vous que l’accessoire est bien installé
▪
à sa position.
FRANÇAIS 29

FONCTIONNEMENT _______________________
Fonctionnement
Remarque:
Avant d’utiliser l’appareil, placez le couvercle
▪
de protection M sur le bol C. Vous pouvez
ajouter les ingrédients à travers la trémie d’alimentation L sans lever le corps supérieur.
1 Branchez l’appareil.
– Le témoin du bouton de réglage de la
vitesse I clignote.
– « 00:00 » s’affiche à l’écran LED.
Remarque:
L’appareil bascule au mode automatique
▪
d’économie d’énergie s’il n’est pas utilisé pendant plus de 3 minutes. L’écran LED G s’éteint.
Vous pouvez commencer le mélange ou
appuyer sur l’un des boutons de réglage du
temps H pour remettre l’appareil en marche.
Avertissement:
Votre appareil est équipé de la technologie de
▪
démarrage au ralenti pour prévenir la projection des ingrédients à mélanger.
2 Pour démarrer le mélange, faites fonctionner
l’appareil avec le bouton de réglage de la
vitesse I à la position « 1 » et augmentez la
vitesse de façon progressive.
– Le témoin du bouton de réglage de la
vitesse I reste allumé.
30 FRANÇAIS
00:00
Avertissement:
Déplacez le bouton de réglage de la vitesse
▪
I
vers la position « 0 » en cas de coupure
d’électricité pendant le fonctionnement de
l’appareil ou lorsqu’il est débranché. Lorsque
l’alimentation électrique est rétablie ou l’appareil est branché, reprenez depuis la première
étape. L’appareil ne reprendra que lorsque
vous aurez déplacé le bouton de réglage
de la position « 0 ». Tournez le régulateur de
vitesse vers la gauche pour sélectionner le
niveau de vitesse désiré.
 Loading...