

Page 1
WAŻNE INFORMACJE NR ARTYKUŁU: 871125247440
3
NORMALNE WAHANIA CIŚNIENIA TĘTNICZEGO
Na wartość ciśnienia tętniczego mogą wpływać: aktywność zyczna, emocje, stres, spożywanie posiłków lub
napojów, palenie tytoniu, postawa ciała oraz wiele innych czynności i czynników (w tym sam fakt wykonywania
pomiaru). W związku z tym rzadko zdarza się, aby wyniki dwóch kolejnych pomiarów były identyczne.
Ciśnienie tętnicze podlega również wahaniom w cyklu dobowym: najwyższe wartości notuje się zwykle przed
południem, a najniższe – o północy. W większości przypadków ciśnienie zaczyna rosnąć około godziny 3:00
i osiąga najwyższy poziom w ciągu dnia, czyli w czasie, gdy większość osób nie śpi i jest aktywna.
Z uwagi na powyższe uwarunkowania zaleca się, aby pomiary ciśnienia były wykonywane każdego dnia
mniej więcej o tej samej porze.
Zbyt częste wykonywanie pomiarów może doprowadzić do urazów związanych z zakłóceniem przepływu krwi,
dlatego po każdym pomiarze należy odczekać od 1 do 1,5 minuty, aby umożliwić przywrócenie prawidłowego
krążenia w ręce. Uzyskanie za każdym razem identycznych odczytów ciśnienia tętniczego jest rzadkością.
OSTRZEŻENIA
1. Przed skorzystaniem z urządzenia należy zapoznać się ze wszystkimi informacjami zawartymi
w instrukcji obsługi i innych dokumentach znajdujących się w opakowaniu.
2. Przed rozpoczęciem pomiaru ciśnienia tętniczego należy odpocząć w ciszy i spokoju przez 5 minut.
3. Mankiet należy umieścić na wysokości serca.
4. Podczas pomiaru nie należy rozmawiać ani zmieniać położenia ręki lub ciała.
5. Pomiar należy wykonywać za każdym razem na lewym ramieniu.
6. Przed kolejnym pomiarem należy odpocząć przez co najmniej 1 lub 1,5 minuty, aby umożliwić
przywrócenie prawidłowego krążenia w ręce. Długotrwałe lub zbyt mocne napompowanie mankietu
(tj. sytuacja, w której ciśnienie w mankiecie przekracza 300 mmHg lub utrzymuje się powyżej 15
mmHg przez dłużej niż 3 minuty) może spowodować powstanie krwiaka na ręce.
7. Przed skorzystaniem z urządzenia należy zasięgnąć porady lekarza, jeśli istnieją wątpliwości co do:
1) zakładania mankietu na ranę lub na miejsce, w którym występuje stan zapalny;
2) zakładania mankietu na kończynę, w której umieszczono wenon lub w której jest wykonywany
wlew dożylny bądź w której wykonano przetokę tętniczo-żylną;
3) zakładania mankietu na rękę po tej samej stronie ciała, po której wykonano zabieg mastektomii;
4) jednoczesnego stosowania urządzenia razem z inną medyczną aparaturą pomiarową na tej samej
kończynie;
5) konieczności zbadania krążenia u pacjenta.
8. Ciśnieniomierz elektroniczny jest przeznaczony dla osób dorosłych i nie może być w żadnym
razie stosowany u noworodków, niemowląt lub małych dzieci. Przed zastosowaniem urządzenia
u starszych dzieci należy zasięgnąć porady lekarza.
9. Z urządzenia nie należy korzystać w poruszającym się pojeździe, ponieważ może to spowodować
błędy pomiaru.
10. Pomiary ciśnienia tętniczego wykonywane za pomocą aparatu są równoważne pomiarom
wykonywanym przez należycie przeszkoloną osobę metodą osłuchową (tj. przy użyciu
mankietu i stetoskopu) w zakresie przewidzianym przez American National Standards Institute
dla ciśnieniomierzy elektronicznych lub automatycznych.
11. Informacje na temat potencjalnych zakłóceń elektromagnetycznych lub innych zakłóceń między
ciśnieniomierzem a innymi urządzeniami oraz wskazówki dotyczące unikania tego rodzaju
zakłóceń przestawiono w rozdziale „INFORMACJE DOTYCZĄCE KOMPATYBILNOŚCI
ELEKTROMAGNETYCZNEJ”. Zaleca się również, aby ciśnieniomierz znajdował się w odległości
co najmniej 30 cm od innych urządzeń bezprzewodowych, takich jak moduły sieci WLAN,
telefony komórkowe, kuchenki mikrofalowe itd. Ponadto z urządzenia nie wolno korzystać
w pobliżu działających aparatów chirurgicznych wykorzystujących fale o dużej częstotliwości oraz
w ekranowanych pomieszczeniach z aparatami do obrazowania metodą rezonansu magnetycznego,
w których występuje duże natężenie zakłóceń elektromagnetycznych.
12. Jeśli w trakcie pomiaru ciśnienia tętniczego zostanie wykryty nieregularny rytm serca spowodowany
arytmią, na wyświetlaczu zostanie wyświetlony symbol . W takim przypadku ciśnieniomierz
elektroniczny może nadal działać, ale uzyskane wyniki mogą nie być miarodajne, dlatego w celu
prawidłowej interpretacji pomiaru należy skontaktować się z lekarzem.
Symbol nieregularnego rytmu serca jest wyświetlany w dwóch przypadkach:
1) jeśli współczynnik zmienności tętna przekracza 25%;
2) jeśli różnica między kolejnymi okresami tętna wynosi co najmniej 0,14 s, a liczba nieregularnych
uderzeń stanowi ponad 53% łącznej liczby uderzeń serca.
13. Należy korzystać wyłącznie z mankietu dostarczonego przez producenta, ponieważ w przeciwnym
razie może powstać zagrożenie wynikające z braku zgodności biologicznej, a także mogą wystąpić
błędy pomiaru.
14. Ciśnieniomierz może działać niezgodnie z podanymi parametrami lub powodować zagrożenie
bezpieczeństwa, jeśli jest przechowywany lub użytkowany w warunkach wykraczających poza zakres
temperatury i wilgotności określony w rozdziale „DANE TECHNICZNE”.
15. Aby uniknąć przeniesienia infekcji, nie należy udostępniać mankietu innym osobom cierpiącym
na choroby zakaźne.
16. Urządzenie pomyślnie przeszło testy zgodności z ograniczeniami dotyczącymi urządzeń cyfrowych
klasy B zgodnie z rozdziałem 15 przepisów FCC. Ograniczenia te mają na celu zapewnienie
należytej ochrony przed szkodliwymi zakłóceniami w przypadku instalacji urządzenia w budynkach
mieszkalnych. Urządzenie wytwarza, wykorzystuje i może emitować energię o częstotliwości radiowej.
Zainstalowanie i użytkowanie urządzenia w sposób niezgodny z instrukcją może spowodować powstanie
zakłóceń w łączności radiowej. Nie ma jednak gwarancji, że zakłócenia takie nie wystąpią w ramach
danej instalacji. Jeśli urządzenie powoduje szkodliwe zakłócenia w odbiorze sygnału radiowego lub
telewizyjnego, co można stwierdzić przez wyłączenie i włączenie urządzenia, zaleca się podjęcie próby
wyeliminowania zakłóceń jednym lub kilkoma z podanych sposobów:
– poprzez zmianę kierunku lub umiejscowienia anteny odbiorczej;
– poprzez zwiększenie odległości między urządzeniem a odbiornikiem;
– poprzez podłączenie urządzenia do gniazda znajdującego się w innym obwodzie niż ten,
do którego jest podłączony odbiornik;
– zwrócenie się o pomoc do sprzedawcy urządzenia lub doświadczonego technika radiowo-
telewizyjnego.
17. Pomiarów nie wolno wykonywać u pacjentów, u których często występują zaburzenia rytmu serca.
18. Urządzenie nie jest przeznaczone do stosowania u noworodków, dzieci i kobiet w ciąży
(w powyższych grupach nie przeprowadzono badań klinicznych).
19. Na dokładność pomiaru mogą wpływać ruch, drżenie i dreszcze.
20. Urządzenia nie należy stosować u pacjentów ze słabym krążeniem obwodowym, zauważalnie niskim
ciśnieniem tętniczym bądź niską temperaturą ciała (co wiąże się ze słabym dopływem krwi do miejsca
wykonywania pomiaru).
21. Urządzenia nie należy stosować u pacjentów podłączonych do sztucznego płucoserca (ponieważ
w tym przypadku nie można zmierzyć tętna).
22. Przed skorzystaniem z urządzenia należy zasięgnąć porady lekarza, jeśli u pacjenta występuje
którekolwiek z następujących schorzeń: typowe zaburzenia rytmu serca, takie jak przedwczesne
pobudzenie komorowe lub przedsionkowe, migotanie przedsionków, miażdżyca tętnic, słaba perfuzja,
cukrzyca, stan przedrzucawkowy oraz choroby nerek.
23. Urządzenie jest przeznaczone do obsługi przez pacjenta.
24. Uwaga: Zmiany lub modykacje urządzenia dokonane bez wyraźnej zgody podmiotu
odpowiedzialnego za zapewnienie zgodności mogą spowodować utratę przez użytkownika uprawnień
do korzystania z urządzenia.
25. Połknięcie baterii lub elektrolitu z baterii może być bardzo niebezpieczne. W związku z tym baterie
i urządzenie należy przechowywać w miejscu niedostępnym dla dzieci i osób niepełnosprawnych.
26. Z urządzenia nie powinny korzystać osoby uczulone na tworzywa sztuczne lub gumę.
27. Jeśli z urządzenia korzysta kilku użytkowników, należy pamiętać o wyborze właściwego banku pamięci.
DANE TECHNICZNE
Nazwa produktu: Ciśnieniomierz naramienny
1. Model: KD-553
2. Klasykacja: zasilanie wewnętrzne, typ części aplikacyjnej BF, IP20, brak klasykacji AP lub APG,
działanie ciągłe
3. Wymiary urządzenia: ok. 136×120×61 mm
4. Obwód mankietu: 22–32 cm, 30–42 cm (opcjonalnie),
42–48 cm (opcjonalnie), 22–36 cm (opcjonalnie),
22–42 cm (opcjonalnie)
5. Masa: ok. 225 g (bez baterii i mankietu)
6. Sposób pomiaru: metoda oscylometryczna, automatyczne napełnianie mankietu i automatyczny pomiar
7. Pojemność pamięci: 2×60 wyników z informacją o dacie i godzinie
8. Źródło zasilania: 4 baterie 1,5 V typu AA
9. Zakres pomiaru:
Ciśnienie w mankiecie: 0–300 mmHg
Skurczowe: 60–260 mmHg
Rozkurczowe: 40–199 mmHg
Tętno: 40–180 uderzeń na minutę
10. Dokładność:
Ciśnienie: ±3 mmHg
Tętno: Poniżej 60: ±3 uderzenia na minutę
60 lub więcej: ±5%
11. Temperatura otoczenia podczas pracy: od 10 do 40 °C
12. Wilgotność otoczenia podczas pracy: ≤85% (względna)
13. Temperatura otoczenia podczas przechowywania i transportu: od -20 do 50 °C
14. Wilgotność otoczenia podczas przechowywania i transportu: ≤85% (względna)
15. Ciśnienie atmosferyczne: 80–105 kPa
16. Czas pracy baterii: ok. 270 pomiarów
17. Elementy ciśnieniomierza, w tym akcesoria: pompa, zawór, wyświetlacz LCD, mankiet, czujnik
Uwaga: Dane techniczne mogą ulec zmianie bez powiadomienia.
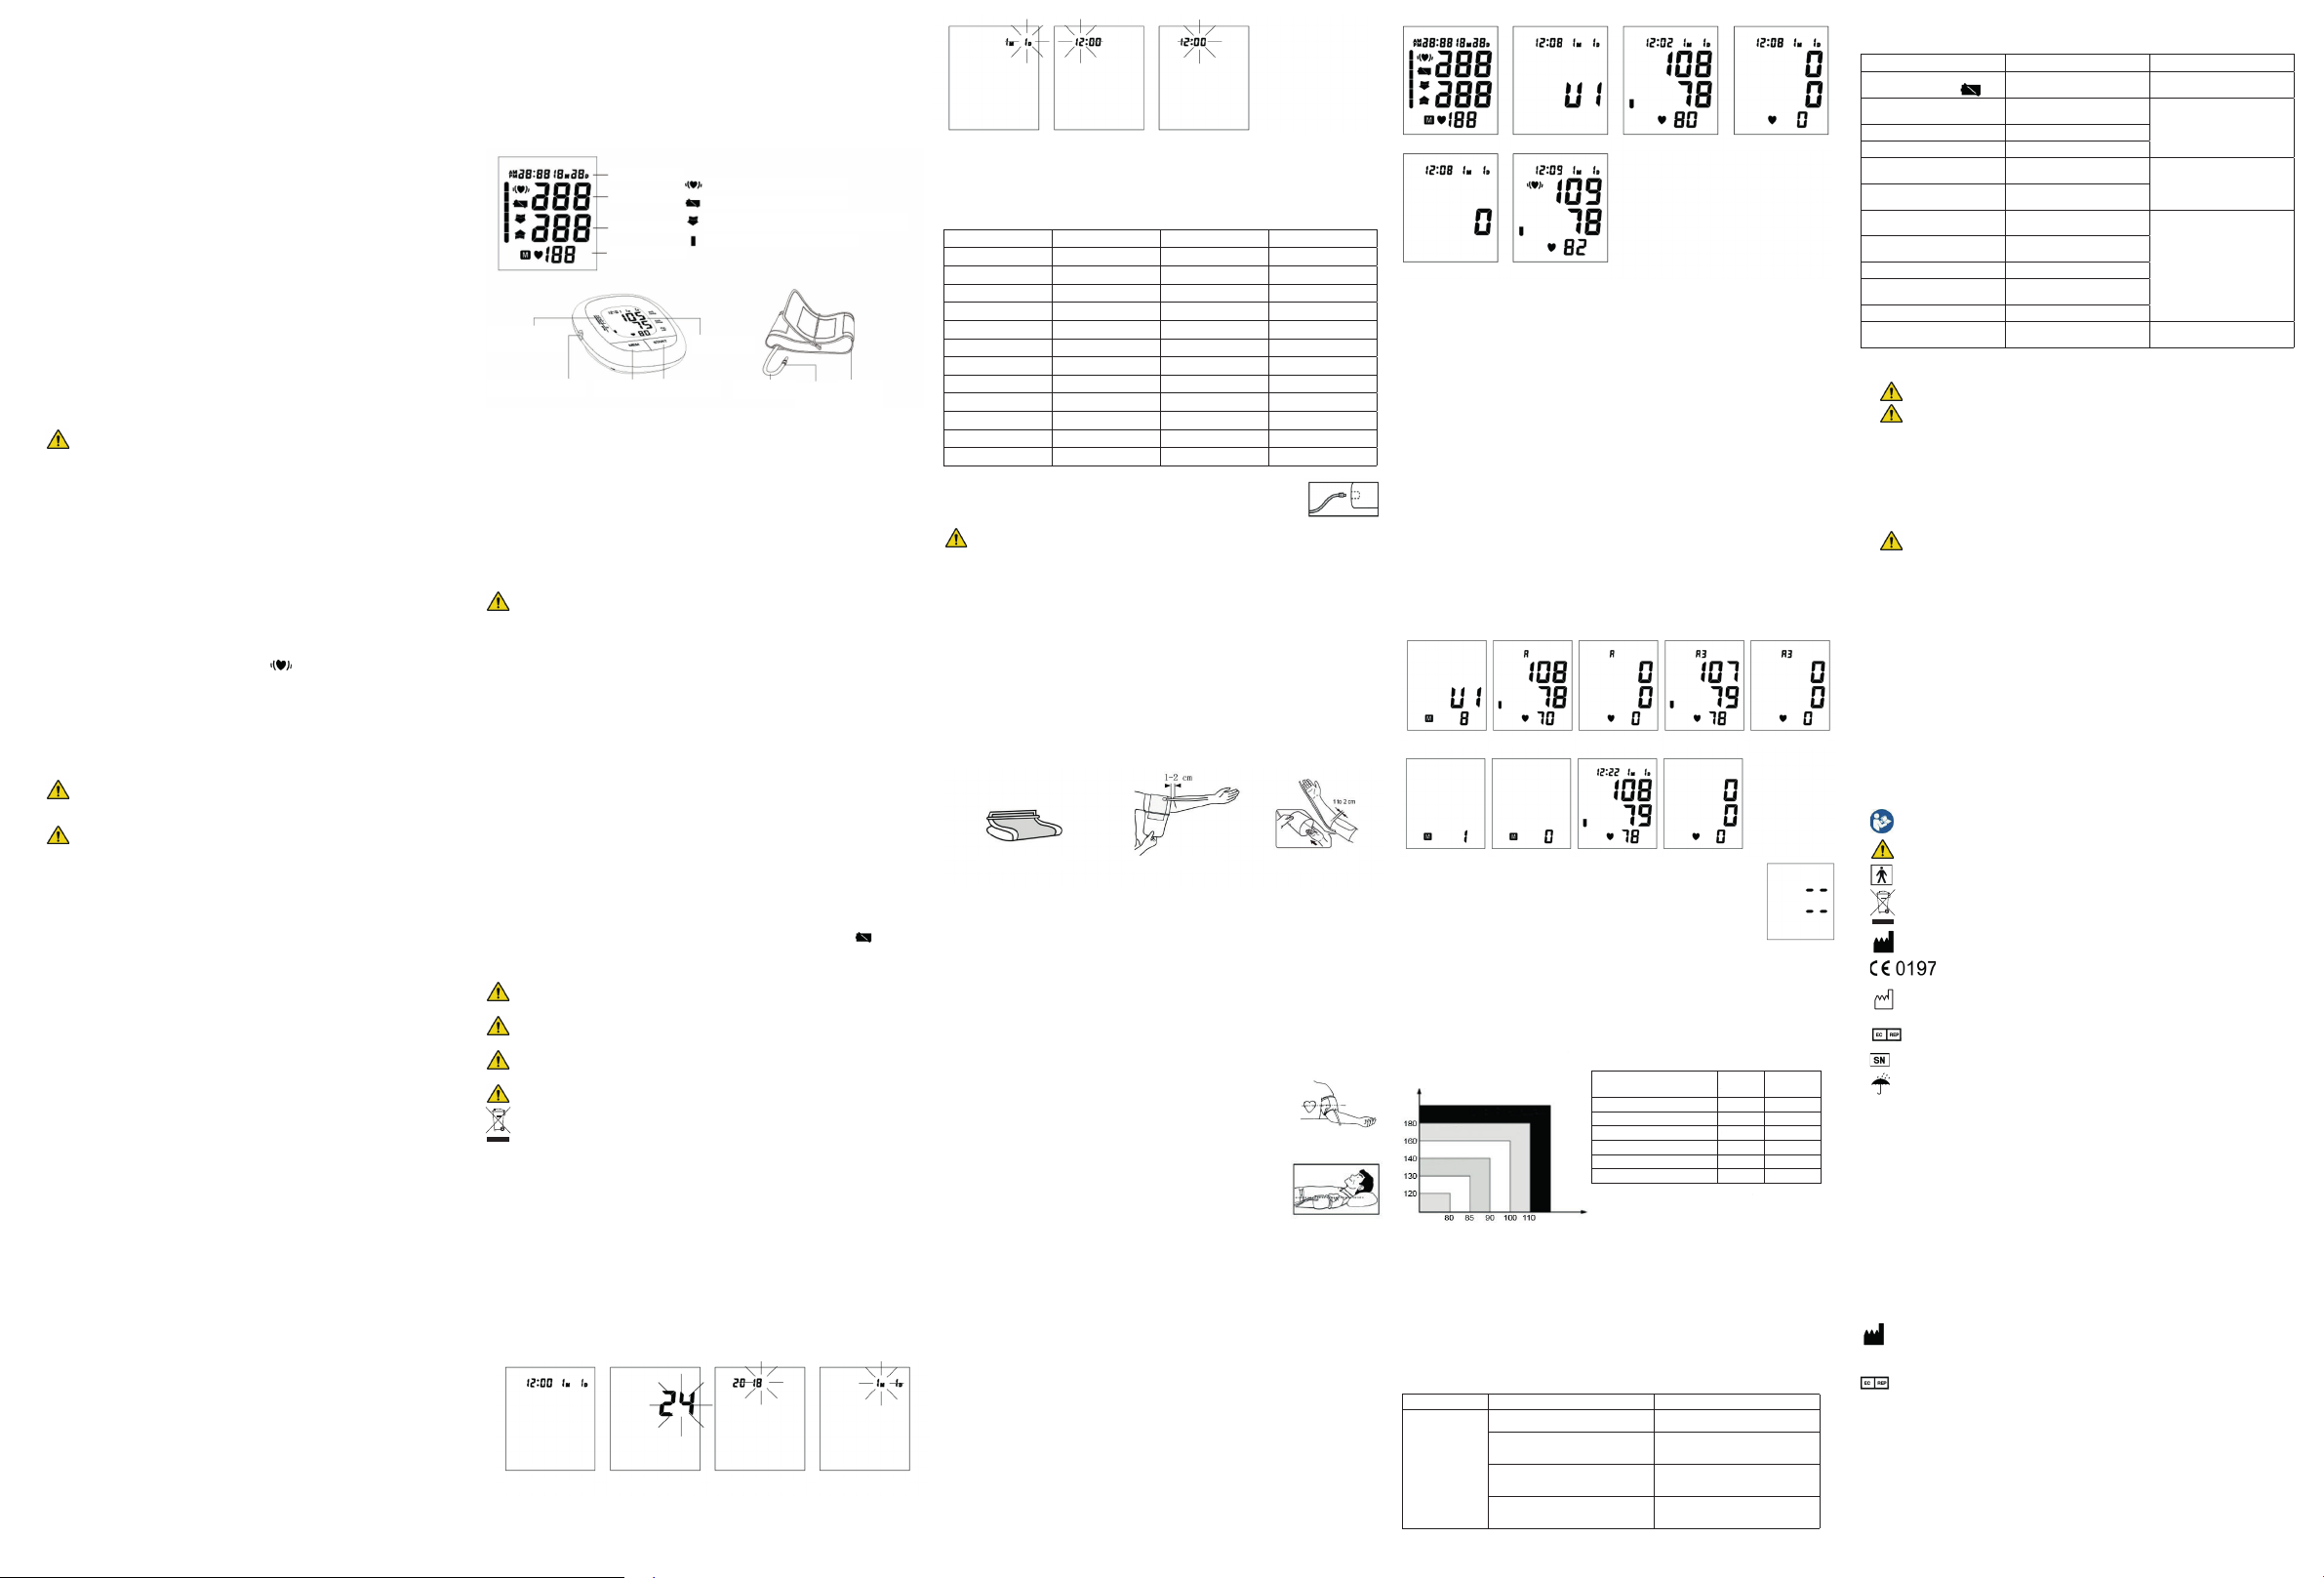
INFORMACJE I WSKAZANIA NA WYŚWIETLACZU
Data i godzina
Ciśnienie skurczowe
Ciśnienie rozkurczowe
Tętno
Wskaźnik klasykacji
ciśnienia tętniczego
Gniazdo
do podłączenia wężyka
Uwaga: Ilustracje przedstawione w instrukcji mają wyłącznie charakter poglądowy.
PRZEZNACZENIE URZĄDZENIA
Całkowicie automatyczny ciśnieniomierz elektroniczny jest przeznaczony do stosowania przez personel
medyczny oraz do użytku domowego. Urządzenie umożliwia nieinwazyjny pomiar ciśnienia tętniczego
(w tym ciśnienia skurczowego i rozkurczowego oraz tętna) u osób dorosłych przy użyciu pompowanego
mankietu zakładanego na ramię. Obwód mankietu jest regulowany w zakresie od 22 do 48 cm.
ZAWARTOŚĆ OPAKOWANIA
• 1 ciśnieniomierz
• 1 instrukcja obsługi
• 1 mankiet na ramię
• 1 miękkie etui
Przycisk „MEM” Przycisk „START”
Symbol nieregularnego rytmu serca
Wskaźnik niskiego poziomu baterii
Symbol oznaczający niewłaściwe zamocowanie mankietu lub
nadmiar powietrza w mankiecie
Wskaźnik klasykacji ciśnienia tętniczego
Wyświetlacz LCD
Gumowy wężyk
Złącze
wężyka
mankietu
Mankiet
PRZECIWWSKAZANIA
Nie zaleca się stosowania ciśnieniomierza elektronicznego u osób z poważnymi zaburzeniami
rytmu serca.
OPIS PRODUKTU
Dzięki zastosowaniu metody oscylometrycznej i zintegrowanego krzemowego czujnika ciśnienia urządzenie
umożliwia automatyczny i nieinwazyjny pomiar ciśnienia tętniczego oraz tętna. Wartości ciśnienia i tętna
są prezentowane na wyświetlaczu LCD, a wbudowana pamięć pozwala zapisać ostatnie 2×60 wyników wraz
z informacją o dacie i godzinie pomiaru. Ciśnieniomierz elektroniczny jest zgodny z następującymi normami:
IEC 60601-1 wydanie 3.1 2012-08/EN 60601-1:2006/A1:2013 (Medyczne urządzenia elektryczne
– Część 1: Wymagania ogólne dotyczące bezpieczeństwa podstawowego oraz funkcjonowania
zasadniczego), IEC 60601-1-2:2014/EN 60601-1-2:2015 (Medyczne urządzenia elektryczne – Część
1-2: Wymagania ogólne dotyczące bezpieczeństwa podstawowego oraz funkcjonowania zasadniczego
– Norma uzupełniająca: Zakłócenia elektromagnetyczne – Wymagania i badania), IEC 80601-230:2009+AMD1:2013/EN 80601-2-30:2010/A1:2015 (Medyczne urządzenia elektryczne – Część 2-30:
Wymagania szczegółowe dotyczące bezpieczeństwa podstawowego oraz funkcjonowania zasadniczego
automatycznych nieinwazyjnych sgmomanometrów), EN 1060-1:1995+A2:2009 (Nieinwazyjne
sgmomanometry – Część 1: Wymagania ogólne), EN 1060-3:1997+A2:2009 (Nieinwazyjne
sgmomanometry – Część 3: Wymagania dodatkowe dotyczące elektromechanicznych systemów
do pomiaru ciśnienia krwi) oraz ISO 81060-2:2013 (Nieinwazyjne sgmomanometry – Część 2: Badania
kliniczne dla pomiarów typu automatycznego).
KONFIGUROWANIE I OBSŁUGA URZĄDZENIA
1. WKŁADANIE BATERII
a. Otwórz pokrywę komory baterii z tyłu obudowy ciśnieniomierza.
b. Włóż cztery baterie AA, zwracając uwagę na to, aby ich bieguny dodatnie i ujemne odpowiadały
oznaczeniom na stykach w komorze baterii.
c. Zamknij pokrywę komory baterii.
Baterie należy wymienić na nowe, jeśli na wyświetlaczu LCD jest widoczny symbol baterii .
W ciśnieniomierzu nie należy stosować akumulatorów.
Jeśli urządzenie nie będzie używane przez miesiąc lub dłużej, należy wyjąć z niego baterie, aby uniknąć
uszkodzeń spowodowanych wyciekiem elektrolitu.
Nieprawidłowa wymiana baterii litowych może spowodować zagrożenie (np. ryzyko przegrzania,
pożaru lub wybuchu).
Należy uważać, aby elektrolit nie dostał się do oczu. Jeśli dojdzie do kontaktu z oczami, należy
natychmiast przemyć je dużą ilością czystej wody, a następnie skontaktować się z lekarzem.
Baterię należy prawidłowo włożyć do komory i wsunąć w taki sposób, aby jej biegun ujemny
docisnął sprężynę stanowiącą elektrodę ujemną w urządzeniu.
Przed włożeniem baterii należy sprawdzić, czy pokrywa komory baterii nie jest uszkodzona.
Po zakończeniu eksploatacji należy zutylizować ciśnieniomierz, baterie i mankiet zgodnie
z miejscowymi przepisami.
2. USTAWIANIE GODZINY I DATY
a. Po włożeniu baterii lub wyłączeniu zasilania ciśnieniomierz przechodzi w tryb zegara, w którym
na wyświetlaczu LCD wyświetlane są godzina i data (patrz rys. 2).
b. Gdy urządzenie znajduje się w trybie zegara, jednocześnie naciśnij i przytrzymaj przez dwie sekundy,
a następnie zwolnij przyciski „START” i „MEM”, co spowoduje przejście w tryb ustawiania godziny i daty.
c. W trybie ustawiania godziny i daty najpierw zaczyna migać format godziny (patrz rys. 2-1). Gdy
na wyświetlaczu miga format godziny, naciśnij przycisk „MEM”, aby go zmienić. Domyślnie ustawiony
jest format 24-godzinny.
d. Po ponownym naciśnięciu przycisku „START” zaczynają migać kolejno rok (zakres 2018–2099),
miesiąc, dzień, godzina oraz minuty (patrz rys. 2-2, 2-3, 2-4, 2-5 i 2-6). Kiedy wybrana liczba miga,
naciśnij przycisk „MEM”, aby zwiększyć wartość (dłuższe przytrzymanie przycisku powoduje szybszą
zmianę wartości).
e. Podczas ustawiania godziny i daty ciśnieniomierz automatycznie powraca do trybu zegara, jeśli
w ciągu 60 sekund nie zostanie naciśnięty żaden przycisk.
f. Wyłączenie ciśnieniomierza za pomocą przycisku „START” w czasie, gdy migają minuty, powoduje
potwierdzenie godziny i daty.
Rysunek 2 Rysunek 2-1 Rysunek 2-2 Rysunek 2-3
Rysunek 2-4
Uwaga:
1.1 Użytkownik może ustawić format godziny.
1.2 W tabeli 2-1 podano zależności między formatem 24-godzinnym a 12-godzinnym.
Rysunek 2-5
Rysunek 2-6
Tabela 2-1
Format 24-godzinny Format 12-godzinny Format 24-godzinny Format 12-godzinny
0:00 12:00 AM 12:00 12:00 PM
1:00 1:00 AM 13:00 1:00 PM
2:00 2:00 AM 14:00 2:00 PM
6
3:00 3:00 AM 15:00 3:00 PM
4:00 4:00 AM 16:00 4:00 PM
5:00 5:00 AM 17:00 5:00 PM
6:00 6:00 AM 18:00 6:00 PM
7:00 7:00 AM 19:00 7:00 PM
8:00 8:00 AM 20:00 8:00 PM
9:00 9:00 AM 21:00 9:00 PM
10:00 10:00 AM 22:00 10:00 PM
11:00 11:00 AM 23:00 11:00 PM
PODŁĄCZANIE MANKIETU DO CIŚNIENIOMIERZA
Złącze wężyka mankietu należy włożyć do gniazda po lewej stronie ciśnieniomierza.
Należy przy tym upewnić się, że złącze zostało wsunięte do końca, aby zapobiec
nieszczelności podczas pomiaru ciśnienia.
Podczas pomiaru należy unikać ściskania lub blokowania wężyka, ponieważ mogłoby
to uniemożliwić prawidłowe napełnienie mankietu powietrzem lub spowodować uraz wynikający z ucisku
wywołanego przez mankiet.
3. ZAKŁADANIE MANKIETU
a. Przełóż koniec mankietu przez metalową klamrę (mankiet jest już w ten sposób spakowany
fabrycznie), wywiń go na zewnątrz (w kierunku od ciała), a następnie zaciśnij i zapnij na rzep
(patrz rys. 4-1).
b. Załóż mankiet na odsłonięte ramię, 1–2 cm nad zgięciem stawu łokciowego.
c. Przy zakładaniu mankietu na lewe ramię umieść wężyk na środku ramienia, w jednej linii
ze środkowym palcem (patrz rys. 4-2).
Przy zakładaniu mankietu na prawe ramię umieść go tak, aby wężyk znalazł się z boku łokcia
(patrz rys. 4-3).
d. Siedząc, połóż dłoń przed sobą, wewnętrzną stroną do góry, na płaskiej powierzchni, na przykład
na blacie biurka lub stołu. Uważaj, aby nie opierać ramienia na wężyku, ponieważ może to ograniczyć
dopływ powietrza do mankietu.
e. Mankiet powinien być założony wygodnie, ale dość ciasno. Pomiędzy ramieniem a mankietem
powinien zmieścić się jeden palec.
Rysunek 4-1 Rysunek 4-2 Rysunek 4-3
Uwaga:
1. Aby upewnić się, że stosowany jest właściwy mankiet, należy sprawdzić zakres obwodu podany
w rozdziale „DANE TECHNICZNE”.
2. Pomiar należy za każdym razem wykonywać na lewej ręce.
3. Podczas wykonywania pomiaru nie należy poruszać ręką ani zmieniać pozycji ciała lub
ciśnieniomierza, a także nie należy poruszać gumowym wężykiem.
4. Przed rozpoczęciem pomiaru ciśnienia tętniczego należy odpocząć w ciszy i spokoju przez 5 minut.
5. Mankiet należy utrzymywać w czystości. Jeśli ulegnie zabrudzeniu, należy go odłączyć
od ciśnieniomierza i wyczyścić ręcznie z użyciem łagodnego detergentu, a następnie dokładnie
wypłukać zimną wodą. Mankietu nie wolno w żadnym razie suszyć w suszarce bębnowej ani
prasować. Zaleca się czyszczenie mankietu po każdych 200 pomiarach.
6. Nie należy zakładać mankietu, jeśli na ramieniu występuje stan zapalny, ostry stan chorobowy,
zakażenie lub skaleczenie skóry.
4. WŁAŚCIWA POSTAWA PODCZAS POMIARU
Pomiar w pozycji siedzącej
a. Usiądź wygodnie, opierając stopy płasko na podłodze i nie krzyżując nóg.
b. Połóż dłoń przed sobą, wewnętrzną stroną do góry, na płaskiej powierzchni,
na przykład na blacie biurka lub stołu.
c. Ustaw rękę tak, aby środek mankietu znajdował się na wysokości prawego
przedsionka serca.
Pomiar w pozycji leżącej
a. Połóż się na plecach.
b. Ułóż wyprostowaną lewą rękę wzdłuż boku tak, aby wewnętrzna strona dłoni
była zwrócona do góry
c. Mankiet należy umieścić na wysokości serca.
5. WYKONYWANIE POMIARU CIŚNIENIA
a. Po założeniu mankietu i przyjęciu wygodnej pozycji ciała naciśnij przycisk „START”. W ramach
autotestu zostaną wyświetlone wszystkie znaki, co pozwala sprawdzić stan wyświetlacza LCD
zgodnie z ilustracją. Jeśli nie są wyświetlane niektóre segmenty (patrz rys. 6-1), należy skontaktować
się z punktem serwisowym.
b. Następnie zaczyna migać numer aktualnie używanego banku pamięci (patrz rys. 6-2). Aby
przełączyć bank, naciśnij przycisk „MEM”, a następnie potwierdź wybór przyciskiem „START”. Wybór
banku jest również potwierdzany automatycznie, jeśli w ciągu 5 sekund nie zostanie wykonana
żadna operacja.
c. Jeśli w ciśnieniomierzu zapisano wyniki pomiarów, na wyświetlaczu LCD jest przez chwilę
wyświetlany najnowszy z nich (patrz rys. 6-3). Jeśli nie zapisano żadnych wyników, na wyświetlaczu
jest widoczna cyfra zero (patrz rys. 6-4).
d. Następnie ciśnieniomierz rozpoczyna wyszukiwanie zerowego poziomu ciśnienia (patrz rys. 6-5).
e. Urządzenie napełnia mankiet do momentu uzyskania ciśnienia wystarczającego do wykonania
pomiaru, a następnie powoli wypuszcza powietrze z mankietu i przeprowadza pomiar.
Na zakończenie urządzenie oblicza ciśnienie i tętno, a uzyskane wartości są prezentowane
na wyświetlaczu LCD. Zależnie od wyniku pomiaru na ekranie może zostać wyświetlony wskaźnik
klasykacji ciśnienia tętniczego i migający symbol nieregularnego rytmu serca (patrz rys. 6-6). Wynik
jest automatycznie zapisywany w ciśnieniomierzu.
Rysunek 6-1
Rysunek 6-5
f. Po zakończeniu pomiaru ciśnieniomierz wyłącza się automatycznie po 1 minucie bezczynności.
Można go również wyłączyć ręcznie, naciskając przycisk „START”.
g. Naciśnij przycisk „START” podczas pomiaru, jeśli chcesz ręcznie wyłączyć ciśnieniomierz.
Uwaga: W sprawie interpretacji wyników pomiaru ciśnienia należy skonsultować się z pracownikiem
opieki zdrowotnej
6. WYŚWIETLANIE ZAPISANYCH WYNIKÓW
a. Naciśnij przycisk „MEM”, gdy urządzenie znajduje się w trybie zegara, aby wyświetlić oznaczenie
aktualnie wybranej grupy. Zostanie wyświetlona liczba wyników zapisanych w aktualnie wybranym
banku pamięci (patrz rys. 7-1). Aby przełączyć grupę, naciśnij przycisk „START”, a następnie
potwierdź wybór przyciskiem „MEM”. Wybór banku jest również potwierdzany automatycznie, jeśli
w ciągu 5 sekund nie zostanie wykonana żadna operacja.
b. Na wyświetlaczu LCD zostanie wyświetlona średnia wartość wszystkich wyników w aktualnie wybranym
banku pamięci (patrz rys. 7-2). Jeśli w aktualnie wybranym banku pamięci nie są zapisane żadne wyniki,
w polach ciśnienia i pulsu na wyświetlaczu LCD jest widoczna wartość „0” (patrz rys. 7-3).
c. Naciśnij przycisk „MEM”, aby wyświetlić na wyświetlaczu LCD średnią wartość z trzech ostatnich
pomiarów zapisanych w aktualnie wybranym banku pamięci (patrz rys. 7-4). Jeśli w aktualnie
wybranym banku pamięci nie są zapisane żadne wyniki, w polach ciśnienia i pulsu na wyświetlaczu
LCD jest widoczna wartość „0” (patrz rys. 7-5).
d. Naciśnij ponownie przycisk „MEM”, aby wyświetlić numer pozycji w aktualnie wybranym banku
pamięci (patrz rys. 7-6). Jeśli w aktualnie wybranym banku pamięci nie są zapisane żadne wyniki,
na wyświetlaczu LCD jest widoczna wartość „0” (patrz rys. 7-7).
e. Następnie wyświetlany jest najnowszy wynik wraz z informacją o dacie i godzinie (patrz rys. 7-8).
Zależnie od okoliczności jednocześnie migają również symbol nieregularnego rytmu serca i wskaźnik
klasykacji ciśnienia tętniczego.
Naciskając ponownie przycisk „MEM”, można przejrzeć poprzednie pomiary. Jeśli w aktualnie
wybranym banku pamięci nie są zapisane żadne wyniki, w polach ciśnienia i pulsu na wyświetlaczu
LCD jest widoczna wartość „0” (patrz rys. 7-9).
f. Podczas wyświetlania zapisanych wyników ciśnieniomierz wyłącza się automatycznie po 1 minucie
bezczynności. Możesz także nacisnąć przycisk „START”, aby ręcznie wyłączyć urządzenie.
Rysunek 7-1
Rysunek 7-6
7. USUWANIE POMIARÓW Z PAMIĘCI
Aby usunąć wszystkie wyniki zapisane w aktualnie wybranym banku pamięci, podczas
wyświetlania dowolnego wyniku (z wyjątkiem wartości średniej) należy nacisnąć
i przytrzymać przez 3 sekundy przycisk „MEM” (patrz rys. 8). Naciśnięcie przycisku
„START” powoduje wyłączenie ciśnieniomierza.
8. OCENA NADCIŚNIENIA TĘTNICZEGO U OSÓB DOROSŁYCH
Poniżej przedstawiono wytyczne dotyczące oceny nadciśnienia tętniczego (bez względu na wiek i płeć)
określone przez Światową Organizację Zdrowia (WHO). Należy jednak pamiętać, że konieczne jest
również uwzględnienie innych czynników (takich jak cukrzyca, otyłość, palenie itd.). W celu dokonania
właściwej oceny sytuacji należy zasięgnąć porady lekarza. W żadnym razie nie wolno samodzielnie
podejmować decyzji o zmianie sposobu leczenia.
Rysunek 7-2
Rysunek 7-7
Rysunek 6-2
Rysunek 6-6
Rysunek 7-3
Rysunek 7-8
Rysunek 6-3
Rysunek 7-4
Rysunek 7-9
Rysunek 6-4
Rysunek 7-5
Rysunek 8
KLASYFIKACJA CIŚNIENIA TĘTNICZEGO U OSÓB DOROSŁYCH
Ciśnienie skurczowe
(mmHG)
Ciężkie nadciśnienie tętnicze
Umiarkowane nadciśnienie tętnicze
Łagodne nadciśnienie tętnicze
Wysokie prawidłowe CT
Prawidłowe CT
Uwaga: Powyższe informacje nie mogą stanowić podstawy do skierowania pacjenta na oddział ratunkowy lub postawienia diagnozy,
a ewentualne oznaczenia barwne służą jedynie rozróżnieniu poszczególnych poziomów ciśnienia tętniczego.
9. INFORMACJE O ALARMIE TECHNICZNYM
Jeśli zmierzone ciśnienie tętnicze (skurczowe lub rozkurczowe) wykracza poza zakres znamionowy określony
w rozdziale „DANE TECHNICZNE”, na wyświetlaczu LCD ciśnieniomierza jest natychmiast wyświetlany alarm
techniczny „HI” lub „Lo”. W takim przypadku należy zasięgnąć porady lekarza lub sprawdzić, czy urządzenie
nie zostało użyte niezgodnie z instrukcją. Warunki, w jakich jest wyzwalany alarm techniczny (przekroczenie
zakresu znamionowego), są skongurowane fabrycznie i nie można ich zmienić ani dezaktywować. Powyższy
stan alarmowy ma przypisany niski priorytet zgodnie z normą IEC 60601-1-8.
Alarm techniczny jest alarmem nieblokującym i nie wymaga resetowania. Sygnał widoczny na wyświetlaczu
LCD znika automatycznie po około 8 sekundach.
Klasyfikacja
CIŚNIENIA TĘTNICZEGO
Optymalne
Prawidłowe
Wysokie prawidłowe
Nadciśnienie tętnicze 1. stopnia
Nadciśnienie tętnicze 2. stopnia
Nadciśnienie tętnicze 3. stopnia
Ciśnienie rozkurczowe
(mmHG)
Definicje i klasyfikacja poziomów
10. ROZWIĄZYWANIE PROBLEMÓW (1)
PROBLEM MOŻLIWA PRZYCZYNA ROZWIĄZANIE
Nieprawidłowy wynik
na wyświetlaczu LCD
Niewłaściwe położenie lub nieprawidłowe
zaciśnięcie mankietu
Nieprawidłowa postawa ciała podczas badania
Rozmowa, poruszanie ręką, zmiana położenia
ciała, złość, emocje lub zdenerwowanie
podczas badania
Nieregularny rytm serca (arytmia)
Załóż prawidłowo mankiet i spróbuj ponownie.
Zapoznaj się z rozdziałem „WŁAŚCIWA
POSTAWA PODCZAS POMIARU” i ponownie
wykonaj pomiar.
Powtórz badanie po uspokojeniu się
i nie rozmawiaj ani nie wykonuj ruchów
w trakcie pomiaru.
Nie zaleca się stosowania ciśnieniomierza
elektronicznego u osób z poważnymi
zaburzeniami rytmu serca.
Rozkurczowe
Skurczowe
mmHg mmHg
<120 <80
120-129 80-84
130-139 85-89
140-159 90-99
160-179 100-109
>180 >110
ciśnienia tętniczego
wg WHO/ISH
ROZWIĄZYWANIE PROBLEMÓW (2)
PROBLEM MOŻLIWA PRZYCZYNA ROZWIĄZANIE
Symbol niskiego poziomu baterii
na wyświetlaczu LCD
„Er 0” na wyświetlaczu LCD
„Er 2” na wyświetlaczu LCD Nie wykryto ciśnienia rozkurczowego
„Er 3” na wyświetlaczu LCD
„Er 4” na wyświetlaczu LCD
„Er 5” na wyświetlaczu LCD
„Er 6” na wyświetlaczu LCD
„Er 7” na wyświetlaczu LCD Błąd pamięci wewnętrznej
„Er 8” na wyświetlaczu LCD
„Er A” na wyświetlaczu LCD Błąd parametrów czujnika ciśnienia
Brak reakcji po naciśnięciu przycisku
lub włożeniu baterii
Rozładowane baterie Wymień baterie.
Niestabilna praca układu
ciśnieniowego przed pomiarem
Zablokowanie układu pneumatycznego
podczas napełniania
Nieszczelność układu
pneumatycznego podczas napełniania
Ciśnienie w mankiecie przekraczające
300 mmHg
Ciśnienie w mankiecie przekraczające
15 mmHg przez ponad 160 sekund
Błąd sprawdzania parametrów
urządzenia
Nieprawidłowe działanie lub silne
zakłócenia elektromagnetyczne
Nie wykonuj żadnych ruchów i spróbuj
Podłącz prawidłowo mankiet i spróbuj
ponownie. Jeśli ciśnieniomierz nadal
nie działa prawidłowo, skontaktuj się
z dystrybutorem lub producentem.
Wykonaj ponownie pomiar po pięciu
minutach. Jeśli ciśnieniomierz nadal
nie działa prawidłowo, skontaktuj się
z dystrybutorem lub producentem.
Wyjmij baterie na pięć minut,
a następnie włóż je ponownie
ponownie.„Er 1” na wyświetlaczu LCD Nie wykryto ciśnienia skurczowego
KONSERWACJA
1. Nie należy upuszczać ciśnieniomierza ani narażać go na silne uderzenia.
2. Należy unikać wysokich temperatur i bezpośredniego działania promieni słonecznych.
Ciśnieniomierza nie wolno zanurzać w wodzie, gdyż spowoduje to jego uszkodzenie.
3. Jeśli ciśnieniomierz jest przechowywany w temperaturze bliskiej zera, przed użyciem należy
odczekać, aż urządzenie dostosuje się do temperatury otoczenia.
4. Ciśnieniomierz potrzebuje 6 godzin na rozgrzanie się od minimalnej temperatury przechowywania
do temperatury umożliwiającej PRAWIDŁOWĄ EKSPLOATACJĘ w pomieszczeniu, w którym
temperatura otoczenia wynosi 20°C.
5. Ciśnieniomierz potrzebuje 6 godzin na ochłodzenie się od maksymalnej temperatury przechowywania
do temperatury umożliwiającej PRAWIDŁOWĄ EKSPLOATACJĘ w pomieszczeniu, w którym
temperatura otoczenia wynosi 20°C.
6. Nie należy podejmować prób demontażu ciśnieniomierza.
7. Jeśli ciśnieniomierz nie będzie używany przez dłuższy czas, należy wyjąć z niego baterie.
8. Zaleca się sprawdzanie poprawności działania urządzenia co 2 lata lub po każdej naprawie. W tym
celu należy skontaktować się z centrum serwisowym.
9. Ciśnieniomierz należy czyścić suchą miękką ściereczką lub dobrze wyciśniętą ściereczką zwilżoną
wodą, rozcieńczonym środkiem dezynfekującym na bazie alkoholu bądź rozcieńczonym detergentem.
10. W ciśnieniomierzu nie znajdują się żadne elementy, które mogą być serwisowane przez użytkownika.
Na życzenie użytkownika mogą zostać dostarczone schematy układów elektronicznych, wykazy
elementów składowych, opisy, instrukcje kalibracji i inne informacje, które ułatwią należycie
wykwalikowanym pracownikom technicznym naprawę elementów urządzenia, które nadają się
do naprawy.
11. Ciśnieniomierz powinien zachować podane parametry bezpieczeństwa i eksploatacji przez
co najmniej 10 tys. pomiarów lub trzy lata, a mankiet powinien wytrzymać co najmniej 1 tys. cykli
odpinania/zapinania.
12. Zaleca się dezynfekowanie mankietu 2 razy w tygodniu, jeśli zachodzi taka potrzeba (np. w szpitalu
lub poradni). W tym celu należy przetrzeć wewnętrzną stronę mankietu (tj. stronę mającą kontakt
ze skórą) miękką ściereczką wyciśniętą po zwilżeniu alkoholem etylowym (75–90%), a następnie
pozostawić mankiet do wyschnięcia.
13. Niedozwolone jest wykonywanie czynności serwisowych lub obsługowych podczas korzystania
z ciśnieniomierza.
ZNACZENIE SYMBOLI UMIESZCZONYCH NA URZĄDZENIU
- Ten symbol (biały znak graczny na niebieskim tle) oznacza, że należy zapoznać się z
instrukcją obsługi.
- Ten symbol oznacza OSTRZEŻENIE.
- Ten symbol oznacza część aplikacyjną typu BF (mankiet jest częścią aplikacyjną typu BF).
- Ten symbol oznacza, że zużytego sprzętu elektronicznego nie wolno wyrzucać razem
z odpadami z gospodarstw domowych, a urządzenie należy w miarę możliwości poddać
recyklingowi. Wskazówki dotyczące recyklingu można uzyskać w lokalnej jednostce
samorządu terytorialnego lub w punkcie sprzedaży.
- Ten symbol oznacza producenta.
- Ten symbol oznacza zgodność z wymogami dyrektywy 93/42/EWG dotyczącej
wyrobów medycznych.
- Ten symbol oznacza kraj produkcji i datę produkcji.
CN
- Ten symbol oznacza, że producent ma przedstawicielstwo w Europie.
- Ten symbol oznacza numer seryjny.
- Ten symbol oznacza, że produkt należy chronić przed wilgocią.
Pierwsza cyfra charakterystyczna oznacza stopień ochrony użytkownika przed dostępem do
IP20
niebezpiecznych elementów oraz przed przedostaniem się do wnętrza urządzenia obcych ciał
stałych. Druga cyfra charakterystyczna oznacza stopień ochrony przed wnikaniem wody.
INFORMACJE O GWARANCJI
Pobierane są wyłącznie opłaty na pokrycie kosztów części i transportu.
CENTRUM SERWISOWE
A.I.&E. Adriaan Mulderweg 9-11,
5657 EM Eindhoven,
Holandia
Edco UK Ltd., 1st Floor Two Chamberlain Square,
B3 3AX, Birmingham, Wielka Brytania
ANDON HEALTH CO., LTD.
No. 3 JinPing Street,
YaAn Road, Nankai District,
Tianjin 300190, Chiny
iHealthLabs Europe SAS,
36 Rue de Ponthieu, 75008,
Paris, Francja
Page 2

INFORMACJE DOTYCZĄCE KOMPATYBILNOŚCI ELEKTROMAGNETYCZNEJ
Tabela 1. Emisje
Zjawisko Norma Środowisko elektromagnetyczne
Emisja fal radiowych CISPR 11, grupa 1, klasa B Opieka zdrowotna w domu
Zniekształcenia harmoniczne IEC 61000-3-2, klasa A Opieka zdrowotna w domu
Wahania i migotanie napięcia IEC 61000-3-3 Opieka zdrowotna w domu
Tabela 2. Port obudowy
Zjawisko
Wyładowania elektrostatyczne IEC 61000-4-2
Emitowane pole elektromagnetyczne
o częstotliwości radiowej
Pola bliskie z urządzeń do radiowej
łączności bezprzewodowej
Pole magnetyczne przy częstotliwości
znamionowej zasilania:
Tabela 3. Pola bliskie z urządzeń do radiowej łączności bezprzewodowej
Zjawisko
385 380–390 Modulacja impulsu 18 Hz, 27 V/m
450 430–470
710
780
810
930
1720
1845
1970
2450 2400–2570 Modulacja impulsu 217 Hz, 28 V/m
5240
5500
5785
Podstawowa norma
kompatybilności
elektromagnetycznej
IEC 61000-4-3
IEC 61000-4-3 Patrz tabela 3.
IEC 61000-4-8
Podstawowa norma
kompatybilności
elektromagnetycznej
704–787 Modulacja impulsu 217 Hz, 9 V/m745
800–960 Modulacja impulsu 18 Hz, 28 V/m870
1700–1990 Modulacja impulsu 217 Hz, 28 V/m
5100–5800 Modulacja impulsu 217 Hz, 9 V/m
Poziomy badania odporności
Opieka zdrowotna w domu
±8 kV (wyładowania kontaktowe)
±2 kV, ±4 kV, ±8 kV, ±15 kV
(wyładowania w powietrzu)
10 V/m
80 MHz–2,7 GHz
modulacja amplitudy 80% przy 1 kHz
30 A/m
50 Hz lub 60 Hz
Poziomy badania odporności
Opieka zdrowotna w domu
Modulacja częstotliwości, odchylenie
±5 kHz, sinus 1 kHz, 28 V/m
Page 3
A IMPORTANT INFORMATION ITEM 871125247440
NORMAL BLOOD PRESSURE FLUCTUATION
All physical activity, excitement, stress, eating, drinking, smoking, body posture and many other
activities or factors (including taking a blood pressure measurement) will inuence blood pressure
value. Because of this, it is mostly unusual to obtain identical multiple blood pressure readings.
Blood pressure uctuates continually ----- day and night. The highest value usually appears in
the daytime and lowest one usually at midnight. Typically, the value begins to increase at around
3:00AM, and reaches to highest level in the daytime while most people are awake and active.
Considering the above information, it is recommended that you measure your blood pressure at
approximately the same time each day.
Too frequent measurements may cause injury due to blood ow interference, please always relax a
minimum moment of 1 to 1.5 minutes between measurements to allow the blood circulation in your
arm to recover. It is rare that you obtain identical blood pressure readings each time.
WARNINGS
1. Read all of the information in the operation guide and any other literature in the box before
operating the unit.
2. Stay still, calm and rest for 5 minutes before blood pressure measurement.
3. The cuff should be placed at the same level as your heart.
4. During measurement, neither speak nor move your body and arm.
5. Measuring on left arm for each measurement.
6. Please always relax at least 1 or 1.5 minutes between measurements to allow the blood
circulation in your arm to recover. Prolonged over-ination (cuff pressure exceed 300 mmHg or
maintained above15 mmHg for longer than 3 minutes) of the bladder may cause ecchymoma
of your arm.
7. Consult your physician if you have any doubt about below cases:
1) The application of the cuff over a wound or inammation diseases;
2) The application of the cuff on any limb where intravascular access or therapy,
or an arterio-venous (A-V) shunt, is present;
3) The application of the cuff on the arm on the side of a mastectomy;
4) Simultaneously used with other monitoring medical equipments on the same limb;
5) Need to check the blood circulation of the user.
8. This Electronic Sphygmomanometer is designed for adults and should never be used on
infants or young children. Consult your physician or other health care professionals before use
on older children.
9. Do not use this unit in a moving vehicle, This may result in erroneous measurement.
10. Blood pressure measurements determined by this monitor are equivalent to those obtained by a
trained observer using the cuff/stethoscope auscultation method, within the limits prescribed by
the American National Standard Institute, Electronic or automated sphygmomanometers.
11. Information regarding potential electromagnetic or other interference between the blood pressure
monitor and other devices together with advice regarding avoidance of such interference please
see part ELECTROMAGNETIC COMPATIBILITY INFORMATION.It is suggested that the blood
pressure monitor be kept at least 30 cm away from other wireless devices, such as WLAN unit,
cell phone, microwave oven, etc. It can’t be used near active HF SURGICAL EQUIPMENT and
the RF shielded room of an ME SYSTEM for magneticresonance imaging, where the intensity of
EM DISTURBANCES is high.
12. If Irregular Heartbeat (IHB) brought by common arrhythmias is detected in the procedure of blood
pressure measurement, a signal of will be displayed. Under this condition, the Electronic
Sphygmomanometers can keep function, but the results may not be accurate, it’s suggested that
you consult with your physician for accurate assessment.
There are 2 conditions under which the signal of IHB will be displayed:
1) The coefcient of variation (CV) of pulse period >25%.
2) The difference of adjacent pulse period≥0.14s, and the number of such pulse takes more than
53 percentage of the total number of pulse.
13. Please do not use the cuff other than supplied by the manufacturer, otherwise it may bring
biocompatible hazard and might result in measurement error.
14. The monitor might not meet its performance specications or cause safety hazard if stored
or used outside the specied temperature and humidity ranges in specications.
15. Please do not share the cuff with other infective person to avoid cross-infection.
16. This equipment has been tested and found to comply with the limits for a Class B digital
device, pursuant to part 15 of the FCC Rules. These limits are designed to provide reasonable
protection against harmful interference in a residential installation. This equipment generates,
uses and can radiate radio frequency energy and, if not installed and used in accordance with
the instructions, may cause harmful interference to radio communications. However, there is no
guarantee that interference will not occur in a particular installation. If this equipment does cause
harmful interference to radio or television reception, which can be determined by turning the
equipment off and on, the user is encouraged to try to correct the interference by one or more of
the following measures:
- Reorient or relocate the receiving antenna.
- Increase the separation between the equipment and receiver.
- Connect the equipment into an outlet on a circuit different from that to which the receiver is
connected.
- Consult the dealer or an experienced radio/TV technician for help.
17. Measurements are not possible in patients with a high frequency of arrhythmias.
18. The device is not intended for use on neonates, children or pregnant women. (Clinical testing has
not been conducted on neonates, children or pregnant women.)
19. Motion, trembling, shivering may affect the measurement reading.
20. The device would not apply to the patients with poor peripheral circulation, noticeably low blood
pressure, or low body temperature (there will be low blood ow to the measurement position).
21. The device would not apply to the patients who use an articial heart and lung (there will be no
pulse).
22. Consult your physician before using the device for any of the following conditions: common
arrhythmias such as atrial or ventricular premature beats or atrial brillation, arterial sclerosis,
poor perfusion, diabetes, pre-eclampsia, renal diseases.
23. The patient is an intended operator.
24. Attention that changes or modication not expressly approved by the party responsible for
compliance could void the user’s authority to operate the equipment.
25. Swallowing batteries and/or battery uid can be extremely dangerous. Keep the batteries and the
unit out of the reach of children and disabled persons.
26. If you are allergic to plastic/rubber, please don’t use this device.
27. If the device is used as a multiuser device, do not select the wrong memory bank.
SPECIFATIONS
Product name: Arm Blood Pressure Monitor
1. Model: KD-553
2. Classication: Internally powered, Type BF applied part,IP20,No AP or APG,Continuous
operation
3. Machine size: Approx.136mm X 120mm X 61mm( 5 11/32″x 4 23/32″x 2 13/32″)
4. Cuff circumference: 22cm-32cm(8 21/32″-12 19/32″), 30cm-42cm(11 13/16″-16 17/32″)
(Optional), 42cm-48cm(16 17/32″-18 29/32″) (Optional), 22cm-36cm(8 21/32″-14 3/16″)
(Optional), 22cm-42cm(8 21/32″-16 17/32″)(Optional)
5. Weight: Approx.225g (7 15/16oz.) (exclude batteries and cuff)
6. Measuring method: Oscillometric method, automatic ination and measurement
7. Memory volume: 2×60 times with time and date stamp
8. Power source: batteries: 4×1.5V SIZE AA
9. Measurement range:
Cuff pressure: 0-300mmHg
Systolic: 60-260mmHg
Diastolic: 40-199mmHg
Pulse rate: 40-180 beats/minute
10. Accuracy:
Pressure: ±3mmHg
Pulse rate: Less than 60: ±3bpm
More than 60 (incl.) : ±5%
11. Environmental temperature for operation: 10°C~40°C(50°C~104°C)
12. Environmental humidity for operation: ≤85%RH
13. Environmental temperature for storage and transport: -20°C~50°C(-4°C~122°C)
14. Environmental humidity for storage and transport: ≤85%RH
15. Environmental pressure: 80kPa-105kPa
16. Battery life: Approx 270 times.
17. All components belonging to the pressure measuring system, including accessories: Pump,Valve,
LCD, Cuff, Sensor
Note:Thesespecicationsaresubjecttochangewithoutnotice.
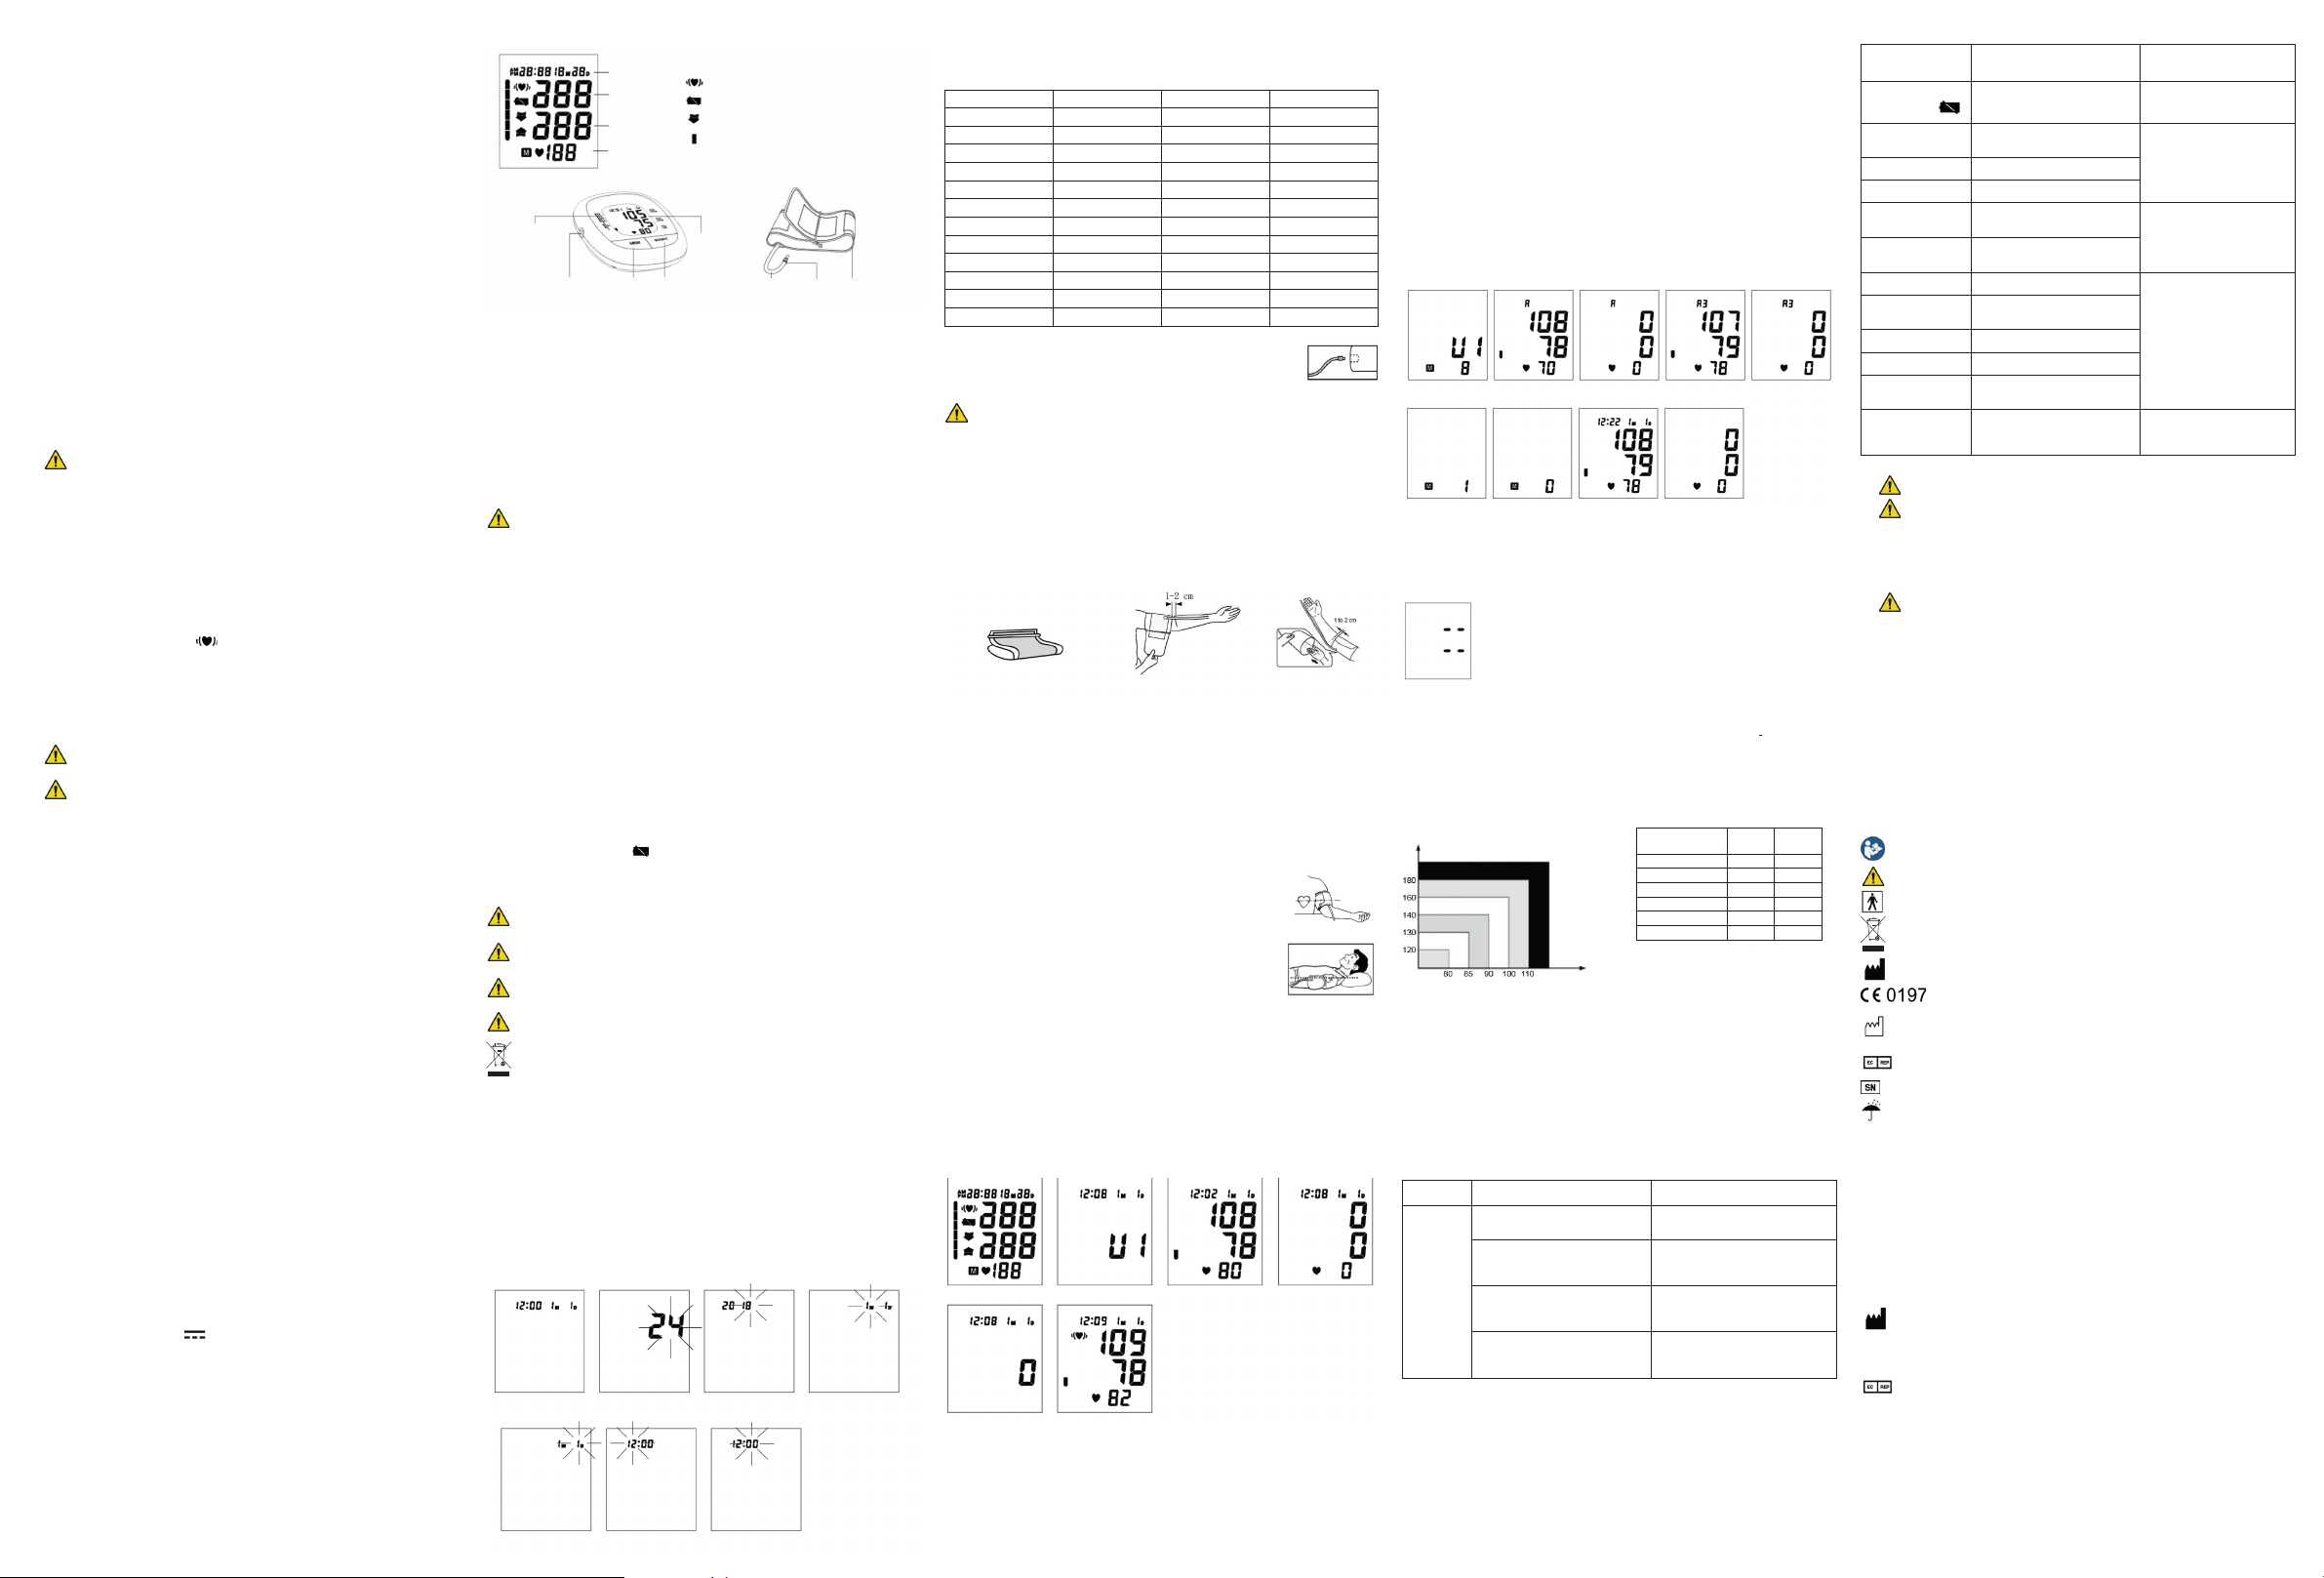
CONTENTS AND DISPLAY INDICATORS
Day and time display
Systolic
Diastolic
Pulse rate
Blood pressure level
classication indicator
Air tube socket
Note:The pictures in the manual are for reference only.
INTENDED USE
Fully Automatic Electronic Sphygmomanometer is for use by medical professionals or at home
and is a non-invasive blood pressure measurement system intended to measure the diastolic and
systolic blood pressures and pulse rate of an adult individual by using a non-invasive technique in
which an inatable cuff is wrapped around the upper arm. The cuff circumference is limited to 22cm48cm(approx. 8 21/32″-18 29/32″).
PACKAGE CONTENTS
• 1 Blood Pressure Monitor
• 1 Operation Guide
• 1 Arm Cuff
• 1 Soft Storage Case
“MEM” button
Irregular heartbeat symbol
Low battery indicator
The pressure in cuff is instable or much remnant air in cuff
Blood pressure level classication indicator
LCD
“START” button
Rubber
tube
Cuff tubing
connector
Cuff
CONTRAINDICATION
It is inappropriate for people with serious arrhythmia to use this Electronic Sphygmomanometer.
PRODUCT DESCRIPTION
Based on Oscillometric methodology and silicon integrated pressure sensor, blood pressure and
pulse rate can be measured automatically and non-invasively. The LCD display will show blood
pressure and pulse rate. The most recent 2×60 measurements can be stored in the memory with
date and time stamp. The Electronic Sphygmomanometer corresponds to the below standards:IEC
60601-1Edition 3.1 2012-08/EN 60601-1:2006/A1:2013 (Medical electrical equipment -- Part
1: General requirements for basic safety and essential performance), IEC60601-1-2:2014/EN
60601-1-2:2015(Medical electrical equipment -- Part 1-2: General requirements for basic safety
and essential performance - Collateral standard: Electromagnetic compatibility - Requirements
and tests), IEC80601-2-30:2009+AMD1:2013/EN 80601-2-30:2010/A1:2015(Medical electrical
equipment –Part 2-30: Particular requirements for the basic safety and essential performance
of automated non-invasive sphygmomanometers)EN 1060-1: 1995 + A2: 2009 (Non-invasive
sphygmomanometers - Part 1: General requirements), EN 1060-3: 1997 + A2: 2009 (Non-invasive
sphygmomanometers - Part 3: Supplementary requirements for electro-mechanical blood pressure
measuring systems);ISO81060-2 :2013(Non-Invasive Sphygmomanometers - Part 2: Clinical
Validation OfAutomated Measurement Type).
SETUP AND OPERATING PROCEDURES
1.BATTERY LOADING
a. Open battery cover at the back of the monitor.
b. Load four “AA” size batteries. Please ensure that the positive and negative poles of each battery
match the imprint of the same poles in the device’s battery housing.
c. Close the battery cover.
When LCD shows battery symbol , replace all batteries with new ones.
Rechargeable batteries are not suitable for this monitor.
Remove the batteries if the monitor will not be used for a month or more to avoid relevant damage
of battery leakage.
Lithium batteries replacement by inadequately trained personnel could result in a hazard (such
as excessive temperatures, re or explosion).
Avoid the battery uid to get in your eyes. If it should get in your eyes, immediately rinse with
plenty of clean water and contact a physician.
The negative terminal of the battery needs to be compressed into the battery compartment
properly after horizontal compression of the negative electrode. The battery is in contact with
the spring
Make sure the battery cover is intact and not damaged before installing the battery
The monitor, the batteries and the cuff, must be disposed of according to local regulations
at the end of their usage.
2.CLOCK AND DATE ADJUSTMENT
a. Once you install the battery or turn off the monitor, it will enter Clock Mode, and LCD will display
time and date. See picture2.
b. While the monitor is in Clock Mode, press the “START” and “MEM” button simultaneously for two
seconds, then release the buttons, the monitor will be in Clock and Date Adjustment Mode.
c. In Clock and Date Adjustment Mode, the time format will blink at rst. See picture2-1. While time
format is blinking, press the button “MEM” to change the time format. The default time format is
24h.
d. Press the button “START” repeatedly, the year (range is 2018~2099), month, day, hour and
minute will blink in turn. See picture2- 2&2-3 & 2-4 & 2-5 & 2-6. While the number is blinking,
press the button “MEM” to increase the number, keep on pressing the button “MEM”, the number
will increase faster.
e. During adjusting clock and date, the monitor will go back to Clock Mode automatically when no
button will be pressed within 60 seconds.
f. You can turn off the monitor by pressing “START” button when the minute is blinking, then the
time and date is conrmed.
Picture2 Picture2-1
Picture2-4 Picture2-5 Picture2-6
Picture2-2 Picture2-3
Note:
1.1 The clock format could be set by user.
1.2 Table 2-1 instructs the conversion relations between 24 hour format and 12 hour format.
Table2-1
24 hour format 12 hour format 24 hour format 12 hour format
0:00 12:00 AM 12:00 12:00 PM
1:00 1:00 AM 13:00 1:00 PM
2:00 2:00 AM 14:00 2:00 PM
3:00 3:00 AM 15:00 3:00 PM
4:00 4:00 AM 16:00 4:00 PM
5:00 5:00 AM 17:00 5:00 PM
6:00 6:00 AM 18:00 6:00 PM
7:00 7:00 AM 19:00 7:00 PM
8:00 8:00 AM 20:00 8:00 PM
9:00 9:00 AM 21:00 9:00 PM
10:00 10:00 AM 22:00 10:00 PM
11:00 11:00 AM 23:00 11:00 PM
CONNECTING THE CUFF TO THE MONITOR
Insert the cuff tubing connector into the air port in the left side of the monitor.
Make sure that the connector is completely inserted to avoid air leakage during
blood pressure measurements.
Avoid compression or restriction of the connection tubing during measurement which may
cause ination error, or harmful injury due to continuous cuff pressure.
3. APPLYING THE CUFF
a. Pulling the cuff end through the medal loop (the cuff is packaged like this already), turn it outward
(away from your body) and tighten it and close the Velcro fastener. See picture4-1.
b. Place the cuff around a bare left arm 1-2cm above the elbow joint.
c. If you place the cuff around left arm, position the air tube in the middle of your arm in line with
your middle nger. See picture4-2.
If you place the cuff around right arm, apply the cuff so that the air tube is at the side of your
elbow. See picture4-3.
d. While seated, place palm upside in front of you on a at surface such as a desk or table. Be
careful not to rest your arm on the air tube, or otherwise restrict the ow of air to the cuff.
e. The cuff should t comfortably, yet snugly around your arm.You should be able to insert one nger
between your arm and the cuff.
Picture4-1 Picture4-2 Picture4-3
Note:
1. Please refer to the cuff circumference range in “SPECIFICATIONS” to make sure that the
appropriate cuff is used.
2. Measuring on left arm each time.
3. Do not move your arm, body, or the monitor and do not move the rubber tube during
measurement.
4. Stay quiet, calm for 5 minutes before blood pressure measurement.
5. Please keep the cuff clean. If the cuff becomes dirty, remove it from the monitor and clear it by
hand in a mild detergent, then rinse it thoroughly in cold water. Never dry the cuff in clothes dryer
or iron it. Clean the cuff after the usage of every 200 times is recommended.
6. Do not place the cuff around your arm if the arm has any inammation, acute diseases, infections
skin wounds.
4.BODY POSTURE DURING MEASUREMENT
SittingComfortablyMeasurement
a. Be seated with your feet at on the oor, and don’t cross your legs.
b. Place palm upside in front of you on a at surface such as a desk or table.
c. The middle of the cuff should be at the level of the right atrium of the heart.
LyingDownMeasurement
a. Lie on your back.
b. Place your left arm straight along your side with your palm upside.
c. The cuff should be placed at the same level as your heart.
5.TAKING YOUR BLOOD PRESSURE READING
a. After applying the cuff and your body is in a comfortable position, press the “START” button.
All display characters are shown for self-test. You can check the LCD display according to the
picture. Please contact the service center if segment is missing.See picture 6-1.
b. Then the current memory bank is blink. See picture 6-2. Press “MEM” button to change over to
other bank. Conrm your selection by pressing “START” button. The current bank can also be
conrmed automatically after 5 seconds with no operation.
c. If the monitor has stored results, the LCD will momentarily display the most recent one. See
picture 6-3.If no result has been stored, zero will appear on LCD.See picture 6-4.
d. Then the monitor starts to seek zero pressure. See picture 6-5.
e. Then the monitor inates the cuff until sufcient pressure has built up for a measurement. Then
the monitor slowly releases air from the cuff and carries out the measurement. Finally the blood
pressure and pulse rate will be calculated and displayed on the LCD screen. The blood pressure
classication indicator and Irregular heartbeat symbol (if any) will blink on the screen. See
picture 6-6. The result will be automatically stored in the monitor.
Picture6-1 Picture6-2
Picture6-5 Picture6-6
f. After measurement, the monitor will turn off automatically after 1 minute of no operation.
Alternatively, you can press the “START” button to turn off the monitor manually.
g. During measurement, you can press the “START” button to turn off the monitor manually.
Note: Please consult a health care professional for interpretation of pressure measurements.
Picture6-3 Picture6-4
6.DISPLAYING STORED RESULTS
a. In Clock Mode, press “MEM” button, the monitor will display sign of current group.The amount
of results in current user memory zone will be displayed. See picture 7-1. Press “START” button
to switch group, press “MEM” to conrm current group. The current bank can also be conrmed
automatically after 5 seconds with no operation.
b. Then LCD will display the average value of all results in the current bank. See picture 7-2. If no
result stored in the current user memory zone, LCD will display “0” for blood pressure and pulse
rate. See picture 7-3.
c. Press “MEM” button, the LCD will display the average value of the last three results in the current
user memory zone. See picture 7-4. If no result stored in the current user memory zone, LCD will
display “0” for blood pressure and pulse rate. See picture 7-5.
d. Press “MEM” button again, the memory number in the current user memory zone will be
displayed. See picture 7-6. If the monitor has no result stored in the current user memory zone,
the LCD will display “0” . See picture 7-7.
e. Then the most recent result will be displayed with date and time stamp. See picture 7-8. Irregular
heartbeat symbol (if any) and blood pressure classication indicator will blink at the same time.
Press “MEM” button repeatedly to review the results measured previously. If the monitor has no
result stored in the current user memory zone, the LCD will display “0” for blood pressure and
pulse rate. See picture 7-9.
f. When displaying the stored results, the monitor will turn off automatically after 1 minutes of no
operation. You can also press the button “START” to turn off the monitor manually.
Picture7-1
Picture7-6
7.DELETING MEASUREMENTS FROM THE MEMORY
When any result is displaying (exclude average value displaying), keeping on pressing button “MEM”
for three seconds, all results in the current bank will be deleted . See picture 8. Press the button
“START”, the monitor will be turned off.
Picture8
8. ASSESSING HIGH BLOOD PRESSURE FOR ADULTS
The following guidelines for assessing high blood pressure (without regard to age or gender) have
been established by the World Health Organization (WHO). Please note that other factors (e.g.
diabetes, obesity, smoking, etc.) need to be taken into consideration. Consult with your physician for
accurate assessment, and never change your treatment by yourself.
Picture7-2
Picture7-7
Picture7-3
Picture7-8
Picture7-4
Picture7-9
Picture7-5
Classicationofbloodpressureforadults
Systolic
(mmHG)
Severe hypertension
Moderate hypertension
Mild hypertension
High-Normal BP
Normal BP
Note: It is not intended to provide a basis of any type of rush toward emergency conditions/diagnosis
based on the color scheme and that the color scheme is meant only to discriminate between the
different levels of blood pressure.
9.TECHNICAL ALARM DESCRIPTION
The monitor will show ‘HI’ or ‘Lo’ as technical alarm on LCD with no delay if the determined blood
pressure (systolic or diastolic) is outside the rated range specied in part SPECIFICACIONS. In this
case, you should consult a physician or check if your operation violated the instructions.
The technical alarm condition (outside the rated range) is preset in the factory and cannot be
adjusted or inactivated. This alarm condition is assigned as low priority according to IEC 60601-1-8.
The technical alarm is non-latching and need no reset. The signal displayed on LCD will disappear
automatically after about 8 seconds.
10.TROUBLESHOOTING (1)
PROBLEM POSSIBLE CAUSE SOLUTION
The cuff position was not correct or it
was not properly tightened
LCD
Display
shows
abnormal
result
Body posture was not correct during
testing
Speaking, arm or body movement,
angry, excited or nervous during
testing
Irregular heartbeat (arrhythmia)
BLOOD PRESSURE
Classication
Optiman <120 <80
Normal 120-129 80-84
High-Normal 130-139 85-89
Grade 1 Hypertension 140-159 90-99
Grade 2 Hypertension 160-179 100-109
Grade 3 Hypertension >180 >110
WHO/ISH Denitions and Classication
of Blood Pressure Levels
Diastolic
(mmHG)
Apply the cuff correctly and try again.
Review the “BODY POSTURE
DURING MEASUREMENT” sections
of the instructions and re-test.
Re-test when calm and without
speaking or moving during the test.
It is inappropriate for people with
serious arrhythmia to use this
Electronic Sphygmomanometer.
SBP
mmHg
DBP
mmHg
TROUBLESHOOTING (2)
PROBLEM POSSIBLE CAUSE SOLUTION
LCD shows low
battery symbol
LCD shows “Er 0”
LCD shows “Er 2” Fail to detect diastolic pressure
LCD shows “Er 3”
LCD shows “Er 4”
LCD shows “Er 5” Cuff pressure above 300mmHg
LCD shows “Er 6”
LCD shows “Er 7” Inner memory error
LCD shows “Er 8” Device parameter checking error
LCD shows “Er A” Pressure sensor parameter error
No response when
you press button or
load battery.
Low Battery Change the batteries
Pressure system is unstable before
measurement
Pneumatic system blocked during
ination
Pneumatic system leakage during
ination
More than 160 seconds with cuff
pressure above 15 mmHg
Incorrect operation or strong
electromagnetic interference.
Don’t move and try again.LCD shows “Er 1” Fail to detect systolic pressure
Connect the cuff correctly and
try again. If the monitor is still
abnormal, please contact the
local distributor or the factory.
Measure again after ve
minutes. If the monitor is still
abnormal, please contact the
local distributor or the factory.
Take out batteries for ve
minutes, and then reinstall all
batteries.
MAINTENANCE
1. Do not drop this monitor or subject it to strong impact.
2. Avoid high temperature and solarization. Do not immerse the monitor in water as this will
result in damage to the monitor.
3. If this monitor is stored near freezing, allow it to acclimate to room temperature before use.
4. The monitor requires 6 hours to warm from the minimum storage temperature between uses until
the monitor is ready for its INTENDED USE when the ambient temperature is 20 °C.
5. The monitor requires 6 hours to cool from the maximum storage temperature between uses until
the the monitor is ready for its INTENDED USE when the ambient temperature is 20 °C
6. Do not attempt to disassemble this monitor.
7. If you do not use the monitor for a long time, please remove the batteries.
8. It is recommended the performance should be checked every 2 years or after repair. Please
contact the service center.
9. Clean the monitor with a dry, soft cloth or a soft cloth squeezed well after moistened with water,
diluted disinfectant alcohol, or diluted detergent.
10. No component can be maintained by user in the monitor. The circuit diagrams, component part
lists, descriptions, calibration instructions, or other information which will assist the user’s appro-
priately qualied technical personnel to repair those parts of equipment which are designated
repairable can be supplied.
11. The monitor can maintain the safety and performance characteristics for a minimum of 10,000
measurements or three years, and the cuff integrity is maintained after 1,000 open–close cycles
of the closure.
12. It is recommended the cuff should be disinfected 2 times every week if needed (For example,
in hospital or in Clinique). Wipe the inner side (the side contacts skin) of the cuff by a soft cloth
squeezed after moistened with Ethyl alcohol (75-90%), then dry the cuff by airing.
13. Not servicing/maintenance while the monitor is in use.
EXPLANATION OF SYMBOLS ON UNIT
Symbol for” THE OPERATION GUIDE MUST BE READ”(The sign background color: blue.
The sign graphical symbol: white)
Symbol for “WARNING”
Symbol for “TYPE BF APPLIED PARTS” (The cuff is type BF applied part)
Symbol for “ENVIRONMENT PROTECTION – Waste electrical products should not be
disposed of with household waste. Please recycle where facilities exist. Check with your local
Authority or retailer for recycling advice”.
Symbol for “MANUFACTURER”
Symbol for “COMPILES WITH MDD93/42/EEC REQUIREMENTS”
Symbol for “COUNTRY OF MANUFACTURER” and “DATE OF MANUFACTURE
CN
Symbol for “EUROPEAN REPRESENTATION”
Symbol for “SERIAL NUMBER”
Symbol for “KEEP DRY”
IP20 The rst characteristic numeral symbol for “Degrees of protection against access to
hazardous parts and against solid foreign objects “.The second characteristic numeral symbol
for “Degrees of protection against ingress of water”
WARRANTY INFORMATION
Only charge the cost of components and transport.
SERVICE CENTER
A.I.&E. Adriaan Mulderweg 9-11,
5657 EM Eindhoven, The Netherlands
Edco UK Ltd,1st Floor Two Chamberlain Square,
B3 3AX, Birmingham, UK
ANDON HEALTH CO., LTD.
No. 3 JinPing Street,
YaAn Road, Nankai District,
Tianjin 300190, China.
iHealthLabs Europe SAS
36 Rue de Ponthieu, 75008,
Paris, France.
Page 4

ELECTROMAGNETIC COMPATIBILITY INFORMATION
Table1-Emission
Phenomenon Compliance Electromagneticenvironment
RF emissions CISPR 11
Harmonic distortion
Voltage uctuations
and icker
Table2-EnclosurePort
Phenomenon
Electrostatic
Discharge
Radiated RF EM eld IEC 61000-4-3
Proximity elds from RF
wireless communications
equipment
Rated power frequency
magnetic elds
Table3–ProximityeldsfromRFwirelesscommunicationsequipment
Testfrequency
(MHz)
385 380-390 Pulse modulation 18Hz, 27V/m
450 430-470 FM, ±5kHz deviation, 1kHz sine, 28V/m
710
780
810
930
1720
1970
2450 2400-2570 Pulse modulation 217Hz, 28V/m
5240
5785
Group 1, Class B
IEC 61000-3-2
Class A
IEC 61000-3-3
Compliance
BasicEMC
standard
IEC 61000-4-2
IEC 61000-4-3 Refer to table 3
IEC 61000-4-8
Band
(MHz)
704-787 Pulse modulation 217Hz, 9V/m745
800-960 Pulse modulation 18Hz, 28V/m870
1700-1990 Pulse modulation 217Hz, 28V/m1845
5100-5800 Pulse modulation 217Hz, 9V/m5500
Immunitytestlevels
Professionalhealthcarefacilityenvironment
Home healthcare environment
Home healthcare environment
Home healthcare environment
Immunitytestlevels
HomeHealthcareEnvironment
±8 kV contact
±2kV, ±4kV, ±8kV, ±15kV air
10V/m
80MHz-2.7GHz
80% AM at 1kHz
30A/m
50Hz or 60Hz
Page 5
B WICHTIGE INFORMATIONEN ARTIKEL 871125247440
NORMALE SCHWANKUNGEN DES BLUTDRUCKS
Körperliche Aktivitäten aller Art, Aufregung, Stress, Essen, Trinken, Rauchen, Körperhaltungen und
viele weitere Aktivitäten oder Faktoren (darunter auch Blutdruckmessungen selbst) beeinussen
den Blutdruckwert. Daher ist es äußerst ungewöhnlich, mehrere identische Blutdruckmesswerte zu
erhalten.
Der Blutdruck schwankt ständig – während des Tages ebenso wie in der Nacht. Der höchste Wert
tritt normalerweise am Tag und der niedrigste in der Nacht auf. In der Regel beginnt der Wert um
03:00 Uhr zu steigen und erreicht seinen höchsten Punkt während des Tages, wenn die meisten
Menschen wach und aktiv sind.
Vor diesem Hintergrund wird empfohlen, den Blutdruck täglich etwa um die gleiche Uhrzeit zu
messen.
Zu häuge Messungen können durch Störung des Blutkreislaufs schädlich sein. Entspannen Sie
sich zwischen Messungen mindestens für 1 bis 1,5 Minuten, damit sich der Blutkreislauf im Arm
normalisieren kann. Es kommt sehr selten vor, dass Sie jedes Mal identische Blutdruckwerte
erhalten.
WARNHINWEISE
1. Lesen Sie alle Informationen in der Bedienungsanleitung und anderen Materialien in der
Packung, bevor Sie das Gerät in Betrieb nehmen.
2. Bleiben Sie ruhig und ruhen Sie sich vor der Blutdruckmessung fünf Minuten lang aus.
3. Die Manschette sollte auf Höhe des Herzens angelegt werden.
4. Während der Messung sollten Sie weder sprechen noch Ihren Körper oder Ihren Arm bewegen.
5. Messen Sie jedes Mal am linken Arm.
6. Entspannen Sie sich zwischen Messungen jeweils mindestens für 1 bis 1,5 Minuten, damit sich
der Blutkreislauf im Arm normalisieren kann. Ein längeres Aufblasen (Manschettendruck über
300 mmHg oder länger als drei Minuten über 15 mmHg) kann eine Ekchymose im Arm auslösen.
7. Wenden Sie sich an Ihren Arzt, wenn Sie in folgenden Fällen Zweifel haben:
1) Anlegen der Manschette über einer Wunde oder Entzündung;
2) Anlegen der Manschette an einem Körperteil, an dem ein intravaskulärer Zugang oder eine
entsprechende Behandlung stattndet
oder eine arteriovenöse Fistel vorliegt;
3) Anlegen der Manschette am Arm auf der Seite einer Mastektomie;
4) bei gleichzeitiger Verwendung mit anderen Überwachungsgeräten am selben Körperteil;
5) wenn die Blutzirkulation des Patienten überprüft werden muss.
8. Dieses elektronische Blutdruckmessgerät ist für Erwachsene gedacht und darf niemals
bei Säuglingen oder Kleinkindern verwendet werden. Wenden Sie sich vor der Verwendung bei
älteren Kindern an Ihren Arzt oder das Krankenhauspersonal.
9. Verwenden Sie dieses Gerät nicht in einem fahrenden Fahrzeug, da dies zu fehlerhaften
Messungen führen kann.
10. Die mithilfe dieses Geräts durchgeführten Blutdruckmessungen entsprechen denen eines
geschulten Mediziners mit der Manschetten-/Stethoskop-Abhörmethode (innerhalb der vom
American National Standard Institute vorgeschriebenen Grenzen) oder von automatisierten
Blutdruckmessgeräten.
11. Informationen zu möglichen elektromagnetischen oder anderen Störungen zwischen
dem Blutdruckmessgerät und anderen Geräten sowie Hinweise zur Vermeidung solcher
Störungen nden Sie im Abschnitt INFORMATIONEN ZUR ELEKTROMAGNETISCHEN
VERTRÄGLICHKEIT. Es wird empfohlen, das Blutdruckmessgerät stets in einem
Mindestabstand von 30 cm zu kabellosen Geräten wie WLAN-Geräten, Mobiltelefonen,
Mikrowellengeräten usw. zu halten. Es darf nicht in der Nähe aktiver RF-CHIRURGIEGERÄTE
und eines RF-abgeschirmten Raumes eines ME-SYSTEMS für Magnetresonanzbildgebung
verwendet werden, wo die Intensität ELEKTROMAGNETISCHER STÖRUNGEN hoch ist.
12. Wenn während der Blutdruckmessung unregelmäßiger Herzschlag aufgrund häuger
Rhythmusstörungen auftritt, wird das Signal angezeigt. In einer solchen Situation können
elektronische Blutdruckmessgeräte ihre Funktion aufrechterhalten, doch die Ergebnisse sind
möglicherweise nicht korrekt. Wenden Sie sich für eine korrekte Prüfung an Ihren Arzt.
Es gibt zwei Bedingungen, unter denen das Signal für unregelmäßigen Herzschlag angezeigt
wird:
1) Die Koefzientenvariation (CV) der Pulsperiode liegt unter 25 %.
2) Die Differenz zwischen benachbarten Pulsperioden ist ≥ 0,14 Sek. und die Anzahl solcher
Pulsschläge liegt über 53 % der normalen Pulsschläge.
13. Verwenden Sie ausschließlich die vom Hersteller gelieferte Manschette, andernfalls kann es zu
Bioverträglichkeitsgefahren und Messfehlern kommen.
14. Möglicherweise erreicht das Gerät nicht seine Leistungsspezikationen oder es
verursacht Sicherheitsrisiken, wenn es außerhalb der angegebenen Temperatur- und
Luftfeuchtigkeitsbereiche gelagert oder verwendet wird.
15. Verwenden Sie die Manschette bei keinen weiteren infektiösen Personen, um
Kreuzinfektionen zu vermeiden.
16. Dieses Gerät wurde getestet und entspricht den Grenzwerten für ein digitales Gerät der
Klasse B gemäß Teil 15 der FCC-Vorschriften. Diese Grenzwerte dienen dem angemessenen
Schutz vor schädlichen Störungen in Heiminstallationen. Dieses Gerät erzeugt und verwendet
Hochfrequenzenergie und kann diese abstrahlen. Wenn es nicht gemäß den Anweisungen
installiert und verwendet wird, kann es die Funkkommunikation stören. Es gibt jedoch keine
Garantie dafür, dass bei einer bestimmten Installation keine Störungen auftreten. Wenn dieses
Gerät schädliche Störungen des Radio- oder Fernsehempfangs verursacht, was durch Ein- und
Ausschalten des Geräts festgestellt werden kann, sollte dies durch eine oder mehrere der
folgenden Maßnahmen behoben werden:
– Neue Ausrichtung oder Umsetzung der Empfängerantenne.
– Vergrößerung des Abstands zwischen Gerät und Empfänger.
– Anschluss des Geräts an eine Steckdose, die zu einem anderen Stromkreis als dem des
Empfängers gehört.
– Konsultation des Händlers oder eines erfahrenen Radio-/Fernsehtechnikers.
17. Bei Patienten mit sehr häugen Herzrhythmusstörungen sind keine Messungen möglich.
18. Das Gerät ist nicht zur Verwendung bei Neugeborenen, Kindern oder Schwangeren geeignet.
(Es wurden keine klinischen Tests mit Neugeborenen, Kindern oder Schwangeren durchgeführt.)
19. Bewegung, Zittern o. ä. kann die Messung beeinträchtigen.
20. Das Gerät ist nicht für Patienten mit schlechter peripherer Durchblutung, deutlich niedrigem
Blutdruck oder niedriger Körpertemperatur geeignet (in diesen Fällen reicht der Blutuss zur
Messposition nicht aus).
21. Das Gerät ist nicht für Patienten mit künstlichem Herzen oder künstlicher Lunge (kein Puls)
geeignet.
22. Wenden Sie sich vor der Verwendung des Gerät an Ihren Arzt, falls eine der folgenden
Bedingungen vorliegt: häuge Herzrhythmusstörungen wie beispielsweise bei Vorhof- oder
ventrikulären Extrasystolen oder Vorhofimmern, Arteriosklerose, Mangeldurchblutung, Diabetes,
Präeklampsie, Nierenerkrankungen.
23. Der Patient ist der vorgesehene Bediener.
24. Achtung: Änderungen oder Modikationen, die nicht ausdrücklich von der für die Einhaltung
von Bestimmungen (Konformität) verantwortlichen Partei genehmigt wurden, können die
Berechtigung des Nutzers zur Verwendung des Geräts aufheben.
25. Das Verschlucken von Batterien und/oder Batterieüssigkeit kann äußerst gefährlich sein.
Bewahren Sie die Batterien und das Gerät außerhalb der Reichweite von Kindern und Personen
mit Behinderungen auf.
26. Verwenden Sie dieses Gerät nicht, wenn Sie an einer Allergie gegen Kunststoff/Gummi leiden.
27. Wenn dieses Gerät von mehreren Personen verwendet wird, wählen Sie nicht die falsche
Speicherbank.
SPEZIFIKATIONEN
Name des Produkts: Arm-Blutdruckmessgerät
1. Modell: KD-553
2. Klassizierung: Interne Stromversorgung, Anwendungsteil des Typs BF, IP20, kein AP oder APG,
kontinuierlicher Betrieb
3. Größe des Geräts: ca.136 mm x 120 mm x 61 mm
4. Umfang der Manschette: 22 cm – 32 cm, 30 cm – 42 cm (optional), 42 cm – 48 cm (optional),
22 cm – 36 cm (optional), 22 cm – 42 cm (optional)
5. Gewicht: ca. 225 g (ohne Batterien und Manschette)
6. Messmethode: Oszillometrische Methode; automatisches Aufblasen und Messung
7. Speichervolumen: 2 x 60 Mal mit Uhrzeit- und Datumsstempel
8. Stromversorgung: Batterien: 4 x 1,5 V GRÖSSE AA
9. Messbereich:
Manschettendruck: 0 – 300 mmHg
Systolisch: 60 – 260 mmHg
Diastolisch: 40 – 199 mmHg
Pulsfrequenz: 40 – 180 Schläge/Minute
10. Messgenauigkeit:
Druck: ±3 mmHg
Pulsfrequenz: Weniger als 60: ±3 bpm
Mehr als 60 (inkl.) : ±5%
11. Umgebungstemperatur für Betrieb: 10 °C ~ 40 °C
12. Umgebungsluftfeuchtigkeit für Betrieb: ≤ 85 % RH
13. Umgebungstemperatur für Lagerung und Transport: -20 °C ~ 50 °C
14. Umgebungsluftfeuchtigkeit für Lagerung und Transport: ≤ 85 % RH
15. Umgebungsdruck: 80 kPa – 105 kPa
16. Batterielebensdauer: ca. 270 Zyklen.
17. Alle Komponenten des Druckmesssystems, einschließlich Zubehör: Pumpe, Ventil, LCD,
Manschette, Sensor
Hinweis:DieseSpezikationenkönnenohnevorherigeAnkündigunggeändertwerden.
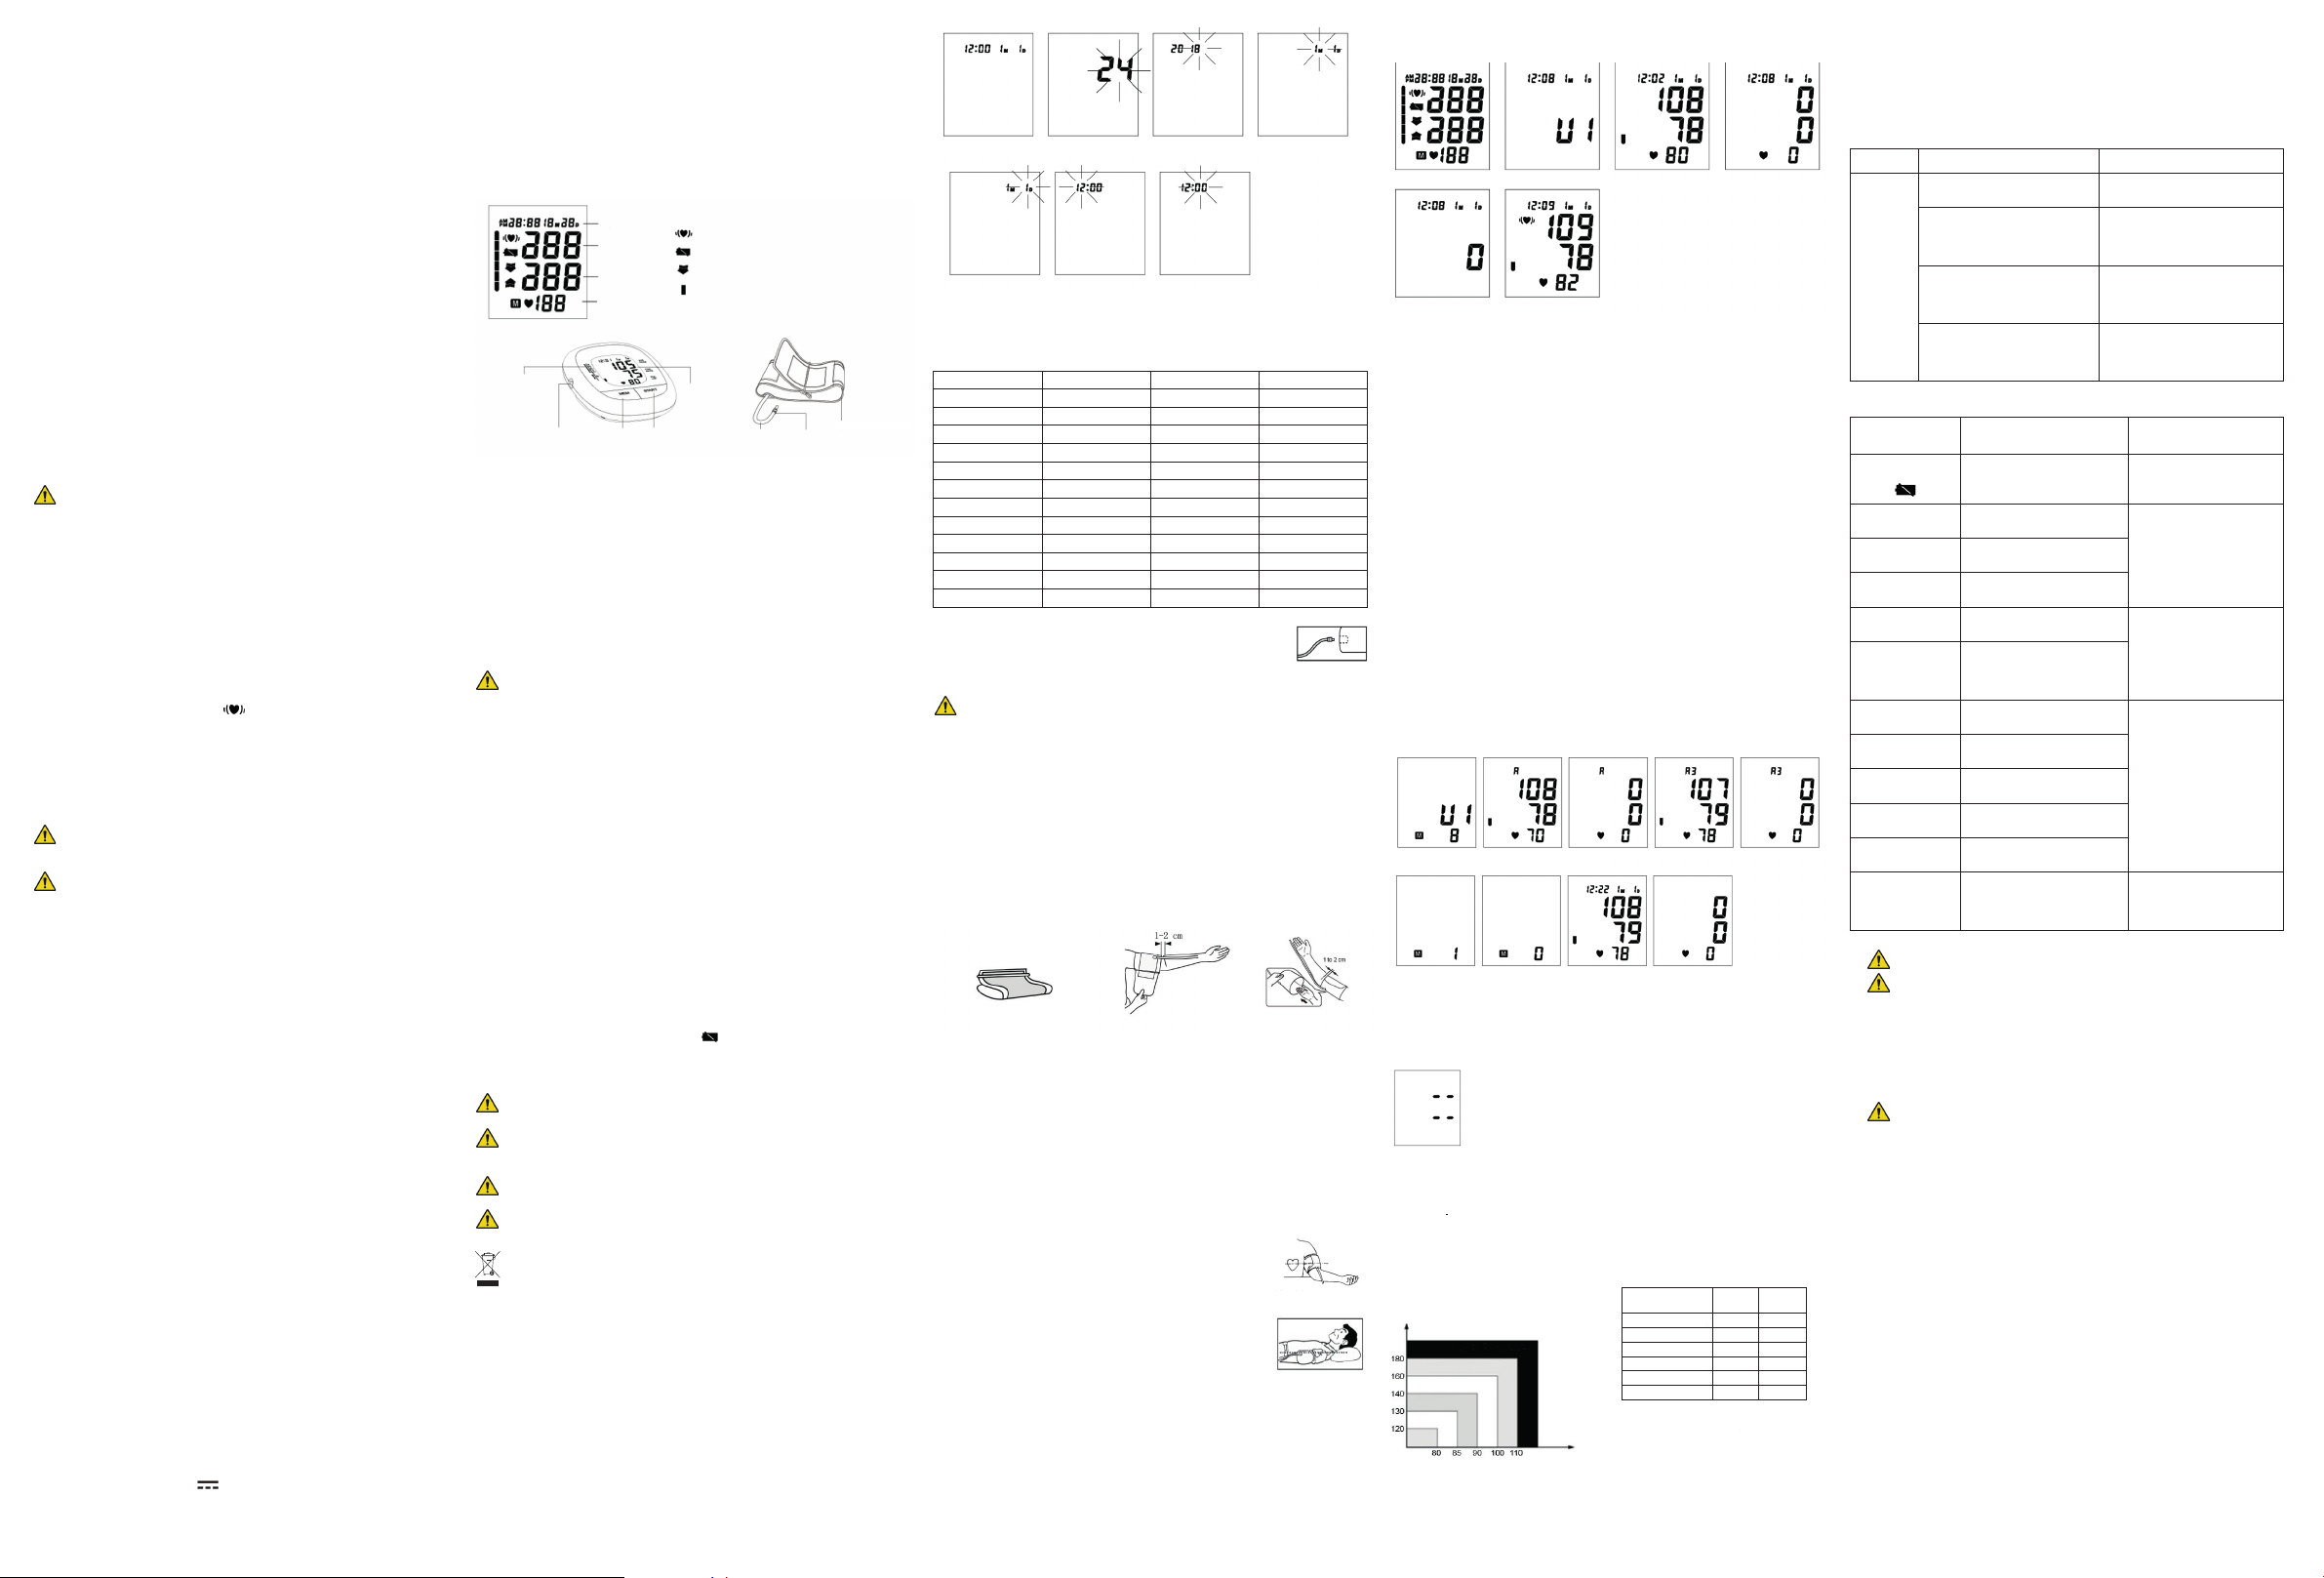
INHALTUNDDISPLAY-ANZEIGEN
Tag- und Nacht-Display
Systolisch
Diastolisch
Pulsfrequenz
Anzeige der
Blutdruckklassizierung
Luftschlauchbuchse
Hinweis: Die Abbildungen im Handbuch dienen nur zu Referenzzwecken.
VERWENDUNGSZWECK
Das vollständig automatische elektronische Blutdruckmessgerät ist zur Verwendung durch
medizinisches Personal oder zu Hause gedacht. Es handelt sich um ein nicht invasives
Blutdruckmesssystem zur Messung des diastolischen und systolischen Blutdrucks sowie der
Pulsfrequenz erwachsener Personen in nicht invasiver Weise durch Anlegen einer aufblasbaren
Manschette am Oberarm. Der Umfang der Manschette ist auf 22 cm bis 48 cm begrenzt. 8 21/32″-18
29/32″).
PACKUNGSINHALT
• 1 Blutdruckmessgerät
• 1 Bedienungsanleitung
• 1 Arm-Manschette
• 1 Aufbewahrungstasche
Taste „MEM“
Symbol für unregelmäßigen Herzschlag
Anzeige niedriger Batteriestand
Der Druck in der Manschette ist instabil oder es verbleibt viel
Luft in der Manschette.
Anzeige der Blutdruckklassizierung
LCD
Taste „START“
Gummi-
Schlauch
Manschettenschlauch-
Anschluss
Manschette
GEGENANZEIGE
Dieses elektronische Blutdruckmessgerät ist nicht für Personen mit schweren
Herzrhythmusstörungen geeignet.
PRODUKTBESCHREIBUNG
Anhand oszillometrischer Methodik und eines integrierten Silizium-Drucksensors können
Blutdruck und Pulsfrequenz automatisch und in nicht invasiver Weise gemessen werden.
Das LCD-Display zeigt Blutdruck und Pulsfrequenz an. Die 2 x 60 letzten Messungen können
mit Uhrzeit- und Datumsstempel gespeichert werden. Das elektronische Blutdruckmessgerät
entspricht den folgenden Normen: IEC 60601-1 Ausgabe 3.1 2012-08/EN 60601-1:2006/A1:2013
(Medizinische elektrische Geräte – Teil 1: Allgemeine Anforderungen an die grundlegende
Sicherheit und Leistung), IEC60601-1-2:2014/EN 60601-1-2:2015 (Medizinische elektrische
Geräte – Teil 1-2: Allgemeine Anforderungen an die grundlegende Sicherheit und die wesentlichen
Leistungsmerkmale – Sicherheitsstandard: Elektromagnetische Verträglichkeit – Anforderungen
und Tests), IEC80601-2-30:2009+AMD1:2013/EN 80601-2-30:2010/A1:2015 (Medizinische
elektrische Geräte – Teil 2-30: Besondere Anforderungen an die grundlegende Sicherheit und
Leistung automatisierter nicht invasiver Blutdruckmessgeräte) EN 1060-1: 1995 + A2: 2009 (Nicht
invasive Blutdruckmessgeräte – Teil 1: Allgemeine Anforderungen), EN 1060-3: 1997 + A2: 2009
(Nicht invasive Blutdruckmessgeräte – Teil 3: Ergänzende Anforderungen an elektromechanische
Blutdruckmesssysteme); ISO 81060-2:2013 (Nicht invasive Blutdruckmessgeräte – Teil 2: Klinische
Validierung automatischer Messverfahren).
EINRICHTUNG UND BETRIEB
1.EINLEGEN DER BATTERIEN
a. Öffnen Sie das Batteriefach an der Rückseite des Geräts.
b. Legen Sie vier „AA“-Batterien ein. Achten Sie darauf, dass die positiven und negativen Pole der
Batterien der Polaritätsangabe im Batteriefach des Geräts entsprechen.
c. Schließen Sie die Abdeckung des Batteriefachs.
Wenn das LCD-Display das Batteriesymbol anzeigt ( ), tauschen Sie alle Batterien aus.
Wiederauadbare Batterien sind für dieses Gerät nicht geeignet.
Nehmen Sie die Batterien aus dem Gerät, wenn es für einen Monat oder länger nicht verwendet
wird, um ein Auslaufen der Batterien zu vermeiden.
Der Austausch von Lithiumbatterien durch nicht ausreichend geschulte Personen kann zu
Gefahren (beispielsweise zu hohen Temperaturen oder Explosionen) führen.
Vermeiden Sie Kontakt zwischen der Batterieüssigkeit und Ihren Augen. Wenn
Batterieüssigkeit in die Augen gerät, spülen Sie diese sofort mit viel Wasser aus und
konsultieren Sie einen Arzt.
Der negative Pol der Batterie muss nach horizontalem Zusammendrücken der negativen
Elektrode korrekt in das Batteriefach gedrückt werden. Die Batterie steht in Kontakt mit der
Feder.
Achten Sie darauf, dass die Batteriefachabdeckung nicht beschädigt ist, bevor Sie die Batterie
einlegen.
Das Messgerät, die Batterien und die Manschette müssen am Ende ihrer Lebensdauer
gemäß den vor Ort geltenden Bestimmungen entsorgt werden.
2.EINSTELLUNG VON UHRZEIT UND DATUM
a. Sobald Sie die Batterie einsetzen oder das Messgerät ausschalten, wechselt es in den Uhr-
Modus und das LCD-Display zeigt Uhrzeit und Datum an. Vgl. Abbildung 2.
b. Wenn sich das Messgerät im Uhr-Modus bendet, halten Sie die Tasten „START“ und „MEM“
zwei Sekunden lang gleichzeitig gedrückt und lassen Sie sie dann los. Das Messgerät bendet
sich nun im Modus zur Einstellung von Uhrzeit und Datum.
c. In diesem Modus blinkt zunächst das Uhrzeitformat. Vgl. Abbildung 2-1. Betätigen Sie bei
blinkendem Uhrzeitformat die Taste „MEM“, um das Uhrzeitformat zu ändern. Das StandardUhrzeitformat ist 24 Std.
d. Betätigen Sie die Taste „START“ wiederholt. Dabei blinken nacheinander Jahr (2018 bis 2099),
Monat, Tag, Stunde und Minute. Vgl. Abbildung 2-2, 2-3, 2-4, 2-5 und 2-6. Während die Zahl
blinkt, betätigen Sie die Taste „MEM“, um die Zahl zu erhöhen. Halten Sie die Taste gedrückt, um
die Zahl schneller zu erhöhen.
e. Während der Anpassung von Uhrzeit und Datum wechselt das Messgerät automatisch zurück in
den Uhr-Modus, wenn 60 Sekunden lang keine Taste betätigt wird.
f. Sie können das Messgerät ausschalten, indem Sie bei blinkender Minutenanzeige die Taste
„START“ betätigen. Dann werden Uhrzeit und Datum bestätigt.
Abbildung2 Abbildung2-1
Abbildung2-2 Abbildung2-3
Abbildung2-4 Abbildung2-5 Abbildung2-6
Hinweis:
1.1 Das Uhrzeitformat kann vom Nutzer eingestellt werden.
1.2 Tabelle 2-1 zeigt die Entsprechungen zwischen dem 24- und dem 12-Stunden-Format.
Tabelle2-1
24-Stunden-Format 12-Stunden-Format 24-Stunden-Format 12-Stunden-Format
0:00 00:00 Uhr 12:00 12:00 Uhr
1:00 1:00 Uhr 13:00 13:00 Uhr
2:00 2:00 Uhr 14:00 14:00 Uhr
3:00 3:00 Uhr 15:00 15:00 Uhr
4:00 4:00 Uhr 16:00 16:00 Uhr
5:00 5:00 Uhr 17:00 17:00 Uhr
6:00 6:00 Uhr 18:00 18:00 Uhr
7:00 7:00 Uhr 19:00 19:00 Uhr
8:00 8:00 Uhr 20:00 20:00 Uhr
9:00 9:00 Uhr 21:00 21:00 Uhr
10:00 10:00 Uhr 22:00 22:00 Uhr
11:00 11:00 Uhr 23:00 23:00 Uhr
VERBINDEN DER MANSCHETTE MIT DEM MESSGERÄT
Führen Sie den Stecker des Manschettenschlauchs in den Luftanschluss auf
der linken Seite des Messgeräts ein. Achten Sie darauf, dass der Stecker
vollständig eingeführt ist, um Luftaustritte während der Blutdruckmessungen
zu vermeiden.
Vermeiden Sie Zusammendrücken oder Behinderungen des Verbindungsschlauchs während
einer Messung, um Fehler oder Verletzungen durch kontinuierlichen Manschettendruck zu
vermeiden.
3. ANLEGEN DER MANSCHETTE
a. Ziehen Sie das Ende der Manschette durch die Schlaufe (die Manschette ist bereits so verpackt),
drehen Sie sie nach außen (weg vom Körper), ziehen Sie sie fest und schließen Sie den
Klettverschluss. Vgl. Abbildung 4-1.
b. Legen Sie die Manschette um den unbekleideten linken Arm etwa 1 bis 2 cm oberhalb des
Ellenbogengelenks an.
c. Wenn Sie die Manschette am linken Arm anlegen, positionieren Sie den Luftschlauch in der Mitte
des Arms, ausgerichtet am Mittelnger. Vgl. Abbildung 4-2.
Wenn Sie die Manschette am rechten Arm anlegen, sorgen Sie dafür, dass sich der Luftschlauch
an der Seite Ihres Ellenbogens bendet. Vgl. Abbildung 4-3.
d. Setzen Sie sich hin und legen Sie Ihren Arm mit der Handäche nach oben auf eine ache
Unterlage wie beispielsweise einen Tisch. Achten Sie darauf, dass Ihr Arm nicht auf dem
Luftschlauch liegt oder dass der Luftstrom zur Manschette nicht auf andere Weise behindert wird.
e. Die Manschette sollte bequem, aber eng um den Arm sitzen. Sie sollten zwischen Arm und
Manschette einen Finger einführen können.
Abbildung4-1 Abbildung4-2 Abbildung4-3
Hinweis:
1. Achten Sie auf den unter „SPEZIFIKATIONEN“ angegebenen Umfangsbereich der Manschette,
um sicherzustellen, dass Sie die korrekte Manschette verwenden.
2. Messen Sie jedes Mal am linken Arm.
3. Bewegen Sie während der Messung nicht Ihren Arm, Ihren Körper, das Messgerät oder den
Gummischlauch.
4. Bleiben Sie ruhig und ruhen Sie sich vor der Blutdruckmessung fünf Minuten lang aus.
5. Halten Sie die Manschette sauber. Wenn die Manschette verschmutzt ist, entfernen Sie sie vom
Messgerät und reinigen Sie sie von Hand mit einem milden Reinigungsmittel. Spülen Sie sie
anschließend mit kaltem Wasser gründlich ab. Trocknen Sie die Manschette niemals in einem
Wäschetrockner und bügeln Sie sie nicht. Nach 200 Verwendungen wird eine Reinigung der
Manschette empfohlen.
6. Legen Sie die Manschette nicht um den Arm, wenn Sie dort Entzündungen, akute Erkrankungen
oder infektiöse Hautwunden haben.
4.KÖRPERHALTUNG WÄHREND DER MESSUNG
KomfortableSitzhaltungbeiderMessung
a. Setzen Sie sich mit den Füßen ach auf dem Boden und kreuzen Sie Ihre Beine nicht.
b. Setzen Sie sich hin und legen Sie Ihren Arm mit der Handäche nach oben auf eine ache
Unterlage wie beispielsweise einen Tisch.
c. Die Mitte der Manschette sollte sich auf der Höhe der rechten Herzkammer benden.
MessungimLiegen
a. Legen Sie sich auf den Rücken.
b. Legen Sie den Arm an Ihre Seite, mit der Handäche nach oben.
c. Die Manschette sollte auf Höhe des Herzens angelegt werden.
5.DURCHFÜHREN DER BLUTDRUCKMESSUNG
a. Wenn Sie die Manschette angelegt und eine bequeme Körperhaltung eingenommen haben,
betätigen Sie die Taste „START“. Beim Selbsttest werden alle Displayzeichen angezeigt. Sie
können das LCD-Display gemäß der Abbildung prüfen. Wenn ein Segment fehlt, wenden Sie
sich an das Servicecenter. Vgl. Abbildung 6-1.
b. Dann blinkt die aktuelle Speicherbank. Vgl. Abbildung 6-2. Betätigen Sie die Taste „MEM“, um
zur anderen Bank zu wechseln. Bestätigen Sie Ihre Auswahl mit der Taste „START“. Alternativ
wird die aktuelle Bank nach 5 Sekunden ohne Bedienung automatisch bestätigt.
c. Wenn das Messgerät gespeicherte Ergebnisse enthält, zeigt das LCD-Display das letzte davon
kurz an. Vgl. Abbildung 6-3. Wenn keine Ergebnisse gespeichert wurden, wird auf dem LCDDisplay Null angezeigt. Vgl. Abbildung 6-4.
d. Anschließend sucht das Gerät Null-Druck. Vgl. Abbildung 6-5.
e. Das Gerät bläst die Manschette auf, bis der Druck für eine Messung ausreicht. Anschließend
lässt das Gerät langsam die Luft aus der Manschette ab und führt die Messung durch.
Schließlich werden Blutdruck und Pulsfrequenz berechnet und auf dem LCD-Display angezeigt.
Die Anzeige für die Blutdruckklassizierung und das Symbol für unregelmäßigen Herzschlag
(falls angezeigt) blinken auf dem Display. Vgl. Abbildung 6-6. Das Ergebnis wird automatisch im
Messgerät gespeichert.
Abbildung6-1
Abbildung6-5 Abbildung6-6
f. Nach der Messung wird das Messgerät automatisch ausgeschaltet, wenn eine Minute lang
keine Bedienung erfolgt. Sie können auch die Taste „START“ betätigen, um das Gerät manuell
auszuschalten.
g. Während der Messung können Sie das Messgerät über die Taste „START“ manuell ausschalten.
Hinweis: Wenden Sie sich zur Interpretation der Blutdruckmesswerte an eine medizinische
Fachkraft.
6.ANZEIGE DER GESPEICHERTEN ERGEBNISSE
a. Betätigen Sie im Uhr-Modus die Taste „MEM“; das Gerät zeigt das Zeichen der aktuellen Gruppe
an. Die Anzahl der Ergebnisse in der aktuellen Benutzer-Speicherzone wird angezeigt. Vgl.
Abbildung 7-1. Betätigen Sie die Taste „START“, um die Gruppe zu wechseln, und „MEM“, um
die aktuelle Gruppe zu bestätigen. Alternativ wird die aktuelle Bank nach 5 Sekunden ohne
Bedienung automatisch bestätigt.
b. Anschließend zeigt das LCD-Display den Durchschnittswert aller Ergebnisse in der aktuellen
Bank an. Vgl. Abbildung 7-2. Wenn in der aktuellen Benutzer-Speicherzone keine Ergebnisse
gespeichert sind, zeigt das LCD-Display für Blutdruck und Pulsfrequenz „0“ an. Vgl.
Abbildung 7-3.
c. Betätigen Sie die Taste „MEM“. Das LCD-Display zeigt den Durchschnittswert der drei letzten
Ergebnisse in der aktuellen Benutzer-Speicherzone an. Vgl. Abbildung 7-4. Wenn in der aktuellen
Benutzer-Speicherzone keine Ergebnisse gespeichert sind, zeigt das LCD-Display für Blutdruck
und Pulsfrequenz „0“ an. Vgl. Abbildung 7-5.
d. Betätigen Sie die Taste „MEM“ erneut. Die Speichernummer in der aktuellen Benutzer-
Speicherzone wird angezeigt. Vgl. Abbildung 7-6. Wenn in der aktuellen Benutzer-Speicherzone
keine Ergebnisse gespeichert sind, zeigt das LCD-Display „0“ an. Vgl. Abbildung 7-7.
e. Anschließend wird das jüngste Ergebnis mit Uhrzeit- und Datumsstempel angezeigt. Vgl.
Abbildung 7-8. Das Symbol für unregelmäßigen Herzschlag (falls angezeigt) und die Anzeige
für die Blutdruckklassizierung blinken gleichzeitig. Betätigen Sie die Taste „MEM“, um die
früher erfassten Ergebnisse anzuzeigen. Wenn in der aktuellen Benutzer-Speicherzone keine
Ergebnisse gespeichert sind, zeigt das LCD-Display für Blutdruck und Pulsfrequenz „0“ an. Vgl.
Abbildung 7-9.
f. Bei der Anzeige der gespeicherten Ergebnisse wird das Messgerät automatisch ausgeschaltet,
wenn 1 Minute lang keine Bedienung erfolgt. Sie können das Messgerät auch über die Taste
„START“ manuell ausschalten.
Abbildung7-1
Abbildung7-6
7.LÖSCHEN VON MESSERGEBNISSEN AUS DEM SPEICHER
Wenn ein Ergebnis angezeigt wird (ausgenommen Durchschnittsergebnisse), halten Sie die Taste
„MEM“ drei Sekunden lang gedrückt, um alle Ergebnisse in der aktuellen Bank zu löschen. Vgl.
Abbildung 8. Betätigen Sie die Taste „START“, um das Messgerät auszuschalten.
Abbildung6-2
Abbildung7-2
Abbildung7-7
Abbildung6-3 Abbildung6-4
Abbildung7-3
Abbildung7-8
Abbildung7-4
Abbildung7-9
Abbildung7-5
Abbildung8
8. BEURTEILUNG HOHEN BLUTDRUCKS BEI ERWACHSENEN
Die folgenden Richtlinien für die Beurteilung hohen Blutdrucks (ohne Berücksichtigung von Alter
oder Geschlecht) wurden von der World Health Organization (WHO) aufgestellt. Beachten Sie, dass
auch andere Faktoren (z. B. Diabetes, Übergewicht, Rauchen usw.) berücksichtigt werden müssen.
Wenden Sie sich für eine korrekte Bestimmung an Ihren Arzt und wechseln Sie niemals selbst das
Behandlungsverfahren.
BlutdruckklassizierungfürErwachsene
Systolisch
(mmHG)
Schwerer Bluthochdruck
Mäßiger Bluthochdruck
Leichter Bluthochdruck
Hoch-normaler Blutdruck
Normaler Blutdruck
Hinweis: Das Farbschema ist nicht dafür geeignet, auf dessen Grundlage Notfalldiagnosen zu
beschleunigen. Es dient lediglich dazu, zwischen verschiedenen Blutdruckstufen zu unterscheiden.
9.TECHNISCHERALARM–BESCHREIBUNG
Das Messgerät zeigt auf dem LCD-Display ohne Verzögerung „Hi“ oder „Lo“ als technischen
Alarm an, wenn der gemessene Blutdruck (systolisch oder diastolisch) außerhalb des im Abschnitt
BLUTDRUCK
Klassizierung
Optimal < 120 < 80
Normal 120-129 80-84
Hoch-normal 130-139 85-89
Hochdruck Grad 1 140-159 90-99
Hochdruck Grad 2 160-179 100-109
Hochdruck Grad 3 > 180 > 110
WHO/ISH-Denitionen und -Klassizierung
von Blutdruckwerten
Diastolisch
(mmHG)
SBP
mmHg
DBP
mmHg
SPEZIFIKATIONEN angegebenen Bereichs liegt. In diesem Fall sollten Sie sich an Ihren Arzt
wenden oder prüfen, ob Sie das Gerät korrekt verwendet haben.
Der technische Alarm (außerhalb des angegebenen Bereichs) ist werkseitig eingestellt und kann
nicht verändert oder deaktiviert werden. Diesem Alarmzustand ist gemäß IEC 60601-1-8 eine
niedrige Priorität zugewiesen.
Der technische Alarm rastet nicht ein und muss nicht zurückgesetzt werden. Das auf dem LCD-
Display angezeigte Signal wird nach etwa acht Sekunden automatisch ausgeblendet.
10.FEHLERSUCHE (1)
PROBLEM MÖGLICHE URSACHE LÖSUNG
Die Manschette war nicht korrekt
angelegt oder festgezogen.
Die Körperhaltung beim Test war
LCD-
Display
zeigt
abnormes
Ergebnis
nicht korrekt.
Sprechen, Arm- oder
Körperbewegungen, Aufregung oder
Nervosität während des Tests
Unregelmäßiger Herzschlag
(Herzrhythmusstörung)
Legen Sie die Manschette korrekt an
und versuchen Sie es erneut.
Lesen Sie erneut den Abschnitt
„KÖRPERHALTUNG WÄHREND
DER MESSUNG“ und führen Sie die
Messung erneut durch.
Führen Sie den Test erneut durch,
wenn Sie sich beruhigt haben, ohne
dabei zu sprechen oder sich zu
bewegen.
Dieses elektronische
Blutdruckmessgerät ist nicht
für Personen mit schweren
Herzrhythmusstörungen geeignet.
FEHLERSUCHE (2)
PROBLEM MÖGLICHE URSACHE LÖSUNG
LCD-Anzeige zeigt
Batteriesymbol an
LCD-Anzeige zeigt
„Er 0“ an
LCD-Anzeige zeigt
„Er 1“ an
LCD-Anzeige zeigt
„Er 2“ an
LCD-Anzeige zeigt
„Er 3“ an
LCD-Anzeige zeigt
„Er 4“ an
LCD-Anzeige zeigt
„Er 5“ an
LCD-Anzeige zeigt
„Er 6“ an
LCD-Anzeige zeigt
„Er 7“ an
LCD-Anzeige zeigt
„Er 8“ an
LCD-Anzeige zeigt
„Er A“ an
Keine Reaktion bei
Tastenbetätigung
oder Austausch der
Batterie
Batteriestand niedrig Batterien austauschen
Drucksystem ist vor Messung
instabil
Systolischer Druck konnte nicht
erkannt werden
Diastolischer Druck konnte nicht
erkannt werden
Beim Aufblasen ist das
pneumatische System blockiert.
Beim Aufblasen zeigt das
pneumatische System ein Leck an.
Bewegen Sie sich nicht und
versuchen Sie es erneut.
Schließen Sie die Manschette
korrekt an und versuchen Sie
es erneut. Wenn das Messgerät
weiterhin abnorme Ergebnisse
anzeigt, wenden Sie sich an
Ihren Händler vor Ort oder an
Manschettendruck über 300 mmHg
Mehr als 160 Sekunden mit
Manschettendruck über 15 mmHg
Interner Speicherfehler
Fehler beim Prüfen der
Geräteparameter
Wiederholen Sie die Messung
nach fünf Minuten. Wenn das
Messgerät weiterhin abnorme
Ergebnisse anzeigt, wenden Sie
sich an Ihren Händler vor Ort
oder an das Werk.
Parameterfehler beim Drucksensor
Inkorrekte Bedienung oder starke
elektromagnetische Störung
Nehmen Sie alle Batterien aus
dem Gerät und legen Sie sie
nach fünf Minuten wieder ein.
das Werk.
PFLEGE
1. Lassen Sie dieses Gerät nicht fallen und setzen Sie es keinen schweren Stößen aus.
2. Vermeiden Sie hohe Temperaturen und direkte Sonneneinstrahlung. Tauchen Sie das
Gerät nicht in Wasser ein, da dies zu Beschädigungen führt.
3. Wenn das Gerät bei sehr tiefen Temperaturen gelagert wurde, lassen Sie es vor der Verwendung
zuerst auf Zimmertemperatur kommen.
4. Das Gerät benötigt sechs Stunden, um von der minimalen Lagertemperatur zwischen Einsätzen
so aufgewärmt zu werden, dass es bei einer Umgebungstemperatur von 20 °C BESTIMMUNGSGEMÄSS verwendet werden kann.
5. Das Gerät benötigt sechs Stunden, um von der maximalen Lagertemperatur zwischen Einsätzen
so abgekühlt zu werden, dass es bei einer Umgebungstemperatur von 20 °C BESTIMMUNGSGEMÄSS verwendet werden kann.
6. Versuchen Sie nicht, das Gerät auseinanderzunehmen.
7. Nehmen Sie die Batterien heraus, wenn das Gerät über einen längeren Zeitraum nicht genutzt
wird.
8. Es wird empfohlen, alle zwei Jahre oder nach einer Reparatur die Funktion des Geräts zu testen.
Wenden Sie sich an ein Servicecenter in Ihrer Nähe.
9. Reinigen Sie das Gerät mit einem trockenen weichen Tuch oder mit einem in Wasser, verdünntem Desinfektionsalkohol oder verdünntem Reinigungsmittel getränkten, gut ausgedrückten
weichen Tuch.
10. Kein Teil des Messgeräts kann vom Benutzer gewartet werden. Die Stromkreisdiagramme,
Komponentenlisten, Beschreibungen, Kalibrierungsanleitungen und weiteren Informationen zur
Unterstützung qualizierter Techniker bei der Reparatur reparierbarer Teile sind auf Anfrage
erhältlich.
11. Das Messgerät kann seine Sicherheits- und Leistungseigenschaften für mindestens 10.000 Messungen oder drei Jahre bewahren, und die Integrität der Manschette bleibt für 1.000 Zyklen
(Öffnen/Schließen) des Verschlusses erhalten.
12. Die Manschette sollte bei Bedarf zweimal pro Woche desinziert werden (beispielsweise in
einem Krankenhaus). Wischen Sie die Innenseite (die Hautkontaktseite) der Manschette mit
einem in Ethylalkohol (75 bis 90 %) getränkten, gut ausgedrückten Tuch ab und lassen Sie die
Manschette dann an der Luft trocknen.
13. Keine Wartungsarbeiten, während das Messgerät verwendet wird.
Page 6

ERLÄUTERUNG DER SYMBOLE AM GERÄT
CN
Symbol für „BEDIENUNGSANLEITUNG MUSS GELESEN WERDEN“ (Hintergrundfarbe:
Blau. Grasches Symbol: Weiß)
Symbol für „WARNUNG“
Symbol für „ANWENDUNGSTEIL DES TYPS BF“ (Die Manschette ist ein Anwendungsteil des
Typs BF)
Symbol für „UMWELTSCHUTZ – Elektroabfälle dürfen nicht mit dem Hausmüll entsorgt
werden. Recyceln Sie diese bitte, sofern Einrichtungen dafür vorhanden sind. Erkundigen Sie
sich bei der zuständigen Behörde vor Ort oder dem Händler, wenn Sie Rat zum Recycling
benötigen.“
Symbol für „HERSTELLER“
Symbol für „ENTSPRICHT DEN ANFORDERUNGEN GEMÄSS MDD93/42/EWG“
Symbol für „LAND DES HERSTELLERS“ und „HERSTELLUNGSDATUM“
Symbol für „EUROPÄISCHE VERTRETUNG“
Symbol für „SERIENNUMMER“
Symbol für „TROCKEN HALTEN“
IP20 Das erste numerische Symbol steht für den Grad des Schutzes vor Zugang zu gefährlichen
Teilen und festen Fremdkörpern. Das zweite numerische Symbol steht für den Grad des
Schutzes vor Eindringen von Wasser.
GARANTIE-INFORMATIONEN
Nur die Kosten für Komponenten und Transport.
SERVICECENTER
A.I.&E. Adriaan Mulderweg 9–11,
5657 EM Eindhoven, Niederlande
Edco UK Ltd, 1st Floor Two Chamberlain Square,
B3 3AX, Birmingham, GB
ANDON HEALTH CO., LTD.
No. 3 JinPing Street,
YaAn Road, Nankai District,
Tianjin 300190, China.
iHealthLabs Europe SAS
36 Rue de Ponthieu, 75008,
Paris, Frankreich.
INFORMATIONEN ZUR ELEKTROMAGNETISCHEN VERTRÄGLICHKEIT
Tabelle1–Emission
Phänomen Konformität ElektromagnetischeUmgebung
HF-Emissionen
Harmonische
Verzerrung
Spannungsschwankun-
gen/Flicker-Ströme
Tabelle2–Gehäuseanschluss
Phänomen
Elektrostatische
Entladung
Hochfrequente elektromagnetische Felder
Näherungsfelder von
kabellosen HF-Kommunikationsgeräten
Magnetfelder mit
eingestuften energietech-
nischen Frequenzen
Tabelle3–NäherungsfeldervonkabellosenHF-Kommunikationsgeräten
Testfrequenz
(MHz)
385 380-390 Pulsmodulation 18 Hz, 27 V/m
450 430-470 FM, ±5 kHz Abweichung, 1 kHz Sinus, 28 V/m
710
780
810
930
1720
1970
2450 2400-2570 Pulsmodulation 217 Hz, 28 V/m
5240
5785
CISPR 11
Gruppe 1,
Klasse B
IEC 61000-3-2
Klasse A
IEC 61000-3-3
Konformität
Grundlegende
EMV-Norm
IEC 61000-4-2
IEC 61000-4-3
IEC 61000-4-3 Vgl. Tabelle 3
IEC 61000-4-8
Band
(MHz)
704-787 Pulsmodulation 217 Hz, 9 V/m745
800-960 Pulsmodulation 18 Hz, 28 V/m870
1700-1990 Pulsmodulation 217 Hz, 28 V/m1845
5100-5800 Pulsmodulation 217 Hz, 9 V/m5500
Störfestigkeitsprüfungsstufen
ProfessionelleGesundheitseinrichtung
Gesundheitsversorgungsumgebung zu Hause
Gesundheitsversorgungsumgebung zu Hause
Gesundheitsversorgungsumgebung zu Hause
Störfestigkeitsprüfungsstufen
Gesundheitsversorgungsumgebung
zuHause
±8 kV Kontakt
±2 kV, ±4 kV, ±8 kV, ±15 kV Luft
10 V/m
80 MHz–2,7 GHz
80 % AM bei 1 kHz
30 A/m
50 Hz oder 60 Hz
Page 7
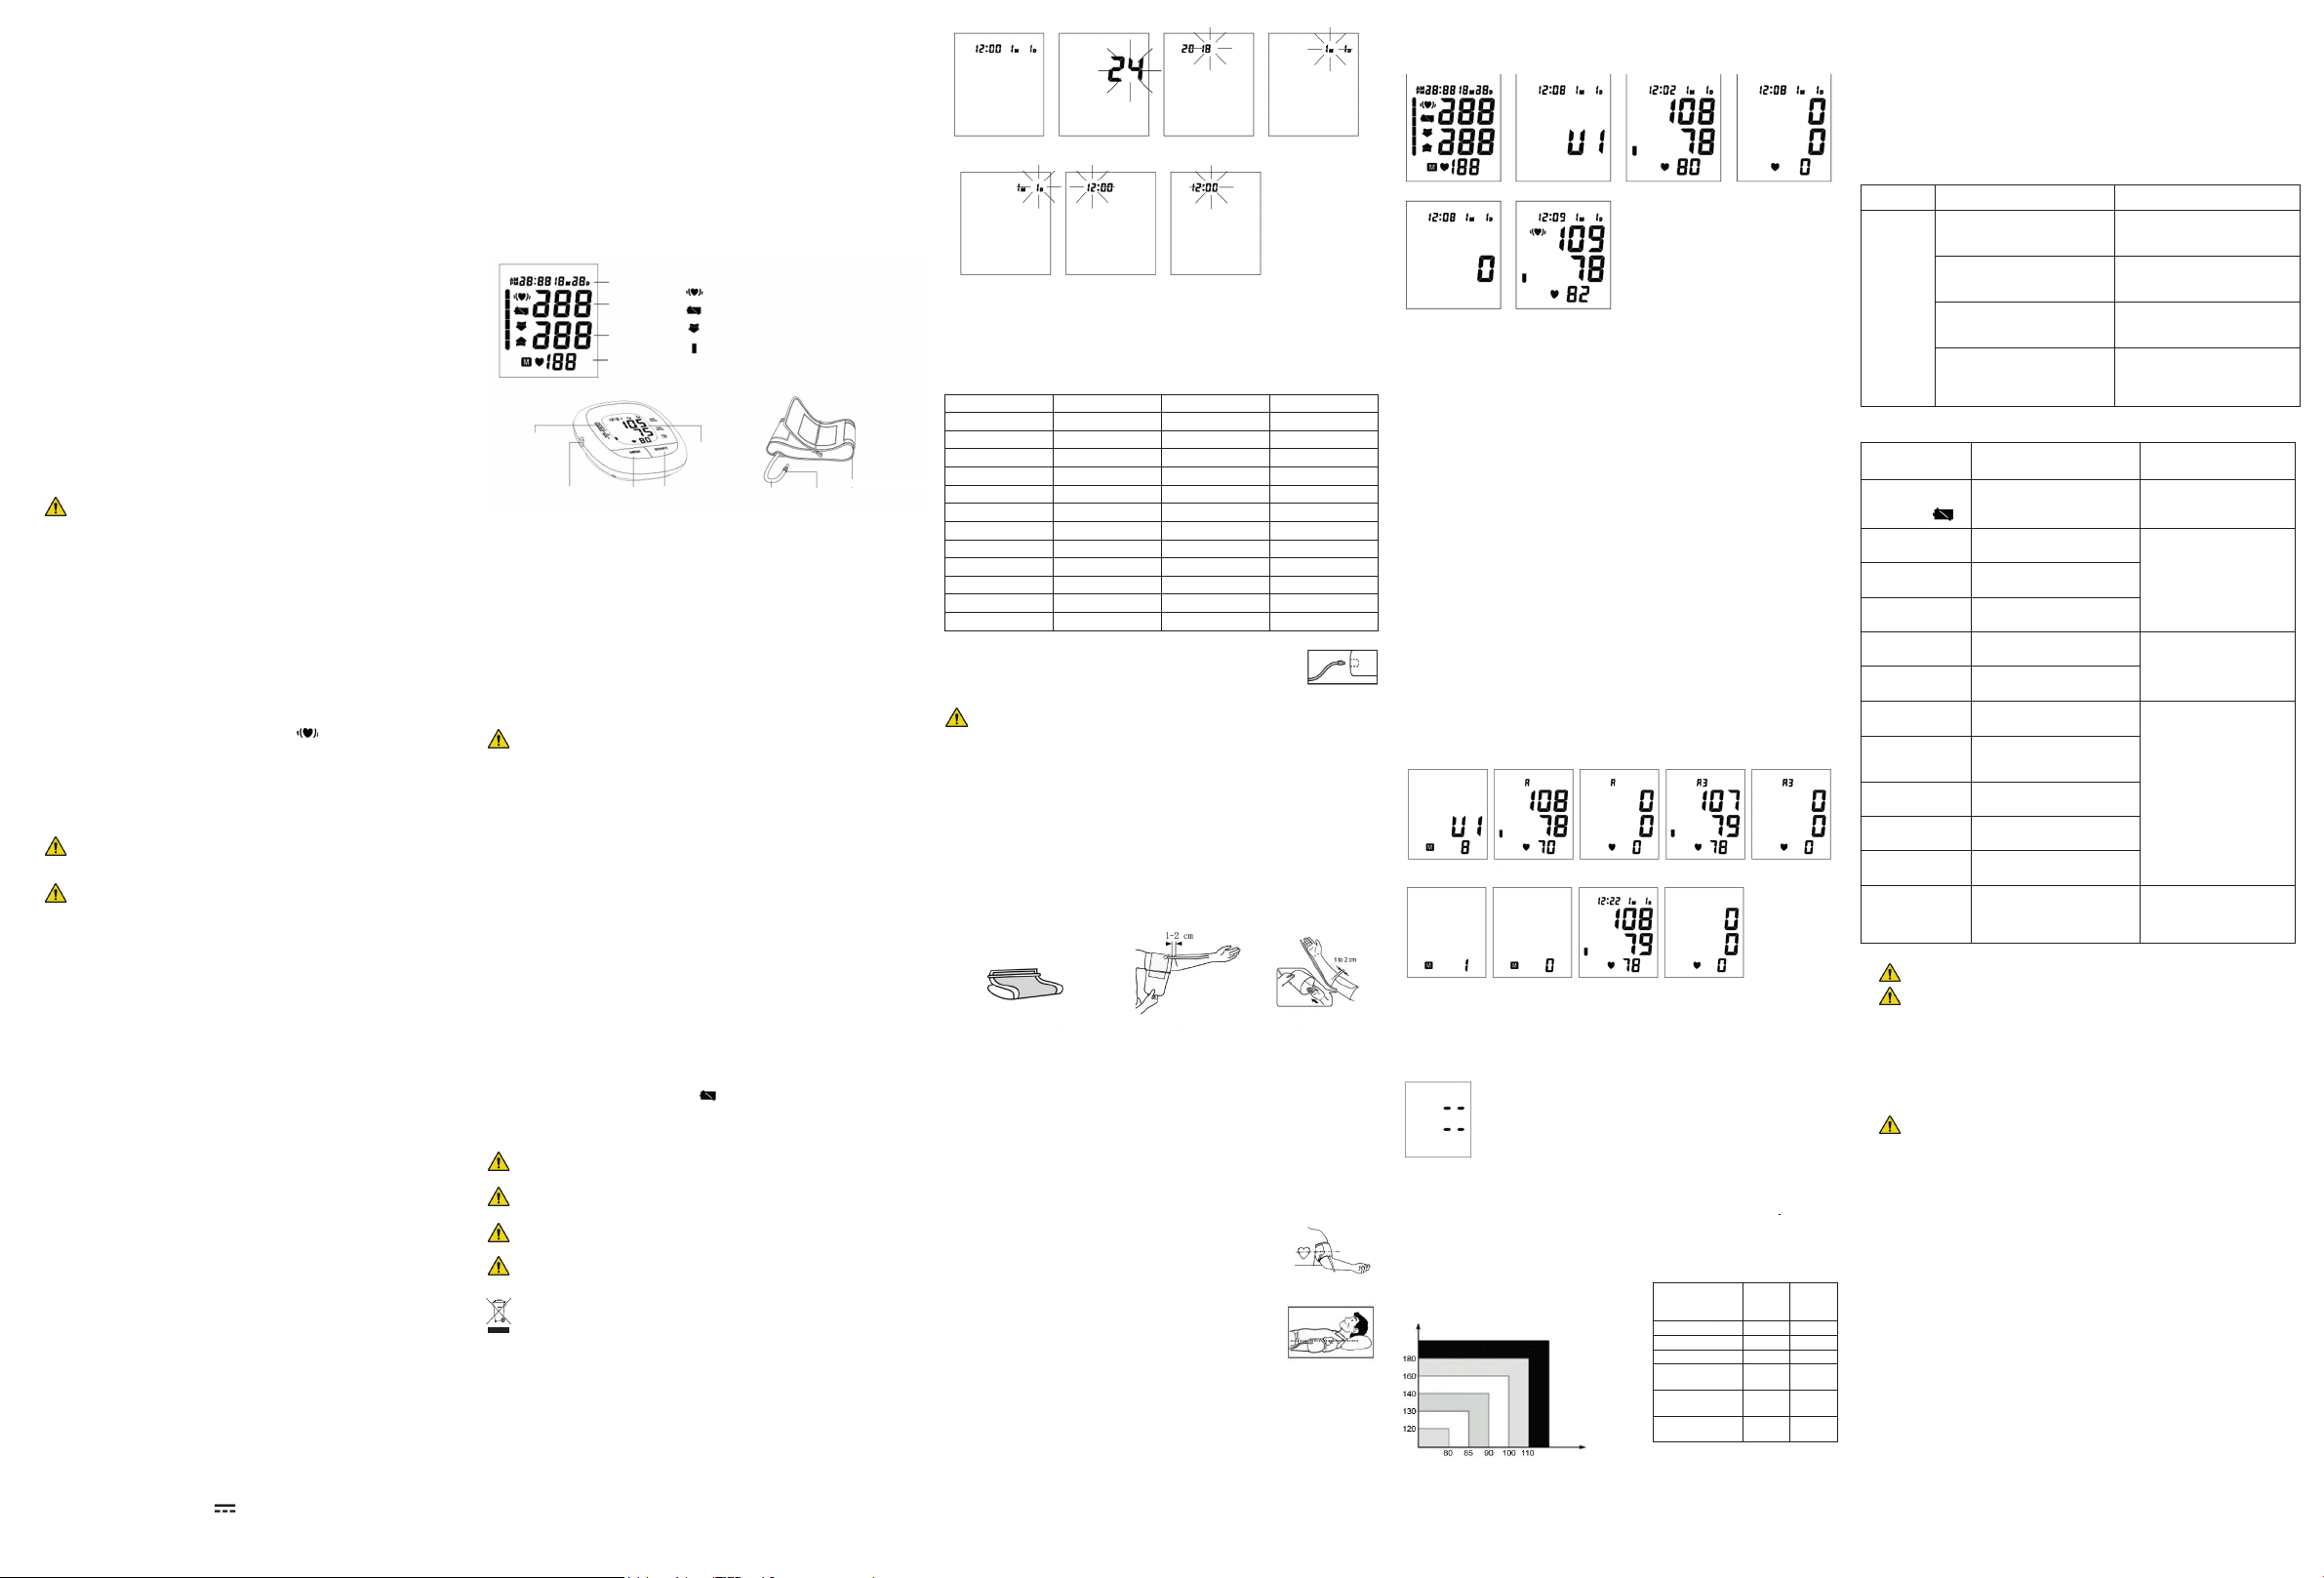
D INFORMATIONS IMPORTANTES ARTICLE 871125247440
FLUCTUATION DE LA PRESSION ARTÉRIELLE NORMALE
Les activités physiques, l'excitation, le stress, le fait de manger, boire, fumer, la posture du corps et
de nombreuses autres activités ou facteurs (y compris prendre une mesure de pression artérielle)
inuencent la valeur de la pression artérielle. De ce fait, il est très inhabituel d'obtenir plusieurs
relevés de pression artérielle identiques.
La pression artérielle uctue continuellement ----- jour et nuit. La valeur la plus élevée apparaît
généralement pendant la journée et la plus basse généralement au cours de la nuit. Généralement,
la valeur commence à augmenter vers 3 h 00 et atteint le niveau le plus élevé pendant la journée,
lorsque la plupart des personnes sont éveillées et actives.
Compte tenu des informations ci-dessus, il est recommandé de mesurer votre pression artérielle à
peu près à la même heure tous les jours.
Des mesures trop fréquentes peuvent causer des blessures en raison des interférences du ux
sanguin, veuillez toujours vous détendre au moins 1 à 1 minute et demie entre les mesures pour
permettre le rétablissement de la circulation sanguine dans votre bras. Il est rare d'obtenir des
relevés de pression artérielle identiques chaque fois.
AVERTISSEMENTS
1. Lisez toutes les informations du guide d'utilisation et des autres documents contenus dans la
boîte avant d'utiliser l'appareil.
2. Restez immobile, calme et au repos pendant 5 minutes avant la mesure de la pression artérielle.
3. Le brassard doit être placé au même niveau que votre cœur.
4. Pendant la mesure, ne parlez pas et ne déplacez pas votre corps ou votre bras.
5. Utilisation du bras gauche pour chaque mesure.
6. Veuillez toujours vous détendre au moins 1 ou 1 minute et demie entre les mesures pour
permettre le rétablissement de la circulation sanguine dans votre bras. Un surgonage prolongé
(pression du brassard supérieure à 300 mmHg ou maintenue au-dessus de 15 mmHg pendant
plus de 3 minutes) de la poche peut causer des ecchymoses sur votre bras.
7. Consultez votre médecin en cas de doute dans les situations ci-dessous :
1) Application du brassard sur une plaie ou en cas de maladie inammatoire ;
2) Application du brassard sur un membre comportant un accès ou une thérapie intravasculaire,
ou un shunt artério-veineux (A-V) ;
3) Application du brassard sur le bras du même côté qu'une mastectomie ;
4) Utilisation simultanée avec d'autres équipements médicaux de surveillance sur le même
membre ;
5) Nécessité de contrôler la circulation sanguine de l'utilisateur.
8. Ce tensiomètre électronique est conçu pour les adultes et ne doit jamais être utilisé sur
les nourrissons ou les jeunes enfants. Consultez votre médecin ou un autre professionnel de la
santé avant de l'utiliser sur des enfants plus âgés.
9. N'utilisez pas cet appareil dans un véhicule en mouvement, cela peut entraîner des mesures
erronées.
10. Les mesures de pression artérielle déterminées par ce tensiomètre sont équivalentes à celles
obtenues par un observateur expérimenté utilisant la méthode d'auscultation par brassard/
stéthoscope, dans les limites prescrites par l'American National Standard Institute pour les
tensiomètres électroniques ou automatisés.
11. Pour toute information concernant les éventuelles interférences électromagnétiques ou
autres entre le tensiomètre et d'autres appareils ou pour obtenir des conseils an d'éviter ces
interférences, veuillez consulter le chapitre INFORMATIONS RELATIVES À LA COMPATIBILITÉ
ÉLECTROMAGNÉTIQUE. Il est conseillé de maintenir le tensiomètre au moins à 30 cm des
autres appareils sans l, tels que les dispositifs Wi-Fi, les téléphones portables, les fours microondes, etc. Il ne peut pas être utilisé à proximité d'ÉQUIPEMENTS CHIRURGICAUX HF actifs
et d'une chambre protégée contre les radiofréquences d'un SYSTÈME ÉLECTROMÉDICAL
pour l'imagerie par résonance magnétique, avec une intensité élevée des PERTURBATIONS
ÉLECTROMAGNÉTIQUES.
12. Si un rythme cardiaque irrégulier (IHB) provoqué par une arythmie courante est détecté lors de
la procédure de mesure de la pression artérielle, un signal s'afche. Dans ces conditions,
le tensiomètre électronique peut continuer de fonctionner, mais les résultats ne seront peut-être
pas exacts. Il est conseillé de consulter votre médecin pour réaliser un bilan précis.
Le signal IHB s'afche dans 2 cas :
1) Coefcient de variation (CV) de la période de pulsation > 25 %.
2) Différence de période de pulsation adjacente ≥ 0,14 s et nombre de pulsations
correspondantes supérieur à 53 % du nombre total de pulsations.
13. Veuillez ne pas utiliser un autre brassard que celui fourni par le fabricant. Dans le cas contraire,
un risque de biocompatibilité peut apparaître et provoquer une erreur de mesure.
14. Il est possible que le tensiomètre n'atteigne pas ses spécications de performances ou
présente un risque de sécurité s'il est rangé ou utilisé en dehors des plages de température et
d'humidité indiquées dans les spécications.
15. Veuillez ne pas partager le brassard avec une autre personne infectée an d'éviter toute
infection croisée.
16. Cet équipement a été testé et déclaré conforme aux limites applicables à un dispositif numérique
de Classe B, conformément à la section 15 des règles de la FCC. Ces limites sont conçues
pour assurer une protection raisonnable contre les interférences nuisibles dans une installation
résidentielle. Cet équipement génère, utilise et peut émettre de l'énergie de radiofréquence et,
s'il n'est pas installé et utilisé conformément aux instructions, peut causer des interférences
nuisibles aux communications radio. Cependant, il n'existe aucune garantie que ces
interférences ne se produiront pas dans une installation spécique. Si cet équipement provoque
des interférences nuisibles à la réception des émissions de radio ou de télévision, ce qui peut
être déterminé en éteignant puis en rallumant l'équipement, l'utilisateur est invité à essayer de
corriger ce problème d'interférences en appliquant une ou plusieurs des mesures suivantes :
- Réorienter ou déplacer l'antenne de réception.
- Augmenter la distance entre l'équipement et le récepteur.
- Brancher l'équipement sur la prise d'un autre circuit que celui sur lequel le récepteur est
branché.
- Consulter le revendeur ou un technicien radio/TV expérimenté pour obtenir de l'aide.
17. Les mesures ne sont pas possibles chez les patients présentant une haute fréquence
d'arythmies.
18. L'appareil n'est pas destiné à être utilisé sur les nouveaux-nés, les enfants ou les femmes
enceintes. (Des essais cliniques n'ont pas été menés sur les nouveaux-nés, les enfants ou les
femmes enceintes.)
19. Les mouvements, les tremblements, les frissonnements peuvent affecter la lecture des mesures.
20. L'appareil ne convient pas aux patients souffrant d'une mauvaise circulation périphérique, une
pression artérielle particulièrement basse ou une température corporelle basse (le ux sanguin
sera faible jusqu'à la position de mesure).
21. L'appareil ne convient pas aux patients équipés d'un cœur et d'un poumon articiels (absence
de pouls).
22. Consultez votre médecin avant d'utiliser l'appareil dans l'un des cas suivants : arythmies
courantes telles qu'extrasystoles auriculaires ou ventriculaires, brillation auriculaire,
artériosclérose, irrigation sanguine insufsante, diabète, pré-éclampsie, maladie rénale.
23. Le patient est un opérateur prévu.
24. Attention : les changements ou les modications non expressément approuvés par la partie
responsable de la conformité peuvent annuler le droit de l'utilisateur à utiliser l'équipement.
25. Avaler des piles et/ou le liquide des piles peut être extrêmement dangereux. Maintenez les piles
et l'appareil hors de portée des enfants et des personnes handicapées.
26. Si vous êtes allergique au plastique/caoutchouc, veuillez ne pas utiliser cet appareil.
27. Si l'appareil est utilisé en tant qu'appareil multi-utilisateurs, ne sélectionnez pas une banque de
mémoire erronée.
CARACTÉRISTIQUES TECHNIQUES
Nom du produit : Tensiomètre au bras
1. Modèle : KD-553
2. Classication : Alimentation interne, pièce appliquée de type BF, IP20, sans AP ni APG,
fonctionnement continu
3. Dimensions de l'appareil : Environ 136 mm X 120 mm X 61 mm (5 11/32″ x 4 23/32″ x 2 13/32″)
4. Circonférence du brassard : 22 cm-32 cm (8 21/32″-12 19/32″), 30 cm-42 cm (11 13/16″-16
17/32″) (Optionnel), 42 cm-48 cm (16 17/32″-18 29/32″) (Optionnel), 22 cm-36 cm (8 21/32″-14
3/16″) (Optionnel), 22 cm-42 cm (8 21/32″-16 17/32″) (Optionnel)
5. Poids : Environ 225 g (7 15/16 oz.) (hors piles et brassard)
6. Méthode de mesure : Méthode oscillométrique, gonage et mesure automatiques
7. Volume de la mémoire : 2 × 60 fois avec horodatage
8. Source d'alimentation : piles : 4 × 1,5 V TYPE AA
9. Plage de mesure :
Pression du brassard : 0-300 mmHg
Systolique : 60-260 mmHg
Diastolique : 40-199 mmHg
Fréquence du pouls : 40-180 battements/minute
10. Précision :
Pression : ±3 mmHg
Fréquence du pouls : Inférieure à 60 : ±3 bpm
Plus de 60 (incl.) : ±5%
11. Température ambiante de fonctionnement : 10 °C à 40 °C (50 °F à 104 °F)
12. Humidité ambiante de fonctionnement : ≤ 85 % HR
13. Température ambiante de stockage et de transport : -20 °C à 50 °C (-4 °C à 122 °C)
14. Humidité ambiante de stockage et de transport : ≤ 85 % HR
15. Pression ambiante : 80 kPa-105 kPa
16. Durée de vie des piles : environ 270 cycles.
17. Tous les composants faisant partie du système de mesure de la pression, y compris les
accessoires : Pompe, valve, écran LCD, brassard, capteur
Remarque:Cesspécicationssontsusceptiblesd'êtremodiéessanspréavis.
CONTENUETINDICATEURSD'AFFICHAGE
Afchage du jour et
de l'heure
Systolique
Diastolique
Fréquence du pouls
Indicateur de classi-
cation du niveau
de pression artérielle
Prise du tube d'air
Remarque : les images contenues dans ce manuel sont fournies uniquement à titre de référence.
UTILISATION PRÉVUE
Ce tensiomètre électronique entièrement automatisé est conçu pour être utilisé par les
professionnels de la santé ou à domicile et constitue un système de mesure non invasive de la
pression artérielle, destiné à mesurer la pression artérielle diastolique et systolique ainsi que la
fréquence du pouls d'un individu adulte à l'aide d'une technique non invasive dans laquelle un
brassard gonable est enroulé autour de la partie supérieure du bras. La circonférence du brassard
est comprise entre 22 cm et 48 cm (environ 8 21/32″-18 29/32″).
CONTENUDEL'EMBALLAGE
• 1 tensiomètre
• 1 guide d'utilisation
• 1 brassard
• 1 étui de rangement souple
Bouton « MEM »
Symbole de rythme cardiaque irrégulier
Témoin de pile faible
La pression dans le brassard est instable ou beaucoup d'air
restant dans le brassard
Indicateur de classication du niveau de pression artérielle
LCD
Bouton « DÉMARRER »
Tube en
caoutchouc
Brassard
Connecteur du tube
du brassard
CONTRE-INDICATIONS
L'utilisation de ce tensiomètre électronique ne convient pas aux personnes présentant une
arythmie grave.
DESCRIPTION DU PRODUIT
À l'aide de la méthodologie oscillométrique et d'un capteur de pression intégré en silicone, la
pression artérielle et la fréquence du pouls peuvent être mesurées automatiquement et de
manière non invasive. L'écran LCD indique la pression artérielle et la fréquence du pouls. Les
2 × 60 mesures les plus récentes peuvent être mémorisées avec un horodatage. Le tensiomètre
électronique correspond aux normes ci-dessous : IEC 60601-1 Édition 3.1 2012-08/EN 606011:2006/A1:2013 (Appareil électromédical -- Partie 1 : Exigences générales pour la sécurité de
base et les performances essentielles), IEC60601-1-2:2014/EN 60601-1-2:2015 (Appareils
électromédicaux -- Partie 1-2 : Exigences générales pour la sécurité de base et les performances
essentielles - Norme de garantie : Compatibilité électromagnétique - Exigences et tests),
IEC80601-2-30:2009+AMD1:2013/EN 80601-2-30:2010/A1:2015 (Appareil électromédical –Partie
2-30 : Exigences particulières pour la sécurité de base et les performances essentielles des
sphygmomanomètres non invasifs automatiques) EN 1060-1: 1995 + A2: 2009 (Tensiomètres non
invasifs - Partie 1 : Exigences générales), EN 1060-3: 1997 + A2: 2009 (Tensiomètres non invasifs Partie 3 : Exigences complémentaires concernant les systèmes électromécaniques de mesure de la
pression sanguine) ; ISO81060-2:2013 (Tensiomètres non invasifs - Partie 2 : Validation clinique du
type de mesure automatisée).
PROCÉDURES DE CONFIGURATION ET OPÉRATIONNELLES
1.CHARGEMENT DES PILES
a. Ouvrez le couvercle du compartiment des piles à l'arrière du tensiomètre.
b. Chargez quatre piles de type « AA ». Veuillez vous assurer que le pôle positif et négatif de
chaque pile correspond à l'indication des mêmes pôles dans le logement des piles de l'appareil.
c. Fermez le couvercle du compartiment des piles.
Lorsque l'écran LCD afche le symbole de la pile , remplacez toutes les piles.
Les piles rechargeables ne sont pas adaptées à ce tensiomètre.
Retirez les piles si le tensiomètre ne va pas être utilisé pendant un mois ou plus pour éviter des
dommages dus à une fuite des piles.
Le remplacement des piles au lithium par du personnel insufsamment formé peut entraîner un
risque (tel qu'une température excessive, un incendie ou une explosion).
Empêchez le liquide des piles de pénétrer dans vos yeux. S'il pénètre dans vos yeux, rincez
abondamment la zone concernée à l'eau claire et consultez un médecin immédiatement.
La borne positive de la pile doit être comprimée correctement dans le compartiment des piles
après une compression horizontale de l'électrode négative. La pile est en contact avec le
ressort
Assurez-vous que le couvercle du compartiment des piles est intact et non endommagé avant
d'installer la pile
Le tensiomètre, les piles et le brassard doivent être mis au rebut conformément aux
règlementations locales à la n de leur utilisation.
2.RÉGLAGEDEL'HORLOGEETDELADATE
a. Une fois que vous installez la pile ou éteignez le tensiomètre, il passe en mode Horloge et
l'afcheur LCD indique l'heure et la date. Voir image 2.
b. Lorsque le tensiomètre est en mode Horloge, appuyez simultanément sur les boutons
« DÉMARRER » et « MEM » pendant deux secondes, puis relâchez les boutons, le tensiomètre
est en mode Réglage de l'horloge et de la date.
c. En mode Réglage de l'horloge et de la date, le format de l'heure clignote d'abord. Voir image 2-1.
Lorsque le format de l'heure clignote, appuyez sur le bouton « MEM » pour changer le format de
l'heure. Le format de l"heure par défaut est 24 h.
d. Appuyez plusieurs fois sur le bouton « DÉMARRER », l'année (plage comprise entre 2018 et
2099), le mois, le jour, les heures et les minutes clignotent à tour de rôle. Voir images 2-2, 2-3,
2-4, 2-5 et 2-6. Lorsque le nombre clignote, appuyez sur le bouton « MEM » pour augmenter le
nombre, maintenez le bouton « MEM » enfoncé pour que le nombre augmente plus rapidement.
e. Pendant le réglage de l'horloge et de la date, le tensiomètre repasse automatiquement en mode
Horloge si aucun bouton n'est actionné pendant 60 secondes.
f. Vous pouvez éteindre le tensiomètre en appuyant sur le bouton « DÉMARRER » lorsque les
minutes clignotent. L'heure et la date sont alors conrmées.
Image2 Image2-1
Image2-2 Image2-3
Image2-4 Image2-5 Image2-6
Remarque:
1.1 Le format de l'horloge peut être déni par l'utilisateur.
1.2 Le tableau 2-1 présente les relations de conversion entre le format 24 heures et le format
12 heures.
Tableau2-1
Format 24 heures Format 12 heures Format 24 heures Format 12 heures
0:00 12:00 AM 12:00 12:00 PM
1:00 1:00 AM 13:00 1:00 PM
2:00 2:00 AM 14:00 2:00 PM
3:00 3:00 AM 15:00 3:00 PM
4:00 4:00 AM 16:00 4:00 PM
5:00 5:00 AM 17:00 5:00 PM
6:00 6:00 AM 18:00 6:00 PM
7:00 7:00 AM 19:00 7:00 PM
8:00 8:00 AM 20:00 8:00 PM
9:00 9:00 AM 21:00 9:00 PM
10:00 10:00 AM 22:00 10:00 PM
11:00 11:00 AM 23:00 11:00 PM
RACCORDEMENT DU BRASSARD AU TENSIOMÈTRE
Insérez le connecteur du tube du brassard dans l'orice d'air sur le côté gauche
du tensiomètre. Assurez-vous que le connecteur est complètement inséré pour
éviter toute fuite d'air pendant les mesures de pression artérielle.
Évitez toute compression ou tout étranglement du tube de raccordement pendant la mesure,
car cela pourrait causer une erreur de gonage ou une blessure due à la pression continue
du brassard.
3. APPLICATION DU BRASSARD
a. En tirant l'extrémité du brassard via la boucle en métal (le brassard est déjà emballé ainsi),
tournez-le vers l'extérieur (en l'éloignant de votre corps), serrez-le et fermez la xation Velcro.
Voir image 4-1.
b. Placez le brassard autour d'un bras gauche nu 1 à 2 cm au-dessus de l'articulation du coude.
c. Si vous placez le brassard autour du bras gauche, positionnez le tube d'air au milieu de votre
bras, dans l'axe de votre majeur. Voir image 4-2.
Si vous placez le brassard autour du bras droit, appliquez le brassard de sorte que le tube d'air
soit sur le bord de votre coude. Voir image 4-3.
d. En position assise, placez la paume orientée vers le haut devant vous sur une surface plane telle
qu'un bureau ou une table. Faites attention à ne pas poser votre bras sur le tube d'air. Dans le
cas contraire, cela limitera le débit d'air vers le brassard.
e. Le brassard doit s'adapter confortablement mais étroitement autour de votre bras. Vous devez
pouvoir insérer un doigt entre votre bras et le brassard.
Image4-1 Image4-2 Image4-3
Remarque:
1. Veuillez consulter la plage de circonférence du brassard dans « SPÉCIFICATIONS » pour vous
assurer que le brassard approprié est utilisé.
2. Mesure sur le bras gauche chaque fois.
3. Ne bougez pas votre bras, votre corps ou le tensiomètre et ne déplacez pas le tube en
caoutchouc pendant la mesure.
4. Restez tranquille, calme pendant 5 minutes avant la mesure de la pression artérielle.
5. Veuillez maintenir le brassard propre. Si le brassard est sale, retirez-le du tensiomètre et
nettoyez-le à la main avec un détergent doux, puis rincez-le soigneusement à l'eau froide. Ne
séchez jamais le brassard au sèche-linge et ne le repassez pas. Il est recommandé de nettoyer le
brassard après 200 utilisations.
6. Ne placez pas le brassard autour de votre poignet si le poignet présente une inammation, une
maladie aiguë, une plaie cutanée ou une infection.
4.POSTURE DU CORPS PENDANT LA MESURE
Mesureenétantconfortablementassis
a. Asseyez-vous avec les pieds à plat au sol et ne croisez pas les jambes.
b. Placez la paume orientée vers le haut devant vous sur une surface plane
telle qu'un bureau ou une table.
c. Le milieu du brassard doit être au niveau de l'oreillette droite du cœur.
Mesureenpositionallongée
a. Allongez-vous sur le dos.
b. Placez votre bras gauche droit le long de votre anc avec votre paume
orientée vers le haut.
c. Le brassard doit être placé au même niveau que votre cœur.
5.FAIRE UN RELEVÉ DE VOTRE PRESSION ARTÉRIELLE
a. Après avoir appliqué le brassard et avec votre corps dans une position confortable, appuyez
sur le bouton « DÉMARRER ». Tous les caractères de l'écran s'afchent à titre d'auto-test. Vous
pouvez consulter l'écran LCD conformément à l'image. Veuillez contacter le centre de service si
un segment est manquant. Voir image 6-1.
b. Le bloc mémoire en cours clignote alors. Voir image 6-2. Appuyez sur le bouton « MEM » pour
passer à l'autre bloc. Conrmez votre sélection en appuyant sur le bouton « DÉMARRER ».
Le bloc en cours peut également être conrmé automatiquement après 5 secondes sans
manipulation.
c. Si le tensiomètre a enregistré des résultats, l'écran LCD afche momentanément le plus
récent. Voir image 6-3. Si aucun résultat n'a été enregistré, zéro apparaît sur l'écran LCD. Voir
image 6-4.
d. Le tensiomètre commence alors à rechercher la pression nulle. Voir image 6-5.
e. Le tensiomètre gone alors le brassard jusqu'à ce qu'une pression sufsante se soit accumulée
pour une mesure. Le tensiomètre libère alors lentement l'air du brassard et effectue la mesure.
Enn, la pression artérielle et la fréquence du pouls sont calculées et afchées sur l'écran LCD.
L'indicateur de classication de la pression artérielle et le symbole de rythme cardiaque irrégulier
(le cas échéant) clignotent à l'écran. Voir image 6-6. Le résultat est automatiquement enregistré
dans le tensiomètre.
Image6-1 Image6-2
Image6-5 Image6-6
f. Après la mesure, le tensiomètre s'éteint automatiquement après 1 minute sans manipulation.
Vous pouvez également appuyer sur le bouton « DÉMARRER » pour éteindre manuellement le
tensiomètre.
g. Pendant la mesure, vous pouvez appuyer sur le bouton « DÉMARRER » pour éteindre
manuellement le tensiomètre.
Remarque : Veuillez consulter un professionnel de la santé pour une interprétation des
mesures de pression.
6.AFFICHAGE DES RÉSULTATS MÉMORISÉS
a. En mode Horloge, appuyez sur le bouton « MEM », le tensiomètre afche alors le pictogramme du
groupe en cours. Le nombre de résultats dans la zone de mémoire de l'utilisateur actuel s'afche.
Voir image 7-1. Appuyez sur le bouton « DÉMARRER » pour changer de groupe, appuyez sur
« MEM » pour conrmer le groupe en cours. Le bloc en cours peut également être conrmé
automatiquement après 5 secondes sans manipulation.
b. L'écran LCD afche alors la valeur moyenne de tous les résultats dans le bloc en cours. Voir
image 7-2. Si aucun résultat n'est enregistré dans la zone de mémoire de l'utilisateur actuel,
l'écran LCD afche « 0 » pour la pression artérielle et la fréquence du pouls. Voir image 7-3.
c. Appuyez sur le bouton « MEM », l'écran LCD afche la valeur moyenne des trois derniers
résultats dans la zone de mémoire de l'utilisateur actuel. Voir image 7-4. Si aucun résultat n'est
enregistré dans la zone de mémoire de l'utilisateur actuel, l'écran LCD afche « 0 » pour la
pression artérielle et la fréquence du pouls. Voir image 7-5.
d. Appuyez à nouveau sur le bouton « MEM », le nombre de mémoires dans la zone de mémoire de
l'utilisateur actuel s'afche. Voir image 7-6. Si le tensiomètre ne contient aucun résultat enregistré
dans la zone de mémoire de l'utilisateur actuel, l'écran LCD afche « 0 ». Voir image 7-7.
e. Le résultat le plus récent est alors afché avec un horodatage. Voir image 7-8. Le symbole de
rythme cardiaque irrégulier (le cas échéant) et l'indicateur de classication de la pression artérielle
clignotent en même temps. Appuyez plusieurs fois sur le bouton « MEM » pour consulter les
résultats mesurés précédemment. Si le tensiomètre ne contient aucun résultat enregistré dans la
zone de mémoire de l'utilisateur actuel, l'écran LCD afche « 0 » pour la pression artérielle et la
fréquence du pouls. Voir image 7-9.
f. Lors de l'afchage des résultats enregistrés, le tensiomètre s'éteint automatiquement après
1 minute sans manipulation. Vous pouvez également appuyer sur le bouton « DÉMARRER » pour
éteindre manuellement le tensiomètre.
Image7-1
Image7-6
7.SUPPRIMER LES MESURES DE LA MÉMOIRE
Lorsqu'un résultat est afché (hors afchage de valeur moyenne), maintenez le bouton « MEM »
enfoncé pendant trois secondes pour supprimer tous les résultats dans le bloc en cours. Voir image
8. Appuyez sur le bouton « DÉMARRER », le tensiomètre s'éteint.
Image7-2
Image7-7
Image6-3 Image6-4
Image7-3
Image7-8
Image7-4
Image7-9
Image7-5
Image8
8. ÉVALUERL'HYPERTENSIONCHEZLESADULTES
Les directives suivantes d'évaluation de l'hypertension (indépendamment de l'âge ou du sexe) ont
été établies par l'Organisation mondiale de la santé (OMS). Veuillez noter que d'autres facteurs
(p. ex. diabète, obésité, fumeur, etc.) doivent être pris en compte. Consultez votre médecin pour une
évaluation précise et ne changez jamais votre traitement vous-même.
Classicationdelapressionartériellepourlesadultes
PRESSION ARTÉRI-
Systolique
(mmHG)
Hypertension sévère
Hypertension modérée
Hypertension légère
PA élevée-normale
PA normale
Diastolique
(mmHG)
Remarque : Il n'est pas destiné à fournir une base pour des besoins rapides en cas de situation/
diagnostic d'urgence en fonction de la combinaison de couleurs. La combinaison de couleurs est
uniquement destinée à distinguer les différents niveaux de pression artérielle.
ELLE
Classication
Optimal < 120 < 80
Normal 120-129 80-84
Élevé-Normal 130-139 85-89
Hypertension de
grade 1
Hypertension de
grade 2
Hypertension de
grade 3
Dénitions et classication des niveaux
de pression artérielle par l'OMS/ISH
SBP
DBP
mmHg
mmHg
140-159 90-99
160-179 100-109
> 180 > 110
9.DESCRIPTIONDEL'ALARMETECHNIQUE
L'écran LCD du tensiomètre indique sans délai « HI » ou « Lo » à titre d'alarme technique si la
pression artérielle déterminée (systolique ou diastolique) est en dehors de la plage nominale
spéciée dans la partie SPÉCIFICATIONS. Dans ce cas, vous devez consulter un médecin ou
vérier si vos manipulations ont enfreint les instructions.
La condition d'alarme technique (en dehors de la plage nominale) est prédénie en usine et ne
peut pas être ajustée ou désactivée. Cette condition d'alarme se voit attribuer une faible priorité
conformément à IEC 60601-1-8.
L'alarme technique n'est pas acquittable et ne nécessite pas de réinitialisation. Le signal afché sur
l'écran LCD disparaît automatiquement après environ 8 secondes.
10.DÉPANNAGE (1)
PROBLÈME CAUSE POSSIBLE SOLUTION
L'écran LCD
indique un
résultat
anormal
La position du brassard n'était pas
correcte ou le brassard n'a pas été
serré correctement
La posture du corps n'était pas
correcte pendant le test
Parler, bouger le bras ou le corps,
être en colère, excité ou nerveux
pendant le test
Rythme cardiaque irrégulier
(arythmie)
Appliquez correctement le brassard et
réessayez.
Consultez les sections « POSTURE
DU CORPS PENDANT LA MESURE »
des instructions et testez à nouveau.
Testez à nouveau une fois calme et
sans parler ni bouger pendant le test.
L'utilisation de ce tensiomètre
électronique ne convient pas aux
personnes présentant une arythmie
grave.
DÉPANNAGE (2)
PROBLÈME CAUSE POSSIBLE SOLUTION
Le symbole de pile
faible apparaît sur
l'écran LCD
L'écran LCD indique
« Er 0 »
L'écran LCD indique
« Er 1 »
L'écran LCD indique
« Er 2 »
L'écran LCD indique
« Er 3 »
L'écran LCD indique
« Er 4 »
L'écran LCD indique
« Er 5 »
L'écran LCD indique
« Er 6 »
L'écran LCD indique
« Er 7 »
L'écran LCD indique
« Er 8 »
L'écran LCD indique
« Er A »
Aucune réponse
lorsque vous appuyez
sur le bouton ou
chargez la pile.
Pile faible Changez les piles
Le système de pression est
instable avant la mesure
Échec de la détection de la
pression systolique
Échec de la détection de la
pression diastolique
Système pneumatique bloqué
pendant le gonage
Fuite du système pneumatique
pendant le gonage
Pression du brassard supérieure
à 300 mmHg
Plus de 160 secondes avec la
pression du brassard supérieure
à 15 mmHg
Erreur de mémoire interne
Erreur de vérication des
paramètres de l'appareil
Erreur des paramètres du capteur
de pression
Fonctionnement incorrect ou fortes
interférences électromagnétiques.
Ne bougez pas et réessayez.
Raccordez correctement le
brassard et réessayez. Si
le tensiomètre est toujours
anormal, veuillez contacter le
distributeur local ou l'usine.
Mesurez à nouveau après
cinq minutes. Si le tensiomètre
est toujours anormal, veuillez
contacter le distributeur local
ou l'usine.
Retirez les piles pendant cinq
minutes, puis réinstallez toutes
les piles.
MAINTENANCE
1. Ne faites pas tomber ce tensiomètre et ne le soumettez pas à un choc violent.
2. Évitez les températures élevées et la solarisation. Ne plongez pas le tensiomètre dans
l'eau car cela endommagera le tensiomètre.
3. Si ce tensiomètre est stocké près du froid, laissez-le s'acclimater à la température ambiante
avant de l'utiliser.
4. Le tensiomètre nécessite un réchauffement pendant 6 heures à partir de la température minimale de stockage entre les utilisations an qu'il soit prêt pour son UTILISATION PRÉVUE à une
température ambiante de 20 °C.
5. Le tensiomètre nécessite un refroidissement pendant 6 heures à partir de la température
maximale de stockage entre les utilisations an qu'il soit prêt pour son UTILISATION PRÉVUE à
une température ambiante de 20 °C
6. N’essayez pas de démonter ce tensiomètre.
7. Si vous n'allez pas utiliser le tensiomètre pendant une longue durée, veuillez retirer les piles.
8. Il est recommandé de vérier les performances tous les 2 ans ou après une réparation. Veuillez
contacter le centre de service.
9. Nettoyez le tensiomètre avec un chiffon sec et doux ou un chiffon doux bien essoré après l'avoir
humidié avec de l'eau, de l'alcool désinfectant dilué ou un détergent dilué.
10. Aucun composant du tensiomètre ne peut être entretenu par l'utilisateur. Les schémas de
circuits, listes des composants, descriptions, instructions d'étalonnage ou autres informations qui
permettront au personnel technique dûment qualié de l'utilisateur de réparer les pièces conçues
pour être réparables peuvent être fournis.
11. Le tensiomètre peut conserver ses caractéristiques de sécurité et de performances pendant au
moins 10 000 mesures ou trois ans et l'intégrité du brassard est maintenue après 1 000 cycles
d'ouverture–fermeture de la fermeture.
12. Il est recommandé de désinfecter le brassard 2 fois par semaine si nécessaire (par exemple
dans un hôpital ou une clinique). Essuyez la face intérieure (la face en contact avec la peau)
du brassard à l'aide d'un chiffon doux essoré après l'avoir humidié avec de l'alcool éthylique
(75-90 %), puis faites sécher le brassard en aérant.
13. Ne pas effectuer d'opérations d'entretien/de maintenance pendant que le tensiomètre est utilisé.
Page 8

EXPLICATIONDESSYMBOLESSURL'APPAREIL
CN
Symbole pour « VEUILLEZ LIRE LE GUIDE DE FONCTIONNEMENT » (Couleur de fond du
pictogramme : bleu. Symbole graphique du pictogramme : blanc)
Symbole pour « AVERTISSEMENT »
Symbole pour « PIÈCES APPLIQUÉES DE TYPE BF » (Le brassard est une pièce appliquée
de type BF)
Symbole pour « PROTECTION DE L'ENVIRONNEMENT – Les déchets de produits
électriques ne doivent pas être éliminés avec les déchets ménagers. Veuillez recycler là où
il y a des installations. Consultez votre autorité locale ou votre détaillant pour obtenir des
conseils sur le recyclage. »
Symbole pour « FABRICANT »
Symbole pour « CONFORME AUX EXIGENCES MDD93/42/EEC »
Symbole pour « PAYS DE FABRICATION » et « DATE DE FABRICATION »
Symbole pour « REPRÉSENTATION EUROPÉENNE »
Symbole pour « NUMÉRO DE SÉRIE »
Symbole pour « MAINTENIR AU SEC »
IP20 Le premier chiffre caractéristique correspond au « Degré de protection contre l'accès à des
parties dangereuses et contre la pénétration de corps étrangers solides ». Le deuxième
chiffre caractéristique correspond au « Degré de protection contre la pénétration d'eau »
INFORMATIONS SUR LA GARANTIE
Facturer uniquement le coût des composants et du transport.
CENTRE DE SERVICE
A.I.&E. Adriaan Mulderweg 9-11,
5657 EM Eindhoven, Pays-Bas
Edco UK Ltd,1st Floor Two Chamberlain Square,
B3 3AX, Birmingham, Royaume-Uni
ANDON HEALTH CO., LTD.
No. 3 JinPing Street,
YaAn Road, Nankai District,
Tianjin 300190, Chine.
iHealthLabs Europe SAS
36 Rue de Ponthieu, 75008,
Paris, France.
INFORMATIONS RELATIVES À LA COMPATIBILITÉ ÉLECTROMAGNÉTIQUE
Tableau1-Émissions
Phénomène Conformité Environnementélectromagnétique
Émissions RF
Distorsion harmonique
Fluctuations de
tension et scintillement
Tableau2-Oricedel'enveloppe
Phénomène
Décharge
électrostatique
Champ électromagnétique
RF rayonné
Champs de proximité
provenant de l’équipe-
ment de communication
sans l RF
Champs magnétiques à la
fréquence de puissance
nominale
Tableau3–Champsdeproximitéprovenantdel’équipementdecommunicationsanslRF
Fréquence de
test
(MHz)
385 380-390 Modulation par impulsions 18 Hz, 27 V/m
450 430-470 FM, déviation ±5 kHz, sinusoïdale 1 kHz, 28 V/m
710
780
810
930
1720
1970
2450 2400-2570 Modulation par impulsions 217 Hz, 28 V/m
5240
5785
CISPR 11
Groupe 1,
Classe B
CEI 61000-3-2
Classe A
CEI 61000-3-3
Conformité
NormeCEMde
base
CEI 61000-4-2
CEI 61000-4-3
CEI 61000-4-3 Consulter le tableau 3
CEI 61000-4-8
Bande
(MHz)
704-787 Modulation par impulsions 217 Hz, 9 V/m745
800-960 Modulation par impulsions 18 Hz, 28 V/m870
1700-1990 Modulation par impulsions 217 Hz, 28 V/m1845
5100-5800 Modulation par impulsions 217 Hz, 9 V/m5500
Niveauxdetestsd’immunité
Environnement d'établissement professionnel de
santé
Environnement de santé à domicile
Environnement de santé à domicile
Environnement de santé à domicile
Niveauxdetestsd’immunité
Environnementdesantéàdomicile
contact ±8 kV
air ±2 kV, ±4 kV, ±8 kV, ±15 kV
10 V/m
80 MHz - 2,7 GHz
80 % AM à 1 kHz
30 A/m
50 Hz ou 60 Hz
Page 9
C BELANGRIJKE INFORMATIE ARTIKEL 871125247440
NORMALE BLOEDDRUKSCHOMMELINGEN
Alle lichamelijke activiteit, opwinding, stress, eten, drinken, roken, lichaamshouding en vele andere
activiteiten of factoren (waaronder het meten van de bloeddruk) beïnvloeden de bloeddrukwaarde.
Daarom is het meestal ongebruikelijk om meerdere identieke bloeddrukmetingen te krijgen.
De bloeddruk schommelt voortdurend ----- dag en nacht. De hoogste waarde doet zich meestal
overdag voor en de laagste rond middernacht. De waarde begint meestal rond 3.00 uur te stijgen en
bereikt het hoogste niveau overdag, als de meeste mensen wakker en actief zijn.
Gezien de bovenstaande informatie is het aan te bevelen uw bloeddruk elke dag op ongeveer
hetzelfde tijdstip te meten.
Te frequente metingen kunnen letsel veroorzaken doordat de bloeddoorstroming gestoord wordt.
Ontspan daarom altijd minimaal 1 tot 1,5 minuut tussen de metingen, zodat de bloedcirculatie in uw
arm zich kan herstellen. Het gebeurt zelden dat u elke keer identieke bloeddrukmetingen krijgt.
WAARSCHUWINGEN
1. Lees alle informatie in de gebruiksaanwijzing en eventuele andere informatie in de doos voordat
u het toestel in gebruik neemt.
2. Blijf stil, kalm en rust 5 minuten uit voordat u de bloeddruk meet.
3. De manchet moet op dezelfde hoogte als uw hart worden geplaatst.
4. Praat niet tijdens de meting en beweeg uw lichaam en arm niet.
5. Meting op de linkerarm voor elke meting.
6. Ontspan u altijd minimaal 1 tot 1,5 minuut tussen de metingen, zodat de bloedcirculatie in uw
arm zich kan herstellen. Langdurige te sterke opblazing (manchetdruk hoger dan 300 mmHg of
langer dan 3 minuten boven 15 mmHg gehouden) van de manchet kan ecchymoses op uw arm
veroorzaken.
7. Raadpleeg uw arts als u twijfelt over onderstaande gevallen:
1) Het aanbrengen van de manchet over een wond of ontstekingsziekten;
2) Het aanbrengen van de manchet op een ledemaat waar intravasculaire toegang of therapie
of een arterio-veneuze (A-V) shunt aanwezig is;
3) Het aanbrengen van de manchet op de arm aan de kant van een mastectomie;
4) Gelijktijdig gebruik met andere bewakingsapparatuur op dezelfde ledemaat;
5) Noodzaak om de bloedcirculatie van de gebruiker te controleren.
8. Deze elektronische bloeddrukmeter is ontworpen voor volwassenen en mag nooit gebruikt
worden bij zuigelingen of jonge kinderen. Raadpleeg uw arts of andere gezondheidswerkers voor
gebruik bij oudere kinderen.
9. Gebruik dit toestel niet in een rijdend voertuig, Dit kan een foutieve meting tot gevolg hebben.
10. De door deze monitor bepaalde bloeddruk is gelijkwaardig aan die welke wordt verkregen door
een geschoolde waarnemer met de auscultatiemethode met manchet/stethoscoop, binnen
de door het American National Standard Institute voorgeschreven grenzen, elektronische of
geautomatiseerde bloeddrukmeters.
11. Informatie over mogelijke elektromagnetische of andere interferentie tussen de bloeddrukmeter
en andere apparaten, samen met advies over het vermijden van dergelijke interferentie, vindt
u in het deel INFORMATIE OVER DE ELEKTROMAGNETISCHE COMPATIBILITEIT. Er wordt
aangeraden de bloeddrukmeter op ten minste 30 cm afstand te houden van andere draadloze
apparaten, zoals witoestellen, mobiele telefoons, magnetrons enz. Hij kan niet worden gebruikt
in de buurt van actieve HF CHIRURGISCHE APPARATUUR en de RF-afgeschermde ruimte
van een ME-SYSTEEM voor magnetische-resonantiebeeldvorming, waar de intensiteit van de
EM-VERSCHILLEN hoog is.
12. Als tijdens het meten van de bloeddruk een door veelvoorkomende hartritmestoornissen
veroorzaakte onregelmatige hartslag (Irregular Heartbeat - IHB) wordt gedetecteerd, verschijnt
het signaal . In dit geval kan de elektronische bloeddrukmeter blijven functioneren, maar
zijn de resultaten mogelijk niet nauwkeurig. U wordt aangeraden uw arts te raadplegen voor een
nauwkeurige beoordeling.
Er zijn 2 omstandigheden waaronder het IHB-signaal wordt weergegeven:
1) De variatiecoëfciënt (CV) van de pulsperiode >25%.
2) 2) Het verschil van aangrenzende pulsperiode ≥0,14 s, en het aantal van dergelijke pulsen
duurt meer dan 53% van het totale aantal pulsen.
13. Gebruik de manchet niet anders dan door de fabrikant geleverd, anders kan hij
biocompatibiliteitsgevaar opleveren en tot meetfouten leiden.
14. Het is mogelijk dat de monitor niet aan zijn prestatiespecicaties voldoet of
veiligheidsrisico's veroorzaakt als hij buiten de in de specicaties aangegeven temperatuur- en
vochtigheidsbereiken wordt opgeslagen of gebruikt.
15. Deel de manchet niet met andere besmettelijke personen om kruisbesmetting te
voorkomen.
16. Dit apparaat is getest en in overeenstemming bevonden met de grenswaarden voor een
digitaal apparaat van klasse B, overeenkomstig deel 15 van de FCC-voorschriften. Deze
grenzen zijn bedoeld om een redelijke bescherming te bieden tegen schadelijke storingen in
een woonhuisinstallatie. Dit apparaat genereert en gebruikt radiofrequentie-energie en kan
die uitstralen, en het kan, als het niet volgens de instructies wordt geïnstalleerd en gebruikt,
schadelijke storingen in de radiocommunicatie veroorzaken. Er is echter geen garantie dat er
in een bepaalde installatie geen storing zal optreden. Als dit apparaat schadelijke storingen in
radio- of televisieontvangst veroorzaakt, die kunnen worden vastgesteld door het apparaat uit en
aan te zetten, wordt de gebruiker aangeraden te proberen de storing te verhelpen door een of
meer van de volgende maatregelen:
- De ontvangstantenne anders richten of verplaatsen.
- De afstand tussen het apparaat en de ontvanger vergroten.
- Het apparaat aansluiten op een stopcontact van een ander circuit dan dat waarop de
ontvanger is aangesloten.
- Raadpleeg de dealer of een ervaren radio/tv-technicus voor hulp.
17. Metingen zijn niet mogelijk bij patiënten met een hoge frequentie van aritmieën.
18. Het apparaat is niet bestemd voor gebruik op pasgeborenen, kinderen en zwangere vrouwen. (Er
zijn geen klinische tests uitgevoerd op pasgeborenen, kinderen en zwangere vrouwen.)
19. Beweging, trillen, rillen kunnen de afgelezen meting beïnvloeden.
20. Het apparaat mag niet worden toegepast bij patiënten met een slechte perifere circulatie,
een merkbaar lage bloeddruk, of een lage lichaamstemperatuur (wanneer er een geringe
bloedstroom naar de meetpositie is).
21. Het apparaat mag niet worden toegepast bij patiënten die een kunsthart en -long gebruiken (er
is geen puls).
22. Raadpleeg uw arts voordat u het apparaat gebruikt voor een van de volgende aandoeningen:
veel voorkomende aritmieën zoals atriale of ventriculaire premature slagen of atriale brillatie,
arteriële sclerose, slechte perfusie, diabetes, pre-eclampsie, nierziekten.
23. De patiënt is een beoogde gebruiker.
24. Opgelet: wijzigingen of aanpassingen die niet uitdrukkelijk goedgekeurd zijn door de partij die
verantwoordelijk is voor de naleving van de voorschriften, kunnen de bevoegdheid van de
gebruiker om het toestel te gebruiken ongeldig maken.
25. Het inslikken van batterijen en/of batterijvloeistof kan extreem gevaarlijk zijn. Bewaar de
batterijen en het toestel daarom buiten bereik van kinderen en personen met een handicap.
26. Als u allergisch bent voor plastic/rubber, mag u dit apparaat niet gebruiken.
27. Als het apparaat voor meerdere personen gebruikt wordt, moet u ervoor zorgen dat u niet de
verkeerde geheugenbank kiest.
SPECIFICATIES
Productnaam: Armbloeddrukmeter
1. Model: KD-553
2. Classicatie: Intern gevoed, Type BF toegepast deel, IP20, Geen AP of APG, Continue werking
3. Machineformaat: Ca. 136 mm x 120 mm x 61 mm
4. Omtrek manchet: 22 cm-32 cm, 30 cm-42 cm (optioneel), 42 cm-48 cm (optioneel), 22 cm-36 cm
(optioneel), 22 cm-42 cm (optioneel)
5. Gewicht: Ca. 225 g (exclusief batterijen en manchet)
6. Meetmethode: Oscillometrische methode, automatisch opblazen en meten
7. Geheugenvolume: 2×60 keer met tijd- en datumstempel
8. Voeding: batterijen: 4×1,5 V AA-FORMAAT
9. Meetbereik:
Manchetdruk: 0-300 mmHg
Systolisch: 60-260 mmHg
Diastolisch: 40-199 mmHg
Polsslag: 40-180 slagen per minuut
10. Nauwkeurigheid:
Druk: ±3 mmHg
Polsslag: Minder dan 60: ±3bpm
Meer dan 60 (incl.) : ±5%
11. Omgevingstemperatuur voor werking: 10 °C~40 °C
12. Omgevingsvochtigheid voor werking: ≤85%RH
13. Omgevingstemperatuur voor opslag en transport: -20 °C~50 °C
14. Omgevingsvochtigheid voor opslag en transport: ≤85%RH
15. Omgevingsdruk: 80 kPa-105 kPa
16. Batterijduur: circa 270 keer.
17. Alle onderdelen die tot het drukmeetsysteem behoren, inclusief de accessoires: pomp, ventiel,
LCD, manchet, sensor
Opmerking:Dezebovenstaandespecicatieskunnenzondermededelingvoorafworden
gewijzigd.
INHOUDENDISPLAY-INDICATOREN
Datum- en tijdweergave
Systolisch
Diastolisch
Polsslag
Geluidsdrukniveau
classicatie-indicator
Luchtslangaansluiting
Opmerking: De afbeeldingen in de handleiding zijn alleen ter referentie.
BEOOGD GEBRUIK
De volautomatische elektronische bloeddrukmeter is bestemd voor gebruik door medisch personeel
of thuis, en is een niet-invasief bloeddrukmeetsysteem dat bedoeld is om de diastolische en
systolische bloeddruk en de polsslag van een volwassen persoon te meten met behulp van een nietinvasieve techniek waarbij een opblaasbare manchet om de bovenarm wordt gewikkeld. De omtrek
van de manchet is beperkt tot 22 cm - 48 cm (ca. 8 21/32″-18 29/32″).
INHOUD VAN DE VERPAKKING
• 1 Bloeddrukmeter
• 1 Gebruiksaanwijzing
• 1 Armmanchet
• 1 Zachte opbergkoffer
'MEM'-knop
Symbool voor onregelmatige hartslag
Aanduiding 'batterij bijna leeg'
De druk in de manchet is instabiel of er zit veel restlucht
in de manchet
Classicatie-indicator bloeddrukniveau
LCD
'START'-knop
Rubberen
buis
Manchetslang
aansluiting
Manchet
CONTRA-INDICATIE
Voor mensen met ernstige aritmie is deze elektronische bloeddrukmeter ongeschikt.
PRODUCTBESCHRIJVING
Op basis van oscillometrische methodologie en in siliconen geïntegreerde druksensor, kunnen
bloeddruk en polsslag automatisch en niet-invasief worden gemeten. Op de LCD-display worden
de bloeddruk en de polsslag aangegeven. De meest recente 2×60 metingen kunnen met datum- en
tijdstempel in het geheugen worden opgeslagen. De elektronische bloeddrukmeter voldoet aan
de onderstaande normen:IEC 60601-1Edition 3.1 2012-08/EN 60601-1:2006/A1:2013 (Medische
elektrische toestellen -- Deel 1: Algemene eisen voor basisveiligheid en essentiële prestaties),
IEC60601-1-2:2014/EN 60601-1-2:2015 (Medische elektrische toestellen -- Deel 1-2: Algemene
eisen voor basisveiligheid en essentiële prestatie - Secundaire norm: Elektromagnetische
compatibiliteit - Eisen en beproevingen), IEC80601-2-30:2009+AMD1:2013/EN 80601-2-30:2010/
A1:2015(Medische elektrische toestellen - Deel 2-30: Bijzondere eisen voor de basisveiligheid
en essentiële prestaties van geautomatiseerde niet-invasieve bloeddrukmeters)EN 1060-1: 1995
+ A2: 2009 (Niet-invasieve bloeddrukmeters - Deel 1: Algemene vereisten), EN 1060-3: 1997 +
A2: 2009 (Niet-invasieve bloeddrukmeters - Deel 3: Aanvullende eisen voor elektro-mechanische
bloeddrukmeetsystemen);ISO81060-2 :2013(Niet-invasieve bloeddrukmeters - Deel 2: Klinische
validatie van geautomatiseerd meettype).
INSTALLATIE EN BEDIENINGSPROCEDURES
1.BATTERIJEN PLAATSEN
a. Open het batterijdeksel aan de achterkant van de monitor.
b. Plaats vier batterijen van het formaat 'AA'. Let erop dat de plus- en minpolen van elke batterij
overeenkomen met de opdruk van dezelfde polen in de batterijbehuizing van het toestel.
c. Sluit het batterijdeksel.
Wanneer op het LCD-scherm het batterijsymbool verschijnt, vervang dan alle batterijen door
nieuwe.
Oplaadbare batterijen zijn niet geschikt voor deze monitor.
Verwijder de batterijen als de monitor een maand of langer niet gebruikt zal worden, om schade door
batterijlekkage te voorkomen.
Lithiumbatterijen vervangen door onvoldoende opgeleid personeel kan gevaar opleveren (zoals
te hoge temperaturen, brand of explosie).
Zorg dat er geen batterijvloeistof in uw ogen komt. Als de vloeistof toch in uw ogen komt,
onmiddellijk spoelen met veel schoon water en een arts raadplegen.
Druk de positieve pool van de batterij goed in de batterijhouder nadat u de negatieve elektrode
goed hebt aangedrukt. De batterij maakt contact met de veer
Controleer of het batterijdeksel intact en niet beschadigd is voordat u de batterijen plaatst
De monitor, de batterijen en de manchet moeten aan het eind van hun gebruik volgens de
plaatselijke voorschriften worden weggegooid.
2.KLOK EN DATUM AANPASSEN
a. Als u de batterij plaatst of de monitor uitzet, gaat het apparaat in de klokmodus en verschijnen de
tijd en de datum op het LCD-scherm. Zie afbeelding2.
b. Terwijl de monitor in de klokmodus staat, drukt u de knoppen 'START' en 'MEM' twee
seconden gelijktijdig in. Laat vervolgens de knoppen dan los. De monitor komt in de klok- en
datumaanpassingsmodus.
c. In de klok- en datumaanpassingsmodus knippert eerst de tijdnotatie. Zie afbeelding2-1.
Terwijl het tijdformaat knippert, drukt u op de toets 'MEM' om de tijdnotatie te veranderen. De
standaardtijdnotatie is 24h.
d. Druk herhaaldelijk op de toets 'START'. Het jaar (bereik is 2018~2099), de maand, de dag, het
uur en de minuten gaan om beurten knipperen. Zie afbeelding2- 2&2-3 & 2-4 & 2-5 & 2-6. Terwijl
het getal knippert, drukt u op de toets 'MEM' om het getal te verhogen. Als u op de toets 'MEM'
blijft drukken, stijgt het getal sneller.
e. Tijdens het instellen van de klok en de datum keert de monitor automatisch terug naar de
klokmodus als er binnen 60 seconden geen toets wordt ingedrukt.
f. U kunt de monitor uitzetten door op de toets 'START' te drukken als de minuten knipperen, dan
worden de tijd en de datum bevestigd.
Afbeelding2 Afbeelding2-1
Afbeelding2-2 Afbeelding2-3
Afbeelding2-4 Afbeelding2-5 Afbeelding2-6
Opmerking:
1.1 De kloknotatie kan door de gebruiker worden ingesteld.
1.2 Tabel 2-1 geeft de conversierelaties tussen 24-uurs notatie en 12-uurs notatie.
Tabel2-1
24-uurs notatie 12-uurs notatie 24-uurs notatie 12-uurs notatie
0:00 12:00 AM 12:00 12:00 PM
1:00 1:00 AM 13:00 1:00 PM
2:00 2:00 AM 14:00 2:00 PM
3:00 3:00 AM 15:00 3:00 PM
4:00 4:00 AM 16:00 4:00 PM
5:00 5:00 AM 17:00 5:00 PM
6:00 6:00 AM 18:00 6:00 PM
7:00 7:00 AM 19:00 7:00 PM
8:00 8:00 AM 20:00 8:00 PM
9:00 9:00 AM 21:00 9:00 PM
10:00 10:00 AM 22:00 10:00 PM
11:00 11:00 AM 23:00 11:00 PM
DE MANCHET AANSLUITEN OP DE MONITOR
Steek de connector van de manchetslang in de luchtpoort aan de linkerkant
van de monitor. Zorg ervoor dat de connector helemaal ingestoken is om
luchtlekkage tijdens de bloeddrukmetingen te voorkomen.
Vermijd compressie of beklemming van de verbindingsslang tijdens de meting, waardoor een
opblaasfout of schadelijk letsel door voortdurende manchetdruk kan ontstaan.
3. DE MANCHET AANLEGGEN
a. Trek het uiteinde van de manchet door de metalen lus (de manchet is al zo verpakt), draai
het naar buiten (van uw lichaam af), trek de manchet strak en sluit de klittenbandsluiting. Zie
afbeelding 4-1.
b. Plaats de manchet om een blote linkerarm, 1-2 cm boven het ellebooggewricht.
c. Als u de manchet om uw linkerarm legt, plaatst u de luchtbuis in het midden van uw arm, op één
lijn met uw middelvinger. Zie afbeelding 4-2.
Als u de manchet om uw rechterarm legt, breng de manchet dan zo aan dat de luchtbuis aan de
kant van uw elleboog zit. Zie afbeelding4-3.
d. Terwijl u zit, legt u uw hand met de handpalm naar voren voor u op een plat oppervlak zoals een
bureau of tafel. Let erop dat u uw arm niet op de luchtbuis laat rusten, of op een andere manier de
luchtstroom naar de manchet beperkt.
e. De manchet moet comfortabel zitten, maar toch strak om uw arm. U moet een vinger tussen uw
arm en de manchet kunnen steken.
Afbeelding4-1 Afbeelding4-2 Afbeelding4-3
Opmerking:
1. Raadpleeg het manchetomtrekbereik in 'SPECIFICATIES' om er zeker van te zijn dat de juiste
manchet wordt gebruikt.
2. Meting elke keer op de linkerarm.
3. Beweeg uw arm, lichaam of de monitor niet en beweeg de rubberen buis niet tijdens de meting.
4. Blijf 5 minuten rustig en kalm voordat u de bloeddruk meet.
5. Houd de manchet schoon. Als de manchet vuil wordt, haalt u hem van de monitor en maakt u hem
met de hand schoon in een mild schoonmaakmiddel, en spoelt u hem daarna grondig af in koud
water. Droog de manchet nooit in de wasdroger en strijk hem niet. Het is aangeraden de manchet
na elke 200 keer gebruik te reinigen.
6. Doe de manchet niet om uw arm als de arm ontstekingen, acute ziekten, infecties of huidwonden
heeft.
4.LICHAAMSHOUDING TIJDENS DE METING
Zitcomfortabeltijdenshetmeten
a. Zit met uw voeten plat op de vloer en kruis uw benen niet over elkaar.
b. Leg uw hand met de handpalm naar voren voor u op een plat oppervlak
zoals een bureau of tafel.
c. Het midden van de manchet moet ter hoogte van de rechterboezem van
het hart liggen.
Liggendmeten
a. Ga op uw rug liggen.
b. Leg uw linkerarm recht langs uw zij met de handpalm naar boven.
c. De manchet moet op dezelfde hoogte als uw hart worden geplaatst.
5.UW BLOEDDRUK OPNEMEN
a. Als u de manchet hebt aangebracht en uw in een comfortabele houding zit of ligt, drukt u op
de toets 'START'. Alle displaytekens worden getoond voor de zelftest. U kunt het LCD-scherm
controleren aan de hand van de afbeelding. Neem contact op met het servicecentrum als er een
gedeelte ontbreekt. Zie afbeelding 6-1.
b. Vervolgens knippert de huidige geheugenbank. Zie afbeelding 6-2. Druk op de toets 'MEM' om
naar een andere bank te schakelen. Bevestig uw selectie door op de toets 'START' te drukken.
De huidige bank wordt ook bevestigd als u 5 seconden geen toetsen indrukt.
c. Als er resultaten zijn opgeslagen in de monitor, wordt op het LCD-scherm kort het meest recente
resultaat weergegeven. Zie afbeelding 6-3. Als er geen resultaten zijn opgeslagen, staat er nul
op het LCD-scherm. Zie afbeelding 6-4.
d. Vervolgens begint de monitor de nuldruk te zoeken. Zie afbeelding 6-5.
e. Daarna blaast de monitor de manchet op tot er voldoende druk is opgebouwd voor een
meting. Daarna laat de monitor langzaam lucht uit de manchet ontsnappen en wordt de meting
uitgevoerd. Ten slotte worden de bloeddruk en de polsslag berekend en weergegeven op het
LCD-scherm. De indicator voor de bloeddrukclassicatie en het symbool voor onregelmatige
hartslag (indien aanwezig) gaan knipperen op het scherm. Zie afbeelding 6-6. Het resultaat
wordt automatisch opgeslagen in de monitor.
Afbeelding6-1 Afbeelding6-2
Afbeelding6-5 Afbeelding6-6
f. Na de meting wordt de monitor automatisch uitgeschakeld nadat er 1 minuut geen toetsen zijn
ingedrukt. U kunt ook op de toets 'START' drukken om de monitor handmatig uit te schakelen.
g. Tijdens de meting kunt u op de toets 'START' drukken om de monitor handmatig uit te schakelen.
Afbeelding6-3 Afbeelding6-4
Opmerking: Raadpleeg een medisch deskundige voor de interpretatie van de drukmetingen.
6.OPGESLAGEN RESULTATEN WEERGEVEN
a. Druk in de klokmodus op de toets 'MEM'. Op de monitor wordt het teken van de huidige groep
weergegeven. Het aantal resultaten in de huidige gebruikersgeheugenzone wordt weergegeven.
Zie afbeelding 7-1. Druk op de toets 'START' om naar een andere groep te schakelen. Druk op
'MEM' om de huidige groep te bevestigen. De huidige bank wordt ook bevestigd als u 5 seconden
geen toetsen indrukt.
b. Vervolgens wordt op het LCD-scherm de gemiddelde waarde van alle resultaten in de huidige
bank weergegeven. Zie afbeelding 7-2. Als er geen resultaten zijn opgeslagen in de huidige
gebruikersgeheugenzone, wordt op het LCD-scherm '0' weergegeven voor bloeddruk en polsslag.
Zie afbeelding 7-3.
c. Als u op de toets 'MEM' drukt, wordt op het LCD-scherm de gemiddelde waarde van de laatste
drie resultaten in de huidige gebruikersgeheugenzone weergegeven. Zie afbeelding 7-4. Als
er geen resultaten zijn opgeslagen in de huidige gebruikersgeheugenzone, wordt op het LCDscherm '0' weergegeven voor bloeddruk en polsslag. Zie afbeelding 7-5.
d. Als u nogmaals op de toets 'MEM' drukt, wordt het geheugennummer in de huidige
gebruikersgeheugenzone weergegeven. Zie afbeelding 7-6. Als er geen resultaten zijn
opgeslagen in de huidige gebruikersgeheugenzone van de monitor, wordt op het LCD-scherm '0'.
Zie afbeelding 7-7.
e. Vervolgens wordt het meest recente resultaat met datum- en tijdstempel weergegeven. Zie
afbeelding 7-8. Het symbool voor onregelmatige hartslag (indien aanwezig) en de indicator voor
de bloeddrukclassicatie en gaan tegelijkertijd knipperen. Druk herhaaldelijk op de toets 'MEM'
om de eerder gemeten resultaten te bekijken. Als er geen resultaten zijn opgeslagen in de huidige
gebruikersgeheugenzone van de monitor, wordt op het LCD-scherm '0' weergegeven voor
bloeddruk en polsslag. Zie afbeelding 7-9.
f. Bij de weergave van de opgeslagen resultaten, wordt de monitor automatisch uitgeschakeld als er
1 minuut geen toetsen worden ingedrukt. U kunt ook op de toets 'START' drukken om de monitor
handmatig uit te schakelen.
Afbeelding7-1
Afbeelding7-6
7.METINGEN UIT HET GEHEUGEN VERWIJDEREN
Als u tijdens de weergave van een resultaat (met uitzondering van de weergave van de gemiddelde
waarde) de toets 'MEM' drie seconden ingedrukt houdt, worden alle resultaten in de huidige bank
gewist. Zie afbeelding 8. Druk op de toets 'START' om de monitor uit te schakelen.
Afbeelding7-2
Afbeelding7-7
Afbeelding7-3
Afbeelding7-8
Afbeelding7-4
Afbeelding7-9
Afbeelding7-5
Afbeelding8
8. BEOORDELING VAN HOGE BLOEDDRUK VOOR VOLWASSENEN
De volgende richtlijnen voor de beoordeling van hoge bloeddruk (zonder rekening te houden
met leeftijd of geslacht) zijn opgesteld door de Wereldgezondheidsorganisatie (WHO). Hierbij
moet rekening worden gehouden met andere factoren (b.v. diabetes, zwaarlijvigheid, roken enz.).
Raadpleeg uw arts voor een nauwkeurige beoordeling, en verander nooit zelf uw behandeling.
Classicatievanbloeddrukvoorvolwassenen
Systolisch
(mmHG)
Ernstige hypertensie
Gematigde hypertensie
Milde hypertensie
Hoge-Normale BP
Normale BP
Opmerking: Het is niet de bedoeling dat er op basis van het kleurenschema enige haast wordt
gemaakt met het stellen van een noodgeval/diagnose. Het kleurenschema is alleen bedoeld om
onderscheid te maken tussen de verschillende bloeddrukniveaus.
9.TECHNISCHE ALARMBESCHRIJVING
Op het LCD-scherm van de monitor verschijnt zonder vertraging 'HI' of 'Lo' als technisch alarm
als de vastgestelde bloeddruk (systolisch of diastolisch) buiten het nominale bereik ligt dat in het
gedeelte SPECIFICATIES is aangegeven. In dat geval moet u een arts raadplegen of nagaan of u
de gebruiksaanwijzing goed hebt gevolgd.
De technische alarmtoestand (buiten het nominale bereik) is in de fabriek vooringesteld en kan niet
BLOEDDRUK
Classicatie
Optimaal <120 <80
Normaal 120-129 80-84
Hoog-Normaal 130-139 85-89
Graad 1 Hypertensie 140-159 90-99
Graad 2 Hypertensie 160-179 100-109
Graad 3 Hypertensie >180 >110
Denities en classicatie volgens WHO/ISH
van bloeddrukniveaus
Diastolisch
(mmHG)
SBP
mmHg
DBP
mmHg
worden aangepast of uitgeschakeld. Deze alarmtoestand wordt volgens IEC 60601-1-8 als lage
prioriteit toegekend.
Het technisch alarm is niet-vergrendelend en er is geen reset nodig. Het op het LCD-scherm
weergegeven signaal verdwijnt automatisch na ongeveer 8 seconden.
10.PROBLEMEN OPLOSSEN (1)
PROBLEEM MOGELIJKE OORZAAK OPLOSSING
Er wordt een
abnormaal
resultaat
weergegeven
op het LCD-
scherm
De manchet is niet goed geplaatst of
niet strak genoeg aangebracht
De lichaamshouding was niet goed
tijdens het onderzoek
Praten, arm of lichaam bewegen,
boos, opgewonden of nerveus tijdens
het onderzoek
Onregelmatige hartslag (aritmie)
Leg de manchet goed aan en
probeer het opnieuw.
Raadpleeg het gedeelte
'LICHAAMSHOUDING TIJDENS DE
METING' van de gebruiksaanwijzing
en voer het onderzoek opnieuw uit.
Kalmeer en voer het onderzoek
opnieuw uit zonder tijdens het
onderzoek te praten of te bewegen.
Voor mensen met ernstige aritmie is
deze elektronische bloeddrukmeter
ongeschikt.
PROBLEMEN OPLOSSEN (2)
PROBLEEM MOGELIJKE OORZAAK OPLOSSING
Het symbool voor
bijna lege batterijen
wordt weergegeven
op het LCD-scherm
Op het LCD-scherm
staat 'Er 0'
Op het LCD-scherm
staat 'Er 1'
Op het LCD-scherm
staat 'Er 2'
Op het LCD-scherm
staat 'Er 3'
Op het LCD-scherm
staat 'Er 4'
Op het LCD-scherm
staat 'Er 5'
Op het LCD-scherm
staat 'Er 6'
Op het LCD-scherm
staat 'Er 7'
Op het LCD-scherm
staat 'Er 8'
Op het LCD-scherm
staat 'Er A'
Geen reactie als u op
een toets drukt of de
batterij plaatst.
Batterij bijna leeg Vervang de batterijen
Het druksysteem is onstabiel voor
de meting
Er wordt geen systolische druk
gedetecteerd
Er wordt geen diastolische druk
gedetecteerd
Pneumatisch systeem geblokkeerd
tijdens opblazen
Pneumatisch systeem lekt tijdens
opblazen
Beweeg niet en probeer het
Sluit de manchet goed aan
en probeer het opnieuw. Als
het beeldscherm nog steeds
abnormaal is, neem dan
contact op met de plaatselijke
distributeur of met de fabriek.
Manchetdruk boven 300 mmHg
Meer dan 160 seconden met
manchetdruk boven 15 mmHg
Interne geheugenfout
Fout bij controle van
apparaatparameters
Fout in de parameters van de
druksensor
Onjuiste bediening of sterke
elektromagnetische interferentie.
Met opnieuw na vijf minuten.
Als het beeldscherm nog
steeds abnormaal is, neem dan
contact op met de plaatselijke
distributeur of met de fabriek.
Verwijder de batterijen
gedurende vijf minuten en
plaats vervolgens alle batterijen
opnieuw.
terug.
ONDERHOUD
1. Laat deze monitor niet vallen en stel hem niet bloot aan sterke schokken.
2. Vermijd hoge temperaturen en blootstelling aan zonlicht. Dompel de monitor niet onder in
water, want dat zal tot beschadiging van de monitor leiden.
3. Als deze monitor rond het vriespunt bewaard wordt, laat hem dan voor gebruik acclimatiseren
tot kamertemperatuur.
4. De monitor heeft 6 uur nodig om op te warmen vanaf de minimale opslagtemperatuur tussen
de gebruiksbeurten door, totdat de monitor klaar is voor het BEOOGDE GEBRUIK wanneer de
omgevingstemperatuur 20 °C bedraagt.
5. De monitor heeft 6 uur nodig om af te koelen vanaf de maximale opslagtemperatuur tussen de
gebruiksbeurten door, totdat de monitor klaar is voor het BEOOGDE GEBRUIK wanneer de
omgevingstemperatuur 20 °C bedraagt.
6. Probeer deze monitor niet uit elkaar te halen.
7. Verwijder de batterijen als u de monitor gedurende langere tijd niet gebruikt.
8. Aanbevolen wordt de werking om de 2 jaar of na reparatie te controleren. Neem contact op met
het servicecentrum.
9. Reinig de monitor met een droge, zachte doek of een goed uitgewrongen zachte doek die is
bevochtigd met water, verdunde ontsmettingsalcohol of een verdund schoonmaakmiddel.
10. De monitor heeft geen onderdelen die door de gebruiker onderhouden kunnen worden.
Schakelschema's, lijsten van onderdelen, beschrijvingen, ijkinstructies en andere informatie die
het naar behoren gekwaliceerde technische personeel van de gebruiker helpt bij het repareren
van onderdelen van het apparaat die als repareerbaar zijn aangemerkt, kunnen worden
geleverd.
11. De monitor behoudt zijn veiligheids- en prestatiekenmerken gedurende minstens 10.000
metingen of drie jaar, en de integriteit van de manchet blijft behouden na 1000 keer openen en
sluiten van de sluiting.
12. Het is aan te bevelen de manchet 2 keer per week te desinfecteren, als dat nodig is (bijvoor-
beeld in het ziekenhuis of in de kliniek). Veeg de binnenkant van de manchet (de kant die in
contact komt met de huid) af met een zachte doek die u uitwringt nadat u hem bevochtigd hebt
met ethylalcohol (75-90%), en laat de manchet dan aan de lucht drogen.
13. Voer geen service/onderhoud uit terwijl de monitor in gebruik is.
Page 10

VERKLARING VAN DE SYMBOLEN OP HET TOESTEL
CN
Symbool voor 'LEES DE HANDLEIDING' (achtergrondkleur van het symbool: blauw. Het
grasche symbool: wit)
Symbool voor 'WAARSCHUWING'
Symbool voor 'TOEGEPASTE ONDERDELEN VAN TYPE BF' (de manchet is een toegepast
onderdeel van het type BF)
Symbool voor 'MILIEUBESCHERMING – Elektrische producten mogen niet met het
huishoudelijk afval worden afgevoerd. Recycleer het apparaat als daar voorzieningen voor
zijn. Bij uw lokale overheid of winkel kunt u advies over de recyclage inwinnen.'
Symbool voor 'FABRIKANT'
Symbool voor 'VOLDOET AAN DE VEREISTEN VAN MDD93/42/EEC'
Symbool voor 'LAND VAN DE FABRIKANT' en 'PRODUCTIEDATUM'
Symbool voor “EUROPESE VERTEGENWOORDIGING”
Symbool voor 'SERIENUMMER'
Symbool voor 'DROOG HOUDEN'
IP20 Het eerste karakteristieke cijfersymbool voor 'Beschermingsgraden tegen toegang tot
gevaarlijke delen en tegen vaste vreemde voorwerpen". Het tweede karakteristieke
cijfersymbool voor "Beschermingsgraden tegen het binnendringen van water'
GARANTIE-INFORMATIE
Alleen de kosten van onderdelen en transport.
SERVICECENTRUM
A.I.&E. Adriaan Mulderweg 9-11,
5657 EM Eindhoven, Nederland
Edco UK Ltd, 1st Floor Two Chamberlain Square,
B3 3AX, Birmingham, VK
ANDON HEALTH CO., LTD.
No. 3 JinPing Street,
YaAn Road, Nankai District,
Tianjin 300190, China.
iHealthLabs Europe SAS
36 Rue de Ponthieu, 75008,
Parijs, Frankrijk.
INFORMATIE OVER ELEKTROMAGNETISCHE COMPATIBILITEIT
Tabel1-Emissie
Fenomeen Naleving Elektromagnetischeomgeving
RF-emissie CISPR 11
Harmonische
vervorming
Spanningsschommelingen en
ikkering
Tabel2-Behuizingspoort
Fenomeen EMC-basisnorm
Elektrostatische
ontlading
Uitgezonden RF EM-veld IEC 61000-4-3
Nabijheidsvelden vanuit
draadloze communicatieapparatuur met radiofre-
quenties
Nominale stroomfrequentie magnetische
velden
Tabel3–Nabijheidsveldenvanuitdraadlozecommunicatieapparatuurmetradiofrequenties
Testfrequentie
(MHz)
385 380-390 Pulsmodulatie 18 Hz, 27 V/m
450 430-470 FM, ±5 kHz afwijking, 1 kHz sinus, 28 V/m
710
780
810
930
1720
1970
2450 2400-2570 Pulsmodulatie 217 Hz, 28 V/m
5240
5785
Groep 1, Klasse B
IEC 61000-3-2
Klasse A
IEC 61000-3-3
Naleving
IEC 61000-4-2
IEC 61000-4-3 Raadpleeg tabel 3
IEC 61000-4-8
Band
(MHz)
704-787 Pulsmodulatie 217 Hz, 9 V/m745
800-960 Pulsmodulatie 18 Hz, 28 V/m870
1700-1990 Pulsmodulatie 217 Hz, 28 V/m1845
5100-5800 Pulsmodulatie 217 Hz, 9 V/m5500
Medische verzorging in de thuisomgeving
Medische verzorging in de thuisomgeving
Medische verzorging in de thuisomgeving
Immuniteitstestniveaus
Medischeverzorgingindethuisomgeving
±8 kV contact
±2 kV, ±4 kV, ±8 kV, ±15 kV lucht
10V/m
80 MHz-2,7 GHz
80% AM bij 1 kHz
30 A/m
50 Hz of 60 Hz
Immuniteitstestniveaus
Indeprofessionelegezondheidszorg
Page 11
E INFORMAZIONI IMPORTANTI ARTICOLON.
871125247440
FLUTTUAZIONE NORMALE DELLA PRESSIONE SANGUIGNA
Tutti i tipi di attività sica, l'eccitazione, lo stress, il mangiare, bere, fumare, la postura del corpo e
molte altre attività e fattori (inclusa la misurazione della pressione sanguigna) inuenzano il valore
della pressione del sangue. Per questo motivo, è quasi sempre impossibile ottenere risultati identici
da più misurazioni della pressione sanguigna.
La pressione del sangue uttua continuamente ----- giorno e notte. Solitamente, i valori più elevati si
riscontrano di giorno, quelli più bassi di notte. Solitamente, il valore inizia ad aumentare attorno alle
3:00 AM e raggiunge il livello più elevato durante il giorno, quando per la maggior parte le persone
sono sveglie e attive.
Tenendo presente quanto sopra, si consiglia di misurare la pressione sanguigna
approssimativamente alla stessa ora ogni giorno.
Misurazioni troppo frequenti possono causare lesioni a causa dell'interferenza con il usso
sanguigno, per cui si consiglia di attendere almeno 1 - 1,5 minuti tra due misurazioni successive
per consentire alla circolazione sanguigna nel braccio di riprendere normalmente. È raro riuscire a
ottenere ogni volta risultati identici.
AVVERTENZE
1. Leggere tutte le informazioni contenute nella presente guida all'uso e in ogni altra
documentazione contenuta nella confezione prima di utilizzare l'apparecchio.
2. Rimanere fermi, calmi e a riposo per 5 minuti prima di effettuare la misurazione della pressione
sanguigna.
3. La fascia deve essere posizionata all'altezza del cuore.
4. Durante la misurazione, non parlare e non muovere né il corpo né il braccio.
5. Effettuare ogni misurazione sul braccio sinistro.
6. Attendere almeno 1 - 1,5 minuti tra due misurazioni successive per consentire alla circolazione
sanguigna nel braccio di riprendere normalmente. L'eccessivo gonaggio prolungato (pressione
della fascia superiore a 300 mmHg o mantenuta al di sopra di 15 mmHg per più di 3 minuti) del
bracciale può causare la formazione di ecchimosi sul braccio.
7. Consultare il proprio medico per eventuali dubbi nei seguenti casi:
1) Applicazione della fascia su una ferita o su tessuto inammato;
2) Applicazione della fascia su un arto durante un'iniezione endovenosa, una terapia
o su cui sia presente una derivazione arterio-venosa (A-V);
3) Applicazione della fascia sul braccio dal lato di una mastectomia;
4) Utilizzo contemporaneo di altre apparecchiature mediche di monitoraggio sullo stesso arto;
5) Necessità di controllo della circolazione del sangue del paziente.
8. Questo sgmomanometro elettronico è destinato all'uso da parte di pazienti adulti e non
deve mai essere utilizzato su neonati o bambini in tenera età. Consultare il proprio medico o altro
operatore sanitario prima di utilizzarlo su bambini di età maggiore.
9. Non utilizzare l'apparecchio a bordo di veicoli in movimento. Questo potrebbe portare a
misurazioni errate.
10. Le misurazioni della pressione sanguigna effettuate con il presente apparecchio equivalgono
a quelle ottenute da un operatore esperto tramite l'utilizzo del bracciale gonabile e
dell'auscultazione con stetoscopio, entro i limiti stabiliti dall'American National Standard Institute
per sgmomanometri elettronici o automatizzati.
11. Per informazioni relative a potenziali interferenze elettromagnetiche o di altro tipo tra lo
sgmomanometro e altri dispositivi e i consigli sul come evitare tali interferenze, vedere il
capitolo INFORMAZIONI SULLA COMPATIBILITÀ ELETTROMAGNETICA. Si consiglia di
tenere lo sgmomanometro ad almeno 30 cm di distanza da altri dispositivi wireless come unità
WLAN, telefoni cellulari, forni a microonde, ecc. Il dispositivo non può essere utilizzato vicino ad
APPARECCHIATURE CHIRURGICHE AD ALTA FREQUENZA attive e nella camera schermata
contro le RF di un SISTEMA ME per imaging tramite risonanza magnetica, laddove il livello di
DISTURBI EM sia elevato.
12. Se nel corso della misurazione della pressione sanguigna si rileva la presenza di battiti cardiaci
irregolari (IHB) causati da aritmia comune, verrà visualizzato un apposito segnale . In
queste condizioni, gli sgmomanometri elettronici possono continuare a funzionare, ma i risultati
potrebbero non risultare accurati. Si consiglia di consultare il proprio medico per una valutazione
accurata.
Ci sono 2 condizioni in cui il segnale di IHB viene visualizzato:
1) Coefciente di variazione (CV) del periodo di pulsazione >25%.
2) Differenza dal periodo di pulsazione adiacente ≥0,14 s e numero di pulsazioni superiore al
53% del numero totale di pulsazioni.
13. Non utilizzare fasce diverse da quella fornita dal produttore per evitare rischi di biocompatibilità
e possibili errori di misura.
14. Lo strumento potrebbe non soddisfare le relative speciche di prestazione o rappresentare
rischi per la sicurezza se conservato o utilizzato al di fuori degli intervalli di temperatura e umidità
indicati nelle speciche.
15. Non condividere la fascia con altre persone malate per evitare la trasmissione di infezioni.
16. Questo dispositivo è stato sottoposto a test e dichiarato conforme ai limiti di un dispositivo
digitale di Classe B, secondo la parte 15 delle Norme FCC. Questi limiti sono stati stabiliti per
garantire un livello di protezione ragionevole contro interferenze nocive in ambiente domestico.
Il presente apparecchio genera, utilizza e può irradiare energia in radiofrequenza e, se non
installato e utilizzato conformemente alle istruzioni, può causare interferenze nocive alle
comunicazioni radio. Tuttavia, non si garantisce in alcun modo l'assoluta assenza di interferenze
in installazioni particolari. Se il presente dispositivo causa interferenze nocive per le ricezioni
radio o televisive, determinabili spegnendo e riaccendendo il dispositivo stesso, si consiglia
all'utente di provare a eliminare l'interferenza adottando una o più delle seguenti misure:
- Riorientare o riposizionare l'antenna ricevente.
- Aumentare la distanza di separazione tra il dispositivo e il ricevitore.
- Collegare il dispositivo a una presa elettrica posta su un circuito diverso da quello a cui è
collegato il ricevitore.
- Consultare il rivenditore o un tecnico radio/TV esperto per un consiglio.
17. Evitare assolutamente misurazioni su pazienti con un'alta frequenza di aritmie.
18. Il dispositivo non è destinato all'uso su neonati, bambini e donne incinte. (Non sono stati condotti
test clinici su neonati, bambini e donne incinte.)
19. Movimenti, tremori e brividi possono inuenzare la misurazione.
20. Non utilizzare il dispositivo su pazienti con una scarsa circolazione periferica, con un'evidente
bassa pressione sanguigna o una bassa temperatura corporea (il usso sanguigno nel punto di
misura sarebbe ridotto).
21. Non utilizzare il dispositivo su pazienti con cuore e polmoni articiali (non ci sarebbe alcuna
pulsazione).
22. Consultare il proprio medico prima di utilizzare il dispositivo nelle seguenti condizioni: aritmie
comuni come battiti atriali o ventricolari prematuri o brillazione atriale, sclerosi arteriosa,
insufcienza, diabete, pre-eclampsia, patologie renali.
23. Il paziente è un operatore previsto.
24. Attenzione: cambiamenti o modiche non espressamente approvati dall'organismo responsabile
della conformità potrebbero comportare la revoca del diritto all'uso dell'apparecchiatura da parte
dell'utente.
25. L'ingestione delle batterie e/o il liquido delle batterie possono essere estremamente pericolosi.
Tenere le batterie e l'apparecchio fuori dalla portata dei bambini e delle persone disabili.
26. Se si è allergici alla plastica/gomma, non utilizzare questo dispositivo.
27. Se il dispositivo viene utilizzato da più utenti, non selezionare la memoria errata.
SPECIFICHE
Nome del prodotto: sgmomanometro da braccio
1. Modello: KD-553
2. Classicazione: alimentazione interna, parte applicata Tipo BF, IP20, No AP o APG,
funzionamento continuo
3. Dimensioni: circa 136 mm X 120 mm X 61 mm (5 11/32″ x 4 23/32″ x 2 13/32″)
4. Circonferenza fascia: 22 cm - 32 cm (8 21/32″ - 12 19/32″), 30 cm - 42 cm (11 13/16″ - 16 17/32″)
(opzionale), 42 cm - 48 cm (16 17/32″ - 18 29/32″) (opzionale), 22 cm - 36 cm (8 21/32″ - 14
3/16″) (opzionale), 22 cm - 42 cm (8 21/32″ - 16 17/32″) (opzionale)
5. Peso: circa 225 g (7 15/16 oz.) (escluse batterie e fascia)
6. Metodo di misurazione: metodo oscillometrico, gonaggio automatico e misurazione
7. Dimensione memoria: 2 × 60 volte con indicazione di data e ora
8. Alimentazione: batterie: 4 × 1,5 V TIPO AA
9. Intervallo di misurazione:
Pressione fascia: 0 - 300 mmHg
Sistolica: 60 - 260 mmHg
Diastolica: 40 - 199 mmHg
Frequenza cardiaca: 40 - 180 battiti/minuto
10. Precisione:
Pressione: ±3 mmHg
Frequenza cardiaca: Inferiore a 60: ±3 bpm
Superiore a 60 (incl.) : ±5%
11. Temperatura ambiente di utilizzo: 10 °C ~ 40 °C (50 °F ~ 104 °F)
12. Umidità ambiente di utilizzo: ≤85% RH
13. Temperatura ambiente di conservazione e trasporto: -20 °C ~ 50 °C (-4 °C ~ 122 °C)
14. Umidità ambiente di conservazione e trasporto: ≤85% RH
15. Pressione ambiente: 80 kPa - 105 kPa
16. Ciclo di vita delle batterie: circa 270 volte.
17. Tutti i componenti facenti parte del sistema di misurazione della pressione, inclusi gli accessori:
pompa, valvola, LCD, fascia, sensore
Nota:questespecichesonosoggetteamodichesenzapreavviso.
CONTENUTO E INDICATORI DI VISUALIZZAZIONE
Display data e ora
Sistolica
Diastolica
Frequenza cardiaca
Indicatore di
classicazione
del livello pressione
sanguigna
Presa tubo aria
Nota: le immagini contenute nel manuale sono a solo titolo di riferimento.
USO PREVISTO
Lo sgmomanometro elettronico completamente automatico è destinato all'utilizzo da parte
di personale medico o in ambiente domestico ed è un sistema di misurazione della pressione
sanguigna non invasivo per la misurazione della pressione del sangue diastolica e sistolica e della
frequenza cardiaca su adulti tramite l'utilizzo di una tecnica non invasiva in cui una fascia gonabile
viene avvolta attorno alla parte superiore del braccio. La circonferenza della fascia è compresa tra
22 cm e 48 cm (circa 8 21/32″-18 29/32″).
CONTENUTO DELLA CONFEZIONE
• 1 sgmomanometro
• 1 guida all'uso
• 1 fascia da braccio
• 1 custodia morbida
Pulsante "MEM"
Simbolo battito cardiaco irregolare
Indicatore batterie scariche
La pressione nella fascia è instabile o presenza di aria
residua nella fascia
Indicatore classicazione del livello della pressione sanguigna
LCD
Pulsante "START"
Tubo
di gomma
Connettore
tubo fascia
Fascia
CONTROINDICAZIONI
Si sconsiglia l'utilizzo del presente sgmomanometro elettronico alle persone che soffrono di
gravi aritmie.
DESCRIZIONE DEL PRODOTTO
Utilizzando la metodologia oscillometrica e un sensore di pressione digitale integrato, è possibile
misurare la pressione sanguigna e la frequenza cardiaca in modo automatico e non invasivo. Il
display LCD visualizza la pressione sanguigna e la frequenza cardiaca. Le 2 x 60 misurazioni più
recenti possono essere memorizzate con indicazione di data e ora. Lo sgmomanometro elettronico
è conforme ai seguenti standard: IEC 60601-1 Edizione 3.1 2012-08/EN 60601-1:2006/A1:2013
(Dispositivi elettromedicali - Parte 1: Requisiti generali per la sicurezza base e le prestazioni
essenziali), IEC 60601-1-2:2014/EN 60601-1-2:2015 (Dispositivi elettromedicali - Parte 1-2:
Prescrizioni generali relative alla sicurezza fondamentale e alle prestazioni essenziali - Norma
collaterale: Compatibilità elettromagnetica - Requisiti e test), IEC80601-2-30:2009 + AMD1:2013/
EN 80601-2-30:2010/A1:2015 (Dispositivi elettromedicali - Parte 2-30: Prescrizioni particolari relative
alla sicurezza fondamentale e alle prestazioni essenziali degli sgmomanometri automatici non
invasivi) EN 1060-1: 1995 + A2: 2009 (Sgmomanometri non invasivi - Parte 1: Requisiti generali),
EN 1060-3: 1997 + A2: 2009 (Sgmomanometri non invasivi - Parte 3: Requisiti supplementari
per sistemi elettromeccanici di misurazione della pressione sanguigna); ISO81060-2: 2013
(Sgmomanometri non invasivi - Parte 2: Validazione clinica del tipo di misurazione automatizzata).
CONFIGURAZIONE E PROCEDURE OPERATIVE
1.INSTALLAZIONE DELLE BATTERIE
a. Aprire il coperchio del vano batterie sul retro del dispositivo.
b. Installare quattro batterie tipo "AA". Vericare che i poli positivo e negativo di ogni batteria
corrispondano alle indicazioni riportate nel vano batterie del dispositivo.
c. Chiudere il vano batterie.
Quando lo schermo LCD mostra il simbolo della batteria , sostituire tutte le batterie con batterie
nuove.
Non utilizzare batterie ricaricabili su questo dispositivo.
Rimuovere le batterie se il dispositivo non verrà utilizzato per più di un mese per evitare danni
causati dalla fuoriuscita di liquido.
La sostituzione delle batterie al litio da parte di personale non qualicato potrebbe causare
rischi (come temperature eccessive, incendio o esplosione).
Evitare il contatto del liquido delle batterie con gli occhi. In caso di contatto con gli occhi,
risciacquare abbondantemente con acqua pulita e consultare un medico.
Il terminale positivo della batteria deve essere correttamente inserito a pressione nel vano
batterie dopo aver compresso in senso orizzontale l'elettrodo negativo. Il contatto della batteria
è assicurato da una molla.
Vericare che il coperchio del vano batterie sia integro e non presenti danni prima di installare
le batterie.
Il dispositivo, le batterie e la fascia devono essere smaltiti secondo le normative locali al
termine del loro utilizzo.
2.REGOLAZIONE DI DATA E ORA
a. Dopo aver installato le batterie e quando il dispositivo viene spento, questo entra in modalità
Orologio e lo schermo LCD mostrerà data e ora. Vedere la gura 2.
b. Mentre il dispositivo è in modalità Orologio, premere contemporaneamente i pulsanti "START" e
"MEM" per due secondi, quindi rilasciare i pulsanti e il dispositivo entrerà in modalità Regolazione
data e ora.
c. In modalità Regolazione data e ora, inizierà a lampeggiare il formato dell'ora. Vedere la gura
2-1. Mentre il formato dell'ora lampeggia, premere il pulsante "MEM" per modicarlo. Il formato
dell'ora predenito è 24 ore.
d. Premere ripetutamente il pulsante "START": l'anno (l'intervallo è 2018~2099), il mese, il giorno,
l'ora e i minuti inizieranno a lampeggiare a turno. Vedere le gure 2-2, 2-3, 2-4, 2-5 e 2-6. Mentre
il numero lampeggia, premere il pulsante "MEM" per aumentarlo; tenendo premuto il pulsante
"MEM", il numero si incrementerà più rapidamente.
e. Durante la regolazione della data e dell'ora, il dispositivo tornerà automaticamente alla modalità
Orologio se non viene premuto alcun pulsante per 60 secondi.
f. Premendo il pulsante "START" mentre lampeggiano i minuti, il dispositivo si spegne,
memorizzando data e ora.
Figura2 Figura2-1
Nota:
1.1 Il formato dell'ora può essere impostato dall'utente.
1.2 La Tabella 2-1 mostra il rapporto di conversione tra il formato 24 ore e il formato 12 ore.
Tabella2-1
COLLEGAMENTO DELLA FASCIA AL DISPOSITIVO
Inserire il connettore del tubo essibile della fascia nel raccordo aria posto sul
lato sinistro del dispositivo. Vericare che il connettore sia completamente
inserito per evitare la fuoriuscita di aria durante le misurazioni della pressione
sanguigna.
3. APPLICAZIONE DELLA FASCIA
a. Far scorrere l'estremità della fascia attraverso il passante metallico (la fascia è già confezionata
con questo), piegarla verso l'esterno (lontano dal corpo) e serrarla utilizzando la chiusura in
velcro. Vedere la gura 4-1.
b. Sistemare la fascia attorno al braccio nudo 1-2 cm al di sopra dell'articolazione del gomito.
c. Se la fascia viene applicata al braccio sinistro, posizionare il tubo dell'aria a metà braccio in linea
con il dito medio. Vedere la gura 4-2.
Se la fascia viene applicata al braccio destro, posizionarla in modo che il tubo dell'aria venga a
trovarsi a anco del gomito. Vedere la gura 4-3.
d. Stando seduti, rivolgere il palmo della mano verso l'alto di fronte a sé appoggiandolo su una
supercie piana come un ripiano o un tavolo. Fare attenzione a non appoggiare il braccio sul tubo
dell'aria per evitare di ostacolare il usso dell'aria nella fascia.
e. La fascia deve adattarsi comodamente e perfettamente attorno al braccio. Tra il braccio e la fascia
deve essere possibile inserire un dito.
Nota:
1. Fare riferimento alla gamma di circonferenze in "SPECIFICHE" per assicurarsi di utilizzare la
fascia appropriata.
2. Effettuare ogni misurazione sul braccio sinistro.
3. Evitare di muovere il braccio, il corpo e il dispositivo e non spostare il tubo dell'aria durante la
misurazione.
4. Rimanere fermi e calmi per 5 minuti prima di effettuare la misurazione della pressione sanguigna.
5. Mantenere pulita la fascia. Se la fascia si sporca, rimuoverla dal dispositivo e pulirla a mano con
un detergente neutro, quindi sciacquare bene in acqua fredda. Non asciugare la fascia utilizzando
un asciugacapelli o un ferro da stiro. Si consiglia di pulire la fascia dopo 200 utilizzi.
6. Evitare di posizionare la fascia attorno al braccio in presenza di inammazioni, malattie acute,
lesioni cutanee infette.
4.POSTURA DEL CORPO DURANTE LA MISURAZIONE
Misurazionestandoseduticomodamente
a. Sedersi tenendo i piedi ben appoggiati sul pavimento senza incrociare le
gambe.
b. Rivolgere il palmo della mano verso l'alto di fronte a sé appoggiandolo su
una supercie piana come un ripiano o un tavolo.
c. Il punto centrale della fascia deve trovarsi al livello dell'atrio destro del
cuore.
Misurazionestandosdraiati
a. Sdraiarsi sulla schiena.
b. Sistemare il braccio sinistro lungo il anco con il palmo della mano rivolto
verso l'alto.
c. La fascia deve essere posizionata all'altezza del cuore.
5.RILEVAMENTO DELLA PRESSIONE SANGUIGNA
a. Dopo aver applicato la fascia e sistemato il corpo in posizione comoda, premere il pulsante
"START". Durante il test di autodiagnosi, vengono visualizzati tutti i caratteri del display.
Vericare il display LCD confrontandolo con la gura. Rivolgersi al centro di assistenza se
risultano segmenti mancanti. Vedere la gura 6-1.
b. A questo punto, inizia a lampeggiare la memoria selezionata. Vedere la gura 6-2. Premere il
pulsante "MEM" per passare ad un'altra memoria. Confermare la scelta premendo il pulsante
"START". In assenza di interventi, dopo 5 secondi verrà confermata automaticamente la
memoria attualmente selezionata.
c. Se il dispositivo contiene risultati memorizzati, lo schermo LCD mostrerà temporaneamente
quello più recente. Vedere la gura 6-3. Se non vi sono risultati memorizzati, lo schermo LCD
mostrerà "0". Vedere la gura 6-4.
d. Quindi il dispositivo inizia dalla pressione nulla. Vedere la gura 6-5.
e. A questo punto, il dispositivo gona la fascia no a raggiungere una pressione sufciente per
la misurazione. Successivamente, il dispositivo rilascia lentamente la pressione dalla fascia ed
effettua la misurazione. Inne, la pressione sanguigna e la frequenza cardiaca vengono calcolate
e visualizzate sul display LCD. Sullo schermo lampeggiano l'indicatore di classicazione della
Figura2-4 Figura2-5 Figura2-6
Formato 24 ore Formato 12 ore Formato 24 ore Formato 12 ore
0:00 12:00 AM 12:00 12:00 PM
1:00 1:00 AM 13:00 1:00 PM
2:00 2:00 AM 14:00 2:00 PM
3:00 3:00 AM 15:00 3:00 PM
4:00 4:00 AM 16:00 4:00 PM
5:00 5:00 AM 17:00 5:00 PM
6:00 6:00 AM 18:00 6:00 PM
7:00 7:00 AM 19:00 7:00 PM
8:00 8:00 AM 20:00 8:00 PM
9:00 9:00 AM 21:00 9:00 PM
10:00 10:00 AM 22:00 10:00 PM
11:00 11:00 AM 23:00 11:00 PM
Evitare compressioni o restrizioni del tubo di collegamento durante la misurazione che
potrebbero causare errori di gonaggio o lesioni dovute alla pressione costantemente
esercitata dalla fascia.
Figura4-1 Figura4-2 Figura4-3
Figura2-2 Figura2-3
pressione sanguigna e il simbolo di battito cardiaco irregolare (se presente). Vedere la gura 6-6.
I risultati verranno automaticamente memorizzati sul dispositivo.
Figura6-1 Figura6-2
Figura6-5 Figura6-6
f. Al termine della misurazione, il dispositivo si spegne automaticamente dopo 1 minuto in
assenza di operazioni. In alternativa, premere il pulsante "START" per spegnere il dispositivo
manualmente.
g. Durante la misurazione, premere il pulsante "START" per spegnere manualmente il dispositivo.
Nota: consultare un operatore sanitario per l'interpretazione dei risultati della misurazione
della pressione.
6.VISUALIZZAZIONE DEI RISULTATI MEMORIZZATI
a. In modalità Orologio, premere il pulsante "MEM": il dispositivo visualizzerà il segno del gruppo
corrente. Viene visualizzato il numero di risultati contenuti nella memoria attualmente selezionata.
Vedere la gura 7-1. Premere il pulsante "START" per cambiare gruppo, premere "MEM"
per confermare il gruppo corrente. In assenza di interventi, dopo 5 secondi verrà confermata
automaticamente la memoria attualmente selezionata.
b. Quindi, lo schermo LCD visualizzerà il valore medio di tutti i risultati nella memoria corrente.
Vedere la gura 7-2. Se la memoria utente selezionata non contiene risultati, lo schermo LCD
mostrerà "0" sia per la pressione sanguigna che per la frequenza cardiaca. Vedere la gura 7-3.
c. Premere il pulsante "MEM": lo schermo LCD visualizzerà il valore medio degli ultimi tre risultati
contenuti nella memoria utente corrente. Vedere la gura 7-4. Se la memoria utente selezionata
non contiene risultati, lo schermo LCD mostrerà "0" sia per la pressione sanguigna che per la
frequenza cardiaca. Vedere la gura 7-5.
d. Premere ancora il pulsante "MEM": verrà visualizzato il numero della memoria utente corrente.
Vedere la gura 7-6. Se la memoria utente selezionata del dispositivo non contiene risultati, lo
schermo LCD mostrerà "0". Vedere la gura 7-7.
e. Verrà quindi visualizzato il risultato più recente con indicazione di data e ora. Vedere la gura
7-8. Sullo schermo lampeggiano contemporaneamente il simbolo di battito cardiaco irregolare
(se presente) e l'indicatore di classicazione della pressione sanguigna. Premere ripetutamente
il pulsante "MEM" per rivedere i risultati precedentemente ottenuti. Se la memoria utente
selezionata del dispositivo non contiene risultati, lo schermo LCD mostrerà "0" sia per la
pressione sanguigna che per la frequenza cardiaca. Vedere la gura 7-9.
f. Durante la visualizzazione dei risultati memorizzati, il dispositivo si spegnerà automaticamente
trascorso 1 minuto senza operazioni. È anche possibile premere il pulsante "START" per
spegnere manualmente il dispositivo.
Figura7-1
Figura7-6
7.ELIMINAZIONE DELLE MISURAZIONI DALLA MEMORIA
Durante la visualizzazione di un risultato (con esclusione dei valori medi), tenendo premuto il
pulsante "MEM" per tre secondi, tutti i risultati contenuti nella memoria corrente verranno eliminati.
Vedere la gura 8. Premere il pulsante "START" per spegnere il dispositivo.
Figura8
8. VALUTAZIONE DELLA PRESSIONE SANGUIGNA PER GLI ADULTI
L'Organizzazione mondiale della sanità (OMS) ha stabilito le seguenti linee guida per la
determinazione della pressione sanguigna alta (indipendentemente dall'età e dal sesso). Si noti
la necessità di prendere in considerazione anche altri fattori (ad es. diabete, obesità, fumo, ecc.).
Consultare il proprio medico per una valutazione accurata e non modicare mai da sé la terapia.
Figura7-2
Figura7-7
Figura6-3 Figura6-4
Figura7-3
Figura7-8
Figura7-4
Figura7-9
Figura7-5
Classicazionedellivellodellapressione
sanguignapergliadulti
Sistolica
(mmHG)
Grave ipertensione
Ipertensione moderata
Ipertensione lieve
BP Alta - Normale
BP Normale
Nota: non si intende fornire alcun tipo di valutazione verso condizioni di emergenza/diagnosi basate
sullo schema a colori e tale schema si propone solo di discriminare tra i differenti livelli di pressione
del sangue.
9.DESCRIZIONE DEGLI ALLARMI TECNICI
Il dispositivo visualizza "HI" o "Lo" come allarmi tecnici sullo schermo LCD senza alcun ritardo se
la pressione sanguigna rilevata (sistolica o diastolica) non rientra negli intervalli stabiliti nel capitolo
SPECIFICHE. In questo caso, consultare un medico o vericare se l'operazione è stata effettuata in
PRESSIONE SANGUIGNA
Classicazione
Ottimale <120 <80
Normale 120-129 80-84
Alta - Normale 130-139 85-89
Ipertensione di livello 1 140-159 90-99
Ipertensione di livello 2 160-179 100-109
Ipertensione di livello 3 >180 >110
Denizioni e classicazione OMS/ISH
Diastolica
(mmHG)
dei livelli della pressione sanguigna
SBP
mmHg
DBP
mmHg
contrasto con le istruzioni.
La condizione di allarme tecnico (fuori dall'intervallo nominale) è preimpostata in fabbrica e non può
essere modicata o disabilitata. La condizione di allarme è considerata a bassa priorità secondo la
IEC 60601-1-8.
L'allarme tecnico non è vincolante e non richiede reset. Il segnale visualizzato sullo schermo LCD
scomparirà automaticamente dopo 8 secondi.
10.RISOLUZIONE DEI PROBLEMI (1)
PROBLEMA POSSIBILE CAUSA SOLUZIONE
Il display
LCD mostra
un risultato
anomalo
La posizione della fascia non è
corretta o la fascia non è stretta
adeguatamente
La postura del corpo non era corretta
durante la misurazione
Il paziente parla, muove il braccio o
il corpo, è irritato, eccitato o nervoso
durante il test
Battito cardiaco irregolare (aritmia)
Applicare la fascia in modo corretto
e riprovare.
Consultare il capitolo "POSTURA
DEL CORPO DURANTE LA
MISURAZIONE" delle istruzioni e
ripetere il test.
Ripetere il test dopo che si è calmato,
senza parlare o muoversi durante la
misurazione.
Si sconsiglia l'utilizzo del presente
sgmomanometro elettronico alle
persone che soffrono di gravi aritmie.
RISOLUZIONE DEI PROBLEMI (2)
PROBLEMA POSSIBILE CAUSA SOLUZIONE
Lo schermo LCD
visualizza il simbolo
di batterie scariche
Lo schermo LCD
mostra "Er 0"
Lo schermo LCD
mostra "Er 1"
Lo schermo LCD
mostra "Er 2"
Lo schermo LCD
mostra "Er 3"
Lo schermo LCD
mostra "Er 4"
Lo schermo LCD
mostra "Er 5"
Lo schermo LCD
mostra "Er 6"
Lo schermo LCD
mostra "Er 7"
Lo schermo LCD
mostra "Er 8"
Lo schermo LCD
mostra "Er A"
Nessuna risposta
quando si preme
il pulsante o si
installano le batterie.
Batterie scariche Sostituire le batterie
Il sistema di pressurizzazione è
instabile prima della misurazione
Mancato rilevamento della
pressione sistolica
Mancato rilevamento della
pressione diastolica
Sistema pneumatico bloccato
durante il gonaggio
Perdita dal sistema pneumatico
durante il gonaggio
Pressione della fascia superiore a
300 mmHg
Trascorsi più di 160 secondi con
pressione della fascia superiore
a 15 mmHg
Errore di memoria interna
Errore di verica del parametro del
dispositivo
Errore parametro sensore di
pressione
Funzionamento errato o intensa
interferenza elettromagnetica.
Non muoversi e riprovare.
Collegare la fascia in modo
corretto e riprovare. Se il
dispositivo funziona ancora in
modo anomalo, contattare il
distributore locale o la fabbrica.
Ripetere la misurazione
dopo cinque minuti. Se il
dispositivo funziona ancora in
modo anomalo, contattare il
distributore locale o la fabbrica.
Estrarre le batterie per cinque
minuti e quindi reinstallarle.
MANUTENZIONE
1. Evitare di far cadere il dispositivo o di esporlo a forti urti.
2. Evitare temperature elevate e l'esposizione alla luce solare diretta. Non immergere il
dispositivo in acqua per evitare di danneggiarlo.
3. Se il dispositivo viene conservato vicino al punto di congelamento, lasciare che si adatti alla
temperatura ambiente prima dell'uso.
4. Il dispositivo richiede 6 ore per riscaldarsi dalla temperatura minima di conservazione tra due
utilizzi prima che sia pronto per L'USO PREVISTO quando la temperatura ambiente è di 20 °C.
5. Il dispositivo richiede 6 ore per raffreddarsi dalla temperatura massima di conservazione tra due
utilizzi prima che sia pronto per L'USO PREVISTO quando la temperatura ambiente è di 20 °C.
6. Non tentare di smontare o riparare il dispositivo.
7. Se si prevede di non usare il dispositivo per un lungo periodo di tempo, rimuovere le batterie.
8. Si consiglia di vericare le prestazioni ogni 2 anni o dopo una riparazione. Contattare il centro
di assistenza.
9. Pulire il dispositivo con un panno asciutto morbido o con un panno morbido ben strizzato dopo
averlo inumidito con acqua, alcol disinfettante diluito o detergente diluito.
10. Nessun componente del dispositivo può essere sottoposto a manutenzione dall'utente. Gli
schemi circuitali, l'elenco dei componenti, descrizioni, istruzioni per la calibrazione o altre
informazioni utili per la riparazione dei componenti riparabili del dispositivo da parte di personale
tecnico dell'utente adeguatamente qualicato sono disponibili su richiesta.
11. Il dispositivo garantisce il mantenimento delle caratteristiche di sicurezza e prestazioni per un
minimo di 10.000 misurazioni o un periodo di tre anni e l'integrità della fascia è garantita per più
di 1.000 cicli di apertura e chiusura della chiusura.
12. Si raccomanda di disinfettare la fascia 2 volte alla settimana, se necessario (ad esempio, in
ospedale o in clinica). Stronare la parte interna della fascia (quella a contatto con la pelle) con
un panno morbido ben strizzato dopo averlo inumidito con alcol etilico (75-90%), quindi lasciare
asciugare all'aria.
13. Non effettuare interventi di assistenza/manutenzione mentre il dispositivo è in uso.
Page 12

SPIEGAZIONE DEI SIMBOLI SUL DISPOSITIVO
CN
Simbolo per "LEGGERE LA GUIDA ALL'USO" (colore dello sfondo: blu; simbolo graco:
bianco)
Simbolo per "AVVERTENZA"
Simbolo per "PARTI APPLICATE TIPO BF" (la fascia è una parte applicata tipo BF)
Simbolo per "PROTEZIONE DELL'AMBIENTE - I prodotti elettrici di scarto non devono
essere smaltiti con i riuti domestici. Riciclare laddove esistono apposite strutture. Per
consigli sul riciclo, contattare le autorità locali o il rivenditore."
Simbolo per "PRODUTTORE"
Simbolo per "CONFORME AI REQUISITI MDD 93/42/CEE"
Simbolo per "PAESE DEL PRODUTTORE" e "DATA DI PRODUZIONE"
Simbolo per "RAPPRESENTANTE EUROPEO"
Simbolo per "NUMERO DI SERIE"
Simbolo per "MANTENERE ASCIUTTO"
IP20 Il primo simbolo numerico indica i "Livelli di protezione contro l'accesso a componenti
pericolosi e la penetrazione di corpi estranei solidi". Il secondo simbolo numerico indica i
"Livelli di protezione contro la penetrazione di acqua"
INFORMAZIONI SULLA GARANZIA
Vengono addebitati solo i costi dei componenti e del trasporto.
CENTRO ASSISTENZA
A.I.&E. Adriaan Mulderweg 9-11,
5657 EM Eindhoven, Paesi Bassi
Edco UK Ltd, 1st Floor Two Chamberlain Square,
B3 3AX, Birmingham, Regno Unito
ANDON HEALTH CO., LTD.
No. 3 JinPing Street,
YaAn Road, Nankai District,
Tientsin 300190, Cina.
iHealthLabs Europe SAS
36 Rue de Ponthieu, 75008,
Parigi, Francia.
INFORMAZIONI SULLA COMPATIBILITÀ ELETTROMAGNETICA
Tabella1-Emissioni
Fenomeno Conformità Ambienteelettromagnetico
Emissioni RF
Distorsione
armonica
Fluttuazioni di ten-
sione e sfarfallio
Tabella2-Portadell'alloggiamento
Fenomeno NormaEMCbase
Elettricità statica
Scarica
Campo EM RF irradiato IEC 61000-4-3
Campi di prossimità da
apparecchiature di comu-
nicazione wireless RF
Campi magnetici alla frequenza di alimentazione
nominale
Tabella3-CampidiprossimitàdaapparecchiaturedicomunicazionewirelessRF
Frequenza di
test
(MHz)
385 380-390 Modulazione a impulsi 18 Hz, 27 V/m
450 430-470 FM, deviazione ±5 kHz, 1 kHz sinusoidale, 28 V/m
710
780
810
930
1720
1970
2450 2400-2570 Modulazione a impulsi 217 Hz, 28 V/m
5240
5785
CISPR 11
Gruppo 1,
Classe B
IEC 61000-3-2
Classe A
IEC 61000-3-3
Conformità
IEC 61000-4-2
IEC 61000-4-3 Vedere la tabella 3
IEC 61000-4-8
Banda
(MHz)
704-787 Modulazione a impulsi 217 Hz, 9 V/m745
800-960 Modulazione a impulsi 18 Hz, 28 V/m870
1700-1990 Modulazione a impulsi 217 Hz, 28 V/m1845
5100-5800 Modulazione a impulsi 217 Hz, 9 V/m5500
Livellitestdiimmunità
Ambienteinstrutturesanitarieprofessionali
Ambiente sanitario domestico
Ambiente sanitario domestico
Ambiente sanitario domestico
Livellitestdiimmunità
Ambientesanitariodomestico
±8 kV a contatto
±2 kV, ±4 kV, ±8 kV, ±15 kV in aria
10 V/m
80 MHz - 2,7 GHz
80% AM a 1 kHz
30 A/m
50 Hz o 60 Hz
Page 13
F INFORMACIÓN IMPORTANTE ARTÍCULO 871125247440
FLUCTUACIÓN NORMAL DE LA TENSIÓN ARTERIAL
Toda actividad física, la excitación, el estrés, la alimentación, la bebida, el tabaquismo, la postura
corporal y muchas otras actividades o factores (incluida la toma de la tensión arterial) inuirán en el
valor de la tensión arterial. Por ello, es muy poco habitual obtener el mismo valor de tensión arterial
en las distintas lecturas.
La tensión arterial uctúa continuamente ----- de día y de noche. El valor más alto suele aparecer
durante el día y el más bajo normalmente a medianoche. Por lo general, el valor comienza a
aumentar alrededor de las 3:00 de la madrugada y alcanza el nivel más alto durante el día, cuando
la mayoría de las personas están despiertas y activas.
Teniendo en cuenta la información anterior, se recomienda tomar la tensión arterial
aproximadamente a la misma hora cada día.
Las mediciones demasiado frecuentes pueden provocar lesiones debido a la interferencia con el
ujo sanguíneo, por favor relaje siempre como mínimo de 1 a 1,5 minutos entre mediciones para
permitir la recuperación de la circulación sanguínea en el brazo. No es frecuente obtener lecturas de
tensión arterial idénticas cada vez.
ADVERTENCIAS
1. Lea toda la información del manual de uso y cualquier otra documentación en la caja antes de
utilizar la unidad.
2. Permanezca quieto, tranquilo y descanse durante 5 minutos antes de tomar la tensión arterial.
3. El manguito debe colocarse al mismo nivel que el corazón.
4. Durante la medición, no hable ni mueva el cuerpo ni el brazo.
5. Realice la medida siembre en el brazo izquierdo.
6. Relaje siempre al menos de 1 a 1,5 minutos entre mediciones para permitir la recuperación de
la circulación sanguínea en el brazo. Un inado excesivo prolongado (la presión del manguito
supera los 300 mmHg o se mantiene por encima de los 15 mmHg durante más de 3 minutos) de
la cámara de aire puede provocar un equimoma en el brazo.
7. Consulte a su médico si tiene alguna duda sobre los siguientes casos:
1) La aplicación del manguito sobre una herida o enfermedades inamatorias;
2) La aplicación del manguito en una extremidad en la que haya un acceso o terapia
intravascular,
o una derivación arteriovenosa (A-V);
3) La aplicación del manguito en el brazo del lado donde se ha realizado una mastectomía;
4) Utilización simultánea con otros equipos médicos de monitorización en la misma extremidad;
5) Necesidad de comprobar la circulación sanguínea del usuario.
8. Este esgmomanómetro electrónico está diseñado para adultos y no debe utilizarse nunca
en bebés o niños pequeños. Consulte a su médico u otros profesionales de la salud antes de
utilizarlo en niños mayores.
9. No utilice esta unidad en un vehículo en movimiento. Esto podría dar lugar a una medición
errónea.
10. Las mediciones de la tensión arterial determinadas por este tensiómetro son equivalentes a
las obtenidas por un observador entrenado utilizando el método de auscultación con manguito/
estetoscopio, dentro de los límites prescritos por el American National Standard Institute,
Esgmomanómetros electrónicos o automatizados.
11. La información relativa a las posibles interferencias electromagnéticas o de otro tipo
entre el tensiómetro y otros dispositivos, junto con los consejos para evitar dichas
interferencias, se encuentra en el apartado INFORMACIÓN SOBRE LA COMPATIBILIDAD
ELECTROMAGNÉTICA. Se recomienda mantener el tensiómetro a una distancia mínima de
30 cm de otros dispositivos inalámbricos, como una unidad WLAN, un teléfono móvil, un horno
microondas, etc. No se puede utilizar cerca de EQUIPOS QUIRÚRGICOS de alta frecuencia
activos y de la sala blindada de RF de un SISTEMA ELECTROMAGNÉTICO para imágenes de
resonancia magnética, donde la intensidad de las PERTURBACIONES EM es alta.
12. Si en el procedimiento de medición de la tensión arterial se detectan latidos irregulares (IHB,
por sus siglas en inglés) provocados por arritmias comunes, se mostrará una señal . Bajo
esta condición, el esgmomanómetro electrónico puede seguir funcionando, pero los resultados
pueden no ser precisos, se recomienda consultar a su médico para una evaluación precisa.
Hay dos condiciones bajo las cuales se mostrará la señal del IHB:
1) El coeciente de variación (CV) del período del pulso >25 %.
2) La diferencia de período de pulso adyacente ≥0,14 s, y el valor de dicho pulso supone más
del 53 % de la cifra total de pulso.
13. No utilice un manguito distinto al suministrado por el fabricante, de lo contrario puede suponer
un riesgo de biocompatibilidad y podría provocar un error de medición.
14. El tensiómetro podría no cumplir con sus especicaciones de rendimiento o provocar un
riesgo de seguridad si se almacena o se utiliza fuera de los rangos de temperatura y humedad
indicados en las especicaciones.
15. No comparta el manguito con otra persona infecciosa para evitar la infección cruzada.
16. Este equipo se ha probado y se ha determinado que cumple con los límites para un dispositivo
digital de Clase B, de acuerdo con el apartado 15 de las normas de la FCC. Estos límites
están diseñados para proporcionar una protección razonable contra las interferencias
perjudiciales en una instalación residencial. Este equipo genera, utiliza y puede irradiar
energía de radiofrecuencia y, si no se instala y utiliza de acuerdo con las instrucciones, podría
provocar interferencias perjudiciales en las comunicaciones de radio. Sin embargo, no se
puede garantizar que no se produzcan interferencias en una instalación concreta. Si este
equipo provoca interferencias perjudiciales en la recepción de radio o televisión, lo cual puede
determinarse apagando y encendiendo el equipo, se recomienda al usuario que intente corregir
las interferencias mediante una o varias de las siguientes medidas:
- Reorientar o reubicar la antena receptora.
- Aumentar la separación entre el equipo y el receptor.
- Conecte el equipo a una toma de corriente en un circuito diferente al que está conectado el
receptor.
- Consulte al distribuidor o a un técnico de radio/televisión con experiencia para obtener ayuda.
17. No es posible llevar a cabo mediciones en pacientes con una alta frecuencia de arritmias.
18. El aparato no está destinado a neonatos, niños o mujeres embarazadas. (No se han realizado
pruebas clínicas en neonatos, niños o mujeres embarazadas).
19. El movimiento, los temblores, los escalofríos pueden afectar a la lectura de la medición.
20. El dispositivo no se aplicará a los pacientes con mala circulación periférica, tensión arterial
notablemente baja o temperatura corporal baja (habrá un ujo de sangre reducido a la posición
de medición).
21. El dispositivo no se aplicará a pacientes que utilicen un corazón y un pulmón articiales (no
habrá pulso).
22. Consulte a su médico antes de utilizar el dispositivo en cualquiera de las condiciones siguientes:
arritmias comunes como latidos prematuros auriculares o ventriculares o brilación auricular,
esclerosis arterial, mala perfusión, diabetes, preeclampsia, enfermedades renales.
23. El paciente es un usuario previsto.
24. Atención: los cambios o modicaciones no aprobados expresamente por la parte responsable
del cumplimiento podrían anular la autoridad del usuario para operar el equipo.
25. La ingestión de las pilas y/o del líquido de las pilas puede ser extremadamente peligrosa.
Mantenga las pilas y el equipo fuera del alcance de los niños y de las personas discapacitadas.
26. Si es alérgico al plástico/caucho, no utilice este aparato.
27. Si el aparato se utiliza como dispositivo multiusuario, no seleccione el banco de memoria
equivocado.
ESPECIFICACIONES
Nombre del producto: Tensiómetro de brazo
1. Modelo: KD-553
2. Clasicación: Alimentación interna, componente de tipo BF, IP20, No es un equipo AP ni APG,
Funcionamiento continuo
3. Tamaño de la máquina: Aprox. 136 mm × 120 mm × 61 mm (5 11/32” × 4 23/32” × 2 13/32”)
4. Circunferencia del manguito: 22 cm-32 cm (8 21/32”-12 19/32”), 30 cm-42 cm (11 13/16”-16
17/32”) (Opcional), 42 cm-48 cm (16 17/32”-18 29/32”) (Opcional), 22 cm-36 cm (8 21/32”-14
3/16”) (Opcional), 22 cm-42 cm (8 21/32”-16 17/32”) (Opcional)
5. Peso: Aprox. 225 g (7 15/16 oz.) (excluidas las pilas y el manguito)
6. Método de medición: método oscilométrico, inado y medición automáticos
7. Volumen de memoria: 2×60 veces con marcado de fecha y hora
8. Fuente de alimentación: pilas: 4×1,5 V TAMAÑO AA
9. Rango de medición:
Presión del manguito: 0-300 mmHg
Sistólica: 60-260 mmHg
Diastólica: 40-199 mmHg
Frecuencia del pulso: 40-180 latidos/minuto
10. Precisión:
Presión: ±3 mmHg
Frecuencia del pulso: Inferior a 60: ±3 lpm
Más de 60 (incl.) : ±5%
11. Temperatura ambiental de funcionamiento: 10 °C~40 °C (50 °F~104 °F)
12. Humedad ambiental de funcionamiento: ≤85 % HR
13. Temperatura ambiental de almacenamiento y transporte: -20 °C~50 °C (-4 °F~122 °F)
14. Humedad ambiental de almacenamiento y transporte: ≤85 % HR
15. Presión ambiental: 80 kPa-105 kPa
16. Duración de las pilas: Aprox. 270 veces.
17. Todos los componentes pertenecientes al sistema de medición de la presión, incluidos los
accesorios: Bomba, válvula, LCD, manguito, sensor
Nota:Estasespecicacionesanterioresestánsujetasacambiossinprevioaviso.
CONTENIDOS E INDICADORES DE VISUALIZACIÓN
Indicador de
día y hora
Sistólica
Diastólica
Frecuencia del pulso
Nivel de tensión
arterial indicador
de clasicación
Conector de tubo
Nota: Las imágenes del manual son solo para referencia.
USO PREVISTO
El esgmomanómetro electrónico totalmente automático es para uso doméstico o de profesionales
médicos y es un sistema de medición de la tensión arterial no invasivo destinado a medir la tensión
arterial diastólica y sistólica y la frecuencia del pulso de un adulto mediante una técnica no invasiva
en la que un manguito inable se coloca alrededor de brazo por encima del codo. La circunferencia
del manguito está limitada a 22 cm ~ 48 cm (aprox. 8 21/32″-18 29/32″).
CONTENIDO DEL PAQUETE
• 1 Tensiómetro de brazo
• 1 Manual de uso
• 1 Manguito de brazo
• 1 Estuche blando
de aire
Botón "MEM"
Símbolo de latidos cardíacos irregulares
Indicador de bajo nivel de pilas
La posición del manguito no era correcta o
no estaba bien ajustado
Indicador de clasicación de nivel de tensión arterial
LCD
Botón "START" (INICIO)
Tubo
de goma
Manguito
Conector
de tubo de manguito
CONTRAINDICACIÓN
El uso de este esgmomanómetro electrónico es inadecuado para personas con arritmias
graves.
DESCRIPCIÓN DEL PRODUCTO
Basado en la metodología oscilométrica y el sensor de presión integrado de silicona, la tensión
arterial y la frecuencia del pulso se pueden medir automáticamente y de forma no invasiva.
La pantalla LCD mostrará la tensión arterial y la frecuencia del pulso. Las mediciones más
recientes de 2×60 pueden almacenarse en la memoria con fecha y hora. El esgmomanómetro
electrónico cumple con las siguientes normas: IEC 60601-1 Edición 3.1 2012-08/EN 60601-1:2006/
A1:2013 (Equipos electromédicos: Parte 1: Requisitos generales para la seguridad básica y las
prestaciones esenciales), IEC60601-1-2:2014/EN 60601-1-2:2015 (Equipos electromédicos -- Parte
1-2: Requisitos generales de seguridad básica y rendimiento esencial - Estándar de garantía:
Compatibilidad electromagnética. Requisitos y ensayos), IEC80601-2-30:2009+AMD1:2013/
EN 80601-2-30:2010/A1:2015 (Equipos electromédicos - Parte 2-30: Requisitos particulares
para la seguridad básica y las prestaciones esenciales de los esgmomanómetros no invasivos
automatizados) EN 1060-1: 1995 + A2: 2009 (Esgmomanómetros no invasivos - Parte 1:
Requisitos generales), EN 1060-3: 1997 + A2: 2009 (Esgmomanómetros no invasivos - Parte 3:
Requisitos suplementarios para los sistemas electromecánicos de medición de la tensión arterial);
ISO81060-2: 2013 (Esgmomanómetros no invasivos - Parte 2: Validación clínica del tipo de
medición automatizada).
PROCEDIMIENTOS DE CONFIGURACIÓN Y FUNCIONAMIENTO
1.CARGA DE LA PILA
a. Abra la tapa de la batería en la parte posterior del tensiómetro.
b. Coloque cuatro pilas de tamaño “AA”. Asegúrese de que los polos positivo y negativo de cada
pila coincidan con la marca impresa de los polos del compartimento para pilas del aparato.
c. Cierre la tapa del compartimento para pilas.
Cuando la pantalla LCD muestre el símbolo de la pila , sustituya todas las pilas por otras
nuevas.
Las pilas recargables no son adecuadas para este tensiómetro.
Retire las pilas si el tensiómetro no se va a utilizar durante un período superior a un mes para evitar
daños importantes por fugas de las pilas.
La sustitución de las pilas de litio por parte de personal sin la formación adecuada podría
suponer un peligro (como temperaturas excesivas, incendio o explosión).
Evite que el líquido de las pilas entre en contacto con los ojos. Si le entrara en los ojos, lávese
inmediatamente con abundante agua limpia y póngase en contacto con un médico.
El terminal positivo de la pila debe comprimirse en el compartimento para pilas correctamente
después de la compresión horizontal del electrodo negativo. La pila está en contacto con el
muelle
Asegúrese de que la tapa del compartimento para pilas esté intacta y no está dañada antes
de instalar la pila
El tensiómetro, las baterías y el manguito, se deben desechar de acuerdo con las
regulaciones locales al nal de su uso.
2.AJUSTE DEL RELOJ Y DE LA FECHA
a. Una vez que instale la pila o apague el tensiómetro, éste entrará en el Modo Reloj, y la pantalla
LCD mostrará la hora y la fecha. Ver la imagen 2.
b. Mientras el tensiómetro está en el modo reloj, pulse los botones “START” y “MEM”
simultáneamente durante dos segundos, luego suelte los botones, el tensiómetro estará en el
modo de ajuste del reloj y la fecha.
c. En el modo de ajuste del reloj y la fecha, el formato de la hora parpadeará al principio. Ver la
imagen 2-1. Mientras el formato de hora está parpadeando, pulse el botón “MEM” para cambiar
el formato de hora. El formato de hora por defecto es de 24 horas.
d. Pulse el botón “START” repetidamente, el año (rango es 2018~2099), el mes, el día, la hora y los
minutos parpadearán sucesivamente. Ver la imagen 2-2, 2-3, 2-4, 2-5 y 2-6. Mientras el número
parpadea, pulse el botón “MEM” para aumentar el número, siga pulsando el botón “MEM”, el
número aumentará más rápido.
e. Durante el ajuste del reloj y la fecha, el tensiómetro volverá al modo Reloj automáticamente si no
se pulsa ningún botón en 60 segundos.
f. Puede apagar el tensiómetro pulsando el botón “START” cuando el minuto esté parpadeando,
entonces se conrmará la hora y la fecha.
Imagen2 Imagen2-1
Imagen2-4 Imagen2-5 Imagen2-6
Nota:
1.1 El usuario puede denir el formato del reloj.
1.2 En la tabla 2-1 se dan indicaciones de las relaciones de conversión entre el formato de 24
horas y el formato de 12 horas.
Imagen2-2 Imagen2-3
Tabla2-1
Formato de 24 horas Formato de 12 horas Formato de 24 horas Formato de 12 horas
0:00 12:00 AM 12:00 12:00 PM
1:00 1:00 AM 13:00 1:00 PM
2:00 2:00 AM 14:00 2:00 PM
3:00 3:00 AM 15:00 3:00 PM
4:00 4:00 AM 16:00 4:00 PM
5:00 5:00 AM 17:00 5:00 PM
6:00 6:00 AM 18:00 6:00 PM
7:00 7:00 AM 19:00 7:00 PM
8:00 8:00 AM 20:00 8:00 PM
9:00 9:00 AM 21:00 9:00 PM
10:00 10:00 AM 22:00 10:00 PM
11:00 11:00 AM 23:00 11:00 PM
CONEXIÓN DEL MANGUITO AL TENSIÓMETRO
Inserte el conector del tubo del manguito en el puerto de aire del lado izquierdo
del tensiómetro. Asegúrese de que el conector esté completamente insertado
para evitar fugas de aire durante las mediciones de la tensión arterial.
Evite la compresión o la restricción del tubo de conexión durante la medición, lo que puede
provocar un error de inado o una lesión perjudicial debido a la presión continua del manguito.
3. APLICACIÓN DEL MANGUITO
a. Tirando del extremo del manguito a través del bucle de la medalla (el manguito ya viene
empaquetado así), gírelo hacia fuera (en dirección contraria a su cuerpo) y apriételo y cierre el
cierre de velcro. Ver la imagen 4-1.
b. Coloque el manguito alrededor del brazo izquierdo desnudo a 1-2 cm por encima de la
articulación del codo.
c. Si coloca el manguito alrededor del brazo izquierdo, sitúe el tubo de aire en el centro del brazo,
en línea con el dedo corazón. Ver la imagen 4-2.
Si coloca el manguito alrededor del brazo derecho, aplique el manguito de manera que el tubo de
aire esté al lado de su codo. Ver la imagen 4-3.
d. Mientras está sentado, coloque la palma de la mano hacia arriba frente a usted en una supercie
plana, como un escritorio o una mesa. Tenga cuidado de no apoyar el brazo en el tubo de aire, o
de no restringir de otro modo el ujo de aire hacia el manguito.
e. El manguito debe ajustarse cómodamente, aunque de forma ajustada, alrededor de su brazo, y
debe poder introducir un dedo entre su brazo y el manguito.
Imagen4-1 Imagen4-2 Imagen4-3
Nota:
1. Consulte el rango de circunferencia del manguito en “ESPECIFICACIONES” para asegurarse de
que se utiliza el manguito adecuado.
2. Realice siempre la medida en el brazo izquierdo.
3. No mueva el brazo, el cuerpo o el tensiómetro y no mueva el tubo de goma durante la medición.
4. Permanezca tranquilo y calmado durante 5 minutos antes de la medición de la tensión arterial.
5. Mantenga limpio el manguito. Si el manguito se ensucia, retírelo del tensiómetro y límpielo a
mano con un detergente suave, luego aclárelo bien en agua fría. No seque nunca el manguito en
la secadora de ropa ni lo planche. Se recomienda limpiar el manguito después del uso de cada
200 usos.
6. No coloque el manguito alrededor del brazo si éste tiene alguna inamación, enfermedades
agudas, heridas infecciosas en la piel.
4.POSTURA DEL CUERPO DURANTE LA MEDICIÓN
Mediciónsentadocómodamente
a. Siéntese con los pies apoyados en el suelo y no cruce las piernas.
b. Coloque las palmas de las manos frente a usted en una supercie plana,
como un escritorio o una mesa.
c. El centro del manguito debe estar a la altura de la aurícula derecha del
corazón.
Medicióntumbado
5.TOMAR LA LECTURA DE LA TENSIÓN ARTERIAL
a. Después de colocar el manguito y de que su cuerpo esté en una posición cómoda, pulse el
botón “START”. Todos los caracteres de la pantalla se muestran para la autocomprobación.
Puede comprobar la pantalla LCD de acuerdo con la imagen. Por favor, póngase en contacto
con el centro de servicio si falta algún segmento. Ver la imagen 6-1.
b. A continuación, el banco de memoria actual parpadea. Ver la imagen 6-2. Pulse el botón “MEM”
para cambiar de banco. Conrme su selección pulsando el botón “START”. El banco actual
también se puede conrmar automáticamente después de 5 segundos sin operación.
c. Si el tensiómetro tiene resultados almacenados, la pantalla LCD mostrará momentáneamente el
más reciente. Ver la imagen 6-3. Si no se ha almacenado ningún resultado, aparecerá un cero
en la pantalla LCD. Ver la imagen 6-4.
d. A continuación, el tensiómetro empieza a buscar la presión cero. Ver la imagen 6-5.
e. A continuación, el tensiómetro ina el manguito hasta que se haya acumulado suciente presión
para una medición. A continuación, el tensiómetro libera lentamente el aire del manguito y
realiza la medición. Finalmente, la tensión arterial y la frecuencia del pulso se calculan y se
muestran en la pantalla LCD. El indicador de clasicación de la tensión arterial y el símbolo
a. Recuéstese sobre la espalda.
b. Coloque el brazo izquierdo recto a lo largo de su costado
con la palma de la mano hacia arriba.
c. El manguito debe colocarse al mismo nivel que el
corazón.
de latido irregular (si lo hay) parpadearán en la pantalla. Ver la imagen 6-6. El resultado se
almacenará automáticamente en el monitor.
Imagen6-1 Imagen6-2
Imagen6-5 Imagen6-6
f. Después de la medición, el tensiómetro se apagará automáticamente después de 1 minuto de
inactividad, o bien puede pulsar el botón “START” para apagar el tensiómetro manualmente.
g. Durante la medición, puede pulsar el botón “START” para apagar el tensiómetro manualmente.
Nota: Consulte a un profesional de la salud para la interpretación de las mediciones de
presión.
6.VISUALIZACIÓN DE LOS RESULTADOS ALMACENADOS
a. En el Modo Reloj, pulse el botón “MEM”, el tensiómetro mostrará el signo del grupo actual. Se
mostrará la cantidad de resultados en la zona de memoria del usuario actual. Ver la imagen 7-1.
Pulse el botón “START” para cambiar de grupo, pulse “MEM” para conrmar el grupo actual.
El banco actual también se puede conrmar automáticamente después de 5 segundos sin
operación.
b. El banco actual también se puede conrmar automáticamente después de 5 segundos sin
funcionamiento. Ver la imagen 7-2. Si no hay ningún resultado almacenado en la zona de
memoria del usuario actual, la pantalla LCD mostrará “0” para la tensión arterial y la frecuencia
del pulso. Ver la imagen 7-3.
c. Pulse el botón “MEM”, la pantalla LCD mostrará el valor medio de los tres últimos resultados en la
zona de memoria del usuario actual. Ver la imagen 7-4. Si no hay ningún resultado almacenado
en la zona de memoria del usuario actual, la pantalla LCD mostrará “0” para la tensión arterial y la
frecuencia del pulso. Ver la imagen 7-5.
d. Pulse de nuevo el botón “MEM” y se mostrará el número de memoria de la zona de memoria del
usuario actual. Ver la imagen 7-6. Si el tensiómetro no tiene ningún resultado almacenado en la
zona de memoria del usuario actual, la pantalla LCD mostrará “0”. Ver la imagen 7-7.
e. A continuación, se mostrará el resultado más reciente con la fecha y la hora. Ver la imagen
7-8. El símbolo de latido irregular (si lo hay) y el indicador de clasicación de la tensión arterial
parpadearán al mismo tiempo. Pulse el botón “MEM” repetidamente para revisar los resultados
medidos anteriormente. Si el tensiómetro no tiene ningún resultado almacenado en la zona de
memoria del usuario actual, la pantalla LCD mostrará “0” para la tensión arterial y la frecuencia
del pulso. Ver la imagen 7-9.
f. Cuando se muestren los resultados almacenados, el tensiómetro se apagará automáticamente
después de 1 minuto sin funcionar. También puede pulsar el botón “START” para apagar el
tensiómetro manualmente.
Imagen7-1
Imagen7-6
7.BORRADO DE MEDIDAS DE LA MEMORIA
Cuando se muestra algún resultado (excepto el valor medio), si se mantiene pulsado el botón
“MEM” durante tres segundos, se borrarán todos los resultados del banco actual. Ver la imagen 8.
Pulse el botón “START”, el tensiómetro se apagará.
Imagen7-2
Imagen7-7
Imagen6-3 Imagen6-4
Imagen7-3
Imagen7-8
Imagen7-4
Imagen7-9
Imagen7-5
Imagen8
8. EVALUACIÓN DE LA TENSIÓN ARTERIAL ALTA EN ADULTOS
La Organización Mundial de la Salud (OMS) ha establecido las siguientes directrices para evaluar
la tensión arterial alta (sin tener en cuenta la edad o el sexo). Tenga en cuenta que deben tenerse
en cuenta otros factores (por ejemplo, diabetes, obesidad, tabaquismo, etc.). Consulte a su médico
para obtener una evaluación precisa, y no modique nunca el tratamiento por sí mismo.
Clasicacióndeniveldetensiónarterialpara
adultos
Sistólica
(mmHg)
Hipertensión grave
Hipertensión moderada
Hipertensión media
Tensión arterial normal alta
Tensión arterial normal
Nota: No se pretende proporcionar una indicación sobre la urgencia de las condiciones de
emergencia / diagnóstico basado en el esquema de color y este solo tiene como objetivo discriminar
entre los distintos niveles de tensión arterial.
TENSIÓN ARTERIAL
Clasicación
Óptima <120 <80
Normal 120-129 80-84
Normal alta 130-139 85-89
Hipertensión de
grado 1
Hipertensión de
grado 2
Hipertensión de
grado 3
Deniciones y clasicación de la OMS/ISH
Diastólica
(mmHg)
de niveles de tensión arterial
PAS
PAD
mmHg
mmHg
140-159 90-99
160-179 100-109
>180 >110
9.DESCRIPCIÓN TÉCNICA DE ALARMA
El tensiómetro mostrará “HI” o “Lo” como alarma técnica en la pantalla LCD sin retardo si la tensión
arterial determinada (sistólica o diastólica) está fuera del rango nominal especicado en la parte
de ESPECIFICACIONES. En este caso, debe consultar a un médico o comprobar si su operación
infringe las instrucciones.
La condición de alarma técnica (fuera del rango nominal) viene preestablecida de fábrica y no se
puede ajustar o desactivar. Esta condición de alarma está asignada como de baja prioridad según
la norma IEC 60601-1-8.
La alarma técnica no está bloqueada y no se tiene que reiniciar. La señal mostrada en la pantalla
LCD desaparecerá automáticamente al cabo de unos 8 segundos.
10.SOLUCIÓN DE PROBLEMAS (1)
PROBLEMA POSIBLE CAUSA SOLUCIÓN
La pantalla
LCD muestra
un resultado
anómalo
La posición del manguito no era
correcta o no estaba bien ajustado
La postura del cuerpo no era correcta
durante la prueba
Hablar, mover el brazo o el cuerpo,
estar enfadado, excitado o nervioso
durante la prueba
Latidos cardíacos irregulares
(arritmia)
Coloque el manguito correctamente y
vuelva a intentarlo.
Revise las secciones "POSTURA
CORPORAL DURANTE LA
MEDICIÓN" de las instrucciones y
vuelva a realizar la prueba.
Vuelva a realizar la prueba cuando
esté tranquilo y sin hablar ni moverse
durante la misma.
El uso de este esgmomanómetro
electrónico es inadecuado para
personas con arritmias graves.
SOLUCIÓN DE PROBLEMAS (2)
PROBLEMA POSIBLE CAUSA SOLUCIÓN
La pantalla LCD
muestra el símbolo
de nivel de pila bajo
La pantalla LCD
muestra “Er 0”
La pantalla LCD
muestra “Er 1”
La pantalla LCD
muestra “Er 2”
La pantalla LCD
muestra “Er 3”
La pantalla LCD
muestra “Er 4”
La pantalla LCD
muestra “Er 5”
La pantalla LCD
muestra “Er 6”
La pantalla LCD
muestra “Er 7”
La pantalla LCD
muestra “Er 8”
La pantalla LCD
muestra “Er A”
No hay respuesta
al pulsar el botón o
cargar la batería.
Nivel de pila bajo Cambie las pilas
El sistema de presión es inestable
antes de la medición
No detecta la presión sistólica
No detecta la presión diastólica
Sistema neumático bloqueado
durante el inado
Fuga del sistema neumático
durante el inado
Presión del manguito superior a
300 mmHg
Más de 160 segundos con la
presión del manguito por encima
de 15 mmHg
Error en la memoria interna
Error de comprobación de los
parámetros del dispositivo
Error en el parámetro del sensor
de presión
Funcionamiento incorrecto
o fuertes interferencias
electromagnéticas.
correctamente y vuelva a
intentarlo. Si el tensiómetro
comportamiento anómalo,
póngase en contacto con
el distribuidor local o con la
tensiómetro sigue teniendo
un comportamiento anómalo,
póngase en contacto con
el distribuidor local o con la
Saque las pilas durante cinco
minutos y vuelva a instalarlas.
No se mueva y vuelva a
intentarlo.
Coloque el manguito
sigue teniendo un
fábrica.
Vuelva a medir después
de cinco minutos. Si el
fábrica.
MANTENIMIENTO
1. No deje caer este tensiómetro ni lo someta a fuertes impactos.
2. Evite las altas temperaturas y dejarlo al sol. No sumerja el tensiómetro en agua, ya que
se dañará.
3. Si este tensiómetro se almacena a una temperatura próxima al punto de congelación, deje que
se aclimate a la temperatura ambiente antes de utilizarlo.
4. El tensiómetro necesita 6 horas para calentarse desde la temperatura mínima de almacenami-
ento entre usos hasta que esté listo para su USO PREVISTO cuando la temperatura ambiente
sea de 20 °C.
5. El tensiómetro necesita 6 horas para enfriarse desde la temperatura máxima de almacenamiento entre usos hasta que esté listo para su USO PREVISTO cuando la temperatura ambiente
sea de 20 °C
6. No intente desmontar este tensiómetro.
7. Si no utiliza el tensiómetro durante mucho tiempo, retire las pilas.
8. Se recomienda comprobar el funcionamiento cada dos años o después de una reparación.
Póngase en contacto con el centro de servicio.
9. Limpie el tensiómetro con un paño seco y suave o un paño suave bien exprimido después de
haberlo humedecido con agua, alcohol desinfectante diluido o detergente diluido.
10. No hay ningún componente en el tensiómetro que requiera mantenimiento por parte del usuario.
Se pueden suministrar los diagramas de circuitos, las listas de piezas de los componentes, las
descripciones, las instrucciones de calibración u otra información que ayude al personal técnico
debidamente cualicado del usuario a reparar las piezas del equipo que se designen como
reparables.
11. El tensiómetro puede mantener las características de seguridad y rendimiento durante un
mínimo de 10 000 mediciones o tres años y la integridad del manguito se mantiene después de
1000 ciclos de apertura y cierre del cierre.
12. Se recomienda desinfectar el manguito dos veces por semana si es necesario (Por ejemplo,
en el hospital o en la clínica). Limpie la parte interior (el lado que entra en contacto con la piel)
del manguito con un paño suave exprimido después de haberlo humedecido con alcohol etílico
(75-90 %), y luego seque el manguito aireándolo.
13. No realizar el servicio/mantenimiento mientras el tensiómetro está en uso.
Page 14

EXPLICACIÓN DE LOS SÍMBOLOS DE LA UNIDAD
CN
Símbolo de “DEBE LEER LA GUÍA DE USO” (El color de fondo de la señal: azul. El símbolo
gráco de la señal: blanco)
Símbolo de “ADVERTENCIA”
Símbolo de “PIEZAS APLICADAS TIPO BF” (El manguito es una pieza aplicada tipo BF)
Símbolo de “PROTECCIÓN DEL MEDIO AMBIENTE - Los residuos de productos eléctricos
no deben eliminarse con la basura doméstica. Recíclelos en las instalaciones indicadas
para ello. Consulte a la autoridad local o al distribuidor para informarse sobre los métodos
de reciclaje”.
Símbolo del “FABRICANTE”
Símbolo de “CUMPLE CON LOS REQUISITOS DE LA MDD93/42/CEE”
Símbolo de “PAÍS DEL FABRICANTE” y “FECHA DE FABRICACIÓN”
Símbolo de “REPRESENTACIÓN EUROPEA”
Símbolo de “NÚMERO DE SERIE”
Símbolo de “MANTENER SECO”
IP20 El primer símbolo numérico característico para el “Grado de protección contra el acceso
a piezas peligrosas y contra objetos sólidos extraños”. El segundo símbolo numérico
característico para el “Grado de protección contra la entrada de agua”.
INFORMACIÓN DE GARANTÍA
Solo se cobra el coste de los componentes y el transporte.
CENTRO DE SERVICIO
A.I.&E. Adriaan Mulderweg 9-11,
5657 EM Eindhoven, Países Bajos
Edco UK Ltd, 1st Floor Two Chamberlain Square,
B3 3AX, Birmingham, Reino Unido
ANDON HEALTH CO., LTD.
No. 3 JinPing Street,
YaAn Road, Nankai District,
Tianjin 300190, China.
iHealthLabs Europe SAS
36 Rue de Ponthieu, 75008,
París, Francia.
INFORMACIÓN DE COMPATIBILIDAD ELECTROMAGNÉTICA
Tabla1-Emisión
Fenómeno Conformidad Entornoelectromagnético
Emisiones RF CISPR 11
Distorsión armónica
Fluctuaciones /
emisiones rápidas
de tensión
Tabla2-Puertodelrecinto
Fenómeno NormaCEMbásica
Descarga
electrostática
Campo EM de RF radiado IEC 61000-4-3
Campos de proximidad
del equipo de comunicaciones inalámbrico de RF
Campos magnéticos de la
frecuencia de alimentación nominales
Tabla3-CamposdeproximidaddelequipodecomunicacionesinalámbricodeRF
Frecuencia de
prueba
(MHz)
385 380-390 Modulación de impulsos 18 Hz, 27 V/m
450 430-470 FM, desviación de ±5 kHz, sinusoidal de 1 kHz, 28 V/m
710
780
810
930
1720
1970
2450 2400-2570 Modulación de impulsos 217 Hz, 28 V/m
5240
5785
Grupo 1, Clase B
IEC 61000-3-2
Clase A
IEC 61000-3-3
Conformidad
IEC 61000-4-2
IEC 61000-4-3 Consulte la tabla 3
IEC 61000-4-8
Banda
(MHz)
704-787 Modulación de impulsos 217 Hz, 9 V/m745
800-960 Modulación de impulsos 18 Hz, 28 V/m870
1700-1990 Modulación de impulsos 217 Hz, 28 V/m1845
5100-5800 Modulación de impulsos 217 Hz, 9 V/m5500
Nivelesdepruebadeinmunidad
Entornodelcentrosanitarioprofesional
Entorno sanitario doméstico
Entorno sanitario doméstico
Entorno sanitario doméstico
Nivelesdepruebadeinmunidad
Entornosanitariodoméstico
Contacto de ±8 kV
±2 kV, ±4 kV, ±8 kV, ±15 kV aire
10 V/m
80 MHz - 2,7 GHz
80 % AM a 1 kHz
30 A/m
50 Hz o 60 Hz
 Loading...