

Page 1
Page 2

IPS01
Introduction
Thank you for buying this GRUNDIG product, which is designed
to give you many years of trouble-free service. You may already
be familiar with using a similar unit, but please take the time to
read these instructions.
Safety is important
Your safety is very important. Please therefore, ensure you read
the “Safety Instructions” before you operate this unit.
Warranty
In the unlikely event that your product fails to work normally,
please call one of our qualified service engineers on either of the
below toll free phone numbers to discuss any issues directly.
Australia
Grundig Warranty: 1800 509 394
New Zealand
Grundig Warranty: 0800 450 259
2
Page 3

IPS01
CONTENTS
Introduction
Important Notes
Location of Controls (Main Unit)
Control Definitions (Main Unit)
Location of Controls (Remote)
Control Definitions (Remote)
Setup
iPod and iPhone
3.5mm Audio Input and Composite Video Output
Playing and Charging an iPod
Warranty
What’s in the box
Carefully remove your Stereo Speaker System with Dock for iPhone
from the box. You may wish to keep the packaging for future use.
In the Box
Inside the box you will find:
2
4
6
7
8
9
10
11
12
13
15
Stereo Speaker System with Dock for iPhone (Main Unit)
Power Adaptor
Remote Control with battery
iPod/iPhone docking adaptors
User Guide
3
Page 4

IPS01
IMPORTANT NOTES
Ensure that you read all of the safety instructions before operating
this unit.
Safety Considerations
Ensure that the power cable and other connected cables are protected
and are positioned so that they are not likely to be walked on, pinched or
damaged.
Do not position the unit in areas where it may experience humid or damp
conditions.
Do not allow the unit to get wet. You must keep it away from dripping or
splashing water.
Never allow children to insert foreign objects into the holes or slots on
the unit.
Do not cover the ventilation holes with items such as tablecloths or
curtains, etc. This may cause the unit to overheat.
No naked flame sources, such as candles, should be placed on or near
the unit.
Do not place objects filled with liquids, such as vases or jugs, on or near
the unit.
Do not place the unit in a closed cabinet without proper ventilation.
Cleaning
Disconnect the unit from the mains supply before cleaning.
Do not use any liquids or aerosol cleaners, as this may damage the unit.
Use a dry, soft, dust free cloth.
Servicing
There are no user serviceable parts in this unit. When servicing, refer to
qualified service technician.
Consult your retailer if you are ever in doubt about the installation/
operation/safety of the product.
4
Page 5
IPS01
Main Unit
1
2
10
3
4
5
8
9
7
6
5
Page 6

IPS01
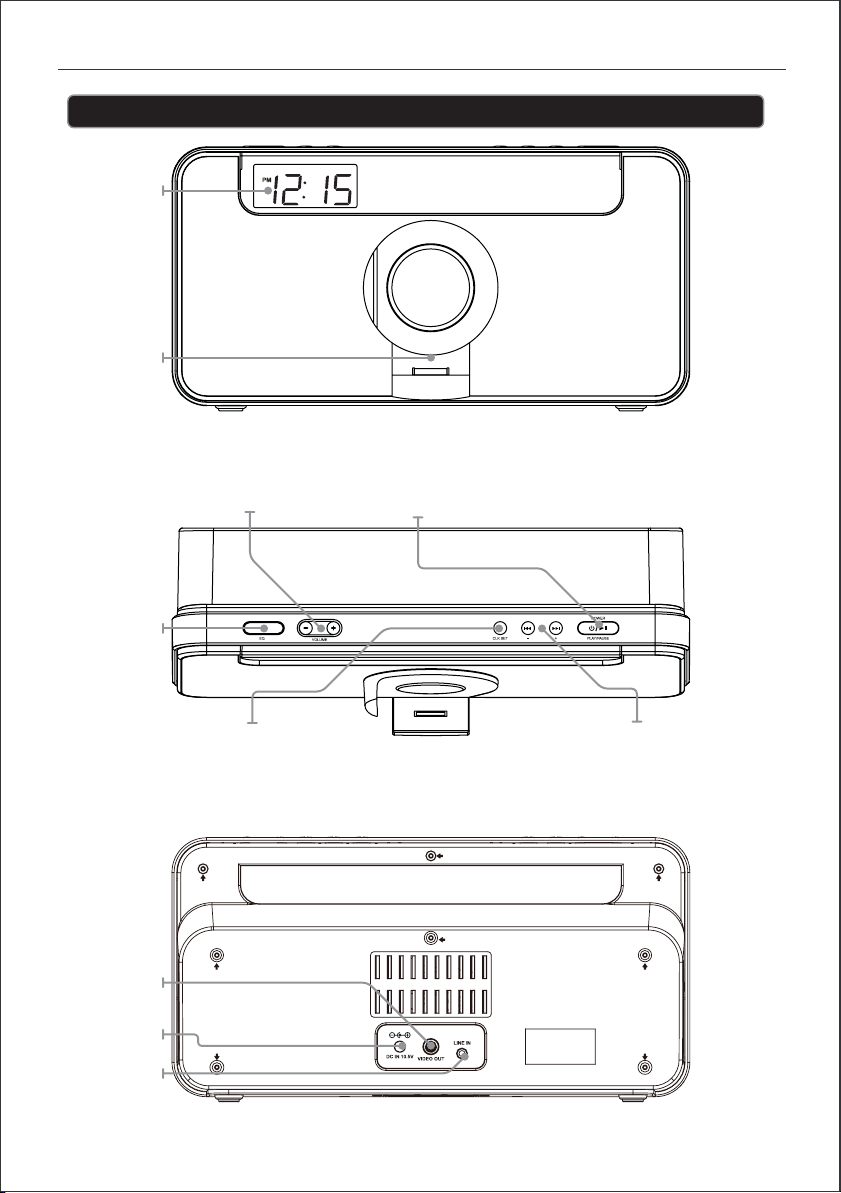
1. LCD DISPLAY: Allows you to view the current time, which can be set manually or
automatically from your iPhone.
2. ROTATING DOCK: Allows you to rotate the view of your iPod/iPhone so you can
watch videos via the dock.
3. VOLUME: Press the VOLUME Button to adjust the volume.
4: EQ: Press the EQ Button to switch between the preset equalizer modes Rock,
Classic, Jazz, and Pop.
5. CLOCK SET/MENU: When the unit is Standy, press and hold the CLOCK SET/
MENU Button to begin setting the clock.
6. SKIP/SEARCH: Press the SKIP/SEARCH Button to skip between tracks on a
docked iPod or iPhone or press and hold to search for an individual track. When
the unit is in Clock setting mode, press the SKIP/SEARCH Button to adjust the time.
7. POWER/PLAY/PAUSE: Press the POWER/PLAY/PAUSE Button to turn the power
on or press and hold to turn the unit off. Once the unit is on, press the POWER/PLAY
/PAUSE Button to play or pause playback on your iPhone/iPod.
8. COMPOSITE VIDEO OUTPUT: Allows you to connect this Speaker Dock to your TV
to watch the movies/videos from your iPhone/iPod on your TV.
9. DC POWER INPUT: Allows to connect the unit to the AC/DC adapter supplied.
10. 3.5mm AUDIO INPUT: Allows you to connect and play your MP3 Player or other
music devices.
6
Page 7

IPS01
Remote Control
1
2
3
4
14
13
12
11
10
9
5
8
6
7
7
Page 8

IPS01
1. POWER/PLAY/PAUSE: Press the POWER/PLAY/PAUSE Button to turn the power
on or press and hold to turn the unit off. Once the unit is on, press the POWER/
PLAY/PAUSE Button to play or pause playback on your iPhone/iPod.
2. STOP: Press the Stop Button to stop playback at anytime.
3. CLOCK SET/MENU: When the unit is off, press and hold the CLOCK SET/MENU
Button to begin setting the clock. When the unit is on use the CLOCK SET/MENU
Button to enter the menu.
4. SKIP/SEARCH: Press the SKIP/SEARCH Button to skip between tracks on a
docked iPod or iPhone or press and hold to search for an individual track. When the
unit is off, press the SKIP/SEARCH Button to adjust the time when setting the clock.
5. REPEAT: Press the REPEAT Button to cycle through the repeat options.
6. CHAPTER: Press the CHAPTER Button to switch between the chapters on a
docked iPod/iPhone.
7. PLAYLIST: Press the PLAYLIST Button to switch between playlists on a docked
iPod/iPhone.
8. ALBUM: Press the ALBUM Button to switch between albums on a docked iPod/
iPhone.
9. SHUFFLE: Press the SHUFFLE Button to activate or deactivate the shuffle mode
on a docked iPod/iPhone.
10. SELECT: Press the SELECT Button to make selections in the menu.
11. SLEEP: Press the SLEEP Button repeatedly to set the sleep timer.
12. VOLUME: Press the VOLUME Button to adjust the volume.
13: EQ: Press the EQ Button to switch between the preset equalizer modes Rock,
Classic, Jazz, and Pop.
14: MUTE: Press the MUTE Button to turn the volume off only.
8
Page 9

IPS01
Setup
Power
DC power input: requires an AC/DC power
adapter (included)
Backup Battery
Backup battery: requires 2 AAA batteries
(not included)
The backup battery will save the set time in
case of an unexpected power outage.
Remote
Requires a CR2025 battery (pre-installed)
CR2025
R
TE
HIUM BAT
CR 2025
3V
LIT
Y
OPEN
PUSH
WARNING: The cell battery contains mercury. Please dispose of responsibly.
9
Page 10

IPS01
iPod and iPhone
Connecting the Spacers
1. Place the spacer onto the dock and turn clockwise to lock the spacer into place.
2. To remove the spacer, turn counter-clockwise.
CLOCKWISE
LOCKS
Docking an iPod or iPhone
1. Follow the instructions for Connecting
the Spacers and use as needed to secure
your iPod or iPhone on to the dock.
2. Connect the iPod/iPhone and adaptor to
the Rotating Dock.
3. Once the iPhone/iPod is connected to
the unit it will begin to charge. Ensure
the Main Power is connected.
COUNTER-CLOCKWISE
UNLOCKS
Playing a Docked iPod or iPhone
1. Follow the instructions for Docking an
iPod or iPhone.
2. Press the POWER button to turn the
speaker on.
3. Press the POWER/PLAY/PAUSE button
to begin playing the docked iPod or
iPhone.
4. Refer to page 7 or 9 on how to use the
unit or remote control Buttons to play
specic songs, playlists or albums on a
dock iPhone/iPod.
Rotating Dock
10
Page 11

IPS01
3.5mm Audio Input and Composite Video Output
Using the 3.5mm Audio Input
To connect a MP3 Player or other Audio
Device you will need a 3.5mm Auxiliary
Cable (not included).
1. Disconnect any iPhone/iPod from the
unit.
2. The unit will automatically switch to
Line In mode when a 3.5mm Auxiliary
Cable is connected to the 3.5mm Audio
Input as long as there isn’t an iPhone/
iPod in the dock.
3. Connect a 3.5mm Auxiliary Cable to the
Audio Input on the unit and to the Audio
Output on the audio device you wish to
play.
4. Use the navigation controls on the audio
device (MP3 Player) to play and control
the audio played.
Using the Composite Video Output
To watch videos from your iPhone/iPod on
your TV you will need a RCA Composite
Video Cable (not included).
1. Use your RCA Composite Video Cable to
connect your TV's Composite Video
Input with the unit's Composite Video
Output.
2. Select and turn on the 'TV OUT' option
on your iPhone/iPod.
3. Insert your iPhone/iPod on to the dock
and turn the unit on.
4. Select the Video Input option on your
TV or Monitor.
Videocable
VIDEO IN
TO YOUR TV/MONITOR
(not included)
VIDEO OUT
FROM YOUR UNIT
5. You will now be able to play videos and
YouTube clips from your iPhone/iPod on
your TV or monitor. Use the iPhone/iPod
to select the videos.
11
Page 12

IPS01
Playing and Charging an iPod
Connecting your iPhone or iPod
1.
Select the iPhone/iPod adaptor that corresponds to your model from the table below.
Please note the highlighted adaptor models which are included with this unit.
2.
Adjust the iPhone/iPod dock support to t your model.
3.
Place the adaptor on the dock at the top of the unit with the two tabs facing forwards.
4.
To remove the adaptor, press the back of the adaptor and pull it up.
iPad, iPod, and iPhone Compatibility Information
iPad
iPad 8GB 16GB 32GB
iPhone
iPhone 4 16GB 32GB
iPhone 3GS 8GB 16GB 32GB
iPhone 3G 8GB 16GB
iPhone 4GB 8GB 16GB
iPod touch
iPod touch 4th generation 8GB 32GB 64GB
iPod touch 3rd generation 32GB 64GB
iPod touch 2nd generation 8GB 16GB 32GB 64GB
iPod touch 1st generation 8GB 16GB 32GB
iPod nano
iPod nano 6th generation 8GB 16GB
iPod nano 5th generation (video camera)
iPod nano 4th generation (video) 8GB 16GB
iPod nano 3rd generation (video) 4GB 8GB
iPod nano 2nd generation (aluminum)
iPod nano 1st generation 1GB 2GB 4GB
iPod and iPod mini
iPod classic (2009) 120GB 160GB
iPod classic (2007) 160GB
iPod classic 80GB
iPod 5th generation (video) 60GB 80GB
iPod 5th generation (video) 30GB
iPod 4th generation (color display) 40GB 60GB
iPod 4th generation (color display) 20GB 30GB
iPod 4th generation 40GB
iPod 4th generation 20GB
iPod mini 4GB 6GB
8GB 16GB
2GB 4GB 8GB
Note: Ensure that you use the dock adaptor corresponding to your iPod in order
that it is installed in a stable way and that the electrical contact is good.
• • •
• • •
• • •
• • •
• • •
• • •
• • •
• • •
• •
• •
• •
• •
•
•
• •
• •
12
TROPPUSGNITATORTUPTUOOEDIVEGRAHC&YALPYTICAPACLEDOM
to ensure
Page 13

IPS01
Trouble Shooting
If a fault occurs, rst check the points listed below before taking the unit for repair. If you are
unable to solve a problem by following the below hints we suggest you consult you retailer
or contact our Service and Warranty team United Electrical on 1800 509 394.
WARNING: Under no circumstances should you try to repair the unit yourself.
RemedyProblem
The unit won't turn on or does not
respond
No sound output
iPod/iPhone is not connecting
- The AC adaptor must be connected properly and
the mains power must be turned on.
- If connected correctly, disconnect the power for 15
minutes. Reconnect and try again.
--Makes sure your Headphones are not connected and
that mute has not been selected.
Check the volume level and adjust.
- Make sure the source is set to iPod mode, your iPod
/iPhone is connected rmly and both your devices
are turned on.
- Press the Play/Pause Button to ensure the unit is in
play mode.
RMS output:
Power:
Battery:
3W x 2
AC – DC adapter
DC 10 V 1.5 A
AAA Size x 2 for Clock Backup
CR2025 x 1 for Remote
13
Page 14

IPS01
Warranty
Please keep your receipt as proof of purchase. This product is warranted
for any defect in materials or workmanship for one year after the original
date of purchase. This product is for normal domestic and office use only.
This warranty does not cover damage from misuse or neglect, accidental
damage, vermin infestation, excessive voltages such us lightning or power
surges or any alternation that affects the performance or reliability of the
product.
Our goods come with guarantees that cannot be excluded under the
Australian Consumer Law. You are entitled to a replacement or refund for a
major failure and for compensation for any other reasonably foreseeable
loss or damage. You are also entitled to have the goods repaired or
replaced if the goods fail to be of acceptable quality and the failure does not
amount to a major failure.
In the unlikely event that your product fails to work normally, please contact
the Grundig warranty number 1800 509 394 (Australia) or 0800 450 259
(New Zealand) and have your receipt of purchase on hand.
This warranty is subject to the following provisions:
● It is only valid within boundaries of the country of purchase;
● The product must be correctly assembled and operated in accordance
with the instructions contained in the manual;
● This product must be used solely for domestic purposes;
● The warranty does not cover accidental damage;
● The warranty will be rendered invalid if the product is resold or has been
damaged by inexpert repair;
● The manufacturer disclaims any liability for incidental or consequential
damaged.
This warranty is in addition to, and does not diminish, your statutory or
rights.
PO BOX 6287
Silverwater NSW 1811
www.grundig.net.au
Grundig warranty: 1800 509 394 Australia
Grundig warranty: 0800 450 259 New Zealand
14
legal
Page 15

IPS01
PO BOX 6287
Silverwater NSW 1811
www.grundig.net.au
 Loading...