

Page 1

VIDEORECORDER
GV 540 HiFi
Page 2

r
Installation and Safety Precautions 2
r
Connecting 3
r
The Remote Control 4-5
Inserting batteries into the remote control . . . . . 4
The two levels of the remote control . . . . . . . . . 4
At a glance . . . . . . . . . . . . . . . . . . . . . . . . . . . . 4-5
r
The User Guide 6
r
Settings 7-11
Tuning the TV set to the recorder 7
Tuning . . . . . . . . . . . . . . . . . . . . . . . . . . . . . . . . 7
Improving the picture quality . . . . . . . . . . . . . . . 7
Switching the recorder’s transmitter
off and on . . . . . . . . . . . . . . . . . . . . . . . . . . . . . . 7
Setting the time and date 8
Tuning TV stations 8-11
Transfer of data from the TV set
(Megalogic function) . . . . . . . . . . . . . . . . . . . . . 8
Tuning to TV stations with the
automatic tuning system
(ATS euro plus) . . . . . . . . . . . . . . . . . . . . . . . . . 9
Resorting TV stations –
with the Follow TV function . . . . . . . . . . . . . . . 10
Resorting TV stations –
manually . . . . . . . . . . . . . . . . . . . . . . . . . . . . . . 10
Entering data manually . . . . . . . . . . . . . . . . . . . 11
Deleting the data of a programme position . . . . 11
r
The Cassette 12
r
Playback 13-15
At a glance . . . . . . . . . . . . . . . . . . . . . . . . . . . . 13
Additional playback functions . . . . . . . . . . . . . . 14
Adjusting picture/sound quality . . . . . . . . . . . . 14
Locating a certain recording . . . . . . . . . . . . . . . 15
r
Recording 16-17
At a glance . . . . . . . . . . . . . . . . . . . . . . . . . . . . 16
Entering a stop time . . . . . . . . . . . . . . . . . . . . . 17
Assembling recordings
with clean joints . . . . . . . . . . . . . . . . . . . . . . . . 17
Special features of sound recording . . . . . . . . . 17
r
TIMER Recording 18-21
The options . . . . . . . . . . . . . . . . . . . . . . . . . . . . 18
Programming with the ShowView
system, variant 1 . . . . . . . . . . . . . . . . . . . . . . . 19
Recorder messages . . . . . . . . . . . . . . . . . . . . . 20
Checking the occupied TIMER positions . . . . . 20
Altering the data of a TIMER position . . . . . . . . 20
Erasing an occupied TIMER position . . . . . . . . 20
Interrupting the record stand-by mode
of the recorder . . . . . . . . . . . . . . . . . . . . . . . . . 20
Reactivating the record stand-by mode
of the recorder . . . . . . . . . . . . . . . . . . . . . . . . . 20
Programming with the user guide
and manual data entry, variant 2 . . . . . . . . . . . 21
r
Copying from a second recorder,
camcorder, CD-i player 22
r
Insert-Splice Functions 23-24
Insert/Dubbing function . . . . . . . . . . . . . . . . . . 23
Insert/Video function . . . . . . . . . . . . . . . . . . . . 24
Insert/Copy function . . . . . . . . . . . . . . . . . . . . . 24
r
The recorder as a
hifi tape recorder 25-26
r
Dubbing 27
r
Operation with a Satellite Receiver 28
r
Operation with a PAY-TV Decoder 29
r
Special Functions 30-34
Recording – controlled from external devices . . . 30
Continuous playback mode . . . . . . . . . . . . . . . 30
The child lock . . . . . . . . . . . . . . . . . . . . . . . . . . 31
.
Setting the function display . . . . . . . . . . . . . . . 32
Operation with a 16:9 format TV set . . . . . . . . . 32
Remote control of other GRUNDIG video
recorders . . . . . . . . . . . . . . . . . . . . . . . . . . . . . 33
Selecting the language for the user guide . . . . . 34
Remote control of the TV set . . . . . . . . . . . . . . 34
r
Useful Information 35-37
Fixing faults yourself . . . . . . . . . . . . . . . . . . . . 35
Technical data . . . . . . . . . . . . . . . . . . . . . . . . . 36
Overview of code numbers . . . . . . . . . . . . . . . . 36
GRUNDIG Service Germany/Europe . . . . . . . . . 37
1
Contents GV 540 HiFi
Page 3
Ń
!
This video recorder is intended for reception, recording, and reproduction of picture and sound
signals.
Any other application is expressly prohibited.
Ń
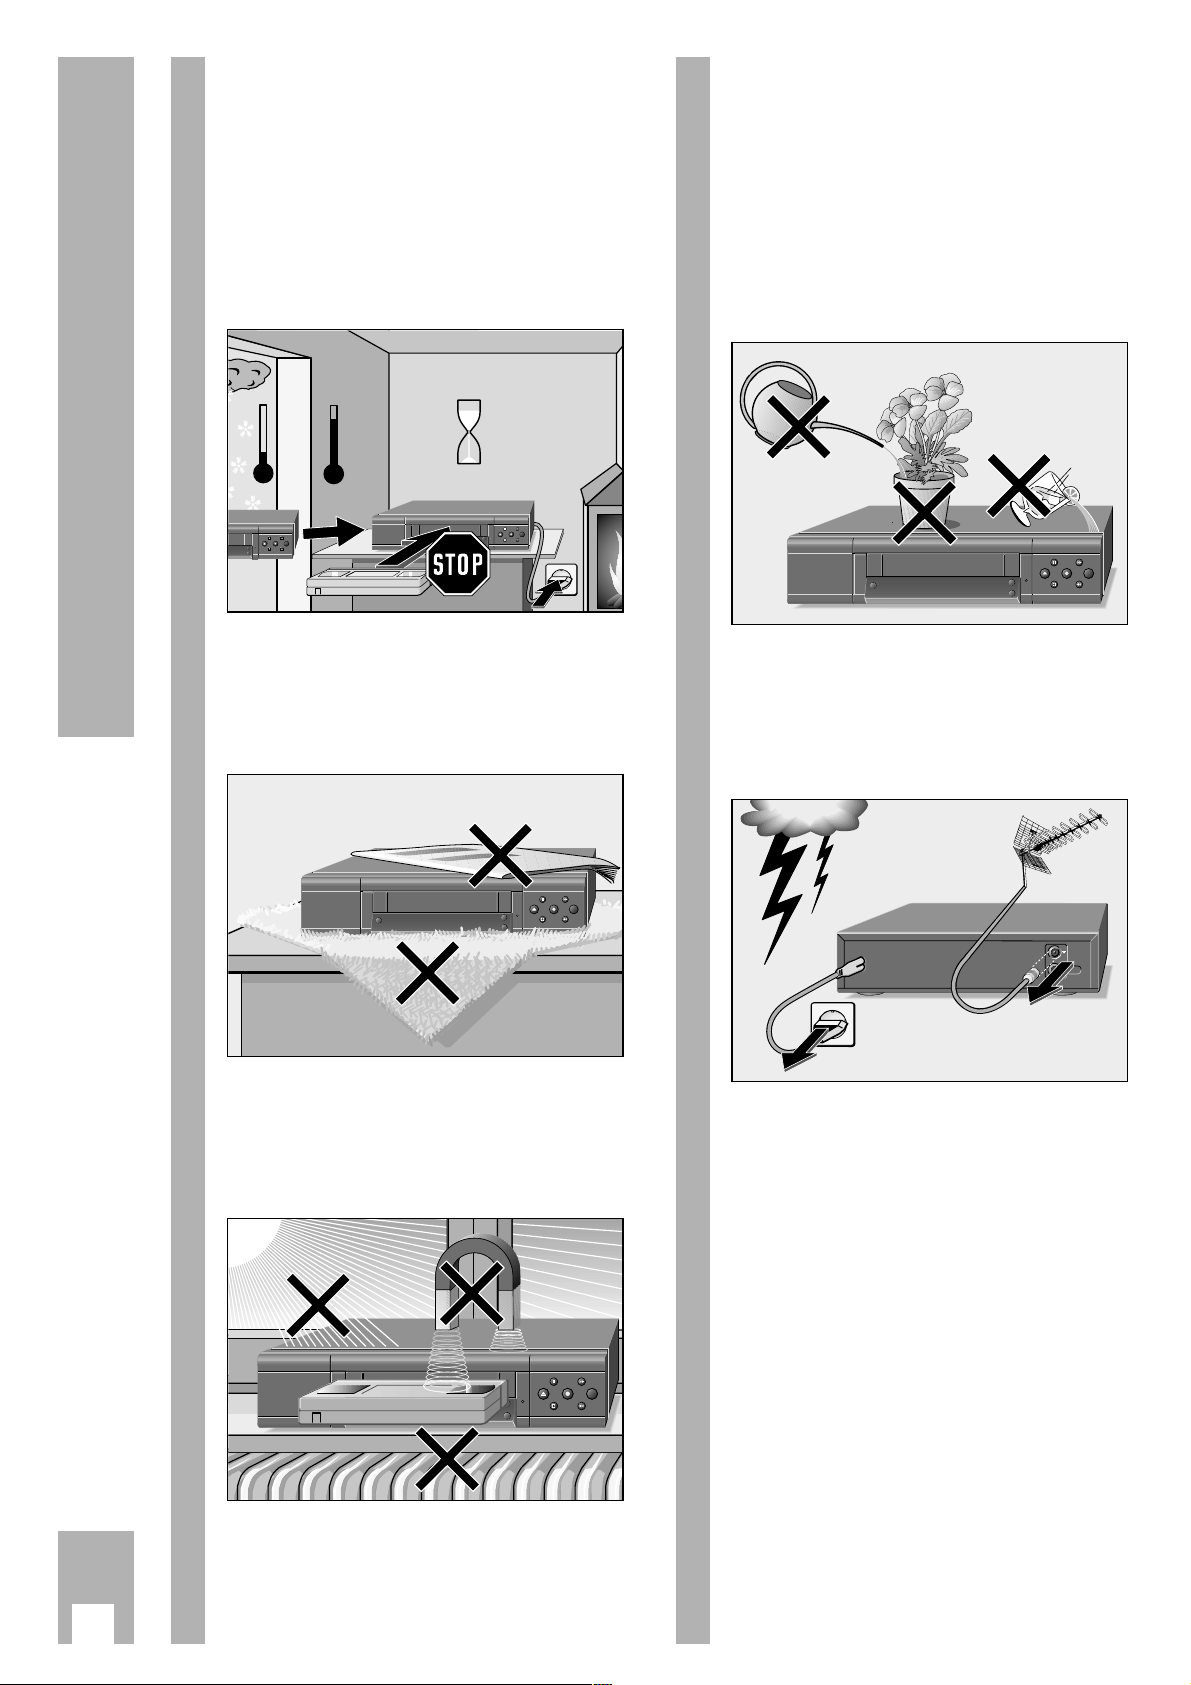
!
If the recorder is exposed to drastic temperature
changes, for example taking it from a cold to a
warm place, connect the recorder to the mains supply and let it stand at the new place for at least two
hours without a cassette loaded.
Ń
!
Place the recorder on a flat and hard surface.
Do not place the recorder on a mat or anything
similar. Do not place any objects (e.g. newspapers)
on the recorder as this would cover the ventilation
slits which are necessary for cooling.
Ń
!
Do not place the recorder in the immediate vicinity
of a heat source or in direct sunlight, as this would
also prevent appropriate cooling.
Keep the recorder away from magnetic fields
(e.g. loudspeakers).
ʺ
TIMER
ON/OFF
ʺ
ı
ʺ
TIMER
ON/OFF
ʺ
ı
Krieg im Balkan
°C
2h
°C
ʺ
TIMER
ON/OFF
ʺ
ı
ʺ
ʺ
ı
Ń
!
Do not expose the recorder or the cassette to any
moisture.
The recorder is intended for use in dry rooms.
If you wish to operate it in the open air, make absolutely sure that it is protected against moisture
(rain, splashes of water).
Do not place any object filled with water (vases and
similar) on the recorder. The object might fall over
and the liquid spilling into the unit would impair its
electrical safety.
Ń
!
Thunderstorms are a danger for any electrical appliance. Even when switched off, the recorder might
be damaged by a lightning strike to the mains supply and/or the aerial lead.
During a thunderstorm you should always disconnect the mains and aerial plugs.
Ń
!
Never insert any foreign objects into the cassette
compartment or the ventilation slits. This might
damage the sensitive mechanism.
Ń
!
Warning! Lithium battery in the video recorder
Tampering may result in explosion.
The battery may be changed only by qualified personnel (as described in the “Service Manual”).
Ń
!
Never open the recorder.
Damage caused by unqualified manipulation is not
covered by the manufacturer’s guarantee.
ń
ʺ
TIMER
ON/OFF
ʺ
ı
2
Installation and Safety Precautions
Page 4

r
Connecting the recorder to the aerial
Remove the aerial cable from the aerial socket on
the TV set and insert it into the aerial socket
–II–
on
the recorder.
r
Connecting the recorder and the TV set
W
ith EURO-AV cable
If the TV set is provided with a EURO-AV socket,
connect this socket using the supplied EURO-AV
cable to the EURO-AV A1 socket on the recorder.
– The advantage of this connection is even better
picture and sound quality during playback and in
the EE mode (loop-through mode).
– Stereo sound can only be reproduced through
this connection via the stereo TV set.
Ń
!
If the connected TV set is provided with Megalogic
functions, recorder and TV set must be connected
using a EURO-AV cable.
Detailed information on the Megalogic functions
can be found in the chapters of the operating
instructions.
Ń
!
If the recorder is connected to a TV set with 16:9
format, please observe the setting on page 32.
W
ith aerial cable
In order that the aerial signal also reaches the TV
set, the supplied aerial cable must be inserted in the
ń
socket on the recorder and in the aerial socket
on the TV set.
3
2
1
3
Connecting
r
Connecting the recorder to the mains
Insert the supplied mains cable into the mains
socket ~
on the recorder.
Insert the plug of the mains cable into the supply
socket. The recorder is now on.
Ń
!
Only by pulling out the mains plug will the recorder
be isolated from the mains.
Ń
!
Connecting possibilities for further units such as a
second video recorder, PAY-TV decoder, satellite
receiver, etc. are described in the chapters concerning these units.
r
Switching the recorder off
(energy-saver mode)
When in stand-by mode – time visible in display on
recorder – press the
¢
Ǽ
button on the remote
control or the k button on the recorder.
– The recorder is switched off, the time display dis-
appears, the yellow indicator is on.
In this mode the recorder requires very little
power.
Ń
!
If a TIMER recording is programmed, the recorder
cannot be switched off.
4
L
H
L
H
ń
ń
+
+
–
–
EURO-AV-1
AUDIO
R
L
R
L
DECODER A2
EURO-AV
4
3
1
2
Page 5

4
The Remote Control
Inserting batteries into the remote
control
Press the catch and remove the cover from the battery compartment.
Insert the batteries (2 x 1.5 V, type Micro RO3P).
Ń
!
Observe correct polarity; marked on the bottom of
the battery compartment.
Ń
!
If your recorder no longer responds correctly to the
remote control commands, the batteries may be
exhausted.
Exhausted batteries must be removed.
The manufacturer cannot be held responsible for
damage resulting from battery leakage.
Exhausted batteries must be handed over to a special waste collecting point (environmental protection).
The two levels of the remote
control
The buttons on the remote control are located on
two separate levels.
The buttons that are required for essential operating functions are located on the upper level.
The buttons that are required for convenience functions are located on the level under the cover flap.
3
5
2
1
ȄǼ
ɾ
Ƒї
IJ
STOP
TIP
INS/DUB
PAL/SEC
CODE
RES
ET
AUDIO
COUNTER
SAT
ED
/EW
VPS
C/S
2
1
·
At a glance
The buttons on the remote control are explained
briefly on this page and the following page.
For operation please see the respective chapter of
these operating instructions.
r
Buttons for TIMER programming
A Switches the recorder off (stand-by).
B
PROG. Selects the TV station.
B
DAY Selects the day.
B
START Selects the start time.
B
STOP Selects the stop time.
¢
SET/CHECK Calls up the »Record Programming«
table for checking, and for altering
data.
¢
CLEAR Deletes data.
¢
ON/OFF Interrupts/activates TIMER recor-
ding.
START
PROG.
SET/CHECK
TIMER
1
4
CLEAR
DAY
ON/OFF
2
5
SP/LP
STOP
SV/V+
3
6
8
7
9
0
AVVPT
+
+
OK
-
I
N
D
E
X
I
N
D
E
X
M
E
A
X
R
E
K
D
I
N
G
N
I
K
C
A
R
T
E
S
A
R
Page 6

5
The Remote Control
r
Buttons under the cover flap
¢
Ȅ
Calls up the time.
¢
Ǽ
Switches the recorder off (stand-by).
¢
ɾ
No function.
¢
Ƒ
No function.
¢
ї
No function.
¢
s
No function.
Z
VPS (red)
Switches VPS/PDC control off/on.
Z
ED/EW (green) Selects a “weekly” or “daily” recor-
ding (when programming with the
TIMER).
Z
(yellow) No function.
Z
C/S(blue) Switches from channel number to
special channel number (when
tuning TV stations).
¢
No function.
¢
PAL/SEC Switches the colour norm (PAL or
MESECAM).
¢
INS/DUB For selecting insert and dubbing
functions.
¢
TIP No function.
¢
CODE For preselection of various special
functions.
¢
COUNTER Switches between the playing time
and tape length display.
¢
RESET Resets the tape length display to
0.00.00.
¢
AUDIO For selecting the audio track during
recording and playback;
for switching the audio on and off
during operation with on-screen dialogue.
¢
SAT No function.
r
Switch for selecting the VCR address
r
Buttons for various entries
¢
SP/LP
Switches to long-play mode and
back to standard mode.
¢
SV/V+ Initiates ShowView programming.
1
...
0
Numbered buttons for various
entries.
g
No function.
e
Selects programme position A1, A 2
or CV for recording or for TIMER
programming.
h
Switches to the info table and back
to the TV picture.
C Cursor buttons,
FE for moving the cursor
D (marker);
for selecting various functions;
for finetuning the TV stations.
G
Confirms data.
r
Drive mechanism buttons
K Starts recording.
H Stops all functions.
W Pause in recording mode,
freeze-frame in playback mode.
T Starts playback.
N Ejects the cassette.
Shuttle ring, for selecting various
playback speeds during playback;
for fast forward/rewind during stop.
Jog dial, advances the freeze-frame;
changes the slow motion speed.
¢
INDEX Selects the INDEX search function.
¢
INDEX MARK Sets markers.
¢
INDEX ERASE Erases markers.
¢
TRACKING Activates the tracking function.
ȄǼ
ɾ
VPS
CO
PAL/SEC
UNTER
1
Ƒї
W
ED/E
INS/DUB
RESET
2
AUDIO
STOP
IJ
C/S
TIP
CODE
SAT
3
Page 7

The GRUNDIG user guide on the
screen of the TV set
… offers a dialogue between you and the recorder.
The recorder responds to many functions which
you select using the remote control, with info tables
and dialogue lines on the screen of the TV set.
Button symbols for the remote control and dialogue
lines indicate the next operating step, and options.
You are guided step by step, simply and understandably.
r
Preparation
Switch the TV set on.
Select the programme position for the video recorder at the TV set (AV programme position).
Ń
!
If the recorder is connected to a TV set with Megalogic functions, the procedure is carried out automatically. When you press the h button the TV set
is switched on and the AV programme position is
selected automatically.
2
1
6
The User Guide
Button on the Representation in Function
remote control the info table and
the dialogue lines
r
h i
Calls up the info table and switches back to the TV picture.
r
1 2 … 90 0–9
For entering data directly.
r
DC Ļļ
For step by step selection of functions or lines in a table.
r
FE ĵŁ
For switching between tables, for selecting data, and for altering settings.
r
B
+
–
For entering data step by step for TIMER recording.
r
G OK
For activating a function and for confirming data and settings.
r ¢
CLEAR CLEAR For deleting data.
r ¢
Ǽ
none To end info tables and settings at any time
.
RECORD PROGRAMMING
A1/A2 RECORD PREPARED
CHILD LOCK
INFO DURATION
INSTALLATION
SET TIME/DATE
––––––––––––––––
ļĻ OK i
PROG DAT START STOP
>
RTL2 01 12:01 13:00 *
ARD 02 10:01 11:00 *
PRO7 03 08:00 09:00
ZDF 04 00:00 00:10
VOX 05 00:20 00:30
SW3 06 01:40 02:12
–––––––––––––––––––––––
ļĻ CLEAR OK i
INFO table
r
Calling up the info table
Press the h button on the remote control.
1
Dialogue lines
DAY
PROG.
CLEAR
K
C
E
H
/C
T
E
S
TIMER
1
4
7
I
N
D
E
X
I
N
D
E
X
M
A
R
K
TIMER
ON/OFF
START
STOP
ON/OFF
SP/LP
SV/V+
2
3
5
6
8
9
0
AVVPT
+
+
OK
-
ʺ
ʺ
ı
G
N
I
K
C
A
R
T
E
S
A
R
E
X
E
D
I
N
Dialogzeilen
Page 8
7
Settings
Tuning the TV set to the recorder
The TV set receives programmes from different
stations on certain channels.
The recorder also transmits on such a channel (between channels 30 and 40 ± 2 channels in the UHF
band) to which the TV set must now be tuned.
A “transmitter” is installed in the recorder to assist
you in finding this channel.
Ń
!
This adjustment is not necessary if the recorder and
the TV set are connected with a EURO-AV cable
(see chapter “Connecting” on page 3).
If necessary, switch the recorder’s transmitter off to
prevent picture interference, see chapter on this
page.
r
Preparation
Switch the TV set on.
Select the programme position for the video recorder at the TV set (AV programme position).
r
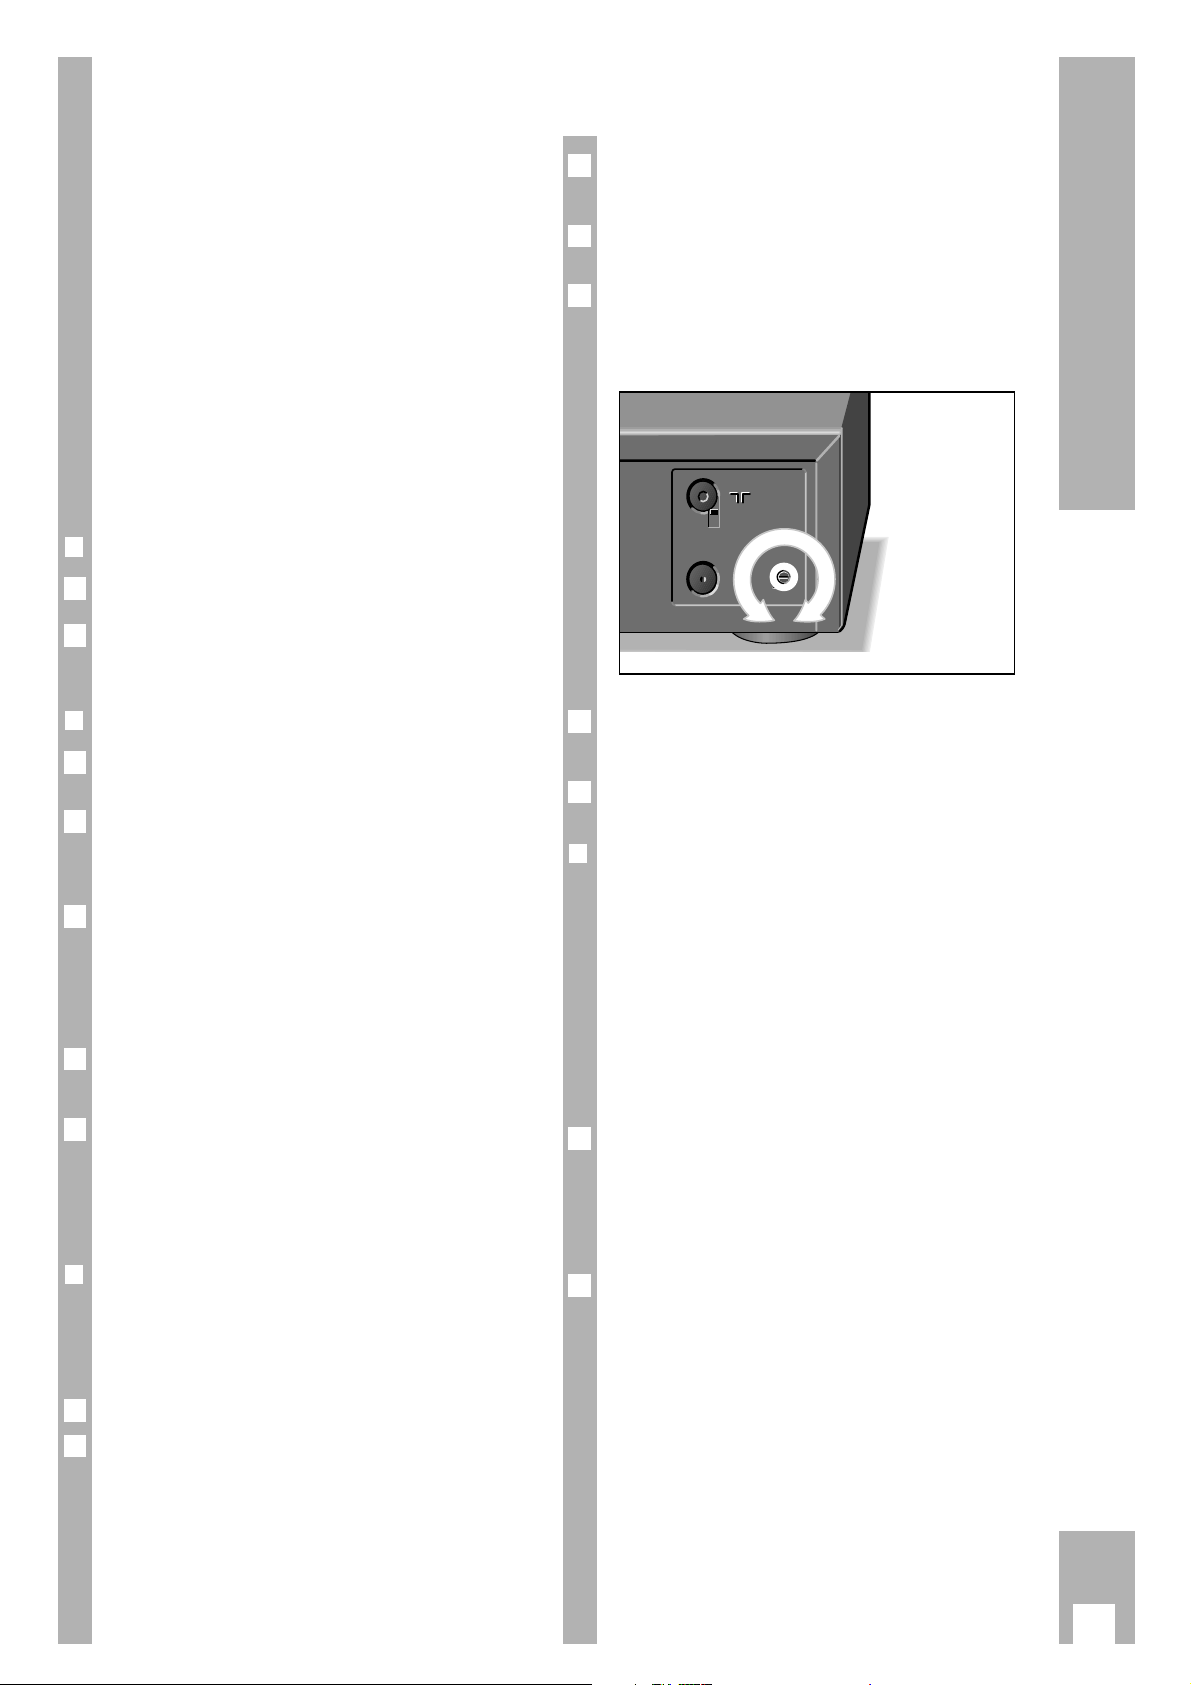
Tuning
Remove the aerial cable from the socket
–II–
on the
recorder.
Press the h button on the remote control.
– The recorder “transmits” the info table.
– Display at recorder: »
INFO
«
Search and store the recorder info table at the TV
set – between channels 30 and 40 ± 2 channels in
the UHF band.
– Follow the instructions in the TV set operating
instructions.
Insert the aerial cable in the aerial socket
–
II
–
on the
recorder.
If the picture quality is good, end the setting using
the k button on the recorder.
Ń
!
If the picture quality is poor, proceed as described
in the next chapter.
r
Improving the picture quality
If wavy lines are visible on the TV screen, the channel tuned to is already occupied by a TV station.
In this case, proceed as follows:
Press the k button on the recorder.
On the TV set, search for a channel – in the UHF
band between the channels 30 and 40 ± 2 channels
– which is not occupied by a TV station (only snow
on the picture screen).
2
1
5
4
3
2
1
2
1
Store the channel at the TV set (see the operating
instructions for the TV set).
Press the h button on the remote control.
– The recorder “transmits” the info table.
Using a screwdriver of appropriate size, turn the
channel selector
q on the back of the recorder (see
illustration) to the left or the right until the info table
appears on the TV screen.
Reconnect the aerial cable to the socket
–
II
–
on the
recorder.
End the setting using the k button on the recorder.
r
Switching the recorder’s transmitter off
and on
If your recorder receives many TV stations between
the channels 30 and 40 in the UHF band, you may
experience picture interference when using your
recorder. To avoid this, the recorder’s transmitter
may be switched off.
Ń
!
In order for the picture/sound signal of the recorder
to be passed to the TV set, the two units must be
connected with a EURO-AV cable (see page 3).
To switch the recorder’s transmitter off, press
the
¢
CODE button, the numbered buttons
8518, and the G button, in sequence.
– The recorder’s transmitter is switched off.
– Brief display at recorder: »
OFF
«.
To switch the recorder’s transmitter on, press
the
¢
CODE button, the numbered buttons
8519, and the G button, in sequence.
– The recorder’s transmitter is switched on.
– Brief display at recorder: »
ON
«.
2
1
7
6
L
H
L
H
ń
ń
+
+
–
–
5
4
3
Page 9

8
Settings
Setting the time and date
Ń
!
The digital clock continues to operate (for up to 7
days) after the recorder has been disconnected
from the mains supply. However, the time is not
displayed and the yellow indicator on the recorder
is off.
Ń
!
If necessary, set the language for the user guide.
Follow the instructions in the chapter “Selecting the
language for the user guide” on page 34.
r
Preparation
Switch the TV set on.
Select the AV programme position for the video
recorder at the TV set (serves as monitor).
r
Operation
Call up the info table using the h button.
Ń
!
When the recorder is used for the first time, the
»Installation« menu appears immediately after button h has been pressed. Press button h once
again and the Info menu appears.
Use the DC buttons to select the »Set Time/Date«
line and call it up using the G button.
– The »Set Time/Date« table appears.
Enter the time as a four-digit number using the
numbered buttons 1 … 0.
Use the D button to select the » Date « line and
enter the date as a six-digit number using the numbered buttons 1 … 0.
Confirm the entry using the G button.
End the setting using the
¢
Ǽ
button.
6
5
4
3
TIME: 20:15
DATE: 19.08.94
–––––––––––––––––––
ļĻ 0-9 OK i
2
1
2
1
Tuning TV stations
Television stations broadcast programmes on different frequencies/channels.
The recorder has a built-in receiver. It can thus
receive and record television programmes independently of the TV set.
First, you must tune your recorder to the channels
used by the different TV stations.
99 programme positions are available. They can be
occupied as required with TV stations from the aerial or a cable connection.
A number of options are available for tuning:
1. By transfer of data from the TV set.
The TV set must be provided with Megalogic
functions.
2. With the automatic tuning system (ATS euro
plus). The recorder searches, sorts, and stores
all channels/special channels which can be received at its location.
This procedure depends on the language and
country you select, as well as the quality of
reception of the TV stations.
If you are not satisfied with the order in which
the TV stations are allocated, the order can be
changed later.
3. By entering data directly.
4. By searching manually, for example if there are
new TV stations, or if the recorder cannot find a
TV station with the automatic tuning system.
Accepting data from the TV set
(Megalogic function)
If the recorder is connected to a TV set with Megalogic function, the recorder automatically accepts
the TV programmes that are stored in the TV set.
To enable the recorder to this, you must carry out
the following steps in the order indicated.
Ń
!
Recorder and TV set must be connected with the
EURO-AV cable provided with your recorder, and
the TV set must be switched on.
Remove the plug for the recorder from the mains.
Re-insert the plug for the recorder into the mains.
– The recorder automatically accepts the TV
programmes from the TV set.
Thus the recorder will have the same programme
position assignments as the TV set.
2
1
·
Page 10

9
Settings
Tuning to TV stations with the
automatic tuning system
(ATS euro plus)
r
Preparation
Switch the TV set on.
Select the programme position for the video recorder at the TV set (AV programme position).
r
Example
Call up the info table using the h button.
Ń
!
When the recorder is switched on for the first time,
the “Installation” table appears immediately after
the h button is pressed.
Use the DC button to select the “ATS euro plus”
line and and call it up using the G button. Continue operation at step .
Select the » Installation « line using the DC buttons and call it up using the G button.
Call up the » ATS euro plus « line using the G
button.
– The »Select language« table appears.
Select the language of your location using the
FE DC buttons and confirm using the G
button.
Select the country (location) using the FE DC
buttons.
Ń
!
If the country you require is not to be found in the
table, select the »?? « line.
Start the ATS euro plus search using the G
button.
– Display at recorder: »
ATS
« and »°«.
– The recorder searches all channels for TV stati-
ons, and sorts and stores them.
6
5
4
DEUTSCH PORTUGUÊS
ESPAÑOL SVENSKA
FRANÇAIS NORSK
ENGLISH DANSK
ITALIANO SUOMI
NEDERLANDS
–––––––––––––––––––
ļĻ
ĵŁ
OK i
3
2
4
1
2
1
– When the search has been completed the » TV
Station Table« appears.
Ń
!
The station identification is inserted automatically
in the » TV Station Table « for TV stations which
broadcast a VPS/PDC signal.
Ń
!
The station identification may be entered manually
for stations which do not broadcast a VPS/PDC
signal.
How to enter this information is explained in the
example on page 11.
Ń
!
How to alter the sequence of TV stations, enter data
manually, and delete data is explained in the examples on the following pages.
End the setting using the
¢
Ǽ
button.
r
Eliminating picture interference
If the recorder does not carry out the ATS euro plus
search correctly, operate attenuator switch to position and repeat the setting starting with step
of the example.
ń
L
H
SIG
MOD.
FREQ.
L
H
SIG
L
H
SIG
1
H
7
PR CH PC DEC P/S
01 C06 ARD OFF
02 C34 ZDF OFF
03 C59 BR3 OFF
04 C40 RTL OFF
05 C36 SAT1 OFF
06 C21 PRO7 OFF
07 C48 WDR OFF
–––––––––––––––––––
GREEN: COPY/SORT
ļĻ
ĵŁ
CLEAR OK i
·
Page 11

10
Settings
Resorting TV stations – manually
r
Preraration
Switch the TV set on.
Select the programme position for the video recorder at the TV set (AV programme position).
r
Example
Call up the info table using the h button.
Select the » Installation « line using the DC buttons and call it up using the G button.
Use the DC buttons to select the » TV Station
Table« line and call it up using the G button.
– The »TV Station Table« appears and the selected
programme position is marked.
Select programme position using the DC E F
buttons.
Mark programme position using the Z
ED/EW (green)
button.
Select new programme position using the DC
buttons.
– The data of the marked programme position will
be transferred to the new programme position.
Store settings using the G button.
– The following TV stations are moved by one
position.
To sort further TV stations repeat the procedure
starting at step .
End the setting using the
¢
Ǽ
button.
8
4
PR CH PC DEC P/S
01 C06 ARD OFF
02 C34 ZDF OFF
03 C59 BR3 OFF
04 C21 PRO7 OFF
05 C36 SAT1 OFF
06 C40 RTL OFF
07 C48 WDR OFF
–––––––––––––––––––
GREEN: COPY/SORT
ļĻ
ĵŁ
CLEAR OK i
7
6
5
4
PR CH PC DEC P/S
01 C06 ARD OFF
02 C34 ZDF OFF
03 C59 BR3 OFF
04 C40 RTL OFF
05 C36 SAT1 OFF
06 C21 PRO7 OFF
07 C48 WDR OFF
–––––––––––––––––––
GREEN: COPY/SORT
ļĻ
ĵŁ
CLEAR OK i
3
2
1
2
1
Resorting TV stations – with the
Follow TV function
Here the recorder receives the same programme
position allocation as the TV set.
Ń
!
The recorder and the TV set must be connected
with a EURO-AV cable.
r
Preparation
Switch the TV set on.
Select the programme position for the video recor-
der at the TV set (AV programme position).
r
Example
Call up the info table using the h button.
Select the » Installation « line using the DC but-
tons and call it up using the G button.
Use the DC buttons to select the » Follow TV «
line and activate it using the G button.
– Display at recorder: »
SELECT TV PO I
«.
Select programme position 1 at the TV set.
Press the G button on the remote control of the
recorder.
– Display at recorder: »
PLEASE WAIT
« and »°«.
– The recorder “searches” for the data of the first
programme position of the TV set. It occupies its
first programme position with the same TV station as at the TV set.
– When this procedure has been completed, the fol-
lowing display appears at the recorder: »
SELECT
TV PO2
«.
Select programme position 2 at the TV set.
Press the G button on the remote control of the
recorder.
– Repeat the setting until all TV stations have been
sorted.
End the setting using the
¢
Ǽ
button.
Ń
!
Errors can occur in allocation if two TV stations are
broadcasting the same programmes.
Repeat the setting when the stations are broadcasting different programmes, or resort the stations
manually.
8
7
6
5
4
3
2
1
2
1
·
Page 12

11
Settings
Entering data manually
r
Preparation
Switch the TV set on.
Select the programme position for the video recorder at the TV set (AV programme position).
r
Example
Call up the info table using the h button.
Select the » Installation « line using the DC but-
tons and call it up using the G button.
Use the DC buttons to select the » TV Station
Table« line and call it up using the G button.
– The » TV Station Table « appears, the selected
programme position is marked.
Select programme position using the DC E F
buttons, then press the G button.
– The »Programme« table appears.
Select data line using the DC buttons.
The texts mean:
SAT : satellite TV programme,
CHANNEL: the channel number or frequency of
the TV station,
NAME: the station identification
(max. 4 places),
NORM: the colour norm of the TV station
(PAL or MESECAM),
DECODER: activate programme position for
external decoder,
FINE TUN.: fine tuning of picture.
Ń
!
For further operating steps please see the dialogue
lines of the »Programme « table.
5
PROGRAMME 08
SAT: YES
*
NO
CHANNEL: C05
NAME: ––––
NORM: MESEC
DECODER: ON*OFF
FINE TUN.:-3
–––––––––––––––––––
RED: FRQ/CH BLUE: C/S
ļĻ
ĵŁ
0-9 OK i
4
PR CH PC DEC P/S
01 C06 ARD OFF
02 C34 ZDF OFF
03 C59 BR3 OFF
04 C40 RTL OFF
05 C36 SAT1 OFF
06 C21 PRO7 OFF
07 C48 WDR OFF
–––––––––––––––––––
GREEN: COPY/SORT
ļĻ
ĵŁ
CLEAR OK i
3
2
1
2
1
Ń
!
For satellite TV programmes, enter the station identification at the same programme positions as in
the satellite receiver.
No additional settings are possible.
Ń
!
Instead of entering the channel number you can
enter the frequency of the TV station. To do this
press the Z VPS (red) button.
– The display changes from » CHANNEL « to
»FREQUENCY «.
Enter the desired frequency as a four-digit number using the numbered buttons 1…0.
Ń
!
If both the channel number and the frequency are
unknown a search may be started. To do this press
the E button.
Store entry using the G button.
– The » TV Station Table « reappears. .
To enter data for the next programme position
repeat the setting starting with step .
End the setting using the
¢
Ǽ
button.
Deleting the data of a programme
position
r
Preparation
Switch the TV set on.
Select the programme position for the video recorder at the TV set (AV programme position).
r
Example
Call up the info table using the h button.
Select the » Installation « line using the DC but-
tons and call it up using the G button.
Use the DC buttons to select the » TV Station
Table« line and call it up using the G button.
– The » TV Station Table « appears, the selected
programme position is marked.
Select programme position using the DC E F
buttons.
Delete the data line using the
¢
CLEAR button.
– The following TV stations move forward by one
position.
End the setting using the
¢
Ǽ
button.
6
5
4
PR CH PC DEC P/S
01 C06 ARD OFF
02 C34 ZDF OFF
03 C59 BR3 OFF
04 C40 RTL OFF
05 C36 SAT1 OFF
06 C21 PRO7 OFF
07
–––––––––––––––––––
GREEN: COPY/SORT
ļĻ
ĵŁ
CLEAR OK i
3
2
1
2
1
7
4
6
Page 13

12
The Cassette
r
Inserting a cassette
Push the cassette with the window facing upwards
into the cassette compartment until it is automatically pulled in.
r
Cassette tape length/playing time
automatic recognition
After having inserted the cassette the recorder will
measure the playing time (display: »
ATTS
«) and
indicate the total playing time in hours if a standard
hours cassette is used (e.g. E 180 for a three-hour
cassette), and the elapsed playing time in hours and
minutes.
In the case of all other cassettes – including 5-hour
cassettes – the playing time must be entered
manually.
r
Entering the playing time manually
Start playback using the T button on the remote
control or the Q button on the recorder. Then
press the h button and the G button.
– The »Cassette Selection« table appears.
Select cassette playing time using the DC F E
buttons and confirm using the G button.
r
Indication of the total playing time
Three display options are available:
Elapsed playing time in hours and minutes,
display »
UI : 30
«;
Remaining playing time in hours and minutes,
display »
L I : 35
«;
Tape length in hours, minutes, and seconds,
display »
0:00:00
«.
Select the desired display using the
¢
COUNTER
button.
Ń
!
If the playing time cannot be determined, the recorder automatically switches to the five-digit tape
length display.
2
1
2
EC30 E105 E210
EC45 E120 E225
EC60 E135 E240
E30 E150 E260
E45 E165 E280
E60 E180 E300
E75 E195
E90 E200
–––––––––––––––––––
ļĻ
ĵŁ
OK i
1
1
Ń
!
The tape length display is automatically set to
» 0.00.00 « when a cassette is inserted.
It can also be reset manually to » 0.00.00 « using
the
¢
RESET
button.
r
Ejecting a cassette
Press the N button; the cassette is ejected.
r
Protecting recordings against accidental
erasure
Whenever a recording is made on a cassette, any
recording already on the tape will automatically be
erased. To avoid this, it is possible to protect your
cassettes against accidental erasure/re-recording.
To do this, simply break out the tab on the cassette.
If you wish to use the cassette for recording again,
cover the opening with adhesive tape.
Function displays
(OSD – O
N SCREEN DISPLAY)
The recorder provides information on the selected
function and the playing time of the cassette.
1. At the display on the recorder.
2. On the screen of the TV set.
It is possible to adjust the duration of the screen
displays:
– permanent display,
– display for a short period,
– no display.
This setting can be found in the chapter “Special
functions, setting the function display” on page 32.
It is possible to alter the language of the display.
The setting can be found in the chapter “Special
functions, selecting the language for the user
guide” on page 34.
1
TIMER
ON/OFF
ʺ
ʺ
ı
Page 14

13
Playback
Remove the cassette by pressing the N button.
Switch the recorder off using the A button on the
remote control or the k button on the recorder.
r
Megalogic functions
If the recorder is connected to a TV set with Megalogic functions, when playback is started the TV set
is automatically switched on and the AV programme position is automatically selected.
7
6
·
At a glance
* Freeze-frame picture in long-play mode is in black and white
r
Preparation
Switch the TV set on.
Select the programme position for the video recorder at the TV set (AV programme position).
Insert a recorded cassette into the cassette compartment. The video recorder automatically determines the playing time of the cassette.
r
Operation
Start playback using the T button on the remote
control or the Q button on the recorder.
Select pause/freeze-frame*. To do this press the
W button on the remote control or the U button
on the recorder during playback.
Switch through freeze-frame pictures step by step.
To do this press the W button on the remote control or turn the jog dial on the recorder. Return to
normal playback. To do this press the T button
on the remote control or the Q button on the
recorder.
End playback using the H button on the remote
control or the k button on the recorder.
To fast-forward or rewind the tape, during the stop
function, turn the shuttle ring on the remote control
to the right or left, or
press the XYbuttons on the recorder.
Terminate fast winding using the H button on the
remote control or the k button on the recorder.
5
4
3
2
1
3
2
1
6
4
7
3
2
1
7
1
6
5
2
3
4
5
ʺ
ʺ
START
DAY
PROG.
ON/OFF
CLEAR
SET/CHECK
TIMER
2
1
5
4
8
ı
7
0
+
STOP
SP/LP
SV/V+
3
6
9
AVVPT
+
OK
-
I
N
D
E
X
I
N
D
E
X
M
A
X
R
E
K
D
I
N
I
K
C
A
R
T
E
S
A
R
E
G
N
Page 15

14
Playback
Additional playback functions
r
Different playback speeds
Select various forward/backward playback speeds
by turning the shuttle ring on the remote control to
the left or right during playback and holding it there,
or
Press the XYbuttons on the recorder.
Ń
!
To return to normal playback from other playback
functions, release the shuttle ring on the remote
control or press the Q button on the recorder.
r
Super slow motion
Select pause/freeze-frame. To do this, during playback, press the W button on the remote control or
the U button on the recorder.
Then keep the U button on the recorder pressed,
or turn the jog dial on the remote control steadily.
r
Playback of long-play recordings
The recorder automatically switches to long-play
playback mode when playing back a long-play
recording.
– Display on recorder: » LP «.
Ń
!
Picture disturbances may occur during long-play
operation.
2
1
2
1
r
Playback of recordings with other colour
norms
MESECAM colour nor
m
Press the
¢
PAL/SEC button to play back MESECAM
recordings.
– Display on recorder: »
MESECAM
«.
Ń
!
The TV set must also correspond to this colour
norm.
After playback, press the
¢
PAL/SEC button again;
the »
MESECAM
« display disappears.
NTSC colour norm
The recorder automatically switches to the NTSC
system when playing back NTSC recordings.
– Brief display on the recorder:
»
NTSC SP
« (Standard Play) or
»
NTSC EP
« (Extended Play).
Ń
!
The total playing time display changes to a five-digit
tape length display.
Ń
!
The freeze-frame function is not possible during
NTSC playback.
Ń
!
Picture disturbances may occur during NTSC longplay mode playback.
r
Playback of S-VHS recordings
The recorder automatically switches to S-VHS
when playing back recordings that were recorded
using this format.
– Display on recorder » «.
r
Selecting the audio track
The desired audio track can be selected when playing back recordings with stereo or two-channel
sound.
The basic setting is stereo (hifi helical track)
– Display on recorder: »
ɳ «.
Pressing the
¢
AUDIO
button repeatedly selects the
following settings:
Audio track 1 – Display on recorder:
»
I
« and »
LEFT
«;
Audio track 2 – Display on recorder: »2« and »
RIGHT
«;
Mono/longitudinal track – Display on recorder:
»
MONO
«;
Mixed mode (hifi helical track and mono/longitudinal track, for checking dubbed cassettes)
– Display on recorder: »
MIX
«.
·
Page 16

15
Playback
Locating certain recordings Video
I
ndex S
eek System (VISS)
This system enables you to locate the beginning of
each of your own recordings quickly and accurately.
r
Marking a tape position – automatically
The “marks” are placed on the tape automatically at
the beginning of each of your own recordings.
r
Marking a tape position – manually
In addition to the automatic “marks”, you can place
“marks” on the tape with the push of a button.
While recording or playing back the tape position
that is to be “marked”, press the
¢
INDEX MARK but-
ton.
– Display on recorder: »
INDEX MARK
«.
– Display on screen: »INDEX MARK«.
r
Locating a tape position
The starting point is the current tape position.
The search can be carried out up to 9 preceding or
9 succeeding marks.
Press the
¢
INDEX button.
– Display on recorder: »
INDEX
« and a number.
– Display on screen: »INDEX« and a number.
Use the numbered buttons 1…9 – for mark 1 to 9
– to enter a number.
Then turn the shuttle ring to the left or right.
– The tape is wound to the selected mark and play-
back is started there.
r
Erasing a mark from the tape
Press the
¢
INDEX
button.
Use the numbered buttons 1…9 to enter a number – for mark 1 to 9 – and then
turn the shuttle ring to the left or right.
– The tape is wound to the selected mark and play-
back is started there.
– Flashing display on recorder: »
INDEX
«.
While the »
INDEX
« display is flashing, the mark
can be erased using the
¢
INDEX ERASE
button.
– Display on recorder: »
INDEX ERASE
«.
– Display on screen: »INDEX ERASE«.
3
2
1
2
1
Adjusting picture/sound quality
r
Picture/sound quality adjustment – automatic
After a cassette has been inserted and playback has
started, the recorder automatically adjusts for the
best possible picture quality (Auto Tracking).
– During adjustment, the recorder display shows
»
AUTO-TRACK
« and the picture/sound quality
may change.
r
Picture/sound quality adjustment –
manual
Press the
¢
TRACKING button.
– Display on recorder: »
TRACKING
«.
– Display on screen: » TRACKING «.
Use the
F E
buttons on the remote control to
carry out the tracking adjustment.
Store the setting using the
G
button.
r
Optimizing the picture/sound quality for
cassettes recorded on another recorder
If the picture jumps or scrolls when playing back
tapes recorded on another recorder, press the
¢
CODE
button, the numbered buttons
8511
and the
G
button one after another.
– Brief display on the recorder: »
ON
«.
r
Optimizing the freeze-frame picture
If the picture jitters or appears uneven during the
freeze-frame function, the picture can be optimized.
During freeze-frame, press the h button.
Select the » Jitter Adjustment « line using the D
button, and call it up using the G button.
– Display on recorder: »
JITTER
«.
– Display on screen: »JITTER ADJUSTMENT«.
Adjust the picture to suit your personal taste using
the
D or C
buttons. Then press the
G
button.
r
Optimizing the picture definition
(Automatic Contour Control Plus)
Automatic
(Automatic Contour Control)
The recorder automatically adjusts to the optimum
picture definition after the cassette has been inserted and playback begins.
Manual
During playback the
DC
buttons can be used to
adjust the picture definition to suit your personal
taste.
– Brief display on recorder: »
SHARPNESS +I
«.
3
2
1
1
3
2
1
Page 17

16
Recording
r
Preparation
Switch the TV set on.
Select the programme position for the video recor-
der at the TV set (AV programme position).
Insert a cassette with sufficient playing time into
the cassette compartment.
r
Operation
Select programme position, step by step using the
DC buttons on the remote control or the cd
buttons on the recorder;
directly using the numbered buttons 1 ... 0 on
the remote control.
Ń
!
For two-digit programme positions, press the
second numbered button directly after the first.
Select long-play recording – if desired – using the
¢
SP/LP button.
– This doubles the playing time of the cassette.
Start recording by pressing the K button for a longer interval.
Select recording pause using the W button on the
remote control or the U button on the recorder.
Resume recording with the K button.
End recording using the H button on the remote
control or the k button on the recorder.
Fast-forward or rewind tape. To do this, while the
recorder is in stop function, turn the shuttle ring on
the remote control to the right or left, or
press the XYbuttons on the recorder.
Terminate fast winding with the H button on the
remote control or the k button on the recorder.
6
5
4
3
2
1
3
2
1
Remove the cassette by pressing the N button.
Switch the recorder off using the A button on the
remote control or the k button on the recorder.
r
Megalogic function
If the recorder is connected to a TV set with Megalogic functions, it is possible to record the TV
programme which is visible on the TV screen by
pressing the K button.
The programme position need not be selected on
the recorder.
8
7
·
At a glance
4
3
6
7
5
1
8
2
1
1
7
6
4
3
5
8
ʺ
ʺ
PROG.
DAY
STOP
START
ON/OFF
CLEAR
SET/CHECK
TIMER
1
ı
4
7
SP/LP
SV/V+
2
3
5
6
8
9
0
AVVPT
+
+
OK
-
I
N
D
E
X
I
N
D
E
X
M
A
R
E
X
R
E
K
D
I
N
G
N
I
K
C
A
R
T
E
S
A
Page 18

17
Recording
Entering a stop time
Ń
!
Recording continues to the end of the tape. .
Then the recorder switches automatically to rewind,
winds the tape to the start, and switches to
standby.
But you can enter a stop time. For this, there are
two options:
Entering to the exact minute;
Entering in 30-minute steps.
r
Entering stop time to the exact minute
Press the K button during recording.
Enter the desired stop time as a four-digit number
using the numbered buttons 1 ... 0 and confirm
using the G button.
r
Entering stop time in 30-minute steps
Press the K button during recording.
During recording, enter the desired stop time by
pressing the K button repeatedly (max. 20 times =
600 minutes) and confirm using the G button.
r
Changing the stop time
If the stop time is to be changed during recording,
press the K button, enter the new stop time using
the numbered buttons 1 ... 0 and confirm using
the G button.
Assembling recordings with clean
joints (assembly editing)
During playback, locate the tape position at which
you wish to join the new recording. Then press the
W
button on the remote control or the U button
on the recorder.
Switch the recorder to recording pause using the
K button.
Enter the desired programme as a one- or two-digit
number using the numbered buttons 1 ... 0.
Start the » new « recording using the
W
button
on the remote control or the U button on the
recorder.
– During playback you will see seamless transitions
without flaws. This is called assembly editing.
4
3
2
1
1
2
1
2
1
Special features of sound
recording
r
The different audio tracks of your
recorder
Your recorder has two different recording and playback systems for the audio track.
The hifi or helical track is for stereo and two-channel recordings.
The mono or longfitudinal track is for sound reproduction on standard VHS recorders and for dubbing.
Ń
!
The sound is recorded on both audio tracks during
recording.
r
Two-channel-sound TV broadcasts
Both sound channels are always recorded on the
helical track.
Sound channel 1 is recorded on the longitudinal
track.
The recorder automatically switches to sound channel 1 for two-channel broadcasts.
The sound channel can be selected using the
¢
AUDIO button and checked using the TV set.
r
Stereo-sound TV broadcasts
Both sound channels are always recorded on the
helical track.
The mono sound is recorded on the longitudinal
track.
Basic position = stereo; the recorder display shows:
»
ɳ «.
r
Sound level control, automatic/manual
After the programme has been selected, the recorder automatically adjusts the sound level.
If you wish to control the sound level manually,
press the
¢
MAN
button on the recorder.
– Display on recorder: »
MAN « and »
LEVEL I0
«.
Use the
¢
– LEVEL + buttons on the recorder to
adjust the sound so that the red mark (+ 0 dB) lights
up during the loudest passages.
By pressing the
¢
MAN button again you can return
to automatic sound level control.
3
2
1
Page 19

18
TIMER Recording
The options for TIMER
programming
The recorder can be programmed to record at a
later date.
r
You can programme:
– Six broadcasts over a period of 31 days,
– Daily or weekly broadcasts with the same starting
time,
– With or without VPS/PDC control.
– with standard or long playing time.
r
You can choose from two variants:
1. With the ShowView system.
2. With the user guide and manual data entry.
r
VPS/PDC – the Video Programme System
VPS/PDC control when programming recording
guarantees that your desired broadcasts are always
recorded completely.
Incorrect recording resulting from programme alterations no longer occurs.
r
Notes on TIMER programming with
VPS/PDC
Many TV stations broadcast an additional programme-related signal (VPS/PDC signal) which indicates
the start and duration of each individual TV programme.
It is therefore important when programming the
recorder to enter the switch-on and switch-off
times to the exact minute.
If TV programmes are altered or moved, special
VPS/PDC times are indicated in the programme
over-views. They must be entered instead of the
normal starting times.
The recorder recognizes these alterations and is
switched on at the actual start of the programme
and switched off at the actual end of the
programme.
r
Programming a number of TV
programmes on one day
If you wish to record a number of TV programmes
on one day, you must decide which one is to be
recorded completely if there is a risk of alterations
to timing.
Example:
You wish to record the 1st station from 20:15 to
21:45 Uhr and the 2nd station from 21:50 to 22:30.
But the programme from the 1st station is extended
by 15 minutes. The recorder records this programme until 22:00, controlled by the VPS/PDC signal.
Only then does it switch to the second station. So
10 minutes of the second programme are missing.
If the programme from the 2nd station is to be
recorded from the beginning you must delete
VPS/PDC control when programming the 1st station. The length of the recording is then controlled by
the switch-on and switch-off times.
Recording of the 1st station then ends at 21:45.
And recording of the 2nd station starts at 21:50.
r
Programming all evening programmes
on one day
You wish to record all the evening programmes on
ARD (for example Saturday starting at 20:15, entertainment programme, winning Lotto numbers,
film). In this case you must use a separate TIMER
position for each of these programmes. Otherwise
the recorder would stop recording at the end of the
first programme – controlled by the VPS/PDC-Signal.
If you only wish to use one TIMER position for all
evening programmes (for example from 20:15 to
00:15) you must delete VPS/PDC control when programming.
How to confirm and delete the VPS/PDC signal is
explained in the programming examples.
Ń
!
When recording TV stations which do not broadcast a VPS/PDC signal, the recording is started by
the set switch-on time only and stopped by the set
switch-off time only.
Ń
!
If you use an aerial positioner and pre-programme
satellite programmes from different satellites, you
should programme the VPS/PDC control for only
one programme.
Reason:
If two satellite programmes from different satellites
are pre-programmed with VPS/PDC control, the
satellite aerial constantly moves back and forth between the satellite positions. This can lead to an
overload of the aerial motor.
·
Page 20

19
TIMER Recording
Programming with the ShowView
system, variant 1
All you have to do is activate the ShowView system
by pressing a button, enter the ShowView number
code – indicated in the TV magazine – and confirm
the entry.
ShowView is a registered trademark of Gemstar
Development Corp.
The ShowView system is manufactured under
license from Gemstar Development Corporation.
Ń
!
When programming a TV station for the first time
the recorder must be “taught” which programme
position the respective TV station is stored on.
How this works is described in operating step of
the example.
r
Preparation
Switch the TV set on.
Select the AV programme position for the video
recorder at the TV set.
Insert a cassette with sufficient playing time, pay
attention to erase prevention.
Ń
!
The time and date at the recorder must be correct.
r
Example
Use the
¢
SV/V+
button to start programming.
– The data is indicated on the TV screen and on the
display on the recorder.
Ń
!
If all TIMER positions are occupied you must erase
a TIMER position. See the chapter “Erasing an
occupied TIMER position” on page 20.
Ń
!
Only the on screen display is described in the
example.
Use the numbered buttons 1 ... 0 to enter the
ShowView number of the desired TV programme.
2
ENTER NUMBER:
---------
–––––––––––––––––––
GREEN: ED/EW
0- 9 SV CLEAR OK i
1
3
2
1
3
Ń
!
If incorrect entries are made, the
¢
CLEAR button
can be used to delete the last digit of the ShowView
number.
Ń
!
The complete ShowView number can be deleted
using the
¢
SV/V+ button.
Ń
!
If the programme is to be recorded daily or weekly
at the same time, press the Z ED/EW (green) button
once or twice.
The “daily” function is not available for recording
on Saturday or Sunday.
Confirm the ShowView number using the G
button.
– The recorder converts the ShowView number into
the actual recording data.
Ń
!
If the display »A2« flashes at the recorder and the
message »Select programme« appears in the table,
the recorder cannot locate the programme position
for the TV programme.
Use the B PROG.
button to select a programme
position and confirm using the G button.
Additional functions
– If the programme is to be recorded without
VPS/PDC control, press the
¢
VPS (red) button.
The star (*) in the table indicates recording with
VPS/PDC control.
– Select long-play recording – if required – using
the
¢
SP/LP button. .
This doubles the playing time of the cassette.
– The data can be altered using the B
PROG., B DAY,
B START, B STOP buttons.
Confirm programming using the G button.
– The data of the programme is stored at the first
memory position (TIMER). The remaining playing
time is indicated briefly.
– Display at recorder: »TIMER«.
Ń
!
The recorder is in record stand-by mode. All drive
mechanism functions of the recorder are now
“blocked”.
5
4
PROG DAT START STOP
RTL2 01 12:01 13:00 *
ARD 02 11:00 12:00 *
PRO7 03 08:00 09:00
–––––––––––––––––––
RED: VPS/PDC GREEN: ED/EW
+/- LP CLEAR OK i
3
·
Page 21

20
TIMER Recording
r
Recorder messages
These indicate various operating states and errors.
The messages appear on the TV screen or in the
display on the recorder.
Remaining playing time
Display: » Rest: « »
REST
« and the remaining playing time of the cassette.
If the »Rest« is negative (–), a cassette with insufficient playing time was inserted or the sum of all
TIMER recording times is too high.
Record length
Display: »Record length « »
REST –: ––
«.
The playing time of the cassette was not recognized.
No cassette
Display: »No Cassette « »
NO CASSETTE
«.
There is no cassette in the recorder.
Cassette protected
Display: »Cassette Protected « »
PROTECTED
«.
The cassette is protected against re-recording. It is
ejected automatically.
Code er
ror
Display: »
CODE ERROR
«.
Indicates incomplete entry, or the ShowView number in the TV magazine is incorrect.
ED er
ror
Display: »ED error « »
ED ERROR
«.
A daily recording was selected for a Saturday or a
Sunday. This is not possible.
Recording starts soon
If you are programming other recordings or using
other info tables, » TIMER « starts flashing ten
minutes before recording starts. Then press the
¢
TIMER ON/OFF
button.
Recor
ding start
When recording is about to start you should quit
the »Record Programming« table, or any other info
tables, so that the recorder can start recording.
To do this press the
¢
TIMER ON OFF button.
r
Checking the occupied TIMER positions
Press the
¢
SET/CHECK button.
– The »Record Programming « table appears.
Ń
!
After an interval the recorder switches the table off
automatically and returns to record stand-by mode.
r
Altering the data of a TIMER position
Press the
¢
SET/CHECK button.
– The » Record Programming « table appears.
Select the required TIMER position. To do this,
press the
¢
SET/CHECK button as often as necessary,
until the marker ( ) is at the required TIMER
position.
Alter data using the B
PROG.
, B
DAY
, B
START
,
B
STOP buttons.
Store the setting using the G button.
r
Erasing an occupied TIMER position
Press the
¢
SET/CHECK button.
– The »Record Programming « table appears.
Select the required TIMER position. To do this,
press the
¢
SET/CHECK
button as often as necessary,
until the marker ( ) is at the required TIMER
position.
Erase the data of the TIMER position using the
¢
CLEAR
button.
r
Interrupting the record stand-by mode of
the recorder
If you have programmed TIMER positions and wish
to use the recorder while it is in record stand-by
mode, or you wish to terminate the TIMER
recording:
Press the
¢
TIMER ON/OFF button on the remote
control.
– The TIMER data in the display field of the recorder
disappear. The TIMER display flashes.
Ń
!
The record stand-by mode of the recorder is now
interrupted.
Select the desired function.
r
Reactivating the record stand-by mode of
the recorder
Insert a cassette with sufficient playing time, wait until
tape measurement is completed, and press the
¢
TIMER ON/OFF button.
– The remaining playing time appears briefly in the
display on the recorder.
– The recorder is once again in the record stand-by
mode and the TIMER recordings will be made at
the programmed times.
– The TIMER display at the recorder is on.
1
2
1
3
>
2
1
4
3
>
2
1
1
··
Page 22

21
TIMER Recording
Programming with the user guide
and manual data entry, variant 2
r
Preparation
Switch the TV set on.
Select the AV programme position for the video
recorder at the TV set.
Ń
!
If the recorder is connected to a TV set with Megalogic functions, the TV set is switched on automatically, and the AV programme position is selected
automatically, when the h button is pressed.
Insert a cassette with sufficient playing time. Pay
attention to erase protection.
Ń
!
The time and date at the recorder must be correct.
r
Example
Ń
!
Operation can be terminated at any time using the
A button.
Call up the »Info « table using the h button.
Activate record programming using the G button.
– The »Record Programming« table appears.
– The data is indicated on the TV screen and in the
display on the recorder.
Ń
!
If all TIMER positions are occupied you must erase
a TIMER position. See the chapter “Erasing an
occupied TIMER position” on page 20.
Ń
!
Only the on screen display is described in the
example.
Ń
!
If the first TIMER position is occupied, use the DC
buttons to select the next free TIMER position.
PROG DAT START STOP
> –––– –– ––:–– ––:––
–––––––––––––––––––
ļĻ CLEAR OK i
2
1
3
2
1
Programme a new recording. To do this press the
G button.
– The following appear in the data line:
a TV station, the current date, the current time as
start time, the current time plus 1 hour 30 minutes as stop time, and VPS/PDC on (
*
).
Alter data for recording:
B
PROG.
– the TV station,
B
DAY – the date,
B
START
– the start time,
B
STOP – the stop time,
Z
VPS (red) – VPS/PDC signal on/of,
Z
ED/EW (green)
– daily or weekly recording at the
same time.
¢
SP/LP – Long-play recording.
Ń
!
If the picture/sound signal is to be recorded from
an external device that has been connected to the
corresponding sockets instead of from the TV programme, this programme source must be selected
using the B PROG. button.
The following messages appear in the data line
instead of the programme number and the station
identification:
– »HiFi« for a stereo system on the ň LR sockets;
– »A1« or » A2 « for example for a satellite receiver
on the EURO-AV A 1 or DECODER A 2 socket;
– »CV« for a camcorder on the VIDEO IN/AUDIO IN
sockets.
Confirm programming using the G button.
– The TIMER position is programmed. The remai-
ning playing time is indicated briefly.
– Display on recorder: »TIMER«.
Ń
!
The recorder is in record stand-by mode. All drive
mechanism functions of the recorder are now
“blocked”.
Ń
!
The recorder “messages” and their meaning, as
well as options for alteration can be found on
page 20.
5
4
PROG DAT START STOP
CNN
01. 15:00 16:30*
–––––––––––––––––––
RED: VPS/PDC GREEN: ED/EW
+/- LP CLEAR OK i
3
Page 23

22
Copying …
… from a second recorder,
camcorder, CD-i player
r
Connection
Connect the DECODER A2 socket on the recorder
and the corresponding socket on the other recorder
or CD-i player using a commercially available cable.
Connect the VIDEO IN (picture signal) and
L AUDIO IN R (sound signal) sockets on the recorder with the corresponding sockets on the camcorder using commercially available cable.
r
Preparation
Switch the TV set on.
Select the AV programme position for the video
recorder on the TV set.
Insert the cassette that is to be copied into the playback recorder or camcorder.
Insert a cassette with sufficient playing time into
the recorder that will be recording.
4
3
2
1
2
1
r
Operation
Select the programme position for the second
recorder or CD-i player by pressing the e button
repeatedly until »A2« appears in the display of the
recorder that is recording.
Select the programme position for the camcorder
by pressing the e button repeatedly until »
CV
«
appears in the display of the recorder that is recording.
Ń
!
When copying MESECAM colour broadcasts, also
press the
¢
PAL/SEC button.
Start playback on the playback recorder, CD-i player, or camcorder.
Start the recording by pressing the K button on
the recorder that is recording.
Terminate recording by pressing the H button on
the remote control or the k button on the recorder.
Ń
!
The sound level can be controlled manually by
pressing the
¢
MAN button and using the
¢
– LEVEL + buttons to adjust the sound until the red
display (+0 dB) is lit during the loudest passages.
Ń
!
Please note the “Insert” options described in the
next chapter.
4
3
2
1
L
H
L
H
ń
ń
+
+
–
–
EURO-AV-1
AUDIO
R
L
R
L
DECODER A2
12 -
630+3 3+036-12
dB dB
VIDEO INL AUDIO IN R
MANINS./DUB.- LEVEL +
y
m
TIMER
ON/OFF
EURO-AV
AUDIO
2
1
to TV set
Page 24

23
Insert-Splice …
… insertion of new recordings at a
later date
r
Insert/Dubbing function
In playback/picture-search mode, locate the tape
position at which the recording to be inserted
should end. Then press the U button.
Press the
¢
INS/DUB. button twice.
– The tape position is electronically marked.
– Display on recorder: »
INSERT DUBB
«.
– The hours/minutes display switches automatically
to five-digit tape length display. The tape length
display is set automatically to »
0:00:00
«.
During playback (picture search backward or reverse mode) locate the tape position at which the
recording to be inserted should begin.
Press the U button and then the K button.
– The recorder switches automatically to record-
pause.
– Display on the recorder: »
INS R P
«.
Select the programme source using the dcbuttons.
Display
I...99
= programme positions of the TV;
Display
AI/A2
= picture/sound source on EURO-
AV A1 or DECODER A2 socket;
Display
CV
= picture/sound source on L
AUDIO IN R and VIDEO IN
sockets.
Begin playback from the external picture/sound
source.
Start the insert function using the U button.
– Display on recorder: »
INS REC
«.
The new pictures will be inserted between the marked tape positions. Then the recorder will switch to
playback-pause.
Terminate the insert function using the H button.
7
6
5
4
3
2
1
You can insert new recordings into existing recordings at a later date. For example, you can add certain scenes that are played back from external picture/sound sources.
r
The insert options
Inser
t/Dubbing
The new picture/sound signal is inserted.
The new sound signal is recorded onto the longitudinal and helical tracks, and the original sound signal is erased.
Insert/Video
The new picture/sound signal is inserted.
The new sound signal is recorded onto the helical
track, and the original sound signal remains on the
longitudinal track.
Insert/Co
py
Only the new picture signal is inserted.
The sound from the mono/longitudinal track of the
original recording is transferred to the helical track
of the tape.
r
Connecting
Connect the picture/sound source to the EURO-AV
A1 or DECODER A2 socket;
or
Connect the picture/sound source to the L AUDIO
IN R and VIDEO IN sockets.
Ń
!
If it is not otherwise indicated, carry out the following functions using the buttons on the recorder.
2
1
12 -
630+3 3+036-12
dB dB
VIDEO INL AUDIO IN R
MANINS./DUB.- LEVEL +
y
m
ʺ
TIMER
ON/OFF
ʺ
ı
1
2
·
Page 25

24
r
Insert/Video function
In playback/picture-search mode, locate the tape
position at which the recording to be inserted
should end. Then press the U button.
Press the
¢
INS/DUB. button three times.
– The tape position is electronically marked.
– Display on recorder: »
INSERT V ID
«.
– The hours/minutes display switches automatically
to five-digit tape length display. The tape length
display is set automatically to »
0:00:00
«.
During playback (picture search backward or reverse mode) locate the tape position at which the
recording to be inserted should begin.
Press the U button and then the K button.
– The recorder switches automatically to record-
pause.
– Display on the recorder: »
INS R P
«.
Select the programme source using the dcbut-
tons.
Display
I...99
= programme positions of the TV;
Display
AI/A2
= picture/sound source on EURO-
AV A1 or DECODER A2 socket;
Display
CV
= picture/sound source on L
AUDIO IN R and VIDEO IN
sockets.
Begin playback from the external picture/sound
source.
Start the insert function using the U button.
– Display on recorder: »
INS REC
«.
The new pictures will be inserted between the marked tape positions. Then the recorder switches to
playback-pause.
Terminate the insert function using the H button.
r
Insert/Copy function
In playback/picture-search mode, locate the tape
position at which the recording to be inserted
should end. Then press the U button.
Press the
¢
INS/DUB. button four times.
– The tape position is electronically marked.
– Display on recorder: »
INSERT
«.
– The hours/minutes display switches automatically
to five-digit tape length display. The tape length
display is set automatically to »
0:00:00
«.
During playback (picture search backward or reverse mode) locate the tape position at which the
recording to be inserted should begin.
Press the U button and then the K button.
– The recorder switches automatically to record-
pause.
– Display on the recorder: »
INS R P
«.
3
2
1
7
6
5
4
3
2
1
Select the programme source using the dcbuttons.
Display
I...99
= programme positions of the TV;
Display
AI/A2
= picture/sound source on EURO-
AV A1 or DECODER A2 socket;
Display
CV
= picture/sound source on L
AUDIO IN R and VIDEO IN
sockets.
Begin playback from the external picture/sound
source.
Start the insert function using the U button.
– Display on recorder: »
INS REC
«.
The new pictures will be inserted between the marked tape positions. Then the recorder switches to
playback-pause.
Terminate the insert function using the H button.
7
6
5
4
Insert-Splice …
Page 26

25
Audio Recording
The recorder as a
hifi tape recorder
r
Preparation
Switch the hifi system on and select a sound source
(e.g. CD player, cassette recorder, etc.).
Insert a cassette with sufficient playing time into
the recorder.
r
Audio recording from the hifi system
Select hifi programme position by pressing the
dcbuttons repeatedly until »HI« appears in the
display on the recorder.
The sound is adjusted automatically.
Ń
!
The sound can also be adjusted manually. Press the
¢
MAN button and adjust the sound using the
¢
- LEVEL+ buttons so that the red mark (0 dB) lights
up during the loudest passages.
Ń
!
Select long-play mode if desired using the
¢
SP/LP button on the remote control.
Begin audio recording using the K button.
Terminate recording using the k button.
3
2
1
2
1
Your recorder offers two different systems for
recording and playing back the sound:
– The hifi (helical) track,
for recording and playing back the finest quality
hifi sound for stereo and two-channel recordings.
– The mono (longitudinal) track,
for audio playback on standard VHS video recorders and for dubbing.
r
Connecting
Connect the hifi system to the AUDIO sockets (at
back of unit) using commercially available phono
cable.
ň = sound input, L = left channel,
R = right channel;
Ň = sound output, L = left channel,
R = right channel;
Connect the headphones to the
m socket.
Ń
!
If it is not otherwise indicated, carry out the following functions using the buttons on the recorder.
2
1
12 -
630+3 3+036-12
dB dB
VIDEO INL AUDIO IN R
MANINS./DUB.
-
LEVEL +
y
m
TIMER
ON/OFF
L
H
L
H
ń
ń
+
+
–
–
EURO-AV-1
AUDIO
R
L
R
L
DECODER A2
1
2
·
Page 27

26
r
Hifi playback
Start playback using the Q button.
– When playing back a long-play recording, the recor-
der automatically switches to long-play mode.
Selecting the audio track:
When playing back cassettes with stereo or twochannel recordings, press the
¢
AUDIO button on
the remote control to select the desired audio track.
Basic setting is stereo (hifi helical track)
– Display on the recorder. »
ɳ «.
Audio track 1 – Display on the recorder »
1 « and
»
LEFT
«.
Audio track 2 – Display on the recorder » 2 « and
»
RIGHT
«.
Mono/longitudinal track – Display on recorder:
»
MONO
«.
Mixed mode (hifi/helical track and mono/longitudinal track, to check dubbed cassettes)
– Display on the recorder »
MIX
«.
Adjusting the hifi audio track:
When playing back a cassette recorded in another
recorder, it may be necessary to adjust the audio
track. Press the
¢
TRACKING
button on the remote
control and adjust the audio track using the FE
buttons on the remote control.
r
Operation with headphones
Set the volume for the headphones as follows:
Press the
¢
y button and set the desired volume
using the
¢
– LEVEL +
buttons.
Select the audio track for listening with the head-
phones by pressing the button
¢
AUDIO
on the
remote control to select an audio track, then pressing button
¢
y and selecting the desired audio
track with button
¢
AUDIO on the remote control.
2
1
3
2
1
Audio Recording
Page 28

27
Dubbing
r
Operation
In playback mode, locate the tape position at which
the dubbing should begin and then press the W
button on the remote control or the U button on
the recorder (playback-pause).
– Display on the recorder: »
STILL
«.
Press the
¢
INS/DUB button (activates the dubbing
function).
– Display on the recorder: »
CV DUB PAU
« or
»
HI DUB PAU
«
Ń
!
The volume is automatically adjusted.
The volume can also be adjusted manually. To do
this, press the
¢
MAN
button on the recorder. Then
use the
¢
-LEVEL+ buttons on the recorder to adjust
the volume until the red display (0 dB) lights up
during the loudest passages.
Begin dubbing using the T button on the remote
control or the Q button on the recorder.
– The original sound remains on the hifi track and
the new sound is recorded on the longitudinal
track.
Stop dubbing using the
¢
INS/DUB button.
– The video recorder switches to playback, and you
hear the sound from the mono (longitudinal)
track. The »
DUB
« display disappears.
Ń
!
When changing a dubbed cassette, you must
switch to the mono (longitudinal) track in order to
hear the dubbed sound. To do so, press the
¢
AUDIO
button on the remote control repeatedly
until »
MONO
« appears on the recorder.
Ń
!
If you wish to hear the original sound as well as the
dubbing, press the
¢
AUDIO
button on the remote
control repeatedly until »
MIX
« appears in the dis-
play on the recorder.
Ń
!
If the recorder is connected to an audio mixer, you
can mix the hifi original sound of the video cassette
with the sound from external sound sources.
4
3
2
1
A new audio track can be added to the recording at
a later date.
Ń
!
The original sound of the longitudinal track is erased completely, and the hifi (helical) track is preserved.
r
Connecting
Connect the hifi system to the ňAUDIO sockets at
the back of the recorder using commercially available phono cable.
R = right channel; L = left channel.
Ń
!
The ŇAUDIO sockets are also suitable for connecting to an audio mixer (input).
Connect the camcorder to the L AUDIO IN R
sockets on the front of the recorder using commercially available phono cable.
Ń
!
These sockets are also suitable for connecting to an
audio mixer (output).
r
Preparation
Ń
!
If not indicated otherwise, execute the following
procedures using the buttons on the recorder.
Insert a recorded cassette into the recorder.
Select a programme source using the dc
buttons.
HI
= sound source on the AUDIO sockets at the
back of the recorder, or
CV
= sound source on the AUDIO sockets on the
front of the recorder.
2
1
2
1
12 -
630+3 3+036-12
dB dB
VIDEO INL AUDIO IN R
MANINS./DUB.
-
LEVEL +
y
m
TIMER
ON/OFF
L
H
L
H
ń
ń
+
+
–
–
EURO-AV-1
AUDIO
R
L
R
L
DECODER A2
L AUDIO IN RL AUDIO IN R
from audio mixer
1
2
to audio mixer
Page 29

28
Operation with a Satellite Receiver
r
Preparation
Switch the TV set and the satellite receiver off.
Remove the mains cable for the video recorder
from the mains socket.
r
Connecting
Connect the ʐ socket on the recorder and the REM.
CONTR. VCR (control line) socket on the satellite
receiver using phono adapter cable / 3.5 mm jack.
Connect the EURO-AV A1 on the recorder and the
EURO-AV socket on the TV set using commercially
available cable.
Ń
!
If the satellite receiver has an additional socket for
decoders, a “PAY-TV decoder” can be connected
there.
Connect the DECODER A2 socket on the recorder
and the EURO-AV socket on the satellite receiver
using appropriate cable.
Insert the aerial plug from the house aerial into the
–
II
–
socket on the recorder.
Connect the
ń
socket on the recorder and the
É
socket (aerial) on the TV set using the aerial cable
provided.
Reinsert the mains cable of the video recorder into
the mains socket.
6
5
4
3
2
1
2
1
r
Operation
Switch the TV set and the satellite receiver on.
If a satellite programme is selected on the recorder,
then this programme is visible on the TV screen
and will be recorded during “recording” or “TIMER
recording”.
2
1
EURO-AV
EURO-AV TV EURO-AV DECODER EURO-AV VCR
L
H
L
H
ń
ń
+
+
–
–
EURO-AV-1
AUDIO
R
L
R
L
DECODER A2
2
1
3
4
5
Page 30

29
Operation with a PAY-TV Decoder
r
Operating modes
The recorder is off (stand-by mode). The PAY-TV
decoder switches automatically to the TV.
The recorder is in EE mode or record, but it is not
receiving a PAY-TV station. In this case, the decoder switches automatically to the TV.
Recording a PAY-TV broadcast
with simultaneous monitoring on the TV set (e.g.
programme position 4 or AV).
For this purpose you must be able to select » AV «
on any programme position at the TV (e.g.
GRUNDIG TV sets).
Select »AV« on programme position 4 or programme position AV on your TV set.
Recording a PAY-TV broadcast
while watching another »normal« broadcast on
the TV set.
If your TV set cannot be switched to the »normal «
TV broadcasts in this situation, please proceed as
follows:
One after another, press the
¢
CODE button, the
numbered buttons 8514 and the G
button.
If you wish to deactivate this function again, press
the
¢
CODE button, the numbered buttons
8513and the G button.
4
3
2
1
If the recorder receives coded TV programmes
from private stations, a decoder is necessary.
Ask your dealer about decoders.
r
Connecting
Connect the DECODER A2 socket on the recorder
with a suitable socket on the decoder using EUROAV cable.
Ń
!
Pay attention to the setting for the programme
position at which the TV station of the decoder is
stored.
r
Setting a programme position for a
decoder
Call up the info table using the h button.
Select the » Installation « line using the DC buttons and call it up using the G button.
Use the DC buttons to select the » TV Station
Table« line and call it up using the G button.
– The »TV Station Table« appears.
Select a programme position for the TV station of
the PAY-TV decoder using the DC buttons. Then
press the G button.
– The »PROGRAMME« table appears.
Select the » DECODER « data line using the DC
buttons.
Activate the decoder. To do this press the F
button.
– The display changes from »OFF« to » ON «.
Store the setting using the G button.
End the setting using the
¢
Ǽ
button.
8
7
6
5
4
3
2
1
1
AUDIO
EURO-AV
PAY-TV
1
R
R
L
L
EURO-AV-1
DECODER A2
L
L
H
H
+
+
ń
ń
–
–
Page 31

30
Special Functions
Recording - controlled from
external devices
If an external device with a timer and control signal
is connected to the recorder at the EURO-AV A1 or
A2 socket, this device can control recording on the
recorder.
r
Preparation
Insert a cassette that has sufficient playing time and
is not erase protected.
r
Preparing the EURO-AV socket for the
external device
Call up the info table using the h button.
Use the DC buttons to select the »A1/A2 Record
Prepared« line and call it up using the G button.
– The »A1/A 2 RECORD PREPARED « table appears.
Use the F or E buttons to switch on “Record Pre-
pared”.
Use the D button to select the » A1 A2« line and
activate EURO-AV socket A1 or A2 using the
F or E buttons.
Store the setting with the G button.
– The recorder is in record prepared mode. The
timing of the recording will be controlled by the
external device.
– Display on the recorder: »
RECORD PREP
«.
Ń
!
If this function has been selected, TIMER recording
and operation with a decoder are not possible.
Ń
!
To terminate this function, repeat the setting proce-
dure from step and switch “Record Prepared”
(see step ) to “OFF”.
3
1
5
4
3
RECORD PREPARED:
ON OFF
SAT SOURCE
*
A1 A2
–––––––––––––––––––
Ļļ ĵŁ OK i
2
1
1
Continuous playback mode
r
Preparation for continuous playback
mode
Insert a recorded cassette.
Start playback using the T button on the remote
control or the Q button on the recorder.
Press the H button on the remote control or the
k button on the recorder at the position where
playback is to end.
Press the
¢
CODE button, the numbered buttons
8501 and the G button in sequence.
– Display at recorder: »
CONTINUOUS
«.
r
Starting continuous playback
Start the function using the T button on the
remote control or the Q button on the recorder.
– Display on the recorder: »
C-PLAY
«.
– The tape is rewound to the beginning, where play-
back starts.
The tape runs to the marked position. Then the
tape is rewound to the beginning and playback
starts again.
r
Terminating the continuous mode
function
Press the N button.
1
1
4
3
2
1
Page 32

31
Special Functions
The child lock
All functions can be locked using the child lock.
Even a cassette that was inserted into the recorder
after locking must remain in the recorder until you
unlock it again.
The child lock can be activated so that the recorder
is blocked for all functions or so that programmes
that are harmful to children cannot be recorded.
A few TV stations broadcast information concerning such broadcasts.
r
Activating the child lock
Call up the info table using the h button.
Use the DC buttons to select the »Child lock «
line and call it up using the G button.
– The » Child lock« table appears.
To lock all functions, enter the four-digit code number using the numbered buttons 1 … 0 and confirm with the G button.
– The recorder switches the table off.
– Display on the recorder: »
LOCKED
« and time.
Ń
!
The recorder is locked.
r
Activating the VPS child lock
Call up the info table using the h button.
Use the DC buttons to select the »Child lock «
line and confirm with the G button.
– The » Child lock« table appears.
To activate the VPS child lock, select the line with
the D button and press the F button.
Use the C button to select the » Code number «
line.
Enter the four-digit code number using the numbered buttons 1 … 0 and confirm with the G
button.
– The recorder switches the table off.
5
4
3
CODE NUMBER: ––––
VPS CHILD LOCK
ON
*
OFF
–––––––––––––––––––
0-9
ļĻ OK i
2
1
3
CODE NUMBER: ––––
VPS CHILD LOCK
ON
*
OFF
–––––––––––––––––––
0-9
ļĻ OK i
2
1
Ń
!
Watching or recording programmes that are dangerous for children is not possible. All other functions
can be used.
Ń
!
Should you forget or misplace your code number,
your specialist dealer will be able to help.
r
Switching the child lock off
Press any button.
– The »Child lock« table appears.
Enter the four-digit code number using the numbered buttons 1 … 0 and confirm with the G
button.
– The recorder switches the table off and the lock is
released.
r
Switching the VPS child lock off
Call up the info table using the h button.
Use the DC buttons to select the » Child lock «
line and call it up using the G button.
– The » Child lock« table appears
Enter the four-digit code number using the numbered buttons 1 … 0 and confirm with the G
button.
Select the »VPS Child lock « line using the D button and press the F button.
Confirm the setting with the G button.
– The recorder switches the table off and the lock is
released.
5
4
3
2
1
2
1
Page 33

32
Special Functions
Setting the function display (OSD –
O
N S
CREEN DISPLAY)
It is possible to adjust the duratioon of the function
displays which appear on the TV screen.
r
Example
Call up the info table using the h button.
Use the DC buttons to select the »Info Duration«
line and call it up using the G button.
– The » Info Duration« table appears.
Select the desired setting using the DC buttons
and confirm it using the G button.
Terminate the setting using the
¢
Ǽ
button.
4
3
OSD OFF
OSD 5 SECONDS
OSD PERMANENT
–––––––––––––––––––
ļĻ OK i
2
1
Operation with a 16:9 format
TV set
The input sockets of the recorder must be adapted
for this purpose.
Call up the info table using the h button.
Use the DC buttons to select the »Installation «
line and call it up using the G button.
Use the DC buttons to select the »16:9 Automatic« line and call it up using the G button.
– The »16x9 AUTOMATIC« table appears.
The automatic feature can be switched on or off
using the F or E buttons.
Store the function using the G button.
– The recorder switches the table off.
5
4
16x9 AUTOMATIC:
ON OFF
–––––––––––––––––––
ĵŁ OK i
3
2
1
Page 34

33
Special Functions
r
Remote control of two recorders
When the switch is in the VIDEO 2 position, you can
control your GV 540.
When the switch is in the VIDEO 1 position, you can
control the second recorder.
Ń
!
If the VIDEO 1 2 switch is not set to the selected
VCR address when controlling your GV 540, the
indication »
VID 1
« or »
VID 2
« on the recorder
advises you that you must switch the remote
control to the other VCR address.
1
2
TV
1
2
TV
SP/LP
ON/OFF
CLEAR
SV/V+
STOP
ART
9
3
6
2
2
1
Remote control of other GRUNDIG
video recorders
With this remote control you can control different
GRUNDIG video recorders independently of each
other.
You can use it with your GV 540 and a second
recorder from the series VS 600 to VS 900 and the
GV 200 and later models.
The GV 540 must be adapted in order for the recorders to respond correctly to the remote control
commands.
r
Preparation
Switch the TV set on.
Select the programme position for the video recorder at the TV set (AV programme position).
r
Selecting the VCR address for the GV 540
Call up the info table using the h button.
Use the DC buttons to select the »Installation «
line and call it up using the G button.
Use the DC buttons to select the »VCR address«
line and call it up using the G button.
– The »VCR address « table appears.
Select VCR address 2 using the FEbuttons.
Confirm the setting using the G button.
– The recorder switches the table off.
5
4
VCR ADDRESS:
1 2
–––––––––––––––––––
ĵŁ OK i
3
2
1
2
1
VIDEO 1
VIDEO 2
TV
Page 35

34
Special Functions
Selecting the language for the
user guide
It is possible to alter the language of the user guide.
r
Preparation
Switch the TV set on.
Select the programme position for the video recor-
der at the TV set (AV programme position).
r
Operation
Call up the info table using the h button.
Use the DC buttons to select the »Installation «
line and call it up using the G button.
Use the DC buttons to select the »Select langua-
ge« line and call it up using the G button.
– The »Select language« table appears.
– The selected language is marked.
Select the desired language using the DC F E
buttons and confirm it using the G button.
– The recorder switches to the TV picture. From
now on all info tables and dialogue lines appear in
the selected language.
4
DEUTSCH PORTUGUÊS
ESPAÑOL SVENSKA
FRANÇAIS NORSK
ENGLISH DANSK
ITALIANO SUOMI
NEDERLANDS
–––––––––––––––––––
ļĻ
ĵŁ
OK i
3
2
1
2
1
Remote control of a TV set
With this remote control you can also control
GRUNDIG colour TV sets that use the remote control TP 590 onwards.
Ń
!
The functions that can actually be operated depend,
of course, on the technical features of your
GRUNDIG TV set.
r
Preparation
Switch the TV set on using the mains button.
Move the switch on the remote control to the TV
position.
Ń
!
Point the remote control at the TV set.
r
Operation
You can switch through the programme positions
step by step from 1 to 99 using the DC buttons.
The programme positions can be selected directly
using the numbered buttons 1 … 0.
The programme positions A1, A2 etc. can be selected by pressing the e button repeatedly.
Altering the volume
Press the F button, the volume decreases.
Press the E button, the volume increases.
Stand-by
During pauses in TV viewing, you can switch the TV
set to stand-by using the A button.
Use the e button to switch the TV set back on.
3
2
1
ART
2
1
VIDEO 1
VIDEO 2
TV
STOP
CLEAR
ON/OFF
MER
2
6
9
SP/LP
SV/V+
3
TV
TV
1
1
2
2
Page 36

35
Useful Information
Fixing faults yourself
Not every picture and sound fault means a defect in
your recorder.
Disturbed reception can also be caused by a cable
which is accidentally pulled out, a defect in the TV
set, or failure of the transmitter or the TV aerial
system.
Fault Cause Remedy
No clock time indication on the recor- Mains plug disconnected or defective Insert mains plug or use a different
der/ the cassette is not pulled in. contact. supply socket.
The recorder cannot be operated, The electronic combination lock is activa- Deactivate the lock.
the mains voltage supply is o.k. ted (display »
LOCKED
«).
Recording of TV programmes Aerial cable not connected. Connect aerial cable.
not possible (only snow on
the picture screen). Station to be recorded from is not Tune to station.
tuned to on the recorder.
Failure of the TV transmitter or Check by selecting the station to be
aerial system is defective. recorded on the TV set or ask your
neighbour if he can receive this station.
Recording not possible. The cassette is protected against Cover the opening at the back of the
new recording. cassette with adhesive tape.
Timer recording was not carried out. Timer incorrectly programmed.
For VPS/PDC-programmed recordings,
VPS/PDC time was entered incorrectly.
The
¢
ON/OFF button was not
pressed after an interruption of the
record stand-by mode
( flashes).
Poor picture quality during The TV set is not correctly Correctly tune the TV set to the
playback. tuned to the transmitting channel transmitting channel of the recorder.
of the video recorder.
The video heads are dirty. Have the video heads cleaned by a
specialist.
The video heads are worn. Contact your dealer.
Operation with the remote control The batteries in the remote control Insert new batteries.
is not possible. are exhausted.
The remote control is not Point the remote control at
pointed at the recorder. the recorder.
Incorrect function level set Switch the remote control to
on the remote control. the correct function level.
TIMER
Page 37

36
Useful Information
Technical Data
This video recorder complies with the VDE 0860
safety regulation and consequently also with the
international safety specifications IEC 65 and
CEE 1.
The video recorder meets the requirements of the
89/336/EC guideline.
Under no circumstances should you open the
video recorder yourself.
Damage which is caused by unqualified manipulation is not covered by the manufacturer’s guarantee.
TV standard: CCIR, PAL B/G, 625 lines
CCIR, SECAM B/G, 625 lines
System: VHS
Mains voltage: 230 V
~, 50 Hz
Weight: approx. 5.5 kg
Power consumption:
– when recording: approx. 18 W
– stand by
modulator off: 6 W
Operating position: horizontal
Ambient temperature: +10 °C to +35 °C
Relative humidity: up to 80%
Wind time
forward/reverse: with E 180 cassette
typical 95 seconds
2 Euro-AV sockets: 21-pole
(DIN/EN 50049)
Aerial
input socket: coaxial B, input 75 Ω
(DIN 45325)
Aerial
output socket: coaxial S, output 75 Ω
(DIN 45325)
Audio sockets:
R
ň L 2 phono
R
Ň L 2 phono
Satellite control socket: 3.5 mm ø
Headphones socket: 3.5 mm ø
Headphones impedance: 8 Ω - 2 kΩ
Video socket: phono
VIDEO IN
Audio sockets: phono
AUDIO IN
Supplied accessories:
Remote control RP 540
2 batteries, 1.5 V–, type Micro RO3P
RF (aerial) connecting cable
EURO-AV cable
Mains cable
Operating instructions
The complete range of accessories can be found
in the » GRUNDIG-REVUE «, which you can obtain
from authorized dealers.
Subject to alteration and error.
Overview of code numbers
Code Meanin
g To be used for
the function
on page …
8501 Selects continuous 30
mode function
8510 Vertical pulse –
insertion off
8511 Vertical pulse 15
insertion on
8513 Switching voltage “ON” 29
(for the TV set)
8514 Switching voltage “OFF” 29
(for the TV set)
8518 RF modulator off 7
8519 RF modulator on 7
Page 38

SERVICE
r
GRUNDIG Germany
r
GRUNDIG Europe
4
.
22113
GRUNDIG
Kundendienst Nord
Kolumbusstraße 14
Hamburg
0 40/7 33 31-0
GRUNDIG
Kundendienst West
Horbeller Straße 19
Köln
50858
0 22 34/95 81-2 51
GRUNDIG
Kundendienst Mitte
Dudenstraße 45-53
Mannheim
68167
06 21/33 76-70
B-1930
GRUNDIG BELUX N.V.
Deltapark, Weihoek 3, Unit 3G
Zaventem
00 32/2-
7 16 0
4 00
VGA00063
GRUNDIG
Kundendienst Ost
Wittestraße 30e
Berlin
13509
0 30/4 38 03-21
GRUNDIG
Kundendienst Süd
Beuthener Straße 65
Nürnberg
90471
09 11/7 03-0
GRUNDIG NORGE A.S.
Glynitveien 25, Postboks 23
Ski
N-1401
00 47/64 87 82 00
GRUNDIG UK LTD.
Elstree Way, Borehamwood, Herts, WD6 1RX
GB
Großbritannien/Great Britain
00 44/1 81-3 24 94 00
Technical Service
Unit 35, Woodside Park, Wood Street
Rugby, Warwickshire, CV21 2NP
Großbritannien/Great Britain
00 44/1 78-8 57 00 88
GRUNDIG IRELAND LTD.
2 Waverley Office Park, Old Naas Road
EIR
Dublin 12
0 03 53/1-4 50 97 17
GRUNDIG FRANCE S.A.
5 Boulevard Marcel Pourtout
F-92563
Rueil Malmaison Cedex
00 33/1-41 39 26 26
GRUNDIG SCHWEIZ AG
Steinacker Straße 28
CH-8302
Kloten
00 41/1-8 15 81 11
GRUNDIG PORTUGUESA
Comércio de Artigos Electrónicos, Lda.
Rua Bento de Jesus Caraça 17
P-1495
Cruz Quebrada, Lisboa
0 03 51/1-4 19 75 70
GRUNDIG ESPAÑA S.A.
Solsonés, 2 planta baja B3
Edificio Muntadas (Mas Blau)
E-08820
El Prat De Llobregat (Barcelona)
00 34/93-4 79 92 00
GRUNDIG DANMARK A/S
Lejrvej 19
Værløse
DK-3500
00 45/44 48 68 22
GRUNDIG OY
Luoteisrinne 5
Espoo
SF-02271
0 03 58/9-8 04 39 00
GRUNDIG SVENSKA AB
Albygatan 109 d, Box 4050
S-17104
Solna
00 46/8-6 29 85 30
GRUNDIG POLSKA SP.Z.O.O
Ul. Czéstochowska 140
PL-62800
Kalisz
00 48/62-7 66 77 70
GRUNDIG AUSTRIA Ges.m.b
Breitenfurter Straße 43-45
A-1120
Wien
00 43/1-81 11 70
GRUNDIG NEDERLAND B.V.
Gebouw Amstelveste
Joan Muyskenweg 22
NL-1096
CJ Amsterdam
00 31/20-5 68 15 68
GRUNDIG ITALIANA S.P.A.
Via G.B. Trener, 8
I-38100
Trento
00 39/4 61-89 31 11
 Loading...