

Page 1

GU19WDVDT/GU19WDVDPCX
WITH INBUILT DVD PLAYER / USB & SD CARD SLOT
ATV/DTV/DVD
CH.
3
1
2
5
4
6
VOL.
7 8
9
GUIDE
SLEEP
+10
0
DVD
SEARCH SKIP
PLAY/PA USE
OPEN/CL OSE STOP
EXIT
MENU
Grundig Web Site: www.grundig.co.uk
INFO INPUT
CH. LIST
I-II
USB/CAR D
AUDIO
ZOOM
FAST TEXT
DVD
TITLE
SETUP
SUBTITL E
SUBTITL E
GO TO
DVD MENU
Page 2
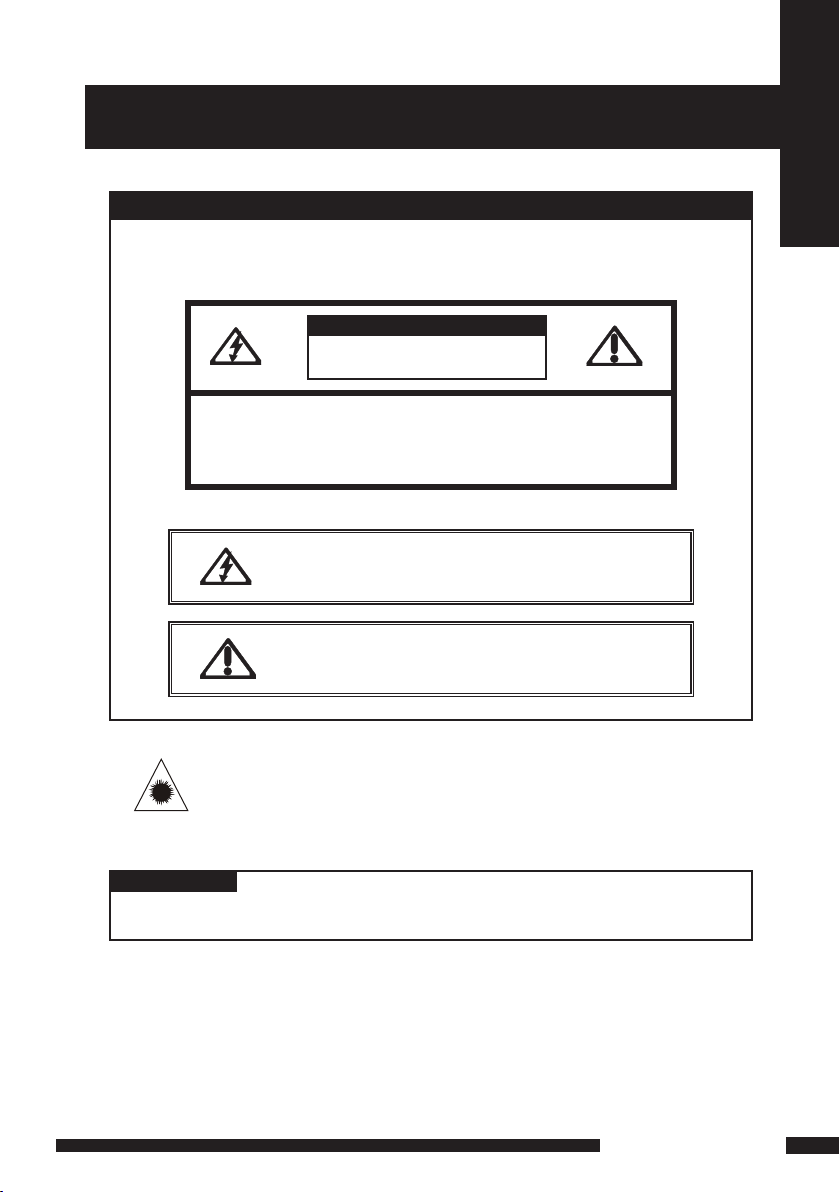
IMPORTANT SAFETY INSTRUCTIONS
WARNING
To reduce the risk of fire or electric shock, do not
expose this equipment to rain or moisture.
CAUTION
RISK OF ELECTRIC SHOCK
DO NOT OPEN
CAUTION: TO AVOID THE RISK OF ELECTRIC SHOCK,
DO NOT REMOVE COVER (OR BACK).
NO USER-SERVICEABLE PARTS INSIDE.
REFER SERVICING TO QUALIFIED SERVICE PERSONNEL.
This symbol is intended to alert the user to avoid the risk of
electric shock, do not disassemble this equipment by
anyone except a qualified service personnel.
Safety Instructions
This symbol is intended to alert the user to the presence
of important operating and maintenance instructions
in the literature accompanying the appliance.
Invisible laser radiation when open and inter locks
defeated.
CAUTION
avoid exposure to beam.
CAUTION
Use of controls or adjustments or performance of procedures other than thos e
specified herein may result in hazardous radiation exp os ur e.
LCD TV User Guide
1
Page 3
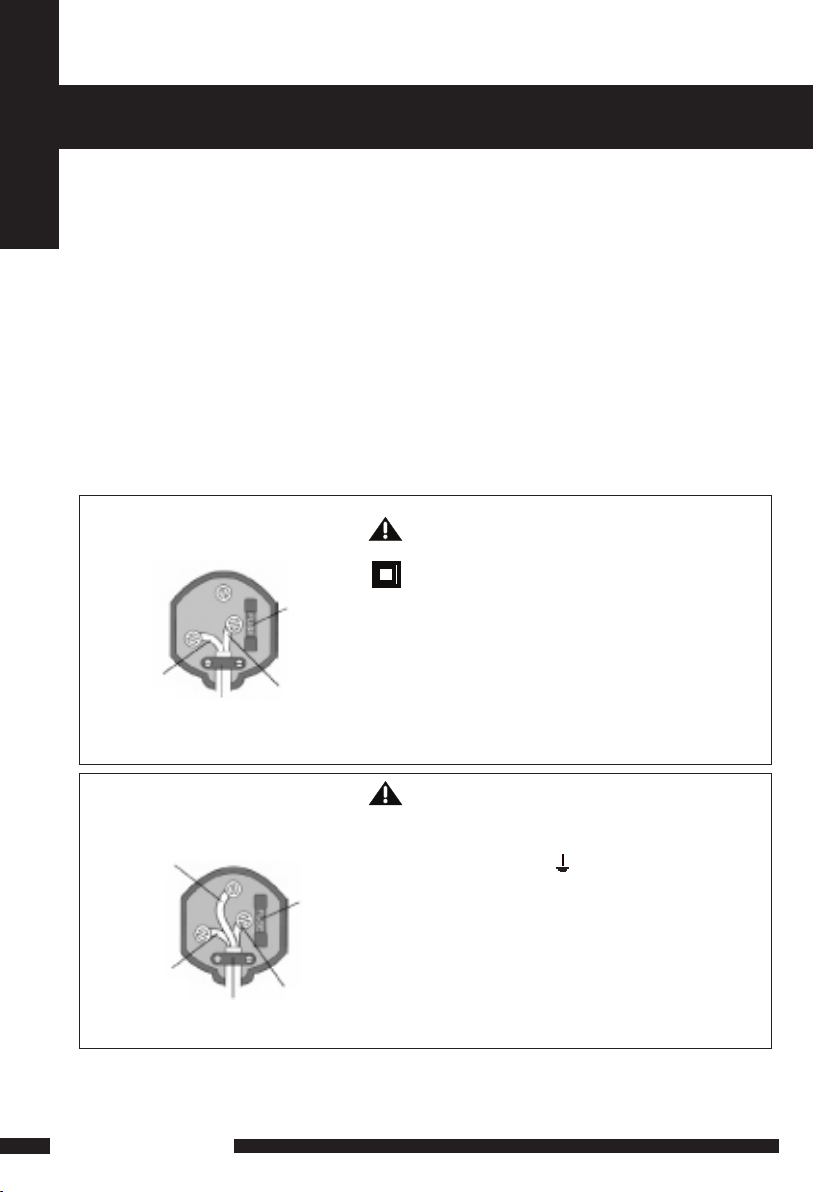
MAINS PLUG WIRING
2- CORE
BLUE
(Neutral)
Cable
clamp
BROWN
(Live)
Fuse
3- CORE
BLUE
(Neutral)
Cable
clamp
BROWN
(Live)
Fuse
GREEN and
YELLOW
(Earth)
Electrical Infor mation
Safety Instructions
The AC adaptor is fitted with a BS1363/A 13 amp plug. If it is not suitable for yo ur
supply sockets it must be removed and replaced with an appropriate plug. If the plug
becomes damaged and/or needs to be replaced please follow the wiring instru ct io ns
below. The plug removed must be disposed of immediately. It must not be plugged int o
a supply socket as this will be an electrical hazard. If the fuse needs to be replaced it
must be of the same rat in g an d AS TA approved to BS1362. If the plug is changed, a
fuse of the appropriate rating must be fitted in the plug, adapter or at th e di st ribu ti on
board. If the fuse in a moulded plug is replac ed , th e fu se c over mu st b e re fi tt ed b efore
the appliance can be used.
Wiring Instructions
The supply cabl e wi ll b e ei th er 2 -c or e or 3 -c or e. Follow the appropriate wiri ng
instructions given below. In both cases ensure that the outer sheath of the cabl e is
firm ly h el d by the cabl e cl am p.
WARNING! Do not connect either wire to
the earth terminal.
This symbol indicates that this 2-core appliance
is Class II and does not require an earth
connection.
The wire coloured blu e must be connected to the
term in al m ar ked with the letter N or coloured
bla ck.
The wire coloured brown m us t be c on nected to
the term in al m ar ked with the letter L or coloured
red.
2
LCD TV User Guide
WARNING! This appliance must be eart he d.
The wire coloured green and yellow must be
connected to the ter mi na l ma rked with the letter E,
or by t he e ar th symbol, , or coloured green or
green and yellow.
The wire coloured blu e must be connected to the
term in al m ar ked with the letter N or coloured black .
The wire coloured brown m us t be c on nected to the
term in al m ar ked with the letter L or coloured red.
Page 4

WARNINGS
● Unqualified attempts to repair this TV are not allowed. Re fer repairs to this unit
to a qualified technician only.
● Do not disassembl e th is u ni t. There are dangerous-voltage par ts i ns id e th at m ay
cause electric shock even after power is disconnected.
● Store your unit in a clean, dry e nvironment, Unplug the unit immediately it gets
wet, and consult your servicing technician.
● Always u np lu g th e un it b efore cleaning it. Wipe dust off the cabinet of t he u ni t
with clean & dr y & so ft c lo th . Apply non-ammonia cleansing lotion onto the cloth,
not directly onto the screen.
● Do not place heavy objects on top of the unit.
● Avoid exp os in g your unit directly to sunlight or other heat sources.
● Put your unit in a well-ventilated area away from high humidity.
● Do not expose this TV to ra in o r mo is tu re, dr ip pi ng o r sp la sh ing.
Safety Ti ps
● If s mo ke, abnormal noise or odour comes out of your unit, unplug from the
mains supply immediately and call you r de al er.
● Never t ry to repair the you r un it o n your own. Al ways call your dealer
for repairs.
Safety Instructions
Note
This user’s manual contains for-refer en ce -o nl y graphics and info rmation that are
subject to change without notice.
WEEE:
This appliance is labelled in accordance with European Directive 2002/96/EG
concer ni ng u se d el ec tr ical and electronic ap pl ia nc es (waste electri ca l an d el ec tr on ic
equipment - WEEE). The guideline determines the framewor k for the return and
recycling of used appliances as applicabl e th ro ug ho ut t he E U.
LCD TV User Guide
3
Page 5

CONTENT
CONTENT
PREPARTION
Key Features.............................................................................................................5
Package Contents.....................................................................................................6
Setting Up Your LCD TV ...........................................................................................7
Your LCD TV..............................................................................................................8
Remote Control........................................................................................................12
INSTALLATION
Connecting a TV Cable or Aerial..............................................................................14
Connecting a VCR & Video Camera.........................................................................17
Connecting a TV box and satellite Receiver ............................................................18
Connecting an Audio Receiver . ..............................................................................19
HDMI ........................................... ............................................................................20
USING THE FEATURES
OSD Menu Operation ............................................................................................ 21
The Video Settings...................................................................................................21
The Audio Settings...................................................................................................22
The Setup Settings...................................................................................................23
The Preference Settings.......................................................................................... 24
The Screen Settings.................................................................................................24
Using The Digital TV Features.............................................................................. ...25
Using The DVD Features.........................................................................................34
4
LCD TV User Guide
TROUBLESHOOTING........................................................................................................43
SPECIFICATIONS...............................................................................................................44
Page 6
Key Features
Various Audio/Video terminals for external equipment connection
▪ 1 set of composite A/V input terminals
▪ 1 SCART input terminals
▪ 1 set of component Video input terminals
▪ 1 VGA/ Audio input terminal
▪ 1 HDMI/Audio input terminals
▪ 1 Headphone terminal
High Definition Multimedia Interface (HDMI)
▪ High Definition Multimedia Interface (HDMI) is a small, user-friendly interconnect that can carry up to 5 Gbps of
combined video and audio in a single cable. This system eliminates the cost, complexity and confusion of multiple
cables used to connect current A/V systems.
HDTV Component Video Inputs
▪ Offers the best video quality for DVD(480p) and digital set-top-box (HD1080i, 720p) connections.
WSS(Wide Screen Scale) Function
▪ This function can automatically convert and display any aspect ration (4:3 / Wide) TV
broadcast signal.
Built-in ATV and DTV Tuners
▪ The built-in DTV tuner allows the reception of DVB-T broadcasting without the addition of a set-top
box.
DISPLAY MODES
The screen resolution has been optimized during production for the display modes listed below.
If the signal from the system equals the standard signal mode, the screen adjusts automatically. If the
signal from the system is not equal to the standard signal mode, adjust the screen resolution by referring to your video
card user guide, otherwise there may be no video.
Video signal: (VGA Standard)
Resoluti on (Dot X Line) Vertical Freq uency(Hz) Horizontal Fre quency(kHz)
640 x 480 59.94 31.46
72.80 37.86
75.00 37.50
800 x 600 60.31 37.87
72.18 48.07
75.00 46.87
1024 x 768 60.00 48.36
70.06 56.47
75.02 60.02
PREPARTION
PREPARATION
5
Page 7
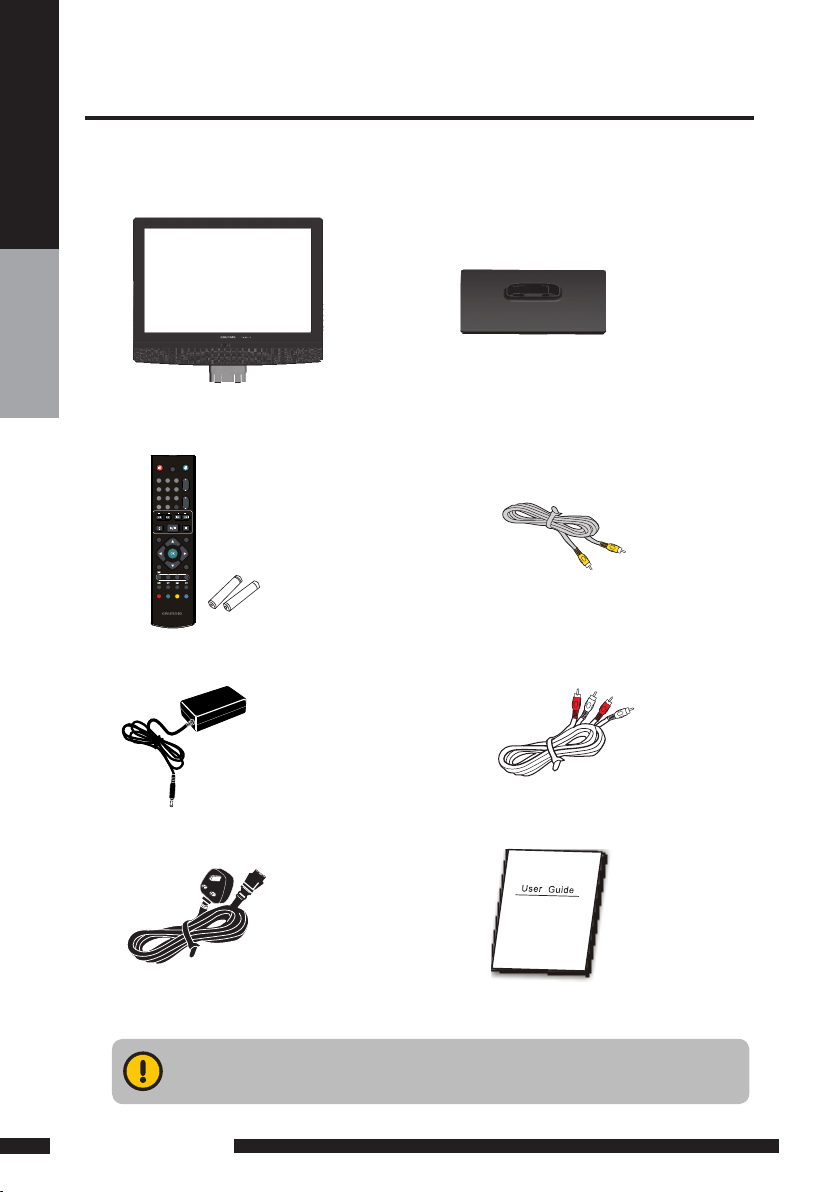
Package Contents
ATV/DTV/DVD
CH.
VOL.
GUIDE
+10
EXIT
INFO INPUT
CH.LIST
MENU
1
4
7
8
9
0
5
6
2
3
OPEN/CLOSE STOP
PLAY/PAUSE
SEARCH SKIP
I-II
DVD
SLEEP
DVD
SUBTITLE
SUBTITLE
USB/CARD
TITLE
FASTTEXT
AUDIO
SETUP
ZOOM
DVDMENU
GOTO
Make sure all of the following contents are included.
PREPARTION
LCD TV
AAA Batteries x 2
Power Adapter
STAND
VIDEO Cable Remote Control/
AUDIO Cable
Power Cord
User’s Manual
These items are all you need to set up and operate the LCD TV in its basic configuration.
6
PREPARATION
Make sure all of the above contents are included in the package. If any items are
missing please contact your dealer.
Page 8
Setting Up Your LCD TV
S
V
I
D
E
O
-
A
U
D
I
O
I
N
Y
P
b
P
r
L
R
P
C
V
G
A
I
N
/
H
D
M
I
P
C
A
U
D
I
O
I
N
V
I
D
E
O
A
U
D
I
O
I
N
L
R
S
C
A
R
T
VHF/UHF IN
DC 12V IN
DIGITAL OUT
SVIDEO
-
AUDIOIN
Y
Pb
Pr L R
PCVGAIN
/
HDMI
PCAUDIOIN
VIDEO
AUDIOIN
L R
SCART
VHF/UHF IN
DC 12V IN
DIGITAL OUT
If you prefer to mount your new TV on a wall instead of attaching it to the stand, please reference the
instructions included in the wall mounting kit (not included).
Ensure the TV stand is still attached with the bottom foam packaging material in the package.
Read all instructions before continuing with the stand installation.
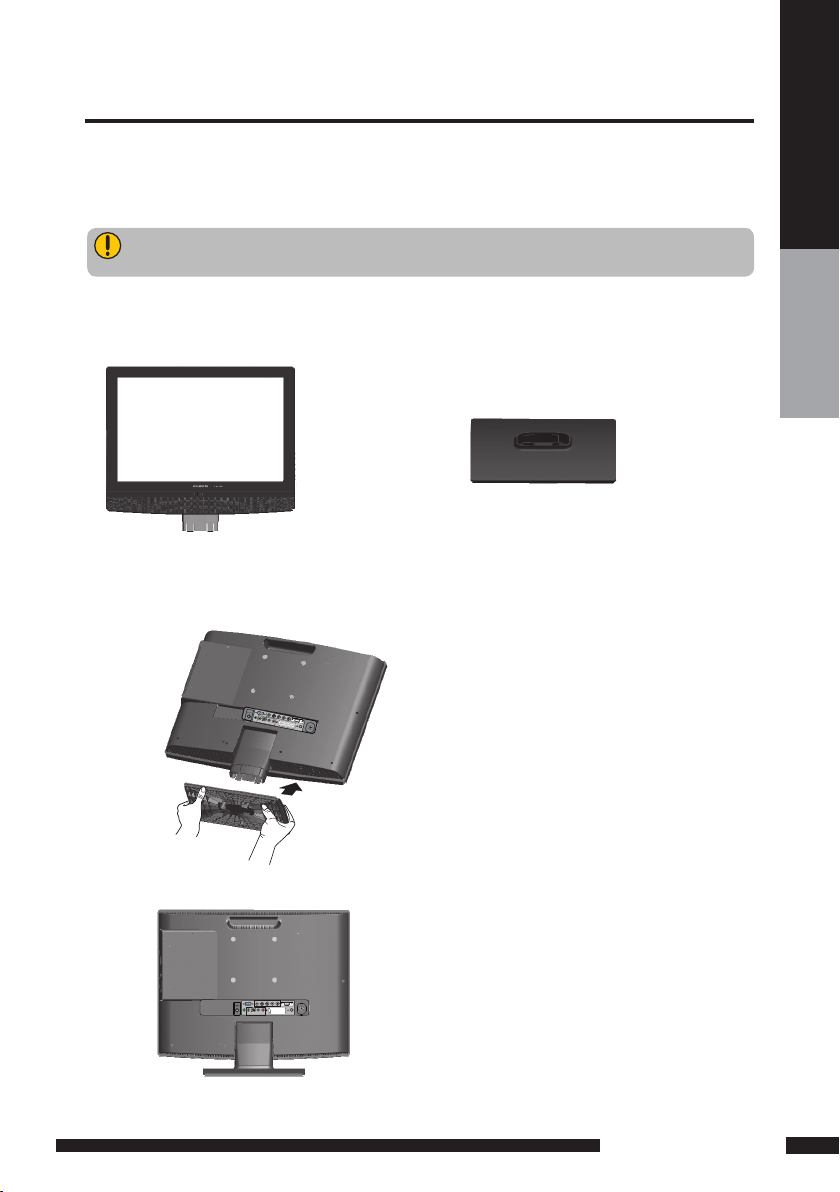
a. Open the box, and make sure all necessary parts are in the box. The package contains:
LCD TV STAND
b. Cover an even stable surface with a soft cloth. Place the LCD TV unit face-down on the cloth. Fit the
stand onto the bottom of the LCD TV unit as shown:
PREPARTION
c. Then push until stand into the LCD TV’s stand socket.
PREPARATION
7
Page 9
How to setup the TV
Connect an existing TV aerial to the aerial input socket on the rear of the TV.
1
2
Connect the DC plug of the AC-DC power adapter to the DC 12V IN socket at the back of the
TV. Connect the AC adaptor to a 230VAC mains socket.
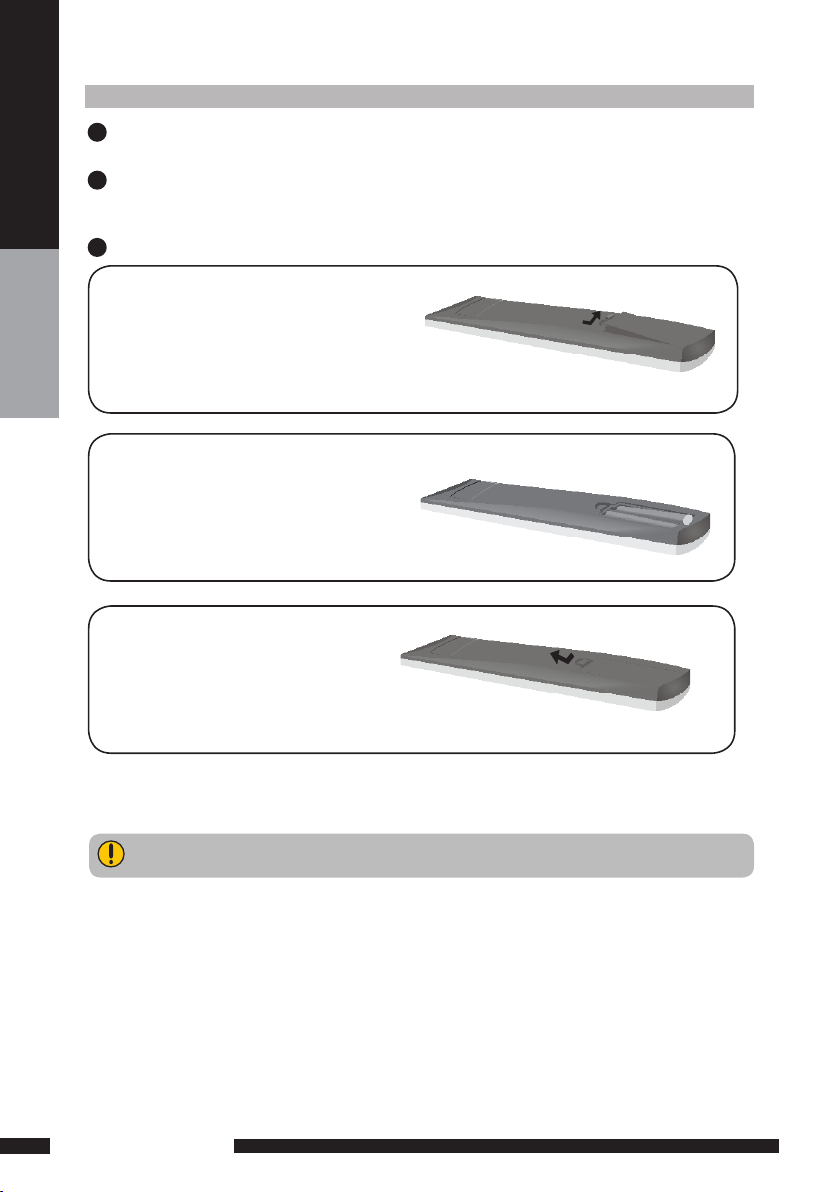
Insert the 2 batteries supplied in remote control.
3
Pull the tab of the back cover and pull up on
the cover to open the battery compartment
of the remote control.
PREPARTION
Insert two AAA size batteries.
Make sure to match the (+) and (-) ends of
the batteries with the (+) and (-) ends indicated
in the battery compartment.
Align the lower tabs of the back cover to the
remote control and squeeze the cover into
place.
Do not use caustic cleaners (porcelain, stainless steel, toilet, or oven cleaner etc.) on the
remote, as it may suffer damage.
8
PREPARATION
Page 10

SVIDEO
-
AUDIOIN
Y
Pb
Pr L R
PCVGA IN
/
HDMI
PCAUDIOIN
VIDEO
AUDIOIN
L R
SCART
VHF/UHF IN
DC 12V IN
DIGITAL OUT
Your LCD TV
Front View / Side View
LED
The LED light indicates when the LCD TV is activated
(Red = standby, Green On).
IR
Infrared
Receiver
PREPARTION
VOLUME + / -
Adjusts the volume up and down.
Selects the main-menu item and change
values for items when in the OSD mode.
CHANNEL.▲ / ▼
Changes TV channels. Selects menu
item when in the OSD mode.
MENU
Presses once to display the OSD (on screen
display), presses again to turn the OSD off.
INPUT
Chooses from different input signal sources.
POWER
Turns the LCD TV on and into standby mode.
Connects to the external earphone for
private listening.
Note:
INPUT button on the TV, has the same function of OK button on the remote control,can be
used as confirm button.
PREPARATION
9
Page 11
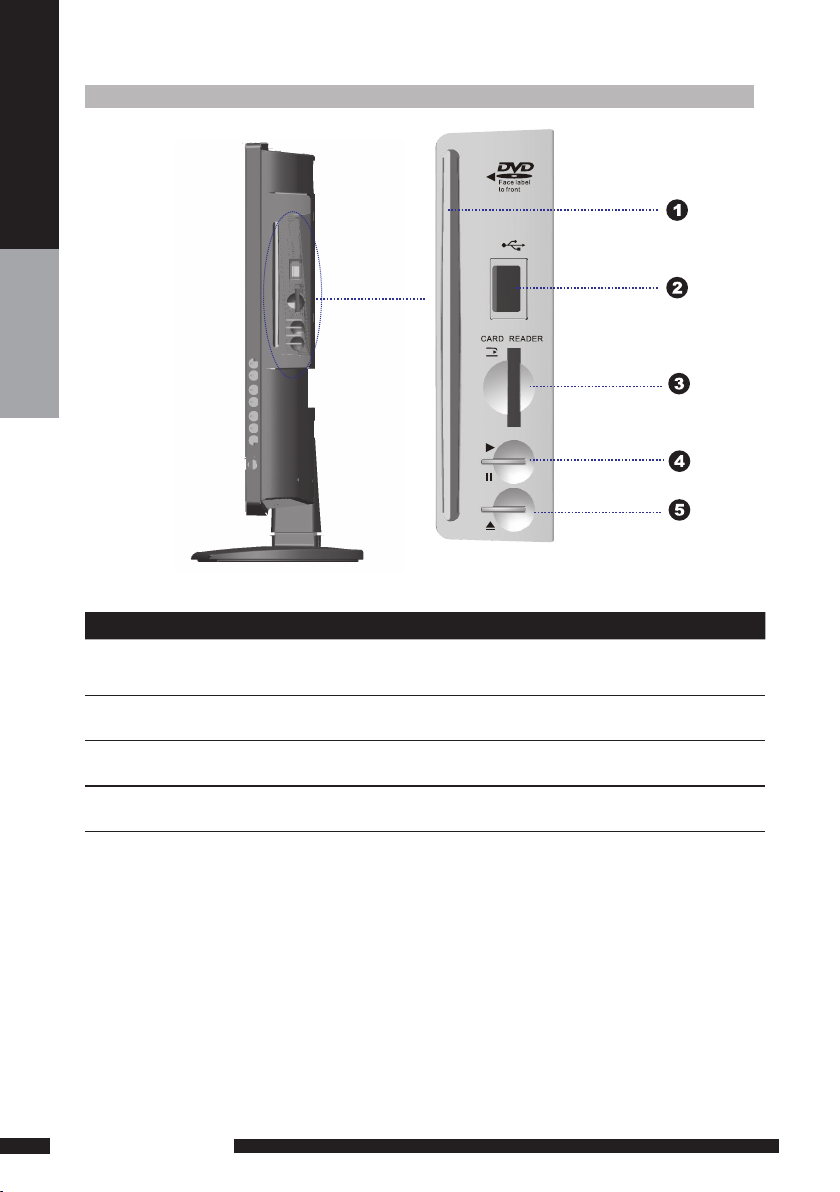
Rear View and Sockets
PREPARTION
ITEM DESCRIPTION
1. SLOT-TYPE DVD
PLAYER
2. USB
3. CARD READER
Any of the following disc types are playable on the DVD player:
CD-R, CD-RW, DVD-R, DVDRW, VCD, SVCD,DVD+R, and DVD+RW. (
DVD mode )
Allow the insertion of a USB disk, You can view digital images or movie
playout on your TV. ( DVD mode )
Allow the insertion of a SD/MMC card. You can view digital images or
movie playout for MPEG1/MPEG2 on your TV. ( DVD mode )
4. PLAY/PAUSE Press to start play back or pause. ( DVD mode )
5. OPEN/CLOSE Press to open and close the disc tray. ( DVD mode )
To View USB or SD/M MC card you must select DVD mode then attach/ inser t USB/SD Card. Using the
remote control to navigate and to select the file shown on the TV screen within the SD/MMC Card or USB
memory disk/stick. Use the arrow/navigation buttons to rotate any JPEG / MPEG1 / MPEG2 / MPEG4
pictures.
10
PREPARATION
Page 12

Rear View and Sockets
S VIDEO
-
AUDIO IN
Y
Pb
Pr L R
PC VGA IN
/
HDMI
PC A UDIO IN
VIDEO
AUDIO IN
L R
SCART
VHF/UHF IN
DC 12V IN
DIGITAL OUT
SVIDEO
-
AUDIOIN
Y
Pb
Pr L R
PCVGA IN
/
HDMI
PCAUDIOIN
VIDEO
AUDIOIN
L R
SCART
VHF/UHF IN
DC 12V IN
DIGITAL OUT
PREPARTION
6
4
ITEM DESCRIPTION
3
5
2 8
7
9
1 DC 12V IN Co nn ec ts t o a w al l outl et via th e su pp li ed 12 V power a da ptor.
Connect to external equipment with scart socket. This
2 AV1
SCART
scart input allows audio and CVBS/YC/RGB+ CVBS.
RGB,S-VIDEO from an external devise to be shown on
your TV.
3 AV2
S-VIDEO/AUDIO
(L/ R)
4 AV3
VIDEO/AUDIO (L/ R)
5 AV4
Y, Pb, Pr /AUDIO(L /R)
6 AV5
VGA IN/PC AUDIO IN
7 AV6
HDMI IN
8 DIGITAL OUT
Connects to the S- VIDEO output sockets and Audio
output sockets on your video equipment.
Connects to the composite A /V output sockets on your
video equipment.
Connects to the component ( Y, Pb, Pr ) video sockets
and audio ( L/R ) sockets of your DVD player, HDTV, or
video equipment.
Connects to a PC or other devices with a VGA interface.
Connects to devices with a HDMI interface.
Connects to digital out socket on external digital
audioequipment.(Only for DVB-T / DVD input sources)
9 VHF/UHF IN Connect TV aerial here.
S-VIDEO and Video have a common aud io input, if b oth devices are being used at t he same time
audio from both will be heard at same time. On ly switch on th e required device to stop the m ixing
of audio.
PREPARATION
11
Page 13

Your Remote Control
ATV/ DTV/DVD
CH.
VOL.
GUID E
+10
EXIT
INFO INPU T
CH. LIST
MENU
1
4
7
8
9
0
5
6
2
3
OPEN /CLO SE STOP
PLAY /PAU SE
SEAR CH SKIP
I-II
DVD
SLEE P
DVD
SUBT ITLE
SUBT ITLE
USB/ CARD
TITL E
FAST TEXT
AUDI O
SETU P
ZOOM
DVD MENU
GO TO
1
2
3
4
5
PREPARTION
6
7
8
9
10
11
Turn the LCD TV on and into standby
mode.
Mute and restore your LCD TV sound.
ATV/DTV/DVD
Press enter ATV / DTV or DVD Mode
.
0-9
Select and switch to a channel by
using 0-9 buttons.
GUIDE/ +10
Press this button displays the electronic program guide
on the screen.(For DVD model)
Press this button twice to select song number
when the number over 9. ( For DTV mode )
CH. +/-
Change the TV channels up and down.
VOL. +/-
Increase and decrease volume.
SLEEP
Set the LCD TV sleep time.
- Press the SLEEP Button to select the number of
minutes, followed by 15, 30, 60 minutes and off.
The timer begins to count down from the number
of minutes selected.
- To check the remaining sleep time, press the
SLEEP Button once.
- To cancel the sleep time, repeatedly press the
SLEEP Button until the display off appears.
- If you turn the set off after setting the sleep
timer, the setting will be erased.
SKIP
Press to skip to the beginning of the currently
played chapter or track. ( DVD mode )
Press to skip to the beginning of the next
chapter or track. ( DVD mode )
SEARCH
Use to advance or reverse playback rapidly.
(DVD mode )
PLAY/PAUSE
//
/
Press to start playback or pause.
( DVD mode )
3
2
4
5
10
11
12
14
OPEN/C LOSE
12
Press to open and close the disc
tray. ( DVD mode )
STOP
13
Press to stop playback. ( DVD mode )
14
EXIT
Exits the OSD ( On Screen Display ) menu.
1
6
7
8
9
13
12
PREPARATION
Page 14

ATV/ DTV/DVD
CH.
VOL.
GUID E
+10
EXIT
INFO INPUT
CH. LIST
MENU
1
4
7
8
9
0
5
6
2
3
OPEN /CLO SE STOP
PLAY /PAU SE
SEAR CH SKIP
I-II
DVD
SLEE P
DVD
SUBT ITLE
SUBT ITLE
USB/ CARD
TITL E
FAST TEXT
AUDI O
SETU P
ZOOM
DVD MENU
GO T O
15
MENU
Displays the OSD ( On Screen Display ) menu.
16
17
INFO
Press once displays a variety of information such as the current
channel and the input source.
Browse the disc’s information. ( DVD mode )
In DTV mode brings up Info Bar to show programme Information.
18
INPUT
Cycle among the different input signal sources:
TV DVD AV1(SCART) AV2(S-VIDEO) AV3(CVBS) AV4(YPbPr) AV5(VGA) AV6(HDMI) DTV
19
Turn on and off the Teletext function.
I-II ( NICAM )
Cycle through the TV Sound options:
MONO / DUAL / STEREO.
CH.LIST
Display all channel list&name.
SUBTITLE
Press the SUBTITLE key to display the subtitle which
is broadcast with the program on the screen.
20
Display the main index in Teletext mode.
Press this button to switch between DVD,
Card Reader, and USB memory disk/stick.
( DVD mode )
Reveal hidden information such as the answer to a
quiz in Teletext mode.
Change the audio language or audio channel.
( DVD mode )
Freeze a multi-page passage on screen in Teletext
mode.
Zoom in/zoom out the displayed frame. ( DVD mode )
Display the top, bottom or all of page, to easily
read in Teletext mode.
Play from the desired location. ( DVD mode )
Allow you to move, select, and set up
OK
the OSD options.
/ USB / CARD
/AUDIO
/ZOOM
/GO TO
PREPARTION
21
Access the TELETEXT items or
corresponding pages.
DVD SUBTITLE
Press to activate and change the subtitling
feature.(DVD MODE)
TITLE
Press the button to display the DVD title
content. (DVD MODE)
SETUP
Press to call up setup menu screen. (DVD
MODE)
DVD MENU
Press the button to display the DVD disc
menu. (DVD MODE)
PREPARATION
13
Page 15

SVIDEO
-
AUDIOIN
Y
Pb
Pr L R
PCVGAIN
/
HDMI
PCAUDIOIN
VIDEO
AUDIOIN
L R
SCART
VHF/UHF IN
DC 12V IN
DIGITAL OUT
Installing the LCD TV
When connecting any external equipment, do not connect any AC power cords to wall outlets until all
other connections are completed.
Connecting a TV Cable or an Antenna
Antenna Connection
The aerial requirements for good digital TV reception are far more important than for normal analogue
TV reception. For this reason, a good quality outdoor aerial is strongly recommended.
PREPARTION
The Power button on the front panel and also on the remote control is only used for powering up and
switching the TV to standby mode, it does not disc onnect the device from the mains supply.
To completely disconnect the main voltage, please remove the AC power adaptor plug from the mains
socket.
14
PREPARATION
POWER
Unplug
from a wall
DC IN
outlet
Page 16

SVIDEO
-
AUDIOIN
Y
Pb
Pr L R
PCVGA IN
/
HDMI
PCAUDIOIN
VIDEO
AUDIOIN
L R
SCART
VHF/UHF IN
DC 12V IN
DIGITAL OUT
Refer to the owner’s manual of the external equipment to be connected.When c onnecting external
DC 12V IN
equipment, do not connect any AC power cords to wall outlets until you have com pleted all the
connections.
Basic Connection: Connecting an aerial
connect the AC-DC
adapter to the DC IN
socket at back of the TV.
Unplug from a
wall outlet
TV Aerial
Aerial /75-ohm coaxial input
Connect your existing TV aerial to the Aerial input socket on the TV.
Connect the power adaptor to the TV as shown above. A red standby indicator will
show on the front panel.
PREPARTION
Tuning in the TV channels
After powering on the TV for the first time. The First Time Installation
screen will show:
1. Make sure an aerial is fitted then press OK button on the remote to start the
Auto Programme Scan (APS).
PREPARATION
15
Page 17

2.In a short while you will see the TV programmes briefly as each channel is
received and stored in the memory. After analogue stations have been
located and stored into the memory,the digital tuning scan will
commence. You may be prompted to start the Digital tuning scan. Press
the OK button to start the scan. When APS is completed BBC1 digital TV will
show, press CH+/- buttons to view the other channels stored.
To view analogue or digital TV press INPUT button and use the up /down
arrow buttons to select DTV or TV and then Press the OK button.Change
channels by pressing the CH +/- buttons.
To power off press the POWER button, the green light will change to red.
Selecting a INPUT
PREPARTION
Press the INPUT button to display the function required (T V/AV).Using the arrow
buttons on the remote highlight the function required and press the OK button to
select the function.
Select TV Channel
Press the CH.+/- button on the remote control and the CH.+/-button on the LCD
TV to change the TV channels.
You can directly select the T V channel required by pressing 1,2 or 3 etc on the
remote button pad.
Adjusting the Volume
Press the VOL. +/– button on the remote control or the VOL. +/- button on the
LCD TV to adjust the volume.
To Mute the Sound
Press MUTE and the sound cuts off.
To turn mute off, press the MUTE button again, or simply press the VOL +/-button.
Sleep Timer
Press the SLEEP button continuously to select the sleep timer or turn the sleep
timer from the OFF,15,30,60minutes; when the LCD TV has reached the set time,
it will automatically turn off. If the TV has no INPUT signal, it will automatically
power down to standby after 15 minutes.
16
PREPARATION
Page 18

Audio
(R)
Video/Audio Cable
ideo
Audi
(L )
V
o
VHF/UHF IN
PC/VGA IN
DC 12V IN
Connecting a VCR&Video Camera
Rear of TV
INSTALLATION
METHOD A (AV2)
Use an Audio cable to connect the VCR’s/ the Video Camera’s audio output sockets to
your LCD TV.
Use a S-Video cable to connect your LCD TV and VCR player/ video camera.
METHOD B (AV3)
Use an A/ V cable to connect the VCR’s/ video camera’s composite output sockets
to your LCD TV.
METHOD C (AV1)
Use a SCART cable to connect the VCR’s SCART socket to the LCD TV ‘s SCART socket.
Connect all power SOURCEs before turning on the LCD TV or other connected equipments.
Press the POWER button to turn on your LCD TV.
To watch video camera, press the INPUT button to select AV2 or AV3.
5
To watch VCR, press the INPUT button to select AV1, AV2 or AV3 .
“Not all ca meras have the ability to connect to a T V. Please check your video camera
user guide for compatibility ”.
INSTALLATION
17
Page 19

Connecting a TV Cable Box or Satellite Receiver
Audio
(R)
Video/Audio Cable
ideo
Audi
(L )
A
Pb
Pr
E
V
GACA BLE
D
HDMI CABL E
F
V
o
PC/VGA IN
SATELLITE RECEIVER
TV CABLE BOX
Satellite antenna
cable
VHF/UHF IN
DC 12V IN
Rear of TV
Method A(AV4) :
INSTALLATION
Use a Component cable to connect the Y/Pb/Pr sockets on the TV Cable Box to your
LCD TV.
Use an Audio cable to connect TV cable box’s audio output sockets to LCD TV.
Method B(AV2) :
Use an Audio cable to connect the TV Cable Box’s audio output sockets to your LCD TV.
Use a S-Video cable to connect your LCD TV and TV Cable Box.
Method C(AV3) :
Use an AV cable to connect the TV Cable Box’s composite output sockets to your LCD TV.
18
Method D(AV5) :
Use a VGA 15 pins cable to connect the TV Cable Box’s RGB output sockets to your LCD TV.
Use a 3.5mm socket to RCA adapter cable for connecting audio.
Method E(AV1) :
Use a SCART cable to connect the TV Cable Box’s SCART socket to the LCD TV’s SCART
socket.
Method F(AV6) :
Use a HDMI cable to connect the Satellite Receiver HDMI connector to your LCD TV.
Connect all power sources before turning on the LCD T V or other connected equipments.
Press the POWER button to turn on your LCD TV.
To watch TV cable box, press the INPUT button to select AV1, AV2, AV3, AV4 ,AV5.
5
To watch programs satellite receiver, press the INPUT button repeatedly to select AV6 .
6
INSTALLATION
Page 20

VHF/UHF IN
PC/VGA IN
DC 12V IN
Connecting an Audio Amplier
Rear of TV
INSTALLATION
Use an audio cable to connect the audio receiver’s audio LINE IN sockets to LCD TV ‘s
DIGITAL OUT sockets. (Only for DVB-T / DVD input sources)
Connect all power SOURCEs before turning on the LCD T V or other connected equipments.
Press the POWER button to turn on your LCD TV.
INSTALLATION
19
Page 21

HDMI
Analog Audio Cable(Stereo to RCA type)
HDMI Cable
(not supplied with the product)
HDMI to DVI Cable
(not supplied with the product)
Cable sample
HDMI
-This TV can accept High-Definition Multimedia Interface(HDMI) .
-This TV SET supports HDCP(High-bandwidth Digital Content Protection) Protocol for TV SET
(480p, 720p, 1080i) modes.
-When you connect to the output of an HD ready player (DVD Player, Set Top Box or PC) switch to the
AV6(HDMI) function and the TV will automatically detect the resolution used by the HDMI source.
- To get the best picture quality, adjust the DVD Player or Set Top Box output resolution to 1280 x 720p.
- To get the best picture quality, adjust the PC graphics card to 1024 x 768, 60Hz.
How to connect
1. If Source Devices have HDMI Output , connect to the HDMI socket located at the rear of the TV
using the HDMI Cable supplied with your external devise. (HDMI sends Digital Video and Audio with
one cable.)
INSTALLATION
20
INSTALLATION
Page 22

USING THE FEATURES
OSD Menu Operation
1 The main menu provides access to the following menus:
Video Adjust picture setting such as picture
Audio Adjust sound option and effects.
Setup Adjust colour standard, sound standard,
Preferences Adjust preferences such as OSD, blue
Screen Adjust screen such as horizontal size,
DTV (Digital
TV)
2 Press the MENU button on the remote control. The main menu will appear on the screen.
3 Use ◄/► to highlight your main menu option, then press OK to enter your selected option.
Use ▲/▼ to highlight an option of the sub-menu. Use ◄/► to change the value of the
item.Press the EXIT button to exit menu.
VIDEO
Use this Video setting menu to adjust the picture quality which best corresponds to your viewing
requirements.The Video Menu includes the following options:
mode, contrast, brightness,sharpness
colour and advanced.
APS, Manual search, Channel setup.
screen, childlock, sleep timer, OSD
timer, OSD reset.
horizontal position, vertical position, phase,
auto sync.
The DTV menu provide four submenus as
follow:edit channel list,configuration,parent
al control, EPG (Electronic Programme
Guide),with which you can set the DTV as
you wish.
USING THE FEATURES
OPTION DESCRIPTION
Picture Mode Custom:Select for user’s settings.
The items of video can be adjusted when
the picture mode is for user’s settings
except advanced item.
Vivid:Select for enhanced picture contrast
and sharpness.
Standard:Select for standard picture
settings.Recommended for home
entertainment.
Mild:Select for mild picture settings.
Contrast Adjust the difference between the
brightness and darkness regions of the
picture.
Brightness Adjust to increase or decrease the
brightness.
Colour Allows to adjust the colour from 0 to 100.
Tint(NTSC) Allows you to adjust the color tint of the
picture.(Only for NTSC)
Sharpness Adjust to sharpen or soften the picture.
USING THE FEATURES
21
Page 23

The VIDEO Settings
OPTION DESCRIPTION
Advanced Display Mode Allows you to select
AUDIO
Use this AUDIO setting menu to adjust the sound and balance and volume to your listening
requirements.
OPTION DESCRIPTION
Volume presets the volume to a given setting.
Balance Adjust to emphasize left or right speaker
the display mode to
be Wide, 4:3,16:9
Original, Zoom.
DCE Allows you to adjust the
Blue
Stretch
Green
Stretch
Color
Temp.
balance.
(Dynamic Contrast
Enhancemen) to be off, low,
mid, high.
Allows you to adjust the blue
stretch.
Allows you to adjust the
green stretch.
Allows you to adjust the color
temp. to be cool, warm ,
standard.
USING THE FEATURES
22
USING THE FEATURES
Page 24

Setup
Channel Setup
Finetune
Save
Manual Search
APS
Setup
Channel Setup
The Setup Settings(Analogue TV)
Setup menu is only available when viewing Analogue TV. Use this Setup menu to select Colour
Standard, Sound Standard, APS, Manual Search, Channel Setup.Use the Up/Down arrow
buttons to highlight the required setting. Press the Press OK button to select the function. Use left
/ right arrow buttons to adjust the settings. Press OK to save the adjustment.
OPTION DESCRIPTION
Colour Standard Allows you to select the colour standard :
AUTO,PAL, SECAM, UK = PAL.
Sound Standard Allows you to select the sound standard :
DK, BG, I, L/L’.
DK PAL D/K, SECAM D/K (East
Europe / China )
BG PAL B/G, SECAM B/G (Europe
/ East Europe / Asia / New
Zealand / M.East / Africa /
Australia)
I PAL I (U.K. / Ireland / Hong
Kong / South Africa)
L/L’ SECAM L/L’
APS Start APS
Press OK to start Auto Search and auto sort
process. Note: Auto Sort will only operate in
UK.
Country
Allows you select the country :Austria,
Belgium, Switzerland, Czech Rep.,
Germany, Denmark, Spain, France, Finland,
UK, Greece, Hungary, Italy, Norway,
Netherlands, Portugal, Poland, Sweden,
Slovenia, Slovakia, Turkey, Others.
Manual Search Allows you to adjust the manual search by
hand if signal is too weak or picture is blurry.
Channel Setup Press the ►button to select Sort, Delete,
Skip, Finetune, Save.
Sort Allows you to manually sort the
stored programme.
Delete Allows you to delete the stored
programme.
Skip Allows you to skip the stored
programme.
Finetune Allows you to finetune the
stored programme.
Save Allows you to save the setup.
USING THE FEATURES
USING THE FEATURES
23
Page 25

Auto Sync
The Preferences Settings
Use this Preferences setting menu to set up some features: OSD, Blue Screen, Childlock, Sleep Timer,
OSD Timer, OSD Reset.
OPTION DESCRIPTION
OSD Language : Allows you to select the OSD
Blue Screen Allows you to select the blue screen to be
Childlock Allows you to select the childlock to be
Sleep Timer Allows you to select the sleep timer to be
OSD Timer Allows selection of the display time of the
OSD Reset Allows you to restore the factory set tings.
to be English, French, Spanish, German,
Italian, Portugese, Dutch, Polish or
Russian .
Transparency: Allows you to adjust
transparency from 0 to15.
off or on.
yes or no. (Default password is 0000.
golden password is 3796.)
Change Pin: Allows you to change the 4digit password.
off, 15min, 30min, 60min.
on-screen menu:5 s,10 s,15 s, 20 s, 25 s.
SCREEN(Only for VGA)
USING THE FEATURES
24
USING THE FEATURES
OPTION DESCRIPTION
Horizontal
Size
Horizontal
Position
Vertical
Position
Phase Allows you to improve focus clarit y and
Auto Sync Allows to auto synchronize VGA signal.
Allows you to adjust the Horizontal Size
from 0 to 100.
Allows you to adjust the Horizontal
Position of the picture.
Allows you to adjust the Vertical Position
of the picture.
image stability.
Page 26

Using the DTV OSD Settings
OPTION DESCRIPTION
Edit Favourite
List
Configuration Add new channel, set audio language,
Parental Control Enable or Disable the menu protection
EPG Electronic Program Guide
Create, Modify or delete a channel list.
Lock some channels that are not suited for
younger members of the family, skip/add
the channel list as.
subtitle language, as you wish. Upgrade
the system. View the signal information.
system and allows the PIN code to be
changed.
EDIT FAVOURITE LIST
Highlight the Edit Favourite List option, then press OK button,there are three Items in the menu.
USING THE FEATURES
CREATE A FAVOURITE LIST
Highlight the Create a favourite list item, pressing OK button, then The menu is displayed on the screen now. Once
you enter the Create a favourite list menu,a new channel list will be created,you can create four favourite lists at
most.
You can lock or unlock the selected channel by pressing the RED button, pressing the BLUE button to skip or add
the selected channel. If you want to skip or add all, first press the GREEN button, then press either the RED button
to skip all, or the GREEN button to add all. A channel selected as a locked appears in the channel list with a lock
icon ( red button ) against the channel name, a channel selected as a added appears in the channel list with a add
icon ( tick ) against the channel name.
USING THE FEATURES
25
Page 27

Using the DTV OSD Settings
1
2
3
4
5
6
BB C O NE
CB BC C hann el
BB C TW O
FAV 1
BB C TH REE
BB C N EWS 24
BB Ci
Lo ck Ski p Sk ip Ad d A ll/ Sor t Mo ve/
Exit
Exit Screen
1
2
3
4
5
6
BB C ON E
CB B C C ha nne l
BB C TWO
FAV 1
BB C THR EE
BB C NEW S 2 4
BB C i
Alp ha btica l
sor t
Mo veLo ck U nlo ck
sor t
/
EX IT
Ca nce l o pera tio n
By pressing the YELLOW button you can sort the channels in the list. Then you can sor t the channels
alphabetically by pressing the RED button or sort the channels manually by pressing the BLUE but ton.
If you have loc ked several c hannels, by pressing the YELLOW button, the locked channels will be placed
at the bot tom of the Channel list in alphabetical sort.
When you complete the edit, press the EXIT button to quit the favourite channel list menu. The next
menu will ask if you want to save the changes you have made, using the ◄/► buttons to highlight the
YES option, and press the OK but ton to save the changes.
USING THE FEATURES
Once you lock a channel, you must enter the PIN Code that is set in the parental control menu at first
before the channel is displayed.
26
USING THE FEATURES
Page 28

Del ete a favouri te l ist
You ar e go ing to re m ov e th e fav ou rit e li st
pr ess O K to co nfir m
,
Modif ty a fa vouri te l ist
TV RA DI O
/
FAV 1
FAV 2
OK E XI T
If you skip a channel, it cannot be shown in the list menu ( Press OK button will pop-up the favorite channel list
menu when you watch the digital terrestrial television ) unless you add it again. ( In the channel list menu, the
skipped channel name is not shown.)
MODIFY A FAVOURITE LIST
You can modif y the favourite list which you have create. The list named “TV / RADIO” is the default list, the
rest are created. Select a favourite list, then press OK button to modif y the list as you do in the create a
favourite list menu.
USING THE FEATURES
DELETE A FAVOURITE LIST
Using the ▲/▼ buttons to highlight the list name which you want to delete, then pressing the OK button to delete
the favourite list, the pop-up menu will ask if you confirm or cancel the delete operation.
( Note: The default favourite channel list name isn’t displayed in the list, so you can only delete the list name you
created.)
USING THE FEATURES
27
Page 29

Using the DTV OSD Settings
CONFIGURATION
Highlight the Configuration option, then press OK button to enter the selected option. The
configuration menu is displayed on the screen now.
CHANNEL INSTALLATION
Use these options If you have moved location or want to rescan for new channels. Press OK
button to display the channel installation menu.
If you want the TV to auto search the channels, press OK button to continue. Then you should
choose the installation type by using the ◄/► buttons and press the OK button to start the
installation process. If you choose ‘add’, the new channels will be added in the channel list. If
you choose ‘new’, the new channels will replace the previous channels in the channel list.
USING THE FEATURES
28
USING THE FEATURES
Page 30

Using the DTV OSD Settings
If you want to install the channels by yourself, using the▲/▼buttons to highlight the channel
installation (manual) option, and press ok to install manually. First you should choose the
installation type, then you can see the following menu. Using ◄/► to cycle the channel option,
then the bar graphs of signal level and signal quality will indicate whether any channels are likely
to be found. You should choose the channel of which the signal quality bar is high as well, then
press OK button to scan the channels.
NEW DETECTED CHANNELS
The New Detected Channels menu shows the channels that you add in the channel list
recently. The type icon of the program is displayed against the channel name.
USING THE FEATURES
USING THE FEATURES
29
Page 31

Using the DTV OSD Settings
Using the ▲/▼buttons to highlight the user settings item in the configuration menu, then
press OK button to display the user settings menu.
AUDIO LANGUAGE
This function selects which language soundtrack you will hear when switching to a channel
broadcasting with multiple soundtracks. Highlight the audio language line in the user settings
menu and use ◄/►buttons to cycle through the language options.
SUBTITLE LANGUAGE
This function selects the desired subtitle language whenever subtitle information is broadcast.
Highlight the subtitle language line in the user settings menu and use◄/► buttons to cycle through
the language option.
SYSTEM PARAMETERS
Using the▲/▼buttons to highlight the system parameters item in the configuration menu, then
press OK button to display the system parameters menu.
USING THE FEATURES
SYSTEM UPGRADE
Highlight the System Upgrade item in the system parameter menu, pressing OK button to
display the System Upgrade menu. press OK button to upgrade system. If there is a new
software, the unit will upgrade itself.
30
USING THE FEATURES
Page 32

Using the DTV OSD Settings
SYSTEM INFORMATION
Highlight the system information item in the system parameter menu, pressing OK button to
display the system information menu. You can view the system information in this menu, however,
you can modify nothing in this menu, Pressing OK button to quit.
SIGNAL INFORMATION
Highlight the Signal information item in the configuration menu, pressing OK button to display
the Signal information menu. Cycle through the channel option by using the ◄/►buttons on the
remote control. The signal level and signal quality of the channel that offers the upgrade
software can be observed on the two bar graphs. The bar graphs of signal quality and signal
level give a good indication of whether the selected channel is likely to be found. If the signal
quality bar is high as well then it is a digital frequency and digital channels
will probably be found.
USING THE FEATURES
USING THE FEATURES
31
Page 33

Using the DTV OSD Settings
PARENTAL CONTROL
Highlight the parental control line in the parental control menu and use◄/► buttons to cycle
through the enable and disable option. Toggle this option to enable, then the following items
can be altered.
RECEIVER LOCK
You should enter the PIN CODE before you can see the DTV program while you power on the
TV and select the DTV INPUT.
CONFIGURATION MENU
If you toggle this option to YES, you will enter the PIN CODE before enter the configuration menu.
CHANNEL LOCK
If you toggle this option to YES, the channels you locked in the edit channel list menu can’t be
displayed before you enter the PIN CODE.
MATURITY LEVEL
There are 18 levels total. If you toggle this option to a number (1-18), for example, you toggle it to 15,
USING THE FEATURES
that’s to say, if the channels broadcast material is not suitable for the family members who are under
15 years old , you must enter the PIN CODE before you can view them. (The maturity level information
should be broadcast with these programs.)
32
USING THE FEATURES
Page 34

REMINDER
14:58 27/09/2005
REMINDER
14:58 27/09/2005
Using the DTV OSD Settings
PIN CODE CHANGE
Pressing the ‘RED’ button will popup the PIN code change menu, enter the previous code by
using the 0-9 buttons on the remote control, then enter the new code twice to confirm and this
menu will disappear (The PIN is factory set to 0000). Pressing EXIT to quit without saving the
new code.
Pressing OK button to quit the parental control menu with saving these alteration. Pressing EXIT
button to quit the parental control menu without saving these alteration.
Note:If you forgot the code which your set it,you can press RED-RED-GREEN-GREEN-YELLOWYELLOW-BLUE-BLUE button to enter the PARENTAL CONTROL SUB-MENU to change the new
mode
EPG
EPG (Electronic Programme Guide) menu is reached by pressing GUIDE button, quit by
pressing GUIDE button again. Current program is highlighted. Use Channel Up/Down ▲/▼
buttons to change channels and view the other programmes on the selected channel. Press
the Arrow up / Arrow down navigation buttons to scroll through and show programme content.
There is a 7day EPG, you can see the other days channel list by using Left / right navigation
arrow ◄/► buttons.
USING THE FEATURES
The short description of the highlighted channel is shown under the image window, and you
can see the extended description by pressing the INFO or OK button and by pressing this
button again you can close this window. Press “RED” button to set a Reminder to
automatically view a chosen channel. by pressing this button again you can
cancel this reminder.
USING THE FEATURES
33
Page 35

/USB/CARD
(SCART)
(CVBS)
(Y Pb Pr)
Using The Built-In DVD
TO INSERT A DISC
Select DVD function before inser ting the disc to the player.
Plays movies and other content on DVD, VCD, SVCD, and audio CD.
Note:
Insert a disc with label side facing to front
of TV
TO REMOVE A DISC
When removing the disc, do not attempt to pull it from its slot. Please push the Button .
1. Turn your LCD TV on.
2. Select INPUT to DVD.
USING THE FEATURES
3. Insert a disc with label side facing front of TV ( CD-R, CD-RW, DVD-R, DVDRW, VCD, SVCD, DVD+R,
or DVD+RW )
4. After the disc is inserted, Smart NAVl will show the contents of the disc automatically.
5. If DVD cannot automatically play, press ▲/▼ or ◄/► Button to select play content, and press OK Button
or PLAY/PAUSE // Button on the remote control to the start playing content.
34
USING THE FEATURES
Page 36

Using The Card Reader & USB
The Smart NAVI Viewer allows you to play JEPG / MPEG1 / MPEG2 / MPEG4 files in a SD storage card
on your LCD TV.
TO INSERT A SD CARD
Be sure to insert the SD card in the correct orientation. If the SD card is forced in the
wrong way, it may cause damage.
TO REMOVE A SD CARD
When removing the SD card, please pull it from its slot.
1. Turn your LCD TV on.
2. Select INPUT to DVD.
3. Insert a SD card that contains JEPG / MPEG1 / MPEG2 / MPEG3 / MPEG4 files.
USING THE FEATURES
4. Press “CARD” Button on the remote control to enter Card Reader Mode.
5. Press▲/▼Button on the remote control to select the file you want to play,
and then press “OK” Button to play the file.
NOTE:
1. The card socket and the DVD player cannot be used simultaneously, so please
insert either a card or a disc, not both at once.
2. If you want to view the DVD program or turn USB file on, please press “USB/CARD” Button
to switch it.
USB ( Universal Serial Bus )
Insert a USB disk memory stick or plug, and press USB/CARD button to switch to USB playing
status. The TV screen will show the USB menu.
The playing interface and operation methods are alike MP1 / MP2 / MP3 / MP4 and JPEG files.The
playing interface is according to the content of your saving.
USING THE FEATURES
35
Page 37

Using The Card Reader & USB
PLAYING BACK DVD / USB / CARD
For trouble free operation of SD CARD/USB or DVD disc play. Please ensure that the
following steps are taken before inser ting an SD card, USB or DVD disc:
DVD Playback
1. Press INPUT Button and select DVD / USB / CARD function.
2. Allow 10 seconds before inserting a DVD disc ensuring that the label side is facing you.
SD CARD/USB Playback
1. Press the INPUT Button and select DVD / USB / CARD function.
2. Press the USB/CARD Button on the remote.
3. Now Insert a Card ( Label side facing you ) or USB cable.
Note: If DVD has been previously played its important that the disc is removed and that the
USB/CARD Button on the remote is pressed before inserting a card or USB cable.
Failure to do so will result in the card/USB failing to be read and shown on the
monitor.
DVD Supports following formats:
1. ( CVR/VBR ) bite rate range : 32kbps~320kbps.
WMA bite rate range: 64kbps~192kbps ( Sample Rate )
2. JPG picture maximum resolution:
Baseline JPG: 3072X2048
Progressive JPG: Width x ( High+128 )<3300000
USING THE FEATURES
3. MPEG4:
Version: DivX3. 11 / DivX4.xx / DivX5.xx / DivX6.0,
Video Input resolution: PAL<=720x576, NTSC <=720x480.
4. *.MPG, *.DAT MPEG1 video format, same as VCD.
36
USING THE FEATURES
Page 38

SEARCH PLAY
For DVD discs:
Press the GO TO key on the remote control in normal playing status to display on screen as follows:
Use the arrow buttons and number keys to adjust the following:
1. Title 5. Time of the Title
2. Chapter 6. Time of the Chapter
3. Audio 7. Repeat On/Off
4. Subtitle Angle 8. Time Display Mode
Both VCD and DVD discs share the same instructions.
For CD discs
Press the GO TO key on the remote control the screen will display as following order:
Track 03/71 05:33
Disc Go To - - :- -
Track Go To:- -:- -
Select track: - -:- -
USING THE FEATURES
WMA Playback
WMA Playback
The DVD player can playback discs, including CD-R, CD-RW, DVD-R, DVD-RW,DVD+R,
or DVD+RW recorded with audio files. Multiple and multi-level directories are also supported.
Upon loading a WMA disc , the screen shows a menu as :
USING THE FEATURES
37
Page 39

WMA Playback
To access your preferred directory, use the up/down ( ▲/▼ ) cursor keys to select the file, and press OK
key to confirm.
Use the up/down ( ▲/▼ ) cursor keys to select song and press OK Button to start playing. Press left
cursor button to return to the previous directory, you can then select other directories.
Picture CD Operations
Playing Kodak Picture CD or JPEG files
The DVD player is compatible to Kodak Picture CD and discs containing JPEG /
MPEG1 / MPEG2 /MPEG4 image files ( with .JPG file extension ). This function is
similar to playback function.
Upon loading a Kodak Picture CD JPEG files, TV screen will display the following :
USING THE FEATURES
Operations:
Picture selection & Preview:
Press cursor buttons to select the target picture and press OK Button to show. The
player will show the preview of the picture in preview area once the cursor stops.
Rotate Picture:
You can use arrow left/right buttons to rotate current showing picture.
38
USING THE FEATURES
Page 40

Picture CD Operations
Previous and Next selection:
You can press But ton to show previous picture or Button to show next picture manually.
Slide Show:
The player will automatically play pictures in slide show mode if the disc
containing more than one picture. There are 16 available modes to wipe the TV
screen when displaying a new picture:
Press up/down ( ▲/▼ ) cursor keys to change the current slide show mode when playing pictures.
MPEG 4 Operations
MPEG-4 Playback
Upon loading the disc, the screen shows a window as follows: ( The following picture just for reference
only )
1. Choose your preferred directory, use the ▲/▼ Buttons to navigate and then press the OK Button to
confirm.
USING THE FEATURES
2. Select the AVI file by using cursor button to choose the preferred AVI fileand press OK Button to play
it
.
3. Return to the main directory. Press left cursor button and then press STOP Button to return to the main
directory, you can then select another directory.
4. To stop playing, press the STOP Button at anytime.
USING THE FEATURES
39
Page 41

Using General Setup Page
The setu p menu is used for configuring the DVD player.
OPTION DESCRIPT ION
TV DISPLAY
4:3 Pan Scan
Select this when the player is connected
with a standard format TV set .
Widescreen picture shown in the full
screen with some part cut.
4:3 Letter box
Select this when the player is connected
with a standard format TV set.
Widescreen picture shown in the full
screen with black bars on the top and
bottom of the screen.
16:9
Select when the player is connected to a
Widescreen TV set.
USING THE FEATURES
OSD LANGUAGE
DIGITAL OUTPUT
OSD Language
The default language is English.
You can select other OSD languages:
English / Norwegian / Sweden / Finish /
Dainish / Greek / Italian / Polish /
Hungarian / Czech / French.
Output
There are 3 kinds of SPDIF output mode
for choose: SPDIF OFF, SPDIF RAW and
SPDIF PCM .
SPDIF OFF:
Set as default, there will be no digital
audio signal output.
RAW:
Set as default, the digital audio signal
output will be in RAW format. Normally,
this mode is used for DTS signal and
Dolby digital signal.
PCM:
Set as default, the digital audio signal
output will be in PCM format. Normally,
this mode is use for audio CD signal.
40
USING THE FEATURES
Page 42

Using General Setup Page
OPTION DESCRIPT ION
SCREEN SAVER
Screen saver
When the player stops or the picture
becomes motionless for a couple of
minutes, there will be a screen saver to
prevent damage to the display screen.
ON: To activate screen saver.
OFF: To disable screen saver.
LAST MEMORY
Last Memory
ON: Each time when you turn off the
player, it will memorize the last played file.
So if you turn on the player or play the
same disc next time, it will resume from
the same point.
OFF: Disable the last memory function.
Analogue Audio Setup Page
OPTION DESCRIPT ION
DOWNMIX
DOWNMIX
LT/RT: Select this option when the DVD
player is connected to external amplifier
with Pro-Logic decoding function.
STEREO: Press down button to select the
stereo, and then press OK Button to
confirm it.
USING THE FEATURES
USING THE FEATURES
41
Page 43

RESOLUTION
Dolby Digital Setup
OPTION DESCRIPT ION
DUAL
MONO
Dual Mono
Stereo: It means that the player will output
Left channel and Right channel audio.
L-Mono: It means that the player will
output left channel audio only.
R-Mono: It means that the player will
output right channel audio only.
MIX-Mono: It means that the player will
output the average signal of the Left
channel and Right channel audio.
Note:
This setting is used to play Dolby AC-3
encoded 2 channel discs. Some DVDs
may not being change in this menu
setting.
USING THE FEATURES
DYNAMIC
Dynamic
When set the dynamic range to FULL, the
soft music will be automatically increase,
and the loudness of the music will
automatically decrease.
When set the dynamic to OFF, the
function will be disabled.
Note:
This setting is used to play Dolby Digital
encode disc.
This function is suitable to use at night.
Using Video Setup Page
OPTION DESCRIPT ION
Allows you to select 480p, 576p, 720p
mode. The factory default is 720P.
42
USING THE FEATURES
Page 44

Using Preference Page
The unit must be at complete STOP mode to access to SETUP Preference Page.
OPTION DESCRIPTION
AUDIO
AUDIO
Set the audio language to your language of
choice: English / Norwegian / Sweden /
Finish / Dainish / Greek / Italian / Polish /
Hungarian / Czech / French.
NOTE: Not all DVD discs are recorded
with multiple languages.
SUBTITLE
DISC MENU
PARENTAL
DEFAULT
SUBTITLE
Select the Subtitle language:English /
Norwegian / Sweden / Finish / Dainish /
Greek / Italian / Polish / Hungarian / Czech
/ French OFF.
NOTE: Not all DVD offer subtitles in
multiple languages.
DISC MENU
Select the Disc Menu language:
English / Norwegian / Sweden / Finish /
Dainish / Greek / Italian / Polish /
Hungarian / Czech / French.
NOTE: The default language is English.
PARENTAL
Allows the user to set a maximum rating of
movie that can be played(e.g. PG rating).
Movies rated higher than the level set will not be
played. The parental lock can only be changed
after input the correct password.
NOTE: This function is available only when the
discs have rating encoded on.
PASSWORD MODE
Select to change old password to new
password. (Factory default is 000000, and
the golden password is 003796)
PASSWORD CHANGE
To change the password, you need to:
1. Input old password.
2. Input a 6-digit new password.
3. Input the new password again to
confirm.
DEFAULT
To restore all setup parameters to the
factory settings EXCEPT the password.
This function available in stop state or
when the tray is opened.
USING THE FEATURES
USING THE FEATURES
43
Page 45

TROUBLESHOOTING
Before consulting Grundig the Helpline, check the following chart for a possible cause of problem and for
a possible solution. HELPLINE NUMBER 0871 230 1777
TV will not t urn on
Make sure the AC adaptor / power cord is plugged in
The batteries in the remote control may be exhausted.
Replace new and same brand batteries.
No picture, n o sound
Check the interface cable between TV and antenna/cable TV.
Press the POWER button on the remote.
Press the TV button on the remote, then press INPUT button repeatedly to select the connected video INPUTs.
Poor pictur e, sound OK
Check the interface cable between TV and antenna/cable TV.
Try another channel, the station may have broadcast difficulties.
Adjust the Brightness/Contrast options in the VIDEO Menu.
Picture OK , poor sound
Sound may be muted. Press the button on the remote.
Press the VOL+ button to increase the volume.
Audio nois e
Move any infrared equipment away from the TV.
SPECIFICATIONS
44
SPECIFICATIONS
Page 46

SPECIFICATIONS
MODEL: GU19WDVDT/GU19WDVDPCX
LCD Panel Panel Size 19” TFT LCD
Brightness 450
Contrast Ratio 800:1
Max. Resolution 1440 x 900
Input Connector VIDEO 1
S-VIDEO 1
YPbPr/ AUDIO IN(L/R) 1
AUDIO IN(L/R) 1
PC/VGA IN 1
HDMI IN 1
PC AUDIO IN 1
DIGITAL OUT 1
HEADPHONE 1
VHF/UHF IN 1
Power Source 12 DC via supplied AC adaptor
Power Consumption 70 W, standby < 3 W
Dimension 470 x 162 x 412.7mm
Weight 5.3 Kg
SPECIFICATIONS
SPECIFICATIONS
45
 Loading...