

Page 1
SOUNDBAR SYSTEM
GSB 980
EN
Page 2

INHALT
3 SETUP AND SAFETY
3 Caution: high-frequency radiation
4 OVERVIEW
4 Buttons on the remote control
and the soundbar
4 The displays on the soundbar
5 Sockets on the back of the soundbar
6 Control elements on the subwoofer
7 PREPARATION/CONNECTING
7 Preparation
7 Connecting the LCD television
8 Connecting an MP3 player
8 Connecting external devices
9 Connecting the soundbar mains adapter
9 Connecting the subwoofer power cord
10 OPERATION
10 Switching on and off
10 Automatic switch-off
10 Selecting the input source
10 Adjusting the volume
10 Selecting sound settings
10 Adjusting base
10 Muting
11 BLUETOOTH MODE
11 Compatible with the following devices
11 Selecting the Bluetooth input source
11 Finding and connecting a Bluetooth
auxiliary device
12 Playback from the Bluetooth auxiliary
device
12 Deactivating the Bluetooth auxiliary
device
12 Reactivating a Bluetooth auxiliary
device that is logged on
13 WALL MOUNTING
------------------------------------------------------------------------------------------------------------------
14 INFORMATION
14 Cleaning the device
14 Environmental note
14 Technical data
ENGLISH
2
Page 3

SETUP AND SAFETY
-----------------------------------------------------------------------------
Please note the following instructions when setting up the system:
T
The devices are designed for the playback of
audio signals. All other uses are expressly prohibited.
T
Please ensure adequate ventilation. A space of
at least 10 cm must be maintained at all times
both to the side and above the soundbar and
subwoofer.
T
Do not cover the devices with newspapers, table cloths, curtains, etc.
T
When setting up the devices, remember that
furniture is often coated with various types of
varnish and plastic, which often contain chemical additives. These additives may cause corrosion to the feet of the unit. This may leave stains
on the surface of the furniture which can be
difficult or impossible to remove.
T
If the devices are exposed to sudden changes
in temperature, for example when taken from
the cold into a warm room, wait at least two
hours before using them.
T
The devices are designed for use in dry rooms. If
you do use it outdoors, make sure it is protected
from moisture such as dripping or splashing water.
T
Only use the devices in a moderate climate.
T
Do not place devices close to heating units or in
direct sunlight, as this will impair cooling.
T
Do not place any vessels containing liquids,
such as vases, on the devices.
T
Do not place any objects such as burning candles on the devices.
T
Do not use any cleaning agents as they may
damage the housing. Clean the devices with
a clean dry cloth.
T
Do not expose the battery to extreme heat, caused
for example by direct sunlight, heating or fire.
T
The remote control contains a button cell battery. Always keep the remote control and the
button cell battery out of the reach of children.
T
If the button cell battery is accidentally swallowed
it can lead to chemical burns and death within
2 hours. Therefore call a doctor immediately.
T
Keep new and used batteries out of the reach
of children. If the battery compartment can no
longer be closed securely, stop using the device and keep out of the reach of children.
T
Remove the battery when it is flat or when you
know that the devices will not be used for
a long period of time. The manufacturer accepts no liability for damage caused by leaking batteries.
T
Batteries, including those which do not contain
heavy metal, should not be disposed of with
household waste. Always dispose of used batteries in accordance with local environmental
regulations.
T
Do not open the devices under any circumstances. Warranty claims are excluded for
damage resulting from improper handling.
T
Thunderstorms are a danger to all electrical devices. Even if the equipment is switched off, it
can be damaged by a lightning strike to the
main power supply. Always remove the power
plug during a thunder storm.
T
Do not connect any other equipment while the
devices are switched on. Also switch off the other devices before connecting.
T
Only plug your devices into the mains socket if
you have connected the external devices!
Make sure the power plug is freely accessible!
Caution: high-frequency
radiation
T
The devices must be registered and operated in
accordance with this operating manual.
The devices have an integrated antenna; they
must not be operated with other antennas or
transmitters.
ENGLISH
3
Page 4
OVERVIEW
-------------------------------------------------------------------------------------------------------
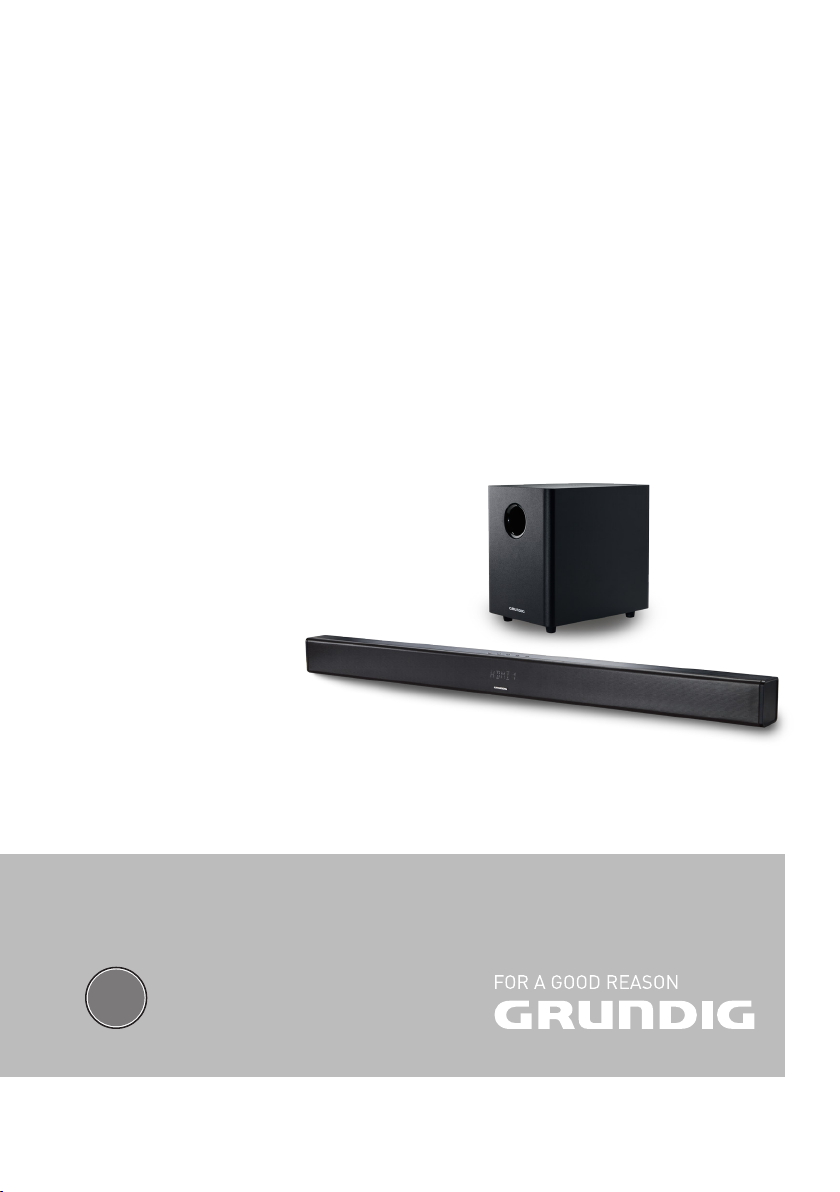
Buttons on the remote control and the soundbar
8 On /Off.
V
+ – Adjusts the volume.
" – + Adjusts the base.
d Switches the sound to mute and back
on again.
Selects the input sources »AUX«,
» AUDIO«, »BT«, »HDMI1«,
»HDMI 2«, »ARC« or »OPT«.
d Selects various sound settings.
A
Display lights up red when the
device is in standby mode.
B
Display flashes blue while Bluetooth
logs on;
lights up blue following successful
logging on.
ENGLISH
4
The displays on the soundbar
88888
Display for:
– Input sources, e.g. »
– Sound settings, e.g. »
– Volume, e.g. »
– Base, e.g. »
– Sound off, »
V 06
SWV 0
MUTE
ARC
«;
MUSIC
«;
«;
«.
«;
Page 5
OVERVIEW
-------------------------------------------------------------------------------------------------------
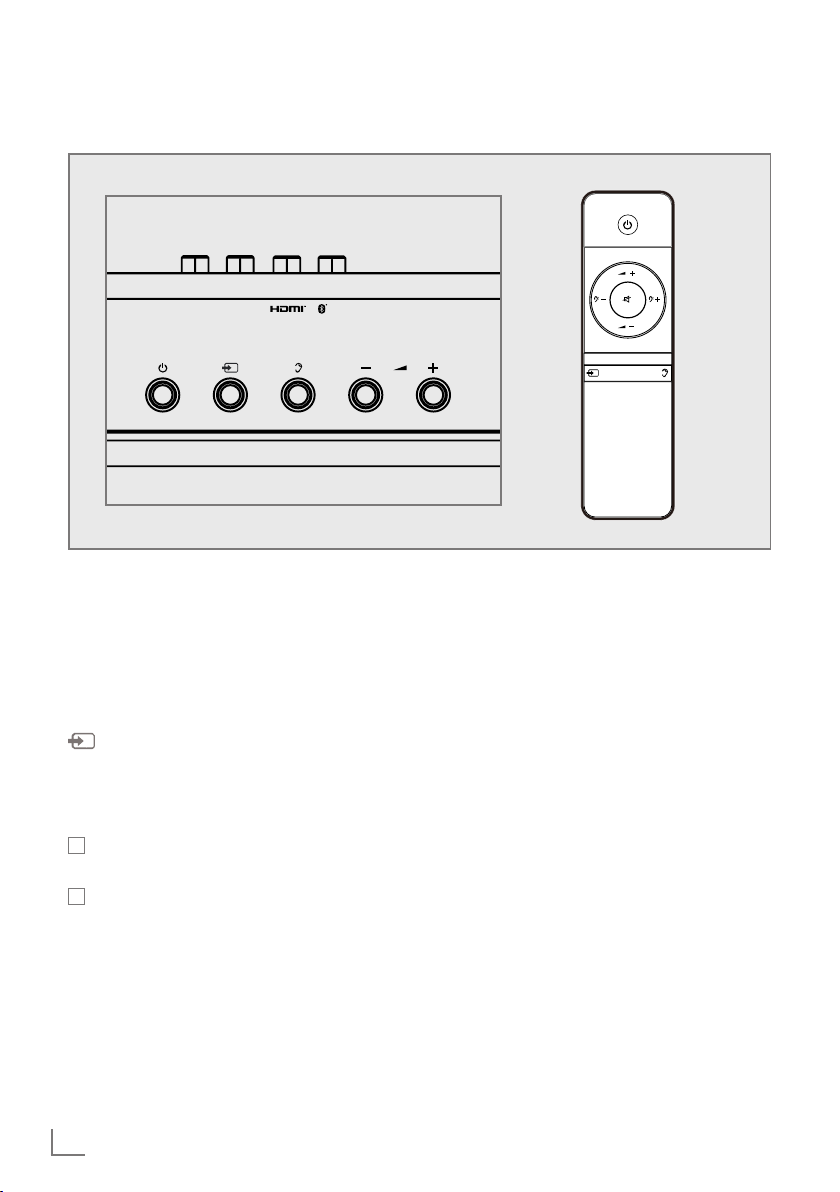
Sockets on the back of the soundbar
HDMI OUT (ARC)
DC IN Socket for the mains adapter
cable.
Note:
T
OPTICAL Audio signal input (digital audio
HDMI OUT HDMI output (digital
(ARC) audio return signal,) for con-
HDMI IN 1 HDMI input for connecting
HDMI IN 2 HDMI input for connecting
The only way to completely
disconnect the soundbar from
the mains supply is to pull out
the mains adapter.
signal, optical) for connecting
an LCD television.
necting an LCD television.
a set-top box, a Blu-ray player
or a games console.
a set-top box, a Blu-ray player
or a games console.
R AUX IN L Analogue audio input for con-
necting an LCD television.
LINE IN Audio input (analogue audio
signal, jack plug) for connecting
an MP3 player.
SERVICE Only for servicing.
ENGLISH
5
Page 6

OVERVIEW
-------------------------------------------------------------------------------------------------------
Control elements on the subwoofer
8 Display lights up red when the
subwoofer is in standby mode;
flashes blue while Bluetooth
logs on;
lights up blue following successful logging on.
Button for logging on the sub-
woofer to the soundbar using
Bluetooth.
AC ~ Socket for power cord.
Note:
T
ENGLISH
6
The only way to completely
disconnect the subwoofer
from the mains supply is to
pull out the power plug.
Page 7

PREPARATION/CONNECTING
Preparation
Insert battery into the
remote control (CR 2032)
1 Hold the remote control in your hand with the
rear side facing upwards.
2 Slide the casing cover upwards and remove.
3 Remove the used battery and place the new
battery in the battery holder, positive terminal
at the top.
4 Replace casing cover and push down until it
latches into place.
Note:
T
If the device no longer reacts properly to
remote control commands, the battery may
be flat. Always remove used batteries. The
manufacturer accepts no liability for damage caused by leaking batteries.
Caution:
T
There is a risk of explosion if the battery is
not replaced properly. Replace only with the
same type of battery or the equivalent.
Connecting the LCD television
Connecting soundbar to the LCD
television (digital audio signal)
This connection enables the digital audio signal
to be played back from the television via the
soundbar using HDMI cable (ARC – Audio Return Channel)
If your television is equipped with the DIGI LINK
function, you are able to switch the soundbar on
and off, and adjust the volume using the television’s remote control (CEC – Consumer Electronics Control).
The setting procedure necessary for this function is described in the operating manual for
the respective Grundig television in the section
“ USING EXTERNAL DEVICES”.
It is necessary to establish both whether, and
how, televisions from other manufacturers support this function.
1 Connect standard HDMI cable (version 1.4 of
later) to the »HDMI OUT (ARC)« socket of
the soundbar.
2 Connect HDMI cable to the television’s HDMI
(ARC) socket.
Notes:
T
In order for the digital audio return signal
from the television to reach the »HDMI OUT
(ARC)« socket, the television must support
“ARC” (Audio Return Channel).
T
The television audio output must be set to
»PCM«.
T
For a digital signal via the »HDMI OUT
(ARC) socket, register the soundbar set us-
ing the “digilink function” on the Grundig
television and activate the “ARC function”.
T
Switch off the television’s loudspeaker.
----------------------------------------------
HDMI OUT (ARC)
ENGLISH
7
Page 8

PREPARATION/CONNECTING
AUXL R
AUDIO IN
AUDIO IN
----------------------------------------------
Connecting soundbar to the LCD
television (digital audio signal)
1 Connect standard optical cable to the
» OPTICAL« socket of the soundbar.
2 Connect the optical cable to the audio output
socket of the LCD television (optical, PCM
signal).
Note:
T
The television audio output must be set
to »PCM«.
Connecting soundbar to the LCD
television (analogue audio signal)
Connecting an MP3 player
1 Connect the USB interface of the MP3 player
to the »LINE IN« socket of the device using
a standard adapter cable.
Note:
T
To remove the MP3 player switch of the device and pull out the cable.
Connecting external devices
Note:
T
Switch the device off in order to connect external devices.
AUX INR L
1 Connect standard audio cable to the
» R – AUX IN – L« sockets on the soundbar.
– Note the left and right channels when doing
this (L = left channel, R = right channel).
2 Connect audio cable to the audio output sock-
et of the LCD television.
Note:
T
Select the appropriate settings for the analogue audio output on the television.
ENGLISH
8
1 Connect the HDMI socket of the external de-
vice to the »HDMI IN 1« or »HDMI IN 2«
sockets of the device using HDMI cable.
Note:
T
The external device audio output must be set
to »PCM«.
Page 9

PREPARATION/CONNECTING
----------------------------------------------
Connecting the soundbar mains
adapter
Notes:
T
Check whether the mains voltage stated on
the type plate (on the mains adapter) corresponds to your local mains supply. If this is
not the case, contact your specialist dealer.
T
All the other devices must be connected before you connect the mains adapter.
1 Plug the mains adapter cable into the »DC IN«
socket of the soundbar.
2 Plug the power cord socket into the mains
adapter.
3 Plug the power cord into the wall socket.
Caution:
T
The soundbar is connected to the mains via
the power cord. Pull out the power plug if
you want to disconnect the device completely from the mains.
T
Make sure the power plug is easily accessible during operation and not hindered by
other objects.
Connecting the subwoofer
power cord
Note:
T
Check whether the mains voltage stated on
the type plate (on the back of the subwoofer) corresponds to your local mains supply.
If this is not the case, contact your specialist
dealer.
1 Plug the power cord supplied into the »AC ~«
socket of the device.
2 Plug the power cord into the wall socket.
Caution:
T
The subwoofer is connected to the mains via
the power cord. Pull out the power plug if
you want to disconnect the device completely from the mains.
T
Make sure the power plug is easily accessible during operation and not hindered by
other objects.
ENGLISH
9
Page 10

PREPARATION/CONNECTING
Logging the subwoofer on to the
soundbar
When first starting up, you must log the subwoofer on to the soundbar so that the audio signal
can be transmitted wirelessly.
Note:
T
The maximum distance between the soundbar and the subwoofer is 9 metres.
1 Connect the subwoofer to the mains supply.
– The display on the subwoofer lights up red.
2 Use »8« to switch the soundbar on and out of
standby.
– The red display in the soundbar goes out.
3 Press and hold the button » « on the sub-
woofer for 3 seconds.
– The display on the subwoofer flashes blue.
4 Press and hold »d« on the soundbar for 3 sec-
onds.
– The display on the subwoofer lights up blue.
5 Following successful logging on, the display
on the subwoofer lights up blue.
Note:
T
If the subwoofer is not logged on, the input
source display on the soundbar flashes,
e.g. »BT«.
----------------------------------------------
Logging out the subwoofer from
the soundbar
1 Press and hold »d« on the soundbar for 3 sec-
onds.
– The display on the subwoofer flashes blue.
ENGLISH
10
Page 11

OPERATION
----------------------------------------------------------------------------------------------------
Switching on and off
1 Switch on the soundbar set by pressing »8«.
– The last input source used is automatically
selected.
2 Switch the soundbar set to standby mode by
pressing »8«.
Automatic switch-off
The device switches off automatically after 15 minutes in standby mode if:
–
there is no audio signal at the respective socket
– the Bluetooth auxiliary device is not sending
an audio signal.
To use the device, switch it back on.
Selecting the input source
1 Press » « to select input source:
– »
AUX
« – Analogue audio signal at socket
»R – AUX IN – L«;
– »
AUDIO
« – Analogue audio signal at socket
»LINE IN«;
– »BT« Bluetooth mode;
– »
HDMI 1
« /»
HDMI 2
« – Digital audio signal at
– »
–
sockets »
»
»
HDMI IN 1
ARC
« – Digital audio return signal at socket
HDMI OUT (ARC)
OPT
« Digital audio signal socket »
« or »
HDMI IN 2
« (TV mode);
OPTICAL
«;
«.
Adjusting base
1
Adjust base using »" – +« on the remote control
– Display: »
SWV -8
« to »
SWV +8
«.
Muting
You can switch the sound to and from mute with
this function.
1
Activate mute using »d« on the remote control.
– Display: »
2 Deactivate mute using »d« on the remote
;
control.
– The display: »
MUTE
«.
MUTE
« goes out.
Adjusting the volume
1 Press »
V
+ –« to set volume.
– Display: briefly »
V MIN
« to »
V MAX
«.
Selecting sound settings
You can choose between several sound settings.
1 Adjust the sound setting using »d«.
– Display: »
FLAT
«, »
MOVIE
«, »
MUSIC
«.
ENGLISH
11
Page 12

BLUETOOTH MODE
-------------------------------------------------------------------------------
Compatible with the following
devices
Your GSB 980 can be connected to any commercially available Bluetooth-compatible devices that comply with the A2DP standard. This
includes smartphones, laptops and tablet PCs,
for example.
Selecting the Bluetooth input
source
1 Press » « to select Bluetooth input source.
– Display: »BT«, the blue display flashes.
Finding and connecting
a Bluetooth auxiliary device
1 Activate the Bluetooth function on the Bluetooth
auxiliary device.
2 Start the search function on the Bluetooth aux-
iliary device.
– After a short time, your GSB 980 will be
displayed on the Bluetooth auxiliary device.
3 Select the GSB 980 on the Bluetooth auxiliary
device and connect to it.
4 When the Bluetooth auxiliary device is connect-
ed to your device, the blue display lights up.
Note:
T
Your GSB 980 can only receive and play
the audio signal from one Bluetooth device;
however, up to 8 Bluetooth auxiliary devices
can be logged on.
Deactivating the Bluetooth
auxiliary device
1 Deactivate the registered Bluetooth auxiliary
device on the auxiliary device or » « press
and hold for 3 seconds.
– the blue display flashes.
Reactivating a Bluetooth auxiliary
device that is logged on
1 If you move out of data transmission range or
switch off Bluetooth mode, the Bluetooth device is deactivated.
Notes:
T
You only have to log Bluetooth auxiliary devices on once.
T When the Bluetooth auxiliary device moves
back into signal range of the GSB 980, the
auxiliary device logs on automatically.
T
The GSB 980 connects first to the last Bluetooth auxiliary device that was logged on.
T
If the Bluetooth auxiliary device is not recognised, it has to be activated again via its own
menu.
T If it is not possible to connect to a Bluetooth
auxiliary device that was registered previously, remove your GSB 980 from the Bluetooth
auxiliary device’s device list and repeat the
search and connection procedure.
Playback from the Bluetooth
auxiliary device
1 Start playback on the Bluetooth auxiliary device.
2 Press »–
3 End playback on the Bluetooth auxiliary device.
Note:
12
V
+« to adjust volume.
T
Note that the data transmission range
can be as much as 9 m, depending on
the Bluetooth device that is used and the
structure of the building.
ENGLISH
Page 13

WALL MOUNTING
1 Place the brackets supplied on the back of the
soundbar and attach using the 4 screws provided.
2 Select the mounting site and mark the holes
(distance 40 cm).
Note:
T
The subsurface must be strong enough to
bear the weight.
3 Drill the holes (8 mm ∅), insert the wall plugs
and screw in the screws.
Note:
T
Distance of screw head from the wall: 5 mm.
4 Carefully slide on the soundbar over the screw
heads.
--------------------------------------------------------------------------------
40 cm
ENGLISH
13
Page 14

INFORMATION
------------------------------------------------------------------------------------------
Cleaning the device
Pull the power cord out of the mains socket. Clean
the appliance with a damp cloth and a mild detergent. Do not use any detergents containing
alcohol, spirit, ammonia or scouring agent.
Environmental note
These products have been
made from high-quality parts
and materials which can be reused and recycled.
Therefore, do not dispose of the products along
with normal household waste at the end of their
service life. Take it to a collection point for the
recycling of electrical and electronic equipment.
The symbol on the product in the operating manual or on the packaging indicates that recycling
is possible.
Please find out about collection points operated
by your local authority.
Help protect the environment by recycling used
products.
Technical data
This device is noise-sup-
2 150
This product fulfils the European directives
2004/108/EC, 2006/95/EC, 2009/125/ EC
and 2011/65/EU.
The type plate is located on the rear/underside
of the devices.
Soundbar voltage supply
Power supply unit: GFP651DA-2028
Input: 100-240 V~, 50/60 Hz
Output: 20 V >, 2,8 A
Subwoofer voltage supply
220-240 V~, 50/60 Hz
Soundbar max. power consumption
Operation: < 58 W
Standby: < 0.5 W
Subwoofer
Operation: < 98 W
Standby: < 0.5 W
Output
1% THD
Soundbar: 2 x 20 W
Subwoofer: 1 x 80 W
Dimensions and weight
Soundbar:
W x H x D 995 x 60 x 73 mm
Weight: 1.91 kg
Subwoofer
W x H x D 250 x 353 x 343 mm
Weight: 8.22 kg
Technical and design modifications are reserved.
pressed according to the
applicable EU directives.
14
ENGLISH
Page 15

Grundig Intermedia GmbH
Beuthener Strasse 41
90471 Nürnberg, Germany
www.grundig.com
72011 412 5100 14/44
 Loading...