

Page 1

COLOUR TV
Cinemo GLCD4000HD
Cinemo GLCD4600HD
ENGLISH
Grundig Helpline: 1800 509 394 Australia
Grundig Helpline: 0800 450 259 New Zealand
Page 2

Installation 3
Remote control handset 4-5
Controls 4
Battery installation 5
Controls of
Front panel 6
Connections of
Back panel 7
Connection to
External equipment 8-12
Basic operation
On and Off 13
Programme selection 13
Volume adjustment 13
On screen language selection 13
On screen menus
Menu selection 14
Setting up TV stations 15-26
Sound adjustment 15-19
Picture adjustment 20-22
Child lock 23
Timer 24-26
DTV option Menu (in digital mode only) 27-30
Preset list Menu 31-33
Installation Menu 34-35
Station search 34
Front Light 35
Other Menu 36
Connection of PC 37
PIP (Picture-In-Picture) Feature 38-39
Watching PIP 38
PIP Audio input 38
Moving the PIP 39
Sub picture size 39
Programme scan 39
Information Menu (In Digital mode only) 40
Teletext 41-42
Displayable Monitor Specification 43
Guarantee 44
Troubleshooting
Check list 47
Contents
2
Page 3
Power
This set operates on an AC mains supply, the voltage is as
indicated on the label on the back cover. Never apply DC
power to the set. In the event of thunderstorms or powercuts, please pull out the aerial and mains plugs.
Warning
To prevent fire or shock hazard, do not expose the set to
rain or moisture. Do not rub or strike the Active Matrix LCD
with anything hard as this may scratch, mar, or damage the
Active Matrix LCD permanently.
Service
Never remove the back cover of the set as this can expose
you to very high voltage and other hazards. If the set does
not operate properly, unplug it and call your dealer.
Aerial
Connect the aerial cable to the socket marked +75 Ω on
the back cover. For the best reception an outdoor aerial
should be used.
Location
Position your set so that no bright light or sunlight falls
directly onto the screen. Care should be taken not to
expose the set to any unnecessary vibration, moisture,
dust or heat. Also ensure that the set is placed in a position to allow a free flow of air. Do not cover the ventilation
openings on the back cover.
Cleaning
Unplug the set before cleaning the face of the LCD Screen.
Dust the set by wiping the screen and the cabinet with a
soft, clean cloth. If the screen requires additional cleaning,
use a clean, damp cloth. Do not use liquid cleaners or
aerosol cleaners.
Installation
3
EN
To preserve the Environment,
do not rubbish.
Page 4

- All the functions can be controlled with the remote control handset.
- Some functions can also be adjusted with the buttons on the front panel of the set.
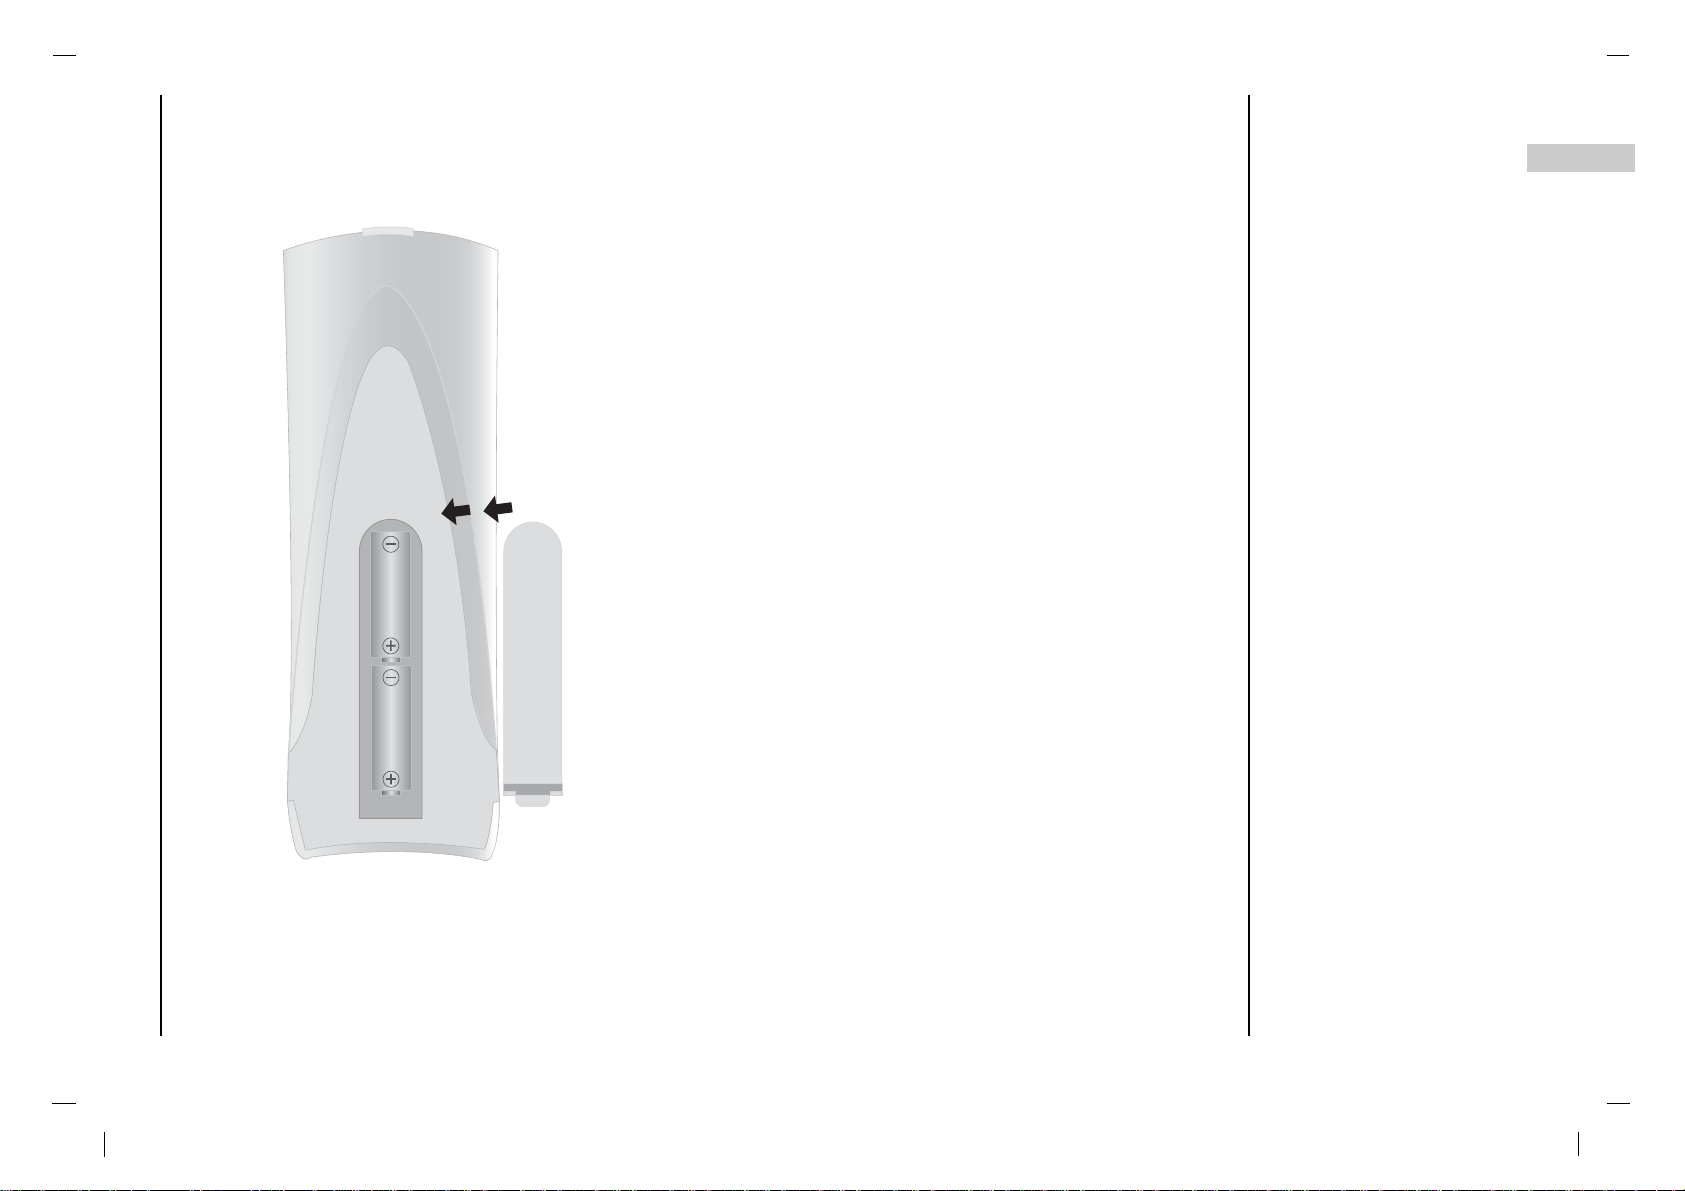
Remote control handset
Controls
Before you use the remote
control handset, please
install the batteries.
4
NUMBER BUTTONS
i BUTTON
selects a menu.
D/ E
(Programme Up/Down)
selects a programme or a menu item.
switches the set on from standby.
F / G (Volume Up/Down)
adjusts the volume.
adjusts menu settings.
OK
accepts your selection or displays the
current mode.
TELETEXT BUTTONS
These buttons are used for teletext.
For further details, see the ‘Teletext’ section.
SCAN
switches on the programme scan mode
through 4/16 sub pictures.
Display the TV Guide in digital mode.
PAP (Picture And Picture)
selects the double window function.
PSM (Picture Status Memory)
recalls your preferred picture setting.
SIZE
adjusts the sub picture size.
VCR, SAT, DVD
Switches to operating a GRUNDIG video
recorder, a GRUNDIG satellite receiver
or a GRUNDIG DVD player.
Keep the appropriate button VCR, SAT, DVD
pressed down. Then press the appropri-
ate button
Note : The functions available depend on the
model of the device you are using.
Just try it out.
POWER
switches the set On from standby or Off to
standby.
PIP
Switches the sub picture On or Off.
ARC
select your desired picture format.
page stop in teletext mode.
SLEEP
sets the sleep timer.
select a sub page number in teletext mode.
MUTE
switches the sound On or Off.
Zap function
returns to the previously viewed programme.
AV INPUT
Select DTV, TV, AV1, AV2, AV3, AV4, S-VIDEO,
COMPONENT, PC-RGB, HDMI1, HDMI2 mode.
switches the set on from standby.
PIP POSITION
relocates the sub picture in clockwise direction.
SSM (Sound Status Memory)
recalls your preferred sound setting.
STILL
freezes motion of the sub picture.
TIME
Display the time at the screen.
Selects a favourite programme add and delete
in digital mode.
- COLOURED BUTTONS
These buttons are used for teletext (only
TELETEXT models) or programme edit.
Page 5
EN
Remote control handset
Battery installation
5
-Your remote control handset is powered by two AA type batteries.
- To insert batteries, turn the remote control handset over and
remove the battery cover.
- Put the two batteries into the compartment observing battery
polarity.
- Replace the cover.
To avoid damage from possible battery leakage, remove the batteries if you do not plan to use the remote control handset for an
extended period time. Do not use batteries of differing age or type.
Always discard of batteries safely.
Page 6
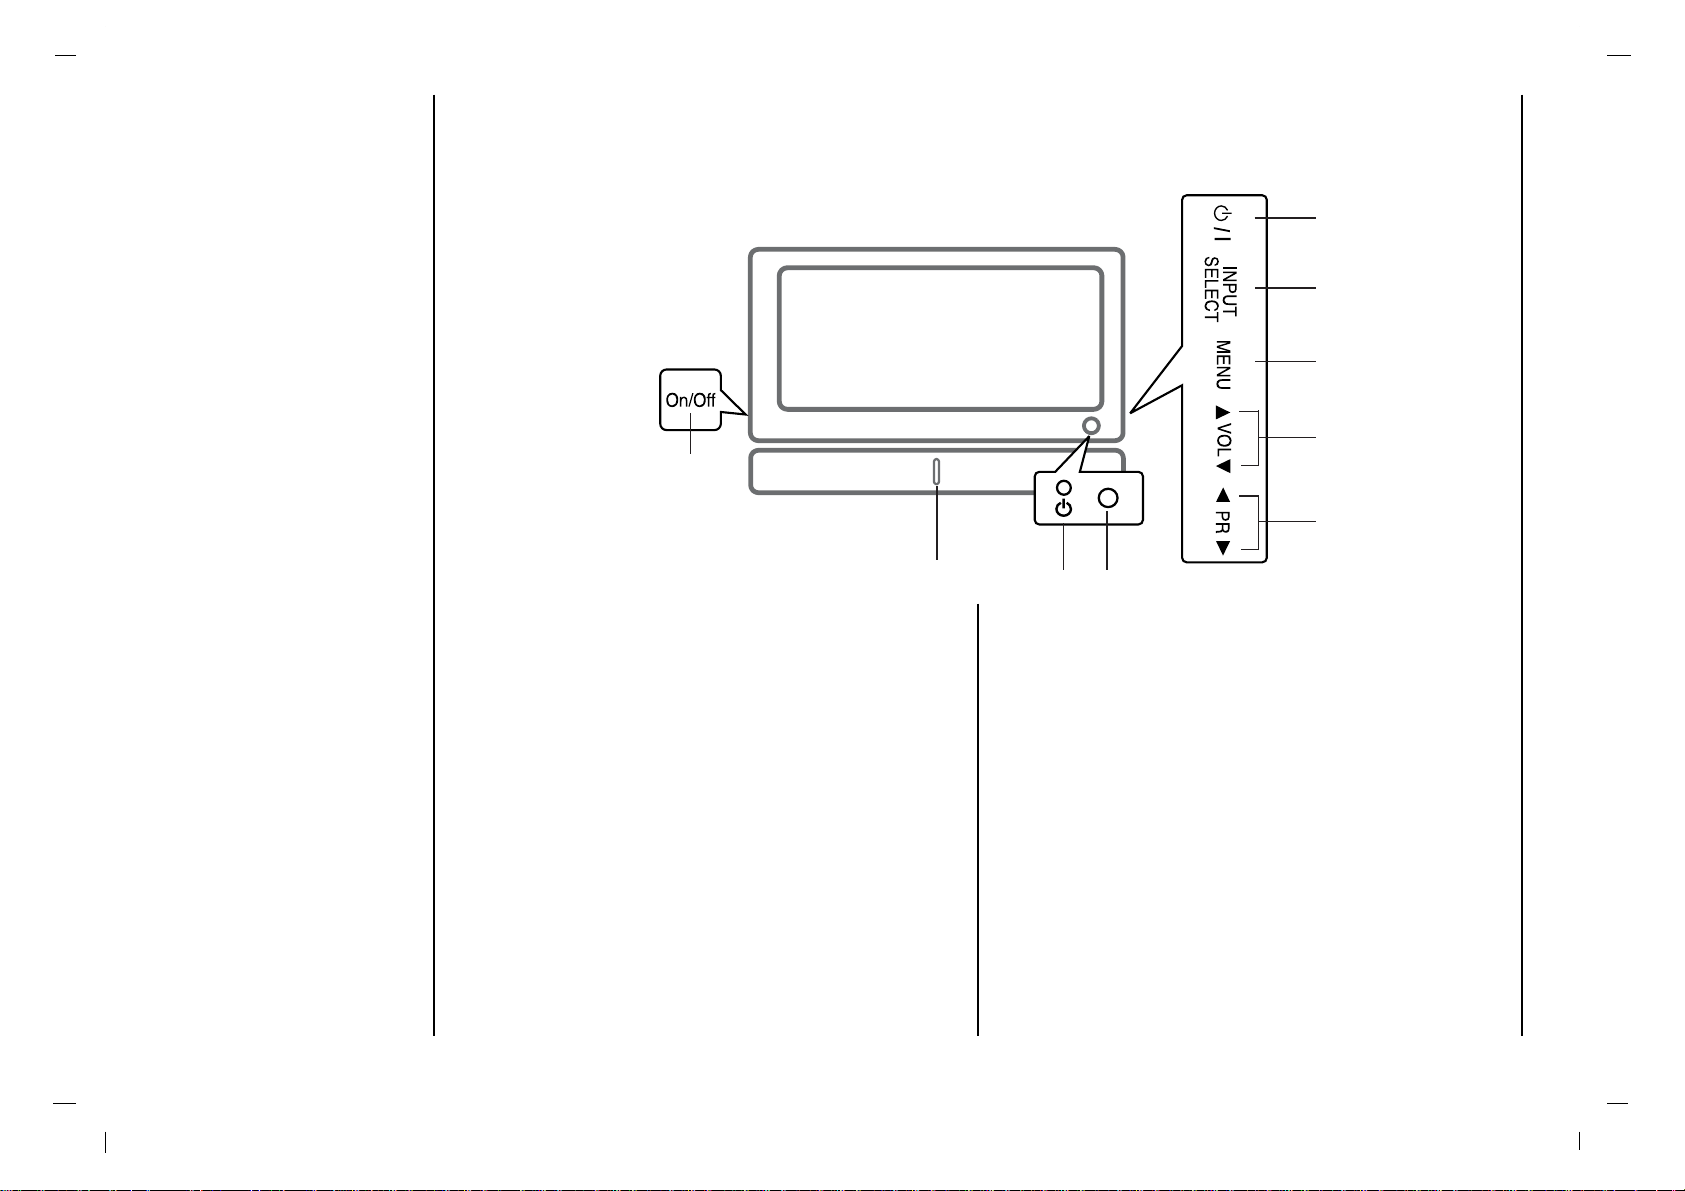
Controls of
Front panel
6
1. MAIN POWER
switches the set On or Off.
2.
D / E
(Programme Up/Down)
selects a programme or a menu item.
switches the set On from standby.
3. F / G (Volume Down/Up)
adjusts the volume.
adjusts menu settings.
4. MENU
selects a menu.
5. INPUT SELECT
selects DTV, TV, AV 1 , AV 2 , AV 3 , AV 4 , S-VIDEO,
COMPONENT, PC-RGB, HDMI1, HDMI2 mode.
6. POWER (rr)
switches the set On from standby or On to standby.
7. POWER/STANDBY INDICATOR (rr)
illuminates red in standby mode.
illuminates green when the set is switched On.
8. REMOTE CONTROL SENSOR
9. Front Light LED
- Shown is a simplified representation of the set.
- Here shown may be somewhat different from your set.
- This manual explains the features available on the Cinemo GLCD4000HD series.
1
798
6
5
4
3
2
Page 7

Connections of
Back panel
7
EN
1. HDMI1 INPUT / HDMI2 INPUT / AUDIO INPUT / RGB
INPUT SOCKETS
Connect the set output socket of the PERSONAL
COMPUTER to this socket.
2. AUDIO INPUT / COMPONENT INPUT (480i / 480p /
576i / 576p / 720p / 1080i / 1080p) SOCKETS
3. AERIAL SOCKET
4. AUDIO / VIDEO SOCKET
Connect the audio/video out sockets of the VCR to AV
sockets of the set.
5. Digital Audio (OPTICAL)
Connect digital audio from various types of equipment.
Note : In standby mode, these ports will not work.
6. POWER CORD SOCKET
This set operates on an AC power. The voltage is indicated on the Specifications page. Never attempt to
operate the set on DC power.
7. AUDIO / VIDEO INPUT (AV4, S-VIDEO)
Connect video out from an S-VIDEO VCR to the SVIDEO input.
Connect the audio/video out sockets of the VCR to AV
sockets of the set.
8. AUDIO / VIDEO OUTPUT SOCKET
9. SERVICE ONLY SOCKET
1
7
8
9
2
3
4
5 6
Page 8

Connection to
External equipment
8
-You can connect additional equipment, such as VCRs, camcorders etc. to your set. However please check with your
manufacturers instruction books for specific information. Make sure all connections are made with both your set and
additional appliance unplugged from the mains to avoid damaging your equipment. Here shown may be somewhat different from your set.
Connect the RF out socket of the VCR to the aerial
socket on the back of the set.
Connect the aerial cable to the RF aerial in socket
of the VCR.
Store the VCR channel on a desired programme
number using the ‘Manual programme tuning’ section.
Select the programme number where the VCR
channel is stored.
Press the PLAY button on the VCR.
Connect to Aerial socket
- If you connect an S-VIDEO VCR to the S-VIDEO input, the picture quality is improved; compared to connecting a regular VCR
to the Video input.
-To avoid picture noise (interference), leave an adequate dis-
tance between the VCR and set.
Use the INPUT SELECT button on the remote control to select
AV 1 , AV 2 , AV 3 , AV 4 or S-VIDEO.
(If connected to S-Video, select the S-VIDEO external input
source.)
Insert a video tape into the VCR and press the PLAY button on the
VCR. (See VCR owner’s manual)
Watching VCR
1
1
2
2
< Side panel of the set >
< Back panel of the set >
< Back panel of VCR >
Page 9
Connection to
External equipment
9
EN
- After subscribing for a local cable TV station and installing a converter you can watch cable TV.
- For further information of cable TV, contact the local cable TV
station.
In using connection 1
Select programme number in programme switch of cable box.
Match the set programme with selected programme of cable box.
Select your desired programme with the remote control for cable
box.
In using connection 2
Use the INPUT SELECT button on the remote control and select
AV 1, AV 2, AV 3, AV4 or S-VIDEO.
Tune to cable service provided channels using the cable box.
Watching Cable TV
3
3
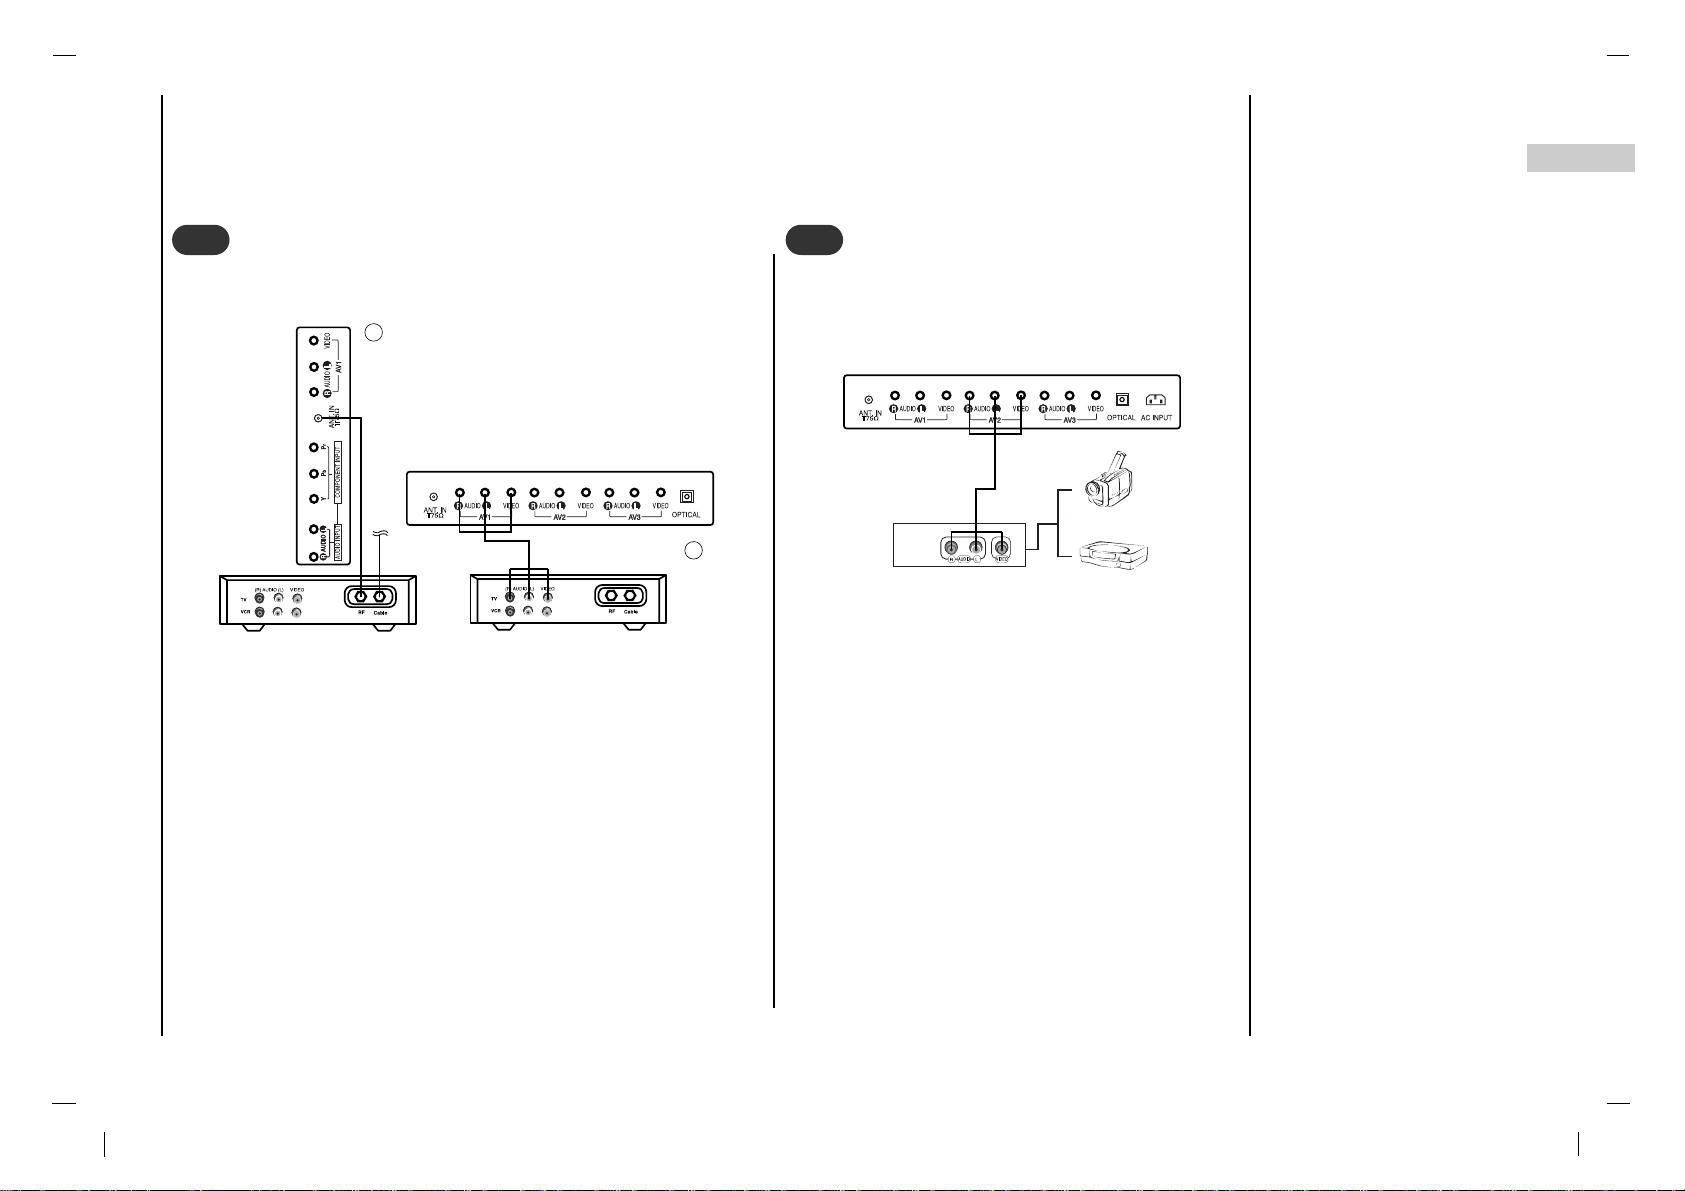
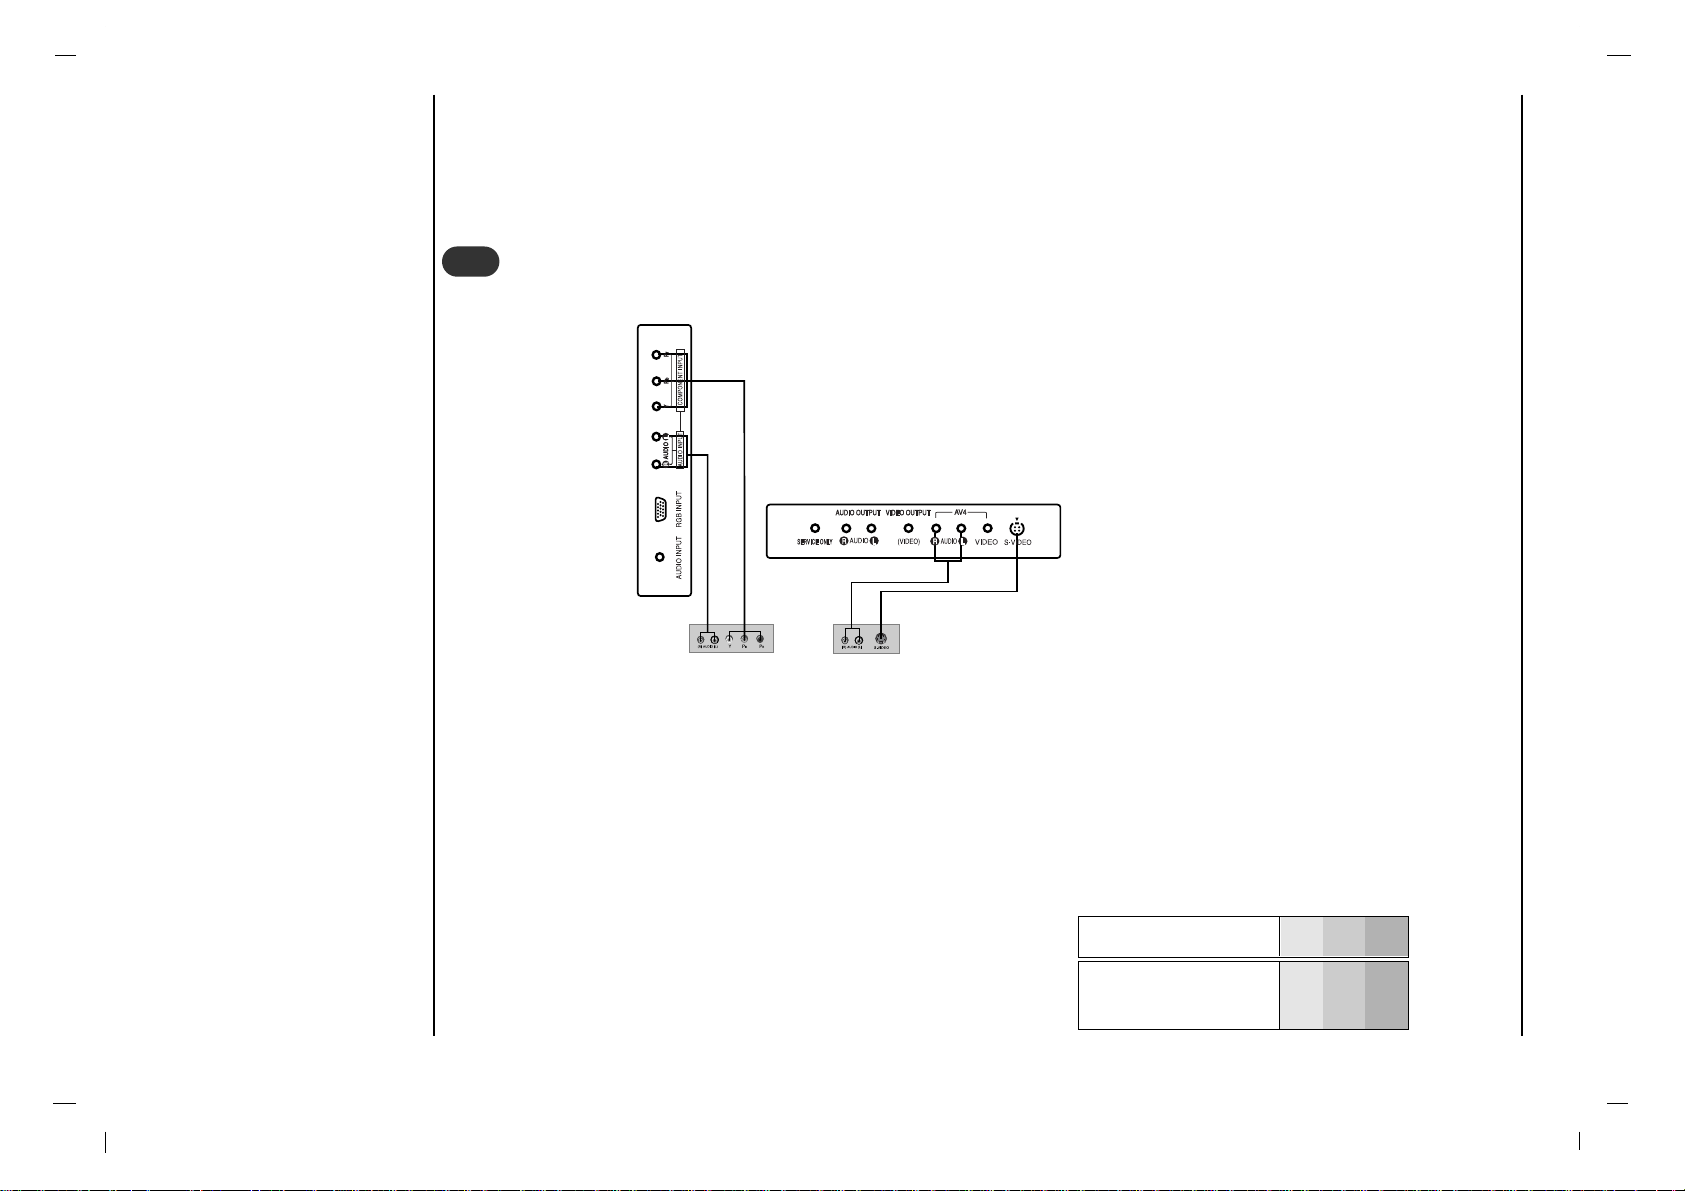
When connecting the set to an external source,
match the colours of AUDIO/VIDEO input jacks on
the set with the output jacks on the audio/video
equipment: Video = yellow, Audio (Left) = white,
Audio (Right) = red.
Use the INPUT SELECT button on the remote control to select AV 1 , AV 2 , AV 3 , AV4 or S-VIDEO.
Operate the corresponding external equipment.
See external equipment operating guide.
Watching external AV source
4
4
For cable TV
< Cable Box >
< Back panel of the set >
< Back panel of the set >
Camcorder
Video game set
< Back panel of the external
equipment >
2
1
Page 10
Connection to
External equipment
10
• Component Input ports
You can get better picture quality if you connect DVD player with
component input ports as below.
How to connect
Connect DVD video inputs to Y, PB, PR of COMPONENT (DVD INPUT) and audio inputs to Audio sockets of AUDIO
INPUT.
How to use
Turn on the DVD player, and insert a DVD.
Use INPUT SELECT button on the remote control to select COMPONENT. Refer to the DVD player's manual for oper-
ating instructions.
Watching DVD
5
5
< Side panel of the set >
< Back panel of a DVD player >
or
Component ports of the
set
Y PB
PR
Video output ports
of DVD player
Y
Y
Y
Y
Pb
B-Y
Cb
PB
Pr
R-Y
Cr
P
R
Page 11
Connection to
External equipment
11
EN
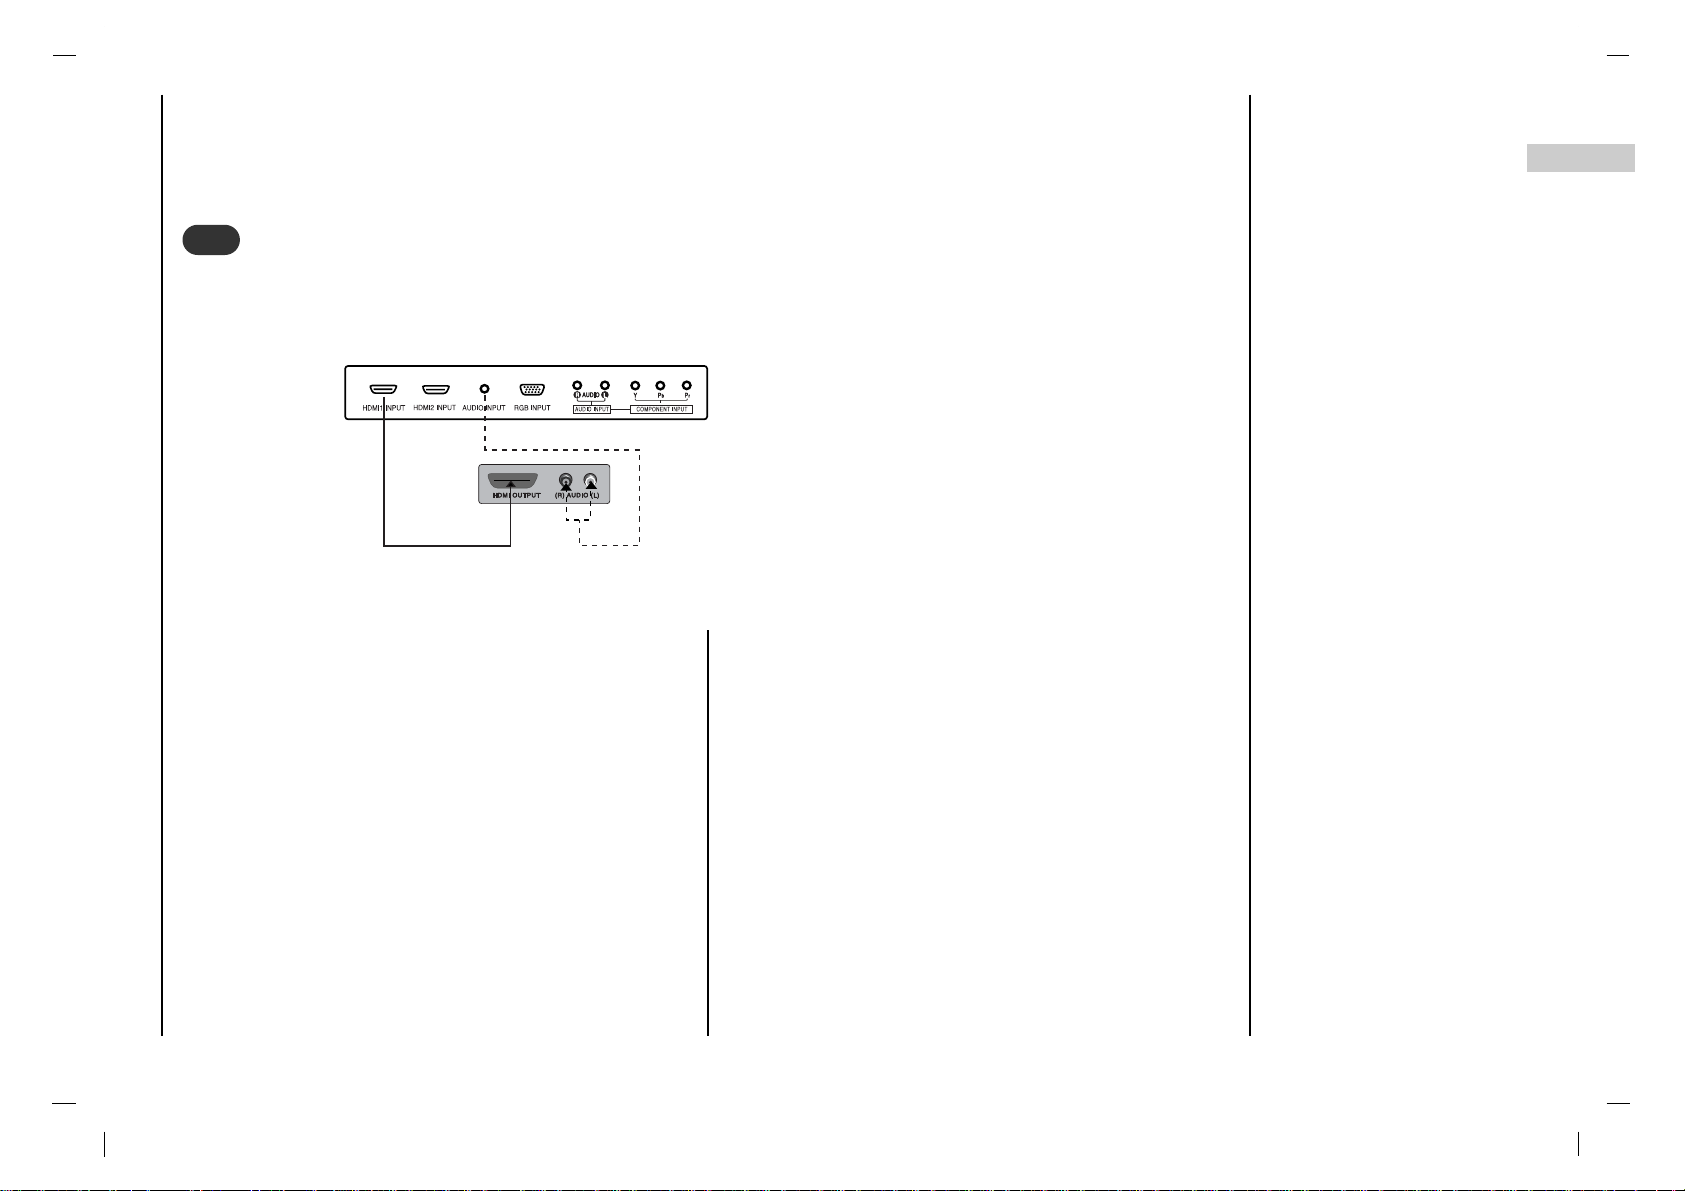
Connect the signal cable from the monitor output socket of
the DVD player or Set top Box to the HDMI INPUT socket
of the set.
Connect the audio cable from the PC to the AUDIO INPUT
sockets of the set.
Press the INPUT SELECT button to select HDMI1,
HDMI2.
Switch on the HDMI, and the HDMI screen appears on the
set.
HDMI input signal : 480p-60Hz, 576p-50Hz, 720p-50Hz,
720p-60Hz, 1080i-50Hz, 1080i-60Hz.
HDMI Interface with HDCP Copy Protection enables alldigital rendering of video without the losses.
This TV SET can receive the High-Definition Multimedia
Interface(HDMI) or Input of Digital Visual Interface(DVI).
Connecting HDMI
6
6
< Back panel of the set >
< DVI signal input only>
Page 12
Connection to
External equipment
12
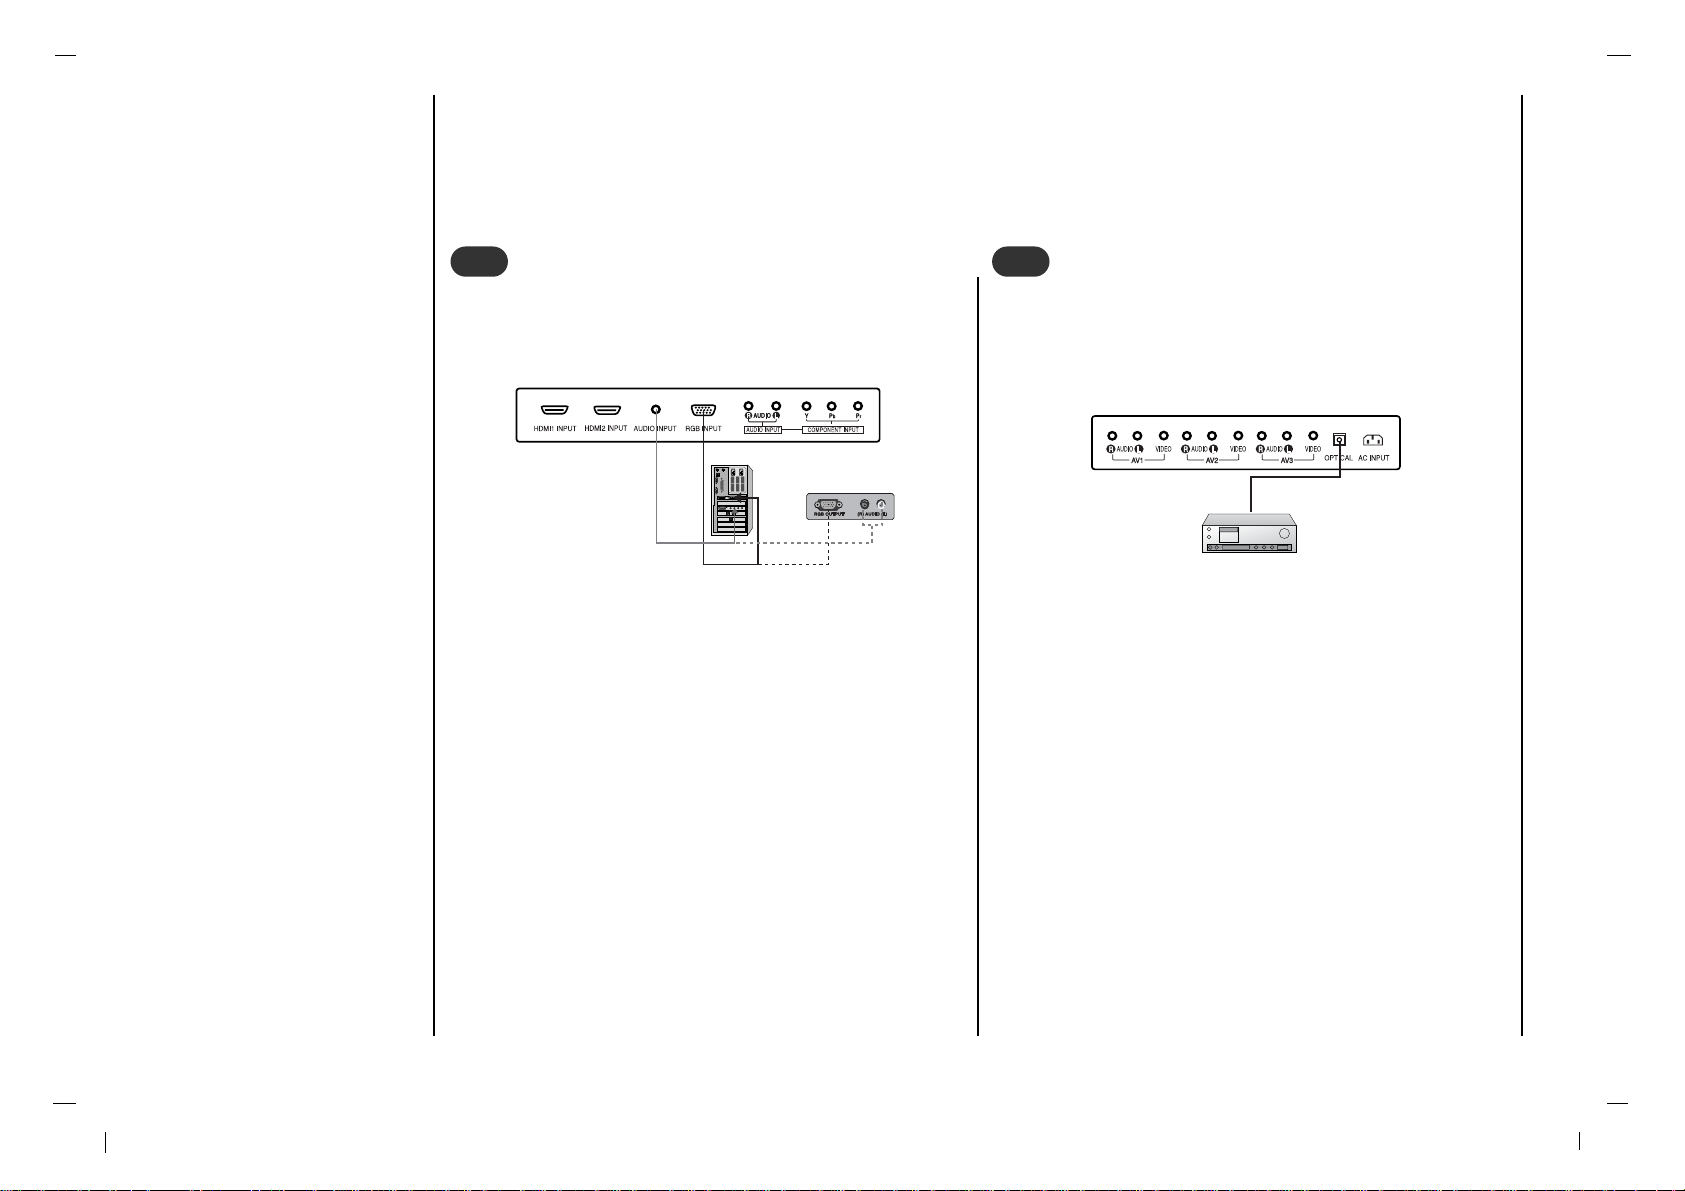
Connect the signal cable from the monitor output socket
of the PERSONAL COMPUTER to the RGB INPUT sock-
et of the set.
Connect the audio cable from the PC to the AUDIO
INPUT sockets of the set.
Press the INPUT SELECT button to select PC-RGB.
Switch on the PC, and the PC screen appears on the set.
The set can be operated as the PC monitor.
RGB input signal : 480p-60Hz, 576p-50Hz, 720p-50Hz,
720p-60Hz, 1080i-50Hz, 1080i-60Hz.
Connecting PC
7
7
< Back panel of the set >
- Send the set’s audio to external audio equipment (stereo
system) via the Digital Audio Output (Optical)
Caution : Do not look into the optical output port. Looking
at the laser beam may damage your vision.
How to connect
Connect one end of an optical cable to the TV Digital
Audio (Optical) Output port.
Connect the other end of the optical cable to the digital
audio (optical) input on the audio equipment.
Note : Digital Audio Output works, when it’s inputted
HDMI signal to the set.
Connecting Digital Audio
8
8
< Back panel of the set >
Page 13

13
EN
Basic operation
Press the F / G button to adjust the
volume.
If you want to switch the sound off,
press the MUTE button.
You can cancel it by pressing the
MUTE, F / G, button.
You can select a programme number
with the
D / E
or NUMBER buttons.
Press the main power button to
switch the set on.
If the set is in standby mode, press
the POWER,
D / E
buttons on the
remote control handset to switch it
on fully.
Press the POWER button on the
remote control handset.
The set reverts to standby mode.
Press the main power button again
to switch the set off.
1
1
On and Off
2
2
Programme selection
3
3
Volume adjustment
Press the button and then use
D / E
button to select the Installation menu.
Press the OK button and then use
D / E
button to select Language.
Press the OK button and then use
D / E
button to select your desired language.
All the on screen displays will appear in
the selected language.
Press the button to return to normal
TV viewing.
4
4
On screen language selection
E
E
Page 14
14
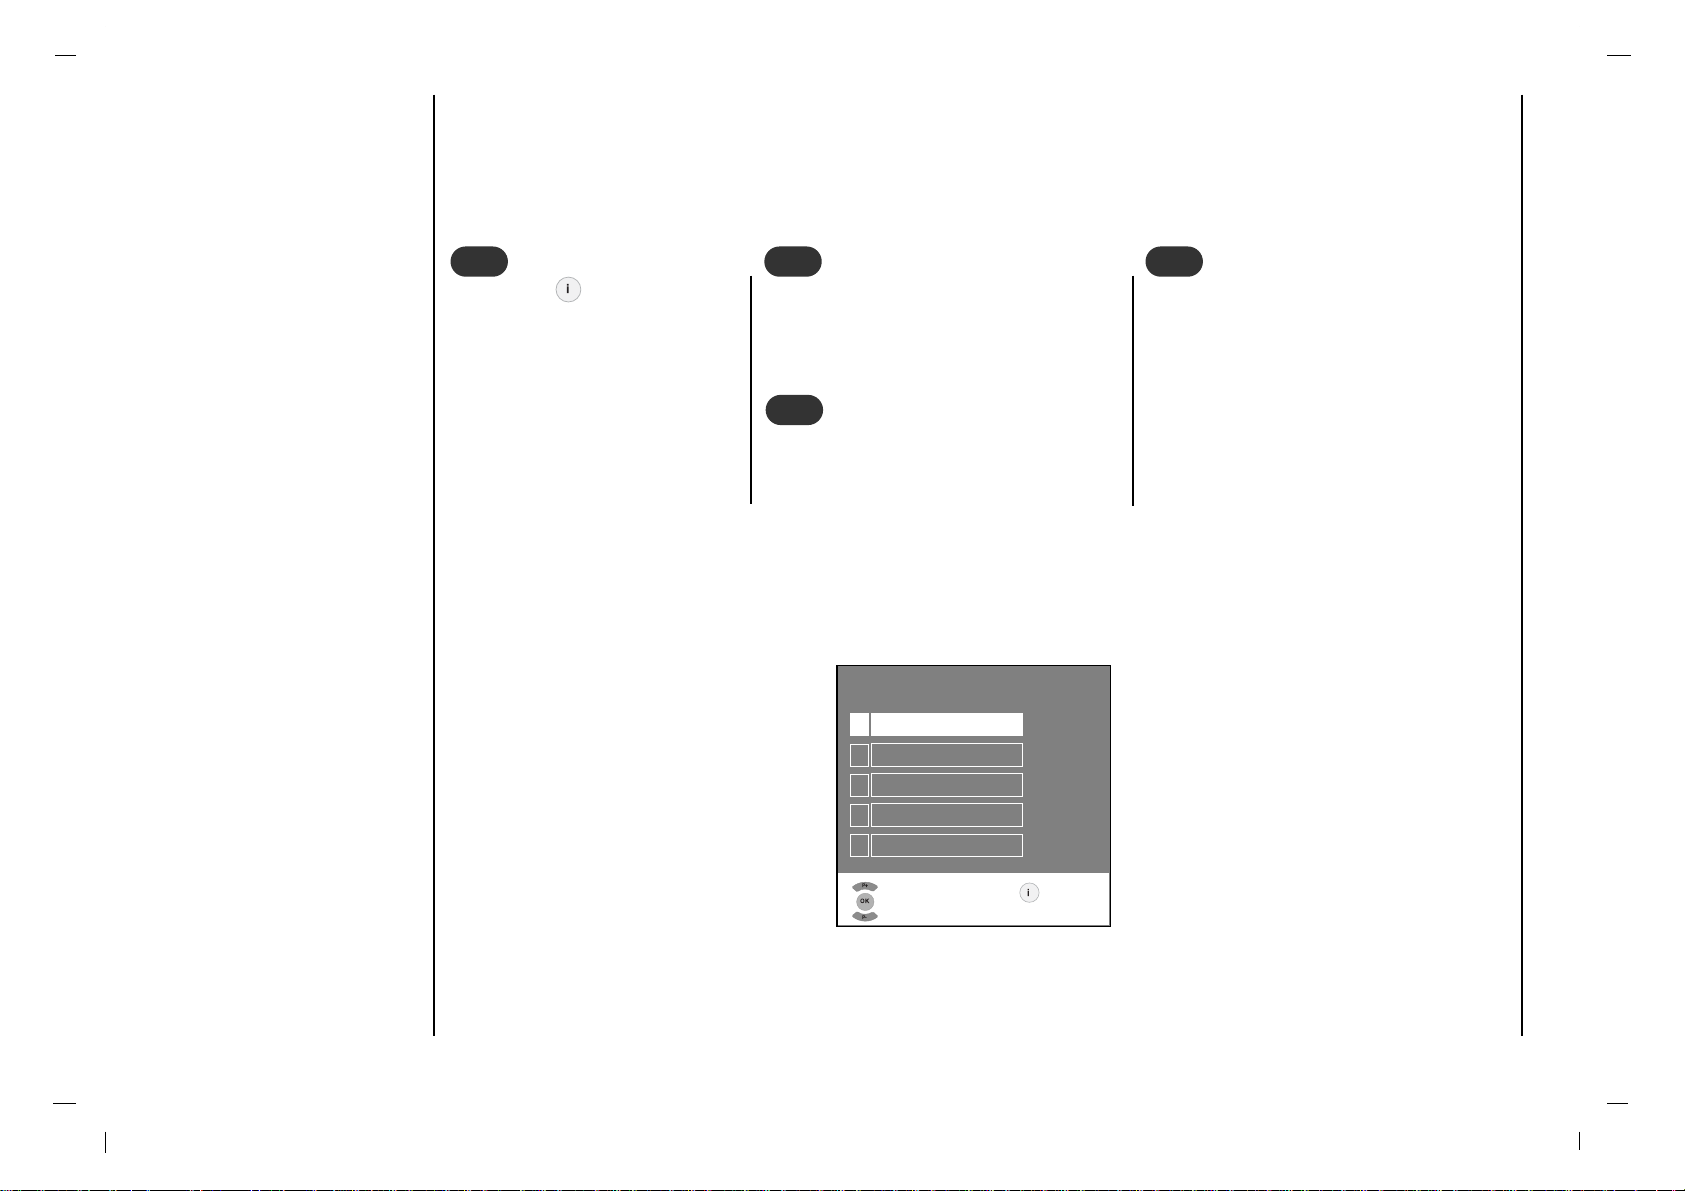
- The dialogue between you and your set takes place on screen with an operator menu. The buttons required for the
operating steps are also displayed.
Press the button and then
use
D / E
button to display each
menu.
1
1
Press the OK button and then use
D / E
button to select a menu item.
2
2
Press the OK button to display the sub
menu or the pull-down menu.
3
3
Change the setting of an item in the sub
or pull-down menu with F / G or
D / E
.
You can move to the higher level menu
with F button and to move to the lower
level menu press the G button.
Note : Menus may vary according to
input mode.
4
4
On screen menus
Menu selection
INFO
GRUNDIG
1
Settings
2
Preset list
3
Installation
4
PIP
5
Information
Select
and open
Exit
E
P+
OK
P-
E
Page 15
Setting up TV stations
Sound adjustment
15
EN
INFO
GRUNDIG
1
Settings
2
Preset list
3
Installation
4
PIP
5
Information
Select
and open
Exit
P+
OK
P-
E
Sound
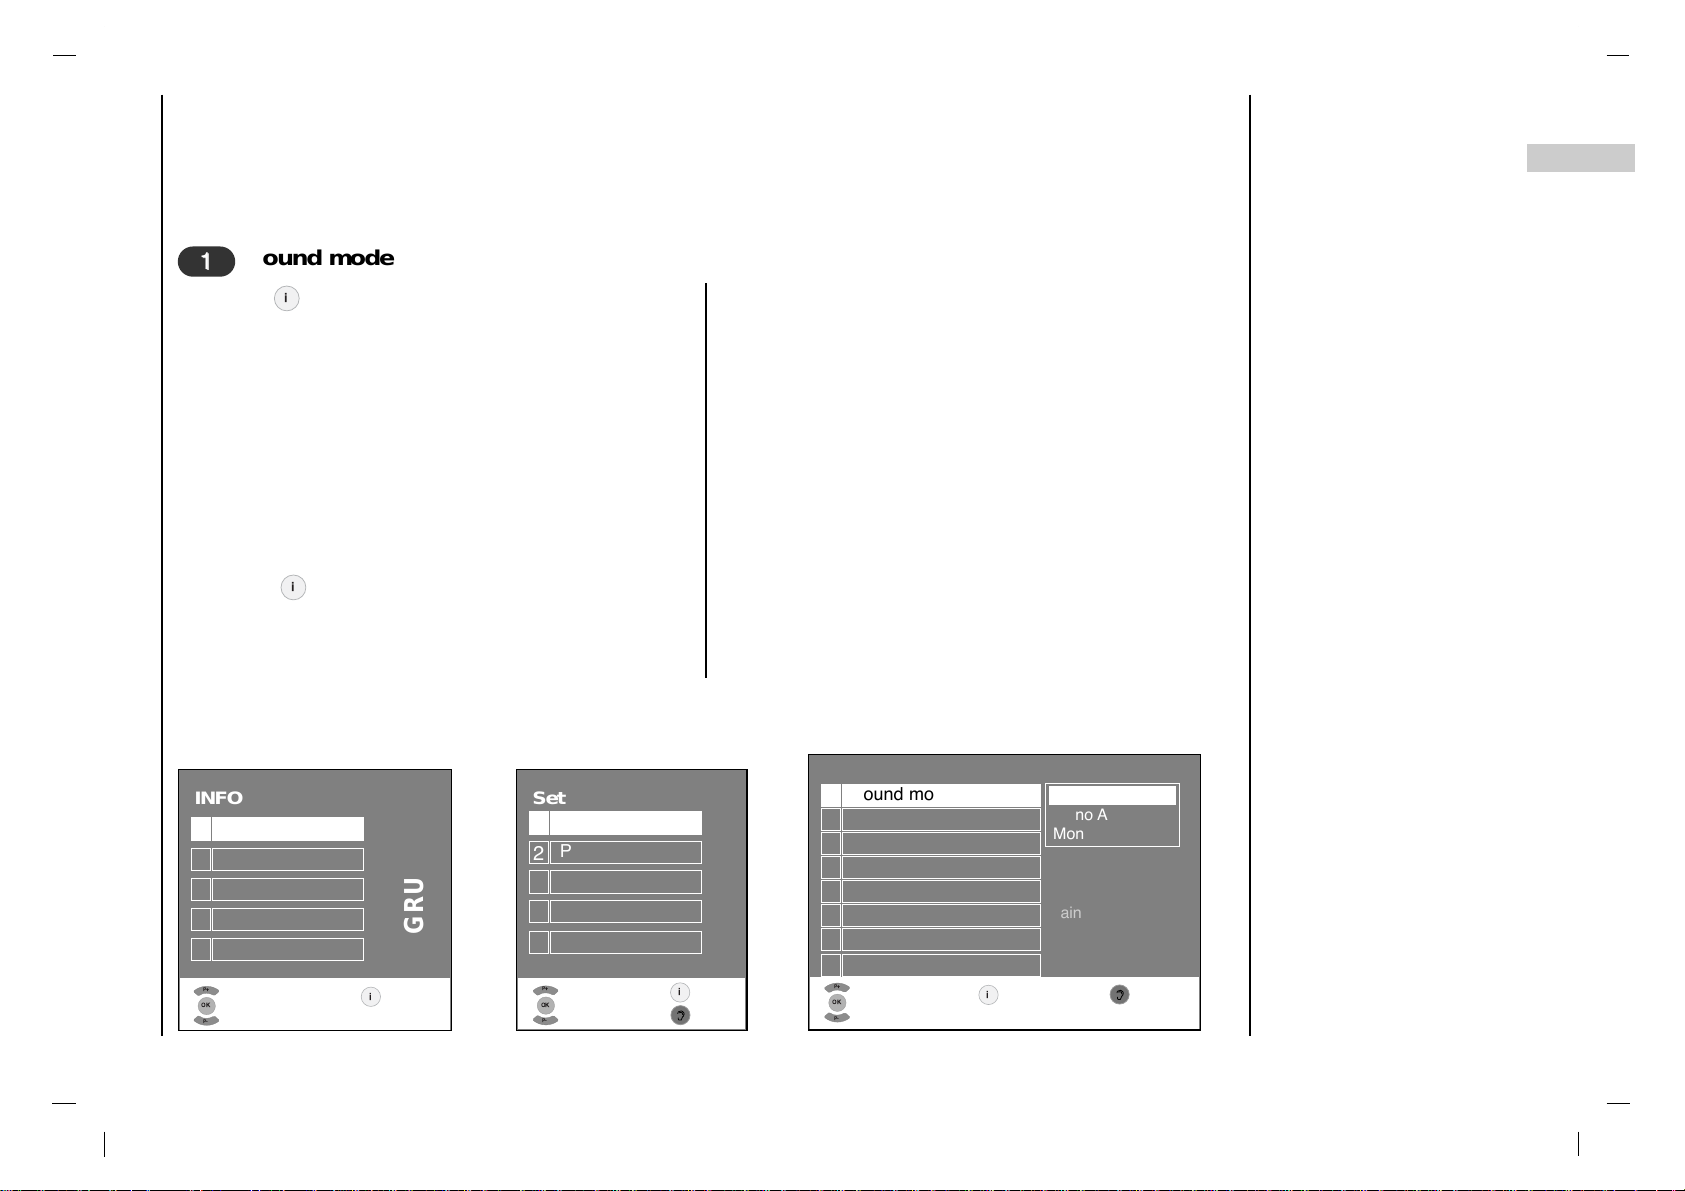
1
Sound mode
2
Balance
3
Defaults
4
Equalizer
5
SPDIF format
6
Audio mode
7
SRS
8
TV speaker
Select
and confirm
Exit Back
Press the button and then use
D / E
button to select
the Settings menu.
Press the OK button and then use
D / E
button to select
Sound.
Press the OK button and then use
D / E
button to select
Sound mode.
Press the OK button and then use
D / E
button to select
the desired sound item.
Press the button to return to normal TV viewing.
Language selection for dual language broadcast
If a programme received in two languages (dual language).
DUAL A sends the primary broadcast language to the
loudspeakers.
DUAL B sends the secondary broadcast language to the
loudspeakers.
DUAL AB sends a separate language to each loud-
speaker.
Mono-A
Flat
Off
Main
Settings
1
Sound
2
Picture
3
Child lock
4
Timer
5
DTV option
Select
and open
Exit
P+
OK
P-
E
Back
P+
OK
P-
E
Mono
Stereo
Mono A
Mono B
Sound mode
1
1
E
E
P+
OK
P-
E
Page 16

Setting up TV stations
Sound adjustment
16
Press the button and then use
D / E
button
to select the Settings menu.
Press the OK button and then use
D / E
button
to select Sound.
Press the OK button and then use
D / E
button
to select Balance.
Press the OK button and then use F / G button
to make appropriate adjustments.
Press the button to return to normal TV viewing.
Press the button and then use
D / E
button to select the
Settings menu.
Press the OK button and then use
D / E
button to select Sound.
Press the OK button and then use
D / E
button to select Defaults.
Press the OK button and then use
D / E
button to select the desired
sound item.
You can also recall a desired sound (Flat, Music, Movie, Speech
or User) with button on the remote control. The sound Flat,
Music, Movie and Speech are programmed for good sound
reproduction at the factory and cannot be changed.
EEE
Select
and Edit
Exit Back
Off
Main
Select
and confirm
Exit Back
User
Off
Main
Flat
Music
Movie
Speech
User
User
DefaultsBalance
2
2
3
3
Sound
1
Sound mode
2
Balance
3
Defaults
4
Equalizer
5
SPDIF format
6
Audio mode
7
SRS
8
TV speaker
Sound
1
Sound mode
2
Balance
3
Defaults
4
Equalizer
5
SPDIF format
6
Audio mode
7
SRS
8
TV speaker
P+
OK
P-
E
P+
OK
P-
E
Page 17

Setting up TV stations
Sound adjustment
17
EN
Press the button and then use
D / E
button to select
the Settings menu.
Press the OK button and then use
D / E
button to select
Sound.
Press the OK button and then use
D / E
button to select
Equalizer.
Press the OK button and then use
D / E
button to select
the desired sound item.
Press the OK button and then use F / G button to make
appropriate adjustments.
Press the button to return to normal TV viewing.
Note : This function works in the User mode.
Equalizer
1
100 Hz
2
200 Hz
3
500 Hz
4
1.2 kHz
5
3.0 kHz
6
7.5 kHz
7
12 kHz
8
Basic adjustment
Select
and Edit
Exit
Back
Select
and open
Exit Back
User
Off
Main
Equalizer
4
4
Sound
1
Sound mode
2
Balance
3
Defaults
4
Equalizer
5
SPDIF format
6
Audio mode
7
SRS
8
TV speaker
E
P+
OK
P-
E
E
P+
+
-
OK
P-
E
Page 18

Setting up TV stations
Sound adjustment
18
Press the button and then use
D / E
button to select
the Settings menu.
Press the OK button and then use
D / E
button to select
Sound.
Press the OK button and then use
D / E
button to select
SPDIF Format.
Press the OK button and then use
D / E
button to select
Dolby D or MPEG.
Press the button to return to normal DTV viewing.
Note :
a : It’s available to use Dolby D or MPEG in Dolby Digital
Audio signal.
b : When it doesn’t apply the Dolby Digital Audio signal,
select the MPEG function to output the dolby digital
audio by SPDIF output.
This function lets you select your preferred sound for
audio.
Press the button and then use
D / E
button to select
the Settings menu.
Press the OK button and then use
D / E
button to select
Sound.
Press the OK button and then use
D / E
button to select
Audio mode.
Press the OK button and then
D / E
button to select
MPEG or Dolby D.
Press the button to return to normal DTV viewing.
EEE
E
Select
and confirm
Exit Back
Select
and confirm
Exit Back
Main
Dolby D
MEPG
Dolby D
MPEG
Dolby D
MPEG
Audio Mode (in digital mode only)SPDIF Format (in digital mode only)
5
5
6
6
Sound
1
Sound mode
2
Balance
3
Defaults
4
Equalizer
5
SPDIF format
6
Audio mode
7
SRS
8
TV speaker
Sound
1
Sound mode
2
Balance
3
Defaults
4
Equalizer
5
SPDIF format
6
Audio mode
7
SRS
8
TV speaker
P+
OK
P-
E
P+
OK
P-
E
Page 19

19
EN
Setting up TV stations
Sound adjustment
SRS
7
7
TV Speaker
8
8
is a trademark of SRS Labs, Inc.
-TruSurround XT technology is incorporated under license form SRS
Labs, Inc.
- Manufactured under license form Dolby Laboratories.
Press the button and then use
D / E
button to select the Settings
menu.
Press the OK button and then use
D / E
button to select SRS.
Press the OK button and then use
D / E
button to select Off, 3D
Echo sound
or TruSurround XT.
When selecting Off option in SRS menu, SSM is automatically
changed Flat.
When selecting 3D Echo sound or TruSurround XT option in SRS
menu, SSM is automatically changed User.
Press the button to return to normal DTV viewing.
-Turn TV speakers off if using external audio
equipment.
Press the button and then use
D / E
but-
ton to select the Settings menu.
Press the OK button and then use
D / E
but-
ton to select TV Speaker.
Press the OK button and then use
D / E
but-
ton to select On or Off.
Press the button to return to normal DTV
viewing.
EEE
E
SRS
1
Off
2
3D Echo sound
3
TruSurround XT
Select
and open
Exit
P+
OK
P-
E
Back
R
TruSurround XTruSurround XT
TV Speaker
1
Off
2
On
Select
and open
Exit
P+
OK
P-
E
Back
Select
and confirm
Exit Back
Main
Sound
1
Sound mode
2
Balance
3
Defaults
4
Equalizer
5
SPDIF format
6
Audio mode
7
SRS
8
TV speaker
P+
OK
P-
E
Page 20

20
Setting up TV stations
Picture adjustment
20
Picture
1
Defaults
2
Brightness
3
Color
4
Contrast
5
Sharpness
6
Tint
7
Color temperature
8
Format
Select
and confirm
Exit Back
Press the button and then use
D / E
button to select
the Settings menu.
Press the OK button and then use
D / E
button to select
Picture.
Press the OK button and then use
D / E
button to select
Defaults.
Press the OK button and then use
D / E
button to select
the desired picture option.
Press the button to return to normal TV viewing.
You can also recall a desired picture (Dynamic,
Standard, Mild or User) with button on the remote
control. The picture Dynamic, Standard, Mild are
programmed for good picture reproduction at the factory
and cannot be changed.
User
Warm
16:9
53
55
50
51
Dynamic
Standard
Mild
User
User
E
E
P+
OK
P-
E
Defaults
INFO
GRUNDIG
1
Settings
2
Preset list
3
Installation
4
PIP
5
Information
Select
and open
Exit
P+
OK
P-
E
1
1
Settings
1
Sound
2
Picture
3
Child lock
4
Timer
5
DTV option
Select
and open
Exit
P+
OK
P-
E
Back
Page 21

21
EN
Setting up TV stations
Picture adjustment
2
2
3
3
Press the button and then use
D / E
button to select the Settings menu.
Press the OK button and then use
D / E
button to select Picture.
Press the OK button and then use
D / E
button to select the desired picture option.
Press the OK button and then use F / G
button to make appropriate adjustments.
You can adjust picture contrast, brightness, color, sharpness and tint (NTSC
input only) to the levels you prefer.
Press the button and then use
D / E
button to select the Settings menu.
Press the OK button and then use
D / E
button to select Picture.
Press the OK button and then use
D / E
button to select Color temper-
ature
.
Press the OK button and then
D / E
button to select the desired colour
temperature.
To initialize values (reset to default settings), select the Normal option.
Only User function ;
a. Press the
D / E
button in User.
b. Press the G button and then use
D / E
, F / G button to make appro-
priate adjustments.
Picture
2
Brightness
1
Defaults
3
Color
4
Contrast
5
Sharpness
6
Tint
7
Color temperature
8
Format
Select
and Edit
Exit Back
User
Warm
16:9
53
55
50
51
Picture
1
Defaults
2
Brightness
3
Color
4
Contrast
5
Sharpness
6
Tint
7
Color temperature
8
Format
Select
and confirm
Exit Back
User
Warm
16:9
53
55
50
51
Cool
Warm
Normal
User
User
E
E
P+
OK
P-
E
P+
OK
P-
+
E
Color temperature
Select
and Edit
Exit
Back
P+
OK
P-
-
+
E
1
R
2
G
3
B
50
50
50
Brightness Color temperature
Page 22

22
Setting up TV stations
Picture adjustment
4
4
Format
16:9
H.ZOOM
V.ZOOM
HV.ZOOM
Select
and confirm
Exit Back
Press the button and then use
D / E
button to select the
Settings menu.
Press the OK button and then use
D / E
button to select
Picture.
Press the OK button and then use
D / E
button to select
Format.
Press the OK button and then use
D / E
button to make
appropriate adjustments.
Press the button to return to normal DTV viewing.
•You can only select 16:9, 14:9, 4:3, ZOOM1, ZOOM2,
SPECTACLE, AUTO in TV, AV1, AV2, AV3, AV4, S-VIDEO,
COMPONENT [480i/576i] mode only.
•You can only select 16:9, H.ZOOM, V.ZOOM, HV.ZOOM in
DTV mode only.
Picture
2
Brightness
1
Defaults
3
Color
4
Contrast
5
Sharpness
6
Tint
7
Color temperature
8
Format
Select
and open
Exit Back
User
Warm
16:9
53
55
50
51
16 : 9
V.ZOOM
HV.ZOOM
H.ZOOM
E
E
P+
OK
P-
E
P+
OK
P-
E
Format
Page 23

23
EN
Setting up TV stations
Timer
Press the button and then use
D / E
button to select
the Settings menu.
Press the OK button and then use
D / E
button to select
Child lock.
Press the OK button and then use
D / E
button to select
Off or On.
Press the button to return to normal TV viewing.
With the lock on, the display Child lock on appears on
the screen if any button on the front panel is pressed
while viewing the TV.
Note : The display Child lock on will not appear on the
screen if any button on the front panel is pressed while
displaying the menus.
Child lock
1
Off
2
On
Select
and confirm
Exit Back
E
E
P+
OK
P-
E
1
1
Child lock
INFO
GRUNDIG
1
Settings
2
Preset list
3
Installation
4
PIP
5
Information
Select
and open
Exit
P+
OK
P-
E
Settings
1
Sound
2
Picture
3
Child lock
4
Timer
5
DTV option
Select
and open
Exit
P+
OK
P-
E
Back
Page 24

24
Setting up TV stations
Timer
Clock
1
1
- Auto time is set automatically from a digital channel sig-
nal.
Press the button and then use
D / E
button to select
the Settings menu.
Press the OK button and then use
D / E
button to select
Timer.
Press the OK button and then use
D / E
button to select
Clock.
Press the OK button and then use
D / E
button to select
Auto or Manual.
Only Manual function; Press the G button and then
D / E
button to adjust hour and minute.
Press the button to save.
Timer
1
Clock
2
Off Time
3
On Time
4
Time zone
5
D.Saving
Clock
Select
and open
Exit
P+
OK
P-
E
Back
Select
and Edit
Exit
P+
OK
P-
-
+
E
Back
INFO
GRUNDIG
1
Settings
2
Preset list
3
Installation
4
PIP
5
Information
Select
and open
Exit
P+
OK
P-
E
D
Auto
E
18:26
Settings
1
Sound
2
Picture
3
Child lock
4
Timer
5
DTV option
Select
and open
Exit
P+
OK
P-
E
Back
E
E
Page 25

25
EN
Setting up TV stations
Timer
On/Off Time
2
2
On time
Select
and Edit
Exit
P+
OK
P-
-
+
E
Back
04:57 TV 3 VOL 30 On
The off timer automatically switches the set to standby at the preset
time.
Press the button and then use
D / E
button to select the Settings
menu.
Press the OK button and then use
D / E
button to select Timer.
Press the OK button and then use
D / E
button to select Off Time
or On Time.
Press the OK button and then
D / E
button to select On.
To cancel Off/On Time function, press the
D / E
button to select
Off.
Press the OK button and then
D / E
button to adjust the hour.
Press the G button and then
D / E
button to adjust the minute.
Only On time function; Press the G button
and then
D / E
button to adjust volume level
and program number.
Press the to save.
Note :
a.In the event of power interruption (disconnec-
tion or power failure), the clock must be reset.
b.Two hours after the set is switched on by the
on time function it will automatically switch
back to standby mode unless a button has
been pressed.
c.Once the on or off time is set, these functions
operate daily at the preset time.
d.Off Timer function overrides On Timer func-
tion if they are set to the same time.
e.The set must be in standby mode for the On
Timer to work.
E
E
Timer
1
Clock
2
Off Time
3
On Time
4
Time zone
5
D.Saving
Select
and open
Exit
P+
OK
P-
E
Back
Settings
1
Sound
2
Picture
3
Child lock
4
Timer
5
DTV option
Select
and open
Exit
P+
OK
P-
E
Back
Page 26

Setting up TV stations
Timer
26
Time zone (in digital mode only)
3
3
D. Saving (in digital mode only)
4
4
The digital channel signal includes information for the current time
provided by the broadcasting station.
Press the button and then use
D / E
button to select the Settings
menu.
Press the OK button and then use
D / E
button to select Timer.
Press the OK button and then use
D / E
button to select Time zone.
Press the OK button and then
D / E
button to select your viewing
area time zone : NSW/ACT, VIC/TAS, QLD, SA, WA , NT, Auto
time zone
.
Press the button to return to normal DTV viewing.
Press the button and then use
D / E
but-
ton to select the Settings menu.
Press the OK button and then use
D / E
but-
ton to select D. Saving.
Press the OK button and then use
D / E
but-
ton to select On or Off.
Press the button to return to normal DTV
viewing.
E
EEE
Time zone
1
NSW / ACT
2
VIC / TAS
3
QLD
4
SA
5
WA
6
NT
7
Auto time zone
Select
and open
Exit
P+
OK
P-
E
Back
Timer
1
Clock
2
Off Time
3
On Time
4
Time zone
5
D.Saving
Select
and open
Exit
P+
OK
P-
E
Back
Timer
1
Clock
2
Off Time
3
On Time
4
Time zone
5
D.Saving
Select
and open
Exit
P+
OK
P-
E
Back
D. Saving
1
Off
2
On
Select
and confirm
Exit Back
P+
OK
P-
E
Page 27

DTV option Menu
(in digital mode only)
27
EN
Parental Control can be used to block specific channels,
ratings and viewing sources.
Press the button and then use
D / E
button to select
the Settings menu.
Press the OK button and then use
D / E
button to select
DTV option.
Press the OK button and then use
D / E
button to select
Rating.
Press the OK button to enter the password as requested.
The TV is set with the initial password “0-0-0-0”.
Press the
D / E
button to select type of ratings to block .
Press the button to return to normal DTV viewing.
E
E
1
1
Rating
INFO
GRUNDIG
1
Settings
2
Channel list
3
Installation
4
PIP
5
Information
Select
and open
Exit
P+
OK
P-
E
DTV option
1
Rating
2
Set password
3
Favorite
4
Caption
Select
and confirm
Exit
P+
OK
P-
E
Back
No block
R & above
AV & above
MA & above
M & above
PG & above
G & above
Block all
No block
Settings
1
Sound
2
Picture
3
Child lock
4
Timer
5
DTV option
Select
and open
Exit
P+
OK
P-
E
Back
Page 28

DTV option Menu
(in digital mode only)
28
2
2
Rating menu option
- No Block
All programs can be watched because there is no age limitation.
- R & Above (Restricted 18+)
Programs are blocked for children under the age of 18.
- AV & Above (Adult Audience strong violence 15+)
This program contains the strong violent contents. Therefore, programs are blocked for children under the age of 15
- MA & Above (Mature Adult Audience 15+)
Programs are blocked for children under the age of 15.
- M & Above (Mature Audience 15+)
Programs are blocked for children under the age of 15.
- PG & Above (Parental Guidance Recommended)
This programs contains unsuitable materials that parents want to prevent their children from watching.
- G & Above (General Audience)
This programs is designed to be appropriate for all ages.
- Block All
All programs are blocked without considering the age level.
Page 29

DTV option Menu
(in digital mode only)
29
EN
3
3
Set password
Change the password by inputting a new password
twice.
Press the button and then use
D / E
button to select
the Settings menu.
Press the OK button and then use
D / E
button to select
DTV option.
Press the OK button and then use
D / E
button to select
Set password.
Press the OK button to enter the password as request-
ed.
The TV is set with the initial password “0-0-0-0”.
Press the OK button and then enter a four digit pass-
word.
Enter it again when requested.
Press the button to return to normal DTV viewing.
E
E
DTV option
1
Rating
2
Set password
3
Favorite
4
Caption
Select
and confirm
Exit
P+
OK
P-
E
Back
New Code
----
Confirm Code
----
Settings
1
Sound
2
Picture
3
Child lock
4
Timer
5
DTV option
Select
and open
Exit
P+
OK
P-
E
Back
Page 30

30
DTV option Menu
(in digital mode only)
4
4
Favorite
This function lets you select your favourite programmes
directly.
Press the button and then use
D / E
button to select
the Settings menu.
Press the OK button and then use
D / E
button to select
DTV option.
Press the OK button and then use
D / E
button to select
Favorite.
Press the OK button and then use
D / E
button to select
On or Off.
Press the button to return to normal DTV viewing.
E
E
5
5
Caption
Press the button and then use
D / E
button to select
the Settings menu.
Press the OK button and then use
D / E
button to select
DTV option.
Press the OK button and then use
D / E
button to select
Caption.
Press the OK button and then use
D / E
button to select
On or Off.
Press the button to return to normal DTV viewing.
E
E
DTV option
1
Rating
2
Set password
3
Favorite
4
Caption
Select
and confirm
Exit
P+
OK
P-
E
Back
Off
On
No block
Off
Off
DTV option
1
Rating
2
Set password
3
Favorite
4
Caption
Select
and confirm
Exit
P+
OK
P-
E
Back
No block
Off
Off
On
Off
Settings
1
Sound
2
Picture
3
Child lock
4
Timer
5
DTV option
Select
and open
Exit
P+
OK
P-
E
Back
Page 31

31
EN
Preset list Menu
Press the button and then use
D / E
button to select the Preset list
menu.
Press the OK button to display the
Preset list menu.
Preset list
0
-----
1
-----
2
-----
3
-----
4
-----
5
-----
6
-----
7
-----
8
-----
9
-----
10
-----
11
-----
12
-----
13
-----
14
-----
15
-----
16
-----
17
-----
18
-----
19
-----
20
-----
21
-----
22
-----
23
-----
Select
and confirm
Edit Delete
ExitBack Move
0
-----
- This function enables you to delete or skip the stored programmes. Also you can move some stations to other programme numbers or insert a blank station data into the selected programme number.
Select a programme to be
deleted with the
D / E
or F / G
button.
Press the button twice.
The selected programme is
deleted, all the following programmes are shifted up one
position.
Deleting a programme
Select a programme to be moved with the
D / E
or F / G button.
Press the button.
Move the programme to the desired programme number with the
D / E
or F / G but-
ton.
Press the button again to release this
function.
Moving a programme
E
P+
OK
P-
-
+
E
< Analogue mode edit >
INFO
GRUNDIG
1
Settings
2
Preset list
3
Installation
4
PIP
5
Information
Select
and open
Exit
P+
OK
P-
E
Page 32

32
Preset list Menu
Edit channel settings ( )
1
Edit name
VHF/UHF
21
0
DK
2
Type
3
Channel entry
4
Finetuning
5
TV standard
Select
and open
Exit Back
Select a programme to be deleted with the
D / E
or F / G button.
Press the button to display the Edit chan-
nel settings
menu.
Press the
D / E
button to select Edit name.
Press the OK button.
Press the D button. You can use a blank, +, -, the numeric 0 to 9 and
the alphabet A to Z.
With the Ebutton you can select in the opposite direction.
Select the position by pressing the F / G button and then take your
choice of the second character, and so on.
Press the
D / E
button to select Type.
Press the OK button and then
D / E
button to select V/UHF or
CABLE.
Edit channel settings ( )
1
Edit name
VHF/UHF
21
0
DK
2
Type
3
Channel entry
4
Finetuning
5
TV standard
Select
and confirm
Exit Back
VHF/UHF
CABLE
CABLE
P+
OK
P-
E
P+
OK
P-
E
1
1
2
2
Page 33

Preset list Menu
33
EN
Press the
D / E
button to select TV standard.
Press the OK button and then use
D / E
button to
select BG, I, DK, M.
Edit channel settings ( )
1
Edit name
VHF/UHF
21
0
DK
2
Type
3
Channel entry
4
Finetuning
5
TV standard
Select
and confirm
Exit Back
BG
I
DK
M
M
P+
OK
P-
E
4
4
Normally fine tuning is only necessary if reception is poor.
Press the
D / E
button to select Finetuning.
Press the OK button.
Press the F / G button to fine tune for the best picture
and sound.
Edit channel settings ( )
1
Edit name
VHF/UHF
21
0
DK
2
Type
3
Channel entry
4
Finetuning
5
TV standard
Select
and Edit
Exit Back
3
3
P+
OK
P-
E
Page 34

Installation Menu
34
Press the button and then use
D / E
button to select
the Installation menu.
Press the OK button and then use
D / E
button to select
Station search.
Press the OK button and then use
D / E
button to select
TV search, DTV search, All search.
Press the OK button.
Press the OK button to begin auto programming.
Press the OK button to begin auto programming.
All receivable stations are stored.
To stop auto programming, press the button.
When auto programming is completed, the Preset list
menu appears on the screen. See the ‘Preset list’ section
to edit the stored programme.
Press the button to return to normal TV viewing.
Note : The auto search operation all data is deleted.
Installation
2
Station search
3
PC Control
4
WXGA
5
VGA
6
Front Light
1
Language
Station search
2
DTV search
3
All search
1
TV search
Select
and open
Exit
Back
All search
5%5
Stop
Select
and open
Exit
P+
OK
P-
E
Back
P+
OK
P-
E
E
Station search
1
1
- Stations can be tuned using automatic or manual modes.
- All stations that can be received are stored by this method. It is recommended that you use auto programme during
installation of this set.
INFO
GRUNDIG
1
Settings
2
Preset list
3
Installation
4
PIP
5
Information
Select
and open
Exit
P+
OK
P-
E
E
E
E
Page 35

35
EN
Installation Menu
You can switch Front Light LED on or off.
Press the button and then use
D / E
button to select
the Installation menu.
Press the OK button and then use
D / E
button to select
Front Light.
Press the OK button and then use
D / E
button to select
Light On, Light Off.
Press the OK button.
Press the OK button to begin auto programming.
Installation
2
Station search
3
PC Control
4
WXGA
5
VGA
6
Front Light
1
Language
Front Light
2
Light Off
1
Light On
Select
and open
Exit
Back
E
Select
and open
Exit
P+
OK
P-
E
Back
P+
OK
P-
E
Front Light
2
2
INFO
GRUNDIG
1
Settings
2
Preset list
3
Installation
4
PIP
5
Information
Select
and open
Exit
P+
OK
P-
E
Page 36

36
Other Menu
You don’t have to remember to switch the set off before
you go to sleep. The sleep timer automatically switches
the set to standby after the preset time has elapsed.
Press the -/-- button to select the number of minutes. The
display ‘ ’ will appear on the screen, followed by 10,
20, 30, 60, 90, 120, 180
and 240. The timer begins to
count down from the number of minutes selected.
Note :
a.To view the remaining sleep time, press the -/-- button
once.
b.To cancel the sleep time, repeatedly press the -/-- but-
ton until the display ‘ ’ appears.
c.When you switch the set off, the set releases the preset
sleep time.
Sleep timer
- - - min
- - - min
Page 37

37
EN
Connection of PC
You can adjust horizontal/vertical position, clock, phase,
and auto-configure, reset as you prefer.
Press the button and then use
D / E
button to select
the Installation menu.
Press the OK button and then use
D / E
button to select
PC Control.
Press the OK button and then D / E button to select the
desired picture item.
Press the F / G button to make appropriate adjustments.
H-Position / V-Position
This function is to adjust picture to left/right and up/down
as you prefer.
Clock
This function is to minimize any vertical bars or stripes visible on the screen background. And the horizontal screen
size will also change.
Phase
This function allows you to remove any horizontal noise
and clear or sharpen the image of characters.
Auto-configure
This function is for the automatic adjustment of the screen
position, clock and phase. The displayed image will disappear for a few seconds while the Auto-configuration is in
progress.
Reset
This function allows you to return to the good picture
reproduction programmed at the factory and cannot be
changed.
Note : Some signal from some graphics boards may not
function properly. If the results are unsatisfactory, adjust
your monitor’s position, clock and phase manually.
Press the OK button to store it for the PC monitor picture.
Press the button to return to PC mode.
PC Setup
a : When the set is inputted WXGA signal, select the desired WXGA resolution.
WXGA or VGA (Only RGB mode)
PC Control
2
V-POS.
3
Clock
4
Phase
5
Auto
6
Reset
1
H-POS.
0
0
50
50
Installation
2
Station search
3
PC Control
4
WXGA
5
VGA
1
Language
WXGA
2
1280X768
3
1360X768
4
1366X768
1
1024X768
Select
and confirm
Exit
Back
E
Select
and open
Exit
P+
OK
P-
E
Back
Select
and Edit
Exit
P+
OK
P-
-
+
E
Back
P+
OK
P-
E
E
Page 38

PIP (Picture-in-Picture) Feature
38
Press the PIP button to show the sub picture.
• Each press of PIP button changes the screen display
as shown below.
1
1
Watching PIP
- PIP lets you view 2 different inputs (sources) on your monitor screen at the same time. One source will be large, and
the other source will show a smaller inset image.
PIP
DW2
POP
DW1
TV
AV1
AV2
AV3
AV4
S-VIDEO
X
O
O
O
O
O
O
X
O
O
O
O
O
O
X
O
O
O
O
O
O
X
O
O
O
O
O
O
X
O
O
O
O
O
O
X
O
O
O
O
O
O
O
O
O
O
O
O
O
O
O
O
O
O
O
O
O
O
O
O
TV
O
O
O
O
O
O
DTV
MAIN
SUB
AV1 AV2 AV3 AV4
S-VIDEO
COMP.
PC-RGB
HDMI1
HDMI2
Page 39

PIP (Picture-in-Picture) Feature
39
EN
Press the POS button.
Press the POS button repeatedly until desired position is
achieved. The sub pictures move clockwise.
3
3
Moving the PIP
Press the SIZE button to select the desired sub picture
size.
The sub picture appears as 1/9 size of the main picture,
followed by 1/16.
4
4
Sub picture size
Press the button and then
D / E
button to select the
PIP menu.
Press the OK button and then
D / E
button to select
Audio Input.
Press the OK button and then
D / E
button to select
Main or Sub.
Press the button to return to normal TV viewing.
2
2
PIP Audio Input
PIP mode - main and sub picture audio select.
PIP
2
Input
3
Format
4
Position
5
Audio Input
1
Mode
PIP
TV
4:3
Bottom Right
Main
Main
Sub
Main
E
E
Select
and confirm
Exit
P+
OK
P-
E
Back
Page 40

40
Information Menu
(In Digital mode only)
- This function shows the present screen information.
Press the button and then
D / E
button to select the
Information menu.
Press the OK button and then
D / E
button to select
Information.
Press the OK button.
The service information appears on screen.
Press the button to return to normal DTV viewing.
Note :
a When you press the OK button, Signal Strength
aren’t displayed on the information OSD.
b It’s disappeared after a while.
3 SD/MPEG
SBS SBS DIGITAL 1
Now Toyota World Sport
Next English Premier League...
18:05
- This function shows the interactive programme guide.
Press the button and then
D / E
button to select the
Information menu.
Press the OK button and then
D / E
button to select
Information.
Press the OK button.
The TV Guide information appears on screen.
Press the button to return to normal DTV viewing.
Press the SCAN button to display the DTV Guide.
Ch.77
PG
Seven Network
7 Guide
NOW 18:00 ~ 18:30
SEVEN NEWS
JENNIFER KEYTE presents to day’s news with ROB GELL updating
the weather. Sport is with TIM WATSON. Ws
NOW 18:30 ~ 19:40
HEARTBEAT
Three farm children are left orphaned, leaving Steve to help the old-
set child fight a custody battle. Vernon opens a campsite, but it is
David who is left to entertain the campers.WS
SD/MPEG
576i 16x9
Information
1
1
TV Guide
2
2
EEE
E
Page 41

41
EN
Teletext
Teletext (or TOP text) is an optional function, therefore only
a set with the teletext system can receive the teletext
broadcast.
Teletext is a free service broadcast by most TV stations
which gives up-to-the-minute information on news, weather, television programmes, share prices and many other
topics.
The teletext decoder of this TV can support the SIMPLE,
TOP and FASTEXT systems. SIMPLE (standard teletext)
consists of a number of pages which are selected by
directly entering the corresponding page number. TOP and
FASTEXT are more modern methods allowing quick and
easy selection of teletext information.
Switch on/off
Press the TEXT button to switch to teletext.
The initial page or last page appears on the screen.
Two page numbers, TV station name, date and time are
displayed on the screen headline. The first page number
indicates your selection, while the second shows the current page displayed.
Press the TEXT button to switch off teletext. The previous
mode reappears.
SIMPLE text
Page selection
1. Enter the desired page number as a three digit number
with the NUMBER buttons. If during selection you
press a wrong number, you must complete the three
digit number and then re-enter the correct page number.
2. The
D / E
button can be used to select the preceding
or following page.
Programming a colour button in LIST mode
If the TV is in SIMPLE text, TOP text or FASTEXT mode,
POS press the button to switch to LIST mode.
Four teletext page numbers of your choice can be colour
coded and easily selected by pressing the corresponding
coloured button on the remote control handset.
1. Press a coloured button.
2. Using the NUMBER buttons, select the page you wish
to programme.
3. Press the OK button. The selected page is stored as
the selected page number, blinking once to confirm
this. From now on, you can select this page with the
same coloured button.
4. The three other coloured buttons are programmed in
this way.
TOP text (option)
The user guide displays four fields-red, green, yellow and
blue at the bottom of the screen. The yellow field denotes
the next group and the blue field indicates the next block.
Page 42

42
Teletext
Block / group / page selection
1. With the blue button you can progress from block to
block.
2. Use the yellow button to proceed to the next group with
automatic overflow to the next block.
3. With the green button you can proceed to the next
existing page with automatic overflow to the next
group.
Alternatively the Dbutton can be used.
4. The red button permits to return to previous selection.
Alternatively the Ebutton can be used.
Direct page selection
Corresponding to the SIMPLE teletext mode, you can
select a page by entering it as a three digit number using
the NUMBER buttons in TOP mode.
FASTEXT
The teletext pages are colour coded along the bottom of
the screen and are selected by pressing the corresponding coloured button.
Special teletext functions
SCAN
Press this button to display concealed information, such as
solutions of riddles or puzzles.
Press this button again to remove the information from the
display.
SIZE
Selects double height text.
Press this button to enlarge the top half of the page.
Press this button again to enlarge the bottom half of the
page.
Press this button again to return to the normal display.
Stops the automatic page change which will occur if a teletext page consists of 2 or more sub pages. The number of
sub pages and the sub page displayed is, usually, shown
on the screen below the time. When this button is pressed
the stop symbol is displayed at the top left-hand corner of
the screen and the automatic page change is inhibited.
To continue press this button again.
PAP
Displays the teletext pages superimposed on the TV picture.
To switch the TV picture off press this button again.
-/--
In the teletext mode, press this button to select a sub page
number. The sub page number is displayed at the bottom
of the screen. To hold or change the sub page, press the
RED / GREEN,
D / E
or NUMBER buttons.
Press this button again to exit this function.
Page 43

43
EN
Displayable Monitor
Specification
Note:
a. If the set is cold, there may be a small “flicker” when the
set is switched on. This is normal, there is nothing wrong
with the set.
b. If possible, use the VESA 1,024x768@60Hz video mode
to obtain the best image quality for your LCD monitor. If
used to PC vertical frequency 85Hz, some noise can be
seen when PIP is on. In this case, set the PC vertical frequency to 60Hz. The set has been pre-adjusted to the
mode VESA 1,024x768@60Hz.
c. Some dot defects may appear on the screen, like Red,
Green or Blue spots. However, this will have no impact
or effect on the monitor performance.
d. Do not press the LCD screen with your finger for a long
time as this may produce some temporary distortion
effects on the screen.
e. When the PC screen appears on the set, a message
may appear on the screen, and the message will differ
according to the Window system version (Win98, 2000).
If a message appears click “Next” until the message finishes.
f. If the message “Out Of Range” appears on the screen,
adjust the PC as in the ‘Displayable Monitor
Specification’ section.
RGB Mode / HDMI Mode
(Synchronization input form : separate)
Resolution
31.5
31.5
37.9
31.5
37.8
37.5
43.2
35.1
37.9
48.0
46.9
53.7
48.4
56.4
60.0
60.0
63.9
75.0
79.9
91.1
47.7
60.1
68.5
49.0
49.0
75.0
640X350
720X400
640X480
800X600
1024X768
1280X1024
1280X768
1360X768
1366X768
1600X1200
MODE
DOS
VGA
SVGA
XGA
SXGA
WXGA
UXGA
Horizontal
Frequency (KHz)
70.0
70.0
85.0
60.0
72.0
75.0
85.0
56.0
60.0
72.0
75.0
85.0
60.0
70.0
75.0
85.0
60.0
70.0
75.0
85.0
60.0
75.0
85.0
60.0
60.0
60.0
Vertical
Frequency (Hz)
Page 44

Guarantee
44
GUARANTEE
This guarantee is subject to the following provisions :
O
It is only valid within boundaries of the country of purchase;
O
The product must be correctly assembled and operated in accordance with the instructions
contained in this manual;
O
This product must be used solely for domestic purposes;
O
The guarantee does not cover accidental damage;
O
The guarantee will be rendered invalid if the product is resold or has been damaged by
inexpert repair;
O
The manufacturer disclaims any liability for incidental or consequential damaged.
This guarantee is in addition to, and does not diminish, your statutory or legal rights.
Please keep your receipt as proof of purchase. This product is warranted for any defect in
materials or workmanship for three years after the original date of purchase. This product is
for normal domestic and office use only. This warranty does not cover damage from misuse
or neglect, accidental damage, vermin infestation, excessive voltages such us lightning or
power surges or any alteration that affects the performance or reliability of the product.
If guarantee is required please contact the Grundig Helpline 1800 509 394 within
Australia or 0800 450 259 within New Zealand. Have your receipt of purchase on hand.
Page 45

Note
45
EN
Page 46

Note
46
Page 47

Troubleshooting
Check list
47
EN
Check these items and try to adjust these
Symptoms
No picture, no sound
Sound OK, poor picture
Picture OK, poor sound
Picture blurred
Lines or streaks in picture
Poor reception on some channels
No colour
Poor colour
Remote control does not work
Incorrect position
Vertical bars or stripes on background
Horizontal noise
Signal Cable message appears
The mains plug-(plugged in and switched on)
Is the TV switched on
Try another channel (weak signal)
Check aerial (plugged into TV?)
Check aerial (broken lead?)
Check aerial
Check for local interference
Adjust contrast
Adjust brightness
Adjust colour
Adjust volume
Check the batteries in remote control
Check Audio/Video sockets (VCR only)
Auto-configure or adjust the H/V position
Auto-configure or adjust Clock
Auto-configure or adjust Clock Phase
Is the Signal Cable connected or loose
Page 48

P/NO : MAN07GDP109
(GPN07MA030A, GRUNDIG)
PO BOX 6287
Silverwater NSW 1811
http://www.grundig.net.au
Grundig Helpline: 1800 509 394 Australia
Grundig Helpline: 0800 450 259 New Zealand
 Loading...