

Page 1
ENG DE
www.grundig.comwww.grundig.com
REFRIGERATOR
USER INSTRUCTIONS
GKN 27930 FX
Page 2

Page 3
Contents
1. Safety and environment
instructions 3
2. Your Refrigerator 7
3 Installation 8
3.1 Appropriate installation
location
3.2 Installing the plastic wedges
3.3 Adjusting the feet
3.4 Electrical connection
3.5 Reversing the doors
3.6 Reversing the doors
4 Preparation 12
4.1 Things to be done for energy
saving
4.2 Initial use
5 Operating the product 14
5.1 Temperature setting button .14
5.2 Fast freeze
5.3 Vacation function
5.4 Thermostat setting button
5.5 Thermostat setting button
5.6 Defrost
5.7 Indicator panel
5.8 Indicator panel
5.9 Indicator panel
5.10 Ice bucket
(This feature is optional)............26
5.11 Egg holder
5.12 Fan
5.13 Vegetable bin
(This feature is optional)............26
5.14 Zero degree compartment
(This feature is optional)............26
5.15Moving door rack
5.16 Sliding storage box
(This feature is optional)............27
5.17 Moisture controlled
vegetable bin
......................................... 8
.8
....................8
..............9
.............10
.............11
..........................................12
..............................13
...........................14
..................15
...16
...16
..................................17
......................18
......................20
......................23
............................26
........................... 26
....................................... 26
......................26
.26
.................27
............27
...............................27
(This feature is optional)............27
5.18 Automatic ice machine
(This feature is optional)............28
5.19 Icematic and ice storage
container
5.20 Using the water dispenser
5.21 Filling the water
dispenser's tank
5.22 Cleaning the water tank
5.23 Drip tray
5.24 HerbBox/HerbFresh
5.25Freezing fresh food
5.26 Recommendations for
preserving the frozen food
5.27 Deep-freeze information
5.28 Placing the food
5.29 Door open warning
5.30 Illumination lamp
6. Maintenance and cleaning 36
6.1 Avoiding bad odours..........36
6.2 Protecting the plastic
surfaces ..................................... 37
6.3 Door Glasses
7. Troubleshooting 38
.....................................29
.........................30
..............................31
..................34
.......................37
......28
.29
...30
...........32
..............33
......... 34
....34
.............35
...............35
DE
3
Page 4

Please read this manual first!
Dear Customer,
We hope that your product, which has been produced in modern plants
and checked under the most meticulous quality control procedures, will
provide you an effective service
For this, we recommend you to carefully read the entire manual of your
product before using it and keep it at hand for future references.
The user manual will help you use the product in a fast and safe way.
Will help you use your appliance in a fast and safe way.
Read the manual before installing and operating your product.
Follow the instructions, especially those for safety.
Keep the manual in an easily accessible place as you may need it later.
Besides, read also the other documents provided with your product.
Please note that this manual may be valid for other models as well.
Symbols and their descriptions
This instruction manual contains the following symbols:
Important information
C
A
or useful usage tips.
Warning against
dangerous conditions
for life and property.
Warning against
B
2
electric voltage.
Packaging materials
of the product are
manufactured from
recyclable materials
in accordance with our
National Environment
Regulations.
Page 5
1. Safety and environment
instructions
This section provides the safety
instructions necessary to
prevent the risk of injury and
material damage. Failure to
observe these instructions will
invalidate all types of product
warranty.
Intended use
WARNING:
Keep ventilation
openings, in the appliance
A
A
A
A
This appliance is intended to be
used in household and similar
applications such as
– staff kitchen areas in shops,
offices and other working
environments;
enclosure or in the builtinstructure, clear of
obstruction.
WARNING:
Do not use mechanical
devices or other means
to accelerate the
defrosting process,
other than those
recommended by the
manufacturer.
WARNING:
Do not damage the
refrigerant circuit.
WARNING:
Do not use electrical
appliances inside
the food storage
compartments of the
appliance, unless
they are of the type
recommended by the
manufacturer.
– farm houses and by clients
in hotels, motels and other
residential type environments;
– bed and breakfast type
environments;
– catering and similar non-retail
applications.
1.1. General safety
• This product should not
be used by persons with
physical, sensory and mental
disabilities, without sufficient
knowledge and experience
or by children. The device
can only be used by such
persons under supervision
and instruction of a person
responsible for their safety.
Children should not be allowed
to play with this device.
• In case of malfunction, unplug
the device.
• After unplugging, wait at least
5 minutes before plugging in
again.
• Unplug the product when not
in use.
• Do not touch the plug with wet
hands! Do not pull the cable to
plug off, always hold the plug.
• Do not plug in the refrigerator
if the socket is loose.
• Unplug the product during
installation, maintenance,
cleaning and repair.
• If the product will not be used
for a while, unplug the product
and remove any food inside.
DE
3
Page 6
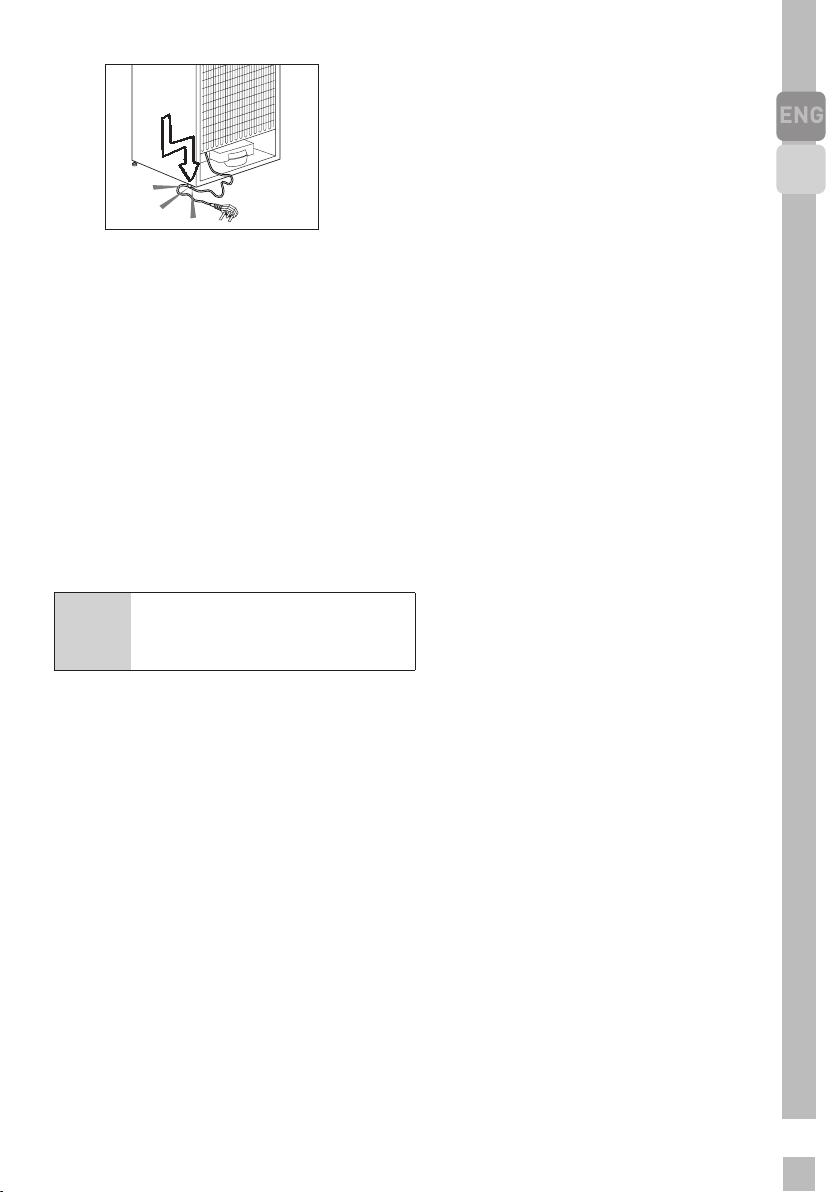
• Do not use the product when
the compartment with circuit
cards located on the upper
back part of the product
(electrical card box cover) (1)
is open.
1
1
• Do not use steam or steamed
cleaning materials for
cleaning the refrigerator and
melting the ice inside. Steam
may contact the electrified
areas and cause short circuit
or electric shock!
• Do not wash the product by
spraying or pouring water on
it! Danger of electric shock!
• In case of malfunction, do not
use the product, as it may
cause electric shock. Contact
the authorised service before
doing anything.
• Plug the product into an
earthed socket. Earthing
must be done by a qualified
electrician.
• If the product has LED
type lighting, contact the
authorised service for
replacing or in case of any
problem.
4
• Do not touch frozen food with
wet hands! It may adhere to
your hands!
• Do not place liquids in bottles
and cans into the freezer
compartment. They may
explode.
• Place liquids in upright
position after tightly closing
the lid.
• Do not spray flammable
substances near the product,
as it may burn or explode.
• Do not keep flammable
materials and products with
flammable gas (sprays, etc.)
in the refrigerator.
• Do not place containers
holding liquids on top of the
product. Splashing water on
an electrified part may cause
electric shock and risk of fire.
• Exposing the product to rain,
snow, sunlight and wind
will cause electrical danger.
When relocating the product,
do not pull by holding the
door handle. The handle may
come off.
• Take care to avoid trapping
any part of your hands or
body in any of the moving
parts inside the product.
• Do not step or lean on the
door, drawers and similar
parts of the refrigerator. This
will cause the product to fall
down and cause damage to
the parts.
• Take care not to trap the
power cable.
Page 7
1.1.1 HC warning
If the product comprises a
cooling system using R600a gas,
take care to avoid damaging
the cooling system and its pipe
while using and moving the
product. This gas is flammable.
If the cooling system is
damaged, keep the product
away from sources of fire and
ventilate the room immediately.
The label on the inner left
C
1.1.2 For models with
water dispenser
• Pressure for cold water inlet
• If there is risk of water
side indicates the type of
gas used in the product.
shall be maximum 90 psi (620
kPa). If your water pressure
exceeds 80 psi (550 kPa), use
a pressure limiting valve in
your mains system. If you
do not know how to check
your water pressure, ask for
the help of a professional
plumber.
hammer effect in your
installation, always
use a water hammer
prevention equipment in
your installation. Consult
Professional plumbers if you
are not sure that there is no
water hammer effect in your
installation.
• Do not install on the hot
water inlet. Take precautions
against of the risk of
freezing of the hoses. Water
temperature operating
interval shall be 33°F (0.6°C)
minimum and 100°F (38°C)
maximum.
• Use drinking water only.
1.2. Intended use
• This product is designed for
home use. It is not intended
for commercial use.
• The product should be used
to store food and beverages
only.
• Do not keep sensitive
products requiring controlled
temperatures (vaccines,
heat sensitive medication,
medical supplies, etc.) in the
refrigerator.
• The manufacturer assumes
no responsibility for any
damage due to misuse or
mishandling.
• Original spare parts will
be provided for 10 years,
following the product
purchasing date.
1.3. Child safety
• Keep packaging materials
out of children’s reach.
DE
5
Page 8
• Do not allow the children to
play with the product.
• If the product’s door
comprises a lock, keep the
key out of children’s reach.
1.4. Compliance with WEEE
Directive and Disposing
of the Waste Product
This product complies with
EU WEEE Directive (2012/19/EU).
This product bears a classification
symbol for waste electrical and
electronic equipment (WEEE).
This product has been
manufactured with high
quality parts and
materials which can be
reused and are suitable
for recycling. Do not
dispose of the waste
product with normal domestic and
other wastes at the end of its
service life. Take it to the collection
center for the recycling of electrical
and electronic equipment. Please
consult your local authorities to
learn about these collection
centers.
1.6. Package information
Packaging materials of the product
are manufactured from recyclable
materials in accordance with our
National Environment Regulations. Do
not dispose of the packaging materials
together with the domestic or other
wastes. Take them to the packaging
material collection points designated
.by the local authorities
1.5. Compliance with
RoHS Directive
• This product complies with EU
WEEE Directive (2011/65/EU).
It does not contain harmful
and prohibited materials
specified in the Directive.
6
Page 9
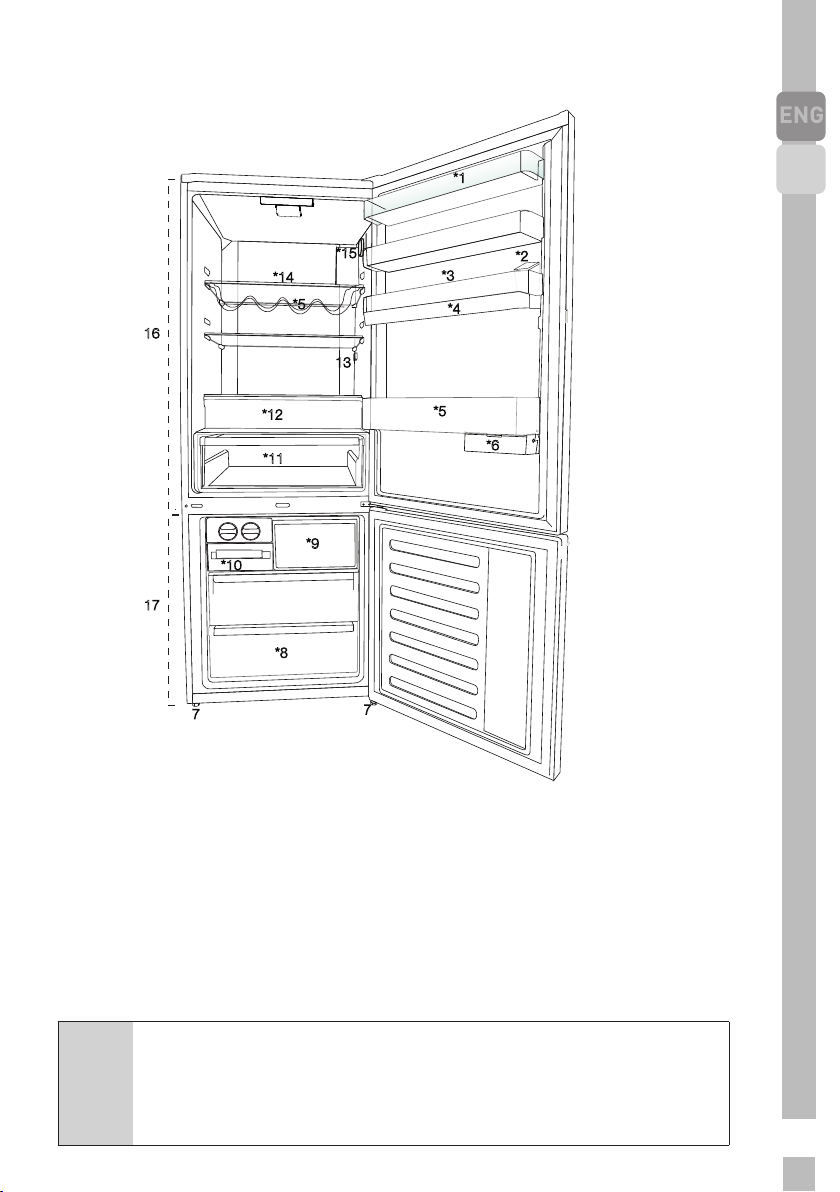
2. Your Refrigerator
*1
*15
*14
*5
16
13
*12
*11
*9
*10
17
*8
7
7
*3
*4
*5
*2
*4
*6
DE
1. Cooler compartment door
shelf
2. Water dispenser filling tank
3. Egg section
4. Water dispenser reservoir
5. Bottle shelf
6. Sliding storage containers
7. Adjustable legs
8. Deep freezer compartment
* optional:Figures in this user manual are schematic and
may not match the product exactly. If the subject parts are not
included in the product you have purchased, then those parts
C
are valid for other models.
9. Quick freeze compartment
10. Ice cube tray & Ice bank
11. Vegetable bin
12. Zero degree compartment
13. Interior light
14. Cooler compartment glass shelf
15. Temperature adjustment button
16. Cooler compartment
17. Freezer compartment
7
Page 10
3 Installation
3.1 Appropriate installation
location
Contact an Authorized Service for
the installation of the product. In
order to prepare the product for use,
refer the information in the user
manual and ensure that electrical
installation and water installation
are appropriate. If not, call a qualified
electrician and technician to have any
.necessary arrangements carried out
WARNING:
Manufacturer shall not be
held liable for damages
B
that may arise from
procedures carried out by
unauthorized persons.
WARNING: Product
must not be plugged
in during installation.
B
Otherwise, there is the
risk of death or serious
injury!
WARNING: If the door
clearance of the room
where the product shall be
place is so tight to prevent
passing of the product,
A
remove the door of the
room and pass the product
through the door by
turning it to its side; if this
does not work, contact the
authorized service.
• Productmustnotbesubjectedto
direct sun light and kept in humid
places.
• Appropriateairventilationmust
be provided around your product
in order to achieve an efficient
operation. If the product is to be
placed in a recess in the wall, pay
attention to leave at least 5 cm
distance with the ceiling and side
walls.
• Donotinstalltheproductinplaces
where the temperature falls below
-5°C.
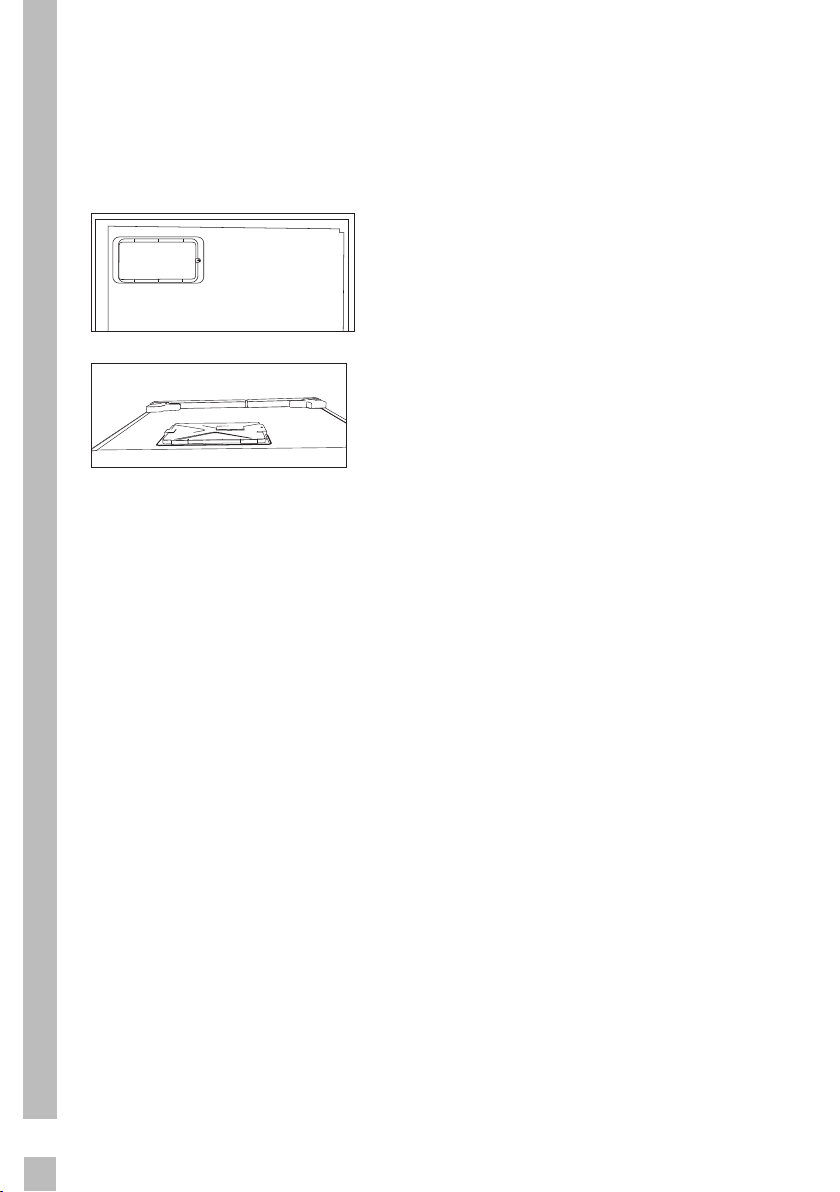
3.2 Installing the
plastic wedges
Plastic wedges supplied with the
product are used to create the
distance for the air circulation
between the product and the rear
wall.
1. To install the wedges, remove the
screws on the product and use the
screws supplied together with the
wedges.
2. Insert the 2 plastic wedges onto
the rear ventilation cover as
illustrated in the figure.
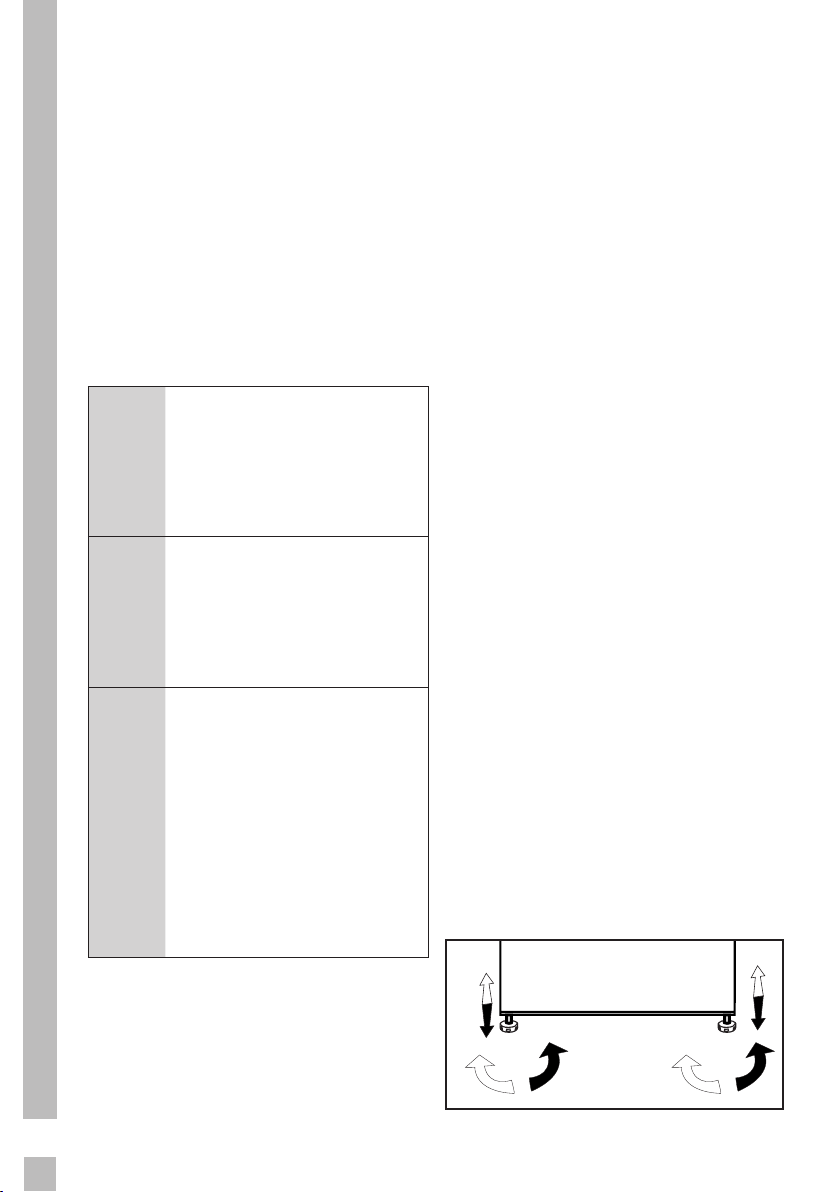
3.3 Adjusting the feet
If the product stands unbalanced
after installation, adjust the feet
on the front by rotating them to the
right or left.
• Placetheproductonanevenfloor
surface to prevent jolts.
• Installtheproductatleast30cm
away from heat sources such as
hobs, heater cores and stoves and
at least 5 cm away from electrical
8
ovens.
Page 11
3.4 Electrical connection
WARNING:Do not make
A
B
C
• Our company shall not be
• Power cable plug must be within
• Do not extension cords or
connections via extension
cables or multi-plugs.
WARNING: Damaged
power cable must
be replaced by the
Authorized Service Agent.
If two coolers are to be
installed side by side,
there should be at least
4 cm distance between
them.
liable for any damages that will
arise when the product is used
without grounding and electrical
connection in accordance with
the national regulations.
easy reach after installation.
cordless multiple outlets
between your product and the
wall outlet.
Hot Surface Warning!
Side walls of your product
is equipped with refrigerant
pipes to improve the cooling
system. Refrigerant with
high temperatures may
flow through these areas,
C
resulting in hot surfaces
on the side walls. This is
normal and does not need
any servicing. Please pay
attention while touching
these areas.
DE
9
Page 12
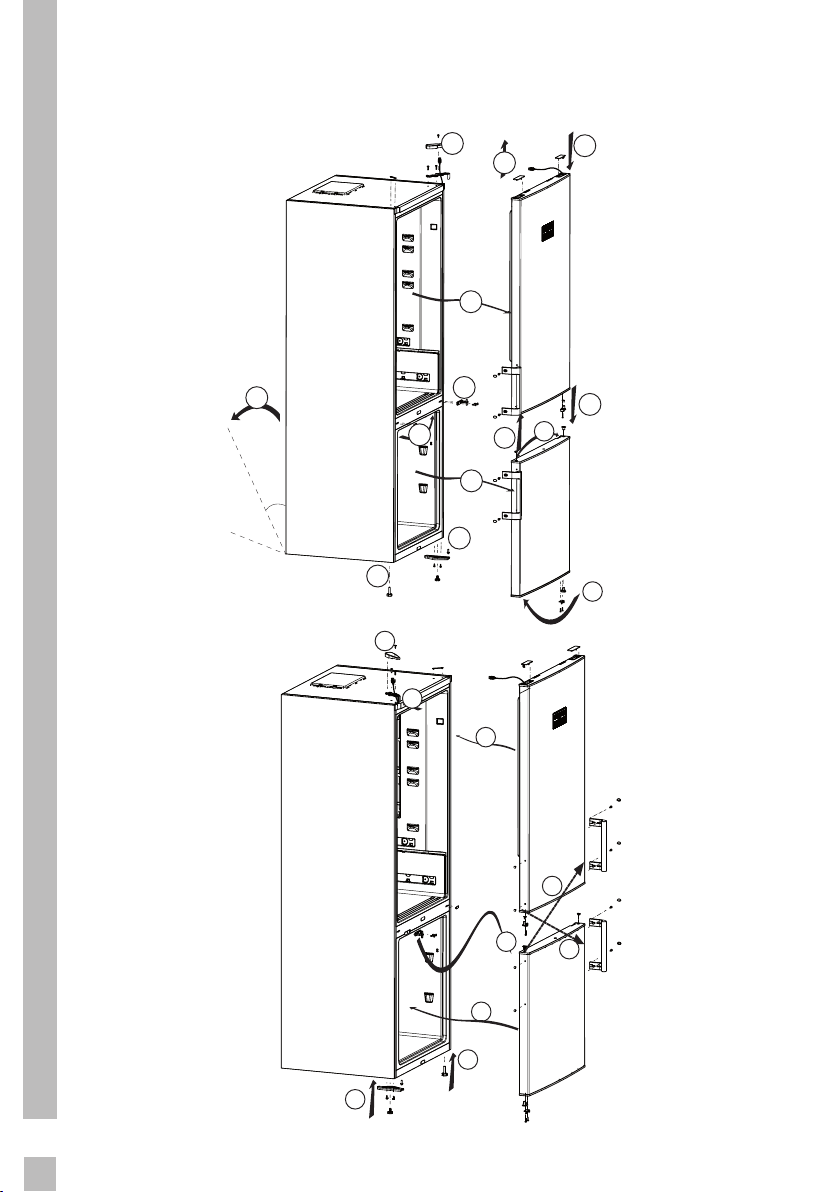
3.5 Reversing the doors
Proceed in numerical order .
1
9
3
9
6
45
7
21
2
5
16
11
4
8
19
18
10
12
13
20
20
10
17
15
14
Page 13
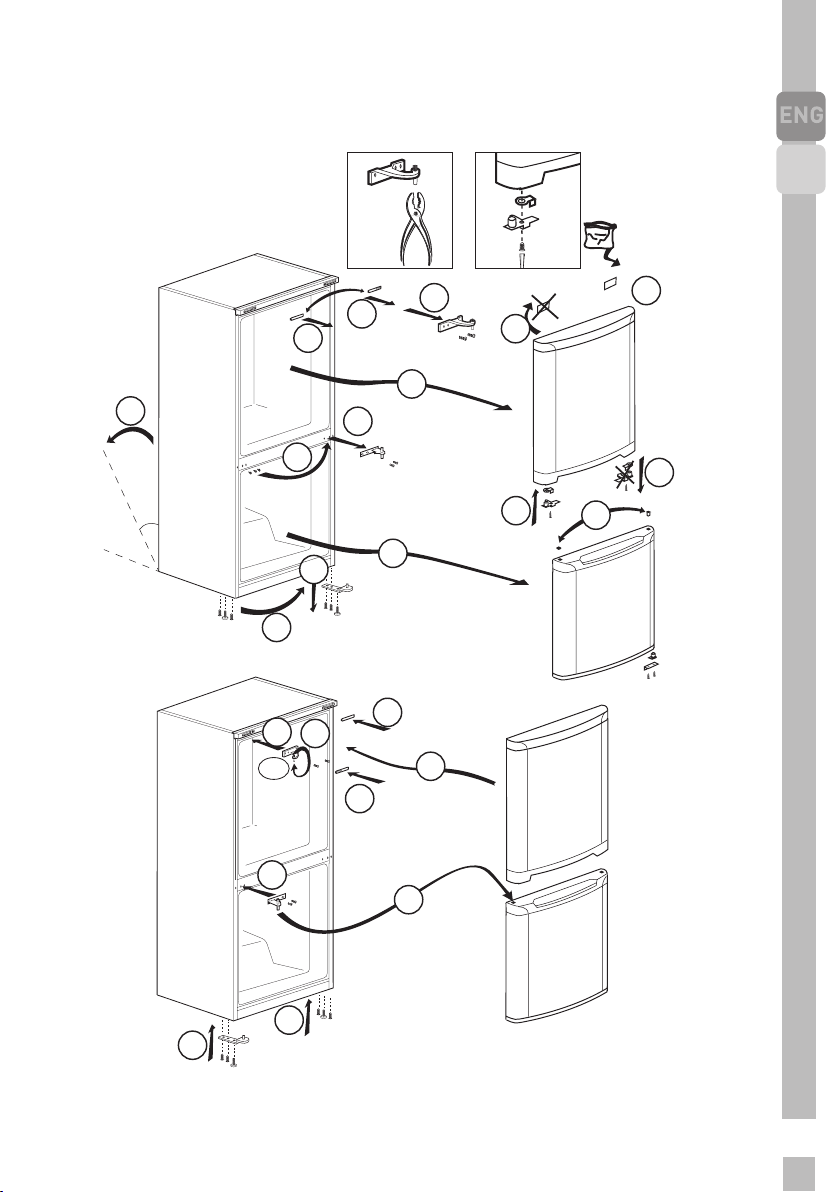
3.6 Reversing the doors
Proceed in numerical order .
(8) (13)
DE
1
1
1
7
20
6
2
14
45 °
5
11
13
9
4
3
10
20
12
8
180°
15
20
19
16
18
17
11
Page 14
4 Preparation
4.1 Things to be done for
energy saving
Connecting the product to
electronic energy-saving
A
systems is harmful, as it
may damage the product.
• Do not keep the refrigerator
doors open for long periods.
• Do not place hot food or
beverages into the refrigerator.
• Do not overfill the refrigerator;
blocking the internal air flow
will reduce cooling capacity.
• In order to store the maximum
amount of food into the
cooler compartment of your
refrigerator, you should take
out the upper drawers and
place it onto the glass rack. The
declared energy consumption
of your refrigerator was
determined by taking out the
cooler, ice tray and upper
drawers in a way that will
enable maximum storage. Using
the below drawer when storing
is strongly recommended.
Energy saving function should
be activated for best energy
consumption.
• You should not block the airflow
by putting food in front of the
cooler fan. A space of minimum
3cm must be left in front of the
protective fan wire when placing
food.
• Depending on the product’s
features; defrosting frozen foods
in the cooler compartment
will ensure energy saving and
preserve food quality.
12
• Food should be stored using
the drawers in the cooler
compartment in order to ensure
energy saving and protect food
in better conditions.
• Food packages should not be
in direct contact with the heat
sensor located in the cooler
compartment. If they are in
contact with the sensor, energy
consumption of the appliance
might increase.
• Make sure the foods are not
in contact with the cooler
compartment temperature
sensor described below.
Page 15

4.2 Initial use
Before using your refrigerator,
make sure the necessary
preparations are made in line with
the instructions in “Safety and
environment instructions” and
“Installation” sections.
• Keep the product running with
no food inside for 6 and do not
open the door, unless absolutely
necessary.
A sound will be heard
C
when the compressor is
engaged. It is normal to
hear sound even when the
compressor is inactive,
due to the compressed
liquids and gasses in the
cooling system.
C
C
Front edges of the
product might heat up.
This is normal. These
areas are designed to
warm up in order to
prevent condensation.
In some models indicator
panel turns off automatically
5 minutes after the door
closes. It will be reactivated
when the door is open or any
button is pressed.
DE
13
Page 16
5 Operating the product
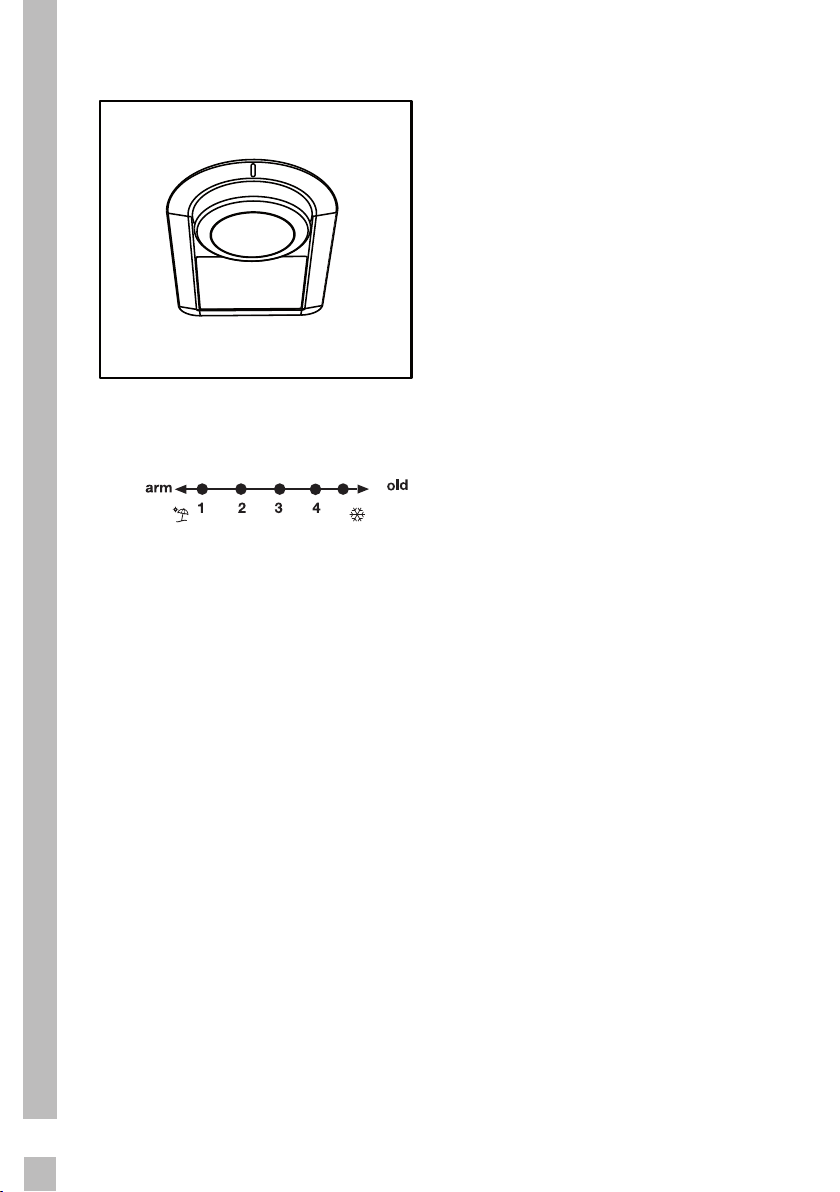
5.1 Temperature setting button
The interior temperature of your
refrigerator changes for the following
reasons;
• Seasonal temperatures,
• Frequent opening of the door
and leaving the door open for
long periods,
• Food put into the refrigerator
without cooling down to the
room temperature,
• The location of the refrigerator
in the room (e.g. exposing to
sunlight).
• You may adjust the varying
interior temperature due to
such reasons by using the
setting button.
• The numbers around the control
knob indicate the temperature
values in “°C”.
• If the ambient temperature is
25°C, we recommend you to
use the temperature control
knob of your refrigerator at 4°C.
This value may be increased or
decreased as required in other
ambient temperatures.
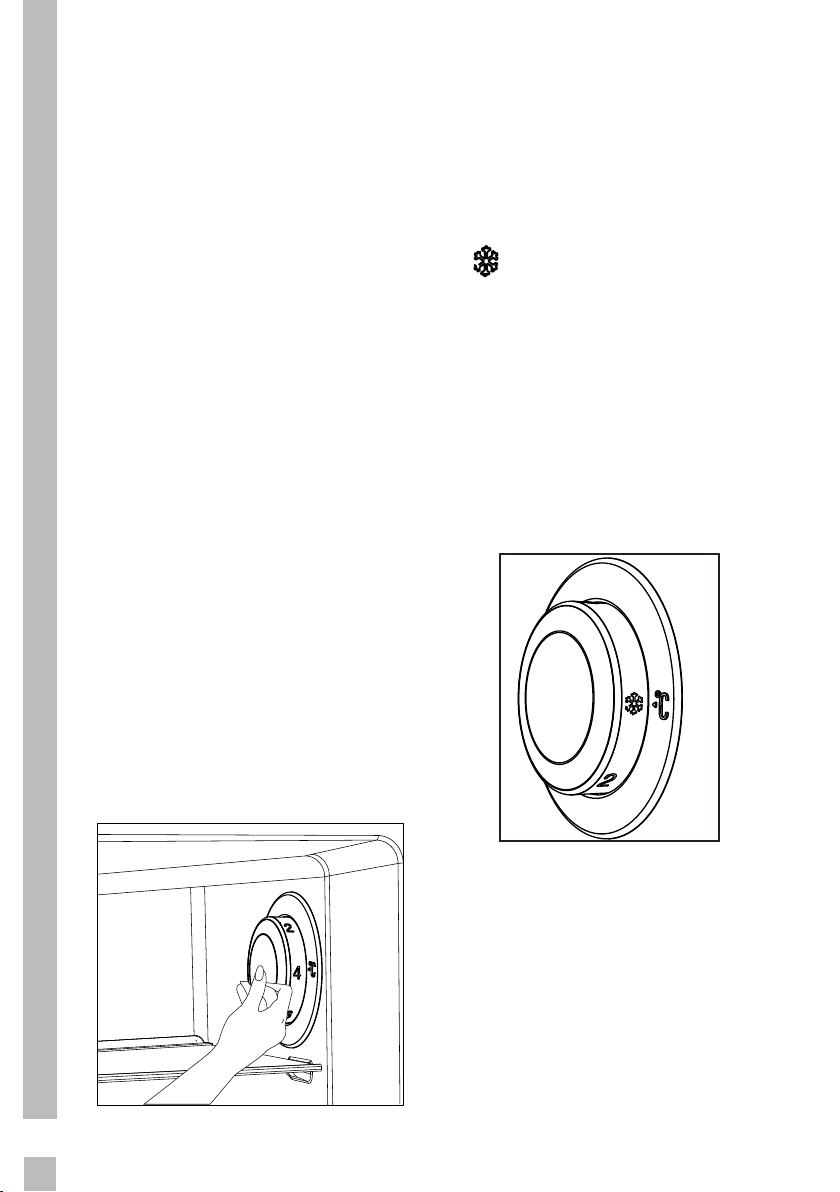
5.2 Fast freeze
If large amounts of fresh food
are going to be frozen, adjust the
temperature control knob to
(
) max. 24 hours before putting
the fresh food in the fast freeze
compartment.
It is strongly recommended to
keep the knob at this position at least
24 hours to freeze maximum amount
of fresh food declared as freezing
capacity. Take special care not to mix
frozen food and fresh food.
Remember to turn the temperature
control knob back to its previous
position once food has frozen.
14
May not be available in all models
Page 17
5.3 Vacation function
If the doors of the product are
not opened for 12 hours after the
temperature control knob is switched
to the hottest position, then the
vacation function will be activated
automatically.
To cancel the function, change the
knob setting.
It is not recommended to store food
in cooler compartment when the
vacation function is active.
• When the setting operation is
completed, you may press the
temperature control knob and
have it hidden.
DE
15
Page 18
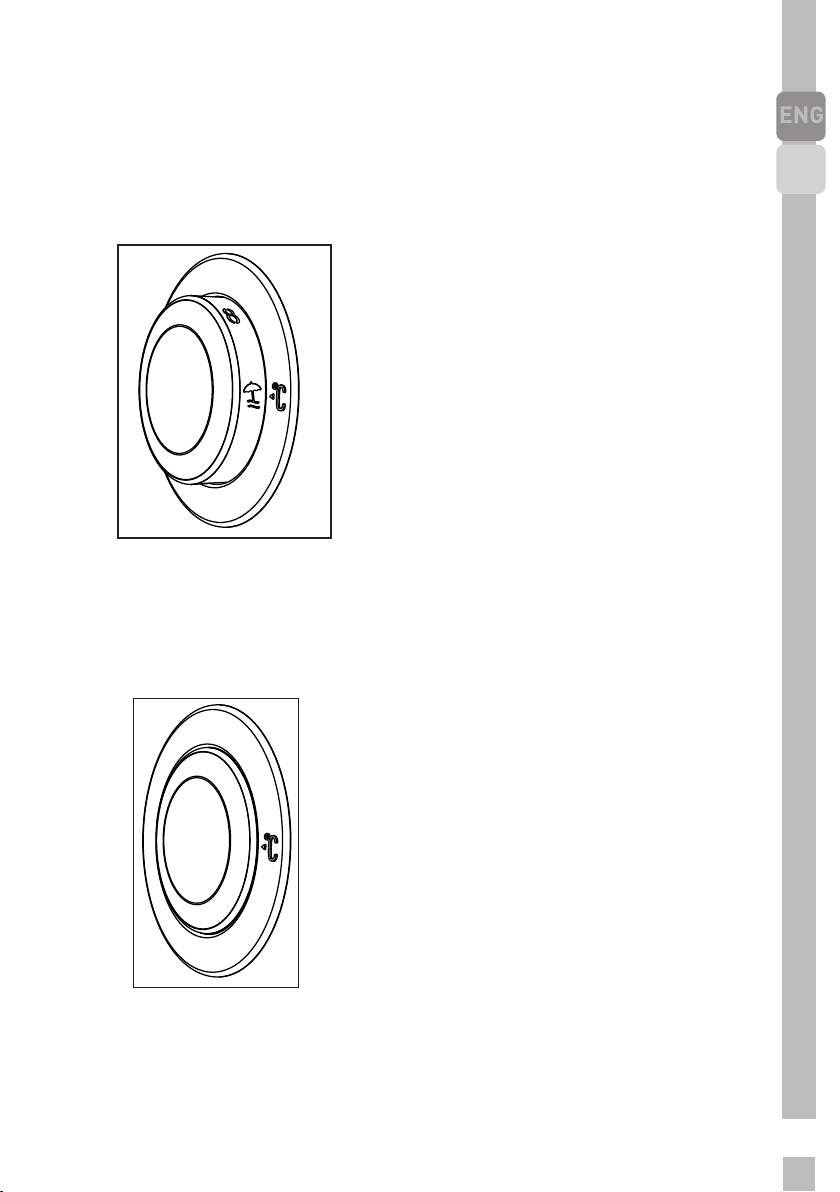
5.4 Thermostat setting button
The operating temperature is
regulated by the temperature
control.
W
1=Lowest cooling setting (Warmest
setting).
4=Highest cooling setting (Coldest
setting).
The average temperature inside the
fridge should be around +5°C.
Please choose the setting according
to the desired temperature.
Please note that there will be
different temperatures in the cooling
area.
The coldest region is immediately
above the vegetable compartment.
The interior temperature also
depends on ambient temperature,
the frequency with which the door is
opened and the amount of foods kept
inside.
Frequently opening the door causes
the interior temperature to rise.
C
5
For this reason, it is recommended
to close the door again as soon as
possible after use.
5.5 Thermostat setting button
The interior temperature of your
refrigerator changes for the following
reasons;
Seasonal temperatures,
Frequent opening of the door and
leaving the door open for long
periods,
Food put into the refrigerator
without cooling down to the room
temperature,
The location of the refrigerator
in the room (e.g. exposing to
sunlight).
You may adjust the varying interior
temperature due to such reasons
by using the thermostat. Numbers
around the thermostat button
indicates the cooling degrees.
If the ambient temperature
is higher than 32°C, turn the
thermostat button to maximum
position.
If the ambient temperature
is lower than 25°C, turn the
thermostat button to minimum
position.
16
May not be available in all models
Page 19
5.6 Defrost
Fridge compartment
Fridge compartment performs fullautomatic defrosting. Water drops
and a frosting up to 7-8 mm can occur
on the inner rear wall of the fridge
compartment while your refrigerator
cools down. Such formation is normal
as a result of the cooling system.
The frost formation is defrosted by
performing automatic defrosting
with certain intervals thanks to the
automatic defrosting system of the
rear wall. User is not required to
scrape the frost or remove the water
drops.
Water resulting from the defrosting
passes from the water collection
groove and flows into the evaporator
through the drain pipe and evaporates
here by itself.
Deep freezer compartment does
not perform automatic defrosting
in order to prevent decaying of the
frozen food.
The freezer compartment defrosts
automatically.
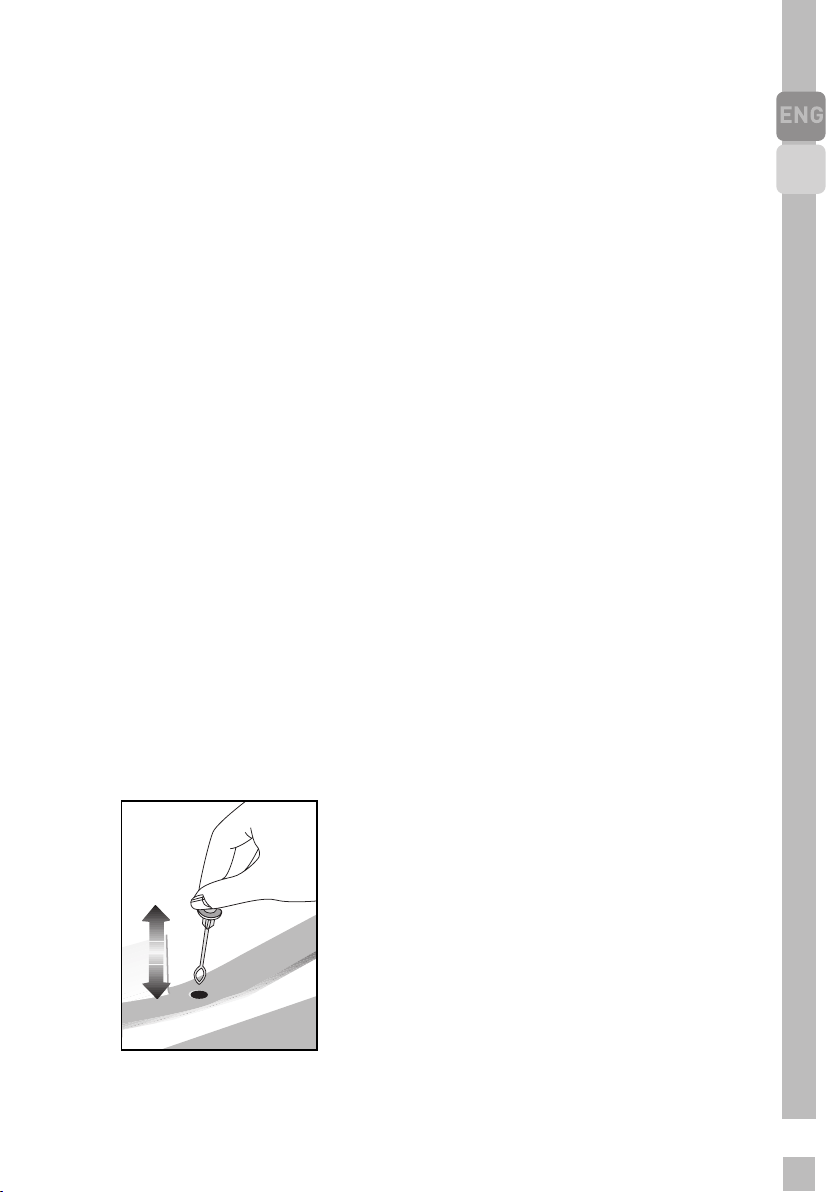
Check regularly to see if the drain
pipe is clogged or not and clear it with
the stick in the hole when necessary.
DE
17
Page 20
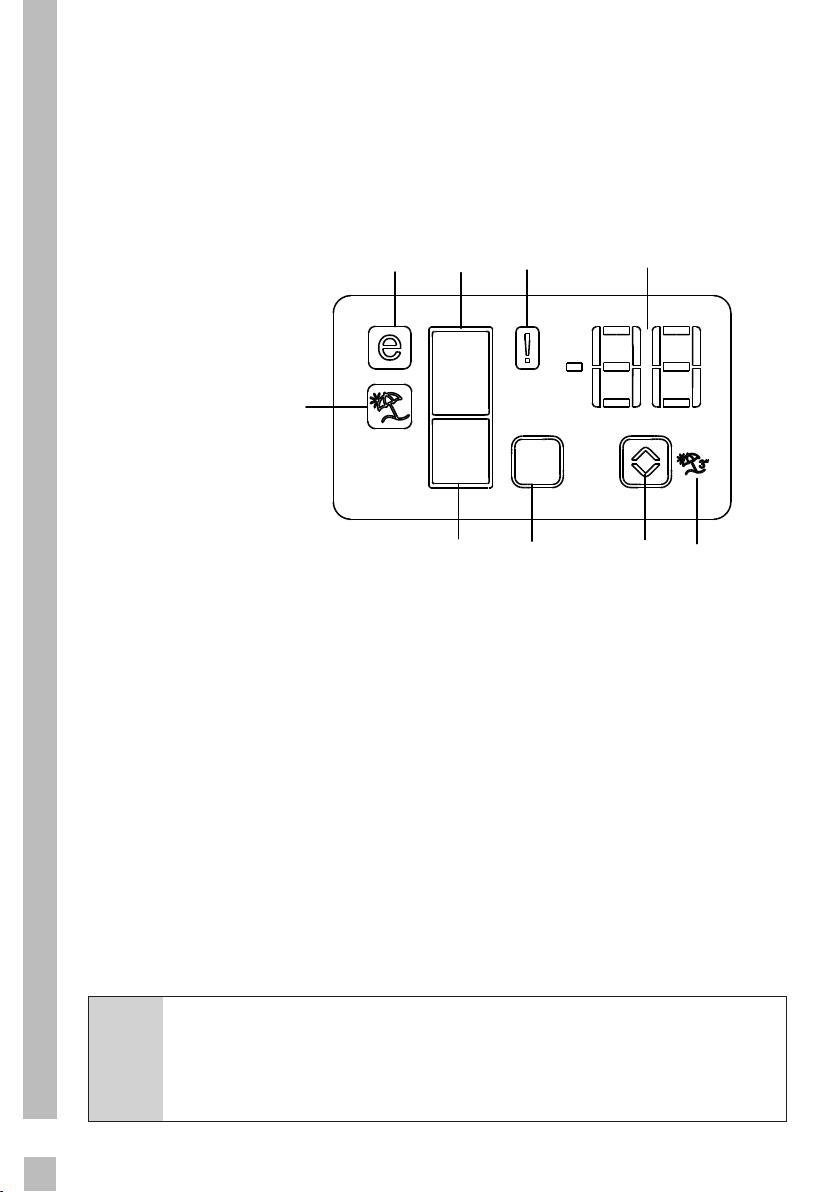
5.7 Indicator panel
Indicator panels may vary according to the product model.
Audio – visual functions on the indicator panel helps you in using your
product.
8
9
1. Fridge Compartment Indicator
2. Error status indicator
3. Temperature indicator
4. Vacation function button
5. Temperature setting button
6. Compartment selection button
7. Freezer compartment indicator
8. Economy mode indicator
9. Vacation function indicator
*optional
1
7
2
6
3
45
18
C
May not be available in all models
Figures in this user manual are schematic and may not match
the product exactly. If the subject parts are not included in the
product you have purchased, then those parts are valid for other
models.
Page 21

1. Fridge compartment indicator
Fridge compartment light
is illuminated while the fridge
compartment temperature is set.
2. Error status indicator
If your refrigerator does not perform
enough cooling or in case of a sensor
fault, this indicator is activated.
When this indicator is activated,
“E” is displayed on the freezer
compartment temperature indicator,
and numbers such as “1,2,3...” are
displayed on the fridge compartment
temperature indicator. These
numbers on the indicator inform
service personnel about the error.
3. Temperature indicator
Indicates freezer, fridge
compartment temperature.
4. Vacation function button
Press on Vacation Button for 3
seconds to activate this function.
When the vacation function is
activated, “- -” is displayed on the
fridge compartment temperature
indicator and no active cooling
is performed on the fridge
compartment. It is not suitable
to keep the food in the fridge
compartment when this function is
activated. Other compartments shall
be continued to be cooled as per their
set temperature.
To cancel this function press
Vacation button again.
5. Temperature setting button
Changes the temperature of the
relevant compartment between
-24°C... -18°C and 8°C...1°C.
6. Compartment selection button
Selection button: Press
compartment selection button to
switch between fridge and freezer
compartments.
7. Freezer compartment indicator
Fridge compartment light is
illuminated while the freezer
compartment temperature is set.
8. Economy mode indicator
Indicates that the refrigerator
operates in energy saving mode.
This display shall be activated if the
freezer compartment temperature is
set to -18°C.
9. Vacation function indicator
Indicates that vacation is activated.
DE
19
Page 22
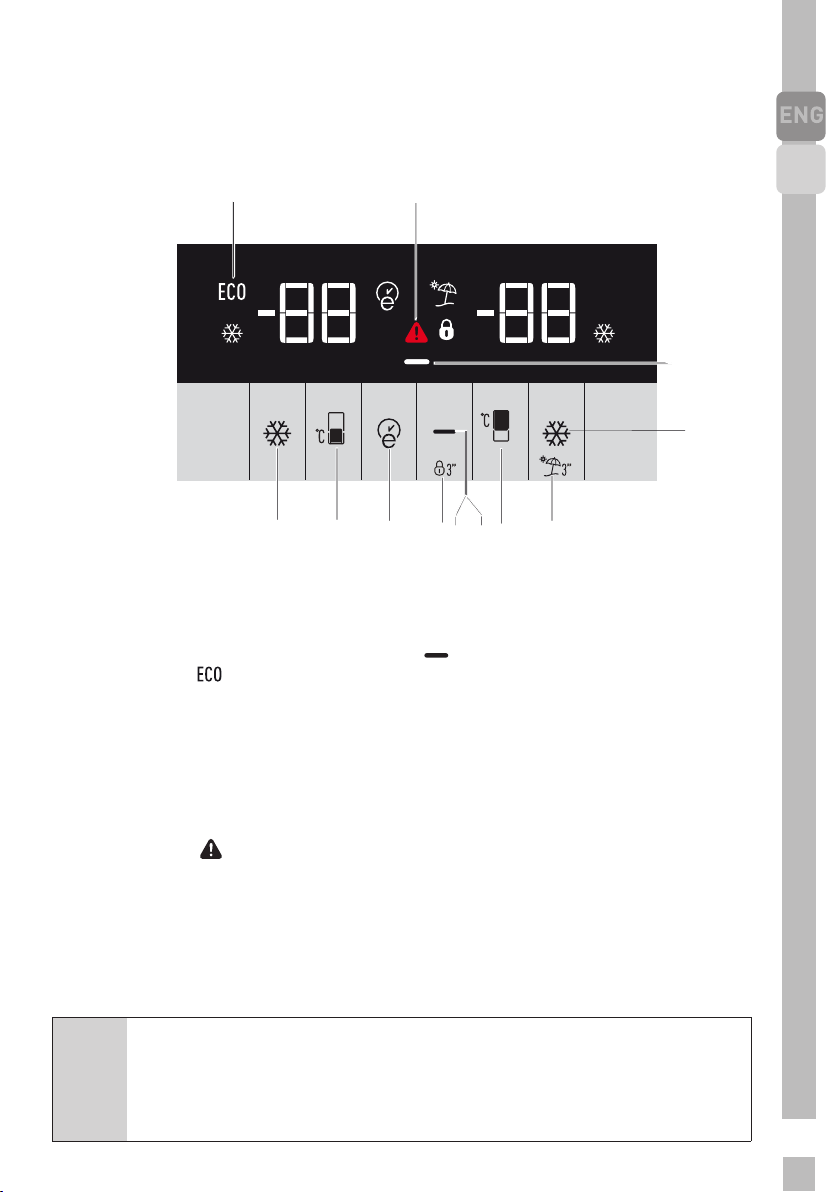
5.8 Indicator panel
Indicator panel allows you to set the temperature and control the other
functions related to the product without opening the door of the product.
Just press the inscriptions on relevant buttons for function settings.
1 2
12
20
*10
11
1. Power failure/High
temperature / error warning
indicator
This indicator ( ) illuminates during
power failure, high temperature
failures and error warnings. During
sustained power failures, the
highest temperature that the freezer
compartment reaches will flash on
the digital display. After checking
the food located in the freezer
compartment (
button to clear the warning.
2. Energy saving function (display
off)
If the product doors are kept closed
for a long time energy saving function
is automatically activated and energy
Figures in this user manual are schematic and may not match
the product exactly. If the subject parts are not included in the
product you have purchased, then those parts are valid for other
C
models.
) press the alarm off
May not be available in all models
789
6
saving symbol is illuminated. (
When energy saving function is
activated, all symbols on the display
other than energy saving symbol will
turn off. When the Energy Saving
function is activated, if any button is
pressed or the door is opened, energy
saving function will be canceled and
the symbols on display will return to
normal.
Energy saving function is activated
during delivery from factory and
cannot be canceled.
3.Quick fridge function
The button has two functions. To
activate or deactivate the quick
cool function press it briefly. Quick
Cool indicator will turn off and the
45
3
)
Page 23
product will return to its normal
settings. (
C
C
C
C
4. Fridge compartment
temperature setting button
Press this button to set the
temperature of the fridge
compartment to 8, 7,6, 5,4,3, 2, 8...
respectively. Press this button to set
the fridge compartment temperature
to the desired value. ( )
5.Vacation Function
In order to activate vacation
function, press the this button (
for 3 seconds, and the vacation mode
indicator (
)
Use quick cooling
function when you want
to quickly cool the food
placed in the fridge
compartment. If you want
to cool large amounts of
fresh food, activate this
function before putting
the food into the product.
If you do not cancel it,
quick cooling will cancel
itself automatically after 8
hours or when the fridge
compartment reaches to
the required temperature.
If you press the
quick cooling button
repeatedly with short
intervals, the electronic
circuit protection will
be activated and the
compressor will not start
up immediately.
This function is not
recalled when power
restores after a power
failure.
)
) will be activated. When
the vacation function is activated,
“- -” is displayed on the fridge
compartment temperature indicator
and no active cooling is performed
on the fridge compartment. It is not
suitable to keep the food in the fridge
compartment when this function is
activated. Other compartments shall
be continued to be cooled as per their
set temperature.
To cancel this function press
Vacation function button again.
6. Alarm off warning
In case of power failure/high
temperature alarm, after checking
the food located in the freezer
compartment press the alarm off
button (
7. Key lock
Press key lock button ( )
simultaneously for 3 seconds. Key
lock symbol
( ) will light up and key lock mode
will be activated. Buttons will
not function if the Key lock mode
is active. Press key lock button
simultaneously for 3 seconds again.
Key lock symbol will turn off and the
key lock mode will be exited.
Press the key lock button if
you want to prevent changing of
the temperature setting of the
refrigerator ( ).
8. Eco fuzzy
Press and hold eco fuzzy button for 1
seconds to activate eco fuzzy function.
Refrigerator will start operating in
the most economic mode at least
6 hours later and the economic
usage indicator will turn on when
the function is active (
and hold eco fuzzy function button
for 3 seconds to deactivate eco fuzzy
function.
) to clear the warning.
). Press
DE
21
Page 24

This indicator is illuminated after 6
hours when eco fuzzy is activated.
9. Freezer compartment
temperature setting button
Press this button to set the
temperature of the freezer
compartment to -18,-19,-20,-21,
-22, -23,-24, -18... respectively.
Press this button to set the freezer
compartment temperature to the
desired value.
10. Icematic off indicator
Indicates whether the icematic is on
or off. ( )If On, then the icematic is
not operating. To operate the icematic
again press and hold the On-Off
button for 3 seconds.
C
11. Quick freeze function button/
icematic on-off button
Press this button to activate or
deactivate the quick freezing function.
When you activate the function, the
freezer compartment will be cooled
to a temperature lower than the set
value. ( )
To turn on and off the icematic press
and hold it for 3 seconds.
C
( )
Water flow from water
tank will stop when this
function is selected.
However, ice made
previously can be taken
from the icematic.
Use the quick freeze
function when you want
to quickly freeze the
food placed in fridge
compartment. If you want
to freeze large amounts
of fresh food, activate this
function before putting
the food into the product.
If you do not cancel it,
C
C
12. Economic usage indicator
Indicates that the product is running
in energy-efficient mode. ( )This
indicator will be active if the Freezer
Compartment temperature is set to
-18 or the energy efficient cooling is
being performed due to Eco-Extra
function.
C
Quick Freeze will cancel
itself automatically after 4
hours or when the fridge
compartment reaches to
the required temperature.
This function is not
recalled when power
restores after a power
failure.
Economic usage indicator
is turned off when quick
cooling or quick freeze
functions are selected.
22
Page 25
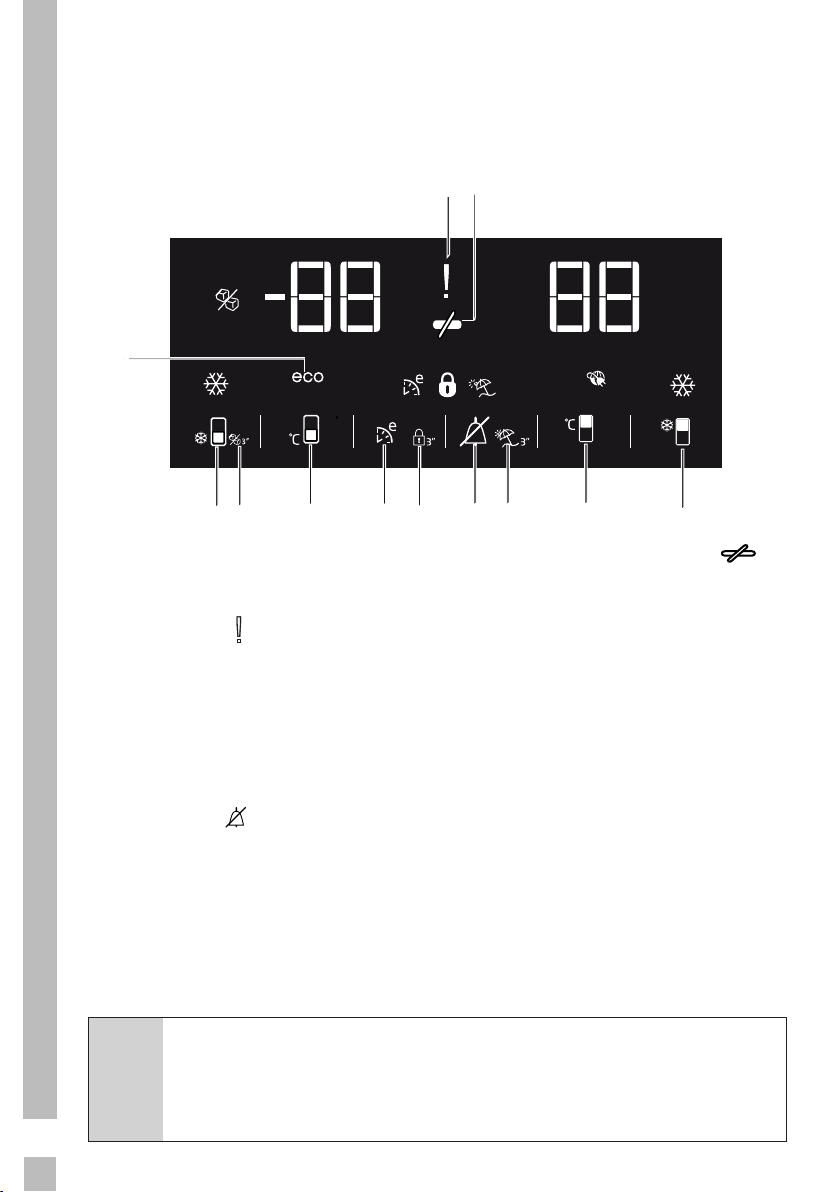
5.9 Indicator panel
Indicator panel allows you to set the temperature and control the other
functions related to the product without opening the door of the product.
Just press the inscriptions on relevant buttons for function settings.
1
11
2
3
4
7.1
7.2
568910
DE
1. Economy
This symbol is illuminated when
the freezer compartment is set to
-18°C’ye as the most economical
setting value (
indicator is turned off when quick
cooling or quick freeze functions
are selected.
2. Power failure/High
temperature / error warning
indicator
This indicator (
during power failure, high
temperature failures and error
warnings. During sustained power
failures, the highest temperature
that the freezer compartment
Figures in this user manual are schematic and may not match
the product exactly. If the subject parts are not included in the
product you have purchased, then those parts are valid for other
C
models.
). Economy
) illuminates
May not be available in all models
reaches will flash on the digital
display. After checking the food
located in the freezer compartment
) press the alarm off button to
(
clear the warning.
3. Energy saving function (display
off)
If the product doors are kept
closed for a long time energy
saving function is automatically
activated and energy saving symbol
is illuminated.When energy saving
function is activated, all symbols
on the display other than energy
saving symbol will turn off. When
the Energy Saving function is
23
Page 26
activated, if any button is pressed
or the door is opened, energy
saving function will be canceled
and the symbols on display will
return to normal.
4. Quick cool
Quick cooling indicator
) is illuminated when quick
(
cooling function is activated and
fridge compartment temperature
indicator value is displayed as
1. To cancel this function press
Quick cooling button again. Quick
cooling indicator will turn off
and refrigerator will return to its
normal settings. Quick cooling
function is canceled automatically
in 1 hour if you do not cancel it
before. If you want to cool large
amounts of fresh food, press
the Quick cooling button before
putting the food into the fridge
compartment.
5. Vacation function
In order to activate vacation
function, press the button no.
(5) (
vacation mode indicator activates.
When the vacation function is
activated, “- -” is displayed on the
fridge compartment temperature
indicator and no active cooling
is performed on the fridge
compartment. It is not suitable
to keep the food in the fridge
compartment when this function
is activated. Other compartments
shall be continued to be cooled as
per their set temperature.To cancel
this function press
function button again.
) for 3 seconds, and the
Vacation
6. Fridge compartment temperature setting
When the button no. (6) is pressed,
you may set the temperature of the
fridge compartment to 8,7,6,5,4,3,2
and 1 respectively (
7.1. Energy saving function (display off):
Energy saving symbol (
illuminated and Energy saving
function is activated when you
press this button (
saving function is activated, all
symbols on the display other than
energy saving symbol will turn off.
When the Energy Saving function is
activated, if any button is pressed
or the door is opened, energy
saving function will be canceled
and the symbols on display will
return to normal. Energy saving
symbol is turned off and energy
saving function is deactivated when
you press this button (
7.2.Alarm off warning:
In case of power failure/high
temperature alarm, after checking
the food located in the freezer
compartment press the alarm off
button to clear the warning.
8. Key lock
Press key lock button (
simultaneously for 3 seconds. Key
lock symbol (
key lock mode will be activated.
Buttons will not function if the
Key lock mode is active. Press key
lock button simultaneously for 3
seconds again. Key lock symbol
will turn off and the key lock mode
will be exited.
) will light up and
).
) is
). When energy
) again.
)
24
Page 27
Press the key lock button if
you want to prevent changing of
the temperature setting of the
refrigerator (
9. Eco fuzzy
Press and hold eco fuzzy button
for 1 seconds to activate eco fuzzy
function. Refrigerator will start
operating in the most economic
mode at least 6 hours later and the
economic usage indicator will turn
on when the function is active (
). Press and hold eco fuzzy function
button for 3 seconds to deactivate
eco fuzzy function.
This indicator is illuminated after 6
hours when eco fuzzy is activated.
10. Freezer compartment temperature setting
Temperature setting for freezer
compartment is performed here.
When button no. 9 is pressed,
you may set the temperature of
the freezer compartment to -18,
-19, -20, -21, -22, -23 and -24
respectively.
11. Fast freeze
Press button no. (11) for fast
freeze operation, quick freeze
indicator
) shall be activated.
(
Quick freeze indicator is
illuminated when quick freeze
function is activated and fridge
compartment temperature
indicator is displayed as -27. To
cancel this function press quick
freeze button (
).
) again.
Quick freeze indicator will turn
off and refrigerator will return to
its normal settings. Quick freeze
function is canceled automatically
in 24 hour if you do not cancel it
before. If you want to freeze large
amounts of fresh food, press
the quick freeze button before
putting the food into the freezer
compartment.
DE
25
Page 28

5.10 Ice bucket
(This feature is optional)
• Take the ice bucket from the
freezer compartment.
• Fill the ice bucket with water.
• Place the ice bucket into the
freezer compartment.
• The ice will be ready after
approximately two hours. Take
the ice bucket from the freezer
compartment and bend in
sightly over the holder that you
are going to serve. Ice will easily
pour into the serving holder.
5.12 Fan
Fan was designed to distribute circulate the cold air inside your refrigera-
tor homogeneously. Operating time of
the fan might vary depending the fea-
tures of your product.
While in some products fan only operates with compressor, in others con-
trol system determines the operating
time based on the need for cooling.
5.11 Egg holder
You can put the eggholder on the
door or body rack of your choice. If you
decide to put it on the body rack, it is
recommended to prefer the shelves
.below as they are colder
Do not put the eggholder
into the freezer
A
26
compartment.
5.13 Vegetable bin
(This feature is optional)
• Product’s vegetable bin is
designed to keep vegetables
fresh by preserving humidity.
For this purpose, the overall
cold air circulation is intensified
in the vegetable bin.
5.14 Zero degree compartment
(This feature is optional)
Use this compartment to
keep delicatessen at lower
temperatures or meat products for
immediate consumption.
Zero degree compartment is the
coolest place where foods such
as dairy products, meat, fish and
chicken can be stored in ideal
storage conditions. Vegetables
and/or fruits should not be stored
in this compartment.
Page 29

5.15Moving door rack
(This feature is optional)
Moving door rack can be fixed in 3
different positions.
In order to move the rack, push the
buttons on the side evenly. Rack will
be movable.
Move the rack up or down.
When the rack is in the position that
you want, release the buttons. Rack
will be fixed again in the position
where you have released the buttons.
5.16 Sliding storage box
(This feature is optional)
This accessory has been designed
to increase the usage volume of the
door racks.
Thanks to its ability to move
sideways, it enables you to easily
place long bottle, jar or boxes that you
put in the bottle rack below.
5.17 Moisture controlled
vegetable bin
(This feature is optional)
DE
With moisture control feature,
moisture rates of vegetables and
fruits are kept under control and
ensures a longer freshness period for
foods.
It is recommended to store leafed
vegetables such as lettuce and
spinach and similar vegetables prone
to moisture loss not on their roots
but in horizontal position into the
vegetable bin as much as possible.
When placing the vegetables, place
heavy and hard vegetables at the
bottom and light and soft ones on the
top, taking into account the specific
weights of vegetables.
Do not leave vegetables in the
vegetable bin in plastic bags.
27
Page 30

Leaving them in plastic bags causes
vegetables to rot in a short time. In
situations where contact with other
vegetables is not preferred, use
packaging materials such as paper
that has a certain porosity in terms of
hygiene.
Do not put fruits that have a high
ethylene gas production such as pear,
apricot, peach and particularly apple
in the same vegetable bin with other
vegetables and fruits. The ethylene
gas coming out of these fruits might
cause other vegetables and fruits to
mature faster and rot in a shorter
period of time.
5.18 Automatic ice machine
(This feature is optional)
Automatic ice machine enables you
to easily make ice in your refrigerator.
In order to obtain ice from the ice
machine, take out the water tank in
the cooler compartment, fill it with
water and fix it back.
First ice will be ready in about 2
hours in the ice machine drawer in
the cooler compartment.
After placing the full water tank, you
can obtain about 60-70 cubes of ice
until it is fully empty.
If the water in the tank has waited
for 2-3 weeks, it should be changed.
C
In products with automatic
ice machine, you might hear
a sound when pouring the ice.
This sound is normal and is not
a sign of failure.
28
Page 31

5.19 Icematic and ice
storage container
*optional
Using the Icematic
Fill the Icematic with water and
place it into its seat. Your ice will be
ready approximately in two hours.
Do not remove the Icematic from its
seating to take ice.
Turn the knobs on the ice reservoirs
clockwise by 90 degrees.
Ice cubes in the reservoirs will fall
down into the ice storage container
below.
You may take out the ice storage
container and serve the ice cubes.
If you wish, you may keep the ice
cubes in the ice storage container.
Ice storage container
Ice storage container is only
intended for accumulating the
ice cubes. Do not put water in it.
Otherwise, it will break.
5.20 Using the water dispenser
*optional
It is normal for the first
C
C
1. Push in the lever of the water dis-
2. After filling the cup up to the level
C
few glasses of water taken
from the dispenser to be
warm.
If the water dispenser is
not used for a long period
of time, dispose of first few
glasses of water to obtain
fresh water.
penser with your glass. If you are
using a soft plastic cup, pushing
the lever with your hand will be easier.
you want, release the lever.
Please note, how much
water flows from the
dispenser depends on
how far you depress the
lever. As the level of water
in your cup / glass rises,
gently reduce the amount
of pressure on the lever
to avoid overflow. If you
slightly press the arm, the
water will drip; this is quite
normal and not a failure.
DE
29
Page 32

5.21 Filling the water
dispenser's tank
Water tank filling reservoir is
located inside the door rack.
1. Open the cover of the tank.
2. Fill the tank with fresh drinking
water.
3. Close the cover.
Do not fill the water
C
C
tank with any other liquid
except for water such as
fruit juices, carbonated
beverages or alcoholic
drinks which are not
suitable to use in the water
dispenser. Water dispenser
will be irreparably damaged
if these kinds of liquids are
used. Warranty does not
cover such usages. Some
chemical substances and
additives contained in these
kinds of drinks/liquids may
damage the water tank.
Use clean drinking water
only.
5.22 Cleaning the water tank
1. Remove the water filling reservoir
inside the door rack.
2. Remove the door rack by holding
from both sides.
3. Grab the water tank from both sides and remove it with an angle of
45°C.
30
C
Capacity of the water tank
is 3 litres; do not overfill.
Page 33

4. Remove the cover of the water tank
and clean the tank.
Components of the water
C
tank and water dispenser
should not be washed in
dishwasher.
DE
5.23 Drip tray
Water that dripped while using the
water dispenser accumulates in the
spillage tray.
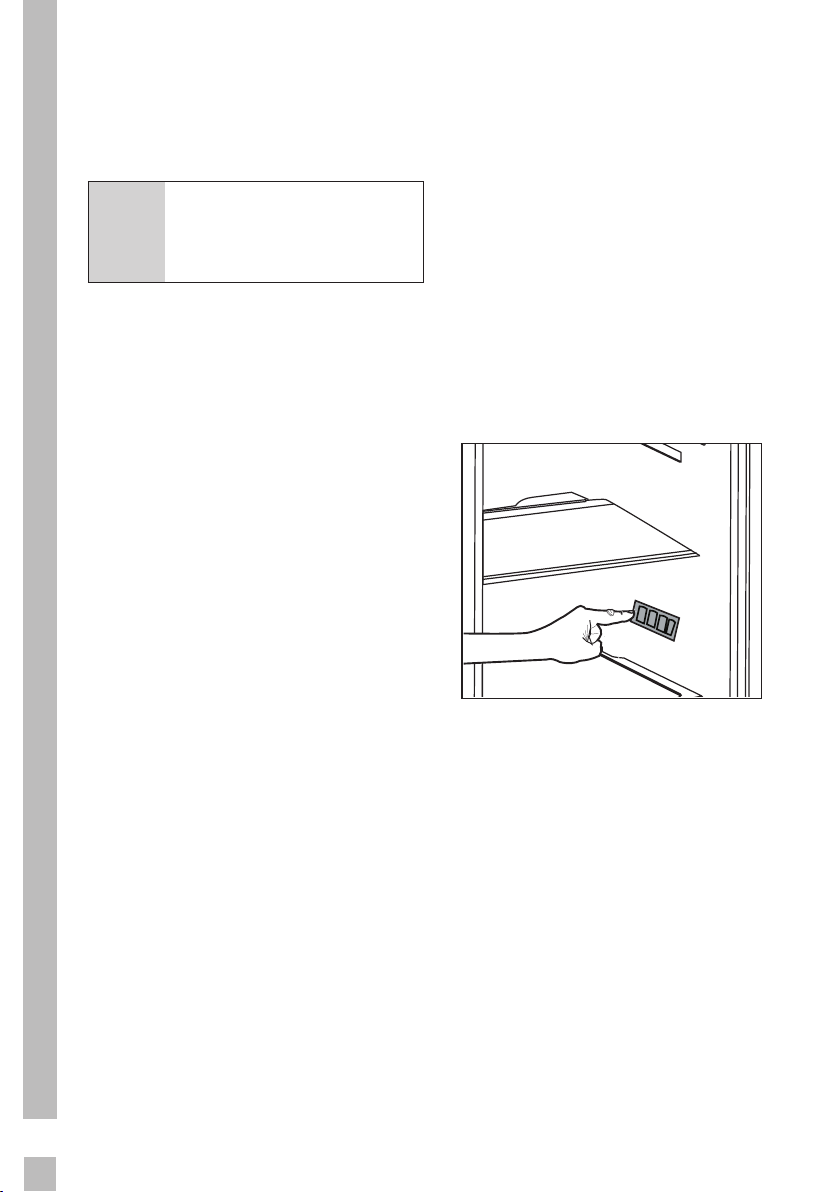
Remove the plastic filter as shown
in the figure.
With a clean and dry cloth, remove
the water that has accumulated.
31
Page 34

5.24 HerbBox/HerbFresh
Remove the film container from
HerbBox/HerbFresh+
Take the film out of the bag and put
it into the film container as shown in
the image.
Seal the container again and replace
it into HerbBox/HerbFresh+ unit.
HerbBox-HerbFresh+ sections are
especially ideal for storage of various
herbs that are supposed to be kept in
delicate conditions. You can store your
unbagged herbs (parsley, dill, etc.)
in this section horizontally and keep
them fresh for a much longer period.
The film shall be replaced in every
six months.
32
Page 35

5.25Freezing fresh food
In order to preserve the quality
•
of the food, it shall be frozen
as quickly as possible when
it is placed in the freezer
compartment, use the fast
freezing feature for this
purpose.
• You may store the food longer
in freezer compartment when
you freeze them while they are
fresh.
• Pack the food to be frozen and
close the packing so that it
would not allow entrance of air.
• Ensure that you pack your food
before putting them in the
freezer. Use freezer containers,
foils and moisture-proof papers,
plastic bags and other packing
materials instead of traditional
packing papers.
• Label each pack of food by
adding the date before freezing.
You may distinguish the
freshness of each food pack in
this way when you open your
freezer each time. Store the
food frozen before in the front
side of compartment to ensure
that they are used first.
The freezer compartment
defrosts automatically.
C
• Frozen food must be used
immediately after they are
thawed and they should not be
re-frozen.
• Do not freeze too large
quantities of food at one time.
DE
33
Page 36

Freezer
Compartment
Setting
-18°C 4°C This is the normal recommended setting.
-20,-22 or -24°C 4°C
Quick Freeze 4°C
-18°C or colder 2°C
Fridge
compartment
Setting
Remarks
These settings are recommended when the
ambient temperature exceeds 30°C.
Use when you wish to freeze your food in a short
time. Your product will return to its previous
mode when the process is over.
Use these settings if you think that your fridge
compartment is not cold enough because of the
hot ambient conditions or frequent opening and
closing of the door.
5.26 Recommendations for
preserving the frozen food
Compartment shall be set to -18°C at
least.
1. Put packages in the freezer
as quickly as possible after
purchase without allowing
the to thaw.
2. Check whether the “Use
By” and “Best Before” dates on the packaging are
expired or not before freezing it.
3. Ensure that the package of
the food is not damaged.
5.27 Deep-freeze information
According to IEC 62552 standards,
the product shall freeze at least
4.5 kg of food at 25°C ambient
temperature to -18°C or lower
within 24 hours for every 100-litres
of freezer volume.
It is possible to preserve the food
for a long time only at -18°C or
lower temperatures.
You can keep the freshness of
food for many months (at -18°C or
lower temperatures in the deep
freeze).
Foods to be frozen should not be
allowed to come in contact with the
previously frozen items to prevent
them from getting thawed partially.
Boil the vegetables and drain their
water in order to store vegetables
for a longer time as frozen. After
draining their water, put them
in air-proof packages and place
them inside the freezer. Food such
as bananas, tomatoes, lettuce,
celery, boiled eggs, potatoes are
not suitable for freezing. When
these foods are frozen, only their
nutritional value and taste shall
be affected negatively. They shall
not be spoiled so that they would
create a risk for human health.
5.28 Placing the food
Various frozen
Freezer
compartment
shelves
food such as
meat, fish,
ice cream,
vegetables and
etc.
34
Page 37

Food in pans,
Refrigerator
compartment
shelves
covered plates
and closed
containers,
eggs (in closed
container)
Door shelves
of fridge
compartment
Crisper
Small and
packaged food
or beverage
Vegetables and
fruits
Delicatessen
(breakfast food,
Fresh zone
compartment
meat products
that shall be
consumed in a
short time)
5.29 Door open warning
(This feature is optional)
Door open warning is given to user
both visually and acoustically. If the
warning continues for 10 minutes,
interior lights will be turned off.
5.30 Illumination lamp
LED lamps are used as
illumination lamps. Contact
authorized service in case of any
problem with this type of light.
The lamp(s) used in this appliance
is not suitable for household room
illumination. The intended purpose
of this lamp is to assist the user to
place foodstuffs in the refrigerator/
freezer in a safe and comfortable
way.
DE
35
Page 38

6. Maintenance and cleaning
Service life of the product extends
and frequently faced problems
decrease if cleaned at regular
intervals.
WARNING: Unplug the
B
product before cleaning it.
• Never use gasoline, benzene or
similar substances for cleaning
purposes.
• Never use any sharp and
abrasive tools, soap, household
cleaners, detergent and wax
polish for cleaning.
• Dissolve one teaspoon of
carbonate in half litre of water.
Soak a cloth with the solution
and wrung it thoroughly. Wipe
the interior of the refrigerator
with this cloth and the dry
thoroughly.
• Make sure that no water enters
the lamp housing and other
electrical items.
• If you will not use the
refrigerator for a long period of
time, unplug it, remove all food
inside, clean it and leave the
door ajar.
• Check regularly that the door
gaskets are clean. If not, clean
them.
• To remove door and body
shelves, remove all of its
contents.
• Remove the door shelves by
pulling them up. After cleaning,
slide them from top to bottom to
install.
• Never use cleaning agents or
water that contain chlorine to
clean the outer surfaces and
chromium coated parts of
the product. Chlorine causes
corrosion on such metal
surfaces
• Do not use sharp, abrasive
tools, soap, household cleaning
agents, detergents, kerosene,
fuel oil, varnish etc. to prevent
removal and deformation of the
prints on the plastic part. Use
lukewarm water and a soft cloth
for cleaning and then wipe it dry.
6.1 Avoiding bad odours
Materials that may cause odour
are not used in the production of
our refrigerators. However, due
to inappropriate food preserving
conditions and not cleaning the
inner surface of the refrigerator
as required can bring forth the
problem of odour. Pay attention to
following to avoid this problem:
• Keeping the refrigerator clean
is important. Food residuals,
stains, etc. can cause odour.
Therefore, clean the refrigerator
with carbonate dissolved in
water every 15 days.Never use
detergents or soap.
• Keep the food in closed
containers.Microorganisms
spreading out from uncovered
containers can cause
unpleasant odours.
• Never keep the food that have
expired best before dates and
spoiled in the refrigerator.
36
Page 39

6.2 Protecting the
plastic surfaces
Do not put liquid oils or oilcooked meals in your refrigerator
in unsealed containers as they
damage the plastic surfaces of
the refrigerator. If oil is spilled or
smeared onto the plastic surfaces,
clean and rinse the relevant part
of the surface at once with warm
water.
6.3 Door Glasses
Remove the protective foil on the
glasses.
There is a coating on the surface of
the glasses.This coating minimizes
the stain build-up and helps to
remove the possible stains and dirt
easily.Glasses that are not protected
with such a coating may be subject
to persistent binding of air or water
based organic or inorganic dirt such
as limescale, mineral salts, unburned
hydrocarbons, metal oxides and
silicones that can easily and quickly
cause stains or material damage.
Keeping the glass clean becomes too
difficult despite the regular cleaning.
Consequently, the appearance
and the transparency of the glass
deteriorates. Harsh and corrosive
cleaning methods and compounds will
intensify these defects and speed up
the deterioration process.
Water-based cleaning products that
are not alkaline and corrosive must be
used for regular cleaning purposes.
Non-alkaline and non-corrosive
materials must be used for cleaning
so that the service life of this coating
lasts for a long time.
These glasses are tempered to
increase their durability against
impacts and breaking.
A safety film is also applied to
their rear surfaces as an extra
safety measure in order to prevent
them from causing damage to their
surrounding in case of a breakage.
*Alkali is a base that forms
hydroxide ions (OH¯) when it is
dissolved in water.
Li (Lithium), Na (Sodium), K
(Potassium) Rb (Rubidium), Cs
(Cesium) and artificial and radioactive
Fr (Fan-sium) metals are called
ALKALI METALS.
DE
37
Page 40

7. Troubleshooting
Check this list before contacting
the service. Doing so will save you
time and money. This list includes
frequent complaints that are not
related to faulty workmanship
or materials. Certain features
mentioned herein may not apply to
your product.
The refrigerator is not working.
• The power plug is not fully
settled. >>> Plug it in to settle
completely into the socket.
• The fuse connected to the
socket powering the product
or the main fuse is blown. >>>
Check the fuses.
Condensation on the side wall of
the cooler compartment (MULTI
ZONE, COOL, CONTROL and FLEXI
ZONE).
• The door is opened too
frequently >>> Take care not
to open the product’s door too
frequently.
• The environment is too humid.
>>> Do not install the product in
humid environments.
• Foods containing liquids are
kept in unsealed holders. >>>
Keep the foods containing
liquids in sealed holders.
• The product’s door is left open.
>>> Do not keep the product’s
door open for long periods.
• The thermostat is set to too
low temperature. >>> Set the
thermostat to appropriate
temperature.
Compressor is not working.
• In case of sudden power failure
or pulling the power plug
off and putting back on, the
gas pressure in the product’s
38
cooling system is not balanced,
which triggers the compressor
thermic safeguard. The product
will restart after approximately 6
minutes. If the product does not
restart after this period, contact
the service.
• Defrosting is active. >>>
This is normal for a fullyautomatic defrosting product.
The defrosting is carried out
periodically.
• The product is not plugged in.
>>> Make sure the power cord is
plugged in.
• The temperature setting
is incorrect. >>> Select the
appropriate temperature
setting.
• The power is out. >>> The
product will continue to operate
normally once the power is
restored.
The refrigerator’s operating noise
is increasing while in use.
• The product’s operating
performance may vary
depending on the ambient
temperature variations. This is
normal and not a malfunction.
The refrigerator runs too often or
for too long.
• The new product may be larger
than the previous one. Larger
products will run for longer
periods.
• The room temperature may
be high. >>> The product will
normally run for long periods in
higher room temperature.
• The product may have been
recently plugged in or a new
food item is placed inside. >>>
The product will take longer to
reach the set temperature when
Page 41

recently plugged in or a new
food item is placed inside. This
is normal.
• Large quantities of hot food may
have been recently placed into
the product. >>> Do not place
hot food into the product.
• The doors were opened
frequently or kept open for
long periods. >>> The warm air
moving inside will cause the
product to run longer. Do not
open the doors too frequently.
• The freezer or cooler door may
be ajar. >>> Check that the
doors are fully closed.
• The product may be set to
temperature too low. >>> Set the
temperature to a higher degree
and wait for the product to reach
the adjusted temperature.
• The cooler or freezer door
washer may be dirty, worn out,
broken or not properly settled.
>>> Clean or replace the washer.
Damaged / torn door washer
will cause the product to run for
longer periods to preserve the
current temperature.
The freezer temperature is very
low, but the cooler temperature is
adequate.
• The freezer compartment
temperature is set to a very
low degree. >>> Set the freezer
compartment temperature to a
higher degree and check again.
The cooler temperature is very
low, but the freezer temperature
is adequate.
• The cooler compartment
temperature is set to a very
low degree. >>> Set the freezer
compartment temperature to a
higher degree and check again.
The food items kept in cooler
compartment drawers are frozen.
• The cooler compartment
temperature is set to a very
low degree. >>> Set the freezer
compartment temperature to a
higher degree and check again.
The temperature in the cooler or
the freezer is too high.
• The cooler compartment
temperature is set to a very high
degree. >>> Temperature setting
of the cooler compartment has
an effect on the temperature in
the freezer compartment. Wait
until the temperature of relevant
parts reach the sufficient level
by changing the temperature of
cooler or freezer compartments.
• The doors were opened
frequently or kept open for long
periods. >>> Do not open the
doors too frequently.
• The door may be ajar. >>> Fully
close the door.
• The product may have been
recently plugged in or a new
food item is placed inside. >>>
This is normal. The product
will take longer to reach the
set temperature when recently
plugged in or a new food item is
placed inside.
• Large quantities of hot food may
have been recently placed into
the product. >>> Do not place
hot food into the product.
Shaking or noise.
• The ground is not level or
durable. >>> If the product is
shaking when moved slowly,
adjust the stands to balance the
product. Also make sure the
ground is sufficiently durable to
bear the product.
DE
39
Page 42

• Any items placed on the product
may cause noise. >>> Remove
any items placed on the product.
The product is making noise of
liquid flowing, spraying etc.
• The product’s operating
principles involve liquid and gas
flows. >>> This is normal and
not a malfunction.
There is sound of wind blowing
coming from the product.
• The product uses a fan for the
cooling process. This is normal
and not a malfunction.
There is condensation on the
product’s internal walls.
• Hot or humid weather will
increase icing and condensation.
This is normal and not a
malfunction.
• The doors were opened
frequently or kept open for long
periods. >>> Do not open the
doors too frequently; if open,
close the door.
• The door may be ajar. >>> Fully
close the door.
There is condensation on the
product’s exterior or between the
doors.
• The ambient weather may be
humid, this is quite normal
in humid weather. >>> The
condensation will dissipate
when the humidity is reduced.
The interior smells bad.
• The product is not cleaned
regularly. >>> Clean the interior
regularly using sponge, warm
water and carbonated water.
• Certain holders and packaging
materials may cause odour.
>>> Use holders and packaging
materials without free of odour.
40
• The foods were placed in
unsealed holders. >>> Keep the
foods in sealed holders. Microorganisms may spread out of
unsealed food items and cause
malodour. Remove any expired
or spoilt foods from the product.
The door is not closing.
• Food packages may be blocking
the door. >>> Relocate any items
blocking the doors.
• The product is not standing
in full upright position on the
ground. >>> Adjust the stands to
balance the product.
• The ground is not level or
durable. >>> Make sure the
ground is level and sufficiently
durable to bear the product.
The vegetable bin is jammed.
• The food items may be in
contact with the upper section of
the drawer. >>> Reorganize the
food items in the drawer.
If The Surface Of The Product Is
Hot.
• High temperatures may be
observed between the two
doors, on the side panels and at
the rear grill while the product
is operating. This is normal
and does not require service
maintenance!Be careful when
touching these areas.
A WARNING:
If the problem persists after
following the instructions in this
section, contact your vendor or an
Authorised Service. Do not try to
repair the product.
Page 43

Inhaltsverzeichnis
1. Hinweise zu Sicherheit und
Umwelt 3
2. Ihr Kühlschrank 8
3. Installation 9
3.1 Der richtige Aufstellungsort ..9
3.2 Kunststoffkeile anbringen
3.3 Füße einstellen
3.4 Stromanschluss
3.5 Türanschlag umkehren
3.6 Türanschlag umkehren
4. Vorbereitung 13
4.1 Maßnahmen zum
Energiesparen
5. Gerät bedienen 15
5.1 Temperatureinstelltaste .......15
5.2 Schnellgefrieren
5.3 Urlaubsfunktion
5.4 Thermostateinstelltaste
5.5 Abtauen
5.6 Anzeigefeld
5.7 Anzeigefeld
5.8 Anzeigefeld
5.9 Eisbehälter
5.10 Eierhalter
5.11 Lüfter
5.12 0-Grad-Fach........................28
5.13 Bewegliche Türablage
5.14 Verschiebbarer
Vorratsbehälter
5.15 Feuchtigkeitskontrolliertes
Gemüsefach
5.16 Automatischer Eisbereiter
5.17 Eisbereiter und Eisbehälter
5.18 Wasserspender
5.19 So benutzen Sie den
Wasserspender
5.20 Wassertank reinigen
.................................18
..................................28
................................29
.....................10
....................10
............................13
..................15
....................16
...........................19
...........................21
...........................25
............................28
............................28
.........................29
................... 31
........................... 31
......9
........ 11
........ 12
.......17
........29
30
30
..........32
5.21 Tropfschale
5.22 HerbBox/HerbFresh
5.23 Frische Lebensmittel
tiefkühlen
5.24 Empfehlungen zur Lagerung
gefrorener Lebensmittel
5.25 Hinweise zum
Tiefkühlbereich
5.26 Lebensmittel einlagern
5.27 Tür-offen-Alarm
5.28 Wechseln des
Türanschlags
5.29 Innenbeleuchtung
6. Reinigung und Wartung 38
6.1 Unangenehme Gerüche
verhindern ..................................38
6.2 Kunststoffflächen pflegen 39
6.3 Türglas
7. Problemlösung 40
....................................34
.........................33
...........33
............35
........................... 35
......36
.................37
..............................37
...............37
.................................39
EN
1
Page 44

Bitte zuerst diese Bedienungsanleitung lesen!
Sehr geehrte Kundin, sehr geehrter Kunde, Danke für die Wahl
eines Grundig-Produktes. Wir hoffen, dass dieses Produkt, das mit
hochwertiger und hochmoderner Technologie hergestellt wurde, beste
Ergebnisse erzielt. Daher bitte die gesamte Bedienungsanleitung
und alle beiliegenden Dokumente aufmerksam durchlesen und zum
zukünftigen Nachschlagen aufbewahren. Bei Weitergabe des Produktes
auch die Bedienungsanleitung mit aushändigen. Alle Warnungen und
Informationen in der Bedienungsanleitung einhalten.
Bitte beachten, dass diese Bedienungsanleitung für unterschiedliche
Modelle geschrieben wurde. Unterschiede zwischen den verschiedenen
Modellen werden natürlich in der Anleitung erwähnt.
Die Symbole
In dieser Bedienungsanleitung verwenden wir folgende Symbole:
Wichtige Informationen
oder nützliche Tipps zum
C
A
Gebrauch.
Warnung vor gefährlichen
Situationen, die eine Gefahr
für Leben und Besitz
darstellen können.
Warnung vor Stromschlägen.
B
Die Verpackungsmaterialien
des Gerätes wurden gemäß nationalen
Umweltschutzbestimmungen
aus recyclingfähigen
Materialien hergestellt.
Verpackungsmaterialien nicht gemeinsam mit dem Haus- oder anderem
Müll entsorgen. Zu den von örtlichen Autoritäten zugewiesenen
Sammelstellen für Verpackungsmaterialien bringen.
2
Page 45

1. Hinweise zu Sicherheit und
Umwelt
Dieser Abschnitt bietet die zur
Vermeidung von Verletzungen und
Materialschäden erforderlichen
Sicherheitsanweisungen.
Bei Nichtbeachtung dieser
Anweisungen erlöschen jegliche
Garantieansprüche.
Bestimmungsgemäßer Einsatz
ACHTUNG:
Stellen Sie
sicher, dass die
Entlüftungsöffnungen
am Aufstellort des
Gerätes nicht blockiert
sind.
ACHTUNG:
Um den Auftauvorgang
zu
beschleunigen, keine
anderen mechanischen
Geräte oder
Geräte verwenden, die
nicht
A
Dieses Gerät ist für die private
Nutzung oder für den Gebrauch
bei folgenden ähnliche
Anwendungen konzipiert worden
vom Hersteller
empfohlen sind.
ACHTUNG:
Dem
Kühlmittelkreislauf
keine Schäden zufügen.
ACHTUNG:
In den
Lebensmittelaufbewahrungsfächern keine
Geräte
verwenden, die nicht
vom
Hersteller empfohlen
sind.
- In Personalküchen in
Geschäften, Büros und anderen
Arbeitsumgebungen;
- In Bauernhöfen, Hotels,
Motels und anderen
Unterkünften, für den Gebrauch
der Kunden;
- Umgebungen mit
Übernachtung und Frühstück;
- Bei Catering und ähnliche
Non-Retail-Anwendungen.
1.1 Allgemeine
Sicherheitshinweise
• Dieses Produkt darf
nicht von Personen
mit körperlichen,
sensorischen oder mentalen
Einschränkungen, einem
Mangel an Erfahrung und
Wissen oder von Kindern
verwendet werden. Das
Gerät darf nur dann von
solchen Personen benutzt
werden, wenn diese von
einer für ihre Sicherheit
verantwortlichen Person
beaufsichtigt werden oder
angeleitet worden. Kinder
dürfen nicht mit diesem
Gerät spielen.
• Ziehen Sie bei
Fehlfunktionen den
Netzstecker des Gerätes.
• Warten Sie nach Ziehen des
Netzsteckers mindestens
5 Minuten, bevor Sie ihn
wieder anschließen.
• Ziehen Sie den Netzstecker,
wenn Sie das Gerät nicht
nutzen.
• Berühren Sie den
Netzstecker niemals mit
feuchten oder gar nassen
Händen. Ziehen Sie beim
Trennen niemals am Kabel,
EN
3
Page 46

greifen Sie immer am
Stecker.
• Wischen Sie den Netzstecker
vor dem Einstecken mit
einem trockenen Tuch ab.
• Schließen Sie den
Kühlschrank nicht an lose
Steckdosen an.
• Das Gerät muss
bei Aufstellung,
Wartungsarbeiten, Reinigung
und bei Reparaturen
vollständig vom Stromnetz
getrennt werden.
• Falls das Produkt längere
Zeit nicht benutzt wird,
ziehen Sie den Netzstecker
und nehmen Sie sämtliche
Lebensmittel aus dem
Kühlschrank.
• Verwenden Sie das Produkt
nicht, wenn das Fach mit
Leiterplatten im unteren
hinteren Bereich des Gerätes
(Abdeckung des Fachs mit
der elektrischen Karte) (1)
geöffnet ist.
1
1
• Benutzen Sie keine
Dampfreiniger oder
ähnliche Gerätschaften
zum Reinigen oder Abtauen
Ihres Gerätes. Der Dampf
kann in Bereiche eindringen,
die unter Spannung
stehen. Kurzschlüsse oder
Stromschläge können die
4
Folge sein!
• Lassen Sie niemals
Wasser direkt auf das
Gerät gelangen; auch nicht
zum Reinigen! Es besteht
Stromschlaggefahr!
• Verwenden Sie das Produkt
bei Fehlfunktionen nicht; es
besteht Stromschlaggefahr!
Wenden Sie sich als erstes
an den autorisierten
Kundendienst.
• Stecken Sie den Netzstecker
des Gerätes in eine geerdete
Steckdose. Die Erdung muss
durch einen qualifizierten
Elektriker vorgenommen
werden.
• Falls das Gerät über eine
LED-Beleuchtung verfügt,
wenden Sie sich zum
Auswechseln sowie im
Falle von Problemen an den
autorisierten Kundendienst.
• Berühren Sie gefrorene
Lebensmittel nicht mit
feuchten Händen! Sie
können an Ihren Händen
festfrieren!
• Geben Sie keine
Flüssigkeiten in Flaschen
oder Dosen in den
Tiefkühlbereich. Sie können
platzen!
• Geben Sie Flüssigkeiten in
aufrechter Position in den
Kühlschrank; zuvor den
Deckel sicher verschließen.
• Sprühen Sie keine
entflammbaren Substanzen
in die Nähe des Gerätes,
da sie Feuer fangen oder
explodieren könnten.
• Bewahren Sie keine
entflammbaren Materialien
Page 47

oder Produkte mit
entflammbaren Gasen
(Sprays etc.) im Kühlschrank
auf.
• Stellen Sie keine mit
Flüssigkeiten gefüllten
Behälter (z. B. Vasen) auf
dem Gerät ab. Falls Wasser
oder andere Flüssigkeiten
an unter Spannung stehende
Teile gelangen, kann es
zu Stromschlägen oder
Bränden kommen.
• Setzen Sie das Gerät keinem
Regen, Schnee, direkten
Sonnenlicht oder Wind aus;
dies kann die elektrische
Sicherheit gefährden.
Verschieben Sie das Gerät
nicht durch Ziehen an den
Türgriffen. Die Griffe könnten
sich lösen.
• Achten Sie darauf, dass
weder Ihre Hände noch
andere Körperteile von
beweglichen Teilen im
Inneren des Gerätes
eingeklemmt oder
gequetscht werden.
• Achten Sie darauf, nicht
auf die Tür, Schubladen
oder ähnliche Teile des
Kühlschranks zu treten;
lehnen Sie sich nicht daran
an. Andernfalls könnte
das Gerät umkippen, Teile
könnten beschädigt werden.
• Achten Sie darauf,
das Netzkabel nicht
einzuklemmen.
1.1.1 Wichtige Hinweise
zum Kältemittel
Wenn das Gerät über ein
Kühlsystem mit R600a-Gas
verfügt, achten Sie darauf,
das Kühlsystem und den
dazugehörigen Schlauch
während der Benutzung
und des Transports nicht
zu beschädigen. Dieses
Gas ist leicht entflammbar.
Bei Beschädigungen des
Kühlsystems halten Sie
das Gerät von potenziellen
Zündquellen (z. B. offenen
Flammen) fern und sorgen für
eine gute Belüftung des Raumes.
Das Typenschild an
der linken Innenwand
C
1.1.2 Modelle mit Wasserspender
• Der Druck für die
des Kühlschranks gibt
die Art des im Gerät
verwendeten Gases an.
Kaltwasserzufuhr sollte
maximal 90 psi (620
kPa) betragen. Wenn
der Wasserdruck in
Ihrem Haushalt 80 psi
(550 kPa) übersteigt,
verwenden Sie bitte ein
Druckbegrenzungsventil
in Ihrem Leitungssystems.
Sollten Sie nicht wissen, wie
der Wasserdruck gemessen
wird, ziehen Sie bitte einen
Fachinstallateur hinzu.
EN
5
Page 48

• Sollte für Ihr Leitungssystem
das Risiko eines
Wasserschlags (Druckstoß)
bestehen, verwenden
Sie stets eine geeignete
Druckstoßsicherung.
Wenden Sie sich bitte an
einen Fachinstallateur,
falls Sie sich über die
Wasserschlaggefährdung in
Ihrem Leitungssystem nicht
sicher sein sollten.
• Nutzen Sie niemals die
Warmwasserzufuhr für den
Einbau. Treffen Sie geeignete
Vorsichtsmaßnahmen zum
Schutz der Leitungen gegen
mögliches Einfrieren. Die
für den Betrieb zulässige
Wassertemperatur liegt im
Bereich von mindestens
0,6°C (33°F) bis hin zu
maximal 38°C (100°F ).
• Nutzen Sie ausschließlich
Trinkwasser.
1.2 Bestimmungsgemäßer Einsatz
• Dieses Gerät ist für den
Einsatz im Haushalt
vorgesehen. Er eignet sich
nicht zum kommerziellen
Einsatz.
• Das Produkt sollte
ausschließlich zum Lagern
von Lebensmitteln und
Getränken verwendet
werden.
• Bewahren Sie keine
empfindlichen Produkte, die
kontrollierte Temperaturen
erfordern (z. B. Impfstoffe,
wärmeempfindliche
Medikamente,Sanitätsartikel
etc.) im Kühlschrank auf.
• Der Hersteller haftet nicht für
jegliche Schäden, die durch
Missbrauch oder falsche
Handhabung entstehen.
• Originalersatzteile stehen
für einen Zeitraum von 10
Jahre beginnend mit dem
Kaufdatum zur Verfügung.
1.3 Sicherheit von Kindern
Bewahren Sie
Verpackungsmaterialien
außerhalb der Reichweite von
Kindern auf.
Lassen Sie Kinder nicht mit dem
Gerät spielen.
Falls das Gerät mit einer
abschließbaren Tür ausgestattet
ist, bewahren Sie den Schlüssel
außerhalb der Reichweite von
Kindern auf.
1.4 Einhaltung von WEEE-Vorgaben
und Altgeräteentsorgung
Dieses Gerät erfüllt die
Vorgaben der EU-WEEE-Direktive
(2012/19/EU). Das Gerät wurde mit
einem Klassifizierungssymbol für
elektrische und elektronische Altgeräte
(WEEE) gekennzeichnet.
Dieses Gerät wurde aus
hochwertigen Materialien
hergestellt, die
wiederverwendet und
recycelt werden können.
Entsorgen Sie das Gerät am
Ende seiner Einsatzzeit nicht mit dem
regulären Hausmüll. Bringen Sie das
Gerät zu einer Sammelstelle zum
Recycling von elektrischen und
elektronischen Geräten.
Ihre Stadtverwaltung informiert Sie
gerne über geeignete Sammelstellen in
Ihrer Nähe.
6
Page 49

1.5 Einhaltung von RoHS-Vorgaben
• Dieses Gerät erfüllt die
Vorgaben der EU-WEEEDirektive (65/2011/EU). Es
enthält keine in der Direktive
angegebenen gefährlichen
und unzulässigen
Materialien.
1.6 Hinweise zur Verpackung
•
Die Verpackungsmaterialien des
Gerätes worden gemäß nationalen
Umweltschutz bestimmungen
aus recyclingfähigen Materialien
hergestellt. Entsorgen Sie
Verpackungsmaterialien nicht
mit dem regulären Hausmüll
oder anderen Abfällen. Bringen
Sie Verpackungsmaterialien zu
geeigneten Sammelstellen; Ihre
Stadtverwaltung berät Sie gern.
EN
7
Page 50

2. Ihr Kühlschrank
*1
*15
*14
*5
16
13
*12
*11
*9
*10
17
*8
7
7
1. Kühlbereich-Türablage
2. Wasserspender-Befüllung
3. Eierhalter
4. Wasserspender-Tank
5. Flaschenablage
6. Verschiebbarer Vorratsbehälter
7. Einstellbare Füße
8. Tiefkühlbereich
9. Schnellgefrierfach
10. Eisbereiter und Eisbehälter
*3
*4
*5
*2
*4
*6
11. Gemüsefach
12. 0-Grad-Fach
13. Innenbeleuchtung
14. Kühlbereichglasablage
15. Temperatureinstelltaste
16. Kühlbereich
17. Tiefkühlbereich
*Optional:Die Abbildungen in dieser Bedienungsanleitung
dienen zur Orientierung und können etwas vom Aussehen
Ihres Gerätes abweichen. Falls Teile nicht zum Lieferumfang
C
8
Ihres Gerätes zählen, gelten sie für andere Modelle.
Page 51

3. Installation
3.1 Der richtige Aufstellungsort
Wenden Sie sich zur Aufstellung
des Gerätes an den autorisierten
Kundendienst. Bereiten Sie das
Gerät auf die Aufstellung vor,
indem Sie die Informationen in der
Bedienungsanleitung beachten
und sicherstellen, dass Strom- und
Wasseranschlüsse wie erforderlich
vorhanden sind. Falls nicht, wenden
Sie sich zum Nachrüsten an einen
Elektriker oder Klempner.
WARNUNG: Der
Hersteller haftet nicht
für jegliche Schäden,
die durch Arbeiten
B
entstanden sind, die
nicht von autorisierten
Personen durchgeführt
wurden.
WARNUNG: Bei der
Aufstellung muss das
Gerät vollständig vom
B
Stromnetz getrennt
sein. Andernfalls drohen
ernsthafte oder sogar
tödliche Verletzungen!
WARNUNG: Falls das
Gerät nicht durch die Tür
passt, entfernen Sie die
Gerätetür und drehen
A
Sie das Gerät auf die
Seite; falls es dennoch
nicht passt, wenden Sie
sich an den autorisierten
Kundendienst.
Heizungen, Öfen und ähnlichen
Wärmequellen auf; halten Sie
einen Mindestabstand von 5 cm
zu elektrischen Öfen ein.
• Setzen Sie das Gerät keinem
direkten Sonnenlicht und keinen
feuchten Umgebungen aus.
• Damit das Gerät effizient
arbeitet, ist eine angemessene
Luftzirkulation erforderlich.
• Falls Sie das Gerät in einer
Nische aufstellen, achten Sie
darauf, dass mindestens 5 cm
zur Decke und zu den Wänden
frei bleiben.
• Stellen Sie das Gerät nicht in
Umgebungen mit Temperaturen
unter -5 °C auf.
3.2 Kunststoffkeile anbringen
Sorgen Sie zur Gewährleistung
einer angemessenen
Luftzirkulation mit Hilfe der
mitgelieferten Kunststoffkeile für
genügend Platz zwischen dem
Gerät und der Wand.
1. Zur Befestigung der Keile
entfernen Sie die Schrauben
am Produkt und verwenden
die mit den Keilen gelieferten
Schrauben.
2. Befestigen Sie die beiden
Kunststoffkeile wie in
der Abbildung gezeigt
an der Abdeckung der
Belüftungsöffnungen.
EN
• Stellen Sie das Gerät auf einem
flachen Untergrund auf, damit
es weder wackelt noch kippelt.
• Stellen Sie das Gerät
mindestens 30 cm von
9
Page 52

3.3 Füße einstellen
Falls das Produkt nicht exakt
in Waage steht, passen Sie die
vorderen einstellbaren Füße durch
Drehen nach rechts oder links an.
3.4 Stromanschluss
WARNUNG:
Verwenden Sie keine
A
B
C
Mehrfachsteckdosen oder
Verlängerungskabel.
WARNUNG: Beschädigte
Netzkabel müssen vom
autorisierten Kundendienst
ausgetauscht werden.
Wenn Sie zwei Kühlgeräte
nebeneinander aufstellen,
halten Sie einen
Mindestabstand von 4 cm
zwischen den Geräten ein.
• Verwenden Sie zwischen
Steckdose und Kühlschrank
keine Mehrfachsteckdose mit
oder ohne Verlängerungskabel.
Achtung: Warnung vor
heißen Oberflächen
Die Seitenwände
Ihres Geräts sind mit
Kühlmittelleitungen für ein
verbessertes Kühlsystem
ausgestattet.
Kühlmittel mit hohen
Temperaturen können in
C
diesen Bereichen 2der
Seitenwände fließen.
Das ist normal und
erfordert keinerlei
Reparatur oder Wartung.
Bitte seien Sie vorsichtig,
wenn Sie diese Bereiche
berühren
• Unser Unternehmen haftet
nicht für jegliche Schäden, die
durch eine Inbetriebnahme
ohne Erdung oder einen nicht
mit nationalen Richtlinien
übereinstimmenden
Stromanschluss verursacht
werden.
• Der Netzstecker muss nach
der Installation frei zugänglich
bleiben.
10
Page 53

3.5 Türanschlag umkehren
Gehen Sie der Reihe nach vor.
EN
1
9
3
9
6
45
7
21
2
5
16
11
4
8
19
18
10
12
13
20
20
17
15
14
11
Page 54

3.6 Türanschlag umkehren
Gehen Sie der Reihe nach vor.
2
45 °
10
12
180°
14
(8) (13)
1
1
1
7
20
6
5
11
13
9
4
3
20
8
15
20
12
16
18
17
19
Page 55

4. Vorbereitung
4.1 Maßnahmen zum
Energiesparen
Der Anschluss
des Gerätes an
Energiesparsysteme birgt
A
Risiken, da Schäden am
Gerät auftreten können.
• Gerätetüren nicht längere Zeit
offen stehen lassen.
• Keine warmen oder gar heißen
Lebensmittel oder Getränke in
den Kühlschrank geben.
• Kühlschrank nicht überladen;
wird der interne Luftstrom
blockiert, verringert sich die
Kühlkapazität.
• Damit Sie die maximale Menge
Lebensmittel im Kühlbereich
Ihres Kühlschranks einlagern
können, sollten Sie die oberen
Schubladen herausnehmen und
auf die Glasablage stellen. Der
angegebene Energieverbrauch
Ihres Kühlschranks wurde ohne
Kühlbereich, Eisablage und
obere Schubladen zur Erzielung
maximalen Stauraums
ermittelt. Beim Einlagern wird
die Verwendung der unteren
Schublade dringend empfohlen.
Für optimalen Energieverbrauch
sollte die Energiesparfunktion
aktiviert werden.
• Platzieren Sie Lebensmittel
nicht vor dem Lüfter, damit die
Luftzirkulation nicht blockiert
wird. Halten Sie beim Verstauen
von Lebensmitteln einen
Mindestabstand von 3 cm vor
dem Schutzgitter des Lüfters
ein.
• Je nach Produktmerkmalen
können Sie durch Auftauen
gefrorener Lebensmittel im
Kühlbereich Energie sparen und
die Qualität der Lebensmittel
bewahren.
• Lebensmittel sollten zur
Gewährleistung eines geringen
Energieverbrauchs und zum
Schutz der Lebensmittel unter
besseren Bedingungen in den
Schubladen im Kühlbereich
verstaut werden.
• Verpackte Lebensmittel sollten
den Wärmesensor im Kühlfach
nicht berühren. Andernfalls kann
sich der Energieverbrauch des
Gerätes erhöhen.
• Achten Sie darauf, dass
Lebensmittel nicht den
nachstehend beschriebenen
Temperatursensor im
Kühlbereich berühren.
EN
13
Page 56

4.2. Erste Inbetriebnahme
Stellen Sie vor Inbetriebnahme
Ihres Kühlschranks sicher, dass
die erforderlichen Vorbereitungen
entsprechend den Anweisungen
in den Abschnitten „Hinweise
zu Sicherheit und Umwelt“ und
„Installation“ getroffen wurden.
• Lassen Sie den Kühlschrank
etwa 6 Stunden lang leer
arbeiten; verzichten Sie
in dieser Zeit möglichst
vollständig auf das Öffnen der
Türen.
Beim Anspringen des
C
C
Kompressors sind
Geräusche zu hören.
Es ist normal, dass das
Gerät auch bei inaktivem
Kompressor Geräusche
macht; diese werden
durch komprimierte
Flüssigkeiten und
Gase im Kühlsystem
verursacht.
Die Vorderkanten des
Kühlschranks können
sich etwas erwärmen.
Dies ist völlig normal.
Diese Bereiche wärmen
sich etwas auf, damit
sich kein Kondenswasser
bildet.
C
Bei einigen Modellen
verdunkelt sich das
Anzeigefeld automatisch
5 Minuten nach Schließen
der Tür. Beim Öffnen der
Tür oder bei Betätigung
einer Taste wird es wieder
aktiviert.
14
Page 57

5. Gerät bedienen
5.1 Temperatureinstelltaste
Die Innentemperatur Ihres
Kühlschranks hängt teilweise von
folgenden Einflüssen ab:
Umgebungstemperatur
Häufiges Öffnen der Tür,
Offenstehen der Tür über längere
Zeit
Einlagern von Lebensmitteln, ohne
diese zuvor auf Raumtemperatur
abkühlen zu lassen.
• Platzierung des Kühlschranks
innerhalb des Raumes (z. B. im
direkten Sonnenlicht).
• Da die Innentemperatur aufgrund
solcher Faktoren variieren
kann, können Sie sie über
den Temperatureinstellknopf
anpassen.
• Die Ziffern rund um den
Einstellknopf zeigen die
Temperatur in „°C“.
• Falls die Umgebungstemperatur
20 °C beträgt, sollten Sie die
Kühlschranktemperatur auf
4 °C anpassen. Bei anderen
Umgebungstemperaturen kann
dieser Wert angepasst werden.
5.2 Schnellgefrieren
Wenn Sie große Mengen
frischer Lebensmittel einfrieren
möchten, stellen Sie den
Temperatureinstellknopf auf die
Position (
Lebensmittel in den Tiefkühlbereich
geben.
Wir empfehlen, den Knopf
mindestens 24 Stunden lang in
dieser Position zu belassen – so
können Sie die maximale Menge an
Gefriergut verarbeiten. Achten Sie vor
allem darauf, gefrorene und frische
Lebensmittel nicht zu vermischen.
Denken Sie daran, den
Temperatureinstellknopf
anschließend auf seine vorherige
Position einzustellen.
) ein, bevor Sie die
EN
15
Page 58

5.3 Urlaubsfunktion
Falls die Gerätetüren (
) mindestens 12 Stunden
lang nach Anpassung des
Temperatureinstellknopfs auf die
höchste Position nicht geöffnet
werden, wird automatisch die
Urlaubsfunktion aktiviert.
Zum Abbrechen der Funktion muss
der Knopf auf eine andere Position
eingestellt werden.
Wir raten davon ab, Lebensmittel
bei aktiver Urlaubsfunktion im
Kühlbereich aufzubewahren.
• Nach Abschluss der
Einstellung können Sie den
Temperatureinstellknopf durch
Hineindrücken verbergen.
16
Page 59

Die Betriebstemperatur wird über
die Temperatursteuerung reguliert.
W
C
5
1=Schwächste Kühlung (wärmste
Einstellung)
4=Stärkste Kühlung (kälteste
Einstellung)
Die Durchschnittstemperatur im
Inneren des Kühlschranks sollte bei
etwa +5 °C liegen.
Bitte wählen Sie die der
gewünschten Temperatur
entsprechende Einstellung.
Bitte beachten Sie, dass im
Kühlbereich unterschiedliche
Temperaturen herrschen.
Der kälteste Bereich befindet sich
unmittelbar über dem Gemüsefach.
Die Innentemperatur hängt auch
von der Umgebungstemperatur
ab, außerdem davon, wie oft die
Tür geöffnet wird und wie viel
Lebensmittel im Inneren gelagert
werden.
Beim häufigen Öffnen der Tür steigt
die Innentemperatur an.
Aus diesem Grund empfehlen wir,
die Tür möglichst schnell wieder zu
schließen.
5.4 Thermostateinstelltaste
Die Innentemperatur Ihres
Kühlschranks hängt teilweise von
folgenden Einflüssen ab:
• Umgebungstemperatur
• Häufigkeit der Türöffnungen,
Offenstehen der Tür über
längere Zeit
• Einlagern von Lebensmitteln,
ohne diese zuvor auf
Raumtemperatur abkühlen zu
lassen
• Platzierung des Kühlschranks
innerhalb des Raumes (z. B. im
direkten Sonnenlicht).
• Zum Anpassen der
Innentemperatur an solche
Einflüsse benutzen Sie das
Thermostat. Die Zahlen rund
um die Thermostateinstelltaste
zeigen die Kühlungsleistung an.
• Falls die Umgebungstemperatur
mehr als 32 °C beträgt,
wählen Sie die höchstmögliche
Thermostateinstellung.
• Sofern die
Umgebungstemperatur
weniger als 25 °C beträgt,
wählen Sie die geringste
Thermostateinstellung.
EN
Trifft möglicherweise nicht auf alle Modelle zu
17
Page 60

5.5 Abtauen
Kühlbereich
Der Kühlbereich taut
vollautomatisch ab. Im Betrieb
können sich Wassertropfen und
eine 7 – 8 mm starke Eisschicht an
der Innenwand des Kühlbereiches
absetzen. Dies ist vollkommen
normal und ein Nebeneffekt des
Kühlungssystems. Dank des
automatischen Abtausystems an der
Rückwand wird das Eis in bestimmten
Abständen automatisch abgetaut.
Weder Eis noch Wassertropfen
müssen manuell entfernt werden.
Beim Abtauen läuft das Tauwasser
in die Ablaufrinne und fließt
anschließend zum Verdampfer – hier
verdunstet das Wasser automatisch.
Der Tiefkühlbereich wird nicht
automatisch abgetaut, da es
ansonsten schnell zum Verderben
gefrorener Lebensmittel kommen
könnte.
Der Tiefkühlbereich taut
automatisch ab.
Überzeugen Sie sich regelmäßig
davon, dass der Ablauf nicht verstopft
ist; beseitigen Sie eventuelle
Verstopfungen mit dem Stäbchen.
18
Page 61

5.6 Anzeigefeld
Die Anzeigefelder können je nach Modell etwas anders ausfallen.
Audiovisuelle Funktionen am Anzeigefeld helfen Ihnen bei der Bedienung
Ihres Gerätes.
EN
8
9
1. Kühlbereichanzeige
2. Fehlerstatusanzeige
3. Temperaturanzeige
4. Urlaubstaste
5. Temperatureinstelltaste
6. Kühlbereichauswahltaste
7. Tiefkühlbereichanzeige
8. Energiesparmodusanzeige
9. Urlaubsfunktionanzeige
1
7
2
6
3
45
C
*Optional:Die Abbildungen in dieser Bedienungsanleitung dienen
zur Orientierung und können etwas vom Aussehen Ihres Gerätes
abweichen. Falls Teile nicht zum Lieferumfang Ihres Gerätes
zählen, gelten sie für andere Modelle.
19
Page 62

1. Kühlbereichanzeige
Die Kühlbereichanzeige
leuchtet beim Einstellen der
Kühlbereichtemperatur auf.
2. Fehlerstatusanzeige
Falls der Kühlschrank nicht
genügend kühlt oder ein Sensor
ausfällt, wird diese Anzeige
aktiv. Wenn diese Anzeige
aktiv ist, zeigt die Tiefkühlbere
ichtemperaturanzeige „E“, die
Kühlbereichtemperaturanzeige
Zahlen an; z. B. 1, 2, 3, ... Diese
Zahlen der Anzeige helfen
Kundendienstmitarbeitern, einen
Fehler einzugrenzen.
3. Temperaturanzeige
Zeigt Tiefkühl- und
Kühlbereichtemperatur.
4. Urlaubstaste
Zum Aktivieren dieser Funktion
halten Sie die Urlaubstaste
3 Sekunden lang gedrückt.
Wenn die Urlaubsfunktion
aktiv ist, erscheint „- -“ in der
Kühlbereichtemperaturanzeige; der
Kühlbereich wird nun nicht mehr
aktiv gekühlt. Wenn diese Funktion
aktiv ist, sollten keine Lebensmittel
im Kühlbereich aufbewahrt
werden. Andere Bereiche werden
entsprechend der eingestellten
Temperatur weiterhin gekühlt.
Zum Aufheben dieser Funktion
drücken Sie die Urlaubstaste noch
einmal.
5. Temperatureinstelltaste
Ändert die Temperatur des
jeweiligen Bereiches zwischen -24 °C
und -18 °C sowie 8 °C und 1 °C.
6. Kühlbereichauswahltaste
Auswahltaste: Mit der
Kühlbereichauswahltaste schalten
Sie zwischen Kühlbereich und
Tiefkühlbereich um.
7. Tiefkühlbereichanzeige
Die Kühlbereichanzeige
leuchtet beim Einstellen der
Tiefkühlbereichtemperatur auf.
8. Energiesparmodusanzeige
Zeigt an, dass das Kühlgerät
besonders energiesparend arbeitet.
Diese Anzeige wird aktiv, wenn die
Tiefkühlbereichtemperatur auf -18 °C
eingestellt ist.
9. Urlaubsfunktionanzeige
Zeigt an, dass die Urlaubsfunktion
aktiv ist.
20
Page 63

5.7 Anzeigefeld
Das Anzeigefeld ermöglicht Ihnen die Einstellung der Temperatur
und die Steuerung anderer Funktionen, ohne dass Sie die Tür des
Produktes öffnen müssen. Drücken Sie einfach die Beschriftungen der
entsprechenden Tasten zur Funktionseinstellung.
1 2
12
EN
*10
11
1. Stromausfall-/
Hochtemperatur-/FehlerWarnanzeige
Diese Anzeige ( ) signalisiert
einen Stromausfall, zu hohe
Innentemperaturen und sonstige
Fehler. Bei längeren Stromausfällen
blinkt die höchste Temperatur, die
der Tiefkühlbereich erreicht, im
digitalen Display. Drücken Sie nach
Prüfung der im Tiefkühlbereich (
) gelagerten Lebensmittel zum
Löschen der Warnung die Alarm-ausTaste.
*Optional:Die Abbildungen in dieser Bedienungsanleitung dienen
zur Orientierung und können etwas vom Aussehen Ihres Gerätes
abweichen. Falls Teile nicht zum Lieferumfang Ihres Gerätes
C
zählen, gelten sie für andere Modelle.
6
789
2. Energiesparfunktion (Display
aus):
Wenn die Gerätetüren lange Zeit
geschlossen bleiben, wird die
Energiesparfunktion automatisch
aktiviert und das Energiesparsymbol
leuchtet auf. ( )
Bei aktiver Energiesparfunktion
erlöschen sämtliche DisplaySymbole mit Ausnahme des
Energiesparsymbols. Die
Energiesparfunktion wird
aufgehoben, sobald Tasten betätigt
werden oder die Tür geöffnet
45
3
21
Page 64

wird. Das Display zeigt wieder die
normalen Symbole.
Die Energiesparfunktion wird
während der Lieferung ab Werk
aktiviert und kann nicht aufgehoben
werden.
3. Schnellkühlen
Diese Taste erfüllt zwei
Funktionen. Zum Einund Ausschalten der
Schnellkühlfunktion drücken
Sie die Taste einmal kurz. Die
Schnellkühlenanzeige erlischt, der
Kühlschrank arbeitet wieder mit
normalen Einstellungen.
)
(
Die Schnellkühlfunktion
C
C
nutzen Sie, wenn
Sie Lebensmittel im
Kühlbereich besonders
schnell abkühlen
möchten. Wenn Sie
große Mengen frischer
Lebensmittel kühlen
möchten, sollten Sie
diese Funktion vor
dem Einlagern der
Lebensmittel einschalten.
Sofern Sie diese Funktion
nicht vorzeitig abschalten,
wird das Schnellkühlen
beendet, sobald die
nötige Temperatur
erreicht ist, spätestens
jedoch nach 8 Stunden.
Sollten Sie die
C
C
4. KühlbereichtemperaturEinstelltaste
Durch mehrmaliges Drücken
dieser Taste stellen Sie die
Kühlbereichtemperatur auf 8 °, 7
°, 6 °, 5 °, 4°, 3 °, 2 °, 8 °C ... ein.
Mit dieser Taste stellen Sie die
gewünschte Kühlbereichtemperatur
ein. ( )
5. Urlaubsfunktion
Drücken Sie zum Aktivieren
der Urlaubsfunktion 3 Sekunden
diese Taste ( ); dadurch wird
die Urlaubsmodusanzeige (
aktiviert. Wenn die Urlaubsfunktion
aktiv ist, erscheint „- -“ in der
Kühlbereichtemperaturanzeige; der
Kühlbereich wird nun nicht mehr
aktiv gekühlt. Wenn diese Funktion
aktiv ist, sollten keine Lebensmittel
im Kühlbereich aufbewahrt
werden. Andere Bereiche werden
entsprechend der eingestellten
Temperatur weiterhin gekühlt.
Zum Aufheben dieser
Funktion drücken Sie die
Schnellkühltaste
mehrmals innerhalb
kurzer Zeit drücken,
greift eine elektronische
Schutzschaltung ein und
sorgt dafür, dass der
Kompressor nicht sofort
anläuft.
Diese Funktion wird
nach einem Stromausfall
nicht automatisch wieder
eingeschaltet.
)
Urlaubsfunktionstaste noch einmal.
22
Page 65

6. Alarm-aus-Warnung
Drücken Sie bei einem Alarm wegen
Stromausfalls/hoher Temperatur
nach Prüfung der im Tiefkühlbereich
gelagerten Lebensmittel zum
Löschen der Warnung die Alarm-ausTaste (
).
7. Tastensperre
Halten Sie die Tastensperre-Taste (
) 3 Sekunden lang gedrückt. Das
Tastensperre-Symbol
( ) leuchtet auf, die Tastensperre
ist aktiv. Bei aktiver Tastensperre
reagiert das Gerät nicht auf
Tastenbetätigungen. Halten Sie die
Tastensperre-Taste noch einmal
3 Sekunden lang gedrückt. Das
Tastensperre-Symbol erlischt, die
Tastensperre wird abgeschaltet.
Verwenden Sie die Tastensperre-
Taste, wenn Sie Änderungen
der Temperatureinstellung des
Kühlschranks verhindern möchten (
).
8. Öko-Fuzzy
Drücken und halten Sie die ÖkoFuzzy-Taste zum Aktivieren der
Öko-Fuzzy-Funktion 1 Sekunde.
Spätestens sechs Stunden später
arbeitet Ihr Kühlgerät besonders
ökonomisch; die Energiesparanzeige
leuchtet (
Sie die Öko-Fuzzy-Taste zum
Deaktivieren der Öko-Fuzzy-Funktion
3 Sekunden.
Diese Anzeige leuchtet nach 6
Stunden auf, wenn Öko-Fuzzy aktiv
ist.
) Drücken und halten
9. TiefkühlbereichtemperaturEinstelltaste
Durch mehrmaliges Drücken
dieser Taste stellen Sie die
Tiefkühlbereichtemperatur auf -18 °,
-19 °, -20 °, -21 °, -22 °, -23 °, -24 °,
-18 °C, ... ein. Mit dieser Taste stellen
Sie die gewünschte Temperatur des
Tiefkühlbereiches ein.
( )
10. Eisbereiter-aus-Anzeige
Zeigt an, ob der Eisbereiter einoder ausgeschaltet ist. ( )Bei der
Einstellung Ein ist der Eisbereiter
abgeschaltet. Zum Einschalten des
Eisbereiters halten Sie die Ein-/
Austaste 3 Sekunden lang gedrückt.
Bei der Auswahl dieser
Funktion wird kein
C
Wasser mehr aus dem
Tank zugeführt. Bereits
bereitetes Eis kann aber
nach wie vor aus dem
Eisbereiter entnommen
werden.
11. Schnellgefriertaste/
Eisbereiter-ein/aus-Taste
Mit dieser Taste schalten Sie die
Schnellgefrierfunktion ein und aus.
Wenn diese Funktionen aktiv ist, wird
der Tiefkühlbereich besonders stark
(über die eingestellte Temperatur
hinaus) gekühlt. ( )
Zum Ein- und Ausschalten des
Eisbereiters halten Sie die Taste 3
Sekunden lang gedrückt.
Die Schnellgefrierfunktion
nutzen Sie, wenn
C
Sie die Lebensmittel
im Tiefkühlbereich
besonders schnell
abkühlen möchten.
Wenn Sie große Mengen
frischer Lebensmittel
kühlen möchten, sollten
Sie diese Funktion vor
dem Einlagern der
Lebensmittel einschalten.
EN
23
Page 66

Sofern Sie diese Funktion
C
C
12. Energiesparanzeige
Zeigt an, dass das Gerät besonders
energiesparend arbeitet. ( )Diese
Anzeige leuchtet auf, wenn die
Temperatur des Tiefkühlbereiches
auf -18 °C eingestellt ist oder das
Gerät mit der Öko-Extra-Funktion
besonders ökonomisch arbeitet.
C
nicht vorzeitig abschalten,
wird das Schnellgefrieren
beendet, sobald die nötige
Temperatur erreicht ist,
spätestens jedoch nach 4
Stunden.
Diese Funktion wird
nach einem Stromausfall
nicht automatisch wieder
eingeschaltet.
Die Energiesparanzeige
erlischt, wenn Sie
Schnellkühlen oder
Schnellgefrieren
zuschalten.
24
Page 67

5.8 Anzeigefeld
Das Anzeigefeld ermöglicht Ihnen die Einstellung der Temperatur
und die Steuerung anderer Funktionen, ohne dass Sie die Tür des
Produktes öffnen müssen. Drücken Sie einfach die Beschriftungen der
entsprechenden Tasten zur Funktionseinstellung.
3
1
11
2
4
7.1
910
7.2
568
EN
C
1. Ökonomischer Einsatz
2. Hohe Temperatur / Fehleralarm
3. Energiesparfunktion (Display aus)
4. Schnellkühlen
5. Urlaubsfunktion
6. Kühlbereichtemperatureinstellung
7. Energiesparen (Display aus)/ Alarm-Aus-
Warnung
8. Bedienfeldsperre
9. Öko-Fuzzy
10. Tiefkühlbereichtemperatureinstellung
11. Schnellgefrieren
*Optional:Die Abbildungen in dieser Bedienungsanleitung dienen
zur Orientierung und können etwas vom Aussehen Ihres Gerätes
abweichen. Falls Teile nicht zum Lieferumfang Ihres Gerätes
zählen, gelten sie für andere Modelle.
25
Page 68

1. Ökonomischer Einsatz
Dieses Zeichen leuchtet auf, wenn
die Temperatur des Tiefkühlbereichs
auf -18 °C eingestellt ist; dies ist
die ökonomischste Einstellung. (
) Die Öko-Anzeige erlischt, wenn
Schnellkühlen oder Schnellgefrieren
ausgewählt werden.
2. Hohe Temperatur / Fehleralarm
Diese Anzeige ( ) leuchtet
bei Temperaturfehlern oder
Fehleralarmen auf. Diese Anzeige
leuchtet bei einem Stromausfall,
zu hohen Innentemperaturen und
sonstigen Fehler. Bei längeren
Stromausfällen blinkt die höchste
Temperatur, die der Tiefkühlbereich
erreichen kann, in der digitalen
Anzeige. Drücken Sie nach Kontrolle
der Lebensmittel im Tiefkühlfach
zum Aufheben des Alarms die Alarmaus-Taste.
3. Energiesparfunktion (Display
aus)
Falls die Gerätetüren lange
Zeit geschlossen bleiben,
wird die Energiesparfunktion
automatisch aktiviert und das
Energiesparsymbol leuchtet.
Bei aktiver Energiesparfunktion
erlöschen sämtliche DisplaySymbole mit Ausnahme des
Energiesparsymbols. Die
Energiesparfunktion wird
aufgehoben, sobald Tasten betätigt
werden oder die Tür geöffnet
wird. Das Display zeigt wieder die
normalen Symbole.
Die Energiesparfunktion wird
während der Lieferung ab Werk
aktiviert und kann nicht aufgehoben
werden.
4. Schnellkühlen
Wenn die Schnellkühlfunktion
eingeschaltet ist, leuchtet
die Schnellkühlanzeige (
) auf und die Temperaturanzeige
des Kühlbereichs zeigt den
Wert 1. Drücken Sie zum
Abbrechen dieser Funktion
erneut die Schnellkühltaste. Die
Schnellkühlanzeige erlischt,
die normalen Einstellungen
werden wiederhergestellt. Die
Schnellkühlfunktion wird nach 1
Stunde automatisch abgebrochen,
sofern sie nicht zuvor bereits
manuell abgebrochen wurde.
Zum Kühlen großer Mengen
frischer Lebensmittel drücken Sie
die Schnellkühltaste, bevor Sie
Lebensmittel in den Kühlbereich
geben.
5. Urlaubsfunktion
Drücken Sie zum Aktivieren
der Urlaubsfunktion 3 Sekunden
die Taste ( ); dadurch wird die
Urlaubsmodusanzeige (
Wenn die Urlaubsfunktion aktiv ist,
zeigt die Temperaturanzeige des
Kühlbereichs „- -“ und der Kühlbereich
wird nicht gekühlt. Diese Funktion ist
nicht geeignet, um Lebensmittel im
Kühlbereich aufzubewahren. Andere
Bereiche werden entsprechend der für
den jeweiligen Bereich eingestellten
Temperatur weiterhin gekühlt.
Zum Abbrechen dieser Funktion
drücken Sie die Urlaubstaste noch
einmal.
) aktiviert.
26
Page 69

6.
Kühlbereichtemperatureinstellung
Nach Betätigung der Taste kann die
Kühlbereichtemperatur entsprechend
auf 8, 7, 6, 5, 4, 3, 2 oder 1 eingestellt
werden. (
)
7. 1 Energiesparen (Display aus)
Bei Betätigung dieser Taste (
) leuchtet das Energiesparsymbol (
) auf und die Energiesparfunktion
wird aktiviert. Mit Aktivierung
der Energiesparfunktion werden
alle anderen Symbole am Display
abgeschaltet. Wird bei aktiver
Energiesparfunktion eine Taste gedrückt oder die Tür geöffnet, schaltet
sich die Energiesparfunktion aus und
alle Displaysignale kehren in den
Normalzustand zurück. Durch erneute
Betätigung dieser Taste ( ) werden
das Energiesparsymbol und die
Energiesparfunktion deaktiviert.
7.2 Alarm-Aus-Warnung
Bei einem Stromausfall/
Temperaturalarm drücken Sie nach
Befüllen des Tiefkühlbereichs mit
Lebensmitteln die Alarm-aus-Taste
zum Aufheben der Warnung.
8. Bedienfeldsperre
Halten Sie die Bedienfeldsperre-Taste
( ) 3 Sekunden lang gedrückt. Das
Bedienfeldsperre-Symbol ( ) leuchtet
auf und die Bedienfeldsperre wird
aktiviert. Die Tasten sind bei eingeschalteter Bedienfeldsperre inaktiv.
Halten Sie die Bedienfeldsperre-Taste
erneut 3 Sekunden lang gedrückt. Das
Bedienfeldsperre-Symbol erlischt, die
Bedienfeldsperre wird abgeschaltet.
Drücken Sie die
Bedienfeldsperre-Taste (
), wenn Sie Änderungen an den
Temperatureinstellungen die
Kühlschranks verhindern möchten.
9. Öko-Fuzzy
Zum Aktivieren der Öko-Fuzzy-Funktion
halten Sie die Öko-Fuzzy-Taste 1 Sekunde
lang gedrückt. Wenn diese Funktion aktiv
ist, wechselt der Tiefkühlbereich nach
mindestens 6 Stunden in den Ökomodus,
die Öko-Anzeige leuchtet auf. Zum
Deaktivieren der Öko-Fuzzy-Funktion (
) halten Sie die Öko-Fuzzy-Taste erneut 3
Sekunden lang gedrückt.
Wenn die Öko-Fuzzy-Funktion aktiv ist,
leuchtet die Anzeige nach 6 Stunden auf.
10.
Tiefkühlbereichtemperatureinstellung
Die Temperatur im Tiefkühlbereich
ist einstellbar. Mit der Taste kann die
Temperatur des Tiefkühlbereichs auf -18,
-19, -20, -21, -22, -23 oder -24 eingestellt
werden. (
)
11. Schnellgefrieren
Drücken Sie zum Schnellgefrieren
die Taste; dadurch wird die
Schnellgefrieranzeige ( ) aktiviert.
Wenn die Schnellgefrierfunktion
eingeschaltet ist, leuchtet die
Schnellgefrieranzeige auf und die
Temperaturanzeige des Tiefkühlbereichs
zeigt den Wert -27. Zum Aufheben
dieser Funktion drücken Sie die
Schnellgefriertaste ( ) noch einmal. Die
Schnellgefrieranzeige erlischt, die normalen Einstellungen werden wiederhergestellt. Die Schnellgefrierfunktion wird
nach 24 Stunden automatisch abgebrochen, sofern sie nicht zuvor bereits manuell abgebrochen wurde. Zum Einfrieren
großer Mengen frischer Lebensmittel
drücken Sie die Schnellgefriertaste, bevor
Sie Lebensmittel in den Tiefkühlbereich
geben.
EN
27
Page 70

5.9 Eisbehälter
(bei bestimmten Modellen)
Nehmen Sie den Eisbehälter aus
dem Tiefkühlbereich.
Füllen Sie den Eisbehälter mit
Trinkwasser.
Geben Sie den Eisbehälter in den
Tiefkühlbereich.
Das Eis ist nach etwa zwei Stunden
fertig. Nehmen Sie den Eisbehälter
aus dem Tiefkühlbereich und
biegen Sie ihn leicht über dem
Gefäß, das Sie servieren möchten.
Das Eis gelangt in den Behälter.
5.10 Eierhalter
Sie können den Eierhalter in der
Tür oder auf der Ablage Ihrer Wahl
platzieren. Falls Sie sich für die
Ablagen entscheiden, sollten Sie
tiefer gelegene Ablagen wählen, da es
dort kühler ist.
Geben Sie den
Eierhalter nicht in den
A
Tiefkühlbereich.
5.11 Lüfter
Der Lüfter wurde dazu entwickelt,
die kalte Luft im Inneren Ihres
Kühlschranks gleichmäßig zu
verteilen. Je nach Modell und
Bedarf arbeitet der Lüfter auf
unterschiedliche Weise.
Während der Lüfter in einigen
Produkten nur mit einem
Kompressor arbeitet, ermittelt in
anderen Modellen ein Kontrollsystem
die Betriebszeit basierend auf den
Kühlanforderungen.
5.12 0-Grad-Fach
(bei bestimmten Modellen)
Bewahren Sie in diesem
Bereich Feinkost bei geringeren
Temperaturen oder schnell
verderbliche Fleischprodukte auf.
Das 0-Grad-Fach ist der
kälteste Bereich, in dem Sie
Lebensmittel, wie Milchprodukte,
Fleisch, Fisch und Geflügel, bei
idealen Lagerungsbedingungen
aufbewahren können. Gemüse
und/oder Obst gehören nicht in
dieses Fach.
28
Page 71

5.13 Bewegliche Türablage
(bei bestimmten Modellen)
Die bewegliche Türablage kann in
3 verschiedenen Positionen fixiert
werden.
Zum Bewegen der Ablage
drücken Sie die Tasten an der
Seite gleichmäßig. Die Ablage wird
beweglich.
Bewegen Sie die Ablage nach oben
oder unten.
Wenn sich die Ablage in der
gewünschten Position befindet,
lassen Sie die Tasten los. Die Ablage
wird wieder in der Position fixiert, in
der Sie die Tasten losgelassen haben.
5.14 Verschiebbarer
Vorratsbehälter
(bei bestimmten Modellen)
Dieses Zubehör ist so konstruiert,
dass das Volumen der Türablagen
vergrößert wird.
Dank seiner Fähigkeit zur
Seitwärtsbewegung können Sie
mühelos lange Flaschen, Gläser oder
Kartons im Flaschenhalter darunter
verstauen.
5.15 Feuchtigkeitskontrolliertes
Gemüsefach
EN
(bei bestimmten Modellen)
Dank der Feuchtigkeitsregelung bleibt
der Feuchtigkeitsgehalt von Gemüse und
Obst unter Kontrolle, die Lebensmittel
bleiben länger frisch.
Es wird empfohlen, Blattgemüse, wie
Salat, Spinat und dergleichen, das zu
Feuchtigkeitsverlust neigt, nicht auf den
Wurzeln, sondern nach Möglichkeit in
horizontaler Position im Gemüsefach
aufzubewahren.
Beim Einlagern von Gemüse platzieren
Sie schweres, hartes Gemüse im
unteren Bereich und leichtes, weiches
Gemüse darüber; achten Sie auf das
jeweilige Gewicht der Lebensmittel.
Lassen Sie Gemüse nicht in
Plastikbeuteln im Gemüsefach. Bleibt
das Gemüse in Plastikbeuteln, kann
es in kurzer Zeit verderben. Falls
29
Page 72

Kontakt mit anderem Gemüse
vermieden werden soll, sollten Sie
Verpackungsmaterialien wie Papier
verwenden, die eine bestimmte
Durchlässigkeit in Sachen Hygiene
aufweisen.
Geben Sie Obst mit einer hohen
Ethylenfreisetzung, wie Birnen,
Aprikosen, Pfirsiche und bestimmte
Apfelsorten, nicht mit anderem Obst
und Gemüse in das Gemüsefach. Das
von solchen Früchten freigesetzte
Ethylen kann dazu führen, dass
anderes Obst und Gemüse in kurzer
Zeit reift und verdirbt.
5.16 Automatischer Eisbereiter
(bei bestimmten Modellen)
Der automatische Eisbereiter
ermöglicht Ihnen die einfache
Bereitung von Eis in Ihrem
Kühlschrank. Damit Sie Eis vom
Eisbereiter erhalten, nehmen Sie den
Wassertank aus dem Kühlbereich,
füllen ihn mit Wasser und setzen ihn
wieder ein.
Nach etwa zwei Stunden liegen die
ersten Eiswürfel in der EisbereiterSchublade im Kühlbereich für Sie
bereit.
Nach Einsetzen des vollen
Wassertanks erhalten Sie 60 bis 70
Eiswürfel, bis er vollständig leer ist.
Wenn das Wasser 2 bis 3 Wochen
im Tank war, sollte es ausgewechselt
werden.
In Produkten mit
automatischem Eisbereiter
C
hören Sie möglicherweise
einen Ton beim Ausgießen
von Eis. Dieser Ton ist völlig
normal und keine Zeichen für
einen Fehler.
5.17 Eisbereiter und
Eisbehälter
(bei bestimmten Modellen)
Eisbereiter verwenden
Füllen Sie den Eisbereiter mit
Wasser, setzen Sie ihn in seine
Halterung. Ihr Eis ist nach etwa zwei
Stunden fertig. Zum Entnehmen des
Eises nehmen Sie den Eisbereiter
nicht heraus.
30
Page 73

Drehen Sie die Knöpfe daran um 90
° im Uhrzeigersinn.
Die Eiswürfel fallen in den darunter
liegenden Eiswürfelbehälter.
Sie können den Eisbehälter
zum Servieren der Eiswürfel
herausnehmen.
Wenn Sie möchten, können Sie das
Eis auch im Eisbehälter aufbewahren.
Eisbehälter
Der Eisbehälter dient ausschließlich
zum Sammeln der Eiswürfel. Füllen
Sie kein Wasser ein. Der Behälter
wird sonst platzen.
5.18 Wasserspender
(bei bestimmten Modellen)
Der Wasserspender ist eine praktische Einrichtung, mit der Sie kühles
Wasser zapfen können, ohne dabei
die Tür Ihres Kühlschranks öffnen zu
müssen. Da Sie die Tür des Gerätes
nicht häufig öffnen müssen, sparen
Sie eine Menge Energie.
5.19 So benutzen Sie den
Wasserspender
Drücken Sie mit dem Glas gegen
den Hebel des Wasserspenders. Die
Wasserausgabe stoppt, sobald der
Hebel losgelassen wird.
Den schnellsten Durchfluss erreichen Sie, wenn Sie den Hebel
komplett eindrücken. Denken
Sie daran, dass die Stärke des
Wasserdurchflusses davon abhängt,
wie weit der Hebel eingedrückt wird.
Geben Sie den Hebel langsam wieder frei, sobald das Glas fast vollständig gefüllt ist, damit nichts überläuft.
Das Wasser tritt nur tropfenweise
aus, wenn Sie den Hebel nur leicht
betätigen; dies ist völlig normal.
Wasserbehälter füllen
Der Wassertank befindet sich an der
Innenseite der Türablage. Öffnen Sie
die Abdeckung des Behälters, füllen
Sie Trinkwasser ein. Schließen Sie
anschließend den Deckel.
EN
31
Page 74

Warnung!
• Füllen Sie den Wassertank nur
mit sauberem Trinkwasser,
nicht mit anderen Flüssigkeiten
gleich welcher Art. Falls andere
Flüssigkeiten eingefüllt werden,
kann der Wasserspender
irreparabel beschädigt werden.
Solche Beschädigungen
werden nicht durch die Garantie
abgedeckt. Viele Flüssigkeiten
und Getränke enthalten
Zusätze, die das Material des
Wassertanks angreifen können.
• Nutzen Sie ausschließlich
klares Trinkwasser.
• Die Kapazität des Wassertanks
beträgt 3 Liter; füllen Sie nicht
mehr hinein.
• Drücken Sie mit einem
haltbaren Glas gegen den Hebel
des Wasserspenders. Falls
Sie Einwegbecher verwenden,
betätigen Sie den Hebel mit
dem Finger.
5.20 Wassertank reinigen
•
Entfernen Sie den Füllbehälter
auf der Innenseite der
Türablage.
• Entfernen Sie die Türablage,
indem Sie diese an beiden
Seiten greifen.
• Greifen Sie den Wassertank an
beiden Seiten und entfernen ihn
in einem Winkel von 45 °C.
• Öffnen Sie die Abdeckung und
reinigen den Wassertank.
Wichtig:
Die Komponenten des
Wasserspenders und des
Wassertanks sollten nicht in der
Spülmaschine gereinigt werden.
32
Page 75

5.21 Tropfschale
Wasser, das bei der Nutzung des
Wasserspenders heruntertropft, sammelt sich in der Tropfschale.
Nehmen Sie das Kunststoffsieb wie
in der Abbildung gezeigt heraus.
Entfernen Sie angesammeltes
Wasser mit einem sauberen, trockenen Tuch.
Achtung: Nur an
Trinkwasserleitungen anschließen.
5.22 HerbBox/HerbFresh
Das Foliengehäuse vom HerbBox/
HerbFresh+ entfernen.
Nehmen Sie die Folie aus dem
Beutel und legen Sie es wie auf
der Abbildung angezeigt in das
Foliengehäuse.
Schließen Sie das Gehäuse und
legen Sie es wieder in die HerbBox/
HerbFresh+.
Die HerbBox-HerbFresh+ Fächer
sind besonders ideal für Kräuter,
die in empfindlichen Bedingungen
aufbewahrt werden müssen.
Ihr Grünzeug (Petersilie, Dill, usw.),
das aus seinem Beutel ausgepackt
wurde, können Sie in diesem Fach in
horizontaler Position länger frisch
aufbewahren.
Die Schicht wird alle sechs Monate
ausgetauscht.
EN
33
Page 76

5.23 Frische Lebensmittel
tiefkühlen
•
Zur Gewährleistung der
Lebensmittelqualität müssen
im Tiefkühlbereich gelagerte
Lebensmittel so schnell
wie möglich eingefroren
werden; nutzen Sie dazu die
Schnellgefrierfunktion.
• Das Einfrieren frischer
Lebensmittel verlängert die
Aufbewahrungsdauer im
Tiefkühlbereich.
• Verpacken Sie Lebensmittel
in sicher verschlossenen
luftdichten Behältern.
• Stellen Sie sicher, dass
die Lebensmittel verpackt
sind, bevor Sie sie in
den Tiefkühlbereich
geben. Verwenden Sie
statt herkömmlichen
Packpapiers tiefkühlgeeignete
Behälter, Alufolie und
feuchtigkeitsbeständiges Papier,
Plastikbeutel oder ähnliche
Verpackungsmaterialien.
• Beschriften Sie die Behälter vor
dem Einfrieren mit dem Datum.
Dadurch können Sie beim
Öffnen des Tiefkühlbereichs
stets die Frische der verpackten
Lebensmittel prüfen. Bewahren
Sie ältere Lebensmittel weiter
vorne auf, damit sie zuerst
verbraucht werden.
• Gefrorene Lebensmittel müssen
unmittelbar nach dem Auftauen
verbraucht und dürfen nicht
wieder eingefroren werden.
• Frieren Sie nicht zu große
Mengen auf einmal ein.
34
C
Eis im Tiefkühlbereich taut
automatisch.
Page 77

Tiefkühlbereich
temperatureinstellung
Kühlbereich
temperatureinstellung
Details
EN
-18 °C 4 °C
- 20 °C, -22 °C oder -24 °C 4 °C
Schnellgefrieren 4 °C
-18 °C und kälter 2 °C
5.24 Empfehlungen zur Lagerung
gefrorener Lebensmittel
Der Bereich muss auf mindestens
-18 °C eingestellt sein.
1. Geben Sie Lebensmittel so
schnell wie möglich in den
Tiefkühlbereich, damit sie nicht
auftauen.
2. Prüfen Sie vor dem Einfrieren,
ob das Verfallsdatum auf der
Verpackung bereits abgelaufen
ist.
3. Stellen Sie sicher, dass die
Lebensmittelverpackung nicht
beschädigt ist.
Dies ist die allgemein
empfohlene Einstellung.
Diese Einstellungen
empfehlen wir bei
Umgebungstemperaturen
über 30 °C.
Diese Funktion nutzen
Sie zum Einfrieren von
Lebensmitteln in kurzer
Zeit. Wenn der Vorgang
endet, nimmt das Produkt
wieder seine Position ein.
Nutzen Sie diese
Einstellungen, falls
Sie meinen, dass der
Kühlbereich aufgrund der
Umgebungstemperatur
oder zu häufigen Öffnens
und Schließens der Tür
nicht kalt genug wird.
5.25 Hinweise zum
Tiefkühlbereich
Gemäß den Standards IEC
62552 muss der Tiefkühlbereich
über die Kapazität verfügen,
4.5 kg Lebensmittel bei -18 °C
oder geringeren Temperaturen
je 100 Liter Volumen des
Tiefkühlbereichs in 24 Stunden
einzufrieren.
Lebensmittel können nur bei
Temperaturen von -18 °C und
darunter längere Zeit aufbewahrt
werden.
Sie können Lebensmittel
monatelang frisch halten (im
Tiefkühlbereich bei oder unter 18
°C).
35
Page 78

Lebensmittel, die eingefroren
werden sollen, dürfen keine bereits
eingefrorenen Lebensmittel
berühren, da diese andernfalls
antauen könnten.
Gekochtes Gemüse und
gefiltertes Wasser können
länger im Tiefkühlberiech
aufbewahrt werden. Geben Sie die
Lebensmittel nach dem Filtern
in luftdichten Verpackungen in den
Tiefkühlbereich. Bananen, Tomaten,
Salat, Sellerie, gekochte Eier,
Kartoffeln und ähnliche Lebensmittel
sollten nicht eingefroren werden.
Falls diese Lebensmittel verderben,
werden nur Nährwert und
Geschmack negativ beeinträchtigt.
Es besteht keine Gefahr für die
menschliche Gesundheit.
5.26 Lebensmittel einlagern
Unterschiedliche
TiefkühlbereichAblagen
KühlbereichAblagen
KühlbereichTürablagen
Gemüsefach Obst und Gemüse
Frischlebens
mittelbereich
gefrorene Lebensmittel
wie Fleisch, Fisch,
Speiseeis, Gemüse etc.
Lebensmittel in Töpfen,
auf abgedeckten Tellern
und in bedeckten
Behältern, Eier (in
abgedecktem Behälter)
Kleine und verpackte
Lebensmittel oder
Getränke
Feinkost
(Frühstücksprodukte,
schnell verderbliche
Fleischprodukte)
36
Page 79

5.27 Tür-offen-Alarm
(optional)
Wenn die Gerätetür mindestens
1 Minute offen bleibt, wird ein
akustischer Alarm ausgegeben.
Dieser akustische Alarm verstummt,
sobald Sie die Tür schließen oder eine
beliebige Taste am Display (sofern
vorhanden) drücken.
Der Tür-offen-Alarm wird
sowohl akustisch als auch visuell
ausgegeben. Die Innenbeleuchtung
schaltet sich aus, wenn die Warnung
10 Minuten lang anhält.
5.28 Wechseln des
Türanschlags
Sie können den Türanschlag Ihres
Kühlschranks je nach Aufstellungsort
wechseln. Wenden Sie sich in
diesem Fall an den autorisierten
Kundendienst in Ihrer Nähe.
Die obige Erklärung ist allgemeiner
Natur. Sie sollten das Warnschild
in der Produktverpackung auf
Möglichkeit zum Wechseln des
Türanschlags prüfen.
5.29 Innenbeleuchtung
Die Innenbeleuchtung nutzt eine
LED-Lampe. Wenden Sie sich bei
jeglichen Problemen mit dieser
Lampe an den autorisierten
Kundendienst.
Die in diesem Gerät verwendete(n)
Lampe(n) können nicht zur
Raumbeleuchtung verwendet
werden. Der vorgesehene Zweck
dieser Lampe dient dem sicheren
und komfortablen Einlagern
von Lebensmitteln im Kühl- /
Tiefkühlbereich.
EN
37
Page 80

6. Reinigung und Wartung
Durch regelmäßige Reinigung
können Sie die die „Lebensdauer“
Ihres Gerätes verlängern; viele
Probleme treten erst gar nicht auf.
WARNUNG: Ziehen Sie
B
den Netzstecker, bevor
Sie das Gerät reinigen.
• Verwenden Sie zu
Reinigungszwecken niemals
Benzin oder ähnliche
Substanzen.
• Verzichten Sie bei der
Reinigung grundsätzlich auf
scharfe Gegenstände, Seife,
Haushaltsreiniger, Waschmittel
oder Wachspolituren.
• Lösen Sie einen Teelöffel Natron
in einem halben Liter Wasser
auf. Feuchten Sie ein Tuch mit
der Lösung an, wringen Sie das
Tuch gut aus. Waschen Sie die
Innenflächen des Kühlschrank/
Gefrierschranks gründlich mit
diesem Tuch ab; anschließend
gut trocknen.
• Achten Sie darauf, dass kein
Wasser in das Lampengehäuse
oder andere elektrische
Komponenten eindringt.
• Falls Sie den Kühlschrank/
Gefrierschrank längere Zeit
nicht benutzen, ziehen Sie den
Netzstecker, nehmen sämtliche
Lebensmittel heraus, reinigen
das Gerät und lassen die Tür
offen stehen.
• Prüfen Sie die Türdichtungen
regelmäßig auf Sauberkeit. Bei
Bedarf reinigen.
• Entnehmen Sie zum Entfernen
von Tür und Hauptablagen
zunächst sämtliche darin/darauf
abgelegten Lebensmittel.
• Ziehen Sie die Türablagen
heraus. Nach der Reinigung
setzen Sie die Ablage wieder
von oben ein.
6.1 Unangenehme
Gerüche verhindern
Bei der Herstellung Ihres
Kühlschrank/ Gefrierschranks
wurde darauf geachtet, dass keine
Materialien verwendet wurden,
die unangenehme Gerüche
verursachen können. Allerdings
können natürlich nach wie vor
unangenehme Gerüche auftreten,
wenn Lebensmittel nicht richtig
gelagert werden und/oder das
Innere des Gerätes nicht ordentlich
gereinigt wird. Dieses Problem
können Sie vermeiden, wenn sie
folgende Hinweise beachten:
• Halten Sie Ihren Kühlschrank/
Gefrier-schrank stets
sauber. Lebensmittelreste,
Verschmutzungen usw.
können Gerüche verursachen.
Reinigen Sie den Kühlschrank/
Gefrierschrank daher alle
15 Tage mit etwas in Wasser
aufgelöstem Natron. Verzichten
Sie grundsätzlich auf
Reinigungsmittel und Seifen.
• Lagern Sie Lebensmittel in
geschlossenen Behältern.
Mikroorganismen, die aus
unverschlossenen Behältern
entweichen, können üble
Gerüche verursachen.
• Nehmen Sie Lebensmittel
mit abgelaufenem
Mindesthaltbarkeitsdatum
38
Page 81

sowie verdorbene Lebensmittel
gleich aus dem Kühlschrank/
Gefrierschrank.
6.2 Kunststoffflächen pflegen
Geben Sie keine Öle oder
stark fetthaltige Speisen
offen in Ihren Kühlschrank/
Gefrierschrank – dadurch
können die Kunststoffflächen
angegriffen werden. Sollten die
Kunststoffflächen einmal mit Öl in
Berührung kommen, so reinigen
Sie die entsprechenden Stellen
umgehend mit warmem Wasser.
6.3 Türglas
Entfernen Sie die Schutzfolie von
der Scheibe.
Die Oberfläche der Scheibe ist
beschichtet. Die Beschichtung
reduziert Fleckenbildung auf
ein Minimum und ermöglicht
die einfache Beseitigung von
Flecken und Schmutz. Nicht
durch eine Beschichtung
geschützte Glasscheiben können
einer dauerhaften Bindung von
organischen oder anorganischen
Reinigern in Luft und Wasser, wie
Kalk, Mineralsalzen, unverbrannten
Kohlenwasserstoffen , Metalloxiden
und Silikonen, ausgesetzt sein,
die in kurzer Zeit zu einfacher
Fleckenbildung und physikalischen
Schäden führen. In diesem Fall lässt
sich das Glas auch bei regelmäßiger
Reinigung nur mit Mühe sauber
halten. Dadurch werden Klarheit
und Aussehen der Glasscheibe
beeinträchtigt. Aggressive und
scheuernde Reinigungsmethoden
und -utensilien verstärken
diesen Schaden zusätzlich und
beschleunigen die Abnutzung.
Zur routinemäßigen Reinigung
empfehlen wir nicht alkalische und
nicht scheuernde Reinigungsprodukte
auf Wasserbasis.
Damit die Beschichtung möglichst
lange hält, sollten Sie keine
alkalischen oder scheuernden
Materialien verwenden.
Zur Erhöhung der Beständigkeit des
Glases gegenüber Stößen und Bruch
wurde es gehärtet.
Zusätzlich zum Glas wurde eine
Sicherheitsschicht auf die Rückseite
aufgetragen, die eine Gefährdung
der Umgebung im Falle von
Bruchschäden verhindert.
*Alkali ist eine Basis, die HydroxidIonen bildet (OH¯), wenn sie in
Wasser aufgelöst wird.
Li (Lithium), Na (Natrium), K
(Kalium), Rb (Rubidium), Cs (Cäsium)
und radioaktive Fr (Fan-sium)
Metalle werden als ALKALIMETALLE
bezeichnet.
EN
39
Page 82

7. Problemlösung
Bitte schauen Sie sich zunächst
diese Liste an, bevor Sie sich
an den Kundendienst wenden.
Das kann Ihnen Zeit und Geld
sparen. In der Liste finden Sie
Lösungsvorschläge für allgemeine
Probleme, die nicht durch
Material- oder Herstellungsfehler
verursacht werden. Bestimmte
hierin erwähnte Funktionen und
Merkmale treffen möglicherweise
nicht auf Ihr Produkt zu.
Der Kühlschrank schaltet sich nicht
ein.
• Der Netzstecker ist nicht
vollständig eingesteckt. >>>
Stecker vollständig in die
Steckdose einstecken.
• Die mit der Steckdose, die das
Produkt mit Strom versorgt,
verbundene Sicherung
oder die Hauptsicherung ist
durchgebrannt. >>> Sicherungen
prüfen.
Kondensation an den Seitenwänden
des Kühlbereiches (Multizone,
Kühlkontrolle und FlexiZone).
• Die Tür wird zu häufig geöffnet.
>>> Darauf achten, die Gerätetür
nicht zu häufig zu öffnen.
• Die Umgebungsfeuchtigkeit
ist zu hoch. >>> Produkt nicht
in Umgebungen mit hoher
Luftfeuchtigkeit aufstellen.
• Lebensmittel mit hohem
Flüssigkeitsgehalt werden in
nicht abgedichteten Behältern
aufbewahrt. >>> Lebensmittel
mit hohem Flüssigkeitsgehalt
in abgedichteten Behältern
aufbewahren.
• Die Gerätetür wurde offen
gelassen. >>> Gerätetür nicht
längere Zeit offen lassen.
• Das Thermostat ist auf eine zu
geringe Temperatur eingestellt.
>>> Thermostat auf eine
geeignete Temperatur einstellen.
Der Kompressor läuft nicht.
40
Page 83

• Wenn ein Stromausfall auftritt
oder der Netzstecker gezogen
und wieder angeschlossen wird,
ist der Gasdruck im Kühlsystem
des Gerätes nicht ausgeglichen,
was den Temperaturschutz
des Kompressors auslöst. Das
Produkt startet nach etwa 6
Minuten neu. Falls das Produkt
nach diesem Zeitraum nicht neu
startet, wenden Sie sich an den
Kundendienst.
• Die Abtaufunktion ist aktiv.
>>> Dies ist bei einem
vollautomatisch abtauenden
Produkt normal. Das Abtauen
wird regelmäßig durchgeführt.
• Das Gerät ist nicht an die
Stromversorgung angeschlossen.
>>> Prüfen, ob das Netzkabel
angeschlossen ist.
• Die Temperatur ist nicht richtig
eingestellt. >>> Die geeignete
Temperatureinstellung wählen.
• Der Strom ist ausgefallen. >>>
Sobald die Stromversorgung
wiederhergestellt ist, setzt das
Gerät den Betrieb fort.
Während der Benutzung nehmen
die Betriebsgeräusche des
Kühlschranks zu.
• Die Betriebsleistung des
Gerätes kann je nach
Umgebungstemperatur variieren.
Dies ist völlig normal und keine
Fehlfunktion.
Der Kühlschrank arbeitet zu oft
oder zu lange.
• Ihr neues Gerät ist vielleicht etwas
grö0er als sein Vorgänger. Größere
Produkte arbeiten länger.
• Die Umgebungstemperatur ist sehr
hoch. >>> Das Gerät arbeitet bei höheren
Umgebungstemperaturen normalerweise
länger.
• Das Gerät wurde erst vor Kurzem
angeschlossen oder mit neuen
Lebensmitteln beladen. >>> Das Gerät
benötigt mehr Zeit zum Erreichen der
eingestellten Temperatur, wenn es
gerade erst angeschlossen oder mit
neuen Lebensmitteln befüllt wurde. Dies
ist völlig normal.
• Es wurden erst vor Kurzem große
Mengen warmer oder gar heißer
Lebensmittel in das Gerät gegeben.
>>> Keine warmen oder gar heißen
Lebensmittel in das Gerät geben.
• Die Türen wurden häufig geöffnet oder
längere Zeit offen gelassen. >>> Da
warme Luft in das Innere strömt, muss
das Gerät länger arbeiten. Türen nicht zu
häufig öffnen.
• Die Tür des Tiefkühl- oder Kühlbereichs
steht halb offen. >>> Prüfen, ob Türen
vollständig geschlossen sind.
• Das Gerät wurde auf eine zu geringe
Temperatur eingestellt. >>> Höhere
Temperatur einstellen und warten, bis
das Gerät die eingestellte Temperatur
erreicht hat.
• Die Türdichtungen von Kühl- oder
Gefrierbereich sind verschmutzt,
verschlissen, beschädigt oder sitzen
nicht richtig. >>> Dichtung reinigen oder
ersetzen. Beschädigte/verschlissene
Dichtungen sorgen dafür, dass das
Produkt zum Halten der aktuellen
Temperatur länger arbeiten muss.
Die Temperatur im Tiefkühlbereich
ist sehr niedrig, während die
Temperatur im Kühlbereich
angemessen ist.
EN
41
Page 84

• Die Tiefkühlbereichtemperatur
ist sehr niedrig eingestellt. >>>
Tiefkühlbereichtemperatur höher
einstellen, Temperatur nach einer
Weile prüfen.
Die Temperatur im Tiefkühlbereich
ist sehr niedrig, während die
Temperatur im Kühlbereich
angemessen ist.
• Die Kühlbereichtemperatur ist
sehr niedrig eingestellt. >>>
Tiefkühlbereichtemperatur höher
einstellen, Temperatur nach einer
Weile prüfen.
Im Kühlbereich gelagerte
Lebensmittel frieren ein.
• Die Kühlbereichtemperatur ist
sehr niedrig eingestellt. >>>
Tiefkühlbereichtemperatur höher
einstellen, Temperatur nach einer
Weile prüfen.
Die Temperatur im Kühl- oder
Tiefkühlbereich ist zu hoch.
• Die Kühlbereichtemperatur
ist sehr hoch eingestellt. >>>
Die Kühlbereichtemperatur
beeinflusst die
Tiefkühlbereichtemperatur.
Warten Sie, bis die
entsprechenden Teile das
erforderliche Temperatur erreicht
haben, indem Sie die Temperatur
des Kühl- oder Tiefkühlbereichs
ändern.
• Die Türen wurden häufig geöffnet
oder längere Zeit offen gelassen.
>>> Türen nicht zu häufig öffnen.
• Die Tür steht halb offen. >>> Tür
vollständig schließen.
• Das Gerät wurde erst kurz
zuvor angeschlossen oder es
wurden neue Lebensmittel
hineingegeben. >>> Dies ist
völlig normal. Das Gerät benötigt
mehr Zeit zum Erreichen der
eingestellten Temperatur, wenn
es gerade erst angeschlossen
oder mit neuen Lebensmitteln
befüllt wurde.
• Es wurden erst vor Kurzem
große Mengen warmer oder gar
heißer Lebensmittel in das Gerät
gegeben. >>> Keine warmen oder
gar heißen Lebensmittel in das
Gerät geben.
Vibrationen oder
Betriebsgeräusche.
42
Page 85

• Der Boden ist nicht eben oder
stabil. >>> Falls das Produkt
bei langsamem Bewegen
wackelt, müssen die Füße
zum Ausgleichen des Gerätes
angepasst werden. Außerdem
darauf achten, dass der
Untergrund ausreichend stabil
ist, das Gerät zu tragen.
• Jegliche auf dem Gerät
abgelegten Dinge können
Geräusche verursachen.
>>> Jegliche auf dem Gerät
abgelegten Dinge entfernen.
Das Produkt macht Sprüh- oder
Fließgeräusche etc.
• Die Arbeitsweise des Gerätes
beinhaltet Flüssigkeits- und
Gasströme. >>>Dies ist völlig
normal und keine Fehlfunktion.
Das Gerät macht windartige
Geräusche.
• Das Produkt nutzt einen Lüfter
zur Kühlung. Dies ist völlig
normal und keine Fehlfunktion.
Es befindet sich Kondenswasser an
den Innenwänden des Produktes.
• Bei heißen oder feuchten
Wetterlagen treten verstärkt
Eisbildung und Kondensation auf.
Dies ist völlig normal und keine
Fehlfunktion.
• Die Tür wurde häufig geöffnet
oder längere Zeit offen gelassen.
>>> Tür nicht zu häufig öffnen;
Tür nicht offen stehen lassen.
• Die Tür steht halb offen. >>> Tür
vollständig schließen.
Es befindet sich Kondenswasser an
der Außenseite des Produktes oder
zwischen den Türen.
• Eventuell herrscht hohe
Luftfeuchtigkeit; dies ist je nach
Wetterlage völlig normal. >>>
Das Kondenswasser verdunstet,
wenn sich die Luftfeuchtigkeit
verringert.
Der Innenraum riecht unangenehm.
• Das Produkt wurde nicht
regelmäßig gereinigt. >>>
Innenraum regelmäßig mit einem
Schwamm und warmem Wasser
und etwas in Wasser aufgelöstem
Natron reinigen.
• Bestimmte
Verpackungsmaterialien können
Geräusche verursachen. >>>
Geruchsneutrale Halterungen
und Verpackungen verwenden.
• Lebensmittel wurde in offenen
Behältern in den Kühlschrank
gestellt. >>> Lebensmittel in
sicher abgedichteten Behältern
aufbewahren. Andernfalls
können sich Mikroorganismen
ausbreiten und unangenehme
Gerüche verursachen. Jegliche
abgelaufenen oder verdorbenen
Lebensmittel aus dem Gerät
entfernen.
Die Tür lässt sich nicht schließen.
• Lebensmittelverpackungen
blockieren die Tür. >>> Inhalt so
platzieren, dass die Tür nicht
blockiert wird.
• Das Gerät steht nicht vollständig
aufrecht auf dem Boden. >>>
Füße zum Ausgleichen des
Gerätes anpassen.
• Der Boden ist nicht eben oder
stabil. >>> Darauf achten,
dass der Untergrund eben und
ausreichend stabil ist, das Gerät
zu tragen.
Das Gemüsefach klemmt.
EN
43
Page 86

• Die Lebensmittel berühren den
oberen Bereich der Schublade.
>>> Lebensmittel in der
Schublade neu anordnen.
Wenn Die Produktoberfläche Heiss
Ist.
• Die Bereiche zwischen den beiden
Türen, an den Seitenflächen
und hinten am Grill können im
Betrieb sehr heiß werden. Dies ist
völlig normal und weist nicht auf
eine Fehlfunktion hin.Seien Sie
sehr vorsichtig, wenn Sie diese
Bereiche berühren.
WARNUNG: Falls sich
A
das Problem nicht durch
Befolgen der Anweisungen
in diesem Abschnitt
beheben lässt, wenden
Sie sich an Ihren Händler
oder ein autorisiertes
Kundencenter. Versuchen
Sie nicht, das Produkt zu
reparieren.
44
Page 87

Notes
..................................................................................
..................................................................................
..................................................................................
..................................................................................
..................................................................................
..................................................................................
..................................................................................
..................................................................................
..................................................................................
..................................................................................
..................................................................................
..................................................................................
..................................................................................
..................................................................................
..................................................................................
..................................................................................
..................................................................................
..................................................................................
..................................................................................
..................................................................................
..................................................................................
..................................................................................
..................................................................................
..................................................................................
..................................................................................
..................................................................................
..................................................................................
..................................................................................
..................................................................................
...............................................................................................................................
...............................................................................................................................
...............................................................................................................................
...............................................................................................................................
...............................................................................................................................
...............................................................................................................................
...............................................................................................................................
...............................................................................................................................
...............................................................................................................................
...............................................................................................................................
...............................................................................................................................
...............................................................................................................................
...............................................................................................................................
...............................................................................................................................
...............................................................................................................................
...............................................................................................................................
...............................................................................................................................
...............................................................................................................................
...............................................................................................................................
...............................................................................................................................
...............................................................................................................................
...............................................................................................................................
...............................................................................................................................
...............................................................................................................................
...............................................................................................................................
...............................................................................................................................
...............................................................................................................................
...............................................................................................................................
...............................................................................................................................
DE
Page 88

Notes
..................................................................................
..................................................................................
..................................................................................
..................................................................................
..................................................................................
..................................................................................
..................................................................................
..................................................................................
..................................................................................
..................................................................................
..................................................................................
..................................................................................
..................................................................................
..................................................................................
..................................................................................
..................................................................................
..................................................................................
..................................................................................
..................................................................................
..................................................................................
..................................................................................
..................................................................................
..................................................................................
..................................................................................
..................................................................................
..................................................................................
..................................................................................
..................................................................................
..................................................................................
...............................................................................................................................
...............................................................................................................................
...............................................................................................................................
...............................................................................................................................
...............................................................................................................................
...............................................................................................................................
...............................................................................................................................
...............................................................................................................................
...............................................................................................................................
...............................................................................................................................
...............................................................................................................................
...............................................................................................................................
...............................................................................................................................
...............................................................................................................................
...............................................................................................................................
...............................................................................................................................
...............................................................................................................................
...............................................................................................................................
...............................................................................................................................
...............................................................................................................................
...............................................................................................................................
...............................................................................................................................
...............................................................................................................................
...............................................................................................................................
...............................................................................................................................
...............................................................................................................................
...............................................................................................................................
...............................................................................................................................
...............................................................................................................................
Page 89

58 0342 0000/AB
EN-DE
www.grundig.com
 Loading...