

Page 1
DECT TELEFON
GDT 310
EN
Page 2

CONTENTS
___________________________________________________
3 IMPORTANT SAFETY
INSTRUCTIONS
4 INSTALLING YOUR PHONE
4 Package contents
4 Connecting the base station
4 Installing and charging the batteries
5 GETTING TO KNOW YOUR
PHONE
5 Base Station Overview
9 Display Icons and Symbols
11 Text and Digit Entry Table
11 Character Set
12 USING YOUR PHONE
12 Make a Call
12 Answer a Call
12 End a Call
12 Adjust Earpiece and Handsfree
Volume
13 Mute a Call
13 Set the Silent Mode
13 Turn on the Keypad Lock
13 Redial the last number
14 Find the Handset
14 Make an Internal Call
16 PRIVATE PHONEBOOK
16 Add a New Phonebook Entry
16 Search a Phonebook Entry
16 View a Phonebook Entry
16 Edit a Phonebook Entry
17 Delete a Phonebook Entry
17 Delete the Entire Private Phone-
book
17 Check the Phonebook Usage
18 CALLER DISPLAY
18 View the Call List
18 Store a Call List Number into the
Phonebook
18 Delete an entry in the Call List
19 Delete the entire list of the Call List
19 View the Details of the Call List
Entry
20 VOICE MAIL
20 Access Voice Mail Messages
20 Delete VMWI Entries
21 PHONE SETTINGS
21 Date and Time Settings
22 Alarm Settings
23 Handset Settings
25 Base Settings
27 Registration
27 Reset Your Phone
28 DEFAULT SETTINGS
29 TECHNICAL FEATURES
31 TROUBLESHOOTING
2
ENGLISH
Page 3

IMPORTANT SAFETY INSTRUCTIONS
_________
When using your telephone equipment,
basic safety precautions should always
be followed to reduce the risk of fire,
electric shock and injury, including the
following:
1 Read and understand all the instruc-
tions.
2 Follow all warnings and instructions
marked on the product.
3 Unplug this product from the wall
outlet before cleaning. Do not use
liquid cleaners or aerosol cleaners.
Use a damp cloth for cleaning.
4 Do not use this product near water
(for example, near a bath tub,
kitchen sink, swimming pool).
5 Do not overload wall outlets and
extension cords as this can result in
the risk of fire or electric shock.
6 Unplug this product from the wall
outlet and refer after sales service
under the following conditions:
█
When the power supply cord or
plug is damaged or frayed.
█
If the product does not operate
normally by following the operating instructions.
█
If the product has been dropped
and the cabinet has been damaged.
█
If the product exhibits a distinct
change in performance.
7 Avoid using a telephone (other than
a cordless type) during an electrical
storm. There may be a remote risk
of electric shock from lightning.
8 Do not use the telephone to report a
gas leak in the vicinity of the leak.
9 Use only the supplied NiMH
(Nickel Metal Hydride) batteries!
The operation periods for the handsets are only applicable with the
default battery capacities
10 The use of other battery types or
non-rechargeable batteries/primary
cells can be dangerous. These may
cause interference and/or unit damages. The manufacturer will not be
held liable for damage arising from
such non-compliance.
11 Do not use third party charging
bays . The batteries may be damaged.
12 Please note the correct polarity
while inserting the batteries.
13 Do not immerse batteries in water,
do not place in fire.
14 Do not use third party power
adapter
ENGLISH
3
Page 4
INSTALLING YOUR PHONE
_________________________
Package contents
The package contains the following
items:
█
1 Handset
█
1 Base station
█
1 AC power adapter
█
1 Telephone line cord
█
2 rechargeable batteries
█
1 User manual
The maximum range between the base
station and the handset is approximately 300 meters. Depending on the
surrounding conditions as well as spatial and structural factors, the range
may be reduced. The range indoors is
normally less than outdoors.
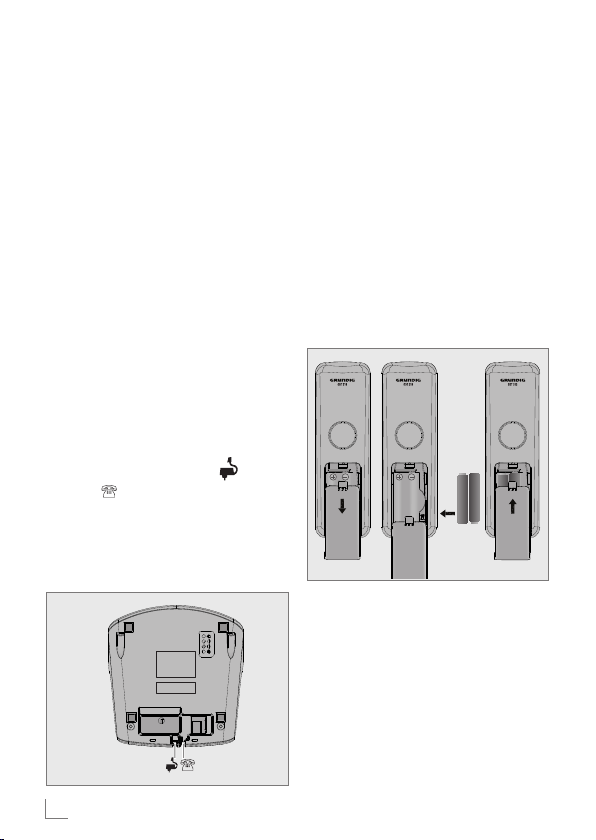
Connecting the base station
1 Plug the power supply » « & line
cord » « into the base station.
2 Plug the power supply & line cord
into the wall socket.
3 Always use the cables provided in
the box.
Installing and charging the
batteries
1 Slide open the battery compartment
cover.
2 Place the 2 batteries as indicated.
Respect polarity.
3 Slide the battery compartment cover
back.
4 Put the handset on the base and
charge for 14 hours first time. A beep
indicates that the handset is properly
placed on the base or charger.
Note:
█
Use only the power pack provided for the base station.
█
Use only NiMH rechargeable
batteries.
4
ENGLISH
Page 5
GETTING TO KNOW YOUR PHONE
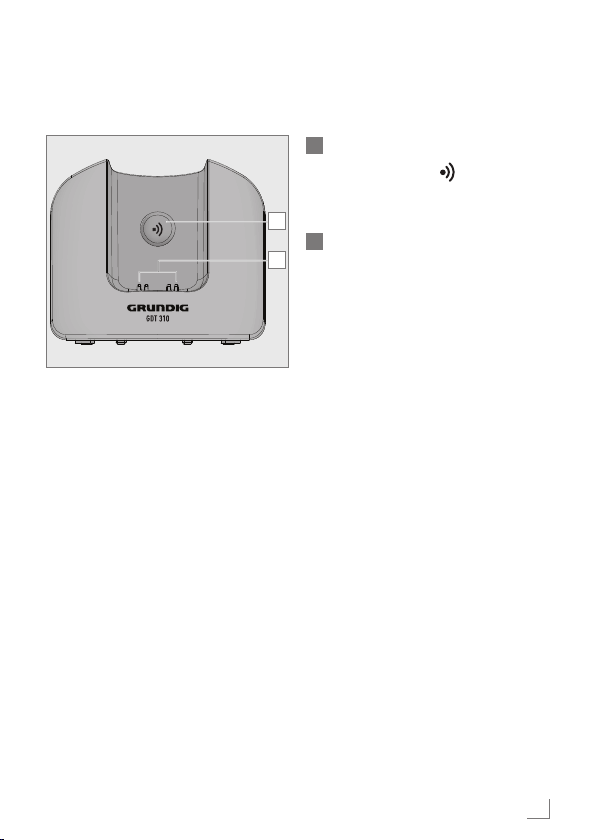
Base Station Overview
A
PAGE
Press the Page » « on the base
station to page your handset. It will
ring for approximately 60 seconds.
A
B
CHARGING CRADLE
B
______
ENGLISH
5
Page 6
GETTING TO KNOW YOUR PHONE
______
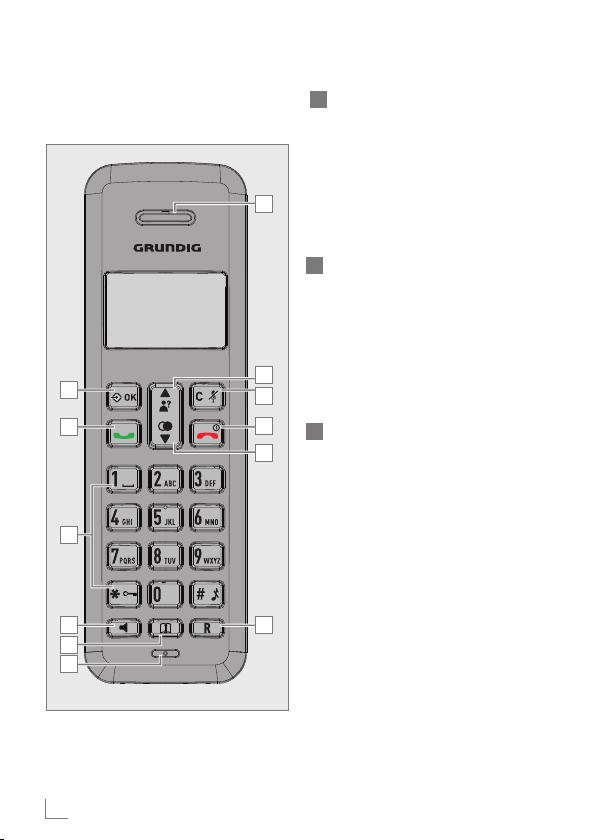
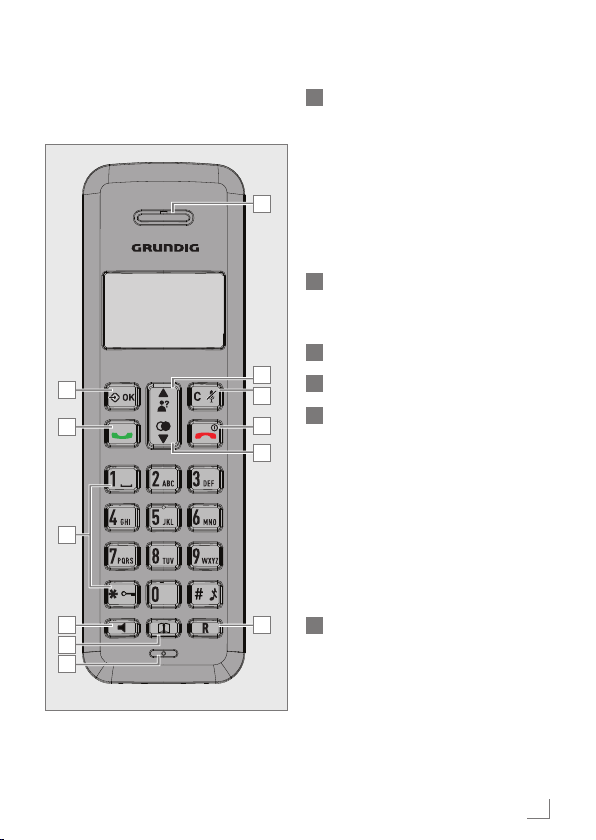
Overview of the Handset
(for Speakerphone model)
A
B
C
D
E
F
6
ENGLISH
A LEFT SOFT KEY (MENU/OK)
In idle mode: Press to access the
main menu
In sub-menu mode: Press to confirm
the selection.
G
During a call: Press to access Intercom/ Phonebook/ Redial List/ Call
List.
B
TALK ON
In idle / predialing mode: Press to
make a call.
In Redial list / Call List / Phonebook
entry: Press to make a call to the
H
I
J
K
selected entry in the list.
During ringing: Press to answer a
call.
C
ALPHANUMERIC KEYPAD,
* (STAR), # (HASH)
Press to insert a digit / character / *
/ #.
1 key in idle mode: Press and hold
to access the voice mail (for EU version.
* key in idle mode: Press and hold
to enable or disable the keypad
lock.
L
* key during a call (in Pulse mode):
Press to switch to tone mode.
# key in Idle mode: Press and hold
to turn on / off the ringer.
0 key in idle / predialing / number
editing mode: Press and hold to insert
a pause.
# key in Call List mode: Press to review caller’s number if applicable.
Page 7
GETTING TO KNOW YOUR PHONE
D
SPEAKERPHONE
During a call: Press to turn on / off
the speakerphone.
In Idle mode / predialing mode /
Redial list / Call List / Phonebook
G
A
B
C
D
E
F
H
I
J
K
L
entry: Press to make a call with
speakerphone.
During ringing: Press to answer a
call with speakerphone.
E
PHONEBOOK
In idle mode: Press to access the
phonebook list.
F
MICROPHONE
G
EARPIECE
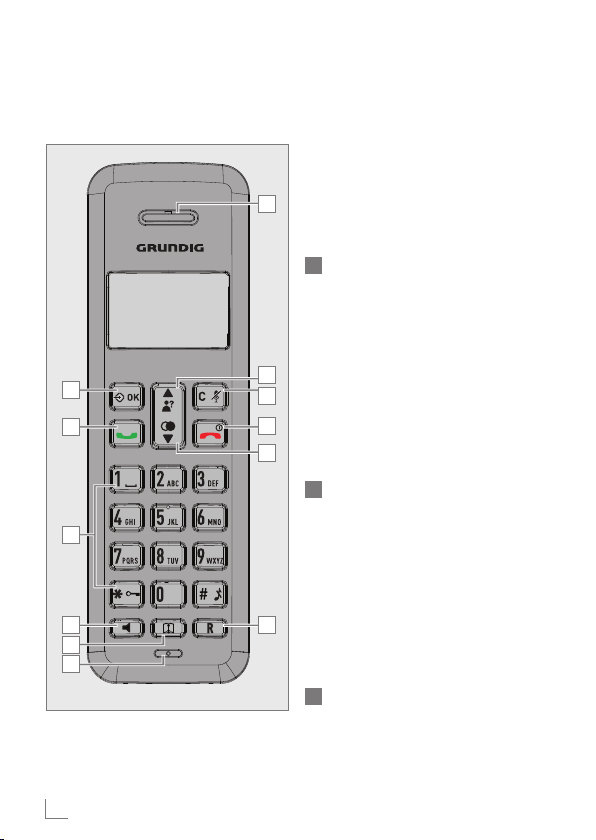
H
U P
In idle mode: Press to access the call list
In menu mode: Press to scroll up the
menu items.
In Phonebook list / Redial list / Call
List: Press to scroll up the list.
During a call: Press to increase the
volume.
In ringing: Press to increase the ringer
volume.
I
RIGHT SOFT KEY (CLEAR/
BACK/MUTE/INTERCOM)
In main menu mode: Press to go
back to idle screen.
In sub-menu mode: Press to go back
to previous level.
In sub-menu mode: Press and hold
to go back to idle screen.
______
ENGLISH
7
Page 8
GETTING TO KNOW YOUR PHONE
In editing / predialing mode: Press
to clear a character / digit.
In editing / predialing mode: Press
and hold to delete all the characters / digits.
G
A
B
C
D
E
F
H
I
J
K
L
During a call: Press to mute / unmute the microphone.
In idle mode: Press to intercom another handset.
J
TALK OFF
During a call: Press to end a call
and go back to idle screen.
In menu / editing mode: Press to go
back to previous menu.
In menu / editing mode: Press and
hold to go back to idle screen.
In idle mode: Press and hold to
power off the handset.
In idle mode (when the handset
is powered off): Press and hold to
power on the handset.
K
DOWN
In idle mode: Press to access the
redial list.
In menu mode: Press to scroll down
the menu items.
In Phonebook list / Redial list / Call
List: Press to scroll down the list.
During a call: Press to decrease the
volume.
In ringing: Press to decrease the
ringer volume.
L
FLASH
In idle / predialing mode: Press to
insert a flash.
During a call: Press to dial a flash.
______
8
ENGLISH
Page 9
GETTING TO KNOW YOUR PHONE
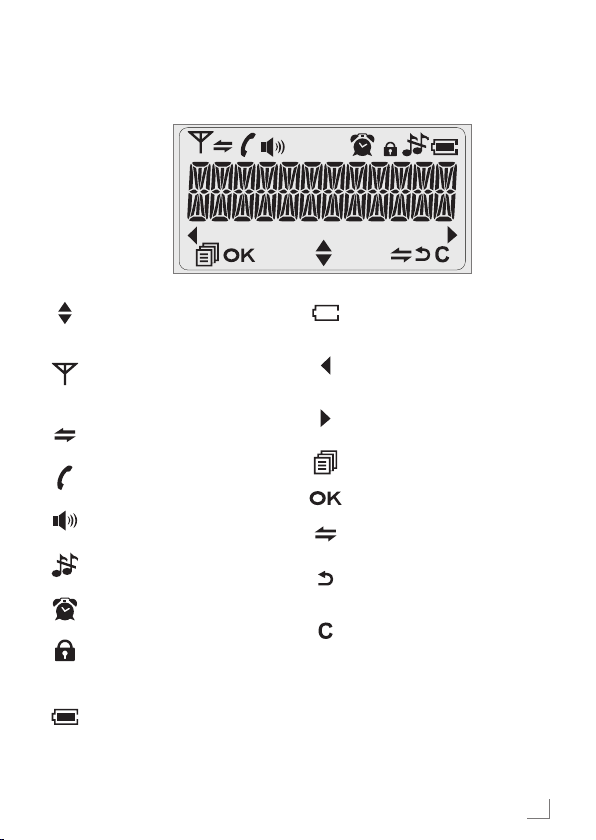
Display Icons and Symbols
______
Scroll up / down the menu items
/ Phonebook list / Redial list /
Call List
Steady when the handset is in
range of the base. Flash when out
of range of the base or not registered to the base.
Steady when an intercom is in
progress. Flash when there is an
incoming internal call.
Indicate a call is in progress.
Indicate that handsfree is being
used. (for speakerphone model
only)
Indicate that the ringer is switched
off.
Steady when an alarm is set. Flash
when the alarm time set before
reaches.
Indicate that the keypad is locked.
Indicate when the battery is fully
charged. Whole icon flashes when
the battery performs initial charging. Internal block icon flashes
when the battery is in final charging stage.
Indicate when the battery needs
charging. Flash when low battery
power level is detected.
Indicate when more characters are
existed before the text currently
displayed.
Indicate when more characters
are existed after the text currently
displayed.
Press to select more menu options
if applicable
Press to confirm the current selection if applicable.
Press to conduct Intercom call
when idle
Press to go back to previous menu
level or cancel the current action if
applicable
Press to clear a character or stop
the alarm if applicable, press to
mute / unmute during a call.
ENGLISH
9
Page 10
GETTING TO KNOW YOUR PHONE
______
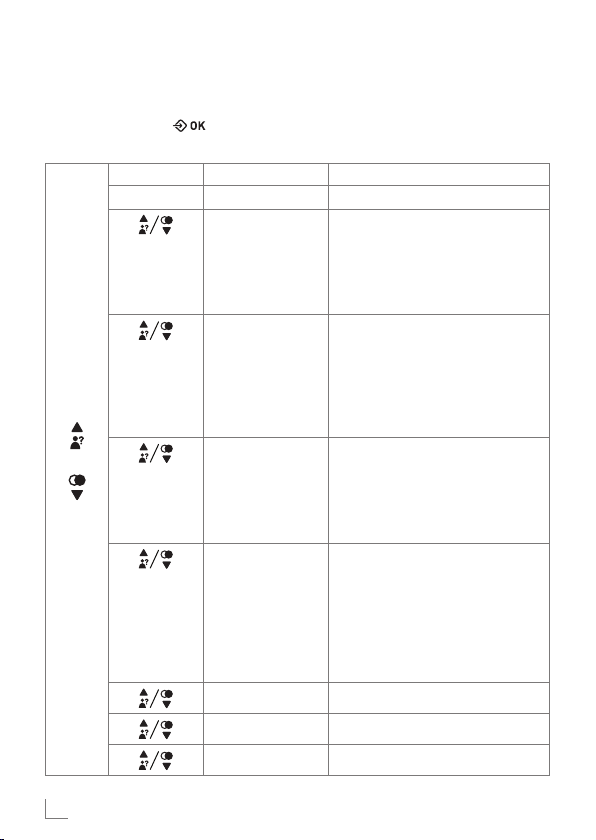
Menu Structure
In idle mode, press » « will firstly access the Call List menu. Refer to the following for the menu structure.
Key Press Main Menu Sub Menu
MENU
UP /
DOWN
CALL LIST Review Call List
PHONEBOOK Review phonebook list
BS SETTINGS PB STATUS BS RINGER (Optional)
HS SETTINGS ALARM
REGISTRATION PIN?
DEFAULT PIN?
Under a selected Call List entry:
ADD TO PB
DELETE
DELETE ALL
DETAILS
Under a phonebook entry:
ADD
VIEW
EDIT
DELETE
DELETE ALL
RING VOLUME (Optional)
DELETE HS
DIAL MODE
FLASH TIME
CHANGE PIN
RING SETUP
TONE SETUP
LANGUAGE
RENAME HS
HS DISPLAY
AUTO ANSWER
DATE & TIME
10
ENGLISH
Page 11

GETTING TO KNOW YOUR PHONE
______
Text and Digit Entry Table
The following tables show you where
each letter and punctuation character
can be found. Respective character
table will be used when corresponding menu language is selected. This
will be helpful when storing a name
in the phonebook and renaming your
handset.
In editing mode, a cursor is displayed
to indicate the current text entry posi-
Writing Tips:
1 Once a character is selected, the
cursor will move to the next position
after a short pause.
2 You can move the cursor within the
text by » « to amend the text
entry.
3 Press » « to delete the last character.
4 Press and hold » « to delete the
entire text string.
tion. It is positioned at the right of the
last character entered.
Character Set
Key
(For phonebook name editing and renaming handset)
Key
1st 2nd 3rd 4th 5th 6th 7th 8th 9th 10th
press
1 space - 1 1
2 A B C 2 2
3 D E F 3 3
4 G H I 4 4
5 J K L 5 5
6 M N O 6 6
7 P Q R S 7 7
8 T U V 8 8
9 W X Y Z 9 9
0 0 0, P (Pause)
* * ? / \ ( ) *
# # , - . & #
Alphanumeric Editing
Number Editing
(For phone number
editing, date/time
editing)
ENGLISH
11
Page 12

USING YOUR PHONE
_________________________________
Make a Call
Preparatory Dialing
Enter the phone number and press » «
or » « to dial the number. Press » «
to clear the entry.
Direct Dialing
Press » « or » « to take the line and
enter the phone number.
Call from the phonebook
Press » « to access the phonebook
and press » « to select the desired
phonebook entry. Press » « or » «
to dial out to the selected phonebook
entry. Alternatively, press » « to access the phonebook to get the desired
phonebook entry.
Call from the Call List
Press » « to access the Call List and
press » « to select the desired Call
List entry. Press » « or » « to dial out
to the selected Call List entry. Alternatively, press » « to access the Call
List from the main menu.
Call from the redial list
Press » « to access the redial list and
press » « to select the desired redial
number. Press » « or » « to dial out
to the selected redial number.
Call timer
Your handset automatically times the
duration of every call. The call timer will
display a few seconds after the call has
made. It is shown in hours, minutes and
seconds format (HH:MM:SS).
Answer a Call
If the handset is not on the charging
cradle:
When the phone rings, press » « / » «
to answer a call.
If the handset is on the charging cradle
or the base station and if AUTO ANSWER is set to ON:
When the phone rings, pick up the
handset to answer a call.
End a Call
During a call connection, press » « to
end the call.
OR
Put the handset on the base station to
end the call.
Adjust Earpiece and
Handsfree Volume
There are 5 levels (VOLUME 1 to VOLUME 5) to choose from for each of earpiece and handsfree volume.
During a call:
Press » « to select volume 1-5. The
current setting is shown. When you end
the call, the setting will remain at the
last selected level.
12
ENGLISH
Page 13

USING YOUR PHONE
_________________________________
Mute a Call
You can talk to someone nearby without
letting the caller hear you during a call.
During a call:
Press » « to mute the microphone and
“MUTED” will display on the LCD. Your
caller cannot hear you. Press again to
unmute the microphone.
Set the Silent Mode
In idle mode, press and hold » « to
turn off the handset ringer. The “RINGER
OFF” icon is displayed on the LCD.
In silent mode, press and hold » «
to turn on the handset ringer. The
“RINGER OFF” icon will disappear.
Turn on the Keypad Lock
In idle mode, press and hold » «
to turn on the keypad lock. The » «
“KEYPAD LOCK” icon is displayed on
the LCD.
In keypad lock mode, press and hold
» « to turn off the keypad lock. The
» « “KEYPAD LOCK” icon will disap-
pear.
Redial the last number
You can redial up to 5 of the last numbers called. If you have stored a name
in the phonebook to go with the number, the name will be displayed instead.
The most recent last number will display
at the top of the redial list.
Redial a Number from the Redial List
1 In idle mode, press » « to access
the redial list.
Remarks: If redial entry with name,
press » « to view the number.
2 Press » « to browse the redial list.
3 Press » «/ » « to dial to the se-
lected redial number.
Note:
█
If there are no numbers in the
redial list, the display shows
“EMPTY”.
Store a Redial Number into the
Phonebook
1 Follow Steps 1 and 2 in section Re-
dial a Number from the Redial List
2 Press » « and » « to select
ADD TO PB.
3 Press » « to enter the name.
4 Press » « to store the redial num-
ber into the phonebook.
5 Press » « to select phonebook
melody.
6 Press » « to browse the melody
list. The respective melody will be
played when browsing the melody
list.
7 Press » « to confirm.
ENGLISH
13
Page 14

USING YOUR PHONE
_________________________________
Delete a Redial Number
1 Follow Steps 1 and 2 in section Re-
dial a Number from the Redial List
2 Press » « and » « to select
DELETE.
3 Press » « to confirm.
Delete the Entire Redial List
1 Follow Steps 1 and 2 in section Re-
dial a Number from the Redial List
2 Press » «and » « to select DE-
LETE ALL.
3 Press » « to confirm.
4 Press » « to confirm again.
Find the Handset
You can locate the handset by pressing
» « on the base station. All the hand-
sets registered to the base will produce
the paging tone and “PAGING” is displayed on the LCD. You can stop the
paging by pressing » «/ » « / » «
/ » « on any handset or » « on the
base again.
Note:
█
If there is an incoming call during
paging, the phone will ring with
the incoming call instead of paging.
Make an Internal Call
This feature is only applicable when
there are at least two registered handsets. It allows you to make internal calls,
transfer external calls from one handset
to another handset and make conference calls. If the called handset is not
answered within 60 seconds, the called
handset will stop ringing and the calling
handset will return to standby mode.
Note:
█
If only one handset is registered
to the base station, press » «
will display “NOT POSSIBLE”
Intercom Another Handset
1 In idle mode, press » « and the
registered handsets will display except the calling handset.
2 Enter the desired handset number to
intercom with.
3 The called handset rings and press
» «on the called handset to establish the internal call.
Note:
If two handsets are registered to the
base station, press » « will connect
to another handset immediately.
Call All Handsets
1 In idle mode, press » « and the
registered handsets will display.
2 Press » KEY 9 « to ring to all regis-
tered handsets.
14
ENGLISH
Page 15

USING YOUR PHONE
_________________________________
Transfer an External Call to another handset
During an external call:
1 Press » « and » « to select
INTERCOM.
2 Press » « to select the desired
handset to intercom with.
3 The external call is put on hold au-
tomatically and the called handset
rings.
4 Press » «on the called handset to
establish an internal call.
5 Press » « on the calling handset or
put the calling handset on the charging cradle to end the current call with
the external party.
6 The external call is transferred to the
called handset.
Make a 3-way Conference Call
The conference call feature allows one
external call to be shared with two
handsets (in intercom). The three parties
can share the conversation and no network subscription is required.
During an external call:
1 Follow Steps 1 to 4 in section Trans-
fer an External Call to another handset
2 Press and hold » « on the calling
handset to establish the conference
call.
Nate:
Any handset hangs up during a
conference call will leave the other
handset still in connection with the
external call.
ENGLISH
15
Page 16

PRIVATE PHONEBOOK
_______________________________
Your phone can store up to 20 private
phonebook entries with names and
numbers. Each phonebook entry can
have a maximum of 20 digits for the
phone number and 12 characters for
the name. You can also select different
ringtones for your phonebook entries.
Phonebook entries are stored alphabetically by name.
Add a New Phonebook
Entry
In idle:
1 Press » « to access the phonebook.
OR
Press » « and » « to select
PHONEBOOK main menu item
and then press <OK> to access the
phonebook.
2 Press » « to select ADD.
3 Press » « to enter the name.
4 Press » « to enter the number.
5 Press » « and » « to select
the desired ringtone for your phonebook entry.
6 Press » « to store the phonebook
entry.
Search a Phonebook Entry
In idle:
1 Press » « to access the phonebook.
2 Enter the first character of the name
by multi-tap.
View a Phonebook Entry
In idle:
1 Press » « to access the phonebook.
2 Press » « to select the desired
phonebook entry.
3 Press » « and » « to select
VIEW.
4 Press » « and » « to review
the name, number and melody of the
selected phonebook entry.
Note:
█
If number is more than 12 digits,
press » « or » « to view the
remaining digits.
Edit a Phonebook Entry
In idle:
1 Press » « to access the phonebook.
2 Press » « to select the desired
phonebook entry.
3 Press » « and » « to select
EDIT.
4 Press » « and the current con-
tents of the selected phonebook
entry displays.
5 Edit the name and press » «.
6 Edit the number and press » «.
7 Press » « to select the ringtone
and press » « to confirm.
16
ENGLISH
Page 17

PRIVATE PHONEBOOK
Delete a Phonebook Entry
In idle:
1 Press » « to access the phonebook.
2 Press » « to select the desired
phonebook entry.
3 Press » « and » « to select
DELETE.
4 Press » « to confirm.
Delete the Entire Private
Phonebook
1 Press » « to access the phonebook.
2 Press » « and » « to select
DELETE ALL.
3 Press » « to confirm.
4 Press » « to re-confirm.
Check the Phonebook
Usage
You can check how many phonebook
entries have been occupied in your
phone and how many phonebook entries are available for you to store in the
phonebook.
1 Press » « to access the phonebook.
2 Press » « and » « to select PB
STATUS.
3 Press » « to confirm.
_______________________________
ENGLISH
17
Page 18

CALLER DISPLAY
___________________________________________
This feature is available if you have
subscribed the Caller Line Identification service with your network service
provider. Your phone can store up to
10 received calls with date/time information in the Call List. The number will
be shown on the LCD when the phone
is ringing. If the number matches with
one of the entries in your Private Phonebook, the caller’s name stored in the
private phonebook will be displayed
alternatively with the number. The handset will ring with the melody associated
with that phonebook entry.
If the caller number is disabled to send
caller information, “WITHHELD” will
display.
If the caller number is not provided,
“OUT OF AREA” will display.
In standby, if three unanswered calls
are received, “3 NEW CALLS” will
be displayed.
View the Call List
All received calls are saved in Call List
with the latest call putting at the top of
the list. When the call list is full, the oldest call will be replaced by a new call.
The unanswered call which has not
been read is marked with a »*« at the
centre of the bottom line of the display.
1 Press » « to access the call list.
OR
Press » « and » « to select
CALL LIST.
2 Press » « to select the desired
entry.
3 Press » « to view the caller’s num-
ber if applicable.
Store a Call List Number
into the Phonebook
1 Follow Steps 1 and 2 in Section
View the Call List
2 Press » « and » « to select
ADD TO PB.
3 Press » « to enter the name.
4 Press » « and the selected call
list number is displayed.
5 Edit the number if necessary.
6 Press » « and » « to select
the melody.
7 Press » « to confirm.
Delete an entry in the Call
List
1 Follow Steps 1 and 2 in Section
View the Call List
2 Press » « and » « to select
DELETE.
3 Press » « to confirm.
18
ENGLISH
Page 19

CALLER DISPLAY
___________________________________________
Delete the entire list of the
Call List
1 Follow Steps 1 and 2 in Section
View the Call List.
2 Press » « and » « to select
DELETE ALL.
3 Press » « to confirm.
4 Press » « to re-confirm.
View the Details of the Call
List Entry
1 Follow Steps 1 and 2 in Section
View the Call List
2 Press » « and » « to select
DETAILS.
3 Press » « to display the date and
time of the selected call list entry.
4 Press » « to go back to previous
screen.
ENGLISH
19
Page 20

VOICE MAIL
_________________________________________________
Voice Mail Waiting Indication (VMWI)
VMWI icon is an indication given to
you when a new voice mail message is
waiting on the network service provider.
This feature is available if you have subscribed to the voicemail service from
you network service provider. You can
press and hold »Key 1«to dial out to the
voice mail number directly to listen to
your voice mail messages.
Access Voice Mail Messages
VMWI icon will display and the VMWI
entry is stored in the Call List when you
have new message in your voice mailbox.
1 Press » « and » « to select
CALL LIST.
OR Press » « in idle to access the
call list.
2 Press » « to select the desired
VMWI entry.
3 Press » « to dial out to the voice
mail server.
Note:
█
If a more recent VMWI entry is
received from the same network
server number of an existing
VMWI entry, the new VMWI will
not be stored but the date/time of
the VMWI will be updated on the
existing VMWI entry. After you
have accessed to all new voice
mail messages, VMWI will turn off
automatically. When the call list is
full, the new VMWI entry will replace the oldest non-VMWI entry
in the call list.
20
ENGLISH
Delete VMWI Entries
To delete a single VMWI entry from the
call list:
1 Press » « and » « to select
CALL LIST.
OR Press » « in idle to access the
call list.
2 Press » « to select the desired
VMWI entry.
3 Press » « and » « to select
DELETE.
4 Press » « to confirm.
To delete all VMWI entries from the
call list:
To delete a single VMWI entry from
the call list:
1 Press » « and » « to select
CALL LIST.
OR Press » « in idle to access the
call list.
2 Press and hold » Key 4 « to delete all
VMWI entries.
The VMWI icon will disappear.
Note:
█
If you choose DELETE ALL function in the call list, the handset will
also delete all VMWI entries and
CID entries.
Page 21

PHONE SETTINGS
________________________________________
Your phone comes with a selection of
settings that you can change to personalize your phone the way you like it to
work.
Date and Time Settings
You will need to set the correct time
and date so that you know when you
received answering machine (applicable to model with answering machine)
or call list entries.
Change the Date Format
1 Press » « and » « to select
HS SETTINGS.
2 Press » « and » « to select
DATE & TIME.
3 Press » « and » « to select
DATE FORMAT.
4 Press » « to select your desired
date format (DD-MM-YY or MMDD-YY).
5 Press » « to confirm.
Change the Time Format
1 Press » « and » « to select
HS SETTINGS.
2 Press » « and » « to select
DATE & TIME.
3 Press » « and » « to select
TIME FORMAT.
4 Press » « to select your desired
time format (12 HR or 24 HR).
5 Press » « to confirm.
Set the Time
1 Press » « and » « to select
HS SETTINGS.
2 Press » « and » « to select
DATE & TIME.
3 Press » « and » « to select
SET TIME.
4 Press » « to enter the time infor-
mation. The time entered will be in
the format you set in Section Change
the Time Format
5 Press » « to confirm.
Note:
█
If time has been set before, the
current time will display, otherwise, “HH:MM” will display.
Set the Date
1 Press » « and » « to select
HS SETTINGS.
2 Press » « and » « to select
DATE & TIME.
3 Press » « and » « to select
SET DATE.
4 Press » « to enter the date infor-
mation. The date entered will be in
the format you set in Section Change
the Date Format
5 Press » « to confirm.
Note:
█
If date has been set before, the
current date will display, otherwise, “DD-MM-YY” will display.
ENGLISH
21
Page 22

PHONE SETTINGS
________________________________________
Alarm Settings
You can use this phone to set an alarm
clock. When an alarm is set, the » «
displays on the LCD. When the alarm
time is reached, the » « and “ALARM
ON” flash on the LCD ringing with the
alarm melody for a duration of 45 seconds. You can press any key to disable
the alarm. If snooze function is activated,
the alarm will sound again at the end of
the snooze period of seven minutes.
Note:
█
Key press is still applicable if
handset keypad is locked and
when the alarm time is reached.
█
The alarm volume level is the same
as the settings of the handset ringer
volume. If the handset ringer is set
to VOLUME OFF, the alarm still
sounds at VOLUME 1 level.
█
During an external call or internal
call, if an alarm is set and when
the alarm time is reached, the » «
and “ALARM ON” will still flash.
An alarm tone will be emitted
from the earpiece to notify user the
alarm time is reached. Once user
press any key or press and hold
» « to disable the alarm, it will
revert to the call duration screen.
█
During paging or ringing, the
alarm will not sound when the
alarm time is reached. However,
if snooze function is enabled, the
alarm will sound again at the end
of the snooze period provided that
it’s not ringing or in paging mode
at the end of the snooze period.
22
ENGLISH
Turn on/off the Alarm
1 Press » « and » « to select
HS SETTINGS.
2 Press » « and » « to select
ALARM.
3 Press » « and » « to select
ON/OFF.
4 Press » « to confirm.
Note:
█
If ON is selected, you will be
asked to set the alarm time.
Set the Alarm Time
(if the Alarm is set to be ON)
1 Follow Steps 1 to 4 in Section Turn
on/off the Alarm
2 Enter the alarm time.
3 Press » « to set the snooze func-
tion.
4 Press » « and » « to select
ON or OFF.
5 Press » « to confirm.
Page 23

PHONE SETTINGS
________________________________________
Handset Settings
Set the Ringer Melody for Internal Calls
1 Press » « and » « to select
HS SETTINGS.
2 Press » « and » « to select
RING SETUP.
3 Press » « and » « to select
INT RING.
4 Press » « and » « to select
the desired ringer melody (a total of
5 melodies for your selection) for setting ringer melody for internal calls.
Note:
█
The respective ringer melody will
be played while browsing the
melody list.
█
Total of 10 melodies for selection
in speakerphone model.
5 Press » « to confirm.
Set the Ringer Melody for
External Calls
1 Press » « and » « to select
HS SETTINGS.
2 Press » « and » « to select
RING SETUP.
3 Press » « and » « to select
EXT RING.
4 Press » « and » « to select the
desired ringer melody (a total of 10
melodies for your selection) for setting
ringer melody for external calls.
Note:
█
The respective ringer melody will
be played while browsing the
melody list.
5 Press » « to confirm.
Set the Ringer Volume
1 Press » « and » « to select
HS SETTINGS.
2 Press » « and » « to select
RING SETUP.
3 Press » « and » « to select
RING VOLUME.
4 Press » « and » « to select
the desired ringer volume (a total
of 6 ringer volume levels including
VOLUME OFF).
Note:
█
The respective ringer volume will
be played during your selection.
█
If VOLUME OFF is selected,
»Ringer Off« icon will display.
5 Press » « to confirm.
ENGLISH
23
Page 24

PHONE SETTINGS
________________________________________
Set Alert Tones
A single beep is emitted when you
press a key. You can turn on or off the
key tone. You can also turn on the alert
tones when low battery and out of
range are detected. Low battery tone
will be emitted while you are talking
with the phone to alert you that you
need to charge up your battery.
1 Press » « and » « to select
HS SETTINGS.
2 Press » « and » « to select
TONE SETUP.
3 Press » « and » « to select
KEY TONE / BATTERY TONE / OUT
OF RANGE.
4 Press » « and » « to turn on
or off these tones.
5 Press » « to confirm.
Set the Handset Language
1 Press » « and » « to select
HS SETTINGS.
2 Press » « and » « to select
LANGUAGE.
3 Press » « and » « to select
the desired language.
4 Press » « to confirm.
Rename the Handset
1 Press » « and » « to select
HS SETTINGS.
2 Press » « and » « to select
RENAME HS.
3 Press and enter the name of your
handset.
4 Press » « to confirm.
Choose the Information to be
displayed in idle
You can choose to display time or
handset name in your idle screen.
1 Press » « and » « to select
HS SETTINGS.
2 Press » « and » « to select
HS DISPLAY.
3 Press » « and » « to select
HANDSET NAME or TIME.
4 Press » « to confirm.
Set the Auto Answer
If you turn on the Auto Answer, you can
pick up the call from the cradle without
pressing any key.
1 Press » « and » « to select
HS SETTINGS.
2 Press » « and » « to select
AUTO ANSWER.
3 Press » « and » « to turn on
or off the auto answer feature.
4 Press » « to confirm.
24
ENGLISH
Page 25

PHONE SETTINGS
________________________________________
Base Settings
The current settings are marked an asterisk which is displayed at the rightmost of the menu item.
Set the Base Ringer Melody
(Optional)
1 Press » « and » « to select BS
SETTINGS.
2 Press » « and » « to select BS
RINGER.
3 Press » « and » « to select
the desired ringer melody (a total of
5 melodies for your selection)
Note:
█
The respective ringer melody will
be played while browsing the
melody list.
4 Press » « to confirm.
Set the Ringer Volume (Optional)
1 Press » « and » « to select BS
SETTINGS.
2 Press » « and » « to select
RING VOLUME.
3 Press » « and » « to select
the desired ringer volume (a total
of 6 ringer volume levels including
VOLUME OFF).
Note:
█
The respective ringer volume will
be played during your selection.
4 Press » « to confirm.
De-register a Handset
You are requested to enter the 4-digit
PIN in order to de-register a handset
from the base station. The antenna icon
on the de-registered handset will blink.
Note:
█
You cannot de-register the handset that you are currently using.
1 Press » « and » « to select BS
SETTINGS.
2 Press » « and » « to select
DELETE HS.
3 Press » « and you are requested
to enter the 4-digit system PIN.
4 Enter the 4-digit system PIN.
5 Press » « and a list of registered
handsets is displayed.
6 Press » « to select one of the
handsets that you want to de-register.
7 Press » « to confirm.
Change the dial mode (Optional)
1 Press » « and » « to select BS
SETTINGS.
2 Press » « and » « to select
DIAL MODE.
3 Press » « and » « to select
TONE or PULSE.
4 Press » « to confirm.
ENGLISH
25
Page 26

PHONE SETTINGS
________________________________________
Change the Flash Time
(Optional)
The flash time settings is country dependent. Please contact your local service
provider for the correct settings.
1 Press » « and » « to select BS
SETTINGS.
2 Press » « and » « to select
FLASH TIME.
3 Press » « and » « to select
your desired flash time (SHORT, MEDIUM, LONG).
4 Press » « to confirm.
Change the System PIN Code
A 4-digit system PIN code is used for
changing the system settings of the
base station. It is used to protect your
phone against unauthorized use. The
default system PIN code is 0000.
1 Press » « and » « to select BS
SETTINGS.
2 Press » « and » « to select
CHANGE PIN.
3 Press » « and you are requested
to enter the 4-digit system PIN.
4 Enter the old system PIN.
5 Press » « and enter the new sys-
tem PIN.
6 Press » « and enter the new sys-
tem PIN again.
Note:
█
If the new PIN entered in Step 6 is
not matched with the new system
PIN entered in Step 5, user is requested to enter the valid system
PIN again in Step 5.
7 Press » « to confirm.
26
ENGLISH
Page 27

PHONE SETTINGS
________________________________________
Registration
Your handset and base station is preregistered. Up to five handsets can be
registered to a single base station.
If for some reason, the handset is not
registered to the base station ( » «
flashes even when the handset is near
the base station), register your handset
according to the following procedure.
1 Press and hold » « on the base station
for about five seconds, the base station
is entered into registration mode.
2 Press » « and » « to select
REGISTRATION.
3 Press » « and select the destina-
tion base you would like to register to.
4 Press » « and you are requested
to enter the 4-digit system PIN.
5 Enter the 4-digit system PIN.
6 Press » « to confirm.
If the handset registration is successful,
you will hear a confirmation tone and
the » « will stop flashing. The handset
will automatically be allocated the next
available handset number. This handset
number is shown in the handset display in
standby mode. If the handset registration
is unsuccessful, the » « will still flash.
Reset Your Phone
You can reset your phone to the default
settings. After reset, all you personal
settings and call list entries will be deleted, but your phonebook remains unchanged.
1 Press » « and » « to select
DEFAULT.
2 Press » « and you are requested
to enter the 4-digit system PIN.
3 Enter the 4-digit system PIN.
4 Press » « to confirm.
5 Press » « to re-confirm.
ENGLISH
27
Page 28

DEFAULT SETTINGS
Items Default Values
EXT RING MELODY 1
INT RING MELODY 2
Handset RING VOLUME VOLUME 3
BS RINGER (Optional) MELODY 1
Base RING VOLUME (Optional) VOLUME 3
EARPIECE VOLUME VOLUME 3
SPEAKER VOLUME VOLUME 3
HANDSET NAME GRUNDIG
KEY TONE ON
BATTERY TONE ON
OUT OF RANGE OFF
RINGER OFF OFF
KEYPAD LOCKED OFF
AUTO ANSWER ON
HS DISPLAY HS NAME
DATE FORMAT DD—MM--YY
TIME FORMAT 24 HR
DATE --/--
TIME --:--
ALARM OFF
MENU LANGUAGE TURKISH
DIAL MODE TONE
SYSTEM PIN 0000
_______________________________________
28
ENGLISH
Page 29

TECHNICAL FEATURES
– LCD display backlighting
– CLIP (Calling Line Identification Presentation)
– Private phonebook memory (20 name, number and melody)
– CID memory (10 )
– Last numbers redial (5)
– Handset ringing melodies (10)
– Handset ringer volume control (5 levels + off )
– Base set ringing melodies (5)
– Base set ringer volume control (5 levels + off )
– Handset keypad lock
– Call timer (call duration)
– Visual warning of handset out of range
– English menu language
– Intercom between handsets
– Call transfer between handsets
– 3-way conference ( 2 internal & 1 external )
– 5 handsets can be registered to the same base unit
– The same handset can be registered to 4 base units
__________________________________
ENGLISH
29
Page 30

TECHNICAL FEATURES
Standard : DECT/GAP
Channel quantity : 120
Voice coding : 32 kbit/s (ADPCM)
Modulation : GFSK
Caller ID standard : DTMF/FSK – ETSI
Dialing system : DTMF / Pulse
Radio frequency range : from 1880 MHz to 1900 MHz
Range : Indoor max. 50 m
: Outdoor max. 300 m
Mains adapter input : 100-240 VAC 50/60 Hz, 150mA
Mains adapter output : 6.0VDC 300mA
Power consumption : 3W (approx.)
Handset battery : 2 pcs AAA type NiMh, 400 mAh
Handset talk time : max. 10 hrs
Handset standby time : max. 100 hrs
Operational temperature range : 0ºC - 40ºC
Dimensions
Handset :48x153x30 mm
Base unit :105x90x110 mm
Weight
Handset :122 gr. (with batteries)
Base unit :110 gr.
Gross weight of package :440 gr.
Note:
█
If you have another GAP compliant DECT phone, its handset and/or base
unit can be registered to your phone.
__________________________________
30
ENGLISH
Page 31

TROUBLESHOOTING
____________________________________
Problem Cause Solutions
No dialing tone
when pressing
key
█
The connection cord of
the base station is not
plugged in.
█
The adapter cord is not
plugged in correctly in
the base station.
█
The line is busy, as another handset is used.
█
Wrong connection cord
(no Euro AS)
█
Check the connections. Unplug and plug back in the
mains. Check that the telephone line cord has been
plugged into the base station
and the phone socket.
█
Check the base station plug
and the 220V plug (remove
and plug-in).
█
Wait until the line is unoccupied.
█
Use the original connection
cord.
When connect to
Dialing prefix is needed. Insert the dialing prefix
a PBX, no and/or
wrong connection
after dialing.
█
“SEARCHING” is
displayed.
Base station out of
range.
█
Base station not con-
Reduce the range.
Connect base station to mains.
nected to mains.
The call does not
work.
Service not activated or
wrong operator or wrong
setting
Check your Subscription with
network or change the dial
mode.
No display. Empty battery Recharge battery
ENGLISH
31
Page 32

R&TTE Declaration of Conformity (DoC)
No: 2013/15
We, Arçelik A.Ş.
Sütlüce Karaağaç Cad. No:2/6
Beyoğlu, Istanbul, Turkey
declare under our sole responsibility that the product:
GDT-310
Grundig brand DECT Telephone
to which this declaration relates is in conformity with the essential requirements
and other relevant requirements of the R&TTE Directive (1999/5/EC).
The product is in comformity with the following standards and/or other normative
documents:
Art 3.1.a SAFETY: EN60950-1/A12: 2011
Art 3.1.b EMC : EN 301489-01 V1.9.2:2011
EN 301489-06 V1.3.1:2008
Art 3.2 Radio: EN 301406 V2.1.1:2009
NOTIFIED BODY INVOLVED:
BRITISH APPROVALS BOARD FOR TELECOMMUNICATIONS
Forsyth House Churchfield Road
Walton-on-Thames
Surrey KT12 2TD
United Kingdom
Yekta URAL
Quality Assurance Manager
0168
Page 33

Grundig Intermedia GmbH
Beuthener Strasse 41
D–90471 Nürnberg
www.grundig.com
72011 909 7000 14/30
 Loading...