

Page 1

HDD DVD RECORDER
GDRH 5625
Page 2

2
CONTENTS
_______________________________________________
6-7 HDD DVD recorder GDRH 5625
6 Special features of your HDD DVD recorder
6 Disc formats
7 Scope of delivery
8 Set-up and safety
9-18 Overview
9-10 The main functions
11 Menus and navigation
12 The front of the HDD DVD recorder
13 The displays of the HDD DVD recorder
14-15 The back of the HDD DVD recorder
16-18 The remote control
19-26 Connection and preparation
19 Connecting a rooftop antenna or cable feed
20 Connecting the DVB receiver
21-23 Connecting a television
24 Connecting an audio system with analogue two-channel stereo sound
25 Connecting a digital multi-channel amplifier or digital two-channel audio
system
26 Connecting the power cord
26 Inserting batteries in the remote control
27-29 Initial setup
27 Switching on the HDD DVD recorder
27-28 Initial setup
28 Sorting television stations
29 Setting the TV norm
29 Selecting the screen format of your television set
30-33 Time shift functions
30-31 Time shift – watching a current television programme with a delay
32 Watching programmes with a time shift
33 Searching for scenes in the time shift memory
33 Copying sections of the programme stored in the time shift memory into the
HDD archive
34-46 Disc playback
34 Preparation
34 Inserting discs
34 Removing discs
35-36 DVD playback
36 DVD+RW/+R/-RW/-R playback
37-38 S-VCD/VCD playback
39-42 Playing audio and video files
43-45 Picture data CD playback
46 Audio CD playback
47-49 HDD archive playback
47 Preparation
47-48 Playback
49 Selecting and playing scenes
Page 3

ENGLISH
3
50-53 Disc playback – convenience functions
50 Selecting titles and chapters
50 Selecting functions in the playback menu
50 Pausing and resuming playback
51 Frame search
51 Slow motion
51 Frame-by-frame playback
51 Selecting camera angles for scenes
51 Enlarging and moving a screen section (zoom)
52 Switching the dubbed language or the audio format
52 Selecting and displaying subtitles
52 Creating and playing a playlist
53 Repeating a chapter, a title or a disc
53 Repeating a selected section (A-B Repeat)
54 PIP mode
55-57 Recording – general information
55 Recording options
55 Suitable discs for recording
55 Unsuitable discs
55 Initialising discs
56-57 Recording quality and time
58-59 Recording on disc
58 Preparing for recording
58-59 Manually recording television programmes
59 Finalising a disc (DVD+R/-R/–RW)
59 Error messages
60-61 YesDVD function
60 Activating and deactivating the YesDVD function
60-61 Executing the YesDVD function
62-63 Recording on the HDD archive
62 Preparing for recording
62-63 Manually recording television programmes
64-67 Simultaneous operating modes
64 Recording on the HDD archive and simultaneous playback from the
HDD archive
65 Recording on the HDD archive and simultaneous playback from disc
66-67 Recording on disc and simultaneous playback from the HDD archive
68-70 Copying recordings
68 Setting the copy mode
69 Copying a title from the HDD archive onto a disc
70 Copying a title on the disc to the HDD archive
70 Copying all title on the disc to the HDD archive
71-74 Timer recordings
71-73 Programming recordings by entering the data for the television programme
73 Messages during or after programming a recording
74 Checking, modifying or deleting recording data
CONTENTS
_______________________________________________
Page 4

4
75-81 Editing data on the HDD archive
75 Preparation
75 Copying a title to disc
76 Deleting titles in the HDD archive
76 Sorting titles in the HDD archive
76-79 Functions in the HDD archive sub-menu
76 Deleting titles
77 Splitting titles in two
77 Editing titles (hiding scenes)
78 Connecting tracks
78 Creating a new index thumbnail for a title
78 Editing the names of recordings
79 Locking playback of a title
79 Protecting titles against accidental deletion and editing
80 Setting the size of the time shift memory
80 Viewing information via the HDD archive
80-81 Organising the hard disc
81 Deleting data in the HDD archive
81 Setting the display of the index picture
82-87 The file browser
82 About the file browser
82 The main menu of the file browser
83 Connecting external data devices
83 Preparation
84 Playing back data
84-87 Additional functions in the »file browser« menu
88-99 Editing data on a disc
88-90 Editing titles
91 Editing the names of recordings
91 Deleting titles (recordings) from the disc
92-93 Overwriting titles
93 Overwriting discs
94 Recording titles
95 Entering the name of the disc
96 Deleting the content of the disc (DVD+RW/-RW)
97 Recording titles
98 Finalising title editing
98 Locking a disc
99 Finalising a disc (DVD+R/-R/-RW only)
99 Deleting the content of the disc (DVD+RW/-RW)
100-101 Using external devices
100 Connection and preparation
101 Recording from external devices
102-103 Operation with a decoder
102 Connection and preparation
103 Recording pay TV programmes
104 Parental lock
104 Authorising the content of a DVD
104 Changing the access code (password)
CONTENTS
_______________________________________________
Page 5

ENGLISH
5
105-106 Audio settings
105 Selecting the digital output
105 Setting the sampling rate
106 Switching the dynamic range (volume range) on and off
107 PIP settings
107 Selecting the PIP default source
107 Selecting the size of the inset picture
107 Selecting the position of the inset picture
108-110 Custom settings
108 Language settings
109 Switching the screen saver on and off
109 Setting the brightness of the device display
109 Setting the transparency of the menu display
110 Inserting chapter markers in the recordings
110 Selecting the recording quality
110 Selecting the input source for recording
111-115 Special settings
111-112 Tuning television stations
113 Setting the time and date
113 Switching the HDD DVD recorder to another Grundig remote control
114 Setting the signal type for the video output socket
115 DivX©Video registration
115 Resetting the HDD DVD recorder to its original condition
116-121 Information
116 Technical data
117 General information on laser devices
118-119 Troubleshooting
120 Environmental note
120 Cleaning discs
120 Software information
121 Additional information for units sold in the UK.
CONTENTS
_______________________________________________
Page 6
6
Special features of your HDD DVD recorder
Your HDD DVD recorder provides you with perfect digital video recording and playback in studio quality.
You can record television programmes on the built-in hard disc of the
HDD DVD recorder, a DVD+RW/-RW or DVD+R/-R.
With the time shift function you can watch television programmes with a
time shift which are stored in the time shift memory. You can stop these
programmes and continue playback at the same point.
It also provides superb cinema-quality audio playback – in stereo or
with digital multi-channel sound – depending on the type of disc and
audio system or stereo television.
Other features of DVD video include the choice of audio channel and language, choice of subtitle language, and various camera recording angles.
Your HDD DVD recorder is suitable for DVDs with regional code 2.
In addition to DVDs the device can also play back DivX
©
Video CDs,
MP3 CDs, video CDs, S-Video CDs, JPEG (photo) CDs, KODAK Picture
CDs, WMA CDs and audio CDs.
DivX
©
, MP3, WMA and JPEG data can be played back from both
CD-ROM and DVD-ROM.
Disc formats
DVD+RW/-RWs and DVD+R/-Rs are suitable for recording and playback.
DVD video, DVD+RW/-RW, DVD+R/-R, audio CD, video CD, Super
Video CD, CD-R and CD-RW are all suitable playback formats.
Due to the difference in quality of the recording media and the quality of
the recording itself, it can occasionally happen that some recorded
DVDs or CDs cannot be read. This does not indicate a malfunction on
the part of the HDD DVD recorder.
You must finalise your own recordings on DVD+R/-R so that they can be
played on a DVD player.
When MP3 CDs are played back, individual tracks or pictures may be
skipped or incorrectly played back. This can be due to the disc configuration, the encoder software or the hardware used for the recording.
Audio CDs (CD-DA) meet the specification and bear the corresponding
logo. Copy-protected CDs do not meet this specification and do not
bear the logo. These CDs can cause playback errors.
HDD DVD RECORDER GDRH 5625
__________
max.
6h
TIME
OTR+
HDD
SHIFT
PARALLEL
MODES
HDD
WR
R 4.7
R
Page 7
ENGLISH
7
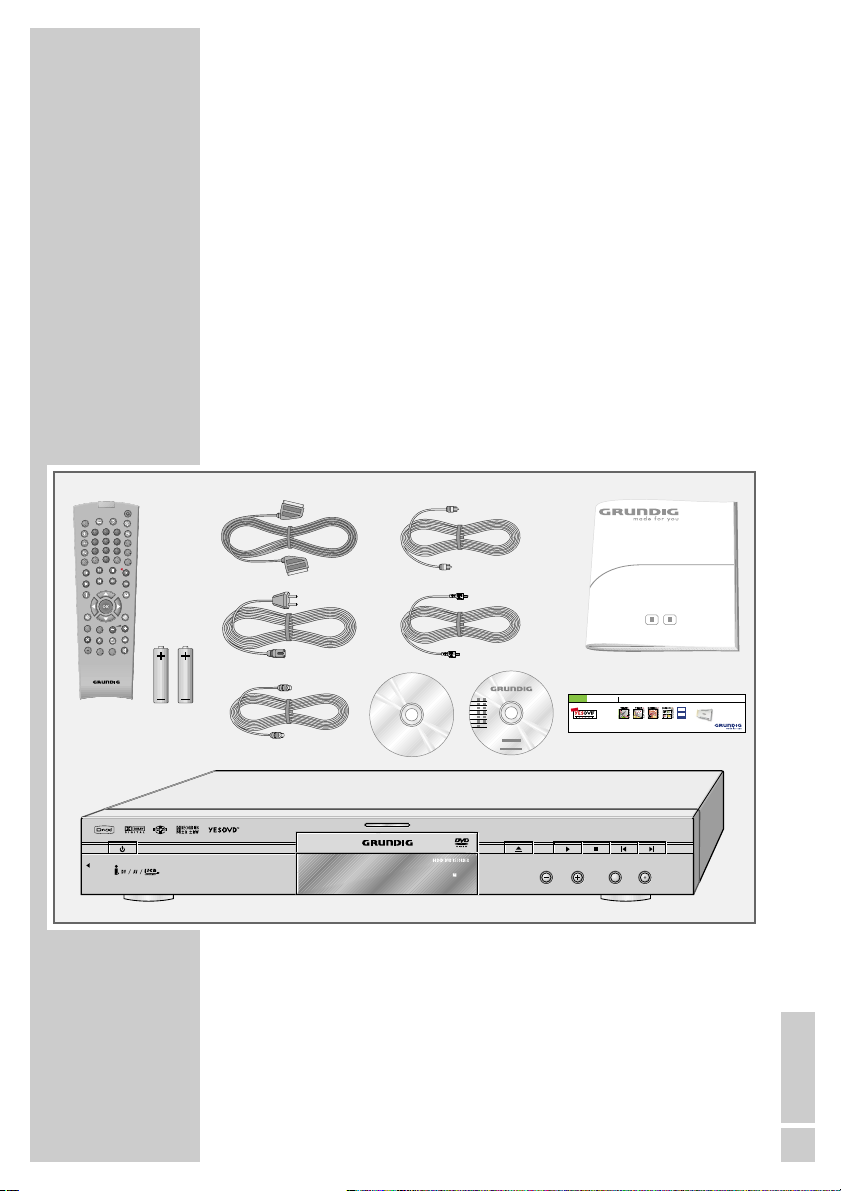
Scope of delivery
1 HDD DVD recorder GDRH 5625
2 Remote control
3 2 batteries, 1.5 V, type AA
4 EURO-AV (SCART) cable
5 Power cord
6 Antenna cable
7
Cinch cable (video)
8 Cinch cable (audio)
9
DVD+RW
10 CD with operating instructions
11 Instruction manual
12 Overview
HDD DVD RECORDER GDRH 5625
__________
3
24 7
5
6
8
11
1
910
12
DISPL
2
3
1
5
6
4
I/P
8
9
7
DV
AV
0
RND
CL
PROG
A-B
TOP
MENUMENU
SELECT
SETUP
Q-SET
SOURCE
Tele Pilot 88 D
USER MANUAL
DVD Hard-Disk-DVD-Recorder GDRH 5625
for HDD
W
E
N
Automatic
Professional YesDVD-Menu creation on HDD and DVD
Time Shift
Recommended Accessory
250GB
max.
Hard Disk Drive
6h
370 h
HDD Memory
One Touch
USB Copy Parallel Modes
Video &
Record+
DVB Receiver:
Multimedia
DTR 1560 Micro
DSR 1650 Micro
PROG. SOURCE
Page 8
8
SET-UP AND SAFETY
________________________________
This HDD DVD recorder is designed to record and play back video and
audio signals.
Any other use is expressly prohibited.
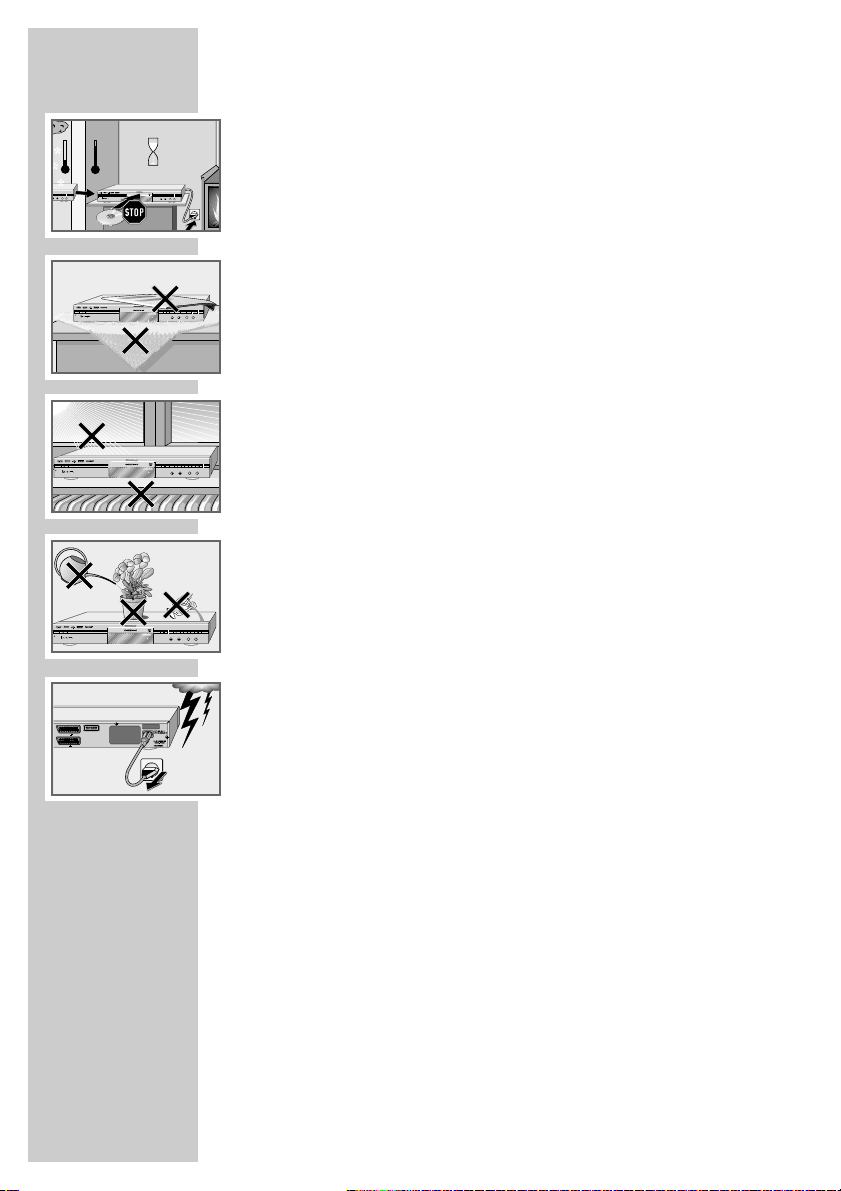
If the HDD DVD recorder is subjected to a sudden change in temperature,
for example if it is brought in from the cold to a warm room, connect it to the
mains supply and let it stand for at least two hours before you use it.
The HDD DVD recorder is designed for use in dry rooms. If you do use it in
the open, please ensure that it is protected from moisture, such as rain or
water splashes.
Place the HDD DVD recorder on a hard, level surface. Do not place any
objects such as newspapers on the HDD DVD recorder, or any cloth or similar items underneath it.
Do not place the HDD DVD recorder directly on top of an AV receiver or
a subwoofer. Do not put any other appliances on top of the HDD DVD
recorder. The laser optics are sensitive to temperature and shocks.
Do not place the HDD DVD recorder close to heating units or in direct sunlight,
as this will impair cooling.
Do not insert objects in the disc compartment of the HDD DVD recorder.
Never open the HDD DVD recorder casing under any circumstances. No
warranty claims are accepted for damage caused by incorrect handling.
Do not place any vessels filled with liquid, such as vases, on the HDD DVD
recorder, as they may spill liquid, thus presenting a safety risk.
Thunderstorms are a danger to all electrical devices. Even if the HDD DVD
recorder is switched off, it can be damaged by a lightning strike to the
mains. Always disconnect the mains and antenna plugs during a storm.
If the HDD DVD recorder fails to read a DVD or CD properly, clean the disc
with a soft cloth. Wipe the disc from the centre outwards. Do not use cleaning CDs to clean the laser optics. This can damage the optics.
Always keep the disc compartment of the HDD DVD video recorder closed to
prevent dust from collecting on the laser optics.
Please note when deciding where to put the device that furniture surfaces are
covered by various types of lacquer and plastic, most of which contain
chemical additives. These may cause corrosion to the feet of the device, thus
resulting in stains on the surface of the furniture which can be difficult or
impossible to remove.
Note:
Do not connect any other equipment while the device is switched on. Switch
off the other equipment as well before connecting it.
Only plug the device into the mains socket after you have connected the
external devices and the antenna.
°C
2h
PROG. SOURCE
PROG. SOURCE
PROG. SOURCE
K
rieg im
B
alkan
PROG. SOURCE
EURO AV 1 TV
EURO AV 2 DECODER
PROG. SOURCE
Apparatus Claims of U.S. patent Nos.
4,631,603; 4,577,216; 4,819,098 and
4,907,093 licensed for limited
viewing uses only.
Manufactured under license from
Dolby laboratories. “Dolby”,”Pro Logic”
and the dolby - D symbol are trademarks
of Dolby Laboratories.
Confidential Unpublished Works.
© 1992-1997 Dolby Laboratories, Inc.
All rights reserved
Page 9
ENGLISH
9
The main functions
Time shift – watching a current television
programme with a delay
(from page 30)
When you switch on the HDD DVD recorder, the programme you
are currently watching is recorded in the time shift memory. You can
choose whether the time shift memory has space for approx. one
hour, three hours or six hours of recording. The default setting is six
hours. After this time the oldest recording is deleted and the new
scenes are recorded.
Disc playback (from page 34)
You can play back DVDs as well as DivX
©
Video CDs, MP3 CDs,
video CDs, S-Video CDs, JPEG (photo) CDs, KODAK Picture CDs,
WMA CDs and audio CDs.
DivX©, MP3, WMA and JPEG data can be played back from both
CD-ROM and DVD-ROM.
HDD archive playback (from page 47)
Manually started recordings or timer recordings which are stored
on the hard disc can be played back.
We recommend making a back-up copy of programmes that you
wish to keep permanently on DVD+RW/-RW or DVD+R/-R.
Recording on discs (from page 58)
DVD+RW/-RWs and DVD+R/-Rs are suitable for recording.
Due to the difference in quality of the recording media and the
quality of the recording itself, it can occasionally happen that a
recorded DVD cannot be read. This does not indicate a malfunction
on the part of the HDD DVD recorder.
You must finalise your own recordings on DVD+R/-R so that they
can be played on a DVD player.
Recording on the HDD archive (from page 62)
Select the television channel or an external input source and start
recording. The television programme is stored in the HDD archive.
The file browser (from page 82)
The file browser shows you the different types of data (JPEG, MP3,
WMA, DivX
©
) in an overview.
The main functions of the file browser are:
– Playing back files
– Copying files from USB to the HDD folder on the HDD DVD
recorder
– Copying files from a disc to the HDD folder on the HDD DVD
recorder
– Copying files from USB onto a disc.
OVERVIEW
______________________________________________
S
TIME
OTR+
HDD
max.
6h
SHIFT
DUBBING
MODE
DVD
Page 10
10
The YesDVD function (from page 60)
The YesDVD function allows you to make professional home videos
from any recordings.
At the end of the recording, the HDD DVD recorder automatically
creates a chapter overview, which is displayed as inset pictures in
the disc menu and in the HDD archive.
You can then create a sleeve cover for the disc with a PC.
Recording on the HDD archive and simultaneous
playback from the HDD archive
(from page 64)
You can record on the HDD archive and simultaneously play back a
title from it.
Recording on the HDD archive and simultaneous
playback from a disc
(page 65)
Select HDD archive recording mode to record programmes in the
HDD archive. At the same time, you can play back a title from the
disc.
Recording on disc while playing back from the
HDD archive
(page 66)
Select disc recording mode, select the television channel or external
input source and start recording. The recording is stored on the disc.
At the same time, you can choose a title from the HDD archive and
play it back.
Copying from the HDD archive to disc (page 68)
You can quickly create a back-up by coping the data from the HDD
archive to disc. You can set the recording quality and the duration
of the copying.
Timer recording on a disc or the HDD archive
(from page 71)
Open the timer menu and enter the data for the television pro-
gramme you want to record. Recording starts at the time you select.
The television programme is stored on disc or in the HDD archive.
OVERVIEW
______________________________________________
PARALLEL
MODES
HDD
Page 11
ENGLISH
11
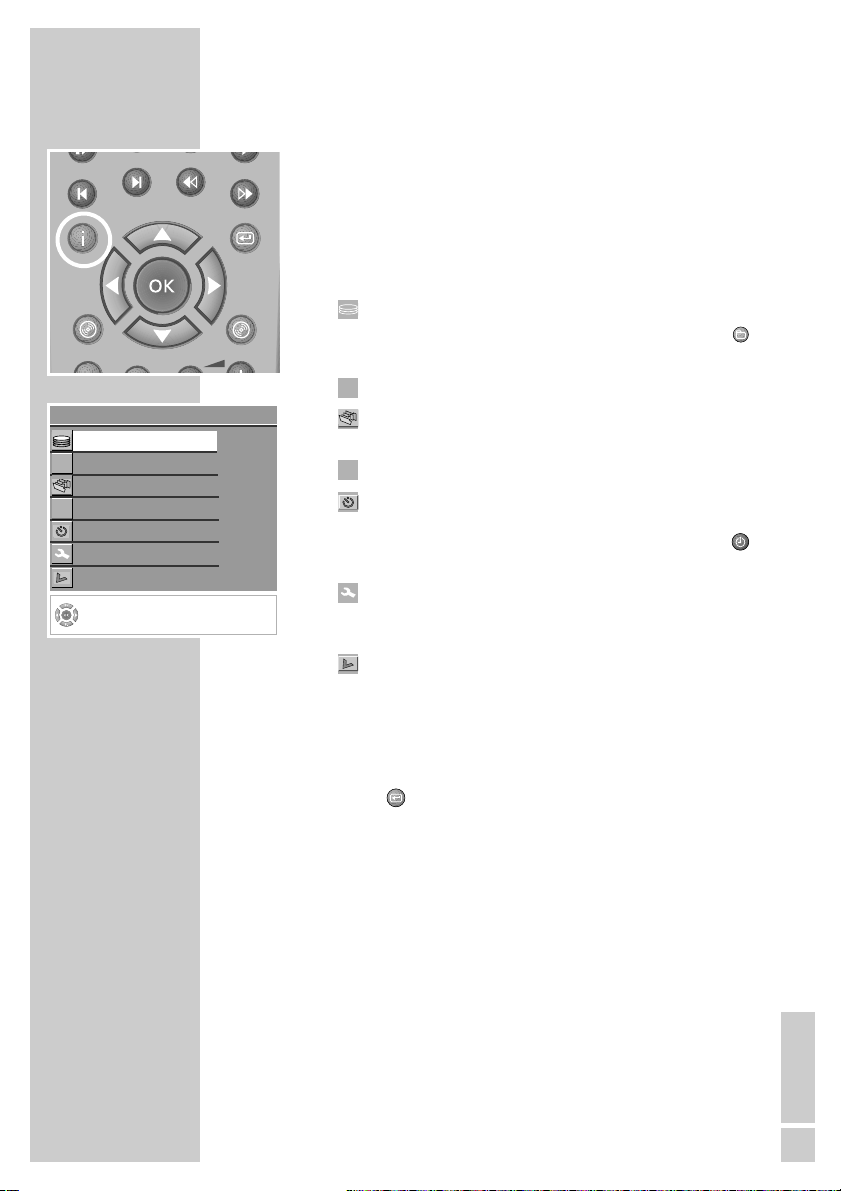
Menus and navigation
You can access the various menus of your HDD DVD recorder
directly using the main menu, or with individual buttons on the
remote control.
1 Open the »MAIN MENU« of the HDD DVD recorder by press-
ing »i«.
2 Press »
S
« or »A« to select the menu item.
»HDD« – switches to the HDD archive.
You can also open the menu directly by pressing » «
(yellow).
»TimeShift« – switches to time shift mode.
»File Manager« – shows you the different types of data
(JPEG, MP3, WMA, DivX
©
) in an overview.
»DVD« – switches to the contents menu of the disc.
»Timer list« – switches to the timer menu where you can
programme up to eight recordings.
You can also open this menu directly by pressing » «
(green).
»Setup« – you can use this menu to make various
device settings.
You can open this menu directly by pressing »SETUP«.
»Edit« – in this menu you can edit the contents of a
home-recorded disc.
3 Press »OK« to activate the menu item.
4 Select individual menu options with »
a
«, »s«, »S« or
»A« and press »OK« to confirm.
5 Press » « to exit individual menu options.
6 Press »i« to quit the main menu.
8
Y
OVERVIEW
______________________________________________
MAIN MENU
Y
HDD
ǵ
TimeShift
File Manager
DVD
Timer List
Setup
Play and Edit video programs
S
Edit
8
TOP
MENUMENU
Page 12
12
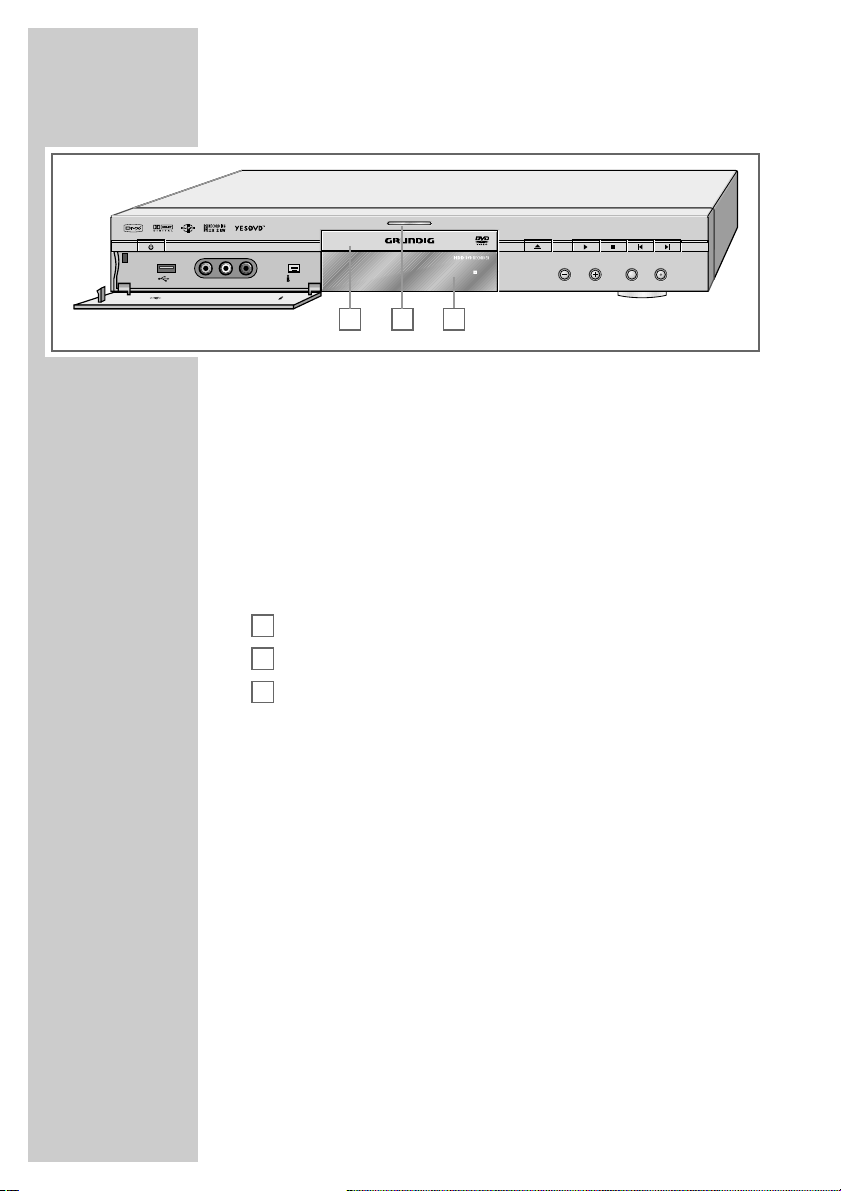
The front of the HDD DVD recorder
Ǽ Switches the HDD DVD recorder in and out of standby
mode.
In standby mode, the current time and day of the week
appear on the display C.
IN USB interface for connecting an external data medium
(under the cover panel).
VIDEO IN Video/audio input sockets for connecting a
L AUDIO IN R camcorder (under the cover panel).
i DV IN Video/audio input socket (Fire Wire IEEE 1394) for
connecting a digital camcorder (under the cover panel).
Compartment for disc media.
Recording display.
Display.
ə
Opens and closes the disc compartment.
8
Starts playback.
Confirms the options selected in the menus.
7
Interrupts playback and recording.
Press twice to stop.
Activates the selected menu.
56 During playback, press briefly to select the previous or
next section.
Move the cursor to the left or right in the menus.
Hold down »6 « to open the main menu.
Move the cursor to the left or right in the menus.
Press »5« to exit the selected menu.
– PROG + Select TV channels – »–« down, »+« up.
Move the cursor up and down in the menus.
SOURCE Selects input sources.
● Starts recording. Press repeatedly to enter the switch-off
time in 30 minute steps.
C
B
A
(
OVERVIEW
______________________________________________
A
C
B
IN DV IN
VIDEO IN AUDIO
RL
AUDIO
VIDEO IN
IN
RL
PROG. SOURCE
DV IN
Page 13

ENGLISH
13
The displays of the HDD DVD recorder
REPEAT ALL Repeat functions activated.
REPEAT A-B
MP3 Disc mode with MP3 CD.
P N PAL or NTSC standard is selected.
SVCD Disc mode with S-Video CD, video CD or audio CD.
ŀ Playback.
!
Pause/freeze-frame.
DVD Disc mode with DVD.
Hdd HDD mode.
PBC PBC function (playback control) for S-Video CD or
video CD is activated.
CHANNEL Selected channel.
dts Information on the type of audio signal.
=
DIGITAL
REC Recording.
Ȅ
Timer recording.
ANGLE The DVD provides various camera angles.
PROGRAM Function is activated.
L/R Stereo audio signal selected.
RANDOM Random function is activated.
Su ... Sa Current day of the week.
0000000 Alphanumerical display for various information such
as the title, chapter, playing time, etc.
OVERVIEW
______________________________________________
1 888:88:88
REPEAT ALL A–B CHANNEL dts
=
DIGITAL ȄREC ANGLE PROGRAM
L/R
RANDOM
SuMo TuWe
Th Fr Sa
MP3 P N
SVCD
ı
!
DVD PBC
Page 14
14
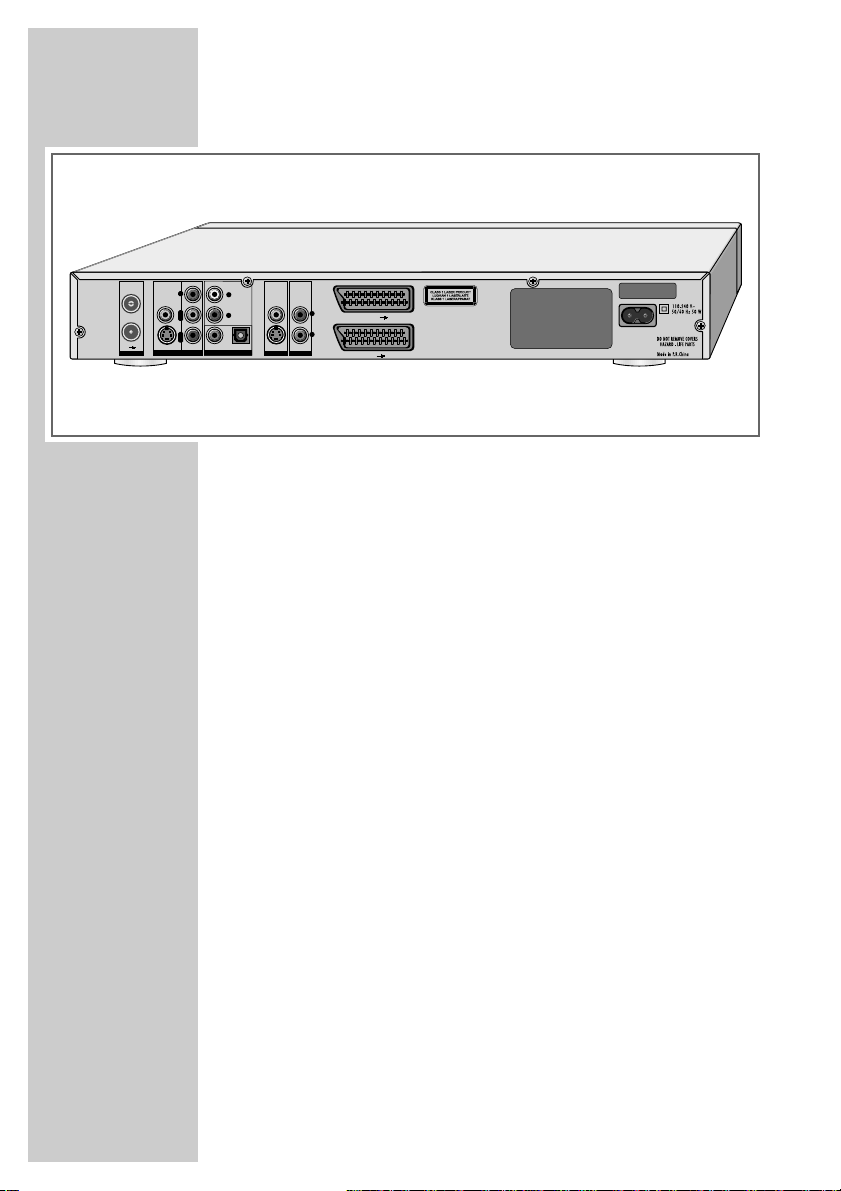
The back of the HDD DVD recorder
ANTENNA
ANTENNA IN Antenna input socket
(for the rooftop antenna).
OUT
➞
TV Antenna output socket
(to the television).
VIDEO OUT
VIDEO OUT Video output socket
for connecting a television or AV receiver
with a cinch socket.
S-VIDEO OUT Video output socket
for connecting a television or AV receiver
with an S-Video socket.
Y Pb/Cb Pr/Cr Video output sockets for connecting a
television, flat screen or projector
(YUV standard).
AUDIO OUT
L AUDIO OUT R Audio output sockets (left/right analogue
channel) for connecting an audio system.
DIGITAL AUDIO OUT Audio output sockets (coaxial)
for PCM/Dolby digital/DTS signals.
For connecting to a digital multi-channel
audio/video amplifier or AV receiver.
Audio output sockets (optical) for
PCM/Dolby digital/DTS signals.
For connecting to a digital multi-channel
audio/video amplifier or AV receiver.
OVERVIEW
______________________________________________
ANTENNA
OUT TV
ANTENNA
VIDEO OUT
IN
Y
Pb
Cb
Pr
Cr
S-VIDEO OUT
VIDEO OUT
L
AUDIO OUT
R
DIGITAL AUDIO OUT
AUDIO OUT
VIDEO IN
Apparatus Claims of U.S. patent Nos.
4,631,603; 4,577,216; 4,819,098 and
4,907,093 licensed for limited
viewing uses only.
Manufactured under license from
Dolby laboratories. “Dolby”,”Pro Logic”
and the dolby - D symbol are trademarks
of Dolby Laboratories.
Confidential Unpublished Works.
© 1992-1997 Dolby Laboratories, Inc.
All rights reserved
S-VIDEO IN
VIDEO IN AUDIO IN
L
R
EURO AV 1 TV
EURO AV 2 DECODER
Page 15

ENGLISH
15
OVERVIEW
______________________________________________
VIDEO IN
VIDEO IN Video input socket for connecting a video
recorder, DVD player or AV receiver with
a cinch socket.
S-VIDEO IN Video input socket for connecting an
SVHS-video recorder or AV receiver with
an S-VIDEO socket.
AUDIO IN
L R Audio input sockets (left/right analogue
channel) for connecting a video recorder,
DVD player or an audio system.
EURO AV1
➞
TV Euro-AV (SCART) socket (input/output)
for the television.
EURO AV2 ➞DECODER Euro/AV (SCART) socket (input/output)
for an external device.
AC 110-240 V~ Power cord socket.
50/60 Hz 50W max.
Caution:
Do not connect any other equipment while the device is switched
on. Switch off the other equipment as well before connecting it.
Only plug the device into the mains socket after you have connected
the external devices and the antenna.
Never touch the inside of the sockets and plugs of the connecting
cables. Electrostatic discharge can damage the HDD DVD recorder.
Page 16
16
OVERVIEW
______________________________________________
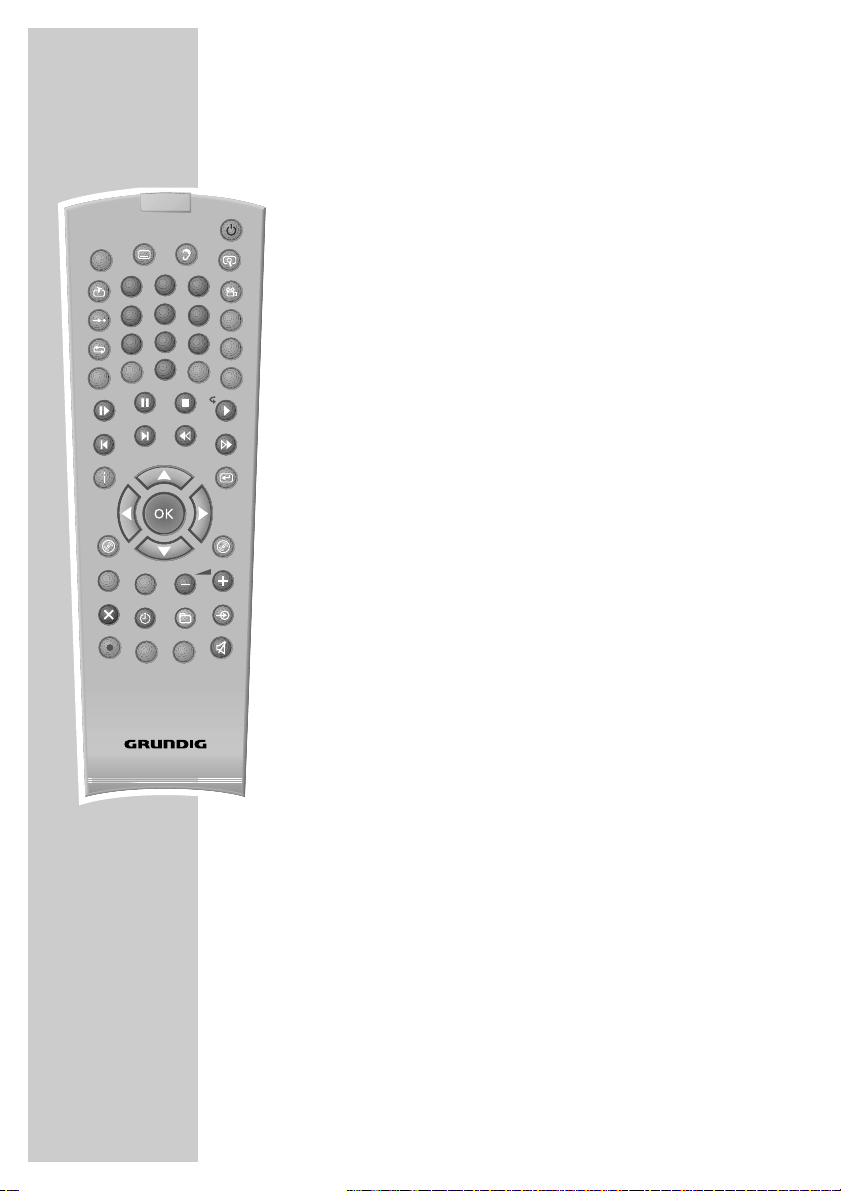
The remote control
Ǽ Switches the HDD DVD recorder in and out of
standby mode.
In standby mode, the current time and day of the
week appear on the display.
DISPL Opens the time shift menu or the playback menu of
a disc.
y For selecting and displaying subtitles* on the DVD
during playback.
d Switches between the original and dubbed language*
during DVD playback.
Switches between the various sound formats.
v Zooms in on scenes* during playback.
c For setting bookmarks*.
1 … 0 Numerical buttons for entering various data.
»0« Selects programme sources.
➞• Selects the search according to track, chapter or time
(disc).
Selects the search according to time (HDD archive).
b Selects various repeat functions.
A-B For marking selected sections* for repeated playback.
CL Deletes a programmed timer recording.
Adds and deletes chapters and sections in the playlist.
RND Selects the RANDOM PLAY* function.
PROG Selects the playlist*.
DV Switches to the »DV« (Digital Video Camera) input
source.
I/P When stopped: Switches the video signal between
progressive and interlace mode. In the “SCART output”
menu, the video output must be set to “YUV”.
n Selects various camera angles* for certain scenes or
passages on the DVD during playback.
* Depends on the disc in use.
DISPL
A-B
SELECT
1
4
7
AV
CL
SETUP
Q-SET
Tele Pilot 88 D
2
5
8
0
SOURCE
RND
3
6
I/P
9
DV
PROG
TOP
MENUMENU
Page 17
ENGLISH
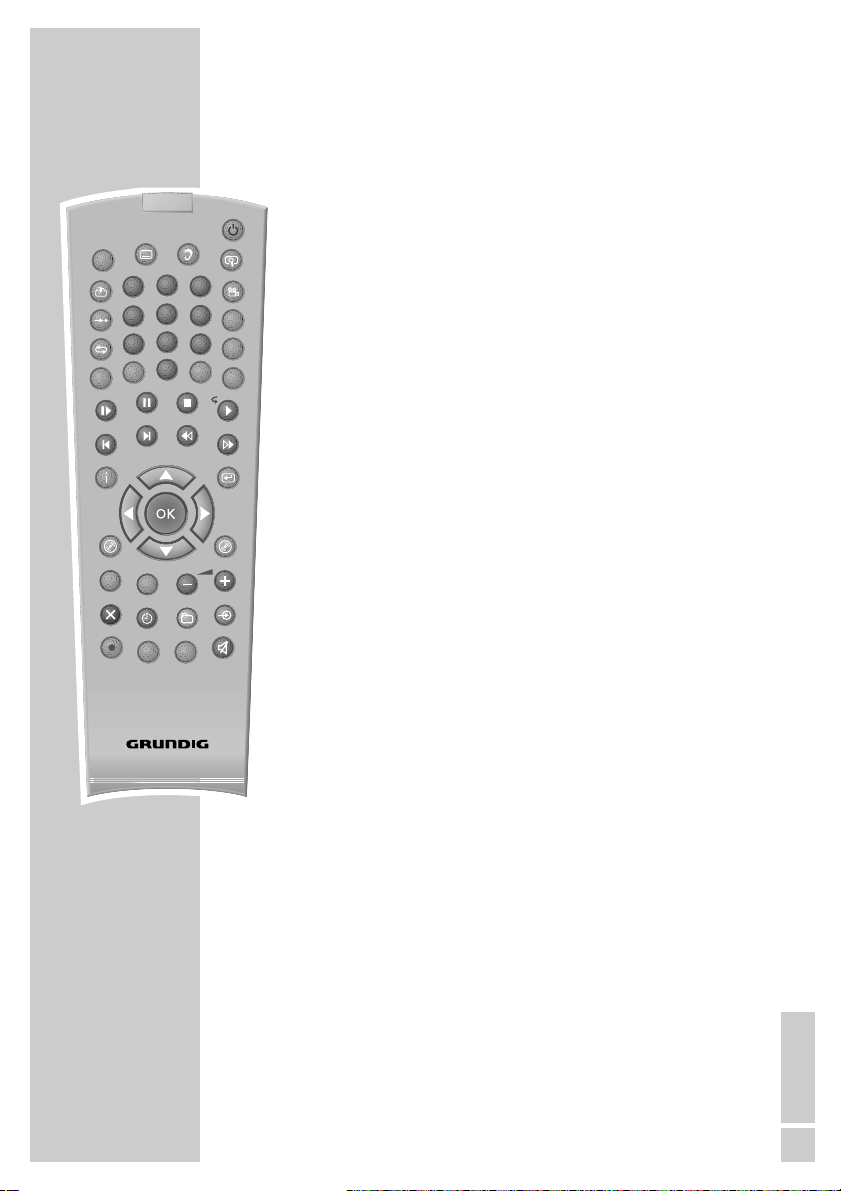
17
% Switches to forwards slow motion* at various speeds
during playback.
! Freeze-frame/pause.
Advances the picture frame by frame.
7 Interrupts playback.
Press twice to stop.
Hold down to open the disc compartment.
8 Starts playback;
During playback, by pressing »8« you can repeat
the last seven seconds of the programme.
56 Select the previous/next chapter or section
during playback.
m, Switch to forwards or reverse picture search at various
speeds during playback.
i Opens the main menu for the HDD DVD recorder.
ASa s
Select various functions in the menus.
Select TV channels, »S« down, »A« up.
OK Press once to display various information on the
television screen during playback.
Press twice to display the playback menu.
Pressing three times displays the channel list.
Confirms selected options in menus.
x Switches up one menu level.
MENU . Opens the disc menu* of a DVD during playback.
Switches from time shift mode to disc mode.
Switches from HDD archive to disc mode.
TOP Closes the disc compartment.
MENU . Opens the title menu* of the DVD during playback.
Switches from time shift mode to disc mode.
Switches from HDD archive to disc mode.
DISPL
OVERVIEW
______________________________________________
* Depends on the disc in use.
A-B
2
1
4
7
CL
3
5
6
I/P
8
9
RND
DV
PROG
AV
0
SELECT
SETUP
Q-SET
Tele Pilot 88 D
SOURCE
TOP
MENUMENU
Page 18
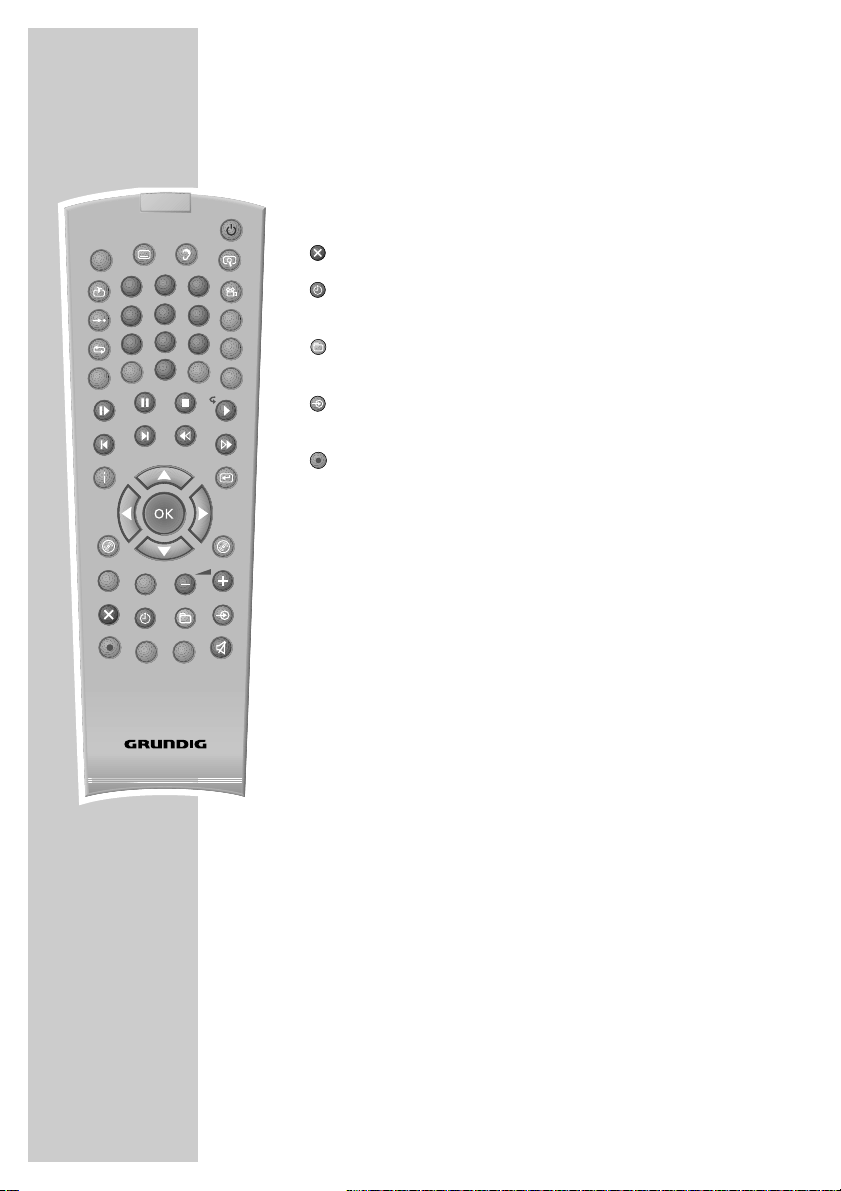
18
SELECT Switches between the file browser and the HDD archive.
SETUP Opens and closes the setup menu of the HDD DVD
recorder.
–
z + Adjusts the volume.
(red) Selects different functions depending on the mode.
(green) Selects different functions depending on the mode.
Main function is selecting the timer list.
(yellow) Selects different functions depending on the mode.
Main function is selecting the HDD archive.
(blue) Selects different functions depending on the mode.
Main function is selecting the DVD recording mode.
Starts the recording and sets the switch-off time
(in 30 minute steps).
Highlights a starting point in the time shift mode for
copying on to the HDD archive.
Q-SET Selects the recording quality (only in DVD recording
mode).
SOURCE Selects input sources.
d Switches the HDD DVD recorder to and from mute
during playback.
OVERVIEW
______________________________________________
DISPL
A-B
SELECT
1
4
7
AV
CL
SETUP
Q-SET
Tele Pilot 88 D
2
5
8
0
SOURCE
RND
3
6
I/P
9
DV
PROG
TOP
MENUMENU
Page 19
ENGLISH
19
Note:
Do not connect any other equipment while the device is
switched on. Switch off the other equipment as well before
connecting it. Only plug the device into the mains socket after
you have connected the external devices.
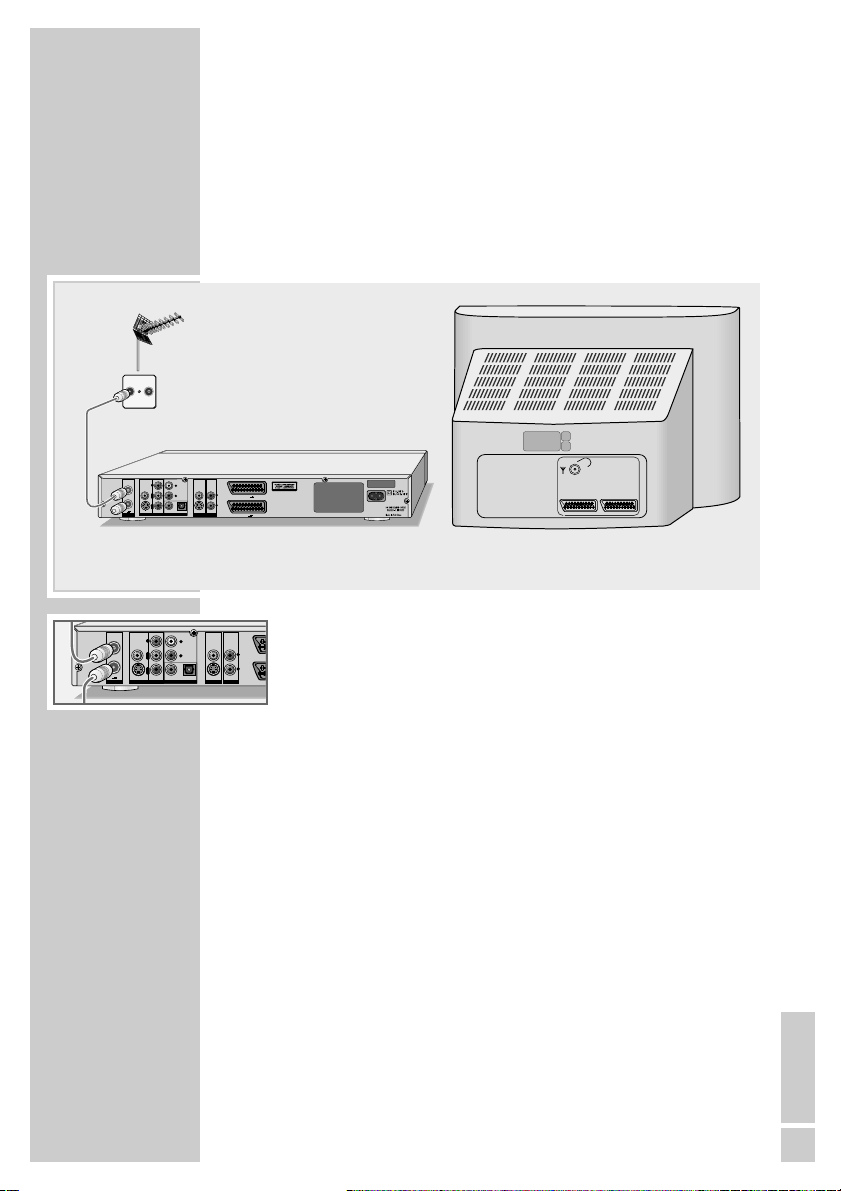
Connecting a rooftop antenna or cable feed
1 Plug the cable of the rooftop antenna or cable feed into the
antenna socket »ANTENNA IN« on the HDD DVD recorder.
2 Plug the antenna cable into the »OUT
➞
TV« socket on the
HDD DVD recorder and the antenna socket on the television set.
CONNECTION AND PREPARATION
_________
U
ANTENNA
OUT TV
ANTENNA
TV R
IN
VIDEO OUT
VIDEO IN
Y
L
AUDIO OUT
Pb
R
Cb
Pr
Cr
DIGITAL AUDIO OUT
S-VIDEO OUT
S-VIDEO IN
AUDIO OUT
VIDEO OUT
VIDEO IN AUDIO IN
Apparatus Claims of U.S. patent Nos.
4,631,603; 4,577,216; 4,819,098 and
L
4,907,093 licensed for limited
EURO AV 1 TV
viewing uses only.
Manufactured under license from
Dolby laboratories. “Dolby”,”Pro Logic”
and the dolby - D symbol are trademarks
EURO AV 2 DECODER
of Dolby Laboratories.
Confidential Unpublished Works.
© 1992-1997 Dolby Laboratories, Inc.
All rights reserved
R
AV1 AV2
VIDEO OUT
ANTENNA
IN
Y
Pb
Cb
Pr
Cr
OUT TV
S-VIDEO OUT
ANTENNA
VIDEO OUT
DIGITAL AUDIO OUT
AUDIO OUT
VIDEO IN
L
AUDIO OUT
L
R
R
S-VIDEO IN
VIDEO IN AUDIO IN
E
Page 20

20
CONNECTION AND PREPARATION
_________
Connecting the DVB receiver
If you do not have an antenna or a cable connection but you receive
the television station via a DVB receiver (DVB-S for satellite stations,
DVB-C for digital television stations from broadband cable or
DVB-T for digital television stations), connect up the DVB receiver
instead of the roof antenna or cable connection.
Note:
Please refer to the »SETUP« menu –>»RECORDING« –
>
»Default Source« to select the socket to connect up the DVB
receiver.
1 Connect the »EURO AV2
➞
Decoder« socket on the HDD
DVD recorder and the corresponding socket on the satellite
receiver using a SCART cable.
SAT
DIGITAL AUDIO OUT
AUDIO OUT
EURO AV 2 VCR
EURO AV 1 TV
VIDEO OUT
ANTENNA
IN
Y
L
AUDIO OUT
Pb
R
Cb
Pr
Cr
OUT TV
DIGITAL AUDIO OUT
S-VIDEO OUT
AUDIO OUT
ANTENNA
VIDEO OUT
VIDEO IN
L
AUDIO OUT
L
R
S-VIDEO IN
VIDEO IN AUDIO IN
EURO AV 1 TV
R
EURO AV 2 DECODER
VIDEO IN
S-VIDEO IN
VIDEO IN AUDIO IN
L
R
Apparatus Claims of U.S. patent Nos.
4,631,603; 4,577,216; 4,819,098 and
4,907,093 licensed for limited
viewing uses only.
Manufactured under license from
Dolby laboratories. “Dolby”,”Pro Logic”
and the dolby - D symbol are trademarks
of Dolby Laboratories.
Confidential Unpublished Works.
© 1992-1997 Dolby Laboratories, Inc.
All rights reserved
EURO AV 1 TV
EURO AV 2 DECODER
RS 232
Apparatus Claims of U.S. patent Nos.
4,631,603; 4,577,216; 4,819,098 and
4,907,093 licensed for limited
viewing uses only.
Manufactured under license from
Dolby laboratories. “Dolby”,”Pro Logic”
and the dolby - D symbol are trademarks
of Dolby Laboratories.
Confidential Unpublished Works.
© 1992-1997 Dolby Laboratories, Inc.
All rights reserved
AV1 AV2
Page 21
ENGLISH
2121
CONNECTION AND PREPARATION
_________
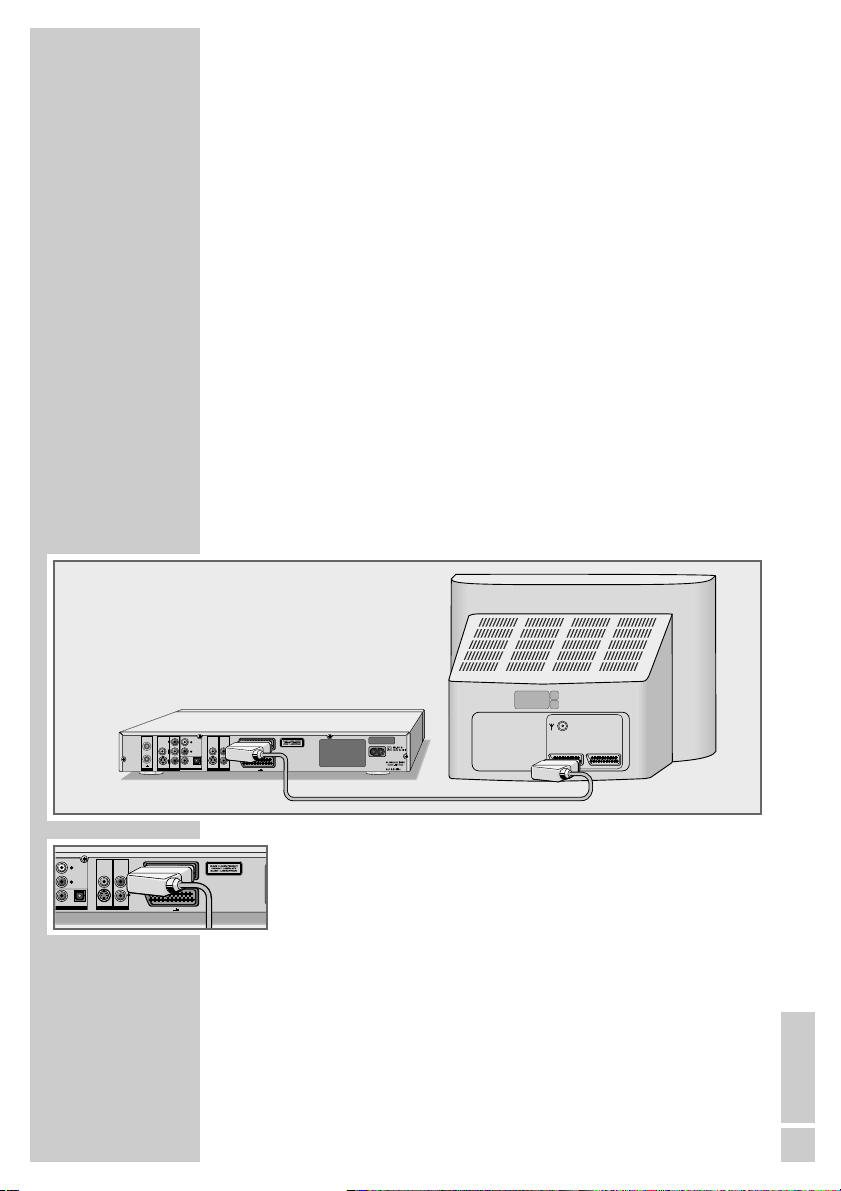
Connecting a television
You have four options, depending on the sockets you have on your
television or flat screen:
– For the best picture quality, make the connection at the EURO-AV
socket using a fully assigned EURO-AV (SCART) cable.
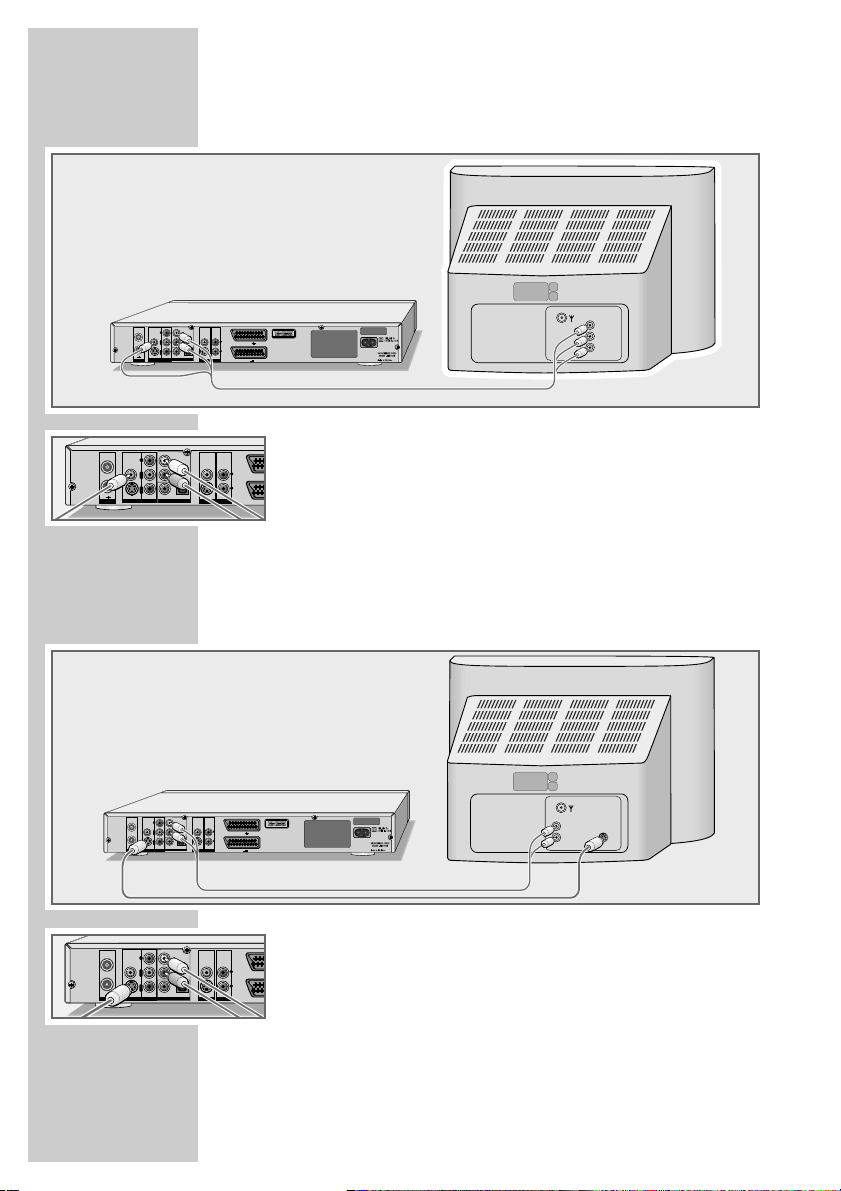
– The simplest option which still offers sufficient quality is to connect
the VIDEO OUT socket and AUDIO OUT sockets using cinch cables.
– The standard connection for many devices, and one which pro-
vides good quality, is via the S-VIDEO OUT socket and the
AUDIO OUT cinch sockets.
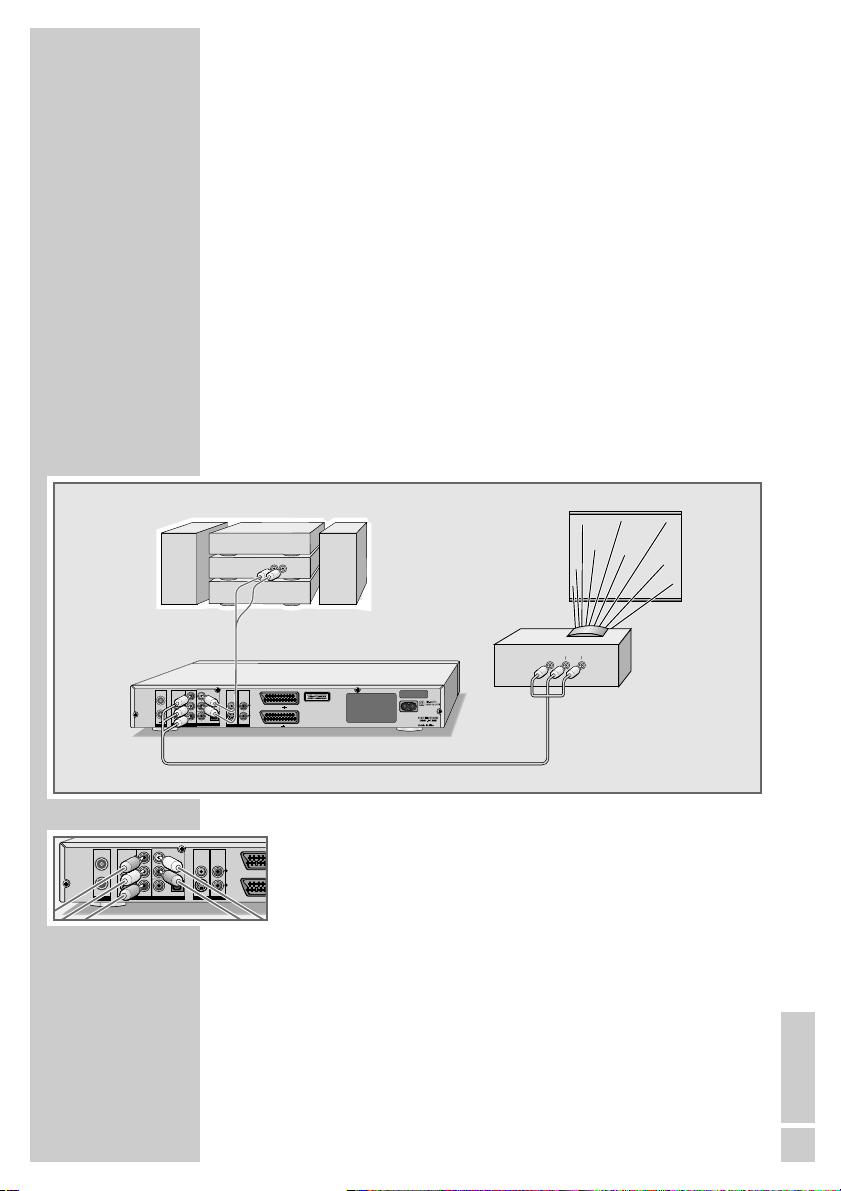
– Connection via the cinch sockets Y, Pb/Cb and Pr/Cr (video sig-
nals) and the AUDIO OUT cinch sockets (audio signals).
This connection (progressive scan) can also be used for projectors.
Connect the HDD DVD recorder directly to the television. If you connect a video recorder in between, the HDD DVD recorder’s copy
protection may impair the picture quality.
Connecting a television using a EURO-AV
(SCART) cable
1 Plug the EURO-AV cable supplied into the »EURO AV1
➞
TV« socket on the HDD DVD recorder and into the correspond-
ing socket on the television.
DIGITAL AUDIO OUT
AUDIO OUT
VIDEO OUT
ANTENNA
IN
OUT TV
ANTENNA
VIDEO IN
L
AUDIO OUT
L
R
R
S-VIDEO IN
VIDEO IN AUDIO IN
Y
Pb
Cb
Pr
Cr
S-VIDEO OUT
VIDEO OUT
EURO AV 1 TV
EURO AV 2 DECODER
DIGITAL AUDIO OUT
VIDEO IN
L
AUDIO OUT
R
S-VIDEO IN
AUDIO OUT
VIDEO IN AUDIO IN
Apparatus Claims of U.S. patent Nos.
4,631,603; 4,577,216; 4,819,098 and
4,907,093 licensed for limited
viewing uses only.
Manufactured under license from
Dolby laboratories. “Dolby”,”Pro Logic”
and the dolby - D symbol are trademarks
of Dolby Laboratories.
Confidential Unpublished Works.
© 1992-1997 Dolby Laboratories, Inc.
All rights reserved
Apparatus Claims of U.S. patent Nos.
4,631,603; 4,577,216; 4,819,098 and
L
4,907,093 licensed for limited
EURO AV 1 TV
viewing uses only.
Manufactured under license from
Dolby laboratories. “Dolby”,”Pro Logic”
and the dolby - D symbol are trademarks
of Dolby Laboratories.
R
Confidential Unpublished Works.
© 1992-1997 Dolby Laboratories, Inc.
All rights reserved
EURO AV 2 DECODER
AV1 AV 2
Page 22
2222
Connecting a televisionusing cinch cables
1 Plug the cinch cable supplied into the »VIDEO OUT« socket
on the HDD DVD recorder and the corresponding socket
(VIDEO IN) on the television.
2 Plug standard cinch cables into the »L AUDIO OUT R« sockets
on the HDD DVD recorder and the corresponding sockets
(AUDIO IN) on the television.
Connecting a television using a Y/C (S-VIDEO)
cable and cinch cables
1 Plug the standard S-Video cable into the »S-VIDEO OUT«
socket on the HDD DVD recorder and the corresponding socket
(S-VIDEO IN) on the television.
2 Plug standard cinch cables into the »L AUDIO OUT R« sockets
on the HDD DVD recorder and the corresponding sockets
(AUDIO IN) on the television.
CONNECTION AND PREPARATION
_________
R
O
R
O
VIDEO OUT
ANTENNA
IN
OUT TV
ANTENNA
VIDEO OUT
ANTENNA
IN
OUT TV
S-VIDEO OUT
ANTENNA
VIDEO OUT
VIDEO IN
Y
L
AUDIO OUT
Pb
R
Cb
Pr
Cr
DIGITAL AUDIO OUT
S-VIDEO OUT
S-VIDEO IN
AUDIO OUT
VIDEO OUT
VIDEO IN AUDIO IN
DIGITAL AUDIO OUT
AUDIO OUT
VIDEO IN
L
AUDIO OUT
R
S-VIDEO IN
VIDEO IN AUDIO IN
Y
Pb
Cb
Pr
Cr
Apparatus Claims of U.S. patent Nos.
4,631,603; 4,577,216; 4,819,098 and
L
4,907,093 licensed for limited
EURO AV 1 TV
viewing uses only.
Manufactured under license from
Dolby laboratories. “Dolby”,”Pro Logic”
and the dolby - D symbol are trademarks
of Dolby Laboratories.
R
Confidential Unpublished Works.
© 1992-1997 Dolby Laboratories, Inc.
All rights reserved
EURO AV 2 DECODER
L
EU
R
EUR
VIDEO
L
AUDIO
INPUT
R
VIDEO OUT
ANTENNA
IN
OUT TV
ANTENNA
VIDEO IN
Y
L
AUDIO OUT
Pb
R
Cb
Pr
Cr
DIGITAL AUDIO OUT
S-VIDEO OUT
S-VIDEO IN
AUDIO OUT
VIDEO OUT
VIDEO IN AUDIO IN
Apparatus Claims of U.S. patent Nos.
4,631,603; 4,577,216; 4,819,098 and
L
4,907,093 licensed for limited
EURO AV 1 TV
viewing uses only.
Manufactured under license from
Dolby laboratories. “Dolby”,”Pro Logic”
and the dolby - D symbol are trademarks
of Dolby Laboratories.
R
Confidential Unpublished Works.
© 1992-1997 Dolby Laboratories, Inc.
All rights reserved
EURO AV 2 DECODER
L
AUDIO
S–VHS
INPUT
R
VIDEO OUT
ANTENNA
IN
OUT TV
S-VIDEO OUT
ANTENNA
VIDEO OUT
VIDEO IN
Y
L
AUDIO OUT
Pb
Cb
Pr
Cr
DIGITAL AUDIO OUT
AUDIO OUT
L
R
R
S-VIDEO IN
VIDEO IN AUDIO IN
EU
EUR
Page 23
ENGLISH
2323
Connecting a television using cinch cables
(progressive scan)
Caution:
This connection transmits video signals at a high frequency
range. Before you first switch on the device, please check
whether your television or projector is suitable for this use.
GRUNDIG accepts no liability for damage resulting from
negligent use.
Notes:
The video output must be set to »YUV« under »SETUP« –
>
»VIDEO« –>»SCART output«.
You can use the »I/P« button to select whether the video signal
is provided in progressive mode or interlace mode.
Depending on the model of television or projector, you have to
activate the relevant input sockets on the device.
1 Plug a standard cinch cable in the »Y«, »Pb/Cb« and
»Pr/Cr« sockets of the HDD DVD recorders and in the corresponding socket (e.g. VIDEO IN or COMPONENT Y P
B/CB
PR/CR) on the television or projector.
2 Plug standard cinch cables into the »L AUDIO OUT R« sockets
on the HDD DVD recorder and in the corresponding sockets
(AUDIO IN) on the television or projector.
CONNECTION AND PREPARATION
_________
V
RL
AUDIO
INPUT
PBCBPRC
Y
R
D
VIDEO OUT
ANTENNA
IN
OUT TV
ANTENNA
VIDEO OUT
ANTENNA
IN
Y
Pb
Cb
Pr
Cr
OUT TV
DIGITAL AUDIO OUT
S-VIDEO OUT
ANTENNA
AUDIO OUT
VIDEO OUT
VIDEO IN
Y
L
AUDIO OUT
Pb
R
Cb
Pr
Cr
DIGITAL AUDIO OUT
S-VIDEO OUT
S-VIDEO IN
AUDIO OUT
VIDEO OUT
VIDEO IN AUDIO IN
VIDEO IN
L
AUDIO OUT
L
R
R
S-VIDEO IN
VIDEO IN AUDIO IN
Apparatus Claims of U.S. patent Nos.
4,631,603; 4,577,216; 4,819,098 and
L
4,907,093 licensed for limited
EURO AV 1 TV
viewing uses only.
Manufactured under license from
Dolby laboratories. “Dolby”,”Pro Logic”
and the dolby - D symbol are trademarks
EURO AV 2 DECODER
of Dolby Laboratories.
Confidential Unpublished Works.
© 1992-1997 Dolby Laboratories, Inc.
All rights reserved
R
EURO A
EURO AV
Page 24
2424
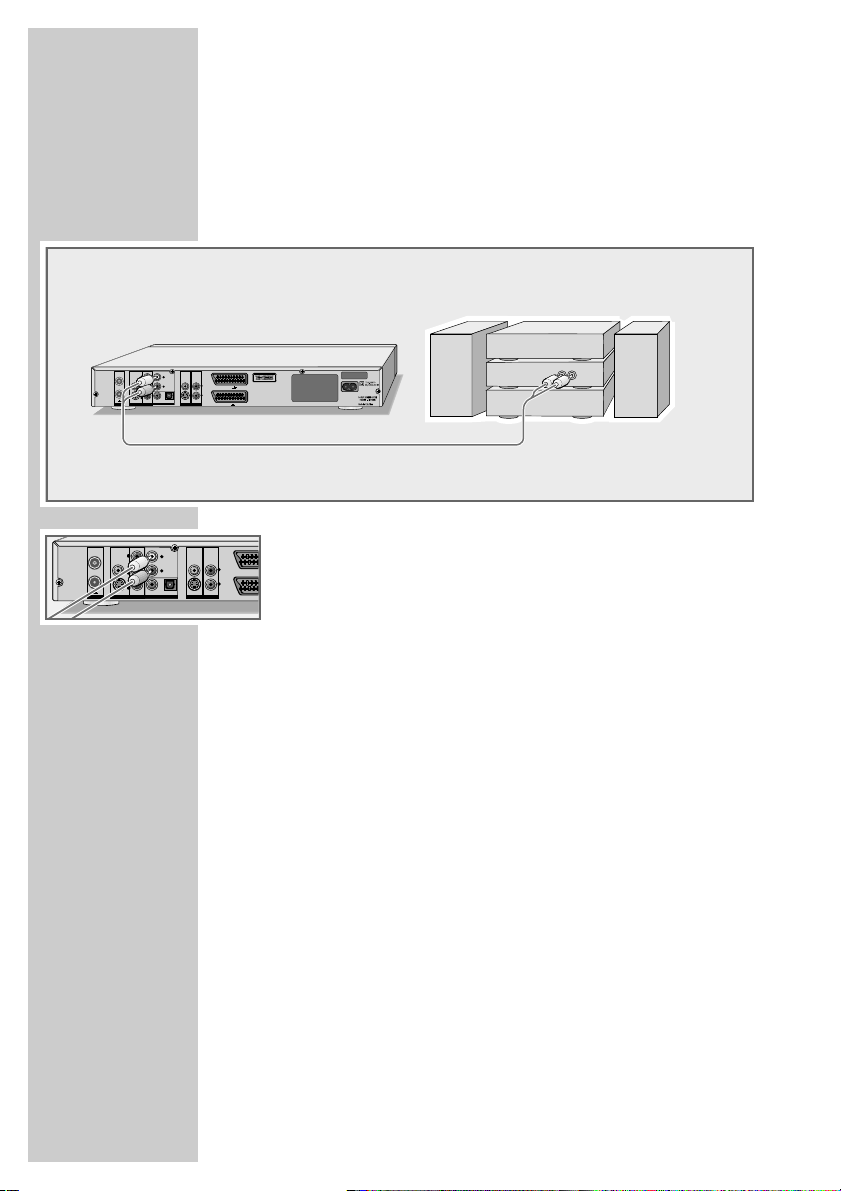
Connecting an audio system with analogue
two-channel stereo sound
As an alternative to using the television’s speakers, the sound can
also be played back through an audio system. This can improve the
sound quality.
1 Plug a standard cinch cable into the »L AUDIO OUT R« socket
on the HDD DVD recorder and the corresponding sockets on
the audio system.
Caution:
Do not connect the »L AUDIO OUT R« sockets on the HDD
DVD recorder to the PHONO (record player) input socket on
the audio system.
CONNECTION AND PREPARATION
_________
V
VIDEO OUT
ANTENNA
IN
OUT TV
ANTENNA
VIDEO OUT
ANTENNA
IN
OUT TV
S-VIDEO OUT
ANTENNA
VIDEO OUT
VIDEO IN
Y
L
AUDIO OUT
Pb
R
Cb
Pr
Cr
DIGITAL AUDIO OUT
S-VIDEO OUT
S-VIDEO IN
AUDIO OUT
VIDEO OUT
VIDEO IN AUDIO IN
DIGITAL AUDIO OUT
AUDIO OUT
VIDEO IN
L
AUDIO OUT
R
S-VIDEO IN
VIDEO IN AUDIO IN
Y
Pb
Cb
Pr
Cr
Apparatus Claims of U.S. patent Nos.
4,631,603; 4,577,216; 4,819,098 and
L
4,907,093 licensed for limited
EURO AV 1 TV
viewing uses only.
Manufactured under license from
Dolby laboratories. “Dolby”,”Pro Logic”
and the dolby - D symbol are trademarks
of Dolby Laboratories.
R
Confidential Unpublished Works.
© 1992-1997 Dolby Laboratories, Inc.
All rights reserved
EURO AV 2 DECODER
L
EURO A
R
EURO AV
RL
AUDIO
INPUT
Page 25
ENGLISH
2525
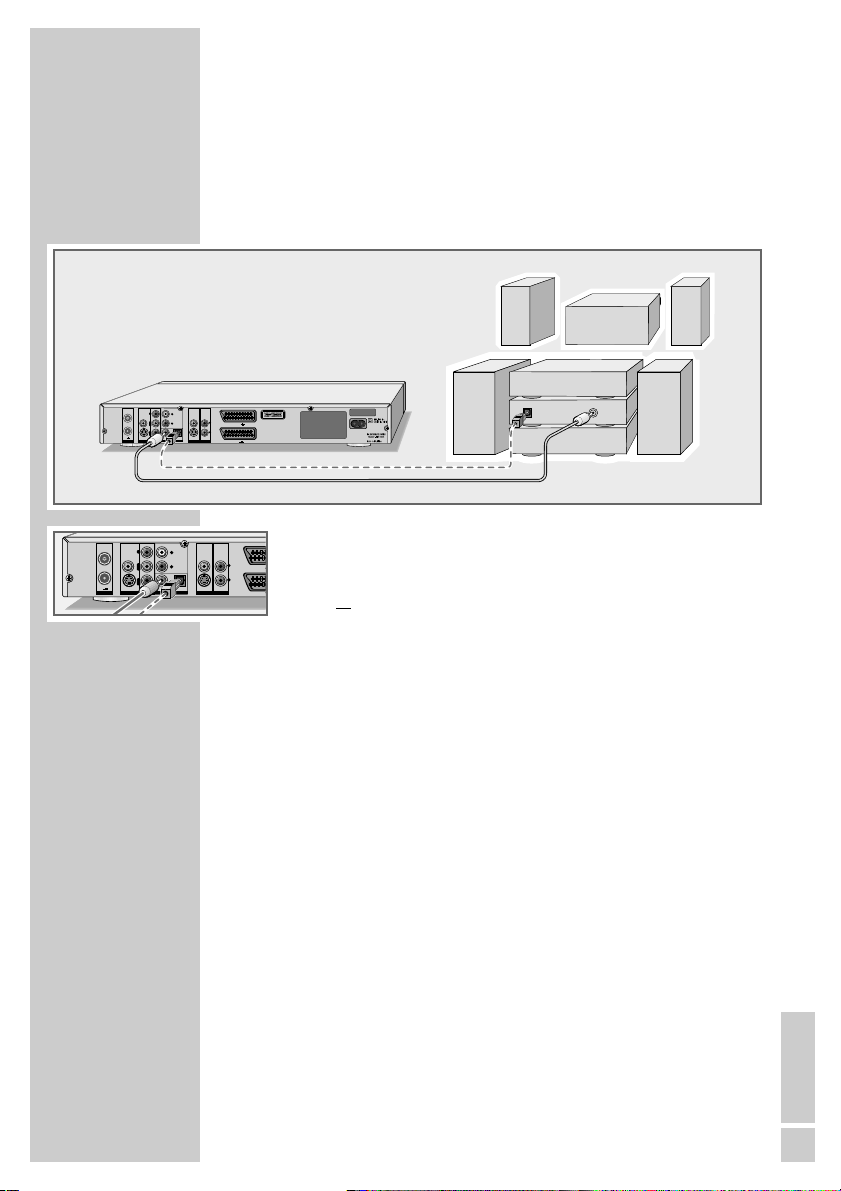
Connecting a digital multi-channel amplifier or
digital two-channel audio system
A multi-channel audio/video amplifier (Dolby* digital decoder or
DTS** – Digital Theatre System) decodes the digital multi-channel
sound of the DVD to provide optimum sound quality.
1 Plug the cinch cable supplied into the cinch socket »DIGITAL
AUDIO OUT« (coaxial) on the HDD DVD recorder and into
the corresponding socket on the digital multi-channel amplifier;
or
plug a standard optical cable into the »DIGITAL AUDIO
OUT« socket (optical) on the HDD DVD recorder and the corre-
sponding socket on the digital multi-channel amplifier.
Note:
Even if you are using a digital connection, you should still make
an analogue audio connection (see page 24) because depending on the disc type, the »DIGITAL AUDIO OUT« socket may
not be able to transfer the signal.
CONNECTION AND PREPARATION
_________
A
AV
* Manufactured under licence from Dolby Laboratories Licensing Corpo-
ration. “Dolby”, “Dolby Pro Logic”, “Dolby Digital” and the double-D
symbol “
ij ” are trademarks of the Dolby Laboratories Licensing Cor-
poration. Copyright 1992 Dolby Laboratories, Inc. All rights reserved.
** DTS and DTS Digital Out are trademarks of Digital Theatre Systems,
Inc. All rights reserved.
VIDEO OUT
ANTENNA
IN
OUT TV
ANTENNA
VIDEO OUT
ANTENNA
IN
OUT TV
S-VIDEO OUT
ANTENNA
VIDEO IN
Y
L
AUDIO OUT
Pb
R
Cb
Pr
Cr
DIGITAL AUDIO OUT
S-VIDEO OUT
S-VIDEO IN
AUDIO OUT
VIDEO OUT
VIDEO IN AUDIO IN
VIDEO IN
Y
L
AUDIO OUT
Pb
R
Cb
Pr
Cr
DIGITAL AUDIO OUT
S-VIDEO IN
AUDIO OUT
VIDEO OUT
VIDEO IN AUDIO IN
Apparatus Claims of U.S. patent Nos.
4,631,603; 4,577,216; 4,819,098 and
L
4,907,093 licensed for limited
EURO AV 1 TV
viewing uses only.
Manufactured under license from
Dolby laboratories. “Dolby”,”Pro Logic”
and the dolby - D symbol are trademarks
of Dolby Laboratories.
R
Confidential Unpublished Works.
© 1992-1997 Dolby Laboratories, Inc.
All rights reserved
EURO AV 2 DECODER
L
EURO
R
EURO
OPTICAL
DIGITAL
INPUT
DIGITAL
AUDIO
INPUT
Page 26

2626
Connecting the power cord
1 Plug the mains cable supplied into the »110-240V~« socket
on the back of the HDD DVD recorder.
2 Plug the power cord into the wall socket.
Caution:
The only way to disconnect the HDD DVD recorder from the
mains is to pull out the plug.
Note:
Do not connect any other equipment while the device is
switched on. Switch off the other equipment as well before connecting it.
Only plug the device into the mains socket after you have connected the external devices and the antenna.
Inserting batteries in the remote control
1 To open the battery compartment, press the catch and remove
the lid.
2 When inserting the batteries (Mignon type, e.g. R06 or AA,
2 x1.5 V), observe the polarity marked on the battery compartment.
3 Close the battery compartment.
Note:
If the HDD DVD recorder no longer reacts properly to remote
control commands, the batteries may be flat. Always remove
used batteries. The manufacturer accepts no liability for damage resulting from leaking batteries.
Environmental note:
Batteries, including those which contain no heavy metal, should
not be disposed of with household waste. Please dispose of
used batteries in an environmentally responsible manner. Find
out about the legal regulations which apply in your area.
CONNECTION AND PREPARATION
_________
Page 27
ENGLISH
27
ENGLISH
27
INITIAL SETUP
__________________________________________
Switching on the HDD DVD recorder
1 Press »Ǽ« to switch on the HDD DVD recorder from standby
mode.
– Display: »HELLO« flashes.
Initial setup
When you first switch on the HDD DVD recorder, the »Initial setup«
menu always appears.
This guides you step by step through each setting.
The HDD DVD recorder is equipped with automatic tuning.
You start the search and can then sort the television stations into
your order of preference.
There are 149 presets, to which you can assign TV stations from the
antenna or from the cable connection.
If you do not have an antenna or cable connection and you receive
the television station via a DVB receiver, skip over “Tuning television
stations”. Press »S« to select the »Next« button and press »OK« to
confirm. Refer to the »SETUP« menu –>»RECORDING« –>»Standard input source« to select the socket you connected the DVB
receiver to.
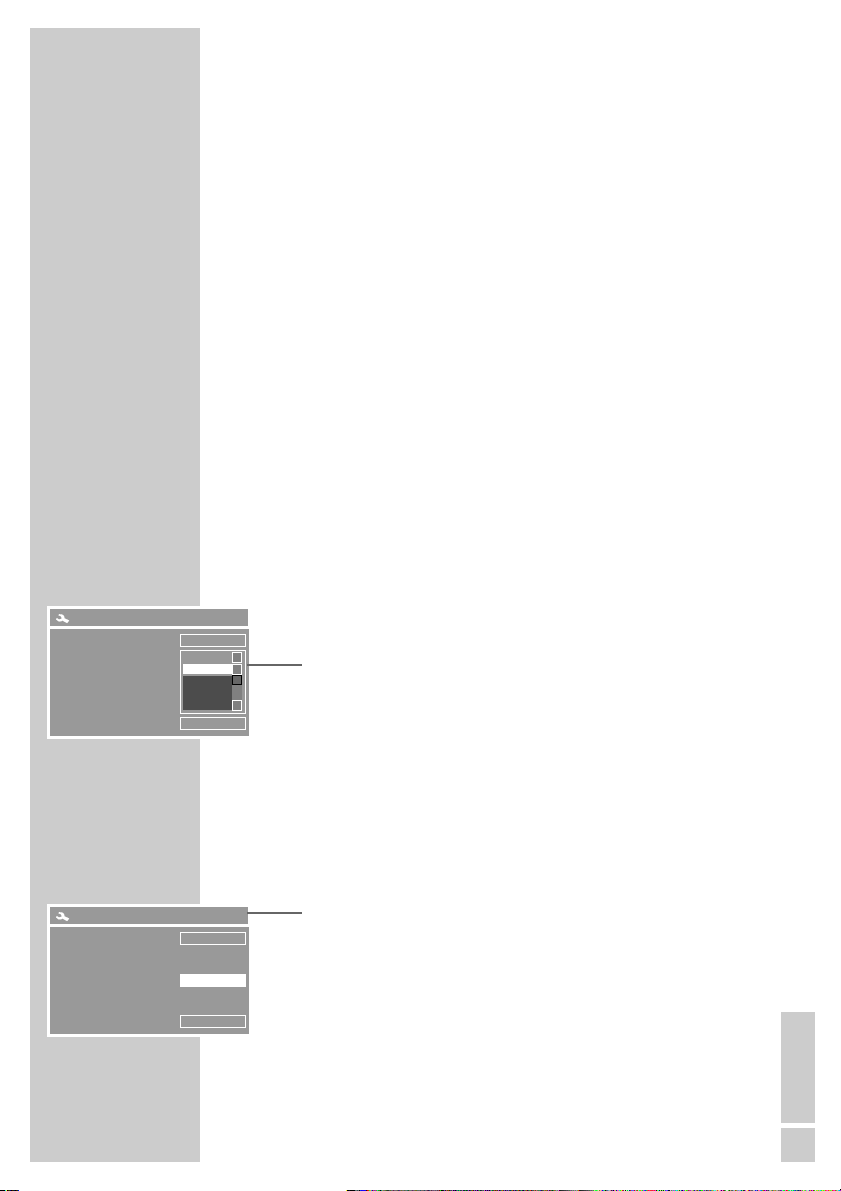
Selecting the screen menu language
This is how to set the language of the HDD DVD recorder’s
screen menus.
1 Select your language using »A« or »S« and press »OK« to
confirm.
2 Select »NEXT« by pressing »OK«.
Tuning television stations
The HDD DVD recorder has its own receiver unit. It can receive and
record from television stations independently of the television. This
means the TV channels have to be tuned on the HDD DVD recorder.
During this setting, the clock is automatically updated. However, this
is only possible if you find a television station with teletext and valid
time information.
1 Select »SCAN« with »S« or »A« and press »OK« to start
the search.
– The HDD DVD recorder searches all channels for television
stations, then sorts and saves them. The automatic search may
take several minutes.
2 Select »NEXT« by pressing »OK«.
Initial setup
PREV
This step will scan for TV signals.
Please check that antenna or
cable has been connected
correctly.
NEXT
SCAN
Initial setup
CANCEL
Select OSD language.
English
English
Français
Español
Deutsch
NEXT
S
S
A
Page 28
2828
INITIAL SETUP
__________________________________________
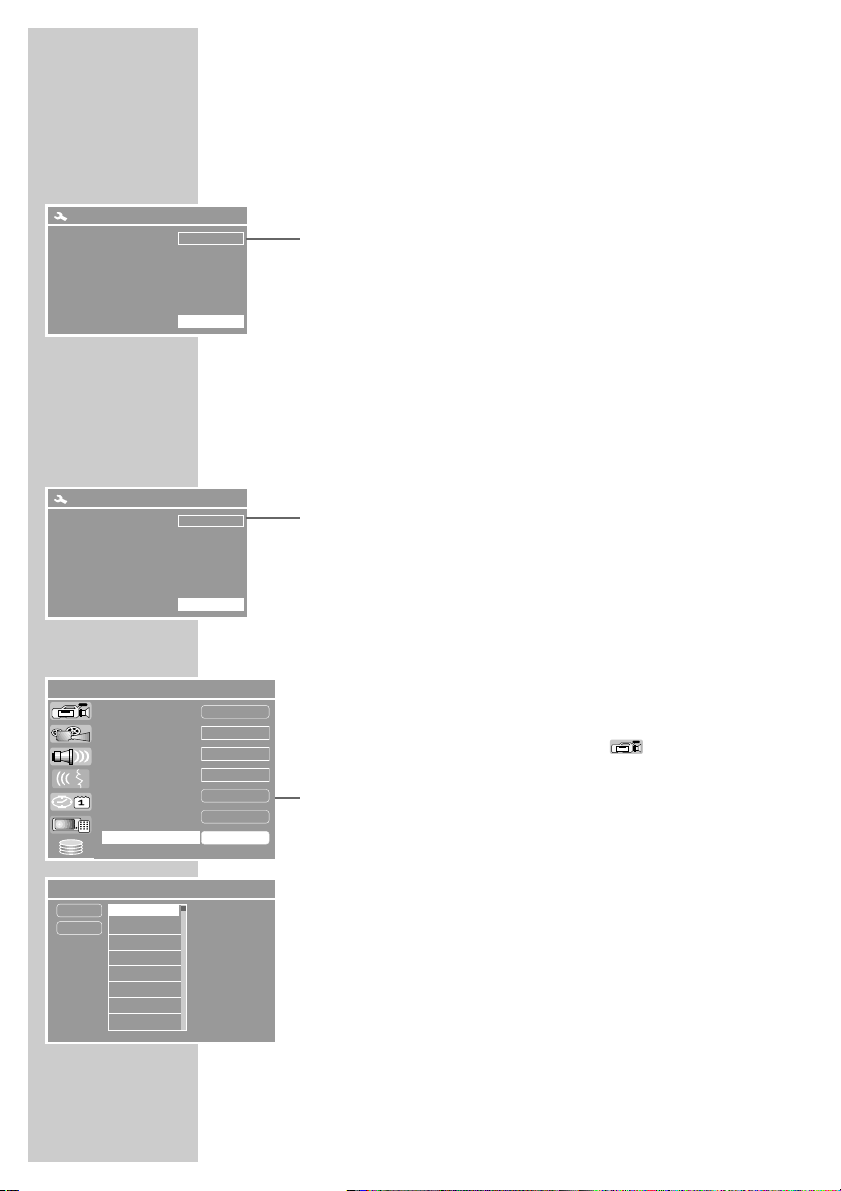
Setting the time and date
1 If the time and date are correct, select »NEXT« »OK« to con-
firm.
Entering a new time and date
1 Select the date line with »S« or »A« and press »OK« to
activate it.
2 Enter the date as six digits using »1…0« and press »OK« to
confirm the setting.
3 Select »NEXT« by pressing »OK«.
4 Select the time line with »S« or »A« and press »OK« to
activate it.
5 Enter the time as six digits using »1…0« and press »OK« to
confirm the setting.
6 Select »NEXT« by pressing »OK«.
Ending initial setup
1 Select »FINISHED« by pressing »OK«.
YesDVD information
1 Information about the YesDVD function appears after a short
time. Press »OK« to switch off the display.
Sorting television stations
You can sort the TV stations in any order you like.
1 Press »SETUP« to open the setup menu.
2 Select »SETUP-MENÜ – RECODING« ( ) with »
S
« or
»A« and press »OK« to confirm.
3 Select »Program Table« with »S« or »A« and press »OK«
to confirm.
4 Press »OK« to confirm the message.
– The »Sort« menu appears.
5 Press »S« or »A« to select the station to move and mark it
with »s«.
6 Select a new preset with »S« or »A« and then press »OK«
to confirm.
7 Press »a« to move to »OK« and press »OK« to confirm the
setting.
Note:
To sort the other television channels, repeat steps 3 to 7.
8 Press »SETUP« to complete the setting.
Initial setup
PREV
Set system date (dd/mm/yy).
01.12.06
NEXT
Initial setup
PREV
Initial setup finished.
FINISHED
SETUP MENU – RECORDING
a
OK
SP (25min/G)
Tuner
SCAN
EDIT
5 min.
SORT
Timer Setting Menu
Auto Chapter Marker
Record Quality
Default Source
Scan Channels
Modify Channel
Program Table
Sort
s
OK
P001 ARD
P002 ZDF
P003 BR3
P004 RTL
P005 SAT1
P006 KABEL
P007 PRO7
P008 RTL2
CANCEL
Page 29
ENGLISH
2929
INITIAL SETUP
__________________________________________
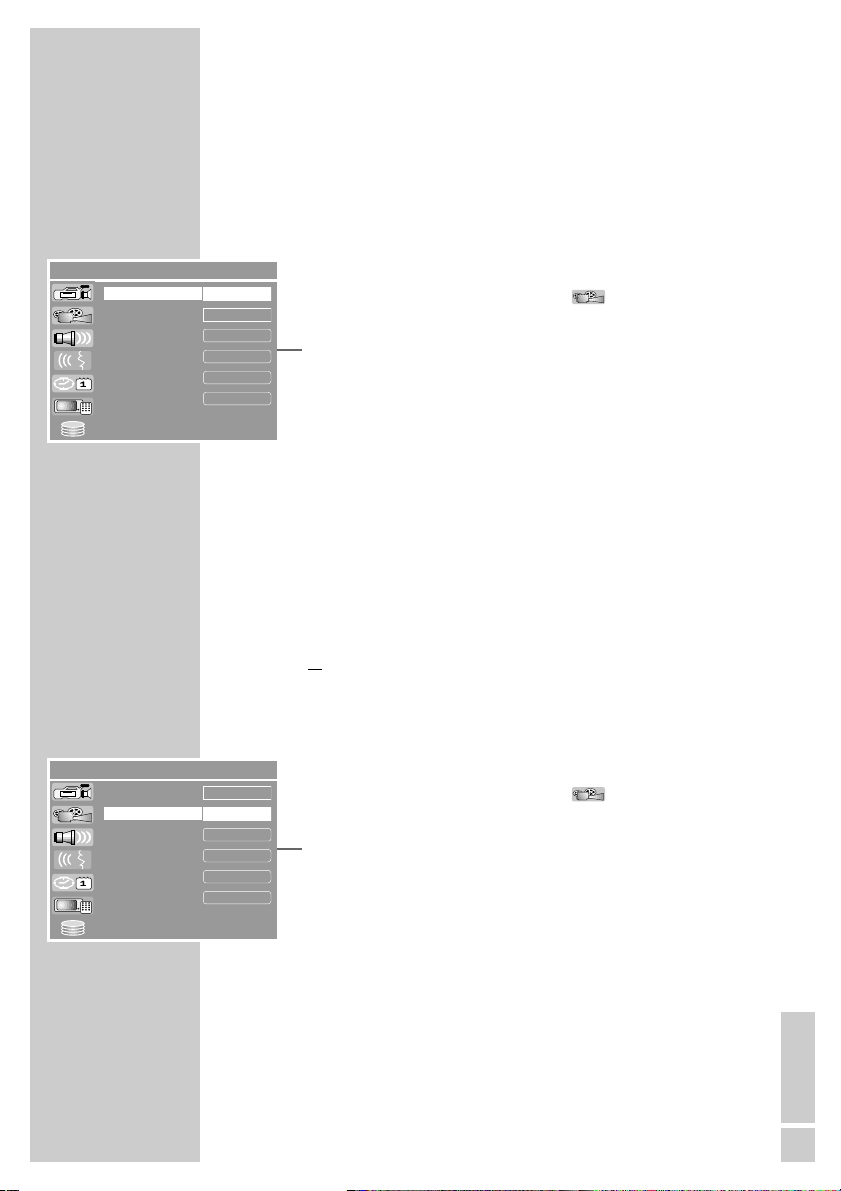
Setting the TV norm
The colour norm of the HDD DVD recorder’s screen menus has to be
adapted to the format of your television.
Select »PAL« for televisions with the PAL standard, or »NTSC« for
those with the NTSC standard.
»PAL« is the default setting.
1 Press »SETUP« to open the setup menu.
2 Select »SETUP-MENU – VIDEO« ( ) with »
S
« or »A«
and press »OK« to confirm.
3 Select »Default TV system« using »
S
« or »A« and press
»OK« to activate it.
4 Select the setting (»NTSC« or »PAL«) with »S« or »A« and
press »OK« to confirm.
5 Press »SETUP« to finish the setting.
Selecting the screen format of your television set
This setting depends on your television, and on the information on
the DVD.
If you have a 4:3 format television, the following settings are available:
»4:3 P&S« for wide-screen playback, with the left and right edges
of the picture cropped (depending on the DVD used).
or
»4:3 LB« for wide-screen playback with black bars on the top
and bottom edges of the screen.
If you have a 16:9 format television, select the »16:9« setting.
»16:9 WS« is the default setting.
1 Press »SETUP« to open the setup menu.
2 Select »SETUP-MENU – VIDEO« ( ) with »
S
« or »A«
and press »OK« to confirm.
3 Select »TV aspect ratio« with »S« or »A« and press »OK«
to activate it.
4 Select the picture format (»4:3 LB«, »4:3 P&S« or »16:9 WS«)
with »S« or »A« and press »OK« to confirm.
5 Press »SETUP« to finish the setting.
SETUP MENU – VIDEO
a
PAL
RGB
Interlaced
OK
4 : 3 LB
Default TV system
TV aspect ratio
Scart output
Progressive/Interlace
DivX(R) Video On Demant
YesDVD
Set
SETUP MENU – VIDEO
a
PAL
RGB
Interlaced
OK
4 : 3 LB
Default TV system
TV aspect ratio
Scart output
Progressive/Interlace
DivX(R) Video On Demant
YesDVD
Set
Page 30
3030
Time shift – watching a current television
programme with a delay
When you switch on the HDD DVD recorder, the current programme that you can see on the television screen is recorded in the
time shift memory.
If a digital receiver is connected to the HDD DVD recorder, select
SETUP MENU –> RECORDING –> Default Source –>EURO-AV 2.
The signal of the digital receiver is then recorded in the time shift
memory.
The time shift memory contains space for one hour, three hours or
six hours of recording depending on the setting on page 79 (the
default setting is six hours). After the selected recording time, the
HDD DVD recorder continues recording but the start of the recording is lost.
The data in the time shift memory can be partially or completely
copied into the HDD archive at any time.
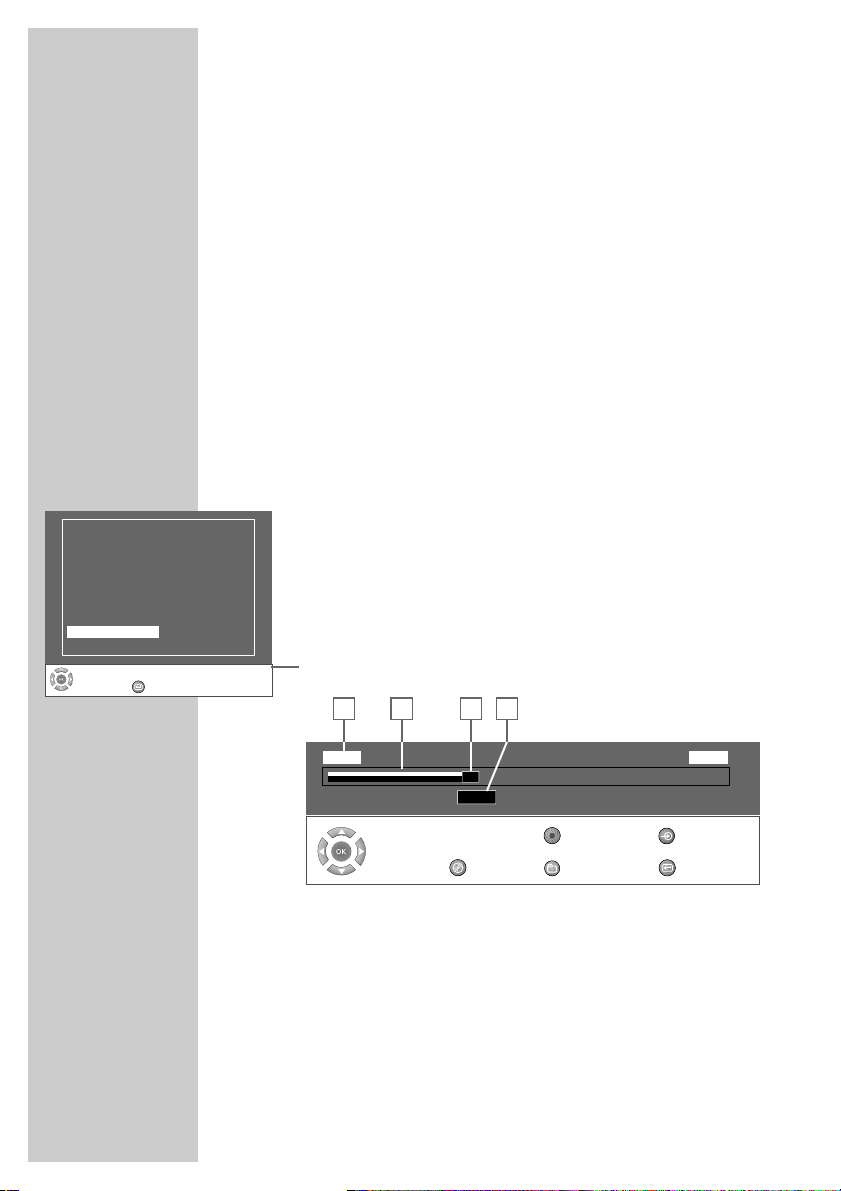
The time shift menu
When you switch on the HDD DVD recorder, the time shift menu is
displayed briefly.
The time shift menu can be hidden and displayed again with
»DISPL« or »OK«.
Press »DISPL« twice to hide the dialog line and buttons.
If »OK« is pressed three times, the channel list is displayed.
1 Start of time shift recording (earliest possible playing position).
2 Visual display of the time shift memory.
3 Current playing position.
4 »LIVE« indicates that you are watching the programme without a
time shift.
If you rewind the programme, the display shows the playing
position of the current scene.
TIME SHIFT FUNCTIONS
__________________________
Select
and
Choose
08:25:47
L I V E
TimeShifting
s
10:51:00
ȀȀ
DVD
Record
HDD
DVD Target
Exit
1 2
3 4
Select
and
Choose
Exit
EURO-AV P003 RTL
EURO-AV 2 P004 SAT 1
Rückseite Video P005 KABEL
S-VIDEO IN h. P006 PRO 7
Vorderseite Video P007 RTL2
EURO-AV 2 YUV P008 VOX
EURO-AV 2 SV P009 3SAT
DV P010 BR3
P001 ARF P011 HESS3
P002 ZDF P012 DSF
Page 31

ENGLISH
31
ENGLISH
31
5 Current time.
6 Animated symbol for recording in the time shift memory.
7 Dialog line with buttons and their functions.
Pressing »OK« three times displays the channel
list.
»A« or »S« select the television station or the AV
channel to be recorded in the time shift memory.
»a« or »s« select scenes from the time shift
recording.
»a« 10 seconds backwards.
»s« 30 seconds forwards.
Operating mode display.
Switches to disc playback; the time shift
recording is continued in the background.
The programme is being recorded in the HDD
archive.
Switches to the HDD archive; the recording in the
time shift memory is continued.
Switches to disc recording mode; the time shift
recording is ended.
The programme can then be recorded on disc.
Switches the time shift menu off.
TIME SHIFT FUNCTIONS
__________________________
TimeShifting
7
Select
and
Choose
08:25:47
L I V E
TimeShifting
s
10:51:00
ȀȀ
DVD
Record
HDD
DVD Target
Exit
5
6
Page 32

3232
Watching programmes with a time shift
1 Switch on the television and select the preset channel for the
HDD DVD recorder.
2 When you switch on the HDD DVD recorder, the current pro-
gramme that you can see on the television screen is recorded in
the time shift memory.
– The time shift menu is displayed briefly.
Note:
You can view the time shift menu with »DISPL« or »OK«.
Pausing a live programme
You can pause the programme you are watching. This is a useful
function, for example, if the telephone rings while you are watching
a film and you don’t want to miss anything.
A freeze-frame display of the last scene appears on the screen and
the programme is recorded in the time shift memory.
1 Press »
!
« to pause the current programme.
– The »LIVE« display disappears.
2 Press »
8« to continue the programme.
– Instead of »LIVE« the relative playing position is shown. The
time display in the right of the time shift menu shows the current time.
Note:
Switch back to live recording by pressing »
6« or » ,«
repeatedly.
If you catch up with the scene currently being broadcast, »LIVE«
appears again in the display.
Note for operation with a digital receiver:
If the television programme is coming from a digital receiver
(connected to the EURO AV2 socket) and you want to make the
setting using the menu of the digital receiver, »LIVE« must be
shown in the time shift menu. If not, then the settings in the
menu of the digital receiver are displayed with a time shift.
Repeating the last scene of the programme
1 By pressing »8« you can repeat the last seven seconds of the
programme.
– Playback then continues with a time shift.
2 Switch back to live recording by pressing »
6«.
TIME SHIFT FUNCTIONS
__________________________
Select
and
Choose
08:25:47
10:51:00
‹‹‹‹
L I V E
TimeShifting Record
HDDDVD
DVD Target
Exit
Page 33

ENGLISH
3333
Searching for scenes in the time shift memory
You can search for scenes in the current recording. The programme
continues to be recorded in the time shift memory.
1 By pressing »
m« you can “rewind” the programme. Three
different speeds are available.
2 By pressing »
5« you can switch back to the start of each chap-
ter. (You can set the duration of each chapter in the setup menu.)
3 If you view past scenes in the time shift memory, you can “fast
forward” the programme with »
,«. Three different speeds
are available.
4 If you view past scenes in the time shift memory, you can “fast
forward” the programme in chapters with »
6«.
Note:
If »LIVE« is displayed, it is not possible to move any further
forward in the programme.
Copying sections of the programme stored in the
time shift memory into the HDD archive
You can copy sections of the programme which are currently stored
in the time shift memory into the HDD archive.
Note that the recordings in the time shift memory before the starting
point marker and the selected section will be deleted from the time
shift memory. The sections after the end point marker are retained.
1 Press »DISPL« or »OK« to open the time shift menu.
2 Using »
a
«, »m« or »5« select the start of the scene that is
to be copied.
3 Once you reach the start of the scene, mark the starting point
with »
●«.
4 Using »
s
«, » ,« or »6« search for the end of the scene that
is to be copied.
– The section that is to be copied is marked red in the time shift
menu.
Note:
The markings can be deleted with »CL«.
5 When the end of the scene is reached, mark the place with »
7«
and press »OK« to confirm the message.
– The marked section is automatically copied into the HDD
archive.
– This section and the recordings before this section are deleted
from the time shift memory.
TIME SHIFT FUNCTIONS
__________________________
Select
and
Choose
14:25:00
14:25:05
‹‹‹‹
L I V E
TimeShifting Record
HDDDVD
DVD Target
Exit
Page 34

3434
DISC PLAYBACK
______________________________________
Preparation
1 Switch on the television and select the preset channel for the
HDD DVD recorder.
2 If an audio system or an AV receiver is connected to the HDD
DVD recorder, switch it on and select the audio input for the
HDD DVD recorder.
3 Press »
Ǽ« to switch on the HDD DVD recorder from standby
mode.
– Display: »HELLO« flashes, followed by the channel position
and the recording quality.
Inserting discs
1 Briefly press »ə« on the HDD DVD recorder or press and hold
down »7« on the remote control.
– Display: » «, the disc compartment opens.
2 Put a disc in the compartment with the label facing upwards.
3 Press »
ə« on the HDD DVD recorder or press and hold down
»7« on the remote control.
or
select disc mode with » « directly.
– Disc mode is selected.
Notes:
You cannot operate the device as long as » LOADING«
is showing in the display.
If the HDD DVD recorder is in the time shift mode, the disc
behaves as follows:
– When a purchased DVD is inserted, playback starts automat-
ically.
– When a home-made DVD+RW/DVD+R is inserted, the index
screen appears and playback starts with »
8«.
– When a blank DVD+RW/DVD+R is inserted, recording can
begin. Switch to recording mode with » « (blue).
– When a data disc is inserted, the file browser is displayed.
– Playback of a VCD, S-VCD, MP3-CD, WMA-CD or audio CD
(CD-DA) starts automatically.
If the » « symbol appears on the television screen, the
selected function is not possible with this disc.
Removing discs
1 Press »ə« on the HDD DVD recorder or press and hold down
»7« on the remote control.
– The disc compartment opens.
Page 35

ENGLISH
3535
DVD playback
DVD features
You can recognise a DVD by the logo on the label.
Depending on the content of the DVD, the discs contain one or
more titles.
Each title may contain one or more chapters.
You can control and direct playback of a DVD using the menu of the
HDD DVD recorder on the television screen.
Special DVD features
DVDs have a title menu which provides an overview of the available
titles and the passages they contain.
Some of the HDD DVD recorder’s functions, such as slow motion,
freeze-frame and auto-play, can also be controlled by the DVD
itself. Because of this you may not be able to select these functions
during certain scenes.
Many DVDs have audio tracks recorded in up to eight languages.
You can select the language you prefer.
Many DVDs are recorded by the manufacturer with subtitles in up to
thirty-two languages. You can select the subtitles you prefer.
Playback
1 If the HDD DVD recorder is in time shift mode and already has
a DVD inserted, playback starts automatically.
Note:
From other operating modes, select the »MAIN MENU« of the
HDD DVD recorder by pressing »i«, select »
8 DVD« with
»S« or »A« and press »OK« to confirm.
Press »8« to start playback.
Notes:
Depending on the DVD you are using, you may have to select a
title or chapter from its table of contents.
Press »A«, »S«, »a« or »s« to select the chapter or title
and »
8« or »OK« to start playback.
If DVD access has not been authorised, you must change the
access level code (1 to 8) (see the section on authorising the
content of the DVD on page 103).
If the » « symbol appears on the television screen, then
the selected function is not possible with this DVD.
2 Press »
!
« to pause playback (freeze-frame).
3 Advance frame-by-frame by pressing »
!
«.
4 Press »
8« to resume playback.
5 To stop playback, press »
7« twice
.
DISC PLAYBACK
______________________________________
MAIN MENU
Y
HDD
ǵ
TimeShift
File Manager
DVD
Timer List
Setup
Play disc
S
Edit
8
A
Page 36

3636
Opening the playback menu
1 Press »DISPL« or »OK« twice to display the playback menu.
2 You can select repeat functions in »Mode«.
DVD+RW/+R/-RW/-R playback
Features of DVD+RW/+R/-RW/-R
You can recognise a disc by the logo on the label.
If programmes were recorded on these discs, your HDD DVD
recorder can play them back.
If you want to play a DVD+R/-R on a DVD player, it must first be
finalised.
Playback
1 If the HDD DVD recorder is in time shift mode and already has
a DVD inserted, playback starts automatically provided the disc
is write-protected or has been finalised.
Note:
From other operating modes, select the »MAIN MENU« of the
HDD DVD recorder by pressing »i«, select »
8 DVD« with
»S« or »A« and press »OK« to confirm.
Note:
If playback does not start automatically, select the track you
want from the index screen by pressing »A« or »S« and
press »OK« to start playback.
2 Press »
!
« to pause playback (freeze-frame).
3 Advance frame-by-frame by pressing »
!
«.
4 Press »
8« to resume playback.
5 To stop playback, press »
7« twice.
DISC PLAYBACK
______________________________________
Trick mode
TITLE
CHAPTER
AUDIO
SUBTITLE
ANGLE
T-TIME
MODE NORMAL
PLAY
01/01
01/01
01/01-OTH
Aus
01/01
0:00:02–0:14:58
S
s
s
1. TITLE
30/09/2004
10:05:12
SP 01:15:00
2. TITLE
30/09/2004
12:30:00
SP 00:45:00
3. TITLE
01/10/2004
21:00:00
SP 00:30:00
Page 37

ENGLISH
3737
S-VCD/VCD playback
S-VCD/VCD features
You can recognise S-VCD/VCDs (video CDs) by the logo on the
label.
Depending on the contents of the S-VCD/VCD (films, music videos
etc.), the discs may carry one or more tracks.
You can create S-VCDs/VCDs using the PBC (playback control)
system for track navigation. This depends on the editing and
burning software used.
You cannot select some of the functions on the HDD DVD recorder
(slow motion, camera angle, marking scenes) when you are playing
an S-VCD/VCD. This depends on how the S-VCD/VCD was created.
Playback
1 If the HDD DVD recorder is in time shift mode and already has
a disc inserted, playback starts automatically.
Note:
From other operating modes, select the »MAIN MENU« of the
HDD DVD recorder by pressing »i«, select »
8 DVD« with
»S« or »A« and press »OK« to confirm.
Note:
Depending on the type of S-VCD/VCD used, you may have to
press »
6« or »5« or »1…0« to select the disc title from a list.
Press »x« to switch back to the previous menu with
PBC ON.
2 Press »
!
« to pause playback (freeze-frame).
3 Advance frame-by-frame by pressing »
!
«.
4 Press »
8« to resume playback.
Notes:
Press »DISPL« twice to open the playback menu. The »Mode«
menu item allows you to select repeat functions.
In PBC, you can switch the PBC function on and off.
5 To stop playback,
press »
7« once if the PBC is ON,
press »7« twice if the PBC is OFF.
Frame search
1 Select the playback speed during playback by pressing »m«
or »,«.
2 Press »
8« to resume normal playback.
DISC PLAYBACK
______________________________________
Page 38

3838
DISC PLAYBACK
______________________________________
Switching PBC (playback control) on and off
1 During playback, press »DISPL« or »OK« twice.
2 Select »PBC« with »
S
« or »A« and press »OK« to confirm.
3 Activate the PBC function with »
S
« or »A« (On) and con-
firm with »OK«.
Note:
To deactivate the PBC function, repeat the setting, but at step 3,
select »Off«.
Page 39

ENGLISH
3939
DISC PLAYBACK
______________________________________
Playing audio and video files
DivX©Video CD features
DivX©Video is an encoder/decoder based on the MPEG-4 compression system which is used to encrypt and display compressed
video data.
This enables the HDD DVD player to play back videos compressed
in the DivX
©
format. This results in playback quality with fewer arte-
facts and higher compression.
DivX
©
Video files have, for example, the suffix AVI. DivX©Video data
is packaged in the AVI file along with audio data compressed in
MP3 format. This means:
DivX©Video and MP3 audio form the AVI file.
Further information on DivX
©
Video and how to create AVI files can
be found under www. divx.com.
You can see the registration code in the »VIDEO« —> »DIVX registration« menu on page 115.
MP3 CD features
MP3 stands for MPEG-1 Audio Layer 3 and comes from the Motion
Picture Expert Group (MPEG) standard, which was developed for
compressing film data.
The MP3 format enables audio files to be saved on a computer with
a sound quality similar to that of a CD. This only requires about
10 % of the original data quantity. The standard encoding bit rate
for MP3 files is 128 kbps. Generally, the higher the bit rate of an
MP3 file, the better the sound quality.
Most MP3 files on the Internet are encoded at 128 or 160 kbps.
160 kbps is considered CD quality.
MP3 files can be downloaded from the Internet and then burned
onto a CD-ROM. Your HDD DVD recorder can read the ID3 tag
from the file header, which contains information on the song and
the artist, and displays this in the info menu/status display.
MP3 CDs contain sound recordings. They can be played in the
normal manner on an audio system. The digital signals transmitted
during MP3 playback are PCM encoded, regardless of the audio
output setting. The signals are output with the same data rate as the
music source (possibilities are: 32 kbps – 320 kbps, usually:
128 kbps).
MP3 files can be organised into folders and subfolders similar to
files on a computer.
Page 40

4040
DISC PLAYBACK
______________________________________
Note:
You cannot playback from the DivX© video disc whilst recording
on the HDD archive.
End the recording to play the DivX© video disc.
Playback
1 If the HDD DVD recorder is in time shift mode, the file browser
is displayed after a disc is inserted.
Note:
From other operating modes, select the »MAIN MENU« of the
HDD DVD recorder by pressing »i«, select »
8 DVD« with
»S« or »A« and press »OK« to confirm.
2 Select the folder or title with »A« or »S«.
3 Press »OK« to open the folder.
– A list of sub-directories appears.
Note:
Press »x« to go back one level.
4 Start playback of the title with »OK«.
– The number of the title and the playing time appears in the
display on the HDD DVD recorder.
Note:
Press »DISPL« twice to open the playback menu. Under
»Mode« you can select repeat functions.
5 Press »
!
« to pause playback.
6 Press »
8« to resume playback.
7 Press »
7« to end playback.
Viewing title information
Information about the DivX©Video title you have selected can be
viewed by pressing »DISPL«.
You can view the contents of the DivX©Video CD (file browser)
by pressing »7«.
Information about the MP3 title you have selected can be viewed
by pressing »DISPL«.
You can view the contents of the MP3 CD (file browser) by
pressing »DISPL«.
Selecting certain titles
1 You can view the titles during playback by pressing »➞•«.
2 Enter the title by pressing »1…0« and press »OK« to confirm.
– The HDD DVD recorder locates the title and starts playback.
Filemanager AUDIO STOP 0:00:00 - 0:00:00
Select
and
Choose
Program
1 MP3/
S
A
../
s
File Size: N/A
Modify Date: N/A
Page 41

ENGLISH
4141
DISC PLAYBACK
______________________________________
Selecting a title in steps (SKIP)
1 Select the next title by pressing »6« during playback.
2 Press »
5« to select the previous title.
– Playback begins with the selected title.
Selecting a section to the minute
1 During playback, enter the playing time in »1…0« five digits
(hours, minutes and seconds) and press »OK« to confirm.
– The HDD DVD recorder locates the section and starts play-
back.
Frame search (DivX©Video CD only)
Several different speeds are available.
1 Select the playback speed during playback by pressing »
m«
or » ,«.
2 Press »
8« to resume normal playback.
Switching to the dubbed language or sound
format (DivX
©
Video CD only)
A DivX©Video CD can contain various dubbed languages or
audio formats.
1 Press »
d« during playback.
2 Select the »Language« line with »
S
« or »A« and press
»s« to confirm.
3 Select the dubbing language or the audio format with »
S
« or
»A« and press »OK« to confirm.
Page 42

4242
DISC PLAYBACK
______________________________________
Selecting and showing subtitles
(DivX
©
Video CD only)
DivX©Video CDs provide two types of subtitles.
There are the familiar subtitles available on a conventional DVD,
and also subtitles shown as a separate file in the browser.
1 Press »y« during playback.
or
2 Select the subtitles file in the file browser (the file name has an
extension, such as .TXT), then press »OK«.
– Display: »External subtitle selected« briefly appears.
In the file browser, select the DivX
©
Video file and press »OK«
to start playback.
– The subtitles are displayed.
Page 43

ENGLISH
4343
Picture data CD playback
JPEG CD features
JPEG stands for Joint Picture Experts Group. This process was
designed to compress picture files.
JPEG files can be burned onto a CD along with other file types.
These CDs are known as file CDs or mixed-mode CDs. For example,
the CD could contain MP3 files (audio) and JPEG files (for example
to display album covers).
The files on a JPEG CD can be organised in directories. This structure is similar to that of an MP3 CD.
JPEG CDs only contain data in the compressed JPEG format. This is
mostly data from digital cameras or from imaging programs.
Displaying pictures on a JPEG-CD
1 If the HDD DVD recorder is in time shift mode, the file browser
is displayed after a disc is inserted.
Note:
From other operating modes, select the »MAIN MENU« of the
HDD DVD recorder by pressing »i«, select »
8 DVD« with
»S« or »A« and press »OK« to confirm.
2 Press »A« or »S« to select the folder (or pictures).
– A list of sub-directories appears.
3 Press »OK« to open the folder.
Note:
Press »x« to go back one level.
4 Press »A« or »S« to select the picture you want to see and
then »OK« to start playback.
– Playback appears on the screen and the slide show begins.
Notes:
To view the picture for longer, press »
!
«. Press »8« to
resume playback.
Press »DISPL« once to display the file browser (table of con-
tents) of the JPEG CD.
Press »DISPL« twice to open the playback menu. You can
select repeats and other additional functions in this menu.
5 Press »
7« to end playback.
DISC PLAYBACK
______________________________________
Page 44

4444
Random playback
1 Press »RND« during playback.
– All the pictures on the JPEG CD are shown in a random order.
2 Press »RND« to quit the function.
Selecting slide transition style
1 During playback, press »n« repeatedly.
– The type of slide transition style is displayed.
Adjusting the picture display
The pictures can be rotated or reversed.
1 During playback, press »a« or »s« to rotate the pictures
by 90°.
2 During playback, press »A« or »S« to reverse (180°)
the pictures.
3 Press »
7« to end playback.
Enlarging the picture (zoom)
This function allows you to enlarge or reduce pictures and move
them on the screen.
1 Press »v« during playback or during a pause.
2 To enlarge or reduce the size of a picture section, press »v«
repeatedly.
– The zoom factor is displayed.
3 Press »a«, »s«, »A« or »S« to move the picture section on
the screen.
Note:
You cannot move pictures which have been reduced in size.
4 Press »v« to switch back to full picture.
DISC PLAYBACK
______________________________________
Page 45

ENGLISH
4545
KODAK picture CD features
This method was developed for archiving analogue photographs.
After they are developed, small photographs are scanned with a
resolution of 1536 x 1024 pixels and burnt onto a CD in JPEG format.
A KODAK picture CD can contain up to 40 pictures. In addition to
the picture files, a KODAK picture CD can also contain imaging
software which enables the user to play the CD on a PC, edit the
pictures or view a slide show.
Playing back a KODAK picture CD
1 If the HDD DVD recorder is in time shift mode, the file browser
is displayed after a disc is inserted.
Note:
From other operating modes, select the »MAIN MENU« of the
HDD DVD recorder by pressing »i«, select »
8 DVD« with
»S« or »A« and press »OK« to confirm.
2 Playback starts automatically. The pictures proceed automati-
cally.
If playback does not start automatically, press »8«..
3 To view the picture for longer, press »
!
«.
Press »8« to continue picture playback.
Adjusting the picture display
The pictures can be rotated or reversed.
1 During playback, press »a« or »s« to rotate the pictures
by 90°.
2 During playback, press »A« or »S« to reverse the pictures.
3 Press »
7« to end playback.
Enlarging the picture (zoom)
This function allows you to enlarge or reduce pictures and move
them on the screen.
1 Press »v« during playback or during a pause.
2 To enlarge or reduce the size of a picture section, press »v«
repeatedly.
– The zoom factor is displayed.
3 Press »a«, »s«, »A« or »S« to move the picture section on
the screen.
Note:
You cannot move pictures which have been reduced in size.
4 Press »v« to switch back to full picture.
DISC PLAYBACK
______________________________________
Page 46

4646
Audio CD playback
Audio CD features
You can recognise audio CDs by this logo.
Audio CDs only contain sound recordings. They can be played in
the normal manner via an audio system, just as on a CD player.
The individual tracks are stored in a sequence. There are no folders.
Playback
1 If the HDD DVD recorder is in time shift mode, the file browser
is displayed after a disc is inserted.
Note:
From other operating modes, select the »MAIN MENU« of the
HDD DVD recorder by pressing »i«, select »
8 DVD« with
»S« or »A« and press »OK« to confirm.
2 If playback is not started automatically, start it by pressing »
8«.
– Display: Track playing time and total playing time.
– Playback stops at the end of the CD.
3 Press »
!
« to pause playback.
4 Press »
8« to resume playback.
Note:
Press »DISPL« to open the playback menu. The »Mode« menu
item allows you to select repeat functions.
5 Press »
7« to end playback.
Selecting tracks directly with the numerical
buttons
1 During playback, press »1…0« to enter the one- or two-digit
track number and press »OK« to confirm.
– Playback begins with the selected track.
Selecting a track in steps (SKIP)
1 Select the next track by pressing »6« during playback.
2 Press »
5« to select the previous track.
– Playback begins with the selected track.
Fast search
Various speeds are available.
1 To select the playback speed, press »
m« during playback or
»,« repeatedly.
2 Press »
8« to resume normal playback.
DISC PLAYBACK
______________________________________
Page 47

ENGLISH
47
ENGLISH
47
Preparation
1 Switch on the television and select the preset channel for the
HDD DVD recorder.
2 If an audio system or an AV receiver is connected to the HDD
DVD recorder, switch it on and select the audio input for the
HDD DVD recorder.
3 Press »
Ǽ« to switch on the HDD DVD recorder from standby
mode.
– The television station of the first preset channel is dis-
played and the current programme is buffered in the time
shift memory.
Playback
1 Open the »MAIN MENU« of the HDD DVD recorder by
pressing »i«.
2 Select the » HDD« menu item with »
S
« or »A« and
confirm with »OK«.
or
open the HDD archive by pressing » « (yellow).
– The HDD archive is displayed and the first eight recordings
are displayed.
3 Select the programme you want by pressing »S« or »A«.
– The thumbnail index and the length of the selected recording
are displayed in the contents table.
– The symbols mean:
» « Title blocked; playing this title is only possible after
entering a password (see page 79).
» « Title is protected. This title cannot be edited.
» « Track is being edited, you cannot activate YesDVD
functions.
4 Press »
8« to start playback.
Note:
When the YesDVD function is activated, press »a«, »s«,
»A« or »S« to select the scene you want (index picture) and
start playback with »
8«.
5 Press »
!
« to pause playback (freeze-frame).
6 Advance frame-by-frame by pressing »
!
«.
7 Press »
8« to resume playback.
Note:
Playback stops automatically at the end of the programme.
Afterwards the contents table of the HDD archive is displayed.
8 Press »7« to end playback.
HDD ARCHIVE PLAYBACK
_______________________
HDD
001 ARD Di 01/11 20:00 My Title 1
002 ZDF Di 01/11 22:00 My Title 2
003 ARD Mi 02/11 20:00 My Title 3
004 RTL Do 03/11 18:00 My Title 4
005 SAT1 Sa 05/11 20:15 My Title 5
006 PRO7 So 06/11 20:15 My Title 6
007 ARD So 06/11 22:25 My Title 7
008 BR3 Mo 07/10 21:45 My Title 8
No. CH Date Time Title
Select
and
Choose
For other options, please
press OK, SOURCE, or
SETUP keys
DVD
DVD Target
Dubbing
Delete Title
Sort Title
Select/Unselect
S
A
s
s
s
s
s
s
s
s
00:15:00
Page 48

4848
Selecting the last playing position
The HDD DVD recorder “remembers” the last playing position.
When starting playback of the title again, a message appears
to ask you if you would like to play the title from the last playing
position (»Yes«) or from the beginning of the title (»No«). This
function is only possible if you have not marked any scenes (see
page 49).
Displaying the info line
1 Press »DISPL« or »OK« once or twice to display the info line.
– You will see information about the title, total running time and
playback time elapsed.
– The info line automatically disappears after a short time.
Frame search
1 Select the playback speed during
playback by pressing »m« or »,«.
2 Press »
8« to resume normal playback.
Selecting chapters (SKIP)
1 Select the next chapter by pressing »6« during playback.
2 Select the previous chapter by pressing »
5« during playback.
– Playback begins with the selected chapter.
Note:
You can set the duration of each chapter in the setup menu.
Enlarging the picture (zoom)
This function allows you to enlarge various picture sections.
1 During playback, press »v«.
– Display: for example »v 1.5«, the HDD DVD player
enlarges a picture section.
2 Move the picture section around the screen with »a«, »s«,
»A« or »S«.
3 Press »v« to return to normal picture size.
Repeating a track
1 Press »b« during playback.
– Display: »b«, the current track being played will be repea-
ted.
2 To quit the function, press »b« again.
HDD ARCHIVE PLAYBACK
_______________________
Select
and
Choose
00:00:00
00:45:00
00:00:10
HDD Play HDD
DVD
HDD Target
Exit
ZDF 12:00 So 19/09 Title 44
Select
and
Choose
00:00:00
00:45:00
00:00:10
HDD Play HDD
DVD
HDD Target
Exit
ZDF 12:00 So 26/03/06
v
1.5
Select
and
Choose
00:00:00
00:45:00
00:00:10
HDD Play HDD
DVD
HDD Target
Exit
ZDF 12:00 So 26/03/06
b
Page 49

ENGLISH
49
Selecting and playing scenes
You can make a bookmark for a scene of a recording in the HDD
archive. This bookmark can be selected directly for playback.
You can set one bookmark per recording.
Setting bookmarks
1 Press »c« during playback.
– Display: »c«.
Note:
This bookmark is automatically overwritten if you create a new
one.
Playing bookmarked scenes
1 During playback, press and hold down »c«.
– Playback starts at the point marked.
Deleting bookmarks
1 Press »CL« during playback.
HDD ARCHIVE PLAYBACK
_______________________
Select
and
Choose
00:00:00
00:45:00
00:00:10
HDD Play HDD
DVD
HDD Target
Exit
ZDF 12:00 So 26/03/06
c
Page 50

50
The sound is muted for the picture search, slow motion and freezeframe functions.
Depending on the disc in use, some of these functions may
be unavailable.
Selecting titles and chapters
If a disc has multiple titles or chapters you can select them separately.
Selecting titles and chapters step by step
1 During playback, select the title or chapter by pressing »6«
or »5«.
Selecting titles and chapters directly
1 During playback, press »➞•« to open the input option (title or
chapter) you want.
2 Enter the title or chapter using »1…0« and press »OK«to
confirm.
– Playback starts with the selected title or chapter.
Selecting a section to the nearest second
1 During playback, press »➞•« several times to open the
time display.
2 Enter the playing time in five digits (hours, minutes and seconds)
using »1…0« and press »OK« to confirm.
– The HDD DVD recorder locates the section and starts play-
back.
Selecting functions in the playback menu
1 During playback, press »DISPL« or »OK« twice.
– The playback menu appears.
2 Select the item by pressing »A« or »S« and activate it
with »s«.
3 Select the function you want by pressing »A« or »S« and
press »OK« to confirm.
4 Switch off the repeat menu with »a« or »DISPL«.
Pausing and resuming playback
You can pause the playback of a DVD at any point and then resume
from the same place.
1 To pause playback, press »
7« once
.
2 Press »
8« to resume playback at the point where it was pause.
DISC PLAYBACK – CONVENIENCE FUNCTIONS
Page 51

ENGLISH
51
Frame search
You can choose amongst various speeds (forwards or backwards).
1 Select the forward or reverse playback speed during playback
by repeatedly pressing »
m« or »,«.
2 Press »
8« to resume normal playback.
Slow motion
Different (forward) playback speeds are available.
1 Press »
%« during playback.
2 Press »
%« to select the slow motion speed.
3 Press »
8« to resume normal playback.
Frame-by-frame playback
1 Press »!« during playback.
2 Advance frame-by-frame by pressing »
!
«.
3 Press »
8« to resume normal playback.
Selecting camera angles for scenes*
Some DVDs contain scenes or passages which were filmed several
times from different camera locations (camera angles).
You can choose amongst these different angles.
1 Press »n« during playback to select the camera angle function.
– Display: Angle »2/4«, in this example 2 of 4.
2 Press »n« to select a different camera angle.
Enlarging and moving the screen section (zoom)
1 Press »v« during playback or pause.
2 Press »v« to select the zoom factor.
– The HDD DVD recorder enlarges a screen section.
3 Move the picture section around the screen with »a«, »s«,
»A« or »S«.
4 Press »v« to return to normal playback.
DISC PLAYBACK – CONVENIENCE FUNCTIONS
* Depends on the disc in use.
Page 52

52
Switching the dubbed language or the audio
format*
These settings allow you to listen to a dubbed language other than
the default one if the DVD provides alternatives.
1 Press »d« during playback.
– Display: for example »AUDIO: 02/03 GER«.
2 Press »d« to select the audio language you want.
Note:
The structure of the DVD itself may stop you from switching the
audio language. In this case you can usually make the setting in
the DVD menu.
Selecting and displaying subtitles*
If the DVD provides subtitles, they can be displayed on your TV screen.
If subtitles are available in several languages, you can select the
ones you want.
1 Press »y« during playback.
– Display: for example »SUBTITLE: 02/10 GER«.
2 Press »y« to select the subtitle language.
Notes:
To switch off the subtitles, keep pressing »y« until »Off«
appears in the display.
The structure of the DVD itself may stop you from activating and
deactivating subtitles. In this case you can usually make the setting in the DVD menu.
Creating and playing a playlist
You can compile titles or chapters into a playlist.
The titles in the »Playlist« are played back in sequence.
1 Press »PROG« during playback.
2 In the »TITLE« (or »Files and folders« list – depending on the
disc in use), select the title, chapter or picture with »A« or
»S« and press »c« to add it to the »Playlist«.
3 Press »s« to select »Playlist« and »
8« to start playback.
Notes:
Individual titles in the »Playlist« can be deleted with »CL«. The
whole list is deleted if you switch off the HDD DVD recorder or
take out the disc. You can hide the »Program play list« by pressing »x«.
DISC PLAYBACK – CONVENIENCE FUNCTIONS
* Depends on the disc in use.
Editing programme play lists
TITLE
Favorite/programme
Title 02
Title 03
Title 04
Title 05
Title 06
Title 07
Title 08
S
A
Title 01
S
A
Page 53

ENGLISH
53
Repeating a chapter, a title or a disc
Depending on the type of disc, you can repeat chapters, titles,
folders or the entire disc.
1 To repeat the chapter, press »b« during playback until
»Repeat chapter« appears in the display.
– The chapter currently playing is repeated.
or
To repeat the title, press »b« during playback until »Repeat
title« appears in the display.
– The current title is repeated.
or
To repeat the entire disc, press »b« during playback until
»Repeat disc« appears in the display.
– The disc is repeated.
2 To quit the function, keep pressing »b« until »Normal«
appears in the display.
Repeating a selected section (A-B Repeat)
You can mark the beginning and end of a section and play
it repeatedly.
1 Press »A-B« during playback.
– Display: »Set A-«, the start of the section is marked.
2 Press »A-B« again to mark the end of the scene.
– Display: »Repeat A-B«, the marked section is constantly
repeated.
3 Press »A-B« again to quit the function.
– Display: »NORMAL«.
DISC PLAYBACK – CONVENIENCE FUNCTIONS
Page 54

54
PIP (picture in a picture) allows you to watch the inset picture from a
second picture source in addition to the playback from the disc or
the HDD archive.
Television stations, DVD players and recorders, video recorders or
DVB receivers can be used as video sources. The external devices
must be connected to the input sockets on the back of the device.
PIP mode settings are described on page 107.
Displaying the inset picture
1 Display inset picture with »n«.
Note:
If you want to display the small picture in large format, press
»OK«. Playback from the disc or the HDD archive is finished.
Selecting channels
1 Select the television station with »S« or »A«.
Selecting AV channels
1 Select a preset AV station with »SOURCE«.
Changing the position of the inset picture
1 Press »SELECT« to change the position of the inset picture.
Swapping the main and inset pictures
1 Press »DISPLAY« to swap the main and inset pictures.
Ending the PIP function
1 Hide inset picture with »n«.
PIP MODE
________________________________________________
Page 55

ENGLISH
55
Recording options
You can record television programmes on the HDD archive of the
HDD DVD recorder or on a DVD+RW/-RW and DVD+R/-R.
– Immediately, with one touch recording – which means you select
the channel on the HDD DVD recorder and start recording straight
away.
– At a later stage – by entering data for the TV channel.
– With option 2 you can program up to eight programmes up to a
year in advance, or record programmes at the same time every
day or week.
– You can also record films from external devices such as cam-
corders connected to the »DV IN« or »VIDEO IN« and
»L AUDIO IN R« sockets on the HDD DVD recorder.
Suitable discs for recording
You can use DVD+R/-R and DVD+RW/-RW discs for recording.
DVD+R/-Rs can only be recorded on once. If you want to play these
discs on a DVD player, you first have to finalise them. Once they
have been finalised, they can no longer be recorded on.
If you only want to play them on your HDD DVD recorder, you do
not have to finalise them.
You can add more recordings and delete them as necessary.
Note that any playing time you delete is no longer available
for recording.
DVD+RW/-RWs (rewritable) can be recorded on very often (up to a
thousand times) and deleted.
You may have to delete recordings made by other devices on
DVD+RW/-RWs before you can record on them.
Unsuitable discs
– Damaged discs cannot be recorded on.
– Finalised discs cannot be recorded on. This can only be done with
unfinalised discs.
– Full discs cannot be recorded on.
– Very rarely, discs are defective and therefore cannot be recorded
on. Try recording on another disc.
Initialising discs
The DVD+R/+RW or DVD-R/-RW is automatically initialised before
recording, this can take a few minutes.
Only then is recording possible.
RECORDING – GENERAL INFORMATION
Page 56

56
Recording quality and time
For the disc
You can set the quality of the recording. The table below shows the
relationship between quality and recording time:
Quality Time
HQ – Very high quality 60 minutes on a
4.7 GB blank DVD
SP – High quality 120 minutes on a
4.7 GB blank DVD
SP+ – Good quality 150 minutes on a
4.7 GB blank DVD
LP – S-VHS picture quality 190 minutes on a
4.7 GB blank DVD
EP – Better than VHS picture quality 240 minutes on a
4.7 GB blank DVD
SLP – VHS picture quality 360 minutes on a
4.7 GB blank DVD
SEP – Longest recording time 550 minutes on a
4.7 GB blank DVD
For the HDD archive
You can set the quality of the recording. The table below shows the
relationship between quality and recording time:
Quality Time
HQ – very high recording quality 45 hours
SP – high recording quality 98 hours
SP+ – good recording quality 114 hours
LP – S-VHS picture quality 137hours
EP – better than VHS picture quality 193 hours
SLP – VHS picture quality 294Stunden
SEP – longest recording time 375 hours
Notes:
The quality and recording time are interdependent. The better
the quality, the more memory the recording requires. This
means that the recording time is shorter in high quality mode
than in standard quality mode.
The recording quality (HQ, SP, SP+, LP, EP, SLP or SEP) is selected
automatically during playback.
Playback is viewed with the recording quality that was selected
for the recording.
RECORDING – GENERAL INFORMATION
Page 57

ENGLISH
57
RECORDING – GENERAL INFORMATION
Available memory (recording time) for the HDD
archive
In the setup menu, you can find out how much memory is still
available.
1 Press »SETUP« to open the setup menu.
2 Select »SETUP MENU – Archive settings« ( ) by pressing
»
S
« or »A« and press »OK« to activate.
3 Select »Hard disc Info« with »S« or »A« and activate with
»OK«.
– The amount of memory still available is displayed.
4 Press »OK« to exit the information page.
5 Press »SETUP« to deactivate the setup menu.
Remaining recording time for the disc
You can find information about the remaining recording time in the
»EMPTY« field in the index screen.
1 Press »
8« to select the index screen.
2 Select the »EMPTY« field with »S« and activate by pressing
»s«.
3 Select »Properties« with »S« and press »OK« to confirm.
– The recording time still available is displayed, dependingon
recording quality.
Recording settings
You can make settings, such as adding chapter markers, selecting
the input source and setting the recoding quality, in the setup menu.
The settings are described on page 110.
Data management in the HDD archive
If you want to record programmes manually in the HDD archive that
are longer than the preset time of the time shift memory, the programme will be shown in the HDD archive separately.
As an example, you record something for 4:30 hours. In the HDD
archive the first entry with 02:59 hours will be displayed and then
the second entry with 01:31 hours, if the time shift memory has
been set to 3 hours.
1. TITLE
30/09/2004
10:05:12
SP 01:15:00
2. TITLE
30/09/2004
12:30:00
SP 00:45:00
EMPTY TITLE
SP 02:03:04
EMPTY
Record title
Property
A
a
SETUP MENU – Archive settings
a
60 minutes
Go!
OK
Show
TimeShift buffer length
Hard disc Info
Hard disc Space Management
Preview Type
HDD/Disc Copy Option
Erase hard disc
Erase disc
High Speed
Static
Manually
Page 58

58
Preparing for recording
1 Switch on the television and select the preset channel for the
HDD DVD recorder.
2 Press »
Ǽ« to switch on the HDD DVD recorder from standby
mode.
3 Briefly press »
ə« on the HDD DVD recorder or press and hold
down »7« on the remote control.
– Display: » «, the disc compartment opens.
4 Put a suitable disc for recording into the disc compartment with
the label facing upwards.
5 Press »
ə« on the HDD DVD recorder or press and hold down
»7« on the remote control.
Recording from a satellite receiver:
If the television programme is being recorded from a satellite
receiver, switch on the satellite receiver and select the satellite
channel you want.
Select the channel position »EURO-AV 2« for the satellite receiver
on the HDD DVD recorder with »SOURCE« or »0« (AV).
Manually recording television programmes
1 When you switch on the HDD DVD recorder, the current pro-
gramme that you can see on the television screen is recorded in
the time shift memory.
2 Switch to disc mode by pressing » « (blue).
– A message is displayed to quit
time shift mode by pressing »OK«. The recording in the time
shift memory is deleted.
– Afterwards the disc type, the selected recording quality, the
current and remaining playing time available (depending on
the recording quality) are displayed.
3 Press »SOURCE« to select the input source (for example, TV).
– Display: for example, »P1 BBC«, the current TV station is shown.
4 Select the TV channel:
– Press »A« or »S«, or
– use the numerical buttons »1…0« to select the TV channel, or
– open the channel list by pressing »OK« once, twice or three
times, select the television station by pressing »A« or »S«
and press »x« to switch off the channel list.
Note:
If you want to change the preset recording quality, press
»Q-SET« until the quality you want appears in the display.
RECORDING ON DISC
_____________________________
Select
and
Choose
Sys state: STOP
Record To Optical Disc as (25min/GB)
Elapsed Time: 00:00:00 Remain Space: 02:05:00
DVD Target Record
HDDDVD
HDD Target
Exit
Page 59

ENGLISH
59
5 Press »●« to start recording.
– The amount of recording time available is shown.
Notes:
During the recording, you can press »
●« to enter the switch-off
time (30 minutes, 60 minutes, 90 minutes, none).
The switch-off time depends on the playing time left on the disc.
The HDD DVD recorder automatically switches off the recording
after this time.
The info line can be hidden by pressing x.
6 Press »
!
« to pause recording.
7 Press »
●« to resume recording.
8 Press »
7« to end the recording.
– A warning message appears.
Press »OK« to acknowledge it.
– The HDD DVD recorder updates the contents table of the disc.
Note:
If this message is not acknowledged, the HDD DVD recorder
continues the recording.
9 After a short while the »YesDVD« menu appears.
– You cannot record any more programmes on this disc.
Notes:
If you wish to use the YesDVD function, please read the section
on executing the YesVideo function on the next page.
If you do not wish to use the YesDVD function, select »No« with
»S« in the menu and confirm it with »OK«.
The YesDVD function cannot be used with recorded discs. This
disc must be deleted before recording.
Finalising a disc (DVD+R/–R/–RW)
If the YesDVD function is not used you must first finalise the disc if
you want to play programmes recorded on your HDD DVD recorder
on a DVD player. Refer to the section on finalising discs
(DVD+R/–R/–RW) on page 99.
Once the disc has been finalised, no further recording is possible.
Error messages
The HDD DVD recorder displays messages showing how to deal
with any errors which might occur.
RECORDING ON DISC
_____________________________
Select
and
Choose
Sys state: RECORDING
Record To Optical Disc as (25min/GB)
Elapsed Time: 00:00:10 Remain Space: 02:04:50
HDD Exit
Page 60

60
The YesDVD function allows you to make professional home videos
from any recordings.
At the end of the recording on the HDD archive or the disc, the HDD
DVD recorder automatically creates a chapter overview, which is
displayed as inset pictures in the disc menu and in the HDD archive.
At the same time, a music video is created from 3 scenes of the
recording (only when recording on to the disc).
You can put the finished disc into a computer, make a cover for the
sleeve and print it out.
The disc is finalised with the YesDVD function and cannot be used
for further recordings. However, DVD+RWs/DVD–RWs can be
deleted again.
Activating and deactivating the YesDVD function
1 Press »SETUP« to open the setup menu.
2 Select »SETUP-MENU – VIDEO« ( ) with »S« or »A«
and press »OK« to confirm.
3 Select »YesDVD« with »S« or »A« and activate with »OK«.
4 Select »YesDVD« or »Music Video« with »S« or »A« and
activate with »OK«.
5 Activate the function by pressing »S« or »A« (»ON«) and
press »OK« to confirm.
6 Press »SETUP« to exit the menu.
Executing the YesDVD function ...
... for a recording
1 Activate the YesDVD function in the setup menu.
2 Make the recording on the disc.
3 At the end of the recording a menu is displayed, requesting you
to activate the YesDVD function.
4 Confirm the YesDVD function with »OK«.
– The YesDVD disc is created. This can take some time, for
example, fifteen minutes for a two hour recording.
5 Acknowledge the message »The YesDVD has been ...« by
pressing »OK«, remove the disc from the HDD DVD recorder
and insert it into the disc compartment of a computer.
6 Open the “Index” document and follow the instructions of
the program.
7 Print the cover for the disc.
YES DVD FUNCTION
_______________________________
! YesDVD
You can now create a YesDVD disc with chapter menus,
music videos, and a DVD jacket with pictures.
Do you want to create a YesDVD disc now?
Note: You cannot record on a YesDVD disc once it has
been created.
No
Yes, create YesDVD disc
YesDVD
ON
S
OK
ON
S
Yes
YesDVD
Music Video
About YesDVD
About YesDVD BoosterPack Yes
Page 61

ENGLISH
61
... subsquently, for several recordings
1 Activate the YesDVD function in the setup menu.
2 Make the recordings on the disc.
3 At the end of every recording a menu is displayed, requesting
you to activate the YesDVD function.
Select »No« with »S« or »A« and confirm with »OK«.
4 After the last recording with »TOP MENU .« switch to the
disc mode.
Note:
If the last recording was switched to another mode (for example,
time shift), you must switch back to the disc mode by pressing
» « (blue) and then »TOP MENU .«.
5 Select the disc information »MY DVD« with »S« or »A« and
activate with »s«.
6 Select »Finalize as YesDVD« with »S« or »A« and confirm
with »OK«.
– The YesDVD disc is created. This can take some time, for
example, fifteen minutes for a two hour recording.
7 Confirm the message »Your YesDVD disc was ...« with »OK«,
remove the disc from the HDD DVD recorder and insert it into
the disc compartment of a PC.
8 Open the “Index” document and follow the instructions of the
program.
9 Print the cover for the disc.
YES DVD FUNCTION
_______________________________
! YesDVD
You can now create a YesDVD disc with chapter menus,
music videos, and a DVD jacket with pictures.
Do you want to create a YesDVD disc now?
Note: You cannot record on a YesDVD disc once it has
been created.
No
Yes, create YesDVD disc
s
Urlaub
01/08/2006
10:05:12
PAL
DVD
EDIT
s
1. TITLE
30/09/2004
10:05:12
SP 01:15:00
2. TITLE
30/09/2004
12:30:00
SP 00:45:00
3. TITLE
01/10/2004
21:00:00
SP 00:30:00
Play
Rename disc
Erase disc
Record title
Overwrite disc
Finalize as YesDVD
Lock disc
S
A
Page 62

62
Preparing for recording
1 Switch on the television and select the preset channel for the
HDD DVD recorder.
2 Switch the HDD DVD recorder to and from standby with »
Ǽ«
on the remote contro.
Note:
Please select the recording quality before starting the recording.
See the section on custom settings and selecting the recording
quality on page 109.
Recording from a DVB receiver
If the television stations are being received via a DVB receiver,
switch on the DVB receiver and select the television station on
the DVB receiver.
Select the »EURO-AV 2« preset for the DVB receiver on the
HDD DVD recorder with »SOURCE« or »0« (AV).
Manually recording television programmes
1 When you switch on the HDD DVD recorder, the current pro-
gramme that you can see on the television screen is recorded in
the time shift memory.
2 Select the television channel by displaying the channel list with
»OK« select the desired television channel with »A« or »S«
and confirm with »OK«.
– Display: for example, »P1 ARD«, the current TV station is
shown.
Note:
If you want to select another input source (for example, a DVD
player on the »SCART« socket), display the AV channel list with
»0«, select the desired input source with »A« or »S« and
confirm with »OK«.
3 Start recording with »
●«.
– The amount of recording time available is shown.
Notes:
During the recording, you can press »●« to enter the switch-off
time (30 to 719 minutes in 30-minute increments). The HDD
DVD recorder automatically switches off the recording after this
time.
Press »
●« again after the elasped 719 minutes to switch the
display to the maximum recording capacity of the HDD archive.
Press »CL« to stop recording, the data will not be saved.
RECORDING ON THE HDD ARCHIVE
_______
Select
and
Choose
14:25:00
14:25:05
‹‹‹‹
L I V E
TimeShifting Record
HDDDVD
DVD Target
Exit
Select
and
Choose
14:25:00
09:25:05
‹‹‹‹
L I V E
Saaving HDD
DVD
Cancel
Exit
SP 00:00:03 Auto
74H
Select
and
Choose
Exit
EURO-AV P003 RTL
EURO-AV 2 P004 SAT 1
Rückseite Video P005 KABEL
S-VIDEO IN h. P006 PRO 7
Vorderseite Video P007 RTL2
EURO-AV 2 YUV P008 VOX
EURO-AV 2 SV P009 3SAT
DV P010 BR3
P001 ARF P011 HESS3
P002 ZDF P012 DSF
Page 63

ENGLISH
63
4 Press »7« to stop recording.
– A message appears. Press »OK« to confirm.
– If the YesDVD function is activated, a message appears
telling you the function is in progress.
– You can see the data for the recording in the HDD archive.
Note:
If this message is not confirmed, the HDD DVD recorder continues recording.
RECORDING ON THE HDD ARCHIVE
_______
Page 64

64
Recording on the HDD archive and simultaneous
playback from the HDD archive
1 Switch on the television and select the preset channel for the
HDD DVD recorder.
2 Press »
Ǽ« to switch on the HDD DVD recorder from standby
mode.
– When you switch on the HDD DVD recorder, the current pro-
gramme that you can see on the television screen is recorded
in the time shift memory.
Note:
Please select the recording quality before starting the recording.
See the section on custom settings and selecting the recording
quality on page 110.
3 Select the television channel by displaying the channel list with
»OK« select the desired television channel with »A« or »S«
and confirm with »OK«.
– Display: for example, »P1 ARD«, the current TV station is
shown.
Note:
If you want to select another input source (for example, a DVD
player on the »SCART« socket), display the AV channel list with
»0«, select the desired input source with »A« or »S« and
confirm with »OK«.
4 Press »
●« to start recording.
5 Open the HDD archive by pressing » « (yellow).
Note:
The recording is continued in the background.
6 Select the track by pressing »S« or »A«.
– The thumbnail index of the recording is displayed in the con-
tents table.
7 Press »
8« to start HDD archive playback.
Note:
When the YesDVD function is activated, press »a«, »s«,
»A« or »S« to select the scene you want (index picture) and
start playback with »
8«.
8 Press »
7« to stop HDD archive playback. If the YesDVD func-
tion is activated, press »7« twice.
– The contents table of the HDD archive is displayed.
9 Switch to the recording mode with » « (blue) and stop the
recording with »
7«.
– A message appears. Press »OK« to confirm.
– You can see the data for the recording in the HDD archive.
Note:
If this message is not confirmed, the HDD DVD recorder
continues recording.
SIMULTANEOUS OPERATING MODES
_____
Select
and
Choose
14:25:00
14:25:05
‹‹‹‹
L I V E
TimeShifting Record
HDDDVD
DVD Target
Exit
HDD
001 ARD Tu 01/11 20:00 MyTitle 1
002 ZDF Tu 01/11 22:00 MyTitle 2
003 ARD We 02/11 20:00 MyTitle 3
004 RTL Th 03/11 18:00 MyTitle 4
005 SAT1 Sa 05/11 20:15 MyTitle 5
006 PRO7 Su 06/11 20:15 MyTitle 6
007 ARD Su 06/11 22:25 MyTitle 7
008 BR3 Mo 07/10 21:45 MyTitle 8
No. CH Date Time Title
Select
and
Choose
For other options, please
press OK, SOURCE, or
SETUP keys
DVD
DVD Target
Dubbing
Delete Title
Sort Title
Select/Unselect
S
A
s
s
s
s
s
s
s
s
00:15:00
Page 65

ENGLISH
65
Recording on the HDD archive and simultaneous
playback from disc
1 Switch on the television and select the preset channel for the
HDD DVD recorder.
2 Press »
Ǽ« to switch on the HDD DVD recorder from standby
mode.
– When you switch on the HDD DVD recorder, the current pro-
gramme that you can see on the television screen is recorded
in the time shift memory.
Note:
Please select the recording quality before starting the recording.
See the section on custom settings and selecting the recording
quality on page 110.
3 Select the television channel by displaying the channel list with
»OK« select the desired television channel with »A« or »S«
and confirm with »OK«.
– Display: for example, »P1 ARD«, the current TV station is
shown.
Note:
If you want to select another input source (for example, a DVD
player on the »SCART« socket), display the AV channel list with
»0«, select the desired input source with »A« or »S« and
confirm with »OK«.
4 Start recording on the HDD archive with »
●«.
5 Press and hold down »
ə« on the HDD DVD recorder or »
7
«
on the remote control.
Put a disc in the disc compartment with the label facing
upwards.
Press »ə« on the HDD DVD recorder or press and hold down
»7« on the remote control.
– The index screen is displayed.
Note:
The recording is continued in the background.
6 Press »S« or »A« to select the track.
7 Press »
8« to start playback.
8 Press »
7« twice to stop recording.
9 Switch to recording mode with » « (blue).
10 Start recording on the HDD archive with »
7«.
– A message appears. Press »OK« to confirm.
– If the YesDVD function is activated, a message appears telling
you the function is in progress.
– You can see the data for the recording in the HDD archive.
Note:
If this message is not confirmed, the HDD DVD recorder
continues recording.
SIMULTANEOUS OPERATING MODES
_____
s
1. TITLE
30/09/2004
10:05:12
SP 01:15:00
2. TITLE
30/09/2004
12:30:00
SP 00:45:00
3. TITLE
01/10/2004
21:00:00
SP 00:30:00
Select
and
Choose
14:25:00
14:25:05
‹‹‹‹
L I V E
TimeShifting Record
HDDDVD
DVD Target
Exit
Page 66

66
Recording on disc and simultaneous playback
from the HDD archive
1 Switch on the television and select the preset channel for the
HDD DVD recorder.
2 Press »
Ǽ« to switch on the HDD DVD recorder from standby
mode.
– When you switch on the HDD DVD recorder, the current pro-
gramme that you can see on the television screen is recorded
in the time shift memory.
Note:
Please select the recording quality before starting the recording.
See the section on custom settings and selecting the recording
quality on page 110.
3 Switch to disc mode with » « (blue).
– A message appears. Press »OK« to acknowledge.
4 Open the disc compartment, insert the disc with the label facing
upwards and close it.
– Display: The recording time and the amount of recording time
still available.
5 Select the television channel by displaying the channel list with
»OK« select the desired television channel with »A« or »S«
and confirm with »OK«.
– Display: for example, »P1 ARD«, the current TV station is
shown.
Note:
If you want to select another input source (for example, a DVD
player on the »SCART« socket), display the AV channel list with
»0«, select the desired input source with »A« or »S« and
confirm with »OK«.
6 If you would like to change the recording quality, press
»Q-SET« until the one you want appears in the display.
7 Press »
●« to start recording on the disc.
– The amount of recording time available is shown.
8 Open the HDD archive by pressing » « (yellow).
9 Select the track by pressing »S« or »A«.
– The thumbnail index of the recording is displayed in the
contents table.
10 Press »
8« to start HDD archive playback.
Note:
When the YesDVD function is activated, press »a«, »s«,
»A« or »S« to select the scene you want (index picture) and
start playback with »
8«.
SIMULTANEOUS OPERATING MODES
_____
Select
and
Choose
14:25:00
14:25:05
‹‹‹‹
L I V E
TimeShifting Record
HDDDVD
DVD Target
Exit
Select
and
Choose
Sys state: STOP
Record To Optical Disc as (25min/GB)
Elapsed Time: 00:00:00 Remain Space: 02:05:00
DVD Target Record
HDDDVD
HDD Target
Exit
Select
and
Choose
Sys state: RECORDING
Record To Optical Disc as (25min/GB)
Elapsed Time: 00:00:05 Remain Space: 02:04:55
HDD Exit
Select
and
Choose
Sys state: STOP
Record To Optical Disc as (25min/GB)
Elapsed Time: 00:00:00 Remain Space: 02:05:00
DVD Target Record
HDDDVD
HDD Target
Exit
Page 67

ENGLISH
67
11 Press »7« to stop HDD archive playback. If the YesDVD
function is activated, press »
7« twice.
12 Switch to disc mode by pressing » « (blue).
13 Press »
7« to stop recording on the disc.
– A message appears. Press »OK« to confirm.
14 At the end of the recording a menu is displayed, requesting you
to activate the YesDVD function.
Confirm the YesDVD function with »OK« or
with »S« to select »No« and press »OK« to confirm.
– The YesDVD disc is created. This can take some time, for
example, fifteen minutes for a two hour recording.
– You can see the recording data in the table of contents on the
disc.
Note:
If this message is not confirmed, the HDD DVD recorder
continues recording on the disc.
SIMULTANEOUS OPERATING MODES
_____
Select
and
Choose
Sys state: STOPPING
Record To Optical Disc as (25min/GB)
Elapsed Time: 00:00:05 Remain Space: 02:05:00
HDD Exit
Page 68

68
Setting the copy mode
There are three ways you can copy data onto a disc.
– »To the disc« – the recording is adapted to the disc depending on
the recording quality and the playing time in the memory. The
copying is done in real time.
If the HDD DVD recorder recognises that the recording will not
fit onto the disc, the quality and the length of the recording is
changed. Other functions are not possible while it is copying.
– »High Speed« – this mode lets you copy at double speed and
simultaneously playback from the HDD archive or the time shift
function.
The recording quality cannot be changed.
– »Highest Speed« – this mode lets you copy at four times the
normal speed. Other functions are not possible during copying.
The recording quality cannot be changed.
1 Press »SETUP« to open the setup menu.
2 Select »SETUP MENU – Archive settings« ( ) with »
S
« or
»A« and press »OK« to activate.
3 Select »HDD/Disc Copy Option« with »
S
« or »A« and
press »OK« to activate.
4 Press »
S
« or »A« to select the setting and press »OK« to
confirm.
5 Press »SETUP« to close the menu.
COPYING RECORDINGS
__________________________
SETUP MENU – Archive settings
a
360 minutes
Go!
OK
Show
TimeShift buffer length
Hard disc Info
Hard disc Space Management
Preview Type
HDD/Disc Copy Option
Erase hard disc
Erase disc
High Speed
Dynamic
Manually
68
Page 69

ENGLISH
69
COPYING RECORDINGS
__________________________
Copying a title from the HDD archive onto a disc
If the HDD archive is full up or you want to make a back-up copy of
special recordings, you can copy the data from the HDD archive
onto a disc.
1 Insert a DVD+R, DVD+RW, DVD-R or DVD-RW into the disc
compartment for copying.
2 Press »i« to open the main menu.
3 Select » HDD« with »S« or »A« and press »OK« to
activate.
– The HDD archive is displayed.
Note:
You can also open the HDD archive by pressing » « (yellow).
4 Select the track by pressing »S« or »A«.
5 Mark the title by pressing »c«.
– A status line appears in the index screen which shows the
space needed for the title on the disc both visually and as a
percentage.
– If the status line is displayed red, the title cannot be copied as
there is not enough space on the disc.
Note:
Press »c« to mark other title to be written on.
6 Press »
●« to start copying the title.
– The » « symbol appears during the copying process
which shows the progress of the copying as a percentage.
Note:
If the recording is not done properly, the disc may be defective
or there may be a data error.
Press »
Ǽ« on the remote control and hold down for five
seconds. The HDD DVD recorder is initialised again.
HDD
001 ARD Tu 01/11 20:00 MyTitle 1
002 ZDF Tu 01/11 22:00 MyTitle 2
003 ARD We 02/11 20:00 MyTitle 3
004 RTL Th 03/11 18:00 MyTitle 4
005 SAT1 Sa 05/11 20:15 MyTitle 5
006 PRO7 Su 06/11 20:15 MyTitle 6
007 ARD Su 06/11 22:25 MyTitle 7
008 BR3 Mo 07/10 21:45 MyTitle 8
No. CH Date Time Title
Select
and
Choose
For other options, please
press OK, SOURCE, or
SETUP keys
DVD
DVD Target
Dubbing
Delete Title
Sort Title
Select/Unselect
S
A
s
s
s
s
s
s
s
s
00:15:00
Page 70

70
Copying a title on the disc to the HDD archive
Note:
This function is only possible if the disc has not been finalised and
the YesDVD function is not activated.
1 Insert a DVD+R, DVD+RW, DVD-R or DVD-RW into the disc
compartment.
2 Press »i« to open the main menu.
3 Select »
8 DVD« with »
S
« or »A« and press »OK« to
activate.
– The index screen appears.
4 Select the title by pressing »S« or »A«.
5 Activate the DVD menu with »s«.
– The »DVD menu« is displayed.
6 Select »Copy« with »S« or »A« and press »OK« to acti-
vate.
– The title is being copied in the HDD archive.
Copying all titles on the disc to the HDD archive
Note:
This function is only possible if the disc has not been finalised and
the YesDVD function is not activated.
1 Insert a DVD+R, DVD+RW, DVD-R or DVD-RW into the disc
compartment.
2 Press »i« to open the main menu.
3 Select »
8 DVD« with »
S
« or »A« and press »OK« to
activate.
– The index screen appears.
4 Select the disc information »MY DVD« with »S« or »A« and
press »s« to activate.
– The disc menu is displayed.
5 Select »Copy All« with »S« or »A« and press »OK« to
activate.
– All titles on the disc are being copied to the HDD archive.
COPYING RECORDINGS
__________________________
Play title
Edit title
Rename title
Erase title
Overwrite title
Overwrite disc
Copy
A
Play
Rename disc
Erase disc
Record title
Overwrite disc
Lock disc
Copy All
A
s
Urlaub
01/08/2006
10:05:12
PAL
DVD
EDIT
s
1. TITLE
30/09/2004
10:05:12
SP 01:15:00
2. TITLE
30/09/2004
12:30:00
SP 00:45:00
3. TITLE
01/10/2004
21:00:00
SP 00:30:00
Page 71

ENGLISH
71
Programming recordings by entering the data for
the television programme
Notes:
You can store the television programme on a disc or in the HDD
archive.
The time and date on the HDD DVD recorder must be accurate.
If all the timer positions are occupied and you want to program
a new recording you must delete one, as described in the section on deleting recording data on page 74.
Preparation
Switch on the television.
Select the »AV« channel on the television for the HDD DVD
recorder.
Insert a DVD+R, DVD+RW, DVD-R or DVD-RW in the disc compartment.
When you switch on the HDD DVD recorder, the current programme that you can see on the television screen is recorded in the
time shift memory.
Example
1 Press »i« to open the main menu.
2 Select »Timer list« by pressing »S« or »A« and activate
with »OK«.
– The »Timer list« is displayed.
Note:
You can also open the »Timer list« by pressing » « (green).
3 Activate the »Item editor« with »OK«.
– The »Item editor« menu appears.
4 Select »Source« with »S« or »A« and press »OK« to
confirm.
Select the TV channel with »S« or »A« and press »OK« to
confirm.
Note:
If you want to record the video and audio signal from an external device instead of the TV channel, select »Front CVBS»,
»Rear CVBS«, »Rear S-VIDEO«, »EURO-AV«, »EURO-AV 2« or
»EURO-AV 2 SV« as the input source by pressing »S« or
»A«.
Recording from a DVB receiver
If you want to record programmes from a connected DVB
receiver, press »S« or »A« to select the »EURO-AV 2«
channel, and select the TV station on the DVB receiver. The DVB
receiver must be switched on at the selected recording time and
for the duration of the timer recording.
TIMER RECORDING
__________________________________
Item editor Time: 18:00:05
HDD
S
OFF
S
OK Cancel
P001 ARD
S
SP
S
Source
Record To
Quality
Mode
Date
Start
End
Title
VPS
Once
01 / 12 / 06
1 8 : 0 0
1 8 : 3 0
MyTitle
Timer list
Source Quality Date Start End Record VPS
Select
and
Choose
S
A
1
2
3
4
5
6
DVD
Delete
HDD
HDD Target
Exit
Page 72

72
5 Select »Record To« with »S« or »A« and activate with
»OK«.
Select the recording medium (HDD = HDD archive, DVD = disc)
with »S« or »A« and confirm with »OK«.
6 Select »Quality« with »S« or »A« and press »OK« to con-
firm.
Select the recording quality with »S« or »A« and press
»OK« to confirm.
7 Select »Mode« with »S« or »A« and press »OK« to con-
firm.
– »Once«, the recording is made once.
– »Daily«, the recording is made at the same time every day
from Monday to Sunday.
– »Weekly«, the recording is made at the same time on the
same day every week.
– »Mon - Fri«, the recording is made at the same time every
day from Monday to Friday.
– »Mon - Sat«, the recording is made at the same time every
day from Monday to Saturday.
– »Weekend«, the recording is made at the same time every
weekend.
Select the recording mode with »S« or »A« and press
»OK« to confirm.
8 Select »Date« with »S« or »A« and press »OK« to confirm.
Enter the recording date in six-digits with »1…0« and confirm
with »OK«.
9 Select »Start« with »S« or »A« and press »OK« to confirm.
Enter the four-digit start time with »1…0« and press »OK« to
confirm.
10 Select »End« with »S« or »A« and press »OK« to confirm.
Enter the four-digit stop time with »1…0« and press »OK« to
confirm.
11 Select »Title« with »S« or »A« and press »OK« to confirm.
Enter a name for the title (up to 12 letters/characters):
Select letters/characters with »S« or »A«.
Switch to the next/previous letter or character with »a« or
»s«.
Press »OK« to confirm the setting.
12 Select »VPS« with »S« or »A« and press »OK« to confirm.
Switch on VPS/PDC control »S« or »A« (On) – if required.
(For »VPS On« the starting time must be entered to the nearest
minute according to the TV guide.)
TIMER RECORDING
__________________________________
Item editor Time: 18:00:05
HDD
S
OFF
S
OK Cancel
P001 ARD
S
SP
S
Source
Record To
Quality
Mode
Date
Start
End
Title
VPS
Once
01 / 12 / 06
1 8 : 0 0
1 8 : 3 0
MyTitle
Item editor Time: 18:00:05
HDD
S
OFF
S
OK Cancel
P001 ARD
S
SP
S
Source
Record To
Quality
Mode
Date
Start
End
Title
VPS
Once
01 / 12 / 06
1 8 : 0 0
1 8 : 3 0
MyTitle
Item editor Time: 18:00:05
HDD
S
OFF
S
OK Cancel
P001 ARD
S
SP
S
Source
Record To
Quality
Mode
Date
Start
End
Title
VPS
Once
01 / 12 / 06
20:15
1 8 : 3 0
MyTitle
Item editor Time: 18:00:05
HDD
S
OFF
S
OK Cancel
P001 ARD
S
SP
S
Source
Record To
Quality
Mode
Date
Start
End
Title
VPS
Once
01 / 12 / 06
20:15
21:45
MyTitle
Page 73

ENGLISH
73
13 Select »OK« with »S« or »A« and press »OK« to confirm
the recording data.
– The »Timer list« menu appears on the screeen.
Note:
If you do not want to save the timer data, select »Cancel« with
»S« or »A« and press »OK« to confirm.
14 To make further recordings, repeat the instructions from step 3
or exit the »Timer list« menu with » « (green).
15 Switch the HDD DVD recorder to standby by pressing »
Ǽ« on
the remote control.
– Display on the HDD DVD recorder: »Ȅ«.
Caution:
Remember that the HDD DVD recorder can only record after
you press »
Ǽ« on the remote control to switch it to standby.
Note:
The timer recordings can be cancelled by pressing »
7
«.
Messages during or after programming a
recording
»Recording due to start – switch off the HDD DVD recorder«
A programmed recording is due to start shortly.
Press »Ǽ« to switch off the HDD DVD recorder.
»Timer starts in 3 minutes, press OK to start«
A programmed recording is due to start shortly. Press the
»OK« button.
»No recording possible. No disc in the disc compartment.«
There is no disc in the compartment, or the disc is unsuitable
for recording. Put in another disc.
»Recording due to start, please insert a disc with sufficient record-
ing capacity«
The disc is write-protected or there is not enough playing time
left on it.
Remove the write protection or put in another disc.
»Input error«
Check the recording data for the programme (date, start time
and stop time) and change if necessary.
»Input error. Clashes with another timer recording.«
The recording times of two programmes overlap.
Change the recording data for one of the programmes or
delete it.
TIMER RECORDING
__________________________________
Item editor Time: 18:00:05
HDD
S
OFF
S
OK Cancel
P001 ARD
S
SP
S
Source
Record To
Quality
Mode
Date
Start
End
Title
VPS
Once
01 / 12 / 06
20:15
21:45
MyTitle
Timer list
Source Quality Date Start End Record VPS
Select
and
Choose
S
A
1 P001 SP 01/12/06 20:15 21:45 HDD OFF
2
3
4
5
6
DVD
Delete
HDD
HDD Target
Exit
Page 74

74
Checking, modifying or deleting recording data
Preparation
Switch on the television.
Select the »AV« channel on the television for the HDD DVD
recorder.
Checking recording data
1 Open the »Timer list« menu by pressing » « (green).
– The »Timer list« menu appears, displaying the current data.
2 Press »S« or »A« to select the timer position.
3 Close the »Timer list« menu by pressing »x«.
Editing recording data
1 Open the »Timer list« menu by pressing » « (green).
– The »Timer list« menu appears, displaying the current data.
2 Press »S« or »A« to select the timer position and activate
with »OK«.
– The »Item editor« menu appears.
3 Press »S« or »A« to select the recording data, press »OK«
and then »S« or »A« or »1…0« to edit the data.
Press »OK« to confirm each change.
4 Select »OK« with »S« or »A« and press »OK« to save the
recording data.
5 Close the »Timer list« menu by pressing »x«.
Deleting recording data
1 Open the »Timer list« menu by pressing » « (green).
– The »Timer list« menu appears, displaying the current data.
2 Press »S« or »A« to select the timer position.
3 Press »CL« to delete the recording data.
4 Close the »Timer list« menu by pressing »x«.
TIMER RECORDING
__________________________________
Page 75

ENGLISH
75
In the »HDD archive« menu there are many options for editing the
recorded programmes.
You can select titles and copy them to disc or delete or sort titles.
You can start playback in a sub-menu, delete a title, split the title in
two parts, mark certain parts of the title and block their playback,
change the title picture index, change the name of the title, secure the
title against inadvertent deletion and prohibit playback of the title.
Note:
If the YesDVD function recorded the track, then this track cannot be
edited. The track protection must be removed before editing. Refer
to the section on accidently deleting tracks and protecting changes
on page 79.
Preparation
1 To make a copy, put a DVD+R, DVD+RW, DVD-R or DVD-RW
into the disc compartment.
2 Press »i« to open the main menu.
3 Select » HDD« with »S« or »A« and activate with
»OK«.
– The HDD archive is displayed.
Note:
You can also open the HDD archive by pressing » « (yellow).
Note:
The rest of the process is described in the following sections,
starting from step 1.
Copying a title to disc
1 Select the title by pressing »S« or »A«.
2 Mark the title by pressing » «.
– A status line is displayed above the index screen. This line
shows the space required by the title on the disc as a graph
and in percent.
3 Start copying the title with »
●«.
– The » « symbol appears during the copying process
which shows the progress of the copying as a percentage.
Notes:
You can mark and skip over several titles.
EDITING DATA ON THE HDD ARCHIVE
___
HDD
001 ARD Tu 01/11 20:00 MyTitle 1
002 ZDF Tu 01/11 22:00 MyTitle 2
003 ARD We 02/11 20:00 MyTitle 3
004 RTL Th 03/11 18:00 MyTitle 4
005 SAT1 Sa 05/11 20:15 MyTitle 5
006 PRO7 Su 06/11 20:15 MyTitle 6
007 ARD Su 06/11 22:25 MyTitle 7
008 BR3 Mo 07/10 21:45 MyTitle 8
No. CH Date Time Title
Page 76

76
EDITING DATA ON THE HDD ARCHIVE
___
Deleting titles in the HDD archive
1 Select the title to be deleted with »S« or »A«.
2 Press » « (red) to delete the titles.
– Display: »Do you want to delete this title?«.
3 Select »Yes« with »a« or »s« and press »OK« to confirm.
Sorting titles in the HDD archive
You can sort titles by recording date, recording time and title name.
1 Press » « (green) once.
– The »Date« display is marked.
2 Press » « (green) to select the sort term.
Functions in the HDD archive sub-menu
Notes:
A title in the HDD archive can only be processed if this title is
not protected.
1 Press »i« to open the main menu.
2 Select » HDD« with »S« or »A« and activate with
»OK«.
– The HDD archive is displayed.
3 Select the title by pressing »S« or »A«.
4 Press »s« to activate the selection menu.
– The »Selection menu« is displayed.
Deleting titles
1 Select »Delete« with »S« or »A« and press »OK« to
confirm.
– Display: »Do you want to delete this title?«.
2 Select »Yes« with »a« or »s« and press »OK« to confirm.
Delete
Split
Segment
Combine
Change Index Pic
Rename
Lock
Prodect
S
Page 77

ENGLISH
77
Splitting titles in two
You can split a title into two. Afterwards you can then delete these
titles separately, so that you can use the memory space on the hard
disc again.
1 Select »Split« with »S« or »A« and confirm with »OK«.
– Playback of the title starts.
2 At the scene where the title is to be split, press »OK«.
– Display: »Do you want to split this title from current point?«.
Note:
To cancel the process, select the »CANCEL« button with »a«
or »s« and confirm with »OK«.
3 Select »OK« and confirm with »OK«.
– The title is split, both parts can be seen as titles in the contents
table.
Editing titles (hiding scenes)
You can bookmark several parts in a track, for example, to remove
the commercial breaks.
1 Select »Segment« with »S« or »A« and confirm with
»OK«.
– Playback of the title starts.
2 Search for the scene which is to be removed in playback
mode or in picture search mode. Then press the » « (green)
button.
3 At the end of the scene you wish to remove, press » « (red).
– This scene is marked in red in the information bar.
Notes:
Repeat the process as often as required for other scenes.
Press »CL« to delete the markings.
4 Press »
7« to end playback.
– The contents table is displayed.
Notes:
During playback of the title, the marked scenes will be skipped,
but not deleted on the HDD archive.
When you copy the title from the HDD archive to disc
the marked scenes will not be recorded over.
EDITING DATA ON THE HDD ARCHIVE
___
Delete
Split
Segment
Combine
Change Index Pic
Rename
Lock
Protect
S
A
Delete
Split
Segment
Combine
Change Index Pic
Rename
Lock
Protect
S
A
Select
and
Choose
00:00:00
02:51:20
‹‹‹‹
01:50:35
Segment
Cut outCut In
Clear
Exit
Select
and
Choose
00:00:00
02:51:20
00:15:00
Split
Exit
ZDF 12:35 So 19/09 Title 38
Page 78

78
EDITING DATA ON THE HDD ARCHIVE
___
Connecting tracks
You can join two different tracks into one track. However, both
tracks must be recorded with the same quality.
1 Select the first track with »S« or »A« and press »OK« to
confirm.
2 Select »Combine« by pressing »S« or »A«.
3 Select the second track with »S« or »A« and press »OK« to
confirm.
Creating a new index thumbnail for a title
You can select and save any scene as a new index thumbnail for the
title.
1 Select »Change Index Pic« with »S« or »A«.
– Playback of the title starts.
2 At the scene you want to use as a new index picture, press
»OK«.
– Display: »Do you want to use current picture as index pic-
ture?«.
Note:
To cancel the process, select the »CANCEL« button with »a«
or »s« and confirm with »OK«.
3 Select »OK« and confirm with »OK«.
– You will see the new title picture index in the contents table.
Editing the names of recordings
1 Select »Rename« with »S« or »A« and confirm with »OK«.
– The keyboard is displayed.
2 Move the cursor »A« to the title line and select the input field
with »a« or »s«.
Note:
With the »Clear« button you can delete the entire title name,
use »BkSp« to delete individual characters.
3 Press »S«, »A«, »a« or »s« to select characters, and
press »OK« to confirm.
Notes:
The buttons at the bottom of the keyboard are function keys:
Press »cC« to switch between uppercase and lowercase. With
»P2«, the keyboard can be switched to special characters.
Press »BkSp« to delete a character and »Clear« to delete a
word. Press »Exit« or »x« to quit the keyboard. Any
changes are not saved.
Delete
Split
Segment
Combine
Change Index Pic
Rename
Lock
Protect
S
A
Delete
Split
Segment
Combine
Change Index Pic
Rename
Lock
Protect
S
A
Delete
Split
Segment
Combine
Change Index Pic
Rename
Lock
Protect
S
A
Titel name:
Title 1_
A
B 210KJIHGFEDC
L
M 543VUTSRQPON
W
X 9876.?:_)(ZY
Space
OKExitClearBkSpcC
Drama
AdultKidsNewsComedySportsAction
P2
Page 79

ENGLISH
79
4 When you have entered the new name, press »S«, »A«,
»a« or »s« to switch to the »OK« button and press »OK« to
confirm.
– You will see the new name in the contents table.
Locking playback of a title
You can only start playing back the title once you have entered a
password.
1 Select »Lock« with »S« or »A« and confirm with »OK«.
– Title is locked, » « is indicated next to the title picture index.
Note:
To undo the lock, select »Unlock« with »S« or »A« and confirm with »OK«.
Enter the password »3 3 0 8« (or your personal password)
with the numerical buttons »1…0« and confirm with »OK«.
Protecting titles against accidental deletion and
editing
This protects titles on the hard disc from being accidentally deleted.
You can only delete the title after you have removed this protection.
1 Select »Protect« with »S« or »A« and press »OK« to con-
firm.
– Title is protected, » « is indicated next to the title
picture index.
Note:
To remove the protection, select »Unprotect« with »S« or
»A« and confirm with »OK«.
EDITING DATA ON THE HDD ARCHIVE
___
Delete
Split
Segment
Combine
Change Index Pic
Rename
Lock
Protect
A
Delete
Split
Segment
Combine
Change Index Pic
Rename
Lock
Protect
S
A
Page 80

80
Setting the size of the time shift memory
This setting allows you to specify the maximum recording time in the
time shift memory.
1 Press »SETUP« to open the setup menu.
2 Select »SETUP-MENU – Archive settings« ( ) with »
S
« or
»A« and press »OK« to activate.
3 Select »TimeShift buffer length« with »S« or »A« and press
»OK« to activate.
4 Select the time using »S« or »A« and press »OK« to con-
firm.
Press »OK« to confirm the message.
5 Press »SETUP« to close the menu.
Viewing information via the HDD archive
This function tells you about the HDD archive memory (total
memory, memory already assigned and the memory still available)
and the number of titles stored.
1 Press »SETUP« to open the setup menu.
2 Select »SETUP-MENU – Archive settings« ( ) with »
S
« or
»A« and press »OK« to confirm.
3 Select »Hard disc Info« with »S« or »A« and activate with
»OK«.
– The information appears.
4 Press »OK« to switch off the information.
5 Press »SETUP« to quit the menu.
Organising the hard disc
This setting allows you to specify whether you delete old recordings
automatically or manually if there is not sufficient memory for new
recordings in the HDD archive.
Select »Automatically« – and the oldest recordings stored will be
automatically deleted to make space for new ones.
Select »Manually« – and before new recordings can be saved,
those already stored in the HDD archive are deleted manually.
Note:
Protected recordings in the HDD archive are not deleted.
1 Press »SETUP« to open the setup menu.
2 Select »SETUP-MENU – Archive settings« ( ) with »
S
« or
»
A
« and press »OK« to confirm.
3 Select »Hard disc Space Management« with »S« or »A«
and activate with »OK«.
EDITING DATA ON THE HDD ARCHIVE
___
SETUP MENU – Archive settings
a
360 minutes
Go!
OK
Show
TimeShift buffer length
Hard disc Info
Hard disc Space Management
Preview Type
HDD/Disc Copy Option
Erase hard disc
Erase disc
High Speed
Dynamic
Manually
SETUP MENU – Archive settings
a
360 minutes
Go!
OK
Show
TimeShift buffer length
Hard disc Info
Hard disc Space Management
Preview Type
HDD/Disc Copy Option
Erase hard disc
Erase disc
High Speed
Dynamic
Manually
SETUP MENU – Archive settings
a
360 minutes
Go!
OK
Show
TimeShift buffer length
Hard disc Info
Hard disc Space Management
Preview Type
HDD/Disc Copy Option
Erase hard disc
Erase disc
High Speed
Dynamic
Manually
Page 81

ENGLISH
81
4 Select »Automatically« or »Manually« and press »OK« to con-
firm.
5 Press »OK« to confirm the function.
6 Press »SETUP« to quit the menu.
Deleting data in the HDD archive
This function deletes all the data in the HDD archive.
Caution:
Even the protected recordings in the »HDD archive« are
deleted.
1 Press »SETUP« to open the setup menu.
2 Select »SETUP-MENU – Archive settings« ( ) with »
S
« or
»A« and press »OK« to confirm.
3 Select »Erase hard disc« with »S« or »A« and activate with
»OK«.
4 Enter the password »3 3 0 8« (or your personal password)
with the numerical buttons »1…0« and confirm with »OK«.
5 Select »OK« with »a« or »s« and press »OK« to confirm.
– Display: »The contents of the hard drive are deleted«.
»Empty« appears in the index screen in the HDD archive.
Note:
We recommend that you pull out the plug and then plug it in
again after you have deleted something.
Setting the display of the index picture
This function allows you to select whether the index picture for the
track is shown as a freeze-frame (static) or as a series of scenes
(dynamic) in the HDD archive.
1 Press »SETUP« to open the setup menu.
2 Select »SETUP MENU – Archive settings« ( ) with »
S
« or
»A« and press »OK« to activate.
3 Select »Preview Type« with »S« or »A« and press »OK« to
activate.
4 Select »Static« or » Dynamic« with »S« or »A« and press
»OK« to confirm.
5 Press »SETUP« to close the menu.
EDITING DATA ON THE HDD ARCHIVE
___
SETUP MENU – Archive settings
a
360 minutes
Go!
OK
Show
TimeShift buffer length
Hard disc Info
Harddisc Space Managemant
Preview Type
HDD/Disc Copy Option
Erase hard disc
Erase disc
High Speed
Dynamic
Manually
SETUP MENU – Archive settings
a
360 minutes
Go!
OK
Show
TimeShift buffer length
Hard disc Info
Harddisc Space Managemant
Preview Type
HDD/Disc Copy Option
Erase hard disc
Erase disc
High Speed
Dynamic
Manually
Page 82

82
About the file browser
The file browser shows you the different types of data (JPEG, MP3,
WMA, DivX©) at a glance.
The data can be retrieved from the archive of the HDD DVD
recorder, from a disc or via the USB socket of a memory stick, an
MP3 player or a digital camera.
A folder (named HDD) is available in the HDD DVD recorder for
saving and managing data with approx. 10 % of the archive
memory.
The main functions of the file browser are:
– Playing back files
– Copying files from USB to the HDD folder on the HDD DVD
recorder
– Copying files from a disc to the HDD folder on the HDD DVD
recorder
– Copying files from USB onto a disc.
The main menu of the file browser
1 Name of the menu.
2 Display for audio data (playback mode, total playing time,
elapsed playing time).
3 Folder 1 HDD – main directory of the HDD DVD recorder.
4 Folder for external media:
2 Disc – for a disc in the disc compartment
3 USB – e.g. for an external memory stick.
5 Status display, e.g. selected folder, MP3 info, copying status.
6 Pictorial display of data content, inset picture of selected JPEG
picture.
7 Information about the files.
8 Dialog line with buttons and their functions.
THE FILE BROWSER
_________________________________
File Manager AUDIO STOP 0:00:00 - 0:00:00
Select
and
Choose
Program Exit
1 HDD
3 USB1
S
A
2 Disc
s
File Size: N/A
Modify Date: N/A
/Disc
1 2
3
4
5
6
7
8
Page 83

ENGLISH
83
Connecting external data devices
To connect a digital camera or an external storage medium, switch
the HDD DVD recorder into standby with »Ǽ« and switch it on only
after connecting. Even if you disconnect the USB, the HDD DVD
recorder must first be switched to standby, otherwise files can be
damaged.
1 Connect the USB interface » IN« on the HDD DVD recorder
to the corresponding socket on the data device (digital camera,
card-reading device or MP3 player) using a USB cable
or
Insert the USB plug of the USB memory stick into the USB inter-
face » IN« on the HDD DVD recorder.
Note:
You can connect several devices to the USB interface » IN«
on the HDD DVD recorder at the same time, using a USB hub.
Preparation
Switch on the television.
Select the »AV« channel on the television for the HDD DVD
recorder.
Insert a DVD+R, DVD+RW, DVD-R or DVD-RW into the disc com-
partment.
Note:
A bi-directional data transfer as defined for ITE (Information
Technology Equipment) devices in EN 55022/EN 55024 is not
possible.
USB transfer is not in itself an operating mode. It is only an
additional function.
(
(
(
THE FILE BROWSER
_________________________________
IN DV IN
VIDEO IN AUDIO
RL
AUDIO
VIDEO IN
RL
IN
DV IN
IN DV IN
VIDEO IN AUDIO
RL
AUDIO
VIDEO IN
RL
IN
DV IN
PROG. SOURCE
Page 84

84
Playing back data
Data can be retrieved from the archive of the HDD DVD recorder,
from a disc or via the USB socket of a memory stick, an MP3 player
or a digital camera.
1 Press »
Ǽ« on the remote control to switch on the HDD DVD
recorder from standby mode.
2 Press »i« to open the main menu.
3 Select » File Manager« with »
S
« or »A« and press
»OK« to activate.
– The »File Manager« appears, the folder display depends on
the medium being used.
4 Select the folder with »
S
« or »A« and press »OK« to open.
5 Select the file using »
S
« or »A« and press »OK« to start
playback.
6 Press »
7« to end playback.
Note:
During playback, the playback menu can be selected with
»DISPL«.
When image files are played at the same time as MP3 audio
files the playback of the audio file, for example, can be stopped
here.
Additional functions in the »File Manager« menu
Functions available to you depend on the medium being used. The
active functions are displayed in white writing, functions which are
not available for the files you have open appear in grey writing.
Preparation
1 Press »Ǽ« on the remote control to switch on the HDD DVD
recorder from standby mode.
2 Press »i« to open the main menu.
3 Select » File Manager« with »
S
« or »A« and press
»OK« to activate.
– The »File browser« appears, the folder display depends on the
medium being used.
Note:
The following sections offer more explanation on using the
equipment, from point 1.
THE FILE BROWSER
_________________________________
File Manager AUDIO STOP 0:00:00 - 0:00:00
Select
and
Choose
Program
Select/Unselect
../
2 BILD_2.JPG
3 BILD_3.JPG
4 BILD_4.JPG
5 BILD_5.JPG
S
A
1 BILD_1.JPG1
s
File Size: 350KB
Modify Date:
10/10/2006
BILD_1.JPG
File Manager AUDIO STOP 0:00:00 - 0:00:00
Select
and
Choose
Program Exit
1 HDD
S
A
2 USB1
s
File Size: N/A
Modify Date: N/A
/USB
Copy
MODE
TRICK
AUDIO
TIME
TYPE Audio
NORMAL
STOP
STEREO
0:00:02–0:06:30
S
s
AUDIO
Page 85

ENGLISH
85
Copying data
Copying a folder or file previously selected.
The copying options:
– USB to HDD
– USB to disc
– Disc to HDD
– HDD to disc
1 Select the folder with »
S
« or »A« and press »OK« to open.
2 Press »
S
« or »A« to select the file.
3 Open the »Additional functions« menu with »
8«.
4 Select »Copy« with »
S
« or »A« and press »OK« to
activate.
5 Select the target folder (HDD or disc) with »
S
« or »A« and
activate with »OK«.
Note:
You can create a new directory by pressing » « (green). The
keyboard is displayed.
Move the cursor with »A« and select the input position with
with »a« or »s«.
Press »Clear« to delete the whole track and »BkSp« to delete
the individual letters or characters.
Press »S«, »A«, »a« or »s« to select the letters/characters and press »OK« to confirm.
The buttons at the bottom of the keyboard are function keys:
Press »cC« to switch between uppercase and lowercase. With
»P2«, the keyboard can be switched to special characters.
Press »BkSp« to delete a character and »Clear« to delete a
word. Press »Exit« or »x« to quit the keyboard. Any
changes are not saved.
When you have entered the new name, press »S«, »A«,
»a« or »s« to switch to the »OK« button and press »OK« to
confirm.
6 Press »
●« to start the copying process.
THE FILE BROWSER
_________________________________
Copy
Delete
Rename
Move
Create Dir
Select all
Favorite
Unfavorite
Favorite list
S
File Manager AUDIO STOP 0:00:00 - 0:00:00
Select
and
Choose
Program
1 Urlaub Sommer 2006
2 Urlaub Herbst 2006
3 Ausflug
4 Sport 1
5 Sport 2
6 Sport 3
S
A
../
s
File Size: N/A
Modify Date: N/A
Create Directory
_
A
B 210KJIHGFEDC
L
M 543VUTSRQPON
W
X 9876.?:_)(ZY
Space
OKExitClearBkSpcC
Drama
AdultKidsNewsComedySportsAction
P2
Page 86

86
Deleting data
Deletes a selected folder or file from the »HDD« folder of the HDD
DVD recorder.
Data from external media cannot be deleted.
1 Select the folder with »
S
« or »A« and press »OK« to open.
2 Press »
S
« or »A« to select the file.
3 Open the »Additional functions« menu with »
8«.
4 Select »Delete« with »
S
« or »A« and press »OK« to con-
firm.
5 Confirm the security queries by pressing the »Yes« button with
»a« or »s« and press »OK« to confirm.
Renaming data/creating a directory
You can give folders or files their own names using the “Rename”
function.
You can create a new directory within a directory using the “Create
directory” function.
– Data from external media cannot be edited.
1 Select the folder with »
S
« or »A« and press »OK« to open.
2 Press »
S
« or »A« to select the file.
3 Open the »Additional functions« menu with »
8«.
4 Select »Rename« or »Create Dir« by pressing »S« or »A«
and press »OK« to confirm.
– The keyboard is displayed.
5 Move the cursor with »A« to the heading and select the input
position with »a« or »s«.
Note:
Press »Clear« to delete the whole track and »BkSp« to delete
the individual letters or characters.
6 Press »S«, »A«, »a« or »s« to select letters or charac-
ters, and confirm with »OK«.
Notes:
The buttons at the bottom of the keyboard are function keys:
Press »cC« to switch between uppercase and lowercase. With
»P2«, the keyboard can be switched to special characters.
Press »BkSp« to delete a character and »Clear« to delete a
word. Press »Exit« or »x« to quit the keyboard. Any
changes are not saved.
7 To confirm the new name, press »S«, »A«, »a« or »s« to
select »OK« and press »OK« to confirm the new track name.
– You will see the new name in the file browser.
THE FILE BROWSER
_________________________________
Copy
Delete
Rename
Move
Create Dir
Select all
Favorite
Unfavorite
Favorite list
S
A
Copy
Delete
Rename
Move
Create Dir
Select all
Favorite
Unfavorite
Favorite list
S
A
Create Directory
AAA_
A
B 210KJIHGFEDC
L
M 543VUTSRQPON
W
X 9876.?:_)(ZY
Space
OKExitClearBkSpcC
Drama
AdultKidsNewsComedySportsAction
P2
Page 87

ENGLISH
87
Selecting/deselecting data
Selects all the files in the folder. These files can then all be copied,
deleted or moved.
1 Select the folder with »
S
« or »A« and press »OK« to open.
2 Press »
S
« or »A« to select the file.
3 Open the »Additional functions« menu with »
8«.
4 Select »Select all« with »
S
« or »A« and press »OK« to
confirm.
– A small tick appears before the file.
Notes:
To delete what is selected, select »Deselect all« by pressing
»
S
« or »A« and confirm with »OK«.
If you only want to highlight individual data, this can be done in
the file browser with »c«.
Editing the favourite list
In this list data can be copied and then played back.
1 Select the folder with »
S
« or »A« and press »OK« to open.
2 Press »
S
« or »A« to select the file.
3 Open the »Additional functions« menu with »
8«.
4 Select »Favorite« with »
S
« or »A« and press »OK« to confirm.
– The file is copied into the favourite list.
5 Select »Favorite list« with »
S
« or »A« and press »OK« to
confirm.
– The favourite list is displayed.
Notes:
You can switch between the file browser and the favourite list with
» « (yellow).
You can delete data from the favourite list with »CL«.
THE FILE BROWSER
_________________________________
Copy
Delete
Rename
Move
Create Dir
Select all
Unselect all
Favorite
Unfavorite
Favorite list
S
A
Coüy
Delete
Rename
Move
Create Dir
Select all
Unselect all
Favorite
Unfavorite
Favorite list
S
A
Page 88

88
The index screen of the DVD+R, DVD+RW, DVD-R and DVD-RW
shows the title, length, quality and date of the recording. The first
frame of the recording is also displayed.
If the »Automatic chapter marking« is activated, the HDD DVD
recorder makes chapter markings during the recording. You can set
the time intervals by referring to the chapter on “Inserting chapter
markers in recordings” on page 110. You can edit, delete or add
new ones later on. This function requires the YesDVD function to be
switched on in the »SETUP MENU«.
You can also edit the name of the recording, rename the disc, and
delete individual recordings or all recordings.
Note:
The functions in the “Editing data on a disc” section do not
work if the recordings have been made with the YesDVD function.
Editing titles
Opening the editing menu
1 Put a DVD+R, DVD+RW, DVD-R or DVD-RW in the disc com-
partment.
2 Press »i« to open the main menu.
3 Select »
8 DVD« by pressing »
S
« or »A« and activate
with »OK«.
– The index screen appears.
4 Select the title by pressing »S« or »A«.
5 Activate the DVD menu with »s«.
– The »DVD menu« is displayed.
6 Select »Edit title« with »S« or »A« and press »OK« to
confirm.
– The »Edit mode« menu appears.
Notes:
The rest of the process is described in the following sections,
starting from step 1.
Adding chapter markers
You can add chapter markers within a title to allow you to find
scenes quickly during playback.
You can add up to 99 markers on each disc. After the 99th marker,
the HDD DVD recorder displays the message »Too many chapters«.
To insert new markers, old ones must first be deleted.
You cannot add markers if the disc is write-protected or finalised.
1 Select »Title« with »S« or »A« and press »OK«to activate.
2 Press »1…0« to enter the title and press »OK« to confirm.
EDITING DATA ON A DISC
______________________
s
1. TITLE
30/09/2004
10:05:12
SP 01:15:00
2. TITLE
30/09/2004
12:30:00
SP 00:45:00
3. TITLE
01/10/2004
21:00:00
SP 00:30:00
Play title
Edit title
Rename title
Erase title
Overwrite title
Overwrite disc
Add title
Copy
S
A
Page 89

ENGLISH
89
3 During playback, select »Chapter marker« with »S« or »A«
and activate with »s«.
4 To add your own markers, select »Insert marker« with »S« or
»A« and press »OK« to insert the marker at the selected
scene.
5 Quit the function by pressing »x« or » «.
Deleting chapter markers
You can delete individual chapter markers or all the chapter
markers on the disc.
1 Select »Title« with »S« or »A« and press »OK«to activate.
2 Press »1…0« to enter the title and press »OK« to confirm.
3 Select »Chapter marker« with »S« or »A« and press »s«
to confirm.
4 To delete the current chapter marker, select »Delete marker«
with »S« or »A« and press »OK« to delete it
or
To delete all the chapter markers select »Delete all markers«
with »S« or »A« and press »OK« to delete them.
5 Quit the function by pressing »x« or » «.
Skip chapter
You can mark chapters which are not to be shown during playback.
1 Select »Title« with »S« or »A« and press »OK« to activate.
2 Press »1…0« to enter the title and press »OK« to confirm.
3 Select »Chapter:« with »S« or »A« and press »1…0« to
select a chapter.
4 Select »Skip chapter« with »S« or »A« and press »OK« to
confirm.
– The chapter is not shown during playback.
Note:
If you want to see the chapter again, select it with »1…0«,
select »Show chapter« with »S« or »A« and press »OK« to
confirm.
5 Quit the function by pressing »x« or » «.
EDITING DATA ON A DISC
______________________
Title 1/01
Chapter: 01/04
PLAY
Chapter marker
Skip chapter
Index picture
Split title
EDIT MODE
S
Chapter marker
A
s
Title 1/01
Chapter: 01/04
PLAY
Chapter marker
Skip chapter
Index picture
Split title
EDIT MODE
S
Chapter marker
A
s
Title 1/01
Chapter: 01/04
PLAY
Chapter marker
Skip chapter
Index picture
Split title
EDIT MODE
Skip chapter
S
A
Page 90

90
Creating a new title thumbnail
You can select and save any scene as a new index thumbnail picture
for the title.
1 Select »Title« with »S« or »A« and press »OK« to activate.
2 Press »1…0« to enter the title and press »OK« to confirm.
3 Select »Index picture« by pressing »S« or »A«.
4 Press »OK« at the scene you want to use as an index thumbnail.
5 Quit the function by pressing »x« or » «.
Splitting titles in two (DVD+RW and DVD-RW
only)
You can split a title into two. You can then delete these two titles separately, so that you can use the memory space on the disc again.
1 Select »Title« with »S« or »A« and press »OK« to activate.
2 Press »1…0« to enter the title and press »OK« to confirm.
3 Select »Split title« with »S« or »A« and press »OK« to
confirm.
– The title is split.
Note:
Depending on the length of the title, this can take some time.
EDITING DATA ON A DISC
______________________
Title 1/01
Chapter: 01/04
PLAY
Chapter marker
Skip chapter
New index picture
Split title
EDIT MODE
S
Index picture
A
Chapter: 01/04
PLAY
Chapter marker
Skip chapter
Index picture
Split title
T-elapsed: 0:00:20
EDIT MODE
S
Split title
A
Page 91

ENGLISH
91
Editing the names of recordings
You can give recordings a name.
1 Put a DVD+R, DVD+RW, DVD-R or DVD-RW in the disc com-
partment.
2 Press »i« to open the main menu.
3 Select »
8 DVD« by pressing »
S
« or »A« and activate
with »OK«.
– The index screen appears.
4 Press »S« or »A« to select the title and activate the title
menu with »s«.
– The »Title menu« is displayed.
5 Select »Rename title« by pressing »S« or »A« and press
»OK« to confirm.
6 Press »a« or »s« to select the input position and »S« to
switch to the keyboard.
7 Press »S«, »A«, »a« or »s« to select letters characters,
and »OK« to confirm.
Notes:
The buttons on both the bottom rows of the keyboard are function keys.
Press »cC« to switch between uppercase and lowercase.
Press »P2« to choose special characters.
Press »BkSp« to delete a letter/character and »Clear« to
delete a word.
Press the »Exit« button to quit the keyboard. Any changes are
not saved.
You can enter topics relating to the title using the buttons on the
bottom row of the keyboard.
8 When you have entered the new name, press »S«, »A«,
»a« or »s« to switch to the »OK« button and press »OK« to
confirm.
– Display: »Updating disc... Please wait«.
9 Press »a« to complete the setting.
EDITING DATA ON A DISC
______________________
s
1. TITLE
30/09/2004
10:05:12
SP 01:15:00
2. TITLE
30/09/2004
12:30:00
SP 00:45:00
3. TITLE
01/10/2004
21:00:00
SP 00:30:00
Play title
Edit title
Rename title
Erase title
Overwrite title
Overwrite disc
Copy
S
A
Titel name:
ARD_
A
B 210KJIHGFEDC
L
M 543VUTSRQPON
W
X 9876.?:_)(ZY
Space
OKExitClearBkSpcC
Drama
AdultKidsNewsComedySportsAction
P2
Page 92

92
Deleting titles (recordings) from the disc
1 Put a DVD+R, DVD+RW, DVD-R or DVD-RW in the disc com-
partment.
2 Press »i« to open the main menu.
3 Select »
8 DVD« by pressing »
S
« or »A« and activate
with »OK«.
– The index screen appears.
4 Press »S« or »A« to select the title and activate the title
menu with »s«.
– The »Title menu« is displayed.
5 Select »Erase title« with »S« or »A« and press »OK« to
confirm.
– Display: »Warning: this operation will irreversibly delete the
current title on the disc. Do you want to continue?«.
6 Select »Yes« with »a« or »s« and press »OK« to confirm.
– Display: »Erasing ...«. The title overview now shows a blank
title.
Notes:
Deleted titles on a DVD+R/-R are only marked as deleted. The
playing time of these titles cannot be used for further recordings. The title is simply skipped during playback.
Once a DVD+R/-R is finalised, deleting is no longer possible.
Overwriting titles
This function allows you to use free recording space on the disc.
Note that only the playing time of the title to be overwritten is avail-
able for recording.
1 Put a DVD+RW or DVD-RW in the disc compartment.
2 Press »i« to open the main menu.
3 Select »
8 DVD« by pressing »
S
« or »A« and activate
with »OK«.
– The index screen appears.
4 Select the title to overwrite by pressing »S« or »A« and
press »s« to open the title menu.
– The title menu is displayed.
5 Select »Overwrite title« with »S« or »A« and press »OK«
to confirm.
EDITING DATA ON A DISC
______________________
s
1. TITLE
30/09/2004
10:05:12
SP 01:15:00
2. TITLE
30/09/2004
12:30:00
SP 00:45:00
3. TITLE
01/10/2004
21:00:00
SP 00:30:00
s
1. TITLE
30/09/2004
10:05:12
SP 01:15:00
2. TITLE
30/09/2004
12:30:00
SP 00:45:00
3. TITLE
01/10/2004
21:00:00
SP 00:30:00
Play title
Edit title
Rename title
Erase title
Overwrite title
Overwrite disc
Copy
S
A
Play title
Edit title
Rename title
Erase title
Overwrite title
Overwrite disc
Copy
S
A
Page 93

ENGLISH
93
6 Press »SOURCE« to select the input source (for example, TV).
– Display: for example, »P1 ARD«, the current TV station is
shown.
7 Select the television programme by pressing »A« or »S«.
8 Press »
●« to start recording.
– The available recording time is displayed.
The recording stops automatically at the end of the title.
Overwriting discs
This function allows you to overwrite the disc from the start to the
end of the recording.
If you no longer need any of the titles on the disc, use the »Delete
disc« function in the disc menu.
1 Put a DVD+RW or DVD-RW in the disc compartment.
2 Press »i« to open the main menu.
3 Select »
8 DVD« by pressing »
S
« or »A« and activate
with »OK«.
– The index screen appears.
4 Select any title with »S« or »A« and press »s« to open the
title menu.
– The title menu is displayed.
5 Select »Overwrite disc« with »S« or »A« and press »OK«
to confirm.
6 Press »SOURCE« to select the input source (for example, TV).
– Display: for example, »P1 ARD«, the current TV station is
shown.
7 Select the television channel with »A« or »S«.
8 Press »
●« to start recording.
– The available recording time is displayed.
The recording stops automatically at the end of the disc.
EDITING DATA ON A DISC
______________________
s
1. TITLE
30/09/2004
10:05:12
SP 01:15:00
2. TITLE
30/09/2004
12:30:00
SP 00:45:00
3. TITLE
01/10/2004
21:00:00
SP 00:30:00
Play
Rename disc
Erase
Erase title
Overwrite title
Overwrite disc
Copy
S
A
Page 94

94
Recording titles
This menu only appears with the last recording on the disc.
The new recording is added to the last one. A new index screen is
not made.
Note:
If you want to create a new index screen for the new recording,
select »EMPTY« by pressing »S« and press »s« to activate.
1 Put a DVD+RW or DVD-RW in the disc compartment.
2 Press »i« to open the main menu.
3 Select »
8 DVD« with »
S
« or »A« and press »OK«
to activate.
– The index screen appears.
4 Select the last title with »S« or »A« and press »s« to con-
firm.
– The title menu is displayed.
5 Select »Add title« with »S« or »A« and press »OK« to acti-
vate.
6 Press »SOURCE« to select the input source (for example, TV).
– Display: for example, »P1 BBC«, the current TV station is
shown.
7 Select the television channel with »A« or »S«.
8 Start recording with »
●«.
– The available recording time is displayed.
The recording stops automatically at the end of the disc.
9 End the recording with »
7«.
EDITING DATA ON A DISC
______________________
s
1. TITLE
30/09/2004
10:05:12
SP 01:15:00
2. TITLE
30/09/2004
12:30:00
SP 00:45:00
3. TITLE
01/10/2004
21:00:00
SP 00:30:00
Edit title
Rename title
Erase title
Overwrite title
Overwrite disc
Add title
Copy
S
A
Page 95

ENGLISH
95
Entering the name of the disc
You can enter a name for each disc; the name is shown on the index
screen.
1 Put a DVD+R, DVD+RW, DVD-R or DVD-RW in the disc com-
partment.
2 Press »i« to open the main menu.
3 Select »
8 DVD« by pressing »
S
« or »A« and activate
with »OK«.
– The index screen appears.
4 Select the disc information »MY DVD« by pressing »S« or
»A« and activate with »s«.
– The disc menu is displayed.
5 Select »Rename disc« with »S« or »A« and press »OK« to
confirm.
6 Select the input field with »s« and press »S« to activate the
input keyboard.
7 Press »S«, »A«, »a« or »s« to select letters and num-
bers, and »OK« to confirm.
Notes:
The buttons on both the bottom rows of the keyboard are function keys.
Press »cC« to switch between uppercase and lowercase.
Press »P2« to choose special characters.
Press »BkSp« to delete a letter/character and »Clear« to
delete a word.
Press the »Exit« button to quit the keyboard. Any changes are
not saved.
You can enter topics relating to the title using the buttons on the
bottom row of the keyboard.
8 When you have entered the new name, press »S«, »A«,
»a« or »s« to switch to the »OK« button and press »OK« to
confirm.
– Display: »Updating disc... Please wait«.
9 Press »a« to complete the setting.
EDITING DATA ON A DISC
______________________
s
Holiday
30/09/2004
10:05:12
PAL
DVD
EDIT
Play
Rename disc
Erase disc
Record title
Overwrite disc
Lock disc
Copy All
S
A
Disc name:
MY DVD_
A
B 210KJIHGFEDC
L
M 543VUTSRQPON
W
X 9876.?:_)(ZY
Space
OKExitClearBkSpcC
Drama
AdultKidsNewsComedySportsAction
P2
Page 96

96
Deleting the content of the disc (DVD+RW/-RW)
1 Put a DVD-RW or DVD+RW in the disc compartment.
2 Press »i« to open the main menu.
3 Select »
8 DVD« by pressing »
S
« or »A« and activate
with »OK«.
– The index screen appears.
4 Select the disc information »MY DVD« by pressing »S« or
»A« and activate with »s«.
– The disc menu is displayed.
5 Select »Erase disc« with »S« or »A« and press »OK« to
confirm.
6 Press »OK« to delete the disc.
– Display: »Warning: This operation will erase all data on the
disc. Are you sure you want to continue?«.
Note:
To cancel the deletion, select »No« with »OK«.
7 Select »Yes« with »a« or »s« and press »OK« to confirm.
– Display: »Erasing ...«. You can no longer open the index
screen.
EDITING DATA ON A DISC
______________________
s
Holiday
30/09/2004
10:05:12
PAL
DVD
EDIT
Play
Rename disc
Erase disc
Record title
Overwrite disc
Lock disc
Copy All
S
A
Page 97

ENGLISH
97
Recording titles
This function allows you to record new titles. A new title is added to
the disc.
1 Put a DVD+R, DVD+RW, DVD-R or DVD-RW in the disc com-
partment.
2 Press »i« to open the main menu.
3 Select »
8 DVD« by pressing »
S
« or »A« and activate
with »OK«.
– The index screen appears.
4 Select the disc information »MY DVD« by pressing »S« or
»A« and activate with »s«.
– The disc menu is displayed.
5 Select »Record title« with »S« or »A« and press »OK« to
confirm.
6 Press »SOURCE« to select the input source (for example, TV).
– Display: for example, »P1 ARD«, the current TV station is
shown.
7 Select the television channel with »A« or »S«.
8 Press »
●« to start recording.
– The available recording time is displayed.
The recording stops automatically at the end of the disc.
EDITING DATA ON A DISC
______________________
s
Holiday
30/09/2004
10:05:12
PAL
DVD
EDIT
Play
Rename disc
Erase disc
Record title
Overwrite disc
Lock disc
Copy All
S
A
Page 98

98
EDITING DATA ON A DISC
______________________
Finalising title editing
If you have edited titles or chapters, a DVD player may not be able
to display this properly.
This function allows you to eliminate this problem.
If »Make compatible« does not appear in the menu, the disc is
already compatible and the setting is not necessary.
1 Put a DVD+R, DVD+RW, DVD-R or DVD-RW in the disc com-
partment.
2 Press »i« to open the main menu.
3 Select »
8 DVD« by pressing »
S
« or »A« and activate
with »OK«.
– The index screen appears.
4 Select the disc information »MY DVD« by pressing »S« or
»A« and activate with »s«.
– The disc menu is displayed.
5 Select »Make compatible« with »S« or »A« and press
»OK« to confirm.
– Display: »Working«, followed by the index screen.
The titles and chapters on the disc are now correctly displayed on a DVD player.
Note:
This can take some time.
Locking a disc
This protects the disc from being accidentally recorded over.
1 Put a DVD+RW or DVD-RW in the disc compartment.
2 Press »i« to open the main menu.
3 Select »
8 DVD« by pressing »
S
« or »A« and activate
with »OK«.
– The index screen appears.
4 Select the disc information »MY DVD« by pressing »S« or
»A« and activate with »s«.
– The disc menu is displayed.
5 Select »Lock disc« with »S« or »A« and press »OK« to
confirm.
– Display: »Working ...«, followed by the index screen.
You can no longer record on the disc.
Note:
To unlock the disc, select »Unlock disc« in the disc menu and
press »OK« to confirm.
s
Holiday
30/09/2004
10:05:12
PAL
DVD
EDIT
s
Holiday
30/09/2004
10:05:12
PAL
DVD
EDIT
Play
Rename disc
Erase disc
Record title
Overwrite disc
Make compatible
Lock disc
S
A
Play
Rename disc
Erase disc
Record title
Overwrite disc
Make compatible
Lock disc
A
Page 99

ENGLISH
99
Finalising a disc (DVD+R/-R/-RW only)
If you want to play a DVD+R/-R on a DVD player, you must first
finalise it. The HDD DVD recorder is able to play the unfinalised
disc.
Note that after a disc is finalised, no changes or any new recordings can be made on it.
If »Finalising disc« does not appear in the menu, the disc has
already been finalised or it is a DVD+RW.
1 Put a DVD+R, DVD-R or DVD-RW in the disc compartment.
2 Press »i« to open the main menu.
3 Select »
8 DVD« by pressing »
S
« or »A« and activate
with »OK«.
– The index screen appears.
4 Select the disc information »MY DVD« by pressing »S« or
»A« and activate with »s«.
– The disc menu is displayed.
5 Select »Finalise disc« with »S« or »A« and press »OK« to
confirm.
– Display: »Working ...«, followed by the index screen.
Deleting the content of the disc (DVD+RW/-RW)
If you cannot switch to the disc menu on a DVD+RW/-RW to delete
the disc (the disc is not compatible with the HDD DVD recorder),
you can delete the disc using the function in the »System Setup«
menu. The HDD DVD recorder must be in the time shift mode.
1 Put a DVD+RW/-RW in the disc compartment.
2 Press »SETUP« to open the setup menu.
3 Select »SETUP-MENU – ARCHIVE SETTINGS« ( ) with »
S
«
or »A« and press »OK« to confirm.
4 Select »Erase disc« with »
S
« or »A« and press »OK« to
confirm.
5 Press »OK« to delete the contents of the disc.
– Display: »Warning: This operation will erase all data on the
disc. Are you sure you want to continue?«.
Note:
To cancel the deletion, select »CANCEL« and confirm with
»OK«.
6 Select »OK« with »a« or »s« and press »OK« to confirm.
EDITING DATA ON A DISC
______________________
s
Holiday
30/09/2004
10:05:12
PAL
DVD
EDIT
Play
Rename disc
Record title
Finalise disc
A
SETUP MENU – Archive settings
a
360 minutes
Go!
OK
Show
TimeShift buffer length
Hard disc Info
Hard disc Space Management
Preview Type
HDD/Disc Copy Option
Erase hard disc
Erase disc
High Speed
Dynamic
Manually
Page 100

100
Note:
Do not connect any other equipment while the device is switched on.
Switch off the other equipment as well before connecting it.
Only plug the device into the mains socket after you have connected the
external devices and the antenna.
Connection and preparation
Connecting a camcorder
1 Connect the »VIDEO IN« and »L AUDIO IN R« sockets on
the front of the HDD DVD recorder to the corresponding sockets
on the camcorder using standard cinch cables
or
Connect the »DV IN« socket on the front of the HDD DVD
recorder to the corresponding socket on the digital camcorder
using a standard cable.
Connecting a video recorder, DVD player or
set-top box
1 Connect the »EURO AV2 ➞DECODER« socket on the HDD
DVD recorder to the corresponding socket on the video
recorder, DVD player or set-top box using a standard EUROAV (SCART) cable.
USING EXTERNAL DEVICES
_____________________
IN DV IN
IN
IN DV IN
IN
VIDEO OUT
ANTENNA
IN
Y
Pb
Cb
Pr
Cr
OUT TV
S-VIDEO OUT
ANTENNA
VIDEO OUT
DIGITAL AUDIO OUT
AUDIO OUT
VIDEO IN AUDIO
VIDEO IN
VIDEO IN AUDIO
VIDEO IN
L
AUDIO OUT
R
VIDEO IN
S-VIDEO IN
VIDEO IN AUDIO IN
IN DV IN
VIDEO IN AUDIO
RL
AUDIO
VIDEO IN
RL
IN
DV IN
IN DV IN
VIDEO IN AUDIO
RL
AUDIO
VIDEO IN
RL
IN
DV IN
RL
AUDIO
RL
DV IN
RL
AUDIO
RL
DV IN
Y
Apparatus Claims of U.S. patent Nos.
4,631,603; 4,577,216; 4,819,098 and
L
4,907,093 licensed for limited
EURO AV 1 TV
viewing uses only.
Manufactured under license from
Dolby laboratories. “Dolby”,”Pro Logic”
and the dolby - D symbol are trademarks
of Dolby Laboratories.
R
Confidential Unpublished Works.
© 1992-1997 Dolby Laboratories, Inc.
All rights reserved
EURO AV 2 DECODER
S VIDEO OUT VIDEO OUT
Pb/Cb
Pr/Cr
 Loading...