

Page 1

ǵ
DVD-PLAYER
GDP 9550
ENGLISH
Page 2

2
CONTENTS
____________________________________________
4 DVD Player GDP 9550
4 Special features of your DVD player
4 Scope of delivery
4 Disc formats
5 Set-up and safety
6-10 Overview
6-7 The front of the DVD player
7 The display elements of the DVD player
8 The back of the DVD player
9-10 The remote control
11-14 Connection and preparation
11-13 Connecting a television or flat screen
13 Connecting a multi-channel amplifier or digital two channel audio system
14 Connecting an audio system with analogue two-channel stereo sound
14 Connecting the power cord
14 Inserting batteries in the remote control
15-17 Getting started
15 Switching on the DVD player
15 Selecting the language of the screen menus
15-17 Adapting the DVD player to the television set/flat screen
18 Before playback
18 Preparation
18 Inserting a disc
18 Removing discs
19-24 Playback a DVD
19 DVD features
19 Special DVD features
20 Playing back a track
20 Calling up information
20 Selecting tracks and chapters with the DVD menu
21 Selecting certain tracks with the number buttons
21 Selecting chapters
21 Interrupting/resuming playback (resume)
21 Ending playback
22-23 Additional playback functions
24 Selecting and playing scenes
24 Repeat functions
25-26 Playback S-VCD/VCD
25 S-VCD/VCD features
25 PBC (playback control)
25 Switching PBC (playback control) on/off
25 Playing back a track
26 Selecting a track
26 Frame search
26 Ending playback
Page 3

ENGLISH
3
27-31 Playback audio/video files
27 Features of the Nero Digital CD
27 Features of the DivX©Video CD
28 Features of the MP3 CD
29-31 Playback
32-33 Playback Picture CD
32 JPEG CD features
32 Features of the KODAK picture CD
32 Displaying JPEG pictures
33 Playing back a the KODAK picture CD
33 Additional playback functions
34-35 Playback Audio CD
34 Audio CD features
34 Calling up info line
34 Playing back a track
34 Selecting a track
34 Quick search
35 Ending playback
35 Repeating a track or an audio CD
35 Random play
35 Creating a playlist
36-37 Parental lock
36 Locking and releasing the disc compartment of the DVD player
37 Authorising the content of a DVD
37 Changing the access code
38-39 Audio settings
38 Selecting the sound menu
38 Selecting sound mode type (downmix mode)
38 Setting the sampling rate
38 Selecting the Pro Logic sound mode
39 Switching the dynamic range (volume range) on/off
39 Selecting the digital output
39 Ending settings
40-42 Personal settings
40 Setting the language
41 Switching the screen saver on/off
41 Switching the camera angle display on and off
41 DivX©Video registration
42 Resetting the DVD player to its original condition
42 Calling up the software status
43 Television remote control
44-46 Information
44 Technical data
44 General instructions for laser devices
45 Troubleshooting
45 Cleaning discs
45 Software information
45 Environmental note
46 Additional Information for units sold in the UK.
CONTENTS
____________________________________________
Page 4
4
Special features of your DVD player
Your DVD player provides you with perfect digital video playback of studio quality.
It also provides superb cinema-quality audio playback – in stereo or
with digital multi-channel sound – depending on the type of DVD and
the Audio system or stereo television.
Other features of DVD video include the choice of audio channel and
language, choice of subtitle language, and various camera recording
angles. Your DVD player is suitable for DVDs with regional code 2.
As well as DVDs, Nero Digital™-CDs, DivX
©
Video-CDs, MP3 CDs, JPEG
coded (photo) CDs, KODAK Picture CDs, Video-CDs, S-Video-CDs and
audio-CDs can also be played back.
Scope of delivery
1 DVD Player GDP 9550
2 Remote control
3 2 Batteries, 1.5 V, type AA
4 EURO-AV (Scart) cable
5 Operating manual
Disc formats
Your DVD player can play back CD-R, CD-RW, VCD 2,0, Super-VCD,
DVD R, DVD RW discs.
Due to the difference in quality of the recording media and the quality of
the recording itself, it can occasionally happen that a home-made DVD
or CD cannot be read. This does not indicate a malfunction of the DVD
player.
You have to finalise your own CD-R/RW recordings.
Make sure the settings of your CD burning program correspond to the
ISO 9660 standard to create a CD R or CD RW.
When DivX
©
Video or Nero Digital™ or MP3 or JPEG CDs are played
back, individual tracks/pictures may be skipped or incorrectly played
back/displayed. This can be due to the disc configuration, the encoder
software or the hardware sued for the recording.
Audio CDs (CDDA) correspond to the specification and bear the corresponding logo. Copy-protected CDs do not correspond to this specification and do not bear the corresponding logo. These CDs can cause
playback errors.
DVD-PLAYER GDP 9550
____________________
1
234 5
DVD
-PLAYER
Title
TV
Tele Pilot 81 D
ON/OFF
ǵ
Page 5
ENGLISH
5
SET-UP AND SAFETY
___________________________
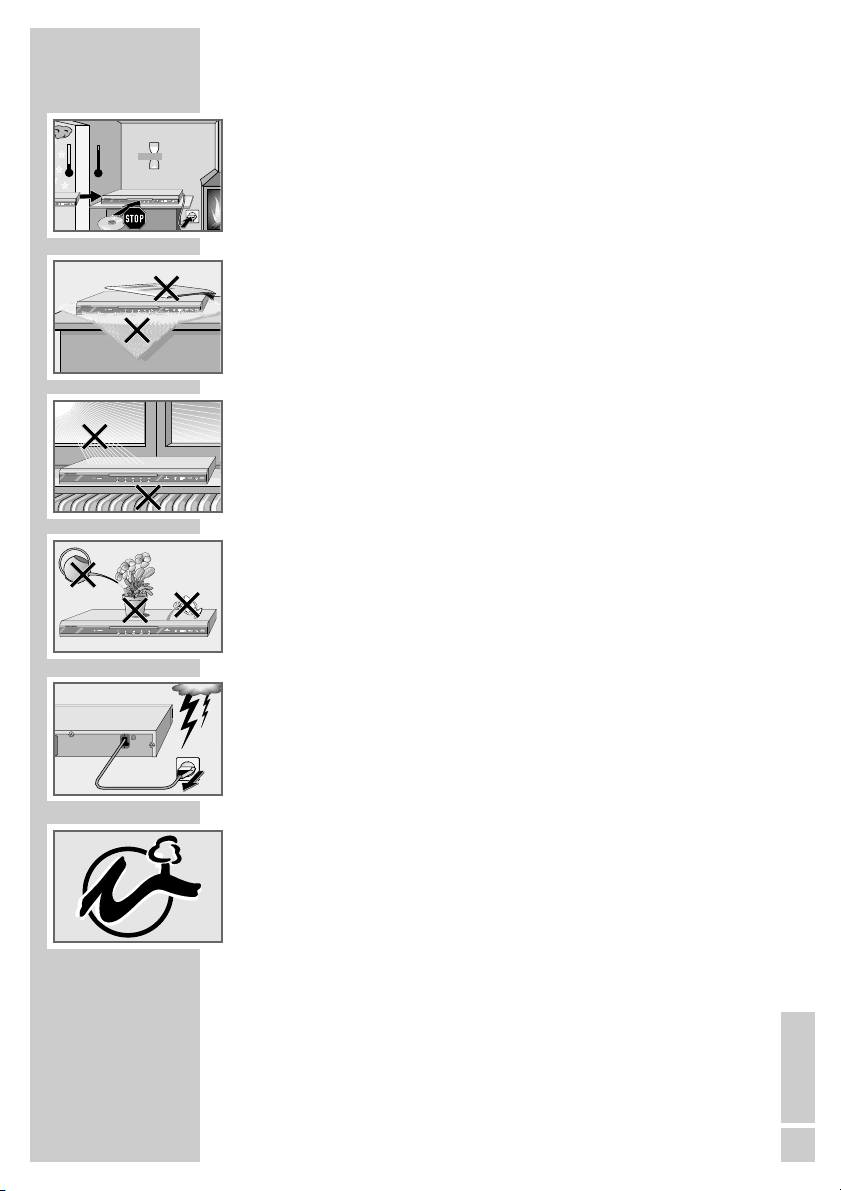
Please note the following information when setting up your DVD player:
This DVD player is designed to play video and audio signals from compact
discs (DVD and CD).
Any other use is expressly prohibited.
If the DVD player is subject to a sudden change in temperature, for example
if it is brought in from the cold to a warm room, connect it to the mains supply and let it stand for at least two hours before you insert a DVD.
The DVD player is designed for use in dry rooms. If you do use it in the
open, please ensure that it is protected from moisture, such as rain or water
splashes.
Place the DVD player on a hard, level surface. Do not place any objects such
as newspapers on the DVD player or any cloth or similar articles underneath
it.
Do not place the DVD player directly on top of an AV receiver or a subwoofer. The laser optics are sensitive to temperature and shocks.
Do not place the DVD player close to heating units or in direct sunlight, as
this will impair cooling.
Do not insert foreign objects in the disc compartment of the DVD player.
Never open the DVD player casing under any circumstances.
Warranty claims are excluded for damage resulting from improper handling.
Do not place any vessels filled with liquid, such as vases, on the DVD player,
as they may spill liquid, thus presenting a safety risk.
Thunderstorms are a danger to all electrical devices. Even if the DVD player
is switched off, it can be damaged by a lightning strike to the mains. Always
remove the mains plug during an electrical storm.
If the DVD player cannot scan DVDs or CDs perfectly, use a commercially
available cleaning-CD to clean the laser optics. Other cleaning methods
may damage the laser optics.
Always keep the disc compartment closed to prevent dust from collecting on
the laser optics.
This DVD player is designed to the highest technological and environmental
standards. Only environmentally-friendly, high-quality materials have been
used. The batteries included contain no mercury or cadmium.
The range of materials used has been deliberately restricted and all the larger plastic parts have been labelled. This DVD player is designed so that it
can be easily disassembled to aid servicing and recycling.
Note:
Do not connect any other equipment while the device is switched on. Switch
off the other equipment as well before connecting it.
Only plug the device into the mains socket after you have connected the
external devices.
°C
2h
°C
ON/OFF
ON/OFF
Krieg im Balkan
ON/OFF
100-240 V~
50/60 Hz 10 W
ON/OFF
Page 6
6
OVERVIEW
____________________________________________
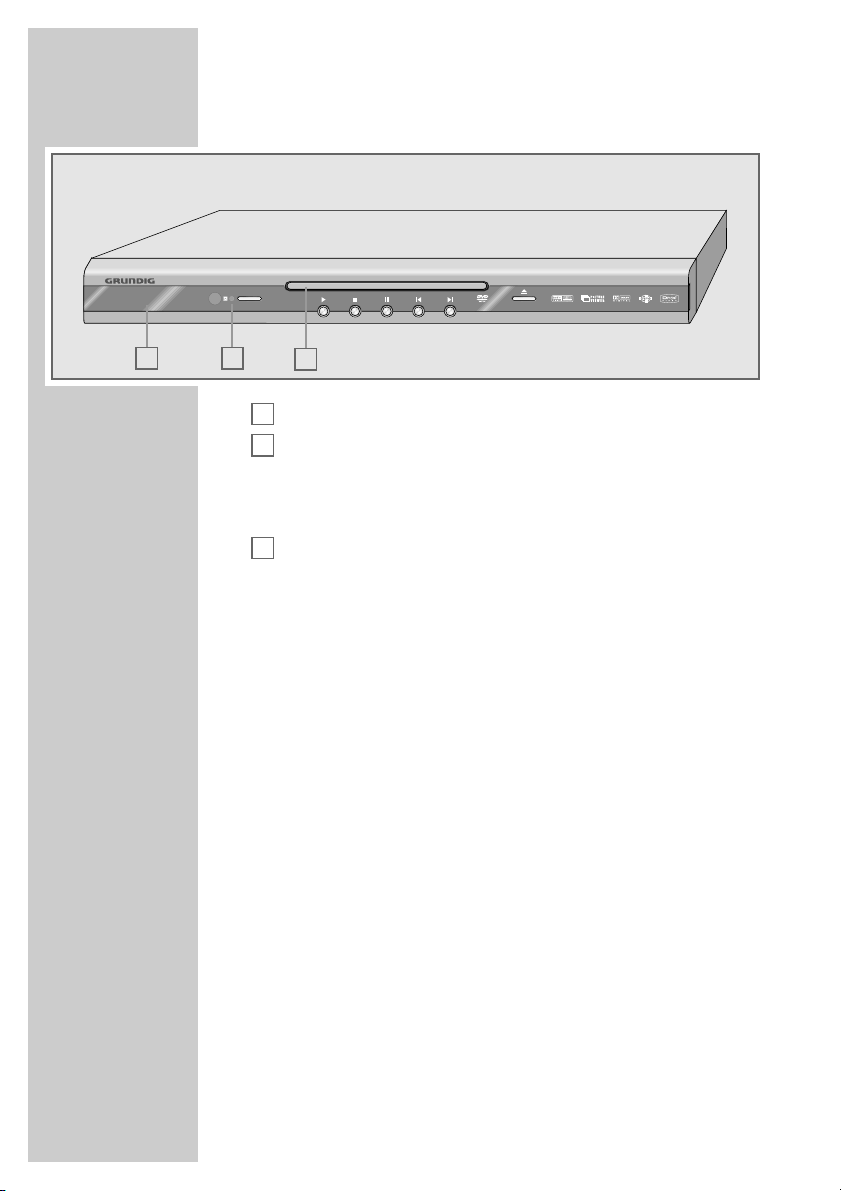
The front of the DVD player
Display.
Stand-by indicator.
ON/OFF Switches the DVD player to stand-by and off again.
Switching off the DVD player does not mean it is discon-
nected from the mains.
Compartment for DVDs/CDs.
8
Starts playback.
7
Press once to activate the “RESUME” function.
Press twice to switch to “STOP”.
!
Press once to interrupt all functions.
Press twice to switch freeze frames forward step by step.
5
Selects the previous track or section during playback.
6
Selects the next track or section during playback.
ə
Opens and closes the disc compartment.
C
B
A
BA
C
ON/OFF
Page 7

ENGLISH
7
OVERVIEW
____________________________________________
The display elements of the DVD player
» « DVD inserted.
» « Function display for playback, pause, search etc.
»
dts« DTS-coded audio track is being played back.
»
ŀ« Playback.
»!« Pause/freeze-frame.
»
ALL
p
« One of the repeat functions is activated.
»
SVCD« Video CD or S-VCD inserted.
»
=
D« The DVD offers a Dolby Digital audio signal.
»n « Various angles available.
»
PBC« Navigation mode during VCD/S-VCD playback.
»
MP3« MP3 CD inserted.
»
01
« Number of a section on a DVD or CD or number of a
music track on a CD.
»
0:00:00
« Total or elapsed playing time in hours, minutes and
seconds.
888 88 88
Page 8
8
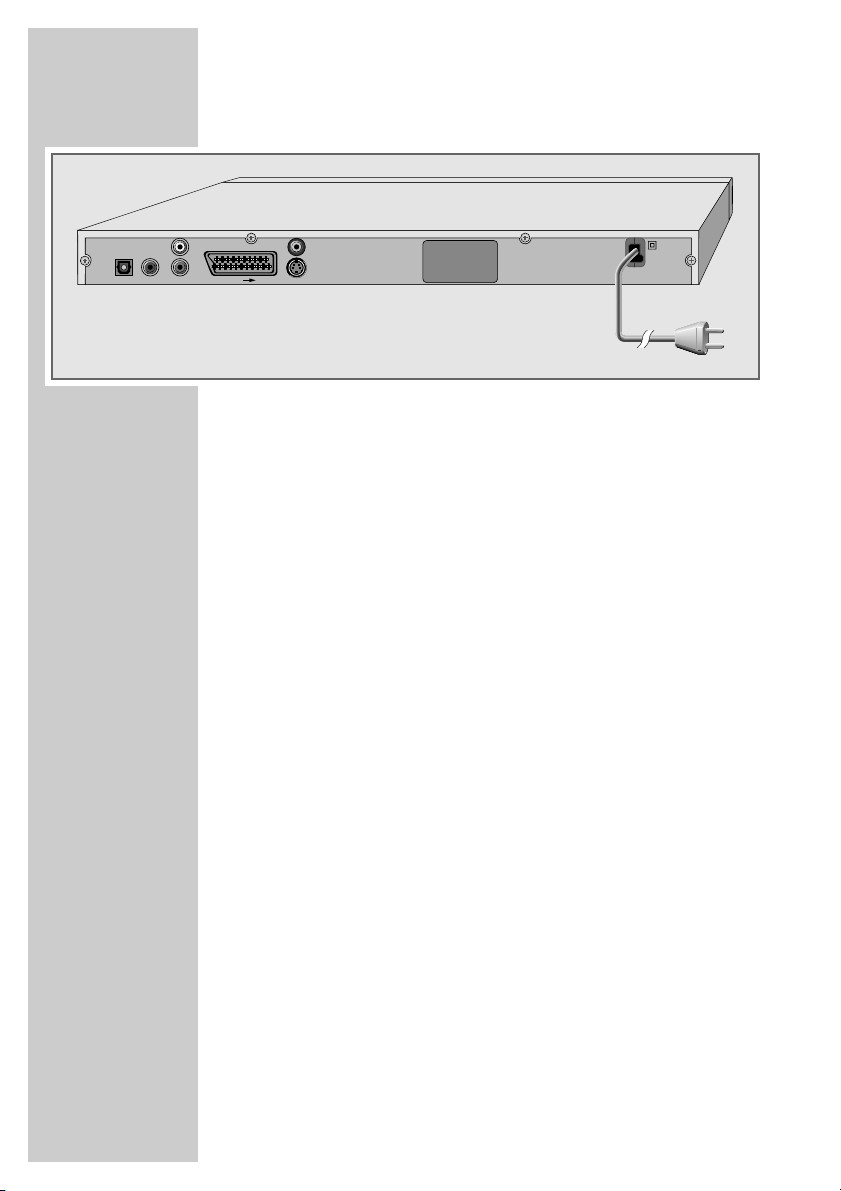
The back of the DVD player
DIGITAL AUDIO OUT Audio output socket (optical) for PCM/
Dolby digital/ DTS signals.
Audio output socket (coaxial) for PCM/
Dolby digital/ DTS signals.
For connecting a digital multi-channel audio
video amplifier or AV receiver.
AUDIO OUT L R Audio output sockets (left/right analogue chan-
nel) for connecting an audio system.
EURO AV
➞
TV For connecting a television with an EURO-AV
socket.
S VIDEO OUT Video output socket for connecting a television
or AV receiver with an S video socket.
VIDEO OUT Video output socket for connecting a television
or AV receiver with a Cinch socket.
100-240V~
Mains cable.
50/60Hz 10 W
Caution:
Do not connect any devices while the DVD player is switched on. Switch off the other device as
well before connecting it.
Never touch the inside of the sockets and plugs
of the connecting cables. An electrostatic
discharge can damage the DVD player.
OVERVIEW
____________________________________________
DIGITAL AUDIO OUT
L
R
AUDIO OUT
100-240 V~
50/60 Hz 10 W
EURO AV TV
VIDEO OUT
S VIDEO OUT
Page 9
ENGLISH
9
* Depends on the DVD used
OVERVIEW
____________________________________________
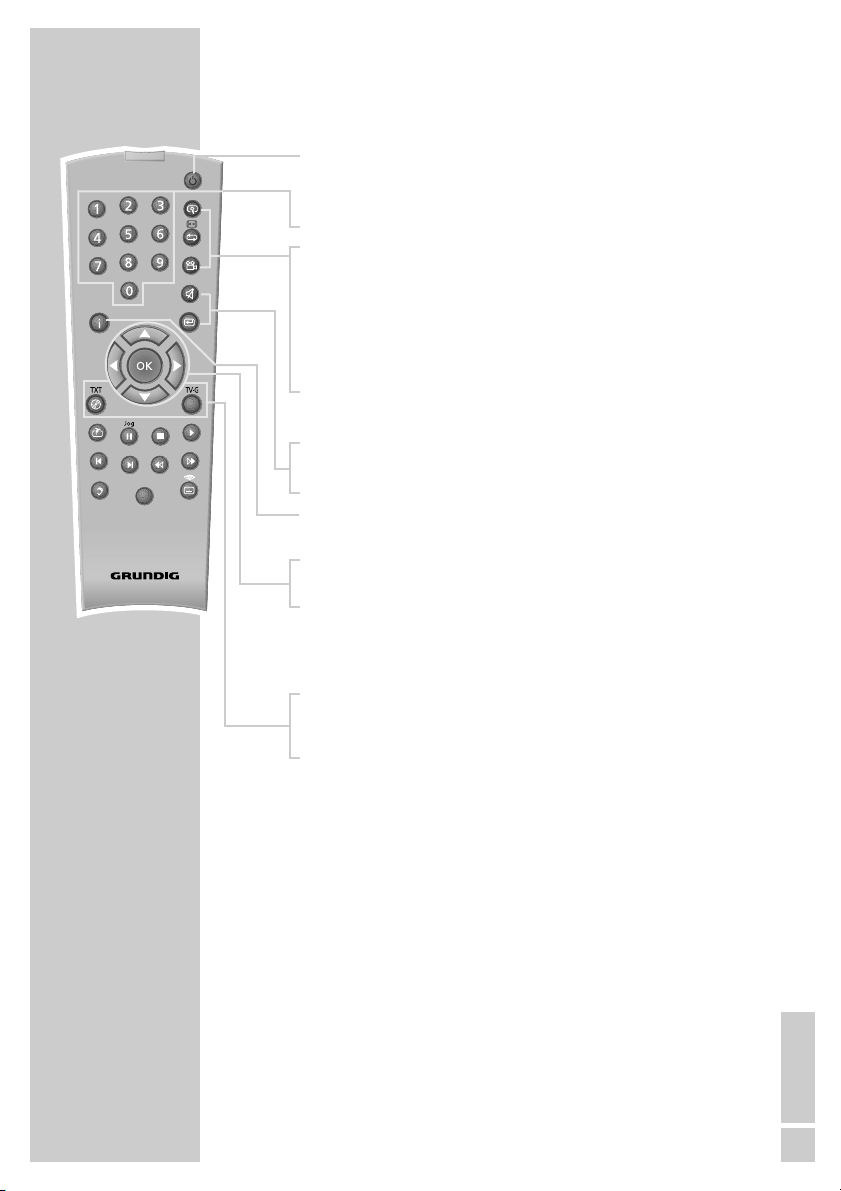
The remote control
Ǽ Switches the DVD player on from stand-by mode and
off again. The red indicator on the DVD player lights
up in stand-by mode.
1 … 0 Numeric keys for various inputs.
v Zooms in on scenes during playback.
b For the selection and repeated playback of sections
from DVDs and video CDs and titles/tracks on
DivX
©
Video-CDs, Nero Digital™
-CDs, audio CDs, MP3
or Picture CDs.
n Selects various camera angles* for certain scenes or
passages on the DVD during playback.
Selects the RANDOM PLAY function in STOP mode.
d
Mutes the sound on a GRUNDIG television.
x Switches up one menu level.
i Calls up the main menu (player menu) of the DVD
player.
ASa s
Select various functions in the menus.
OK Displays various information on the television screen
during playback, such as the title or chapter number
and playing time.
Confirms selected functions in the menus.
. Opens up the disc menu* of a DVD during playback.
Switches playback control (PBC) on/off (VCD/S-VCD).
Title Calls up the DVD title menu* during playback.
TV
Tele Pilot 81 D
Title
Page 10
10
* Depends on the DVD used
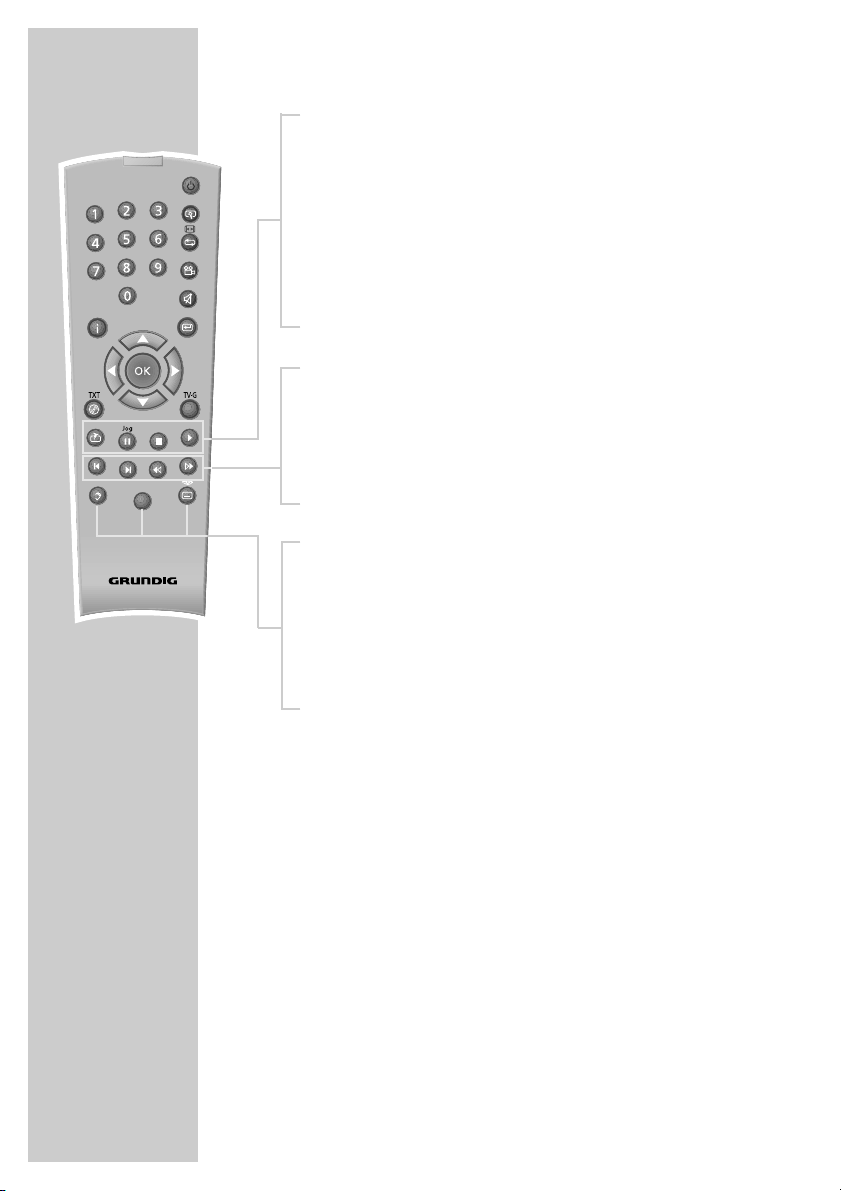
c Press briefly to mark scenes on the DVD.
Hold down to start playback at the selected marker.
! Freeze-frame for DVDs, video CDsNero Digital™-CDs and
DivX©Video-CDs;
pause for audio CDs and MP3 CDs.
Hold down to switch to slow motion (DVD).
7 Interrupts all drive functions;
Hold down to open the tray
8 Switches the DVD player on from standby mode.
Starts playback.
5 Selects the previous title or section during playback.
6 Selects the next title or section during playback.
m Switches to backwards frame search at various speeds
during playback.
, Switches to forwards frame search at various speeds
during playback.
d Switches between the original and the dubbed language*
during DVD playback.
Switches between the various sound formats.
TV Switches the remote controller between controlling your
DVD player and controlling your GRUNDIG television. The
possibilities of this are described on page 43.
y For selecting and displaying subtitles* of the DVD during
playback.
OVERVIEW
____________________________________________
TV
Tele Pilot 81 D
Title
Page 11

ENGLISH
11
Note:
Do not connect any other equipment while the device is switched
on. Switch off the other equipment as well before connecting it.
Only plug the device into the mains socket after you have connected
the external devices.
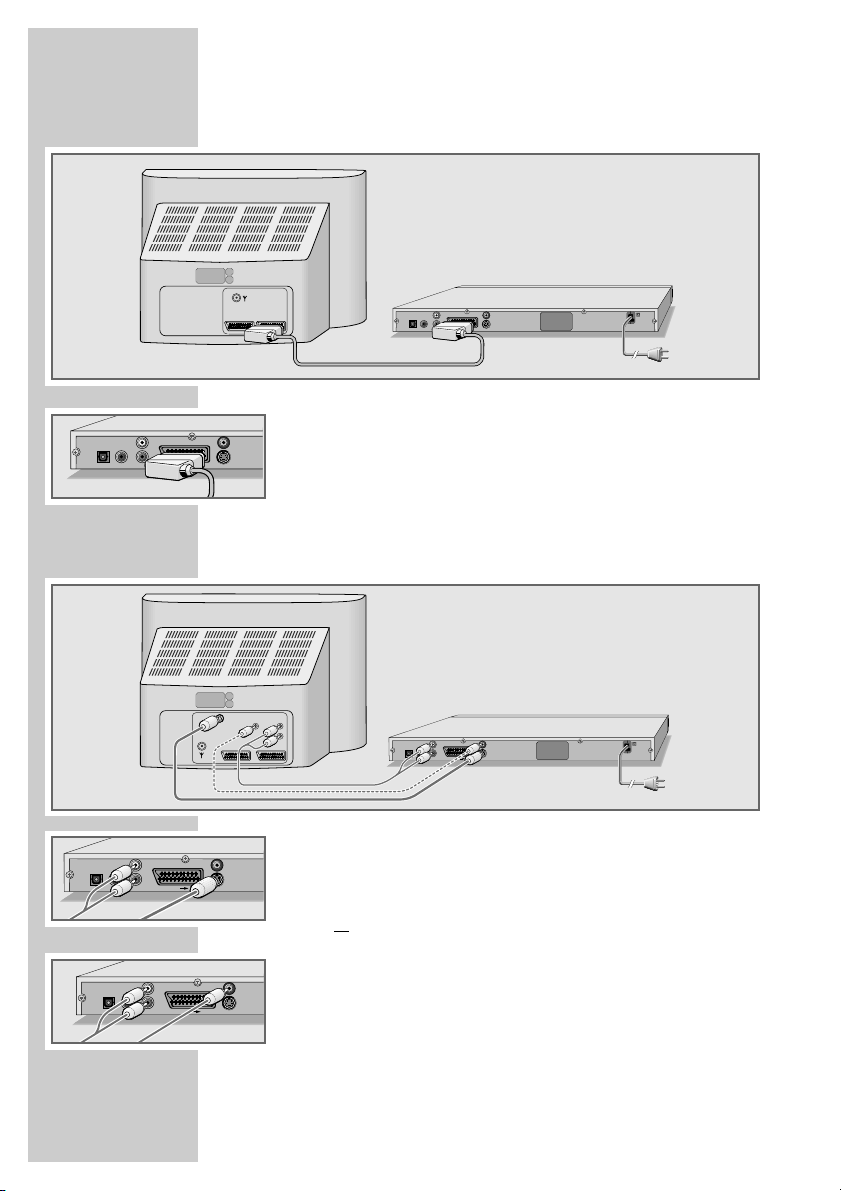
Connecting a television or flat screen
You have three options, depending on the sockets you have on your
television or flat screen:
– You get the best picture quality by making the connection at the
EURO-AV socket using a fully assigned EURO-AV cable.
– The standard connection for many devices, and one which provi-
des good quality, is via the S-VIDEO OUT socket and the AUDIO
OUT cinch sockets.
– The simplest option which still offers sufficient quality is connecting
to the video socket and the audio sockets with a cinch cable.
Necessary adjustments to the television or the
flat screen
After you have made the connections at the selected output sockets,
you must activate them. The setting procedure is described in the
”Selecting the video output socket (EURO AV/RGB or S-video)”
section on page 16.
If the DVD player is connected to a television set or a flat screen with
a 16:9 format, observe the settings described in the ”Selecting the
television format” section on page 17.
The colour standard of the DVD player must be matched to the
colour standard of your television or flat screen. The setting procedure is described in the section ”Setting the TV system (TV norm)”
on page 16.
Connect the »EURO AV
➞
TV« socket directly to the television or
the flat screen, and not indirectly via a video recorder. This can
cause difficulties when playing back copy-protected DVDs/CDs.
CONNECTION AND PREPARATION
_
Page 12
12
Connection using a EURO-AV (Scart) cable
1 Plug the EURO-AV cable supplied into the »EURO AV ➞TV«
socket of the DVD player and into the corresponding socket of
the television or flat screen.
Connection using a Y/C (S-VIDEO) cable or a
cinch cable (picture signal) and a cinch cable
(audio signal)
1 Plug a standard Y/C cable into the »S VIDEO OUT« socket
of the DVD player and into the corresponding socket (S VIDEO
IN) of the television or flat screen;
or
plug a standard cinch cable into the »VIDEO OUT« socket on
the DVD player and the corresponding socket (VIDEO IN) on
the television or flat screen.
2 Plug standard cinch cables into the »AUDIO OUT L R« sockets
of the DVD player and the appropriate sockets (AUDIO IN) on
the television or flat screen.
CONNECTION AND PREPARATION
_
DIGITAL AUDIO OUT
DIGITAL AUDIO OUT
L
R
AUDIO OUT
L
R
AUDIO OUT
EURO AV TV
EURO AV TV
AV1 AV2
VIDEO OUT
S VIDEO OUT
S-VIDEO
IN
AV1
VIDEO OUT
S VIDEO OUT
DIGITAL AUDIO OUT
L
R
AUDIO OUT
EURO AV TV
VIDEO OUT
S VIDEO OUT
AUDIO
VIDEO
INPUT
INPUT
L
R
AV2
DIGITAL AUDIO OUT
L
R
AUDIO OUT
EURO AV TV
VIDEO OUT
S VIDEO OUT
50/60 Hz 10 W
50/60 Hz 10 W
100-240 V~
100-240 V~
DIGITAL AUDIO OUT
L
R
AUDIO OUT
EURO AV TV
VIDEO OUT
S VIDEO OUT
Page 13
ENGLISH
13
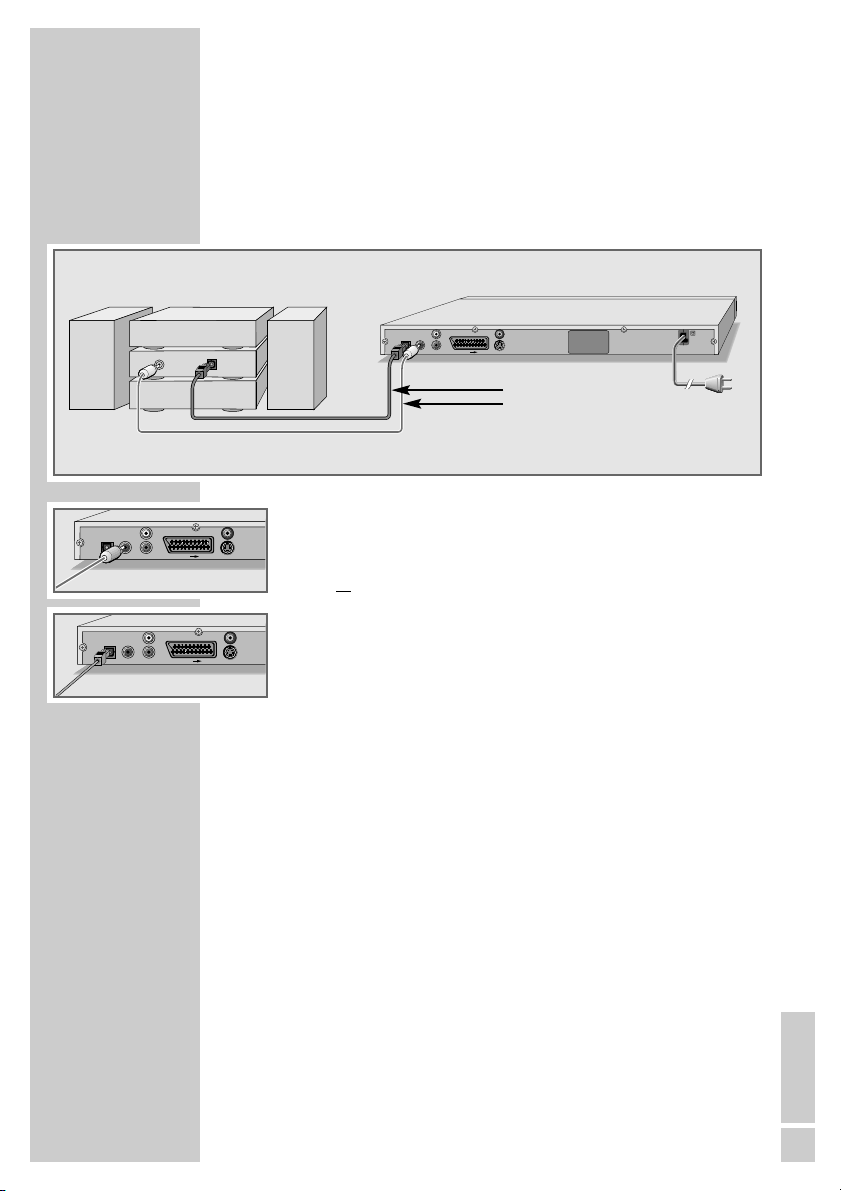
Connecting a multi-channel amplifier or digital
two channel audio system
The digital multi-channel sound of a DVD can best be decoded and
played back with a multi-channel audio/video amplifier (Dolby*
digital decoder or DTS**).
1 Plug a standard cinch cable into the »DIGITAL AUDIO
OUT« socket on the DVD player and into the appropriate
socket on the digital multi-channel amplifier;
or
remove the protective cap of the optical digital output and plug
an optical digital cable into the digital output »DIGITAL
AUDIO OUT« of the DVD player and into the corresponding
socket of the digital multi-channel amplifier.
Notes:
Keep the protective cap in a safe place and put it back in place
on the device if it is not to be used for a longer period of time.
Even if you are using a digital connection, you should still make
an analogue audio connection as it is possible, depending on
the disc type, that no signal can be output via the »DIGITAL
AUDIO OUT« socket (For the connection, see page 14).
* Manufactured under licence from Dolby Laboratories Licensing Corporation.
“Dolby”, “Dolby Pro Logic”, “Dolby Digital” and the double-D symbol “
ij ” are
trademarks of the Dolby Laboratories Licensing Corporation. Copyright 1992
Dolby Laboratories, Inc. All rights reserved.
** DTS and DTS Digital Out are trademarks of Digital Theater Systems, Inc. All rights
reserved.
CONNECTION AND PREPARATION
_
Optional
DIGITAL AUDIO OUT
DIGITAL AUDIO OUT
L
R
AUDIO OUT
R
L
AUDIO OUT
DIGITAL
AUDIO
INPUT
EURO AV TV
EURO AV TV
L
R
DIGITAL AUDIO OUT
OPTICAL
DIGITAL
INPUT
AUDIO OUT
EURO AV TV
VIDEO OUT
S VIDEO OUT
50/60 Hz 10 W
100-240 V~
VIDEO OUT
S VIDEO OUT
VIDEO OUT
S VIDEO OUT
Page 14
14
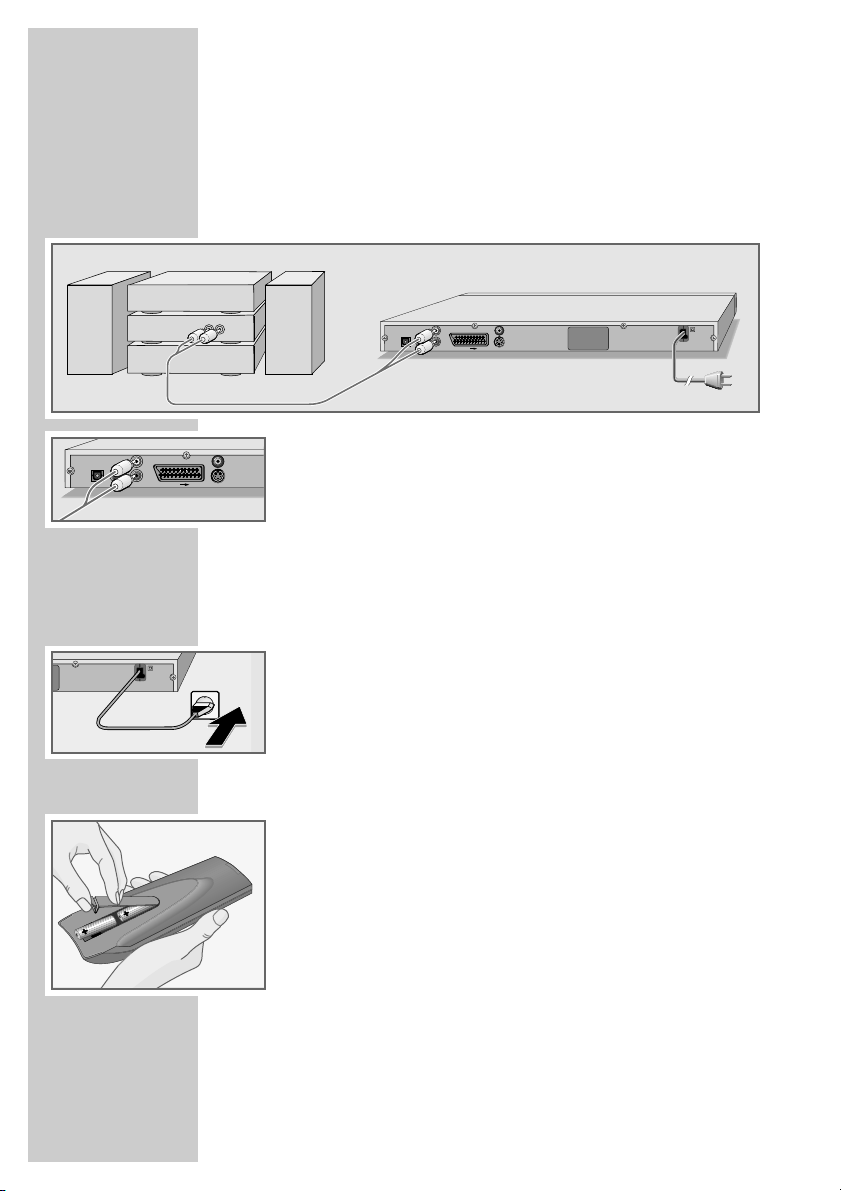
Connecting an audio system with analogue
two-channel stereo sound
As an alternative to using the television’s speakers, the sound can
also be played back through an audio system. This can improve
audio playback.
1 Plug a standard cinch cable into the »AUDIO OUT L R«
socket of the DVD player and into the corresponding socket on
the audio system.
Caution:
Do not connect the »AUDIO OUT L R« socket on the DVD
player to the PHONO (record player) input socket on the audio
system.
Connecting the power cord
1 Plug the power cord into the wall socket.
Note:
Only plug the device into the mains socket after you have
connected the external devices.
Inserting batteries in the remote control
1 Open the battery compartment by pressing the snap-catch, and
remove the lid.
2 When inserting the batteries (Micro type, e.g. R06 or AA,
2 x1.5 V), observe the polarity marked on the battery compartment.
3 Close the battery compartment.
Note:
If the DVD player no longer reacts properly to remote control
commands, the batteries may be flat. Be sure to remove used
batteries. The manufacturer accepts no liability for damage
resulting from used batteries.
Environmental note:
Batteries, including those which contain no heavy metal, may
not be disposed of with household waste. Please dispose of
used batteries in an environmentally sound manner. Find out
about the legal regulations which apply in your area.
CONNECTION AND PREPARATION
_
100-240 V~
50/60 Hz 10 W
RL
AUDIO
INPUT
DIGITAL AUDIO OUT
L
R
AUDIO OUT
EURO AV TV
VIDEO OUT
S VIDEO OUT
50/60 Hz 10 W
100-240 V~
DIGITAL AUDIO OUT
R
L
AUDIO OUT
EURO AV TV
VIDEO OUT
S VIDEO OUT
Page 15
ENGLISH
15
Switching on the DVD player
1 Press »
ON/OFF
« on the DVD player to switch it to standby.
– The red indicator on the DVD player lights up.
2 Switch on the DVD player by pressing »
ə« on the device, or
»9« on the remote control.
Notes:
If the DVD player has been connected to the »S-VIDEO OUT«
socket, no picture will appear. Press the »i«, »5«, »2«, »A«
and »OK« buttons in succession.
The video output is set to »S-Video«, and the »Installation«
menu appears.
Selecting the language of the screen menu
With this you set the language of the DVD player’s screen menu.
You can choose between various languages.
1 Press »i« to open the main menu.
2 Select »Installation« with »S« or »A« and activate with
»OK«.
3 Select the »Player language« line by pressing »S« or »A«
and press »OK« to activate it.
4 Select your language using »S« or »A« and press »OK« to
confirm.
5 Press »i« to finish the setting.
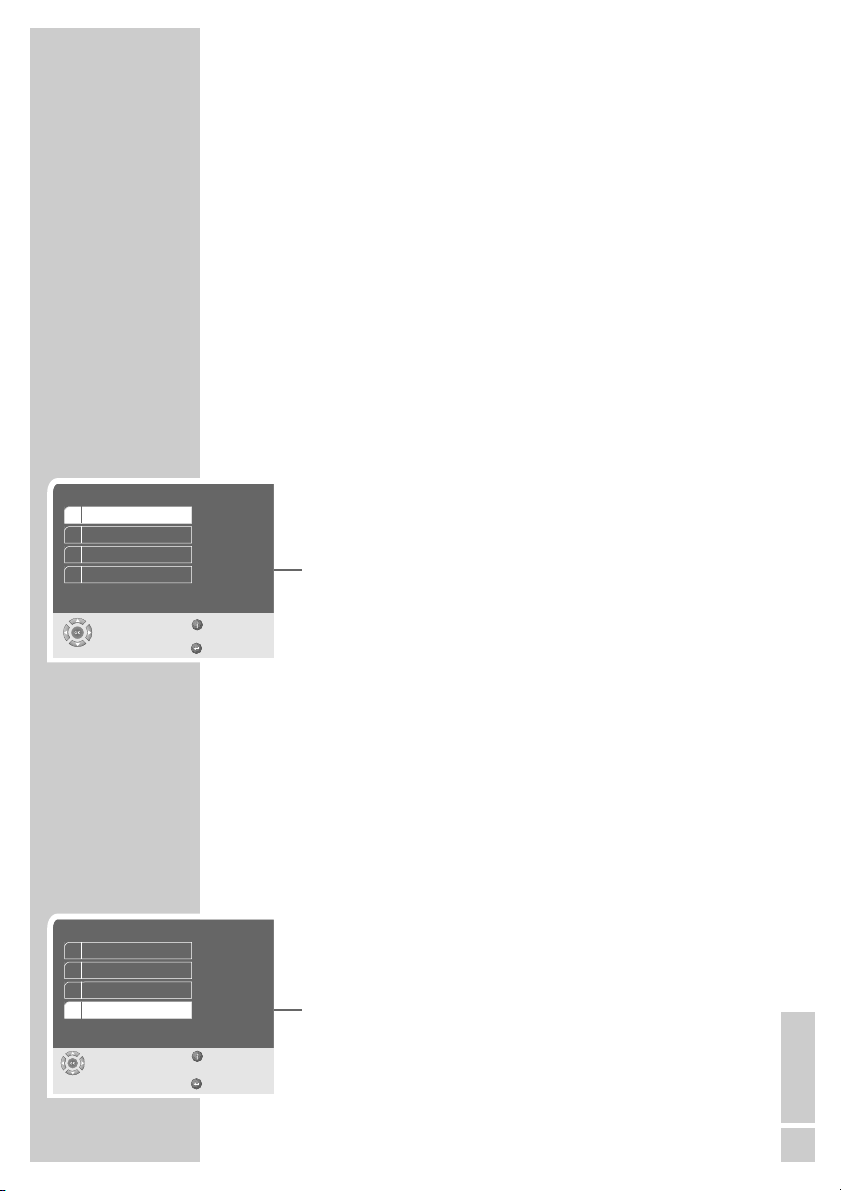
Adapting the DVD player to the television set
Setting the TV system (TV norm)
The colour norm of the DVD player’s screen menus has to be adapted to the format of your television or flat screen.
Select »NTSC« for televisions with the NTSC standard, or »PAL« for
those with the PAL standard.
Select »Auto« for televisions with multi-norm, and the TV norm follows that on the disc.
1 Press »i« to open the main menu.
2 Select »Installation« with »S« or »A« and activate with
»OK«.
3 Select »TV standard« using »S« or »A« and press »OK« to
activate it.
4 Select the desired setting (»Auto«, »NTSC« or »PAL«) with
»S« or »A« and confirm with »OK«.
5 Press »i« to switch off the menu.
GETTING STARTED
_______________________________
Installation
Select
Exit
and choose
Back
1 Player language
2 Video Output
3 Factory Default
4 TV standard
English
RGB
Reset
PAL
Installation
Select
Exit
and choose
Back
1 Player language
2 Video output
3 Factory default
4 TV standard
English
RGB
Reset
PAL
Page 16

16
Selecting the video output socket (EURO AV/RGB
or S-Video)
The video output of your DVD player has been set at the factory to
»RGB«.
When you connect your DVD-Player to the television, flat screen or
projector using a Y/C cable (»S-VIDEO OUT« socket on the DVD
player), you will need to set the video output for the video
signal and the image to be relayed to the television.
1 Press »i« to open the main menu.
2 Select »Installation« with »S« or »A« and press »OK« to
conform.
3 Select »Video output« with »S« or »A« and press »OK« to
confirm.
4 Select the video output with »S« or »A« and press »OK« to
confirm.
– »RGB« for »EURO AV
➞
TV« socket
»S-Video« for »S-VIDEO OUT« socket.
5 Press »i« to quit the menu.
Note:
If the DVD player has been connected to the »S-VIDEO OUT«
socket, no picture will appear. Press the »i«, »5«, »2«, »A«
and »OK« buttons in succession.
The video output is set to »S-Video«, and the »Installation«
menu appears.
GETTING STARTED
_______________________________
Installation
Select
Exit
and choose
Back
1 Player language
2 Video output
3 Factory default
4 TV standard
English
RGB
Reset
PAL
Video output
Select
and choose
RGB
S-Video
Page 17

ENGLISH
17
Selecting the screen format of your television set
This setting depends on your television or flat screen, and on the
information on the DVD.
If you have a 4:3 format television or flat screen, the following settings are available:
»4:3 Pan&Scan« for wide-screen playback, with the left and right
edges of the picture cropped (depending on the DVD used)
or
»4:3 Letterbox« for wide-screen playback, with black bars on the
top and bottom edges of the screen
If you have a 16:9 format television or flat screen, select the »16:9«
setting:
1 Press »i« to open the main menu.
2 Select »Picture« with »S« or »A« and activate it with »OK«.
3 Select the »TV format« menu with »S« or »A« and activate
it with »OK«.
4 Select the picture format (»4:3 Pan&Scan«, »4:3 Letterbox« or
»16:9«) using »S« or »A« and press »OK« to confirm.
5 Press »i« to quit the menu.
GETTING STARTED
_______________________________
TV format
Select
and choose
4:3 Letterbox
16:9
4:3 Pan&Scan
Page 18

18
BEFORE PLAYBACK
_____________________________
gen
ə
gen
{
gen
Ø
gen
no disc
gen
.
...
gen
ə
Preparation
1 Switch on the television and select the preset channel for the
DVD player.
2 If an audio system or an AV receiver is connected to the DVD
player, switch it on and select the audio input for the DVD
player.
3 Press »
ON/OFF
« on the DVD player to switch it to standby.
– The red indicator on the DVD player lights up.
4 Switch on the DVD player by pressing »
ə« on the device or
»9« on the remote control.
– Display on DVD player and television: »no disc«.
Inserting a disc
1 Press »ə« on the DVD player, or
press and hold down »7« on the remote control.
– Display: »ə«, the disc tray opens.
2 Insert the disc you want to play in the disc compartment with the
label facing upwards.
3 Press »
ə« on the DVD player, or
press and hold down »7« on the remote control.
– Display: »{«, the disc tray retracts again, then »....«, and
the disc is read.
– DVD player display: The elapsed playing time of the disc.
Notes:
Playback of a DVD, VCD, SVCD, KODAK Picture CD or audio
CD (CDDA) starts automatically.
The file browser appears if an DivX
©
Video-CD, MP3 or JPEG
CD is inserted.
If the »-« symbol appears on the television screen, the selec-
ted function is not possible with this disc.
Removing discs
1 Press »ə« on the DVD player, or
press and hold down »7« on the remote control.
– Display: »ə«, the disc tray opens.
Page 19

ENGLISH
19
DVD features
You can recognise a DVD by the logo on the label.
Depending on the content of the DVD, the discs contain one or more
titles.
Each title may contain one or more chapters. Titles and chapters
can be selected easily and conveniently.
You can control and direct playback of a DVD using the menu of the
DVD player on the television screen.
Special DVD features
DVDs have a title menu which provides an overview of the available
titles and the passages they contain.
Some of the DVD player’s functions, such as slow motion, freezeframe and auto-play, can also be controlled by the DVD itself. It is
therefore possible that the freeze-frame function, for example, cannot be selected during certain scenes.
Many DVDs have audio tracks recorded in up to eight languages.
This enables you to select the language you prefer.
Many DVDs are recorded by the manufacturer with subtitles in several languages. You can select subtitle superimposition from up to 32
different languages.
Since films are released in different parts of the world at different
times, all DVD players world-wide are given a regional code. The
regional code for your DVD player is 2.
DVDs may also be given a supplementary regional code. If you insert a DVD with a code different to that of the DVD player, a reference to the regional code appears on the television screen. The DVD
player will not be able to play back the DVD.
Notes:
If the parental lock is activated, the »D« display appears on
the television screen.
You need to switch off this lock, please refer to the chapter on
”Locking and enabling the disc compartment of the DVD player”
on page 36.
If a DVD is not authorised, the coded rating of the access level
(1 ... 8) must be changed (see the ”Authorising the content of
the DVD” chapter on page 37).
If the »-« symbol appears on the television screen, then the
selected function is not possible with this DVD.
PLAYBACK A DVD
_______________________________
gen
Ø
gen
D
title 1
title 2
chapter2 chapter3 chapter1 chapter2
chapter1
Titel 1
Kapitel 1 Kapitel 2 Kapitel 3 Kapitel 1 Kapitel 2
Titel 2
Page 20

20
Playing back a track
1 After the disc compartment closes and the DVD is scanned,
playback starts automatically.
2 To pause playback (freeze-frame), press »
!
«.
3 Press »
8« to resume playback.
4 Press »
7« to end playback.
Note:
Depending on the DVD you are using, you may have to select a
title or chapter from its table of contents.
Select a chapter or track using the »A«, »S«, »
a
« or »s«
buttons and press »OK« to activate it, or press »
8« to start
playback.
Calling up information
You can call up information on the title, chapter and playing time
for display on the screen.
1 Press »OK« to see the Info line.
– You receive the following information:
DVD Type of disc
T 1/2 Current track and total tracks
C 33/45 Current chapter and total chapters
00:00:05 Playing time
01:31:55 Remaining playing time
F1/3 de Dubbing language available (in the example
3, de for German)
= 5.1 Audio system
y 1/5 de Subtitles available (in the example 5, de for
German)
n 2/4 Camera positions available (in the example 4)
Mbit/s Bit rate
2 Press »OK« to hide the Info line.
Selecting tracks and chapters with the DVD menu
If a DVD contains several titles and/or chapters, you can select
them. If a DVD contains several titles/chapters, this can be seen in
the info line in the »T« and »C« boxes.
1 Call up the contents of the DVD with ».« (Disc Menu) or
»Title« (Title Menu).
– If the DVD has a title menu it will appear on the screen.
2 Select tracks or chapters with »A«, »S«, »
a
« or »s« and
activate with »OK«.
– Playback of the selected title/chapter begins.
PLAYBACK A DVD
_______________________________
gen
■
ı
gen
ľ
gen
II
gen
ľ
Einstellungen
DVD
T 01/02 C 33/45 00:10:15 01:21:55
F 1/3 de =5.1
y 1/5 de
n 1/4
Mbit/s
3
Page 21

ENGLISH
21
Selecting certain tracks with the number buttons
The function depends on the DVD you are using.
1 In stop mode, select the track you want using »1 … 0« and
press »OK« to confirm.
– Playback begins with the selected track.
Selecting chapters ...
... using the numerical buttons
1 During playback, select the desired chapter using »1 … 0« and
press »OK« to confirm.
– Playback of the selected chapter begins.
... step by step (SKIP)
1 Select the next chapter, to do this, press »6« during playback.
2 Select the start of the chapter with »5« (press once).
3 Select the previous chapter with »5« (press twice).
– Playback of the selected chapter begins.
Interrupting/resuming playback (resume)
The playback of a DVD can be interrupted at any point and then
resumed from the same place.
1 Interrupt playback by pressing »
7« once only.
2 Resume playback at the point where it was interrupted by
pressing »
8«.
Ending playback
You can stop playback at any point by pressing »7« twice.
PLAYBACK A DVD
_______________________________
gen
C
_
2
gen
C
2
gen
C
2
gen
C
1
gen
ľ
gen
■
ı
gen
■
gen
T
3
Page 22

22
Additional playback functions
Notes:
The sound is muted during the ”Frame search”, ”Slow motion”
and ”Freeze-frame” functions.
Depending on the DVD, some functions cannot be selected.
Frame search
You can select different speeds (2-fold, 4-fold, 6-fold and 8-fold forwards and reverse).
1 Select the desired playback speed during playback with »m«
or »,«.
2 Press »
8« to resume normal playback.
Slow motion
You can choose between different speeds (1/2, 1/4, 1/8, forwards
or reverse).
1 During playback, press »
!
«.
2 Select the slow motion speed by pressing »m« or »,«.
3 Press »
8« to resume normal playback.
Switching the freeze frame forwards/backwards
in steps
1 During playback, press »!«.
2 Move the freeze frame step by step backwards or forwards with
»5« or »6«.
3 Press »
8« to resume normal playback.
Selecting the camera angle for particular scenes
or passages
Some DVDs contain scenes or passages which were filmed several
times from different camera angles.
You can choose from among these different angles.
With DVDs which support this function, the status display
(Info menu) on the television screen shows »n 1/4« for example.
1 To select the camera angle function, press »n« during
playback.
– Display: camera angle »n 2/4«, 2 from 4 in this example.
2 Select another camera angle, to do this, press »n«
repeatedly.
PLAYBACK A DVD
_______________________________
e
2
e
4
e
6
e
8
gen
II
gen
!s
gen
ľ
gen
ľ
gen
ľ
I
1/ 8
gen
ľ
I
1/ 2
gen
a!
gen
ľ
I
1/ 4
Einstellungen
DVD
T 01/02 C 33/45 00:10:15 01:21:55
F 1/3 de =5.1
y 1/5 de
n 1/4
Mbit/s
3
Einstellungen
DVD
T 01/02 C 33/45 00:10:17 01:21:53
F 1/3 de =5.1
y 1/5 de
n 2/4
Mbit/s
3
Page 23

ENGLISH
23
Enlarging the picture (Zoom)
This function allows you to enlarge various picture sections. The picture enlargement options are selected in the sequence: 1.5x – 2x –
3x – normal size.
1 During playback or pause, press »v« repeatedly.
– Display: for example »k X1.5«, and the DVD player
enlarges a section of the picture.
2 Move the picture section on the screen with »a«, »s«, »A«
or »S«.
3 Switch back to “normal˝ picture size with »v«.
Switching the dubbed language or the audio
format
These settings switch away from the pre
set dubbed language, if the
DVD offers any alternatives.
1 During playback, press »d«.
– Display: for example »d 1/3 de
= 5.1« is displayed
briefly, and the current dubbing language is displayed, in the
example: the 1st of 3 possible dubbed languages, sound format = 5.1.
2 Keep pressing »d« to select the dubbing language.
Note:
Switching the dubbed language can be suppressed by the
structure of the DVD itself. In this case the setting is usually
made in the DVD menu.
Selecting and displaying subtitles
If the DVD provides subtitles, they can be displayed on your TV
screen.
When subtitles in several languages are available, you can select
your language of choice.
1 During playback, press »y«.
– Display: for example, »y 1/5 de« is briefly displayed,
and the current subtitle is displayed.
2 Keep pressing »y« to select the language for the subtitles.
Notes:
To switch off the subtitles, keep pressing »y« until »1/05-«
appears in the display, or press and hold down »y«.
Switching the sub-titles can be suppressed by the structure of
the DVD itself. In this case the setting is usually made in the
DVD menu.
PLAYBACK A DVD
_______________________________
gen
v
X 1,5
gen
v
X 2
gen
v
X 1
gen
v
X 3
Einstellungen
DVD
T 01/02 C 33/45 00:10:15 01:21:55
F 1/3 de =5.1
y
1/5 de
n 1/4
Mbit/s
3
Einstellungen
DVD
T 01/02 C 33/45 00:10:15 01:21:55
F 2/3 en =5.1
y 1/5 de
n 1/4
Mbit/s
3
Einstellungen
DVD
T 01/02 C 33/45 00:10:15 01:21:55
F 1/3 de =5.1
y 1/5 de
n 1/4
Mbit/s
3
Einstellungen
DVD
T 01/02 C 33/45 00:10:15 01:21:55
F 1/3 de =5.1
y
2/5 en
n 1/4
Mbit/s
3
Page 24

24
Selecting and playing scenes
You can make a bookmark for a scene on a DVD. This bookmark
can be selected directly for playback.
You can set one bookmark per DVD.
Setting bookmarks
1 During playback, press »c«.
Note:
This bookmark is automatically overwritten if you create a new
bookmark.
Playing bookmarked scenes
1 During playback, press and hold down »c«.
– Playback starts at the point marked.
Repeat functions
Selecting the repeat function
During playback, select the repeat function
1) A-B Repeat or
2) Chapter/DVD Repeat
by pressing and holding down »b«.
Repeating a selected scene (A-B Repeat)
You can mark the start and end of a scene, this is then played back
repeatedly.
1 During playback, mark the beginning of the scene, to do this,
briefly press »b«.
– Display: »b A–«.
2 To mark the end of a scene, briefly press »b«.
– Display: »b A-B«, the scene marked is now played back
constantly.
3 To quit this function, briefly press »b« again.
Repeating a chapter or a DVD
These functions repeat the chapter currently playing or the entire
DVD.
1 Press »b« briefly during playback.
– Display: »bC«, the chapter is repeated.
2 During playback, briefly press »b« twice.
– Display: »bT«, the DVD is repeated.
3 To quit this function, briefly press »b« again.
PLAYBACK A DVD
_______________________________
gen
b
C
gen
b
T
gen
b
– –
gen
c
gen
c
8
b
A–
b
A–B
b
– –
Page 25

ENGLISH
25
S-VCD/VCD features
You can recognise S-VCD/VCDs (video CDs) by the logo on the
label.
Depending on the contents of the S-VCD/VCD (films, music videos
etc.), the discs may carry one or more tracks.
Like audio CDs, S-VCDs/VCDs have a track structure.
S-VCDs/VCDs can be created using the PBC (playback control)
system for track navigation. This depends on the processing and
burning software used.
You can control and direct playback of the S-VCD/VCD using the
menu of the DVD player on the television screen.
You cannot select some of the functions on the DVD player (slow
motion, camera angle, marking scenes) when you are playing an
S-VCD/VCD. This depends on how the S-VCD/VCD was created.
Depending on how they were created, S-VCDs can have various
subtitles and dubbed languages.
PBC (playback control)
PBC is a navigation option for S-VCD/VCDs. PBC information is
burned onto the disc when it is made. PBC switches between the
playlist structure (the menu on the S-VCD/VCD) and manual selection by the user.
The default setting upon delivery is PBC activated. PBC and the program info on the S-VCD/VCD predetermine the navigation options.
If the disc has PBC, »PBC« appears in the display.
If PBC is deactivated, the S-VCD/VCD behaves like a normal CD
as regards navigation (with a track structure). The user selects
tracks or titles using »1 … 0«, »5« and »6«, starts playback
using »
8«, and stops it using »7«.
Switching PBC (playback control) on/off
1 To deactivate the PBC function, press ».« during playback.
– The display »PBC« on the DVD player goes out.
2 To activate the PBC function, press ».« during playback.
– The display »PBC« on the DVD player lights up.
PLAYBACK S-VCD/VCD
______________________
Page 26

26
Playing back a track
1 After the disc compartment closes and the S-VCD/VCD is scan-
ned, playback starts automatically.
2 To pause playback (freeze-frame), press »
!
«.
3 Press »
!
« repeatedly to switch through individual frames.
4 Press »
8« to resume playback.
5 To stop playback, press »
7« twice.
Selecting a track
If an S-VCD/VCD has several tracks, you can select them. If an SVCD/VCD has several tracks, you can see them in the info line.
1 To deactivate the PBC function, press ».« during playback.
– If the S-VCD/VCD has a track menu it will appear on the
screen.
2 Select the desired track directly by pressing »1 … 0« and then
press »OK« to confirm
or
Select the track step-by-step with »5« or »6«.
Frame search
Several different speeds are available.
1 Select the desired playback speed during playback with »m«
or »,«.
2 Press »
8« to resume normal playback.
Ending playback
You can stop playback at any point by pressing »7« twice.
PLAYBACK S-VCD/VCD
______________________
gen
II
gen
!s
gen
ľ
gen
T
3
gen
ľ
e
4
gen
■
Page 27

ENGLISH
27
Nero DigitalTMCD features
Nero Digital™ is the ideal solution for video and audio codecs.
Codecs are required for processing and playing audio and video files.
The Nero Digital™ codec allows you to save all the audio and video
material on a DVD on a normal data CD – with no perceptible loss in
quality.
The audio and video codecs of Nero Digital™ are based entirely on the
industry standard MPEG-4 Video ISO 14496-2 and MPEG-4 Audio
High Efficiency AAC and Parametric Stereo AAC.
Nero Digital™ files have the extension .MP4.
Nero Digital™ files can contain a video track, up to 8 audio tracks and
up to 32 overlay tracks (e.g. subtitles).
To create Nero Digital™ files you need the “Nero Recode” or “Nero
Vision Express” software. You can find out more about Nero Digital™ at
www.nerodigital.com.
Features of the DivX©VIDEO CD
DivX©Video is an encoder/decoder, based on the MPEG-4 compression
system, which is used to encrypt and display compressed video data.
This enables the DVD player to play back videos compressed in the
DivX
©
format. This results in playback quality with less artefacts and
higher compression.
DivX
©
video files have the suffix .AVI. DivX©Video data are packed into
the AVI file along with audio data which is compressed as MP3 data,
this means:
DivX©Video and MP3 audio form the AVI file.
Further information on DivX
©
Video and how to create AVI files can be
found under www.DivX Networks.de.
You can see the registration code in the »Disc preferences« —> »DIVX
Registration« menu on page 41.
PLAYBACK AUDIO/VIDEO FILES_________
Page 28

28
MP3 CD features
MP3 stands for MPEG-1 Audio Layer 3 and arises from the Motion Picture Expert Group (MPEG) Standard which was developed for compressing film data.
The MP3 format enables audio files to be saved on a computer with a
sound quality similar to that of a CD. This only requires approx. 10% of
the original data quantity. The standard encoding byte rate for MP3 files
is 128 kbps. Generally, the higher the byte rate of a an MP3 file, the
better the sound quality.
Most MP3 files in the Internet are encoded at 128 or 160 kbps. 160
kbps is considered CD quality.
MP3 files can be downloaded from the Internet and then burned onto a
CD-ROM disc. Your DVD player can read the ID3 tag from the file header, which contains information on title and artist, and display this in the
info menu/status display.
MP3 CDs contain sound recordings. They can be played in the normal
manner on an audio system. The digital signals transmitted during MP3
playback are PCM coded, regardless of the audio output setting. The
signals are output with the same data rate as the music source (possibilities are: 32 kbps – 320 kbps, ideal: 128 kbps).
MP3 files can be organised into folders and subfolders, similar to files
within a PC.
PLAYBACK AUDIO/VIDEO FILES_________
Page 29

ENGLISH
29
PLAYBACK AUDIO/VIDEO FILES_________
Playback
1 After the disc compartment shuts and the DivX©Video CD/MP3
CD is scanned, the file browser (the table of contents) of the
DivX©Video CD/MP3 CD is displayed.
2 Select the folder or track required with »A« or »S«.
– A list of sub-directories appears.
3 Open the folder with »OK« or »
8«.
Note:
Press »a« to go back one level.
4 Press »
8« or »OK« to start playback of the track.
– The playing time appears in the display on the DVD player.
5 Press »
!
« to interrupt playback (pause).
6 Press »
8« to resume playback.
7 End playback by pressing »
7«.
Calling up information
Press »OK« for information on the selected
Nero Digital™ or
DivX
©
Video track.
Press »7« to see the contents of the Nero Digital™ or
DivX©Video D (file browser).
Information about the MP3 track selected can be called up with
»Title«.
The contents of the MP3 CD (file browser) can be called up with
»Title«.
Selecting specific tracks using the number keys
1 During playback select the desired track with »1 … 0« and
confirm with »OK«.
– Playback begins with the selected track.
Selecting a track in steps (SKIP)
1 Select the next track by pressing »6« during playback.
2 Select the previous track by pressing »
5«.
– Playback begins with the selected track.
Random play
1 During stop mode, press and hold down »n«.
2 Start random play with »
8«.
3 End playback by pressing »
7«.
ROOT/MP3
Sting - Terra d´Oru.mp3
Bob Dylan – Tangled up in blue.mp3
Bob Dylan – Simple twist of fate.mp3
Bon Jovi – Bed of roses.mp3
Supertramp – Crime of the Century.mp3
Bon Jovi – Bed of roses.mp3
Dire Straits – Brothers in arms.mp3
Donovan – Universal soldier.mp3
Ľ
Select file File informationen
Playback
gen
T
3
gen
■
gen
ľ
gen
II
gen
T
2
Einstellungen
CD-ROM
T 001/009 00:02:15 01:21:55
F MP3 JPG/MP3/WMA 128000
Mbit/s
Einstellungen
CD-ROM
T 01/01 00:00:15 00:38:55
F MP3 DIVX (720x320) 0910K
Bit/s
Einstellungen
CD-ROM
T 01/01 00:00:15 00:38:55
F MP3 MP4 (720x576) 0910K
Bit/s
Page 30

30
Frame search
(Nero Digital
TM
/DivX©Video CD only)
You can select different speeds (2-fold, 4-fold, 8-fold and 16-fold
forwards and backwards).
1 Select the desired playback speed during playback with »
m«
or » ,«.
2 Press »
8« to resume normal playback.
Switching freeze frames forwards step-by-step
(Nero Digital
TM
/DivX©Video CD only)
1 During playback, press»!«.
2 Move the freeze frame step by step forwards with »
!
«.
3 Press »
8« to resume normal playback.
Enlarging the picture – zoom
(Nero Digital
TM
/DivX©Video CD only)
This function allows you to enlarge various picture sections.
1 During playback or pause, press »v«.
– Display: for example »zoom on«, the DVD player enlarges a
picture section.
2 Move the picture section around the screen with »a«, »s«,
»A« or »S«.
3 Switch back to “normal˝ picture size with »v«.
Slow motion
(Nero Digital
TM
/DivX©Video CD only)
You can choose between different speeds (1/2, 1/4, 1/8, forwards
or reverse).
1 During playback, press »
!
«.
2 Select the slow motion speed by pressing »m« or »,«.
3 Press »
8« to resume normal playback.
PLAYBACK AUDIO/VIDEO FILES_________
e
2
e
4
e
8
e
16
gen
II
gen
!s
gen
ľ
gen
zoom on
gen
zoom off
gen
ľ
gen
ľ
I
1/ 8
gen
ľ
I
1/ 2
gen
ľ
I
1/ 4
Page 31

ENGLISH
31
PLAYBACK AUDIO/VIDEO FILES_________
gen
ə
Switching the dubbing language or the audio
format (Nero Digital
TM
/DivX©Video CD only)
A Nero DIGITAL or DivX©Video CD can contain various dubbing
languages or audio formats.
1 Press »
d« during playback.
2 Keep pressing »d« to select the dubbing language or the
audio format.
Selecting and hiding subtitles
(Nero Digital
TM
only)
1 Press »y« during playback.
2
Keep pressing »y« to select the subtitle language.
Selecting and showing subtitles
(DivX
©
Video CD only)
DivX©Video CDs provide two types of subtitles.
There are the familiar subtitles available on a conventional DVD,
and also subtitles shown as a separate file in the browser.
1 Press »y« to show subtitles during playback
or
2 Select the subtitles file in the browser (the file name has an
extension such as .TXT), then press »y«.
– Display: »DIVX SUB TITLE SELECTED« briefly appears.
In the file browser, select the DivX
©
Video file and press »8« to
start playback.
– The subtitles are displayed.
Removing the CD
1 Press »ə« on the DVD player;
or
press and hold down »7« on the remote control.
– Display: »ə«, the disc tray opens.
Page 32

32
JPEG CD features
JPEG stands for Joint Picture Experts Group. This process was designed to
compress picture files.
JPEG files can be burned onto a CD along with other file types. Such CDs
are known as file CDs or mixed mode CDs. For example, the CD could contain MP3 files (audio) and JPEG files (for example to display album covers).
The files on a JPEG CD can be organised in directories. This structure is similar to that of an MP3 CD.
JPEG CDs only contain data in the compressed JPEG format. This is mostly
data from digital cameras or from picture processing programs. The data
(pictures) can be displayed individually or in sequence in a slide show.
Features of the KODAK picture CD
This method was developed for archiving analogue photographs.
After they are developed, small photographs are scanned with a resolution
of 1536 x 1024 pixel and burnt onto a CD in JPEG format.
A KODAK picture CD can contain up to 40 pictures. In addition to the pictu-
re files, a KODAK picture CD can also contain imaging software which enables the user to play the CD on a PC, edit the pictures or view a slide show.
Displaying JPEG pictures
1 After the disc compartment has closed and the JPEG CD has
been scanned, the File Browser (Contents menu) of the JPEG CD
is displayed.
2 Select the desired folder (or picture) with »A« or »S«.
– A list of sub-directories appears.
3 Open the folder with »OK« or »
8«.
Note:
Press »a« to go back one level.
4 Select the desired picture with »A« or »S« and confirm with
»OK« or »
8«.
– The JPEG picture appears as a still image on the screen, and
after a short while the next picture appears.
Notes:
To view the picture for longer, press »
!
«. Press »8« to conti-
nue the slide show.
The contents of the JPEG CD (file browser) can be called up with
»
7«. The picture last selected is highlighted.
PLAYBACK PICTURE CD
______________________
ROOT/MP3
BIRDS
BUSINESS
COAST
FLOWERS
ON THE BEACH
NEW YORK
Select file File informationen
Playback
Page 33

ENGLISH
33
Playing back a KODAK picture CD
1 After the disc compartment closes and the KODAK picture CD is
scanned, the slide show starts automatically.
Additional playback functions
Adjusting the picture display
The pictures can be rotated or reversed.
1 During playback, press »a« or »s« to rotate the pictures by
90°.
2 During playback, press »A« or »S« to reverse the pictures.
3 Press »
7« to quit the function.
Enlarging the picture (Zoom)
This function enables you to enlarge sections of the picture and
move them on the screen.
1 During playback or pause, press »v«.
2 To enlarge a picture section, press »m« or »,« repeatedly.
3 Move the picture section on the screen with »a«, »s«, »A«
or »S«.
4 Switch back to “normal” picture size with »v«.
Random play (JPEG CD only)
1 During stop mode, press and hold down »n«.
2 Press »
8« once or twice to start random playback.
– The pictures on the entire picture CD are shown in random
order.
3 End playback by pressing »
7«.
PLAYBACK PICTURE CD
______________________
gen
rotating
gen
rotating
gen
zoom on
gen
pct 150
Page 34

34
Audio CD features
An audio CD is identified by this logo.
Audio CDs contain only sound recordings. They can be played in
the normal manner on an audio system.
The individual tracks are stored in a sequence. There are no folders.
Calling up the info line
The info line is displayed on the television screen.
1 Press »OK« during playback to call up the info line.
– The info line is displayed.
This gives information about the CD: the number of tracks,
the elapsed playing time of the track, the playing time remaining, and about the audio system and the data flow.
– The display on the device shows the elapsed playing time of
the track.
2 Press »OK« to deactivate the info line.
Playing back a track
1 Playback starts automatically when a CD is inserted.
– Playback stops at the end of the CD.
2 Press »
!
« to interrupt playback (pause).
3 Press »
8« to resume playback.
Selecting a track ...
... using the numerical buttons
1 In the STOP position select the desired track with »1 … 0« and
confirm with »OK«.
– Playback begins with the selected track.
... step by step (SKIP)
1 Select the next track during playback with »6«.
2 Select the previous track by pressing »5«.
– Playback begins with the selected track.
Quick search
Four different speeds are available.
1 To select the required playback speed, press »m« or »,«
repeatedly during playback.
2 Press »
8« to resume normal playback.
PLAYBACK AUDIO CD
________________________
Track 1 Track 2 Track 3 Track 4
gen
ľ
gen
II
gen
ľ
gen
T
_
2
gen
T
4
gen
T
3
e
4
w
4
gen
ľ
Einstellungen
CD-DA
T 01/14 00:00:15 00:03:24
F PCM 2.0
Mbit/s
1
Page 35

ENGLISH
35
Ending playback
Playback of the CD stops automatically at the end of the last track.
You can stop playback at any point by pressing »7«.
Repeating a track or an audio CD
These functions repeat the track currently being played or the entire
audio CD.
1 During playback, press »b«.
– Display: »bT« and the track is repeated.
2 During playback, press »b« and then press again.
– Display: »b.«, the audio CD is repeated.
3 Press »b« again to cancel the function.
Random play
1 During stop mode, press and hold down »n«.
2 Start random play with »
8«.
3 End playback by pressing »
7«.
Creating a playlist
Tracks on an audio CD can be compiled into a playlist.
The tracks in the playlist are played back in sequence.
1 Press »
7« to end playback.
2 Call up the playlist with »b«.
3 Enter the title by pressing »1 … 0« and press »OK« to con-
firm.
– Tracks can be added to the playlist several times.
– Display: The tracks and playing time, and the total playing
time of the playlist.
4 Press »
8« to start playback.
Note:
The playlist is deleted if the DVD player is switched off or the
CD is removed.
Viewing/playing back a playback program
1 Switch the DVD player to STOP by pressing »7«.
2 Call up the playlist with »b«.
3 Press »
8« to start playback.
PLAYBACK AUDIO CD
________________________
gen
■
gen
b
T
gen
b.
gen
b
– –
Track Track Time
1 _ _ 5 00:03:45
2 > _ _ 0 00:00:00
Total: 00:03:45
Select 0-9 Enter Track
and choose
Playback
Page 36

36
With the parental lock you can:
– Lock the disc tray of the DVD player.
– Block scenes which are not appropriate for children from DVDs or
video CDs, or select alternative scenes.
Locking and releasing the disc compartment of
the DVD player
Locking the disc compartment of the DVD player
1 Press »i« to open the main menu.
2 Select »Child lock« with »S« or »A« and activate with
»OK«.
3 Select »Device lock« with »S« or »A« and activate with
»OK«.
4 Lock the DVD player by pressing »A« or »S« (»On«) and
press »OK« to confirm.
5 Enter the code using the numerical keys »3« »3«»0«»8« and
press »OK« to confirm.
6 Press »i« to exit the menu.
Note:
The »
ə« button on the DVD player is disabled and »
D
« is displayed on the screen every time a button is pressed. The disc
compartment cannot be opened. A disc in the DVD player can
be played.
Enabling the disc compartment of the DVD player
1 To unlock the disc compartment, repeat points 1 to 4 in the
”Locking the disc compartment of the DVD player” chapter, select »Off« with »A« or »S« and confirm with »OK«.
2 Enter the code using the numerical keys »3« »3«»0«»8« and
press »OK« to confirm.
PARENTAL LOCK
__________________________________
Child lock
Select Exit
and choose
Back
1 Device lock
2 Country
3 Access level
4 Code
Off
USA
8
Change
CDevice lock
Select
and choose
Off
On
Device lock
Select
and choose
Off
On
Page 37

ENGLISH
37
Authorising the contents of a DVD
Films on DVD may be wholly or partially unsuitable for children.
Such DVDs contain information which identifies these scenes, providing them with access levels from 1 to 8. You can select one of the
access levels and thereby authorise alternative scenes for playback.
1 Place any disc in the tray. After playback starts automatically,
press »
7« to stop playback.
2 Press »i« to open the main menu.
3 Select »Child lock« with »A« or »S« and activate it with
»OK«.
4 Select the »Country« line using »A« or »S« and press
»OK« to confirm.
5 Select the desired country with »S« or »A« and confirm with
»OK«.
6 Enter the code using the numerical keys »3« »3«»0«»8« and
press »OK« to confirm.
7 Press »x« to return to the »Child lock« menu..
8 Select »Access Level« with »S« or »A« and confirm with
»OK«.
9 Select the desired access level with »S« or »A« and confirm
with »OK«.
10
Enter the code using the numerical keys »3« »3«»0«»8« and
press »OK« to confirm.
11
Press »i« to exit the menu.
Changing the access code
1 Press »i« to open the main menu.
2 Select »Child lock« with »A« or »S« and activate it with
»OK«.
3 Select the »Code« line using »A« or »S« and press »OK«
to confirm.
4 Activate »Change« by pressing »OK«.
5 Enter the current code using the numerical keys »3«
»3«»0«»8«.
6 Enter a new four-digit code using the numerical keys »1 ... 0«.
7 Enter the new code again using the numerical keys »1 ... 0«
and press »OK« to confirm.
8 Press »i« to exit the menu.
PARENTAL LOCK
__________________________________
Country
Select
and choose
Italy
USA
France
Netherlands
Germany
Change code
Old code:
New code:
Confirm code:
Enter old code
Select
and choose
Child lock
Select Exit
and choose
Back
1 Device lock
2 Country
3 Access level
4 Code
Off
USA
8
Change
Page 38

38
Selecting the sound menu
1 Press »i« to open the main menu.
2 Select »Sound« with »S« or »A« and activate with » OK«
– The »Sound« menu appears.
Note:
For further operation, see the following sections, each one starting from Step 1.
Selecting the sound mode (downmix mode)
This enables you to select stereo (two-channel sound) or surround
sound.
1 Select the »Downmix mode« line by pressing »S« or »A«
and press »OK« to confirm.
2 Select the mode (»Stereo« or »Surround Sound«) by pressing
»S« or »A« and press »OK« to confirm.
Setting the sampling rate
This setting is used to adjust the sampling rate of the digital output.
The sampling rate indicates how many samples can be read in per
time interval.
– Use »96 kHz« for DVDs with a 96 kHz audio signal for optimum
analogue audio output at the »AUDIO OUT L R« sockets.
– Use »48 kHz« for DVDs with a 48 kHz audio signal. The signal is
emitted at the »AUDIO OUT L R« and »DIGITAL AUDIO
OUT« sockets.
1 Select the »PCM output« line by pressing »S« or »A« and
press »OK« to confirm.
2 Select the required value (»48 kHz« or »96 kHz«) by pressing
»S« or »A« and press »OK« to confirm.
Selecting Pro Logic sound mode
1 Select the »Pro Logic« line by pressing »S« or »A« and
press »OK« to confirm.
2 Activate the function by pressing »S« or »A« (»On«) and
press »OK« to confirm.
AUDIO SETTINGS
________________________________
Downmix mode
Select
and choose
Stereo
Surround
Clock rate
Select
and choose
96 kHz
48 kHz
Pro Logic
Select
and choose
Off
On
Sound
Select Exit
and choose
Back
1 Downmix mode
2 Clock rate
3 Pro Logic
4 Dynamic
Surround
48 kHz
Off
On
Original
5 SPDIF output
Page 39

ENGLISH
39
Switching the dynamic range (volume range)
on/off
Dolby digital soundtracks have a very large dynamic volume range,
hence there is a great difference in volume between quiet and loud
tones. When played at high volume this can be a fascinating experience, which may however cause disturbance late at night.
Simply reducing the volume does not produce pleasing results, and
the dialogue becomes difficult to understand. In order to achieve
the desired results, you would have to reduce the volume only for
the louder sounds, increase the volume during quieter scenes and
maintain the volume of the dialogue.
1 Select the »Dynamic« line by pressing »S« or »A« and
press »OK« to confirm.
2 Select the function by pressing »S« or »A« (»On«) and
press »OK« to confirm.
Selecting the digital output
Here you select whether the audio signal is emitted from the »DIGI-
TAL AUDIO OUT« sockets in the original data format or in PCM
format.
1 Select the »SPDIF output« line by pressing »S« or »A« and
press »OK« to confirm.
2 Select the mode (»Original« or »PCM«) by pressing »S« or
»A« and press »OK« to confirm.
Ending settings
1 Press »i« to exit the menu.
AUDIO SETTINGS
________________________________
Dynamic
Select
and choose
Off
On
SPDIF output
Select
and choose
PCM
Original
Page 40

40
Setting the language
You can choose between various languages.
1 Press »i« to open the main menu.
2 Select the »Disc preferences« line by pressing »S« or »A«
and press »OK« to confirm.
– The »Disc preferences« menu appears.
Note:
For further operation, see the following sections, each one starting from Step 1.
Selecting the dubbing language
If several languages are available on the current DVD, the sound is
played back in the language you have selected.
If the language you select is not on the DVD, the first dubbed language available is automatically selected.
1 Select »Audio language« by pressing »S« or »A« and press
»OK« to confirm.
2 Select the desired dubbing language by pressing »S« or
»A« and press »OK« to confirm.
Selecting the language for the subtitles
If subtitles are available on the current DVD, they are shown in the
language you have selected.
If the language you have selected for the subtitles is not on the DVD,
the first language available is automatically selected.
1 Select »Subtitles« by pressing »S« or »A« and press »OK«
to confirm.
2 Select your language using »S« or »A« and press »OK« to
confirm.
Selecting the language of the DVD menus
If the DVD has menus in several languages, you can select the language of your choice.
1 Select the »Menu language« line by pressing »S« or »A«
and press »OK« to confirm.
2 Select the language for the DVD menus using »S« or »A«
and press »OK« to confirm.
Concluding the settings
1 Press »i« to switch off the menu.
PERSONAL SETTINGS
_________________________
Disc preference
Select Exit
and choose
Back
1 Audio language
2 Subtitle
3 Menu language
English
English
English
Audio language
Select
and choose
Italian
English
French
Dutch
German
S
Menu language
Select
and choose
Italian
English
French
Dutch
German
S
4 DIVX Registration
Subtitle
Select
and choose
Italian
English
French
Dutch
German
S
Page 41

ENGLISH
41
Switching the screen saver on/off
When this function is activated, the screen saver starts when no function has been selected on the DVD player for some time.
1 Press »i« to open the main menu.
2 Select the »Picture« line with »S« or »A« and activate it with
»OK«.
3 Select the »Screen saver« line by pressing »S« or »A« and
press »OK« to confirm.
4 Select the function by pressing »S« or »A« (»On«) and
press »OK« to confirm.
Note:
To deactivate the screen saver, repeat the setting procedure and
select »Off«.
5 Press » i« to exit the menu.
Switching the camera angle display on and off
When you activate this function, a display appears on the television
screen, telling you that various camera angles are available on the
DVD which is currently playing.
1 Press »i« to open the main menu.
2 Select the »Picture« line with »S« or »A« and activate it with
»OK«.
3 Select the »Angle mark« line by pressing »S« or »A« and
press »OK« to confirm.
4 Select the function by pressing »S« or »A« (»On«) and
press »OK« to confirm.
Note:
To deactivate the camera angle, repeat the setting procedure
and select »Off«.
5 Press » i« to exit the menu.
DivX©VIDEO registration
1 Press »i« to open the main menu.
2 Select the »Disc preference« line with »S« or »A« and
activate it with »OK«.
3 Select the »DIVX Registration« line by pressing »S« or »A«
and press »OK« to confirm.
– The menu shows the registration code for the Internet.
4 Press »i« to exit the menu.
PERSONAL SETTINGS
________________________
Screen saver
Select
and choose
Off
On
Angle mark
Select
and choose
Off
On
Your registration code is: xxxxxxxx.
Please use this code to register with the
DivX (R) Video On Demand service. This
will allow you to rent & purchase videos
using the DivX (R) Video On Demand format.
To learn more go to www.divx.com/vod
Select
Exit
and choose
Back
Page 42

42
Resetting the DVD player to its original condition
All custom settings are restored to the original status.
1 Press »i« to open the main menu.
2 Select »Installation« with »S« or »A« and activate with
»OK«.
3 Select the »Factory Defaults« line by pressing »S« or »A«
and press »OK« to confirm.
4 Press »OK« to reset the DVD player to its original state.
5 Press » i« to exit the menu.
Calling up the software status
In this menu you can get information about your DVD player’s software version.
1 Press »i« to open the main menu.
2 Select »Installation« with »S« or »A« and activate with
»OK«.
3 Select the »Factory default« line by pressing »S« or »A«
and press »OK« to confirm.
– The »System information« is displayed.
4 Press »i« to exit the menu.
PERSONAL SETTINGS
________________________
Factory default
System information
SW ver: 1.00 xxxxx xxxxxxxx
HW ver: xxxxxxxx
Copyright GRUNDIG 2005
http://www.grundig.com
Select
Exit
and choose
Back
Reset
Factory default
System information
SW ver: 1.00 xxxxx xxxxxxxx
HW ver: xxxxxxxx
Copyright GRUNDIG 2005
http://www.grundig.com
Select
Exit
and choose
Back
Reset
Page 43

ENGLISH
43
You can also operate GRUNDIG televisions with this remote control. The functions available to you depend on the model of the GRUNDIG television.
Point the remote control directly at the TV.
TV Switches the remote control to television operation.
To do this, press and hold down »TV« then press the
relevant button for the desired function.
Ǽ Switches off the television set (stand-by).
1 … 0 Switches the television on from standby mode.
Selects the television channel directly.
» 0 « Selects the preset stations»
AV
«.
In teletext mode: for entering the three-figure page
number.
v Picture in picture.
E
b Calls up the ”Picture Format” menu.
n Calls up the concise TV help menu.
d Switches the sound on or off (mute).
i Calls up the ”DIALOG CENTER” or switches to menu
operation.
x Switches between the two most recently selected chan-
nels (zapping).
as
Volume setting, »a« lower, »s« higher.
In menu mode: »a« cursor left, »s« cursor right.
OK Activates functions, calls up data, confirms and saves
data.
AS
Select TV channels, »A« up, »S« down.
In menu mode: »A« cursor up, »S« cursor down.
TXT . Switches from TV mode to teletext mode and back.
TV-G Title Switches the TV Guide on and off.
5
In teletext mode: Returns to the previous page.
6
In teletext mode: Advances to the next page.
m In teletext mode: Switches to the next topic.
, In teletext mode: Switches to the next chapter.
F
Calls up the sound menu.
z
y Call up the ”Picture” menu.
TELEVISION REMOTE CONTROL
_______
TV
Tele Pilot 81 D
Title
Page 44

44
Technical data
This product fulfils the European directives 89/336/EEC, 73/23/EEC and 93/68/EEC.
This device conforms to the safety regulation DIN EN 60065 (VDE 0860) and therefore the
international safety regulation IEC 60065.
You may not open the DVD player. The manufacturer will not accept any liability for damage resulting
from improper handling.
General instructions for laser devices
Your system is a CLASS 1 LASER PRODUCT. This means that the laser is designed in such a way as to
ensure that the maximum permissible emission value cannot be exceeded under any circumstances.
Caution:
If operating devices or methods other than those specified here are employed, it may lead to dangerous exposure to emissions.
This device emits laser radiation. Because of the danger of eye injuries, the unit may only be opened
or serviced by trained personnel.
If settings other than those specified here are employed or OTHER PROCEDURES are carried out, this
may lead to dangerous radiation exposure.
DTS and DTS Digital Out are trademarks of Digital Theater Systems, Inc. All rights reserved.
During playback of DTS-coded CDs and DVDs, a high noise level is produced at the analogue stereo outputs. In order to avoid possible damage to he audio system, the user should take appropriate preventive measures when the stereo outputs of the DVD player are connected to an amplification system. For DTS Digital Surround playback, an external 5.1-channel DTS Digital Surround
decoder must be connected to the digital output (S/PDIF) of the DVD player.
Manufactured with permission from Dolby Laboratories. The ”Dolby” label and the double-D logo
”ij ” are trademarks of Dolby Laboratories. Confidential unpublished material.
©1992-1997 Dolby Laboratories, Inc. All rights reserved.
This product contains components which are covered by certain U.S. patents or for other reasons
are considered intellectual property of the Macrovision Corporation and other proprietors. Use of
this protected technology must be approved by the Macrovision Company and is only permissible
for private presentation at home or for other limited applications, where no special permission has
been granted by Macrovision. Reproduction or disassembly of the device is prohibited.
INFORMATION
_____________________________________
CLASS 1
LASER PRODUCT
Mains voltage:
100 – 240 V ~, 50/60 Hz
Power consumption:
Operating: approx. 10 W
Standby: ≤ 4 W
Ambient temperature:
+10°C to +35°C
Playback standard:
PAL, 50 Hz, 625 lines
NTSC, 60 Hz, 525 lines
Playback system:
CD-R, CD-RW, VCD 2,0,
Super VCD, DVD R, DVD RW
Disc formats:
DVD R, DVD RW, CD R, CD RW
Media formats:
DVD video, audio CD,
video CD (VCD 1.0/1.1/2.0), S-Video
CD,
CD ROM (DivX
©
Video, MP3, WMA, JPEG,
Kodak Picture CD)
Laser:
Semiconductor laser
Wavelength 650 nm for DVD
Wavelength 780 nm for CDAudio format:
Digital: MPEG2/Dolby Digital, PCM, DTS
Analogue: Stereo sound, Dolby Pro Logic
Audio:
Signal: Analogue
DVD: 48/96 kHz 4Hz-22/44 kHz
Video CD: 44.1 kHz 4Hz-20 kHz
Audio CD: 44.1 kHz 20Hz-20 kHz
Signal-to-noise ratio
(at 1 kHz): ≥ 90 dB
Sound volume
(at 1 kHz): ≥ 80 dB
Dimensions and weight:
Dimensions:
W x H x L 430 x 38 x 251 mm
Weight 2.3 kg
Page 45

ENGLISH
45
INFORMATION
_____________________________________
Troubleshooting
Not every picture or sound problem is caused by a defect in your DVD player. Impairment can also be
caused by leads having been accidentally pulled out, damaged DVDs/CDs and worn-out batteries in
the remote control.
If the following measures do not bring about satisfactory results, consult an authorised dealer.
DVD-R/RWs in DVD video format, as well as CD-Rs and CD-RWs in CD-DA and MP3 format can be
played. Due to the difference in quality of the recording media and the quality of the recording itself,
it can occasionally happen that a home-made DVD or CD cannot be read. This does not indicate a
malfunction of the DVD player.
Cleaning discs
Wipe the dirty disc with a cloth from the centre outwards in a straight line.
Do not use any solvents such as benzene, thinners, conventional cleaner or anti-static spray for vinyl
records.
Software information
We wish to point out explicitly that only operating software authorised by GRUNDIG is permissible for
the DVD player. This operating software is available from specialist dealers or will be available shortly on the Grundig web sites www.grundig.com and www.grundig.de. Any instance of operating software from a dubious Internet source being loaded to the device will impair functioning and also, since
it is an unauthorised intervention, invalidate any claims under the guarantee.
GRUNDIG will refuse to refund any costs resulting in such cases. Any repair costs in such cases, even
those occurring within the guarantee period, are to be paid by the customer.
Environmental note
This product has been made from high-quality parts and materials which can be re-used and
recycled.
Therefore, do not throw the product away with normal household waste at the end of its life. Take it to
a collection point for recycling electrical and electronic devices. This is indicated by this symbol on the
product, in the operating manual and on the packaging.
Please find out about collection points operated by your local authority.
Help protect the environment by recycling used products.
Subject to alteration and correction!
Problem Possible cause/remedy
DVD player does not respond to Point the remote control directly at the DVD player.
the remote control Remove all obstacles which may interfere with the path of
the remote control signal.
Check or replace the remote control batteries.
The disc tray will not open, Using the mains switch, switch the DVD player »ON/OFF«
Picture/sound problems off and on again.
No picture Check the video connection.
Distorted image Make sure that there are no fingerprints on the DVD/CD,
follow the cleaning instructions on this page.
The DVD/CD cannot be played Check if the label on the DVD/CD is facing upwards.
Clean the DVD/CD.
Check if the DVD/CD is damaged by testing out another
DVD/CD.
No sound Check the audio connections.
Try another playback source.
Use an external decoder for DTS audio formats.
No sound at the digital output The scanning rate was set to 96 kHz. Set the scanning rate
to 48 kHz as described on page 38.
Distorted sound from the HiFi system
Ensure that the audio connections have not been connected
to the phono input on the amplifier.
Page 46

46
Additional Information for units sold in the UK.
Units sold in the UK are suitable for operation from a 240V ac, 50Hz mains
supply.
The range of multi-system receivers is built to work in most European countries. However, the mains plug and socket system for the UK differs from
many European countries.
This appliance has been supplied with a fitted, non-removable, approved
converter plug for use in the UK. This converter plug is fitted with a 5A rated
fuse.
In case this appliance is supplied with a moulded 2-pin Euro plug only,
which is unsuitable for UK operation, this must be cut off and immediately
disposed of. An approved 13A, 3-pin UK plug should then be fitted by a
qualified electrician.
Note:
The severed Euro plug must be destroyed to avoid a possible shock
hazard should it be inserted into a socket elsewhere.
If a non-rewireable 3-pin plug or a rewireable 13A (BS1363) 3-pin plug is
used, it must be fitted with a 5A ASTA or BSI approved BS1362 fuse. If any
other type of plug is used it must be protected by a 5A fuse either in the
plug, or at the distribution board. If this type of plug becomes defective,
ensure that the fuse is removed before disposal, to eliminate potential shock
hazard.
If it is necessary to change the fuse in the non-rewireable plug, the correct
type and rating (5A ASTA or BSI approved BS1362) must be used and the
fuse cover must be refitted. If the fuse cover is lost or damaged, the lead and
plug must not be used until a replacement is obtained. Replacement fuse
covers should be obtained from your dealer.
Important:
The wires in the mains lead are colour coded in accordance with the following code:
BLUE – NEUTRAL
BROWN – LIVE
As the colours of the wires in the mains lead of your appliance may not correspond with the coloured marking identifying terminals in your plug, proceed as follows:
Connect the BLUE coloured wire to plug terminal marked with the letter “N”
or coloured black.
Connect the BROWN coloured wire to the plug terminal marked with the letter “L” or coloured red.
In no circumstance must any of the wires be connected to the terminal marked with the letter “E”, earth symbol “
z”, coloured green, or green &
yellow.
INFORMATION
_____________________________________
Page 47

Grundig Multimedia B.V. • De Boelelaan 7 • NL-1083 HJ Amsterdam • http://www.grundig.com
28/05
 Loading...