

Grundig GDP 1100/1, GDP 1100/2 User Manual

ǵ
GDP 1100
ENGLISH
DVD-PLAYER

2
CONTENTS
________________________________________________________________________
4 DVD Player GDP 1100
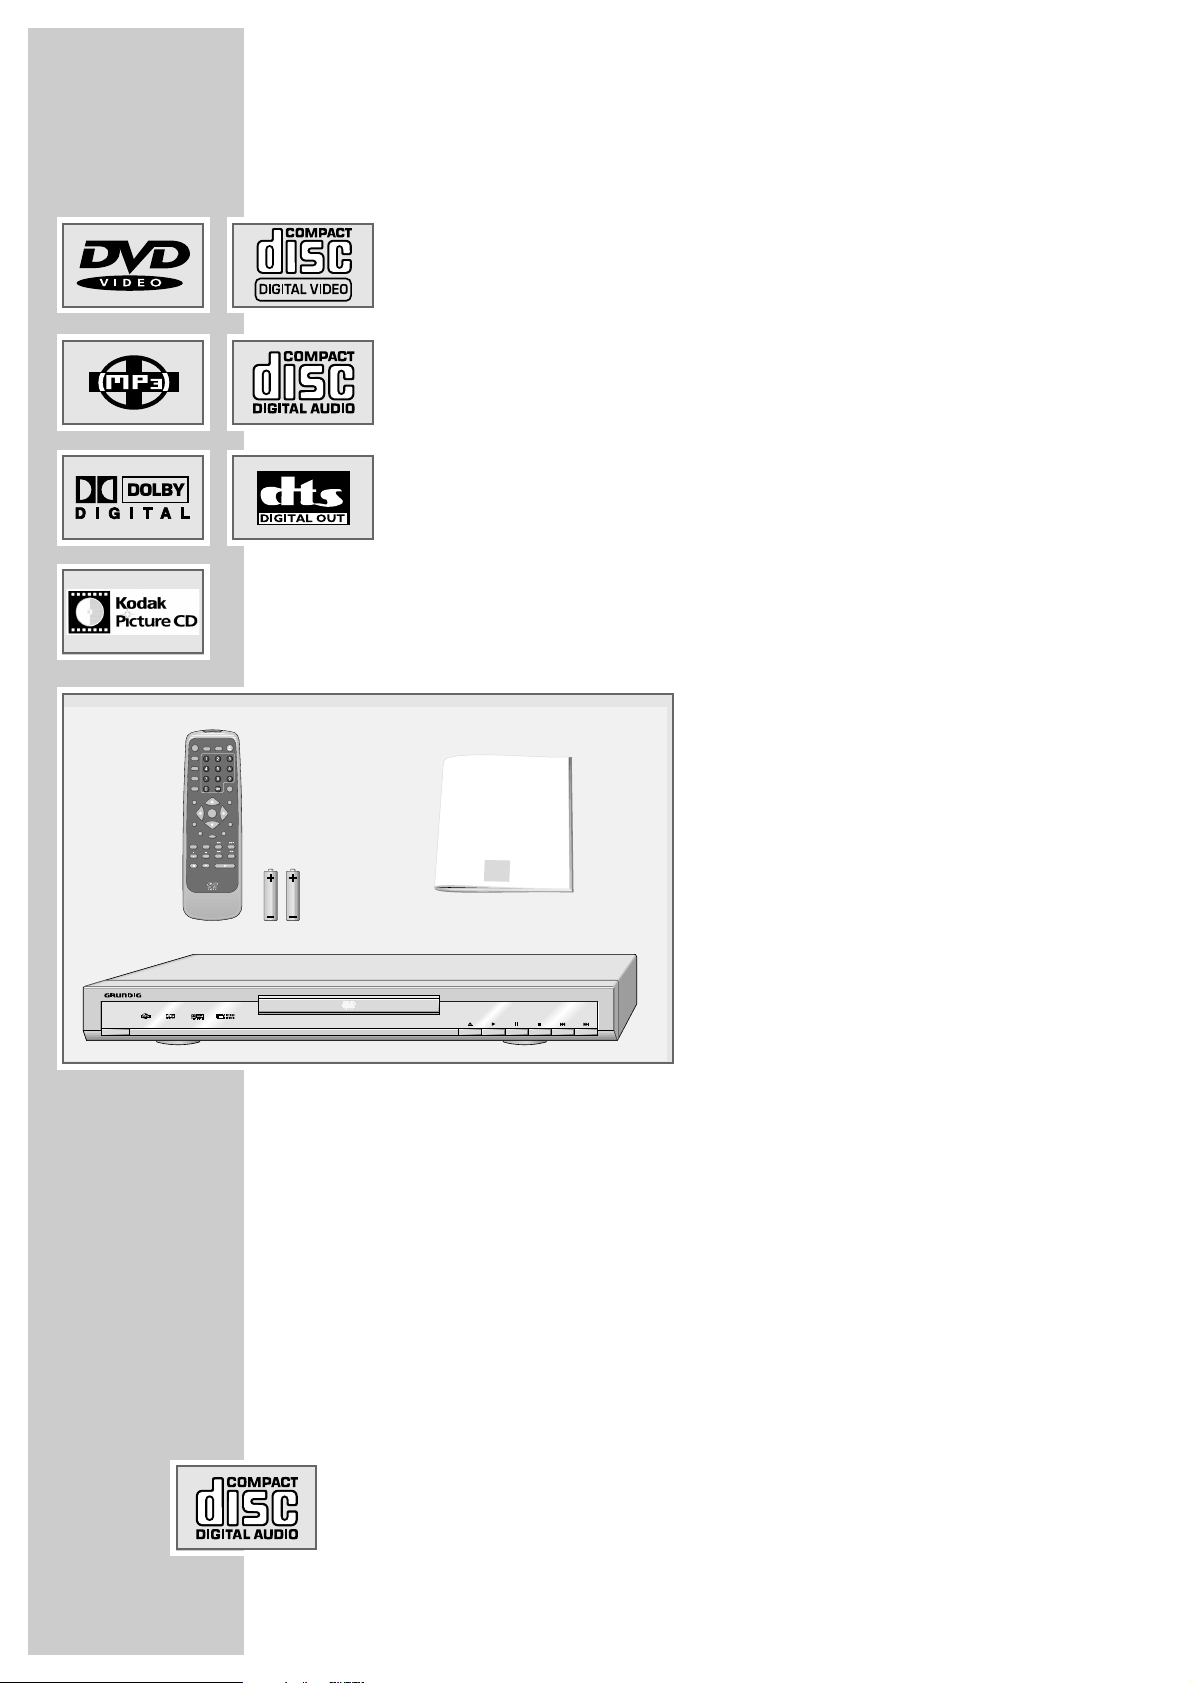
4 Special features of your DVD player
4 Scope of delivery
4 Disc formats
5 Set-up and safety
6-9 Overview
6 The front of the DVD player
7 The back of the DVD player
8-9 The remote control
10-13 Connection and preparation
10-11 Connecting a television or flat screen
12 Connecting a multi-channel amplifier or digital two-channel audio system
13 Connecting an audio system with analogue two-channel stereo sound
13 Connecting the power cord
13 Inserting batteries in the remote control
14-15 Getting started
14 Switching on the DVD player
14 Selecting the language of the screen menus
14-15 Adapting the DVD player to the television set
16 Before playback
16 Preparation
16 Inserting a disc
16 Removing discs
17-23 DVD playback
17 DVD features
17 Special DVD features
18 DVD playback
18 Selecting titles or chapters
19 Picture settings
19 Calling up information
20 Interrupting/resuming playback (resume)
20 Ending playback
20-22 Additional playback functions
22 Selecting and playing scenes
23 Playing back chapters in random order
23 Repeat functions
24-25 VCD/S-VCD playback
24 S-VCD/VCD features
24 PBC (playback control)
24 Switching PBC (playback control) on/off
25 Playing back a track
25 Selecting a track
25 Frame search
25 Ending playback
2

ENGLISH
3
CONTENTS
__________________________________________________________________________________
26-27 MP3 CD playback
26 MP3 CD features
26 Playback
27 Selecting files
27 Ending playback
27 Removing the MP3 CD
28-29 Picture CD playback
28 JPEG CD features
28 Features of the KODAK picture CD
28-29 Displaying JPEG pictures
29 Selecting pictures
29 Adjusting the picture display
29 Enlarging the picture (zoom)
30-31 Audio CD playback
30 Audio CD features
30-31 Audio CD playback
31 Repeat functions
32 Creating a program
33 Audio settings
33 Selecting the digital output
33 Setting the sampling rate
34 Child lock
34 Authorising the contents of a DVD
35-36 Personal settings
35 Setting the language
36 Resetting the DVD player to its original condition
37-39 Information
37 Technical data
37 General instructions for laser devices
38 Troubleshooting
38 Cleaning discs
39 Software information
39 Calling up software information
39 Additional information for units sold in the UK.
4
Special features of your DVD player
Your DVD player provides you with perfect digital video playback of studio
quality.
It also provides superb cinema-quality audio playback – in stereo or with digital
multi-channel sound – depending on the type of DVD and the audio system or
stereo television.
Other features of DVD video include the choice of audio channel and language,
choice of subtitle language, and various camera recording angles. Your DVD
player is suitable for DVDs with regional code 2.
As well as DVDs, MP3 CDs, JPEG coded (photo) CDs, KODAK Picture CDs,
Video CDs, S Video-CDs and audio CDs can also be played back.
Scope of delivery
1 DVD Player GDP 1100
2 Remote control
3 2 Batteries, 1.5 V, type AAA
4 Operating manual
Disc formats
Your DVD player can play back CD R, CD RW, VCD 2.0, Super VCD, DVD R,
DVD RW discs.
Due to the difference in quality of the recording media and the quality of the
recording itself, it can occasionally happen that a home-made DVD or CD
cannot be read. This does not indicate a malfunction of the DVD player.
You have to finalise your own CD R and CD RW recordings.
Make sure the settings of your CD burning program correspond to the ISO 9660
standard to create a CD R or CD RW.
When MP3 or JPEG CDs are played back, individual tracks/pictures may be
skipped or incorrectly played back/ displayed. This can be due to the disc
configuration, the encoder software or the hardware used for the recording.
Audio CDs (CD-DA) meet the specification and bear the corresponding logo.
Copy-protected CDs do not meet this specification and do not bear the corresponding logo. These CDs can cause playback errors.
DVD PLAYER GDP 1100
_____________________________________
1
2
3
4
SUB TITLE
PROG
CLEAR
GOTO
SETUP PAL/NTSC
ENTER
MENU
TITLE
AUDIO RETURN
ZOOM
SLOWMUTE
PAUSE/STEP
VOLUME
STOP
ǵ
PLAY
D
V
D
-P
LA
Y
E
R
ǵ
OPEN
OSD
REPEAT A-B
ANGLE
ON/OFF
ENGLISH
5
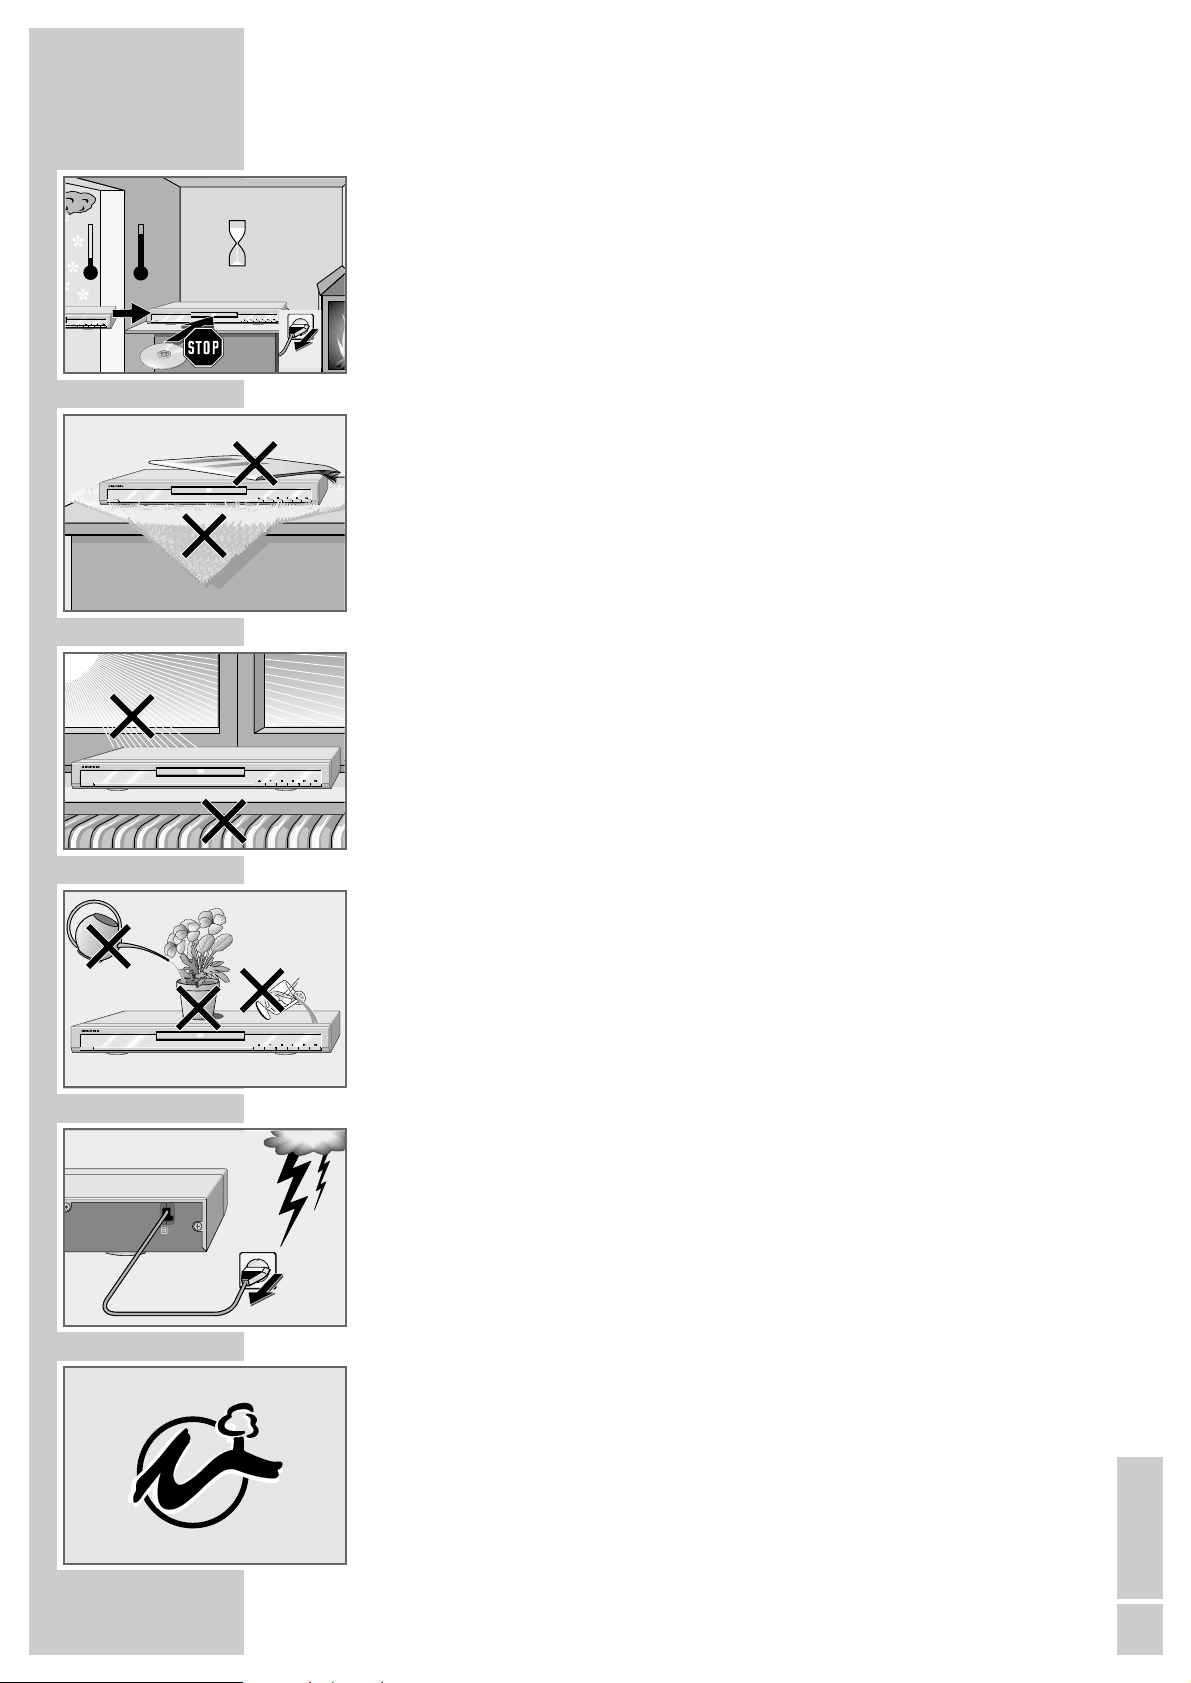
Please note the following information when setting up your DVD player:
This DVD player set is designed to play video and audio signals from compact
discs (DVDs and CDs).
Any other use is expressly prohibited.
If the DVD player is subjected to a sudden change in temperature, for example if
it is brought in from the cold to a warm room, do not connect it to the mains
supply and let it stand for at least two hours before you insert a DVD.
The DVD player is designed for use in dry rooms. If you do use it in the open,
please ensure that it is protected from moisture, such as rain or water splashes.
Place the DVD player on a hard, level surface. Do not place any objects such as
newspapers on the DVD player or any cloth or similar articles underneath it.
Do not place the DVD player directly on top of an AV receiver or a subwoofer.
The laser optics are sensitive to temperature and shocks.
Do not place the DVD player close to heating units or in direct sunlight, as this
will impair cooling.
Do not insert foreign objects in the disc compartment of the DVD player.
Never open the DVD player casing under any circumstances. No warranty
claims are accepted for damage resulting from improper handling.
Do not place any vessels filled with liquid, such as vases, on the DVD player, the
vessel may tip and the liquid spilled may penetrate into electrical components,
thereby presenting a safety hazard.
Thunderstorms are a danger to all electrical devices. Even if the DVD player is
switched off, it can be damaged by a lightning strike to the mains. Always
remove the mains plug during an electrical storm.
If the DVD player cannot scan DVDs or CDs perfectly, use a commercially
available cleaning-CD to clean the laser optics. Other cleaning methods may
damage the laser optics.
Always keep the disc compartment closed to prevent dust from collecting on the
laser optics.
This DVD player is designed to the highest technological and environmental
standards. Only environmentally-friendly, high-quality materials have been
used. The batteries included contain no mercury or cadmium.
The range of materials used has been deliberately restricted and all the larger
plastic parts have been labelled. This DVD player is designed so that it can be
easily disassembled to aid servicing and recycling.
SET-UP AND SAFETY
______________________________________________
ON/OFF
Krieg im Balkan
ON/OFF
ON/OFF
110-240 V~
50/60 Hz 10 W
°C
2h
ON/OFF
°C
!
6
OVERVIEW
_______________________________________________________________________
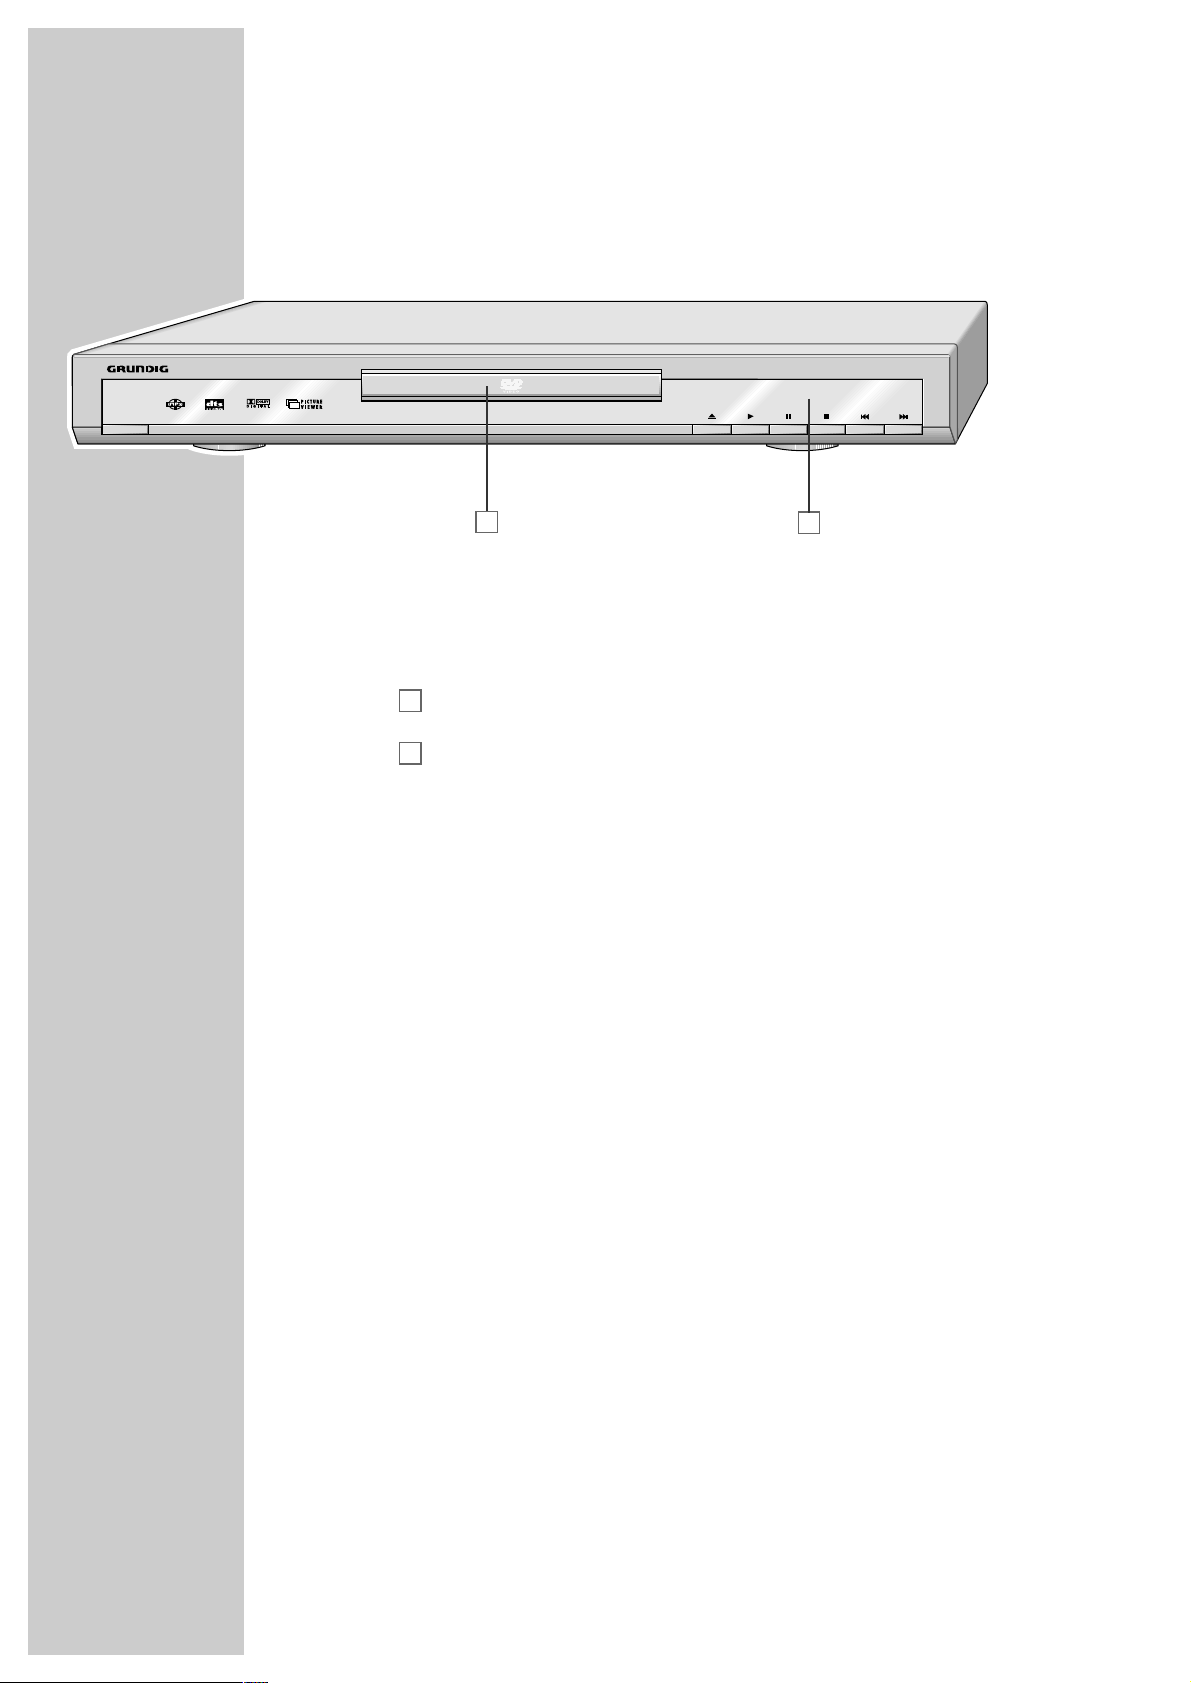
The front of the DVD player
ON/OFF Switches the DVD player on and off.
The device is only completely disconnected from the
mains if the plug is pulled out.
Compartment for CD media.
Display.
ə
Opens and closes the disc compartment.
ı Starts playback.
!
Freeze-frame and frame-by-frame playback for DVDs and
video CDs.
Pause for MP3 CDs, JPEG CDs, Kodak Picture CDs and
audio CDs.
7
Press once to interrupt or resume playback.
Press twice to stop playback.
5a
Selects the previous track or section during playback.
s6
Selects the next track or section during playback.
B
A
ON/OFF
A
B
ENGLISH
7
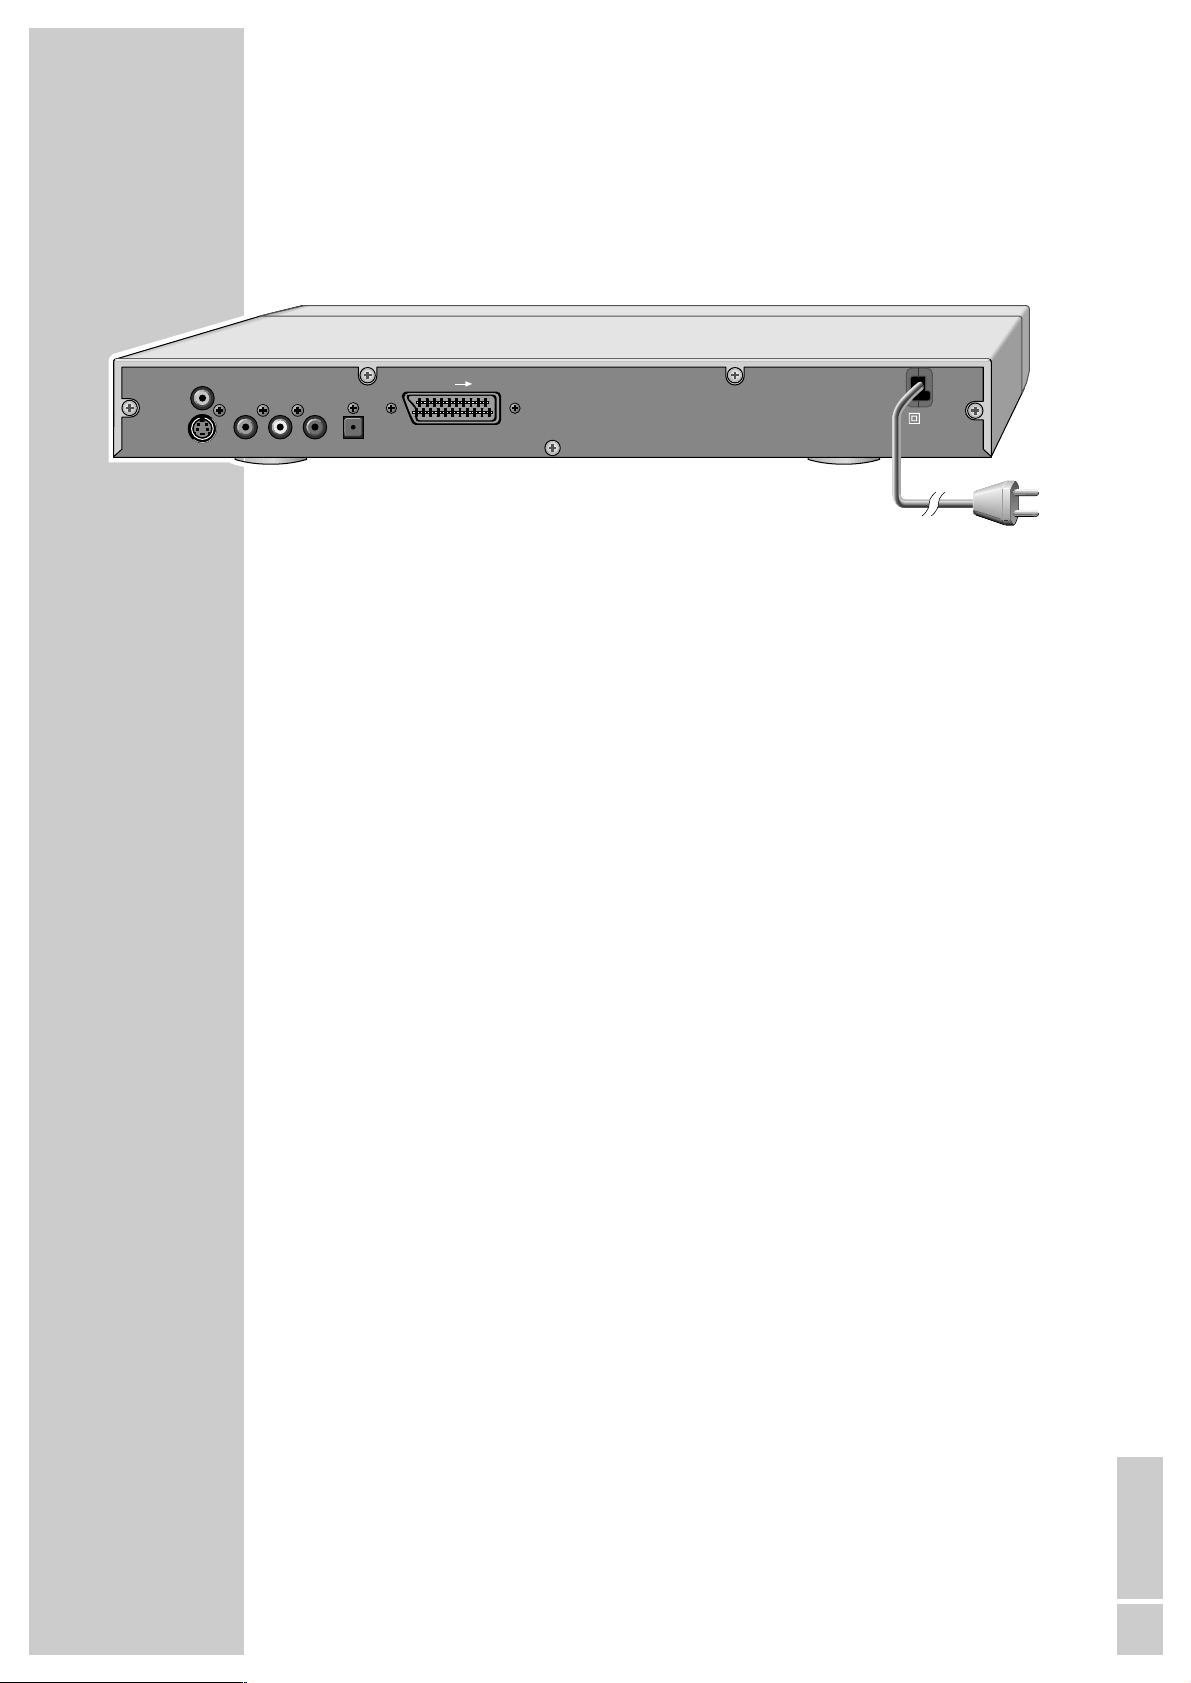
The back of the DVD player
VIDEO OUT Video output socket for connecting a television or AV
receiver with a cinch socket.
S VIDEO OUT Video output socket for connecting a television or AV
receiver with an S video socket.
R AUDIO OUT L Audio output sockets (right/left analogue channel) for
connecting an audio system.
DIGITAL AUDIO OUT Audio output socket (optical) for PCM/Dolby digital/
DTS signals.
Audio output socket (coaxial) for PCM/Dolby digital/
DTS signals.
For connecting a digital multi-channel audio video
amplifier or AV receiver.
EURO AV
➞ TV For connecting a television with an EURO-AV socket.
110-240 V~ Mains cable.
50/60 Hz 10W
Caution:
Do not connect any devices while the DVD player is
switched on. Switch off the other device as well before
connecting it.
Never touch the inside of the sockets and plugs of the
connecting cables.
An electrostatic discharge can damage the DVD player.
OVERVIEW
__________________________________________________________________________________
EURO AV TV
110-240 V~
50/60 Hz 10 W
S VIDEO OUT
VIDEO OUT
R AUDIO OUT L DIGITAL AUDIO OUT
8
OVERVIEW
__________________________________________________________________________________
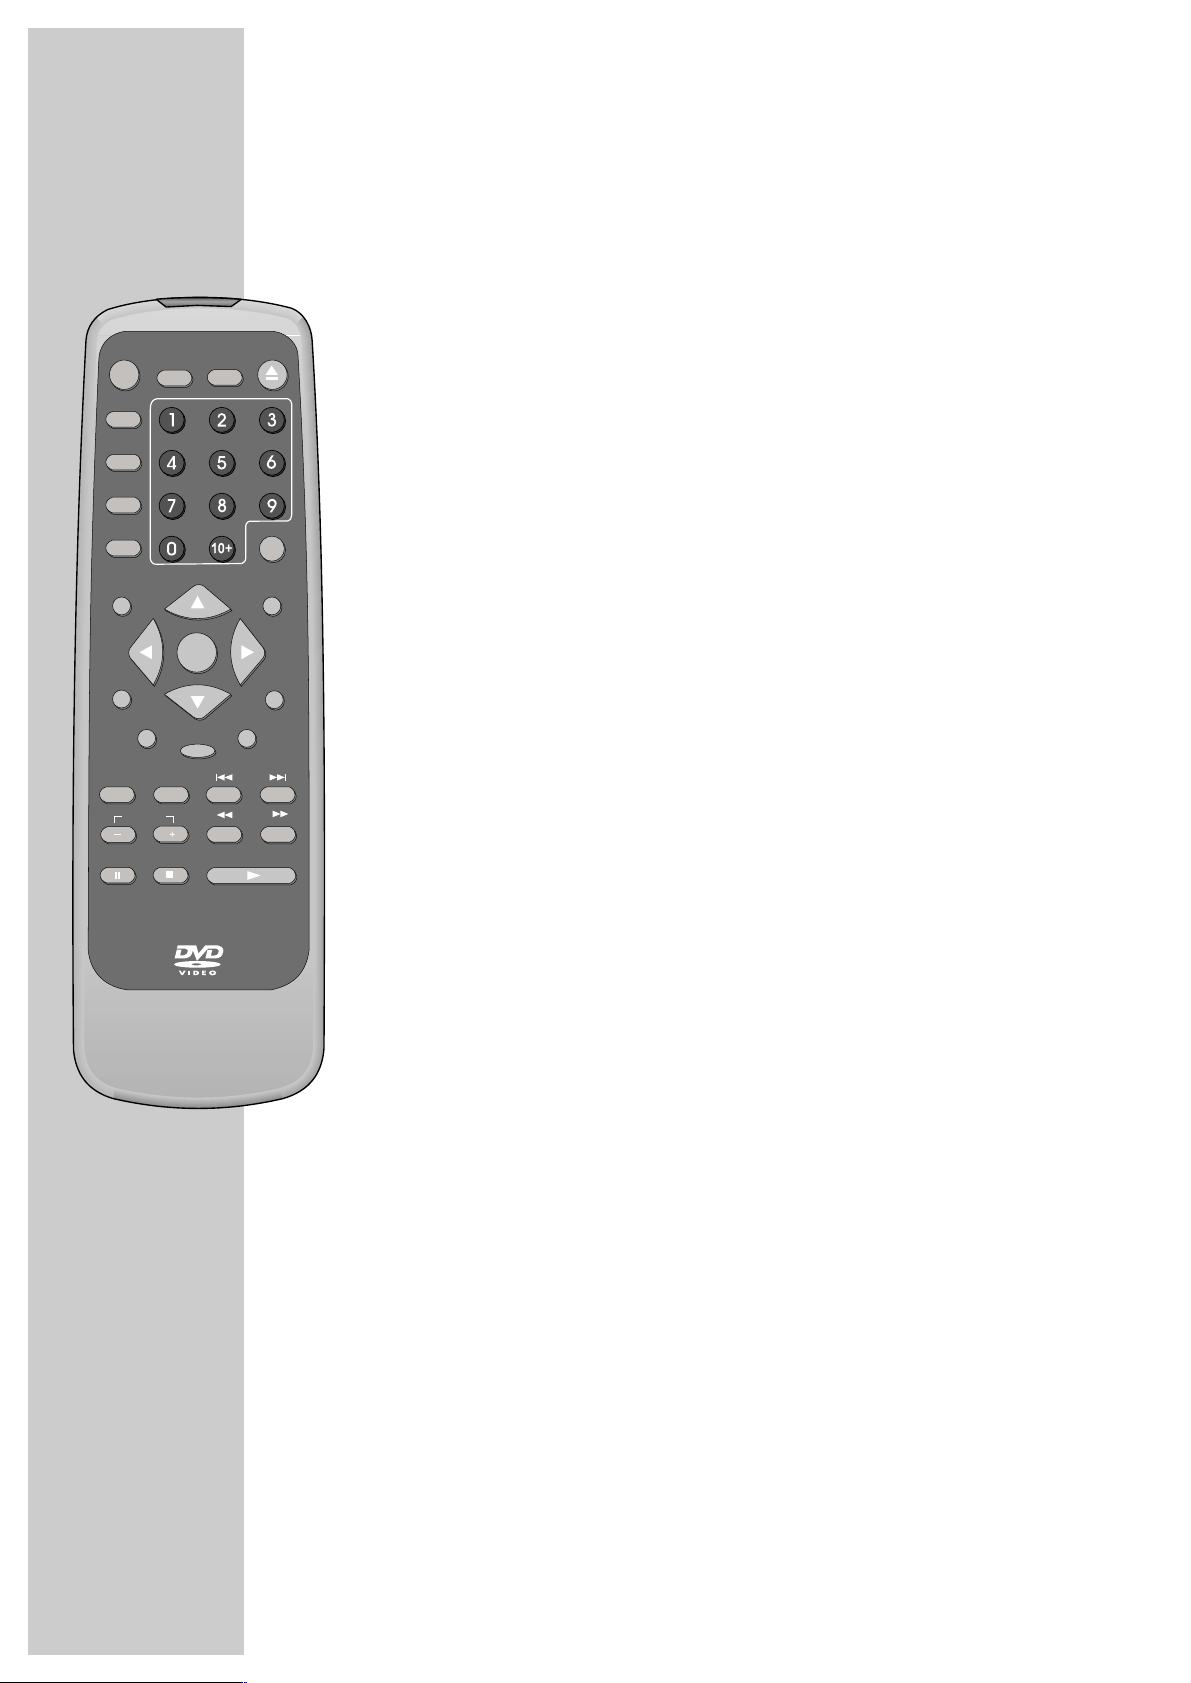
The remote control
OSD Displays various information on the television screen during
playback, such as the title or chapter number and playing time
(not used for MP3 CDs).
Displays GRUNDIG software information when the disc compartment
is open.
REPEAT Switches between various REPEAT functions.
A-B For marking sections for repeated playback.
OPEN
ə
Opens and closes the disc compartment.
ANGLE Selects various camera angles* for certain scenes or passages on the
DVD during playback.
SUB TITLE For selecting subtitles on the DVD during playback.
PROG When stopped: for programming a playback list for the media
inserted.
Calls up the SHUFFLE function when playing back DVDs,
S-VCD/VCDs, MP3 CDs and audio CDs.
GOTO Selects a section on the disc.
1 … 0 10+ Numeric keys for various inputs.
CLEAR Deletes inputs.
SETUP Calls up the main menu of the DVD player during STOP mode.
Calls up the picture settings during playback.
a sAS
Selects various functions in the menus.
Moves in the zoom mode in the picture section.
ENTER Confirms inputs and selected functions.
PAL/NTSC Selects the PAL or NTSC television format.
MENU Opens up the disc menu of the DVD during playback.
Switches the content menu of an MP3 CD (file browser) on.
Enters 9 miniatures display of a S-VCD/VCD during playback.
AUDIO Switches between the original and dubbed language during DVD
playback.
Selects various audio channels.
ZOOM Enlarges scenes during playback (not used for MP3 and audio CDs).
OSD
* Depends on the DVD in use
ANGLE
REPEAT A-B
OPEN
SUB TITLE
PROG
GOTO
SETUP PAL/NTSC
ENTER
MENU
AUDIO RETURN
ZOOM
SLOWMUTE
VOLUME
PAUSE/STEP
STOP
PLAY
ǵ
CLEAR
TITLE

ENGLISH
9
OVERVIEW
__________________________________________________________________________________
RETURN Switches up one menu level (available for S-VCD/VCD).
TITLE Calls up the DVD’s title menu* or the S-VCD’s/VCD’s menu dur-
ing playback.
MUTE Mutes the sound of the DVD player.
SLOW Selects forward slow motion during playback.
5a
Selects the previous title or section during playback.
s6
Selects the next title or section during playback.
– VOLUME + Adjusts the volume.
3
Switches to backwards frame search at various speeds during
playback.
4
Switches to forwards frame search at various speeds during
playback.
PAUSE/STEP
!
Freeze-frame and frame-by-frame playback for DVDs and SVCDs/VCDs.
Pause for MP3 and audio CDs.
STOP
7
Press once to interrupt playback.
Press twice to stop playback.
PLAY
8
Starts playback.
OSD
* Depends on the DVD in use
ANGLE
SUB TITLE
REPEAT A-B
OPEN
PROG
GOTO
SETUP PAL/NTSC
ENTER
MENU
AUDIO RETURN
ZOOM
SLOWMUTE
VOLUME
PAUSE/STEP
STOP
PLAY
ǵ
CLEAR
TITLE

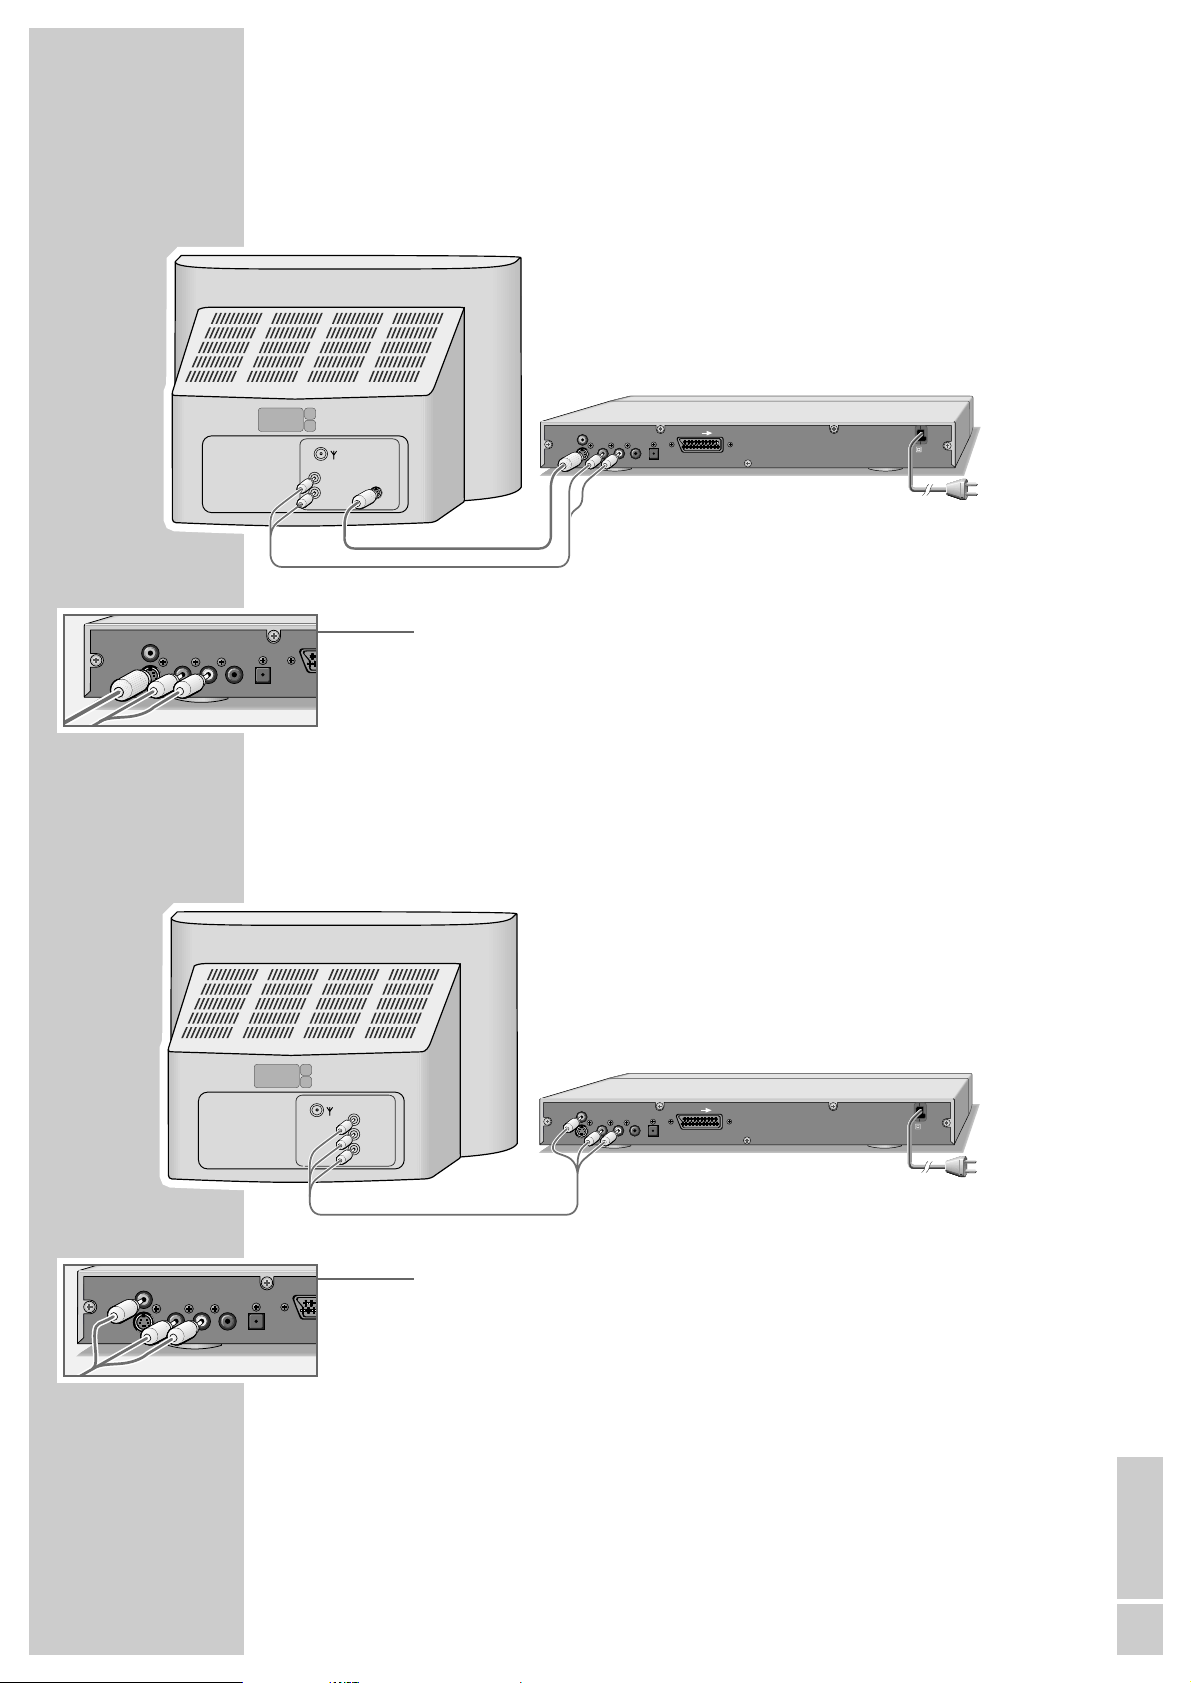
Connecting a television or flat screen
You have three options, depending on the sockets you have on your television or
flat screen:
– You get the best picture quality by making the connection at the EURO-AV
socket using a fully assigned EURO-AV cable.
– The standard connection for many devices, and one which provides good
quality, is via the S-VIDEO OUT socket and the AUDIO OUT cinch sockets.
– The simplest option which stills offers sufficient quality is connecting the
VIDEO OUT video socket and AUDIO OUT sockets with a cinch cable.
Necessary adjustments to the television
After you have made the connections at the selected output sockets, you must
activate them. The setting procedure is described in the “Selecting the video output socket (EURO AV/RGB or S-Video)” section on page 15.
If the DVD player is connected to a television set or a flat screen with a 16:9 format, observe the settings described in the “Selecting the screen format of your
television set” section on page 15.
The colour standard of the DVD player must be matched to the colour standard
of your television or flat screen. The setting procedure is described in the section
“Setting the TV standard” on page 14.
Connect the »EURO AV
➞ TV« socket directly to the television or flat screen,
not indirectly via a video recorder. This can cause difficulties when playing back
copy-protected CDs.
Connection using a EURO-AV (Scart) cable
1 Plug a standard, fully assigned EURO-AV cable into the »EURO AV ➞ TV«
socket of the DVD player and into the corresponding socket of the television
or flat screen.
10
CONNECTION AND PREPARATION
_______
O
AV1 AV2
VIDEO OUT
S VIDEO OUT
R AUDIO OUT L DIGITAL AUDIO OUT
EURO AV TV
110-240 V~
50/60 Hz 10 W
UT
OUT
R AUDIO OUT L DIGITAL AUDIO OUT
EURO AV TV
ENGLISH
11
CONNECTION AND PREPARATION
_______________________________________
Connection using a Y/C (S-VIDEO) cable and a
cinch cable
1 Plug a standard Y/C cable into the »S VIDEO OUT« socket of the DVD
player and into the corresponding socket (S VIDEO IN) of the television or
flat screen.
2 Plug a standard cinch cable into the »R AUDIO OUT L« socket on the DVD
player and into the corresponding sockets (AUDIO IN) of the television or flat
screen.
Connecting using a cinch cable
1 Plug a standard cinch cable into the »VIDEO OUT« socket on the DVD
player and the corresponding socket (VIDEO IN) on the television or flat
screen.
2 Plug a standard cinch cable into the »R AUDIO OUT L« socket on the DVD
player and into the corresponding sockets (AUDIO IN) of the television or
flat screen.
VIDEO OUT
S VIDEO OUT
R AUDIO OUT L DIGITAL AUDIO OUT
R AUDIO OUT L DIGITAL AUDIO OUT
VIDEO OUT
S VIDEO OUT
L
AUDIO
S–VHS
INPUT
R
E
EURO AV TV
110-240 V~
50/60 Hz 10 W
VIDEO OUT
S VIDEO OUT
R AUDIO OUT L DIGITAL AUDIO OUT
R AUDIO OUT L DIGITAL AUDIO OUT
VIDEO
L
AUDIO
INPUT
R
EUR
VIDEO OUT
S VIDEO OUT
EURO AV TV
110-240 V~
50/60 Hz 10 W
12
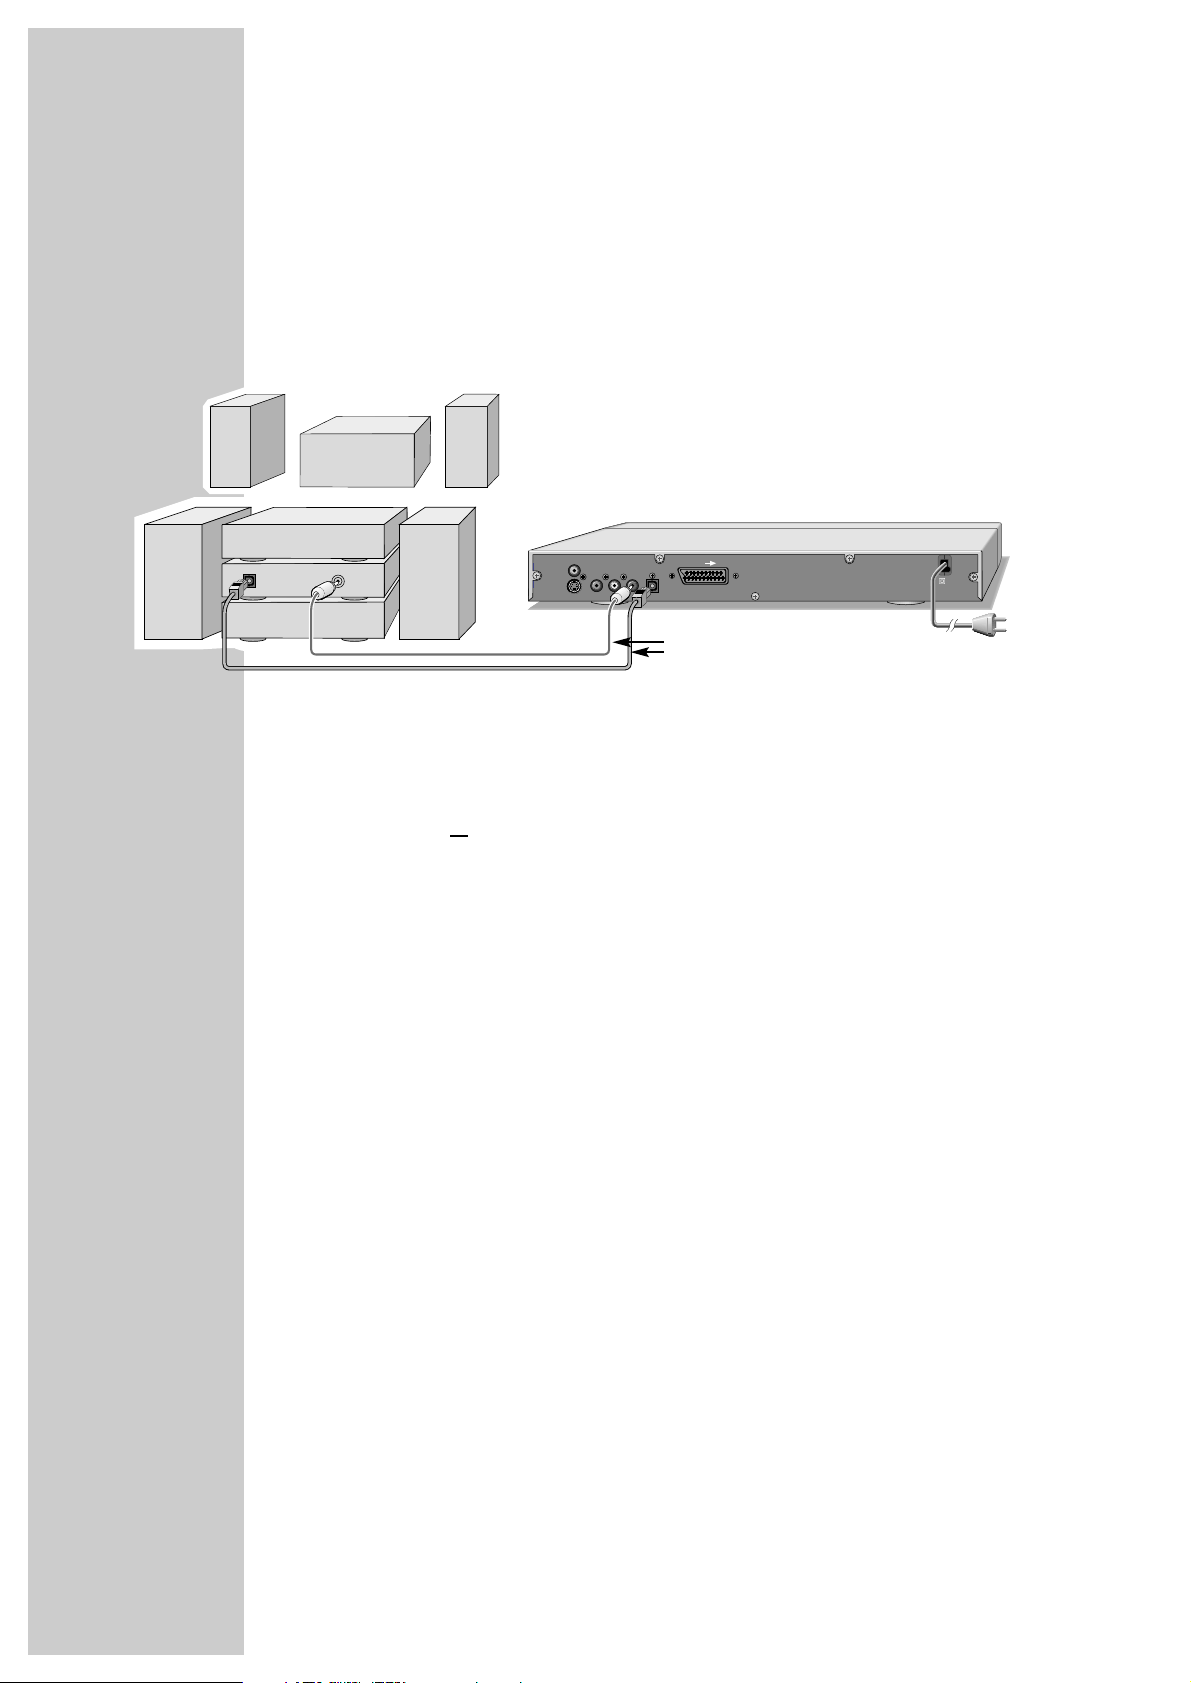
Connecting a multi-channel amplifier or digital
two-channel audio system
The digital multi-channel sound of a DVD can best be decoded and played back
with a multi-channel audio/video amplifier (Dolby* digital decoder or DTS*).
1 Plug a standard cinch cable into the »DIGITAL AUDIO OUT« socket on
the DVD player and into the appropriate socket on the digital multi-channel
amplifier
or
Remove the protective cap of the optical digital output and plug an optical
digital cable into the digital output »DIGITAL AUDIO OUT« of the DVD
player and into the corresponding socket of the digital multi-channel amplifier.
Notes:
Keep the protective cap in a safe place and put it back in place on the device
if it is not to be used for a longer period of time.
Even if you are using a digital connection, you should still make an analogue
audio connection as it is possible, depending on the disc type, that no signal
can be output via the »DIGITAL AUDIO OUT« socket see page 13 for
connection).
*
Manufactured under licence from Dolby Laboratories Licensing Corporation. “Dolby”, “Dolby
Pro Logic”, “Dolby Digital” and the double-D symbol “
ij ” are trademarks of the Dolby Labo-
ratories Licensing Corporation. Copyright 1992 Dolby Laboratories, Inc. All rights reserved.
* DTS and DTS Digital Out are trademarks of Digital Theater Systems, Inc. All rights reserved.
CONNECTION AND PREPARATION
_______________________________________
Optional
OPTICAL
DIGITAL
INPUT
DIGITAL
AUDIO
INPUT
VIDEO OUT
S VIDEO OUT
R AUDIO OUT L DIGITAL AUDIO OUT
EURO AV TV
110-240 V~
50/60 Hz 10 W
 Loading...