

Page 1
www.etoncorp.com
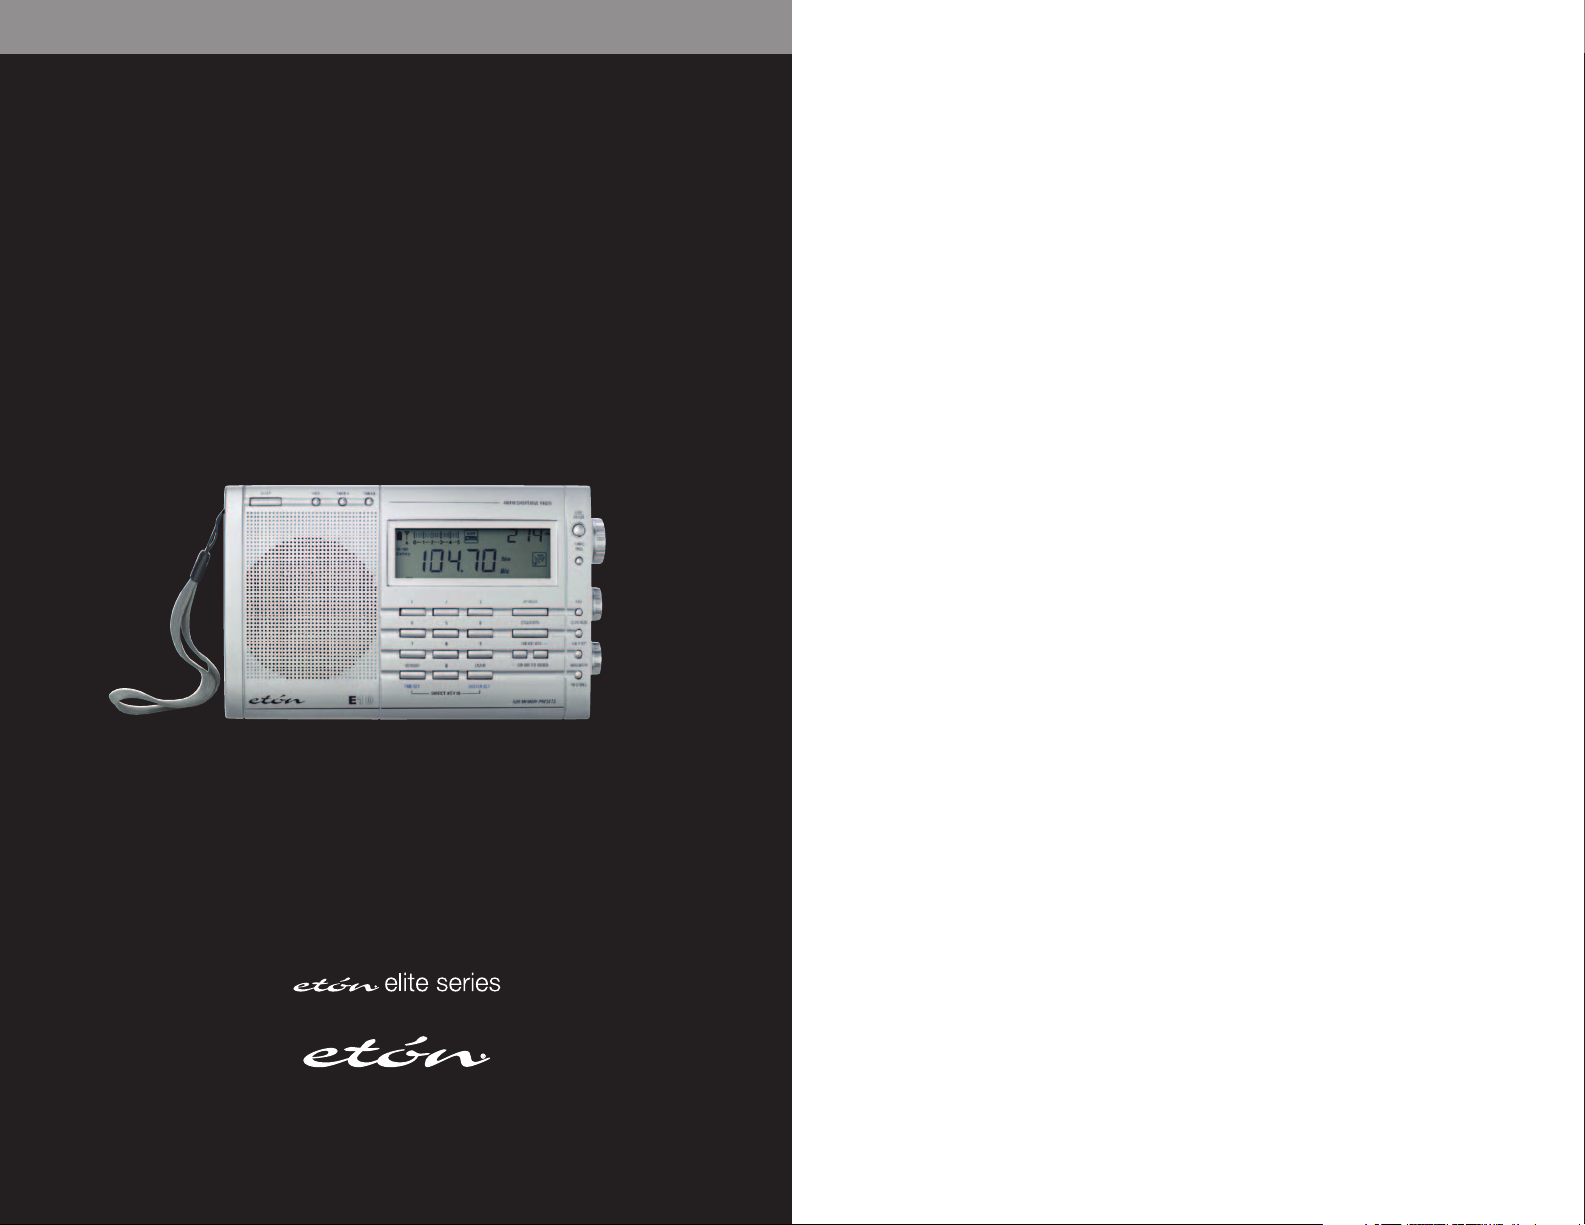
E10
OPERATION MANUAL
AM/FM/SHORTWAVE RADIO
Page 2

DO YOU NEED HELP?
Thank you for purchasing the E10
AM/FM/Shortwave Radio.
We want you to thoroughly enjoy the use of
this product. To take advantage of its many
excellent and unique features, we urge you to
carefully read the owner’s manual. If you need
help while learning its operation, please
contact us, using the methods below.
Monday-Friday, 8:30 a.m. - 4:00 p.m.,
North American Pacific Time.
1-800-872-2228 from the U.S.
1-800-637-1648 from Canada
1-650-903-3866, worldwide
FAX: 650-903-3867
customersvc@etoncorp.com
Web Site: www.etoncorp.com
Mailing Address:
etón Corporation
1015 Corporation Way
Palo Alto, CA 94303
USA
TABLE OF CONTENTS
DO YOU NEED HELP?.....................................................2
1
TABLE OF CONTENTS.....................................................3
2
MAJOR FEATURES OF THE
3
DIAGRAMS....................................................................5
4
GETTING STARTED.........................................................7
5
WHAT THE E10 INCLUDES........................................7
INSTALLING BATTERIES............................................ 7
PREVENTING BATTERY ACID LEAKAGE.....................7
USING THE INCLUDED AC ADAPTOR/CHARGER........ 7
CHARGING BATTERIES IN THE E10...........................7
6
BASIC RADIO OPERATION..............................................9
7
CLOCK AND TIMER FEATURES........................................12
SETTING THE CLOCK................................................ 12
SETTING THE TIMERS................................................12
STORING A RADIO STATION INTO TIMER MEMORY... 13
ACTIVATING/DEACTIVATING THE TIMER................... 14
USING THE SNOOZE FEATURE.................................. 14
8
WORKING WITH MEMORY............................................. 14
STORING STATIONS INTO MEMORY...........................14
SELECTING/CHANGING MEMORY PAGES..................14
ACCESSING WHAT IS STORED INTO MEMORY...........15
DIRECT MEMORY ACCESS........................................15
MANUAL MEMORY SEARCH.....................................15
MEMORY AUTO-SCAN..............................................15
etón E10............................. 4
E10 OPERATION MANUAL
DELETING A MEMORY’S CONTENTS......................... 15
DELETING ALL MEMORY PAGE CONTENTS............... 16
MOVING A STORED FREQUENCY.............................. 16
9
CUSTOMIZING MEMORY PAGES.....................................16
SYSTEM SET CODES.......................................................17
SYSTEM SET CODE TABLE.........................................17
CHANGING SYSTEM SET CODES...............................18
CHANGING THE CLOCK FROM 24 TO
12 HOUR FORMAT....................................................18
DEFAULT FACTORY SYSTEM SET CODES....................18
MONITORING THE CURRENT STATUS OF SET
CODES AND OTHER SETTINGS..................................18
10
ADDITIONAL E10 CONTROLS.........................................19
11
LISTENING TO SHORTWAVE STATIONS............................20
SELECTING A SHORTWAVE METER BAND
WITH THE E10.......................................................... 21
SHORTWAVE TIME STATIONS....................................22
SHORTWAVE PUBLICATIONS: FINDING
SPECIFIC STATIONS.................................................. 23
12
UNDERSTANDING SHORTWAVE BANDS.........................24
13
TROUBLESHOOTING.......................................................28
14
WARRANTY REGISTRATION........................................... 29
15
LIMITED WARRANTY TO THE ORIGINAL CUSTOMER.......30
16
SERVICE INFORMATION.................................................31
2
3
Page 3
E10 OPERATION MANUAL
3 MAJOR FEATURES OF THE etón E10
• FM Frequency Range: 87 – 108 MHz (For America); 76 – 108 MHz (For Japan)
• Shortwave Frequency Range: 1711 – 29999KHz
• 9/10KHz step selector for Medium Wave (AM) reception
• 1KHz step for the display of Medium wave and Shortwave
• SW IF SET feature, shifts the intermediate frequency to minimize interference during shortwave reception.
• Shortwave antenna trimmer
• ATS (Auto tuning system) for the memory storage of FM/MW reception
• Manual Tuning
• Auto Scan Tuning
• Direct Keypad Frequency Entry
• Digital Tuning Knob
• 550 Programmable Memories
• Memory Page Customization
• Auto-Scan and manually scan stations stored into memory
• Direct Memory Access
• Fast/Slow tuning rate selection for manual tuning
• Sleep Function
• Two Turn-On Timers With Station Memory
• Snooze Function: 10 minutes, repeated three times.
• FM Stereo/Mono selection
• High/Low Tone Control
• LCD Backlight
• Key Lock
• 12/24 Hr Format selection
• Built-in Ni-MH battery charger
• SYSTEM SET CODES
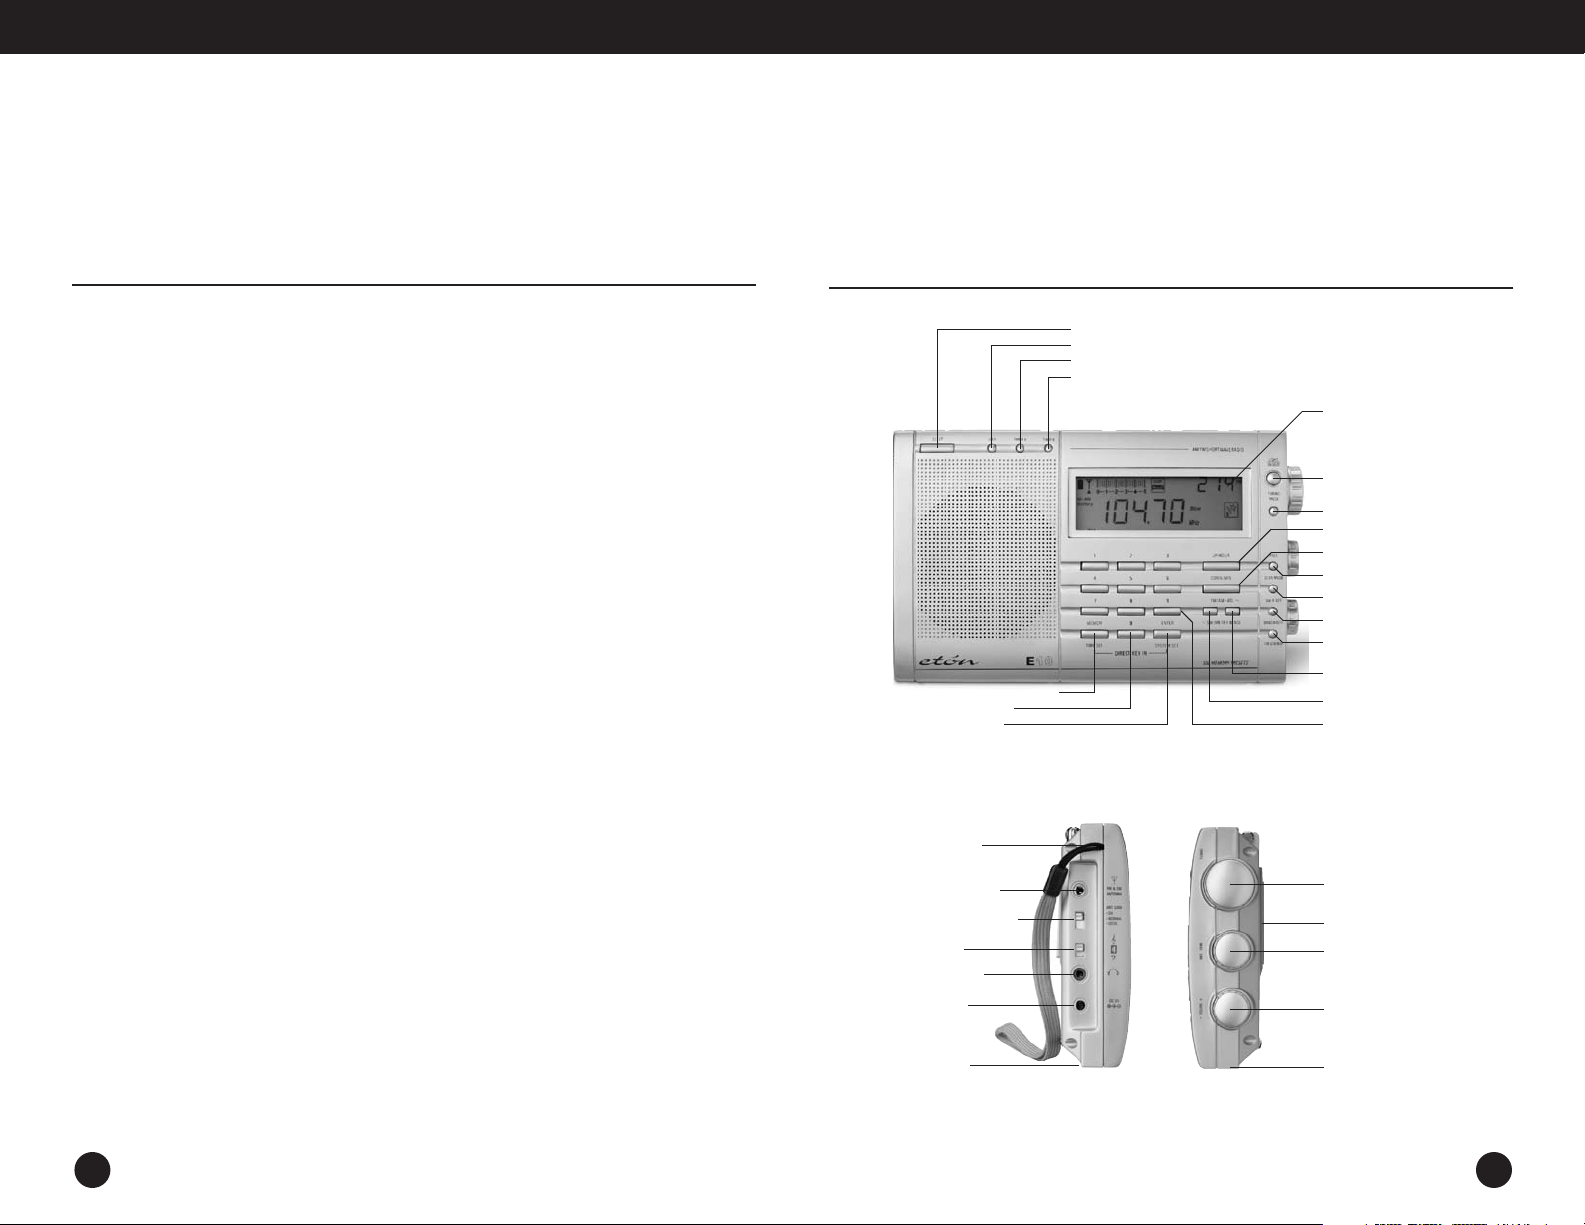
4 DIAGRAMS
Memory & Edit/Time set Button
Charger On/Off Button
Enter/Sys. Set Button
Hand Carry Belt
FM/SW ANT. Socket
ANT.Gain DX/Normal/Local
Tone Control
Earphone Socket
DC 6V Socket
Vertical Stand
POWER/SLEEP
Lock Button
Timer A Button
Timer B Button
LCD Display
Light Snooze Button
Tuning Mode Button
Up/Hour
Down/Min
Page Button
Scan Mode Button
SWIF Set Button
Bandwidth Button
FM/AM Band (ATS) Button
SW (SW Meter) Band Button
Numeric Keypad
Tuning Knob
Stand
ANT. Trim
Volume Knob
Reset Button
4
5
Page 4
E10 OPERATION MANUAL
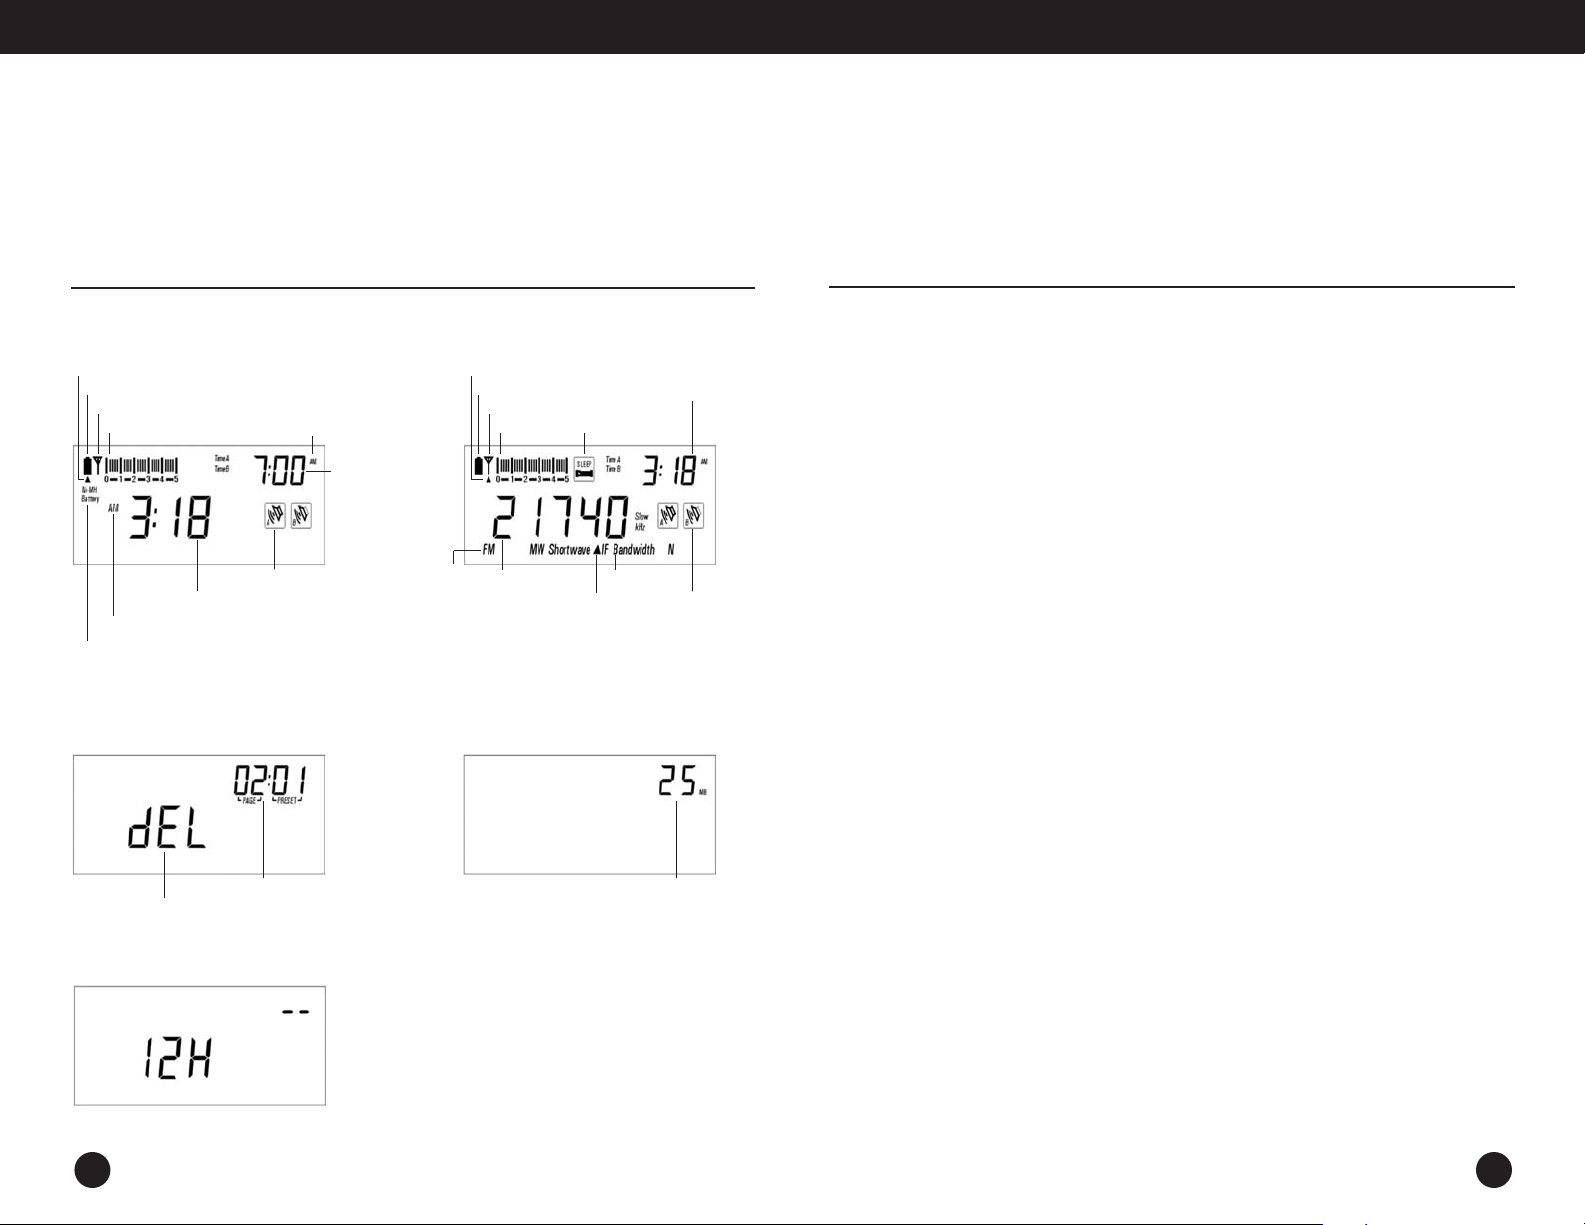
DIAGRAMS continued
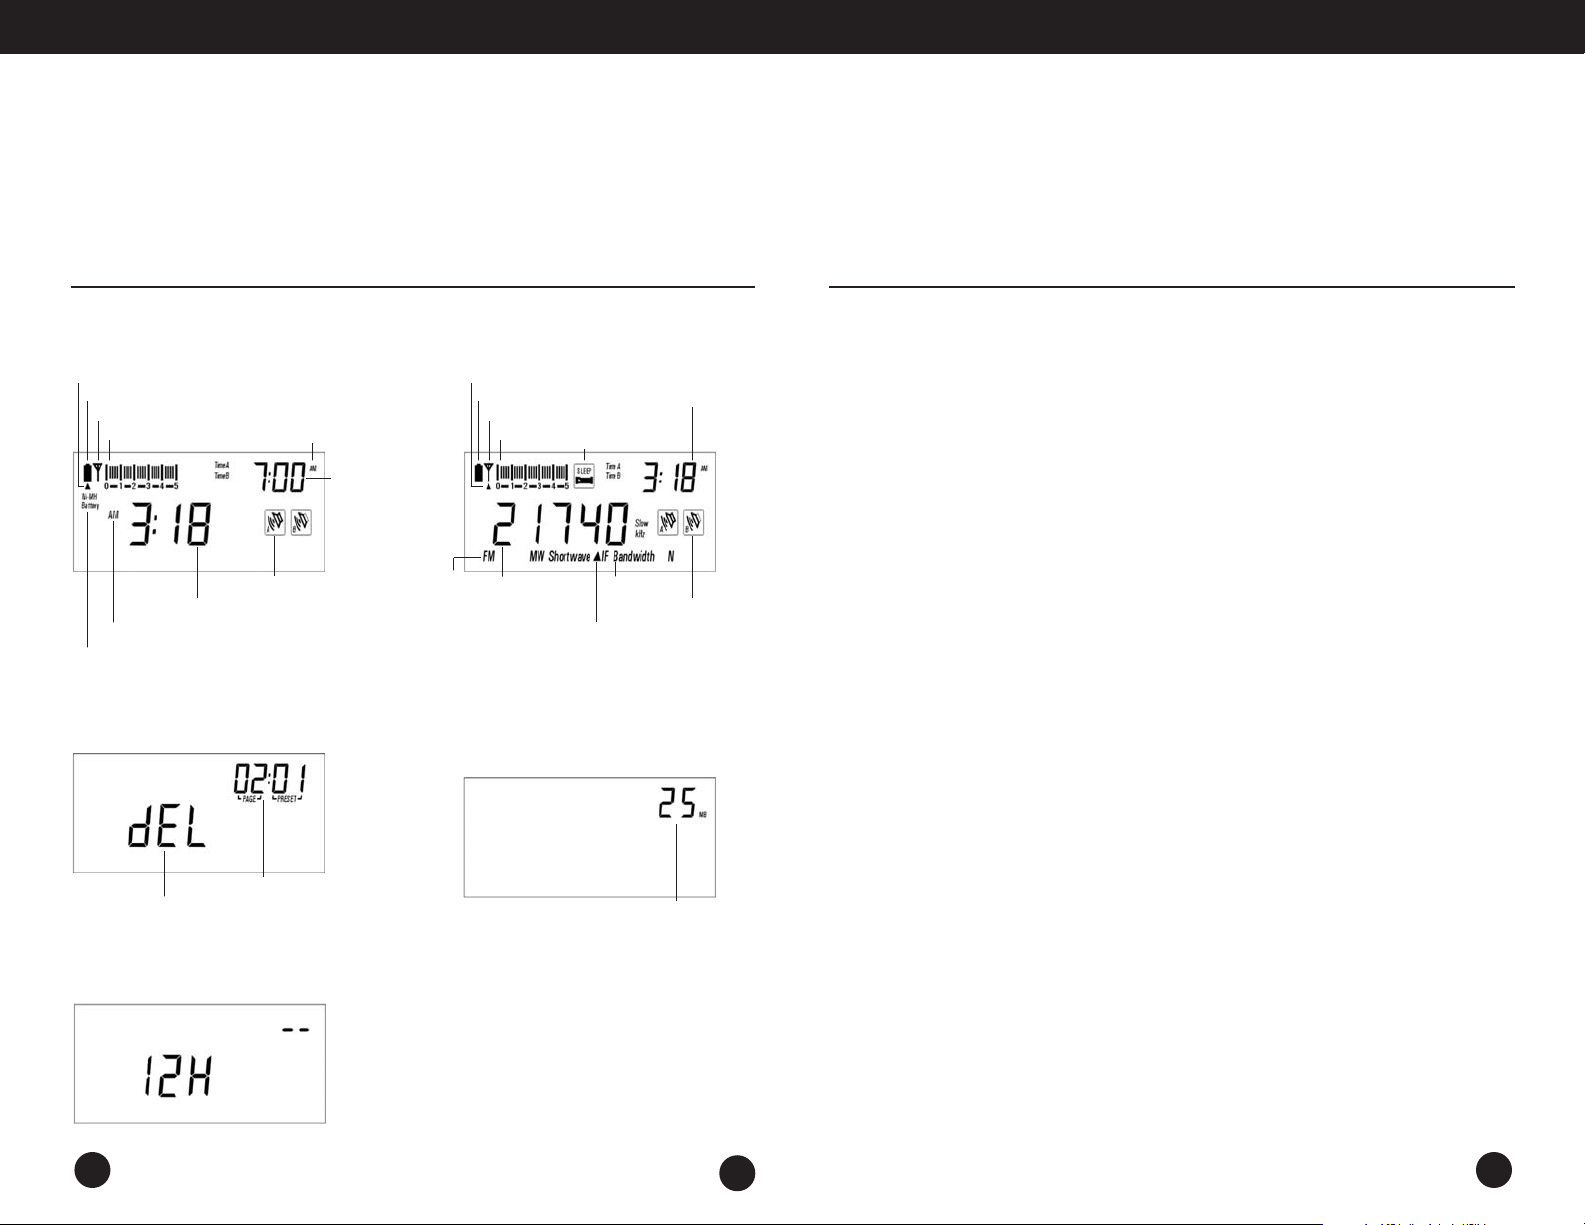
RADIO OFF DISPLAYRADIO OFF DISPLAY RADIO ON DISPLAY
Triangle Pointer
Battery Symbol
Antenna Symbol
1-5 Scale
Time AM/PM Indicator
Ni-MH Battery Symbol
Alarm AM/PM Indicator
Alarm Activation Symbol FM, MW,
Clock Digits
MEMORY DISPLAY
Refers only the the display’s upper right corner.
Delete Indicator
Memory Display Shortwave Meter Band Display
SYSTEM SET CODE DISPLAY
Alarm
Clock
Digits
Shortwave
Indicators
Triangle Pointer
Battery Symbol Clock Digits
Antenna Symbol
1-5 Scale Sleep Timer Symbol
Frequency Digits
Bandwidth
450K IF
SHORTWAVE METER BAND DISPLAY
Refers only the the display’s upper right corner.
Alarm
Activation
Symbol
5 GETTING STARTED
WHAT THE E10 INCLUDES
• Earbud style earphones
• Carrying pouch
• AC adaptor/charger
• 4 - 1100 mAh, Ni-MH rechargeable batteries.
• Owner’s manual
NOTE: In the instructions below, numbers in
parenthesis ( ), refer to the diagrams.
INSTALLING BATTERIES
The battery compartment is located on the back of
the E10. Its cover is on the lower right corner of the
back. To remove the battery compartment cover,
apply thumb pressure and slide it towards the bottom
of the radio. Install 4 AA alkaline batteries into the
battery compartment, observing the battery polarity
diagram on the back of the radio.
NOTE: If you don’t plan to use rechargeable batteries at all, then it’s a good idea to set SYSTEM SET
CODE 29. To do this, see the section titled SYSTEM
SET CODES.This assures that the battery strength
indicator will display correctly for your nonrechargeable batteries.This is not a mandatory
procedure and the E10 will function if it is not done.
PREVENTING BATTERY ACID
LEAKAGE
To avoid battery acid leakage, only use high quality
alkaline, lithium or rechargeable nickel-metalhydride batteries. Never intermix old with new, or
different brands or types of batteries. Damage
caused by battery acid leakage is not covered by
this product’s warranty. If the batteries leak, don’t
throw them away and immediately contact the
manufacturer of the batteries to inquire about their
battery leakage warranty program.
USING THE INCLUDED AC
ADAPTOR/CHARGER
To power the E10 with the included AC Adaptor/
Charger, plug it into a wall outlet first, and then
into the socket on the left side of the E10, labeled
DC 6 V. Batteries can be in the radio while using
the AC Adaptor/Charger.
CHARGING BATTERIES IN THE
E10
The E10 will play using whatever type of AA batteries
are in the battery compartment, but only nickelmetal-hydride batteries can be charged within it. If
non-rechargeable batteries are installed, the E10
has a built-in safeguard system that will prevent
them from being charged. This safeguard system
works with the E10 set to either SYSTEM SET
CODE 28 or 29, as described below, and only with
the included AC Adaptor/Charger.
WARNING: Use only the included AC
Adaptor/Charger to recharge Ni-MH batteries. Use
of any other device may cause the rechargeable
batteries to overheat, become damaged and possibly
damage the E10. The built-in safeguard system,
described above, works only with the included AC
Adaptor/Charger. Damage caused to the E10
resulting from failure to observe this warning is not
covered by the warranty and voids the warranty.
76
Page 5

E10 OPERATION MANUAL
GETTING STARTED continued
The included AC Adaptor/Charger may be used to
charge 4 Ni-MH rechargeable batteries (included)
when installed onto the E10’s battery compartment. Before charging, the E10 must be set up for
use with Ni-MH batteries and the correct charging
rate must be selected for them to be charged. Ni-MH
batteries are manufactured with specific capacities
rated in milliamp-hours (mAh). These capacities vary
from about 1100 mAh up to 2400 mAh at the time
of this writing (usually printed on the batteries). For
proper charging without damage to the batteries, the
correct charging rate must be set. To set the
charging rate, plug in the AC adaptor and turn the
E10 off.Then follow the instructions below.
1. Enter SYSTEM SET CODE 28. See instructions in
the section titled SYSTEM SET CODES.
2. While ‘1100’ flashes in the display, use the UP
HOUR/DOWN MIN buttons to select the mAh
rating of your Ni-MH batteries.
To charge Ni-MH batteries:
1. Install 4 Ni-MH AA batteries.
2. Connect the adaptor/charger to the AC wall
3. Press/release the CHARGER ON/OFF button.
‘CHARGE’ will flash in the display and the
charge indication bars will advance from left to
right on the 0 – 5 scale in the upper left corner
of the display.The digits in the upper right corner
of the display will change to 00:00 and will
count up in minutes and hours until charging
is finished.
Once charging is finished, ‘CHARGE’ will stop
flashing and the charging indicator bars in the
upper left corner will stay on 5.
Charging time varies depending on the milliamphour rating of the batteries.The charging circuit
automatically senses the milliamp-hour rating of
the batteries and will charge them for the correct
amount of time. Charging time can take from 6 hours
for 1100 mAh batteries to 13 hours for 2300 mAh
batteries.The charging circuit will sense when the
batteries are fully charged and automatically
go into trickle-charge mode, thus safeguarding the
batteries from being overcharged. Disconnecting
the adaptor/charger ACG-10 from the E10 or
pressing the CHARGER ON/OFF button will also
stop charging.
6 BASIC RADIO OPERATION
TURNING THE E10 ON AND OFF
The E10 can be turned on by the two methods
shown below.To turn it off, press the
POWER/SLEEP button (1).
1. BATTERY SAVER/TIMER METHOD:
Perform a quick, short press of the POWER/SLEEP
button (1). This turns the radio on with 90 in the
display and causes the radio to shut off automatically
after 90 minutes.The sleep timer symbol, , also
appears in the display.To change the automatic
shut off time from 90 minutes to the number of
minutes-to-play of your preference, use the Up/Hour
or Down/Min. buttons (9, 10) immediately after
turning on the radio.This allows selection of 1 – 480
minutes of playtime before automatic shut-off
occurs.The number of minutes that you last set are
also used the next time the radio is turned on.
2. TIMER-DEFEAT METHOD:
This method defeats the automatic minute timer
and causes the radio to stay on until deliberately
turned off, until the batteries drain or indefinitely if
used with an AC adaptor. Hold down the POWER
button for about 3 seconds, then release. Note that
‘On’ appears in the display and that he sleep timer
symbol does not appear when this method is used.
SIGNAL STRENGTH AND
BATTERY STRENGTH INDICATOR
When the radio is turned off, the upper left corner
of the display (6) shows battery strength on the
1–5 scale (36), with the triangle pointer (33) under
the battery symbol (34) on the far left side of the
scale.When the radio is turned on, the pointer is
under the antenna symbol (35) and the 1-5 scale
shows relative signal strength.
VOLUME AND TONE CONTROLS
• The volume control (31), labeled VOLUME, is
located on the right side of the radio.To change the
volume, rotate the volume control knob.
• The tone control (24), on the left side of the radio
is labeled TREBLE/BASS. Use the position producing
the sound that you like best.
USING EARPHONES
Earphones/headphones with a 1/8 inch stereo plug
can be used. Plug them into the earphone socket
(25) on the left side of the radio.
SELECTING FM, AM OR
SHORTWAVE
When listening to FM or shortwave, fully extend the
telescopic antenna (5). It need not be extended
when listening to AM stations. After turning on the
E10, perform quick, short presses of the ‘FM/AM-ATS’
button (15) to select FM or AM. Note that when the
AM band is selected, the display shows MW, not AM.
To select SW press the ‘SW METER BAND’
button (16). Each sequential press of the SW METER
BAND button or of the UP/HOUR or DOWN/MIN
buttons places the radio at the beginning of a specific
shortwave meter band. The frequency digits (46)
appear toward the center portion of the display.The
local stations of the area that you are currently in
will be heard on AM and FM, while shortwave
stations from around the world can be heard on SW.
NOTE: If you are new to shortwave, see the special
shortwave sections later in this manual.
98
Page 6

E10 OPERATION MANUAL
BASIC RADIO OPERATION continued
LISTENING IN FM STEREO
FM stereo can be heard when using earphones/
headphones.To hear FM in stereo, press the FM
STEREO button (14). ‘FM-STEREO’ will appear in
the display.
SETTING UP AM AND FM
OUTSIDE OF NORTH AMERICA
You can skip this section if you are in North
America and just purchased the E10. It is already
set-up in the factory for use in North America.
Outside of North America,AM stations (MW in the
E10’s display) are spaced in 9 KHz tuning steps.
The FM frequency range may be different from that
used in North America, e.g. like that used in Japan,
76-108MHz. To make these changes, see the
SYSTEM SET CODE TABLE and the instructions
CHANGING SYSTEM SET CODES.
TUNING IN STATIONS
There are four ways to tune-in stations, described
below.They are Manual Tuning, Auto-scan Tuning,
Direct Frequency Entry and Fine Tuning.
MANUAL TUNING
Quick, short presses of the Up/Hour-Down/Min.
buttons (9,10) enables tuning up or down frequency.
AUTO-SCAN TUNING
Pressing the Up/Hour or Down/Min. buttons (9, 10)
for just over 1 second enables automatic scan-tuning.
The radio will then automatically stop on the next
station encountered. Use the Up/Hour button to
auto-scan upward in frequency and the Down/Min.
button to auto-scan downward in frequency.
DIRECT FREQUENCY ENTRY
When the desired frequency is known, it can be
entered via the numeric keypad (17) and the ‘Enter’
button (20). First, make sure that the correct band
is selected - AM, FM or SW.
Most AM and Shortwave frequencies are designated
in kilohertz (KHz), e.g. 810 KHz or 9475 KHz. All
FM frequencies are designated in megahertz
(MHz), e.g. 102.9 MHz. To enter such frequencies:
1. Press/release the ‘Enter’ (20) button.
2. Enter the frequency using the numeric keypad (17).
Sometimes Shortwave frequencies are designated
in megahertz (MHz). If you encounter such a shortwave frequency and it has less than three digits
after the decimal point (e.g. 15.10 MHz or 6.92
MHz), then use the following method to enter it.
However, if there are three digits after the decimal
point (e.g. 15110 MHz or 5.975 MHz), use the
method described previously.
1. Press/release the ‘Enter’ (20) button.
2. Enter the frequency using the numeric keypad
3. Press/release the ‘Enter’ button again.
TUNING KNOB
The TUNING knob control (28) is located on the
right side of the radio. Use it to ‘fine-tune’ stations
or as you would a tuning knob.
(17).
BASIC RADIO OPERATION continued
LOCKING THE TUNING KNOB
To prevent accidentally tuning off of the radio station, the tuning knob can be locked while the radio
is turned on. To lock it, press and hold the TUNING
MODE button for about three seconds. Notice that
the key-lock symbol flashed twice in the lower right
side of the display.The tuning knob is now locked.
If turned, the frequency does not change and the
key-lock symbol flashes.To unlock it, press the
TUNING MODE button for about three seconds.
TUNING MODE – FAST TUNING
– SLOW TUNING
The TUNING MODE button (8) allows selection of
fast or slow tuning when using the tuning knob or
the UP/HOUR and DOWN/MIN controls. FAST or
SLOW appear in the display.When tuning with the
tuning knob (28), fast tuning is usually appropriate.
When tuning with the UP/HOUR and DOWN/MIN
buttons, use slow tuning to tune in stations and
fast tuning to move up or down frequency at a
rapid rate.Then use slow to actually tune in stations. Experiment with this control to see which
tuning mode that you prefer.
USING THE BANDWIDTH
BUTTON
The BANDWIDTH button (14) is used when listening to AM and SW stations. Its purpose is to help
minimize interference.The preferred setting is
WIDE, which provides best audio fidelity. Use NARROW when there is interference.W or N will
appear in the display.
USING THE SW IF SET
CONTROL
The SW IF SET control (13) shifts the intermediate
frequency oscillator, which may help to minimize
interference.This functions both for AM and shortwave.When activated, pIF shows in the display.
CANCELLING TUNE-MUTE
The tune-mute cancellation capability makes the
E10 ‘feel’ more like an analog tuned radio, even
though it’s a high-tech digital tuner. The difference
is somewhat subtle and is mainly noticeable in
slow tuning mode using the tuning knob. Note that
it may be difficult for some to actually hear the
difference. For those who can hear the difference,
tuning may sound somewhat ‘smoother’ when
using the tuning knob.To cancel Tune-Mute,
press/release the SYSTEM SET button, then the
TUNING MODE button. The display will read OFF.
The Tune-Mute feature is now cancelled.To reactivate, do the same and the display will read ON.
1110
Page 7

E10 OPERATION MANUAL
7 CLOCK AND TIMER FEATURES
SETTING THE CLOCK
The factory has set the clock to function as a 24hour format clock. If you prefer a 12 hour, AM/PM
clock format, see the section titled CHANGING THE
CLOCK FROM 24 TO 12 HOUR FORMAT in the
section titled SYSTEM SET CODES.
There are three methods for setting the clock.
CLOCK SET METHOD 1 – UP/HOUR
AND DOWN/MIN BUTTONS:
1. Turn the radio off. The clock digits appear in the
center of the display (40).
2. Press/release the button labeled ‘Time Set’ (18).
The clock’s digits flash in the display.
3. Within 5 seconds, set the hour using the
Up/Hour button and the minutes using the
Down/Min button (9, 10).Within 5 seconds of
finishing, press/release the TIME SET button or
wait until the clock digits stop flashing.
CLOCK SET METHOD 2 – NUMERIC
KEYPAD:
When using this method, only 24 hour key-in format
can be used to enter the time, even if the clock is
set for 12 hr format time display.
1. Turn the radio off. The clock digits appear in the
center of the display (40).
2. Press/release the button labeled ‘Time Set’ (18).
The clock’s digits flash in the display.
3. Use the numeric keypad to key-in the time in 24
hour format. Within 5 seconds of finishing,
press/release the TIME SET button or wait until
the timer digits stop flashing.
CLOCK SET METHOD 3 – TUNING
KNOB
1. Turn the radio off. The clock digits appear in the
center of the display (40).
2. Press/release the button labeled ‘Time Set’ (18).
The clock digits flash in the display.
3. Within 5 seconds, press/release the Up/Hour
button, then use the tuning knob to set the hour.
4. Within 5 seconds, press/release the Down/Min
button, then use the tuning knob to set the
minutes.
5. Within 5 seconds of finishing, press/release the
TIME SET button or wait until the clock digits
stop flashing.
SETTING THE TIMERS (USE AS
WAKE-UP ALARM)
The E10 has two, independently programmable
timers, timer A and B, enabling the E10 to turn on
and play the radio for 30 minutes and then turn
off.The timers can be used as wake-up alarms.
After setting a timer, store a radio station into
timer memory and activate the timer. See the next
sections titled STORING A RADIO STATION INTO
TIMER MEMORY and ACTIVATING/DEACTIVATING
THE TIMER.
NOTE: A radio station must be stored into timer
memory. If this is not done, there will only be static
once the timer is activated.
CLOCK AND TIMER FEATURES continued
When the timer activates, it turns on the radio,
with the timer activation symbol appear flashing in
the display.The radio will play the station stored
into timer memory for 30 minutes or until you turn
the radio off with the POWER/SLEEP button. The
‘snooze’ feature can also be used (see section
titled USING THE SNOOZE FEATURE).
There are three methods to set the timer.
TIMER SET METHOD 1 – UP/DOWN
MIN BUTTONS:
1. Turn the radio off. The timer digits (38) appear
in the upper right corner of the display.
2. Press and hold down TIMER A or B button for
about two seconds.The timer digits flash in the
display.
3. Within 5 seconds, set the hour using the
Up/Hour button and the minutes using the
Down/Min button. Within 5 seconds of finishing,
press the A or B button once or just wait until
the timer digits stop flashing.
TIMER SET METHOD 2 – NUMERIC
KEYPAD:
1. Turn the radio off. The timer digits (38) appear
in the upper right corner of the display.
2. Press and hold down TIMER A or B button for
about two seconds.The timer digits flash in the
display.
3. Use the numeric keypad to key-in the wake up
time in 24 hour format. Within 5 seconds of
finishing, press the A or B button once or just
wait until the timer digits stop flashing.
TIMER SET METHOD 3 – TUNING
KNOB
1. Turn the radio off. The timer digits (38) appear
in the upper right corner of the display.
2. Press and hold down TIMER A or B button for
about two seconds.The timer digits flash in the
display.
3. Within 5 seconds, press/release the Up/Hour
button, then use the tuning knob to set the
hour.
4. Within 5 seconds, press/release the Down/Min
button, then use the tuning knob to set the
minutes.
5. Within 5 seconds of finishing, press/release the
TIMER A or B button that’s being worked with
or wait until the timer digits stop flashing.
STORING A RADIO STATION
INTO TIMER MEMORY
To hear a radio station when the timer activates,
the station must be stored into timer memory.
Here’s the 3 step procedure:
1. Turn on the E10 and tune to the desired station.
2. Press/Release the MEMORY button.
3. Press/Release the TIMER A or TIMER B button.
The timer symbol flashes in the display twice.
NOTE: To monitor the frequencies stored into
timer memory A and B, perform a three second
press of the SYSTEM SET button while the radio is
turned off.The set code information and the
frequencies stored into timer memory flash in the
display.
1312
Page 8

E10 OPERATION MANUAL
CLOCK AND TIMER FEATURES continued
ACTIVATING/DEACTIVATING
THE TIMER
For a timer to turn on the radio, it must be activated.
A timer can be activated/deactivated with the radio
on or off.To activate the timer, press/release the
TIMER A or TIMER B button. The timer symbol will
appear in the display.To deactivate a timer,
press/release the TIMER A or TIMER B button. The
timer symbol will disappear from the display.
USING THE SNOOZE FEATURE
When the timer activates and turns the radio on,
the timer activation symbol (39) appears flashing in
the display.While it is flashing, press/release the
SNOOZE/LIGHT button (7). The radio will turn off
and then turn on again in 10 minutes.This process
can be repeated 3 times.
8 WORKING WITH MEMORY
At the factory, the E10 is set up with 10 pages of
memory, each page holding 50 frequencies. This
enables storing of 500 frequencies into memory.
This factory setting can be changed and tailored to
your personal needs or can be left as-is.When first
learning to store stations into memory, we suggest
using the factory setting. To change the factory
setting, see the section CUSTOMIZING MEMORY
PAGES. When working with memory, the term
PRESET appears in the display under the memory
numbers.
STORING STATIONS INTO
MEMORY
1. Turn on the radio.
2. Tune to the desired station.
3. Press/release the MEMORY button (18). Note
that the memory number digits, labeled PRESET
(48) flash in the upper right corner of the display.The memory page number, labeled PAGE,
also appears, but does not flash.
4. Within 5 seconds use the numeric keypad to
enter the memory number that you wish to
store the station into. For memories 1-9, enter
the numbers as 01 – 09.
5. Within 5 seconds press the MEMORY button, or
wait 5 seconds.This finalizes storing into memory
and after a few seconds, the upper right corner’s
display returns to showing the clock.
SELECTING/CHANGING
MEMORY PAGES
To select/change memory pages:
1. Press/release the PAGE button (11). The page
number flashes in the display.
2. Within three seconds, use either the UP/HOURDOWN/MIN button to change to the page of
your choice. Alternately, use the numeric keypad
to enter the page.
3. Press/release the PAGE button to finalize the
page change.
WORKING WITH MEMORY continued
ACCESSING WHAT IS STORED
INTO MEMORY
There are three ways to access what has been
stored into memory: Direct Memory Access, Manual
Memory Search and Memory Auto-scan.These
three methods are described below.When the
memory page and memory preset numbers appear
in the upper right corner of the display, as it will in
the descriptions below, the radio is in MEMORY
ACCESS MODE. This mode can be exited any time
with a press/release of the SCAN MODE button (12).
If you first need to change memory pages, see the
previous section, SELECTING/CHANGING MEMORY
PAGES.
DIRECT MEMORY ACCESS
Use the numeric keypad to key-in the memory
number. For example, if the desired radio station is
in memory number 01, just press ‘0’, then ‘1’, and
it will go to memory 01.
MANUAL MEMORY SEARCH
Manual Memory Search enables manual searching
through the memories within a memory page, as
shown below:
1. Press/release the SCAN MODE (12) button.
2. Use quick, short presses on the Up/HourDown/Min. buttons or use the tuning knob to
search through the memories.
3. Press the SCAN MODE button when finished.
MEMORY AUTO-SCAN
Memory Auto-scan enables scanning through the
memories within the selected memory page. Each
filled memory is accessed for about 5 seconds, after
which the scan move on to the next used memory
automatically, staying on it for about 5 seconds.
This continues indefinitely on the selected page
until deliberately stopped. Unused memories are
not accessed.
1. Press/release SCAN MODE (12) button.
2. Press/hold either the Up/Hour or Down/Min.
To stop memory preset auto-scan, press/release
either the Up/Hour or Down/Min. button.
DELETING A MEMORY’S
CONTENTS
1. Press/release the SCAN MODE button (12).
2. Use the Up/Hour or Down/Min. button (5,6) to
3. Press/hold the MEMORY button (18) for about 2
4. While ‘del’ is still flashing, press/release the
button for about a second. Then release it. Note
that PRESET flashes under the memory number,
indicating that memory scanning is functioning
with each memory being scanned for about 4
seconds. It then moves on to the next memory
for another 4 seconds.
select the memory preset location of the frequency that you wish to delete.Alternately, use
the numeric keypad to enter the memory number.
seconds and then release it. ‘dEL’ appears flashing
in the display.
MEMORY button.
1514
Page 9
E10 OPERATION MANUAL
WORKING WITH MEMORY continued
DELETING ALL MEMORY PAGE
CONTENTS
1. Press/release the PAGE button (11).
2. Press/hold the MEMORY button (18) for 5
seconds and then release it. ‘Del’ and PAGE
(48, 49) appear flashing in the display.
3. Within 2 seconds, press/release the MEMORY
button.
MOVING A STORED FREQUENCY
A stored frequency can be moved to a different
memory or memory page.
1. Turn on the radio.
2. Press/release the PAGE button.
3. Within 3 seconds, use the UP/HOUR or
DOWN/MIN button to select the required
memory page.
4. Press/release the MEMORY button twice.
5. Within 5 seconds use the numeric keypad to
enter the memory number that you wish to
store the station into.
6. Within 5 seconds press/release the MEMORY
button.
CUSTOMIZING MEMORY PAGES
The E10 is configured at the factory with 10 memory
pages, each page having 50 memories, for a total
of 500 memories.You can change this set-up via
the SYSTEM SET CODES, shown below.
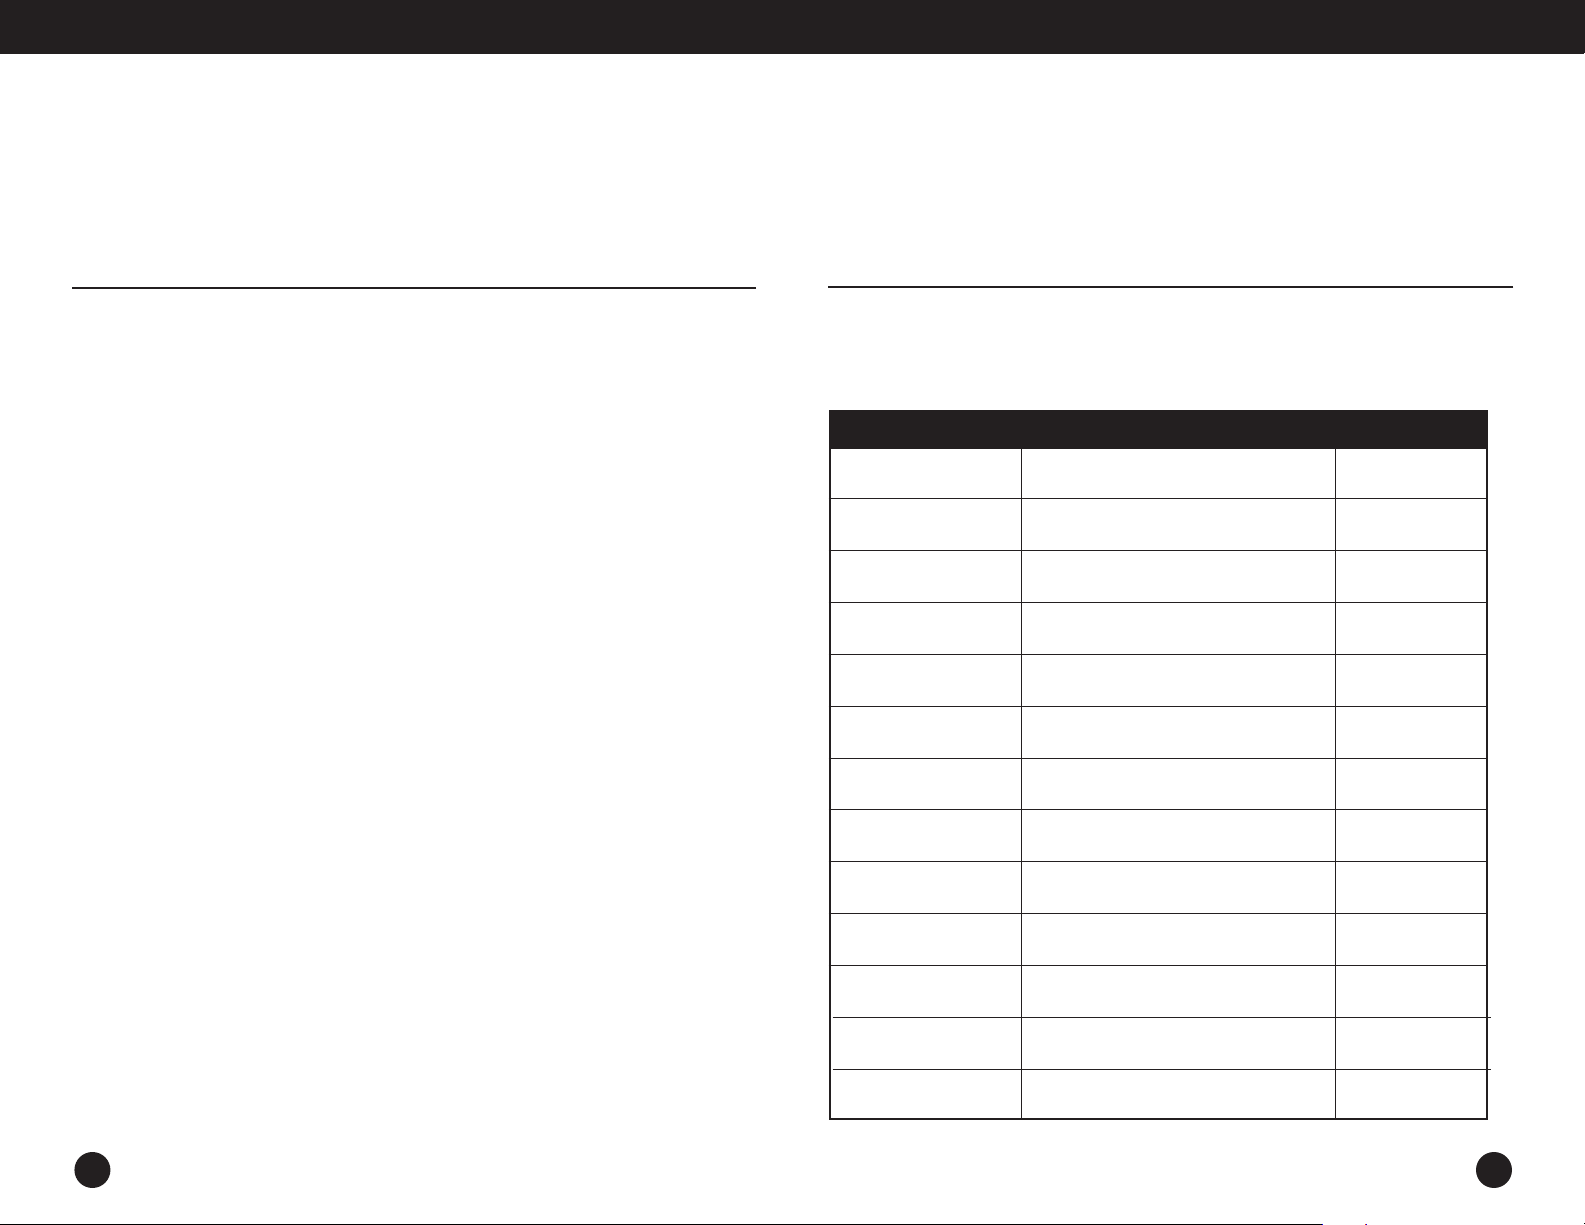
9 SYSTEM SET CODES
System Set Codes allow the radio to be tailored to your needs by changing certain programmable functions.These
functions and their descriptions are noted in the table.
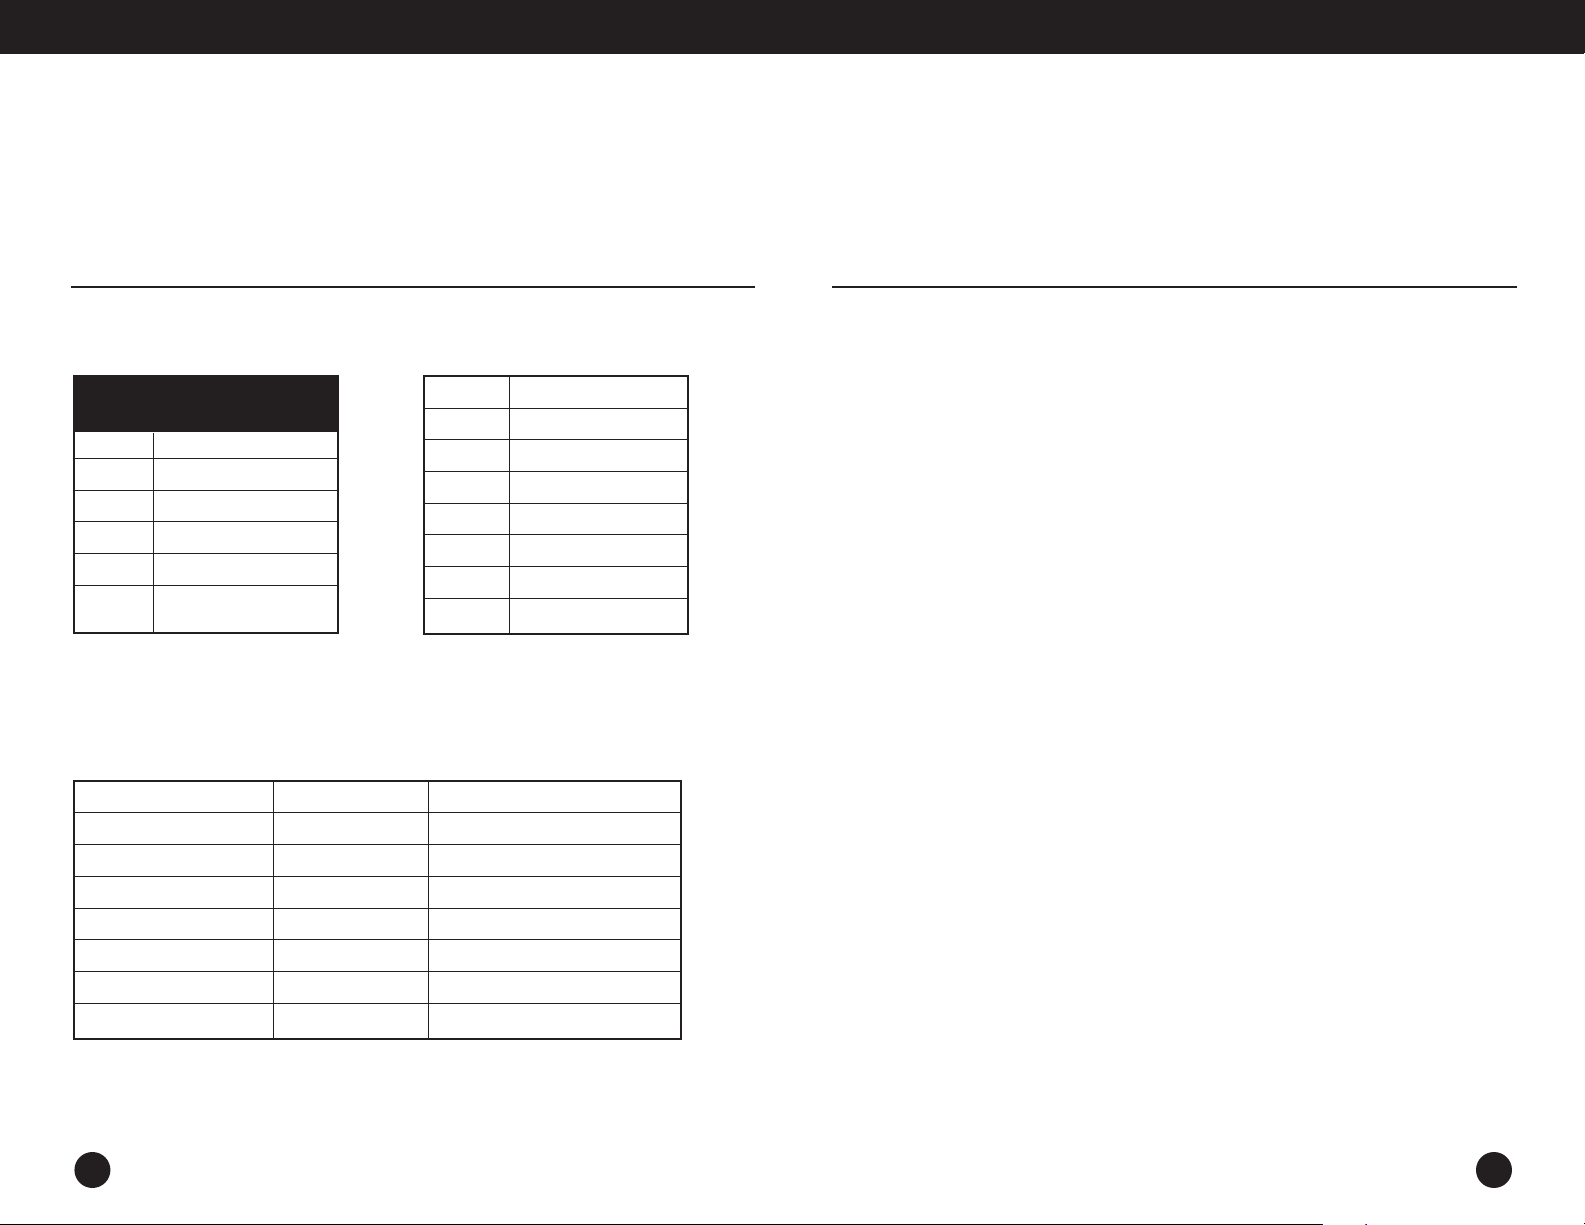
SYSTEM SET CODE TABLE
CODE NUMBER
00 (factory default setting)
20
25
50
09
10
12
24
22
28
FUNCTION
Divide the memories into 10 pages
with 50 locations
Divide the memories into 20 pages
with 25 locations
Divide the memories into 25 pages
with 20 locations
Divide the memories into 50 pages
with 10 locations
Set the tuning steps for MW (AM)
to 9KHz
Set the tuning steps for MW (AM)
to 10KHz
Set the clock system to 12 Hr
format
Set the clock system to 24 Hr
format
Check all the segments on LCD
display
Rechargeable battery to be used
IN DISPLAY
10:50
20:25
25:20
50:10
9kHz
10kHz
12H
24H
Ni-MH
29
76
87 (factory default setting)
Normal AA battery to be used
Set the FM frequency range to
76-108MHz (for Japan)
Set the FM frequency range to
87-108MHz (N.America/Europe)
76 108
87 108
1716
Page 10

E10 OPERATION MANUAL
SYSTEM SET CODES continued
CHANGING SYSTEM SET
CODES
To enter a system code of your choice, use the
procedure below.
1. Turn off the radio.
2. Press/release the SYSTEM SET button (20). Note
that ‘- - ‘ (51) appears in the upper right corner of
the display and the clock digits disappear.
3. Within 5 seconds, enter the desired numeric
code with the numeric key pad, then immediately
press/release the button labeled SYSTEM SET. The
code ICON (52) will briefly appear in the lower
right corner of the display.
CHANGING THE CLOCK FROM
24 TO 12 HOUR FORMAT – AN
EXAMPLE OF CHANGING A SYSTEM SET
CODE
The instructions below serve as an excellent example
of how to change a system set code, in this case
changing the clock system to a 12 hour format:
1. Turn off the radio.
2. Press/release the SYSTEM SET button. Note that
‘- - ‘ appears in the upper right corner of the display
and the clock digits disappear.
3. Within 5 seconds, enter 12 with the numeric
keypad, then immediately press/release the SYSTEM
SET button. ‘12H’ briefly appears in the display.
DEFAULT FACTORY SYSTEM
SET CODES
When shipped from the factory, the radio’s System
Set Code Table is set up as follows. Changes can
be made via the procedure shown in the section
titled CHANGING SYSTEM SET CODES.
• Ten pages with 50 memories each. Code 08.
• 10 KHz AM (MW) tuning rate. Code 10.
• 24 hour clock system. Code 24.
• Rechargeable batteries to be used. Code 28.
• 87-108 MHz FM frequency coverage. Code 87.
MONITORING THE CURRENT
STATUS OF SET CODES AND
OTHER SETTINGS
Performing a three second press of the SYSTEM
SET button, with the E10 turned off, allows
monitoring of key set codes and other settings.This
information quickly flashes in the display in the
following order.
1. Time format
2. 9 or 10 kilohertz setting
3. FM tuning range setting
4. Timer A’s radio frequency
5. Timer B’s radio frequency
6. Rechargeable battery milliamp-hour setting
10 ADDITIONAL E10 CONTROLS
USING THE LIGHT
A quick, short press/release of the SNOOZE/LIGHT
button (7), located on the front of the radio’s upper
right corner, will turn on the display light, shining
from the left side of the display, for about 5 seconds.
A longer press/release of the button (about 3
seconds) will cause it to stay on indefinitely (note
that this will decrease battery life). Turn off the
light with a quick short press of the button.
The E10 has a ‘timed backlight’ feature. When this
feature is activated, pressing any key during the
hours of 6 pm to 7 am activates the backlight for 3
seconds. Follow the instructions below to turn this
feature on or off.
1. Turn on the radio.
2. Press/release the ‘ENTER/SYSTEM SET button.
3. Press/release the LIGHT/SNOOZE button.
The display shows either ON or OFF, depending on
its last state.
USING THE ANTENNA GAIN
SWITCH
The Antenna Gain switch (23) has three positions,
DX, NORMAL and LOCAL. This switch should
normally be in the DX position, providing maximum
receiving performance. If the AM or Shortwave
station that you are listening to is overwhelmingly
powerful and causes distortion, try the NORMAL
or LOCAL position. This switch is not used for FM
stations.
USING THE ANTENNA
TRIMMER CONTROL
This control knob, labeled ANT TRIM and located
on the right side of the E10, enables optimization
of the E10’s telescopic antenna when listening to
shortwave.While listening to the station, adjust the
knob for best reception.
USING THE LOCK BUTTON
Pressing the LOCK button causes all button-activated
controls to be ‘locked’ and the lock symbol
appears in the lower right corner of the display.A
quick, short press engages the LOCK feature.A
longer press disengages it and the symbol disappears.This is an excellent feature to use when traveling, as it keeps the radio from being accidentally
turned on. Before placing the radio into a suitcase,
purse or briefcase, turn it off and then lock it.This
control does not disengage timer functions.
USING THE EXTERNAL
ANTENNA SOCKET
The external antenna socket is used to improve
shortwave or FM performance.There are many such
antennas on the market today.Typing in ‘shortwave
antennas’ or ‘FM antennas’ on your favorite
Internet search site will provide further information
if you with to purchase or make such an antenna.
18
19
Page 11

E10 OPERATION MANUAL
11 LISTENING TO SHORTWAVE STATIONS
Are you new to shortwave listening? If so, you’ll
want to read this section and the next section
called UNDERSTANDING SHORTWAVE BANDS.
WHAT ARE SHORTWAVE STATIONS?
These are radio broadcast stations around the
world broadcasting on frequencies that can be
heard over vast distances, often many thousands of
miles. In the United States, there are also about 30
domestic shortwave broadcasters with religious,
politically and ideologically oriented broadcasts.
WHY LISTEN TO SHORTWAVE
STATIONS?
There are many reasons why you may enjoy shortwave stations. Here are just some, as reported to
us by our customers.
• Listening to news and information from other
world sources often exposes you to different and
unique perspectives on national and world events.
• Exposure to other languages and cultures,
including their music and perspectives. Hearing a
country’s native or ‘folk’ music can be very enjoyable, even if you don’t understand the language.
• Learning a language by hearing native speakers.
• Keeping in touch with another part of the world,
perhaps your original homeland or that of your
family’s heritage.
• Religious, politically and ideologically oriented
broadcasts.
GENERAL SHORTWAVE ‘RULESOF-THUMB’
• Night shortwave reception is usually better than
daytime shortwave.This can change from time-totime, so it’s worth checking the bands during the
day too.
• During daytime the most active shortwave bands
are 13, 15, 16, 19, and 22 meters. 16 and 19 usually being the best. At night, the most active bands
are 25, 31, 41 and 49 meters, with 31 and 49 usually best.
• Around sunset and sunrise, both the day and
night bands may be good, sometimes exceptionally
good. Listening at these times can often be quite
rewarding.
• The construction materials of some buildings
severely block shortwave signals.To counteract this,
hold the radio in your hands and get very close to
a window.
LISTENING TO SHORTWAVE STATIONS continued
SELECTING A SHORTWAVE
METER BAND WITH THE E10
All 14 of the international broadcast bands can be
accessed with the E10. The bands are numbered
120, 90, 75, 60, 49, 31, 25, 22, 19, 16, 15, 13 and
11 meters and are commonly called ‘Meter Bands’.
The E10 offers two ways to access a shortwave
band. Each method places the tuner at the beginning of the band’s frequency range.
1. Each successive quick, short press of the button
labeled SW METER BAND (16) places the radio at
the beginning of a band. While pressing the button, the band number shows in the upper right corner of the display (50) and disappears a few seconds after it is released, causing the clock to reappear in the corner. Start tuning only after the clock
reappears. If you don’t wait, then method 2, below
will automatically be used.
2. Perform one quick, short press of the button
labeled SW METER BAND, immediately followed by
quick, short presses of either the Up/Hour or
Down/Min. tuning buttons.The band number
appears in the upper right corner of the display.
Once the band of choice is selected, start tuning
after the clock reappears in the upper right corner.
AUTO-SCAN TUNING WHILE IN
SHORTWAVE
In shortwave, auto-scan tuning scans in the shortwave frequency ranges noted in the Band Chart
below.To tune shortwave frequencies that are inbetween these ranges, or outside of these ranges,
use one of the other tuning methods, e.g. Regular
Tuning (manual tuning) or Direct Frequency Entry
as discussed titled TUNING IN STATIONS.
2120
Page 12
E10 OPERATION MANUAL
LISTENING TO SHORTWAVE STATIONS continued
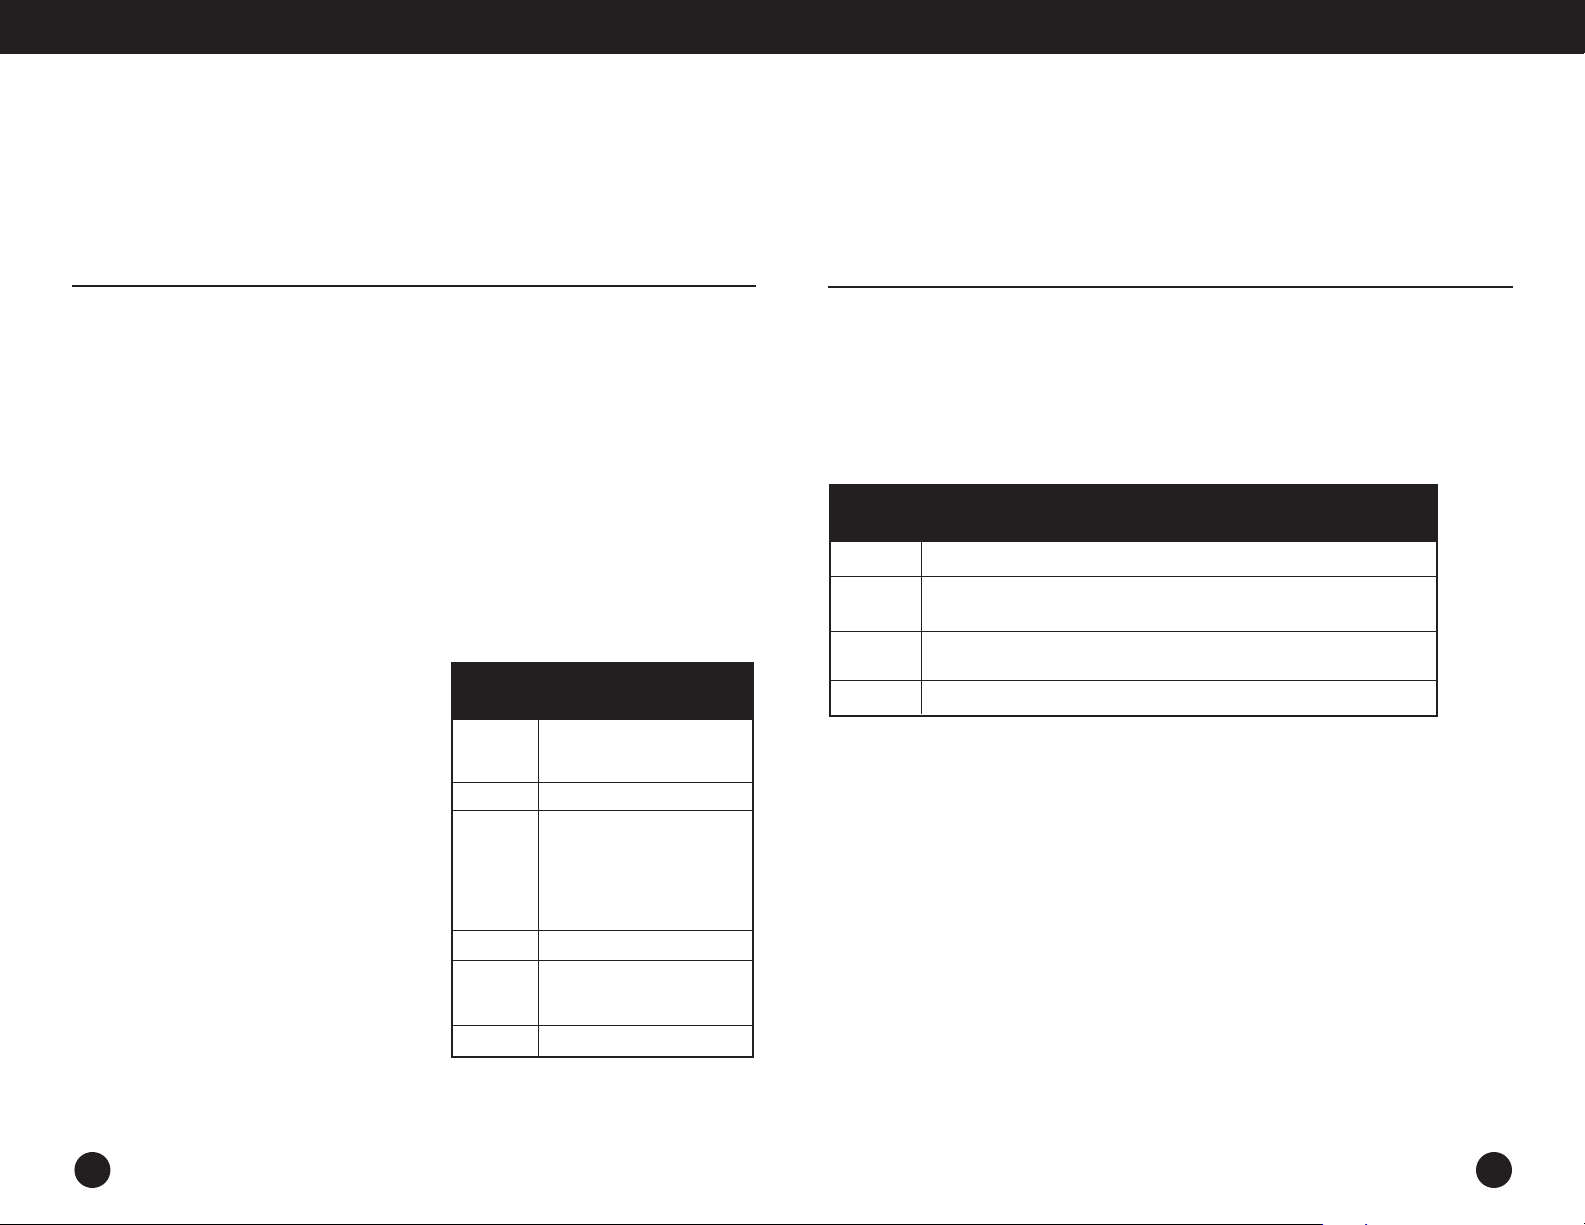
BAND CHART OF SHORTWAVE AUTO-SCANING RANGES
BAND
(METERS)
120
90
75
60
49
41
SHORTWAVE TIME STATIONS (NORTH AMERICA)
The United States and Canada have shortwave time stations. The time of day is broadcast continually in
Universal Time, also know as UTC and Greenwich Mean Time. The frequencies are noted below.
CHU-time(Canada)
CHU-time(Canada)
CHU-time(Canada)
WWV-time/weather(US)
WWV-time/weather(US)
WWV-time/weather(US)
WWV-time/weather(US)
WWV-time/weather(US)
FREQUENCY RANGE
2250 – 2550
3150 - 3450
3850 - 4050
4700 - 5100
5800 – 6300
7100 – 7500
3330
7335
14670
2500
5000
10000
15000
20000
31
25
22
19
16
15
13
11
Best at night
Day/night
Best during daylight
Best at night
Best at night
Day/night
Best during daylight
Best during daylight
9400 – 10000
11500 – 12150
13500 – 13900
15000 – 15900
17450 - 18000
18850 - 19100
21450 - 21950
25600 - 26100
LISTENING TO SHORTWAVE STATIONS continued
SHORTWAVE PUBLICATIONS:
FINDING SPECIFIC STATIONS
To help find specific stations and their broadcast
times, frequencies and target areas, review the two
excellent publications shown below.They are
available from major bookstores and at online
booksellers.
PASSPORT TO WORLD BAND RADIO. Published by
International Broadcasting Services.Address: IBS
North America, Box 300, Penn’s Park, PA 18943.
Phone: 215-598-3794. Web: www.passband.com.
WORLD RADIO TV HANDBOOK. Published in North
America by Watson Guptil Publications, 770
Broadway – 7th Floor, New York, NY 10003-9595.
www.watsonguptill.com.
Another way to find shortwave station information
is to use an Internet search site, typing in search
criteria such as ‘shortwave radio stations’ or ‘shortwave frequencies’.
LEARNING MORE ABOUT
SHORTWAVE
To learn more about shortwave see the next section
titled UNDERSTANDING SHORTWAVE BANDS.
Another successful way to learn more is to use your
favorite Internet search site.Type in ‘shortwave
listening’ or ‘shortwave stations’ and many articles
will show.
2322
Page 13

E10 OPERATION MANUAL
12 UNDERSTANDING SHORTWAVE BANDS
THE KEY TO ENJOYING YOUR
SHORTWAVE RADIO
Now that you have a shortwave radio, no doubt
you’ll want to hear worldwide stations right away. If
you’re new to shortwave, please take some time to
learn the basics outlined below. Even if you are an
experienced shortwave listener, you may find this a
useful refresher.
WHAT ARE BANDS?
To fully enjoy shortwave listening, this is the most
important concept to learn right away.
To successfully listen to shortwave stations you must
know how to find them. They are found in the shortwave bands. If you have ever listened to AM or FM
radio, then you already know what a band is. The
AM band is a frequency range stretching form 530
to 1600 kilohertz, the FM band is 66-108 megahertz.
A band is simply a frequency range where
stations are located. When you look for stations in
these “bands”, you simply tune around with your
tuning buttons (or the tuning knob on an analog
radio) until you find a station you like. Shortwave is
similar and the shortwave bands have names like 25
meters, 31 meters, 49 meters, etc.These are abbreviated 25m, 31m and 49m. Just like in AM and FM
radio, one simply gets into the shortwave band and
tunes around, looking for stations.
For example, the 19 meter shortwave band encompasses the frequency range of 15100 to 15600
kilohertz. In the chart below is a list of the shortwave bands used for international shortwave
broadcasts and their corresponding frequency
ranges. Since some radios show frequency in megahertz and some in kilohertz, both are shown here.
The E10 shows shortwave radio frequencies in kilohertz, KHz.
The following information can be used with any
shortwave radio. Look at your radio’s tuning scale
or digital display (or owner’s manual) to determine
which frequency designation it uses in shortwave.
Most radios use the abbreviations KHz or MHz. On
some shortwave radios these frequencies will look
like 15100 KHz, 15105 KHz or 15110 KHz, but on
other radios they might look like this: 15.1 MHz,
15.105 MHz or 15.11 MHz. That’s because some
radios show frequencies as kilohertz and others
show the frequencies as megahertz, as in the
accompanying table.The exact frequency ranges for
these bands may vary somewhat from one radio
model to another. This is perfectly OK. On some
radios the bands are clearly marked, on others they
are not marked at all. If it is not apparent how to
get into a band on your radio, consult the owner’s
manual, the etón Corporation web site (www.etoncorp.com) or contact etón Corporation and we’ll
show you how this is done for your model.
UNDERSTANDING SHORTWAVE BANDS continued
A HELPFUL ANALOGY:
A SHORTWAVE BAND IS LIKE A STREET WITH
MANY INDIVIDUAL ADDRESSES ON IT.
Think of a shortwave band as you would a street
with a full range of individual addresses on it, each
address is a specific frequency.The 19 meter band
could be called 19 Meter Street. As on any street,
we have a range of addresses encompassing
THE GENERAL SHORTWAVE BAND CHART, SHOWN BELOW,
SHOWS ALL OFFICIALLY ALLOCATED SHORTWAVE BANDS.
BAND MEGAHERTZ (MHz) KILOHERTZ (KHz)
120m
90m
75m
60m
49m
41m
31m
25m
22m
19m
16m
13m
11m
2.300-2.500MHz
3.20-3.40 MHz
3.90-4.00 MHz
4.750-5.060 MHz
5.950-6.20 MHz
7.10-7.60 MHz
9.20-9.90 MHz
11.600-12.200 MHz
13.570-13.870 MHz
15.10-15.80 MHz
17.480-17.90 MHz
21.450-21.850 MHz
25.60-26.10 MHz
individual house numbers such as 15100, 15105,
15110, etc., each of these house numbers
representing an individual house that you could
visit on the street. In the 19 meter shortwave band,
these ‘addresses’ or ‘house numbers’ are called
frequencies and on each frequency you might visit
a different shortwave radio station.
2300-2500 KHz
3200-3400 KHz
3900-4000 KHz
4750-5060 KHz
5950-6200 KHz
7100-7600 KHz
9200-9900 KHz
11600-12100 KHz
13570-13870 KHz
15100-15800 KHz
17480-17900 KHz
21450-21850 KHz
25600-26100 KHz
2524
Page 14
E10 OPERATION MANUAL
UNDERSTANDING SHORTWAVE BANDS continued
DAY BANDS AND NIGHT BANDS
THE DIFFERENCE IS IMPORTANT
Because shortwave signals depend on such factors
as the sun, the ionosphere and interaction with the
earth itself, signals cannot be heard on all bands
throughout the day. Some bands are best during
the daylight hours, and some are best at night. In
general, the bands with frequencies below 13 MHz
(13000 KHz) are better at night and the bands
with frequencies above 13 MHz (13000 KHz) are
best during the day. Listed below are the characteristics of the major shortwave bands. Follow these
guidelines for best listening results. How to get into
a specific band will vary from one radio to another.
Consult your owner’s manual for instruction on
how to access the bands on your radio or call etón
Corporation if it’s not clear to you.
SUNSET AND SUNRISE
OFTEN THE VERY BEST TIME TO LISTEN.
We are often asked whether there is a truly best
time for listening to shortwave, when signals are
strongest and clearest. Often, this is a window of
hours right around sunset and sunrise. Sometimes
it’s a two-hour window, other times three or four
hours. Experiment to determine when it’s best in
your area.
DAYTIME LISTENING
Shortwave listening is generally at its poorest during the daylight hours of about 10 a.m. to 3 p.m.
The major reason for this is that the broadcasters
are not transmitting to North America at this time,
assuming that we are all either at work or at
school and are not able to listen during the day. If
you want to try daytime listening, use the guidelines below.Typically, daytime shortwave tends to
be better in Eastern North America than in Western
North America.The best daytime bands are shown
in BOLD print in the table below.
DAY
CHARACTERISTICS
BANDS
13m
16m
19m
22m
25m
31m
Results vary.Worth trying.
Sometimes extremely good around
sunrise and sunset.
Similar to 19m.
The best overall daytime band. May
also be good at night in the summer months. Sometimes extremely
good around sunrise and sunset.
Sometimes good at night in the
summer.
Similar to 19m.
Best around sunrise and sunset.
May be good mid-day in Eastern
North America.
Similar to 25m.
UNDERSTANDING SHORTWAVE BANDS continued
EVENING/NIGHT LISTENING
This is the best time to listen, because the broadcasters are deliberately transmitting to North America.
These bands may be extremely good around sunset and sunrise too. Best night bands are shown in BOLD
print in the table below.
NIGHT BAND CHART
NIGHT
BANDS
25m
31m
41m
49m
IF YOUR BUILDING BLOCKS SIGNALS:
If you notice that the signal strength of a stations
substantially improves when you get very close to a
window or when you go outside, then it is certain
that your building blocks shortwave signals.This
blockage is due to the construction materials of
your building or to having one or more stories or
levels above you. The solutions to this are to do
CHARACTERISTICS
Similar to 31m
Good all night everywhere. Often extremely good at sunrise and sunset.
Good results often start about an hour before sunset.
Similar to 49m. Good all night in Eastern North America; varies in
Western North America.
The best overall night band.
your listening very close to a window, to go outside
or to set up an outdoor shortwave antenna. For
ideas on how to set up an outdoor shortwave
antenna, use your favorite Internet search site and
type in ‘shortwave antennas’. If you don’t have
Internet access, contact us, etón Corporation, using
the contact methods noted at the beginning of this
manual.
2726
Page 15

E10 OPERATION MANUAL
13 TROUBLESHOOTING
RESET PROCEDURE
The RESET button is on the bottom of the E10.
When performing a reset, have good batteries in the
radio or power it with an AC adaptor and turn it off.
Perform a reset if the solutions outlined below don’t
resolve the issue.To perform a reset, press the reset
button with a paper clip or similar object.
WILL NOT TURN ON
1. Assure that the LOCK feature is not engaged.
2. Assure that the radio has power (batteries
installed or AC adaptor plugged in.
3. Assure that batteries are inserted with correct
polarity
4. Assure that the batteries are not depleted
5. If using an AC adaptor, assure that it is plugged
into the household outlet (mains socket) and into
the radio’s DC socket. Take care not to plug it
into the earphone socket.Also, assure that the
AC adaptor is of the correct DC voltage output
and polarity and that its plug-tip is of the correct
inner and outer diameter.
SHUTS OFF ABRUPTLY WHILE PLAYING
DURING BATTERY USE
This is caused by depleted batteries. Replace them.
SHUTS OFF ABRUPTLY WHILE BEING MOVED
DURING AC ADAPTOR USE
This is usually caused by a broken wire or loose connection in the AC adaptor’s cord or if the AC adaptor’s plug-tip is of the wrong diameter.
OPERATES ERRATICALLY
Perform a RESET, as described in the section titled
RESET PROCEDURE.
STATIONS ARE RECEIVED TOO WEAK
• Assure that the ANTENNA GAIN switch is set to
the DX position.
• Assure that the telescopic antenna is pulled up
all the way for FM and Shortwave reception.
• When listening to AM stations, swivel the radio.
The AM internal ferrite bar antenna is highly
directional.
• On shortwave, adjust the ANTENNA TRIMMER.
THERE IS NO SOUND FROM THE SPEAKER
Assure that earphones/headphones are not
plugged in and that the volume control is turned up.
A STATION CAUSES SEVERE AUDIO
DISTORTION, BUT SEEMS TO BE VERY STRONG
IN SIGNAL STRENGTH
This is probably a strong, local station, very close to
your location. Because of its close proximity to you,
its signal is too strong. To reduce signal strengths,
place the ANTENNA GAIN switch into the NORMAL
or LOCAL position.
THE BATTERY COMPARTMENT HAS A STICKY
LIQUID OR DRIED WHITE POWDER IN IT
This is the result of battery acid leakage.To avoid
battery acid leakage, only use high quality alkaline
or rechargeable nickel-metal-hydride batteries.
Never intermix old with new, or different brands or
types of batteries. If the batteries leak, immediately
contact the manufacturer of the batteries and don’t
throw them away. Damage caused by battery acid
leakage is not covered under warranty.
14 WARRANTY REGISTRATION
To ensure full warranty coverage or product updates, registration of your etón or Grundig product should be complete
as soon as possible after purchase or receipt. To register your radio, please select one of the following methods:
1. Register by visiting our website at
http://www.etoncorp.com
2. Call our toll-free registration number
anywhere in the United States or Canada at
(888) 889-4391 or world-wide by dialing
(204) 336-6547. French and English speaking
operators available.
3. Mail your registration information to the
following address:
etón Corporation
1015 Corporation Way
Palo Alto, CA 94303
PRODUCT REGISTRATION
Include your name, full mailing address, phone
number, model purchased, date purchased, retail
vendor name and product serial number (typically
located in or near the battery compartment).
2928
Page 16

E10 OPERATION MANUAL
15 LIMITED WARRANTY TO THE ORIGINAL CUSTOMER
This etón or Grundig brand product, as supplied and distributed by etón Corporation (etón) is warranted by etón
against manufacturing defects in material and workmanship for the following limited warranty period:
ONE (1) YEAR PARTS AND LABOR
This limited warranty begins on the original date of
purchase, and is valid only on products purchased
through an authorized etón retailer and does not
include transportation, installation, removal or
reinstallation. Warranty repairs must be performed
by etón or etón’s authorized service center. To
receive warranty service, the original dated bill of
sale must be presented upon request as proof of
purchase to etón or etón’s authorized service center.
Transportation to etón or etón’s authorized service
center is the responsibility of the purchaser.
etón will repair or replace this product, at our
option and at no charge with new or reconditioned
parts, if found to be defective during the limited
warranty period specified above. The product must
be returned no later than 15 days beyond the
expiration of the warranty period with transportation
charges prepaid to etón or etón’s designated service
center for warranty coverage. Prior to returning
any product for warranty service, the purchaser
must contact etón for problem determination and
service procedure. All replaced parts and products
become the property of etón. Replacement parts
and products assume the remaining original
warranty, or ninety (90) days, whichever is longer.
This limited warranty covers manufacturing defects
in material and workmanship encountered in normal,
noncommercial use of this product and shall not
apply to the following, including, but not limited
to: damage which occurs due to applications and
uses for which the product was not intended;
failures or problems which are caused by products
or equipment not supplied by etón; accidents,
misuse, abuse, neglect, misapplication, fire, water,
lightning, or other acts of nature; incorrect line
voltage, fluctuations or surges; damage caused by
improper or faulty installation (including batteries,
which may create an acid leak with irreversible
circuit damage); damage caused by acid leakage;
product alteration or modification; or use of
unauthorized parts, supplies, accessories, or
equipment which damage this product or result in
service problems.
16 SERVICE INFORMATION
SERVICE YOUR ETÓN OR GRUNDIG PRODUCT
To obtain service for your etón or Grundig product we recommend first contacting an etón service representative at
800-872-2228 US, 800-637-1648 Canada or (650) 903-3866 for problem determination and trouble-shooting.
Many of the common questions can be resolved quickly over the phone.
THERE ARE TWO SERVICE TYPES SHOULD YOUR ETÓN OR GRUNDIG PRODUCT NEED REPAIR.
1. WARRANTY – If your product is still in warranty
and the etón service representative determines
that warranty service is needed, a return
authorization will be issued and instructions for
shipment to an authorized warranty repair facility.
Do Not ship your radio back without obtaining
the return authorization number.
2. NON-WARRANTY – If your product is no
longer under warranty and requires service our
technical staff will refer you to the nearest
repair facility that will be able to best handle
the repair.
3130
Page 17

E10 MANUEL D’OPÉRATION
TABLE DES MATIÈRES
AVEZ-VOUS BESOIN D’AIDE ?
Nous vous remercions de votre achat du
poste récepteur de radio AM/FM/Ondes
courtes E10.
Nous voulons que vous profitiez pleinement de
l’utilisation de ce produit. Pour profiter de
ses nombreuses caractéristiques excellentes et
uniques, nous vous recommandons avec
insistance de lire attentivement le guide
d’utilisation. Si vous avez besoin d’aide tout en
suivant le mode d’emploi, veuillez nous
contacter, en utilisant les méthodes ci-dessous.
Du lundi au vendredi, de 8 h 30 à 16 heures,
heure standard côte d’Amérique du Nord du
Pacifique.
1-800-872-2228 à partir des États-Unis
1-800-637-1648 à partir du Canada
1-650-903-3866, de partout dans le monde.
TÉLÉCOPIE : 650-903-3867
customersvc@etoncorp.com
Site Web : www.etoncorp.com
Adresse Postale :
etón Corporation
1015 Corporation Way
Palo Alto, CA 94303
USA
AVEZ-VOUS BESOIN D’AIDE ?........................................32
1
TABLE DES MATIÈRES.................................................... 33
2
LES CARACTÉRISTIQUES PRINCIPALES DU
3
DIAGRAMS....................................................................35
4
POUR COMMENCER......................................................37
5
CE QUI EST INCLUS AVEC LE E10............................. 37
L’INSTALLATION DES PILES....................................... 37
COMMENT EMPÊCHER LES FUITES DE
L’ACIDE DES PILES....................................................37
L’UTILISATION DE L’ADAPTATEUR CA/
CHARGEUR INCLUS..................................................37
LE FONCTIONNEMENT DE BASE DU POSTE
6
RÉCEPTEUR DE RADIO.................................................. 39
LES CARACTÉRISTIQUES DE L’HORLOGE ET DE
7
LA FONCTION DE MINUTERIE........................................43
RÉGLAGE DE L’HORLOGE......................................... 43
RÉGLAGE DES MINUTERIES......................................44
STOCKAGE D’UNE STATION EN MÉMOIRE
DE MINUTERIE......................................................... 45
ACTIVATION/DÉSACTIVATION DE LA MINUTERIE...... 45
UTILISATION DE LA FONCTION DE
RAPPEL D’ALARME.................................................. 45
L’UTILISATION DE LA MÉMOIRE..................................... 46
8
STOCKAGE DES STATIONS EN MÉMOIRE..................46
SÉLECTION/MODIFICATION DES PAGES
DE MÉMOIRE........................................................... 46
ACCÉDER CE QUI EST STOCKÉ EN MÉMOIRE........... 46
ACCÈS DIRECT À LA MÉMOIRE................................ 47
RECHERCHE MANUELLE DE LA MÉMOIRE................47
BALAYAGE AUTOMATIQUE DE LA MÉMOIRE.............47
SUPPRESSION D’UNE FRÉQUENCE STOCKÉE
EN MÉMOIRE...........................................................48
etón E10..... 34
SUPPRESSION DE TOUT LE CONTENU EN
MÉMOIRE D’UNE PAGE............................................48
DÉPLACEMENT SUR UNE FRÉQUENCE
STOCKÉE EN MÉMOIRE............................................48
PERSONNALISER LES PAGES DE MÉMOIRE...............48
CODES DE RÉGLAGE DU SYSTÈME.................................49
9
TABLEAU DES CODES DE RÉGLAGE DU SYSTÈME.....49
CHANGEMENT DES CODES DE RÉGLAGE
DU SYSTÈME............................................................50
CHANGEMENT DE FORMAT DE L’HORLOGE
DE 24 À 12 HEURES.................................................50
LES CODES DE RÉGLAGE DU SYSTÈME
PAR DÉFAUT EN USINE.............................................50
SURVEILLANCE DU STATUT DES CODES
DE RÉGLAGE ACTUELS ET D’AUTRES RÉGLAGES.......51
AUTRES COMMANDES DU E10......................................51
10
L’ÉCOUTE DES STATIONS EN ONDES COURTES...............52
11
SÉLECTION D’UNE BANDE DE FRÉQUENCES
EN MÈTRES DES ONDES COURTES AVEC LE E10.......53
STATIONS HORAIRES SUR ONDES COURTES............. 55
PUBLICATIONS SUR LES ONDES COURTES :
TROUVER DES STATIONS SPÉCIFIQUES..................... 55
COMPRENDRE LES BANDES D’ONDES COURTES
12
LA CLÉ POUR APPRÉCIER VOTRE POSTE RÉCEPTEUR
D’ONDES COURTES........................................................56
DÉPANNAGE..................................................................60
13
ENREGISTREMENT DE LA GARANTIE............................. 61
14
GARANTIE LIMITÉE AU CLIENT INITIAL..........................62
15
RENSEIGNEMENTS SUR LES SERVICES...........................63
16
3332
Page 18

E10 MANUEL D’OPÉRATION
3 LES CARACTÉRISTIQUES PRINCIPALES DU etón E10
• Bande de fréquences FM : 87 – 108 MHz (Pour l’Amérique); 76 – 108 MHz (Pour le Japon)
• Bande de fréquences Ondes Courtes : 1711 – 29999KHz
• Sélecteur de taille de bonds de 9 ou 10 kHz pour bien recevoir les ondes hectométriques (AM)
• Bond de 1KHz pour l’affichage des ondes Hectométriques et des ondes courtes
• Fonction SW IF SET (Fréquence intermédiaire), transfère la fréquence intermédiaire pour réduire l’interférence
durant la réception en ondes courtes.
• Accord d’antenne d’ondes courtes
• Système automatique d’accord (ATS) pour le stockage de mémoire de réception FM/MW
• Syntonisation manuelle
• Syntonisation à balayage automatique
• Saisie directe des fréquences
• Bouton de syntonisation numérique
• 550 mémoires programmables
• Personnalisation des pages de mémoire
• Balayage manuel ou automatique pour balayer les stations stockées en mémoire
• Accès direct à la mémoire
• Sélection Rapide/Lent de taux de syntonisation pour la syntonisation manuelle
• Fonction minuterie de sommeil
• Deux fonctions de réveil avec mémoire des stations
• Fonction rappel d’alarme : 10 minutes, répété trois fois.
• Sélection FM Stéréo/Mono
• Commande de tonalité Haut/Bas
• Afficheur à cristaux liquide à rétroéclairage
• Verrouillage à clé
• Sélection du mode 12/24 h
• Chargeur de piles Ni-MH incorporé
• CODES DE RÉGLAGE DU SYSTÈME
4 DIAGRAMS
Bouton Mémoire & Éditer/Réglage de l’heure
Bouton Chargeur Marche/Arrêt
Bouton Réglage Entré/Sys.
Ceinture de transport
Prise FM/SW ANT
Gain ANT. DX/Normal/Local
Réglage de tonalité
Prise pour écouteurs
Prise 6V C.C
Support vertical
ALIMENTATION/ SOMMEIL
Bouton de verrouillage
Bouton Minuterie A
Bouton Minuterie B
Affichage à cristaux liquides
Bouton Éclairage Rappel d’alarme
Bouton Mode de syntonisation
Haut / Heure
Bas / Minute
Bouton de Page
Bouton Mode balayage
Bouton SW IF
Bouton de Largeur de bande
Bouton Bande FM/AM (ATS)
Bouton SW (SW Meter)
Pavé numérique
Bouton de syntonisation
Support
Ajustage d’antenne
Bouton du volume
Bouton de réinitialisation
3534
Page 19
E10 MANUEL D’OPÉRATION
DIAGRAMS continué
AFFICHAGE DU POSTE
RÉCEPTEUR DE RADIO ÉTEINT
Pointeur en triangle
Symbole des piles
Symbole de l’antenne
Échelle 1-5
Indicateur AM/PM de l’heure
Symbole des piles Ni-MH
AFFICHAGE DE LA MÉMOIRE
Fait seulement référence au coin supérieur
droit de l’affichage
Indicateur de suppression
AFFICHAGE DES CODES DE
RÉGLAGE DU SYSTÈME
Indicateur AM/PM de la
fonction réveil
Symbole d’activation d’alarme Indicateurs
Chiffres de l’horloge
Affichage de la mémoire
Chiffres
Réveil de
l’horloge
AFFICHAGE DU POSTE
RÉCEPTEUR DE RADIO ALLUMÉ
Pointeur en triangle
Symbole des piles Chiffres de l’horloge
FM,MM,
Ondes
Courtes
Symbole de l’antenne
Échelle 1-5
Chiffres de la
fréquence
Symbole de la
minuterie de réveil
Largeur de
bande
450K IF
AFFICHAGE DE LA BANDE EN MÈTRES
DES ONDES COURTES
Fait seulement référence au coin supérieur
droit de l’affichage
Affichage de la bande en
mètres des ondes courtes
Symbole
d’activation
d’alarme
5 POUR COMMENCER
CE QUI EST INCLUS AVEC LE E10
• Une paire d’écouteurs de style mini-écouteurs
• Une pochette de transport
• Un adaptateur/chargeur CA
• 4 piles rechargeables - 1100 mAh, Ni-MH.
• Le Guide d’utilisation
NOTE: Dans les instructions ci-dessous, les
chiffres entre parenthèses ( ), se réfèrent aux diagrammes.
L’INSTALLATION DES PILES
Le compartiment des piles se situe au dos du E10.
Son couvercle est dans le coin an bas à droite au
dos du poste récepteur de radio. Pour retirer le
couvercle du compartiment des piles, appuyez avec
le pouce et glissez-le vers le bas du poste récepteur
de radio. Installez 4 piles AA alcalines dans le compartiment des piles en observant le diagramme de
la polarité des piles situé au dos du poste récepteur de radio.
REMARQUE : Si vous ne prévoyez pas d’utiliser
du tout des piles rechargeables, alors c’est une
bonne idée de régler le CODE DE RÉGLAGE DU
SYSTÈME 29. Pour le faire, voyez la section intitulée
CODES DE RÉGLAGE DU SYSTÈME. Ceci assure que
l’indicateur de puissance des piles affichera une
lecture correcte de vos piles non-rechargeables.
Ceci n’est pas une procédure obligatoire et le E10
fonctionnera si ce réglage n’est pas effectué.
COMMENT EMPÊCHER LES
FUITES DE L’ACIDE DES PILES
Pour empêcher les fuites de l’acide des piles,
n’utilisez que des piles de haute qualité, alcalines,
lithium ou rechargeables en nickel métal hydrure.
Ne mélangez jamais les piles vieilles et neuves ou
des marques ou types différents de piles. Les fuites
d’acide des piles ne sont pas couvertes sous la
garantie. Si les piles fuient, ne les jetez pas, et
contactez immédiatement le fabricant des piles
pour vous renseigner à propos de leur programme
de garantie de la fuite des piles.
L’UTILISATION DE L’ADAPTATEUR
CA/CHARGEUR INCLUS
Pour alimenter le E10 avec l’adaptateur
CA/Chargeur, branchez-le premièrement dans une
prise de courant murale, et puis dans la prise sur le
côté gauche du E10, marquée ‘DC 6 V’. Les piles
peuvent être dans le poste récepteur de radio
pendant l’utilisation de l’adaptateur CA/chargeur.
LE CHARGEMENT DES PILES
DANS LE E10
Le E10 fonctionnera quel que soit le type de piles
AA que vous utilisez dans le compartiment à piles,
mais seulement des piles en nickel métal hydrure
peuvent y être chargées. Si des piles
non-rechargeables sont installées, le E10 a un
système de protection incorporé qui les empêchera
de se charger. Ce système de protection fonctionne
seulement avec le E10 réglé soit avec le CODE DE
RÉGLAGE DU SYSTÈME 28 ou 29, comme décrit
ci-dessous, et seulement avec l’Adaptateur
CA/Chargeur inclus.
36
3736
Page 20

E10 MANUEL D’OPÉRATION
6 LE FONCTIONNEMENT DE BASE DU POSTE
POUR COMMENCER continué
AVERTISSEMENT : Utilisez seulement
l’Adaptateur CA/Chargeur inclus pour recharger
des piles Ni-MH. L’utilisation de tout autre appareil
peut causer une surchauffe des piles, peut les
endommager les piles et possiblement votre E10.
Le système de protection incorporé, décrit ci-dessus,
fonctionne seulement avec l’Adaptateur
CA/Chargeur inclus. Des dégâts causés au E10
résultant du non-respect de cet avertissement ne
sont pas couverts par la garantie et annule la
garantie.
L’Adaptateur CA/Chargeur inclus peut être utilisé
pour charger 4 piles rechargeables au Nickel métal
hydrure (Ni-MH) (comprises) lorsqu’elles sont
installées dans le compartiment à piles du E10.
Avant de les charger, le E10 doit être réglé pour
une utilisation avec des piles Ni-MH et le régime
de charge correct doit être choisi afin que celles-ci
puissent être chargées. Les piles Ni-MH sont
fabriquées avec des capacités spécifiques indiquées
en milliampère-heure (mAh). Ces capacités varient
d’environ 1100 mAh jusqu’à 2400 mAh lorsque ce
manuel a été rédigé (généralement cette indication
est marquée sur les piles). Pour un chargement
correct sans endommager les piles, le régime de
charge correct doit être réglé. Pour régler ce régime
de charge, branchez l’adaptateur CA et mettez à
l’arrêt le E10. Puis suivez les instructions ci-dessous.
1. Entrez le CODE DE RÉGLAGE DU SYSTÈME 28.
Voir les instructions dans la section intitulée
CODES DE RÉGLAGE DU SYSTÈME.
2. Pendant que ‘1100’ clignote sur l’affichage,
utilisez les boutons UP HOUR/DOWN MIN
(HAUT HEURE/ BAS MINUTE pour choisir le
régime mAh de vos piles Ni-MH.
Pour charger les piles Ni-MH :
1. Installez les 4 piles AA Ni-MH.
2. Branchez l’adaptateur/chargeur à la prise de
courant murale CA et puis au poste récepteur
de radio E10.
3. Appuyez puis relâchez le bouton CHARGER
ON/OFF (MARCHE/ARRÊT CHARGEUR).
‘CHARGE’ clignotera sur l’affichage et les barres
d’indication de charge avanceront de la gauche
vers la droite sur l’échelle 0 – 5 dans le coin en
haut à gauche de l’affichage. Les chiffres dans
le coin en haut à droite de l’affichage changeront
pour indiquer 00:00 et compteront les minutes
et les heures dans l’ordre croissant jusqu’à ce
que le chargement soit fini.
Une fois la charge finie, ‘CHARGE’ s’arrêtera de
clignoter et les barres d’indication de charge dans
le coin en haut à gauche resteront sur 5.
Le temps de charge varie suivant le régime en
milliampère-heure des piles. Le circuit de charge
détecte automatiquement quel est le régime en
milliampère-heure des piles et les chargera pour la
durée correcte. La durée de la charge peut varier
entre 6 heures pour des piles de 1100 mAh jusqu’à
13 heures pour des piles de 2300 mAh. Le circuit
de charge détectera lorsque les piles sont
complètement chargées et se mettra
automatiquement dans un mode de charge
d’entretien, protégeant ainsi les piles contre une
surcharge. Le débranchement de
l’adaptateur/chargeur ACG-10 de votre poste
récepteur de radio E10 ou la pression sur le bouton
CHARGER ON/OFF (MARCHE/ARRÊT CHARGEUR)
arrêtera aussi le chargement.
RÉCEPTEUR DE RADIO
ALLUMER ET ÉTEINDRE LE E10
Le E10 peut être allumé par l’une des deus méthodes
indiquées ci-dessous. Pour l’étreindre, appuyez sur
le bouton POWER/SLEEP [ALIMENTATION/
SOMMEIL] (1).
1. La méthode de l’économie des piles/de
la minuterie :
Appuyez rapidement et pendant un court instant
sur le bouton POWER/SLEEP [ALIMENTATION/
SOMMEIL] (1) . Ceci met le poste récepteur de
radio en marche avec 90 sur l’affichage et le force
de s’éteindre automatiquement après 90 minutes.
Le symbole minuterie de sommeil, , apparaît
aussi sur l’affichage. Pour modifier la durée de mise
à l’arrêt automatique de 90 minutes à une durée
de temps que vous préfériez, utilisez les boutons
Up/Hour [Haut/Heure] ou Down/Min. [Bas/Minute]
(9, 10) immédiatement après avoir allumé le poste
récepteur de radio. Ceci permet de sélectionner
entre 1 et 480 minutes de durée d’écoute avant
que la mise à l’arrêt automatique se produise. Le
nombre de minutes que vous avez établi en dernier
lieu sera également utilisé la prochaine fois que le
poste de radio est allumé.
2. La méthode d’annulation de la minuterie:
Cette méthode annule la minuterie automatique et
force le poste récepteur de radio à rester allumé
jusqu’à ce qu’il soit délibérément éteint par
l’utilisateur, jusqu’à ce que les piles se vident ou
indéfiniment si utilisé avec un adaptateur CA.
Maintenez le bouton POWER [ALIMENTATION]
appuyé pendant environ 3 secondes, puis relâchez-le.
Remarquez que ‘On’ apparaît sur l’affichage et que
le symbole de minuterie de sommeil n’apparaît pas
lorsque cette méthode est utilisée.
L’INDICATEUR DE LA FORCE
DU SIGNAL ET DE LA CHARGE
DES PILES
Lorsque le poste récepteur de radio est éteint, le
coin supérieur gauche de l’affichage (6) indique la
charge des piles sur une échelle de 1 à 5 (36), avec
le pointeur en triangle (33) en dessous du symbole
des piles (34) sur le côté complètement à gauche
de l’échelle. Lorsque le poste récepteur de radio est
allumé, le pointeur est en dessous du symbole de
l’antenne (35) et l’échelle de 1 à 5 indique la force
relative du signal.
LES COMMANDES DE RÉGLAGE
DU VOLUME ET DE LA TONALITÉ
• Le réglage du volume (31), marqué VOLUME,
est situé sur le côté droit du poste récepteur de
radio. Pour changer le volume, tournez le bouton
de réglage du volume.
• Le réglage de la tonalité (24), sur le côté
gauche du poste est appelé TREBLE/BASS
[AIGU/GRAVE]. Utilisez la position qui produit le
son que vous préférez.
L’UTILISATION DES ÉCOUTEURS
Un casque d’écoute/des écouteurs avec une
fiche stéréo de 1/8 de pouce peuvent être utilisés.
Branchez-les dans la prise pour écouteurs (25)
située sur le côté gauche du poste récepteur de
radio.
38
39
Page 21

E10 MANUEL D’OPÉRATION
LE FONCTIONNEMENT DE BASE DU POSTE
RÉCEPTEUR DE RADIO
LA SÉLECTION FM, AM OU
ONDES COURTES
Lors de l’écoute en FM ou Ondes courtes, déployez
complètement l’antenne télescopique (5). Il n’est
pas nécessaire de la déployer lors de l’écoute des
stations en AM.Après avoir allumé le E10, appuyez
quelques courts instants et rapidement sur le bouton
‘FM/AM-ATS’ (15) pour choisir FM ou AM.
Remarquez que lorsque la bande AM est
sélectionnée, l’affichage indique MW, et non AM.
Pour choisir SW (Ondes courtes) appuyez sur le
bouton ‘SW METER BAND’ (16). Chaque pression
séquentielle du bouton SW METER BAND ou des
boutons UP/HOUR ou DOWN/MIN place le poste
de radio au début d’une bande métrique d’ondes
courtes spécifique. Les chiffres de la fréquence (46)
apparaissent sur la partie vers le centre de
l’affichage.Vous pouvez écouter les stations locales
de votre région sur AM et FM.Vous pouvez écouter
les stations internationales en ondes courtes en
provenance du monde entier sur SW.
REMARQUE: Si vous êtes novice dans les
ondes courtes, reportez-vous aux sections spéciales
sur les ondes courtes plus loin dans ce manuel.
L’ÉCOUTE EN FM STÉRÉO
Vous pouvez écouter la FM en stéréo lorsque vous
utilisez des écouteurs/casque stéréo. Pour écouter
la FM en stéréo, appuyez sur le bouton FM STEREO
(14). ‘FM-STEREO’ apparaîtra sur l’affichage.
continué
LE RÉGLAGE POUR L’ÉCOUTE
AM ET FM EN DEHORS DE
L’AMÉRIQUE DU NORD
Vous pouvez sauter cette section si vous êtes en
Amérique du Nord et si vous venez d’acheter le
E10. Il est déjà réglé à l’usine pour être utilisé en
Amérique du Nord. En dehors de l’Amérique du
Nord, les stations AM (MW sur l’affichage du E10)
sont espacées de 9 KHz. La gamme des fréquences
FM peut être différente à celle utilisée en Amérique
du Nord, par exemple celle utilisée au Japon, 76 à
108MHz. Pour effectuer ces changements,
reportez-vous au TABLEAU DES CODES DE
RÉGLAGE DU SYSTÈME et aux instructions
CHANGEMENT DES CODES DE RÉGLAGE DU
SYSTÈME.
SYNTONISATION DES STATIONS
Quatre façons de syntoniser des stations sont
décrites ci-dessous. Elles sont la Syntonisation
Manuelle, la Syntonisation par Balayage
Automatique, la Saisie Directe des Fréquences et
l’Accord Fin.
SYNTONISATION MANUELLE
Appuyez rapidement et pendant un court instant
sur les boutons Up/Hour-Down/Min. [Haut/Heure Bas/Minute] (9,10) pour syntoniser les fréquences
supérieures ou inférieures.
LE FONCTIONNEMENT DE BASE DU POSTE
RÉCEPTEUR DE RADIO
LA SYNTONISATION PAR
BALAYAGE AUTOMATIQUE
Appuyez sur les boutons Up/Hour ou Down/Min.
[Haut/Heure ou Bas/Minute] (9,10) pendant un peu
plus d’une seconde pour mettre en marche la
syntonisation par balayage automatique. Le poste
récepteur de radio s’arrêtera alors automatiquement
à la station suivante qu’il balayera. Utilisez le bouton
Up/Hour [Haut/Heure] pour balayer
automatiquement vers les fréquences plus élevées
et le bouton Down/Min [Bas/Minute] pour balayer
automatiquement vers les fréquences plus basses.
LA SAISIE DIRECTE DES
FRÉQUENCES
Lorsque vous connaissez la fréquence exacte
voulue, vous pouvez la saisir à l’aide du pavé
numérique (17) et le bouton ‘Enter’ [Saisir] (20).
Premièrement, assurez-vous que la bande de
fréquences correcte est sélectionnée - AM, FM ou
SW.
La plupart des fréquences AM et ondes courtes
sont indiquées en kilohertz (KHz), par exemple 810
KHz ou 9475 KHz. Toutes les fréquences FM sont
indiquées en mégahertz (MHz), par exemple 102,9
MHz. Pour saisir de telles fréquences:
1. Appuyez puis relâchez le bouton ‘Enter’ [Saisir]
(20).
2. Saisissez la fréquence en utilisant le pavé
numérique (17).
continué
Quelquefois les fréquences d’ondes courtes sont
indiquées en mégahertz (MHz). Si vous rencontrez
une telle fréquence d’ondes courtes et si elle a
moins de trois chiffres après la virgule (par exemple
15,10 MHz ou 6,92 MHz), alors utilisez la méthode
suivante pour la saisir. Toutefois, s’il y a trois
chiffres après la virgule (par exemple 15110 MHz
or 5,975 MHz), utilisez la méthode décrite
antérieurement.
1. Appuyez puis relâchez le bouton ‘Enter’ [Saisir]
(20)
2. Saisissez la fréquence en utilisant le pavé
numérique (17).
3. Appuyez puis relâchez à nouveau le bouton
‘Enter’ [Saisir]
BOUTON DE SYNTONISATION
Le bouton de SYNTONISATION (28) est située sur
le côté droit du poste récepteur de radio. Utilisez-le
pour ‘accorder finement’ des stations comme vous
le feriez pour un bouton de syntonisation.
4140
Page 22

E10 MANUEL D’OPÉRATION
LE FONCTIONNEMENT DE BASE DU POSTE
RÉCEPTEUR DE RADIO
VERROUILLAGE DU BOUTON
DE SYNTONISATION
Pour empêcher la perte accidentelle d’accord sur la
station, le bouton de syntonisation peut être
verrouillé pendant que le récepteur est en marche.
Pour le verrouiller, appuyez et maintenez appuyé le
bouton TUNING MODE pendant environ trois
secondes. Remarquez que le symbole d’un verrou
clignote deux fois dans le coin en bas à droite de
l’affichage. Le bouton de syntonisation est
maintenant verrouillé. Si tourné, la fréquence ne
change pas et le symbole du verrou clignote. Pour
le déverrouiller, appuyez sur le bouton TUNING
MODE pendant environ trois secondes.
MODE DE SYNTONISATION –
SYNTONISATION RAPIDE –
SYNTONISATION LENTE
Le bouton TUNING MODE (8) permet la sélection
d’une syntonisation rapide ou lente lorsque vous
utilisez le bouton de syntonisation ou les commandes
UP/HOUR [HAUT/HEURE] et DOWN/MIN
[BAS/MINUTE]. ‘FAST’ [RAPIDE] ou ‘SLOW’ [LENTE]
apparaît sur l’affichage. Lors d’une syntonisation
avec le bouton de syntonisation (28), la
syntonisation rapide convient généralement. Lors
d’une syntonisation avec les boutons UP/HOUR
[HAUT/HEURE] et DOWN/MIN [BAS/MINUTE],
utilisez la syntonisation lente pour syntoniser et la
syntonisation rapide pour syntoniser rapidement les
fréquences supérieures et inférieures. Puis utilisez
la syntonisation lente pour syntoniser réellement la
station. Pratiquez l’utilisation de cette commande
pour trouver le mode de syntonisation que vous
préférez.
continué
UTILISATION DU BOUTON DE
LARGEUR DE BANDE
Le bouton BANDWIDTH [LARGEUR DE BANDE]
(14) est utilisé lors de l’écoute des stations sur AM
et SW. Sa fonction est d’aider à réduire les interférences. Le réglage préféré est sur WIDE [LARGE],
qui fournit la meilleure fidélité audio. Utilisez la
position NARROW [ÉTROITE] lorsqu’il y a des
interférences.W ou N apparaîtra sur l’affichage.
UTILISATION DE LA COMMANDE
‘SW IF SET’
La commande SW IF SET (13) transfère l’oscillateur
à la fréquence intermédiaire, ce qui permet de
réduire les interférences. Cette commande est
fonctionnelle dans le mode des ondes courtes et
AM. Lorsqu’elle est activée,‘pIF’sera indiqué sur
l’affichage.
ANNULATION “TUNE-MUTE”
La fonction d’annulation “tune-mute” donne au
E10 ‘l’impression’ d’un récepteur radio à recherche
de station analogique, malgré qu’il s’agisse d’un
syntoniseur numérique de haute technologie. La
différence est assez subtile est peut être surtout
remarquable dans le mode de syntonisation lente
en utilisant le bouton de syntonisation. Remarquez
qu’il peut être difficile pour certains de vraiment
écouter la différence. Pour ceux qui peuvent entendre
la différence, la syntonisation peut sembler un peu
‘plus douce’ lorsque le bouton de syntonisation est
utilisé. Pour annuler Tune-Mute, appuyez puis
relâchez le bouton SYSTEM SET, puis le bouton
TUNING MODE. L’affichage indiquera OFF. La
fonction Tune-Mute est maintenant annulée. Pour
la réactiver, faites la même chose et l’affichage
indiquera ON.
7 LES CARACTÉRISTIQUES DE L’HORLOGE ET DE LA
FONCTION DE MINUTERIE
RÉGLAGE DE L’HORLOGE
Le réglage par défaut en usine a établi le
fonctionnement de l’horloge en format d’horloge
de 24 heures. Si vous préférez un format d’horloge
AM/PM [Matin/Après-midi] de 12 heures,
référez-vous à la section intitulée LE CHANGEMENT
DE L’HORLOGE DE FORMAT DE 24 À 12 HEURES à
la section intitulée CODES DE RÉGLAGE DU
SYSTÈME.
Il y a trois méthodes pour le réglage de l’horloge.
MÉTHODE 1 DU RÉGLAGE DE L’HORLOGE –
Boutons UP/HOUR [HAUT/HEURE] et
DOWN/MIN [BAS/MINUTE] :
1. Éteignez le poste récepteur de radio. Les
chiffres de l’horloge apparaissent au centre de
l’affichage (40).
2. Appuyez puis relâchez le bouton appelé ‘Time
Set’ [Réglage de l’heure] (18). Les chiffres de
l’horloge clignotent à l’affichage.
3. Dans les 5 secondes, réglez les heures en utilisant le bouton Up/Hour [Haut/Heure] (9) et les
minutes en utilisant le bouton Down/Min.
[Bas/Minute] (10). Dans les 5 secondes après
avoir terminé, appuyez puis relâchez le bouton
TIME SET [Réglage de l’heure] ou attendez
jusqu’à ce que les chiffres d’horloge s’arrêtent
de clignoter.
MÉTHODE 2 DU RÉGLAGE DE L’HORLOGE –
PAVÉ NUMÉRIQUE :
Lors de l’utilisation de cette méthode, seul le format
24 heures peut être utilisé pour saisir l’heure,
même si l’horloge est réglée pour l’affichage en
format 12 heures.
1. Éteignez le poste récepteur de radio. Les
chiffres de l’horloge apparaissent au centre de
l’affichage (40).
2. Appuyez puis relâchez le bouton marqué ‘Time
Set’ [Réglage de l’heure] (18). Les chiffres de
l’horloge clignotent à l’affichage.
3. Utilisez le pavé numérique pour saisir l’heure en
format 24 heures. Dans les 5 secondes après
avoir terminé, appuyez puis relâchez le bouton
TIME SET [Réglage de l’heure] ou attendez
jusqu’à ce que les chiffres d’horloge s’arrêtent
de clignoter.
MÉTHODE 3 DU RÉGLAGE DE L’HORLOGE –
BOUTON DE SYNTONISATION
1. Éteignez le poste récepteur de radio. Les
chiffres de l’horloge apparaissent au centre de
l’affichage (40).
2. Appuyez puis relâchez le bouton marqué ‘Time
Set’ [Réglage de l’heure] (18). Les chiffres de
l’horloge clignotent à l’affichage.
3. Dans les 5 secondes, appuyez puis relâchez le
bouton Up/Hour [Haut/Heure], puis utilisez le
bouton de syntonisation pour régler l’heure.
4. Dans les 5 secondes, appuyez puis relâchez le
bouton Down/Min [Bas/Min.], puis utilisez le
bouton de syntonisation pour régler les minutes.
5. Dans les 5 secondes après avoir terminé,
appuyez puis relâchez le bouton TIME SET
[Réglage de l’heure] ou attendez jusqu’à ce que
les chiffres d’horloge s’arrêtent de clignoter.
4342
Page 23

E10 MANUEL D’OPÉRATION
LES CARACTÉRISTIQUES DE L’HORLOGE ET DE LA
FONCTION DE MINUTERIE
RÉGLAGE DES MINUTERIES
(UTILISATION COMME RÉVEIL)
Le E10 possède deux minuteries programmables
indépendamment, minuteries A et B, permettant au
E10 de s’allumer et de faire marcher la radio pendant
30 minutes et puis de s’arrêter. Les minuteries
peuvent être utilisées comme des réveils.Après
avoir réglé une minuterie, stockez une station de
radio dans la mémoire de minuterie et activez la
minuterie.Voir les sections suivantes intitulées
STOCKAGE D’UNE STATION EN MÉMOIRE DE
MINUTERIE et ACTIVATION/DÉSACTIVATION DE
MINUTERIE.
REMARQUE : Une station de radio doit être stockée
dans la mémoire de minuterie. Si cela n’est pas
fait, il y aura seulement que des parasites dès que
la minuterie est activée.
Lorsque la minuterie se met en marche, elle allume
la radio, et le symbole d’activation de minuterie
apparaît en clignotant à l’affichage. La radio
marchera sur la station stockée dans la mémoire de
la minuterie pendant 30 minutes ou jusqu’à ce que
vous mettiez la radio à l’arrêt avec le bouton
POWER/SLEEP [ALIMENTATION/SOMMEIL]. La
fonction ‘rappel d’alarme’ peut aussi être utilisée
(voir la section intitulée UTILISATION DE LA
FONCTION RAPPEL D’ALARME).
Il y a trois méthodes pour le réglage de minuterie.
continué
MÉTHODE 1 DU RÉGLAGE DE MINUTERIE –
BOUTONS UP/DOWN MIN [HAUT/BAS MIN] :
1. Éteignez le poste récepteur de radio. Les chiffres
de la minuterie (38) apparaissent dans le coin
supérieur droit de l’affichage.
2. Appuyez et maintenez appuyé le bouton
TIMER A ou B pendant environ deux secondes.
Les chiffres de la minuterie clignoteront sur
l’affichage.
3. Dans les 5 secondes qui suivent, réglez l’heure
en utilisant le bouton Up/Hour [Haut/Bas] et
les minutes en utilisant le bouton Down/Min
[Bas/Min]. Dans les 5 secondes après avoir
terminé, appuyez une fois sur le bouton A ou B
ou attendez simplement jusqu’à ce que les
chiffres de la minuterie s’arrêtent de clignoter.
MÉTHODE 2 DU RÉGLAGE DE MINUTERIE –
PAVÉ NUMÉRIQUE :
1. Éteignez le poste récepteur de radio. Les chiffres
de la minuterie (38) apparaissent dans le coin
supérieur droit de l’affichage.
2. Appuyez et maintenez appuyé le bouton TIMER
A ou B pendant environ deux secondes. Les
chiffres de la minuterie clignoteront sur l’affichage.
3. Utilisez le pavé numérique pour saisir l’heure de
réveil en format 24 heures. Dans les 5 secondes
après avoir terminé, appuyez une fois sur le
bouton A ou B ou attendez simplement jusqu’à
ce que les chiffres de la minuterie s’arrêtent de
clignoter.
LES CARACTÉRISTIQUES DE L’HORLOGE ET DE LA
FONCTION DE MINUTERIE
MÉTHODE 3 DU RÉGLAGE DE MINUTERIE –
BOUTON DE SYNTONISATION
1. Éteignez le poste récepteur de radio. Les chiffres
de la minuterie (38) apparaissent dans le coin
supérieur droit de l’affichage.
2. Appuyez et maintenez appuyé le bouton
TIMER A ou B pendant environ deux secondes.
Les chiffres de la minuterie clignoteront sur
l’affichage.
3. Dans les 5 secondes, appuyez puis relâchez le
bouton Up/Hour [Haut/Heure], puis utilisez le
bouton de syntonisation pour régler l’heure.
4. Dans les 5 secondes, appuyez puis relâchez le
bouton Down/Min [Bas/Min.], puis utilisez le
bouton de syntonisation pour régler les minutes.
5. Dans les 5 secondes après avoir terminé,
appuyez puis relâchez le bouton TIMER A ou B
qui est utilisé ou attendez simplement jusqu’à
ce que les chiffres de la minuterie s’arrêtent de
clignoter.
STOCKAGE D’UNE STATION EN
MÉMOIRE DE MINUTERIE
Pour écouter une station de radio lorsque la
minuterie se met en marche, la station doit être
stockée dans la mémoire de minuterie.Voici la
procédure composée de 3 étapes :
1. Allumez le E10 et syntonisez à la station voulue.
2. Appuyez puis relâchez le bouton MEMORY
[MÉMOIRE].
3. Appuyez puis relâchez le bouton TIMER A ou
TIMER B. Le symbole de la minuterie clignote
deux fois sur l’affichage.
continué
REMARQUE : Pour surveiller les fréquences stock-
ées dans la mémoire de minuterie A et B, appuyez
pendant trois secondes sur le bouton SYSTEM SET
tandis que la radio est à l’arrêt. L’information de
code de réglage et les fréquences stockées dans la
mémoire de minuterie clignotent sur l’affichage.
ACTIVATION/DÉSACTIVATION
DE LA MINUTERIE
Pour qu’une minuterie puisse allumer la radio, elle
doit être activée. Une minuterie peut être
activée/désactivée avec la radio allumée ou éteinte.
Pour activer la minuterie, appuyez et relâchez le
bouton TIMER A ou TIMER B. Le symbole de
minuterie apparaîtra sur l’affichage. Pour désactiver
une minuterie, appuyez et relâchez le bouton
TIMER A ou TIMER B. Le symbole de minuterie
disparaîtra de l’affichage.
UTILISATION DE LA FONCTION
DE RAPPEL D’ALARME
Lorsque la fonction de minuterie se met en marche
et allume la radio, le symbole d’activation de la
minuterie (39) apparaît en clignotant à l’affichage.
Pendant que le symbole clignote, appuyez puis
relâchez le bouton SNOOZE/LIGHT [RAPPEL
D’ALARME/ÉCLAIRAGE] (7). Le poste récepteur de
radio s’éteindra et se rallumera à nouveau dans 10
minutes. Ce processus peut être répété 3 fois.
4544
Page 24

E10 MANUEL D’OPÉRATION
8 L’UTILISATION DE LA MÉMOIRE
À l’usine, le E10 est configuré par défaut avec 10
pages de mémoire, chaque page peut contenir 50
fréquences. Ceci permet de stocker 500 fréquences
en mémoire. Cette configuration par défaut faite à
l’usine peut être modifiée et personnalisée selon
vos besoins propres ou elle peut être laissée telle
qu’elle est. Lorsque vous commencez à apprendre
à stocker les stations en mémoire, nous suggérons
l’utilisation des réglages faits à l’usine. Pour modifier
les réglages effectués à l’usine, reportez-vous à la
section PERSONNALISER LES PAGES DE MÉMOIRE.
Lorsque vous utilisez la mémoire, le terme PRESET
apparaît sur l’affichage sous les chiffres de
mémoire.
STOCKAGE DES STATIONS EN
MÉMOIRE
1. Allumez le poste récepteur de radio.
2. Syntonisez à la station voulue.
3. Appuyez puis relâchez le bouton MEMORY
[MÉMOIRE] (18). Remarquez que les chiffres du
numéro de mémoire, marqués PRESET (48)
clignotent dans le coin supérieur droit de
l’affichage. Le numéro de la page de la
mémoire, marqué PAGE, est également affiché,
mais ne clignote pas.
4. Dans les 5 secondes, utilisez le pavé
numérique pour saisir le numéro de mémoire où
vous souhaitez stocker la fréquence de la station.
Pour les mémoires 1 à 9, saisissez les chiffres 01
à 09.
5. Dans les 5 secondes, appuyez sur le bouton
MEMORY [MÉMOIRE], ou attendez 5 secondes.
Ceci finalise le stockage en mémoire et après
quelques secondes, le coin en haut à droite de
l’affichage montre à nouveau l’horloge.
SÉLECTION/MODIFICATION DES
PAGES DE MÉMOIRE
Pour sélectionner/modifier les pages de mémoire :
1. Appuyez et relâchez le bouton PAGE (11). Le
numéro de page clignote sur l’affichage.
2. Dans les trois secondes qui suivent, utilisez soit
le bouton UP/HOUR [HAUT/HEURE] ou
DOWN/MIN [BAS/MINUTE] pour changer à la
page de votre choix. Alternativement, utilisez le
pavé numérique pour saisir la page.
3. Appuyez et relâchez le bouton PAGE pour
finaliser le changement de page.
ACCÉDER CE QUI EST STOCKÉ
EN MÉMOIRE
Il y a trois méthodes pour accéder à ce qui a été
stocké en mémoire: L’Accès direct à la mémoire,
la fonction de Recherche manuelle de la mémoire
et la fonction de Balayage automatique de la
mémoire. Ces trois méthodes sont décrites
ci-dessous. Lorsque les numéros de la page de
mémoire et du préréglage de mémoire apparaissent
dans le coin supérieur droit de l’affichage, comme
ce sera le cas dans les descriptions ci-dessous, le
poste récepteur de radio est en MODE D’ACCÈS À
LA MÉMOIRE. Ce mode peut être quitté à tout
moment en appuyant puis en relâchant le bouton
SCAN MODE [MODE BALAYAGE] (12).
L’UTILISATION DE LA MÉMOIRE continué
Si vous avez besoin en premier de changer de
pages de mémoire, reportez-vous à la section
précédente, SÉLECTION/MODIFICATION DES PAGES
DE MÉMOIRE.
ACCÈS DIRECT À LA MÉMOIRE
Utilisez le pavé numérique pour saisir le numéro de
mémoire. Par exemple, si la station de radio désirée
est dans le numéro de mémoire 01, appuyez
simplement sur ‘0’, puis sur ‘1’, et il ira à la
mémoire 01.
RECHERCHE MANUELLE DE LA
MÉMOIRE
La fonction de Recherche manuelle de la mémoire
vous permet de faire une recherche manuelle
parmi les préréglages en mémoire, comme indiqué
ci-dessous :
1. Appuyez puis relâchez le bouton SCAN MODE
[MODE BALAYAGE] (12).
2. Appuyez rapidement et pendant un court
instant sur les boutons Up/Hour [Haut/Heure] Down/Min. [Bas/Minute] ou utilisez le bouton
de syntonisation pour chercher parmi les
préréglages en mémoire.
3. Appuyez sur le bouton SCAN MODE [MODE
BALAYAGE] lorsque vous avez fini.
BALAYAGE AUTOMATIQUE DE
LA MÉMOIRE
La fonction de Balayage automatique de la
mémoire permet de balayer les préréglages en
mémoire à l’intérieur d’une page en mémoire
choisie. Chaque mémoire qui est balayée est
accédée pendant environ 5 secondes, et passera
ensuite automatiquement à la mémoire suivante, y
restant sur celle-ci pendant 5 secondes environ.
Ceci continuera indéfiniment sur la page sélectionnée
jusqu’à ce que cette fonction soit délibérément
arrêtée. Les préréglages non utilisés ne sont pas
accédés.
1. Appuyez puis relâchez le bouton SCAN MODE
[MODE BALAYAGE] (12).
2. Appuyez puis maintenez appuyé soit le bouton
Up/Hour [Haut/Heure] ou Down/Min.
[Bas/Minute] pendant 3 secondes environ. Puis
relâchez-le. Remarquez que PRESET clignote
sous le chiffre de mémoire, indiquant que le
balayage de mémoire fonctionne avec chaque
mémoire balayée pendant environ 4 secondes. Il
passe ensuite au préréglage de mémoire suivant
pendant 4 autres secondes.
Pour arrêter le balayage automatique des
préréglages en mémoire, appuyez puis relâchez l’un
des boutons Up/Hour [Haut/Heure] ou Down/Min.
[Bas/Minute].
46
47
Page 25

E10 MANUEL D’OPÉRATION
L’UTILISATION DE LA MÉMOIRE continué
SUPPRESSION D’UNE
FRÉQUENCE STOCKÉE EN
MÉMOIRE
1. Appuyez puis relâchez le bouton SCAN MODE
[MODE BALAYAGE] (12).
2. Utilisez le bouton Up/Hour [Haut/Heure] ou
Down/Min. [Bas/Minute] (5,6) pour sélectionner
l’emplacement du préréglage de mémoire de la
fréquence que vous voulez supprimer.
Alternativement, utilisez le pavé numérique pour
saisir le chiffre de la mémoire.
3. Appuyez puis maintenez appuyé le bouton
MEMORY [MÉMOIRE] (18) pendant 2 secondes
environ et puis relâchez-le. ‘del’ [Supprimer]
apparaît et se met à clignoter à l’affichage.
4. Pendant que ‘del’ clignote, appuyez puis
relâchez le bouton MEMORY [MÉMOIRE].
SUPPRESSION DE TOUT LE
CONTENU EN MÉMOIRE D’UNE
PAGE
1. Appuyez puis relâchez le bouton PAGE (11).
2. Appuyez puis maintenez appuyé le bouton
MEMORY [MÉMOIRE] (18) pendant 5 secondes
environ et puis relâchez-le. ‘Del’ et PAGE (48,
49) apparaissent et se mettent à clignoter à
l’affichage.
3. Dans les 2 secondes, appuyez puis relâchez le
bouton MEMORY.
DÉPLACEMENT SUR UNE
FRÉQUENCE STOCKÉE EN
MÉMOIRE
Une fréquence qui a été stockée en mémoire peut
être déplacée vers une mémoire différente sur la
même page ou sur une page différente.
1. Allumez le poste récepteur de radio.
2. Appuyez puis relâchez le bouton PAGE.
3. Dans les trois secondes qui suivent, utilisez le
bouton UP/HOUR [HAUT/HEURE] ou
DOWN/MIN [BAS/MIN.] pour sélectionner la
page de mémoire nécessaire.
4. Appuyez puis relâchez deux fois le bouton
MEMORY [MÉMOIRE].
5. Dans les 5 secondes, utilisez le pavé numérique
pour saisir le numéro de préréglage de mémoire
dans lequel vous désirez stocker la fréquence de
la station.
6. Dans les 5 secondes, appuyez puis relâchez le
bouton MEMORY [MÉMOIRE].
PERSONNALISER LES PAGES
DE MÉMOIRE
Le E10 est configuré à l’usine avec 10 pages de
mémoires, chaque page ayant 50 préréglages en
mémoire, pour un total de 500 préréglages en
mémoire.Vous pouvez changer cette configuration
par l’intermédiaire des CODES DE RÉGLAGE DU
SYSTÈME, montré ci-dessous.
9 CODES DE RÉGLAGE DU SYSTÈME
Les codes de réglage du système permettent d’adapter exactement le poste récepteur de radio suivant vos
besoins en changeant certaines fonctions programmables. Ces fonctions et leurs descriptions sont indiquées
dans le tableau.
TABLEAU DES CODES DE RÉGLAGE DU SYSTÈME
NUMERO DE CODE
00 (réglage par défaut à l’usine)
20
25
50
09
10
12
24
22
28
29
FONCTION
Divise les mémoires en 10 pages avec 50
adresses
Divise les mémoires en 20 pages avec 25
adresses
Divise les mémoires en 25 pages avec 20
adresses
Divise les mémoires en 50 pages avec 10
adresses
Règle les bonds de syntonisation à 9kHz
pour MW (AM)
Règle les bonds de syntonisation à 10kHz
pour MW (AM)
Règle le système de l’horloge en format de
12 heures
Règle le système de l’horloge en format de
24 heures
Vérifie tous les segments sur l’affichage de
l’écran à cristaux liquides
Pile rechargeable à utiliser
Pile AA normale à utiliser
SUR L’AFFICHAGE
10:50
20:25
25:20
50:10
9kHz
10kHz
12H
24H
Ni-MH
48
76
87 (réglage par défaut à l’usine)
Règle la gamme de fréquence FM de 76 à
108 MHz (pour le Japon)
Règle la gamme de fréquence FM de 87 à
108MHz (Amérique du Nord/ Europe)
76 108
87 108
49
Page 26

E10 MANUEL D’OPÉRATION
CODES DE RÉGLAGE DU SYSTÈME continué
CHANGEMENT DES CODES DE
RÉGLAGE DU SYSTÈME
Pour saisir un code du système de votre choix,
utilisez la procédure ci-dessous.
1. Éteignez le poste récepteur de radio.
2. Appuyez puis relâchez le bouton SYSTEM
SET[Réglage du système] (20). Remarquez que
‘- - ‘ (51) apparaît dans le coin supérieur droit
de l’affichage et les chiffres de l’horloge
disparaissent.
3. Dans les 5 secondes, saisissez le code
numérique voulu avec le pavé numérique, puis
appuyez et relâchez immédiatement le bouton
marqué SYSTEM SET[Réglage du système]. Le
code ICON [icône] (52) apparaîtra un court
instant au coin inférieur droit de l’affichage.
CHANGEMENT DE FORMAT
DE L’HORLOGE DE 24 À
12 HEURES – UN EXEMPLE
DE CHANGEMENT DE CODE
DE RÉGLAGE DE SYSTÈME
Le mode d’emploi ci-dessous constitue un très
bon exemple de la façon de changer un code
de réglage du système, dans ce cas, il s’agit de
faire passer le système d’horloge à un format
de 12 heures:
1. Éteignez le poste récepteur de radio.
2. Appuyez puis relâchez le bouton SYSTEM SET
[Réglage du système]. Remarquez que les
caractères ‘- - ‘ apparaissent dans le coin
supérieur droit de l’affichage et que les chiffres
de l’horloge disparaissent.
3. Dans les 5 secondes, saisissez le nombre 12
avec l’aide du pavé numérique, puis appuyez et
relâchez immédiatement le bouton SYSTEM
SET[Réglage du système]. Les caractères ‘12H’
apparaissent un court instant à l’affichage.
LES CODES DE RÉGLAGE DU
SYSTÈME PAR DÉFAUT EN
USINE
Lorsqu’il est livré de l’usine, le Tableau des codes
de réglage du système du poste récepteur de radio
est réglé de la façon suivante. Des modifications
peuvent être effectuées à l’aide de la procédure
montrée dans la section intitulée CHANGEMENT
DES CODES DE RÉGLAGE DU SYSTÈME.
• Dix pages avec 50 mémoires chacune. Code 08.
• Bonds de syntonisation de 10 kHz en AM (MW).
Code 10.
• Système d’horloge en format 24 heures. Code 24.
• Piles rechargeables à utiliser. Code 28.
• Couverture des fréquences de 87 à 108 MHz en
FM. Code 87.
CODES DE RÉGLAGE DU SYSTÈME continué
SURVEILLANCE DU STATUT DES
CODES DE RÉGLAGE ACTUELS
ET D’AUTRES RÉGLAGES
Le fait d’appuyer pendant 3 secondes sur le bouton
SYSTEM SET [Réglage du Système], avec le E10 à
l’arrêt, permet la surveillance de codes de réglage
importants. Cette information clignote rapidement
sur l’affichage dans l’ordre suivant.
1. Format horaire
2. Réglage sur 9 ou 10 kilohertz
3. Réglage de gamme de fréquence FM
4. Fréquence de radio de la minuterie A
5. Fréquence de radio de la minuterie B
6. Réglage milliampère-heure de pile rechargeable
10 AUTRES COMMANDES DU E10
L’UTILISATION DE L’ÉCLAIRAGE
Si vous appuyez puis relâchez rapidement et un
court instant le bouton SNOOZE/LIGHT [RAPPEL
D’ALARME/ÉCLAIRAGE] (7), situé sur dans le coin
en haut à droite sur la face avant du poste récepteur
de radio, l’éclairage de l’affichage s’allumera, en
éclairant à partir du côté gauche de l’affichage,
pendant 5 secondes environ. Si vous appuyez puis
relâchez le bouton plus longtemps, (3 secondes
environ), l’éclairage restera allumé indéfiniment
(remarquez que cela diminuera la durée de vie des
piles). Vous pouvez éteindre l’éclairage en appuyant
rapidement et un court instant sur le bouton.
Le E10 est équipé de la fonction ‘rétroéclairage
temporisé’. Lorsque cette fonction est activée, le
fait d’appuyer sur n’importe quelle touche pendant
les heurs de 18 h à 7 h activera le rétroéclairage
pendant 3 secondes. Suivez les instructions cidessous activer ou désactiver cette fonction.
1. Allumez le poste récepteur de radio.
2. Appuyez puis relâchez le bouton ENTER/SYSTEM
SET [RÉGLAGE ENTRÉ/SYSTÈME].
3. Appuyez puis relâchez le bouton
LIGHT/SNOOZE [ÉCLAIRAGE/RAPPEL
D’ALARME].
L’affichage indique soit ON [MARCHE] ou OFF
[ARRÊT], suivant son dernier état.
L’UTILISATION DU COMMUTATEUR
DE GAIN D’ANTENNE
Le Commutateur de gain d’antenne (23 ) a trois
positions, DX, NORMAL et LOCAL Ce commutateur
devrait être placé en fonctionnement normal sur la
position DX, à condition que la performance de
réception soit maximale. Si la station AM ou d’ondes
courtes que vous écoutez est extrêmement puissante
et provoque des distorsions audio, essayez la position
NORMAL ou LOCAL. Ce commutateur n’est pas
utilisé pour les stations FM.
50
51
Page 27

E10 MANUEL D’OPÉRATION
AUTRES COMMANDES DU E10 continué
UTILISATION DE LA COMMANDE
D’AJUSTEMENT DE L’ANTENNE
Ce bouton de commande, marqué ANT TRIM et
situé sur le côté droit du E10, permet l’optimisation
de l’antenne télescopique du E10 lorsque vous
écoutez la radio sur ondes courtes.Tout en écoutant
la station, ajustez le bouton pour obtenir la
meilleure réception.
L’UTILISATION DU BOUTON DE
VERROUILLAGE
Le fait d’appuyez sur le bouton LOCK
[VERROUILLAGE] causera toutes les commandes
activées par bouton d’être verrouillées et le symbole
de verrouillage apparaîtra dans le coin en
bas à droite de l’affichage.Appuyez rapidement et
pendant un court instant pour enclencher la fonction
LOCK. Appuyez plus longuement pour la déclencher
et le symbole disparaîtra. C’est une fonction
excellente à utiliser lorsque vous voyagez, puisqu’il
empêche une mise en marche accidentelle du poste
récepteur de radio. Avant de mettre le poste
récepteur de radio dans une valise, un sac à main
ou une serviette, éteignez-le puis verrouillez-le.
Cette commande ne déclenche pas les fonctions de
minuterie.
UTILISATION DE LA PRISE
D’ANTENNE EXTERNE
La prise d’antenne externe est utilisée pour
améliorer la performance en ondes courtes ou FM.
Il y a de nombreuses antennes de ce type
disponibles sur le marché de nos jours. En tapant
‘antennes d’ondes courtes’ ou ‘antennes FM’ sur
votre site de recherche Internet favori vous
trouverez des renseignements supplémentaires au
cas où vous voudriez acheter ou fabriquer une
antenne de la sorte.
11 L’ÉCOUTE DES STATIONS EN ONDES COURTES
Êtes-vous un novice dans l’écoute des ondes
courtes ? Si oui, vous voudrez lire cette section et
la section suivante intitulée COMPRENDRE LES
BANDES D’ONDES COURTES.
QU’EST-CE QUE SONT LES
STATIONS EN ONDES COURTES ?
Elles sont des stations de radio situées autour du
monde qui diffusent sur des fréquences qui peuvent
être écoutées sur de très longues distances, souvent
des milliers de kilomètres.Aux États-Unis, il y a
aussi environ 30 radiodiffuseurs en ondes courtes
diffusant à l’intérieur du pays des émissions à
caractère religieux, politique et idéologique.
POURQUOI ÉCOUTER LES
STATIONS EN ONDES COURTES ?
Il y a de nombreuses raisons pourquoi vous
aimerez écouter des stations en ondes courtes. En
voici quelques-unes qui nous ont été rapportées
par nos clients.
• L’écoute de nouvelles et d’actualités provenant
d’autres sources mondiales vous expose souvent
à des perspectives uniques et différentes sur les
événements nationaux et internationaux.
• L’exposition à d’autres langues et cultures, y
compris leurs musiques et perspectives. L’écoute
de musique d’un pays étranger ou de musique
L’ÉCOUTE DES STATIONS EN ONDES COURTES continué
‘folk’ peut être très agréable, même si vous ne
comprenez pas la langue.
• L’apprentissage d’une langue en écoutant des
locuteurs natifs.
• Rester en contact avec une autre région du
monde, peut être votre pays d’origine ou celui
de votre patrimoine de famille.
• Diffusions à caractère religieux, politique, et
idéologique.
‘ RÈGLES EMPIRIQUES ’
GÉNÉRALES SUR LES ONDES
COURTES
• La qualité de réception des ondes courtes
durant la nuit est généralement meilleure que
durant la journée. Ceci peut changer de temps à
autre, cela vaut donc la peine d’essayer aussi de
recevoir les bandes durant la journée.
• Durant la journée, les bandes d’ondes courtes
les plus actives sont 13, 15, 16, 19, et 22
mètres. 16 et 19 étant généralement les
meilleures. La nuit, les bandes les plus actives
sont 25, 31, 41 et 49 mètres, avec 31 et 49
généralement les meilleures.
• Au coucher et au lever du soleil, les bandes
diurnes et nocturnes peuvent être bonnes,
quelquefois exceptionnellement bonnes.
L’écoute à ces heurs peut bien souvent vous
donner des résultats assez satisfaisants.
• Les matériaux de construction de certains bâtiments bloquent sévèrement les signaux d’ondes
courtes. Pour neutraliser ceci. Tenez votre poste
récepteur de radio en main et mettez-vous à
proximité d’une fenêtre.
SÉLECTION D’UNE BANDE DE
FRÉQUENCES EN MÈTRES DES
ONDES COURTES AVEC LE E10
Avec le E10, vous pouvez accéder à chacune des
14 bandes de fréquences de radiodiffusion
internationale. Les bandes de fréquence sont
numérotées 120, 90, 75, 60, 49, 31, 25, 22, 19,
16, 15, 13 et 11 mètres et sont couramment
appelées ‘Bandes métriques’.
Le E10 offre deux manières d’accéder une bande
de fréquences. Chaque méthode place le syntoniseur
au début de la bande de fréquences qui a été
accédée.
1. Chaque fois que vous appuyez rapidement et
pendant un court instant sur le bouton marqué
SW METER BAND [BANDE DE FRÉQUENCES
DES ONDES COURTES] (16) le poste récepteur
de radio est syntonisé au début de la bande de
fréquences. Pendant que vous appuyez sur le
bouton, le numéro de bande de fréquences est
indiqué dans le coin supérieur droit de l’affichage
(50) et disparaît quelques secondes après que le
bouton a été relâché, ce qui permet à l’horloge
de réapparaître dans ce coin de l’affichage. Ne
commencez à syntoniser qu’après que l’horloge
aura réapparue. Si vous n’attendez pas, alors la
méthode 2, ci-dessous sera automatiquement
utilisée.
52
53
Page 28

E10 MANUEL D’OPÉRATION
L’ÉCOUTE DES STATIONS EN ONDES COURTES continué
2. Appuyez une fois rapidement et pendant un
court instant sur le bouton appelé SW METER
BAND [BANDE DE FRÉQUENCES EN MÈTRES
DES ONDES COURTES], et appuyez plusieurs fois
immédiatement après, rapidement et pendant
un court instant, sur les touches de syntonisation
Up/Hour [Haut/Heure] ou Down/Min.
[Bas/Minute]. Le numéro de bande de
fréquences apparaît alors dans le coin supérieur
droit de l’affichage.Après avoir sélectionné la
bande de fréquences de votre choix, commencez
à syntoniser après que l’horloge a réapparu
dans le coin supérieur droit de l’affichage.
LA SYNTONISATION AUTOMATIQUE
EN ONDES COURTES
En ondes courtes, la syntonisation en balayage
automatique ne balaye automatiquement que les
gammes de fréquences des ondes courtes listées
ci-dessous dans le Tableau des bandes. Pour
syntoniser des fréquences des ondes courtes qui
sont entre ces gammes ou à l’extérieur, utilisez
l’une des autres méthodes de syntonisation, par
exemple la Syntonisation normale (syntonisation
manuelle) ou la Saisie directe des fréquences
comme discuté dans la section intitulée
SYNTONISATION DES STATIONS.
54
TABLEAU DES BANDES DE
BALAYAGE AUTOMATIQUE
POUR LES BANDES DE
FRÉQUENCES POUR ONDES
COURTES
BANDE
(en mètres)
120
90
75
60
49
41
31
25
22
19
16
15
13
11
GAMME DES FRÉQUENCES
(en kilohertz)
2250 – 2550
3150 - 3450
3850 - 4050
4700 - 5100
5800 – 6300
7100 – 7500
9400 – 10000
11500 – 12150
13500 – 13900
15000 – 15900
17450 - 18000
18850 - 19100
21450 - 21950
25600 - 26100
L’ÉCOUTE DES STATIONS EN ONDES COURTES continué
STATIONS HORAIRES SUR ONDES COURTES (AMÉRIQUE DU NORD)
Les États-Unis et le Canada ont des stations horaires diffusées sur ondes courtes. L’heure du jour est
diffusée continuellement en Heure Universelle, appelée aussi UTC et Temps Moyen de Greenwich (GMT).
Les fréquences sont indiquées ci-dessous.
CHU-time(Canada)
CHU-time(Canada)
CHU-time(Canada)
WWV-time/weather(US)
WWV-time/weather(US)
WWV-time/weather(US)
WWV-time/weather(US)
WWV-time/weather(US)
PUBLICATIONS SUR LES
ONDES COURTES : TROUVER
DES STATIONS SPÉCIFIQUES
Pour aider à trouver des stations spécifiques et
leurs heures de diffusion, fréquences et les régions
visées, passez en revue les deux excellentes
publications indiquées ci-dessous. Elles sont en
vente dans les plus grandes librairies et aux
librairies en ligne.
PASSPORT TO WORLD BAND RADIO. Publié par
International Broadcasting Services.Adresse: IBS
North America, Box 300, Penn’s Park, PA 18943.
Téléphone: 215-598-3794. Web:
www.passband.com.
WORLD RADIO TV HANDBOOK. Publié en
Amérique du Nord par Watson Guptil Publications,
770 Broadway – 7th Floor, New York, NY 10003-
9595. www.watsonguptill.com.
3330
7335
14670
2500
5000
10000
15000
20000
Meilleur la nuit
Jour/nuit
Meilleur durant le jour
Meilleur la nuit
Meilleur la nuit
Jour/nuit
Meilleur durant le jour
Meilleur durant le jour
Un autre moyen de trouver des renseignements sur
les ondes courtes est d’utiliser un site de recherche
Internet, tapez un critère de recherche tel que ‘
stations de radio en ondes courtes’ ou ‘fréquences
d’ondes courtes’.
APPRENDRE PLUS À PROPOS
DES ONDES COURTES
Pour apprendre plus à propos des ondes courtes,
reportez-vous à la section suivante intitulée
COMPRENDRE LES BANDES D’ONDES COURTES.
Un autre moyen d’apprendre avec succès est
d’utiliser votre site de recherche Internet favori.
Tapez ‘écoute des ondes courtes’ ou ‘stations en
ondes courtes’ et de nombreux articles apparaîtront.
55
Page 29

E10 MANUEL D’OPÉRATION
12 COMPRENDRE LES BANDES D’ONDES COURTES
LA CLÉ POUR APPRÉCIER VOTRE POSTE RÉCEPTEUR
D’ONDES COURTES
Maintenant que vous avez un poste récepteur de
radio à ondes courtes, vous voudrez sans aucun
doute écouter immédiatement des stations
internationales. Si vous êtes novice dans les ondes
courtes, prenez quelques minutes pour apprendre
les principes fondamentaux présentés ci-dessous.
Même si vous êtes un expert dans l’écoute des
ondes courtes, vous trouverez que ceci est un rappel
bien utile.
QU’EST-CE QUE SONT LES BANDES ?
Pour apprécier au maximum l’écoute des ondes
courtes, c’est le plus important concept d’apprendre
dès maintenant
Pour apprécier au maximum l’écoute des stations
d’ondes courtes vous devez savoir comment les
trouver. Elles se trouvent dans les bandes d’ondes
courtes. Si vous avez déjà écouté des radios AM ou
FM, alors vous savez déjà ce qu’est une bande. La
bande AM est une gamme de fréquence allant de
530 à 1600 kilohertz, la bande FM va de 66 à
108 mégahertzs. Une bande est simplement une
gamme de fréquences dans laquelle les stations
sont situées. Lorsque vous cherchez des stations
dans ces « bandes », vous balayez simplement la
bande avec vos boutons de syntonisation (ou le
bouton de syntonisation sur un poste récepteur de
radio analogique) jusqu’à ce que vous ayez trouvé
une station que vous aimez. Les ondes courtes sont
similaires et les bandes des ondes courtes portent
des noms comme 25 mètres, 31 mètres, 49 mètres,
etc. Celles-ci sont abrégées 25 m, 31 m et 49 m.
Comme pour les radios AM et FM, il suffit d’aller
dans la bande des ondes courtes et de la balayer
pour chercher des stations.
La bande des ondes courtes de 19 mètres comprend
par exemple la gamme de fréquence de 15100 à
15600 kilohertz. Dans le tableau ci-dessous vous
trouverez une liste des bandes d’ondes courtes
utilisées pour les émissions internationales en
ondes courtes et leurs gammes de fréquence
correspondantes. Comme certains programme de
radio présentent habituellement des fréquences en
mégahertz et d’autres en kilohertz, les deux sont
montrés ici. Le E10 affiche les fréquences d’ondes
courtes en kilohertz, KHz.
Les renseignements suivants s’appliquent pour tout
poste récepteur de radio d’ondes courtes. La plupart
des postes récepteurs de radio utilisent les
abréviations kHz et MHz. Sur certains postes
récepteurs de radio ces fréquences ressembleront à
: 15100 kHz, 15105 kHz ou 15110 kHz, mais sur
d’autres postes récepteurs de radio elles
ressembleront à : 15.1 MHz, 15.105 MHz ou 15.11
MHz. C’est parce que certains poste récepteur de
radio affichent les fréquences en kilohertz et
d’autres affichent les fréquences en mégahertz,
comme sur le tableau ci-dessous. Les gammes de
fréquences exactes pour ces bandes peuvent varier
un peu d’un modèle de poste récepteur de radio
et un autre. C’est absolument normal. Sur certains
postes récepteurs de radio, les bandes sont
clairement marquées, sur d’autres elles ne sont pas
marquées du tout. Si cela n’est pas apparent
comment trouver une bande sur votre poste récepteur de radio, consultez le guide de l’utilisateur, le
site Web de etón Corporation (www.etoncorp.com)
ou contactez etón Corporation et nous vous
montrerons comment vous pouvez le faire avec
votre modèle.
COMPRENDRE LES BANDES D’ONDES COURTES
LA CLÉ POUR APPRÉCIER VOTRE POSTE RÉCEPTEUR
D’ONDES COURTES
UNE ANALOGIE UTILE :
UNE BANDE D’ONDES COURTES EST COMME
UNE RUE AVEC DE NOMBREUSES ADRESSES
INDIVIDUELLES.
Pensez à une bande d’ondes courtes comme vous
le feriez d’une rue avec une gamme complète
d’adresses individuelles dans celle-ci, chaque
adresse est une fréquence spécifique. La bande de
19 mètres pourrait être appelée Rue 19 Mètres.
Comme pour chaque rue, nous avons une gamme
d’adresses comprenant des numéros de maison
individuelle tels que 15100, 15105, 15110, etc.,
TABLEAU GÉNÉRAL DES BANDES D’ONDES COURTES
BANDE MÉGAHERTZ (MHz) KILOHERTZ (KHz)
120m
90m
75m
60m
49m
41m
31m
25m
22m
19m
16m
13m
11m
2.300-2.500MHz
3.20-3.40 MHz
3.90-4.00 MHz
4.750-5.060 MHz
5.950-6.20 MHz
7.10-7.60 MHz
9.20-9.90 MHz
11.600-12.200 MHz
13.570-13.870 MHz
15.10-15.80 MHz
17.480-17.90 MHz
21.450-21.850 MHz
25.60-26.10 MHz
continué
chacun de ces numéros de maison représentant
une maison individuelle que vous pourriez visiter
dans la rue. Dans la bande d’ondes courtes de 19
mètres, ces « adresses » ou « numéros de maison
» sont appelés fréquences et sur chaque fréquence
vous pouvez visiter une station de radio d’ondes
courtes différente.
Le TABLEAU GÉNÉRAL DES BANDES D’ONDES
COURTES, montré ci-dessous, indique toutes les
bandes d’ondes courtes officiellement affectées.
2300-2500 KHz
3200-3400 KHz
3900-4000 KHz
4750-5060 KHz
5950-6200 KHz
7100-7600 KHz
9200-9900 KHz
11600-12100 KHz
13570-13870 KHz
15100-15800 KHz
17480-17900 KHz
21450-21850 KHz
25600-26100 KHz
56
57
Page 30

E10 MANUEL D’OPÉRATION
COMPRENDRE LES BANDES D’ONDES COURTES
LA CLÉ POUR APPRÉCIER VOTRE POSTE RÉCEPTEUR
D’ONDES COURTES
BANDES DIURNES ET BANDES NOCTURNES
LA DIFFÉRENCE EST IMPORTANTE
Comme les signaux des ondes courtes dépendent
de facteurs comme le soleil, l’ionosphère et
l’interaction avec la terre elle-même, les signaux ne
peuvent pas être entendus sur toutes les bandes
toute la journée. Certaines bandes sont meilleures
le jour tandis que d’autres sont meilleures la nuit.
En général, les bandes avec des fréquences
inférieures à 13 MHz (13000 KHz) sont meilleures
la nuit et les bandes avec des fréquences
supérieures à 13 MHz (13000 KHz) sont meilleures
le jour. Veuillez trouver ci-dessous une liste des
caractéristiques des principales bandes d’ondes
courtes. Suivez ces règles pour obtenir les meilleurs
résultats. Comment trouver une bande particulière
pourra varier d’un poste récepteur de radio à un
autre. Consultez votre guide de l’utilisateur pour
obtenir les instructions pour accéder aux bandes
sur votre poste récepteur de radio ou appelez etón
Corporation si cela vous trouvez que cela n’est pas
clair.
COUCHER ET LEVER DU SOLEIL
SOUVENT LE MEILLEUR MOMENT POUR ÉCOUTER.
On nous demande souvent s’il existe vraiment un
meilleur moment pour l’écoute des ondes courtes,
quand les signaux sont les plus forts et les plus
clairs. Souvent, c’est une fenêtre de quelques
heures autour du coucher et du lever du soleil.
Quelques fois c’est une fenêtre de deux heures,
d’autres fois c’est trois ou quatre heures. Faites
l’expérience pour déterminer lorsque c’est le
meilleur moment pour l’écoute des ondes courtes
dans votre région.
continué
ÉCOUTE DE JOUR
L’écoute des ondes courtes est généralement la
plus mauvaise pendant les heures diurnes allant de
10 heures le matin à 15 heures l’après-midi. La
raison principale pour cela est que les radiodiffuseurs n’émettent pas vers l’Amérique du Nord
à ces heures, car ils supposent que nous sommes
tous au travail ou à l’école et donc pas en mesure
d’écouter pendant la journée. Si vous voulez essayer
d’écouter des stations pendant la journée, utilisez
les règles ci-dessous. En général, les ondes courtes
diurnes ont tendance à être meilleures dans l’est
de l’Amérique du Nord que dans l’ouest de
l’Amérique du Nord. Les meilleures bandes diurnes
sont indiquées en caractères GRAS dans le tableau
ci-dessous.
COMPRENDRE LES BANDES D’ONDES COURTES
LA CLÉ POUR APPRÉCIER VOTRE POSTE RÉCEPTEUR
D’ONDES COURTES
TABLEAU DES BANDES DIURNES
BANDES
DIURNES
13m
16m
19m
22m
25m
31m
ÉCOUTE DE NUIT/EN SOIRÉE
C’est le meilleur temps pour l’écoute car les
radio-diffuseurs émettent intentionnellement vers
l’Amérique du Nord. Ces bandes peuvent aussi être
extrêmement bonnes au lever et au coucher du
soleil. Les meilleures bandes de nuit/en soirée sont
indiquées en caractères GRAS dans le tableau
ci-dessous.
CARACTÉRISTIQUES
Les résultats varient. Vaut la peine
d’essayer.Parfois extrêmement
bonne au lever et au coucher du
soleil.
Similaire à 19 m.
La meilleure bande de jour
générale. Peut être bonne aussi la
nuit pendant les mois d’été. Parfois
extrêmement bonne au lever et au
coucher du soleil. Parfois bonne la
nuit pendant l’été.
Similaire à 19m.
Meilleure au lever et au coucher du
soleil. Peut être bonne au milieu de
la journée dans l’Est de l’Amérique
du Nord.
Similaire à 25 m.
continué
TABLEAU DES BANDES NOCTURNES
BANDES
NOCTURNES
25m
31m
41m
49m
SI VOTRE BÂTIMENT BLOQUE
LES SIGNAUX :
Si vous remarquez que la puissance des signaux
des stations s’améliore considérablement lorsque
vous êtes à proximité d’une fenêtre ou lorsque
vous allez dehors, alors il est certain que votre
bâtiment bloque les signaux en ondes courtes. Ce
blocage est causé par les matériaux de construction
de votre bâtiment ou par le fait d’avoir un ou
plusieurs étages ou niveaux au-dessus de vous. Les
solutions pour ceci sont d’écouter à proximité
d’une fenêtre, d’aller dehors ou d’installer une
antenne ondes courtes. Pour des renseignements
sur l’installation d’une antenne extérieure pour
ondes courtes, utilisez votre site Internet de
recherche préféré et tapez ‘antennes ondes courtes’.
Si vous n’avez pas l’accès Internet, contactez-nous,
etón Corporation, en utilisant les méthodes de
contact indiquées au début de ce manuel.
CHARACTERISTICS
Similaire à 31 m.
Bonne toute la nuit, partout.
Souvent extrêmement bonne au
lever et au coucher du soleil. Donne
souvent de bons résultats une heure
environ avant le coucher du soleil.
Similaire à 49 m. Bonne toute la nuit
dans l’est de l’Amérique du Nord;
Varie dans l’ouest de l’Amérique du
Nord.
La meilleure bande de nuit générale.
58
59
Page 31

E10 MANUEL D’OPÉRATION
13 DÉPANNAGE
LA PROCÉDURE DE RÉINITIALISATION
Le bouton RESET (RÉINITIALISATION) est situé en
bas du E10. Lorsque vous effectuez une
réinitialisation, assurez-vous que les piles utilisées
sont en bonne condition ou alimentez le poste
récepteur de radio avec un adaptateur CA et
mettez-le à l’arrêt. Faites un réinitialisation si les
solutions décrites ci-dessous ne résolvent pas le
problème. Pour faire une réinitialisation, appuyez
sur le bouton ‘reset’ avec un trombone ou objet
similaire.
LE POSTE RÉCEPTEUR DE RADIO NE
S’ALLUME PAS
1. Assurez-vous que la fonction LOCK
[VERROUILLAGE] est hors service
2. Assurez-vous que le poste récepteur de radio
est alimenté (piles installées ou adaptateur CA
branché)
3. Assurez-vous que les piles sont insérées avec la
bonne polarité
4. Assurez-vous que les piles ne sont pas épuisées
5. Si vous utilisez un adaptateur CA, assurez-vous
que celui-ci est branché dans une prise de
courant de la maison (prise de réseau électrique)
et dans la prise d’alimentation DC [C.C.] du
poste récepteur de radio. Faites attention de ne
pas brancher le dans la prise pour écouteurs.
Aussi, assurez-vous que l’adaptateur CA est de
tension de sortie DC (CC) et de polarité correcte
et que la pointe de sa prise a un diamètre
intérieur et extérieur de dimensions correctes
60
LE POSTE RÉCEPTEUR DE RADIO S’ÉTEINT
BRUSQUEMENT LORSQUE VOUS L’UTILISEZ
SOUS PILES
Ceci est causé par des piles épuisées. Remplacez-les.
LE POSTE RÉCEPTEUR DE RADIO
S’ÉTEINT BRUSQUEMENT LORSQUE VOUS
LE DÉPLACEZ ET VOUS L’UTILISEZ AVEC
UN ADAPTATEUR CA
Ceci est causé par un fil coupé ou un branchement
lâche dans le cordon de l’adaptateur CA ou si
l’embout de prise de l’adaptateur CA est d’un
diamètre incorrect.
LE POSTE RÉCEPTEUR DE RADIO FONCTIONNE IRRÉGULIÈREMENT
Effectuez une RÉINITIALISATION, tel que décrit
dans la section intitulée LA PROCÉDURE DE
RÉINITIALISATION.
LE SIGNAL DES STATIONS REÇUES EST TROP
FAIBLE
• Assurez-vous que le commutateur de GAIN
D’ANTENNE est en position DX.
• Assurez-vous que l’antenne télescopique est
déployée en entier pour la réception FM et des
ondes courtes.
• Si vous écoutez des stations AM, faites pivoter
le poste récepteur de radio. L’antenne AM
intégrée en ferrite est très directionnelle.
• En ondes courtes, réglez le L’AJUSTABLE
D’ANTENNE.
DÉPANNAGE continué
IL N’Y A PAS DE SON EN PROVENANCE DU
HAUT-PARLEUR
Assurez-vous que des écouteurs ou un casque ne
sont pas branchés dans le poste récepteur de radio
et que la commande de réglage du volume est à
un niveau élevé.
UNE STATION PROVOQUE DES DISTORSIONS
AUDIO GRAVES, MAIS SEMBLE POSSÉDER UN
SIGNAL TRÈS FORT
Il s’agit probablement d’une station locale et forte,
très près de votre emplacement. Comme cette station est très proche de vous, son signal est trop
fort. Pour réduire la puissance du signal, mettez le
commutateur de GAIN D’ANTENNE sur la position
NORMAL ou LOCAL.
LE COMPARTIMENT DES PILES CONTIENT UN
LIQUIDE COLLANT OU UNE POUDRE
BLANCHE DESSÉCHÉE
C’est la conséquence de fuite d’acide de pile. Pour
éviter une fuite d’acide de pile, utilisez seulement
des piles alcalines de haute qualité ou des piles
rechargeables en nickel métal hydrure. Ne
mélangez jamais les piles vieilles et neuves ou des
marques ou types différents de piles. Si les piles
fuient, contactez immédiatement le fabricant des
piles et ne les jeter pas. Les dégâts causés par les
fuites d’acide des piles ne sont pas couverts sous la
garantie.
14 ENREGISTREMENT DE LA GARANTIE
Pour assurer l’étendue totale de la garantie ou les mises à jours de produit, l’enregistrement de votre produit etón
ou Grundig doit être complété le plus tôt possible après l’achat ou le reçu. Pour enregistrer votre radio, veuillez
sélectionner une des méthodes suivantes :
1. Effectuez l’enregistrement en visitant notre site
Internet au http://www.etoncorp.com
2. Appelez notre numéro gratuit d’enregistrement
n’importe où aux États-Unis ou au Canada au
(888) 889-4391 ou dans le monde entier en
composant le (204) 336-6547. Des opérateurs
parlant le Français et l’Anglais sont disponibles.
3. Postez votre information d’enregistrement à
l’adresse suivante :
etón Corporation
1015 Corporation Way
Palo Alto, CA 94303
PRODUCT REGISTRATION
Inclure votre nom, adresse postale complète,
numéro de téléphone, modèle acheté, date d’achat,
nom du commerçant et numéro de série du produit
(typiquement situé à l’intérieur ou près du
compartiment à piles).
61
Page 32

E10 MANUEL D’OPÉRATION
15 GARANTIE LIMITÉE AU CLIENT INITIAL
Ce produit de marque
etón contre tout défaut de fabrication en matériau et en main-d’œuvre pendant la période de garantie limitée suivante :
UN (1) ANS PIÈCES ET MAIN D’ŒUVRE
Cette garantie limitée commence à partir de la date
de l’achat initial, et est valide seulement pour les
produits achetés par l’intermédiaire d’un détaillant
autorisé etón et n’inclue pas le transport,
l’installation, l’enlèvement ou la réinstallation. Les
réparations sous-garantie doivent être faites par
etón ou par un centre accrédité de réparation etón.
Pour recevoir le service de garantie, la facture
originale datée doit être présentée à la demande à
etón ou au centre accrédité de réparation etón
comme preuve d’achat. Le transport à etón ou au
centre accrédité de réparation etón est à la
responsabilité de l’acheteur.
etón réparera ou remplacera ce produit, à notre
option et sans frais avec des pièces neuves ou
remises en état, s’il est trouvé défectueux durant la
période de garantie limitée spécifiée ci-dessus. Le
produit doit être renvoyé pas plus tard que 15 jours
au-delà de la date d’expiration de la période de
garantie avec les frais de transport payés à l’avance
à etón ou au centre de réparation désigné par etón
pour bénéficier de la garantie. Avant de retourner
tout produit pour le service de garantie, l’acheteur
doit contacter etón pour la détermination du
problème et la procédure de service. Toutes les
pièces et produits remplacés deviennent la propriété
d’etón. Les pièces et produits de remplacement
assument la garantie originale restante, ou
quatre-vingt-dix (90) jours, selon laquelle de ces
deux périodes est la plus longue.
etón ou GRUNDIG, tel que fourni et distribué par etón Corporation (etón) est garanti par
Cette garantie limitée couvre les défauts de
fabrication, en matériau et en main d’œuvre
rencontrés avec une utilisation normale, non
commerciale de ce produit et ne s’appliquera pas à
ce qui suit, y compris, mais pas limité à : des
dégâts qui se produisent à la suite d’applications et
d’utilisations pour lesquelles le produit n’était pas
prévu; des pannes ou problèmes qui sont causés
par des produits ou équipements non fournis par
etón; des accidents, l’utilisation incorrecte, abusive,
négligente, la mauvaise application, le feu, l’eau, la
foudre, ou d’autres évènements fortuits; une tension
de secteur incorrecte, des variations de tension ou
des surtensions; des dégâts causés par une
installation incorrecte ou erronée (y compris des
piles, qui peuvent créer une fuite d’acide avec des
dégâts de circuit irréversibles); des dégâts causés
par une fuite d’acide; des altérations ou
modifications de produit; ou l’utilisation de pièces,
de fournitures, d’accessoires ou d’équipements
non-autorisés qui détériorent ce produit ou
entraînent des problèmes de réparation.
16 RENSEIGNEMENTS SUR LES SERVICES
SERVICE POUR VOTRE PRODUIT ETÓN OU GRUNDIG
Pour obtenir le service de votre produit etón ou Grundig nous recommandons de contacter premièrement un
représentant du service des réparations etón au 800-872-2228 aux États-Unis, 800-637-1648 au Canada ou
(650) 903-3866 pour la détermination du problème et le dépannage. De nombreuses questions communes peuvent
être résolues rapidement au téléphone.
IL Y A DEUX TYPES DE SERVICE DANS LE CAS OÙ VOTRE PRODUIT ETÓN OU GRUNDIG AURAIT
BESOIN D’UNE RÉPARATION.
SOUS GARANTIE – Si votre produit est encore
1.
sous garantie et le représentant du service de
réparation etón détermine que le service sous
garantie est nécessaire, une autorisation de
retour sera émise et les instructions pour
l’expédition vers un centre accrédité de réparation
sous garantie. Ne renvoyez pas votre radio sans
avoir obtenu le numéro d’autorisation de retour.
2. HORS-GARANTIE – Si votre produit n’est plus
sous garantie et nécessite une réparation, notre
personnel technique et de réparation vous
référera au centre de réparation le plus proche
qui sera le mieux adapté pour la réparation.
62
63
Page 33

E10 BENUTZERHANDBUCH
INHALTSVERZEICHNIS
BENÖTIGEN SIE HILFE?
Vielen Dank, dass Sie sich für das E10
UKW/MW/KW -Radio entschieden haben.
Dieses Radio soll Ihnen optimalen Nutzen
bringen. Bitte lesen Sie das Benutzerhandbuch
sorgfältig durch, damit Sie die vielen
ausgezeichneten und einzigartigen
Eigenschaften des Radios voll nutzen können.
Wenn Sie beim Erlernen der Bedienung des
Radios Hilfe brauchen, kontaktieren Sie uns
bitte folgendermaßen:
Montag bis Freitag, 8:30 Uhr bis 16:00 Uhr,
Pazifische Standardzeit Nordamerikas.
1-800-872-2228 von den USA
1-800-637-1648 von Kanada
1-650-903-3866, weltweit
FAX: 650-903-3867
customersvc@etoncorp.com
Website: www.etoncorp.com
Postadresse:
etón Corporation
1015 Corporation Way
Palo Alto, CA 94303
USA
BENÖTIGEN SIE HILFE?..................................................64
1
INHALTSVERZEICHNIS.................................................... 65
2
DIE WICHTIGSTEN FUNKTIONEN DES
3
ABBILDUNGEN.............................................................. 67
4
VOR BEGINN................................................................. 69
5
ZUBEHÖR FÜR DAS E10...........................................69
EINSETZEN VON BATTERIEN/AKKUS..........................69
VERMEIDEN DES AUSLAUFENS
VON BATTERIESÄURE...............................................69
GEBRAUCH DES WS-NETZTEILS/ LADEGERÄTS.......... 69
LADEN VON AKKUS IM E10...................................... 69
ALLGEMEINER BETRIEB DES RADIOS............................. 71
6
UHR UND TIMER............................................................74
7
STELLEN DER UHR....................................................74
STELLEN DER TIMER.................................................75
SPEICHERN EINES RADIOSENDERS
IM TIMER-SPEICHER................................................. 76
AKTIVIEREN UND DEAKTIVIEREN DES TIMERS..........76
SCHLUMMERFUNKTION........................................... 76
SPEICHER...................................................................... 77
8
EINGABE VON SENDERN IN DIE SPEICHER...............77
WÄHLEN UND ÄNDERN DER SPEICHERSEITEN......... 77
ZUGRIFF AUF GESPEICHERTE FREQUENZEN..............77
DIREKTZUGRIFF AUF DEN SPEICHER.........................78
MANUELLE SPEICHERSUCHE....................................78
AUTOMATISCHE SPEICHERSUCHE.............................78
LÖSCHEN DES INHALTS EINES SPEICHERS.................78
etón E10............ 66
LÖSCHEN DES INHALTS ALLER SPEICHERSEITEN....... 79
SPEICHERN EINER FREQUENZ AN EINEM
ANDERN ORT............................................................79
ANPASSEN VON SPEICHERSEITEN.............................79
CODES ZUR SYSTEMEINSTELLUNG.................................80
9
CODE-TABELLE ZUR SYSTEMEINSTELLUNG............... 80
ÄNDERN DER CODES ZUR SYSTEMEINSTELLUNG......81
ÄNDERN DES ZEITFORMATS VON 24 STUNDEN
IN 12 STUNDEN....................................................... 81
VOM WERK VOREINGESTELLTE CODES......................81
PRÜFEN DES MOMENTANEN STATUS DER
CODES ZUR SYSTEMEINSTELLUNG UND ANDERER
EINSTELLUNGEN...................................................... 81
ZUSÄTZLIHCHE BEDIENELEMENTE DES E10...................82
10
EMPFANG VON KURZWELLENSENDERN.........................83
11
WAHL EINES KURZWELLENBANDS MIT DEM E10.....84
KURZWELLENSENDER MIT ZEITANGABE...................85
VERÖFFENTLICHUNGEN ZUR KURZWELLE:
FINDEN BESTIMMTER SENDER................................. 86
INFORMATIONEN ÜBER KURZWELLENBÄNDER
12
DER SCHLÜSSEL ZUM ERFOGREICHEN
KURZWELLENEMPFANG.................................................87
FEHLERBEHEBUNG........................................................ 91
13
GARANTIE-REGISTRIERUNG...........................................93
14
BEGRENZTE GARANTIE FÜR DEN URSPRÜNGLICHEN
15
KUNDE.......................................................................... 94
WARTUNGSINFORMATIONEN........................................ 95
16
6564
Page 34

E10 BENUTZERHANDBUCH
3 DIE WICHTIGSTEN FUNKTIONEN DES etón E10
• UKW-Frequenzbereich: 87 – 108 MHz (für Amerika); 76 – 108 MHz (für Japan)
• KW-Frequenzbereich: 1711 – 29999 kHz
• Frequenzwahl in Stufen von 9 bzw. 10 kHz für den Empfang der Mittelwelle (MW)
• 1 kHz-Stufen für die Anzeige der Mittelwelle und Kurzwelle.
• Die SW IF SET-Funktion schaltet die Zwischenfrequenz um, um Störungen während des
Kurzwellenempfangs zu vermindern.
• Antennentrimmer für Kurzwelle
• ATS (automatisches Sendersuchsystem) für gespeicherte von UKW/MW-Sender
• Manuelle Sendersuche
• Automatische Sendersuche
• Direkte Frequenzeingabe über die Zifferntasten
• Digitaler Sendersuchregler
• 550 programmierbare Speicher
• Anpassung der Speicherseiten
• Automatische und manuelle Suche der in die Speicher eingegebenen Sender
• Direkter Speicherzugriff
• Schnelle/langsame Sendersuche für die manuelle Sendereinstellung
• Einschlafzeit-Automatik (Sleep)
• Zwei Einschalttimer mit Senderspeicher
• Schlummerfunktion (Snooze): 10 Minuten, kann drei Mal wiederholt werden.
• Stereo/Mono-Wahl für UKW
• Klangregler High/Low
• LCD Hintergrundlicht
• Tastensperre
• 12- bzw. 24- Stundenformat
• Integriertes Ladegerät für Ni-MH-Akkus
• CODES ZUR SYSTEMEINSTELLUNG
4 ABBILDUNGEN
Speichern & Bearbeiten / Uhr stellen
Ladegerät Ein/Aus
Eingabe / Systemeinstellung
Handschlaufe
Buchse für UKW/KW-Antenne
Antennenverstärkung DX/Normal/Local
Klangregler
Kopfhörerbuchse
Netzteilbuchse (6 V)
Einschlafzeit-Automatik
Sperrtaste
Timer A
Timer B
LCD-Anzeige
Light Snooze Button
Beleuchtung / Schlummerfunktion
Tuning-Modus
Weiter / Stunden
Zurück / Minuten
Speicherseite
SW IF Set
Bandbreite
UKW/MW-Band (ATS)
KW-Meter-Band
Zifferntasten
Sendersuchregler
Ständer
Antennentrimmer
Lautstärkenregler
Ständer
Rückstellknopf
6766
Page 35

E10 BENUTZERHANDBUCH
ABBILDUNGEN fortgesetzt
ANZEIGE BEI AUSGESCHALTETEM RADIO ANZEIGE BEI EINGESCHALTETEM RADIO
Dreieckspfeil
Batterie-Symbol
Antennen-Symbol
Skala von 1-5
AM/PM-Anzeige Uhr (32)
Symbol fü Ni-MH-Akku
Wecker, AM/PM-Anzeige
Symbol für die Aktivierung
der Weckfunktion
Uhrzeit
Weckzeit
Anzeige für
UKW/MW/
KW
SPEICHERANZEIGE
Gilt nur für die Anzeige in der rechten oberen Ecke
Löschanzeige
Speicheranzeige Anzeige des Kurzwellenbands
ANZEIGE DER CODES ZUR SYSTEMEINSTELLUNG
Dreieckspfeil
Batterie-Symbol Uhrzeit
Antennen-Symbol
Skala von 1-5
Frequenz
Symbol für
Einschlafzeit-Automatik
Bandbreite
450K IF
Symbol für die
Aktivierung der
Weckfunktion
KURZWELLENBAND
Gilt nur für die Anzeige in der rechten oberen Ecke
5 VOR BEGINN
ZUBEHÖR FÜR DAS E10
• Kopfhörer in Form von Ohrsteckern
• Tragetasche
• WS-Netzteil/Ladegerät
• 4 - Ni-MH-Akkus, 1100 mAh.
• Benutzerhandbuch
ANMERKUNG: In den Anleitungen unten
beziehen sich die Zahlen in Klammern ( ) auf die
Abbildungen.
EINSETZEN VON
BATTERIEN/AKKUS
Das Batteriefach befindet sich auf der Rückseite
des E10. Die Abdeckung befindet sich in der
unteren rechten Ecke der Rückseite. Der
Batteriefachabdeckung zum Abnehmen mit dem
Daumen nach unten drücken und in Richtung
Unterseite des Radios schieben. Vier AAAlkalibatterien in das Batteriefach einlegen. Dabei
die Polarität beachten (siehe Abbildung auf der
Rückseite des Radios).
HINWEIS: Wenn generell kein Einsatz von Akkus
geplant ist, empfiehlt es sich, den CODE ZUR
SYSTEMEINSTELLUNG 29 einzustellen. Dazu im
Abschnitt CODES ZUR SYSTEMEINSTELLUNG
nachlesen. Dadurch wird sichergestellt, dass die
Anzeige der Batterieladung für nicht aufladbare
Batterien richtig funktioniert. Dies ist nicht unbedingt
notwendig, das E10 funktioniert auch, wenn dies
nicht getan wird.
VERMEIDEN DES AUSLAUFENS
VON BATTERIESÄURE
Um das Auslaufen von Batteriesäure zu vermeiden,
nur Alkali- oder Lithiumbatterien bester Qualität
bzw. Ni-MH-Akkus verwenden. Nie alte und neue
Batterien oder Batterien verschiedener Marken oder
Typen kombinieren. Schäden, die durch das
Auslaufen von Batteriesäure entstehen, sind nicht
durch die Garantie für dieses Produkt abgedeckt.
Ausgelaufene Batterien nicht wegwerfen sondern
sofort den Batteriehersteller benachrichtigen und
sich nach dessen Garantieprogramm im Falle eines
Auslaufens von Batterien erkundigen.
GEBRAUCH DES WS-NETZTEILS/
LADEGERÄTS
Wenn das E10 mit dem mitgelieferten WSNetzteil/Ladegerät betrieben werden soll, dieses
zuerst in eine Steckdose und dann in die Buchse
auf der linken Seite des E10 mit der Aufschrift DC 6
V einstecken. Das WS-Netzteil/Ladegerät kann
verwendet werden wenn sich Batterien im Radio
befinden.
LADEN VON AKKUS IM E10
Das E10 funktioniert mit allen AA-Batterien im
Batteriefach, jedoch nur Nickel-Metallhydrid-Akkus
können darin aufgeladen werden. Wenn nicht
aufladbare Batterien eingesetzt werden verhindert
das integrierte Sicherheitssystem des E10, dass
diese geladen werden. Dieses Sicherheitssystem ist
aktiviert, wenn das E10 auf CODE ZUR SYSTEMEINSTELLUNG 28 oder 29 eingestellt ist (wie unten
beschrieben) und funktioniert nur mit dem
mitgelieferten WS-Netzteil/Ladegerät.
6968
Page 36

E10 BENUTZERHANDBUCH
VOR BEGINN fortgesetzt
WARNUNG: Nur das mitgelieferte WSNetzteil/Ladegerät zum Aufladen von Ni-MH-Akkus
verwenden. Beim Einsatz eines anderen Geräts
können die Akkus überhitzen, beschädigt werden
und möglicherweise das E10 beschädigen. Das
oben beschriebene integrierte Sicherheitssystem
funktioniert nur mit dem mitgelieferten WSNetzteil/Ladegerät. Durch Nichtbeachtung dieser
Warnung entstandene Schäden an dem E10 sind
nicht von der Garantie abgedeckt und machen die
Garantie ungültig.
Das mitgelieferte WS-Netzteil/Ladegerät kann zum
Laden von 4 Ni-MH-Akkus verwendet werden (mitgeliefert), wenn diese in das Batteriefach des E10
eingesetzt sind. Vor dem Laden muss das E10 auf
den Gebrauch mit Ni-MH-Akkus eingestellt werden; außerdem muss die richtige Ladestromstärke
für die Akkus gewählt werden. Ni-MH-Akkus werden
in bestimmten Stärken hergestellt, die in
Milliamperestunden (mAh) gemessen werden. Die
Stärke kann zwischen ungefähr 1100 mAh und
2400 mAh liegen (zum Zeitpunkt des Verfassen
dieses Handbuchs). Sie ist gewöhnlich auf den
Akkus aufgedruckt. Zum ordnungsgemäßen
Aufladen ohne Beschädigung der Akkus, muss die
richtige Ladestromstärke eingestellt werden. Zum
Einstellen der Ladestromstärke, das WS-Netzteil
einstecken und das E10 ausschalten. Den
Anweisungen unten folgen.
1. CODE ZUR SYSTEMEINSTELLUNG 28 eingeben.
Siehe Anweisungen im Abschnitt CODES ZUR
SYSTEMEINSTELLUNG.
2. Wenn ‚1100’ auf der Anzeige blinkt, mit den
Tasten UP HOUR/DOWN MIN die mAh-Stärke
der Ni-MH-Akkus einstellen, die eingesetzt
werden sollen.
Laden der Ni-MH-Akkus:
1. 4 Ni-MH-Akkus der Größe AA einlegen.
2. Das Netzteil/Ladegerät in die Steckdose und
dann in das Radio einstecken.
3. Die Taste CHARGER ON/OFF (LADEGERÄT
EIN/AUS) drücken und wieder loslassen.Auf der
Anzeige blinkt ‚CHARGE’ und in der oberen
linken Ecke bewegen sich die Balken für die
Ladeanzeige auf der Skala von 0 bis 5 von links
nach rechts. Die Ziffern in der oberen rechten
Ecke der Anzeige stellen sich auf 00:00 und
zählen dann die Minuten und Stunden, bis das
Laden beendet ist.
Wenn der Ladevorgang beendet ist, hört ‚CHARGE’
auf zu blinken und die Ladeanzeige in der oberen
linken Ecke bleibt auf 5.
Die Ladezeit hängt von der mAh-Leistung der
Akkus ab. Der Ladekreis stellt die mAh-Leistung der
Akkus automatisch fest und lädt sie für den richtigen
Zeitraum. Die Ladezeit kann von 6 Stunden für
1100 mAh-Akkus bis zu 13 Stunden für 2300
mAH-Akkus betragen. Der Ladekreis stellt fest,
wenn die Akkus vollständig geladen sind und
schaltet dann automatisch auf Kleinladung.
Dadurch werden die Akkus vor dem Überladen
geschützt. Das Laden kann auch durch Ziehen des
Steckers des WS-Netzteils/Ladegeräts aus dem E10
oder durch Drücken auf die Taste CHARGER
ON/OFF abgebrochen werden
6 ALLGEMEINER BETRIEB DES RADIOS
EIN- UND AUSSCHALTEN
DES E10
Das E10 kann auf eine der beiden unten
beschriebenen Weisen eingeschaltet werden. Zum
Ausschalten auf die Taste POWER/SLEEP (1) drücken.
1. Einschalten mit Batterieschutz / EinschlafzeitAutomatik:
Schnell und kurz auf die Taste POWER/SLEEP (1)
drücken. Dadurch wird das Radio eingeschaltet,
wobei in der Anzeige ‚90’ erscheint. Das Radio
wird automatisch nach 90 Minuten abgeschaltet.
Auf der Anzeige erscheint auch das Symbol
für die Einschlafzeit-Automatik. Wenn die automatische Abschaltzeit von 90 Minuten in eine andere
Minutenzahl geändert werden soll, diese sofort
nach dem Einschalten des Radios mit den Tasten
‚Up/Hour’ oder ‚Down/Min.’ (9, 10) einstellen.
Dadurch kann eine Spielzeit von 1 bis 480 Minuten
gewählt werden, bevor sich das Radio automatisch
abschaltet. Die Minutenzahl, die zuletzt eingestellt
wurde, wird auch beim nächsten Einschalten des
Radios verwendet.
2. Einschalten unter Umgehung der EinschlafzeitAutomatik:
Mit dieser Methode wird die EinschlafzeitAutomatik umgangen. Das Radio bleibt eingeschaltet, bis es absichtlich wieder ausgeschaltet wird
oder bis die Batterien leer sind. Wenn ein Netzteil
verwendet wird, bleibt das Radio unbegrenzt
eingeschaltet. Die Taste POWER 3 Sekunden lang
gedrückt halten und dann loslassen. Auf der
Anzeige wird ‚On’ angezeigt. Das Symbol für die
Einschlafzeit-Automatik ist nicht zu sehen, wenn
diese Methode verwendet wird.
ANZEIGE DER SIGNALSTÄRKE
UND BATTERIE-/AKKULADUNG
Wenn das Radio abgeschaltet ist, wird in der
oberen linke Ecke der Anzeige (6) die Batteriestärke
auf einer Skala von 1 bis 5 (36) angezeigt. Der
Dreieckspfeil (33) befindet sich dabei unter dem
Batteriesymbol (34) auf der linken Seite der Skala.
Bei eingeschaltetem Radio, befindet sich der Pfeil
unter dem Antennensymbol (35) und die Skala von
1 bis 5 zeigt jetzt die relative Signalstärke.
REGELUNG DER LAUTSTÄRKE
UND DES KLANGS
• Der Lautstärkenregler (31) mit der Bezeichnung
VOLUME befindet sich auf der rechten Seite des
Radios. Zum Ändern der Lautstärke an dem
Lautstärkenregler drehen.
• Der Klangregler (24) mit der Bezeichnung TREBLE/BASS befindet sich auf der linken Seite des
Radios. Die Einstellungen gemäß den eigenen
Klangvorstellungen vornehmen.
KOPFHÖRER
Es können Kopfhörer/Ohrstecker mit einer 1/8-Zoll
Stereobuchse verwendet werden. In die
Kopfhörerbuchse (25) auf der linken Seite des
Radios einstecken.
WAHL VON UKW, MW ODER
KURZWELLE
Zum Empfang von UKW und Kurzwelle die
teleskopische Antenne (5) vollständig ausziehen.
Beim Empfang von MW-Sendern muss diese
Antenne nicht ausgezogen werden. Nach dem
7170
Page 37

E10 BENUTZERHANDBUCH
ALLGEMEINER BETRIEB DES RADIOS fortgesetzt
Einschalten des E10 schnell und kurz auf die Taste
‘FM/AM-ATS’ (15) drücken und dadurch FM (UKW)
oder AM (MW) wählen.Wenn das AM-Band
gewählt wird, erscheint auf der Anzeige MW und
nicht AM. Zur Wahl der KW auf die Taste ‚SW
METER BAND’ (16) drücken. Jeder Druck auf die
Taste SW METER BAND oder die Tasten UP/HOUR
oder DOWN/MIN stellt das Radio auf den Anfang
eines bestimmten Kurzwellenbands ein. Die
Frequenz erscheint in Ziffern (46) im mittleren Teil
der Anzeige. Die örtlichen Sender in dem Gebiet, in
dem Sie sich befinden können in UKW und MW
empfangen werden. Kurzwellensender aus aller
Welt können in KW empfangen werden.
ANMERKUNG: Wenn Sie keine Erfahrung mit
Kurzwelle haben, bitte die speziellen Abschnitte
über die Kurzwelle weiter hinten in diesem
Handbuch beachten.
EMPFANG VON UKW IN STEREO
UKW kann über Kopfhörer/Ohrstecker in Stereo
gehört werden. Soll UKW in Stereo empfangen
werden, auf die Taste FM STEREO (14) drücken. In
der Anzeige erscheint ‚FM-STEREO’.
EINSTELLEN VON UKW
UND MW AUSSERHALB VON
NORDAMERIKA
Wenn Sie sich in Nordamerika befinden und das
E10 gerade erst gekauft haben, können Sie diesen
Abschnitt überspringen. Das Gerät wurde im Werk
schon für den Gebrauch in Nordamerika eingestellt.
Außerhalb Nordamerikas werden die MWStationen (MW auf der Anzeige des E10) in
Einstellschritten von 9 kHz angeordnet. Der UKWFrequenzbereiche kann sich von dem in
Nordamerika unterscheiden, so wird z. B. in Japan
76-108 MHz verwendet. Um diese Änderungen
vorzunehmen, bitte in der CODE-TABELLE ZUR SYSTEMEINSTELLUNG nachschauen und den
Anweisungen in ÄNDERN DER CODES ZUR SYSTEMEINSTELLUNG folgen.
EINSTELLEN VON SENDERN
Unten werden vier Methoden beschrieben, mit
denen Sender gefunden werden können. Es handelt sich um die manuelle Sendersuche, die
automatische Sendersuche, die direkte
Frequenzeingabe und die Feineinstellung.
MANUELLE SENDERSUCHE
Durch schnelles kurzes Drücken auf die Tasten
‚Up/Hour’ bzw. ‚Down/Min.’ (9, 10) kann eine
Frequenzeinstellung nach oben oder unten
vorgenommen werden.
AUTOMATISCHE SENDERSUCHE
(AUTO-SCAN TUNING)
Wenn die Tasten ‚Up/Hour’ oder ‚Down/Min.’ (9,
10) etwas länger als eine Sekunde gedrückt werden, wird die automatische Sendersuche aktiviert.
Das Radio hält dann automatisch bei dem nächsten
gefundenen Sender an. Mit der Taste ‚Up/Hour’
kann automatisch in steigender Frequenz, mit der
Taste ‚Down/Min.’ in absteigender Frequenz
gesucht werden.
ALLGEMEINER BETRIEB DES RADIOS fortgesetzt
DIREKTE FREQUENZEINGABE
Wenn die gewünschte Frequenz bekannt ist, kann
sie über die Zifferntasten (17) und die Taste ‚Enter’
(20) eingegeben werden. Zuvor prüfen, ob das
richtige Band - UKW, MW oder KW - gewählt ist.
Die meisten UKW- und Kurzwellenfrequenzen sind
in Kilohertz (kHz) angegeben, z. B. 810 kHz oder
9475 kHz. Alle MW-Frequenzen sind in Megahertz
angegeben (MHz), z. B. 102,9 MHz. Eingabe der
Frequenzen:
1. Die Taste ‚Enter’ (20) drücken und wieder
loslassen.
2. Die Frequenz mit den Zifferntasten eingeben (17).
Kurzwellenfrequenzen werden manchmal in
Megahertz (MHz) angegeben. Wenn eine
Kurzwellenfrequenz weniger als drei Ziffern hinter
dem Komma hat (z. B. 15,10 MHz oder 6,92 MHz),
diese bitte wie unten beschrieben eingeben. Stehen
hinter dem Komma jedoch drei Ziffern, (z.B. 15110
MHz oder 5,975 MHz), diese bitte wie oben
beschrieben eingeben.
1. Die Taste ‚Enter’ (20) drücken und wieder
loslassen.
2. Die Frequenz mit den Zifferntasten eingeben (17).
3. Die Taste ‚Enter’ erneut drücken und wieder
loslassen.
REGLER ZUR SENDEREINSTELLUNG
Der Regler zur SENDEREINSTELLUNG (28) befindet
sich auf der rechten Seite des Radios. Er kann zur
Feineinstellung der Sender oder als Regler zur
Sendereinstellung verwendet werden.
SPERREN DES KNOPF ZUR
SENDEREINSTELLUNG
Um ein versehentliches Verstellen des
Radiosenders zu verhindern, kann der Regler zur
Sendereinstellung gesperrt werden, wenn das
Radio eingeschaltet ist. Zum Sperren die Taste TUNING MODE ungefähr drei Sekunden lang gedrückt
halten. Das Symbol für die Tastensperre in der
unteren rechten Ecke der Anzeige blinkt zwei mal.
Der Regler zur Sendereinstellung ist jetzt gesperrt.
Wenn am Regler gedreht wird, ändert sich die
Frequenz nicht und das Symbol für die Tastensperre
blinkt. Zur Freigabe der Sperre die Taste TUNING
MODE ungefähr drei Sekunden lang gedrückt halten.
TUNING-MODUS – SCHNELLE
SENDERSUCHE – LANGSAME
SENDERSUCHE
Mit der Taste TUNING MODE (8) kann zwischen
schneller und langsamer Sendersuche gewählt
werden, wenn der Regler zur Sendereinstellung
oder die Taste UP/HOUR und DOWN/MIN verwendet
wird. Auf der Anzeige erscheint FAST oder SLOW.
Wenn zur Sendersuche der Sendersuchregler (28)
verwendet wird, ist meistens die schnelle
Sendersuche besser geeignet. Wenn Sender mit den
Tasten UP/HOUR und DOWN/MIN gesucht werden,
eignet sich die langsame Suche für das Einstellen
von Sendern und die schnelle Suche für den
schnellen Übergang zwischen Frequenzen. Dann
kann der Sender mit der langsamen Suche
eingestellt werden. Nach einigen Versuchen können
Sie selbst entscheiden welcher Modus Ihnen besser
zusagt.
7372
Page 38

E10 BENUTZERHANDBUCH
ALLGEMEINER BETRIEB DES RADIOS fortgesetzt
TASTE ZUR
BANDBREITENEINSTELLUNG
Die Taste BANDWITH (Bandbreite) (14) wird beim
Empfang von MW- und KW-Sendern eingesetzt.
Dadurch können Störungen möglichst gering gehalten werden. Die bevorzugte Einstellung ist WIDE,
da sie die beste Klangtreue bietet. Bei Störungen
wird NARROW eingestellt. Auf der Anzeige
erscheint W oder N.
TASTE SW IF SET
Die Taste SW IF SET (13) schaltet den
Zwischenfrequenzgenerator um, wodurch
Störungen abgeschwächt werden können. Dies gilt
sowohl für die Mittel- als auch die Kurzwelle.Wenn
sie aktiviert ist, wird auf der Anzeige pIF angezeigt.
ABSTELLEN VON TUNE-MUTE
Die Abstellfunktion für Tune-Mute bewirkt, dass
sich das E10 mehr wie ein analog eingestelltes
Radio ‚anfühlt’, obwohl es sich um eine digitale
Hightech-Sendereinstellung handelt. Der
Unterschied ist recht fein und kann hauptsächlich
im langsamen Einstellmodus mit dem
Sendersuchregler festgestellt werden. Für manche
Personen ist es schwierig, diesen Unterschied
tatsächlich zu hören. Wenn man jedoch einen
Unterschied hören kann, kann die Einstellung
etwas ‚gleichmäßiger’ klingen, wenn der Regler zur
Sendereinstellung verwendet wird. Zum Abstellen
von Tune-Mute, den Knopf SYSTEM SET drücken
und wieder loslassen, dann den Knopf TUNING
MODE. Auf der Anzeige ist OFF zu sehen. Die TuneMute-Funktion ist jetzt aufgehoben. Zur erneuten
Aktivierung den Vorgang wiederholen. Auf der
Anzeige ist jetzt ON zu sehen.
7 UHR UND TIMER
STELLEN DER UHR
Das Zeitformat wird im Werk auf 24 Stunden
eingestellt. Wenn ein Zeitformat von 12 Stunden mit
AM und FM vorgezogen wird, bitte den Abschnitt mit
der Überschrift ÄNDERN DES ZEITFORMATS VON 24
STUNDEN IN 12 STUNDEN im Abschnitt CODES ZUR
SYSTEMEINSTELLUNG lesen.
Die Uhr kann auf drei Weisen gestellt werden.
STELLEN DER UHR, METHODE 1 –
Tasten UP/HOUR und DOWN/MIN:
1. Das Radio ausschalten. Die Ziffern der Uhrzeit
erscheinen in der Mitte der Anzeige (40).
2. Die Taste ‚Time Set’ (18) drücken und wieder
loslassen. Die Ziffern der Uhrzeit blinken auf der
Anzeige.
3. Innerhalb von 5 Sekunden die Stunden mit der
Taste ‚Up/Hour’ und die Minuten mit der Taste
Down/Min (9, 10) einstellen. Innerhalb von 5
Sekunden nach vollendeter Eingabe die Taste TIME
SET drücken oder warten, bis die Ziffern der Uhrzeit
zu blinken aufhören.
UHR UND TIMER fortgesetzt
STELLEN DER UHR, METHODE 2 –
ZIFFERNTASTEN:
Wenn diese Methode verwendet wird, kann die Zeit
nur im 24-Stundenformat eingegeben werden, auch
wenn die Uhr auf die Anzeige im 12-Stundenformat
eingestellt ist.
1. Das Radio ausschalten. Die Ziffern der Uhrzeit
erscheinen in der Mitte der Anzeige (40).
2. Die Taste ‚Time Set’ (18) drücken und wieder
loslassen. Die Ziffern der Uhrzeit blinken auf der
Anzeige.
3. Mit den Zifferntasten die Zeit im 24-Stundenformat
eingeben. Innerhalb von 5 Sekunden nach vollendeter Eingabe die Taste TIME SET drücken oder
warten, bis die Ziffern der Uhrzeit zu blinken
aufhören.
STELLEN DER UHR, METHODE 3 –
REGLER ZUR SENDEREINSTELLUNG
1. Das Radio ausschalten. Die Ziffern der Uhrzeit
erscheinen in der Mitte der Anzeige (40).
2. Die Taste ‚Time Set’ (18) drücken und wieder
loslassen. Die Ziffern der Uhrzeit blinken auf der
Anzeige.
3. Innerhalb von 5 Sekunden die Taste ‚Up/Hour’
drücken und wieder loslassen, dann mit dem Regler
zur Sendereinstellung die Stunden einstellen.
4. Innerhalb von 5 Sekunden die Taste ‚Down/Min’
drücken und wieder loslassen, dann mit dem Regler
zur Sendereinstellung die Minuten einstellen.
5. Innerhalb von 5 Sekunden nach vollendeter
Eingabe die Taste TIME SET drücken oder warten,
bis die Ziffern der Uhrzeit zu blinken aufhören.
STELLEN DER TIMER (GEBRAUCH
ALS WECKER)
Das E10 ist mit zwei unabhängig programmierbaren
Timern ausgestattet,Timer A und B. Dadurch kann sich
das E10 einschalten und das Radio 30 Minuten lang
eingeschaltet lassen. Die Timer können als Wecker
eingesetzt werden. Nach dem Stellen eines Timers
einen Radiosender in den Timer-Speicher eingeben und
den Timer aktivieren. Dies wird in den nächsten
Abschnitten SPEICHERN EINES RADIOSENDERS IM
TIMER-SPEICHER und AKTIVIEREN UND DEAKTIVIEREN DES TIMERS beschrieben.
HINWEIS: Es muss ein Radiosender in den TimerSpeicher eingegeben werden. Wenn dies nicht erfolgt,
ist nach der Aktivierung des Timers nur Statik zu
hören.
Wenn der Timer aktiviert wird, schaltet er das Radio
ein. Auf der Anzeige blinkt das Symbol für die
Aktivierung des Timers. Das Radio spielt den in dem
Timer-Speicher eingegebenen Sender 30 Minuten lang
oder bis das Radio mit der Taste POWER/SLEEP
abgeschaltet wird. Es kann auch die
Schlummerfunktion verwendet werden (siehe Abschnitt
SCHLUMMERFUNKTION).
Der Timer kann auf drei Weisen gestellt werden.
STELLEN DES TIMERS, METHODE 1 –
TASTEN UP/DOWN MIN:
1. Das Radio ausschalten. In der oberen rechten Ecke
der Anzeige erscheint die Timerzeit in Ziffern (38).
2. Die Tasten TIMER A oder B drücken und nach ungefähr 2 Sekunden wieder loslassen. Die Ziffern der
Timerzeit blinken auf der Anzeige.
3. Innerhalb von 5 Sekunden die Stunden mit der
Taste ‚Up/Hour’ und die Minuten mit der Taste
‚Down/Min’ einstellen. Innerhalb von 5 Sekunden
nach vollendeter Eingabe die Tasten A oder B einmal drücken oder warten, bis die Ziffern der
Timerzeit aufhören zu blinken.
7574
Page 39

E10 BENUTZERHANDBUCH
UHR UND TIMER fortgesetzt
STELLEN DES TIMERS, METHODE 2 –
ZIFFERNTASTEN:
1. Das Radio ausschalten. In der oberen rechten Ecke
der Anzeige erscheint die Timerzeit in Ziffern (38).
2. Die Tasten TIMER A oder B drücken und nach ungefähr 2 Sekunden wieder loslassen. Die Ziffern der
Timerzeit blinken auf der Anzeige.
3. Mit den Zifferntasten die Weckzeit im 24Stundenformat eingeben. Innerhalb von 5
Sekunden nach vollendeter Eingabe die Tasten A
oder B einmal drücken oder warten, bis die Ziffern
der Timerzeit aufhören zu blinken.
STELLEN DES TIMERS, METHODE 3 –
REGLER ZUR SENDEREINSTELLUNG
1. Das Radio ausschalten. In der oberen rechten Ecke
der Anzeige erscheint die Timerzeit in Ziffern (38).
2. Die Tasten TIMER A oder B drücken und nach ungefähr 2 Sekunden wieder loslassen. Die Ziffern der
Timerzeit blinken auf der Anzeige.
3. Innerhalb von 5 Sekunden die Taste ‚Up/Hour’
drücken und wieder loslassen, dann mit dem Regler
zur Sendereinstellung die Stunden einstellen.
4. Innerhalb von 5 Sekunden die Taste ‚Down/Min’
drücken und wieder loslassen, dann mit dem Regler
zur Sendereinstellung die Minuten einstellen.
5. Innerhalb von 5 Sekunden nach vollendeter
Eingabe die entsprechende Taste TIMER A oder B
zweimal drücken und wieder loslassen oder warten,
bis die Ziffern der Timerzeit aufhören zu blinken.
SPEICHERN EINES RADIOSENDERS
IM TIMER-SPEICHER
Wenn nach Aktivierung des Timers ein Radiosender
gehört werden soll, muss dieser Sender in den TimerSpeicher eingegeben werden. Dies erfolgt in drei
Schritten:
1. Das E10 einschalten und den gewünschten Sender
einstellen.
2. Die Taste MEMORY drücken und wieder loslassen.
3. Die Tasten TIMER A oder TIMER B drücken und
wieder loslassen. Das Timersymbol auf der Anzeige
blinkt zwei Mal.
ANMERKUNG: Zum Prüfen der in Timerspeicher
A und B gespeicherten Frequenzen, bei ausgeschaltetem Radio die Taste SYSTEM SET erneut Mal drei
Sekunden lang gedrückt halten. Die Informationen
zum Einstellungscode und die im Timer-Speicher
eingegebenen Frequenzen blinken auf der Anzeige.
AKTIVIEREN UND DEAKTIVIEREN
DES TIMERS
Wenn der Timer das Radio einschalten soll, muss er
aktiviert werden. Der Timer kann bei ein- oder ausgeschaltetem Radio aktiviert bzw. deaktiviert werden.
Zum Aktivieren des Timers, die Tasten TIMER A oder
TIMER B drücken und wieder loslassen.Auf der
Anzeige erscheint das Timersymbol. Zum Deaktivieren
eines Timers, die Tasten TIMER A oder TIMER B drücken
und wieder loslassen. Das Timersymbol auf der
Anzeige erlischt.
SCHLUMMERFUNKTION
Wenn der Timer aktiviert wird und das Radio einschaltet, blinkt auf der Anzeige das Timersymbol (39).
Während das Symbol blinkt, die Taste SNOOZE/LIGHT
(7) drücken und wieder loslassen. Das Radio schaltet
sich ab und nach 10 Minuten wieder ein. Dieser
Vorgang kann 3 Mal wiederholt werden.
8 SPEICHER
Die Werkeinstellung sieht 10 Speicherseiten für das
E10 vor. Auf jede Seite passen 50 Frequenzen.
Folglich können 500 Frequenzen in die Speicher
eingegeben werden. Diese Werkseinstellung kann
belassen oder geändert und je nach persönlichen
Vorlieben angepasst werden. Beim Erlernen des
Eingebens von Sendern in den Speicher wird empfohlen, die Werkseinstellungen zu verwenden.
Informationen über das Ändern der
Werkseinstellungen befinden sich im Abschnitt
ANPASSEN DER SPEICHERSEITEN. Während der
Einstellung von Speichern erscheint in der Anzeige
unter den Speichernummern das Wort PRESET.
EINGABE VON SENDERN IN
DIE SPEICHER
1. Das Radio einschalten.
2. Den gewünschten Sender einstellen.
3. Die Taste MEMORY (18) drücken und wieder
loslassen. Die Ziffern der Speichernummer (48)
mit der Bezeichnung PRESET blinken jetzt in der
oberen rechten Ecke der Anzeige. Die Nummer
der Speicherseite mit der Bezeichnung PAGE
wird ebenfalls angezeigt, blinkt jedoch nicht.
4. Mit den Zifferntasten innerhalb von 5 Sekunden
die Nummer des Speichers eingeben, in der der
Sender gespeichert werden soll. Für die Speicher
1-9 die Zahlen 01 – 09 eingeben.
5. Innerhalb von 5 Sekunden die Taste MEMORY
drücken oder 5 Sekunden warten. Dadurch wird
die Eingabe in den Speicher beendet und nach
einigen Sekunden erscheint in der oberen rechten Ecke der Anzeige wieder die Uhrzeit.
WÄHLEN UND ÄNDERN DER
SPEICHERSEITEN
Wählen/Ändern der Speicherseiten:
1. Die Taste PAGE (11) drücken und wieder
loslassen. Auf der Anzeige blinkt die Seitennummer.
2. Innerhalb von drei Sekunden mit der Taste
UP/HOUR bzw. DOWN/MIN auf die gewünschte
Seite übergehen. Zur Eingabe der Speicherseite
können auch die Zifferntasten verwendet werden.
3. Die Taste PAGE drücken und wieder loslassen,
um die Seitenänderung abzuschließen.
ZUGRIFF AUF GESPEICHERTE
FREQUENZEN
Es gibt drei Methoden, mit denen auf im Speicher
eingegebene Frequenzen zugegriffen werden kann:
Direkter Zugriff auf den Speicher, manuelle
Speichersuche und automatische Speichersuche.
Diese drei Methoden werden unten beschrieben.
Wenn die Speicherseite und die voreingestellten
Speichernummern in der oberen rechten Ecke der
Anzeige erscheinen, wie es in der Beschreibung
unten der Fall sein wird, ist das Radio im Modus
SPEICHEZUGRIFF. Dieser Modus kann jederzeit ausgeschaltet werden, indem die Taste SCAN MODE
(12) gedrückt und wieder losgelassen wird.
Wenn zuerst die Speicherseite geändert werden
muss, bitte in dem Abschnitt oben WAHL UND
ÄNDERUNG DER SPEICHERSEITE nachlesen.
7776
Page 40

E10 BENUTZERHANDBUCH
SPEICHER fortgesetzt
DIREKTZUGRIFF AUF DEN
SPEICHER
Zur Eingabe der Speichernummer die Zifferntasten
verwenden. Wenn sich der gewünschte Sender z. B.
in Speicher Nummer 01 befindet, einfach ‚0’ und
dann’1’ drücken. Das Radio stellt sich dann auf
Speicher 01 ein.
MANUELLE SPEICHERSUCHE
Die manuelle Speichersuche ermöglicht die
manuelle Suche der Speicher innerhalb einer
Speicherseite (siehe unten):
1. Die Taste SCAN MODE (12) drücken und wieder
loslassen.
2. Durch kurzes schnelles Drücken auf die Tasten
‚Up/Hour’ bzw. ‚Down/Min.’ oder mit dem
Regler zur Sendereinstellung die Speicher durchsuchen.
3. Zuletzt die Taste SCAN MODE drücken.
AUTOMATISCHE SPEICHERSUCHE
(AUTO-SCAN)
Die automatische Speichersuche ermöglicht das
automatische Durchsuchen der Speicher innerhalb
einer bestimmten Speicherseite. Jeder Speicher mit
einer Eingabe wird ungefähr 5 Sekunden lang
eingestellt, dann geht die Suche automatisch zum
nächsten Speicher mit einer Eingabe über und
bleibt dort 5 Sekunden lang stehen. Die automatische Suche setzt sich auf der gewählten Seite unbegrenzt fort, bis sie absichtlich gestoppt wird.Auf
Speicher ohne Eingabe wird nicht zugegriffen.
1. Die Taste SCAN MODE (12) drücken und wieder
loslassen.
2. Die Taste ‚Up/Hour’ oder die Taste ‚Down/Min.’
ungefähr eine Sekunden lang gedrückt halten.
Dann loslassen. Unter der Speichernummer
blinkt das Wort PRESET, wodurch angezeigt
wird, dass die automatische Speichersuche
aktiviert ist und jeder Speicher ungefähr 4
Sekunden lang eingestellt wird. Dann wird für
ungefähr 4 Sekunden zum nächsten Speicher
übergegangen.
Zum Stoppen der automatischen
Voreinstellungssuche, entweder die Taste ‚Up/Hour’
oder die Taste ‚Down/Min’ drücken und wieder
loslassen.
LÖSCHEN DES INHALTS EINES
SPEICHERS
1. Die Taste SCAN MODE (12) drücken und wieder
loslassen.
2. Mit den Tasten ‚Up/Hour’ oder ‚Down/Min.’ (5,
6) den voreingestellten Speicherplatz der
Frequenz wählen, die gelöscht werden soll. Zur
Eingabe der Speichernummer können auch die
Zifferntasten verwendet werden.
3. Die Taste MEMORY (18) ungefähr zwei
Sekunden lang gedrückt halten und dann
loslassen. Auf der Anzeige blinkt ‚dEL’.
4. Während ‘dEL’ blinkt, die Taste MEMORY drücken und wieder loslassen.
SPEICHER fortgesetzt
LÖSCHEN DES INHALTS ALLER
SPEICHERSEITEN
1. Die Taste PAGE (11) drücken und wieder
loslassen.
2. Die Taste MEMORY (18) ungefähr 5 Sekunden
lang gedrückt halten und dann loslassen. Auf
der Anzeige blinken ‚dEL’ und PAGE (48, 49).
3. Innerhalb von 2 Sekunden die Taste MEMORY
drücken und wieder loslassen.
SPEICHERN EINER FREQUENZ
AN EINEM ANDERN ORT
Eine gespeicherte Frequenz kann in einem anderen
Speicher oder auf einer anderen Speicherseite
gespeichert werden.
1. Das Radio einschalten.
2. Die Taste PAGE drücken und wieder loslassen.
3. Innerhalb von 3 Sekunden mit den Tasten
UP/HOUR oder DOWN/MIN die gewünschte
Speicherseite wählen.
4. Die Taste MEMORY zwei Mal drücken und
wieder loslassen.
5. Mit den Zifferntasten innerhalb von 5 Sekunden
die Nummer des Speichers eingeben, in der der
Sender gespeichert werden soll.
6. Innerhalb von 5 Sekunden die Taste MEMORY
drücken und wieder loslassen.
ANPASSEN VON SPEICHERSEITEN
Im Werk wird das E10 mit 10 Speicherseiten mit
jeweils 50 Speichern ausgestattet, so dass insgesamt 500 Speicher verfügbar sind. Diese
Einstellung kann über die CODES ZUR SYSTEMEINSTELLUNG wie unten gezeigt geändert werden.
78
79
Page 41

E10 BENUTZERHANDBUCH
9 CODES ZUR SYSTEMEINSTELLUNG
Mit den Codes zur Systemeinstellung werden gewisse programmierbare Funktionen geändert und das Radio
kann dadurch den individuellen Bedürfnissen angepasst werden. Diese Funktionen und ihre Beschreibung sind
in der Tabelle aufgeführt.
CODE-TABELLE ZUR SYSTEMEINSTELLUNG
CODENUMMER
00 (Werkeinstellung)
20
25
50
09
10
12
24
22
28
29
76
87 (Werkeinstellung)
FUNKTION
Speicher auf 10 Seiten mit je 50
Speicherplätzen aufteilen
Speicher auf 20 Seiten mit je 25
Speicherplätzen aufteilen
Speicher auf 25 Seiten mit je 20
Speicherplätzen aufteilen
Speicher auf 50 Seiten mit je 10
Speicherplätzen aufteilen
Sendereinstellungsstufen für MW
auf 9 kHz einstellen
Sendereinstellungsstufen für MW
auf 10 kHz einstellen
Zeitformat der Uhr auf 12 Stunden
einstellen
Zeitformat der Uhr auf 24 Stunden
einstellen
Alle Segmente auf der LCD-Anzeige
prüfen
Gebrauch mit Akku
Gebrauch mit regulären
AA-Batterien
Den UKW-Frequenzbereich auf 76
bis 108 MHz einstellen (für Japan)
Den UKW-Frequenzbereich auf 87
bis 108 MHz einstellen
(Nordamerika und Europa).
AUF DER ANZEIGE
10:50
20:25
25:20
50:10
9kHz
10kHz
12H
24H
Ni-MH
76 108
87 108
CODES ZUR SYSTEMEINSTELLUNG fortgesetzt
ÄNDERN DER CODES ZUR
SYSTEMEINSTELLUNG
Zur Eingabe eines gewünschten Systemcodes den
unten aufgeführten Schritten folgen:
1. Das Radio ausschalten.
2. Die Taste SYSTEM SET (20) drücken und wieder
loslassen. Anmerkung: In der oberen rechten
Ecke der Anzeige erscheint - - (51) und die
Uhrzeit wird ausgeblendet.
3. Innerhalb von 5 Sekunden mit den Zifferntasten
den gewünschten Zahlencode eingeben und
dann sofort die Taste SYSTEM SET drücken und
wieder loslassen. In der unteren rechten Ecke
der Anzeige erscheint kurz der Code ICON (52).
ÄNDERN DES ZEITFORMATS
VON 24 STUNDEN IN 12
STUNDEN – EIN BEISPIEL FÜR DIE
ÄNDERUNG EINES CODES ZUR SYSTEMEINSTELLUNG
Die Anleitungen unten sind ein sehr gutes Beispiel
dafür, wie ein Code zur Systemeinstellung geändert
wird. In diesem Fall handelt es sich um die
Änderung in das Zeitformat mit 12 Stunden:
1. Das Radio ausschalten.
2. Die Taste SYSTEM SET drücken und wieder
loslassen. Anmerkung: In der oberen rechten
Ecke der Anzeige erscheint - - und die Uhrzeit
wird ausgeblendet.
3. Innerhalb von 5 Sekunden mit den Zifferntasten
‚12’ eingeben und dann sofort die Taste SYSTEM
SET drücken und wieder loslassen.Auf der
Anzeige erscheint kurz ‚12H’.
VOM WERK VOREINGESTELLTE
CODES
Wenn das Gerät vom Werk geliefert wird, ist die
Code-Tabelle zur Systemeinstellung des Radios
folgendermaßen eingestellt. Änderung können
durch Folgen der Anweisungen im Abschnitt
ÄNDERN DER CODES ZUR SYSTEMEINSTELLUNG
vorgenommen werden.
• Zehn Seiten mit je 50 Speichern. Code 08.
• Einstellungsstufen MW (AM): 10 kHz. Code 10.
• 24-Stunden-Uhrzeitformat. Code 24.
• Gebrauch mit Akkus. Code 28.
• UKW-Frequenzabdeckung: 87-108 MHz.Code 87.
PRÜFEN DES MOMENTANEN
STATUS DER CODES ZUR
SYSTEMEINSTELLUNG UND
ANDERER EINSTELLUNGEN
Wenn die Taste SYSTEM SET drei Sekunden lang
gedrückt wird während das E10 abgeschaltet ist,
können wichtige Codes zur Systemeinstellung und
andere Einstellungen geprüft werden. Diese
Informationen leuchten kurz in folgender
Reihenfolge auf der Anzeige auf:
1. Zeitformat
2. Einstellung auf 9 oder 10 Kilohertz
3. Einstellung des UKW-Frequenzbereichs
4. Radiofrequenz von Timer A
5. Radiofrequenz von Timer B
6. Einstellung der mAh der Akkus
8180
Page 42

E10 BENUTZERHANDBUCH
10 ZUSÄTZLIHCHE BEDIENELEMENTE DES E10
BELEUCHTUNG
Die Beleuchtung für die Anzeige wird eingeschaltet,
indem die Taste SNOOZE/LIGHT (7) oben rechts auf
der Vorderseite des Radios einmal schnell und kurz
gedrückt und wieder losgelassen wird. Sie leuchtet
ungefähr 5 Sekunden lang von der rechten Seite
der Anzeige aus. Wenn die Taste länger (ungefähr 3
Sekunden) gedrückt und dann wieder losgelassen
wird, bleibt die Beleuchtung unbegrenzt an
(dadurch wird die Lebensspanne der Batterien
verkürzt). Die Beleuchtung wird durch einen
schnellen kurzen Druck auf die Taste ausgeschaltet.
Das E10 verfügt über ein ‚zeitabhängiges
Hintergrundlicht’. Wenn diese Funktion aktiviert ist,
schaltet von 18:00 Uhr bis 6:00 Uhr das Drücken
auf eine beliebige Taste das Hintergrundlicht für 3
Sekunden ein. Zum Aktivieren bzw. Deaktivieren
dieser Funktion den Anweisungen unten folgen.
1. Das Radio einschalten.
2. Die Taste ENTER/SYSTEM SET drücken und
wieder loslassen.
3. Den Knopf LIGHT/SNOOZE drücken und wieder
loslassen.
Auf der Anzeige wird abhängig vom aktuellen
Status ON oder OFF angezeigt.
SCHALTER ZUR
ANTENNENVERSTÄRKUNG
Der Schalter zur Antennenverstärkung (23) hat drei
Positionen: DX, NORMAL und LOCAL. Der Schalter
sollte sich normalerweise in der DX-Stellung
befinden, in der die beste Empfangsleistung erreicht
wird. Wenn ein empfangener MW- oder KWSender ausgesprochen stark ist und Verzerrungen
verursacht, sollte die Stellung NORMAL oder
LOCAL versucht werden. Der Schalter kann nicht
für UKW-Sender eingesetzt werden.
REGLER FÜR ANTENNENTRIMMER
Dieser Regler mit der Bezeichnung ANT TRIM auf
der rechten Seite des E10 ermöglicht einen
optimalen Einsatz der teleskopischen Antenne des
E10 beim Empfang von Kurzwelle. Beim Hören
eines Senders diesen Regler auf den besten
Empfang einstellen.
SPERRTASTE
Wenn die Taste LOCK gedrückt wird, werden alle
durch Tasten aktivierte Bedienelemente ‚gesperrt’
und das Symbol erscheint in der unteren
rechten Ecke der Anzeige. Ein schneller kurzer
Druck aktiviert die Sperrfunktion (LOCK). Ein längerer Druck deaktiviert die Funktion und das
Symbol wird ausgeblendet. Diese Funktion ist auf
Reisen sehr nützlich, da sie verhindert, dass das
Radio
versehentlich eingeschaltet wird. Das Radio vor
dem Verpacken in einen Koffer, das Handgepäck
oder einen Aktenkoffer ausschalten und dann
sperren. Die Timerfunktionen werden durch die
Sperre nicht deaktiviert.
EXTERNE ANTENNENBUCHSE
Die externe Antennenbuchse wird zur Verbesserung
des Kurzwellen- oder UKW-Empfangs verwendet.
Heute sind viele solche Antennen auf dem Markt.
Sollten Sie den Kauf oder den Bau einer solchen
Antenne planen, kann die Eingabe von‚
Kurzwellenantenne’ oder ‚UKW-Antenne’ in eine
Internet-Suchmaschine viele weitere Informationen
liefern.
11 EMPFANG VON KURZWELLENSENDERN
Haben Sie Erfahrung mit dem Empfang von
Kurzwelle? Wenn nicht, lesen sie bitte diesen
Abschnitt und den folgenden Abschnitt INFORMATIONEN ÜBER KURZWELLENBÄNDER.
WAS SIND
KURZWELLENSENDER?
Es handelt sich um Radiosender in der ganzen
Welt, die auf Frequenzen senden, die über große
Entfernungen gehört werden können, oft über
mehrere tausend Meilen. In den USA gibt es auch
ungefähr 30 lokale Sender mit religiös, politisch
und ideologisch orientierten Sendungen.
WARUM KURZWELLENSENDER
HÖREN?
Es gibt viele Gründe, warum das Hören von
Kurzwellensendern interessant ist. Hier sind nur
einige davon, die von unseren Kunden genannt
wurden.
• Das Hören von Nachrichten und Informationen
aus anderen Quellen in der Welt ermöglicht oft
eine andere und einzigartige Perspektive auf
nationale und internationale Ereignisse.
• Kontakt mit anderen Sprachen und Kulturen,
einschließlich mit Musik und Perspektiven. Die
einheimische oder volkstümliche Musik eines
Lands wird gerne gehört, selbst wenn man die
Sprache nicht versteht.
• Das Hören von Einheimischen hilft beim Lernen
einer Sprache.
• Kontakt mit einem anderen Teil der Welt, vielleicht
mit der ursprünglichen Heimat oder dem
Herkunftsland der Familie.
• Religiös, politisch und ideologisch orientierte
Sendungen.
ALLGEMEINE FAUSTREGELN
ZUR KURZWELLE
• Der Empfang der Kurzwelle während der Nacht
ist gewöhnlich besser als der Kurzwellenempfang
während des Tags. Das kann sich von Zeit zu
Zeit ändern. Es empfiehlt sich also, die Bänder
auch während des Tags zu prüfen.
• Während des Tags sind die aktivsten
Kurzwellenbänder 13, 15, 16, 19 und 22 Meter.
16 und 19 sind gewöhnlich am besten. Während
der Nacht sind die aktivsten Bänder 25, 31, 41
und 49 Meter, wobei 31 und 49 im Allgemeinen
am besten sind.
• Während des Sonnenauf- und
Sonnenuntergangs können sowohl die Tagesals auch die Nachtbänder gut sein, manchmal
ungewöhnlich gut. Das Hören zu diesen Zeiten
kann oft besonders lohnend sein.
• Die Baumaterialien mancher Gebäude können
die Kurzwellensignale stark blockieren. In
diesem Fall das Radio in den Händen halten und
sehr nahe an ein Fenster gehen.
8382
Page 43

E10 BENUTZERHANDBUCH
EMPFANG VON KURZWELLENSENDERN fortgesetzt
WAHL EINES KURZWELLENBANDS MIT DEM E10
Mit dem E10 kann auf alle 14 internationalen
Übertragungsbänder zugegriffen werden. Die
Bänder sind mit 120, 90, 75, 60, 49, 31, 25, 22,
19, 16, 15, 13 und 11 Meter nummeriert und
werden im Allgemeinen ‚Bänder’ genannt.
Mit dem E10 kann auf zwei Arten auf die
Kurzwellenbänder zugegriffen werden. Bei beiden
Methoden wird auf den Anfang des
Frequenzbereichs des jeweiligen Bands eingestellt.
1. Jeder aufeinanderfolgende schnelle kurze Druck
auf die Taste SW METER BAND (16) stellt das
Radio auf den Anfang eines Bands ein.Während
die Taste gedrückt wird, erscheint die
Bandnummer in der oberen rechten Ecke der
Anzeige (50) und wird einige Sekunden nach
Loslassen der Taste wieder ausgeblendet. Dann
wird in dieser Ecke wieder die Uhrzeit
angezeigt. Die Sendersuche erst beginnen, wenn
die Uhrzeit wieder erschienen ist. Wenn nicht
gewartet wird, wird automatisch Methode 2
(siehe unten) aktiviert.
2. Einmal schnell und kurz auf die Taste SW
METER BAND und danach sofort schnell und
kurz entweder auf die Taste ‚Up/Hour’ oder
‚Down/Min’ drücken. In der oberen rechten Ecke
der Anzeige erscheint die Bandnummer.
Nachdem das gewünschtes Band gewählt
wurde, mit der Sendersuche erst beginnen,
wenn in der oberen rechten Ecke wieder die
Uhrzeit erschienen ist.
FINDEN VON
KURZWELLENSENDERN MIT
DER AUTOMATISCHEN
SENDERSUCHE
In der Kurzwelle sucht die automatische
Sendersuche in den Kurzwellen-Frequenzbereichen,
die unten in der Tabelle der Bänder angegeben
sind. Zum Einstellen von Frequenzen, die zwischen
diesen Bereichen oder außerhalb dieser Bereiche
liegen, muss eine andere Sendersuchmethode
angewendet werden, z. B. die normale Sendersuche
(manuelle Sendersuche) oder die direkte
Frequenzeingabe wie im Abschnitt EINSTELLEN
VON SENDERN beschrieben.
EMPFANG VON KURZWELLENSENDERN fortgesetzt
TABELLE DER KURZWELLENBÄNDER IN AUTOMATISCHEN SUCHBEREICHEN
BAND
(METER)
120
90
75
60
49
41
KURZWELLENSENDER MIT ZEITANGABE (NORDAMERIKA)
In den USA und Kanada bestehen Kurzwellensender mit Zeitangabe. Sie geben fortlaufend die Uhrzeit in
der koordinierten Weltzeit an, auch Weltzeit oder mittlere Greenwich Zeit genannt. Die Frequenzen sind
unten angegeben.
CHU-Zeit (Kanada)
CHU-Zeit (Kanada)
CHU-Zeit (Kanada)
WWV-Zeit/Wetter (US)
WWV-Zeit/Wetter (US)
WWV-Zeit/Wetter (US)
WWV-Zeit/Wetter (US)
WWV-Zeit/Wetter (US)
FREQUENZBEREICH
(Kilohertz)
2250 – 2550
3150 - 3450
3850 - 4050
4700 - 5100
5800 – 6300
7100 – 7500
3330
7335
14670
2500
5000
10000
15000
20000
31
25
22
19
16
15
13
11
Am besten nachts
Tag/Nacht
Am besten während Tageslichts
Am besten nachts
Am besten nachts
Tag/Nacht
Am besten während Tageslichts
Am besten während Tageslichts
9400 – 10000
11500 – 12150
13500 – 13900
15000 – 15900
17450 - 18000
18850 - 19100
21450 - 21950
25600 - 26100
8584
Page 44

EMPFANG VON KURZWELLENSENDERN fortgesetzt
E10 BENUTZERHANDBUCH
12 INFORMATIONEN ÜBER KURZWELLENBÄNDER
DER SCHLÜSSEL ZUM ERFOGREICHEN
KURZWELLENEMPFANG
VERÖFFENTLICHUNGEN ZUR
KURZWELLE: FINDEN
BESTIMMTER SENDER
Beim Finden von bestimmten Sendern und ihren
Sendezeiten, Frequenzen und Zielgebieten sind die
beiden unten erwähnten sehr guten
Veröffentlichungen hilfreich. Sie sind in größeren
Buchhandlungen und Online erhältlich.
PASSPORT TO WORLD BAND RADIO. Veröffentlicht
von International Broadcasting Services.Adresse:
IBS North America, Box 300, Penn’s Park, PA
18943. Telefon: 215-598-3794. Web: www.pass-
band.com.
WORLD RADIO TV HANDBOOK.Veröffentlicht in
Nordamerika von Watson Guptil Publications, 770
Broadway – 7th Floor, New York, NY 10003-9595.
www.watsonguptill.com.
Informationen über Kurzwellensender können auch
über Internet-Suchmaschinen gefunden werden,
indem Suchkriterien wie ‚Kurzwellensender’ oder‚
Kurzwellenfrequenzen’ eingegeben werden.
WEITERE INFORMATIONEN ZUR
KURZWELLE
Im nächsten Abschnitt INFORMATIONEN ÜBER
KURZWELLENBÄNDER können Sie mehr über die
Kurzwelle lernen.Auch eine Suche nach mehr
Informationen über die Internet-Suchmaschinen
kann sehr erfolgreich sein. Geben Sie
‚Kurzwellenempfang’ oder ‚Kurzwellensender’ ein,
und Sie werden viele Artikel finden.
Da Sie jetzt ein Kurzwellenradio besitzen, möchten
Sie sicherlich gleich Kurzwellensender aus der
ganzen Welt hören.Wenn Sie keine Erfahrung mit
Kurzwelle haben, nehmen Sie sich bitte etwas Zeit,
um die unten beschriebenen Grundlagen zu lernen.
Selbst wenn Sie schon Erfahrung haben, kann dies
eine nützliche Auffrischung sein.
WAS SIND BÄNDER?
Wenn man erfolgreich Kurzwellensender empfangen möchte, ist dies die wichtigste Grundlage, die
man sofort lernen sollte.
Wenn man erfolgreich Kurzwellensender hören
möchte, muss man wissen, wie man sie finden
kann. Sie können in Kurzwellen- ‚Bändern’ gefunden werden. Wenn Sie jemals MW oder UKW
gehört haben, wissen Sie schon, was ein Band ist.
Das MW-Band ist ein Frequenzbereich, der sich von
530 bis 1600 kHz erstreckt, das UKW-Band
erstreckt sich von 66 bis 108 MHz. Ein Band ist
nichts anderes als ein Frequenzbereich, in dem
Sender liegen. Wenn Sie innerhalb dieser ‚Bänder’
nach Sendern suchen, drücken Sie einfach die
Sendertasten (oder drehen den Senderknopf an
analogen Radios) bis sie einen Sender finden, der
Ihnen zusagt. Mit der Kurzwelle verhält es sich
ähnlich und die Kurzwellenbänder haben Namen
wie 25 Meter, 31 Meter, 49 Meter usw. Sie werden
durch 25 m, 31 m und 49 m abgekürzt.Wie bei
MW und UKW geht man einfach zu einem
Kurzwellenband und sucht nach Sendern.
Das 19 Meter Kurzwellenband umfasst z. B. den
Frequenzbereich von 15100 bis 15600 kHz. In der
Tabelle unten finden Sie eine Liste der zur
internationalen Kurzwellenübertragung verwendeten
Kurzwellenbänder zusammen mit den entsprechenden Frequenzbereichen. Da manche Radios die
Frequenz in Megahertz und andere in Kilohertz
anzeigen, werden hier beide Frequenzen aufgeführt.
Das E10 zeigt die Kurzwellenfrequenzen in
Kilohertz (kHz) an.
Die folgenden Informationen gelten für alle
Kurzwellenradios. Aus der Frequenzskala oder der
Digitalanzeige (oder in dem Benutzerhandbuch)
des Radios ist ersichtlich, welche Frequenzeinheit in
der Kurzwelle verwendet wird. Die meisten Radios
verwenden die Abkürzungen kHz oder MHz.Auf
manchen Kurzwellenradios sehen diese Frequenzen
so aus: 15100 kHz, 15105 kHz oder 15110 kHz,
auf anderen Radios können sie jedoch folgendermaßen aussehen: 15.1 MHz, 15.105 MHz oder
15.11 MHz. Das kommt daher, dass manche Radios
die Frequenzen in Kilohertz anzeigen, andere in
Megahertz, wie in der beigefügten Tabelle. Die
genauen Frequenzbereiche für diese Bänder können
sich bei verschiedenen Radiomodellen leicht
unterscheiden. Das ist ganz normal.Auf manchen
Radios sind die Bänder deutlich gekennzeichnet,
auf anderen gibt es keine Kennzeichnungen.Wenn
es nicht offensichtlich ist, wie das Radio auf ein
Band eingestellt werden kann, schauen Sie bitte in
dem Benutzerhandbuch oder auf der Website der
etón Corporation (www.etoncorp.com) nach oder
holen Sie bei der etón Corporation Auskünfte
darüber ein, wie bei Ihrem Modell vorzugehen ist.
8786
Page 45

E10 BENUTZERHANDBUCH
INFORMATIONEN ÜBER KURZWELLENBÄNDER
DER SCHLÜSSEL ZUM ERFOGREICHEN
KURZWELLENEMPFANG
EIN HILFREICHES GLEICHNIS: Ein
Kurzwellenband entspricht einer Straße mit vielen
verschiedenen Hausnummern.
Stellen Sie sich ein Kurzwellenband wie eine
Strasse mit vielen verschiedenen Hausnummern vor,
wobei jede Hausnummer eine bestimmte Frequenz
ist. Das 19-Meter-Band könnte 19-Meter-Straße
genannt werden. Wie bei jeder Straße gibt es
verschiedene Adressen mit einzelnen Hausnummern,
wie 15100, 15105, 15110 usw. Jede dieser
TABELLE DER ALLGEMEINEN KURZWELLENBÄNDER
BAND MEGAHERTZ (MHz) KILOHERTZ (KHz)
120m
90m
75m
60m
49m
41m
31m
25m
22m
19m
16m
13m
11m
2.300-2.500MHz
3.20-3.40 MHz
3.90-4.00 MHz
4.750-5.060 MHz
5.950-6.20 MHz
7.10-7.60 MHz
9.20-9.90 MHz
11.600-12.200 MHz
13.570-13.870 MHz
15.10-15.80 MHz
17.480-17.90 MHz
21.450-21.850 MHz
25.60-26.10 MHz
fortgesetzt
Hausnummern repräsentiert ein bestimmtes Haus,
das auf dieser Straße besucht werden kann. Auf
dem 19-Meter-Kurzwellenband werden diese
„Hausnummern“ Frequenzen genannt.Auf jeder
Frequenz können Sie einen anderen
Kurzwellensender besuchen.
Die TABELLE DER ALLGEMEINEN
KURZWELLENBÄNDER unten zeigt alle offiziell
zugeordneten Kurzwellenbänder.
2300-2500 KHz
3200-3400 KHz
3900-4000 KHz
4750-5060 KHz
5950-6200 KHz
7100-7600 KHz
9200-9900 KHz
11600-12100 KHz
13570-13870 KHz
15100-15800 KHz
17480-17900 KHz
21450-21850 KHz
25600-26100 KHz
INFORMATIONEN ÜBER KURZWELLENBÄNDER
DER SCHLÜSSEL ZUM ERFOGREICHEN
KURZWELLENEMPFANG
TAGESBÄNDER UND
NACHTBÄNDER –
EIN WICHTIGER UNTERSCHIED
Da Kurzwellensignale von Faktoren wie der Sonne,
der Ionosphäre und Interaktionen mit der Erde
selbst abhängen, können während des Tages nicht
auf allen Bändern Signale gehört werden. Manche
Bänder sind während Zeiten mit Tageslicht besser
zu hören, andere während der Nacht. Im
Allgemeinen sind die Bänder mit Frequenzen unter
13 MHz (13000 kHz) während der Nacht und die
Bänder mit Frequenzen über 13 MHz (13000 kHz)
während des Tages besser. Unten werden die
Eigenschaften der wichtigsten Kurzwellenbänder
aufgeführt. Wenn Sie diesen Richtlinien folgen,
werden sie beste Ergebnisse erzielen. Wie ein bestimmtes Band eingestellt wird, hängt von dem
Radio ab. Schauen Sie in Ihrem Benutzerhandbuch
nach, wie die Bänder eingestellt werden oder rufen
Sie bei der etón Corporation an, wenn Sie noch
Fragen haben.
SONNENUNTERGAN UND
SONNENAUFGANG – OFT DIE
BESTEN EMPFANGSZEITEN
Wir werden oft gefragt, ob es wirklich eine beste
Zeit für den Empfang der Kurzwelle gibt, während
der die Signale am stärksten und deutlichsten sind.
Dies ist oft in einem bestimmten Zeitraum während
des Sonnenuntergangs und Sonnenaufgangs der
Fall. Manchmal beträgt dieser Zeitraum zwei
Stunden, manchmal drei oder vier Stunden.
Probieren Sie aus, wann der Empfang in Ihrem
Gebiet am besten ist.
fortgesetzt
EMPFANG WÄHREND DES TAGS
Der Empfang der Kurzwelle ist gewöhnlich
während der Stunden mit Tageslicht zwischen
ungefähr 10:00 Uhr und 15:00 Uhr am schlechtesten. Der Hauptgrund dafür ist, dass die Sender
um diese Zeit nicht an Nordamerika senden, da sie
annehmen, dass wir alle entweder bei der Arbeit
oder in der Schule sind und während des Tages
keine Zeit zum Radiohören haben.Wenn Sie versuchen möchten, während des Tags zu empfangen,
folgen Sie bitte den Richtlinien unten. Im
Allgemeinen ist Kurzwelle während des Tags im
Osten Nordamerikas besser als im Westen
Nordamerikas. Die besten Bänder während des
Tags sind in der Tabelle unten FETT gedruckt.
TAGES
BÄNDER1
3m
16m
19m
22m
25m
31m
EIGENSCHAFTEN
Die Ergebnisse sind unterschiedlich.
Einen Versuch wert.Manchmal sehr
gut um die Zeit des Sonnenaufund Sonnenuntergangs.
Ähnlich wie 19m.
Allgemein das beste Band während
des Tages. Kann während der
Sommermonate auch in der Nacht
gut sein. Manchmal sehr gut um
die Zeit des Sonnenauf- und
Sonnenuntergangs. Im Sommer
manchmal gut in der Nacht.
Ähnlich wie 19m.
Am besten um die Zeit des
Sonnenauf- und Sonnenuntergangs.
Kann im Osten Nordamerikas zur
Tagesmitte gut sein.
Ähnlich wie 25 m.
8988
Page 46

INFORMATIONEN ÜBER KURZWELLENBÄNDER
DER SCHLÜSSEL ZUM ERFOGREICHEN
KURZWELLENEMPFANG
fortgesetzt
E10 BENUTZERHANDBUCH
13 FEHLERBEHEBUNG
EMPFANG WÄHREND DES ABENDS UND DER NACHT
Dies ist die beste Empfangszeit, da die Sender absichtlich nach Nordamerika senden. Diese Bänder können auch in
der Zeit um den Sonnenauf- und Sonnenuntergang sehr gut sein. Die besten Bänder während der Nacht sind in der
Tabelle unten FETT gedruckt.
TABELLE DER NACHTBÄNDER
NACHTBÄNDER
25m
31m
41m
49m
WENN DAS GEBÄUDE SIGNALE
BLOCKIERT:
Wenn sich die Signalstärke von Sendern wesentlich
verbessert, wenn das Radio sehr nahe an ein
Fenster oder ins Freie gebracht wird, blockiert das
Gebäude Kurzwellensignale. Diese Blockierung ist
auf die Baumaterialien des Gebäudes zurückzuführen, oder darauf, dass mehrere Stockwerke
über Ihnen liegen. Dieses Problem kann gelöst werden, indem das Radio sehr nahe an ein Fenster
oder ins Freie gebracht wird oder indem eine
EIGENSCHAFTEN
Ähnlich wie 31m.
Überall die ganze Nacht über gut. Oft während des Sonnenauf- und
Sonnenuntergangs sehr gut. Gute Ergebnisse oft von ungefähr einer Stunde
vor Sonnenuntergang an.
Ähnlich wie 49m. Im Osten Nordamerikas die ganze Nacht über gut, verschieden im Westen Nordamerikas.
Allgemein das beste Band während der Nacht.
Kurzwellen-Außenantenne angebracht wird. Für
Informationen über das Aufstellen einer
Kurzwellenantenne kann das Wort
‚Kurzwellenantenne’ in eine Internet-Suchmaschine
eingegeben werden. Sollten Sie keinen Zugang zum
Internet haben, nehmen Sie mit uns, der etón
Corporation, Kontakt auf (siehe
Kontaktinformationen zu Beginn dieses
Handbuchs).
VORGEHENSWEISE BEIM
ZUZRÜCKSETZEN
Der RESET-Knopf befindet sich auf der Unterseite
des E10. Vor dem Zurücksetzen sicherstellen, dass
die Batterien im Radio gut sind, oder dass das WSNetzteil angeschlossen ist. Dann das Radio
abschalten. Ein Zurücksetzen ist notwendig, wenn
ein Problem nicht durch die unten erwähnten
Lösungen behoben werden kann. Zum
Zurücksetzen mit einer Büroklammer oder einem
ähnlichen Gegenstand den Knopf RESET drücken.
KANN NICHT EINGESCHALTET
WERDEN
1. Sicherstellen, dass die Sperrfunktion (LOCK)
nicht aktiviert ist.
2. Prüfen, ob das Radio an den Strom
angeschlossen ist (sind Batterien installiert, ist
das Netzteil eingesteckt?).
3. Prüfen, ob die Batterien mit der richtigen
Polarität eingelegt sind.
4. Prüfen, ob die Batterien nicht entladen sind.
5. Bei Verwendung eines Netzteils prüfen, ob
dieses in eine geeignete Steckdose und am
anderen Ende in die Gleichstrombuchse des
Radios eingesteckt ist. Darauf achten, dass es
nicht in die Kopfhörerbuchse eingesteckt wird.
Sicherstellen, dass das WS-Netzteil die richtige
GS-Spannung und Polarität hat und die
Steckerspitzen den richtigen Innen- und
Außendurchmesser haben.
SCHALTET SICH BEIM EINSATZ
MIT BATTERIEN PLÖTZLICH AB
Dies wird durch leere Batterien verursacht. Die
Batterien ersetzen.
SCHALTET SICH BEIM EINSATZ
MIT DEM NETZTEIL PLÖTZLICH
AB, WENN ES UMGESELLT
WIRD
Dies wird gewöhnlich durch gebrochene Drähte
oder lose Verbindungen im Kabel des WS-Netzteils
verursacht, oder wenn die Steckerspitze des
Netzteils den falschen Durchmesser hat.
UNREGELMÄSSIGER BETRIEB
Das Gerät zurücksetzen wie im Abschnitt mit der
Überschrift VORGEHENSWEISE BEIM
ZURÜCKSETZEN beschrieben.
SENDER WERDEN ZU SCHWACH EMPFANGEN
• Prüfen, ob sich der Schalter ANTENNA GAIN in
der Stellung DX befindet.
• Prüfen, ob zum UKW- und Kurzwellenempfang
die teleskopische Antenne ganz herausgezogen
ist.
• Beim Empfang von Mittelwellensendern das
Radio drehen. Die interne MW-Ferritantenne ist
sehr richtungsempfindlich.
• In der Kurzwelle den ANTENNENTRIMMER einstellen.
90
91
Page 47

E10 BENUTZERHANDBUCH
FEHLERBEHEBUNG fortgesetzt
ES KOMMT KEIN KLANG AUS
DEM LAUTSPRECHER
Sicherstellen, dass kein Kopfhörer bzw. Ohrstecker
eingesteckt ist und dass sich der Lautstärkenregler
in der richtigen Position befindet.
DER KLANG EINES SENDERS
IST STARK VERZERRT, SCHEINT
JEDOCH EIN SEHR STARKES
SIGNAL ZU HABEN
Es handelt sich wahrscheinlich um einen starken
örtlichen Sender, der sich sehr nahe an Ihrem
Aufenthaltsort befindet. Da er so nahe ist, ist das
Signal zu stark. Zur Verminderung der Signalstärke
den Schalter ANTENNA GAIN auf die Stellung
NORMAL oder LOCAL schalten.
IM BATTERIEFACH BEFINDET
SICH EINE KLEBRIGE
FLÜSSIGKEIT ODER WEISSES
PULVER
Der Grund hierfür sind ausgelaufene Batterien. Um
das Auslaufen von Batteriesäure zu vermeiden, nur
Alkalibatterien bester Qualität oder Ni-MH -Akkus
verwenden. Nie alte und neue Batterien oder
Batterien verschiedener Marken oder Typen kombinieren. Wenn die Batterien auslaufen, sofort den
Hersteller der Batterien benachrichtigen und die
Batterien nicht wegwerfen. Schäden, die durch das
Auslaufen von Batteriesäure entstehen, werden
nicht von der Garantie abgedeckt.
14 GARANTIE-REGISTRIERUNG
Um eine volle Garantieabdeckung und Produktaktualisierung zu gewährleisten, sollte die Registrierung Ihres
Produkts von etón oder Grundig so bald wie möglich nach dem Kauf oder Erhalt vorgenommen werden. Wählen
Sie zur Registrierung des Radios bitte eine der folgenden Methoden:
1. Registrierung über unsere Website
http://www.etoncorp.com
2. Rufen Sie unsere gebührenfreie
Registrierungsnummer an. Von den Vereinigten
Staaten und Kanada unter (888) 889-4391 oder
weltweit unter (204) 336-6547. Französischund englischsprechende Mitarbeiter stehen zur
Verfügung.
3. Schicken Sie die Registrierungsinformationen an
die folgende Adresse:
etón Corporation
1015 Corporation Way
Palo Alto, CA 94303
PRODUKTREGISTRIERUNG
Geben Sie Ihren Namen, die vollständige
Postadresse, Ihre Telefonnummer, das gekaufte
Modell, das Kaufdatum, den Namen der
Verkaufsstelle und die Seriennummer des Produkts
an (diese befindet sich normalerweise im
Batteriefach oder in dessen Nähe).
92
93
Page 48

15 BEGRENZTE GARANTIE FÜR
E10 BENUTZERHANDBUCH
DEN URSPRÜNGLICHEN KUNDE
Für dieses von der etón Corporation (etón) vertriebene Markenprodukt von etón oder GRUNDIG besteht eine Garantie
bezüglich herstellungsbedingter Material- und Verarbeitungsmängel für die folgende begrenzte Garantiezeit:
EIN (1) JAHR FÜR ERSATZTEILE UND ARBEIT
Diese begrenzte Garantie beginnt zum Zeitpunkt
des ursprünglichen Kaufs und gilt nur für Produkte,
die von einem autorisierten etón-Vertreter gekauft
wurden. Sie gilt nicht für Transport, Installation,
Ausbau oder erneute Installation. Durch die
Garantie abgedeckte Reparaturen müssen von etón
oder einem von etón autorisierten Kundendienst
durchgeführt werden. Zum Erhalt von
Garantieleistungen muss als Kaufbeweis für etón
oder den von etón autorisierten Kundendienst auf
Verlangen der Originalkaufbeleg vorgelegt werden.
Der Käufer ist für den Transport zu etón oder einen
von etón autorisierten Kundendienst verantwortlich.
etón repariert oder ersetzt dieses Produkt nach
eigenem Ermessen. Dies geschieht kostenlos mit
neuen oder aufgearbeiteten Teilen, an denen
während der oben angegebenen Garantieperiode
Schäden festgestellt werden. Das Produkt muss
nicht mehr als 15 Tage vor Ablauf der Garantieperiode
zurückgesendet werden, wobei die Transportkosten
im Voraus an etón oder einen von etón bestimmten
Kundendienst für Garantieabdeckung gezahlt werden müssen. Vor der Rückgabe eines Produktes für
Garantieleistungen muss der Käufer etón zur
Problemfeststellung Informationen über das
Leistungsverfahrens kontaktieren. Alle ersetzten
Teile und Produkte werden Eigentum von etón. Für
Ersatzteile und -produkte gilt die verbleibende
Originalgarantie oder neunzig (90) Tage, wobei der
längere Zeitraum zutrifft.
Diese begrenzte Garantie deckt herstellungsbedingte
Material- und Verarbeitungsmängel ab, die bei
normalem nichtgewerblichem Gebrauch dieses
Produkts auftreten und gilt nicht für folgende Fälle
einschließlich u.a.: Schäden, die durch
Anwendungen oder Gebrauch entstehen, für die
das Produkt nicht vorgesehen ist; Mängel oder
Probleme, die durch nicht von etón gelieferte
Produkte oder Geräte verursacht wurden; Unfälle,
Missbrauch, Vernachlässigung, unsachgemäße
Behandlung, Feuer, Wasser Blitzschlag oder andere
Naturereignisse; falsche Spannung,
Spannungsschwankungen oder Überspannung;
durch falsche oder fehlerhafte Installation
entstandene Schäden (einschließlich Batterien, die
ein Auslaufen von Säure und dadurch irreversible
Stromkreisschäden verursachen können); Schäden
durch Auslaufen von Säure; Änderungen oder
Modifikationen am Produkt oder den Einsatz
unautorisierter Teile, Materialien, Zubehöre oder
Geräte, die das Produkt beschädigen oder zu
Leistungsproblemen führen.
16 WARTUNGSINFORMATIONEN
DIE WARTUNG IHRES PRODUKTS VON ETÓN ODER GRUNDIG
Wenn Sie Ihr Produkt von etón oder Grundig warten lassen möchten, empfehlen wir, zunächst einen
Kundendienstvertreter von etón zur Problemfeststellung und Fehlerbehebung unter der Nummer 800-872-2228 in
den USA, 800-637-1648 in Kanada oder unter der Nummer (650) 903-3866 zu kontaktieren. Viele der häufigsten
Fragen können am Telefon schnell gelöst werden.
SOLLTE IHR PRODUKT VON ETÓN ODER GRUNDIG EINE REPARATUR BENÖTIGEN, STEHEN ZWEI
DIENSTLEISTUNGSTYPEN ZUR VERFÜGUNG.
1.
VON DER GARANTIE ABGEDECKT – Wenn
für Ihr Produkt noch Garantie besteht und der
Kundendienstvertreter von etón festgestellt hat,
dass eine Wartung notwendig ist, wird eine
Rückgabegenehmigung ausgestellt und Sie
bekommen Anweisungen zum Einsenden an eine
autorisierte Stelle für durch die Garantie
abgedeckte Reparaturen. Das Radio NICHT
einsenden, ohne eine Autorisationsnummer zur
Rücksendung eingeholt zu haben.
2. NICHT VON DER GARANTIE ABGEDECKT –
Wenn das Produkt nicht länger durch die
Garantie abgedeckt ist und gewartet werden
muss, werden unsere technischen Berater Sie an
die nächste Reparaturstelle verweisen, die eine
Reparatur durchführen kann.
9594
Page 49

E10 MANUAL DE OPERATIÓN
CONTENIDO
¿NECESITA AYUDA?
Muchas gracias por haber comprado el
radio de AM / FM / Onda corta modelo E10.
Deseamos que disfrute mucho del uso de este
producto. Para tomar ventaja de sus excelentes
características, le pedimos que lea este manual
con mucha atención. Si necesita ayuda mientras
aprende su operación, por favor comuníquese
con nosotros usando cualquiera de los métodos
indicados abajo.
Lunes a viernes, 8:30 a.m. - 4:00 p.m., hora del
Pacífico de los Estados Unidos.
1-800-872-2228, desde los Estados Unidos
1-800-637-1648, desde Canadá
1-650-903-3866, desde cualquier parte
del mundo
FAX: 650-903-3867
customersvc@etoncorp.com
Sitio de Internet: www.etoncorp.com
Dirección postal:
etón Corporation
1015 Corporation Way
Palo Alto, CA 94303
EE.UU.
¿NECESITA AYUDA?...................................................... 96
1
CONTENIDO.................................................................. 97
2
CARACTERÍSTICAS PRINCIPALES DEL
3
etón E10........................................................... 98
RADIO
DIAGRAMS....................................................................99
4
INSTRUCCIONES INICIALES............................................101
5
LO QUE INCLUYE EL MODELO E10...........................101
INSTALACIÓN DE LAS BATERÍAS...............................101
FORMA DE EVITAR EL ESCAPE DE ÁCIDO.................101
USO DEL ADAPTADOR DE C.A. Y
CARGADOR INCLUIDO.............................................101
CARGA DE LAS BATERÍAS EN EL MODELO E10........ 101
OPERACIÓN BÁSICA DEL RADIO....................................103
6
FUNCIONES DE RELOJ Y ALARMA..................................107
7
FORMA DE PONER EL RELOJ EN HORA.................... 107
FORMA DE PONER LOS TEMPORIZADORES
EN HORA................................................................. 107
PARA GUARDAR UNA ESTACIÓN DE RADIO EN
LA MEMORIA DEL TEMPORIZADOR..........................109
ACTIVACIÓN Y DESACTIVACIÓN DEL
TEMPORIZADOR.......................................................109
USO DE LA FUNCIÓN DE TIEMPO PARA
SEGUIR DURMIENDO................................................109
USO DE LA MEMORIA................................................... 110
8
PARA GUARDAR ESTACIONES EN LA MEMORIA.......110
SELECCIÓN O CAMBIO DE LAS PÁGINAS
DE LA MEMORIA......................................................110
ACCESO A LO QUE ESTÁ GUARDADO EN
LA MEMORIA...........................................................110
ACCESO DIRECTO A LA MEMORIA........................... 111
BÚSQUEDA MANUAL EN LA MEMORIA....................111
EXPLORACIÓN AUTOMÁTICA DE LA MEMORIA........111
PARA BORRAR UNA ESTACIÓN DE LA MEMORIA.....111
FORMA DE BORRAR TODO EL CONTENIDO
DE UNA PÁGINA......................................................112
FORMA DE MOVER UNA FRECUENCIA GUARDADA. 112
FORMA DE ADAPTAR LAS PÁGINAS DE MEMORIA...112
CÓDIGOS DEL SISTEMA.................................................113
9
TABLA DE CÓDIGOS DEL SISTEMA........................... 113
PARA CAMBIAR LOS CÓDIGOS DEL SISTEMA...........114
FORMA DE CAMBIAR EL FORMATO DEL
RELOJ DE 24 HORAS A 12 HORAS............................114
CÓDIGOS DEL SISTEMA PROGRAMADOS
EN LA FÁBRICA........................................................114
OBSERVACIÓN DEL ESTADO ACTUAL DE LOS
CÓDIGOS DEL SISTEMA Y DE OTRAS FUNCIONES.....114
CONTROLES ADICIONALES DEL MODELO E10................115
10
FORMA DE ESCUCHAR LAS ESTACIONES
11
DE ONDA CORTA.....................................................116
PARA SELECCIONAR UNA BANDA DE ONDA
CORTA CON EL MODELO E10...................................117
ESTACIONES DE ONDA CORTA QUE DAN LA HORA..118
PUBLICACIONES DE ONDA CORTA: FRECUENCIAS
ESPECÍFICAS.............................................................119
FORMA DE ENTENDER LAS BANDAS DE ONDA CORTA..120
12
LOCALIZACIÓN DE FALLAS............................................ 124
13
PARA REGISTRAR SU GARANTÍA...................................125
14
GARANTÍA LIMITADA PARA EL COMPRADOR
15
ORIGINAL......................................................................126
INFORMACIÓN DE SERVICIO..........................................127
16
9796
Page 50

3 CARACTERÍSTICAS PRINCIPALES
DEL RADIO
etón E10
E10 MANUAL DE OPERATIÓN
4 DIAGRAMS
• Gama de frecuencias de FM: 87 – 108 MHz (para América); 76 – 108 MHz (para Japón)
• Gama de frecuencias de onda corta: 1711 – 29999 KHz
• Selección de pasos de sintonización de 9 ó 10KHz para recepción de ondas medias (AM).
• Pasos de 1 KHz para mostrar las frecuencias de onda medio y de onda corta.
• Control SW IF SET, que mueve la frecuencia intermedia para reducir interferencia durante la recepción
de onda corta.
• Control de resonancia de la antena telescópica.
• ATS (Sistema de sintonización automática) para las frecuencias de FM/MW guardadas en la memoria.
• Sintonización manual
• Sintonización por exploración automática
• Ingreso directo de frecuencia usando el teclado
• Perilla para sintonización analógica
• 550 memorias programables
• Adaptación de las páginas de memoria
• Exploración automática y manual de las estaciones guardadas en la memoria.
• Acceso directo a la memoria
• Sintonización rápida o lenta para la sintonización manual.
• Temporizador para apagar el radio y dormir
• Dos temporizadores para encender el radio con sintonización de la estación en memoria.
• Función de tiempo para seguir durmiendo: 10 minutos, repetida tres veces.
• Selección de FM con sonido estereofónico o monofónico.
• Control de tono para bajos y agudos
• Iluminación de fondo para la pantalla LCD.
• Tecla de bloqueo
• Selección de formato de 12/24 horas para el reloj.
• Cargador integral para baterías de Ni-MH
• CONJUNTO DE CÓDIGOS DEL SISTEMA
BOTÓN PARA ENCENDER EL RADIO Y DORMIR
Botón de bloqueo
Botón del temporizador “A”
Botón del temporizador “B”
Botón de ingreso en el sistema
Botón para encender y apagar el cargador
Botón para editar la memoria y ajustar la hora
Correa de mano para transporte
Conector para antena de FM y onda corta
Ganancia de antena (DX / Normal / Local)
Control de tono
Receptáculo de audífono
Receptáculo para adaptador de C.C.de 6 V.
Soporte vertical
Pantalla LCD
Botón para seguir durmiendo
Botón del modo de sintonización
Arriba / Hora
Abajo / Minuto
Botón de página
Botón del modo de exploración
Botón de ajuste de la IF de onda corta
Botón de ancho de banda
Botón ATS de la banda de FM/AM
Botón de banda de onda corta
(bandas en metros)
Teclado numérico
Perilla de sintonización
Soporte
Ajuste de antena
Perilla del control de volumen
Botón de reposición
9998
Page 51

E10 MANUAL DE OPERATIÓN
DIAGRAMS continué
PANTALLA CON EL RADIO APAGADO PANTALLA CON EL RADIO ENCENDIDO
Triángulo apuntador
Símbolo de batería
Símbolo de antena
Escala 1 - 5
Indicador de hora AM/PM
Símbolo de batería de Ni-MH
PANTALLA DE LA MEMORIA
Se refiere solamente a la esquina superior derecha
de la pantalla.
Indicador de borrar
PANTALLA DE CÓDIGOS DEL SISTEMA
Indicador AM/PM de la alarma
Dígitos del
reloj de
alarma
Símbolo de activación de la alarma Indicadores
Dígitos del reloj
Indicación de la memoria
de FM,
MW, ONDA
CORTA
Triángulo apuntador
Símbolo de batería Dígitos del reloj
Símbolo de antena
Escala 1 - 5
Dígitos de la
frecuencia
PANTALLA DE BANDA DE ONDA
CORTA EN METROS
Se refiere solamente a la esquina superior derecha
de la pantalla.
Indicador de banda de onda corta en metros
Símbolo del temporizador
para seguir durmiendo
Ancho de banda
450K IF
Símbolo de
activación
de la alarma
5 INSTRUCCIONES INICIALES
LO QUE INCLUYE EL MODELO E10
• Audífonos de estilo miniatura
• Bolsa de transporte
• Adaptador de C.A. y cargador
• Cuatro baterías recargables de Ni-MH y 1100 mAh
• Manual del propietario
NOTA: En las instrucciones de abajo, los números
en paréntesis ( ) se refieren a los diagramas.
INSTALACIÓN DE LAS BATERÍAS
El compartimiento de baterías está situado en la
parte posterior del modelo E10. Su cubierta está
en la esquina inferior derecha de la parte posterior
del radio. Para quitar la cubierta del compartimiento
de baterías, aplique presión con su dedo pulgar y
deslice la cubierta hacia la parte inferior del radio.
Instale 4 baterías alcalinas tamaño AA en el
compartimiento, observando el diagrama de
polaridad en la parte posterior del radio.
NOTA: Si usted no va a usar baterías recargables,
entonces será una buena idea ajustar el CÓDIGO
DE SISTEMA 29. Para hacerlo, vea la sección titulada
CÓDIGOS DEL SISTEMA. Esto asegurará que el
indicador de carga de la batería provea una
indicación correcta para sus baterías no recargables.
Esto no es algo absolutamente necesario y el modelo
E10 funcionará correctamente aún si no se cambia
el código.
FORMA DE EVITAR EL ESCAPE
DE ÁCIDO
Para evitar el escape de ácido de la batería, use
solamente baterías alcalinas, baterías de litio o
baterías recargables de níquel-metal-hidruro de la
más alta calidad. Nunca mezcle baterías gastadas
con nuevas, ni diferentes marcas o tipos de
baterías. El daño causado por el escape de ácido
de las baterías no está cubierto por la garantía de
este producto. Si las baterías tienen un escape, no
las bote y póngase en contacto inmediatamente
con el fabricante de las baterías para averiguar
acerca de su programa de garantía contra el
escape de ácido de las baterías.
USO DEL ADAPTADOR DE C.A.
Y CARGADOR INCLUIDO
Para alimentar el radio E10 con el adaptador /
cargador de C.A, enchúfelo primero en un
tomacorriente de la pared y entonces en el receptáculo marcado “DC 6 V” en un lado del modelo
E10. Las baterías pueden permanecer en el radio
mientras se usa el adaptador / cargador de C.A.
CARGA DE LAS BATERÍAS EN
EL MODELO E10
El radio E10 funcionará con cualquier tipo de
baterías AA instaladas en el compartimiento de
baterías, pero sólo las baterías de níquel-metalhidruro pueden ser recargadas mientras permanecen
dentro del radio. Si se instalan baterías no
recargables, el modelo E10 tiene un sistema integral
de protección que evitará tratar de cargar esas
baterías. Este sistema de protección trabaja con el
modelo E10 usando el CÓDIGO DE SISTEMA 28 ó
29, como se describe abajo, y solamente con el
adaptador / cargador de C.A. incluido.
101100
Page 52

E10 MANUAL DE OPERATIÓN
INSTRUCCIONES INICIALES continué
ADVERTENCIA: Use solamente el adaptador /
cargador de C.A. para recargar las baterías de
Ni-MH. El uso de cualquier otro dispositivo puede
causar el sobrecalentamiento de las baterías recargables, las que se podrán dañar y posiblemente
dañar el modelo E10. El sistema protector, descrito
arriba, trabaja solamente con el adaptador /
cargador de C.A. incluido con el radio. El daño
causado en el modelo E10, por la falla en observar
esta advertencia, no está cubierto por la garantía y
anulará la garantía.
El adaptador / cargador de C.A. incluido se puede
usar para cargar 4 baterías recargables de Ni-MH
cuando estén instaladas en el compartimiento de
baterías del modelo E10. Antes de cargarlas, el
modelo E10 se debe preparar para el uso de las
baterías Ni-MH y se debe seleccionar el nivel de
carga correcto. Las baterías de Ni-MH son
fabricadas con capacidades específicas expresadas
en miliamperios-hora (mAh). En el presente, estas
capacidades pueden variar desde 1100 mAh hasta
2400 mAh (la capacidad está generalmente impresa
en las baterías). Para poder cargarlas sin dañarlas,
se debe establecer el nivel de carga correcto. Para
establecer el nivel de carga, enchufe el adaptador
de C.A. y apague el radio E10. Entonces siga las
instrucciones siguientes.
1. Ingrese el CÓDIGO DE SISTEMA 28. Vea las
instrucciones en la sección titulada CÓDIGOS
DEL SISTEMA.
2. Mientras el número ‘1100’ parpadea en la pan-
talla, use los botones “UP HOUR/DOWN MIN”
(Arriba hora / Abajo minutos) para seleccionar el
nivel de carga para sus baterías de Ni-MH.
Para cargar baterías de Ni-MH:
1. Instale 4 baterías de Ni-MH.
2. Conecte el adaptador / cargador en el tomacor-
3. Oprima y suelte el botón “CHARGER ON/OFF”
Una vez que se haya completado la carga,
‘CHARGE’ dejará de parpadear y el indicador de
carga en la esquina superior izquierda permanecerá en 5.
El tiempo de carga varía, dependiendo de la
capacidad en miliamperios-hora de las baterías. El
circuito de carga detecta automáticamente el nivel
de carga de las baterías y las cargará por el tiempo
que estime necesario. El tiempo de carga puede ser
desde 6 horas para baterías de 1100 mAh hasta
13 horas para las baterías de 2300 mAh). El circuito cargador detectará cuando las baterías están
totalmente cargadas y pasará automáticamente al
modo de carga de flotación, evitando así la sobrecarga de las baterías. El desconectar el cargador
AGC-10 del radio E10 o el oprimir el botón
“CHARGER ON/OFF” también detendrá la carga.
riente de la pared y entonces en el receptáculo
del E10.
(Encender / apagar el cargador). La palabra
‘CHARGE’ parpadeará en la pantalla y las barras
indicadoras de carga avanzarán de izquierda a
derecha en la escala de 0 – 5, situada en la
esquina superior izquierda de la pantalla. Los
dígitos en la esquina superior derecha cambiarán a 00:00 y comenzarán a contar los minutos y las horas hasta que se terminan de cargar
las baterías.
6 OPERACIÓN BÁSICA DEL RADIO
FORMA DE ENCENDER Y APAGAR
EL MODELO E10
El modelo E10 se puede encender por los dos
métodos indicados abajo. Para apagarlo, pulse el
botón "POWER/SLEEP" (1).
1. Método de temporizador para ahorrar baterías:
Pulse en forma rápida y corta el botón
"POWER/SLEEP" (1). Esto encenderá el radio con
el número 90 en la pantalla y causará que el radio
se apague automáticamente después de 90 minutos.
El símbolo del temporizador para dormir, ,
también aparecerá en la pantalla. Para cambiar el
tiempo de apagado de 90 minutos al tiempo de su
preferencia, use los botones "Up/Hour" o
"Down/Min." (9,10) inmediatamente después de
encender el radio. Esto permitirá la selección de 1
a 480 minutos de uso del radio antes de que se
apague automáticamente. El número de minutos
seleccionado por usted también se usará la próxima
vez que se encienda el radio.
2. Método de desactivación del temporizador:
Este método desactiva el temporizador automático
del radio y causa que el radio se quede encendido
hasta que se apague manualmente, se descarguen
las baterías, o permanezca encendido indefinidamente si se usa con un adaptador de C.A.
Mantenga oprimido el botón “POWER” durante
aproximadamente 3 segundos y entonces suéltelo.
Note que la palabra ‘On’ aparece en la pantalla y
que el símbolo del temporizador para seguir
durmiendo no aparece cuando se usa este método.
INDICADOR DE INTENSIDAD
DE SEÑAL Y CARGA DE BATERÍA
Cuando se apaga el radio, la esquina superior
izquierda de la pantalla (6) muestra la carga de la
batería en la escala de 1 – 5 (36), con el indicador
de triángulo (33) bajo el símbolo de batería (34) en
el extremo izquierdo de la escala. Cuando se
enciende el radio, el triángulo apuntador está bajo
el símbolo de antena (35) y la escala 1 – 5 muestra
la intensidad relativa de la señal.
CONTROLES DE VOLUMEN Y
TONO
• El control de volumen (31), marcado
• El control de tono (24), en el lado izquierdo del
USO DE LOS AUDÍFONOS
Se pueden usar audífonos con enchufe de tipo
estéreo de 1/8 pulgada. Enchúfelos en el receptáculo de audífonos (25), situado en el lado
izquierdo del radio.
SELECCIÓN DE LAS BANDAS
DE FM, AM Y ONDA CORTA
Cuando escuche las bandas de FM o de onda
corta, extienda completamente la antena
telescópica (5). No es necesario extenderla cuando
se escuchan estaciones de AM. Después de encender
"VOLUME", está situado en el lado derecho
del radio. Para cambiar el volumen, gire la perilla
del control de volumen.
radio, está marcado "TREBLE/BASS". Use la
posición que produzca el sonido que más le
guste.
103102
Page 53

E10 MANUAL DE OPERATIÓN
OPERACIÓN BÁSICA DEL RADIO continué
el radio E10, pulse en forma corta y rápida el
botón “FM/AM-ATS” (15) para seleccionar FM o
AM. Note que cuando se selecciona la banda de
AM, la pantalla muestra las letras "MW" en lugar
de "AM". Para seleccionar la onda corta, pulse el
botón “SW METER BAND” (16). Cada vez que
oprima este botón SW METER BAND o los botones
UP/HOUR o DOWN/MIN, el radio sintoniza el
comienzo de una banda específica de onda corta.
Los dígitos de frecuencia (46) aparecen en la parte
central de la pantalla. Las estaciones locales en el
área que usted reside se oirán en AM o FM, mientras que las estaciones de onda corta de todo el
mundo se podrán escuchar en onda corta.
NOTA: Si usted nunca ha escuchado estaciones
de onda corta, lea las secciones especiales acerca
de la onda corta más adelante en este manual.
PARA ESCUCHAR LAS ESTACIONES
ESTEREOFÓNICAS DE FM
El sonido estereofónico de FM se puede oír solamente cuando se usen audífonos. Para oír FM con
sonido estereofónico, oprima el botón “FM
STEREO” (14). La palabra “FM-STEREO” aparecerá
en la pantalla.
FORMA DE AJUSTAR LAS
BANDAS DE AM Y FM FUERA
DE NORTEAMÉRICA
Puede ignorar esta sección si reside en
Norteamérica y acaba de comprar el modelo E10.
Ya está ajustado en la fábrica para uso en
Norteamérica. Fuera de Norteamérica, las estaciones
de AM (MW en la pantalla del E10) están separadas en pasos de sintonización de 9 KHz. La gama
de frecuencias de FM también puede ser diferente
de la usada en Norteamérica. Por ejemplo, en
Japón es de 76 a 108 MHz. Para hacer estos cambios, por favor lea las instrucciones tituladas
"TABLA DE CÓDIGOS DEL SISTEMA" y siga las
instrucciones en la sección “PARA CAMBIAR LOS
CÓDIGOS DEL SISTEMA”.
SINTONIZACIÓN DE LAS
ESTACIONES
Hay cuatro formas de sintonizar estaciones, que se
describen abajo. Ellas son: Sintonización manual,
Sintonización automática por exploración, Ingreso
directo de frecuencia y Sintonización fina.
SINTONIZACIÓN MANUAL
Pulsaciones rápidas y cortas de los botones
"Up/Hour" y "Down/Min." (9,10) permiten sintonizar hacia arriba y abajo de las frecuencias.
SINTONIZACIÓN AUTOMÁTICA
POR EXPLORACIÓN
El pulsar los botones "Up/Hour" y "Down/Min."
(9,10) durante más de 1 segundo activa la sintonización automática por exploración o búsqueda
de estaciones. El radio entonces se detendrá
automáticamente en la siguiente estación que
encuentre. Use el botón "Up/Hour" para buscar
estaciones en frecuencias más altas y el botón
"Down/Min." para buscar estaciones en frecuencias más bajas.
OPERACIÓN BÁSICA DEL RADIO continué
INGRESO DIRECTO DE FRECUENCIA
Cuando se sabe la frecuencia deseada, esa
frecuencia se puede ingresar directamente en el
teclado numérico (17), pulsando después el botón
"Enter" (20). Primero, asegúrese de haber s
eleccionado la banda correcta, ya sea AM, FM o SW.
La mayoría de las frecuencias de AM y onda corta
son designadas en kilohercios (KHz), por ejemplo
810 KHz o 9475 KHz. Todas las frecuencias de FM
son designadas en megahercios (MHz), por ejemplo
102.9 MHz. Para ingresar esas frecuencias:
1. Oprima y suelte el botón "Enter" (20).
2. Ingrese la frecuencia usando el teclado
numérico (17).
Algunas veces las frecuencias de onda corta son
designadas en megahercios (MHz). Si encuentra
una de esas frecuencias y tiene menos de tres
dígitos después del punto decimal (por ejemplo,
15.10 MHz o 6.92 MHz), entonces use el método
siguiente para ingresarla. Sin embargo, si tiene tres
dígitos después del punto decimal (por ejemplo
15110 MHz o 5.975 MHz), use el método descrito
anteriormente.
1. Oprima y suelte el botón "Enter" (20).
2. Ingrese la frecuencia usando el teclado
numérico (17).
3. Oprima y suelte el botón "Enter" nuevamente.
PERILLA DE SINTONIZACIÓN
La perilla de control “TUNING" (Sintonización) (28)
está situada en el lado derecho del radio. Use este
control para la sintonización fina de sus estaciones
favoritas, o en la forma en que usted usaría una
perilla de sintonización.
FORMA DE DESACTIVAR LA
PERILLA DE SINTONIZACIÓN
Para evitar la desintonización accidental de una
estación de radio, la perilla de sintonización se
puede desactivar mientras el radio está encendido.
Para hacerlo, oprima y mantenga oprimido el botón
“TUNING MODE” durante aproximadamente tres
segundos. Note que el símbolo de una cerradura
parpadeó dos veces en la esquina inferior derecha
de la pantalla. La perilla de sintonización está
ahora desactivada. Si se gira, la frecuencia no
cambia y el símbolo de cerradura vuelve a
parpadear. Para volver a activar la perilla, oprima el
botón “TUNING MODE” durante aproximadamente
tres segundos.
MODO DE SINTONIZACIÓN –
SINTONIZACIÓN RÁPIDA –
SINTONIZACIÓN LENTA
El botón “TUNING MODE” (Modo de sintonización)
(8) permite la selección de una sintonización rápida
cuando se use la perilla de sintonización o los
botones “UP/HOUR” y “DOWN/MIN”. La palabra
“FAST” (Rápida) o “SLOW” (Lenta) aparecerá en la
pantalla. Cuando sintonice con la perilla de
sintonización (28), la sintonización rápida es usualmente apropiada. Cuando sintonice con los
botones “UP/HOUR” y “DOWN/MIN”, use la
sintonización lenta para sintonizar estaciones y la
sintonización rápida para mover la frecuencia hacia
arriba o hacia debajo de una forma rápida.
Entonces cambie a una sintonización lenta para
sintonizar actualmente las estaciones. Experimente
con este control para decidir su modo de
sintonización favorito.
105104
Page 54

E10 MANUAL DE OPERATIÓN
OPERACIÓN BÁSICA DEL RADIO continué
USO DEL BOTÓN DE ANCHURA
DE BANDA
El botón “BANDWIDTH” (Anchura de banda) (14)
se usa cuando escuche estaciones de AM y onda
corta. Su función es ayudar a reducir la interferencia.
La posición preferida es “WIDE” (Ancha), que
provee la mejor fidelidad de audio. Use la posición
“NARROW” (Estrecha) cuando hay interferencia.
Las letras “W” o “N” aparecerán en la pantalla.
USO DEL CONTROL “SW IF SET”
El control “SW IF SET” (Ajuste de la frecuencia
intermedia) (13) cambia la operación del oscilador
de frecuencia intermedia, lo que puede ayudar a
reducir la interferencia. Funciona solamente en el
modo de AM y onda corta. Cuando se activa, el
símbolo pIF aparece en la pantalla.
CANCELACIÓN DEL MODO DE
SINTONIZACIÓN MUDA
La cancelación del modo de sintonización muda
hace que el modelo E10 se ‘sienta’ más como un
radio con sintonización analógica, aun cuando
tiene un sintonizador digital de alta tecnología. La
diferencia se nota principalmente en el modo de
sintonización lenta usando la perilla de sintonización.
Note que a veces es algo difícil oír la diferencia.
Para las personas que pueden oír la diferencia, la
sintonización podrá sonar más ‘suave’ cuando se
usa la perilla de sintonización. Para cancelar el
modo de sintonización muda, oprima y suelte el
botón ‘SYSTEM SET’ y entonces el botón ‘TUNING
MODE’. La palabra “OFF” aparecerá en la pantalla.
La función de sintonización muda está ahora
cancelada. Para volver a activarla, haga lo mismo y
la palabra “ON” aparecerá en la pantalla.
7 FUNCIONES DE RELOJ Y ALARMA
FORMA DE PONER EL RELOJ EN
HORA
La fábrica ha ajustado el reloj para que funcione en un
formato de 24 horas. Si prefiere el formato de 12
horas (AM/PM) para el reloj, vea la sección titulada
"CAMBIO DEL FORMATO DEL RELOJ DE 24 A 12
HORAS" en la sección “CÓDIGOS DEL SISTEMA”.
Hay tres métodos para poner el reloj en hora:
MÉTODO 1 PARA PONER EL RELOJ EN HORA –
Botones “UP/HOUR” y “DOWN/MIN”:
1. Apague el radio. Los dígitos del reloj aparecen en
el centro de la pantalla (40).
2. Oprima y suelte el botón marcado "Time Set" (18).
Los dígitos del reloj parpadearán en la pantalla.
3. Dentro de 5 segundos, ponga el reloj en hora usando
el botón "Úp/Hour" y los minutos usando el botón
"Down/Min." (9,10). Dentro de 5 segundos
después de hacerlo, oprima y suelte el botón "TIME
SET" o espere a que los dígitos del reloj dejen de
parpadear.
MÉTODO 2 PARA PONER EL RELOJ EN HORA –
TECLADO NUMÉRICO:
1. Apague el radio. Los dígitos del reloj aparecen en
el centro de la pantalla (40).
2. Oprima y suelte el botón marcado "Time Set" (18).
Los dígitos del reloj parpadearán en la pantalla.
3. Use el teclado numérico para ingresar la hora en
un formato de 24 horas. Dentro de 5 segundos
después de hacerlo, oprima y suelte el botón "TIME
SET" o espere a que los dígitos del reloj dejen de
parpadear.
MÉTODO 3 PARA PONER EL RELOJ EN HORA –
PERILLA DE SINTONIZACIÓN:
1. Apague el radio. Los dígitos del reloj aparecen en
2. Oprima y suelte el botón marcado "Time Set" (18).
3. Dentro de 5 segundos, pulse el botón "Úp/Hour" y
4. Dentro de 5 segundos, pulse el botón "Down/Min"
5. Dentro de 5 segundos después de hacerlo, oprima
FORMA DE PONER LOS TEMPORIZADORES EN HORA
ALARMA PARA DESPERTAR)
El radio E10 tiene dos temporizadores independientemente programables, denominados “A” y “B”, que
permiten que el radio se encienda automáticamente,
toque durante 30 minutos y entonces se apague. Los
temporizadores se pueden usar también como alarmas
para despertar. Después de ajustar un temporizador,
ponga una estación en la memoria del sintonizador y
active el temporizador. Vea las secciones siguientes tituladas “PARA GUARDAR UNA ESTACIÓN DE RADIO
EN LA MEMORIA DEL TEMPORIZADOR” y
“ACTIVACIÓN Y DESACTIVACIÓN DE LOS TEMPORIZADORES”.
NOTA: Debe haber una estación de radio guardada
en la memoria del temporizador. Si no la hay, se oirá
estática solamente cuando se active el temporizador.
el centro de la pantalla (40).
Los dígitos del reloj parpadearán en la pantalla.
entonces use la perilla de sintonización para poner
la hora en el reloj.
y entonces use la perilla de sintonización para
poner los minutos en el reloj.
y suelte el botón "TIME SET" o espere a que los
dígitos del reloj dejen de parpadear.
(ÚSELOS COMO
107106
Page 55

E10 MANUAL DE OPERATIÓN
FUNCIONES DE RELOJ Y ALARMA continué
Cuando se active el temporizador se encenderá el
radio y el símbolo de activación aparecerá parpadeando en la pantalla. El radio tocará esa estación
durante 30 minutos o hasta que usted lo apague
usando el botón “POWER/SLEEP”. La función
“snooze” (para seguir durmiendo) también se
puede usar (vea ;a sección “USO DE LA FUNCIÓN
DE TIEMPO PARA SEGUIR DURMIENDO”).
Hay tres métodos para poner el temporizador en
hora.
MÉTODO 1 PARA PONER EL TEMPORIZADOR
EN HORA – Botones “UP/DOWN MIN”:
1. Apague el radio. Los dígitos del temporizador
(38) aparecerán en la esquina superior derecha
de la pantalla.
2. Oprima y mantenga oprimido el botón marcado
"TIMER A o B” durante dos segundos. Los dígitos
del temporizador parpadearán en la pantalla.
3. Dentro de 5 segundos, ponga el temporizador
en hora usando el botón "Úp/Hour" y los minutos usando el botón "Down/Min.". Dentro de 5
segundos después de hacerlo, oprima el botón
“TIMER A” o “TIMER B” una sola vez, o espere
a que los dígitos del temporizador dejen de
parpadear.
MÉTODO 2 PARA PONER EL TEMPORIZADOR
EN HORA – TECLADO NUMÉRICO:
1. Apague el radio. Los dígitos del temporizador
(38) aparecerán en la esquina superior derecha
de la pantalla.
2. Oprima y mantenga oprimido el botón TIMER A
o TIMER B durante dos segundos. Los dígitos
del temporizador parpadearán en la pantalla.
3. Use el teclado numérico para ingresar la hora
de la alarma para despertar en un formato de
24 horas. Dentro de 5 segundos después de
hacerlo, oprima el botón "TIMER A” o “TIMER
B” una vez o espere a que los dígitos del temporizador dejen de parpadear.
MÉTODO 3 PARA PONER EL TEMPORIZADOR
EN HORA – Botones “UP/DOWN MIN”:
1. Apague el radio. Los dígitos del temporizador
(38) aparecerán en la esquina superior derecha
de la pantalla.
2. Oprima y mantenga oprimido el botón marcado
"TIMER A o B” durante dos segundos. Los dígitos del temporizador parpadearán en la pantalla.
3. Dentro de 5 segundos, oprima y suelte el botón
“Up/Hour” y entonces use la perilla de sintonización para poner la hora en el temporizador.
4. Dentro de 5 segundos, oprima y suelte el botón
“Down/Min” y entonces use la perilla de
sintonización para poner los minutos en el temporizador.
5. Dentro de 5 segundos después de hacerlo, oprima el botón "TIMER A” o “TIMER B” una vez o
espere a que los dígitos del temporizador dejen
de parpadear.
FUNCIONES DE RELOJ Y ALARMA continué
PARA GUARDAR UNA
ESTACIÓN DE RADIO EN LA
MEMORIA DEL TEMPORIZADOR
Para escuchar una estación de radio cuando se
active el temporizador, la estación deberá estar
guardada en la memoria de dicho temporizador.
Este es un procedimiento de 3 pasos:
1. Encienda el radio E10 y sintonice la estación
deseada.
2. Oprima y suelte el botón “MEMORY” (Memoria).
3. Oprima y suelte el botón “TIMER A” o “TIMER
B”. El símbolo del temporizador parpadeará dos
veces en la pantalla.
NOTA: Para escuchar las frecuencias guardadas
en la memoria de los sintonizadores A y B, oprima
durante tres segundos el botón “SYSTEM SET” con
el radio apagado. La información sobre el código y
las frecuencias guardadas en la memoria del temporizador parpadearán en la pantalla.
ACTIVACIÓN Y DESACTIVACIÓN
DEL TEMPORIZADOR
Para que un temporizador pueda encender el radio,
deberá ser activado. Un temporizador puede ser
activado o desactivado con el radio encendido o
apagado. Para activar el temporizador, oprima y
suelte el botón “TIMER A” o “TIMER B” . El símbolo del temporizador aparecerá en la pantalla.
Para desactivar un temporizador, oprima y suelte el
botón “TIMER A” o “TIMER B”. El símbolo del
temporizador desaparecerá de la pantalla.
USO DE LA FUNCIÓN DE TIEMPO
PARA SEGUIR DURMIENDO
Cuando se activa el temporizador y enciende el
radio, el símbolo de activación del temporizador
(39) aparecerá parpadeando en la pantalla.
Mientras esté parpadeando, oprima y suelte el
botón “SNOOZE/LIGHT” (Seguir durmiendo / Luz)
(7). El radio se apagará y se encenderá nuevamente en 10 minutos. Este proceso se puede repetir 3 veces.
109108
Page 56

E10 MANUAL DE OPERATIÓN
8 USO DE LA MEMORIA
El modelo E100 está programado en la fábrica
con 10 páginas de memoria, cada página capaz de
guardar 50 frecuencias. Esto permite guardar 500
frecuencias en la memoria. Esta programación de
fábrica se puede cambiar para adaptarse mejor a
su preferencia personal o se puede dejar como
viene de fábrica. Mientras esté aprendiendo la
forma de guardar estaciones en la memoria, le
sugerimos que use la programación de fábrica.
Para cambiar esta programación, vea la sección
titulada "ADAPTACIÓN DE LAS PÁGINAS DE
MEMORIA". Cuando trabaje con la memoria, la
palabra “PRESET” aparece en la pantalla bajo los
números de memoria.
PARA GUARDAR ESTACIONES
EN LA MEMORIA
1. Encienda el radio.
2. Sintonice la estación deseada.
3. Oprima y suelte el botón "MEMORY” (Memoria)
(18). Note que los dígitos de la memoria,
marcados “PRESET” (48), parpadean en la
esquina superior derecha de la pantalla. El
número de página de la memoria, marcado
“PAGE”, también aparece, pero no parpadea.
4. Dentro de 5 segundos use el teclado numérico
para ingresar el número de memoria donde
desea guardar la estación. Para las memorias 1
– 9, ingrese los números como 01 – 09.
5. Dentro de 5 segundos pulse el botón "MEMORY”
o espere 5 segundos. Esto completa la acción
de guardar una estación en la memoria y,
después de unos segundos, la esquina superior
derecha de la pantalla vuelve a mostrar el reloj.
SELECCIÓN O CAMBIO DE LAS
PÁGINAS DE LA MEMORIA
Para seleccionar o cambiar las páginas de la
memoria:
1. Oprima y suelte el botón “PAGE” (Página) (11).
El número de la página parpadeará en la pantalla.
2. Dentro de tres segundos, use el botón
“UP/HOUR” o “DOWN/MIN” para cambiar a la
página que desea. Alternativamente, use el
teclado numérico para ingresar el número de la
página.
3. Oprima y suelte el botón “PAGE” para finalizar
el cambio de página.
ACCESO A LO QUE ESTÁ
GUARDADO EN LA MEMORIA
Hay tres formas de tener acceso a lo que se ha
guardado en la memoria: Acceso directo a la
memoria, Búsqueda manual en la memoria y
Exploración automática o "Autoscan" de la memoria. Estos tres métodos se describen a continuación.
Cuando la página de la memoria y los números
prefijados de la memoria aparecen en la esquina
superior derecha de la pantalla, como lo harán en
las secciones de abajo, el radio está en el "MEMORY
ACCESS MODE" (Modo de acceso de la memoria).
Puede salir de ese modo en cualquier momento,
oprimiendo y soltando el botón "SCAN MODE" (12).
Si necesita primero cambiar las páginas de la
memoria, vea la sección anterior “SELECCIÓN O
CAMBIO DE LAS PÁGINAS DE LA MEMORIA”
USO DE LA MEMORIA continué
ACCESO DIRECTO A LA MEMORIA
Use el teclado numérico para ingresar el número
de memoria. Por ejemplo, si la estación de radio
deseada está en el número de memoria 01, sólo
pulse "0" y entonces "1", y pasará a la memoria 01.
BÚSQUEDA MANUAL EN LA
MEMORIA
La búsqueda manual en la memoria permite buscar
en los números prefijados de la memoria, dentro
de una página específica, como se muestra abajo:
1. Oprima y suelte el botón "SCAN MODE” (12).
2. Use pulsaciones cortas y rápidas sobre los
botones "Up/Hour" o "Down/Min.", o use la
perilla de sintonización para buscar a través de
las memorias.
3. Oprima el botón “SCAN MODE” cuando haya
terminado.
EXPLORACIÓN AUTOMÁTICA
DE LA MEMORIA
La exploración automática (Autoscan) de la memoria
permite la exploración de la memoria dentro de la
página seleccionada de memoria. Cada memoria
que contenga una estación será sintonizada
durante aproximadamente 5 segundos, después de
lo cual pasará automáticamente a la memoria
siguiente utilizada y permanecerá en ella por otros
5 segundos. Esto continuará indefinidamente en la
página seleccionada hasta que el proceso sea
detenido deliberadamente. Las memorias vacías no
serán exploradas.
1. Oprima y suelte el botón "SCAN MODE” (12).
2. Oprima y mantenga oprimido el botón
"Up/Hour", o el botón "Down/Min.", durante 1
segundo. Entonces suelte el botón. Note que la
palabra “PRESET” parpadea debajo del número
de la memoria, indicando que cada memoria
está siendo explorada durante aproximadamente
4 segundos y entonces se mueve a la memoria
siguiente por otros 4 segundos.
Para detener la exploración automática de la
memoria, oprima y suelte el botón “Up/Hour” o el
botón “Down/Min.”.
PARA BORRAR UNA ESTACIÓN
DE LA MEMORIA
1. Oprima y suelte el botón “SCAN MODE” (12).
2. Use el botón “Up/Hour” o “Down/Min.” (5,6)
para seleccionar la frecuencia de la estación que
desea borrar. Alternativamente, use el teclado
numérico para ingresar el número de memoria.
3. Oprima y mantenga oprimido el botón “MEMORY” (18) durante 2 segundos y entonces suéltelo.
La palabra ”dEL” aparecerá parpadeando en la
memoria.
4. Mientras “dEL” esté parpadeando, oprima y
suelte el botón “MEMORY”.
111110
Page 57

E10 MANUAL DE OPERATIÓN
USO DE LA MEMORIA continué
FORMA DE BORRAR TODO EL
CONTENIDO DE UNA PÁGINA
1. Pulse y suelte el botón "PAGE” (11).
2. Oprima y mantenga oprimido el botón "MEMORY" (18) durante unos 5 segundos y entonces
suéltelo. Las palabras "Del" y “PAGE” (48, 49)
aparecerán parpadeando en la pantalla.
3. Dentro de 2 segundos, oprima y suelte el botón
"MEMORY".
FORMA DE MOVER UNA
FRECUENCIA GUARDADA
Si lo desea, una frecuencia guardada en una
memoria puede ser movida a una memoria diferente
en la misma página o a una página diferente.
1. Encienda el radio.
2. Oprima y suelte el botón "PAGE".
3. Dentro de 3 segundos, use el botón
"UP/HOUR" o "DOWN/MIN." para seleccionar
la página de memoria requerida.
4. Oprima y suelte el botón "MEMORY" dos veces.
5. Dentro de 5 segundos, use el teclado numérico
para ingresar el número de memoria en el que
desea guardar la estación.
6. Dentro de 5 segundos, oprima y suelte el botón
"MEMORY".
FORMA DE ADAPTAR LAS
PÁGINAS DE MEMORIA
El modelo E10 es programado en la fábrica con 10
páginas de memoria, cada una de ellas con 50
memorias, para un total de 500 memorias. Usted
puede cambiar esta programación usando los
CÓDIGOS DEL SISTEMA mostrados abajo.
9 CÓDIGOS DEL SISTEMA
Estos códigos permiten programar su radio para satisfacer sus necesidades, cambiando algunas de las funciones
programables. Estas funciones y sus descripciones se muestran en la tabla de abajo.
TABLA DE CÓDIGOS DEL SISTEMA
NÚMERO DE CÓDIGO
00 (como viene de fábrica)
20
25
50
09
10
12
24
22
28
FUNCIÓN
Divide las memorias en 10 páginas con 50
espacios
Divide las memorias en 20 páginas con 25
espacios
Divide las memorias en 25 páginas con 20
espacios
Divide las memorias en 50 páginas con 10
espacios
Pasos de sintonización para MW (AM) de
9KHz
Pasos de sintonización para MW (AM) de
10KHz
Pone el reloj en el formato de 12 Horas
Pone el reloj en el formato de 24 horas
Inspecciona todos los segmentos en la pantalla LCD
Se van a usar baterías recargables
EN LA PANTALLA
10:50
20:25
25:20
50:10
9kHz
10kHz
12H
24H
Ni-MH
29
76
(como viene de fábrica)
87
Se van a usar baterías normales AA
Ajusta la gama de frecuencia de FM a
76-108MHz (para Japón)
Ajusta la gama de frecuencia de FM a
87-108MHz (Norteamérica y Europa)
76 108
87 108
113112
Page 58

E10 MANUAL DE OPERATIÓN
CÓDIGOS DEL SISTEMA continué
PARA CAMBIAR LOS CÓDIGOS
DEL SISTEMA
Para ingresar el código de sistema que desee, use
el procedimiento indicado abajo.
1. Apague el radio.
2 Oprima y suelte el botón "SYSTEM SET" (20).
Note que "--" (51) aparece en la esquina
superior derecha de la pantalla y los dígitos del
reloj desaparecen.
3. Dentro de 5 segundos, ingrese el código
numérico deseado con el teclado numérico.
Entonces oprima y suelte inmediatamente el
botón marcado "SYSTEM SET". El “ICON” del
código (52) aparecerá brevemente en la esquina
inferior derecha de la pantalla.
FORMA DE CAMBIAR EL
FORMATO DEL RELOJ DE 24
HORAS A 12 HORAS -- UN EJEMP-
LO DEL CAMBIO DE UN CÓDIGO DEL SISTEMA
Las instrucciones de abajo sirven como un ejemplo
excelente de la forma de cambiar un código del
sistema. En este caso, vamos a cambiar el sistema
del reloj al formato de 12 horas:
1. Apague el radio.
2. Oprima y suelte el botón "SYSTEM SET". Note
que "--" aparece en la esquina superior derecha
de la pantalla y los dígitos del reloj desaparecen.
3. Dentro de 5 segundos, ingrese "12" con el
teclado numérico y entonces, inmediatamente,
oprima y suelte el botón marcado "SYSTEM
SET". El número y letra "12H" aparecerá
brevemente en la pantalla.
CÓDIGOS DEL SISTEMA PROGRAMADOS EN LA FÁBRICA
Cuando el radio salió de la fábrica, estaba
programado con los códigos indicados abajo. Los
cambios se pueden hacer usando el procedimiento
mostrado en la sección titulada "FORMA DE
CAMBIAR LOS CÓDIGOS DEL SISTEMA".
• Diez páginas con 50 memorias cada una.
Código 08.
• Sintonización de AM (MW) en pasos de 10 KHz.
Código 10.
• Formato de 24 horas para el reloj. Código 24.
• Uso de baterías recargables. Código 28.
• Cobertura de frecuencia de FM de 87-108 MHz.
Código 87.
OBSERVACIÓN DEL ESTADO
ACTUAL DE LOS CÓDIGOS DEL
SISTEMA Y DE OTRAS FUNCIONES
Si oprime el botón “SYSTEM SET” durante 3
segundos, con el radio E10 apagado,podrá saber el
estado actual de los códigos del sistema y de otras
funciones. Esta información parpadeará rápidamente
en la pantalla en el orden siguiente:
1. Formato de la hora
2. Sintonización en pasos de 9 o 10 kilohercios
3. Gama de sintonización en la banda de FM
4. Frecuencia del radio en el temporizador “A”
5. Frecuencia del radio en el temporizador “B”
6. Nivel de carga en miliamperios-hora de las
baterías recargables
10 CONTROLES ADICIONALES DEL MODELO E10
USO DE LA LUZ
Una pulsación rápida y corta del botón
"SNOOZE/LIGHT" (7), situado en la esquina superior
derecha del frente del radio, encenderá la luz que
ilumina la pantalla desde el lado izquierdo durante
aproximadamente 5 segundos. Si oprime el botón
por más tiempo (3 segundos), la luz se quedará
encendida indefinidamente (note que esto disminuirá
mucho la vida de la batería). Apague la luz con
sólo pulsar brevemente el botón.
El modelo E10 está provisto de una característica
que apaga la luz después de un cierto tiempo,
Cuando se activa esta función y se oprime cualquier
tecla entre las 6 pm y las 7 am, la luz de la pantalla
se enciende durante 3 segundos. Siga las
instrucciones de abajo para activar o desactivar
esta función.
1. Encienda el radio.
2. Oprima y suelte el botón “ENTER/SYSTEM SET”.
3. Oprima y suelte el botón “LIGHT/SNOOZE”.
La pantalla mostrará las palabras “ON” (Activada)
u “OFF” (Desactivada).
USO DEL INTERRUPTOR DE
CONTROL DE GANANCIA DE LA
ANTENA
El interruptor de ganancia de antena (23) tiene tres
posiciones, DX, NORMAL y LOCAL. Este interruptor
debe estar normalmente en la posición "DX" para
tener la mayor sensibilidad en la recepción. Si la
estación de AM o de onda corta que escucha es
muy poderosa y causa distorsión, mueva el interruptor a la posición "NORMAL” o “LOCAL”. Este
interruptor no se usa para las estaciones de FM.
USO DEL CONTROL DE
RESONANCIA DE ANTENA
Esta perilla de control, marcada “ANT TRIM” y
situada en el lado derecho del modelo E10, permite
la optimización de la antena telescópica del E10
cuando se están recibiendo señales de onda corta,
ajustando su resonancia con respecto a la frecuencia
de la estación recibida. Mientras escucha la estación,
ajuste esta perilla para obtener la mejor recepción.
USO DEL BOTÓN DE BLOQUEO
El oprimir el botón “LOCK” causa que todos los
controles activados por botones queden “bloqueados” y que el símbolo de bloqueo aparezca
en la esquina inferior derecha de la pantalla. Una
pulsación rápida de este botón habilita la función
de bloqueo. Si lo oprime por más tiempo, la función
se inhabilita y el símbolo desaparece. Esta es una
característica excelente para usar durante viajes, ya
que evita que el radio se encienda accidentalmente.
Antes de colocar el radio en una maleta, bolsa o
maletín, apáguelo y oprima el botón de bloqueo.
Este control no afecta las funciones del temporizador.
USO DEL RECEPTÁCULO PARA
UNA ANTENA EXTERNA
El receptáculo para una antena externa se usa para
mejorar el funcionamiento del radio en onda corta
o FM. Hay muchas antenas en el mercado que se
pueden usar. Si necesita más información para
comprar o hacer una de estas antenas, búsquela en
Internet usando las palabras “shortwave antennas”
o “FM antennas”.
115114
Page 59

E10 MANUAL DE OPERATIÓN
11 FORMA DE ESCUCHAR LAS ESTACIONES
DE ONDA CORTA
¿Ha escuchado alguna vez estaciones de onda
corta? Si no lo ha hecho, deberá leer esta sección y
la sección siguiente titulada “LAS BANDAS DE
ONDA CORTA”.
¿QUÉ SON ESTACIONES DE
ONDA CORTA?
Son estaciones situadas en todo el mundo que
transmiten en frecuencias que se pueden escuchar
sobre grandes distancias, muchas veces de miles de
millas. En los Estados Unidos hay también cerca de
30 estaciones radiodifusoras de onda corta que
transmiten programas religiosos, políticos o
ideológicos.
¿POR QUÉ ESCUCHAR
ESTACIONES DE ONDA CORTA?
Hay muchas razones para disfrutar de las estaciones
de onda corta. Aquí les indicamos algunas que nos
han sido reportadas por nuestros clientes.
• Escuchar noticias e informaciones de otras
fuentes en el mundo para tener la oportunidad
de exponerse a otras perspectivas diferentes y
únicas, relacionadas con eventos nacionales e
internacionales.
• Escuchar otros idiomas y culturas, incluyendo su
música y perspectivas. Es agradable escuchar las
músicas nativas de otros países, aún si no
entiende el idioma.
• Aprender otro idioma escuchando a otras
personas hablándolo.
continué
• Mantenerse en contacto con otras partes del
mundo, quizás su tierra nativa o la de sus
antepasados.
• Escuchar transmisiones con orientaciones
religiosas, políticas o ideológicas.
REGLAS GENERALES PARA
ESCUCHAR LA ONDA CORTA
• La recepción nocturna de onda corta es usualmente mejor que la del día. Esto puede cambiar
de tiempo en tiempo, así que vale la pena
escuchar las bandas durante el día también.
• Durante el día, las bandas de onda corta más
activas son las de 13, 15, 16, 19, y 22 metros.
Las bandas de 16 y 19 metros son usualmente
las mejores. Por la noche, las bandas más activas
son las de 25, 31, 41 y 49 metros, con las bandas
de 31 y 49 metros generalmente las mejores.
• Alrededor de la salida y puesta del sol, tanto las
bandas de día como las de noche pueden ser
buenas y algunas veces excepcionalmente buenas.
Escuchar durante esas horas puede ser muy
interesante.
• Los materiales de construcción de algunos
edificios afectan severamente las señales de
onda corta. Para compensar este problema,
sostenga el radio en sus manos y acérquese lo
más posible a una ventana.
FORMA DE ESCUCHAR LAS ESTACIONES
DE ONDA CORTA
PARA SELECCIONAR UNA
BANDA DE ONDA CORTA CON
EL MODELO E10
El radio E10 puede sintonizar todas las 14 bandas
internacionales de onda corta. Las bandas son
designadas como las bandas de 120, 90, 75, 60,
49, 31, 25, 22, 19, 16, 15, 13 y 11 metros y se
conocen comúnmente como las “Bandas en
Metros”.
El modelo E10 ofrece dos formas de tener acceso a
una banda de onda corta. Cada método coloca el
sintonizador del radio al comienzo de la banda.
1. Cada toque corto y sucesivo del botón marcado
“SW METER BAND” (16) coloca el radio en el
comienzo de otra banda. Mientras oprime este
botón, el número de la banda se mostrará en la
esquina superior derecha de la pantalla (50) y
desaparecerá unos segundos después de soltar
el botón, causando que el reloj vuelva a
reaparecer en esa esquina. Comience a sintonizar
solamente después de que aparezca el reloj. Si
no espera, entonces el segundo método se
usará automáticamente.
2. Haga un toque corto y rápido del botón marcado
“SW METER BAND” e, inmediatamente después,
pulse en forma corta y rápida los botones de
sintonización “Up/Hour” o “Down/Min.”. El
número de la banda aparecerá en la esquina
superior derecha de la pantalla. Una vez que
haya seleccionado la banda que desea, comience
a sintonizar la banda después de que vuelva a
aparecer el reloj en la esquina superior derecha
de la pantalla.
continué
SINTONIZACIÓN AUTOMÁTICA
EN ONDA CORTA
En onda corta, la sintonización automática es
posible dentro de las gamas de frecuencias
mostradas en el cuadro de bandas de abajo. Para
sintonizar otras frecuencias entre esas gamas, o
fuera de esas gamas, use uno de los otros métodos
de sintonización, por ejemplo la sintonización
manual o el ingreso directo de la frecuencia, como
se explica en la sección que explica la sintonización
de estaciones.
117116
Page 60

E10 MANUAL DE OPERATIÓN
FORMA DE ESCUCHAR LAS ESTACIONES
DE ONDA CORTA
CUADRO DE BANDA PARA LA SINTONIZACIÓN
AUTOMÁTICA DE ONDA CORTA
BANDA
(metros}
120
90
75
60
49
41
ESTACIONES DE ONDA CORTA QUE DAN LA HORA (NORTEAMÉRICA)
Los Estados Unidos y Canadá tienen estaciones de onda corta que dan la hora. La hora se da continuamente en hora universal, también conocida como hora UTC u hora del meridiano de Greenwich. Las
frecuencias de estas estaciones se indican abajo.
CHU-hora (Canadá)
CHU-hora (Canadá)
CHU-hora(Canadá)
WWV-hora/tiempo (EEUU)
WWV-hora/tiempo (EEUU)
WWV-hora/tiempo (EEUU)
WWV-hora/tiempo (EEUU)
WWV-hora/tiempo (EEUU)
GAMA DE FRECUENCIAS
(kilohercios)
2250 – 2550
3150 - 3450
3850 - 4050
4700 - 5100
5800 – 6300
7100 – 7500
continué
3330
7335
14670
2500
5000
10000
15000
20000
31
25
22
19
16
15
13
11
Mejor de noche
Día o noche
Mejor de día
Mejor de noche
Mejor de noche
Día o noche
Mejor de día
Mejor de día
9400 – 10000
11500 – 12150
13500 – 13900
15000 – 15900
17450 - 18000
18850 - 19100
21450 - 21950
25600 - 26100
FORMA DE ESCUCHAR LAS ESTACIONES
DE ONDA CORTA
PUBLICACIONES DE ONDA
CORTA: FRECUENCIAS
ESPECÍFICAS
Para ayudarlo a encontrar estaciones específicas y
saber las horas en que transmiten, al igual que sus
frecuencias y dirección de sus transmisiones, vea
las dos excelentes publicaciones indicadas abajo.
Ellas se pueden comprar en las librerías principales
y a través de Internet.
PASSPORT TO WORLD BAND RADIO (Pasaporte a
las bandas mundiales de radio). Publicado por
International Broadcasting Services. Dirección: IBS
North America, Box 300, Penn’s Park, PA 18943.
Teléfono: 215-598-3794.
Internet: www.passband.com.
WORLD RADIO TV HANDBOOK (Manual mundial
de radio y TV). Publicado en Norteamérica por
Watson Guptil Publications, 770 Broadway – 7th
Floor, New York, NY 10003-9595.
www.watsonguptill.com
Otra forma de encontrar información sobre
estaciones de onda corta es usar un sitio de
búsqueda en Internet y escribir en el teclado el
criterio de búsqueda, como ‘shortwave radio stations’
o ‘shortwave frequencies’.
continué
PARA APRENDER MÁS ACERCA
DE LAS ONDAS CORTAS
Para saber más acerca de la onda corta, vea la
sección siguiente titulada “FORMA DE ENTENDER
LAS BANDAS DE ONDA CORTA”. Otra forma de
aprender es buscar en Internet artículos apropiados.
Escriba en el teclado el criterio de búsqueda, como
‘shortwave listening’ o ‘shortwave stations’ y podrá
leer muchos artículos pertinentes
119118
Page 61

E10 MANUAL DE OPERATIÓN
12 FORMA DE ENTENDER LAS BANDAS
DE ONDA CORTA
LA CLAVE PARA DISFRUTAR DE
SU RADIO DE ONDA CORTA
Ahora que tiene un radio de onda corta, sin duda
deseará escuchar inmediatamente las estaciones
internacionales. Si nunca lo ha hecho anteriormente,
por favor aprenda los conocimientos básicos que se
describen abajo.Aún si ya tiene experiencia
escuchando estaciones de onda corta, las informaciones siguientes le podrán ser útiles.
¿QUÉ SON BANDAS?
Para disfrutar completamente de la recepción de
ondas cortas, éste es el concepto más importante
que debe aprender rápidamente.
Para escuchar bien las estaciones de onda corta,
usted debe saber dónde buscarlas. Ellas están en
las bandas de onda corta.. Si ha escuchado alguna
vez un radio de AM o FM, entonces ya sabe lo que
es una banda. La banda de AM cubre una gama de
frecuencias desde 530 hasta 1600 kilohercios, la
banda de FM es de 66 a 108 megahercios. Una
banda es simplemente una gama de frecuencias
donde se encuentran las estaciones. Cuando busca
alguna estación en estas "bandas", usted simplemente usa los botones de sintonización (o la perilla
sintonizadora en un radio analógico) hasta que
encuentra la estación que le gusta. La onda corta
es similar y las bandas tienen nombres como 25
metros, 31 metros, 49 metros, etc. Estos nombres
se abrevian 25 m, 31 m y 49 m.Al igual que en las
bandas de AM y FM, usted simplemente sintoniza
una banda de onda corta y busca entonces las
estaciones.
continué
Por ejemplo, la banda de onda corta de 19 metros
abarca la gama de frecuencias de 15100 a 15600
kilohercios. En el cuadro de abajo se muestra una
lista de las bandas de onda corta usadas para
transmisiones internacionales y sus correspondientes
gamas de frecuencias. Como algunos radios
muestran las frecuencias en megahercios y otros en
kilohercios, aquí se muestran ambas. El modelo
E10 muestra las frecuencias de onda corta en
kilohercios, o KHz
La información siguiente se puede usar con
cualquier radio de onda corta. Vea la escala de
sintonización de su radio o la pantalla digital (o el
manual del propietario) para determinar la
designación de frecuencias que usa en onda corta.
La mayoría de los radios usan las abreviaturas KHz
y MHz. En algunos radios de onda corta, estas
frecuencias se mostrarán como 15100 KHz, 15105
KHz o 15110 KHz, pero en otros radios las
frecuencias podrán mostrarse como 15.1 MHz,
15.105 MHz o 15.11 MHz. Esto es porque algunos
radios muestran las frecuencias en kilohercios y
otros en megahercios, como en la tabla que se
acompaña. Las gamas exactas de frecuencias para
estas bandas pueden variar algo de un modelo de
radio a otro. Esto está perfectamente bien. En
algunos radios las bandas están marcadas
claramente, mientras que en otros no están marcadas
en absoluto. Si no es aparente la forma en que
puede sintonizar una banda en su radio, consulte el
manual del propietario, el sitio en Internet de etón
Corporation (www.etoncorp.com), o comuníquese
con etón Corporation y le mostraremos la forma de
hacerlo en su modelo.
FORMA DE ENTENDER LAS BANDAS
DE ONDA CORTA
UNA BUENA ANALOGÍA:
una banda de onda corta es como una calle
con muchas direcciones individuales.
Piense en una banda de onda corta como si fuera
una calle con un gran número de direcciones individuales. Cada dirección es una frecuencia específica. La banda de 19 metros se pudiera llamar
"Calle 19 metros". Al igual que en cualquier calle,
existe una variedad de direcciones para casas individuales, con números tales como 15100, 15105,
CUADRO GENERAL DE BANDAS DE ONDA CORTA
BAND MEGAHERTZ (MHz) KILOHERTZ (KHz)
120m
90m
75m
60m
49m
41m
31m
25m
22m
19m
16m
13m
11m
2.300-2.500MHz
3.20-3.40 MHz
3.90-4.00 MHz
4.750-5.060 MHz
5.950-6.20 MHz
7.10-7.60 MHz
9.20-9.90 MHz
11.600-12.200 MHz
13.570-13.870 MHz
15.10-15.80 MHz
17.480-17.90 MHz
21.450-21.850 MHz
25.60-26.10 MHz
continué
15110, etc. Cada uno de estos números de casas
representa una casa en particular que usted puede
visitar en la calle. En la banda de onda corta de 19
metros, estas "direcciones" o "números de casas"
se llaman frecuencias y en cada frecuencia usted
puede visitar una estación diferente de onda corta.
El CUADRO GENERAL DE BANDAS DE ONDA
CORTA, mostrado abajo, contiene todas las bandas
designadas de onda corta.
2300-2500 KHz
3200-3400 KHz
3900-4000 KHz
4750-5060 KHz
5950-6200 KHz
7100-7600 KHz
9200-9900 KHz
11600-12100 KHz
13570-13870 KHz
15100-15800 KHz
17480-17900 KHz
21450-21850 KHz
25600-26100 KHz
121120
Page 62

E10 MANUAL DE OPERATIÓN
FORMA DE ENTENDER LAS BANDAS
DE ONDA CORTA
BANDAS DE DÍA Y BANDAS DE NOCHE LA DIFERENCIA ES MUY IMPORTANTE
Debido a que las señales de onda corta dependen
de ciertos factores como el sol, la ionosfera y la
interacción con la misma tierra, las señales no se
pueden oír en todas las bandas durante todo el
día. Algunas bandas son mejores durante las horas
del día y algunas son mejores durante la noche. En
general, las bandas con frecuencias por debajo de
13 MHz (13000 KHz) son mejores por la noche y
las bandas con frecuencias mayores de 13 MHz
(13000 KHz) son mejores durante el día. Abajo se
muestran las características de las bandas principales de onda corta. Siga estas pautas para obtener los mejores resultados. La forma de sintonizar
una banda específica podrá variar de un radio a
otro. Consulte su manual de propietario para
obtener instrucciones acerca de la forma de tener
acceso a las bandas en su radio, o llame a etón
Corporation si tiene alguna duda.
AMANECER Y PUESTA DEL SOL - muchas veces
las mejores horas para escuchar su radio.
Muchas veces nos preguntan cuál es verdaderamente la mejor hora para escuchar estaciones de
onda corta, cuando las señales son más fuertes y
más claras.A menudo, es un grupo de horas
alrededor del amanecer y la puesta del sol. A veces,
son dos horas, otras veces pueden ser tres o cuatro
horas. Experimente para determinar las mejores
horas en su área.
continué
USO DEL RADIO DURANTE EL DÍA
La sintonía de las bandas de onda corta es generalmente más difícil durante las horas del día,
aproximadamente desde las 10 a.m. hasta las 3
p.m. La razón principal es que los radiodifusores no
transmiten hacia Norteamérica durante ese tiempo,
porque asumen que estamos trabajando, o en la
escuela, y no podemos sentarnos a oír el radio
durante el día. Si quiere tratar de escuchar las bandas durante el día, use la información indicada
abajo.Típicamente, las ondas cortas durante el día
tienden a ser mejores en el este que en el oeste de
Norteamérica. Las bandas mejores durante el día
se muestran EN NEGRITAS en la tabla de abajo.
CUADRO DE BANDAS DE DÍA
BANDAS
DE DÍA
13m
16m
19m
22m
25m
31m
CARACTERÍSTICAS
Resultados varían. Vale la pena
tratar. Algunas veces muy buena al
amanecer y puesta del sol.
Similar a la banda de 19m.
La mejor banda durante el día.
Puede ser buena también durante
la noche en los meses de verano.
Algunas veces extremadamente
buena al amanecer y puesta del
sol. Algunas veces es buena
durante la noche en el verano.
Similar a la banda de 19m.
Es mejor alrededor del amanecer y
de la puesta del sol. Puede ser
buena al mediodía en la parte oriental de Norteamérica.
Similar a la banda de 25m.
FORMA DE ENTENDER LAS BANDAS
DE ONDA CORTA
SINTONIZACIÓN AL ATARDECER Y EN LA NOCHE
Esta es la mejor hora para escuchar estaciones de onda corta porque los radiodifusores están transmitiendo
deliberadamente hacia Norteamérica. Estas bandas pueden ser extremadamente buenas alrededor del amanecer y
la puesta del sol. Las mejores bandas nocturnas se muestran en negritas en la tabla de abajo.
CUADRO DE BANDAS NOCTURNAS
BANDAS
NOCTURNAS
25m
31m
41m
49m
SI SU EDIFICIO BLOQUEA LAS SEÑALES:
Si nota que la intensidad de señal de las estaciones
mejoran substancialmente cuando usted se acerca
a una ventana o cuando sale del edificio, entonces
es cierto que su edificio bloquea las señales de
onda corta. Este bloqueo se debe a los materiales
de construcción usados en su edificio o al hecho de
que tiene uno o más pisos o niveles por encima de
usted. Las soluciones son oír el radio cerca de una
CARACTERÍSTICAS
Similar a la banda de 31m.
Buena toda la noche en todas partes. A menudo extremadamente
buena al amanecer y puesta del sol. Buenos resultados desde una hora
antes del anochecer.
Similar a la banda de 49m. Buena toda la noche en el este de
Norteamérica; varía en el oeste de Norteamérica.
En general, la mejor banda nocturna.
continué
ventana, salir fuera del edificio o usan una antena
exterior apropiada para onda corta. Para información
acerca de la forma de instalar una antena exterior
de onda corta, use su sitio de búsqueda favorito de
Internet e ingrese en el teclado “shortwave
antennas”. Si no tiene acceso a Internet,
comuníquese con nosotros, etón Corporation,
usando los métodos de contacto indicados al
comienzo de este manual.
123122
Page 63

E10 MANUAL DE OPERATIÓN
13 LOCALIZACIÓN DE FALLAS
PROCEDIMIENTO DE REPOSICIÓN
El botón “RESET” está situado en la parte inferior del
modelo E10. Cuando lleve a cabo una "reposición",
asegúrese de que las baterías en uso estén buenas o use
un adaptador de C.A. y apague el radio. Haga una
reposición si las soluciones indicadas abajo no resuelven el
problema. Para hacer la reposición,oprima el botón con la
punta de una presilla de papel de metal o con un objeto
similar.
EL RADIO NO SE ENCIENDE
1. Asegúrese de que interruptor "LOCK" no haya sido
activado.
2. Asegúrese de que el radio reciba energía eléctrica
(baterías instaladas o el adaptador de C.A. enchufado).
3. Asegúrese de que las baterías estén instaladas con la
polaridad correcta.
4. Asegúrese de que las baterías no estén descargadas.
5. Si usa un adaptador de C.A., asegúrese de que está
enchufado en un tomacorriente de la casa y en el
receptáculo de C.C. del radio. Tenga cuidado de no
enchufarlo en el receptáculo para audífonos.Asegúrese
también de que el adaptador de C.A. produce el voltaje
y la polaridad correcta de C.C. y que el enchufe en la
punta tenga los diámetros interno y externo correctos.
EL RADIO SE APAGA ABRUPTAMENTE DURANTE EL
USO CON BATERÍAS
Esto es causado por baterías descargadas. Cámbielas.
EL RADIO SE APAGA ABRUPTAMENTE
MIENTRAS ES MOVIDO DURANTE EL USO CON EL
ADAPTADOR DE C.A.
Esto es causado por la ruptura de un alambre o por una
mala conexión en el cordón del adaptador de C.A., o si la
punta del enchufe no tiene el diámetro correcto.
EL RADIO FUNCIONA ERRÁTICAMENTE
Ejecute un procedimiento de reposición "RESET", como se
describe en la sección titulada "PROCEDIMIENTO DE
REPOSICIÓN".
LAS ESTACIONES RECIBIDAS SON MUY DÉBILES
• Asegúrese de que el interruptor "ANTENNA GAIN"
esté en la posición "DX".
• Asegúrese de que la antena telescópica esté extendida
completamente para la recepción de FM y onda corta.
• Si está escuchando estaciones de AM, gire el radio.
La antena interior de barra de ferrita para AM es
altamente direccional.
• Ajuste el control “ANTENA TRIMMER” en onda corta.
NO HAY SONIDO DEL ALTOPARLANTE
Asegúrese de que los audífonos no estén enchufados en el
receptáculo y que el control de volumen esté alto.
UNA ESTACIÓN SE RECIBE CON MUCHA DISTORSIÓN
EN EL SONIDO, PERO SU SEÑAL PARECE SER MUY
FUERTE
Esta es probablemente una estación local que está muy
cerca de donde usted se encuentra. Debido a esta
proximidad, la señal es demasiado fuerte. Para reducir la
intensidad de señal, coloque el interruptor "ANTENNA
GAIN" en la posición "NORMAL" o "LOCAL".
EL COMPARTIMIENTO DE LA BATERÍA CONTIENE UN
LÍQUIDO PEGAJOSO O UN POLVO BLANCO SECO
Este es el resultado de un escape de ácido de la batería.
Para evitar el escape de ácido de las baterías,use
solamente baterías alcalinas o baterías recargables de
níquel-metal-hidruro de alta calidad. Nunca mezcle
baterías viejas con nuevas, ni diferentes marcas o tipos de
baterías. Si hay un escape de alguna batería, comuníquese
inmediatamente con el fabricante de esas baterías y no las
bote. Los daños producidos por un escape de ácido no
están cubiertos por la garantía.
14 PARA REGISTRAR SU GARANTÍA
Para asegurar una cobertura completa de la garantía o información acerca de nuevos productos, el registro de su
producto de etón o Grundig debe ser completado tan pronto como sea posible, después de la compra o llegada del
producto. Para registrar su radio, por favor seleccione uno de los métodos siguientes:
1. Registre el producto visitando nuestro sitio de
Internet en http://www.etoncorp.com
2. Llame a nuestro número de teléfono gratis
de registro de productos desde cualquier parte
de los Estados Unidos o Canadá, usando el
número (888) 889-4391, o desde cualquier
parte del mundo por el teléfono
(204) 336-6547. Hay operadores disponibles
que hablan francés e inglés.
3. Envíe por correo la información necesaria para
registrar su producto a la dirección siguiente:
etón Corporation
1015 Corporation Way
Palo Alto, CA 94303
PRODUCT REGISTRATION
Incluya su nombre, dirección completa, número de
teléfono, modelo comprado, fecha de la compra,
nombre del comercio donde lo compró y número
de serie del producto (este número está situado
normalmente dentro o cerca del compartimiento de
la batería).
124
125
Page 64

E10 MANUAL DE OPERATIÓN
15 GARANTÍA LIMITADA PARA EL COMPRADOR ORIGINAL
Este producto de la marca etón o GRUNDIG, como es suministrado y distribuido por etón Corporation (etón), está
garantizado por etón contra defectos de fabricación, incluyendo defectos de material y mano de obra, durante el
siguiente período de garantía limitada.
UN (1) AÑO DE GARANTÍA PARA PIEZAS Y MANO DE OBRA
Esta garantía limitada comienza en la fecha de la
compra original y es válida solamente para los
productos comprados a través de un vendedor
autorizado de etón. La garantía no cubre el trans-
porte, la instalación, desinstalación o reinstalación
del producto. Las reparaciones bajo garantía deben
ser efectuadas por etón o por un centro de servicio
autorizado por etón. Para recibir servicio bajo la
garantía, el recibo de venta original deberá ser
presentado, si lo piden,a etón o al centro de servicio autorizado por etón como prueba de la compra. El transporte del producto a etón o al centro de
servicio autorizado por etón es la responsabilidad
del comprador.
etón reparará o reemplazará el producto, a nuestra
opción y sin ningún costo, con piezas nuevas o
reacondicionadas, si se determina que dichas
piezas son defectuosas durante el período de
garantía limitada especificado anteriormente. El
producto debe ser retornado no más tarde que 15
días después de la expiración del período de la
garantía a etón o al centro de servicio designado
por etón, con el costo de transporte prepagado,
para recibir servicio bajo la garantía.Antes de
retornar cualquier producto para recibir servicio
bajo la garantía, el comprador debe comunicarse
con etón para determinar el problema y el
procedimiento de servicio.Todas las piezas y
productos reemplazados se convierten en propiedad
de etón. Las piezas y los productos usados en la
reparación asumen el resto de la garantía original,
o noventa (90) días, lo que sea más largo.
Esta garantía limitada cubre los defectos de
fabricación, ya sean de material o de mano de
obra, encontrados durante el uso normal y no
comercial de este producto, pero no cubre los
problemas siguientes que incluyen pero no se
limitan a los daños que ocurren debido a
aplicaciones y usos para los cuales el producto no
fue diseñado; fallas o problemas causados por
productos o equipos no suministrados por etón;
accidentes, mal uso, abuso, negligencia, mala
aplicación del producto, fuego, agua, rayos o
descargas eléctricas u otros actos de la naturaleza;
voltaje incorrecto de la línea, fluctuaciones o
aumentos momentáneos de voltaje; daños causados
por una instalación incorrecta o inapropiada
(incluyendo baterías que puedan descargar un
ácido capaz de causar daños irreversibles en los
circuitos); daños causados por el escape de ácido;
alteración o modificación del producto; o uso de
piezas no autorizadas, suministros, accesorios o
equipos que puedan dañar este producto o resultar
en problemas de servicio.
16 INFORMACIÓN DE SERVICIO
SERVICIO DE SU PRODUCTO ETÓN O GRUNDIG
Para obtener servicio para su producto etón o Grundig, recomendamos que se comunique primero con un representante
de servicio de etón por los teléfonos 800-872-2226 (EE.UU.), 800-637-1648 (Canadá) o (650) 903-3866 para
determinar el problema y localizar la falla. Muchas de las preguntas más comunes pueden ser contestadas
rápidamente por teléfono.
HAY DOS TIPOS DE SERVICIOS DISPONIBLES SI SU PRODUCTO DE ETÓN O
GRUNDIG NECESITA REPARACIÓN.
1. GARANTÍA – Si su producto está todavía bajo
garantía y el representante de servicio de etón
determina que necesita servicio bajo la garantía,
recibirá una autorización para devolver el
producto con instrucciones para enviarlo a un
centro autorizado de servicio bajo garantía. No
envíe su radio de vuelta sin haber recibido
primero un número de autorización para devolver
el producto.
2. SIN GARANTÍA – Si su producto ya no está
cubierto por la garantía y requiere servicio, nuestro personal técnico lo referirá al centro de
reparaciones más cercano a usted, que sea
capaz de hacer la reparación.
127126
Page 65

E10 MANUALE OPERATIVO
INDICE
INTRODUZIONE
Grazie dell'acquisto della radio
AM/FM/onde corte E10.
La etón si augura che l'uso della E10 risulti del
tutto piacevole. Leggere attentamente questo
manuale per sfruttare bene le tante funzioni
esclusive dell'apparecchio. Quanti richiedano
aiuto in merito al funzionamento della radio
sono pregati di mettersi in contatto con il
fabbricante, usando i metodi indicati sotto.
Dal lunedì al venerdì, 8.30 – 16.00,
ora di Los Angeles.
+800 872-2228 dagli Stati Uniti d'America
+800 637-1648 dal Canada
+650 903-3866, dal resto del mondo
Fax: 650-903-3867
customersvc@etoncorp.com
URL: www.etoncorp.com
Recapito postale:
etón Corporation
1015 Corporation Way
Palo Alto, CA 94303
USA
INTRODUZIONE............................................................. 128
1
INDICE.......................................................................... 129
2
CARATTERISTICHE PRINCIPALI DELLA
3
ILLUSTRAZIONI..............................................................131
4
ATTIVITÀ INIZIALI.......................................................... 133
5
ACCESSORI IN DOTAZIONE DELLA E10.....................133
INSTALLAZIONE DELLE BATTERIE..............................133
PREVENZIONE DELLE PERDITE D'ACIDO
DALLE BATTERIE.......................................................133
USO DEL TRASFORMATORE CA/
CARICABATTERIE IN DOTAZIONE..............................133
CARICA DELLE BATTERIE DELLA E10........................133
FUNZIONAMENTO DELLA RADIO...................................135
6
CARATTERISTICHE DELL'OROLOGIO E DEI TIMER...........138
7
IMPOSTAZIONE DELL'OROLOGIO..............................138
IMPOSTAZIONE DEI TIMER....................................... 138
MEMORIZZAZIONE DELLE STAZIONI NELLA
MEMORIA DEL TIMER...............................................139
ATTIVAZIONE E DISATTIVAZIONE DEL TIMER............ 139
USO DELLA FUNZIONE SNOOZE............................... 139
OPERAZIONI IN MEMORIA.............................................140
8
MEMORIZZAZIONE DELLE STAZIONI.........................140
SELEZIONE/MODIFICA DELLE PAGINE DI MEMORIA..140
ACCESSO AI DATI MEMORIZZATI..............................140
ACCESSO DIRETTO ALLA MEMORIA..........................140
RICERCA IN MEMORIA.............................................141
SCANSIONE AUTOMATICA DELLA MEMORIA............141
CANCELLAZIONE DEL CONTENUTO
DELLA MEMORIA..................................................... 141
etón E10............ 130
CANCELLAZIONE DI UNA PAGINA DI MEMORIA.......141
TRASFERIMENTO DI UNA FREQUENZA
MEMORIZZATA.........................................................142
PERSONALIZZAZIONE DELLE PAGINE DI MEMORIA.. 142
CODICI DI IMPOSTAZIONE DEL SISTEMA........................143
9
TABELLA DEI CODICI DI IMPOSTAZIONE
DEL SISTEMA........................................................... 143
MODIFICA DEI CODICI DI IMPOSTAZIONE
DEL SISTEMA........................................................... 144
MODIFICA DEL FORMATO DELL'OROLOGIO
DA 24 A 12 ORE......................................................144
CODICI DI IMPOSTAZIONE DEL SISTEMA
PREDEFINITI IN FABBRICA........................................144
MONITORAGGIO DELLO STATO DEL CODICE DI
IMPOSTAZIONE E DI ALTRE IMPOSTAZIONI............... 144
ULTERIORI COMANDI DELLA E10...................................145
10
RICEZIONE DELLE EMITTENTI AD ONDE CORTE..............146
11
SELEZIONE DI UNA BANDA AD ONDE CORTE...........146
STAZIONI ORA ESATTA............................................. 148
PUBBLICAZIONI SULLE ONDE CORTE:
COME TROVARE UNA EMITTENTE............................ 148
CAPIRE LE BANDE: LA CHIAVE DI LETTURA
12
DELLE ONDE CORTE...................................................... 149
INDIVIDUAZIONE DEI GUASTI........................................153
13
REGISTRAZIONE DELLA GARANZIA................................155
14
GARANZIA LIMITATA ESTESA ALL'ACQUIRENTE
15
ORIGINARIO..................................................................156
INFORMAZIONI SUL SERVIZIO........................................157
16
129128
Page 66

E10 MANUALE OPERATIVO
3 CARATTERISTICHE PRINCIPALI DELLA etón E10
• Gamma di frequenza FM: 87 – 108 MHz (America); 76 – 108 MHz (Giappone)
• Gamma di frequenza ad onde corte: 1711 – 29999 kHz
• Selettore di spaziatura da 9/10 kHz per onde medie MW (Medium Wave o AM)
• Gradino da 1 kHz per il display delle onde medie (AM) e corte
• Funzione SW IF SET di scorrimento della frequenza intermedia ai fini della riduzione al minimo dell'interferenza
durante l'ascolto ad onde corte.
• Trimmer per antenna ad onde corte
• ATS (Auto Tuning System o sistema di sintonia automatica) per la memorizzazione dell'ascolto FM/MW
• Sintonia manuale
• Sintonia a scansione automatica
• Immissione diretta della frequenza tramite tastiera
• Manopola di sintonia digitale
• 550 impostazioni programmabili di memoria
• Personalizzazione delle pagine di memoria
• Memorizzazione delle stazioni sintonizzate automaticamente e manualmente
• Accesso diretto alla memoria
• Selezione della velocità di sintonizzazione FAST/SLOW per la sintonia manuale
• Funzione SLEEP
• Due timer di accensione della radio con memorizzazione della stazione preferita
• Funzione SNOOZE: 10 minuti, ripetibile tre volte.
• Selezione di FM stereo/monoaurale
• Comando del tono HIGH/LOW
• Schermo LCD retroilluminato
• Chiave di bloccaggio
• Formato selezionabile da 12/24 ore
• Caricabatterie incorporato per batterie al Ni-MH
• Codici di impostazione del sistema
4 ILLUSTRAZIONI
Memoria e modifica/impostazione dell'orologio
caricabatterie ON/OFF
invio/impostazione del sistema
Cinturino
Antenna FM/SW
Guadagno d'antenna per
stazione distante/normale/locale
Alti/Bassi
Per Cuffia
Presa CC 6 V
Alimentazione e spegnimento differito
Bloccaggio
Timer A Button
Timer B Button
Display a cristalli liquidi LCD
"Pisolo" o allarme ripetuto/illuminazione
Modalità Sintonia
Su/Ora
Giù/Minuti
Pagina
Modalità Scansione
Impostazione onde corte
a frequenza intermedia
Ampiezza di banda
Banda FM/AM (ATS)
[sistema di sintonia automatica]
Misuratore SW
Tastiera numerica
Ma nopola della sintonia
Piedistallo
Trimmer d'antenna
Manopola del volume
Piedistallo
Pulstante Reset
131130
Page 67

E10 MANUALE OPERATIVO
ILLUSTRAZIONI segue
DISPLAY A RADIO SPENTA DISPLAY A RADIO ACCESA
Cursore triangolare
Icona della batteria
Icona dell'antenna
Scala 1-5
Indicatore AM/PM dell'orologio
Ni-MH Battery Symbol
Indicatore AM/PM della sveglia
Ora
della
sveglia
Icona di attivazione della sveglia Indicatori
Ora d'orologio
DISPLAY DELLA MEMORIA
Occupa solo l'angolo superiore destro dello display.
Indicazione DELETE
Display della memoria
DISPLAY DEL CODICE DI
IMPOSTAZIONE DEL SISTEMA
FM, MW,
SHORTWAVE
Cursore triangolare
Icona della batteria Ora d'orologio
Icona dell'antenna
Scala 1-5
Frequenza
Icona dello sleep timer
Ampiezza di banda
450K IF
Icona di
attivazione
della sveglia
DISPLAY DELLA BANDA METRICA
AD ONDE CORTE
Occupa solo l'angolo superiore destro dello display
Display della banda metrica ad onde corte
5 ATTIVITÀ INIZIALI
ACCESSORI IN DOTAZIONE
DELLA E10
• Auricolari
• Custodia
• Trasformatore CA/caricabatterie
• 4 batterie ricaricabili da 1100 mAh, al Ni-MH.
• Manuale operativo
N.B. Nelle istruzioni successive, i numeri tra
parentesi ( ) fanno riferimento alle illustrazioni.
INSTALLAZIONE DELLE BATTERIE
Lo scompartimento delle batterie si trova sul retro
della E10, in corrispondenza all'angolo inferiore
destro. Per rimuovere lo sportello, far pressione su
di esso con il pollice e farlo scorrere verso il fondo
della radio. Installare 4 batterie alcaline ministilo
AA nello scompartimento delle batterie, in conformità alla schema della polarità apposto sul retro
della radio.
N.B. Se si decide di non usare le batterie
ricaricabili, conviene impostare il codice SYSTEM
SET CODE 29 (vedere la sezione CODICI DI
IMPOSTAZIONE DEL SISTEMA). In questo modo si è
sicuri che l'indicatore delle batterie misuri
accuratamente la carica delle batterie non ricaricabili.
Questa procedura non è obbligatoria e la E10 funziona benissimo comunque.
PREVENZIONE DELLE PERDITE
D'ACIDO DALLE BATTERIE
Per evitare perdite dalle batterie, usare solamente
batterie di alta qualità alcaline, al litio o ricaricabili
al nichel-idruro metallico. Non mescolare mai batterie vecchie e nuove , di marche o di tipi diversi. I
danni causati dalle eventuali perdite d'acido dalle
batterie non sono coperti da garanzia. Se le batterie perdono, non gettarle via ma rivolgersi immediatamente al fabbricante e richiedere informazioni
sul relativo programma di garanzia.
USO DEL TRASFORMATORE
CA/CARICABATTERIE IN
DOTAZIONE
Per alimentare la E10 con il trasformatore CA/caricabatterie in dotazione, collegare il trasformatore
ad una presa a muro prima di inserire l'apposita
spina nella presa laterale sinistra della E10, contraddistinta dall'indicazione DC 6 V. Le batterie
possono rimanere nella radio mentre si usa il
trasformatore CA/caricabatterie.
CARICA DELLE BATTERIE
DELLA E10
La E10 può essere alimentata con qualsiasi tipo di
batterie ministilo AA, anche se la radio può ricaricare solo quelle al nichel-idruro metallico. Se si
installano batterie non ricaricabili, la E10 attiva un
sistema incorporato di protezione che ne impedisce
la ricarica. Tale sistema entra in funzione con la
radio impostata sul codice SYSTEM SET CODE 28 o
29, come descritto sotto, purché si usa il trasformatore CA/caricabatterie in dotazione.
133132
Page 68

E10 MANUALE OPERATIVO
ATTIVITÀ INIZIALI segue
AVVERTENZA – Usare solamente il trasformatore CA/caricabatterie in dotazione per ricaricare le
batterie Ni-MH. L'uso di un altro dispositivo può
causare il surriscaldamento delle batterie ricaricabili, il loro danneggiamento ed il possibile danneggiamento della E10. Il sistema incorporato di protezione, descritto in precedenza, funziona solo con
il trasformatore CA/caricabatterie in dotazione. I
danni causati alla E10 dalla mancata osservanza di
questa avvertenza non sono coperti da garanzia e
ne annullano i termini.
Il trasformatore CA/caricabatterie in dotazione può
essere usato per caricare le 4 batterie ricaricabili al
Ni-MH (incluse) installate nello scompartimento
delle batterie della E10. Prima di ricaricare del batterie, è necessario impostare la E10 in funzione
delle batterie al Ni-MH e selezionare la relativa
velocità di carica. Le batterie al Ni-MH sono
prodotte con capacità specifiche espresse in milliampere-ora (mAh). Al momento della stampa del
presente opuscolo, tale capacità varia da circa
1100 mAh a 2400 mAh (come riportato sulle batterie). Per caricare bene le batterie senza danneggiarle, bisogna impostarne la velocità di carica.A
questo fine, collegare il trasformatore CA e spegnere la E10. Attenersi alle istruzioni di cui sotto.
1. Immettere il codice SYSTEM SET CODE 28,
seguendo le istruzioni presentate a pagina nella
sezione CODICI DI IMPOSTAZIONE DEL SISTEMA.
2. Mentre l'indicazione 1100 lampeggia sul display, usare i pulsanti UP HOUR/DOWN MIN per
selezionare il valore mAh delle batterie al Ni-MH.
Per caricare le batterie al Ni-MH:
1. Installare 4 batterie AA al Ni-MH.
2. Collegare il trasformatore/caricabatterie ad una
pressa CA a muro e poi alla E10.
3. Premere e rilasciare il pulsante CHARGER
ON/OFF. L'indicazione CHARGE lampeggia sul
display e le barre indicanti la carica avanzano
da sinistra verso destra sulla scala 0 – 5 posta
sull'angolo superiore sinistro del display. Le cifre
visualizzate sull'angolo superiore destro del display vengono azzerate [00:00] e parte un conteggio in ore e minuti del tempo di ricarica.
Una volta conclusa la ricarica, si interrompe il lampeggio del messaggio CHARGE e le barre dell'indicatore di carica si attestano sul valore 5 nell'angolo
superiore sinistro.
Il tempo di ricarica varia a seconda del valore nominale in milliampere-ora delle batterie. Il circuito di
ricarica rileva automaticamente tale valore e tiene
sotto carica batterie per il lasso di tempo necessario, da 6 ore per le batterie da 1100 mAh a 13
ore per le batterie da 2300 mAh. Il circuito di ricarica rileva il conseguimento della piena carica e
passa automaticamente in modalità di mantenimento, impedendo di sovraccaricare le batterie. La
ricarica viene inoltre interrotta scollegando il
trasformatore ACG-10 dalla E10 o premendo il pulsante CHARGER ON/OFF
6 FUNZIONAMENTO DELLA RADIO
ACCENSIONE E SPEGNIMENTO
E' possibile accendere la E10 in due modi, come
indicato sotto. Per spegnerla, premere il pulsante
POWER/SLEEP (1).
1. METODO DEL SALVABATTERIE/TIMER
Premere e rilasciare rapidamente il pulsante
POWER/SLEEP (1). La radio si accende e visualizza
sul display l'indicazione 90 per segnalare lo
spegnimento automatico dopo 90 minuti. Inoltre,
viene visualizzata sul display l'icona dello sleep
timer . Per modificare a piacimento il tempo
d'ascolto prespegnimento di 90 minuti , usare i
pulsanti UP/HOUR o DOWN/MIN (9, 10) subito
dopo l'accensione della radio. Le opzioni selezionabili
vanno da 1 – 480 minuti. Il numero di minuti
impostato per ultimo viene usato a titolo predefinito
anche quando si riaccende la radio.
2. METODO SENZA TIMER
Questo metodo prevede l'esclusione del timer
automatico e permette di lasciar accesa la radio
finché non si decide altrimenti (se si usa il
trasformatore CA/caricabatterie) o non si scaricano
le batterie. Premere il pulsante POWER per circa 3
secondi e poi rilasciarlo. Usando questo metodo,
l'indicazione On appare sul display, ma non l'icona
dello sleep timer.
INDICATORI DELLA FORZA DEL
SEGNALE/LIVELLO DI CARICA
DELLE BATTERIE
Quando la radio è spenta, sull'angolo superiore
sinistro del display (6) viene indicata la carica delle
batterie lungo una scala da 1 a 5 (36), con il cursore
triangolare (33) sotto l'icona della batteria (34)
all'estrema sinistra della scala stessa. Quando la
radio è accesa, il cursore punta sull'icona
dell'antenna (35) e la scala 1-5 indica la forza
relativa del segnale.
COMANDI DEL VOLUME
E DEL TONO
• Il comando del VOLUME (31) è posto sul lato
• Il comando del tono TREBLE/BASS (24) si trova
USO DELLE CUFFIE
Inserire la spina delle cuffie/auricolari da 1/8 di
pollice nell'apposita presa (25) sul lato sinistro
della radio.
SELEZIONE DI AM, FM
O ONDE CORTE
Quando si ascolta una emittente FM o ad onde
corte, estendere completamente l'antenna telescopica
(5). L'antenna non serve per le trasmissioni in
ampiezza modulata AM. Dopo aver messo sotto
tensione la E10, premere rapidamente il pulsante
FM/AM-ATS (15) per selezionare FM o AM. Quando
si selezione la banda AM, il display visualizza
l'indicazione MW [onde medie] al posto di AM. Per
selezionare le onde corte SW premere il pulsante
SW METER BAND (16). Ogni volta che si preme in
sequenza il pulsante SW METER BAND o uno dei
pulsanti UP/HOUR o DOWN/MIN, la radio inizia a
destro della radio. Ruotare la manopola per
regolare il volume.
sul lato sinistro della radio e va regolato a
piacimento.
135134
Page 69

E10 MANUALE OPERATIVO
FUNZIONAMENTO DELLA RADIO segue
sintonizzarsi all'inizio della banda metrica ad onde
corte del caso. Le cifre indicanti la frequenza (46)
appaiono al centro del display. Le stazioni locali
presenti nell'area circonvicina vengono captate in
AM e FM, mentre è possibile sintonizzarsi in SW
con le emittenti ad onde corte di tutto il mondo.
N.B. Chi si avvicina per la prima volta alle onde
conte può trarre vantaggio dalla lettura dell'apposita
sezione alle pagine #.
ASCOLTO STEREO IN FM
La frequenza modulata stereo richiede l'uso delle
cuffie/auricolari. Per ascoltare le trasmissioni FM in
stereo, premere il pulsante FM STEREO (15).
L'indicazione FM-STEREO appare sul display.
APPRONTAMENTO AM ED FM
FUORI DEL NORD AMERICA
Quanti si trovano in Nord America ed hanno appena
acquistato la E10 possono ignorare questa sezione,
perché la radio viene impostata in fabbrica in
funzione di tale zona. Fuori dal Nord America, le
stazioni AM (o MW secondo il display della E10)
sono spaziate ad intervalli di 9 kHz e la gamma FM
può essere diversa da quella statunitense, com'è il
caso del Giappone, dove è pari a 76-108 MHz. Per
eseguire queste modifiche vedere la sezione TABELLA
DEI CODICI DI IMPOSTAZIONE DEL SISTEMA e
seguire le istruzioni per la MODIFICA DEI CODICI
DI IMPOSTAZIONE DEL SISTEMA.
SINTONIA
La sintonia è conseguibile adottando uno dei quattro
metodi descritti sotto.
1. SINTONIA MANUALE
Premendo rapidamente il pulsante UP/HOUR o
DOWN/MIN (9,10) si aumenta o diminuisce la
frequenza d'ascolto.
2. SCANSIONE AUTOMATICA
Premendo il pulsante UP/HOUR o DOWN/MIN (9,
10) per poco più di 1 secondo si attiva la scansione
automatica. La radio si sintonizza automaticamente
sulla prossima emittente. Il pulsante UP/HOUR
permette di aumentare la frequenza d'ascolto ed il
pulsante DOWN/MIN di diminuirla.
3. IMMISSIONE DIRETTA DELLA FREQUENZA
Quando si conosce la frequenza esatta, basta
immetterla sulla tastiera numerica (17) ed impostarla
premendo il pulsante ENTER (20). Accertarsi di aver
selezionato la banda giusta: AM, FM o SW.
La maggior parte delle frequenze AM e ad onde
corte sono espresse in kilohertz (kHz), ad es., 810
kHz o 9475 kHz. Tutte le frequenze FM sono
designate in megahertz (MHz), ad es., 102,9 MHz.
Per immettere una frequenza:
1. Premere e rilasciare il pulsante ENTER (20).
2. Immettere la frequenza desiderata usando la
tastiera numerica (17).
FUNZIONAMENTO DELLA RADIO segue
Talvolta, le frequenze ad onde corte sono designate
in megahertz (MHz). In questo caso, il metodo
precedente permette di sintonizzarsi su una emittente
che trasmetta su una frequenza con tre cifre decimali
(ad esempio, 15110 MHz o 5,975 MHz). Quando la
frequenza prevede non più di due cifre decimali (ad
esempio, 15,10 MHz o 6,92 MHz), adottare il
metodo indicato sotto:
1. Premere e rilasciare il pulsante ENTER (20).
2. Immettere la frequenza usando la tastiera
numerica (17).
3. Premere e rilasciare un'altra volta il pulsante
ENTER.
4. SINTONIA FINE
Il comando di sintonia fine (28) si trova sul lato
destro della radio. Esegue la sintonia in passi da 1
kilohertz in AM ed onde corte e da 0,05 megahertz
in FM. E' possibile usarlo per la messa a punto sia
fine che approssimata della sintonia.
MODALITÀ SINTONIA RAPIDA
E LENTA
Il pulsante TUNING MODE (8) permette di scegliere
la sintonia rapida o lenta. Le corrispondenti
indicazioni FAST o SLOW appaiono sul display.
Quando si usa l'apposita manopola (28), di solito si
adotta la sintonia rapida. Quando ci si sintonizza
con i pulsanti UP/HOUR e DOWN/MIN, la sintonia
rapida permette di spostarsi rapidamente lungo la
gamma delle frequenze e quella lenta di centrare
bene le stazioni. L'esperienza suggerirà la modalità
preferita di sintonia.
USO DEL PULSANTE BANDWIDTH
Il pulsante BANDWIDTH (14) viene usato durante
l'ascolto in AM e SW al fini di ridurre al minimo le
interferenze. L'impostazione preferita è WIDE
[ampia], visto che garantisce la migliore fedeltà
audio. Se ci sono interferenze, scegliere
l'impostazione NARROW [ristretta]. W o N appaiono
sul display.
USO DEL COMANDO SW IF SET
Il comando SW IF SET (13) attiva l'oscillatore di
frequenza intermedia, contribuendo a ridurre al
minimo le interferenze. Funziona solo in modalità
ad onde corte. Quando viene attivato, appare sul
display l'indicazione πIF
137136
Page 70

E10 MANUALE OPERATIVO
7 CARATTERISTICHE DELL'OROLOGIO E DEI TIMER
IMPOSTAZIONE DELL'OROLOGIO
L'orologio è impostato in fabbrica a titolo predefinito
sul formato a 24 ore. Se si preferisce il formato a
12 ore AM/PM, vedere la sezione MODIFICA DEL
FORMATO DELL'OROLOGIO DA 24 A 12 ORE nella
sezione CODICI DI IMPOSTAZIONE DEL SISTEMA.
L'orologio può essere impostato in due modi.
METODO 1 – Pulsanti UP/HOUR e DOWN/MIN
1. Spegnere la radio. L'ora appare al centro del
display (40).
2. Premere e rilasciare il pulsante TIME SET (18).
L'ora lampeggia sul display.
3. Entro 5 secondi, impostare l'ora con il pulsante
UP/HOUR ed i minuti con il pulsante DOWN/MIN
(9, 10). Entro 5 secondi dalla conclusione
dell'operazione, premere e rilasciare il pulsante
TIME SET o attendere semplicemente che l'ora
smetta di lampeggiare.
METODO 2 – Tastiera numerica:
1. Spegnere la radio. L'ora appare al centro del
display (40).
2. Premere e rilasciare il pulsante TIME SET (18).
L'ora lampeggia sul display.
3. Usare la tastiera numerica per immettere l'ora
nel formato a 24 ore. Entro 5 secondi dalla
conclusione dell'operazione, premere e rilasciare
il pulsante TIME SET o attendere semplicemente
che l'ora smetta di lampeggiare.
Quando si usa il metodo 2, l'ora può essere immessa
solo nel formato a 24 ore, nonostante l'orologio
possa essere impostato in formato a 12 ore.
IMPOSTAZIONE DEI TIMER
(DA USARSI COME SVEGLIA)
La E10 dispone di due timer programmabili
indipendentemente, il timer A ed il B, che permettono di mantenere accesa la radio per 30 minuti
prima di spegnerla o di usarla come una sveglia .
Dopo aver impostato un timer, memorizzare una
emittente nella memoria del timer stesso e poi
attivarlo.Vedere le sezioni successive, MEMORIZZAZIONE DELLE STAZIONI NELLA MEMORIA DEL
TIMER ed ATTIVAZIONE E DISATTIVAZIONE DEL
TIMER.
N.B. È indispensabile memorizzazione una
stazione radio nella memoria del timer. In caso
contrario quando il timer scatta si sentono
solo disturbi.
L'attivazione del timer causa l'accensione della
radio ed il lampeggio sul display dell'apposita
icona. La radio continua a rimanere sintonizzata
sulla stazione memorizzata nella memoria del timer
per 30 minuti o finché non si spegne la radio
premendo il pulsante POWER/SLEEP. È possibile
usare anche la caratteristica "snooze" (vedere
l'USO DELLA FUNZIONE SNOOZE).
Un timer può essere impostato in due modi.
METODO 1 – Pulsanti UP/DOWN MIN:
1. Spegnere la radio. Le cifre del timer (38)
appaiono sull'angolo superiore destro del display.
2. Mantenere premuto il pulsante TIMER A o B per
circa due secondi. Le cifre del timer lampeggiano.
CARATTERISTICHE DELL'OROLOGIO E DEI TIMER segue
3. Entro 5 secondi, impostare l'ora usando il
pulsante UP/HOUR ed i minuti tramite il pulsante
DOWN/MIN. Entro 5 secondi dalla conclusione
dell'operazione, premere una volta il pulsante A
o B o attendere semplicemente che le cifre
smettano di lampeggiare.
METODO 2 – Tastiera numerica:
1. Spegnere la radio. Le cifre del timer (38)
appaiono sull'angolo superiore destro del display.
2. Mantenere premuto il pulsante TIMER A o B per
circa due secondi. Le cifre del timer lampeggiano.
3. Usare la tastiera numerica per immettere l'ora
del risveglio nel formato a 24 ore. Entro 5 secondi
dalla conclusione dell'operazione, premere una
volta il pulsante A o B o attendere semplicemente
che le cifre smettano di lampeggiare.
Quando si usa il metodo 2 di cui sopra, è possibile
usare solamente il formato a 24 ore per il time,
nonostante l'orologio possa essere stato impostato
nel formato a 12 ore.
MEMORIZZAZIONE DELLE
STAZIONI NELLA MEMORIA
DEL TIMER
Per ascoltare una emittente radio in risposta all'
attivazione del timer, è necessario memorizzare tale
station nella memoria del timer. La procedure
prevede 3 passi:
1. Accendere la E10 e sintonizzarsi sulla stazione
desiderata.
2. Premere e rilasciare il pulsante MEMORY.
3. Premere e rilasciare il pulsante TIMER A o
TIMER B. L'icona del timer lampeggia due volte
sul display.
N.B. Per monitorare le frequenze memorizzate
nella memoria del timer A e B, dopo aver spento la
radio, premere per tre secondi il pulsante SYSTEM
SET. Lampeggiano sul display le informazioni sul
codice di impostazione e sulle frequenze conservate
nella memoria del timer.
ATTIVAZIONE E DISATTIVAZIONE
DEL TIMER
Per accendere la radio, il timer deve essere attivo.
Può essere attivato e disattivato sia a radio accesa
che spenta. Per attivare un timer, premere e rilasciare
il pulsante TIMER A o TIMER B. L'icona del timer
symbol appare sul display. Per disattivare un timer,
premere e rilasciare il pulsante TIMER A o TIMER B,
facendo sparire l'apposita icona dal display.
USO DELLA FUNZIONE SNOOZE
Quando il timer si attiva ed accende la radio, l'icona
di attivazione (39) lampeggia sul display. Mentre
l'icona lampeggia, premere e rilasciare il pulsante
SNOOZE/LIGHT (7). La radio si spegne per riaccendersi dopo 10 minuti. Questo processo può essere
ripetuto 3 volte.
139138
Page 71

E10 MANUALE OPERATIVO
8 OPERAZIONI IN MEMORIA
La memoria della radio E10 è impostata in fabbrica
su 10 pagine, ciascuna delle quali contiene le
impostazioni di 50 frequenze, per un totale di 500
frequenze complessive. Questa impostazione
predefinita può essere modificata, personalizzandola.
Durante l'apprendimento della memorizzazione
delle emittenti, si consiglia di adottare l'impostazione predefinita. Per cambiarla, vedere la
sezione PERSONALIZZAZIONE DELLE PAGINE DI
MEMORIA. Quando si lavora con la memoria,
l'indicazione PRESET [preimpostazione] appare sul
display sotto i numeri della memoria.
MEMORIZZAZIONE DELLE
STAZIONI
1. Accendere la radio.
2. Sintonizzarsi sull'emittente desiderata.
3. Premere e rilasciare il pulsante MEMORY (18).
Notare come le cifre del numero di memoria,
sopra l'indicazione PRESET (48), lampeggino
sull'angolo superiore destro del display.Viene
inoltre visualizzato senza lampeggiare il numero
di pagina della memoria, sopra l'indicazione
PAGE.
4. Entro 5 secondi, usare la tastiera numerica per
immettere il numero di memoria a cui attribuire
la stazione da memorizzare. Nel caso delle
impostazioni memorizzate 1-9, immettere i
numeri come 01 – 09.
5. Entro 5 secondi, premere il pulsante MEMORY o
attendere 5 secondi. Ciò finalizza la memorizzazione e nel giro di qualche secondo, l'orologio
riappare sull'angolo superiore destro del display.
SELEZIONE/MODIFICA DELLE
PAGINE DI MEMORIA
Per modificare le pagine della memoria:
1. Premere e rilasciare il pulsante PAGE (11). Il numero
di pagina lampeggia sul display.
2. Entro 3 secondi, usare il pulsante UP/HOUR o
DOWN/MIN per modificare la pagina prescelta. A
titolo alternativo, usare la tastiera numerica per
immettere la pagina.
3. Premere e rilasciare il pulsante MEMORY per
finalizzare la modifica di pagina.
ACCESSO AI DATI MEMORIZZATI
Segue la descrizione dei tre metodi disponibili di accesso
alle frequenze memorizzate: accesso diretto alla
memoria, ricerca in memoria e scansione automatica
della memoria. Quando i numeri di pagina e di preimpostazione della memoria appaiono sull'angolo superiore
destro del display, come nel caso descritto sotto, la
radio si trova in modalità di accesso alla memoria. È
possibile uscire da questa modalità in qualsiasi
momento, premendo e rilasciando il pulsante SCAN
MODE (12).
ACCESSO DIRETTO ALLA MEMORIA
Se è stata attivata la pagina di memoria desiderata,
basta digitarne il numero di elenco sulla tastiera
numerica. Per esempio, se l'emittente desiderata è
stata memorizzata con il numero 01, premere prima il
tasto 0 e poi l'1.
OPERAZIONI IN MEMORIA segue
RICERCA IN MEMORIA
Per ricercare manualmente le preimpostazioni di
una data pagina di memoria, intraprendere i
seguenti passi:
1. Premere e rilasciare il pulsante SCAN MODE (12).
2. Premere rapidamente e ripetutamente il pulsante
UP/HOUR o DOWN/MIN per ricercare tutte le
impostazioni di memoria.
SCANSIONE AUTOMATICA
DELLA MEMORIA
Quando si scandiscono automaticamente le preimpostazioni di una pagina di memoria, ciascuna
stazione memorizzata viene attivata per circa 5
secondi in rapida successione. La pagina selezionata
è soggetta alla scansione automatica a titolo
indefinito e deve essere interrotta deliberatamente.
Le impostazioni di memoria non utilizzate non sono
soggette a scansione.
1. Premere e rilasciare il pulsante SCAN MODE (12).
2. Mantenere premuto il pulsante UP/HOUR o
DOWN/MIN per circa un secondo e poi rilasciarlo.
L'indicazione PRESET lampeggia sotto il numero
di memoria, indicando come ciascuna
impostazione sia soggetta a scansione per circa
4 secondi trascorsi i quali viene attivata la
preimpostazione successiva per lo stesso lasso
di tempo.
Per arrestare la scansione delle preimpostazioni in
memoria, premere e rilasciare il pulsante UP/HOUR
o DOWN/MIN.
CANCELLAZIONE DEL
CONTENUTO DELLA MEMORIA
1. Premere e rilasciare il pulsante SCAN MODE (12).
2. Usare il pulsante UP/HOUR o DOWN/MIN (5,6)
per selezionare la preimpostazione assegnata
alla frequenza da eliminare dalla memoria. A
titolo alternativo, usare la tastiera numerica per
immettere il numero della memoria.
3. Mantenere premuto il pulsante MEMORY (18)
per circa 2 secondi prima di rilasciarlo.
L'indicazione dEL lampeggia sul display.
4. Mentre dEL lampeggia, premere e rilasciare il
pulsante MEMORY.
CANCELLAZIONE DI UNA PAGINA
DI MEMORIA
1. Premere e rilasciare il pulsante PAGE (11).
2. Mantenere premuto il pulsante MEMORY (18)
per 5 secondi e poi rilasciarlo. Le indicazioni dEL
e PAGE (48, 49) lampeggiano sul display.
3. Entro 2 secondi, premere e rilasciare il pulsante
MEMORY.
141140
Page 72

E10 MANUALE OPERATIVO
OPERAZIONI IN MEMORIA segue
TRASFERIMENTO DI UNA
FREQUENZA MEMORIZZATA
Se lo si desidera, è possibile trasferire una frequenza
memorizzata in una pagina differente o in una
posizione d'elenco diversa della stessa pagina.
1. Accendere la radio.
2. Premere e rilasciare il pulsante PAGE.
3. Entro 3 secondi, usare il pulsante UP/HOUR o
DOWN/MIN per selezionare la pagina di memoria desiderata.
4. Premere due volte il pulsante MEMORY.
5. Entro 5 secondi, usare la tastiera numerica per
immettere il numero d'elenco da assegnare alla
memorizzazione della stazione radio.
6. Entro 5 secondi, premere e rilasciare il pulsante
MEMORY.
PERSONALIZZAZIONE DELLE
PAGINE DI MEMORIA
La E10 è configurata in fabbrica con 10 pagine di
memoria, ciascuna con 50 impostazioni, per un
totale di 500 frequenze memorizzabili. Il numero di
pagine di memoria può essere modificato per
mezzo dei CODICI DI IMPOSTAZIONE DEL SISTEMA,
descritti sotto.
9 CODICI DI IMPOSTAZIONE DEL SISTEMA
I codici di impostazione del sistema permettono di personalizzare la radio, grazie alla modifica di alcune funzioni
programmabili elencate e descritte sotto.
TABELLA DEI CODICI DI IMPOSTAZIONE DEL SISTEMA
DI CODICE
00 (impostazione predefinita in fabbrica)
20
25
50
09
10
12
24
22
28
29
76
87 (impostazione predefinita in fabbrica)
DESCRIZIONE
Divide le memorie in 10 pagine da
50 impostazioni ciascuna.
Divide le memorie in 20 pagine da
25 impostazioni ciascuna.
Divide le memorie in 25 pagine da
20 impostazioni ciascuna.
Divide le memorie in 50 pagine da
10 impostazioni ciascuna.
Imposta la spaziatura di frequenza
in MW (AM) su 9 kHz.
Imposta la spaziatura di frequenza
in MW (AM) su 10 kHz.
Imposta l'orologio sul formato a 12
ore.
Imposta l'orologio sul formato a 24
ore.
Verifica tutti i segmenti del display
LCD.
Definisce l'uso di batterie ricaricabili.
Definisce l'uso di normali batterie
ministilo AA.
Imposta la gamma di frequenza FM
su 76-108 MHz (Giappone).
Imposta la gamma di frequenza FM
su 87–108 MHz (Nord America;
Europa Occidentale).
INDICAZIONE SUL DISPLAY
10:50
20:25
25:20
50:10
9kHz
10kHz
12H
24H
Ni-MH
76 108
87 108
143142
Page 73

E10 MANUALE OPERATIVO
CODICI DI IMPOSTAZIONE DEL SISTEMA segue
MODIFICA DEI CODICI DI
IMPOSTAZIONE DEL SISTEMA
Per immettere un codice di sistema, seguire la
procedura di cui sotto.
1. Spegnere la radio.
2. Premere e rilasciare il pulsante SYSTEM SET
(20). Notare come l'indicazione - - (51) appaia
sull'angolo superiore destro del display, facendo
sparire le cifre dell'orologio.
3. Entro 5 secondi, immettere il codice numerico
desiderato tramite la tastiera, per poi premere e
rilasciare immediatamente il pulsante SYSTEM
SET. Il code ICON (52) appare brevemente
sull'angolo inferiore destro del display.
MODIFICA DEL FORMATO
DELL'OROLOGIO DA 24 A 12
ORE – UN ESEMPIO DI MODIFICA DI UN
CODICE DI IMPOSTAZIONE
Le istruzioni di cui sotto sono un buon esempio di
modifica del codice di impostazione del sistema, in
questo caso del cambio del formato dell'orologio
da 24 a 12 ore:
1. Spegnere la radio..
2. Premere e rilasciare il pulsante SYSTEM SET.
come l'indicazione - - appaia sull'angolo superiore
destro del display e l'ora dell'orologio sparisca
dallo schermo.
3. Immettere entro 5 secondi il codice numerico
desiderato per mezzo della tastiera e poi premere
e rilasciare immediatamente il pulsante SYSTEM
SET. L'indicazione 12H appare brevemente sul
display.
CODICI DI IMPOSTAZIONE
DEL SISTEMA PREDEFINITI IN
FABBRICA
Quando la radio viene spedita dalla fabbrica, la
tabella dei codici di impostazione del sistema è
impostata come segue. Le modifiche vanno apportate
in conformità alle istruzioni presentate nella
sezione MODIFICA DEI CODICI DI IMPOSTAZIONE
DEL SISTEMA.
• Dieci pagine di memoria con 50 impostazioni
cadauna. Codice 08.
• Incrementi di sintonia AM (MW) da 10 kHz.
Codice 10.
• Formato a 24 ore dell'orologio. Codice 24.
• Uso di batterie ricaricabili. Codice 28.
• Gamma di frequenza FM da 87 a 108 MHz.
Codice 87.
MONITORAGGIO DELLO STATO
DEL CODICE DI IMPOSTAZIONE
E DI ALTRE IMPOSTAZIONI
Premendo per tre secondi il pulsante SYSTEM SET,
dopo aver spento la E10, è possibile monitorare i
codici chiave ed altre impostazioni. Tali informazioni
lampeggiano rapidamente sul display nell'ordine
indicato sotto.
1. Formato dell'ora
2. Impostazione da 9 o da 10 kilohertz
3. Impostazione della gamma di sintonia FM
4. Radiofrequenza del timer A
5. Radiofrequenza del timer B
6. Impostazione dei milliampere-ora delle batterie
ricaricabili
10 ULTERIORI COMANDI DELLA E10
USO DELL'ILLUMINAZIONE
Una breve pressione del pulsante SNOOZE/LIGHT
(7), posto sull'angolo angolo superiore destro della
radio, attiva l'illuminazione del display che si irradia
dal lato sinistro dello schermo per circa 5 secondi.
Premendo il pulsante più a lungo (per circa 3
secondi) l'illuminazione resta accesa in continuazione
(accorciando notevolmente la durata utile delle
batterie). Spegnere l'illuminazione premendo e
rilasciando rapidamente il pulsante.
USO DELL'INTERRUTTORE DI
GUADAGNO D'ANTENNA
L'interruttore di guadagno (23) ha tre posizioni,
DX, NORMAL e LOCAL. Di norma, questo
interruttore è impostato su DX, assicurando
prestazioni massime in ricezione. Se l'emittente AM
o ad onde corte a cui si sta dando ascolto risulta
talmente potente da causare distorsioni, provare la
posizione NORMAL o LOCAL. Questo interruttore
non viene usato per le stazioni FM.
USO DEL COMANDO DI
COMPENSAZIONE D'ANTENNA
Questa manopola di comando del trimmer, contraddistinta dalla dicitura ANT TRIM e posta sul lato
destro della E10, permette di ottimizzare l'antenna
telescopica della E10 durante l'ascolto delle emittenti
ad onde corte. Mentre si ascolta una stazione,
regolare la manopola in modo da ottenere la
migliore ricezione.
USO DEL PULSANTE LOCK
Premendo il pulsante LOCK si escludono tutti i
comandi attivati tramite pulsante, facendo apparire
l'icona sull'angolo inferiore sinistro del display.
L'esclusione viene attivata premendo rapidamente
il pulsante LOCK. Una pressione più prolungata
disattiva l'esclusione e fa sparire l'icona da display.
Questa caratteristica risulta molto utile durante i
viaggi. Prima di porre la radio in una valigia,
borsetta o ventiquattrore, conviene infatti spegnerla
e bloccarla, evitandone l'accensione accidentale e
la conseguente scarica della delle batterie. Questo
comando non disattiva le funzioni dei timer.
USO DELLA PRESA
DELL'ANTENNA ESTERNA
La presa per l'antenna esterna viene usata per
migliorare la ricezione ad onde corte o FM. Oggi
sono disponibili sul mercato molte antenne di
questo tipo. Digitando "antenne ad onde corte" o
"antenne FM" sul motore di ricerca Internet preferito
si possono ottenere ulteriori informazioni in merito
all'acquisto o alla fabbricazione di antenne di
questo tipo.
145144
Page 74

E10 MANUALE OPERATIVO
11 RICEZIONE DELLE EMITTENTI AD ONDE CORTE
Quanti si avvicinano per la prima volta alle onde
corte possono trovare utile la lettura di questa
sezione e di quella successiva, GUIDA ALL'ASCOLTO
DELLE ONDE CORTE.
STAZIONI AD ONDE CORTE
IN tutto il mondo sono presenti stazioni di diffusione
radiofonica che trasmettono su frequenze udibili a
grandissima distanza, spesso pari a svariate migliaia
di chilometri. Negli Stati Uniti d'America operano
circa 30 emittenti nazionali ad onde corte che
trasmettono programmi religiosi, politici ed ideologici.
ASCOLTO DELLE STAZIONI AD
ONDE CORTE
Ci sono molte ragioni per ascoltare trasmissioni ad
onde corte. Eccone alcune, dichiarate dai clienti etón.
• L'ascolto di notiziari e di informazioni da altre
fonti mondiali spesso rivela prospettive diverse
ed inattese in merito agli eventi nazionali ed
internazionali.
• Le onde corte espongono l'ascoltatore ad altre
lingue e culture, musica e prospettive comprese.
La musica popolare di un'altra nazione è spesso
molto gradevole, anche se non si capiscono le
parole..
• Le trasmissioni permettono di apprendere le
lingue straniere, dando ascolto a parlanti del
posto.
• Consentono di tenersi in contatto con altre parti
del mondo, forse con la nazione di origine o di
provenienza della propria famiglia.
• Affinità con i messaggi religiosi, politici o
ideologici trasmessi.
INDICAZIONI DI MASSIMA
SULLE ONDE CORTE
• La ricezione notturna delle onde corte è quasi
sempre migliore di quella diurna. La ricezione
cambia di volta in volta, perciò conviene
controllare le bande anche di giorno.
• Durante il giorno, le bande di onde corte più
attive sono quelle da 13, 15, 16, 19 e 22 metri.
Le bande da 16 e 19 metri sono di solito le
migliori. Di notte, le bande più attive sono
quelle da 25, 31, 41 e 49 metri. Di solito le
migliori sono la 31 e la 49.
• All'alba ed al tramonto, è possibile ricevere bene
o benissimo le bande sia diurne che notturne,
con risultati d'ascolto molto soddisfacenti.
• Il materiali di costruzione di alcuni edifici
interferiscono con la ricezione. La ricezione
aumenta notevolmente se, dopo essersi avvicinati
ad una finestra, si regge la radio in mano.
SELEZIONE DI UNA BANDA AD
ONDE CORTE
La E10 permette di accedere a tutte e 14 le bande
di trasmissione internazionale.Tali bande
corrispondono alle frequenze su 120, 90, 75, 60,
49, 31, 25, 22, 19, 16, 15, 13 e 11 metri e sono
dette comunemente "bande metriche".
La E10 consente di accedere alle bande ad onde
corte in due modi. Ciascun metodo colloca il sintonizzatore all'inizio della gamma di frequenze.
RICEZIONE DELLE EMITTENTI AD ONDE CORTE segue
1. Premendo il pulsante di banda metrica ad
onde corte SW METER BAND (16) in rapida
successione si salta all'inizio della scala.
Mantenendo premuto il pulsante, si visualizza
il numero di banda sull'angolo superiore
destro del display (50) L'indicazione sparisce
dopo pochi istanti dal rilascio del pulsante,
sostituita dall'indicazione dell'ora.
Cominciare a sintonizzare la radio solo dopo
la rivisualizzazione dell'ora. Se non si
attende, la radio attiva automaticamente il
secondo metodo
2. Premere e rilasciare rapidamente il pulsante
SW METER BAND, per poi premere rapidamente e ripetutamente il pulsante UP/HOUR
o DOWN/MIN. Il numero della banda appare
sull'angolo superiore destro del display. Una
volta selezionata la banda, cominciare a
sintonizzarsi non appena riappare l'orologio
sull'angolo superiore destro del display.
SCANSIONE AUTOMATICA
DELLE ONDE CORTE
Ai fini della ricezione delle onde corte , la sintonia
tramite scansione automatica è conseguibile
solo entro le gamme di frequenza indicate nella
tabella successiva. Per sintonizzarsi su frequenze
ad onde corte intermedie o eccedenti tali gamme,
adottare uno degli altri metodi di sintonia, ad
es., la sintonia regolare (manuale) o l'immissione
diretta della frequenza, come indicato nella
sezione SINTONA.
TABELLA DELLE GAMME A
SCANSIONE AUTOMATICA
DELLE ONDE CORTE
BANDA
(metri}
120
90
75
60
49
41
31
25
22
19
16
15
13
11
GAMMA DI FREQUENZA
(kilohertz)
2250 – 2550
3150 - 3450
3850 - 4050
4700 - 5100
5800 – 6300
7100 – 7500
9400 – 10000
11500 – 12150
13500 – 13900
15000 – 15900
17450 - 18000
18850 - 19100
21450 - 21950
25600 - 26100
147146
Page 75

RICEZIONE DELLE EMITTENTI AD ONDE CORTE segue
E10 MANUALE OPERATIVO
12 CAPIRE LE BANDE: LA CHIAVE DI LETTURA
DELLE ONDE CORTE
STAZIONI ORA ESATTA (NORD AMERICA)
Gli Stati Uniti d'America ed il Canada dispongono di stazioni ad onde corte che trasmettono l'ora esatta. L'ora viene espressa continuamente in fuso orario universale, detto anche UTC e fuso medio di
Greenwich. Le frequenze sono elencate qui di seguito.
CHU – ora esatta (Canada)
CHU – ora esatta (Canada)
CHU – ora esatta (Canada)
WWV – meteo/ora esatta (USA)
WWV – meteo/ora esatta (USA)
WWV – meteo/ora esatta (USA)
WWV – meteo/ora esatta (USA)
WWV – meteo/ora esatta (USA)
PUBBLICAZIONI SULLE ONDE
CORTE: COME TROVARE UNA
EMITTENTE
Due eccellenti pubblicazioni offrono informazioni
particolareggiate sulle onde corte, compreso un
elenco di tutte le emittenti mondiali, delle loro
frequenze, orari di trasmissione e le zone a cui è
diretto il broadcast. Tali pubblicazioni elencate
sotto sono reperibili presso le principali librerie ed
in linea.
PASSPORT TO WORLD BAND RADIO. Pubblicato
dalla International Broadcasting Services. Indirizzo:
IBS North America, Box 300, Penn’s Park, PA
18943, U.S.A. Telefono: +215 598-3794. URL:
www.passband.com.
3330
7335
14670
2500
5000
10000
15000
20000
Migliore di notte
Giorno/notte
Migliore di giorno
Migliore di notte
Migliore di notte
Giorno/notte
Migliore di giorno
Migliore di giorno
WORLD RADIO TV HANDBOOK. Pubblicato in Nord
America dalla Watson Guptil Publications, 770
Broadway – 7th Floor, New York, NY 10003-9595,
U.S.A. www.watsonguptill.com
Un altro modo per reperire ulteriori informazioni
sulle emittenti ad onde corte consiste nell'usare un
motore di ricerca Internet, digitando criteri di ricerca
quali "stazioni radio ad onde corte" o "frequenze
ad onde corte".
ULTERIORI INFORMAZIONI
SULLE ONDE CORTE
Un altro modo per reperire ulteriori informazioni
sulle emittenti ad onde corte consiste nell'usare un
motore di ricerca Internet, digitando criteri di
ricerca quali "ascolto ad onde corte" o "stazioni
ad onde corte". Non mancheranno di apparire
numerosi articoli.
Stazioni radio di tutto il mondo trasmettono in
onde corte e questa radio è l'ideale per dedicarsi
immediatamente al loro ascolto. I neofiti possono
trarre vantaggio dalle direttive di massima indicate
sotto, mentre gli esperti possono confermare le
proprie conoscenze.
BANDE
QUESTO E' IL CONCETTO PIÙ IMPORTANTE AI FINI
DELL'ASCOLTO AD ONDE CORTE
Per ascoltare con successo le trasmissioni ad onde
corte è indispensabile sintonizzarsi bene sulle relative
emittenti. Esse trasmettono su specifiche bande ad
onde corte. Chiunque abbia ascoltato trasmissioni
AM o FM, ha fatto esperienza con le bande radio.
La banda AM è pari a 530-1600 KHz, mentre quella
FM va da 66 a 108 megahertz. Per banda si
intende infatti una gamma di frequenze entro la
quale operano le varie stazioni. Quando si cerca
un'emittente in queste bande, basta continuare a
cambiare sintonia finché non si incontra una
stazione di proprio gradimento. Le bande ad
onde corte sono simili, anche se vengono espresse
in metri, tipo 25 metri, 31 metri, 49 metri, etc. e
visualizzate abbreviate in 25m, 31m, 49m, etc.
Com'è il caso con le trasmissioni in AM ed FM,
basta accedere alla banda ad onde corte e regolare
la sintonia finché non si ottiene una stazione
accettabile.
Per esempio, la banda ad onde corte da 19 metri
comprende la gamma di frequenze da 15.100 a
15.600 kilohertz. Segue un elenco delle bande ad
onde corte usate per le trasmissioni internazionali e
le relative gamme di frequenza. Visto che alcune
radio esprimono tali frequenze in megahertz ed
altre in kilohertz, la tabella riporta entrambe le
unità. La scala di sintonia della radio E10 esprime
le radiofrequenze ad onde corte in kilohertz, kHz.
Le seguenti informazioni sono applicabili a qualsiasi
radio ad onde corte. Osservare la scala di sintonia
o il display digitale (o il manuale operativo) della
radio in dotazione per determinare la designazione
di frequenza adottata per le onde corte. La maggior
parte delle radio usa le abbreviazioni kHz o MHz.
In alcuni apparecchi ad onde corte le frequenze
sono espresse da diciture tipo 15100 KHz, 15105
KHz o 15110 KHz, mentre altre radio propongono
15,1 MHz, 15,105 MHz o 15,11 MHz, a seconda
dell'unità adottata. Le gamme esatte di frequenza
di tali bande possono variare leggermente da
modello a modello, ma questo è perfettamente
normale. Infatti alcuni apparecchi radio contrad
distinguono chiaramente le bande ed altri non le
differenziano affatto. In caso di dubbi sul modello
in dotazione, consultare il manuale operativo, il
sito Web della etón Corporation
(www.etoncorp.com) o rivolgersi direttamente alla
etón Corporation.
UN'UTILE ANALOGIA:
una banda ad onde corte è come una
strada con svariati numeri civici.
Se si pensa ad una banda ad onde corte come se
fosse una via cittadina, ad ogni numero civico
corrisponderebbe una frequenza specifica. La
banda da 19 metri potrebbe essere chiamata via
Metri 19. Ciascuna casa ha un suo numero civico
tipo 15100, 15105, 15110, etc. e ciascun numero
corrisponde ad una casa specifica. Nella banda ad
149148
Page 76

E10 MANUALE OPERATIVO
CAPIRE LE BANDE: LA CHIAVE DI LETTURA
DELLE ONDE CORTE
onde corte da 19 metri, questi indirizzi o numeri
civici sono detti frequenze e su ciascuna frequenza
opera una diversa emittente ad onde corte.
La TABELLA GENERALE DELLE BANDE AD ONDE
CORTE, riportata sotto, illustra tutte le bande ad
onde corte assegnate ufficialmente.
BANDE DIURNE E NOTTURNE:
UN'IMPORTANTE DIFFERENZA
Visto che le onde corte dipendono da fattori quali il
sole, la ionosfera e l'interazione con la terra, non è
TABELLA GENERALE DELLE BANDE AD ONDE CORTE.
BANDE MEGAHERTZ (MHz) KILOHERTZ (KHz)
120m
90m
75m
60m
49m
41m
31m
25m
22m
19m
16m
13m
11m
2.300-2.500MHz
3.20-3.40 MHz
3.90-4.00 MHz
4.750-5.060 MHz
5.950-6.20 MHz
7.10-7.60 MHz
9.20-9.90 MHz
11.600-12.200 MHz
13.570-13.870 MHz
15.10-15.80 MHz
17.480-17.90 MHz
21.450-21.850 MHz
25.60-26.10 MHz
segue
possibile ricevere segnali su tutte le bande in ogni
momento della giornata. Alcune bande si propagano meglio durante il giorno, altre durante la
notte. In genere, di notte si ricevono meglio le
bande con frequenze inferiori a 13 MHz (13000
kHz) e di giorno quelle con frequenze superiori.
Segue la descrizione delle caratteristiche delle principali bande ad onde corte ed alcune indicazioni di
massima utili a migliorare la ricezione. L'accesso ad
una data banda varia da radio a radio. Consultare
il manuale operativo per istruzioni in merito o rivolgersi alla etón Corporation per ulteriori chiarimen-
2300-2500 KHz
3200-3400 KHz
3900-4000 KHz
4750-5060 KHz
5950-6200 KHz
7100-7600 KHz
9200-9900 KHz
11600-12100 KHz
13570-13870 KHz
15100-15800 KHz
17480-17900 KHz
21450-21850 KHz
25600-26100 KHz
CAPIRE LE BANDE: LA CHIAVE DI LETTURA
DELLE ONDE CORTE
ti.
ALBA E TRAMONTO –
I MOMENTI SPESSO MIGLIORI
Spesso la gente chiede quale sia l'ora migliore
d'ascolto della onde corte, in momento in cui i
segnali sono più forti e chiari. Spesso si tratta di
alcune ore, da un paio a tre o quattro, immediatamente prima e dopo l'alba ed il tramonto.
Conviene determinare sperimentalmente gli orari
migliori a seconda della zona di operazione.
ASCOLTO DIURNO
La ricezione dei segnali ad onde corte è
generalmente peggiore durante le ore diurne, dalle
10 del mattino alle 3 del pomeriggio. Il motivo
principale va ricercato nel numero ridotto di
emissioni dirette specificatamente verso la zona di
chi ascolta. Le emittenti non trasmettono durante
questo periodo perché la loro audience è al lavoro
o a scuola e pertanto difficilmente in grado di
ascoltare la radio. Per provare comunque, attenersi
alle direttive di cui sotto. Di solito, le trasmissioni
diurne tendono ad essere ricevute meglio lungo la
costiera atlantica statunitense di quanto non sia il
segue
caso lungo la costiera pacifica. Le bande migliori
sono indicate sotto in NERETTO.
ASCOLTO SERALE E NOTTURNO
Il momento migliore per dedicarsi all'ascolto è di
sera o di notte, quando le emittenti intensificano i
broadcast. Le bande indicate sotto possono
risultare particolarmente buone anche all'alba ed al
TABELLA DELLE BANDE DIURNE
BANDE
DIURNE
13metri
16metri
19metri
22metri
25metri
31metri
CARATTERISTICHE
Risultati variabili. Val la pena di
provare.Talvolta la ricezione è
particolarmente buona all'alba
ed al tramonto.
Simile a quella da 19 m.
Nel complesso, questa è la
migliore banda diurna. D'estate
la ricezione è buona anche di
notte.Talvolta la ricezione è particolarmente buona all'alba ed al
tramonto.
Simile a quella da 19 m.
La ricezione migliore è conseguibile all'alba ed al tramonto.
Talvolta è buona anche verso
metà giornata sul versante
atlantico del Nord America.
Simile a quella da 25 m.
151
151
Page 77

CAPIRE LE BANDE: LA CHIAVE DI LETTURA
DELLE ONDE CORTE
segue
E10 MANUALE OPERATIVO
13 INDIVIDUAZIONE DEI GUASTI
tramonto. Le bande migliori sono indicate sotto in
NERETTO.
L'EDIFICIO IN CUI SI RISIEDE BLOCCA I
SEGNALI AD ONDE CORTE.
Questa ipotesi viene confermata se si nota che la
forza del segnale emesso da una stazione migliora
significativamente avvicinando la radio ad una
TABELLA DELLE BANDE
NOTTURNE
BANDE
NOTTURNE13m
25 metri
31 metri
41 metri
49 metri
CARATTERISTICHE
Simile a quella da 31 m.
Buona ricezione tutta la notte,
ovunque. Spesso è particolarmente
buona all'alba ed al tramonto.
Comincia ad ascoltarsi bene circa
un'ora prima del tramonto.
Simile a quella da 49 m, Buona
ricezione tutta la notte sul versante
atlantico nordamericano; varia sul
versante pacifico.
Nel complesso, questa è la migliore
banda notturna.
finestra o portandola all'esterno. Spesso i materiali
di costruzione di alcuni edifici interferiscono con la
ricezione, altrettanto quanto la presenza di uno o
più piani sovrastanti. La soluzione consiste
nell'avvicinare il più possibile la radio ad una
finestra, nel trasferire l'apparecchio all'aperto o
nell'approntare una antenna esterna ad onde
corte. Per idee in merito alla predisposizione
all'aperto di una antenna ad onde corte, ricorrere
al motore di ricerca preferito e digitare "antenne
ad onde corte". Quanti non avessero accesso al
Web possono rivolgersi direttamente alla etón
Corporation, usando le metodiche indicate all'inizio
del manuale.
PROCEDURA DI RIPRISTINO
Il pulsante RESET si trova sul fondo della E10.
Quando si esegue un ripristino, accertarsi che le
batterie in uso siano cariche o alimentare la radio
con il trasformatore CA/caricabatterie e poi
spegnerla. Se le soluzioni indicate sotto non risolvono
un dato problema eseguire un ripristino, premendo
l'apposito pulsante con un fermaglio per documenti
o un altro oggetto simile.
LA RADIO NON SI ACCENDE
1. Accertarsi che l'interruttore di bloccaggio LOCK
non sia inserito.
2. Accertarsi che la radio sia alimentata (ovvero
che le batterie siano installate o il trasformatore
CA/caricabatterie collegato in rete).
3. Verificare la corretta polarità di orientamento
delle batterie nello scomparto
4. Controllare che le batterie non siano scariche.
5. Se usa un trasformatore, accertarsi che sia
collegato ad una presa a muro collegata alla
rete elettrica dell'edificio ed alla presa di
alimentazione CC della radio. Evitare di inserire
la spina di alimentazione del trasformatore nella
presa delle cuffie.Verificare inoltre che il
trasformatore CA eroghi la prevista tensione
CC in uscita, con la polarità giusta e che la
spina abbia l'opportuno diametro sia interno
che esterno.
LA RADIO SI SPEGNE IMPROVVISAMENTE
MENTRE E' ALIMENTATA A BATTERIE
Le batterie sono scariche e vanno sostituite.
LA RADIO ALIMENTATA DAL TRASFORMATORE
CA SI SPEGNE IMPROVVISAMENTE DURANTE
GLI SPOSTAMENTI
Il cavo del trasformatore CA/caricabatterie ha un
filo rotto o un collegamento allentato, oppure la
spina CA è di diametro sbagliato.
LA RADIO FUNZIONA IN MODO ERRATICO
Eseguirne la reimpostazione nel modo indicato
nella sezione PROCEDURA DI RIPRISTINO.
LA RICEZIONE DELLE STAZIONI E' TROPPO
DEBOLE
• Accertarsi che l'interruttore ANTENNA GAIN sia
in posizione DX.
• Verificare che l'antenna telescopica sia
completamente estesa ai fini della ricezione
della frequenza modulata e delle onde corte.
• Se si sta ascoltando una emittente AM, far
ruotare la radio. L'antenna AM interna in ferrite
è altamente direzionale.
• Durante l'ascolto delle trasmissione ad onde
corte, regolare la manopola ANTENNA TRIMMER.
152
153
Page 78

E10 MANUALE OPERATIVO
INDIVIDUAZIONE DEI GUASTI segue
IL DIFFUSORE NON PRODUCE ALCUN SUONO
Verificare che le cuffie non siano collegate e che il
comando del volume sia ben regolato.
UNA STAZIONE CAUSA GRAVI DISTORSIONI
ACUSTICHE ED IL SEGNALE E' MOLTO FORTE
Probabilmente c'è una forte emittente locale nelle
immediate vicinanze.A causa della sua prossimità,
il relativo segnale è troppo forte. Per ridurre la
forza del segnale, impostare l'interruttore ANTENNA
GAIN nella posizione NORMAL o LOCAL.
NELLO SCOMPARTO DELLE BATTERIE E'
PRESENTE UN LIQUIDO APPICCICOSO O UNA
POLVERE BIANCA SECCA
Questi sono sintomi di una perdita di acido dalle
batterie. Per evitare tali perdite, usare solamente
batterie alcaline di alta qualità o batterie ricaricabili
al nichel-idruro metallico. Non mescolare mai
batterie vecchie e nuove , di marche o di tipi diversi.
Se le batterie perdono, non gettarle via ma rivolgersi
immediatamente al fabbricante. I danni causati
dalle eventuali perdite d'acido dalle batterie non
sono coperti da garanzia.
14 REGISTRAZIONE DELLA GARANZIA
Per assicurare la completa copertura in garanzia o gli aggiornamenti del prodotto etón o Grundig, la registrazione
della relativa garanzia va effettuata quanto prima possibile dopo l'acquisto o la ricezione. Per registrare la radio,
selezionare uno dei seguenti metodi:
1. Registrazione presso il sito Web
www.etoncorp.com
2. Telefonata di registrazione, componendo il
numero verde +888 889-4391 da qualunque
località degli Stati Uniti o del Canada o il
+204 336-6547 da qualsiasi altro luogo del
mondo. Sono disponibili operatori sia di lingua
inglese che francese.
3. Invio della registrazione per posta al seguente
indirizzo:
etón Corporation
1015 Corporation Way
Palo Alto, CA 94303
PRODUCT REGISTRATION
Indicare il proprio nome, recapito postale e numero
telefonico, il modello acquistato, la data d'acquisto,
il nome del rivenditore ed il numero di serie del
prodotto (di solito apposto sullo scompartimento
delle batterie o nelle sue immediate vicinanze).
155154
Page 79

15 GARANZIA LIMITATA ESTESA
ALL'ACQUIRENTE ORIGINARIO
E10 MANUALE OPERATIVO
16 INFORMAZIONI SUL SERVIZIO
Questo prodotto di marchio etón o GRUNDIG, fornito e distribuito dalla etón Corporation (etón), è garantito dalla
etón privo di difetti di materiali e di lavorazione per il seguente periodo limitato di garanzia:
UN (1) ANNO SUI PEZZI E LA MANODOPERA.
Questa garanzia limitata decorre dalla data originale
di acquisto, è valida solo nel caso di prodotti
acquistati presso un rivenditore etón autorizzato e
non comprende il trasporto, l'installazione, la
rimozione né la reinstallazione. Le riparazioni in
garanzia devono essere eseguite dalla etón o da
un centro di servizio autorizzato etón.Per
richiedere un intervento in garanzia, è necessario
presentare alla etón o al centro di servizio autoriz-
zato etón la ricevuta originale e datata di vendita,
che funge da prova d'acquisto. L'acquirente si
assume la responsabilità della spedizione del
prodotto alla etón o al centro di servizio autorizza-
to etón.
Durante il periodo di validità della garanzia limitata
suindicato, se questo prodotto viene riscontrato
difettoso, la etón lo riparerà o sostituirà a proprio
pare insindacabile con parti nuove o ricondizionate.
Per essere considerato in garanzia, il prodotto deve
essere reso alla etón o al centro di servizio
autorizzato etón entro non più di 15 giorni dopo la
data di scadenza della garanzia, a carico del
mittente. Prima di inviare un qualsiasi prodotto per
sottoporlo ad un intervento in garanzia, l'acquirente
deve mettersi in contatto con la etón per
determinare il problema e chiarire la procedura di
servizio.Tutti i pezzi ed i prodotti sostituiti diventano
proprietà della etón. I prezzi ed i prodotti di
ricambio sono sotto garanzia per il periodo rimasto
della garanzia originale o per novanta (90) giorni, a
seconda della scadenza più lunga.
Questa garanzia limitata copre difetti di materiali e
di lavorazione emersi nel corso dell'uso normale,
non commerciale di questo prodotto e non è
applicabile in modo non esclusivo a quanto segue:
danni incorsi durante usi ed applicazioni per i quali
il prodotto non era destinato; guasti o problemi
causati da prodotti o attrezzature non forniti dalla
etón; incidenti, uso erroneo, abuso, incuria,
applicazione erronea, incendio, allagamento, fulmini
o altri disastri naturali; tensione errata di linea,
fluttuazioni o sovratensioni istantanee; danni
causati da un'installazione errata o difettosa
(compresa quella delle batterie, creando una perdita
d'acido e danni irreversibili ai circuiti elettronici);
danni causati dalle perdite d'acido; alterazioni o
modifiche del prodotto; oppure uso di parti, forniture,
accessori o attrezzature non autorizzate, capaci di
danneggiare il prodotto o di rendere problematici
gli interventi di servizio.
SERVIZIO DI ASSISTENZA AI PRODOTTI ETÓN O GRUNDIG
Per sottoporre ad un intervento di servizio il proprio prodotto etón o Grundig, si suggerisce anzitutto di rivolgersi
ad un tecnico etón, telefonando all'+800 872-2228 negli U.S.A., all'+800 637-1648 in Canada o al
+650 903-3866, in modo da determinare il problema e la relativa soluzione. La maggior parte delle richieste di
chiarimenti possono essere risolte rapidamente per telefono.
SE UN PRODOTTO ETÓN O GRUNDIG RICHIEDE RIPARAZIONI, SONO DISPONIBILI DUE TIPI DI SERVIZIO:
1. IN GARANZIA – Se il prodotto è sotto garanzia
ed il tecnico del servizio etón determina la
necessità di un intervento, quest'ultimo fornirà
una autorizzazione alla resa ed informazioni
sulla spedizione ad un centro autorizzato di
riparazione in garanzia. Non inviare la radio in
resa senza aver prima ottenuto l'apposito
numero di autorizzazione.
2. FUORI GARANZIA – Dopo la scadenza della
garanzia, se un prodotto richiede un intervento
di servizio, il tecnico etón sarà lieto di indicare il
centro di riparazioni più vicino in grado di
provvedere alle eventuali riparazioni.
156
157
Page 80

www.etoncorp.com
From the United States: (800) 872-2228
From Canada: (800) 637-1648
From Everywhere Else: (650) 903-3866
Email: customersvc@etoncorp.com
Internet: www.etoncorp.com
etón Corporation
1015 Corporation Way
Palo Alto, California 94303
USA
 Loading...