

Page 1

ǵ
HOME CINEMA
SYSTEM
Cinemo
DR 3400 DD
DEUTSCH
ENGLISH
FRANÇAIS
ITALIANO
PORTUGUÊS
ESPAÑOL
Page 2

2
CONTENTS ____________________________________________
4 Cinemo DR 3400 DD
4 Special features of your home cinema system
4 Packing contents
4 Dolby Pro Logic II, Dolby Digital and DTS
5 Set-up and safety
6-11 Overview
6 The front of the DVD receiver
7 The displays of the DVD receiver
8 The back of the DVD receiver
9-11 The remote control
12-15 Connection and preparation
12 Connection diagram for the loudspeakers
12 Setting up the loudspeakers
13 Connecting the loudspeakers
13-14 Connecting a television, flat screen or projector
14 Connecting digital external devices
14 Connecting analogue external devices
15 Connecting the antennas
15 Connecting the power cord
15 Inserting batteries in the remote control
16 Additional information for unit sold in the UK.
17-25 Settings
17 General information
18 Setting the video functions
19-20 Setting the loudspeaker configuration
21 Setting the audio functions
22 Language settings
23 Setting the parental lock
24-25 Tuning and storing radio stations
25 Restoring all default settings
25 Resetting the DVD receiver
26-28 General functions
26 Switching on and off
26 Selecting the input source
26 Preparing for disc playback
26 Inserting a disc
27 Removing discs
27 Adjusting the volume
27 Muting
27 Selecting sound effects
28 Switching between two-channel and multi-channel mode
28 Adjusting the brightness of the DVD receiver display
28 General information on disc playback
Page 3

ENGLISH
3
29-30 Disc features
29 Disc formats
29 DVD features
29-30 VCD/S-VCD features
30 MP3/WMA CD features
30 Audio CD features
30 JPEG/Kodak picture CD features
31-38 Disc mode
31 Playback functions
31 Selecting titles or chapters
32 Selecting titles or chapters (in DVD mode)
32-33 PBC playback (in Video CD mode)
33 Picture settings
33-34 Displaying information
34-36 Additional playback functions
36-37 Zero setting (GO TO)
37 Repeat functions
38 Creating a track memory – playing back titles or tracks in selected order
39-41 Other modes
39-40 Tuner mode
41 Sleep timer mode
42-44 Information
42-43 Technical data
43 General instructions for laser devices
43 Cleaning discs
44 Rectifying minor problems
CONTENTS ____________________________________________
Page 4
4
Special features of your home cinema system
Your DVD receiver provides you with perfect digital video playback
in studio quality.
It also provides superb cinema-quality audio playback – in stereo or
with digital multi-channel sound – depending on the type of DVD or
CD used.
In addition to DVDs, you can also play S-Video CDs, MP3/WMA
CDs and audio CDs. Additionally, the DVD receiver can read homemade DVD Rs and DVD RWs with video data and CD Rs and
CD RWs with audio or image data (JPEG/Kodak pictures).
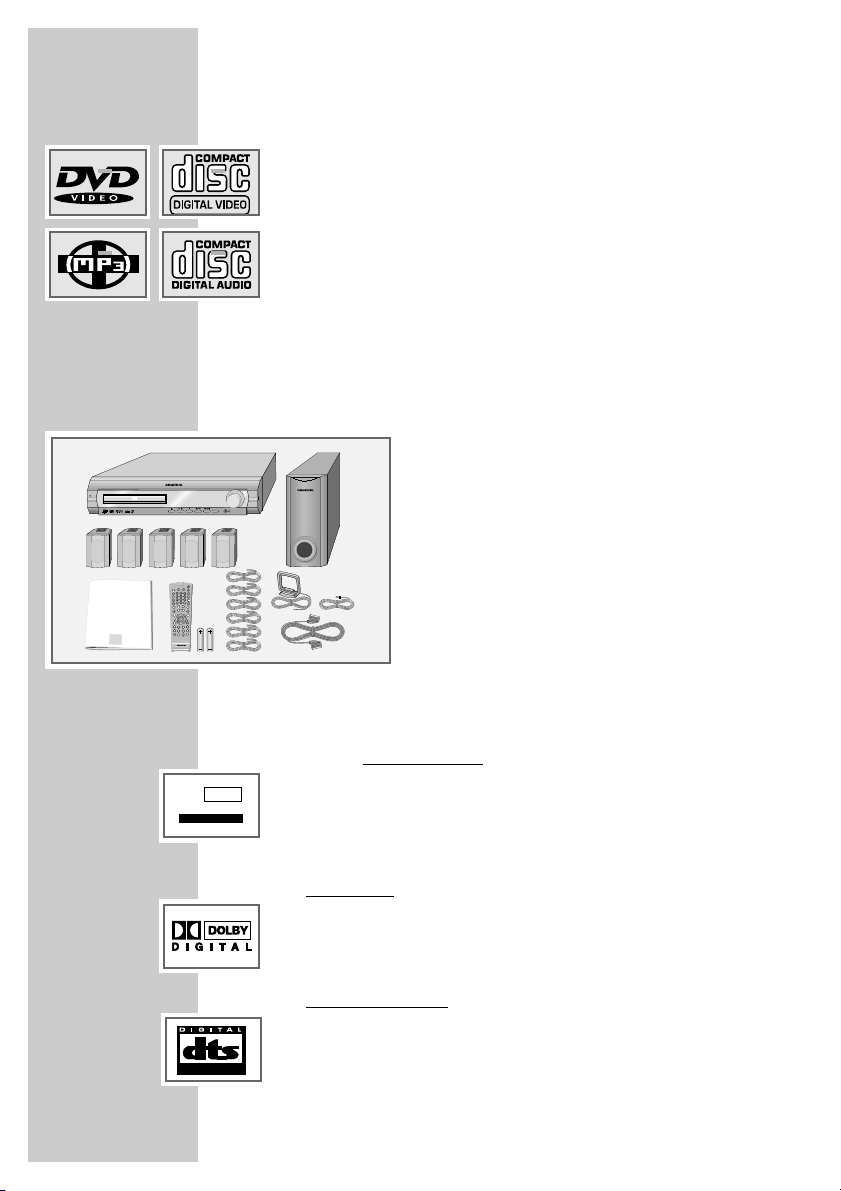
Packing contents
1 Cinemo DR 3400 DD DVD receiver
2 Remote control
3 2 Batteries, 1.5 V, type AA
4 2 front loudspeakers, 1 centre loudspeaker,
2 surround loudspeakers
5 Passive subwoofer
6 6 loudspeaker cables
7 FM wire antenna
8 AM frame antenna
9 Euro/AV (Scart) cable
10 Operating manual
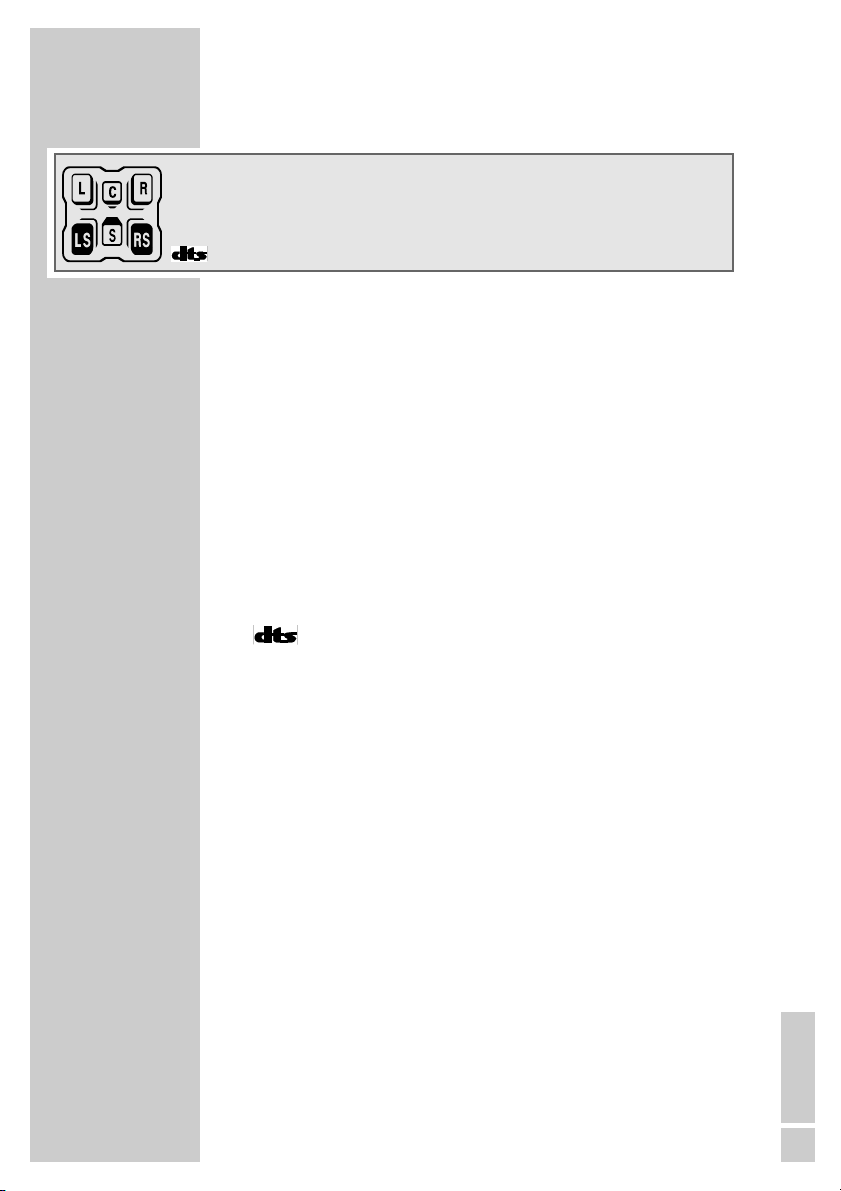
Dolby Pro Logic II, Dolby Digital and DTS
With its Dolby Pro Logic II decoder, the DVD receiver has the latest
surround decoder technology. It generates surround sound from the
stereo signal. However, the rear channel consists of two separate
stereo channels, whose frequency range is not restricted. This
means Pro Logic II produces a sound zone with a completely new
sense of space, location and stability.
Dolby Digital
, on the other hand, is a digital sound system designed
for completely independent multi-channel audio playback. It carries
five full audio channels and a low frequency effects (LFE) channel. In
general, Dolby Digital signals can also consist of fewer than 5 channels (for example 2.0 or 3.0).
DTS Digital Sur
round is a digital sound system for differentiated 5.1
multi-channel audio reproduction which creates three-dimensional
surround sound effects.
CINEMO DR 3400 DD ________________________
10
1
5
7
9
8
6
2
3
4
PRO LOGIC II
DOLBY
SURROUND
1
igital Home Cinema System
D
ON / OFF
inemo
C
VOLUME
FUNCTION
DSP MODE
HOME CINEMA
SYSTEM
A-B
PROG
CD
S/I
PTY
DSP
ǵ
AUX
DVD
AM
FM
FM
2
3
1
MODE
5
6
4
DISPL
8
9
7
0
M
CL
RGB/
SV
RDS
INFO/NEWS
PTY
TOP
MENU
PTY SEARCH
SPK
LEVEL
Tele Pilot 60 A
SURROUND
Page 5

ENGLISH
5
SET-UP AND SAFETY___________________________
Please note the following information when setting up the home cinema system:
The DVD receiver and loudspeakers are designed for playing back video
and audio signals at home. Any other use is expressly prohibited.
If you want to set up the DVD receiver on wall shelves or in cupboards,
please ensure that the device is adequately ventilated. There must be at least
10 cm of space at the side, above and behind the device.
Please note when setting up the DVD receiver that furniture surfaces are
coated with various types of paint and plastic, which often contain chemical
additives. These additives may cause corrosion to the feet of the unit. This
may leave stains on the surface of the furniture which can be difficult or
impossible to remove.
If the DVD and loudspeakers are subjected to sudden changes in temperature, for example if they are brought in from the cold to a warm room, let
them stand for at least two hours without inserting a disc. Do not connect
them to the mains supply during this time.
The DVD receiver and loudspeakers are designed for use in dry rooms. You
must make sure that they are protected from moisture such as rain or water
splashes.
Place the DVD receiver on a hard, level surface. Do not place any objects
such as newspapers on the DVD receiver, or any cloth or similar articles
underneath it.
The laser lens is sensitive to temperature. Therefore, do not place the DVD
receiver near heating units or in direct sunlight, as this will impair cooling.
Do not insert foreign objects in the disc compartment of the DVD receiver.
Never open the casing of the DVD receiver and loudspeakers. No warranty
claims are accepted for damage resulting from improper handling.
Do not place any vessels such as vases containing fluid on the DVD receiver
and loudspeakers. These may be knocked over and spill fluid on the electrical components, thus presenting a safety risk. Do not place any objects such
as burning candles on the DVD receiver or loudspeakers.
Thunderstorms are a danger to all electrical devices. Even if the DVD receiver is switched off, it can be damaged by a lightning strike to the mains.
Always disconnect the mains and antenna plugs of the DVD receiver during
a storm.
If the DVD receiver cannot scan DVDs or CDs perfectly, use a commercially
available cleaning CD. Other cleaning methods may damage the laser
optics. Always keep the disc compartment closed to prevent dust from collecting on the laser optics.
°C
2h
ON / OFF
DSP MODE
FUNCTION
VOLUME
D
igital
H
ome Cinema System
C
inemo
FUNCTION
VOLUME
°C
ON / OFF
DSP MODE
FUNCTION
VOLUME
D
igital Home Cinema System
C
inemo
K
rieg
im
B
a
lk
a
n
ON / OFF
DSP MODE
FUNCTION
VOLUME
D
igital Home Cinema
S
ystem
C
inemo
~AC IN
SPEAKER
SW C RS LS R L
8-16Ω4-8Ω
IMPEDANCE
SCART
FM 75Ω
S-VIDEO
AM
LOOP
RESET
L
R
IN OUT
AUDIO
IN OUT
VIDEO
IN OUT
OPTICAL
igital Home Cinema System
inemo
D
C
ON / OFF
VOLUME
FUNCTION
DSP MODE
Page 6

6
The front of the DVD receiver
ON/OFF Switches the device to standby mode and back on again,
using the last signal source selected.
The device is only fully disconnected from the mains after
the plug has been pulled out.
•
Standby indicator. Lights up when the DVD receiver is in
standby mode.
ə Opens and closes the disc compartment.
ı
II Starts and pauses disc playback.
7
Ends disc playback.
5a
Q
In disc mode – press briefly during playback to select the
previous section or title. Hold down during playback to
start a reverse search.
In tuner mode – selects the previous preset station (stored
radio station).
W
s6
In disc mode – press briefly during playback to select the
next section or title. Hold down during playback to start a
reverse search.
In tuner mode – selects the next preset station (stored
radio station).
DSP MODE Depending on the type of disc, selects the sound effects
LIVE HOUSE, HALL, CONCERT, STADIUM and THEATRE or
DSP OFF.
y Headphone jack for connecting a stereo headphone set
with a jack plug (ø 3.5 mm).
The loudspeakers are switched off automatically. The
sound is reproduced in stereo two-channel sound with no
surround sound effects.
VOLUME Control dial for volume control.
FUNCTION Switches between DVD, TUNER FM/AM AV IN, SCART IN
and DIGITAL IN functions.
OVERVIEW____________________________________________
ON / OFF
igital Home Cinema System
D
SURROUND
inemo
C
DSP MODE
VOLUME
FUNCTION
Page 7
ENGLISH
7
The displays of the DVD receiver
00 0:00:00 Displays various function conditions and settings, as well
as the name or frequency of the radio station.
KHz In combination with the frequency display for AM (medium
wave) reception.
MHz In combination with the frequency display for FM recep-
tion.
L C R Indicates whether the source signal consists of two or more
LS S RS channels.
/ A DVD is inserted.
ijDIGITAL Dolby Digital indicator.
ijPro Logic II Dolby Pro Logic II indicator.
CD An audio CD inserted.
DTS indicator.
STEREO In tuner mode – two-channel stereo reception.
VCD A VCD or S-VCD is inserted.
MP3 An MP3 CD is inserted.
II The disc has been paused during playback.
s Disc playback.
TITLE Displays the title number.
TRK Displays the track number.
TUNED A radio station is optimally tuned.
CHP Displays the chapter number.
PROG In disc mode – lights up when playing a track memory.
RDS In tuner mode – an RDS station is being received.
REPEAT 1 The repeat function is activated.
A-B A selected section is repeated.
8 The sleep timer is activated.
OVERVIEW____________________________________________
00 00000
::
ij DIGITAL
ij ProLogic II
STEREO
VCD
CD
II
s
8
MP3
TITLE TRK TUNED CHP PROG RDS REPEAT 1 A-B
KHz
MHz
/
Page 8
8
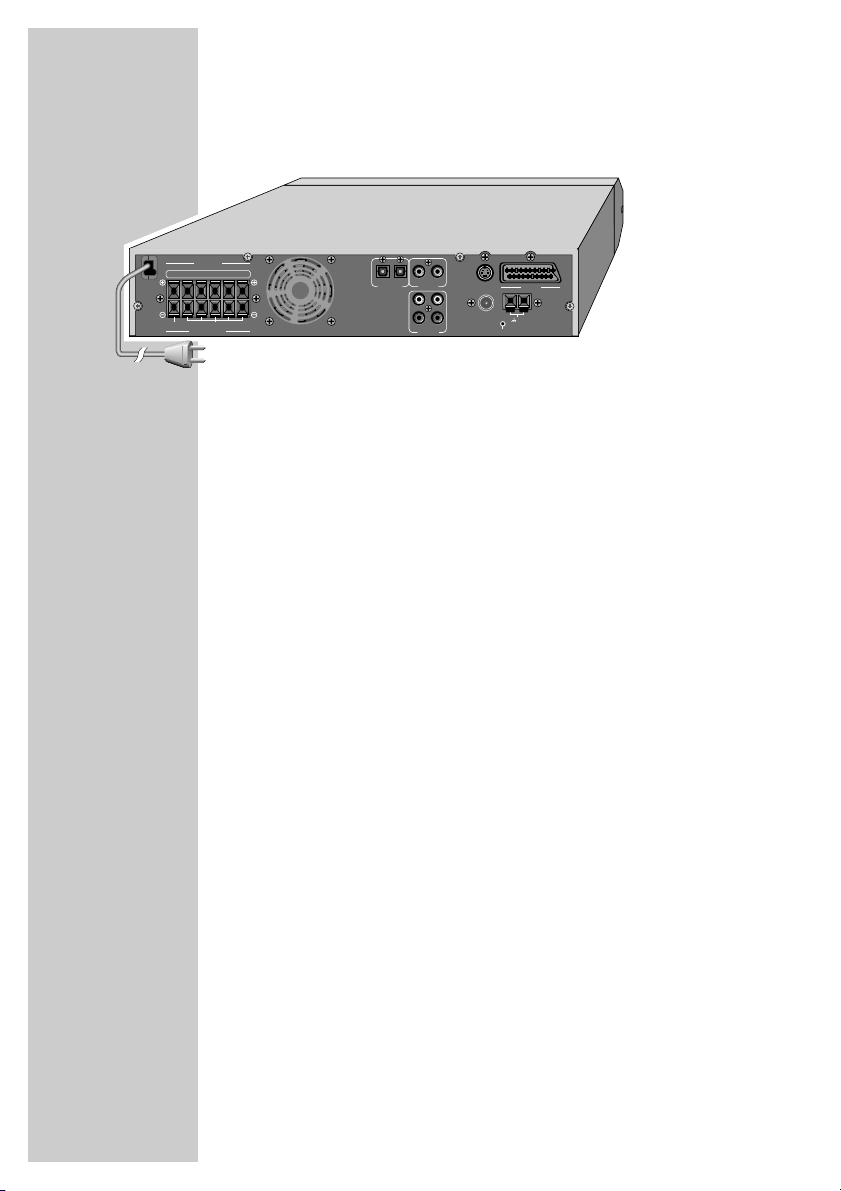
The back of the DVD receiver
~AC IN Power cord.
SPEAKER Terminals for connecting the supplied
SW C RS LS R L loudspeaker cables for the subwoofer, centre
speaker, right surround speaker, left surround
speaker, right front speaker and left front speaker.
OPTICAL IN Digital (optical) audio signal input for connecting an
external device.
OPTICAL OUT Digital (optical) audio signal output for connecting
an external device.
VIDEO IN Video signal input for connecting an external device.
VIDEO OUT Alternative video signal output for connecting the
television using a conventional cinch cable.
S-VIDEO Alternative video signal output for connecting the
television using a conventional Y/C cable.
SCART Euro AV (Scart) socket for connecting the television
using the Euro-AV cable supplied.
AUDIO IN L R Audio signal inputs for connecting an analogue
playback device.
AUDIO OUT L R Audio signal outputs for connecting an analogue
recording device.
FM 75Ω Connection socket for the FM antenna.
AM LOOP Connection socket for the AM frame antenna
supplied.
RESET Resets the DVD receiver in case the operating
electronics are blocked.
OVERVIEW____________________________________________
~AC IN
SPEAKER
SW C RS LS R L
8-16Ω4-8Ω
IMPEDANCE
SCART
FM 75Ω
S-VIDEO
AM
LOOP
RESET
L
R
IN OUT
AUDIO
IN OUT
VIDEO
IN OUT
OPTICAL
Page 9

ENGLISH
9
OVERVIEW____________________________________________
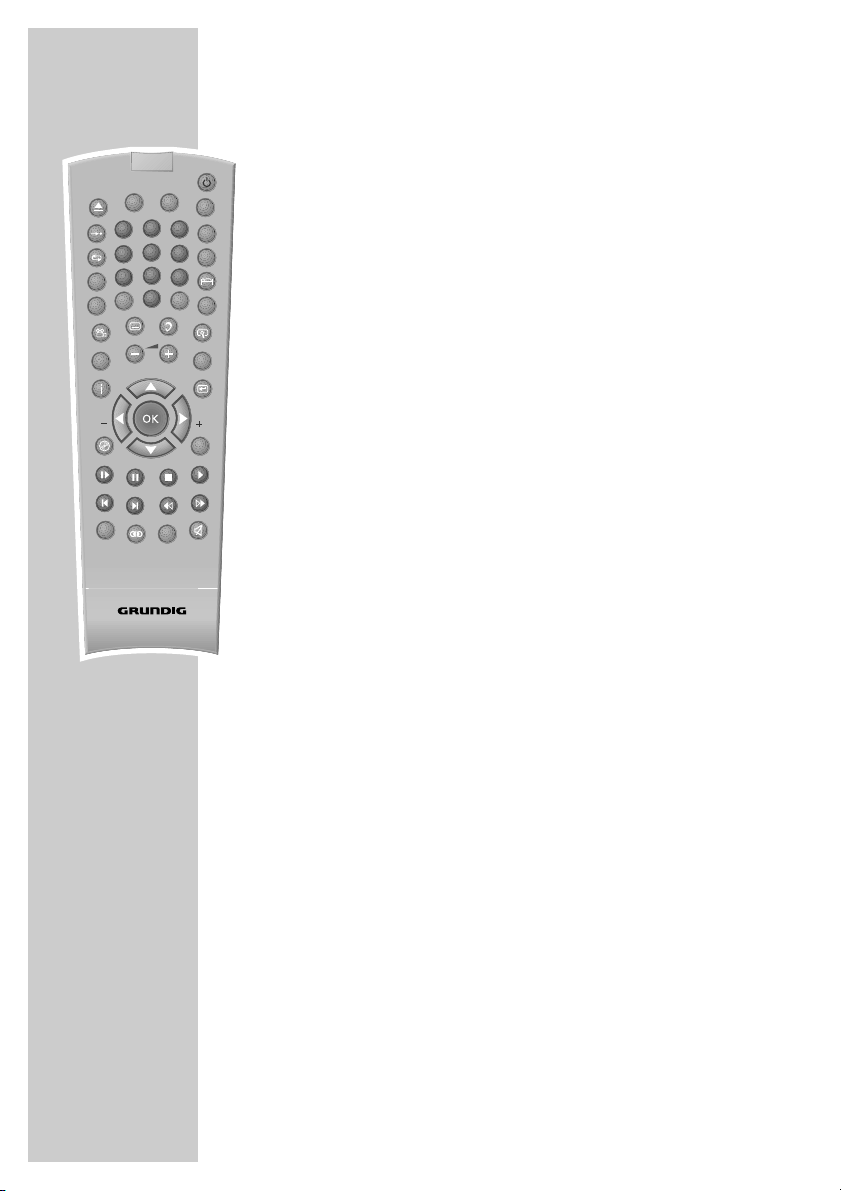
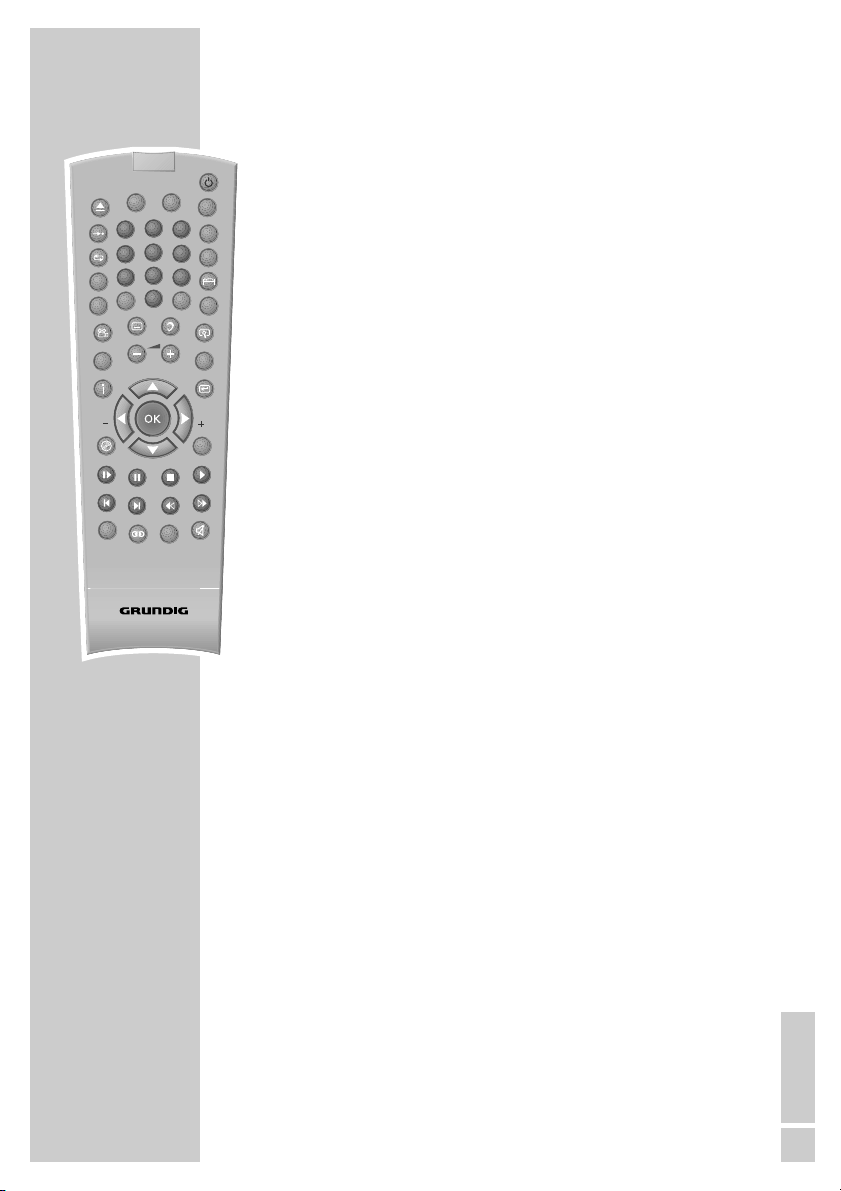
The remote control
9 Switches the DVD receiver to standby mode and from
standby mode using the last signal source selected.
ə Opens and closes the disc compartment.
DVD Selects the DISC input source.
AUX Selects the AV IN, SCART IN and DIGITAL IN (Aux)
input sources.
AM FM Selects the TUNER input source and switches between
FM and AM wavebands.
1 ... 0 Numerical buttons for various inputs.
In disc mode – select titles or chapters.
In tuner mode – to directly entering the preset number
or frequency.
ɧ Selects the “GO TO” function (for selecting the starting
point for playback, or a particular title, chapter or
track).
FM MODE Switches between stereo and mono reception in FM
tuner mode.
b In DVD mode – for repeating a chapter or the entire
DVD.
In CD mode – for repeating a title, a file (MP3), all
titles or all files (MP3).
DISPL Switches the screen display in disc mode between various
information on chapters, titles and playing time.
A-B In disc mode – marks a section, which is then
constantly repeated.
O Press once to activate the brightness setting for the
display. Press twice to activate the sleep timer setting.
PROG Opens the menu for creating a track memory.
CL Deletes a track memory.
M Activates the memory function for storing radio
stations in preset positions.
Starts and pauses the automatic station search (ASP).
RGB/SV Selects the video output format (RGB or S-Video).
A-B
PROG
AUX
DVD
1
4
7
CL
CD
S/I
INFO/NEWS
PTY
PTY SEARCH
DSP
Tele Pilot 60 A
AM
FM
FM
2
3
MODE
5
6
DISPL
8
9
0
M
RGB/
SV
RDS
PTY
TOP
MENU
SPK
LEVEL
Page 10
10
n Selects various camera angles for certain scenes
or passages on the DVD during playback.
y For selecting and displaying subtitles on the DVD
during playback.
d Switches between the original and dubbed
language during DVD playback
v Enlarges scenes during playback (zoom).
CD S/I In CD mode – for playing back tracks or files in
random order (S = shuffle); for playing the introductions of tracks or files (I = intro).
– z + Adjusts the volume of the home cinema system.
RDS In tuner mode – calls up RDS information.
i Opens the set-up menu in disc mode when the
disc is not playing, regulates the brightness and
focus during playback.
x For quitting screen menus.
.
Opens the DVD title menu during playback;
switches playback control (PBC) of VCDs and
S-VCDs off and on.
In MP3 mode: switches between playback of a
file, an album and the entire disc.
TOP MENU Opens the disc menu.
OK Activates the selected setting and confirms
entries.
A INFO/NEWS Moves the cursor up in the set-up or disc menu
(on the TV screen).
S PTY SEARCH Moves the cursor down in the set-up or disc
menu (on the TV screen).
In tuner mode – activates the PTY search function.
PTY – a Moves the cursor left in the set-up or disc menu
(on the TV screen).
In tuner mode – selects programme types.
s PTY + Moves the cursor right in the set-up or disc menu
(on the TV screen).
In tuner mode – selects programme types.
I
s
Switches to slow motion search at various speeds
during DVD playback.
OVERVIEW____________________________________________
A-B
PROG
AUX
DVD
1
4
7
CL
CD
S/I
INFO/NEWS
PTY
PTY SEARCH
DSP
Tele Pilot 60 A
AM
FM
FM
2
3
MODE
5
6
DISPL
8
9
0
M
RGB/
SV
RDS
SPK
LEVEL
PTY
TOP
MENU
Page 11
ENGLISH
11
II Press once to pause playback (freeze frame). Press
repeatedly to move forward frame by frame.
7
Press once to interrupt disc playback (resume), press
twice to end playback (stop).
ı
Starts playback.
56 During disc playback, selects the previous or next title
or section.
In tuner mode – for selecting the previous or next
preset radio station.
m, In tuner mode – switches the frequency up or down in
50 kHz increments. Starts the forward or reverse
frequency search.
In disc mode – starts the fast forward and reverse
search.
DSP Selects the sound effects LIVE HOUSE, HALL, CONCERT,
STADIUM and THEATRE or DSP OFF (not for MP3).
K Selects the sound effects Pro-Logic II Music and Pro-
Logic II Movie or Pro-Logic II Off (2-channel stereo)
(not for MP3).
SPK LEVEL For setting the output level of the loudspeakers.
d Switches the home cinema system to and from mute
mode.
OVERVIEW____________________________________________
A-B
PROG
AUX
DVD
1
4
7
CL
CD
S/I
INFO/NEWS
PTY
PTY SEARCH
AM
FM
FM
2
3
MODE
5
6
DISPL
8
9
0
M
RGB/
SV
RDS
PTY
TOP
MENU
DSP
SPK
LEVEL
Tele Pilot 60 A
Page 12
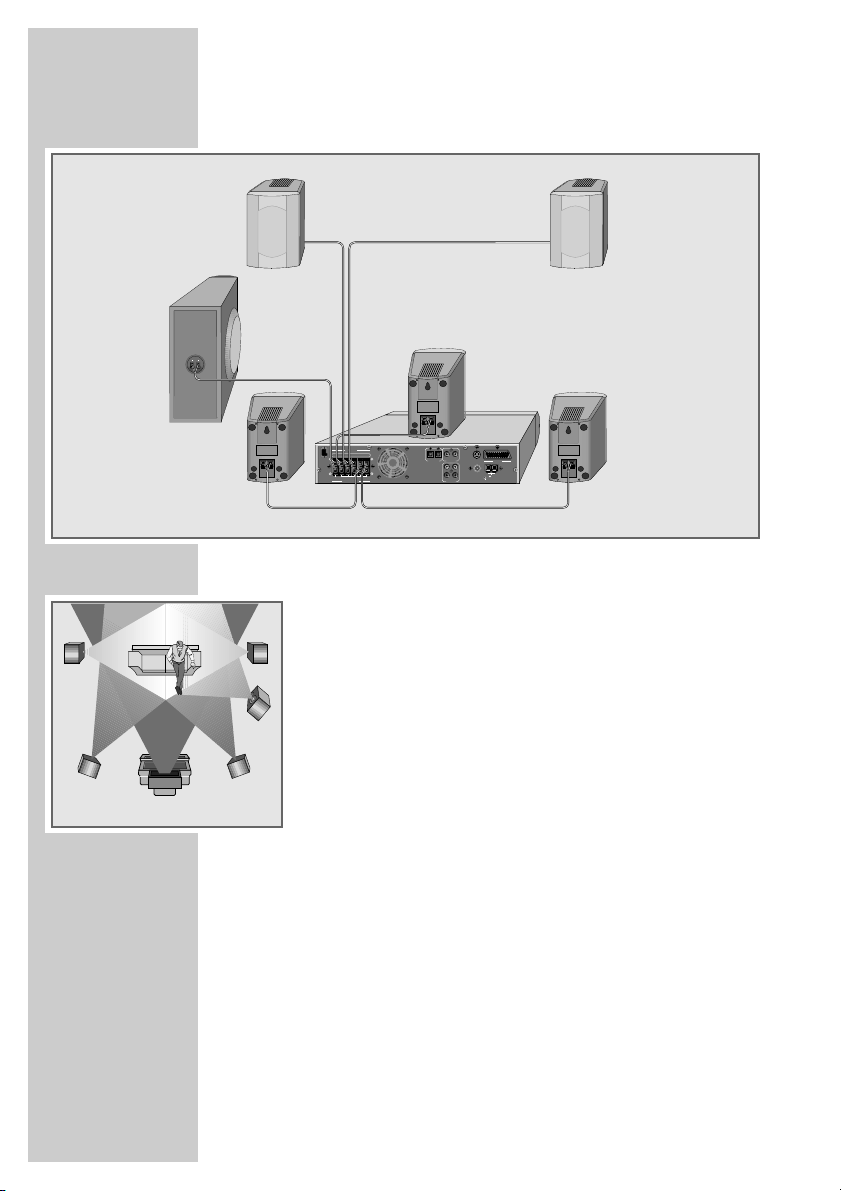
12
Connection diagram for the loudspeakers
Setting up the loudspeakers
If possible, set up the front loudspeakers in line with the TV set,
angled slightly towards the listener. The listener and the speakers
should form an equilateral triangle. This creates the best stereo
effect.
The surround loudspeakers should be angled slightly towards each
other at a sufficient distance to the left and right behind the listener.
They should be positioned at ear height, even when wall-mounted.
Set up the central loudspeaker at the midpoint between the two front
speakers, for example above or below the TV set. The best height
for the centre loudspeaker is at head height of the seated listener.
To achieve the best possible bass sound, we recommend that you set
up the subwoofer to the left or right of the front loudspeakers, in
such a way that the sound crosses the room diagonally.
When you are in the middle of the room, you may not be able to
hear the bass tone of the subwoofer sufficiently. This is caused by
what are known as standing waves, which occur between parallel
walls. In this case, simply position the subwoofer at an angle to the
wall.
Avoid placing the loudspeakers in a corner, because this overamplifies the bass tones.
Objects in front of the loudspeakers significantly impair the treble
tones and the stereo effect.
CONNECTION AND PREPARATION_________
Surround
right
Centre
Subwoofer
Surround
left
Front left
Front right
Surround R
Front R
Front L
Surround L
Centre
Subwoofer
INPUT
SPEAKER
SW C RS LS R L
~AC IN
8-16Ω4-8Ω
IMPEDANCE
IN OUT
IN OUT
S-VIDEO
VIDEO
OPTICAL
SCART
L
FM 75Ω
R
AM
LOOP
IN OUT
RESET
AUDIO
Page 13
ENGLISH
13
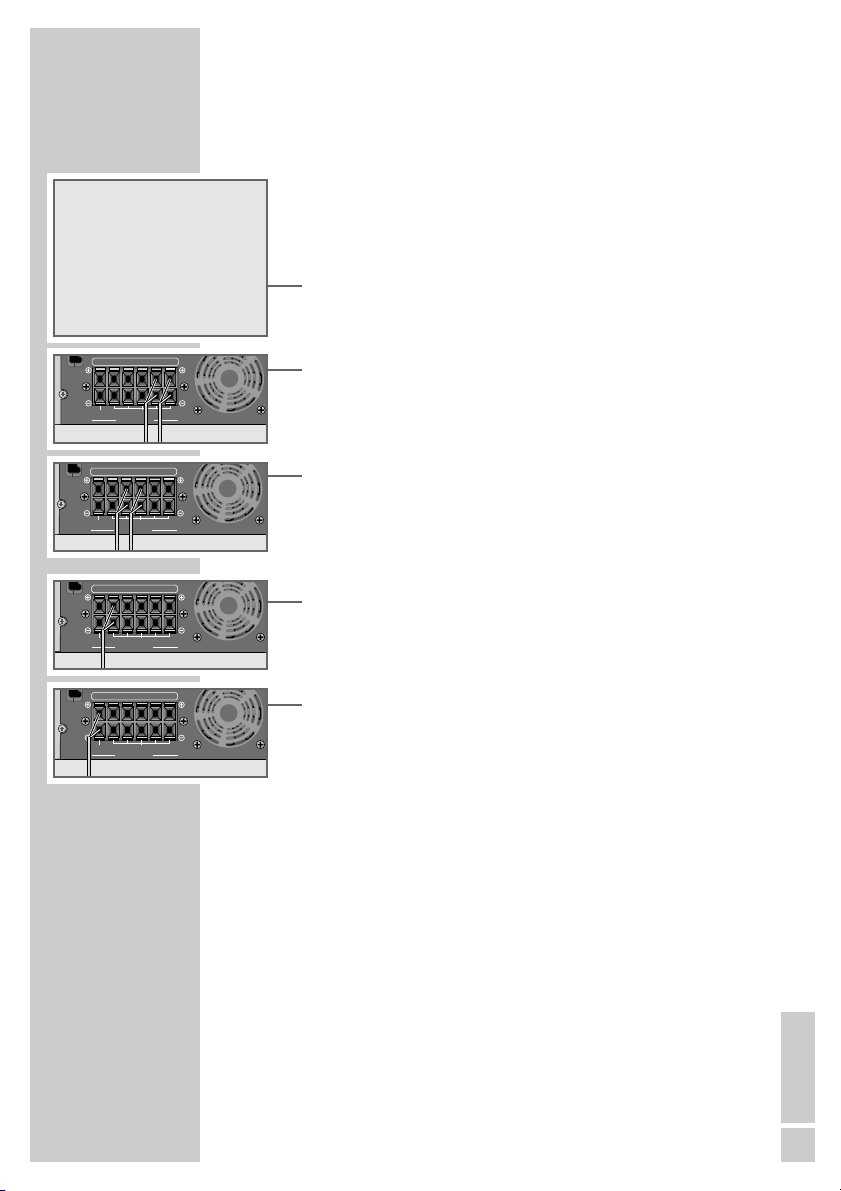
Connecting the loudspeakers
Note:
To connect the loudspeakers, switch off the DVD receiver and disconnect the mains.
When you connect the loudspeaker cables, do not let frayed ends
protrude, as this can cause short circuits.
Note:
Connect the coloured loudspeaker cable to the coloured terminals,
and the black cable to the black terminals.
Connecting the front loudspeakers
1 Connect the cables for the right and left front loudspeakers to
the »SPEAKER R« and »SPEAKER L« terminals on the DVD
receiver and the appropriate terminals on the loudspeakers.
Connecting the surround loudspeakers
1 Connect the cables for the right and left surround loudspeakers
to the »SPEAKER RS« and »SPEAKER LS« terminals on the
DVD receiver and the appropriate terminals on the loudspeakers.
Connecting the central loudspeaker
1 Connect the cables for the central loudspeaker to the terminals
on the DVD receiver and the appropriate terminals on the loudspeaker.
Connecting the subwoofer
1 Connect the cables for the subwoofer to the »SPEAKER SW«
terminals on the DVD receiver and the appropriate terminals on
the subwoofer.
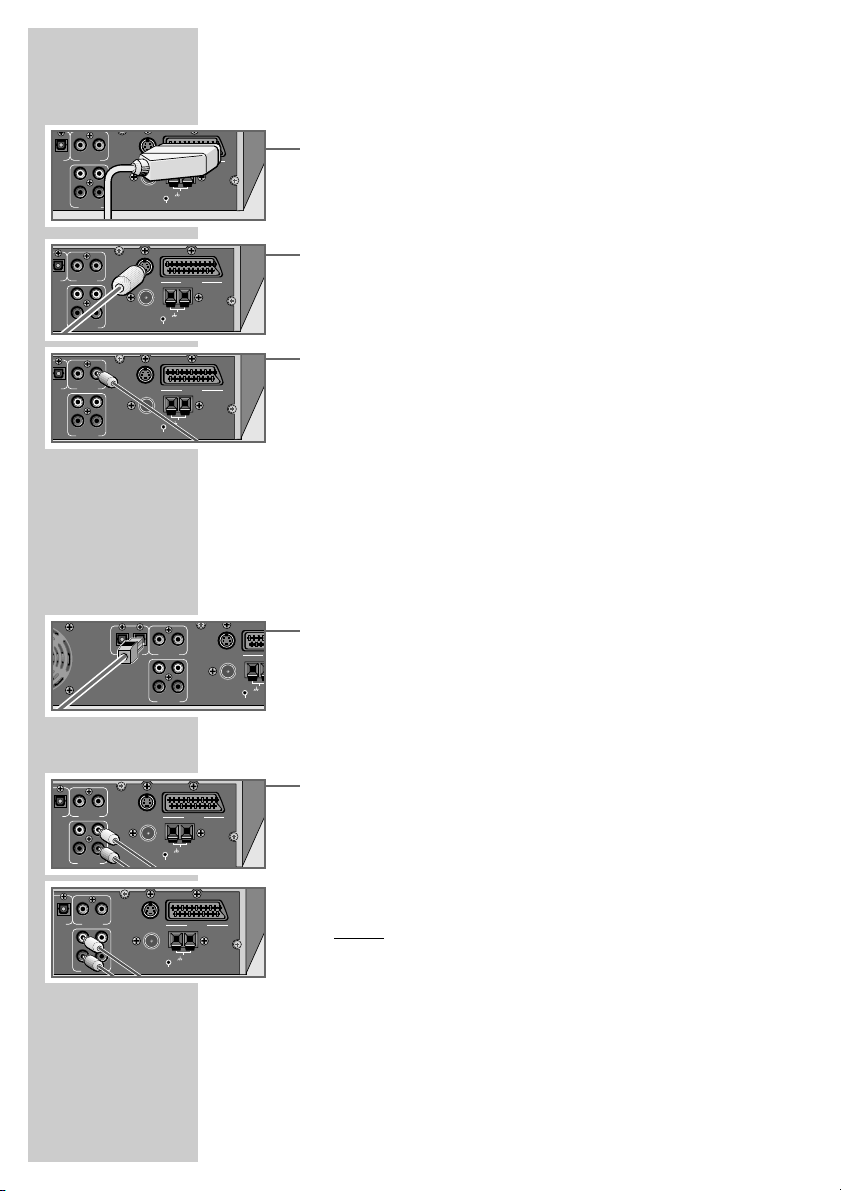
Connecting a television, flat screen or projector
You have three options, depending on the sockets you have on your
television or projector:
– Connecting to the Euro-AV (Scart) socket using the Euro-AV cable
supplied is the best option, because the video, audio and format
switching signals are all on the same connection.
– If your television has no Euro-AV socket, you can still achieve a
good picture quality by connecting it via the S-VIDEO OUT sockets.
– Alternatively, you can connect it using cinch cables to the VIDEO
OUT sockets for standard picture quality.
CONNECTION AND PREPARATION_________
Loudspeakers yx
Front left Black White
Front right Black Red
Surround left Black Green
Surround right Black Brown
Centre Black Yellow
Subwoofer Black Blue
SW C RS LS R L
~AC IN
8-16Ω4-8Ω
IMPEDANCE
SW C RS LS R L
~AC IN
8-16Ω4-8Ω
IMPEDANCE
~AC IN
~AC IN
SW C RS LS R L
8-16Ω4-8Ω
IMPEDANCE
SW C RS LS R L
8-16Ω4-8Ω
IMPEDANCE
Page 14
14
Connection using a EURO-AV (Scart) cable
1 Plug the EURO-AV cable supplied into the »SCART« socket of
the DVD receiver and into the corresponding socket on the television, flat screen or projector.
Connection using a Y/C (S-Video) cable
1 Plug a standard Y/C cable into the »S-VIDEO« socket on the
DVD receiver and the corresponding socket (S-VIDEO IN) on
the television, flat screen or projector.
Connecting using a video cinch cable
1 Plug a standard video cinch cable into the »VIDEO OUT«
socket on the DVD receiver and the corresponding socket
(VIDEO IN) on the television, flat screen or projector.
Connecting digital external devices
You can connect external devices, such as a digital recorder, for
disc mode. An optical output »OPTICAL OUT« is available for this
purpose. The digital output must be activated and set in the set-up
menu (see page 21).
You can connect digital audio sources using the optical input
»OPTICAL IN«.
1 Connect the input socket of the external device to the corres-
ponding output socket on the DVD receiver.
2 Connect the output socket of the external device to the corre-
sponding input socket on the DVD receiver.
Connecting analogue external devices
1 Use cinch cables to connect the audio input sockets of the
external device to the »AUDIO OUT L R« sockets on the DVD
receiver.
2 Use a cinch cable to connect the video input socket of the
external device to the »VIDEO OUT« socket on the DVD
receiver;
and/or
1 Use cinch cables to connect the audio output sockets of the
external device to the »AUDIO IN L R« sockets on the DVD
receiver.
2 Use a cinch cable to connect the video output socket of the
external device to the »VIDEO IN« socket on the DVD receiver.
CONNECTION AND PREPARATION_________
C
A
M
O
IN OUT
OUT
AL
IN OUT
OUT
L
IN OUT
IN OUT
OUT
AL
IN OUT
VIDEO
IN OUT
AUDIO
VIDEO
L
R
AUDIO
VIDEO
L
R
AUDIO
S-VIDEO
FM 75Ω
S-VIDEO
FM 75Ω
S-VIDEO
FM 75Ω
RESET
RESET
RESET
IN OUT
VIDEO
IN OUT
AUDIO
SCART
AM
LOOP
SCART
AM
LOOP
SCART
AM
LOOP
S-VIDEO
L
FM 75Ω
R
RESET
L
R
IN OUT
OPTICAL
A
LO
IN OUT
OUT
AL
OUT
CAL
VIDEO
L
R
IN OUT
AUDIO
IN OUT
VIDEO
IN OUT
AUDIO
S-VIDEO
SCART
FM 75Ω
AM
LOOP
RESET
S-VIDEO
FM 75Ω
SCART
AM
LOOP
RESET
L
R
Page 15

ENGLISH
15
Connecting the antennas
1 Plug the cable of the rooftop antenna into the FM antenna
socket »FM 75Ω«.
Note:
If no rooftop antenna is available, use the auxiliary antenna
supplied. This antenna provides reasonably good reception of
local FM (VHF) stations. Do not shorten the auxiliary antenna.
2 For medium wave reception, plug the cable of the supplied MW
frame antenna into the »AM LOOP« socket.
Note:
In order to prevent interference, place the MW frame antenna
as far as possible from the home cinema system or other
sources of interference.
Connecting the power cord
1 Plug the power cord (»~AC IN«) into the wall socket.
Note:
If the DVD receiver does not react when the buttons are
pressed, this may be caused by electrostatic discharge in the
area. In this case pull out the mains plug and insert it into the
socket again after a few seconds.
Inserting batteries in the remote control
1 Open the battery compartment by pressing the marked area
and pulling down the cover.
2 When inserting the batteries (2 x 1.5 V, LR 06/UM 3/AA),
observe the polarity marked on the battery compartment.
3 Close the battery compartment.
Note:
If the DVD receiver no longer reacts properly to remote control
commands, the batteries may be flat. Be sure to remove used
batteries. The manufacturer accepts no liability for damage
resulting from leaking batteries.
Environmental note:
Batteries, including those which contain no heavy metal, may
not be disposed of with household waste. Please dispose of
used batteries in an environmentally sound manner. Find out
about the legal regulations which apply in your area.
CONNECTION AND PREPARATION_________
S-VIDEO
FM 75Ω
S-VIDEO
FM 75Ω
SCART
AM
LOOP
RESET
SCART
AM
LOOP
RESET
TVR
M
A
A
N
N
E
T
N
A
P
O
O
L
SPEAKER
SW C RS LS R
~AC IN
8-16Ω4-8Ω
IMPEDANCE
Page 16

16
Additional information for units sold in the UK.
Units sold in the UK are suitable for operation from a 240V ac, 50Hz mains
supply.
The range of multi-system receivers is built to work in most European countries. However, the mains plug and socket system for the UK differs from
many European countries.
This appliance has been supplied with a fitted, non-removable, approved
converter plug for use in the UK. This converter plug is fitted with a 5A rated
fuse.
In case this appliance is supplied with a moulded 2-pin Euro plug only,
which is unsuitable for UK operation, this must be cut off and immediately
disposed of. An approved 13A, 3-pin UK plug should then be fitted by a
qualified electrician.
Note:
The severed Euro plug must be destroyed to avoid a possible shock
hazard should it be inserted into a socket elsewhere.
If a non-rewireable 3-pin plug or a rewireable 13A (BS1363) 3-pin plug is
used, it must be fitted with a 5A ASTA or BSI approved BS1362 fuse. If any
other type of plug is used it must be protected by a 5A fuse either in the
plug, or at the distribution board. If this type of plug becomes defective,
ensure that the fuse is removed before disposal, to eliminate potential shock
hazard.
If it is necessary to change the fuse in the non-rewireable plug, the correct
type and rating (5A ASTA or BSI approved BS1362) must be used and the
fuse cover must be refitted. If the fuse cover is lost or damaged, the lead and
plug must not be used until a replacement is obtained. Replacement fuse
covers should be obtained from your dealer.
Important:
The wires in the mains lead are colour coded in accordance with the following code:
BLUE – NEUTRAL
BROWN – LIVE
As the colours of the wires in the mains lead of your appliance may not correspond with the coloured marking identifying terminals in your plug, proceed as follows:
Connect the BLUE coloured wire to plug terminal marked with the letter “N”
or coloured black.
Connect the BROWN coloured wire to the plug terminal marked with the letter “L” or coloured red.
In no circumstance must any of the wires be connected to the terminal marked with the letter “E”, earth symbol “
z”, coloured green, or green & yel-
low.
Replacement mains lead sets can be obtained from your local dealer, or by
contacting Grundig Consumer Relations (01788 570088)
Moulded 3-pin lead set, suitable for UK use:
Ref: Leadset UK 8290-991-224
Moulded 2-pin Euro lead set, not suitable for UK use:
Ref: Leadset Euro 8290-991-316
CONNECTION AND PREPARATION_________
Page 17

ENGLISH
17
General information
You can make the settings required for operating the system in the
set-up menu which appears on the television screen. To do this,
switch on the television and switch it to the channel on which the
DVD is set. You can only make settings with the remote control in
disc mode when the device is stopped.
Switching on
1 Press »DVD« to switch on the DVD receiver from standby
mode.
Selecting the menu language
The set-up menu is available in English, German, French and Spanish. The default setting is English.
1 Press »
i« to open the set-up menu.
2 Select the »Language« menu item with »
a
« or »s« and press
»OK« to confirm.
3 Select »OSD Menu« with »
A
« or »S« and press »OK« to
confirm.
4 Select your language using »
A
« or »S« and press »OK« to
confirm.
5 Press »
i« to quit the set-up menu.
Navigating in the set-up menu
Move through the set-up menu with »a« or »s« and select the
main menu item. The selected menu item is shown on a light blue
background.
When you press »OK« to confirm your selection, a sub-menu with
two columns appears. Here too, you can navigate with »
A
« and
»S« and select the item you require in the right column. The selected line is shown on a light blue background.
When you press »OK« to confirm your selection, a third column
usually appears, where you can make the setting by pressing »
A
«
or »S«. The selected setting is shown on a light blue background.
When you press »OK« to confirm the setting, the third column disappears. You can now quit the set-up menu by pressing »i« or press
»A« to return to the main menu and make other settings.
Some sub-menus have no third column. In this case, you make the
setting in the second column by repeatedly pressing »OK«. You can
then quit the set-up menu by pressing »
i« or press »
A
« to return to
the main menu and make other settings.
SETTINGS ______________________________________________
Language
OSD Menu
English English
Subtitle English Deutsch
Audio English Français
DVD Menu English Español
Video Audio Rating
Language
TV Shape
4:3 Pan Scan
TV System PAL
Video Audio Rating
Language
TV Shape
4:3 Pan Scan 4:3 Letter Box
TV System PAL
4:3 Pan Scan
16:9 Wide
Video Audio Rating
Page 18

18
Setting the video functions
Setting the picture format
1 Select the »Video« menu item with »a« or »s« and press
»OK« to confirm.
2 Select »TV Shape« by pressing »
A
« or »S« and press »OK«
to confirm.
3 In the third column, press »
A
« or »S« to make the setting
and press »OK« to confirm:
– »4:3 Letter Box« for a normal 4:3 television.
– »4:3 Pan Scan« for a normal 4:3 television. Wide-screen pic-
tures are cropped to the left and right. »Pan Scan« is the
default setting.
– »16:9 Wide« for a 16:9 wide-screen television.
Setting the colour norm for the television
1 Select the »Video« menu item with »a« or »s« and press
»OK« to confirm.
2 Select »TV System« by pressing »
A
« or »S« and press
»OK« to confirm.
3 In the third column, press »
A
« or »S« to make the setting
and press »OK« to confirm:
– »NTSC«: PAL video signals are converted to NTSC signals.
– »PAL«: NTSC video signals are converted to PAL signals.
»PAL« is the default setting.
– »Auto«: PAL or NTSC video signal output is selected automat-
ically in the multi-system.
Selecting the video format for the Euro-AV (Scart)
output
1 In the Stop position, press »RGB/SV« to switch between two
video formats:
– »RGB« or »RGB« on the device: the video output of the Euro-
AV socket provides RGB video signals. The S-Video socket is
switched off. This is the default setting.
– »S-Video« or »S-VIDEO« on the device: the video output of
the Euro-AV and S-Video socket provides S-Video signals.
SETTINGS ______________________________________________
Language
TV Shape
4:3 Pan Scan 4:3 Letter Box
TV System PAL
4:3 Pan Scan
16:9 Wide
Video Audio Rating
Language
TV Shape 4:3 Pan Scan
TV System
PAL NTSC
PAL
Auto
Video Audio Rating
Page 19

ENGLISH
19
Setting the loudspeaker configuration
Switching on
1 Switch on the DVD receiver from standby by pressing »9« on
the remote control or »ON/OFF« on the device.
Setting the distance to the listening position
Ideally, all the speakers in a home cinema system, should be set up
at equal distances from the listener. The central speaker should also
be positioned in line with the front speakers. If these preconditions
are met, you do not need to set a time delay for the sound, because
the default setting is »0ms«.
However, central and front loudspeakers are often set up closer to
the listener. In this case, the sound must be electronically delayed by
a fraction of a second. This is done using the sound time delay function.
If the central speaker is no more than 50 cm from the line between
the front speakers, the setting is not necessary. If the distance is
greater, you must find out the difference between the distances from
the listener to the front speakers and from the listener to the central
speaker. Enter the travel time of the sound in milliseconds (ms)
(»0ms« to »5ms«). One metre roughly corresponds to 3 milliseconds.
When using surround speakers, you must also find out the difference between the distances from the listener to the front speakers
and from the listener to the surround speakers. Enter the travel time
of the sound from »0ms«, »3ms« to »12ms«, »15ms«. One metre
roughly corresponds to 3 milliseconds.
1 Select the »Audio« menu item with »
a
« or »s« and press
»OK« to confirm.
2 Select »CNTR CTRL« with »
A
« or »S« and press »OK« to
confirm.
3 In the third column, press »
A
« or »S« to make the setting
and press »OK« to confirm.
4 Select »REAR CTRL« with »
A
« or »S« and press »OK« to
confirm.
5 In the third column, press »
A
« or »S« to make the setting
and press »OK« to confirm.
Checking the volume with a test tone
A test tone can be created for each connected speaker to check the
volume level. »Off« is the default value.
1 Select the »Sound« menu item with »
a
« or »s« and press
»OK« to confirm.
SETTINGS ______________________________________________
Language
AC3 PCM
DTS PCM 5ms
MP3/WMA PCM 4ms
Others PCM 3ms
Pink Noise Off 2ms
DRC Off 1ms
CNTR CTRL
0ms 0ms
REAR CTRL 0ms
Video Audio Rating
Page 20

20
SETTINGS ______________________________________________
2 Select »Pink noise« with »A« or »S« and press »OK« to con-
firm.
3 In the third column, select »On« with »
A
« or »S« and press
»OK« to confirm.
– The test tone sounds in turn from the left front speaker, the
central speaker, the right speaker, the surround speakers and
the subwoofer (see the loudspeaker indicator on the DVD
receiver).
4 Use »– z +« to adjust the volume of the test tone to a clear-
ly audible level.
– If you want to adjust the volume level of all the loudspeakers,
please read the section entitled “Setting the volume level on
all channels”.
5 To stop the test tone, press »
A
« or »S« to select »Off« in the
third column and press »OK« to confirm.
Setting the volume level on all channels
Depending on the current operating mode (see the loudspeaker
indicator on the DVD receiver), you can adjust the loudspeaker
volumes according to your preference. You can make this setting
either with or without the test tone. The volume impression should be
about the same for all channels. The individual volumes can be
adjusted within a range of -5 to +5 dB.
When entering the settings, if no button is pushed for more than
5 seconds, the DVD receiver quits the menu automatically. However,
altered settings are saved.
1 Press »SPK LEVEL« to open the menu for setting the level.
– Display: »SOUND«.
2 Press »
A
« to open the first setting.
– Display: e.g. »L-CH 0«.
3 Set the volume of the front speaker using »
a
« or »s«.
– Display: e.g. »L-CH +4«.
4 To set the central speaker (»C-CH 0«), the right front speaker
(»R-CH 0«), the surround speakers (»SL-CH 0« and »SR-CH
0«) or the subwoofer (»SW-CH 0«), repeat steps 2 and 3.
– The DVD receiver quits the menu automatically after five
seconds. All settings are retained.
SOUND
L-CH 0
L-CH +4
Language
AC3 PCM
DTS PCM
MP3/WMA PCM
Others PCM
Pink Noise
Off Off
DRC Off
On
CNTR CTRL 0ms
REAR CTRL 0ms
Video Audio Rating
Page 21

ENGLISH
21
Setting the audio functions
Setting digital audio signal output
You can make the setting for the optical output for connection to an
external device here.
1 Select the »Audio« menu item with »
a
« or »s« and press
»OK« to confirm.
2 Select the output format (»AC3«, »DTS«, »MP3/WMA« or
»Others«) using »
A
« or »S«.
3 Press »OK« repeatedly to make the setting.
– »PCM«: The digital output converts into PCM audio format for
digital recorders. »PCM« is the default value.
– »Original«: The digital output provides the original audio
format.
– »Off«: The digital output does not process any signals.
Setting the dynamic range
Dolby Digital and DTS soundtracks have a very large dynamic
volume range, hence there is a great difference between quiet and
loud sounds. When played at full volume this can be a fascinating
experience, but it can cause disturbance late at night. Simply reducing the volume does not produce satisfactory results, since the
dialogue can be hard to understand.
You can turn down the louder sounds and turn up the quieter passages, while retaining the volume of the dialogue. This function is
called the dynamic range.
1 Select the »Audio« menu item with »
a
« or »s« and press
»OK« to confirm.
2 Select »DRC« with »
a
« or »s« and press »OK« to confirm.
3 Make the setting with »
A
« or »S« and press »OK« to confirm:
– »Off« or »On«. »Off« (the default setting) means uncom-
pressed dynamics (during the day), »On« means compressed
dynamics (late at night).
SETTINGS ______________________________________________
Language
AC3
PCM
DTS PCM
MP3/WMA PCM
Others PCM
Pink Noise Off
DRC Off
CNTR CTRL 0ms
REAR CTRL 0ms
Video Audio Rating
Language
AC3 PCM
DTS PCM
MP3/WMA PCM
Others PCM
Pink Noise Off
DRC
Off Off
CNTR CTRL 0ms On
REAR CTRL 0ms
Video Audio Rating
Page 22

22
Language settings
The default for all language settings is »English«.
Setting the preferred subtitle language
1 Select the »Language« menu item with »a« or »s« and press
»OK« to confirm.
2 Select »Subtitle« with »
A
« or »S« and press »OK« to con-
firm.
3 In the third column, press »
A
« or »S« to select the language
or the »Auto« or »Off« setting, and press »OK« to confirm.
Setting the preferred dubbing language
1 Select the »Language« menu item with »a« or »s« and press
»OK« to confirm.
2 Select »Audio« with »
A
« or »S« and press »OK« to confirm.
3 In the third column, press »
A
« or »S« to select the language
and press »OK« to confirm.
Setting the preferred disc menu language
1 Select the »Language« menu item with »a« or »s« and press
»OK« to confirm.
2 Select »DVD Menu« with »
A
« or »S« and press »OK« to
confirm.
3 In the third column, press »
A
« or »S« to select the language
and press »OK« to confirm.
SETTINGS ______________________________________________
Language
OSD Menu
English
Subtitle
English English
Audio English Deutsch
DVD Menu English Français
Español
Auto
Off
Video Audio Rating
Language
OSD Menu English
Subtitle English
Audio
Deutsch English
DVD Menu English Deutsch
Français
Español
Video Audio Rating
Language
OSD Menu English
Subtitle English
Audio Deutsch
DVD Menu
English English
Deutsch
Français
Español
Video Audio Rating
Page 23

ENGLISH
23
Setting the parental lock
Age restrictions for viewing can be set on some DVDs. The parental
lock allows you to define age limits on several levels in the setup
menu. »Off« is the default setting. If the DVD is not suitable for an
age group you have defined, then the DVD receiver will not play the
DVD. You can enable and disable the parental lock using a personal code.
1 Select the »Rating« menu item with »
a
« or »s« and press
»OK« to confirm.
– »Password« is shown on a blue background.
2 Enter your four-digit personal code number with »1 ... 0« and
press »OK« to confirm.
– The lock symbol opens.
3 Select »Rating« by pressing »
S
«.
4 Press »OK« repeatedly to change the setting.
The following settings are available:
– Off.: Parental lock off.
– 1.: Suitable for all ages.
– 2.: Only with parental guidance.
– 3.: Not suitable for children under 13, from ages 13 to 18
only under parental guidance.
– 4.: May contain violence or sex scenes, can only be viewed
by children under 18 under with parental guidance.
– 5.: Level 5
– 6.: Only for adults, not for those under 17.
– 7.: Only for adults.
5 Press »
A
« to return to the »Password« item.
6 Enter your four-digit personal code number with »1 ... 0« and
press »OK« to confirm.
– The lock symbol closes.
Note:
If you have forgotten or lost your personal code number, use the
master code listed in the troubleshooting section on page 44.
Once you have disabled the parental lock using the master
code, you can then enter any personal code you choose.
SETTINGS ______________________________________________
Language
Password
* * * *
FF
Rating 3.
Load Factory Reset
Video Audio Rating
Language
Password – – – –
FF
Rating 7.
Load Factory Reset
Video Audio Rating
Language
Password
– – – –
DD
Rating 7.
Load Factpry Reset
Video Audio Rating
Page 24

24
Tuning and storing radio stations ...
You can store up to 30 FM radio stations and 30 AM radio stations.
You can see the displays for this in the DVD receiver.
... using the automatic station search (ASP)
1 Switch on the DVD receiver from standby by pressing »9« on
the remote control or »ON/OFF« on the device.
– The DVD receiver switches on with the last input source selected.
2 Press »AM FM« on the remote control or »FUNCTION« on
the DVD receiver to select the TUNER input source.
– Display on the DVD receiver: e.g. »FM 87.50
MHz«.
3 To start the automatic station search, press »M« on the remote
control until »AUTO SAVE« appears in the display.
– The automatic station search begins. The receiver searches for
up to 30 stations with the strongest signals in the FM range
and another 30 in the AM range.
– After the search has finished, you will hear the station stored
at position 1.
Note:
You can stop the search by pressing »M« on the remote control
(display: »SAVE STOP«).
... manually
1 Press »AM FM« on the remote control or »FUNCTION« on
the DVD receiver to select the waveband (FM or AM).
2 To start the search, press »
m« or »,« until the frequency in
the search changes.
– The search stops when a radio station is found.
– Display: e.g. »FM 100.60 MHz«.
Note:
To change the frequency in steps, briefly press »
m« or »,«
several times.
– Display: the frequency in 50 kHz increments
or
Enter the frequency directly with »1 ... 0« and press »OK« to
confirm.
– Display: e.g. »FM
- - - -
8«, then e.g.
»FM- 88.60«.
– The radio station is then played.
SETTINGS ______________________________________________
FM 100.60 MHz
FM
- - - -
8
FM 87.50 MHz
FM03 92.50 MHz
Page 25

ENGLISH
25
3 Press »M« on the remote control to select the memory function.
– Display: »SAVE TO --«, »--« for the preset position.
Note:
If no button is pressed within 5 seconds, the DVD receiver automatically quits the memory function.
4 Select the preset position by pressing »
5« or »6« on the
remote control.
Note:
You can enter the preset position directly using the numerical
keys »1 ... 0« on the remote control.
5 Store the radio station by pressing »OK« on the remote control
within five seconds.
– Display: briefly »SAVED«, then for example
»FM03100.60
MHz«.
Restoring all default settings
You can return all settings to their default values with this function.
1 In the set-up menu, select »Rating« by pressing »
a
« or »s«
and then press »OK« to confirm.
2 Select »Load Factory« with »
A
« or »S« and then press
»OK« to confirm.
– All the default settings are restored.
Resetting the DVD receiver
In the unlikely event of the electronic controls of the DVD receiver
becoming blocked (for example due to static electricity from the carpet or because of electrical storms), you can reset the device to its
original state.
1 Use a pointed object such as a paper clip to press »RESET« (on
the back of the device) for two seconds
or
pull out the mains plugs and plug it back in after two minutes.
SETTINGS ______________________________________________
FM03 100.60 MHz
SAVE TO 03
SAVE TO
--
Language
Password – – – –
DD
Rating 7.
Load Factory
Reset
Video Audio Rating
Page 26

26
Switching on and off
1 Switch on the home cinema system from standby by pressing
»9« on the remote control or »ON/OFF« on the device.
– DVD receiver display: briefly »WELCOME«.
– The system switches on with the most recently selected input
source.
2 Switch the home cinema system to standby by pressing »9«
on the remote control or »ON/OFF« on the device.
– Display: briefly »GOOD-BYE«, the display on the DVD receiv-
er goes out.
Selecting the input source
1 Select the input source (DVD, TUNER FM/AM, AUX) by press-
ing »FUNCTION« on the DVD receiver or »DVD«, »AM
FM« or »AUX« on the remote control.
– Display on the DVD receiver: »DVD«, »TUNER FM«/»TUNER
AM«, »AV IN«, »SCART IN« or »DIGITAL IN«.
Preparing for disc playback
1 Switch on the television and select the preset channel for the
DVD receiver.
2 Switch on the DVD receiver from standby by pressing »9« on
the remote control or »ON/OFF« on the device.
3 Select the DISC input source.
– Display on the DVD receiver: briefly »DVD«, followed by
»LOADING« and then »NO DISC«.
Inserting a disc
1 Press »ə«.
– The disc compartment opens.
– Display on the DVD receiver: »OPEN«.
2 Insert the disc in the disc compartment with its label facing
upwards.
3 Press »
ə«.
– The disc compartment closes again (display: »CLOSE«).
The disc is scanned.
– Display on the DVD receiver: information on the disc.
GENERAL FUNCTIONS________________________
WELCOME
GOOD-BYE
DVD
NO DISC
CLOSE
OPEN
26
Page 27

ENGLISH
27
Removing discs
1 Press »ə« to open the disc compartment.
2 Remove the disc.
Adjusting the volume
1 Alter the volume of the whole system by pressing »VOLUME«
on the DVD receiver or »– z +« on the remote control.
– Display on the DVD receiver: briefly »VOLUME« and the
selected level (scale from »MIN«, »01« to »62«, »MAX«).
Note:
In Aux mode, the volume of the television set should be set to a
minimum, as the sound is transmitted through the DVD receiver.
Muting
The DVD receiver mutes the connected loudspeakers using this function.
1 Press »d« on the remote control to mute.
– Display on the DVD receiver: the loudspeaker indicator flashes.
2 Briefly press »d« on the remote control again to cancel the
muting.
– Display on the DVD receiver: the loudspeaker indicator
remains on.
Selecting sound effects
You can choose between five different sound effects (LIVE HOUSE,
HALL, CONCERT, STADIUM, THEATRE and DSP OFF).
1 Press »DSP« to call up the current sound effect.
– Display on the DVD receiver: »LIVE HOUSE«, »HALL«,
»CONCERT«, »STADIUM«, »THEATRE« or »DSP OFF«.
2 Keep pressing »DSP« on the remote control to select the sound
effect you want.
GENERAL FUNCTIONS________________________
VOLUME 23
O
THEATRE
Page 28

28
Switching between two-channel and
multi-channel mode
The DVD receiver has a Dolby Pro Logic II Decoder, which changes
the stereo signal into a Dolby surround signal during disc playback,
thus providing a high quality surround sound effect.
Pro Logic II has two playback modes, namely music and movie. In
music mode, there is a shelf filter, which acts gently on high frequencies on the surround channels. It provides a natural, convincing
sound effect, because surround sound information is normally subject to slight treble attenuation due to reflection and absorption.
Movie mode, on the other hand, does not use a surround filter, but
stereo surround outputs instead.
The loudspeaker configuration (two-channel or multi-channel)
appears in the loudspeaker display on the DVD receiver.
1 To switch between two-channel and multi-channel mode, press
»
K« on the remote control repeatedly.
– Display during switching: briefly »PLII OFF«, »PLII
MUSIC« or »PL II MOVIE«.
– Display on the DVD receiver in Dolby Pro Logic II mode:
»ijProLogic II«.
Adjusting the brightness of the DVD receiver
display
You can change the brightness of the display in three levels.
1 To activate the function, press »
O« on the remote control.
– Display: »DIMMER MAX«, »DIMMER MID« or »DIMMER
MIN«.
2 To set the brightness level, press »
a
« or »s« repeatedly and
press »OK« to confirm.
– Display: briefly »OK«.
– The brightness is set.
General information on disc playback
If the symbol »-« appears on the television screen and
»INVALID« appears on the DVD receiver display after certain key
commands, the disc manufacturer has restricted the functions, or the
function is not available in the current operating mode.
GENERAL FUNCTIONS________________________
PLII MOVIE
DIMMER MAX
INVALID
OK
ijProLogic II
Page 29

ENGLISH
29
Disc formats
Your DVD receiver can play DVD R/DVD RW in DVD video format and
CD R and CD RW in CD-DA Format or MP3/WMA format.
Due to difference in quality of the recording media and the quality of the
recording itself, it can occasionally happen that a home-made DVD R/DVD
RW or CD R and CD RW with audio data cannot be read. This does not
indicate a malfunction of the DVD receiver. The causes for this can be faulty
software or hardware settings, or even the CD itself. Should such problems
arise, contact the customer services of your CD burner or software manufacturer or search for information about this, for example online.
If you make a DVD R/DVD RW or CD R/CD RW, please observe the legal
regulations and do not infringe the copyright of third parties. Recordings
you make yourself (DVD R/DVD RW, CD R and CD RW) have to be
finalised.
When MP3/WMA CDs are played back, individual tracks may be skipped
or incorrectly played back. This can be due to the disc configuration, the
encoder software or the hardware used for the recording.
Audio CDs (CD-DA) meet the specification and bear the corresponding
logo. Copy-protected CDs do not meet this specification in some circumstances and do not bear the corresponding logo. These CDs can cause playback errors.
DVD features
You can recognise a DVD by the logo on the label. Depending on the content of the DVD, the discs contain one or more titles. Each title may contain
one or more chapters. Titles and chapters can be selected easily and conveniently.
You can control and direct playback of a DVD using the menu of the DVD
receiver on the television screen.
Many DVDs have audio tracks recorded in up to eight languages. This
enables you to select the language you prefer. Also, many DVDs are recorded by the manufacturer with subtitles in several languages. You can select
subtitles from up to 32 different languages.
Your DVD receiver has been given region code 2. DVDs with other regional
codes cannot be played.
VCD/S-VCD features
You can tell VCDs/S-VCDs (video CDs) by the logo on the label. Depending
on the contents of the VCD/S-VCD (films, music videos etc.), the discs may
carry one or more titles. Like audio CDs, VCDs/S-VCD have a track structure.
DISC FEATURES ____________________________________
Page 30

30
You can control and direct playback of the VCD/S-VCD using the menu of
the DVD receiver on the television screen.
S-VCDs can contain different dubbed languages and subtitles.
PBC (playback control)
VCDs/S-VCDs can be created using the PBC (playback control) system for
track navigation. PBC switches between the playlist structure (the menu on
the VCD/S-VCD) and manual selection by the user.
PBC is activated after the VCD/S-VCD has been scanned. This function
allows interactive playback of the VCD/S-VCD if you follow the menu on the
television screen.
MP3/WMA CD features
MP3 stands for MPEG-1 Audio Layer 3, WMA for Windows Media Audio.
Both formats enable audio files to be saved on a computer with a sound
quality similar to that of a CD. The standard encoding bit rate for MP3 files
is 128 kbps. The fundamental rule applies: the higher the bit rate of a file,
the better the sound quality.
Most MP3 files on the Internet are encoded at 128 or 160 kbps. 160 kbps is
considered CD quality. MP3/WMA files can be downloaded from the Internet and then burned onto a CD ROM disc using suitable PC software.
In MP3/WMA mode, the terms “album” and “file” are very important.
“Album” corresponds to a folder on a PC, “File” to a file on a PC or a CDDA track (title).
Audio CD features
An audio CD (CD-DA) is identified by this logo. Audio CDs contain only
sound recordings. They can be played in the normal manner on an audio
system. The individual tracks are stored in a sequence. There are no folders.
As well as audio CDs, the DVD receiver can also read CD R and CD RW
with audio data.
JPEG/Kodak picture CD features
JPEG stands for Joint Picture Experts Group. This process was designed to
compress picture files.
The files on a JPEG CD can be organised in directories. This structure is similar to that of an MP3 CD. JPEG CDs only contain data in the compressed
JPEG format. This is mostly data from digital cameras or from imaging programs. The data (images) can be displayed individually or in sequence in a
slide show.
DISC FEATURES ____________________________________
Page 31

ENGLISH
31
Playback functions
In DVD mode, playback starts automatically after the disc has been
scanned. A menu may also appear on the screen where you can
start disc playback.
A menu also appears on the screen with VCDs/S-VCDs where you
can control the playback of the disc interactively if you activate the
PBC function (see page 32).
Playing back the disc
1 Start playback in stop mode by pressing »ı«.
2 To pause playback (freeze-frame in video mode), press »II«.
3 Press »
ı
« to resume playback.
4 To end playback, press »
7
«.
Pausing and resuming playback
1 To pause playback, press »7« once.
2 Press »
ı
« to resume playback.
3 To end
playback, press »7« twice.
Selecting titles or chapters ...
... step-by-step
1 Select the next chapter, file or title by pressing »6« briefly
during playback.
2 Press »
5
« to switch to the start of the current chapter, file or
title.
– Playback begins at the start of the current chapter, file or title.
3 Press »
5
« again.
– Playback starts with the previous chapter, file or title.
... directly with the numerical keys
1 During playback, select the title by pressing »1 … 0« on the
remote control.
– Playback starts with the selected chapter, file or title.
Notes:
These functions are not available in Aux mode.
Direct selection using the numerical keys is not possible with
every disc function.
DISC MODE___________________________________________
II
ı
ı
ı
7
7
ı
9
8
Page 32

32
Selecting titles or chapters (in DVD mode) ...
... using the title or DVD menu
If a DVD contains several titles or chapters, you can select these in
the title or DVD menu, if the DVD itself offers this function.
1 Press »
.
« on the remote control to open the title or DVD
menu.
– The title or DVD menu appears on the screen.
2 Select the title or chapter with »
A
« or »S« or with »a« or
»s« and press »OK« to confirm.
– Playback of the selected title or chapter begins.
Note:
Depending on the DVD, you can also select the title or chapter
directly using the numerical keys »1 ... 0« on the remote control. Press »OK« to confirm.
... using the DVD main menu
Some DVDs offer a main menu which shows the titles and chapters.
1 Press »TOP MENU« on the remote control to open the main
menu.
– The main menu appears on the screen.
2 Select the title or chapter with »
A
« or »S« or with »a« or
»s« and press »OK« to confirm.
– Playback of the selected title or chapter begins.
Notes:
Depending on the DVD, you can also select the title or chapter
directly using the numerical keys »1 ... 0« on the remote control. Press »OK« to confirm. On certain DVDs, if you press
»TOP MENU«, the whole disc is repeated from the beginning.
PBC playback (in Video CD mode)
After the VCD or S-VCD is scanned, the PBC function is activated,
provided the disc supports this function (»PBC ON« briefly
appears).
1 Press »
ı
II« to start playback.
– The DVD receiver automatically switches to PBC playback
mode.
2 Select the menu option with »A« or »S« or with »a« or
»s« and press »OK« to confirm.
3 Follow the instructions in the menu to use the interactive func-
tions.
4 Press »x« on the remote control to quit the menu or to return
to the previous menu.
DISC MODE ____________________________________________
PBC ON
Page 33

ENGLISH
33
5 To deactivate the PBC function, press ».« on the remote con-
trol during playback.
– »PBC OFF« appears briefly on the television screen.
– Normal playback starts automatically.
Note:
In MP3 mode, »
.
« switches between playback of a file, an
album and the entire disc.
Picture settings
1 Press »i« during playback.
– Display: the »Video Enhance« menu.
2 Select »Brightness« with »
A
« or »S« and adjust the picture
brightness with »a« or »s«.
3 Select »Edges« with »
A
« or »S« and adjust the picture
sharpness with »a« or »s«.
4 Press »
i« to quit the menu.
Displaying information ...
... in DVD mode
1 Press »DISPL« to see the Info line.
– Display:
00:00:05 Playing time
01:31:55 Remaining playing time
2 To call up further information press »DISPL« again.
– Display:
DVD Type of disc
Title 1/2 Current and available titles
Chapter 13/20 Current and available chapters
Angle 1/4 Camera positions (in the example 4)
Audio
b1/3
=
Current sound language is English
1 ch English
Subtitle Off Subtitles are off
Bitrate 6400Mbps Bit rate
3 Press »DISPL« to hide the Info line.
... in video CD mode
1 Press »DISPL« repeatedly on the remote control.
– You will receive information concerning:
– The elapsed playing time
– The remaining playing time
– The type of VCD/S-VCD
– The current track on the VCD/S-VCD
DISC MODE ____________________________________________
PBC OFF
VCD1.1 00:01:26 00:50:51
Track 1/1
Video Enhance
Brightness
Edges
15
11
Page 34

34
... in MP3 mode
1 Press »DISPL« repeatedly on the remote control.
– You will receive information concerning:
– The elapsed playing time of the current file
– The remaining playing time of the file
... in audio CD mode
1 Press »DISPL« repeatedly on the remote control.
– You will receive information concerning:
– The elapsed playing time of the current track
– The remaining playing time of the track
– The current track
– The total number of tracks on the CD
Additional playback functions
During the fast search and slow motion functions, the sound is
muted or the volume is reduced (CD-DA). Some of the functions are
not available depending on the disc.
Fast search
1 During playback, press »m« or »,« on the remote control.
– The fast search starts either forwards or backwards.
Note:
By repeatedly pressing »
m« or »,« you can alter the for-
ward or backward search speed during the search. The maximum speed varies according to the medium.
2 Press »
ı
« at the desired position.
– Normal playback starts.
Note:
In video CD mode, the search stops at the end of a track. When
the next track begins, normal playback starts automatically.
Slow motion
You can choose between three different forward playback speeds.
The maximum speed varies according to the medium.
1 During playback, press »
I
s« on the remote control.
2 Select the forward slow motion speed by repeatedly pressing
»
I
s«.
3 Press »
ı
« to return to normal playback.
DISC MODE___________________________________________
$ x 2
$ x 4
ı
I
s1/6
ı
CDDA 00:02:42 00:00:34
Track 5/19
Page 35

ENGLISH
35
Selecting the camera angle for particular scenes
or passages
Many DVDs contain scenes or passages which were filmed by
various cameras from different angles. You can choose from among
these different angles.
On DVDs which offer this function, the multi-angle symbol appears
on the television screen, for example »n 1/4«.
1 To select the camera angle function, press »
n « during play-
back.
– Display: camera angle »n 2/4«, in the example 2 of 4.
2 To select another camera angle, press »
n « repeatedly.
Enlarging the picture (zoom)
This function allows you to enlarge various picture sections. The
zoom factors can be selected in the order v1 – v2 – vOff.
1 During playback, pause or slow motion, press »v« on the
remote control.
– Display: »
v1«, part of the picture is enlarged.
2 Press »
A
« or »S«, or »a« or »s« to move the enlarged
image around the screen.
3 To quit the function, press »v« to switch to »
vOff«.
Switching the dubbed language or the audio
format
Use this setting to change from the pr
eset dubbed language if the
DVD offers alternatives.
1 Press »d« during playback.
– Display: the current dubbed language.
2 Keep pressing »d« to select the dubbed language.
Note:
Switching the dubbed language can be suppressed by the
structure of the DVD itself. In this case the setting is usually
made in the DVD menu.
DISC MODE___________________________________________
v
1
v
Off
b2/3 =1 ch German
b1/3 =1 ch English
n 2/4
Page 36

36
Selecting and displaying subtitles
If the DVD provides subtitles, they can be displayed on your TV
screen.
When subtitles are available in several languages, you can select
your preferred language.
1 Press »
y« during playback.
– Display: for example, »o 1/21 English« is briefly dis-
played, and the current subtitle is displayed.
2 Keep pressing »
y« to select the subtitle language.
Notes:
To switch off the subtitles, keep pressing »
y« until »o Off«
appears in the display. Switching the subtitles can be suppressed by the structure of the DVD itself. In this case the setting
is usually made in the DVD menu.
Playing back tracks or files in random order (in
CD mode)
1 Press »CD S/I« to call up the function.
– Display: »Normal«.
2 Press »CD S/I« again.
– Display: »Shuffle«.
– The tracks or files are played back in random order.
3 To quit the function, press »CD S/I« twice.
– Display: briefly »Normal«.
Playing the introductions of tracks or files
1 To call up this function, press »CD S/I« three times.
– Display: »Intro«.
– The first ten seconds of each track or file are played. Playback
begins with the first track or file.
2 Press »CD S/I« twice to quit the function at the point you want.
– Display: »Normal«
or
Press »7« to quit the function.
Zero setting (GO TO)
This function allows you to choose the playback position on the
DVD, video CD or audio CD to the precise second.
1 Press »
a« on the remote control to call up the function.
– The zero setting menu is displayed.
DISC MODE___________________________________________
Normal
Normal
Normal
Shuffle
Intro
Search
Time --:--:-Title/chapter --- /---
o1/21 English
oOff
Page 37

ENGLISH
37
2 Select the title or chapter number display with »A« or »S« on
the remote control.
3 Using the numerical buttons »1 … 0« on the remote control,
enter the title or chapter number and press »OK« to confirm.
– Playback of the selected title or chapter begins.
or
2 Press »A« or »S« on the remote control to select the time dis-
play.
3 Enter the time with »1 … 0« and press »OK« to confirm.
– Playback starts at exactly the position you entered.
Repeat functions
Repeating a selected section (A-B Repeat)
You can mark a section within a chapter, file or title to be repeated.
1 Briefly press »A-B« during playback to mark the start of the
section.
– Display: »Rep A-«.
2 Briefly press »A-B« again to mark the end of the section.
– Display: »Rep A-B«, the scene marked is now constantly
repeated.
3 Press »A-B« again to quit the function.
– Display: briefly »Rep Off«.
Repeating a chapter, file, title or all chapters,
files, or titles on a disc
1 During playback, press »b« on the remote control.
– Display: briefly, e.g. »Repeat Chapter«; a chapter, file or title
is repeated.
2 Press »b« on the remote control again.
– Display: briefly e.g. »Repeat Title«; all chapters, files or titles
are repeated.
3 Press »b« on the remote control a third time to quit the func-
tion.
– Display: briefly »Off«.
Notes:
These functions are not available in Aux mode.
The PBC function must be switched off in video CD mode.
DISC MODE___________________________________________
Rep A-
Rep A-B
Rep Off
Repeat Chapter
Repeat Title
Off
Page 38

38
Creating a track memory – playing back titles
or tracks in selected order
You can store and then play back up to 12 titles or tracks in a particular order from the disc. A track may be stored more than once.
The DVD receiver must be in the stop position. When entering the
settings, if no button is pushed for more than 5 seconds, the DVD
receiver ends the process automatically. You then have to start
again.
1 Open the »Program Input« function by pressing »PROG« on
the remote control.
– Depending on the type of disc in use the program menu
appears, and a bookmark is displayed on item 1.
2 Enter the number of the title, chapter or track with »1 … 0«
and press »OK« to confirm.
3 Select the next item using »
a
«, »s«, »A« or »S« and repeat
the entry.
Playing back a track memory
1 To play back the track memory, select »Play Program« with
»a«, »s«, »A« or »S« and press »OK« to confirm.
– Playback of the track memory starts.
2 End playback of the track memory by pressing »
7
« (twice
).
Deleting a track memory
1 Call up the »Program Input« menu in stop mode by pressing
»PROG«.
2 Select »Clear All« with »
a
«, »s«, »A« or »S« and press
»OK« to confirm
or
Press »ə« to open the disc compartment.
– The track memory is deleted
or
Switch the DVD receiver to standby by pressing »9« on the
remote control or »ON/OFF« on the device.
DISC MODE___________________________________________
Program Input
1 – – – –
4 – – – – 7 – – – – 10 – – – –
2 – – – – 5 – – – – 8 – – – – 11 – – – –
3 – – – – 6 – – – – 9 – – – – 12 – – – –
Play Program Clear All
Title/Chapter
__
Program Input
1 3 – – –
4 10 – – 7 – – – – 10 – – – –
2 8 – – – 5 14 – – 8 – – – – 11 – – – –
3 6 – – – 6 – – – – 9 – – – – 12 – – – –
Play Program Clear All
Title/Chapter
Program Input
1 3 – – – 4 10 – – 7 – – – – 10 – – – –
2 8 – – – 5 14 – – 8 – – – – 11 – – – –
3 6 – – – 6 – – – – 9 – – – – 12 – – – –
Play Program Clear All
Title/Chapter
Page 39

ENGLISH
39
Tuner mode
Selecting the tuner input source
1 Select the input source by pressing »AM FM« on the remote
control or »FUNCTION« on the DVD receiver.
– The most recently selected radio station is played (Last Station
Memory).
– Display on the DVD receiver: frequency band and frequency,
or station name.
Selecting the waveband
1 Select the wavebands FM (VHF) or AM (medium wave) by
pressing »AM FM« on the remote control or »FUNCTION«
on the DVD receiver.
– Display on the DVD receiver: »FM« or »AM« and the frequen-
cy or briefly »TUNER FM« or »TUNER AM«.
Calling up stored radio stations
1 Select the preset position by pressing »1 ... 0« and »OK« on
the remote control.
– Display on the DVD receiver: briefly, e.g.
»FM06 100. 60 MHz«
or
Press »5« or »6« on the remote control to select preset position one at a time.
– Display on the DVD receiver: briefly e.g. »STATION 08«,
then the frequency or station name.
Switching between stereo and mono reception
When the DVD receiver receives FM stereo stations, »STEREO«
appears in the display. If the signal from the FM stereo station is
weak, you can improve the sound quality by switching to mono
reception.
1 Press »FM MODE« on the remote control to switch to mono
reception.
– Display: briefly »MONO«, »STEREO« disappears.
2 To switch back to FM stereo, press »FM MODE« on the remote
control.
– Display: briefly »STEREO«, »STEREO« remains on.
RDS station service
RDS (Radio Data System) is an additional information system provided by most FM stations. When the DVD receiver is receiving an
RDS station, »RDS« and the station name appear in the display.
OTHER MODES_____________________________________
FM 100.60 MHz
FM06 100.60 MHz
STATION 08
STEREO STEREO
AM 1404 KHz
Page 40

40
Searching for RDS stations
1 To search for an RDS station, press »m« or »,« repeatedly
until »RDS« appears in the display indicating that an RDS
station is being received.
– After a short time the station name sometimes appears if the
reception is sufficiently strong.
Note:
It may take some time before all the RDS information is available.
Calling up RDS information
If an RDS station is being received, various station information can
be called up in the display.
1 Press »RDS« repeatedly.
– The display shows the waveband with the preset position and
frequency, station type, radio ticker text, the station name,
and then the waveband again with the preset position and
frequency.
Searching for station types (PTY)
1 Press »SPTY SEARCH« to call up the PTY search function.
– Display: »PTY SEARCH«.
– If no station type code is transmitted, »NO PTY« appears in
the display.
2 Select other station types by pressing »
a PTY –« or
»s PTY +«.
3 Press »OK« to start the PTY search.
– If the station type cannot be found, the following ticker text
message appears: »NOT FOUND«.
– If the station type is found, the frequency appears in the dis-
play and the desired station type can be heard.
OTHER MODES_____________________________________
RDS
ENERGY
PTY SEARCH
NOT FOUND
Page 41

ENGLISH
41
Sleep timer mode
Setting the sleep timer
The sleep timer switches the system off at the set time.
1 To activate the function, keep pressing »
O« on the remote
control until »SLEEP OFF« appears in the display.
2 To set the switch-off time (»10«, »20«, »30«, »60« to »150«)
press »
a
« or »s« repeatedly and then press »OK« to confirm.
– Display: briefly »OK«, then »8«.
– The system switches off after the selected time.
3 To see the remaining time until the device switches off, press
»
O« on the remote control until »SLEEP -19« (for exam-
ple) appears in the display.
Deactivating the sleep timer
1 To activate the function, keep pressing »O« on the remote
control until the remaining time, e.g. »SLEEP -8«, appears in
the display.
2 Keep pressing »
a
« or »s« until »SLEEP OFF« appears in the
display, then press »OK« to confirm.
– Display: briefly, »SLEEP -19«, then »8« disappears.
– The system stays on.
or
1 Press »ON/OFF« to switch the DVD receiver to standby mode.
OTHER MODES_____________________________________
SLEEP OFF
SLEEP OFF
8
OK
8
SLEEP -19
Page 42

42
Technical data
This device is noise-suppressed according to the applicable EU directives.
This product fulfils the European directives 89/336/EEC, 73/23/EEC and
93/68/EEC.
This device conforms to the safety regulation DIN EN 60065 (VDE 0860)
and therefore the international safety regulation IEC 60065.
Never open up the DVD receiver. No warranty claims are accepted for
damage resulting from improper handling.
INFORMATION_____________________________________
Manufactured with permission from Dolby Laboratories.
“Dolby”, “Pro Logic” and the double-D symbol “
ij ” are trademarks of Dolby Laboratories.
“DTS” and “DTS Digital Surround” are registered trademarks of Digital Theater Systems, Inc.
Technical and design modifications reserved.
General information
Mains voltage:
230 V~, 50 Hz
Rated power consumption:
Operating: ≤ 140 W
Standby: ≤ 1 W (DVD receiver)
Ambient temperature:
+10 °C to +35 °C
Amplifier
Output:
Nominal:
5 x 25 W (5 x 8 Ω), 1 x 50 W passive
Music:
5 x 50 W (5 x 4 Ω)
Input sensitivity/impedance
(audio analogue):
400 mV / 22 kOhm
Frequency range:
10 ... 24,000 Hz
Non-linear distortion factor:
-1 dB, 8 Ω, 1 kHz, ≤ 0.3 %
Disc unit
Playback standard:
PAL, 50 Hz, 625 lines
NTSC, 60 Hz, 525 lines
Picture format:
4:3, 16:9
Playback system:
DVD-video, video-CD 1.1 and 2.0, S-video-CD,
MP3/WMA-CD, audio-CD (CD-DA)
CD-R, CD-RW, DVD R, DVD RW
CD ROM (MP3), sampling frequency 44.1 kHz
Radio
Sensitivity:
Mono (S/N=26 dB), 4 µV
Stereo (S/N=46 dB), 30 µV
Non-linear distortion factor:
Mono (1 kHz, 40 kHz dev.), 0.3 %
Stereo (1 kHz, 40 kHz dev.), 0.6 %
Frequency range:
(± 3 dB) 20 ... 14,000 Hz
Noise voltage ratio:
22.5 kHz dev., DIN A, Mono, ≥ 60 dB
40 kHz dev., DIN A, Stereo, ≥ 63 dB
FM and AM frequency bands:
FM 87.5 ... 108 MHz
AM 522 ... 1629 kHz
Page 43

ENGLISH
43
General instructions for laser devices
Your system is a CLASS 1 LASER PRODUCT. This means that the laser is
designed in such a way as to ensure that the maximum permissible emission
value cannot be exceeded under any circumstances.
Caution:
If operating devices or methods other than those specified here are
employed, it may lead to dangerous exposure to emissions.
This device emits laser radiation. Because of the danger of eye injuries, the
unit may only be opened or serviced by trained personnel.
If settings other than those specified here are employed or other procedures
are carried out, this may lead to dangerous radiation exposure.
Cleaning discs
Wipe the dirty disc with a cloth from the centre outwards in a straight line.
Do not use any solvents such as benzene, thinners, conventional cleaner or
anti-static spray for vinyl records.
INFORMATION_____________________________________
Loudspeakers
Music/rated load:
Nominal:
5 x 25 W (4 Ω), 1 x 50 W (Subwoofer)
Frequency range:
Front and surround loudspeakers:
150 ... 20,000 Hz
Subwoofer:
40 ... 150 Hz
System:
5 x broadband (front and centre magnetically
shielded)
subwoofer: Bass reflex system
Dimensions and weight
DVD receiver
W x H x L: 360 x 80 x 380 mm
6.4 kg
Front loudspeakers
W x H x L: 90 x 130 x 120 mm
0.6 kg
Centre loudspeaker
W x H x L: 90 x 130 x 120 mm
0.6 kg
Surround loudspeakers
W x H x L: 90 x 130 x 120 mm
0.47 kg
Subwoofer
W x H x L: 165 x 330 x 335 mm
4 kg
CLASS 1
LASER PRODUCT
Page 44

44
INFORMATION_____________________________________
Fault
The DVD receiver will not switch on.
The DVD receiver does not respond to
the remote control.
No picture or sound.
No sound from some loudspeakers,
e.g. centre, surround or subwoofer.
No sound or insufficient bass tone
coming from the subwoofer.
The inserted disc does not play.
Search, slow motion, playback repeat,
programmed playback etc. do not
work.
Insufficient MP3 playback or none at
all.
CD-Rs or CD-RWs are not played
back, or are played back incorrectly.
Distorted audio signal during FM
reception.
You have forgotten the personal access
code for the parental lock.
You cannot operate the DVD receiver.
Possible cause/remedy
No electrical supply:
Check the connection to the mains cable.
Obstacles, used batteries:
Remove all obstacles which could disturb the signal of the
remote control.
Test or replace the batteries of the remote control.
Wrong cable connection, the video or audio connection
cable is faulty:
Check the connections on the DVD player and on the television.
Wrong video dignal selected:
Check the RGB/S-video-switiching (see page 18)
The MUTE function has been activated:
Deactivate this function as described on page 27.
Activate the test tone (see page 19). If you hear a signal
from all the loudspeakers, then the loudspeaker setting
and cabling are correct. In this case the multi-channel
mode is set incorrectly or the inserted disc does not produce multi-channel sound.
Check the multi-channel settings on the DVD receiver.
Check the loud speaker settings in the set-up menu.
The subwoofer has been connected incorrectly:
Check to make sure the subwoofer has been connected
properly.
Make sure the printed side of the disc is facing upwards.
Clean the disc. The DVD receiver cannot read the inserted
disc format. Check to see if the inserted DVD has the
regional code 2.
The parental lock settings prevent the playback of the disc:
Alter the parental lock settings (see page 23).
The relevant functions are not available with the inserted
disc.
The sampling frequency 44.1 kHz has not been observed:
Burn a new MP3 CD observing the sampling frequency.
Faulty software or hardware settings during burning or
the CD itself:
Check the components of your CD burner/software or
change the CD being used.
Poor stereo reception:
Correct the frequency manually or switch to mono (see
page 39).
Faulty antenna connection:
Check the antenna connection.
Enter the master code »8888«.
Press »RESET« (on the back of the device) or pull out the
mains plug for around two minutes.
Rectifying minor problems
Not every picture or sound problem is caused by a defect in your DVD receiver. Defects can also be
caused by leads having been accidentally pulled out, damaged discs and worn out batteries in the
remote control. If the following measures do not rectify the problem, consult your authorised dealer.
Due to the difference in quality of the recording media and the quality of the recording itself, it can
occasionally happen that a home-made disc cannot be read. This does not indicate a malfunction of
the DVD receiver.
Page 45

 Loading...