

Page 1
INTERNET RADIO
Cosmopolit 9 WEB DAB
+
DE EN
Page 2

GRUNDIG Kundenberatungszentrum
Haben Sie Fragen?
Unser Kundenberatungszentrum steht Ihnen
werktags stets von 8.00 – 18.00 Uhr zur
Verfügung.
Montag bis Freitag
von 8.00 bis 18.00 Uhr
Deutschland: 0911 / 59 059 730
Österreich: 0820 / 220 33 22 *
* gebührenpflichtig (0,145 €/Min. aus dem
Festnetz, Mobilfunk: max. 0,20 €/Min.)
Page 3
3
COSMOPOLIT 9 WEB DAB+
--------------------------------------------------------------------
ON/OFF
OK/SNOOZE
Antenne
i
MENU
V
Λ
+ C –
M
1I6 e
2I7 II
3I8
7
Display
●
Λ
Λ
4I9
5I10
USB LED AUX IN DC 9V IN
USB LAN
U
Page 4

4
-----------------------------------------------------------------------------------------------------------------------------------------------------------------------------
DEUTSCH 05-20
ENGLISH 21-37
Page 5

5
DEUTSCH
AUFSTELLEN UND SICHERHEIT
---------------------------------------------------------
Beachten Sie beim Aufstellen bitte folgende Hinweise:
7
Das Gerät ist für die Wiedergabe von Ton-
signalen bestimmt. Jede andere Verwendung
ist ausdrücklich ausgeschlossen.
7
Wollen Sie das Gerät in Regalwänden,
Schränken, etc. aufstellen, sorgen Sie bitte
für ausreichende Belüftung. Ein Freiraum von
mindestens 10 cm seitlich und an der Rückseite
des Gerätes darf nicht unterschritten werden.
7
Bedecken Sie das Gerät nicht mit Zeitungen,
Tischtüchern, Vorhängen, etc.
7
Bitte beachten Sie beim Aufstellen des Gerä-
tes, dass Möbeloberflächen mit den verschiedensten Lacken und Kunststoffen beschichtet
sind, die häufig chemische Zusätze enthalten.
Diese Zusätze greifen u.a. das Material der
Gerätefüße an. So entstehen Rückstände auf
der Möbeloberfläche, die sich nur schwer
oder nicht mehr entfernen lassen.
7
Wenn das Gerät starken Temperaturschwan-
kungen ausgesetzt ist, zum Beispiel beim Transport vom Kalten ins Warme, nehmen Sie es für
mindestens zwei Stunden nicht in Betrieb.
7
Das Gerät ist für den Betrieb in trockenen
Räumen bestimmt. Sollten Sie es dennoch im
Freien betreiben, sorgen Sie unbedingt dafür,
dass es vor Feuchtigkeit (Tropf- und Spritzwasser) geschützt ist.
7
Betreiben Sie das Gerät nur in einem gemä-
ßigten Klima.
7
Stellen Sie das Gerät nicht in unmittelbare
Nähe der Heizung oder in die pralle Sonne;
dadurch wird die Kühlung beeinträchtigt.
7
Stellen Sie keine mit Flüssigkeit gefüllten Gefä-
ße (z.B. Vasen) auf das Gerät.
7
Stellen Sie keine offenen Brandquellen, z.B.
Kerzen, auf das Gerät.
7
Verwenden Sie keine Reinigungsmittel; diese
können das Gehäuse beschädigen. Reinigen
Sie das Gerät mit einem sauberen, trockenen
Tuch.
7
Gewitter stellen eine Gefahr für jedes elektri-
sche Gerät dar. Auch wenn das Gerät ausgeschaltet ist, kann es durch einen Blitzschlag in
das Stromnetz beschädigt werden. Bei einem
Gewitter müssen Sie immer den Netzadapter
ziehen.
7
Treten Fehlfunktionen auf, etwa wegen einer
elektrostatischen Aufladung oder kurzzeitiger
Netzüberspannung, setzen Sie das Gerät zurück. Ziehen Sie hierzu den Netzadapter und
schließen ihn nach einigen Sekunden wieder
an.
7
Setzen Sie die Batterie keiner extremen Hitze
wie z.B. durch Sonneneinstrahlung, Heizung,
Feuer, etc. aus.
7
Die Fernbedienung beinhaltet eine Knopfzelle.
Die Fernbedienung und die Knopfzelle immer
von Kindern fernhalten.
7
Wurde die Knopfzelle versehentlich ver-
schluckt, kann das innerhalb von 2 Stunden
zu Verätzungen und zum Tod führen. Deshalb
unverzüglich einen Arzt aufsuchen.
7
Neue und gebrauchte Batterien von Kindern
fernhalten. Wenn das Batteriefach nicht sicher
geschlossen werden kann, das Gerät nicht
mehr verwenden und von Kindern fernhalten.
7
Achtung: Explosionsgefahr bei unsachgemä-
ßem Auswechseln der Batterie. Ersatz nur
durch denselben oder einen gleichwertigen
Typ.
7
Ständige Benutzung der Kopfhörer bei hoher Lautstärke kann zu
Schäden am Gehör führen.
7
Sie dürfen das Gerät auf keinen Fall öffnen. Bei
Schäden, die durch unsachgemäße Eingriffe
entstehen, geht der Anspruch auf Gewährleistung verloren.
7
Schließen Sie keine externen Geräte an wenn
Ihr Gerät eingeschaltet ist.
7
Schalten Sie auch die externen Geräte vor
dem Anschließen aus.
7
Nur durch Ziehen des Netzadapters ist das
Gerät vollständig vom Stromnetz getrennt.
7
Sorgen Sie dafür, dass der Stecker des Netzadapters frei zugänglich ist!
Page 6
DEUTSCH
6
AUFSTELLEN UND SICHERHEIT
---------------------------------------------------------
7
Über die Fernbedienung -
Die Batteriefachabdeckung kann mit Werkzeu-
gen, wie einer Münze, geöffnet und geschlossen werden und muss in der „SPERREN“-Position verriegelt werden, damit die Lithium-Batterie
sicher im Batteriefach gehalten wird.
7
WARNUNG: Batterie nicht verschlucken. Gefahr chemischer Verbrennungen.
7
(Mit der Fernbedienung geliefert) Dieses Pro-
dukt enthält eine Knopfzelle. Falls die Knopfzelle verschluckt wird, können in nur 2 Stunden
ernsthafte oder gar lebensgefährliche innere
Verbrennungen auftreten.
7
Halten Sie neue und verbrauchte Batterien von
Kindern fern.
7
Falls das Batteriefach nicht richtig schließt, stel-
len Sie die Verwendung des Produktes ein und
halten Sie es von Kindern fern.
7
Falls Sie befürchten, dass Batterien verschluckt
oder anderweitig in den Körper eingeführt
wurden, suchen Sie umgehend ärztlichen Rat
auf.
Page 7

7
DEUTSCH
AUF EINEN BLICK
---------------------------------------------------------------------------------------------------------
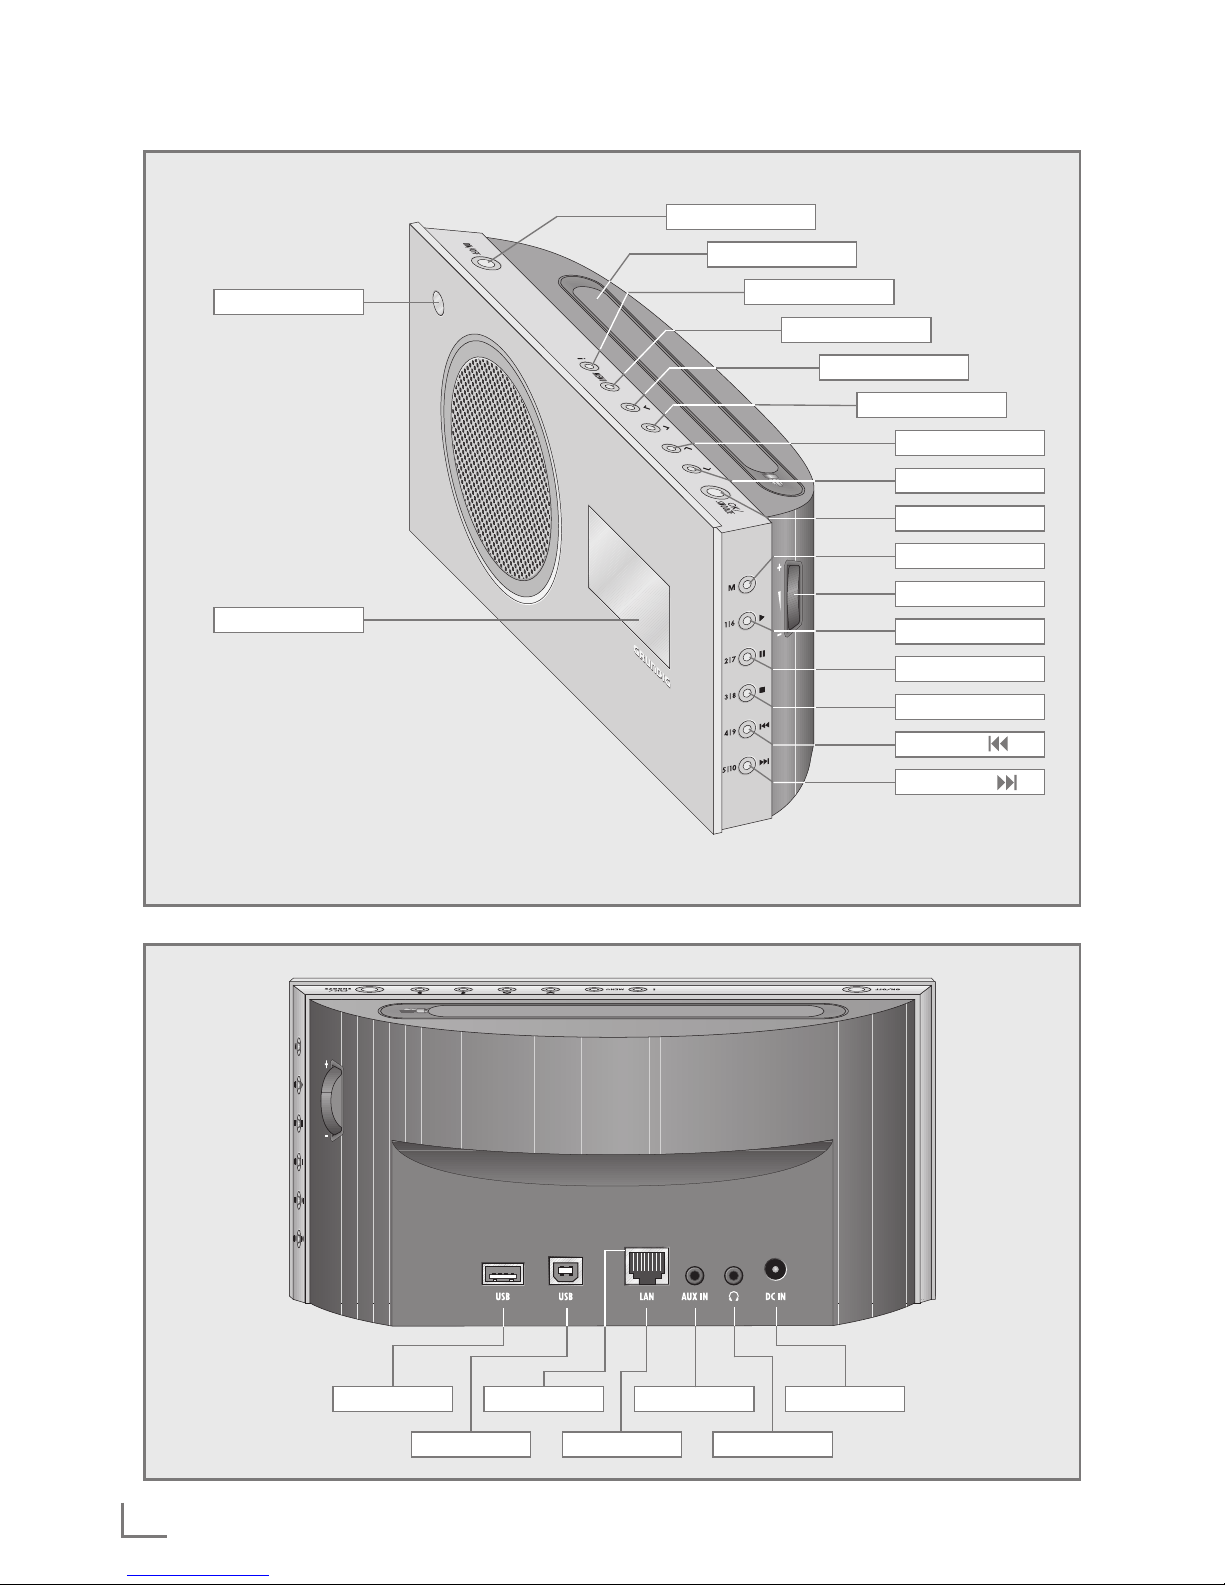
Die Bedienelemente
Die Abbildung des Gerätes finden Sie auf
Seite 3.
● Infrarotsensor für die Signale
der Fernbedienung.
Display Multifunktions-Anzeige.
ON/OFF Schaltet das Gerät in Bereit-
schaft (Stand-by) und aus Bereitschaft ein.
Antenne Teleskopantenne für den DAB -
und FM-Empfang.
i Blendet Informationen zu den
Internet-, DAB- und FM-RadioProgrammen und Spotify ein.
MENU Ruft Menüs auf.
V
In den Menüs: Bewegt den
Cursor nach unten.
Im Radio-Betrieb: Startet den
FM-Suchlauf.
Λ
In den Menüs: Bewegt den
Cursor nach oben.
Im Radio-Betrieb: Startet den
FM-Suchlauf.
Λ
Schaltet zur nächsten Menü-
ebene.
V
Schaltet zur vorherigen Menü-
ebene.
SNOOZE/OK
In den Menüs: Wählt und bestä-
tigt Optionen.
Im Alarm-Betrieb: Unterbricht
das Alarm-Signal.
M Schaltet um zwischen den Pro-
grammquellen Internet Radio,
Musik Archiv, DAB, FM und
Aux.
+ C – Ändern die Lautstärke.
1I6 e Im Radio-Betrieb: Stationstaste
1/6.
Im Musik Archiv-Betrieb: Startet
die Wiedergabe eines Titels.
2I7 II Im Radio-Betrieb:
Stationstaste 2/7.
Im Musik Archiv-Betrieb:
Schaltet in Wiedergabe-Pause.
3I8 7 Im Radio-Betrieb:
Stationstaste 3/8.
Im Musik Archiv-Betrieb:
Beendet die Wiedergabe.
4I9 Im Radio-Betrieb:
Stationstaste 4/9.
Im Musik Archiv-Betrieb: Wählt
den vorhergehenden Titel.
5I10 Im Radio-Betrieb:
Stationstaste 5/10.
Im Musik Archiv-Betrieb: Wählt
den nächsten Titel.
Die Anschlüsse
USB USB-Schnittstelle Typ A.
Zum Anschließen eines USBMemory Sticks oder MP3-Players.
USB USB-Schnittstelle Typ B.
Nur für Software Upgrade.
LAN Buchse zum Anschließen an das
Ethernet-Netzwerk über LANKabel.
LED Anzeige für Netzwerkstatus.
(grün/gelb)
AUX IN Audiosignal-Eingang (Stereo/
Mono) zum Anschließen eines
externen Gerätes.
U Kopfhörerbuchse zum Anschlie-
ßen eines Stereo-Kopfhörers mit
Klinkenstecker (ø 3,5 mm).
Der Lautsprecher des Gerätes
wird automatisch abgeschaltet.
DC 9V IN Buchse für den Stecker des
Netzadapter-Kabels.
Nur durch Ziehen des Netz-
adapters ist das Gerät vollständig vom Stromnetz getrennt.
Page 8
DEUTSCH
8
AUF EINEN BLICK
---------------------------------------------------------------------------------------------------------
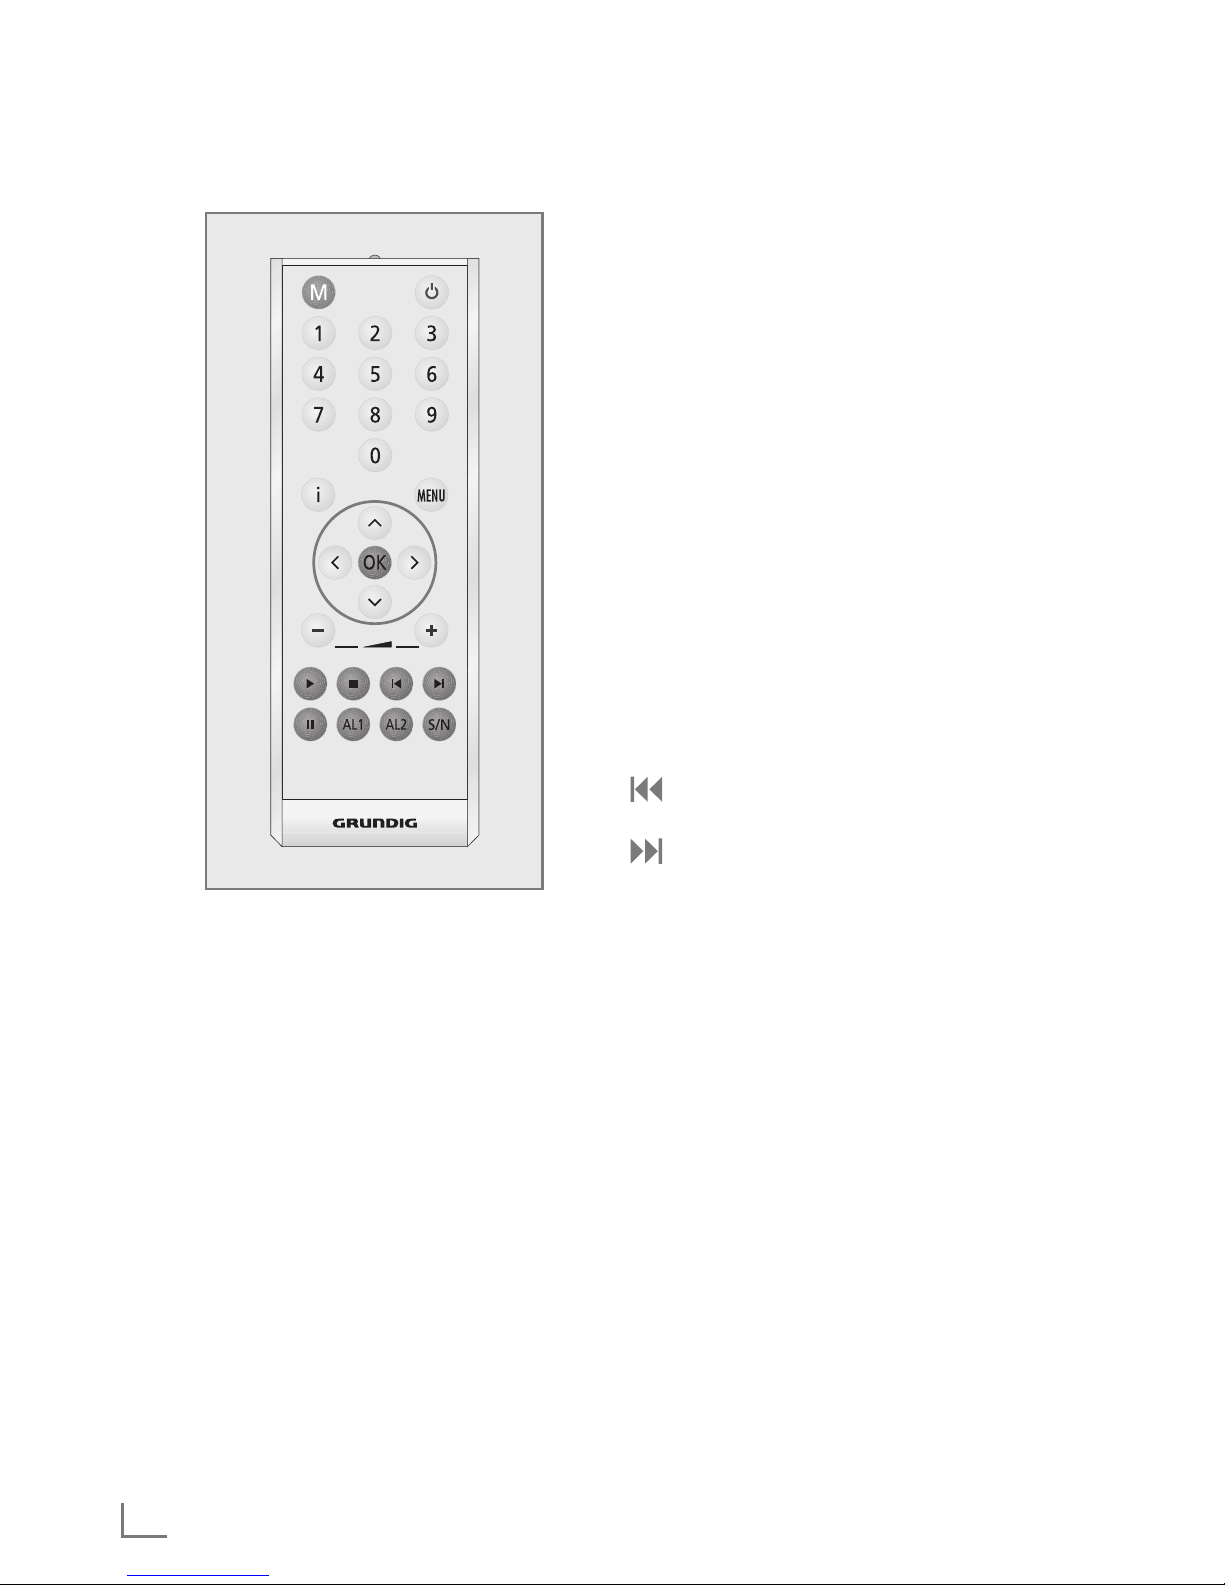
Die Fernbedienung
MENU Ruft die Menüs der Programmquel-
len Internet Radio, Spotify, Musik
Archiv, DAB, FM und Aux auf.
Λ
Blättert im Menü nach oben.
Im Radio-Betrieb: Startet den FM-
Suchlauf.
V
Blättert im Menü nach unten.
Im Radio-Betrieb: Startet den FM-
Suchlauf.
Λ
Schaltet zur nächsten Menüebene.
V
Schaltet zur vorherigen Menü-
ebene.
OK In den Menüs: Bestätigt Optionen.
Unterbricht das Wecksignal.
–
X
+ Ändern die Lautstärke.
e Im Musik Archiv- und USB-Betrieb:
Startet die Wiedergabe eines Titels.
7 Im Musik Archiv- und USB-Betrieb:
Beendet die Wiedergabe eines
Titels.
Im Musik Archiv- und USB-Betrieb:
Wählt den vorhergehenden Titel.
Im Musik Archiv- und USB-Betrieb:
Wählt den nächsten Titel.
II Im Musik Archiv- und USB-Betrieb:
Schaltet in Wiedergabe-Pause.
AL1 Aktiviert die Einstellung der Weck-
zeit 1.
AL2 Aktiviert die Einstellung der Weck-
zeit 2.
S/N Kurz drücken: Zum Einstellen und
Abschalten des Sleep Timers.
Drücken und gedrückt halten: Ruft
das Menü für die Einstellung des
Erinnerungs-Timers (NAP) auf.
8 Schaltet das Gerät in Bereitschaft
(Stand-by) und aus Bereitschaft mit
der zuletzt gewählten Programmquelle ein.
M Schaltet zwischen den Programm-
quellen Internet Radio, Spotify,
Musik Archiv, DAB, FM und Aux
um.
1 ... 0 Zifferntasten für verschiedene Einga-
ben.
Im Radio-Betrieb: Aufrufen von
gespeicherten Internet-/ DAB- und
FM-Programme auf den Programmplätzen 1 bis 10.
i Blendet Informationen zu den Inter-
net-/ DAB-/ FM-Radio-Programmen
und zu Spotify ein.
Page 9

9
DEUTSCH
AUF EINEN BLICK
---------------------------------------------------------------------------------------------------------
Fernbedienen mit UNDOK
Für Ihr Gerät ist eine Applikation für
Smartphones und Tablet-PCs erhältlich.
Einfach den App Store oder Google play
besuchen und Applikation herunterladen.
Mit der Applikation „UNDOKTM“ können
Sie viele Funktionen des Gerätes über
das Smartphone und den Tablet-PC fernbedienen.
Die Funktionen sind in der Langanleitung
beschrieben.
Der Name und das Logo UNDOK sind Markenzeichen von Frontier Silicon Limited.
Page 10

DEUTSCH
10
ANSCHLIESSEN / VORBEREITEN
---------------------------------------------------
Externes Gerät anschließen
Hinweis:
7
Schalten Sie das Gerät zum Anschließen
externer Geräte aus.
1 Tonausgangs-Buchsen des externen Gerätes
über ein handelsübliches Audiokabel an die
Buchse »AUX IN« des Gerätes anschließen.
MP3 Player oder USB-Memory
Stick anschließen
Das Gerät unterstützt die meisten der auf dem
Markt erhältlichen MP3 Player oder USB-Memory Sticks.
Achtung:
7
Beim Herstellen der USB-Verbindung muss
das Gerät ausgeschaltet sein. Ist dies nicht
der Fall, kann es zum Verlust von Daten
kommen.
1 USB-Schnittstelle des MP3 Players über ein
handelsübliches USB-Kabel mit der Buchse
»USB« (Typ A) des Gerätes verbinden;
oder
USB-Stecker des USB-Memory Sticks in die
Buchse »USB« des Gerätes stecken.
Hinweise:
7
Zum Entfernen des MP3 Players oder des
USB-Memory Sticks das Gerät ausschalten
und das Kabel bzw. den Datenträger abziehen.
7
Die Buchse »USB« des Gerätes ist nicht
geeignet zum Anschließen eines USB-Verteilers oder eines Computers.
Kopfhörer anschließen
1 Klinkenstecker (ø 3,5 mm) des Kopfhörers in
die Buchse »U« des Gerätes stecken.
– Der Lautsprecher des Gerätes wird abge-
schaltet.
Achtung:
7
Übermäßige Lautstärke bei Verwendung
von Kopf- oder Ohrhörern kann zur Schädigung des Gehörs führen.
Netzadapter anschließen
Hinweise:
7
Prüfen Sie, ob die auf dem Typenschild (auf
dem Netzadapter) angegebene Netzspannung mit der örtlichen Netzspannung übereinstimmt. Ist dies nicht der Fall, wenden Sie
sich an Ihren Fachhändler.
7
Vor dem Anschließen des Netzadapters
müssen alle anderen Geräte angeschlossen
sein.
1 Stecker des Netzadapter-Kabels in die Buchse
»DC 9V IN« stecken.
2 Stecker des Netzadapters in die Steckdose
stecken.
Achtung:
7
Über den Netzadapter ist das Gerät mit
dem Stromnetz verbunden. Wenn Sie das
Gerät vollständig vom Stromnetz trennen
wollen, müssen Sie den Stecker des Netzadapters ziehen.
Batterie in die Fernbedienung
einlegen
1 Folie von der Batterie abziehen.
2 Batteriefach-Abdeckung (Schraubverschluss)
abnehmen.
3 Beim Einlegen der Batterie (3 V, Lithium, Typ
CR 2025) darauf achten, dass der Pluspol (+)
nach oben zeigt.
4 Batteriefach-Abdeckung (Schraubverschluss)
auflegen und festdrehen.
Hinweise:
7
Setzen Sie die Batterie keiner extremen Hit-
ze wie z.B. durch Sonneneinstrahlung, Heizungen, Feuer, etc. aus.
7
Entfernen Sie die Batterie, wenn Sie ver-
braucht ist oder wenn Sie das Gerät längere Zeit nicht benutzen. Für Schäden, die
durch ausgelaufene Batterien entstehen,
kann nicht gehaftet werden.
Umwelthinweis:
7
Die Batterien – auch schwermetallfreie –
dürfen nicht im Hausmüll entsorgt werden.
Verbrauchte Batterien müssen in die Altbatteriesammelgefäße bei Handel und öffentlich–rechtlichen Entsorgungsträgern gegeben werden.
Page 11
11
DEUTSCH
ANSCHLIESSEN / VORBEREITEN
---------------------------------------------------
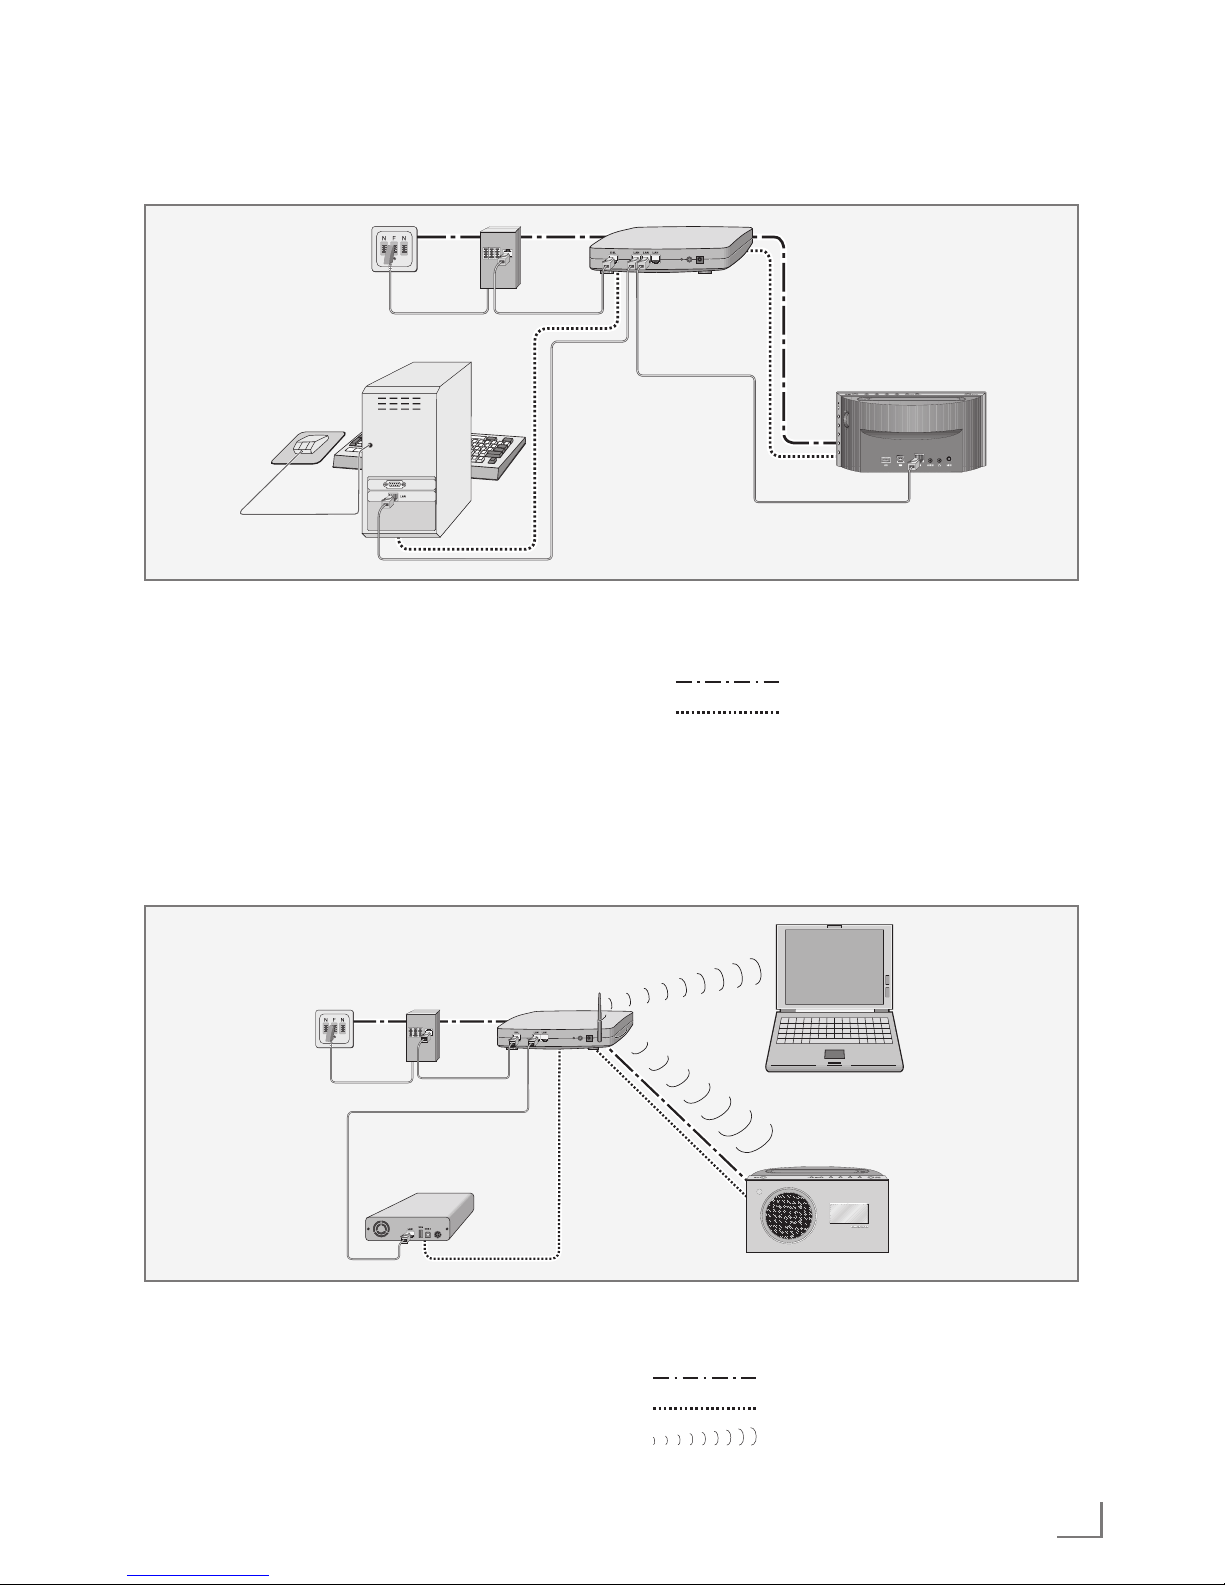
LAN-Verbindung zum Internet
Hinweise:
7
Die Linien stellen die Funktion dar.
Internet Radio
Media Server (Audio
Streaming)
7
Der Datendurchsatz beträgt 10/100 Mbit.
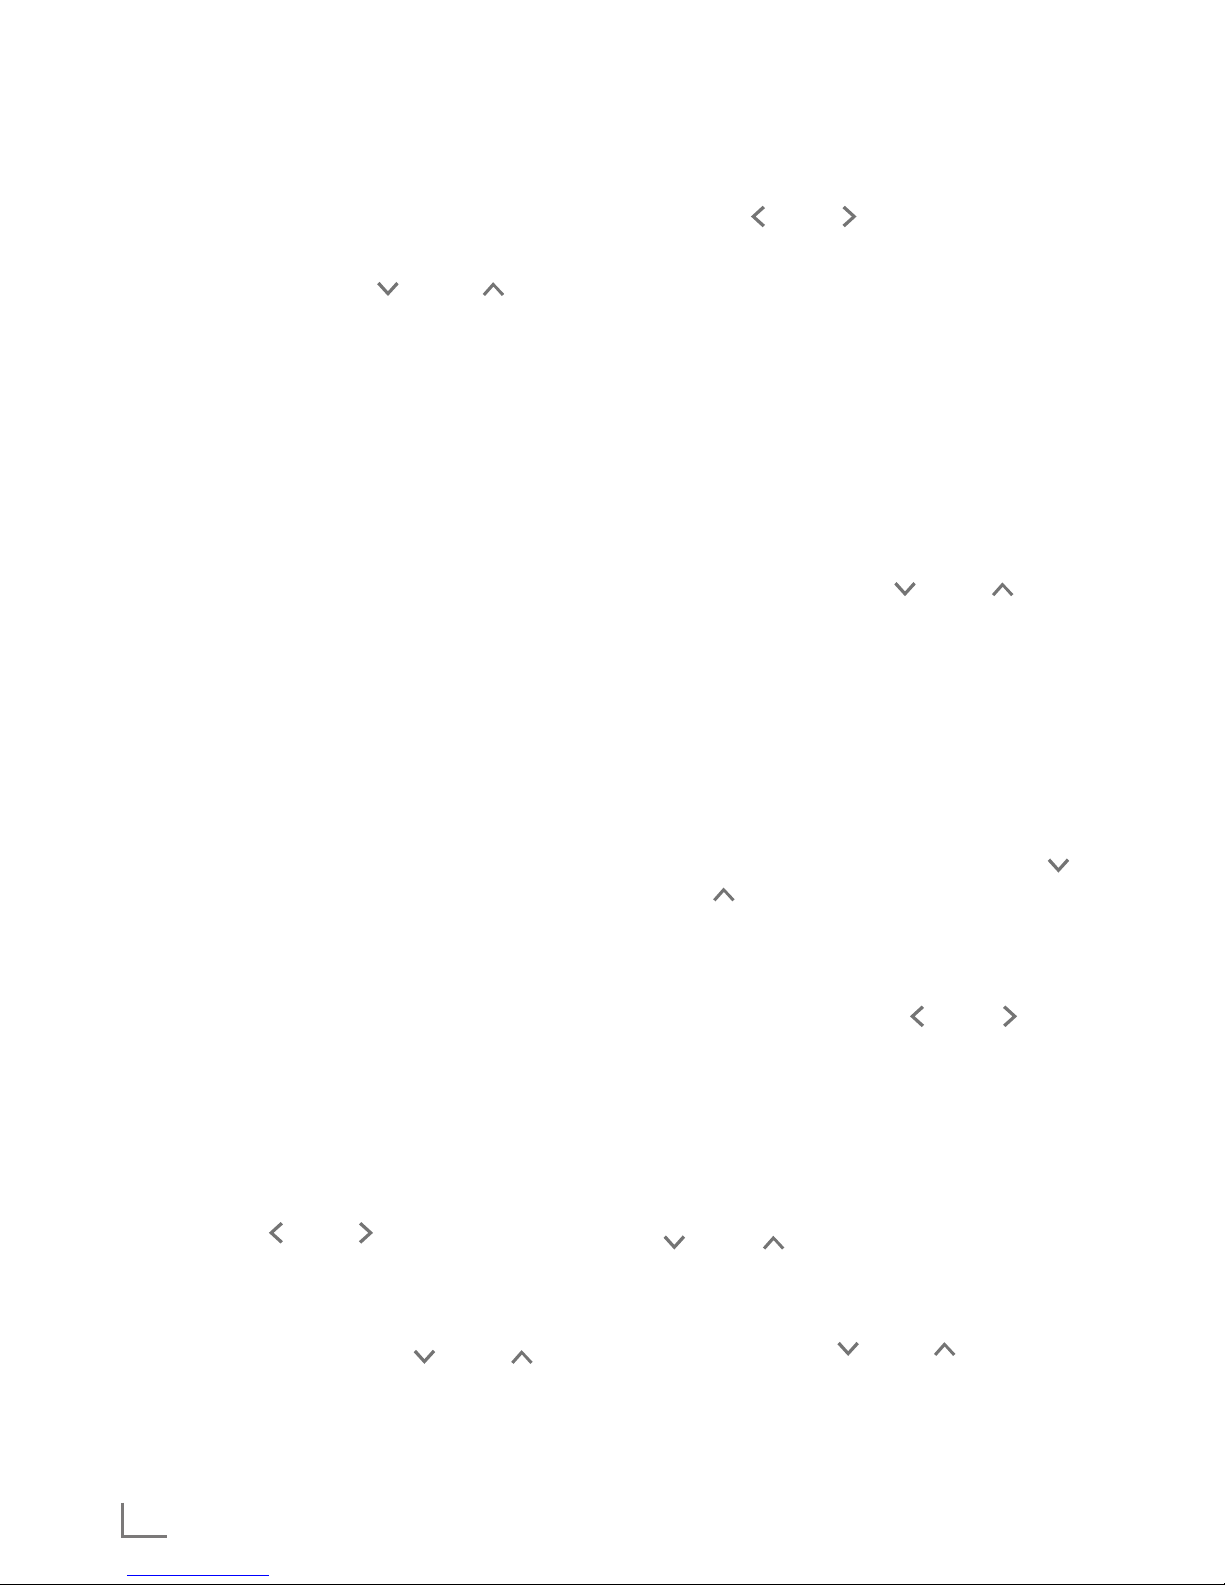
WLAN-Verbindung zum Internet
Hinweise:
7
Die Qualität des Funksignals ist von der
Entfernung des Gerätes zu Ihrem Modem/
Router abhängig.
7
Auch die Bausubstanz am Aufstellort kann
dies beeinflussen.
Hinweis:
Die Linien stellen die Funktion dar.
Internet Radio
Musik Archiv (Audio Streaming)
WLAN
Hinweis:
7
Schalten Sie das Gerät vor dem Anschlie-
ßen an das Internet aus.
1 Ethernet-Buchse des Modems/Routers über
ein handelsübliches Standard-Netzwerkkabel
(Twistedpair, RJ45 Stecker) an die Buchse
»LAN« des Gerätes anschließen.
Modem/Router
Cosmopolit 9 WEB DAB+
Media Server
im Computer
Telefondose
Splitter
Modem/Router
Cosmopolit 9 WEB
DAB+
Laptop
SplitterTelefondose
Media Server auf
Festplatte
(NAS - Network
Attached Storage)
Page 12
DEUTSCH
12
Navigation in den Menüs
Das Menü mit »MENU« am Gerät oder der
Fernbedienung aufrufen, der Inhalt ist abhängig
vom aktuellen Betriebsmodus.
Das »Hauptmenü« mit » « oder » « wählen
und mit »OK« bestätigen.
Erstinstallation mit dem Installationsassistenten “Wizard”
Nach dem ersten Anschließen des Gerätes an
die Stromversorgung wird das GRUNDIG Logo
angezeigt.
Danach wird der Wizard Installationsassistent
eingeblendet, der Sie Schritt für Schritt durch die
Installation führt.
Hinweise:
7
Der für die WLAN Verbindung benötigte
WLAN Router muss eingeschaltet sein!
7
Der Netzwerkname (SSID) muss sichtbar
sein und die MAC-Adresse des Gerätes
muss ggf. im WLAN Router freigeschaltet
sein.
7
Führen Sie die erste Installation in der Nähe
Ihres WLAN Routers durch um Probleme mit
der WLAN-Reichweite zu vermeiden.
7
Soll die Internetverbindung über ein LAN-
Kabel erfolgen, muss das Gerät und der
Router mit einem LAN-Kabel verbunden sein
(siehe Kapitel “LAN-Verbindung zum Inter-
net”).
Erstinstallation durchführen
1 Gerät mit »8« an der Fernbedienung oder
»ON/OFF« am Gerät aus Bereitschaft (Standby) einschalten.
– Anzeige: »Setup wizard«.
2 Die Schaltfläche »YES« im Menü »Setup wi-
zard« mit » « oder » « wählen und mit »OK«
bestätigen.
– Das Menü »Language« (Sprache) wird ein-
geblendet.
3 Gewünschte Sprache mit » « oder » « wäh-
len und mit »OK« bestätigen.
– Das Menü »Datum/Zeit« wird eingeblendet.
EINSTELLUNGEN
------------------------------------------------------------------------------------------------------------
4 Gewünschtes Zeitformat für die Uhranzeige
einstellen, dazu die Schaltfläche »12« oder
»24« mit » « oder » « wählen und mit »OK«
bestätigen.
– Das Menü »Autom. Update« (Automatische
Aktualisierung) wird eingeblendet.
5 Programmquelle wählen, von der die Zeitsyn-
chronisation automatisch durchgeführt werden
soll
Auswahlmöglichkeiten:
– »Update von DAB«,
– »Update von FM«,
– »Update von NET« (vom Internet),
– »Kein Update« (keine automatische Zeitsyn-
chronisation).
Gewünschte Option mit » « oder » « wählen und mit »OK« bestätigen.
– Das Menü »Zeitzone wählen« wird einge-
blendet (nur wenn »Update von NET« gewählt wurde).
Hinweis:
7
Wurde »Update von FM« oder »Update
von DAB« gewählt, setzen Sie die Bedienung bei Punkt 8 fort.
6 Benötigte Zeitzone für die Uhranzeige mit » «
oder » « wählen und mit »OK« bestätigen.
– Das Menü »Sommer-/Winterzeit« wird ein-
geblendet.
7 Sommerzeit (für Mitteleuropa) wählen, dazu
die Schaltfläche »Ein« mit » « oder » « wählen und mit »OK« bestätigen.
Mit Schaltfläche »Aus« wird die Winterzeit
gewählt.
– Das Menü »Interneteinst.« wird eingeblen-
det.
8 Wenn das Gerät über das Netzwerk einge-
schaltet werden soll, die Schaltfläche »JA« mit
» « oder » « wählen und mit »OK« bestätigen.
Wenn das Gerät nicht eingeschaltet werden
soll (niederige Stand-by Leistung), die Schaltfläche »NEIN« mit » « oder » « wählen und
mit »OK« bestätigen.
– Das Menü »WLAN-Region« wird eingeblen-
det.
Page 13

13
DEUTSCH
EINSTELLUNGEN
------------------------------------------------------------------------------------------------------------
9 Benötigte WLAN-Region mit » « oder » «
wählen und mit »OK« bestätigen.
(Diese Einstellung ist davon abhängig, an wel-
chem Standort Sie den Cosmopolit 9 WEB
DAB+ betreiben.)
– Das Menü »SSID« wird eingeblendet, die
vorhandenen Netzwerke werden angezeigt.
Hinweise:
7
Wenn die Verbindung über LAN-Kabel gewünscht ist, die Option »[Kabel]« mit » «
oder » « wählen und mit »OK« bestätigen.
Die Erstinstallation ist jetzt beendet.
7
Soll die Verbindung zum Router über WLAN
erfolgen, gibt es – abhängig vom verwendeten Router – zwei Möglichkeiten:
Der Router unterstützt [WPS], setzen Sie die
Bedienung bei Pkt. 10/11 oder Pkt. 10/12
fort.
Wenn der Router [WPS] nicht unterstützt,
setzen Sie die Bedienung bei Pkt. 13 fort.
7
Wenn am WLAN-Router der Netzwerkname (SSID) aus Sicherheitsgründen unterdrückt wird, kann das Netzwerk nicht
gefunden werden. Es muss dann manuell
eingegeben werden. Die Option »[Manuelle Konfig]« mit » « oder » « wählen und
mit »OK« bestätigen. Einstellung mit dem
Kapitel „Sondereinstellungen“ – „Das Gerät am WLAN Router anmelden ...“ (siehe
„Langanleitung”) fortsetzen.
10 Gewünschtes [WPS] Netzwerk mit » « oder
» « wählen und mit »OK« bestätigen.
Hinweis:
7
Bei der Anmeldung an ein [WPS] Netzwerk
gibt es zwei Möglichkeiten: mittels dem
Push-Button am Router oder durch Eingabe
einer PIN am Router.
11 Die Option »Taste drücken« mit » « oder »
« wählen und mit »OK« bestätigen.
Am Router die Funktion »Push-Button« akti-
vieren (Menü oder Taste) und innerhalb von
2 Minuten »OK« am Gerät drücken.
– Anzeige: »Bitte warten, Verbindungsauf-
bau« und danach »verbunden«.
Einstellung mit »OK« am Gerät beenden;
oder
12 Die Option »PIN« mit » « oder » « wählen
und mit »OK« bestätigen.
– Anzeige: PIN Nummer, die das Gerät vor-
gibt.
Im Menü des Routers die PIN Nummer einge-
ben und bestätigen.
– Anzeige: »Bitte warten, Verbindungsauf-
bau« und danach »verbunden«.
13 Gewünschtes Netzwerk mit » « oder » «
wählen und mit »OK« bestätigen.
– Das Menü »Schlüssel:« wird eingeblendet
(wenn das Netzwerk verschlüsselt ist), der
Cursor steht an der ersten Eingabestelle.
Hinweis:
7
Wenn das Netzwerk verschlüsselt ist, muss
der Netzwerkschlüssel (Sicherheitscode
WEP oder WPA) eingegeben werden.
14 Netzwerkschlüssel eingeben:
Erstes Zeichen mit » «, » «, » « oder » «
eingeben und mit »OK« bestätigen.
Eingabe für weitere Zeichen wiederholen.
Ist der Netzwerkschlüssel vollständig ein-
gegeben, mit » «, » «, » « oder » « die
Schaltfläche »OK« wählen und mit »OK« be-
stätigen.
– Das Menü »Einrichtungsassistent« wird
eingeblendet, der Anmeldeprozess an das
Netzwerk wird durchgeführt.
– Anzeige: »Bitte warten, Verbindungsauf-
bau« und danach »verbunden«.
– Nach erfolgreicher Anmeldung wird die
Meldung »Einrichtungsassi. abgeschlossen«
eingeblendet.
Hinweise:
7
Mit » « oder » « blättern Sie durch die
Menüseite, um weitere Zeichen anzuwählen.
7
Bei Fehleingaben mit » «, » «, » « oder
» « die Schaltfläche »BKSP« wählen und
mit »OK« bestätigen. Das letzte Zeichen
wird gelöscht.
7
Soll die Eingabe abgebrochen werden, mit
» «, » «, » « oder » « die Schaltfläche
»CANCEL« wählen und mit »OK« bestätigen.
15 Einstellung mit »OK« beenden.
Page 14

DEUTSCH
14
EINSTELLUNGEN
------------------------------------------------------------------------------------------------------------
DAB-Programme einstellen
Automatischer Programmsuchlauf
Wird das Gerät erstmals im DAB-Bereich in Betrieb genommen, führt es einen automatischen
Programmsuchlauf durch.
Während des Suchlaufs erscheint in der ersten
Zeile der Anzeige die Anzahl der gefundenen
Programme, in der zweiten Zeile die SuchlaufSkala.
Nach dem Suchlauf werden die Programme alpha be tisch in einer Liste gezeigt.
1 Programmquelle »DAB Radio« mit »M« wäh-
len.
– Der Automatische Suchlauf startet.
Hinweis:
7
Im Menü »DAB« – »Vollständiger Suchlauf«
kann ein neuer “Automatischer Programmsuchlauf” gestartet werden. Das kann bei
einem Standortwechsel des Gerätes not-
wendig sein.
Programme sortieren
Die nach dem Programmsuchlauf in der Programmliste gespeicherten DAB-Programme lassen sich auf drei verschiedene Weisen anordnen.
– »Alphanumerisch«: Alle Programme werden
alphanumerisch sortiert (Werkseinstellung).
– »Ensemble«: Alle Programme werden nach En-
sembles sortiert.
– »Verfügbar«: Aktive Programme werden zuerst
aufgelistet, nicht aktive Programme mit einem
Fragezeichen versehen.
1 DAB-Menü mit »MENU« aufrufen.
2 Die Option »Senderreihenfolge« mit » « oder
» « wählen und mit »OK« bestätigen.
3 Gewünschte Option mit » « oder » « wäh-
len und mit »OK« bestätigen.
FM-Programme einstellen
Suchlauf-Modus wählen
Es stehen zwei Modi für die automatische Programmsuche zur Verfügung.
1 Programmquelle »FM Radio« mit »M« wählen.
2 Menü »FM« mit »MENU« aufrufen.
3 Die Option »Suchlauf-Einstellung« mit » «
oder » « wählen und mit »OK« bestätigen.
– Anzeige: »Nur empfangsstarke Sender?«.
4 Gewünschte Option (»JA« oder »NEIN«) mit
» « oder » « wählen und mit »OK« bestätigen.
5 Menü »FM« mit »MENU« abschalten.
Automatische Programmsuche
1 Automatischen Suchlauf starten, dazu » «
oder » « drücken und gedrückt halten. Wird
die jeweilige Taste losgelassen, stoppt der
automatische Suchlauf beim nächsten FMProgramm.
Programme manuell einstellen
1 Frequenz schrittweise fortschalten, dazu » «
oder » « wiederholt kurz drücken.
– Die Frequenz ändert sich vorwärts oder
rückwärts in 50 kHz-Schritten.
FM-Programme auf Programmplätzen speichern
1 Gewünschtes FM-Programm wie beschrieben
einstellen.
2 Zum Speichern des Programmes gewünschte
Zifferntaste »1 ... 0« so lange drücken, bis
in der Anzeige »Programm gespeichert« erscheint.
– Anzeige: Das gespeicherte Programm mit
der Programmplatznummer, z.B. »P1«.
Hinweis:
7
Mit Zifferntaste »0« wird der Programmplatz
10 gewählt.
3 Zum Speichern weiterer Programme die Schrit-
te 1 und 2 entsprechend oft wiederholen.
Page 15

15
DEUTSCH
EINSTELLUNGEN
------------------------------------------------------------------------------------------------------------
Spotify installieren
Wenn Sie die vielfälltige Musikauswahl von
„Spotify” abspielen wollen, müssen Sie die Applikation auf Ihrem Mobil Phone oder Tablet PC
laden und installieren und die Premiumversion
abonnieren.
Mobil Phone/Tablet PC müssen im gleichen
WLAN-Netz angemeldet sein wie Ihr Cosmopolit 9 WEB DAB+ .
1 Am Mobil Phone/Tablet PC die Applikation
„Spotify” herunterladen und installieren.
2 Den Account einrichten.
3 Die Premiumversion auswählen.
Hinweis:
7
Die Premiumversion von „Spotify” ist kosten-
pflichtig.
Page 16

DEUTSCH
16
ALLGEMEINE FUNKTIONEN
-------------------------------------------------------------------
Ein- und Ausschalten
1 Gerät mit »8« an der Fernbedienung oder
»ON/OFF« am Gerät aus Bereitschaft (Standby) einschalten.
– Die zuletzt aktive Programmquelle wird auto-
matisch gewählt.
2 Gerät mit »8« an der Fernbedienung oder
»ON/OFF« am Gerät in Bereitschaft (Standby) schalten.
– Anzeige: Die aktuelle Uhrzeit und das Da-
tum.
Programmquelle wählen
1 Gewünschte Programmquelle (»Internet Ra-
dio«, »Spotify«, »Musik Archiv«, »DAB Radio«,
»FM Radio« oder »Aux In«) mit »M« wählen.
Lautstärke ändern
1 Lautstärke mit »-« oder »+« ändern.
Automatische Abschaltung
1 Das Gerät schaltet automatisch nach 15 Mi-
nuten in Stand-by, wenn:
– sich das Gerät in Stellung „Stopp“ befindet;
– an Buchse »AUX IN« kein Audio-Signal
anliegt.
2 Für den weiteren Gebrauch das Gerät erneut
einschalten.
Die Spotify-Software unterliegt den Nutzungsrechten Dritter, die unter www.spotify.com/
connect/third-party-licenses eingesehen werden
können.
Hinweis:
7
Mobil Phone oder Tablet PC müssen im glei-
chen WLAN-Netz angemeldet sein wie Ihr
Cosmopolit 9 WEB DAB+.
Musiktitel auswählen und abspielen
1 Gerät mit »8« an der Fernbedienung oder
»ON/OFF« am Gerät aus Bereitschaft (Standby) einschalten.
2 Am Mobil Phone oder Tablet PC die Applikati-
on „Spotify” starten.
3 Bei „Spotify” anmelden.
SPOTIFY-BETRIEB
------------------------------------------------------------------------------------------------------------
4 Gewünschten Musiktitel auswählen und Wie-
dergabe starten.
5 Das Lautsprechersymbol anklicken.
– Die verfügbaren Wiedergabegeräte wer-
den angezeigt.
6 Ihren Cosmopolit 9 WEB DAB+ anwählen.
– Der Musiktitel wird am Cosmopolit 9 WEB
DAB+ abgespielt.
Hinweis:
7
Die Programmquelle „Spotify” am Cosmo-
polit 9 WEB DAB+ wird automatisch angewählt.
Page 17

17
DEUTSCH
Internet-Radioprogramme suchen –
nach Namen
Bei der Suche nach Ländern kann gezielt nach
Programmnamen gesucht werden.
1 Im Menü »Sender« die Option »Suchen Sen-
der« mit » « oder » « wählen und mit »OK«
bestätigen.
– Sie werden aufgefordert, den Programmna-
men einzugeben.
Hinweise:
7
Mit » «, » «, » « oder » « das gewünsch-
te Zeichen wählen und mit »OK« bestätigen. Der Cursor springt zur nächsten Eingabestelle.
7
Bei Fehleingaben mit » «, » «, » « oder
» « das Schaltfeld »BKSP« wählen und mit
»OK« bestätigen. Das letzte Zeichen wird
gelöscht.
7
Zum Verlassen des Eingabemenüs mit » «,
» «, » « oder » « das Schaltfeld »CANCEL« wählen und mit »OK« bestätigen.
7
Ist der Programmname eingegeben, mit
» «, » «, » « oder » « das Schaltfeld
»OK« wählen und mit »OK« bestätigen. Anschließend erscheint in der Anzeige »Bitte
warten, Ladevorgang«. Danach wird eine
Liste von Programmnamen angezeigt, auf
die der eingegebene Suchbegriff zutrifft.
2 Gewünschtes Radioprogramm mit » « oder
» « wählen und mit »OK« bestätigen.
– Anzeige: »Verbindungsaufbau« und danach
»Ladevorgang«, kurz danach ist das gesuchte Radioprogramm zu hören.
INTERNET-BETRIEB
-------------------------------------------------------------------------------------------------------
Wissenswertes über die Internet
Radiostationen
Sie können in einer Übersicht nach verschiedensten Internet Radiostationen suchen. Diese sind
aufgeteilt nach Musikstile, nach Ländern oder
auch nach der Popularität.
Programmquelle Internet Radio
wählen
1 Programmquelle »Internet Radio« mit »M«
wählen.
– Anzeige: »Bitte warten, verbinden« und da-
nach »Verbindung hergestellt«.
Internet-Radioprogramme wählen – nach Suchkriterien
Internet-Menü aufrufen
1 Das Menü mit »MENU« aufrufen.
2 Die Option »Senderliste« mit » « oder » «
wählen und mit »OK« aufrufen.
3 Die Option »Sender« mit » « oder » « wäh-
len und mit »OK« aufrufen.
Hinweis:
7
Die weitere Bedienung entnehmen Sie bitte
den folgenden Kapiteln.
Internet-Radioprogramme suchen –
nach Stilrichtungen (Genre)
1 Im Menü »Sender« die Option »Genre« mit
» « oder » « wählen und mit »OK« bestätigen.
2 Gewünschtes Suchkriterium (z.B. »Ambient«)
mit » « oder » « wählen und mit »OK« bestätigen.
– Eine Länderauswahl wird angezeigt.
3 Gewünschtes Land mit » « oder » « wählen
und mit »OK« bestätigen.
– Die ersten Radioprogramme des gewählten
Landes werden angezeigt.
4 Gewünschtes Radioprogramm mit » « oder
» « wählen und mit »OK« bestätigen.
– Anzeige: »Verbindungsaufbau« und danach
»Ladevorgang«, kurz danach ist das gesuchte Radioprogramm zu hören.
Page 18

DEUTSCH
18
INTERNET-BETRIEB
-------------------------------------------------------------------------------------------------------
Internet-Radioprogramme auf
Programmplätzen speichern
1 Gewünschtes Internet-Radioprogramm wie be-
schrieben einstellen
2 Zum Speichern des Internet-Radioprogramms
gewünschte Zifferntaste »1 .. 0« so lange drücken, bis in der Anzeige »Programm gespeichert« erscheint.
– Anschließend erscheint in der Anzeige das
gespeicherte Programm mit der Programmplatznummer, z.B. »P1«.
Hinweis:
7
Mit Zifferntaste »0« wird der Programmplatz
10 gewählt.
3 Zum Speichern weiterer Programme die Schrit-
te 1 und 2 entsprechend oft wiederholen.
Gespeicherte Internet-Radioprogramme aufrufen
1 Gewünschtes Internet-Radioprogramm auf-
rufen, dazu eine der Stationstasten »1I6«
bis »5I10« am Gerät drücken (einmal für die
Programmplätze 1 – 5, zweimal für die Pro-
grammplätze 6 – 10) oder eine der Ziffern-
tasten »1 ... 0« der Fernbedienung drücken.
– Anzeige:»Verbindungsaufbau« und danach
»Ladevorgang« und die Nummer des Programmplatzes, kurz danach ist das gewählte Radioprogramm zu hören.
USB-BETRIEB
----------------------------------------------------------------------------------------------------------------------------
Inhalt eines MP3-Players oder
USB-Memory Sticks wiedergeben
1 Gerät mit »8« an der Fernbedienung oder
»ON/OFF« am Gerät in Bereitschaft (Standby) schalten.
2 USB-Schnittstelle des MP3-Players über ein
handelsübliches USB-Kabel mit der Buchse
»USB« des Gerätes (an der Rückseite) verbin-
den;
oder
USB-Stecker des USB-Memory Sticks in die
Buchse »USB« des Gerätes (an der Rückseite)
stecken.
3 Gerät mit »8« an der Fernbedienung oder
»ON/OFF« am Gerät aus Bereitschaft (Stand-
by) einschalten.
4 Programmquelle »Musik-Archiv« mit »M« wäh-
len.
– Das Menü »Musik-Archiv« wird eingeblen-
det.
5 Die Option »USB Abspielen« mit » « oder
» « wählen und mit »OK« bestätigen.
– Der Inhalt des Datenträgers wird angezeigt.
Hinweis:
7
Ist kein Datenträger angeschlossen, wird die
Meldung, »kein USB Gerät« angezeigt.
6 Den gewünschten Ordner oder Titel mit » «
oder » « wählen.
7 Wiedergabe des Titels mit »OK« starten.
– Anzeige: Der Titelname, die abgelaufene
Spielzeit und die Gesamtspielzeit.
8 Wiedergabe mit »7« beenden.
Informationen aufrufen
1 Informationen zum aktuellen Titel einblenden,
dazu »i« wiederholt drücken.
– Informationen zum Interpreten, Titel, Album,
usw. werden eingeblendet.
Page 19

19
DEUTSCH
FM-BETRIEB
--------------------------------------------------------------------------------------------------------------------------------
Programmquelle FM wählen
1 Programmquelle »FM Radio« mit »M« wählen.
FM-Programm wählen – von
Programmplätzen
1 Gewünschtes FM-Programm aufrufen, dazu
eine der Stationstasten »1I6« bis »5I10« am
Gerät drücken (einmal für die Programmplätze 1 – 5, zweimal für die Programmplätze
6 – 10) oder eine der Zifferntasten »1 ... 0«
der Fernbedienung drücken.
Stereo - /Monoempfang
1 Das Menü mit »MENU« aufrufen.
2 Die Option »Audio-Einstellung« mit » « oder
» « wählen und mit »OK« aufrufen.
3 Auf Monoempfang schalten, dazu die Schalt-
fläche »JA« mit » « oder » « wählen und mit
»OK« bestätigen.
Mit Schaltfläche »NEIN« wird Stereoempfang
eingestellt.
4 Einstellung mit »MENU« beenden.
DAB-BETRIEB
---------------------------------------------------------------------------------------------------------------------------
Programmquelle DAB wählen
1 Programmquelle »DAB« mit »M« wählen.
DAB-Programm wählen – von
Programmplätzen
1 Gewünschtes DAB-Programm mit »1« bis »0«
aufrufen.
DAB-Programm wählen – aus
der Senderliste
Die angebotenen DAB-Programme sind in einer
»Senderliste« gespeichert.
1 DAB-Menü mit »MENU« aufrufen.
2 Die Option »Senderliste« mit » « oder » «
wählen und mit »OK« aufrufen.
3 Gewünschtes DAB-Programm mit » « oder
» « wählen und mit »OK« aufrufen.
– Anzeige: »Abspielen«, das gewählte DAB-
Programm ist zu hören.
DAB-Programminformationen
aufrufen
1 Informationen zum aktuellen DAB-Programm
einblenden, dazu »i« wiederholt drücken.
– Folgende Anzeigen erscheinen nacheinan-
der:
das Genre;
der Programmanbieter und die Frequenz;
Hinweise auf Signalstörungen, z.B. »Si-
gnalfehler 10« (bei optimalem Empfang
wird »Signalfehler 0« angezeigt);
Bit-Rate, Sendeformat und die Kanäle.
das aktuelle Datum;
Radiotext als Laufschrift.
Hinweise:
7
Die jeweilige Information wird konstant angezeigt, falls nicht erneut »i« gedrückt wird.
7
Wird vom Programmanbieter der Zusatzdienst „MOT SlideShow“ angeboten, so
kann der Inhalt mit »OK« auf dem Display
vergrößert dargestellt werden. Zurückschalten zum „Kleinbild”, dazu »OK« noch einmal drücken.
Page 20

DEUTSCH
20
INFORMATION
------------------------------------------------------------------------------------------------------------------
Entsorgung von Altgeräten:
Dieses Produkt erfüllt die Vorgaben der EUWEEE-Direktive (2012/19/EU). Das Produkt
wurde mit einem Klassifizierungssymbol für elektrische und elektronische Altgeräte (WEEE) gekennzeichnet.
Dieses Gerät wurde aus hochwertigen Materialien hergestellt, die wiederverwendet und recycelt werden
können. Entsorgen Sie das Gerät am
Ende seiner Einsatzzeit nicht mit dem
regulären Hausmüll; geben Sie es stattdessen bei
einer Sammelstelle zur Wiederverwertung von
elektrischen und elektronischen Altgeräten ab.
Ihre Stadtverwaltung informiert Sie gerne über
geeignete Sammelstellen in Ihrer Nähe.
Einhaltung von RoHS-Vorgaben:
Das von Ihnen erworbene Produkt erfüllt die Vorgaben der EU-RoHS Direktive (2011/65/EU).
Es enthält keine in der Direktive angegebenen
gefährlichen und unzulässigen Materialien.
Informationen zur Verpackung
Die Verpackung des Produkts wurde
gemäß unserer nationalen Gesetzgebung aus recyclingfähigen Materia-
lien hergestellt. Entsorgen Sie die Verpackungsmaterialien nicht mit dem Hausmüll
oder anderem Müll. Bringen Sie sie zu einer von
der Stadtverwaltung bereitgestellten Sammelstelle für Verpackungsmaterial.
Technische Daten
Dieses Gerät ist funkentstört entsprechend den geltenden EURichtlinien.
Dieses Produkt erfüllt die europäischen Richtlinien 2014/53/EU, 2009/125/EC
und 2011/65/EU.
Den genauen Wortlaut der Konformitätserklärung
(DOC) finden Sie auf der GRUNDIG Homepage
www.grundig.com/downloads/doc.
Das Typenschild befindet sich an der Unterseite
des Gerätes.
System
Spannungsversorgung
Netzteil:
Eingang: 230 V~ , 50/60 Hz
Ausgang: 9 V > 1500 mA
Ó
Max.
Leistungsaufnahme: 8 W
Leistungsaufnahme
in Stand-by: ≤ 1 W
Verstärkerteil
Ausgangsleistung
Sinusleistung: 1 x 1,2 W
Musikleistung: 1 x 1,5 W
Empfangsteil
FM: 87,5 ...108,0 MHz
DAB, Band III: 174.928–239.200 MHz,
5A–13F
WLAN
Netzwerkstandard: IEEE 802.11b, g, n
Das Gerät unterstützt die Übertragungsraten
nach Standard IEEE 802.11 b, IEEE 802.11 g
und IEEE 802.11 n
Betriebskanäle: 13 (abhängig vom Router)
Sicherheit: Hardware-WEP-Engine
(64/128-Bit); WEP-WeakKey-Avoidance (WEPplus),
TKIP, Hardware-AES-Engine
mit Unterstützung für CCM
und OCB, 802.1x, SSN
USB
USB 2.0 kompatibel für Format FAT 32/16
Abmessungen und Gewicht
Abmessungen: B x H x T
252 x 127 x 79 mm
Gewicht: 0,99 kg
Technische und optische Änderungen vorbehalten!
Page 21

21
ENGLISH
SET-UP AND SAFETY
-----------------------------------------------------------------------------------------------
Please note the following instructions when setting up the system:
7
The device is designed for the playback of
audio signals. Any other use is expressly prohibited.
7
If you want to set up the device on wall shelves
or in cupboards, please ensure that it is adequately ventilated. There must be at least 10
cm of space at the side, above and behind the
device.
7
Do not cover the device with newspapers, table cloths, curtains, etc.
7
When setting up the device, remember that
furniture is often coated with various types of
varnish and plastic, which often contain chemical additives. These additives may cause corrosion to the feet of the unit. This may leave
stains on the surface of the furniture which can
be difficult or impossible to remove.
7
If the device is exposed to sudden changes in
temperature, for example when taken from the
cold into a warm room, wait at least two hours
before using it.
7
The device is designed for use in dry rooms. If
you do use it outdoors, make sure it is protected from moisture such as dripping or splashing
water.
7
Only use the device in a moderate climate.
7
Do not place the device close to heating units
or in direct sunlight, as this will impair cooling.
7
Do not place any vessels containing liquids,
such as vases, on the device.
7
Do not place any objects such as burning candles on the device.
7
Do not use any cleaning agents as they may
damage the housing. Clean the device with a
clean, dry cloth.
7
Thunderstorms are a danger to all electrical
devices. Even if the device is switched off, it
can be damaged by a lightning strike to the
mains or the antenna cable. Always disconnect the mains during a storm.
7
If malfunctions occur due to static electricity
charges or brief mains voltage surges, reset
the device. To do this, pull out the mains adapter and connect it again after a few seconds.
7
Do not expose the battery to extreme heat,
such as for example sunlight, radiators, fire,
etc.
7
The remote control contains a button cell.
Please always keep the remote control and the
button cell out of reach of children.
7
If the button cell is accidentally swallowed, it
can lead to burns and even death within two
hours. You should therefore see a doctor immediately.
7
Keep new and used batteries out of reach of
children. If the battery compartment cannot be
closed safely, do not continue to use the device and keep out of reach of children.
7
CAUTION: Danger of explosion if battery is
incorrectly replaced. Replace only with the
same or equivalent type.
7
Continuous use at high volume
level can cause damage to the
user’s hearing.
7
Do not open the device casing under any cir-
cumstances. Warranty claims are excluded for
damage resulting from improper handling.
7
Do not connect any other equipment while the
device is switched on.
7
Switch off the other devices as well before con-
necting them.
7
Unplug the mains adapter to completely dis-
connect the device from the mains.
7
Make sure the mains adapter is freely acces-
sible.
Page 22

ENGLISH
22
SET-UP AND SAFETY
-----------------------------------------------------------------------------------------------
7
For remote control-
Battery door can be opened and closed by
tools such as coin and the battery door must
be locked and located at the ‘’LOCK’’ position so as to ensure the lithium battery can be
locked inside the battery compartment.
7
WARNING: Do not ingest the
battery. Chemical Burn Hazard
7
(The remote control supplied with) This product contains a coin/button cell battery. If the
coin/button cell battery is swallowed, it can
cause severe internal burns in just 2 hours and
can lead to death.
7
Keep new and used batteries away from
children.
7
If the battery compartment does not close
securely, stop using the product and keep it
away from children.
7
If you think batteries might have been swallowed or placed inside any part of the body,
seek immediate medical attention.
Page 23

23
ENGLISH
OVERVIEW
----------------------------------------------------------------------------------------------------------------------------------
The device controls
See the figure on page 3.
● Infrared sensor for remote con-
trol signals.
Display Multifunction display.
ON/OFF Switches the device in and out
of standby mode.
Antenna Telescopic antenna for DAB
and FM reception.
i Displays information about the
Internet, DAB and FM radio
stations and Spotify.
MENU Opens the menu.
V
In the menus: moves cursor down.
In radio mode: starts the FM
search.
Λ
In the menus: moves cursor up.
In radio mode: starts the FM
search.
Λ
Selects options and menu
pages in reverse.
V
Selects options and menu
pages forwards.
SNOOZE/OK
In the menu: selects and con-
firms options.
In alarm mode: interrupts the
alarm signal.
M Switches between the Internet
radio, spotify, music archive,
DAB, FM and Aux input sources.
+ C – Adjust the volume.
1I6 e In radio mode: station button
1/6.
In music archive mode:
starts playback of a track.
2I7 II In radio mode: station button
2/7.
In music archive mode: pauses
playback.
3I8 7 In radio mode: station button
3/8.
In music archive mode: ends
playback.
4I9 In radio mode: station button
4/9.
In music archive mode: selects
the previous track
5I10 In radio mode: station button
5/10.
In music archive mode: selects
the next track.
The back of the device
USB USB port type A.
For connecting a USB memory
stick or an MP3 player.
USB USB port type B.
Only for software upgrades.
LAN Socket for connecting to the Eth-
ernet network via LAN cable.
LED Network status display.
(green/yellow)
AUX IN Audio signal input (stereo/
mono) for connecting an external device.
U Headphone jack for connecting
a stereo headphone set with a
jack plug (3.5 mm).
The loudspeaker of the device is
automatically switched off.
DC 9V IN Socket for the mains adapter
cable.
The only way to completely
disconnect the device from the
mains is to unplug the mains
adapter cable.
Page 24

ENGLISH
24
OVERVIEW
----------------------------------------------------------------------------------------------------------------------------------
The remote control
8 Switches the device to standby
mode and from standby mode to
the last input source selected.
M Switches between the Internet ra-
dio, Spotify, music archive, DAB,
FM and Aux input sources.
1 ... 0 Number buttons for various
inputs.
In radio mode: selects Internet,
DAB and FM stations stored on
preset channels 1 to 10.
i D isplays information about the
Internet, DAB and FM radio stations and Spotify.
MENU S witches between the Internet
radio, Spotify, music archive,
DAB, FM and Aux input sources.
Λ
In the menus: moves cursor up.
In radio mode: starts the FM
search.
V
In the menus: moves cursor
down.
In radio mode: starts the FM
search.
Λ
Switches in the menu one step
forwards.
V
Switches in the menu one step
backwards.
OK
I n the menus: confirms selected
options.
Interrupts the alarm signal.
–
X
+
A djusts the volume.
e In music archive and USB mode:
starts playback of a track.
7 In music archive and USB mode:
ends playback.
In music archive and USB
mode: selects the previous
track.
In music archive and USB
mode: selects the next track.
II In music archive and USB mode:
pauses playback.
AL1
Activates the setting for alarm
time 1.
AL2
Activates the setting for alarm
time 2.
S/N
Press briefly: sets and deactivates the sleep timer.
Press and hold down: activates
the reminder timer (NAP) settings.
Page 25

25
ENGLISH
OVERVIEW
----------------------------------------------------------------------------------------------------------------------------------
Operate by UNDOK
An application for smartphones and tablet PCs is available for your device.
Just go to the App Store or Google play
and download the application.
With the “UNDOKTM“ application, you
can control many functions of the device
remotely using the smartphone and the
tablet PC.
The functions are described in the detailed instruction manual.
The UNDOK name and logo are trademarks of
Frontier Silicon Limited.
Page 26

ENGLISH
26
CONNECTION AND PREPARATION
---------------------------------------
Connecting an external device
Note:
7
Switch the device off before you connect
external devices.
1 Use standard audio cables to connect the
audio outputs of the external device to the
»AUX IN« socket on the device.
Connecting an MP3 player or a
USB memory stick
The device supports most MP3 Players or USB
memory sticks.
Caution:
7
The device must be switched off while the
USB connection is being made. If it is not
switched off, data can be lost.
1 Connect the USB interface of the MP3 player
to the »USB« (type A) socket on the device
using a standard USB cable;
or
insert the USB plug of the USB memory stick in
the USB socket »USB« (type A) on the device.
Notes:
7
To remove the MP3 player or the USB mem-
ory stick, switch off the device and pull out
the cable for the data medium.
7
The USB socket on the device does not sup-
port a connection for a USB extension cable
and is not designed for directly connecting
to a computer.
Connecting the headphones
1 Insert the headphone plug (3.5 mm) into the
»U« socket on the device.
– The loudspeaker of the device is switched
off.
Caution:
7
Excessive volume levels when using headphones or earphonescan damage your
hearing.
Connecting the mains adapter
Notes:
7
Check that the mains voltage on the type
plate (on the mains adapter) corresponds
to your local mains supply. If this is not the
case, contact your specialist dealer.
7
Before connecting the power adapter plug
to the wall socket, ensure that all other connections have been made.
1 Insert the plug of the mains adapter cable into
the »DC 9V IN« socket.
2 Plug the power adapter into an electrical out-
let.
Caution:
7
The device is connected to the mains with
the power supply unit. Unplug the mains
adapter to completely disconnect the device from the mains.
Inserting battery in the remote
control
1 Pull off the film from the battery.
2 Take off the battery compartment cover (screw
cap).
3 When inserting the battery (3 V, lithium, CR
2025), make sure the positive terminal (+) is
facing upwards and the buttons on the remote
control are facing downwards.
4 Replace the battery compartment cover
(screw cap) and fasten it.
Notes:
7
Do not expose the battery to extreme heat,
caused for example by direct sunlight, heaters or fire.
7
If the device no longer reacts properly to
remote control commands, the battery may
be flat. Always remove used batteries. The
manufacturer accepts no liability for damage caused by leaking batteries.
Environmental note:
7
Batteries, including those which contain no
heavy metal, should not be disposed of with
household waste. Always dispose of used
batteries in accordance with local environmental regulations.
Page 27

27
ENGLISH
CONNECTION AND PREPARATION
---------------------------------------
LAN connection to the internet
Notes:
7
The lines represent the function.
Internet radio
Media servers (audio
streaming)
7
The data throughput level is 10/100 Mbit.
WLAN connection to the internet
Notes:
7
The quality of the radio signal depends on
the distance between the device and your
modem/router.
7
The substance of the building at the installa-
tion site can also affect this.
Note:
The lines represent the function.
Internet radio
Music archive (audio streaming)
WLAN
Note:
7
Switch the device off before you connect it
to the internet.
1 Connect the Ethernet socket of the modem/
router to the »LAN« socket of the device using a standard network cable (Twisted pair,
RJ45 plug).
Modem/Router
Cosmopolit 9 WEB DAB+ WEB
Media servers
on the computer
Telephone socket
Splitter
Modem/Router
Cosmopolit 9 WEB DAB+ WEB
Laptop
SplitterTelephone socket
Media servers on
hard drive (NASNetwork Attached
Storage)
Page 28

ENGLISH
28
Menu navigation
Press »MENU« on the device or on the remote
control to open the menu.
Select the »Main menu« by using » « or
» « and confirm by pressing »OK«.
First Installation using the installation assistant “Wizard”
When you connect the device to the mains, or after factory reset, the display will show the Grundig logo. The Wizard installation assistant then
appears, which guides you through the installation step by step.
Notes:
7
For Wi-Fi connection, please make sure, that
the Wi-Fi router is switched on.
7
The network name (SSID) must be visible
and the MAC address of the device may be
entered in the Wi-Fi router.
7
Perform the registration process in the prox-
imity of the router in order to avoid problems with the Wi-Fi range.
7
If you wish to use a LAN cable for internet
access, the device has to be connected to
the router via LAN cable (see “Connection
and Preparation” section).
Start First Installation
1 First switch on the device by pressing »8« on the
remote control or »ON/OFF« on the device.
– Display: »Setup wizard« menu opens.
2 Select the push button »YES« by pressing » «
or » « and confirm by pressing »OK«.
– Display: »Language« menu opens.
3 Select your preferred language by pressing
» « or » « and confirm by pressing »OK«.
– Display: »Date/Time« menu opens.
SETTINGS
---------------------------------------------------------------------------------------------------------------------------------------
4 Select the hour format »12« or »24« by press-
ing » « or » « and confirm by pressing »OK«.
– Display: »Auto update« menu opens.
5 Select the input source from which the automat-
ic time synchronisation should be performed.
Selection options:
– »Update from DAB«;
– »Update from FM«;
– »Update from Network« (from an Internet
station);
– »No update« (No automatic time synchro-
nisation).
Select one of the options by pressing » « or
» « and confirm by pressing »OK«.
– The menu »Set timezone« appears (only if
»Update from Network« was selected).
Note:
7
If »Update from DAB« or »Update from FM«
was selected, continue from point 8.
6 Select the time zone by pressing » « or » «
and confirm by pressing »OK«.
– Display: »Daylight savings« menu opens.
7 Select Daylight savings (for Central Europe)
by pressing » « or » « to select »ON«, and
confirm by pressing »OK«.
Normal time is set using »OFF«.
– The menu »Network settings« appears.
8 If the device is to be switched on via the network,
select the »YES« button with » « or » « and
confirm with »OK«.
If the device is not to be switched on (low
stand-by power), select the »NO« button with
» « or » « and confirm with »OK«.
– The menu »Wlan region« appears.
9 Select one of the WLAN regions by pressing
» « or » « and confirm by pressing »OK«.
(This setting depends on the location where
you are operating your Cosmopolit 9 WEB
DAB+.)
– The »SSID« menu appears, and the avail-
able networks (access points) are displayed.
Page 29

29
ENGLISH
SETTINGS
---------------------------------------------------------------------------------------------------------------------------------------
Notes:
7
If you wish to connect via a LAN cable, se-
lect the option »Wired« using » « or » «
and confirm by pressing »OK«.
The initial set-up is then finished.
7
If the connection to the router is via a
WLAN, there are two options, depending
on the router in use: If the router supports
[WPS], then continue operation from step
10/11 or step. 10/12.
If the router does not support [WPS], then
continue operation from step 13.
7
If the network name (SSID) is suppressed on
the WLAN router for security reasons, the
network cannot be found. It must then be entered manually. Select the option »[Manual
config]« with »V« or »Λ« and press »OK«
to confirm. Continue with the chapter “Special Settings” – “Registering the device ...”
(see "Long manual").
10 Select your wireless [WPS] network with » «
or » « and press »OK« to confirm.
Note:
7
There are two options for logging on to
a [WPS] network: using the push button
on the router or by entering a PIN on the
router.
11 S elect the option »Push-Button« with» « or
» « and press »OK« to confirm.
Activate the »Push Button« function on the
router (menu or button) and press »OK« on
the device within 2 minutes.
– Display: »Please wait, connecting« and
then »Connected«.
End setting with »OK« on the device;
or
12 S elect the option »PIN« with » « or » «
and press »OK« to confirm.
– Display: PIN number that specifies the de-
vice.
Enter the PIN number in the router menu and
confirm.
– Display: »Please wait, connecting« and then
»Connected«.
13 Select your wireless network (SSID) with » «
or » « and press »OK« to confirm.
– Key menu opens, the cursor is positioned in
the first input position.
Note:
7
If the network is encrypted, the network
key (security code WEP or WPA) must be
entered.
14 Enter your wireless security code:
Select the first character (capital and small
letters, numbers, symbols) with » «, » «, » «
or » « and press »OK« to confirm.
Repeat the procedure for all characters.
After you finish entering all characters, select
the push button »OK« with » «, » «, » « or
» « and press »OK« to confirm.
– The menu »Internet Setup« appears, the
network registration is processed.
– Display: »Please wait, Connecting« and
then »Connected«.
– After successful registration, the message
»Setup wizard completed« appears.
Notes:
7
You can choose between numbers, lower and
upper case letters, and special characters.
7
Press » « or » « to scroll through the menu
pages (numbers, letters, special characters,
etc.).
7
If you make a mistake during entry, press
» «, » «, » « or » « to select the push button »BKSP« and press »OK« to confirm. The
last character is deleted.
7
If you wish to exit the menu prematurely,
press » «, » «, » « or » « to select the
push button »CANCEL« and press »OK« to
confirm.
15 Press »OK« to end the setting.
Page 30

ENGLISH
30
SETTINGS
---------------------------------------------------------------------------------------------------------------------------------------
Setting DAB stations
Automatic station search
If you first switch on the device in DAB mode, the
automatic station search starts.
During the search, the first line shows the number of stations found, and the second shows the
search scale.
After the end of the search, an alphanumeric arrangement of stations appears. If no stations are
found, the DAB menu appears in the display.
1 Press »M« repeatedly until »DAB radio« ap-
pears on display.
– The device searches for DAB stations.
Note:
7
In the »DAB Radio« – »Scan« menu, you can
restart a new “Automatic station search”.
This may be necessary when the location of
the device is changed.
Sorting channels
You can sort the station list stored during the station search in three different ways.
– »Alphanumeric«: all stations are sorted alpha-
numerically (default setting).
– »Ensemble«: all stations are sorted by ensem-
ble.
– »Valid«: active stations are listed first, stations
that are not active are shown with a question
mark.
1 Press »MENU« to open the DAB menu.
2 Select the option »Station order« by pressing »
« or » « and confirm by pressing »OK«.
3 Select your settings by pressing » « or » «
and confirm by pressing »OK«.
Setting FM stations
Setting the search mode
There are two different automatic station search
modes.
1 Press »M« repeatedly until »FM radio« ap-
pears on display.
2 Press »MENU« to open the »FM« menu.
3 Select the option »Scan setting« by pressing
» « or » « and confirm by pressing »OK«.
– Display: »Strong stations only?«.
4 Select your setting (»YES« or »NO«) using » «
or » « and confirm by pressing »OK«.
5 Press »MENU« to end the setting.
Automatic station search
1 Press and hold » « or » «. When you re-
lease the button, the automatic search stops at
the next station.
Tuning stations manually
1 Move the frequency forward in brief steps by
repeatedly pressing » « or » «.
– The frequency goes up or down in 50 kHz
steps.
Saving FM radio stations on presets
1 Search for the FM station as described.
2 To save stations, keep pressing the number but-
ton »1...0« until »Preset stored« appears in the
display.
– The stored station with a preset number then
appears in the display.
Note:
7
Button »0« is used for preset 10.
3 To store more stations, repeat steps 1 and 2 as
many times as necessary.
Page 31

31
ENGLISH
SETTINGS
---------------------------------------------------------------------------------------------------------------------------------------
Installing Spotify
If you wish to play back the wide selection of
music available from “Spotify”, you need to load
the application onto your mobile phone or tablet
PC, install it and purchase the premium version.
The mobile phone/tablet PC must be registered
in the same WLAN network as your Cosmopolit 9
WEB DAB+.
1 Download the “Spotify” application to your
mobile phone/tablet PC and install it.
2 Set up and account.
3 Select premium version.
Note:
7
The premium version of “Spotify” is a fee-
charging service.
Page 32

ENGLISH
32
Adjusting the volume
1 Adjust the volume by pressing »_« or »+«.
Automatic switch-off
1 The device switches automatically to stand-by
after 15 minutes, if:
– The device is in the “Stop” position;
– No audio signal is present at the »AUX IN«
socket.
2 Switch on the device again to continue using
the device.
GENERAL FUNCTIONS
---------------------------------------------------------------------------------------
Switching on and off
1 Switch on the device from standby mode
by pressing »8« on the remote control or
»ON/OFF« on the device.
– Display: The system switches to the last
source selected.
2 Switch the device to standby mode by pressing
»8« on the remote control or »ON/OFF« on
the device.
– Display: The current time and date.
Selecting the input source
1 Press »M« repeatedly to select »Internet Radio«,
»Spotify«, »Music player«, »DAB Radio«, »FM
Radio« or »Aux In« on the display.
The Spotify software is subject to third party licenses found here: www.spotify.com/connect/
third-party-licenses
Note:
7
The mobile phone or tablet PC must be reg-
istered in the same WLAN network as your
Cosmopolit 9 WEB DAB+.
SPOTIFY MODE
-----------------------------------------------------------------------------------------------------------------
Selecting and playing back music
tracks
1 Switch on the device from stand-by with »8«
on the remote control or »ON/OFF« on the
device.
2 Start the “Spotify” application on the mobile
phone or tablet PC.
3 Log on to “Spotify”.
4 Select the desired music track and start play-
back.
5 Click on the loudspeaker symbol.
– The available playback devices are dis-
played.
6 Select your Cosmopolit 9 WEB DAB+.
– The music track is played back on the Cos-
mopolit 9 WEB DAB+.
Note:
7
The “Spotify” input source is automatically
selected on the Cosmopolit 9 WEB DAB+.
Page 33

33
ENGLISH
Searching for Internet radio stations
by name
1 In the »Stations« menu, select the option
»Search stations« by pressing » « or » « and
confirm by pressing »OK«.
– Enter the station name.
Notes:
7
Press » «, » «, » « or » « to select letters
and confirm by pressing »OK«. The cursor
jumps to the next input position.
7
If you make a mistake during entry, press
» «, » «, » « or » « to select the push button »BKSP« and press »OK« to confirm. The
last character is deleted.
7
If you want to exit the menu prematurely,
press » «, » «, » « or » « to select the
push button »CANCEL« and press »OK« to
confirm.
7
If the station name is entered, press » «, » «,
» « or » « to select the push button »OK«
and press »OK« to confirm. »Please wait
Loading« then appears in the display.
A list of the station names is then displayed
which match the search item.
2 Select the station by pressing » « or » « and
confirm by pressing »OK«.
– »Connecting…« and then »Loading« ap-
pears in the display, after a short time the
station is played.
INTERNET RADIO MODE
--------------------------------------------------------------------------------
Listening to an Internet radio
station
You can browse the catalogue of Internet radio
stations and classify them by genre (style of music), by country or by popularity.
Selecting the internet radio
stations input source
1 Press »M« repeatedly to select the »Internet
radio« input source.
– Display: »Please wait« and then »Loading«.
Selecting Internet radio stations
according to search criteria
Selecting the Internet radio menu
1 Press »MENU« to open the menu.
2 Select the option »Station list« by pressing
» « or » « and confirm by pressing »OK«.
3 Select the option »Stations« by pressing » « or
» « and confirm by pressing »OK«.
Note:
7
Additional operations are explained in the
following chapters.
Searching for Internet radio stations
in the »Genre« category
1 In the »Stations« menu, select the option »Gen-
re« by pressing » « or » « and confirm by
pressing »OK«.
2 Press » « or » « to select the search criteria
(e.g. »Alternative«, »Ambient«) and confirm by
pressing »OK«.
– A country selection is displayed.
3 Select the country by pressing » « or » «
and confirm by pressing »OK«.
– The first radio stations for the country chosen
are displayed.
4 Select the station by pressing » « or » « and
confirm by pressing »OK«.
– »Connecting…« and then »Loading« ap-
pears in the display, after a short time the
station is played.
Page 34

ENGLISH
34
INTERNET RADIO MODE
--------------------------------------------------------------------------------
Storing Internet radio stations
on presets
1 Search for the Internet radio station as de-
scribed.
2 To save stations, keep pressing the number but-
ton »1...0« until »Preset stored« appears in the
display.
– The stored station with a preset number then
appears in the display.
Note:
7
Button »0« is used for preset10.
3 To store more stations, repeat steps 1 and 2 as
many times as necessary.
Opening preset Internet stations
1 Open the Internet radio station by pressing
one of the preset buttons »1I6« til »5I10« on
the device (press once for the presets 1 – 5,
twice for presets 6 – 10), or by pressing the
number buttons »1...0« on the remote controll.
– »Connecting…« and then »Loading« ap-
pears in the display, after a short time the
station is played.
USB MODE
----------------------------------------------------------------------------------------------------------------------------------
Playing the contents of a USB
memory stick
1 Switch off the device from standby mode
by pressing »8« on the remote control or
»ON/OFF« on the device.
2 Connect the USB interface of the MP3 player
to the »USB« socket on the device (on the
back side), using a standard USB cable;
or
insert the USB plug of the USB memory stick
in the »USB« socket (on the back side) on the
device.
3 Switch on the device from standby mode
by pressing »8« on the remote control or
»ON/OFF« on the device.
4 Press »MODE« repeatedly until »Music play-
er« appears on the display.
– Display: »Music player« submenu opens.
5 Select the option »USB playback« by pressing
» « or » « and confirm by pressing »OK«.
– The content of the USB appears in the dis-
play.
Note:
7
If no USB memory stick has been inserted,
»No USB device found« appears in the dis-
play after a short time.
6 Select the file or track by pressing » « or » «.
7 Press »OK« to start playback.
– Display: Playback starts, elapsed playing
time, total playing time and file information
appears in the display.
8 Press »7« on the remote control to stop play-
back.
Viewing information
1 To display information on the current track,
press »i« repeatedly.
– Information on the artist, track, album, etc.
is displayed.
Page 35

35
ENGLISH
FM MODE
--------------------------------------------------------------------------------------------------------------------------------------
Selecting the tuner input source
1 Press »M« repeatedly until »FM radio« ap-
pears on the display.
1 Open a FM station by pressing one of the
preset buttons »1I6« til »5I10« on the device
(press once for the presets 1 – 5, twice for pre-
sets 6 – 10), or by pressing the number buttons
»1...0« on the remote controll.
Setting stereo or mono reception
1 Press »MENU« to open the menu.
2 Select the option »Audio setting« by pressing »
« or » « and confirm by pressing »OK«.
3 Switch to mono reception by selecting the
»YES« button using » « or » « and confirm by
pressing »OK«.
Stereo reception is set using the »NO« button.
4 Press »MENU« to end the setting.
DAB MODE
---------------------------------------------------------------------------------------------------------------------------------
Selecting the DAB input source
1 Press »M« repeatedly until »DAB radio« ap-
pears on display.
Selecting a DAB station – from
presets
1 Open a DAB station by pressing »1« to »0«.
Selecting a DAB station – from
the station list
The available DAB stations are stored in a »Station list«.
1 Open the DAB menu using »MENU«.
2 Select the option »Station list« by pressing
» « or » « and open by pressing »OK«.
3 Select a DAB station by pressing » « or
» « and open by pressing »OK«.
– Display: »Playing«, the DAB station selected
can be heard.
Displaying DAB station information
1 To display information on the current DAB sta-
tion, press »i« repeatedly.
– The following displays appear in succession:
The genre;
the location and the frequency;
reference to signal interference, e.g. »Sig-
nal error 10« (at optimum signal »Signal
error 0«);
Bit rate, broadcasting format and the chan-
nel;
the current date;
radio text as ticker text.
Notes:
7
The information is displayed continuously
until »i« is pressed again.
7
If the program provider offers the supple-
mentary service “MOT SlideShow”, the content can be shown enlarged on the display if
you press »OK«. You can return to the small
image by pressing »OK« again.
Page 36

ENGLISH
36
INFORMATION
------------------------------------------------------------------------------------------------------------------
Compliance with the WEEE Directive and Disposing of the Waste
Product:
This product complies with EU WEEE Directive
(2012/19/EU). This product bears a classification symbol for waste electrical and electronic
equipment (WEEE).
This product has been manufactured
with high quality parts and materials
which can be reused and are suitable
for recycling. Do not dispose of the
waste product with normal domestic
and other wastes at the end of its service life.
Take it to the collection center for the recycling of
electrical and electronic equipment. Please consult your local authorities to learn about these collection centers.
Compliance with RoHS Directive
The product you have purchased complies with
EU RoHS Directive (2011/65/EU). It does not
contain harmful and prohibited materials specified in the Directive.
Package information
Packaging materials of the product
are manufactured from recyclable materials in accordance with our Na-
tional Environment Regulations. Do
not dispose of the packaging materials together
with the domestic or other wastes. Take them to
the packaging material collection points designated by the local authorities.
Technical data
This device is noise–suppressed
according to the applicable EU
directives.
This product fulfils the European
directives 2014/53/EU, 2009/125/EC and
2011/65/EU.
You can find the CE declaration of conformity for
the device in the form of a pdf file on the Grundig
Homepage www.grundig.com/downloads/doc.
The type plate is located on the bottom of the
device.
System
Power supply:
Power Adapter:
Input: 230 V~ , 50/60 Hz
Output: 9 V > 1500 mA
Ó
Max. power consumption: 8 W
Power consumption in standby: ≤ 1 W
Amplifier unit Output
Sine wave power: 1 x 1.2 W
Audio power: 1 x 1.5 W
Receiver unit
Reception range:
DAB: 174.928 – 239.200 MHz,
5A–13F
FM: 87.5 ...108.0 MHz
WLAN
Network standard:
IEEE 802.11 b, g, n
This model supports all the transfer rates according standard IEEE 802.11b, IEEE 802.11g and
IEEE 802.11n
Operating channels:
13 (based on the router)
Safety:
Hardware-WEP-Engine (64/128Bit); WEPWeak-Key-Avoidance (WEPplus), TKIP, Hardware-AES-Engine with support for CCM and
OCB, 802.1x, SSN
WPA, WPA2
USB
USB 2.0 compatible FAT 32/16
Dimensions and weight
Dimensions: W x H x D
252 x 127 x 79 mm
Weight: 0.99 kg
Technical and design modifications reserved.
Page 37

Grundig Intermedia GmbH
Thomas-Edison-Platz 3
D-63263 Neu-Isenburg
www.grundig.com
17/23
 Loading...